Embed Size (px)
Citation preview
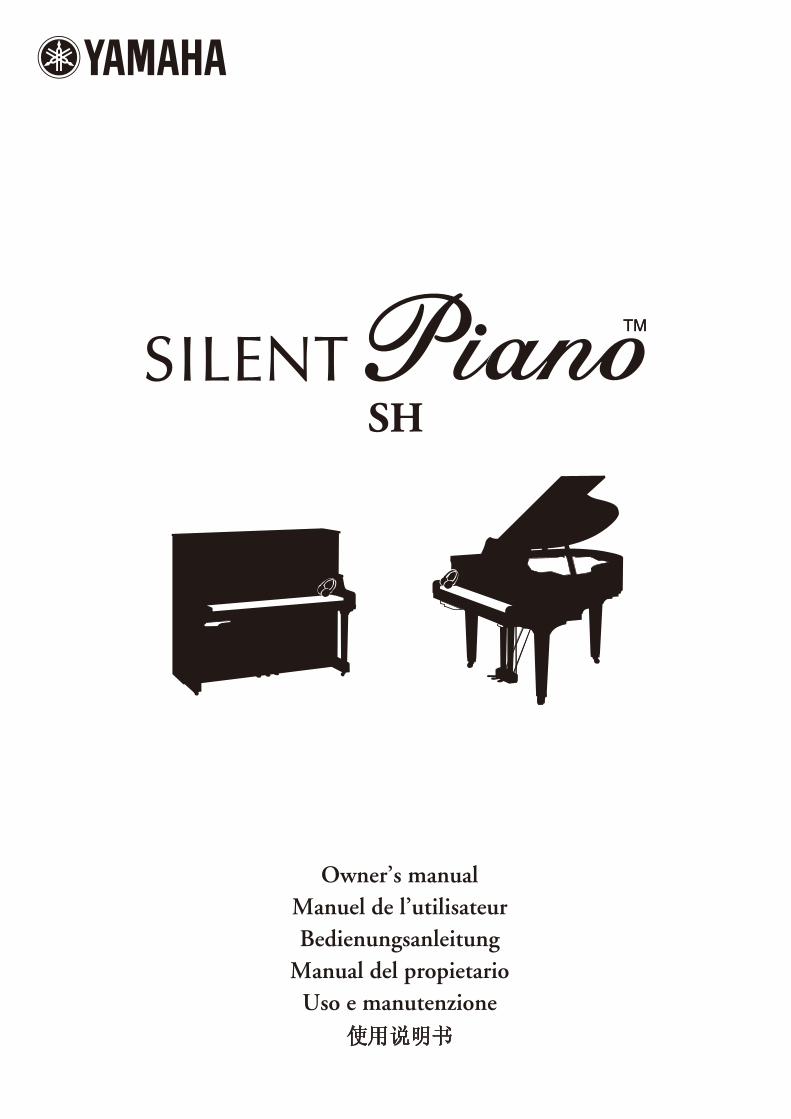
Owner’s manualManuel de l’utilisateurBedienungsanleitung
Manual del propietarioUso e manutenzione
使用说明书
SH
Copyright © 2013 Yamaha CorporationP.O.Box 1, Hamamatsu, 430-8650 Japan
Nov-13 Printed in JapanYF091C0
SH
N
IMPORTANT NOTICE FOR THE UNITED KINGDOM
Applies to power adaptor
Connecting the Plug and Cord
IMPORTANT: THE WIRES IN THE MAINS LEAD ARE COLOURED IN ACCORDANCE WITH
THE FOLLOWING CODE:
BLUE: NEUTRAL
BROWN: LIVE
As the colours of the wires in the mains lead of this apparatus may not correspond with
the coloured markings identifying the terminals in your plug, proceed as follows:
The wire which is coloured BLUE must be connected to the terminal which is marked
with the letter N or coloured BLACK.
The wire which is coloured BROWN must be connected to the terminal which is marked
with the letter L or coloured RED.
Make sure that neither core is connected to the earth terminal of the three pin plug.
FCC INFORMATION (U.S.A)
1. IMPORTANT NOTICE: DO NOT MODIFY THIS UNIT!This product, when installed as indicated in the instructions contained in this manual, meets FCC requirements.
Modifications not expressly approved by Yamaha may void your authority, granted by the FCC, to use the product.
2. IMPORTANT: When connecting this product to accessories and/or another product use only high quality shielded cables. Cable/s
supplied with this product MUST be used. Follow all installation instructions. Failure to follow instructions could void
your FCC authorization to use to use this product in the USA.
3. NOTE: This product has been tested and found to comply with the requirements listed in FCC Regulations, Part 15 for Class
“B” digital devices. Compliance with these requirements provides a reasonable level of assurance that your use of this
product in a residential environment will not result in harmful interference with other electronic devices. This equipment
generates/uses radio frequencies and, if not installed and used according to the instructions found in the users manual,
may cause interference harmful to the operation of other electronic devices. Compliance with FCC regulations does not
guarantee that interference will not occur in all installations. If this product is found to be the source of interference,
which can be determined by turning the unit “OFF” and “ON”, please try to eliminate the problem by using one of the
following measures:
Relocate either this product or the device that is being affected by the interference.
Utilize power outlets that are on different branch (circuit breaker or fuse) circuits or install AC line filter/s.
In the case of radio or TV interference, relocate/reorient the antenna. If the antenna lead-in is 300 ohm ribbon lead,
change the lead-in to co-axial type cable.
If these corrective measures do not produce satisfactory results, please contact the local retailer authorized to distribute
this type of product. If you can not locate the appropriate retailer, please contact Yamaha Corporation of America,
Electronic Service Division, 6600 Orangethorpe Ave, Buena Park, CA 90620
The above statements apply ONLY to those products distributed by Yamaha Corporation of America and its subsidiaries.
Information for Users on Collection and Disposal of Old Equipment
This symbol on the products, packaging, and/or accompanying documents means that used electrical and electronic products should not be mixed with general household waste.For proper treatment, recovery and recycling of old products, please take them to applicable collection points, in accordance with your national legislation and the Directives 2002/96/EC.
By disposing of these products correctly, you will help to save valuable resources and prevent any potential negative effects on human health and the environment which could otherwise arise from inappropriate waste handling.
For more information about collection and recycling of old products, please contact your local municipality, your waste disposal service or the point of sale where you purchased the items.
[For business users in the European Union]If you wish to discard electrical and electronic equipment, please contact your dealer or supplier for further information.
[Information on Disposal in other Countries outside the European Union]This symbol is only valid in the European Union. If you wish to discard these items, please contact your local authorities ordealer and ask for the correct method of disposal.
Information concernant la Collecte et le Traitement des déchets d’équipements électriques et électroniques
Le symbole sur les produits, l’emballage et/ou les documents joints signifie que les produits électriques ou électroniques usagés ne doivent pas être mélangés avec les déchets domestiques habituels.Pour un traitement, une récupération et un recyclage appropriés des déchets d’équipements électriques et électroniques, veuillez les déposer aux points de collecte prévus à cet effet, conformément à la réglementation nationale et aux Directives 2002/96/EC.
En vous débarrassant correctement des déchets d’équipements électriques et électroniques, vous contribuerez à la sauvegarde de précieuses ressources et à la prévention de potentiels effets négatifs sur la santé humaine qui pourraient advenir lors d’un traitement inapproprié des déchets.
Pour plus d’informations à propos de la collecte et du recyclage des déchets d’équipements électriques et électroniques, veuillez contacter votre municipalité, votre service de traitement des déchets ou le point de vente où vous avez acheté les produits.
[Pour les professionnels dans l’Union Européenne]Si vous souhaitez vous débarrasser des déchets d’équipements électriques et électroniques veuillez contacter votre vendeur ou fournisseur pour plus d’informations.
[Information sur le traitement dans d’autres pays en dehors de l’Union Européenne]Ce symbole est seulement valables dans l’Union Européenne. Si vous souhaitez vous débarrasser de déchets d’équipements électriques et électroniques, veuillez contacter les autorités locales ou votre fournisseur et demander la méthode de traitement appropriée.
Verbraucherinformation zur Sammlung und Entsorgung alter Elektrogeräte
Befindet sich dieses Symbol auf den Produkten, der Verpackung und/oder beiliegenden Unterlagen, so sollten benutzte elektrischeGeräte nicht mit dem normalen Haushaltsabfall entsorgt werden.In Übereinstimmung mit Ihren nationalen Bestimmungen und den Richtlinien 2002/96/EC, bringen Sie alte Geräte bitte zur fachgerechten Entsorgung, Wiederaufbereitung und Wiederverwendung zu den entsprechenden Sammelstellen.
Durch die fachgerechte Entsorgung der Elektrogeräte helfen Sie, wertvolle Ressourcen zu schützen und verhindern mögliche negative Auswirkungen auf die menschliche Gesundheit und die Umwelt, die andernfalls durch unsachgerechte Müllentsorgung auftreten könnten.
Für weitere Informationen zum Sammeln und Wiederaufbereiten alter Elektrogeräte, kontaktieren Sie bitte Ihre örtliche Stadtoder Gemeindeverwaltung, Ihren Abfallentsorgungsdienst oder die Verkaufsstelle der Artikel.
[Information für geschäftliche Anwender in der Europäischen Union]Wenn Sie Elektrogeräte ausrangieren möchten, kontaktieren Sie bitte Ihren Händler oder Zulieferer für weitere Informationen.
[Entsorgungsinformation für Länder außerhalb der Europäischen Union]Dieses Symbol gilt nur innerhalb der Europäischen Union. Wenn Sie solche Artikel ausrangieren möchten, kontaktieren Sie bitte Ihre örtlichen Behörden oder Ihren Händler und fragen Sie nach der sachgerechten Entsorgungsmethode.
Información para Usuarios sobre Recolección y Disposición de Equipamiento Viejo
Este símbolo en los productos, embalaje, y/o documentación que se acompañe significa que los productos electrónicos y eléctricos usados no deben ser mezclados con desechos hogareños corrientes.Para el tratamiento, recuperación y reciclado apropiado de los productos viejos, por favor llévelos a puntos de recolección aplicables, de acuerdo a su legislación nacional y las directivas 2002/96/EC.
Al disponer de estos productos correctamente, ayudará a ahorrar recursos valiosos y a prevenir cualquier potencial efecto negativo sobre la salud humana y el medio ambiente, el cual podría surgir de un inapropiado manejo de los desechos.
Para mayor información sobre recolección y reciclado de productos viejos, por favor contacte a su municipio local, su servicio de gestión de residuos o el punto de venta en el cual usted adquirió los artículos.
[Para usuarios de negocios en la Unión Europea]Si usted desea deshacerse de equipamiento eléctrico y electrónico, por favor contacte a su vendedor o proveedor para mayor información.
[Información sobre la Disposición en otros países fuera de la Unión Europea]Este símbolo sólo es válidos en la Unión Europea. Si desea deshacerse de estos artículos, por favor contacte a sus autoridades locales y pregunte por el método correcto de disposición.
Informazioni per gli utenti sulla raccolta e lo smaltimento di vecchia attrezzatura
Questo simbolo sui prodotti, sull’imballaggio, e/o sui documenti che li accompagnano significa che i prodotti elettriche e elettroniche non dovrebbero essere mischiati con i rifiuti domestici generici.Per il trattamento, recupero e riciclaggio appropriati di vecchi prodotti, li porti, prego, ai punti di raccolta appropriati, in accordo con la Sua legislazione nazionale e le direttive 2002/96/CE.
Smaltendo correttamente questi prodotti, Lei aiuterà a salvare risorse preziose e a prevenire alcuni potenziali effetti negativi sulla salute umana e l’ambiente, che altrimenti potrebbero sorgere dal trattamento improprio dei rifiuti.
Per ulteriori informazioni sulla raccolta e il riciclaggio di vecchi prodotti, prego contatti la Sua amministrazione comunale locale, il Suo servizio di smaltimento dei rifiuti o il punto vendita dove Lei ha acquistato gli articoli.
[Per utenti imprenditori dell’Unione europea]Se Lei desidera disfarsi di attrezzatura elettrica ed elettronica, prego contatti il Suo rivenditore o fornitore per ulteriori informazioni.
[Informazioni sullo smaltimento negli altri Paesi al di fuori dell’Unione europea]Questo simbolo è validi solamente nell’Unione europea. Se Lei desidera disfarsi di questi articoli, prego contatti le Sue autorità locali o il rivenditore e richieda la corretta modalità di smaltimento.
Для инструментов с заземленным кабелем питанияПРЕДУПРЕЖДЕНИЕ
Электропитание/кабель питания• Подключайтетолькокэлектросетиссоответствующимнапряжениемизащитнымзаземлением.Неправильноезаземлениеможетвызватьпоражениеэлектрическимтоком.
Беречь от воды• Недержитеинструменттам,гдеонможетпопастьподдождь,рядомсводой,атакжевсырыхивлажныхпомещениях.Неставьтенанегоемкостисжидкостью,котораяможетпролитьсяипопастьвотверстия.
Беречь от огня• Неставьтенаинструментзажженныесвечиидругиеподобныепредметы.Горящийпредметможетупастьивызватьпожар.
ВНИМАНИЕ!
Место установки• Приустановкеинструментаубедитесьвтом,чтоиспользуемаяэлектрическаярозеткалегкодоступна.Привозникновениикакого-либосбояилинеисправностинемедленноотключитепитаниеинструментаиотсоединитекабельпитанияотэлектросети.Дажееслипитаниеустройстваотключено,инструментпродолжаетвминимальномколичествепотреблятьэлектроэнергию.Еслиинструментнеиспользуетсявтечениедлительноговремени,отсоединитекабельпитанияотэлектросети.
Для инструментов с незаземленным кабелем питанияПРЕДУПРЕЖДЕНИЕ
Беречь от воды• Недержитеинструменттам,гдеонможетпопастьподдождь,рядомсводой,атакжевсырыхивлажныхпомещениях.Неставьтенанегоемкостисжидкостью,котораяможетпролитьсяипопастьвотверстия.
Беречь от огня• Неставьтенаинструментзажженныесвечиидругиеподобныепредметы.Горящийпредметможетупастьивызватьпожар.
ВНИМАНИЕ!
Место установки• Приустановкеинструментаубедитесьвтом,чтоиспользуемаяэлектрическаярозеткалегкодоступна.Привозникновениикакого-либосбояилинеисправностинемедленноотключитепитаниеинструментаиотсоединитекабельпитанияотэлектросети.Дажееслипитаниеустройстваотключено,инструментпродолжаетвминимальномколичествепотреблятьэлектроэнергию.Еслиустройствонеиспользуетсявтечениедлительноговремени,отсоединитекабельпитанияотэлектросети.
Для инструментов с блоком питанияПРЕДУПРЕЖДЕНИЕ
Беречь от воды• Недержитеинструменттам,гдеонможетпопастьподдождь,рядомсводой,атакжевсырыхивлажныхпомещениях.Неставьтенанегоемкостисжидкостью,котораяможетпролитьсяипопастьвотверстия.
Беречь от огня• Неставьтенаинструментзажженныесвечиидругиеподобныепредметы.Горящийпредметможетупастьивызватьпожар.
ВНИМАНИЕ!
Место установки• Приустановкеинструментаубедитесьвтом,чтоиспользуемаяэлектрическаярозеткалегкодоступна.Привозникновениикакого-либосбояилинеисправностинемедленноотключитепитаниеинструментаиотсоединитекабельпитанияотэлектросети.ДажеесликнопкапитаниянаходитсявположенииSTANDBY,устройствопродолжаетвминимальномколичествепотреблятьэлектроэнергию.Еслиустройствонеиспользуетсявтечениедлительноговремени,отсоединитекабельпитанияотэлектросети.
部件名称
有毒有害物质或元素
铅(Pb)
汞(Hg)
镉(Cd)
六价铬(Cr (VI))
多溴联苯(PBB)
多溴二苯醚(PBDE)
外壳、框架 × ○ ○ ○ ○ ○
印刷线路板 × ○ ○ ○ ○ ○
○: 表示该有毒有害物质在该部件所有均质材料中的含量均在SJ/T 11363-2006标准规定的限量要求以下。×: 表示该有毒有害物质至少在该部件的某一均质材料中的含量超出SJ/T 11363-2006标准规定的限量要求。
(此产品符合EU的RoHS指令。)
(この製品はEUのRoHS指令に適合しています。)
(This product conforms to the RoHS regulations in the EU.)
(Dieses Produkt entspricht der RoHS-Richtlinie der EU.)
(Ce produit est conforme aux réglementations RoHS de l’EU.)
(Este producto cumple con los requisitos de la directive RoHS en la UE.)
此标识适用于在中华人民共和国销售的电子信息产品。
标识中间的数字为环保使用期限的年数。
이 기기는 가정용(B급) 전자파적 합기기로서
주로 가정에서 사용하는 것을 목적
으로 하며, 모든 지역에서 사용할 수 있습니다.

En
glish
SHOwner’s manual
2
SPECIAL MESSAGE SECTIONThis product utilizes an external power supply (adaptor). DO NOT connect this product to any power supply or adaptor other
than one described in the manual, on the name plate, or specifically recommended by Yamaha.
WARNING: Do not place this product in a position where anyone
could walk on, trip over, or roll anything over power
cords or other connecting cords. The use of an
extension cord is not recommended! If you must use
an extension cord, the minimum wire size for a 25’
cord (or less) is 18 AWG.
NOTE: The smaller the AWG number, the larger the current
handling capacity. For longer extension cords, consult
a local electrician.
This product should be used only with the components
supplied or; a cart, rack, or stand that is recommended
by Yamaha. If a cart, etc., is used, please observe all
safety markings and instructions that accompany the
accessory product.
SPECIFICATIONS SUBJECT TO CHANGE: The information contained in this manual is believed
to be correct at the time of printing. However, Yamaha
reserves the right to change or modify any of the
specifications without notice or obligation to update
existing units.
Do not attempt to service this product beyond that
described in the user-maintenance instructions. All
other servicing should be referred to qualified service
personnel.
This product, either alone or in combination with an
amplifier and headphones or speaker/s, may be capable
of producing sound levels that could cause permanent
hearing loss. DO NOT operate for a long period
of time at a high volume level or at a level that is
uncomfortable. If you experience any hearing loss or
ringing in the ears, you should consult an audiologist.
IMPORTANT: The louder the sound, the shorter the time period
before damage occurs.
Some Yamaha products may have benches and/or
accessory mounting fixtures that are either supplied as
a part or the product or as optional accessories. Some
of these items are designed to be dealer assembled
or installed. Please make sure that benches are stable
and any optional fixtures (where applicable) are well
secured BEFORE using. Benches supplied by Yamaha
are designed for seating only. No other uses are
recommended.
NOTICE: Service charges incurred due to lack of knowledge
relating to how a function or effect works (when the
unit is operating as designed) are not covered by the
manufacturer’s warranty, and are therefore the owners
responsibility. Please study this manual carefully and
consult your dealer before requesting service.
ENVIRONMENTAL ISSUES:Yamaha strives to produce products that are both
user safe and environmentally friendly. We sincerely
believe that our products and the production methods
used to produce them, meet these goals. In keeping
with both the letter and the spirit of the law, we want
you to be aware of the following:
Disposal Notice: Should this product become damaged beyond repair,
or for some reason its useful life is considered to be
at an end, please observe all local, state, and federal
regulations that relate to the disposal of products that
contain lead, batteries, plastics, etc. If your dealer is
unable to assist you, please contact Yamaha directly.
PLEASE KEEP THIS MANUAL
3
En
glish
Introduction
Features
Yamaha’s Innovative Silencing System• The hammer shank stopper stops the movement of the hammer just before striking the string, and the optical
sensor will catch keystroke information precisely. The internal tone generator receives the keystroke information and reproduces enrich sound of the piano.
• The noncontact optical sensor faithfully detects subtle movement of the keys without affecting the touch of the keys. You can enjoy the natural expression of the music.
Realistic Piano Voice• The piano voice is faithfully sampled from the Yamaha CFX concert grand piano. You can enjoy the clear and
beautiful tone of the piano.• The piano voice is sampled with the binaural sampling* method. Even if you listen through headphones, you can
enjoy the immersive sound, as if it sounds from the piano. In addition, you can enjoy the natural sound for a long time without straining the ear.
• The unit is equipped with various effects that reproduce the specific resonance of an acoustic piano (Damper Resonance, String Resonance, and Sustain Sample). You can also add subtle sound produced when the keys are released (Key-off Sample). By combining these, you can enjoy the realistic and rich piano sound even when used with the Silent Piano™ function.
* Binaural sampling: method that uses two microphones set at the ear position of a performer and records the sound from a piano as it is.
Useful Features for Lesson• You can record your performance on the internal memory or commercially available USB storage device. Since
you can record your performance as an audio data (WAV) as well as a MIDI data (USB Audio Recorder), it is now easy to create your own CDs or upload your performance to the net.
• The metronome is built in this unit. You can practice playing or record your performance more accurately with the metronome.
• Since the unit has two headphone jacks, you can practice sharing your performance with others, or enjoy a duet. The supplied headphones have an open type structure which reproduces the high-quality and clear sound.
• 50 masterpieces of piano are preset on the unit. The unit also comes with a corresponding music book “50 greats for the Piano.”
• In addition to a piano voice, the unit has various voices of instruments, such as harpsichord or pipe organ.
4
Introduction
AccessoriesCheck that the following items are supplied with your piano.
• AC adaptor (PA-150A [upright piano], PJP-PS04 [grand piano] or an equivalent recommended by Yamaha) × 1• Power cable × 1 *• Headphones × 1• Headphones hanger × 1• Attachment screws for headphones hanger × 2• Owner’s manual × 1• Music book “50 greats for the Piano” × 1
* Supplied only if the PJP-PS04 AC adaptor is supplied with your piano.
InstallationAvoid placing this instrument in direct sunlight, in close proximity to heating equipment or other high temperature areas, or in locations with a high degree of humidity.
Avoid placing this instrument in dusty or dirty areas.
Do not expose this instrument to spray or fumes.
Use only the specified AC adaptor. Use of other AC adaptors may result in damage, overheating, or fire.
Trademarks and Copyrights• The contents of this owner’s manual and the copyrights thereof are under exclusive ownership by Yamaha
Corporation. • Yamaha, Silent Piano, Silent, CFX, and Disklavier are trademarks of Yamaha Corporation.• The company names and product names in this owner’s manual are trademarks or registered trademarks of their
respective companies.
5
En
glish
Introduction
Chapter
1 Getting Started �����������������������������������������6
Part Names and Functions ���������������������������������6Connecting the AC Adaptor ������������������������������9Attaching the Headphones Hanger ������������������10Turning the Power On �������������������������������������10Turning the Power Off �������������������������������������10
Chapter
2 Playing the Piano �����������������������������������11
Using the Silent Piano™ Function ������������������11Selecting Voices ����������������������������������������������12Applying the Reverb Effect �����������������������������14Using the Metronome ��������������������������������������15
Chapter
3 Playing Back Songs �������������������������������16
Songs You Can Play on This Unit ������������������16Playing Back the Demonstration Song ������������17Playing Back the Preset Song ��������������������������18Playing Back the Song Recorded on the Internal Memory ����������������������������������������������19Playing Back the Song Saved on the USB Storage Device �������������������������������������������������20Operations during Playback �����������������������������22Changing the Playback Tempo ������������������������23
Chapter
4 Recording Your Performance ���������������24
Recording Your Performance on the Internal Memory ����������������������������������������������24Recording Your Performance on the USB Storage Device �������������������������������������������������26Recording with the Metronome �����������������������28
Chapter
5 Handling Song Files �������������������������������29
Copying a Song File to the USB Storage Device ��������������������������������������������������������������29Deleting a Song File ����������������������������������������31
Chapter
6 Connecting to Other Devices ����������������33
Connecting to Audio Devices ��������������������������33Connecting to MIDI Devices ���������������������������35Connecting the USB Storage Device ���������������36Connecting Powered Speakers [for Grand Piano] ���������������������������������������������37
Chapter
7 Using Various Functions �����������������������38
Setting the Various Convenient Functions (Function Setup) ����������������������������������������������38Details on Each Function Setup Item ��������������40Restoring the Default Settings �������������������������45Changing the Language Support for the Song File Name �����������������������������������������������45Deactivating the Auto Power-off Function �����46
Chapter
8 Appendix �������������������������������������������������47
Messages ����������������������������������������������������������47Troubleshooting �����������������������������������������������48Preset Voice List ����������������������������������������������49Song List ����������������������������������������������������������50Playback Sequence of Song Files on the USB Storage Device ����������������������������������������51Specifications ���������������������������������������������������52Index ����������������������������������������������������������������53
XG Voice List �����������������������������������������D2
XG Drum Kit List ������������������������������������D5
MIDI Data Format �����������������������������������D7
MIDI IMPLEMENTATION CHART ��������D18
Table of Contents
0102_silentseries_en.indd 5 13/11/28 16:58

6
Chapter
1 Getting Started
Part Names and Functions
■ Piano
Upright piano Grand piano
11
2
Control unit(page 7)
[for models equipped with a sostenuto pedal]
(on the rear of the piano)
Control unit(page 7)
GM unit(page 8)
Upright piano Grand piano
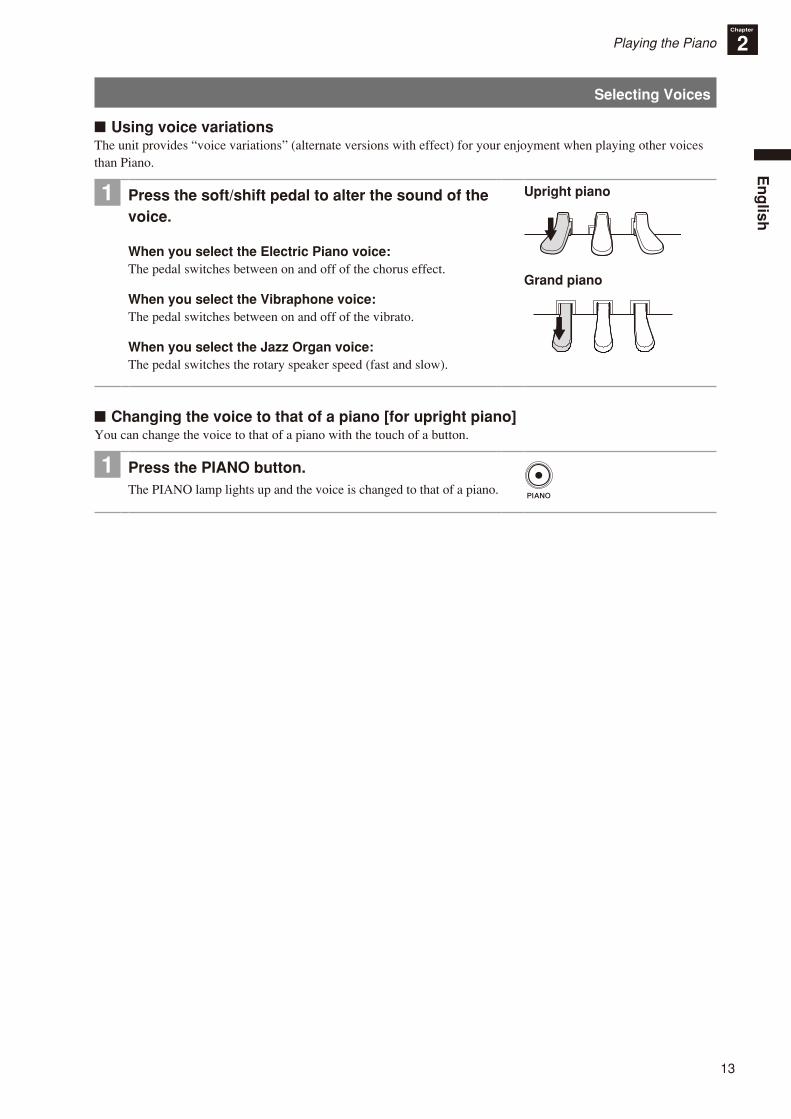
1 Soft pedal / shift pedalReduces the volume and slightly changes the timbre notes played after the pedal is pressed.When you select the Electric Piano voice, this pedal switches between on and off of the chorus effect.When you select the Vibraphone voice, this pedal switches between on and off of the vibrato.When you select the Jazz Organ voice, this pedal switches the rotary speaker speed (fast and slow).
2 Silencing pedal[For models not equipped with a sostenuto pedal] Activates the Silent Piano™ function (page 11).
Sostenuto pedal[For models equipped with a sostenuto pedal] Sustains the notes that are being played at that time even after you release the keys. Subsequently played notes are not affected.
3 Damper pedalSustains notes even after you release the keys. While performing with the Piano voice, this recreates a sympathetic resonance occurs in the strings and soundboard on an acoustic piano (Damper Resonance effect). You can set the depth of this resonance in the Function Setup (page 38).
1 2 31 2 3
1 Silencing leverActivates the Silent Piano™ function (page 11).
■ Pedals
2 DC12V jackConnect the supplied AC adaptor (page 9).

7
En
glish
Part Names and Functions
Getting StartedChapter
1
■ Control unit (front panel)
Upright piano
10
1 2 3 4 5 6 7 8 9
11 12
Grand piano
10
1 2 3 4 5 6 7 8 9
11 12
1 POWER buttonTurns the digital piano on and off.
2 PIANO button[For upright pianos]Switches the voice of the digital piano to the Piano voice.
QUIET button[For grand pianos]Activates the Silent Piano™ function (page 11).
3 REC buttonPlaces the instrument in record standby mode.
4 STOP buttonStops playback.
5 PLAY/PAUSE buttonStarts and pauses playback.
6 +/YES and –/NO buttonsSelect songs, voices, and parameters, or set values of various settings.
7 FUNC. buttonSwitches the function. The function will be switched as follows each time you press this button.
8 Function indicatorsShow the selected function.
9 DisplayShows the voice number, song number, or values of various settings.
10 USB portConnect the USB storage device (page 36).
11 PHONES jacks (stereo mini jack)You can connect two stereo headphones, allowing you to share your playing with another person.
12 VOLUME knobAdjusts the volume for headphones, the OUTPUT jacks (only for grand piano), and the AUX OUT jack (page 11).
8
Part Names and Functions
Getting StartedChapter
1
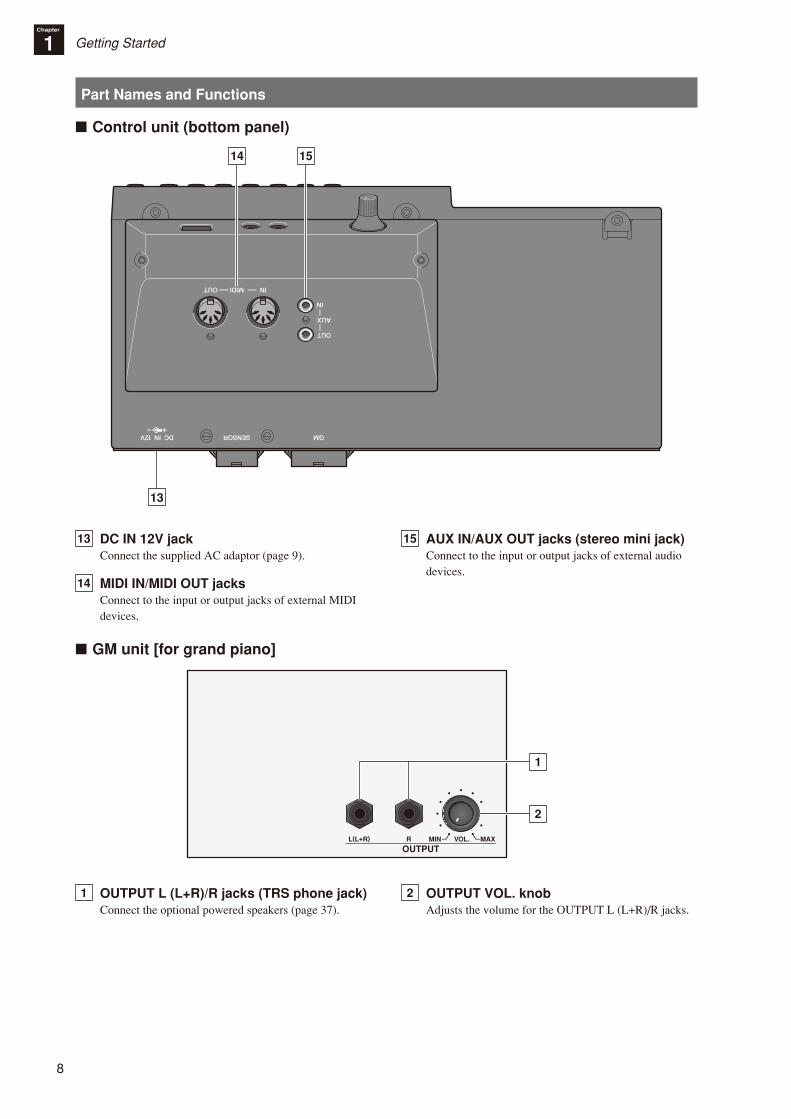
■ Control unit (bottom panel)
13
14 15
13 DC IN 12V jackConnect the supplied AC adaptor (page 9).
14 MIDI IN/MIDI OUT jacksConnect to the input or output jacks of external MIDI devices.
15 AUX IN/AUX OUT jacks (stereo mini jack)Connect to the input or output jacks of external audio devices.
■ GM unit [for grand piano]
L(L+R) R
OUTPUTVOL.MIN MAX
2
1
1 OUTPUT L (L+R)/R jacks (TRS phone jack)Connect the optional powered speakers (page 37).
2 OUTPUT VOL. knobAdjusts the volume for the OUTPUT L (L+R)/R jacks.

9
En
glish
Getting StartedChapter
1
Connecting the AC Adaptor
■ Upright piano
NoteFor some models, the PJP-PS04 AC adaptor is supplied.
1 Connect the AC adaptor to the DC12V jack at the rear of the piano.
DC12Vjack
1
2
3
PA-150A
2 Loop the cord through the hook on the piano, as shown.
3 Connect the AC adaptor to the AC wall outlet.
■ Grand piano
1 Connect the AC adaptor to the DC IN 12V jack at the rear of the control unit.
PJP-PS04
DC IN 12V jack
1
2
3
2 Connect the power cable to the AC adaptor.
3 Connect the power cable extended from the AC adaptor to the AC wall outlet.
WarningUse the Yamaha PA-150A/PJP-PS04 AC adaptor, or an equivalent recommended by Yamaha. Use of other AC adaptors may result in damage, overheating, or fire.
Caution•Do not stretch the cord or bend its ends.•Do not attempt to use the cord if it is stretched or if the ends of the cord have been bent. Attempting to do so may cause
interruptions to the power supply.•Always turn off the main unit power before disconnecting the AC adaptor.•When you wish to move the piano, unplug the AC adaptor from the AC outlet and disconnect it from the DC12V or DC IN 12V
jack before proceeding.•Unplug the AC adaptor from the AC outlet if you do not intend to use the instrument for an extended period of time.
10
Getting StartedChapter
1
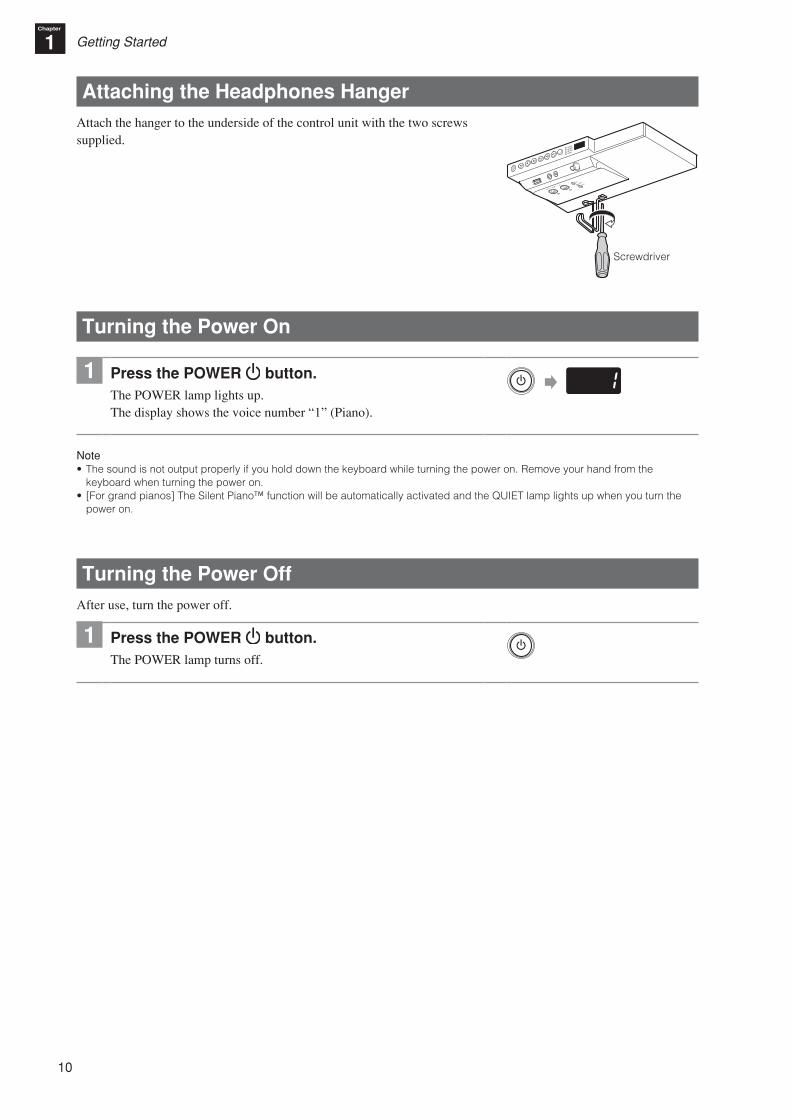
Attaching the Headphones HangerAttach the hanger to the underside of the control unit with the two screws supplied�
Turning the Power On
1 Press the POWER button�The POWER lamp lights up�The display shows the voice number “1” (Piano)�
Note•Thesoundisnotoutputproperlyifyouholddownthekeyboardwhileturningthepoweron.Removeyourhandfromthe
keyboardwhenturningthepoweron.• [Forgrandpianos]TheSilentPiano™functionwillbeautomaticallyactivatedandtheQUIETlamplightsupwhenyouturnthe
poweron.
Turning the Power OffAfter use, turn the power off�
1 Press the POWER button�The POWER lamp turns off�
Screwdriver
0102_silentseries_en.indd 10 13/11/28 16:58
11
En
glish
Chapter
2 Playing the Piano
Using the Silent Piano™ Function
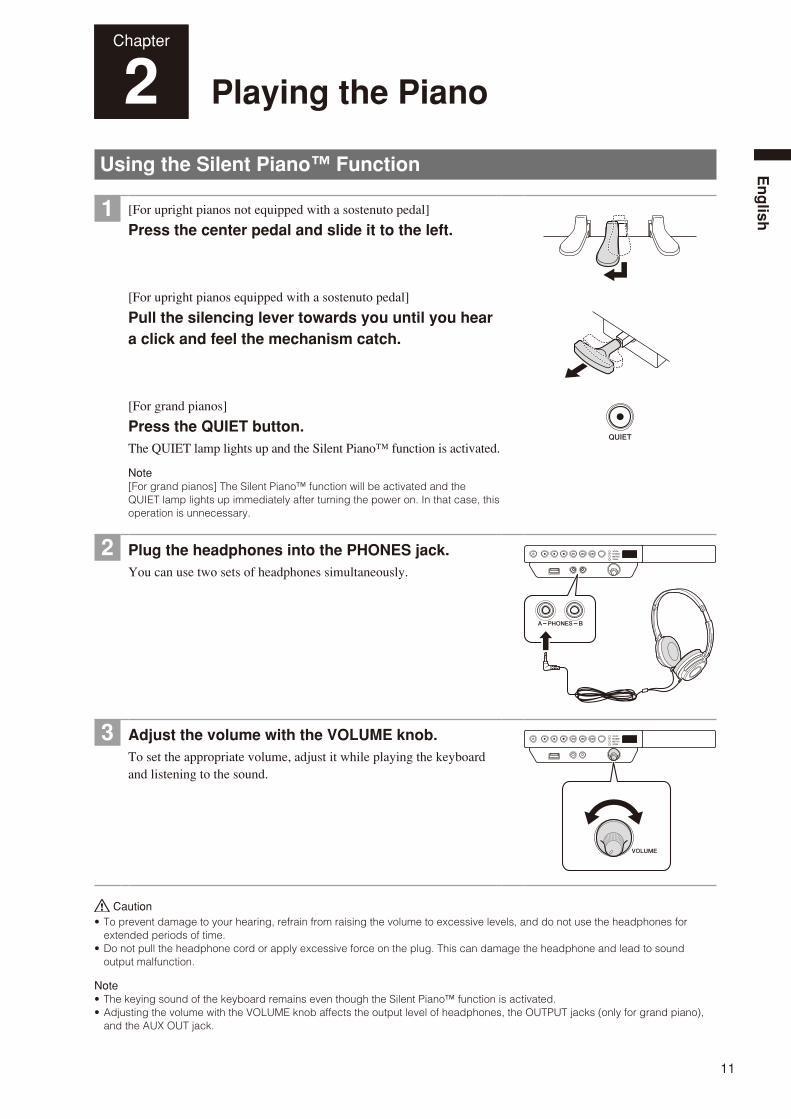
1 [For upright pianos not equipped with a sostenuto pedal]
Press the center pedal and slide it to the left.
[For upright pianos equipped with a sostenuto pedal]
Pull the silencing lever towards you until you hear a click and feel the mechanism catch.
[For grand pianos]
Press the QUIET button.The QUIET lamp lights up and the Silent Piano™ function is activated.
Note[For grand pianos] The Silent Piano™ function will be activated and the QUIET lamp lights up immediately after turning the power on. In that case, this operation is unnecessary.
2 Plug the headphones into the PHONES jack.You can use two sets of headphones simultaneously.
3 Adjust the volume with the VOLUME knob.To set the appropriate volume, adjust it while playing the keyboard and listening to the sound.
Caution•To prevent damage to your hearing, refrain from raising the volume to excessive levels, and do not use the headphones for
extended periods of time.•Do not pull the headphone cord or apply excessive force on the plug. This can damage the headphone and lead to sound
output malfunction.
Note•The keying sound of the keyboard remains even though the Silent Piano™ function is activated.•Adjusting the volume with the VOLUME knob affects the output level of headphones, the OUTPUT jacks (only for grand piano),
and the AUX OUT jack.
12
Playing the PianoChapter
2
Selecting VoicesWhen using the Silent Piano™ function, you can use the internal voices of this unit to perform with voices other than that of a piano.
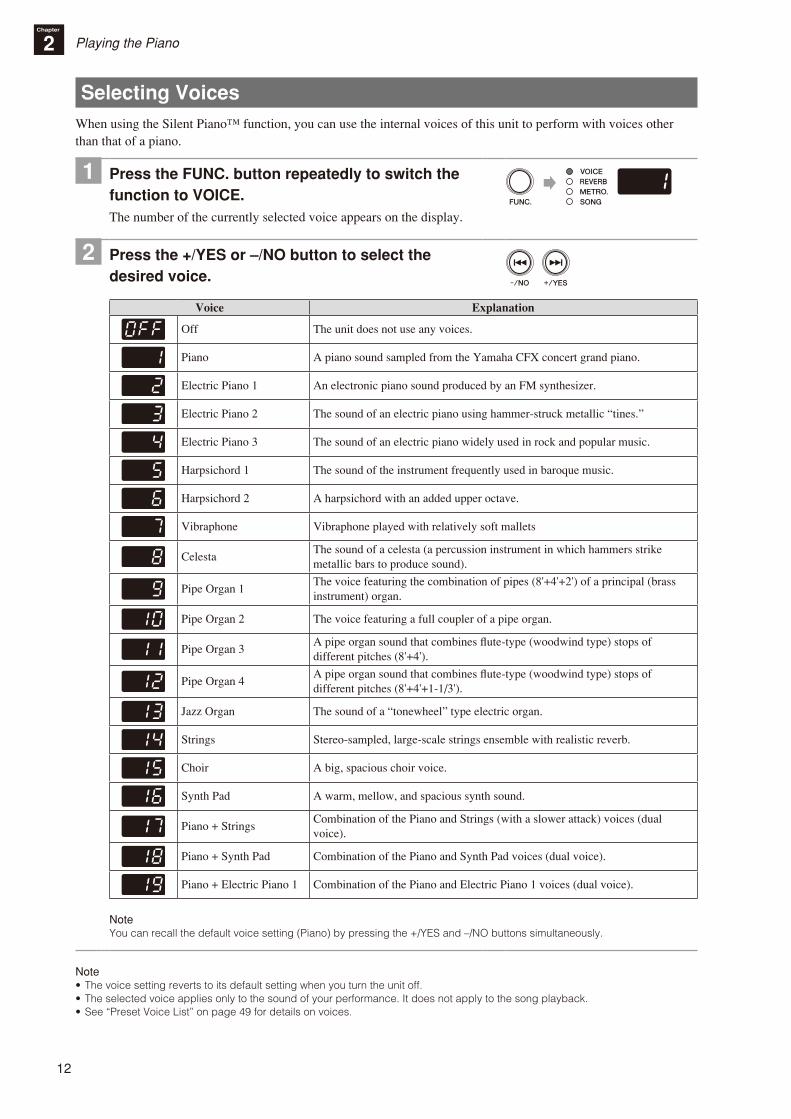
1 Press the FUNC. button repeatedly to switch the function to VOICE.The number of the currently selected voice appears on the display.
2 Press the +/YES or –/NO button to select the desired voice.
Voice Explanation
Off The unit does not use any voices.
Piano A piano sound sampled from the Yamaha CFX concert grand piano.
Electric Piano 1 An electronic piano sound produced by an FM synthesizer.
Electric Piano 2 The sound of an electric piano using hammer-struck metallic “tines.”
Electric Piano 3 The sound of an electric piano widely used in rock and popular music.
Harpsichord 1 The sound of the instrument frequently used in baroque music.
Harpsichord 2 A harpsichord with an added upper octave.
Vibraphone Vibraphone played with relatively soft mallets
CelestaThe sound of a celesta (a percussion instrument in which hammers strike metallic bars to produce sound).
Pipe Organ 1The voice featuring the combination of pipes (8'+4'+2') of a principal (brass instrument) organ.
Pipe Organ 2 The voice featuring a full coupler of a pipe organ.
Pipe Organ 3A pipe organ sound that combines flute-type (woodwind type) stops of different pitches (8'+4').
Pipe Organ 4A pipe organ sound that combines flute-type (woodwind type) stops of different pitches (8'+4'+1-1/3').
Jazz Organ The sound of a “tonewheel” type electric organ.
Strings Stereo-sampled, large-scale strings ensemble with realistic reverb.
Choir A big, spacious choir voice.
Synth Pad A warm, mellow, and spacious synth sound.
Piano + StringsCombination of the Piano and Strings (with a slower attack) voices (dual voice).
Piano + Synth Pad Combination of the Piano and Synth Pad voices (dual voice).
Piano + Electric Piano 1 Combination of the Piano and Electric Piano 1 voices (dual voice).
NoteYou can recall the default voice setting (Piano) by pressing the +/YES and –/NO buttons simultaneously.
Note•The voice setting reverts to its default setting when you turn the unit off.•The selected voice applies only to the sound of your performance. It does not apply to the song playback.•See “Preset Voice List” on page 49 for details on voices.
13
En
glish
Selecting Voices
Playing the PianoChapter
2
■ Using voice variationsThe unit provides “voice variations” (alternate versions with effect) for your enjoyment when playing other voices than Piano.
1 Press the soft/shift pedal to alter the sound of the voice.
When you select the Electric Piano voice:The pedal switches between on and off of the chorus effect.
When you select the Vibraphone voice:The pedal switches between on and off of the vibrato.
When you select the Jazz Organ voice:The pedal switches the rotary speaker speed (fast and slow).
Upright piano
Grand piano
■ Changing the voice to that of a piano [for upright piano]You can change the voice to that of a piano with the touch of a button.
1 Press the PIANO button.The PIANO lamp lights up and the voice is changed to that of a piano.
14
Playing the PianoChapter
2
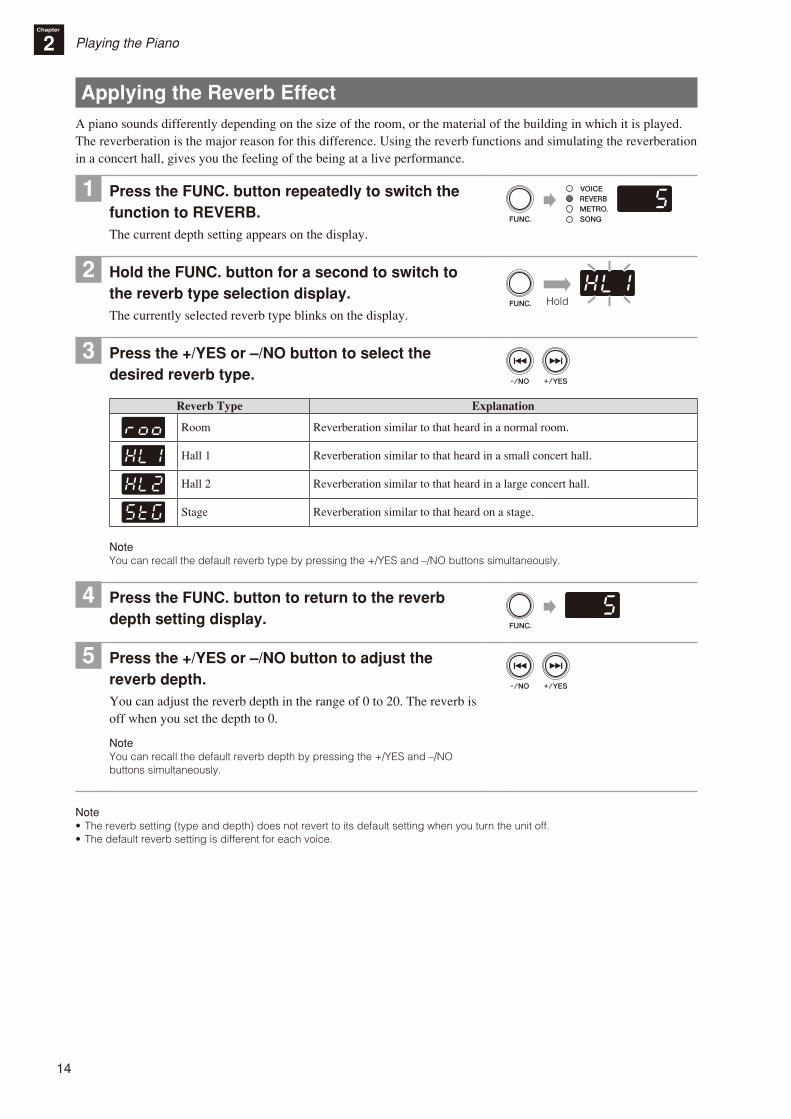
Applying the Reverb EffectA piano sounds differently depending on the size of the room, or the material of the building in which it is played. The reverberation is the major reason for this difference. Using the reverb functions and simulating the reverberation in a concert hall, gives you the feeling of the being at a live performance.
1 Press the FUNC. button repeatedly to switch the function to REVERB.The current depth setting appears on the display.
2 Hold the FUNC. button for a second to switch to the reverb type selection display.The currently selected reverb type blinks on the display.
Hold
3 Press the +/YES or –/NO button to select the desired reverb type.
Reverb Type Explanation
Room Reverberation similar to that heard in a normal room.
Hall 1 Reverberation similar to that heard in a small concert hall.
Hall 2 Reverberation similar to that heard in a large concert hall.
Stage Reverberation similar to that heard on a stage.
NoteYou can recall the default reverb type by pressing the +/YES and –/NO buttons simultaneously.
4 Press the FUNC. button to return to the reverb depth setting display.
5 Press the +/YES or –/NO button to adjust the reverb depth.You can adjust the reverb depth in the range of 0 to 20. The reverb is off when you set the depth to 0.
NoteYou can recall the default reverb depth by pressing the +/YES and –/NO buttons simultaneously.
Note•The reverb setting (type and depth) does not revert to its default setting when you turn the unit off.•The default reverb setting is different for each voice.
15
En
glish
Playing the PianoChapter
2
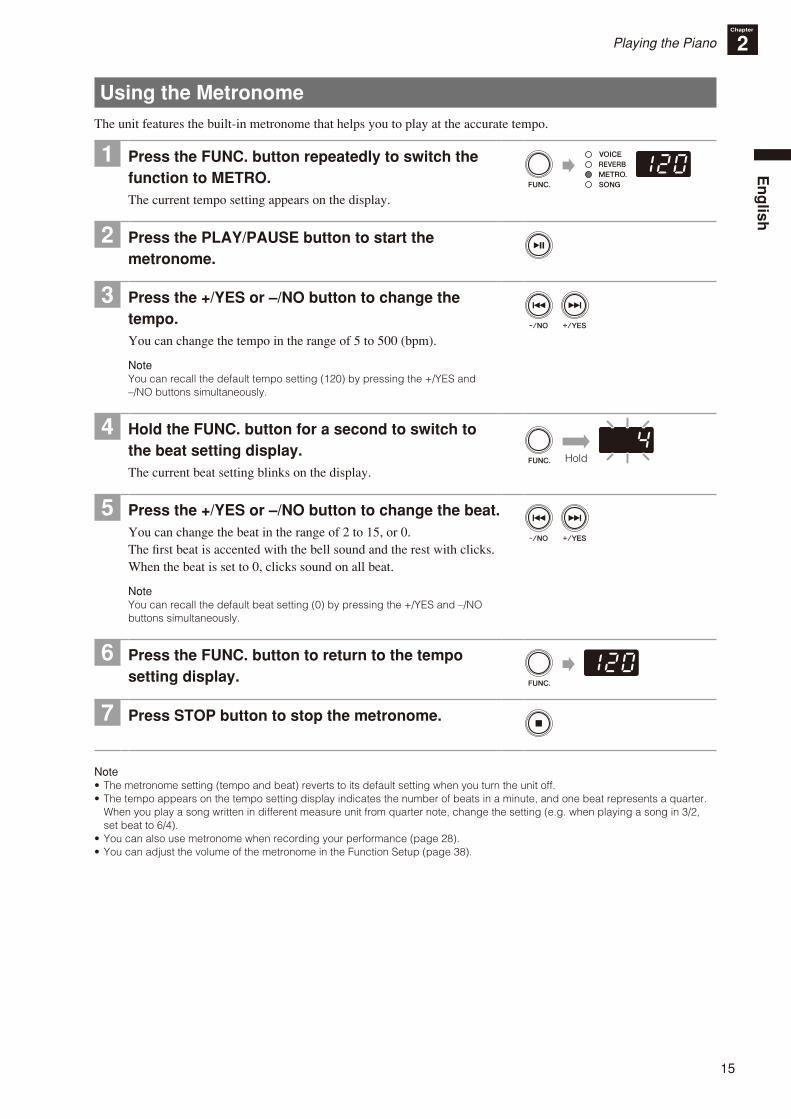
Using the MetronomeThe unit features the built-in metronome that helps you to play at the accurate tempo.
1 Press the FUNC. button repeatedly to switch the function to METRO.The current tempo setting appears on the display.
2 Press the PLAY/PAUSE button to start the metronome.
3 Press the +/YES or –/NO button to change the tempo.You can change the tempo in the range of 5 to 500 (bpm).
NoteYou can recall the default tempo setting (120) by pressing the +/YES and –/NO buttons simultaneously.
4 Hold the FUNC. button for a second to switch to the beat setting display.The current beat setting blinks on the display.
Hold
5 Press the +/YES or –/NO button to change the beat.You can change the beat in the range of 2 to 15, or 0.The first beat is accented with the bell sound and the rest with clicks. When the beat is set to 0, clicks sound on all beat.
NoteYou can recall the default beat setting (0) by pressing the +/YES and –/NO buttons simultaneously.
6 Press the FUNC. button to return to the tempo setting display.
7 Press STOP button to stop the metronome.
Note•The metronome setting (tempo and beat) reverts to its default setting when you turn the unit off.•The tempo appears on the tempo setting display indicates the number of beats in a minute, and one beat represents a quarter.
When you play a song written in different measure unit from quarter note, change the setting (e.g. when playing a song in 3/2, set beat to 6/4).
•You can also use metronome when recording your performance (page 28).•You can adjust the volume of the metronome in the Function Setup (page 38).
16
Chapter
3 Playing Back Songs
Songs You Can Play on This Unit The unit can play the preset songs, songs you recorded, or commercially available songs. In this manual, they are collectively called “songs.” You can simply listen to these songs, but also practice playing along with the song playback.
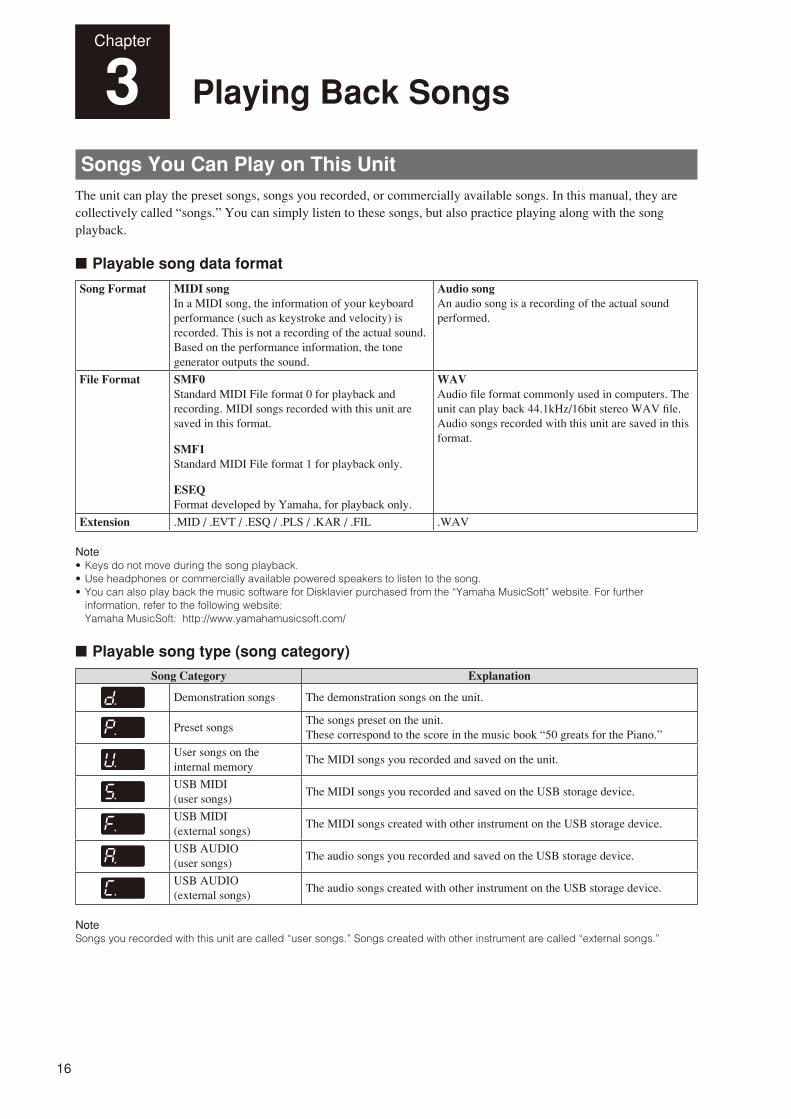
■ Playable song data format
Song Format MIDI songIn a MIDI song, the information of your keyboard performance (such as keystroke and velocity) is recorded. This is not a recording of the actual sound. Based on the performance information, the tone generator outputs the sound.
Audio songAn audio song is a recording of the actual sound performed.
File Format SMF0Standard MIDI File format 0 for playback and recording. MIDI songs recorded with this unit are saved in this format.
SMF1Standard MIDI File format 1 for playback only.
ESEQFormat developed by Yamaha, for playback only.
WAVAudio file format commonly used in computers. The unit can play back 44.1kHz/16bit stereo WAV file. Audio songs recorded with this unit are saved in this format.
Extension .MID / .EVT / .ESQ / .PLS / .KAR / .FIL .WAV
Note•Keys do not move during the song playback.•Use headphones or commercially available powered speakers to listen to the song.•You can also play back the music software for Disklavier purchased from the “Yamaha MusicSoft” website. For further
information, refer to the following website: Yamaha MusicSoft: http://www.yamahamusicsoft.com/
■ Playable song type (song category)
Song Category Explanation
Demonstration songs The demonstration songs on the unit.
Preset songsThe songs preset on the unit.These correspond to the score in the music book “50 greats for the Piano.”
User songs on the internal memory
The MIDI songs you recorded and saved on the unit.
USB MIDI (user songs)
The MIDI songs you recorded and saved on the USB storage device.
USB MIDI (external songs)
The MIDI songs created with other instrument on the USB storage device.
USB AUDIO (user songs)
The audio songs you recorded and saved on the USB storage device.
USB AUDIO (external songs)
The audio songs created with other instrument on the USB storage device.
NoteSongs you recorded with this unit are called “user songs.” Songs created with other instrument are called “external songs.”
17
En
glish
Playing Back SongsChapter
3
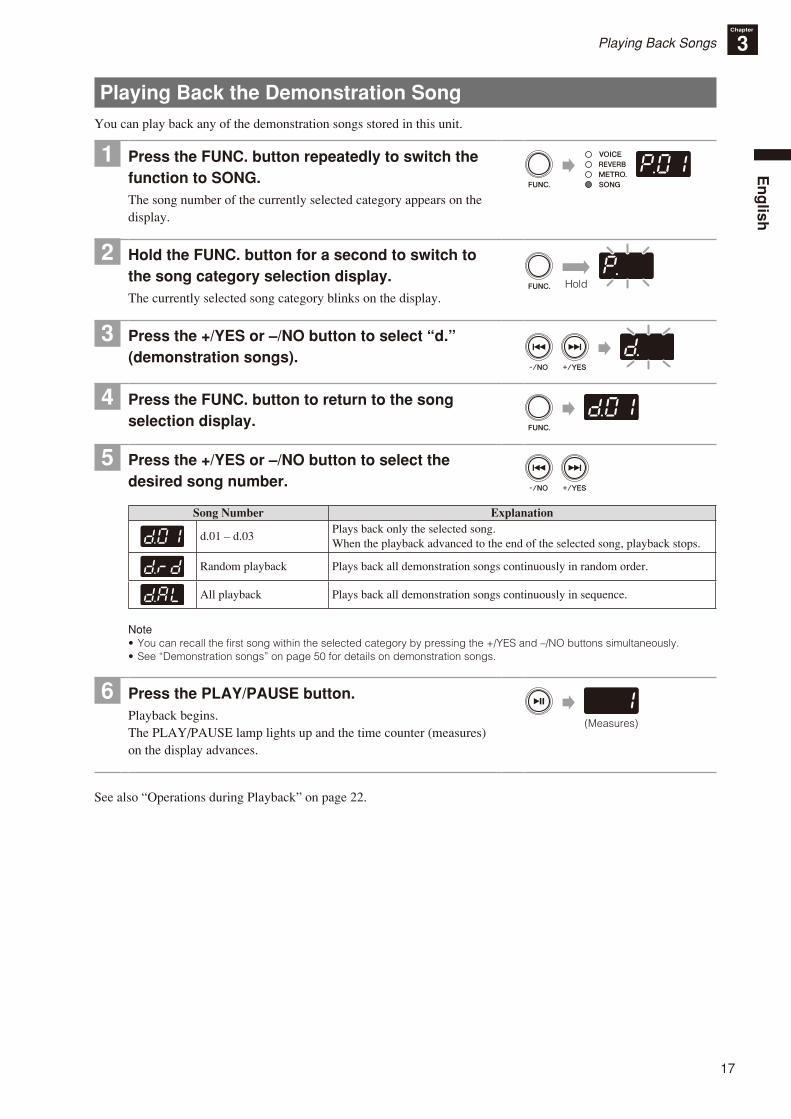
Playing Back the Demonstration SongYou can play back any of the demonstration songs stored in this unit.
1 Press the FUNC. button repeatedly to switch the function to SONG.The song number of the currently selected category appears on the display.
2 Hold the FUNC. button for a second to switch to the song category selection display.The currently selected song category blinks on the display.
Hold
3 Press the +/YES or –/NO button to select “d.” (demonstration songs).
4 Press the FUNC. button to return to the song selection display.
5 Press the +/YES or –/NO button to select the desired song number.
Song Number Explanation
d.01 – d.03Plays back only the selected song.When the playback advanced to the end of the selected song, playback stops.
Random playback Plays back all demonstration songs continuously in random order.
All playback Plays back all demonstration songs continuously in sequence.
Note•You can recall the first song within the selected category by pressing the +/YES and –/NO buttons simultaneously.•See “Demonstration songs” on page 50 for details on demonstration songs.
6 Press the PLAY/PAUSE button.Playback begins.The PLAY/PAUSE lamp lights up and the time counter (measures) on the display advances.
(Measures)
See also “Operations during Playback” on page 22.
18
Playing Back SongsChapter
3
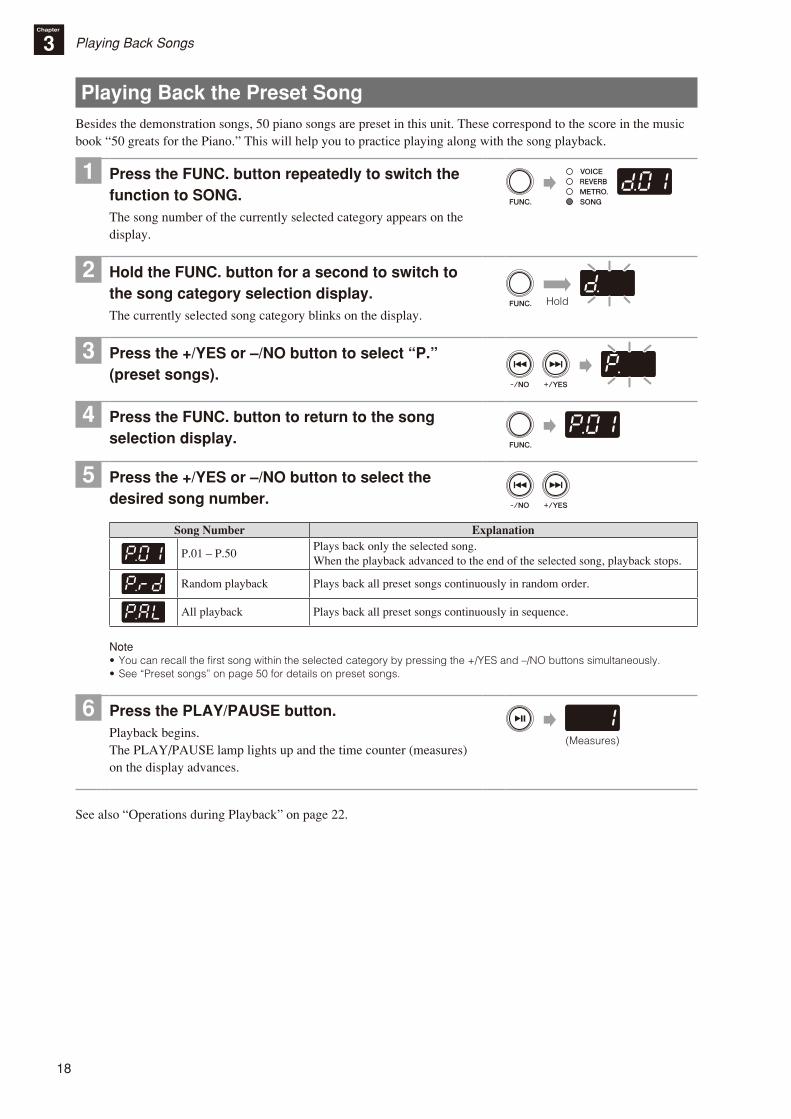
Playing Back the Preset SongBesides the demonstration songs, 50 piano songs are preset in this unit. These correspond to the score in the music book “50 greats for the Piano.” This will help you to practice playing along with the song playback.
1 Press the FUNC. button repeatedly to switch the function to SONG.The song number of the currently selected category appears on the display.
2 Hold the FUNC. button for a second to switch to the song category selection display.The currently selected song category blinks on the display.
Hold
3 Press the +/YES or –/NO button to select “P.” (preset songs).
4 Press the FUNC. button to return to the song selection display.
5 Press the +/YES or –/NO button to select the desired song number.
Song Number Explanation
P.01 – P.50Plays back only the selected song.When the playback advanced to the end of the selected song, playback stops.
Random playback Plays back all preset songs continuously in random order.
All playback Plays back all preset songs continuously in sequence.
Note•You can recall the first song within the selected category by pressing the +/YES and –/NO buttons simultaneously.•See “Preset songs” on page 50 for details on preset songs.
6 Press the PLAY/PAUSE button.Playback begins.The PLAY/PAUSE lamp lights up and the time counter (measures) on the display advances.
(Measures)
See also “Operations during Playback” on page 22.
19
En
glish
Playing Back SongsChapter
3
Playing Back the Song Recorded on the Internal MemoryYour performance that has been recorded as a MIDI song and saved on the internal memory can also be played back.
NoteTo record your performance, see “Recording Your Performance on the Internal Memory” on page 24.
1 Press the FUNC. button repeatedly to switch the function to SONG.The song number of the currently selected category appears on the display.
2 Hold the FUNC. button for a second to switch to the song category selection display.The currently selected song category blinks on the display.
Hold
3 Press the +/YES or –/NO button to select “U.” (user song on the internal memory).
4 Press the FUNC. button to return to the song selection display.
5 Press the +/YES or –/NO button to select the desired song number.
Song Number Explanation
U.01 – U.10Plays back only the selected song.When the playback advanced to the end of the selected song, playback stops.
Random playbackPlays back all user songs on the internal memory continuously in random order.
All playback Plays back all user songs on the internal memory continuously in sequence.
Note•You can recall the first song within the selected category by pressing the +/YES and –/NO buttons simultaneously.• If you select an empty song (which contains no data), the song number and the blank indication (- - -) appears alternately
on the display.• If the internal memory contains no songs, “random playback” and “all playback” do not appear on the display.
6 Press the PLAY/PAUSE button.Playback begins.The PLAY/PAUSE lamp lights up and the time counter (measures) on the display advances.
(Measures)
See also “Operations during Playback” on page 22.
20
Playing Back SongsChapter
3
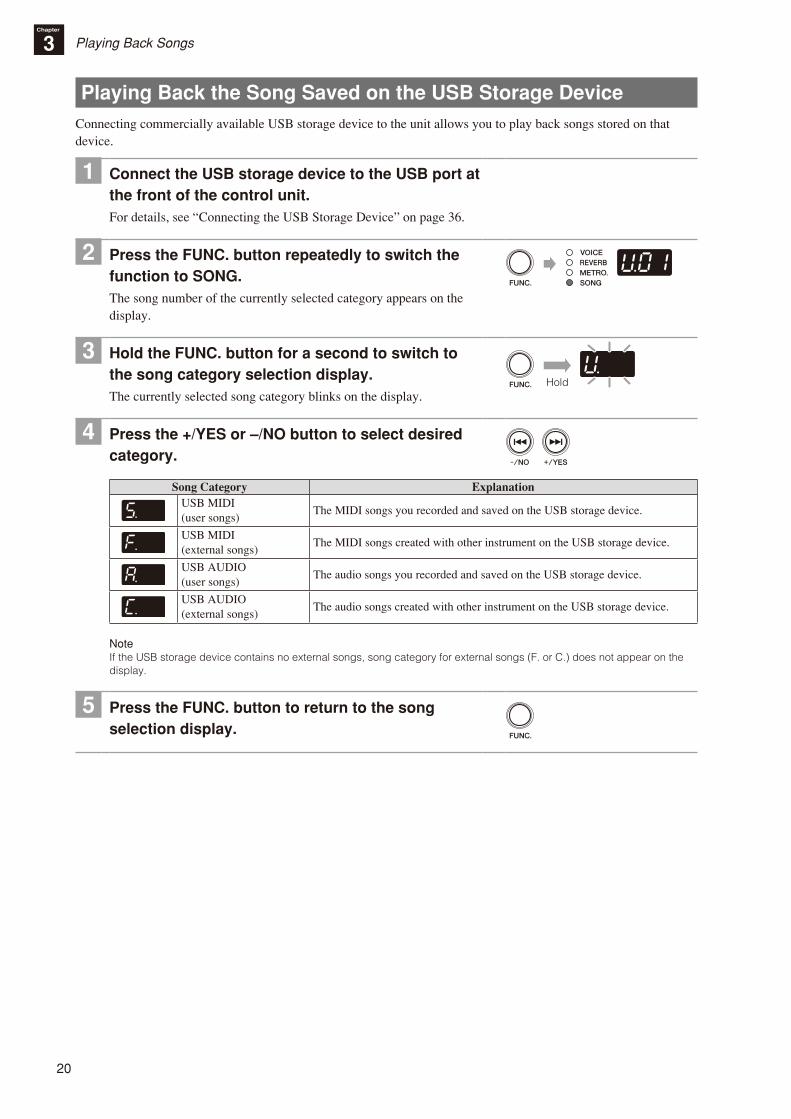
Playing Back the Song Saved on the USB Storage DeviceConnecting commercially available USB storage device to the unit allows you to play back songs stored on that device.
1 Connect the USB storage device to the USB port at the front of the control unit.For details, see “Connecting the USB Storage Device” on page 36.
2 Press the FUNC. button repeatedly to switch the function to SONG.The song number of the currently selected category appears on the display.
3 Hold the FUNC. button for a second to switch to the song category selection display.The currently selected song category blinks on the display.
Hold
4 Press the +/YES or –/NO button to select desired category.
Song Category ExplanationUSB MIDI (user songs)
The MIDI songs you recorded and saved on the USB storage device.
USB MIDI (external songs)
The MIDI songs created with other instrument on the USB storage device.
USB AUDIO (user songs)
The audio songs you recorded and saved on the USB storage device.
USB AUDIO (external songs)
The audio songs created with other instrument on the USB storage device.
NoteIf the USB storage device contains no external songs, song category for external songs (F. or C.) does not appear on the display.
5 Press the FUNC. button to return to the song selection display.

21
En
glish
Playing Back the Song Saved on the USB Storage Device
Playing Back SongsChapter
3
6 Press the +/YES or –/NO button to select the desired song number.
Song Number Explanation
S.00 – S.99
Plays back only the selected song.When the playback advanced to the end of the selected song, playback stops.
F.00 – F.99100 – 399
A.00 – A.99
C.00 – C.99100 – 399
Random playbackPlays back all songs in the selected category continuously in random order. (The example shows the USB MIDI user song category.)
All playbackPlays back all preset songs in the selected category continuously in sequence. (The example shows the USB MIDI user song category.)
Note•You can recall the first song within the selected category by pressing the +/YES and –/NO buttons simultaneously.• If you select the user songs that contains no data, the song number and the blank indication (- - -) appears alternately on
the display.• If the selected song category contains no songs, “random playback” and “all playback” do not appear on the display.
7 Press the PLAY/PAUSE button.Playback begins.The PLAY/PAUSE lamp lights up and the time counter (measures or time) on the display advances.
(Measures) or
(Time)
See also “Operations during Playback” on page 22.
22
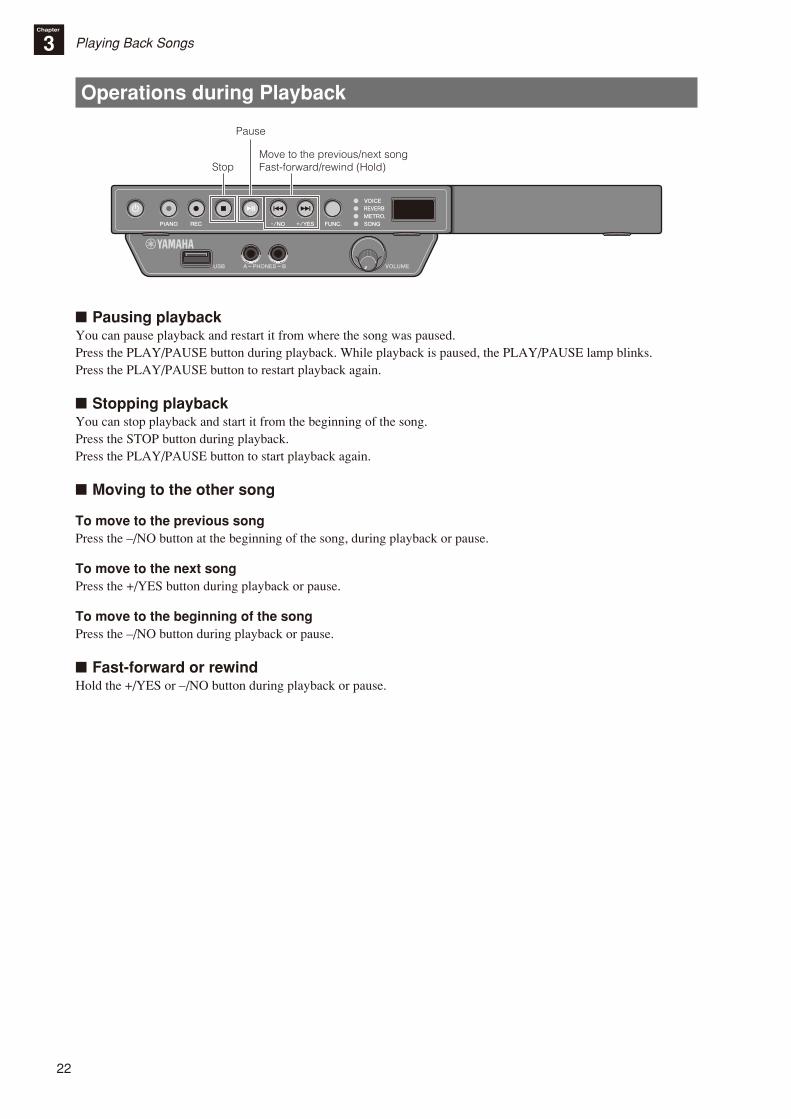
Playing Back SongsChapter
3
Operations during Playback
Stop
Pause
Move to the previous/next songFast-forward/rewind (Hold)
■ Pausing playbackYou can pause playback and restart it from where the song was paused.Press the PLAY/PAUSE button during playback. While playback is paused, the PLAY/PAUSE lamp blinks.Press the PLAY/PAUSE button to restart playback again.
■ Stopping playbackYou can stop playback and start it from the beginning of the song.Press the STOP button during playback.Press the PLAY/PAUSE button to start playback again.
■ Moving to the other song
To move to the previous songPress the –/NO button at the beginning of the song, during playback or pause.
To move to the next songPress the +/YES button during playback or pause.
To move to the beginning of the songPress the –/NO button during playback or pause.
■ Fast-forward or rewindHold the +/YES or –/NO button during playback or pause.
23
En
glish
Playing Back SongsChapter
3
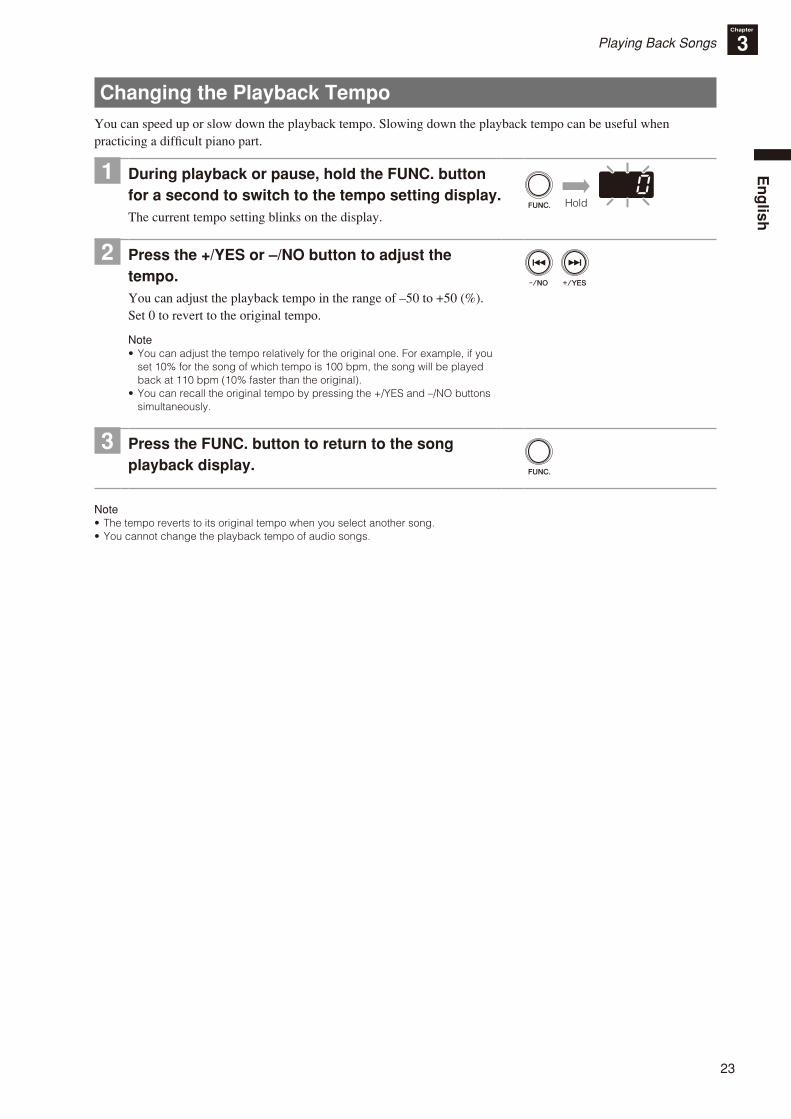
Changing the Playback TempoYou can speed up or slow down the playback tempo. Slowing down the playback tempo can be useful when practicing a difficult piano part.
1 During playback or pause, hold the FUNC. button for a second to switch to the tempo setting display.The current tempo setting blinks on the display.
Hold
2 Press the +/YES or –/NO button to adjust the tempo.You can adjust the playback tempo in the range of –50 to +50 (%). Set 0 to revert to the original tempo.
Note•You can adjust the tempo relatively for the original one. For example, if you
set 10% for the song of which tempo is 100 bpm, the song will be played back at 110 bpm (10% faster than the original).
•You can recall the original tempo by pressing the +/YES and –/NO buttons simultaneously.
3 Press the FUNC. button to return to the song playback display.
Note•The tempo reverts to its original tempo when you select another song.•You cannot change the playback tempo of audio songs.
24
Chapter
4 Recording Your Performance
Recording Your Performance on the Internal MemoryYou can record your performance on the internal memory of the unit. Recorded performances are saved as a MIDI song (SMF0).
Note•You can record up to 10 songs on the internal memory.•You can record up to approximately 500 KB, which equates to a standard song of approximately 30 minutes in length, per one
recording.•The recorded performances are preserved even if you turn the unit off.•You can also use metronome when recording your performance (page 28).
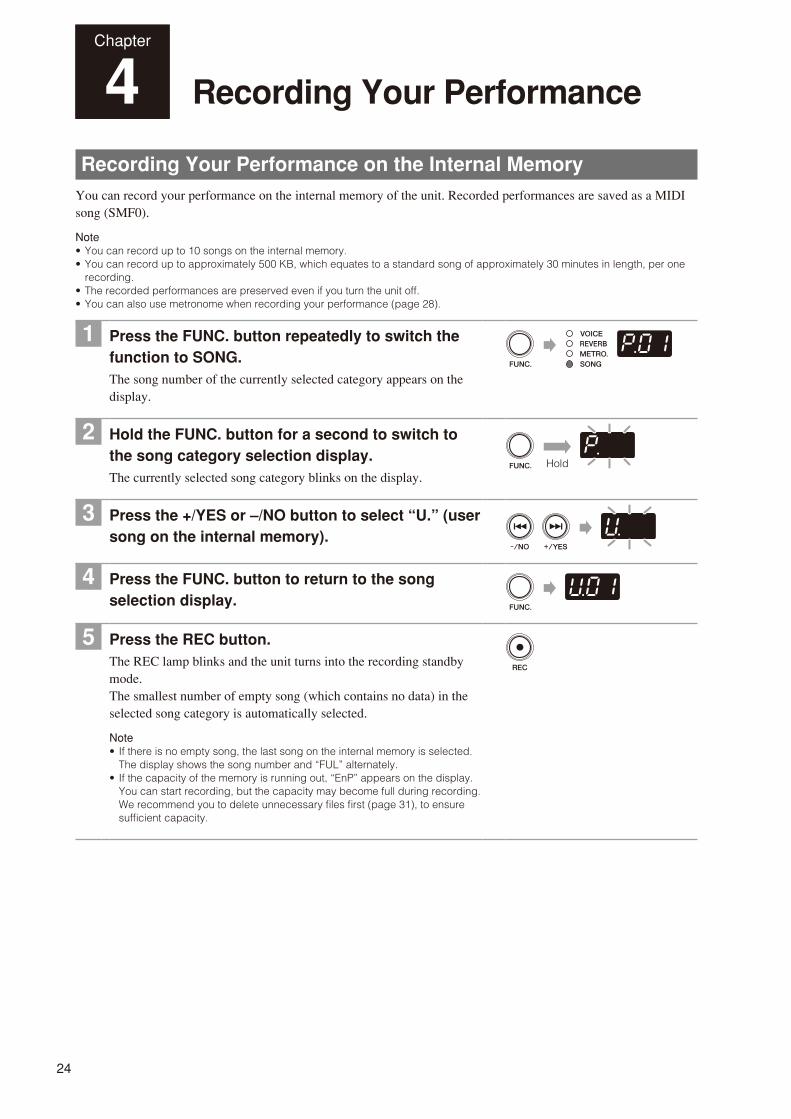
1 Press the FUNC. button repeatedly to switch the function to SONG.The song number of the currently selected category appears on the display.
2 Hold the FUNC. button for a second to switch to the song category selection display.The currently selected song category blinks on the display.
Hold
3 Press the +/YES or –/NO button to select “U.” (user song on the internal memory).
4 Press the FUNC. button to return to the song selection display.
5 Press the REC button.The REC lamp blinks and the unit turns into the recording standby mode.The smallest number of empty song (which contains no data) in the selected song category is automatically selected.
Note• If there is no empty song, the last song on the internal memory is selected.
The display shows the song number and “FUL” alternately.• If the capacity of the memory is running out, “EnP” appears on the display.
You can start recording, but the capacity may become full during recording. We recommend you to delete unnecessary files first (page 31), to ensure sufficient capacity.
25
En
glish
Recording Your Performance on the Internal Memory
Recording Your PerformanceChapter
4
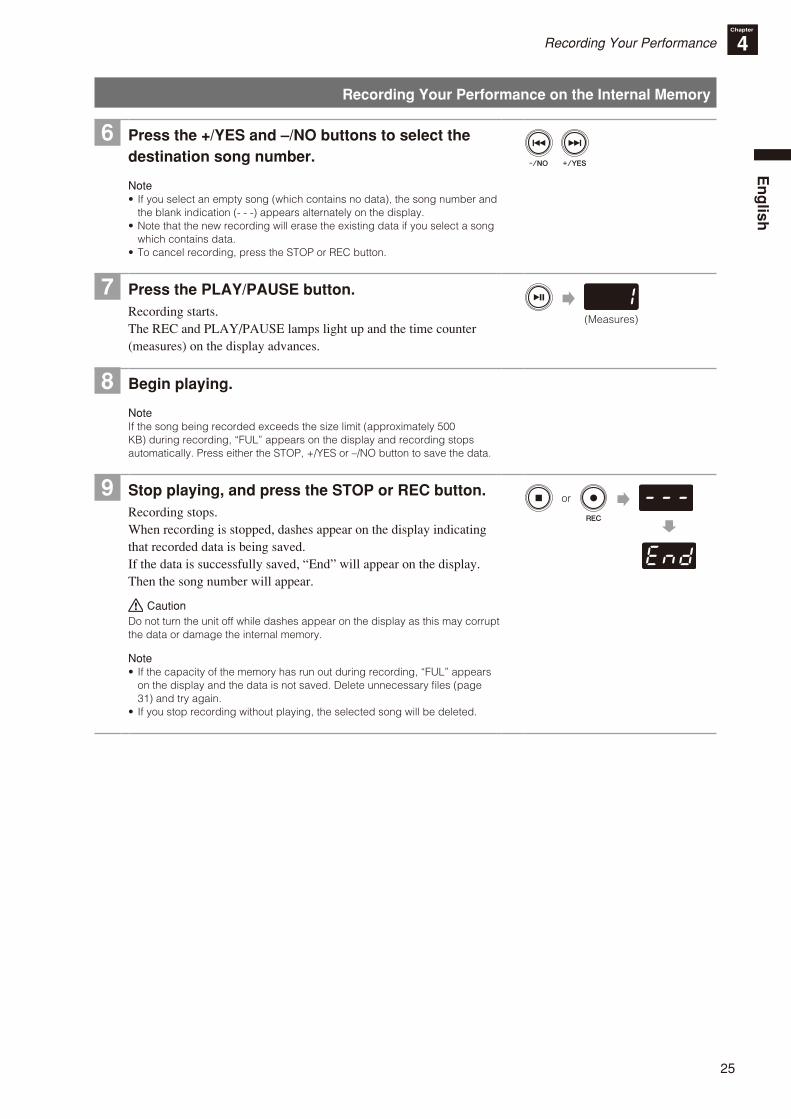
6 Press the +/YES and –/NO buttons to select the destination song number.
Note• If you select an empty song (which contains no data), the song number and
the blank indication (- - -) appears alternately on the display.•Note that the new recording will erase the existing data if you select a song
which contains data.•To cancel recording, press the STOP or REC button.
7 Press the PLAY/PAUSE button.Recording starts.The REC and PLAY/PAUSE lamps light up and the time counter (measures) on the display advances.
(Measures)
8 Begin playing.
NoteIf the song being recorded exceeds the size limit (approximately 500 KB) during recording, “FUL” appears on the display and recording stops automatically. Press either the STOP, +/YES or –/NO button to save the data.
9 Stop playing, and press the STOP or REC button.Recording stops.When recording is stopped, dashes appear on the display indicating that recorded data is being saved.If the data is successfully saved, “End” will appear on the display. Then the song number will appear.
CautionDo not turn the unit off while dashes appear on the display as this may corrupt the data or damage the internal memory.
Note• If the capacity of the memory has run out during recording, “FUL” appears
on the display and the data is not saved. Delete unnecessary files (page 31) and try again.
• If you stop recording without playing, the selected song will be deleted.
or
26
Recording Your PerformanceChapter
4
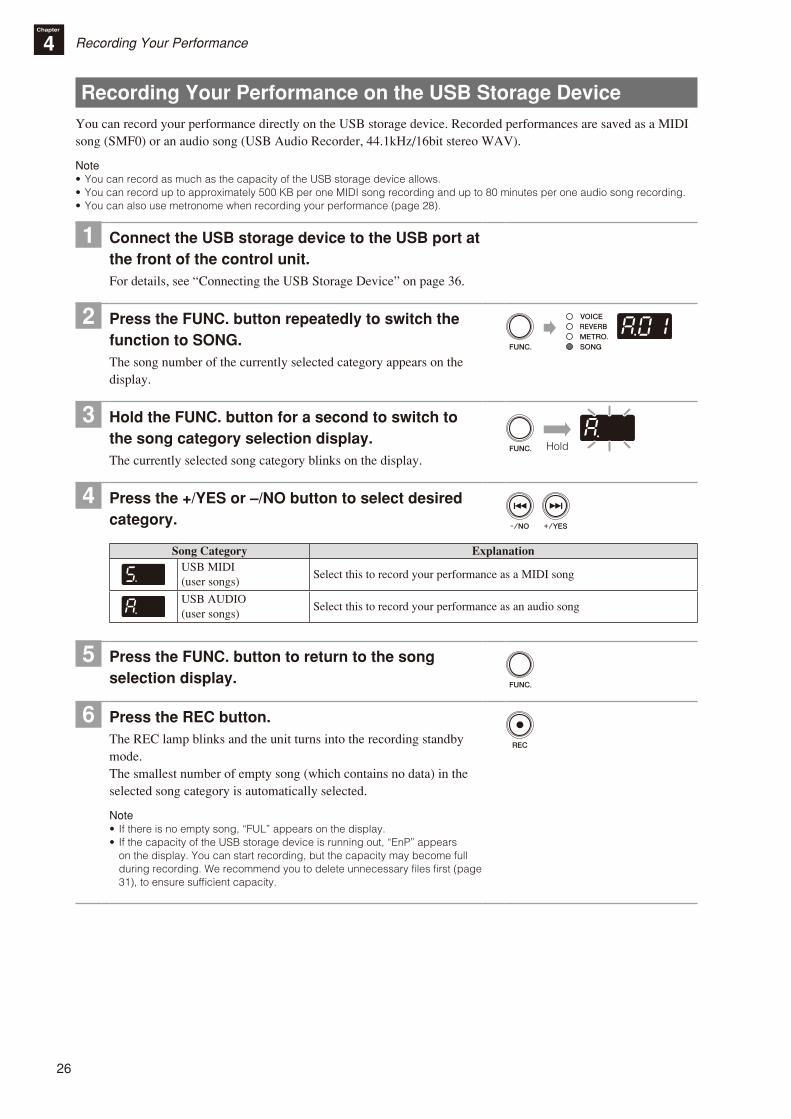
Recording Your Performance on the USB Storage DeviceYou can record your performance directly on the USB storage device. Recorded performances are saved as a MIDI song (SMF0) or an audio song (USB Audio Recorder, 44.1kHz/16bit stereo WAV).
Note•You can record as much as the capacity of the USB storage device allows.•You can record up to approximately 500 KB per one MIDI song recording and up to 80 minutes per one audio song recording.•You can also use metronome when recording your performance (page 28).
1 Connect the USB storage device to the USB port at the front of the control unit.For details, see “Connecting the USB Storage Device” on page 36.
2 Press the FUNC. button repeatedly to switch the function to SONG.The song number of the currently selected category appears on the display.
3 Hold the FUNC. button for a second to switch to the song category selection display.The currently selected song category blinks on the display.
Hold
4 Press the +/YES or –/NO button to select desired category.
Song Category ExplanationUSB MIDI (user songs)
Select this to record your performance as a MIDI song
USB AUDIO (user songs)
Select this to record your performance as an audio song
5 Press the FUNC. button to return to the song selection display.
6 Press the REC button.The REC lamp blinks and the unit turns into the recording standby mode.The smallest number of empty song (which contains no data) in the selected song category is automatically selected.
Note• If there is no empty song, “FUL” appears on the display.• If the capacity of the USB storage device is running out, “EnP” appears
on the display. You can start recording, but the capacity may become full during recording. We recommend you to delete unnecessary files first (page 31), to ensure sufficient capacity.
27
En
glish
Recording Your Performance on the USB Storage Device
Recording Your PerformanceChapter
4
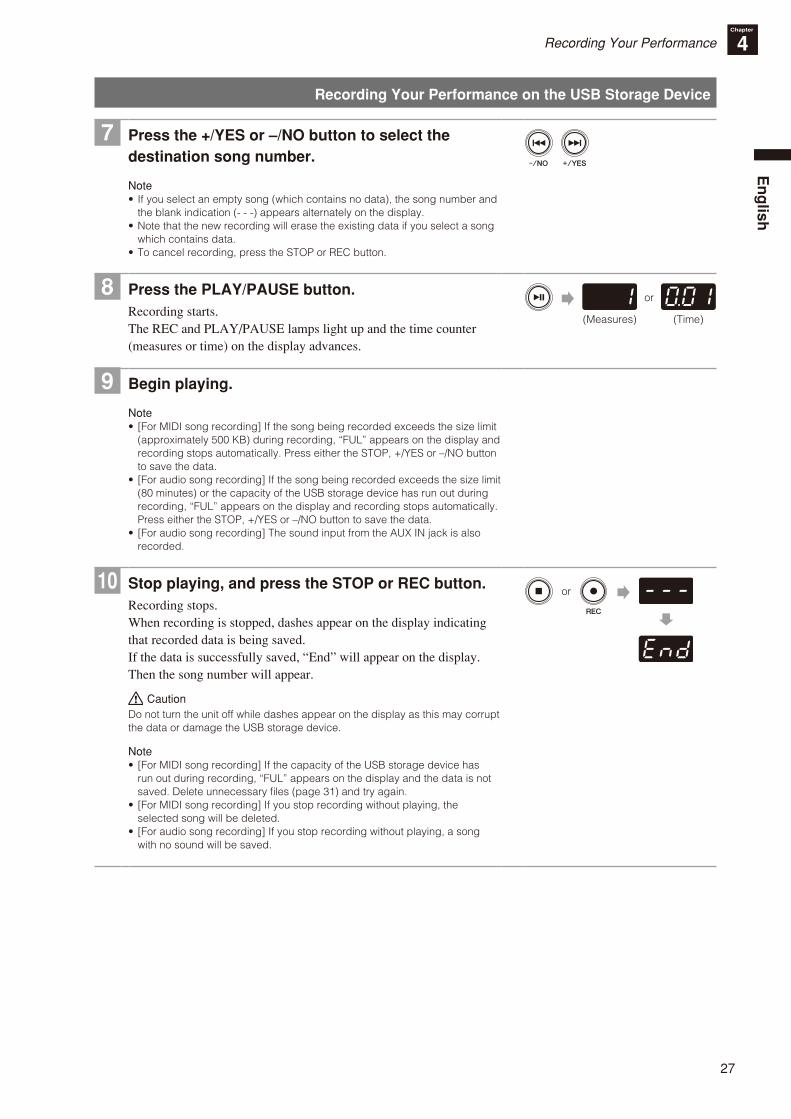
7 Press the +/YES or –/NO button to select the destination song number.
Note• If you select an empty song (which contains no data), the song number and
the blank indication (- - -) appears alternately on the display.•Note that the new recording will erase the existing data if you select a song
which contains data.•To cancel recording, press the STOP or REC button.
8 Press the PLAY/PAUSE button.Recording starts.The REC and PLAY/PAUSE lamps light up and the time counter (measures or time) on the display advances.
(Measures) or
(Time)
9 Begin playing.
Note• [For MIDI song recording] If the song being recorded exceeds the size limit
(approximately 500 KB) during recording, “FUL” appears on the display and recording stops automatically. Press either the STOP, +/YES or –/NO button to save the data.
• [For audio song recording] If the song being recorded exceeds the size limit (80 minutes) or the capacity of the USB storage device has run out during recording, “FUL” appears on the display and recording stops automatically. Press either the STOP, +/YES or –/NO button to save the data.
• [For audio song recording] The sound input from the AUX IN jack is also recorded.
10 Stop playing, and press the STOP or REC button.Recording stops.When recording is stopped, dashes appear on the display indicating that recorded data is being saved.If the data is successfully saved, “End” will appear on the display. Then the song number will appear.
CautionDo not turn the unit off while dashes appear on the display as this may corrupt the data or damage the USB storage device.
Note• [For MIDI song recording] If the capacity of the USB storage device has
run out during recording, “FUL” appears on the display and the data is not saved. Delete unnecessary files (page 31) and try again.
• [For MIDI song recording] If you stop recording without playing, the selected song will be deleted.
• [For audio song recording] If you stop recording without playing, a song with no sound will be saved.
or

28
Recording Your PerformanceChapter
4
Recording with the MetronomeYou can use the metronome to record performance.
1 Press the FUNC. button repeatedly to switch the function to METRO.The current tempo setting appears on the display.
2 Press the PLAY/PAUSE button to start the metronome.
3 Press the +/YES or –/NO button to change the tempo.You can change the tempo in the range of 5 to 500 (bpm).
NoteYou can recall the default tempo setting (120) by pressing the +/YES and –/NO buttons simultaneously.
4 Hold the FUNC. button for a second to switch to the beat setting display.The current beat setting blinks on the display.
Hold
5 Press the +/YES or –/NO button to change the beat.You can change the beat in the range of 2 to 15, or 0.The first beat is accented with the bell sound and the rest with clicks. When the beat is set to 0, clicks sound on all beat.
NoteYou can recall the default beat setting (0) by pressing the +/YES and –/NO buttons simultaneously.
6 Press the FUNC. button to return to the tempo setting display.
7 Start recording.See “Recording Your Performance on the Internal Memory” on page 24 or “Recording Your Performance on the USB Storage Device” on page 26.
Note•The metronome also stops when recording stops.•The metronome sound is not recorded.
29
En
glish
Chapter
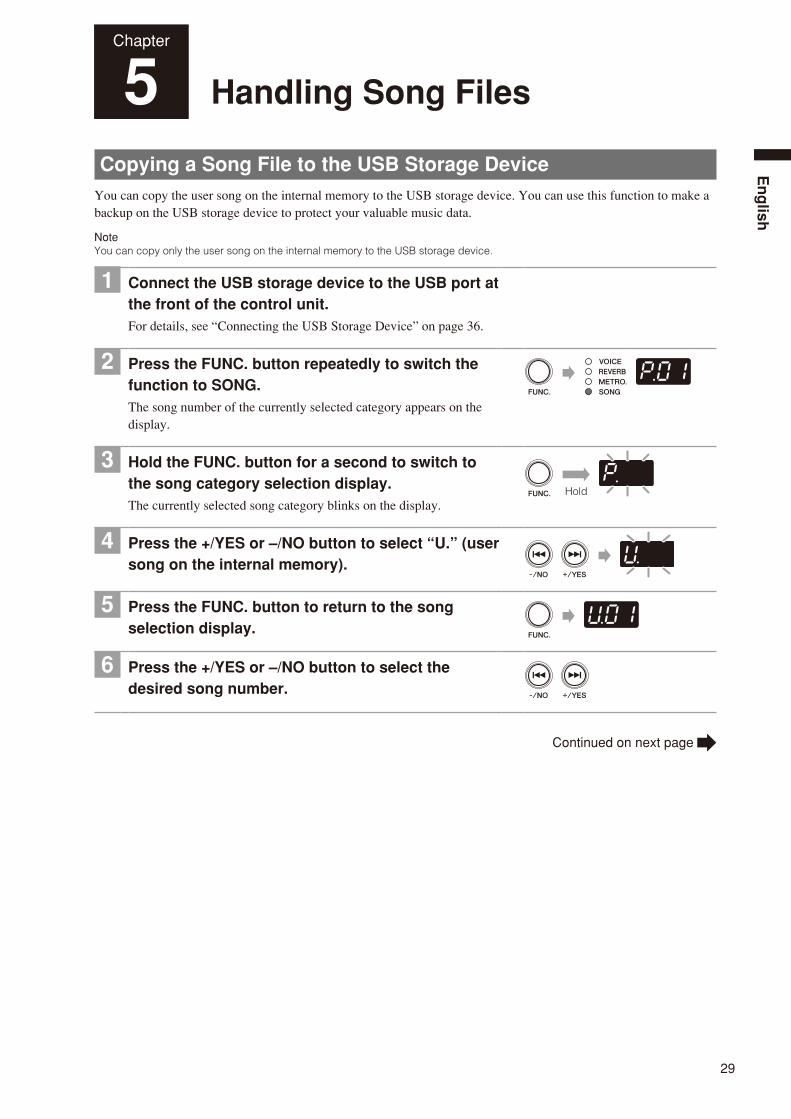
5 Handling Song Files
Copying a Song File to the USB Storage DeviceYou can copy the user song on the internal memory to the USB storage device. You can use this function to make a backup on the USB storage device to protect your valuable music data.
NoteYou can copy only the user song on the internal memory to the USB storage device.
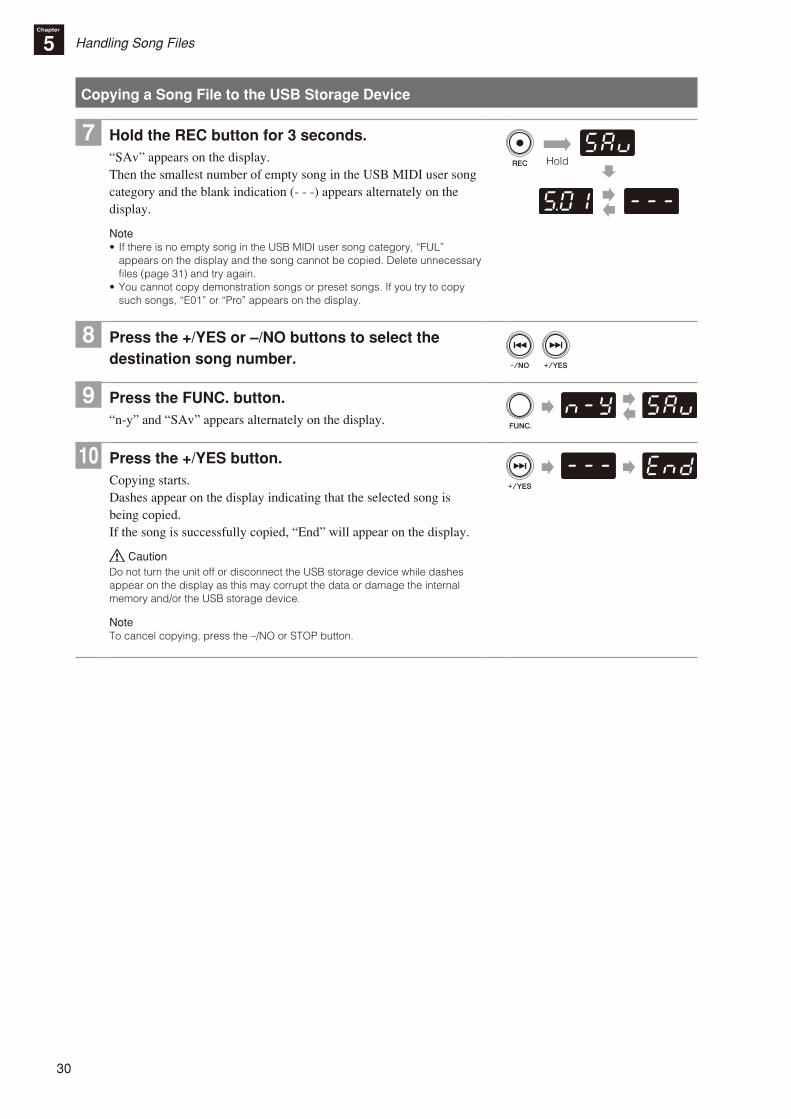
1 Connect the USB storage device to the USB port at the front of the control unit.For details, see “Connecting the USB Storage Device” on page 36.
2 Press the FUNC. button repeatedly to switch the function to SONG.The song number of the currently selected category appears on the display.
3 Hold the FUNC. button for a second to switch to the song category selection display.The currently selected song category blinks on the display.
Hold
4 Press the +/YES or –/NO button to select “U.” (user song on the internal memory).
5 Press the FUNC. button to return to the song selection display.
6 Press the +/YES or –/NO button to select the desired song number.
Continued on next page
30
Copying a Song File to the USB Storage Device
Handling Song FilesChapter
5
7 Hold the REC button for 3 seconds.“SAv” appears on the display.Then the smallest number of empty song in the USB MIDI user song category and the blank indication (- - -) appears alternately on the display.
Note• If there is no empty song in the USB MIDI user song category, “FUL”
appears on the display and the song cannot be copied. Delete unnecessary files (page 31) and try again.
•You cannot copy demonstration songs or preset songs. If you try to copy such songs, “E01” or “Pro” appears on the display.
Hold
8 Press the +/YES or –/NO buttons to select the destination song number.
9 Press the FUNC. button.“n-y” and “SAv” appears alternately on the display.
10 Press the +/YES button.Copying starts. Dashes appear on the display indicating that the selected song is being copied.If the song is successfully copied, “End” will appear on the display.
CautionDo not turn the unit off or disconnect the USB storage device while dashes appear on the display as this may corrupt the data or damage the internal memory and/or the USB storage device.
NoteTo cancel copying, press the –/NO or STOP button.
31
En
glish
Handling Song FilesChapter
5
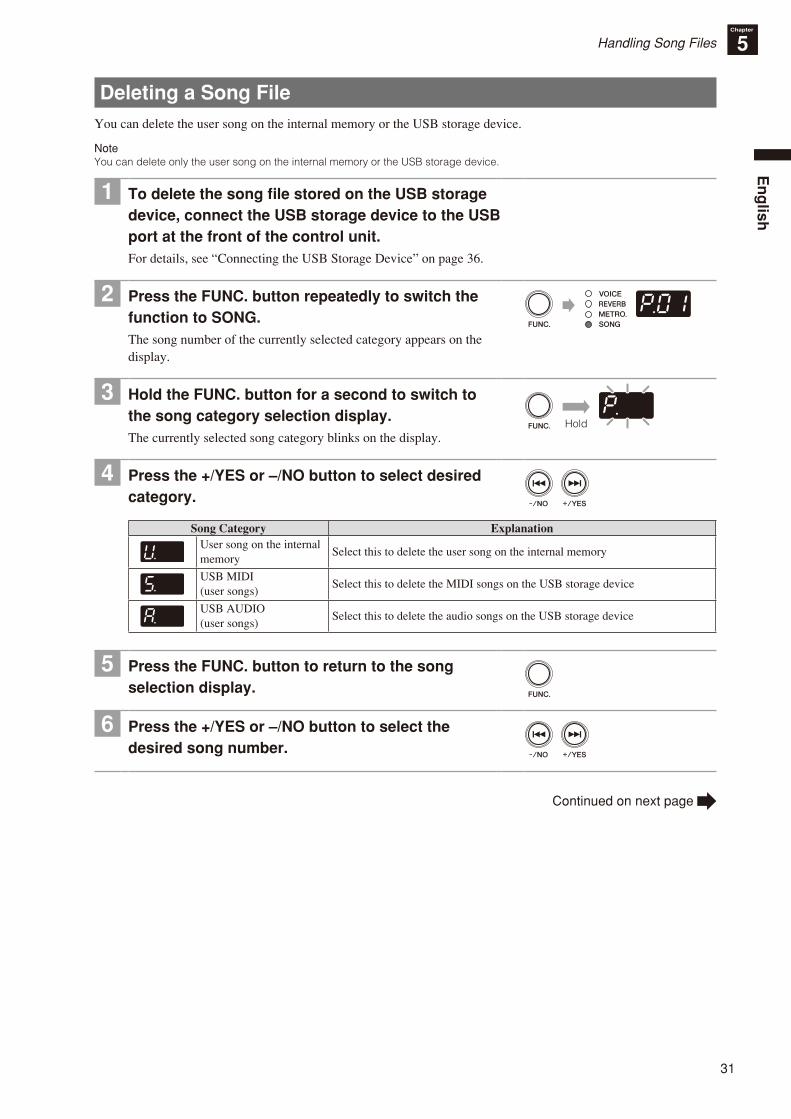
Deleting a Song FileYou can delete the user song on the internal memory or the USB storage device.
NoteYou can delete only the user song on the internal memory or the USB storage device.
1 To delete the song file stored on the USB storage device, connect the USB storage device to the USB port at the front of the control unit.For details, see “Connecting the USB Storage Device” on page 36.
2 Press the FUNC. button repeatedly to switch the function to SONG.The song number of the currently selected category appears on the display.
3 Hold the FUNC. button for a second to switch to the song category selection display.The currently selected song category blinks on the display.
Hold
4 Press the +/YES or –/NO button to select desired category.
Song Category ExplanationUser song on the internal memory
Select this to delete the user song on the internal memory
USB MIDI (user songs)
Select this to delete the MIDI songs on the USB storage device
USB AUDIO (user songs)
Select this to delete the audio songs on the USB storage device
5 Press the FUNC. button to return to the song selection display.
6 Press the +/YES or –/NO button to select the desired song number.
Continued on next page
32
Deleting a Song File
Handling Song FilesChapter
5
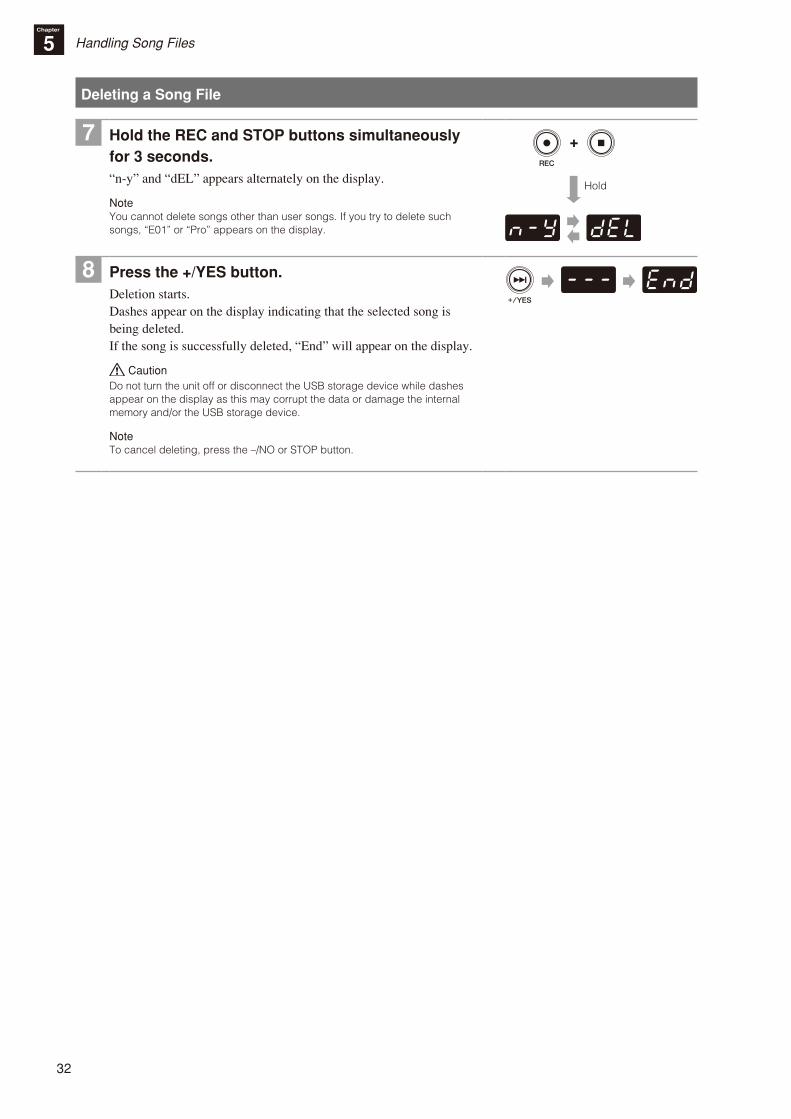
7 Hold the REC and STOP buttons simultaneously for 3 seconds.“n-y” and “dEL” appears alternately on the display.
NoteYou cannot delete songs other than user songs. If you try to delete such songs, “E01” or “Pro” appears on the display.
+
Hold
8 Press the +/YES button.Deletion starts.Dashes appear on the display indicating that the selected song is being deleted.If the song is successfully deleted, “End” will appear on the display.
CautionDo not turn the unit off or disconnect the USB storage device while dashes appear on the display as this may corrupt the data or damage the internal memory and/or the USB storage device.
NoteTo cancel deleting, press the –/NO or STOP button.
33
En
glish
Chapter
6 Connecting to Other Devices
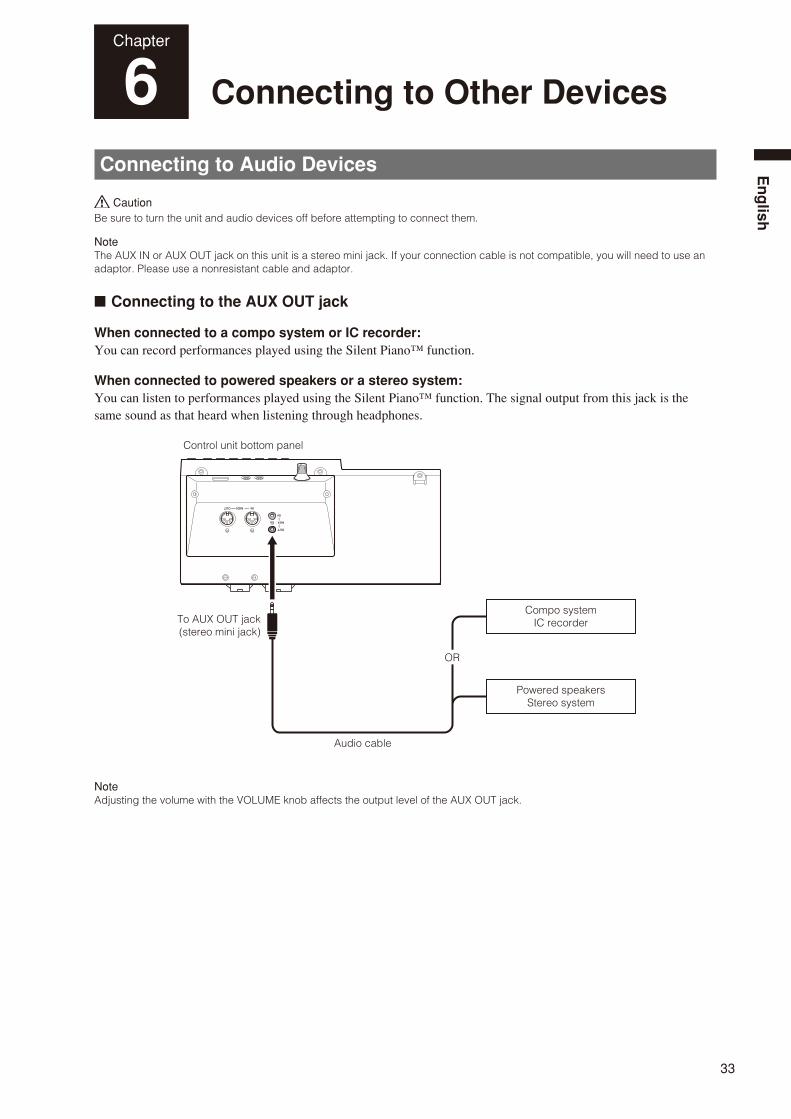
Connecting to Audio Devices
CautionBe sure to turn the unit and audio devices off before attempting to connect them.
NoteThe AUX IN or AUX OUT jack on this unit is a stereo mini jack. If your connection cable is not compatible, you will need to use an adaptor. Please use a nonresistant cable and adaptor.
■ Connecting to the AUX OUT jack
When connected to a compo system or IC recorder:You can record performances played using the Silent Piano™ function.
When connected to powered speakers or a stereo system:You can listen to performances played using the Silent Piano™ function. The signal output from this jack is the same sound as that heard when listening through headphones.
To AUX OUT jack(stereo mini jack)
Control unit bottom panel
OR
Audio cable
Compo systemIC recorder
Powered speakersStereo system
NoteAdjusting the volume with the VOLUME knob affects the output level of the AUX OUT jack.

34
Connecting to Audio Devices
Connecting to Other DevicesChapter
6
■ Connecting to the AUX IN jack
When connected to other sound modules or playback devices (such as CD players):You can use the Silent Piano™ function together with the sound received from the connected devices.
To AUX IN jack(stereo mini jack)
Audio cable
Control unit bottom panel
OR
CD playeretc.
Other sound modules
CautionDo not route the output from the AUX OUT jack to the AUX IN jack. Doing so will cause feedback of the audio signal which may damage the unit and/or the connected device.
Note•During the playback of audio songs, you cannot hear the sound input through the AUX IN jack.•You can transpose (page 42) or fine tune (page 42) the pitch of the sound input through the AUX IN jack.
35
En
glish
Connecting to Other DevicesChapter
6
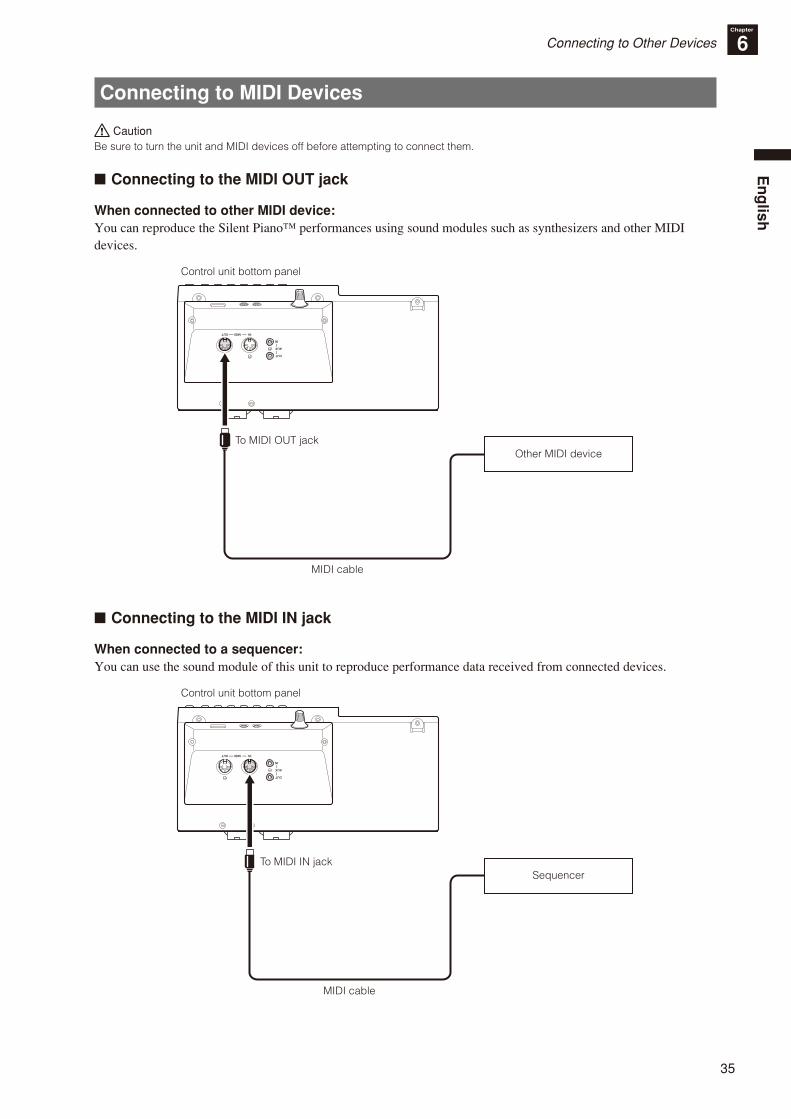
Connecting to MIDI Devices
CautionBe sure to turn the unit and MIDI devices off before attempting to connect them.
■ Connecting to the MIDI OUT jack
When connected to other MIDI device:You can reproduce the Silent Piano™ performances using sound modules such as synthesizers and other MIDI devices.
Control unit bottom panel
To MIDI OUT jack
MIDI cable
Other MIDI device
■ Connecting to the MIDI IN jack
When connected to a sequencer:You can use the sound module of this unit to reproduce performance data received from connected devices.
Sequencer
Control unit bottom panel
To MIDI IN jack
MIDI cable
36
Connecting to Other DevicesChapter
6
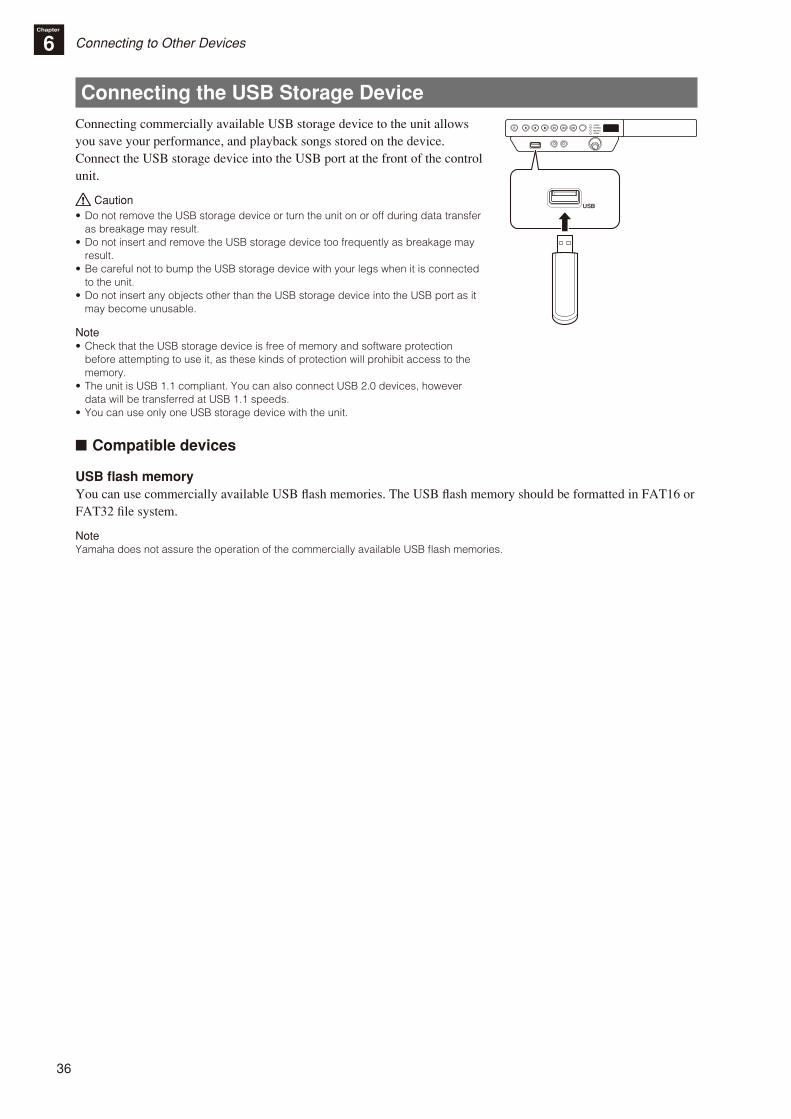
Connecting the USB Storage DeviceConnecting commercially available USB storage device to the unit allows you save your performance, and playback songs stored on the device.Connect the USB storage device into the USB port at the front of the control unit.
Caution•Do not remove the USB storage device or turn the unit on or off during data transfer
as breakage may result.•Do not insert and remove the USB storage device too frequently as breakage may
result.•Be careful not to bump the USB storage device with your legs when it is connected
to the unit.•Do not insert any objects other than the USB storage device into the USB port as it
may become unusable.
Note•Check that the USB storage device is free of memory and software protection
before attempting to use it, as these kinds of protection will prohibit access to the memory.
•The unit is USB 1.1 compliant. You can also connect USB 2.0 devices, however data will be transferred at USB 1.1 speeds.
•You can use only one USB storage device with the unit.
■ Compatible devices
USB flash memoryYou can use commercially available USB flash memories. The USB flash memory should be formatted in FAT16 or FAT32 file system.
NoteYamaha does not assure the operation of the commercially available USB flash memories.
37
En
glish
Connecting to Other DevicesChapter
6
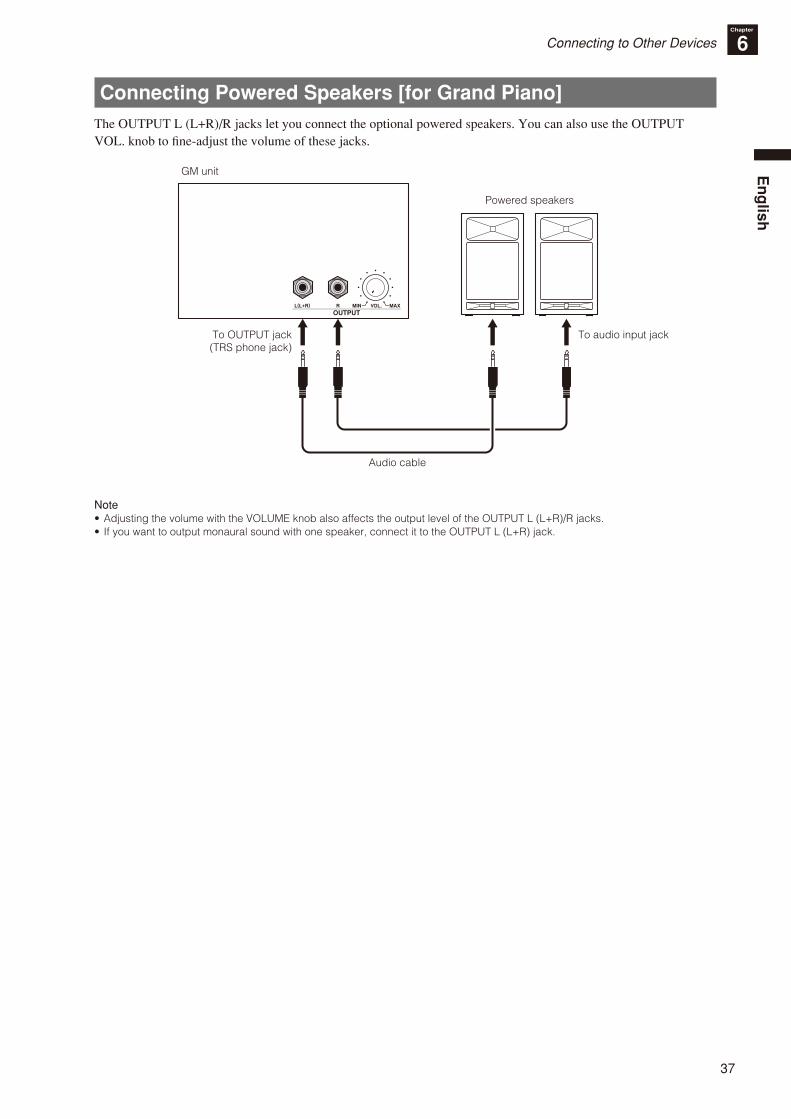
Connecting Powered Speakers [for Grand Piano]The OUTPUT L (L+R)/R jacks let you connect the optional powered speakers. You can also use the OUTPUT VOL. knob to fine-adjust the volume of these jacks.
L(L+R) R
OUTPUTVOL.MIN MAX
GM unit
Powered speakers
To OUTPUT jack(TRS phone jack)
To audio input jack
Audio cable
Note•Adjusting the volume with the VOLUME knob also affects the output level of the OUTPUT L (L+R)/R jacks.• If you want to output monaural sound with one speaker, connect it to the OUTPUT L (L+R) jack.
38
Chapter
7 Using Various Functions
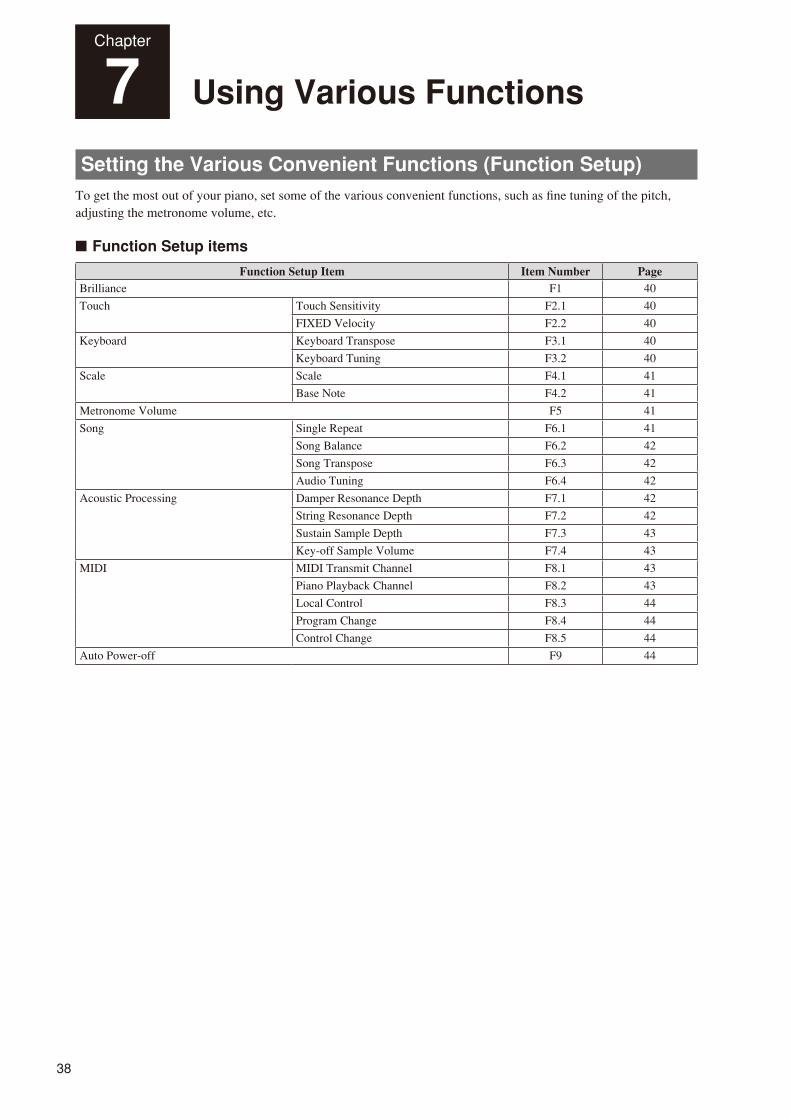
Setting the Various Convenient Functions (Function Setup)To get the most out of your piano, set some of the various convenient functions, such as fine tuning of the pitch, adjusting the metronome volume, etc.
■ Function Setup items
Function Setup Item Item Number PageBrilliance F1 40
Touch Touch Sensitivity F2.1 40
FIXED Velocity F2.2 40
Keyboard Keyboard Transpose F3.1 40
Keyboard Tuning F3.2 40
Scale Scale F4.1 41
Base Note F4.2 41
Metronome Volume F5 41
Song Single Repeat F6.1 41
Song Balance F6.2 42
Song Transpose F6.3 42
Audio Tuning F6.4 42
Acoustic Processing Damper Resonance Depth F7.1 42
String Resonance Depth F7.2 42
Sustain Sample Depth F7.3 43
Key-off Sample Volume F7.4 43
MIDI MIDI Transmit Channel F8.1 43
Piano Playback Channel F8.2 43
Local Control F8.3 44
Program Change F8.4 44
Control Change F8.5 44
Auto Power-off F9 44
39
En
glish
Setting the Various Convenient Functions (Function Setup)
Using Various FunctionsChapter
7
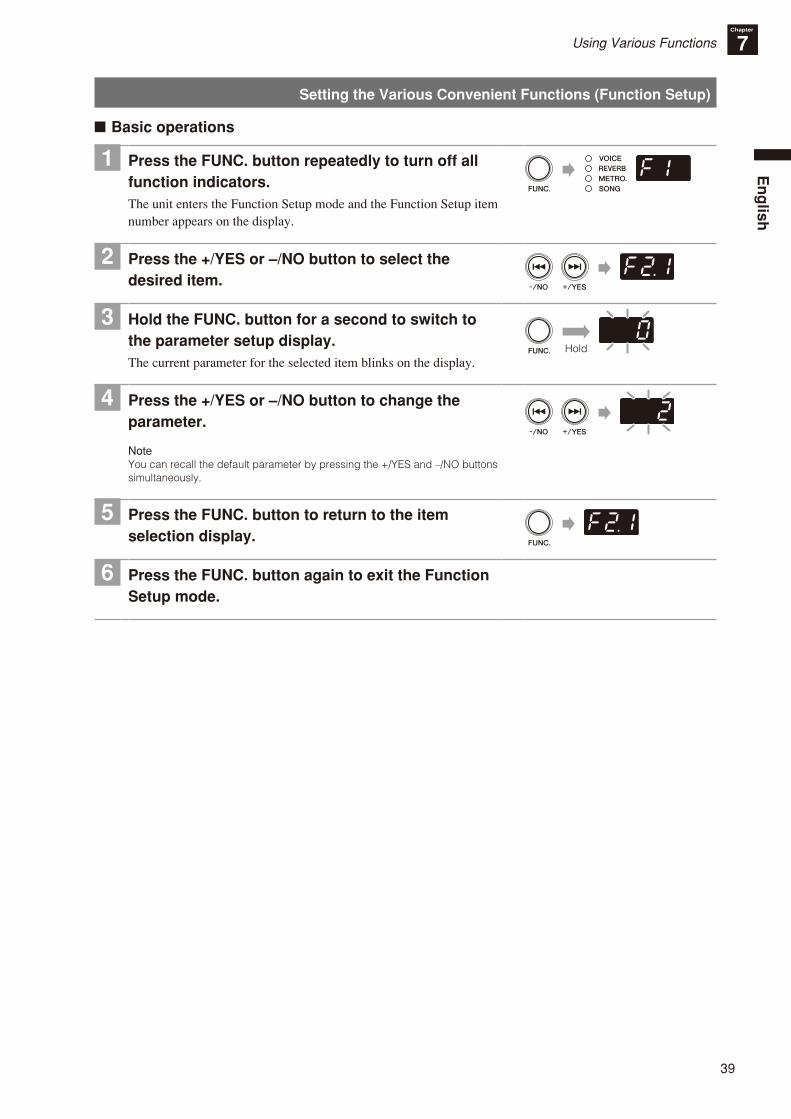
■ Basic operations
1 Press the FUNC. button repeatedly to turn off all function indicators.The unit enters the Function Setup mode and the Function Setup item number appears on the display.
2 Press the +/YES or –/NO button to select the desired item.
3 Hold the FUNC. button for a second to switch to the parameter setup display.The current parameter for the selected item blinks on the display.
Hold
4 Press the +/YES or –/NO button to change the parameter.
NoteYou can recall the default parameter by pressing the +/YES and –/NO buttons simultaneously.
5 Press the FUNC. button to return to the item selection display.
6 Press the FUNC. button again to exit the Function Setup mode.
40
Using Various FunctionsChapter
7
Details on Each Function Setup Item
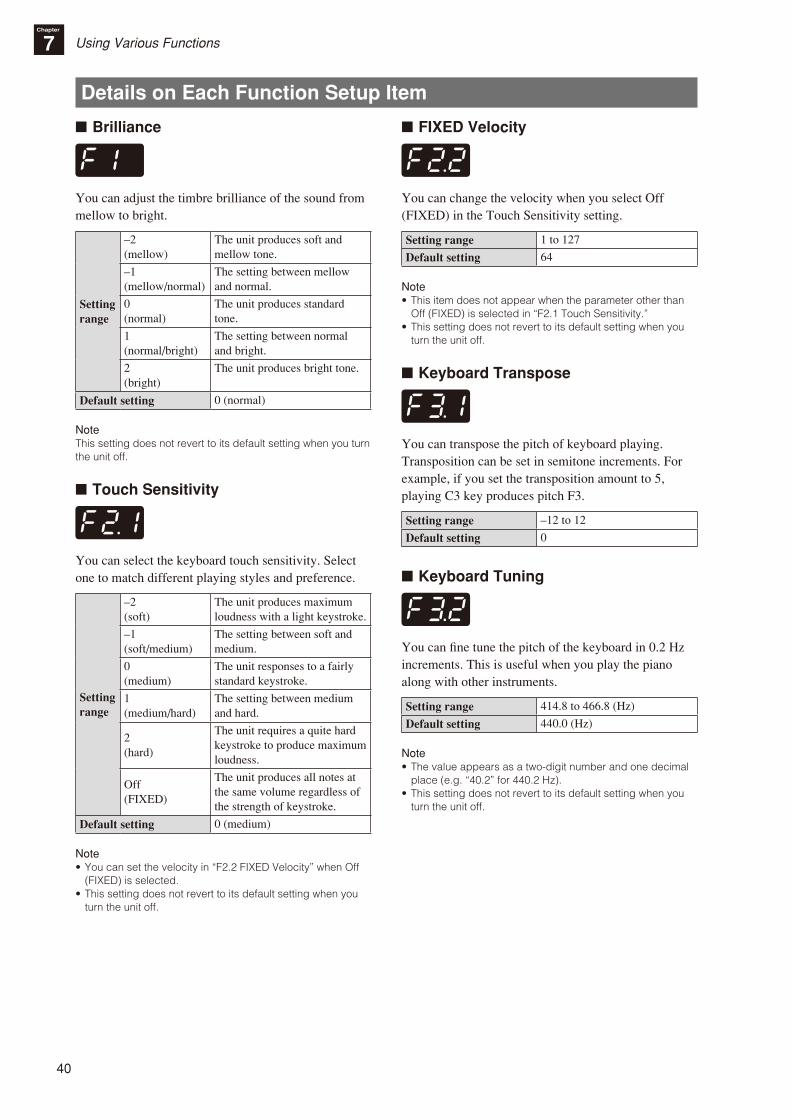
■ Brilliance
You can adjust the timbre brilliance of the sound from mellow to bright.
Setting range
–2 (mellow)
The unit produces soft and mellow tone.
–1 (mellow/normal)
The setting between mellow and normal.
0 (normal)
The unit produces standard tone.
1 (normal/bright)
The setting between normal and bright.
2 (bright)
The unit produces bright tone.
Default setting 0 (normal)
NoteThis setting does not revert to its default setting when you turn the unit off.
■ Touch Sensitivity
You can select the keyboard touch sensitivity. Select one to match different playing styles and preference.
Setting range
–2 (soft)
The unit produces maximum loudness with a light keystroke.
–1 (soft/medium)
The setting between soft and medium.
0 (medium)
The unit responses to a fairly standard keystroke.
1 (medium/hard)
The setting between medium and hard.
2 (hard)
The unit requires a quite hard keystroke to produce maximum loudness.
Off (FIXED)
The unit produces all notes at the same volume regardless of the strength of keystroke.
Default setting 0 (medium)
Note•You can set the velocity in “F2.2 FIXED Velocity” when Off
(FIXED) is selected.•This setting does not revert to its default setting when you
turn the unit off.
■ FIXED Velocity
You can change the velocity when you select Off (FIXED) in the Touch Sensitivity setting.
Setting range 1 to 127
Default setting 64
Note•This item does not appear when the parameter other than
Off (FIXED) is selected in “F2.1 Touch Sensitivity.”•This setting does not revert to its default setting when you
turn the unit off.
■ Keyboard Transpose
You can transpose the pitch of keyboard playing. Transposition can be set in semitone increments. For example, if you set the transposition amount to 5, playing C3 key produces pitch F3.
Setting range –12 to 12
Default setting 0
■ Keyboard Tuning
You can fine tune the pitch of the keyboard in 0.2 Hz increments. This is useful when you play the piano along with other instruments.
Setting range 414.8 to 466.8 (Hz)
Default setting 440.0 (Hz)
Note•The value appears as a two-digit number and one decimal
place (e.g. “40.2” for 440.2 Hz).•This setting does not revert to its default setting when you
turn the unit off.
41
En
glish
Details on Each Function Setup Item
Using Various FunctionsChapter
7
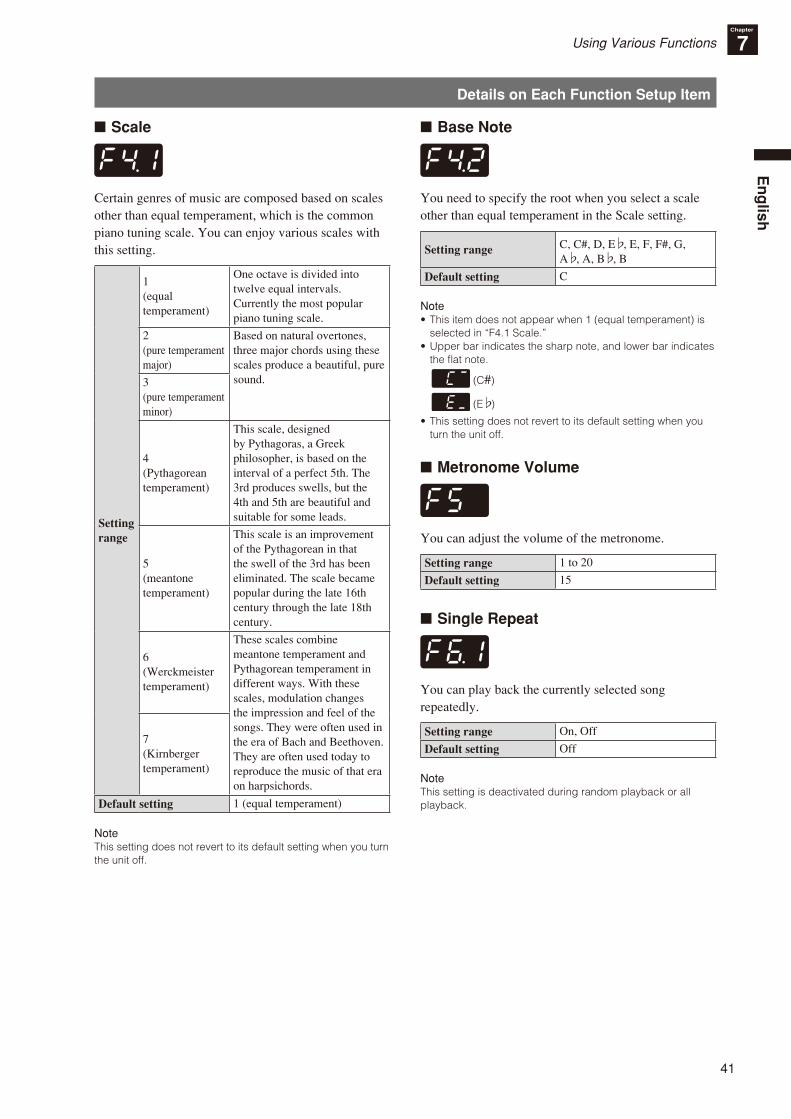
■ Scale
Certain genres of music are composed based on scales other than equal temperament, which is the common piano tuning scale. You can enjoy various scales with this setting.
Setting range
1(equal temperament)
One octave is divided into twelve equal intervals. Currently the most popular piano tuning scale.
2(pure temperament major)
Based on natural overtones, three major chords using these scales produce a beautiful, pure sound.3
(pure temperament minor)
4(Pythagorean temperament)
This scale, designed by Pythagoras, a Greek philosopher, is based on the interval of a perfect 5th. The 3rd produces swells, but the 4th and 5th are beautiful and suitable for some leads.
5(meantone temperament)
This scale is an improvement of the Pythagorean in that the swell of the 3rd has been eliminated. The scale became popular during the late 16th century through the late 18th century.
6(Werckmeister temperament)
These scales combine meantone temperament and Pythagorean temperament in different ways. With these scales, modulation changes the impression and feel of the songs. They were often used in the era of Bach and Beethoven. They are often used today to reproduce the music of that era on harpsichords.
7(Kirnberger temperament)
Default setting 1 (equal temperament)
NoteThis setting does not revert to its default setting when you turn the unit off.
■ Base Note
You need to specify the root when you select a scale other than equal temperament in the Scale setting.
Setting range C, C#, D, E , E, F, F#, G, A , A, B , B
Default setting C
Note•This item does not appear when 1 (equal temperament) is
selected in “F4.1 Scale.”•Upper bar indicates the sharp note, and lower bar indicates
the flat note.
(C#)
(E )
•This setting does not revert to its default setting when you turn the unit off.
■ Metronome Volume
You can adjust the volume of the metronome.
Setting range 1 to 20
Default setting 15
■ Single Repeat
You can play back the currently selected song repeatedly.
Setting range On, Off
Default setting Off
NoteThis setting is deactivated during random playback or all playback.
42
Details on Each Function Setup Item
Using Various FunctionsChapter
7
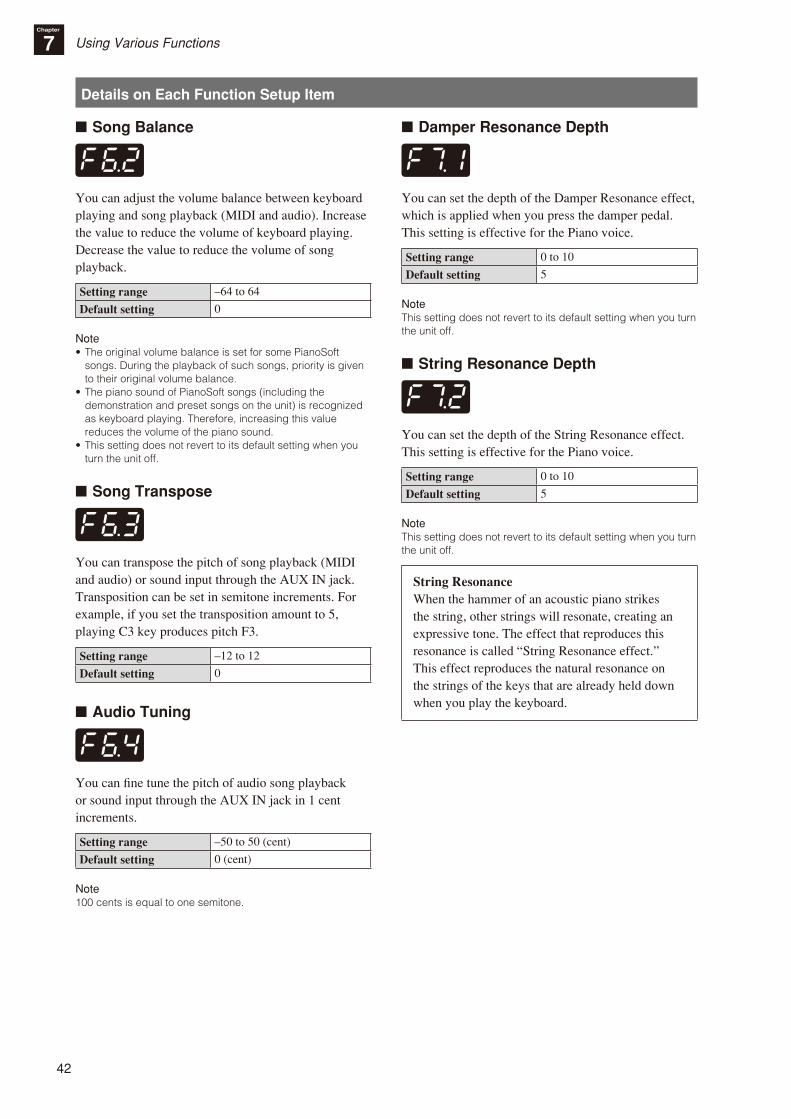
■ Song Balance
You can adjust the volume balance between keyboard playing and song playback (MIDI and audio). Increase the value to reduce the volume of keyboard playing. Decrease the value to reduce the volume of song playback.
Setting range –64 to 64
Default setting 0
Note•The original volume balance is set for some PianoSoft
songs. During the playback of such songs, priority is given to their original volume balance.
•The piano sound of PianoSoft songs (including the demonstration and preset songs on the unit) is recognized as keyboard playing. Therefore, increasing this value reduces the volume of the piano sound.
•This setting does not revert to its default setting when you turn the unit off.
■ Song Transpose
You can transpose the pitch of song playback (MIDI and audio) or sound input through the AUX IN jack. Transposition can be set in semitone increments. For example, if you set the transposition amount to 5, playing C3 key produces pitch F3.
Setting range –12 to 12
Default setting 0
■ Audio Tuning
You can fine tune the pitch of audio song playback or sound input through the AUX IN jack in 1 cent increments.
Setting range –50 to 50 (cent)
Default setting 0 (cent)
Note100 cents is equal to one semitone.
■ Damper Resonance Depth
You can set the depth of the Damper Resonance effect, which is applied when you press the damper pedal. This setting is effective for the Piano voice.
Setting range 0 to 10
Default setting 5
NoteThis setting does not revert to its default setting when you turn the unit off.
■ String Resonance Depth
You can set the depth of the String Resonance effect. This setting is effective for the Piano voice.
Setting range 0 to 10
Default setting 5
NoteThis setting does not revert to its default setting when you turn the unit off.
String ResonanceWhen the hammer of an acoustic piano strikes the string, other strings will resonate, creating an expressive tone. The effect that reproduces this resonance is called “String Resonance effect.” This effect reproduces the natural resonance on the strings of the keys that are already held down when you play the keyboard.
43
En
glish
Details on Each Function Setup Item
Using Various FunctionsChapter
7
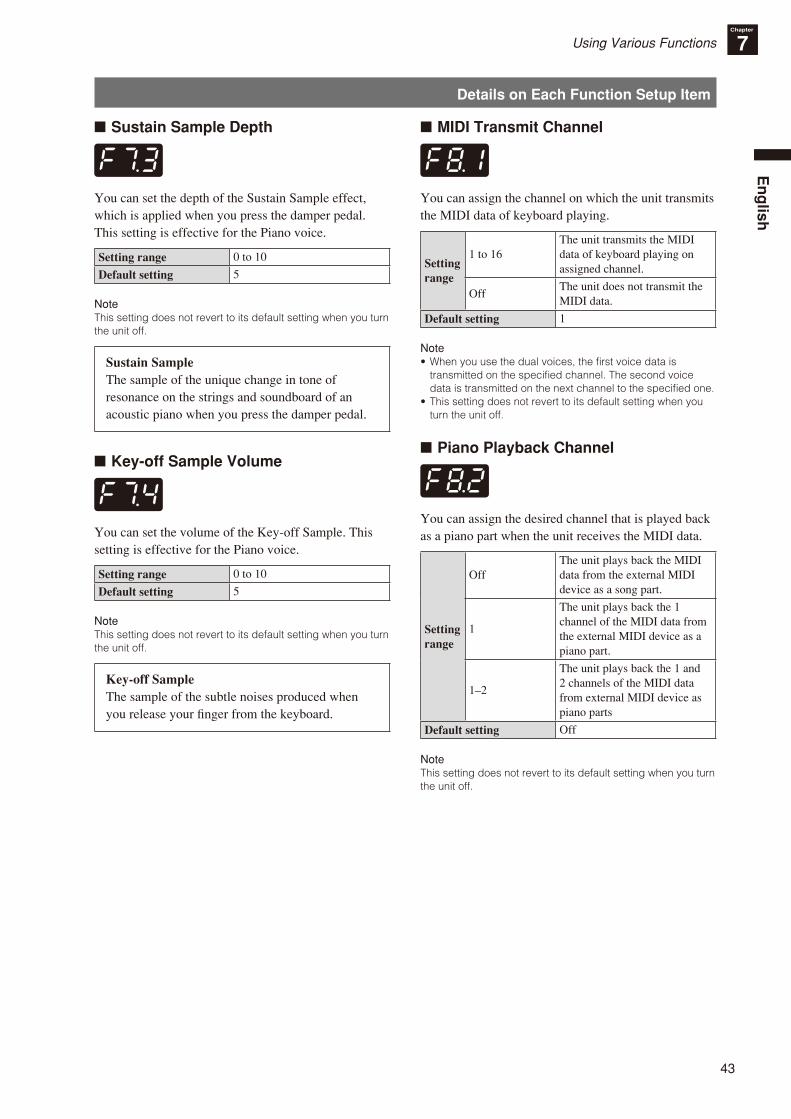
■ Sustain Sample Depth
You can set the depth of the Sustain Sample effect, which is applied when you press the damper pedal. This setting is effective for the Piano voice.
Setting range 0 to 10
Default setting 5
NoteThis setting does not revert to its default setting when you turn the unit off.
Sustain SampleThe sample of the unique change in tone of resonance on the strings and soundboard of an acoustic piano when you press the damper pedal.
■ Key-off Sample Volume
You can set the volume of the Key-off Sample. This setting is effective for the Piano voice.
Setting range 0 to 10
Default setting 5
NoteThis setting does not revert to its default setting when you turn the unit off.
Key-off SampleThe sample of the subtle noises produced when you release your finger from the keyboard.
■ MIDI Transmit Channel
You can assign the channel on which the unit transmits the MIDI data of keyboard playing.
Setting range
1 to 16The unit transmits the MIDI data of keyboard playing on assigned channel.
OffThe unit does not transmit the MIDI data.
Default setting 1
Note•When you use the dual voices, the first voice data is
transmitted on the specified channel. The second voice data is transmitted on the next channel to the specified one.
•This setting does not revert to its default setting when you turn the unit off.
■ Piano Playback Channel
You can assign the desired channel that is played back as a piano part when the unit receives the MIDI data.
Setting range
OffThe unit plays back the MIDI data from the external MIDI device as a song part.
1
The unit plays back the 1 channel of the MIDI data from the external MIDI device as a piano part.
1–2
The unit plays back the 1 and 2 channels of the MIDI data from external MIDI device as piano parts
Default setting Off
NoteThis setting does not revert to its default setting when you turn the unit off.
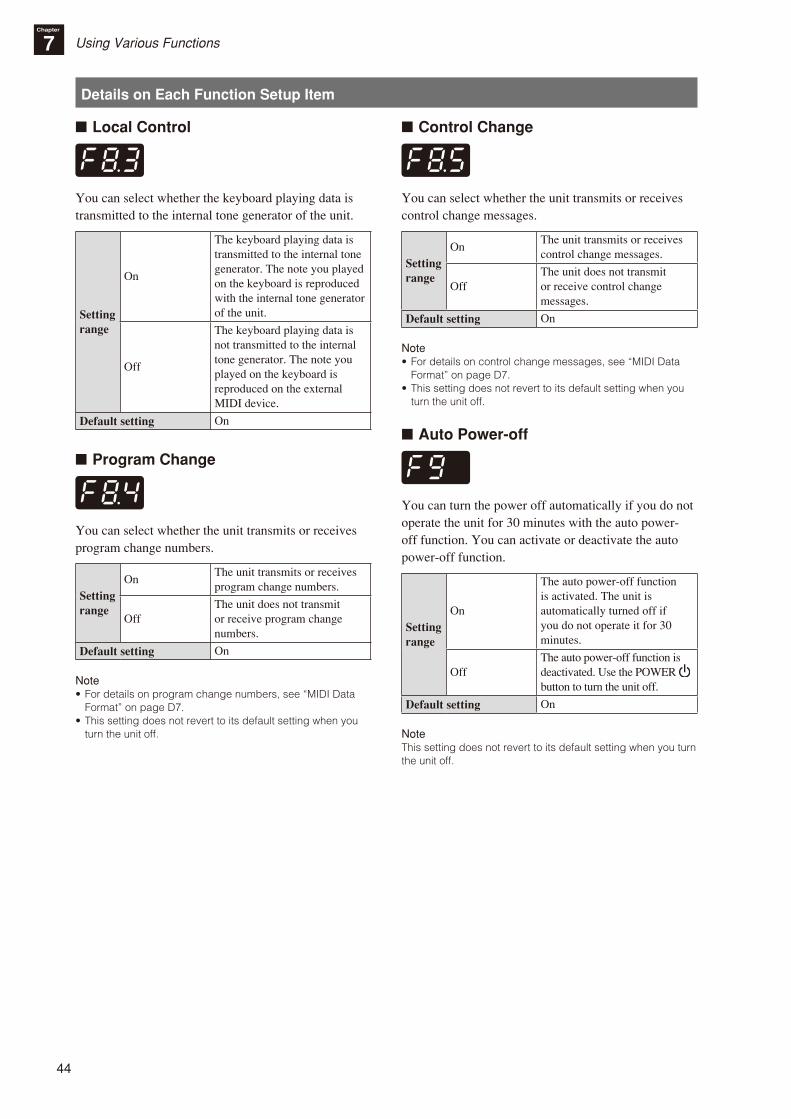
44
Details on Each Function Setup Item
Using Various FunctionsChapter
7
■ Local Control
You can select whether the keyboard playing data is transmitted to the internal tone generator of the unit.
Setting range
On
The keyboard playing data is transmitted to the internal tone generator. The note you played on the keyboard is reproduced with the internal tone generator of the unit.
Off
The keyboard playing data is not transmitted to the internal tone generator. The note you played on the keyboard is reproduced on the external MIDI device.
Default setting On
■ Program Change
You can select whether the unit transmits or receives program change numbers.
Setting range
OnThe unit transmits or receives program change numbers.
OffThe unit does not transmit or receive program change numbers.
Default setting On
Note•For details on program change numbers, see “MIDI Data
Format” on page D7.•This setting does not revert to its default setting when you
turn the unit off.
■ Control Change
You can select whether the unit transmits or receives control change messages.
Setting range
OnThe unit transmits or receives control change messages.
OffThe unit does not transmit or receive control change messages.
Default setting On
Note•For details on control change messages, see “MIDI Data
Format” on page D7.•This setting does not revert to its default setting when you
turn the unit off.
■ Auto Power-off
You can turn the power off automatically if you do not operate the unit for 30 minutes with the auto power-off function. You can activate or deactivate the auto power-off function.
Setting range
On
The auto power-off function is activated. The unit is automatically turned off if you do not operate it for 30 minutes.
OffThe auto power-off function is deactivated. Use the POWER button to turn the unit off.
Default setting On
NoteThis setting does not revert to its default setting when you turn the unit off.

45
En
glish
Using Various FunctionsChapter
7
Restoring the Default SettingsYou can erase the backup of all settings made and restore the factory default settings.
1 While holding the STOP button, press the POWER button to turn the unit on.
“CLr” appears on the display and all settings are reset to factory default.
+
CautionDO NOT turn the unit off while “CLr” appears on the display as may corrupt the data or damage the internal memory.
NoteThe user songs on the internal memory will be retained.
Changing the Language Support for the Song File NameDepending on this setting, folders or files the unit can recognize vary.
Setting Explanation
International Folders or files named in alphabet and umlaut can be recognized.
Japanese Folders or files named in alphabet and Japanese can be recognized.
1 To change this setting to International, while holding the FUNC. and –/NO buttons simultaneously, press the POWER button to turn the unit on.“Int” appears on the display and the setting is changed to International.
+
+
To change this setting to Japanese, while holding the FUNC. and +/YES buttons simultaneously, press the POWER button to turn the unit on.“JA” appears on the display and the setting is changed to Japanese.
+
+
NoteThis setting does not revert to its default setting when you turn the unit off.
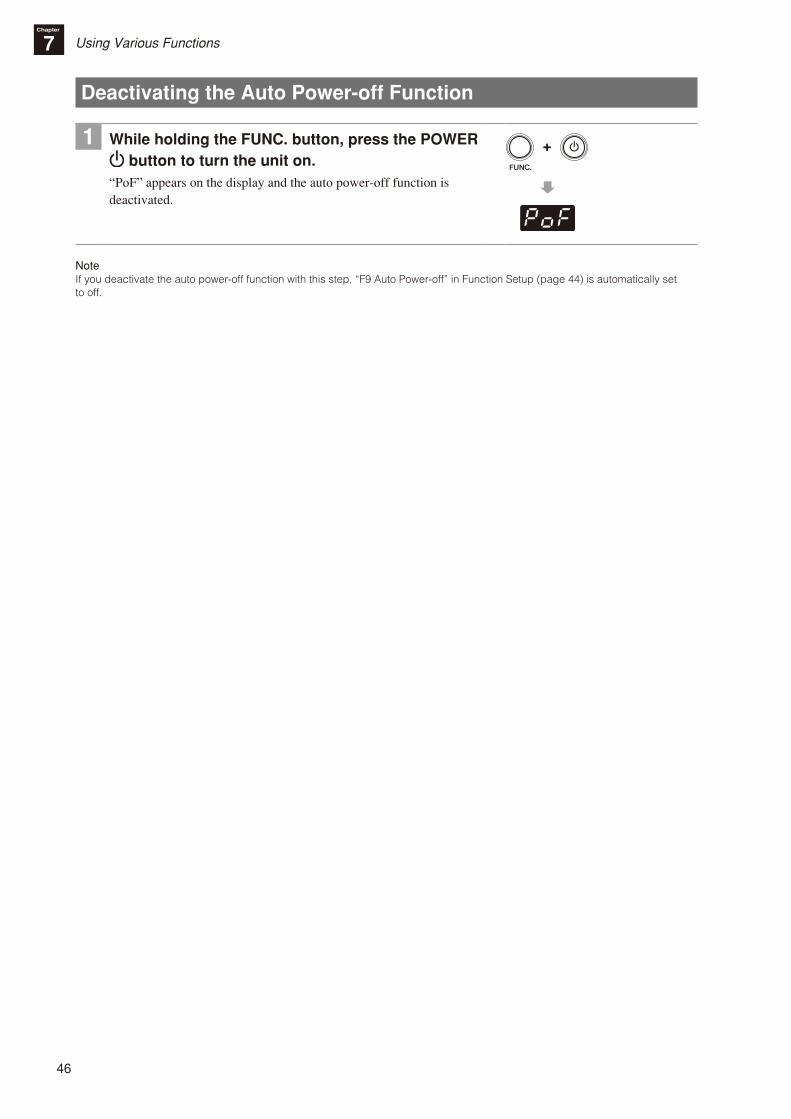
46
Using Various FunctionsChapter
7
Deactivating the Auto Power-off Function
1 While holding the FUNC. button, press the POWER button to turn the unit on.
“PoF” appears on the display and the auto power-off function is deactivated.
+
NoteIf you deactivate the auto power-off function with this step, “F9 Auto Power-off” in Function Setup (page 44) is automatically set to off.
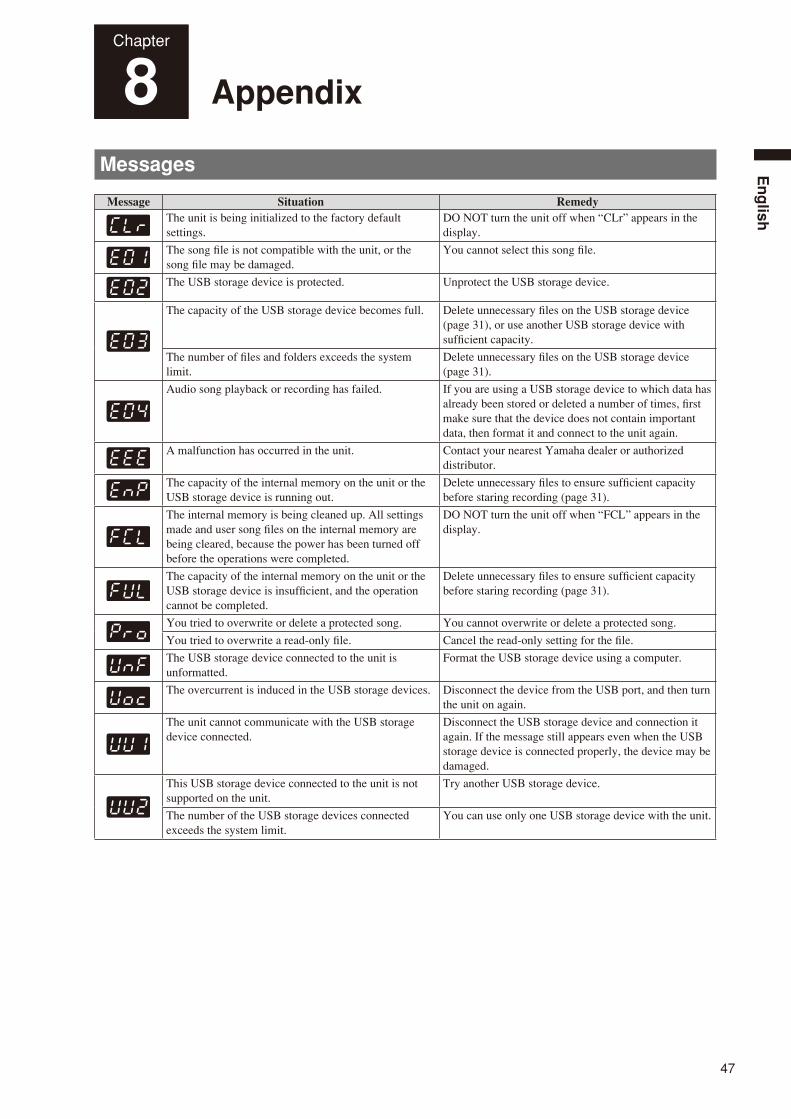
47
En
glish
Chapter
8 Appendix
Messages
Message Situation RemedyThe unit is being initialized to the factory default settings.
DO NOT turn the unit off when “CLr” appears in the display.
The song file is not compatible with the unit, or the song file may be damaged.
You cannot select this song file.
The USB storage device is protected. Unprotect the USB storage device.
The capacity of the USB storage device becomes full. Delete unnecessary files on the USB storage device (page 31), or use another USB storage device with sufficient capacity.
The number of files and folders exceeds the system limit.
Delete unnecessary files on the USB storage device (page 31).
Audio song playback or recording has failed. If you are using a USB storage device to which data has already been stored or deleted a number of times, first make sure that the device does not contain important data, then format it and connect to the unit again.
A malfunction has occurred in the unit. Contact your nearest Yamaha dealer or authorized distributor.
The capacity of the internal memory on the unit or the USB storage device is running out.
Delete unnecessary files to ensure sufficient capacity before staring recording (page 31).
The internal memory is being cleaned up. All settings made and user song files on the internal memory are being cleared, because the power has been turned off before the operations were completed.
DO NOT turn the unit off when “FCL” appears in the display.
The capacity of the internal memory on the unit or the USB storage device is insufficient, and the operation cannot be completed.
Delete unnecessary files to ensure sufficient capacity before staring recording (page 31).
You tried to overwrite or delete a protected song. You cannot overwrite or delete a protected song.
You tried to overwrite a read-only file. Cancel the read-only setting for the file.
The USB storage device connected to the unit is unformatted.
Format the USB storage device using a computer.
The overcurrent is induced in the USB storage devices. Disconnect the device from the USB port, and then turn the unit on again.
The unit cannot communicate with the USB storage device connected.
Disconnect the USB storage device and connection it again. If the message still appears even when the USB storage device is connected properly, the device may be damaged.
This USB storage device connected to the unit is not supported on the unit.
Try another USB storage device.
The number of the USB storage devices connected exceeds the system limit.
You can use only one USB storage device with the unit.
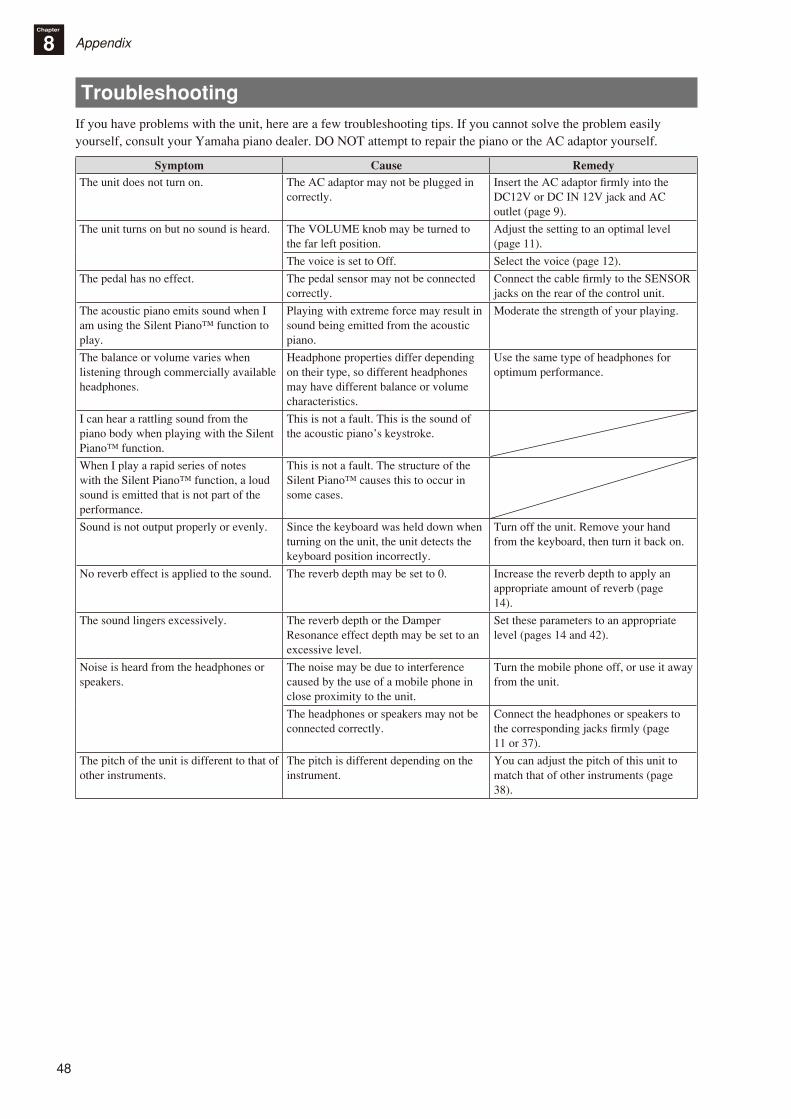
48
AppendixChapter
8
TroubleshootingIf you have problems with the unit, here are a few troubleshooting tips. If you cannot solve the problem easily yourself, consult your Yamaha piano dealer. DO NOT attempt to repair the piano or the AC adaptor yourself.
Symptom Cause RemedyThe unit does not turn on. The AC adaptor may not be plugged in
correctly.Insert the AC adaptor firmly into the DC12V or DC IN 12V jack and AC outlet (page 9).
The unit turns on but no sound is heard. The VOLUME knob may be turned to the far left position.
Adjust the setting to an optimal level (page 11).
The voice is set to Off. Select the voice (page 12).
The pedal has no effect. The pedal sensor may not be connected correctly.
Connect the cable firmly to the SENSOR jacks on the rear of the control unit.
The acoustic piano emits sound when I am using the Silent Piano™ function to play.
Playing with extreme force may result in sound being emitted from the acoustic piano.
Moderate the strength of your playing.
The balance or volume varies when listening through commercially available headphones.
Headphone properties differ depending on their type, so different headphones may have different balance or volume characteristics.
Use the same type of headphones for optimum performance.
I can hear a rattling sound from the piano body when playing with the Silent Piano™ function.
This is not a fault. This is the sound of the acoustic piano’s keystroke.
When I play a rapid series of notes with the Silent Piano™ function, a loud sound is emitted that is not part of the performance.
This is not a fault. The structure of the Silent Piano™ causes this to occur in some cases.
Sound is not output properly or evenly. Since the keyboard was held down when turning on the unit, the unit detects the keyboard position incorrectly.
Turn off the unit. Remove your hand from the keyboard, then turn it back on.
No reverb effect is applied to the sound. The reverb depth may be set to 0. Increase the reverb depth to apply an appropriate amount of reverb (page 14).
The sound lingers excessively. The reverb depth or the Damper Resonance effect depth may be set to an excessive level.
Set these parameters to an appropriate level (pages 14 and 42).
Noise is heard from the headphones or speakers.
The noise may be due to interference caused by the use of a mobile phone in close proximity to the unit.
Turn the mobile phone off, or use it away from the unit.
The headphones or speakers may not be connected correctly.
Connect the headphones or speakers to the corresponding jacks firmly (page 11 or 37).
The pitch of the unit is different to that of other instruments.
The pitch is different depending on the instrument.
You can adjust the pitch of this unit to match that of other instruments (page 38).
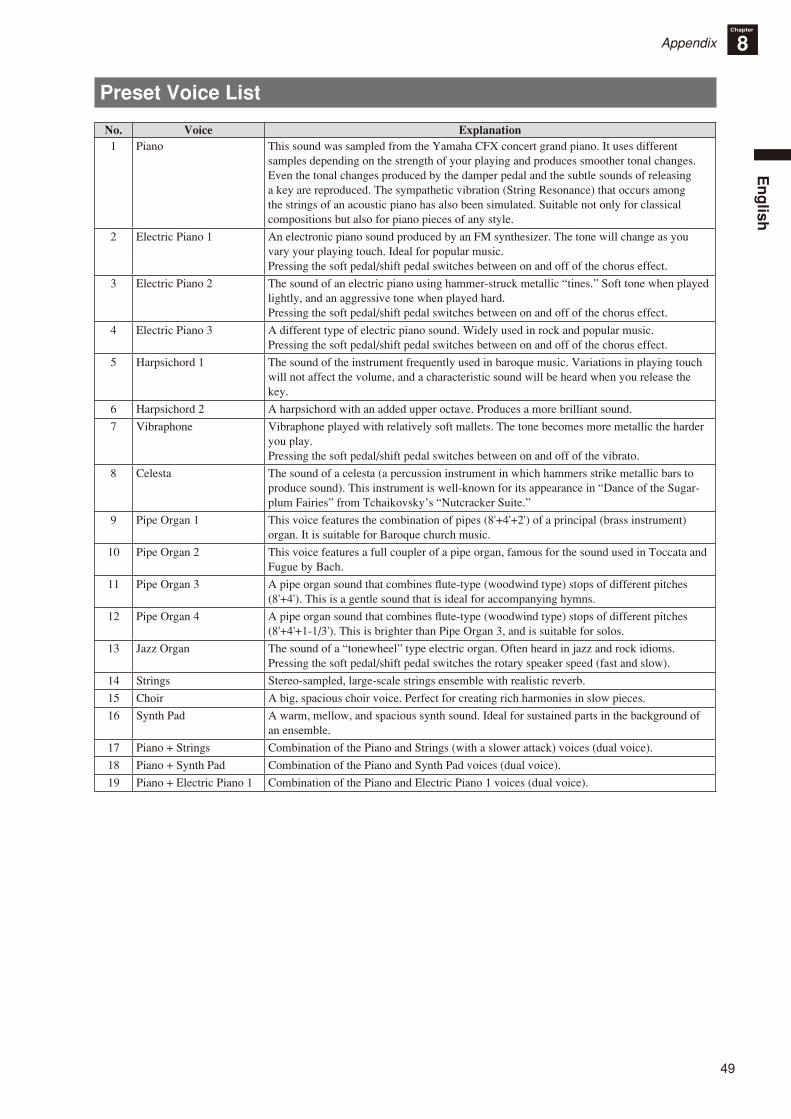
49
En
glish
AppendixChapter
8
Preset Voice List
No. Voice Explanation1 Piano This sound was sampled from the Yamaha CFX concert grand piano. It uses different
samples depending on the strength of your playing and produces smoother tonal changes. Even the tonal changes produced by the damper pedal and the subtle sounds of releasing a key are reproduced. The sympathetic vibration (String Resonance) that occurs among the strings of an acoustic piano has also been simulated. Suitable not only for classical compositions but also for piano pieces of any style.
2 Electric Piano 1 An electronic piano sound produced by an FM synthesizer. The tone will change as you vary your playing touch. Ideal for popular music.Pressing the soft pedal/shift pedal switches between on and off of the chorus effect.
3 Electric Piano 2 The sound of an electric piano using hammer-struck metallic “tines.” Soft tone when played lightly, and an aggressive tone when played hard.Pressing the soft pedal/shift pedal switches between on and off of the chorus effect.
4 Electric Piano 3 A different type of electric piano sound. Widely used in rock and popular music.Pressing the soft pedal/shift pedal switches between on and off of the chorus effect.
5 Harpsichord 1 The sound of the instrument frequently used in baroque music. Variations in playing touch will not affect the volume, and a characteristic sound will be heard when you release the key.
6 Harpsichord 2 A harpsichord with an added upper octave. Produces a more brilliant sound.
7 Vibraphone Vibraphone played with relatively soft mallets. The tone becomes more metallic the harder you play.Pressing the soft pedal/shift pedal switches between on and off of the vibrato.
8 Celesta The sound of a celesta (a percussion instrument in which hammers strike metallic bars to produce sound). This instrument is well-known for its appearance in “Dance of the Sugar-plum Fairies” from Tchaikovsky’s “Nutcracker Suite.”
9 Pipe Organ 1 This voice features the combination of pipes (8'+4'+2') of a principal (brass instrument) organ. It is suitable for Baroque church music.
10 Pipe Organ 2 This voice features a full coupler of a pipe organ, famous for the sound used in Toccata and Fugue by Bach.
11 Pipe Organ 3 A pipe organ sound that combines flute-type (woodwind type) stops of different pitches (8'+4'). This is a gentle sound that is ideal for accompanying hymns.
12 Pipe Organ 4 A pipe organ sound that combines flute-type (woodwind type) stops of different pitches (8'+4'+1-1/3'). This is brighter than Pipe Organ 3, and is suitable for solos.
13 Jazz Organ The sound of a “tonewheel” type electric organ. Often heard in jazz and rock idioms.Pressing the soft pedal/shift pedal switches the rotary speaker speed (fast and slow).
14 Strings Stereo-sampled, large-scale strings ensemble with realistic reverb.
15 Choir A big, spacious choir voice. Perfect for creating rich harmonies in slow pieces.
16 Synth Pad A warm, mellow, and spacious synth sound. Ideal for sustained parts in the background of an ensemble.
17 Piano + Strings Combination of the Piano and Strings (with a slower attack) voices (dual voice).
18 Piano + Synth Pad Combination of the Piano and Synth Pad voices (dual voice).
19 Piano + Electric Piano 1 Combination of the Piano and Electric Piano 1 voices (dual voice).
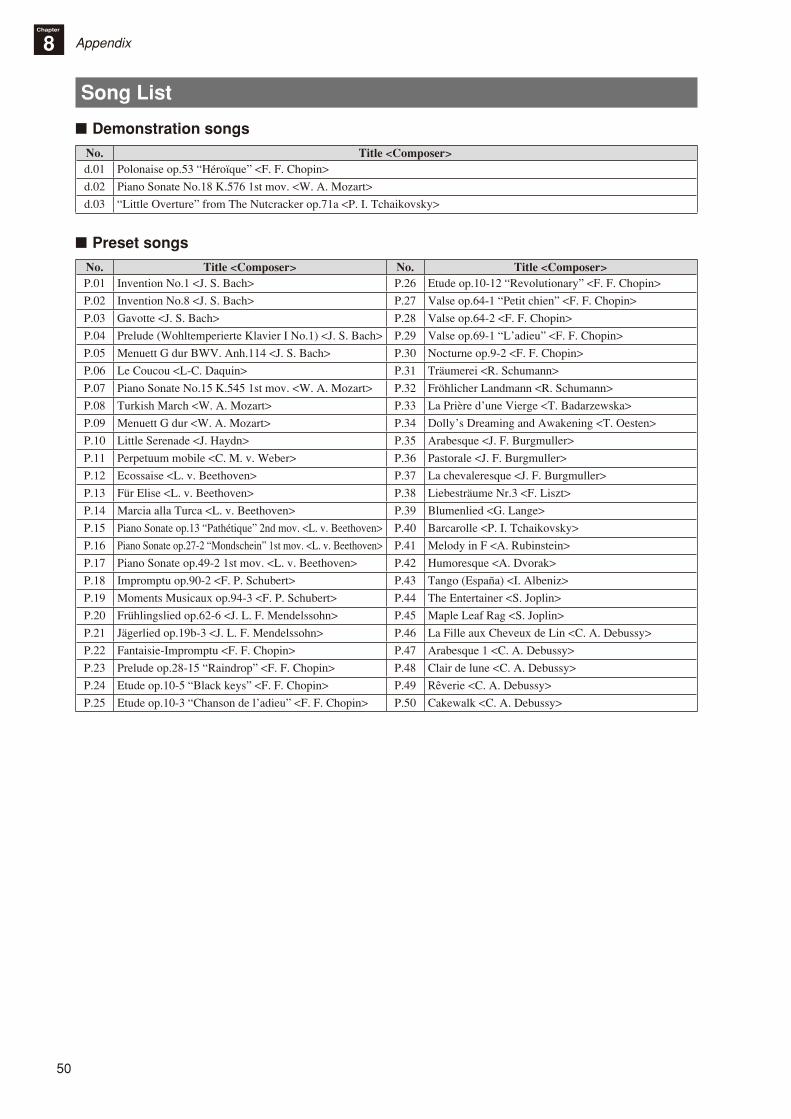
50
AppendixChapter
8
Song List
■ Demonstration songs
No. Title <Composer>d.01 Polonaise op.53 “Héroïque” <F. F. Chopin>
d.02 Piano Sonate No.18 K.576 1st mov. <W. A. Mozart>
d.03 “Little Overture” from The Nutcracker op.71a <P. I. Tchaikovsky>
■ Preset songs
No. Title <Composer> No. Title <Composer>P.01 Invention No.1 <J. S. Bach> P.26 Etude op.10-12 “Revolutionary” <F. F. Chopin>
P.02 Invention No.8 <J. S. Bach> P.27 Valse op.64-1 “Petit chien” <F. F. Chopin>
P.03 Gavotte <J. S. Bach> P.28 Valse op.64-2 <F. F. Chopin>
P.04 Prelude (Wohltemperierte Klavier I No.1) <J. S. Bach> P.29 Valse op.69-1 “L’adieu” <F. F. Chopin>
P.05 Menuett G dur BWV. Anh.114 <J. S. Bach> P.30 Nocturne op.9-2 <F. F. Chopin>
P.06 Le Coucou <L-C. Daquin> P.31 Träumerei <R. Schumann>
P.07 Piano Sonate No.15 K.545 1st mov. <W. A. Mozart> P.32 Fröhlicher Landmann <R. Schumann>
P.08 Turkish March <W. A. Mozart> P.33 La Prière d’une Vierge <T. Badarzewska>
P.09 Menuett G dur <W. A. Mozart> P.34 Dolly’s Dreaming and Awakening <T. Oesten>
P.10 Little Serenade <J. Haydn> P.35 Arabesque <J. F. Burgmuller>
P.11 Perpetuum mobile <C. M. v. Weber> P.36 Pastorale <J. F. Burgmuller>
P.12 Ecossaise <L. v. Beethoven> P.37 La chevaleresque <J. F. Burgmuller>
P.13 Für Elise <L. v. Beethoven> P.38 Liebesträume Nr.3 <F. Liszt>
P.14 Marcia alla Turca <L. v. Beethoven> P.39 Blumenlied <G. Lange>
P.15 Piano Sonate op.13 “Pathétique” 2nd mov. <L. v. Beethoven> P.40 Barcarolle <P. I. Tchaikovsky>
P.16 Piano Sonate op.27-2 “Mondschein” 1st mov. <L. v. Beethoven> P.41 Melody in F <A. Rubinstein>
P.17 Piano Sonate op.49-2 1st mov. <L. v. Beethoven> P.42 Humoresque <A. Dvorak>
P.18 Impromptu op.90-2 <F. P. Schubert> P.43 Tango (España) <I. Albeniz>
P.19 Moments Musicaux op.94-3 <F. P. Schubert> P.44 The Entertainer <S. Joplin>
P.20 Frühlingslied op.62-6 <J. L. F. Mendelssohn> P.45 Maple Leaf Rag <S. Joplin>
P.21 Jägerlied op.19b-3 <J. L. F. Mendelssohn> P.46 La Fille aux Cheveux de Lin <C. A. Debussy>
P.22 Fantaisie-Impromptu <F. F. Chopin> P.47 Arabesque 1 <C. A. Debussy>
P.23 Prelude op.28-15 “Raindrop” <F. F. Chopin> P.48 Clair de lune <C. A. Debussy>
P.24 Etude op.10-5 “Black keys” <F. F. Chopin> P.49 Rêverie <C. A. Debussy>
P.25 Etude op.10-3 “Chanson de l’adieu” <F. F. Chopin> P.50 Cakewalk <C. A. Debussy>
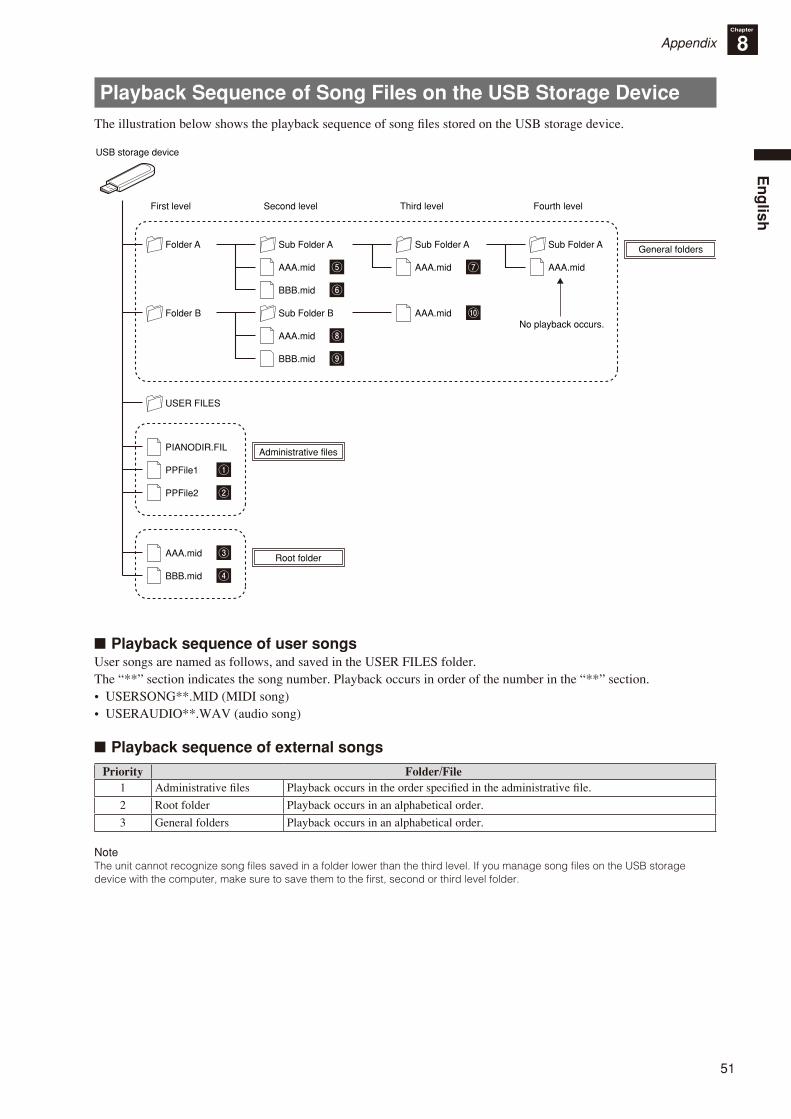
51
En
glish
AppendixChapter
8
Playback Sequence of Song Files on the USB Storage DeviceThe illustration below shows the playback sequence of song files stored on the USB storage device.
USB storage device
BBB.mid
AAA.mid
PPFile1
PPFile2
PIANODIR.FIL
AAA.mid
BBB.mid
Sub Folder AFolder A
AAA.mid
BBB.mid
Sub Folder BFolder B
USER FILES
AAA.mid
Sub Folder A
AAA.mid
AAA.mid
No playback occurs.
Sub Folder A
Second levelFirst level Third level Fourth level
General folders
Administrative files
Root folder
■ Playback sequence of user songsUser songs are named as follows, and saved in the USER FILES folder.The “**” section indicates the song number. Playback occurs in order of the number in the “**” section.• USERSONG**.MID (MIDI song)• USERAUDIO**.WAV (audio song)
■ Playback sequence of external songs
Priority Folder/File1 Administrative files Playback occurs in the order specified in the administrative file.
2 Root folder Playback occurs in an alphabetical order.
3 General folders Playback occurs in an alphabetical order.
NoteThe unit cannot recognize song files saved in a folder lower than the third level. If you manage song files on the USB storage device with the computer, make sure to save them to the first, second or third level folder.

52
AppendixChapter
8
Specifications
Upright Piano Grand PianoPedals Damper pedal, Silencing pedal/
Sostenuto pedal*1, Soft pedalDamper pedal, Sostenuto pedal, Shift pedal
Sensor System Key Sensor Noncontact continuous detection optical sensor
Hammer Sensor — Noncontact 2-point optical fiber sensor
Pedal Sensors
Damper Pedal Continuous detection sensor
Sostenuto Pedal ON/OFF detection sensor*1 ON/OFF detection sensor
Soft/Shift Pedal ON/OFF detection sensor
Silencing System Mechanism Hammer shank stopper operated by silencing pedal/silencing lever*1
Hammer shank stopper operated by motor drive
Action — Quick Escape mechanism
Internal Tone Digital Tone Type AWM Stereo Sampling
Sound Engine (Piano) CFX Binaural Sampling
Piano Effects Damper Resonance, String Resonance, Sustain Sample, Key-off Sample
Polyphony (max.) 256
Number of Voices 19 (16 voices + 3 dual voices)
Voice Selection Piano, Electric Piano 1, Electric Piano 2, Electric Piano 3, Harpsichord 1, Harpsichord 2, Vibraphone, Celesta, Pipe Organ 1, Pipe Organ 2, Pipe Organ 3, Pipe Organ 4, Jazz Organ, Strings, Choir, Synth Pad, Piano + Strings (dual), Piano + Synth Pad (dual), Piano + Electric Piano 1 (dual)
Voice Selection (Playback) 480 XG voices + 12 Drum / SFX kits
Wave Memory 256MB
Functions Voice Variations
Reverb Type Switch (Room, Hall 1, Hall 2, Stage)
Reverb Depth Adjustment
Metronome
MIDI Recording/Playback
Audio (WAV) Recording/Playback
Brilliance Adjustment (5 steps)
Keyboard Tuning (414.8 Hz to 466.8 Hz)
Damper Resonance Depth Adjustment
String Resonance Depth Adjustment
Sustain Sample Depth Adjustment
Key-off Sample Volume Adjustment
Auto Power-off
Preset Songs 53 (50 greats for the Piano + 3 piano demonstrations)
Connectors Headphones PHONES (stereo mini jack) × 2
Audio AUX IN/AUX OUT (stereo mini jack)
Speakers — OUTPUT L/R (TRS phone jack, impedance balanced)
MIDI MIDI IN/MIDI OUT
USB USB TO DEVICE
Power DC12V DC IN 12V
Power Consumption 11W (DC 12V) 17W (DC 12V)
Weight 4 kg 10 kg
Accessories AC adapter (PA-150A [upright piano], PJP-PS04 [grand piano] or an equivalent recommended by Yamaha), Power cable*2, Headphones, Headphones hanger, Attachment screws for headphones hanger, Owner’s manual, Music book “50 greats for the Piano”
* 1 For models equipped with a sostenuto pedal.* 2 Supplied only if the PJP-PS04 AC adaptor is supplied with your piano.
53
En
glish
AppendixChapter
8
Index
AAC adaptor ......................................................................................4, 9Accessory ............................................................................................4Administrative file ............................................................................51All playback ....................................................................17, 18, 19, 21Audio device ...............................................................................33, 34Audio song ..................................................................................16, 51Auto power-off ............................................................................44, 46
BBase note ...........................................................................................41Beat setting (metronome) ............................................................15, 28Binaural sampling ...............................................................................3Brilliance ...........................................................................................40
CControl change ..................................................................................44Control unit .....................................................................................7, 8Copying .............................................................................................29
DDamper pedal ......................................................................................6Damper Resonance .......................................................................6, 42Deleting .............................................................................................31Demo song ............................................................................16, 17, 50Dual voice ...................................................................................12, 49
EESEQ .................................................................................................16External song ..............................................................................16, 51
FFast-forward ......................................................................................22FIXED velocity .................................................................................40Function Setup ............................................................................38, 40
GGeneral folder ...................................................................................51GM unit .........................................................................................8, 37
HHeadphones ...................................................................................4, 11Headphones hanger .......................................................................4, 10
IInternal memory ....................................................................16, 19, 24
KKey-off Sample .................................................................................43
LLanguage support ..............................................................................45Local control .....................................................................................44
MMessage .............................................................................................47Metronome ..................................................................................15, 28Metronome volume ...........................................................................41MIDI data format .............................................................................D7MIDI device ......................................................................................35MIDI IMPLEMENTATION CHART ...........................................D18MIDI song ...................................................................................16, 51MIDI transmit channel ......................................................................43
PPause .................................................................................................22Piano playback channel .....................................................................43Playback ............................................................................................16Playback sequence ............................................................................51Playback tempo .................................................................................23Power ................................................................................................10Powered speakers ........................................................................33, 37Preset song ............................................................................16, 18, 50Program change ................................................................................44
RRandom playback ............................................................17, 18, 19, 21Recording ..........................................................................................24Restoring of the factory default setting .............................................45Reverb ...............................................................................................14Reverb depth .....................................................................................14Reverb type .......................................................................................14Rewind ..............................................................................................22Root folder ........................................................................................51
SScale ..................................................................................................41Shift pedal ...........................................................................................6Silencing lever ..............................................................................6, 11Silent Piano™ function .....................................................................11Single repeat ......................................................................................41SMF0.....................................................................................16, 24, 26SMF1.................................................................................................16Soft pedal ............................................................................................6Song ............................................................................................16, 50Song balance .....................................................................................42Song category ....................................................................................16Sostenuto pedal ...................................................................................6Stop ...................................................................................................22String Resonance ..............................................................................42Sustain Sample ..................................................................................43
TTempo setting (metronome) ........................................................15, 28Touch sensitivity ...............................................................................40Transpose ....................................................................................40, 42Tuning of the pitch ......................................................................40, 42
UUSB AUDIO .....................................................................................16USB Audio Recorder ........................................................................26USB MIDI .........................................................................................16USB storage device ...................................................20, 26, 29, 36, 51USER FILES folder ..........................................................................51User song ....................................................................................16, 51
VVoice ....................................................................................12, 49, D7Voice variations ................................................................................13Volume ..............................................................................................11
WWAV ...........................................................................................16, 26
XXG drum kit .....................................................................................D5XG voice ..........................................................................................D2
SHData list
Data list
D2
XG Voice List
* The number of elements becomes 4 when the damper pedal is pressed.
Voice Group Voice Name MSB LSB PRG ElementPiano GrandPiano 0 0 1 2*
GrndPianoKSP 0 1 1 1MellowGrPno 0 18 1 2PianoStrings 0 40 1 2Dream 0 41 1 2BrightPiano 0 0 2 2BritePnoKSP 0 1 2 1ElecGrandPno 0 0 3 2ElecGrPnoKSP 0 1 3 2DetunedCP80 0 32 3 2LayeredCP1 0 40 3 2LayeredCP2 0 41 3 2Honkytonk 0 0 4 2HonkytonkKSP 0 1 4 2El.Piano1 0 0 5 2El.Piano1KSP 0 1 5 1MellowEP1 0 18 5 2ChorusEP1 0 32 5 2HardEl.Piano 0 40 5 2VXfadeEl.P1 0 45 5 260sEl.Piano1 0 64 5 1El.Piano2 0 0 6 2El.Piano2KSP 0 1 6 1ChorusEP2 0 32 6 2DXEPHard 0 33 6 2DXLegend 0 34 6 2DXPhaseEP 0 40 6 2DX+AnalogEP 0 41 6 2DXKotoEP 0 42 6 2VXfadeEl.P2 0 45 6 2Harpsichord 0 0 7 1Harpsi.KSP 0 1 7 1Harpsichord2 0 25 7 2Harpsichord3 0 35 7 2Clavi. 0 0 8 1Clavi.KSP 0 1 8 1Clavi.Wah 0 27 8 2PulseClavi. 0 64 8 1PierceClavi. 0 65 8 2
Chromatic Percussion
Celesta 0 0 9 1Glockenspiel 0 0 10 1MusicBox 0 0 11 2Orgel 0 64 11 2Vibraphone 0 0 12 1VibesKSP 0 1 12 1HardVibes 0 45 12 2Marimba 0 0 13 1MarimbaKSP 0 1 13 1SineMarimba 0 64 13 2Balimba 0 97 13 2LogDrums 0 98 13 2Xylophone 0 0 14 1TubularBells 0 0 15 1ChurchBells 0 96 15 2Carillon 0 97 15 2Dulcimer 0 0 16 1Dulcimer2 0 35 16 2Cimbalom 0 96 16 2Santur 0 97 16 2
Organ DrawbarOrgan 0 0 17 1DetDrawOrgan 0 32 17 260sDrawOrg1 0 33 17 260sDrawOrg2 0 34 17 270sDrawOrg1 0 35 17 2DrawbarOrg2 0 36 17 260sDrawOrg3 0 37 17 2EvenBarOrg 0 38 17 216+2’2_3Org 0 40 17 2OrganBass 0 64 17 170sDrawOrg2 0 65 17 2CheezyOrgan 0 66 17 2DrawbarOrg3 0 67 17 2Perc.Organ 0 0 18 170sPercOrg1 0 24 18 2DetPercOrgan 0 32 18 2LightOrgan 0 33 18 2
Voice Group Voice Name MSB LSB PRG ElementOrgan Perc.Organ2 0 37 18 2
RockOrgan 0 0 19 1RotaryOrgan 0 64 19 2SlowRotary 0 65 19 2FastRotary 0 66 19 2ChurchOrgan 0 0 20 2ChurchOrgan3 0 32 20 2ChurchOrgan2 0 35 20 2NotreDame 0 40 20 2OrganFlute 0 64 20 2Trem.OrganFl 0 65 20 2ReedOrgan 0 0 21 1PuffOrgan 0 40 21 2Accordion 0 0 22 1AccordIt 0 32 22 2Harmonica 0 0 23 1Harmonica2 0 32 23 2TangoAccord 0 0 24 1TangoAccord2 0 64 24 2
Guitar NylonGuitar 0 0 25 1NylonGuitar2 0 16 25 1NylonGuitar3 0 25 25 2VelGtrHarmo 0 43 25 1Ukulele 0 96 25 1SteelGuitar 0 0 26 1SteelGuitar2 0 16 26 112StrGuitar 0 35 26 2Nylon&Steel 0 40 26 2Steel&Body 0 41 26 2Mandolin 0 96 26 2JazzGuitar 0 0 27 1MellowGuitar 0 18 27 1JazzAmp 0 32 27 2CleanGuitar 0 0 28 1ChorusGuitar 0 32 28 2MutedGuitar 0 0 29 1FunkGuitar1 0 40 29 2MuteSteelGtr 0 41 29 2FunkGuitar2 0 43 29 1JazzMan 0 45 29 2Overdriven 0 0 30 1GuitarPinch 0 43 30 1Distortion 0 0 31 1FeedbackGtr 0 40 31 2FeedbackGtr2 0 41 31 2GtrHarmonics 0 0 32 1GtrFeedback 0 65 32 1GtrHarmonic2 0 66 32 1
Bass AcousticBass 0 0 33 1JazzRhythm 0 40 33 2VXUprghtBass 0 45 33 2FingerBass 0 0 34 1FingerDark 0 18 34 2FlangeBass 0 27 34 2Bass&DistEG 0 40 34 2FingerSlap 0 43 34 1FingerBass2 0 45 34 2Mod.Bass 0 65 34 2PickBass 0 0 35 1MutePickBass 0 28 35 1FretlessBass 0 0 36 1Fretless2 0 32 36 2Fretless3 0 33 36 2Fretless4 0 34 36 2Syn.Fretless 0 96 36 2SmthFretless 0 97 36 2SlapBass1 0 0 37 1ResonantSlap 0 27 37 1PunchThumb 0 32 37 2SlapBass2 0 0 38 1Velo.Sw.Slap 0 43 38 1SynthBass1 0 0 39 1SynBass1Dark 0 18 39 1FastResoBass 0 20 39 1AcidBass 0 24 39 1ClaviBass 0 35 39 2

D3
XG Voice ListD
ata list
Voice Group Voice Name MSB LSB PRG ElementBass TechnoBass 0 40 39 2
Orbiter 0 64 39 2SquareBass 0 65 39 1RubberBass 0 66 39 2Hammer 0 96 39 2SynthBass2 0 0 40 2MellowSyBass 0 6 40 1SequenceBass 0 12 40 2ClickSynBass 0 18 40 2SynBass2Dark 0 19 40 1SmoothSyBass 0 32 40 2ModulrSyBass 0 40 40 2DXBass 0 41 40 2XWireBass 0 64 40 2
Strings Violin 0 0 41 1SlwAtkViolin 0 8 41 1Viola 0 0 42 1Cello 0 0 43 1Contrabass 0 0 44 1Trem.Strings 0 0 45 1SlwAtTremStr 0 8 45 1SuspenseStr 0 40 45 2PizzicatoStr 0 0 46 1Orch.Harp 0 0 47 1YangChin 0 40 47 2Timpani 0 0 48 1
Ensemble Strings1 0 0 49 1StereoStrngs 0 3 49 2SlwAtkStrngs 0 8 49 1ArcoStrings 0 24 49 260’sStrings 0 35 49 2Orchestra 0 40 49 2Orchestra2 0 41 49 2TremOrchstra 0 42 49 2Velo.Strings 0 45 49 2Strings2 0 0 50 1S.SlowStrngs 0 3 50 2LegatoStrngs 0 8 50 2WarmStrings 0 40 50 2Kingdom 0 41 50 270’sStrings 0 64 50 1Strings3 0 65 50 1SynStrings1 0 0 51 2ResoStrings 0 27 51 2SynStrings4 0 64 51 2SynStrings5 0 65 51 2SynStrings2 0 0 52 2ChoirAahs 0 0 53 1StereoChoir 0 3 53 2ChoirAahs2 0 16 53 2MellowChoir 0 32 53 2ChoirStrings 0 40 53 2VoiceOohs 0 0 54 1SynthVoice 0 0 55 1SynthVoice2 0 40 55 2Choral 0 41 55 2AnalogVoice 0 64 55 1OrchestraHit 0 0 56 2OrchestrHit2 0 35 56 2Impact 0 64 56 2
Brass Trumpet 0 0 57 1Trumpet2 0 16 57 1BriteTrumpet 0 17 57 2WarmTrumpet 0 32 57 2Trombone 0 0 58 1Trombone2 0 18 58 2Tuba 0 0 59 1Tuba2 0 16 59 1MutedTrumpet 0 0 60 1FrenchHorn 0 0 61 1Fr.HornSolo 0 6 61 1FrenchHorn2 0 32 61 2HornOrchestr 0 37 61 2BrassSection 0 0 62 1Tp&TbSection 0 35 62 2BrassSect2 0 40 62 2HighBrass 0 41 62 2MellowBrass 0 42 62 2SynthBrass1 0 0 63 2QuackBrass 0 12 63 2ResoSynBrass 0 20 63 2PolyBrass 0 24 63 2
Voice Group Voice Name MSB LSB PRG ElementBrass SynthBrass3 0 27 63 2
JumpBrass 0 32 63 2AnaVelBrass1 0 45 63 2AnalogBrass1 0 64 63 2SynthBrass2 0 0 64 1SoftBrass 0 18 64 2SynthBrass4 0 40 64 2ChoirBrass 0 41 64 2AnaVelBrass2 0 45 64 2AnalogBrass2 0 64 64 2
Reed SopranoSax 0 0 65 1AltoSax 0 0 66 1SaxSection 0 40 66 2HyperAltoSax 0 43 66 1TenorSax 0 0 67 1BreathyTenor 0 40 67 2SoftTenorSax 0 41 67 2TenorSax2 0 64 67 1BaritoneSax 0 0 68 1Oboe 0 0 69 1EnglishHorn 0 0 70 1Bassoon 0 0 71 1Clarinet 0 0 72 1
Pipe Piccolo 0 0 73 1Flute 0 0 74 1Recorder 0 0 75 1PanFlute 0 0 76 1BlownBottle 0 0 77 2Shakuhachi 0 0 78 1Whistle 0 0 79 1Ocarina 0 0 80 1
Synth. Lead SquareLead 0 0 81 2SquareLead2 0 6 81 1LMSquare 0 8 81 2Hollow 0 18 81 1Shroud 0 19 81 2Mellow 0 64 81 2SoloSine 0 65 81 2SineLead 0 66 81 1SawtoothLead 0 0 82 2SawtoothLd2 0 6 82 1ThickSaw 0 8 82 2DynamicSaw 0 18 82 1DigitalSaw 0 19 82 2BigLead 0 20 82 2HeavySynth 0 24 82 2WaspySynth 0 25 82 2PulseSaw 0 40 82 2Dr.Lead 0 41 82 2VelocityLead 0 45 82 2Seq.Analog 0 96 82 2CalliopeLead 0 0 83 2PureLead 0 65 83 2ChiffLead 0 0 84 2Rubby 0 64 84 2CharangLead 0 0 85 2DistortedLd 0 64 85 2WireLead 0 65 85 2VoiceLead 0 0 86 2SynthAahs 0 24 86 2VoxLead 0 64 86 2FifthsLead 0 0 87 2BigFive 0 35 87 2Bass&Lead 0 0 88 2Big&Low 0 16 88 2Fat&Perky 0 64 88 2SoftWhirl 0 65 88 2
Synth. Pad NewAgePad 0 0 89 2Fantasy 0 64 89 2WarmPad 0 0 90 2ThickPad 0 16 90 2SoftPad 0 17 90 2SinePad 0 18 90 2HornPad 0 64 90 2RotaryStrngs 0 65 90 2PolySynthPad 0 0 91 2PolyPad80 0 64 91 2ClickPad 0 65 91 2AnalogPad 0 66 91 2SquarePad 0 67 91 2ChoirPad 0 0 92 2Heaven 0 64 92 2
D4
XG Voice List
Voice Group Voice Name MSB LSB PRG ElementSynth. Pad Itopia 0 66 92 2
CCPad 0 67 92 2BowedPad 0 0 93 2Glacier 0 64 93 2GlassPad 0 65 93 2MetallicPad 0 0 94 2TinePad 0 64 94 2PanPad 0 65 94 2HaloPad 0 0 95 2SweepPad 0 0 96 2Shwimmer 0 20 96 2Converge 0 27 96 2PolarPad 0 64 96 2Celestial 0 66 96 2
Synth. Effects Rain 0 0 97 2ClaviPad 0 45 97 2HarmoRain 0 64 97 2AfricanWind 0 65 97 2Carib 0 66 97 2SoundTrack 0 0 98 2Prologue 0 27 98 2Ancestral 0 64 98 2Crystal 0 0 99 2SynthDr.Comp 0 12 99 2Popcorn 0 14 99 2TinyBells 0 18 99 2RoundGlocken 0 35 99 2GlockenChime 0 40 99 2ClearBells 0 41 99 2ChorusBells 0 42 99 2SynthMallet 0 64 99 1SoftCrystal 0 65 99 2LoudGlocken 0 66 99 2ChristmasBel 0 67 99 2VibeBells 0 68 99 2DigitalBells 0 69 99 2AirBells 0 70 99 2BellHarp 0 71 99 2Gamelimba 0 72 99 2Atmosphere 0 0 100 2WarmAtmos. 0 18 100 2HollwRelease 0 19 100 2NylonElPiano 0 40 100 2NylonHarp 0 64 100 2HarpVox 0 65 100 2Atmos.Pad 0 66 100 2Planet 0 67 100 2Brightness 0 0 101 2FantasyBells 0 64 101 2Smokey 0 96 101 2Goblins 0 0 102 2GoblinsSynth 0 64 102 2Creeper 0 65 102 2RingPad 0 66 102 2Ritual 0 67 102 2ToHeaven 0 68 102 2Night 0 70 102 2Glisten 0 71 102 2BellChoir 0 96 102 2Echoes 0 0 103 2Echoes2 0 8 103 2EchoPan 0 14 103 2EchoBells 0 64 103 2BigPan 0 65 103 2SynthPiano 0 66 103 2Creation 0 67 103 2StarDust 0 68 103 2Reso&Panning 0 69 103 2Sci-Fi 0 0 104 2Starz 0 64 104 2
Ethnic Sitar 0 0 105 1DetunedSitar 0 32 105 2Sitar2 0 35 105 2Tambra 0 96 105 2Tamboura 0 97 105 2Banjo 0 0 106 1MutedBanjo 0 28 106 1Rabab 0 96 106 2Gopichant 0 97 106 2Oud 0 98 106 2Shamisen 0 0 107 1Koto 0 0 108 1
Voice Group Voice Name MSB LSB PRG ElementEthnic Taisho-kin 0 96 108 2
Kanoon 0 97 108 2Kalimba 0 0 109 1Bagpipe 0 0 110 2Fiddle 0 0 111 1Shanai 0 0 112 1Shanai2 0 64 112 1Pungi 0 96 112 1Hichiriki 0 97 112 2
Percussive TinkleBell 0 0 113 2Bonang 0 96 113 2Altair 0 97 113 2GamelanGongs 0 98 113 2StereoGamlan 0 99 113 2RamaCymbal 0 100 113 2AsianBells 0 101 113 2Agogo 0 0 114 2SteelDrums 0 0 115 1GlassPerc. 0 97 115 2ThaiBells 0 98 115 2Woodblock 0 0 116 1Castanets 0 96 116 1TaikoDrum 0 0 117 1GranCassa 0 96 117 1MelodicTom 0 0 118 2MelodicTom2 0 64 118 1RealTom 0 65 118 2RockTom 0 66 118 2SynthDrum 0 0 119 1AnalogTom 0 64 119 1ElectroPerc. 0 65 119 2Rev.Cymbal 0 0 120 1
Sound Effects GtrFretNoise 0 0 121 1BreathNoise 0 0 122 1Seashore 0 0 123 2BirdTweet 0 0 124 2TelephonRing 0 0 125 1Helicopter 0 0 126 1Applause 0 0 127 1Gunshot 0 0 128 1
SFX CuttingNoise 64 0 1 1CuttingNoiz2 64 0 2 2StringSlap 64 0 4 1Fl.KeyClick 64 0 17 1Shower 64 0 33 1Thunder 64 0 34 1Wind 64 0 35 1Stream 64 0 36 2Bubble 64 0 37 2Feed 64 0 38 2Dog 64 0 49 1Horse 64 0 50 1BirdTweet2 64 0 51 1Ghost 64 0 55 2Maou 64 0 56 2PhoneCall 64 0 65 1DoorSqueak 64 0 66 1DoorSlam 64 0 67 1ScratchCut 64 0 68 1ScratchSplit 64 0 69 2WindChime 64 0 70 1TelphonRing2 64 0 71 1CarEngineIgn 64 0 81 1CarTiresSqel 64 0 82 1CarPassing 64 0 83 1CarCrash 64 0 84 1Siren 64 0 85 2Train 64 0 86 1JetPlane 64 0 87 2Starship 64 0 88 2Burst 64 0 89 2RollrCoaster 64 0 90 2Submarine 64 0 91 1Laugh 64 0 97 1Scream 64 0 98 1Punch 64 0 99 1Heartbeat 64 0 100 1FootSteps 64 0 101 1MachineGun 64 0 113 1LaserGun 64 0 114 2Explosion 64 0 115 2Firework 64 0 116 2
D5
Data list
XG Drum Kit List
: Same as Standard Kit 1
: No Sound
Bank Select MSB (0-127) 127 127 127 127 127 127Bank Select LSB (0-127) 0 0 0 0 0 0Program Change (0-127) 0 1 8 16 24 25Program Change (1-128) 1 2 9 17 25 26
MIDIKey Off Alternate
Group Standard Kit1 Standard Kit2 Room Kit Rock Kit Electro Kit Analog KitNote # Note
13 C#-1 3 Surdo Mute14 D-1 3 Surdo Open15 D#-1 Hi Q16 E-1 Whip Slap17 F-1 4 Scratch H18 F#-1 4 Scratch L19 G-1 Finger Snap20 G#-1 Click Noise21 A-1 Metronome Click22 A#-1 Metronome Bell23 B-1 Seq Click L24 C0 Seq Click H25 C#0 Brush Tap26 D0 Brush Swirl27 D#0 Brush Slap28 E0 Brush Tap Swirl Reverse Cymbal Reverse Cymbal29 F0 Snare Roll30 F#0 Castanet Hi Q 2 Hi Q 231 G0 Snare Soft Snare Soft 2 Snare Noisy Snare Snappy Electro Snare Noisy 432 G#0 Sticks33 A0 Kick Soft Kick 3 Kick 334 A#0 Open Rim Shot Open Rim Shot H Short35 B0 Kick Tight Kick 2 Kick Gate Kick Analog Short36 C1 Kick Kick Shot Kick Gate Kick Gate Heavy Kick Analog37 C#1 Side Stick Side Stick Light Side Stick Analog38 D1 Snare Snare Short Snare Snappy Snare Rock Snare Noisy 2 Snare Analog39 D#1 Hand Clap40 E1 Snare Tight Snare Tight H Snare Tight Snappy Snare Rock Tight Snare Noisy 2 Snare Analog 241 F1 Floor Tom L Tom Room 1 Tom Room 1 Tom Electro 1 Tom Analog 142 F#1 1 Hi-Hat Closed Hi-Hat Closed Analog43 G1 Floor Tom H Tom Room 2 Tom Room 2 Tom Electro 2 Tom Analog 244 G#1 1 Hi-Hat Pedal Hi-Hat Closed Analog 245 A1 Low Tom Tom Room 3 Tom Room 3 Tom Electro 3 Tom Analog 346 A#1 1 Hi-Hat Open Hi-Hat Open Analog47 B1 Mid Tom L Tom Room 4 Tom Room 4 Tom Electro 4 Tom Analog 448 C2 Mid Tom H Tom Room 5 Tom Room 5 Tom Electro 5 Tom Analog 549 C#2 Crash Cymbal 1 Crash Analog50 D2 High Tom Tom Room 6 Tom Room 6 Tom Electro 6 Tom Analog 651 D#2 Ride Cymbal 152 E2 Chinese Cymbal53 F2 Ride Cymbal Cup54 F#2 Tambourine55 G2 Splash Cymbal56 G#2 Cowbell Cowbell Analog57 A2 Crash Cymbal 258 A#2 Vibraslap59 B2 Ride Cymbal 260 C3 Bongo H61 C#3 Bongo L62 D3 Conga H Mute Conga Analog H63 D#3 Conga H Open Conga Analog M64 E3 Conga L Conga Analog L65 F3 Timbale H66 F#3 Timbale L67 G3 Agogo H68 G#3 Agogo L69 A3 Cabasa70 A#3 Maracas Maracas 271 B3 Samba Whistle H72 C4 Samba Whistle L73 C#4 Guiro Short74 D4 Guiro Long75 D#4 Claves Claves 276 E4 Wood Block H77 F4 Wood Block L78 F#4 Cuica Mute Scratch H 2 Scratch H 279 G4 Cuica Open Scratch L 2 Scratch L 280 G#4 2 Triangle Mute81 A4 2 Triangle Open82 A#4 Shaker83 B4 Jingle Bells84 C5 Bell Tree85 C#586 D587 D#588 E589 F590 F#591 G5
* Key Off: Keys marked with a circle stop sounding the instant they are released.* Alternate Group: Playing any instrument within a numbered group will immediately stop the sound of any other instrument in the same group of the same number.
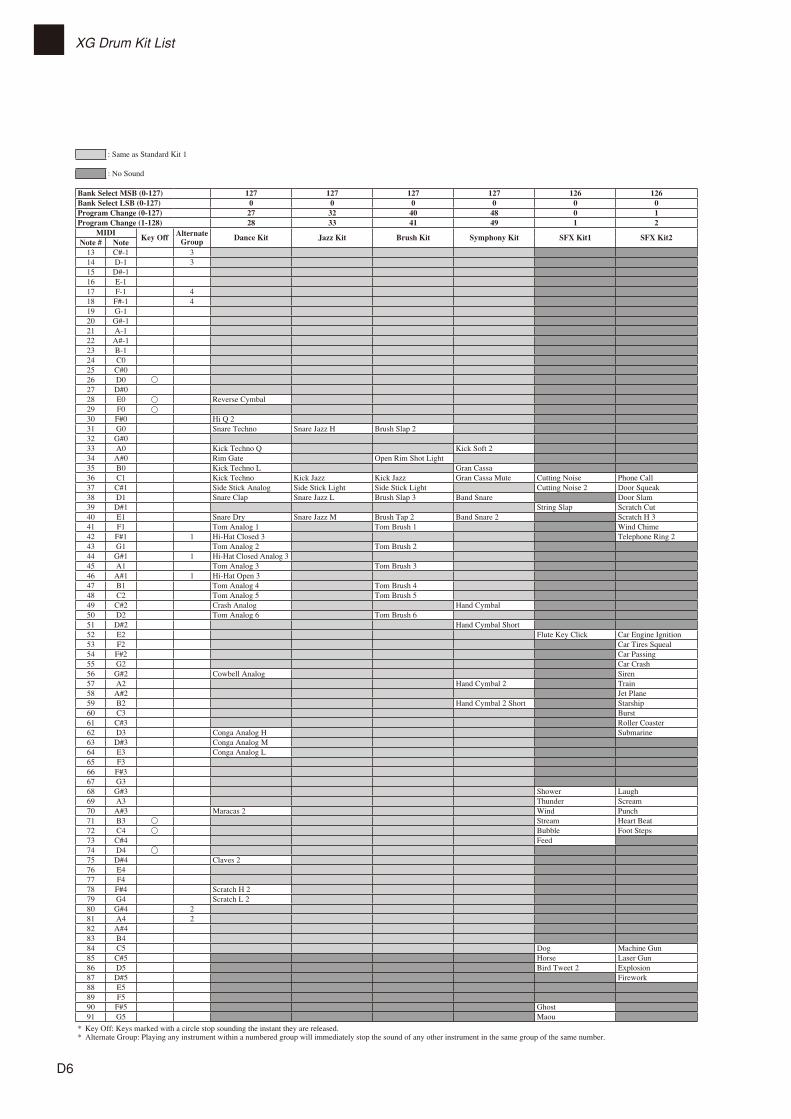
D6
XG Drum Kit List
: Same as Standard Kit 1
: No Sound
Bank Select MSB (0-127) 127 127 127 127 126 126Bank Select LSB (0-127) 0 0 0 0 0 0Program Change (0-127) 27 32 40 48 0 1Program Change (1-128) 28 33 41 49 1 2
MIDIKey Off Alternate
Group Dance Kit Jazz Kit Brush Kit Symphony Kit SFX Kit1 SFX Kit2Note # Note
13 C#-1 314 D-1 315 D#-116 E-117 F-1 418 F#-1 419 G-120 G#-121 A-122 A#-123 B-124 C025 C#026 D027 D#028 E0 Reverse Cymbal29 F030 F#0 Hi Q 231 G0 Snare Techno Snare Jazz H Brush Slap 232 G#033 A0 Kick Techno Q Kick Soft 234 A#0 Rim Gate Open Rim Shot Light35 B0 Kick Techno L Gran Cassa36 C1 Kick Techno Kick Jazz Kick Jazz Gran Cassa Mute Cutting Noise Phone Call37 C#1 Side Stick Analog Side Stick Light Side Stick Light Cutting Noise 2 Door Squeak38 D1 Snare Clap Snare Jazz L Brush Slap 3 Band Snare Door Slam39 D#1 String Slap Scratch Cut40 E1 Snare Dry Snare Jazz M Brush Tap 2 Band Snare 2 Scratch H 341 F1 Tom Analog 1 Tom Brush 1 Wind Chime42 F#1 1 Hi-Hat Closed 3 Telephone Ring 243 G1 Tom Analog 2 Tom Brush 244 G#1 1 Hi-Hat Closed Analog 345 A1 Tom Analog 3 Tom Brush 346 A#1 1 Hi-Hat Open 347 B1 Tom Analog 4 Tom Brush 448 C2 Tom Analog 5 Tom Brush 549 C#2 Crash Analog Hand Cymbal50 D2 Tom Analog 6 Tom Brush 651 D#2 Hand Cymbal Short52 E2 Flute Key Click Car Engine Ignition53 F2 Car Tires Squeal54 F#2 Car Passing55 G2 Car Crash56 G#2 Cowbell Analog Siren57 A2 Hand Cymbal 2 Train58 A#2 Jet Plane59 B2 Hand Cymbal 2 Short Starship60 C3 Burst61 C#3 Roller Coaster62 D3 Conga Analog H Submarine63 D#3 Conga Analog M64 E3 Conga Analog L65 F366 F#367 G368 G#3 Shower Laugh69 A3 Thunder Scream70 A#3 Maracas 2 Wind Punch71 B3 Stream Heart Beat72 C4 Bubble Foot Steps73 C#4 Feed74 D475 D#4 Claves 276 E477 F478 F#4 Scratch H 279 G4 Scratch L 280 G#4 281 A4 282 A#483 B484 C5 Dog Machine Gun85 C#5 Horse Laser Gun86 D5 Bird Tweet 2 Explosion87 D#5 Firework88 E589 F590 F#5 Ghost91 G5 Maou
* Key Off: Keys marked with a circle stop sounding the instant they are released.* Alternate Group: Playing any instrument within a numbered group will immediately stop the sound of any other instrument in the same group of the same number.
D7
Data list
MIDI Data Format
Preset Voice List
Voice NameBank Program Change
(0 – 127)MSB LSBPiano 108 0 0
Electric Piano 1 108 0 5
Electric Piano 2 108 0 4
Electric Piano 3 108 1 4
Harpsichord 1 108 0 6
Harpsichord 2 108 1 6
Vibraphone 108 0 11
Celesta 108 0 8
Pipe Organ 1 108 1 19
Pipe Organ 2 108 0 19
Pipe Organ 3 108 2 19
Pipe Organ 4 108 3 19
Jazz Organ 108 0 16
Strings 108 0 48
Choir 108 0 52
Synth Pad 108 0 89* Dual voices (Piano + Strings, Piano + Synth Pad, Piano + Electric Piano 1) cannot be recalled from the external MIDI devices.
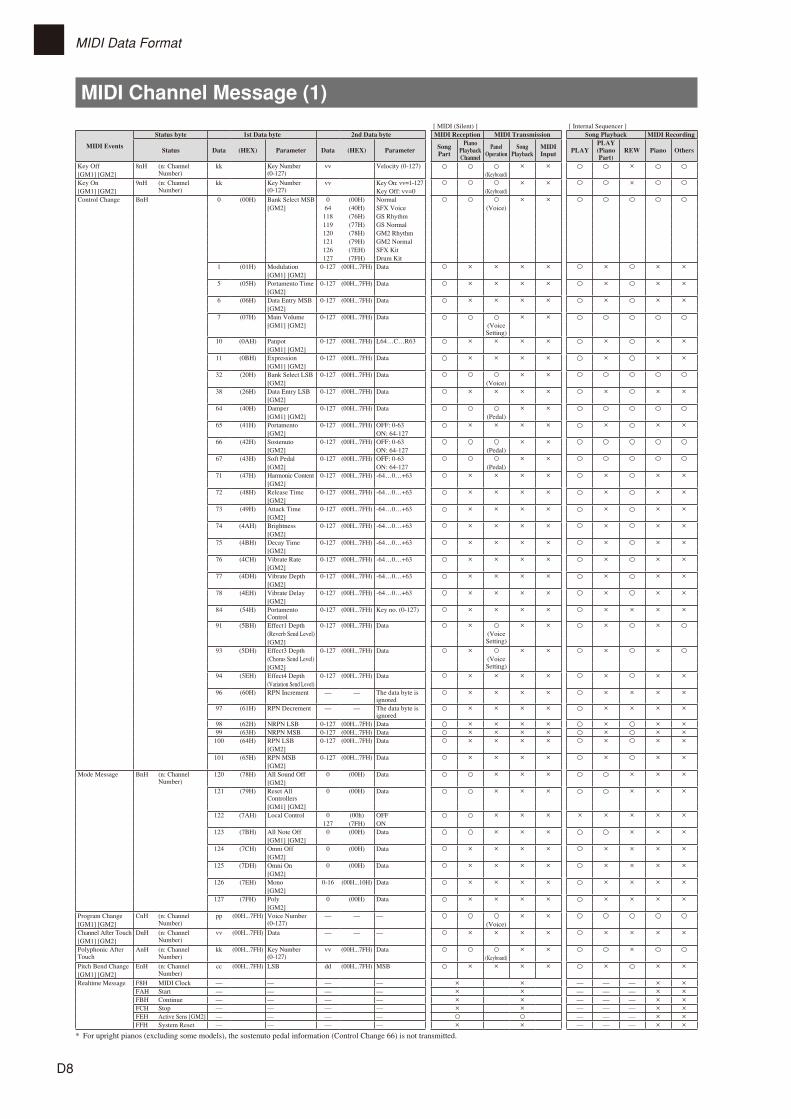
D8
MIDI Data Format
MIDI Channel Message (1)
[ MIDI (Silent) ] [ Internal Sequencer ]
MIDI Events
Status byte 1st Data byte 2nd Data byte MIDI Reception MIDI Transmission Song Playback MIDI Recording
Status Data (HEX) Parameter Data (HEX) Parameter Song Part
Piano Playback Channel
Panel Operation
Song Playback
MIDI Input PLAY
PLAY(Piano Part)
REW Piano Others
Key Off 8nH (n: Channel Number)
kk Key Number (0-127)
vv Velocity (0-127) × × ×[GM1] [GM2] (Keyboard)Key On 9nH (n: Channel
Number)kk Key Number
(0-127)vv Key On: vv=1-127 × × ×
[GM1] [GM2] Key Off: vv=0 (Keyboard)Control Change BnH 0 (00H) Bank Select MSB 0 (00H) Normal × ×
[GM2] 64 (40H) SFX Voice (Voice)118 (76H) GS Rhythm119 (77H) GS Normal120 (78H) GM2 Rhythm121 (79H) GM2 Normal126 (7EH) SFX Kit127 (7FH) Drum Kit
1 (01H) Modulation 0-127 (00H...7FH) Data × × × × × × ×[GM1] [GM2]
5 (05H) Portamento Time 0-127 (00H...7FH) Data × × × × × × ×[GM2]
6 (06H) Data Entry MSB 0-127 (00H...7FH) Data × × × × × × ×[GM2]
7 (07H) Main Volume 0-127 (00H...7FH) Data × ×[GM1] [GM2] (Voice
Setting)10 (0AH) Panpot 0-127 (00H...7FH) L64…C…R63 × × × × × × ×
[GM1] [GM2]11 (0BH) Expression 0-127 (00H...7FH) Data × × × × × × ×
[GM1] [GM2]32 (20H) Bank Select LSB 0-127 (00H...7FH) Data × ×
[GM2] (Voice)38 (26H) Data Entry LSB 0-127 (00H...7FH) Data × × × × × × ×
[GM2]64 (40H) Damper 0-127 (00H...7FH) Data × ×
[GM1] [GM2] (Pedal)65 (41H) Portamento 0-127 (00H...7FH) OFF: 0-63 × × × × × × ×
[GM2] ON: 64-12766 (42H) Sostenuto 0-127 (00H...7FH) OFF: 0-63 × ×
[GM2] ON: 64-127 (Pedal)67 (43H) Soft Pedal 0-127 (00H...7FH) OFF: 0-63 × ×
[GM2] ON: 64-127 (Pedal)71 (47H) Harmonic Content 0-127 (00H...7FH) -64…0…+63 × × × × × × ×
[GM2]72 (48H) Release Time 0-127 (00H...7FH) -64…0…+63 × × × × × × ×
[GM2]73 (49H) Attack Time 0-127 (00H...7FH) -64…0…+63 × × × × × × ×
[GM2]74 (4AH) Brightness 0-127 (00H...7FH) -64…0…+63 × × × × × × ×
[GM2]75 (4BH) Decay Time 0-127 (00H...7FH) -64…0…+63 × × × × × × ×
[GM2]76 (4CH) Vibrate Rate 0-127 (00H...7FH) -64…0…+63 × × × × × × ×
[GM2]77 (4DH) Vibrate Depth 0-127 (00H...7FH) -64…0…+63 × × × × × × ×
[GM2]78 (4EH) Vibrate Delay 0-127 (00H...7FH) -64…0…+63 × × × × × × ×
[GM2]84 (54H) Portamento
Control0-127 (00H...7FH) Key no. (0-127) × × × × × × × ×
91 (5BH) Effect1 Depth 0-127 (00H...7FH) Data × × × × ×(Reverb Send Level) (Voice
Setting)[GM2]93 (5DH) Effect3 Depth 0-127 (00H...7FH) Data × × × × ×
(Chorus Send Level) (Voice Setting)[GM2]
94 (5EH) Effect4 Depth 0-127 (00H...7FH) Data × × × × × × ×(Variation Send Level)
96 (60H) RPN Increment — — The data byte is ignored
× × × × × × × ×
97 (61H) RPN Decrement — — The data byte is ignored
× × × × × × × ×
98 (62H) NRPN LSB 0-127 (00H...7FH) Data × × × × × × ×99 (63H) NRPN MSB 0-127 (00H...7FH) Data × × × × × × ×100 (64H) RPN LSB 0-127 (00H...7FH) Data × × × × × × ×
[GM2]101 (65H) RPN MSB 0-127 (00H...7FH) Data × × × × × × ×
[GM2]Mode Message BnH (n: Channel
Number)120 (78H) All Sound Off 0 (00H) Data × × × × × ×
[GM2]121 (79H) Reset All
Controllers0 (00H) Data × × × × × ×
[GM1] [GM2]122 (7AH) Local Control 0 (00h) OFF × × × × × × × ×
127 (7FH) ON123 (7BH) All Note Off 0 (00H) Data × × × × × ×
[GM1] [GM2]124 (7CH) Omni Off 0 (00H) Data × × × × × × × ×
[GM2]125 (7DH) Omni On 0 (00H) Data × × × × × × × ×
[GM2]126 (7EH) Mono 0-16 (00H...10H) Data × × × × × × × ×
[GM2]127 (7FH) Poly 0 (00H) Data × × × × × × × ×
[GM2]Program Change CnH (n: Channel
Number)pp (00H...7FH) Voice Number
(0-127)— — — × ×
[GM1] [GM2] (Voice)Channel After Touch DnH (n: Channel
Number)vv (00H...7FH) Data — — — × × × × × × × ×
[GM1] [GM2]Polyphonic After Touch
AnH (n: Channel Number)
kk (00H...7FH) Key Number (0-127)
vv (00H...7FH) Data × × ×(Keyboard)
Pitch Bend Change EnH (n: Channel Number)
cc (00H...7FH) LSB dd (00H...7FH) MSB × × × × × × ×[GM1] [GM2]Realtime Message F8H MIDI Clock — — — — × × — — — × ×
FAH Start — — — — × × — — — × ×FBH Continue — — — — × × — — — × ×FCH Stop — — — — × × — — — × ×FEH Active Sens [GM2] — — — — — — — × ×FFH System Reset — — — — × × — — — × ×
* For upright pianos (excluding some models), the sostenuto pedal information (Control Change 66) is not transmitted.
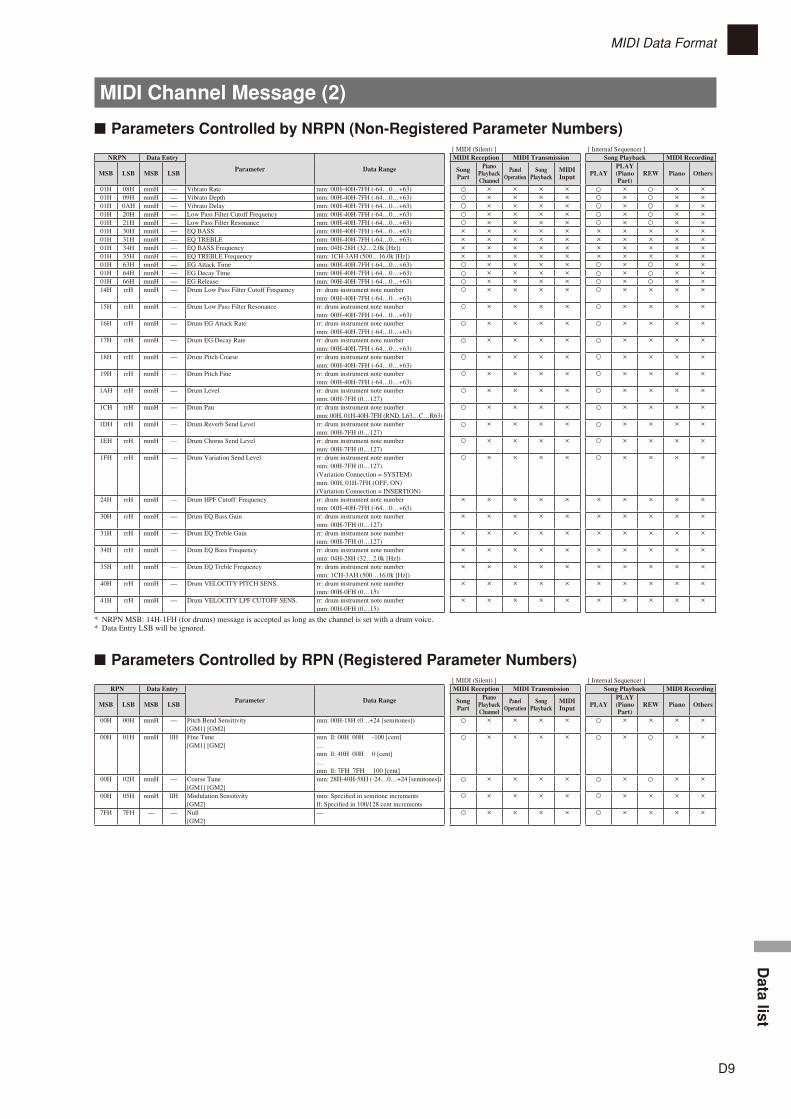
D9
MIDI Data FormatD
ata list
MIDI Channel Message (2)
■ Parameters Controlled by NRPN (Non-Registered Parameter Numbers)[ MIDI (Silent) ] [ Internal Sequencer ]
NRPN Data Entry
Parameter Data Range
MIDI Reception MIDI Transmission Song Playback MIDI Recording
MSB LSB MSB LSB Song Part
Piano Playback Channel
Panel Operation
Song Playback
MIDI Input PLAY
PLAY (Piano Part)
REW Piano Others
01H 08H mmH — Vibrato Rate mm: 00H-40H-7FH (-64…0…+63) × × × × × × ×01H 09H mmH — Vibrato Depth mm: 00H-40H-7FH (-64…0…+63) × × × × × × ×01H 0AH mmH — Vibrato Delay mm: 00H-40H-7FH (-64…0…+63) × × × × × × ×01H 20H mmH — Low Pass Filter Cutoff Frequency mm: 00H-40H-7FH (-64…0…+63) × × × × × × ×01H 21H mmH — Low Pass Filter Resonance mm: 00H-40H-7FH (-64…0…+63) × × × × × × ×01H 30H mmH — EQ BASS mm: 00H-40H-7FH (-64…0…+63) × × × × × × × × × ×01H 31H mmH — EQ TREBLE mm: 00H-40H-7FH (-64…0…+63) × × × × × × × × × ×01H 34H mmH — EQ BASS Frequency mm: 04H-28H (32…2.0k [Hz]) × × × × × × × × × ×01H 35H mmH — EQ TREBLE Frequency mm: 1CH-3AH (500…16.0k [Hz]) × × × × × × × × × ×01H 63H mmH — EG Attack Time mm: 00H-40H-7FH (-64…0…+63) × × × × × × ×01H 64H mmH — EG Decay Time mm: 00H-40H-7FH (-64…0…+63) × × × × × × ×01H 66H mmH — EG Release mm: 00H-40H-7FH (-64…0…+63) × × × × × × ×14H rrH mmH — Drum Low Pass Filter Cutoff Frequency rr: drum instrument note number × × × × × × × ×
mm: 00H-40H-7FH (-64…0…+63)15H rrH mmH — Drum Low Pass Filter Resonance rr: drum instrument note number × × × × × × × ×
mm: 00H-40H-7FH (-64…0…+63)16H rrH mmH — Drum EG Attack Rate rr: drum instrument note number × × × × × × × ×
mm: 00H-40H-7FH (-64…0…+63)17H rrH mmH — Drum EG Decay Rate rr: drum instrument note number × × × × × × × ×
mm: 00H-40H-7FH (-64…0…+63)18H rrH mmH — Drum Pitch Coarse rr: drum instrument note number × × × × × × × ×
mm: 00H-40H-7FH (-64…0…+63)19H rrH mmH — Drum Pitch Fine rr: drum instrument note number × × × × × × × ×
mm: 00H-40H-7FH (-64…0…+63)1AH rrH mmH — Drum Level rr: drum instrument note number × × × × × × × ×
mm: 00H-7FH (0…127)1CH rrH mmH — Drum Pan rr: drum instrument note number × × × × × × × ×
mm: 00H, 01H-40H-7FH (RND, L63…C…R63)1DH rrH mmH — Drum Reverb Send Level rr: drum instrument note number × × × × × × × ×
mm: 00H-7FH (0…127)1EH rrH mmH — Drum Chorus Send Level rr: drum instrument note number × × × × × × × ×
mm: 00H-7FH (0…127)1FH rrH mmH — Drum Variation Send Level rr: drum instrument note number × × × × × × × ×
mm: 00H-7FH (0…127)(Variation Connection = SYSTEM)mm: 00H, 01H-7FH (OFF, ON)(Variation Connection = INSERTION)
24H rrH mmH — Drum HPF Cutoff Frequency rr: drum instrument note number × × × × × × × × × ×mm: 00H-40H-7FH (-64…0…+63)
30H rrH mmH — Drum EQ Bass Gain rr: drum instrument note number × × × × × × × × × ×mm: 00H-7FH (0…127)
31H rrH mmH — Drum EQ Treble Gain rr: drum instrument note number × × × × × × × × × ×mm: 00H-7FH (0…127)
34H rrH mmH — Drum EQ Bass Frequency rr: drum instrument note number × × × × × × × × × ×mm: 04H-28H (32…2.0k [Hz])
35H rrH mmH — Drum EQ Treble Frequency rr: drum instrument note number × × × × × × × × × ×mm: 1CH-3AH (500…16.0k [Hz])
40H rrH mmH — Drum VELOCITY PITCH SENS. rr: drum instrument note number × × × × × × × × × ×mm: 00H-0FH (0…15)
41H rrH mmH — Drum VELOCITY LPF CUTOFF SENS. rr: drum instrument note number × × × × × × × × × ×mm: 00H-0FH (0…15)
* NRPN MSB: 14H-1FH (for drums) message is accepted as long as the channel is set with a drum voice.* Data Entry LSB will be ignored.
■ Parameters Controlled by RPN (Registered Parameter Numbers)[ MIDI (Silent) ] [ Internal Sequencer ]
RPN Data Entry
Parameter Data Range
MIDI Reception MIDI Transmission Song Playback MIDI Recording
MSB LSB MSB LSB Song Part
Piano Playback Channel
Panel Operation
Song Playback
MIDI Input PLAY
PLAY (Piano Part)
REW Piano Others
00H 00H mmH — Pitch Bend Sensitivity mm: 00H-18H (0…+24 [semitones]) × × × × × × × ×[GM1] [GM2]
00H 01H mmH llH Fine Tune mm ll: 00H 00H -100 [cent] × × × × × × ×[GM1] [GM2] …
mm ll: 40H 00H 0 [cent]…mm ll: 7FH 7FH 100 [cent]
00H 02H mmH — Coarse Tune mm: 28H-40H-58H (-24…0…+24 [semitones]) × × × × × × ×[GM1] [GM2]
00H 05H mmH llH Modulation Sensitivity mm: Specified in semitone increments × × × × × × × ×[GM2] ll: Specified in 100/128 cent increments
7FH 7FH — — Null — × × × × × × × ×[GM2]
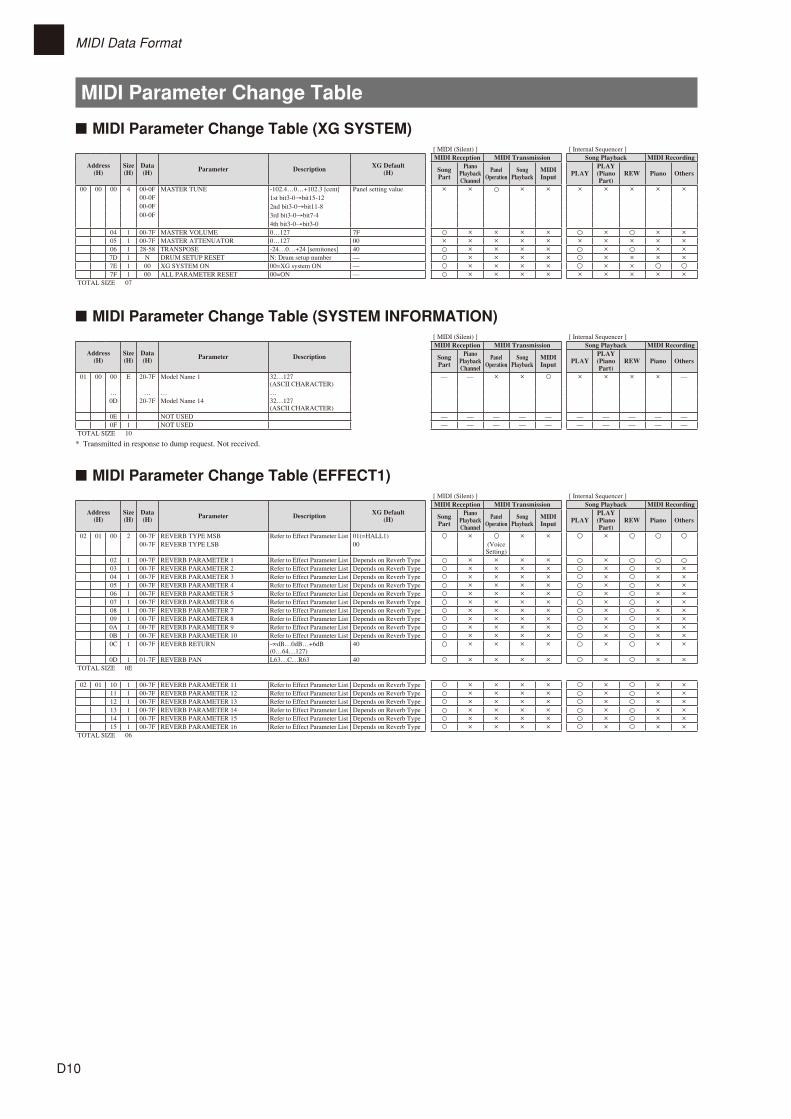
D10
MIDI Data Format
MIDI Parameter Change Table
■ MIDI Parameter Change Table (XG SYSTEM)[ MIDI (Silent) ] [ Internal Sequencer ]
Address(H)
Size(H)
Data(H) Parameter Description XG Default
(H)
MIDI Reception MIDI Transmission Song Playback MIDI Recording
Song Part
Piano Playback Channel
Panel Operation
Song Playback
MIDI Input PLAY
PLAY (Piano Part)
REW Piano Others
00 00 00 4 00-0F MASTER TUNE -102.4…0…+102.3 [cent] Panel setting value × × × × × × × × ×00-0F 1st bit3-0→bit15-1200-0F 2nd bit3-0→bit11-800-0F 3rd bit3-0→bit7-4
4th bit3-0→bit3-004 1 00-7F MASTER VOLUME 0…127 7F × × × × × × ×05 1 00-7F MASTER ATTENUATOR 0…127 00 × × × × × × × × × ×06 1 28-58 TRANSPOSE -24…0…+24 [semitones] 40 × × × × × × ×7D 1 N DRUM SETUP RESET N: Drum setup number — × × × × × × × ×7E 1 00 XG SYSTEM ON 00=XG system ON — × × × × × ×7F 1 00 ALL PARAMETER RESET 00=ON — × × × × × × × × ×
TOTAL SIZE 07
■ MIDI Parameter Change Table (SYSTEM INFORMATION)[ MIDI (Silent) ] [ Internal Sequencer ]
Address(H)
Size(H)
Data(H) Parameter Description
MIDI Reception MIDI Transmission Song Playback MIDI Recording
Song Part
Piano Playback Channel
Panel Operation
Song Playback
MIDI Input PLAY
PLAY (Piano Part)
REW Piano Others
01 00 00 E 20-7F Model Name 1 32…127 (ASCII CHARACTER)
— — × × × × × × —
… … … …0D 20-7F Model Name 14 32…127
(ASCII CHARACTER)0E 1 NOT USED — — — — — — — — — —0F 1 NOT USED — — — — — — — — — —
TOTAL SIZE 10
* Transmitted in response to dump request. Not received.
■ MIDI Parameter Change Table (EFFECT1)[ MIDI (Silent) ] [ Internal Sequencer ]
Address(H)
Size(H)
Data(H) Parameter Description XG Default
(H)
MIDI Reception MIDI Transmission Song Playback MIDI Recording
Song Part
Piano Playback Channel
Panel Operation
Song Playback
MIDI Input PLAY
PLAY (Piano Part)
REW Piano Others
02 01 00 2 00-7F REVERB TYPE MSB Refer to Effect Parameter List 01(=HALL1) × × × ×00-7F REVERB TYPE LSB 00 (Voice
Setting)02 1 00-7F REVERB PARAMETER 1 Refer to Effect Parameter List Depends on Reverb Type × × × × ×03 1 00-7F REVERB PARAMETER 2 Refer to Effect Parameter List Depends on Reverb Type × × × × × × ×04 1 00-7F REVERB PARAMETER 3 Refer to Effect Parameter List Depends on Reverb Type × × × × × × ×05 1 00-7F REVERB PARAMETER 4 Refer to Effect Parameter List Depends on Reverb Type × × × × × × ×06 1 00-7F REVERB PARAMETER 5 Refer to Effect Parameter List Depends on Reverb Type × × × × × × ×07 1 00-7F REVERB PARAMETER 6 Refer to Effect Parameter List Depends on Reverb Type × × × × × × ×08 1 00-7F REVERB PARAMETER 7 Refer to Effect Parameter List Depends on Reverb Type × × × × × × ×09 1 00-7F REVERB PARAMETER 8 Refer to Effect Parameter List Depends on Reverb Type × × × × × × ×0A 1 00-7F REVERB PARAMETER 9 Refer to Effect Parameter List Depends on Reverb Type × × × × × × ×0B 1 00-7F REVERB PARAMETER 10 Refer to Effect Parameter List Depends on Reverb Type × × × × × × ×0C 1 00-7F REVERB RETURN -∞dB…0dB…+6dB
(0…64…127)40 × × × × × × ×
0D 1 01-7F REVERB PAN L63…C…R63 40 × × × × × × ×TOTAL SIZE 0E
02 01 10 1 00-7F REVERB PARAMETER 11 Refer to Effect Parameter List Depends on Reverb Type × × × × × × ×11 1 00-7F REVERB PARAMETER 12 Refer to Effect Parameter List Depends on Reverb Type × × × × × × ×12 1 00-7F REVERB PARAMETER 13 Refer to Effect Parameter List Depends on Reverb Type × × × × × × ×13 1 00-7F REVERB PARAMETER 14 Refer to Effect Parameter List Depends on Reverb Type × × × × × × ×14 1 00-7F REVERB PARAMETER 15 Refer to Effect Parameter List Depends on Reverb Type × × × × × × ×15 1 00-7F REVERB PARAMETER 16 Refer to Effect Parameter List Depends on Reverb Type × × × × × × ×
TOTAL SIZE 06
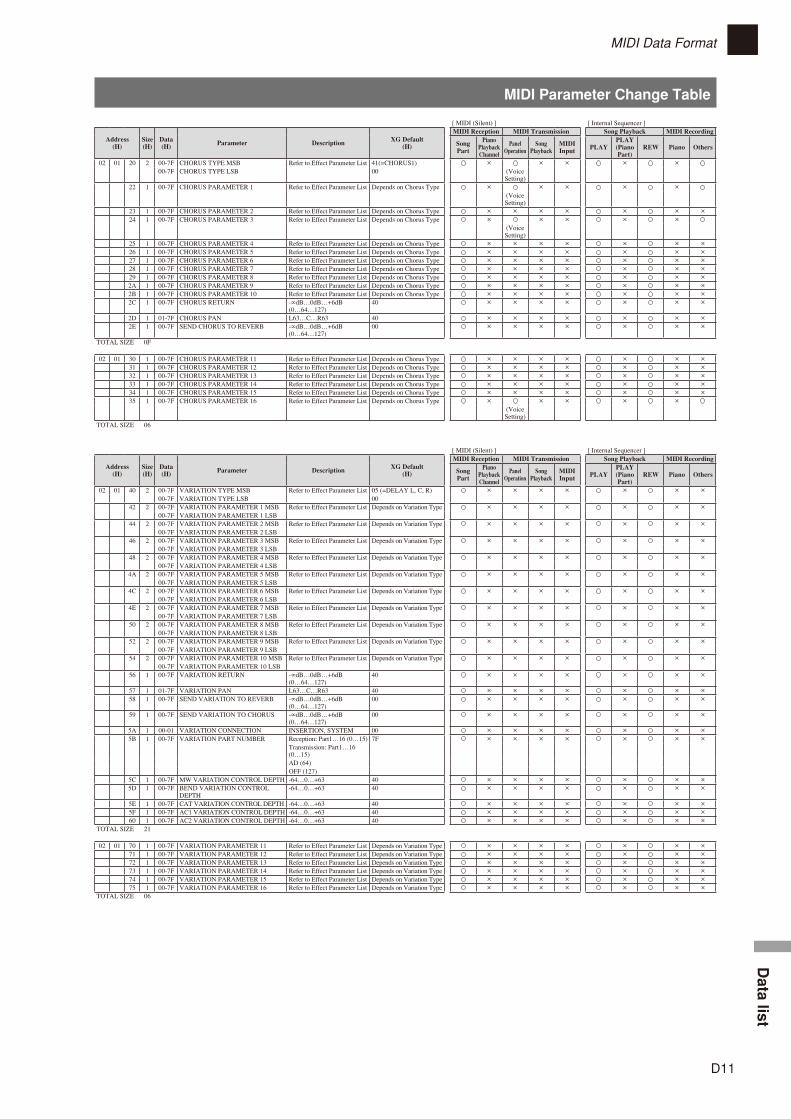
MIDI Parameter Change Table
D11
MIDI Data FormatD
ata list
[ MIDI (Silent) ] [ Internal Sequencer ]
Address(H)
Size(H)
Data(H) Parameter Description XG Default
(H)
MIDI Reception MIDI Transmission Song Playback MIDI Recording
Song Part
Piano Playback Channel
Panel Operation
Song Playback
MIDI Input PLAY
PLAY (Piano Part)
REW Piano Others
02 01 20 2 00-7F CHORUS TYPE MSB Refer to Effect Parameter List 41(=CHORUS1) × × × × ×00-7F CHORUS TYPE LSB 00 (Voice
Setting)22 1 00-7F CHORUS PARAMETER 1 Refer to Effect Parameter List Depends on Chorus Type × × × × ×
(Voice Setting)
23 1 00-7F CHORUS PARAMETER 2 Refer to Effect Parameter List Depends on Chorus Type × × × × × × ×24 1 00-7F CHORUS PARAMETER 3 Refer to Effect Parameter List Depends on Chorus Type × × × × ×
(Voice Setting)
25 1 00-7F CHORUS PARAMETER 4 Refer to Effect Parameter List Depends on Chorus Type × × × × × × ×26 1 00-7F CHORUS PARAMETER 5 Refer to Effect Parameter List Depends on Chorus Type × × × × × × ×27 1 00-7F CHORUS PARAMETER 6 Refer to Effect Parameter List Depends on Chorus Type × × × × × × ×28 1 00-7F CHORUS PARAMETER 7 Refer to Effect Parameter List Depends on Chorus Type × × × × × × ×29 1 00-7F CHORUS PARAMETER 8 Refer to Effect Parameter List Depends on Chorus Type × × × × × × ×2A 1 00-7F CHORUS PARAMETER 9 Refer to Effect Parameter List Depends on Chorus Type × × × × × × ×2B 1 00-7F CHORUS PARAMETER 10 Refer to Effect Parameter List Depends on Chorus Type × × × × × × ×2C 1 00-7F CHORUS RETURN -∞dB…0dB…+6dB
(0…64…127)40 × × × × × × ×
2D 1 01-7F CHORUS PAN L63…C…R63 40 × × × × × × ×2E 1 00-7F SEND CHORUS TO REVERB -∞dB…0dB…+6dB
(0…64…127)00 × × × × × × ×
TOTAL SIZE 0F
02 01 30 1 00-7F CHORUS PARAMETER 11 Refer to Effect Parameter List Depends on Chorus Type × × × × × × ×31 1 00-7F CHORUS PARAMETER 12 Refer to Effect Parameter List Depends on Chorus Type × × × × × × ×32 1 00-7F CHORUS PARAMETER 13 Refer to Effect Parameter List Depends on Chorus Type × × × × × × ×33 1 00-7F CHORUS PARAMETER 14 Refer to Effect Parameter List Depends on Chorus Type × × × × × × ×34 1 00-7F CHORUS PARAMETER 15 Refer to Effect Parameter List Depends on Chorus Type × × × × × × ×35 1 00-7F CHORUS PARAMETER 16 Refer to Effect Parameter List Depends on Chorus Type × × × × ×
(Voice Setting)
TOTAL SIZE 06
[ MIDI (Silent) ] [ Internal Sequencer ]
Address(H)
Size(H)
Data(H) Parameter Description XG Default
(H)
MIDI Reception MIDI Transmission Song Playback MIDI Recording
Song Part
Piano Playback Channel
Panel Operation
Song Playback
MIDI Input PLAY
PLAY (Piano Part)
REW Piano Others
02 01 40 2 00-7F VARIATION TYPE MSB Refer to Effect Parameter List 05 (=DELAY L, C, R) × × × × × × ×00-7F VARIATION TYPE LSB 00
42 2 00-7F VARIATION PARAMETER 1 MSB Refer to Effect Parameter List Depends on Variation Type × × × × × × ×00-7F VARIATION PARAMETER 1 LSB
44 2 00-7F VARIATION PARAMETER 2 MSB Refer to Effect Parameter List Depends on Variation Type × × × × × × ×00-7F VARIATION PARAMETER 2 LSB
46 2 00-7F VARIATION PARAMETER 3 MSB Refer to Effect Parameter List Depends on Variation Type × × × × × × ×00-7F VARIATION PARAMETER 3 LSB
48 2 00-7F VARIATION PARAMETER 4 MSB Refer to Effect Parameter List Depends on Variation Type × × × × × × ×00-7F VARIATION PARAMETER 4 LSB
4A 2 00-7F VARIATION PARAMETER 5 MSB Refer to Effect Parameter List Depends on Variation Type × × × × × × ×00-7F VARIATION PARAMETER 5 LSB
4C 2 00-7F VARIATION PARAMETER 6 MSB Refer to Effect Parameter List Depends on Variation Type × × × × × × ×00-7F VARIATION PARAMETER 6 LSB
4E 2 00-7F VARIATION PARAMETER 7 MSB Refer to Effect Parameter List Depends on Variation Type × × × × × × ×00-7F VARIATION PARAMETER 7 LSB
50 2 00-7F VARIATION PARAMETER 8 MSB Refer to Effect Parameter List Depends on Variation Type × × × × × × ×00-7F VARIATION PARAMETER 8 LSB
52 2 00-7F VARIATION PARAMETER 9 MSB Refer to Effect Parameter List Depends on Variation Type × × × × × × ×00-7F VARIATION PARAMETER 9 LSB
54 2 00-7F VARIATION PARAMETER 10 MSB Refer to Effect Parameter List Depends on Variation Type × × × × × × ×00-7F VARIATION PARAMETER 10 LSB
56 1 00-7F VARIATION RETURN -∞dB…0dB…+6dB (0…64…127)
40 × × × × × × ×
57 1 01-7F VARIATION PAN L63…C…R63 40 × × × × × × ×58 1 00-7F SEND VARIATION TO REVERB -∞dB…0dB…+6dB
(0…64…127)00 × × × × × × ×
59 1 00-7F SEND VARIATION TO CHORUS -∞dB…0dB…+6dB (0…64…127)
00 × × × × × × ×
5A 1 00-01 VARIATION CONNECTION INSERTION, SYSTEM 00 × × × × × × ×5B 1 00-7F VARIATION PART NUMBER Reception: Part1…16 (0…15) 7F × × × × × × ×
Transmission: Part1…16 (0…15)AD (64)OFF (127)
5C 1 00-7F MW VARIATION CONTROL DEPTH -64…0…+63 40 × × × × × × ×5D 1 00-7F BEND VARIATION CONTROL
DEPTH-64…0…+63 40 × × × × × × ×
5E 1 00-7F CAT VARIATION CONTROL DEPTH -64…0…+63 40 × × × × × × ×5F 1 00-7F AC1 VARIATION CONTROL DEPTH -64…0…+63 40 × × × × × × ×60 1 00-7F AC2 VARIATION CONTROL DEPTH -64…0…+63 40 × × × × × × ×
TOTAL SIZE 21
02 01 70 1 00-7F VARIATION PARAMETER 11 Refer to Effect Parameter List Depends on Variation Type × × × × × × ×71 1 00-7F VARIATION PARAMETER 12 Refer to Effect Parameter List Depends on Variation Type × × × × × × ×72 1 00-7F VARIATION PARAMETER 13 Refer to Effect Parameter List Depends on Variation Type × × × × × × ×73 1 00-7F VARIATION PARAMETER 14 Refer to Effect Parameter List Depends on Variation Type × × × × × × ×74 1 00-7F VARIATION PARAMETER 15 Refer to Effect Parameter List Depends on Variation Type × × × × × × ×75 1 00-7F VARIATION PARAMETER 16 Refer to Effect Parameter List Depends on Variation Type × × × × × × ×
TOTAL SIZE 06
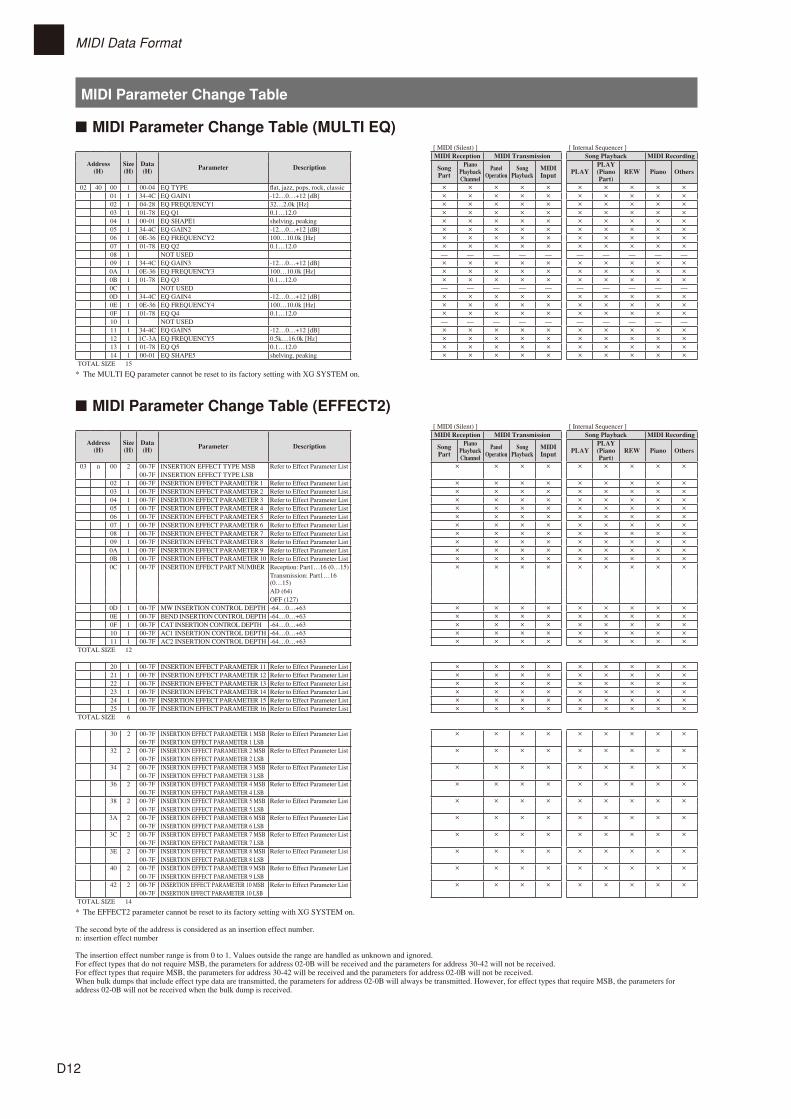
MIDI Parameter Change Table
D12
MIDI Data Format
■ MIDI Parameter Change Table (MULTI EQ)[ MIDI (Silent) ] [ Internal Sequencer ]
Address(H)
Size(H)
Data(H) Parameter Description
MIDI Reception MIDI Transmission Song Playback MIDI Recording
Song Part
Piano Playback Channel
Panel Operation
Song Playback
MIDI Input PLAY
PLAY (Piano Part)
REW Piano Others
02 40 00 1 00-04 EQ TYPE flat, jazz, pops, rock, classic × × × × × × × × × ×01 1 34-4C EQ GAIN1 -12…0…+12 [dB] × × × × × × × × × ×02 1 04-28 EQ FREQUENCY1 32…2.0k [Hz] × × × × × × × × × ×03 1 01-78 EQ Q1 0.1…12.0 × × × × × × × × × ×04 1 00-01 EQ SHAPE1 shelving, peaking × × × × × × × × × ×05 1 34-4C EQ GAIN2 -12…0…+12 [dB] × × × × × × × × × ×06 1 0E-36 EQ FREQUENCY2 100…10.0k [Hz] × × × × × × × × × ×07 1 01-78 EQ Q2 0.1…12.0 × × × × × × × × × ×08 1 NOT USED — — — — — — — — — —09 1 34-4C EQ GAIN3 -12…0…+12 [dB] × × × × × × × × × ×0A 1 0E-36 EQ FREQUENCY3 100…10.0k [Hz] × × × × × × × × × ×0B 1 01-78 EQ Q3 0.1…12.0 × × × × × × × × × ×0C 1 NOT USED — — — — — — — — — —0D 1 34-4C EQ GAIN4 -12…0…+12 [dB] × × × × × × × × × ×0E 1 0E-36 EQ FREQUENCY4 100…10.0k [Hz] × × × × × × × × × ×0F 1 01-78 EQ Q4 0.1…12.0 × × × × × × × × × ×10 1 NOT USED — — — — — — — — — —11 1 34-4C EQ GAIN5 -12…0…+12 [dB] × × × × × × × × × ×12 1 1C-3A EQ FREQUENCY5 0.5k…16.0k [Hz] × × × × × × × × × ×13 1 01-78 EQ Q5 0.1…12.0 × × × × × × × × × ×14 1 00-01 EQ SHAPE5 shelving, peaking × × × × × × × × × ×
TOTAL SIZE 15
* The MULTI EQ parameter cannot be reset to its factory setting with XG SYSTEM on.
■ MIDI Parameter Change Table (EFFECT2)[ MIDI (Silent) ] [ Internal Sequencer ]
Address(H)
Size(H)
Data(H) Parameter Description
MIDI Reception MIDI Transmission Song Playback MIDI Recording
Song Part
Piano Playback Channel
Panel Operation
Song Playback
MIDI Input PLAY
PLAY (Piano Part)
REW Piano Others
03 n 00 2 00-7F INSERTION EFFECT TYPE MSB Refer to Effect Parameter List × × × × × × × × ×00-7F INSERTION EFFECT TYPE LSB
02 1 00-7F INSERTION EFFECT PARAMETER 1 Refer to Effect Parameter List × × × × × × × × ×03 1 00-7F INSERTION EFFECT PARAMETER 2 Refer to Effect Parameter List × × × × × × × × ×04 1 00-7F INSERTION EFFECT PARAMETER 3 Refer to Effect Parameter List × × × × × × × × ×05 1 00-7F INSERTION EFFECT PARAMETER 4 Refer to Effect Parameter List × × × × × × × × ×06 1 00-7F INSERTION EFFECT PARAMETER 5 Refer to Effect Parameter List × × × × × × × × ×07 1 00-7F INSERTION EFFECT PARAMETER 6 Refer to Effect Parameter List × × × × × × × × ×08 1 00-7F INSERTION EFFECT PARAMETER 7 Refer to Effect Parameter List × × × × × × × × ×09 1 00-7F INSERTION EFFECT PARAMETER 8 Refer to Effect Parameter List × × × × × × × × ×0A 1 00-7F INSERTION EFFECT PARAMETER 9 Refer to Effect Parameter List × × × × × × × × ×0B 1 00-7F INSERTION EFFECT PARAMETER 10 Refer to Effect Parameter List × × × × × × × × ×0C 1 00-7F INSERTION EFFECT PART NUMBER Reception: Part1…16 (0…15) × × × × × × × × ×
Transmission: Part1…16 (0…15)AD (64)OFF (127)
0D 1 00-7F MW INSERTION CONTROL DEPTH -64…0…+63 × × × × × × × × ×0E 1 00-7F BEND INSERTION CONTROL DEPTH -64…0…+63 × × × × × × × × ×0F 1 00-7F CAT INSERTION CONTROL DEPTH -64…0…+63 × × × × × × × × ×10 1 00-7F AC1 INSERTION CONTROL DEPTH -64…0…+63 × × × × × × × × ×11 1 00-7F AC2 INSERTION CONTROL DEPTH -64…0…+63 × × × × × × × × ×
TOTAL SIZE 12
20 1 00-7F INSERTION EFFECT PARAMETER 11 Refer to Effect Parameter List × × × × × × × × ×21 1 00-7F INSERTION EFFECT PARAMETER 12 Refer to Effect Parameter List × × × × × × × × ×22 1 00-7F INSERTION EFFECT PARAMETER 13 Refer to Effect Parameter List × × × × × × × × ×23 1 00-7F INSERTION EFFECT PARAMETER 14 Refer to Effect Parameter List × × × × × × × × ×24 1 00-7F INSERTION EFFECT PARAMETER 15 Refer to Effect Parameter List × × × × × × × × ×25 1 00-7F INSERTION EFFECT PARAMETER 16 Refer to Effect Parameter List × × × × × × × × ×
TOTAL SIZE 6
30 2 00-7F INSERTION EFFECT PARAMETER 1 MSB Refer to Effect Parameter List × × × × × × × × ×00-7F INSERTION EFFECT PARAMETER 1 LSB
32 2 00-7F INSERTION EFFECT PARAMETER 2 MSB Refer to Effect Parameter List × × × × × × × × ×00-7F INSERTION EFFECT PARAMETER 2 LSB
34 2 00-7F INSERTION EFFECT PARAMETER 3 MSB Refer to Effect Parameter List × × × × × × × × ×00-7F INSERTION EFFECT PARAMETER 3 LSB
36 2 00-7F INSERTION EFFECT PARAMETER 4 MSB Refer to Effect Parameter List × × × × × × × × ×00-7F INSERTION EFFECT PARAMETER 4 LSB
38 2 00-7F INSERTION EFFECT PARAMETER 5 MSB Refer to Effect Parameter List × × × × × × × × ×00-7F INSERTION EFFECT PARAMETER 5 LSB
3A 2 00-7F INSERTION EFFECT PARAMETER 6 MSB Refer to Effect Parameter List × × × × × × × × ×00-7F INSERTION EFFECT PARAMETER 6 LSB
3C 2 00-7F INSERTION EFFECT PARAMETER 7 MSB Refer to Effect Parameter List × × × × × × × × ×00-7F INSERTION EFFECT PARAMETER 7 LSB
3E 2 00-7F INSERTION EFFECT PARAMETER 8 MSB Refer to Effect Parameter List × × × × × × × × ×00-7F INSERTION EFFECT PARAMETER 8 LSB
40 2 00-7F INSERTION EFFECT PARAMETER 9 MSB Refer to Effect Parameter List × × × × × × × × ×00-7F INSERTION EFFECT PARAMETER 9 LSB
42 2 00-7F INSERTION EFFECT PARAMETER 10 MSB Refer to Effect Parameter List × × × × × × × × ×00-7F INSERTION EFFECT PARAMETER 10 LSB
TOTAL SIZE 14
* The EFFECT2 parameter cannot be reset to its factory setting with XG SYSTEM on.
The second byte of the address is considered as an insertion effect number.n: insertion effect number
The insertion effect number range is from 0 to 1. Values outside the range are handled as unknown and ignored.For effect types that do not require MSB, the parameters for address 02-0B will be received and the parameters for address 30-42 will not be received.For effect types that require MSB, the parameters for address 30-42 will be received and the parameters for address 02-0B will not be received.When bulk dumps that include effect type data are transmitted, the parameters for address 02-0B will always be transmitted. However, for effect types that require MSB, the parameters for address 02-0B will not be received when the bulk dump is received.
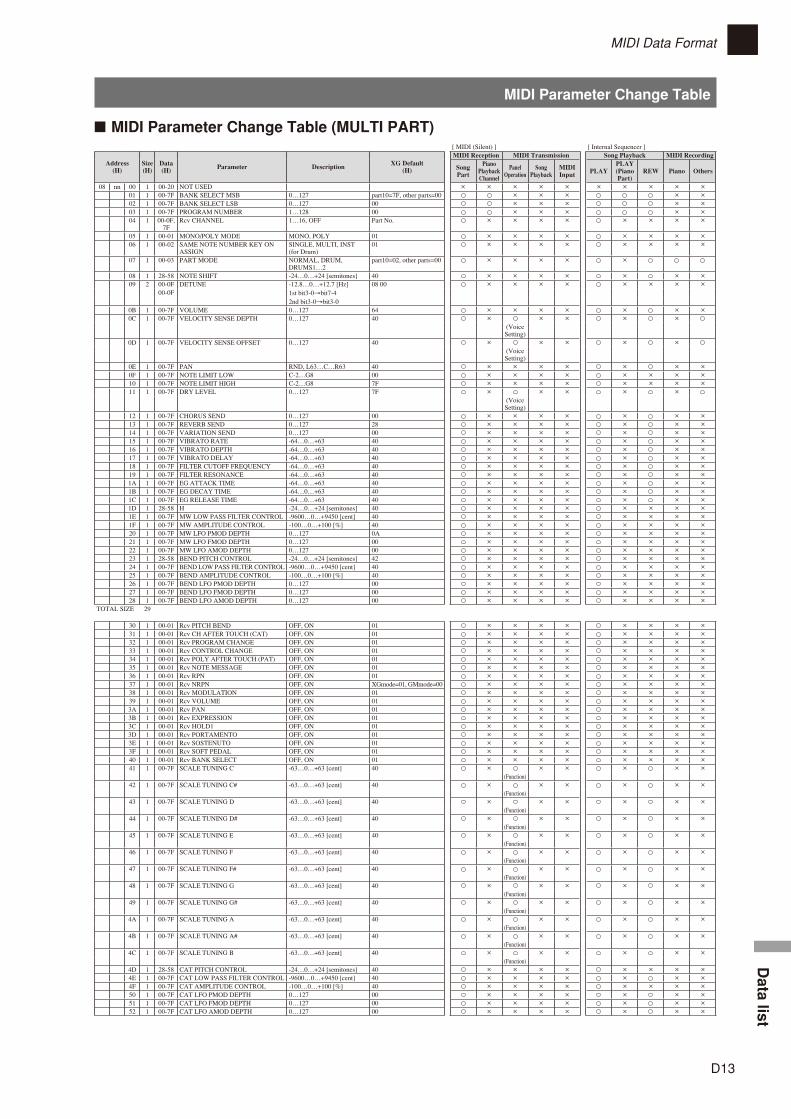
MIDI Parameter Change Table
D13
MIDI Data FormatD
ata list
■ MIDI Parameter Change Table (MULTI PART)[ MIDI (Silent) ] [ Internal Sequencer ]
Address(H)
Size(H)
Data(H) Parameter Description XG Default
(H)
MIDI Reception MIDI Transmission Song Playback MIDI Recording
Song Part
Piano Playback Channel
Panel Operation
Song Playback
MIDI Input PLAY
PLAY (Piano Part)
REW Piano Others
08 nn 00 1 00-20 NOT USED × × × × × × × × × ×01 1 00-7F BANK SELECT MSB 0…127 part10=7F, other parts=00 × × × × ×02 1 00-7F BANK SELECT LSB 0…127 00 × × × × ×03 1 00-7F PROGRAM NUMBER 1…128 00 × × × × ×04 1 00-0F,
7FRcv CHANNEL 1…16, OFF Part No. × × × × × × × ×
05 1 00-01 MONO/POLY MODE MONO, POLY 01 × × × × × × × ×06 1 00-02 SAME NOTE NUMBER KEY ON
ASSIGNSINGLE, MULTI, INST (for Drum)
01 × × × × × × × ×
07 1 00-03 PART MODE NORMAL, DRUM, DRUMS1…2
part10=02, other parts=00 × × × × ×
08 1 28-58 NOTE SHIFT -24…0…+24 [semitones] 40 × × × × × × ×09 2 00-0F DETUNE -12.8…0…+12.7 [Hz] 08 00 × × × × × × × ×
00-0F 1st bit3-0→bit7-42nd bit3-0→bit3-0
0B 1 00-7F VOLUME 0…127 64 × × × × × × ×0C 1 00-7F VELOCITY SENSE DEPTH 0…127 40 × × × × ×
(Voice Setting)
0D 1 00-7F VELOCITY SENSE OFFSET 0…127 40 × × × × ×(Voice Setting)
0E 1 00-7F PAN RND, L63…C…R63 40 × × × × × × ×0F 1 00-7F NOTE LIMIT LOW C-2…G8 00 × × × × × × × ×10 1 00-7F NOTE LIMIT HIGH C-2…G8 7F × × × × × × × ×11 1 00-7F DRY LEVEL 0…127 7F × × × × ×
(Voice Setting)
12 1 00-7F CHORUS SEND 0…127 00 × × × × × × ×13 1 00-7F REVERB SEND 0…127 28 × × × × × × ×14 1 00-7F VARIATION SEND 0…127 00 × × × × × × ×15 1 00-7F VIBRATO RATE -64…0…+63 40 × × × × × × ×16 1 00-7F VIBRATO DEPTH -64…0…+63 40 × × × × × × ×17 1 00-7F VIBRATO DELAY -64…0…+63 40 × × × × × × ×18 1 00-7F FILTER CUTOFF FREQUENCY -64…0…+63 40 × × × × × × ×19 1 00-7F FILTER RESONANCE -64…0…+63 40 × × × × × × ×1A 1 00-7F EG ATTACK TIME -64…0…+63 40 × × × × × × ×1B 1 00-7F EG DECAY TIME -64…0…+63 40 × × × × × × ×1C 1 00-7F EG RELEASE TIME -64…0…+63 40 × × × × × × ×1D 1 28-58 H -24…0…+24 [semitones] 40 × × × × × × × ×1E 1 00-7F MW LOW PASS FILTER CONTROL -9600…0…+9450 [cent] 40 × × × × × × × ×1F 1 00-7F MW AMPLITUDE CONTROL -100…0…+100 [%] 40 × × × × × × × ×20 1 00-7F MW LFO PMOD DEPTH 0…127 0A × × × × × × × ×21 1 00-7F MW LFO FMOD DEPTH 0…127 00 × × × × × × × ×22 1 00-7F MW LFO AMOD DEPTH 0…127 00 × × × × × × × ×23 1 28-58 BEND PITCH CONTROL -24…0…+24 [semitones] 42 × × × × × × × ×24 1 00-7F BEND LOW PASS FILTER CONTROL -9600…0…+9450 [cent] 40 × × × × × × × ×25 1 00-7F BEND AMPLITUDE CONTROL -100…0…+100 [%] 40 × × × × × × × ×26 1 00-7F BEND LFO PMOD DEPTH 0…127 00 × × × × × × × ×27 1 00-7F BEND LFO FMOD DEPTH 0…127 00 × × × × × × × ×28 1 00-7F BEND LFO AMOD DEPTH 0…127 00 × × × × × × × ×
TOTAL SIZE 29
30 1 00-01 Rcv PITCH BEND OFF, ON 01 × × × × × × × ×31 1 00-01 Rcv CH AFTER TOUCH (CAT) OFF, ON 01 × × × × × × × ×32 1 00-01 Rcv PROGRAM CHANGE OFF, ON 01 × × × × × × × ×33 1 00-01 Rcv CONTROL CHANGE OFF, ON 01 × × × × × × × ×34 1 00-01 Rcv POLY AFTER TOUCH (PAT) OFF, ON 01 × × × × × × × ×35 1 00-01 Rcv NOTE MESSAGE OFF, ON 01 × × × × × × × ×36 1 00-01 Rcv RPN OFF, ON 01 × × × × × × × ×37 1 00-01 Rcv NRPN OFF, ON XGmode=01, GMmode=00 × × × × × × × ×38 1 00-01 Rcv MODULATION OFF, ON 01 × × × × × × × ×39 1 00-01 Rcv VOLUME OFF, ON 01 × × × × × × × ×3A 1 00-01 Rcv PAN OFF, ON 01 × × × × × × × ×3B 1 00-01 Rcv EXPRESSION OFF, ON 01 × × × × × × × ×3C 1 00-01 Rcv HOLD1 OFF, ON 01 × × × × × × × ×3D 1 00-01 Rcv PORTAMENTO OFF, ON 01 × × × × × × × ×3E 1 00-01 Rcv SOSTENUTO OFF, ON 01 × × × × × × × ×3F 1 00-01 Rcv SOFT PEDAL OFF, ON 01 × × × × × × × ×40 1 00-01 Rcv BANK SELECT OFF, ON 01 × × × × × × × ×41 1 00-7F SCALE TUNING C -63…0…+63 [cent] 40 × × × × × ×
(Function)42 1 00-7F SCALE TUNING C# -63…0…+63 [cent] 40 × × × × × ×
(Function)43 1 00-7F SCALE TUNING D -63…0…+63 [cent] 40 × × × × × ×
(Function)44 1 00-7F SCALE TUNING D# -63…0…+63 [cent] 40 × × × × × ×
(Function)45 1 00-7F SCALE TUNING E -63…0…+63 [cent] 40 × × × × × ×
(Function)46 1 00-7F SCALE TUNING F -63…0…+63 [cent] 40 × × × × × ×
(Function)47 1 00-7F SCALE TUNING F# -63…0…+63 [cent] 40 × × × × × ×
(Function)48 1 00-7F SCALE TUNING G -63…0…+63 [cent] 40 × × × × × ×
(Function)49 1 00-7F SCALE TUNING G# -63…0…+63 [cent] 40 × × × × × ×
(Function)4A 1 00-7F SCALE TUNING A -63…0…+63 [cent] 40 × × × × × ×
(Function)4B 1 00-7F SCALE TUNING A# -63…0…+63 [cent] 40 × × × × × ×
(Function)4C 1 00-7F SCALE TUNING B -63…0…+63 [cent] 40 × × × × × ×
(Function)4D 1 28-58 CAT PITCH CONTROL -24…0…+24 [semitones] 40 × × × × × × × ×4E 1 00-7F CAT LOW PASS FILTER CONTROL -9600…0…+9450 [cent] 40 × × × × × × ×4F 1 00-7F CAT AMPLITUDE CONTROL -100…0…+100 [%] 40 × × × × × × × ×50 1 00-7F CAT LFO PMOD DEPTH 0…127 00 × × × × × × ×51 1 00-7F CAT LFO FMOD DEPTH 0…127 00 × × × × × × ×52 1 00-7F CAT LFO AMOD DEPTH 0…127 00 × × × × × × ×

MIDI Parameter Change Table
D14
MIDI Data Format
[ MIDI (Silent) ] [ Internal Sequencer ]
Address(H)
Size(H)
Data(H) Parameter Description XG Default
(H)
MIDI Reception MIDI Transmission Song Playback MIDI Recording
Song Part
Piano Playback Channel
Panel Operation
Song Playback
MIDI Input PLAY
PLAY (Piano Part)
REW Piano Others
53 1 28-58 PAT PITCH CONTROL -24…0…+24 [semitones] 40 × × × × × × × ×54 1 00-7F PAT LOW PASS FILTER CONTROL -9600…0…+9450 [cent] 40 × × × × × × × ×55 1 00-7F PAT AMPLITUDE CONTROL -100…0…+100 [%] 40 × × × × × × × ×56 1 00-7F PAT LFO PMOD DEPTH 0…127 00 × × × × × × × ×57 1 00-7F PAT LFO FMOD DEPTH 0…127 00 × × × × × × × ×58 1 00-7F PAT LFO AMOD DEPTH 0…127 00 × × × × × × × ×59 1 00-5F AC1 CONTROLLER NUMBER 0…95 10 × × × × × × ×5A 1 28-58 AC1 PITCH CONTROL -24…0…+24 [semitones] 40 × × × × × × × ×5B 1 00-7F AC1 LOW PASS FILTER CONTROL -9600…0…+9450 [cent] 40 × × × × × × × ×5C 1 00-7F AC1 AMPLITUDE CONTROL -100…0…+100 [%] 40 × × × × × × × ×5D 1 00-7F AC1 LFO PMOD DEPTH 0…127 00 × × × × × × × ×5E 1 00-7F AC1 LFO FMOD DEPTH 0…127 00 × × × × × × × ×5F 1 00-7F AC1 LFO AMOD DEPTH 0…127 00 × × × × × × × ×60 1 00-5F AC2 CONTROLLER NUMBER 0…95 11 × × × × × × × ×61 1 28-58 AC2 PITCH CONTROL -24…0…+24 [semitones] 40 × × × × × × × ×62 1 00-7F AC2 LOW PASS FILTER CONTROL -9600…0…+9450 [cent] 40 × × × × × × × ×63 1 00-7F AC2 AMPLITUDE CONTROL -100…0…+100 [%] 40 × × × × × × × ×64 1 00-7F AC2 LFO PMOD DEPTH 0…127 00 × × × × × × × ×65 1 00-7F AC2 LFO FMOD DEPTH 0…127 00 × × × × × × × ×66 1 00-7F AC2 LFO AMOD DEPTH 0…127 00 × × × × × × × ×67 1 00-01 PORTAMENTO SWITCH OFF, ON 00 × × × × × × ×68 1 00-7F PORTAMENTO TIME 0…127 00 × × × × × × ×69 1 00-7F PITCH EG INITIAL LEVEL -64…0…+63 40 × × × × × × × ×6A 1 00-7F PITCH EG ATTACK TIME -64…0…+63 40 × × × × × × × ×6B 1 00-7F PITCH EG RELEASE LEVEL -64…0…+63 40 × × × × × × × ×6C 1 00-7F PITCH EG RELEASE TIME -64…0…+63 40 × × × × × × × ×6D 1 01-7F VELOCITY LIMIT LOW 1…127 01 × × × × × × × ×6E 1 01-7F VELOCITY LIMIT HIGH 1…127 7F × × × × × × × ×
TOTAL SIZE 3F
70 1 NOT USED — — — — — — — — — — —71 1 NOT USED — — — — — — — — — — —72 1 00-7F EQ BASS GAIN -12dB…+12dB 40 × × × × × × × × × ×73 1 00-7F EQ TREBLE GAIN -12dB…+12dB 40 × × × × × × × × × ×
TOTAL SIZE 04
74 1 NOT USED — — — — — — — — — — —75 1 NOT USED — — — — — — — — — — —76 1 04-28 EQ BASS FREQUENCY 32…2.0k [Hz] 0C × × × × × × × × × ×77 1 1C-3A EQ TREBLE FREQUENCY 500…16.0k [Hz] 36 × × × × × × × × × ×78 1 NOT USED — — — — — — — — — — —79 1 NOT USED — — — — — — — — — — —7A 1 NOT USED — — — — — — — — — — —7B 1 NOT USED — — — — — — — — — — —7C 1 NOT USED — — — — — — — — — — —7D 1 NOT USED — — — — — — — — — — —7E 1 NOT USED — — — — — — — — — — —7F 1 NOT USED — — — — — — — — — — —
TOTAL SIZE 0C
0A nn 40 1 00-7F MW OFFSET LEVEL CONTROL -100 - 100 [%] 40 × × × × × × ×41 1 00-7F BEND OFFSET LEVEL CONTROL -100 - 100 [%] 40 × × × × × × ×42 1 00-7F CAT OFFSET LEVEL CONTROL -100 - 100 [%] 40 × × × × × × ×43 1 00-7F PAT OFFSET LEVEL CONTROL -100 - 100 [%] 40 × × × × × × ×44 1 00-7F AC1 OFFSET LEVEL CONTROL -100 - 100 [%] 40 × × × × × × ×45 1 00-7F AC2 OFFSET LEVEL CONTROL -100 - 100 [%] 40 × × × × × × ×
TOTAL SIZE 06
nn: part number
If there is a Drum voice assigned to the part, the following parameters are ineffective.•BANKSELECTLSB•PORTAMENTO•MONO/POLY•SCALETUNING•POLYAFTERTOUCH•PITCHEG
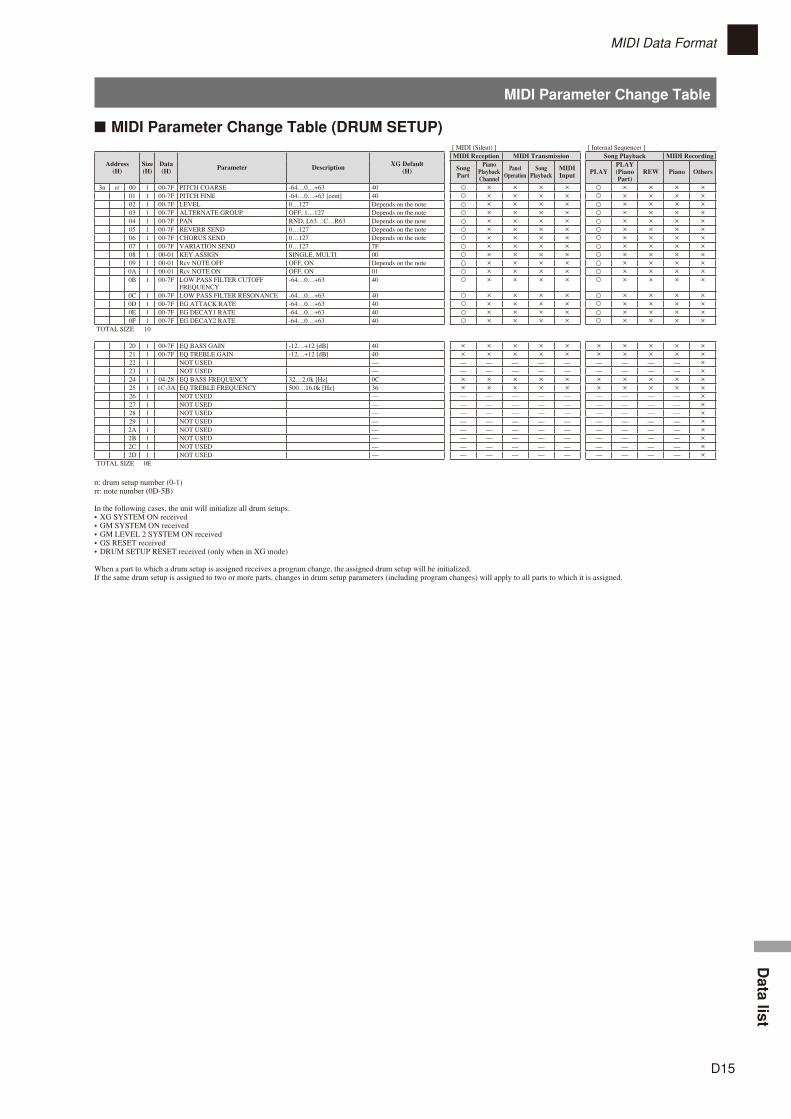
MIDI Parameter Change Table
D15
MIDI Data FormatD
ata list
■ MIDI Parameter Change Table (DRUM SETUP)[ MIDI (Silent) ] [ Internal Sequencer ]
Address(H)
Size(H)
Data(H) Parameter Description XG Default
(H)
MIDI Reception MIDI Transmission Song Playback MIDI Recording
Song Part
Piano Playback Channel
Panel Operation
Song Playback
MIDI Input PLAY
PLAY (Piano Part)
REW Piano Others
3n rr 00 1 00-7F PITCH COARSE -64…0…+63 40 × × × × × × × ×01 1 00-7F PITCH FINE -64…0…+63 [cent] 40 × × × × × × × ×02 1 00-7F LEVEL 0…127 Depends on the note × × × × × × × ×03 1 00-7F ALTERNATE GROUP OFF, 1…127 Depends on the note × × × × × × × ×04 1 00-7F PAN RND, L63…C…R63 Depends on the note × × × × × × × ×05 1 00-7F REVERB SEND 0…127 Depends on the note × × × × × × × ×06 1 00-7F CHORUS SEND 0…127 Depends on the note × × × × × × × ×07 1 00-7F VARIATION SEND 0…127 7F × × × × × × × ×08 1 00-01 KEY ASSIGN SINGLE, MULTI 00 × × × × × × × ×09 1 00-01 Rcv NOTE OFF OFF, ON Depends on the note × × × × × × × ×0A 1 00-01 Rcv NOTE ON OFF, ON 01 × × × × × × × ×0B 1 00-7F LOW PASS FILTER CUTOFF
FREQUENCY-64…0…+63 40 × × × × × × × ×
0C 1 00-7F LOW PASS FILTER RESONANCE -64…0…+63 40 × × × × × × × ×0D 1 00-7F EG ATTACK RATE -64…0…+63 40 × × × × × × × ×0E 1 00-7F EG DECAY1 RATE -64…0…+63 40 × × × × × × × ×0F 1 00-7F EG DECAY2 RATE -64…0…+63 40 × × × × × × × ×
TOTAL SIZE 10
20 1 00-7F EQ BASS GAIN -12…+12 [dB] 40 × × × × × × × × × ×21 1 00-7F EQ TREBLE GAIN -12…+12 [dB] 40 × × × × × × × × × ×22 1 NOT USED — — — — — — — — — — ×23 1 NOT USED — — — — — — — — — — ×24 1 04-28 EQ BASS FREQUENCY 32…2.0k [Hz] 0C × × × × × × × × × ×25 1 1C-3A EQ TREBLE FREQUENCY 500…16.0k [Hz] 36 × × × × × × × × × ×26 1 NOT USED — — — — — — — — — — ×27 1 NOT USED — — — — — — — — — — ×28 1 NOT USED — — — — — — — — — — ×29 1 NOT USED — — — — — — — — — — ×2A 1 NOT USED — — — — — — — — — — ×2B 1 NOT USED — — — — — — — — — — ×2C 1 NOT USED — — — — — — — — — — ×2D 1 NOT USED — — — — — — — — — — ×
TOTAL SIZE 0E
n: drum setup number (0-1)rr: note number (0D-5B)
In the following cases, the unit will initialize all drum setups.•XGSYSTEMONreceived•GMSYSTEMONreceived•GMLEVEL2SYSTEMONreceived•GSRESETreceived•DRUMSETUPRESETreceived(onlywheninXGmode)
When a part to which a drum setup is assigned receives a program change, the assigned drum setup will be initialized.If the same drum setup is assigned to two or more parts, changes in drum setup parameters (including program changes) will apply to all parts to which it is assigned.
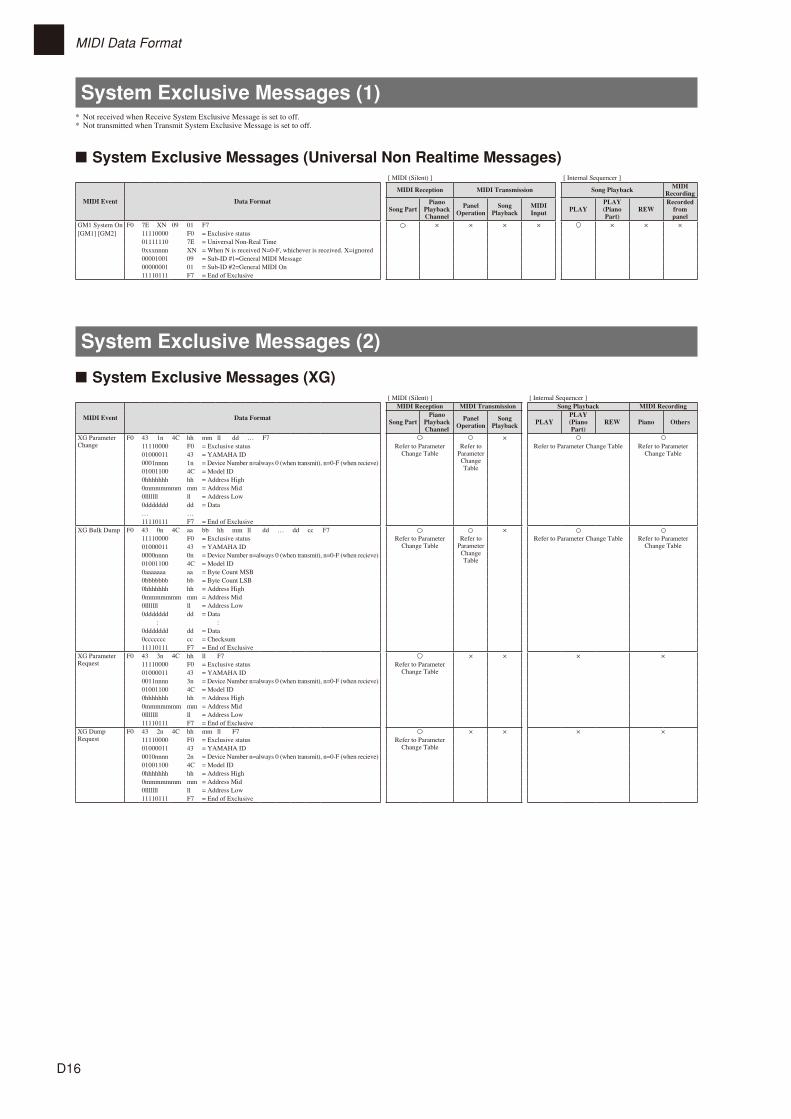
D16
MIDI Data Format
System Exclusive Messages (1)* Not received when Receive System Exclusive Message is set to off.* Not transmitted when Transmit System Exclusive Message is set to off.
■ System Exclusive Messages (Universal Non Realtime Messages)[ MIDI (Silent) ] [ Internal Sequencer ]
MIDI Event Data Format
MIDI Reception MIDI Transmission Song Playback MIDI Recording
Song PartPiano
Playback Channel
Panel Operation
Song Playback
MIDI Input PLAY
PLAY (Piano Part)
REWRecorded
from panel
GM1 System On F0 7E XN 09 01 F7 × × × × × × ×[GM1] [GM2] 11110000 F0 = Exclusive status
01111110 7E = Universal Non-Real Time0xxxnnnn XN = When N is received N=0-F, whichever is received. X=ignored00001001 09 = Sub-ID #1=General MIDI Message00000001 01 = Sub-ID #2=General MIDI On11110111 F7 = End of Exclusive
System Exclusive Messages (2)
■ System Exclusive Messages (XG)[ MIDI (Silent) ] [ Internal Sequencer ]
MIDI Event Data Format
MIDI Reception MIDI Transmission Song Playback MIDI Recording
Song PartPiano
Playback Channel
Panel Operation
Song Playback PLAY
PLAY (Piano Part)
REW Piano Others
XG Parameter Change
F0 43 1n 4C hh mm ll dd … F7 ×11110000 F0 = Exclusive status Refer to Parameter
Change TableRefer to
Parameter Change Table
Refer to Parameter Change Table Refer to Parameter Change Table01000011 43 = YAMAHA ID
0001nnnn 1n = Device Number n=always 0 (when transmit), n=0-F (when recieve)01001100 4C = Model ID0hhhhhhh hh = Address High0mmmmmmm mm = Address Mid0lllllll ll = Address Low0ddddddd dd = Data… …11110111 F7 = End of Exclusive
XG Bulk Dump F0 43 0n 4C aa bb hh mm ll dd … dd cc F7 ×11110000 F0 = Exclusive status Refer to Parameter
Change TableRefer to
Parameter Change Table
Refer to Parameter Change Table Refer to Parameter Change Table01000011 43 = YAMAHA ID
0000nnnn 0n = Device Number n=always 0 (when transmit), n=0-F (when recieve)01001100 4C = Model ID0aaaaaaa aa = Byte Count MSB0bbbbbbb bb = Byte Count LSB0hhhhhhh hh = Address High0mmmmmmm mm = Address Mid0lllllll ll = Address Low0ddddddd dd = Data
: :0ddddddd dd = Data0ccccccc cc = Checksum11110111 F7 = End of Exclusive
XG Parameter Request
F0 43 3n 4C hh ll F7 × × × ×11110000 F0 = Exclusive status Refer to Parameter
Change Table01000011 43 = YAMAHA ID0011nnnn 3n = Device Number n=always 0 (when transmit), n=0-F (when recieve)01001100 4C = Model ID0hhhhhhh hh = Address High0mmmmmmm mm = Address Mid0lllllll ll = Address Low11110111 F7 = End of Exclusive
XG Dump Request
F0 43 2n 4C hh mm ll F7 × × × ×11110000 F0 = Exclusive status Refer to Parameter
Change Table01000011 43 = YAMAHA ID0010nnnn 2n = Device Number n=always 0 (when transmit), n=0-F (when recieve)01001100 4C = Model ID0hhhhhhh hh = Address High0mmmmmmm mm = Address Mid0lllllll ll = Address Low11110111 F7 = End of Exclusive
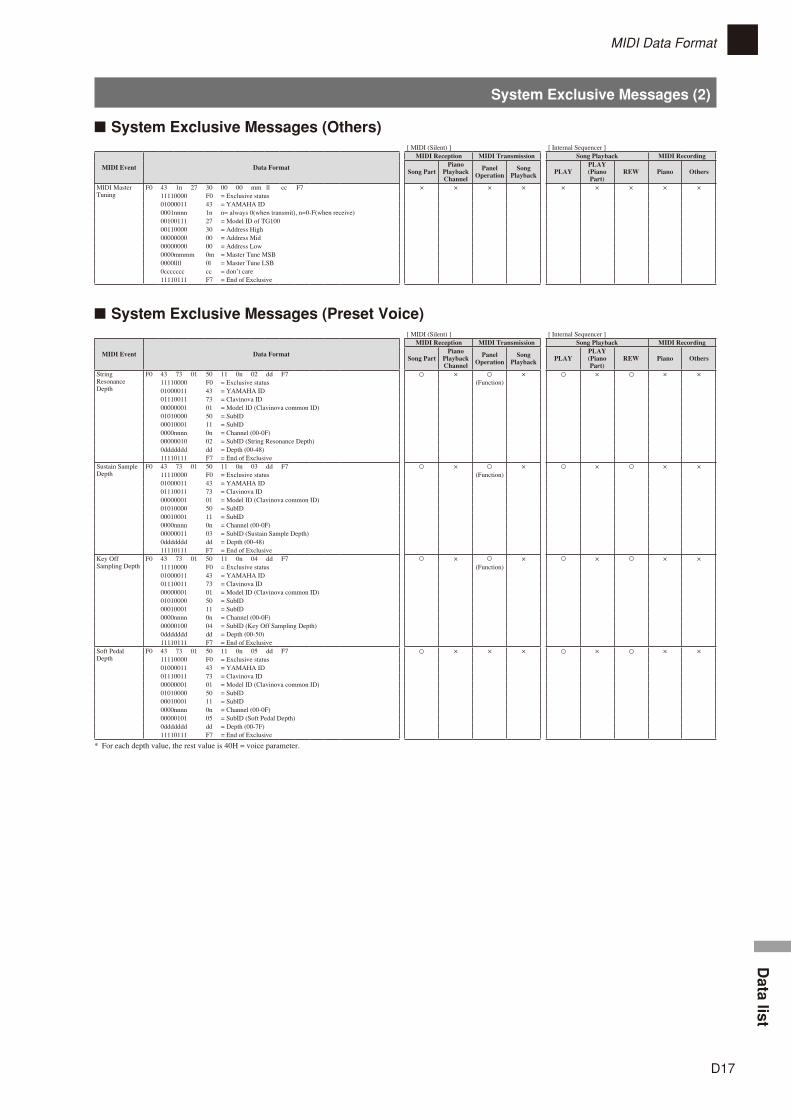
System Exclusive Messages (2)
D17
MIDI Data FormatD
ata list
■ System Exclusive Messages (Others)[ MIDI (Silent) ] [ Internal Sequencer ]
MIDI Event Data Format
MIDI Reception MIDI Transmission Song Playback MIDI Recording
Song PartPiano
Playback Channel
Panel Operation
Song Playback PLAY
PLAY (Piano Part)
REW Piano Others
MIDI Master Tuning
F0 43 1n 27 30 00 00 mm ll cc F7 × × × × × × × × ×11110000 F0 = Exclusive status01000011 43 = YAMAHA ID0001nnnn 1n n= always 0(when transmit), n=0-F(when receive)00100111 27 = Model ID of TG10000110000 30 = Address High00000000 00 = Address Mid00000000 00 = Address Low0000mmmm 0m = Master Tune MSB0000llll 0l = Master Tune LSB0ccccccc cc = don’t care11110111 F7 = End of Exclusive
■ System Exclusive Messages (Preset Voice)[ MIDI (Silent) ] [ Internal Sequencer ]
MIDI Event Data Format
MIDI Reception MIDI Transmission Song Playback MIDI Recording
Song PartPiano
Playback Channel
Panel Operation
Song Playback PLAY
PLAY (Piano Part)
REW Piano Others
String Resonance Depth
F0 43 73 01 50 11 0n 02 dd F7 × × × × ×11110000 F0 = Exclusive status (Function)01000011 43 = YAMAHA ID01110011 73 = Clavinova ID00000001 01 = Model ID (Clavinova common ID)01010000 50 = SubID00010001 11 = SubID0000nnnn 0n = Channel (00-0F)00000010 02 = SubID (String Resonance Depth)0ddddddd dd = Depth (00-48)11110111 F7 = End of Exclusive
Sustain Sample Depth
F0 43 73 01 50 11 0n 03 dd F7 × × × × ×11110000 F0 = Exclusive status (Function)01000011 43 = YAMAHA ID01110011 73 = Clavinova ID00000001 01 = Model ID (Clavinova common ID)01010000 50 = SubID00010001 11 = SubID0000nnnn 0n = Channel (00-0F)00000011 03 = SubID (Sustain Sample Depth)0ddddddd dd = Depth (00-48)11110111 F7 = End of Exclusive
Key Off Sampling Depth
F0 43 73 01 50 11 0n 04 dd F7 × × × × ×11110000 F0 = Exclusive status (Function)01000011 43 = YAMAHA ID01110011 73 = Clavinova ID00000001 01 = Model ID (Clavinova common ID)01010000 50 = SubID00010001 11 = SubID0000nnnn 0n = Channel (00-0F)00000100 04 = SubID (Key Off Sampling Depth)0ddddddd dd = Depth (00-50)11110111 F7 = End of Exclusive
Soft Pedal Depth
F0 43 73 01 50 11 0n 05 dd F7 × × × × × ×11110000 F0 = Exclusive status01000011 43 = YAMAHA ID01110011 73 = Clavinova ID00000001 01 = Model ID (Clavinova common ID)01010000 50 = SubID00010001 11 = SubID0000nnnn 0n = Channel (00-0F)00000101 05 = SubID (Soft Pedal Depth)0ddddddd dd = Depth (00-7F)11110111 F7 = End of Exclusive
* For each depth value, the rest value is 40H = voice parameter.
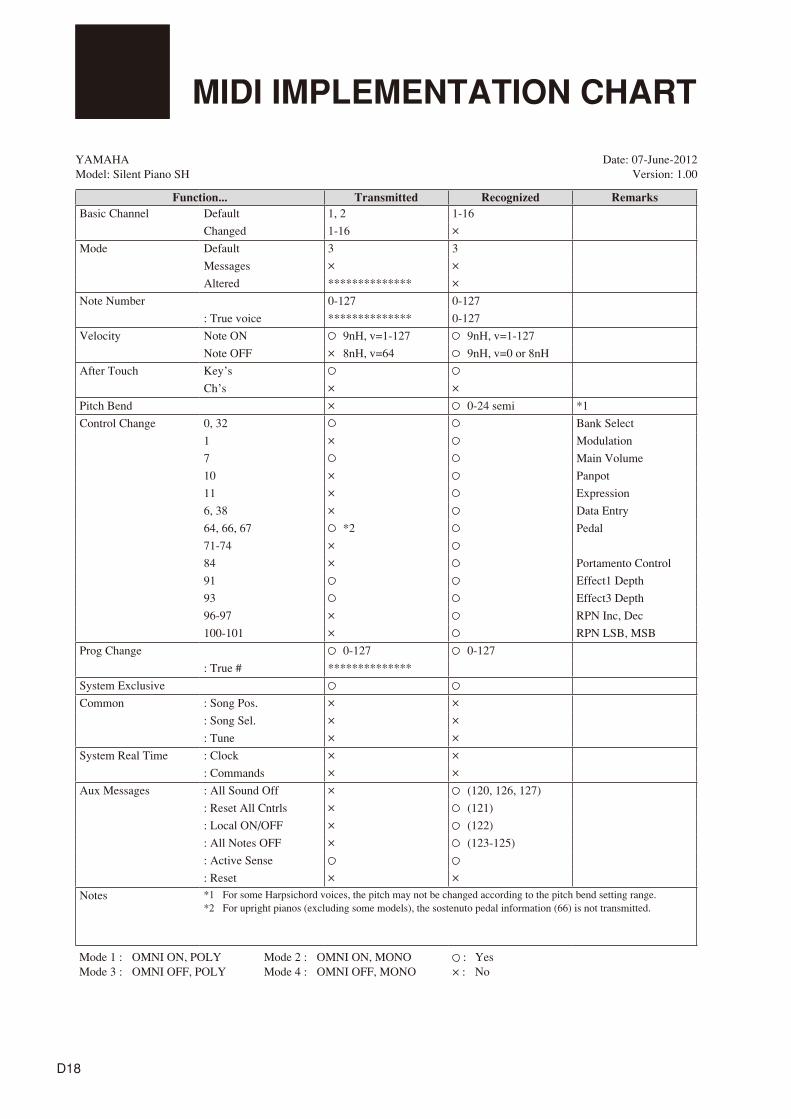
D18
MIDI IMPLEMENTATION CHART
YAMAHA Date: 07-June-2012Model: Silent Piano SH Version: 1.00
Function... Transmitted Recognized RemarksBasic Channel Default 1, 2 1-16
Changed 1-16 ×
Mode Default 3 3
Messages × ×
Altered ************** ×
Note Number 0-127 0-127
: True voice ************** 0-127
Velocity Note ON 9nH, v=1-127 9nH, v=1-127
Note OFF × 8nH, v=64 9nH, v=0 or 8nH
After Touch Key’s
Ch’s × ×
Pitch Bend × 0-24 semi *1
Control Change 0, 32 Bank Select
1 × Modulation
7 Main Volume
10 × Panpot
11 × Expression
6, 38 × Data Entry
64, 66, 67 *2 Pedal
71-74 ×
84 × Portamento Control
91 Effect1 Depth
93 Effect3 Depth
96-97 × RPN Inc, Dec
100-101 × RPN LSB, MSB
Prog Change 0-127 0-127
: True # **************
System Exclusive
Common : Song Pos. × ×
: Song Sel. × ×
: Tune × ×
System Real Time : Clock × ×
: Commands × ×
Aux Messages : All Sound Off × (120, 126, 127)
: Reset All Cntrls × (121)
: Local ON/OFF × (122)
: All Notes OFF × (123-125)
: Active Sense
: Reset × ×
Notes *1 For some Harpsichord voices, the pitch may not be changed according to the pitch bend setting range.*2 For upright pianos (excluding some models), the sostenuto pedal information (66) is not transmitted.
Mode 1 : OMNI ON, POLY Mode 2 : OMNI ON, MONO : Yes Mode 3 : OMNI OFF, POLY Mode 4 : OMNI OFF, MONO × : No

Owner’s manualManuel de l’utilisateurBedienungsanleitung
Manual del propietarioUso e manutenzione
使用说明书
SH
Copyright © 2013 Yamaha CorporationP.O.Box 1, Hamamatsu, 430-8650 Japan
Nov-13 Printed in JapanYF091C0
SH
N