Embed Size (px)
Citation preview
SK2500L SK LINE sportkoncept
UNIDAD ELECTRÓNICA ELECTONIC MONITOR UNITÉ ÉLECTRONIQUE ELEKTRONIKEINHEIT
UNIDADE ELECTRÓNICA IMPIANTO ELETTRONICO
ELEKTRONISCHER MONITOR

SK2500L SK LINE sportkoncept
2
Fig.1
SK2500L SK LINE sportkoncept
3
Fig.2
Fig.3
SK2500L SK LINE sportkoncept
4
ESPAÑOL
INDICACIONES GENERALES.- Este monitor electrónico está diseñado para ser utilizado de forma sencilla e intuitiva. Los textos que aparecen en la pantalla inferior (B) guiarán al usuario durante la realización del ejercicio. Sin embargo, recomendamos que el preparador físico lea atentamente esta sección con el fin de conocer a fondo el monitor electrónico y mostrar al usuario su funcionamiento de forma efectiva. Esta pantalla de monitor es táctil, para lo cual el pulsar una tecla es, posicionando el dedo, en la señalización de dicha tecla en la pantalla.
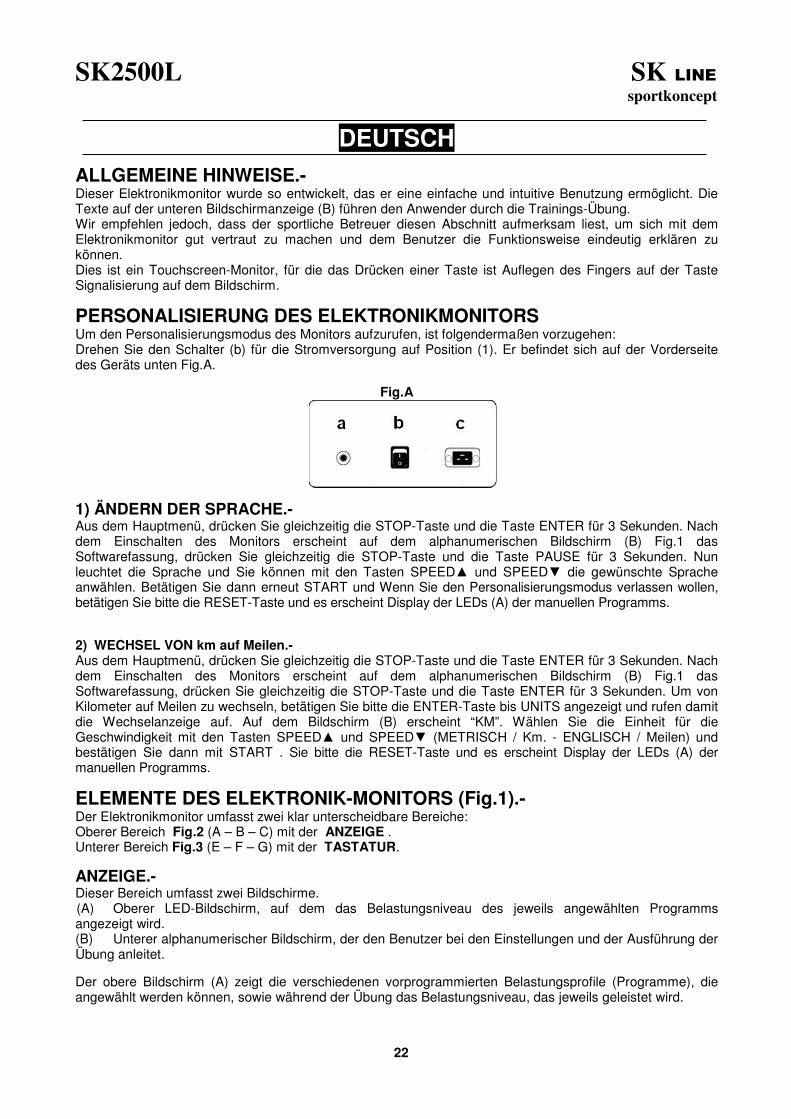
PERSONALIZACIÓN DEL MONITOR ELECTRÓNICO.- Para entrar en el modo de personalización del monitor es necesario seguir los siguientes pasos: Coloque el interruptor (b) entrada de corriente eléctrica a la maquina, en la posición (1) Fig.A, situado en la parte inferior delantera de la máquina.
Fig.A
1) CAMBIO DE IDIOMA.- En el menú principal, presione a la vez la tecla STOP y la tecla ENTER durante 3 segundos. Le aparecerá en la pantalla alfanumérica (B) Fig.1, la versión del software, presione a la vez la tecla STOP y la tecla PAUSE durante 3 segundos. Seleccione su idioma con las teclas SPEED▲ y SPEED▼ y pulse la tecla START. Si desea salir del modo personalización pulse la tecla RESET.
2) CAMBIO DE Km. a Millas.- En el menú principal, presione a la vez la tecla STOP y la tecla ENTER durante 3 segundos. Le aparecerá en la pantalla alfanumérica (B) Fig.1, la versión del software, presione a la vez la tecla STOP y la tecla ENTER durante 3 segundos. Para cambiar de Km. a Millas, pulse la tecla ENTER hasta que aparezca UNITS y accederá al cambio, visualizando en la pantalla (B) “KM”, seleccione la medida de su velocidad con las teclas SPEED ▲ y SPEED ▼ (METRIC / Km. -- ENGLISH / Millas) pulse la tecla START. Si desea salir del modo personalización pulse la tecla RESET.
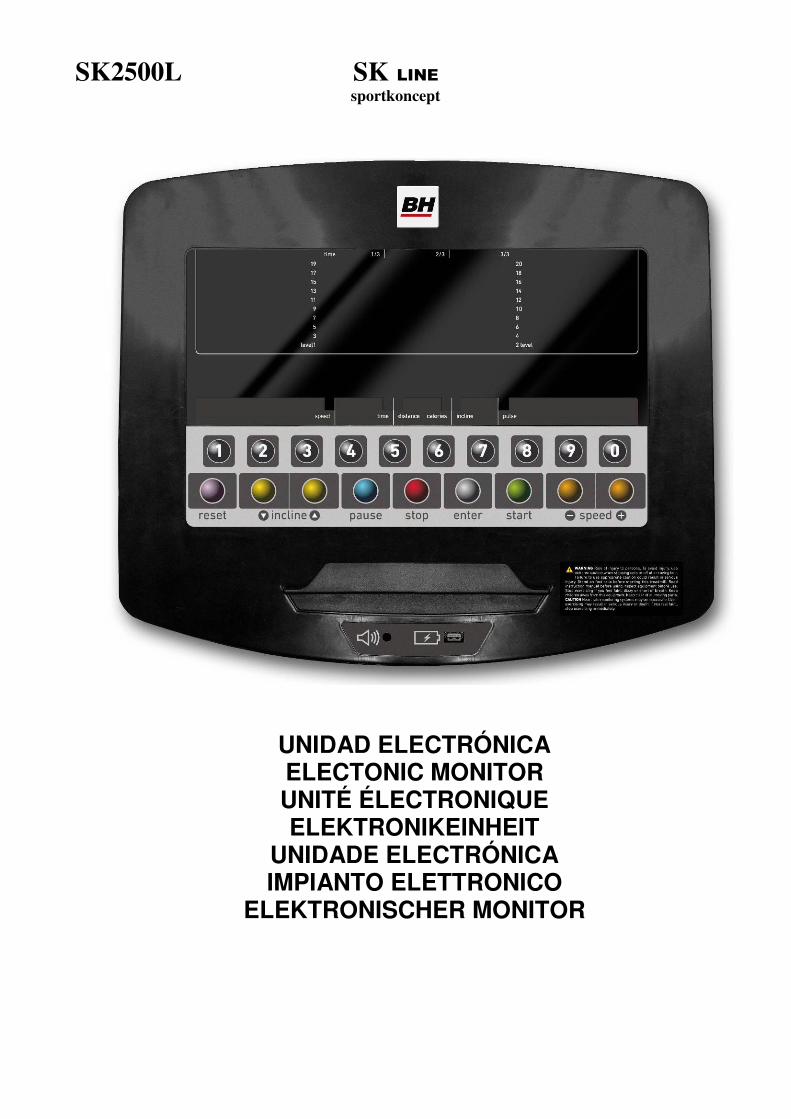
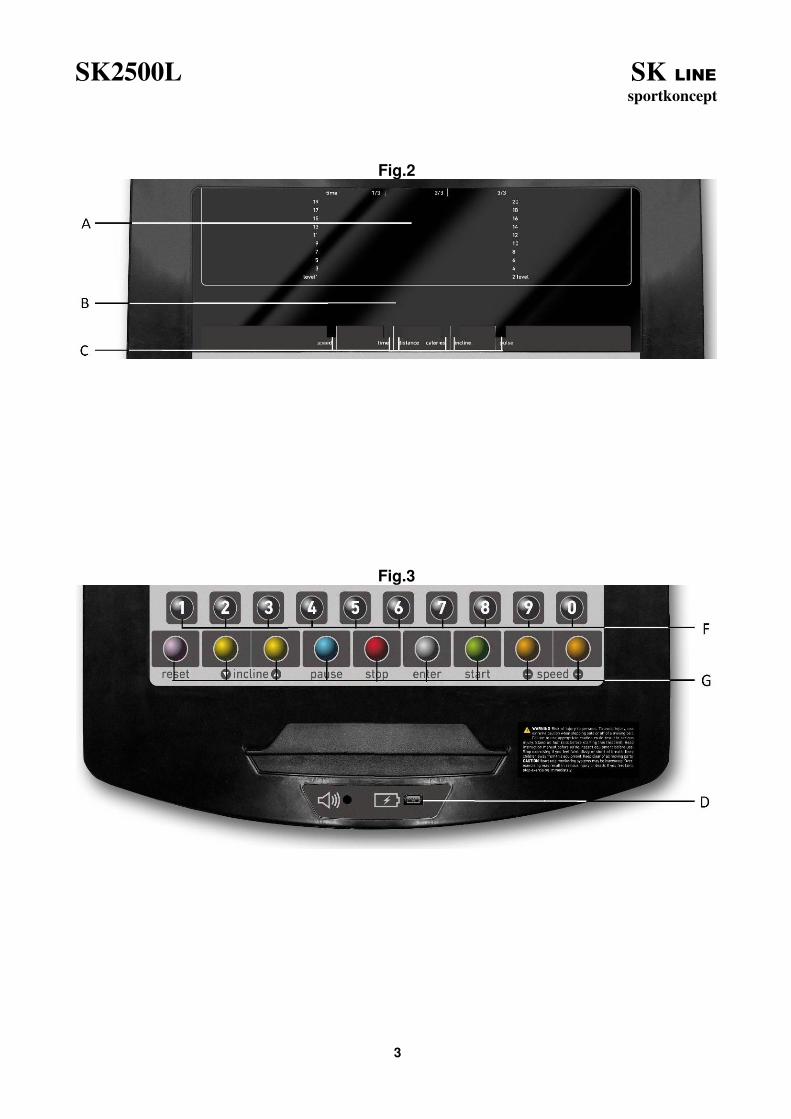
ELEMENTOS DEL MONITOR ELECTRÓNICO (Fig.1).- El monitor electrónico se compone de dos zonas bien diferenciadas; La zona superior Fig.2 (A – B – C) se encuentra la VISUALIZACIÓN. La zona inferior Fig.3 (E – F – G) se encuentra el TECLADO.
VISUALIZACIÓN.- Esta zona está compuesta por dos pantallas. (A).- Display Matriz de LEDs superior, donde se monitoriza el nivel de esfuerzo que se realiza del programa seleccionado en cada momento. (B).- Display de Pantalla alfanumérica inferior, que guía al usuario durante la selección y realización del ejercicio. La pantalla superior (A) mostrará los diferentes perfiles preprogramados de esfuerzo (programas) que podemos seleccionar y, durante el ejercicio, el nivel de esfuerzo que se realiza en cada momento. La pantalla alfanumérica inferior (B) se encarga de guiar al usuario durante la selección del ejercicio a realizar y de mostrar información sobre el ejercicio durante y después de su realización. Los LEDs indicadores (C) que se encuentran debajo de la pantalla alfanumérica muestran simultáneamente la VELOCIDAD; TIEMPO / DISTANCIA; CALORIAS / INCLINE; PULSO e indican cual es la información que se está mostrando en cada momento del ejercicio.
SK2500L SK LINE sportkoncept
5
Los datos que se muestran en los LEDs (C) durante la realización del ejercicio son los siguientes: -SPEED - VELOCIDAD: Se muestra un valor estimado de la velocidad lineal a la que se desplaza la banda de la maquina. El valor se muestra en kilómetros por hora (Km/h). -TIME – TIEMPO: Durante el ejercicio se muestra el tiempo que ha trascurrido desde que comenzamos el mismo, o, en caso de haber seleccionado un tiempo de ejercicio predefinido, el tiempo que resta para acabar el ejercicio. El tiempo se muestra en minutos y segundos (mm:ss).
-DISTANCE – DISTANCIA: Se muestra la distancia que hemos recorrido desde el inicio del ejercicio. La distancia se calcula teniendo en cuenta la estimación de velocidad lineal (SPEED) y las unidades son los kilómetros y hectómetros. -CALORIES – CALORIAS: Se muestra una estimación de las calorías que se han quemado hasta el momento. La estimación se realiza tomando en cuenta la energía que se está realizando en cada momento y los datos de peso y edad introducidos por el usuario. -INCLINE – INCLINACION: Se muestra el nivel de inclinación que tiene la máquina en cada momento. La máquina tiene 15 niveles de inclinación (0 a 15). El grado de inclinación se puede cambiar actuando sobre las teclas INCLINE ▼ e INCLINE▲. Al finalizar el ejercicio la máquina vuelve al nivel de inclinación 0. -PULSE – PULSO: Se muestra la frecuencia cardiaca del usuario, siempre que esta información sea accesible mediante los sensores de mano ( Hand – Grip )o la banda telemétrica de pecho, cuando se utilizan los dos juntos, se da prioridad a la banda telemétrica de pecho. Para más información acerca de la frecuencia cardiaca, consultar la sección: Medida de pulso; banda de pecho y hand-grip.
TECLADO (Fig.3). A continuación se enumera la función de cada tecla. El monitor electrónico incluye un teclado de uso sencillo. Este teclado consta de las teclas de teclas numéricas (F) y de las teclas función (G). - Teclas numéricas (F).- (1- 0) se utilizan para introducir los datos que el monitor solicite. - Teclas de función (G).- reset; speed-; speed�; pause; stop; incline▼; incline▲;� quick/start; enter. Estas teclas se utilizan para seleccionar el ejercicio a realizar, introducir los datos solicitados, controlar el nivel de resistencia del ejercicio y finalizar el mismo.
-reset.- Tecla de anulación. Se utiliza para borrar los datos que se introducen en el monitor a la hora de seleccionar un programa.
-Speed▼.- Tecla de disminución de velocidad. Durante la realización del ejercicio esta tecla disminuye en una décima de kilómetro por hora la velocidad de la maquina. Si se mantiene pulsada esta tecla la velocidad continuara disminuyendo. Durante la selección de los perfiles preprogramados se utiliza para mostrar en pantalla el perfil anterior al mostrado.
-Speed▲.- Tecla de incremento de velocidad. Durante la realización del ejercicio está tecla aumenta en una décima de kilómetro por hora la velocidad de la maquina. Si se mantiene pulsada esta tecla la velocidad continuara aumentando. Durante la selección de los perfiles preprogramados se utiliza para mostrar en pantalla el perfil siguiente al mostrado. -enter.- Tecla de selección y validación. Se utiliza durante la selección de un perfil preprogramado para seleccionarlo, validar los datos que han de introducirse y comenzar el ejercicio. Durante la programación del perfil de usuario se utiliza además para validar el nivel de esfuerzo correspondiente a cada minuto.
-pause.- Tecla de pausa. Si se pulsa durante la realización del ejercicio, éste se interrumpe, deteniendo el cronometro de duración de ejercicio. Para reanudar el cronometro de duración del ejercicio pulse la tecla pause de nuevo. Si, estando en modo pausa, se pulsa la tecla STOP en ejercicio se dará por finalizado. El tiempo límite de modo pausa es de cinco minutos, una vez transcurrido este tiempo el ejercicio se dará por finalizado. Si, estando en modo pausa, se pulsa la tecla STOP en ejercicio se dará por finalizado. -stop.- Tecla de parada. Si se pulsa durante la realización del ejercicio, éste se da por finalizado y la cinta se para. Se muestra un resumen con los datos del ejercicio y se vuelve a la pantalla de inicio.
SK2500L SK LINE sportkoncept
6
-Incline▼.- Tecla de decremento del nivel de inclinación. Durante la realización del ejercicio esta tecla disminuye en un grado la inclinación de la máquina. Si se mantiene pulsada esta tecla la inclinación continuará disminuyendo.
-Incline▲.- Tecla de incremento del nivel de inclinación. Durante la realización del ejercicio esta tecla aumenta en un grado la inclinación de la máquina. Si se mantiene pulsada esta tecla la inclinación continuará aumentando.
-quick/start.- Tecla de inicio inmediato. Siempre que el LED de la tecla se encuentre parpadeando, al pulsar esta tecla y transcurriendo 3 segundos, contados en forma descendente, comienza el ejercicio en modo manual.
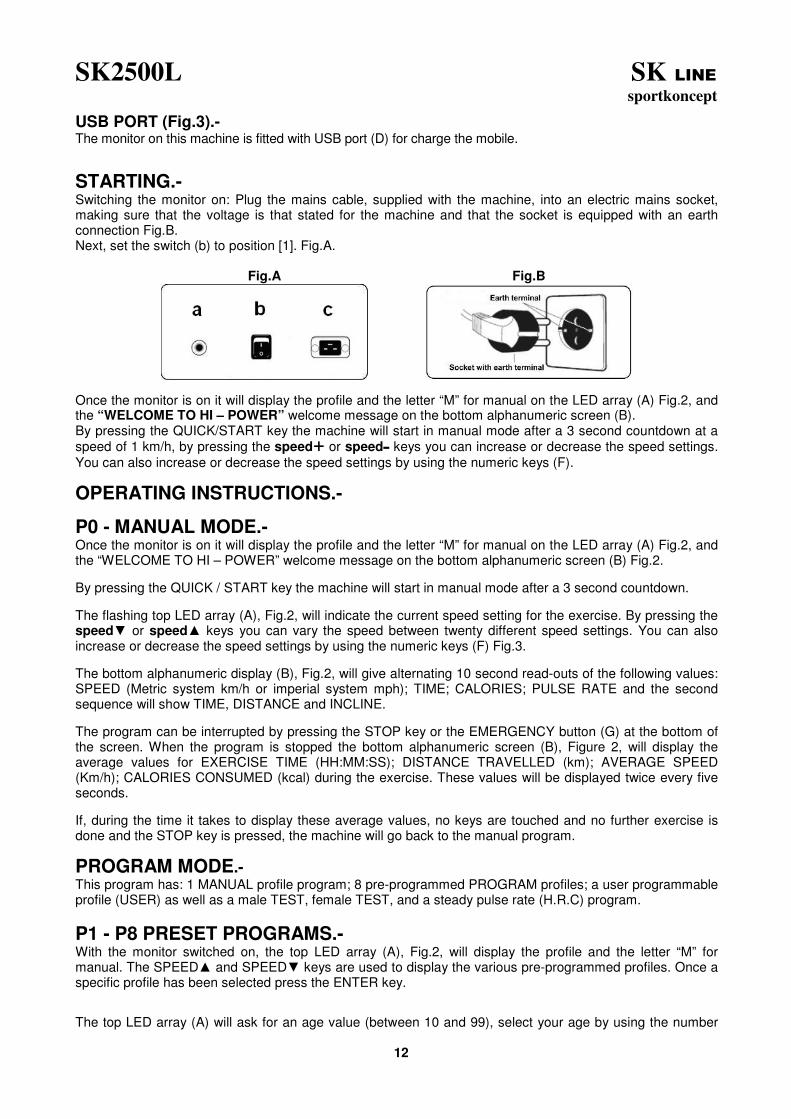
PUERTO USB (Fig.3).- Esta maquina dispone en el monitor de un puerto usb (D) para la carga del móvil.
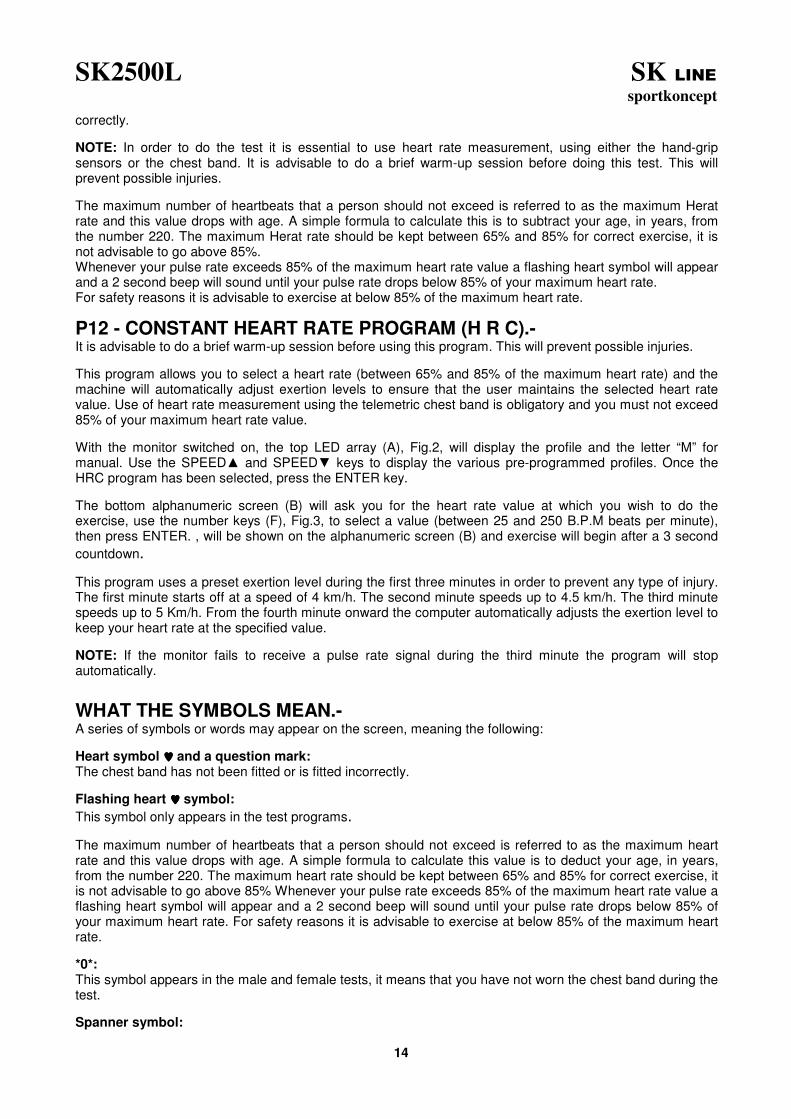
PUESTA EN MARCHA.- Para la puesta en marcha del monitor: Conectar el cable eléctrico que se suministra con la máquina, al enchufe de red eléctrica, comprobando que corresponde al voltaje que especifica en la maquina, también compruebe que el enchufe tiene toma de tierra Fig.B. Seguido ponga el interruptor (b) en posición 1 Fig.A.
Fig.A Fig.B
Una vez encendido el monitor le mostrará en el display de matriz de LEDs (A) Fig.2, el perfil y la letra “M” de manual, y en display de pantalla alfanumérica inferior (B) le mostrara el saludo de bienvenida “BIENVENIDO A HI – POWER”. Pulsando la tecla QUICK/START se pone en marcha el programa en manual, transcurridos 3 segundos indicados en forma descendente, con una velocidad de 1 Km/h. y pulsando las teclas speed- o speed�, usted puede aumentar o disminuir la velocidad de la máquina. También puede aumentar o disminuir la velocidad con las teclas numéricas (F) del teclado.
INSTRUCCIONES DE FUNCIONAMIENTO.- P0 - MODO MANUAL.- Una vez encendido el monitor le mostrara en el display de matriz de LEDs superior (A) Fig.2 el perfil y la letra “M” de manual, y en display de pantalla alfanumérica inferior (B) Fig.2 le mostrará el saludo de bienvenida “BIENVENIDO A HI – POWER”. Pulsando la tecla QUICK / START a los 3 segundos .contados en forma descendente se pone en marcha el programa, en manual. En el display de matriz de LEDs superior (A) Fig.2 le indicara parpadeando a la velocidad que esta realizando el ejercicio. Pulsando las teclas speed▲ o speed▼, usted puede aumentar o disminuir entre los veinte niveles de velocidad del ejercicio. También puede aumentar o disminuir la velocidad con las teclas numéricas (F) del teclado Fig.3. En el display de pantalla alfanumérica inferior (B) Fig.2 le irá mostrando cada 10 segundos alternativamente, los valores de; La velocidad SPEED; Sistema Métrico Km/h, Sistema Británico Mª/h; El tiempo (TIME); Calorías (CALORIES) y Pulso (PULSE) y en otra secuencia le mostrara; El tiempo (TIME); Distancia (DISTANCE) e Inclinación (INCLINE). Pulsando la tecla STOP o pulsando la tecla de EMERGENCIA (G) situada en la parte inferior de las pantallas de monitor, se interrumpe el programa y en el display de pantalla alfanumérica inferior (B) Fig.2, le informara de la media de los valores TIEMPO DE EJERCICIO (HH:MM:SS); DISTANCIA RECORRIDA (Km./h); VELOCIDAD MEDIA (Km./h); CALORIAS CONSUMIDAS (Kcal.); que ha realizado durante el ejercicio, mostrándoselos dos veces cada cinco segundos.
SK2500L SK LINE sportkoncept
7
Si en el tiempo que trascurre la información de los valores medios, no se toca ninguna tecla, no se hace ejercicio y se pulsa la tecla STOP pasara al programa manual.
MODO PROGRAMAS.- El monitor dispone de: 1 programa de perfil MANUAL; 8 PROGRAMAS con perfiles preprogramados; de un perfil programable por el usuario (USER); programas TEST masculino, y TEST femenino; y programa de ritmo cardiaco constante (H.R.C.).
P1 - P8 PROGRAMAS PREPROGRAMADOS.- Estando el monitor encendido le mostrara el display de matriz de LEDs superior (A) Fig.2 el perfil y la letra “M” de manual. Para visualizar lo diferentes perfiles preprogramados se utilizan las teclas SPEED▼ y SPEED▲. Una vez se haya seleccionado un perfil en concreto pulse la tecla ENTER. En el display de matriz de LEDs superior (A) le pedirá la edad entre (10 y 99años) seleccione su edad con las teclas numéricas (F) Fig.3, pulse ENTER. A continuación le pedirá el peso entre (30 y 199Kg), seleccione su peso con las teclas numéricas (F) Fig.3, pulse ENTER. A continuación le pedirá el tiempo de duración del ejercicio entre (10 y 60 minutos), seleccione el tiempo con las teclas numéricas (F) Fig.3, pulse ENTER, le mostrara en la pantalla alfanumérica (B) INICIO DE EJERCICIO y dará comienzo a su ejercicio transcurridos 3 segundos, indicados en forma descendente con una velocidad de 2Km/h. Dentro de cada perfil preprogramado el usuario dispone de niveles de dificultad diferentes, para seleccionar cualquiera de ellos es suficiente con utilizar las teclas SPEED▼ y SPEED▲ durante la realización del ejercicio. Una vez haya terminado el programa que ha estado realizando el ejercicio el monitor le habrá calculado la media de los valores en el cual ha realizado el ejercicio y se los mostrará el la pantalla alfanumérica inferior (B) Fig.2. Pulsando la tecla STOP se interrumpe el programa y en el display de pantalla alfanumérica inferior (B) Fig.2, le informara de la media de los valores TIEMPO DE EJERCICIO; DISTANCIA RECORRIDA; VELOCIDAD MEDIA; CALORIAS CONSUMIDAS; que ha realizado durante el ejercicio, mostrándoselos dos veces cada cinco segundos. Si en el tiempo que trascurre la información de los valores medios, no se toca ninguna tecla, y se pulsa la tecla STOP pasará al programa manual.
P9 - PROGRAMA USUARIO (USER).- Estando el monitor encendido le mostrara el display de matriz de LEDs superior (A) Fig.2 el perfil y la letra “M” de manual, para visualizar lo diferentes perfiles preprogramados se utilizan las teclas Speed▼ y Speed▲. Una vez se haya seleccionado el programa 9 (USER), pulse la tecla ENTER. En el display de matriz de Leds (A) Fig.2 le pedirá la edad entre (10 y 99 años) seleccione su edad con las teclas numéricas (F) Fig.3, (si se introduce el valor, fuera de los dos dígitos le mostrara el valor mas cercano). Pulse ENTER. A continuación le pedirá el peso entre (30 y 199Kg.), seleccione su peso con las teclas numéricas (F) Fig.3, pulse ENTER. A continuación le pedirá el tiempo de duración del ejercicio entre (10 y 60 minutos), seleccione el tiempo con las teclas numéricas (F) y pulse ENTER a continuación pulse la tecla RESET y pulsando las teclas SPEED▼ y SPEED▲, puede comenzar a diseñar el perfil de velocidad que usted desee en el display de matriz de LEDs (A). A continuación pulse la tecla ENTER, y así sucesivamente hasta completar el gráfico del programa que usted desee. El perfil a diseñar esta subdividido en 21 pasos. Si se ha equivocado al grabar algún paso, pulse la tecla RESET y volverá al paso anterior. A continuación pulse tecla ENTER y le mostrará en la pantalla alfanumérica (B) INICIO DE EJERCICIO y dará comienzo a su ejercicio transcurridos 3 segundos, indicados en forma descendente. Una vez haya terminado el programa que ha estado realizando el ejercicio el monitor le habrá calculado la media de los valores en el cual ha realizado el ejercicio y se los mostrara el la pantalla alfanumérica (B) Fig.2. Pulsando la tecla STOP se interrumpe el programa y en el display de pantalla alfanumérica inferior (B) Fig.2, le informara de la media de los valores TIEMPO DE EJERCICIO; DISTANCIA RECORRIDA; VELOCIDAD MEDIA; CALORIAS CONSUMIDAS; que ha realizado durante el ejercicio, mostrándoselos dos veces cada cinco segundos .
SK2500L SK LINE sportkoncept
8
Si en el tiempo que trascurre la información de los valores medios no se toca ninguna tecla, y no se hace ejercicio si pulsa la tecla STOP pasara al programa manual.
P10 - P11 PROGRAMAS DE TEST VARON – MUJER.- El objetivo del test es valorar la forma física del usuario. La diferencia entre los programas de varón y de mujer esta en los Watios, los valores del varón están seleccionados en 150 W. y en el programa de mujer en 100 W. Estando el monitor encendido, el display de matriz de LEDs superior (A) Fig.2 le mostrará el perfil y la letra “M” de manual. Para visualizar los diferentes perfiles preprogramados se utilizan las teclas SPEED▼ y SPEED▲. Una vez se haya seleccionado el programa TEST Varón ó TEST Mujer, pulse la tecla ENTER. A continuación, el display de Pantalla alfanumérica inferior (B) Fig.2 le pedirá la edad (entre 10 y 99 años). Seleccione su edad con las teclas numéricas (F) Fig.3 y pulse ENTER, le mostrara en la pantalla alfanumérica (B) INICIO DE EJERCICIO y dará comienzo a su ejercicio transcurridos 3 segundos, indicados en forma descendente. En el dispay de matriz de LEDs superior (A) Fig.2 le mostrara un corazón parpadeante, coloque sus manos sobre los sensores de pulso (hand -grip) situados en el manillar o en el caso de disponer de banda medidora de pulso telemétrica colóquesela en el pecho. Comience el TEST. Al finalizar los 12 minutos de duración del test le mostrará una valoración entre el 1 (muy deficiente) y el 5 (excelente). También puede aparecer una valoración de 0 que quiere decir que el test no ha sido realizado correctamente, no se ha utilizado la medición de ritmo cardiaco correctamente. NOTA: Es obligatorio para hacer el test utilizar la medición del ritmo cardiaco, usando para ello los sensores manuales (hand-grip) o la banda de pecho. Es conveniente hacer un pequeño calentamiento antes de realizar el test. Esto evitará lesiones. El máximo número de pulsaciones que una persona nunca debe sobrepasar se le denomina ritmo máximo y éste disminuye con la edad. Una sencilla fórmula para calcular es restar a 220 la edad en años. El ejercicio, para que sea correcto, debe mantenerse entre el 65% y el 85 % del ritmo cardíaco máximo y se recomienda no sobrepasar el 85%. Cuando sus pulsaciones pasen del 85% del ritmo cardiaco máximo aparecerá un corazón parpadeando y un pitido durante 2 segundos hasta que sus pulsaciones no bajen del 85 % de su ritmo cardiaco máximo. Se recomienda trabajar por debajo del 85% del ritmo cardíaco máximo por razones de seguridad.
P12 - PROGRAMA DE RITMO CARDIACO CONSTANTE (H R C).- Es conveniente hacer un pequeño calentamiento antes de realizar el programa. Esto evitará posibles lesiones. Este programa permite hacer el ejercicio a un ritmo cardiaco (entre el 65 y el 85% del ritmo cardiaco máximo) y la máquina le ajustara el nivel de resistencia para lograr que en todo momento el usuario mantenga el ritmo cardiaco al nivel seleccionado. Es obligatorio utilizar la medición del ritmo cardiaco, usando para ello la banda de pulso telemétrico de pecho únicamente, y no sobrepasar del 85% del ritmo cardiaco máximo. Estando el monitor encendido le mostrara el display de matriz de LEDs superior (A) Fig.2 el perfil y la letra “M” de manual, para visualizar lo diferentes perfiles preprogramados se utilizan las teclas SPEED▼ y SPEED▲. Una vez se haya seleccionado el programa HRC pulse la tecla ENTER. En el display de la Pantalla alfanumérica inferior (B) le pedirá el valor del ritmo cardiaco que desea hacer el ejercicio seleccione con las teclas numéricas (F) Fig.3 entre (25 y 250 P.P.M. Pulsaciones Por Minuto) pulse ENTER, le mostrara en la pantalla alfanumérica (B) INICIO DE EJERCICIO y dará comienzo a su ejercicio transcurridos 3 segundos, indicados en forma descendente. En los tres primeros minutos este programa tiene un esfuerzo programado para evitar cualquier tipo de lesión. En el primer minuto se comienza con una velocidad de 4Km./h. En el segundo minuto se pasa a una velocidad de 4,5 Km/h. En el tercer minuto se pasa a una velocidad de 5Km/h. A partir del cuarto minuto, el ordenador adecua automáticamente el esfuerzo para mantener el pulso entorno al valor previamente programado. NOTA: Si en el paso al minuto tercero el monitor no ha recibido ninguna señal de pulso el programa se para.
SK2500L SK LINE sportkoncept
9
SIGNIFICADO DE LOS SÍMBOLOS.- En la pantalla pueden aparecer una serie de símbolos o de palabras con el siguiente significado:
Símbolo del corazón ♥ y una interrogante: No se ha colocado la banda del pecho o no se la ha colocado adecuadamente.
Símbolo del corazón ♥ parpadeando: Este símbolo sólo aparecerá en los programas de tests. Al máximo número de pulsaciones que una persona nunca debe sobrepasar se le denomina ritmo máximo y éste disminuye con la edad. Una sencilla fórmula para calcular es restar a 220 la edad en años. El ejercicio, para que sea correcto, debe mantenerse entre el 65 y el 85% del ritmo cardíaco máximo y se recomienda no sobrepasar el 85%. Cuando sus pulsaciones pasen del 85 % del ritmo cardiaco máximo aparecerá un corazón parpadeando y un pitido durante 2 segundos hasta que sus pulsaciones no bajen del 85 % de su ritmo cardiaco máximo. Se recomienda trabajar por debajo del 85% del ritmo cardíaco máximo por razones de seguridad. *0*: Este símbolo aparece en los tests masculino y femenino y significa que usted ha realizado el test no se ha colocado la banda de pecho). Símbolo de Llave fija: Avería mecánica. Apagar la máquina y encenderla pasados 2 minutos. La máquina posee un sistema de corrección de averías automático, no obstante, si el problema persiste, póngase en contacto con el servicio técnico.
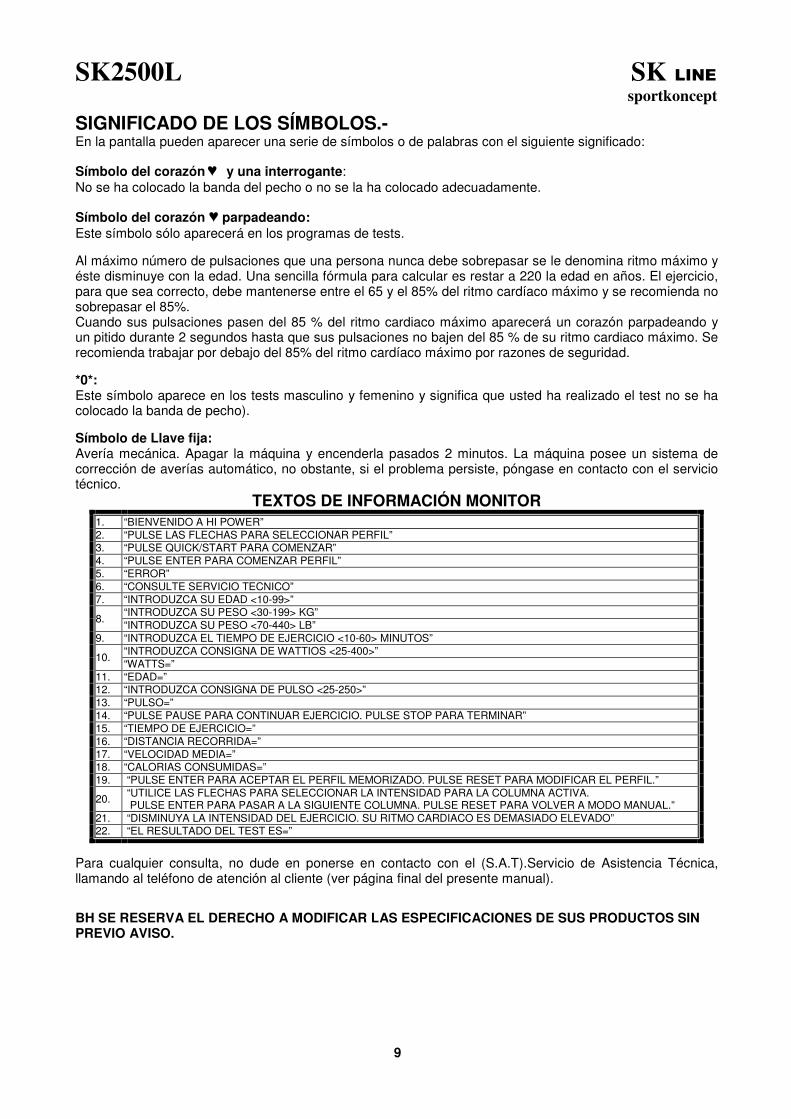
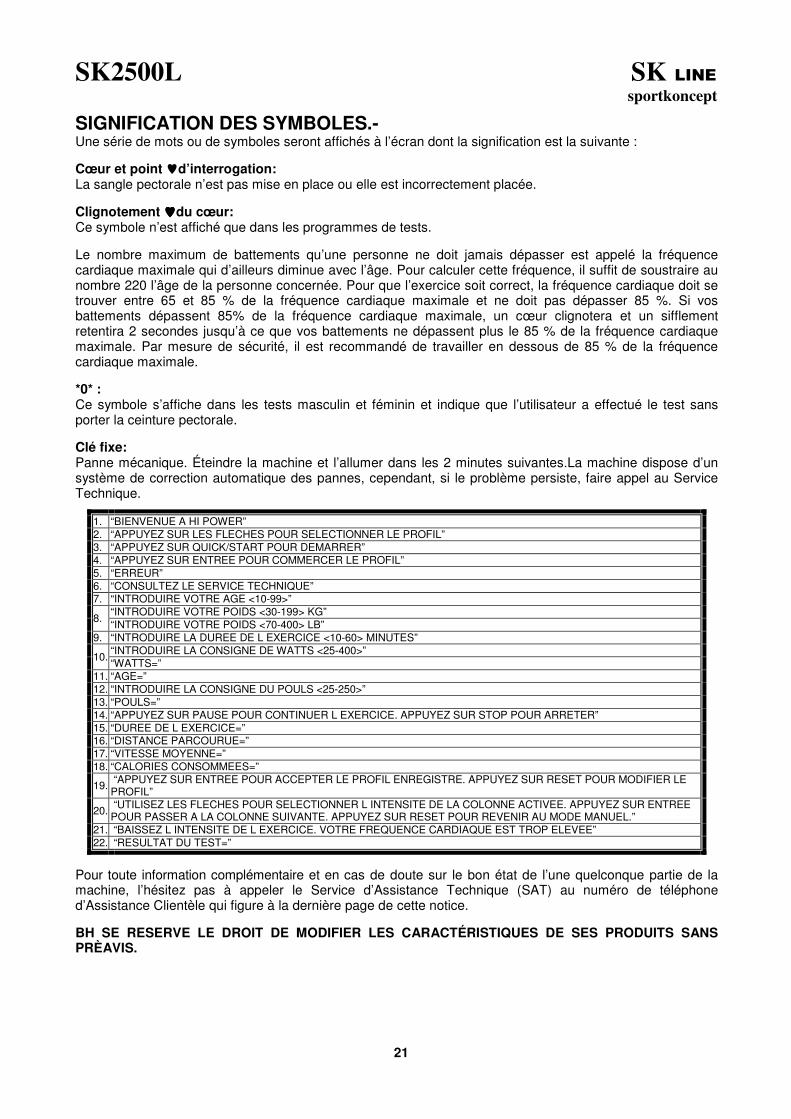
TEXTOS DE INFORMACIÓN MONITOR 1. “BIENVENIDO A HI POWER” 2. “PULSE LAS FLECHAS PARA SELECCIONAR PERFIL” 3. “PULSE QUICK/START PARA COMENZAR” 4. “PULSE ENTER PARA COMENZAR PERFIL” 5. “ERROR” 6. “CONSULTE SERVICIO TECNICO” 7. “INTRODUZCA SU EDAD <10-99>”
8. “INTRODUZCA SU PESO <30-199> KG” “INTRODUZCA SU PESO <70-440> LB”
9. “INTRODUZCA EL TIEMPO DE EJERCICIO <10-60> MINUTOS”
10. “INTRODUZCA CONSIGNA DE WATTIOS <25-400>” “WATTS=”
11. “EDAD=” 12. “INTRODUZCA CONSIGNA DE PULSO <25-250>” 13. “PULSO=” 14. “PULSE PAUSE PARA CONTINUAR EJERCICIO. PULSE STOP PARA TERMINAR” 15. “TIEMPO DE EJERCICIO=” 16. “DISTANCIA RECORRIDA=” 17. “VELOCIDAD MEDIA=” 18. “CALORIAS CONSUMIDAS=” 19. “PULSE ENTER PARA ACEPTAR EL PERFIL MEMORIZADO. PULSE RESET PARA MODIFICAR EL PERFIL.”
20. “UTILICE LAS FLECHAS PARA SELECCIONAR LA INTENSIDAD PARA LA COLUMNA ACTIVA. PULSE ENTER PARA PASAR A LA SIGUIENTE COLUMNA. PULSE RESET PARA VOLVER A MODO MANUAL.”
21. “DISMINUYA LA INTENSIDAD DEL EJERCICIO. SU RITMO CARDIACO ES DEMASIADO ELEVADO” 22. “EL RESULTADO DEL TEST ES=”
Para cualquier consulta, no dude en ponerse en contacto con el (S.A.T).Servicio de Asistencia Técnica, llamando al teléfono de atención al cliente (ver página final del presente manual).
BH SE RESERVA EL DERECHO A MODIFICAR LAS ESPECIFICACIONES DE SUS PRODUCTOS SIN PREVIO AVISO.

SK2500L SK LINE sportkoncept
10
ENGLISH
GENERAL INSTRUCTIONS.- The electronic monitor is designed to be easy and intuitive to use. The messages that appear on the bottom screen (B) will guide the user throughout the whole exercise. Nevertheless, we recommend that the gym instructor reads through this section carefully to become fully familiar with the electronic monitor in order to show the user how to operate it correctly. This monitor screen is touch sensitive, so to press a key just place your finger on the said key displayed on the screen.
PERSONALISING THE ELECTRONIC MONITOR.- Follow the procedure below to access the monitor’s personalisation mode: Set the mains switch (b), located at the bottom front of the machine, to the position (1) Fig.A.
Fig.A
1) CHANGING LANGUAGE.- From the main menu, press both the STOP key and the ENTER button for 3 seconds. The software version will appear on the alphanumeric screen (B), Fig.1, press both the STOP key and the PAUSE button for 3 seconds. Select your language using the SPEED▲ and SPEED▼ keys and then press START. If you wish to exit the persnalization mode, press the RESET key and the manual program will be displayed on the LED array (A). 2) CHANGING FROM km to Miles.- From the main menu, press both the STOP key and the ENTER button for 3 seconds. The software version will appear on the alphanumeric screen (B), Fig.1, press both the STOP key and the ENTER button for 3 seconds. To change from km to miles press the ENTER key until UNITS appears, this will take you to the change option, displaying “KM” on screen (B). Use the SPEED▲ and SPEED ▼ keys to select the speed measure scale (METRIC / km. -- IMPERIAL / Miles) and press the START key. If you wish to exit the persnalization mode, press the RESET key and the manual program will be displayed on the LED array (A).
ELEMENTS OF THE ELECTRONIC MONITOR (Fig.1).- The electronic monitor is made up of two distinct areas: The top area, Fig.2 (A – B – C) for the DISPLAY The bottom area, Fig.3 (E – F – G) for the KEYPAD
DISPLAY.- This area comprises of two screens. (A) The top LED array, which displays real-time exertion levels being produced during the selected program. (B) Bottom alphanumeric screen, which guides the user selection options and exercise. The top screen (A) displays the various pre-programmed exercise profiles (programs) that we can select and, during exercise, current exertion levels. The bottom alphanumeric screen (B) is used to guide the user when selecting the exercise to do, as well as displaying information about the exercise both during and after the session. The LED indicators (C) located below the alphanumeric screen give a simultaneous readout of SPEED; TIME / DISTANCE; CALORIES / WATTS; PULSE RATE and indicate which information is being displayed throughout the exercise. The data that are displayed on the LEDs (C) during exercise are as follows: -SPEED: This displays the linear velocity at which the belt is travelling. The value is displayed in kilometres per hour (km/h).
SK2500L SK LINE sportkoncept
11
-TIME: This shows the time that has elapsed since you started the exercise or, if a time limit has been established, the amount of time left before the exercise finishes. The time is displayed in minutes and seconds (mm:ss). -DISTANCE: This shows the distance that you have travelled since beginning the exercise. The distance is calculated by using the estimated linear velocity (SPEED) and the units displayed are kilometres and hectometres -CALORIES: This shows the estimated number of calories that have been burnt off up until now. This calculation is based on the energy being produced and the weight and age values provided by the user. -INCLINATION: This displays the machine’s current level of inclination. The machine has 15 levels of inclination (0 to 15). The degree of inclination can be changed by using the INCLINE▲ and INCLINE▼ keys. At the end of the exercise the machine returns to a 0 inclination level. -PULSE: This shows the user’s heart rate, assuming that this information can be accessed through the hand-grip sensors or the telemetric chest band. When both of these are used together, priority is given to the telemetric chest band. For more information about heart rate refer to the section entitled: Pulse measurement; chest band and hand-grip
KEYPAD(Fig.3).- The function of each key is listed below. See Fig.3. The electronic monitor includes an easy-to-use keypad. This keypad consists of numeric keys (F) and function keys (G). - Numeric keys (F) - (1- 0) are used to enter the data requested by the monitor. - Function keys (G) – reset; speed�; speed-; enter; pause; stop; incline▲; incline▼; quick/start. are used to select a particular exercise, enter requested data, control exercise exertion levels and to finish the exercise.
-reset.- Reset key. This is used to erase the data that have been entered into the monitor when selecting a program.
-Speed▼-.- Key for decreasing speed. When pressed during exercise this key will decrease the speed of the machine by one tenth of a kilometre per hour. The speed will continue to decrease as long as this button is being pressed. During the selection of pre-programmed profiles, it is used to move back to the previous profile screen.
-Speed▲.- Key for increasing speed. When pressed during exercise this key will increase the speed of the machine by one tenth of a kilometre per hour. The speed will continue to increase as long as this button is being pressed. During the selection of pre-programmed profiles, it is used to move on to the next profile screen.
-enter.- Selection and validation key. This is used during pre-programmed profile selection to select a profile, confirm data that have been entered and to start the exercise. It is also used during user profile programming to confirm the exertion level settings for each minute.
-pause.- Pause key. If this is pressed during a session, the exercise is interrupted and the exercise chronometer is halted. To restart the exercise chronometer press the pause key again or continue exercising. If, in pause mode, you press the STOP key then the exercise will be finished.
-stop.- Stop key. If this is pressed during the session, the exercise will finish and the belt will stop. A summary of all the exercise data will be displayed and it will then return to the start screen.
-Incline▼.- Decrease inclination key. When pressed during exercise this key will decrease the level of inclination by one degree. Inclination will continue to decrease as long as this button is being pressed.
-Incline▲.- Increase inclination key When pressed during exercise this key will increase the level of inclination by one degree. Inclination will continue to increase as long as this button is being pressed.
-quick/start.- Quick start key. When this key is pressed, provided that the LED on the key is flashing, exercise will begin in manual mode after a 3 second countdown.
SK2500L SK LINE sportkoncept
12
USB PORT (Fig.3).- The monitor on this machine is fitted with USB port (D) for charge the mobile.
STARTING.- Switching the monitor on: Plug the mains cable, supplied with the machine, into an electric mains socket, making sure that the voltage is that stated for the machine and that the socket is equipped with an earth connection Fig.B. Next, set the switch (b) to position [1]. Fig.A.
Fig.A Fig.B
Once the monitor is on it will display the profile and the letter “M” for manual on the LED array (A) Fig.2, and the “WELCOME TO HI – POWER” welcome message on the bottom alphanumeric screen (B). By pressing the QUICK/START key the machine will start in manual mode after a 3 second countdown at a speed of 1 km/h, by pressing the speed� or speed- keys you can increase or decrease the speed settings. You can also increase or decrease the speed settings by using the numeric keys (F).
OPERATING INSTRUCTIONS.-
P0 - MANUAL MODE.- Once the monitor is on it will display the profile and the letter “M” for manual on the LED array (A) Fig.2, and the “WELCOME TO HI – POWER” welcome message on the bottom alphanumeric screen (B) Fig.2. By pressing the QUICK / START key the machine will start in manual mode after a 3 second countdown. The flashing top LED array (A), Fig.2, will indicate the current speed setting for the exercise. By pressing the speed▼ or speed▲ keys you can vary the speed between twenty different speed settings. You can also increase or decrease the speed settings by using the numeric keys (F) Fig.3. The bottom alphanumeric display (B), Fig.2, will give alternating 10 second read-outs of the following values: SPEED (Metric system km/h or imperial system mph); TIME; CALORIES; PULSE RATE and the second sequence will show TIME, DISTANCE and INCLINE. The program can be interrupted by pressing the STOP key or the EMERGENCY button (G) at the bottom of the screen. When the program is stopped the bottom alphanumeric screen (B), Figure 2, will display the average values for EXERCISE TIME (HH:MM:SS); DISTANCE TRAVELLED (km); AVERAGE SPEED (Km/h); CALORIES CONSUMED (kcal) during the exercise. These values will be displayed twice every five seconds. If, during the time it takes to display these average values, no keys are touched and no further exercise is done and the STOP key is pressed, the machine will go back to the manual program.
PROGRAM MODE.- This program has: 1 MANUAL profile program; 8 pre-programmed PROGRAM profiles; a user programmable profile (USER) as well as a male TEST, female TEST, and a steady pulse rate (H.R.C) program.
P1 - P8 PRESET PROGRAMS.- With the monitor switched on, the top LED array (A), Fig.2, will display the profile and the letter “M” for manual. The SPEED▲ and SPEED▼ keys are used to display the various pre-programmed profiles. Once a specific profile has been selected press the ENTER key. The top LED array (A) will ask for an age value (between 10 and 99), select your age by using the number

SK2500L SK LINE sportkoncept
13
keys (F), Fig.3, press ENTER. It will now ask for your weight (between 30 and 199 kg), select your weight by using the number keys (F), Fig.3, press ENTER. It will now ask for an exercise time limit (between 10 and 60 minutes), select the time by using the number keys (F), Fig.3, press ENTER ,will be shown on the alphanumeric screen (B) and exercise will begin after a 3 second countdown at a speed of 2km/h. There are different difficulty levels within each pre-programmed profile, to select any of these just press the SPEED▲ and SPEED▼ keys during the exercise. Once you have finished the exercise program, the monitor will calculate the average values at which you did the exercise and display these on the bottom alphanumeric screen (B), Fig.2. The program can be interrupted by pressing the STOP key and the bottom alphanumeric screen (B), Fig.2, will display the average values for EXERCISE TIME; DISTANCE TRAVELLED; AVERAGE SPEED; CALORIES CONSUMED during the exercise. These values will be displayed twice every five seconds. If, during the time it takes to display these average values, no keys are touched and the STOP key is pressed, the machine will go back to the manual program.
P9 USER PROGRAM (USER). With the monitor switched on, the top LED array (A), Fig.2, will display the profile and the letter “M” for manual. Use the SPEED▲ and SPEED▼ keys to display the various pre-programmed profiles. Once program 9 (USER) has been selected, press the ENTER key. The top LED array (A), Fig.2, will ask for an age value (between 10 and 99), select your age by using the number keys (F), Fig.3, (If the value entered exceeds these limits it will display the closest acceptable value). Press ENTER. It will now ask for your weight (between 30 and 199 kg), select your weight by using the number keys (F), Fig.3, press ENTER. It will now ask for an exercise time limit (between 10 and 60 minutes), select the time by using the number keys (F), and press ENTER. Now press the RESET key and you can begin to design a personalised exercise profile on the LED array (A). Then press ENTER and so on until you have completed the program graph to your liking. The profile being designed is divided into 21 steps. If you make a mistake when recording any step, press the RESET key and repeat the previous step. Next press ENTER. START EXERCISE will be shown on the alphanumeric screen (B) and exercise will begin after a 3 second countdown. Once you have finished the exercise program, the monitor will calculate the average values at which you did the exercise and display these on the bottom alphanumeric screen (B), Fig.2. The program can be interrupted by pressing the STOP key and the bottom alphanumeric screen (B), Fig.2, will display the average values for EXERCISE TIME; DISTANCE TRAVELLED; CALORIES CONSUMED during the exercise. These values will be displayed twice every five seconds. If, during the time it takes to display these average values, no keys are touched and no further exercise is done and the STOP key is pressed, the machine will go back to the manual program.
10 – P11 MALE - FEMALE TEST PROGRAMS.- The aim of this test is to assess the user’s level of fitness the difference between the Male and Female programs is in the Watts. The value for the Male test is set at 150 W whereas the Female test is set at 100W. With the monitor switched on, the top LED array (A), Fig.2, will display the profile and the letter “M” for manual. The SPEED▲ and SPEED▼ keys are used to display the various pre-programmed profiles. Once the Male TEST or Female TEST has been selected, press the ENTER key. Next, the bottom alphanumeric screen (B), Fig.2, will ask for an age value (between 10 and 99). Select your age using the numeric keys (F) Fig.3, and press ENTER. START EXERCISE will be shown on the alphanumeric screen (B) and exercise will begin after a 3 second countdown. The top LED array (A), Fig.2, will display a flashing heart symbol. Place your hands on the pulse sensors (handgrip) located on the handlebar or place the telemetric chest band on your chest, if you have one. Begin the TEST. At the end of the 12 minute test you will be awarded a score between 1 (very poor) and 5 (excellent). A 0 score may also appear, which means that either the test or heart rate measurement sensor were not used
SK2500L SK LINE sportkoncept
14
correctly. NOTE: In order to do the test it is essential to use heart rate measurement, using either the hand-grip sensors or the chest band. It is advisable to do a brief warm-up session before doing this test. This will prevent possible injuries. The maximum number of heartbeats that a person should not exceed is referred to as the maximum Herat rate and this value drops with age. A simple formula to calculate this is to subtract your age, in years, from the number 220. The maximum Herat rate should be kept between 65% and 85% for correct exercise, it is not advisable to go above 85%. Whenever your pulse rate exceeds 85% of the maximum heart rate value a flashing heart symbol will appear and a 2 second beep will sound until your pulse rate drops below 85% of your maximum heart rate. For safety reasons it is advisable to exercise at below 85% of the maximum heart rate.
P12 - CONSTANT HEART RATE PROGRAM (H R C).-
It is advisable to do a brief warm-up session before using this program. This will prevent possible injuries. This program allows you to select a heart rate (between 65% and 85% of the maximum heart rate) and the machine will automatically adjust exertion levels to ensure that the user maintains the selected heart rate value. Use of heart rate measurement using the telemetric chest band is obligatory and you must not exceed 85% of your maximum heart rate value. With the monitor switched on, the top LED array (A), Fig.2, will display the profile and the letter “M” for manual. Use the SPEED▲ and SPEED▼ keys to display the various pre-programmed profiles. Once the HRC program has been selected, press the ENTER key. The bottom alphanumeric screen (B) will ask you for the heart rate value at which you wish to do the exercise, use the number keys (F), Fig.3, to select a value (between 25 and 250 B.P.M beats per minute), then press ENTER. , will be shown on the alphanumeric screen (B) and exercise will begin after a 3 second countdown. This program uses a preset exertion level during the first three minutes in order to prevent any type of injury. The first minute starts off at a speed of 4 km/h. The second minute speeds up to 4.5 km/h. The third minute speeds up to 5 Km/h. From the fourth minute onward the computer automatically adjusts the exertion level to keep your heart rate at the specified value. NOTE: If the monitor fails to receive a pulse rate signal during the third minute the program will stop automatically.
WHAT THE SYMBOLS MEAN.- A series of symbols or words may appear on the screen, meaning the following: Heart symbol and a question mark: The chest band has not been fitted or is fitted incorrectly. Flashing heart symbol: This symbol only appears in the test programs. The maximum number of heartbeats that a person should not exceed is referred to as the maximum heart rate and this value drops with age. A simple formula to calculate this value is to deduct your age, in years, from the number 220. The maximum heart rate should be kept between 65% and 85% for correct exercise, it is not advisable to go above 85% Whenever your pulse rate exceeds 85% of the maximum heart rate value a flashing heart symbol will appear and a 2 second beep will sound until your pulse rate drops below 85% of your maximum heart rate. For safety reasons it is advisable to exercise at below 85% of the maximum heart rate. *0*: This symbol appears in the male and female tests, it means that you have not worn the chest band during the test. Spanner symbol:

SK2500L SK LINE sportkoncept
15
Mechanical fault. Switch the machine off for 2 minutes and then switch it back on again. The machine has an automatic fault correction system, nevertheless if the problem persists get in touch with your technical service centre.
Do not hesitate to get touch with the Technical Assistance Service if you have any queries by phoning customer services (see last page in manual).
BH RESERVES THE RIGHT TO MODIFY THE SPECIFICATIONS OF ITS PRODUCTS WITHOUT PRIOR NOTICE.
1. “WELCOME TO HI POWER” 2. “PRESS THE ARROWS TO SELECT PROFILE” 3. “ PRESS QUICK/START TO BEGIN” 4. “ PRESS ENTER TO BEGIN PROFILE” 5. “ ERROR” 6. “ CONSULT TECHNICAL SERVICE” 7. “ INTRODUCE YOUR AGE <10-99>”
8. “ INTRODUCE YOUR WEIGHT <30-199> KG” “ INTRODUCE YOUR WEIGHT <70-440> LB”
9. “ INTRODUCE EXERCISE TIME <10-60> MINUTES”
10. “ INTRODUCE WATT SETTING <25-400>” “ WATTS=”
11. “ AGE=” 12. “ INTRODUCE PULSE RATE SETTING <25-250>” 13. “ PULSE RATE=” 14. “ PRESS PAUSE TO CONTINUE THE EXERCISE. PRESS STOP TO FINISH” 15. “ EXERCISE TIME=” 16. “ DISTANCE COVERED=” 17. “ AVERAGE SPEED=” 18. “ CALORIES BURNT=” 19. “ PRESS ENTER TO ACCEPT THE STORED PROFILE. PRESS RESET TO MODIFY THE PROFILE.”
20. “ USE THE ARROWS TO SELECT THE EXERTION LEVELS FOR THE ACTIVE COLUMN. PRESS ENTER TO MOVE TO THE NEXT COLUMN. PRESS RESET TO RETURN TO MANUAL MODE”
21. “ DECREASE EXERTION OF EXERCISE. YOUR HERAT RATE IS TOO HIGH” 22. “ THE RESULT OF THE TEST IS=”
SK2500L SK LINE sportkoncept
16
FRANÇAIS
REMARQUES GÉNÉRALES.- Ce moniteur électronique a été conçu pour être utilisé d’une façon simple et intuitive. Les textes qui s’afficheront sur l’écran inférieur (B) guideront l’utilisateur pendant la réalisation de l’exercice. Cependant, nous recommandons au préparateur physique de lire très attentivement ce chapitre afin de disposer de toutes les informations relatives au moniteur électronique et de montrer ensuite à l’utilisateur la bonne façon de l’utiliser. Cet écran de moniteur étant du type tactile, pour appuyer sur une touche il faudra placer le doigt sur l’icône de cette touche située sur l’écran.
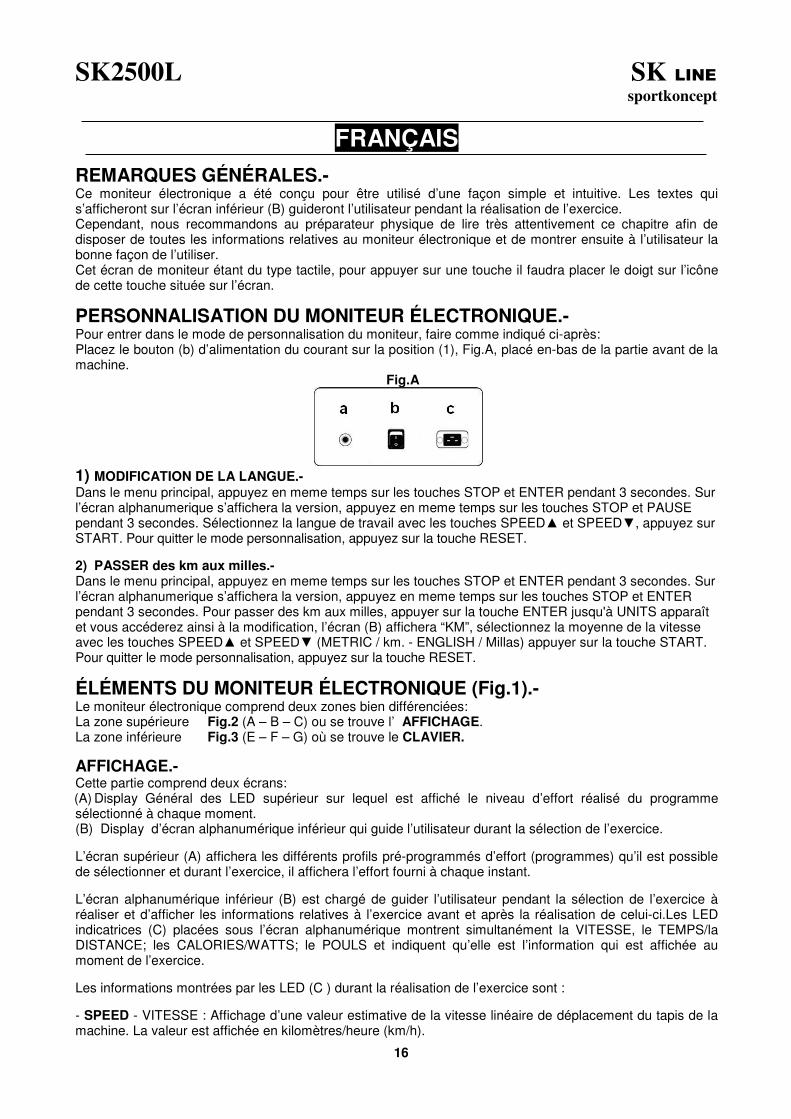
PERSONNALISATION DU MONITEUR ÉLECTRONIQUE.- Pour entrer dans le mode de personnalisation du moniteur, faire comme indiqué ci-après: Placez le bouton (b) d’alimentation du courant sur la position (1), Fig.A, placé en-bas de la partie avant de la machine.
Fig.A
1) MODIFICATION DE LA LANGUE.- Dans le menu principal, appuyez en meme temps sur les touches STOP et ENTER pendant 3 secondes. Sur l’écran alphanumerique s’affichera la version, appuyez en meme temps sur les touches STOP et PAUSE pendant 3 secondes. Sélectionnez la langue de travail avec les touches SPEED▲ et SPEED▼, appuyez sur START. Pour quitter le mode personnalisation, appuyez sur la touche RESET. 2) PASSER des km aux milles.- Dans le menu principal, appuyez en meme temps sur les touches STOP et ENTER pendant 3 secondes. Sur l’écran alphanumerique s’affichera la version, appuyez en meme temps sur les touches STOP et ENTER pendant 3 secondes. Pour passer des km aux milles, appuyer sur la touche ENTER jusqu'à UNITS apparaît et vous accéderez ainsi à la modification, l’écran (B) affichera “KM”, sélectionnez la moyenne de la vitesse avec les touches SPEED▲ et SPEED▼ (METRIC / km. - ENGLISH / Millas) appuyer sur la touche START. Pour quitter le mode personnalisation, appuyez sur la touche RESET.
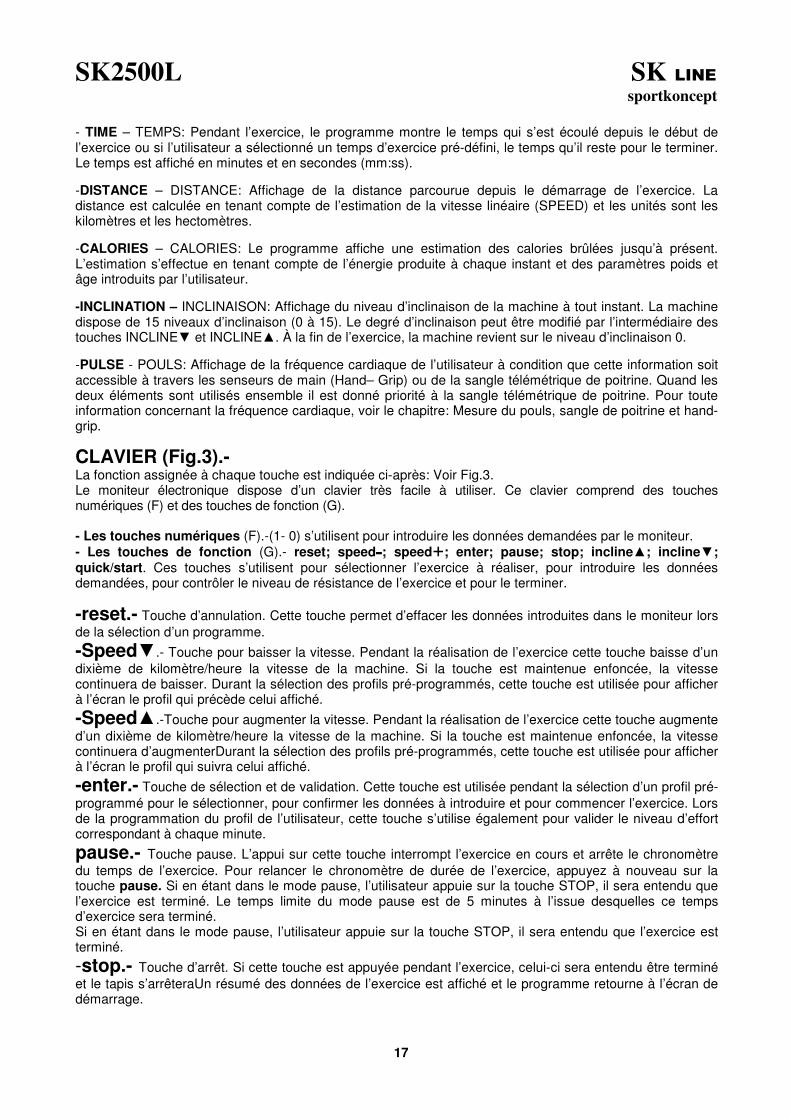
ÉLÉMENTS DU MONITEUR ÉLECTRONIQUE (Fig.1).- Le moniteur électronique comprend deux zones bien différenciées: La zone supérieure Fig.2 (A – B – C) ou se trouve l’ AFFICHAGE. La zone inférieure Fig.3 (E – F – G) où se trouve le CLAVIER.
AFFICHAGE.- Cette partie comprend deux écrans: (A) Display Général des LED supérieur sur lequel est affiché le niveau d’effort réalisé du programme sélectionné à chaque moment. (B) Display d’écran alphanumérique inférieur qui guide l’utilisateur durant la sélection de l’exercice. L’écran supérieur (A) affichera les différents profils pré-programmés d’effort (programmes) qu’il est possible de sélectionner et durant l’exercice, il affichera l’effort fourni à chaque instant. L’écran alphanumérique inférieur (B) est chargé de guider l’utilisateur pendant la sélection de l’exercice à réaliser et d’afficher les informations relatives à l’exercice avant et après la réalisation de celui-ci.Les LED indicatrices (C) placées sous l’écran alphanumérique montrent simultanément la VITESSE, le TEMPS/la DISTANCE; les CALORIES/WATTS; le POULS et indiquent qu’elle est l’information qui est affichée au moment de l’exercice. Les informations montrées par les LED (C ) durant la réalisation de l’exercice sont : - SPEED - VITESSE : Affichage d’une valeur estimative de la vitesse linéaire de déplacement du tapis de la machine. La valeur est affichée en kilomètres/heure (km/h).
SK2500L SK LINE sportkoncept
17
- TIME – TEMPS: Pendant l’exercice, le programme montre le temps qui s’est écoulé depuis le début de l’exercice ou si l’utilisateur a sélectionné un temps d’exercice pré-défini, le temps qu’il reste pour le terminer. Le temps est affiché en minutes et en secondes (mm:ss). -DISTANCE – DISTANCE: Affichage de la distance parcourue depuis le démarrage de l’exercice. La distance est calculée en tenant compte de l’estimation de la vitesse linéaire (SPEED) et les unités sont les kilomètres et les hectomètres. -CALORIES – CALORIES: Le programme affiche une estimation des calories brûlées jusqu’à présent. L’estimation s’effectue en tenant compte de l’énergie produite à chaque instant et des paramètres poids et âge introduits par l’utilisateur. -INCLINATION – INCLINAISON: Affichage du niveau d’inclinaison de la machine à tout instant. La machine dispose de 15 niveaux d’inclinaison (0 à 15). Le degré d’inclinaison peut être modifié par l’intermédiaire des touches INCLINE▼ et INCLINE▲. À la fin de l’exercice, la machine revient sur le niveau d’inclinaison 0. -PULSE - POULS: Affichage de la fréquence cardiaque de l’utilisateur à condition que cette information soit accessible à travers les senseurs de main (Hand– Grip) ou de la sangle télémétrique de poitrine. Quand les deux éléments sont utilisés ensemble il est donné priorité à la sangle télémétrique de poitrine. Pour toute information concernant la fréquence cardiaque, voir le chapitre: Mesure du pouls, sangle de poitrine et hand-grip.
CLAVIER (Fig.3).- La fonction assignée à chaque touche est indiquée ci-après: Voir Fig.3. Le moniteur électronique dispose d’un clavier très facile à utiliser. Ce clavier comprend des touches numériques (F) et des touches de fonction (G). - Les touches numériques (F).-(1- 0) s’utilisent pour introduire les données demandées par le moniteur. - Les touches de fonction (G).- reset; speed-; speed�; enter; pause; stop; incline▲; incline▼; quick/start. Ces touches s’utilisent pour sélectionner l’exercice à réaliser, pour introduire les données demandées, pour contrôler le niveau de résistance de l’exercice et pour le terminer.
-reset.- Touche d’annulation. Cette touche permet d’effacer les données introduites dans le moniteur lors de la sélection d’un programme.
-Speed▼.- Touche pour baisser la vitesse. Pendant la réalisation de l’exercice cette touche baisse d’un dixième de kilomètre/heure la vitesse de la machine. Si la touche est maintenue enfoncée, la vitesse continuera de baisser. Durant la sélection des profils pré-programmés, cette touche est utilisée pour afficher à l’écran le profil qui précède celui affiché.
-Speed▲.-Touche pour augmenter la vitesse. Pendant la réalisation de l’exercice cette touche augmente d’un dixième de kilomètre/heure la vitesse de la machine. Si la touche est maintenue enfoncée, la vitesse continuera d’augmenterDurant la sélection des profils pré-programmés, cette touche est utilisée pour afficher à l’écran le profil qui suivra celui affiché. -enter.- Touche de sélection et de validation. Cette touche est utilisée pendant la sélection d’un profil pré-programmé pour le sélectionner, pour confirmer les données à introduire et pour commencer l’exercice. Lors de la programmation du profil de l’utilisateur, cette touche s’utilise également pour valider le niveau d’effort correspondant à chaque minute.
pause.- Touche pause. L’appui sur cette touche interrompt l’exercice en cours et arrête le chronomètre du temps de l’exercice. Pour relancer le chronomètre de durée de l’exercice, appuyez à nouveau sur la touche pause. Si en étant dans le mode pause, l’utilisateur appuie sur la touche STOP, il sera entendu que l’exercice est terminé. Le temps limite du mode pause est de 5 minutes à l’issue desquelles ce temps d’exercice sera terminé. Si en étant dans le mode pause, l’utilisateur appuie sur la touche STOP, il sera entendu que l’exercice est terminé.
-stop.- Touche d’arrêt. Si cette touche est appuyée pendant l’exercice, celui-ci sera entendu être terminé et le tapis s’arrêteraUn résumé des données de l’exercice est affiché et le programme retourne à l’écran de démarrage.

SK2500L SK LINE sportkoncept
18
-Incline▼.- Touche décroissante du niveau d’inclinaison. Pendant la réalisation de l’exercice cette touche baisse d’un degré l’inclinaison de la machine. Si la touche est maintenue enfoncée, l’inclinaison continuera de baisser.
-Incline▲.- Touche augmentant le niveau d’inclinaison. Pendant la réalisation de l’exercice cette touche augmente d’un degré l’inclinaison de la machine. Si la touche est maintenue enfoncée, l’inclinaison continuera d’augmenter.
-quick/start.- Touche de démarrage immédiatSi la LED de la touche clignote, en appuyant sur cette touche et dans les trois secondes de compte à rebours, l’exercice démarre en mode manuel. PORT USB (Fig.3).- Sur cette machine, le moniteur dispose d'un port usb (D) pour la charge mobile.
MISE EN MARCHE.- Mise en marche du moniteur: Connectez le câble électrique fourni avec la machine à la prise électrique en vérifiant si elle concorde bien avec les indications de la plaque signalétique de la machine, vérifiez également si la prise est mise à la terre Fig.B. Ensuite placez l’interrupteur (b) sur la position 1 Fig.A.
Fig.A Fig.B
Après allumage, le moniteur affichera au display général des LED (A) Fig.2, le profil et la lettre “M” de manuel et au display de l’écran alphanumérique inférieur (B) le message de bienvenue “BIENVENUE À HI – POWER ”. En appuyant sur la touche QUICK / START le programme se met en marche dans les 3 secondes de compte à rebours à une vitesse de 1 km/h et en appuyant sur les touches speed▼ ou speed▲, vous pourrez augmenter ou baisser la vitesse de la machine. Possibilité également d’augmenter ou de baisser la vitesse par l’intermédiaire des touches alphanumériques (F) du clavier.
FONCTIONNEMENT.-
P0 - MODE MANUEL.- Quand le moniteur s’allume, le display général supérieur des LED (A) Fig.2 affiche le profil et la lettre “M” de manual et le display de l’écran alphanumérique inférieur (B) Fig.2 affichera le message de bienvenue “BIENVENUE À HI – POWER ”. En appuyant sur la touche QUICK/START le programme se met en marche en mode manuel dans les trois secondes du compte à rebours. Le display général supérieur des LED (A) Fig.2 affichera en clignotant la vitesse à laquelle l’exercice est réalisé. En appuyant sur les touches speed▼ ou speed▲, vous pourrez augmenter ou baisser parmi les vingt niveaux de vitesse de l’exercice. Possibilité également d’augmenter ou de baisser la vitesse par l’intermédiaire des touches numériques (F) du clavier Fig.3. Le display alphanumérique inférieur (B) Fig.2 affichera toutes les 10 secondes et successivement: la vitesse SPEED; Système Métrique km/h, Système du Royaume-Uni Milles/h; Le temps (TIME); Calories (CALORIES) et le Pouls (PULSE) et dans une autre séquence, le display affichera: le temps (TIME), la Distance (DISTANCE) et l’Inclinaison (INCLINE). En appuyant sur la touche STOP ou sur la touche d’URGENCE (G) placée en-bas des écrans du moniteur, le programme s’interrompt et le display de l’écran alphanumérique inférieur (B) Fig.2, affichera la moyenne des valeurs TEMPS DE L’EXERCICE (HH:MM:SS), DISTANCE PARCOURUE (km/h), VITESSE MOYENNE (km/h); CALORIES BRÛLÉES (Kcal), pendant l’exercice. Ces informations seront affichées deux fois toutes les cinq secondes.
SK2500L SK LINE sportkoncept
19
Si durant l’affichage des informations relatives aux valeurs moyennes, aucune touche n’est appuyée, si l’utilisateur ne réalise pas d’exercice et s’il appuie sur la touche STOP, la machine passera au programme manuel.
MODE PROGRAMMES.- Le moniteur dispose des programmes suivants: 1 programme de profil MANUEL; 8 PROGRAMMES avec profils préprogrammés, un profil programmable par l’utilisateur ( USER ) ; programmes TEST masculin et TEST féminin, programme de fréquence cardiaque constante( H.R.C. ).
P1 - P8 PROGRAMMES PRÉ-PROGRAMMÉS.- Ave le moniteur allumé, le display général supérieur des LED (A) Fig.2 affichera le profil et la lettre “M” de manuel. L’affichage des différents profils préprogrammés s’effectue par l’intermédiaire des touches SPEED▲ et SPEED▼. Après avoir sélectionné un profil concret, appuyez sur la touche ENTER. Le display général supérieur des LED (A) demandera d’introduire l’âge entre (10 et 99 ans), sélectionnez votre âge avec les touches numériques (F) Fig.3, appuyez sur ENTER. Ensuite, il vous sera demandé le poids entre (30 et 199 kg), sélectionnez votre poids par l’intermédiaire des touches numériques (F) Fig.3, appuyez sur ENTER. affichera à l’écran alphanumérique (B) DÉMARRAGE DE L’EXERCICE et démarrera l’exercice dans les 3 secondes du compte à rebours à une vitesse de 2 km/h À la fin du programme de l’exercice en cours de réalisation, le moniteur aura calculé la moyenne des valeurs avec lesquelles l’exercice a été réalisé et les affichera à l’écran alphanumérique inférieur (B) Fig.2. En appuyant sur la touche STOP, le programme s’interrompt et le display de l’écran alphanumérique inférieur (B) Fig.2, affiche la moyenne des valeurs: TEMPS D’EXERCICE, DISTANCE PARCOURUE, VITESSE MOYENNE; CALORIES BRÛLÉES réalisées pendant l’exercice. Ces valeurs seront affichées deux fois toutes les cinq secondes. Si durant l’affichage des informations relatives aux valeurs moyennes, aucune touche n’est appuyée et s’il appuie sur la touche STOP, la machine passera au programme manuel.
P9 PROGRAMME UTILISATEUR (USER).- Avec le moniteur allumé, le display général supérieur des LED (A) Fig.2 affichera le profil et la lettre “M” de manuel. Pour voir les différents profils préprogrammés, appuyez sur les touches SPEED▲ et SPEED▼. Après avoir sélectionné le programme 9 (USER), appuyez sur la touche ENTER. Il sera demandé au display général des LED (A) Fig.2 un âge entre (10 et 99 ans), sélectionnez votre âge avec les touches numériques (F) Fig.3, (si vous introduisez une valeur non comprise dans ces deux chiffres, l’écran affichera la valeur la plus proche). Appuyer sur ENTER. Ensuite, il vous sera demandé le poids entre ( 30 et 199 kg), sélectionnez votre poids par l’intermédiaire des touches numériques (F) Fig.3, appuyez sur ENTER. Il vous sera ensuite demandé une durée de réalisation de l’exercice entre ( 10 et 60 minutes ), sélectionnez la durée avec les touches numériques (F), appuyez sur ENTER puis sur la touche RESET, le programme commence alors à dessiner le profil de résistance souhaité au display général des LED (A). Ensuite appuyez sur la touche ENTER et ainsi de suite jusqu’à compléter le graphique du programme à réaliser. Le profil à préparer est sous-divisé en 21 points. En cas d’erreur dans l’enregistrement d’une étape, appuyez sur la touche RESET et le programme reviendra à l’étape précédente. Ensuite appuyez sur la touche ENTER et le programme affichera à l’écran alphanumérique (B) DÉMARRAGE DE L’EXERCICE et démarrera l’exercice dans les 3 secondes du compte à rebours. À la fin du programme de l’exercice en cours de réalisation, le moniteur aura calculé la moyenne des valeurs avec lesquelles l’exercice a été réalisé et les affichera à l’écran alphanumérique inférieur ( B ) Fig.2. En appuyant sur la touche STOP, le programme s’interrompt et le display de l’écran alphanumérique inférieur (B) Fig.2, affichera la moyenne des valeurs TEMPS DE L’EXERCICE, DISTANCE PARCOURUE, VITESSE MOYENNE; CALORIES BRÛLÉES, pendant l’exercice. Ces informations seront affichées deux fois toutes les cinq secondes. Si durant l’affichage des informations relatives aux valeurs moyennes, aucune touche n’est appuyée, si l’utilisateur ne réalise pas d’exercice et s’il appuie sur la touche STOP, la machine passera au programme manuel.
SK2500L SK LINE sportkoncept
20
P10 - P11 PROGRAMMES TEST HOMME-FEMME.- L’objectif de ce test est dévaluer la forme physique de l’utilisateur. La différence entre les programmes homme et femme se trouve dans les watts : les valeurs pour l’homme sont de 150 W tandis que pour les femmes cette valeur est de 100 W. Avec le moniteur allumé, le display général supérieur des LED (A) Fig.2 affichera le profil et la lettre “M” de manuel. L’affichage des différents profils préprogrammés s’effectue par l’intermédiaire des touches SPEED▲ et SPEED▼. Après avoir sélectionné le programme TEST Homme ou TEST Femme, appuyez sur la touche ENTER. Ensuite, il sera demandé au display de l’écran alphanumérique inférieur (B) Fig.2 d’introduire l’âge (entre 10 et 99 ans), sélectionnez votre âge par l’intermédiaire des touches numériques (F) Fig.3 et appuyez sur ENTER, le programme affichera à l’écran alphanumérique (B) DÉMARRAGE DE L’EXERCICE et démarrera l’exercice dans les 3 secondes du compte à rebours. Le display général supérieur des LED (A) Fig.2 affichera un cœur en train de clignoter, posez vos mains sur les senseurs de pouls (hand-grip ) qui se trouvent sur le guidon ou si la machine dispose d’une sangle télémétrique pour mesurer le pouls, posez-la sur votre poitrine. Commencez le TEST. Au bout des 12 minutes que dure le test, le display affichera une évaluation entre 1 (très insuffisant) et 5 (excellente). Le display affichera également une note 0 indiquant que le test n’a pas été réalisé correctement, la mesure de la fréquence cardiaque a été incorrectement effectuée. NOTE: Pour faire le test, il est obligatoire d’utiliser la mesure de la fréquence cardiaque en utilisant les senseurs manuels ou (hand-grip) ou la sangle de poitrine. Avant de faire le test, il convient de réaliser de petits exercices d’échauffement qui permettront d’éviter des blessures. Le nombre maximum de pulsations qu’une personne ne doit jamais dépasser est dénommé la fréquence maximale, celui-ci diminue d’ailleurs avec l’âge. La façon la plus simple pour la calculer est de soustraire le nombre 220 à l’âge en années. Pour que l’exercice soit correct, la fréquence doit se trouver entre 65 et 85 % de la fréquence cardiaque maximale et il est en outre recommandé de ne pas dépasser 85%. Si vos pulsations dépassent 85 % de la fréquence cardiaque maximale, l’écran affichera un cœur clignotant et un bip retentira 2 secondes jusqu’à ce que vos pulsations descendent des 85 % de votre fréquence cardiaque maximale. Pour des raisons de sécurité, il est recommandé de travailler sous 85% de la fréquence cardiaque maximale.
P12 - PROGRAMME FRÉQUENCE CARDIAQUE CONSTANTE (H R C). Avant de réaliser le programme, il convient de réaliser de petits exercices d’échauffement afin d’éviter d’éventuelles blessures. Ce programme permet de réaliser l’exercice à une fréquence cardiaque entre 65 et 85 % de la fréquence cardiaque maximale. La machine réglera le niveau de résistance requis pour que l’utilisateur puisse à tout moment avoir la fréquence cardiaque au niveau correspondant. Il est obligatoire d’utiliser la mesure de la fréquence cardiaque en utilisant pour ce faire, la sangle du pouls télémétrique de poitrine et de ne pas dépasser 85 % de la fréquence cardiaque maximale. Ave le moniteur allumé, le display général supérieur des LED (A) Fig.2 affichera le profil et la lettre “M” de manuel. Pour voir les différents profils préprogrammés, appuyez sur les touches SPEED▲ SPEED▼. Après avoir sélectionné le programme HRC, appuyez sur la touche ENTER. Sur le display de l’écran alphanumérique inférieur (B) il sera demandé d’introduire la valeur de la fréquence cardiaque avec laquelle l’utilisateur veut réaliser l’exercice. Sélectionnez cette valeur par l’intermédiaire des touches numériques (F) Fig.3 entre 25 et 250 P.P.M. Pulsations Par Minute) et appuyez sur ENTER.Affichera à l’écran alphanumérique (B) DÉMARRAGE DE L’EXERCICE et démarrera l’exercice dans les 3 secondes du compte à rebours. Pour éviter tous risques de blessures, il a été prévu un effort programmé pour les trois premières minutes.La vitesse au cours de la première minute est de 4 km/h, dans la seconde minute, la vitesse passe à 4,5 km/h, dans la troisième minute, la vitesse passe à 5 km/h et à partir de la quatrième minute, l’ordinateur adapte automatiquement l’effort pour maintenir le pouls près de la valeur préalablement programmée. NOTE: Si en passant à la troisième minute, le moniteur n’a reçu aucun signal de pouls, le programme s’arrête.
SK2500L SK LINE sportkoncept
21
SIGNIFICATION DES SYMBOLES.- Une série de mots ou de symboles seront affichés à l’écran dont la signification est la suivante : Cœur et point d’interrogation: La sangle pectorale n’est pas mise en place ou elle est incorrectement placée. Clignotement du cœur: Ce symbole n’est affiché que dans les programmes de tests. Le nombre maximum de battements qu’une personne ne doit jamais dépasser est appelé la fréquence cardiaque maximale qui d’ailleurs diminue avec l’âge. Pour calculer cette fréquence, il suffit de soustraire au nombre 220 l’âge de la personne concernée. Pour que l’exercice soit correct, la fréquence cardiaque doit se trouver entre 65 et 85 % de la fréquence cardiaque maximale et ne doit pas dépasser 85 %. Si vos battements dépassent 85% de la fréquence cardiaque maximale, un cœur clignotera et un sifflement retentira 2 secondes jusqu’à ce que vos battements ne dépassent plus le 85 % de la fréquence cardiaque maximale. Par mesure de sécurité, il est recommandé de travailler en dessous de 85 % de la fréquence cardiaque maximale. *0* : Ce symbole s’affiche dans les tests masculin et féminin et indique que l’utilisateur a effectué le test sans porter la ceinture pectorale. Clé fixe: Panne mécanique. Éteindre la machine et l’allumer dans les 2 minutes suivantes.La machine dispose d’un système de correction automatique des pannes, cependant, si le problème persiste, faire appel au Service Technique.
Pour toute information complémentaire et en cas de doute sur le bon état de l’une quelconque partie de la machine, l’hésitez pas à appeler le Service d’Assistance Technique (SAT) au numéro de téléphone d’Assistance Clientèle qui figure à la dernière page de cette notice.
BH SE RESERVE LE DROIT DE MODIFIER LES CARACTÉRISTIQUES DE SES PRODUITS SANS PRÈAVIS.
1. “BIENVENUE A HI POWER” 2. “APPUYEZ SUR LES FLECHES POUR SELECTIONNER LE PROFIL” 3. “APPUYEZ SUR QUICK/START POUR DEMARRER” 4. “APPUYEZ SUR ENTREE POUR COMMERCER LE PROFIL” 5. “ERREUR” 6. “CONSULTEZ LE SERVICE TECHNIQUE” 7. “INTRODUIRE VOTRE AGE <10-99>”
8. “INTRODUIRE VOTRE POIDS <30-199> KG” “INTRODUIRE VOTRE POIDS <70-400> LB”
9. “INTRODUIRE LA DUREE DE L EXERCICE <10-60> MINUTES”
10. “INTRODUIRE LA CONSIGNE DE WATTS <25-400>” “WATTS=”
11. “AGE=” 12. “INTRODUIRE LA CONSIGNE DU POULS <25-250>” 13. “POULS=” 14. “APPUYEZ SUR PAUSE POUR CONTINUER L EXERCICE. APPUYEZ SUR STOP POUR ARRETER” 15. “DUREE DE L EXERCICE=” 16. “DISTANCE PARCOURUE=” 17. “VITESSE MOYENNE=” 18. “CALORIES CONSOMMEES=”
19. “APPUYEZ SUR ENTREE POUR ACCEPTER LE PROFIL ENREGISTRE. APPUYEZ SUR RESET POUR MODIFIER LE PROFIL”
20. “UTILISEZ LES FLECHES POUR SELECTIONNER L INTENSITE DE LA COLONNE ACTIVEE. APPUYEZ SUR ENTREE POUR PASSER A LA COLONNE SUIVANTE. APPUYEZ SUR RESET POUR REVENIR AU MODE MANUEL.”
21. “BAISSEZ L INTENSITE DE L EXERCICE. VOTRE FREQUENCE CARDIAQUE EST TROP ELEVEE” 22. “RESULTAT DU TEST=”
SK2500L SK LINE sportkoncept
22
DEUTSCH
ALLGEMEINE HINWEISE.- Dieser Elektronikmonitor wurde so entwickelt, das er eine einfache und intuitive Benutzung ermöglicht. Die Texte auf der unteren Bildschirmanzeige (B) führen den Anwender durch die Trainings-Übung. Wir empfehlen jedoch, dass der sportliche Betreuer diesen Abschnitt aufmerksam liest, um sich mit dem Elektronikmonitor gut vertraut zu machen und dem Benutzer die Funktionsweise eindeutig erklären zu können. Dies ist ein Touchscreen-Monitor, für die das Drücken einer Taste ist Auflegen des Fingers auf der Taste Signalisierung auf dem Bildschirm.
PERSONALISIERUNG DES ELEKTRONIKMONITORS Um den Personalisierungsmodus des Monitors aufzurufen, ist folgendermaßen vorzugehen: Drehen Sie den Schalter (b) für die Stromversorgung auf Position (1). Er befindet sich auf der Vorderseite des Geräts unten Fig.A.
Fig.A
1) ÄNDERN DER SPRACHE.- Aus dem Hauptmenü, drücken Sie gleichzeitig die STOP-Taste und die Taste ENTER für 3 Sekunden. Nach dem Einschalten des Monitors erscheint auf dem alphanumerischen Bildschirm (B) Fig.1 das Softwarefassung, drücken Sie gleichzeitig die STOP-Taste und die Taste PAUSE für 3 Sekunden. Nun leuchtet die Sprache und Sie können mit den Tasten SPEED▲ und SPEED▼ die gewünschte Sprache anwählen. Betätigen Sie dann erneut START und Wenn Sie den Personalisierungsmodus verlassen wollen, betätigen Sie bitte die RESET-Taste und es erscheint Display der LEDs (A) der manuellen Programms. 2) WECHSEL VON km auf Meilen.- Aus dem Hauptmenü, drücken Sie gleichzeitig die STOP-Taste und die Taste ENTER für 3 Sekunden. Nach dem Einschalten des Monitors erscheint auf dem alphanumerischen Bildschirm (B) Fig.1 das Softwarefassung, drücken Sie gleichzeitig die STOP-Taste und die Taste ENTER für 3 Sekunden. Um von Kilometer auf Meilen zu wechseln, betätigen Sie bitte die ENTER-Taste bis UNITS angezeigt und rufen damit die Wechselanzeige auf. Auf dem Bildschirm (B) erscheint “KM”. Wählen Sie die Einheit für die Geschwindigkeit mit den Tasten SPEED▲ und SPEED▼ (METRISCH / Km. - ENGLISCH / Meilen) und bestätigen Sie dann mit START . Sie bitte die RESET-Taste und es erscheint Display der LEDs (A) der manuellen Programms.
ELEMENTE DES ELEKTRONIK-MONITORS (Fig.1).- Der Elektronikmonitor umfasst zwei klar unterscheidbare Bereiche: Oberer Bereich Fig.2 (A – B – C) mit der ANZEIGE . Unterer Bereich Fig.3 (E – F – G) mit der TASTATUR.
ANZEIGE.- Dieser Bereich umfasst zwei Bildschirme. (A) Oberer LED-Bildschirm, auf dem das Belastungsniveau des jeweils angewählten Programms angezeigt wird. (B) Unterer alphanumerischer Bildschirm, der den Benutzer bei den Einstellungen und der Ausführung der Übung anleitet. Der obere Bildschirm (A) zeigt die verschiedenen vorprogrammierten Belastungsprofile (Programme), die angewählt werden können, sowie während der Übung das Belastungsniveau, das jeweils geleistet wird.
SK2500L SK LINE sportkoncept
23
Der untere alphanumerische Bildschirm (B) führt den Benutzer durch die Anwahl der auszuführenden Übung und während und nach dem Training Informationen zu demselben an. Die Anzeige-LEDs (C), die sich unterhalb des alphanumerischen Bildschirms befinden, zeigen gleichzeitig GESCHWINDIGKEIT; DAUER / STRECKE; KALORIEN / WATT; PULS an. Dabei wird angegeben, welche der Informationen jeweils angezeigt wird. Die LEDs (C) zeigen während der Übung folgende Daten an: -SPEED - GESCHWINDIGKEIT: Angezeigt wird ein geschätzter Wert der linearen Geschwindigkeit mit der das Laufband des Geräts sich bewegt. Der Wert wird in Stundenkilometern angegeben (km/h). -TIME – DAUER: Während der Übung wird die Zeit angezeigt, die seit Beginn der Übung vergangen ist bzw., falls eine vorgegebene Trainingsdauer angewählt wurde, die Zeit, die noch bis zum Ende der Übung verbleibt. Die Zeit wird in Minuten und Sekunden (mm:ss) angezeigt. -DISTANCE – STRECKE: Anzeige der seit Beginn der Übung zurückgelegten Strecke. Diese Strecke wird auf der Grundlage der geschätzten linearen Geschwindigkeit (SPEED) berechnet und in Kilometern und Hektometern angezeigt. -CALORIES – KALORIEN: Es wird ein Schätzwert der bis zum jeweiligen Anzeigemoment verbrauchten Kalorien angezeigt. Diese Schätzung beruht Benutzer eingegebenen Daten zu Körpergewicht und Alter. INCLINE – STEIGUNG: Angezeigt wird das jeweilige Steigungsniveau des Geräts. Dieses verfügt über 15 Steigungsstufen (0 bis 15). Der Steigungsgrad kann durch Betätigen der Tasten INCLINE ▼ und INCLINE▲ geändert werden. Nach Beendigung der Übung geht das Gerät auf das Steigungsniveau 0 zurück. -PULSE – PULS: Anzeige des Herzrhythmus des Benutzers. Voraussetzung hierfür ist, dass dieser Wert verfügbar ist, d.h. die Handsensoren (Hand-Grip) oder das telemetrische Brustband verwendet werden. Werden beide Elemente benutzt, werden die Werte des Brustbands angezeigt. Für nähere Informationen zur Herzfrequenz siehe Abschnitt: Pulsmessung: Brustband und Hand-Grip.
TASTATUR (Fig.3).- Nachfolgend finden Sie die Funktionen der einzelnen Tasten. Siehe Fig.3. Der elektronische Monitor verfügt über eine bedienerfreundliche Tastatur. Sie umfasst die numerischen Tasten (F) sowie die Funktionstasten (G). - Numerische Tasten (F)-(1- 0) Mit diesen Tasten werden die Daten eingegeben, die der Monitor abfragt. - Funktionstasten (G).- reset; speed�; speed-; enter; pause; stop;incline▲; incline▼; quick/start. Mit diesen Tasten wählt man die auszuführende Übung an, gibt die erforderlichen Daten ein, steuert das Widerstandsniveau der Übung und beendet diese.
-reset.- Annullierungstaste. Sie wird zum Loschen der Daten benutzt, die bei der Anwahl eines Programms in den Monitor eingegeben werden.
-Speed▼. Diese Taste reduziert die Geschwindigkeit. Während der Übung wird die Geschwindigkeit mit dieser Taste um ein Zehntel Stundenkilometer reduziert. Solange man die Taste gedrückt hält, wird die Geschwindigkeitsverringerung fortgesetzt. Während der Anwahl der vorprogrammierten Profile wird diese Taste benutzt, um die Bildschirmanzeige des jeweils vorherigen Profils aufzurufen.
-Speed▲. Diese Taste erhöht die Geschwindigkeit. Während der Übung wird die Geschwindigkeit mit dieser Taste um ein Zehntel Stundenkilometer erhöht. Solange man die Taste gedrückt hält, wird die Geschwindigkeitserhöhung fortgesetzt. Während der Anwahl der vorprogrammierten Profile wird diese Taste benutzt, um die Bildschirmanzeige des jeweils nächsten Profils aufzurufen. -enter.- Anwahl- und Bestätigungstaste. Bei der Anwahl eines vorprogrammierten Profils dient sie dazu ein solches Profil anzuwählen, die einzugebenden Daten zu bestätigen und die Übung zu beginnen. Beim Programmieren des Anwenderprofils dient sie darüber hinaus dazu, das der jeweiligen Minute entsprechende Belastungsniveau zu bestätigen.
-pause.- Pausentaste. Wird diese Taste während der Übung betätigt, wird diese unterbrochen. Das Chronometer für die Übungsdauer wird gestoppt. Um es wieder in Gang zu setzen, betätigen Sie erneut die Taste pause. Wird vom Pausemodus aus die STOP-Taste betätigt, wird die Übung beendet. Der Pausenmodus ist zeitlich auf fünf Minuten begrenzt. Nach Ablauf dieser Zeit wird die Übung beendet. Wird vom Pause-Modus aus die STOP-Taste betätigt, gilt die Übung als beendet.
SK2500L SK LINE sportkoncept
24
-stop.- Stoptaste. Wird diese Taste während der Übung betätigt, wird diese beendet und das Laufband hält an. Es wird eine Zusammenfassung der Daten der Übung angezeigt und anschließend der Anfangsbildschirm angezeigt.
-Incline▼.- Taste zum Reduzieren der Steigung. Während der Übung wird mit dieser Taste die Steigung des Geräts um einen Grad verringert. Hält man die Taste gedrückt, wird die Reduzierung der Steigung fortgesetzt.
-Incline▲.- Taste zum Erhöhen der Steigung. Während der Übung wird mit dieser Taste die Steigung des Geräts um einen Grad erhöht. Hält man die Taste gedrückt, wird die Erhöhung der Steigung fortgesetzt..
-quick/start.- Sofortstart-Taste. Wenn die LED dieser Taste blinkt, wird durch Betätigen dieser Taste nach Ablauf von 3 Sekunden, die in Rückwärtszählung angezeigt werden, die Übung im manuellen Modus gestartet.
USB-ANSCHLUSS (Fig.3).- Dieses Gerät verfügt über eines Port-USB (D) für die mobile Ladung.
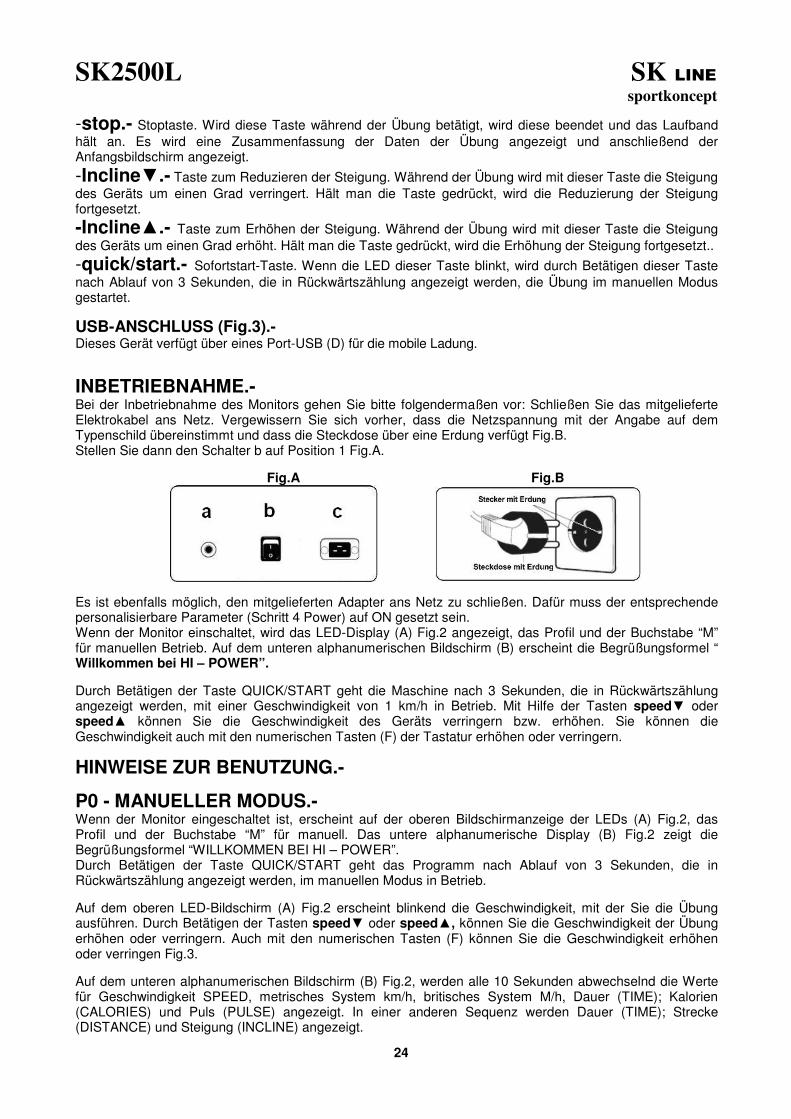
INBETRIEBNAHME.- Bei der Inbetriebnahme des Monitors gehen Sie bitte folgendermaßen vor: Schließen Sie das mitgelieferte Elektrokabel ans Netz. Vergewissern Sie sich vorher, dass die Netzspannung mit der Angabe auf dem Typenschild übereinstimmt und dass die Steckdose über eine Erdung verfügt Fig.B. Stellen Sie dann den Schalter b auf Position 1 Fig.A.
Fig.A Fig.B
Es ist ebenfalls möglich, den mitgelieferten Adapter ans Netz zu schließen. Dafür muss der entsprechende personalisierbare Parameter (Schritt 4 Power) auf ON gesetzt sein. Wenn der Monitor einschaltet, wird das LED-Display (A) Fig.2 angezeigt, das Profil und der Buchstabe “M” für manuellen Betrieb. Auf dem unteren alphanumerischen Bildschirm (B) erscheint die Begrüßungsformel “ Willkommen bei HI – POWER”. Durch Betätigen der Taste QUICK/START geht die Maschine nach 3 Sekunden, die in Rückwärtszählung angezeigt werden, mit einer Geschwindigkeit von 1 km/h in Betrieb. Mit Hilfe der Tasten speed▼ oder speed▲ können Sie die Geschwindigkeit des Geräts verringern bzw. erhöhen. Sie können die Geschwindigkeit auch mit den numerischen Tasten (F) der Tastatur erhöhen oder verringern.
HINWEISE ZUR BENUTZUNG.-
P0 - MANUELLER MODUS.- Wenn der Monitor eingeschaltet ist, erscheint auf der oberen Bildschirmanzeige der LEDs (A) Fig.2, das Profil und der Buchstabe “M” für manuell. Das untere alphanumerische Display (B) Fig.2 zeigt die Begrüßungsformel “WILLKOMMEN BEI HI – POWER”. Durch Betätigen der Taste QUICK/START geht das Programm nach Ablauf von 3 Sekunden, die in Rückwärtszählung angezeigt werden, im manuellen Modus in Betrieb. Auf dem oberen LED-Bildschirm (A) Fig.2 erscheint blinkend die Geschwindigkeit, mit der Sie die Übung ausführen. Durch Betätigen der Tasten speed▼ oder speed▲, können Sie die Geschwindigkeit der Übung erhöhen oder verringern. Auch mit den numerischen Tasten (F) können Sie die Geschwindigkeit erhöhen oder verringen Fig.3. Auf dem unteren alphanumerischen Bildschirm (B) Fig.2, werden alle 10 Sekunden abwechselnd die Werte für Geschwindigkeit SPEED, metrisches System km/h, britisches System M/h, Dauer (TIME); Kalorien (CALORIES) und Puls (PULSE) angezeigt. In einer anderen Sequenz werden Dauer (TIME); Strecke (DISTANCE) und Steigung (INCLINE) angezeigt.

SK2500L SK LINE sportkoncept
25
Durch Betätigen der STOP-Taste oder der NOT-AUS-TASTE (G) auf dem unteren Teil der Monitorbildschirme, wird das Programm unterbrochen und das Display des unteren, alphanumerischen Bildschirms (B) Fig.2 gibt den Durchschnitt der Werte für TRAININGSDAUER (HH:MM:SS); ZURÜCKGELEGTE STRECKE Km GESCHWINDIGKEIT (km./h); und KALORIENVERBRAUCH (Kcal.) an, die während der Übung erreicht wurden. Diese Werte werden zwei Mal in einem Abstand von fünf Sekunden angezeigt. Wenn während der Zeit, in der die Durchschnittswerte angezeigt werden, keine Taste betätigt wird, die Übung nicht fortgesetzt und die STOP-Taste betätigt wird, erfolgt ein Wechsel auf den manuellen Modus.
PROGRAMM-MODUS.- Der Monitor verfügt über: 1 Programm für MANUELLES Profil; 8 PROGRAMME mit vorprogrammierten Profilen, ein programmierbares Anwenderprofil (USER), TEST-Programme für Männer und Frauen sowie ein Programm für konstanten Herzrhythmus ( H.R.C. ).
P1 - P8 VORPROGRAMMIERTE KONFIGURATIONEN.- Wenn der Monitor eingeschaltet ist, erscheint auf dem oberen LED-Display (A) Fig.2 das Profil und der Buchstabe “M” für manuell. Um die verschiedenen vorprogrammierten Profile anzuzeigen, benutzen Sie bitte die Tasten SPEED▲ und SPEED▼. Wenn Sie ein bestimmtes Profil ausgewählt haben, betätigen Sie bitte die ENTER-Taste. Auf dem oberen LED-Display (A) werden Sie aufgefordert, ein Alter zwischen 10 und 99 Jahren einzugeben. Geben Sie Ihr Alter mit den numerischen Tasten (F) Fig.3 ein und betätigen Sie ENTER. Anschließend wird nach Ihrem Körpergewicht gefragt (zwischen 30 und 199kg). Geben Sie dieses mit den numerischen Tasten (F) Fig.3 ein und betätigen Sie ENTER. Nun sollen Sie die Dauer der Übung eingeben (zwischen 10 und 60 Minuten). Geben Sie auch diesen Wert mit den numerischen Tasten (F) Fig.3 ein und betätigen Sie ENTER. Damit beginnt Ihre Übung. dann erscheint der alphanumerische Bildschirm (B) ÜBUNGSBEGINN und nach 3 Sekunden, die in Rückwärtszählung angezeigt werden, beginnt die Übung mit einer Geschwindigkeit von 2km/h. Innerhalb jedes einzelnen vorprogrammierten Profils stehen verschiedene Schwierigkeitsniveaus zur Verfügung. Die Auswahl eines dieser Profile erfolgt während der Übung mit Hilfe der Tasten SPEED▲ und SPEED▼. Wenn Sie das Programm, mit dem Sie die Übung ausgeführt haben, beendet haben, berechnet der Monitor die Durchschnittswerte für die ausgeführte Übung und zeigt diese auf dem unteren alphanumerischen Bildschirm (B) Fig.2 an. Betätigt man die STOP-Taste, wird das Programm unterbrochen und auf dem unteren alphanumerischen Bildschirm (B) Fig.2 erscheinen die ¨Durchschnittswerte für ÜBUNGSDAUER, STRECKE, GESCHWINDIGKEIT, VERBRAUCHTE KALORIEN, die während der Übung erreicht wurden. Sie werden zwei Mal in 5-sekündigem Abstand angezeigt. Wenn während der Zeit, in der die Durchschnittswerte angezeigt werden, keine Taste betätigt wird und dann die STOP-Taste gedrückt wird, erfolgt ein Wechsel auf das manuelle Programm.
P9 - BENUTZERPROGRAMM (USER).- Wenn der Monitor eingeschaltet ist, erscheint auf dem oberen LED-Display (A) Fig.2 das Profil und der Buchstabe “M” für manuell. Um die verschiedenen vorprogrammierten Profile anzuzeigen, benutzen Sie bitte die Tasten SPEED▲ und SPEED▼. Wenn Sie das Programm 9 (USER) ausgewählt haben, betätigen Sie bitte die ENTER-Taste. Auf dem oberen LED-Display (A) Fig.2 werden Sie aufgefordert, ein Alter zwischen 10 und 99 Jahren einzugeben. Geben Sie Ihr Alter mit den numerischen Tasten (F) Fig.3 ein und betätigen Sie ENTER. (Wird ein Wert außerhalb der angegebenen Ziffern eingegeben, wird der nächstliegende Wert gewählt). Anschließend wird nach Ihrem Körpergewicht gefragt (zwischen 30 und 199 kg ). Geben Sie dieses mit den numerischen Tasten (F) Fig.3 ein und betätigen Sie ENTER. Nun sollen Sie die Dauer der Übung eingeben (zwischen 10 und 60 Minuten). Geben Sie auch diesen Wert mit den numerischen Tasten (F) ein und betätigen Sie ENTER und anschließend RESET. Jetzt können Sie beginnen, auf dem LED-Display (A) das Widerstandsprofil zu erstellen, mit dem Sie die Übung ausführen wollen. Anschließend ENTER. Wiederholen Sie dies, bis die gewünschte Programmgraphik vollständig ist. Das zu erstellende Profil ist in 21 Schritte unterteilt.
SK2500L SK LINE sportkoncept
26
Wenn Sie sich beim Erstellen einer der einzelnen Schritte geirrt haben, betätigen Sie RESET. Damit gehen Sie auf den vorherigen Schritt zurück. Betätigen Sie ENTER und auf dem alphanumerischen Bildschirm (B) erscheint ÜBUNGSBEGINN und nach 3 Sekunden, die in Rückwärtszählung angezeigt werden, beginnt die Übung. Wenn Sie das Programm, mit dem Sie die Übung ausgeführt haben, beendet haben, berechnet der Monitor die Durchschnittswerte für die ausgeführte Übung und zeigt diese auf dem unteren alphanumerischen Bildschirm (B) Fig.2 an. Betätigt man die STOP-Taste, wird das Programm unterbrochen und auf dem unteren alphanumerischen Bildschirm (B) Fig.2 erscheinen die ¨Durchschnittswerte für ÜBUNGSDAUER, STRECKE, GESCHWINDIGKEIT, VERBRAUCHTE KALORIEN, die während der Übung erreicht wurden. Sie werden zwei Mal in 5-sekündigem Abstand angezeigt. Wenn während der Zeit, in der die Durchschnittswerte angezeigt werden, keine Taste betätigt wird und dann die STOP-Taste gedrückt wird, erfolgt ein Wechsel auf das manuelle Programm.
P10 - P11 TESTPROGRAMME MÄNNER-FRAUEN.- Ziel des Tests ist die Bewertung der physischen Kondition des Benutzers. Der Unterschied zwischen den Programmen für Männer und Frauen liegt in dem Watt-Wert, der für Männer auf 150W, für Frauen auf 100W eingestellt ist. Wenn der Monitor eingeschaltet ist, zeigt das obere LED-Display (A) Fig.2 das Profil und den Buchstaben “M” für manuell. Um die verschiedenen vorprogrammierten Profile anzuzeigen, benutzen Sie bitte die Tasten SPEED▲ und SPEED▼. Nach der Anwahl des TEST-Programms für Männer oder für Frauen, betätigen Sie bitte die ENTER-Taste. Der untere alphanumerische Bildschirm (B) Fig.2 fragt dann nach dem Alter (zwischen 10 und 99 Jahren). Wählen Sie das Alter mit den numerischen Tasten (F) Fig.3 und betätigen Sie ENTER. Auf dem alphanumerischen Bildschirm erscheint ÜBUNGSBEGINN und nach 3 Sekunden, die in Rückwärtszählung angezeigt werden, beginnt die Übung. Auf dem oberen LED-Bildschirm (A) Fig.2 erscheint ein blinkendes Herz. Legen Sie die Hände auf die Pulssensoren (Handgrip) im Lenker. Wenn Sie über ein telemetrisches Pulsmessband verfügen, legen Sie dieses Um die Brust. Der TEST beginnt. Nach Ablauf der 12 Minuten Testzeit erscheint eine Bewertung zwischen 1 (sehr schlecht) und 5 (hervorragend). Wenn als Bewertung die Ziffer 0 erscheint, wurde der Test nicht korrekt ausgeführt, die Herzrhythmus-Messvorrichtung wurde nicht richtig benutzt. ANMERKUNG: Für die Ausführung des Tests ist die Benutzung der Herzrhythmusmessung zwingend notwendig. Dazu sind die manuellen Sensoren (Hand-Grip) oder das Brustband zu benutzen. Es ist ratsam, sich vor dem Test aufzuwärmen, um Verletzungen vorzubeugen. Der maximale Pulswert, den eine Person niemals übersteigen sollte, heißt maximaler Rhythmus und nimmt mit dem Alter ab. Eine einfache Berechnungsformel besteht darin, von der Zahl 220 das Alter in Jahren abzuziehen. Damit die Übung korrekt ist, muss sie sich innerhalb des Bereichs zwischen 65% und 85% des maximalen Herzrhythmus befinden. Es wird empfohlen, den Wert von 85% nicht zu übersteigen. Sollte Ihr Pulswert 85% des maximalen Herzrhythmus übersteigen, erschein ein blinkendes Herzsymbol und ein 2-sekündiges akustisches Signal, bis Ihr Pulswert wieder unter 85% des maximalen Herzrhythmus absinkt. Aus Sicherheitsgründen wird empfohlen, unterhalb von 85% des maximalen Herzrhythmus zu arbeiten.
P12 - PROGRAMM KONSTANTER HERZRHYTHMUS (H R C).- Vor der Ausführung dieses Programms ist es empfehlenswert, sich aufzuwärmen, um Verletzungen vorzubeugen. Mit diesem Programm kann die Übung bei einem konstanten Herzrhythmus (zwischen 65 und 85% des maximalen Herzrhythmus) ausgeführt werden. Das Gerät passt das Widerstandsniveau so an, dass der Herzrhythmus des Benutzers stets das angewählte Niveau einhält. Dazu muss die Messung des Herzrhythmus mittels dem telemetrischen Brustband zwingend ausgeführt werden. 85% des maximalen Herzrhythmus dürfen nicht überschritten werden.
SK2500L SK LINE sportkoncept
27
Wenn der Monitor eingeschaltet ist, erscheint auf dem oberen LED-Display (A) Fig.2 das Profil und der Buchstabe “M” für manuell. Um die verschiedenen vorprogrammierten Profile anzuzeigen, benutzen Sie bitte die Tasten SPEED▲ und SPEED▼. Wenn Sie das HRC-Programm ausgewählt haben, betätigen Sie bitte die ENTER-Taste. Auf dem unteren alphanumerischen Bildschirm (B) werden Sie aufgefordert, den gewünschten Herzrhythmus einzugeben, mit dem Sie die Übung durchführen wollen. Geben Sie diesen Wert über die numerischen Tasten (F) Fig.3 einen Wert zwischen 25 und 250 P.P.M (Pulschläge pro Minute) ein und betätigen Sie ENTER. auf dem alphanumerischen Bildschirm (B) erscheint ÜBUNGSBEGINN und nach 3 Sekunden, die in Rückwärtszählung angezeigt werden, beginnt die Übung. Während der ersten drei Minuten ist die Belastung des Programms vorprogrammiert, um mögliche Verletzungen zu vermeiden. Während der ersten Minute liegt die Geschwindigkeit bei 4 km/h, in der zweiten bei 4,5 km/h, in der dritten bei 5 km/h. Ab der vierten Minute passt der Computer die Belastung automatisch so an, dass der Puls annähernd auf dem zuvor programmierten Wert gehalten wird. ANMERKUNG: Wenn bei Beginn der dritten Minute der Monitor kein Pulssignal erhalten hat, wird das Programm unterbrochen.
ERLÄUTERUNG DER SYMBOLE.- Auf dem Bildschirm können eine Reihe von Symbolen oder Begriffen erscheinen, die folgende Bedeutung haben: Herzsymbol und Fragezeichen: Der Brustgurt wurde nicht oder nicht korrekt angelegt. Blinkendes Herzsymbol: Dieses Symbol erscheint nur in den Testprogrammen Die höchste Pulszahl, die eine Person niemals überschreiten sollte, heißt maximaler Herzrhythmus. und nimmt mit dem Alter ab. Er lässt sich durch Abziehen des Lebensalters von 220 einfach berechnen. Damit die Übung korrekt ist, muss zwischen 65% und 85% des aximalen Herzrhythmus liegen, wobei 85% nicht überschritten werden sollen. Wenn Ihr Pulsschlag 85% des maximalen Herzrhythmus übersteigt, erscheint das Symbol des blinkenden Herzens und ein zweisekündiger Pfeifton,bis die Pulszahl wieder unter 85% Ihres maximalen Herzrhythmus absinkt. Aus Sicherheitsgründen empfehlen wir, unter 85% des maximalen Herzrhythmus zu arbeiten. 0* : Dieses Symbol erscheint in den Testprogrammen für Männer bzw. Frauen und bedeutet, dass Sie den Test ausgeführt haben, ohne sich das Brustband umzulegen. Schraubenschlüssel: Mechanische Störung. Schalten Sie das Gerät aus und nach 2 Minuten wieder ein. Die Maschine verfügt über eine automatische Störungskorrektur. Sollte das Problem weiter bestehen, setzen Sie sich bitte mit dem Kundendienst in Verbindung.
SK2500L SK LINE sportkoncept
28
Sollten über den Zustand einer Komponente Zweifel bestehen, setzen Sie sich bitte mit dem (TKD) Technischen Kundendienst in Verbindung, indem Sie das Servicetelefon anrufen (siehe letzte Seite des Handbuchs).
BH BEHALT SICH DAS RECHT VOR, ÄNDERUNGEN DER MODELL-ANGABEN OHRE VORHERIGE ANKÜNDIGUNG VORZUNEHMEN.
1. “WILLKOMMEN BEI HI POWER” 2. “PROFIL MIT PFEILTASTEN ANWAEHLEN” 3. “UM ZU BEGINNEN. QUICK/START BETAETIGEN” 4. “UM PROFIL ZU STARTEN. ENTER BETAETIGEN” 5. “FEHLER” 6. “TECHNISCHEN KUNDENDIENST KONSULTIEREN” 7. “ALTER EINGEBEN <10-99>”
8. “GEWICHT EINGEBEN <30-199> KG” “GEWICHT EINGEBEN <70-400> LB”
9. “DAUER DER UEBUNG EINGEBEN <10-60> MINUTEN”
10. “WATTWERT EINGEBEN <25-400>” “WATTS=”
11. “ALTER=” 12. “PULSWERT EINGEBEN <25-250>” 13. “PULS=” 14. “UM DIE UEBUNG FORTSETZEN ZU KOENNEN. PAUSE DRUECKEN. ZUM BEENDEN STOP BETAETIGEN” 15. “DAUER DER UEBUNG=” 16. “ZURUECKGELEGTE STRECKE=” 17. “DURCHSCHNITTSGESCHWINDIGKEIT=” 18. “KALORIENVERBRAUCH=”
19. “ZUM BESTAETIGEN DES GESPEICHERTEN PROFILS ENTER BETAETIGEN. ZUM MODIFIZIEREN DES PROFILS RESET BETAETIGEN.”
20. “DIE INTENSITAET DER AKTIVEN SPALTE MIT PFEILTASTEN ANWAEHLEN. UM DIE NAECHSTE SPALTE ANZUWAEHLEN. ENTER BETAETIGEN. UM AUF MANUELLEN MODUS ZU WECHSELN. RESET BETAETIGEN”
21. “VERRINGERN SIE DIE INTENSITAET DER UEBUNG. IHR HERZRHYTHMUS IST ZU SCHNELL” 22. “DAS TESTERGEBNIS LAUTET=”
SK2500L SK LINE sportkoncept
29
PORTUGUÊS
INDICAÇÕES GERAIS.- Este monitor electrónico está desenhado para poder ser utilizado de forma simples e intuitiva. Os textos que aparecem no ecrã inferior (B) guiarão o usuário durante a realização do exercício. No entanto, recomendamos que o preparador físico leia atentamente esta secção para assim poder conhecer profundamente o monitor electrónico e poder mostrar ao usuário o seu funcionamento de forma efectiva. Este ecrã monitor de é sensível ao toque; para carregar numa tecla, basta posicionar o dedo na indicação dessa tecla no ecrã.
PERSONALIZAÇÃO DO MONITOR ELECTRÓNICO Para entrar no modo de personalização do monitor é necessário seguir os seguintes passos: Ponha o interruptor de alimentação eléctrica (b) situado na parte dianteira inferior da máquina, na posição (1), Fig.A.
Fig.A
1) MUDANÇA DE IDIOMA. No menu principal, pressione tanto a tecla STOP eo botão ENTER durante 3 segundos. Aparecer-lhe-á no ecrã alfanumérico (B) Fig.1, a versão de software; pressione tanto a tecla STOP eo botão PAUSE durante 3 segundos. Seleccione o seu idioma com as teclas SPEED▲ e SPEED▼, aperte a tecla START. Se desejar sair do modo personalização aperte a tecla RESET e poderá ver no display Matriz de LEDs (A) o programa manual. 2) MUDANÇA DE Km. PARA Milhas. No menu principal, pressione tanto a tecla STOP eo botão ENTER durante 3 segundos. Aparecer-lhe-á no ecrã alfanumérico (B) Fig.1, a versão de software; pressione tanto a tecla STOP eo botão ENTER durante 3 segundos. Para mudar de Km. para Milhas, carregue na tecla ENTER até UNITS aparece e acederá à mudança; ao visualizar no ecrã (B) “KM”, seleccione a medida da sua velocidade com as teclas SPEED▲ e SPEED▼ (METRIC / Km. - ENGLISH / Milhas); carregue na tecla START. Se desejar sair do modo personalização aperte a tecla RESET e poderá ver no display Matriz de LEDs (A) o programa manual.
ELEMENTOS DO MONITOR ELECTRÓNICO (Fig.1).- O monitor electrónico está composto por duas zonas bem diferenciadas; A zona superior Fig.2 (A - B – C) está a VISUALIZAÇÃO. Na zona inferior Fig.3 (E – F – G) está o TECLADO.
VISUALIZAÇÃO.- Esta zona está composta por dois ecrãs. (A) Display Matriz de LEDs superior, onde se monitoriza o nível de esforço realizado no programa seleccionado em cada momento. (B) Display do Ecrã alfanumérico inferior, que guia o usuário durante a selecção e realização do exercício. O ecrã superior (A) mostrará os diferentes perfis previamente programados de esforço (programas) que podemos seleccionar e, durante o exercício, o nível de esforço que se realiza em cada momento. O ecrã alfanumérico inferior (B) encarrega-se de guiar o usuário durante a selecção do exercício a realizar e de mostrar informação sobre o exercício durante e depois da sua realização. Os LEDs indicadores (C) que se encontram por baixo do ecrã alfanumérico mostram simultaneamente a VELOCIDADE; TEMPO / DISTÂNCIA; CALORIAS / WATTS; PULSAÇÃO e indicam qual é a informação que se está a mostrar em cada momento do exercício. Os dados que se mostram nos LEDs (C) durante a realização do exercício são os seguintes:
SK2500L SK LINE sportkoncept
30
-SPEED - VELOCIDADE: Mostra-se uma estimativa da velocidade linear à qual se deslocaria a banda da máquina. O valor mostra-se em quilómetros por hora (Km./h). -TIME – TEMPO: Durante o exercício mostra-se o tempo transcorrido desde que este se começou ou, no caso de ter seleccionado um tempo de exercício previamente definido, o tempo que falta para acabar o exercício. O tempo aparece em minutos e segundos (mm:ss).
-DISTANCE – DISTÂNCIA: Mostra-se a distância que percorremos desde o início do exercício. A distância é calculada tendo em conta a estimativa da velocidade linear (SPEED) e as unidades são os quilómetros e hectómetros. -CALORIES – CALORIAS: Mostra-se uma estimativa das calorias que foram queimadas até esse momento. A estimativa realiza-se tendo em conta a energia que se está a realizar em cada momento e os dados de peso e idade introduzidos pelo usuário. -INCLINE – INCLINAÇÃO: Mostra o nível de inclinação que tem a máquina em cada momento. A máquina tem 15 níveis de inclinação (0 a 15). O grau de inclinação poderá mudar-se actuando sobre as teclas INCLINE ▼ e INCLINE▲. Ao finalizar o exercício a máquina voltará ao nível de inclinação 0. -PULSE – PULSAÇÃO: Mostra-se a frequência cardíaca do usuário, sempre que esta informação esteja acessível através dos sensores de mãos (Hand – Grip) ou da banda telemétrica de peito; quando se utilizam os dois juntos, dá-se prioridade à banda telemétrica de peito. Para mais informação sobre a frequência cardíaca, consultar a secção: Medida da pulsação; banda de peito e hand-grip.
TECLADO (Fig.3).- A seguir enumera-se a função de cada tecla. Ver Fig.3. O monitor electrónico inclui um teclado simples de usar. Este teclado está constituído pelas, teclas numéricas (F) e teclas função (G). - Teclas numéricas (F) .- ( 1 – 0 ) utilizam-se para introduzir os dados que o monitor solicite. - Teclas de função (G) .- reset; speed▼; speed▲; enter; pause; stop; incline▲; incline▼; quick / start. Estas teclas utilizam-se para seleccionar o exercício a realizar, introduzir os dados solicitados, controlar o nível de resistência do exercício e finalizar este último.
-reset.- Tecla de anulação. Utiliza-se para apagar os dados que se introduzem no monitor no momento de seleccionar um programa.
-Speed▼.- Tecla de diminuição da velocidade. Durante a realização do exercício esta tecla diminui a velocidade da máquina uma décima de quilómetro por hora. Se mantiver apertada esta tecla, a velocidade continuará diminuindo. Durante a selecção dos perfis previamente programados pode ser utilizada para mostrar no ecrã o perfil anterior ao mostrado.
-Speed▲.- Tecla de incremento de velocidade. Durante a realização do exercício esta tecla incrementa a velocidade da máquina uma décima de quilómetro por hora. Se mantiver esta tecla apertada a velocidade continuará aumentando. Durante a selecção dos perfis previamente programados pode ser utilizada para mostrar no ecrã o perfil seguinte ao mostrado.
-enter.- Tecla de selecção e validez. Utiliza-se durante a selecção dum perfil previamente programado para seleccioná-lo, dar validez ao dados que irão introduzir-se e começar o exercício. Durante a programação do perfil do usuário também se utiliza para dar validez ao nível de esforço correspondente a cada minuto. -pause.- Tecla de pausa. Se for apertada durante a realização do exercício, este será interrompido, detendo o cronómetro de duração de exercício. Para que o cronometro de duração de exercício volte a funcionar, aperte novamente a tecla pause. Se, estando em modo pausa, apertar a tecla STOP, o exercício terminará. O tempo limite do modo pausa é de cinco minutos; depois de transcorrido este tempo o exercício terminará.
-Incline▼.- Tecla de diminuição do nível de inclinação. Durante a realização do exercício esta tecla diminui um grau a inclinação da máquina. Se mantiver apertada esta tecla a inclinação continuará diminuindo.
SK2500L SK LINE sportkoncept
31
-Incline▲.- Tecla de incremento do nível de inclinação. Durante a realização do exercício esta tecla aumenta um grau a inclinação da máquina. Se mantiver apertada esta tecla a inclinação continuará aumentando.
-quick/start.- Tecla de inicio imediato. Sempre que o LED da tecla esteja a piscar, ao apertar esta tecla e transcorridos 3 segundos, contados de forma decrescente, o exercício começará em modo manual.
PORTA USB (Fig.3).- Esta máquina possui no monitor uma porta USB (D) para a carga do celular.
COLOCAÇÃO EM FUNCIONAMENTO.- Para a colocação em funcionamento do monitor: Ligar o cabo eléctrico fornecido com a máquina à tomada da rede eléctrica, comprovando que a voltagem corresponde com a especificada na máquina; também deverá comprovar que a tomada tem ligação à terra Fig.B. A seguir, ponha o interruptor (b) na posição 1 Fig.A.
Fig.A Fig.B
Depois de ter o monitor aceso, o display de matriz de LEDs (A) Fig.2, mostrar-lhe-á o perfil e a letra “M” de manual e o display do ecrã alfanumérico inferior (B) mostrar-lhe-á a saudação de boas-vindas “BEM VINDO A HI-POWER”. Apertando a tecla QUICK/START começará a funcionar o programa em manual, transcorridos 3 segundos, indicados de forma decrescente, com uma velocidade de 1 Km/h. e apertando as teclas speed▼ ou speed▲, poderá aumentar ou diminuir a velocidade da máquina. Também poderá aumentar ou diminuir a velocidade com as teclas numéricas (F) do teclado .
INSTRUÇÕES DE FUNCIONAMENTO.-
P0 - MODO MANUAL.- Depois de aceso, o monitor mostrar-lhe-á no display de matriz de LEDs superior (A) Fig.2 o perfil e a letra “M” de manual e no display do ecrã alfanumérico inferior (B) Fig.2 mostrar-lhe-á a saudação de boas-vindas “BEM VINDO A HI-POWER”. Apertando a tecla QUICK / START e depois de 3 segundos, contados de forma decrescente, começará a funcionar o programa, em manual. O display de matriz de LEDs superior (A) Figura 2 indicar-lhe-á de forma intermitente a velocidade á qual está a realizar o exercício. Apertando as teclas speed▼ ou speed▲, poderá aumentar ou diminuir entre os vinte níveis de velocidade do exercício. Também poderá aumentar ou diminuir a velocidade com as teclas numéricas (F) do teclado Fig.3. O display do ecrã alfanumérico inferior (B) Fig.2 irá mostrando-lhe cada 10 segundos alternadamente: Os valores de: A velocidade SPEED; Sistema Métrico Km./h, Sistema Britânico Mª/h; O tempo (TIME); Calorías (CALORIES) e Pulsação (PULSE) e noutra sequência mostrar-lhe-á; O tempo (TIME); Distância (DISTANCE) e Inclinação (INCLINE). Apertando a tecla STOP ou apertando a tecla de EMERGÊNCIA (G), situada na parte inferior dos ecrãs do monitor, interrompe-se o programa e o display do ecrã alfanumérico inferior (B) Fig.2, informar-lhe-á sobre a média dos valores de TEMPO DE EXERCÍCIO (HH:MM:SS); DISTÂNCIA PERCORRIDA (Km./h); VELOCIDADE MÉDIA (Km./h); CALORIAS CONSUMIDAS (Kcal); que realizou durante o exercício, mostrando-os duas vezes cada cinco segundos. Se durante o tempo em que transcorre a informação dos valores médios, não for tocada nenhuma tecla, não se fizer exercício e apertar-se a tecla STOP, passar-se-á ao programa manual.

SK2500L SK LINE sportkoncept
32
MODO PROGRAMAS.- O monitor possui:1 programa de perfil MANUAL; 8 PROGRAMAS com perfis previamente programados; um perfil programável pelo usuário (USER); programas TESTE masculino e TESTE feminino; e programa do ritmo cardíaco constante (H.R.C).
P1 - P8 PROGRAMAS PRÉ-PROGRAMADOS.- Estando o monitor aceso, o display de matriz de LEDs superior (A) Fig.2, mostrar-lhe-á o perfil e a letra “M” de anual. Para poder ver os diferentes perfis previamente programados utilizam-se as teclas SPEED▲ e SPEED▼. Depois de ter seleccionado um perfil em concreto, aperte a tecla ENTER. O display de matriz de LEDs superior (A) pedir-lhe-á a idade entre ( 10 e 99 anos ); seleccione a sua idade com as teclas numéricas (F) Fig.3; aperte ENTER. A seguir, pedir-lhe-á o peso entre (30 e 199Kg). Seleccione o seu peso com as teclas numéricas (F) Fig.3; aperte ENTER. A seguir, pedir-lhe-á o tempo de duração do exercício entre (10 e 60 minutos); seleccione o tempo com as teclas numéricas (F) Fig.3; aperte ENTER e começará o seu exercício. mostrar-lhe-á no ecrã alfanumérico (B) INÍCIO DO EXERCÍCIO e o seu exercício começará transcorridos 3 segundos, indicados de forma descendente com uma velocidade de 2Km/h. Dentro de cada perfil previamente programado o usuário possui níveis de dificuldade diferentes; para seleccionar qualquer um deles só terá que utilizar as teclas SPEED▲ e SPEED▼ durante a realização do exercício. Depois de ter terminado o programa no qual esteve a realizar o exercício, o monitor ter-lhe-á calculado a média dos valores nos quais realizou o exercício e estes aparecerão no ecrã alfanumérico inferior (B) Fig.2. Apertando a tecla STOP interromper-se-á o programa e o display do ecrã alfanumérico inferior (B) Fig.2, informar-lhe-á da média dos valores TEMPO DE EXERCÍCIO; DISTÂNCIA PERCORRIDA; VELOCIDADE MÉDIA; CALORIAS CONSUMIDAS, que foram realizados durante o exercício, mostrando-os duas vezes cada cinco segundos. Se durante o tempo em que transcorre a informação dos valores médios, não for tocada nenhuma tecla, e for apertada a tecla STOP, passar-se-á ao programa manual.
P9 - PROGRAMA USUÁRIO (USER).- Estando o monitor aceso, o display de matriz de LEDs superior (A) Fig.2, mostrar-lhe-á o perfil e a letra “M” do manual; para poder ver os diferentes perfis previamente programados utilizam-se as teclas SPEED▲ e SPEED▼. Depois de ter seleccionado o programa 9 (USER), aperte a tecla ENTER. No display de matriz de LEDs (A) Fig.2 pedir-lhe-á a idade entre (10 e 99 anos) seleccione a sua idade com as teclas numéricas (F) Fig.3, (se introduzir um valor fora dos dois algarismos, aparecer-lhe-á o valor mais próximo). Aperte ENTER. A seguir, pedir-lhe-á o peso entre (30 e 199Kg); seleccione o seu peso com as teclas numéricas (F) Fig.3 e aperte ENTER. A seguir, pedir-lhe-á o tempo de duração do exercício entre (10 e 60 minutos); seleccione o tempo com as teclas numéricas (F) e aperte ENTER; a seguir aperte a tecla RESET e poderá começar a desenhar o perfil de resistência que deseja no display de matriz de LEDs (A). A seguir aperte a tecla ENTER e assim sucessivamente até completar o gráfico do programa que deseja. O perfil a desenhar está subdividido em 21 passos. Se houver um engano ao gravar algum passo, aperte a tecla RESET e voltará ao passo anterior. A seguir, aperte a tecla ENTER e mostrar-lhe-á o ecrã alfanumérico (B) INICIO DE EXERCÍCIO e começará o seu exercício transcorridos 3 segundos, indicados de forma decrescente. Depois de ter terminado o programa no qual esteve a realizar o exercício o monitor terá calculado a média dos valores nos quais realizou o exercício e mostrá-los-á no ecrã alfanumérico (B) Fig.2. Apertando a tecla STOP interromper-se-á o programa e o display do ecrã alfanumérico inferior (B) Fig.2, informar-lhe-á da média dos valores TEMPO DE EXERCÍCIO; DISTÂNCIA PERCORRIDA; VELOCIDADE MÉDIA; CALORIAS CONSUMIDAS, que foram realizados durante o exercício, mostrando-os duas vezes cada cinco segundos. Se durante o tempo em que transcorre a informação dos valores médios, não se toca nenhuma tecla, não se faz nenhum exercício ou se aperta a tecla STOP, passar-se-á ao programa manual.
SK2500L SK LINE sportkoncept
33
P10 - P11 PROGRAMAS DO TESTE HOMEM – MULHER.- O objectivo do teste é o de valorar a forma física do usuário. A diferença entre os programas de homem e mulher está nos Watts; o valor para os homens foi seleccionado a 150W e o programa de mulheres a 100W. Estando o monitor aceso, o display de matriz de LEDs superior (A) Fig.2, mostrar-lhe-á o perfil e a letra “M” de manual. Para poder ver os diferentes perfis previamente programados utilizam-se as teclas SPEED▲ e SPEED▼. Depois de ter seleccionado o programa TESTE Homem ou TESTE Mulher, aperte a tecla ENTER. A seguir, o display do Ecrã alfanumérico inferior (B) Fig.2 pedir-lhe-á a idade (entre os 10 e os 99 nos).Seleccione a sua idade com as teclas numéricas (F) Fig.3 e aperte ENTER; aparecer-lhe-á no ecrã alfanumérico (B) INÍCIO DO EXERCÍCIO e começará o seu exercício transcorridos 3 segundos, indicados de forma decrescente. No display de matriz de LEDs superior (A) Fig.2, aparecerá um coração intermitente; coloque as suas mãos sobre os sensores de pulsação (hand -grip) situados no guiador ou no caso de possuir banda medidora de pulsação telemétrica, coloque-a no peito. Comece o TESTE. Ao terminarem os 12 minutos de duração do teste, aparecerá uma avaliação que vai do 1 (bastante deficiente) ao 5 (excelente). Também poderá aparecer uma avaliação de 0 que significa que o teste não foi realizado de forma correcta, que a medição do ritmo cardíaco não foi realizada de forma correcta. NOTA: É obrigatório, para poder realizar o teste, utilizar a medição do ritmo cardíaco, usando, para isso, os sensores manuais (hand-grip) ou a banda do peito. Será conveniente realizar um pequeno aquecimento antes de realizar o teste. Isto evitará lesões. O número máximo de pulsações que uma pessoa nunca deve ultrapassar denomina-se ritmo máximo e este diminui com a idade. Uma forma simples de calculá-lo é a de diminuir a 220 a idade em anos. O exercício, para que seja correcto, deverá manter-se entre os 65% e os 85% do ritmo cardíaco máximo e recomendamos não ultrapassar os 85%. Quando as suas pulsações ultrapassem os 85% do ritmo cardíaco máximo, aparecerá um coração intermitente e um apito durante 2 segundos até que as suas pulsações desçam dos 85% do seu ritmo cardíaco máximo. Recomendamos trabalhar por baixo dos 85% do ritmo cardíaco máximo por razões de segurança.
P12 - PROGRAMA DO RITMO CARDÍACO CONSTANTE (H R C).- Será conveniente realizar um pequeno aquecimento antes de realizar o teste. Isto evitará possíveis lesões. Este programa permite fazer exercício a um ritmo cardíaco (entre os 65% e os 85% do ritmo cardíaco normal) e a máquina adaptará o nível de resistência para conseguir que em todo o momento o usuário mantenha o ritmo cardíaco no nível seleccionado. Será obrigatório utilizar a medição do ritmo cardíaco, usando para isso a banda telemétrica de pulsação para o peito, não podendo ultrapassar 85% do ritmo cardíaco máximo. Estando o monitor aceso, o display de matriz de LEDs superior (A) Fig.2, mostrar-lhe-á o perfil e a letra “M” do manual; para poder ver os diferentes perfis previamente programados utilizam-se as teclas SPEED▲ e SPEED▼. Depois de ter seleccionado o programa HRC, aperte a tecla ENTER, mostrar-lhe-á no ecrã alfanumérico (B) INÍCIO DO EXERCÍCIO e começará o seu exercício transcorridos 3 segundos, indicados de forma decrescente. Nos três primeiros minutos este programa tem um esforço programado de forma a evitar qualquer tipo de lesões. No primeiro minuto começa-se com uma velocidade de 4 Km./h. No segundo minuto passa-se para uma velocidade de 4,5 Km./h. No terceiro minuto passa-se para uma velocidade de 5 km/h. A partir do quarto minuto, o computador adequa automaticamente o esforço de forma a manter a pulsação á volta do valor previamente programado. NOTA: Se na passagem para o terceiro minuto o monitor não receber nenhum sinal de pulsação, o programa parará.
SIGNIFICADO DOS SÍMBOLOS.- No ecrã poderão aparecer uma serie de símbolos ou de palavras com o seguinte significado: Símbolo do coração e uma interrogante: Não foi colocada a banda do peito ou não foi colocada adequadamente.
SK2500L SK LINE sportkoncept
34
Símbolo do coração intermitente: Este símbolo só aparecerá nos programas de testes. O número máximo de pulsações que uma pessoa nunca deverá ultrapassar denominase ritmo máximo e este diminui com a idade. Uma simples fórmula para calculálo será subtrair a 220 a sua idade em anos.O exercício,para que seja correcto, deverá manterse entre os 65 e os 85 % do ritmo cardíaco máximo e recomendase não ultrapassar os 85%.Quando as suas pulsações ultrapassem os 85 % do ritmo cardíaco máximo, aparecerá um coração intermitente e um sinal sonoro durante 2 segundos até que as suas pulsações desçam dos 85 % do seu ritmo cardíaco máximo. Recomendase trabalhar por baixo dos 85% do ritmo cardíaco máximo por razões de segurança. *0* : Este símbolo aparece nos testes masculino e feminino e significa que realizou o teste não colocou a banda do peito). Símbolo de Chave fixa: Avaria mecânica. Apagar a máquina e acendêla passados 2 minutos. A máquina possui um sistema de correcção de avarias automático,no entanto, se o problema persiste, ponhase em contacto como serviço técnico.
Para qualquier consulta, não hesite em contactar com o S.A.T - Serviço de Assistência Técnica - , telefonando para o serviço de apoio ao cliente (ver página final do presente manual).
BH RESERVA O DIREITO DE MODIFICAR AS ESPECIFICAÇÕES DOS SEUS PRODUTOS SEM AVISAR PREVIAMENTE.
1. “BENVINDO A HI POWER” 2. “CARREGUE NAS SETAS PARA SELECCIONAR O PERFIL” 3. “CARREGUE INICIO/START PARA COMECAR” 4. “CARREGUE INSERIR PARA INICIAR O PERFIL” 5. “ERRO” 6. “CONSULTE O SERVICO TECNICO” 7. “INSIRA A SUA IDADE <10-99>”
8. “INSIRA O SEU PESO <30-199> KG” “INSIRA O SEU PESO <70-440> LB”
9. “INSIRA O TEMPO DE EXERCICIO <10-60> MINUTOS”
10. “INSIRA O REGISTO DE WATTS <25-400>” “WATTS=”
11. “IDADE=” 12. “INSIRA O REGISTO DE PULSO <25-250>” 13. “PULSO=” 14. “CARREGUE PAUSA PARA CONTINUAR O EXERCICIO. CARREGUE EM STOP PARA PARAR” 15. “TEMPO DE EXERCICIO=” 16. “DISTANCIA PERCORRIDA=” 17. “VELOCIDADE MEDIA=” 18. “CALORIAS CONSUMIDAS=”
19. “CARREGUE INSERIR PARA ACEITAR O PERFIL MEMORIZADO. CARREGUE RESET/REINICIAR PARA MODIFICAR O PERFIL”
20. “UTILIZE AS TECLAS PARA SELECCIONAR A INTENSIDADE PARA A COLUNA ACTIVA. CARREGUE INSERIR PARA PASSAR PARA A COLUNA SEGUINTE. CARREGUE RESET/REINICIAR PARA VOLTAR AO MODO MANUAL.”
21. “DIMINUA A INTENSIDADE DO EXERCICIO, O SEU RITMO CARDIACO E DEMASIADO ELEVADO” 22. “O RESULTADO DO TESTE E”

SK2500L SK LINE sportkoncept
35
ITALIANO Il presente monitor elettronico è stato progettato per essere utilizzato in modo semplice ed intuitivo.I testi che appaiono sullo schermo inferiore (B) guideranno l’utente durante la realizzazione dell’esercizio. In ogni caso, vi raccomandiamo che il preparatore fisico legga attentamente questa sezione per conoscere a fondo il monitor elettronico ed insegnare all’utente il suo funzionamento in modo effettivo. Lo schermo del presente monitore è tattile per cui per selezionare un tasto, si posiziona il dito sul segnale del tasto relativo sullo schermo.
PERSONALIZZAZIONE DEL MONITOR ELETTRONICO.- Per entrare nella modalità personalizzata del monitor è necessario seguire i seguenti passi: Inserire l’interruttore (b) di alimentazione elettrica che si trova nella parte inferiore anteriore dell’attrezzo, sulla posizione (1) Fig.A.
Fig.A
1) CAMBIO LINGUA.- Dal menu principale, premere contemporaneamente il tasto STOP e il tasto ENTER per 3 secondi. Apparirà sullo schermo alfanumerico (B) Fig.1, la versione del software, premere contemporaneamente il tasto STOP e il tasto PAUSE per 3 secondi. Selezionare la vostra lingua con i tasti SPEED▲ e SPEED▼ premere il tasto START. Se si vuole uscire dal sistema personalizzazione premere il tasto RESET.
2) CAMBIO DA km a Miglia.- Dal menu principale, premere contemporaneamente il tasto STOP e il tasto ENTER per 3 secondi. Apparirà sullo schermo alfanumerico (B) Fig.1, la versione del software, premere contemporaneamente il tasto STOP e il tasto ENTER per 3 secondi. Per cambiare da km a Miglia, premere il tasto ENTER fino a quando appare UNITS e si potrà effettuare il cambio, sullo schermo (B) apparirà la dicitura “KM”, selezionare la media della propria velocità, con i tasti SPEED▲ e SPEED▼ (METRIC / Km. -- ENGLISH / Miglia) premere il tasto START. Se si vuole uscire dal sistema personalizzazione premere il tasto RESET.
ELEMENTI DEL MONITOR ELETTRONICO (Fig.1).- Il monitor elettronico si compone di due zone ben differenziate; La zona superiore Fig.2 (A – B – C) si trova la VISUALIZZAZIONE. La zona inferiore Fig.3 (E – F – G-) si trova la TASTIERA.
VISUALIZZAZIONE.- Questa zona è composta da due schermi. (A) Display Matriz di LEDs superiore, in cui si monitorizza il livello di sforzo che si realizza del programma selezionato per ciascun momento. (B) Display dello Schermo alfanumerico inferiore, che guida l’utente durante la selezione e la realizzazione dell’esercizio. Lo schermo superiore (A) mostrerà i differenti profili preprogrammati di sforzo (programmi) che si possono selezionare e , durante l’esercizio, il livello di sforzo che si realizza in ciascun momento. Lo schermo alfanumerico inferiore (B) si occupa di guidare l’utente durante la selezione dell’esercizio da realizzare e di visualizzare l’informazione sull’esercizio durante e dopo la sua realizzazione. I LEDs indicatori (C) che si trovano sotto lo schermo alfanumerico mostrano simultaneamente la VELOCITÀ; TEMPO / DISTANZA; CALORIE / WATTS; POLSO ed indicano qual è l’informazione che si sta mostrando in ciascun momento dell’esercizio. I dati che si visualizzano nei LEDs (C) durante la realizzazione dell’esercizio sono i seguenti:

SK2500L SK LINE sportkoncept
36
-SPEED - VELOCITÀ:Se indica un valore approssimato della velocità lineare a quella con cui si sposta la banda della macchina.Il valore è indicato in chilometri per ora (km/h) -TIME – TEMPO: Durante l’esercizio si mostra il tempo che è passato dall’inizio che si comincia, o, nel caso in cui si è selezionato un tempo di esercizio predefinito, il tempo rimanente per terminare l’esercizio. Il tempo si mostra in minuti e secondi (mm:ss). -DISTANCE – DISTANZA: Si mostra la distanza che abbiamo percorso dall’inizio dell’esercizio. La distanza si calcola considerando la stima della velocità lineare (SPEED) e le unità sono i chilometri e gli ettometri. -CALORIES – CALORIE: Si mostra una stima delle calorie che sono state bruciate fino al momento. La stima si realizza prendendo in considerazione l’energia che si sta realizzando in ciascun momento ed i dati di peso ed età introdotti dall’utente. -INCLINE – INCLINAZIONE:Indica il livello d’inclinazione che ha la macchina in ciascun momento.La macchina ha 15 livelli d’inclinazione (da 0 a 15).Il grado d’inclinazione si può cambiare agendo sui tasti INCLINE ▼ e INCLINE▲Finalizzato l’esercizio la macchina torna al livello d’inclinazione 0. -PULSE – POLSO: Si mostra la frequenza cardiaca dell’utente, sempre che quest’informazione sia accessibile mediante i sensori di mano (Hand – Grip) o la fascia toracica telemetrica, quando si utilizzano entrambi contemporaneamente, si concede la priorità alla fascia toracica telemetrica per il petto. Per ulteriori informazioni sulla frequenza cardiaca, consultare la sezione: Misurazione del polso; fascia toracica per il petto ed hand-grip.
TASTIERA (Fig.3).- Qui di seguito si enumera la funzione di ciascun tasto. Vedere Fig.3. Il monitor elettronico include una tastiera facile da usare. Questa tastiera consta di tasti numerici (F) e di tasti di funzione (G). - Tasti numerici (F). – (1-0) si utilizzano per introdurre i dati che il monitor richiede. - Tasti di funzione (G).- reset; speed-; speed�; enter; pause ; stop; incline▲; incline▼; quick / start. Questo tasti si utilizzano per selezionare l’esercizio da realizzare, introdurre i dati richiesti, controllare il livello di resistenza dell’esercizio e la sua finalizzazione.
-reset.- Tasto di annullamento. Si utilizza per cancellare i dati che si introducono nel monitor quando si seleziona un programma.
-Speed▼.- Tasto d’inclinazione della velocità.Durante la realizzazione dell’esercizio questo tasto diminuisce in un decimo di chilometro l’ora la velocità della macchina.Se si mantiene premuto questo tasto la velocità continuerà a diminuire.Durante la selezione dei profili preprogrammati si utilizza per mostrare sullo schermo il profilo anteriore a quello mostrato.
-Speed▲.- Tasto di aumento della velocità.Durante la realizzazione dell’esercizio questo tasto diminuisce in un decimo di chilometro l’ora la velocità della macchina.Se si mantiene premuto questo tasto la velocità continuerà ad aumentare.Durante la selezione dei profili preprogrammati si utilizza per mostrare sullo schermo il profilo successivo a quello mostrato. -enter .- Tasto di selezione e convalida. Si utilizza durante la selezione di un profilo preprogrammato per selezionarlo, convalidare i dati da introdurre ed iniziare l’esercizio. Durante la programmazione del profilo dell’utente si utilizza anche per convalidare il livello di sforzo corrispondente a ciascun minuto. pause.- Tasto per la pausa.Se si preme durante la realizzazione dell’esercizio, questo s’interrompe, fermando il cronometro di misurazione dell’esercizio.Per riavviare il cronometro di misurazione dell’esercizio premere il tasto pause di nuovo.Se, trovandosi in modalità pausa, si preme il tasto STOP l’esercizio si considererà terminato.Il tempo limite della modalità pausa è di cinque minuti, una volta trascorso questo tempo l’esercizio si considererà terminato. Se, essendo impostato su modo pausa, si preme il tasto STOP durante l’esercizio questi, si considererà terminato. stop.- Tasto per la fermata.Se si preme durante la realizzazione dell’esercizio, questo si considera terminato e la cinta si ferma.Si mostra una riassunto con i dati dell’esercizio e si torna alla schermata iniziale. Incline▼.- Tasto di decrescenza del livello d’inclinazione.Durante la realizzazione dell’esercizio questo tasto diminuisce di un grado l’inclinazione della macchina.Se si mantiene premuto questo tasto l’inclinazione continuerà a diminuire.
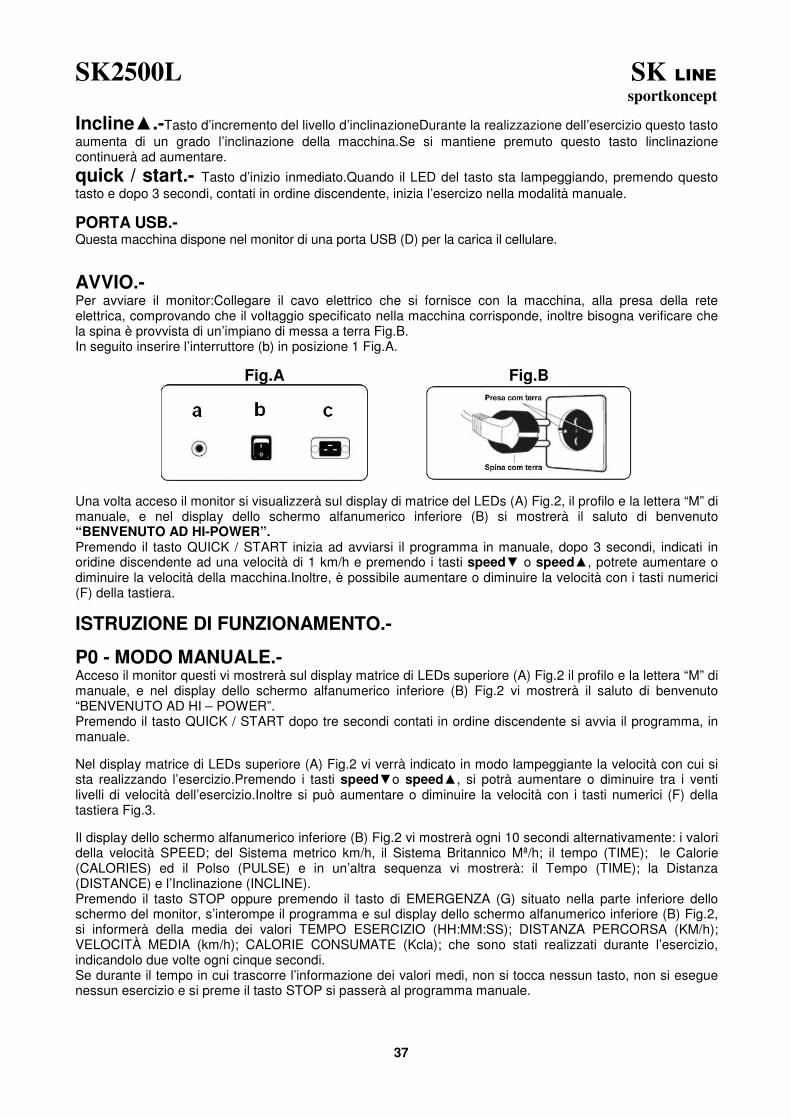
SK2500L SK LINE sportkoncept
37
Incline▲.-Tasto d’incremento del livello d’inclinazioneDurante la realizzazione dell’esercizio questo tasto aumenta di un grado l’inclinazione della macchina.Se si mantiene premuto questo tasto linclinazione continuerà ad aumentare. quick / start.- Tasto d’inizio inmediato.Quando il LED del tasto sta lampeggiando, premendo questo tasto e dopo 3 secondi, contati in ordine discendente, inizia l’esercizo nella modalità manuale.
PORTA USB.- Questa macchina dispone nel monitor di una porta USB (D) per la carica il cellulare.
AVVIO.- Per avviare il monitor:Collegare il cavo elettrico che si fornisce con la macchina, alla presa della rete elettrica, comprovando che il voltaggio specificato nella macchina corrisponde, inoltre bisogna verificare che la spina è provvista di un’impiano di messa a terra Fig.B. In seguito inserire l’interruttore (b) in posizione 1 Fig.A.
Fig.A Fig.B
Una volta acceso il monitor si visualizzerà sul display di matrice del LEDs (A) Fig.2, il profilo e la lettera “M” di manuale, e nel display dello schermo alfanumerico inferiore (B) si mostrerà il saluto di benvenuto “BENVENUTO AD HI-POWER”. Premendo il tasto QUICK / START inizia ad avviarsi il programma in manuale, dopo 3 secondi, indicati in oridine discendente ad una velocità di 1 km/h e premendo i tasti speed▼ o speed▲, potrete aumentare o diminuire la velocità della macchina.Inoltre, è possibile aumentare o diminuire la velocità con i tasti numerici (F) della tastiera.
ISTRUZIONE DI FUNZIONAMENTO.-
P0 - MODO MANUALE.- Acceso il monitor questi vi mostrerà sul display matrice di LEDs superiore (A) Fig.2 il profilo e la lettera “M” di manuale, e nel display dello schermo alfanumerico inferiore (B) Fig.2 vi mostrerà il saluto di benvenuto “BENVENUTO AD HI – POWER”. Premendo il tasto QUICK / START dopo tre secondi contati in ordine discendente si avvia il programma, in manuale. Nel display matrice di LEDs superiore (A) Fig.2 vi verrà indicato in modo lampeggiante la velocità con cui si sta realizzando l’esercizio.Premendo i tasti speed▼o speed▲, si potrà aumentare o diminuire tra i venti livelli di velocità dell’esercizio.Inoltre si può aumentare o diminuire la velocità con i tasti numerici (F) della tastiera Fig.3. Il display dello schermo alfanumerico inferiore (B) Fig.2 vi mostrerà ogni 10 secondi alternativamente: i valori della velocità SPEED; del Sistema metrico km/h, il Sistema Britannico Mª/h; il tempo (TIME); le Calorie (CALORIES) ed il Polso (PULSE) e in un’altra sequenza vi mostrerà: il Tempo (TIME); la Distanza (DISTANCE) e l’Inclinazione (INCLINE). Premendo il tasto STOP oppure premendo il tasto di EMERGENZA (G) situato nella parte inferiore dello schermo del monitor, s’interompe il programma e sul display dello schermo alfanumerico inferiore (B) Fig.2, si informerà della media dei valori TEMPO ESERCIZIO (HH:MM:SS); DISTANZA PERCORSA (KM/h); VELOCITÀ MEDIA (km/h); CALORIE CONSUMATE (Kcla); che sono stati realizzati durante l’esercizio, indicandolo due volte ogni cinque secondi. Se durante il tempo in cui trascorre l’informazione dei valori medi, non si tocca nessun tasto, non si esegue nessun esercizio e si preme il tasto STOP si passerà al programma manuale.
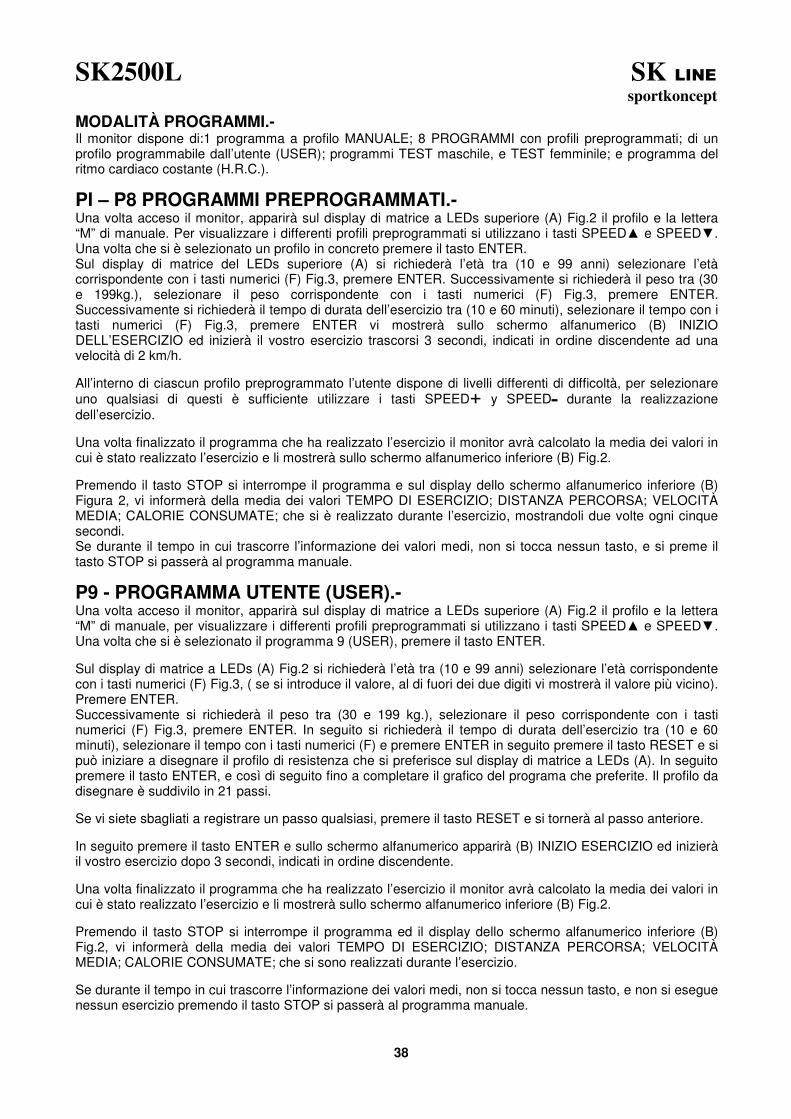
SK2500L SK LINE sportkoncept
38
MODALITÀ PROGRAMMI.- Il monitor dispone di:1 programma a profilo MANUALE; 8 PROGRAMMI con profili preprogrammati; di un profilo programmabile dall’utente (USER); programmi TEST maschile, e TEST femminile; e programma del ritmo cardiaco costante (H.R.C.).
PI – P8 PROGRAMMI PREPROGRAMMATI.- Una volta acceso il monitor, apparirà sul display di matrice a LEDs superiore (A) Fig.2 il profilo e la lettera “M” di manuale. Per visualizzare i differenti profili preprogrammati si utilizzano i tasti SPEED▲ e SPEED▼. Una volta che si è selezionato un profilo in concreto premere il tasto ENTER. Sul display di matrice del LEDs superiore (A) si richiederà l’età tra (10 e 99 anni) selezionare l’età corrispondente con i tasti numerici (F) Fig.3, premere ENTER. Successivamente si richiederà il peso tra (30 e 199kg.), selezionare il peso corrispondente con i tasti numerici (F) Fig.3, premere ENTER. Successivamente si richiederà il tempo di durata dell’esercizio tra (10 e 60 minuti), selezionare il tempo con i tasti numerici (F) Fig.3, premere ENTER vi mostrerà sullo schermo alfanumerico (B) INIZIO DELL’ESERCIZIO ed inizierà il vostro esercizio trascorsi 3 secondi, indicati in ordine discendente ad una velocità di 2 km/h. All’interno di ciascun profilo preprogrammato l’utente dispone di livelli differenti di difficoltà, per selezionare uno qualsiasi di questi è sufficiente utilizzare i tasti SPEED� y SPEED- durante la realizzazione dell’esercizio. Una volta finalizzato il programma che ha realizzato l’esercizio il monitor avrà calcolato la media dei valori in cui è stato realizzato l’esercizio e li mostrerà sullo schermo alfanumerico inferiore (B) Fig.2. Premendo il tasto STOP si interrompe il programma e sul display dello schermo alfanumerico inferiore (B) Figura 2, vi informerà della media dei valori TEMPO DI ESERCIZIO; DISTANZA PERCORSA; VELOCITÀ MEDIA; CALORIE CONSUMATE; che si è realizzato durante l’esercizio, mostrandoli due volte ogni cinque secondi. Se durante il tempo in cui trascorre l’informazione dei valori medi, non si tocca nessun tasto, e si preme il tasto STOP si passerà al programma manuale.
P9 - PROGRAMMA UTENTE (USER).- Una volta acceso il monitor, apparirà sul display di matrice a LEDs superiore (A) Fig.2 il profilo e la lettera “M” di manuale, per visualizzare i differenti profili preprogrammati si utilizzano i tasti SPEED▲ e SPEED▼. Una volta che si è selezionato il programma 9 (USER), premere il tasto ENTER. Sul display di matrice a LEDs (A) Fig.2 si richiederà l’età tra (10 e 99 anni) selezionare l’età corrispondente con i tasti numerici (F) Fig.3, ( se si introduce il valore, al di fuori dei due digiti vi mostrerà il valore più vicino). Premere ENTER. Successivamente si richiederà il peso tra (30 e 199 kg.), selezionare il peso corrispondente con i tasti numerici (F) Fig.3, premere ENTER. In seguito si richiederà il tempo di durata dell’esercizio tra (10 e 60 minuti), selezionare il tempo con i tasti numerici (F) e premere ENTER in seguito premere il tasto RESET e si può iniziare a disegnare il profilo di resistenza che si preferisce sul display di matrice a LEDs (A). In seguito premere il tasto ENTER, e così di seguito fino a completare il grafico del programa che preferite. Il profilo da disegnare è suddivilo in 21 passi. Se vi siete sbagliati a registrare un passo qualsiasi, premere il tasto RESET e si tornerà al passo anteriore. In seguito premere il tasto ENTER e sullo schermo alfanumerico apparirà (B) INIZIO ESERCIZIO ed inizierà il vostro esercizio dopo 3 secondi, indicati in ordine discendente. Una volta finalizzato il programma che ha realizzato l’esercizio il monitor avrà calcolato la media dei valori in cui è stato realizzato l’esercizio e li mostrerà sullo schermo alfanumerico inferiore (B) Fig.2. Premendo il tasto STOP si interrompe il programma ed il display dello schermo alfanumerico inferiore (B) Fig.2, vi informerà della media dei valori TEMPO DI ESERCIZIO; DISTANZA PERCORSA; VELOCITÀ MEDIA; CALORIE CONSUMATE; che si sono realizzati durante l’esercizio. Se durante il tempo in cui trascorre l’informazione dei valori medi, non si tocca nessun tasto, e non si esegue nessun esercizio premendo il tasto STOP si passerà al programma manuale.
SK2500L SK LINE sportkoncept
39
P10 – P11 PROGRAMMI DI TES UOMO – DONNA.- L’obiettivo del test è valorare la forma fisica dell’utente.La differenza tra i programmi per l’uomo e la donna è nei Watts, i valori dell’uomo solo selezionati in 150 W e nel programma per la donna in 100 W. Mentre il monitor è acceso, il display matrice di LEDs superiore (A) Fig.2 vi mostrerà il profilo e la lettera “M” di manuale.Per visualizzare i differenti profili preprogrammati si utilizzano i tasti SPEED▲ e SPEED▼.Una volta che si è selezionato il programma TEST Uomo oppure TEST Donna, premere il tasto ENTER.Successivamente, il display dello Schermo alfanumerico inferiore (B) Fig.2 vi richiederà l’età (tra i 10 ed i 99 anni).Selezionare la vostra età con i tasti numerici (F) Fig.3 e premere ENTER, vi mostrerà sullo schermo alfanumerico (B) INIZIO ESERCIZIO ed inizierà il vostro esercizio dopo 3 secondi, indicati in modo discendente. Sul display matrice di LEDs superiore (A) Fig.2 apparirà un cuore lampeggiante, collocare le vostre mai sui sensori per la misurazione delle pulsazioni (hand-grip) collocati sulla maniglia o nell’eventualità in cui abbiate a disposizione la fascia telemetrica misuratrice delle pulsazioni collocarla sul torace.Iniziare il TEST. Finalizzati i 12 minuti che equivalgono al tempo di durata del test vi verrà indicata una stima tra 1 (molto scarsa) e 5 (eccellente), inoltre potrebbe apparire una stima di 0 che significa che il test non è stato eseguito correttamente, non si è utilizzato il misuratore del ritmo cardicaco correttamente. NOTA: È obbligatorio per eseguire il test utilizzare la misurazione del ritmo cardiaco, e per fare ciò si utilizzano i sensori manuali (hand-grip) oppure la fascia toracica per il petto. È conveniente eseguire un breve riscaldamento prima di realizzare il test. Questo eviterà lesioni. Il numero massimo di pulsazioni che una persona non deve mai superare si denomina ritmo massimo e questo diminuisce con l’età. Una formula semplice per calcolare è sottrarre a 220 l’età in anni. L’esercizio, affinché sia corretto, deve mantenersi tra il 65% e l’85% del ritmo cardiaco massimo e si raccomanda di non superare l’85%. Quando le pulsazioni superano l’85% del ritmo cardiaco massimo apparirà un cuore lampeggiando ed un suono acuto per 2 secondi circa finché le pulsazioni non si abbassano all’85% del ritmo cardiaco massimo. Si raccomanda di lavorare al di sotto dell’85% del ritmo cardiaco massimo per ragioni di sicurezza.
P12 - PROGRAMMA SUL RITMO CARDIACO COSTANTE (H R C).-
Si consiglia di eseguire un breve esercizio di riscaldamento prima di realizzare il programma. Questo eviterà lesioni. Questo programma permette di fare esercizio ad un ritmo cardiaco (tra il 65 e l’85% del ritmo cardiaco massimo) e la macchina regolerà il livello di resistenza per far si che l’utente, in qualsiasi momento, mantenga il ritmo cardiaco secondo il livello selezionato. È obbligatorio utilizzare la misurazione del ritmo cardiaco, utilizzando gli appositi la fascia toracica da polso telemetrica per il petto, e non superare l’85% del ritmo cardiaco massimo. Una volta acceso il monitor sul display di matrice a LEDs superiore (A) apparirà Fig.2 il profilo e la lettera “M” di manuale, per visualizzare i differenti profili preprogrammati si utilizzano i tasti SPEED▲ e SPEED▼. Una volta che si è selezionato il programma HRC, premere il tasto ENTER. Sul display dello Schermo alfanumerico inferiore (B) si richiederà il valore del ritmo cardiaco che si desidera conforme all’esercizio quindi selezionare con i tasti numerici (F) Fig.3 tra (25 e 250 P.P.M. Pulsazioni Al Minuto) premere ENTER vi mostrerà sullo schermo alfanumerico (B) INIZIO ESERCIZIO ed inizierà il vostro esercizio dopo 3 secondi, indicati in ordine discendente. Durante i primi tre minuti questo programma subisce uno sforzo programmato per evitare qualsiasi tipo di lesione.Durante il primo minuto s’inizia con una velocità di 4 km/h., nel secondo minuto si passa ad una velocità di 4,5 km/h., nel terzo minuto si passa ad una velocità di 5 km/h. Dopo il quarto minuto, il computer adegua automaticamente lo sforzo per mantenere le pulsazioni intorno al valore previamente programmato. NOTA:Se durante il passaggio al terzo minuto il monitor non ha ricevuto nessun segnale di pulsazione il programma si ferma.
SK2500L SK LINE sportkoncept
40
SIGNIFICATO DEI SIMBOLI.- Nello schermo possono apparire una serie di simboli o di parole con il seguente significato: Simbolo del cuore ed un punto interrogativo: Non è stata collocata la cintura da torace o non è stata collocata correttamente.
Simbolo del cuore lampeggiando: Questo simbolo apparirà solamente nei programmi dei test. Il numero massimo di pulsazioni che una persona mai deve sorpassare è denominato ritmo massimo e questo diminuisce con l’ età. Una semplice formula per calcolarlo è sottrarre a 220 l’ età in anni. L’ allenamento, per fare in modo che sia corretto, si deve mantenere fra il 65 e l’ 85 % del ritmo cardiaco massimo e si consiglia di non sorpassare l’ 85%. Quando le sue pulsazioni vadano oltre l’ 85 % del battito cardiaco massimo apparirà un cuore lampeggiando ed un fischio durante 2 secondi fino a che le sue pulsazioni non scendano all’ 85 % del suo battito cardiaco massimo. Si consiglia di lavorare al di sotto dell’ 85% del ritmo cardiaco massimo per motivi di sicurezza. **0* : Questo simbolo appare nei test maschili e femminili e significa che avete realizzato il test senza aver collocato la fascia toracica. Simbolo di chiave fissa: Guasto meccanico.Spegnere la macchina e riaccenderla trascorsi 2 minuti.La macchina ha un sistema automatico per correggere i guasti, ciò nonostante se il problema persiste, si metta in contatto con il servizio tecnico.
Per qualsiasi domanda, non esitate a mettervi in contatto con il Servizio di Assistenza Tecnica, chiamando al telefono di attenzione al cliente (consultare l’ultima pagina del presente manuale).
BH SI RISERVA IL DIRITTO A MODIFICARE LE SPECIFICAZIONE DEI SUOI PRODOTTI SENZA PREVIO AVVISO.
1. “BENVENUTO A HI POWER” 2. “PREMA LE FRECCE PER SCEGLIERE PROFILO” 3. “PREMA QUICK/START PER COMINCIARE” 4. “PREMA ENTER PER COMINCIARE IL PROFILO” 5. “ERRORE” 6. “CONTATTI IL SERVIZIO TECNICO” 7. “INTRODUCA LA SUA ETA <10-99>”
8. “INTRODUCA IL SUO PESO <30-199> KG” “INTRODUCA IL SUO PESO <70-440> LB”
9. “INTRODUCA IL TEMPO D ESERCIZIO <10-60> MINUTI”
10. “INTRODUCA I DATI DEI WATT <25-400>” “WATTS=”
11. “ETA=” 12. “INTRODUCA I DATI DI POLSO <25-250>” 13. “POLSO=” 14. “PREMA PAUSE PER CONTINUARE L ESERCIZIO. PREMA STOP PER FINIRE” 15. “TEMPO D ESERCIZIO=” 16. “DISTANZA PERCORSA=” 17. “VELOCITA MEDIA=” 18. “CALORIE CONSUMATE=” 19. “PREMA ENTER PER ACCETTARE IL PROFILO MEMORIZZATO. PREMA RESET PER MODIFICARE IL PROFILO”
20. “USI LE FRECCE PER SCEGLIERE L INTENSITA PER LA COLONNA ATTIVA. PREMA ENTER PER PASSARE ALLA PROSSIMA COLONNA. PREMA RESET PER TORNARE AL MODO MANUALE.”
21. “DIMINUISCA L INTENSITA DELL ESERCIZIO. IL SUO RITMO CARDIACO E TROPPO ELEVATO” 22. “IL RISULTATO DEL TEST E=”

SK2500L SK LINE sportkoncept
41
NEDERLANDS
ALGEMENE INSTRUCTIES De elektronische monitor is zodanig ontworpen dat hij gemakkelijk en intuïtief in het gebruik is. De boodschappen die op het onderste scherm (B) verschijnen, zullen de gebruiker gedurende de gehele beoefening begeleiden. Niettemin raden we de sportinstructreur aan deze sectie grondig door te lezen om volledig vertrouwd te raken met de elektronische monitor, zodat hij/zij de gebruiker kan voordoen hoe het toestel op de juiste manier te gebruiken. Het monitor scherm is drukgevoelig, dus om op een toets te drukken hoeft u slechts uw vinger op genoemde toets op het scherm te plaatsen.
DE ELEKTRONISCHE MONITOR AANPASSEN Volg onderstaande procedure om toegang te verkrijgen tot de aanpassingsmodus van de monitor: Zet de netschakelaar (b) onderaan de voorzijde van de machine in de stand (1), Fig.A.
Fig.A.
1) WIJZIGEN TAAL Vanuit het hoofdmenu, druk op zowel de STOP-toets en de ENTER-knop gedurende 3 seconden. verschijnen de softwareversie op het alfanumerieke scherm (B), Fig.1. Druk op zowel de STOP-toets en de PAUSE -knop gedurende 3 seconden. Selecteer uw taal door gebruik te maken van de toetsen SPEED▲ en SPEED▼, druk vervolgens op START. Als u de aanpassingsmodus wenst te verlaten, druk op RESET, waarna het handleidingsprogramma op de LED-reeks (A) zal worden getoond.
2) OVERGAAN VAN km op mijlen.- Vanuit het hoofdmenu, druk op zowel de STOP-toets en de ENTER-knop gedurende 3 seconden. verschijnen de softwareversie op het alfanumerieke scherm (B), Fig.1. Druk op zowel de STOP-toets en de ENTER-knop gedurende 3 seconden. Als u van km wilt overgaan op mijlen, druk de ENTER totdat UNITS wordt weergegeven, wat u naar de wijzigingsoptie zal brengen, met “KM” op scherm (B). Maak gebruik van de toetsen SPEED▲ en SPEED▼ om de meetschaal te selecteren (METRISCH / km – IMPERIAAL / mijlen) en druk op START. Als u de aanpassingsmodus wenst te verlaten, druk op RESET, waarna het handleidingsprogramma op de LED-reeks (A) zal worden getoond.
ELEMENTEN VAN DE ELEKTRONISCHE MONITOR (Fig.1).- De elektronische monitor bestaat uit twee aparte gebieden: Het bovenste gedeelte, Fig.2 (A – B – C ) voor het WEERGAVE Het onderste gedeelte, Fig.3 (E – F – G ) voor het TOETSENBORD
WEERGAVE.- Dit gebied bestaat uit twee schermen. (A) De bovenste LED-reeks die realtime inspanningsniveaus weergeeft die geproduceerd worden gedurende het geselecteerde programma. (B) Onderste alfanumerieke scherm die de selectie-opties en oefening van de gebruiker begeleidt. Het bovenste scherm (A) geeft de verschillende voorgeprogrammeerde oefeningsprofielen (programma’s) die geselecteerd kunnen worden weer, en huidige inspanningsniveaus gedurende beoefening. Het onderste alfanumerieke scherm (B) wordt zowel gebruikt om de gebruiker te begeleiden bij het selecteren van de uit te voeren oefening, als om informatie weer te geven over de oefening zowel gedurende als na de sessie. De LED-indicators (C) die onder het alfanumerieke scherm staan verschaffen een gelijktijdige aflezing van SPEED; TIME / DISTANCE; CALORIES / WATTS; PULSE RATE en ze geven aan welke informatie wordt weergegeven gedurende de hele oefening.
SK2500L SK LINE sportkoncept
42
De gegevens die weer worden gegeven op de LED’s (C) gedurende de oefening zijn als volgt: -SPEED - SNELHEID: Dit geeft de lineaire snelheid waarop de band zich voortbeweegt weer. De waarde wordt weergegeven in kilometers per uur (km/h). -TIME: Dit toont de tijd die verstreken is sinds met de oefening begonnen is of, indien een tijdslimiet is vastgesteld, de hoeveelheid tijd die over is voordat de oefening op zijn einde loopt. De tijd wordt weergegeven in minuten en seconden (mm:ss). -DISTANCE: Dit geeft de afstand weer die is afgelegd sinds met de oefening begonnen is. De afstand wordt berekend door gebruik te maken van de geschatte lineaire snelheid (SPEED) en de weergegeven eenheden zijn in kilometers en hectometers. -CALORIES: Dit toont het geschatte aantal calorieën die tot nu toe verbrand zijn. Deze berekening is gebaseerd op de energie die geproduceerd wordt en de gewichts- en leeftijdswaarden die de gebruiker opgegeven heeft.
-INCLINE - INCLINATIE: Dit geeft het huidige inclinatieniveau van het toestel weer. Het toestel bezit 15 inclinatieniveaus (0 tot 15). De inclinatiegraad kan gewijzigd worden door gebruik te maken van de toetsen INCLINE▲ – INCLINATIE▲. Aan het einde van de oefening keert het toestel terug naar een inclinatieniveau van 0. -PULSE: Dit toont de hartfrequentie van de gebruiker, ervan uitgaande dat deze informatie verkregen kan worden via de handgreepsensoren of de telemetrische borstband. Als deze beiden gebruikt worden, heeft de telemetrische borstband prioriteit. Voor meer informatie over hartfrequentie, wordt verwezen naar de sectie met de titel: Pulsmeting; borstband en handgreep
TOETSENBORD.- De functie van elke toets wordt hieronder behandeld. Zie Fig.3. De elektronische monitor bezit een eenvoudig te gebruiken toetsenbord. Dit toetsenbord bestaat uit numerieke toetsen ( F ) en functietoetsen ( G ). - Numerieke toetsen (F) - (1- 0) worden gebruikt om de door de monitor verzochte gegevens in te voeren. - Functietoetsen (G) – reset; speed▲; speed▼; enter; pause; stop; incline▼: incline▲; quick/start. Deze toetsen worden gebruikt om de uit te voeren oefening te selecteren, de verzochte gegevens in te voeren, het weerstandsniveau van de oefening te regelen en deze te beëindigen.
-reset.- reset-toets. Deze wordt gebruikt om gegevens te wissen die in de monitor zijn ingevoerd bij het selecteren van een programma.
-Speed▼.- Toets voor het verlagen van de snelheid. Als er gedurende de oefening op deze toets gedrukt wordt, zal de snelheid van het toestel afnemen in tienden van een kilometer per uur. De snelheid zal net zolang blijven afnemen als er op deze knop gedrukt wordt. Tijdens de selectie van voorgeprogrammeerde profielen wordt deze toets gebruikt om naar het vorige profielscherm terug te gaan.
-Speed▲.- Toets voor het verhogen van de snelheid. Als er gedurende de oefening op deze toets gedrukt wordt, zal de snelheid van het toestel toenemen in tienden van een kilometer per uur. De snelheid zal net zolang blijven toenemen als er op deze knop gedrukt wordt. Tijdens de selectie van voorgeprogrammeerde profielen wordt deze toets gebruikt om naar het volgende profielscherm te gaan.
-enter.- Selectie- en validatietoets. Deze wordt gebruikt tijdens selectie van een voorgeprogrammeerd profiel om het profiel te selecteren, gegevens die ingevoerd zijn te bevestigen en de oefening te starten. Ook wordt deze toets gebruikt tijdens het programmeren van een gebruikersprofiel om de inspanningsniveau-instellingen voor elke minuut te bevestigen.
-pause.- pauze.- Pauzetoets. Als tijdens een sessie hierop wordt gedrukt, wordt de oefening onderbroken en de oefeningschronometer wordt gestopt. Om de oefeningschronometer opnieuw te starten, druk opnieuw op de toets pause - pauze of ga door met de oefening. Als u op de STOP-toets drukt in de pauzemodus zal de oefening beëindigd worden. De tijdslimiet voor de pauzemodus is vijf minuten, als deze tijd voorbij is zal de oefening beëindigd worden.
- stop.- Stoptoets.- Als hierop gedrukt wordt tijdens de sessie, zal de oefening beëindigd worden en de band stoppen. Een samenvatting van alle oefeningsgegevens zal worden weergegeven en daarna zal de monitor terugkeren naar het startscherm.
SK2500L SK LINE sportkoncept
43
-Incline▼ – Inclinatie▼.-. Toets om de inclinatie te verminderen. Als hierop gedrukt wordt tijdens het oefenen, zal deze toets het inclinatieniveau met één graad verlagen. De inclinatie zal net zolang blijven afnemen als er op deze knop gedrukt wordt.
-Incline▲– Inclinatie▲.-Toets om de inclinatie te verhogen. Als hierop gedrukt wordt tijdens het oefenen, zal deze toets het inclinatieniveau met één graad verhogen. De inclinatie zal net zolang blijven toenemen als er op deze knop gedrukt wordt.
-quick/start – snel starten.- Toets voor snel starten. Als op deze toets gedrukt wordt, zal de oefening beginnen in manuele modus na 3 seconden afgeteld te hebben, mits de LED op de toets knippert.
USB-POORT.- De monitor op dit toestel is uitgerust met een haven usb (D) voor het opladen van de mobiele.
STARTEN.- De monitor inschakelen: Steek de stekker van het bijgeleverde snoer in het stopcontact, daarbij controlerend of de spanning overeenkomt met die van het toestel en dat het stopcontact geaard is Fig.B. Zet schakelaar (b) vervolgens in positie [1]. Fig.A.
Fig.A Fig.B
Zodra de monitor aanstaat, zal het profiel en de letter “M” voor manueel op de LED-reeks (A) Fig.2 en de “WELCOME TO HI – POWER”-welkomstboodschap weergegeven worden op het onderste alfanumerieke scherm (B). Als er op de toets QUICK/START – SNEL STARTEN gedrukt wordt, zal het toestel na 3 seconden afgeteld te hebben starten in de manuele modus met een snelheid van 1 km/uur, waarna u de snelheidsinstellingen kan doen toe- of afnemen met de toetsen speed▲ of speed▼. U kunt de snelheidsinstellingen ook wijzigen door gebruik te maken van de numerieke toetsen (F).
P0 - HANDBEDIENING.- Zodra de monitor aanstaat, zal het profiel en de letter “M” voor manueel op de LED-reeks (A) Fig.2 en de “WELCOME TO HI – POWER”-welkomstboodschap weergegeven worden op het onderste alfanumerieke scherm (B) Fig.2. Als u op de toets QUICK / START – SNEL STARTEN drukt, zal het toestel na 3 seconden afgeteld te hebben starten in de manuele modus. De knipperende bovenste LED-reeks (A), Fig.2, zal de huidige snelheidsinstelling voor de oefening aangeven. Met de toetsen speed▲ of speed▼ kunt u de snelheid variëren tussen twintig verschillende snelheidsinstellingen. U kunt de snelheidsinstellingen ook wijzigen door gebruik te maken van de numerieke toetsen (F). Het onderste alfanumerieke scherm (B), Fig.2, zal elke tien seconden wisselende uitlezingen opgeven van de volgende waarden: SPEED - SNELHEID (Metrisch systeem km/uur of Engels systeem mijlen/uur); TIME – TIJD; CALORIES - CALORIEËN; PULSE RATE – PULSFREQUENTIE, en de tweede reeks zal de TIME - TIJD, DISTANCE – AFSTAND, en INCLINE – INCLINATIE tonen. Het programma kan onderbroken worden door op de STOP-toets of de knop EMERGENCY – NOODGEVAL (G) te drukken onderaan het scherm. Als het programma gestopt is, zal het onderste alfanumerieke scherm (B), Figuur 2, de gemiddelde waarden weergeven voor EXERCISE TIME (HH:MM:SS) – OEFENINGSTIJD (UU:MM:SS); DISTANCE TRAVELLED (km) – AFGELEGDE AFSTAND (km); AVERAGE SPEED (Km/h) – GEMIDDELDE SNELHEID (Km/uur); CALORIES CONSUMED (kcal) – VERBRANDE CALORIEËN gedurende de oefening. Deze waarden zullen twee keer per vijf seconden weergegeven worden. Als gedurende de tijd die het kost om deze gemiddelde waarden weer te geven geen toetsen aangeraakt worden en er wordt verder geen oefening meer gedaan en er wordt op de STOP-toets gedrukt, dan zal het toestel terugkeren naar het manuele programma.

SK2500L SK LINE sportkoncept
44
PROGRAMMAMODUS.- De monitor heeft de beschikking over: 1 profielprogramma MANUAL - MANUEEL; 8 voorgeprogrammeerde PROGRAMMA-profielen; zowel een profiel dat door de gebruiker geprogrammeerd kan worden (USER - GEBRUIKER), als ook een man-TEST, vrouw-TEST, en een continu pulsfrequentieprogramma (H.R.C.).
P1 - P8 VOORAF INGESTELDE PROGRAMMA’S.- Met de monitor ingeschakeld zal de bovenste LED-reeks (A), Fig.2, het profiel en de letter “M” voor manueel weergeven. De toetsen SPEED▲ en SPEED▼ worden gebruikt om de verschillende voorgeprogrammeerde profielen weer te geven. Zodra er een specifiek profiel geselecteerd is, druk op ENTER. De bovenste LED-reeks ( A ) zal om een leeftijdswaarde vragen (tussen 10 en 99), selecteer uw leeftijd door gebruik te maken van de getallentoetsen (F), Fig.3, en druk op ENTER. Vervolgens zal naar uw gewicht gevraagd worden (tussen 30 en 199 kg), selecteer uw gewicht door gebruik te maken van de getallentoetsen (F), Fig.3, en druk op ENTER. START EXERCISE – OEFENING STARTEN zal weergegeven worden op het alfanumerieke scherm (B) en de oefening zal beginnen na 3 seconden afgeteld te hebben met een snelheid van 2km/uur. Er zijn verschillende moeilijkheidsgraden binnen elk voorgeprogrammeerde profiel, om er één van te selecteren hoeft u slechts op de toetsen SPEED▲ en SPEED▼ te drukken tijdens de oefening. Als u de minimale snelheid niet bereikt heeft 4Km/h om de monitor aan de gang te krijgen, weergeven; als u deze snelheid niet binnen 15 seconden bereikt, zal de monitor gedurende 45 seconden in PAUSE-modus gaan en het alfanumerieke scherm zal een aftelling weergeven, Fig.2. Als u opnieuw met oefenen begint binnen deze 45 seconden pauze, zal de monitor doorgaan de opgeslagen gegevens te gebruiken; als aan de andere kant de aftelling 0 bereikt, zal de monitor uitschakelen en zullen alle opgeslagen gegevens verloren gaan. Zodra u het oefeningsprogramma hebt beëindigd, zal de monitor de gemiddelde waarden waarop u de oefening hebt uitgevoerd berekenen en deze tonen op het onderste alfanumerieke scherm (B), Fig.2 . Als gedurende de tijd die het kost om deze gemiddelde waarden weer te geven geen toetsen aangeraakt worden en er wordt op de STOP-toets gedrukt, dan zal het toestel terugkeren naar het manuele programma.
P9 - PROGRAMMA 9 (USER).- Met de monitor ingeschakeld zal de bovenste LED-reeks (A), Fig.2, het profiel en de letter “M” voor manueel weergeven. Gebruik de toetsen SPEED▲ en SPEED▼ om de verschillende voorgeprogrammeerde profielen weer te geven. Zodra programma 9 ( USER ) geselecteerd is, druk op ENTER. De bovenste LED-reeks (A), Fig.2, zal om een leeftijdswaarde vragen (tussen 10 en 99), selecteer uw leeftijd door gebruik te maken van de getallentoetsen (F), Fig.3 (als de ingevoerde waarde deze limieten overschrijdt, zal de meest toelaatbare waarde weergegeven worden). Druk op ENTER. Vervolgens zal naar uw gewicht gevraagd worden (tussen 30 en 199 kg), selecteer uw gewicht door gebruik te maken van de getallentoetsen (F), Fig.3, en druk op ENTER. Dan zal er een tijdslimiet voor de oefening gevraagd worden (tussen 10 en 60 minuten), selecteer de tijd door gebruik te maken van de getallentoetsen (F), en druk op ENTER. Druk nu op RESET, waarna u een aangepast oefeningsprofiel kunt beginnen te ontwerpen op de LED-reeks (A). Waarna u op ENTER drukt, enzovoort, totdat u de programmagrafiek naar uw eigen wensen hebt voltooid. Het profiel dat ontworpen wordt is verdeeld in 21 stappen. Als u een fout maakt tijdens het vastleggen van elke stap, drukt u op RESET en herhaalt u de vorige stap. Druk vervolgens op ENTER. START EXERCISE – OEFENING STARTEN zal weergegeven worden op het alfanumerieke scherm (B) en de oefening zal beginnen na 3 seconden afgeteld te hebben met een snelheid van 2km/uur. Zodra u het oefeningsprogramma hebt beëindigd, zal de monitor de gemiddelde waarden waarop u de oefening hebt uitgevoerd berekenen en deze tonen op het onderste alfanumerieke scherm (B), Fig.2 . Het programma kan onderbroken worden door op STOP te drukken, waarna het onderste alfanumerieke scherm (B), Fig.2, de gemiddelde waarden weer zal geven voor EXERCISE TIME; DISTANCE TRAVELLED; CALORIES. Als gedurende de tijd die het kost om deze gemiddelde waarden weer te geven geen toetsen aangeraakt worden en er wordt verder geen oefening meer gedaan en er wordt op de STOP-toets gedrukt, dan zal het toestel terugkeren naar het manuele programma.
SK2500L SK LINE sportkoncept
45
P10 – P11 MAN - VROUW TESTPROGRAMMA’S.- Het doel van deze test is om het conditieniveau van de gebruiker te beoordelen. Het verschil tussen het programma voor mannen en dat voor vrouwen zit hem in de Watts. De waarde voor de mannentest is ingesteld op 150 W, terwijl de vrouwentest is ingesteld op 100 W. Met de monitor ingeschakeld zal de bovenste LED-reeks (A), Fig.2, het profiel en de letter “M” voor manueel weergeven. De toetsen SPEED▲ en SPEED▼ worden gebruikt om de verschillende voorgeprogrammeerde profielen weer te geven. Zodra de mannen-TEST of vrouwen-TEST geselecteerd is, drukt u op ENTER. Daarna zal het onderste alfanumerieke scherm (B), Fig.2, om een leeftijdswaarde vragen (tussen 10 en 99). U selecteert uw leeftijd door gebruik te maken van de numerieke toetsen (F), Fig.3, en vervolgens op ENTER te drukken. START EXERCISE – OEFENING STARTEN zal weergegeven worden op het alfanumerieke scherm (B) en de oefening zal beginnen na 3 seconden afgeteld te hebben met een snelheid van 2 km/uur. De bovenste LED-reeks (A), Fig.2, zal een oplichtend hartsymbool weergeven. Plaats uw handen op de pulssensoren (handgreep) op het handvat of bevestig de telemetrische borstband op uw borst als u die heeft. Begin met de TEST. Aan het einde van de 12 minuten-test zal u een score toegekend worden tussen 1 (erg zwak) en 5 (uitstekend). Er kan ook een score van 0 verschijnen, wat betekent dat de testmeetsensor of de hartfrequentiemeetsensor niet op de juiste wijze gebruikt zijn. OPMERKING: Om de test te kunnen doen is het van belang hartfrequentiemeting te gebruiken, gebruik makend van ofwel de handgreepsensoren of de borstband. Het valt aan te bevelen een korte warming-up-sessie te doen alvorens aan de test te beginnen. Dit zal mogelijk letsel voorkomen. Het maximale aantal pulsaties dat een persoon nooit zou moeten passeren wordt het maximale ritme genoemd en dit vermindert bij toenemende leeftijd. Een simpele berekeningsformule is de leeftijd in jaren af te trekken van 220. De oefening, opdat deze correct verloopt, moet zich handhaven tussen 65% en 85 % van het maximale hartritme en het wordt aanbevolen de 85% niet te overschrijden. Wanneer uw pulsaties 85% van het maximale hartritme overschrijden, zal een knipperend hart verschijnen en zal gedurende 2 seconden een geluid opklinken totdat uw pulsaties onder 85 % van uw maximale hartritme komen. Uit veiligheidsoverwegingen wordt aanbevolen onder 85% van het maximale hartritme te oefenen.
P12 - CONSTANT HARTRITMEPROGRAMMA (H R C).-
Het valt aan te bevelen een korte warming-up-sessie te doen alvorens dit programma te gebruiken. Dit zal mogelijk letsel voorkomen. Dit programma staat u toe een hartrime te selecteren (tussen 65% en 85% van het maximale hartritme) en het toestel zal automatisch inspanningsniveaus aanpassen om te verzekeren dat de gebruiker de geselecteerde hartritmewaarde handhaaft. Gebruik van hartrimemeting, gebruik makend van de telemetrische borstband, is verplicht en u moet de 85% van uw maximale hartritmewaarde niet overschrijden. Met de monitor ingeschakeld zal de bovenste LED-reeks (A), Fig.2, het profiel en de letter “M” voor manueel weergeven. Gebruik de toetsen SPEED▲ en SPEED▼ om de verschillende voorgeprogrammeerde profielen weer te geven. Zodra het HRC-programma geselecteerd is, druk op ENTER. Het onderste alfanumerieke scherm (B) zal u vragen om de hartritmewaarde waarop de oefening wenst te doen, gebruik de getallentoetsen (F), Fig.3, om een waarde te selecteren (tussen 25 en 250 B.P.M beats per minute = hartslagen per minuut) en druk vervolgens op ENTER. START EXERCISE – OEFENING STARTEN zal weergegeven worden op het alfanumerieke scherm (B) en de oefening zal beginnen na 3 seconden afgeteld te hebben. Dit programma gebruikt een vooraf ingesteld inspanningsniveau gedurende de eerste drie minuten om elk type letsel te voorkomen. De eerste minuut begint met een snelheid van 4 km/uur. De tweede minuut neemt de snelheid toe tot 4.5km/uur. De derde minuut neemt de snelheid toe tot 5 km/uur. Vanaf de vierde minuut past de computer het inspanningsniveau automatisch aan om uw hartfrequentie op de gespecificeerde waarde te houden. OPMERKING: Als de monitor geen pulsfrequentie doorkrijgt gedurende de derde minuut, zal het programma automatisch stoppen.
SK2500L SK LINE sportkoncept
46
BETEKENIS VAN DE GEBRUIKTE SYMBOLEN.-
Op het scherm kunnen verschillende symbolen of woorden verschijnen en die hebben de volgende betekenis: Een hartje met een vraagteken: De borstband is niet of nietgoed aangebracht. Een knipperend hartje: Dit symbool verschijnt alleen in de testprogramma’s. Het maximum aantal hartslagen dat een persoon nooit mag overschrijden, wordt het maximum ritme genoemdendat aantal neemt met de leeftijd af. Een eenvoudige manier om dat maximum te berekenen is de leeftijd af te trekken van het getal 220. Wanneer de slagen de 85 % van de maximum hartslag overschrijden,verschijnt er en knipperende hartje en is er gedurende twee seconden een waarschuwingssignaal te horen en dat zolang uw slagen niet onder de 85 % van uw maximum hartritme zakken. Om gezondheidsredenen wordtalgemeen aangeraden om onder de 85 % van de maximum hartslag oefeningen te doen. *0*: Dit symbool verschijnt in de mannen- en vrouwentest, en het betekent dat u geen borstband heeftgedragen gedurende de test.
Afbeelding van een steeksleutel: Technisch defect.Zet het toestel af en schakel het na 2 minuten weer aan.Het toestel beschikt over een automatisch correctiesysteem bij defecten, als het probleem toch aanhoudt, neem dan contact op met de technische dienst.
Als u twijfels hebt over enig onderdeel van dit toestel, aarzel dan niet contact op te nemen met de technische bijstandsdienst door dienstverlening te bellen (zie laatste pagina van de handleiding).
BH BEHOUDT ZICH HET RECHT VOOR OM DE SPECIFICATIES VAN HAAR PRODUKTEN ZONDER VOORAFGAANDE BEKENDMAKING TE WIJZIGEN.
1. “WELKOM BIJ HI POWER” 2. “DRUK OP DE PIJLEN OM HET PROFIEL TE SELECTEREN” 3. “DRUK QUICK/START OM TE BEGINNEN” 4. “DRUK OP ENTER OM HET PROFIEL TE STARTEN” 5. “ERROR” 6. “NEEM CONTACT OP MET DE TECHNISCHE DIENST” 7. “GEEF UW LEEFTIJD IN <10-99>”
8. “GEEF UW GEWICHT IN <30-199> KG” “GEEF UW GEWICH IN <70-440> LB”
9. “GEEF DE DUUR VAN DE OEFENING IN <10-60> MINUTEN”
10. “GEEF DE WAARDE VOOR WATT IN <25-400>” “WATTS=”
11. “LEEFTIJD=” 12. “GEEF DE WAARDE VOOR DE POLSSLAG IN <25-250>” 13. “POLSSLAG=” 14. “DRUK OP PAUSE OM DE OEFENING VOORT TE ZETTEN. DRUK OP STOP OM” 15. “DUUR OEFENING=” 16. “AFGELEGDE AFSTAND=” 17. “GEMIDDELDE SNELHEID=” 18. “VERBRUIKTE CALORIEEN=”
19. “DRUK OP ENTER OM HET OPGESLAGEN PROFIEL TE BEVESTIGEN. DRUK OP RESET OM HET PROFIEL TE WIJZIGEN.”
20. “GEBRUIK DE PIJLEN OM DE INTENSITEIT VAN DE ACTIEVE KOLOM TE SELECTEREN. DRUK OP ENTER OM NAAR DE VOLGENDE KOLOM TE GAAN. DRUK OP RESET OM NAAR DE MANUELE STAND TERUG TE KEREN.”
21. “VERMINDER DE INTENSITEIT VAN DE OEFENING. UW HARTSLAG IS TE HOOG” 22. “HET RESULTAAT VAN DE TEST IS=”

SK2500L SK LINE sportkoncept
(E) PERFILES DE LOS PROGRAMAS; (GB) PROGRAM PROFILES; (F) PROFILS DES PROGRAMMES; (D) PROGRAMMPROFILE; (P) PERFIS DOS PROGRAMAS; (I) PROFILI DEI PROGRAMMI; (NL) PROGRAMMAPROFIELEN;
P0
P1 P2
P3 P4
P5 P6
P7 P8

SK2500L SK LINE sportkoncept
P9 P10
P11 P12
SK2500L SK LINE sportkoncept
BH HIPOWER SPAIN EXERCYCLE,S.L. (Manufacturer) P.O.BOX 195 01080 VITORIA (SPAIN) Tel.: +34 945 29 02 58 Fax: +34 945 29 00 49 e-mail: [email protected] www.bhfitness.com POST-VENTA Tel: +34 945 292 012 / 902 170 258 Fax: +34 945 56 05 27 e-mail: [email protected] BH HIPOWER NORTH AMERICA 20155 Ellipse Foothill Ranch CA 92610 Tel: + 1 949 206 0330 Toll free: +1 866 325 2339 Fax: +1 949 206 0013 e-mail: [email protected] www.bhnorthamerica.com BH HIPOWER ASIA BH Asia Ltd. No.80, Jhongshan Rd., Daya Dist., Taichung City 42841, Taiwan. R.O.C. Tel.: +886 4 25609200 Fax: +886 4 25609280 E-mail: [email protected]
BH HIPOWER PORTUGAL MAQUINASPORT, APARELHOS DE DESPORTO, S.A. Rua do Caminho Branco Lote 8, ZI Oiã 3770-068 Oiã Oliveira do Bairro (PORTUGAL) Tel.: +351 234 729 510 Fax: +351 234 729 519 e-mail: [email protected] BH SERVICE PORTUGAL Tel.: +351 234 729 510 Fax: +351 234 729 519 e-mail: [email protected] BH HIPOWER MEXICO BH Exercycle de México S.A. de CV Eje 132 / 136 Zona Industrial, 2A Secc. 78395 San Luis Potosí S:L:P: MÉXICO Tel.: +52 (444) 824 00 29 Fax: +52 (444) 824 00 31 www.bh.com.mx BH HIPOWER CHINA BH China Co., Ltd. Block A, NO.68, Branch Lane 455, Lane 822, Zhen Nan RD., Li Zi Yuan, Putuo, Shanghai 200331, P.R.C. Tel: +86-021-5284 6694 Fax:+86-021-5284 6814 e-mail: [email protected]
BH HIPOWER UK Tel: 02037347554 e-mail: [email protected] AFTER SALES – UK Tel.: 02074425525 e-mail: [email protected] BH HIPOWER FRANCE
SAV FRANCE Tel : +33 0810 000 301 Fax : +33 0810 000 290 [email protected] BH Germany GmbH Grasstrasse 13 45356 ESSEN GERMANY Tel: +49 2015 997018 e-mail: [email protected]
BH SE RESERVA EL DERECHO A MODIFICAR LAS ESPECIFICACIONES DE SUS PRODUCTOS SIN PREVIO AVISO. SPECIFICATIONS MAY BE CHANGED WITHOUT PRIOR NOTICE DUE TO OUR PROGRAMME OF CONTINUOUS PRODUCT DEVELOPMENT. BH SE RÉSERVE LE DROIT DE MODIFIER LES SPECIFICATIONS DE SES PRODUITS SANS PRÉAVIS. BH BEHALT SICH DAS RECHT VOR, ÄNDERUNGEN DER MODELL-ANGABEN OHRE VORHERIGE ANKÜNDIGUNG VORZUNEHMEN. DATI TECNICI E COMMERCIALI RELATIVI AGLI ARTICOLI DEL PRESENTE CATALOGO POSSONO ESSERE SOGGETIL A VARIAZIONI SENZA ALGUN PREAVVISO. BH SE RESERVA O DIREITO A MODIFICAÇÀO ESPECIFICAÇOES DOS SEUS PRODUCTOS SEM PRÉVIO AVISO. DOOR KONSTANTE PRODUKTVERNIEUWING EN VERBETERING HOUDEN WIJ ONS HET RECHT VAN WIJZIGING VOOR ZONDER VOORAFGAAND BERICHT.
v1