Embed Size (px)
Citation preview
Learner Workbook
SMART Notebook™ software training for SMART Board™ users Level 2
For Windows® operating systems
Extraordinary made simple'" ~

Trainer Information
Name
Phone ____________________________________ __
Best practices and tools ......................................................... III •••••••••••••••••••••••••• 1 Tips for designing effective lesson activities using SMART Notebook software ............................ 2 The SMART Exchange online community ...................................................................................... 6
Structuring and organizing lessons ............................................................... 11 The Lesson Activity Toolkit ........................................................................................................... 12 Title pages and lesson pages ....................................................................................................... 14 Page grouping .............................................................................................................................. 16 Linking .......................................................................................................................................... 19 Attachments .................................................................................................................................. 23 My Content ................................................................................................................................... 25 Team content ................................................................................................................................ 27
Adding style to lesson activities ..................................................................... 31 Properties tab ............................................................................................................................... 32 Themes ......................................................................................................................................... 35 Active alignment ........................................................................................................................... 37 Tables ........................................................................................................................................... 38 Lesson pages ............................................................................................................................... 42 Graphics ....................................................................................................................................... 43
Building interactive lesson activities .............................................................. 47 Dual Page Display and Pin Page ................................................................................................ 48 Attaching sound ............................................................................................................................ 50 Object Animation .......................................................................................................................... 51 Interactive resources from the Lesson Activity Toolkit ................................................................. 52
Integrating rich media into lesson activities .................................................. 59 Integrating rich media into lesson activities .................................................................................. 60 Using your favorite websites ......................................................................................................... 60 Page Recorder ............................................................................................................................. 63 SMART Recorder ......................................................................................................................... 64 SMART Video Player .................................................................................................................... 68 Video Player Settings ................................................................................................................... 71 Import images ............................................................................................................................... 73 Importing a file with SMART Notebook Print Capture .................................................................. 74
Lesson development in SMART Notebook software ..................................... 75 Hands-on practice ........................................................................................................................ 76
Delivering lessons and leveraging interactive tools ..................................... 77 Organization and planning for a sophisticated delivery ....................................................... ......... 78 Customizing SMART Notebook software for effective lesson delivery ..... ........................... ......... 80 Customizing the Floating Tools toolbar ...................................................... .................................. 80 Customizing the interface in SMART Notebook software ... .................................................. ........ 82 Presentation tips for delivery on an interactive whiteboard ............................................. ............. 84 Leveraging interactive tools .......................................................................................................... 87 Responsive lesson delivery .......................................................................................................... 89
Additional resources ........................................................................................ 93 SMART training and professional development ........................................................................... 94 SMART's support site ................................................................................................................... 95 The SMART Exchange website ............ ........................................................................................ 95
© 2010 SIVIART Technologies ULC. All rights reserved. SMART Notebook, SMART Notebook Express, SMART Board, SMART Exchange, smarttech and the SMART logo are trademarks or registered trademarks of SMART Technologies ULC in the U.S. and/or other countries. Adobe and Flash are either registered trademarks or trademarks of Adobe Systems I ncorporated in the U.S. and/or other countries. Microsoft is either a registered trademark or a trademark of Microsoft Corporation in the U.S. and/or other countries. All other third-party company names and products are for identification purposes only and may be trademarks of their respective owners. Printed in Canada 10/2010.
SMART Notebook Software Training for SMART Board Users Level 2 Learner Workbook
How can design effective and interactive lesson activities using SMART Notebook software?
Many tools are available for creating professional looking interactive lesson activities using SMART Notebook collaborative learning software. The SMART Exchange ™ online community enables you to download lessons and collaborate with peers.
1
Best practices and tools
Tips for designing effective lesson activities using SMART Notebook software
2
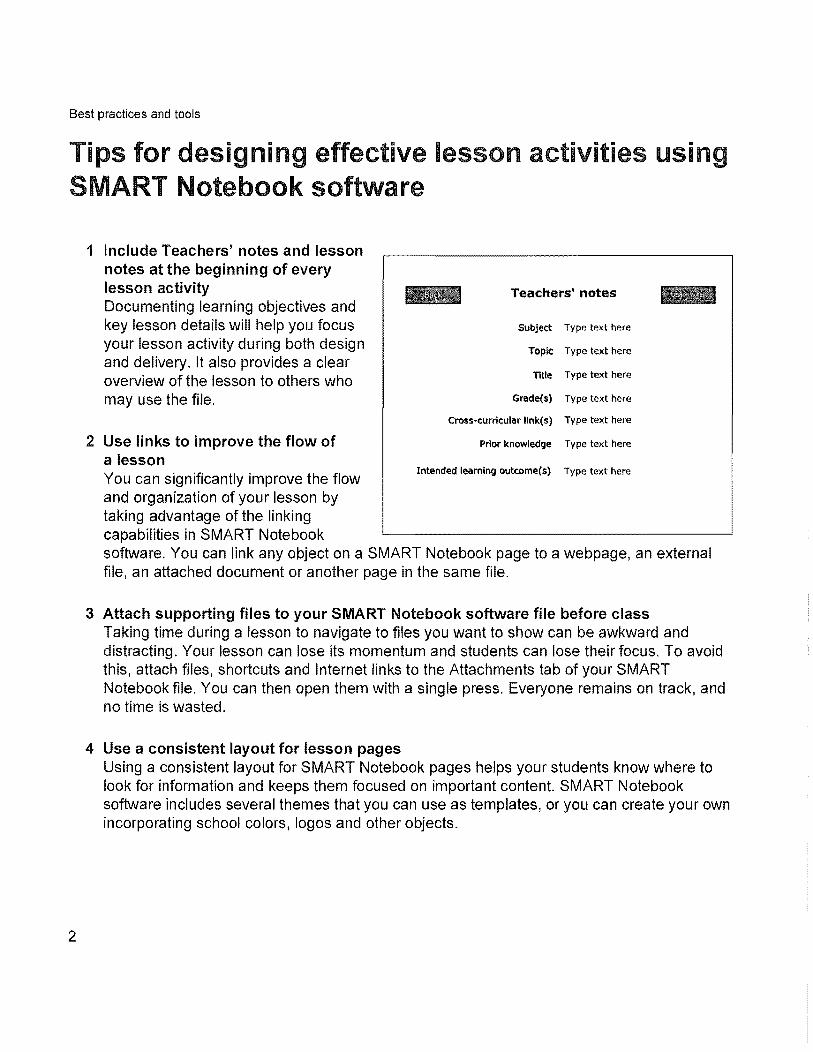
1 Include Teachers' notes and lesson notes at the beginning of every lesson activity Documenting learning objectives and key lesson details will help you focus your lesson activity during both design and delivery. It also provides a clear overview of the lesson to others who may use the file.
2 Use links to improve the flow of a lesson You can significantly improve the flow and organization of your lesson by taking advantage of the linking capabilities in SMART Notebook
Teachers' notes
Subject Type text here
TOpiC Type text here
Title Type text here
Grade(s) Type text here
Cross-curricular IInk(s) Type text here
Prior knowledge Type text here
Intended learning outcome(s) Type text here
software. You can link any object on a SMART Notebook page to a webpage, an external file, an attached document or another page in the same file.
3 Attach supporting files to your SMART Notebook software file before class Taking time during a lesson to navigate to files you want to show can be awkward and distracting. Your lesson can lose its momentum and students can lose their focus. To avoid this, attach files, shortcuts and Internet links to the Attachments tab of your SMART Notebook file. You can then open them with a single press. Everyone remains on track, and no time is wasted.
4 Use a consistent layout for lesson pages Using a consistent layout for SMART Notebook pages helps your students know where to look for information and keeps them focused on important content. SMART Notebook software includes several themes that you can use as templates, or you can create your own incorporating school colors, logos and other objects.
SMART Notebook Software Training for SMART Board Users Level 2 Learner Workbook
5 Create lessons that fully involve learners The SMART Board ™ interactive whiteboard is more than a teaching tool: it's a learning tool. Students can use the interactive whiteboard to manipulate objects, complete activities, make notes during brainstorming sessions and deliver presentations.
6 Use the Internet and extra resources to encourage inquiry Store links to relevant websites and additional resources as attachments in your SMART Notebook file. When stUdents are particularly interested in a topic or have a question, these links can serve as a starting point for inquiry. Consider planning virtual field trips, or having the class compose an e-mail to an expert, an author, or another class with a question or idea about the interactive whiteboard.
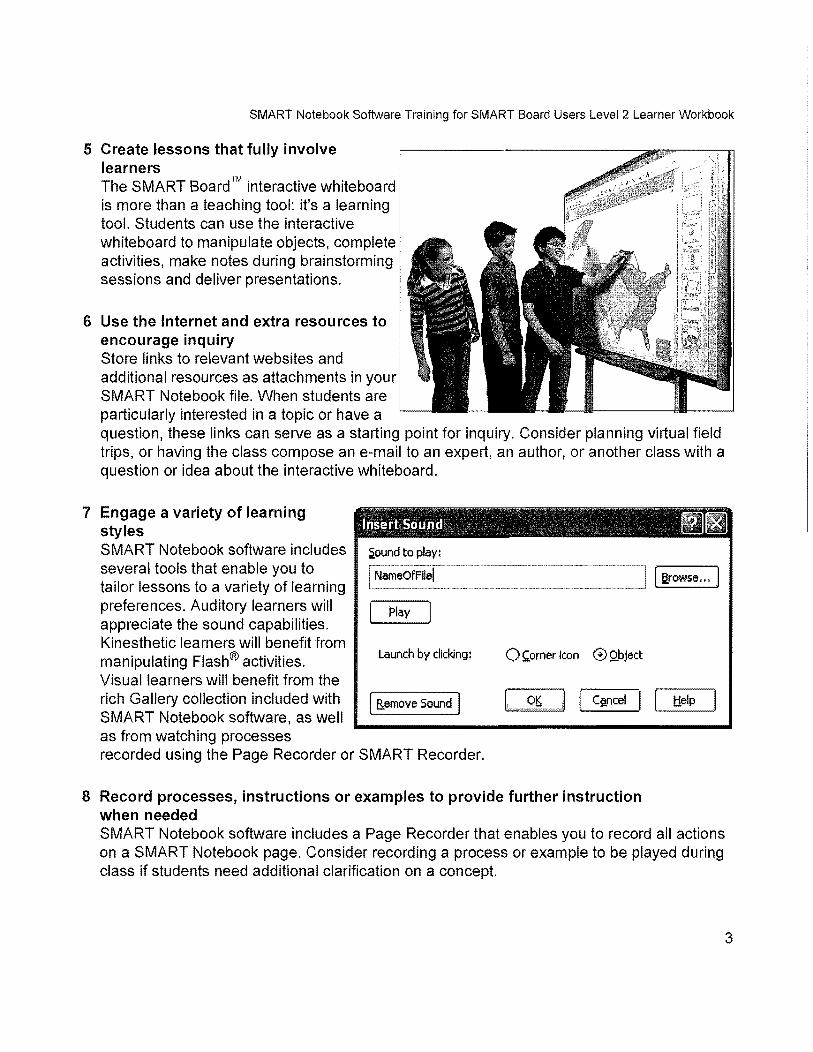
7 Engage a variety of learning styles SMART Notebook software includes several tools that enable you to tailor lessons to a variety of learning preferences. Auditory learners will appreciate the sound capabilities. Kinesthetic learners will benefit 'from manipulating Flash® activities. launch by clicking: O~orner Icon o Qbject
Visual learners will benefit from the rich Gallery collection included with I Remove Sound I CS!,ncel SMART Notebook software, as well as from watching processes recorded using the Page Recorder or SMART Recorder.
8 Record processes, instructions or examples to provide further instruction when needed SMART Notebook software includes a Page Recorder that enables you to record all actions on a SMART Notebook page. Consider recording a process or example to be played during class if students need additional clarification on a concept.
3
Best practices and tools
4
9 Seek lesson activities on the Internet Begin by searching the SMART Exchange ™
online community, which offers hundreds of ready-made lesson activities and resources. Download and modify lesson activities to suit the needs of your students.
1 0 Collaborate and share resources Keep in regular contact with other educators who are using a SMART Board interactive whiteboard. Share experiences, ideas, challenges, lesson activities and solutions.
SMART Notebook Software Training for SMART Board Users Level 2 Learner Workbook
Notes and ideas for designing effective lesson activities
Use this page to write notes and ideas from the training session discussions.
TIP: One of the quickest ways to add interactivity to a lesson is with a reveal activity, where the answer to a question is hidden on the SMART Notebook page. A great way to do this is using erase and reveal.
Type your question and answer, and then use a pen tool to cover the answer with digital ink. Select the digital ink, and set it to the same color as the page background. For example, if the page background is white, then the digital ink should also be white. To reveal the answer during your lesson, select the Eraser tool, and erase the digital ink covering the answer.
5
Best practices and tools
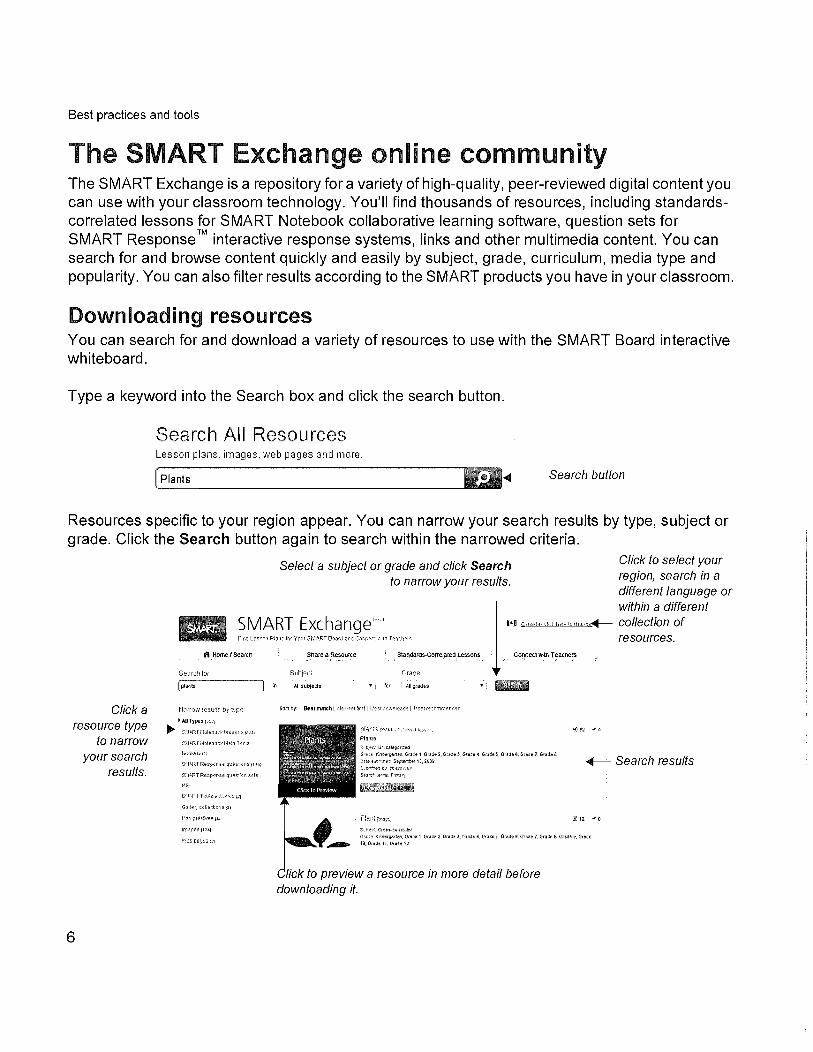
The SMART Exchange online community The SMART Exchange is a repository for a variety of high-quality, peer-reviewed digital content you can use with your classroom technology. You'll find thousands of resources, including standardscorrelated lessons for SMART Notebook collaborative learning software, question sets for SMART Response ™ interactive response systems, links and other multimedia content. You can search for and browse content quickly and easily by subject, grade, curriculum, media type and popularity. You can also filter results according to the SMART products you have in your classroom.
Downloading resources You can search for and download a variety of resources to use with the SMART Board interactive whiteboard.
Type a keyword into the Search box and click the search button.
Search All Resources Lesson plans, image5, web page5 and more,
Plants 4-- Search button
Resources specific to your region appear. You can narrow your search results by type, subject or grade. Click the Search button again to search within the narrowed criteria.
Click a
Select a subject or grade and click Search to narrow your results.
Click to select your region, search in a different language or
SMART Exchange'l.
tt Home / Search Share a Resource Slaodards·Correlafed Lessons
Selu::.hfor SubJ~cl Gracie
f~,a(i~ _____________ J in Nisubjects T for fJI'i/fad~s
.-a ;;,;o"",rl,.,,,~,,,cm"',,l'~ collection of resources. 1 within a different
Connect Vt,th Teachers
resource type -----. • :'J~:;':;::'", Imce" "," prams IS:""R-'-',ci'~_·:' :~~s,n, Plants to narrow "PRT""''',o''I'''',To,",
your search 1m'"",·, S!!t·HT Res~(rse Clli"'~t:.;r.2 If_H)
results.
6
~,t;~u lJr'f.cat~~~ro;::M
G-a~~ Kn;!efT(arten, Graj~ 1, Or&~t-1, Cll!jd~, Gtl~e. C, Gf,l~e ~ Ora;ie~. Cluje-7, C:r~1t: Ii
~"t-_'"~:lti t.r:.,~,'t"!~'1
SedC' Hr·'!; P'r.:;'1
SA ~-'l Cren.N~.u\e~
+-- Search results
ml2 ""0
G·s~., K:,,:dff~II1.¢fI, Gr~~ " Gf~j~:1 Gr8:f~:!>. Gla~~4 C..,.~~e~, Or!1e 5, Gracte 7, Gr~j,o; e: G'5~! So, Grll~e 10, GI5de I\. G'I.~e I;;
to preview a resource in more detail before downloading it.
SMART Notebook Software Training for SMART Board Users Level 2 Learner Workbook
Sharing resources Contribute to the SMART Exchange community by sharing the resources that you've created with other teachers. Simply click Share a Resource on the SMART Exchange menu bar and fill out the required fields to share a resource you've created.
You can also use this area to recommend web pages that you love to use with your SMART Board interactive whiteboard. You do not need to own or have created a web page in order to share a link to it.
Finding standards-correlated lessons In many regions, you can search for resources that have been correlated to your local curriculum standards. If this service is available for your region, you will see a Standards-Correlated Lessons button on the SMART Exchange menu bar.
Click the Standards-Correlated Lessons button and select a standard, grade and subject. Click View to display the standards for that region. If a resource is available for a standard, a View Resources button displays beside the standard. Click the View Resources button to display the correlated resources for that standard.
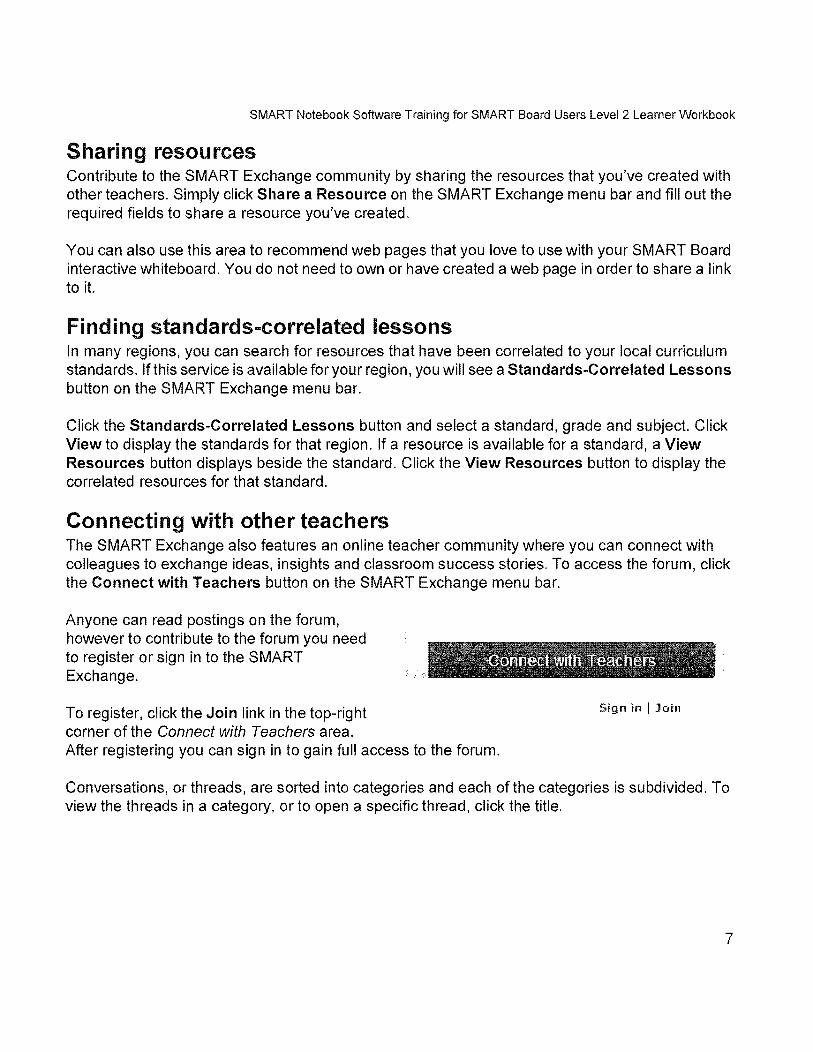
Connecting with other teachers The SMART Exchange also features an online teacher community where you can connect with colleagues to exchange ideas, insights and classroom success stories. To access the forum, click the Connect with Teachers button on the SMART Exchange menu bar.
Anyone can read postings on the forum, however to contribute to the forum you need to register or sign in to the SMART Exchange.
To register, click the Join link in the top-right corner of the Connect with Teachers area. After registering you can sign in to gain full access to the forum.
Sign in I Join
Conversations, or threads, are sorted into categories and each of the categories is subdivided. To view the threads in a category, or to open a specific thread, click the title.
7


SMART Notebook Software Training for SMART Board Users Level 2 Learner Workbook
Review: Best practices and tools
1 List three tips for designing effective lesson activities in SMART Notebook software.
2 From which website can you download SMART-created lesson activities?
3 Describe two of the areas in the SMART Exchange.
9
Best practices and tools Q and A
Review: Best practices and tools
10
1 List three tips for designing effective lesson activities in SMART Notebook software .
.. Include Teachers' notes and lesson notes at the beginning of every lesson activity
.. Use links to improve the flow of a lesson
.. Attach supporting files to your SMART Notebook software file before class
• Use a consistent layout for lesson pages
• Create lessons that are hands-on for learners
.. Use the Internet and extra resources to encourage inquiry
• Engage a variety of learning styles in each lesson activity
• Record processes, instructions or examples to provide further instruction when needed
• Seek lesson activities on the Internet
.. Collaborate and share resources with others
2 From which website can you download SMART-created lesson activities? http://exchange.smarttech.com
3 Describe two of the areas in the SMART Exchange .
.. Home / Search - Search for and download lessons, images, web pages and more.
• Share a Resource Share resources and web page addresses
• Standards-Correlated Lessons (available in some regions only) - Download resources that are aligned to your regional standards
.. Connect with Teachers - Online forum for sharing ideas and resources
SMART Notebook Software Training for SMART Board Users Level 2 Learner Workbook
How can I make my SMA T Notebook files organized and easy to use?
The Page Grouping feature in SMART Notebook software enables you to organize pages. Links, buttons and attachments can help you improve the flow of a lesson activity. Additional features, such as My Content and team content, help you keep your learning objects and SMART Notebook files well organized.
11
Structuring and organizing lessons
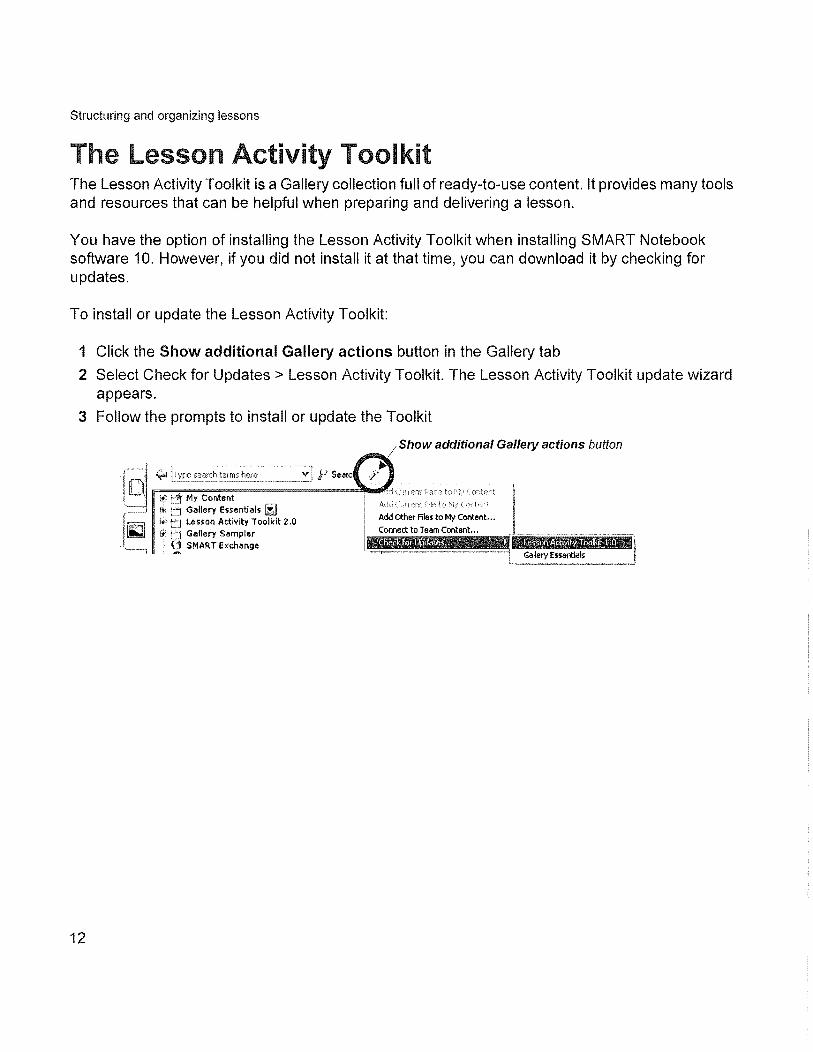
The Lesson Activity Toolkit The Lesson Activity Toolkit is a Gallery collection full of ready-to-use content. It provides many tools and resources that can be helpful when preparing and delivering a lesson.
You have the option of installing the Lesson Activity Toolkit when installing SMART Notebook software 10. However, if you did not install it at that time, you can download it by checking for updates.
To install or update the Lesson Activity Toolkit:
1 Click the Show additional Gallery actions button in the Gallery tab
2 Select Check for Updates> Lesson Activity Toolkit. The Lesson Activity Toolkit update wizard appears.
3 Follow the prompts to install or update the Toolkit
Show additional Gallery actions button
II i~j r====c=:=:==::=~======"!~d "~~ fB My Content , fB:::I Gallery Essentials IiJ
1
"- fB t:J Lesson Activity Toolkit 2.0 Add Other Files to My Content ... ~ Comect to Team Content ... ~ (±It:'j Gallery Sampler ".I,I~ ... m.1 '--~l 'Q SMART Exchange !!
12
SMART I\lotebook Software Training for SMART Board Users Level 2 Learner Workbook
Lesson Activity Toolkit contents When installed, the Lesson Activity Toolkit will appear as a folder in the Gallery. It has the following six subfolders:
Activities - Activity templates are Flash®-created objects that make it easy for you to create sorting, matching and other interactive lesson activities.
Examples - The Examples folder includes filled-in content from the Activities, Pages, and Tools folders. These demonstrate the many dynamic and fun ways that SMART Notebook can help you bring your lessons to life. Many examples include instructional videos that will tell you how to create them.
Games - The Games folder contains classic game objects like cards, game boards, and playing pieces.
Graphics - Graphics help give your lessons a more professional look with its array of icons, borders, labels, and pull tabs.
Pages - Pre-made pages save you time and effort when creating title pages, questions, and other lesson pages. Its contents are similar to those of the Activities folder, but are fully made of SMART Notebook objects and are more cutomizable than Activities.
Tools - Tools are Flash-created objects that perform a variety of actions from animated answer revealers, randomizers, and timers.
13
Structuring and organizing lessons
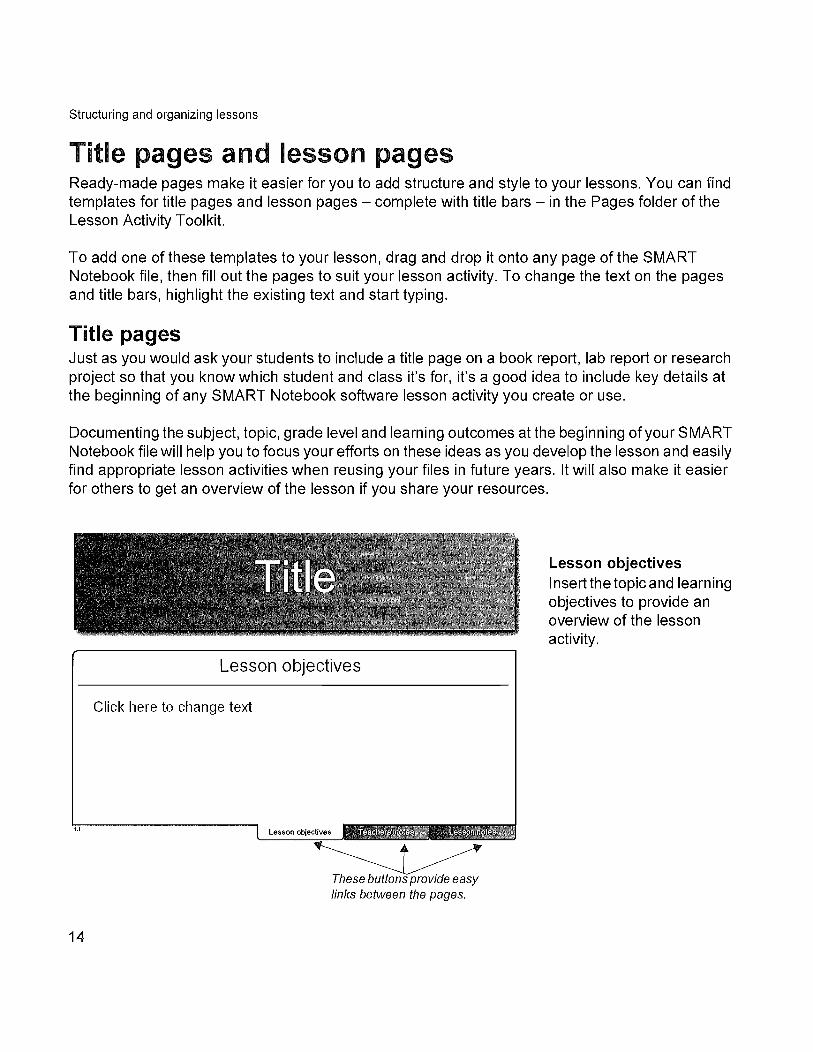
Title pages and lesson pages Ready-made pages make it easier for you to add structure and style to your lessons. You can find templates for title pages and lesson pages - complete with title bars - in the Pages folder of the Lesson Activity Toolkit.
To add one of these templates to your lesson, drag and drop it onto any page of the SMART Notebook file, then fill out the pages to suit your lesson activity. To change the text on the pages and title bars, highlight the existing text and start typing.
Title pages Just as you would ask your students to include a title page on a book report, lab report or research project so that you know which student and class it's for, it's a good idea to include key details at the beginning of any SMART Notebook software lesson activity you create or use.
Documenting the Subject, topic, grade level and learning outcomes at the beginning of your SMART Notebook file will help you to focus your efforts on these ideas as you develop the lesson and easily find appropriate lesson activities when reusing your files in future years. It will also make it easier for others to get an overview of the lesson if you share your resources.
14
Lesson objectives
Click here to change text
These button provide easy links between the pages.
Lesson objectives Insert the topic and learning objectives to provide an overview of the lesson activity.
SMART Notebook Software Training for SMART Board Users Level 2 Learner Workbook
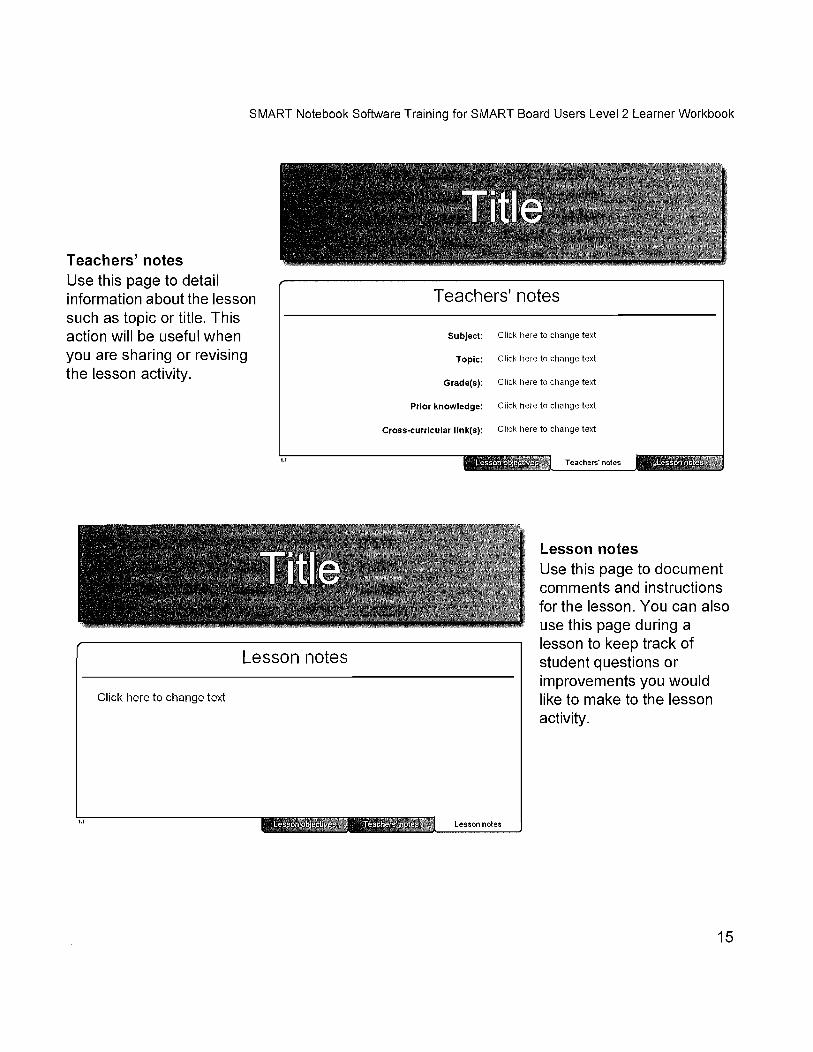
Teachers' notes Use this page to detail information about the lesson such as topic or title. This action will be useful when you are sharing or revising the lesson activity.
Lesson notes
Click here to change text
Teachers' notes
Subject: Click here to change text
Topic: Click here to change text
Grade(s): Click here to change text
Prior knowledge: Click here to change text
Cross-curricular IInk(s): Click here to change text
lesson notes
Teachers' notes
Lesson notes Use this page to document comments and instructions for the lesson. You can also use this page during a lesson to keep track of student questions or improvements you would like to make to the lesson activity.
15
Structuring and organizing lessons
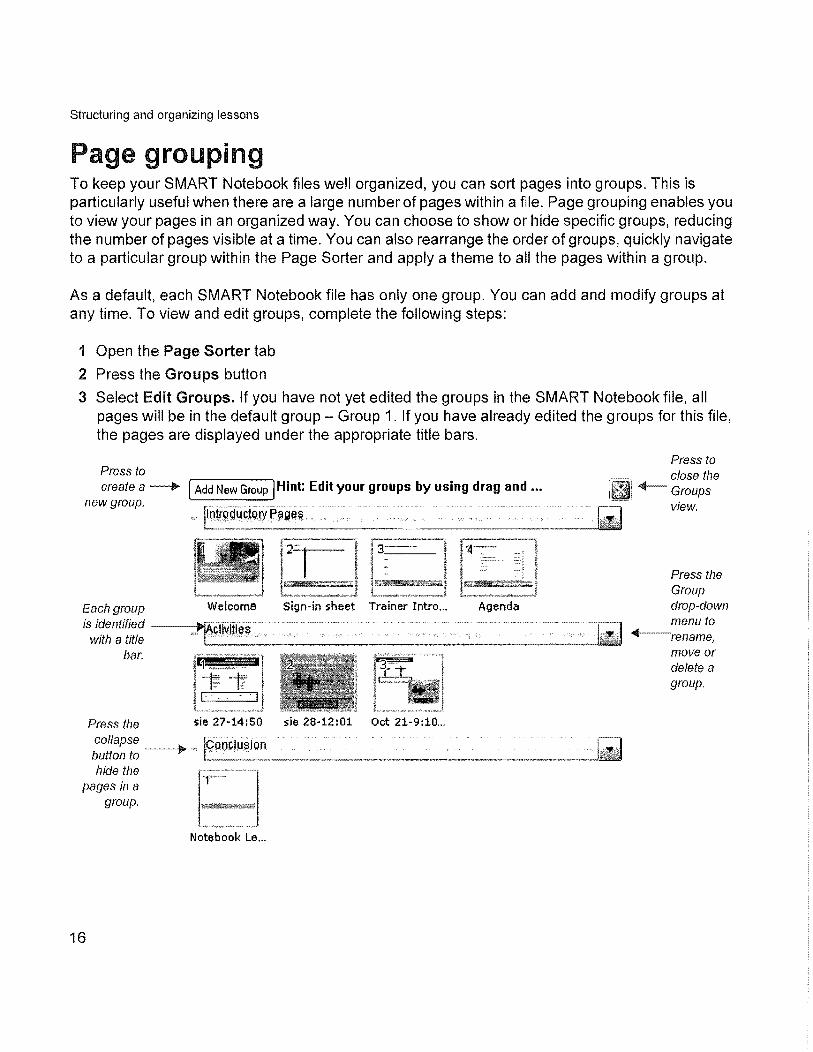
Page grouping To keep your SMART Notebook files well organized, you can sort pages into groups. This is particularly useful when there are a large number of pages within a file. Page grouping enables you to view your pages in an organized way. You can choose to show or hide specific groups, reducing the number of pages visible at a time. You can also rearrange the order of groups, quickly navigate to a particular group within the Page Sorter and apply a theme to all the pages within a group.
As a default, each SMART Notebook file has only one group. You can add and modify groups at any time. To view and edit groups, complete the following steps:
1 Open the Page Sorter tab
2 Press the Groups button
3 Select Edit Groups. If you have not yet edited the groups in the SMART Notebook file, all pages will be in the default group - Group 1. If you have already edited the groups for this file, the pages are displayed under the appropriate title bars.
Press to create a ----/II> [Add New Group 1 Hint: Edit your groups by using drag and ...
new group.
.:!
Each group Welcome Sign-in sheet Trainer Intro ...
is identified --~\ctlvjtles with a title
bar.
Press the collapse button to hide the
pages in a group.
16
sie 27-14:50 sie 28-12:01 oct 21-9:10 ...
Notebook Le ...
Agenda
Press to close the
+-- Groups view .
Press the Group drop-down menu to
~renameJ move or delete a group.
SMART Notebook Software Training for SMART Board Users Level 2 Learner Workbook
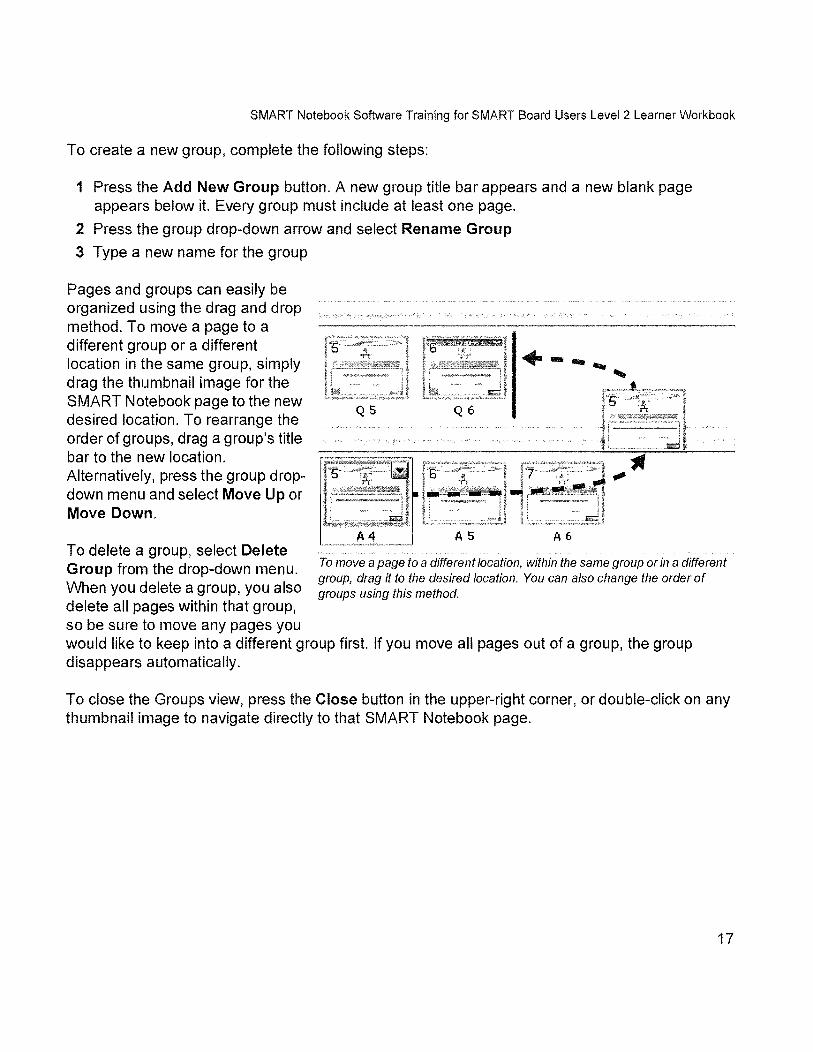
To create a new group, complete the following steps:
1 Press the Add New Group button. A new group title bar appears and a new blank page appears below it. Every group must include at least one page.
2 Press the group drop-down arrow and select Rename Group
3 Type a new name for the group
Pages and groups can easily be organized using the drag and drop method. To move a page to a different group or a different location in the same group, simply drag the thumbnail image for the SMART Notebook page to the new desired location. To rearrange the order of groups, drag a group's title bar to the new location. Alternatively, press the group dropdown menu and select Move Up or Move Down.
A4 AS
.-- ... ,
A6 To delete a group, select Delete Group from the drop-down menu. When you delete a group, you also delete all pages within that group, so be sure to move any pages you
To move a page to a different location, within the same group or in a different group, drag it to the desired location. You can also change the order of groups using this method.
would like to keep into a different group first. If you move all pages out of a group, the group disappears automatically.
To close the Groups view, press the Close button in the upper-right corner, or double-click on any thumbnail image to navigate directly to that SMART Notebook page.
17
Structuring and organizing lessons
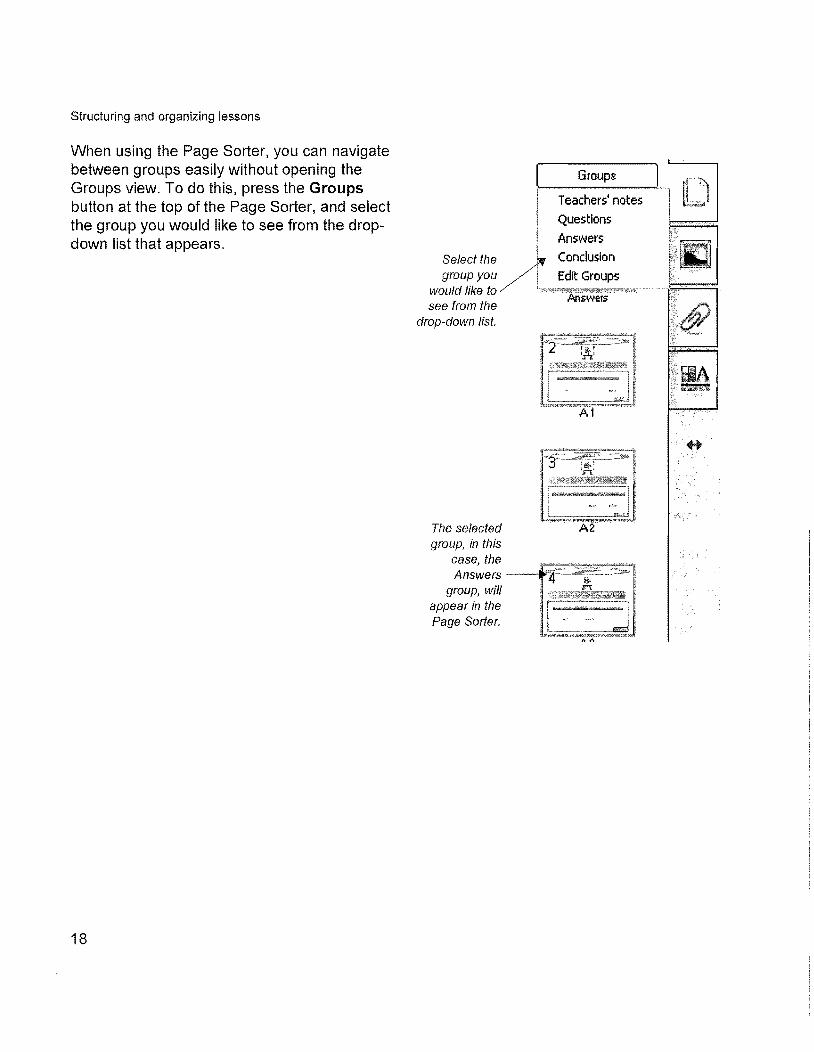
When using the Page Sorter, you can navigate between groups easily without opening the Groups view. To do this, press the Groups button at the top of the Page Sorter, and select the group you would like to see from the dropdown list that appears.
18
Select the group you
would like to see from the
drop-down list.
The selected group, in this
case, the Answers ----IV
group, will appear in the Page Sorter.
Teachers' notes
Questions
Answers
Conclusion
Edit Groups

SMART Notebook Software Training for SMART Board Users Level 2 Learner Workbook
Linking You can significantly improve the flow and organization of your lesson by taking advantage of the linking capabilities in SMART Notebook software. You can link any object on a SMART Notebook page to a webpage, an external file, an attached item or another page in the same SMART Notebook file.
The ability to link to another page within the SMART Notebook file enables you to move between pages quickly, without using the Page Sorter. Since any object can be linked, you can create objects that serve as navigation buttons or set different messages to appear based on which object you or a student touches on the SMART I\lotebook page.
Many teachers like to write congratulatory messages or hints on specific pages, providing students with immediate feedback when they touch an object linked to that page. Navigation buttons created with links found on the message pages allow students to return to the activity easily to try again or move on to the next activity.
This causes acid
rain.
Lightning ~
To respond to the question, the student presses the object that he believes causes acid rain. All three objects are linked to answer pages. within the SMART Notebook file. After pressing an object, the student will be presented with one of
'----------------' the two pages shown below.
® This does not cause
acid rain.
19
Structuring and organizing lessons
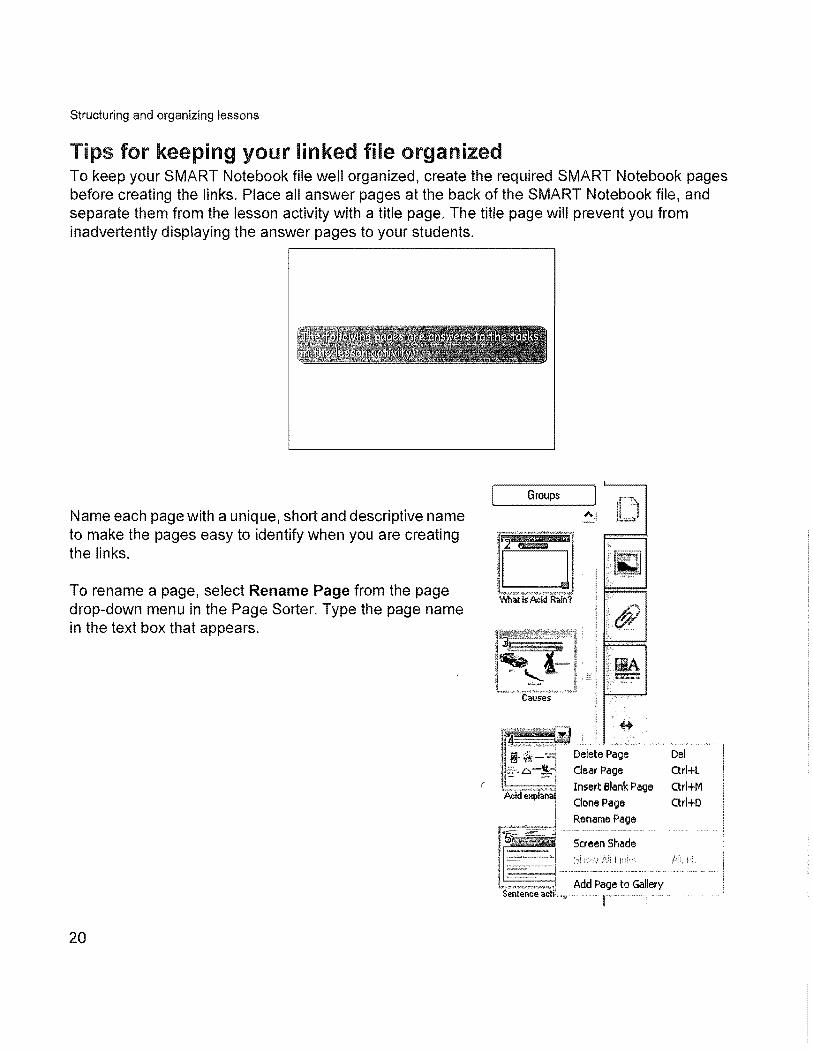
ps for keeping your linked file organized To keep your SMART Notebook file well organized, create the required SMART Notebook pages before creating the links. Place all answer pages at the back of the SMART Notebook file, and separate them from the lesson activity with a title page. The title page will prevent you from inadvertently displaying the answer pages to your students.
Name each page with a uniq ue, short and descriptive name to make the pages easy to identify when you are creating the links.
To rename a page, select Rename Page from the page drop-down menu in the Page Sorter. Type the page name in the text box that appears.
20
Delete Page Del Clear Page Ctrl+L Insert Blank Page Ctrl+M Clone Page Ctrl+D Rename Page
SMART Notebook Software Training for SMART Board Users Level 2 Learner Workbook
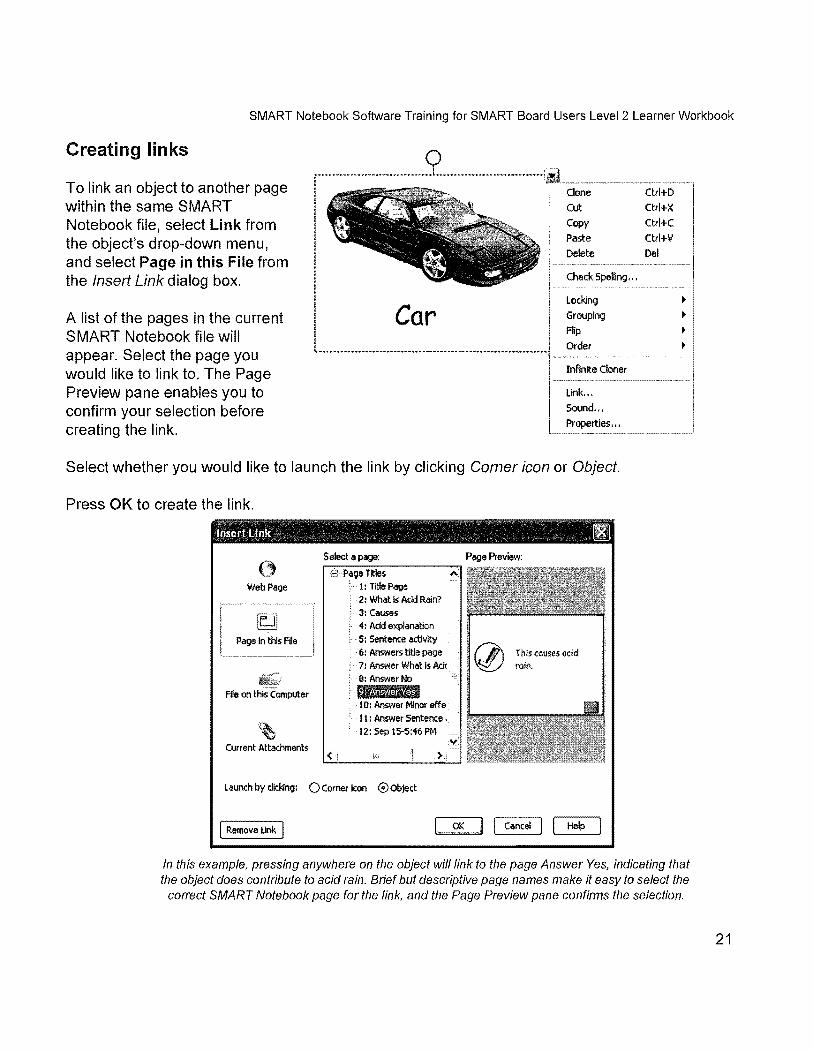
Creating links
To link an object to another page within the same SMART Notebook file, select Link from the object's drop-down menu, and select Page in this File from the Insert Link dialog box.
A list of the pages in the current SMART Notebook file will appear. Select the page you would like to link to. The Page Preview pane enables you to confirm your selection before creating the link.
Car
Clone Cut Copy Paste Delete
Check Spelling •••
Locking Grouping Flip Order
Infinite Cloner
Link .•• Sound ...
Properties" •
Select whether you would like to launch the link by clicking Corner icon or Object.
Press OK to create the link.
Web Page
Page In this Fde
File on Computer
Current Attachments
EJPage Titles
(,
··1: TI~e Page ··2: What Is Acid Rain?
3: Causes 4: Acid explanation 5: Sentence activity
. ·6: Answers title page 7: Answer What Is Ack 8: Answer No ~ .Maim,. 10: Answer Minor effe II : Answer Sentence. 12: Sep 15-5:46 PM
Launch by clic\<Jng: 0 Corner Icon 0 Object
I Remove Link I
This cooses acid roin.
Ctrl+D Ctrl+X Ctrl+C ctrl+V Del
~
~
~
~
In this example, pressing anywhere on the object will link to the page Answer Yes, indicating that the object does contribute to acid rain. Brief but descriptive page names make it easy to select the
correct SMART Notebook page for the link, and the Page Preview pane confirms the selection.
21
Structuring and organizing lessons
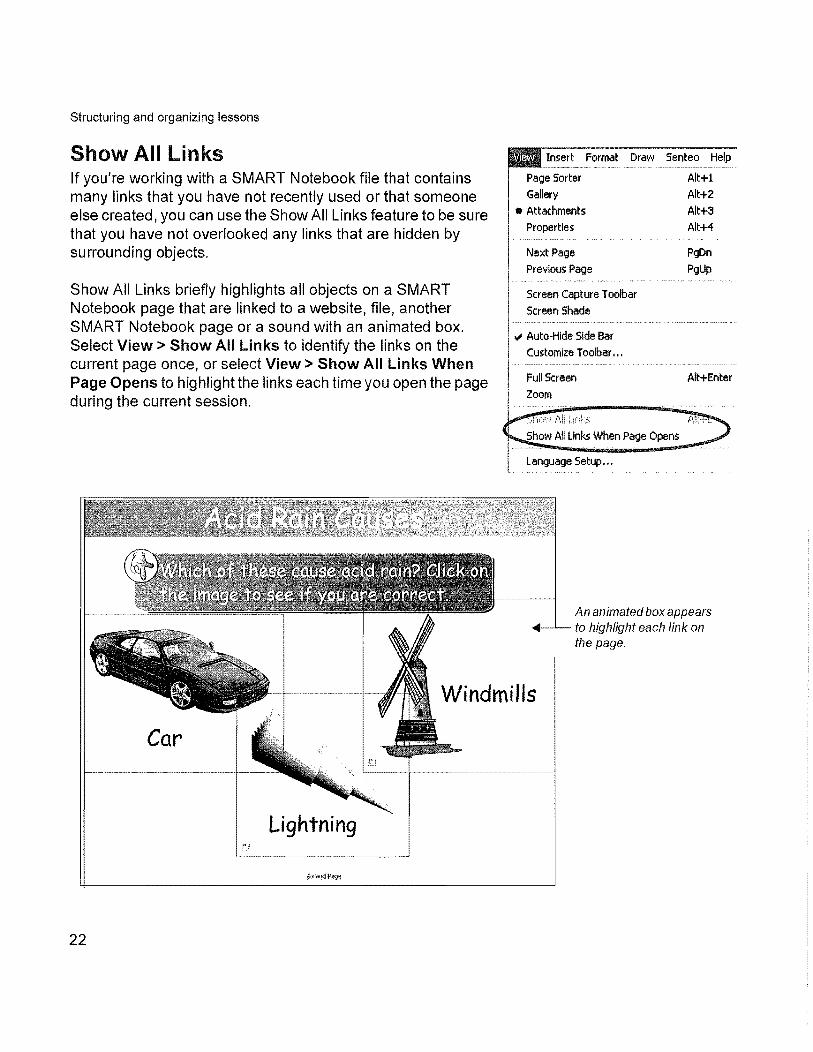
Show All Links If you're working with a SMART Notebook file that contains many links that you have not recently used or that someone else created, you can use the Show All Links feature to be sure that you have not overlooked any links that are hidden by surrounding objects.
Show All Links briefly highlights all objects on a SMART Notebook page that are linked to a website, file, another SMART Notebook page or a sound with an animated box. Select View> Show All Links to identify the links on the current page once, or select View> Show All Links When Page Opens to highlight the links each time you open the page during the current session.
Car
Lightning
22
Page Sorter Gallery
• Attachments
Properties
Next Page
Previous Page
Draw Senteo Help
Alt+l
Alt+2 Alt+3
Alt+4
PgDn PgUp
Screen Capture Toolbar
Screen Shade
.; Auto-Hide Side Bar
Customize Toolbar •••
Full Screen
Zoom
I_C;f",{""""I',1!
All Links When Page Opens
Alt+Enter
An animated box appears -4--'-- to highlight each link on
the page.
SMART Notebook Software Training for SMART Board Users Level 2 Learner Workbook
Attachments Taking time during a class to navigate to the files you want to show can be awkward and distracting. Your lesson can lose its momentum and students can lose their focus. To avoid this situation, attach files, shortcuts to files and Internet links to the Attachments tab of your SMART Notebook file and open them easily during your lesson. You can then open them with a single press. Everyone remains on track, and no time is wasted. Attachments give you ready access to the information you want to display.
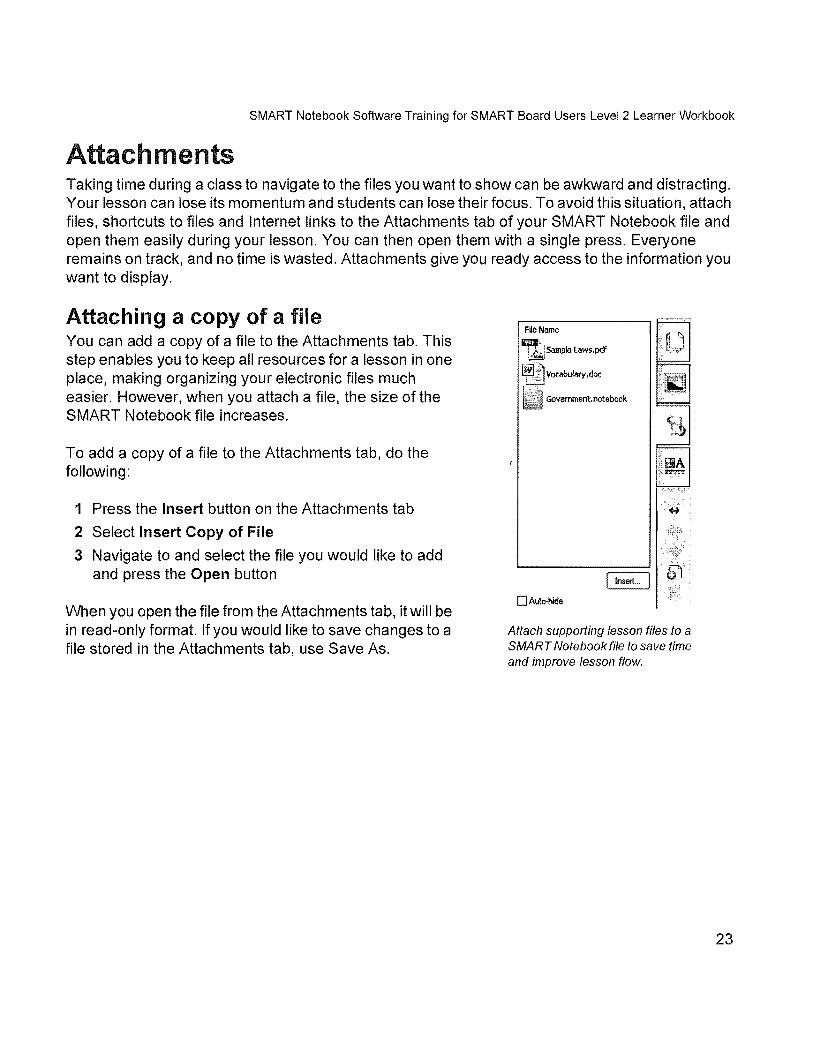
Attaching a copy of a file You can add a copy of a file to the Attachments tab. This step enables you to keep all resources for a lesson in one place, making organizing your electronic files much easier. However, when you attach a file, the size of the SMART Notebook file increases.
To add a copy of a file to the Attachments tab, do the following:
1 Press the Insert button on the Attachments tab
2 Select Insert Copy of File
3 Navigate to and select the file you would like to add and press the Open button
When you open the file from the Attachments tab, it will be in read-only format. If you would like to save changes to a file stored in the Attachments tab, use Save As.
FdeName
~: Sample laws.pdf
~ Vocabulary.doc
id Government.notebook
o Aulo·hide
Attach supporting lesson files to a SMART Notebook file to save time and improve lesson flow.
23
Structuring and organizing lessons
Attaching a hyperlink To save time finding Internet resources and reduce distractions during your lesson, you can add hyperlinks to the Attachments tab, similar to saving bookmarks or favorites in your Web browser.
To add a hyperlink to the Attachments tab, do the following:
1 Press the Insert button on the Attachments tab
2 Select Insert Hyperlink
3 Type the hyperlink address into the Hyperlink field
4 Type the text you would like to see in the Attachments list for example, the website nameinto the Display name field
5 Press OK
The hyperlink appears in the Attachments tab. To open the webpage in your default browser, double-press the link.
Attaching a shortcut to a file A shortcut is a link to a file that is stored outside of SMART Notebook software. To add the shortcut to a file in the Attachments tab, do the following:
1 Press the Insert button on the Attachments tab
2 Select Insert Shortcut To File
3 Navigate to and select the file you would like to add and press the Open button
24
SMART Notebook Software Training for SMART Board Users Level 2 Learner Workbook
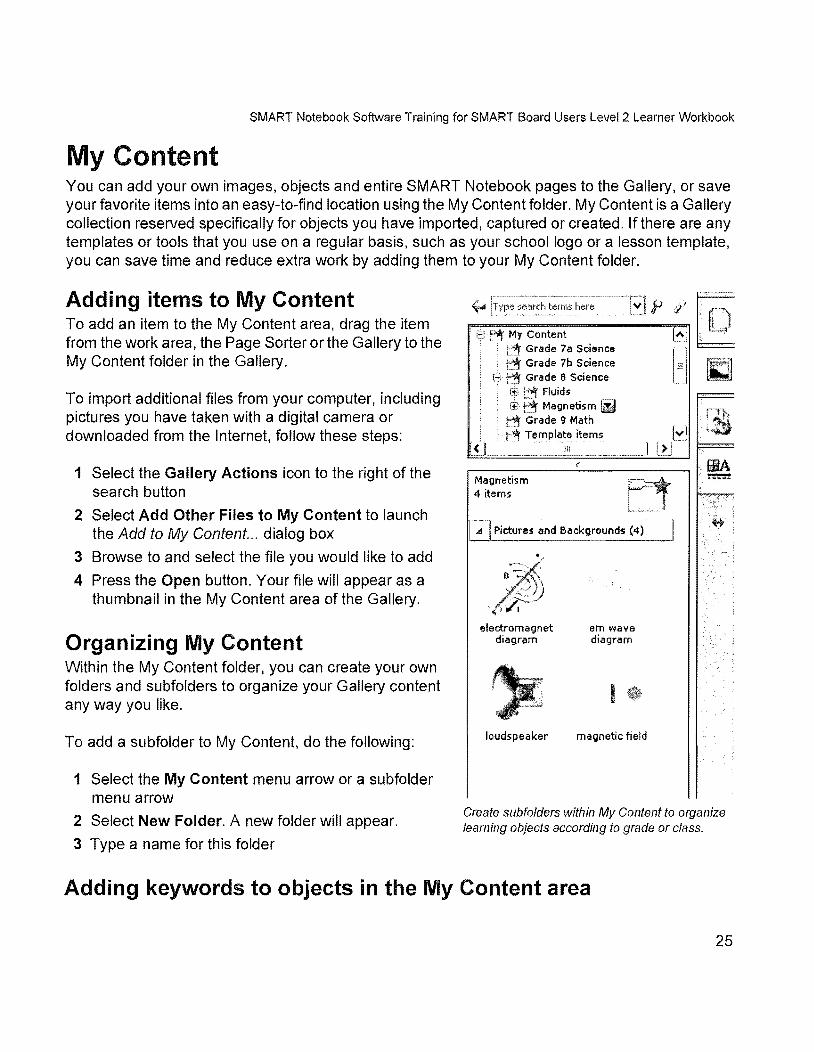
My Content You can add your own images, objects and entire SMART Notebook pages to the Gallery, or save your favorite items into an easy-to-find location using the My Content folder. My Content is a Gallery collection reserved specifically for objects you have imported, captured or created. If there are any templates or tools that you use on a regular basis, such as your school logo or a lesson template, you can save time and reduce extra work by adding them to your My Content folder.
Adding items to My Content To add an item to the My Content area, drag the item from the work area, the Page Sorter or the Gallery to the My Content folder in the Gallery.
To import additional files from your computer, including pictures you have taken with a digital camera or downloaded from the Internet, follow these steps:
1 Select the Gallery Actions icon to the right of the search button
2 Select Add Other Files to My Content to launch the Add to My Content... dialog box
3 Browse to and select the file you would like to add
4 Press the Open button. Your file will appear as a thumbnail in the My Content area of the Gallery.
Organizing My Content Within the My Content folder, you can create your own folders and subfolders to organize your Gallery content any way you like.
To add a subfolder to My Content, do the following:
1 Select the My Content menu arrow or a subfolder menu arrow
2 Select New Folder. A new folder will appear.
3 Type a name for this folder
Grade a Science Fluids Magnetism Ii)
Grade 9 Math Template items
Magnetism 4 items
Ilil
['1] Pictures and Backgrounds (4)
•
electromagnet diagram
loudspeaker
em wave diagram
I magnetic field
Create subfolders within My Content to organize learning objects according to grade or class.
Adding keywords to objects in the My Content area
25
Structuring and organizing lessons
The search function in the Gallery works by scanning keywords associated with each Gallery item. When you add an item to the My Content area of the Gallery, you can provide keywords to the item so it is recognized by the search function and appears in future search results.
To add keywords to a My Content item, do the following:
1 Press the item's thumbnail in the My Content area
2 Press the drop-down menu arrow
3 Select Properties to launch the Gallery Item Properties dialog box
4 Type the keywords you would like associated with the item. For example, you could type editing and symbol if the Gallery item is an editing symbol you frequently use
5 Press OK
26
SMART Notebook Software Training for SMART Board Users Level 2 Learner Workbook
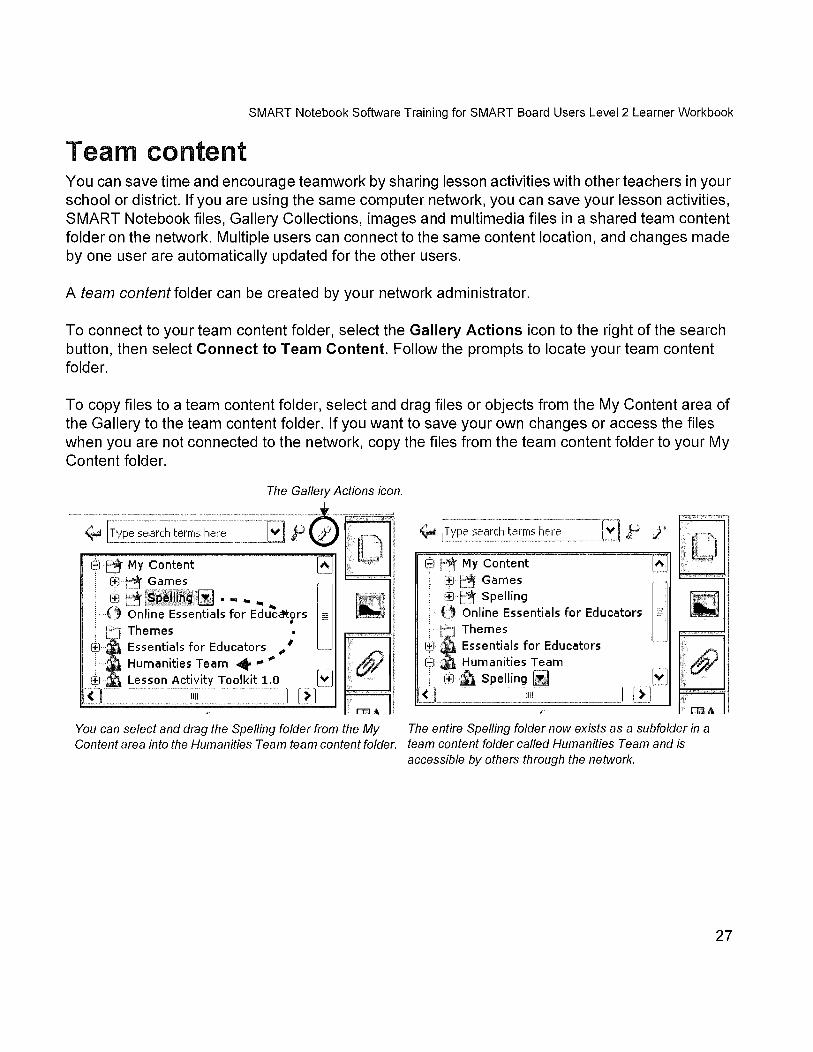
Team content You can save time and encourage teamwork by sharing lesson activities with other teachers in your school or district. If you are using the same computer network, you can save your lesson activities, SMART Notebook files, Gallery Collections, images and multimedia files in a shared team content folder on the network. Multiple users can connect to the same content location, and changes made by one user are automatically updated for the other users.
A team content folder can be created by your network administrator.
To connect to your team content folder, select the Gallery Actions icon to the right of the search button, then select Connect to Team Content. Follow the prompts to locate your team content folder.
To copy files to a team content folder, select and drag files or objects from the My Content area of the Gallery to the team content folder. If you want to save your own changes or access the files when you are not connected to the network, copy the files from the team content folder to your My Content folder.
The Gallery Actions icon.
-":-~-~;:;;t::,~:,:-~----p~~'~ I~Jt~ My Content A II
(±J ~ Games I~n~ [SpeHihg lil ....... . -. ~. ...
() Online Essentials for Educc!t~rs _
!~_ Themes •
-_ - Essentials for Educators " .' Humanities Team .... ' . - Lesson Activity Toolkit 1,0 l .... J
1111 [~~J
,:..t search terms here r' :.i' I_~____________ _______ 'c~d
1$1 ~ My Content I_~J . r.tlt:~ Games rtq~ Spelling C' Online Essentials for Educators -
Themes Essentials for Educators Humanities Team it Spelling IiJ
1111
You can select and drag the Spelling folder from the My The entire Spelling folder now exists as a subfolder in a Content area into the Humanities Team team content folder. team content folder called Humanities Team and is
accessible by others through the network.
27
Structuring and organizing lessons
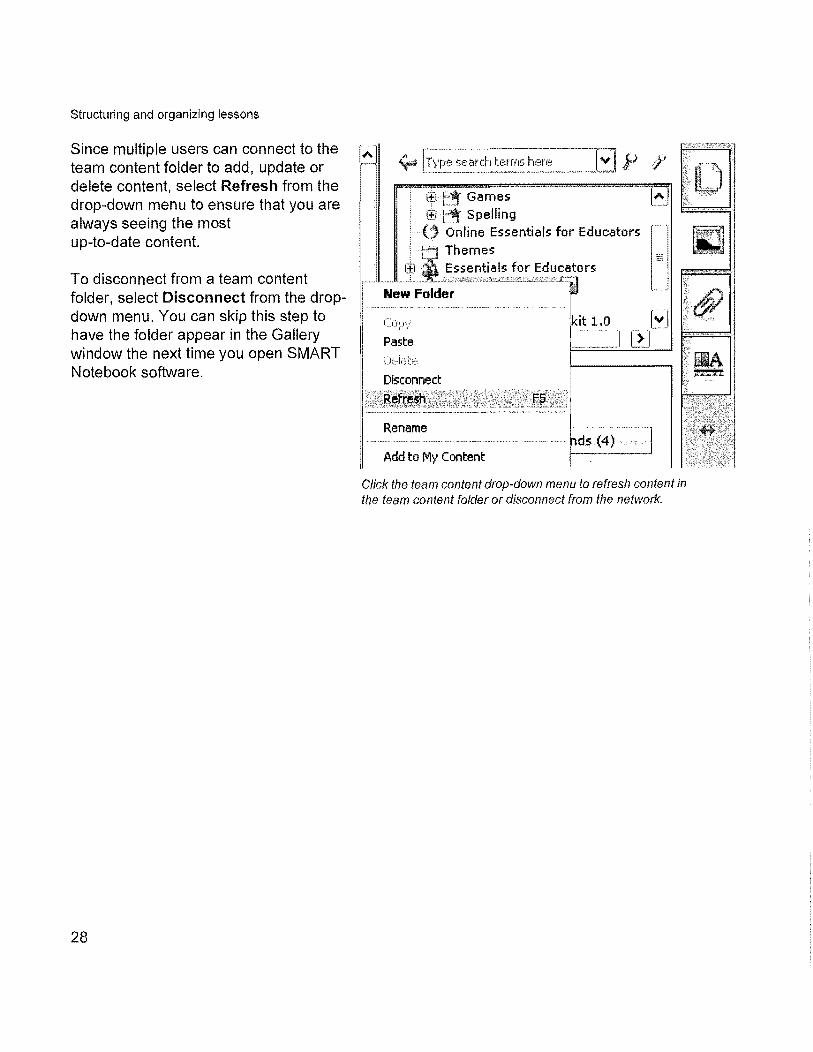
Since multiple users can connect to the team content folder to add, update or delete content, select Refresh from the drop-down menu to ensure that you are always seeing the most up-to-date content.
To disconnect from a team content folder, select Disconnect from the dropdown menu. You can skip this step to have the folder appear in the Gallery window the next time you open SMART Notebook software.
28
search terms here
i*lt~ Games rtlt~ Spelling
Online Essentials for Educators Themes Essentials for Educators
New Folder
kit 1.0
Paste
Disconnect
Add to My Content
Click the team content drop-down menu to refresh content in the team content folder or disconnect from the network.
SMART Notebook Software Training for SMART Board Users Level 2 Learner Workbook
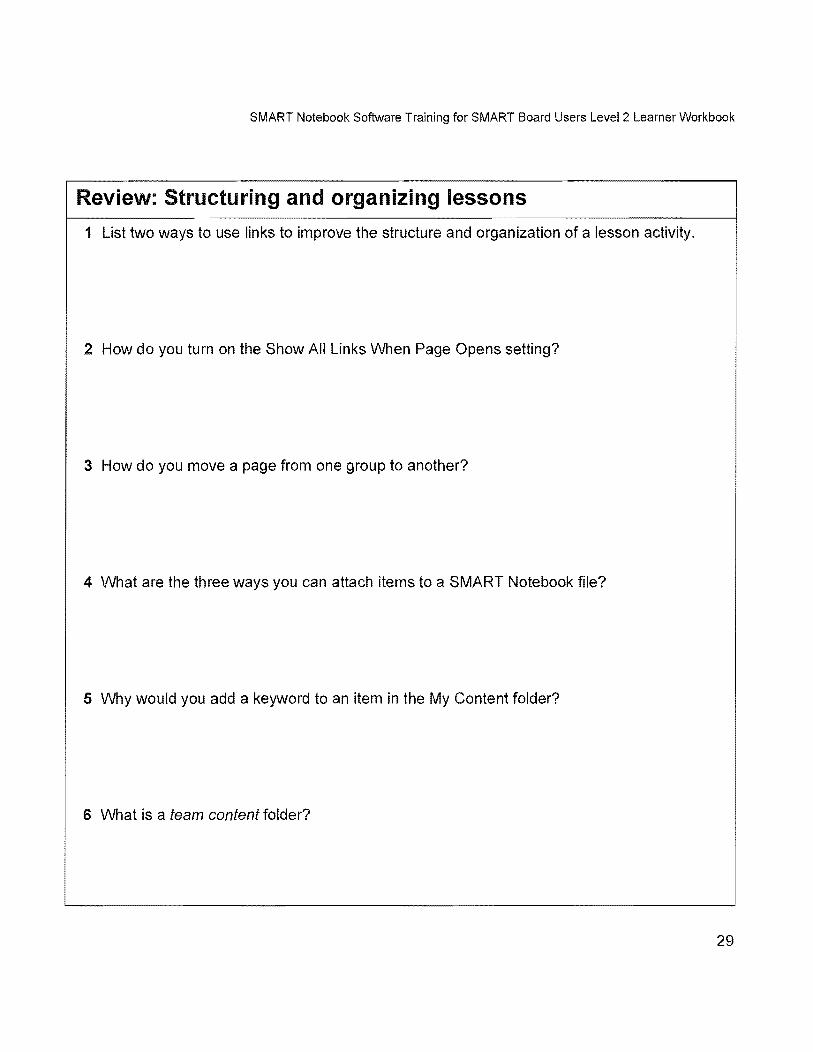
Review: Structuring and organizing lessons
1 List two ways to use links to improve the structure and organization of a lesson activity.
2 How do you turn on the Show All Links When Page Opens setting?
3 How do you move a page from one group to another?
4 What are the three ways you can attach items to a SMART Notebook file?
5 Why would you add a keyword to an item in the My Content folder?
6 What is a team content folder?
29
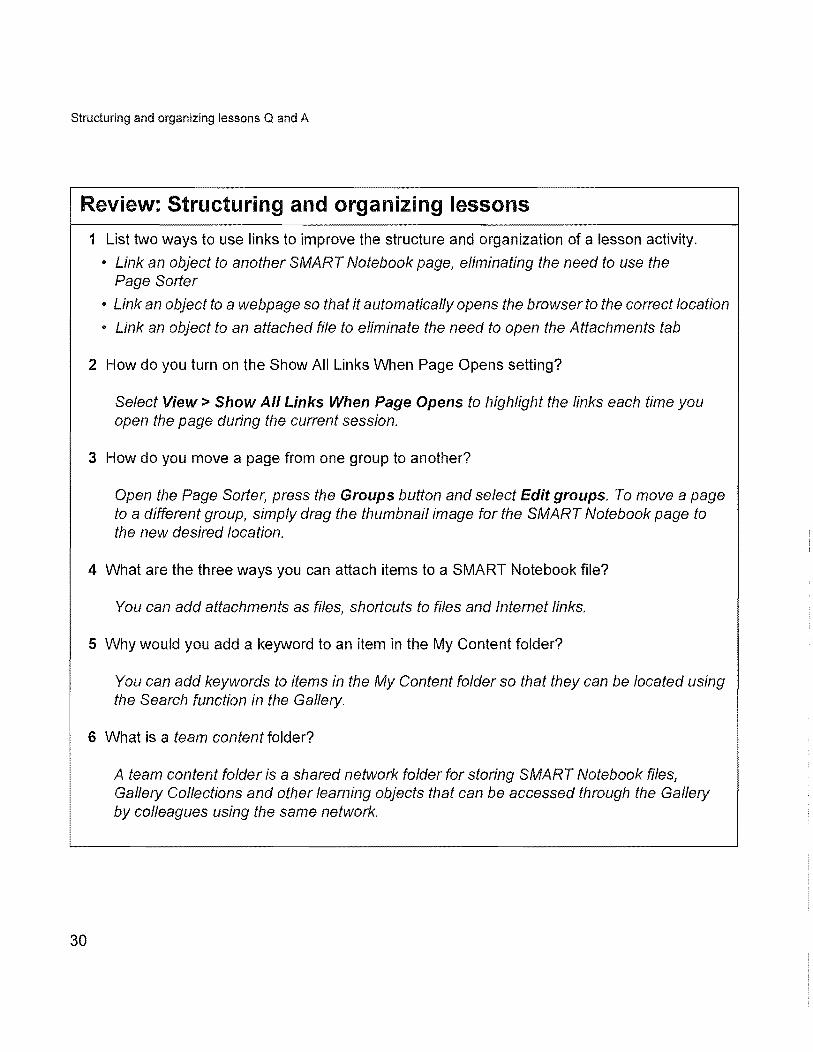
Structuring and organizing lessons Q and A
Review: Structuring and organizing lessons
30
1 List two ways to use links to improve the structure and organization of a lesson activity.
• Link an object to another SMART Notebook page, eliminating the need to use the Page Sorter
• Link an object to a webpage so that it automatically opens the browser to the correct location
• Link an object to an attached file to eliminate the need to open the Attachments tab
2 How do you turn on the Show All Links When Page Opens setting?
Select View> Show All Links When Page Opens to highlight the links each time you open the page during the current session.
3 How do you move a page from one group to another?
Open the Page Sorter, press the Groups button and select Edit groups. To move a page to a different group, simply drag the thumbnail image for the SMART Notebook page to the new desired location.
4 What are the three ways you can attach items to a SMART Notebook file?
You can add attachments as files, shortcuts to files and Internet links.
5 Why would you add a keyword to an item in the My Content folder?
You can add keywords to items in the My Content folder so that they can be located using the Search function in the Gallery.
6 What is a team content folder?
A team content folder is a shared network folder for storing SMART Notebook files, Gallery Collections and other learning objects that can be accessed through the Gallery by colleagues using the same network.
SMART Notebook Software Training for SMART Board Users Level 2 Learner Workbook
How can create profess ion a 1-100 ki n 9 lesson activities?
SMART Notebook software 10 includes many features to enable you to create lesson activities with a professional look. Themes, alignment tools and tables will enable you to create visually appealing SMART Notebook files.
31
Adding style to lesson activities
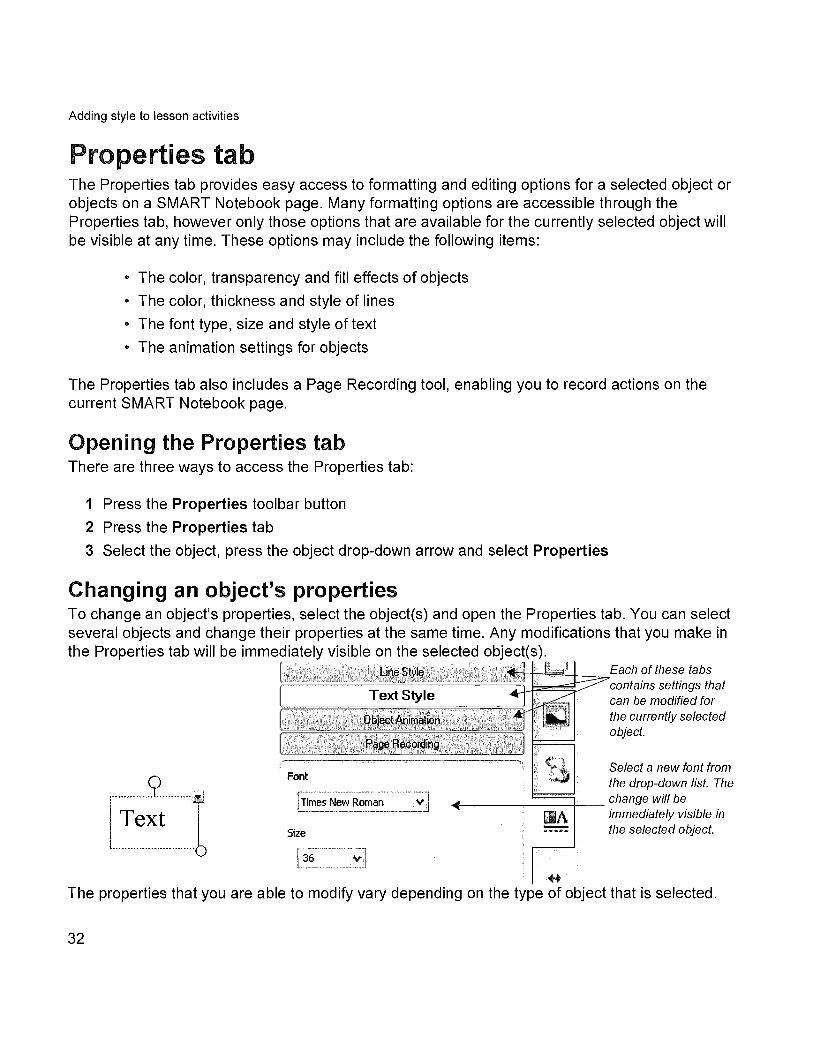
Properties tab The Properties tab provides easy access to formatting and editing options for a selected object or objects on a SMART l\Jotebook page. Many formatting options are accessible through the Properties tab, however only those options that are available for the currently selected object will be visible at any time. These options may include the following items:
• The color, transparency and fill effects of objects
• The color, thickness and style of lines
• The font type, size and style of text
• The animation settings for objects
The Properties tab also includes a Page Recording tool, enabling you to record actions on the current SMART Notebook page.
Opening the Properties tab There are three ways to access the Properties tab:
1 Press the Properties toolbar button
2 Press the Properties tab
3 Select the object, press the object drop-down arrow and select Properties
Changing an object's properties To change an object's properties, select the object(s) and open the Properties tab. You can select several objects and change their properties at the same time. Any modifications that you make in the Properties tab will be immediately visible on the selected object(s).
......... " .. 2 .......... ,:;;.-1
I Text T I 0
L·-·------·-----·-·--··----b
[ Line$tyle ~H-__ 4------o~Each of these tabs
[=======~~~~:========~W::-====t:: contains settings that Text Style . can be modified for
Obiect Animation
Page Recording
Font
Size
the currently selected object.
Select a new font from the drop-down list. The
+-___ -==~- change will be immediately visible in the selected object.
... The properties that you are able to modify vary depending on the type of object that is selected.
32
SMART Notebook Software Training for SMART Board Users Level 2 Learner Workbook
Fill effects In this section, you can change the transparency and fill effects of an object. Increasing an object's transparency means that the image appears lighter on the page, enabling you to see objects that are placed behind it. To change the object's transparency, drag the slider from solid to more transparent.
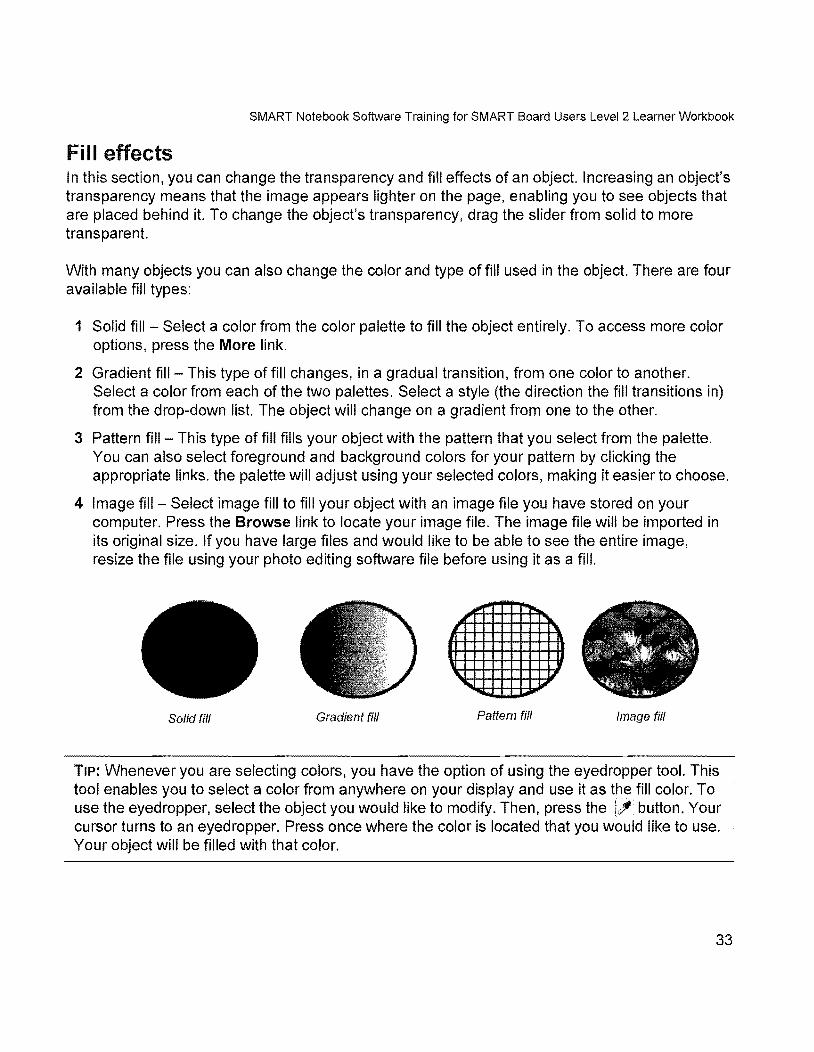
With many objects you can also change the color and type of fill used in the object. There are four available fill types:
1 Solid fill - Select a color from the color palette to fill the object entirely. To access more color options, press the More link.
2 Gradient fill - This type of fill changes, in a gradual transition, from one color to another. Select a color from each of the two palettes. Select a style (the direction the fill transitions in) from the drop-down list. The object will change on a gradient from one to the other.
3 Pattern fill- This type of fill fills your object with the pattern that you select from the palette. You can also select foreground and background colors for your pattern by clicking the appropriate links. the palette will adjust using your selected colors, making it easier to choose.
4 Image fill - Select image fill to fill your object with an image file you have stored on your computer. Press the Browse link to locate your image file. The image file will be imported in its original size. If you have large files and would like to be able to see the entire image, resize the file using your photo editing software file before using it as a fill.
Solid fill Gradient fill Pattern fill Image fill
TIP: Whenever you are selecting colors, you have the option of using the eyedropper tool. This tool enables you to select a color from anywhere on your display and use it as the fill color. To use the eyedropper, select the object you would like to modify. Then, press the !t" button. Your cursor turns to an eyedropper. Press once where the color is located that you would like to use. Your object will be filled with that color.
33
Adding style to lesson activities
Line Style Press the Line Style tab to modify line settings for a line or the outline of an object. Select the color and thickness from the palettes provided. Next, select the line style, and start and end styles from the drop-down menus.
Text Style Press the Text Style tab to modify font properties including the font type, size and style.
34
SMART Notebook Software Training for SMART Board Users Level 2 Learner Workbook
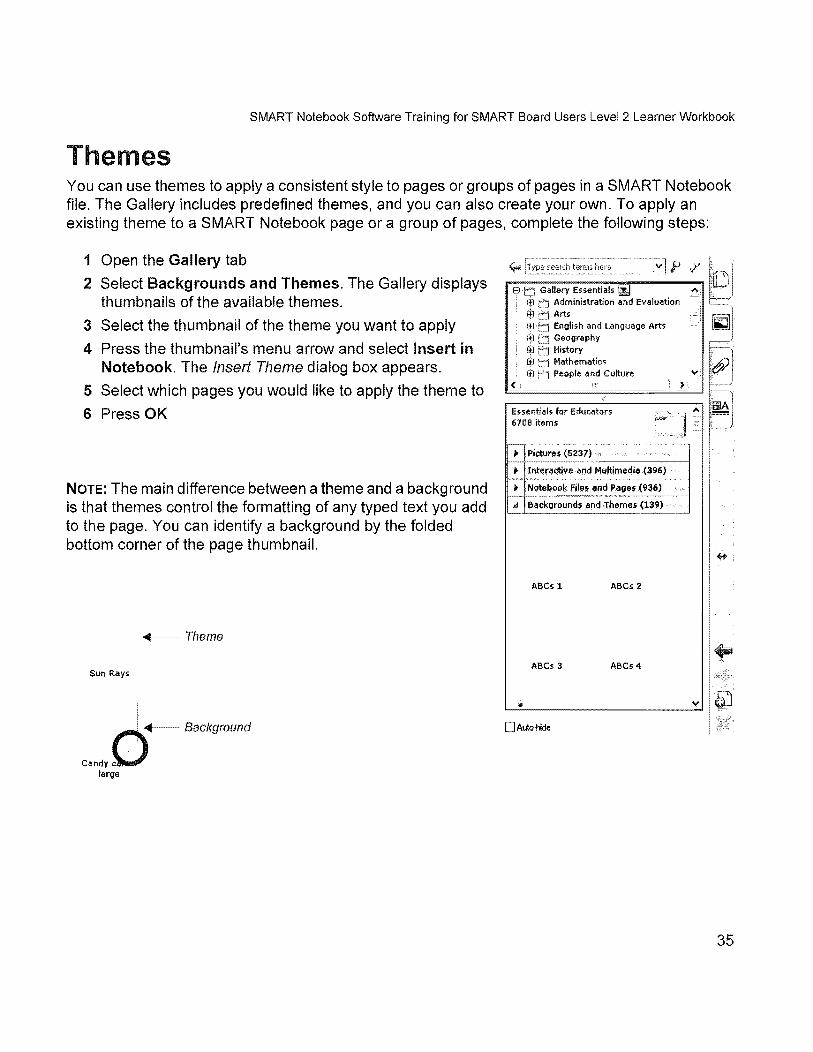
Themes You can use themes to apply a consistent style to pages or groups of pages in a SMART Notebook file. The Gallery includes predefined themes, and you can also create your own. To apply an existing theme to a SMART Notebook page or a group of pages, complete the following steps:
1 Open the Gallery tab
2 Select Backgrounds and Themes. The Gallery displays thumbnails of the available themes.
3 Select the thumbnail of the theme you want to apply
4 Press the thumbnail's menu arrow and select Insert in Notebook. The Insert Theme dialog box appears.
5 Select which pages you would like to apply the theme to
6 Press OK
NOTE: The main difference between a theme and a background is that themes control the formatting of any typed text you add to the page. You can identify a background by the folded bottom corner of the page thumbnail.
~Theme
Sun Rays
i
0.' ; <OIf-- Background
Candy c large
G.'O" "".'.1. }> :, ~~ __ ~.·_-.·.l, Administration and Evaluation _
~:'i;h and language Arts [;l,,1 Geography
Ho.,,, [1 Mathematics' £.)
People and Culture » ",i :~) (.I '-'=-'='-'-'-~~~===~-~ Cl
~- ~~I - i---Essentials for Educators 670a items
~ Pictures (5237)
t- Intenu:tive and Multimedia.(396)
.. Notebook files and Pages (936)
.<II Backgrounds and 'Themes (139)
ABCs 1 ABCs 2
ABCs 3 ABCs4
.. OAIJo-hide
#,
35
Adding style to lesson activities
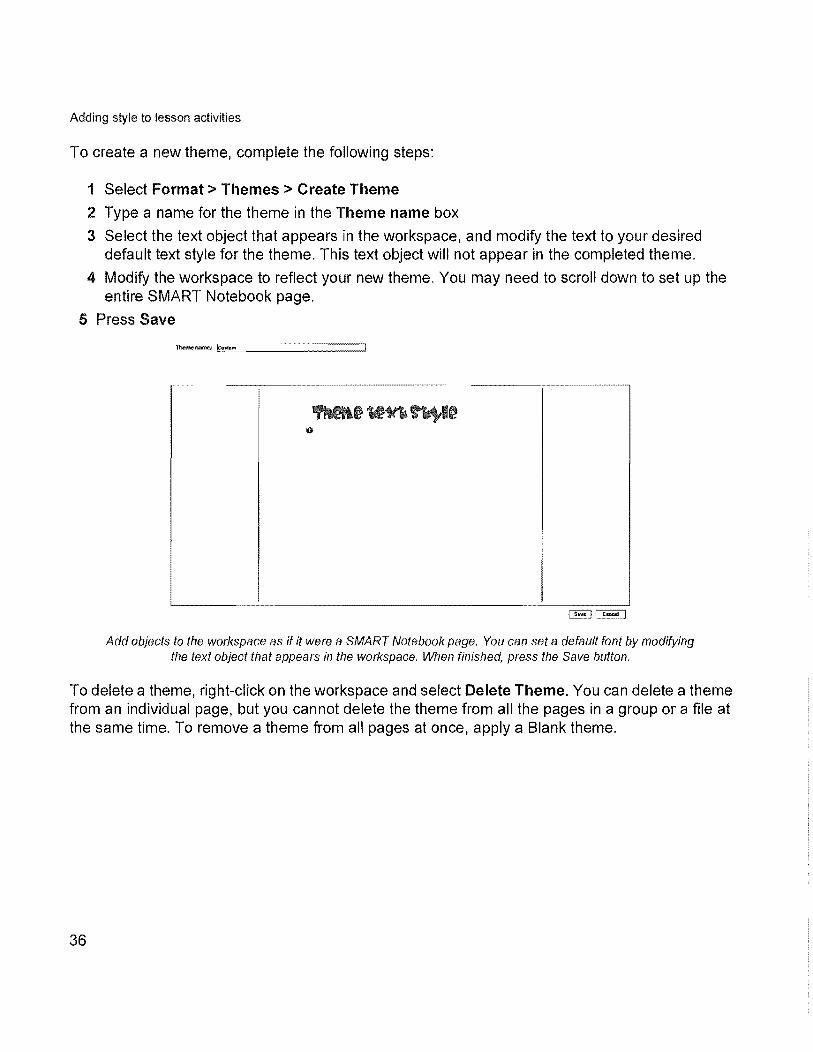
To create a new theme, complete the following steps:
1 Select Format> Themes> Create Theme
2 Type a name for the theme in the Theme name box
3 Select the text object that appears in the workspace, and modify the text to your desired default text style for the theme. This text object will not appear in the completed theme.
4 Modify the workspace to reflect your new theme. You may need to scroll down to set up the entire SMART Notebook page.
5 Press Save
Add objects to the workspace as if it were a SMART Notebook page. You can set a default font by modifying the text object that appears in the workspace. When finished, press the Save button.
To delete a theme, right-click on the workspace and select Delete Theme. You can delete a theme from an individual page, but you cannot delete the theme from all the pages in a group or a file at the same time. To remove a theme from all pages at once, apply a Blank theme.
36
SMART Notebook Software Training for SMART Board Users Level 2 Learner Workbook
Active alignment When arranging objects on a SMART l\lotebook page, you may want to align objects to increase clarity of your page. SMART Notebook software can display guides on the page to assist you in aligning objects with other objects, the page's vertical center and the page's horizontal center.
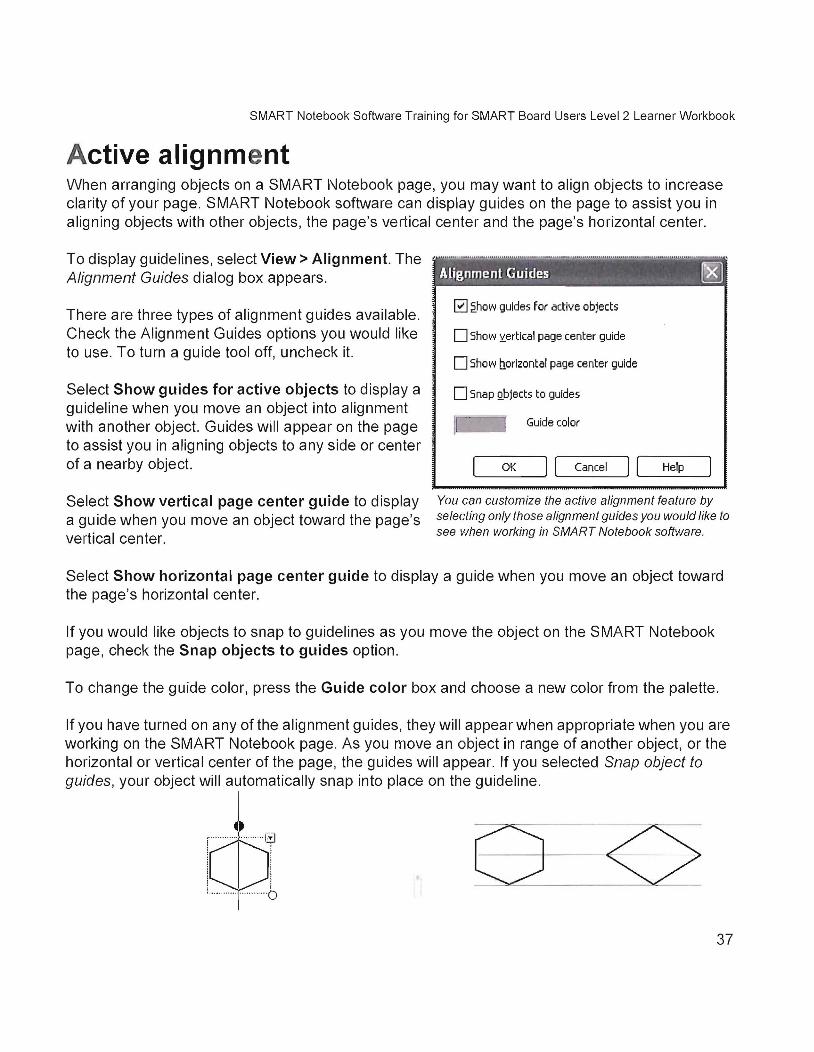
To display guidelines, select View> Alignment. The Alignment Guides dialog box appears.
There are three types of alignment guides available. Check the Alignment Guides options you would like to use. To turn a guide tool off, uncheck it.
Select Show guides for active objects to display a guideline when you move an object into alignment with another object. Guides will appear on the page to assist you in aligning objects to any side or center of a nearby object.
Select Show vertical page center guide to display a guide when you move an object toward the page's vertical center.
Aljg,llment Guides ~
~ ahow guides for active objects
o Show ~ertlcal page center gUide
o Show b.orlzontal page center gUide
o Snap Q.bjects to guides
Guide color
OK I [ Cancel I [L-_He--=--!p---->
You can customize the active alignment feature by selecting only those alignment guides you would like to see when working in SMART Notebook software.
Select Show horizontal page center guide to display a guide when you move an object toward the page's horizontal center.
If you would like objects to snap to guidelines as you move the object on the SMART Notebook page, check the Snap objects to guides option.
To change the guide color, press the Guide color box and choose a new color from the palette.
If you have turned on any of the alignment guides, they will appear when appropriate when you are working on the SMART Notebook page. As you move an object in range of another object, or the horizontal or vertical center of the page, the guides will appear. If you selected Snap object to guides, your object will automatically snap into place on the guideline.
! i ! i :· .. ·· .... · .... ··· .. 0
37
Adding style to lesson activities
Tables To add a table, complete the following steps:
1 Press the Table button or select Insert> Table. An eight by eight grid appears.
2 Select the number of columns and rows that you would like to include in the table by dragging over the cells in the grid
3 The table appears on the SMART Notebook page
Adding text and objects to tables Once you have created your table, you can add text and objects, including freehand objects, geometric shapes, straight lines and graphic files to the table cells simply by dragging and dropping. To add text to a table cell, double-click on a cell. A text box will appear. To add an object to a table, select the object and drag it to the destination cell. To remove an object from a table, select it and drag it out of the table.
TIP: Each cell can contain only one object. If you would like to add multiple objects to a cell, for example, an image and a text descriptor of the image, group the objects before adding them to the table.
Selecting tables, columns, rows or cells on a SMART Notebook page You can select a table, a column, a row, an individual cell or a selection of cells. After you have selected a table or a part of a table, you can modify the properties of the selected area.
Selecting a table is easily accomplished using the marquee select method. Use the select tool, and drag a rectangle to encompass the entire table.
To select cells, rows or columns, press inside the table area and drag over the specific cells you would like to select.
38
SMART Notebook Software Training for SMART Board Users Level 2 Learner Workbook
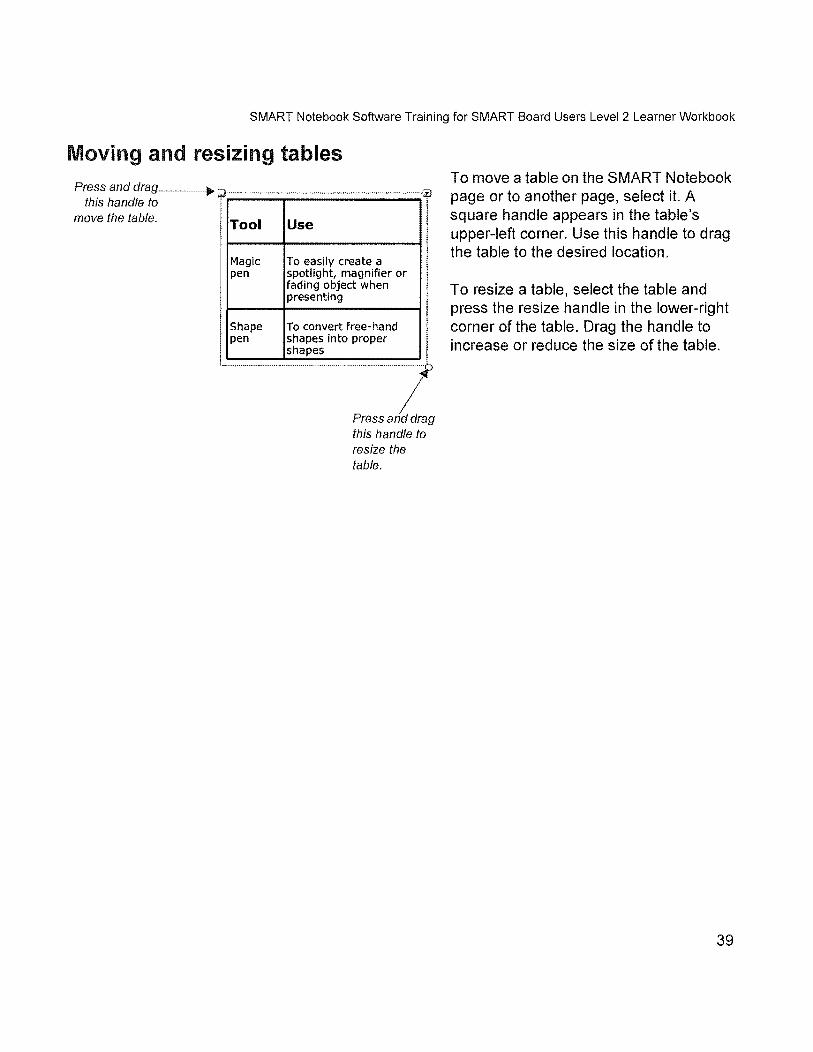
Moving and resizing tables Press and
this handle to move the table.
y ................................... , ... """"""""" .... " .. ",,. """"""" .. ".""."".'ij
I ! Tool Use I I
Magic pen
i I
To easily create a spotlight, magnifier or fading object when presenting
To convert free-hand
~ I
I ,
1._______ --------7 Press and drag this handle to resize the table.
I Shape pen shapes into proper
shapes
To move a table on the SMART Notebook page or to another page, select it. A square handle appears in the table's upper-left corner. Use this handle to drag the table to the desired location.
To resize a table, select the table and press the resize handle in the lower-right corner of the table. Drag the handle to increase or reduce the size of the table.
39
Adding style to lesson activities
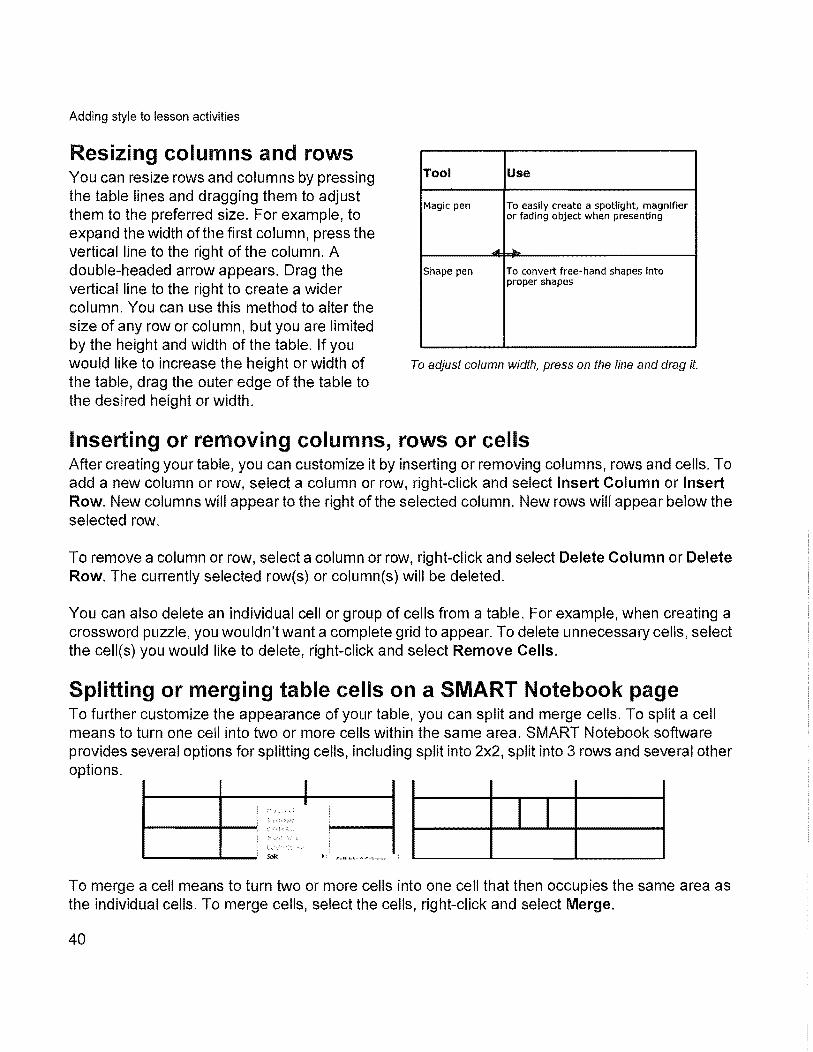
Resizing columns and rows You can resize rows and columns by pressing the table lines and dragging them to adjust them to the preferred size. For example, to expand the width ofthe first column, press the vertical line to the right of the column. A double-headed arrow appears. Drag the vertical line to the right to create a wider column. You can use this method to alter the size of any row or column, but you are limited by the height and width of the table. If you would like to increase the height or width of the table, drag the outer edge of the table to the desired height or width.
Tool Use
Magic pen To easily create a spotlight, magnifier or fading object when presenting
... .... Shape pen To convert free-hand shapes Into
proper shapes
To adjust column width, press on the line and drag it.
Inserting or removing columns, rows or cells After creating your table, you can customize it by inserting or removing columns, rows and cells. To add a new column or row, select a column or row, right-click and select Insert Column or Insert Row. New columns will appear to the right of the selected column. New rows will appear below the selected row.
To remove a column or row, select a column or row, right-click and select Delete Column or Delete Row. The currently selected row(s) or column(s) will be deleted.
You can also delete an individual cell or group of cells from a table. For example, when creating a crossword puzzle, you wouldn't want a complete grid to appear. To delete unnecessary cells, select the cell(s) you would like to delete, right-click and select Remove Cells.
Splitting or merging table cells on a SMART Notebook page To further customize the appearance of your table, you can split and merge cells. To split a cell means to turn one cell into two or more cells within the same area. SMART Notebook software provides several options for splitting cells, including split into 2x2, split into 3 rows and several other options.
. ._ .... __ .1 II I To merge a cell means to turn two or more cells into one cell that then occupies the same area as the individual cells. To merge cells, select the cells, right-click and select Merge.
40
SMART Notebook Software Training for SMART Board Users Level 2 Learner Workbook
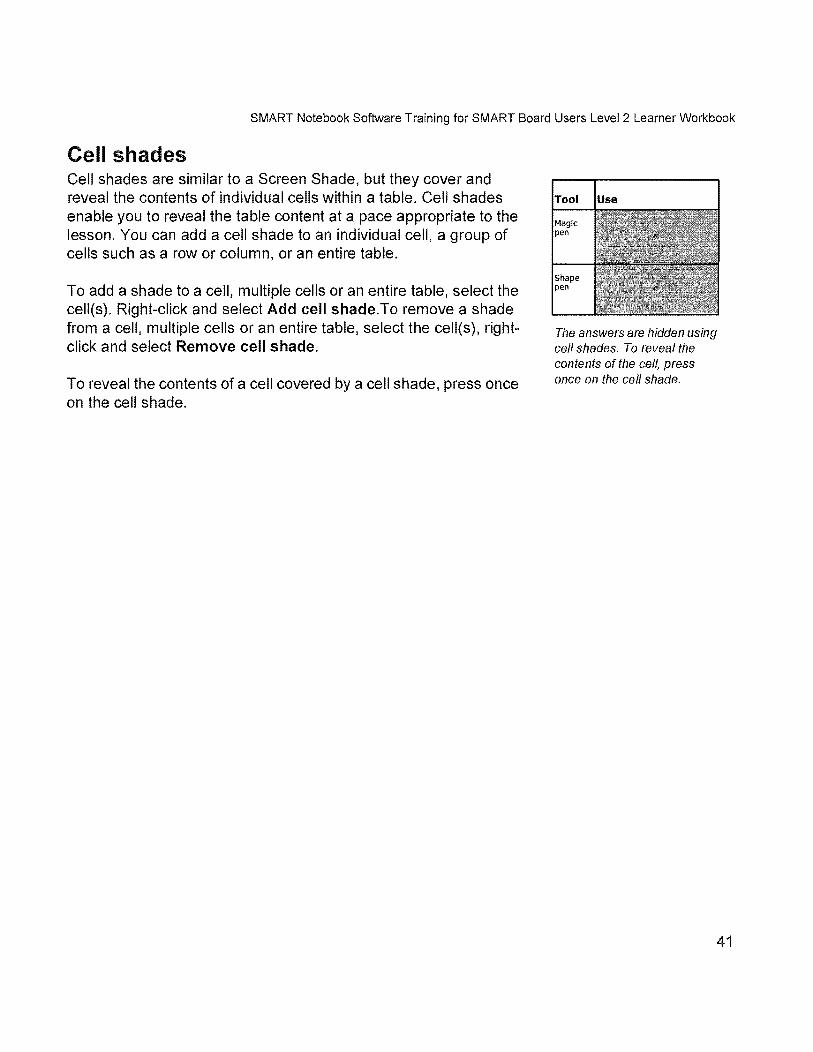
Cell shades Cell shades are similar to a Screen Shade, but they cover and reveal the contents of individual cells within a table. Cell shades enable you to reveal the table content at a pace appropriate to the lesson. You can add a cell shade to an individual cell, a group of cells such as a row or column, or an entire table.
To add a shade to a cell, multiple cells or an entire table, select the cell(s). Right-click and select Add cell shade.To remove a shade from a cell, multiple cells or an entire table, select the cell(s), rightclick and select Remove cell shade.
To reveal the contents of a cell covered by a cell shade, press once on the cell shade.
The answers are hidden using cell shades. To reveal the contents of the cell, press once on the cell shade.
41
Adding style to lesson activities
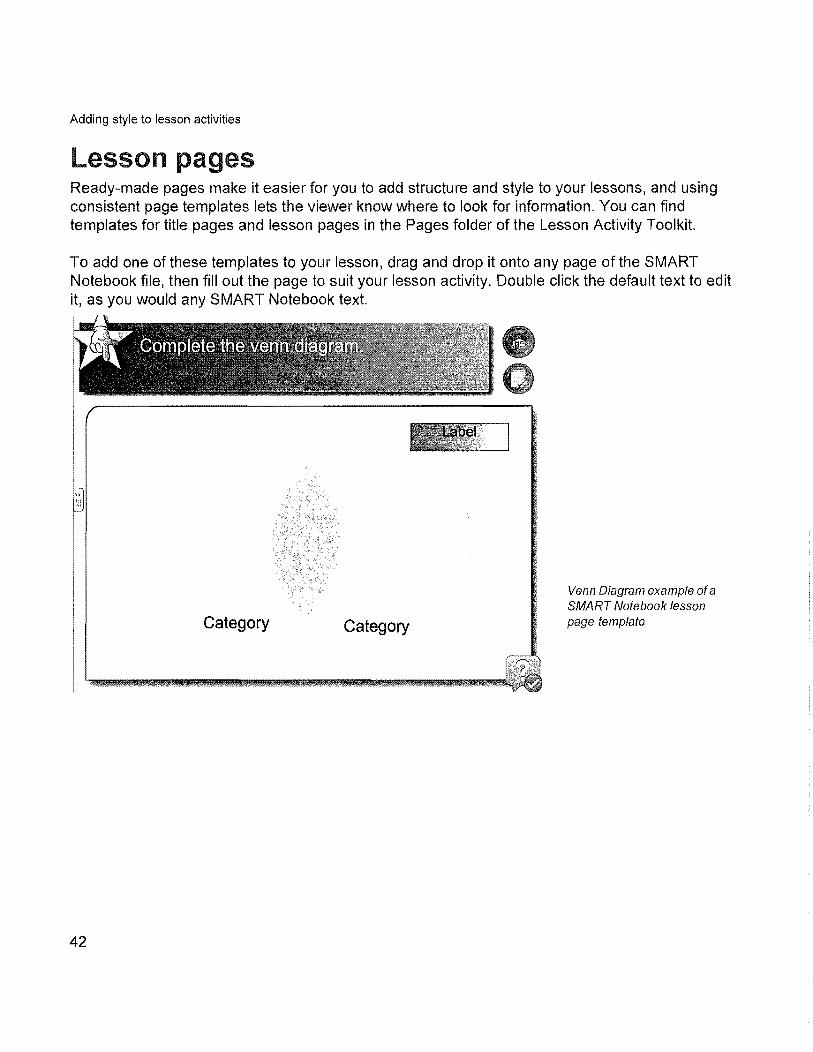
Lesson pages Ready-made pages make it easier for you to add structure and style to your lessons, and using consistent page templates lets the viewer know where to look for information. You can find templates for title pages and lesson pages in the Pages folder of the Lesson Activity Toolkit.
To add one of these templates to your lesson, drag and drop it onto any page of the SMART Notebook file, then fill out the page to suit your lesson activity. Double click the default text to edit it, as you would any SMART Notebook text.
Category
42
Category
Venn Diagram example of a SMART Notebook lesson page template
SMART Notebook Software Training for SMART Board Users Level 2 Learner Workbook
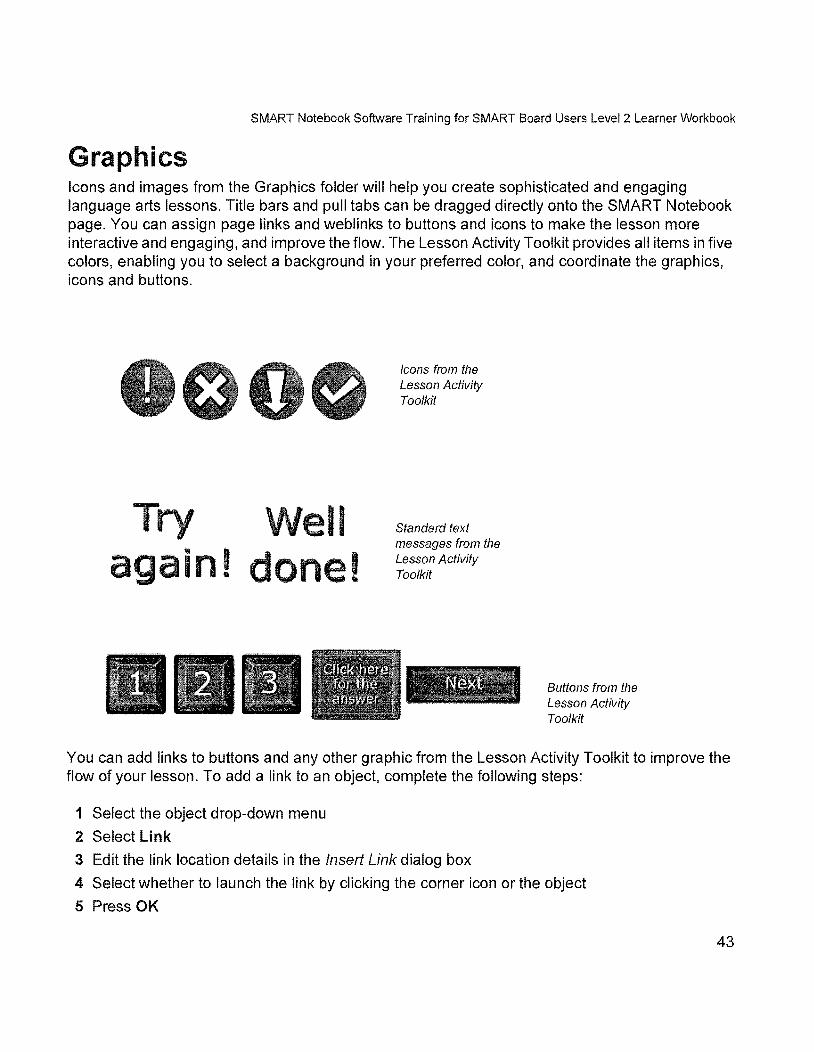
Graphics Icons and images from the Graphics folder will help you create sophisticated and engaging language arts lessons. Title bars and pull tabs can be dragged directly onto the SMART Notebook page. You can assign page links and weblinks to buttons and icons to make the lesson more interactive and engaging, and improve the flow. The Lesson Activity Toolkit provides all items in five colors, enabling you to select a background in your preferred color, and coordinate the graphics, icons and buttons.
I I again! done!
Icons from the Lesson Activity Toolkit
Standard text messages from the Lesson Activity Toolkit
Buttons from the Lesson Activity Toolkit
You can add links to buttons and any other graphic from the Lesson Activity Toolkit to improve the flow of your lesson. To add a link to an object, complete the following steps:
1 Select the object drop-down menu
2 Select Link
3 Edit the link location details in the Insert Link dialog box
4 Select whether to launch the link by clicking the corner icon or the object
5 Press OK
43

SMART Notebook Software Training for SMART Board Users Level 2 Learner Workbook
Review: Adding style to lesson activities
1 How do you turn active alignment on?
2 How do you move a table?
3 How do you add a cell or table shade?
4 What's the difference between a theme and a background?
5 List four items you can modify in the Properties side tab.
45
Adding style to lesson activities Q and A
Review: Adding style to lesson activities
46
1 How do you turn active alignment on?
Select Format> Alignment. The Alignment Guides dialog box appears. Check the Alignment Guides options you would like to use and click OK.
2 How do you move a table?
To move a table on the SMART Notebook page or to another page, select it. A square handle appears in the table's upper-left comer. Use this handle to drag the table to the desired location.
3 How do you add a cell or table shade?
To add cell shades to an entire table, select the table, press the table's menu arrow and select Add table shade. To add a shade to a cell or multiple cells, select the cell(s), rightclick and select Add cell shade.
4 What's the difference between a theme and a background?
A theme controls the formatting of typed text on the page, a background does not.
5 List four items you can modify in the Properties side tab.
• The color, transparency and fill effects of objects
• The color, thickness and style of lines
• The font type, size and style of text
• The animation settings for objects
SMART Notebook Software Training for SMART Board Users Level 2 Learner Workbook
How can I take advantage of the interactive features in SMART Notebook software in my lesson activities?
SMART Notebook software includes many tools and features that enable you to make lesson activities that are engaging and interactive. Bringing students up to the interactive whiteboard provides them with a hands-on experience that they will remember.
47
Building interactive lesson activities
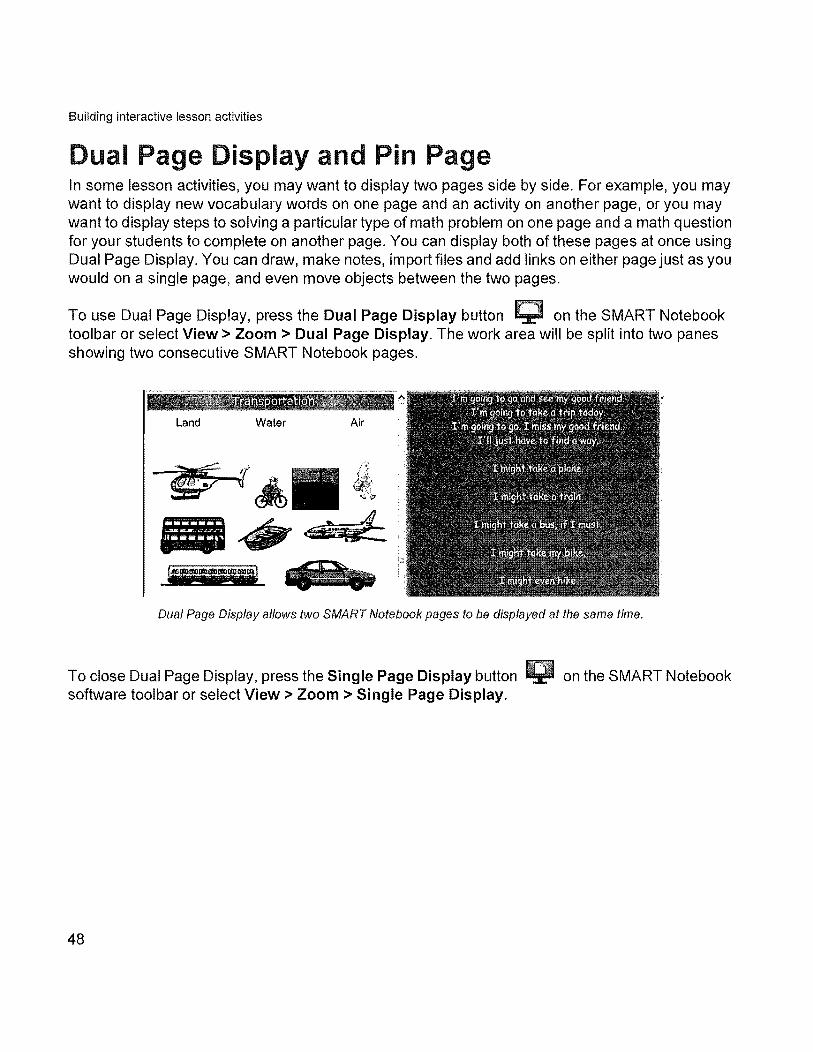
Dual Page Display and Pin Page In some lesson activities, you may want to display two pages side by side. For example, you may want to display new vocabulary words on one page and an activity on another page, or you may want to display steps to solving a particular type of math problem on one page and a math question for your students to complete on another page. You can display both of these pages at once using Dual Page Display. You can draw, make notes, import files and add links on either page just as you would on a single page, and even move objects between the two pages.
To use Dual Page Display, press the Dual Page Display button 1;1 on the SMART Notebook toolbar or select View> Zoom> Dual Page Display. The work area will be split into two panes showing two consecutive SMART Notebook pages.
Dual Page Display allows two SMART Notebook pages to be displayed at the same time.
To close Dual Page Display, press the Single Page Display button software toolbar or select View> Zoom> Single Page Display.
48
on the SMART Notebook
SMART Notebook Software Training for SIVIART Board Users Level 2 Learner Workbook
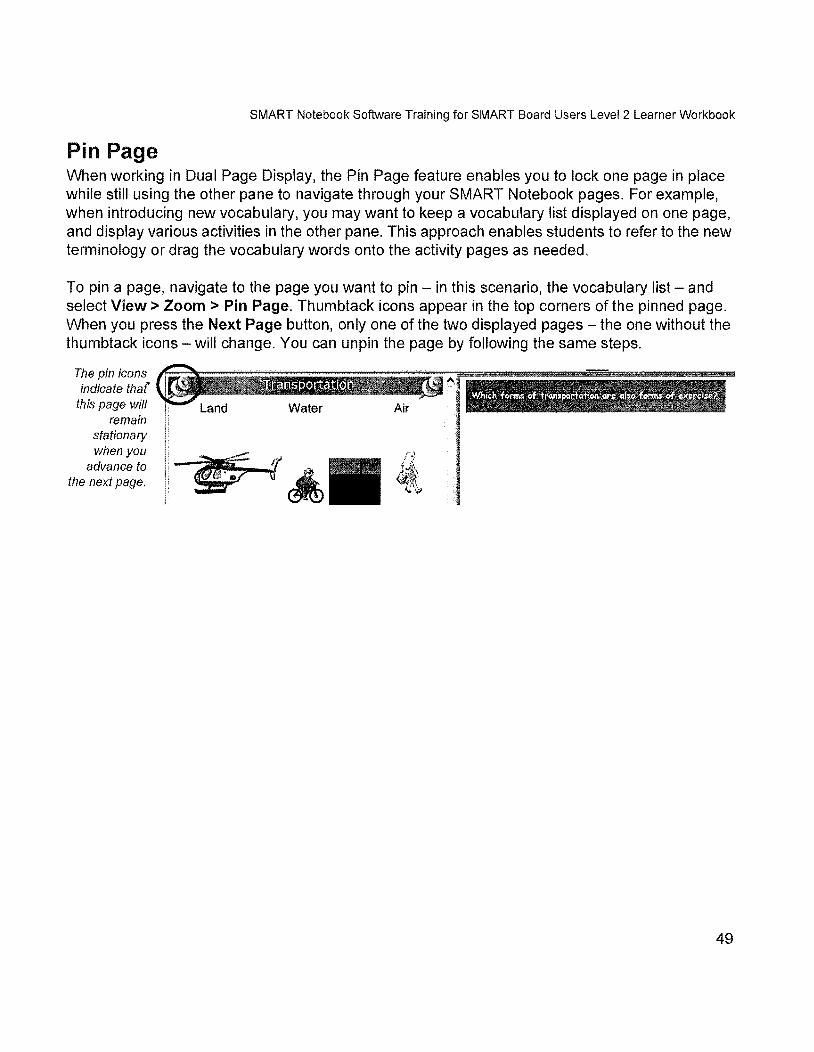
Pin Page When working in Dual Page Display, the Pin Page feature enables you to lock one page in place while still using the other pane to navigate through your SMART Notebook pages. For example, when introducing new vocabulary, you may want to keep a vocabulary list displayed on one page, and display various activities in the other pane. This approach enables students to refer to the new terminology or drag the vocabulary words onto the activity pages as needed.
To pin a page, navigate to the page you want to pin - in this scenario, the vocabulary list - and select View> Zoom> Pin Page. Thumbtack icons appear in the top corners of the pinned page. When you press the Next Page button, only one of the two displayed pages - the one without the thurnbtack icons - will change. You can unpin the page by following the same steps.
The pin icons indicate that
this page will remain
stationary when you
advance to the next page.
49
Building interactive lesson activities
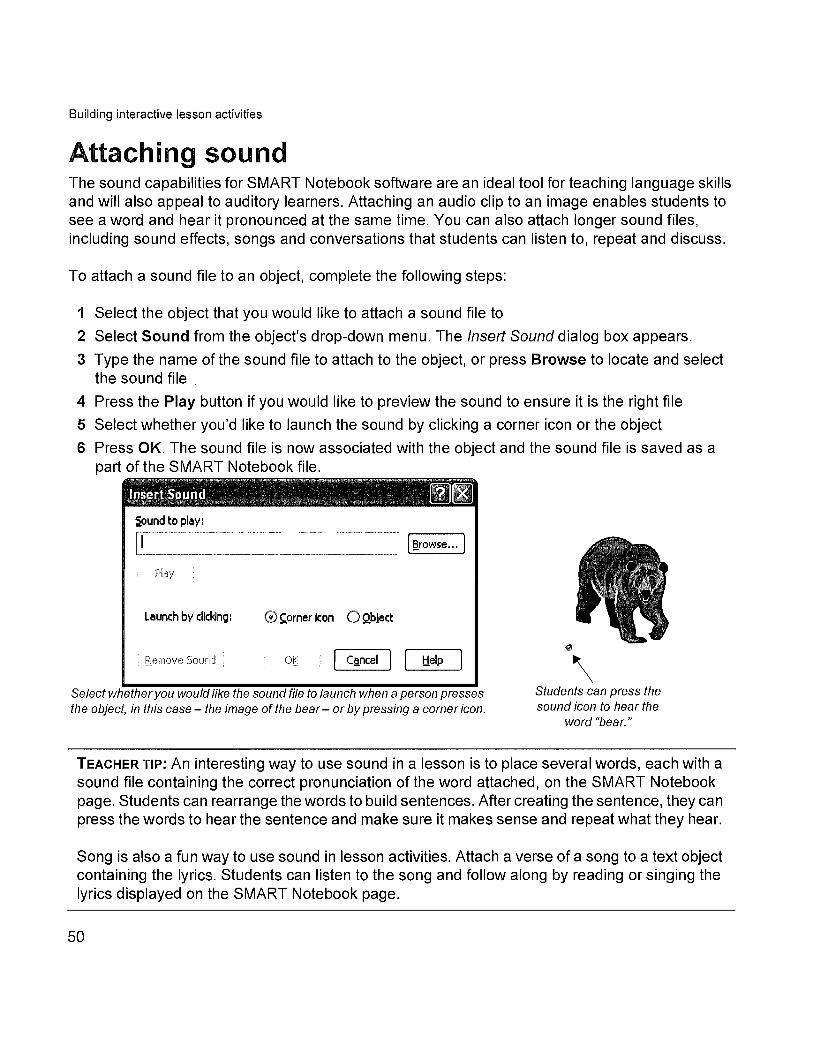
Attaching sound The sound capabilities for SMART Notebook software are an ideal tool for teaching language skills and will also appeal to auditory learners. Attaching an audio clip to an image enables students to see a word and hear it pronounced at the same time. You can also attach longer sound files, including sound effects, songs and conversations that students can listen to, repeat and discuss.
To attach a sound file to an object, complete the following steps:
1 Select the object that you would like to attach a sound file to
2 Select Sound from the object's drop-down menu. The Insert Sound dialog box appears.
3 Type the name of the sound file to attach to the object, or press Browse to locate and select the sound file
4 Press the Play button if you would like to preview the sound to ensure it is the right file
5 Select whether you'd like to launch the sound by clicking a corner icon or the object
6 Press OK. The sound file is now associated with the object and the sound file is saved as a part of the SMART Notebook file.
aound to play:
PI,~':/
Launch by clicking: ~) ~orner Icon 0 Qbject
Cll.ncel I [ l:1elp
Select whether you would like the sound file to launch when a person presses the object, in this case - the image of the bear - or by pressing a corner icon.
(1'.
\ Students can press the sound icon to hear the
word "bear."
TEACHER TIP: An interesting way to use sound in a lesson is to place several words, each with a sound file containing the correct pronunciation of the word attached, on the SMART Notebook page. Students can rearrange the words to build sentences. After creating the sentence, they can press the words to hear the sentence and make sure it makes sense and repeat what they hear.
Song is also a fun way to use sound in lesson activities. Attach a verse of a song to a text object containing the lyrics. Students can listen to the song and follow along by reading or singing the lyrics displayed on the SMART Notebook page.
50
SMART Notebook Software Training for SMART Board Users Level 2 Learner Workbook
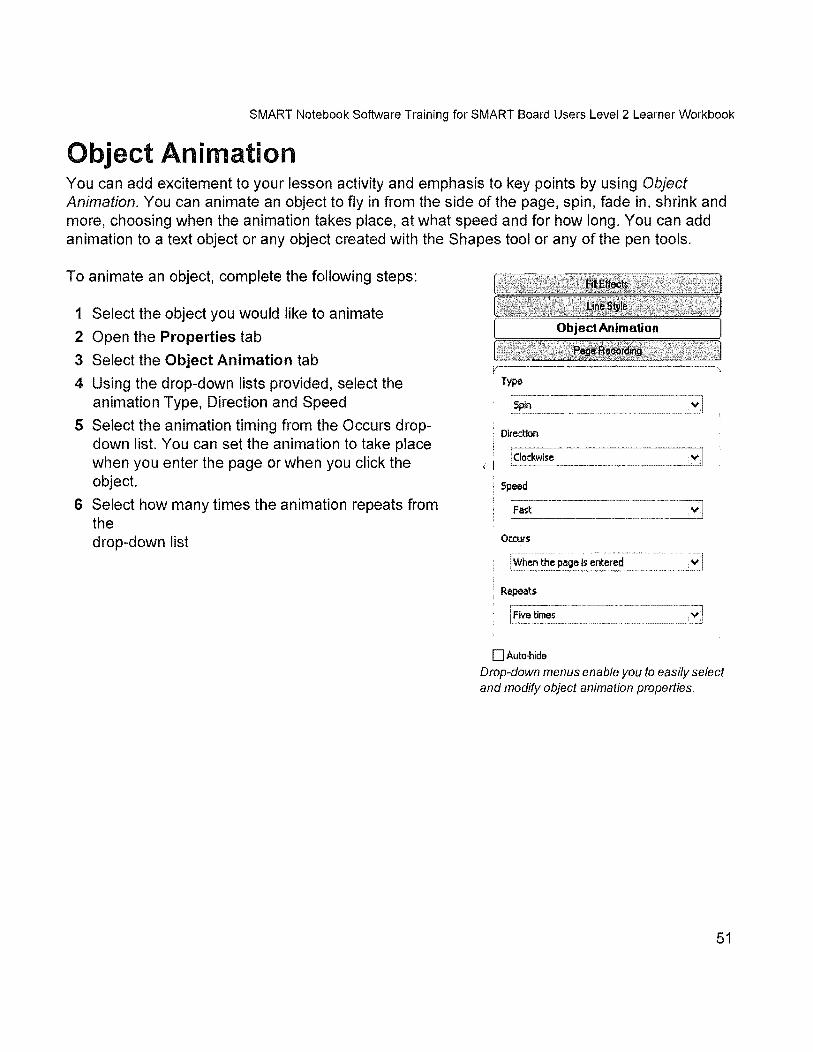
Object Animation You can add excitement to your lesson activity and emphasis to key points by using Object Animation. You can animate an object to fly in from the side of the page, spin, fade in, shrink and more, choosing when the animation takes place, at what speed and for how long. You can add animation to a text object or any object created with the Shapes tool or any of the pen tools.
To animate an object, complete the following steps:
1 Select the object you would like to animate
2 Open the Properties tab
3 Select the Object Animation tab
4 Using the drop-down lists provided, select the animation Type, Direction and Speed
5 Select the animation timing from the Occurs dropdown list. You can set the animation to take place when you enter the page or when you click the object.
6 Select how many times the animation repeats from the drop-down list
Type
Direction
Speed
Occurs
I §hen the page Is entered .=-~_~==n_~J
Repeats
DAuto-hide
Drop-down menus enable you to easily select and modify object animation properties.
51
Building interactive lesson activities
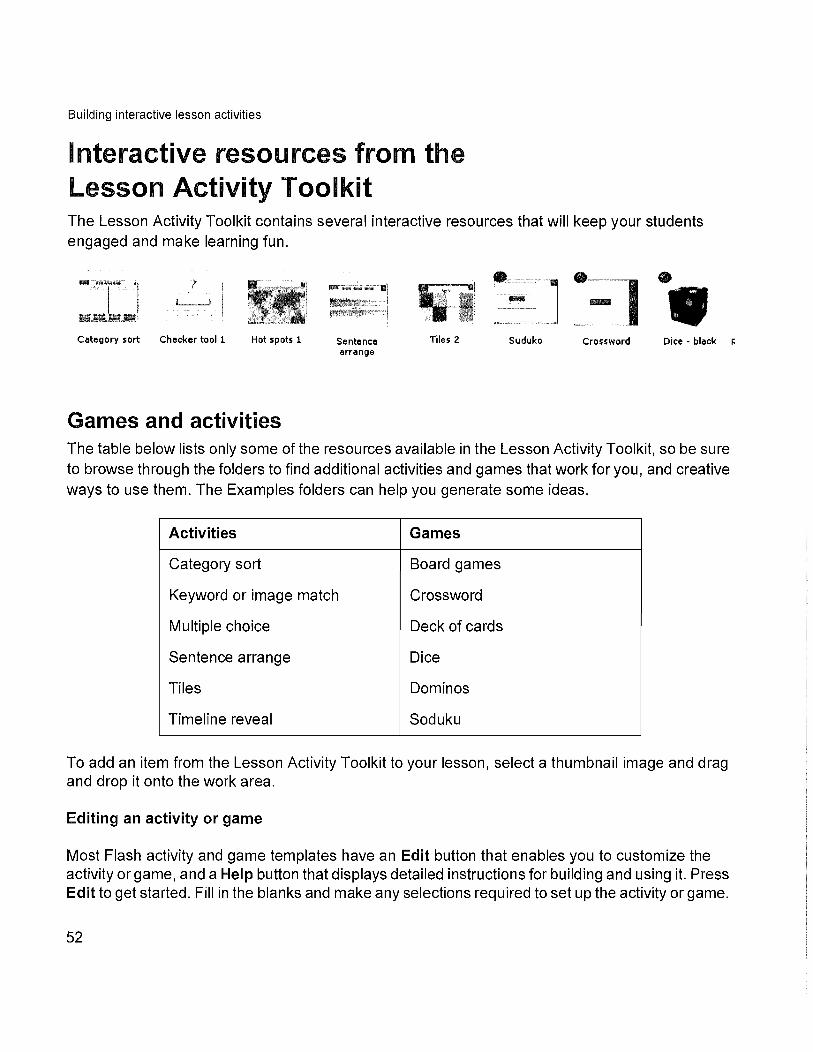
Interactive resources from the Lesson Activity Toolkit The Lesson Activity Toolkit contains several interactive resources that will keep your students engaged and make learning fun.
Category sort Checker tool 1 Hot spots 1
Games and activities
Sentence arrange
Tiles 2
• Suduko Crossword Dice· black F
The table below lists only some of the resources available in the Lesson Activity Toolkit, so be sure to browse through the folders to find additional activities and games that work for you, and creative ways to use them. The Examples folders can help you generate some ideas.
Activities Games
Category sort Board games
Keyword or image match Crossword
Multiple choice Deck of cards
Sentence arrange Dice
Tiles Dominos
Timeline reveal Soduku
To add an item from the Lesson Activity Toolkit to your lesson, select a thumbnail image and drag and drop it onto the work area.
Editing an activity or game
Most Flash activity and game templates have an Edit button that enables you to customize the activity orgame, and a Help button that displays detailed instructions for building and using it. Press Edit to get started. Fill in the blanks and make any selections required to set up the activity or game.
52
SMART Notebook Software Training for SMART Board Users Level 2 Learner Workbook
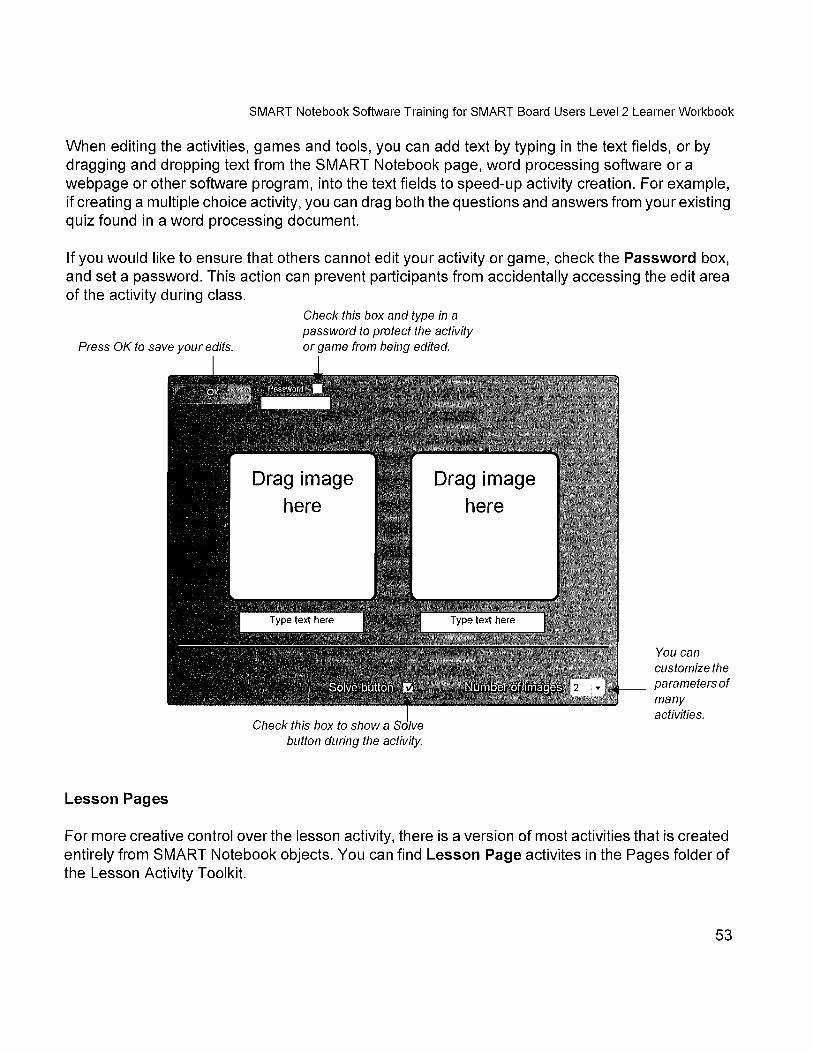
When editing the activities, games and tools, you can add text by typing in the text fields, or by dragging and dropping text from the SMART Notebook page, word processing software or a webpage or other software program, into the text fields to speed-up activity creation. For example, if creating a multiple choice activity, you can drag both the questions and answers from your existing quiz found in a word processing document.
If you would like to ensure that others cannot edit your activity or game, check the Password box, and set a password. This action can prevent participants from accidentally accessing the edit area of the activity during class.
Press OK to save your edits.
Lesson Pages
Check this box and type in a password to protect the activity or game from being edited.
Drag image here
Check this box to show a button during the activity.
Drag image here
You can customize the parameters of many activities.
For more creative control over the lesson activity, there is a version of most activities that is created entirely from SMART Notebook objects. You can find Lesson Page activites in the Pages folder of the Lesson Activity Toolkit.
53
Building interactive lesson activities
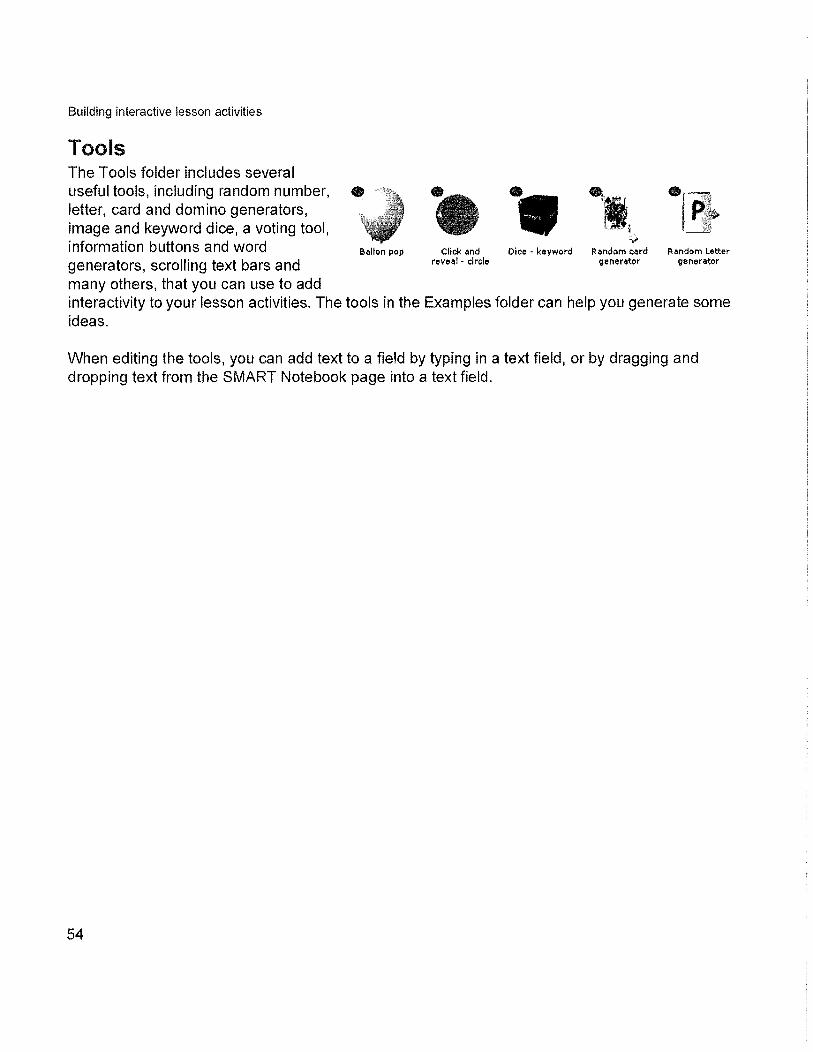
Tools The Tools folder includes several useful tools, including random number, letter, card and domino generators, image and keyword dice, a voting tool, information buttons and word generators, scrolling text bars and many others, that you can use to add
Bailon pop Click and reveal" circle
Dice" keyword Random card generator
Random Letter generator
interactivity to your lesson activities. The tools in the Examples folder can help you generate some ideas.
When editing the tools, you can add text to a field by typing in a text field, or by dragging and dropping text from the SMART Notebook page into a text field.
54
SMART Notebook Software Training for SMART Board Users Level 2 Learner Workbook
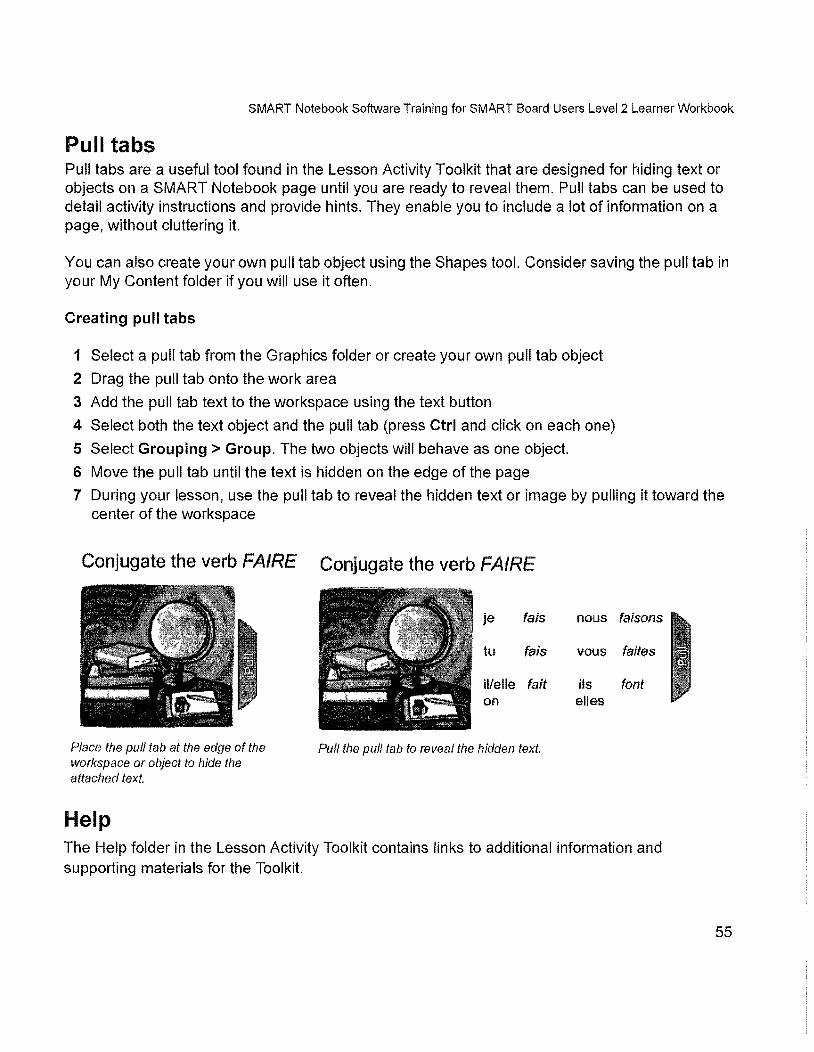
Pull tabs Pull tabs are a useful tool found in the Lesson Activity Toolkit that are designed for hiding text or objects on a SMART Notebook page until you are ready to reveal them. Pull tabs can be used to detail activity instructions and provide hints. They enable you to include a lot of information on a page, without cluttering it.
You can also create your own pull tab object using the Shapes tool. Consider saving the pull tab in your My Content folder if you will use it often.
Creating pull tabs
1 Select a pull tab from the Graphics folder or create your own pull tab object
2 Drag the pull tab onto the work area
3 Add the pull tab text to the workspace using the text button
4 Select both the text object and the pull tab (press Ctrl and click on each one)
5 Select Grouping> Group. The two objects will behave as one object.
6 Move the pull tab until the text is hidden on the edge of the page
7 During your lesson, use the pull tab to reveal the hidden text or image by pulling it toward the center of the workspace
Conjugate the verb FAIRE Conjugate the verb FAIRE
Place the pull tab at the edge of the workspace or object to hide the attached text.
Help
je fais
tu fais
illelle fait on
Pull the pull tab to reveal the hidden text.
nous faisons
vous faites
Us font elles
The Help folder in the Lesson Activity Toolkit contains links to additional information and supporting materials for the Toolkit.
55

SMART Notebook Software Training for SMART Board Users Level 2 Learner Workbook
Review: Building interactive lesson activities
1 How do you turn on Dual Page Display?
2 How do you attach a sound file to an object?
3 What are three object animation styles?
4 What are two ways to add text to a text field in an Adobe Flash activity, game or tool from the Lesson Activity Toolkit?
5 How do you create a pull tab?
57
Building interactive lesson activities Q and A
Review: Building interactive lesson activities
58
1 How do you turn on Dual Page Display?
Press the Dual Page Display button on the toolbar or select View> Zoom> Dual Page Display.
2 How do you attach a sound file to an object?
Select the object that you would like to attach a sound file to and select Sound from its drop-down menu. The Insert Sound dialog box appears. Press Browse to locate and select the sound file. Select whether you'd like to launch the sound by clicking a corner icon or the object, and press OK
3 What are three object animation types?
Fade in, fade out, flip around axis, fly in, fly out, shrink and grow, and spin
4 What are two ways to add text to a text field in an Adobe Flash activity, game or tool from the Lesson Activity Toolkit?
You can add text by typing into the text fields, or by dragging and dropping text from the SMART Notebook page, word processing software or a webpage or other software program, into the text fields to speed up activity creation.
5 How do you create a pull tab?
Select a pull tab from the Graphics folder and drag it onto the work area. Position it next to the object you would like to group it with. Select both the object and the pull tab (press Ctrl and click on each one), and select Grouping> Group. Move the pull tab until the text is hidden on the edge of the page.


![Tutorial notebook de smart board[1]](https://img.pdfslide.tips/doc/110x75/557b6de2d8b42a7f6e8b4fd5/tutorial-notebook-de-smart-board1.jpg)