Embed Size (px)
Citation preview

Sony® αDSLR–A700
Digital Field Guide
Alan Hess
01_270318 ffirs.qxp 4/18/08 11:48 AM Page iii

01_270318 ffirs.qxp 4/18/08 11:48 AM Page ii

Sony® α
DSLR-A700 Digital Field Guide
01_270318 ffirs.qxp 4/18/08 11:48 AM Page i

01_270318 ffirs.qxp 4/18/08 11:48 AM Page ii

Sony® αDSLR–A700
Digital Field Guide
Alan Hess
01_270318 ffirs.qxp 4/18/08 11:48 AM Page iii
Sony® α DSLR-A700 Digital Field Guide
Published byWiley Publishing, Inc.10475 Crosspoint Blvd.Indianapolis, IN 46256www.wiley.com
Copyright © 2008 by Wiley Publishing, Inc., Indianapolis, Indiana
Published simultaneously in Canada
ISBN: 978-0-470-27031-8
Manufactured in the United States of America
10 9 8 7 6 5 4 3 2 1
No part of this publication may be reproduced, stored in a retrieval system or transmitted in anyform or by any means, electronic, mechanical, photocopying, recording, scanning or otherwise,except as permitted under Sections 107 or 108 of the 1976 United States Copyright Act, withouteither the prior written permission of the Publisher, or authorization through payment of theappropriate per-copy fee to the Copyright Clearance Center, 222 Rosewood Drive, Danvers, MA01923, (978) 750-8400, fax (978) 750-4744. Requests to the Publisher for permission should beaddressed to the Legal Department, Wiley Publishing, Inc., 10475 Crosspoint Blvd., Indianapolis, IN46256, (317) 572-3447, fax (317) 572-4355, or online at http://www.wiley.com/go/permissions.
LIMIT OF LIABILITY/DISCLAIMER OF WARRANTY: THE PUBLISHER AND THE AUTHOR MAKE NOREPRESENTATIONS OR WARRANTIES WITH RESPECT TO THE ACCURACY OR COMPLETENESSOF THE CONTENTS OF THIS WORK AND SPECIFICALLY DISCLAIM ALL WARRANTIES, INCLUDINGWITHOUT LIMITATION WARRANTIES OF FITNESS FOR A PARTICULAR PURPOSE. NO WARRANTYMAY BE CREATED OR EXTENDED BY SALES OR PROMOTIONAL MATERIALS. THE ADVICE ANDSTRATEGIES CONTAINED HEREIN MAY NOT BE SUITABLE FOR EVERY SITUATION. THIS WORK ISSOLD WITH THE UNDERSTANDING THAT THE PUBLISHER IS NOT ENGAGED IN RENDERINGLEGAL, ACCOUNTING, OR OTHER PROFESSIONAL SERVICES. IF PROFESSIONAL ASSISTANCE ISREQUIRED, THE SERVICES OF A COMPETENT PROFESSIONAL PERSON SHOULD BE SOUGHT.NEITHER THE PUBLISHER NOR THE AUTHOR SHALL BE LIABLE FOR DAMAGES ARISING HERE-FROM. THE FACT THAT AN ORGANIZATION OR WEB SITE IS REFERRED TO IN THIS WORK AS ACITATION AND/OR A POTENTIAL SOURCE OF FURTHER INFORMATION DOES NOT MEAN THATTHE AUTHOR OR THE PUBLISHER ENDORSES THE INFORMATION THE ORGANIZATION OR WEBSITE MAY PROVIDE OR RECOMMENDATIONS IT MAY MAKE. FURTHER, READERS SHOULD BEAWARE THAT INTERNET WEB SITES LISTED IN THIS WORK MAY HAVE CHANGED OR DISAP-PEARED BETWEEN WHEN THIS WORK WAS WRITTEN AND WHEN IT IS READ.For general information on our other products and services or to obtain technical support, pleasecontact our Customer Care Department within the U.S. at (800) 762-2974, outside the U.S. at (317)572-3993 or fax (317) 572-4002.
Wiley also publishes its books in a variety of electronic formats. Some content that appears in printmay not be available in electronic books.
Library of Congress Control Number: 2008925790
Trademarks: Wiley and the Wiley Publishing logo are trademarks or registered trademarks of JohnWiley and Sons, Inc. and/or its affiliates. Sony is a registered trademark of Sony, Inc. All othertrademarks are the property of their respective owners. Wiley Publishing, Inc. is not associatedwith any product or vendor mentioned in this book.
01_270318 ffirs.qxp 4/18/08 11:48 AM Page iv

About the AuthorAlan Hess is a freelance photographer based in San Diego, California. He has done com-mercial photography on a wide variety of subjects, from guitar manufacturing to a clothingcatalog for women’s workout wear. His concert and backstage images have appeared innumerous online and print publications and have been used for promotional purposes andmusic packaging.
Alan is a key contributor to the Lexar Pro Photographer Web site and has written articles onconcert photography and technology.
Alan can be contacted through his Web site www.alanhessphotography.com.
01_270318 ffirs.qxp 4/18/08 11:48 AM Page v

Acquisitions EditorCourtney Allen
Senior Project EditorCricket Krengel
Technical EditorBen Holland
Copy EditorScott Tullis
Editorial ManagerRobyn B. Siesky
Vice President & Group ExecutivePublisherRichard Swadley
Vice President & PublisherBarry Pruett
Business ManagerAmy Knies
Senior Marketing ManagerSandy Smith
Project CoordinatorErin Smith
Graphics and Production SpecialistsAlissa D. ElletJennifer Mayberry
Quality Control TechnicianJessica Kramer
ProofreadingLinda Quigley
IndexingBroccoli Information Mgt.
Special HelpJama CarterSarah Cisco
Credits
01_270318 ffirs.qxp 4/18/08 11:48 AM Page vi

For Nadra
01_270318 ffirs.qxp 4/18/08 11:48 AM Page vii

01_270318 ffirs.qxp 4/18/08 11:48 AM Page viii

Acknowledgments
Special thanks to my family and friends for putting up with me always having a cam-era pointed at them. I really do appreciate all your patience.
Thanks to Courtney for getting this whole thing started and to Cricket for keeping it on track.
Thanks to Mark and Maile for all the encouragement and the constant “Is the book doneyet?” e-mails.
01_270318 ffirs.qxp 4/18/08 11:48 AM Page ix

01_270318 ffirs.qxp 4/18/08 11:48 AM Page x
Contents at a GlanceAcknowledgments . . . . . . . . . . . . . . . . . . . . . . . . . . . . . . . . . . . . . ixIntroduction . . . . . . . . . . . . . . . . . . . . . . . . . . . . . . . . . . . . . . . . xxi
Quick Tour . . . . . . . . . . . . . . . . . . . . . . . . . . . . . . . . . . . . . . . . . . 1
Part I: Using the Sony Alpha A700 . . . . . . . . . . . . . . . . . . . . 9Chapter 1: Exploring the Sony Alpha A700 . . . . . . . . . . . . . . . . . . . . . . 11Chapter 2: Setting Up the Alpha A700 . . . . . . . . . . . . . . . . . . . . . . . . . 45
Part II: Creating Great Photos with the Sony Alpha A700 . . . . . . 81Chapter 3: Photography Essentials . . . . . . . . . . . . . . . . . . . . . . . . . . . 83Chapter 4: All About Light . . . . . . . . . . . . . . . . . . . . . . . . . . . . . . . 103Chapter 5: All About Lenses . . . . . . . . . . . . . . . . . . . . . . . . . . . . . . 125Chapter 6: Photo Subjects . . . . . . . . . . . . . . . . . . . . . . . . . . . . . . . 141Chapter 7: Viewing, Downloading, and Printing Your Photos . . . . . . . . . . . 229
Part III: Appendixes . . . . . . . . . . . . . . . . . . . . . . . . . . . 239Appendix A: Camera Care . . . . . . . . . . . . . . . . . . . . . . . . . . . . . . . 241Appendix B: Editing Software Options . . . . . . . . . . . . . . . . . . . . . . . . 247Glossary . . . . . . . . . . . . . . . . . . . . . . . . . . . . . . . . . . . . . . . . . . 261
Index. . . . . . . . . . . . . . . . . . . . . . . . . . . . . . . . . . . . . . . . . . . . 269
02_270318 ftoc.qxp 4/18/08 11:49 AM Page xi

02_270318 ftoc.qxp 4/18/08 11:49 AM Page xii
ContentsAcknowledgments ix
Introduction xxi
Quick Tour 1
Basic Setup of the A700 1Setting the Image Size and Quality 2Setting the Metering Mode 3Setting the ISO 4Setting the White Balance 4Setting the Drive Mode 5Setting the Focus Mode 5Setting the Focus Area 6Reviewing Your Images 7
Part I: Using the SonyAlpha A700 9
Chapter 1: Exploring the SonyAlpha A700 11
Camera Controls 11On the front 12On top 13On the back 15On the bottom 17On the left side 18On the right side 19
Remote Commander 20Viewfinder Display 22
The main display 22The data display 23
LCD Display 24Recording Information display 24
02_270318 ftoc.qxp 4/18/08 11:49 AM Page xiii

Playback screen 27Image alone view 27Image with shooting
data view 27Image with thumbnail
strip view 28Histogram view 29Index view 30
Image Files 30Aspect ratio 30File quality setting 31File size setting 32
ISO Sensitivity 33Viewing Images on the Camera 33White Balance Setting 36Metering Modes 38Scene Exposure Modes 39Semiautomatic and Manual
Exposure Modes 40Drive Modes 40Creative Styles 42D-Range Optimization 43
Chapter 2: Setting Up the Alpha A700 45
Choosing the Exposure Mode 45Basic Exposure modes 45
Auto mode 45Program Auto mode 46Aperture Priority mode 46Shutter Speed Priority
mode 47Manual mode 47Memory Recall mode 47
Choosing a Scene selection 48Portrait 49Landscape 49Macro 49Sports Action 50Sunset 50Night View / Night Portrait 50
Using the Function Button 51File Quality, Size, and Aspect Ratio 51
Choosing the file quality 51JPEG 53RAW 53
Setting the image size 53Setting the aspect ratio 54
White Balance 55Setting the white balance 55
Setting the ISO 57Setting the Dynamic-Range
Optimizer 58Setting the Drive Mode 58
Bracketing modes 59Remote Commander 60
Focusing the A700 60Eye-Start focusing system 61Selecting the auto focus area 61Auto Focus modes 62
Creative Styles 62Using the Built-In Flash 65
Selecting the Flash mode 65Flash compensation 66
A700 Menus 66Recording menu 1 67
Image size 67Aspect ratio 67Quality 67
02_270318 ftoc.qxp 4/18/08 11:49 AM Page xiv

D-RangeOptimizer 67Creative Style 67Custom button 67Exposure step 68
Recording menu 2 68Flash mode 68Flash control 68Power ratio 69Flash compens. 69ISO Auto max. 69ISO Auto min. 69
Recording menu 3 69AF A setup 69AF area 69Priority setup 69AF illuminator 70AF w/ shutter 70Long exp.NR 70High ISO NR 70
Recording menu 4 70Memory 70Rec mode reset 70
Custom menu 1 70Eye-Start AF 71EyeStart trigr. 71AF/MF button 71AF/MF control 71AF drive speed 71AF area disp. 71FocusHoldButton 71
Custom menu 2 72AEL button 72Ctrl dial setup 72Dial exp.comp 72Ctrl dial lock 72Button ops. 72Release w/oCard 73Release w/oLens 73
Custom menu 3 73Red eye reduc. 74Exp.comp.set 74
Bracket order 74Auto review 74Auto off w/ VF 74Rec.info.disp. 74Img.orientation 74
Custom menu 4 74Playback menu 1 75
Delete 75Format 75Protect 76DPOF setup 76Date imprint 76Index print 76PlaybackDisplay 76
Playback menu 2 77Slide show 77Interval 77
Setup menu 1 77LCD brightness 77Info.disp.time 77Power save 77Video output 78HDMI output 78Language 78Date/Time setup 78
Setup menu 2 78Memory card 78File number 78Folder name 78Select folder / New folder 79USB connection 79MassStrg.card 79
Setup menu 3 79Menu start 79Delete confirm. 79Audio signals 79Cleaning mode 79Reset default 79
02_270318 ftoc.qxp 4/18/08 11:49 AM Page xv

Part II: Creating GreatPhotos with the SonyAlpha A700 81
Chapter 3: PhotographyEssentials 83
Understanding Exposure 83Controlling Exposure 84
Light 84Aperture 85Shutter speed 87ISO 89Equivalent exposures 90
Fine-Tuning Exposure 91Exposure compensation 91Manual mode 91Exposure Metering modes 92Bracketing 92Using the histogram 94
Composition Basics 95The Rule of Thirds 97Other compositional tips 99Break the rules 101
Chapter 4: All About Light 103
The Intensity of Light 103The Direction of Light 105The Color of Light 107The Diffusion of Light 107Available Light 108
Daylight 108Sunrise and sunset 108Midday 109
Electrical light 110Fluorescent lights 110Incandescent lights 110Vapor discharge lights 110
Mixed light 110Supplemental Light 111
The built-in flash 111Red eye and Red-eye
reduction 111Dedicated flash units 112
Flash sync modes 117Flash compensation 118
Studio lights 119Strobe lights 119Continuous lights 120
Accessories to Control Light 120Reflectors 120Diffusers 122
02_270318 ftoc.qxp 4/18/08 11:49 AM Page xvi

Chapter 5: All About Lenses 125
Sony Lens Basics 125Compatibility 126Maximum aperture and
focal length 126Expanding your lens options 128
Understanding the Lens Crop Factor 128
Sony Lenses 129Choosing Between Prime
and Zoom Lenses 130Prime lenses 130Zoom lenses 131
Wide-Angle Lenses 132Normal Lenses 133Telephoto Lenses 134Macro Lenses 137Tele-Converters 138Reducing Vibration 139
Chapter 6: Photo Subjects 141
Abstract Photography 141Inspiration 141Abstract photography
practice 144Abstract photography tips 144
Architectural Photography 145Inspiration 145Architectural photography
practice 146Architectural photography
tips 148Candid Photography 148
Inspiration 149Candid photography practice 150Candid photography tips 152
Child Photography 152Inspiration 153Child photography practice 154Child photography tips 156
Concert Photography 156Inspiration 158Concert photography practice 159Concert photography tips 160
Event Photography 161Inspiration 162Event photography practice 162Event photography tips 164
Flower and Plant Photography 164Inspiration 165Flower and plant
photography practice 166Flower and plant
photography tips 168
02_270318 ftoc.qxp 4/18/08 11:49 AM Page xvii
Group Portrait Photography 168Considering lighting
and location 169Working with people 169Inspiration 170Group portrait photography
practice 171Group portrait photography
tips 172Indoor Portraits 173
Inspiration 175Indoor portrait practice 176Indoor portrait tips 177
Landscape and Nature Photography 178
Inspiration 178Landscape and nature
photography practice 179Landscape and nature
photography tips 181Light Trail Photography 181
Inspiration 182Light trail photography
practice 183Light trail photography tips 184
Macro Photography 186Inspiration 186Macro photography practice 188Macro photography tips 188
Night and Low Light Photography 189Inspiration 190Night and low light
photography practice 190Night and low light
photography tips 191Online Auction Photography 192
Inspiration 192Online auction photography
practice 193Online auction photography
tips 195
Outdoor portrait photography 195Inspiration 196Outdoor portrait
photography 197Outdoor portrait
photography tips 198Sports Photography 200
Inspiration 201Sports photography practice 202Sports photography tips 203
Still Life Photography 204Inspiration 205Still life photography
practice 206Still life photography tips 207
Street Life Photography 208Inspiration 208Street life photography
practice 209Street life photography tips 211
Sunrise and Sunset Photography 211Inspiration 211Sunset and sunrise
photography practice 212Sunset and sunrise
photography tips 214Travel Photography 214
Inspiration 215Travel photography practice 216Travel photography tips 218
Wedding Photography 219Inspiration 219Wedding photography
practice 220Wedding photography tips 222
Wildlife Photography 223Inspiration 224Wildlife photography
practice 225Wildlife photography tips 227
02_270318 ftoc.qxp 4/18/08 11:49 AM Page xviii
Chapter 7: Viewing,Downloading, and Printing Your Photos 229
Viewing Your Images on a Television 229
Connecting to a regular television 230
Connecting to an HDTV 231Viewing the images on a
television 231Using the camera to
display images 231Using the Remote
Commander to display images 233
Connecting to a Computer 234Using the USB cable 234Using a card reader 235
Connecting to a Printer 236Print menu 1 236Print menu 2 237
Part III: Appendixes 239
Appendix A: Camera Care 241
Preventing Dust from Entering the Camera Body 242
Cleaning Your Gear after Shooting 243Cleaning the Lenses 243Cleaning the Mirror 244Cleaning the Sensor 245
Appendix B: Editing Software Options 247
Sony Software 247Image Data Lightbox SR 247Image Data Converter SR 248
Adjustment 1 248Adjustment 2 250Adjustment 3 250Other features 250
Remote Camera Control 251
02_270318 ftoc.qxp 4/18/08 11:49 AM Page xix

Other Software Options 252Adobe Photoshop 252
Bridge 252Adobe Camera Raw 253Photoshop 254
Adobe Photoshop Elements 254Adobe Photoshop Lightroom 255Apple Aperture 257iPhoto 259Photo Mechanic 260
Glossary 261
Index 269
02_270318 ftoc.qxp 4/18/08 11:49 AM Page xx
Introduction
Welcome to the Sony Alpha DSLR-A700 Digital Field Guide. The A700 is a greatcamera — with its super-fast focusing, it practically focuses itself before you have
it all the way up to your eyes, and with the Super Steady Shot vibration reduction built rightinto the camera body so that it works with all lenses, Sony has produced a camera that willkeep professionals and novices happy for years.
With all the buttons, levers, and dials, it can be a daunting task to get the A700 to producethe images that you want. Just remember, the camera is only a tool, one that is used to cap-ture your vision. My job here is to help you do that in a wide variety of scenarios.
There is nothing more exciting to me than going out and photographing, and there is noth-ing more frustrating than not getting the shot I thought I did. The purpose of this book is tohelp you get the results you want when shooting a variety of subjects. The idea behind itbeing in helping you get the best results in specific photographic situations, and also pro-viding specifics on getting to know the A700.
If you are the type of person who just wants to jump in and start taking photos, then goahead and check out the Quick Tour. The Quick Tour gives you a quick run-down on usingthe A700 so you can get shooting fast. Chapter 1 goes into the location and function of themany controls on the A700 in more detail, and it makes a great reference guide later on.Chapter 2 gives an overview of all the settings and menu choices, including my recom-mended settings and what each mode and setting is best used for.
Chapter 3 is a review on the basics of photography and how they relate to digital photog-raphy and the A700. Need a little brush up on getting the correct exposure and a reminderabout the Rule of Thirds? It’s in this chapter.
Because light is so important to photography, it has its own chapter, Chapter 4. Natural lightand artificial light are both covered along with getting the best results when using a flash.Reflectors, diffusers, and studio lighting are all covered along with tips and techniques forusing a dedicated flash to get professional-looking results.
While the camera is important, the right lens can make all the difference. Chapter 5 is allabout lenses, and Sony’s lenses in particular. Prime lenses compared to zoom lens, normal,wide, and telephoto lenses are all discussed here.
Chapter 6 is the meat of the book, with information to help you get the best images pos-sible in a wide variety of situations. From taking travel photos on your next vacation toshooting a child’s baseball game, from capturing a candid moment to shooting a still life
03_270318 flast.qxp 4/18/08 11:49 AM Page xxi
scene, Chapter 6 has the sample photos, shooting data, and tips for many different photo-graphic opportunities.
Taking the photos is one thing, showing them to others is another thing entirely. Chapter 7deals with getting the images from the camera to a computer or just using the camera todisplay the images on a television, including HDTV. It is also possible to print images directlywith the PictBridge software, and that is also covered in Chapter 7.
Appendix A covers cleaning and keeping you camera and lens in good working order. Evenwith the new anti-dust coating and self-cleaning, knowing the correct way to remove dustand dirt is important. Less time trying to get the camera clean means more time to photo-graph, and photographing is what it is all about.
Appendix B covers the software that is bundled with the A700 along with some of the otherchoices for today’s photographers. There are a great many different programs for photog-raphers in today’s digital age, and there is no way to cover them all, so I picked some of myfavorites and those that are the most commonly used in digital photography today.
Read through the book now, and take it with you when you go out to photograph. Whilethis book would look great on your bookshelf, it works even better if you keep it with yourcamera. Tuck it into your camera bag and you will have a handy reference guide to all thecontrols and menus of your camera and advice on how to capture the best shot in differ-ent situations.
xxii Introduction
03_270318 flast.qxp 4/18/08 11:49 AM Page xxii
QTQTQuick Tour
Congratulations on owning a Sony A700, a feature-laden digital SLR that novices and professional pho-
tographers alike can use with equally stunning results. Withmanual controls and enough settings to make any profes-sional photographer happy, the Sony A700 dSLR can also beused in a fully automatic mode, letting novices use the cam-era without being overwhelmed. This Quick Tour will help youget out and start taking photos right away.
Taking photos with your A700 is as simple as putting in thebattery, attaching a lens, inserting a memory card, and open-ing the flash if necessary. Turn the Mode dial on the top of thecamera to Auto and you are ready to go out and start photo-graphing. Sure, the camera has many buttons and dials andmenu settings, but you can start without using most of them.
Basic Setup of the A700After the A700 has a charged battery, a freshly formatted mem-ory card, and a lens attached, it is time to pick a Recordingmode. The A700 has 12 Recording modes, 6 of which are spe-cific scene selection modes. You select a mode by turning theMode dial on the top left of the camera to the desired setting.
✦ Auto. Setting the camera to Auto turns the camerainto a very big and powerful point-and-shoot camera.
✦ Program Auto. Turning the Mode dial to P sets the camera to Program Auto mode. Although theProgram Auto mode also lets the camera pick the shutter speed and the aperture, this mode isadjustable by using the Front and Rear control dials.The Front control dial adjusts the shutter speed and the camera then picks the aperture; the Rearcontrol dial changes the aperture and the camerathen picks the shutter speed.
✦ ✦ ✦ ✦
In This Quick Tour
Basic setup of theA700
Setting the image sizeand quality
Setting the Meteringmode
Setting the ISO
Setting the whitebalance
Setting the Drive mode
Setting the Focus mode
Setting the focus area
Reviewing your images
✦ ✦ ✦ ✦
04_270318 prechap01.qxp 4/18/08 11:49 AM Page 1
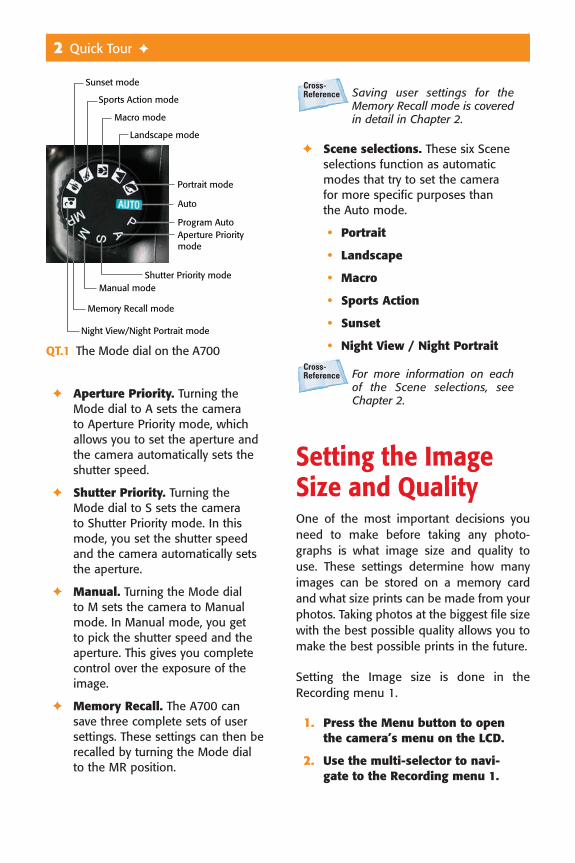
✦ Aperture Priority. Turning theMode dial to A sets the camera to Aperture Priority mode, whichallows you to set the aperture andthe camera automatically sets theshutter speed.
✦ Shutter Priority. Turning theMode dial to S sets the camera to Shutter Priority mode. In thismode, you set the shutter speedand the camera automatically setsthe aperture.
✦ Manual. Turning the Mode dial to M sets the camera to Manualmode. In Manual mode, you get to pick the shutter speed and theaperture. This gives you completecontrol over the exposure of theimage.
✦ Memory Recall. The A700 cansave three complete sets of usersettings. These settings can then berecalled by turning the Mode dialto the MR position.
Saving user settings for theMemory Recall mode is coveredin detail in Chapter 2.
✦ Scene selections. These six Sceneselections function as automaticmodes that try to set the camerafor more specific purposes thanthe Auto mode.
• Portrait
• Landscape
• Macro
• Sports Action
• Sunset
• Night View / Night Portrait
For more information on each of the Scene selections, seeChapter 2.
Setting the ImageSize and QualityOne of the most important decisions youneed to make before taking any photo-graphs is what image size and quality touse. These settings determine how manyimages can be stored on a memory cardand what size prints can be made from yourphotos. Taking photos at the biggest file sizewith the best possible quality allows you tomake the best possible prints in the future.
Setting the Image size is done in theRecording menu 1.
1. Press the Menu button to openthe camera’s menu on the LCD.
2. Use the multi-selector to navi-gate to the Recording menu 1.
2 Quick Tour ✦
Macro mode
Landscape mode
Portrait mode
Aperture Prioritymode
Program Auto
Auto
Sunset mode
Sports Action mode
Night View/Night Portrait mode
Memory Recall mode
Manual modeShutter Priority mode
QT.1 The Mode dial on the A700
04_270318 prechap01.qxp 4/18/08 11:49 AM Page 2
3. Use the multi-selector to navi-gate to the Image size menuchoice and press the multi-selector’s center button. TheImage size submenu gives youthree choices: Large, Medium, andSmall.
4. Select the size you want withthe multi-selector and press themulti-selector’s center button.
The Image size menu is notavailable if the Quality is set toRAW or cRAW.
The A700 is capable of saving photos inboth JPEG and RAW file formats. You canalso save each photo in both formats at thesame time. The image Quality gives youseven choices for saving your files.
✦ RAW
✦ cRAW
✦ RAW & JPEG
✦ cRAW & JPEG
✦ Extra Fine JPEG
✦ Fine JPEG
✦ Standard JPEG
To change the image Quality, follow thesesteps:
1. Press the Menu button to openthe camera’s menu on the LCD.
2. Use the multi-selector to navi-gate to the Recording menu 1.
3. Use the multi-selector to navi-gate to the Quality menu choiceand press the multi-selector’scenter button.
4. The Quality submenu now offersyou the seven choices for imagequality.
Image Size and Quality is covered in greater detail inChapter 2
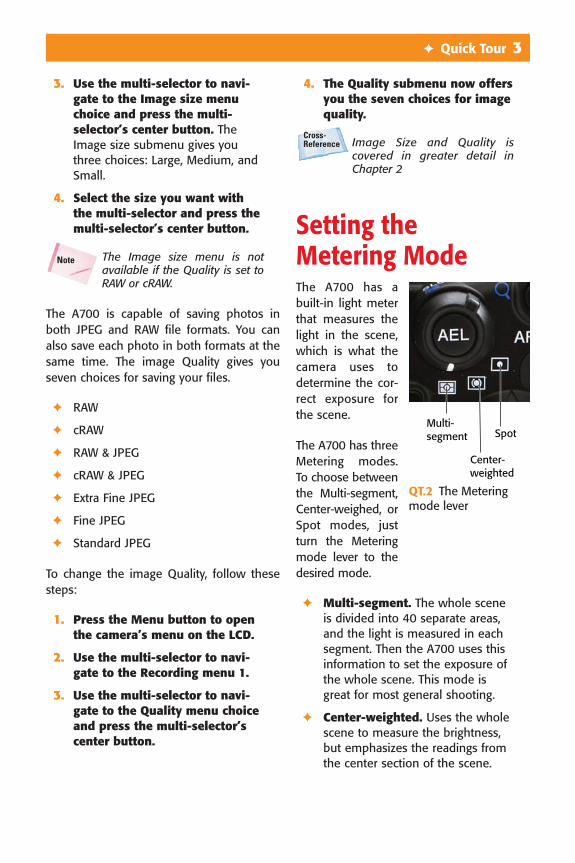
Setting the Metering ModeThe A700 has abuilt-in light meterthat measures thelight in the scene,which is what thecamera uses todetermine the cor-rect exposure forthe scene.
The A700 has threeMetering modes.To choose betweenthe Multi-segment,Center-weighed, orSpot modes, justturn the Meteringmode lever to thedesired mode.
✦ Multi-segment. The whole sceneis divided into 40 separate areas,and the light is measured in eachsegment. Then the A700 uses thisinformation to set the exposure ofthe whole scene. This mode isgreat for most general shooting.
✦ Center-weighted. Uses the wholescene to measure the brightness,but emphasizes the readings fromthe center section of the scene.
Note
✦ Quick Tour 3
Multi-segment
Center-weighted
Spot
QT.2 The Meteringmode lever
04_270318 prechap01.qxp 4/18/08 11:49 AM Page 3
✦ Spot. Uses only the informationfrom the Spot metering circle in the center of the frame.
Setting the ISOThe ISO setting determines how sensitivethe image sensor is to light. The A700 hasan ISO range of 100 to 6400 and an Automode. The higher the ISO, the less light isneeded to get a proper exposure. Settingthe ISO is quick and easy.
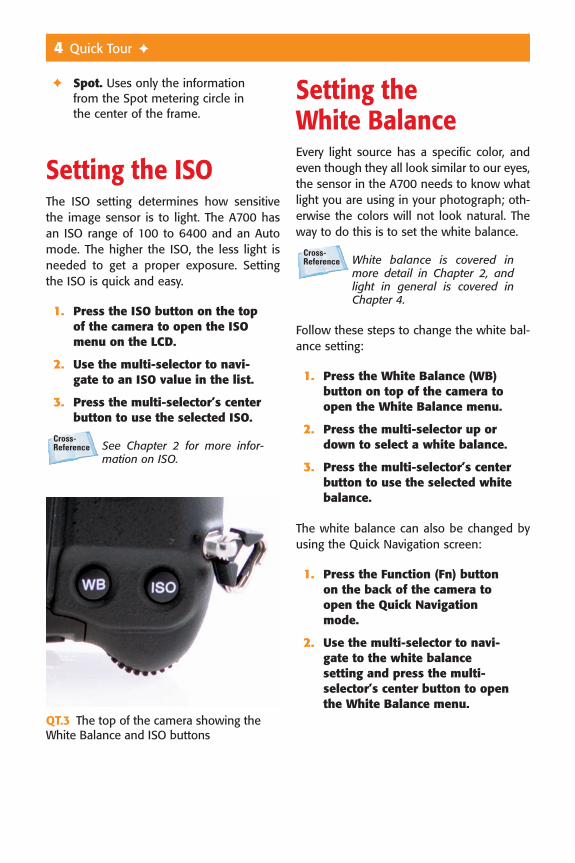
1. Press the ISO button on the topof the camera to open the ISOmenu on the LCD.
2. Use the multi-selector to navi-gate to an ISO value in the list.
3. Press the multi-selector’s centerbutton to use the selected ISO.
See Chapter 2 for more infor-mation on ISO.
Setting the White BalanceEvery light source has a specific color, andeven though they all look similar to our eyes,the sensor in the A700 needs to know whatlight you are using in your photograph; oth-erwise the colors will not look natural. Theway to do this is to set the white balance.
White balance is covered inmore detail in Chapter 2, andlight in general is covered inChapter 4.
Follow these steps to change the white bal-ance setting:
1. Press the White Balance (WB)button on top of the camera toopen the White Balance menu.
2. Press the multi-selector up ordown to select a white balance.
3. Press the multi-selector’s centerbutton to use the selected whitebalance.
The white balance can also be changed byusing the Quick Navigation screen:
1. Press the Function (Fn) buttonon the back of the camera toopen the Quick Navigationmode.
2. Use the multi-selector to navi-gate to the white balance setting and press the multi-selector’s center button to openthe White Balance menu.
4 Quick Tour ✦
QT.3 The top of the camera showing theWhite Balance and ISO buttons
04_270318 prechap01.qxp 4/18/08 11:49 AM Page 4
3. Use the multi-selector to navi-gate to the white balance ofyour choice and press the multi-selector’s center button to acti-vate your choice.
The A700 has nine different White Balancemodes:
✦ Auto White Balance
✦ Daylight
✦ Shade
✦ Cloudy
✦ Tungsten
✦ Fluorescent
✦ Flash
✦ Color Temperature
✦ Custom
The Auto White Balance setting is thedefault and this setting is great for mostphotography.
If you shoot in RAW file quality,setting the white balance isn’tas important because the whitebalance can be changed andfine-tuned using software afterthe photo has been taken.
Setting the Drive ModeThe Drive mode controls how many photosare taken when the Shutter button ispressed. The basic Drive modes are
✦ Single-shot Advance. The defaultsetting takes a single image everytime the Shutter button is pressed.
✦ Continuous Advance. The camerakeeps taking photos as long as theShutter button is held down. Thereare two Continuous Advanceshooting modes.
• LO. Shoots up to 3 images persecond.
• HI. Shoots up to 5 images persecond.
Changing the Drive mode is as easy aspressing the Drive mode button on the topof the camera and opening the Drive menu.The multi-selector can then be used toselect the Drive mode; pressing the multi-selector’s center button sets the new Drivemode.
The Drive mode is also the loca-tion to set the A700 Bracketingmodes The Drive menu andbracketing are covered in depthin Chapter 2.
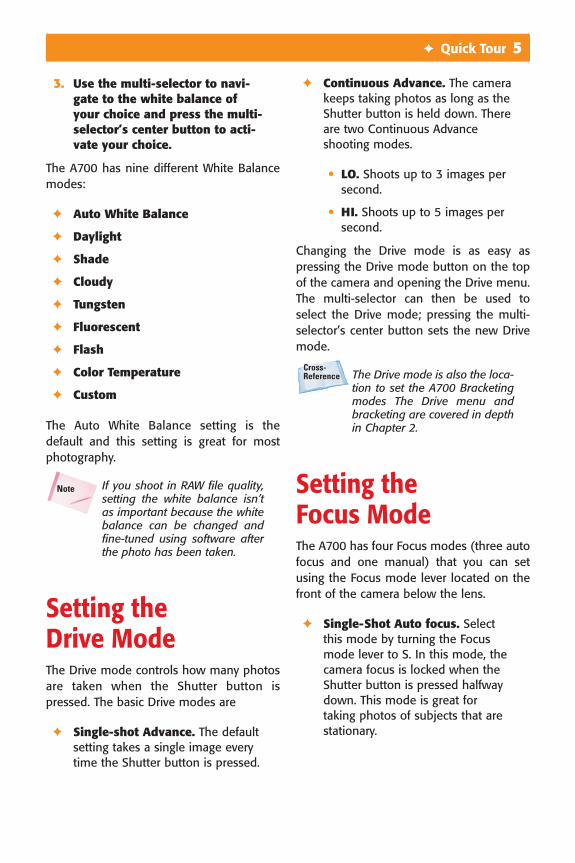
Setting the Focus ModeThe A700 has four Focus modes (three autofocus and one manual) that you can setusing the Focus mode lever located on thefront of the camera below the lens.
✦ Single-Shot Auto focus. Selectthis mode by turning the Focusmode lever to S. In this mode, thecamera focus is locked when theShutter button is pressed halfwaydown. This mode is great for taking photos of subjects that arestationary.
Note
✦ Quick Tour 5
04_270318 prechap01.qxp 4/18/08 11:49 AM Page 5

✦ Continuous Auto focus. In thismode, which you set by turningthe Focus mode lever to C, thecamera keeps focusing while theShutter button is pressed halfwaydown. This mode is best for shoot-ing moving subjects.
✦ Automatic. This mode is a combi-nation of the Single-Shot Autofocus and Continuous Auto Focusmodes. When the Focus modelever is set to A, the AutomaticAuto Focus mode switchesbetween the Single-Shot andContinuous Auto Focus modes,depending on whether the subjectis moving when the Shutter buttonis pressed halfway down.
✦ Manual. Turning the Focus modelever to MF, the Manual mode set-ting disengages the camera’s autofocus motor; you must adjust thelens’s focus manually by turningthe focusing ring.
Setting the Focus AreaThe auto focus capabilities of the A700 areamazingly fast, and with the Eye-Start sen-sor, the camera starts to focus even beforeyou press the Shutter button. There are 11
auto focus sensors in the camera, with threedifferent methods of deciding which of thefocus sensors are used. The three differentmethods are
✦ Wide auto focus area. This is thedefault setting. When in this modethe camera decides which one ofthe 11 auto focus sensors is used.
✦ Spot auto focus area. This modeuses the center spot exclusively todetermine what to focus on.
✦ Local auto focus area mode.This mode lets you use the multi-selector to pick the desired focusarea from any of the 11 auto focus sensors.
To change the auto focus area
1. Press the Menu button to openthe menu screen and use themulti-selector to navigate toRecording menu 3.
3. Use the multi-selector to choosethe AF area menu choice, andthen press the multiselector’scenter button to open the AFarea submenu.
4. Use the multi-selector to pickfrom Wide, Spot, or Local as theAF area.
The auto focus area can also be changed byusing the Quick Navigation screen.
1. Press the Function button onthe back of the camera to openthe Quick Navigation menu.
2. Use the multi-selector to navi-gate to the AF area, which is inthe center of the display, andpress the multi-selector’s centerbutton to open the AF areamenu.
6 Quick Tour ✦
Continuous
Manual
Single-Shot
Automatic
QT.4 The Focus mode lever on the A700
04_270318 prechap01.qxp 4/18/08 11:49 AM Page 6