Embed Size (px)
Citation preview
Steal this Whitepaper
Or how to actually set up 802.1x on Windows Active Directory, Linux, SteelBelted RADIUS, Windows 2000/XP clients, ProCurve
520 and 420 Wireless Access Points and the 5300XL High Performance LAN switch.
Jimmy Ray Purser Systems Engineer, Midwest
Hewlett-Packard ProCurve Networking
1

Scope and purpose “Everybody is talking at me, nobody is talking to me….” Is kinda the feeling that most network administrators get looking to use 802.1x on their network. Certainly one can find tons and tons of info about 802.1x, but hardly any on implementing it. Most vendors take a “Not my job approach” to explaining how to set 802.1x past their equipment. To some point this is understandable since all vendors change features and functions with time. But it is like buying a PC or Home Theater, you gotta jump in somewhere and as soon as you do, a better one will come out for a lower price. So this document will certainly go out of date with time. But what doesn’t…So we are going jump in on today’s stuff and go from there. The real power of 802.1x is that it is extensible. So it’s like the Force…it surrounds us and binds us… The intention of this paper is to be a, “how to” for 802.1x not a 802.1x educational paper. It is assumed that you have already read about 802.1x and like what you saw. What you will find in this paper are configs that I used to set up 802.1x at various customer sites. So I will for go explaining how it works and how cool it is. I figure you know that and are ready to get it running on your network. But certainly everyone has time for a joke. OK so a man walks into a bar….just kidding…he actually walks into a Star Trek convention and bumps into me and says, “Hey what kinda platforms are you going to discuss in this paper.” Of course I reply (in Klingon) that I will discuss Windows, Linux and Steel Belted Radius as well as client set ups. Then with a hearty laugh, we pound our chest and proclaim, “It’s a good day to config 802.1x!”…..
2
Microsoft Windows 2000 Server So you want to use Microsoft for 802.1x eh? Certainly this is the most common set up that I see to date. For Microsoft implementations, you need to first install the IAS (Internet Authentication Server) component. The following procedures were used to install Microsoft IAS on a Windows 2000 Server running as an Active Directory Domain Controller. You will need at least one Windows 2000 Active Directory server to authenticate client users. For this example, IAS was installed onto the Domain Controller server running the Active Directory database to provide seamless operation between IAS and Active Directory. By installing IAS on each Active Directory Domain Controller, redundancy and load balancing can be achieved with 802.1x. Multiple IAS authentication servers can be configured on each ProCurve device. If multiple IAS servers were defined, the ProCurve switch will authenticate against them in the order they were added. For Microsoft view on IAS installation instructions, please refer to the following Microsoft web site: http://www.microsoft.com/technet/treeview/default.asp?url=/technet/prodtechnol/windowsserver2003/proddocs/server/sag_ias_install.asp
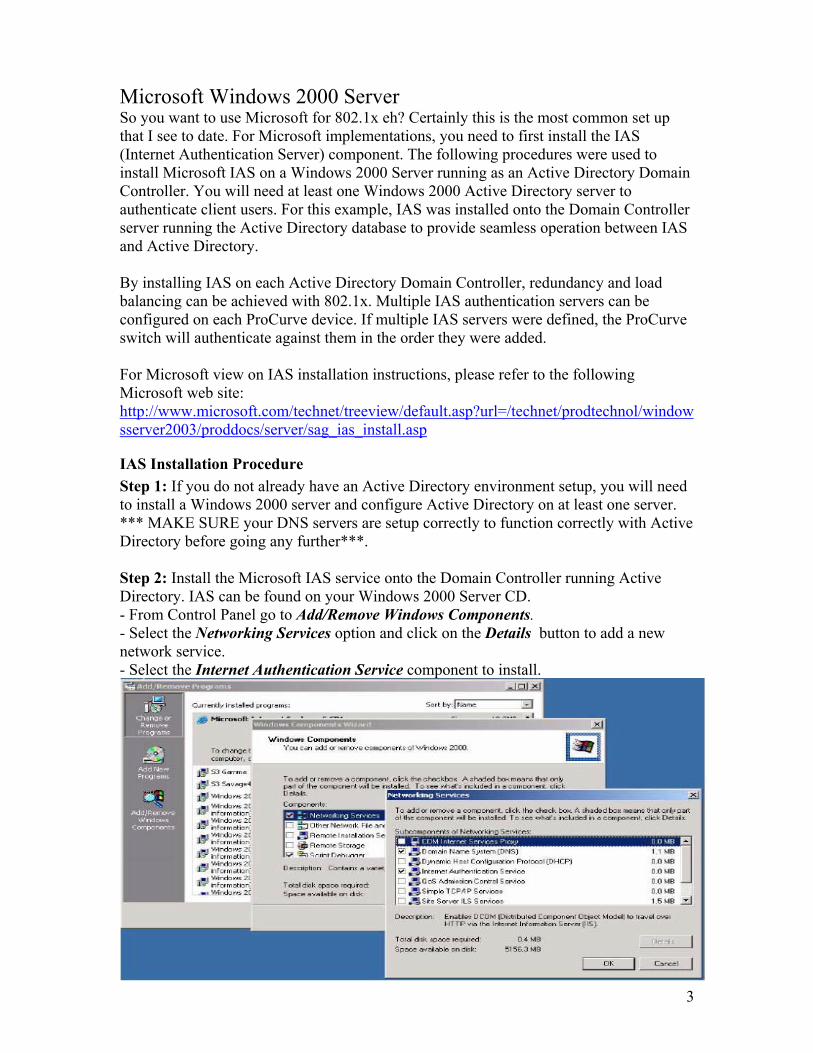
IAS Installation Procedure Step 1: If you do not already have an Active Directory environment setup, you will need to install a Windows 2000 server and configure Active Directory on at least one server. *** MAKE SURE your DNS servers are setup correctly to function correctly with Active Directory before going any further***. Step 2: Install the Microsoft IAS service onto the Domain Controller running Active Directory. IAS can be found on your Windows 2000 Server CD. - From Control Panel go to Add/Remove Windows Components. - Select the Networking Services option and click on the Details button to add a new network service. - Select the Internet Authentication Service component to install.
3
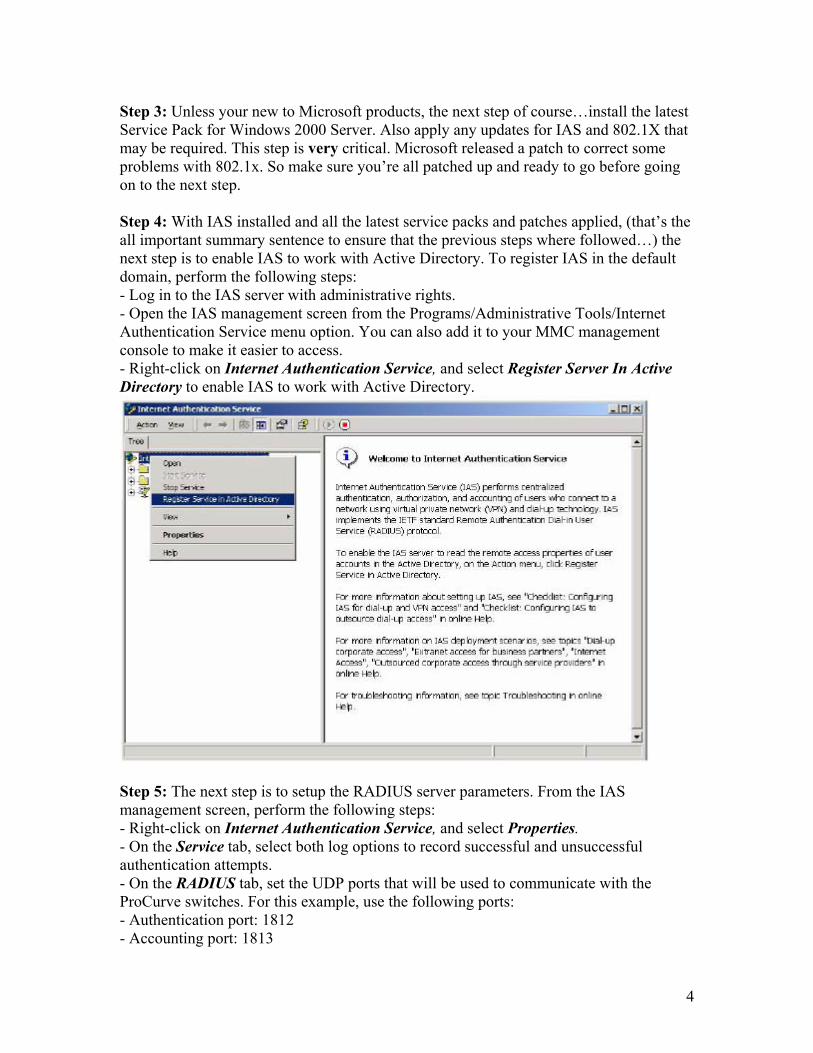
Step 3: Unless your new to Microsoft products, the next step of course…install the latest Service Pack for Windows 2000 Server. Also apply any updates for IAS and 802.1X that may be required. This step is very critical. Microsoft released a patch to correct some problems with 802.1x. So make sure you’re all patched up and ready to go before going on to the next step. Step 4: With IAS installed and all the latest service packs and patches applied, (that’s the all important summary sentence to ensure that the previous steps where followed…) the next step is to enable IAS to work with Active Directory. To register IAS in the default domain, perform the following steps: - Log in to the IAS server with administrative rights. - Open the IAS management screen from the Programs/Administrative Tools/Internet Authentication Service menu option. You can also add it to your MMC management console to make it easier to access. - Right-click on Internet Authentication Service, and select Register Server In Active Directory to enable IAS to work with Active Directory.
Step 5: The next step is to setup the RADIUS server parameters. From the IAS management screen, perform the following steps: - Right-click on Internet Authentication Service, and select Properties. - On the Service tab, select both log options to record successful and unsuccessful authentication attempts. - On the RADIUS tab, set the UDP ports that will be used to communicate with the ProCurve switches. For this example, use the following ports: - Authentication port: 1812 - Accounting port: 1813
4
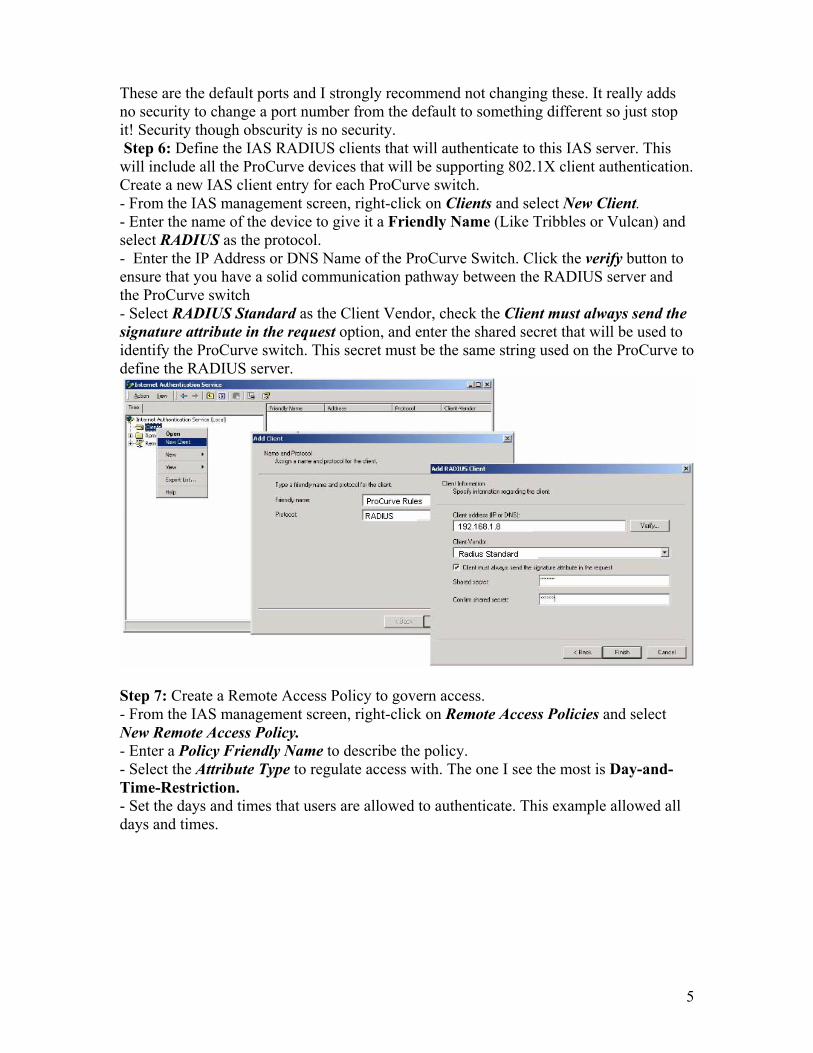
These are the default ports and I strongly recommend not changing these. It really adds no security to change a port number from the default to something different so just stop it! Security though obscurity is no security. Step 6: Define the IAS RADIUS clients that will authenticate to this IAS server. This will include all the ProCurve devices that will be supporting 802.1X client authentication. Create a new IAS client entry for each ProCurve switch. - From the IAS management screen, right-click on Clients and select New Client. - Enter the name of the device to give it a Friendly Name (Like Tribbles or Vulcan) and select RADIUS as the protocol. - Enter the IP Address or DNS Name of the ProCurve Switch. Click the verify button to ensure that you have a solid communication pathway between the RADIUS server and the ProCurve switch - Select RADIUS Standard as the Client Vendor, check the Client must always send the signature attribute in the request option, and enter the shared secret that will be used to identify the ProCurve switch. This secret must be the same string used on the ProCurve to define the RADIUS server.
Step 7: Create a Remote Access Policy to govern access. - From the IAS management screen, right-click on Remote Access Policies and select New Remote Access Policy. - Enter a Policy Friendly Name to describe the policy. - Select the Attribute Type to regulate access with. The one I see the most is Day-and-Time-Restriction. - Set the days and times that users are allowed to authenticate. This example allowed all days and times.
5
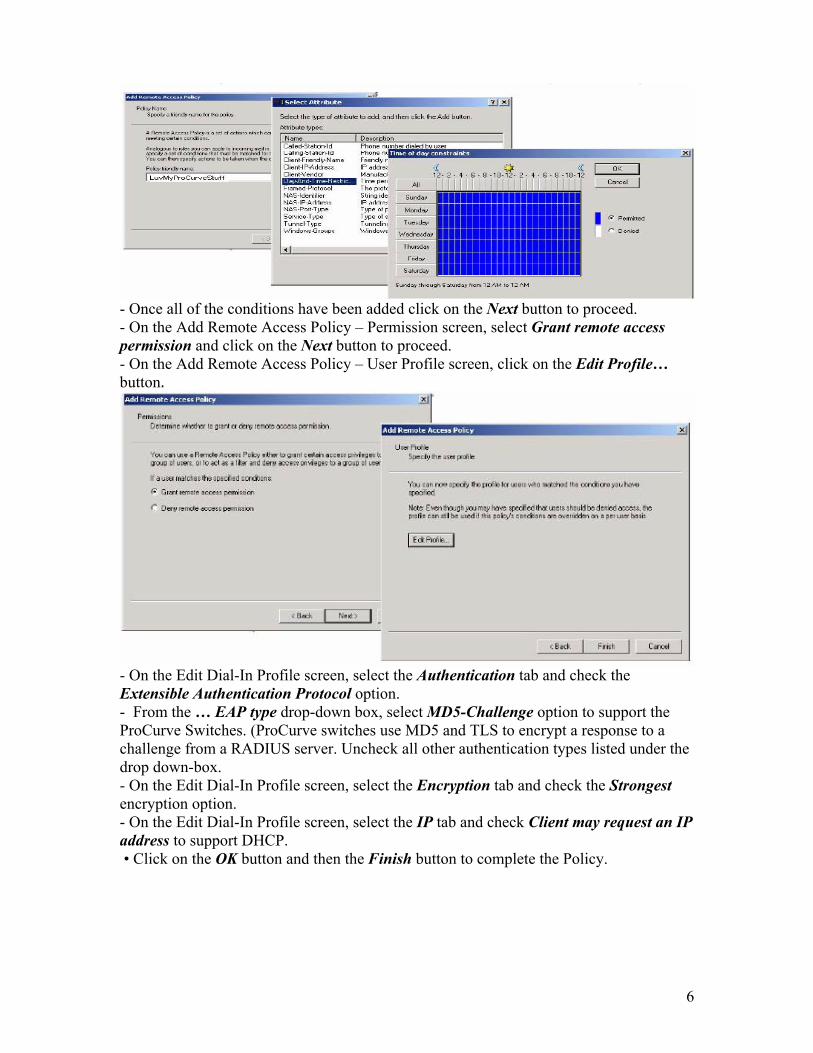
- Once all of the conditions have been added click on the Next button to proceed. - On the Add Remote Access Policy – Permission screen, select Grant remote access permission and click on the Next button to proceed. - On the Add Remote Access Policy – User Profile screen, click on the Edit Profile… button.
- On the Edit Dial-In Profile screen, select the Authentication tab and check the Extensible Authentication Protocol option. - From the … EAP type drop-down box, select MD5-Challenge option to support the ProCurve Switches. (ProCurve switches use MD5 and TLS to encrypt a response to a challenge from a RADIUS server. Uncheck all other authentication types listed under the drop down-box. - On the Edit Dial-In Profile screen, select the Encryption tab and check the Strongest encryption option. - On the Edit Dial-In Profile screen, select the IP tab and check Client may request an IP address to support DHCP. • Click on the OK button and then the Finish button to complete the Policy.
6
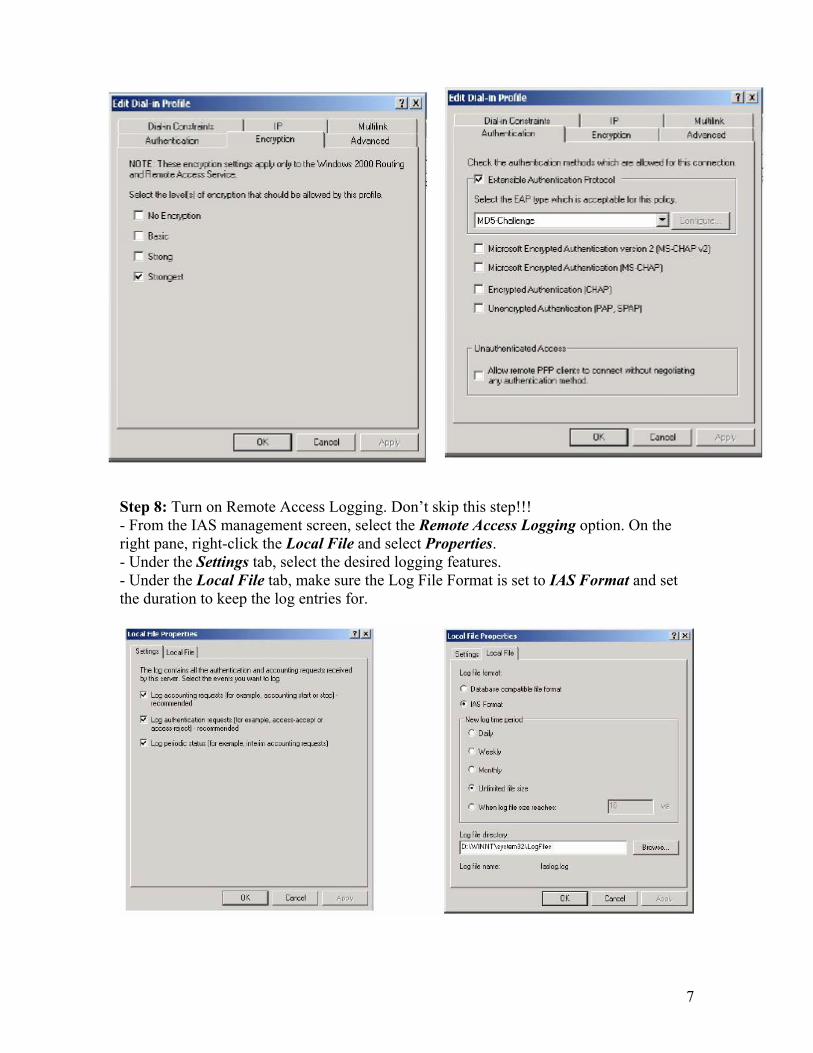
Step 8: Turn on Remote Access Logging. Don’t skip this step!!! - From the IAS management screen, select the Remote Access Logging option. On the right pane, right-click the Local File and select Properties. - Under the Settings tab, select the desired logging features. - Under the Local File tab, make sure the Log File Format is set to IAS Format and set the duration to keep the log entries for.
7
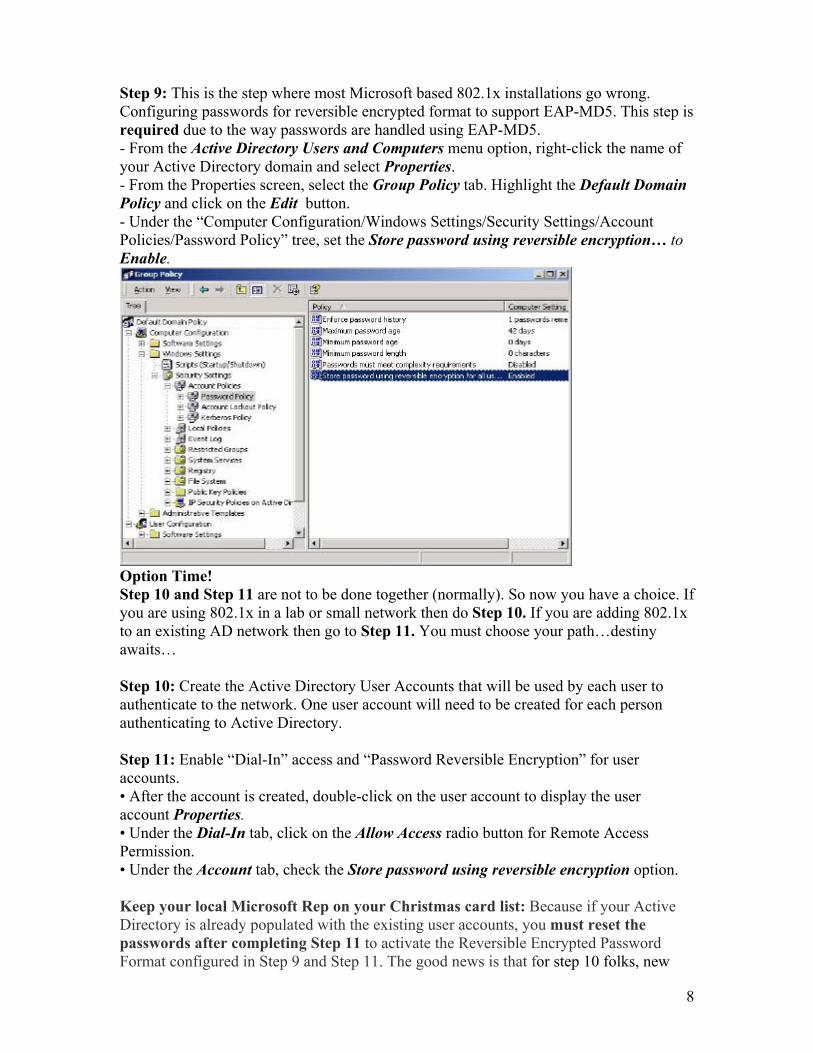
Step 9: This is the step where most Microsoft based 802.1x installations go wrong. Configuring passwords for reversible encrypted format to support EAP-MD5. This step is required due to the way passwords are handled using EAP-MD5. - From the Active Directory Users and Computers menu option, right-click the name of your Active Directory domain and select Properties. - From the Properties screen, select the Group Policy tab. Highlight the Default Domain Policy and click on the Edit button. - Under the “Computer Configuration/Windows Settings/Security Settings/Account Policies/Password Policy” tree, set the Store password using reversible encryption… to Enable.
Option Time! Step 10 and Step 11 are not to be done together (normally). So now you have a choice. If you are using 802.1x in a lab or small network then do Step 10. If you are adding 802.1x to an existing AD network then go to Step 11. You must choose your path…destiny awaits… Step 10: Create the Active Directory User Accounts that will be used by each user to authenticate to the network. One user account will need to be created for each person authenticating to Active Directory. Step 11: Enable “Dial-In” access and “Password Reversible Encryption” for user accounts. • After the account is created, double-click on the user account to display the user account Properties. • Under the Dial-In tab, click on the Allow Access radio button for Remote Access Permission. • Under the Account tab, check the Store password using reversible encryption option. Keep your local Microsoft Rep on your Christmas card list: Because if your Active Directory is already populated with the existing user accounts, you must reset the passwords after completing Step 11 to activate the Reversible Encrypted Password Format configured in Step 9 and Step 11. The good news is that for step 10 folks, new
8
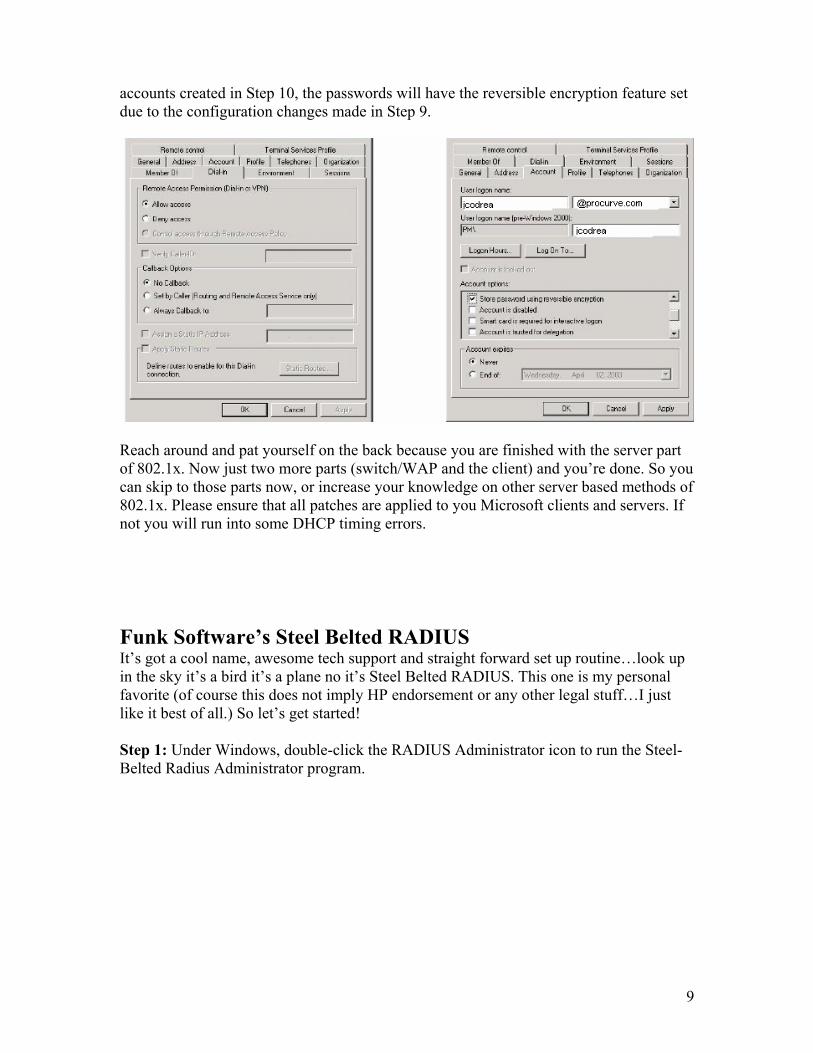
accounts created in Step 10, the passwords will have the reversible encryption feature set due to the configuration changes made in Step 9.
Reach around and pat yourself on the back because you are finished with the server part of 802.1x. Now just two more parts (switch/WAP and the client) and you’re done. So you can skip to those parts now, or increase your knowledge on other server based methods of 802.1x. Please ensure that all patches are applied to you Microsoft clients and servers. If not you will run into some DHCP timing errors. Funk Software’s Steel Belted RADIUS It’s got a cool name, awesome tech support and straight forward set up routine…look up in the sky it’s a bird it’s a plane no it’s Steel Belted RADIUS. This one is my personal favorite (of course this does not imply HP endorsement or any other legal stuff…I just like it best of all.) So let’s get started! Step 1: Under Windows, double-click the RADIUS Administrator icon to run the Steel- Belted Radius Administrator program. 9
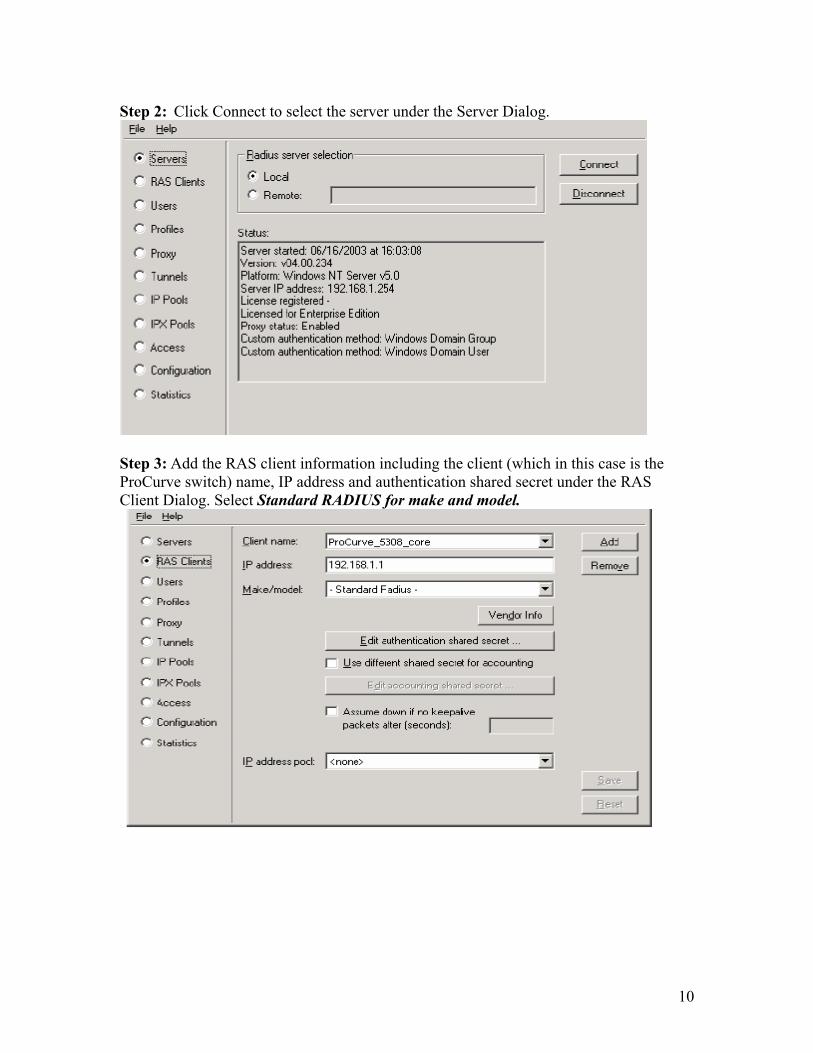
Step 2: Click Connect to select the server under the Server Dialog.
Step 3: Add the RAS client information including the client (which in this case is the ProCurve switch) name, IP address and authentication shared secret under the RAS Client Dialog. Select Standard RADIUS for make and model.
10
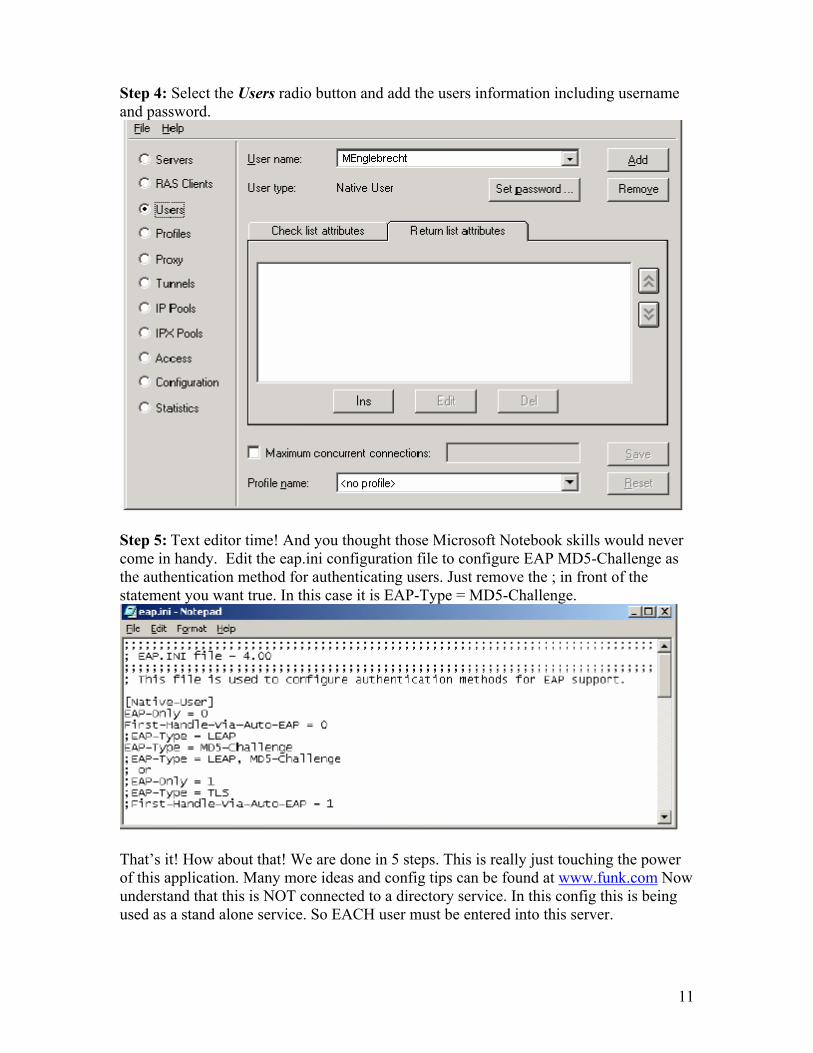
Step 4: Select the Users radio button and add the users information including username and password.
Step 5: Text editor time! And you thought those Microsoft Notebook skills would never come in handy. Edit the eap.ini configuration file to configure EAP MD5-Challenge as the authentication method for authenticating users. Just remove the ; in front of the statement you want true. In this case it is EAP-Type = MD5-Challenge.
That’s it! How about that! We are done in 5 steps. This is really just touching the power of this application. Many more ideas and config tips can be found at www.funk.com Now understand that this is NOT connected to a directory service. In this config this is being used as a stand alone service. So EACH user must be entered into this server.
11

Linux FreeRADIUS
You’re a rebel. Star Trek Classic not Next Generation. (Captain Kirk would never allow an android on the bridge, I mean come not after what happened with M5…) No software licensing fees for you. Oh no, if it isn’t Open Source then it is not for your network. But you still want 802.1x so now what? Well ProCurve to the rescue! Well sorta…more like the great folks who believe in Open Source. Let’s get started. First we need to install OpenSSL and yes all three of these are required. Here is why. A stable version of openSSL is required to build most of FreeRADIUS. A recent SNAP version of openSSL is required to build the EAP/TLS modules. OpenSSL-0.9.6g does not support the enhanced OID's needed to create certificates that WinXP can use for EAP/TLS authentication. Actually any relatively recent stable version of openSSL should be fine for the base openSSL used for the entire system. I do strongly recommend using >=0.9.6g as some SERIOUS security issues have been fixed. A great big thanks to Raymond McKay whose previous work is used as a example here to get my stuff up and running.
OPENSSL Step 1: Download and untar the 3 versions of openSSL. (tar -xzf openssl-<version>.tar.gz OPENSSL 0.9.6g Step 2: cd to the openssl-0.9.6g folder Step 3: type "./config --prefix=/path/to/current/openssl shared" (substitute the path to your current openssl install here. For RedHat 8/9 systems, this is /usr. If you have any other options you want to compile, I leave that up to you.) Step 4: type "make" Step 5: assuming the make completed successfully type "make install" OPENSSL SNAP-20021027 Step 6: Enter the openssl-SNAP-20021027 source folder Step 7: type "./config --prefix=/usr/local/openssl shared" (Obviously you don't want to overwrite your stable openSSL install so this SNAP version needs to be installed somewhere else.) Step 8: type "make" Step 9: assuming the make completed successfully type "make install" Step 10: cd to /usr/local/openssl (or wherever you installed this SNAP version) and enter the lib directory. Step 11: Verify that libssl.so and libssl.so.0 are sym linked to libssl.so.0.9.8 and that libcrypto.so libcrypto.so.0 are sym linked to libcrypto.so.0.9.8 OPENSSL 0.9.7-beta3 Step 12: Enter the openssl-0.9.7beta3 source folder Step 13: type "./config --prefix=/usr/local/openssl-certgen shared" Step 14: type "make" Step 15: assuming the make completed successfully type "make install" Step 16: cd to /usr/local/openssl-certgen (or wherever you installed this beta version) and enter the lib directory Step 17: Verify that libssl.so and libssl.so.0 are sym linked to libssl.so.0.9.7 and that libcrypto.so libcrypto.so.0 are sym linked to libcrypto.so.0.9.7
12

FreeRADIUS Install Step 1: Untar FreeRADIUS (tar -xzf freeradius-snapshot-20021028.tar.gz) Step 2: type "./configure --sysconfdir=/etc" (add any specific options you need here see FreeRADIUS documentation for details) Step 3: cd to src/modules/rlm_eap/types/rlm_eap_tls Step 4: Edit the Makefile in this directory to look like this. Substitute the path to the SNAP version of openssl you installed earlier if different. # Generated automatically from Makefile.in by configure. TARGET = rlm_eap_tls SRCS = rlm_eap_tls.c eap_tls.c cb.c tls.c mppe_keys.c RLM_CFLAGS = $(INCLTDL) -I../.. -I/usr/local/openssl/include HEADERS = eap_tls.h RLM_INSTALL = RLM_LDFLAGS += -L/usr/local/openssl/lib RLM_LIBS += -lssl -lcrypto $(STATIC_OBJS): $(HEADERS) $(DYNAMIC_OBJS): $(HEADERS) RLM_DIR=../../ include ${RLM_DIR}../rules.mak Step 5: Return to the root of the FreeRADIUS source and type "make" Step 6: Assuming the build went without errors type "make install" If you got any errors at this point chances are the path you supplied in the Makefile is not the correct path to the openssl-SNAP installation include and lib directories. Hey that wasn’t to bad right? OK now let’s generate some certificates to be used with FreeRADIUS. Of course if you have a certificate authority currently in place, then you can use it and import the certificates into FreeRADIUS. I will plan for the worst and assume that this is not the case so we need to generate these ourselves. You will need to use openSSL-0.9.7beta3 to generate the certificates. 0.9.6g apparently has an issue that doesn't allow it to generate certificates with the added attributes WinXP needs to identify the certificate as an authentication certificate. If you try to specify those attributes it outputs a "header too long" error during certificate generation. The SNAP version of openSSL supports these attributes but the SNAP version used in this build seems to have some issues with PKCS12 encoding and decoding that generates errors. This is why openSSL-0.9.7beta3 gets used. It generates the certificates properly without generating any errors. Step 1: cd to the openSSL-0.9.7beta3 install directory (/usr/local/openssl-certgen if you used the path specified earlier) Step 2: Enter the ./ssl directory Step 3: First, I recommend editing your openssl.cnf file to include the default variables you will use. This will save you quite a bit of time and typing later. Here is an example of how I configured. Obviously, edit the parameters in the [req_distinguished_name] section to match your locale and information
13
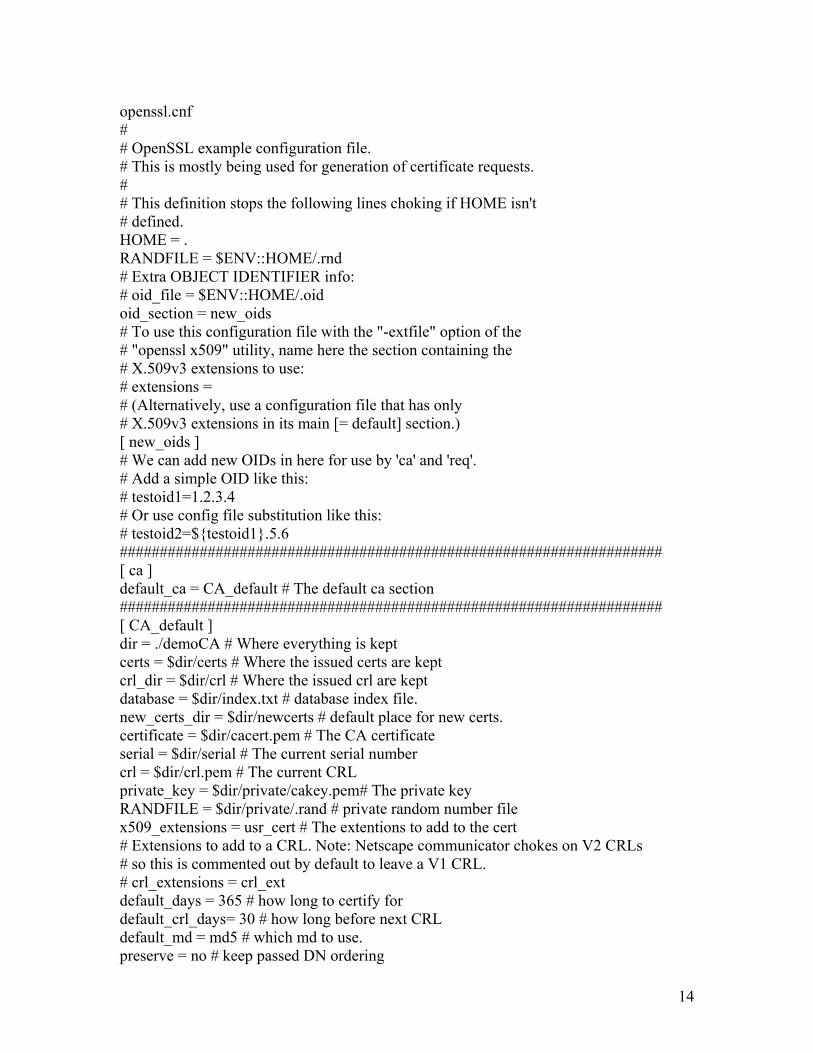
openssl.cnf # # OpenSSL example configuration file. # This is mostly being used for generation of certificate requests. # # This definition stops the following lines choking if HOME isn't # defined. HOME = . RANDFILE = $ENV::HOME/.rnd # Extra OBJECT IDENTIFIER info: # oid_file = $ENV::HOME/.oid oid_section = new_oids # To use this configuration file with the "-extfile" option of the # "openssl x509" utility, name here the section containing the # X.509v3 extensions to use: # extensions = # (Alternatively, use a configuration file that has only # X.509v3 extensions in its main [= default] section.) [ new_oids ] # We can add new OIDs in here for use by 'ca' and 'req'. # Add a simple OID like this: # testoid1=1.2.3.4 # Or use config file substitution like this: # testoid2=${testoid1}.5.6 #################################################################### [ ca ] default_ca = CA_default # The default ca section #################################################################### [ CA_default ] dir = ./demoCA # Where everything is kept certs = $dir/certs # Where the issued certs are kept crl_dir = $dir/crl # Where the issued crl are kept database = $dir/index.txt # database index file. new_certs_dir = $dir/newcerts # default place for new certs. certificate = $dir/cacert.pem # The CA certificate serial = $dir/serial # The current serial number crl = $dir/crl.pem # The current CRL private_key = $dir/private/cakey.pem# The private key RANDFILE = $dir/private/.rand # private random number file x509_extensions = usr_cert # The extentions to add to the cert # Extensions to add to a CRL. Note: Netscape communicator chokes on V2 CRLs # so this is commented out by default to leave a V1 CRL. # crl_extensions = crl_ext default_days = 365 # how long to certify for default_crl_days= 30 # how long before next CRL default_md = md5 # which md to use. preserve = no # keep passed DN ordering
14

# A few difference way of specifying how similar the request should look # For type CA, the listed attributes must be the same, and the optional # and supplied fields are just that :-) policy = policy_match # For the CA policy [ policy_match ] countryName = match stateOrProvinceName = match organizationName = match organizationalUnitName = optional commonName = supplied emailAddress = optional # For the 'anything' policy # At this point in time, you must list all acceptable 'object' # types. [ policy_anything ] countryName = optional stateOrProvinceName = optional localityName = optional organizationName = optional organizationalUnitName = optional commonName = supplied emailAddress = optional #################################################################### [ req ] default_bits = 1024 default_keyfile = privkey.pem distinguished_name = req_distinguished_name attributes = req_attributes x509_extensions = v3_ca # The extentions to add to the self signed cert # Passwords for private keys if not present they will be prompted for # input_password = secret # output_password = secret # This sets a mask for permitted string types. There are several options. # default: PrintableString, T61String, BMPString. # pkix : PrintableString, BMPString. # utf8only: only UTF8Strings. # nombstr : PrintableString, T61String (no BMPStrings or UTF8Strings). # MASK:XXXX a literal mask value. # WARNING: current versions of Netscape crash on BMPStrings or UTF8Strings # so use this option with caution! string_mask = nombstr # req_extensions = v3_req # The extensions to add to a certificate request [ req_distinguished_name ] countryName = Country Name (2 letter code) countryName_default = TN countryName_min = 2 countryName_max = 2
15
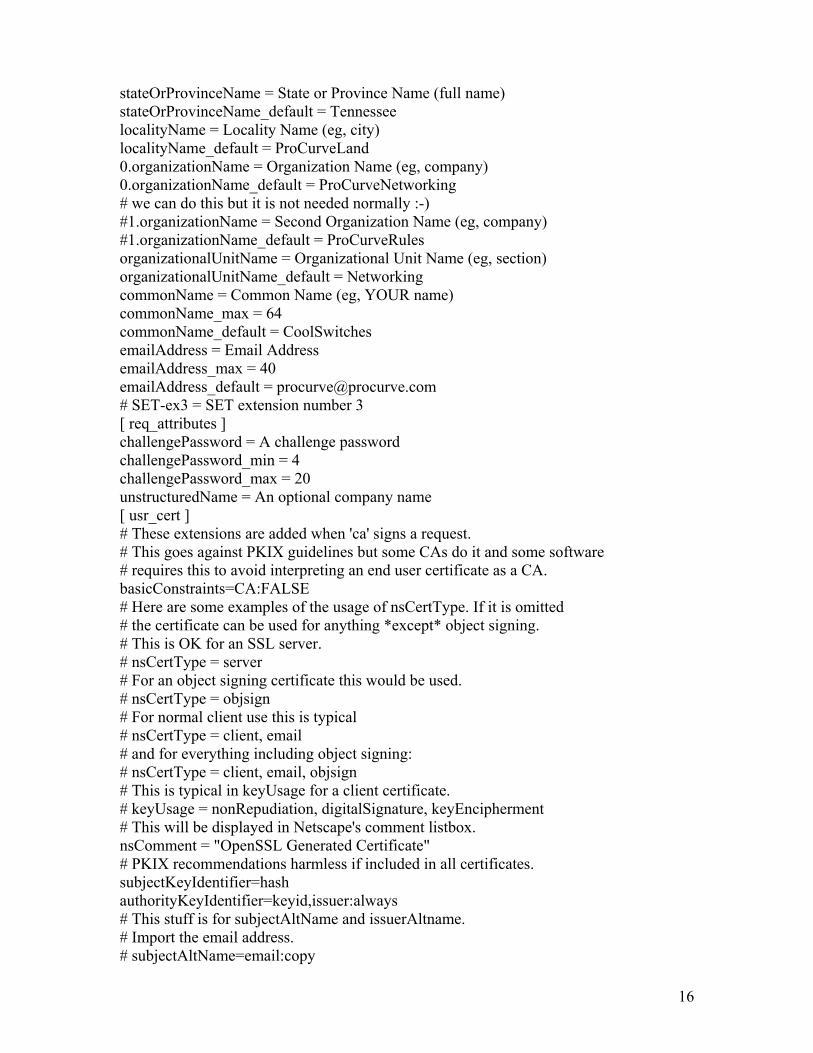
stateOrProvinceName = State or Province Name (full name) stateOrProvinceName_default = Tennessee localityName = Locality Name (eg, city) localityName_default = ProCurveLand 0.organizationName = Organization Name (eg, company) 0.organizationName_default = ProCurveNetworking # we can do this but it is not needed normally :-) #1.organizationName = Second Organization Name (eg, company) #1.organizationName_default = ProCurveRules organizationalUnitName = Organizational Unit Name (eg, section) organizationalUnitName_default = Networking commonName = Common Name (eg, YOUR name) commonName_max = 64 commonName_default = CoolSwitches emailAddress = Email Address emailAddress_max = 40 emailAddress_default = [email protected] # SET-ex3 = SET extension number 3 [ req_attributes ] challengePassword = A challenge password challengePassword_min = 4 challengePassword_max = 20 unstructuredName = An optional company name [ usr_cert ] # These extensions are added when 'ca' signs a request. # This goes against PKIX guidelines but some CAs do it and some software # requires this to avoid interpreting an end user certificate as a CA. basicConstraints=CA:FALSE # Here are some examples of the usage of nsCertType. If it is omitted # the certificate can be used for anything *except* object signing. # This is OK for an SSL server. # nsCertType = server # For an object signing certificate this would be used. # nsCertType = objsign # For normal client use this is typical # nsCertType = client, email # and for everything including object signing: # nsCertType = client, email, objsign # This is typical in keyUsage for a client certificate. # keyUsage = nonRepudiation, digitalSignature, keyEncipherment # This will be displayed in Netscape's comment listbox. nsComment = "OpenSSL Generated Certificate" # PKIX recommendations harmless if included in all certificates. subjectKeyIdentifier=hash authorityKeyIdentifier=keyid,issuer:always # This stuff is for subjectAltName and issuerAltname. # Import the email address. # subjectAltName=email:copy
16
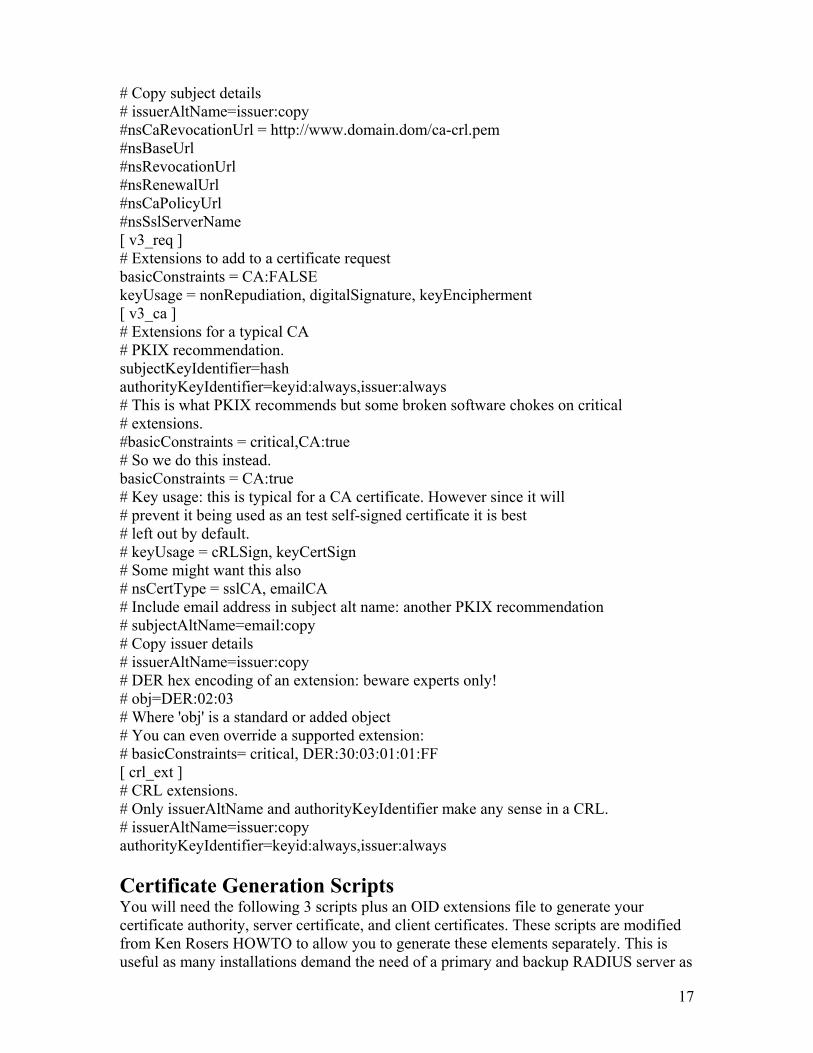
# Copy subject details # issuerAltName=issuer:copy #nsCaRevocationUrl = http://www.domain.dom/ca-crl.pem #nsBaseUrl #nsRevocationUrl #nsRenewalUrl #nsCaPolicyUrl #nsSslServerName [ v3_req ] # Extensions to add to a certificate request basicConstraints = CA:FALSE keyUsage = nonRepudiation, digitalSignature, keyEncipherment [ v3_ca ] # Extensions for a typical CA # PKIX recommendation. subjectKeyIdentifier=hash authorityKeyIdentifier=keyid:always,issuer:always # This is what PKIX recommends but some broken software chokes on critical # extensions. #basicConstraints = critical,CA:true # So we do this instead. basicConstraints = CA:true # Key usage: this is typical for a CA certificate. However since it will # prevent it being used as an test self-signed certificate it is best # left out by default. # keyUsage = cRLSign, keyCertSign # Some might want this also # nsCertType = sslCA, emailCA # Include email address in subject alt name: another PKIX recommendation # subjectAltName=email:copy # Copy issuer details # issuerAltName=issuer:copy # DER hex encoding of an extension: beware experts only! # obj=DER:02:03 # Where 'obj' is a standard or added object # You can even override a supported extension: # basicConstraints= critical, DER:30:03:01:01:FF [ crl_ext ] # CRL extensions. # Only issuerAltName and authorityKeyIdentifier make any sense in a CRL. # issuerAltName=issuer:copy authorityKeyIdentifier=keyid:always,issuer:always Certificate Generation Scripts You will need the following 3 scripts plus an OID extensions file to generate your certificate authority, server certificate, and client certificates. These scripts are modified from Ken Rosers HOWTO to allow you to generate these elements separately. This is useful as many installations demand the need of a primary and backup RADIUS server as
17
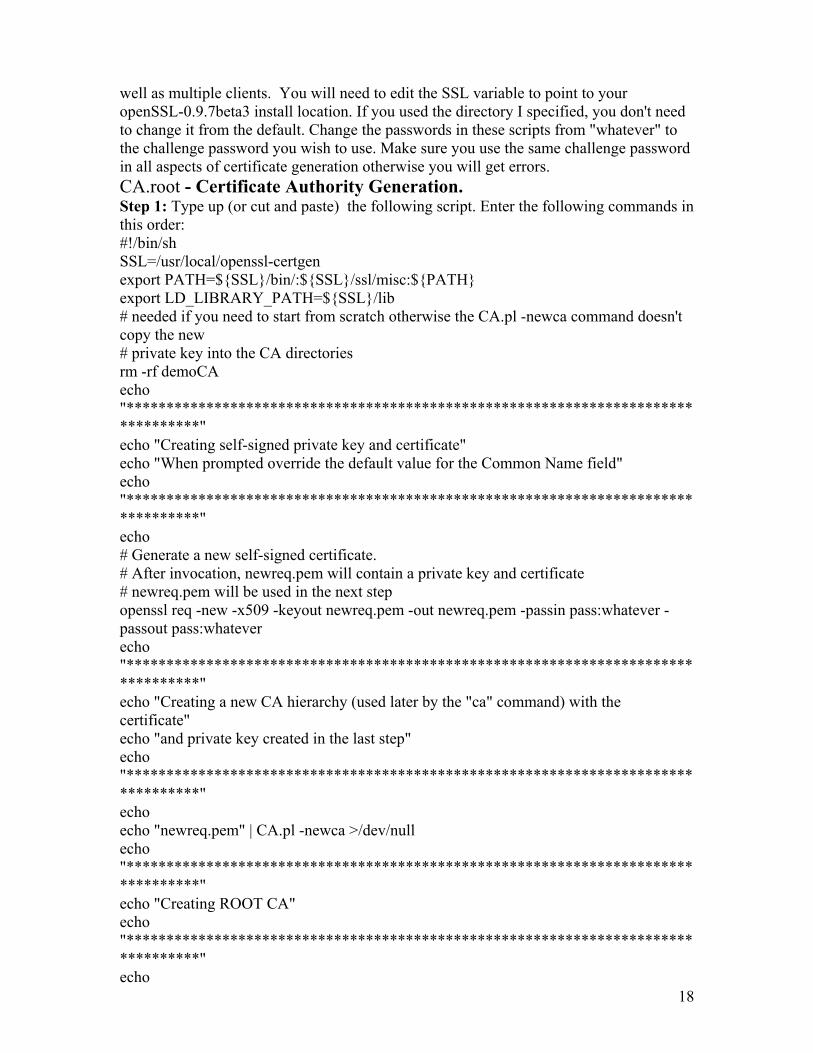
well as multiple clients. You will need to edit the SSL variable to point to your openSSL-0.9.7beta3 install location. If you used the directory I specified, you don't need to change it from the default. Change the passwords in these scripts from "whatever" to the challenge password you wish to use. Make sure you use the same challenge password in all aspects of certificate generation otherwise you will get errors. CA.root - Certificate Authority Generation. Step 1: Type up (or cut and paste) the following script. Enter the following commands in this order:
18
#!/bin/sh SSL=/usr/local/openssl-certgen export PATH=${SSL}/bin/:${SSL}/ssl/misc:${PATH} export LD_LIBRARY_PATH=${SSL}/lib # needed if you need to start from scratch otherwise the CA.pl -newca command doesn't copy the new # private key into the CA directories rm -rf demoCA echo "*********************************************************************************" echo "Creating self-signed private key and certificate" echo "When prompted override the default value for the Common Name field" echo "*********************************************************************************" echo # Generate a new self-signed certificate. # After invocation, newreq.pem will contain a private key and certificate # newreq.pem will be used in the next step openssl req -new -x509 -keyout newreq.pem -out newreq.pem -passin pass:whatever -passout pass:whatever echo "*********************************************************************************" echo "Creating a new CA hierarchy (used later by the "ca" command) with the certificate" echo "and private key created in the last step" echo "*********************************************************************************" echo echo "newreq.pem" | CA.pl -newca >/dev/null echo "*********************************************************************************" echo "Creating ROOT CA" echo "*********************************************************************************" echo
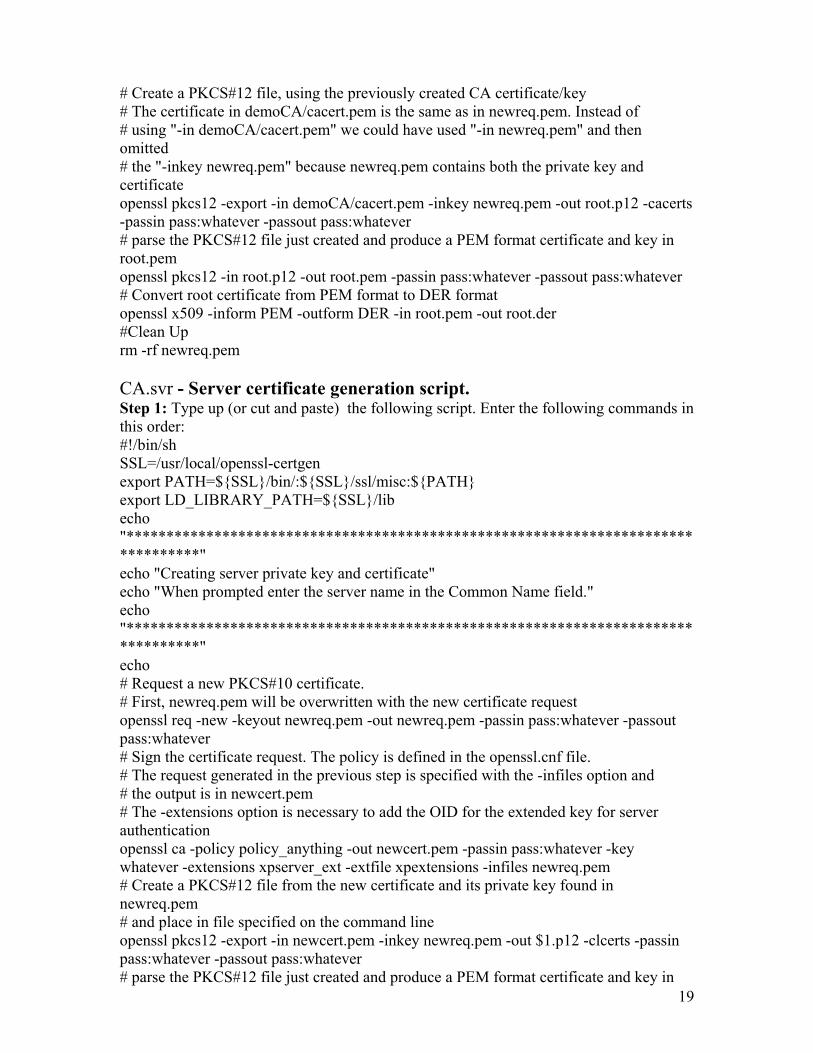
# Create a PKCS#12 file, using the previously created CA certificate/key # The certificate in demoCA/cacert.pem is the same as in newreq.pem. Instead of # using "-in demoCA/cacert.pem" we could have used "-in newreq.pem" and then omitted # the "-inkey newreq.pem" because newreq.pem contains both the private key and certificate openssl pkcs12 -export -in demoCA/cacert.pem -inkey newreq.pem -out root.p12 -cacerts -passin pass:whatever -passout pass:whatever # parse the PKCS#12 file just created and produce a PEM format certificate and key in root.pem openssl pkcs12 -in root.p12 -out root.pem -passin pass:whatever -passout pass:whatever # Convert root certificate from PEM format to DER format openssl x509 -inform PEM -outform DER -in root.pem -out root.der #Clean Up rm -rf newreq.pem CA.svr - Server certificate generation script. Step 1: Type up (or cut and paste) the following script. Enter the following commands in this order:
19
#!/bin/sh SSL=/usr/local/openssl-certgen export PATH=${SSL}/bin/:${SSL}/ssl/misc:${PATH} export LD_LIBRARY_PATH=${SSL}/lib echo "*********************************************************************************" echo "Creating server private key and certificate" echo "When prompted enter the server name in the Common Name field." echo "*********************************************************************************" echo # Request a new PKCS#10 certificate. # First, newreq.pem will be overwritten with the new certificate request openssl req -new -keyout newreq.pem -out newreq.pem -passin pass:whatever -passout pass:whatever # Sign the certificate request. The policy is defined in the openssl.cnf file. # The request generated in the previous step is specified with the -infiles option and # the output is in newcert.pem # The -extensions option is necessary to add the OID for the extended key for server authentication openssl ca -policy policy_anything -out newcert.pem -passin pass:whatever -key whatever -extensions xpserver_ext -extfile xpextensions -infiles newreq.pem # Create a PKCS#12 file from the new certificate and its private key found in newreq.pem # and place in file specified on the command line openssl pkcs12 -export -in newcert.pem -inkey newreq.pem -out $1.p12 -clcerts -passin pass:whatever -passout pass:whatever # parse the PKCS#12 file just created and produce a PEM format certificate and key in
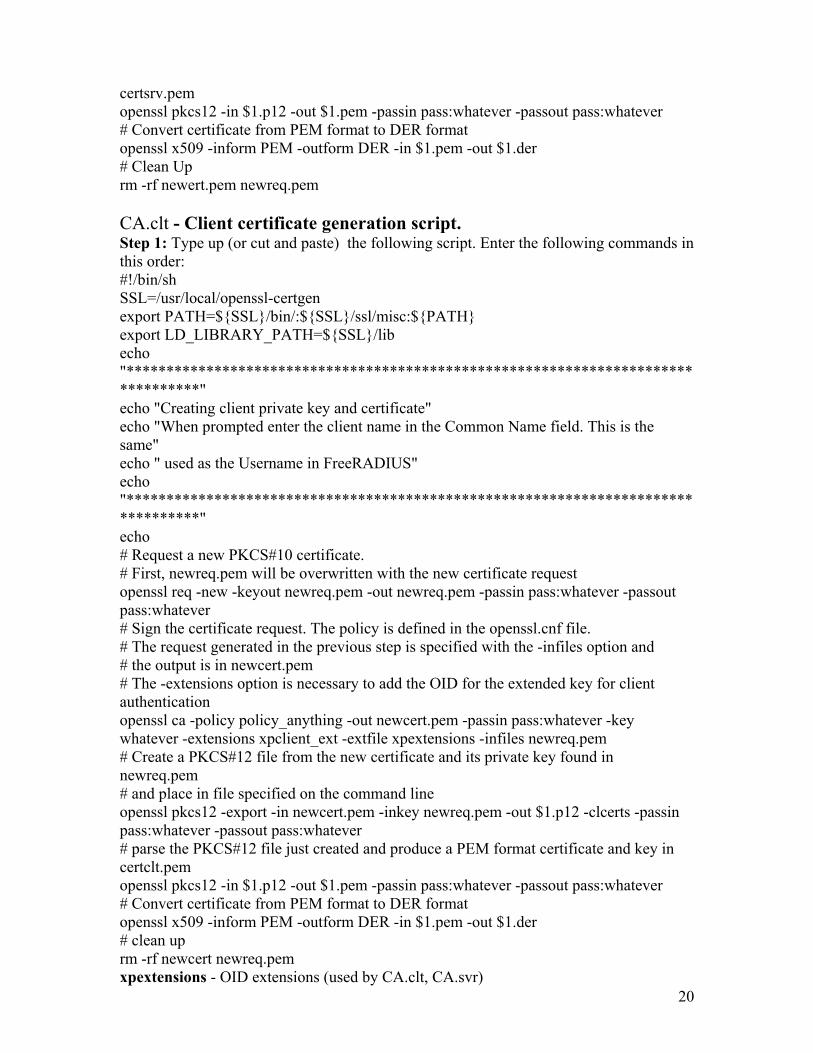
certsrv.pem openssl pkcs12 -in $1.p12 -out $1.pem -passin pass:whatever -passout pass:whatever # Convert certificate from PEM format to DER format openssl x509 -inform PEM -outform DER -in $1.pem -out $1.der # Clean Up rm -rf newert.pem newreq.pem CA.clt - Client certificate generation script. Step 1: Type up (or cut and paste) the following script. Enter the following commands in this order: #!/bin/sh SSL=/usr/local/openssl-certgen export PATH=${SSL}/bin/:${SSL}/ssl/misc:${PATH} export LD_LIBRARY_PATH=${SSL}/lib echo "*********************************************************************************" echo "Creating client private key and certificate" echo "When prompted enter the client name in the Common Name field. This is the same" echo " used as the Username in FreeRADIUS" echo "*********************************************************************************" echo # Request a new PKCS#10 certificate. # First, newreq.pem will be overwritten with the new certificate request openssl req -new -keyout newreq.pem -out newreq.pem -passin pass:whatever -passout pass:whatever # Sign the certificate request. The policy is defined in the openssl.cnf file. # The request generated in the previous step is specified with the -infiles option and # the output is in newcert.pem # The -extensions option is necessary to add the OID for the extended key for client authentication openssl ca -policy policy_anything -out newcert.pem -passin pass:whatever -key whatever -extensions xpclient_ext -extfile xpextensions -infiles newreq.pem # Create a PKCS#12 file from the new certificate and its private key found in newreq.pem # and place in file specified on the command line openssl pkcs12 -export -in newcert.pem -inkey newreq.pem -out $1.p12 -clcerts -passin pass:whatever -passout pass:whatever # parse the PKCS#12 file just created and produce a PEM format certificate and key in certclt.pem openssl pkcs12 -in $1.p12 -out $1.pem -passin pass:whatever -passout pass:whatever # Convert certificate from PEM format to DER format openssl x509 -inform PEM -outform DER -in $1.pem -out $1.der # clean up rm -rf newcert newreq.pem
20xpextensions - OID extensions (used by CA.clt, CA.svr)
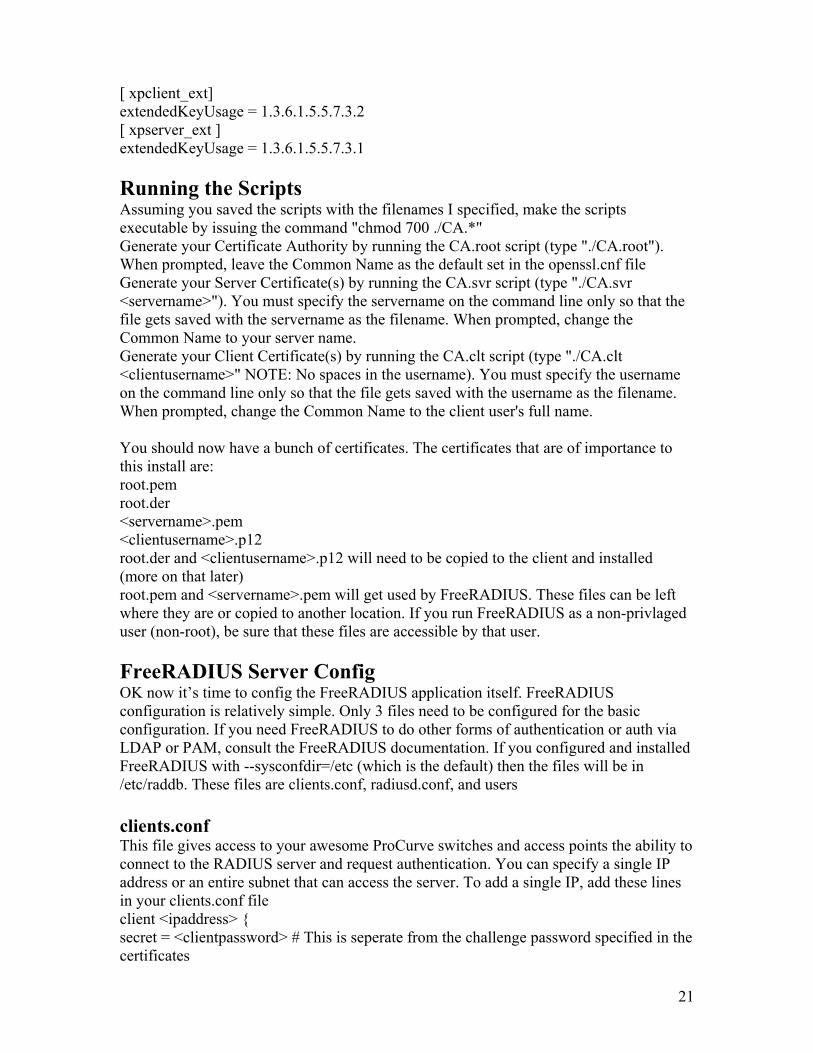
[ xpclient_ext] extendedKeyUsage = 1.3.6.1.5.5.7.3.2 [ xpserver_ext ] extendedKeyUsage = 1.3.6.1.5.5.7.3.1 Running the Scripts Assuming you saved the scripts with the filenames I specified, make the scripts executable by issuing the command "chmod 700 ./CA.*" Generate your Certificate Authority by running the CA.root script (type "./CA.root"). When prompted, leave the Common Name as the default set in the openssl.cnf file Generate your Server Certificate(s) by running the CA.svr script (type "./CA.svr <servername>"). You must specify the servername on the command line only so that the file gets saved with the servername as the filename. When prompted, change the Common Name to your server name. Generate your Client Certificate(s) by running the CA.clt script (type "./CA.clt <clientusername>" NOTE: No spaces in the username). You must specify the username on the command line only so that the file gets saved with the username as the filename. When prompted, change the Common Name to the client user's full name. You should now have a bunch of certificates. The certificates that are of importance to this install are: root.pem root.der <servername>.pem <clientusername>.p12 root.der and <clientusername>.p12 will need to be copied to the client and installed (more on that later) root.pem and <servername>.pem will get used by FreeRADIUS. These files can be left where they are or copied to another location. If you run FreeRADIUS as a non-privlaged user (non-root), be sure that these files are accessible by that user. FreeRADIUS Server Config OK now it’s time to config the FreeRADIUS application itself. FreeRADIUS configuration is relatively simple. Only 3 files need to be configured for the basic configuration. If you need FreeRADIUS to do other forms of authentication or auth via LDAP or PAM, consult the FreeRADIUS documentation. If you configured and installed FreeRADIUS with --sysconfdir=/etc (which is the default) then the files will be in /etc/raddb. These files are clients.conf, radiusd.conf, and users clients.conf This file gives access to your awesome ProCurve switches and access points the ability to connect to the RADIUS server and request authentication. You can specify a single IP address or an entire subnet that can access the server. To add a single IP, add these lines in your clients.conf file client <ipaddress> { secret = <clientpassword> # This is seperate from the challenge password specified in the certificates
21
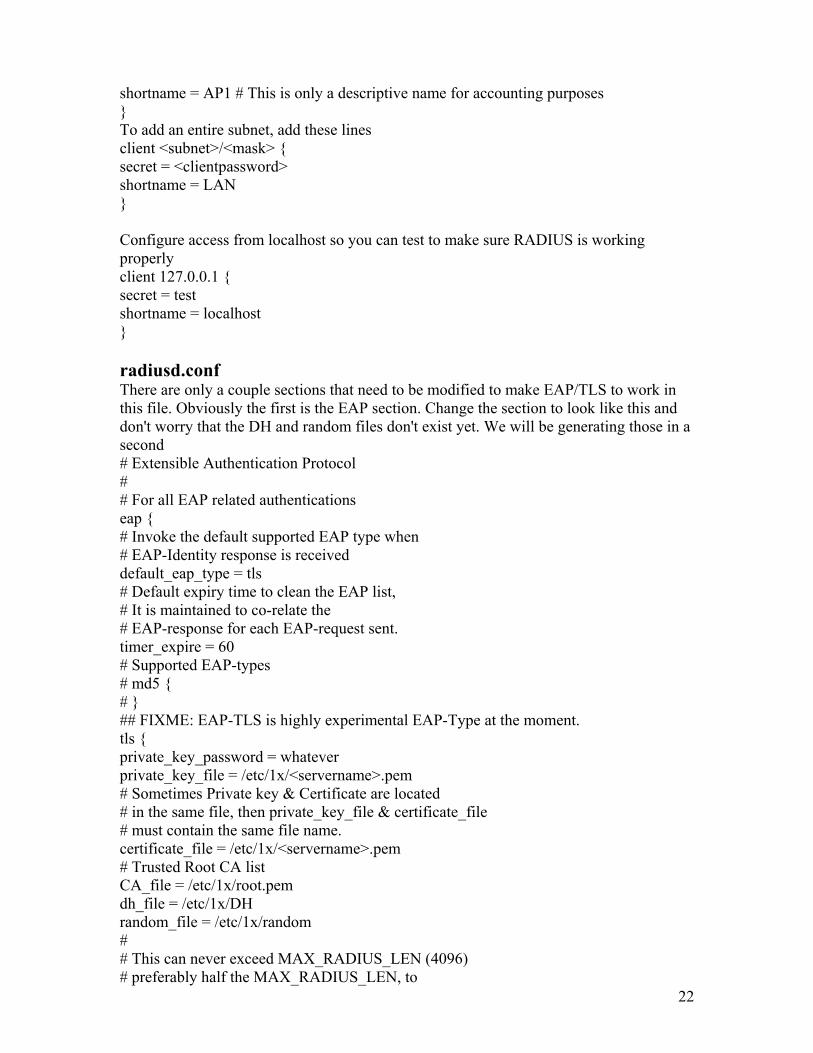
shortname = AP1 # This is only a descriptive name for accounting purposes } To add an entire subnet, add these lines client <subnet>/<mask> { secret = <clientpassword> shortname = LAN } Configure access from localhost so you can test to make sure RADIUS is working properly client 127.0.0.1 { secret = test shortname = localhost } radiusd.conf There are only a couple sections that need to be modified to make EAP/TLS to work in this file. Obviously the first is the EAP section. Change the section to look like this and don't worry that the DH and random files don't exist yet. We will be generating those in a second # Extensible Authentication Protocol # # For all EAP related authentications eap { # Invoke the default supported EAP type when # EAP-Identity response is received default_eap_type = tls # Default expiry time to clean the EAP list, # It is maintained to co-relate the # EAP-response for each EAP-request sent. timer_expire = 60 # Supported EAP-types # md5 { # } ## FIXME: EAP-TLS is highly experimental EAP-Type at the moment. tls { private_key_password = whatever private_key_file = /etc/1x/<servername>.pem # Sometimes Private key & Certificate are located # in the same file, then private_key_file & certificate_file # must contain the same file name. certificate_file = /etc/1x/<servername>.pem # Trusted Root CA list CA_file = /etc/1x/root.pem
22
dh_file = /etc/1x/DH random_file = /etc/1x/random # # This can never exceed MAX_RADIUS_LEN (4096) # preferably half the MAX_RADIUS_LEN, to
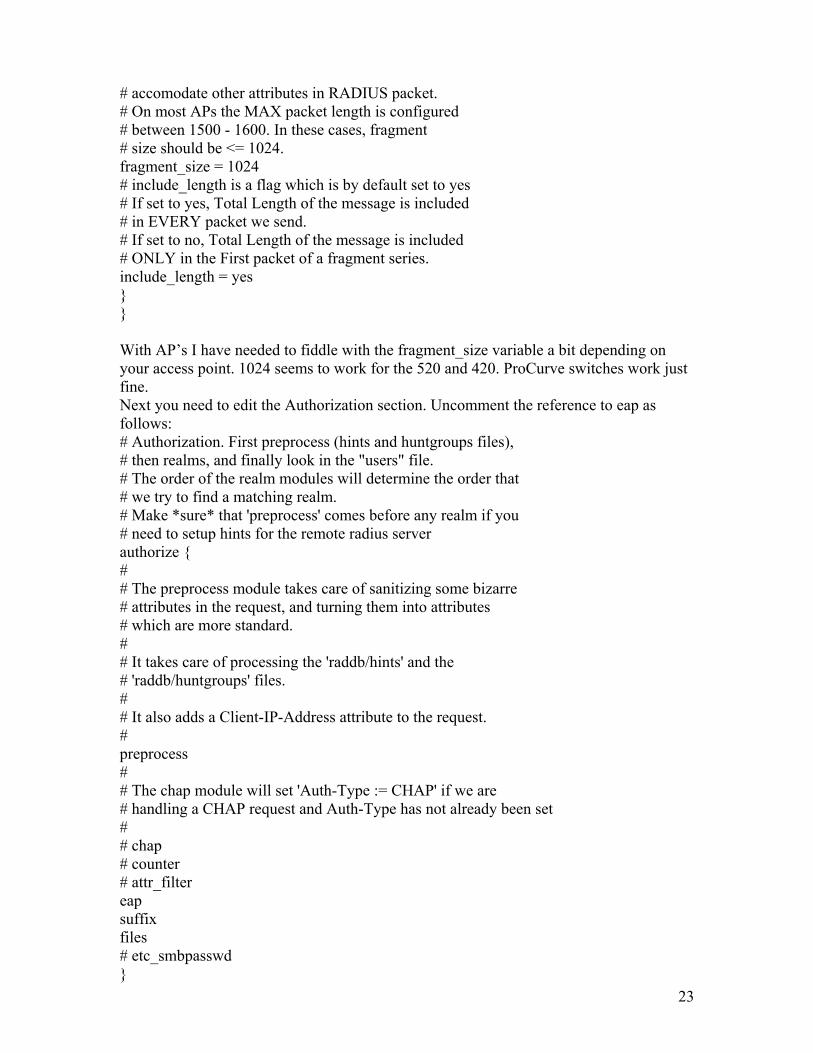
# accomodate other attributes in RADIUS packet. # On most APs the MAX packet length is configured # between 1500 - 1600. In these cases, fragment # size should be <= 1024. fragment_size = 1024 # include_length is a flag which is by default set to yes # If set to yes, Total Length of the message is included # in EVERY packet we send. # If set to no, Total Length of the message is included # ONLY in the First packet of a fragment series. include_length = yes } } With AP’s I have needed to fiddle with the fragment_size variable a bit depending on your access point. 1024 seems to work for the 520 and 420. ProCurve switches work just fine. Next you need to edit the Authorization section. Uncomment the reference to eap as follows: # Authorization. First preprocess (hints and huntgroups files), # then realms, and finally look in the "users" file. # The order of the realm modules will determine the order that # we try to find a matching realm. # Make *sure* that 'preprocess' comes before any realm if you # need to setup hints for the remote radius server authorize { # # The preprocess module takes care of sanitizing some bizarre # attributes in the request, and turning them into attributes # which are more standard. # # It takes care of processing the 'raddb/hints' and the # 'raddb/huntgroups' files. # # It also adds a Client-IP-Address attribute to the request. # preprocess # # The chap module will set 'Auth-Type := CHAP' if we are # handling a CHAP request and Auth-Type has not already been set # # chap # counter # attr_filter eap suffix files # etc_smbpasswd } 23

Finally edit the Authentication section once again uncommenting out the reference to EAP # Authentication. # # This section lists which modules are available for authentication. # Note that it does NOT mean 'try each module in order'. It means # that you have to have a module from the 'authorize' section add # a configuration attribute 'Auth-Type := FOO'. That authentication type # is then used to pick the apropriate module from the list below. # # The default Auth-Type is Local. That is, whatever is not included inside # an authtype section will be called only if Auth-Type is set to Local # # So you should do the following: # Set Auth-Type to an appropriate value in the authorize section. For example chap # will set Auth-Type to CHAP, ldap to LDAP etc # After that create corresponding authtype sections in the authenticate section below # and call the appropriate modules (chap for CHAP etc) authenticate { # pam unix # Uncomment it if you want to use ldap for authentication # authtype LDAP { # ldap # } # mschap eap # Uncomment it if you want to support CHAP # authtype CHAP { # chap # } # Uncomment the following if you want to support PAP and you # extract user passwords from the user database (LDAP,SQL, etc). # You should use the 'files'module to set 'Auth-Type := PAP' for # this to work. # authtype PAP { # pap # } # } users Add lines that reference to your client certificates "<clientusersfullname>" Auth-Type := EAP I would also add a test user to make sure that RADIUS is working properly. This can be removed later. "test" Auth-Type := Local, User-Password =="test"
24
Random Files Two random files need to be created for session key management. These files only need contain random characters which can be generated using your preferred method. They need to be stored as /etc/1x/random and /etc/1x/DH. Some examples I have seen show generating these files as simply as by issuing the following two commands date > /etc/1x/random date >/etc/1x/DH Finishing Up If everything has been installed and configured correctly at this point, FreeRADIUS should be ready to run and authenticate users. You will need a wrapper script to run FreeRADIUS to make sure that it uses the SSL libraries from the SNAP version of openSSL. Script should look like this: run-radiusd #!/bin/sh -x LD_LIBRARY_PATH=/usr/local/openssl/lib LD_PRELOAD=/usr/local/openssl/lib/libcrypto.so export LD_LIBRARY_PATH LD_PRELOAD /usr/local/radius/sbin/radiusd $@ Copy this script to /usr/local/sbin (or wherever you installed radiusd) and make executable. (chmod 700 ./run-radiusd) If you installed the SNAP version of openSSL in a different location than /usr/local/openssl then you will need to edit this script to reflect that. Running FreeRADIUS for the first time. Run FreeRADIUS by typing "run-radiusd -X -A" This will run radiusd in debug mode with the proper SSL libraries. If everything is configured correctly, the server should inform you that it is listening for requests. In another session type "radtest test test localhost 0 test". If the RADIUS server is working correctly, an Access-Accept should be returned. (at this point you can delete the test user line from the FreeRADIUS users file) If you get an Access-Reject or no response, than recheck to make sure you configured FreeRADIUS correctly by reviewing the previous sections. Running FreeRADIUS at startup FreeRadius provides some init scripts for debian and redhat systems that can be used for starting the service at startup. These scripts need to be edited to either include the information in the wrapper script or run the wrapper script instead of the binary itself. Now you are done with the FreeRADIUS setup. Do not let the length of the Linux config portion scare you off. Really it is just editing some files and installing some apps. Certainly there could be a RPM’s out there to make this an easier install, I just have not found them. Windows 2000/XP client setup. Oh yes it’s that time. Client time. There are many good clients out there like the Aegis client from MeetingHouse Data or the Odyssey from Funk and even a great OpenX client
25
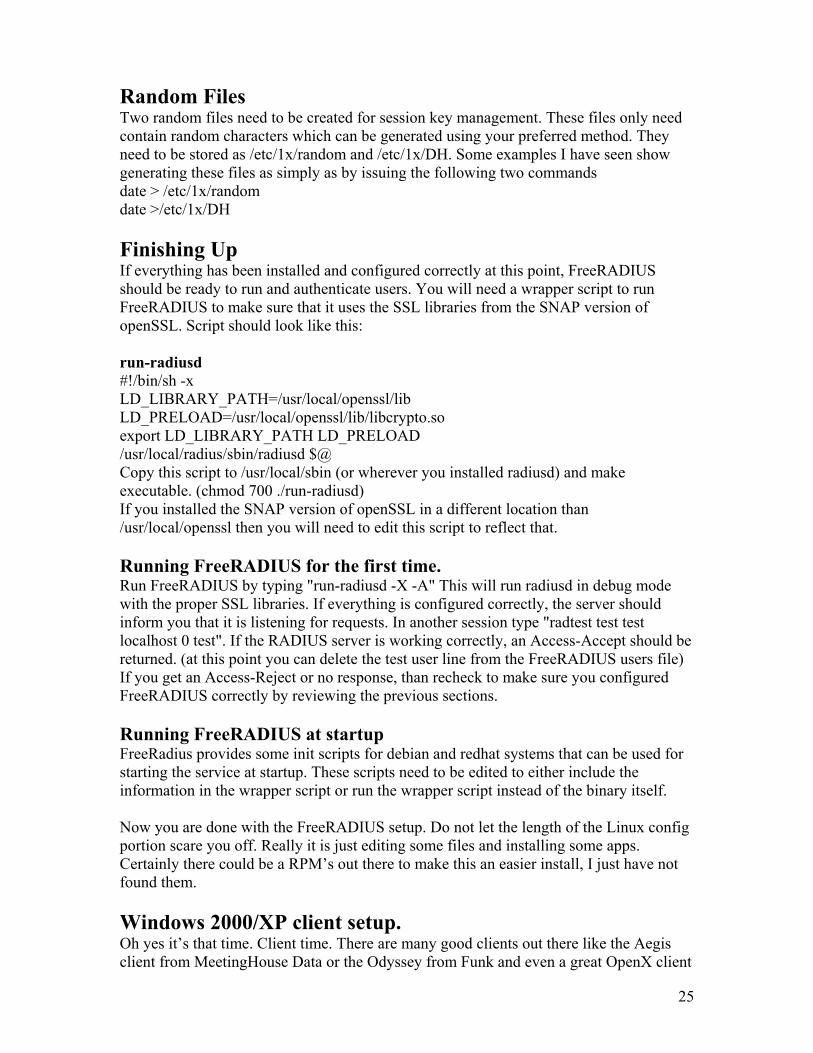
for Linux. I will only address the Microsoft client since it is built in. However, it is only built into XP. 2000 is a Microsoft downloadable add in. If you have other platforms, then certainly take a look at these other clients. Especially Odyssey. Of course for Mac lovers OSX has the 802.1x client built in and truthfully it works best of all! Before we even get started, please ensure all service packs and patches are applied. I know of two DHCP timing issues with 2K/XP clients that are corrected in the Microsoft patches for 802.1x. So let’s get started and install this stuff. Step 1: Open the Properties window for your Ethernet network connection. With 802.1X support installed, you should see the “Authentication” tab. - Check the “Enable network access control using IEEE 802.1X” box. - Select the proper EAP type by selecting “MD5-Challenge” from the EAP drop-down box. - The “Authenticate as computer when computer information is available” selection is optional. - Click the “OK” button when all the selections have been made to save the changes.
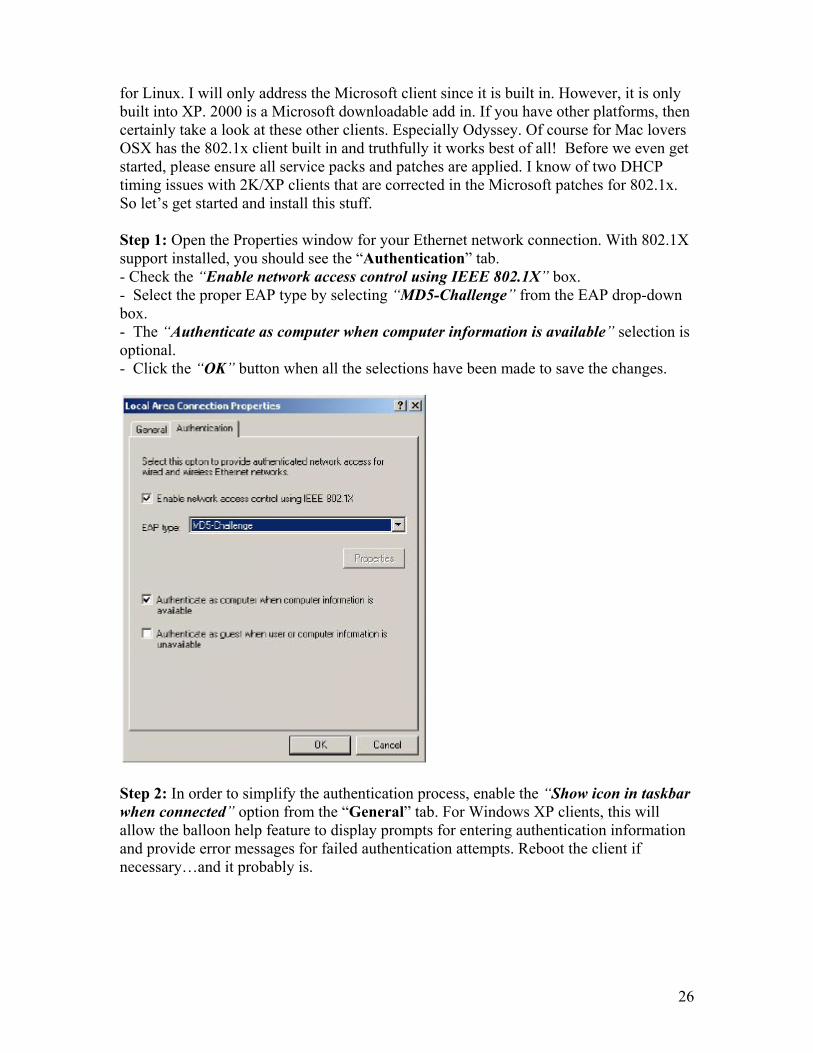
Step 2: In order to simplify the authentication process, enable the “Show icon in taskbar when connected” option from the “General” tab. For Windows XP clients, this will allow the balloon help feature to display prompts for entering authentication information and provide error messages for failed authentication attempts. Reboot the client if necessary…and it probably is.
26
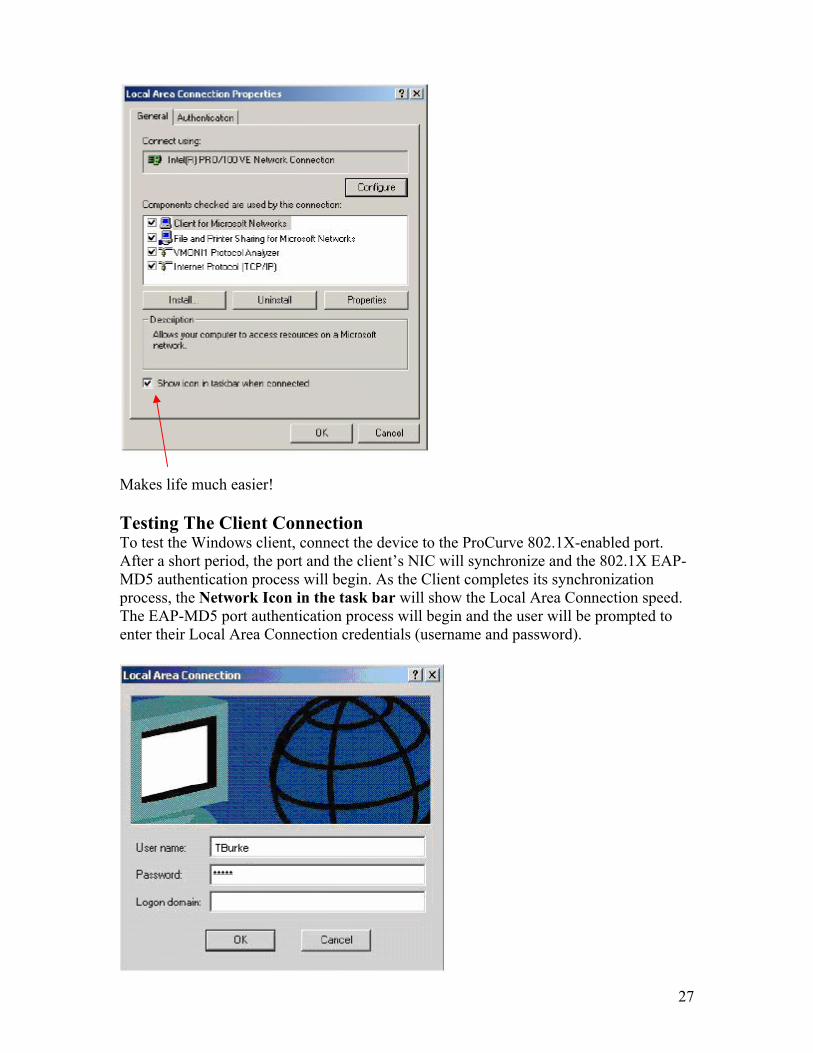
Makes life much easier! Testing The Client Connection To test the Windows client, connect the device to the ProCurve 802.1X-enabled port. After a short period, the port and the client’s NIC will synchronize and the 802.1X EAP-MD5 authentication process will begin. As the Client completes its synchronization process, the Network Icon in the task bar will show the Local Area Connection speed. The EAP-MD5 port authentication process will begin and the user will be prompted to enter their Local Area Connection credentials (username and password).
27
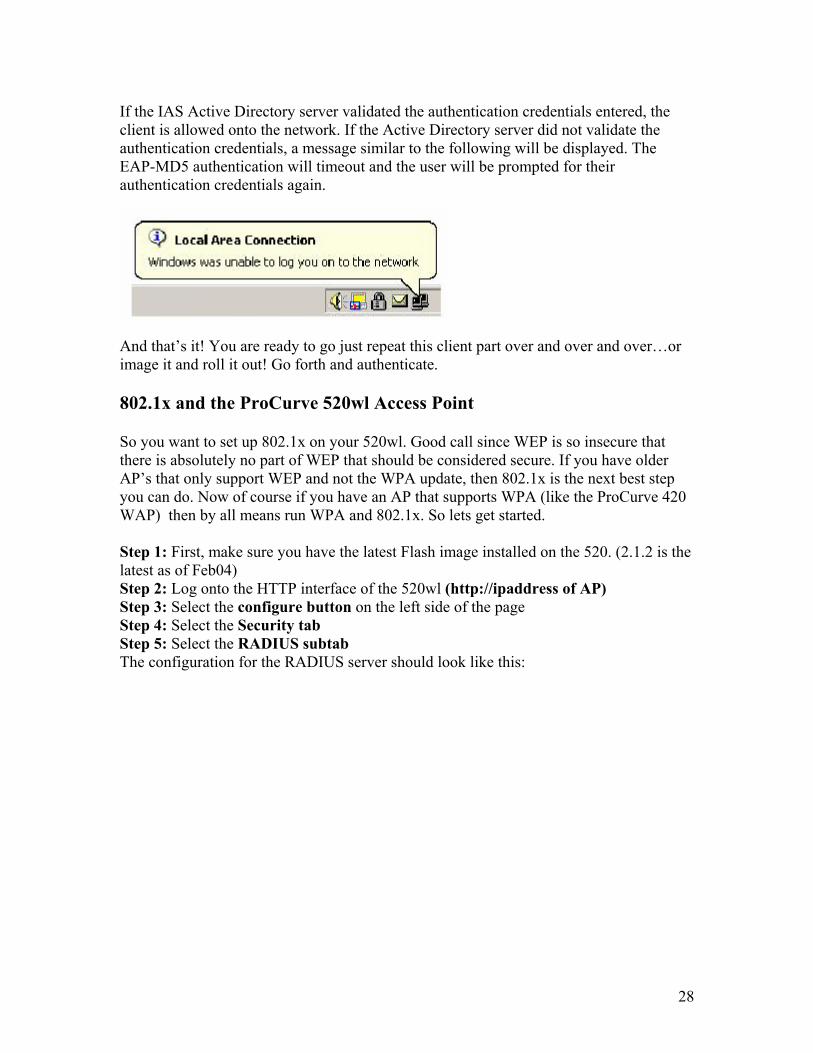
If the IAS Active Directory server validated the authentication credentials entered, the client is allowed onto the network. If the Active Directory server did not validate the authentication credentials, a message similar to the following will be displayed. The EAP-MD5 authentication will timeout and the user will be prompted for their authentication credentials again.
And that’s it! You are ready to go just repeat this client part over and over and over…or image it and roll it out! Go forth and authenticate. 802.1x and the ProCurve 520wl Access Point So you want to set up 802.1x on your 520wl. Good call since WEP is so insecure that there is absolutely no part of WEP that should be considered secure. If you have older AP’s that only support WEP and not the WPA update, then 802.1x is the next best step you can do. Now of course if you have an AP that supports WPA (like the ProCurve 420 WAP) then by all means run WPA and 802.1x. So lets get started. Step 1: First, make sure you have the latest Flash image installed on the 520. (2.1.2 is the latest as of Feb04) Step 2: Log onto the HTTP interface of the 520wl (http://ipaddress of AP) Step 3: Select the configure button on the left side of the page Step 4: Select the Security tab Step 5: Select the RADIUS subtab The configuration for the RADIUS server should look like this:
28
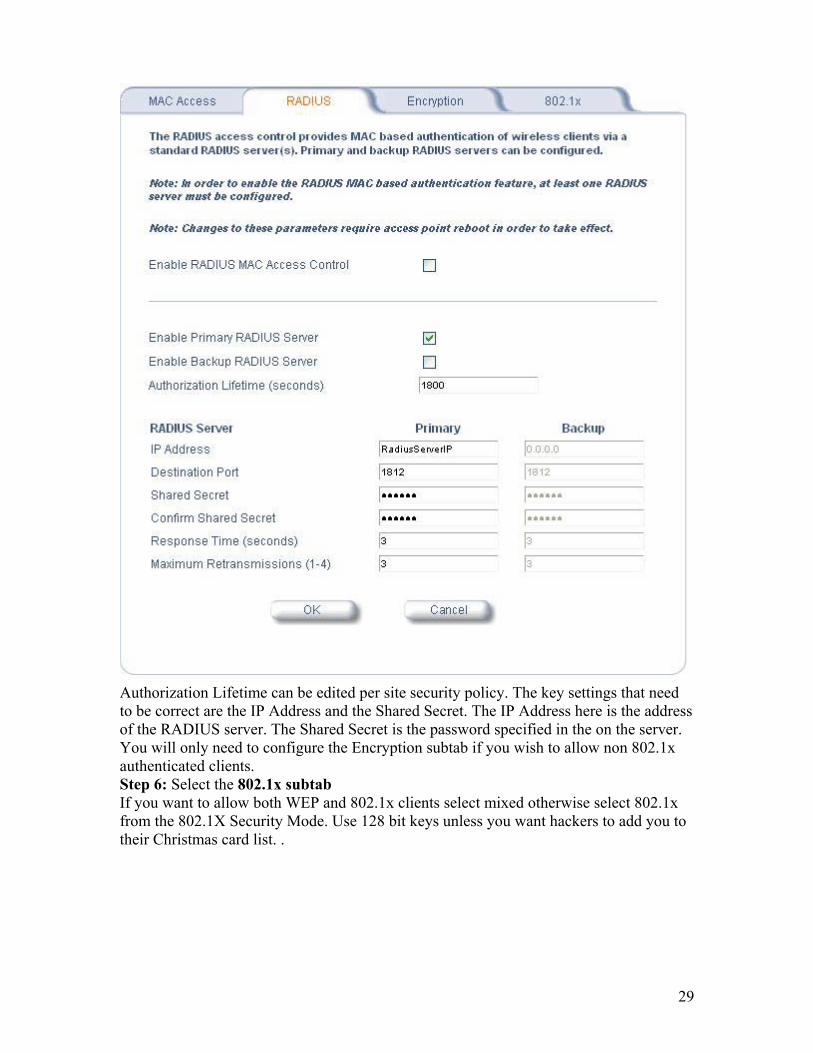
Authorization Lifetime can be edited per site security policy. The key settings that need to be correct are the IP Address and the Shared Secret. The IP Address here is the address of the RADIUS server. The Shared Secret is the password specified in the on the server. You will only need to configure the Encryption subtab if you wish to allow non 802.1x authenticated clients. Step 6: Select the 802.1x subtab If you want to allow both WEP and 802.1x clients select mixed otherwise select 802.1x from the 802.1X Security Mode. Use 128 bit keys unless you want hackers to add you to their Christmas card list. .
29

Now your 520wl is ready to go. 802.1x and the ProCurve 420 Wireless Access Point So you have a 420 and you want to add 802.1x to the security of your network. Good call. The 420 is a awesome and very secure AP. (sleazy attempt to sell….) Please ensure that you also config WPA as well for security 10 million times better then WEP. So let’s get started. The 420 has both a command line interface and a web interface. I will show the command line interface. I am a command line junky and find it more efficient and quicker. However, 802.1x can also be set up from the web U/I as well. Please refer to the 420 manual for this info. Step1: The 420 needs a RADIUS server so… lets connect the 420 to RADIUS server. Enter in the following commands: HP420#config HP420(config)#radius-server address 192.168.1.33 HP420(config)#radius-server port 1812 HP420(config)#radius-server key procurverules HP420(config)#radius-server timeout 10 HP420(config)#radius-server retransmit 5 ***** Optional if you have a secondary RADIUS server******** HP420(config)#radius-server address secondary 192.168.1.34
30
HP420(config)#radius-server secondary key procurve4me (side note…no procurve4me is not my license plate number…CoRNBRD is…) HP420(config)# Step 2: Enable the 420 to support 802.1x HP420#config HP420(config)# HP420(config)#interface wireless g HP420(if-wireless g)#authentication open HP420(if-wireless g)#end HP420(config)#802.1x required HP420(config)#802.1x broadcast-key-refresh-rate 5 HP420(config)#802.1x session-key-refresh-rate 5 HP420(config)#802.1x session-timeout 600 HP420(config)# Not bad right? The AP is relativity easy to set up. Truthfully I think the servers are the biggest pain in the butt! The rest of the stuff is easy. 802.1x and the ProCurve 5300 You have the ProCurve 5300 and you are ready to take security to the next level. Certainly the 5300 is no stranger to security. It has some of the strongest publicly available security on it today. Features like SSHv2, SNMPv3, SFTP, SSLv3 and many many others. Of 802.1x is our business today and the 5300 runs 802.1x very good. I would venture to state that 802.1x is really designed for the wired network as indicated in the opening paragraph of the standard; IEEE 802 Local Area Networks are often deployed in environments that permit unauthorized devices to be physically attached to the LAN infrastructure. Physically is the key word here. So do not let anyone tell you that 802.1x is only for wireless. As a matter of fact since 802.1x is extensible it fits into WLANs and many more things as well. So lets get started: HP5304#config HP5304(config)# radius-server host <ip-address> key <string> HP5304(config)# radius-server dead-time 5 HP5304(config)# radius-server timeout 3 HP5304(config)# radius-server retransmit 2 HP5304(config)# aaa authentication port-access eap-radius chap-radius **choose your 802.1x method, eap is used most HP5304(config)# aaa port-access authenticator A1-A24 ***Ports are are protected by 802.1x**** HP5304(config)# aaa port-access authenticator active HP5304(config)#wr mem And that’s it! Now you are ready to roll 802.1x out!
31
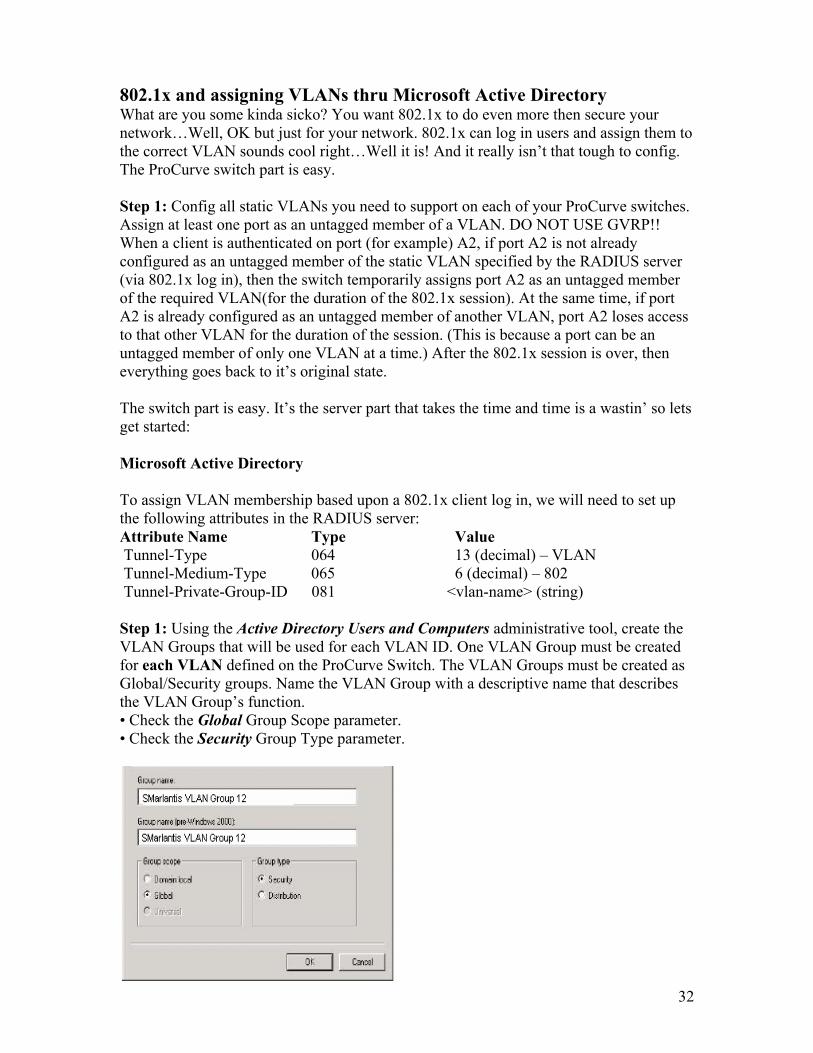
802.1x and assigning VLANs thru Microsoft Active Directory What are you some kinda sicko? You want 802.1x to do even more then secure your network…Well, OK but just for your network. 802.1x can log in users and assign them to the correct VLAN sounds cool right…Well it is! And it really isn’t that tough to config. The ProCurve switch part is easy. Step 1: Config all static VLANs you need to support on each of your ProCurve switches. Assign at least one port as an untagged member of a VLAN. DO NOT USE GVRP!! When a client is authenticated on port (for example) A2, if port A2 is not already configured as an untagged member of the static VLAN specified by the RADIUS server (via 802.1x log in), then the switch temporarily assigns port A2 as an untagged member of the required VLAN(for the duration of the 802.1x session). At the same time, if port A2 is already configured as an untagged member of another VLAN, port A2 loses access to that other VLAN for the duration of the session. (This is because a port can be an untagged member of only one VLAN at a time.) After the 802.1x session is over, then everything goes back to it’s original state. The switch part is easy. It’s the server part that takes the time and time is a wastin’ so lets get started: Microsoft Active Directory To assign VLAN membership based upon a 802.1x client log in, we will need to set up the following attributes in the RADIUS server: Attribute Name Type Value Tunnel-Type 064 13 (decimal) – VLAN Tunnel-Medium-Type 065 6 (decimal) – 802 Tunnel-Private-Group-ID 081 <vlan-name> (string) Step 1: Using the Active Directory Users and Computers administrative tool, create the VLAN Groups that will be used for each VLAN ID. One VLAN Group must be created for each VLAN defined on the ProCurve Switch. The VLAN Groups must be created as Global/Security groups. Name the VLAN Group with a descriptive name that describes the VLAN Group’s function. • Check the Global Group Scope parameter. • Check the Security Group Type parameter.
32
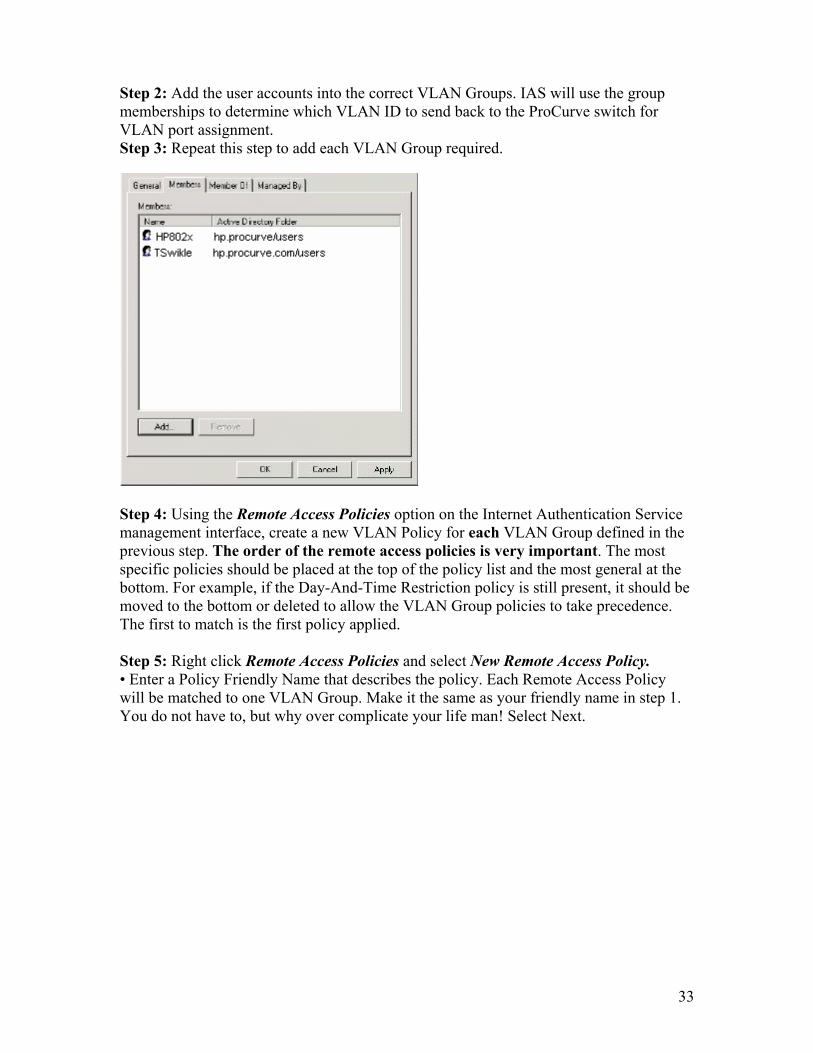
Step 2: Add the user accounts into the correct VLAN Groups. IAS will use the group memberships to determine which VLAN ID to send back to the ProCurve switch for VLAN port assignment. Step 3: Repeat this step to add each VLAN Group required.
Step 4: Using the Remote Access Policies option on the Internet Authentication Service management interface, create a new VLAN Policy for each VLAN Group defined in the previous step. The order of the remote access policies is very important. The most specific policies should be placed at the top of the policy list and the most general at the bottom. For example, if the Day-And-Time Restriction policy is still present, it should be moved to the bottom or deleted to allow the VLAN Group policies to take precedence. The first to match is the first policy applied. Step 5: Right click Remote Access Policies and select New Remote Access Policy. • Enter a Policy Friendly Name that describes the policy. Each Remote Access Policy will be matched to one VLAN Group. Make it the same as your friendly name in step 1. You do not have to, but why over complicate your life man! Select Next.
33

Step 6: The Conditions Window will be displayed. Select Add to add the condition that this policy will act on. • Select the Windows-Groups attribute type and click on the Add button.
Step 7: Groups window will be displayed. Click on the Add button and select the VLAN Group that matches this new policy. Only one VLAN Group should be associated with each policy. • Select the OK and Next options in the next few screens…(blah…blah…blah) to accept the group value.
34
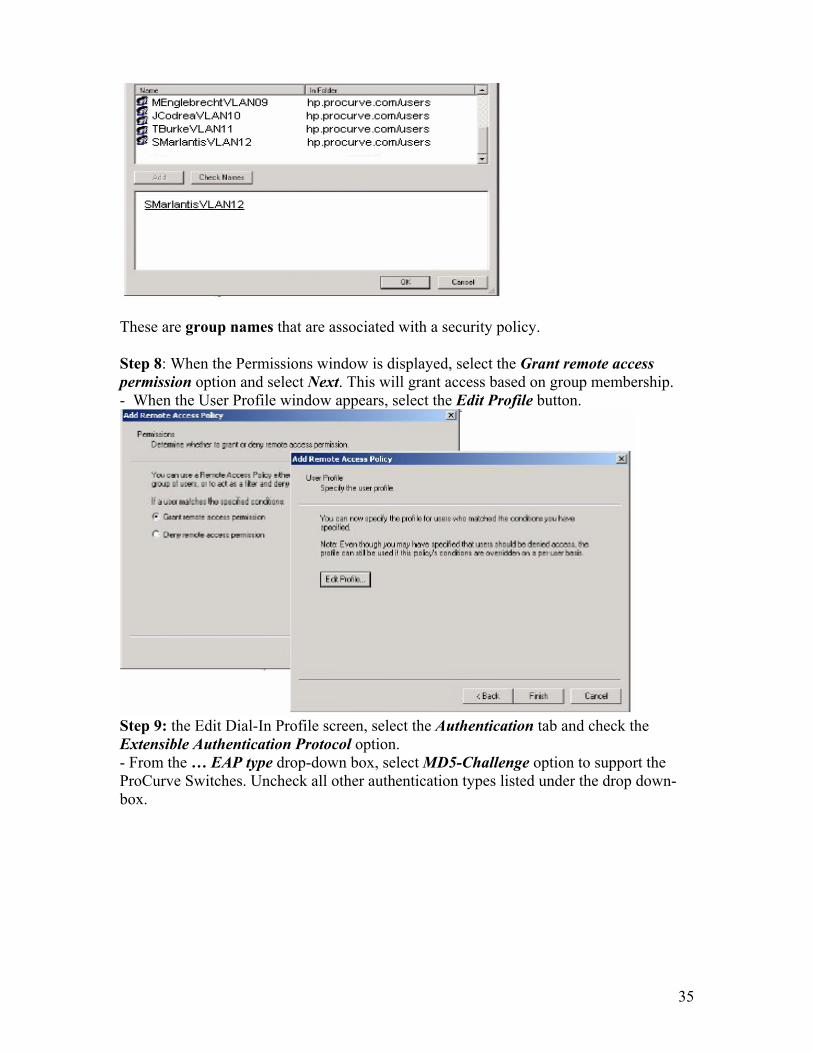
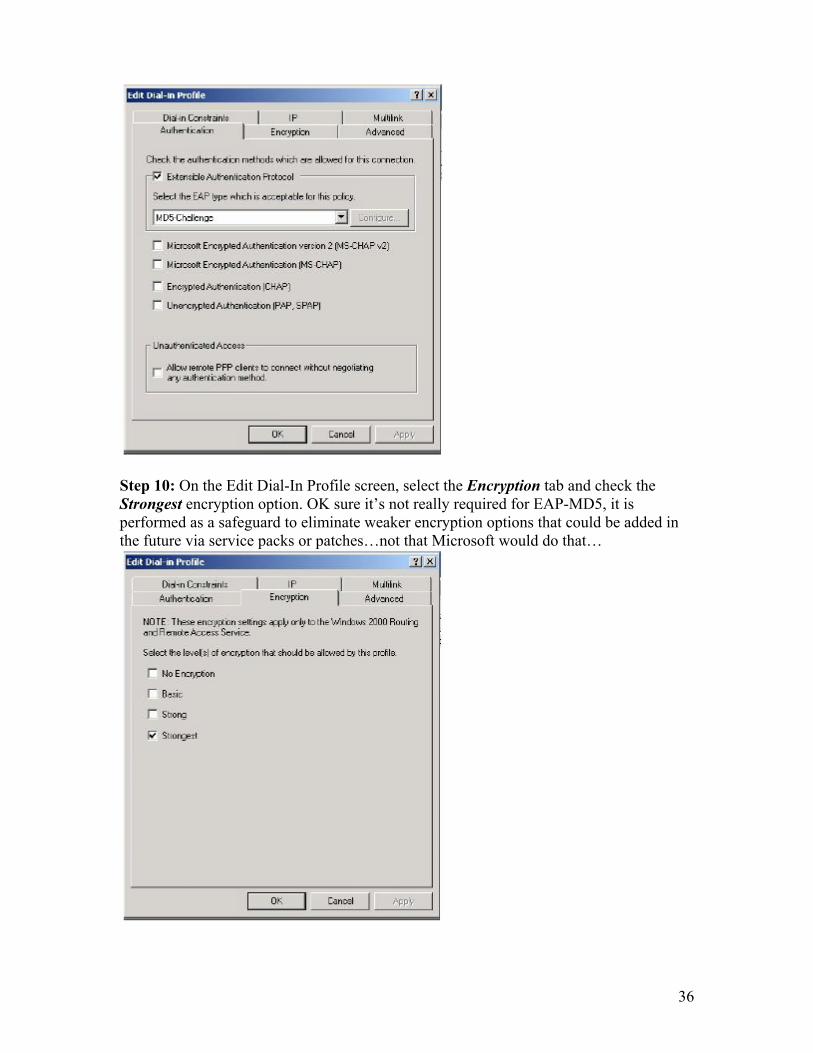
These are group names that are associated with a security policy. Step 8: When the Permissions window is displayed, select the Grant remote access permission option and select Next. This will grant access based on group membership. - When the User Profile window appears, select the Edit Profile button.
Step 9: the Edit Dial-In Profile screen, select the Authentication tab and check the Extensible Authentication Protocol option. - From the … EAP type drop-down box, select MD5-Challenge option to support the ProCurve Switches. Uncheck all other authentication types listed under the drop down-box.
35
Step 10: On the Edit Dial-In Profile screen, select the Encryption tab and check the Strongest encryption option. OK sure it’s not really required for EAP-MD5, it is performed as a safeguard to eliminate weaker encryption options that could be added in the future via service packs or patches…not that Microsoft would do that…
36
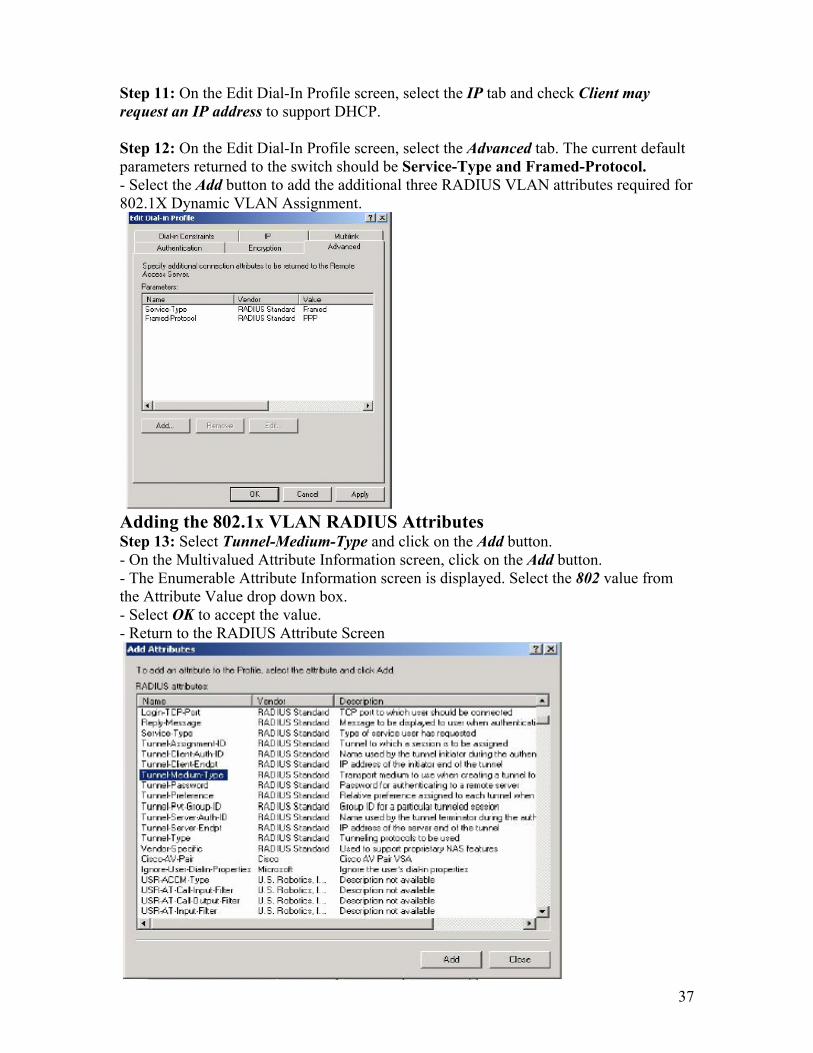
Step 11: On the Edit Dial-In Profile screen, select the IP tab and check Client may request an IP address to support DHCP. Step 12: On the Edit Dial-In Profile screen, select the Advanced tab. The current default parameters returned to the switch should be Service-Type and Framed-Protocol. - Select the Add button to add the additional three RADIUS VLAN attributes required for 802.1X Dynamic VLAN Assignment.
Adding the 802.1x VLAN RADIUS Attributes Step 13: Select Tunnel-Medium-Type and click on the Add button. - On the Multivalued Attribute Information screen, click on the Add button. - The Enumerable Attribute Information screen is displayed. Select the 802 value from the Attribute Value drop down box. - Select OK to accept the value. - Return to the RADIUS Attribute Screen
37
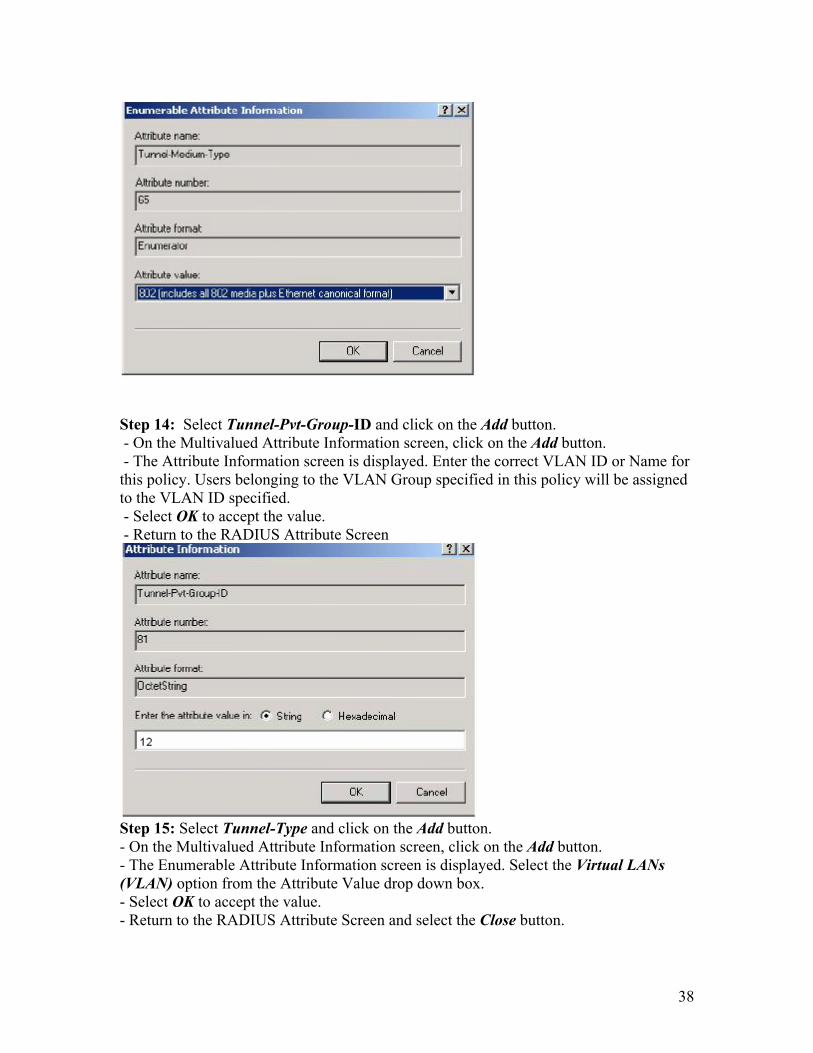
Step 14: Select Tunnel-Pvt-Group-ID and click on the Add button. - On the Multivalued Attribute Information screen, click on the Add button. - The Attribute Information screen is displayed. Enter the correct VLAN ID or Name for this policy. Users belonging to the VLAN Group specified in this policy will be assigned to the VLAN ID specified. - Select OK to accept the value. - Return to the RADIUS Attribute Screen
Step 15: Select Tunnel-Type and click on the Add button. - On the Multivalued Attribute Information screen, click on the Add button. - The Enumerable Attribute Information screen is displayed. Select the Virtual LANs (VLAN) option from the Attribute Value drop down box. - Select OK to accept the value. - Return to the RADIUS Attribute Screen and select the Close button. 38
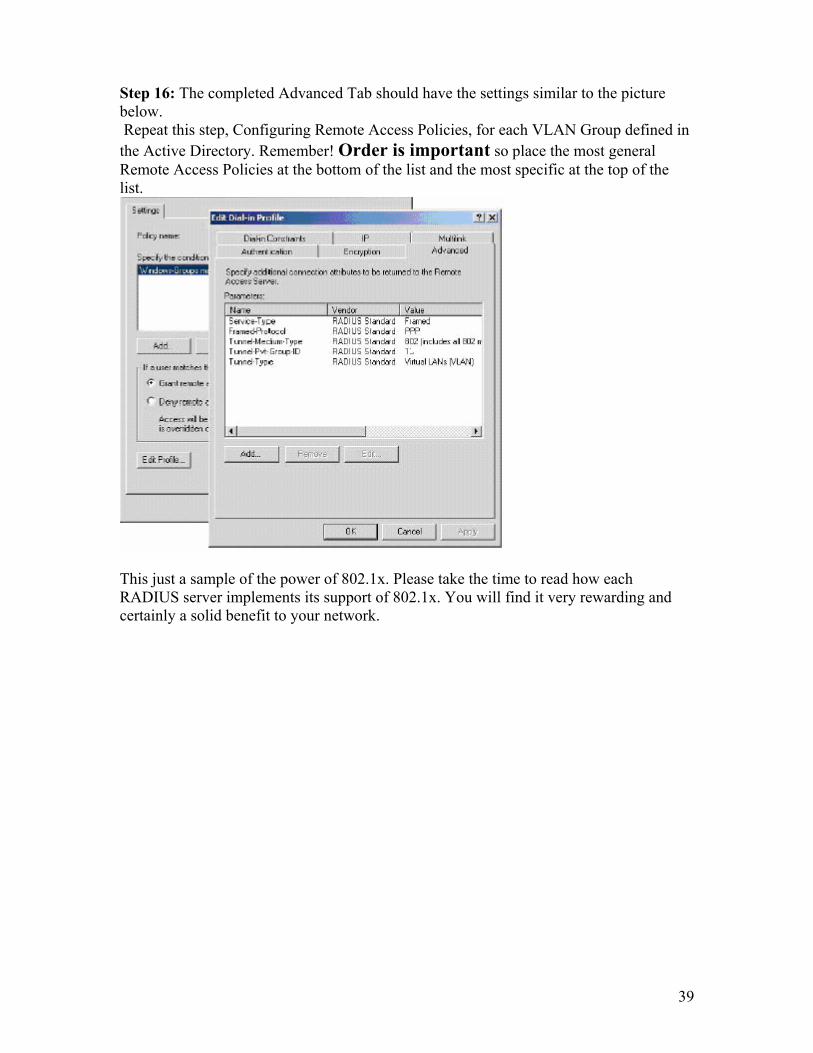
Step 16: The completed Advanced Tab should have the settings similar to the picture below. Repeat this step, Configuring Remote Access Policies, for each VLAN Group defined in the Active Directory. Remember! Order is important so place the most general Remote Access Policies at the bottom of the list and the most specific at the top of the list.
This just a sample of the power of 802.1x. Please take the time to read how each RADIUS server implements its support of 802.1x. You will find it very rewarding and certainly a solid benefit to your network.
39

40