Embed Size (px)
DESCRIPTION
Step by Step Linux Guideby M. B. G. Suranga De SilvaStep by Step Linux Guide, describes the system administration aspects of using Linux. It is intended for people who know nothing about system administration. This bookStep by StepTM Linux Guide.Page 1doesn’t tell you how to install Linux since it is very straight forward but it gives you real world mail, DNS, proxy, web, messaging etc… server installations and configurations. System administration is all the things that one has to do
Citation preview
Step by StepTM Linux Guide. Page 1
Step by Step Linux Guide
by M. B. G. Suranga De Silva Step by Step Linux Guide, describes the system administration aspects of using Linux. It is intended for people who know nothing about system administration. This book

Step by StepTM Linux Guide. Page 2
doesn’t tell you how to install Linux since it is very straight forward but it gives you real world mail, DNS, proxy, web, messaging etc… server installations and configurations. System administration is all the things that one has to do to keep a computer system in a useable shape. It Includes things like backing up files and restoring , installing new programs, creating accounts for users, making certain that the filesystem is not corrupted, and so on. There is no one official Linux distribution, so different people have different setups, and many people have a setup they have built up themselves. This book is not targeted at any one distribution, even though I use Red Hat Linux 8 and 9 the contents can be applied to any distribution. Many people have helped me with this book, directly or indirectly. I would like to especially thank my own brother Dilan Kalpa De Silva, Luckshika Jayadeva for her excellent type-setting, my ever loving mother, two sisters and my aunt Mallika Vitharana.

Step by StepTM Linux Guide. Page 3
Quick Configs Jabberd Sendmail Qpopper Qmail CourrierIMAP Server Squirrelmail DHCP Server PHP and Mysql PostGRE File Server Squid Squidguard Iptables Freeradius Apache Apache Monitoring Tool (AWTStats) Samba DNS Bind OpenLDAP NoCatAuth Load Balancers Load Sharing Network Monitoring Tool (nagios) Kernal Recompilation Java in Linux Linux commands in brief
Step by StepTM Linux Guide. Page 4
Target Market IT Training Institutes IT Departments of any organization Libraries (school/public/ universities) Students Unique Selling Points 1. Open Source freely available 2. Stable 3. Everything in single book 4. Administrators can build their own systems, from that they can take the full control over the system. When company relies on the system, administrators will feel more job security. 5. No need of expensive PCs to learn, just 486 is enough to become an expert. 6. High Security 7. Free Five hours onsite cooperate training. 8. Easiest way to become a System Administrator or Systems Engineer.
Jabberd Quick Installation Guide
Step by StepTM Linux Guide. Page 5
The jabberd server is the original open-source server implementation of the Jabber protocol, and is the most popular software for deploying Jabber either inside a company or as a public IM service.
1. Save the file jabberd-1.4.2.tar.gz to /tmp/ (or to a directory of your choice).
1. Open a console window and create the directory as /path/to/jabber/ as follows
[root@im root]#mkdir /path/
[root@im root]#mkdir /path/to/
[root@im root]#mkdir /path/to/jabber/
3. Type mv /tmp/jabberd-1.4.2.tar.gz /path/to/jabber/
4. Type cd /path/to/jabber/
5. Type gzip -d jabberd-1.4.2.tar.gz
6. Type tar -xvf jabberd-1.4.2.tar (this creates a jabberd-1.4.2/ directory containing various files and subdirectories)
7. Type cd jabber-1.4.2/
8. Type ./configure
9 Type make
10. Open another console and type cd /path/to/jabber/jabber-1.4.2/
11. Type ls -l jabberd/jabberd to view the permissions on the Jabber daemon. The output on your console should look something like this: -rwxr-xr-x 1 user group 675892 Feb 25 2004 jabberd/jabberd
12. Type ./jabberd/jabberd to start the Jabber daemon. This will run the server using the default hostname of localhost. You should see
Step by StepTM Linux Guide. Page 6
one line of output in your console window: 20020923T02:50:26: [notice] (-internal): initializing server.
13. Open a separate console window on the same machine and type telnet localhost 5222 to connect to your server (yes, you can connect using simple old telnet!). You should see the following:
Trying 127.0.0.1... Connected to your-machine-name. Escape character is '^]'.
14. Now open an XML stream to your server by pasting the full text of the following XML snippet into your telnet window:
<stream:stream to='localhost' xmlns='jabber:client' xmlns:stream='http://etherx.jabber.org/streams'>
You should immediately receive a reply from your server:
<?xml version='1.0'?> <stream:stream xmlns:stream='http://etherx.jabber.org/streams' id='some-random-id' xmlns='jabber:client' from='localhost'>
Congratulations! Your Jabber server is working.
15. Close the stream properly by pasting the following XML snippet into your telnet window: </stream:stream>
16. Stop the server by killing the process or simply typing ^C in the window where you started the server deamon.
Configuring the Hostname
Step by StepTM Linux Guide. Page 7
You change the configuration of jabberd by editing a file named jabber.xml, which is located in your /path/to/jabber/jabber-1.4.2 directory. The jabber.xml file contains a great deal of comments that help you understand what each configuration option does. However, right now all that we need to change is the hostname. So open jabber.xml in your favorite text editor (vi, emacs, etc.) and edit the line that reads as follows:
<host><jabberd:cmdline flag="h">localhost</jabberd:cmdline></host>
You now need to give Jabber server's ip address or hostname here.
Ex.
<host><jabberd:cmdline flag="h">192.168.200.8</jabberd:cmdline></host>
or
<host><jabberd:cmdline flag="h">im.jic.com</jabberd:cmdline></host>
Note:
Make sure to create a folder and name it as the name you put in the above line that is 192.168.200.8 or im.jic.com in /path/to/jabber/jabber-1.4.2/spool/
Ex:
[root@im root]#mkdir /path/to/jabber/jabber-1.4.2/spool/192.168.200.8
or
[root@im root]#mkdir /path/to/jabber/jabber-1.4.2/spool/im.jic.com
Now you need to configure your server to bind to a specific IP address. First, in the <pthcsock/> section of your jabber.xml file, change <ip port="5222"/> to <ip port="5222">yourIPaddress</ip>. Second, in the
Step by StepTM Linux Guide. Page 8
dialback section of your jabber.xml file, change <ip port="5269"/> to <ip port="5269">yourIPaddress</ip>.
Ex:
<ip port=”5222”>192.168.200.8</ip>
<ip port=”5269”>192.168.200.8</ip>
Now jabber.xml and type in console again ./jabberd/jabberd to start the Jabber daemon previously you have killed.
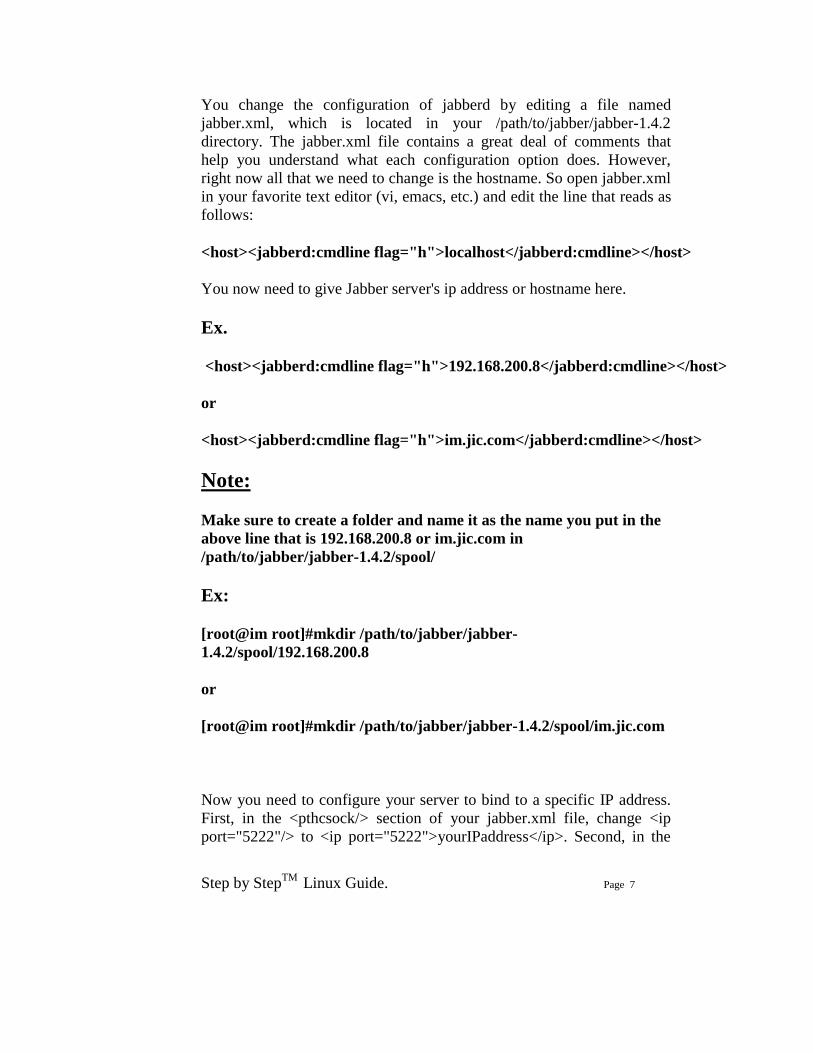
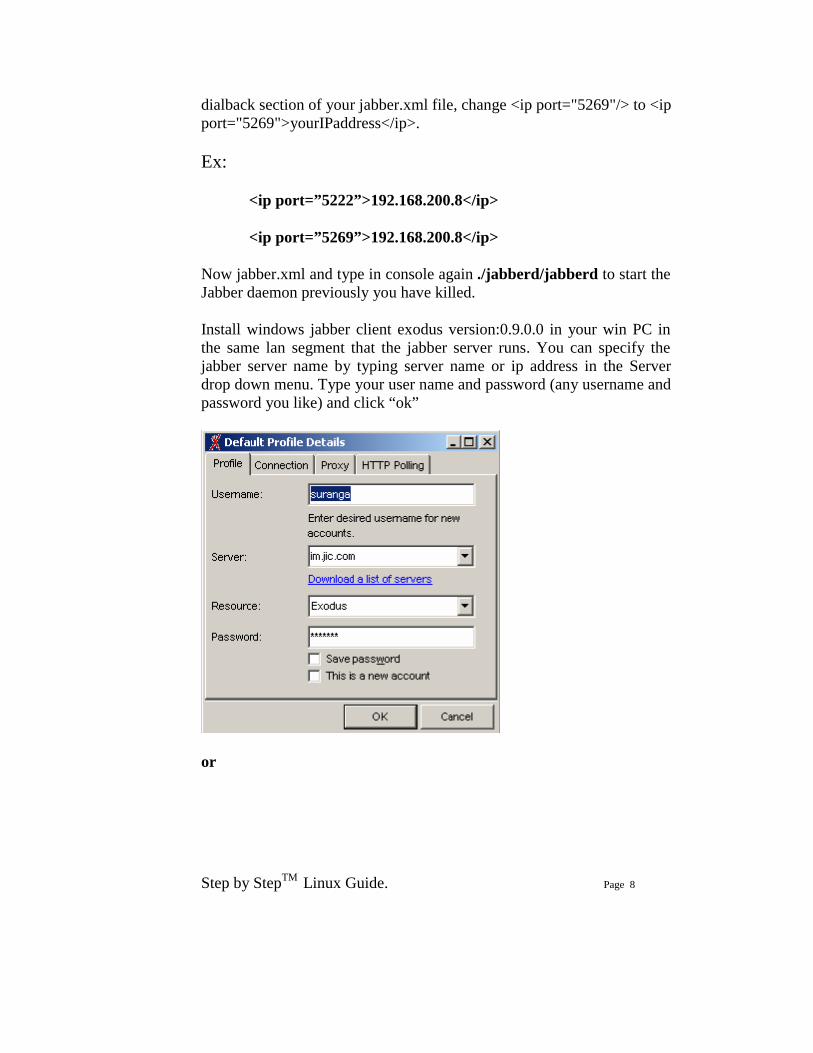
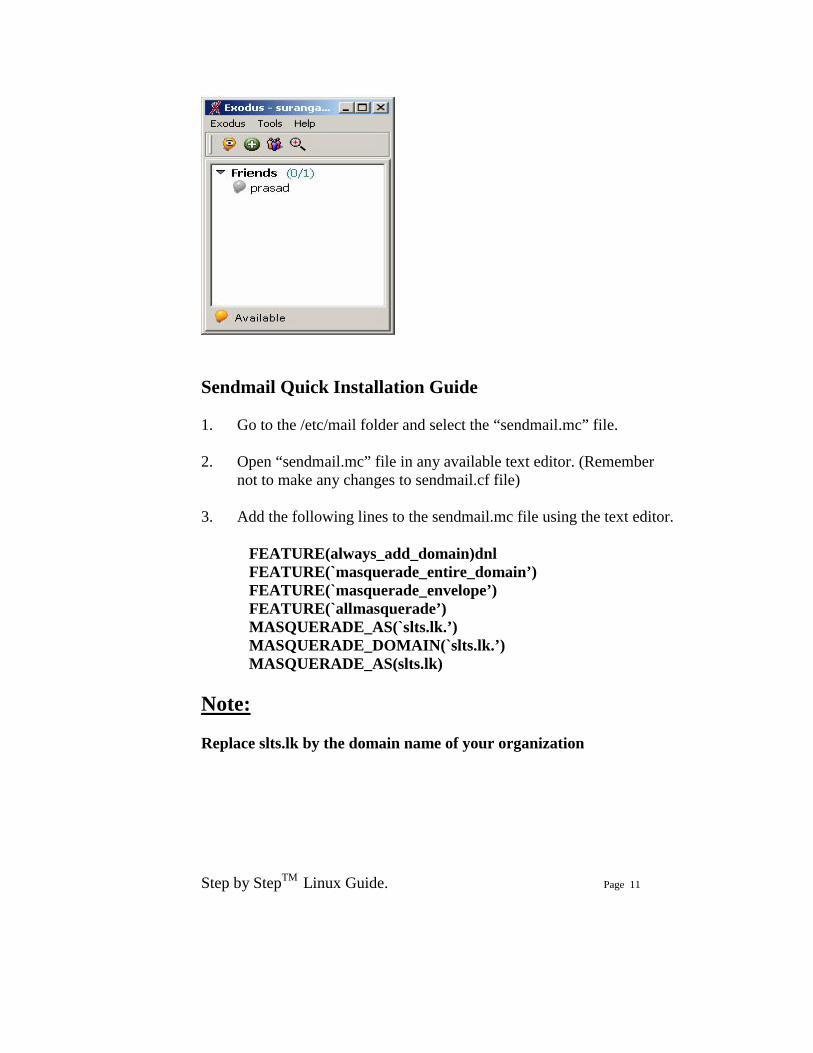
Install windows jabber client exodus version:0.9.0.0 in your win PC in the same lan segment that the jabber server runs. You can specify the jabber server name by typing server name or ip address in the Server drop down menu. Type your user name and password (any username and password you like) and click “ok”
or
Step by StepTM Linux Guide. Page 9
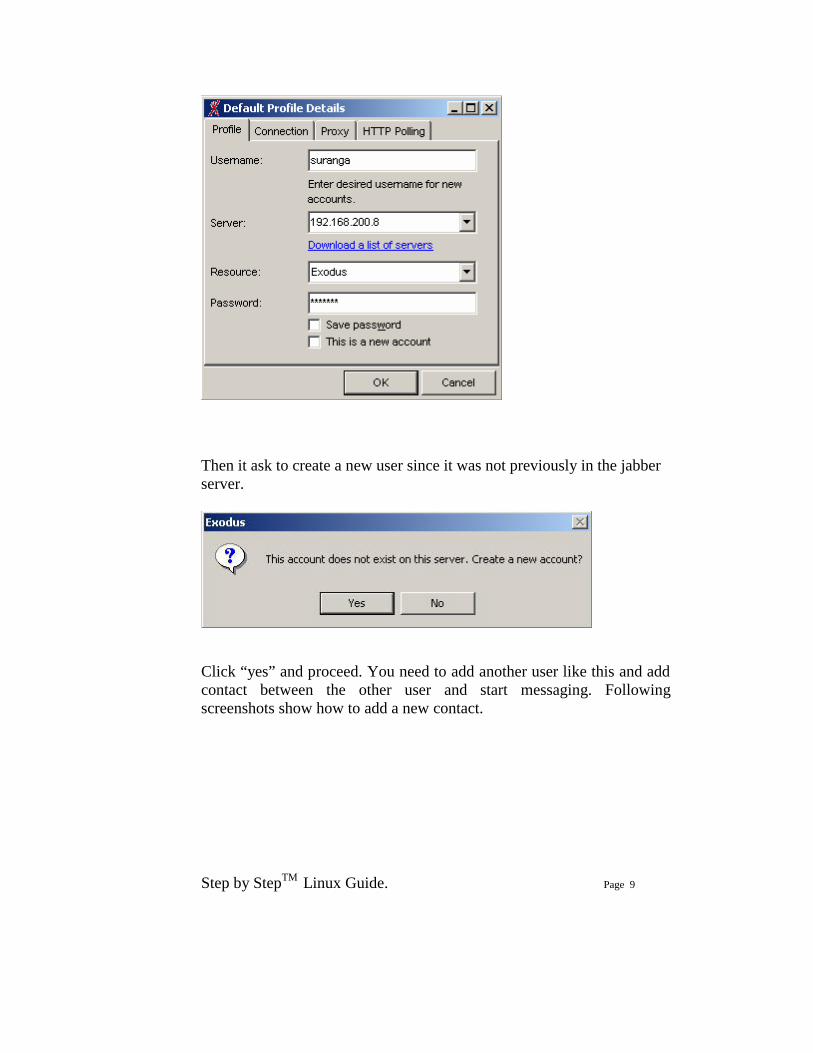
Then it ask to create a new user since it was not previously in the jabber server.
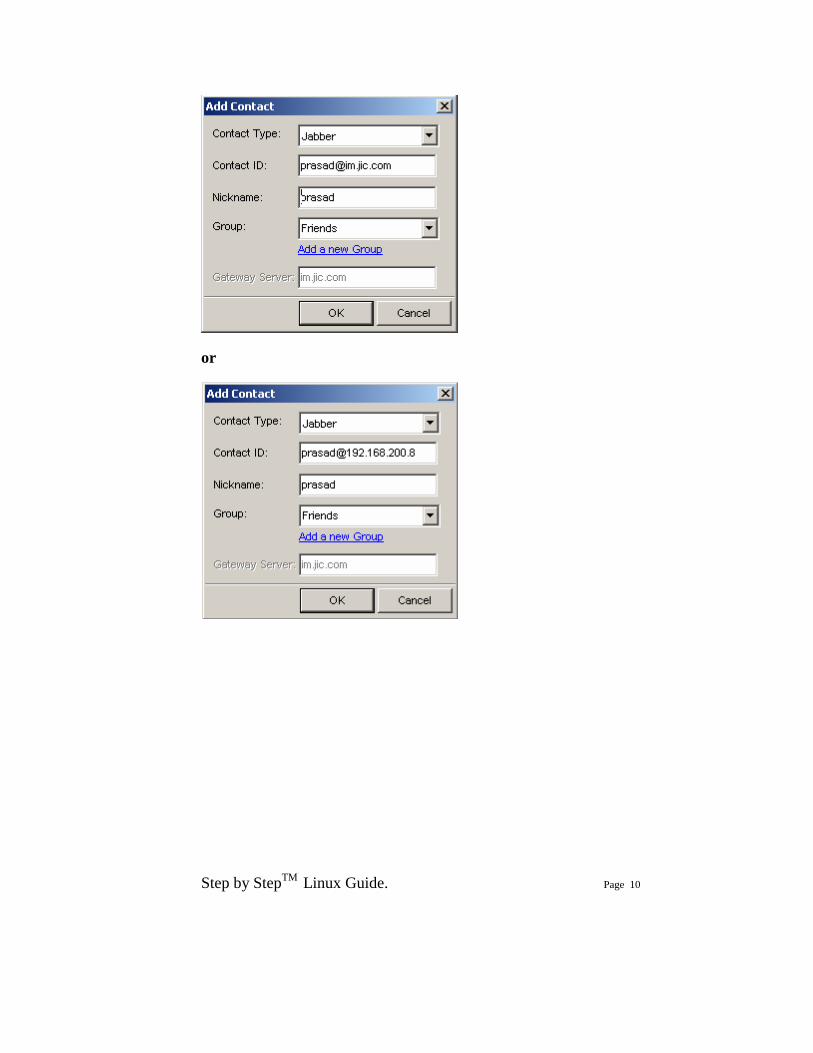
Click “yes” and proceed. You need to add another user like this and add contact between the other user and start messaging. Following screenshots show how to add a new contact.
Step by StepTM Linux Guide. Page 10
or
Step by StepTM Linux Guide. Page 11
Sendmail Quick Installation Guide 1. Go to the /etc/mail folder and select the “sendmail.mc” file. 2. Open “sendmail.mc” file in any available text editor. (Remember
not to make any changes to sendmail.cf file) 3. Add the following lines to the sendmail.mc file using the text editor.
FEATURE(always_add_domain)dnl FEATURE(`masquerade_entire_domain’) FEATURE(`masquerade_envelope’) FEATURE(`allmasquerade’) MASQUERADE_AS(`slts.lk.’) MASQUERADE_DOMAIN(`slts.lk.’) MASQUERADE_AS(slts.lk)
Note: Replace slts.lk by the domain name of your organization

Step by StepTM Linux Guide. Page 12
4. Comment the following line in the sendmail.mc file by adding “dnl” in front:
DAEMON_OPTIONS(`port=smtp, ……..)
Changed lines should look like this:
dnl DAEMON_OPTIONS(`port=smtp, ……..) 5. Type the following in the command prompt to generate a new
“sendmail.cf” file:
m4 /etc/mail/sendmail.mc > /etc/mail/sendmail.cf 6. Add the following lines to etc/mail/access file:
localhost.localdomain RELAY localhost RELAY 192.168.1 RELAY slts.lk RELAY
Note: Add the network id of your domain and domain name instead of the values given here. 7. Type the following in the command prompt:
makemap hash /etc/mail/access.db < /etc/mail/access 8. Add the following lines to the /etc/mail/local-host-names file:
slts.lk eng.slts.lk
Note: Add the names of your domains or sub-domains
Step by StepTM Linux Guide. Page 13
9. Add the following entries to the etc/hosts file:
127.0.0.1 mail.slts.lk mail 127.0.0.1 mail.eng.slts.lk mail
Note: These are aliases for the local server. Replace the entries with your own domain info. 7. Edit the /etc/sysconfig/network as follows:
NETWORKING = YES HOSTNAME = mail.slts.lk
Note: Replace with your own domain info. 8. Edit the /etc/sysconfig/networking/profiles/default/network file
HOSTNAME = mail.slts.lk 9. Type the following in command prompt to restart sendmail
/sbin/service sendmail restart 10. To test sendmail type following in the command prompt:
telnet localhost 25
Step by StepTM Linux Guide. Page 14
Qpopper Quick Installation Guide
1. Make /usr/local/qpopper/ directory and download and save
qpopper4.0.5.tar.gz file to that directory directory. 2. Go to the directory where qpopper is stored (/usr/local/qpopper/)
and type following in the command line:
gunzip qpopper4.0.5.tar.gz
then type:
tar xvf qpopper4.0.5.tar 3. Go to the qpopper4.0.5 directory (/usr/local/qpopper/qpopper4.0.5/)
and type the following in command line:
./configure
Then type:
make 4. Use “mkdir” command to create a directory as follows:
mkdir /usr/local/man/ mkdir /usr/local/man/man8
5. Type following in command line:
make install 6. Open the file “/etc/xinetd.conf” and add the following lines to the file and save: (A similar configuration is available in the following file: /qpopper/qpopper4.0.5/samples/qpopper.xinetd You can copy it to the destination and do the necessary changes)
Step by StepTM Linux Guide. Page 15
service pop3 { flags = REUSE NAMEINARGS socket_type = stream wait = no user = root server = /usr/local/sbin/popper server_args = popper –f /etc/qpopper110.cfg –s instances = 50 disable = no port = 110 per_source = 10 } service pop3s { flags = REUSE NAMEINARGS socket_type = stream wait = no user = root server = /usr/local/sbin/popper server_args = popper –f /etc/qpopper110.cfg –s instances = 50 disable = no per_source = 10 } 7. Go to qpopper source directory and then to the “samples” directory inside that (e.g. /usr/local/qpopper/qpopper4.0.5/samples) 8. Open the qpopper.config file in
/usr/local/qpopper/qpopper4.0.5/samples/ and save it as “qpopper110.cfg” in /etc/.
9. Type following in the command prompt:
service xinetd restart 10. Type the following in command prompt to test qpopper:
telnet localhost 110

Step by StepTM Linux Guide. Page 16
SquirrelMail with change_passwd Quick Installation Guide
1. Start the IMAP server and httpd in Red Hat services and put
squirrelmail-1.4.2.tar.gz to /var/www/html/ directory 2. Unpack SquirrelMail in
tar -xvzf squirrelmail-1.4.2.tar.gz
3. Go to the config folder of squirrelmail-1.4.2 directory as follows
cd /var/www/html/squirrelmail-1.4.2/config/
4. make a new file called “config.php” in that directory and copy the contents of “config_default.php” to “config.php” (“config_default.php” is in the same directory that is /var/www/html/squirrelmail-1.4.2/config/ )
5. Now open config.php and change the $domain = ‘yourdomain.com’;
6. Open your web browser and type http://localhost/ squirrelmail-1.4.2/
7. Now you should see the login page.
8. Go to the directory /var/www/html/squirrelmail-1.4.2/plugins
9. Download change_passwd-3.1-1.2.8.tar.gz and compatibility-1.2.tar.gz to that directory and unpack
10. [root@im root]#cd /var/www/html/squirrelmail-1.4.2/config
11. [root@im config]#./conf.pl
12. choose option 8 and add the compatibility plugin.save and exit
13. [root@im root]#cd /var/www/html/squirrelmail-1.4.2/plugins/change_passwd
14. [root@im change_passwd]#cp config.php.sample config.php
Step by StepTM Linux Guide. Page 17
15. [root@im change_passwd]#chown root:apache chpasswd
16. [root@im change_passwd]#chmod 4750 chpasswd
17. [root@im change_passwd]#cd ../../config/
18. [root@im config]#./conf.pl
19. choose option 8 and add the change_passwd plugin.save and exit.
Installing and Configuring Samba 1. Download Samba (samba-latest.tar.gz) from www.samba.org 2. # tar zxpf samba-latest.tar.gz 3. # cd samba-*** 4. # ./configure 5. # make 6. # make install 7. make smb.conf file and put it into /usr/local/samba/lib folder. Get
the smb.conf from RedHat Linux's etc/samba and do the following changes.
WORKGROUP = SLTSERVICES (NT domain nad or workgroup name) netbios name = samba (machine name) server string = SLTS Samba server (small description about the server) uncomment hosts allow = 192.168.1. 192.168.2. 127. * refer the appendix for an example smb.conf file.
Step by StepTM Linux Guide. Page 18
Add new user to Samba # /usr/local/samba/bin/smbpasswd -a < username > < password > Note : The users you need to add into samaba should be already created in Linux. Start Samba # /usr/local/samba/sbin/smbd -D # /usr/local/samba/sbin/nmbd -D
If you want to have start samba on bootup, put the above lines into the etc/rc.d/rc.local file. Stop Samba # killall -9 smbd # killall -9 nmbd
DHCP Server These are the steps of setting up DHCP server in eth0 interface You can edit /etc/dhcpd.conf as follows ddns-update-style interim; ignore client-update; default-lease-time 600; max-lease-time 7200; option subnet-mask 255.255.255.0; option brodcat-address 192.168.1.255; option roters 192.168.1.1; option domain-name-servers 203.115.0.1 subnet 192.168.1.0 netmask 255.255.255.0 { range 192.168.1.100 192.168.1.200 }
Step by StepTM Linux Guide. Page 19
Make sure to give the interface that the DHCP drags in /etc/sysconfig/dhcpd as follows #command line option here DHCPDRAGS = eth0 Now start the DHCP by executing the following command. /sbin/service dhcpd start If you want to change the configuration of a DHCP server that was running before, then you have to change the lease database stored in /var/lib/dhcp/dhcpd.leases as follows, mv dhcpd.leases~ dhcpd.leases Say Yes to over write the file and restart the dhcpd. service dhcpd restart
PHP/MySQL
Testing For PHP and MySQL There is a simple test for both PHP and MySQL. Open a text editor and type in the following: <? phpinfo(); ?> and save it as phpinfo.php in /var/www/html/ If you have PHP installed you will see a huge page with all the details of your PHP installation on it. Next, scroll down through all this information. If you find a section about MySQL then you will know that MySQL is installed. These are pre installed in RH8 and RH9.

Step by StepTM Linux Guide. Page 20
Using MySQL Start Mysql database by typing /etc/init.d/mysqld start Type mysqladmin password yourpassword Type mysql –u root –p Then it asks to enter the password you just given above Then you come to a prompt like this mysql> Type exit and come back to the prompt Now you can create a database called “database1” by typing the following command. mysqladmin –p create database1 Now type again mysql –u root –p and come to the mysql prompt There type show databases as follows mysql> show databases; Then you should be able to see the database you have just created “database1” Put “createtable.php” as follows in /var/www/html/ <? $user="root"; $password="suranga"; $database="database"; mysql_connect(localhost,$user,$password); @mysql_select_db($database) or die( "Unable to select database"); $query="CREATE TABLE contacts (id int(6) NOT NULL auto_increment,first varchar(15) NOT NULL,last varchar(15) NOT NULL,phone varchar(20) NOT NULL,mobile varchar(20) NOT NULL,fax varchar(20) NOT NULL,email varchar(30) NOT NULL,web varchar(30) NOT NULL,PRIMARY KEY (id),UNIQUE id (id),KEY id_2 (id))"; mysql_query($query); mysql_close(); ?>
Step by StepTM Linux Guide. Page 21
save this in /var/www/html/ and type http://localhost/createtable.php in your browser again come to mysql prompt and type use database1; and show tables; then you should see the newly created contacts table Following is the insertdata.php save it also in /var/www/html/ and in your browser type http://localhost/insertdata.php and press enter. <? $user="root"; $password="suranga"; $database="database"; mysql_connect(localhost,$user,$password); @mysql_select_db($database) or die( "Unable to select database"); $query = "INSERT INTO contacts VALUES ('','John','Smith','01234 567890','00112 334455','01234 567891','[email protected]','http://www.gowansnet.com')"; mysql_query($query); mysql_close(); ?> again come to mysql prompt and type select * from contacts; Now you can see the contents of the contact table. Inserting data to mysql via html web page Create a database called “kalpadb” by typing [prompt]# mysqladmin –p create kalpadb Goto mysql prompt by typing [prompt]# mysql –u root –p Create a table called kalpa

Step by StepTM Linux Guide. Page 22
mysql>CREATE TABLE kalpa (fname varchar(20) NOT NULL,age varchar(15) NOT NULL);
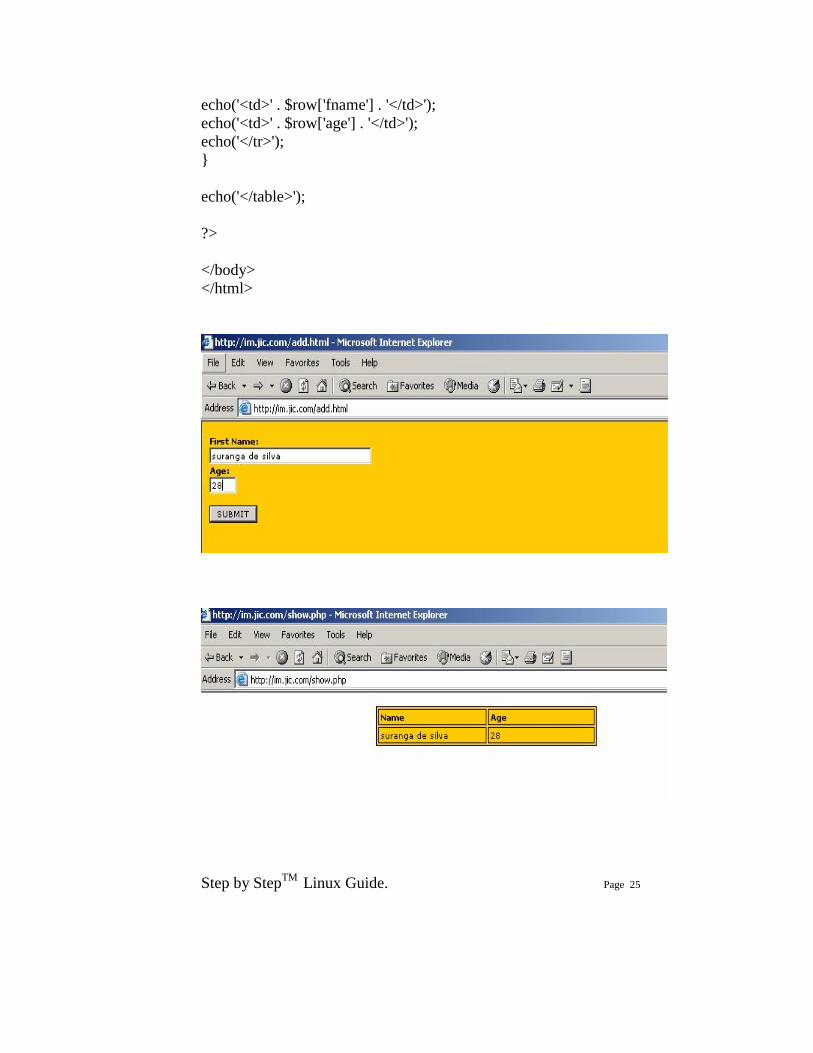
Now you can save following add.html in /var/www/html/ folder
<html>
<head> <title></title> <style> .text {color:black ; font-size:10px; font-family:verdana} .text2 {color:black ; font-size:10px; font-weight:bold ; font-family:verdana} </style> </head> <body bgcolor=#ffcc00> <div class=text2> <form action="add.php" method="post"> <p>First Name:<br /> <input class=text type="text" name="first_name" size=40 /><br /> Age:<br /> <input class=text type="text" name="age" size=4 /><br /><br /> <input class=text type="submit" name="submitjoke" value="SUBMIT" /> </p> </form> </div> </body> </html> This is add.php need to save in /var/www/html/ <html> <head> <title></title> <style>
Step by StepTM Linux Guide. Page 23
.text {color:black ; font-size:10px; font-family:verdana}
.text2 {color:black ; font-size:10px; font-weight:bold ; font-family:verdana} </style> </head> <body class=text bgcolor=#ffcc00> <?php $dbcnx = @mysql_connect('localhost', 'root', 'kagawena'); if (!$dbcnx) { die( '<p>Unable to connect to the ' . 'database server at this time.</p>' ); } if (! @mysql_select_db('kalpadb') ) { die( '<p>Unable to locate the joke ' . 'database at this time.</p>' ); } if (isset($_POST['submitjoke'])) { $fname = $_POST['first_name']; $age = $_POST['age']; $sql = "INSERT INTO kalpa SET fname='$fname',age='$age' "; if (@mysql_query($sql)) { echo('<p>Successfully added.</p>'); echo('<a href=add.html>Back</a>'); } else { echo('<p>Error adding to the database: ' . mysql_error() . '</p>'); } } ?> </body> </html> This is show.php where you can see the contents of the table via your browser. Save this also in /var/www/html/
Step by StepTM Linux Guide. Page 24
<html> <head> <title></title> <META HTTP-EQUIV="Expires" CONTENT="0"> <meta http-equiv="pragma" content="no-cache"> <style> .text {color:black ; font-size:10px; font-family:verdana} </style> </head> <body> <?php $dbcnx = @mysql_connect('localhost', 'root', 'kagawena'); if (!$dbcnx) { die( '<p>Unable to connect to the ' . 'database server at this time.</p>' ); } if (! @mysql_select_db('kalpadb') ) { die( '<p>Unable to locate the ' . 'database at this time.</p>' ); } $result = @mysql_query('SELECT * FROM kalpa'); if (!$result) { die('<p>Error performing query: ' . mysql_error() . '</p>'); } echo('<table bgcolor=#ffcc00 class=text bordercolor=#000000 cellpadding=2 align=center border=1 width=300>'); echo('<tr>'); echo('<td width=150><b>Name</b></td>'); echo('<td width=150><b>Age</b></td>'); echo('</tr>'); while ( $row = mysql_fetch_array($result) ) { echo('<tr>');
Step by StepTM Linux Guide. Page 25
echo('<td>' . $row['fname'] . '</td>'); echo('<td>' . $row['age'] . '</td>'); echo('</tr>'); } echo('</table>'); ?> </body> </html>
Step by StepTM Linux Guide. Page 26
Installing Tomcat and JAVA in Linux
The only requirements to run Tomcat are that a Java Development Kit (JDK), also called a Java Software Developement Kit (SDK), be installed and the JAVA_HOME environment variable be set.
Java SDK
I chose to install Sun's Java 2 Platform, Standard Edition, which can be downloaded from http://java.sun.com/j2se/). I chose the J2SE v1.4.2 SDK Linux self-extracting binary file.
Change to the directory where you downloaded the SDK and make the self-extracting binary executable (/usr/local/java)
chmod +x j2sdk-1_4_1_06-linux-i586.bin
Run the self-extracting binary:
./j2sdk-1_4_1_06-linux-i586.bin
There should now be a directory called j2sdk1.4.2 in the download directory.
Set the JAVA_HOME environment variable, by modifying /etc/profile so it includes the following:
JAVA_HOME="/usr/local/java/j2sdk1.4.2" export JAVA_HOME CATALINA_HOME=”/usr/local/tomcat/jakarta-tomcat-4.1.29” export CATALINA_HOME
There will be other environment variables being set in /etc/profile, so you will probably be adding JAVA_HOME to an existing export command. /etc/profile is run at startup and when a user logs into a system. Tomcat will be discussed later but for the time being append the above mentioned JAVA_HOME and CATALINA_HOME in /etc/profile
You can check the environment variables by typing echo $JAVA_HOME or echo $CATALINA_HOME in command prompt

Step by StepTM Linux Guide. Page 27
Tomcat Account
You will install and configure Tomcat as root; however, you should create a group and user account for Tomcat to run under as follows:
groupadd tomcat useradd -g tomcat tomcat
This will create the /home/tomcat directory, where I will install my Tomcat applications.
Tomcat Standalone
Unzip Tomcat by issuing the following command from your download directory:
tar xvzf tomcat-4.1.29.tar.gz
This will create a directory called jakarta-tomcat-4.1.29
The directory where Tomcat is installed is referred to as CATALINA_HOME in the Tomcat documentation. In this case CATALINA_HOME=/usr/local/tomcat/jakarta-tomcat-4.1.29
It is recommend setting up a symbolic link to point to your current Tomcat version. This will save you from having to change your startup and shutdown scripts each time you upgrade Tomcat or set a CATALINA_HOME environment variable. It also allows you to keep several versions of Tomcat on your system and easily switch amongst them. Here is the command I issued from inside /usr/local to create a symbolic link called /usr/local/tomcat/jakarta-tomcat that points to /usr/local/tomcat/jakarta-tomcat-4.1.29:
ln -s jakarta-tomcat-4.1.29 jakarta-tomcat
Change the group and owner of the /usr/local/tomcat/jakarta-tomcat and /usr/local/jakarta-tomcat-4.1.29 directories to tomcat:
chown tomcat.tomcat /usr/local/tomcat/jakarta-tomcat chown -R tomcat.tomcat /usr/local/tomcat/jakarta-tomcat-4.1.29
Step by StepTM Linux Guide. Page 28
It is not necessary to set the CATALINA_HOME environment variable. Tomcat is smart enough to figure out CATALINA_HOME on its own.
You should now be able to start and stop Tomcat from the CATALINA_HOME/bin directory by typing ./startup.sh and ./shutdown.sh respectively. Test that Tomcat is working by starting it and typing http://localhost:8080 into your browser. You should see the Tomcat welcome page with links to documentation and sample code. Verify Tomcat is working by clicking on some of the examples links.
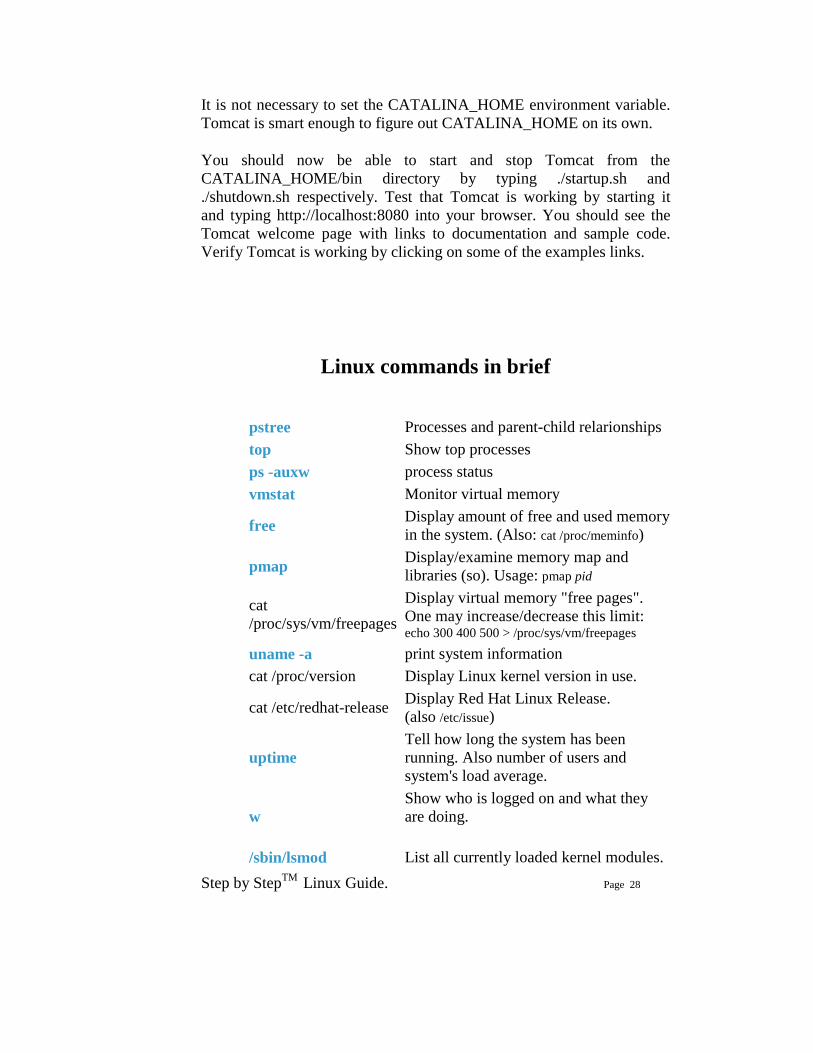
Linux commands in brief
pstree Processes and parent-child relarionships top Show top processes ps -auxw process status vmstat Monitor virtual memory
free Display amount of free and used memory in the system. (Also: cat /proc/meminfo)
pmap Display/examine memory map and libraries (so). Usage: pmap pid
cat /proc/sys/vm/freepages
Display virtual memory "free pages". One may increase/decrease this limit: echo 300 400 500 > /proc/sys/vm/freepages
uname -a print system information cat /proc/version Display Linux kernel version in use.
cat /etc/redhat-release Display Red Hat Linux Release. (also /etc/issue)
uptime Tell how long the system has been running. Also number of users and system's load average.
w Show who is logged on and what they are doing.
/sbin/lsmod List all currently loaded kernel modules.
Step by StepTM Linux Guide. Page 29
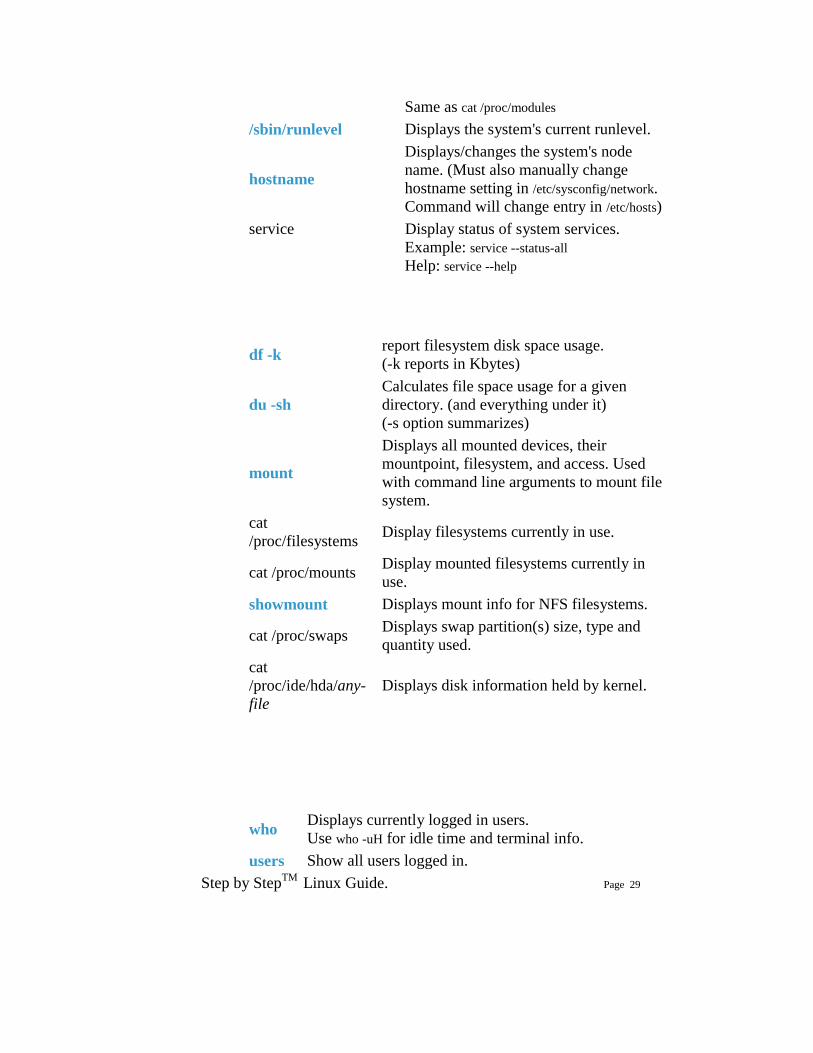
Same as cat /proc/modules /sbin/runlevel Displays the system's current runlevel.
hostname
Displays/changes the system's node name. (Must also manually change hostname setting in /etc/sysconfig/network. Command will change entry in /etc/hosts)
service Display status of system services. Example: service --status-all Help: service --help
df -k report filesystem disk space usage. (-k reports in Kbytes)
du -sh Calculates file space usage for a given directory. (and everything under it) (-s option summarizes)
mount
Displays all mounted devices, their mountpoint, filesystem, and access. Used with command line arguments to mount file system.
cat /proc/filesystems Display filesystems currently in use.
cat /proc/mounts Display mounted filesystems currently in use.
showmount Displays mount info for NFS filesystems.
cat /proc/swaps Displays swap partition(s) size, type and quantity used.
cat /proc/ide/hda/any-file
Displays disk information held by kernel.
who Displays currently logged in users. Use who -uH for idle time and terminal info.
users Show all users logged in.
Step by StepTM Linux Guide. Page 30
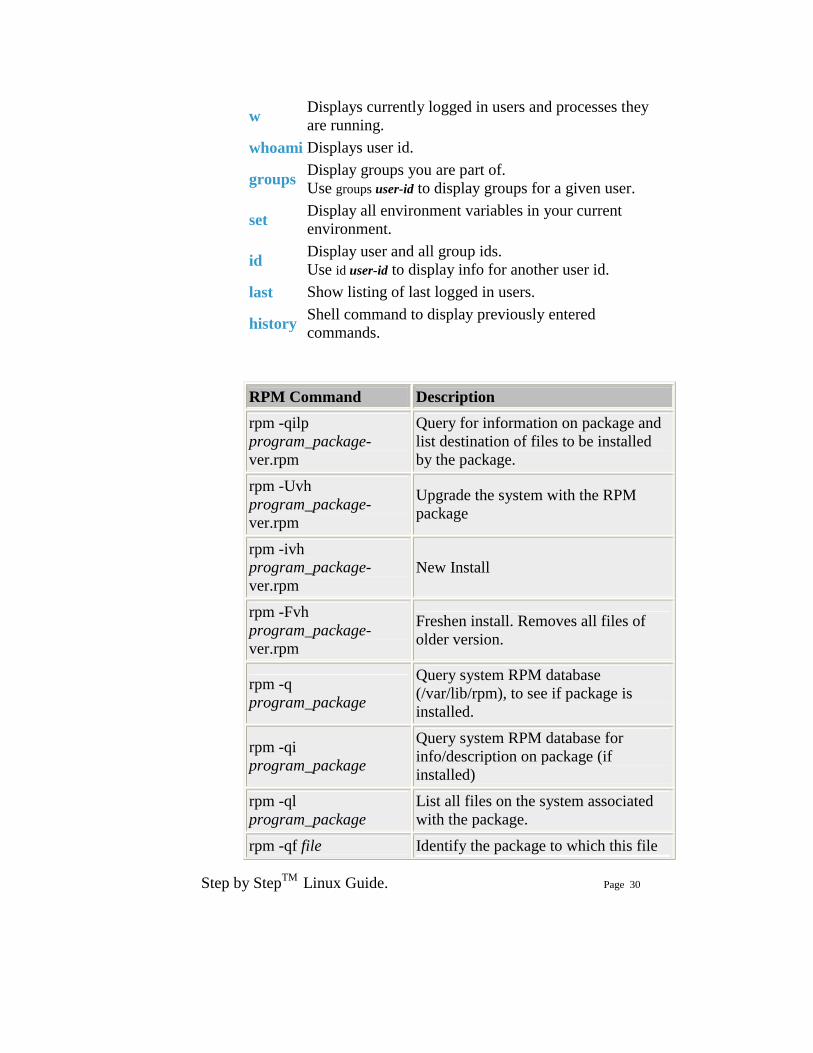
w Displays currently logged in users and processes they are running.
whoami Displays user id.
groups Display groups you are part of. Use groups user-id to display groups for a given user.
set Display all environment variables in your current environment.
id Display user and all group ids. Use id user-id to display info for another user id.
last Show listing of last logged in users.
history Shell command to display previously entered commands.
RPM Command Description rpm -qilp program_package-ver.rpm
Query for information on package and list destination of files to be installed by the package.
rpm -Uvh program_package-ver.rpm
Upgrade the system with the RPM package
rpm -ivh program_package-ver.rpm
New Install
rpm -Fvh program_package-ver.rpm
Freshen install. Removes all files of older version.
rpm -q program_package
Query system RPM database (/var/lib/rpm), to see if package is installed.
rpm -qi program_package
Query system RPM database for info/description on package (if installed)
rpm -ql program_package
List all files on the system associated with the package.
rpm -qf file Identify the package to which this file
Step by StepTM Linux Guide. Page 31
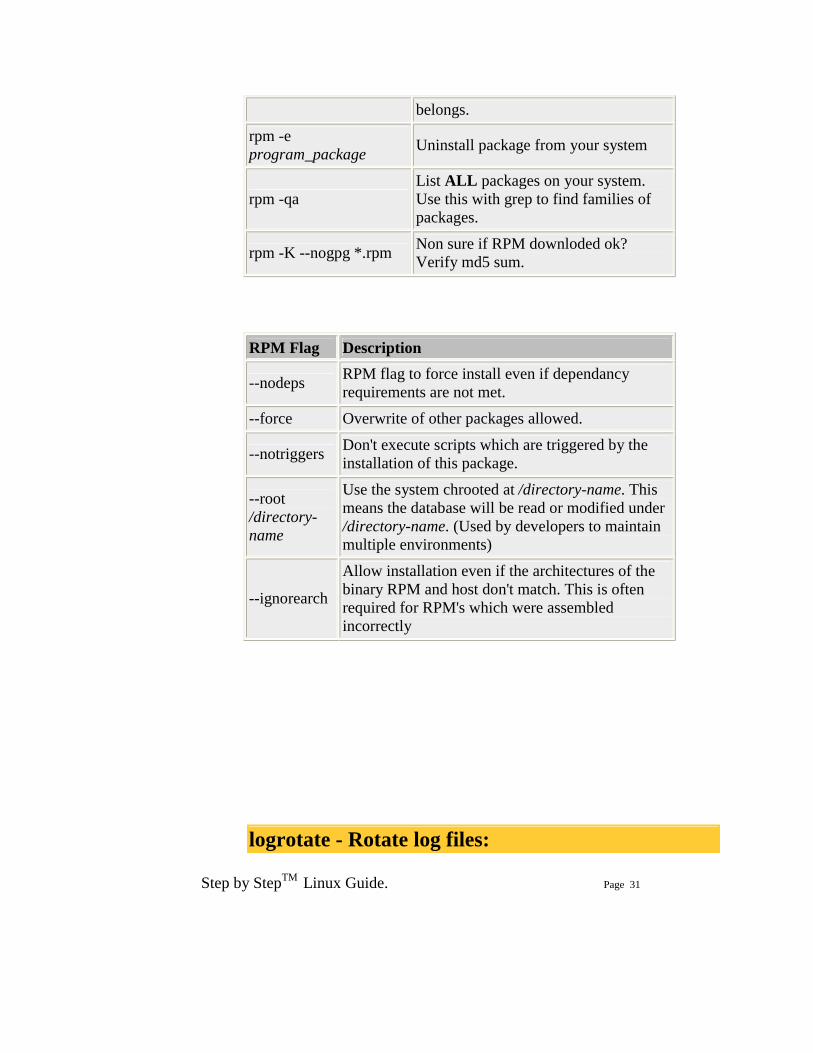
belongs.
rpm -e program_package Uninstall package from your system
rpm -qa List ALL packages on your system. Use this with grep to find families of packages.
rpm -K --nogpg *.rpm Non sure if RPM downloded ok? Verify md5 sum.
RPM Flag Description
--nodeps RPM flag to force install even if dependancy requirements are not met.
--force Overwrite of other packages allowed.
--notriggers Don't execute scripts which are triggered by the installation of this package.
--root /directory-name
Use the system chrooted at /directory-name. This means the database will be read or modified under /directory-name. (Used by developers to maintain multiple environments)
--ignorearch
Allow installation even if the architectures of the binary RPM and host don't match. This is often required for RPM's which were assembled incorrectly
logrotate - Rotate log files:
Step by StepTM Linux Guide. Page 32
Many system and server application programs such as Apache, generate log files. If left unchecked they would grow large enough to burden the system and application. The logrotate program will periodically backup the log file by renameing it. The program will also allow the system administrator to set the limit for the number of logs or their size. There is also the option to compress the backed up files.
Configuration file: /etc/logrotate.conf Directory for logrotate configuration scripts: /etc/logrotate.d/
Example logrotate configuration script: /etc/logrotate.d/process-name
/var/log/process-name.log { rotate 12 monthly errors root@localhost missingok postrotate /usr/bin/killall -HUP process-name 2> /dev/null || true endscript } The configuration file lists the log file to be rotated, the process kill command to momentarily shut down and restart the process, and some configuration parameters listed in the logrotate man page.
Using the find command:
Step by StepTM Linux Guide. Page 33
Find man page
Form of command: find path operators
Ex.
• Search and list all files from current directory and down for the string ABC: find ./ -name "*" -exec grep -H ABC {} \; find ./ -type f -print | xargs grep -H "ABC" /dev/null egrep -r ABC *
• Find all files of a given type from current directory on down:
find ./ -name "*.conf" -print • Find all user files larger than 5Mb:
find /home -size +5000000c -print • Find all files owned by a user (defined by user id number. see
/etc/passwd) on the system: (could take a very long time) find / -user 501 -print
• Find all files created or updated in the last five minutes: (Great for
finding effects of make install) find / -cmin -5
• Find all users in group 20 and change them to group 102: (execute as root)
find / -group 20 -exec chown :102 {} \; • Find all suid and setgid executables:
find / \( -perm -4000 -o -perm -2000 \) -type f -exec ls -ldb {} \; find / -type f -perm +6000 -ls
Note:
Suid executable binaries are programs which switch to root privaleges to perform their tasks. These are created by applying a "stickey" bit: chmod +s. These programs should be watched as they are often the first point of entry for hackers. Thus it is prudent to run this command and remove the "stickey" bits from executables
Step by StepTM Linux Guide. Page 34
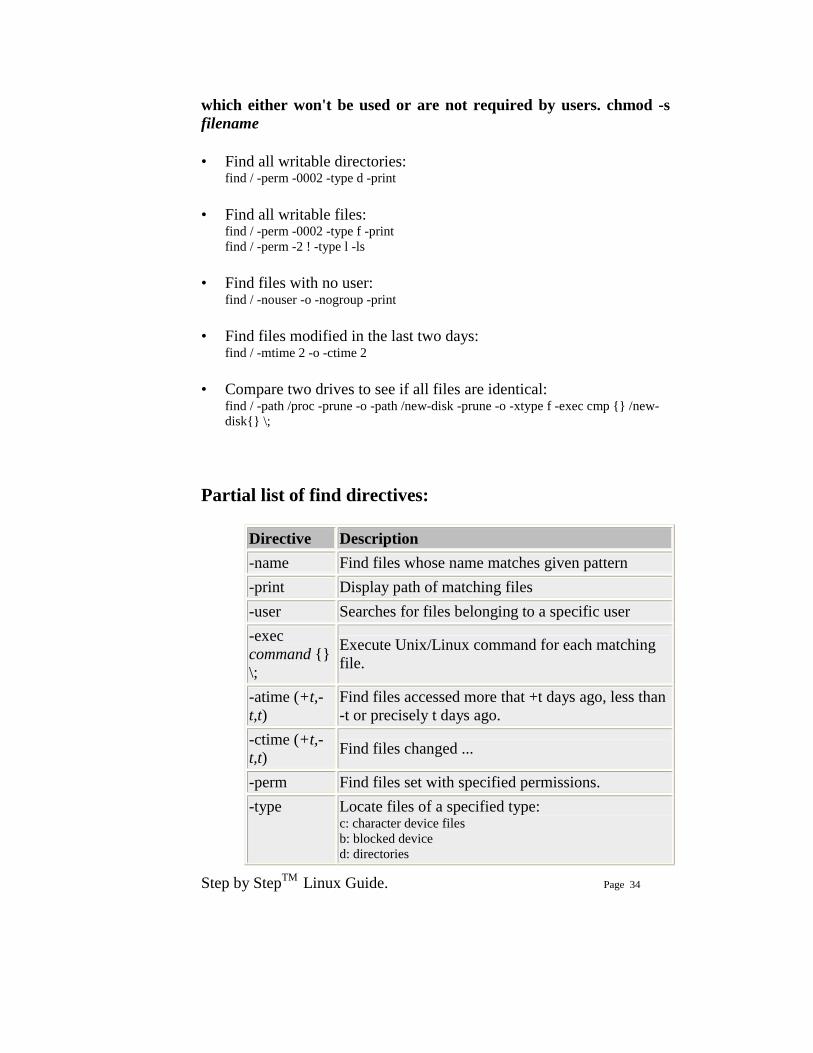
which either won't be used or are not required by users. chmod -s filename
• Find all writable directories: find / -perm -0002 -type d -print
• Find all writable files:
find / -perm -0002 -type f -print find / -perm -2 ! -type l -ls
• Find files with no user:
find / -nouser -o -nogroup -print • Find files modified in the last two days:
find / -mtime 2 -o -ctime 2 • Compare two drives to see if all files are identical:
find / -path /proc -prune -o -path /new-disk -prune -o -xtype f -exec cmp {} /new-disk{} \;
Partial list of find directives:
Directive Description -name Find files whose name matches given pattern -print Display path of matching files -user Searches for files belonging to a specific user -exec command {} \;
Execute Unix/Linux command for each matching file.
-atime (+t,-t,t)
Find files accessed more that +t days ago, less than -t or precisely t days ago.
-ctime (+t,-t,t) Find files changed ...
-perm Find files set with specified permissions. -type Locate files of a specified type:
c: character device files b: blocked device d: directories
Step by StepTM Linux Guide. Page 35
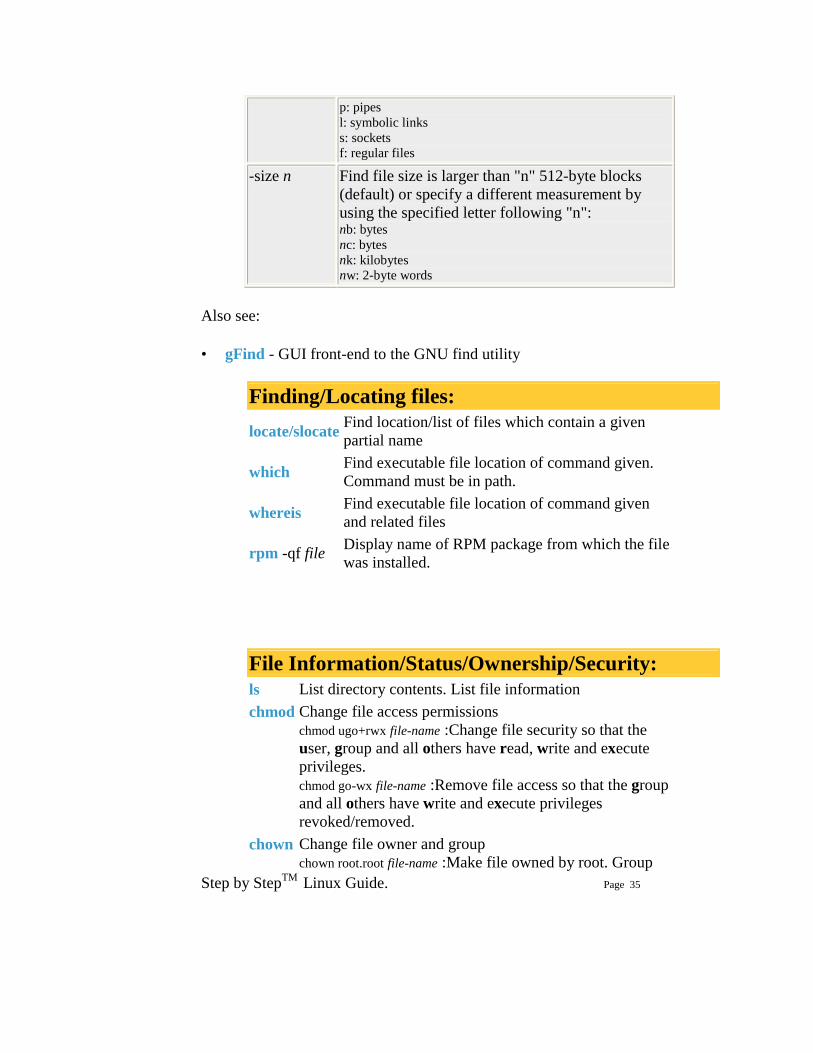
p: pipes l: symbolic links s: sockets f: regular files
-size n Find file size is larger than "n" 512-byte blocks (default) or specify a different measurement by using the specified letter following "n": nb: bytes nc: bytes nk: kilobytes nw: 2-byte words
Also see:
• gFind - GUI front-end to the GNU find utility
Finding/Locating files: locate/slocate Find location/list of files which contain a given
partial name
which Find executable file location of command given. Command must be in path.
whereis Find executable file location of command given and related files
rpm -qf file Display name of RPM package from which the file was installed.
File Information/Status/Ownership/Security: ls List directory contents. List file information chmod Change file access permissions
chmod ugo+rwx file-name :Change file security so that the user, group and all others have read, write and execute privileges. chmod go-wx file-name :Remove file access so that the group and all others have write and execute privileges revoked/removed.
chown Change file owner and group chown root.root file-name :Make file owned by root. Group
Step by StepTM Linux Guide. Page 36
assignment is also root. fuser Identify processes using files or sockets
If you ever get the message: error: cannot get exclusive lock then you may need to kill a process that has the file locked. Either terminate the process through the application interface or using the fuser command: fuser -k file-name
file Identify file type. file file-name Uses /usr/share/magic, /usr/share/magic.mime for file signatures to identify file type. The file extention is NOT used.
cat /proc/ioports List I/O ports used by system. cat /proc/cpuinfo List info about CPU.
CPAN module installation
• Automatically: (preferred) • # perl -MCPAN -e shell - First time through it will ask a
bunch of questions. Answer "no" to the first question for autoconfigure.
• cpan> install Image::Magick • cpan> install IO::String IO::String is up to date.
• cpan> help
Step by StepTM Linux Guide. Page 37
File compression/decompression utilities:
Basic file compression utilities: (and file extensions)
• gzip (.gz): Also see zcat, gunzip, gznew, gzmore compress: gzip file-name decompress: gzip -d file-name.gz
• bzip2 (.bz2): Also see: bunzip2, bzcat, bzip2recover
compress: bzip2 file-name decompress: bunzip2 file-name.bz2
• compress (.Z): (Adaptive Lempel-Ziv compression) Also see:
uncompress, zcat compress: compress file-name decompress: uncompress file-name.Z (Provided by the RPM package ncompress)
• pack (.z): Also see: unpack
compress: pack file-name decompress: unpack file-name.z
• zip (.zip): Compress files or groups of files. (R.P.Byrne compression) Compatable with PC PKZIP files. Also see: unzip compress: zip file-name decompress: unzip file-name.zip
Using TAR (Tape Archive) for simple backups:
It should be noted that automated enterprise wide multi-system backups should use a system such as Amanda. (See Backup/Restore links on YoLinux home page) Simple backups can be performed using the tar command:
tar -cvf /dev/st0 /home /opt
This will backup the files, directories and all it's subdirectories and files of the directories /home and /opt to the first SCSI tape device. (/dev/st0)

Step by StepTM Linux Guide. Page 38
Restoring files from backup:
tar -xvf /dev/st0
Script to perform weekly archive backups: /etc/cron.weekly/backup-weekly.sh
#!/bin/bash tar -cz -f /mnt/BackupServer/user-id/backup-weekly-`date +%F`.tar.gz -C /home/user-id dir-to-back-up Be sure to allow execute permission on the script: chmod ugo+x /etc/cron.weekly/backup-weekly.sh
Manual page for the tar command.
Notes:
• Backup using compression to put more on SCSI tape device: tar -z -cvf /dev/st0 /home /opt
• List contents of tape: tar -tf /dev/st0 • List contents of compressed backup tape: tar -tzf /dev/st0 • Backup directory to a floppy: tar -cvf /dev/fd0 /home/user1
When restored it requires root because the root of the backup is "/home".
• Backup sub-directory to floppy using a relative path: tar -cvf /dev/fd0 src First execute this command to go to the parent directory: cd /home/user1
Step by StepTM Linux Guide. Page 39
• Backup sub-directory to floppy using a defined relative path: tar -cvf /dev/fd0 -C /home/user1 src
• Restore from floppy: tar -xvf /dev/fd0 • Backup directory to a compressed archive file:
tar -z -cvf /usr/local/Backups/backup-03212001.tar.gz -C /home/user2/src project-x List contents: tar -tzf /usr/local/Backups/backup-03212001.tar.gz Restore: cd /home/user2/src tar -xzf /usr/local/Backups/backup-03212001.tar.gz
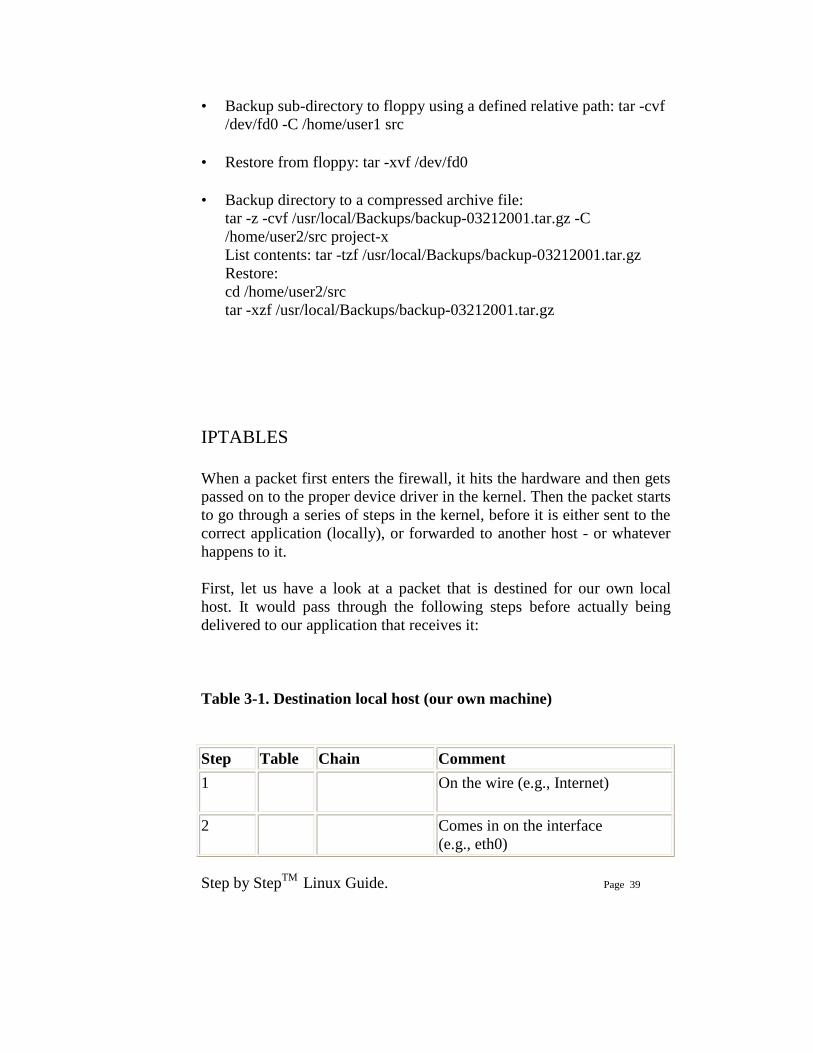
IPTABLES When a packet first enters the firewall, it hits the hardware and then gets passed on to the proper device driver in the kernel. Then the packet starts to go through a series of steps in the kernel, before it is either sent to the correct application (locally), or forwarded to another host - or whatever happens to it. First, let us have a look at a packet that is destined for our own local host. It would pass through the following steps before actually being delivered to our application that receives it: Table 3-1. Destination local host (our own machine) Step Table Chain Comment 1 On the wire (e.g., Internet)
2 Comes in on the interface
(e.g., eth0)
Step by StepTM Linux Guide. Page 40
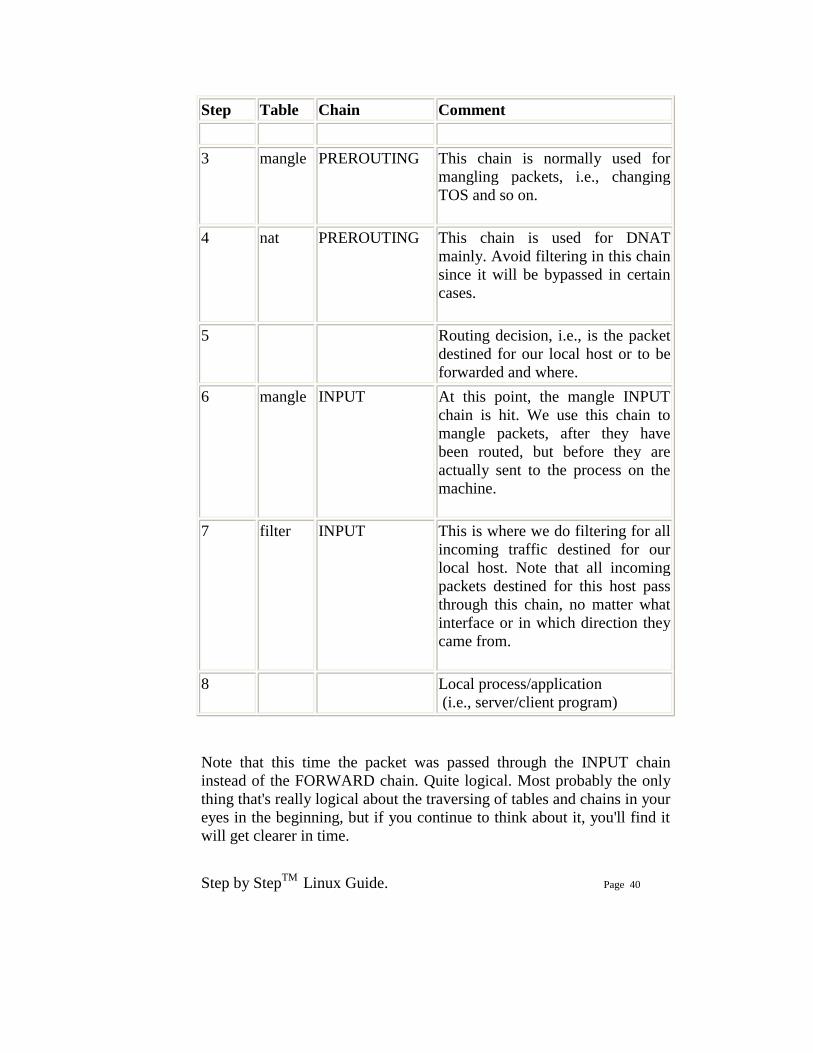
Step Table Chain Comment
3 mangle PREROUTING This chain is normally used for mangling packets, i.e., changing TOS and so on.
4 nat PREROUTING This chain is used for DNAT mainly. Avoid filtering in this chain since it will be bypassed in certain cases.
5 Routing decision, i.e., is the packet destined for our local host or to be forwarded and where.
6 mangle INPUT At this point, the mangle INPUT chain is hit. We use this chain to mangle packets, after they have been routed, but before they are actually sent to the process on the machine.
7 filter INPUT This is where we do filtering for all incoming traffic destined for our local host. Note that all incoming packets destined for this host pass through this chain, no matter what interface or in which direction they came from.
8 Local process/application (i.e., server/client program)
Note that this time the packet was passed through the INPUT chain instead of the FORWARD chain. Quite logical. Most probably the only thing that's really logical about the traversing of tables and chains in your eyes in the beginning, but if you continue to think about it, you'll find it will get clearer in time.
Step by StepTM Linux Guide. Page 41
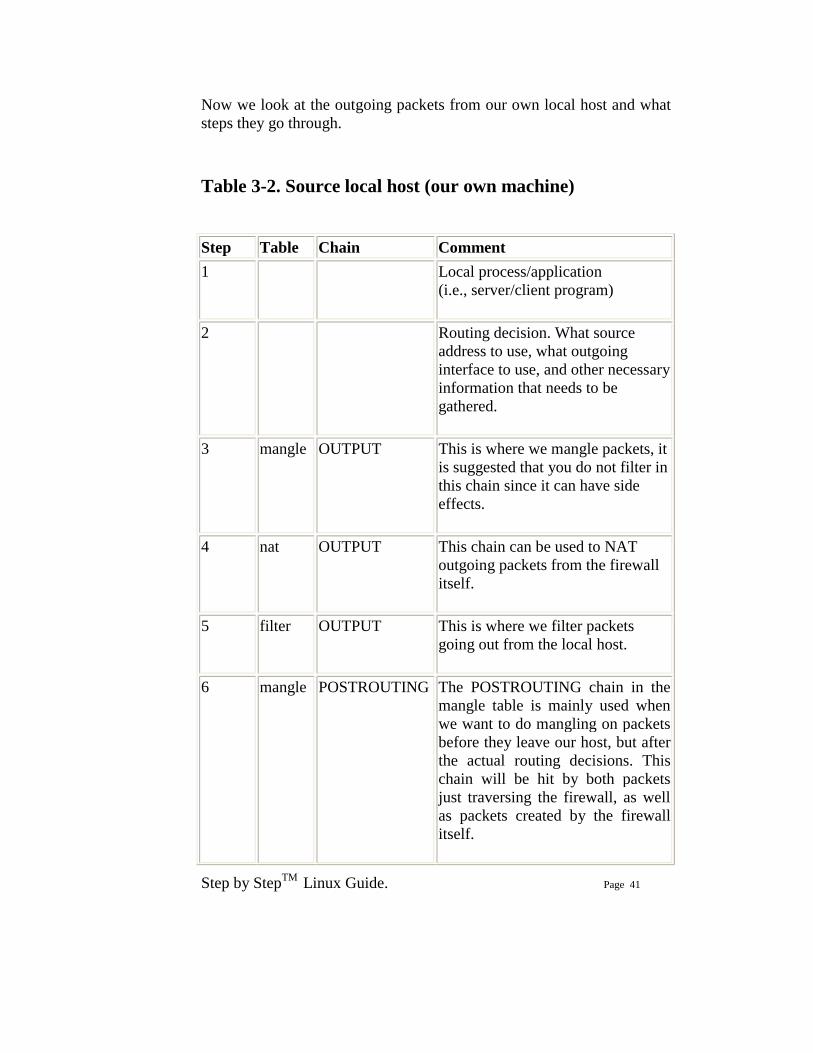
Now we look at the outgoing packets from our own local host and what steps they go through. Table 3-2. Source local host (our own machine) Step Table Chain Comment 1 Local process/application
(i.e., server/client program)
2 Routing decision. What source address to use, what outgoing interface to use, and other necessary information that needs to be gathered.
3 mangle OUTPUT This is where we mangle packets, it is suggested that you do not filter in this chain since it can have side effects.
4 nat OUTPUT This chain can be used to NAT outgoing packets from the firewall itself.
5 filter OUTPUT This is where we filter packets going out from the local host.
6 mangle POSTROUTING The POSTROUTING chain in the mangle table is mainly used when we want to do mangling on packets before they leave our host, but after the actual routing decisions. This chain will be hit by both packets just traversing the firewall, as well as packets created by the firewall itself.
Step by StepTM Linux Guide. Page 42
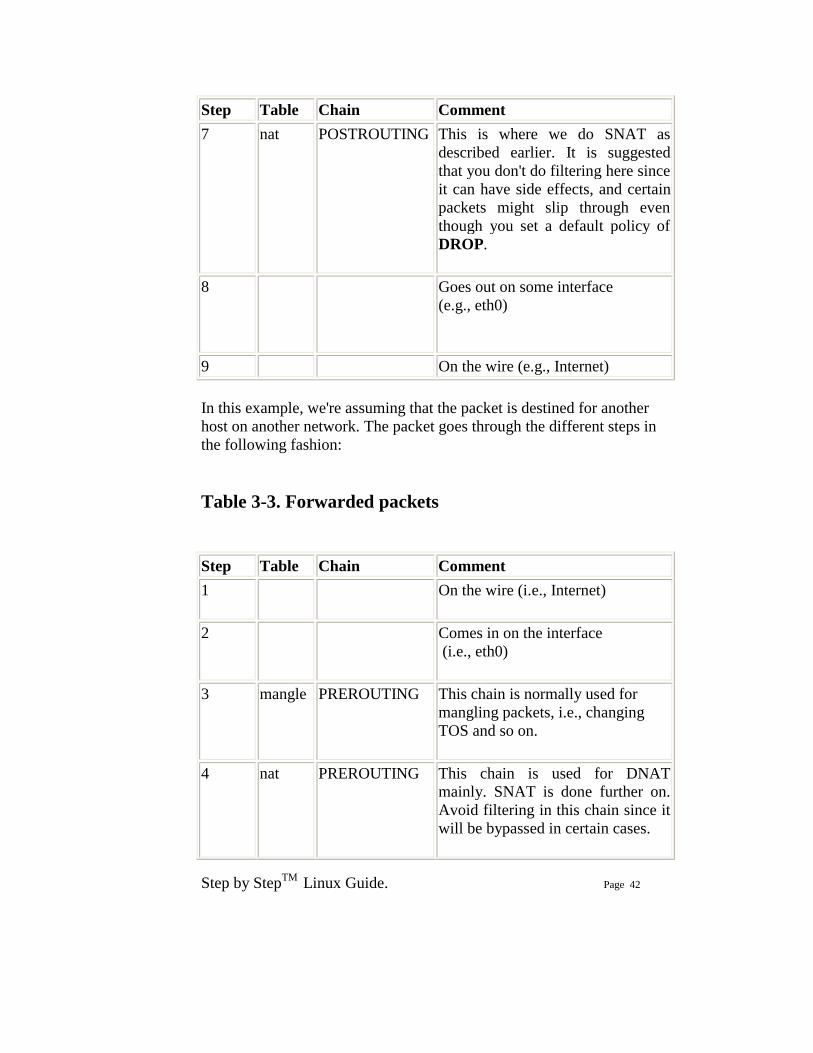
Step Table Chain Comment 7 nat POSTROUTING This is where we do SNAT as
described earlier. It is suggested that you don't do filtering here since it can have side effects, and certain packets might slip through even though you set a default policy of DROP.
8 Goes out on some interface (e.g., eth0)
9 On the wire (e.g., Internet) In this example, we're assuming that the packet is destined for another host on another network. The packet goes through the different steps in the following fashion: Table 3-3. Forwarded packets Step Table Chain Comment 1 On the wire (i.e., Internet)
2 Comes in on the interface
(i.e., eth0)
3 mangle PREROUTING This chain is normally used for mangling packets, i.e., changing TOS and so on.
4 nat PREROUTING This chain is used for DNAT mainly. SNAT is done further on. Avoid filtering in this chain since it will be bypassed in certain cases.

Step by StepTM Linux Guide. Page 43
Step Table Chain Comment 5 Routing decision, i.e., is the packet
destined for our local host or to be forwarded and where.
6 mangle FORWARD The packet is then sent on to the FORWARD chain of the mangle table. This can be used for very specific needs, where we want to mangle the packets after the initial routing decision, but before the last routing decision made just before the packet is sent out.
7 filter FORWARD The packet gets routed onto the FORWARD chain. Only forwarded packets go through here, and here we do all the filtering. Note that all traffic that's forwarded goes through here (not only in one direction), so you need to think about it when writing your rule-set.
8 mangle POSTROUTING This chain is used for specific types of packet mangling that we wish to take place after all kinds of routing decisions has been done, but still on this machine.
9 nat POSTROUTING This chain should first and foremost be used for SNAT. Avoid doing filtering here, since certain packets might pass this chain without ever hitting it. This is also where Masquerading is done.
10 Goes out on the outgoing interface (i.e., eth1).
11 Out on the wire again (i.e., LAN).
Step by StepTM Linux Guide. Page 44
Step Table Chain Comment
As you can see, there are quite a lot of steps to pass through. The packet can be stopped at any of the iptables chains, or anywhere else if it is malformed; however, we are mainly interested in the iptables aspect of this lot. Do note that there are no specific chains or tables for different interfaces or anything like that. FORWARD is always passed by all packets that are forwarded over this firewall/router.
Do not use the INPUT chain to filter on in the previous scenario! INPUT is meant solelyfor packets to our local host that do not get routed to any otherdestination.
We have now seen how the different chains are traversed in three separate scenarios. If we were to figure out a good map of all this, it would look something like this:

Step by StepTM Linux Guide. Page 45
To clarify this image, consider this. If we get a packet into the first routing decision that is not destined for the local machine itself, it will be routed through the FORWARD chain. If the packet is, on the other hand, destined for an IP address that the local machine is listening to, we would send the packet through the INPUT chain and to the local machine.
Step by StepTM Linux Guide. Page 46
Also worth a note, is the fact that packets may be destined for the local machine, but the destination address may be changed within the PREROUTING chain by doing NAT. Since this takes place before the first routing decision, the packet will be looked upon after this change. Because of this, the routing may be changed before the routing decision is done. Do note, that all packets will be going through one or the other path in this image. If you DNAT a packet back to the same network that it came from, it will still travel through the rest of the chains until it is back out on the network.
If you feel that you want more information, you could use the rc.test-iptables.txt script. This test script should give you the necessary rules to test how the tables and chains are traversed.
3.2. mangle table This table should as we've already noted mainly be used for mangling packets. In other words, you may freely use the mangle matches etc that could be used to change TOS (Type Of Service) fields and so on.
You are strongly advised not to use this table for any filtering; nor will any DNAT, SNAT or Masquerading work in this table.
Targets that are only valid in the mangle table:
• TOS • TTL • MARK
Step by StepTM Linux Guide. Page 47
The TOS target is used to set and/or change the Type of Service field in the packet. This could be used for setting up policies on the network regarding how a packet should be routed and so on. Note that this has not been perfected and is not really implemented on the Internet and most of the routers don't care about the value in this field, and sometimes, they act faulty on what they get. Don't set this in other words for packets going to the Internet unless you want to make routing decisions on it, with iproute2. The TTL target is used to change the TTL (Time To Live) field of the packet. We could tell packets to only have a specific TTL and so on. One good reason for this could be that we don't want to give ourself away to nosy Internet Service Providers. Some Internet Service Providers do not like users running multiple computers on one single connection, and there are some Internet Service Providers known to look for a single host generating different TTL values, and take this as one of many signs of multiple computers connected to a single connection. The MARK target is used to set special mark values to the packet. These marks could then be recognized by the iproute2 programs to do different routing on the packet depending on what mark they have, or if they don't have any. We could also do bandwidth limiting and Class Based Queuing based on these marks.
3.3. nat table This table should only be used for NAT (Network Address Translation) on different packets. In other words, it should only be used to translate the packet's source field or destination field. Note that, as we have said before, only the first packet in a stream will hit this chain. After this, the rest of the packets will automatically have the same action taken on them as the first packet. The actual targets that do these kind of things are:
• DNAT • SNAT • MASQUERADE
The DNAT target is mainly used in cases where you have a public IP and want to redirect accesses to the firewall to some other host (on a
Step by StepTM Linux Guide. Page 48
DMZ for example). In other words, we change the destination address of the packet and reroute it to the host. SNAT is mainly used for changing the source address of packets. For the most part you'll hide your local networks or DMZ, etc. A very good example would be that of a firewall of which we know outside IP address, but need to substitute our local network's IP numbers with that of our firewall. With this target the firewall will automatically SNAT and De-SNAT the packets, hence making it possible to make connections from the LAN to the Internet. If your network uses 192.168.0.0/netmask for example, the packets would never get back from the Internet, because IANA has regulated these networks (among others) as private and only for use in isolated LANs. The MASQUERADE target is used in exactly the same way as SNAT, but the MASQUERADE target takes a little bit more overhead to compute. The reason for this, is that each time that the MASQUERADE target gets hit by a packet, it automatically checks for the IP address to use, instead of doing as the SNAT target does - just using the single configured IP address. The MASQUERADE target makes it possible to work properly with Dynamic DHCP IP addresses that your ISP might provide for your PPP, PPPoE or SLIP connections to the Internet.
3.4. Filter table The filter table is mainly used for filtering packets. We can match packets and filter them in whatever way we want. This is the place that we actually take action against packets and look at what they contain and DROP or /ACCEPT them, depending on their content. Of course we may also do prior filtering; however, this particular table, is the place for which filtering was designed. Almost all targets are usable in this chain. We will be more prolific about the filter table here; however you now know that this table is the right place to do your main filtering.

Step by StepTM Linux Guide. Page 49
Chapter 4. The state machine This chapter will deal with the state machine and explain it in detail. After reading trough it, you should have a complete understanding of how the State machine works. We will also go through a large set of examples on how states are dealt within the state machine itself. These should clarify everything in practice.
4.1. Introduction The state machine is a special part within iptables that should really not be called the state machine at all, since it is really a connection tracking machine. However, most people recognize it under the first name. Throughout this chapter i will use this names more or less as if they where synonymous. This should not be overly confusing. Connection tracking is done to let the Netfilter framework know the state of a specific connection. Firewalls that implement this are generally called stateful firewalls. A stateful firewall is generally much more secure than non-stateful firewalls since it allows us to write much tighter rule-sets. Within iptables, packets can be related to tracked connections in four different so called states. These are known as NEW, ESTABLISHED, RELATED and INVALID. We will discuss each of these in more depth later. With the --state match we can easily control who or what is allowed to initiate new sessions. All of the connection tracking is done by special framework within the kernel called conntrack. conntrack may be loaded either as a module, or as an internal part of the kernel itself. Most of the time, we need and want more specific connection tracking than the default conntrack engine can maintain. Because of this, there are also more specific parts of conntrack that handles the TCP, UDP or ICMP protocols among others. These modules grabs specific, unique, information from the packets, so that they may keep track of each stream of data. The information that conntrack gathers is then used to tell conntrack in which state the stream is currently in. For example, UDP streams are, generally, uniquely
Step by StepTM Linux Guide. Page 50
identified by their destination IP address, source IP address, destination port and source port. In previous kernels, we had the possibility to turn on and off defragmentation. However, since iptables and Netfilter were introduced and connection tracking in particular, this option was gotten rid of. The reason for this is that connection tracking can not work properly without defragmenting packets, and hence defragmenting has been incorporated into conntrack and is carried out automatically. It can not be turned off, except by turning off connection tracking. Defragmentation is always carried out if connection tracking is turned on. All connection tracking is handled in the PREROUTING chain, except locally generated packets which are handled in the OUTPUT chain. What this means is that iptables will do all recalculation of states and so on within the PREROUTING chain. If we send the initial packet in a stream, the state gets set to NEW within the OUTPUT chain, and when we receive a return packet, the state gets changed in the PREROUTING chain to ESTABLISHED, and so on. If the first packet is not originated by ourself, the NEW state is set within the PREROUTING chain of course. So, all state changes and calculations are done within the PREROUTING and OUTPUT chains of the nat table.
4.2. The conntrack entries Let's take a brief look at a conntrack entry and how to read them in /proc/net/ip_conntrack. This gives a list of all the current entries in your conntrack database. If you have the ip_conntrack module loaded, a cat of /proc/net/ip_conntrack might look like: Tcp 6 117 SYN_SENT src=192.168.1.6 dst=192.168.1.9 sport=32775 \ dport=22 [UNREPLIED] src=192.168.1.9 dst=192.168.1.6 sport=22 \ dport=32775 use=2

Step by StepTM Linux Guide. Page 51
This example contains all the information that the conntrack module maintains to know which state a specific connection is in. First of all, we have a protocol, which in this case is tcp. Next, the same value in normal decimal coding. After this, we see how long this conntrack entry has to live. This value is set to 117 seconds right now and is decremented regularly until we see more traffic. This value is then reset to the default value for the specific state that it is in at that relevant point of time. Next comes the actual state that this entry is in at the present point of time. In the above mentioned case we are looking at a packet that is in the SYN_SENT state. The internal value of a connection is slightly different from the ones used externally with iptables. The value SYN_SENT tells us that we are looking at a connection that has only seen a TCP SYN packet in one direction. Next, we see the source IP address, destination IP address, source port and destination port. At this point we see a specific keyword that tells us that we have seen no return traffic for this connection. Lastly, we see what we expect of return packets. The information details the source IP address and destination IP address (which are both inverted, since the packet is to be directed back to us). The same thing goes for the source port and destination port of the connection. These are the values that should be of any interest to us. The connection tracking entries may take on a series of different values, all specified in the conntrack headers available in linux/include/netfilter-ipv4/ip_conntrack*.h files. These values are dependent on which sub-protocol of IP we use. TCP, UDP or ICMP protocols take specific default values as specified in linux/include/netfilter-ipv4/ip_conntrack.h . We will look closer at this when we look at each of the protocols; however, we will not use them extensively through this chapter, since they are not used outside of the conntrack internals. Also, depending on how this state changes, the default value of the time until the connection is destroyed will also change.
Step by StepTM Linux Guide. Page 52
Recently there was a new patch made available in iptables patch-o-matic, called tcp-window-tracking. This patch adds, among other things, all of the above timeouts to special sysctl variables, which means that they can be changed on the fly, while the system is still running. Hence, this makes it unnecessary to recompile the kernel every time you want to change the timeouts. These can be altered via using specific system calls available in the /proc/sys/net/ipv4/netfilter directory. You should in particular look at the /proc/sys/net/ipv4/netfilter/ip_ct_* variables.
When a connection has seen traffic in both directions, the conntrack entry will erase the [UNREPLIED] flag, and then reset it. The entry tells us that the connection has not seen any traffic in both directions, will be replaced by the [ASSURED] flag, to be found close to the end of the entry. The [ASSURED] flag tells us that this connection is assured and that it will not be erased if we reach the maximum possible tracked connections. Thus, connections marked as [ASSURED] will not be erased, contrary to the non assured connections (those not marked as [ASSURED]). How many connections that the connection tracking table can hold depends upon a variable that can be set through the ip-sysctl functions in recent kernels. The default value held by this entry varies heavily depending on how much memory you have. On 128 MB of RAM you will get 8192 possible entries, and at 256 MB of RAM, you will get 16376 entries. You can read and set your settings through the /proc/sys/net/ipv4/ip_conntrack_max setting.
4.3. User-land states As you have seen, packets may take on several different states within the kernel itself, depending on what protocol we are talking about. However, outside the kernel, we only have the 4 states as described previously. These states can mainly be used in conjunction with the state match which will then be able to match packets based on their current
Step by StepTM Linux Guide. Page 53
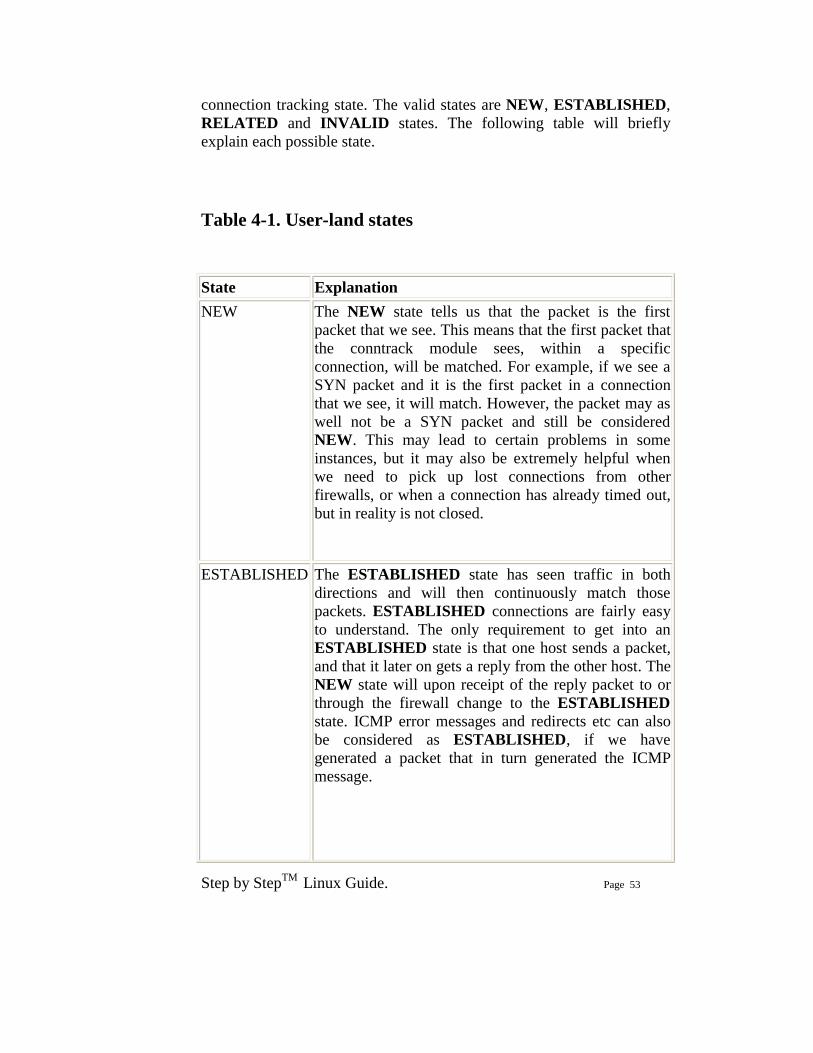
connection tracking state. The valid states are NEW, ESTABLISHED, RELATED and INVALID states. The following table will briefly explain each possible state.
Table 4-1. User-land states
State Explanation NEW The NEW state tells us that the packet is the first
packet that we see. This means that the first packet that the conntrack module sees, within a specific connection, will be matched. For example, if we see a SYN packet and it is the first packet in a connection that we see, it will match. However, the packet may as well not be a SYN packet and still be considered NEW. This may lead to certain problems in some instances, but it may also be extremely helpful when we need to pick up lost connections from other firewalls, or when a connection has already timed out, but in reality is not closed.
ESTABLISHED The ESTABLISHED state has seen traffic in both directions and will then continuously match those packets. ESTABLISHED connections are fairly easy to understand. The only requirement to get into an ESTABLISHED state is that one host sends a packet, and that it later on gets a reply from the other host. The NEW state will upon receipt of the reply packet to or through the firewall change to the ESTABLISHED state. ICMP error messages and redirects etc can also be considered as ESTABLISHED, if we have generated a packet that in turn generated the ICMP message.
Step by StepTM Linux Guide. Page 54
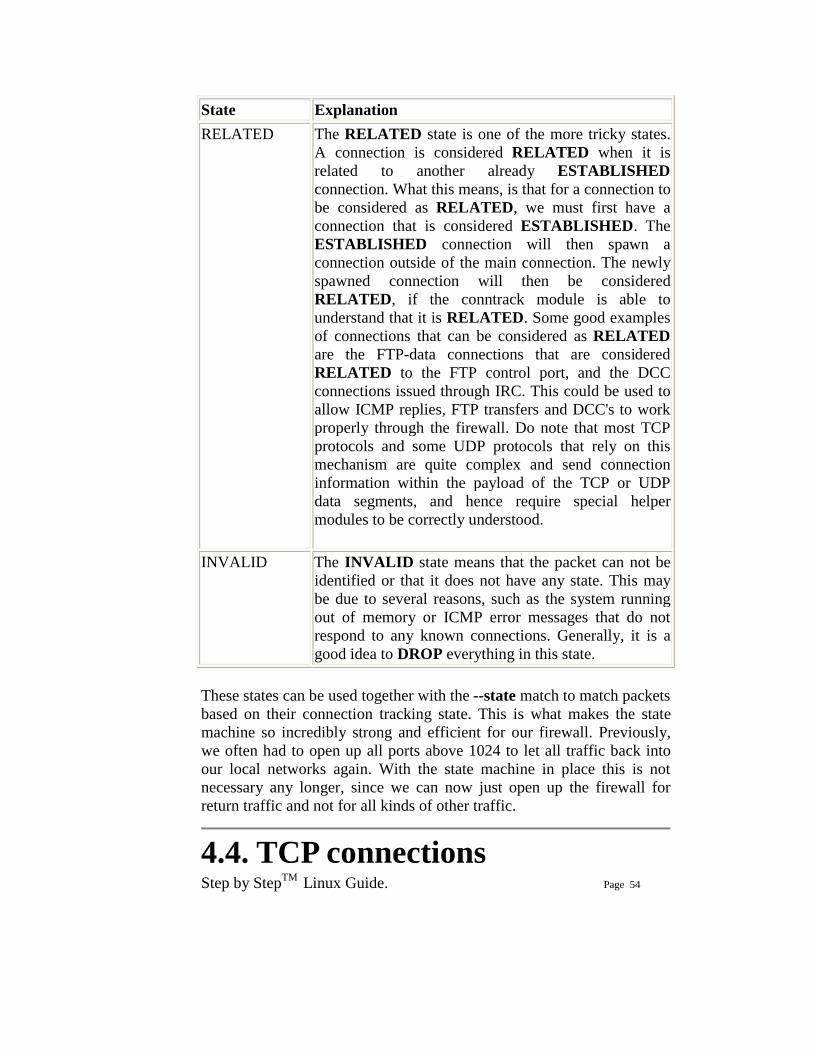
State Explanation RELATED The RELATED state is one of the more tricky states.
A connection is considered RELATED when it is related to another already ESTABLISHED connection. What this means, is that for a connection to be considered as RELATED, we must first have a connection that is considered ESTABLISHED. The ESTABLISHED connection will then spawn a connection outside of the main connection. The newly spawned connection will then be considered RELATED, if the conntrack module is able to understand that it is RELATED. Some good examples of connections that can be considered as RELATED are the FTP-data connections that are considered RELATED to the FTP control port, and the DCC connections issued through IRC. This could be used to allow ICMP replies, FTP transfers and DCC's to work properly through the firewall. Do note that most TCP protocols and some UDP protocols that rely on this mechanism are quite complex and send connection information within the payload of the TCP or UDP data segments, and hence require special helper modules to be correctly understood.
INVALID The INVALID state means that the packet can not be identified or that it does not have any state. This may be due to several reasons, such as the system running out of memory or ICMP error messages that do not respond to any known connections. Generally, it is a good idea to DROP everything in this state.
These states can be used together with the --state match to match packets based on their connection tracking state. This is what makes the state machine so incredibly strong and efficient for our firewall. Previously, we often had to open up all ports above 1024 to let all traffic back into our local networks again. With the state machine in place this is not necessary any longer, since we can now just open up the firewall for return traffic and not for all kinds of other traffic.
4.4. TCP connections

Step by StepTM Linux Guide. Page 55
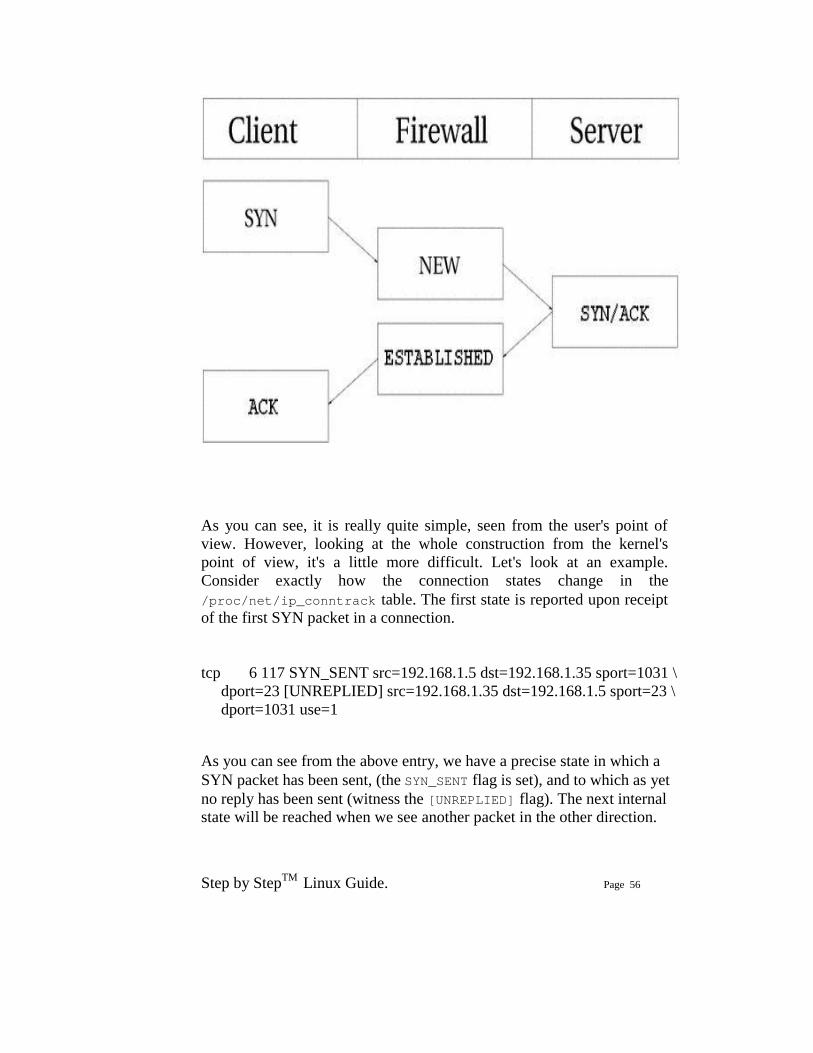
In this section and the upcoming ones, we will take a closer look at the states and how they are handled for each of the three basic protocols TCP, UDP and ICMP. Also, we will take a closer look at how connections are handled per default, if they can not be classified as either of these three protocols. We have chosen to start out with the TCP protocol since it is a stateful protocol in itself, and has a lot of interesting details with regard to the state machine in iptables. A TCP connection is always initiated with the 3-way handshake, which establishes and negotiates the actual connection over which data will be sent. The whole session is begun with a SYN packet, then a SYN/ACK packet and finally an ACK packet to acknowledge the whole session establishment. At this point the connection is established and able to start sending data. The big problem is, how does connection tracking hook up into this? Quite simply really. As far as the user is concerned, connection tracking works basically the same for all connection types. Have a look at the picture below to see exactly what state the stream enters during the different stages of the connection. As you can see, the connection tracking code does not really follow the flow of the TCP connection, from the users viewpoint. Once it has seen one packet(the SYN), it considers the connection as NEW. Once it sees the return packet(SYN/ACK), it considers the connection as ESTABLISHED. If you think about this a second, you will understand why. With this particular implementation, you can allow NEW and ESTABLISHED packets to leave your local network, only allow ESTABLISHED connections back, and that will work perfectly. Conversely, if the connection tracking machine were to consider the whole connection establishment as NEW, we would never really be able to stop outside connections to our local network, since we would have to allow NEW packets back in again. To make things more complicated, there is a number of other internal states that are used for TCP connections inside the kernel, but which are not available for us in User-land. Roughly, they follow the state standards specified within RFC 793 - Transmission Control Protocol at page 21-23. We will consider these in more detail further along in this section.
Step by StepTM Linux Guide. Page 56
As you can see, it is really quite simple, seen from the user's point of view. However, looking at the whole construction from the kernel's point of view, it's a little more difficult. Let's look at an example. Consider exactly how the connection states change in the /proc/net/ip_conntrack table. The first state is reported upon receipt of the first SYN packet in a connection. tcp 6 117 SYN_SENT src=192.168.1.5 dst=192.168.1.35 sport=1031 \ dport=23 [UNREPLIED] src=192.168.1.35 dst=192.168.1.5 sport=23 \ dport=1031 use=1 As you can see from the above entry, we have a precise state in which a SYN packet has been sent, (the SYN_SENT flag is set), and to which as yet no reply has been sent (witness the [UNREPLIED] flag). The next internal state will be reached when we see another packet in the other direction.
Step by StepTM Linux Guide. Page 57
tcp 6 57 SYN_RECV src=192.168.1.5 dst=192.168.1.35 sport=1031 \ dport=23 src=192.168.1.35 dst=192.168.1.5 sport=23 dport=1031 \ use=1 Now we have received a corresponding SYN/ACK in return. As soon as this packet has been received, the state changes once again, this time to SYN_RECV. SYN_RECV tells us that the original SYN was delivered correctly and that the SYN/ACK return packet also got through the firewall properly. Moreover, this connection tracking entry has now seen traffic in both directions and is hence considered as having been replied to. This is not explicit, but rather assumed, as was the [UNREPLIED] flag above. The final step will be reached once we have seen the final ACK in the 3-way handshake. tcp 6 431999 ESTABLISHED src=192.168.1.5 dst=192.168.1.35 \ sport=1031 dport=23 src=192.168.1.35 dst=192.168.1.5 \ sport=23 dport=1031 use=1 In the last example, we have gotten the final ACK in the 3-way handshake and the connection has entered the ESTABLISHED state, as far as the internal mechanisms of iptables are aware. After a few more packets, the connection will also become [ASSURED], as shown in the introduction section of this chapter. When a TCP connection is closed down, it is done in the following way and takes the following states.

Step by StepTM Linux Guide. Page 58
As you can see, the connection is never really closed until the last ACK is sent. Do note that this picture only describes how it is closed down under normal circumstances. A connection may also, for example, be closed by sending a RST(reset), if the connection were to be refused. In this case, the connection would be closed down after a predetermined time. When the TCP connection has been closed down, the connection enters the TIME_WAIT state, which is per default set to 2 minutes. This is used so that all packets that have gotten out of order can still get through our rule-set, even after the connection has already closed. This is used as a kind of buffer time so that packets that have gotten stuck in one or another congested router can still get to the firewall, or to the other end of the connection.
Step by StepTM Linux Guide. Page 59
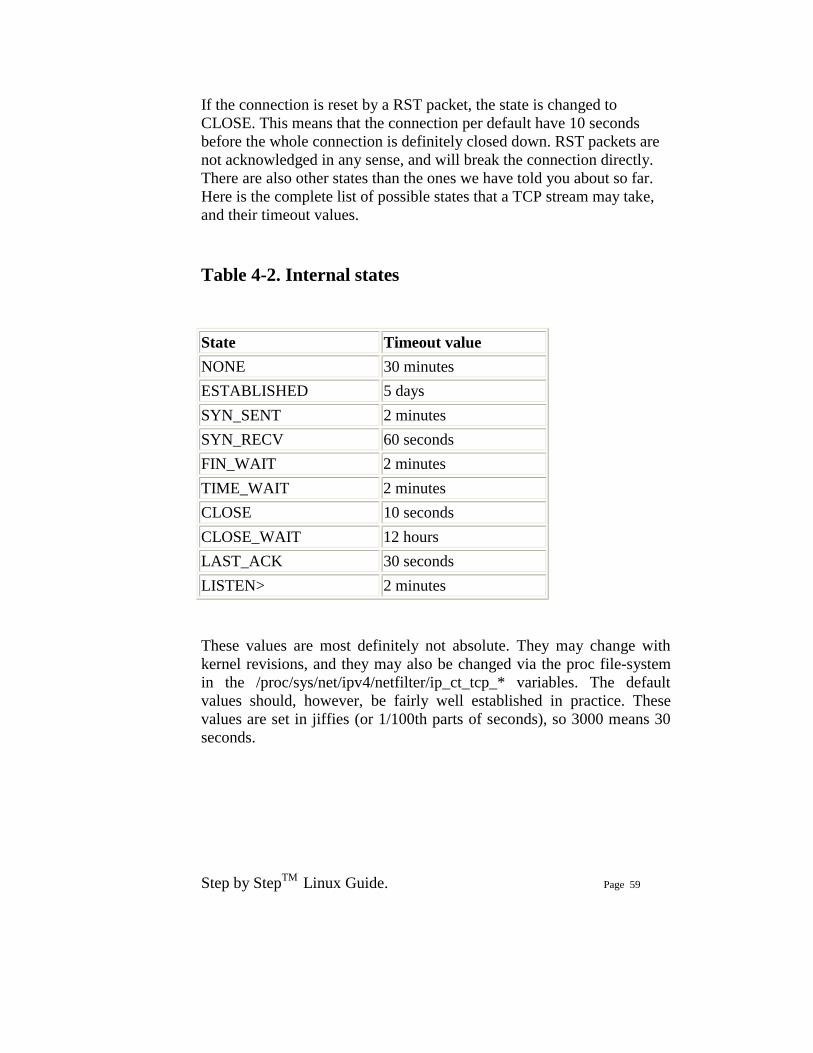
If the connection is reset by a RST packet, the state is changed to CLOSE. This means that the connection per default have 10 seconds before the whole connection is definitely closed down. RST packets are not acknowledged in any sense, and will break the connection directly. There are also other states than the ones we have told you about so far. Here is the complete list of possible states that a TCP stream may take, and their timeout values. Table 4-2. Internal states State Timeout value NONE 30 minutes ESTABLISHED 5 days SYN_SENT 2 minutes SYN_RECV 60 seconds FIN_WAIT 2 minutes TIME_WAIT 2 minutes CLOSE 10 seconds CLOSE_WAIT 12 hours LAST_ACK 30 seconds LISTEN> 2 minutes These values are most definitely not absolute. They may change with kernel revisions, and they may also be changed via the proc file-system in the /proc/sys/net/ipv4/netfilter/ip_ct_tcp_* variables. The default values should, however, be fairly well established in practice. These values are set in jiffies (or 1/100th parts of seconds), so 3000 means 30 seconds.
Step by StepTM Linux Guide. Page 60
Also note that the User-land side of the state machine does not look at TCP flags set in the TCP packets. This is generally bad, since you may want to allow packets in the NEW state to get through the firewall, but when you specify the NEW flag, you will in most cases mean SYN packets. This is not what happens with the current state implementation; instead, even a packet with no bit set or an ACK flag, will count as NEW and if you match on NEW packets. This can be used for redundant firewalling and so on, but it is generally extremely bad on your home network, where you only have a single firewall. To get around this behavior, you could use the command explained in the State NEW packets but no SYN bit set section of the Common problems and questions appendix. Another way is to install the tcp-window-tracking extension from patch-o-matic, which will make the firewall able to track states depending on the TCP window settings.
4.5. UDP connections UDP connections are in them selves not stateful connections, but rather stateless. There are several reasons why, mainly because they don't contain any connection establishment or connection closing; most of all they lack sequencing. Receiving two UDP datagrams in a specific order does not say anything about which order in which they where sent. It is, however, still possible to set states on the connections within the kernel. Let's have a look at how a connection can be tracked and how it might look in conntrack.
Step by StepTM Linux Guide. Page 61
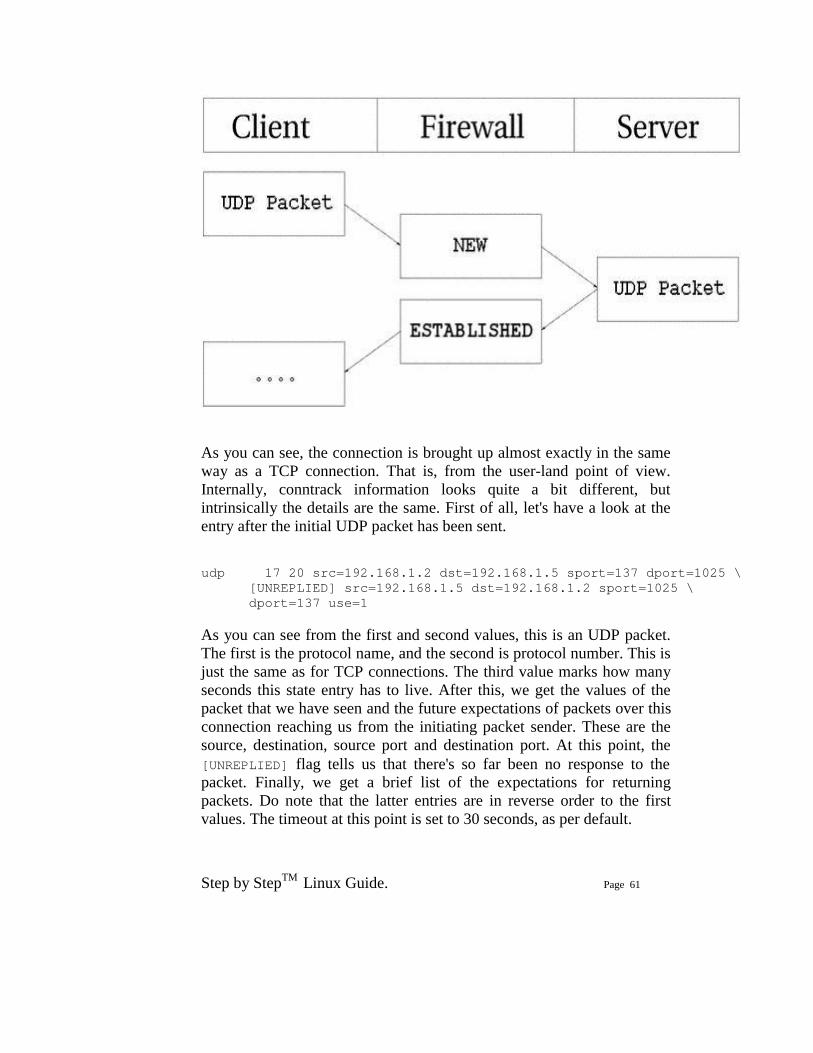
As you can see, the connection is brought up almost exactly in the same way as a TCP connection. That is, from the user-land point of view. Internally, conntrack information looks quite a bit different, but intrinsically the details are the same. First of all, let's have a look at the entry after the initial UDP packet has been sent. udp 17 20 src=192.168.1.2 dst=192.168.1.5 sport=137 dport=1025 \ [UNREPLIED] src=192.168.1.5 dst=192.168.1.2 sport=1025 \ dport=137 use=1 As you can see from the first and second values, this is an UDP packet. The first is the protocol name, and the second is protocol number. This is just the same as for TCP connections. The third value marks how many seconds this state entry has to live. After this, we get the values of the packet that we have seen and the future expectations of packets over this connection reaching us from the initiating packet sender. These are the source, destination, source port and destination port. At this point, the [UNREPLIED] flag tells us that there's so far been no response to the packet. Finally, we get a brief list of the expectations for returning packets. Do note that the latter entries are in reverse order to the first values. The timeout at this point is set to 30 seconds, as per default.
Step by StepTM Linux Guide. Page 62
udp 17 170 src=192.168.1.2 dst=192.168.1.5 sport=137 \ dport=1025 src=192.168.1.5 dst=192.168.1.2 sport=1025 \ dport=137 use=1 At this point the server has seen a reply to the first packet sent out and the connection is now considered as ESTABLISHED. This is not shown in the connection tracking, as you can see. The main difference is that the [UNREPLIED] flag has now gone. Moreover, the default timeout has changed to 180 seconds - but in this example that's by now been decremented to 170 seconds - in 10 seconds' time, it will be 160 seconds. There's one thing that's missing, though, and can change a bit, and that is the [ASSURED] flag described above. For the [ASSURED] flag to be set on a tracked connection, there must have been a small amount of traffic over that connection. udp 17 175 src=192.168.1.5 dst=195.22.79.2 sport=1025 \ dport=53 src=195.22.79.2 dst=192.168.1.5 sport=53 \ dport=1025 [ASSURED] use=1 At this point, the connection has become assured. The connection looks exactly the same as the previous example, except for the [ASSURED] flag. If this connection is not used for 180 seconds, it times out. 180 Seconds is a comparatively low value, but should be sufficient for most use. This value is reset to its full value for each packet that matches the same entry and passes through the firewall, just the same as for all of the internal states.
Step by StepTM Linux Guide. Page 63
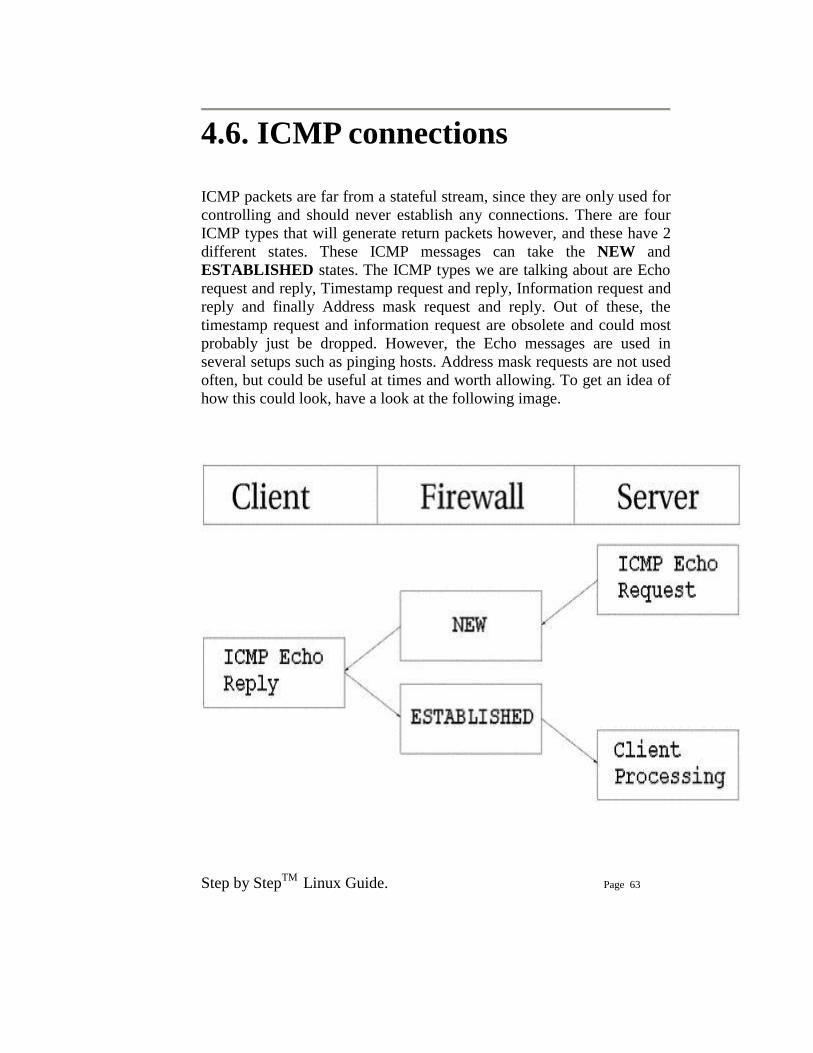
4.6. ICMP connections ICMP packets are far from a stateful stream, since they are only used for controlling and should never establish any connections. There are four ICMP types that will generate return packets however, and these have 2 different states. These ICMP messages can take the NEW and ESTABLISHED states. The ICMP types we are talking about are Echo request and reply, Timestamp request and reply, Information request and reply and finally Address mask request and reply. Out of these, the timestamp request and information request are obsolete and could most probably just be dropped. However, the Echo messages are used in several setups such as pinging hosts. Address mask requests are not used often, but could be useful at times and worth allowing. To get an idea of how this could look, have a look at the following image.
Step by StepTM Linux Guide. Page 64
As you can see in the above picture, the host sends an echo request to the target, which is considered as NEW by the firewall. The target then responds with a echo reply which the firewall considers as state ESTABLISHED. When the first echo request has been seen, the following state entry goes into the ip_conntrack. icmp 1 25 src=192.168.1.6 dst=192.168.1.10 type=8 code=0 \ id=33029 [UNREPLIED] src=192.168.1.10 dst=192.168.1.6 \ type=0 code=0 id=33029 use=1 This entry looks a little bit different from the standard states for TCP and UDP as you can see. The protocol is there, and the timeout, as well as source and destination addresses. The problem comes after that however. We now have 3 new fields called type, code and id. They are not special in any way, the type field contains the ICMP type and the code field contains the ICMP code. These are all available in ICMP types appendix. The final id field, contains the ICMP ID. Each ICMP packet gets an ID set to it when it is sent, and when the receiver gets the ICMP message, it sets the same ID within the new ICMP message so that the sender will recognize the reply and will be able to connect it with the correct ICMP request. The next field, we once again recognize as the [UNREPLIED] flag, which we have seen before. Just as before, this flag tells us that we are currently looking at a connection tracking entry that has seen only traffic in one direction. Finally, we see the reply expectation for the reply ICMP packet, which is the inversion of the original source and destination IP addresses. As for the type and code, these are changed to the correct values for the return packet, so an echo request is changed to echo reply and so on. The ICMP ID is preserved from the request packet. The reply packet is considered as being ESTABLISHED, as we have already explained. However, we can know for sure that after the ICMP reply, there will be absolutely no more legal traffic in the same connection. For this reason, the connection tracking entry is destroyed once the reply has traveled all the way through the Netfilter structure.
Step by StepTM Linux Guide. Page 65
In each of the above cases, the request is considered as NEW, while the reply is considered as ESTABLISHED. Let's consider this more closely. When the firewall sees a request packet, it considers it as NEW. When the host sends a reply packet to the request it is considered ESTABLISHED.
Note that this means that the reply packet must match the criterion given by the connection tracking entry to be considered as established, just as with all other traffic types.
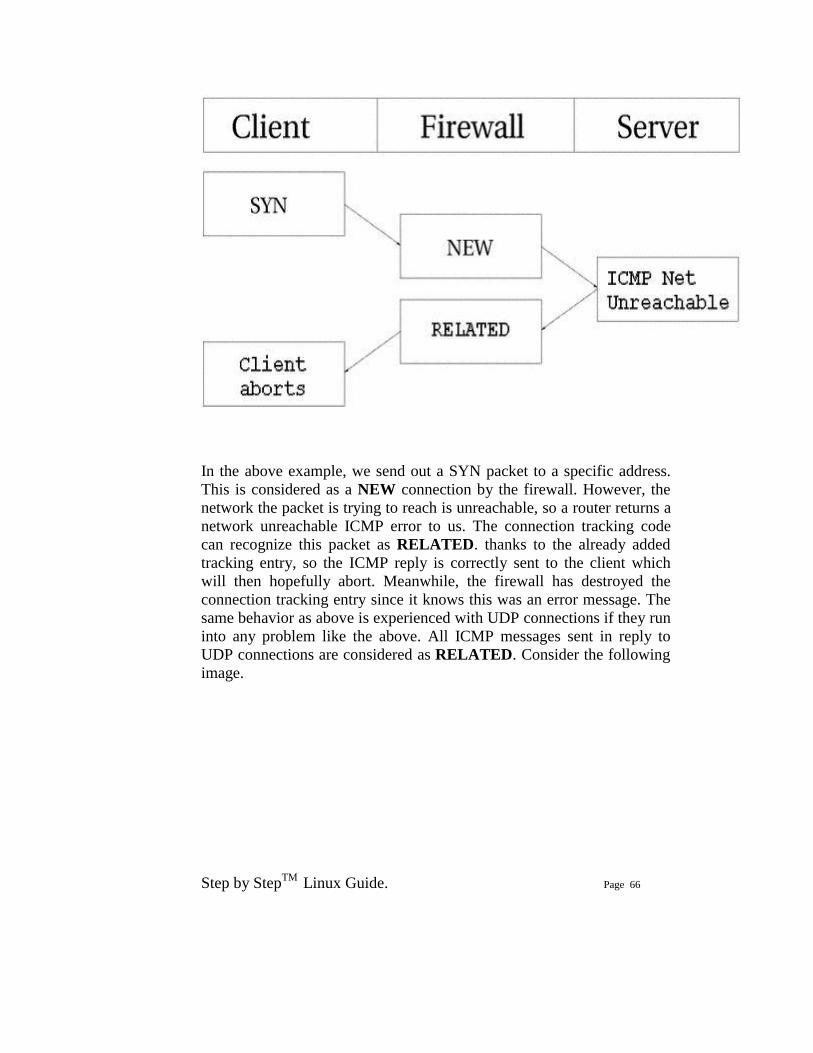
ICMP requests has a default timeout of 30 seconds, which you can change in the /proc/sys/net/ipv4/netfilter/ip_ct_icmp_timeout entry. This should in general be a good timeout value, since it will be able to catch most packets in transit. Another hugely important part of ICMP is the fact that it is used to tell the hosts what happened to specific UDP and TCP connections or connection attempts. For this simple reason, ICMP replies will very often be recognized as RELATED to original connections or connection attempts. A simple example would be the ICMP Host unreachable or ICMP Network unreachable. These should always be spawned back to our host if it attempts an unsuccessful connection to some other host, but the network or host in question could be down, and hence the last router trying to reach the site in question will reply with an ICMP message telling us about it. In this case, the ICMP reply is considered as a RELATED packet. The following picture should explain how it would look.
Step by StepTM Linux Guide. Page 66
In the above example, we send out a SYN packet to a specific address. This is considered as a NEW connection by the firewall. However, the network the packet is trying to reach is unreachable, so a router returns a network unreachable ICMP error to us. The connection tracking code can recognize this packet as RELATED. thanks to the already added tracking entry, so the ICMP reply is correctly sent to the client which will then hopefully abort. Meanwhile, the firewall has destroyed the connection tracking entry since it knows this was an error message. The same behavior as above is experienced with UDP connections if they run into any problem like the above. All ICMP messages sent in reply to UDP connections are considered as RELATED. Consider the following image.
Step by StepTM Linux Guide. Page 67
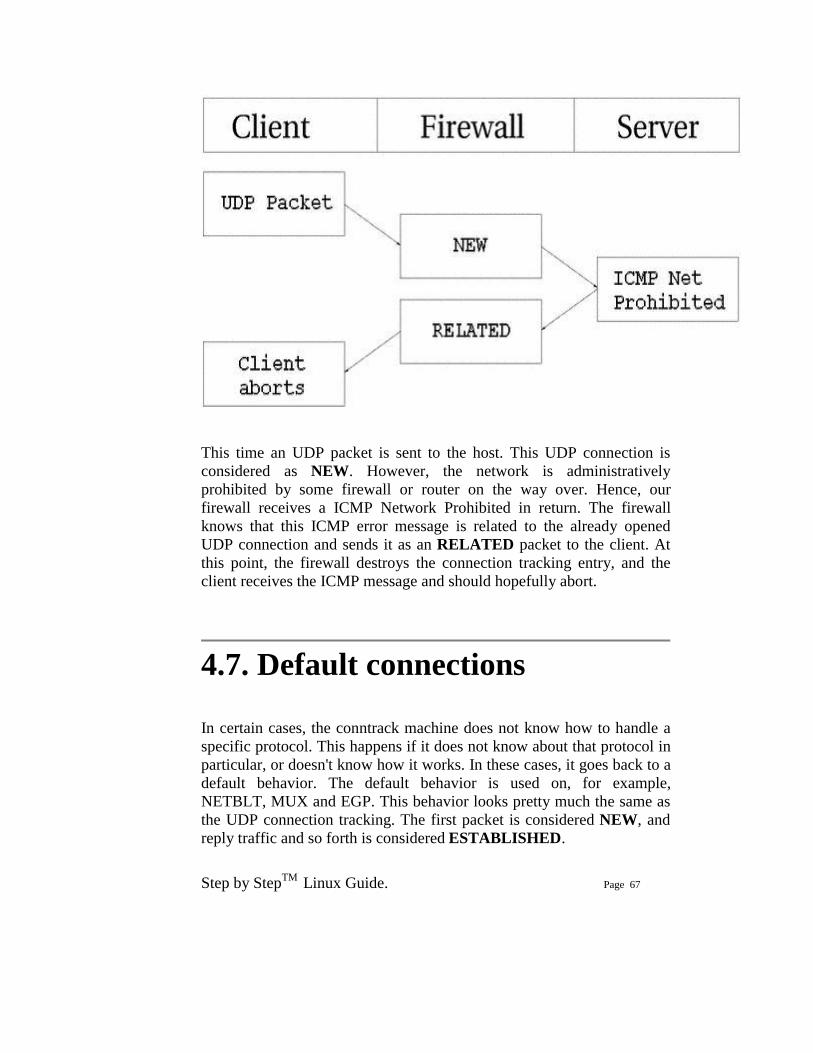
This time an UDP packet is sent to the host. This UDP connection is considered as NEW. However, the network is administratively prohibited by some firewall or router on the way over. Hence, our firewall receives a ICMP Network Prohibited in return. The firewall knows that this ICMP error message is related to the already opened UDP connection and sends it as an RELATED packet to the client. At this point, the firewall destroys the connection tracking entry, and the client receives the ICMP message and should hopefully abort.
4.7. Default connections In certain cases, the conntrack machine does not know how to handle a specific protocol. This happens if it does not know about that protocol in particular, or doesn't know how it works. In these cases, it goes back to a default behavior. The default behavior is used on, for example, NETBLT, MUX and EGP. This behavior looks pretty much the same as the UDP connection tracking. The first packet is considered NEW, and reply traffic and so forth is considered ESTABLISHED.
Step by StepTM Linux Guide. Page 68
When the default behavior is used, all of these packets will attain the same default timeout value. This can be set via the /proc/sys/net/ipv4/netfilter/ip_ct_generic_timeout variable. The default value here is 600 seconds, or 10 minutes. Depending on what traffic you are trying to send over a link that uses the default connection tracking behavior, this might need changing. Especially if you are bouncing traffic through satellites and such, which can take a long time.
4.8. Complex protocols and connection tracking Certain protocols are more complex than others. What this means when it comes to connection tracking, is that such protocols may be harder to track correctly. Good examples of these are the ICQ, IRC and FTP protocols. Each and every one of these protocols carries information within the actual data payload of the packets, and hence requires special connection tracking helpers to enable it to function correctly. Let's take the FTP protocol as the first example. The FTP protocol first opens up a single connection that is called the FTP control session. When we issue commands through this session, other ports are opened to carry the rest of the data related to that specific command. These connections can be done in two ways, either actively or passively. When a connection is done actively, the FTP client sends the server a port and IP address to connect to. After this, the FTP client opens up the port and the server connects to that specified port from its own port 20 (known as FTP-Data) and sends the data over it. The problem here is that the firewall will not know about these extra connections, since they where negotiated within the actual payload of the protocol data. Because of this, the firewall will be unable to know that it should let the server connect to the client over these specific ports. The solution to this problem is to add a special helper to the connection tracking module which will scan through the data in the control connection for specific syntaxes and information. When it runs into the correct information, it will add that specific information as RELATED
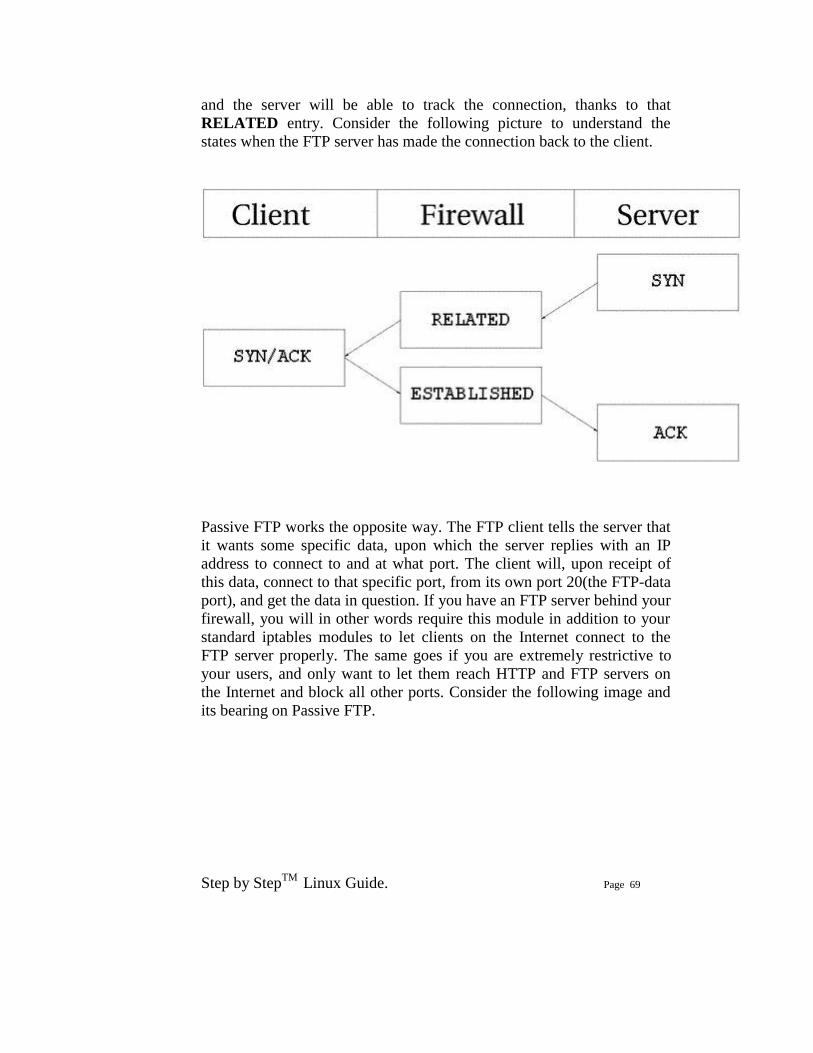
Step by StepTM Linux Guide. Page 69
and the server will be able to track the connection, thanks to that RELATED entry. Consider the following picture to understand the states when the FTP server has made the connection back to the client.
Passive FTP works the opposite way. The FTP client tells the server that it wants some specific data, upon which the server replies with an IP address to connect to and at what port. The client will, upon receipt of this data, connect to that specific port, from its own port 20(the FTP-data port), and get the data in question. If you have an FTP server behind your firewall, you will in other words require this module in addition to your standard iptables modules to let clients on the Internet connect to the FTP server properly. The same goes if you are extremely restrictive to your users, and only want to let them reach HTTP and FTP servers on the Internet and block all other ports. Consider the following image and its bearing on Passive FTP.
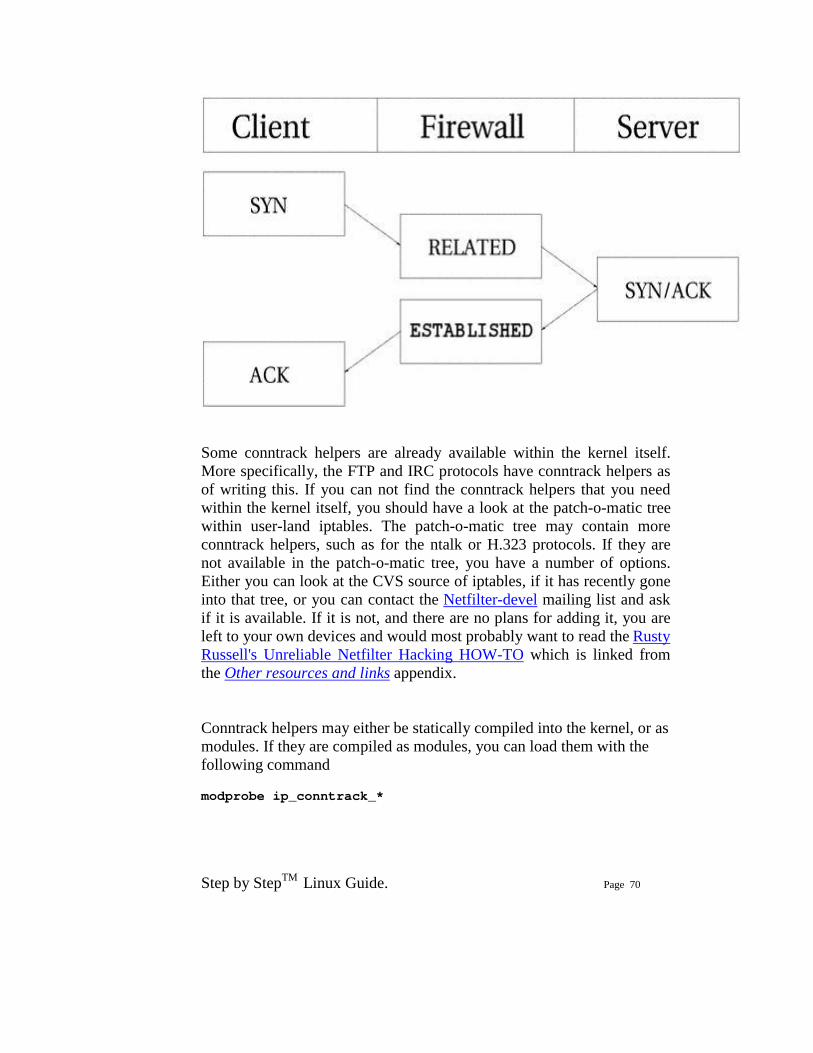
Step by StepTM Linux Guide. Page 70
Some conntrack helpers are already available within the kernel itself. More specifically, the FTP and IRC protocols have conntrack helpers as of writing this. If you can not find the conntrack helpers that you need within the kernel itself, you should have a look at the patch-o-matic tree within user-land iptables. The patch-o-matic tree may contain more conntrack helpers, such as for the ntalk or H.323 protocols. If they are not available in the patch-o-matic tree, you have a number of options. Either you can look at the CVS source of iptables, if it has recently gone into that tree, or you can contact the Netfilter-devel mailing list and ask if it is available. If it is not, and there are no plans for adding it, you are left to your own devices and would most probably want to read the Rusty Russell's Unreliable Netfilter Hacking HOW-TO which is linked from the Other resources and links appendix. Conntrack helpers may either be statically compiled into the kernel, or as modules. If they are compiled as modules, you can load them with the following command modprobe ip_conntrack_*
Step by StepTM Linux Guide. Page 71
Do note that connection tracking has nothing to do with NAT, and hence you may require more modules if you are NAT'ing connections as well. For example, if you were to want to NAT and track FTP connections, you would need the NAT module as well. All NAT helpers starts with ip_nat_ and follow that naming convention; so for example the FTP NAT helper would be named ip_nat_ftp and the IRC module would be named ip_nat_irc. The conntrack helpers follow the same naming convention, and hence the IRC conntrack helper would be named ip_conntrack_irc, while the FTP conntrack helper would be named ip_conntrack_ftp.
Chapter 5. Saving and restoring large rule-sets The iptables package comes with two more tools that are very useful, specially if you are dealing with larger rule-sets. These two tools are called iptables-save and iptables-restore and are used to save and restore rule-sets to a specific file-format that looks a quite a bit different from the standard shell code that you will see in the rest of this tutorial.
5.1. Speed considerations One of the largest reasons for using the iptables-save and iptables-restore commands is that they will speed up the loading and saving of larger rule-sets considerably. The main problem with running a shell script that contains iptables rules is that each invocation of iptables within the script will first extract the whole rule-set from the Netfilter kernel space, and after this, it will insert or append rules, or do whatever change to the rule-set that is needed by this specific command. Finally, it will insert the new rule-set from its own memory into kernel space. Using a shell script, this is done for each and every rule that we want to insert, and for each time we do this, it takes more time to extract and insert the rule-set.
Step by StepTM Linux Guide. Page 72
To solve this problem, there is the iptables-save and restore commands. The iptables-save command is used to save the rule-set into a specially formatted text-file, and the iptables-restore command is used to load this text-file into kernel again. The best parts of these commands is that they will load and save the rule-set in one single request. iptables-save will grab the whole rule-set from kernel and save it to a file in one single movement. iptables-restore will upload that specific rule-set to kernel in a single movement for each table. In other words, instead of dropping the rule-set out of kernel some 30.000 times, for really large rule-sets, and then upload it to kernel again that many times, we can now save the whole thing into a file in one movement and then upload the whole thing in as little as three movements depending on how many tables you use. As you can understand, these tools are definitely something for you if you are working on a huge set of rules that needs to be inserted. However, they do have drawbacks that we will discuss more in the next section.
5.2. Drawbacks with restore As you may have already wondered, can iptables-restore handle any kind of scripting? So far, no, it can not and it will most probably never be able to. This is the main flaw in using iptables-restore since you will not be able to do a huge set of things with these files. For example, what if you have a connection that has a dynamically assigned IP address and you want to grab this dynamic IP every-time the computer boots up and then use that value within your scripts? With iptables-restore, this is more or less impossible. One possibility to get around this is to make a small script which grabs the values you would like to use in the script, then sed the iptables-restore file for specific keywords and replace them with the values collected via the small script. At this point, you could save it to a temporary file, and then use iptables-restore to load the new values. This causes a lot of problems however, and you will be unable to use iptables-save properly since it would probably erase your manually added keywords in the restore script. It is in other words a clumsy solution.
Step by StepTM Linux Guide. Page 73
Another solution is to load the iptables-restore scripts first, and then load a specific shell script that inserts more dynamic rules in their proper places. Of course, as you can understand, this is just as clumsy as the first solution. iptables-restore is simply not very well suited for configurations where IP addresses are dynamically assigned to your firewall or where you want different behaviors depending on configuration options and so on. Another drawback with iptables-restore and iptables-save is that it is not fully functional as of writing this. The problem is simply that not a lot of people use it as of today and hence there is not a lot of people finding bugs, and in turn some matches and targets will simply be inserted badly, which may lead to some strange behaviors that you did not expect. Even though these problems exist, I would highly recommend using these tools which should work extremely well for most rule-sets as long as they do not contain some of the new targets or matches that it does not know how to handle properly.
5.3. iptables-save The iptables-save command is, as we have already explained, a tool to save the current rule-set into a file that iptables-restore can use. This command is quite simple really, and takes only two arguments. Take a look at the following example to understand the syntax of the command. iptables-save [-c] [-t table] The -c argument tells iptables-save to keep the values specified in the byte and packet counters. This could for example be useful if we would like to reboot our main firewall, but not loose byte and packet counters which we may use for statistical purposes. Issuing a iptables-save command with the -c argument would then make it possible for us to reboot but without breaking our statistical and accounting routines. The default value is, of course, to not keep the counters intact when issuing this command.
Step by StepTM Linux Guide. Page 74
The -t argument tells the iptables-save command which tables to save. Without this argument the command will automatically save all tables available into the file. The following is an example on what output you can expect from the iptables-save command if you do not have any rule-set loaded.
# Generated by iptables-save v1.2.6a on Wed Apr 24 10:19:17 2002 *filter :INPUT ACCEPT [404:19766] :FORWARD ACCEPT [0:0] :OUTPUT ACCEPT [530:43376] COMMIT # Completed on Wed Apr 24 10:19:17 2002 # Generated by iptables-save v1.2.6a on Wed Apr 24 10:19:17 2002 *mangle :PREROUTING ACCEPT [451:22060] :INPUT ACCEPT [451:22060] :FORWARD ACCEPT [0:0] :OUTPUT ACCEPT [594:47151] :POSTROUTING ACCEPT [594:47151] COMMIT # Completed on Wed Apr 24 10:19:17 2002 # Generated by iptables-save v1.2.6a on Wed Apr 24 10:19:17 2002 *nat :PREROUTING ACCEPT [0:0] :POSTROUTING ACCEPT [3:450] :OUTPUT ACCEPT [3:450] COMMIT # Completed on Wed Apr 24 10:19:17 2002
This contains a few comments starting with a # sign. Each table is marked like *<table-name>, for example *mangle. Then within each table we have the chain specifications and rules. A chain specification looks like :<chain-name> <chain-policy> [<packet-counter>:<byte-counter>]. The chain-name may be for example PREROUTING, the policy is described previously and can for example be ACCEPT. Finally the packet-counter and byte-counters are the same counters as in the output from iptables -L -v. Finally, each table declaration ends in a COMMIT keyword. The COMMIT keyword tells us that at this point we should commit all rules currently in the pipeline to kernel.
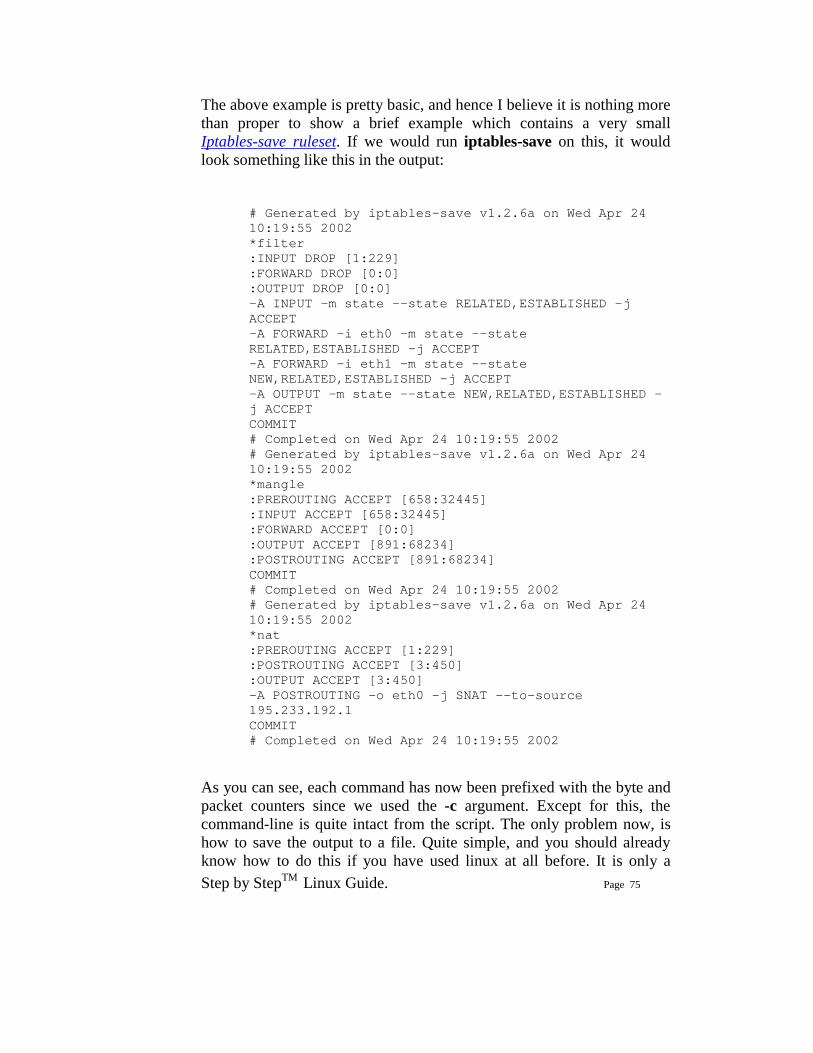
Step by StepTM Linux Guide. Page 75
The above example is pretty basic, and hence I believe it is nothing more than proper to show a brief example which contains a very small Iptables-save ruleset. If we would run iptables-save on this, it would look something like this in the output:
# Generated by iptables-save v1.2.6a on Wed Apr 24 10:19:55 2002 *filter :INPUT DROP [1:229] :FORWARD DROP [0:0] :OUTPUT DROP [0:0] -A INPUT -m state --state RELATED,ESTABLISHED -j ACCEPT -A FORWARD -i eth0 -m state --state RELATED,ESTABLISHED -j ACCEPT -A FORWARD -i eth1 -m state --state NEW,RELATED,ESTABLISHED -j ACCEPT -A OUTPUT -m state --state NEW,RELATED,ESTABLISHED -j ACCEPT COMMIT # Completed on Wed Apr 24 10:19:55 2002 # Generated by iptables-save v1.2.6a on Wed Apr 24 10:19:55 2002 *mangle :PREROUTING ACCEPT [658:32445] :INPUT ACCEPT [658:32445] :FORWARD ACCEPT [0:0] :OUTPUT ACCEPT [891:68234] :POSTROUTING ACCEPT [891:68234] COMMIT # Completed on Wed Apr 24 10:19:55 2002 # Generated by iptables-save v1.2.6a on Wed Apr 24 10:19:55 2002 *nat :PREROUTING ACCEPT [1:229] :POSTROUTING ACCEPT [3:450] :OUTPUT ACCEPT [3:450] -A POSTROUTING -o eth0 -j SNAT --to-source 195.233.192.1 COMMIT # Completed on Wed Apr 24 10:19:55 2002
As you can see, each command has now been prefixed with the byte and packet counters since we used the -c argument. Except for this, the command-line is quite intact from the script. The only problem now, is how to save the output to a file. Quite simple, and you should already know how to do this if you have used linux at all before. It is only a
Step by StepTM Linux Guide. Page 76
matter of piping the command output on to the file that you would like to save it as. This could look like the following: iptables-save -c > /etc/iptables-save The above command will in other words save the whole rule-set to a file called /etc/iptables-save with byte and packet counters still intact.
5.4. iptables-restore The iptables-restore command is used to restore the iptables rule-set that was saved with the iptables-save command. It takes all the input from standard input and can not load from files as of writing this, unfortunately. This is the command syntax for iptables-restore:
iptables-restore [-c] [-n] The -c argument restores the byte and packet counters and must be used if you want to restore counters that was previously saved with iptables-save. This argument may also be written in its long form --counters. The -n argument tells iptables-restore to not overwrite the previously written rules in the table, or tables, that it is writing to. The default behavior of iptables-restore is to flush and destroy all previously inserted rules. The short -n argument may also be replaced with the longer format --noflush. To load rule-set with the iptables-restore command, we could do this in several ways, but we will mainly look at the simplest and most common way here.
cat /etc/iptables-save | iptables-restore -c This would cat the rule-set located within the /etc/iptables-save file and then pipe it to iptables-restore which takes the rule-set on the standard input and then restores it, including byte and packet counters. It is that simple to begin with. This command could be varied until oblivion and we could show different piping possibilities, however, this is a bit out of

Step by StepTM Linux Guide. Page 77
the scope of this chapter, and hence we will skip that part and leave it as an exercise for the reader to experiment with. The rule-set should now be loaded properly to kernel and everything should work. If not, you may possibly have run into a bug in these commands, however likely that sounds.
Chapter 6. How a rule is built This chapter will discuss at length how to build your own rules. A rule could be described as the directions the firewall will adhere to when blocking or permitting different connections and packets in a specific chain. Each line you write that's inserted to a chain should be considered a rule. We will also discuss the basic matches that are available, and how to use them, as well as the different targets and how we can construct new targets of our own (i.e., new sub chains).
6.1. Basics As we have already explained, each rule is a line that the kernel looks at to find out what to do with a packet. If all the criteria - or matches - are met, we perform the target - or jump - instruction. Normally we would write our rules in a syntax that looks something like this:
iptables [-t table] command [match] [target/jump] There is nothing that says that the target instruction has to be last function in the line. However, you would usually adhere to this syntax to get the best readability. Anyway, most of the rules you'll see are written in this way. Hence, if you read someone else's script, you'll most likely recognize the syntax and easily understand the rule.

Step by StepTM Linux Guide. Page 78
If you want to use another table than the standard table, you could insert the table specification at the point at which [table] is specified. However, it is not necessary to state explicitly what table to use, since by default iptables uses the filter table on which to implement all commands. Neither do you have to specify the table at just this point in the rule. It could be set pretty much anywhere along the line. However, it is more or less standard to put the table specification at the beginning. One thing to think about though: The command should always come first, or alternatively directly after the table specification. We use 'command' to tell the program what to do, for example to insert a rule or to add a rule to the end of the chain, or to delete a rule. We shall take a further look at this below. The match is the part of the rule that we send to the kernel that details the specific character of the packet, what makes it different from all other packets. Here we could specify what IP address the packet comes from, from which network interface, the intended IP address, port, protocol or whatever. There is a heap of different matches that we can use that we will look closer at further on in this chapter. Finally we have the target of the packet. If all the matches are met for a packet, we tell the kernel what to do with it. We could, for example, tell the kernel to send the packet to another chain that we've created ourselves, and which is part of this particular table. We could tell the kernel to drop the packet dead and do no further processing, or we could tell the kernel to send a specified reply to the sender. As with the rest of the content in this section, we'll look closer at it further on in the chapter.
6.2. Tables The -t option specifies which table to use. Per default, the filter table is used. We may specify one of the following tables with the -t option. Do note that this is an extremely brief summary of some of the contents of the Traversing of tables and chains chapter.
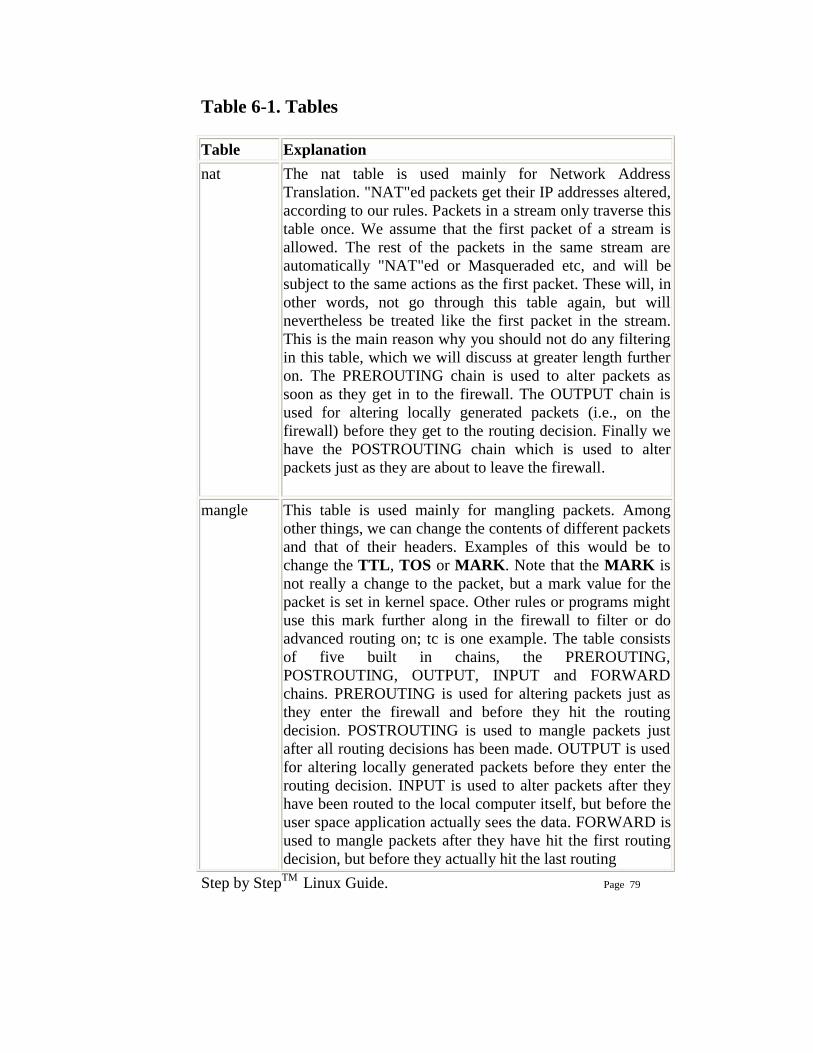
Step by StepTM Linux Guide. Page 79
Table 6-1. Tables Table Explanation nat The nat table is used mainly for Network Address
Translation. "NAT"ed packets get their IP addresses altered, according to our rules. Packets in a stream only traverse this table once. We assume that the first packet of a stream is allowed. The rest of the packets in the same stream are automatically "NAT"ed or Masqueraded etc, and will be subject to the same actions as the first packet. These will, in other words, not go through this table again, but will nevertheless be treated like the first packet in the stream. This is the main reason why you should not do any filtering in this table, which we will discuss at greater length further on. The PREROUTING chain is used to alter packets as soon as they get in to the firewall. The OUTPUT chain is used for altering locally generated packets (i.e., on the firewall) before they get to the routing decision. Finally we have the POSTROUTING chain which is used to alter packets just as they are about to leave the firewall.
mangle This table is used mainly for mangling packets. Among other things, we can change the contents of different packets and that of their headers. Examples of this would be to change the TTL, TOS or MARK. Note that the MARK is not really a change to the packet, but a mark value for the packet is set in kernel space. Other rules or programs might use this mark further along in the firewall to filter or do advanced routing on; tc is one example. The table consists of five built in chains, the PREROUTING, POSTROUTING, OUTPUT, INPUT and FORWARD chains. PREROUTING is used for altering packets just as they enter the firewall and before they hit the routing decision. POSTROUTING is used to mangle packets just after all routing decisions has been made. OUTPUT is used for altering locally generated packets before they enter the routing decision. INPUT is used to alter packets after they have been routed to the local computer itself, but before the user space application actually sees the data. FORWARD is used to mangle packets after they have hit the first routing decision, but before they actually hit the last routing
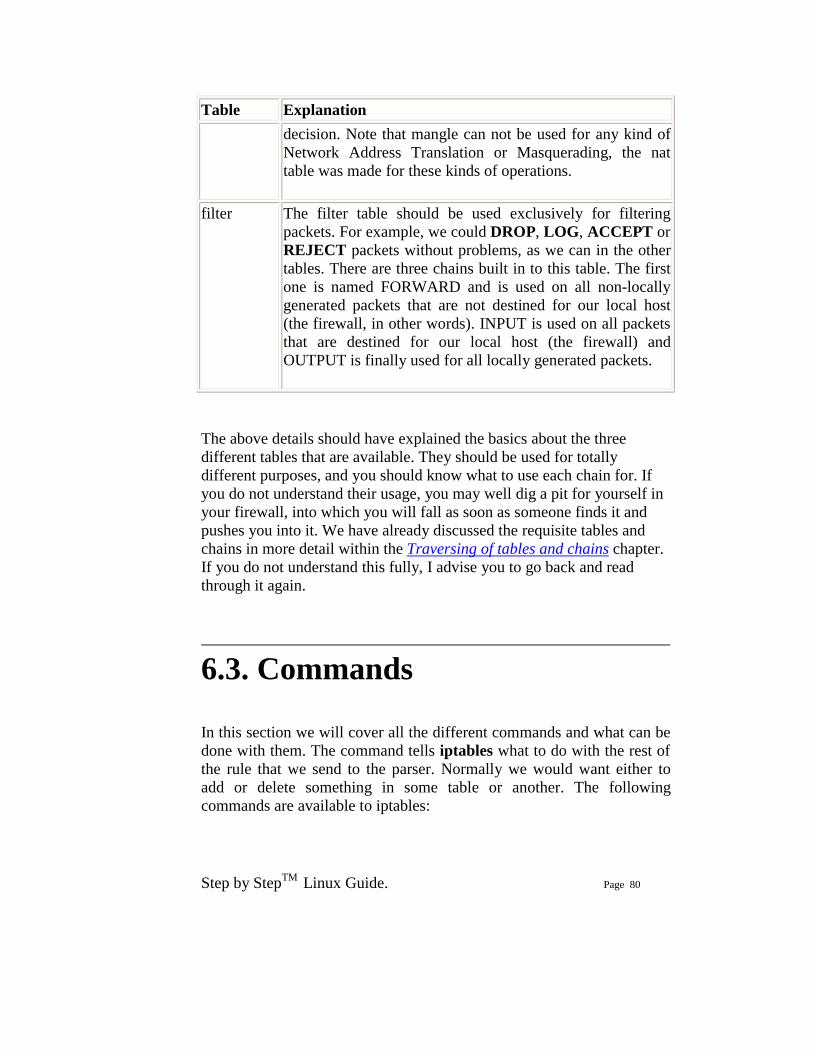
Step by StepTM Linux Guide. Page 80
Table Explanation decision. Note that mangle can not be used for any kind of Network Address Translation or Masquerading, the nat table was made for these kinds of operations.
filter The filter table should be used exclusively for filtering packets. For example, we could DROP, LOG, ACCEPT or REJECT packets without problems, as we can in the other tables. There are three chains built in to this table. The first one is named FORWARD and is used on all non-locally generated packets that are not destined for our local host (the firewall, in other words). INPUT is used on all packets that are destined for our local host (the firewall) and OUTPUT is finally used for all locally generated packets.
The above details should have explained the basics about the three different tables that are available. They should be used for totally different purposes, and you should know what to use each chain for. If you do not understand their usage, you may well dig a pit for yourself in your firewall, into which you will fall as soon as someone finds it and pushes you into it. We have already discussed the requisite tables and chains in more detail within the Traversing of tables and chains chapter. If you do not understand this fully, I advise you to go back and read through it again.
6.3. Commands In this section we will cover all the different commands and what can be done with them. The command tells iptables what to do with the rest of the rule that we send to the parser. Normally we would want either to add or delete something in some table or another. The following commands are available to iptables:
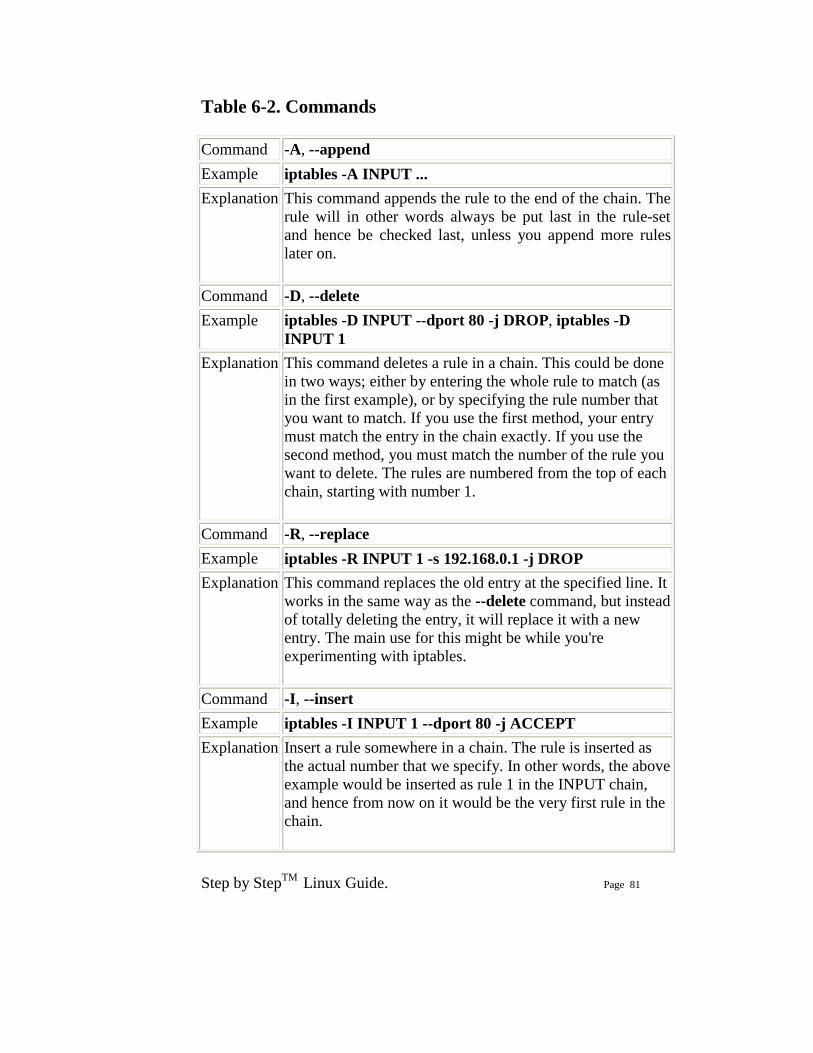
Step by StepTM Linux Guide. Page 81
Table 6-2. Commands Command -A, --append Example iptables -A INPUT ... Explanation This command appends the rule to the end of the chain. The
rule will in other words always be put last in the rule-set and hence be checked last, unless you append more rules later on.
Command -D, --delete Example iptables -D INPUT --dport 80 -j DROP, iptables -D
INPUT 1 Explanation This command deletes a rule in a chain. This could be done
in two ways; either by entering the whole rule to match (as in the first example), or by specifying the rule number that you want to match. If you use the first method, your entry must match the entry in the chain exactly. If you use the second method, you must match the number of the rule you want to delete. The rules are numbered from the top of each chain, starting with number 1.
Command -R, --replace Example iptables -R INPUT 1 -s 192.168.0.1 -j DROP Explanation This command replaces the old entry at the specified line. It
works in the same way as the --delete command, but instead of totally deleting the entry, it will replace it with a new entry. The main use for this might be while you're experimenting with iptables.
Command -I, --insert Example iptables -I INPUT 1 --dport 80 -j ACCEPT Explanation Insert a rule somewhere in a chain. The rule is inserted as
the actual number that we specify. In other words, the above example would be inserted as rule 1 in the INPUT chain, and hence from now on it would be the very first rule in the chain.
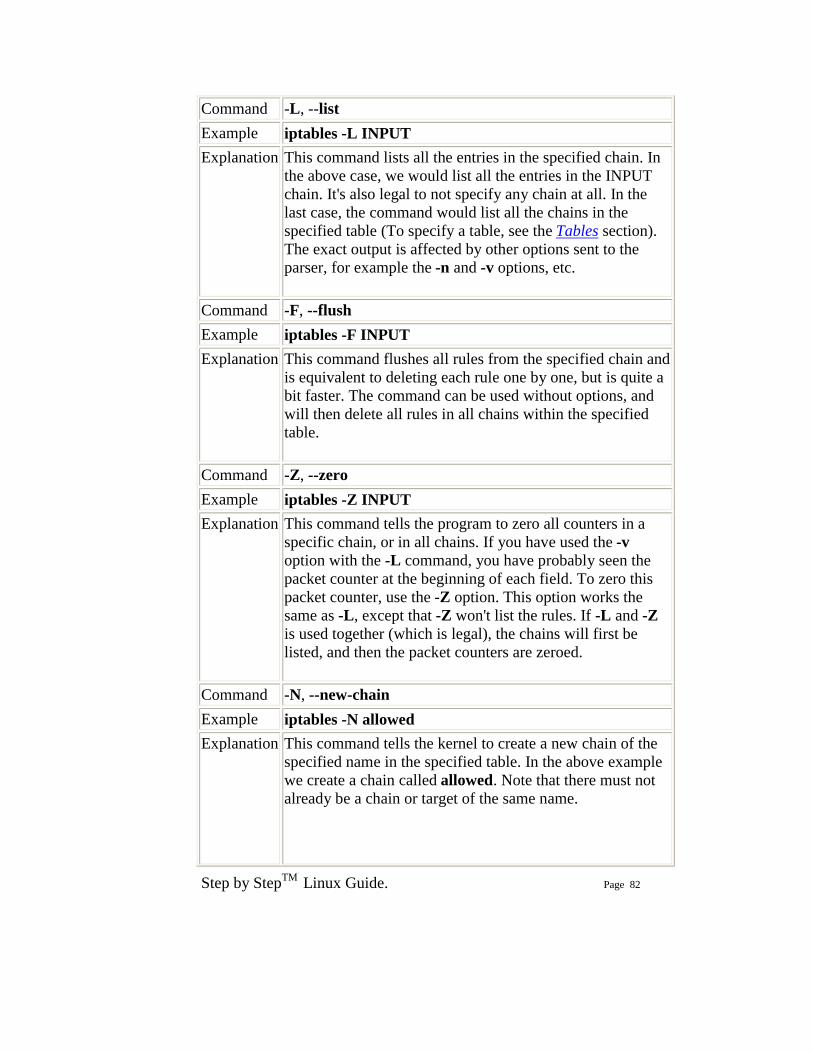
Step by StepTM Linux Guide. Page 82
Command -L, --list Example iptables -L INPUT Explanation This command lists all the entries in the specified chain. In
the above case, we would list all the entries in the INPUT chain. It's also legal to not specify any chain at all. In the last case, the command would list all the chains in the specified table (To specify a table, see the Tables section). The exact output is affected by other options sent to the parser, for example the -n and -v options, etc.
Command -F, --flush Example iptables -F INPUT Explanation This command flushes all rules from the specified chain and
is equivalent to deleting each rule one by one, but is quite a bit faster. The command can be used without options, and will then delete all rules in all chains within the specified table.
Command -Z, --zero Example iptables -Z INPUT Explanation This command tells the program to zero all counters in a
specific chain, or in all chains. If you have used the -v option with the -L command, you have probably seen the packet counter at the beginning of each field. To zero this packet counter, use the -Z option. This option works the same as -L, except that -Z won't list the rules. If -L and -Z is used together (which is legal), the chains will first be listed, and then the packet counters are zeroed.
Command -N, --new-chain Example iptables -N allowed Explanation This command tells the kernel to create a new chain of the
specified name in the specified table. In the above example we create a chain called allowed. Note that there must not already be a chain or target of the same name.
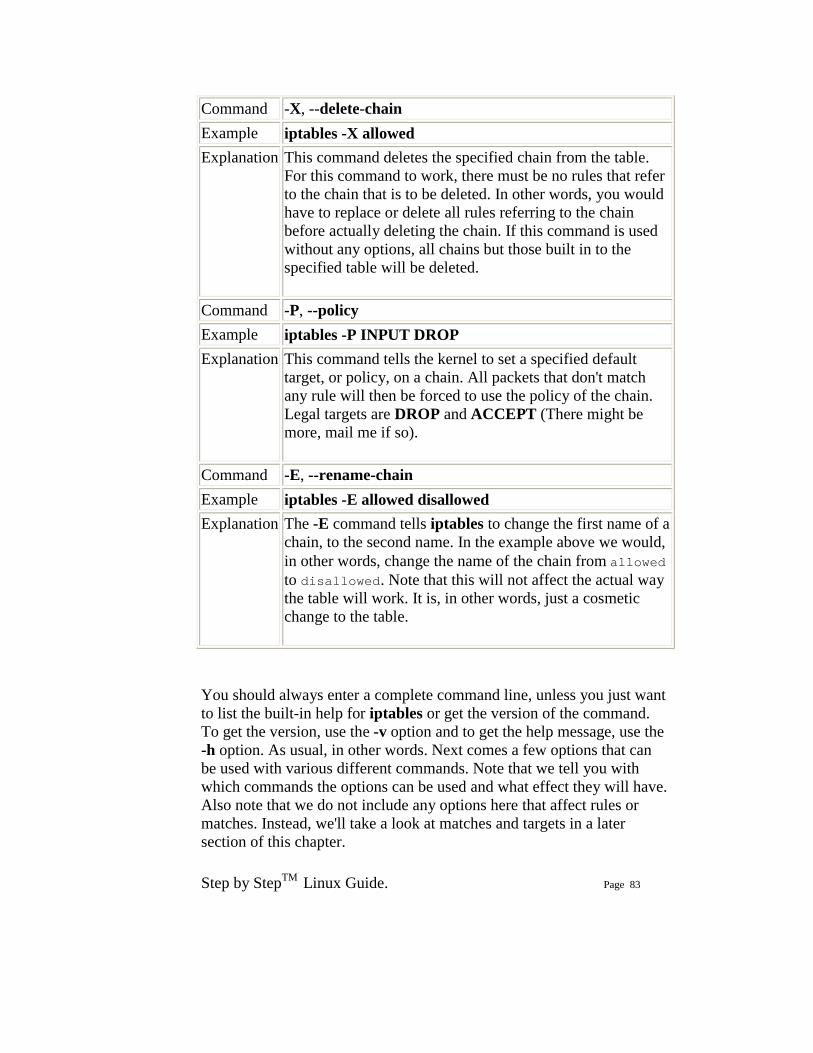
Step by StepTM Linux Guide. Page 83
Command -X, --delete-chain Example iptables -X allowed Explanation This command deletes the specified chain from the table.
For this command to work, there must be no rules that refer to the chain that is to be deleted. In other words, you would have to replace or delete all rules referring to the chain before actually deleting the chain. If this command is used without any options, all chains but those built in to the specified table will be deleted.
Command -P, --policy Example iptables -P INPUT DROP Explanation This command tells the kernel to set a specified default
target, or policy, on a chain. All packets that don't match any rule will then be forced to use the policy of the chain. Legal targets are DROP and ACCEPT (There might be more, mail me if so).
Command -E, --rename-chain Example iptables -E allowed disallowed Explanation The -E command tells iptables to change the first name of a
chain, to the second name. In the example above we would, in other words, change the name of the chain from allowed to disallowed. Note that this will not affect the actual way the table will work. It is, in other words, just a cosmetic change to the table.
You should always enter a complete command line, unless you just want to list the built-in help for iptables or get the version of the command. To get the version, use the -v option and to get the help message, use the -h option. As usual, in other words. Next comes a few options that can be used with various different commands. Note that we tell you with which commands the options can be used and what effect they will have. Also note that we do not include any options here that affect rules or matches. Instead, we'll take a look at matches and targets in a later section of this chapter.
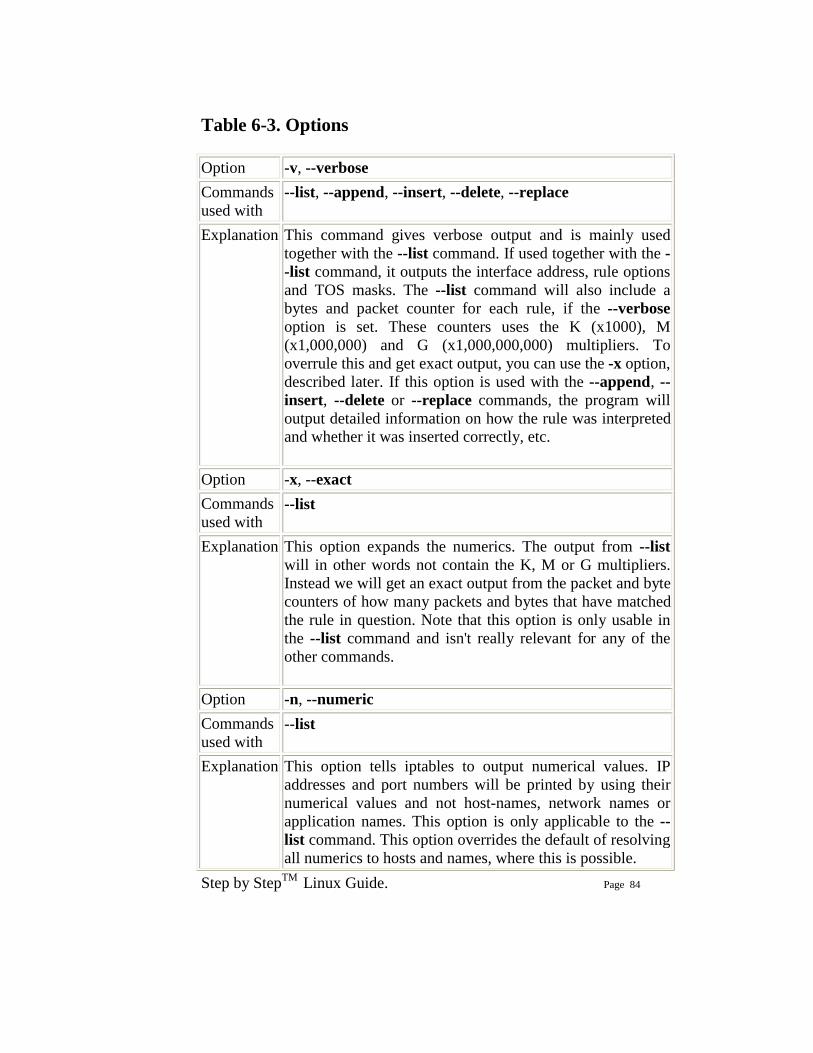
Step by StepTM Linux Guide. Page 84
Table 6-3. Options Option -v, --verbose Commands used with
--list, --append, --insert, --delete, --replace
Explanation This command gives verbose output and is mainly used together with the --list command. If used together with the --list command, it outputs the interface address, rule options and TOS masks. The --list command will also include a bytes and packet counter for each rule, if the --verbose option is set. These counters uses the K (x1000), M (x1,000,000) and G (x1,000,000,000) multipliers. To overrule this and get exact output, you can use the -x option, described later. If this option is used with the --append, --insert, --delete or --replace commands, the program will output detailed information on how the rule was interpreted and whether it was inserted correctly, etc.
Option -x, --exact Commands used with
--list
Explanation This option expands the numerics. The output from --list will in other words not contain the K, M or G multipliers. Instead we will get an exact output from the packet and byte counters of how many packets and bytes that have matched the rule in question. Note that this option is only usable in the --list command and isn't really relevant for any of the other commands.
Option -n, --numeric Commands used with
--list
Explanation This option tells iptables to output numerical values. IP addresses and port numbers will be printed by using their numerical values and not host-names, network names or application names. This option is only applicable to the --list command. This option overrides the default of resolving all numerics to hosts and names, where this is possible.
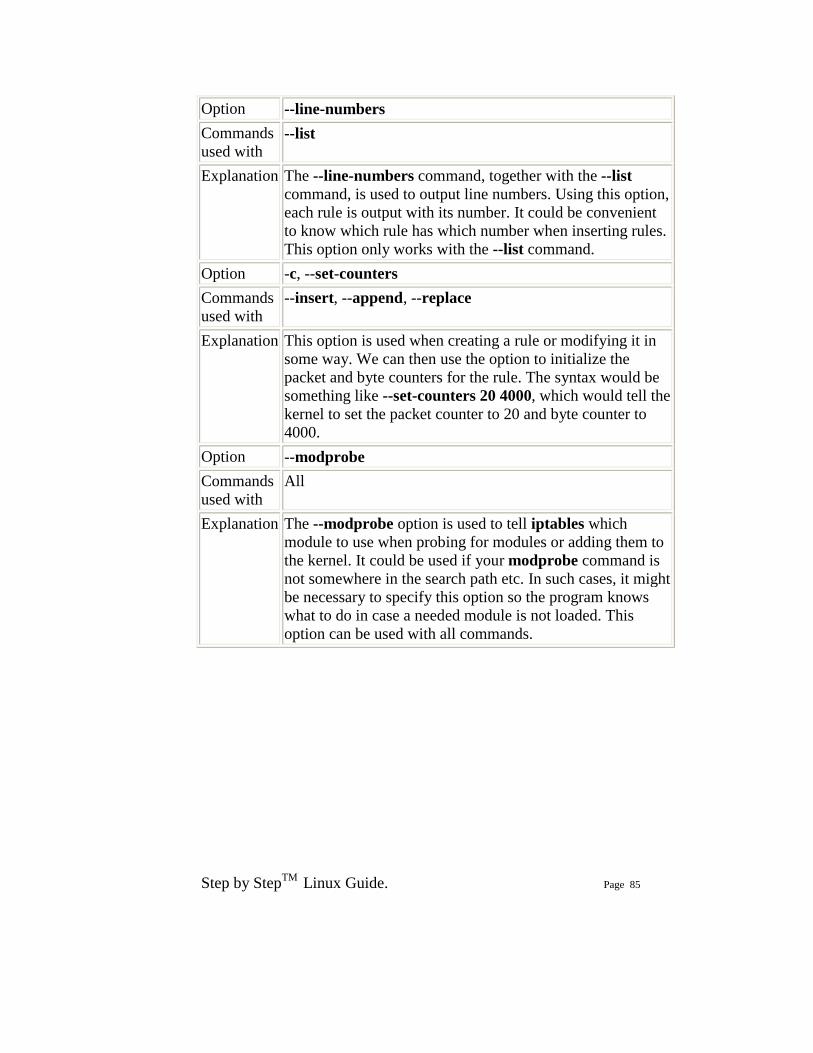
Step by StepTM Linux Guide. Page 85
Option --line-numbers Commands used with
--list
Explanation The --line-numbers command, together with the --list command, is used to output line numbers. Using this option, each rule is output with its number. It could be convenient to know which rule has which number when inserting rules. This option only works with the --list command.
Option -c, --set-counters Commands used with
--insert, --append, --replace
Explanation This option is used when creating a rule or modifying it in some way. We can then use the option to initialize the packet and byte counters for the rule. The syntax would be something like --set-counters 20 4000, which would tell the kernel to set the packet counter to 20 and byte counter to 4000.
Option --modprobe Commands used with
All
Explanation The --modprobe option is used to tell iptables which module to use when probing for modules or adding them to the kernel. It could be used if your modprobe command is not somewhere in the search path etc. In such cases, it might be necessary to specify this option so the program knows what to do in case a needed module is not loaded. This option can be used with all commands.

Step by StepTM Linux Guide. Page 86
6.4. Matches In this section we'll talk a bit more about matches. I've chosen to narrow down the matches into five different subcategories. First of all we have the generic matches, which can be used in all rules. Then we have the TCP matches which can only be applied to TCP packets. We have UDP matches which can only be applied to UDP packets, and ICMP matches which can only be used on ICMP packets. Finally we have special matches, such as the state, owner and limit matches and so on. These final matches have in turn been narrowed down to even more subcategories, even though they might not necessarily be different matches at all. I hope this is a reasonable breakdown and that all people out there can understand it.
6.4.1. Generic matches This section will deal with Generic matches. A generic match is a kind of match that is always available, whatever kind of protocol we are working on, or whatever match extensions we have loaded. No special parameters at all are needed to use these matches; in other words. I have also included the --protocol match here, even though it is more specific to protocol matches. For example, if we want to use a TCP match, we need to use the --protocol match and send TCP as an option to the match. However, --protocol is also a match in itself, since it can be used to match specific protocols. The following matches are always available.
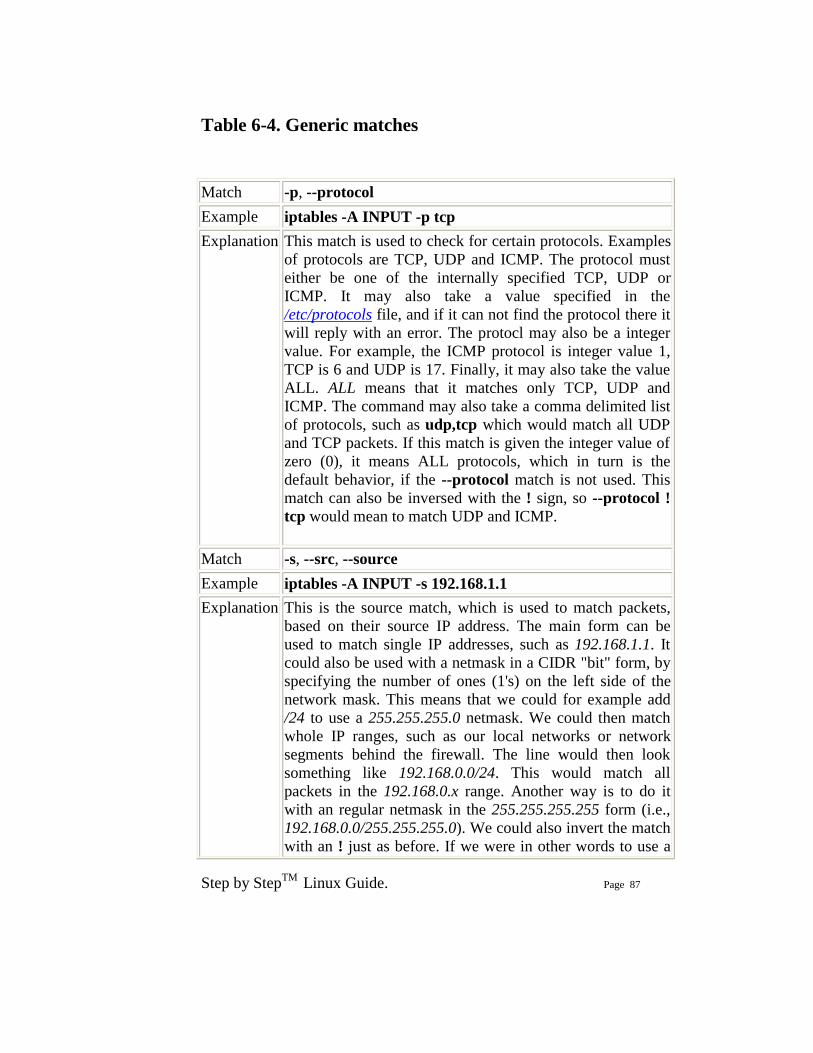
Step by StepTM Linux Guide. Page 87
Table 6-4. Generic matches Match -p, --protocol Example iptables -A INPUT -p tcp Explanation This match is used to check for certain protocols. Examples
of protocols are TCP, UDP and ICMP. The protocol must either be one of the internally specified TCP, UDP or ICMP. It may also take a value specified in the /etc/protocols file, and if it can not find the protocol there it will reply with an error. The protocl may also be a integer value. For example, the ICMP protocol is integer value 1, TCP is 6 and UDP is 17. Finally, it may also take the value ALL. ALL means that it matches only TCP, UDP and ICMP. The command may also take a comma delimited list of protocols, such as udp,tcp which would match all UDP and TCP packets. If this match is given the integer value of zero (0), it means ALL protocols, which in turn is the default behavior, if the --protocol match is not used. This match can also be inversed with the ! sign, so --protocol ! tcp would mean to match UDP and ICMP.
Match -s, --src, --source Example iptables -A INPUT -s 192.168.1.1 Explanation This is the source match, which is used to match packets,
based on their source IP address. The main form can be used to match single IP addresses, such as 192.168.1.1. It could also be used with a netmask in a CIDR "bit" form, by specifying the number of ones (1's) on the left side of the network mask. This means that we could for example add /24 to use a 255.255.255.0 netmask. We could then match whole IP ranges, such as our local networks or network segments behind the firewall. The line would then look something like 192.168.0.0/24. This would match all packets in the 192.168.0.x range. Another way is to do it with an regular netmask in the 255.255.255.255 form (i.e., 192.168.0.0/255.255.255.0). We could also invert the match with an ! just as before. If we were in other words to use a

Step by StepTM Linux Guide. Page 88
match in the form of --source ! 192.168.0.0/24, we would match all packets with a source address not coming from within the 192.168.0.x range. The default is to match all IP addresses.
Match -d, --dst, --destination Example iptables -A INPUT -d 192.168.1.1 Explanation The --destination match is used for packets based on their
destination address or addresses. It works pretty much the same as the --source match and has the same syntax, except that the match is based on where the packets are going to. To match an IP range, we can add a netmask either in the exact netmask form, or in the number of ones (1's) counted from the left side of the netmask bits. Examples are: 192.168.0.0/255.255.255.0 and 192.168.0.0/24. Both of these are equivalent. We could also invert the whole match with an ! sign, just as before. --destination ! 192.168.0.1 would in other words match all packets except those not destined to the 192.168.0.1 IP address.
Match -i, --in-interface Example iptables -A INPUT -i eth0 Explanation This match is used for the interface the packet came in on.
Note that this option is only legal in the INPUT, FORWARD and PREROUTING chains and will return an error message when used anywhere else. The default behavior of this match, if no particular interface is specified, is to assume a string value of +. The + value is used to match a string of letters and numbers. A single + would in other words tell the kernel to match all packets without considering which interface it came in on. The + string can also be appended to the type of interface, so eth+ would all Ethernet devices. We can also invert the meaning of this option with the help of the ! sign. The line would then have a syntax looking something like -i ! eth0, which would match all incoming interfaces, except eth0.
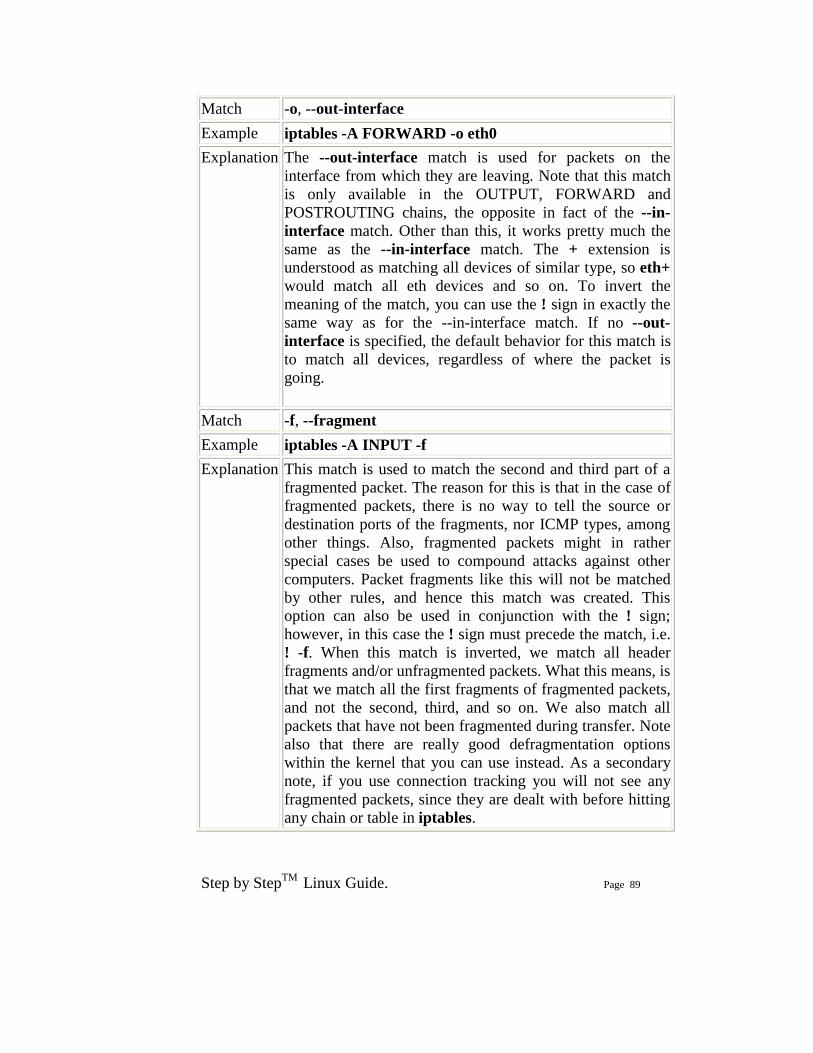
Step by StepTM Linux Guide. Page 89
Match -o, --out-interface Example iptables -A FORWARD -o eth0 Explanation The --out-interface match is used for packets on the
interface from which they are leaving. Note that this match is only available in the OUTPUT, FORWARD and POSTROUTING chains, the opposite in fact of the --in-interface match. Other than this, it works pretty much the same as the --in-interface match. The + extension is understood as matching all devices of similar type, so eth+ would match all eth devices and so on. To invert the meaning of the match, you can use the ! sign in exactly the same way as for the --in-interface match. If no --out-interface is specified, the default behavior for this match is to match all devices, regardless of where the packet is going.
Match -f, --fragment Example iptables -A INPUT -f Explanation This match is used to match the second and third part of a
fragmented packet. The reason for this is that in the case of fragmented packets, there is no way to tell the source or destination ports of the fragments, nor ICMP types, among other things. Also, fragmented packets might in rather special cases be used to compound attacks against other computers. Packet fragments like this will not be matched by other rules, and hence this match was created. This option can also be used in conjunction with the ! sign; however, in this case the ! sign must precede the match, i.e. ! -f. When this match is inverted, we match all header fragments and/or unfragmented packets. What this means, is that we match all the first fragments of fragmented packets, and not the second, third, and so on. We also match all packets that have not been fragmented during transfer. Note also that there are really good defragmentation options within the kernel that you can use instead. As a secondary note, if you use connection tracking you will not see any fragmented packets, since they are dealt with before hitting any chain or table in iptables.
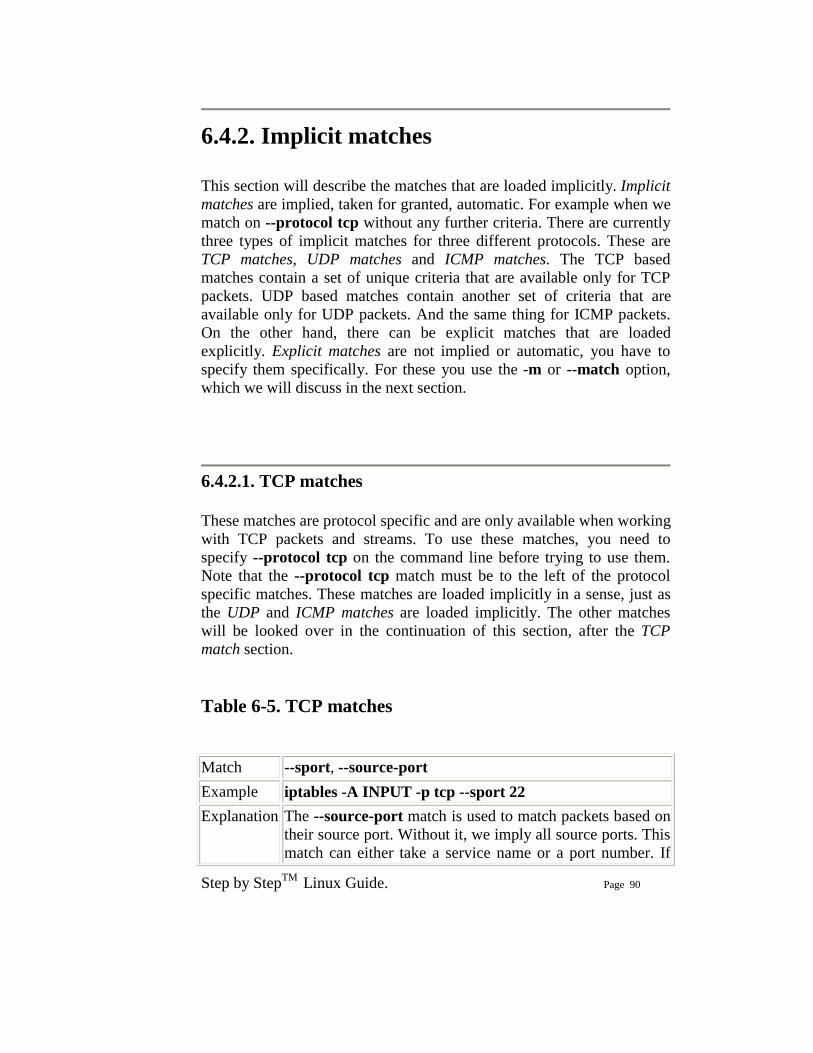
Step by StepTM Linux Guide. Page 90
6.4.2. Implicit matches This section will describe the matches that are loaded implicitly. Implicit matches are implied, taken for granted, automatic. For example when we match on --protocol tcp without any further criteria. There are currently three types of implicit matches for three different protocols. These are TCP matches, UDP matches and ICMP matches. The TCP based matches contain a set of unique criteria that are available only for TCP packets. UDP based matches contain another set of criteria that are available only for UDP packets. And the same thing for ICMP packets. On the other hand, there can be explicit matches that are loaded explicitly. Explicit matches are not implied or automatic, you have to specify them specifically. For these you use the -m or --match option, which we will discuss in the next section.
6.4.2.1. TCP matches These matches are protocol specific and are only available when working with TCP packets and streams. To use these matches, you need to specify --protocol tcp on the command line before trying to use them. Note that the --protocol tcp match must be to the left of the protocol specific matches. These matches are loaded implicitly in a sense, just as the UDP and ICMP matches are loaded implicitly. The other matches will be looked over in the continuation of this section, after the TCP match section. Table 6-5. TCP matches Match --sport, --source-port Example iptables -A INPUT -p tcp --sport 22 Explanation The --source-port match is used to match packets based on
their source port. Without it, we imply all source ports. This match can either take a service name or a port number. If
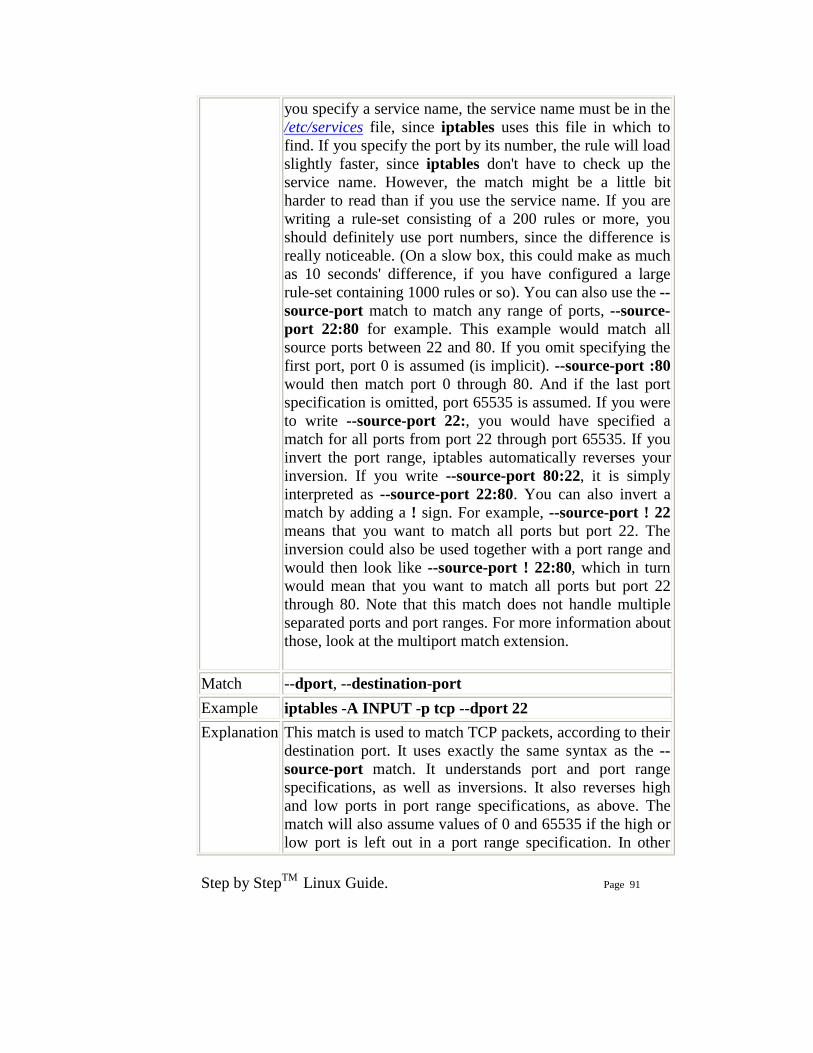
Step by StepTM Linux Guide. Page 91
you specify a service name, the service name must be in the /etc/services file, since iptables uses this file in which to find. If you specify the port by its number, the rule will load slightly faster, since iptables don't have to check up the service name. However, the match might be a little bit harder to read than if you use the service name. If you are writing a rule-set consisting of a 200 rules or more, you should definitely use port numbers, since the difference is really noticeable. (On a slow box, this could make as much as 10 seconds' difference, if you have configured a large rule-set containing 1000 rules or so). You can also use the --source-port match to match any range of ports, --source-port 22:80 for example. This example would match all source ports between 22 and 80. If you omit specifying the first port, port 0 is assumed (is implicit). --source-port :80 would then match port 0 through 80. And if the last port specification is omitted, port 65535 is assumed. If you were to write --source-port 22:, you would have specified a match for all ports from port 22 through port 65535. If you invert the port range, iptables automatically reverses your inversion. If you write --source-port 80:22, it is simply interpreted as --source-port 22:80. You can also invert a match by adding a ! sign. For example, --source-port ! 22 means that you want to match all ports but port 22. The inversion could also be used together with a port range and would then look like --source-port ! 22:80, which in turn would mean that you want to match all ports but port 22 through 80. Note that this match does not handle multiple separated ports and port ranges. For more information about those, look at the multiport match extension.
Match --dport, --destination-port Example iptables -A INPUT -p tcp --dport 22 Explanation This match is used to match TCP packets, according to their
destination port. It uses exactly the same syntax as the --source-port match. It understands port and port range specifications, as well as inversions. It also reverses high and low ports in port range specifications, as above. The match will also assume values of 0 and 65535 if the high or low port is left out in a port range specification. In other
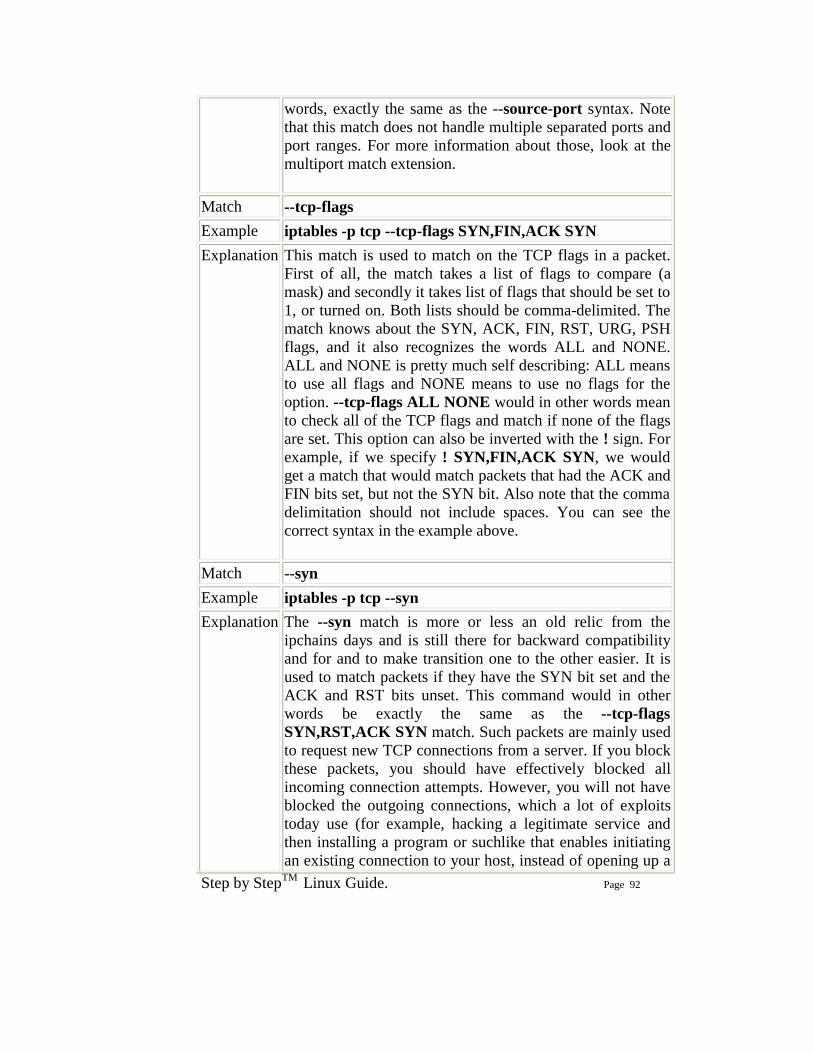
Step by StepTM Linux Guide. Page 92
words, exactly the same as the --source-port syntax. Note that this match does not handle multiple separated ports and port ranges. For more information about those, look at the multiport match extension.
Match --tcp-flags Example iptables -p tcp --tcp-flags SYN,FIN,ACK SYN Explanation This match is used to match on the TCP flags in a packet.
First of all, the match takes a list of flags to compare (a mask) and secondly it takes list of flags that should be set to 1, or turned on. Both lists should be comma-delimited. The match knows about the SYN, ACK, FIN, RST, URG, PSH flags, and it also recognizes the words ALL and NONE. ALL and NONE is pretty much self describing: ALL means to use all flags and NONE means to use no flags for the option. --tcp-flags ALL NONE would in other words mean to check all of the TCP flags and match if none of the flags are set. This option can also be inverted with the ! sign. For example, if we specify ! SYN,FIN,ACK SYN, we would get a match that would match packets that had the ACK and FIN bits set, but not the SYN bit. Also note that the comma delimitation should not include spaces. You can see the correct syntax in the example above.
Match --syn Example iptables -p tcp --syn Explanation The --syn match is more or less an old relic from the
ipchains days and is still there for backward compatibility and for and to make transition one to the other easier. It is used to match packets if they have the SYN bit set and the ACK and RST bits unset. This command would in other words be exactly the same as the --tcp-flags SYN,RST,ACK SYN match. Such packets are mainly used to request new TCP connections from a server. If you block these packets, you should have effectively blocked all incoming connection attempts. However, you will not have blocked the outgoing connections, which a lot of exploits today use (for example, hacking a legitimate service and then installing a program or suchlike that enables initiating an existing connection to your host, instead of opening up a
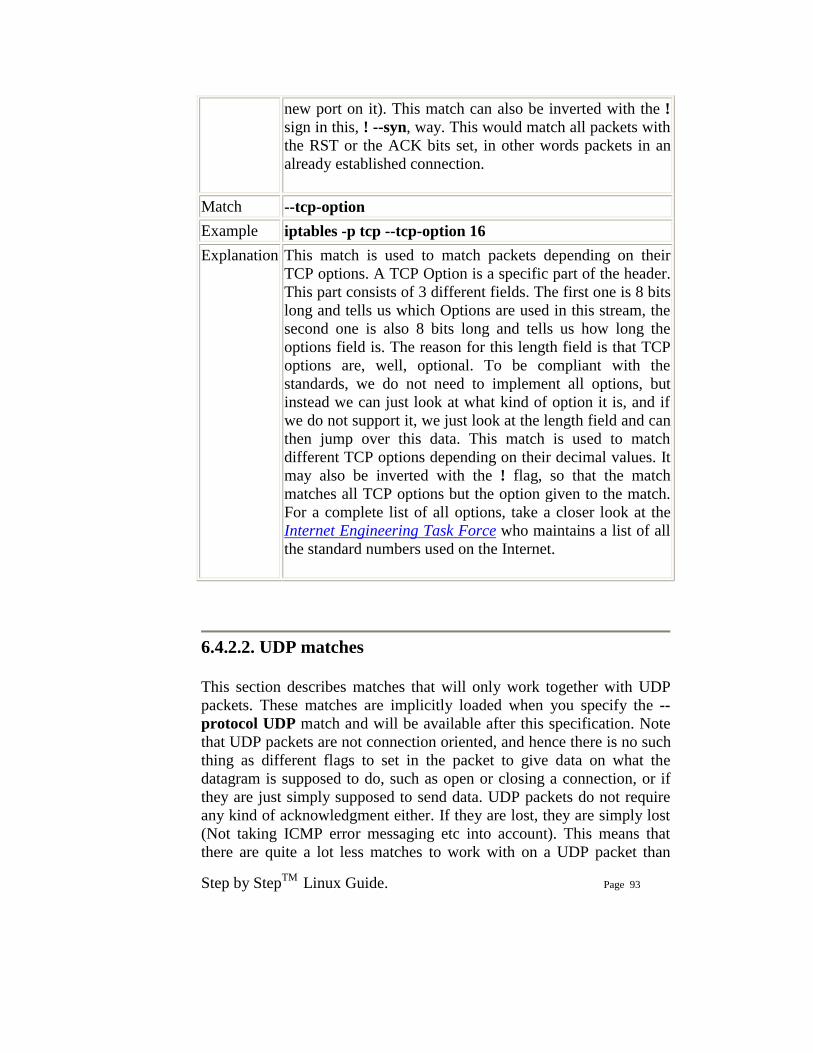
Step by StepTM Linux Guide. Page 93
new port on it). This match can also be inverted with the ! sign in this, ! --syn, way. This would match all packets with the RST or the ACK bits set, in other words packets in an already established connection.
Match --tcp-option Example iptables -p tcp --tcp-option 16 Explanation This match is used to match packets depending on their
TCP options. A TCP Option is a specific part of the header. This part consists of 3 different fields. The first one is 8 bits long and tells us which Options are used in this stream, the second one is also 8 bits long and tells us how long the options field is. The reason for this length field is that TCP options are, well, optional. To be compliant with the standards, we do not need to implement all options, but instead we can just look at what kind of option it is, and if we do not support it, we just look at the length field and can then jump over this data. This match is used to match different TCP options depending on their decimal values. It may also be inverted with the ! flag, so that the match matches all TCP options but the option given to the match. For a complete list of all options, take a closer look at the Internet Engineering Task Force who maintains a list of all the standard numbers used on the Internet.
6.4.2.2. UDP matches This section describes matches that will only work together with UDP packets. These matches are implicitly loaded when you specify the --protocol UDP match and will be available after this specification. Note that UDP packets are not connection oriented, and hence there is no such thing as different flags to set in the packet to give data on what the datagram is supposed to do, such as open or closing a connection, or if they are just simply supposed to send data. UDP packets do not require any kind of acknowledgment either. If they are lost, they are simply lost (Not taking ICMP error messaging etc into account). This means that there are quite a lot less matches to work with on a UDP packet than
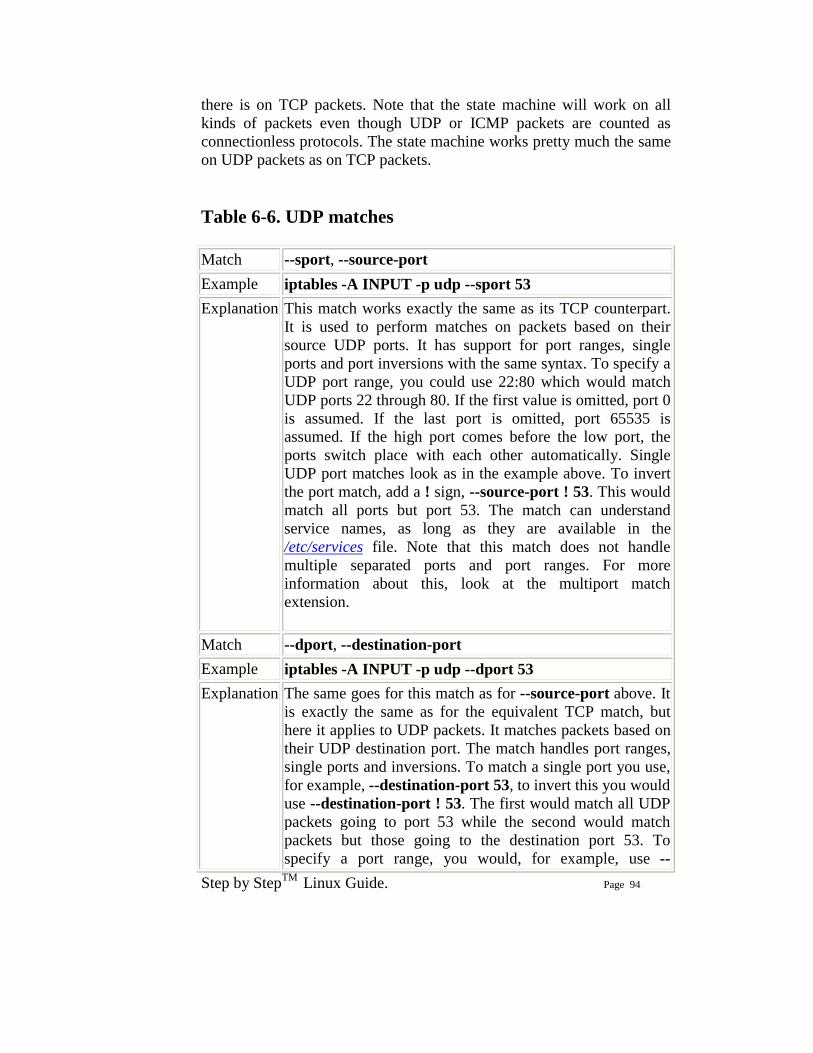
Step by StepTM Linux Guide. Page 94
there is on TCP packets. Note that the state machine will work on all kinds of packets even though UDP or ICMP packets are counted as connectionless protocols. The state machine works pretty much the same on UDP packets as on TCP packets. Table 6-6. UDP matches Match --sport, --source-port Example iptables -A INPUT -p udp --sport 53 Explanation This match works exactly the same as its TCP counterpart.
It is used to perform matches on packets based on their source UDP ports. It has support for port ranges, single ports and port inversions with the same syntax. To specify a UDP port range, you could use 22:80 which would match UDP ports 22 through 80. If the first value is omitted, port 0 is assumed. If the last port is omitted, port 65535 is assumed. If the high port comes before the low port, the ports switch place with each other automatically. Single UDP port matches look as in the example above. To invert the port match, add a ! sign, --source-port ! 53. This would match all ports but port 53. The match can understand service names, as long as they are available in the /etc/services file. Note that this match does not handle multiple separated ports and port ranges. For more information about this, look at the multiport match extension.
Match --dport, --destination-port Example iptables -A INPUT -p udp --dport 53 Explanation The same goes for this match as for --source-port above. It
is exactly the same as for the equivalent TCP match, but here it applies to UDP packets. It matches packets based on their UDP destination port. The match handles port ranges, single ports and inversions. To match a single port you use, for example, --destination-port 53, to invert this you would use --destination-port ! 53. The first would match all UDP packets going to port 53 while the second would match packets but those going to the destination port 53. To specify a port range, you would, for example, use --
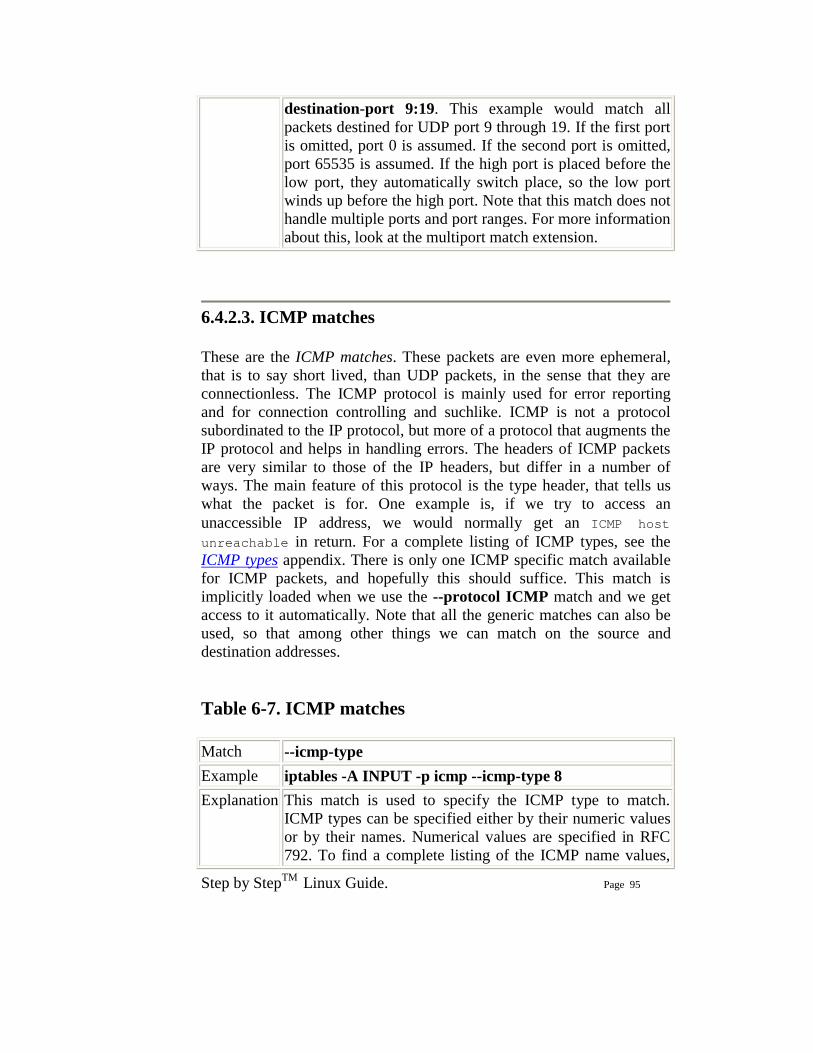
Step by StepTM Linux Guide. Page 95
destination-port 9:19. This example would match all packets destined for UDP port 9 through 19. If the first port is omitted, port 0 is assumed. If the second port is omitted, port 65535 is assumed. If the high port is placed before the low port, they automatically switch place, so the low port winds up before the high port. Note that this match does not handle multiple ports and port ranges. For more information about this, look at the multiport match extension.
6.4.2.3. ICMP matches These are the ICMP matches. These packets are even more ephemeral, that is to say short lived, than UDP packets, in the sense that they are connectionless. The ICMP protocol is mainly used for error reporting and for connection controlling and suchlike. ICMP is not a protocol subordinated to the IP protocol, but more of a protocol that augments the IP protocol and helps in handling errors. The headers of ICMP packets are very similar to those of the IP headers, but differ in a number of ways. The main feature of this protocol is the type header, that tells us what the packet is for. One example is, if we try to access an unaccessible IP address, we would normally get an ICMP host unreachable in return. For a complete listing of ICMP types, see the ICMP types appendix. There is only one ICMP specific match available for ICMP packets, and hopefully this should suffice. This match is implicitly loaded when we use the --protocol ICMP match and we get access to it automatically. Note that all the generic matches can also be used, so that among other things we can match on the source and destination addresses. Table 6-7. ICMP matches Match --icmp-type Example iptables -A INPUT -p icmp --icmp-type 8 Explanation This match is used to specify the ICMP type to match.
ICMP types can be specified either by their numeric values or by their names. Numerical values are specified in RFC 792. To find a complete listing of the ICMP name values,
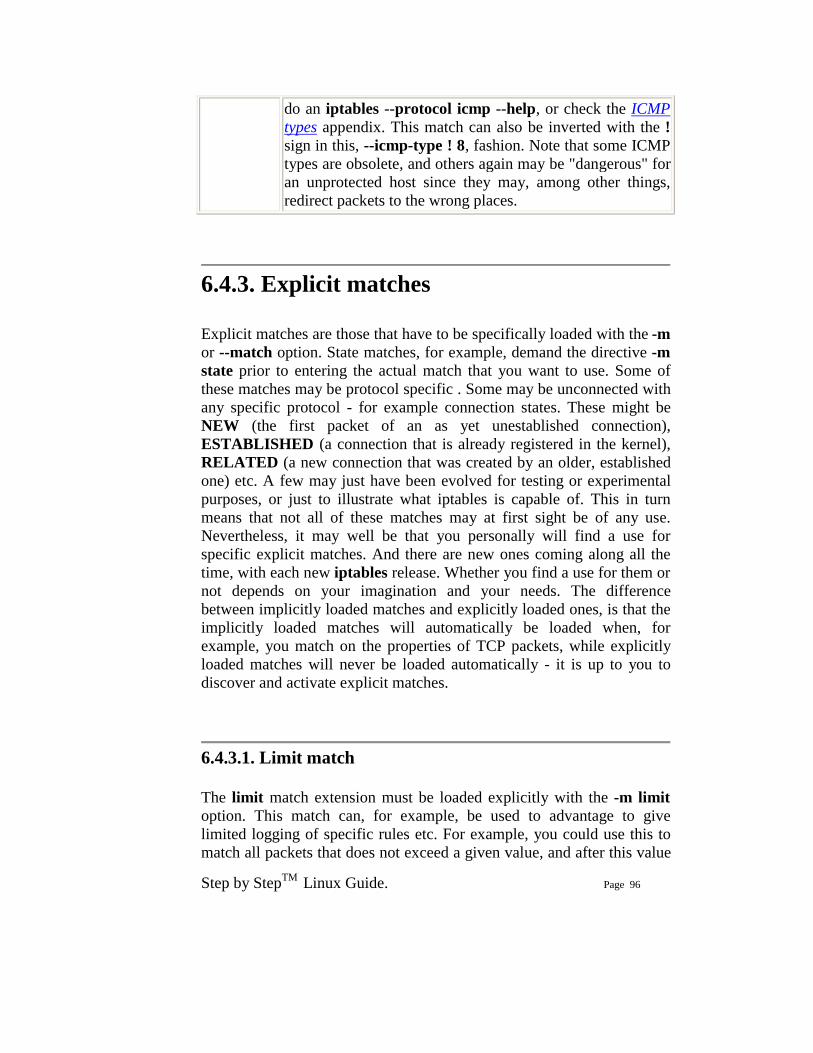
Step by StepTM Linux Guide. Page 96
do an iptables --protocol icmp --help, or check the ICMP types appendix. This match can also be inverted with the ! sign in this, --icmp-type ! 8, fashion. Note that some ICMP types are obsolete, and others again may be "dangerous" for an unprotected host since they may, among other things, redirect packets to the wrong places.
6.4.3. Explicit matches Explicit matches are those that have to be specifically loaded with the -m or --match option. State matches, for example, demand the directive -m state prior to entering the actual match that you want to use. Some of these matches may be protocol specific . Some may be unconnected with any specific protocol - for example connection states. These might be NEW (the first packet of an as yet unestablished connection), ESTABLISHED (a connection that is already registered in the kernel), RELATED (a new connection that was created by an older, established one) etc. A few may just have been evolved for testing or experimental purposes, or just to illustrate what iptables is capable of. This in turn means that not all of these matches may at first sight be of any use. Nevertheless, it may well be that you personally will find a use for specific explicit matches. And there are new ones coming along all the time, with each new iptables release. Whether you find a use for them or not depends on your imagination and your needs. The difference between implicitly loaded matches and explicitly loaded ones, is that the implicitly loaded matches will automatically be loaded when, for example, you match on the properties of TCP packets, while explicitly loaded matches will never be loaded automatically - it is up to you to discover and activate explicit matches.
6.4.3.1. Limit match The limit match extension must be loaded explicitly with the -m limit option. This match can, for example, be used to advantage to give limited logging of specific rules etc. For example, you could use this to match all packets that does not exceed a given value, and after this value

Step by StepTM Linux Guide. Page 97
has been exceeded, limit logging of the event in question. Think of a time limit : You could limit how many times a certain rule may be matched in a certain time frame, for example to lessen the effects of DoS syn flood attacks. This is its main usage, but there are more usages, of course. The limit match may also be inverted by adding a ! flag in front of the limit match. It would then be expressed as -m limit ! --limit 5/s.This means that all packets will be matched after they have broken thelimit. To further explain the limit match, it is basically a token bucket filter. Consider having a leaky bucket where the bucket leaks X packets per time-unit. X is defined depending on how many matching packets we get, so if we get 3 packets, the bucket leaks 3 packets per that time-unit. The --limit option tells us how many packets to refill the bucket with per time-unit, while the --limit-burst option tells us how big the bucket is in the first place. So, setting --limit 3/minute --limit-burst 5, and then receiving 5 matches will empty the bucket. After 20 seconds, the bucket is refilled with another token, and so on until the --limit-burst is reached again or until they get used. Consider the example below for further explanation of how this may look.
1. We set a rule with -m limit --limit 5/second --limit-burst 10/second. The limit-burst token bucket is set to 10 initially. Each packet that matches the rule uses a token.
2. We get packet that matches, 1-2-3-4-5-6-7-8-9-10, all within a
1/1000 of a second. 3. The token bucket is now empty. Once the token bucket is empty, the
packets that qualify for the rule otherwise no longer match the rule and proceed to the next rule if any, or hit the chain policy.
4. For each 1/5 s without a matching packet, the token count goes up by
1, upto a maximum of 10. 1 second after receiving the 10 packets, we will once again have 5 tokens left.
5. And of course, the bucket will be emptied by 1 token for each packet
it receives.
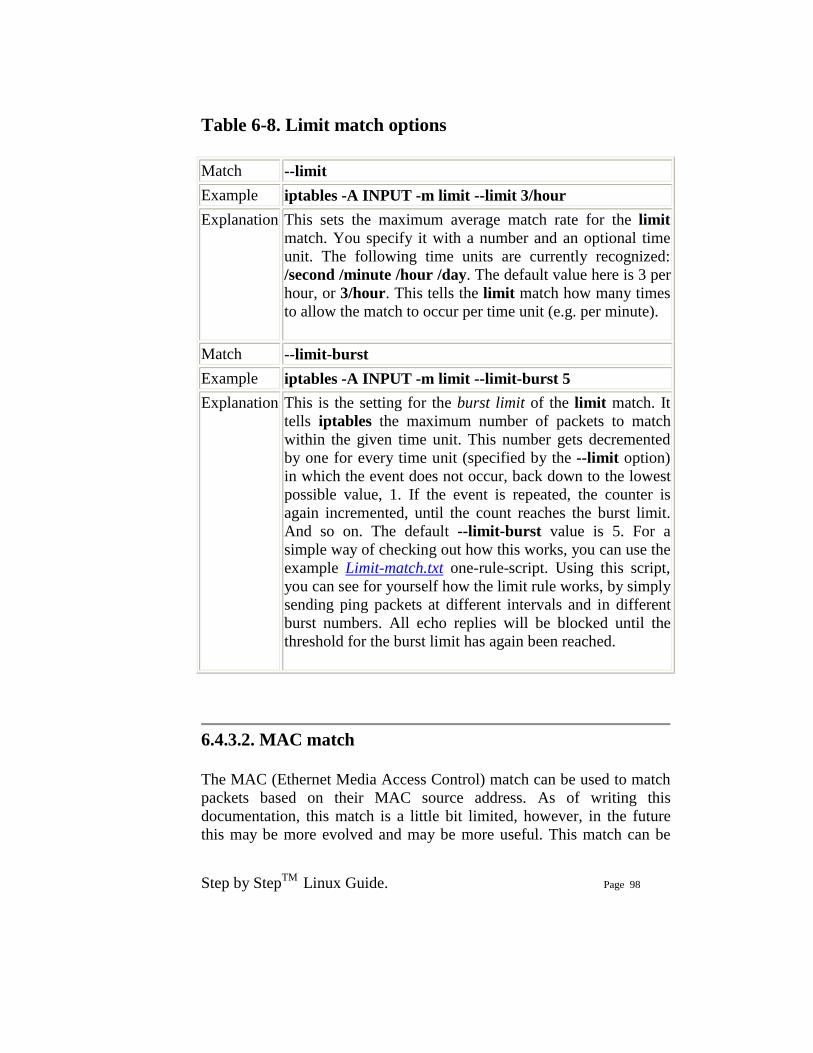
Step by StepTM Linux Guide. Page 98
Table 6-8. Limit match options Match --limit Example iptables -A INPUT -m limit --limit 3/hour Explanation This sets the maximum average match rate for the limit
match. You specify it with a number and an optional time unit. The following time units are currently recognized: /second /minute /hour /day. The default value here is 3 per hour, or 3/hour. This tells the limit match how many times to allow the match to occur per time unit (e.g. per minute).
Match --limit-burst Example iptables -A INPUT -m limit --limit-burst 5 Explanation This is the setting for the burst limit of the limit match. It
tells iptables the maximum number of packets to match within the given time unit. This number gets decremented by one for every time unit (specified by the --limit option) in which the event does not occur, back down to the lowest possible value, 1. If the event is repeated, the counter is again incremented, until the count reaches the burst limit. And so on. The default --limit-burst value is 5. For a simple way of checking out how this works, you can use the example Limit-match.txt one-rule-script. Using this script, you can see for yourself how the limit rule works, by simply sending ping packets at different intervals and in different burst numbers. All echo replies will be blocked until the threshold for the burst limit has again been reached.
6.4.3.2. MAC match The MAC (Ethernet Media Access Control) match can be used to match packets based on their MAC source address. As of writing this documentation, this match is a little bit limited, however, in the future this may be more evolved and may be more useful. This match can be

Step by StepTM Linux Guide. Page 99
used to match packets on the source MAC address only as previously said.
Do note that to use this module we explicitly load it with the -m mac option. The reason that I am saying this is that a lot of people wonder if it should not be -m mac-source, which it should not.
Table 6-9. MAC match options Match --mac-source Example iptables -A INPUT -m mac --mac-source
00:00:00:00:00:01 Explanation This match is used to match packets based on their MAC
source address. The MAC address specified must be in the form XX:XX:XX:XX:XX:XX, else it will not be legal. The match may be reversed with an ! sign and would look like --mac-source ! 00:00:00:00:00:01. This would in other words reverse the meaning of the match, so that all packets except packets from this MAC address would be matched. Note that since MAC addresses are only used on Ethernet type networks, this match will only be possible to use for Ethernet interfaces. The MAC match is only valid in the PREROUTING, FORWARD and INPUT chains and nowhere else.
6.4.3.3. Mark match The mark match extension is used to match packets based on the marks they have set. A mark is a special field, only maintained within the kernel, that is associated with the packets as they travel through the computer. Marks may be used by different kernel routines for such tasks as traffic shaping and filtering. As of today, there is only one way of setting a mark in Linux, namely the MARK target in iptables. This was previously done with the FWMARK target in ipchains, and this is why people still refer to FWMARK in advanced routing areas. The mark
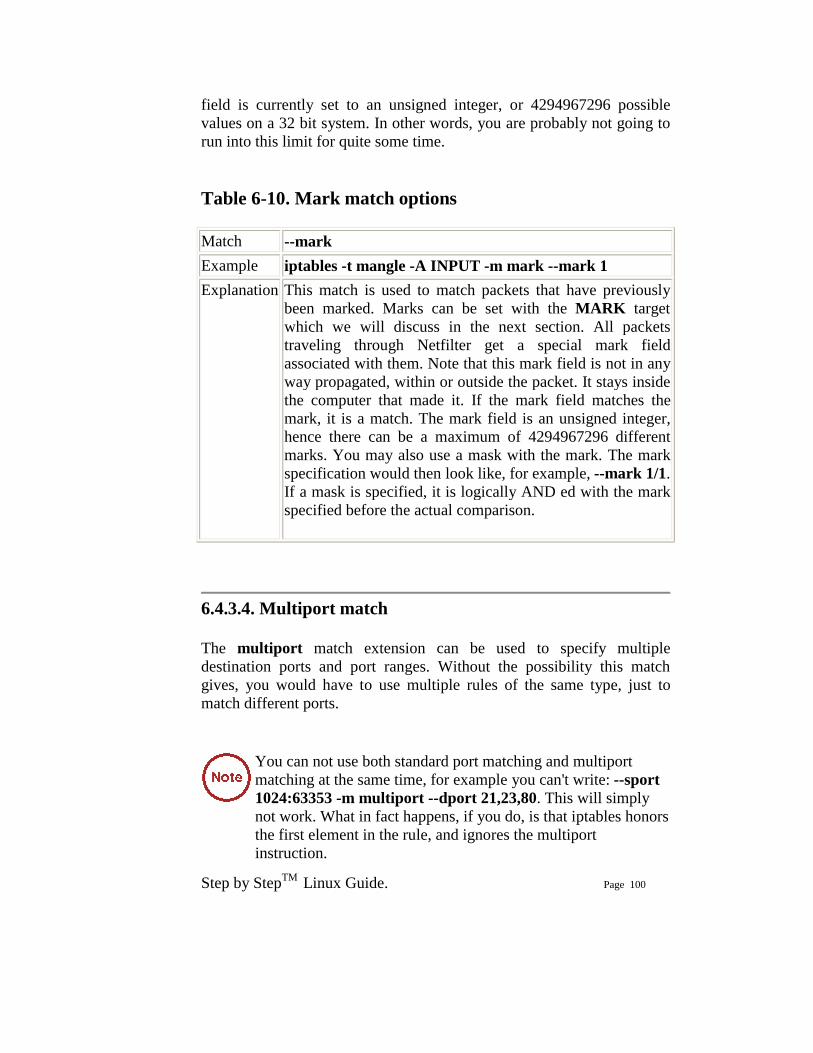
Step by StepTM Linux Guide. Page 100
field is currently set to an unsigned integer, or 4294967296 possible values on a 32 bit system. In other words, you are probably not going to run into this limit for quite some time. Table 6-10. Mark match options Match --mark Example iptables -t mangle -A INPUT -m mark --mark 1 Explanation This match is used to match packets that have previously
been marked. Marks can be set with the MARK target which we will discuss in the next section. All packets traveling through Netfilter get a special mark field associated with them. Note that this mark field is not in any way propagated, within or outside the packet. It stays inside the computer that made it. If the mark field matches the mark, it is a match. The mark field is an unsigned integer, hence there can be a maximum of 4294967296 different marks. You may also use a mask with the mark. The mark specification would then look like, for example, --mark 1/1. If a mask is specified, it is logically AND ed with the mark specified before the actual comparison.
6.4.3.4. Multiport match The multiport match extension can be used to specify multiple destination ports and port ranges. Without the possibility this match gives, you would have to use multiple rules of the same type, just to match different ports.
You can not use both standard port matching and multiport matching at the same time, for example you can't write: --sport 1024:63353 -m multiport --dport 21,23,80. This will simply not work. What in fact happens, if you do, is that iptables honors the first element in the rule, and ignores the multiport instruction.
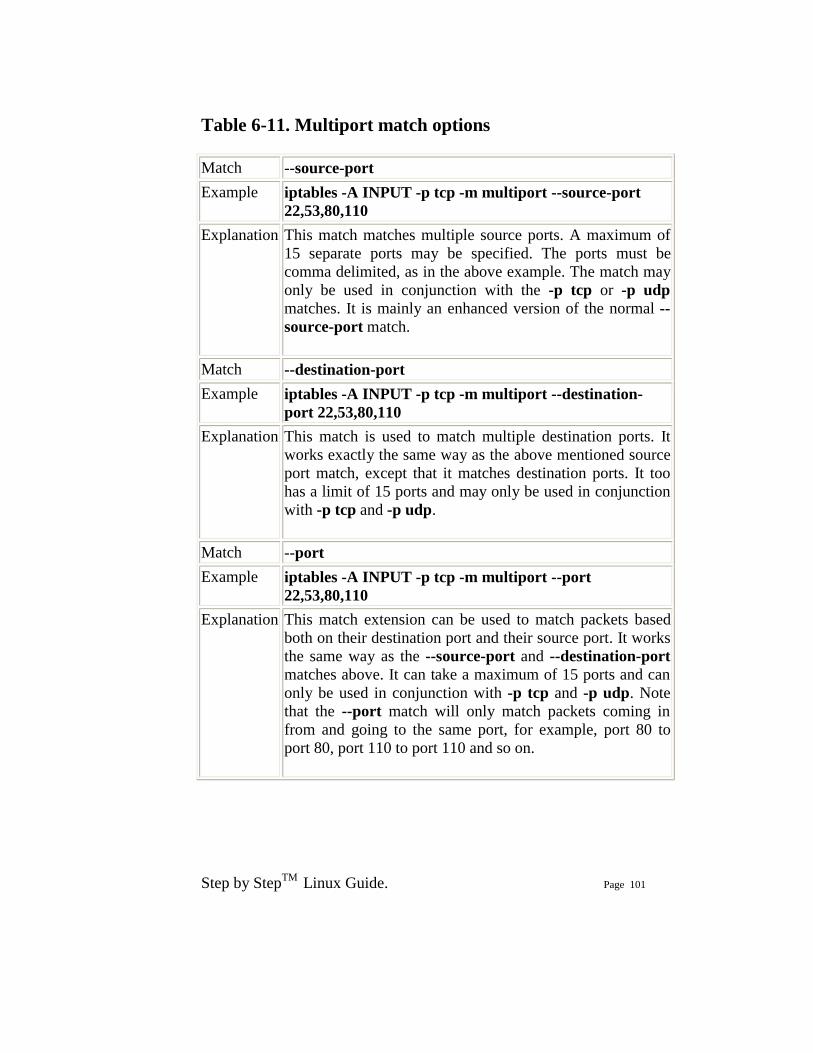
Step by StepTM Linux Guide. Page 101
Table 6-11. Multiport match options Match --source-port Example iptables -A INPUT -p tcp -m multiport --source-port
22,53,80,110 Explanation This match matches multiple source ports. A maximum of
15 separate ports may be specified. The ports must be comma delimited, as in the above example. The match may only be used in conjunction with the -p tcp or -p udp matches. It is mainly an enhanced version of the normal --source-port match.
Match --destination-port Example iptables -A INPUT -p tcp -m multiport --destination-
port 22,53,80,110 Explanation This match is used to match multiple destination ports. It
works exactly the same way as the above mentioned source port match, except that it matches destination ports. It too has a limit of 15 ports and may only be used in conjunction with -p tcp and -p udp.
Match --port Example iptables -A INPUT -p tcp -m multiport --port
22,53,80,110 Explanation This match extension can be used to match packets based
both on their destination port and their source port. It works the same way as the --source-port and --destination-port matches above. It can take a maximum of 15 ports and can only be used in conjunction with -p tcp and -p udp. Note that the --port match will only match packets coming in from and going to the same port, for example, port 80 to port 80, port 110 to port 110 and so on.
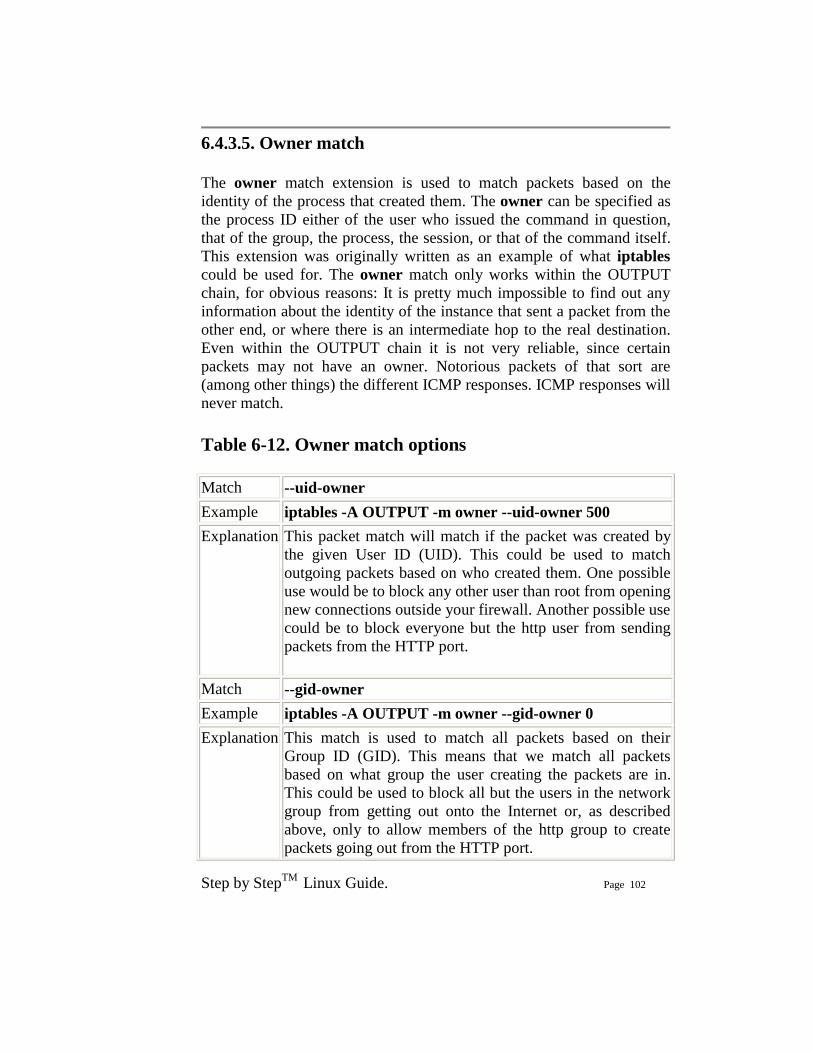
Step by StepTM Linux Guide. Page 102
6.4.3.5. Owner match The owner match extension is used to match packets based on the identity of the process that created them. The owner can be specified as the process ID either of the user who issued the command in question, that of the group, the process, the session, or that of the command itself. This extension was originally written as an example of what iptables could be used for. The owner match only works within the OUTPUT chain, for obvious reasons: It is pretty much impossible to find out any information about the identity of the instance that sent a packet from the other end, or where there is an intermediate hop to the real destination. Even within the OUTPUT chain it is not very reliable, since certain packets may not have an owner. Notorious packets of that sort are (among other things) the different ICMP responses. ICMP responses will never match. Table 6-12. Owner match options Match --uid-owner Example iptables -A OUTPUT -m owner --uid-owner 500 Explanation This packet match will match if the packet was created by
the given User ID (UID). This could be used to match outgoing packets based on who created them. One possible use would be to block any other user than root from opening new connections outside your firewall. Another possible use could be to block everyone but the http user from sending packets from the HTTP port.
Match --gid-owner Example iptables -A OUTPUT -m owner --gid-owner 0 Explanation This match is used to match all packets based on their
Group ID (GID). This means that we match all packets based on what group the user creating the packets are in. This could be used to block all but the users in the network group from getting out onto the Internet or, as described above, only to allow members of the http group to create packets going out from the HTTP port.
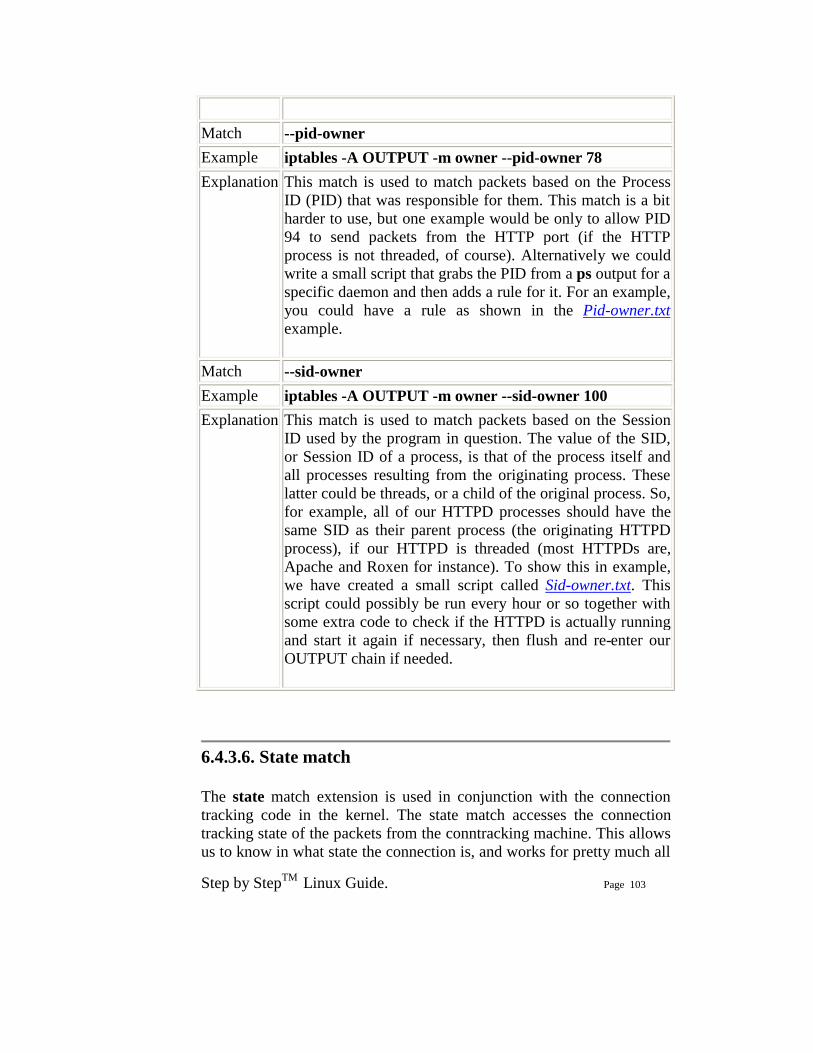
Step by StepTM Linux Guide. Page 103
Match --pid-owner Example iptables -A OUTPUT -m owner --pid-owner 78 Explanation This match is used to match packets based on the Process
ID (PID) that was responsible for them. This match is a bit harder to use, but one example would be only to allow PID 94 to send packets from the HTTP port (if the HTTP process is not threaded, of course). Alternatively we could write a small script that grabs the PID from a ps output for a specific daemon and then adds a rule for it. For an example, you could have a rule as shown in the Pid-owner.txt example.
Match --sid-owner Example iptables -A OUTPUT -m owner --sid-owner 100 Explanation This match is used to match packets based on the Session
ID used by the program in question. The value of the SID, or Session ID of a process, is that of the process itself and all processes resulting from the originating process. These latter could be threads, or a child of the original process. So, for example, all of our HTTPD processes should have the same SID as their parent process (the originating HTTPD process), if our HTTPD is threaded (most HTTPDs are, Apache and Roxen for instance). To show this in example, we have created a small script called Sid-owner.txt. This script could possibly be run every hour or so together with some extra code to check if the HTTPD is actually running and start it again if necessary, then flush and re-enter our OUTPUT chain if needed.
6.4.3.6. State match The state match extension is used in conjunction with the connection tracking code in the kernel. The state match accesses the connection tracking state of the packets from the conntracking machine. This allows us to know in what state the connection is, and works for pretty much all
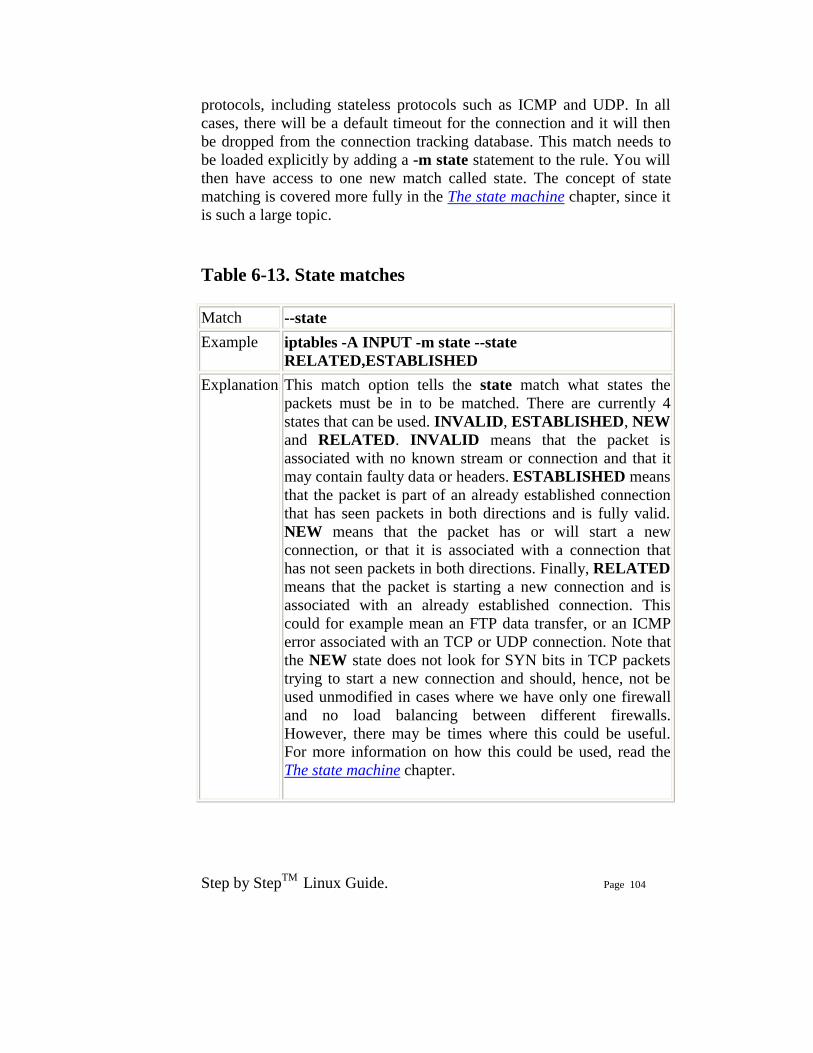
Step by StepTM Linux Guide. Page 104
protocols, including stateless protocols such as ICMP and UDP. In all cases, there will be a default timeout for the connection and it will then be dropped from the connection tracking database. This match needs to be loaded explicitly by adding a -m state statement to the rule. You will then have access to one new match called state. The concept of state matching is covered more fully in the The state machine chapter, since it is such a large topic. Table 6-13. State matches Match --state Example iptables -A INPUT -m state --state
RELATED,ESTABLISHED Explanation This match option tells the state match what states the
packets must be in to be matched. There are currently 4 states that can be used. INVALID, ESTABLISHED, NEW and RELATED. INVALID means that the packet is associated with no known stream or connection and that it may contain faulty data or headers. ESTABLISHED means that the packet is part of an already established connection that has seen packets in both directions and is fully valid. NEW means that the packet has or will start a new connection, or that it is associated with a connection that has not seen packets in both directions. Finally, RELATED means that the packet is starting a new connection and is associated with an already established connection. This could for example mean an FTP data transfer, or an ICMP error associated with an TCP or UDP connection. Note that the NEW state does not look for SYN bits in TCP packets trying to start a new connection and should, hence, not be used unmodified in cases where we have only one firewall and no load balancing between different firewalls. However, there may be times where this could be useful. For more information on how this could be used, read the The state machine chapter.
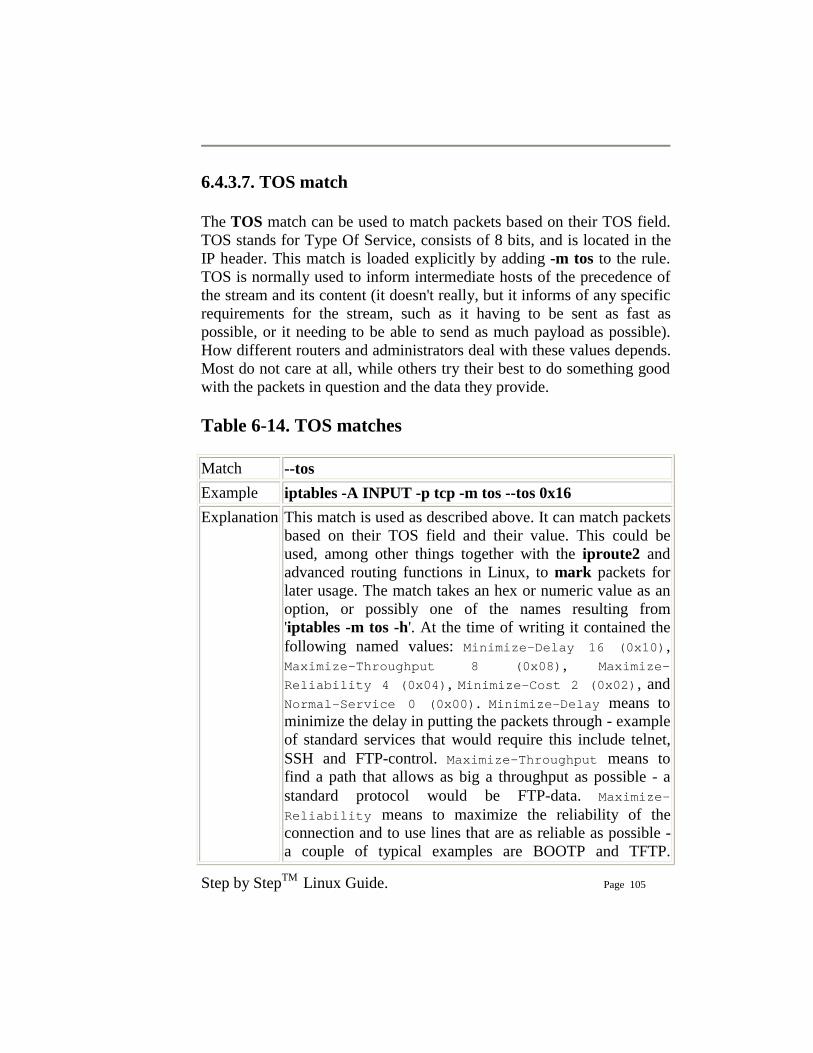
Step by StepTM Linux Guide. Page 105
6.4.3.7. TOS match The TOS match can be used to match packets based on their TOS field. TOS stands for Type Of Service, consists of 8 bits, and is located in the IP header. This match is loaded explicitly by adding -m tos to the rule. TOS is normally used to inform intermediate hosts of the precedence of the stream and its content (it doesn't really, but it informs of any specific requirements for the stream, such as it having to be sent as fast as possible, or it needing to be able to send as much payload as possible). How different routers and administrators deal with these values depends. Most do not care at all, while others try their best to do something good with the packets in question and the data they provide. Table 6-14. TOS matches Match --tos Example iptables -A INPUT -p tcp -m tos --tos 0x16 Explanation This match is used as described above. It can match packets
based on their TOS field and their value. This could be used, among other things together with the iproute2 and advanced routing functions in Linux, to mark packets for later usage. The match takes an hex or numeric value as an option, or possibly one of the names resulting from 'iptables -m tos -h'. At the time of writing it contained the following named values: Minimize-Delay 16 (0x10), Maximize-Throughput 8 (0x08), Maximize-Reliability 4 (0x04), Minimize-Cost 2 (0x02), and Normal-Service 0 (0x00). Minimize-Delay means to minimize the delay in putting the packets through - example of standard services that would require this include telnet, SSH and FTP-control. Maximize-Throughput means to find a path that allows as big a throughput as possible - a standard protocol would be FTP-data. Maximize-Reliability means to maximize the reliability of the connection and to use lines that are as reliable as possible - a couple of typical examples are BOOTP and TFTP.
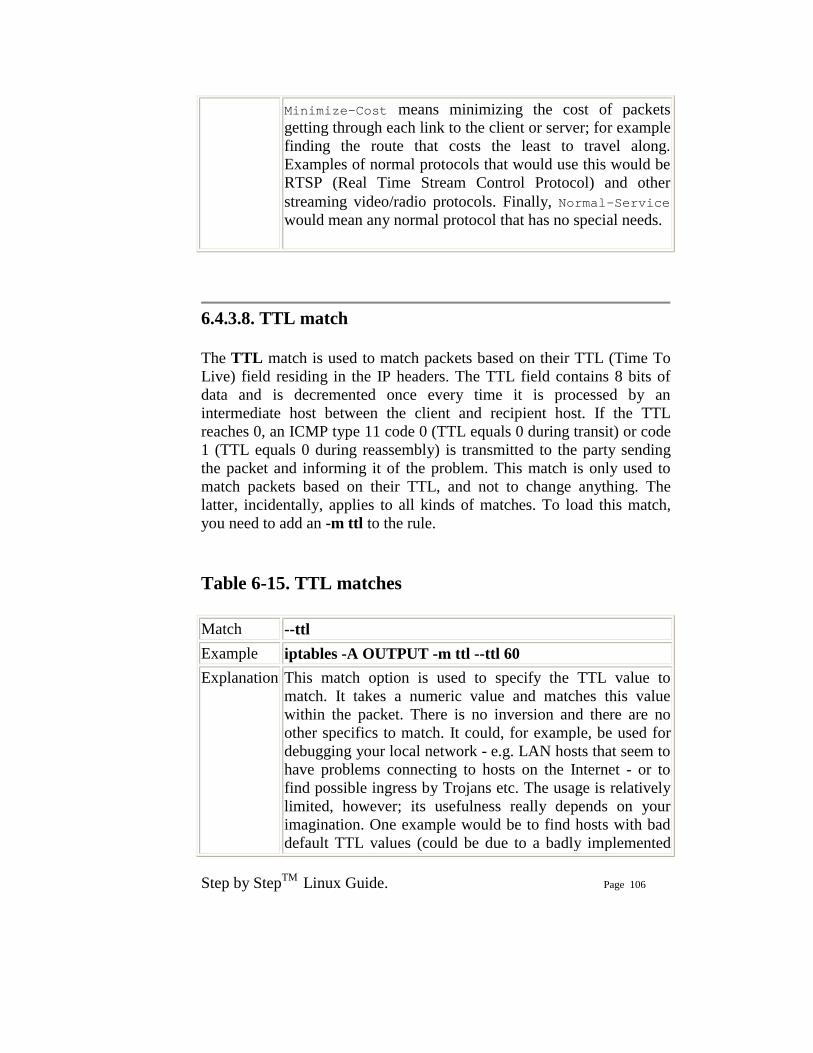
Step by StepTM Linux Guide. Page 106
Minimize-Cost means minimizing the cost of packets getting through each link to the client or server; for example finding the route that costs the least to travel along. Examples of normal protocols that would use this would be RTSP (Real Time Stream Control Protocol) and other streaming video/radio protocols. Finally, Normal-Service would mean any normal protocol that has no special needs.
6.4.3.8. TTL match The TTL match is used to match packets based on their TTL (Time To Live) field residing in the IP headers. The TTL field contains 8 bits of data and is decremented once every time it is processed by an intermediate host between the client and recipient host. If the TTL reaches 0, an ICMP type 11 code 0 (TTL equals 0 during transit) or code 1 (TTL equals 0 during reassembly) is transmitted to the party sending the packet and informing it of the problem. This match is only used to match packets based on their TTL, and not to change anything. The latter, incidentally, applies to all kinds of matches. To load this match, you need to add an -m ttl to the rule. Table 6-15. TTL matches Match --ttl Example iptables -A OUTPUT -m ttl --ttl 60 Explanation This match option is used to specify the TTL value to
match. It takes a numeric value and matches this value within the packet. There is no inversion and there are no other specifics to match. It could, for example, be used for debugging your local network - e.g. LAN hosts that seem to have problems connecting to hosts on the Internet - or to find possible ingress by Trojans etc. The usage is relatively limited, however; its usefulness really depends on your imagination. One example would be to find hosts with bad default TTL values (could be due to a badly implemented
Step by StepTM Linux Guide. Page 107
TCP/IP stack, or simply to misconfiguration).
6.4.4. Unclean match The unclean match takes no options and requires no more than explicitly loading it when you want to use it. Note that this option is regarded as experimental and may not work at all times, nor will it take care of all unclean packages or problems. The unclean match tries to match packets that seem malformed or unusual, such as packets with bad headers or checksums and so on. This could be used to DROP connections and to check for bad streams, for example; however you should be aware that it could possibly break legal connections.
6.5. Targets/Jumps The target/jumps tells the rule what to do with a packet that is a perfect match with the match section of the rule. There are a couple of basic targets, the ACCEPT and DROP targets, which we will deal with first. However, before we do that, let us have a brief look at how a jump is done. The jump specification is done in exactly the same way as in the target definition, except that it requires a chain within the same table to jump to. To jump to a specific chain, it is of course a prerequisite that that chain exists. As we have already explained, a user-defined chain is created with the -N command. For example, let's say we create a chain in the filter table called tcp_packets, like this:
iptables -N tcp_packets We could then add a jump target to it like this:
iptables -A INPUT -p tcp -j tcp_packets We would then jump from the INPUT chain to the tcp_packets chain and start traversing that chain. When/If we reach the end of that chain,
Step by StepTM Linux Guide. Page 108
we get dropped back to the INPUT chain and the packet starts traversing from the rule one step below where it jumped to the other chain (tcp_packets in this case). If a packet is ACCEPTed within one of the sub chains, it will be ACCEPT'ed in the superset chain also and it will not traverse any of the superset chains any further. However, do note that the packet will traverse all other chains in the other tables in a normal fashion. For more information on table and chain traversing, see the Traversing of tables and chains chapter. Targets on the other hand specify an action to take on the packet in question. We could for example, DROP or ACCEPT the packet depending on what we want to do. There are also a number of other actions we may want to take, which we will describe further on in this section. Jumping to targets may incur different results, as it were. Some targets will cause the packet to stop traversing that specific chain and superior chains as described above. Good examples of such rules are DROP and ACCEPT. Rules that are stopped, will not pass through any of the rules further on in the chain or in superior chains. Other targets, may take an action on the packet, after which the packet will continue passing through the rest of the rules. A good example of this would be the LOG, ULOG and TOS targets. These targets can log the packets, mangle them and then pass them on to the other rules in the same set of chains. We might, for example, want this so that we in addition can mangle both the TTL and the TOS values of a specific packet/stream. Some targets will accept extra options (What TOS value to use etc), while others don't necessarily need any options - but we can include them if we want to (log prefixes, masquerade-to ports and so on). We will try to cover all of these points as we go through the target descriptions. Let us have a look at what kinds of targets there are.
6.5.1. ACCEPT target This target needs no further options. As soon as the match specification for a packet has been fully satisfied, and we specify ACCEPT as the target, the rule is accepted and will not continue traversing the current chain or any other ones in the same table. Note however, that a packet that was accepted in one chain might still travel through chains within other tables, and could still be dropped there. There is nothing special about this target whatsoever, and it does not require, nor have the
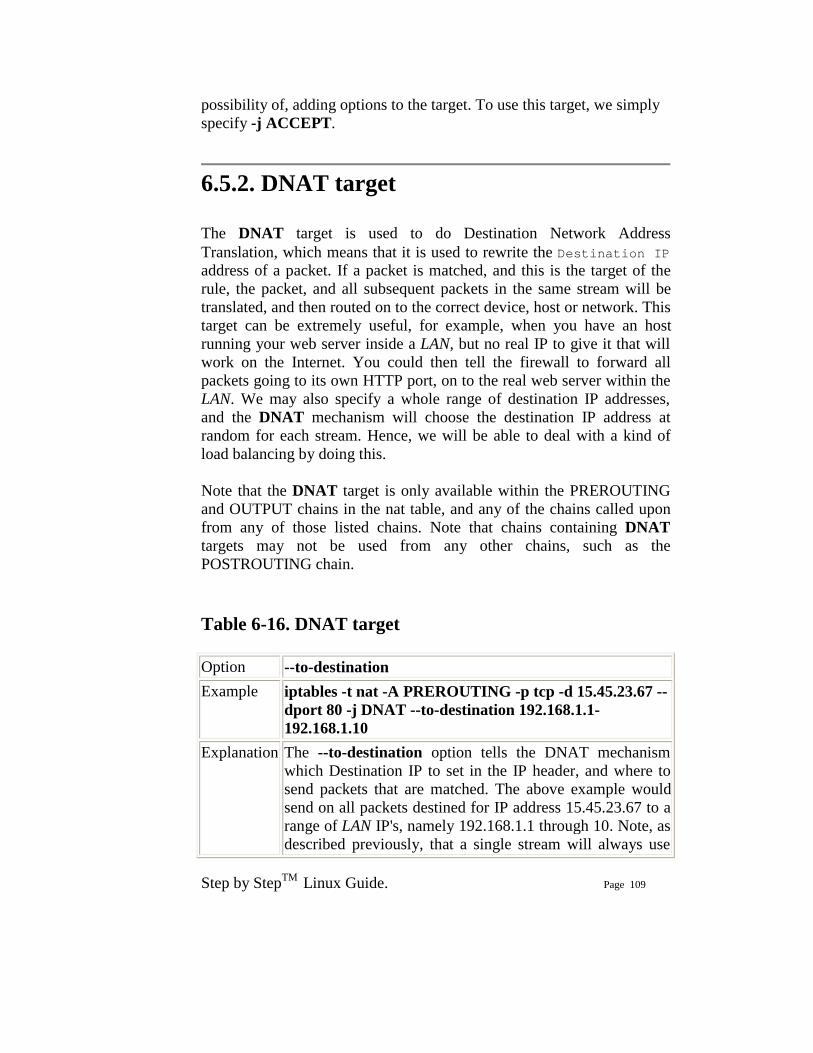
Step by StepTM Linux Guide. Page 109
possibility of, adding options to the target. To use this target, we simply specify -j ACCEPT.
6.5.2. DNAT target The DNAT target is used to do Destination Network Address Translation, which means that it is used to rewrite the Destination IP address of a packet. If a packet is matched, and this is the target of the rule, the packet, and all subsequent packets in the same stream will be translated, and then routed on to the correct device, host or network. This target can be extremely useful, for example, when you have an host running your web server inside a LAN, but no real IP to give it that will work on the Internet. You could then tell the firewall to forward all packets going to its own HTTP port, on to the real web server within the LAN. We may also specify a whole range of destination IP addresses, and the DNAT mechanism will choose the destination IP address at random for each stream. Hence, we will be able to deal with a kind of load balancing by doing this. Note that the DNAT target is only available within the PREROUTING and OUTPUT chains in the nat table, and any of the chains called upon from any of those listed chains. Note that chains containing DNAT targets may not be used from any other chains, such as the POSTROUTING chain. Table 6-16. DNAT target Option --to-destination Example iptables -t nat -A PREROUTING -p tcp -d 15.45.23.67 --
dport 80 -j DNAT --to-destination 192.168.1.1-192.168.1.10
Explanation The --to-destination option tells the DNAT mechanism which Destination IP to set in the IP header, and where to send packets that are matched. The above example would send on all packets destined for IP address 15.45.23.67 to a range of LAN IP's, namely 192.168.1.1 through 10. Note, as described previously, that a single stream will always use
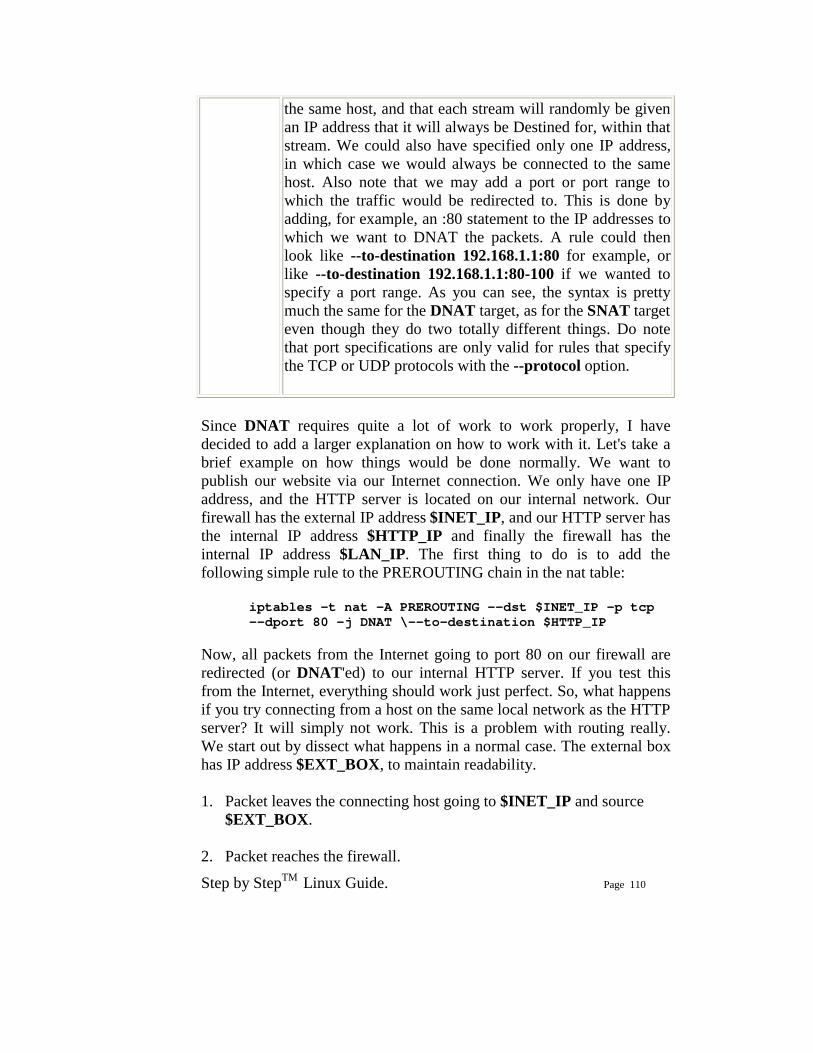
Step by StepTM Linux Guide. Page 110
the same host, and that each stream will randomly be given an IP address that it will always be Destined for, within that stream. We could also have specified only one IP address, in which case we would always be connected to the same host. Also note that we may add a port or port range to which the traffic would be redirected to. This is done by adding, for example, an :80 statement to the IP addresses to which we want to DNAT the packets. A rule could then look like --to-destination 192.168.1.1:80 for example, or like --to-destination 192.168.1.1:80-100 if we wanted to specify a port range. As you can see, the syntax is pretty much the same for the DNAT target, as for the SNAT target even though they do two totally different things. Do note that port specifications are only valid for rules that specify the TCP or UDP protocols with the --protocol option.
Since DNAT requires quite a lot of work to work properly, I have decided to add a larger explanation on how to work with it. Let's take a brief example on how things would be done normally. We want to publish our website via our Internet connection. We only have one IP address, and the HTTP server is located on our internal network. Our firewall has the external IP address $INET_IP, and our HTTP server has the internal IP address $HTTP_IP and finally the firewall has the internal IP address $LAN_IP. The first thing to do is to add the following simple rule to the PREROUTING chain in the nat table:
iptables -t nat -A PREROUTING --dst $INET_IP -p tcp --dport 80 -j DNAT \--to-destination $HTTP_IP
Now, all packets from the Internet going to port 80 on our firewall are redirected (or DNAT'ed) to our internal HTTP server. If you test this from the Internet, everything should work just perfect. So, what happens if you try connecting from a host on the same local network as the HTTP server? It will simply not work. This is a problem with routing really. We start out by dissect what happens in a normal case. The external box has IP address $EXT_BOX, to maintain readability. 1. Packet leaves the connecting host going to $INET_IP and source
$EXT_BOX. 2. Packet reaches the firewall.
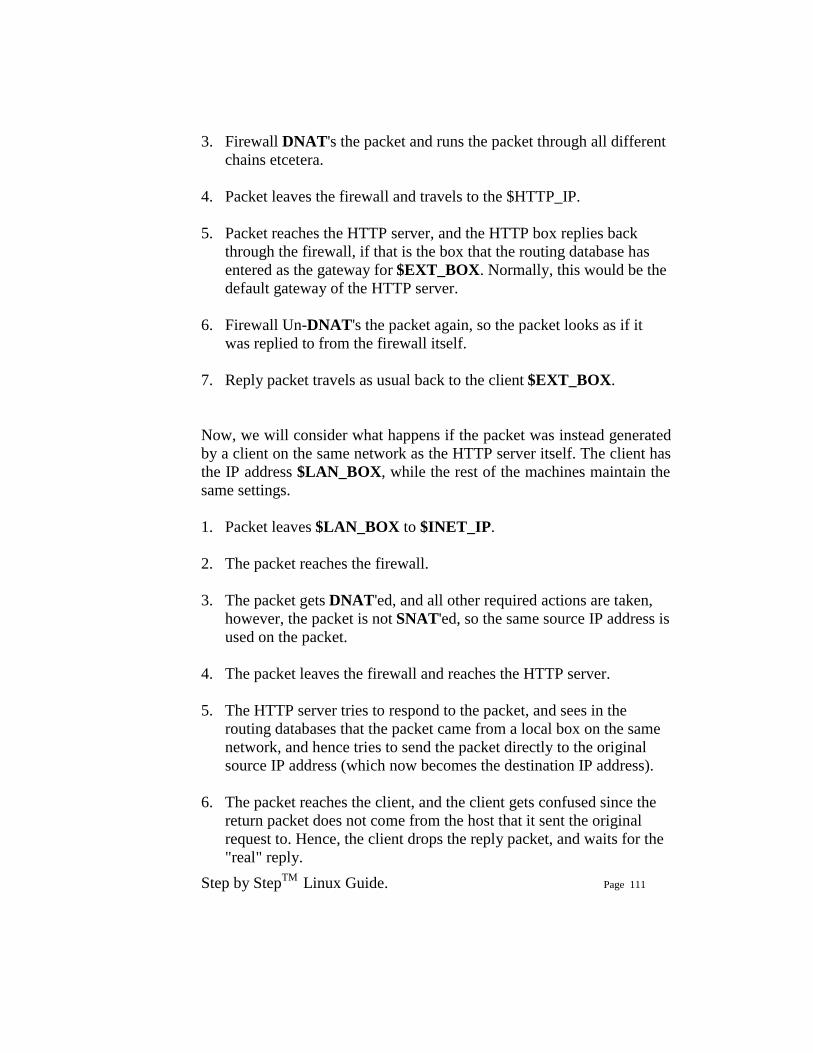
Step by StepTM Linux Guide. Page 111
3. Firewall DNAT's the packet and runs the packet through all different
chains etcetera. 4. Packet leaves the firewall and travels to the $HTTP_IP. 5. Packet reaches the HTTP server, and the HTTP box replies back
through the firewall, if that is the box that the routing database has entered as the gateway for $EXT_BOX. Normally, this would be the default gateway of the HTTP server.
6. Firewall Un-DNAT's the packet again, so the packet looks as if it
was replied to from the firewall itself. 7. Reply packet travels as usual back to the client $EXT_BOX. Now, we will consider what happens if the packet was instead generated by a client on the same network as the HTTP server itself. The client has the IP address $LAN_BOX, while the rest of the machines maintain the same settings.
1. Packet leaves $LAN_BOX to $INET_IP. 2. The packet reaches the firewall. 3. The packet gets DNAT'ed, and all other required actions are taken,
however, the packet is not SNAT'ed, so the same source IP address is used on the packet.
4. The packet leaves the firewall and reaches the HTTP server.
5. The HTTP server tries to respond to the packet, and sees in the
routing databases that the packet came from a local box on the same network, and hence tries to send the packet directly to the original source IP address (which now becomes the destination IP address).
6. The packet reaches the client, and the client gets confused since the return packet does not come from the host that it sent the original request to. Hence, the client drops the reply packet, and waits for the "real" reply.

Step by StepTM Linux Guide. Page 112
The simple solution to this problem is to SNAT all packets entering the firewall and leaving for a host or IP that we know we do DNAT to. For example, consider the above rule. We SNAT the packets entering our firewall that are destined for $HTTP_IP port 80 so that they look as if they came from $LAN_IP. This will force the HTTP server to send the packets back to our firewall, which Un-DNAT's the packets and sends them on to the client. The rule would look something like this:
iptables -t nat -A POSTROUTING -p tcp --dst $HTTP_IP --dport 80 -j SNAT \--to-source $LAN_IP
Remember that the POSTROUTING chain is processed last of the chains, and hence the packet will already be DNAT'ed once it reaches that specific chain. This is the reason that we match the packets based on the internal address.
This last rule will seriously harm your logging, so it is really advisable not to use this method, but the whole example is still a valid one for all of those who can't afford to set up a specific DMZ or alike. What will happen is this, packet comes from the Internet, gets SNAT'ed and DNAT'ed, and finally hits the HTTP server (for example). The HTTP server now only sees the request as if it was coming from the firewall, and hence logs all requests from the internet as if they came from the firewall. This can also have even more severe implications. Take a SMTP server on the LAN, that allows requests from the internal network, and you have your firewall set up to forward SMTP traffic to it. You have now effectively created an open relay SMTP server, with horrenduously bad logging! You will in other words be better off solving these problems by either setting up a separate DNS server for your LAN, or to actually set up a separate DMZ, the latter being preferred if you have the money. ]
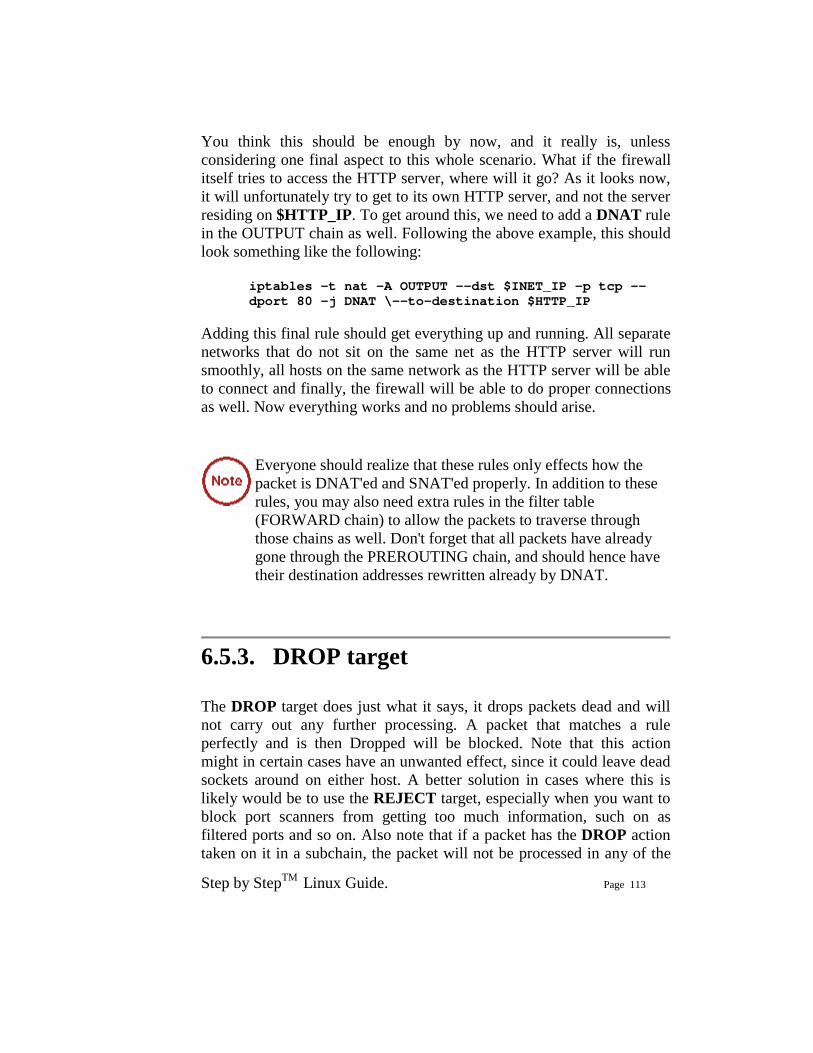
Step by StepTM Linux Guide. Page 113
You think this should be enough by now, and it really is, unless considering one final aspect to this whole scenario. What if the firewall itself tries to access the HTTP server, where will it go? As it looks now, it will unfortunately try to get to its own HTTP server, and not the server residing on $HTTP_IP. To get around this, we need to add a DNAT rule in the OUTPUT chain as well. Following the above example, this should look something like the following:
iptables -t nat -A OUTPUT --dst $INET_IP -p tcp --dport 80 -j DNAT \--to-destination $HTTP_IP
Adding this final rule should get everything up and running. All separate networks that do not sit on the same net as the HTTP server will run smoothly, all hosts on the same network as the HTTP server will be able to connect and finally, the firewall will be able to do proper connections as well. Now everything works and no problems should arise.
Everyone should realize that these rules only effects how the packet is DNAT'ed and SNAT'ed properly. In addition to these rules, you may also need extra rules in the filter table (FORWARD chain) to allow the packets to traverse through those chains as well. Don't forget that all packets have already gone through the PREROUTING chain, and should hence have their destination addresses rewritten already by DNAT.
6.5.3. DROP target
The DROP target does just what it says, it drops packets dead and will not carry out any further processing. A packet that matches a rule perfectly and is then Dropped will be blocked. Note that this action might in certain cases have an unwanted effect, since it could leave dead sockets around on either host. A better solution in cases where this is likely would be to use the REJECT target, especially when you want to block port scanners from getting too much information, such on as filtered ports and so on. Also note that if a packet has the DROP action taken on it in a subchain, the packet will not be processed in any of the
Step by StepTM Linux Guide. Page 114
main chains either in the present or in any other table. The packet is in other words totally dead. As we've seen previously, the target will not send any kind of information in either direction, nor to intermediaries such as routers.
6.5.4. LOG target The LOG target is specially designed for logging detailed information about packets. These could for example be considered as illegal. Or, logging can be used purely for bug hunting and error finding. The LOG target will return specific information on packets, such as most of the IP headers and other information considered interesting. It does this via the kernel logging facility, normally syslogd. This information may then be read directly with dmesg, or from the syslogd logs, or with other programs or applications. This is an excellent target to use in debug your rule-sets, so that you can see what packets go where and what rules are applied on what packets. Note as well that it could be a really great idea to use the LOG target instead of the DROP target while you are testing a rule you are not 100% sure about on a production firewall, since a syntax error in the rule-sets could otherwise cause severe connectivity problems for your users. Also note that the ULOG target may be interesting if you are using really extensive logging, since the ULOG target has support direct logging to MySQL databases and suchlike.
Note that if you get undesired logging direct to consoles, this is not an iptables or Netfilter problem, but rather a problem caused by your syslogd configuration - most probably /etc/syslog.conf. Read more in man syslog.conf for information about this kind of problem.
The LOG target currently takes five options that could be of interest if you have specific information needs, or want to set different options to specific values. They are all listed below.

Step by StepTM Linux Guide. Page 115
Table 6-17. LOG target options Option --log-level Example iptables -A FORWARD -p tcp -j LOG --log-level debug Explanation This is the option to tell iptables and syslog which log level
to use. For a complete list of log levels read the syslog.conf manual. Normally there are the following log levels, or priorities as they are normally referred to: debug, info, notice, warning, warn, err, error, crit, alert, emerg and panic. The keyword error is the same as err, warn is the same as warning and panic is the same as emerg. Note that all three of these are deprecated, in other words do not use error, warn and panic. The priority defines the severity of the message being logged. All messages are logged through the kernel facility. In other words, setting kern.=info /var/log/iptables in your syslog.conf file and then letting all your LOG messages in iptables use log level info, would make all messages appear in the /var/log/iptables file. Note that there may be other messages here as well from other parts of the kernel that uses the info priority. For more information on logging I recommend you to read the syslog and syslog.conf man-pages as well as other HOWTOs etc.
Option --log-prefix Example iptables -A INPUT -p tcp -j LOG --log-prefix "INPUT
packets" Explanation This option tells iptables to prefix all log messages with a
specific prefix, which can the easily be combined with grep or other tools to track specific problems and output from different rules. The prefix may be up to 29 letters long, including white-spaces and other special symbols.
Option --log-tcp-sequence
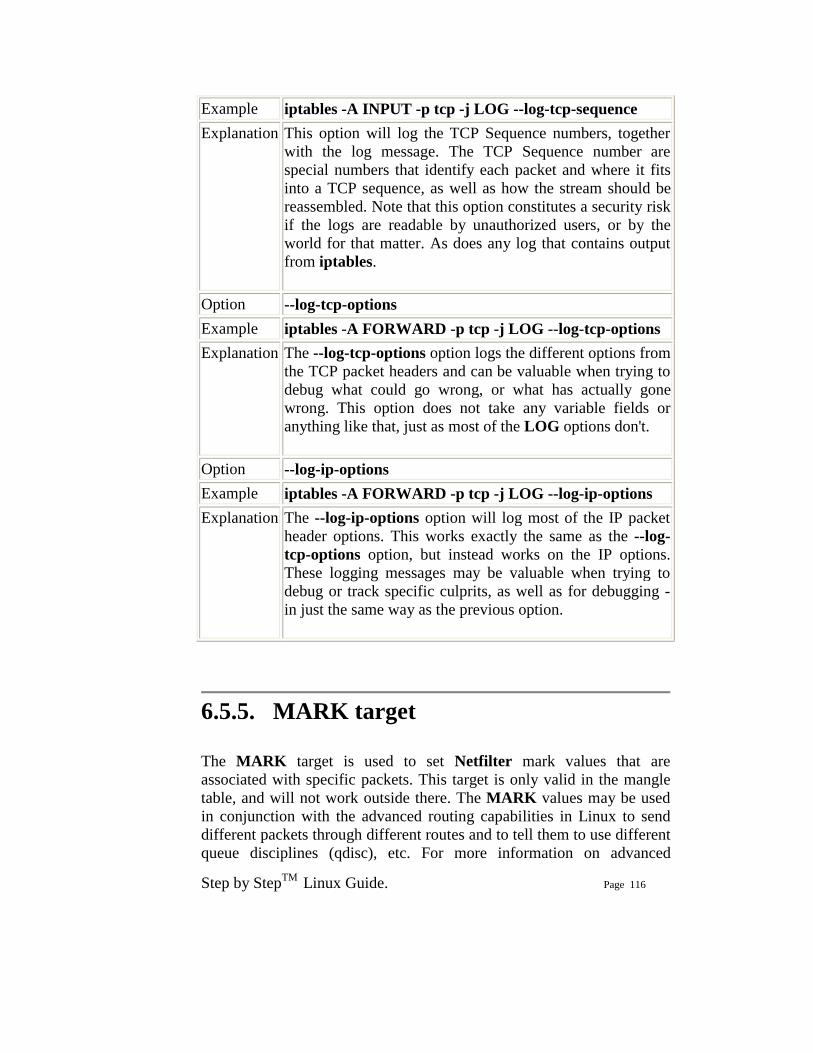
Step by StepTM Linux Guide. Page 116
Example iptables -A INPUT -p tcp -j LOG --log-tcp-sequence Explanation This option will log the TCP Sequence numbers, together
with the log message. The TCP Sequence number are special numbers that identify each packet and where it fits into a TCP sequence, as well as how the stream should be reassembled. Note that this option constitutes a security risk if the logs are readable by unauthorized users, or by the world for that matter. As does any log that contains output from iptables.
Option --log-tcp-options Example iptables -A FORWARD -p tcp -j LOG --log-tcp-options Explanation The --log-tcp-options option logs the different options from
the TCP packet headers and can be valuable when trying to debug what could go wrong, or what has actually gone wrong. This option does not take any variable fields or anything like that, just as most of the LOG options don't.
Option --log-ip-options Example iptables -A FORWARD -p tcp -j LOG --log-ip-options Explanation The --log-ip-options option will log most of the IP packet
header options. This works exactly the same as the --log-tcp-options option, but instead works on the IP options. These logging messages may be valuable when trying to debug or track specific culprits, as well as for debugging - in just the same way as the previous option.
6.5.5. MARK target
The MARK target is used to set Netfilter mark values that are associated with specific packets. This target is only valid in the mangle table, and will not work outside there. The MARK values may be used in conjunction with the advanced routing capabilities in Linux to send different packets through different routes and to tell them to use different queue disciplines (qdisc), etc. For more information on advanced
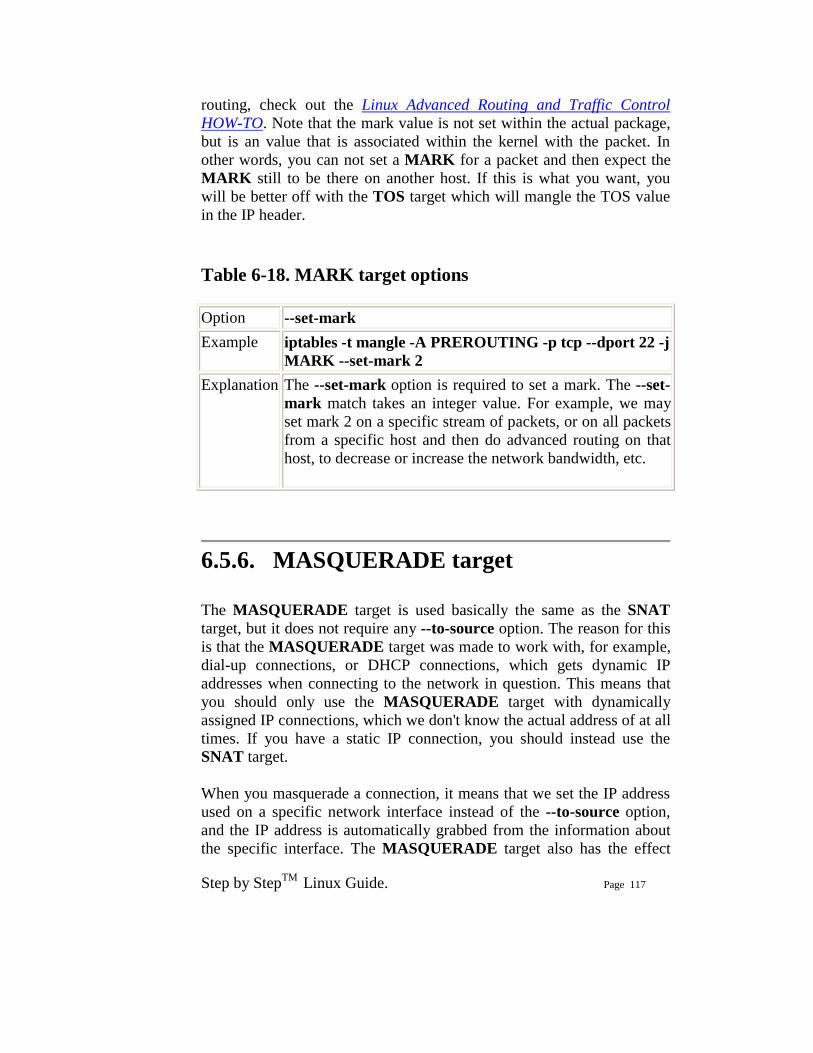
Step by StepTM Linux Guide. Page 117
routing, check out the Linux Advanced Routing and Traffic Control HOW-TO. Note that the mark value is not set within the actual package, but is an value that is associated within the kernel with the packet. In other words, you can not set a MARK for a packet and then expect the MARK still to be there on another host. If this is what you want, you will be better off with the TOS target which will mangle the TOS value in the IP header. Table 6-18. MARK target options Option --set-mark Example iptables -t mangle -A PREROUTING -p tcp --dport 22 -j
MARK --set-mark 2 Explanation The --set-mark option is required to set a mark. The --set-
mark match takes an integer value. For example, we may set mark 2 on a specific stream of packets, or on all packets from a specific host and then do advanced routing on that host, to decrease or increase the network bandwidth, etc.
6.5.6. MASQUERADE target The MASQUERADE target is used basically the same as the SNAT target, but it does not require any --to-source option. The reason for this is that the MASQUERADE target was made to work with, for example, dial-up connections, or DHCP connections, which gets dynamic IP addresses when connecting to the network in question. This means that you should only use the MASQUERADE target with dynamically assigned IP connections, which we don't know the actual address of at all times. If you have a static IP connection, you should instead use the SNAT target. When you masquerade a connection, it means that we set the IP address used on a specific network interface instead of the --to-source option, and the IP address is automatically grabbed from the information about the specific interface. The MASQUERADE target also has the effect
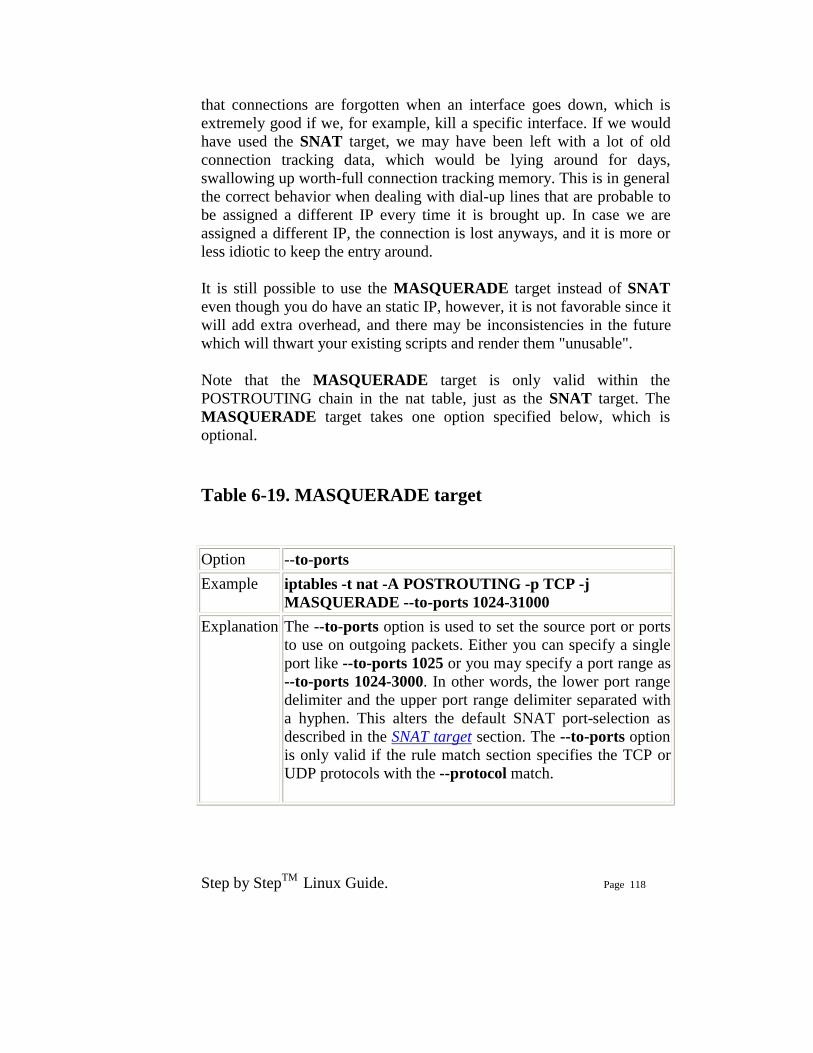
Step by StepTM Linux Guide. Page 118
that connections are forgotten when an interface goes down, which is extremely good if we, for example, kill a specific interface. If we would have used the SNAT target, we may have been left with a lot of old connection tracking data, which would be lying around for days, swallowing up worth-full connection tracking memory. This is in general the correct behavior when dealing with dial-up lines that are probable to be assigned a different IP every time it is brought up. In case we are assigned a different IP, the connection is lost anyways, and it is more or less idiotic to keep the entry around. It is still possible to use the MASQUERADE target instead of SNAT even though you do have an static IP, however, it is not favorable since it will add extra overhead, and there may be inconsistencies in the future which will thwart your existing scripts and render them "unusable". Note that the MASQUERADE target is only valid within the POSTROUTING chain in the nat table, just as the SNAT target. The MASQUERADE target takes one option specified below, which is optional. Table 6-19. MASQUERADE target Option --to-ports Example iptables -t nat -A POSTROUTING -p TCP -j
MASQUERADE --to-ports 1024-31000 Explanation The --to-ports option is used to set the source port or ports
to use on outgoing packets. Either you can specify a single port like --to-ports 1025 or you may specify a port range as --to-ports 1024-3000. In other words, the lower port range delimiter and the upper port range delimiter separated with a hyphen. This alters the default SNAT port-selection as described in the SNAT target section. The --to-ports option is only valid if the rule match section specifies the TCP or UDP protocols with the --protocol match.

Step by StepTM Linux Guide. Page 119
6.5.7. MIRROR target The MIRROR target is an experimental and demonstration target only, and you are warned against using it, since it may result in really bad loops hence, among other things, resulting in serious Denial of Service. The MIRROR target is used to invert the source and destination fields in the IP header, and then to retransmit the packet. This can cause some really funny effects, and I'll bet that thanks to this target not just one red faced cracker has cracked his own box by now. The effect of using this target is stark, to say the least. Let's say we set up a MIRROR target for port 80 at computer A. If host B were to come from yahoo.com, and try to access the HTTP server at host A, the MIRROR target would return the yahoo host's own web page (since this is where it came from). Note that the MIRROR target is only valid within the INPUT, FORWARD and PREROUTING chains, and any user-defined chains which are called from those chains. Also note that outgoing packets resulting from the MIRROR target are not seen by any of the normal chains in the filter, nat or mangle tables, which could give rise to loops and other problems. This could make the target the cause of unforeseen headaches. For example, a host might send a spoofed packet to another host that uses the MIRROR command with a TTL of 255, at the same time spoofing its own packet, so as to seem as if it comes from a third host that uses the MIRROR command. The packet will then bounce back and forth incessantly, for the number of hops there are to be completed. If there is only 1 hop, the packet will jump back and forth 240-255 times. Not bad for a cracker, in other words, to send 1500 bytes of data and eat up 380 kbyte of your connection. Note that this is a best case scenario for the cracker or script kiddie, whatever we want to call them.
6.5.8. QUEUE target
The QUEUE target is used to queue packets to User-land programs and applications. It is used in conjunction with programs or utilities that are
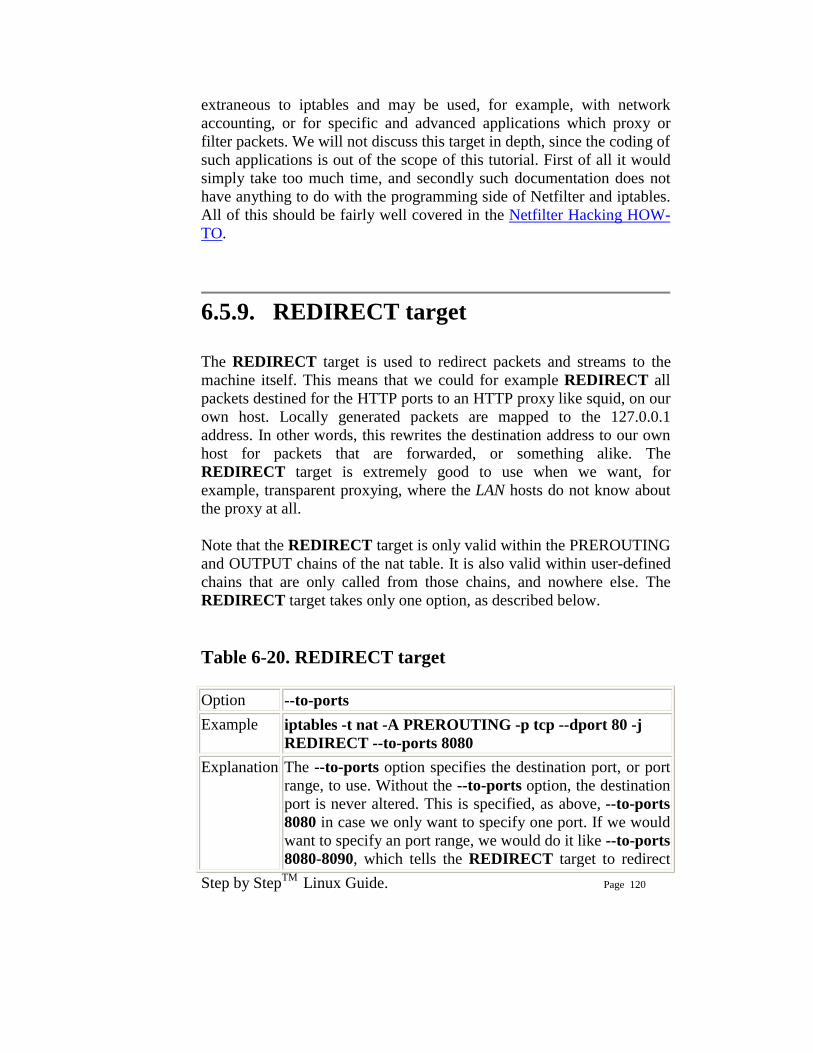
Step by StepTM Linux Guide. Page 120
extraneous to iptables and may be used, for example, with network accounting, or for specific and advanced applications which proxy or filter packets. We will not discuss this target in depth, since the coding of such applications is out of the scope of this tutorial. First of all it would simply take too much time, and secondly such documentation does not have anything to do with the programming side of Netfilter and iptables. All of this should be fairly well covered in the Netfilter Hacking HOW-TO.
6.5.9. REDIRECT target
The REDIRECT target is used to redirect packets and streams to the machine itself. This means that we could for example REDIRECT all packets destined for the HTTP ports to an HTTP proxy like squid, on our own host. Locally generated packets are mapped to the 127.0.0.1 address. In other words, this rewrites the destination address to our own host for packets that are forwarded, or something alike. The REDIRECT target is extremely good to use when we want, for example, transparent proxying, where the LAN hosts do not know about the proxy at all. Note that the REDIRECT target is only valid within the PREROUTING and OUTPUT chains of the nat table. It is also valid within user-defined chains that are only called from those chains, and nowhere else. The REDIRECT target takes only one option, as described below. Table 6-20. REDIRECT target Option --to-ports Example iptables -t nat -A PREROUTING -p tcp --dport 80 -j
REDIRECT --to-ports 8080 Explanation The --to-ports option specifies the destination port, or port
range, to use. Without the --to-ports option, the destination port is never altered. This is specified, as above, --to-ports 8080 in case we only want to specify one port. If we would want to specify an port range, we would do it like --to-ports 8080-8090, which tells the REDIRECT target to redirect
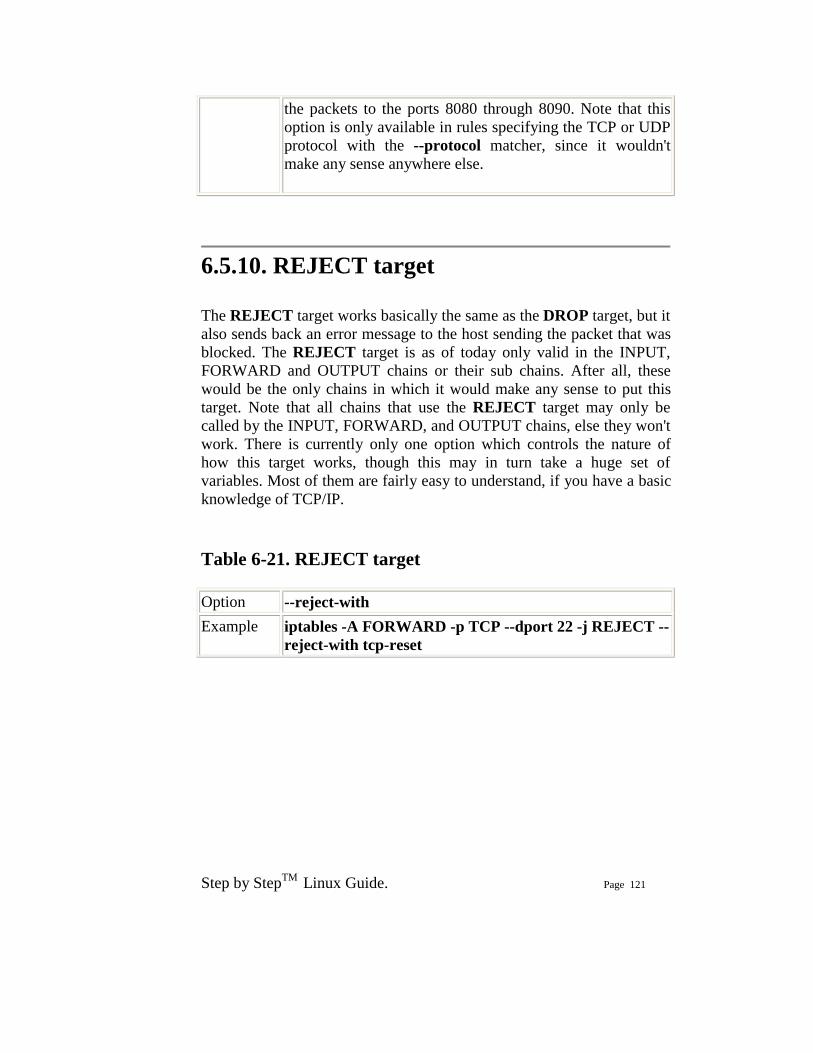
Step by StepTM Linux Guide. Page 121
the packets to the ports 8080 through 8090. Note that this option is only available in rules specifying the TCP or UDP protocol with the --protocol matcher, since it wouldn't make any sense anywhere else.
6.5.10. REJECT target
The REJECT target works basically the same as the DROP target, but it also sends back an error message to the host sending the packet that was blocked. The REJECT target is as of today only valid in the INPUT, FORWARD and OUTPUT chains or their sub chains. After all, these would be the only chains in which it would make any sense to put this target. Note that all chains that use the REJECT target may only be called by the INPUT, FORWARD, and OUTPUT chains, else they won't work. There is currently only one option which controls the nature of how this target works, though this may in turn take a huge set of variables. Most of them are fairly easy to understand, if you have a basic knowledge of TCP/IP. Table 6-21. REJECT target Option --reject-with Example iptables -A FORWARD -p TCP --dport 22 -j REJECT --
reject-with tcp-reset
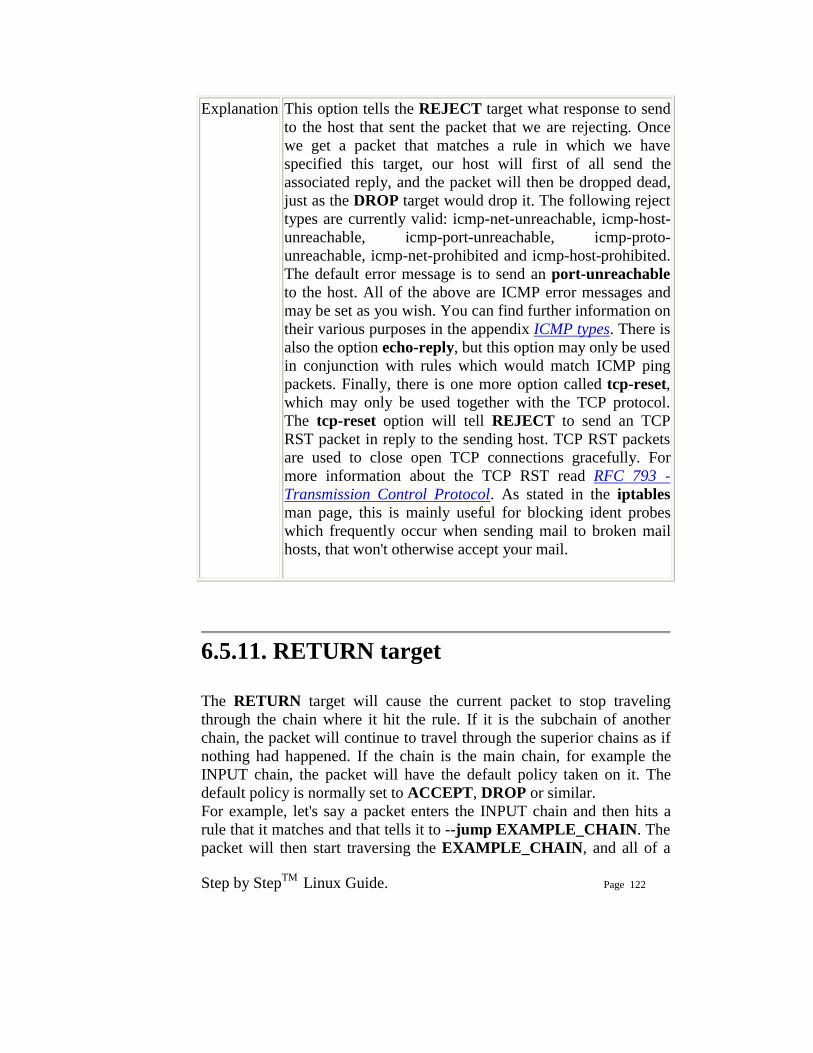
Step by StepTM Linux Guide. Page 122
Explanation This option tells the REJECT target what response to send to the host that sent the packet that we are rejecting. Once we get a packet that matches a rule in which we have specified this target, our host will first of all send the associated reply, and the packet will then be dropped dead, just as the DROP target would drop it. The following reject types are currently valid: icmp-net-unreachable, icmp-host-unreachable, icmp-port-unreachable, icmp-proto-unreachable, icmp-net-prohibited and icmp-host-prohibited. The default error message is to send an port-unreachable to the host. All of the above are ICMP error messages and may be set as you wish. You can find further information on their various purposes in the appendix ICMP types. There is also the option echo-reply, but this option may only be used in conjunction with rules which would match ICMP ping packets. Finally, there is one more option called tcp-reset, which may only be used together with the TCP protocol. The tcp-reset option will tell REJECT to send an TCP RST packet in reply to the sending host. TCP RST packets are used to close open TCP connections gracefully. For more information about the TCP RST read RFC 793 - Transmission Control Protocol. As stated in the iptables man page, this is mainly useful for blocking ident probes which frequently occur when sending mail to broken mail hosts, that won't otherwise accept your mail.
6.5.11. RETURN target
The RETURN target will cause the current packet to stop traveling through the chain where it hit the rule. If it is the subchain of another chain, the packet will continue to travel through the superior chains as if nothing had happened. If the chain is the main chain, for example the INPUT chain, the packet will have the default policy taken on it. The default policy is normally set to ACCEPT, DROP or similar. For example, let's say a packet enters the INPUT chain and then hits a rule that it matches and that tells it to --jump EXAMPLE_CHAIN. The packet will then start traversing the EXAMPLE_CHAIN, and all of a
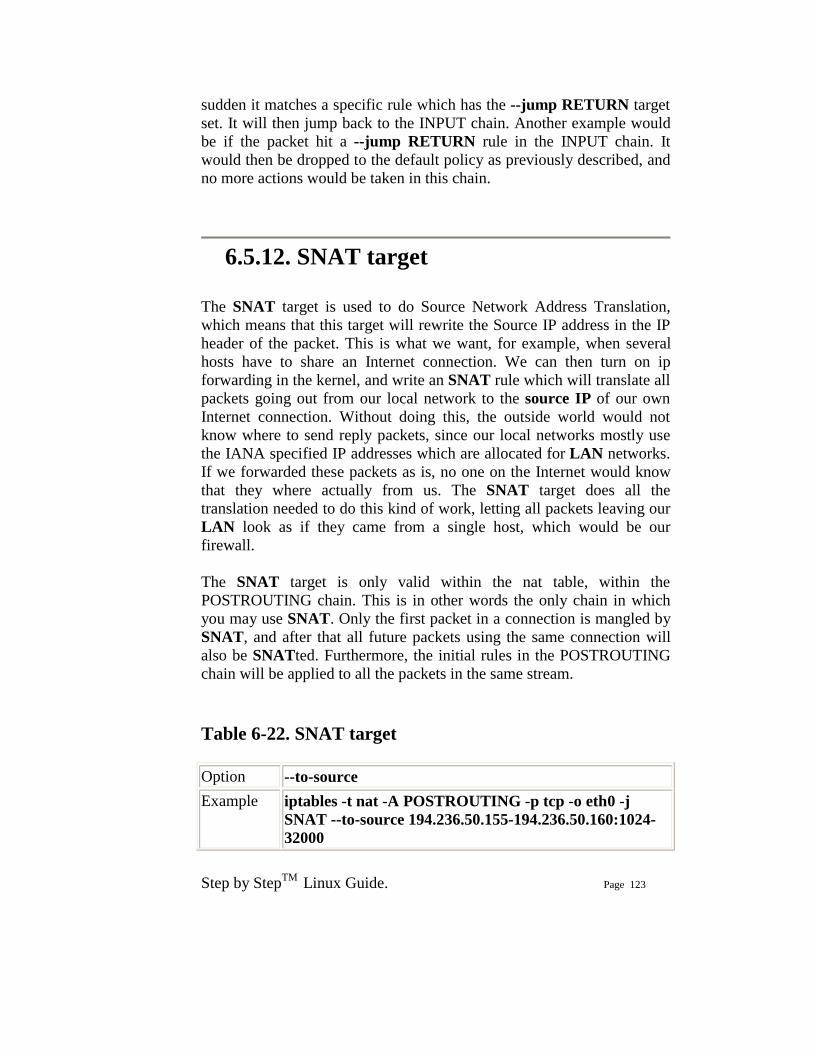
Step by StepTM Linux Guide. Page 123
sudden it matches a specific rule which has the --jump RETURN target set. It will then jump back to the INPUT chain. Another example would be if the packet hit a --jump RETURN rule in the INPUT chain. It would then be dropped to the default policy as previously described, and no more actions would be taken in this chain.
6.5.12. SNAT target
The SNAT target is used to do Source Network Address Translation, which means that this target will rewrite the Source IP address in the IP header of the packet. This is what we want, for example, when several hosts have to share an Internet connection. We can then turn on ip forwarding in the kernel, and write an SNAT rule which will translate all packets going out from our local network to the source IP of our own Internet connection. Without doing this, the outside world would not know where to send reply packets, since our local networks mostly use the IANA specified IP addresses which are allocated for LAN networks. If we forwarded these packets as is, no one on the Internet would know that they where actually from us. The SNAT target does all the translation needed to do this kind of work, letting all packets leaving our LAN look as if they came from a single host, which would be our firewall. The SNAT target is only valid within the nat table, within the POSTROUTING chain. This is in other words the only chain in which you may use SNAT. Only the first packet in a connection is mangled by SNAT, and after that all future packets using the same connection will also be SNATted. Furthermore, the initial rules in the POSTROUTING chain will be applied to all the packets in the same stream. Table 6-22. SNAT target Option --to-source Example iptables -t nat -A POSTROUTING -p tcp -o eth0 -j
SNAT --to-source 194.236.50.155-194.236.50.160:1024-32000
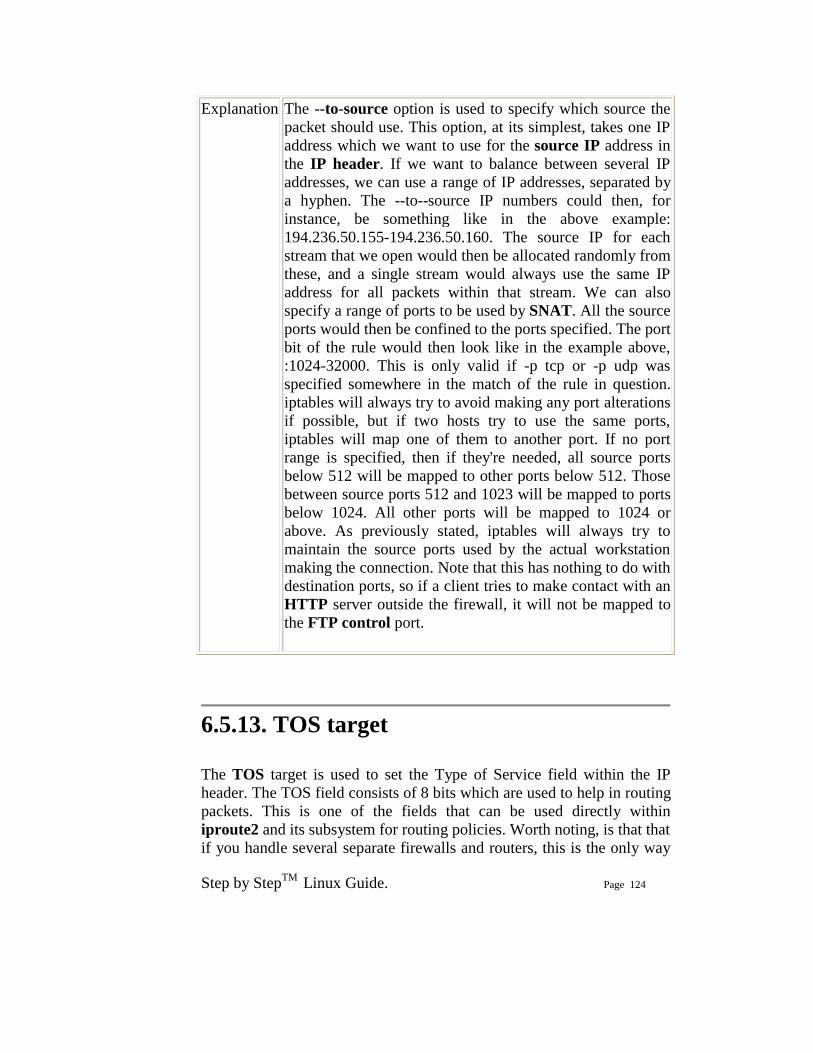
Step by StepTM Linux Guide. Page 124
Explanation The --to-source option is used to specify which source the packet should use. This option, at its simplest, takes one IP address which we want to use for the source IP address in the IP header. If we want to balance between several IP addresses, we can use a range of IP addresses, separated by a hyphen. The --to--source IP numbers could then, for instance, be something like in the above example: 194.236.50.155-194.236.50.160. The source IP for each stream that we open would then be allocated randomly from these, and a single stream would always use the same IP address for all packets within that stream. We can also specify a range of ports to be used by SNAT. All the source ports would then be confined to the ports specified. The port bit of the rule would then look like in the example above, :1024-32000. This is only valid if -p tcp or -p udp was specified somewhere in the match of the rule in question. iptables will always try to avoid making any port alterations if possible, but if two hosts try to use the same ports, iptables will map one of them to another port. If no port range is specified, then if they're needed, all source ports below 512 will be mapped to other ports below 512. Those between source ports 512 and 1023 will be mapped to ports below 1024. All other ports will be mapped to 1024 or above. As previously stated, iptables will always try to maintain the source ports used by the actual workstation making the connection. Note that this has nothing to do with destination ports, so if a client tries to make contact with an HTTP server outside the firewall, it will not be mapped to the FTP control port.
6.5.13. TOS target
The TOS target is used to set the Type of Service field within the IP header. The TOS field consists of 8 bits which are used to help in routing packets. This is one of the fields that can be used directly within iproute2 and its subsystem for routing policies. Worth noting, is that that if you handle several separate firewalls and routers, this is the only way

Step by StepTM Linux Guide. Page 125
to propagate routing information within the actual packet between these routers and firewalls. As previously noted, the MARK target - which sets a MARK associated with a specific packet - is only available within the kernel, and can not be propagated with the packet. If you feel a need to propagate routing information for a specific packet or stream, you should therefore set the TOS field, which was developed for this. There are currently a lot of routers on the Internet which do a pretty bad job at this, so as of now it may prove to be a bit useless to attempt TOS mangling before sending the packets on to the Internet. At best the routers will not pay any attention to the TOS field. At worst, they will look at the TOS field and do the wrong thing. However, as stated above, the TOS field can most definitely be put to good use if you have a large WAN or LAN with multiple routers. You then in fact have the possibility of giving packets different routes and preferences, based on their TOS value - even though this might be confined to your own network.
The TOS target is only capable of setting specific values, or named values on packets. These predefined TOS values can be found in the kernel include files, or more precisely, the Linux/ip.h file. The reasons are many, and you should actually never need to set any other values; however, there are ways around this limitation. To get around the limitation of only being able to set the named values on packets, you can use the FTOS patch available at the Paksecured Linux Kernel patches site maintained by Matthew G. Marsh. However, be cautious with this patch! You should not need to use any other than the default values, except in extreme cases.
Note that this target is only valid within the mangle table and can not be used outside it.
Also note that some old versions (1.2.2 or below) of iptables provided a broken implementation of this target which did not fix the packet checksum upon mangling, hence rendered the packets bad and in need of retransmission. That in turn would most probably lead to further mangling and the connection never working.
The TOS target only takes one option as described below.
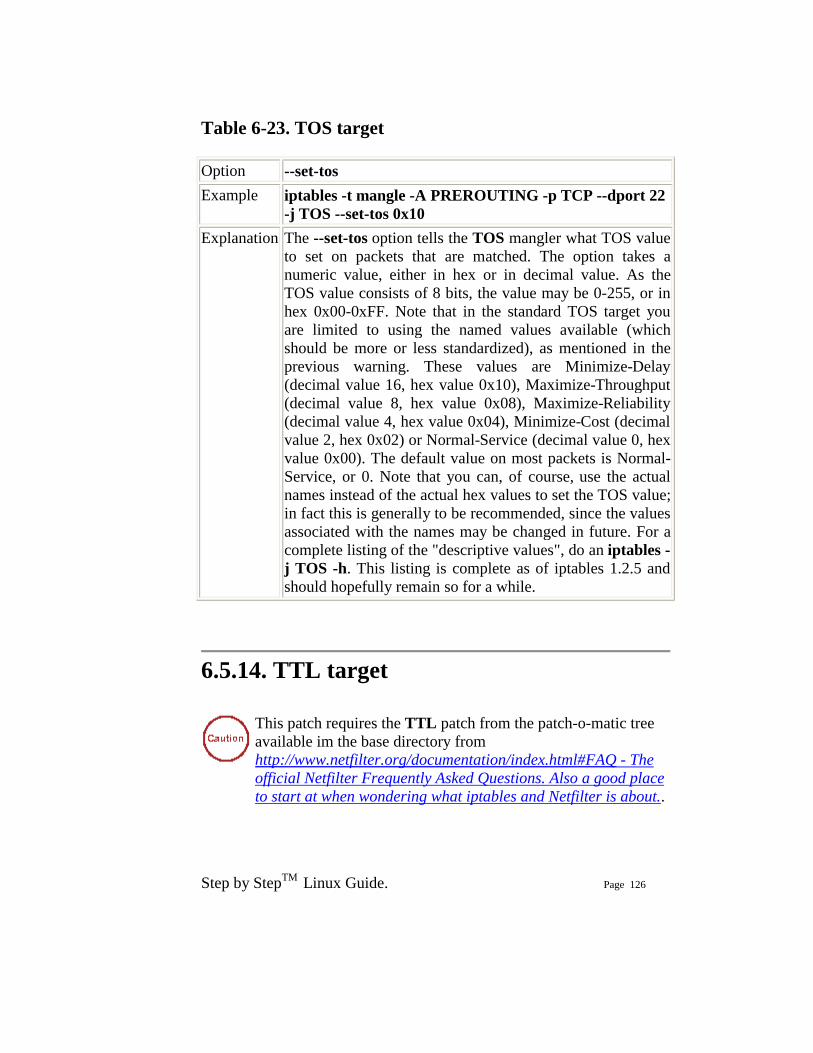
Step by StepTM Linux Guide. Page 126
Table 6-23. TOS target Option --set-tos Example iptables -t mangle -A PREROUTING -p TCP --dport 22
-j TOS --set-tos 0x10 Explanation The --set-tos option tells the TOS mangler what TOS value
to set on packets that are matched. The option takes a numeric value, either in hex or in decimal value. As the TOS value consists of 8 bits, the value may be 0-255, or in hex 0x00-0xFF. Note that in the standard TOS target you are limited to using the named values available (which should be more or less standardized), as mentioned in the previous warning. These values are Minimize-Delay (decimal value 16, hex value 0x10), Maximize-Throughput (decimal value 8, hex value 0x08), Maximize-Reliability (decimal value 4, hex value 0x04), Minimize-Cost (decimal value 2, hex 0x02) or Normal-Service (decimal value 0, hex value 0x00). The default value on most packets is Normal-Service, or 0. Note that you can, of course, use the actual names instead of the actual hex values to set the TOS value; in fact this is generally to be recommended, since the values associated with the names may be changed in future. For a complete listing of the "descriptive values", do an iptables -j TOS -h. This listing is complete as of iptables 1.2.5 and should hopefully remain so for a while.
6.5.14. TTL target
This patch requires the TTL patch from the patch-o-matic tree available im the base directory from http://www.netfilter.org/documentation/index.html#FAQ - The official Netfilter Frequently Asked Questions. Also a good place to start at when wondering what iptables and Netfilter is about..

Step by StepTM Linux Guide. Page 127
The TTL target is used to modify the Time To Live field in the IP header. One useful application of this is to change all Time To Live values to the same value on all outgoing packets. One reason for doing this is if you have a bully ISP which don't allow you to have more than one machine connected to the same Internet connection, and who actively pursue this. Setting all TTL values to the same value, will effectively make it a little bit harder for them to notify that you are doing this. We may then reset the TTL value for all outgoing packets to a standardized value, such as 64 as specified in Linux kernel. For more information on how to set the default value used in Linux, read the ip-sysctl.txt, which you may find within the Other resources and links appendix. The TTL target is only valid within the mangle table, and nowhere else. It takes 3 options as of writing this, all of them described below in the table. Table 6-24. TTL target Option --ttl-set Example iptables -t mangle -A PREROUTING -i eth0 -j TTL --
ttl-set 64 Explanation The --ttl-set option tells the TTL target which TTL value to
set on the packet in question. A good value would be around 64 somewhere. It's not too long, and it is not too short. Do not set this value too high, since it may affect your network and it is a bit immoral to set this value to high, since the packet may start bouncing back and forth between two mis-configured routers, and the higher the TTL, the more bandwidth will be eaten unnecessary in such a case. This target could be used to limit how far away our clients are. A good case of this could be DNS servers, where we don't want the clients to be too far away.
Option --ttl-dec Example iptables -t mangle -A PREROUTING -i eth0 -j TTL --
ttl-dec 1
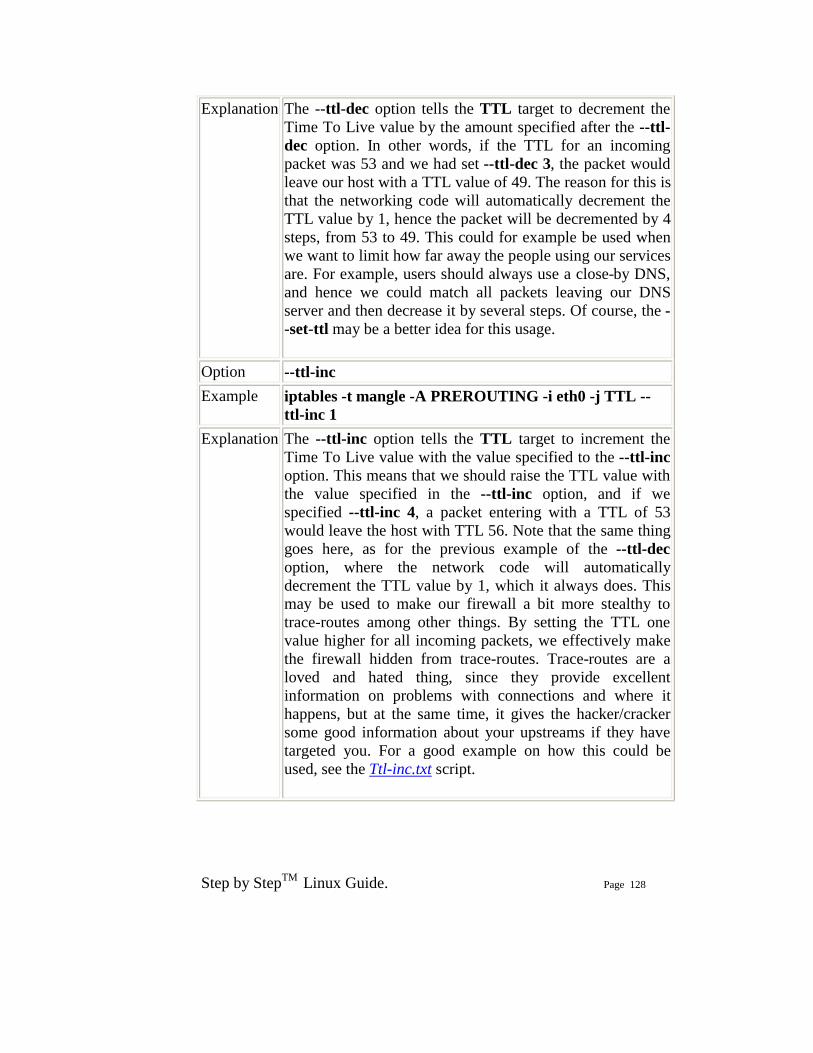
Step by StepTM Linux Guide. Page 128
Explanation The --ttl-dec option tells the TTL target to decrement the Time To Live value by the amount specified after the --ttl-dec option. In other words, if the TTL for an incoming packet was 53 and we had set --ttl-dec 3, the packet would leave our host with a TTL value of 49. The reason for this is that the networking code will automatically decrement the TTL value by 1, hence the packet will be decremented by 4 steps, from 53 to 49. This could for example be used when we want to limit how far away the people using our services are. For example, users should always use a close-by DNS, and hence we could match all packets leaving our DNS server and then decrease it by several steps. Of course, the --set-ttl may be a better idea for this usage.
Option --ttl-inc Example iptables -t mangle -A PREROUTING -i eth0 -j TTL --
ttl-inc 1 Explanation The --ttl-inc option tells the TTL target to increment the
Time To Live value with the value specified to the --ttl-inc option. This means that we should raise the TTL value with the value specified in the --ttl-inc option, and if we specified --ttl-inc 4, a packet entering with a TTL of 53 would leave the host with TTL 56. Note that the same thing goes here, as for the previous example of the --ttl-dec option, where the network code will automatically decrement the TTL value by 1, which it always does. This may be used to make our firewall a bit more stealthy to trace-routes among other things. By setting the TTL one value higher for all incoming packets, we effectively make the firewall hidden from trace-routes. Trace-routes are a loved and hated thing, since they provide excellent information on problems with connections and where it happens, but at the same time, it gives the hacker/cracker some good information about your upstreams if they have targeted you. For a good example on how this could be used, see the Ttl-inc.txt script.
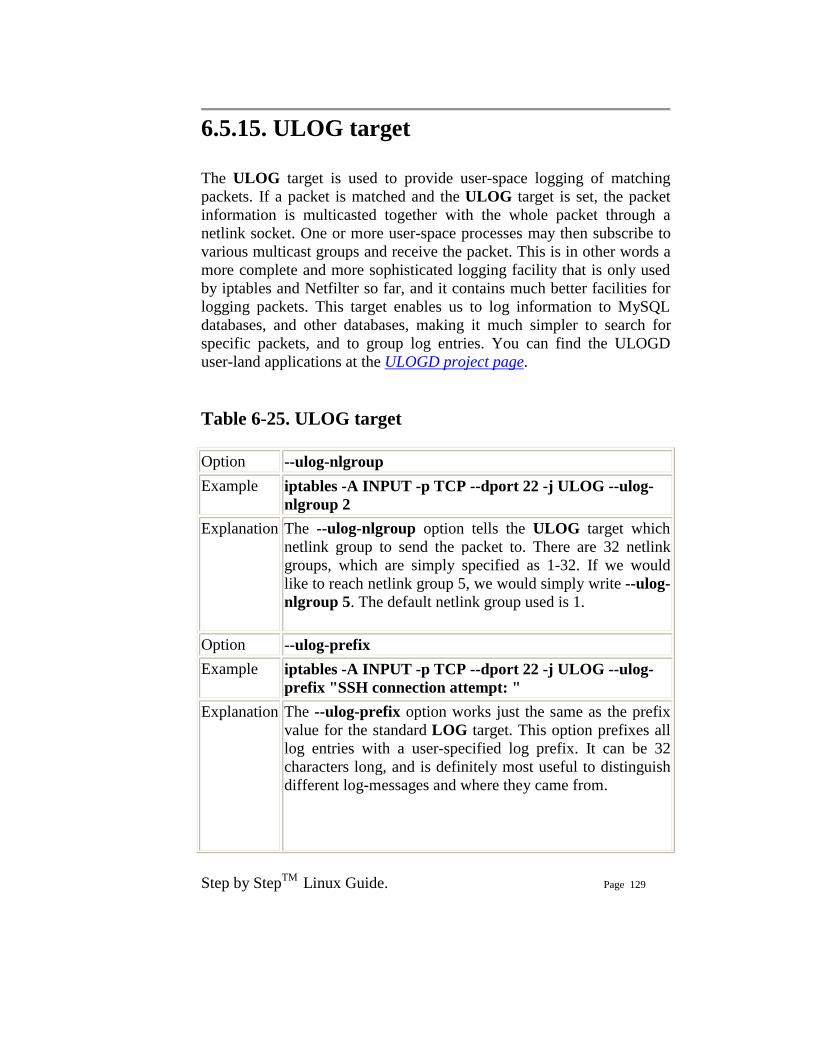
Step by StepTM Linux Guide. Page 129
6.5.15. ULOG target
The ULOG target is used to provide user-space logging of matching packets. If a packet is matched and the ULOG target is set, the packet information is multicasted together with the whole packet through a netlink socket. One or more user-space processes may then subscribe to various multicast groups and receive the packet. This is in other words a more complete and more sophisticated logging facility that is only used by iptables and Netfilter so far, and it contains much better facilities for logging packets. This target enables us to log information to MySQL databases, and other databases, making it much simpler to search for specific packets, and to group log entries. You can find the ULOGD user-land applications at the ULOGD project page. Table 6-25. ULOG target Option --ulog-nlgroup Example iptables -A INPUT -p TCP --dport 22 -j ULOG --ulog-
nlgroup 2 Explanation The --ulog-nlgroup option tells the ULOG target which
netlink group to send the packet to. There are 32 netlink groups, which are simply specified as 1-32. If we would like to reach netlink group 5, we would simply write --ulog-nlgroup 5. The default netlink group used is 1.
Option --ulog-prefix Example iptables -A INPUT -p TCP --dport 22 -j ULOG --ulog-
prefix "SSH connection attempt: " Explanation The --ulog-prefix option works just the same as the prefix
value for the standard LOG target. This option prefixes all log entries with a user-specified log prefix. It can be 32 characters long, and is definitely most useful to distinguish different log-messages and where they came from.
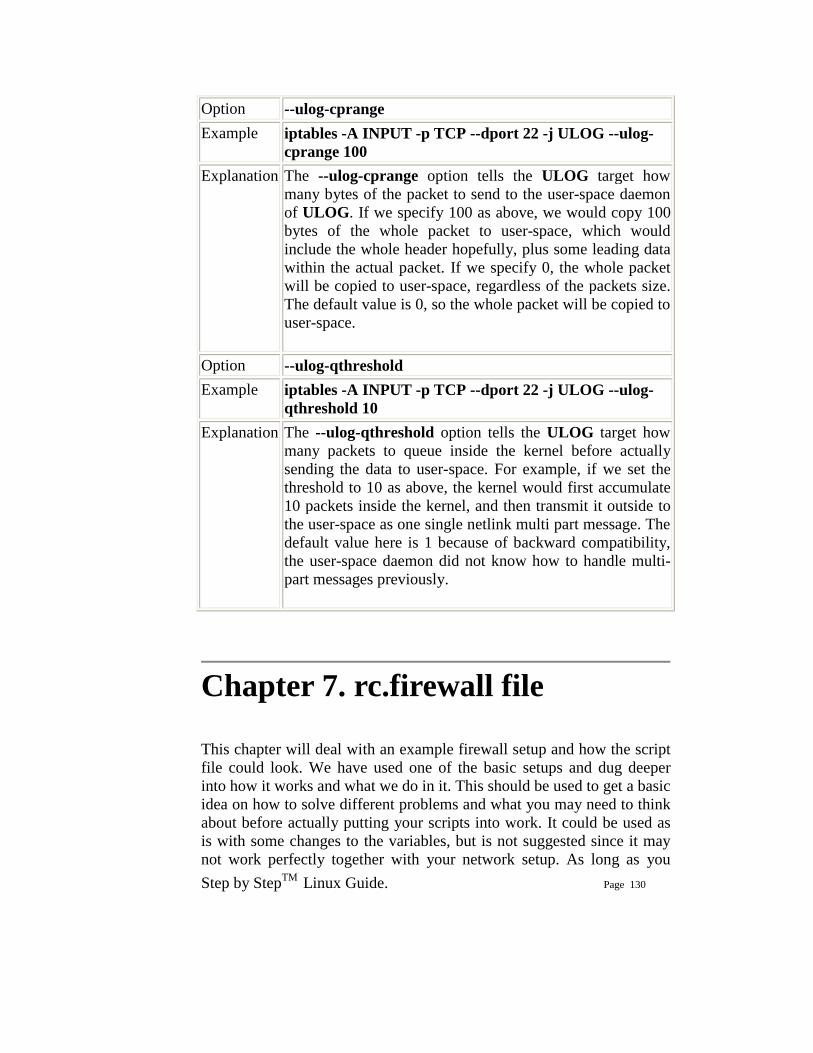
Step by StepTM Linux Guide. Page 130
Option --ulog-cprange Example iptables -A INPUT -p TCP --dport 22 -j ULOG --ulog-
cprange 100 Explanation The --ulog-cprange option tells the ULOG target how
many bytes of the packet to send to the user-space daemon of ULOG. If we specify 100 as above, we would copy 100 bytes of the whole packet to user-space, which would include the whole header hopefully, plus some leading data within the actual packet. If we specify 0, the whole packet will be copied to user-space, regardless of the packets size. The default value is 0, so the whole packet will be copied to user-space.
Option --ulog-qthreshold Example iptables -A INPUT -p TCP --dport 22 -j ULOG --ulog-
qthreshold 10 Explanation The --ulog-qthreshold option tells the ULOG target how
many packets to queue inside the kernel before actually sending the data to user-space. For example, if we set the threshold to 10 as above, the kernel would first accumulate 10 packets inside the kernel, and then transmit it outside to the user-space as one single netlink multi part message. The default value here is 1 because of backward compatibility, the user-space daemon did not know how to handle multi-part messages previously.
Chapter 7. rc.firewall file This chapter will deal with an example firewall setup and how the script file could look. We have used one of the basic setups and dug deeper into how it works and what we do in it. This should be used to get a basic idea on how to solve different problems and what you may need to think about before actually putting your scripts into work. It could be used as is with some changes to the variables, but is not suggested since it may not work perfectly together with your network setup. As long as you
Step by StepTM Linux Guide. Page 131
have a very basic setup however, it will very likely run quite smooth with just a few fixes to it.
note that there might be more efficient ways of making the rule-set, however, the script has been written for readability so that everyone can understand it without having to know too much BASH scripting before reading this
7.1. example rc.firewall
OK, so you have everything set up and are ready to check out an example configuration script. You should at least be if you have come this far. This example rc.firewall.txt (also included in the Example scripts code-base appendix) is fairly large but not a lot of comments in it. Instead of looking for comments, I suggest you read through the script file to get a basic hum about how it looks, and then you return here to get the nitty gritty about the whole script.
7.2. explanation of rc.firewall 7.2.1. Configuration options The first section you should note within the example rc.firewall.txt is the configuration section. This should always be changed since it contains the information that is vital to your actual configuration. For example, your IP address will always change, hence it is available here. The $INET_IP should always be a fully valid IP address, if you got one (if not, then you should probably look closer at the rc.DHCP.firewall.txt, however, read on since this script will introduce a lot of interesting stuff anyways). Also, the $INET_IFACE variable should point to the actual device used for your Internet connection. This could be eth0, eth1, ppp0, tr0, etc just to name a few possible device names.
Step by StepTM Linux Guide. Page 132
This script does not contain any special configuration options for DHCP or PPPoE, hence these sections are empty. The same goes for all sections that are empty, they are however left there so you can spot the differences between the scripts in a more efficient way. If you need these parts, then you could always create a mix of the different scripts, or (hold yourself) create your own from scratch. The Local Area Network section contains most of the configuration options for your LAN, which are necessary. For example, you need to specify the IP address of the physical interface connected to the LAN as well as the IP range which the LAN uses and the interface that the box is connected to the LAN through. Also, as you may see there is a Localhost configuration section. We do provide it, however you will with 99% certainty not change any of the values within this section since you will almost always use the 127.0.0.1 IP address and the interface will almost certainly be named lo. Also, just below the Localhost configuration, you will find a brief section that pertains to the iptables. Mainly, this section only consists of the $IPTABLES variable, which will point the script to the exact location of the iptables application. This may vary a bit, and the default location when compiling the iptables package by hand is /usr/local/sbin/iptables. However, many distributions put the actual application in another location such as /usr/sbin/iptables and so on.
7.2.2. Initial loading of extra modules First, we see to it that the module dependencies files are up to date by issuing an /sbin/depmod -a command. After this we load the modules that we will require for this script. Always avoid loading modules that you do not need, and if possible try to avoid having modules lying around at all unless you will be using them. This is for security reasons, since it will take some extra effort to make additional rules this way. Now, for example, if you want to have support for the LOG, REJECT and MASQUERADE targets and don't have this compiled statically into your kernel, we load these modules as follows:
Step by StepTM Linux Guide. Page 133
/sbin/insmod ipt_LOG /sbin/insmod ipt_REJECT /sbin/insmod ipt_MASQUERADE
In these scripts we forcedly load the modules, which could lead to failures of loading the modules. If a module fails to load, it could depend upon a lot of factors, and it will generate an error message. If some of the more basic modules fail to load, its biggest probable error is that the module, or functionality, is statically compiled into the kernel. For further information on this subject, read the Problems loading modules section in the Common problems and questions appendix.
Next is the option to load ipt_owner module, which could for example be used to only allow certain users to make certain connections, etc. I will not use that module in this example but basically, you could allow only root to do FTP and HTTP connections to redhat.com and DROP all the others. You could also disallow all users but your own user and root to connect from your box to the Internet, might be boring for others, but you will be a bit more secure to bouncing hacker attacks and attacks where the hacker will only use your host as an intermediate host. For more information about the ipt_owner match, look at the Owner match section within the How a rule is built chapter. We may also load extra modules for the state matching code here. All modules that extend the state matching code and connection tracking code are called ip_conntrack_* and ip_nat_*. Connection tracking helpers are special modules that tells the kernel how to properly track the specific connections. Without these so called helpers, the kernel would not know what to look for when it tries to track specific connections. The NAT helpers on the other hand, are extensions of the connection tracking helpers that tells the kernel what to look for in specific packets and how to translate these so the connections will actually work. For example, FTP is a complex protocol by definition, and it sends connection information within the actual payload of the packet. So, if one of your NATed boxes connect to a FTP server on the Internet, it will send its own local network IP address within the payload of the packet, and tells the FTP server to connect to that IP address. Since this local network address is not valid outside your own network, the FTP server will not know what to do with it and hence the connection will break down. The
Step by StepTM Linux Guide. Page 134
FTP NAT helpers do all of the translations within these connections so the FTP server will actually know where to connect. The same thing applies for DCC file transfers (sends) and chats. Creating these kind of connections requires the IP address and ports to be sent within the IRC protocol, which in turn requires some translation to be done. Without these helpers, some FTP and IRC stuff will work no doubt, however, some other things will not work. For example, you may be able to receive files over DCC, but not be able to send files. This is due to how the DCC starts a connection. First off, you tell the receiver that you want to send a file and where he should connect to. Without the helpers, the DCC connection will look as if it wants the receiver to connect to some host on the receivers own local network. In other words, the whole connection will be broken. However, the other way around, it will work flawlessly since the sender will (most probably) give you the correct address to connect to.
If you are experiencing problems with mIRC DCCs over your firewall and everything works properly with other IRC clients, read the mIRC DCC problems section in the Common problems and questions appendix.
As of this writing, there is only the option to load modules which add support for the FTP and IRC protocols. For a long explanation of these conntrack and nat modules, read the Common problems and questions appendix. There are also H.323 conntrack helpers within the patch-o-matic, as well as some other conntrack as well as NAT helpers. To be able to use these helpers, you need to use the patch-o-matic and compile your own kernel. For a better explanation on how this is done, read the Preparations chapter.
Note that you need to load the ip_nat_irc and ip_nat_ftp if you want Network Address Translation to work properly on any of the FTP and IRC protocols. You will also need to load the ip_conntrack_irc and ip_conntrack_ftp modules before actually loading the NAT modules. They are used the same way as the conntrack modules, but it will make it possible for the computer to do NAT on these two protocols.
Step by StepTM Linux Guide. Page 135
7.2.3. proc set up At this point we start the IP forwarding by echoing a 1 to /proc/sys/net/ipv4/ip_forward in this fashion:
echo "1" > /proc/sys/net/ipv4/ip_forward
It may be worth a thought where and when we turn on the IP forwarding. In this script and all others within the tutorial, we turn it on before actually creating any kind of IP filters (i.e., iptables rule-sets). This will lead to a brief period of time where the firewall will accept forwarding any kind of traffic for everything between a millisecond to a minute depending on what script we are running and on what box. This may give malicious people a small time-frame to actually get through our firewall. In other words, this option should really be turned on after creating all firewall rules, however, I have chosen to turn it on before loading any rules to maintain consistency with the script breakdown currently used in all scripts.
In case you need dynamic IP support, for example if you use SLIP, PPP or DHCP you may enable the next option, ip_dynaddr by doing the following :
echo "1" > /proc/sys/net/ipv4/ip_dynaddr
If there is any other options you might need to turn on you should follow that style, there's other documentations on how to do these things and this is out of the scope of this documentation. There is a good but rather brief document about the proc system available within the kernel, which is also available within the Other resources and links appendix. The Other resources and links appendix is generally a good place to start looking when you have specific areas that you are looking for information on, that you do not find here.
Step by StepTM Linux Guide. Page 136
The rc.firewall.txt script, and all other scripts contained within this tutorial, do contain a small section of non-required proc settings. These may be a good primer to look at when something is not working exactly as you want it to, however, do not change these values before actually knowing what they mean.
7.2.4. Displacement of rules to different chains This section will briefly describe my choices within the tutorial regarding user specified chains and some choices specific to the rc.firewall.txt script. Some of the paths I have chosen to go here may be wrong from one or another of aspect. I hope to point these aspects and possible problems out to you when and where they occur. Also, this section contains a brief look back to the Traversing of tables and chains chapter. Hopefully, this will remind you a little bit of how the specific tables and chains are traversed in a real live example. I have displaced all the different user-chains in the fashion I have to save as much CPU as possible but at the same time put the main weight on security and readability. Instead of letting a TCP packet traverse ICMP, UDP and TCP rules, I simply match all TCP packets and then let the TCP packets traverse an user specified chain. This way we do not get too much overhead out of it all. The following picture will try to explain the basics of how an incoming packet traverses Netfilter. With these pictures and explanations, I wish to explain and clarify the goals of this script. We will not discuss any specific details yet, but instead further on in the chapter. This is a really trivial picture in comparison to the one in the Traversing of tables and chains chapter where we discussed the whole traversal of chains and tables in depth.
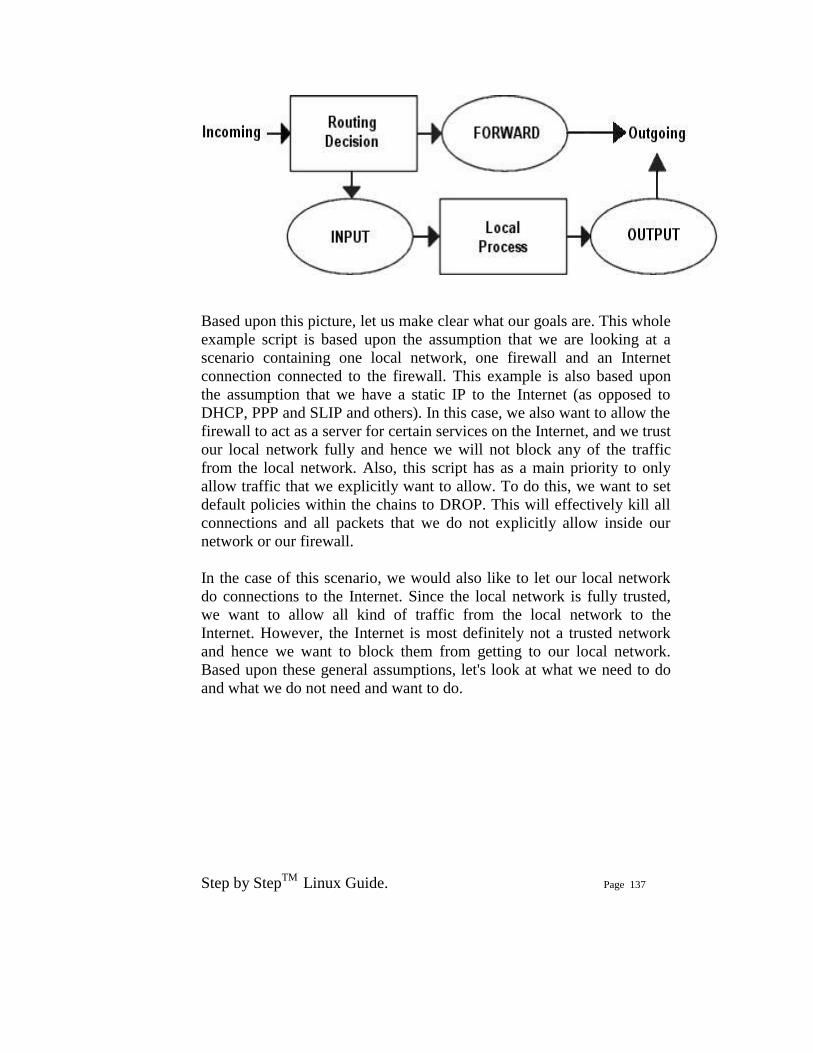
Step by StepTM Linux Guide. Page 137
Based upon this picture, let us make clear what our goals are. This whole example script is based upon the assumption that we are looking at a scenario containing one local network, one firewall and an Internet connection connected to the firewall. This example is also based upon the assumption that we have a static IP to the Internet (as opposed to DHCP, PPP and SLIP and others). In this case, we also want to allow the firewall to act as a server for certain services on the Internet, and we trust our local network fully and hence we will not block any of the traffic from the local network. Also, this script has as a main priority to only allow traffic that we explicitly want to allow. To do this, we want to set default policies within the chains to DROP. This will effectively kill all connections and all packets that we do not explicitly allow inside our network or our firewall. In the case of this scenario, we would also like to let our local network do connections to the Internet. Since the local network is fully trusted, we want to allow all kind of traffic from the local network to the Internet. However, the Internet is most definitely not a trusted network and hence we want to block them from getting to our local network. Based upon these general assumptions, let's look at what we need to do and what we do not need and want to do.
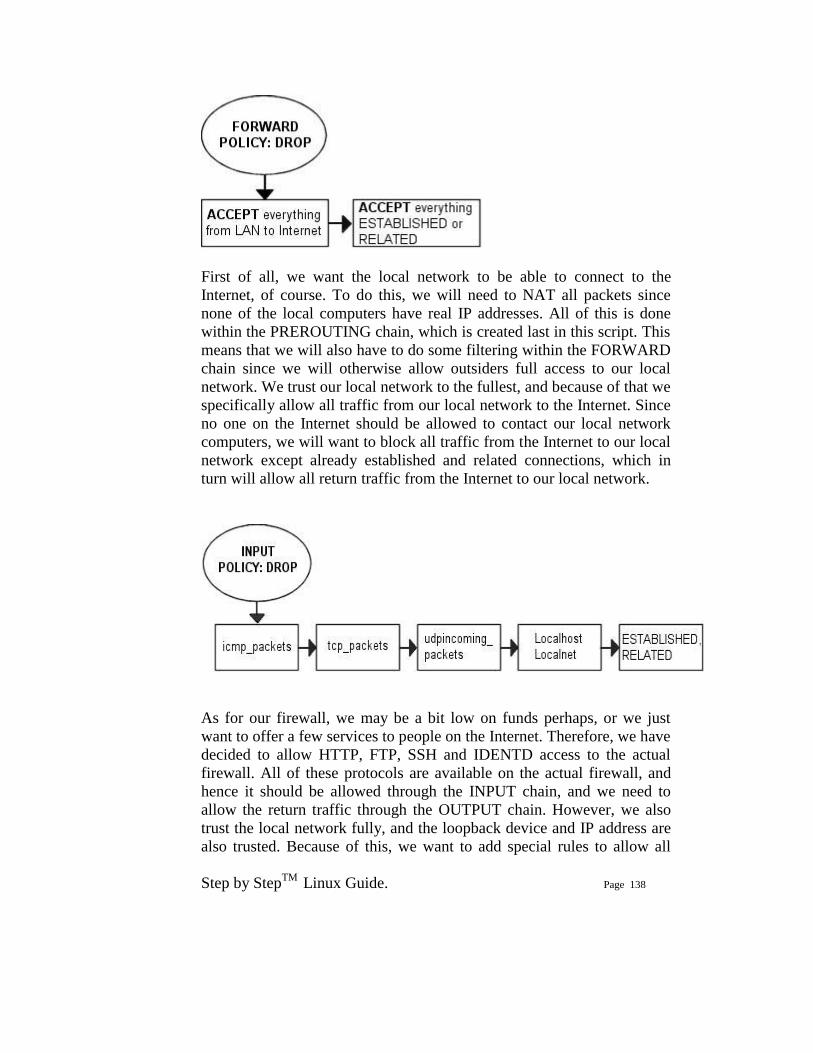
Step by StepTM Linux Guide. Page 138
First of all, we want the local network to be able to connect to the Internet, of course. To do this, we will need to NAT all packets since none of the local computers have real IP addresses. All of this is done within the PREROUTING chain, which is created last in this script. This means that we will also have to do some filtering within the FORWARD chain since we will otherwise allow outsiders full access to our local network. We trust our local network to the fullest, and because of that we specifically allow all traffic from our local network to the Internet. Since no one on the Internet should be allowed to contact our local network computers, we will want to block all traffic from the Internet to our local network except already established and related connections, which in turn will allow all return traffic from the Internet to our local network.
As for our firewall, we may be a bit low on funds perhaps, or we just want to offer a few services to people on the Internet. Therefore, we have decided to allow HTTP, FTP, SSH and IDENTD access to the actual firewall. All of these protocols are available on the actual firewall, and hence it should be allowed through the INPUT chain, and we need to allow the return traffic through the OUTPUT chain. However, we also trust the local network fully, and the loopback device and IP address are also trusted. Because of this, we want to add special rules to allow all
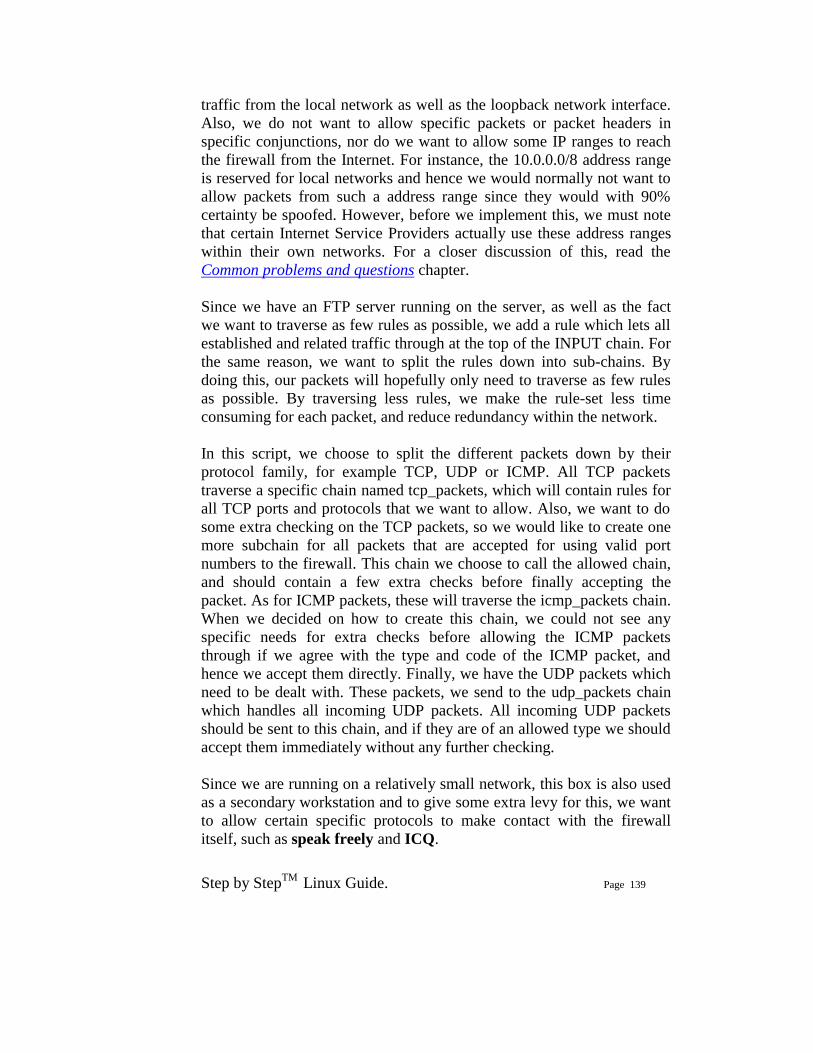
Step by StepTM Linux Guide. Page 139
traffic from the local network as well as the loopback network interface. Also, we do not want to allow specific packets or packet headers in specific conjunctions, nor do we want to allow some IP ranges to reach the firewall from the Internet. For instance, the 10.0.0.0/8 address range is reserved for local networks and hence we would normally not want to allow packets from such a address range since they would with 90% certainty be spoofed. However, before we implement this, we must note that certain Internet Service Providers actually use these address ranges within their own networks. For a closer discussion of this, read the Common problems and questions chapter. Since we have an FTP server running on the server, as well as the fact we want to traverse as few rules as possible, we add a rule which lets all established and related traffic through at the top of the INPUT chain. For the same reason, we want to split the rules down into sub-chains. By doing this, our packets will hopefully only need to traverse as few rules as possible. By traversing less rules, we make the rule-set less time consuming for each packet, and reduce redundancy within the network. In this script, we choose to split the different packets down by their protocol family, for example TCP, UDP or ICMP. All TCP packets traverse a specific chain named tcp_packets, which will contain rules for all TCP ports and protocols that we want to allow. Also, we want to do some extra checking on the TCP packets, so we would like to create one more subchain for all packets that are accepted for using valid port numbers to the firewall. This chain we choose to call the allowed chain, and should contain a few extra checks before finally accepting the packet. As for ICMP packets, these will traverse the icmp_packets chain. When we decided on how to create this chain, we could not see any specific needs for extra checks before allowing the ICMP packets through if we agree with the type and code of the ICMP packet, and hence we accept them directly. Finally, we have the UDP packets which need to be dealt with. These packets, we send to the udp_packets chain which handles all incoming UDP packets. All incoming UDP packets should be sent to this chain, and if they are of an allowed type we should accept them immediately without any further checking. Since we are running on a relatively small network, this box is also used as a secondary workstation and to give some extra levy for this, we want to allow certain specific protocols to make contact with the firewall itself, such as speak freely and ICQ.
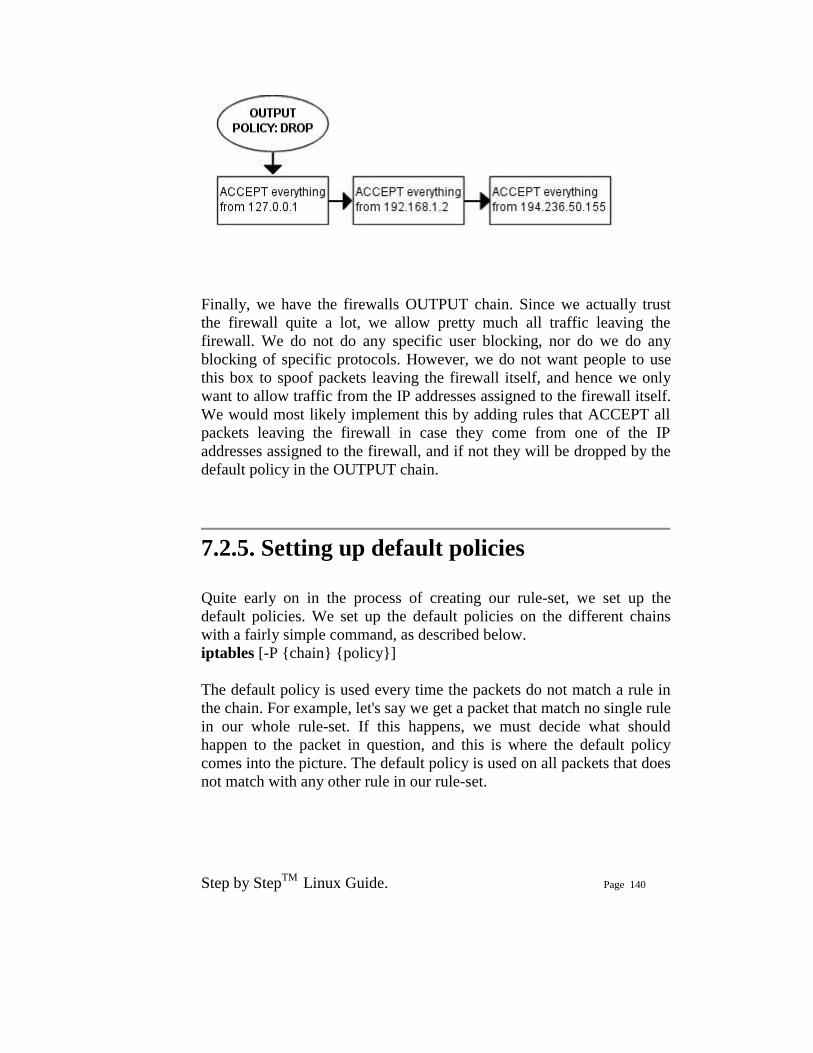
Step by StepTM Linux Guide. Page 140
Finally, we have the firewalls OUTPUT chain. Since we actually trust the firewall quite a lot, we allow pretty much all traffic leaving the firewall. We do not do any specific user blocking, nor do we do any blocking of specific protocols. However, we do not want people to use this box to spoof packets leaving the firewall itself, and hence we only want to allow traffic from the IP addresses assigned to the firewall itself. We would most likely implement this by adding rules that ACCEPT all packets leaving the firewall in case they come from one of the IP addresses assigned to the firewall, and if not they will be dropped by the default policy in the OUTPUT chain.
7.2.5. Setting up default policies Quite early on in the process of creating our rule-set, we set up the default policies. We set up the default policies on the different chains with a fairly simple command, as described below. iptables [-P {chain} {policy}] The default policy is used every time the packets do not match a rule in the chain. For example, let's say we get a packet that match no single rule in our whole rule-set. If this happens, we must decide what should happen to the packet in question, and this is where the default policy comes into the picture. The default policy is used on all packets that does not match with any other rule in our rule-set.

Step by StepTM Linux Guide. Page 141
Do be cautious with what default policy you set on chains in other tables since they are simply not made for filtering, and it may lead to very strange behaviors.
7.2.6. Setting up user specified chains in the filter table Now you got a good picture on what we want to accomplish with this firewall, so let us get on to the actual implementation of the rule-set. It is now high time that we take care of setting up all the rules and chains that we wish to create and to use, as well as all of the rule-sets within the chains. After this, we create the different special chains that we want to use with the -N command. The new chains are created and set up with no rules inside of them. The chains we will use are, as previously described, icmp_packets, tcp_packets, udp_packets and the allowed chain, which is used by the tcp_packets chain. Incoming packets on $INET_IFACE, of ICMP type, will be redirected to the chain icmp_packets. Packets of TCP type, will be redirected to the tcp_packets chain and incoming packets of UDP type from $INET_IFACE go to udp_packets chain. All of this will be explained more in detail in the INPUT chain section below. To create a chain is quite simple and only consists of a short declaration of the chain as this:
iptables [-N chain] In the upcoming sections we will have a closer look at each and one of the user defined chains that we have by now created. Let us have a closer look at how they look and what rules they contain and what we will accomplish within them.
Step by StepTM Linux Guide. Page 142
7.2.6.1. The bad_tcp_packets chain The bad_tcp_packets chain is devoted to contain rules that inspects incoming packets for malformed headers or other problems. As it is, we have only chosen to include a packet filter which blocks all incoming TCP packets that are considered as NEW but does not have the SYN bit set, as well as a rule that blocks SYN/ACK packets that are considered NEW. This chain could be used to check for all possible inconsistencies, such as above or XMAS port-scans etc. We could also add rules that looks for state INVALID. If you want to fully understand the NEW not SYN, you need to look at the State NEW packets but no SYN bit set section in the Common problems and questions appendix regarding state NEW and non-SYN packets getting through other rules. These packets could be allowed under certain circumstances but in 99% of the cases we wouldn't want these packets to get through. Hence, we log them to our logs and then we DROP them. The reason that we REJECT SYN/ACK packets that are considered NEW is also very simple. It is described in more depth in the SYN/ACK and NEW packets section in the Common problems and questions appendix. Basically, we do this out of courtesy to other hosts, since we will prevent them from being attacked in a sequence number prediction attack.
7.2.6.2. The allowed chain If a packet comes in on $INET_IFACE and is of TCP type, it travels through the tcp_packets chain and if the connection is against a port that we want to allow traffic on, we want to do some final checks on it to see if we actually do want to allow it or not. All of these final checks are done within the allowed chain.

Step by StepTM Linux Guide. Page 143
First of all, we check if the packet is a SYN packet. If it is a SYN packet, it is most likely to be the first packet in a new connection so, of course, we allow this. Then we check if the packet comes from an ESTABLISHED or RELATED connection, if it does, then we, again of course, allow it. An ESTABLISHED connection is a connection that has seen traffic in both directions, and since we have seen a SYN packet, the connection then must be in state ESTABLISHED, according to the state machine. The last rule in this chain will DROP everything else. In this case this pretty much means everything that has not seen traffic in both directions, i.e., we didn't reply to the SYN packet, or they are trying to start the connection with a non SYN packet. There is no practical use of not starting a connection with a SYN packet, except to port scan people pretty much. There is no currently available TCP/IP implementation that supports opening a TCP connection with something else than a SYN packet to my knowledge, hence, DROP it since it is 99% sure to be a port scan.
7.2.6.3. The TCP chain The tcp_packets chain specifies what ports that are allowed to use on the firewall from the Internet. There is, however, even more checks to do, hence we send each and one of the packets on to the allowed chain, which we described previously. -A tcp_packets tells iptables in which chain to add the new rule, the rule will be added to the end of the chain. -p TCP tells it to match TCP packets and -s 0/0 matches all source addresses from 0.0.0.0 with netmask 0.0.0.0, in other words all source addresses. This is actually the default behavior but I am using it just to make everything as clear as possible. --dport 21 means destination port 21, in other words if the packet is destined for port 21 they also match. If all the criteria are matched, then the packet will be targeted for the allowed chain. If it doesn't match any of the rules, they will be passed back to the original chain that sent the packet to the tcp_packets chain. As it is now, I allow TCP port 21, or FTP control port, which is used to control FTP connections and later on I also allow all RELATED connections, and that way we allow PASSIVE and ACTIVE connections since the ip_conntrack_ftp module is, hopefully, loaded. If we do not want to allow FTP at all, we can unload the ip_conntrack_ftp module
Step by StepTM Linux Guide. Page 144
and delete the $IPTABLES -A tcp_packets -p TCP -s 0/0 --dport 21 -j allowed line from the rc.firewall.txt file. Port 22 is SSH, which is much better than allowing telnet on port 23 if you want to allow anyone from the outside to use a shell on your box at all. Note that you are dealing with a firewall. It is always a bad idea to give others than yourself any kind of access to a firewall box. Firewalls should always be kept to a bare minimum and no more. Port 80 is HTTP, in other words your web server, delete it if you do not want to run a web server directly on your firewall. And finally we allow port 113, which is IDENTD and might be necessary for some protocols like IRC, etc to work properly. Do note that it may be worth to use the oidentd package if you NAT several hosts on your local network. oidentd has support for relaying IDENTD requests on to the correct boxes within your local network. If you feel like adding more open ports with this script, well, it should be quite obvious how to do that by now. Just cut and paste one of the other lines in the tcp_packets chain and change it to the port you want to open.
7.2.6.4. The UDP chain If we do get a UDP packet on the INPUT chain, we send them on to udp_packets where we once again do a match for the UDP protocol with -p UDP and then match everything with a source address of 0.0.0.0 and netmask 0.0.0.0, in other words everything again. Except this, we only accept specific UDP ports that we want to be open for hosts on the Internet. Do note that we do not need to open up holes depending on the sending hosts source port, since this should be taken care of by the state machine. We only need to open up ports on our host if we are to run a server on any UDP port, such as DNS etc. Packets that are entering the firewall and that are part of an already established connection (by our local network) will automatically be accepted back in by the --state ESTABLISHED,RELATED rules at the top of the INPUT chain. As it is, we do not ACCEPT incoming UDP packets from port 53, which is what we use to do DNS lookups. The rule is there, but it is per
Step by StepTM Linux Guide. Page 145
default commented out. If you want your firewall to act as an DNS server, uncomment this line. I personally also allow port 123, which is NTP or network time protocol. This protocol is used to set your computer clock to the same time as certain other time servers which have very accurate clocks. Most of you probably do not use this protocol and hence I am not allowing it per default. The same thing applies here however, the rule is there and it is simple to uncomment to get it working. We do currently allow port 2074, which is used for certain real-time multimedia applications like speak freely which you can use to talk to other people in real-time by using speakers and a microphone, or even better, a headset. If you would not like to use this, you could turn it off quite simply by commenting it out. Port 4000 is the ICQ protocol. This should be an extremely well known protocol that is used by the Mirabilis application named ICQ. There is at least 2-3 different ICQ clones for Linux and it is one of the most widely used chat programs in the world. I doubt there is any further need to explain what it is. At this point, two extra rules are available if you are experiencing a lot of log entries due to different circumstances. The first rule will block broadcast packets to destination ports 135 through 139. These are used by NetBIOS, or SMB for most Microsoft users. This will block all log entries we may get from Microsoft Networks on our outside otherwise. The second rule was also created to take care of excessive logging problems, but instead takes care of DHCP queries from the outside. This is specifically true if your outside network consists of a non-switched Ethernet type of network, where the clients receive their IP addresses by DHCP. During these circumstances, you could wind up with a lot of logs from just that.
Do note that the last two rules are specifically opted out since some people may be interested in these kind of logs. If you are experiencing problems with excessive legit logging, try to drop these types of packages at this point. There are also more rules of this type just before the log rules in the INPUT chain.
Step by StepTM Linux Guide. Page 146
7.2.6.5. The ICMP chain This is where we decide what ICMP types to allow. If a packet of ICMP type comes in on eth0 on the INPUT chain, we then redirect it to the icmp_packets chain as explained before. Here we check what kind of ICMP types to allow. For now, I only allow incoming ICMP Echo requests, TTL equals 0 during transit and TTL equals 0 during reassembly. The reason that we do not allow any other ICMP types per default here, is that almost all other ICMP types should be covered by the RELATED state rules.
If an ICMP packet is sent as a reply to an already existing packet or packet stream it is considered RELATED to the original stream. For more information on the states, read the The state machine chapter.
The reason that I allow these ICMP packets are as follows, Echo Requests are used to request an echo reply, which in turn is used to mainly ping other hosts to see if they are available on any of the networks. Without this rule, other hosts will not be able to ping us to see if we are available on any network connection. Do note that some people would tend to erase this rule, since they simple do not want to be seen on the Internet. Deleting this rule will effectively render any pings to our firewall totally useless from the Internet since the firewall will simply not respond to them. Time Exceeded (i.e., TTL equals 0 during transit and TTL equals 0 during reassembly), is allowed in the case we want to trace-route some host or if a packet gets its Time To Live set to 0, we will get a reply about this. For example, when you trace-route someone, you start out with TTL = 1, and it gets down to 0 at the first hop on the way out, and a Time Exceeded is sent back from the first gateway en route to the host we are trying to trace-route, then TTL = 2 and the second gateway sends Time Exceeded, and so on until we get an actual reply from the host we finally want to get to. This way, we will get a reply from each host on our way to the actual host we want to reach, and we can see every host in between and find out what host is broken.
Step by StepTM Linux Guide. Page 147
For a complete listing of all ICMP types, see the ICMP types appendix . For more information on ICMP types and their usage, i suggest reading the following documents and reports:
• The Internet Control Message Protocol by Ralph Walden. • RFC 792 - Internet Control Message Protocol by J. Postel.
As a side-note, I might be wrong in blocking some of these ICMP types for you, but in my case, everything works perfectly while blocking all the ICMP types that I do not allow.
7.2.7. INPUT chain The INPUT chain as I have written it uses mostly other chains to do the hard work. This way we do not get too much load from iptables, and it will work much better on slow machines which might otherwise drop packets at high loads. This is done by checking for specific details that should be the same for a lot of different packets, and then sending those packets into specific user specified chains. By doing this, we can split down our rule-set to contain much less rules that needs to be traversed by each packet and hence the firewall will be put through a lot less overhead by packet filtering. First of all we do certain checks for bad packets. This is done by sending all TCP packets to the bad_tcp_packets chain. This chain contains a few rules that will check for badly formed packets or other anomalies that we do not want to accept. For a full explanation of the The bad_tcp_packets chain section in this chapter. At this point we start looking for traffic from generally trusted networks. These include the local network adapter and all traffic coming from there, all traffic to and from our loopback interface, including all our currently assigned IP addresses (this means all of them, including our Internet IP address). As it is, we have chosen to put the rule that allows LAN activity to the firewall at the top, since our local network generates more traffic than the Internet connection. This allows for less overhead used to try and match each packet with each rule and it is always a good
Step by StepTM Linux Guide. Page 148
idea to look through what kind of traffic mostly traverses the firewall. By doing this, we can shuffle around the rules to be more efficient, leading to less overhead on the firewall and less congestion on your network. Before we start touching the "real" rules which decides what we allow from the Internet interface and not, we have a related rule set up to reduce our overhead. This is a state rule which allows all packets part of an already ESTABLISHED or RELATED stream to the Internet IP address. This rule has an equivalent rule in the allowed chain, which are made rather redundant by this rule, which will be evaluated before the allowed ones are. However, the --state ESTABLISHED,RELATED rule in the allowed chain has been retained for several reasons, such as people wanting to cut and pasting the function. After this, We match all TCP packets in the INPUT chain that comes in on the $INET_IFACE interface, and send those to the tcp_packets, which was previously described. Now we do the same match for UDP packets on the $INET_IFACE and send those to the udp_packets chain, and after this all ICMP packets are sent to the icmp_packets chain. Normally, a firewall would be hardest hit by TCP packets, then UDP and last of them all ICMP packets. This is in normal case, mind you, and it may be wrong for you. The absolute same thing should be looked upon here, as with the network specific rules. Which causes the most traffic? Should the rules be thrown around to generate less overhead? On networks sending huge amounts of data, this is an absolute necessity since a Pentium III equivalent machine may be brought to its knees by a simple rule-set containing 100 rules and a single 100mbit Ethernet card running at full capacity if the rule-set is badly written. This is an important piece to look at when writing a rule-set for your own local network. At this point we have one extra rule, that is per default opted out, that can be used to get rid of some excessive logging in case we have some Microsoft network on the outside of our Linux firewall. Microsoft clients have a bad habit of sending out tons of multicast packets to the 224.0.0.0/8 range, and hence we have the opportunity to block those packets here so we don't fill our logs with them. There are also two more rules doing something similar tasks in the udp_packets chain described in the The UDP chain.
Step by StepTM Linux Guide. Page 149
Before we hit the default policy of the INPUT chain, we log it so we may be able to find out about possible problems and/or bugs. Either it might be a packet that we just do not want to allow or it might be someone who is doing something bad to us, or finally it might be a problem in our firewall not allowing traffic that should be allowed. In either case we want to know about it so it can be dealt with. Though, we do not log more than 3 packets per minute as we do not want to flood our logs with crap which in turn may fill up our whole logging partition, also we set a prefix to all log entries so we know where it came from. Everything that has not yet been caught will be DROPed by the default policy on the INPUT chain. The default policy was set quite some time back, in the Setting up default policies section, in this chapter.
7.2.8. FORWARD chain The FORWARD chain contains quite few rules in this scenario. We have a single rule which sends all packets to the bad_tcp_packets chain, which was also used in the INPUT chain as described previously. The bad_tcp_packets chain is constructed in such a fashion that it can be used recycled in several calling chains, disregarding of what packet traverses it. After this first check for bad TCP packets, we have the main rules in the FORWARD chain. The first rule will allow all traffic from our $LAN_IFACE to any other interface to flow freely, without restrictions. This rule will in other words allow all traffic from our LAN to the Internet. The second rule will allow ESTABLISHED and RELATED traffic back through the firewall. This will in other words allow packets belonging to connections that was initiated from our internal network to flow freely back to our local network. These rules are required for our local network to be able to access the Internet, since the default policy of the FORWARD chain was previously set to DROP. This is quite clever, since it will allow hosts on our local network to connect to hosts on the Internet, but at the same time block hosts on the Internet from connecting to the hosts on our internal network.
Step by StepTM Linux Guide. Page 150
Finally we also have a logging rule which will log packets that are not allowed in one or another way to pass through the FORWARD chain. This will most likely show one or another occurrence of a badly formed packet or other problem. One cause may be hacker attacks, and others may be malformed packets. This is exactly the same rule as the one used in the INPUT chain except for the logging prefix, "IPT FORWARD packet died: ". The logging prefix is mainly used to separate log entries, and may be used to distinguish log entries to find out where the packet was logged from and some header options.
7.2.9. OUTPUT chain Since i know that there is pretty much no one but me using this box which is partially used as a Firewall and a workstation currently, I allow almost everything that goes out from it that has a source address $LOCALHOST_IP, $LAN_IP or $STATIC_IP. Everything else might be spoofed in some fashion, even though I doubt anyone that I know would do it on my box. Last of all we log everything that gets dropped. If it does get dropped, we will most definitely want to know about it so we may take action against the problem. Either it is a nasty error, or it is a weird packet that is spoofed. Finally we DROP the packet in the default policy.
7.2.10. PREROUTING chain of the nat table The PREROUTING chain is pretty much what it says, it does network address translation on packets before they actually hit the routing decision that sends them onward to the INPUT or FORWARD chains in the filter table. The only reason that we talk about this chain in this script is that we once again feel obliged to point out that you should not do any filtering in it. The PREROUTING chain is only traversed by the first packet in a stream, which means that all subsequent packets will go totally unchecked in this chain. As it is with this script, we do not use the PREROUTING chain at all, however, this is the place we would be working in right now if we wanted to do DNAT on any specific packets, for example if you want to host your web server within your local

Step by StepTM Linux Guide. Page 151
network. For more information about the PREROUTING chain, read the Traversing of tables and chains chapter.
The PREROUTING chain should not be used for any filtering since, among other things, this chain is only traversed by the first packet in a stream. The PREROUTING chain should be used for network address translation only, unless you really know what you are doing.
7.2.11. Starting SNAT and the POSTROUTING chain So, our final mission would be to get the Network Address Translation up, correct? At least to me. First of all we add a rule to the nat table, in the POSTROUTING chain that will NAT all packets going out on our interface connected to the Internet. For me this would be eth0. However, there are specific variables added to all of the example scripts that may be used to automatically configure these settings. The -t option tells iptables which table to insert the rule in, in this case the nat table. The -A command tells us that we want to Append a new rule to an existing chain named POSTROUTING and -o $INET_IFACE tells us to match all outgoing packets on the INET_IFACE interface (or eth0, per default settings in this script) and finally we set the target to SNAT the packets. So all packets that match this rule will be SNAT'ed to look as it came from your Internet interface. Do note that you must set which IP address to give outgoing packets with the --to-source option sent to the SNAT target. In this script we have chosen to use the SNAT target instead of MASQUERADE for a couple of reasons. The first one is that this script was supposed to run on a firewall that has a static IP address. A follow up reason to the first one, would hence be that it is faster and more efficient to use the SNAT target if possible. Of course, it was also used to show how it would work and how it would be used in a real live example. If you do not have a static IP address, you should definitely give thought to use the MASQUERADE target instead which provides a
Step by StepTM Linux Guide. Page 152
simple and easy facility that will also do NAT for you, but that will automatically grab the IP address that it should use. This takes a little bit extra computing power, but it may most definitely be worth it if you use DHCP for instance. If you would like to have a closer look at how the MASQUERADE target may look, you should look at the rc.DHCP.firewall.txt script.
Chapter 8. Example scripts The objective of this chapter is to give a fairly brief and short explanation of each script available with this tutorial, and to provide an overlook of the scripts and what services they provide. These scripts are not in any way perfect, and they may not fit your exact intentions perfectly. It is in other words up to you to make these scripts suitable for your needs. The rest of this tutorial should most probably be helpful in making this feat. The first section of this tutorial deals with the actual structure that I have established in each script so we may find our way within the script a bit easier.
8.1. rc.firewall.txt script structure All scripts written for this tutorial has been written after a specific structure. The reason for this is that they should be fairly conformable to each other and to make it easier to find the differences between the scripts. This structure should be fairly well documented in this brief chapter. This chapter should hopefully give a short understanding to why all the scripts has been written as they have, and why I have chosen to maintain this structure.
Even though this is the structure I have chosen, do note that this may not be the best structure for your scripts. It is only a structure that I have chosen to use since it fits the need of being easy to read and follow the best according to my logic.
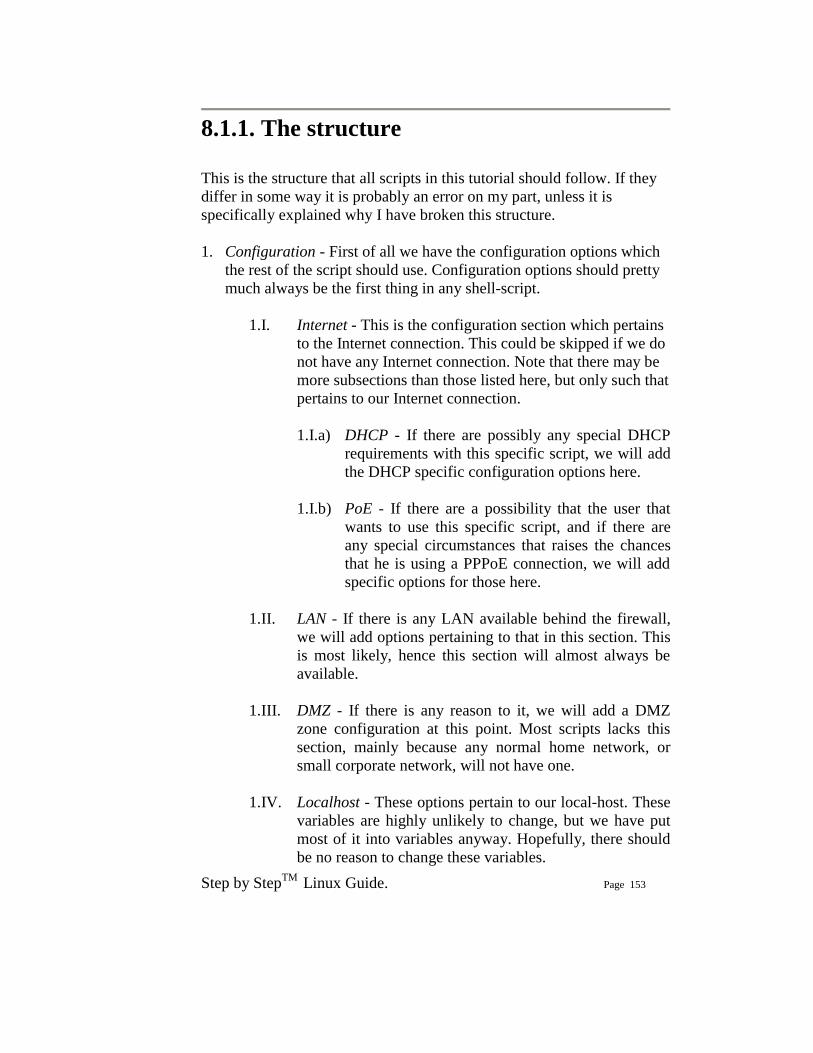
Step by StepTM Linux Guide. Page 153
8.1.1. The structure This is the structure that all scripts in this tutorial should follow. If they differ in some way it is probably an error on my part, unless it is specifically explained why I have broken this structure. 1. Configuration - First of all we have the configuration options which
the rest of the script should use. Configuration options should pretty much always be the first thing in any shell-script.
1.I. Internet - This is the configuration section which pertains
to the Internet connection. This could be skipped if we do not have any Internet connection. Note that there may be more subsections than those listed here, but only such that pertains to our Internet connection.
1.I.a) DHCP - If there are possibly any special DHCP
requirements with this specific script, we will add the DHCP specific configuration options here.
1.I.b) PoE - If there are a possibility that the user that
wants to use this specific script, and if there are any special circumstances that raises the chances that he is using a PPPoE connection, we will add specific options for those here.
1.II. LAN - If there is any LAN available behind the firewall,
we will add options pertaining to that in this section. This is most likely, hence this section will almost always be available.
1.III. DMZ - If there is any reason to it, we will add a DMZ
zone configuration at this point. Most scripts lacks this section, mainly because any normal home network, or small corporate network, will not have one.
1.IV. Localhost - These options pertain to our local-host. These
variables are highly unlikely to change, but we have put most of it into variables anyway. Hopefully, there should be no reason to change these variables.
Step by StepTM Linux Guide. Page 154
1.V. iptables - This section contains iptables specific configuration. In most scripts and situations this should only require one variable which tells us where the iptables binary is located.
1.VI. Other - If there are any other specific options and
variables, they should first of all be fitted into the correct subsection (If it pertains to the Internet connection, it should be sub-sectioned there, etc). If it does not fit in anywhere, it should be sub-sectioned directly to the configuration options somewhere.
2. Module loading - This section of the scripts should maintain a list of
modules. The first part should contain the required modules, while the second part should contain the non-required modules.
Note that some modules that may raise security, or add certain services or possibilities, may have been added even though they are not required. This should normally be noted in such cases within the example scripts.
2. I Required modules - This section should contain the
required modules, and possibly special modules that adds to the security or adds special services to the administrator or clients.
2. II. Non-required modules - This section contains modules
that are not required for normal operations. All of these modules should be commented out per default, and if you want to add the service it provides, it is up to you.
3. proc configuration - This section should take care of any special
configuration needed in the proc file system. If some of these options are required, they will be listed as such, if not, they should be commented out per default, and listed under the non-required proc configurations. Most of the useful proc configurations will be listed here, but far from all of them.
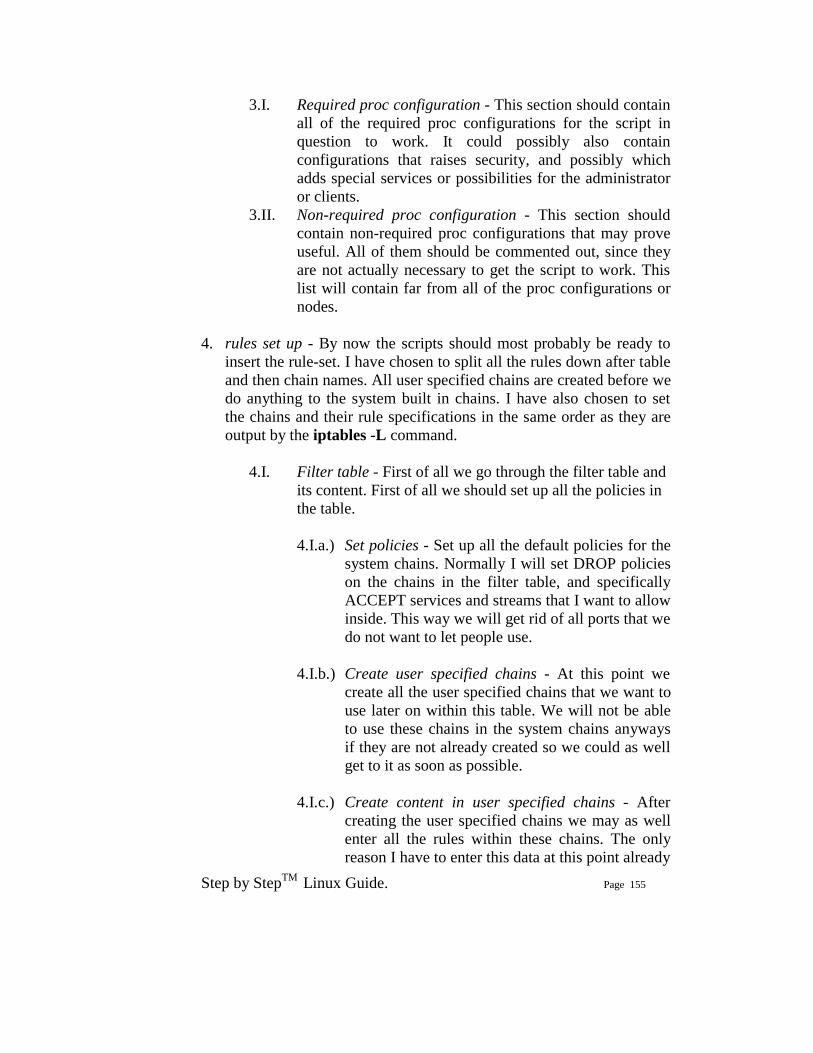
Step by StepTM Linux Guide. Page 155
3.I. Required proc configuration - This section should contain all of the required proc configurations for the script in question to work. It could possibly also contain configurations that raises security, and possibly which adds special services or possibilities for the administrator or clients.
3.II. Non-required proc configuration - This section should contain non-required proc configurations that may prove useful. All of them should be commented out, since they are not actually necessary to get the script to work. This list will contain far from all of the proc configurations or nodes.
4. rules set up - By now the scripts should most probably be ready to
insert the rule-set. I have chosen to split all the rules down after table and then chain names. All user specified chains are created before we do anything to the system built in chains. I have also chosen to set the chains and their rule specifications in the same order as they are output by the iptables -L command.
4.I. Filter table - First of all we go through the filter table and
its content. First of all we should set up all the policies in the table.
4.I.a.) Set policies - Set up all the default policies for the
system chains. Normally I will set DROP policies on the chains in the filter table, and specifically ACCEPT services and streams that I want to allow inside. This way we will get rid of all ports that we do not want to let people use.
4.I.b.) Create user specified chains - At this point we
create all the user specified chains that we want to use later on within this table. We will not be able to use these chains in the system chains anyways if they are not already created so we could as well get to it as soon as possible.
4.I.c.) Create content in user specified chains - After
creating the user specified chains we may as well enter all the rules within these chains. The only reason I have to enter this data at this point already
Step by StepTM Linux Guide. Page 156
is that may as well put it close to the creation of the user specified chains. You may as well put this later on in your script, it is totally up to you.
4.I.d.) INPUT chain - When we have come this far, we
do not have a lot of things left to do within the filter table so we get onto the INPUT chain. At this point we should add all rules within the INPUT chain.
At this point we start following the output from the iptables -L command as you may see. There is no reason for you to stay with this structure, however, do try to avoid mixing up data from different tables and chains since it will become much harder to read such rule-sets and to fix possible problems.
4.I.e.) FORWARD chain - At this point we go on to add
the rules within the FORWARD chain. Nothing special about this decision.
4.I.f.) OUTPUT chain - Last of all in the filter table, we
add the rules dealing with the OUTPUT chain. There should hopefully not be too much to do at this point.
5. nat table - After the filter table we take care of the nat table. This is
done after the filter table because of a number of reasons within these scripts. First of all we do not want to turn the whole forwarding mechanism and NAT function on at a too early stage, which could possibly lead to packets getting through the firewall at just the wrong time point (i.e., when the NAT has been turned on, but none of the filter rules has been run). Also, I look upon the nat table as a sort of layer that lies just outside the filter table and kind of surrounds it. The filter table would hence be the core, while the nat table acts as a layer lying around the filter table, and finally the mangle table lies around the nat table as a second layer. This may be wrong in some perspectives, but not too far from reality.
Step by StepTM Linux Guide. Page 157
5.I. Set policies - First of all we set up all the default policies within the nat table. Normally, I will be satisfied with the default policy set from the beginning, namely the ACCEPT policy. This table should not be used for filtering anyways, and we should not let packets be dropped here since there are some really nasty things that may happen in such cases due to our own presumptions. I let these chains be set to ACCEPT since there is no reason not to do so.
5.II. Create user specified chains - At this point we create any
user specified chains that we want within the nat table. Normally I do not have any of these, but I have added this section anyways, just in case. Note that the user specified chains must be created before they can actually be used within the system chains.
5.III. Create content in user specified chains - By now it should
be time to add all the rules to the user specified chains in the nat table. The same thing goes here as for the user specified chains in the filter table. We add this material here since I do not see any reason not to.
5.VI. PREROUTING chain - The PREROUTING chain is used
to do DNAT on packets in case we have any need for it. In most scripts this feature is not used, or at the very least commented out, reason being that we do not want to open up big holes to our local network without knowing about it. Within some scripts we have this turned on by default since the sole purpose of those scripts are to provide such services.
5.V. POSTROUTING chain - The POSTROUTING chain
should be fairly well used by the scripts I have written since most of them depend upon the fact that you have one or more local networks that we want to firewall against the Internet. Mainly we will try to use the SNAT target, but in certain cases we are forced to use the MASQUERADE target instead.

Step by StepTM Linux Guide. Page 158
5.VI. OUTPUT chain - The OUTPUT chain is barely used at all in any of the scripts. As it looks now, it is not broken, but I have been unable to find any good reasons to use this chain so far. If anyone has a reason to use this chain, send me a line and I will add it to the tutorial.
6. mangle table - The last table to do anything about is the mangle
table. Normally I will not use this table at all, since it should normally not be used for anyone, unless they have specific needs, such as masking all boxes to use the exact same TTL or to change TOS fields etc. I have in other words chosen to leave these parts of the scripts more or less blank, with a few exceptions where I have added a few examples of what it may be used for.
6.I. Set policies - Set the default policies within the chain. The
same thing goes here as for the nat table pretty much. The table was not made for filtering, and hence you should avoid it all together. I have not set any policies in any of the scripts in the mangle table one way or the other, and you are encouraged not to do so either.
6.II. Create user specified chains - Create all the user specified
chains. Since I have barely used the mangle table at all in the scripts, I have neither created any chains here since it is fairly unusable without any data to use within it. However, this section was added just in case someone, or I, would have the need for it in the future.
6.III. Create content in user specified chains - If you have any
user specified chains within this table, you may at this point add the rules that you want within them here.
6.IV PREROUTING - At this point there is barely any
information in any of the scripts in this tutorial that contains any rules here.
6.V. INPUT chain - At this point there is barely any
information in any of the scripts in this tutorial that contains any rules here.

Step by StepTM Linux Guide. Page 159
6.VI. FORWARD chain - At this point there is barely any information in any of the scripts in this tutorial that contains any rules here.
6.VII. OUTPUT chain - At this point there is barely any
information in any of the scripts in this tutorial that contains any rules here.
6.VIII POSTROUTING chain - At this point there is barely any
information in any of the scripts in this tutorial that contains any rules here.
Hopefully this should explain more in detail how each script is structured and why they are structured in such a way.
Do note that these descriptions are extremely brief, and should mainly just be seen as a brief explanation to what and why the scripts has been split down as they have. There is nothing that says that this is the only and best way to go.
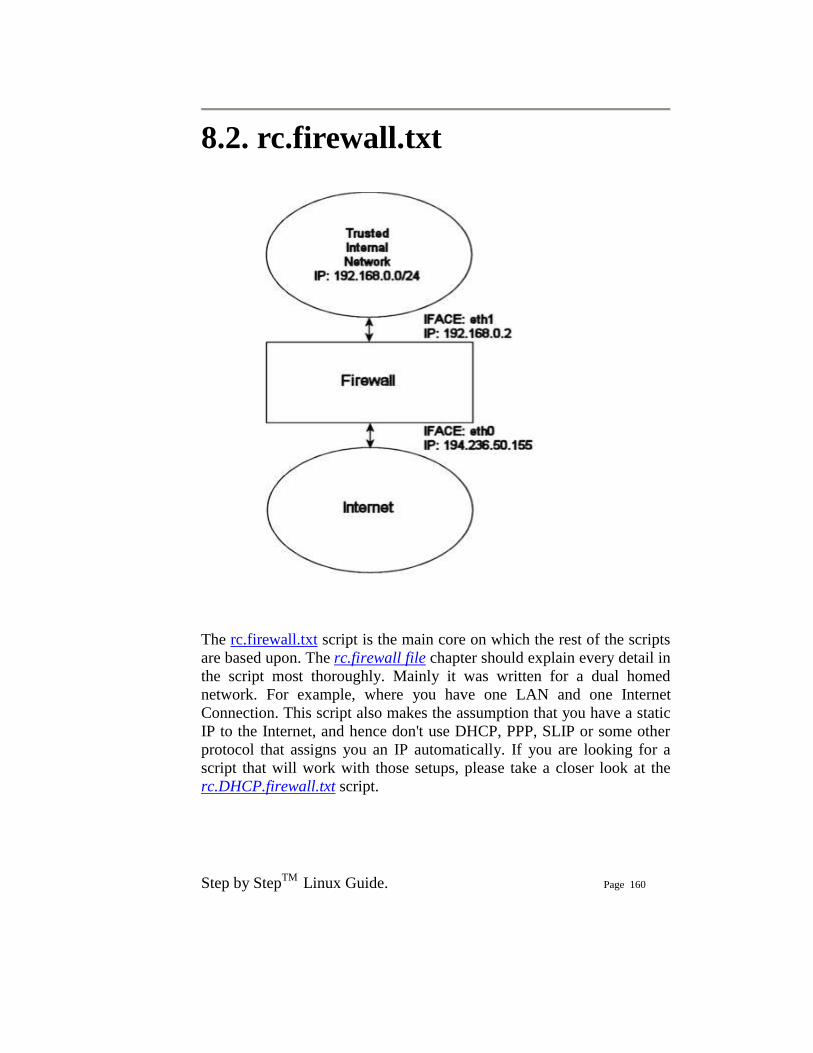
Step by StepTM Linux Guide. Page 160
8.2. rc.firewall.txt
The rc.firewall.txt script is the main core on which the rest of the scripts are based upon. The rc.firewall file chapter should explain every detail in the script most thoroughly. Mainly it was written for a dual homed network. For example, where you have one LAN and one Internet Connection. This script also makes the assumption that you have a static IP to the Internet, and hence don't use DHCP, PPP, SLIP or some other protocol that assigns you an IP automatically. If you are looking for a script that will work with those setups, please take a closer look at the rc.DHCP.firewall.txt script.

Step by StepTM Linux Guide. Page 161
The rc.firewall.txt script requires the following options to be compiled statically to the kernel, or as modules. Without one or more of these, the script will become more or less flawed since parts of the scripts required functionalities will be unusable. As you change the script you use, you could possibly need more options to be compiled into your kernel depending on what you want to use.
CONFIG_NETFILTER CONFIG_IP_NF_CONNTRACK CONFIG_IP_NF_IPTABLES CONFIG_IP_NF_MATCH_LIMIT CONFIG_IP_NF_MATCH_STATE CONFIG_IP_NF_FILTER CONFIG_IP_NF_NAT CONFIG_IP_NF_TARGET_LOG
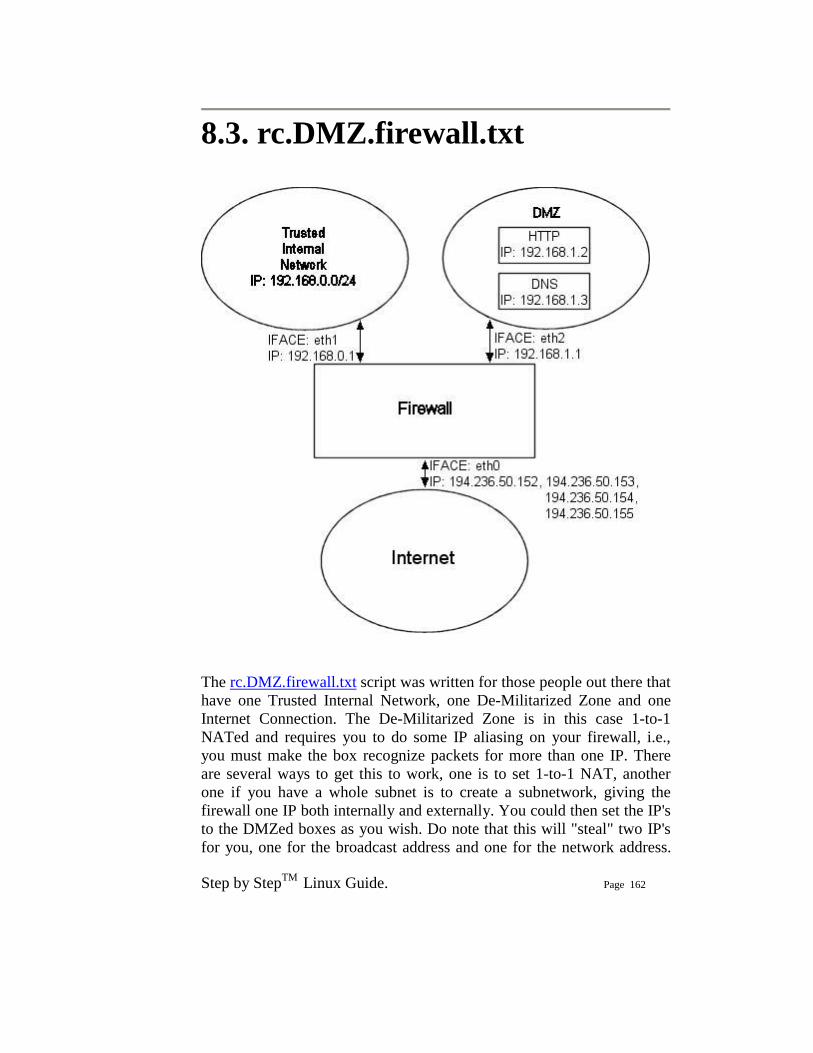
Step by StepTM Linux Guide. Page 162
8.3. rc.DMZ.firewall.txt
The rc.DMZ.firewall.txt script was written for those people out there that have one Trusted Internal Network, one De-Militarized Zone and one Internet Connection. The De-Militarized Zone is in this case 1-to-1 NATed and requires you to do some IP aliasing on your firewall, i.e., you must make the box recognize packets for more than one IP. There are several ways to get this to work, one is to set 1-to-1 NAT, another one if you have a whole subnet is to create a subnetwork, giving the firewall one IP both internally and externally. You could then set the IP's to the DMZed boxes as you wish. Do note that this will "steal" two IP's for you, one for the broadcast address and one for the network address.
Step by StepTM Linux Guide. Page 163
This is pretty much up to you to decide and to implement, this tutorial will give you the tools to actually accomplish the firewalling and NATing part, but it will not tell you exactly what you need to do since it is out of the scope of the tutorial. The rc.DMZ.firewall.txt script requires these options to be compiled into your kernel, either statically or as modules. Without these options, at the very least, available in your kernel, you will not be able to use this scripts functionality. You may in other words get a lot of errors complaining about modules and targets/jumps or matches missing. If you are planning to do traffic control or any other things like that, you should see to it that you have all the required options compiled into your kernel there as well.
CONFIG_NETFILTER CONFIG_IP_NF_CONNTRACK CONFIG_IP_NF_IPTABLES CONFIG_IP_NF_MATCH_LIMIT CONFIG_IP_NF_MATCH_STATE CONFIG_IP_NF_FILTER CONFIG_IP_NF_NAT CONFIG_IP_NF_TARGET_LOG
You need to have two internal networks with this script as you can see from the picture. One uses IP range 192.168.0.0/24 and consists of a Trusted Internal Network. The other one uses IP range 192.168.1.0/24 and consists of the De-Militarized Zone which we will do 1-to-1 NAT to. For example, if someone from the Internet sends a packet to our DNS_IP, then we use DNAT, to send the packet on to our DNS on the DMZ network. When the DNS sees our packet, the packet will be destined for the actual DNS internal network IP, and not to our external DNS IP. If the packet would not have been translated, the DNS wouldn't have answered the packet. We will show a short example of how the DNAT code looks: $IPTABLES -t nat -A PREROUTING -p TCP -i $INET_IFACE -d $DNS_IP \ --dport 53 -j DNAT --to-destination $DMZ_DNS_IP
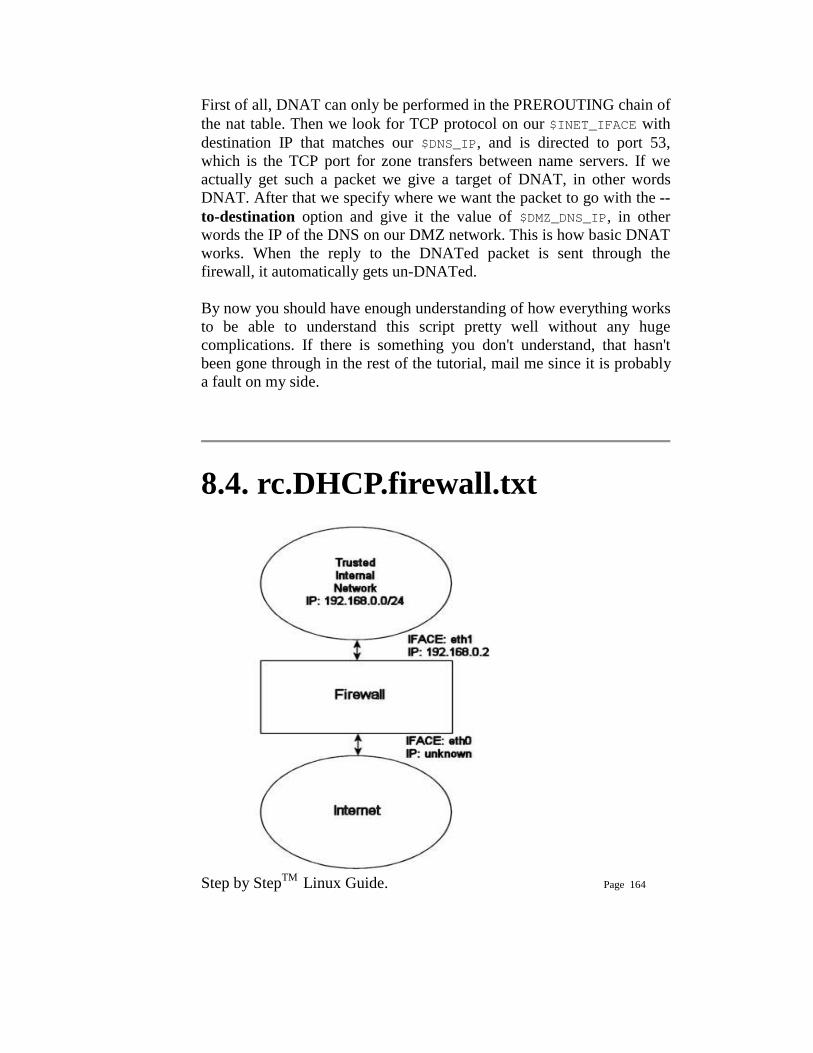
Step by StepTM Linux Guide. Page 164
First of all, DNAT can only be performed in the PREROUTING chain of the nat table. Then we look for TCP protocol on our $INET_IFACE with destination IP that matches our $DNS_IP, and is directed to port 53, which is the TCP port for zone transfers between name servers. If we actually get such a packet we give a target of DNAT, in other words DNAT. After that we specify where we want the packet to go with the --to-destination option and give it the value of $DMZ_DNS_IP, in other words the IP of the DNS on our DMZ network. This is how basic DNAT works. When the reply to the DNATed packet is sent through the firewall, it automatically gets un-DNATed. By now you should have enough understanding of how everything works to be able to understand this script pretty well without any huge complications. If there is something you don't understand, that hasn't been gone through in the rest of the tutorial, mail me since it is probably a fault on my side.
8.4. rc.DHCP.firewall.txt
Step by StepTM Linux Guide. Page 165
The rc.DHCP.firewall.txt script is pretty much identical to the original rc.firewall.txt. However, this script no longer uses the STATIC_IP variable, which is the main change to the original rc.firewall.txt script. The reason is that this won't work together with a dynamic IP connection. The actual changes needed to be done to the original script is minimal, however, I've had some people mail me and ask about the problem so this script will be a good solution for you. This script will allow people who uses DHCP, PPP and SLIP connections to connect to the Internet. The rc.DHCP.firewall.txt script requires the following options to be compiled statically to the kernel, or as modules, as a bare minimum to run properly.
• CONFIG_NETFILTER • CONFIG_IP_NF_CONNTRACK • CONFIG_IP_NF_IPTABLES • CONFIG_IP_NF_MATCH_LIMIT • CONFIG_IP_NF_MATCH_STATE • CONFIG_IP_NF_FILTER • CONFIG_IP_NF_NAT • CONFIG_IP_NF_TARGET_MASQUERADE • CONFIG_IP_NF_TARGET_LOG
The main changes done to the script consists of erasing the STATIC_IP variable as I already said and deleting all references to this variable. Instead of using this variable the script now does its main filtering on the variable INET_IFACE. In other words -d $STATIC_IP has been changed to -i $INET_IFACE. This is pretty much the only changes made and that's all that's needed really. There are some more things to think about though. We can no longer filter in the INPUT chain depending on, for example, --in-interface $LAN_IFACE --dst $INET_IP. This in turn forces us to filter only based on interfaces in such cases where the internal machines must access the Internet addressable IP. One great example is if we are running an HTTP on our firewall. If we go to the main page, which contains static links back to the same host, which could be some dyndns solution, we would get a real hard trouble. The NATed box would ask the DNS for the IP of the HTTP server, then try to access that IP. In case we filter based on interface and IP, the NATed box would be unable to get to the HTTP because the INPUT chain would DROP the packets flat

Step by StepTM Linux Guide. Page 166
to the ground. This also applies in a sense to the case where we got a static IP, but in such cases it could be gotten around by adding rules which check the LAN interface packets for our INET_IP, and if so ACCEPT them. As you may read from above, it may be a good idea to get a script, or write one, that handles dynamic IP in a better sense. We could for example make a script that grabs the IP from ifconfig and adds it to a variable, upon boot-up of the Internet connection. A good way to do this, would be to use for example the ip-up scripts provided with pppd and some other programs. For a good site, check out the linuxguruz.org iptables site which has a huge collection of scripts available to download. You will find a link to the linuxguruz.org site from the Other resources and links appendix.
This script might be a bit less secure than the rc.firewall.txt script. I would definitely advise you to use that script if at all possible since this script is more open to attacks from the outside.
Also, there is the possibility to add something like this to your scripts: INET_IP=`ifconfig $INET_IFACE | grep inet | cut -d : -f 2 | \ cut -d ' ' -f 1` The above would automatically grab the IP address of the $INET_IFACE variable, grep the correct line which contains the IP address and then cuts it down to a manageable IP address. For a more elaborate way of doing this, you could apply the snippets of code available within the retreiveip.txt script, which will automatically grab your Internet IP address when you run the script. Do note that this may in turn lead to a little bit of "weird" behaviors, such as stalling connections to and from the firewall on the internal side. The most common strange behaviors are described in the following list.
1. If the script is run from within a script which in turn is executed by, for example, the PPP daemon, it will hang all currently active connections due to the NEW not SYN rules (see the State NEW packets but no SYN bit set section). It is possible to get by, if you get rid of the NEW not SYN rules for example, but it is questionable.
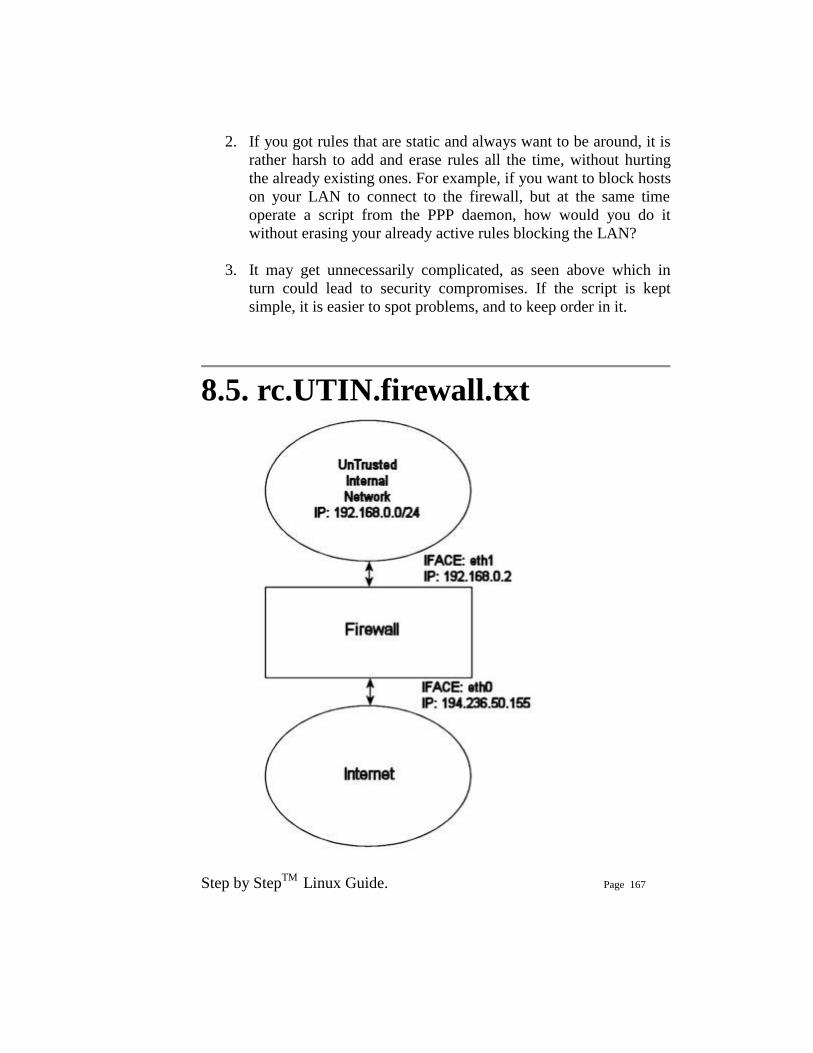
Step by StepTM Linux Guide. Page 167
2. If you got rules that are static and always want to be around, it is rather harsh to add and erase rules all the time, without hurting the already existing ones. For example, if you want to block hosts on your LAN to connect to the firewall, but at the same time operate a script from the PPP daemon, how would you do it without erasing your already active rules blocking the LAN?
3. It may get unnecessarily complicated, as seen above which in
turn could lead to security compromises. If the script is kept simple, it is easier to spot problems, and to keep order in it.
8.5. rc.UTIN.firewall.txt
Step by StepTM Linux Guide. Page 168
The rc.UTIN.firewall.txt script will in contrast to the other scripts block the LAN that is sitting behind us. In other words, we don't trust anyone on any networks we are connected to. We also disallow people on our LAN to do anything but specific tasks on the Internet. The only things we actually allow is POP3, HTTP and FTP access to the Internet. We also don't trust the internal users to access the firewall more than we trust users on the Internet. The rc.UTIN.firewall.txt script requires the following options to be compiled statically to the kernel, or as modules. Without one or more of these, the script will become more or less flawed since parts of the scripts required functionalities will be unusable. As you change the script you use, you could possibly need more options to be compiled into your kernel depending on what you want to use.
• CONFIG_NETFILTER • CONFIG_IP_NF_CONNTRACK • CONFIG_IP_NF_IPTABLES • CONFIG_IP_NF_MATCH_LIMIT • CONFIG_IP_NF_MATCH_STATE • CONFIG_IP_NF_FILTER • CONFIG_IP_NF_NAT • CONFIG_IP_NF_TARGET_LOG
This script follows the golden rule to not trust anyone, not even our own employees. This is a sad fact, but a large part of the hacks and cracks that a company gets hit by is a matter of people from their own staff perpetrating the hit. This script will hopefully give you some clues as to what you can do with your firewall to strengthen it up. It's not very different from the original rc.firewall.txt script, but it does give a few hints at what we would normally let through etc.
Step by StepTM Linux Guide. Page 169
8.6. rc.test-iptables.txt The rc.test-iptables.txt script can be used to test all the different chains, but it might need some tweaking depending on your configuration, such as turning on ip_forwarding, and setting up masquerading etc. It will work for mostly everyone though who has all the basic set up and all the basic tables loaded into kernel. All it really does is set some LOG targets which will log ping replies and ping requests. This way, you will get information on which chain was traversed and in which order. For example, run this script and then do: ping -c 1 host.on.the.internet And tail -n 0 -f /var/log/messages while doing the first command. This should show you all the different chains used and in which order, unless the log entries are swapped around for some reason.
This script was written for testing purposes only. In other words, it's not a good idea to have rules like this that logs everything of one sort since your log partitions might get filled up quickly and it would be an effective Denial of Service attack against you and might lead to real attacks on you that would be unlogged after the initial Denial of Service attack.
8.7. rc.flush-iptables.txt The rc.flush-iptables.txt script should not really be called a script in itself. The rc.flush-iptables.txt script will reset and flush all your tables and chains. The script starts by setting the default policies to ACCEPT on the INPUT, OUTPUT and FORWARD chains of the filter table. After this we reset the default policies of the PREROUTING, POSTROUTING and OUTPUT chains of the nat table. We do this first so we won't have to bother about closed connections and packets not getting through. This script is intended for actually setting up and

Step by StepTM Linux Guide. Page 170
troubleshooting your firewall, and hence we only care about opening the whole thing up and reset it to default values. After this we flush all chains first in the filter table and then in the NAT table. This way we know there is no redundant rules lying around anywhere. When all of this is done, we jump down to the next section where we erase all the user specified chains in the NAT and filter tables. When this step is done, we consider the script done. You may consider adding rules to flush your mangle table if you use it.
One final word on this issue. Certain people have mailed me asking from me to put this script into the original rc.firewall script using Red Hat Linux syntax where you type something like rc.firewall start and the script starts. However, I will not do that since this is a tutorial and should be used as a place to fetch ideas mainly and it shouldn't be filled up with shell scripts and strange syntax. Adding shell script syntax and other things makes the script harder to read as far as I am concerned and the tutorial was written with readability in mind and will continue being so.
8.8. Limit-match.txt The limit-match.txt script is a minor test script which will let you test the limit match and see how it works. Load the script up, and then send ping packets at different intervals to see which gets through, and how often they get through. All echo replies will be blocked until the threshold for the burst limit has again been reached.
Step by StepTM Linux Guide. Page 171
8.9. Pid-owner.txt The pid-owner.txt is a small example script that shows how we could use the PID owner match. It does nothing real, but you should be able to run the script, and then from the output of iptables -L -v be able to tell that the rule actually matches.
8.10. Sid-owner.txt The sid-owner.txt is a small example script that shows how we could use the SID owner match. It does nothing real, but you should be able to run the script, and then from the output of iptables -L -v be able to tell that the rule actually matches.
8.11. Ttl-inc.txt A small example ttl-inc.txt script. This script shows how we could make the firewall/router invisible to traceroutes, which would otherwise reveal much information to possible attackers.
8.12. Iptables-save ruleset A small example script used in the Saving and restoring large rule-sets chapter to illustrate how iptables-save may be used. This script is non-working, and should hence not be used for anything else than a reference.
Step by StepTM Linux Guide. Page 172
Example scripts code-base I.1. Example rc.firewall script #!/bin/sh # # rc.firewall - Initial SIMPLE IP Firewall script for Linux 2.4.x and iptables # # Copyright (C) 2001 Oskar Andreasson <bluefluxATkoffeinDOTnet> # # This program is free software; you can redistribute it and/or modify # it under the terms of the GNU General Public License as published by # the Free Software Foundation; version 2 of the License. # # This program is distributed in the hope that it will be useful, # but WITHOUT ANY WARRANTY; without even the implied warranty of # MERCHANTABILITY or FITNESS FOR A PARTICULAR PURPOSE. See the # GNU General Public License for more details. # # You should have received a copy of the GNU General Public License # along with this program or from the site that you downloaded it # from; if not, write to the Free Software Foundation, Inc., 59 Temple # Place, Suite 330, Boston, MA 02111-1307 USA # ########################################################################### # # 1. Configuration options. # # # 1.1 Internet Configuration. #
Step by StepTM Linux Guide. Page 173
INET_IP="194.236.50.155" INET_IFACE="eth0" INET_BROADCAST="194.236.50.255" # # 1.1.1 DHCP # # # 1.1.2 PPPoE # # # 1.2 Local Area Network configuration. # # your LAN's IP range and localhost IP. /24 means to only use the first 24 # bits of the 32 bit IP address. the same as netmask 255.255.255.0 # LAN_IP="192.168.0.2" LAN_IP_RANGE="192.168.0.0/16" LAN_IFACE="eth1" # # 1.3 DMZ Configuration. # # # 1.4 Localhost Configuration. # LO_IFACE="lo" LO_IP="127.0.0.1" # # 1.5 IPTables Configuration. # IPTABLES="/usr/sbin/iptables" # # 1.6 Other Configuration. # ########################################################################### # # 2. Module loading. #
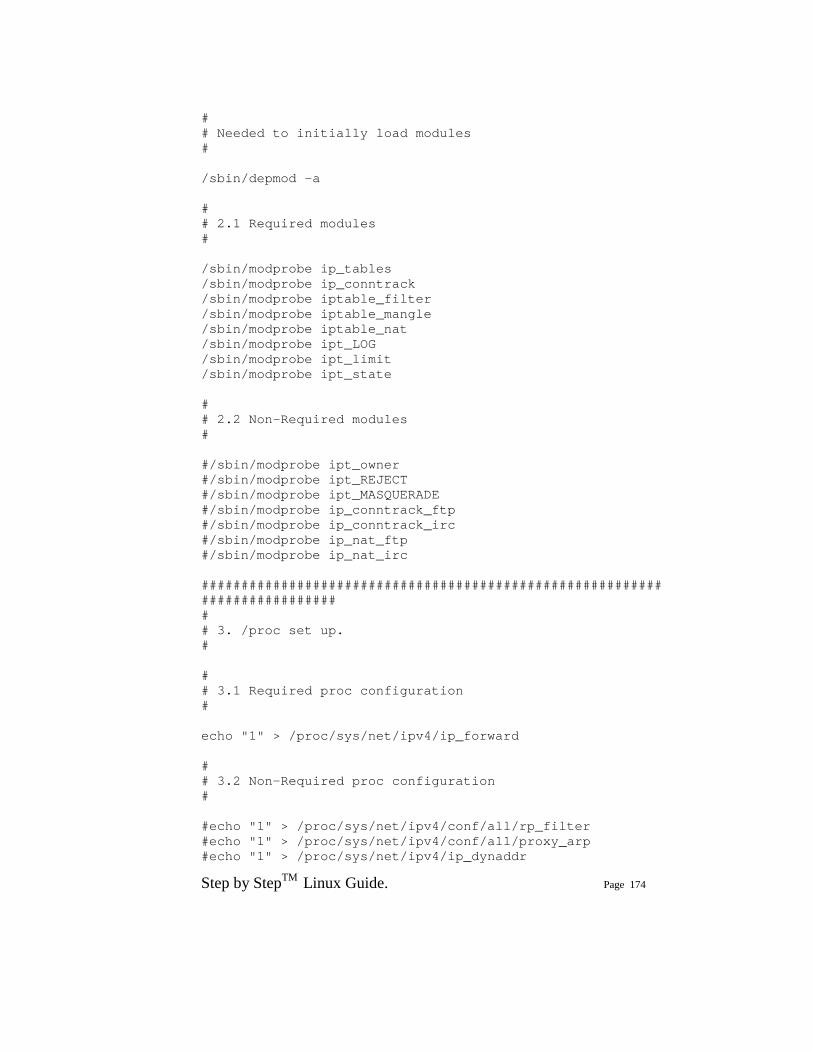
Step by StepTM Linux Guide. Page 174
# # Needed to initially load modules # /sbin/depmod -a # # 2.1 Required modules # /sbin/modprobe ip_tables /sbin/modprobe ip_conntrack /sbin/modprobe iptable_filter /sbin/modprobe iptable_mangle /sbin/modprobe iptable_nat /sbin/modprobe ipt_LOG /sbin/modprobe ipt_limit /sbin/modprobe ipt_state # # 2.2 Non-Required modules # #/sbin/modprobe ipt_owner #/sbin/modprobe ipt_REJECT #/sbin/modprobe ipt_MASQUERADE #/sbin/modprobe ip_conntrack_ftp #/sbin/modprobe ip_conntrack_irc #/sbin/modprobe ip_nat_ftp #/sbin/modprobe ip_nat_irc ########################################################################### # # 3. /proc set up. # # # 3.1 Required proc configuration # echo "1" > /proc/sys/net/ipv4/ip_forward # # 3.2 Non-Required proc configuration # #echo "1" > /proc/sys/net/ipv4/conf/all/rp_filter #echo "1" > /proc/sys/net/ipv4/conf/all/proxy_arp #echo "1" > /proc/sys/net/ipv4/ip_dynaddr
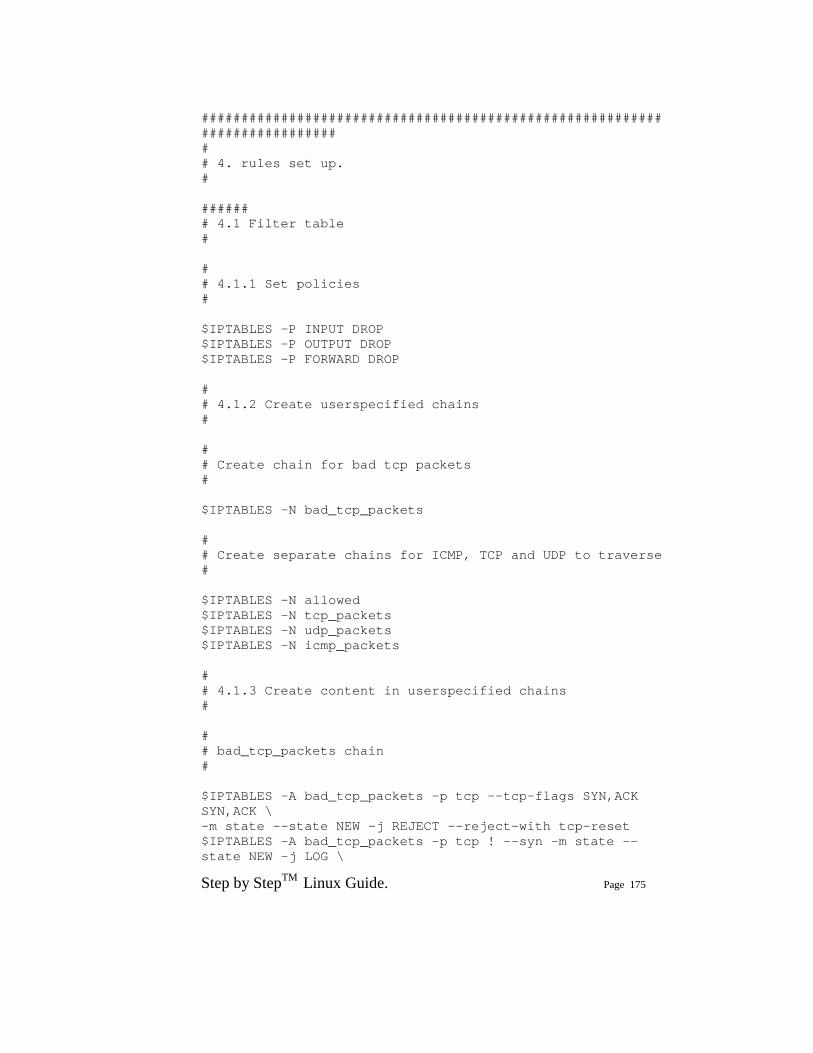
Step by StepTM Linux Guide. Page 175
########################################################################### # # 4. rules set up. # ###### # 4.1 Filter table # # # 4.1.1 Set policies # $IPTABLES -P INPUT DROP $IPTABLES -P OUTPUT DROP $IPTABLES -P FORWARD DROP # # 4.1.2 Create userspecified chains # # # Create chain for bad tcp packets # $IPTABLES -N bad_tcp_packets # # Create separate chains for ICMP, TCP and UDP to traverse # $IPTABLES -N allowed $IPTABLES -N tcp_packets $IPTABLES -N udp_packets $IPTABLES -N icmp_packets # # 4.1.3 Create content in userspecified chains # # # bad_tcp_packets chain # $IPTABLES -A bad_tcp_packets -p tcp --tcp-flags SYN,ACK SYN,ACK \ -m state --state NEW -j REJECT --reject-with tcp-reset $IPTABLES -A bad_tcp_packets -p tcp ! --syn -m state --state NEW -j LOG \
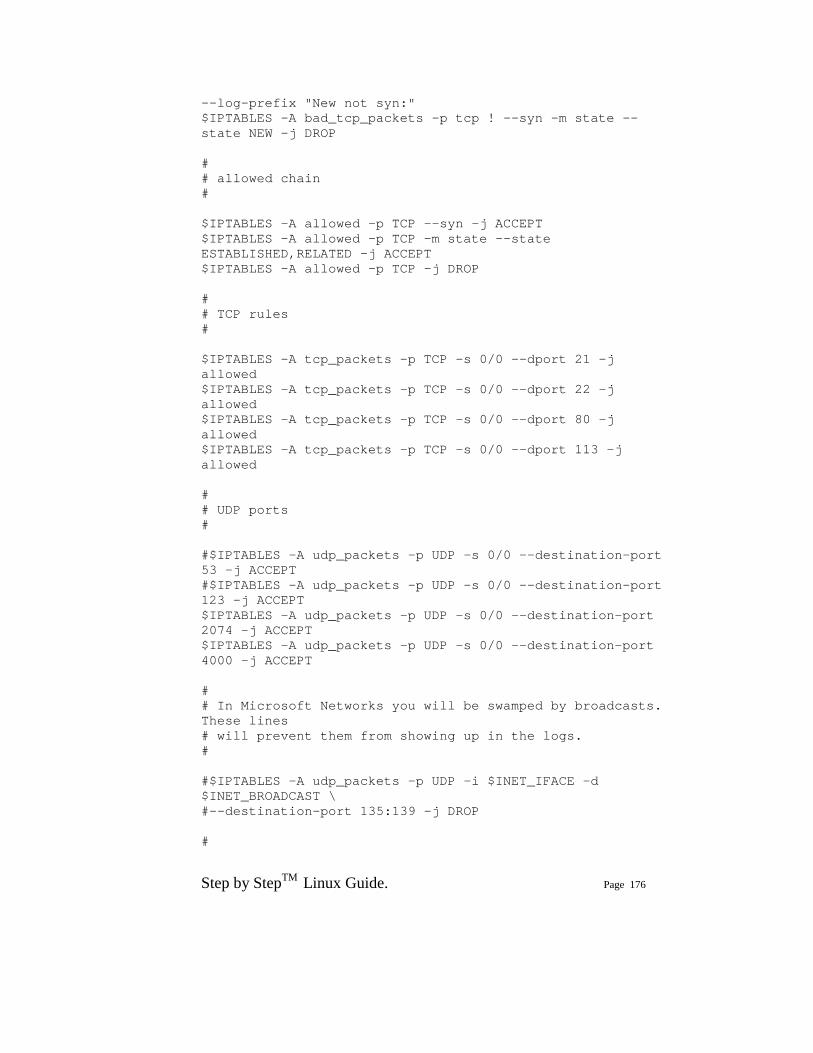
Step by StepTM Linux Guide. Page 176
--log-prefix "New not syn:" $IPTABLES -A bad_tcp_packets -p tcp ! --syn -m state --state NEW -j DROP # # allowed chain # $IPTABLES -A allowed -p TCP --syn -j ACCEPT $IPTABLES -A allowed -p TCP -m state --state ESTABLISHED,RELATED -j ACCEPT $IPTABLES -A allowed -p TCP -j DROP # # TCP rules # $IPTABLES -A tcp_packets -p TCP -s 0/0 --dport 21 -j allowed $IPTABLES -A tcp_packets -p TCP -s 0/0 --dport 22 -j allowed $IPTABLES -A tcp_packets -p TCP -s 0/0 --dport 80 -j allowed $IPTABLES -A tcp_packets -p TCP -s 0/0 --dport 113 -j allowed # # UDP ports # #$IPTABLES -A udp_packets -p UDP -s 0/0 --destination-port 53 -j ACCEPT #$IPTABLES -A udp_packets -p UDP -s 0/0 --destination-port 123 -j ACCEPT $IPTABLES -A udp_packets -p UDP -s 0/0 --destination-port 2074 -j ACCEPT $IPTABLES -A udp_packets -p UDP -s 0/0 --destination-port 4000 -j ACCEPT # # In Microsoft Networks you will be swamped by broadcasts. These lines # will prevent them from showing up in the logs. # #$IPTABLES -A udp_packets -p UDP -i $INET_IFACE -d $INET_BROADCAST \ #--destination-port 135:139 -j DROP #
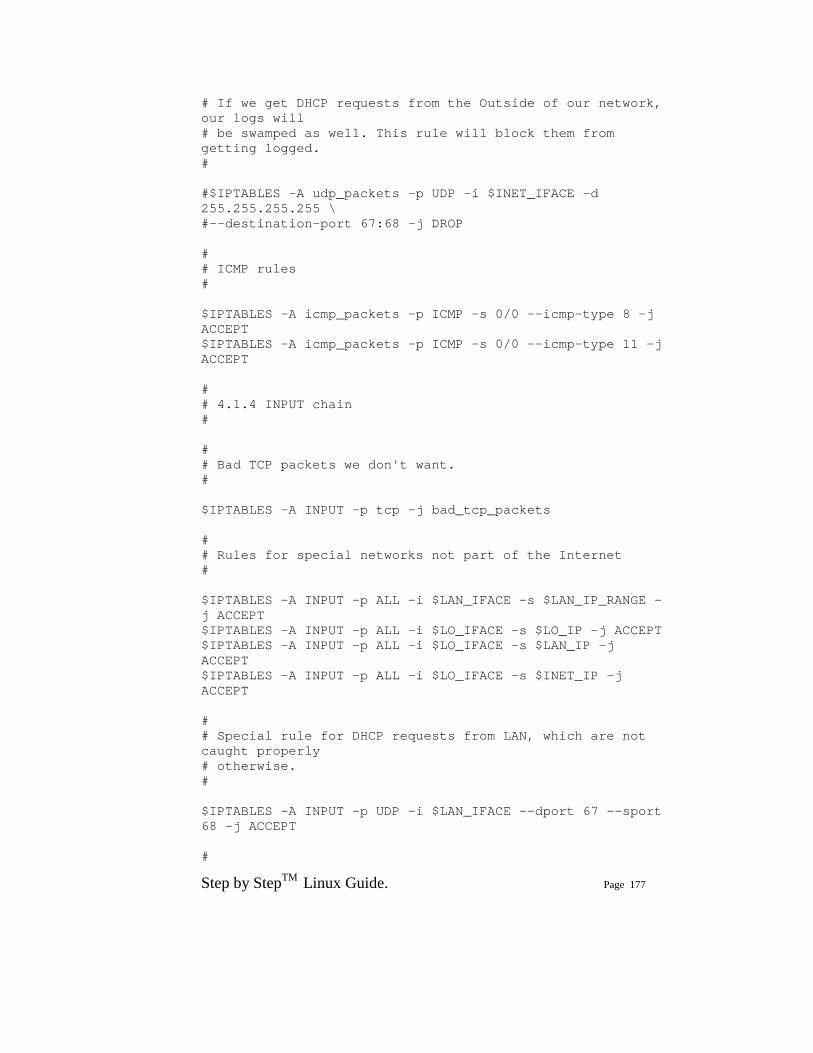
Step by StepTM Linux Guide. Page 177
# If we get DHCP requests from the Outside of our network, our logs will # be swamped as well. This rule will block them from getting logged. # #$IPTABLES -A udp_packets -p UDP -i $INET_IFACE -d 255.255.255.255 \ #--destination-port 67:68 -j DROP # # ICMP rules # $IPTABLES -A icmp_packets -p ICMP -s 0/0 --icmp-type 8 -j ACCEPT $IPTABLES -A icmp_packets -p ICMP -s 0/0 --icmp-type 11 -j ACCEPT # # 4.1.4 INPUT chain # # # Bad TCP packets we don't want. # $IPTABLES -A INPUT -p tcp -j bad_tcp_packets # # Rules for special networks not part of the Internet # $IPTABLES -A INPUT -p ALL -i $LAN_IFACE -s $LAN_IP_RANGE -j ACCEPT $IPTABLES -A INPUT -p ALL -i $LO_IFACE -s $LO_IP -j ACCEPT $IPTABLES -A INPUT -p ALL -i $LO_IFACE -s $LAN_IP -j ACCEPT $IPTABLES -A INPUT -p ALL -i $LO_IFACE -s $INET_IP -j ACCEPT # # Special rule for DHCP requests from LAN, which are not caught properly # otherwise. # $IPTABLES -A INPUT -p UDP -i $LAN_IFACE --dport 67 --sport 68 -j ACCEPT #
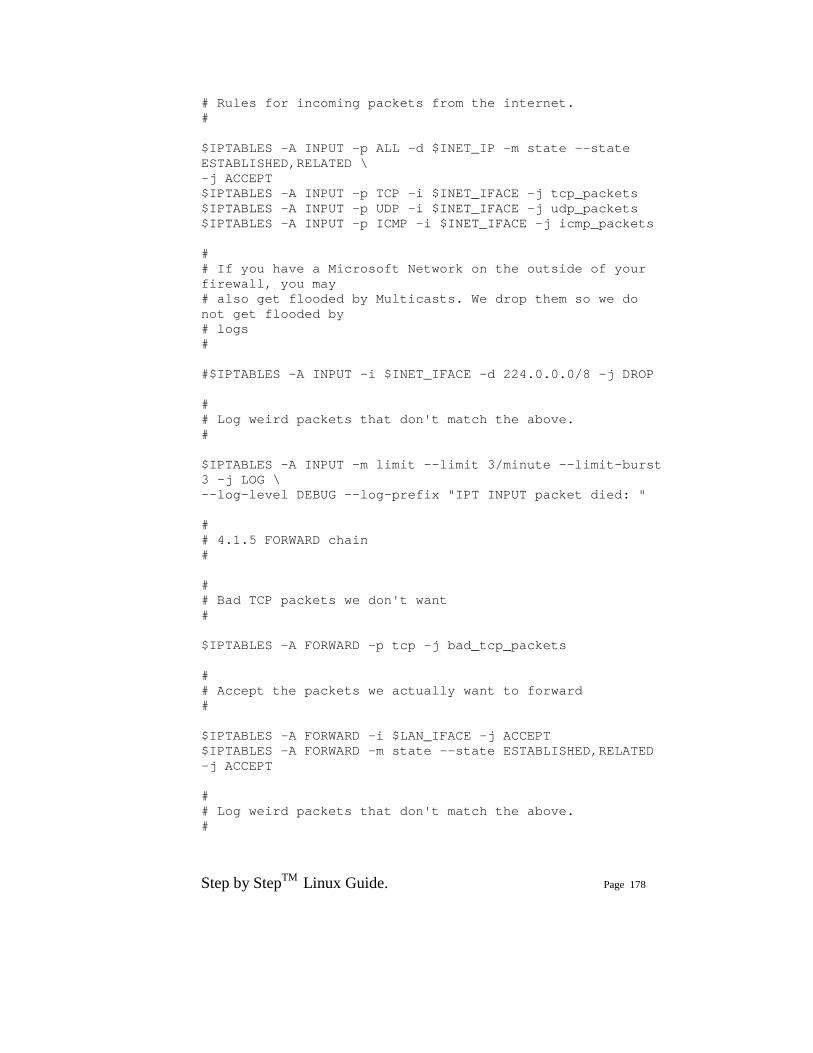
Step by StepTM Linux Guide. Page 178
# Rules for incoming packets from the internet. # $IPTABLES -A INPUT -p ALL -d $INET_IP -m state --state ESTABLISHED,RELATED \ -j ACCEPT $IPTABLES -A INPUT -p TCP -i $INET_IFACE -j tcp_packets $IPTABLES -A INPUT -p UDP -i $INET_IFACE -j udp_packets $IPTABLES -A INPUT -p ICMP -i $INET_IFACE -j icmp_packets # # If you have a Microsoft Network on the outside of your firewall, you may # also get flooded by Multicasts. We drop them so we do not get flooded by # logs # #$IPTABLES -A INPUT -i $INET_IFACE -d 224.0.0.0/8 -j DROP # # Log weird packets that don't match the above. # $IPTABLES -A INPUT -m limit --limit 3/minute --limit-burst 3 -j LOG \ --log-level DEBUG --log-prefix "IPT INPUT packet died: " # # 4.1.5 FORWARD chain # # # Bad TCP packets we don't want # $IPTABLES -A FORWARD -p tcp -j bad_tcp_packets # # Accept the packets we actually want to forward # $IPTABLES -A FORWARD -i $LAN_IFACE -j ACCEPT $IPTABLES -A FORWARD -m state --state ESTABLISHED,RELATED -j ACCEPT # # Log weird packets that don't match the above. #

Step by StepTM Linux Guide. Page 179
$IPTABLES -A FORWARD -m limit --limit 3/minute --limit-burst 3 -j LOG \ --log-level DEBUG --log-prefix "IPT FORWARD packet died: " # # 4.1.6 OUTPUT chain # # # Bad TCP packets we don't want. # $IPTABLES -A OUTPUT -p tcp -j bad_tcp_packets # # Special OUTPUT rules to decide which IP's to allow. # $IPTABLES -A OUTPUT -p ALL -s $LO_IP -j ACCEPT $IPTABLES -A OUTPUT -p ALL -s $LAN_IP -j ACCEPT $IPTABLES -A OUTPUT -p ALL -s $INET_IP -j ACCEPT # # Log weird packets that don't match the above. # $IPTABLES -A OUTPUT -m limit --limit 3/minute --limit-burst 3 -j LOG \ --log-level DEBUG --log-prefix "IPT OUTPUT packet died: " ###### # 4.2 nat table # # # 4.2.1 Set policies # # # 4.2.2 Create user specified chains # # # 4.2.3 Create content in user specified chains # # # 4.2.4 PREROUTING chain # #

Step by StepTM Linux Guide. Page 180
# 4.2.5 POSTROUTING chain # # # Enable simple IP Forwarding and Network Address Translation # $IPTABLES -t nat -A POSTROUTING -o $INET_IFACE -j SNAT --to-source $INET_IP # # 4.2.6 OUTPUT chain # ###### # 4.3 mangle table # # # 4.3.1 Set policies # # # 4.3.2 Create user specified chains # # # 4.3.3 Create content in user specified chains # # # 4.3.4 PREROUTING chain # # # 4.3.5 INPUT chain # # # 4.3.6 FORWARD chain # # # 4.3.7 OUTPUT chain # # # 4.3.8 POSTROUTING chain #

Step by StepTM Linux Guide. Page 181
I.2. Example rc.DMZ.firewall script #!/bin/sh # # rc.DMZ.firewall - DMZ IP Firewall script for Linux 2.4.x and iptables # # Copyright (C) 2001 Oskar Andreasson <bluefluxATkoffeinDOTnet> # # This program is free software; you can redistribute it and/or modify # it under the terms of the GNU General Public License as published by # the Free Software Foundation; version 2 of the License. # # This program is distributed in the hope that it will be useful, # but WITHOUT ANY WARRANTY; without even the implied warranty of # MERCHANTABILITY or FITNESS FOR A PARTICULAR PURPOSE. See the # GNU General Public License for more details. # # You should have received a copy of the GNU General Public License # along with this program or from the site that you downloaded it # from; if not, write to the Free Software Foundation, Inc., 59 Temple # Place, Suite 330, Boston, MA 02111-1307 USA # ########################################################################### # # 1. Configuration options. # # # 1.1 Internet Configuration. # INET_IP="194.236.50.152" HTTP_IP="194.236.50.153" DNS_IP="194.236.50.154" INET_IFACE="eth0"
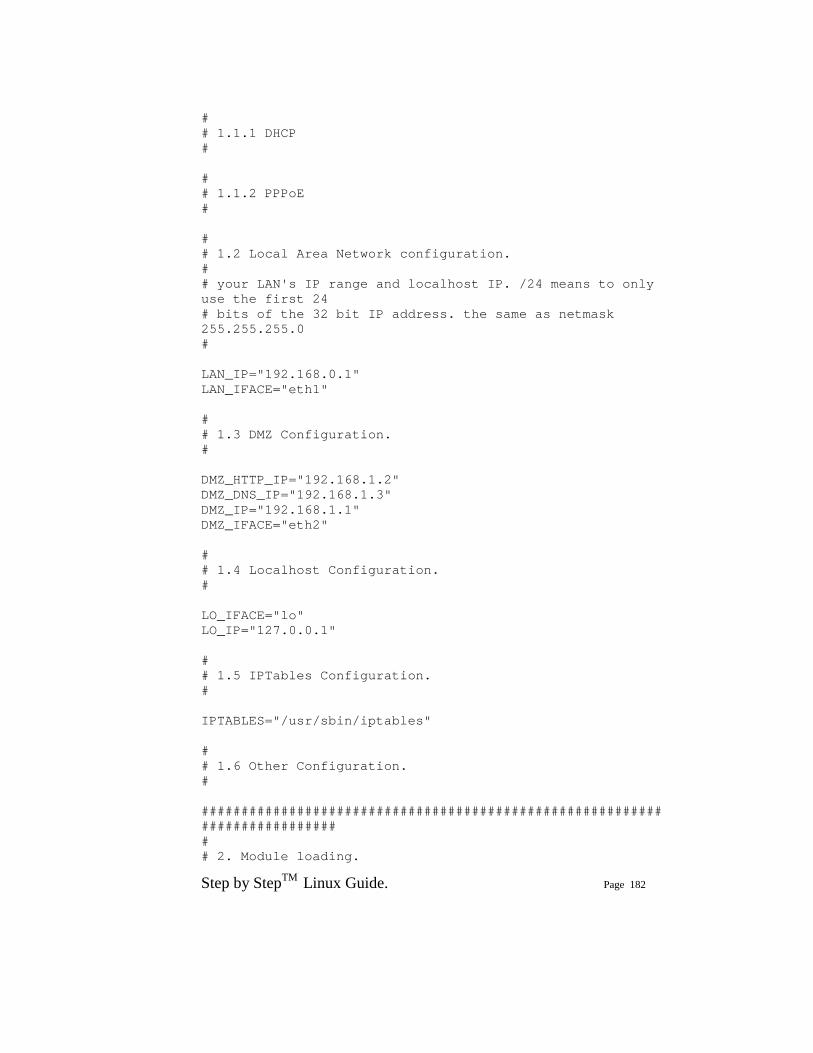
Step by StepTM Linux Guide. Page 182
# # 1.1.1 DHCP # # # 1.1.2 PPPoE # # # 1.2 Local Area Network configuration. # # your LAN's IP range and localhost IP. /24 means to only use the first 24 # bits of the 32 bit IP address. the same as netmask 255.255.255.0 # LAN_IP="192.168.0.1" LAN_IFACE="eth1" # # 1.3 DMZ Configuration. # DMZ_HTTP_IP="192.168.1.2" DMZ_DNS_IP="192.168.1.3" DMZ_IP="192.168.1.1" DMZ_IFACE="eth2" # # 1.4 Localhost Configuration. # LO_IFACE="lo" LO_IP="127.0.0.1" # # 1.5 IPTables Configuration. # IPTABLES="/usr/sbin/iptables" # # 1.6 Other Configuration. # ########################################################################### # # 2. Module loading.
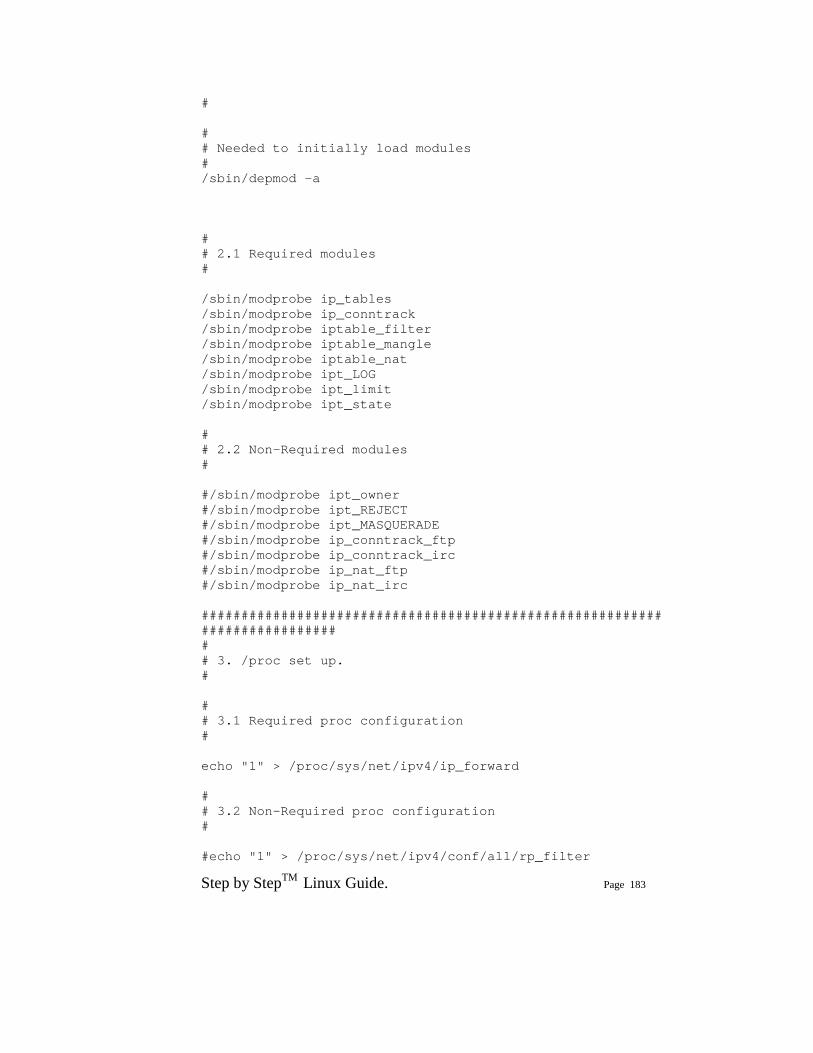
Step by StepTM Linux Guide. Page 183
# # # Needed to initially load modules # /sbin/depmod -a # # 2.1 Required modules # /sbin/modprobe ip_tables /sbin/modprobe ip_conntrack /sbin/modprobe iptable_filter /sbin/modprobe iptable_mangle /sbin/modprobe iptable_nat /sbin/modprobe ipt_LOG /sbin/modprobe ipt_limit /sbin/modprobe ipt_state # # 2.2 Non-Required modules # #/sbin/modprobe ipt_owner #/sbin/modprobe ipt_REJECT #/sbin/modprobe ipt_MASQUERADE #/sbin/modprobe ip_conntrack_ftp #/sbin/modprobe ip_conntrack_irc #/sbin/modprobe ip_nat_ftp #/sbin/modprobe ip_nat_irc ########################################################################### # # 3. /proc set up. # # # 3.1 Required proc configuration # echo "1" > /proc/sys/net/ipv4/ip_forward # # 3.2 Non-Required proc configuration # #echo "1" > /proc/sys/net/ipv4/conf/all/rp_filter
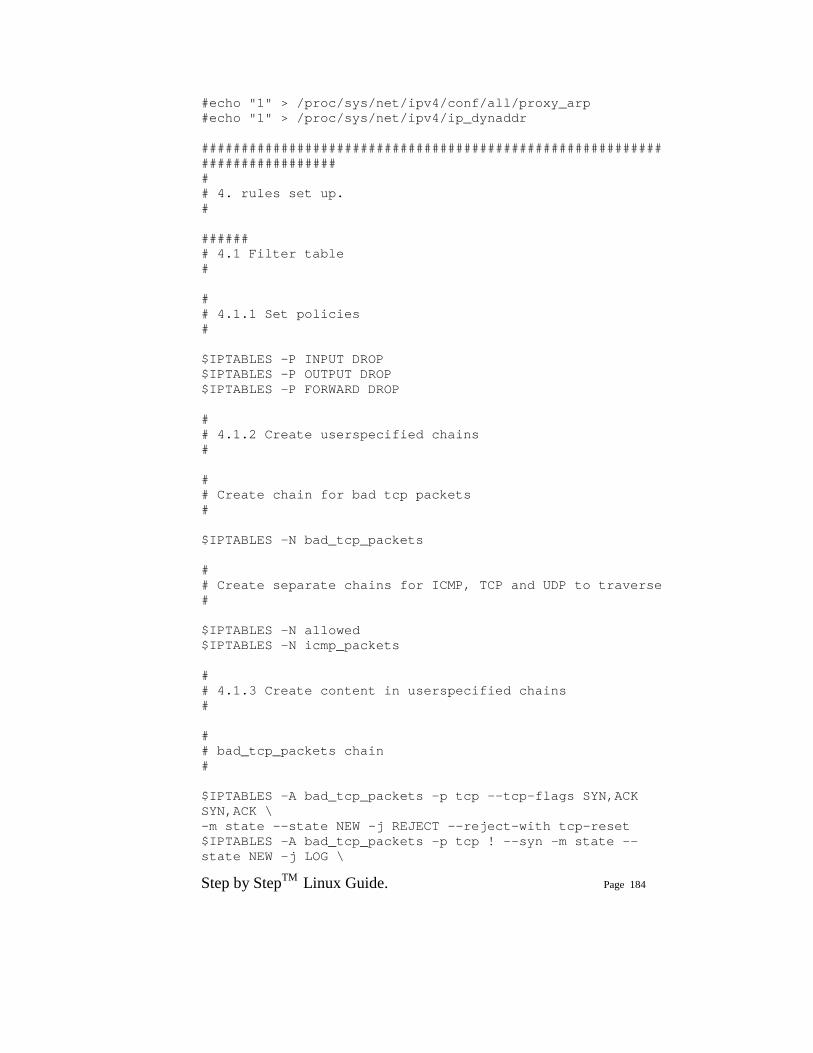
Step by StepTM Linux Guide. Page 184
#echo "1" > /proc/sys/net/ipv4/conf/all/proxy_arp #echo "1" > /proc/sys/net/ipv4/ip_dynaddr ########################################################################### # # 4. rules set up. # ###### # 4.1 Filter table # # # 4.1.1 Set policies # $IPTABLES -P INPUT DROP $IPTABLES -P OUTPUT DROP $IPTABLES -P FORWARD DROP # # 4.1.2 Create userspecified chains # # # Create chain for bad tcp packets # $IPTABLES -N bad_tcp_packets # # Create separate chains for ICMP, TCP and UDP to traverse # $IPTABLES -N allowed $IPTABLES -N icmp_packets # # 4.1.3 Create content in userspecified chains # # # bad_tcp_packets chain # $IPTABLES -A bad_tcp_packets -p tcp --tcp-flags SYN,ACK SYN,ACK \ -m state --state NEW -j REJECT --reject-with tcp-reset $IPTABLES -A bad_tcp_packets -p tcp ! --syn -m state --state NEW -j LOG \
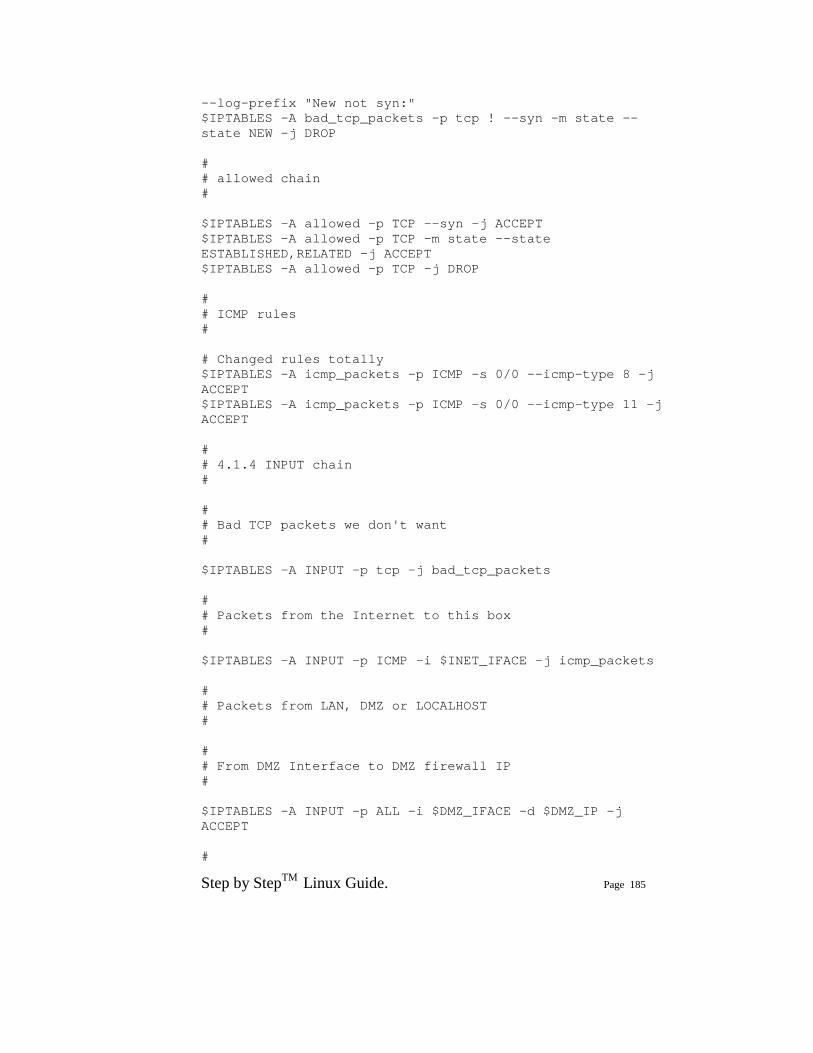
Step by StepTM Linux Guide. Page 185
--log-prefix "New not syn:" $IPTABLES -A bad_tcp_packets -p tcp ! --syn -m state --state NEW -j DROP # # allowed chain # $IPTABLES -A allowed -p TCP --syn -j ACCEPT $IPTABLES -A allowed -p TCP -m state --state ESTABLISHED,RELATED -j ACCEPT $IPTABLES -A allowed -p TCP -j DROP # # ICMP rules # # Changed rules totally $IPTABLES -A icmp_packets -p ICMP -s 0/0 --icmp-type 8 -j ACCEPT $IPTABLES -A icmp_packets -p ICMP -s 0/0 --icmp-type 11 -j ACCEPT # # 4.1.4 INPUT chain # # # Bad TCP packets we don't want # $IPTABLES -A INPUT -p tcp -j bad_tcp_packets # # Packets from the Internet to this box # $IPTABLES -A INPUT -p ICMP -i $INET_IFACE -j icmp_packets # # Packets from LAN, DMZ or LOCALHOST # # # From DMZ Interface to DMZ firewall IP # $IPTABLES -A INPUT -p ALL -i $DMZ_IFACE -d $DMZ_IP -j ACCEPT #
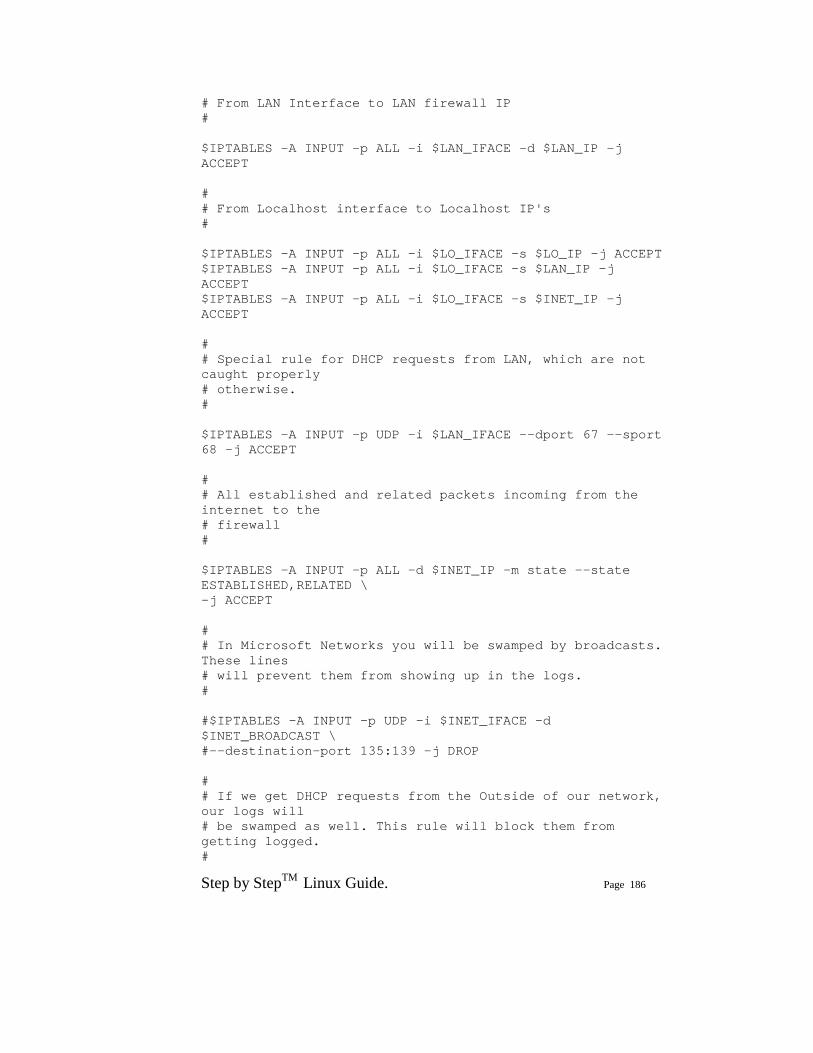
Step by StepTM Linux Guide. Page 186
# From LAN Interface to LAN firewall IP # $IPTABLES -A INPUT -p ALL -i $LAN_IFACE -d $LAN_IP -j ACCEPT # # From Localhost interface to Localhost IP's # $IPTABLES -A INPUT -p ALL -i $LO_IFACE -s $LO_IP -j ACCEPT $IPTABLES -A INPUT -p ALL -i $LO_IFACE -s $LAN_IP -j ACCEPT $IPTABLES -A INPUT -p ALL -i $LO_IFACE -s $INET_IP -j ACCEPT # # Special rule for DHCP requests from LAN, which are not caught properly # otherwise. # $IPTABLES -A INPUT -p UDP -i $LAN_IFACE --dport 67 --sport 68 -j ACCEPT # # All established and related packets incoming from the internet to the # firewall # $IPTABLES -A INPUT -p ALL -d $INET_IP -m state --state ESTABLISHED,RELATED \ -j ACCEPT # # In Microsoft Networks you will be swamped by broadcasts. These lines # will prevent them from showing up in the logs. # #$IPTABLES -A INPUT -p UDP -i $INET_IFACE -d $INET_BROADCAST \ #--destination-port 135:139 -j DROP # # If we get DHCP requests from the Outside of our network, our logs will # be swamped as well. This rule will block them from getting logged. #
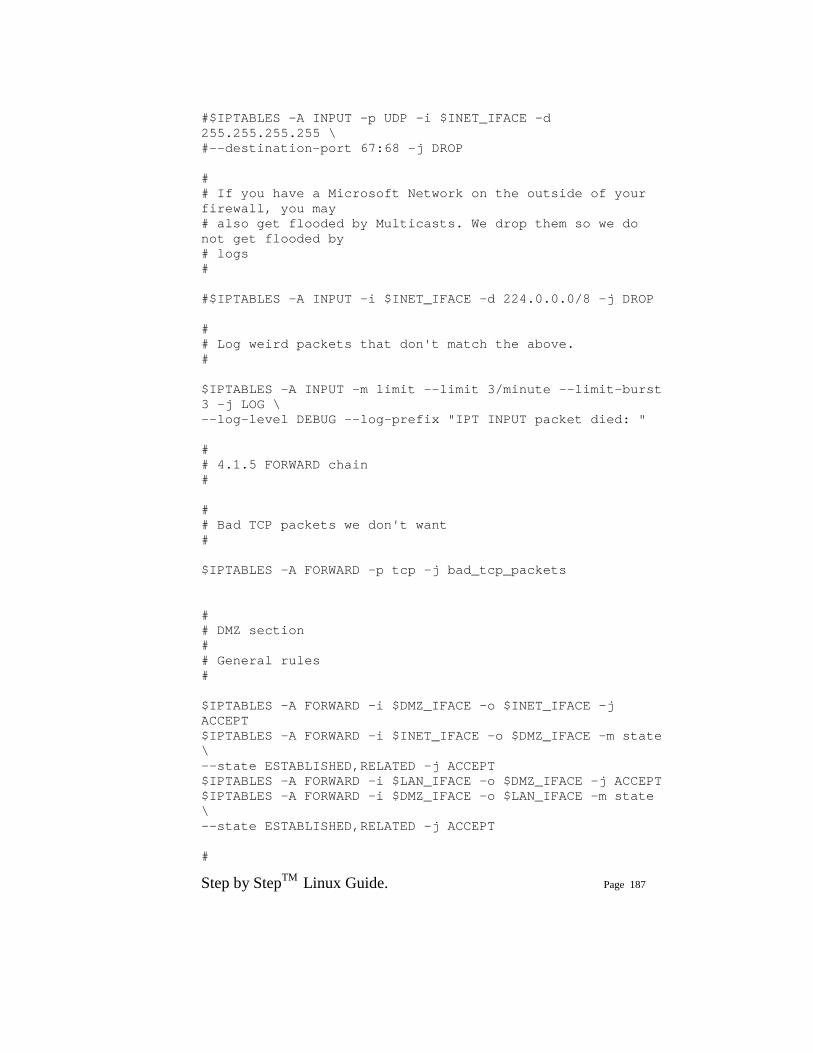
Step by StepTM Linux Guide. Page 187
#$IPTABLES -A INPUT -p UDP -i $INET_IFACE -d 255.255.255.255 \ #--destination-port 67:68 -j DROP # # If you have a Microsoft Network on the outside of your firewall, you may # also get flooded by Multicasts. We drop them so we do not get flooded by # logs # #$IPTABLES -A INPUT -i $INET_IFACE -d 224.0.0.0/8 -j DROP # # Log weird packets that don't match the above. # $IPTABLES -A INPUT -m limit --limit 3/minute --limit-burst 3 -j LOG \ --log-level DEBUG --log-prefix "IPT INPUT packet died: " # # 4.1.5 FORWARD chain # # # Bad TCP packets we don't want # $IPTABLES -A FORWARD -p tcp -j bad_tcp_packets # # DMZ section # # General rules # $IPTABLES -A FORWARD -i $DMZ_IFACE -o $INET_IFACE -j ACCEPT $IPTABLES -A FORWARD -i $INET_IFACE -o $DMZ_IFACE -m state \ --state ESTABLISHED,RELATED -j ACCEPT $IPTABLES -A FORWARD -i $LAN_IFACE -o $DMZ_IFACE -j ACCEPT $IPTABLES -A FORWARD -i $DMZ_IFACE -o $LAN_IFACE -m state \ --state ESTABLISHED,RELATED -j ACCEPT #
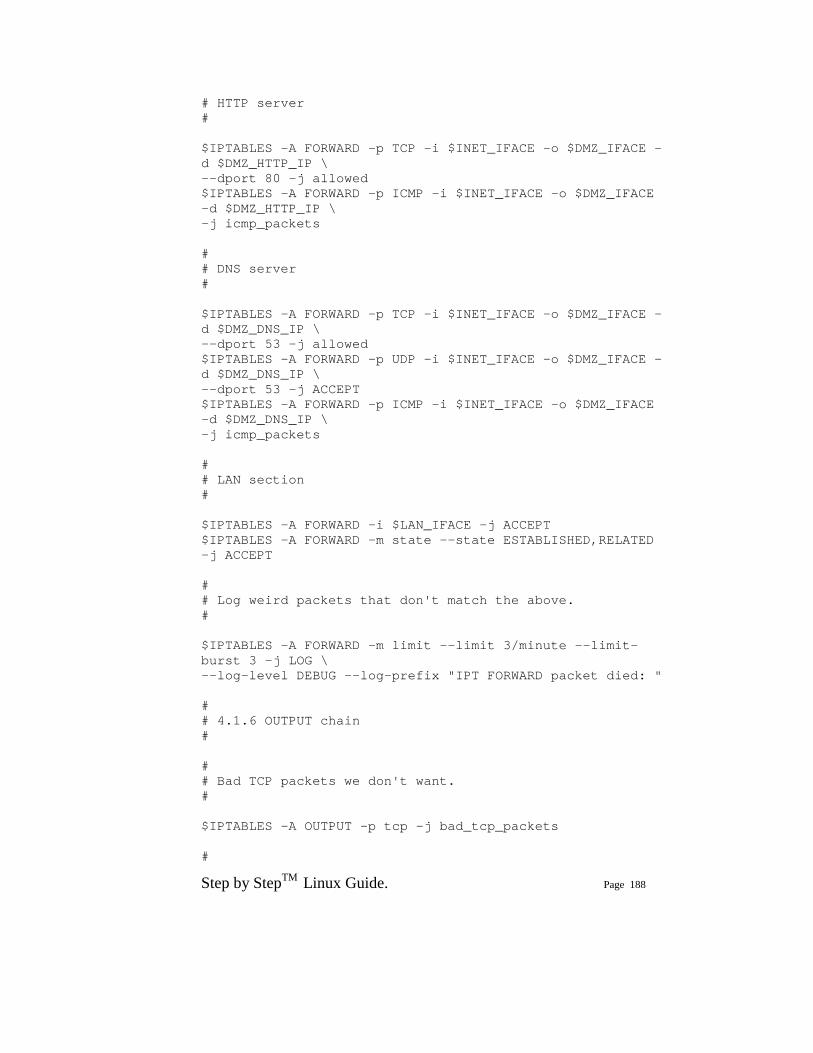
Step by StepTM Linux Guide. Page 188
# HTTP server # $IPTABLES -A FORWARD -p TCP -i $INET_IFACE -o $DMZ_IFACE -d $DMZ_HTTP_IP \ --dport 80 -j allowed $IPTABLES -A FORWARD -p ICMP -i $INET_IFACE -o $DMZ_IFACE -d $DMZ_HTTP_IP \ -j icmp_packets # # DNS server # $IPTABLES -A FORWARD -p TCP -i $INET_IFACE -o $DMZ_IFACE -d $DMZ_DNS_IP \ --dport 53 -j allowed $IPTABLES -A FORWARD -p UDP -i $INET_IFACE -o $DMZ_IFACE -d $DMZ_DNS_IP \ --dport 53 -j ACCEPT $IPTABLES -A FORWARD -p ICMP -i $INET_IFACE -o $DMZ_IFACE -d $DMZ_DNS_IP \ -j icmp_packets # # LAN section # $IPTABLES -A FORWARD -i $LAN_IFACE -j ACCEPT $IPTABLES -A FORWARD -m state --state ESTABLISHED,RELATED -j ACCEPT # # Log weird packets that don't match the above. # $IPTABLES -A FORWARD -m limit --limit 3/minute --limit-burst 3 -j LOG \ --log-level DEBUG --log-prefix "IPT FORWARD packet died: " # # 4.1.6 OUTPUT chain # # # Bad TCP packets we don't want. # $IPTABLES -A OUTPUT -p tcp -j bad_tcp_packets #
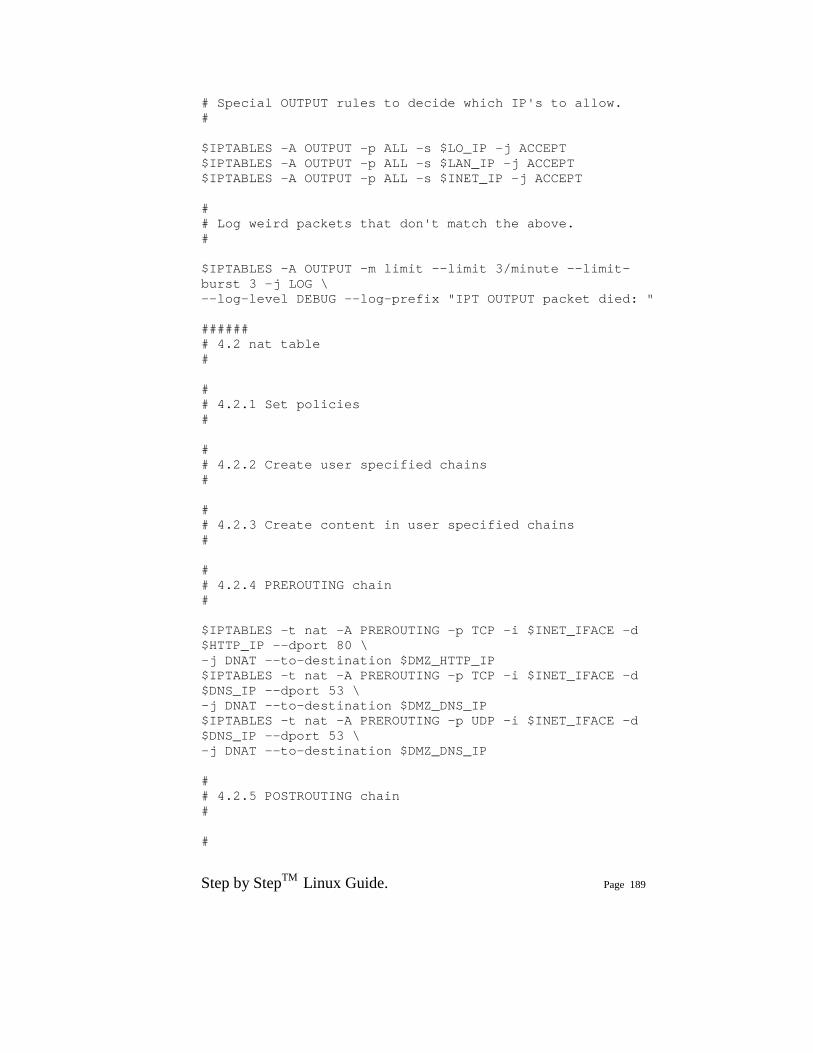
Step by StepTM Linux Guide. Page 189
# Special OUTPUT rules to decide which IP's to allow. # $IPTABLES -A OUTPUT -p ALL -s $LO_IP -j ACCEPT $IPTABLES -A OUTPUT -p ALL -s $LAN_IP -j ACCEPT $IPTABLES -A OUTPUT -p ALL -s $INET_IP -j ACCEPT # # Log weird packets that don't match the above. # $IPTABLES -A OUTPUT -m limit --limit 3/minute --limit-burst 3 -j LOG \ --log-level DEBUG --log-prefix "IPT OUTPUT packet died: " ###### # 4.2 nat table # # # 4.2.1 Set policies # # # 4.2.2 Create user specified chains # # # 4.2.3 Create content in user specified chains # # # 4.2.4 PREROUTING chain # $IPTABLES -t nat -A PREROUTING -p TCP -i $INET_IFACE -d $HTTP_IP --dport 80 \ -j DNAT --to-destination $DMZ_HTTP_IP $IPTABLES -t nat -A PREROUTING -p TCP -i $INET_IFACE -d $DNS_IP --dport 53 \ -j DNAT --to-destination $DMZ_DNS_IP $IPTABLES -t nat -A PREROUTING -p UDP -i $INET_IFACE -d $DNS_IP --dport 53 \ -j DNAT --to-destination $DMZ_DNS_IP # # 4.2.5 POSTROUTING chain # #

Step by StepTM Linux Guide. Page 190
# Enable simple IP Forwarding and Network Address Translation # $IPTABLES -t nat -A POSTROUTING -o $INET_IFACE -j SNAT --to-source $INET_IP # # 4.2.6 OUTPUT chain # ###### # 4.3 mangle table # # # 4.3.1 Set policies # # # 4.3.2 Create user specified chains # # # 4.3.3 Create content in user specified chains # # # 4.3.4 PREROUTING chain # # # 4.3.5 INPUT chain # # # 4.3.6 FORWARD chain # # # 4.3.7 OUTPUT chain # # # 4.3.8 POSTROUTING chain #
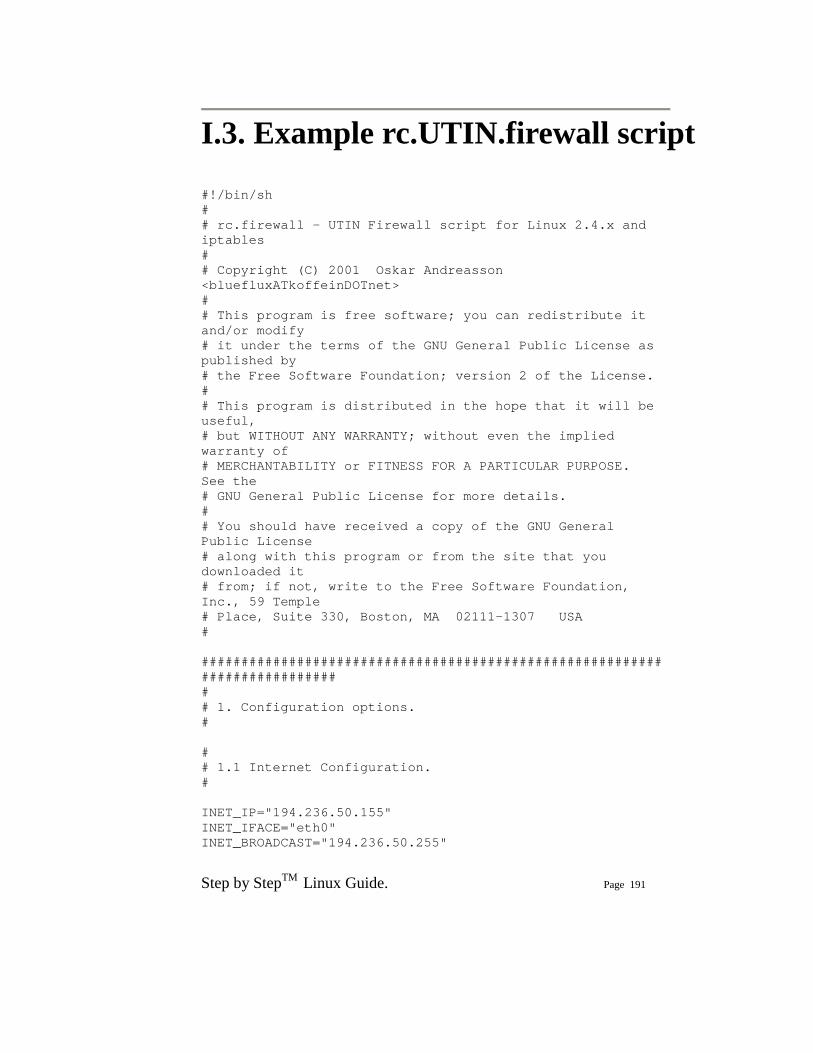
Step by StepTM Linux Guide. Page 191
I.3. Example rc.UTIN.firewall script #!/bin/sh # # rc.firewall - UTIN Firewall script for Linux 2.4.x and iptables # # Copyright (C) 2001 Oskar Andreasson <bluefluxATkoffeinDOTnet> # # This program is free software; you can redistribute it and/or modify # it under the terms of the GNU General Public License as published by # the Free Software Foundation; version 2 of the License. # # This program is distributed in the hope that it will be useful, # but WITHOUT ANY WARRANTY; without even the implied warranty of # MERCHANTABILITY or FITNESS FOR A PARTICULAR PURPOSE. See the # GNU General Public License for more details. # # You should have received a copy of the GNU General Public License # along with this program or from the site that you downloaded it # from; if not, write to the Free Software Foundation, Inc., 59 Temple # Place, Suite 330, Boston, MA 02111-1307 USA # ########################################################################### # # 1. Configuration options. # # # 1.1 Internet Configuration. # INET_IP="194.236.50.155" INET_IFACE="eth0" INET_BROADCAST="194.236.50.255"
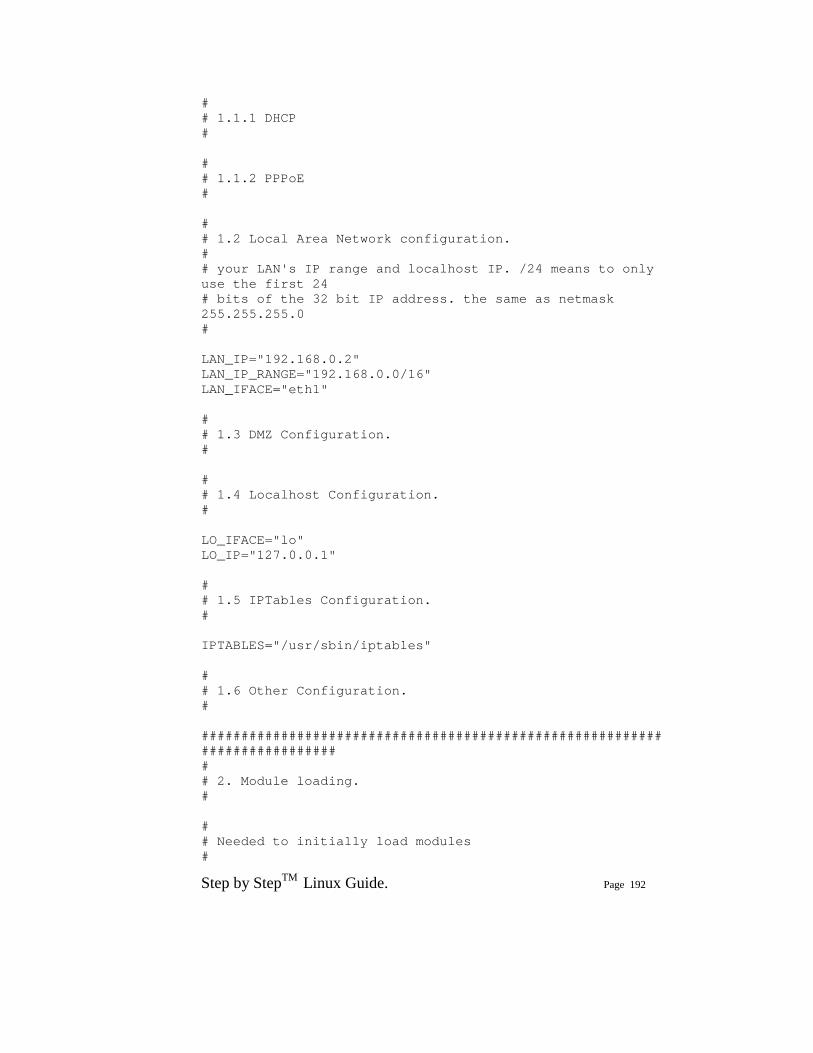
Step by StepTM Linux Guide. Page 192
# # 1.1.1 DHCP # # # 1.1.2 PPPoE # # # 1.2 Local Area Network configuration. # # your LAN's IP range and localhost IP. /24 means to only use the first 24 # bits of the 32 bit IP address. the same as netmask 255.255.255.0 # LAN_IP="192.168.0.2" LAN_IP_RANGE="192.168.0.0/16" LAN_IFACE="eth1" # # 1.3 DMZ Configuration. # # # 1.4 Localhost Configuration. # LO_IFACE="lo" LO_IP="127.0.0.1" # # 1.5 IPTables Configuration. # IPTABLES="/usr/sbin/iptables" # # 1.6 Other Configuration. # ########################################################################### # # 2. Module loading. # # # Needed to initially load modules #
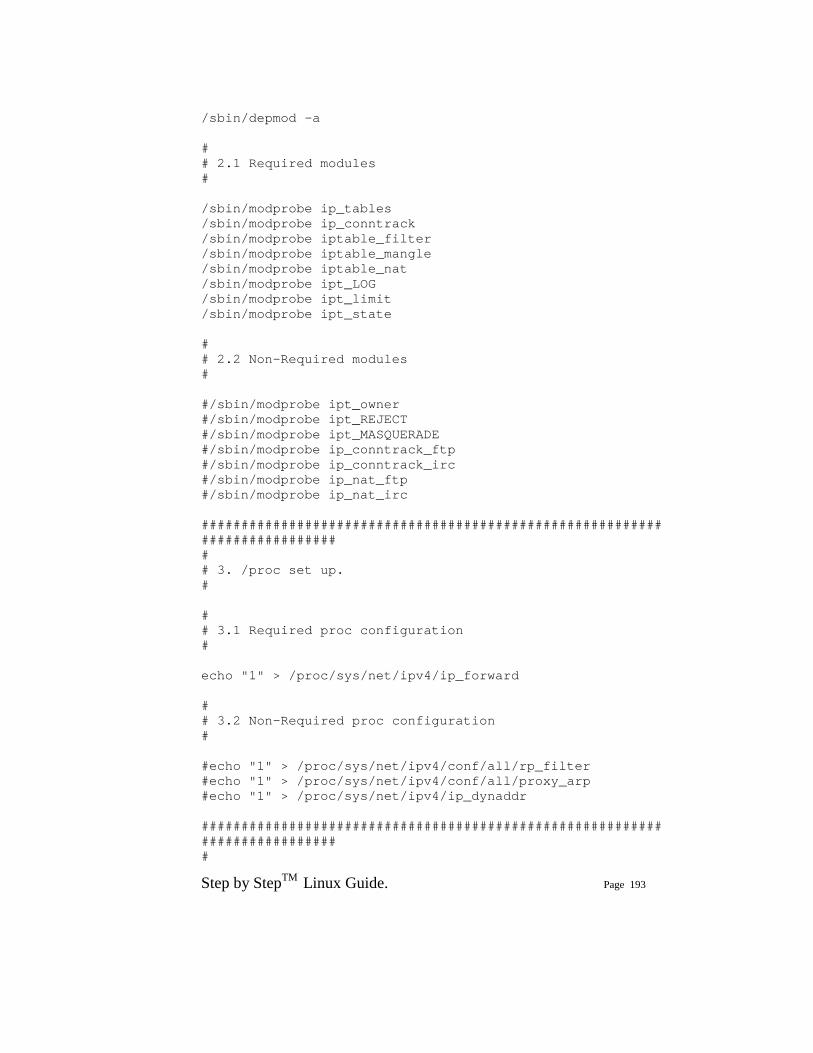
Step by StepTM Linux Guide. Page 193
/sbin/depmod -a # # 2.1 Required modules # /sbin/modprobe ip_tables /sbin/modprobe ip_conntrack /sbin/modprobe iptable_filter /sbin/modprobe iptable_mangle /sbin/modprobe iptable_nat /sbin/modprobe ipt_LOG /sbin/modprobe ipt_limit /sbin/modprobe ipt_state # # 2.2 Non-Required modules # #/sbin/modprobe ipt_owner #/sbin/modprobe ipt_REJECT #/sbin/modprobe ipt_MASQUERADE #/sbin/modprobe ip_conntrack_ftp #/sbin/modprobe ip_conntrack_irc #/sbin/modprobe ip_nat_ftp #/sbin/modprobe ip_nat_irc ########################################################################### # # 3. /proc set up. # # # 3.1 Required proc configuration # echo "1" > /proc/sys/net/ipv4/ip_forward # # 3.2 Non-Required proc configuration # #echo "1" > /proc/sys/net/ipv4/conf/all/rp_filter #echo "1" > /proc/sys/net/ipv4/conf/all/proxy_arp #echo "1" > /proc/sys/net/ipv4/ip_dynaddr ########################################################################### #
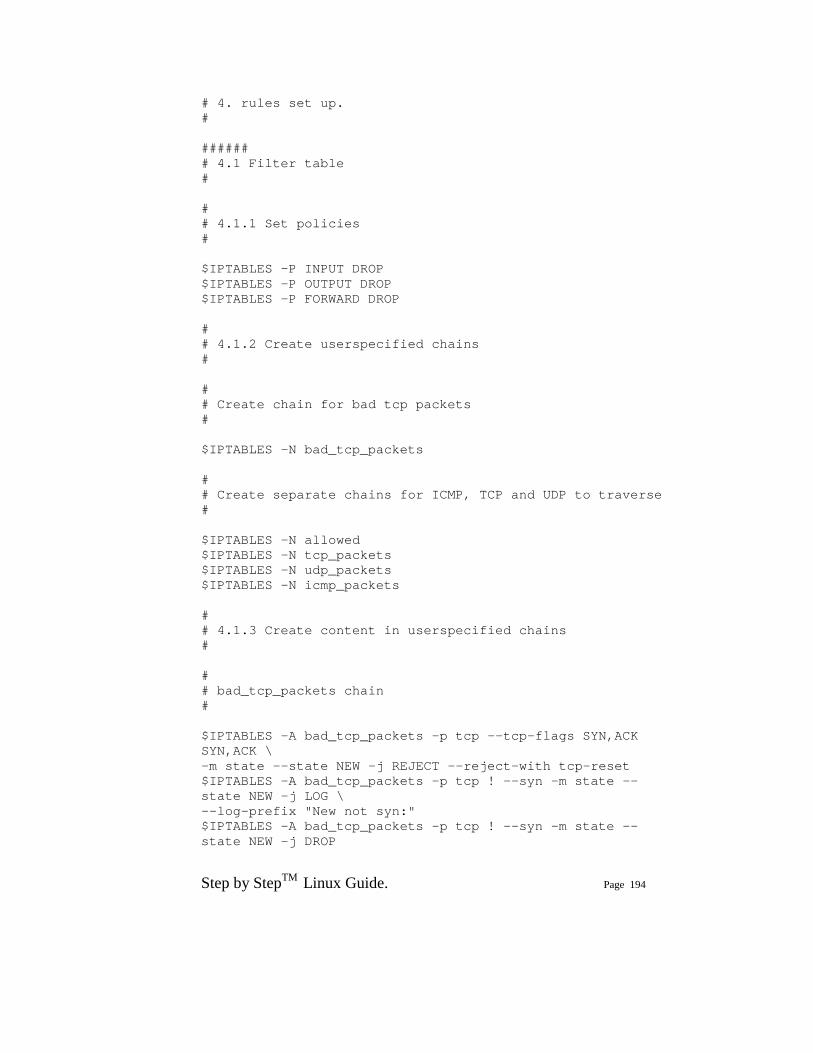
Step by StepTM Linux Guide. Page 194
# 4. rules set up. # ###### # 4.1 Filter table # # # 4.1.1 Set policies # $IPTABLES -P INPUT DROP $IPTABLES -P OUTPUT DROP $IPTABLES -P FORWARD DROP # # 4.1.2 Create userspecified chains # # # Create chain for bad tcp packets # $IPTABLES -N bad_tcp_packets # # Create separate chains for ICMP, TCP and UDP to traverse # $IPTABLES -N allowed $IPTABLES -N tcp_packets $IPTABLES -N udp_packets $IPTABLES -N icmp_packets # # 4.1.3 Create content in userspecified chains # # # bad_tcp_packets chain # $IPTABLES -A bad_tcp_packets -p tcp --tcp-flags SYN,ACK SYN,ACK \ -m state --state NEW -j REJECT --reject-with tcp-reset $IPTABLES -A bad_tcp_packets -p tcp ! --syn -m state --state NEW -j LOG \ --log-prefix "New not syn:" $IPTABLES -A bad_tcp_packets -p tcp ! --syn -m state --state NEW -j DROP
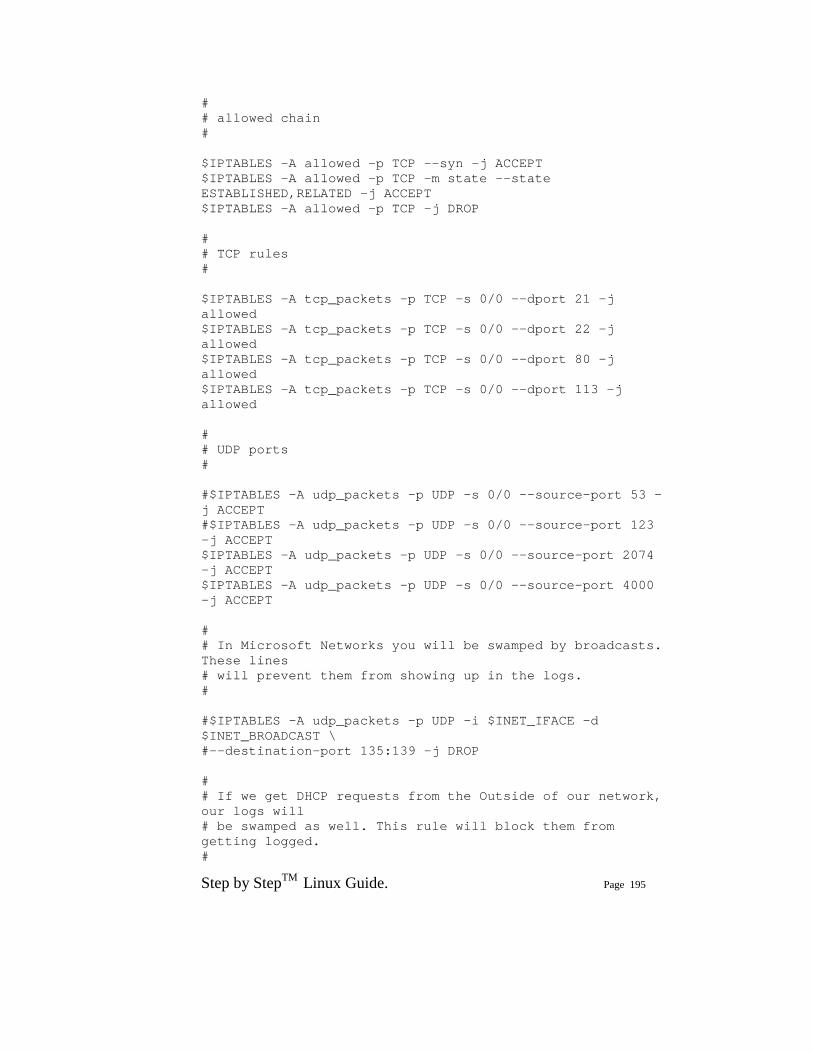
Step by StepTM Linux Guide. Page 195
# # allowed chain # $IPTABLES -A allowed -p TCP --syn -j ACCEPT $IPTABLES -A allowed -p TCP -m state --state ESTABLISHED,RELATED -j ACCEPT $IPTABLES -A allowed -p TCP -j DROP # # TCP rules # $IPTABLES -A tcp_packets -p TCP -s 0/0 --dport 21 -j allowed $IPTABLES -A tcp_packets -p TCP -s 0/0 --dport 22 -j allowed $IPTABLES -A tcp_packets -p TCP -s 0/0 --dport 80 -j allowed $IPTABLES -A tcp_packets -p TCP -s 0/0 --dport 113 -j allowed # # UDP ports # #$IPTABLES -A udp_packets -p UDP -s 0/0 --source-port 53 -j ACCEPT #$IPTABLES -A udp_packets -p UDP -s 0/0 --source-port 123 -j ACCEPT $IPTABLES -A udp_packets -p UDP -s 0/0 --source-port 2074 -j ACCEPT $IPTABLES -A udp_packets -p UDP -s 0/0 --source-port 4000 -j ACCEPT # # In Microsoft Networks you will be swamped by broadcasts. These lines # will prevent them from showing up in the logs. # #$IPTABLES -A udp_packets -p UDP -i $INET_IFACE -d $INET_BROADCAST \ #--destination-port 135:139 -j DROP # # If we get DHCP requests from the Outside of our network, our logs will # be swamped as well. This rule will block them from getting logged. #
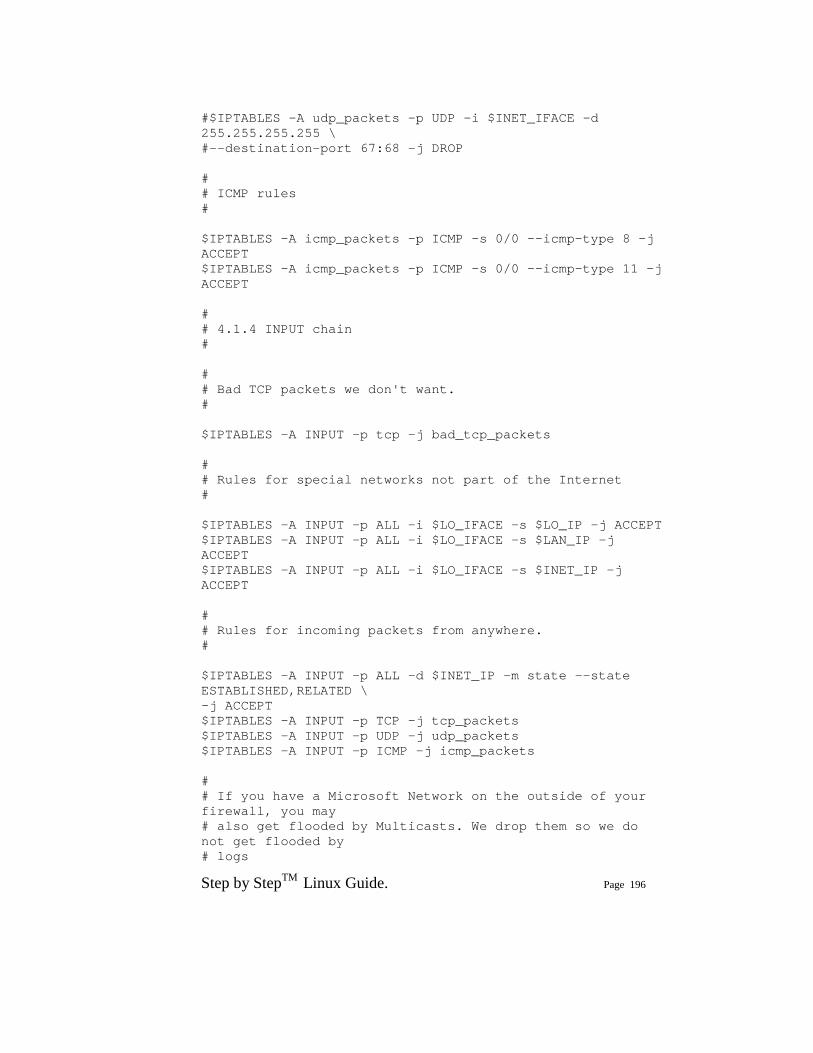
Step by StepTM Linux Guide. Page 196
#$IPTABLES -A udp_packets -p UDP -i $INET_IFACE -d 255.255.255.255 \ #--destination-port 67:68 -j DROP # # ICMP rules # $IPTABLES -A icmp_packets -p ICMP -s 0/0 --icmp-type 8 -j ACCEPT $IPTABLES -A icmp_packets -p ICMP -s 0/0 --icmp-type 11 -j ACCEPT # # 4.1.4 INPUT chain # # # Bad TCP packets we don't want. # $IPTABLES -A INPUT -p tcp -j bad_tcp_packets # # Rules for special networks not part of the Internet # $IPTABLES -A INPUT -p ALL -i $LO_IFACE -s $LO_IP -j ACCEPT $IPTABLES -A INPUT -p ALL -i $LO_IFACE -s $LAN_IP -j ACCEPT $IPTABLES -A INPUT -p ALL -i $LO_IFACE -s $INET_IP -j ACCEPT # # Rules for incoming packets from anywhere. # $IPTABLES -A INPUT -p ALL -d $INET_IP -m state --state ESTABLISHED,RELATED \ -j ACCEPT $IPTABLES -A INPUT -p TCP -j tcp_packets $IPTABLES -A INPUT -p UDP -j udp_packets $IPTABLES -A INPUT -p ICMP -j icmp_packets # # If you have a Microsoft Network on the outside of your firewall, you may # also get flooded by Multicasts. We drop them so we do not get flooded by # logs
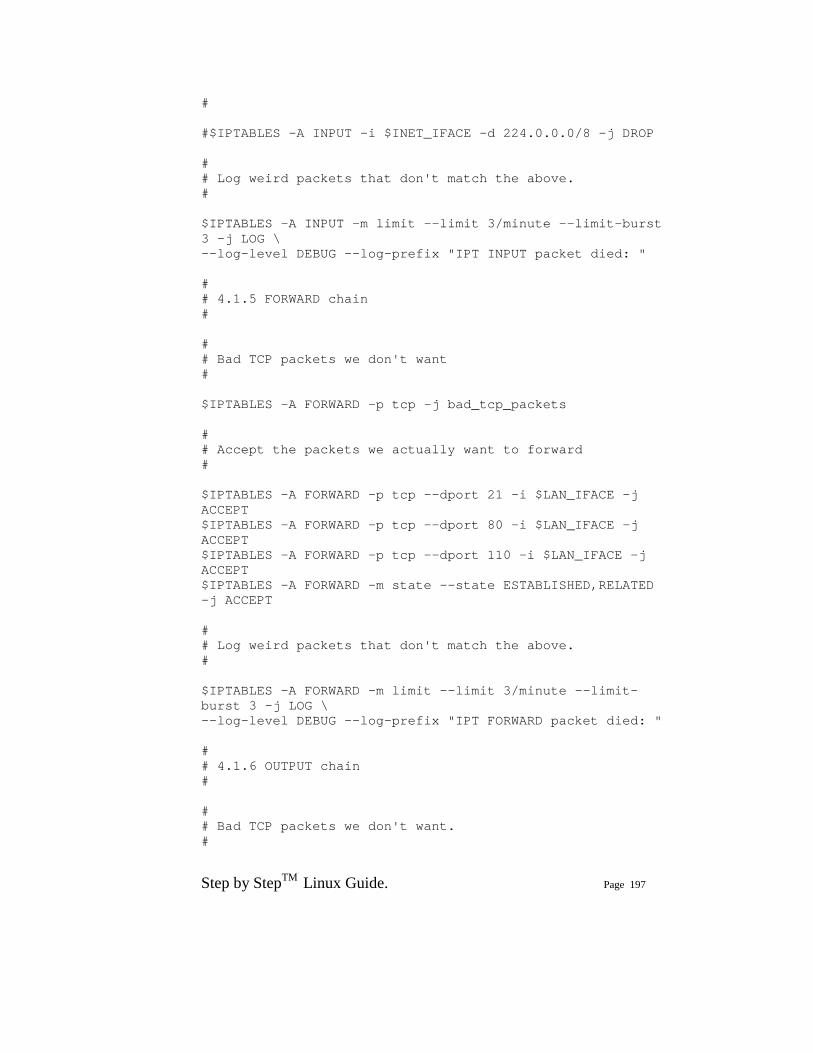
Step by StepTM Linux Guide. Page 197
# #$IPTABLES -A INPUT -i $INET_IFACE -d 224.0.0.0/8 -j DROP # # Log weird packets that don't match the above. # $IPTABLES -A INPUT -m limit --limit 3/minute --limit-burst 3 -j LOG \ --log-level DEBUG --log-prefix "IPT INPUT packet died: " # # 4.1.5 FORWARD chain # # # Bad TCP packets we don't want # $IPTABLES -A FORWARD -p tcp -j bad_tcp_packets # # Accept the packets we actually want to forward # $IPTABLES -A FORWARD -p tcp --dport 21 -i $LAN_IFACE -j ACCEPT $IPTABLES -A FORWARD -p tcp --dport 80 -i $LAN_IFACE -j ACCEPT $IPTABLES -A FORWARD -p tcp --dport 110 -i $LAN_IFACE -j ACCEPT $IPTABLES -A FORWARD -m state --state ESTABLISHED,RELATED -j ACCEPT # # Log weird packets that don't match the above. # $IPTABLES -A FORWARD -m limit --limit 3/minute --limit-burst 3 -j LOG \ --log-level DEBUG --log-prefix "IPT FORWARD packet died: " # # 4.1.6 OUTPUT chain # # # Bad TCP packets we don't want. #
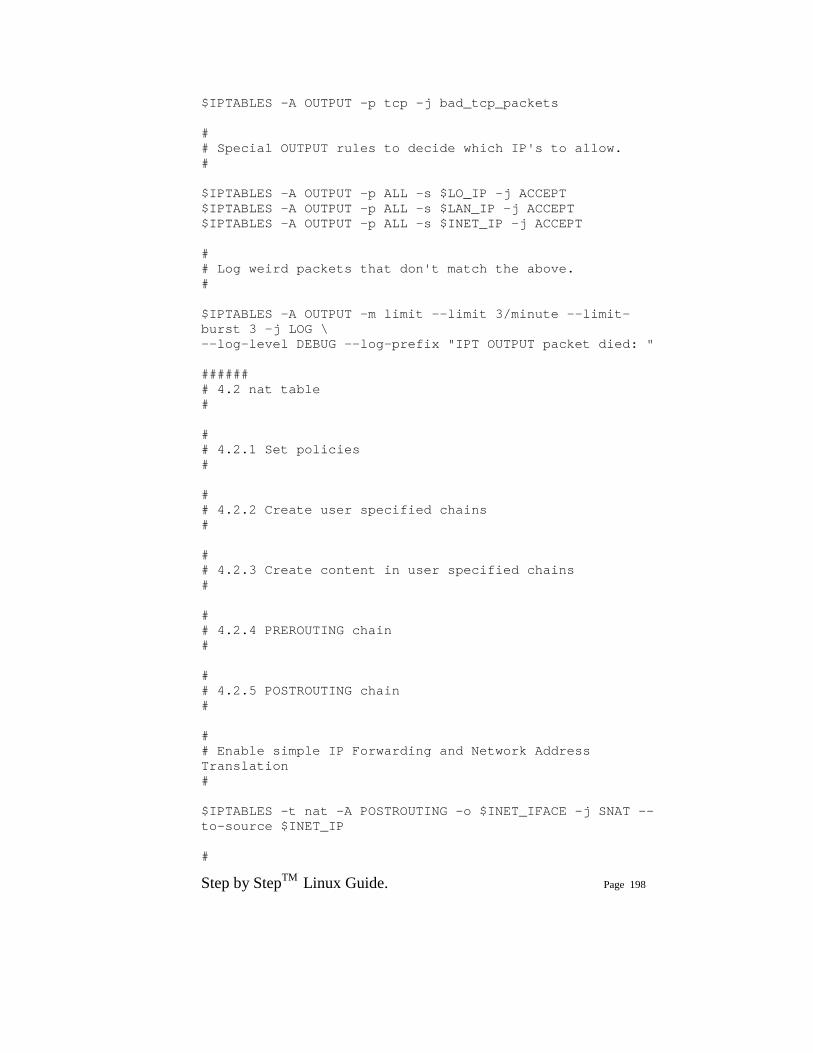
Step by StepTM Linux Guide. Page 198
$IPTABLES -A OUTPUT -p tcp -j bad_tcp_packets # # Special OUTPUT rules to decide which IP's to allow. # $IPTABLES -A OUTPUT -p ALL -s $LO_IP -j ACCEPT $IPTABLES -A OUTPUT -p ALL -s $LAN_IP -j ACCEPT $IPTABLES -A OUTPUT -p ALL -s $INET_IP -j ACCEPT # # Log weird packets that don't match the above. # $IPTABLES -A OUTPUT -m limit --limit 3/minute --limit-burst 3 -j LOG \ --log-level DEBUG --log-prefix "IPT OUTPUT packet died: " ###### # 4.2 nat table # # # 4.2.1 Set policies # # # 4.2.2 Create user specified chains # # # 4.2.3 Create content in user specified chains # # # 4.2.4 PREROUTING chain # # # 4.2.5 POSTROUTING chain # # # Enable simple IP Forwarding and Network Address Translation # $IPTABLES -t nat -A POSTROUTING -o $INET_IFACE -j SNAT --to-source $INET_IP #

Step by StepTM Linux Guide. Page 199
# 4.2.6 OUTPUT chain # ###### # 4.3 mangle table # # # 4.3.1 Set policies # # # 4.3.2 Create user specified chains # # # 4.3.3 Create content in user specified chains # # # 4.3.4 PREROUTING chain # # # 4.3.5 INPUT chain # # # 4.3.6 FORWARD chain # # # 4.3.7 OUTPUT chain # # # 4.3.8 POSTROUTING chain #
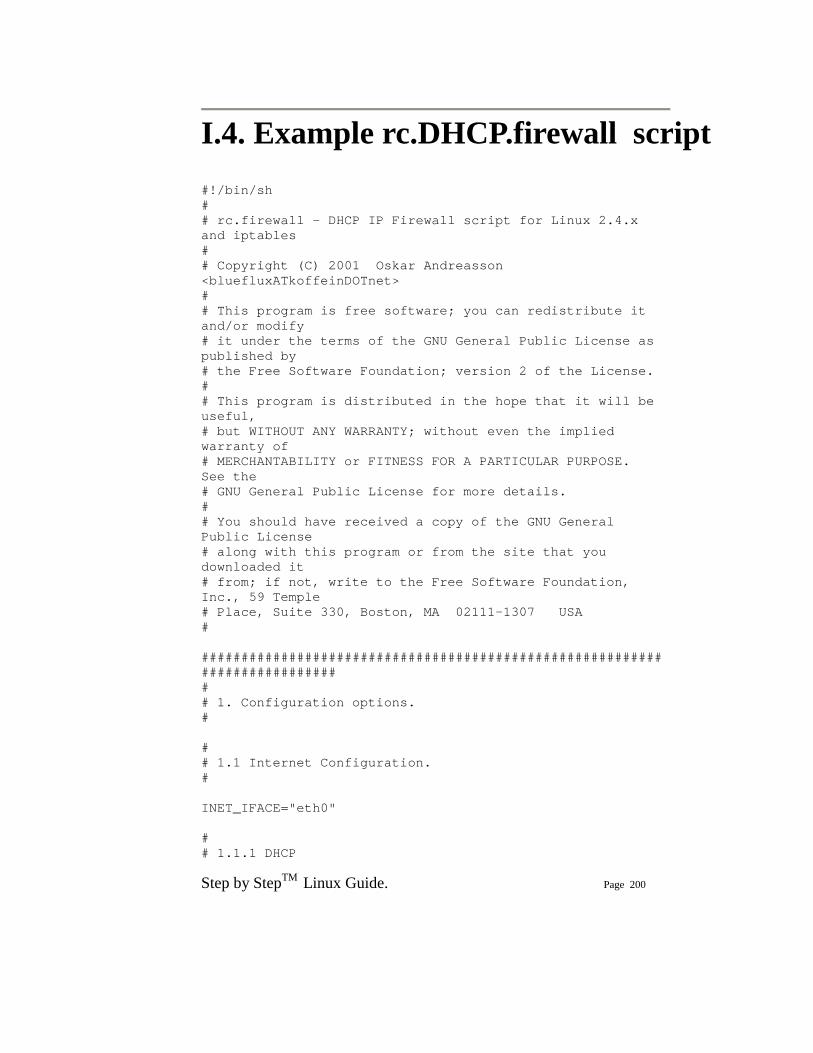
Step by StepTM Linux Guide. Page 200
I.4. Example rc.DHCP.firewall script #!/bin/sh # # rc.firewall - DHCP IP Firewall script for Linux 2.4.x and iptables # # Copyright (C) 2001 Oskar Andreasson <bluefluxATkoffeinDOTnet> # # This program is free software; you can redistribute it and/or modify # it under the terms of the GNU General Public License as published by # the Free Software Foundation; version 2 of the License. # # This program is distributed in the hope that it will be useful, # but WITHOUT ANY WARRANTY; without even the implied warranty of # MERCHANTABILITY or FITNESS FOR A PARTICULAR PURPOSE. See the # GNU General Public License for more details. # # You should have received a copy of the GNU General Public License # along with this program or from the site that you downloaded it # from; if not, write to the Free Software Foundation, Inc., 59 Temple # Place, Suite 330, Boston, MA 02111-1307 USA # ########################################################################### # # 1. Configuration options. # # # 1.1 Internet Configuration. # INET_IFACE="eth0" # # 1.1.1 DHCP
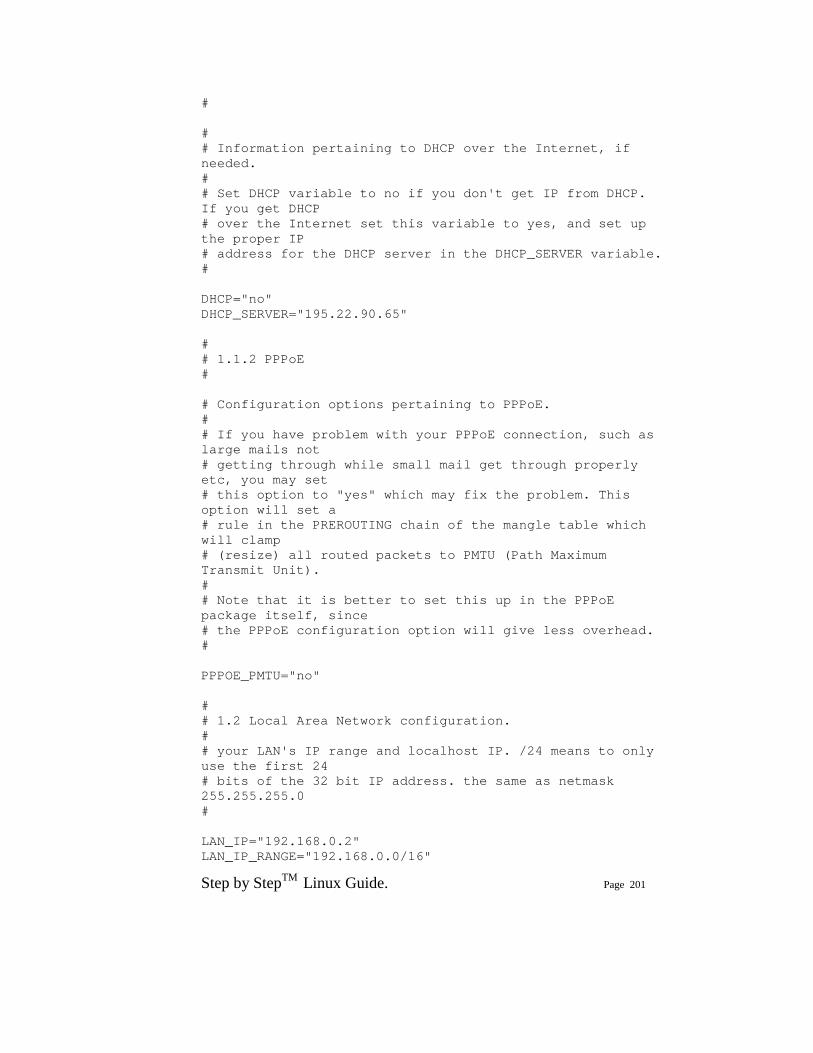
Step by StepTM Linux Guide. Page 201
# # # Information pertaining to DHCP over the Internet, if needed. # # Set DHCP variable to no if you don't get IP from DHCP. If you get DHCP # over the Internet set this variable to yes, and set up the proper IP # address for the DHCP server in the DHCP_SERVER variable. # DHCP="no" DHCP_SERVER="195.22.90.65" # # 1.1.2 PPPoE # # Configuration options pertaining to PPPoE. # # If you have problem with your PPPoE connection, such as large mails not # getting through while small mail get through properly etc, you may set # this option to "yes" which may fix the problem. This option will set a # rule in the PREROUTING chain of the mangle table which will clamp # (resize) all routed packets to PMTU (Path Maximum Transmit Unit). # # Note that it is better to set this up in the PPPoE package itself, since # the PPPoE configuration option will give less overhead. # PPPOE_PMTU="no" # # 1.2 Local Area Network configuration. # # your LAN's IP range and localhost IP. /24 means to only use the first 24 # bits of the 32 bit IP address. the same as netmask 255.255.255.0 # LAN_IP="192.168.0.2" LAN_IP_RANGE="192.168.0.0/16"
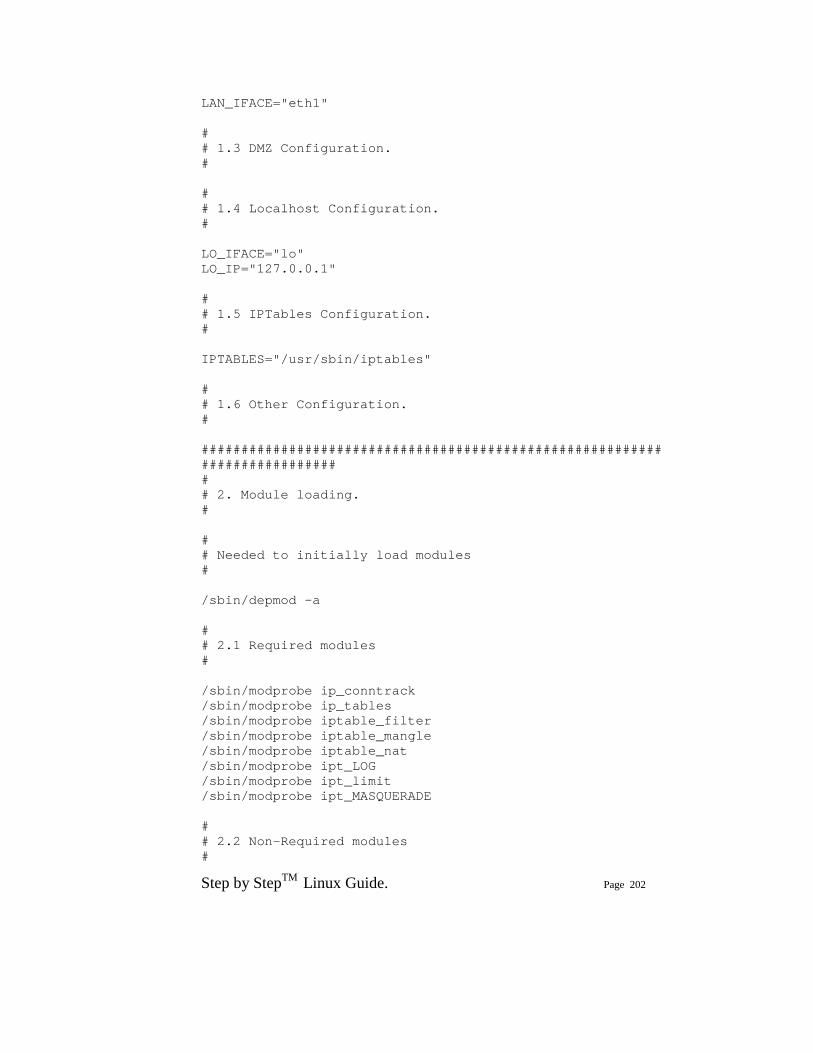
Step by StepTM Linux Guide. Page 202
LAN_IFACE="eth1" # # 1.3 DMZ Configuration. # # # 1.4 Localhost Configuration. # LO_IFACE="lo" LO_IP="127.0.0.1" # # 1.5 IPTables Configuration. # IPTABLES="/usr/sbin/iptables" # # 1.6 Other Configuration. # ########################################################################### # # 2. Module loading. # # # Needed to initially load modules # /sbin/depmod -a # # 2.1 Required modules # /sbin/modprobe ip_conntrack /sbin/modprobe ip_tables /sbin/modprobe iptable_filter /sbin/modprobe iptable_mangle /sbin/modprobe iptable_nat /sbin/modprobe ipt_LOG /sbin/modprobe ipt_limit /sbin/modprobe ipt_MASQUERADE # # 2.2 Non-Required modules #
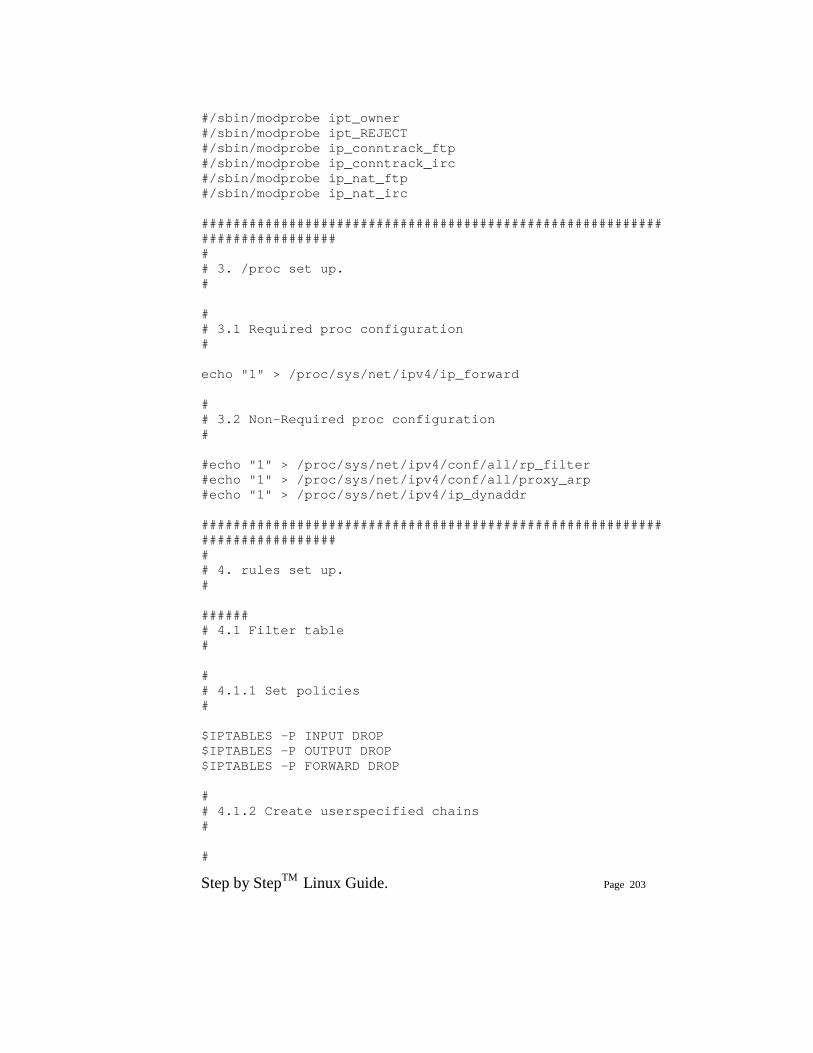
Step by StepTM Linux Guide. Page 203
#/sbin/modprobe ipt_owner #/sbin/modprobe ipt_REJECT #/sbin/modprobe ip_conntrack_ftp #/sbin/modprobe ip_conntrack_irc #/sbin/modprobe ip_nat_ftp #/sbin/modprobe ip_nat_irc ########################################################################### # # 3. /proc set up. # # # 3.1 Required proc configuration # echo "1" > /proc/sys/net/ipv4/ip_forward # # 3.2 Non-Required proc configuration # #echo "1" > /proc/sys/net/ipv4/conf/all/rp_filter #echo "1" > /proc/sys/net/ipv4/conf/all/proxy_arp #echo "1" > /proc/sys/net/ipv4/ip_dynaddr ########################################################################### # # 4. rules set up. # ###### # 4.1 Filter table # # # 4.1.1 Set policies # $IPTABLES -P INPUT DROP $IPTABLES -P OUTPUT DROP $IPTABLES -P FORWARD DROP # # 4.1.2 Create userspecified chains # #
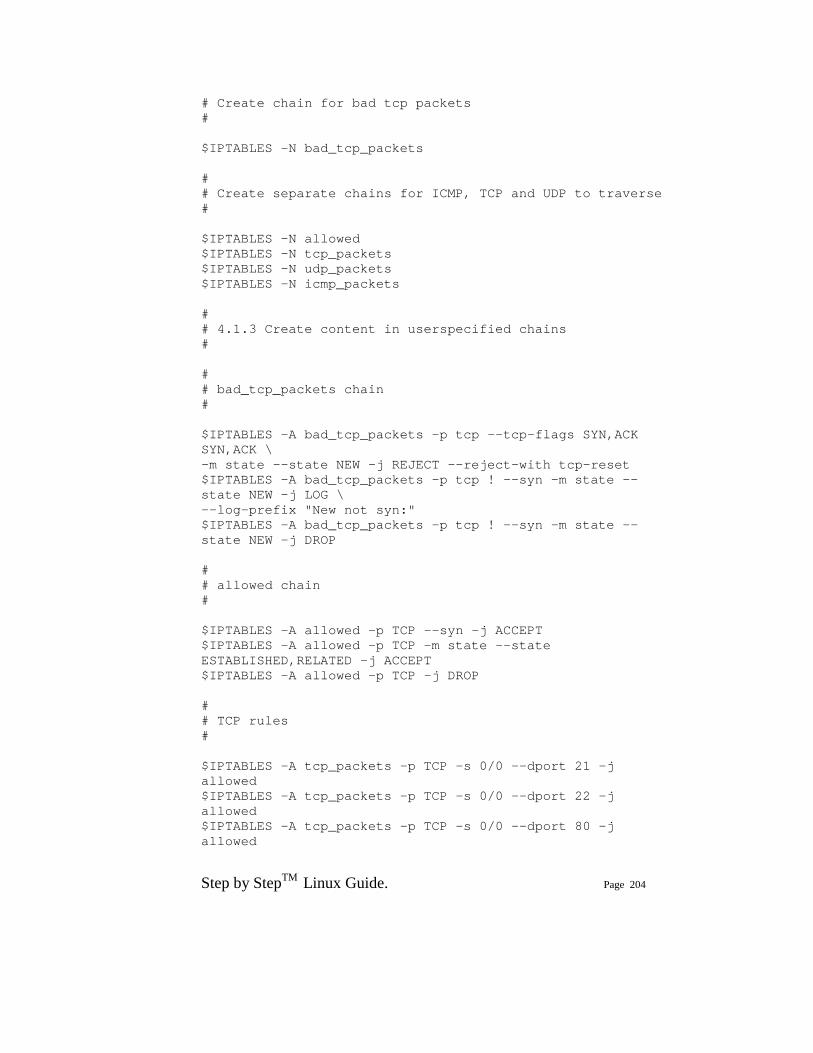
Step by StepTM Linux Guide. Page 204
# Create chain for bad tcp packets # $IPTABLES -N bad_tcp_packets # # Create separate chains for ICMP, TCP and UDP to traverse # $IPTABLES -N allowed $IPTABLES -N tcp_packets $IPTABLES -N udp_packets $IPTABLES -N icmp_packets # # 4.1.3 Create content in userspecified chains # # # bad_tcp_packets chain # $IPTABLES -A bad_tcp_packets -p tcp --tcp-flags SYN,ACK SYN,ACK \ -m state --state NEW -j REJECT --reject-with tcp-reset $IPTABLES -A bad_tcp_packets -p tcp ! --syn -m state --state NEW -j LOG \ --log-prefix "New not syn:" $IPTABLES -A bad_tcp_packets -p tcp ! --syn -m state --state NEW -j DROP # # allowed chain # $IPTABLES -A allowed -p TCP --syn -j ACCEPT $IPTABLES -A allowed -p TCP -m state --state ESTABLISHED,RELATED -j ACCEPT $IPTABLES -A allowed -p TCP -j DROP # # TCP rules # $IPTABLES -A tcp_packets -p TCP -s 0/0 --dport 21 -j allowed $IPTABLES -A tcp_packets -p TCP -s 0/0 --dport 22 -j allowed $IPTABLES -A tcp_packets -p TCP -s 0/0 --dport 80 -j allowed
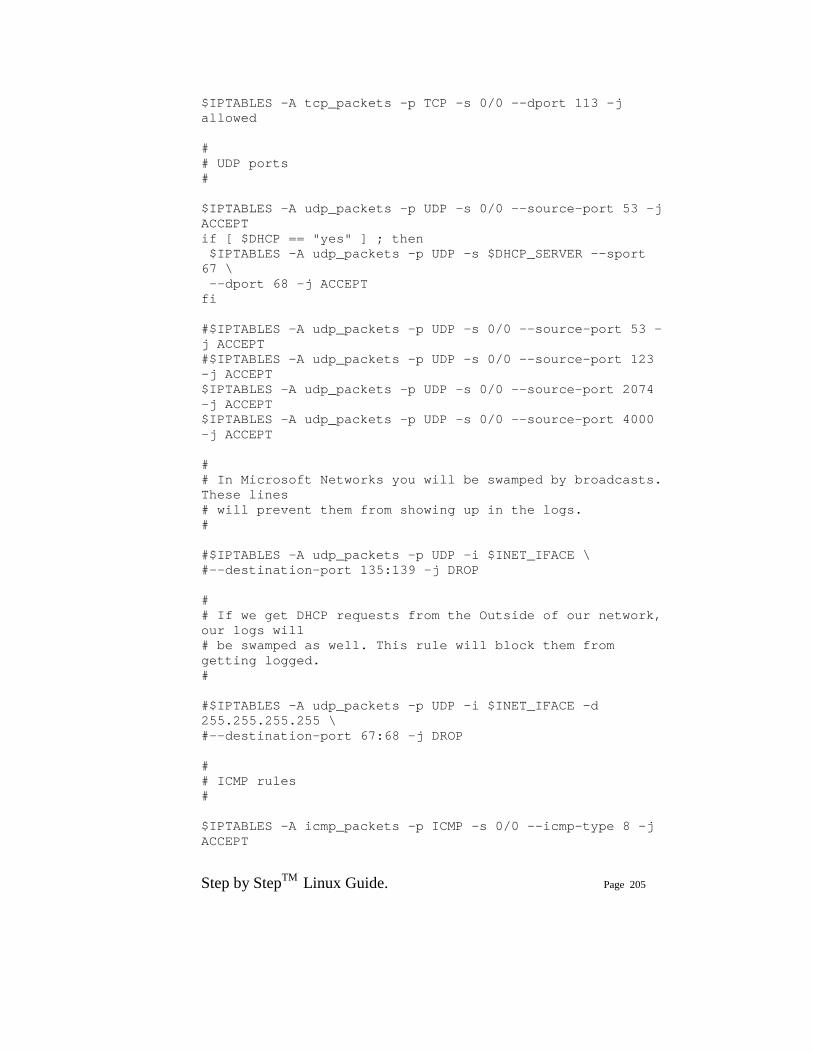
Step by StepTM Linux Guide. Page 205
$IPTABLES -A tcp_packets -p TCP -s 0/0 --dport 113 -j allowed # # UDP ports # $IPTABLES -A udp_packets -p UDP -s 0/0 --source-port 53 -j ACCEPT if [ $DHCP == "yes" ] ; then $IPTABLES -A udp_packets -p UDP -s $DHCP_SERVER --sport 67 \ --dport 68 -j ACCEPT fi #$IPTABLES -A udp_packets -p UDP -s 0/0 --source-port 53 -j ACCEPT #$IPTABLES -A udp_packets -p UDP -s 0/0 --source-port 123 -j ACCEPT $IPTABLES -A udp_packets -p UDP -s 0/0 --source-port 2074 -j ACCEPT $IPTABLES -A udp_packets -p UDP -s 0/0 --source-port 4000 -j ACCEPT # # In Microsoft Networks you will be swamped by broadcasts. These lines # will prevent them from showing up in the logs. # #$IPTABLES -A udp_packets -p UDP -i $INET_IFACE \ #--destination-port 135:139 -j DROP # # If we get DHCP requests from the Outside of our network, our logs will # be swamped as well. This rule will block them from getting logged. # #$IPTABLES -A udp_packets -p UDP -i $INET_IFACE -d 255.255.255.255 \ #--destination-port 67:68 -j DROP # # ICMP rules # $IPTABLES -A icmp_packets -p ICMP -s 0/0 --icmp-type 8 -j ACCEPT
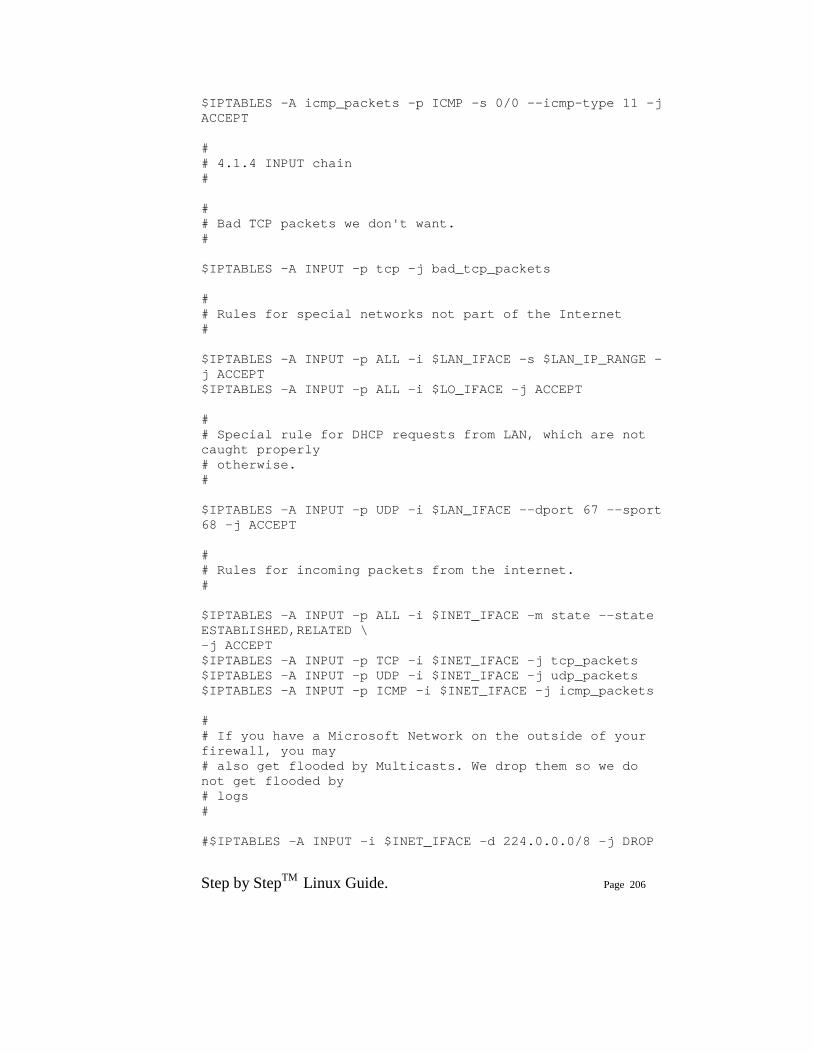
Step by StepTM Linux Guide. Page 206
$IPTABLES -A icmp_packets -p ICMP -s 0/0 --icmp-type 11 -j ACCEPT # # 4.1.4 INPUT chain # # # Bad TCP packets we don't want. # $IPTABLES -A INPUT -p tcp -j bad_tcp_packets # # Rules for special networks not part of the Internet # $IPTABLES -A INPUT -p ALL -i $LAN_IFACE -s $LAN_IP_RANGE -j ACCEPT $IPTABLES -A INPUT -p ALL -i $LO_IFACE -j ACCEPT # # Special rule for DHCP requests from LAN, which are not caught properly # otherwise. # $IPTABLES -A INPUT -p UDP -i $LAN_IFACE --dport 67 --sport 68 -j ACCEPT # # Rules for incoming packets from the internet. # $IPTABLES -A INPUT -p ALL -i $INET_IFACE -m state --state ESTABLISHED,RELATED \ -j ACCEPT $IPTABLES -A INPUT -p TCP -i $INET_IFACE -j tcp_packets $IPTABLES -A INPUT -p UDP -i $INET_IFACE -j udp_packets $IPTABLES -A INPUT -p ICMP -i $INET_IFACE -j icmp_packets # # If you have a Microsoft Network on the outside of your firewall, you may # also get flooded by Multicasts. We drop them so we do not get flooded by # logs # #$IPTABLES -A INPUT -i $INET_IFACE -d 224.0.0.0/8 -j DROP

Step by StepTM Linux Guide. Page 207
# # Log weird packets that don't match the above. # $IPTABLES -A INPUT -m limit --limit 3/minute --limit-burst 3 -j LOG \ --log-level DEBUG --log-prefix "IPT INPUT packet died: " # # 4.1.5 FORWARD chain # # # Bad TCP packets we don't want # $IPTABLES -A FORWARD -p tcp -j bad_tcp_packets # # Accept the packets we actually want to forward # $IPTABLES -A FORWARD -i $LAN_IFACE -j ACCEPT $IPTABLES -A FORWARD -m state --state ESTABLISHED,RELATED -j ACCEPT # # Log weird packets that don't match the above. # $IPTABLES -A FORWARD -m limit --limit 3/minute --limit-burst 3 -j LOG \ --log-level DEBUG --log-prefix "IPT FORWARD packet died: " # # 4.1.6 OUTPUT chain # # # Bad TCP packets we don't want. # $IPTABLES -A OUTPUT -p tcp -j bad_tcp_packets # # Special OUTPUT rules to decide which IP's to allow. # $IPTABLES -A OUTPUT -p ALL -s $LO_IP -j ACCEPT $IPTABLES -A OUTPUT -p ALL -s $LAN_IP -j ACCEPT $IPTABLES -A OUTPUT -p ALL -o $INET_IFACE -j ACCEPT
Step by StepTM Linux Guide. Page 208
# # Log weird packets that don't match the above. # $IPTABLES -A OUTPUT -m limit --limit 3/minute --limit-burst 3 -j LOG \ --log-level DEBUG --log-prefix "IPT OUTPUT packet died: " ###### # 4.2 nat table # # # 4.2.1 Set policies # # # 4.2.2 Create user specified chains # # # 4.2.3 Create content in user specified chains # # # 4.2.4 PREROUTING chain # # # 4.2.5 POSTROUTING chain # if [ $PPPOE_PMTU == "yes" ] ; then $IPTABLES -t nat -A POSTROUTING -p tcp --tcp-flags SYN,RST SYN \ -j TCPMSS --clamp-mss-to-pmtu fi $IPTABLES -t nat -A POSTROUTING -o $INET_IFACE -j MASQUERADE # # 4.2.6 OUTPUT chain # ###### # 4.3 mangle table # # # 4.3.1 Set policies
Step by StepTM Linux Guide. Page 209
# # # 4.3.2 Create user specified chains # # # 4.3.3 Create content in user specified chains # # # 4.3.4 PREROUTING chain # # # 4.3.5 INPUT chain # # # 4.3.6 FORWARD chain # # # 4.3.7 OUTPUT chain # # # 4.3.8 POSTROUTING chain #
I.5. Example rc.flush-iptables script #!/bin/sh # # rc.flush-iptables - Resets iptables to default values. # # Copyright (C) 2001 Oskar Andreasson <bluefluxATkoffeinDOTnet> # # This program is free software; you can redistribute it and/or modify # it under the terms of the GNU General Public License as published by # the Free Software Foundation; version 2 of the License. # # This program is distributed in the hope that it will be useful,

Step by StepTM Linux Guide. Page 210
# but WITHOUT ANY WARRANTY; without even the implied warranty of # MERCHANTABILITY or FITNESS FOR A PARTICULAR PURPOSE. See the # GNU General Public License for more details. # # You should have received a copy of the GNU General Public License # along with this program or from the site that you downloaded it # from; if not, write to the Free Software Foundation, Inc., 59 Temple # Place, Suite 330, Boston, MA 02111-1307 USA # # Configurations # IPTABLES="/usr/sbin/iptables" # # reset the default policies in the filter table. # $IPTABLES -P INPUT ACCEPT $IPTABLES -P FORWARD ACCEPT $IPTABLES -P OUTPUT ACCEPT # # reset the default policies in the nat table. # $IPTABLES -t nat -P PREROUTING ACCEPT $IPTABLES -t nat -P POSTROUTING ACCEPT $IPTABLES -t nat -P OUTPUT ACCEPT # # reset the default policies in the mangle table. # $IPTABLES -t mangle -P PREROUTING ACCEPT $IPTABLES -t mangle -P OUTPUT ACCEPT # # flush all the rules in the filter and nat tables. # $IPTABLES -F $IPTABLES -t nat -F $IPTABLES -t mangle -F # # erase all chains that's not default in filter and nat table. # $IPTABLES -X $IPTABLES -t nat -X $IPTABLES -t mangle -X

Step by StepTM Linux Guide. Page 211
I.6. Example rc.test-iptables script #!/bin/bash # # rc.test-iptables - test script for iptables chains and tables. # # Copyright (C) 2001 Oskar Andreasson <bluefluxATkoffeinDOTnet> # # This program is free software; you can redistribute it and/or modify # it under the terms of the GNU General Public License as published by # the Free Software Foundation; version 2 of the License. # # This program is distributed in the hope that it will be useful, # but WITHOUT ANY WARRANTY; without even the implied warranty of # MERCHANTABILITY or FITNESS FOR A PARTICULAR PURPOSE. See the # GNU General Public License for more details. # # You should have received a copy of the GNU General Public License # along with this program or from the site that you downloaded it # from; if not, write to the Free Software Foundation, Inc., 59 Temple # Place, Suite 330, Boston, MA 02111-1307 USA # # # Filter table, all chains # iptables -t filter -A INPUT -p icmp --icmp-type echo-request \ -j LOG --log-prefix="filter INPUT:" iptables -t filter -A INPUT -p icmp --icmp-type echo-reply \ -j LOG --log-prefix="filter INPUT:" iptables -t filter -A OUTPUT -p icmp --icmp-type echo-request \ -j LOG --log-prefix="filter OUTPUT:"
Step by StepTM Linux Guide. Page 212
iptables -t filter -A OUTPUT -p icmp --icmp-type echo-reply \ -j LOG --log-prefix="filter OUTPUT:" iptables -t filter -A FORWARD -p icmp --icmp-type echo-request \ -j LOG --log-prefix="filter FORWARD:" iptables -t filter -A FORWARD -p icmp --icmp-type echo-reply \ -j LOG --log-prefix="filter FORWARD:" # # NAT table, all chains except OUTPUT which don't work. # iptables -t nat -A PREROUTING -p icmp --icmp-type echo-request \ -j LOG --log-prefix="nat PREROUTING:" iptables -t nat -A PREROUTING -p icmp --icmp-type echo-reply \ -j LOG --log-prefix="nat PREROUTING:" iptables -t nat -A POSTROUTING -p icmp --icmp-type echo-request \ -j LOG --log-prefix="nat POSTROUTING:" iptables -t nat -A POSTROUTING -p icmp --icmp-type echo-reply \ -j LOG --log-prefix="nat POSTROUTING:" iptables -t nat -A OUTPUT -p icmp --icmp-type echo-request \ -j LOG --log-prefix="nat OUTPUT:" iptables -t nat -A OUTPUT -p icmp --icmp-type echo-reply \ -j LOG --log-prefix="nat OUTPUT:" # # Mangle table, all chains # iptables -t mangle -A PREROUTING -p icmp --icmp-type echo-request \ -j LOG --log-prefix="mangle PREROUTING:" iptables -t mangle -A PREROUTING -p icmp --icmp-type echo-reply \ -j LOG --log-prefix="mangle PREROUTING:" iptables -t mangle -I FORWARD 1 -p icmp --icmp-type echo-request \ -j LOG --log-prefix="mangle FORWARD:" iptables -t mangle -I FORWARD 1 -p icmp --icmp-type echo-reply \ -j LOG --log-prefix="mangle FORWARD:" iptables -t mangle -I INPUT 1 -p icmp --icmp-type echo-request \ -j LOG --log-prefix="mangle INPUT:" iptables -t mangle -I INPUT 1 -p icmp --icmp-type echo-reply \

Step by StepTM Linux Guide. Page 213
-j LOG --log-prefix="mangle INPUT:" iptables -t mangle -A OUTPUT -p icmp --icmp-type echo-request \ -j LOG --log-prefix="mangle OUTPUT:" iptables -t mangle -A OUTPUT -p icmp --icmp-type echo-reply \ -j LOG --log-prefix="mangle OUTPUT:" iptables -t mangle -I POSTROUTING 1 -p icmp --icmp-type echo-request \ -j LOG --log-prefix="mangle POSTROUTING:" iptables -t mangle -I POSTROUTING 1 -p icmp --icmp-type echo-reply \ -j LOG --log-prefix="mangle POSTROUTING:"
Step by StepTM Linux Guide. Page 214
DNS BIND How to set up your own domain
First do this lab and read the DNS concepts after this lab. Good Luck
This is named.conf in /etc/ folder According to the following configuration I have created a zone called suranga.com and in that zone im3 is a host. Therefore the full name of that host would be im3.suranga.com. like that you can have any amount of PCs in your domain. This will definitely works if you type following according to your network. (// are comments) options { directory "/var/named"; // query-source address * port 53; }; zone "." IN { //The zone '.' is shorthand for the root domain which translates to 'any //domain not defined as either a master or slave in this named.conf file'. type hint; // If a server is going to provide caching services then it must provide //recursive queries and recursive queries need access to the root servers which is //provided via the 'type hint' statement. file "named.ca"; //named.ca file has the list of root servers }; zone "localhost" IN { type master; file "localhost.zone"; allow-update { none; }; }; zone "0.0.127.in-addr.arpa" IN { type master; file "named.local"; allow-update { none; }; }; zone "suranga.com" IN { type master;

Step by StepTM Linux Guide. Page 215
file "suranga.com.zone"; allow-update { none; }; }; zone "200.168.192.in-addr.arpa" IN { type master; allow-update { none; }; }; Following files should be created in /var/named/ folder we do not need to customize the default file named.ca in the /var/named/ folder.
1. 0.0.127.in-addr.arpa.zone 2. 200.168.192.in-addr.arpa.zone 3. suranga.com.zone 4. localhost.zone 5 . named.local
The contents of 0.0.127.in-addr.arpa.zone as follows $TTL 86400 @ IN SOA localhost. root.localhost ( 1 ; serial 28800 ; refresh 7200 ; retry 604800 ; expire 86400 ; ttk ) @ IN NS localhost. 1 IN PTR localhost.
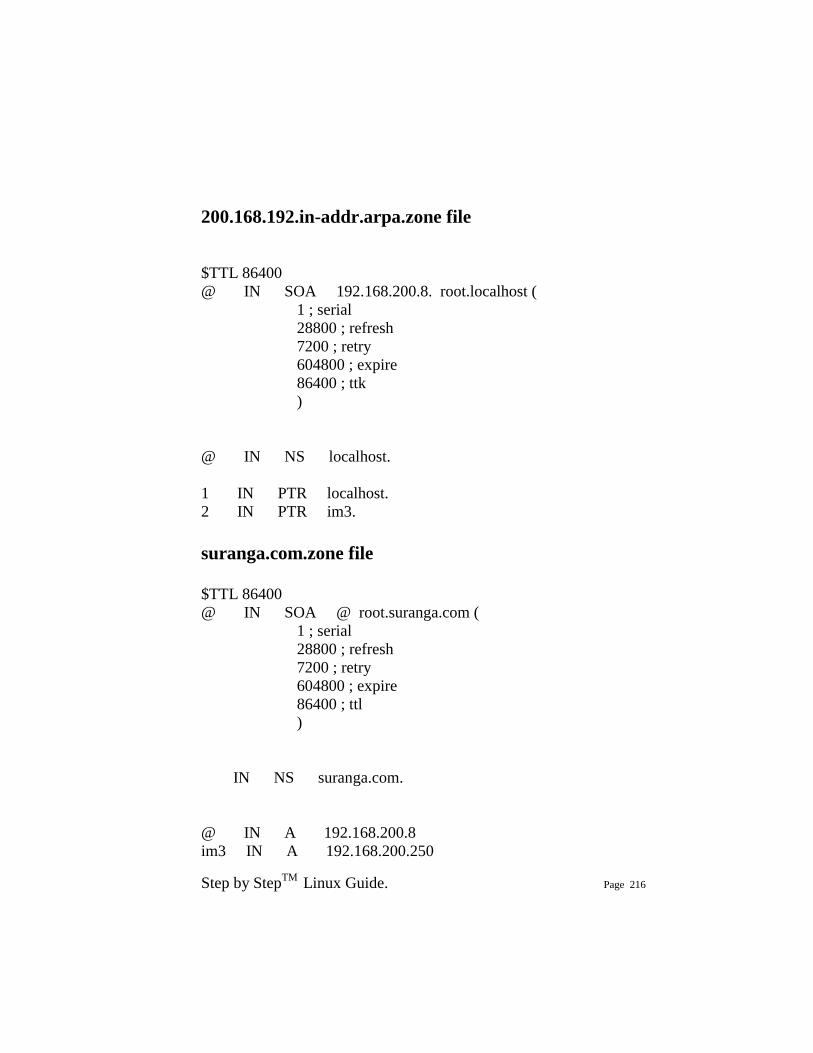
Step by StepTM Linux Guide. Page 216
200.168.192.in-addr.arpa.zone file $TTL 86400 @ IN SOA 192.168.200.8. root.localhost ( 1 ; serial 28800 ; refresh 7200 ; retry 604800 ; expire 86400 ; ttk ) @ IN NS localhost. 1 IN PTR localhost. 2 IN PTR im3. suranga.com.zone file $TTL 86400 @ IN SOA @ root.suranga.com ( 1 ; serial 28800 ; refresh 7200 ; retry 604800 ; expire 86400 ; ttl ) IN NS suranga.com. @ IN A 192.168.200.8 im3 IN A 192.168.200.250
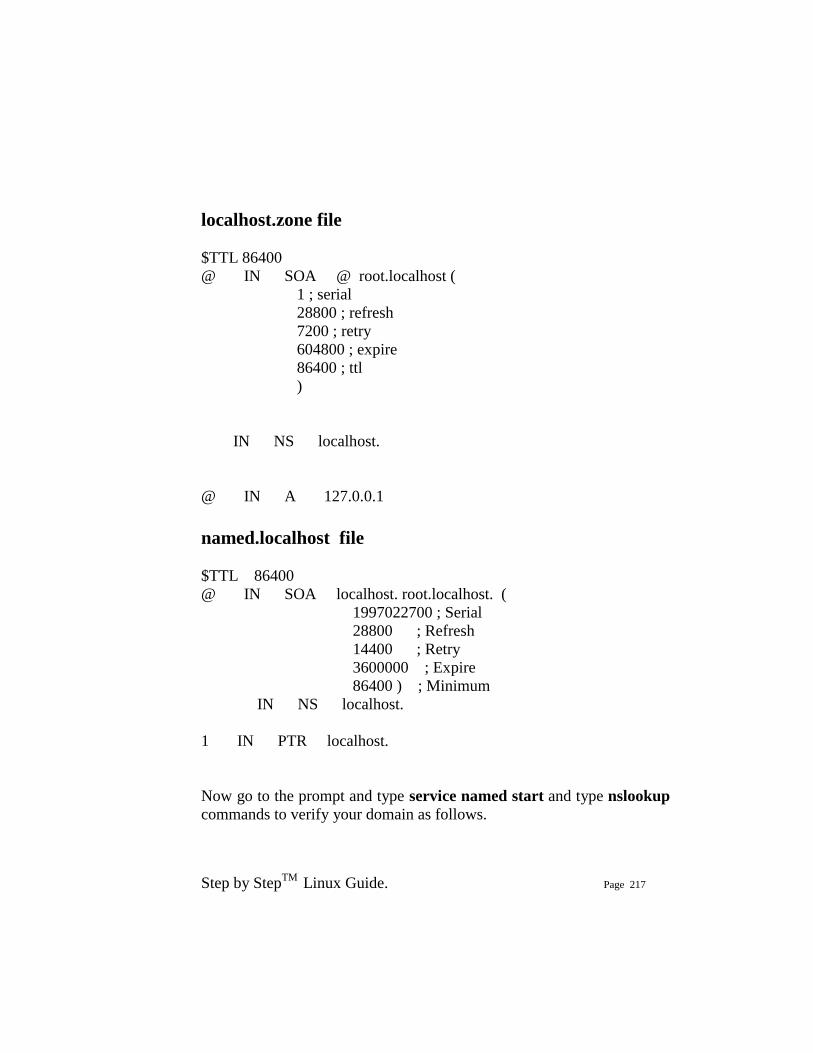
Step by StepTM Linux Guide. Page 217
localhost.zone file $TTL 86400 @ IN SOA @ root.localhost ( 1 ; serial 28800 ; refresh 7200 ; retry 604800 ; expire 86400 ; ttl ) IN NS localhost. @ IN A 127.0.0.1 named.localhost file $TTL 86400 @ IN SOA localhost. root.localhost. ( 1997022700 ; Serial 28800 ; Refresh 14400 ; Retry 3600000 ; Expire 86400 ) ; Minimum IN NS localhost. 1 IN PTR localhost. Now go to the prompt and type service named start and type nslookup commands to verify your domain as follows.
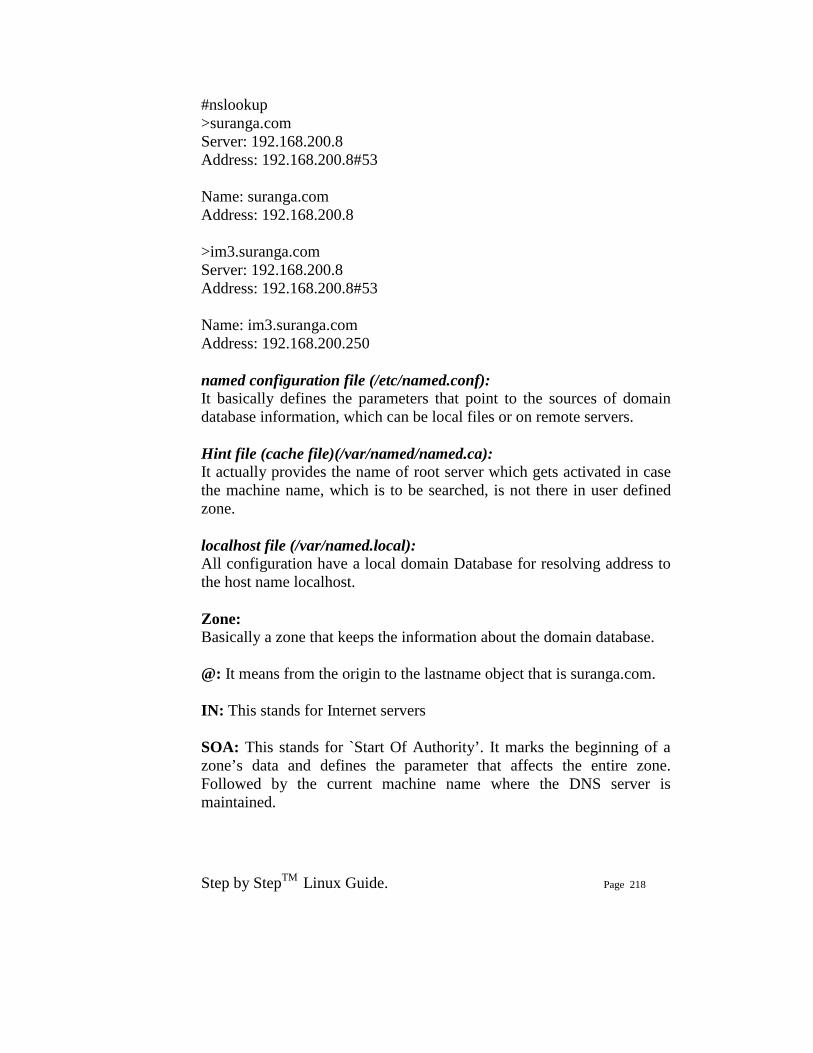
Step by StepTM Linux Guide. Page 218
#nslookup >suranga.com Server: 192.168.200.8 Address: 192.168.200.8#53 Name: suranga.com Address: 192.168.200.8 >im3.suranga.com Server: 192.168.200.8 Address: 192.168.200.8#53 Name: im3.suranga.com Address: 192.168.200.250 named configuration file (/etc/named.conf): It basically defines the parameters that point to the sources of domain database information, which can be local files or on remote servers. Hint file (cache file)(/var/named/named.ca): It actually provides the name of root server which gets activated in case the machine name, which is to be searched, is not there in user defined zone. localhost file (/var/named.local): All configuration have a local domain Database for resolving address to the host name localhost. Zone: Basically a zone that keeps the information about the domain database. @: It means from the origin to the lastname object that is suranga.com. IN: This stands for Internet servers SOA: This stands for `Start Of Authority’. It marks the beginning of a zone’s data and defines the parameter that affects the entire zone. Followed by the current machine name where the DNS server is maintained.

Step by StepTM Linux Guide. Page 219
20000011301;serial: This is the serial number--a numeric value that tells or notifies the slave server, that the database has been updated. So slave server should also update it. 3600;refresh: This is the refresh cycle in seconds. In every refresh cycle the slave server comes to master server and checks for the updated database. 1800;retry: This particular line refers to the retry cycle which in turn means that the slave server should wait before asking the master server again in case master server doesn’t respond. 1209600;expire: This is the time for slave server to respond to queries of client for the expiration time if master server fails and has to be up and not getting up. After this period slave server also fails to solve the queries of clients and sits idle. 432100;default_ttl: This refers to the default time to leave, for this domain to work for, when named is once started. Remember the user doesn’t have to play with this unless he wants that the query time from the slave server should be somewhat less or more. In case we want to change, we should change only the refresh time in both master and slave. The best way is to make it 2, which means after each 2 seconds slave server will query to master server.
Before begin just skim the following definitions you will understand all later
Zones and Zone files
A 'zone' is convenient short-hand for that part of the domain name for which we are configuring the DNS server (e.g. BIND) and is always an entity for which we are authoritative.
Assume we have a 'Domain Name' of suranga.com. This is comprised of a domain-name (suranga) and a gTLD (Generic Top Level Domain which will be discussed later) name (com). The zone in this case is
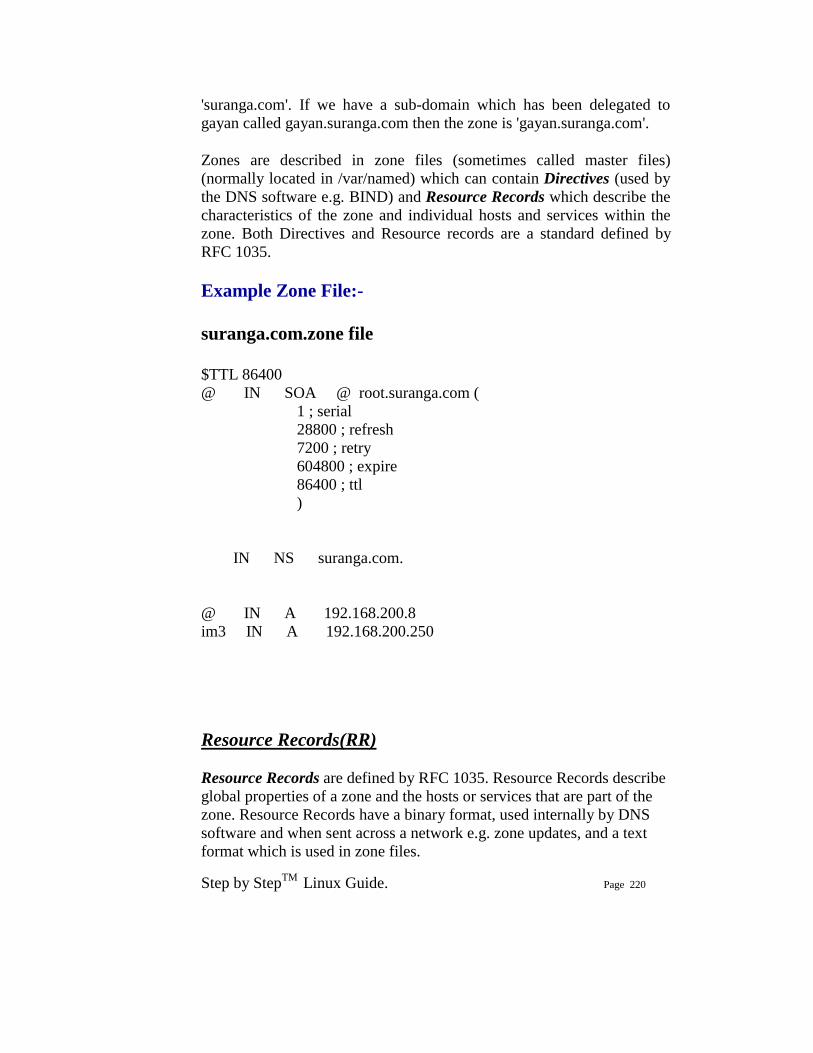
Step by StepTM Linux Guide. Page 220
'suranga.com'. If we have a sub-domain which has been delegated to gayan called gayan.suranga.com then the zone is 'gayan.suranga.com'.
Zones are described in zone files (sometimes called master files) (normally located in /var/named) which can contain Directives (used by the DNS software e.g. BIND) and Resource Records which describe the characteristics of the zone and individual hosts and services within the zone. Both Directives and Resource records are a standard defined by RFC 1035.
Example Zone File:- suranga.com.zone file $TTL 86400 @ IN SOA @ root.suranga.com ( 1 ; serial 28800 ; refresh 7200 ; retry 604800 ; expire 86400 ; ttl ) IN NS suranga.com. @ IN A 192.168.200.8 im3 IN A 192.168.200.250
Resource Records(RR)
Resource Records are defined by RFC 1035. Resource Records describe global properties of a zone and the hosts or services that are part of the zone. Resource Records have a binary format, used internally by DNS software and when sent across a network e.g. zone updates, and a text format which is used in zone files.
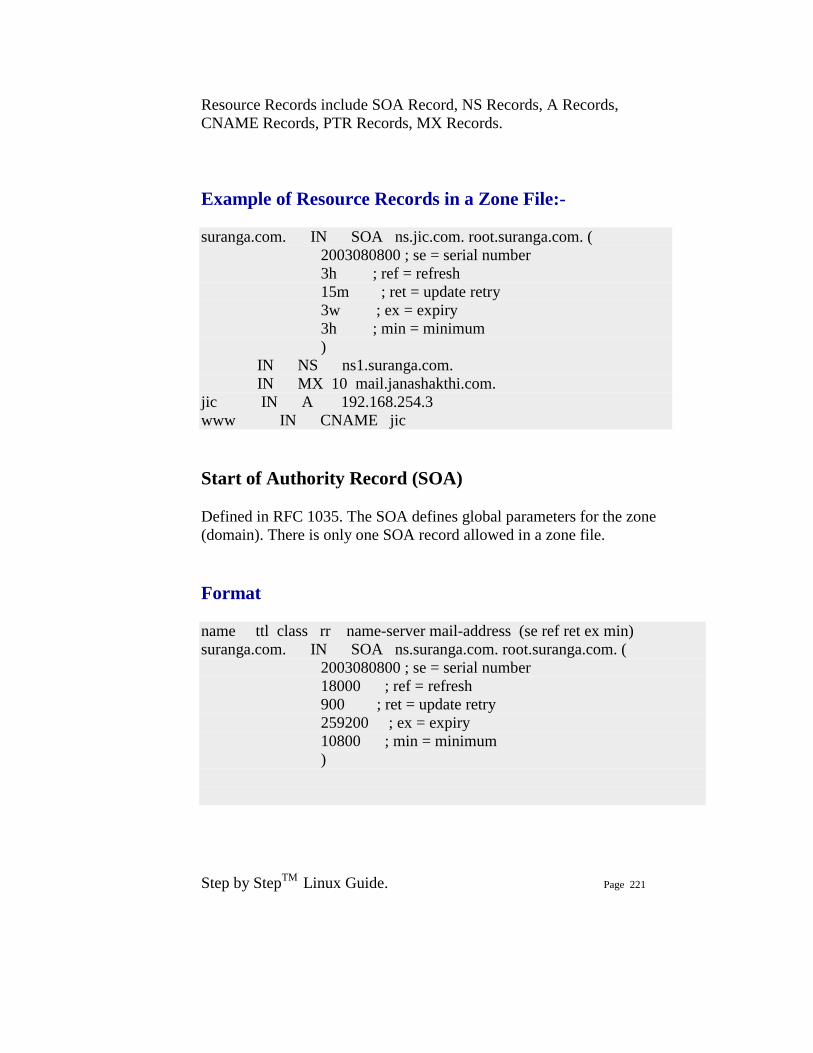
Step by StepTM Linux Guide. Page 221
Resource Records include SOA Record, NS Records, A Records, CNAME Records, PTR Records, MX Records.
Example of Resource Records in a Zone File:- suranga.com. IN SOA ns.jic.com. root.suranga.com. ( 2003080800 ; se = serial number 3h ; ref = refresh 15m ; ret = update retry 3w ; ex = expiry 3h ; min = minimum ) IN NS ns1.suranga.com. IN MX 10 mail.janashakthi.com. jic IN A 192.168.254.3 www IN CNAME jic Start of Authority Record (SOA)
Defined in RFC 1035. The SOA defines global parameters for the zone (domain). There is only one SOA record allowed in a zone file.
Format name ttl class rr name-server mail-address (se ref ret ex min) suranga.com. IN SOA ns.suranga.com. root.suranga.com. ( 2003080800 ; se = serial number 18000 ; ref = refresh 900 ; ret = update retry 259200 ; ex = expiry 10800 ; min = minimum )
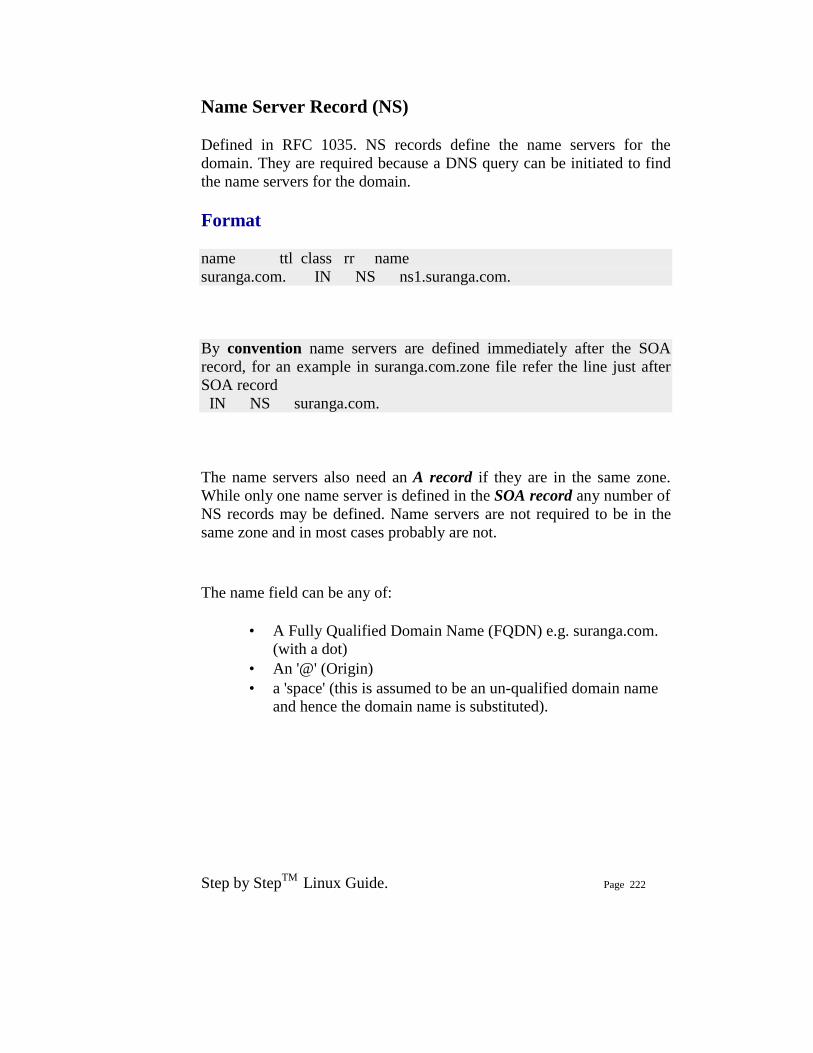
Step by StepTM Linux Guide. Page 222
Name Server Record (NS)
Defined in RFC 1035. NS records define the name servers for the domain. They are required because a DNS query can be initiated to find the name servers for the domain.
Format name ttl class rr name suranga.com. IN NS ns1.suranga.com.
By convention name servers are defined immediately after the SOA record, for an example in suranga.com.zone file refer the line just after SOA record IN NS suranga.com.
The name servers also need an A record if they are in the same zone. While only one name server is defined in the SOA record any number of NS records may be defined. Name servers are not required to be in the same zone and in most cases probably are not.
The name field can be any of:
• A Fully Qualified Domain Name (FQDN) e.g. suranga.com. (with a dot)
• An '@' (Origin) • a 'space' (this is assumed to be an un-qualified domain name
and hence the domain name is substituted).
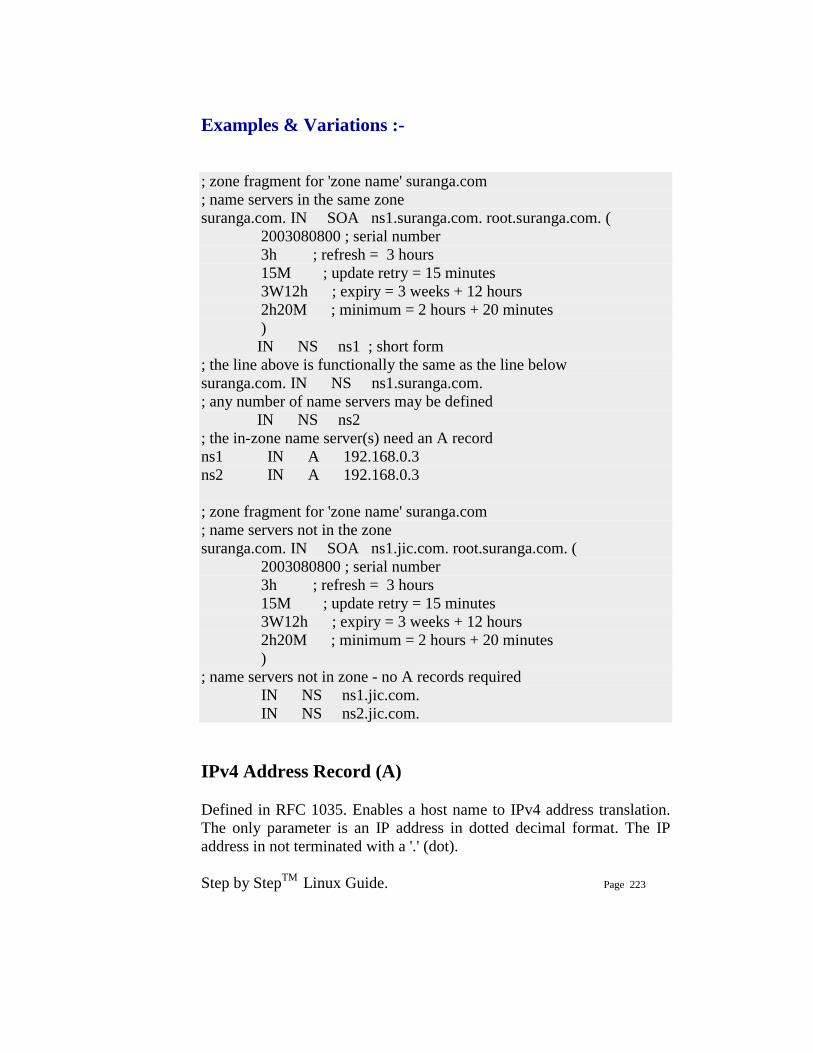
Step by StepTM Linux Guide. Page 223
Examples & Variations :- ; zone fragment for 'zone name' suranga.com ; name servers in the same zone suranga.com. IN SOA ns1.suranga.com. root.suranga.com. ( 2003080800 ; serial number 3h ; refresh = 3 hours 15M ; update retry = 15 minutes 3W12h ; expiry = 3 weeks + 12 hours 2h20M ; minimum = 2 hours + 20 minutes ) IN NS ns1 ; short form ; the line above is functionally the same as the line below suranga.com. IN NS ns1.suranga.com. ; any number of name servers may be defined IN NS ns2 ; the in-zone name server(s) need an A record ns1 IN A 192.168.0.3 ns2 IN A 192.168.0.3 ; zone fragment for 'zone name' suranga.com ; name servers not in the zone suranga.com. IN SOA ns1.jic.com. root.suranga.com. ( 2003080800 ; serial number 3h ; refresh = 3 hours 15M ; update retry = 15 minutes 3W12h ; expiry = 3 weeks + 12 hours 2h20M ; minimum = 2 hours + 20 minutes ) ; name servers not in zone - no A records required IN NS ns1.jic.com. IN NS ns2.jic.com. IPv4 Address Record (A)
Defined in RFC 1035. Enables a host name to IPv4 address translation. The only parameter is an IP address in dotted decimal format. The IP address in not terminated with a '.' (dot).
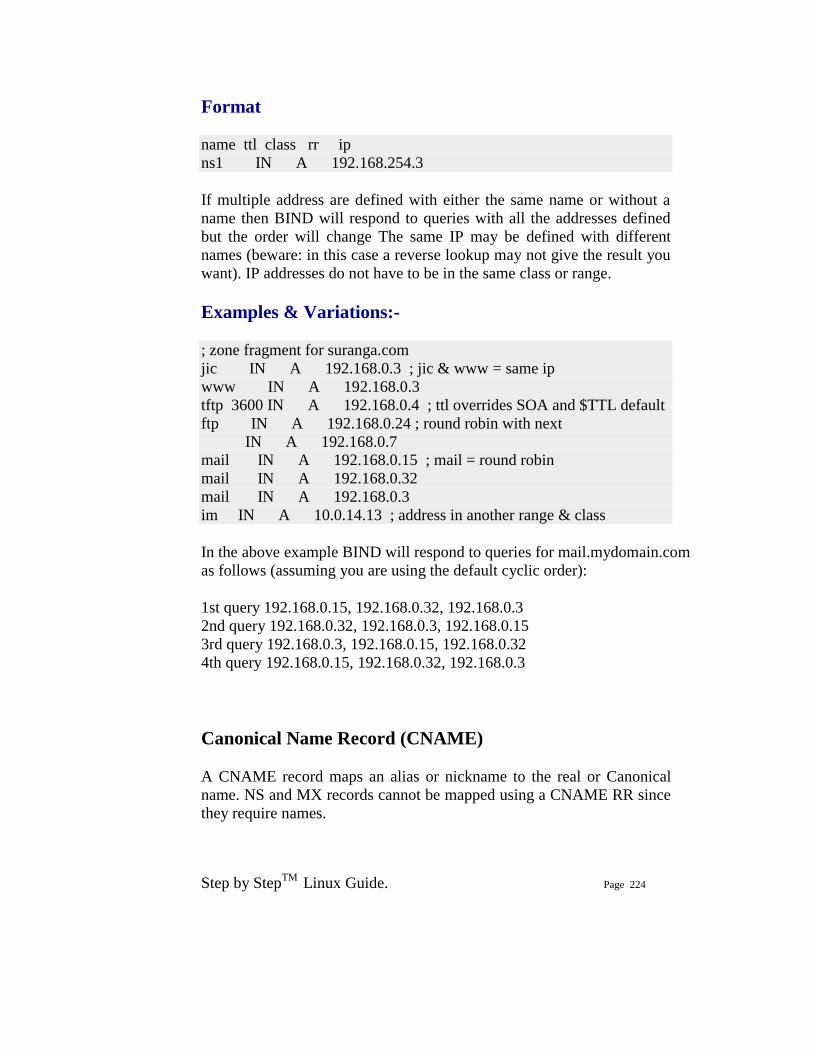
Step by StepTM Linux Guide. Page 224
Format name ttl class rr ip ns1 IN A 192.168.254.3
If multiple address are defined with either the same name or without a name then BIND will respond to queries with all the addresses defined but the order will change The same IP may be defined with different names (beware: in this case a reverse lookup may not give the result you want). IP addresses do not have to be in the same class or range.
Examples & Variations:- ; zone fragment for suranga.com jic IN A 192.168.0.3 ; jic & www = same ip www IN A 192.168.0.3 tftp 3600 IN A 192.168.0.4 ; ttl overrides SOA and $TTL default ftp IN A 192.168.0.24 ; round robin with next IN A 192.168.0.7 mail IN A 192.168.0.15 ; mail = round robin mail IN A 192.168.0.32 mail IN A 192.168.0.3 im IN A 10.0.14.13 ; address in another range & class
In the above example BIND will respond to queries for mail.mydomain.com as follows (assuming you are using the default cyclic order):
1st query 192.168.0.15, 192.168.0.32, 192.168.0.3 2nd query 192.168.0.32, 192.168.0.3, 192.168.0.15 3rd query 192.168.0.3, 192.168.0.15, 192.168.0.32 4th query 192.168.0.15, 192.168.0.32, 192.168.0.3
Canonical Name Record (CNAME)
A CNAME record maps an alias or nickname to the real or Canonical name. NS and MX records cannot be mapped using a CNAME RR since they require names.
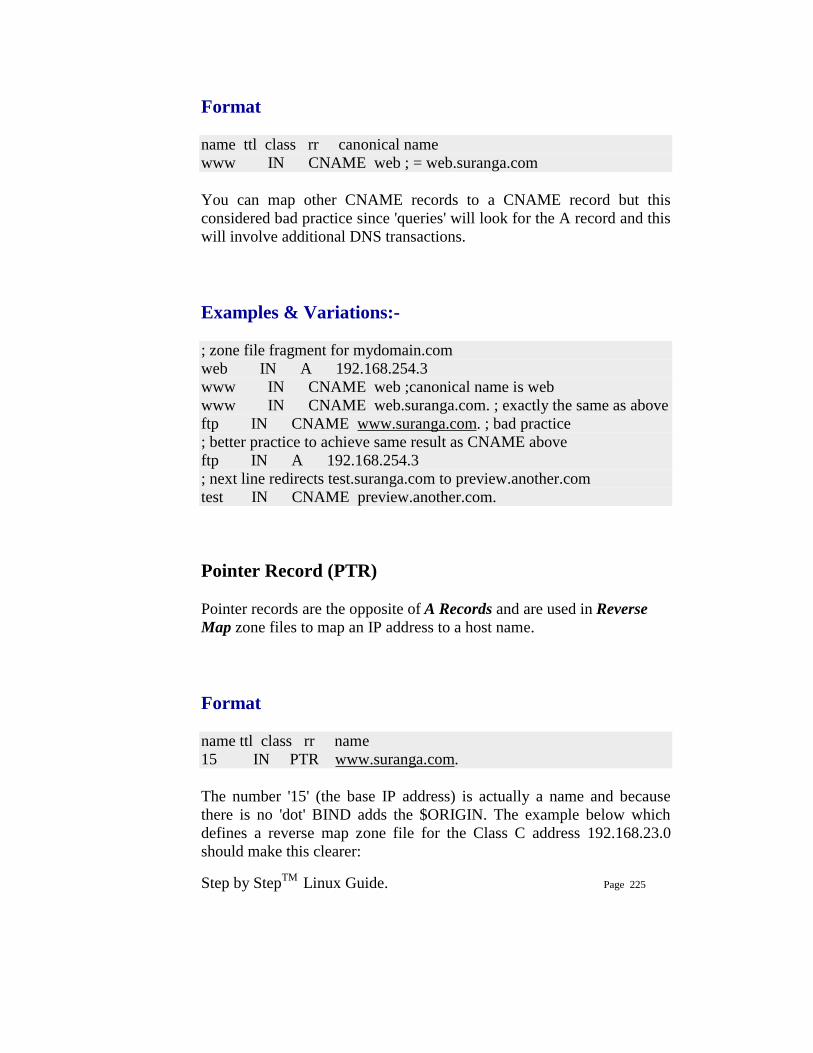
Step by StepTM Linux Guide. Page 225
Format name ttl class rr canonical name www IN CNAME web ; = web.suranga.com
You can map other CNAME records to a CNAME record but this considered bad practice since 'queries' will look for the A record and this will involve additional DNS transactions.
Examples & Variations:- ; zone file fragment for mydomain.com web IN A 192.168.254.3 www IN CNAME web ;canonical name is web www IN CNAME web.suranga.com. ; exactly the same as above ftp IN CNAME www.suranga.com. ; bad practice ; better practice to achieve same result as CNAME above ftp IN A 192.168.254.3 ; next line redirects test.suranga.com to preview.another.com test IN CNAME preview.another.com.
Pointer Record (PTR)
Pointer records are the opposite of A Records and are used in Reverse Map zone files to map an IP address to a host name.
Format name ttl class rr name 15 IN PTR www.suranga.com.
The number '15' (the base IP address) is actually a name and because there is no 'dot' BIND adds the $ORIGIN. The example below which defines a reverse map zone file for the Class C address 192.168.23.0 should make this clearer:
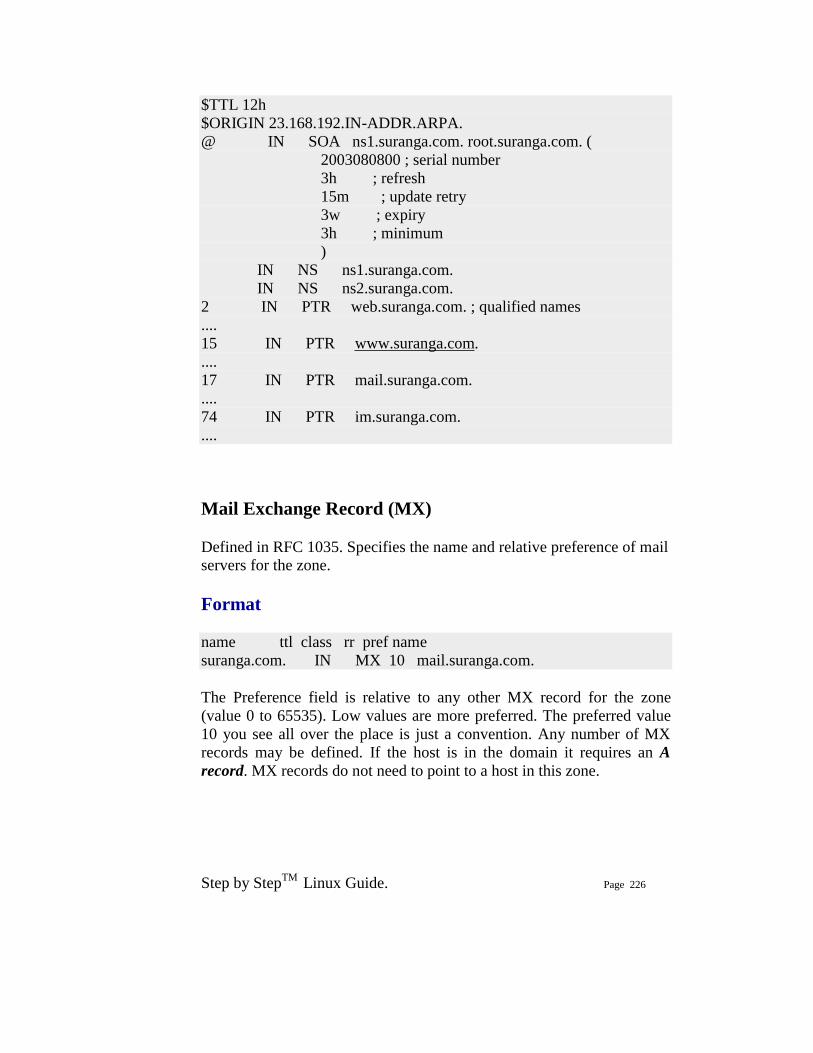
Step by StepTM Linux Guide. Page 226
$TTL 12h $ORIGIN 23.168.192.IN-ADDR.ARPA. @ IN SOA ns1.suranga.com. root.suranga.com. ( 2003080800 ; serial number 3h ; refresh 15m ; update retry 3w ; expiry 3h ; minimum ) IN NS ns1.suranga.com. IN NS ns2.suranga.com. 2 IN PTR web.suranga.com. ; qualified names .... 15 IN PTR www.suranga.com. .... 17 IN PTR mail.suranga.com. .... 74 IN PTR im.suranga.com. ....
Mail Exchange Record (MX)
Defined in RFC 1035. Specifies the name and relative preference of mail servers for the zone.
Format name ttl class rr pref name suranga.com. IN MX 10 mail.suranga.com.
The Preference field is relative to any other MX record for the zone (value 0 to 65535). Low values are more preferred. The preferred value 10 you see all over the place is just a convention. Any number of MX records may be defined. If the host is in the domain it requires an A record. MX records do not need to point to a host in this zone.
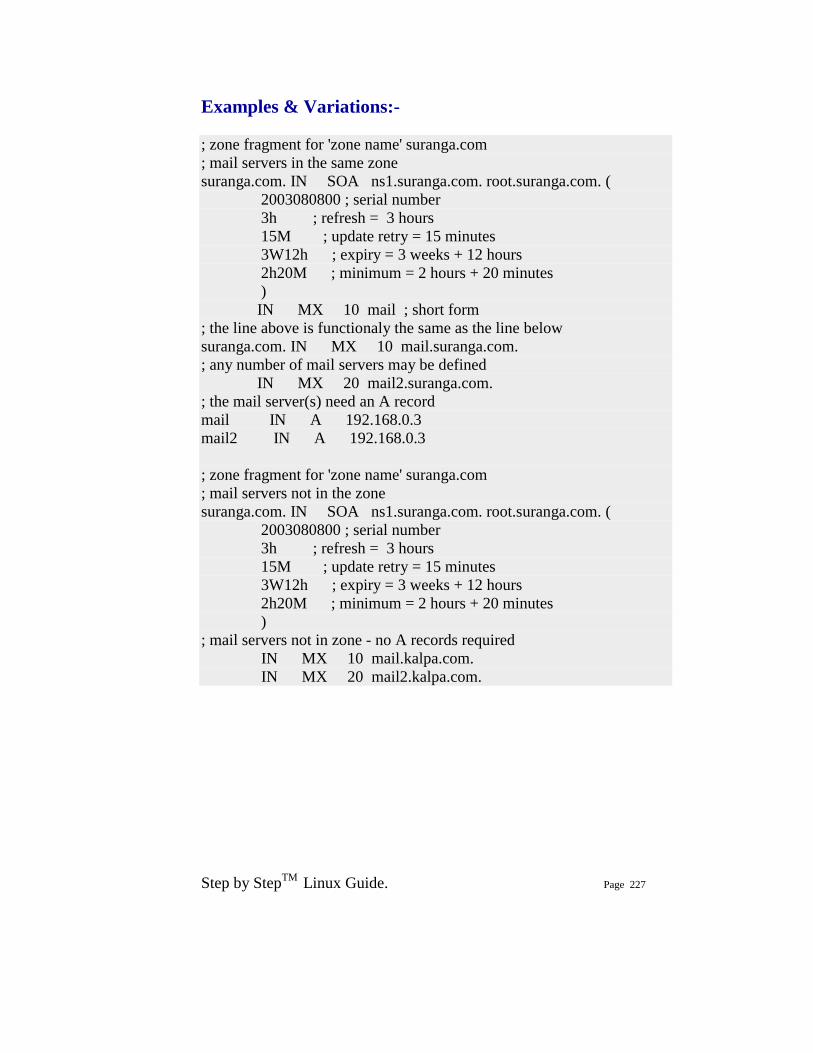
Step by StepTM Linux Guide. Page 227
Examples & Variations:- ; zone fragment for 'zone name' suranga.com ; mail servers in the same zone suranga.com. IN SOA ns1.suranga.com. root.suranga.com. ( 2003080800 ; serial number 3h ; refresh = 3 hours 15M ; update retry = 15 minutes 3W12h ; expiry = 3 weeks + 12 hours 2h20M ; minimum = 2 hours + 20 minutes ) IN MX 10 mail ; short form ; the line above is functionaly the same as the line below suranga.com. IN MX 10 mail.suranga.com. ; any number of mail servers may be defined IN MX 20 mail2.suranga.com. ; the mail server(s) need an A record mail IN A 192.168.0.3 mail2 IN A 192.168.0.3 ; zone fragment for 'zone name' suranga.com ; mail servers not in the zone suranga.com. IN SOA ns1.suranga.com. root.suranga.com. ( 2003080800 ; serial number 3h ; refresh = 3 hours 15M ; update retry = 15 minutes 3W12h ; expiry = 3 weeks + 12 hours 2h20M ; minimum = 2 hours + 20 minutes ) ; mail servers not in zone - no A records required IN MX 10 mail.kalpa.com. IN MX 20 mail2.kalpa.com.

Step by StepTM Linux Guide. Page 228
Resolvers
The generic term 'resolver' actually refers to a set of functions supplied as part of the standard C network/socket libraries or supplied as part of a package (e.g. BIND). These functions are used by applications to answer questions such as 'what is the IP address of this host'. The most common method to invoke such resolver services, used by your browser among many other applications, is to use the socket functions 'gethostbyname' for name to IP and 'gethostbyaddr' for IP to name.
There are a number of ways your system can resolve a name and the actual order will vary based on your configuration:
1. If you are using a linux system with the GNU glibc libraries the order of lookup is determined by the 'hosts' entry in the /etc/nsswitch.conf file which will read something like:
hosts files nisplus dns
Indicating look at /etc/hosts, then use NIS (Network Information Systems), then DNS (via resolv.conf)
2. The order of lookup is determined by the 'order' entry in the /etc/host.conf file which will read something like:
order hosts,bind
Indicating look at /etc/hosts then DNS (using resolv.conf).
Step by StepTM Linux Guide. Page 229
DNS Concepts Without a DNS there would simply not be Internet. DNS does the following.
1. A DNS translates (or maps) the name of a resource to its physical IP address
2. A DNS can also translate the physical IP address to the name of a resource by using reverse look-up or mapping.
Internet works by allocating every point a physical IP address (which may be locally unique or globally unique).
The Internet's Domain Name Service (DNS) is just a specific implementation of the Name Server concept optimized for the prevailing conditions on the Internet.
Name Servers need following
1. The need for a hierarchy of names 2. The need to spread the operational loads on our name
servers 3. The need to delegate the administration of our Name
servers
Domains and Delegation The Domain Name System uses a tree (or hierarchical) name structure. At the top of the tree is the root followed by the Top Level Domains (TLDs) then the domain-name and any number of lower levels each separated with a dot.
NOTE:
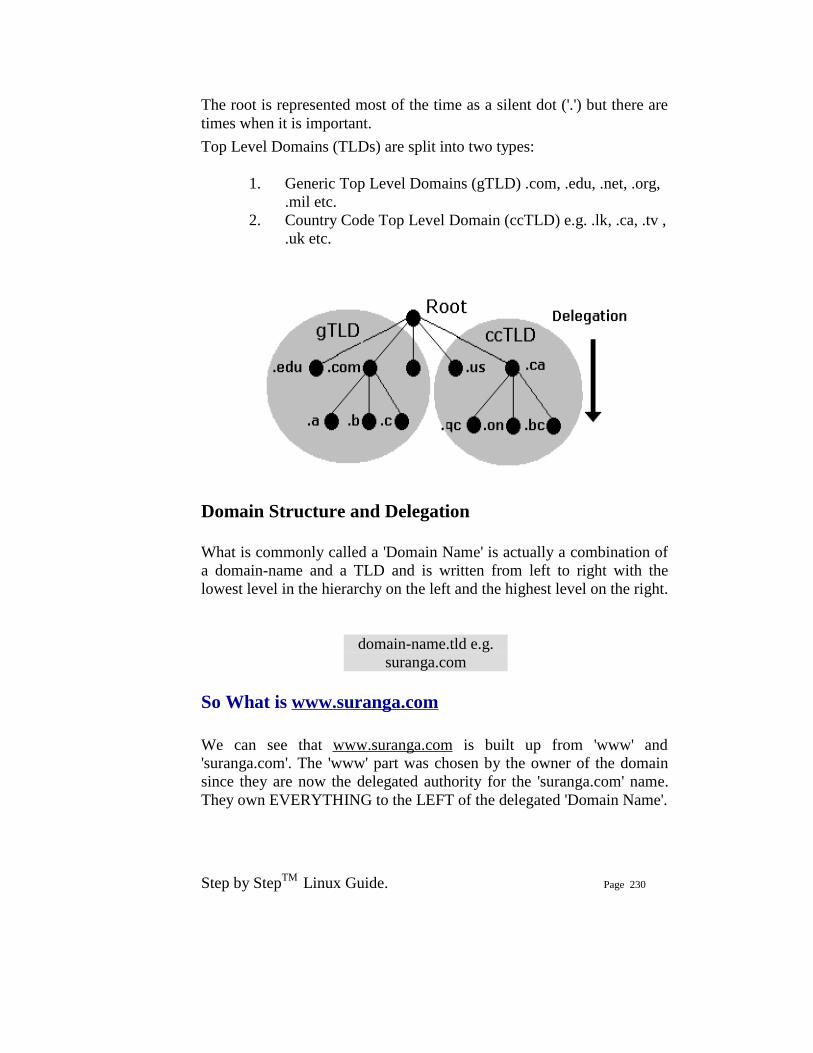
Step by StepTM Linux Guide. Page 230
The root is represented most of the time as a silent dot ('.') but there are times when it is important. Top Level Domains (TLDs) are split into two types:
1. Generic Top Level Domains (gTLD) .com, .edu, .net, .org, .mil etc.
2. Country Code Top Level Domain (ccTLD) e.g. .lk, .ca, .tv , .uk etc.
Domain Structure and Delegation What is commonly called a 'Domain Name' is actually a combination of a domain-name and a TLD and is written from left to right with the lowest level in the hierarchy on the left and the highest level on the right.
domain-name.tld e.g. suranga.com
So What is www.suranga.com We can see that www.suranga.com is built up from 'www' and 'suranga.com'. The 'www' part was chosen by the owner of the domain since they are now the delegated authority for the 'suranga.com' name. They own EVERYTHING to the LEFT of the delegated 'Domain Name'.
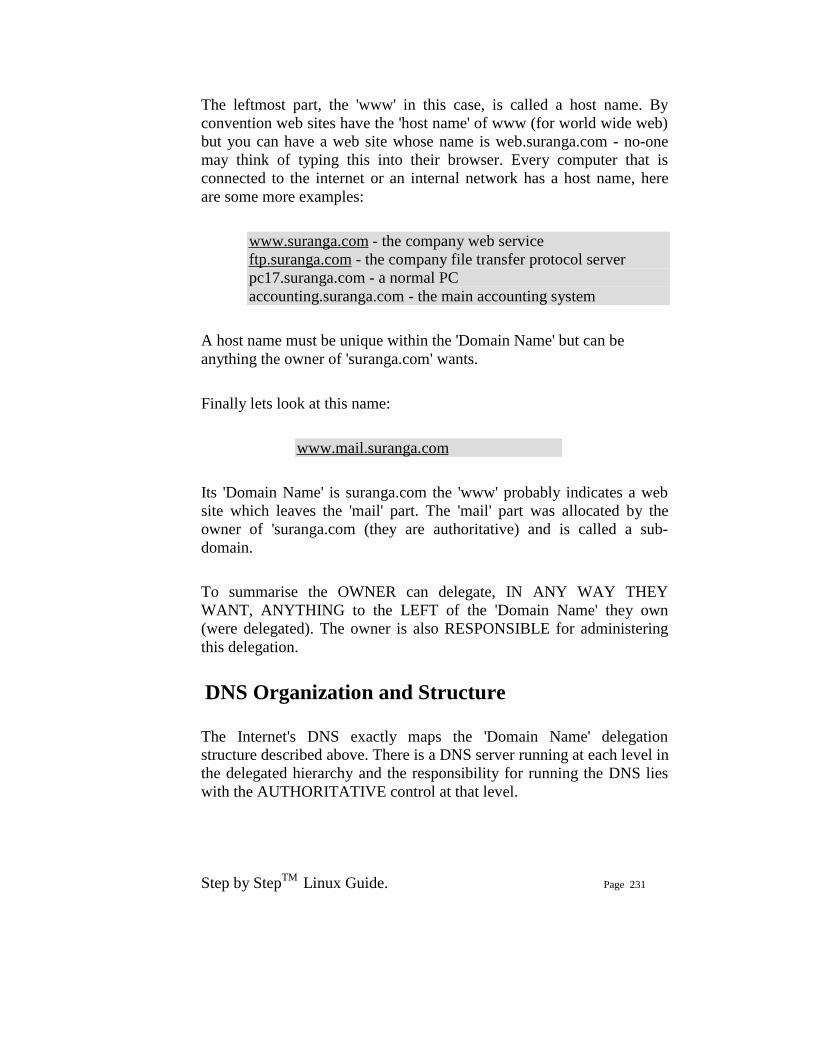
Step by StepTM Linux Guide. Page 231
The leftmost part, the 'www' in this case, is called a host name. By convention web sites have the 'host name' of www (for world wide web) but you can have a web site whose name is web.suranga.com - no-one may think of typing this into their browser. Every computer that is connected to the internet or an internal network has a host name, here are some more examples:
www.suranga.com - the company web service ftp.suranga.com - the company file transfer protocol server pc17.suranga.com - a normal PC accounting.suranga.com - the main accounting system
A host name must be unique within the 'Domain Name' but can be anything the owner of 'suranga.com' wants.
Finally lets look at this name:
www.mail.suranga.com
Its 'Domain Name' is suranga.com the 'www' probably indicates a web site which leaves the 'mail' part. The 'mail' part was allocated by the owner of 'suranga.com (they are authoritative) and is called a sub-domain.
To summarise the OWNER can delegate, IN ANY WAY THEY WANT, ANYTHING to the LEFT of the 'Domain Name' they own (were delegated). The owner is also RESPONSIBLE for administering this delegation. DNS Organization and Structure The Internet's DNS exactly maps the 'Domain Name' delegation structure described above. There is a DNS server running at each level in the delegated hierarchy and the responsibility for running the DNS lies with the AUTHORITATIVE control at that level.
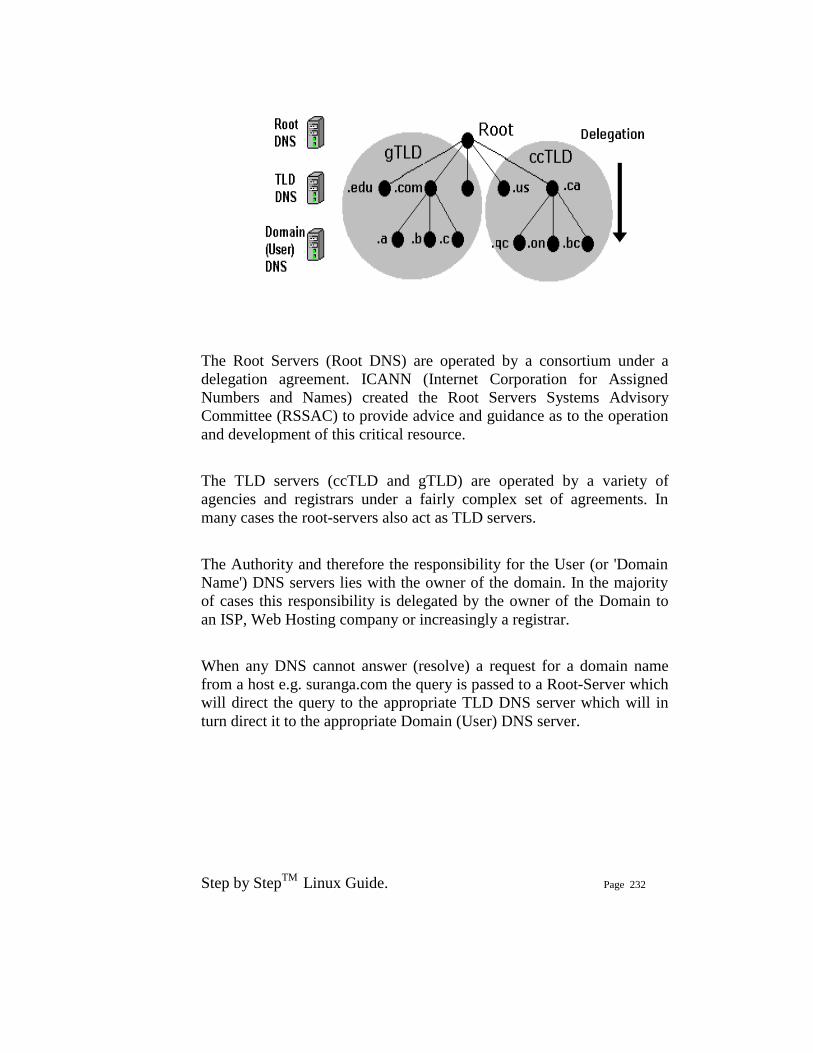
Step by StepTM Linux Guide. Page 232
The Root Servers (Root DNS) are operated by a consortium under a delegation agreement. ICANN (Internet Corporation for Assigned Numbers and Names) created the Root Servers Systems Advisory Committee (RSSAC) to provide advice and guidance as to the operation and development of this critical resource. The TLD servers (ccTLD and gTLD) are operated by a variety of agencies and registrars under a fairly complex set of agreements. In many cases the root-servers also act as TLD servers. The Authority and therefore the responsibility for the User (or 'Domain Name') DNS servers lies with the owner of the domain. In the majority of cases this responsibility is delegated by the owner of the Domain to an ISP, Web Hosting company or increasingly a registrar. When any DNS cannot answer (resolve) a request for a domain name from a host e.g. suranga.com the query is passed to a Root-Server which will direct the query to the appropriate TLD DNS server which will in turn direct it to the appropriate Domain (User) DNS server.
Step by StepTM Linux Guide. Page 233
DNS System Components A Domain Name System (DNS) as defined by RFC 1034 includes three parts:
1. Data which describes the domain(s) 2. One or more Name Server programs. 3. A resolver program or library.
A single DNS server may support many domains. The data for each domain describes global properties of the domain and its hosts (or services). This data is defined in the form of textual Resource Records organized in Zone Files. The format of Zone files is defined in RFC 1035 and is supported by most DNS software. The Name Server program typically does three things:
1. It will read a configuration file which defines the zones for which it is responsible.
2. Depending on the Name Servers functionality the configuration file may describe various behaviours e.g. to cache or not. Some DNS servers are very specialized and do not provide this level of control.
3. Respond to questions (queries) from local or remote hosts.
The resolver program or library is located on each host and provides a means of translating a users request for, say, www.suranga.com into one or more queries to DNS servers using UDP (or TCP) protocols. The zone file formats which constitute the majority of the work (depending on how many sites you operate) is standard and is typically supported by all the DNS suppliers.
Step by StepTM Linux Guide. Page 234
Zones and Zone Files
Zone files contain Resource Records that describe a domain or sub-domain. The format of zone file is defined by RFC 1035 and is an IETF standard. Almost any sensible DNS software should be able to read zone files. A zone file will consist of the following types of data:
1 Data that describes the top of the zone (a SOA Record). SOA: This stands for `Start Of Authority’. It marks the beginning of a zone’s data and defines the parameter that affects the entire zone.
2 Authoritative data for all nodes or hosts within the zone (typically A Records).
3 Data that describes global information for the zone (typically MX Records and NS Records).
4 In the case of sub-domain delegation the name servers responsible for this sub-domain (a NS Record).
5 In the case of sub-domain delegation a 'glue' record that allows this name server to reach the sub-domain (typically one or more A Records) for the sub-domain name servers.
DNS Queries The major task carried out by a DNS server is to respond to queries (questions) from a local or remote resolver or other DNS acting on behalf of a resolver. A query would be something like 'what is the IP address of host=mail in domain=suranga.com'.
A DNS server may receive such a query for any domain. DNS servers may be configured to be authoritative for some (if any) domains, slaves, caching, forwarding or many other combination.
Most of the queries that a DNS server will receive will be for domains for which it has no knowledge that is outside its own domain for which it has no local zone files. The DNS system allows the name server to respond in different ways to queries about which it has no knowledge.
There are three types of queries defined for DNS:
Step by StepTM Linux Guide. Page 235
1. A recursive query - the real answer to the question is always returned. DNS servers are not required to support recursive queries.
2. An Iterative (or non-recursive) query - where the real answer MAY be returned. All DNS servers must support Iterative queries.
3. An Inverse query - where the user wants to know the domain name given a resource record.
Recursive Queries A recursive query is one where the DNS server will fully answer the query (or give an error). DNS servers are not required to support recursive queries. There are three possible responses to a recursive query:
1 The answer to the query accompanied by any CNAME records (aliases) that may be useful.
2 An error indicating the domain or host does not exist(NXDOMAIN). This response may also contain CNAME records that pointed to the non-existing host.
3 An temporary error indication - e.g. can't access other DNS's due to network error etc..
A simple query such as 'what is the IP address of a host=mail in domain=suranga.com' to a DNS server which supports recursive queries could look something like this:
1 Resolver on a host sends query 'what is the IP address of a host=mail in domain=suranga.com' to locally configured DNS server.
2 DNS server looks up suranga.com in local tables - not present
3 DNS sends request to a root-server for the IP of a name server for suranga.com
Step by StepTM Linux Guide. Page 236
4 Using root-server supplied IP, the DNS server sends query 'what is the IP address of a host=mail in domain=suranga.com' to suranga.com name server.
5 Response is a CNAME record which shows mail is aliased to mailserver.
6 DNS server sends another query 'what is the IP address of a host=mailserver in domain=suranga.com' to authoritative suranga.com name server.
7 send response mailserver=192.168.1.1 (with CNAME record mail=mailserver) to original client resolver.
Iterative (non-recursive) Queries
An Iterative (or non-recursive) query is one where the DNS server may provide a partial answer to the query (or give an error). DNS servers must support non-recursive queries. There are four possible responses to a non-recursive query:
1 The answer to the query accompanied by any CNAME records (aliases) that may be useful. The response will indicate whether the data is authoritative or cached.
2 An error indicating the domain or host does not exist(NXDOMAIN). This response may also contain CNAME records that pointed to the non-existing host.
3 An temporary error indication - e.g. can't access other DNS's due to network error.
4 A referral (an IP address) of a name server that is closer to the requested domain name. This may or may not be the authoritative name server.
A simple query such as 'what is the IP address of a host=mail in domain=suranga.com' to a DNS server which supports Iterative (non-recursive) queries could look something like this:
Step by StepTM Linux Guide. Page 237
1 Resolver on a host sends query 'what is the IP address of a host=mail in domain=suranga.com' to locally configured DNS server.
2 DNS server looks up suranga.com in local tables - not present
3 DNS sends request to a root-server for the IP of a name server for suranga.com
4 DNS server sends received IP as a referral to the original client resolver.
5 Resolver sends another query 'what is the IP address of a host=mailserver in domain= suranga.com' to referral IP address obtained from DNS server.
6 Resolver receives a response with a CNAME which shows mail is aliased to mailserver.
7 Resolver sends another query 'what is the IP address of a host=mailserver in domain=suranga.com' to referral IP address obtained from DNS server.
8 Resolver gets response mailserver=192.168.1.1
Inverse Queries An Inverse query maps a resource record to a domain. An example Inverse query would be 'what is the domain name for this MX record'. Inverse query support is optional and it is permitted from the DNS server to return a response 'Not Implemented'. Inverse queries are NOT used to find a host name given an IP address. This process is called Reverse Mapping (Look-up) uses recursive and Iterative (non-recursive) queries with the special domain name IN-ADDR.ARPA.
Step by StepTM Linux Guide. Page 238
Zone Updates Full Zone Update (AXFR) In DNS specifications the slave (or secondary) DNS servers would 'poll' the 'master'. The time between such 'polling' is determined by the REFRESH value on the domain's SOA Resource Record The polling process is accomplished by the 'slave' send a query to the 'master' and requesting the latest SOA record. If the SERIAL number of the record is different from the current one maintained by the 'slave' a zone transfer (AXFR) is requested. Zone transfers are always carried out using TCP on port 53 not UDP (normal DNS query operations use UDP on port 53).
Incremental Zone Update (IXFR) Transferring very large zone files can take a long time and waste bandwidth and other resources. This is especially wasteful if only a single record has been changed! RFC 1995 introduced Incremental Zone Transfers (IXFR) which as the name suggests allows the 'slave' and 'master' to transfer only those records that have changed. The process works as for AXFR. The 'slave' sends a query for the domain's SOA Resource Record every REFRESH interval. If the SERIAL value of the SOA record has changed the 'slave' requests a Zone Transfer and indicates whether or not it is capable of accepting an Incremental Transfer (IXFR). If both 'master' and 'slave' support the feature and incremental transfer takes place. Incremental Zone transfers use TCP on port 53. The default mode for BIND when acting as a 'slave' is to use IXFR.
Step by StepTM Linux Guide. Page 239
The default mode for BIND when acting as a 'master' is to use IXFR only when the zone is dynamic. The use of IXFR is controlled using the provide-ixfr parameter in the server or options section of the named.conf file.
Notify (NOTIFY) RFC 1912 recommends a REFRESH interval of up to 12 hours on the REFRESH interval of an SOA Resource Record. This means that changes to the 'master' DNS may not be visible at the 'slave' DNS for up to 12 hours. In a dynamic environment this is unacceptable. RFC 1996 introduced a scheme whereby the 'master' will send a NOTIFY message to the 'slave' DNS systems that a change MAY have occurred in the domain records. The 'slave' on receipt of the NOTIFY will request the latest SOA Resource Record and if the SERIAL value is different will attempt a Zone Transfer using either a full Zone Transfer (AXFR) or an Incremental Transfer (IXFR). NOTIFY behavior in BIND is controlled by notify, also-notify and notify-source parameters in the zone or options statements of the named.conf file.
Dynamic Update The classic method of updating Zone Resource Records is to manually edit the zone file and then stop and start the name server to propagate the changes. When the volume of changes reaches a certain level this can become operationally unacceptable - especially considering that in an organization which handle large numbers of Zone Files, such as service provider, BIND itself can take a long time to restart at it plows through very large numbers of zone statements. DNS is to provide a method of dynamically changing the DNS records while DNS continues to service requests.

Step by StepTM Linux Guide. Page 240
There are two architectural approaches to solving this problem:
1 Allow 'run-time' updating of the Zone Records from an external source/application.
2 Directly feed BIND (say via one of its two APIs) from a database which can be dynamically updated.
RFC 2136 takes the first approach and defines a process where zone records can be updated from an external source. The key limitation in this specification is that a new domain cannot be added dynamically. All other records within an existing zone can be added, changed or deleted. In fact this limitation is also true for both of BIND's APIs as well. As part of this specification the term 'Primary Master' is coined to describe the Name Server defined in the SOA Resource Record for the zone. The significance of this term is that when dynamically updating records it is sensible (essential) to update only one server while there may be multiple 'master' servers for the zone. In order to solve this problem a 'boss' server must be selected, this 'boss' server termed the Primary Master has no special characteristics other than it is defined as the Name Server in the SOA record and may appear in an allow-update clause to control the update process. While normally associated with Secure DNS features (TSIG - RFC 2845/TKEY - RFC 2930) Dynamic DNS (DDNS) does not REQUIRE TSIG/TKEY. However there is a good reason to associate the two specifications when you consider than by enabling Dynamic DNS you are opening up the possibility of 'master' zone file corruption or subversion. Simple IP address protection (acl) can be configured into BIND but this provides at best limited protection. For that reason serious users of Dynamic DNS will always use TSIG/TKEY procedures to authenticate incoming requests. Dynamic Updating is defaulted to deny from all hosts. Control of Dynamic Update is provided by the BIND allow-update (usable with and without TSIG/TKEY) and update-policy (only usable with TSIG/TKEY) clauses in the zone or options statements of the named.conf file.
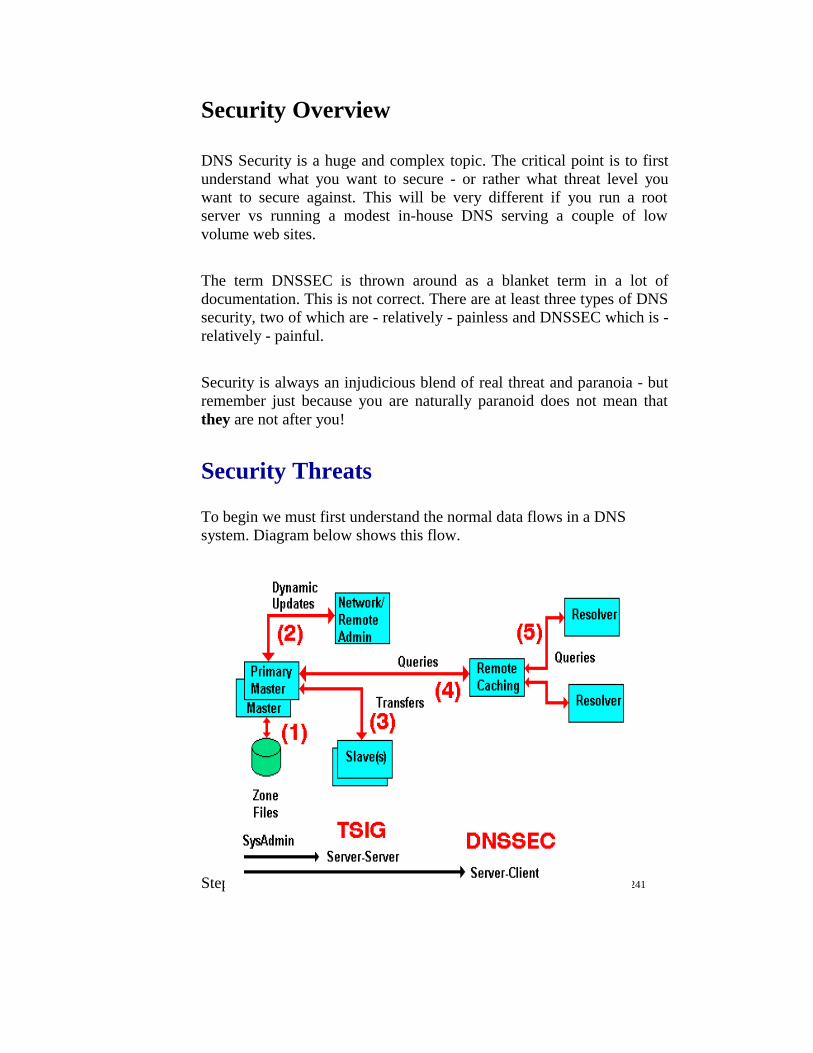
Step by StepTM Linux Guide. Page 241
Security Overview
DNS Security is a huge and complex topic. The critical point is to first understand what you want to secure - or rather what threat level you want to secure against. This will be very different if you run a root server vs running a modest in-house DNS serving a couple of low volume web sites. The term DNSSEC is thrown around as a blanket term in a lot of documentation. This is not correct. There are at least three types of DNS security, two of which are - relatively - painless and DNSSEC which is - relatively - painful. Security is always an injudicious blend of real threat and paranoia - but remember just because you are naturally paranoid does not mean that they are not after you!
Security Threats To begin we must first understand the normal data flows in a DNS system. Diagram below shows this flow.
Diagram 1-3 DNS Data Flow
Every data flow (each RED line above) is a potential source of threat!. Using the numbers from the above diagram here is what can happen at each flow (beware you may not sleep tonight):
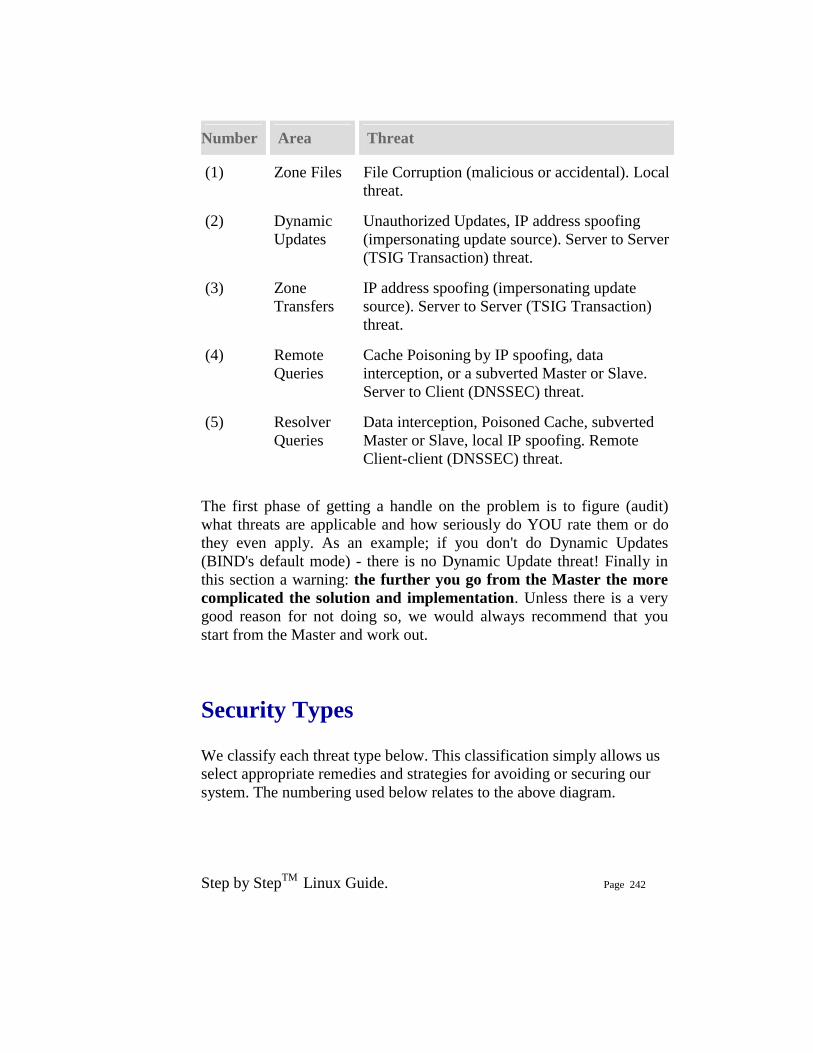
Step by StepTM Linux Guide. Page 242
Number Area Threat
(1) Zone Files File Corruption (malicious or accidental). Local threat.
(2) Dynamic Updates
Unauthorized Updates, IP address spoofing (impersonating update source). Server to Server (TSIG Transaction) threat.
(3) Zone Transfers
IP address spoofing (impersonating update source). Server to Server (TSIG Transaction) threat.
(4) Remote Queries
Cache Poisoning by IP spoofing, data interception, or a subverted Master or Slave. Server to Client (DNSSEC) threat.
(5) Resolver Queries
Data interception, Poisoned Cache, subverted Master or Slave, local IP spoofing. Remote Client-client (DNSSEC) threat.
The first phase of getting a handle on the problem is to figure (audit) what threats are applicable and how seriously do YOU rate them or do they even apply. As an example; if you don't do Dynamic Updates (BIND's default mode) - there is no Dynamic Update threat! Finally in this section a warning: the further you go from the Master the more complicated the solution and implementation. Unless there is a very good reason for not doing so, we would always recommend that you start from the Master and work out.
Security Types We classify each threat type below. This classification simply allows us select appropriate remedies and strategies for avoiding or securing our system. The numbering used below relates to the above diagram.
Step by StepTM Linux Guide. Page 243
1. The primary source of Zone data is normally the Zone Files (and don't forget the named.conf file which contains lots of interesting data as well). This data should be secure and securely backed up. This threat is classified as Local and is typically handled by good system administration.
2. If you run slave servers you will do zone transfers. Note:
You do NOT have to run with slave servers, you can run with multiple masters and eliminate the transfer threat entirely. This is classified as a Server-Server (Transaction) threat.
3. The BIND default is to deny Dynamic Zone Updates. If
you have enabled this service or require to it poses a serious threat to the integrity of your Zone files and should be protected. This is classified as a Server-Server (Transaction) threat.
4. The possibility of Remote Cache Poisoning due to IP
spoofing, data interception and other hacks is a judgement call if you are running a simple web site. If the site is high profile, open to competitive threat or is a high revenue earner you have probably implemented solutions already. This is classified as a Server-Client threat.
5. We understand that certain groups are already looking at
the implications for secure Resolvers but as of early 2004 this was not standardised. This is classified as a Server-Client threat.
Security – Local Normal system administration practices such as ensuring that files (configuration and zone files) are securely backed-up, proper read and write permissions applied and sensible physical access control to servers may be sufficient.
Step by StepTM Linux Guide. Page 244
Implementing a Stealth (or Split) DNS server provides a more serious solution depending on available resources.
Server-Server (TSIG Transactions) Zone transfers. If you have slave servers you will do zone transfers. BIND provides Access Control Lists (ACLs) which allow simple IP address protection. While IP based ACLs are relatively easy to subvert they are a lot better than nothing and require very little work. You can run with multiple masters (no slaves) and eliminate the threat entirely. You will have to manually synchronise zone file updates but this may be a simpler solution if changes are not frequent. Dynamic Updates. If you must run with this service it should be secured. BIND provides Access Control Lists (ACLs) which allow simple IP address protection but this is probably not adequate unless you can secure the IP addresses i.e. both systems are behind a firewall/DMZ/NAT or the updating host is using a private IP address. TSIG/TKEY If all other solutions fail DNS specifications (RFCs 2845 - TSIG and RFC 2930 - TKEY) provide authentication protocol enhancements to secure these Server-Server transactions. TSIG and TKEY implementations are messy but not too complicated - simply because of the scope of the problem. With Server-Server transactions there is a finite and normally small number of hosts involved. The protocols depend on a shared secret between the master and the slave(s) or updater(s). It is further assumed that you can get the shared secret securely to the peer server by some means not covered in the protocol itself. This process, known as key exchange. The shared-secret is open to brute-force attacks so frequent (monthly or more) changing of shared secrets will become a fact of life. What works once may not work monthly or weekly. TKEY allows automation of key-exchange using a Diffie-Hellman algorithm but seems to start with a shared secret!
Step by StepTM Linux Guide. Page 245
Server-Client (DNSSEC) The classic Remote Poisoned cache problem is not trivial to solve simply because there may an infinitely large number of Remote Caches involved. It is not reasonable to assume that you can use a shared secret. Instead the mechanism relies on public/private key authentication. The DNSSEC specifications (RFC 2535 augmented with others) attempt to answer three questions:
1. Authentication - the DNS responding really is the DNS that the request was sent to.
2. Integrity - the response is complete and nothing is missing. 3. Integrity - the DNS records have not been compromised.
///////////////////////////////////////////////////////chap3 Reverse Mapping Overview A normal DNS query would be of the form 'what is the IP of host=www in domain=mydomain.com'. There are times however when we want to be able to find out the name of the host whose IP address = x.x.x.x. Sometimes this is required for diagnostic purposes more frequently these days it is used for security purposes to trace a hacker or spammer, indeed many modern mailing systems use reverse mapping to provide simple authentication using dual look-up, IP to name and name to IP. In order to perform Reverse Mapping and to support normal recursive and Iterative (non-recursive) queries the DNS designers defined a special (reserved) Domain Name called IN-ADDR.ARPA. This domain allows for all supported Internet IPv4 addresses (and now IPv6).
IN-ADDR.ARPA Reverse Mapping Domain

Step by StepTM Linux Guide. Page 246
Reverse Mapping looks horribly complicated. It is not. As with all things when we understand what is being done and why - all becomes as clear as mud! We defined the normal domain name structure as a tree starting from the root. We write a normal domain name LEFT to RIGHT but the hierarchical structure is RIGHT to LEFT.
domain name = www.mydomain.com highest node in tree is = .com next (lower) = .mydomain next (lower) = www An IPv4 address is written as: 192.168.23.17
This IPv4 address defines a host = 17 in a Class C address range (192.168.23.x). In this case the most important part (the highest node) is on the LEFT (192) not the RIGHT. This is a tad awkward and would make it impossible to construct a sensible tree structure that could be searched in a single lifetime. The solution is to reverse the order of the address and place the result under the special domain IN-ADDR.ARPA (you will see this also written as in-addr.arpa which is OK since domains are case insensitive but the case should be preserved so we will use IN-ADDR.ARPA). Finally the last part of the IPv4 Address (17) is the host address and hosts, from our previous reading, are typically defined inside a zone file so we will ignore it and only use the Class C address base. The result of our manipulations are:
IP address =192.168.23.17 Class C base = 192.168.23 ; omits the host address = 17 Reversed Class C base = 23.168.192 Added to IN-ADDR.ARPA domain = 23.168.192.IN-ADDR.ARPA
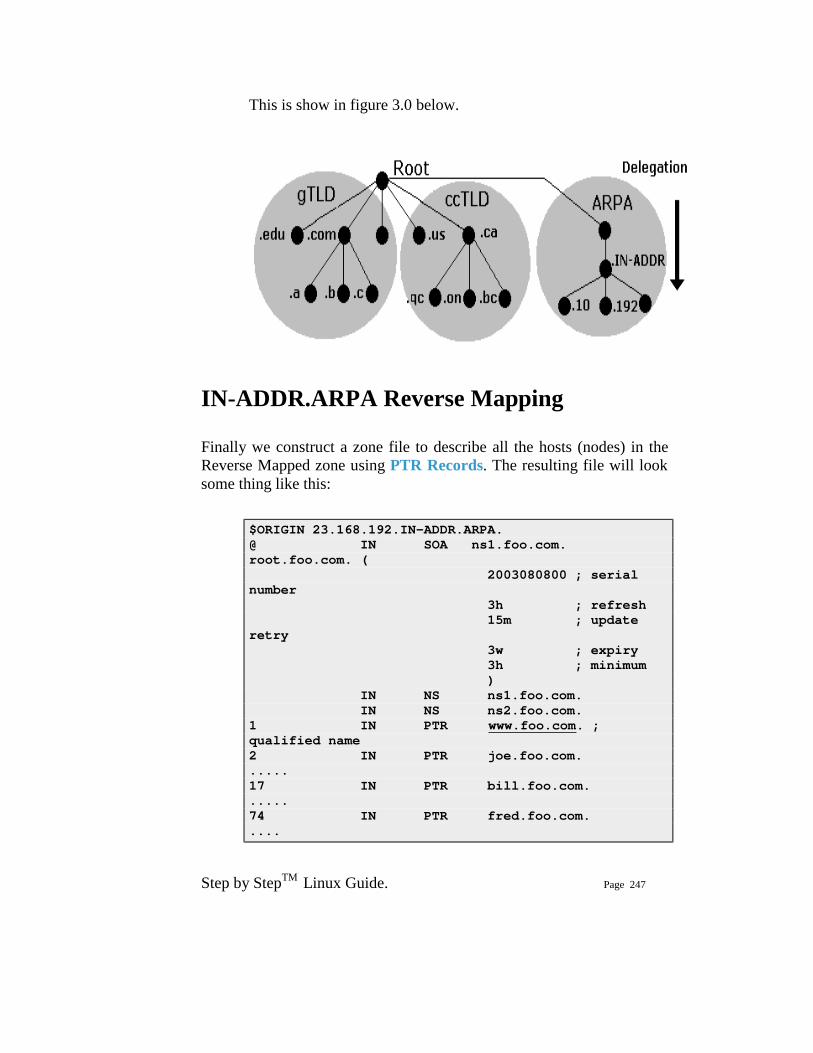
Step by StepTM Linux Guide. Page 247
This is show in figure 3.0 below.
IN-ADDR.ARPA Reverse Mapping
Finally we construct a zone file to describe all the hosts (nodes) in the Reverse Mapped zone using PTR Records. The resulting file will look some thing like this:
$ORIGIN 23.168.192.IN-ADDR.ARPA. @ IN SOA ns1.foo.com. root.foo.com. ( 2003080800 ; serial number 3h ; refresh 15m ; update retry 3w ; expiry 3h ; minimum ) IN NS ns1.foo.com. IN NS ns2.foo.com. 1 IN PTR www.foo.com. ; qualified name 2 IN PTR joe.foo.com. ..... 17 IN PTR bill.foo.com. ..... 74 IN PTR fred.foo.com. ....

Step by StepTM Linux Guide. Page 248
We must use qualified names ending with a dot (in fact they are Fully Qualified Domain Names FQDN) in this file because if we did not our $ORIGIN directive would lead to some strange results.
Reverse Map Delegation
Classless Reverse Map Delegation is defined by RFC 2317 which has Best Current Practice status and should be regarded as a definitive reference. Classless routing allows allocation of sub-nets on non-octet boundaries i.e. less that 256 addresses from a Class C address may be allocated and routed. The technique defined in the RFC is attributed to Glen A. Herrmannsfeldt. Normal domain name mapping as we have seen maps the domain name to an IP address. This process is independent of the ISP or other authority that allocated the IP name space. If the addresses were to change then the owner of the domain that maps these addresses would be able to make the necessary changes directly with either the relevant registrar i.e. change the IP address of DNS's for the domain or change the zone file(s) that describe the domain. The rule is that entities can be delegated only once in the domain name tree this includes IN-ADDR.ARPA. When a Class C subnet is assigned by an ISP or other authority e.g. 192.168.23.64/27 (a 32 IP address subnet) the responsibility for reverse mapping for the whole Class C address has already been assigned to the ISP or Authority. If you want to change the host names in the assigned subnet they must be notified to the authority for that Class C address. Generally this is unacceptable since such requests may encounter indifference, cost or questions. It is most desirable that responsibility for reverse mapping be delegated when the IP address subnet is assigned. The technique defined in RFC 2317 provides for such delegation to take place using CNAME Resource Records (rather than the more normal PTR Resource Records) in an expanded IN-ADDR.ARPA name space.
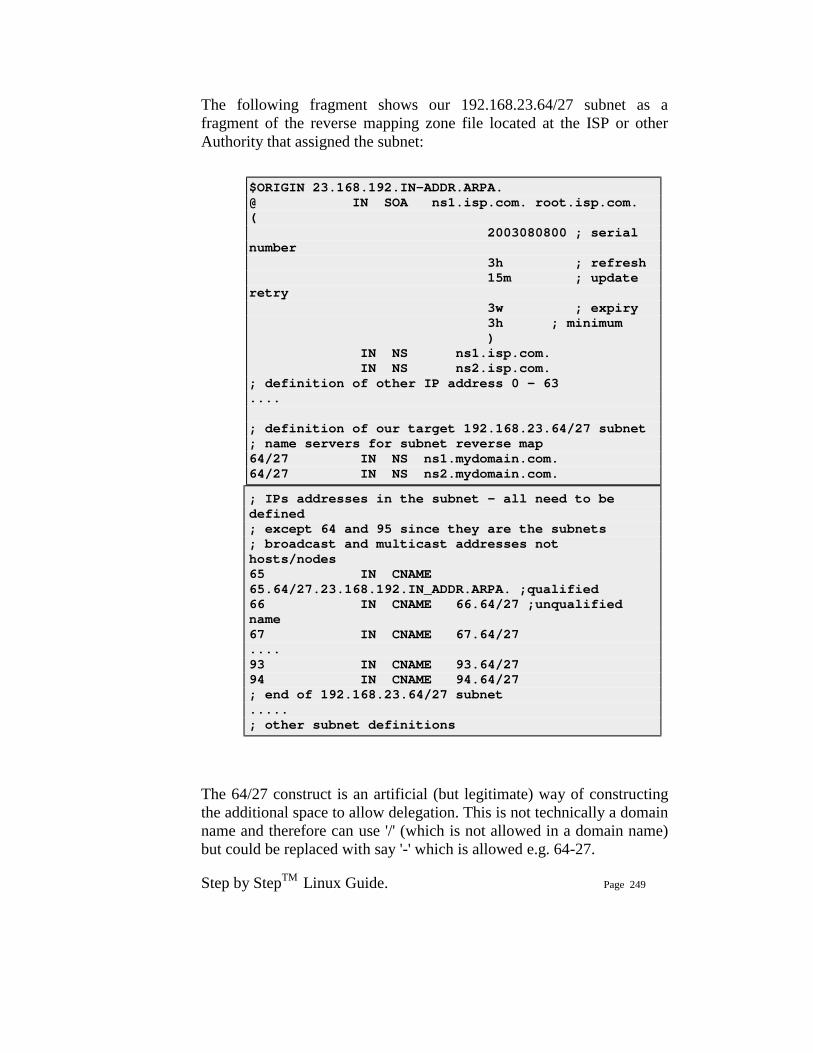
Step by StepTM Linux Guide. Page 249
The following fragment shows our 192.168.23.64/27 subnet as a fragment of the reverse mapping zone file located at the ISP or other Authority that assigned the subnet:
$ORIGIN 23.168.192.IN-ADDR.ARPA. @ IN SOA ns1.isp.com. root.isp.com. ( 2003080800 ; serial number 3h ; refresh 15m ; update retry 3w ; expiry 3h ; minimum ) IN NS ns1.isp.com. IN NS ns2.isp.com. ; definition of other IP address 0 - 63 .... ; definition of our target 192.168.23.64/27 subnet ; name servers for subnet reverse map 64/27 IN NS ns1.mydomain.com. 64/27 IN NS ns2.mydomain.com. ; IPs addresses in the subnet - all need to be defined ; except 64 and 95 since they are the subnets ; broadcast and multicast addresses not hosts/nodes 65 IN CNAME 65.64/27.23.168.192.IN_ADDR.ARPA. ;qualified 66 IN CNAME 66.64/27 ;unqualified name 67 IN CNAME 67.64/27 .... 93 IN CNAME 93.64/27 94 IN CNAME 94.64/27 ; end of 192.168.23.64/27 subnet ..... ; other subnet definitions
The 64/27 construct is an artificial (but legitimate) way of constructing the additional space to allow delegation. This is not technically a domain name and therefore can use '/' (which is not allowed in a domain name) but could be replaced with say '-' which is allowed e.g. 64-27.
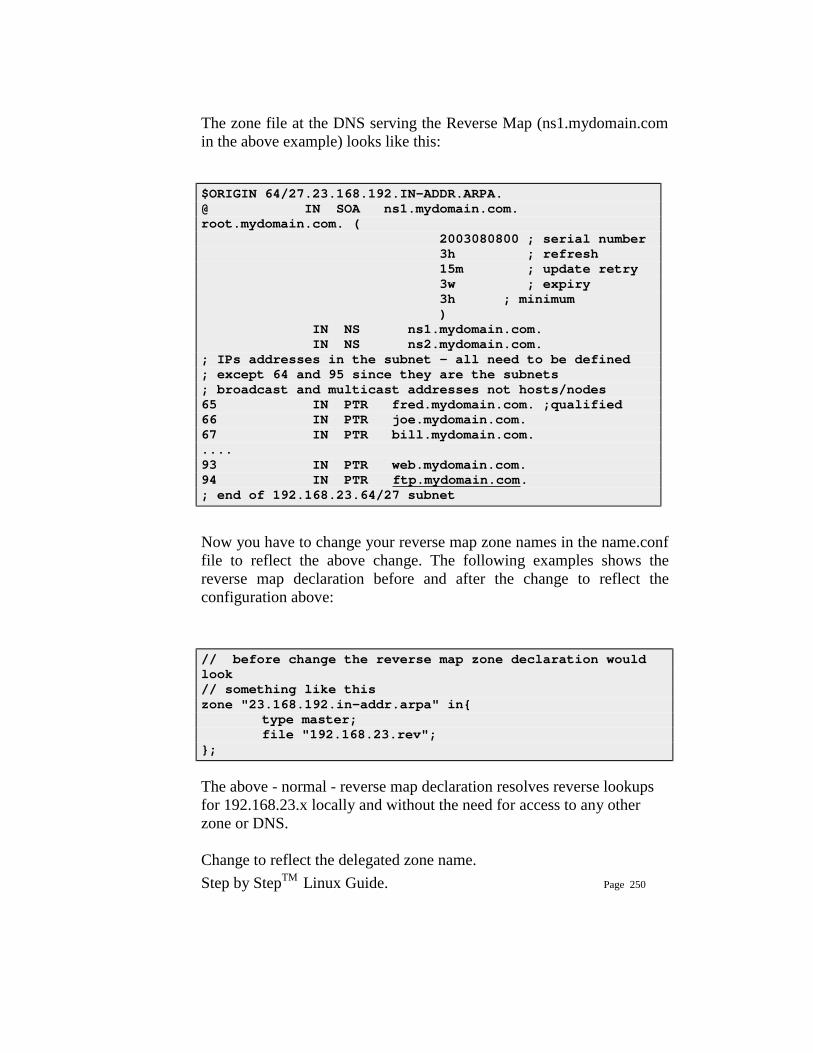
Step by StepTM Linux Guide. Page 250
The zone file at the DNS serving the Reverse Map (ns1.mydomain.com in the above example) looks like this: $ORIGIN 64/27.23.168.192.IN-ADDR.ARPA. @ IN SOA ns1.mydomain.com. root.mydomain.com. ( 2003080800 ; serial number 3h ; refresh 15m ; update retry 3w ; expiry 3h ; minimum ) IN NS ns1.mydomain.com. IN NS ns2.mydomain.com. ; IPs addresses in the subnet - all need to be defined ; except 64 and 95 since they are the subnets ; broadcast and multicast addresses not hosts/nodes 65 IN PTR fred.mydomain.com. ;qualified 66 IN PTR joe.mydomain.com. 67 IN PTR bill.mydomain.com. .... 93 IN PTR web.mydomain.com. 94 IN PTR ftp.mydomain.com. ; end of 192.168.23.64/27 subnet
Now you have to change your reverse map zone names in the name.conf file to reflect the above change. The following examples shows the reverse map declaration before and after the change to reflect the configuration above:
// before change the reverse map zone declaration would look // something like this zone "23.168.192.in-addr.arpa" in{ type master; file "192.168.23.rev"; }; The above - normal - reverse map declaration resolves reverse lookups for 192.168.23.x locally and without the need for access to any other zone or DNS. Change to reflect the delegated zone name.
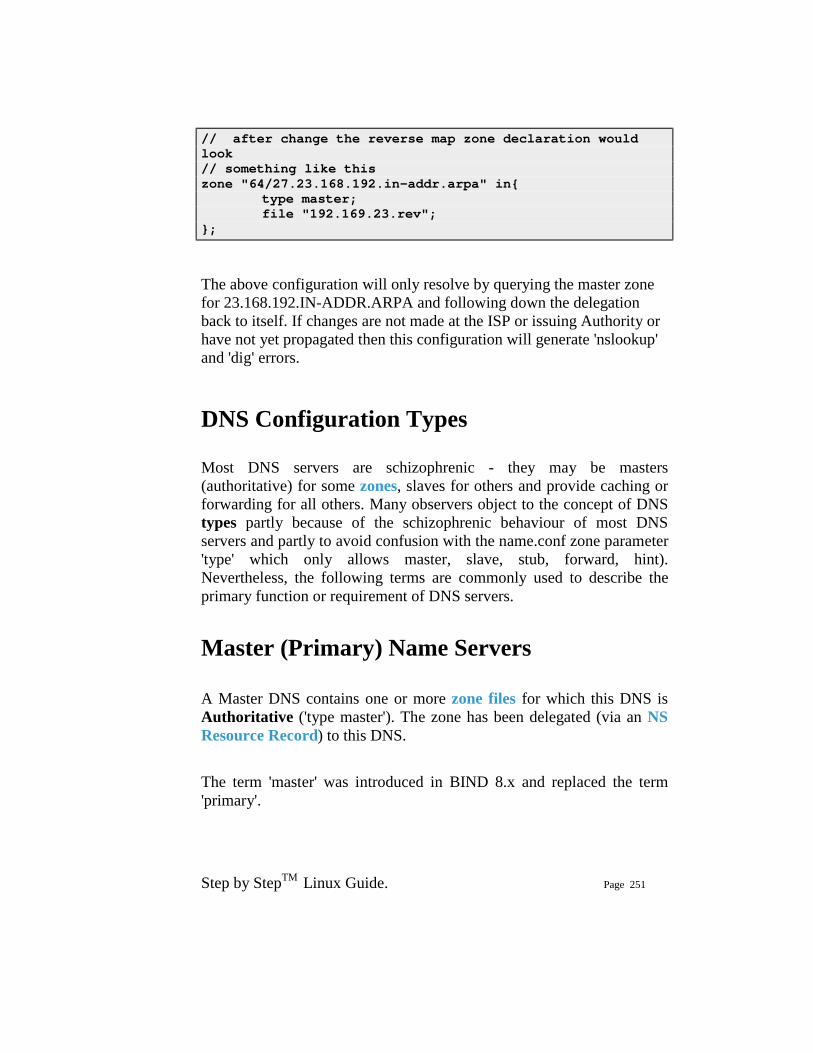
Step by StepTM Linux Guide. Page 251
// after change the reverse map zone declaration would look // something like this zone "64/27.23.168.192.in-addr.arpa" in{ type master; file "192.169.23.rev"; };
The above configuration will only resolve by querying the master zone for 23.168.192.IN-ADDR.ARPA and following down the delegation back to itself. If changes are not made at the ISP or issuing Authority or have not yet propagated then this configuration will generate 'nslookup' and 'dig' errors.
DNS Configuration Types
Most DNS servers are schizophrenic - they may be masters (authoritative) for some zones, slaves for others and provide caching or forwarding for all others. Many observers object to the concept of DNS types partly because of the schizophrenic behaviour of most DNS servers and partly to avoid confusion with the name.conf zone parameter 'type' which only allows master, slave, stub, forward, hint). Nevertheless, the following terms are commonly used to describe the primary function or requirement of DNS servers.
Master (Primary) Name Servers A Master DNS contains one or more zone files for which this DNS is Authoritative ('type master'). The zone has been delegated (via an NS Resource Record) to this DNS. The term 'master' was introduced in BIND 8.x and replaced the term 'primary'.
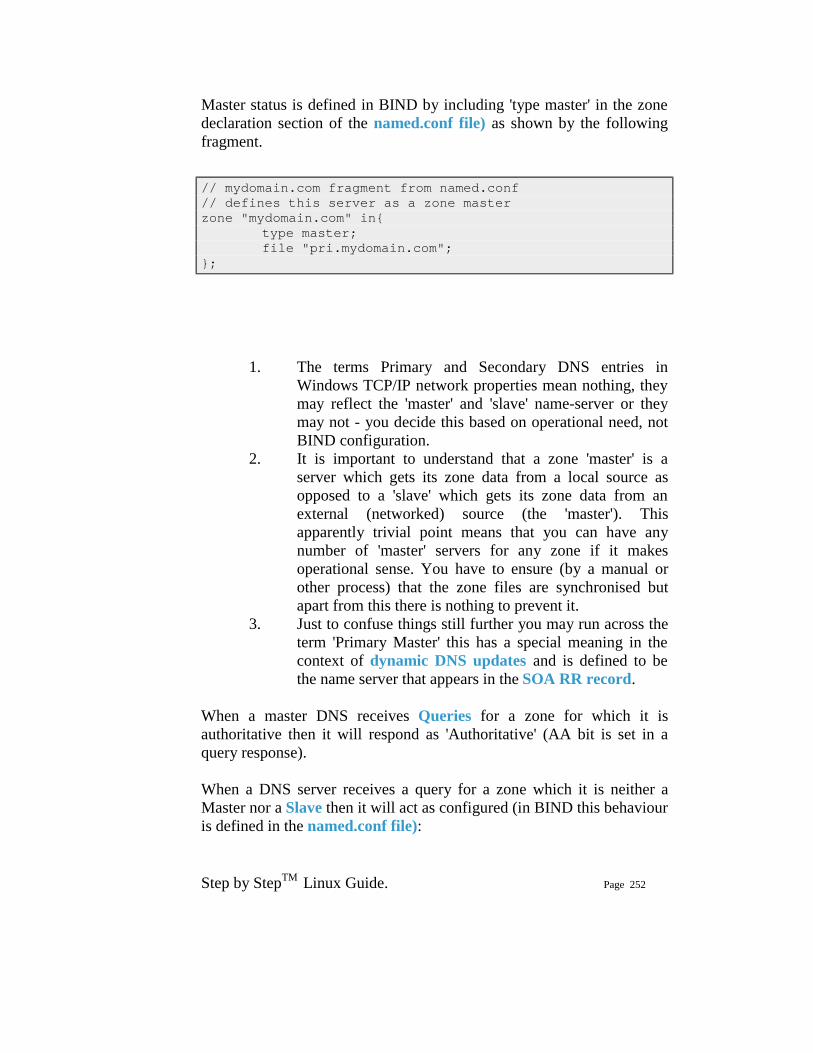
Step by StepTM Linux Guide. Page 252
Master status is defined in BIND by including 'type master' in the zone declaration section of the named.conf file) as shown by the following fragment.
// mydomain.com fragment from named.conf // defines this server as a zone master zone "mydomain.com" in{ type master; file "pri.mydomain.com"; };
1. The terms Primary and Secondary DNS entries in Windows TCP/IP network properties mean nothing, they may reflect the 'master' and 'slave' name-server or they may not - you decide this based on operational need, not BIND configuration.
2. It is important to understand that a zone 'master' is a server which gets its zone data from a local source as opposed to a 'slave' which gets its zone data from an external (networked) source (the 'master'). This apparently trivial point means that you can have any number of 'master' servers for any zone if it makes operational sense. You have to ensure (by a manual or other process) that the zone files are synchronised but apart from this there is nothing to prevent it.
3. Just to confuse things still further you may run across the term 'Primary Master' this has a special meaning in the context of dynamic DNS updates and is defined to be the name server that appears in the SOA RR record.
When a master DNS receives Queries for a zone for which it is authoritative then it will respond as 'Authoritative' (AA bit is set in a query response). When a DNS server receives a query for a zone which it is neither a Master nor a Slave then it will act as configured (in BIND this behaviour is defined in the named.conf file):
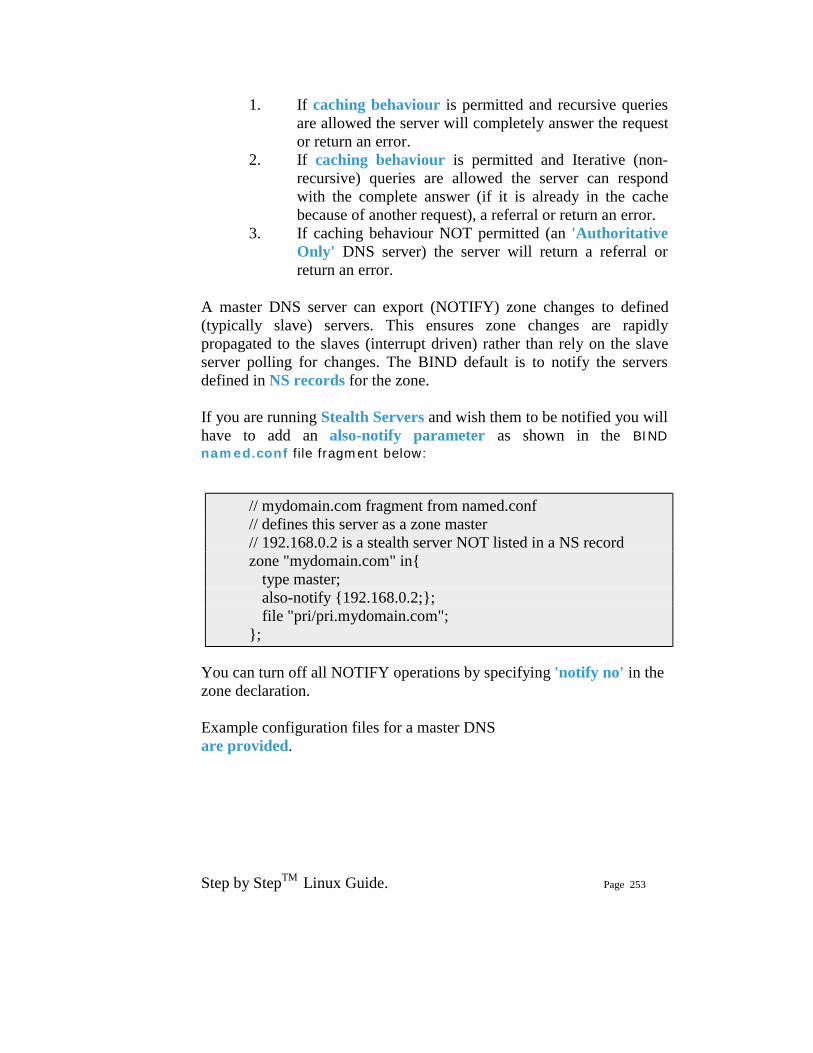
Step by StepTM Linux Guide. Page 253
1. If caching behaviour is permitted and recursive queries are allowed the server will completely answer the request or return an error.
2. If caching behaviour is permitted and Iterative (non-recursive) queries are allowed the server can respond with the complete answer (if it is already in the cache because of another request), a referral or return an error.
3. If caching behaviour NOT permitted (an 'Authoritative Only' DNS server) the server will return a referral or return an error.
A master DNS server can export (NOTIFY) zone changes to defined (typically slave) servers. This ensures zone changes are rapidly propagated to the slaves (interrupt driven) rather than rely on the slave server polling for changes. The BIND default is to notify the servers defined in NS records for the zone. If you are running Stealth Servers and wish them to be notified you will have to add an also-notify parameter as shown in the BIND named.conf file fragment below:
// mydomain.com fragment from named.conf // defines this server as a zone master // 192.168.0.2 is a stealth server NOT listed in a NS record zone "mydomain.com" in{ type master; also-notify {192.168.0.2;}; file "pri/pri.mydomain.com"; };
You can turn off all NOTIFY operations by specifying 'notify no' in the zone declaration. Example configuration files for a master DNS are provided.
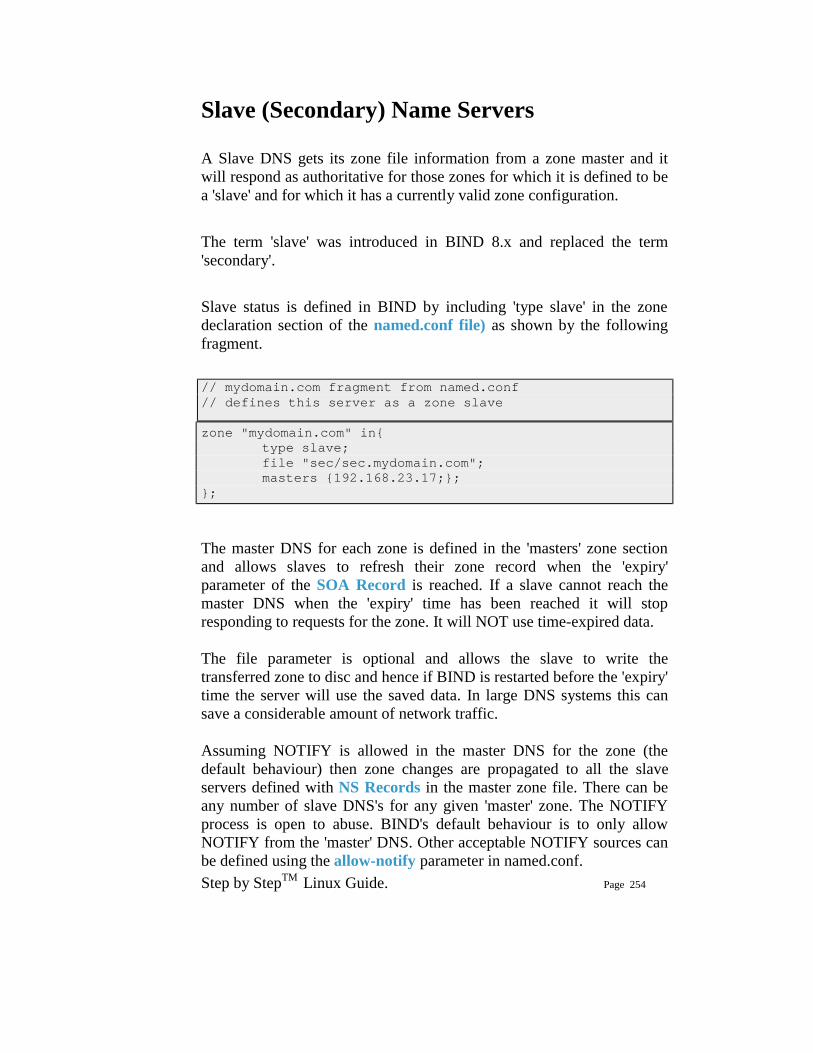
Step by StepTM Linux Guide. Page 254
Slave (Secondary) Name Servers
A Slave DNS gets its zone file information from a zone master and it will respond as authoritative for those zones for which it is defined to be a 'slave' and for which it has a currently valid zone configuration. The term 'slave' was introduced in BIND 8.x and replaced the term 'secondary'. Slave status is defined in BIND by including 'type slave' in the zone declaration section of the named.conf file) as shown by the following fragment.
// mydomain.com fragment from named.conf // defines this server as a zone slave
zone "mydomain.com" in{ type slave; file "sec/sec.mydomain.com"; masters {192.168.23.17;}; };
The master DNS for each zone is defined in the 'masters' zone section and allows slaves to refresh their zone record when the 'expiry' parameter of the SOA Record is reached. If a slave cannot reach the master DNS when the 'expiry' time has been reached it will stop responding to requests for the zone. It will NOT use time-expired data.
The file parameter is optional and allows the slave to write the transferred zone to disc and hence if BIND is restarted before the 'expiry' time the server will use the saved data. In large DNS systems this can save a considerable amount of network traffic.
Assuming NOTIFY is allowed in the master DNS for the zone (the default behaviour) then zone changes are propagated to all the slave servers defined with NS Records in the master zone file. There can be any number of slave DNS's for any given 'master' zone. The NOTIFY process is open to abuse. BIND's default behaviour is to only allow NOTIFY from the 'master' DNS. Other acceptable NOTIFY sources can be defined using the allow-notify parameter in named.conf.
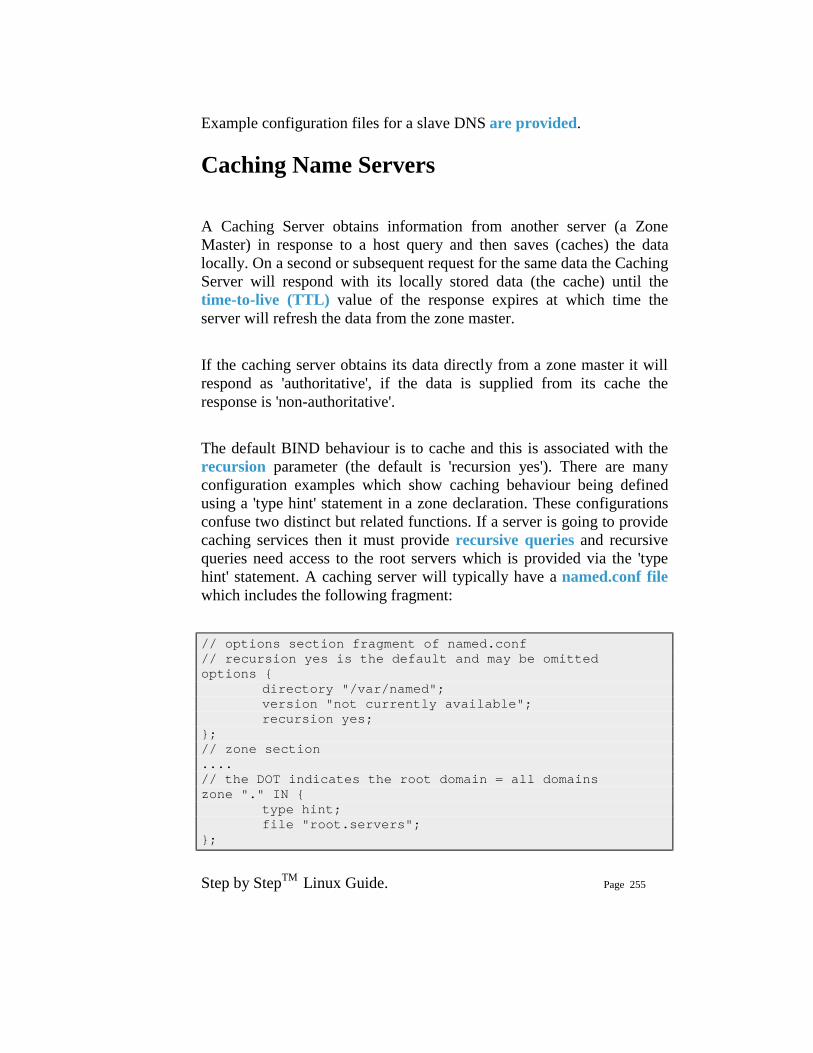
Step by StepTM Linux Guide. Page 255
Example configuration files for a slave DNS are provided. Caching Name Servers
A Caching Server obtains information from another server (a Zone Master) in response to a host query and then saves (caches) the data locally. On a second or subsequent request for the same data the Caching Server will respond with its locally stored data (the cache) until the time-to-live (TTL) value of the response expires at which time the server will refresh the data from the zone master. If the caching server obtains its data directly from a zone master it will respond as 'authoritative', if the data is supplied from its cache the response is 'non-authoritative'. The default BIND behaviour is to cache and this is associated with the recursion parameter (the default is 'recursion yes'). There are many configuration examples which show caching behaviour being defined using a 'type hint' statement in a zone declaration. These configurations confuse two distinct but related functions. If a server is going to provide caching services then it must provide recursive queries and recursive queries need access to the root servers which is provided via the 'type hint' statement. A caching server will typically have a named.conf file which includes the following fragment: // options section fragment of named.conf // recursion yes is the default and may be omitted options { directory "/var/named"; version "not currently available"; recursion yes; }; // zone section .... // the DOT indicates the root domain = all domains zone "." IN { type hint; file "root.servers"; };
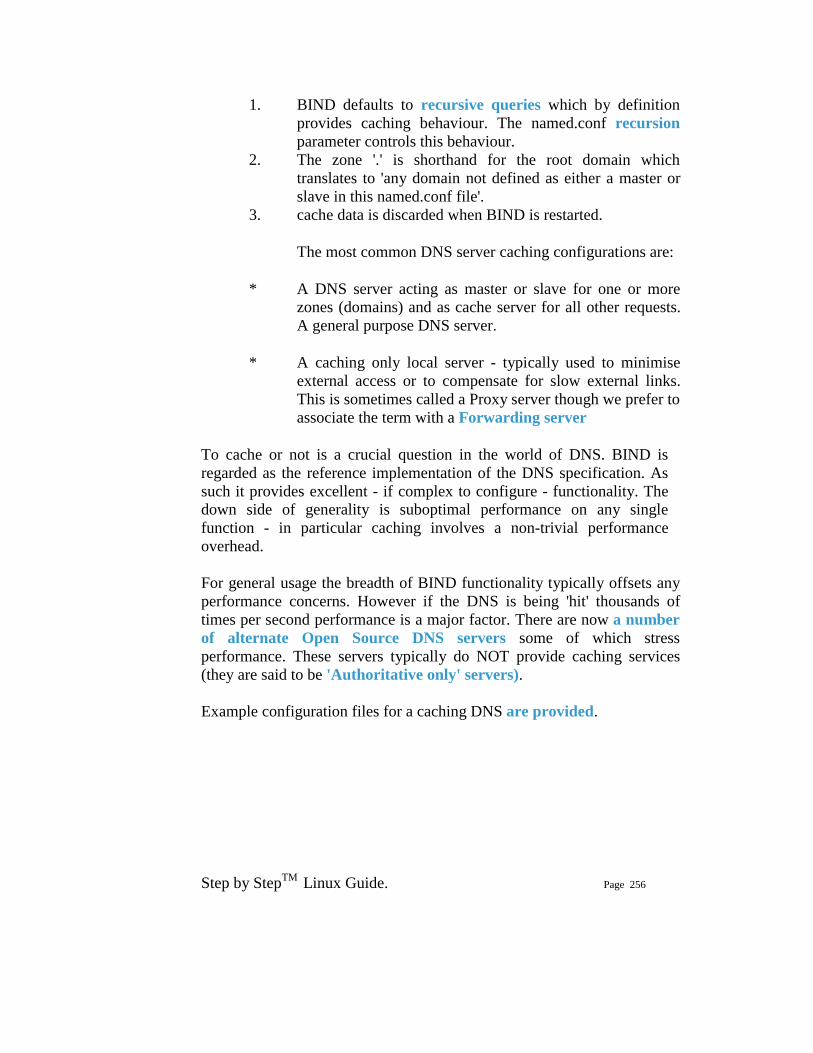
Step by StepTM Linux Guide. Page 256
1. BIND defaults to recursive queries which by definition provides caching behaviour. The named.conf recursion parameter controls this behaviour.
2. The zone '.' is shorthand for the root domain which translates to 'any domain not defined as either a master or slave in this named.conf file'.
3. cache data is discarded when BIND is restarted.
The most common DNS server caching configurations are:
* A DNS server acting as master or slave for one or more zones (domains) and as cache server for all other requests. A general purpose DNS server.
* A caching only local server - typically used to minimise external access or to compensate for slow external links. This is sometimes called a Proxy server though we prefer to associate the term with a Forwarding server
To cache or not is a crucial question in the world of DNS. BIND is regarded as the reference implementation of the DNS specification. As such it provides excellent - if complex to configure - functionality. The down side of generality is suboptimal performance on any single function - in particular caching involves a non-trivial performance overhead.
For general usage the breadth of BIND functionality typically offsets any performance concerns. However if the DNS is being 'hit' thousands of times per second performance is a major factor. There are now a number of alternate Open Source DNS servers some of which stress performance. These servers typically do NOT provide caching services (they are said to be 'Authoritative only' servers).
Example configuration files for a caching DNS are provided.
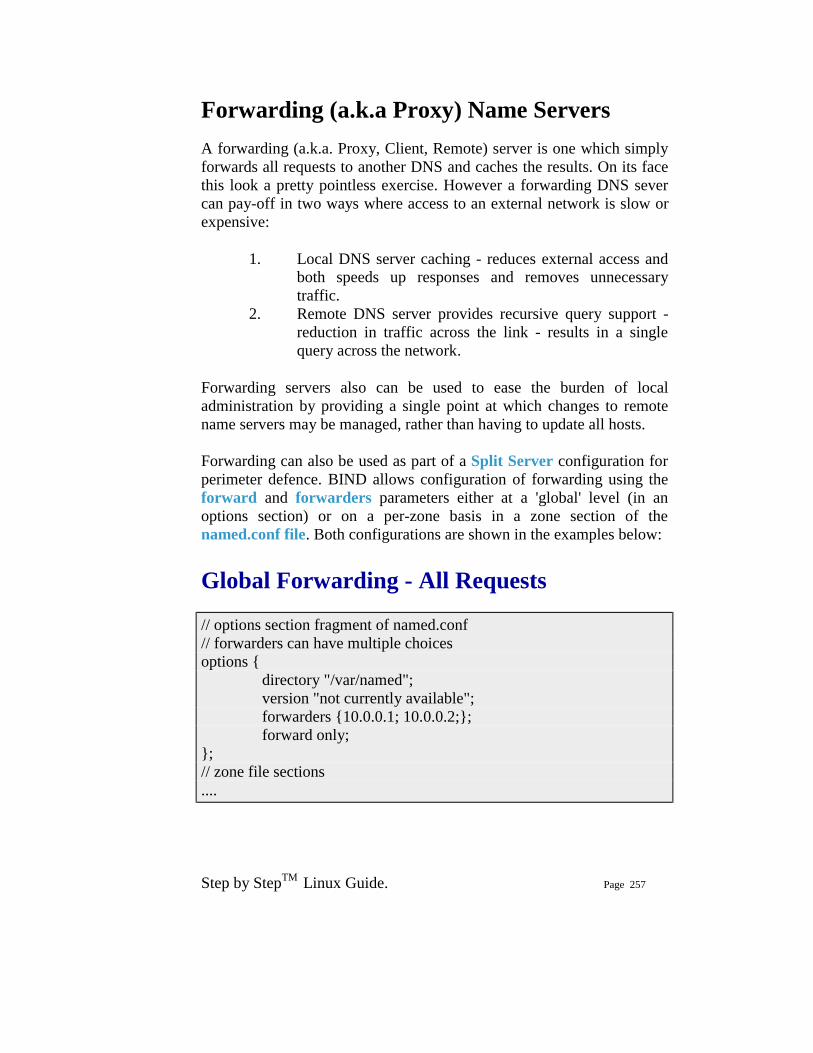
Step by StepTM Linux Guide. Page 257
Forwarding (a.k.a Proxy) Name Servers A forwarding (a.k.a. Proxy, Client, Remote) server is one which simply forwards all requests to another DNS and caches the results. On its face this look a pretty pointless exercise. However a forwarding DNS sever can pay-off in two ways where access to an external network is slow or expensive:
1. Local DNS server caching - reduces external access and both speeds up responses and removes unnecessary traffic.
2. Remote DNS server provides recursive query support - reduction in traffic across the link - results in a single query across the network.
Forwarding servers also can be used to ease the burden of local administration by providing a single point at which changes to remote name servers may be managed, rather than having to update all hosts. Forwarding can also be used as part of a Split Server configuration for perimeter defence. BIND allows configuration of forwarding using the forward and forwarders parameters either at a 'global' level (in an options section) or on a per-zone basis in a zone section of the named.conf file. Both configurations are shown in the examples below:
Global Forwarding - All Requests // options section fragment of named.conf // forwarders can have multiple choices options { directory "/var/named"; version "not currently available"; forwarders {10.0.0.1; 10.0.0.2;}; forward only; }; // zone file sections ....
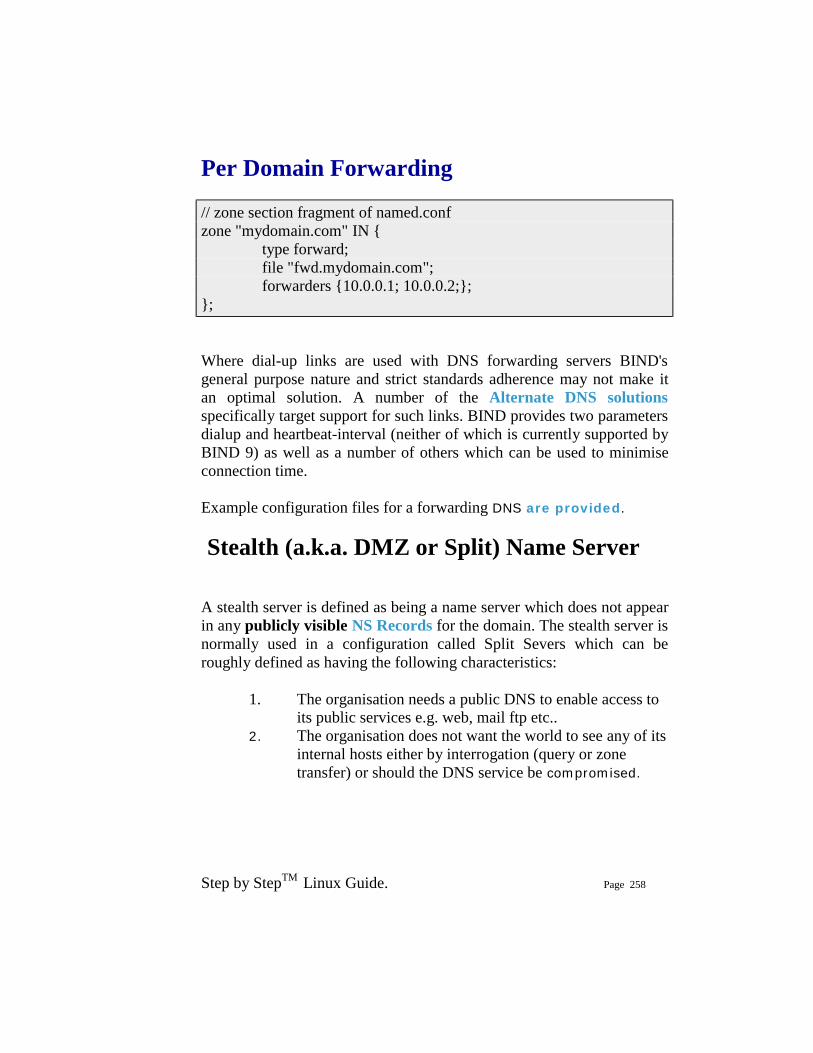
Step by StepTM Linux Guide. Page 258
Per Domain Forwarding // zone section fragment of named.conf zone "mydomain.com" IN { type forward; file "fwd.mydomain.com"; forwarders {10.0.0.1; 10.0.0.2;}; }; Where dial-up links are used with DNS forwarding servers BIND's general purpose nature and strict standards adherence may not make it an optimal solution. A number of the Alternate DNS solutions specifically target support for such links. BIND provides two parameters dialup and heartbeat-interval (neither of which is currently supported by BIND 9) as well as a number of others which can be used to minimise connection time. Example configuration files for a forwarding DNS are provided.
Stealth (a.k.a. DMZ or Split) Name Server A stealth server is defined as being a name server which does not appear in any publicly visible NS Records for the domain. The stealth server is normally used in a configuration called Split Severs which can be roughly defined as having the following characteristics:
1. The organisation needs a public DNS to enable access to its public services e.g. web, mail ftp etc..
2. The organisation does not want the world to see any of its internal hosts either by interrogation (query or zone transfer) or should the DNS service be compromised.
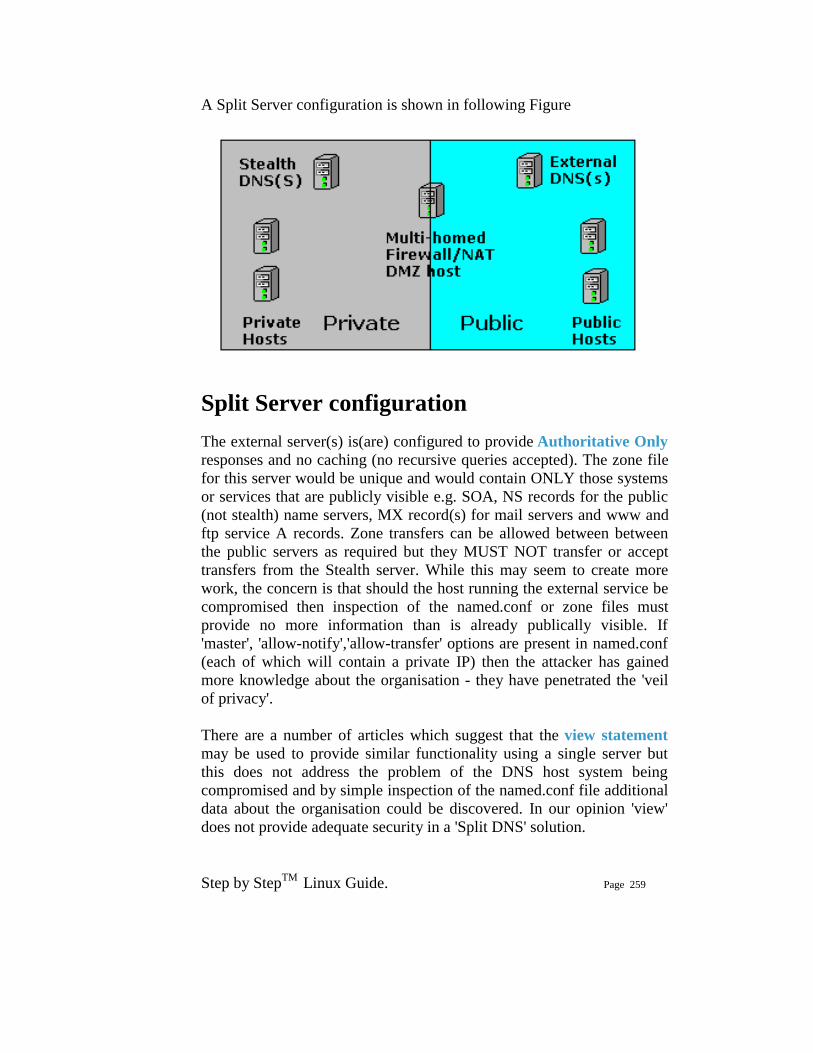
Step by StepTM Linux Guide. Page 259
A Split Server configuration is shown in following Figure
Split Server configuration The external server(s) is(are) configured to provide Authoritative Only responses and no caching (no recursive queries accepted). The zone file for this server would be unique and would contain ONLY those systems or services that are publicly visible e.g. SOA, NS records for the public (not stealth) name servers, MX record(s) for mail servers and www and ftp service A records. Zone transfers can be allowed between between the public servers as required but they MUST NOT transfer or accept transfers from the Stealth server. While this may seem to create more work, the concern is that should the host running the external service be compromised then inspection of the named.conf or zone files must provide no more information than is already publically visible. If 'master', 'allow-notify','allow-transfer' options are present in named.conf (each of which will contain a private IP) then the attacker has gained more knowledge about the organisation - they have penetrated the 'veil of privacy'. There are a number of articles which suggest that the view statement may be used to provide similar functionality using a single server but this does not address the problem of the DNS host system being compromised and by simple inspection of the named.conf file additional data about the organisation could be discovered. In our opinion 'view' does not provide adequate security in a 'Split DNS' solution.
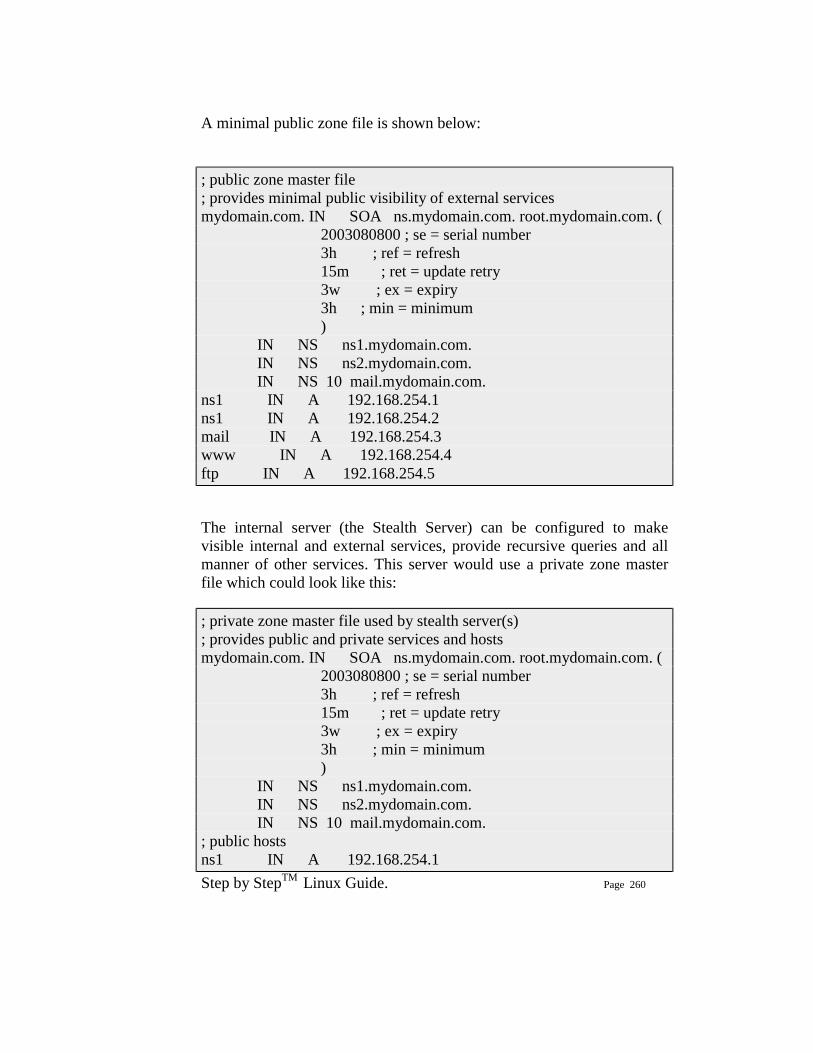
Step by StepTM Linux Guide. Page 260
A minimal public zone file is shown below:
; public zone master file ; provides minimal public visibility of external services mydomain.com. IN SOA ns.mydomain.com. root.mydomain.com. ( 2003080800 ; se = serial number 3h ; ref = refresh 15m ; ret = update retry 3w ; ex = expiry 3h ; min = minimum ) IN NS ns1.mydomain.com. IN NS ns2.mydomain.com. IN NS 10 mail.mydomain.com. ns1 IN A 192.168.254.1 ns1 IN A 192.168.254.2 mail IN A 192.168.254.3 www IN A 192.168.254.4 ftp IN A 192.168.254.5 The internal server (the Stealth Server) can be configured to make visible internal and external services, provide recursive queries and all manner of other services. This server would use a private zone master file which could look like this:
; private zone master file used by stealth server(s) ; provides public and private services and hosts mydomain.com. IN SOA ns.mydomain.com. root.mydomain.com. ( 2003080800 ; se = serial number 3h ; ref = refresh 15m ; ret = update retry 3w ; ex = expiry 3h ; min = minimum ) IN NS ns1.mydomain.com. IN NS ns2.mydomain.com. IN NS 10 mail.mydomain.com. ; public hosts ns1 IN A 192.168.254.1
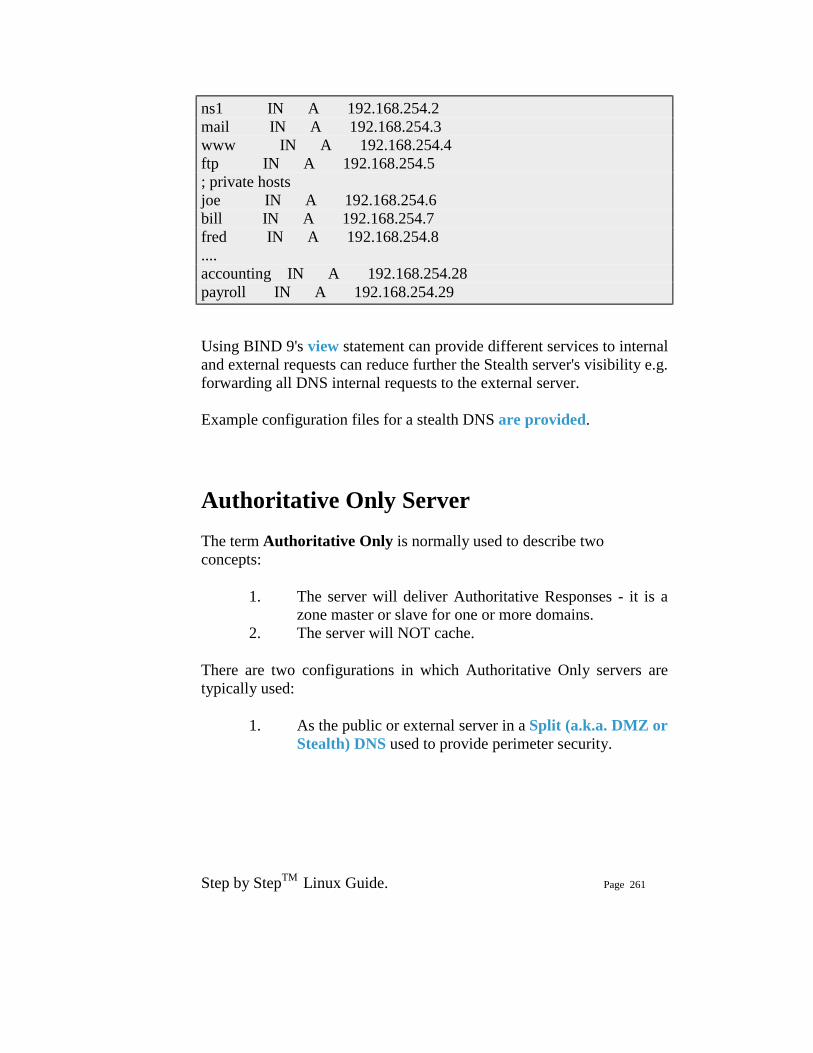
Step by StepTM Linux Guide. Page 261
ns1 IN A 192.168.254.2 mail IN A 192.168.254.3 www IN A 192.168.254.4 ftp IN A 192.168.254.5 ; private hosts joe IN A 192.168.254.6 bill IN A 192.168.254.7 fred IN A 192.168.254.8 .... accounting IN A 192.168.254.28 payroll IN A 192.168.254.29 Using BIND 9's view statement can provide different services to internal and external requests can reduce further the Stealth server's visibility e.g. forwarding all DNS internal requests to the external server. Example configuration files for a stealth DNS are provided.
Authoritative Only Server The term Authoritative Only is normally used to describe two concepts:
1. The server will deliver Authoritative Responses - it is a zone master or slave for one or more domains.
2. The server will NOT cache.
There are two configurations in which Authoritative Only servers are typically used:
1. As the public or external server in a Split (a.k.a. DMZ or Stealth) DNS used to provide perimeter security.
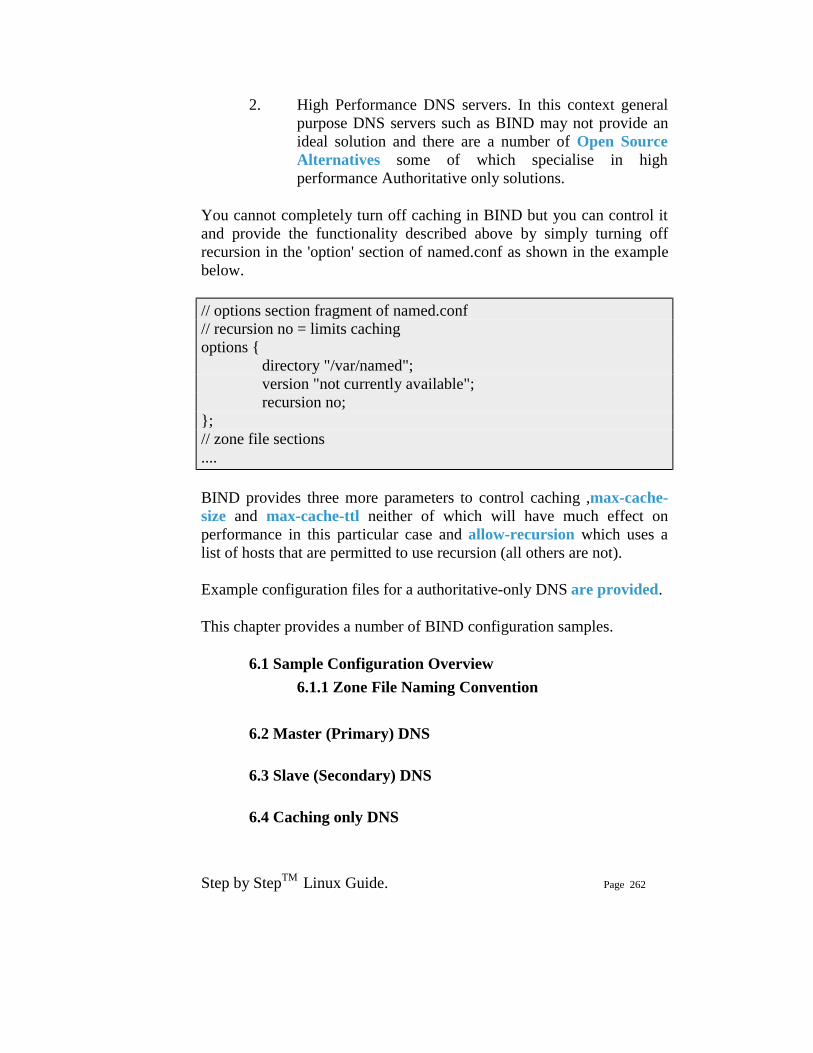
Step by StepTM Linux Guide. Page 262
2. High Performance DNS servers. In this context general purpose DNS servers such as BIND may not provide an ideal solution and there are a number of Open Source Alternatives some of which specialise in high performance Authoritative only solutions.
You cannot completely turn off caching in BIND but you can control it and provide the functionality described above by simply turning off recursion in the 'option' section of named.conf as shown in the example below. // options section fragment of named.conf // recursion no = limits caching options { directory "/var/named"; version "not currently available"; recursion no; }; // zone file sections .... BIND provides three more parameters to control caching ,max-cache-size and max-cache-ttl neither of which will have much effect on performance in this particular case and allow-recursion which uses a list of hosts that are permitted to use recursion (all others are not). Example configuration files for a authoritative-only DNS are provided.
This chapter provides a number of BIND configuration samples.
6.1 Sample Configuration Overview 6.1.1 Zone File Naming Convention
6.2 Master (Primary) DNS 6.3 Slave (Secondary) DNS 6.4 Caching only DNS
Step by StepTM Linux Guide. Page 263
6.5 Forwarding (a.k.a. Proxy, Client, Remote) DNS 6.6 Stealth (a.k.a. Split or DMZ) DNS 6.7 Authoritative Only DNS 6.8 Views based Authoritative Only DNS
6.1 Sample BIND Configuration Overview This chapter provides samples configurations and descriptions for each of the DNS types previously described. A BIND systems consists of the following parts:
1. A named.conf file describing the functionality of the BIND system. The entries in this file are fully described.
2. Depending on the configuration one or more zone files describing the domains being managed. The entries in zone files are fully described. Zone files contain Resource Records which are fully described.
3. Depending on the configuration one or more required zone files describing the 'localhost' and root name servers.
Many BIND/DNS configurations are schizophrenic in nature - they may be 'masters' for some zones, 'slaves' for others, forward others and provide caching services for all comers. Where possible we cover alternate configurations or as least note the alternate configurations. All the configuration files are deliberately kept simple - links are provided to the various sections that will describe more 'advanced' parameters as appropriate. Comments are included in the files to describe functionality. The configuration used throughout is:
Step by StepTM Linux Guide. Page 264
1. Two name servers are used one internal (ns1) and one external (ns2) to the domain
2. The mail service is external to the domain (provided by a third party)
3. FTP and WWW services are provided by the same host 4. There are two hosts named bill and fred 5. The host address are all in the class C private address
range 192.168.0.0 (a slightly artificial case)
6.1.1 Zone File Naming Convention
Everyone has their own ideas on a good naming convention and thus something that is supposed to be useful becomes contentious. Here is a convention that is in daily use. Its sole merits are that it is a convention and makes sense to its authors.
1. All zone files are placed in /var/named/. The base directory contains all the housekeeping zone files (e.g. localhost, reverse-mapping, root.servers etc.) with a subdirectory structure used as follows:
1.I /var/named/pri - master zone files
1.II /var/named/sec - slave zones files
1.III /var/named/views - where views are used
2. master files are named pri.mydomain.com (or pri.mydomain.net etc.) if its a sub-domain it will be pri.sub-domain.mydomain.com etc.
3. slave zone files are named sec.mydomain.com (or sec.mydomain.ca etc.) if its a sub-domain it will be sec.sub-domain.mydomain.com etc.
4. The root server zone file is called root.servers (typically called named.ca or named.root in BIND distributions).
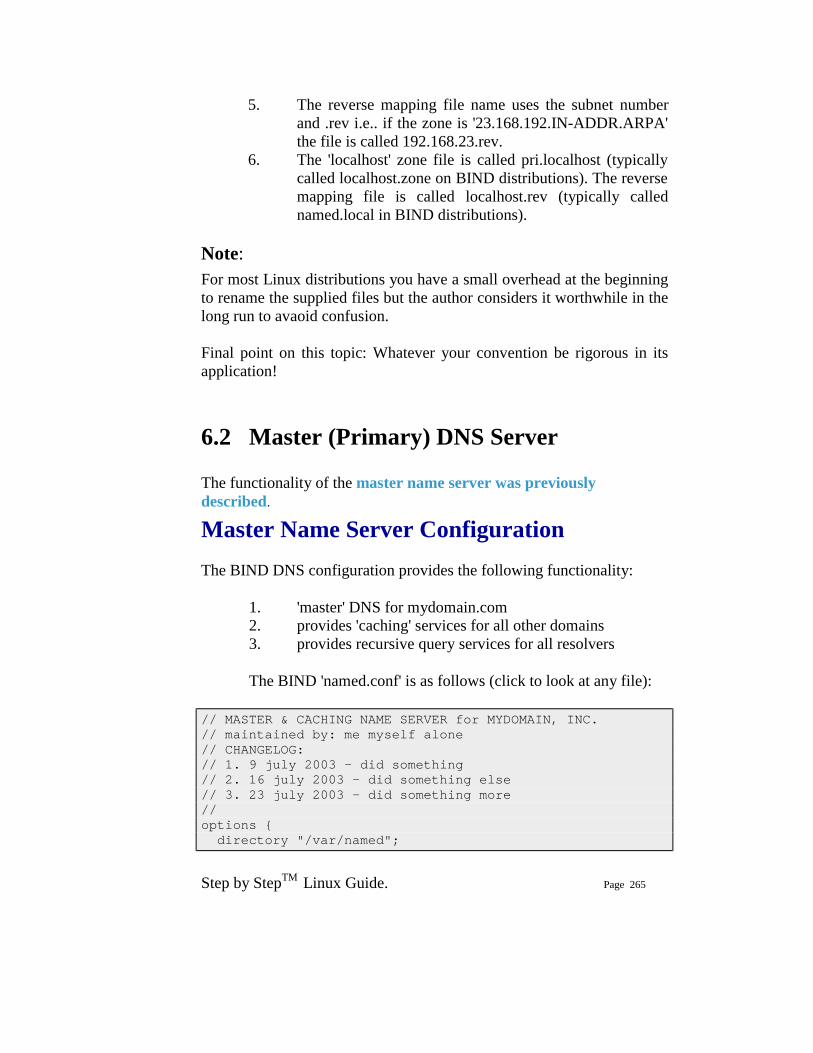
Step by StepTM Linux Guide. Page 265
5. The reverse mapping file name uses the subnet number and .rev i.e.. if the zone is '23.168.192.IN-ADDR.ARPA' the file is called 192.168.23.rev.
6. The 'localhost' zone file is called pri.localhost (typically called localhost.zone on BIND distributions). The reverse mapping file is called localhost.rev (typically called named.local in BIND distributions).
Note:
For most Linux distributions you have a small overhead at the beginning to rename the supplied files but the author considers it worthwhile in the long run to avaoid confusion. Final point on this topic: Whatever your convention be rigorous in its application!
6.2 Master (Primary) DNS Server
The functionality of the master name server was previously described.
Master Name Server Configuration The BIND DNS configuration provides the following functionality:
1. 'master' DNS for mydomain.com 2. provides 'caching' services for all other domains 3. provides recursive query services for all resolvers
The BIND 'named.conf' is as follows (click to look at any file):
// MASTER & CACHING NAME SERVER for MYDOMAIN, INC. // maintained by: me myself alone // CHANGELOG: // 1. 9 july 2003 - did something // 2. 16 july 2003 - did something else // 3. 23 july 2003 - did something more // options { directory "/var/named";
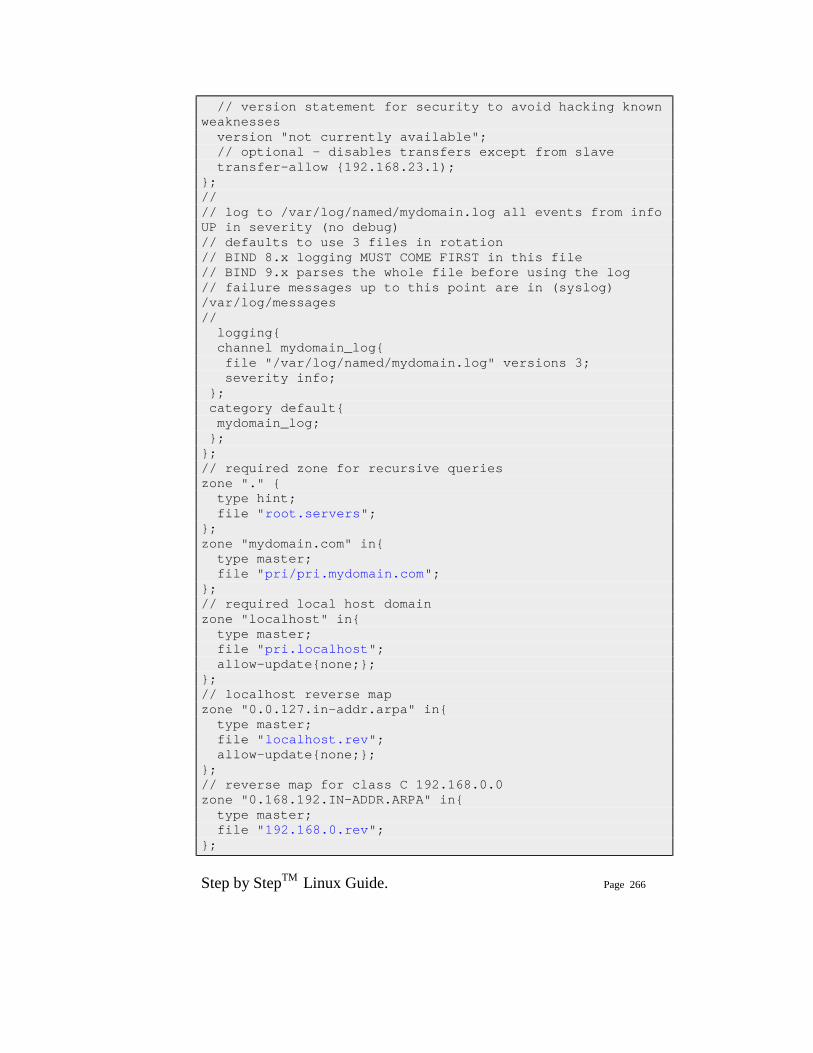
Step by StepTM Linux Guide. Page 266
// version statement for security to avoid hacking known weaknesses version "not currently available"; // optional - disables transfers except from slave transfer-allow {192.168.23.1); }; // // log to /var/log/named/mydomain.log all events from info UP in severity (no debug) // defaults to use 3 files in rotation // BIND 8.x logging MUST COME FIRST in this file // BIND 9.x parses the whole file before using the log // failure messages up to this point are in (syslog) /var/log/messages // logging{ channel mydomain_log{ file "/var/log/named/mydomain.log" versions 3; severity info; }; category default{ mydomain_log; }; }; // required zone for recursive queries zone "." { type hint; file "root.servers"; }; zone "mydomain.com" in{ type master; file "pri/pri.mydomain.com"; }; // required local host domain zone "localhost" in{ type master; file "pri.localhost"; allow-update{none;}; }; // localhost reverse map zone "0.0.127.in-addr.arpa" in{ type master; file "localhost.rev"; allow-update{none;}; }; // reverse map for class C 192.168.0.0 zone "0.168.192.IN-ADDR.ARPA" in{ type master; file "192.168.0.rev"; };
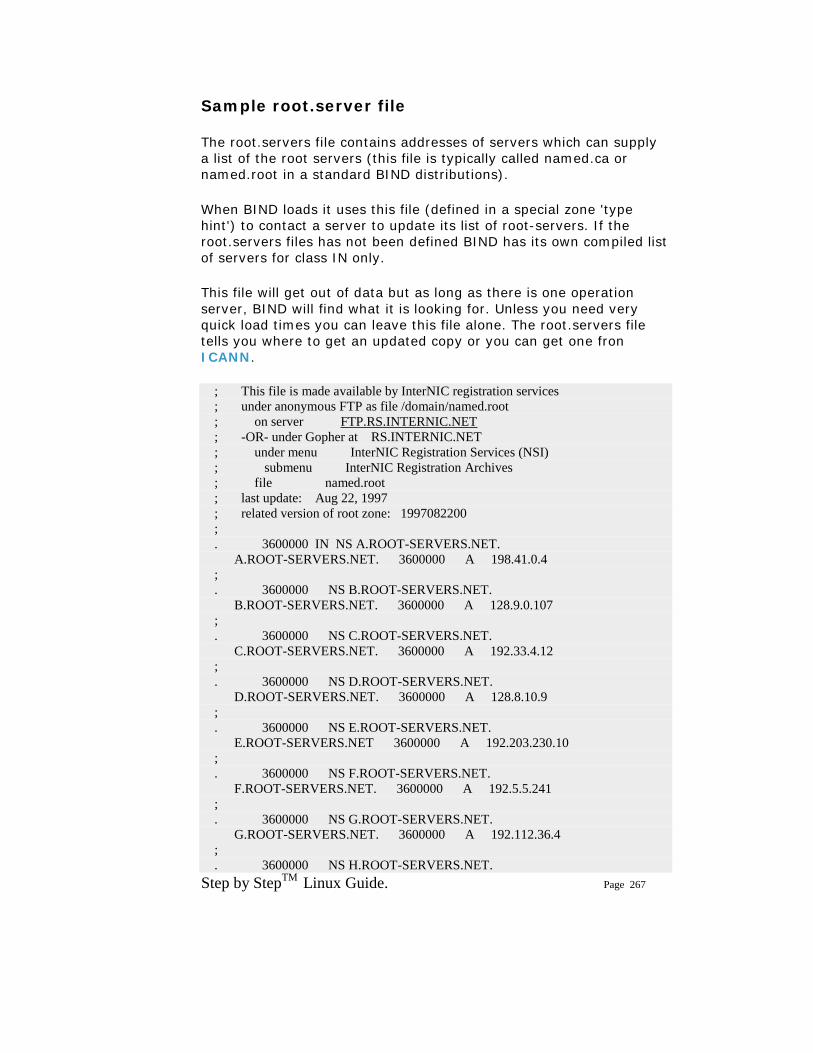
Step by StepTM Linux Guide. Page 267
Sample root.server file
The root.servers file contains addresses of servers which can supply a list of the root servers (this file is typically called named.ca or named.root in a standard BIND distributions).
When BIND loads it uses this file (defined in a special zone 'type hint') to contact a server to update its list of root-servers. If the root.servers files has not been defined BIND has its own compiled list of servers for class IN only.
This file will get out of data but as long as there is one operation server, BIND will find what it is looking for. Unless you need very quick load times you can leave this file alone. The root.servers file tells you where to get an updated copy or you can get one fron ICANN.
; This file is made available by InterNIC registration services ; under anonymous FTP as file /domain/named.root ; on server FTP.RS.INTERNIC.NET ; -OR- under Gopher at RS.INTERNIC.NET ; under menu InterNIC Registration Services (NSI) ; submenu InterNIC Registration Archives ; file named.root ; last update: Aug 22, 1997 ; related version of root zone: 1997082200 ; . 3600000 IN NS A.ROOT-SERVERS.NET. A.ROOT-SERVERS.NET. 3600000 A 198.41.0.4 ; . 3600000 NS B.ROOT-SERVERS.NET. B.ROOT-SERVERS.NET. 3600000 A 128.9.0.107 ; . 3600000 NS C.ROOT-SERVERS.NET. C.ROOT-SERVERS.NET. 3600000 A 192.33.4.12 ; . 3600000 NS D.ROOT-SERVERS.NET. D.ROOT-SERVERS.NET. 3600000 A 128.8.10.9 ; . 3600000 NS E.ROOT-SERVERS.NET. E.ROOT-SERVERS.NET 3600000 A 192.203.230.10 ; . 3600000 NS F.ROOT-SERVERS.NET. F.ROOT-SERVERS.NET. 3600000 A 192.5.5.241 ; . 3600000 NS G.ROOT-SERVERS.NET. G.ROOT-SERVERS.NET. 3600000 A 192.112.36.4 ; . 3600000 NS H.ROOT-SERVERS.NET.
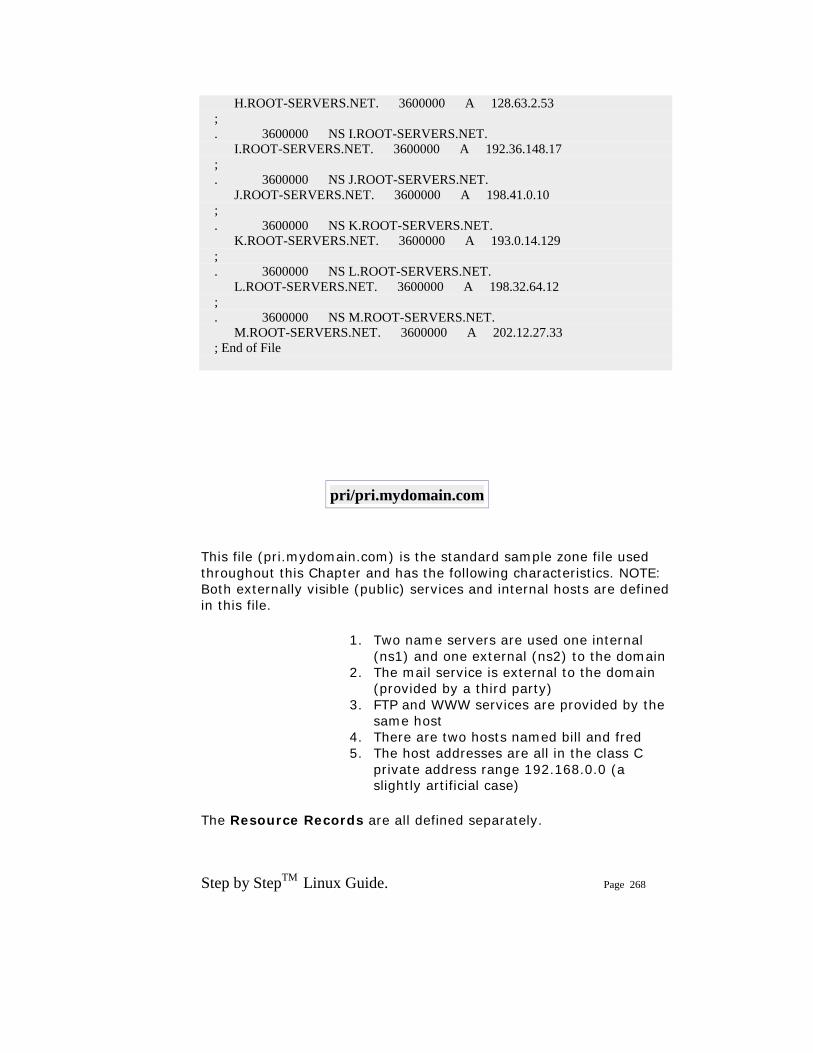
Step by StepTM Linux Guide. Page 268
H.ROOT-SERVERS.NET. 3600000 A 128.63.2.53 ; . 3600000 NS I.ROOT-SERVERS.NET. I.ROOT-SERVERS.NET. 3600000 A 192.36.148.17 ; . 3600000 NS J.ROOT-SERVERS.NET. J.ROOT-SERVERS.NET. 3600000 A 198.41.0.10 ; . 3600000 NS K.ROOT-SERVERS.NET. K.ROOT-SERVERS.NET. 3600000 A 193.0.14.129 ; . 3600000 NS L.ROOT-SERVERS.NET. L.ROOT-SERVERS.NET. 3600000 A 198.32.64.12 ; . 3600000 NS M.ROOT-SERVERS.NET. M.ROOT-SERVERS.NET. 3600000 A 202.12.27.33 ; End of File
pri/pri.mydomain.com
This file (pri.mydomain.com) is the standard sample zone file used throughout this Chapter and has the following characteristics. NOTE: Both externally visible (public) services and internal hosts are defined in this file.
1. Two name servers are used one internal (ns1) and one external (ns2) to the domain
2. The mail service is external to the domain (provided by a third party)
3. FTP and WWW services are provided by the same host
4. There are two hosts named bill and fred 5. The host addresses are all in the class C
private address range 192.168.0.0 (a slightly artificial case)
The Resource Records are all defined separately.
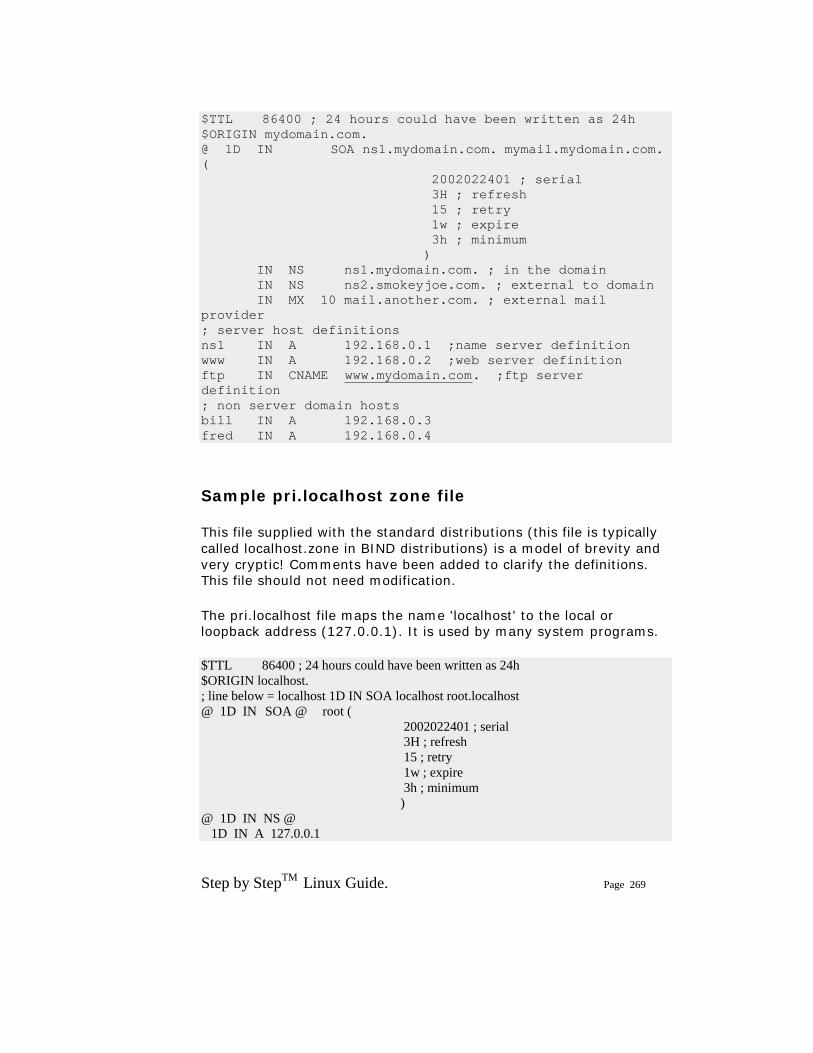
Step by StepTM Linux Guide. Page 269
$TTL 86400 ; 24 hours could have been written as 24h $ORIGIN mydomain.com. @ 1D IN SOA ns1.mydomain.com. mymail.mydomain.com. ( 2002022401 ; serial 3H ; refresh 15 ; retry 1w ; expire 3h ; minimum ) IN NS ns1.mydomain.com. ; in the domain IN NS ns2.smokeyjoe.com. ; external to domain IN MX 10 mail.another.com. ; external mail provider ; server host definitions ns1 IN A 192.168.0.1 ;name server definition www IN A 192.168.0.2 ;web server definition ftp IN CNAME www.mydomain.com. ;ftp server definition ; non server domain hosts bill IN A 192.168.0.3 fred IN A 192.168.0.4
Sample pri.localhost zone file
This file supplied with the standard distributions (this file is typically called localhost.zone in BIND distributions) is a model of brevity and very cryptic! Comments have been added to clarify the definitions. This file should not need modification.
The pri.localhost file maps the name 'localhost' to the local or loopback address (127.0.0.1). It is used by many system programs.
$TTL 86400 ; 24 hours could have been written as 24h $ORIGIN localhost. ; line below = localhost 1D IN SOA localhost root.localhost @ 1D IN SOA @ root ( 2002022401 ; serial 3H ; refresh 15 ; retry 1w ; expire 3h ; minimum ) @ 1D IN NS @ 1D IN A 127.0.0.1
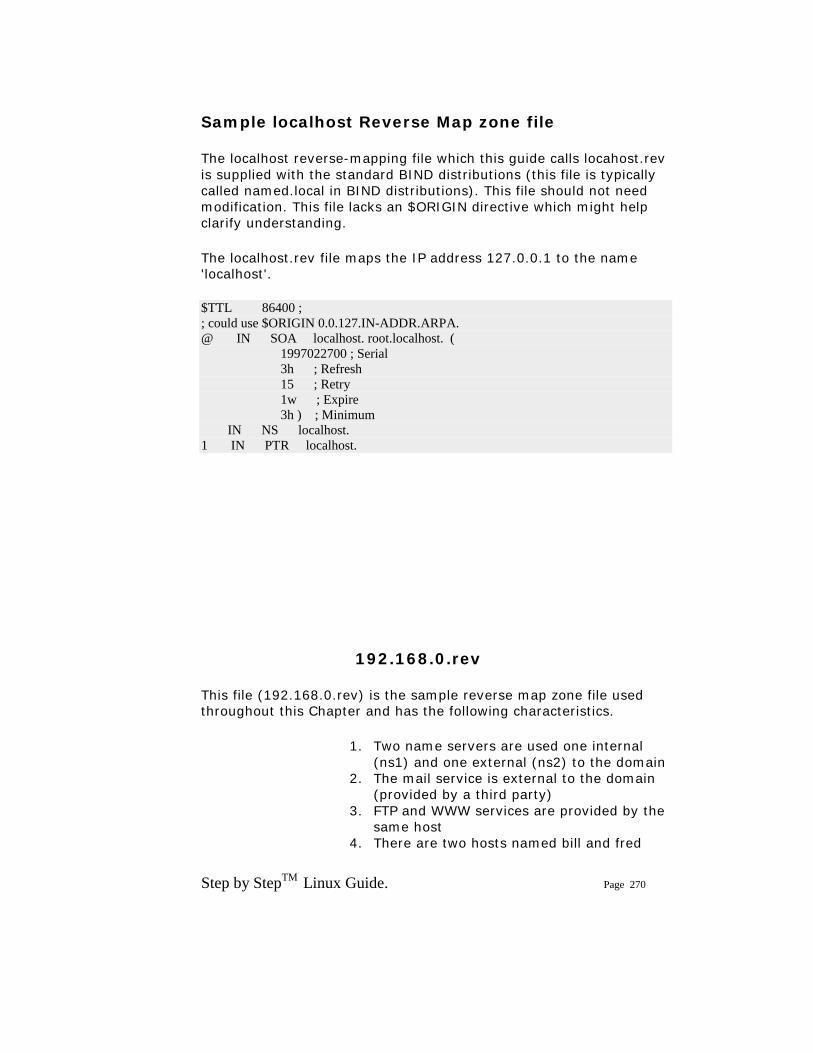
Step by StepTM Linux Guide. Page 270
Sample localhost Reverse Map zone file
The localhost reverse-mapping file which this guide calls locahost.rev is supplied with the standard BIND distributions (this file is typically called named.local in BIND distributions). This file should not need modification. This file lacks an $ORIGIN directive which might help clarify understanding.
The localhost.rev file maps the IP address 127.0.0.1 to the name 'localhost'.
$TTL 86400 ; ; could use $ORIGIN 0.0.127.IN-ADDR.ARPA. @ IN SOA localhost. root.localhost. ( 1997022700 ; Serial 3h ; Refresh 15 ; Retry 1w ; Expire 3h ) ; Minimum IN NS localhost. 1 IN PTR localhost.
192.168.0.rev
This file (192.168.0.rev) is the sample reverse map zone file used throughout this Chapter and has the following characteristics.
1. Two name servers are used one internal (ns1) and one external (ns2) to the domain
2. The mail service is external to the domain (provided by a third party)
3. FTP and WWW services are provided by the same host
4. There are two hosts named bill and fred
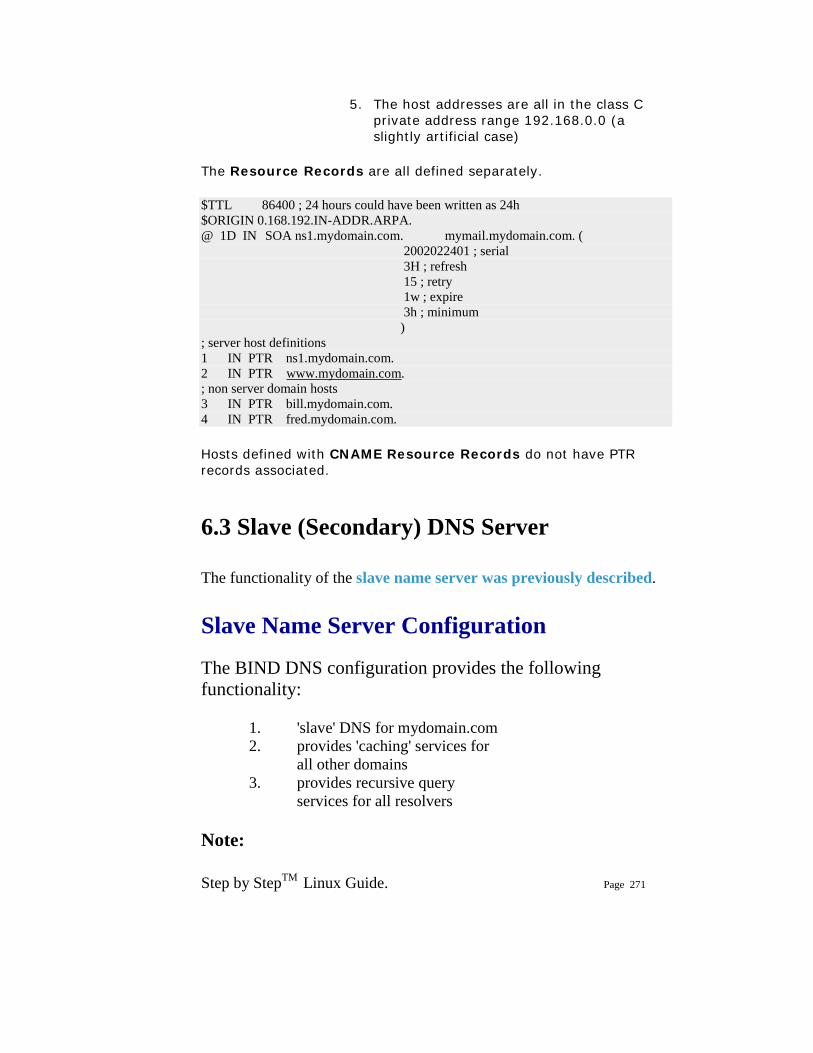
Step by StepTM Linux Guide. Page 271
5. The host addresses are all in the class C private address range 192.168.0.0 (a slightly artificial case)
The Resource Records are all defined separately.
$TTL 86400 ; 24 hours could have been written as 24h $ORIGIN 0.168.192.IN-ADDR.ARPA. @ 1D IN SOA ns1.mydomain.com. mymail.mydomain.com. ( 2002022401 ; serial 3H ; refresh 15 ; retry 1w ; expire 3h ; minimum ) ; server host definitions 1 IN PTR ns1.mydomain.com. 2 IN PTR www.mydomain.com. ; non server domain hosts 3 IN PTR bill.mydomain.com. 4 IN PTR fred.mydomain.com.
Hosts defined with CNAME Resource Records do not have PTR records associated.
6.3 Slave (Secondary) DNS Server The functionality of the slave name server was previously described.
Slave Name Server Configuration The BIND DNS configuration provides the following functionality:
1. 'slave' DNS for mydomain.com 2. provides 'caching' services for
all other domains 3. provides recursive query
services for all resolvers
Note:
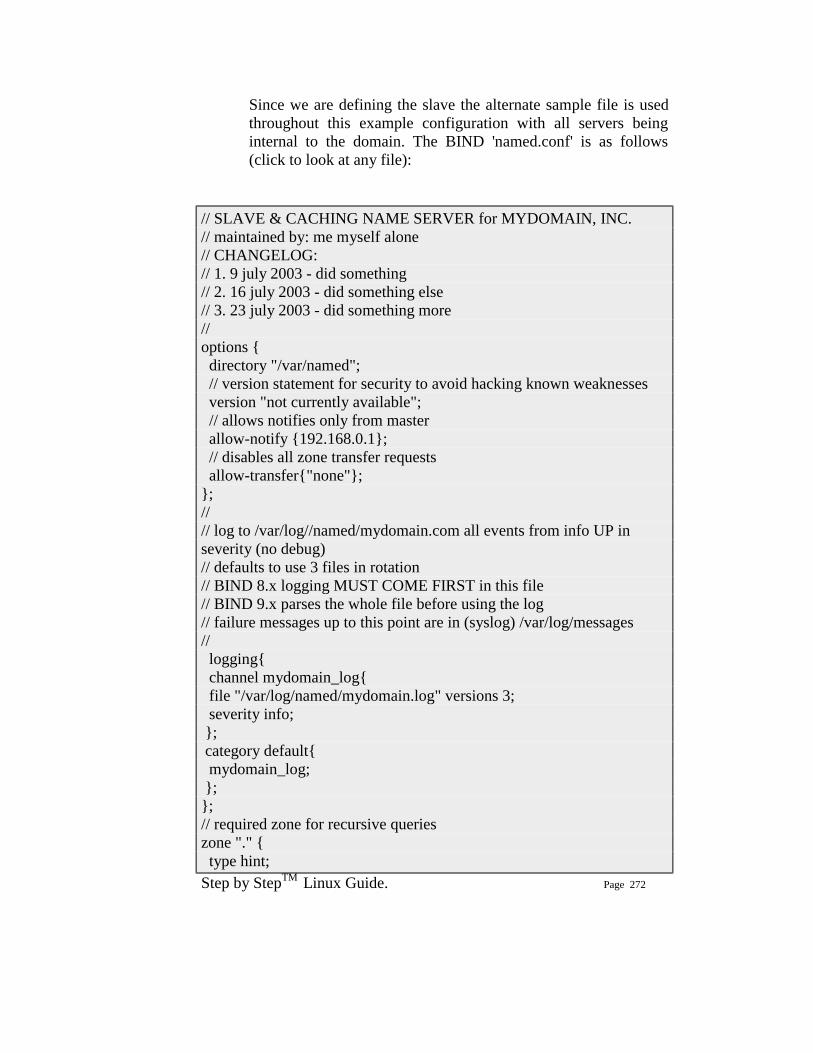
Step by StepTM Linux Guide. Page 272
Since we are defining the slave the alternate sample file is used throughout this example configuration with all servers being internal to the domain. The BIND 'named.conf' is as follows (click to look at any file):
// SLAVE & CACHING NAME SERVER for MYDOMAIN, INC. // maintained by: me myself alone // CHANGELOG: // 1. 9 july 2003 - did something // 2. 16 july 2003 - did something else // 3. 23 july 2003 - did something more // options { directory "/var/named"; // version statement for security to avoid hacking known weaknesses version "not currently available"; // allows notifies only from master allow-notify {192.168.0.1}; // disables all zone transfer requests allow-transfer{"none"}; }; // // log to /var/log//named/mydomain.com all events from info UP in severity (no debug) // defaults to use 3 files in rotation // BIND 8.x logging MUST COME FIRST in this file // BIND 9.x parses the whole file before using the log // failure messages up to this point are in (syslog) /var/log/messages // logging{ channel mydomain_log{ file "/var/log/named/mydomain.log" versions 3; severity info; }; category default{ mydomain_log; }; }; // required zone for recursive queries zone "." { type hint;
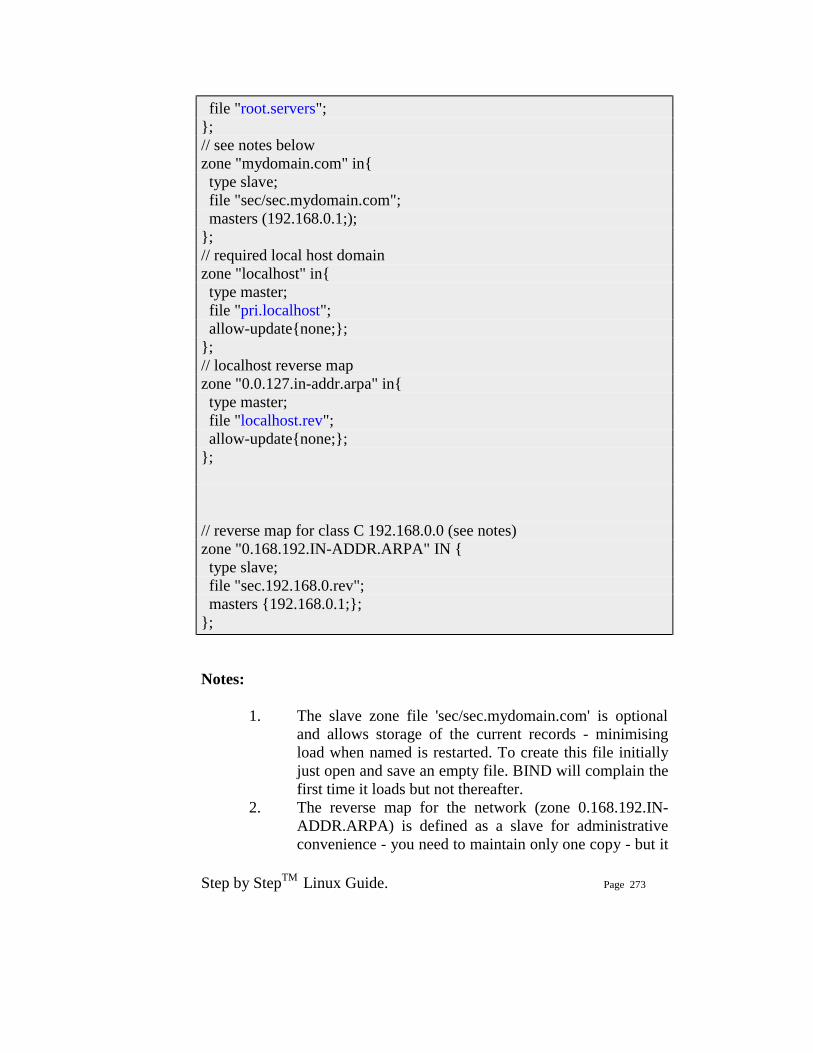
Step by StepTM Linux Guide. Page 273
file "root.servers"; }; // see notes below zone "mydomain.com" in{ type slave; file "sec/sec.mydomain.com"; masters (192.168.0.1;); }; // required local host domain zone "localhost" in{ type master; file "pri.localhost"; allow-update{none;}; }; // localhost reverse map zone "0.0.127.in-addr.arpa" in{ type master; file "localhost.rev"; allow-update{none;}; }; // reverse map for class C 192.168.0.0 (see notes) zone "0.168.192.IN-ADDR.ARPA" IN { type slave; file "sec.192.168.0.rev"; masters {192.168.0.1;}; }; Notes:
1. The slave zone file 'sec/sec.mydomain.com' is optional and allows storage of the current records - minimising load when named is restarted. To create this file initially just open and save an empty file. BIND will complain the first time it loads but not thereafter.
2. The reverse map for the network (zone 0.168.192.IN-ADDR.ARPA) is defined as a slave for administrative convenience - you need to maintain only one copy - but it
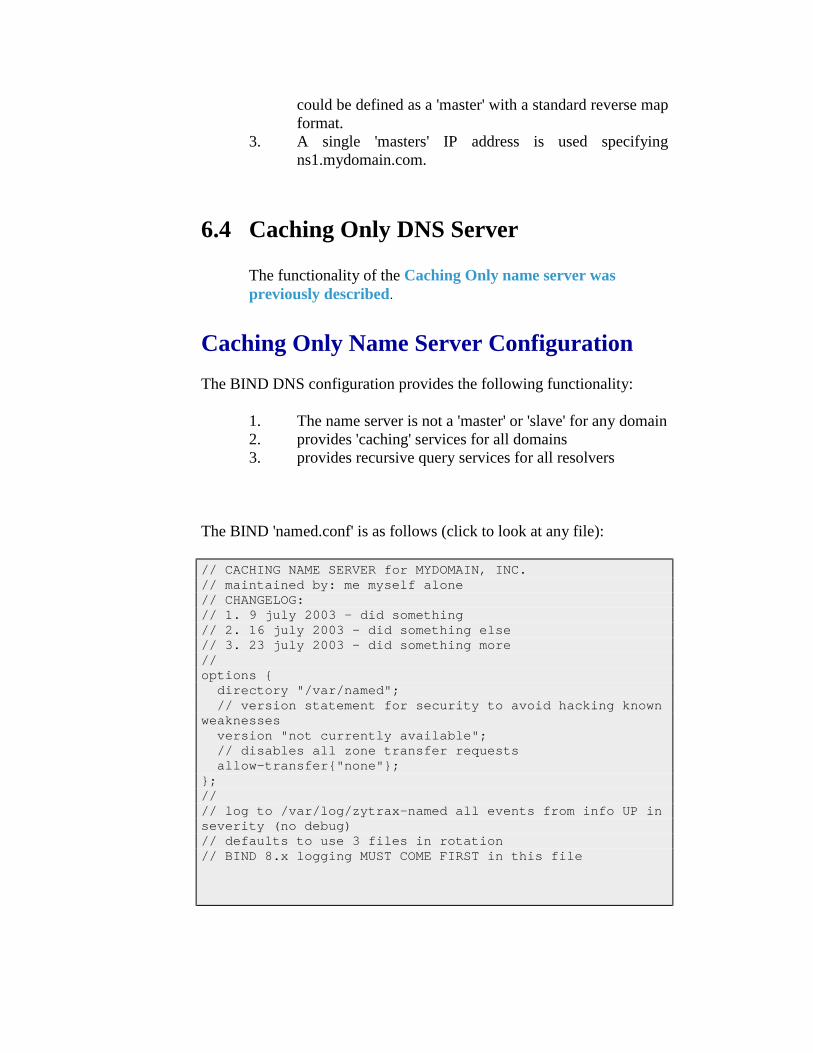
Step by StepTM Linux Guide. Page 274
could be defined as a 'master' with a standard reverse map format.
3. A single 'masters' IP address is used specifying ns1.mydomain.com.
6.4 Caching Only DNS Server
The functionality of the Caching Only name server was previously described.
Caching Only Name Server Configuration The BIND DNS configuration provides the following functionality:
1. The name server is not a 'master' or 'slave' for any domain 2. provides 'caching' services for all domains 3. provides recursive query services for all resolvers
The BIND 'named.conf' is as follows (click to look at any file): // CACHING NAME SERVER for MYDOMAIN, INC. // maintained by: me myself alone // CHANGELOG: // 1. 9 july 2003 - did something // 2. 16 july 2003 - did something else // 3. 23 july 2003 - did something more // options { directory "/var/named"; // version statement for security to avoid hacking known weaknesses version "not currently available"; // disables all zone transfer requests allow-transfer{"none"}; }; // // log to /var/log/zytrax-named all events from info UP in severity (no debug) // defaults to use 3 files in rotation // BIND 8.x logging MUST COME FIRST in this file
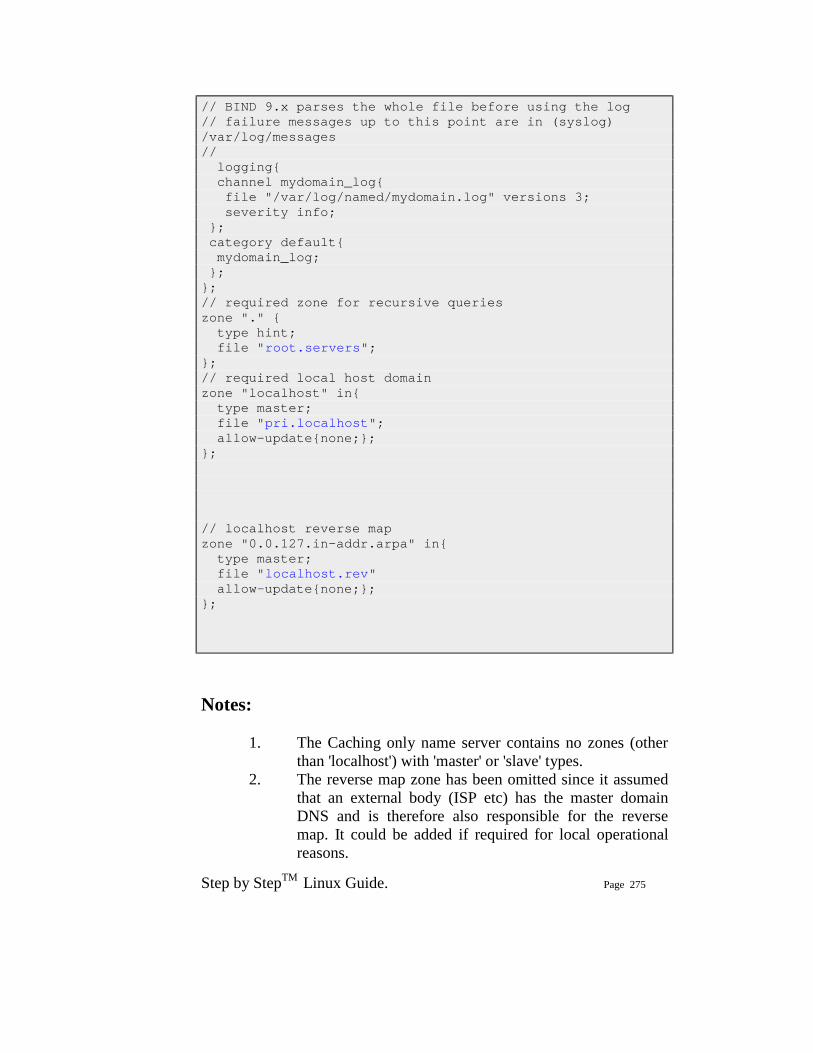
Step by StepTM Linux Guide. Page 275
// BIND 9.x parses the whole file before using the log // failure messages up to this point are in (syslog) /var/log/messages // logging{ channel mydomain_log{ file "/var/log/named/mydomain.log" versions 3; severity info; }; category default{ mydomain_log; }; }; // required zone for recursive queries zone "." { type hint; file "root.servers"; }; // required local host domain zone "localhost" in{ type master; file "pri.localhost"; allow-update{none;}; }; // localhost reverse map zone "0.0.127.in-addr.arpa" in{ type master; file "localhost.rev" allow-update{none;}; };
Notes:
1. The Caching only name server contains no zones (other than 'localhost') with 'master' or 'slave' types.
2. The reverse map zone has been omitted since it assumed that an external body (ISP etc) has the master domain DNS and is therefore also responsible for the reverse map. It could be added if required for local operational reasons.
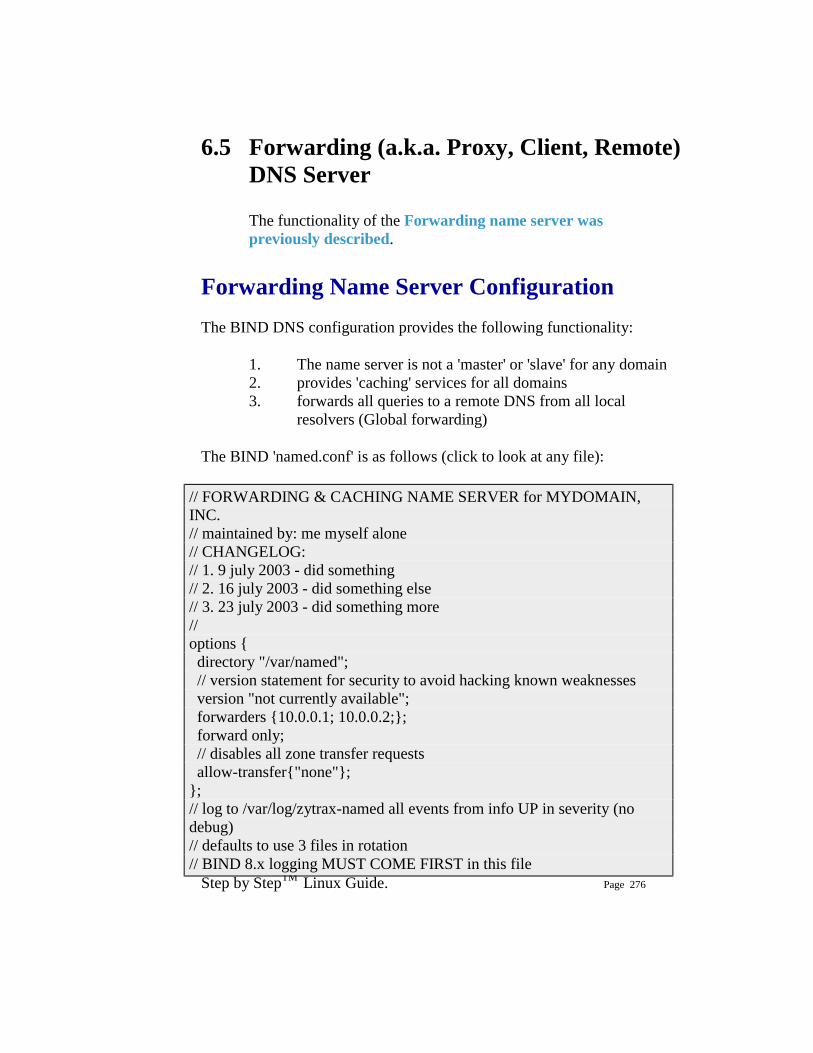
Step by StepTM Linux Guide. Page 276
6.5 Forwarding (a.k.a. Proxy, Client, Remote) DNS Server
The functionality of the Forwarding name server was previously described.
Forwarding Name Server Configuration The BIND DNS configuration provides the following functionality:
1. The name server is not a 'master' or 'slave' for any domain 2. provides 'caching' services for all domains 3. forwards all queries to a remote DNS from all local
resolvers (Global forwarding)
The BIND 'named.conf' is as follows (click to look at any file):
// FORWARDING & CACHING NAME SERVER for MYDOMAIN, INC. // maintained by: me myself alone // CHANGELOG: // 1. 9 july 2003 - did something // 2. 16 july 2003 - did something else // 3. 23 july 2003 - did something more // options { directory "/var/named"; // version statement for security to avoid hacking known weaknesses version "not currently available"; forwarders {10.0.0.1; 10.0.0.2;}; forward only; // disables all zone transfer requests allow-transfer{"none"}; }; // log to /var/log/zytrax-named all events from info UP in severity (no debug) // defaults to use 3 files in rotation // BIND 8.x logging MUST COME FIRST in this file
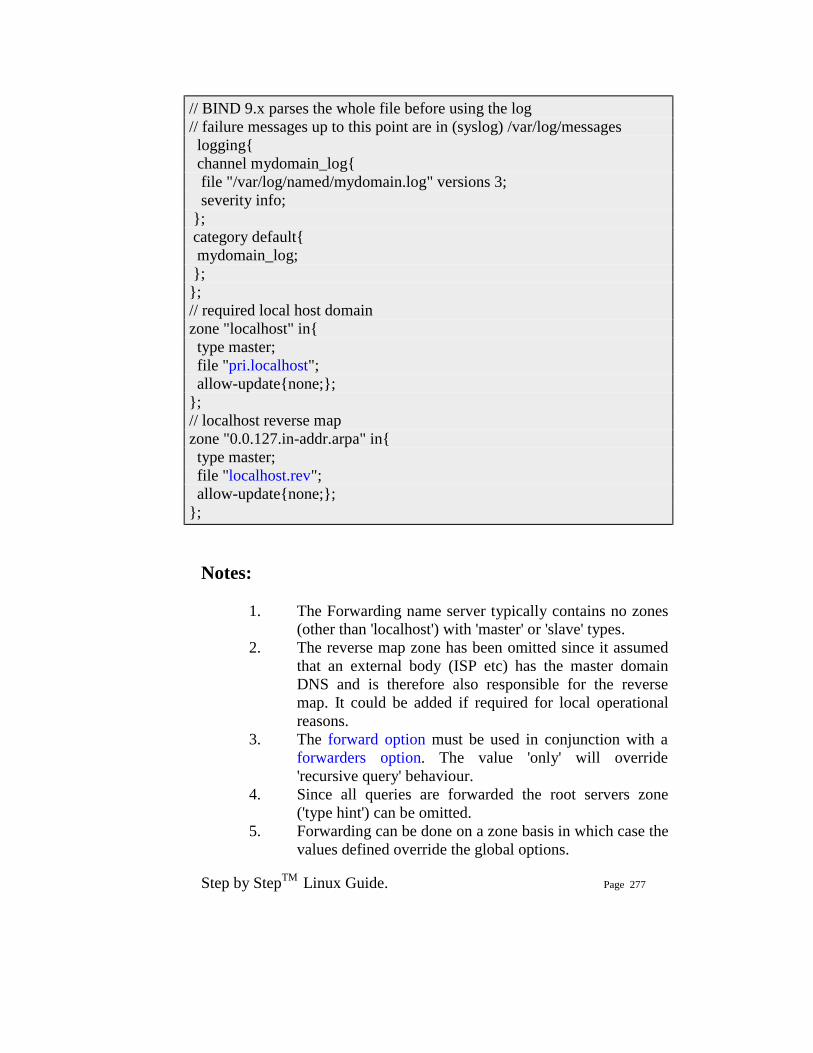
Step by StepTM Linux Guide. Page 277
// BIND 9.x parses the whole file before using the log // failure messages up to this point are in (syslog) /var/log/messages logging{ channel mydomain_log{ file "/var/log/named/mydomain.log" versions 3; severity info; }; category default{ mydomain_log; }; }; // required local host domain zone "localhost" in{ type master; file "pri.localhost"; allow-update{none;}; }; // localhost reverse map zone "0.0.127.in-addr.arpa" in{ type master; file "localhost.rev"; allow-update{none;}; };
Notes:
1. The Forwarding name server typically contains no zones (other than 'localhost') with 'master' or 'slave' types.
2. The reverse map zone has been omitted since it assumed that an external body (ISP etc) has the master domain DNS and is therefore also responsible for the reverse map. It could be added if required for local operational reasons.
3. The forward option must be used in conjunction with a forwarders option. The value 'only' will override 'recursive query' behaviour.
4. Since all queries are forwarded the root servers zone ('type hint') can be omitted.
5. Forwarding can be done on a zone basis in which case the values defined override the global options.
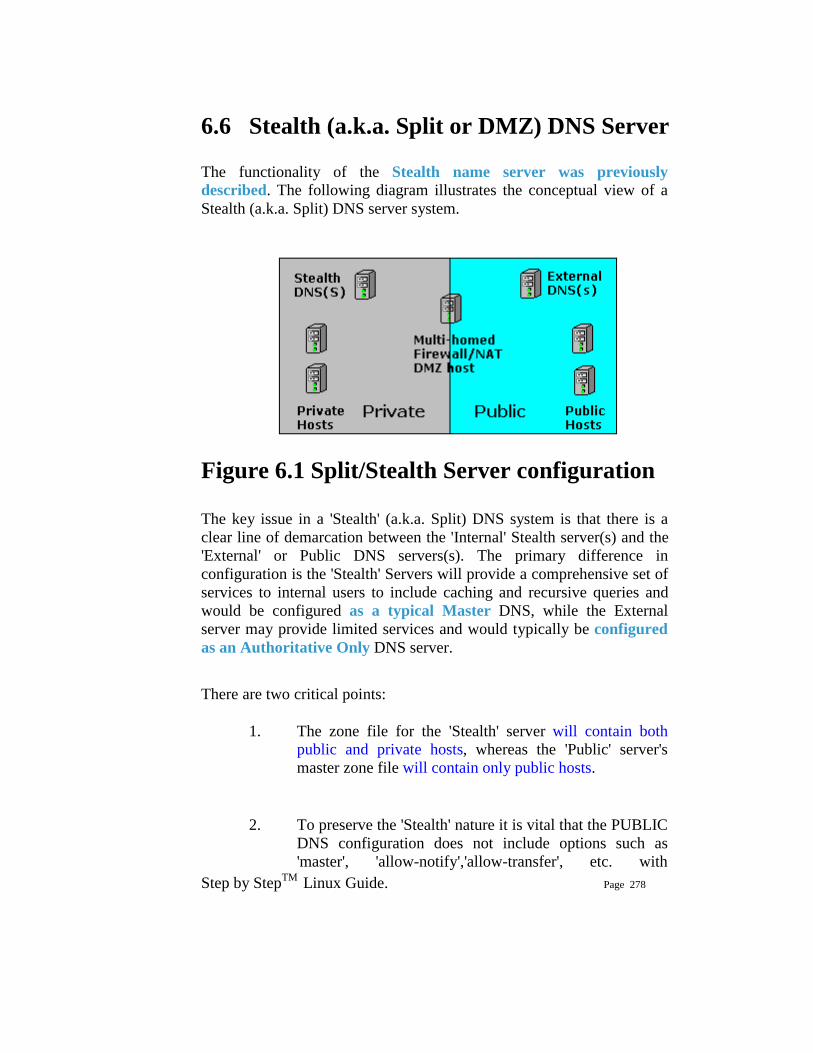
Step by StepTM Linux Guide. Page 278
6.6 Stealth (a.k.a. Split or DMZ) DNS Server The functionality of the Stealth name server was previously described. The following diagram illustrates the conceptual view of a Stealth (a.k.a. Split) DNS server system.
Figure 6.1 Split/Stealth Server configuration
The key issue in a 'Stealth' (a.k.a. Split) DNS system is that there is a clear line of demarcation between the 'Internal' Stealth server(s) and the 'External' or Public DNS servers(s). The primary difference in configuration is the 'Stealth' Servers will provide a comprehensive set of services to internal users to include caching and recursive queries and would be configured as a typical Master DNS, while the External server may provide limited services and would typically be configured as an Authoritative Only DNS server. There are two critical points:
1. The zone file for the 'Stealth' server will contain both public and private hosts, whereas the 'Public' server's master zone file will contain only public hosts.
2. To preserve the 'Stealth' nature it is vital that the PUBLIC DNS configuration does not include options such as 'master', 'allow-notify','allow-transfer', etc. with
Step by StepTM Linux Guide. Page 279
references to the IP of the 'Stealth' server. If the Stealth servers IP where to appear in the Public DNS server and its file system were to be compromised the attacker could gain more knowledge about the organisation - they can penetrated the 'veil of privacy' by simply inspecting the 'named.conf file.
There are a number of articles which suggest that the view statement may be used to provide similar functionality using a single server. This does not address the problem of the DNS host system being compromised and by simple 'named.conf' file inspection additional data about the organisation being discovered. In a secure environment 'view' does not provide a 'Stealth DNS' solution.
6.7 Authoritative Only DNS Server The functionality of the Authoritative name server was previously described. If security is not the primary requirement then the view statement may be used to provide 'Authoritative only' services to external users and more comprehensive services to internal users. An example configuration is shown below.
Authoritative Only Name Server Configuration The BIND DNS configuration provides the following functionality:
1. 'master' DNS for mydomain.com 2. does NOT provide 'caching' services for any other
domains 3. does NOT provide recursive query services for all
resolvers (Iterative only) 4. optimised for maximum performance
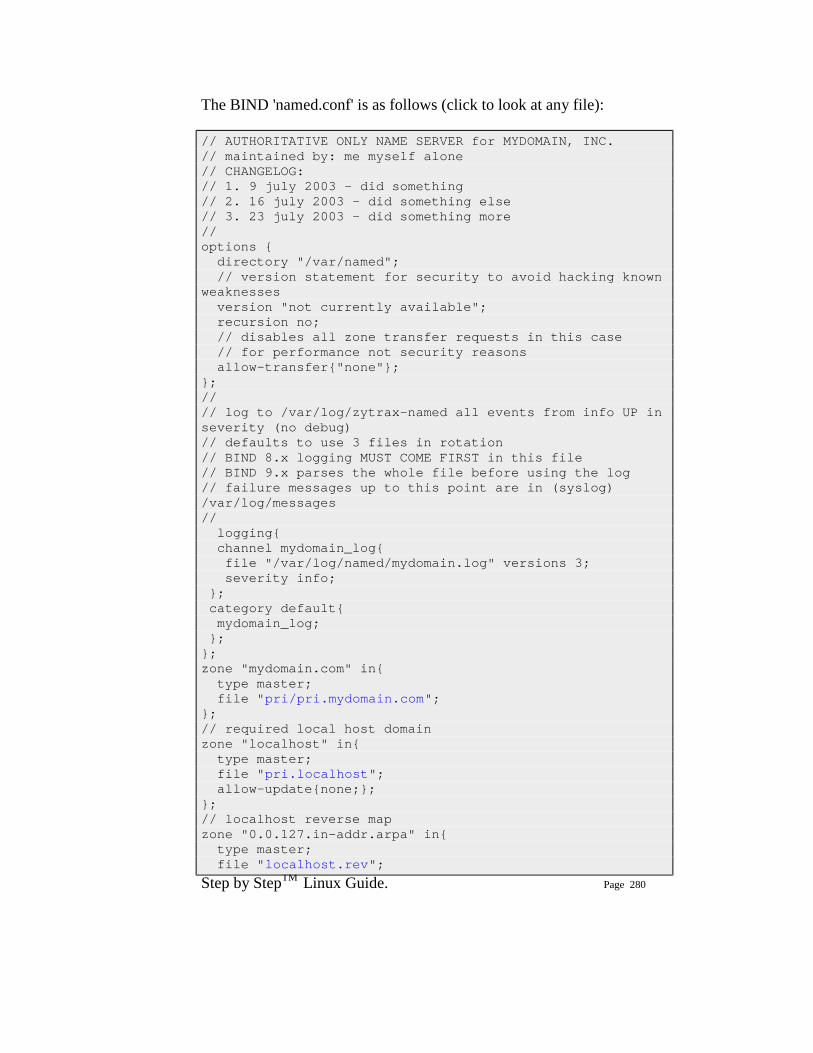
Step by StepTM Linux Guide. Page 280
The BIND 'named.conf' is as follows (click to look at any file):
// AUTHORITATIVE ONLY NAME SERVER for MYDOMAIN, INC. // maintained by: me myself alone // CHANGELOG: // 1. 9 july 2003 - did something // 2. 16 july 2003 - did something else // 3. 23 july 2003 - did something more // options { directory "/var/named"; // version statement for security to avoid hacking known weaknesses version "not currently available"; recursion no; // disables all zone transfer requests in this case // for performance not security reasons allow-transfer{"none"}; }; // // log to /var/log/zytrax-named all events from info UP in severity (no debug) // defaults to use 3 files in rotation // BIND 8.x logging MUST COME FIRST in this file // BIND 9.x parses the whole file before using the log // failure messages up to this point are in (syslog) /var/log/messages // logging{ channel mydomain_log{ file "/var/log/named/mydomain.log" versions 3; severity info; }; category default{ mydomain_log; }; }; zone "mydomain.com" in{ type master; file "pri/pri.mydomain.com"; }; // required local host domain zone "localhost" in{ type master; file "pri.localhost"; allow-update{none;}; }; // localhost reverse map zone "0.0.127.in-addr.arpa" in{ type master; file "localhost.rev";
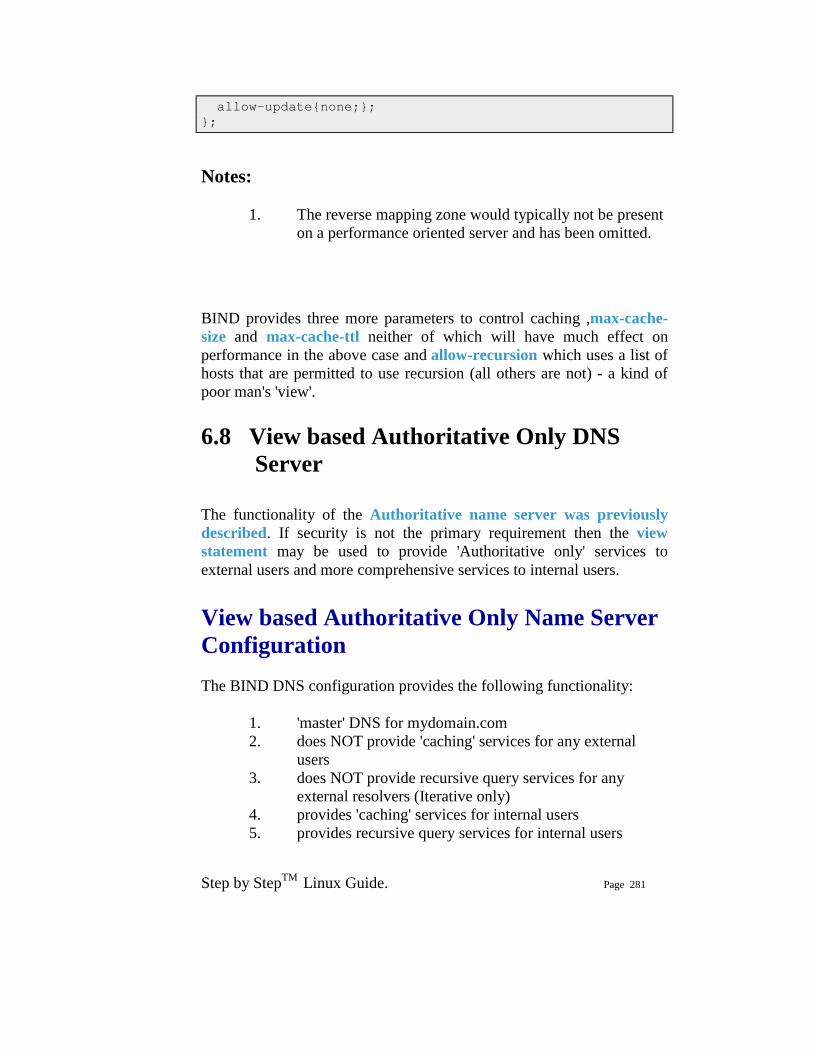
Step by StepTM Linux Guide. Page 281
allow-update{none;}; };
Notes:
1. The reverse mapping zone would typically not be present on a performance oriented server and has been omitted.
BIND provides three more parameters to control caching ,max-cache-size and max-cache-ttl neither of which will have much effect on performance in the above case and allow-recursion which uses a list of hosts that are permitted to use recursion (all others are not) - a kind of poor man's 'view'.
6.8 View based Authoritative Only DNS Server The functionality of the Authoritative name server was previously described. If security is not the primary requirement then the view statement may be used to provide 'Authoritative only' services to external users and more comprehensive services to internal users.
View based Authoritative Only Name Server Configuration The BIND DNS configuration provides the following functionality:
1. 'master' DNS for mydomain.com 2. does NOT provide 'caching' services for any external
users 3. does NOT provide recursive query services for any
external resolvers (Iterative only) 4. provides 'caching' services for internal users 5. provides recursive query services for internal users
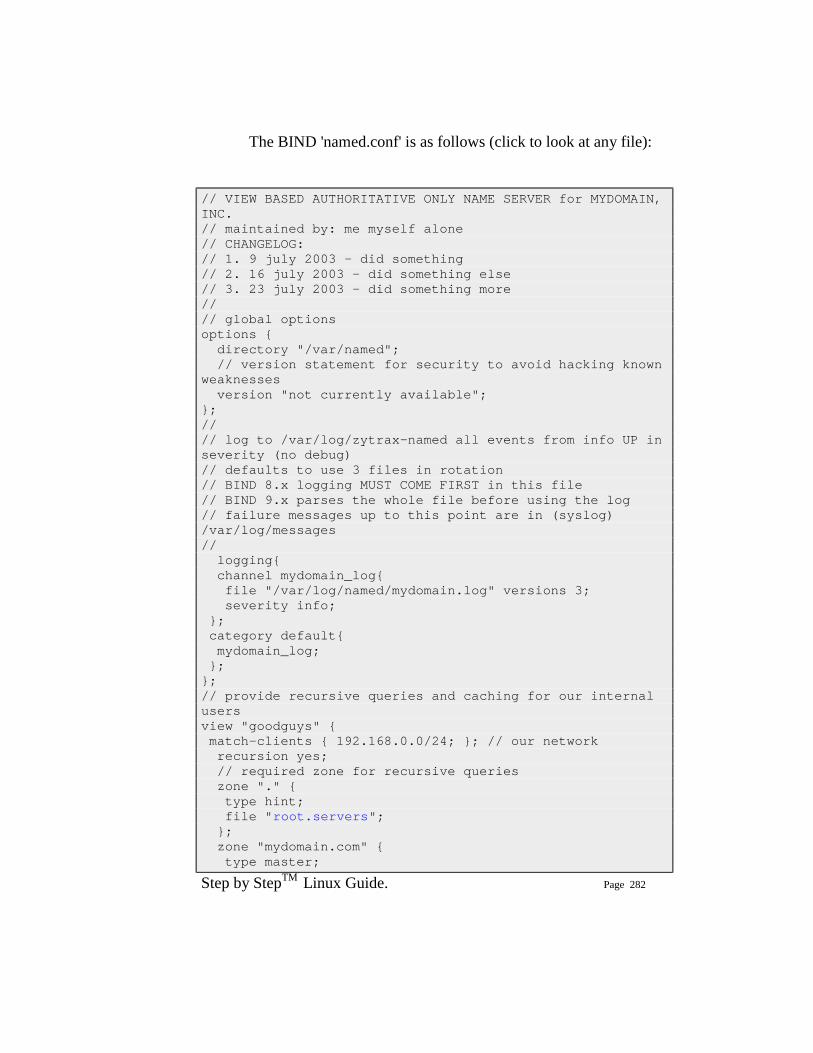
Step by StepTM Linux Guide. Page 282
The BIND 'named.conf' is as follows (click to look at any file):
// VIEW BASED AUTHORITATIVE ONLY NAME SERVER for MYDOMAIN, INC. // maintained by: me myself alone // CHANGELOG: // 1. 9 july 2003 - did something // 2. 16 july 2003 - did something else // 3. 23 july 2003 - did something more // // global options options { directory "/var/named"; // version statement for security to avoid hacking known weaknesses version "not currently available"; }; // // log to /var/log/zytrax-named all events from info UP in severity (no debug) // defaults to use 3 files in rotation // BIND 8.x logging MUST COME FIRST in this file // BIND 9.x parses the whole file before using the log // failure messages up to this point are in (syslog) /var/log/messages // logging{ channel mydomain_log{ file "/var/log/named/mydomain.log" versions 3; severity info; }; category default{ mydomain_log; }; }; // provide recursive queries and caching for our internal users view "goodguys" { match-clients { 192.168.0.0/24; }; // our network recursion yes; // required zone for recursive queries zone "." { type hint; file "root.servers"; }; zone "mydomain.com" { type master;
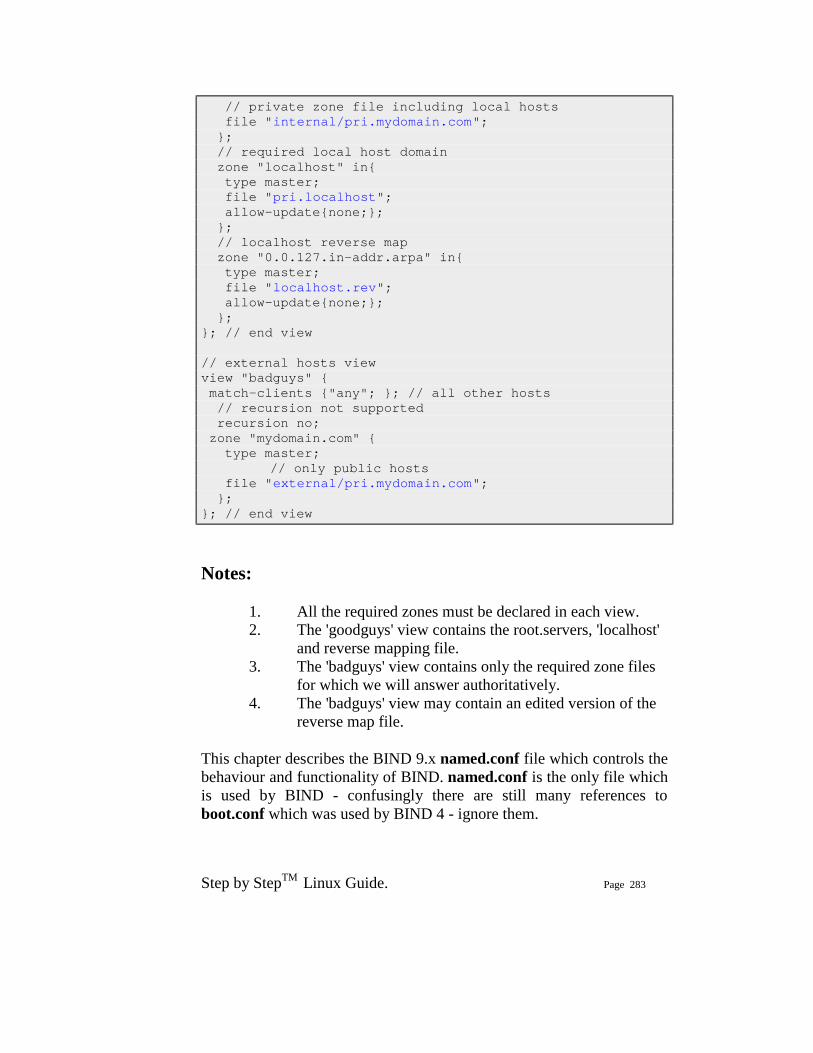
Step by StepTM Linux Guide. Page 283
// private zone file including local hosts file "internal/pri.mydomain.com"; }; // required local host domain zone "localhost" in{ type master; file "pri.localhost"; allow-update{none;}; }; // localhost reverse map zone "0.0.127.in-addr.arpa" in{ type master; file "localhost.rev"; allow-update{none;}; }; }; // end view // external hosts view view "badguys" { match-clients {"any"; }; // all other hosts // recursion not supported recursion no; zone "mydomain.com" { type master; // only public hosts file "external/pri.mydomain.com"; }; }; // end view
Notes:
1. All the required zones must be declared in each view. 2. The 'goodguys' view contains the root.servers, 'localhost'
and reverse mapping file. 3. The 'badguys' view contains only the required zone files
for which we will answer authoritatively. 4. The 'badguys' view may contain an edited version of the
reverse map file.
This chapter describes the BIND 9.x named.conf file which controls the behaviour and functionality of BIND. named.conf is the only file which is used by BIND - confusingly there are still many references to boot.conf which was used by BIND 4 - ignore them.
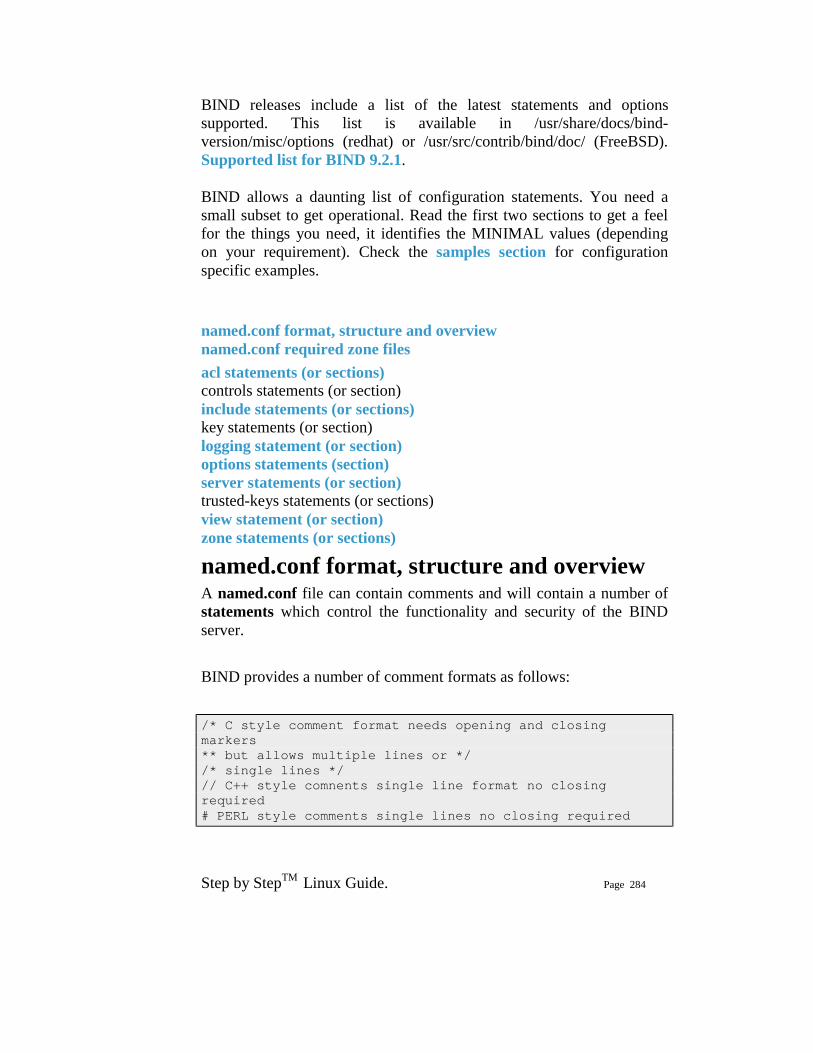
Step by StepTM Linux Guide. Page 284
BIND releases include a list of the latest statements and options supported. This list is available in /usr/share/docs/bind-version/misc/options (redhat) or /usr/src/contrib/bind/doc/ (FreeBSD). Supported list for BIND 9.2.1.
BIND allows a daunting list of configuration statements. You need a small subset to get operational. Read the first two sections to get a feel for the things you need, it identifies the MINIMAL values (depending on your requirement). Check the samples section for configuration specific examples.
named.conf format, structure and overview named.conf required zone files acl statements (or sections) controls statements (or section) include statements (or sections) key statements (or section) logging statement (or section) options statements (section) server statements (or section) trusted-keys statements (or sections) view statement (or section) zone statements (or sections)
named.conf format, structure and overview A named.conf file can contain comments and will contain a number of statements which control the functionality and security of the BIND server. BIND provides a number of comment formats as follows: /* C style comment format needs opening and closing markers ** but allows multiple lines or */ /* single lines */ // C++ style comnents single line format no closing required # PERL style comments single lines no closing required
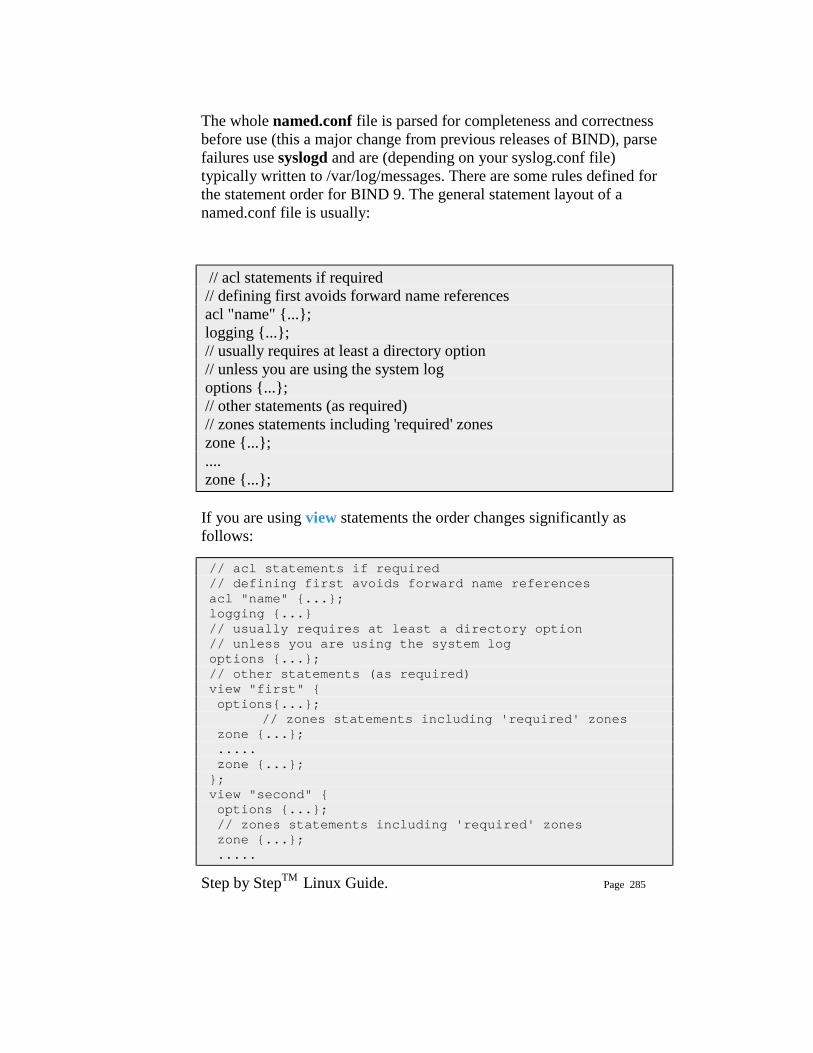
Step by StepTM Linux Guide. Page 285
The whole named.conf file is parsed for completeness and correctness before use (this a major change from previous releases of BIND), parse failures use syslogd and are (depending on your syslog.conf file) typically written to /var/log/messages. There are some rules defined for the statement order for BIND 9. The general statement layout of a named.conf file is usually:
// acl statements if required // defining first avoids forward name references acl "name" {...}; logging {...}; // usually requires at least a directory option // unless you are using the system log options {...}; // other statements (as required) // zones statements including 'required' zones zone {...}; .... zone {...};
If you are using view statements the order changes significantly as follows: // acl statements if required // defining first avoids forward name references acl "name" {...}; logging {...} // usually requires at least a directory option // unless you are using the system log options {...}; // other statements (as required) view "first" { options{...}; // zones statements including 'required' zones zone {...}; ..... zone {...}; }; view "second" { options {...}; // zones statements including 'required' zones zone {...}; .....
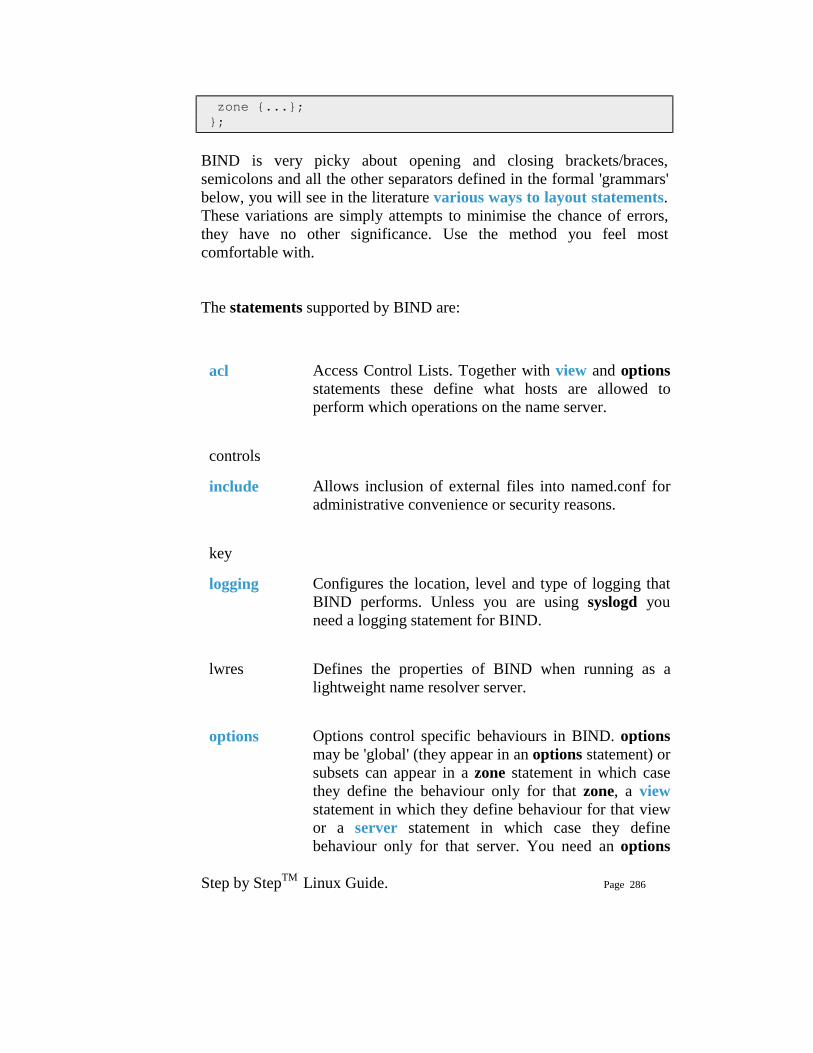
Step by StepTM Linux Guide. Page 286
zone {...}; }; BIND is very picky about opening and closing brackets/braces, semicolons and all the other separators defined in the formal 'grammars' below, you will see in the literature various ways to layout statements. These variations are simply attempts to minimise the chance of errors, they have no other significance. Use the method you feel most comfortable with. The statements supported by BIND are:
acl Access Control Lists. Together with view and options statements these define what hosts are allowed to perform which operations on the name server.
controls
include Allows inclusion of external files into named.conf for administrative convenience or security reasons.
key
logging Configures the location, level and type of logging that BIND performs. Unless you are using syslogd you need a logging statement for BIND.
lwres Defines the properties of BIND when running as a lightweight name resolver server.
options Options control specific behaviours in BIND. options may be 'global' (they appear in an options statement) or subsets can appear in a zone statement in which case they define the behaviour only for that zone, a view statement in which they define behaviour for that view or a server statement in which case they define behaviour only for that server. You need an options
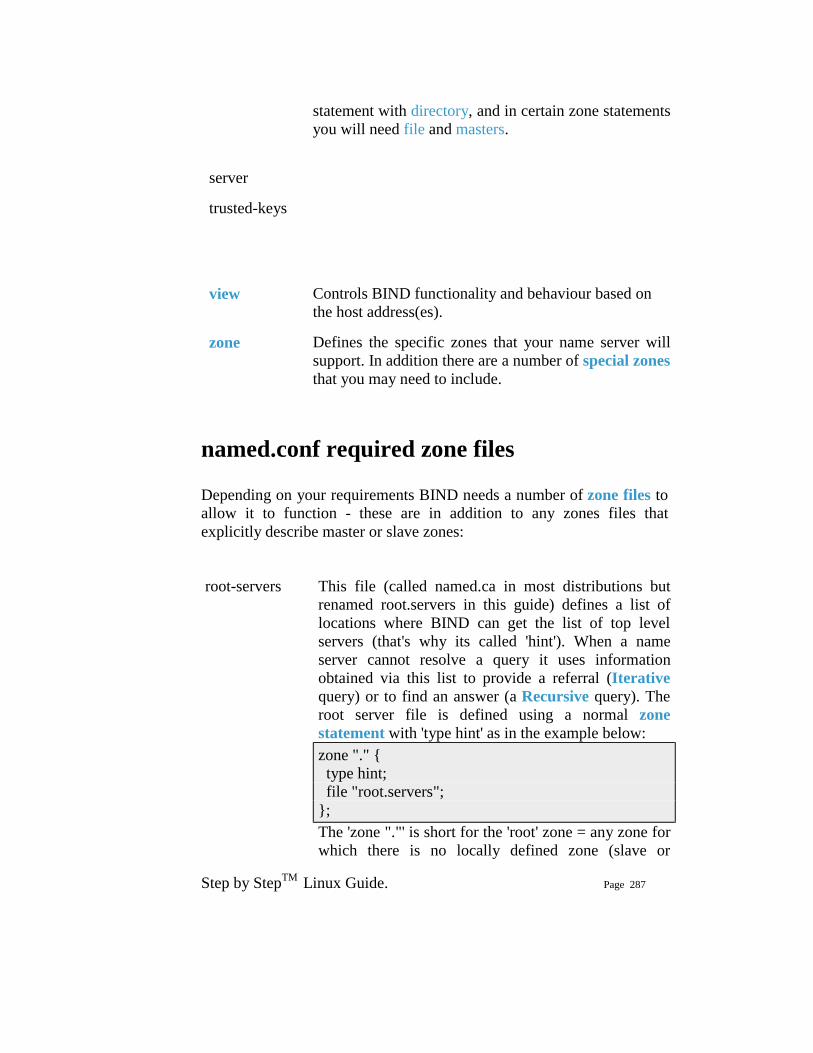
Step by StepTM Linux Guide. Page 287
statement with directory, and in certain zone statements you will need file and masters.
server
trusted-keys
view Controls BIND functionality and behaviour based on the host address(es).
zone Defines the specific zones that your name server will support. In addition there are a number of special zones that you may need to include.
named.conf required zone files Depending on your requirements BIND needs a number of zone files to allow it to function - these are in addition to any zones files that explicitly describe master or slave zones:
root-servers This file (called named.ca in most distributions but renamed root.servers in this guide) defines a list of locations where BIND can get the list of top level servers (that's why its called 'hint'). When a name server cannot resolve a query it uses information obtained via this list to provide a referral (Iterative query) or to find an answer (a Recursive query). The root server file is defined using a normal zone statement with 'type hint' as in the example below: zone "." { type hint; file "root.servers"; }; The 'zone "."' is short for the 'root' zone = any zone for which there is no locally defined zone (slave or
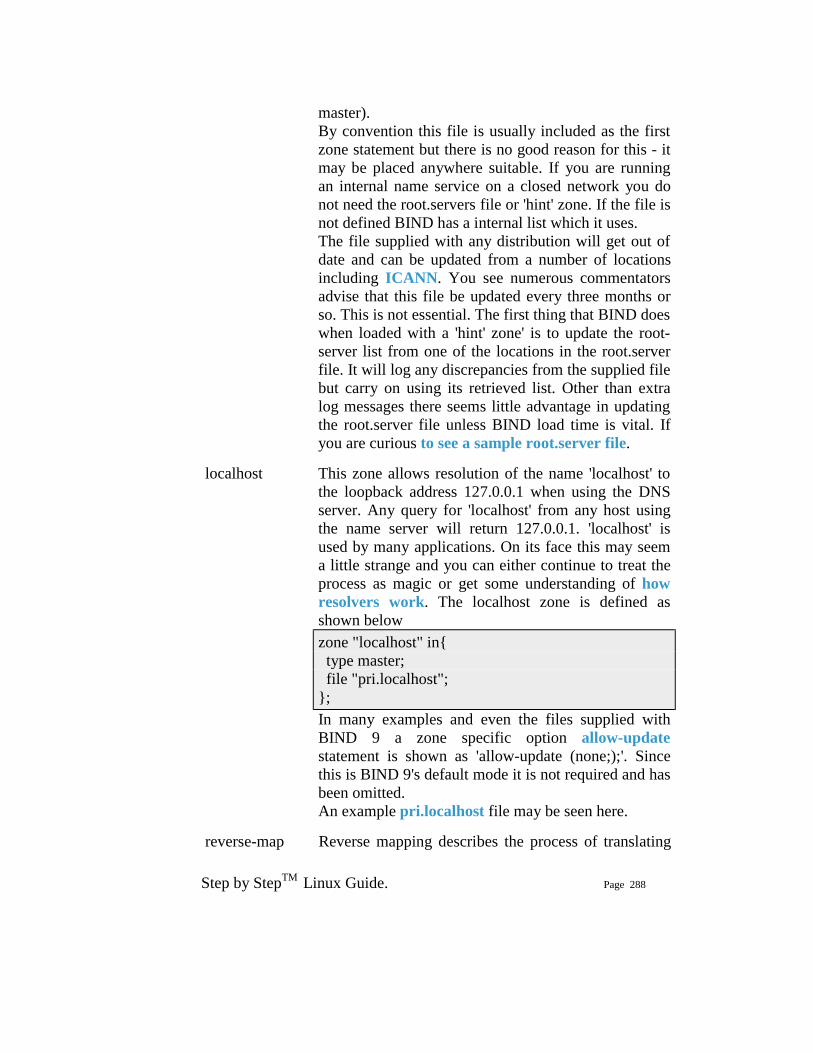
Step by StepTM Linux Guide. Page 288
master). By convention this file is usually included as the first zone statement but there is no good reason for this - it may be placed anywhere suitable. If you are running an internal name service on a closed network you do not need the root.servers file or 'hint' zone. If the file is not defined BIND has a internal list which it uses. The file supplied with any distribution will get out of date and can be updated from a number of locations including ICANN. You see numerous commentators advise that this file be updated every three months or so. This is not essential. The first thing that BIND does when loaded with a 'hint' zone' is to update the root-server list from one of the locations in the root.server file. It will log any discrepancies from the supplied file but carry on using its retrieved list. Other than extra log messages there seems little advantage in updating the root.server file unless BIND load time is vital. If you are curious to see a sample root.server file.
localhost This zone allows resolution of the name 'localhost' to the loopback address 127.0.0.1 when using the DNS server. Any query for 'localhost' from any host using the name server will return 127.0.0.1. 'localhost' is used by many applications. On its face this may seem a little strange and you can either continue to treat the process as magic or get some understanding of how resolvers work. The localhost zone is defined as shown below zone "localhost" in{ type master; file "pri.localhost"; }; In many examples and even the files supplied with BIND 9 a zone specific option allow-update statement is shown as 'allow-update (none;);'. Since this is BIND 9's default mode it is not required and has been omitted. An example pri.localhost file may be seen here.
reverse-map Reverse mapping describes the process of translating
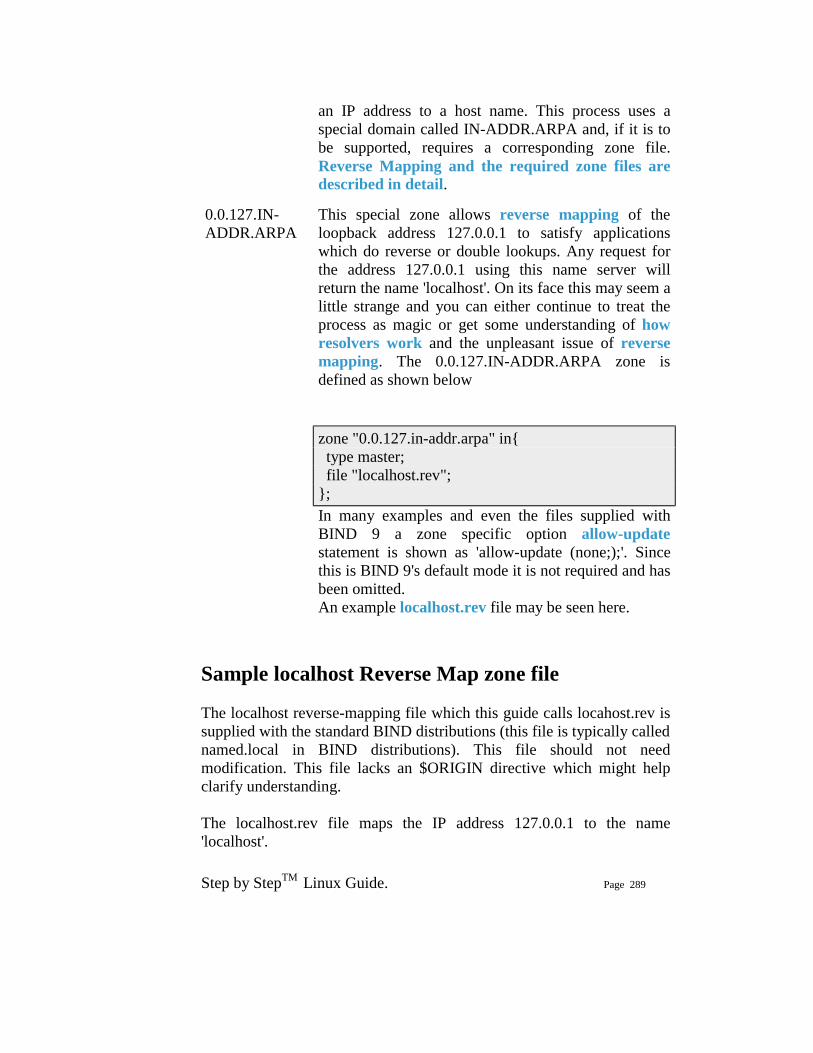
Step by StepTM Linux Guide. Page 289
an IP address to a host name. This process uses a special domain called IN-ADDR.ARPA and, if it is to be supported, requires a corresponding zone file. Reverse Mapping and the required zone files are described in detail.
0.0.127.IN-ADDR.ARPA
This special zone allows reverse mapping of the loopback address 127.0.0.1 to satisfy applications which do reverse or double lookups. Any request for the address 127.0.0.1 using this name server will return the name 'localhost'. On its face this may seem a little strange and you can either continue to treat the process as magic or get some understanding of how resolvers work and the unpleasant issue of reverse mapping. The 0.0.127.IN-ADDR.ARPA zone is defined as shown below zone "0.0.127.in-addr.arpa" in{ type master; file "localhost.rev"; }; In many examples and even the files supplied with BIND 9 a zone specific option allow-update statement is shown as 'allow-update (none;);'. Since this is BIND 9's default mode it is not required and has been omitted. An example localhost.rev file may be seen here.
Sample localhost Reverse Map zone file The localhost reverse-mapping file which this guide calls locahost.rev is supplied with the standard BIND distributions (this file is typically called named.local in BIND distributions). This file should not need modification. This file lacks an $ORIGIN directive which might help clarify understanding. The localhost.rev file maps the IP address 127.0.0.1 to the name 'localhost'.
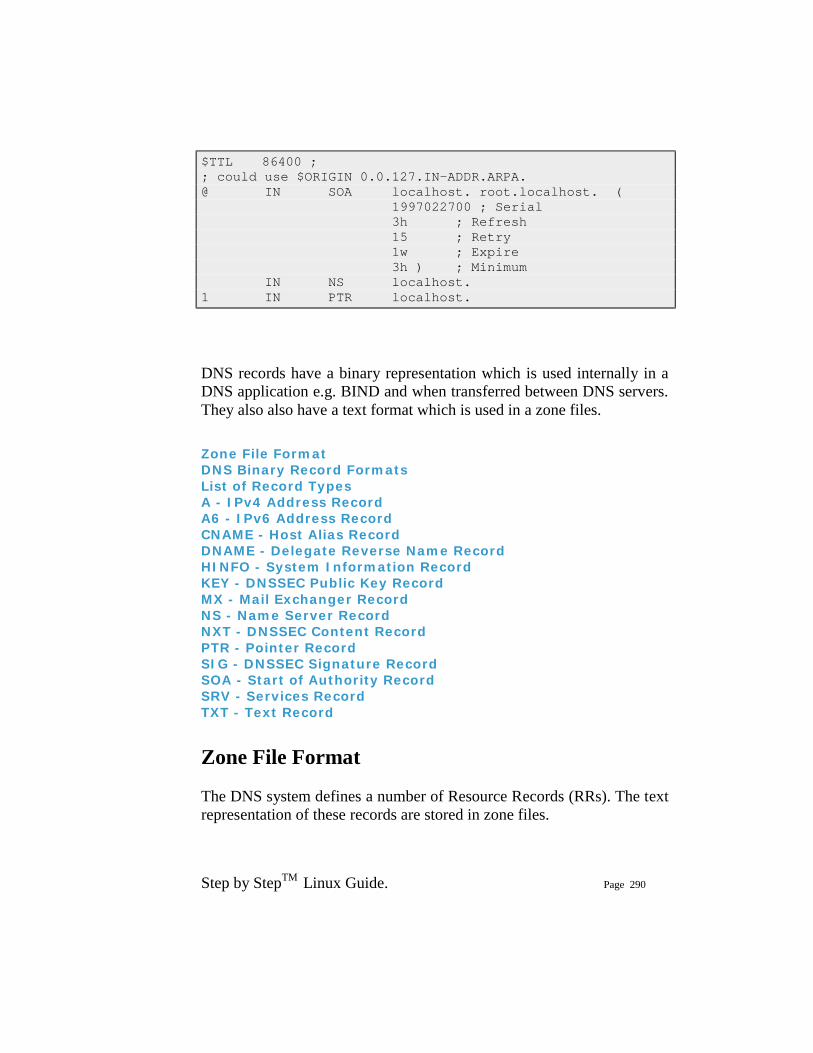
Step by StepTM Linux Guide. Page 290
$TTL 86400 ; ; could use $ORIGIN 0.0.127.IN-ADDR.ARPA. @ IN SOA localhost. root.localhost. ( 1997022700 ; Serial 3h ; Refresh 15 ; Retry 1w ; Expire 3h ) ; Minimum IN NS localhost. 1 IN PTR localhost.
DNS records have a binary representation which is used internally in a DNS application e.g. BIND and when transferred between DNS servers. They also also have a text format which is used in a zone files.
Zone File Format DNS Binary Record Formats List of Record Types A - IPv4 Address Record A6 - IPv6 Address Record CNAME - Host Alias Record DNAME - Delegate Reverse Name Record HINFO - System Information Record KEY - DNSSEC Public Key Record MX - Mail Exchanger Record NS - Name Server Record NXT - DNSSEC Content Record PTR - Pointer Record SIG - DNSSEC Signature Record SOA - Start of Authority Record SRV - Services Record TXT - Text Record
Zone File Format The DNS system defines a number of Resource Records (RRs). The text representation of these records are stored in zone files.
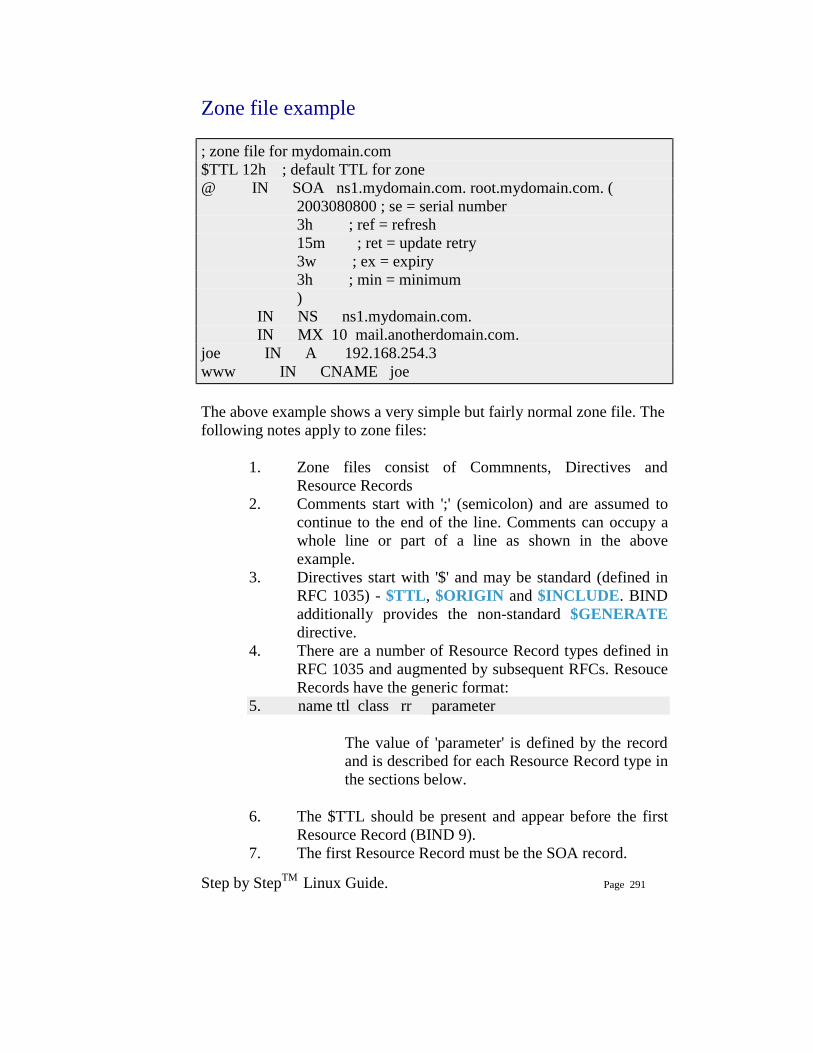
Step by StepTM Linux Guide. Page 291
Zone file example ; zone file for mydomain.com $TTL 12h ; default TTL for zone @ IN SOA ns1.mydomain.com. root.mydomain.com. ( 2003080800 ; se = serial number 3h ; ref = refresh 15m ; ret = update retry 3w ; ex = expiry 3h ; min = minimum ) IN NS ns1.mydomain.com. IN MX 10 mail.anotherdomain.com. joe IN A 192.168.254.3 www IN CNAME joe The above example shows a very simple but fairly normal zone file. The following notes apply to zone files:
1. Zone files consist of Commnents, Directives and Resource Records
2. Comments start with ';' (semicolon) and are assumed to continue to the end of the line. Comments can occupy a whole line or part of a line as shown in the above example.
3. Directives start with '$' and may be standard (defined in RFC 1035) - $TTL, $ORIGIN and $INCLUDE. BIND additionally provides the non-standard $GENERATE directive.
4. There are a number of Resource Record types defined in RFC 1035 and augmented by subsequent RFCs. Resouce Records have the generic format:
5. name ttl class rr parameter
The value of 'parameter' is defined by the record and is described for each Resource Record type in the sections below.
6. The $TTL should be present and appear before the first Resource Record (BIND 9).
7. The first Resource Record must be the SOA record.
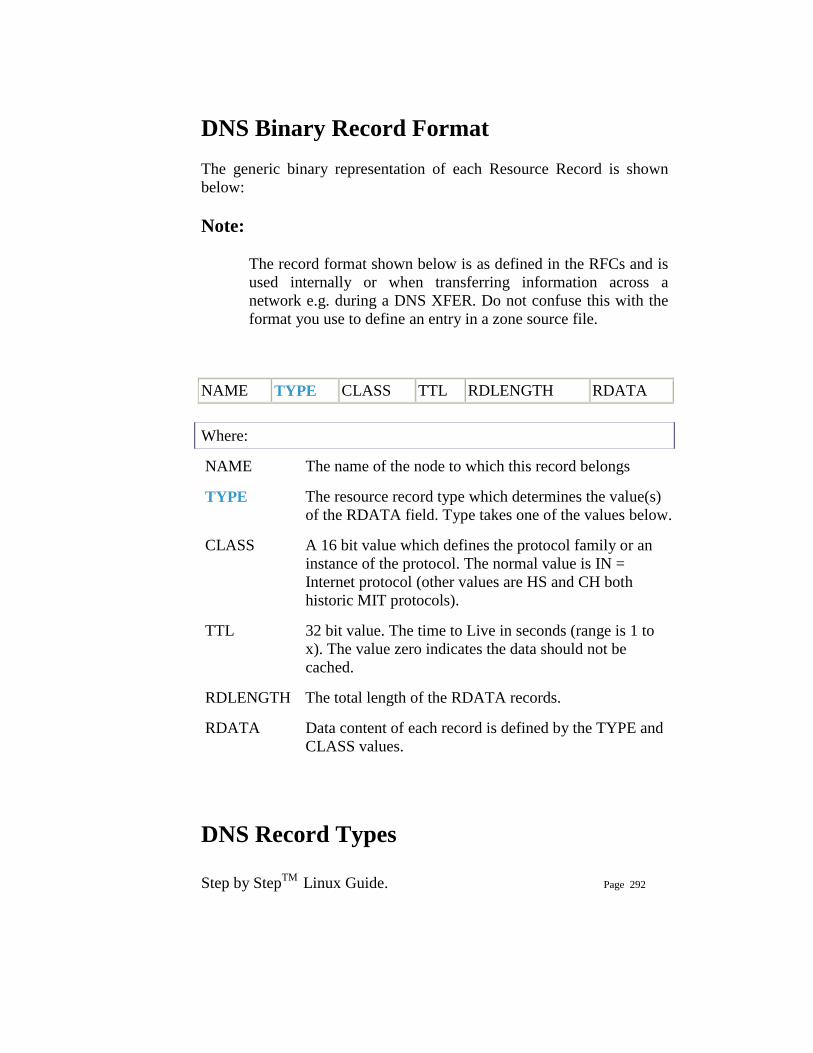
Step by StepTM Linux Guide. Page 292
DNS Binary Record Format The generic binary representation of each Resource Record is shown below: Note:
The record format shown below is as defined in the RFCs and is used internally or when transferring information across a network e.g. during a DNS XFER. Do not confuse this with the format you use to define an entry in a zone source file.
Where:
NAME The name of the node to which this record belongs
TYPE The resource record type which determines the value(s) of the RDATA field. Type takes one of the values below.
CLASS A 16 bit value which defines the protocol family or an instance of the protocol. The normal value is IN = Internet protocol (other values are HS and CH both historic MIT protocols).
TTL 32 bit value. The time to Live in seconds (range is 1 to x). The value zero indicates the data should not be cached.
RDLENGTH The total length of the RDATA records.
RDATA Data content of each record is defined by the TYPE and CLASS values.
DNS Record Types
NAME TYPE CLASS TTL RDLENGTH RDATA
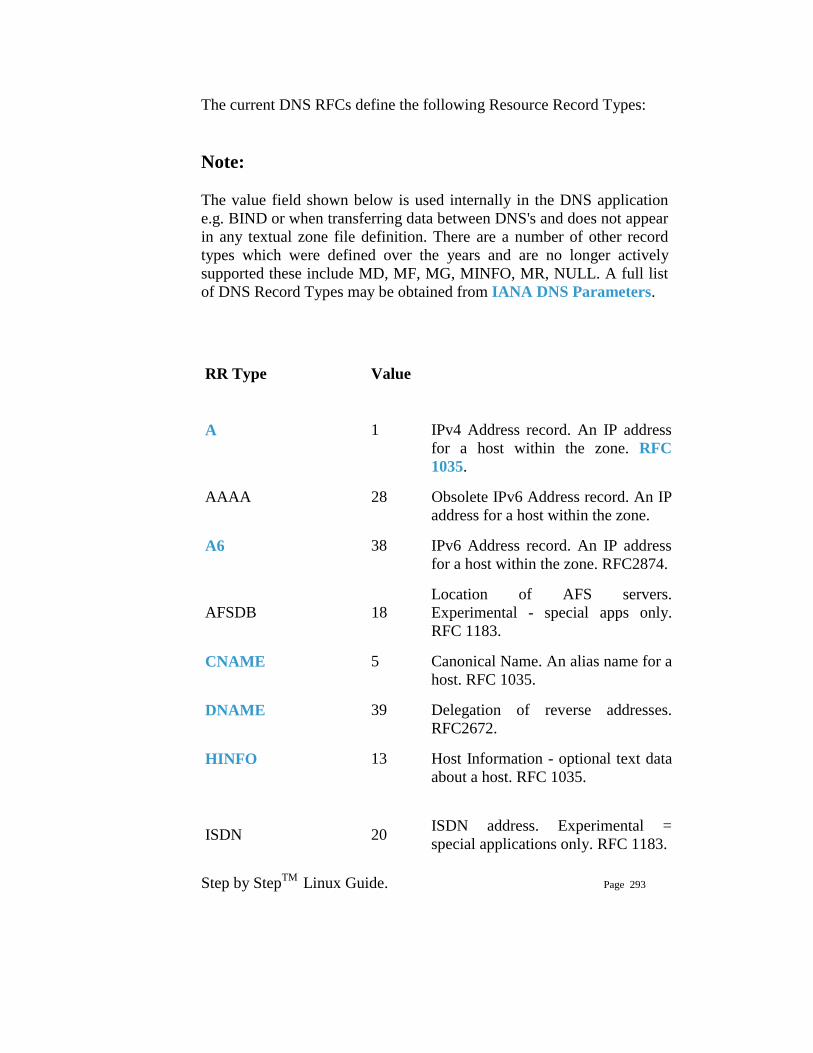
Step by StepTM Linux Guide. Page 293
The current DNS RFCs define the following Resource Record Types:
Note:
The value field shown below is used internally in the DNS application e.g. BIND or when transferring data between DNS's and does not appear in any textual zone file definition. There are a number of other record types which were defined over the years and are no longer actively supported these include MD, MF, MG, MINFO, MR, NULL. A full list of DNS Record Types may be obtained from IANA DNS Parameters.
RR Type
Value
A 1 IPv4 Address record. An IP address for a host within the zone. RFC 1035.
AAAA 28 Obsolete IPv6 Address record. An IP address for a host within the zone.
A6 38 IPv6 Address record. An IP address for a host within the zone. RFC2874.
AFSDB 18 Location of AFS servers. Experimental - special apps only. RFC 1183.
CNAME 5 Canonical Name. An alias name for a host. RFC 1035.
DNAME 39 Delegation of reverse addresses. RFC2672.
HINFO 13 Host Information - optional text data about a host. RFC 1035.
ISDN 20 ISDN address. Experimental = special applications only. RFC 1183.
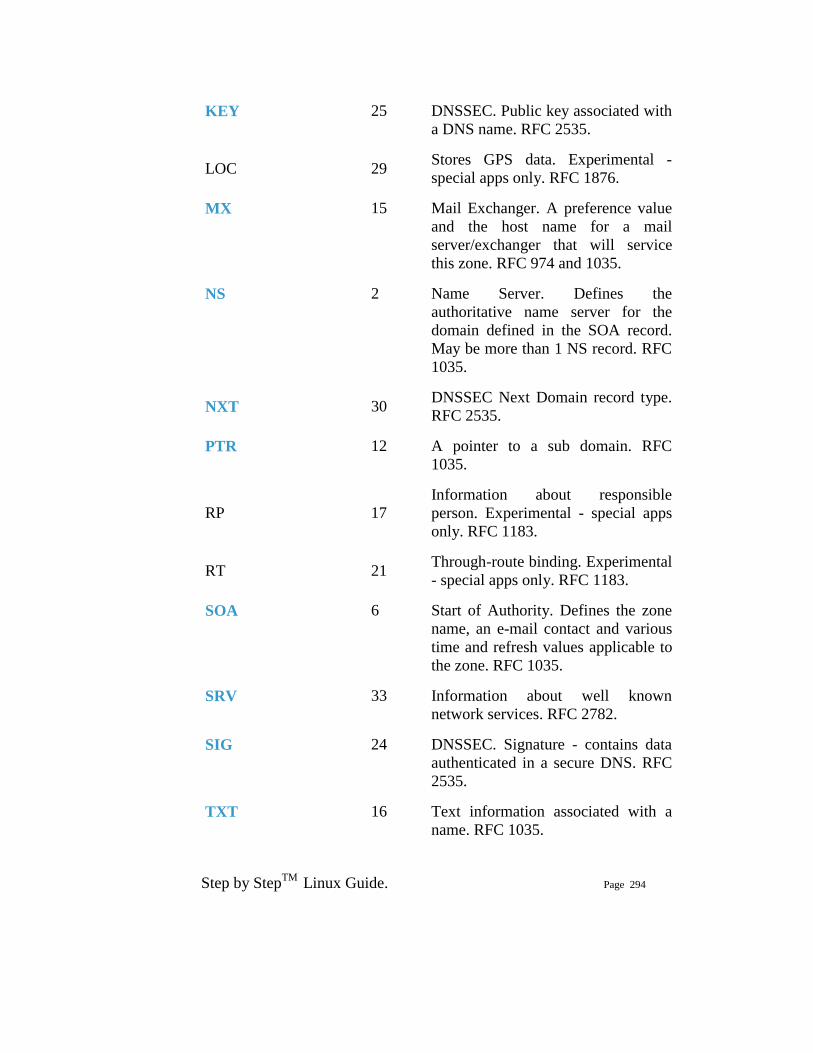
Step by StepTM Linux Guide. Page 294
KEY 25 DNSSEC. Public key associated with a DNS name. RFC 2535.
LOC 29 Stores GPS data. Experimental - special apps only. RFC 1876.
MX 15 Mail Exchanger. A preference value and the host name for a mail server/exchanger that will service this zone. RFC 974 and 1035.
NS 2 Name Server. Defines the authoritative name server for the domain defined in the SOA record. May be more than 1 NS record. RFC 1035.
NXT 30 DNSSEC Next Domain record type. RFC 2535.
PTR 12 A pointer to a sub domain. RFC 1035.
RP 17 Information about responsible person. Experimental - special apps only. RFC 1183.
RT 21 Through-route binding. Experimental - special apps only. RFC 1183.
SOA 6 Start of Authority. Defines the zone name, an e-mail contact and various time and refresh values applicable to the zone. RFC 1035.
SRV 33 Information about well known network services. RFC 2782.
SIG 24 DNSSEC. Signature - contains data authenticated in a secure DNS. RFC 2535.
TXT 16 Text information associated with a name. RFC 1035.
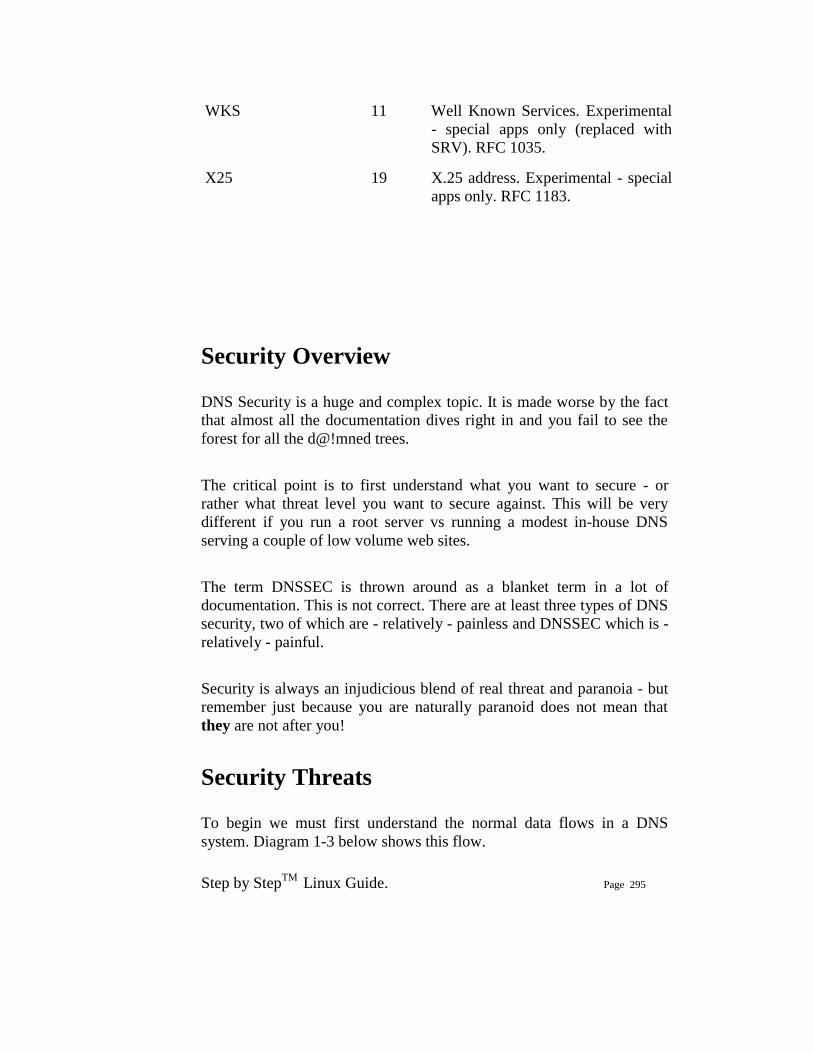
Step by StepTM Linux Guide. Page 295
WKS 11 Well Known Services. Experimental - special apps only (replaced with SRV). RFC 1035.
X25 19 X.25 address. Experimental - special apps only. RFC 1183.
Security Overview DNS Security is a huge and complex topic. It is made worse by the fact that almost all the documentation dives right in and you fail to see the forest for all the d@!mned trees. The critical point is to first understand what you want to secure - or rather what threat level you want to secure against. This will be very different if you run a root server vs running a modest in-house DNS serving a couple of low volume web sites. The term DNSSEC is thrown around as a blanket term in a lot of documentation. This is not correct. There are at least three types of DNS security, two of which are - relatively - painless and DNSSEC which is - relatively - painful. Security is always an injudicious blend of real threat and paranoia - but remember just because you are naturally paranoid does not mean that they are not after you!
Security Threats To begin we must first understand the normal data flows in a DNS system. Diagram 1-3 below shows this flow.
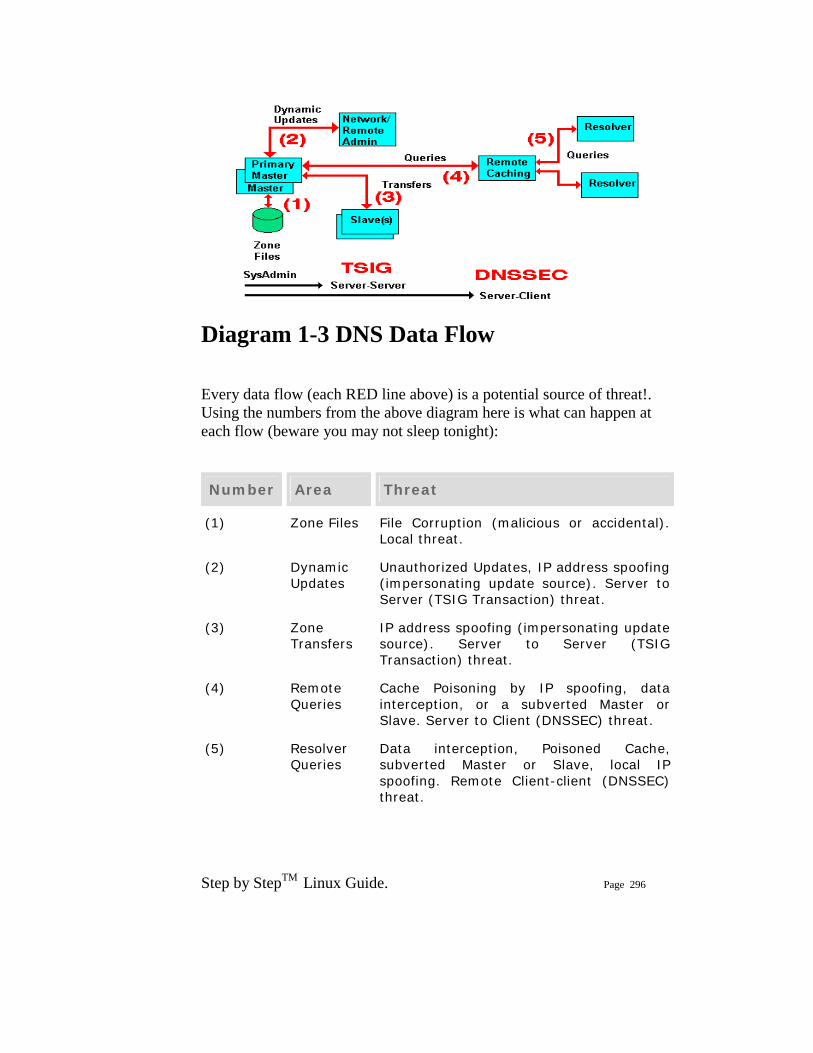
Step by StepTM Linux Guide. Page 296
Diagram 1-3 DNS Data Flow Every data flow (each RED line above) is a potential source of threat!. Using the numbers from the above diagram here is what can happen at each flow (beware you may not sleep tonight):
Number Area Threat
(1) Zone Files File Corruption (malicious or accidental). Local threat.
(2) Dynamic Updates
Unauthorized Updates, IP address spoofing (impersonating update source). Server to Server (TSIG Transaction) threat.
(3) Zone Transfers
IP address spoofing (impersonating update source). Server to Server (TSIG Transaction) threat.
(4) Remote Queries
Cache Poisoning by IP spoofing, data interception, or a subverted Master or Slave. Server to Client (DNSSEC) threat.
(5) Resolver Queries
Data interception, Poisoned Cache, subverted Master or Slave, local IP spoofing. Remote Client-client (DNSSEC) threat.

Step by StepTM Linux Guide. Page 297
The first phase of getting a handle on the problem is to figure (audit) what threats are applicable and how seriously do YOU rate them or do they even apply. As an example; if you don't do Dynamic Updates (BIND's default mode) - there is no Dynamic Update threat! Finally in this section a warning: the further you go from the Master the more complicated the solution and implementation. Unless there is a very good reason for not doing so, we would always recommend that you start from the Master and work out.
Security Types We classify each threat type below. This classification simply allows us select appropriate remedies and strategies for avoiding or securing our system. The numbering used below relates to diagram 1-3.
1. The primary source of Zone data is normally the Zone
Files (and don't forget the named.conf file which contains lots of interesting data as well). This data should be secure and securely backed up. This threat is classified as Local and is typically handled by good system administration.
2. If you run slave servers you will do zone transfers. Note: You do NOT have to run with slave servers, you can run with multiple masters and eliminate the transfer threat entirely. This is classified as a Server-Server (Transaction) threat.
3. The BIND default is to deny Dynamic Zone Updates. If you have enabled this service or require to it poses a serious threat to the integrity of your Zone files and should be protected. This is classified as a Server-Server (Transaction) threat.
4 The possibility of Remote Cache Poisoning due to IP spoofing, data interception and other hacks is a judgement call if you are running a simple web site. If the site is high profile, open to competitive threat or is a high revenue earner you have probably implemented solutions already. This is classified as a Server-Client threat.
Step by StepTM Linux Guide. Page 298
5. We understand that certain groups are already looking at the implications for secure Resolvers but as of early 2004 this was not standardised. This is classified as a Server-Client threat.
Security – Local
Normal system administration practices such as ensuring that files (configuration and zone files) are securely backed-up, proper read and write permissions applied and sensible physical access control to servers may be sufficient. Implementing a Stealth (or Split) DNS server provides a more serious solution depending on available resources. Finally you can run BIND (named) in a chroot jail.
Server-Server (TSIG Transactions)
Zone transfers. If you have slave servers you will do zone transfers. BIND provides Access Control Lists (ACLs) which allow simple IP address protection. While IP based ACLs are relatively easy to subvert they are a lot better than nothing and require very little work. You can run with multiple masters (no slaves) and eliminate the threat entirely. You will have to manually synchronise zone file updates but this may be a simpler solution if changes are not frequent. Dynamic Updates. If you must run with this service it should be secured. BIND provides Access Control Lists (ACLs) which allow simple IP address protection but this is probably not adequate unless you can secure the IP addresses i.e. both systems are behind a firewall/DMZ/NAT or the updating host is using a private IP address.
Step by StepTM Linux Guide. Page 299
TSIG/TKEY If all other solutions fail DNS specifications (RFCs 2845 - TSIG and RFC 2930 - TKEY) provide authentication protocol enhancements to secure these Server-Server transactions. TSIG and TKEY implementations are messy but not too complicated - simply because of the scope of the problem. With Server-Server transactions there is a finite and normally small number of hosts involved. The protocols depend on a shared secret between the master and the slave(s) or updater(s). It is further assumed that you can get the shared secret securely to the peer server by some means not covered in the protocol itself. This process, known as key exchange, may not be trivial (typically long random strings of base64 characters are involved) but you can use the telephone(!), mail, fax or PGP email amongst other methods. The shared-secret is open to brute-force attacks so frequent (monthly or more) changing of shared secrets will become a fact of life. What works once may not work monthly or weekly. TKEY allows automation of key-exchange using a Diffie-Hellman algorithm but seems to start with a shared secret!
Server-Client (DNSSEC) The classic Remote Poisoned cache problem is not trivial to solve simply because there may an infinitely large number of Remote Caches involved. It is not reasonable to assume that you can use a shared secret. Instead the mechanism relies on public/private key authentication. The DNSSEC specifications (RFC 2535 augmented with others) attempt to answer three questions:
1. Authentication - the DNS responding really is the DNS that the request was sent to.
2. Integrity - the response is complete and nothing is missing.
3. Integrity - the DNS records have not been compromised.
Step by StepTM Linux Guide. Page 300
DNS BIND 'named.conf' Zone Transfers and Updates This chapter describes all the options available in BIND 9.x named.conf relating to zone transfers and Updates.
allow-notify [ allow-notify { address_match_list }; ]
allow-notify applies to slave zones only and defines a match list e.g. IP address(es) that are allowed to update the zone in addition to those IPs defined in the masters option for the zone. The default behaviour is to allow zone updates only from the 'masters' IP(s). This option may be specified in a zone statement or in a 'global' options statement.
// allows notify from the defined IPs allow-notify (192.168.0.15; 192.168.0.16; 10.0.0.1;); // allows no notifies allow-notify (none;); allow-transfer [ allow-transfer { address_match_list }; ]
allow-transfer defines a match list e.g. IP address(es) that are allowed to transfer (copy) the zone information from the server (master or slave for the zone). The default behaviour is to allow zone transfers to any host. To disable transfers the following should be placed in the global or a zone section.
allow-transfer ("none");
This option may be specified in a zone statement or in a 'global' options statement.
allow-update [ allow-update { address_match_list }; ]
Step by StepTM Linux Guide. Page 301
allow-update defines a match list e.g. IP address(es) that are allowed to submit dynamic updates for 'master' zones. The default in BIND 9 is to disallow updates from all hosts. This option may be specified in a zone statement or in a 'global' options statement. Mutually exclusive with update-policy and applies to master zones only.
allow-update-forwarding [ allow-update-forwarding { address_match_list }; ]
allow-update-forwarding defines a match list e.g. IP address(es) that are allowed to submit dynamic updates to a 'slave' sever for onward transmission to a 'master'. This option may be specified in a zone statement or in a 'global' options statement.
also-notify [ also-notify { ip_addr [port ip_port] ; [ ip_addr [port ip_port] ; ... ] }; ]
also-notify is applicable to 'type master' only and defines a list of IP address(es) (and optional port numbers) that will be sent a NOTIFY when a zone changes (or the specific zone if the option is specified in a zone statement). These IP(s)s are in addition to those listed in the NS records for the zone. If a global notify option is 'no' this option may be used to override it for a specific zone, and conversely if the global <>options contain a also-notify list, setting notify 'no' in the zone will override the global option. This option may be specified in a zone statement or in a 'global' options statement.
dialup [ dialup dialup_option; ]
Step by StepTM Linux Guide. Page 302
dialup controls the behaviour of BIND when used with dial-on-demand links. This option may be specified in a zone, view or 'global' options statement. NOT YET IMPLEMENTED IN BIND 9.
max-refresh-time, min-refresh-time [ max-refresh-time number ; ] [ min-refresh-time number ; ]
Only valid for 'type slave' zones. The refresh time is normally defined by the SOA record 'refresh' parameter. This allows the slave server administrator to override the definition and substitute the values defined. The values may take the normal time short-cuts. This option may be specified in a zone statement or in a 'global' options statement.
max-retry-time, min-retry-time [ max-retry-time number ; ] [ min-retry-time number ; ] Only valid for 'type slave' zones. The retry time is normally defined by the SOA record 'update retry' parameter. This allows the slave server administrator to override the definition and substitute the values defined. The values may take the normal time short-cuts. This option may be specified in a zone statement or in a 'global' options statement. max-transfer-idle-in [ max-transfer-idle-in number ; ]
Only valid for 'type slave' zones. Inbound zone transfers making no progress in this many minutes will be terminated. The default is 60 minutes (1 hour). The maximum value is 28 days (40320 minutes). This option may be specified in a zone statement or in a 'global' options statement.
Step by StepTM Linux Guide. Page 303
max-transfer-idle-out [ max-transfer-idle-out number ; ]
Only valid for 'type master' zones. Outbound zone transfers running longer than this many minutes will be terminated. The default is 120 minutes (2 hours). The maximum value is 28 days (40320 minutes). This option may be specified in a zone statement or in a 'global' options statement.
max-transfer-time-in [ max-transfer-time-in number ; ]
Only valid for 'type slave' zones. Inbound zone transfers running longer than this many minutes will be terminated. The default is 120 minutes (2 hours). The maximum value is 28 days (40320 minutes). This option may be specified in a zone statement or in a 'global' options statement.
max-transfer-time-out [ max-transfer-time-out number ; ]
Only valid for 'type master' zones. Outbound zone transfers running longer than this many minutes will be terminated. The default is 120 minutes (2 hours). The maximum value is 28 days (40320 minutes). This option may be specified in a zone statement or in a 'global' options statement.
Notify [ notify yes | no | explicit; ]
notify behaviour is only applicable to zones with 'type master' and if set to 'yes' then, when zone information changes, NOTIFY messages are sent from zone masters to the slaves defined in the NS records for the zone (with the exception of the 'Primary Master' name server defined in the SOA record) and to any IPs listed in also-notify options.
Step by StepTM Linux Guide. Page 304
If set to 'no' NOTIFY messages are not sent.
If set to 'explicit' NOTIFY is only sent to those IP(s) listed in a also-notify option.
If a global notify option is 'no' an also-notify option may be used to override it for a specific zone, and conversely if the global options contain an also-notify list, setting notify 'no' in the zone will override the global option. This option may be specified in a zone statement or in a 'global' options statement.
notify-source [ notify-source (ip4_addr | *) [port ip_port] ; ] Only valid for 'type master' zones. notify-source defines the IPv4 address (and optionally port) to be used for outgoing NOTIFY operations. The value '*' means the IP of this server (default). This IPv4 address must appear in the masters or also-notify option for the receiving slave name servers. This option may be specified in a zone statement or in a 'global' options statement. notify-source-v6 [ notify-source-v6 (ip6_addr | *) [port ip_port] ; ] Only used by 'type master' zones. notify-source-v6 defines the IPv6 address (and optionally port) to be used for outgoing NOTIFY operations. The value '*' means the IP of this server (default). This IPv6 address must appear in the masters or also-notify option for the receiving slave name servers. This option may be specified in a zone statement or in a 'global' options statement. provide-ixfr [ provide-ixfr yes|no ; ]
Step by StepTM Linux Guide. Page 305
The provide-ixfr option defines whether a master will respond to an incremental (IXFR) zone request (option = yes) or will respond with a full zone transfer (AXFR) (option = no). The BIND 9 default is yes. This option may be specified in a 'server' statement or in a 'global' options statement.
request-ixfr [ request-ixfr yes|no ; ]
The request-ixfr option defines whether a server (acting as a slave or on behalf of a slave zone) will request an incremental (IXFR) zone transfer (option = yes) or will request a full zone transfer (AXFR) (option = no). The BIND 9 default is yes. This option may be specified in a 'server' statement or in a 'global' options statement.
transfers [ transfers number ; ]
Limits the number of concurrent zone transfers from any given server. If not present the default for transfers-per-ns is used. This option may be specified only in a server statement.
transfer-format [ transfer-format ( one-answer | many-answers ); ] Only used by 'type master' zones. transfer-format determines the format the server uses to transfer zones. 'one-answer' places a single record in each message, 'many-answers' packs as many records as possible into a maximum sized message. The default is 'many-answers' which is ONLY KNOWN TO BE SUPPORTED BY BIND 9, BIND 8 and later BIND 4 releases. This option may be specified in a server statement or in a 'global' options statement. transfer-in [ transfer-in number ; ]

Step by StepTM Linux Guide. Page 306
Only used by 'type slave' zones. transfer-in determines the number of concurrent inbound zone transfers. Default is 10. This option may only be specified in a 'global' options statement.
transfers-per-ns [ transfer-per-ns number ; ]
Only used by 'type slave' zones. transfer-per-ns determines the number of concurrent inbound zone transfers for any zone. Default is 2. This option may only be specified in a 'global' options statement.
transfer-source [ transfer-source (ip4_addr | *) [port ip_port] ; ]] Only valid for 'type slave' zones. transfer-source determines which local IPv4 address will be bound to TCP connections used to fetch zones transferred inbound by the server. It also determines the source IPv4 address, and optionally the UDP port, used for the refresh queries and forwarded dynamic updates. If not set, it defaults to a BIND controlled value which will usually be the address of the interface "closest to" the remote end. This address must appear in the remote end's allow-transfer option for the zone being transferred, if one is specified. This option may be specified in a zone statement or in a 'global' options statement. transfer-source-v6 [ transfer-source-v6 (ip6_addr | *) [port ip_port] ; ]]
Only valid for 'type slave' zones. transfer-source determines which local IPv6 address will be bound to TCP connections used to fetch zones transferred inbound by the server. It also determines the source IPv4 address, and optionally the UDP port, used for the refresh queries and forwarded dynamic updates. If not set, it defaults to a BIND controlled value which will usually be the address of the interface "closest to" the remote end. This address must appear in the remote end's allow-transfer option for the zone being transferred, if one is specified. This option may be specified in a zone statement or in a 'global' options statement.
Step by StepTM Linux Guide. Page 307
transfer-out [ transfer-out number ; ]
Only used by 'type master' zones. transfer-out determines the number of concurrent outbound zone transfers. Default is 10. Zone transfer requests in excess of this limit will be REFUSED. This option may only be specified in a 'global' options statement.
update-policy [ update-policy { update_policy_rule [...] }; ]
Incomplete - to be supplied
update-policy defines the conditions (rules) by which Dynamic Zone Updates may be carried out. This option may only be used with a key (DNSSEC/TSIG/TKEY) and may be specified only in a zone statement. Mutually exclusive with allow-update and applies to master zones only.
update_policy_rule takes the following format:
permission identity matchtype name [rr]
Where:
Parameter Description
permission May be either grant or deny
identity To be supplied
matchtype Value Meaning
name To be supplied
subdomain
self To be supplied
wildcard To be supplied
Step by StepTM Linux Guide. Page 308
name to be supplied
[rr] Optional. Defines the Resource Record types that may be updated and may take the value TXT, A, PTR, NS, SOA, A6, CNAME, MX, ANY (any of TXT, A, PTR, NS, SOA, MX). If omitted default allows TXT, PTR, A, A6, MX, CNAME. Multiple entries may be defined using a space separated entries e.g. A MX PTR
DNS BIND 'named.conf' acl statements
This section describes the use of the acl (Access Control List) statement available in BIND 9.x named.conf. The 'acl' statement allows fine-grained control over what hosts may perform what operations on the name server.
acl statement grammer acl acl-name { address_match_list };
acl's define a match list e.g. IP address(es), which are then referenced (used) in a number of options statements and the view statement(s). acl's MUST be defined before they are referenced in any other statement. For this reason they are usually defined first in the named.conf file. 'acl-name' is an arbitrary (but unique) quoted string defining the specific list. The 'acl-name' is the method used to reference the particular list. Any number of acl's may be defined. The following special 'acl-name' values are built into BIND:
• "none" - matches no hosts • "any" - matches all hosts • "localhost" - matches all the IP address(es)
of the server on which BIND is running • "localnets" - matches all the IP address(es)
and subnetmasks of the server on which BIND is running
Step by StepTM Linux Guide. Page 309
acl Examples
The following examples show acls being created and used including the 'special' acl's.
//defining acl's // simple ip address acl acl "someips" { 10.0.0.1; 192.168.23.1; 192.168.23.15; }; // ip address acl with '/' format acl "moreips" { 10.0.0.1; 192.168.23.128/25; }; // nested acl acl "allips" { "someips"; "moreips"; }; // messy acl acl "complex" { "someips"; 10.0.15.0/24; !10.0.16.1/24; // negated (10.0.17.1;10.0.18.2;); // nested }; // using acl's zone "somedomain.com" { type master; file "pri.somedomain.com"; also-notify {"moreips"}; }; zone "mydomain.com" { type slave; masters ("someips"}; file "sec.mydomain.com; allow-transfer {"none"}; // this is a 'special' acl };

Step by StepTM Linux Guide. Page 310
NoCatAuth Project Installing Gateway
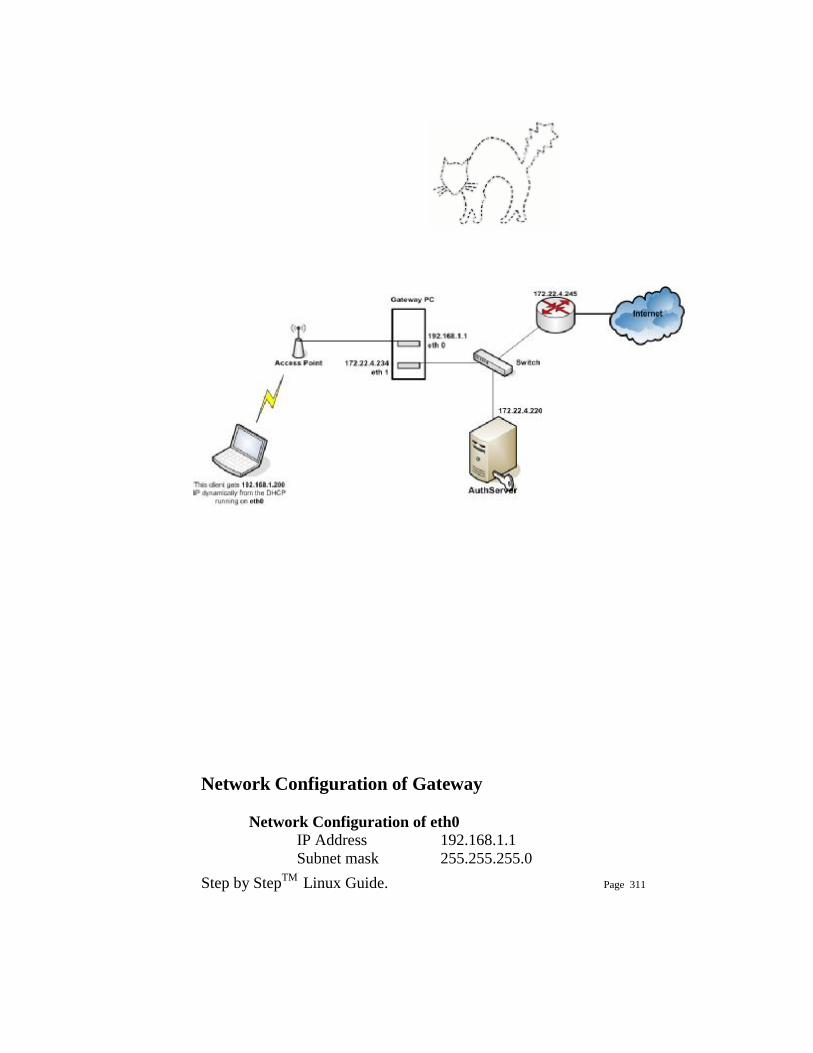
Step by StepTM Linux Guide. Page 311
Network Configuration of Gateway
Network Configuration of eth0 IP Address 192.168.1.1 Subnet mask 255.255.255.0
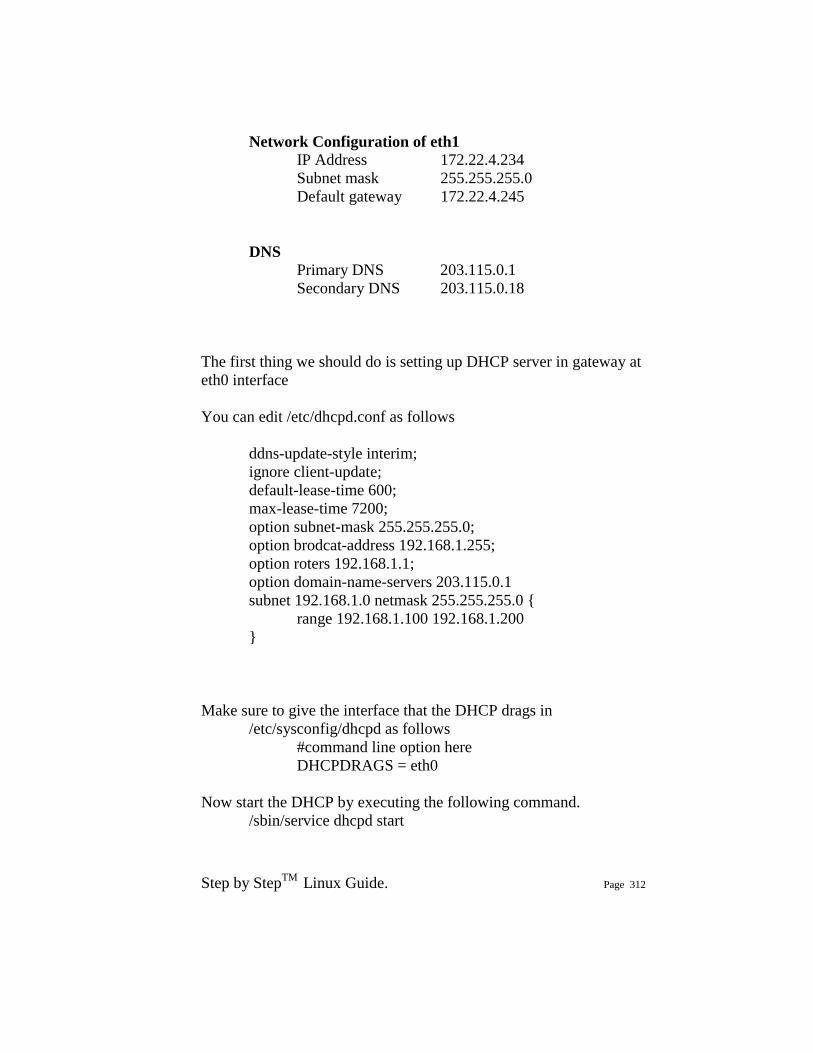
Step by StepTM Linux Guide. Page 312
Network Configuration of eth1 IP Address 172.22.4.234 Subnet mask 255.255.255.0 Default gateway 172.22.4.245
DNS Primary DNS 203.115.0.1 Secondary DNS 203.115.0.18
The first thing we should do is setting up DHCP server in gateway at eth0 interface You can edit /etc/dhcpd.conf as follows ddns-update-style interim; ignore client-update; default-lease-time 600; max-lease-time 7200; option subnet-mask 255.255.255.0; option brodcat-address 192.168.1.255; option roters 192.168.1.1; option domain-name-servers 203.115.0.1 subnet 192.168.1.0 netmask 255.255.255.0 { range 192.168.1.100 192.168.1.200 } Make sure to give the interface that the DHCP drags in /etc/sysconfig/dhcpd as follows #command line option here DHCPDRAGS = eth0 Now start the DHCP by executing the following command. /sbin/service dhcpd start
Step by StepTM Linux Guide. Page 313
If you want to change the configuration of a DHCP server that was running before, then you have to change the lease database stored in /var/lib/dhcp/dhcpd.leases as follows, mv dhcpd.leases~ dhcpd.leases Say Yes to over write the file and restart the dhcpd. service dhcpd restart Download the NoCatAuth and put in /nocat directory if there is no such directory create it by executing this command mkdir /nocat /nocat/NoCatAuth-0.82.tar.gz cd /nocat tar zvxf NoCatAuth-x.xx.tar.gz cd NoCatAuth-x.xx make gateway Now go to /usr/local/nocat and edit the nocat.conf as follows. GatewayMode Passive AuthServiceAddress 172.22.4.1 ExternalDevice eth1 InternalDevice eth0 LocalNetwork 192.168.1.0/255.255.255.0 DNS Address 203.115.0.1
Following steps should follow only after installing the FreeRADIUS on the AuthServer
Step by StepTM Linux Guide. Page 314
Installing the Radius Patch
Download the patch from pogozon site and save it in /usr/local/nocat
cd /usr/local/nocat execute the following command patch –p0 < NoCatAuth-0.82+RADIUS-20031015.patch once we patch the gateway the configuration file (nocat.conf) changes. We have to make some changes in nocat.conf of gateway as follows. AccountingMethod RADIUS RADIUS_HOST 172.22.4.1:1646 RADIUS_Secret testing123 RADIUS_TimeOut 5 Note: The radius port of gateway is 1646 and radius port of authserver is 1645, because 1645 is the port that free radius work and 1646 is the port for accounting. Other important configurations Remove iptables rules Put stats.fw into /usr/local/nocat/bin where the original is at /usr/local/nocat/libexec/iptables/stats.fw and give the permission to execute Get the trustedkeys.gpg of the AuthServer and put it into the /usr/local/nocat/pgp of the gateway. Installing Authen Radius Module # perl –MCPAN –e shell # install Authen::Radius
Step by StepTM Linux Guide. Page 315
Installing AuthServer Network Configuration of AuthServer Network Configuration of eth0
IP Address 172.22.4.1 Subnet mask 255.255.255.0 Default gateway 172.22.4.245
Setting up a SSL enable Web Server with Self-signed Certificate The first thing we should do is setting up a SSL enable web server with self-signed certificate. This is a pre-requisite of the AuthServer. 1. Install RedHat Linux 8 in AuthServer (as a Linux Server) 2. /sibn/service httpd start 3. cd /etc/https/conf 4. rm ssl.key/server.key 5. rm ssl.crt/server.crt 6. cd /usr/share/ssl/certs 7. make genkey 8. Enter the password (PEM pass phrase) 9. Re-enter the password (PEM pass phrase) 10. make testcert 11. Enter the password 12. Then enter the following arguments
• sl • central • clombo • slts • networking • suranga • [email protected]
13. /sbin/service httpd restart 14. Enter password
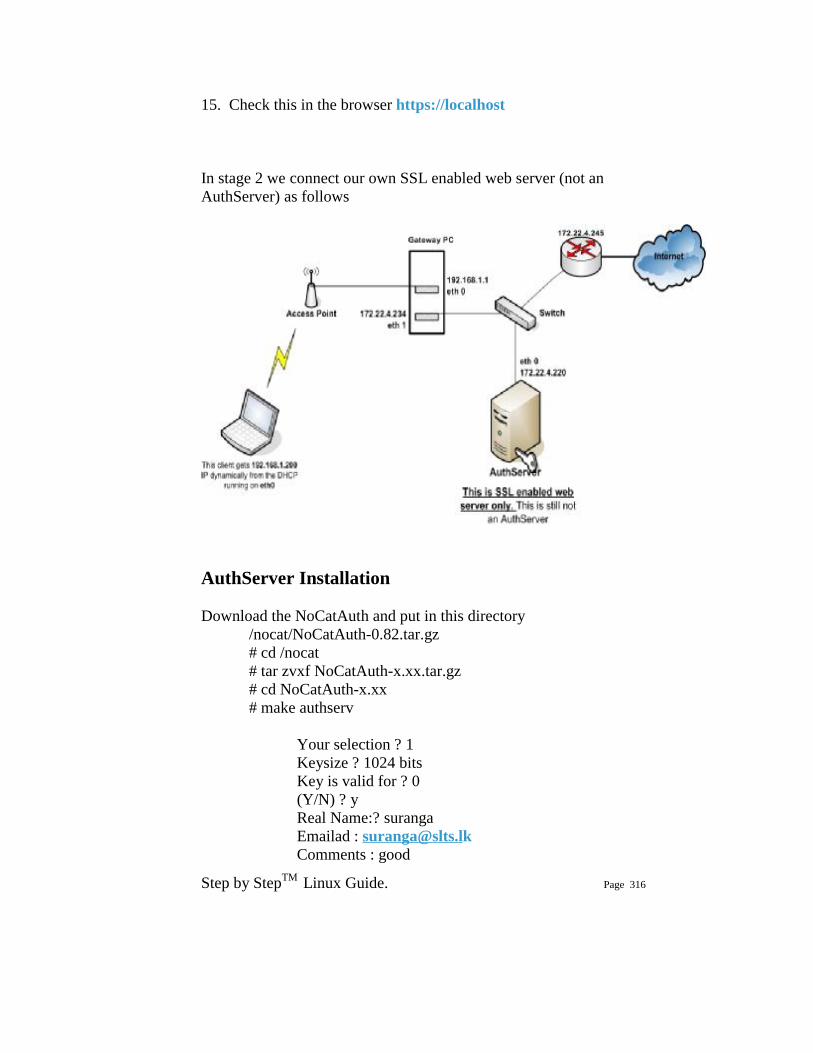
Step by StepTM Linux Guide. Page 316
15. Check this in the browser https://localhost In stage 2 we connect our own SSL enabled web server (not an AuthServer) as follows
AuthServer Installation Download the NoCatAuth and put in this directory /nocat/NoCatAuth-0.82.tar.gz # cd /nocat # tar zvxf NoCatAuth-x.xx.tar.gz # cd NoCatAuth-x.xx # make authserv Your selection ? 1 Keysize ? 1024 bits Key is valid for ? 0 (Y/N) ? y Real Name:? suranga Emailad : [email protected] Comments : good
Step by StepTM Linux Guide. Page 317
(N)(C)(E)(O)(Q) ? O Enter passphrase : 8 Repeat passphrase : 8 (IMPORTANT – do not enter passprase) #chown –R nobody:nobody /usr/local/nocat/pgp Install relevant modules from CPAN #perl –mcpan –e shell Cpan> install Digest::MD5 httpd.conf ServerTokens OS ServerRoot "/etc/httpd" PidFile run/httpd.pid Timeout 300 KeepAlive Off MaxKeepAliveRequests 100 KeepAliveTimeout 15 <IfModule prefork.c> StartServers 8 MinSpareServers 5 MaxSpareServers 20 MaxClients 150 MaxRequestsPerChild 1000 </IfModule> <IfModule worker.c> StartServers 2 MaxClients 150 MinSpareThreads 25 MaxSpareThreads 75 ThreadsPerChild 25 MaxRequestsPerChild 0 </IfModule> <IfModule perchild.c> NumServers 5 StartThreads 5 MinSpareThreads 5

Step by StepTM Linux Guide. Page 318
MaxSpareThreads 10 MaxThreadsPerChild 20 MaxRequestsPerChild 0 </IfModule> Listen 80 Include conf.d/*.conf LoadModule access_module modules/mod_access.so LoadModule auth_module modules/mod_auth.so LoadModule auth_anon_module modules/mod_auth_anon.so LoadModule auth_dbm_module modules/mod_auth_dbm.so LoadModule auth_digest_module modules/mod_auth_digest.so LoadModule include_module modules/mod_include.so LoadModule log_config_module modules/mod_log_config.so LoadModule env_module modules/mod_env.so LoadModule mime_magic_module modules/mod_mime_magic.so LoadModule cern_meta_module modules/mod_cern_meta.so LoadModule expires_module modules/mod_expires.so LoadModule headers_module modules/mod_headers.so LoadModule usertrack_module modules/mod_usertrack.so LoadModule unique_id_module modules/mod_unique_id.so LoadModule setenvif_module modules/mod_setenvif.so LoadModule mime_module modules/mod_mime.so LoadModule dav_module modules/mod_dav.so LoadModule status_module modules/mod_status.so LoadModule autoindex_module modules/mod_autoindex.so LoadModule asis_module modules/mod_asis.so LoadModule info_module modules/mod_info.so LoadModule cgi_module modules/mod_cgi.so LoadModule dav_fs_module modules/mod_dav_fs.so LoadModule vhost_alias_module modules/mod_vhost_alias.so LoadModule negotiation_module modules/mod_negotiation.so LoadModule dir_module modules/mod_dir.so LoadModule imap_module modules/mod_imap.so LoadModule actions_module modules/mod_actions.so LoadModule speling_module modules/mod_speling.so LoadModule userdir_module modules/mod_userdir.so LoadModule alias_module modules/mod_alias.so LoadModule rewrite_module modules/mod_rewrite.so LoadModule proxy_module modules/mod_proxy.so LoadModule proxy_ftp_module modules/mod_proxy_ftp.so LoadModule proxy_http_module modules/mod_proxy_http.so LoadModule proxy_connect_module modules/mod_proxy_connect.so

Step by StepTM Linux Guide. Page 319
User nobody Group nobody ServerAdmin root@localhost UseCanonicalName Off DocumentRoot "/var/www/html" <Directory /> Options FollowSymLinks AllowOverride None </Directory> <Directory "/var/www/html"> Options Indexes FollowSymLinks AllowOverride Options Order allow,deny Allow from all </Directory> <LocationMatch "^/$> Options -Indexes ErrorDocument 403 /error/noindex.html </LocationMatch> <IfModule mod_userdir.c> UserDir disable </IfModule> DirectoryIndex index.html index.html.var AccessFileName .htaccess <Files ~ "^\.ht"> Order allow,deny Deny from all </Files> TypesConfig /etc/mime.types DefaultType text/plain <IfModule mod_mime_magic.c> MIMEMagicFile conf/magic </IfModule> HostnameLookups Off ErrorLog logs/error_log LogLevel warn LogFormat "%h %l %u %t \"%r\" %>s %b \"%{Referer}i\" \"%{User-Agent}i\"" combined LogFormat "%h %l %u %t \"%r\" %>s %b" common LogFormat "%{Referer}i -> %U" referer LogFormat "%{User-agent}i" agent CustomLog logs/access_log combined

Step by StepTM Linux Guide. Page 320
ServerSignature On Alias /icons/ "/var/www/icons/" <Directory "/var/www/icons"> Options Indexes MultiViews AllowOverride None Order allow,deny Allow from all </Directory> Alias /manual "/var/www/manual" <Directory "/var/www/manual"> Options Indexes FollowSymLinks MultiViews AllowOverride None Order allow,deny Allow from all </Directory> <IfModule mod_dav_fs.c> DAVLockDB /var/lib/dav/lockdb </IfModule> ScriptAlias /cgi-bin/ "/var/www/cgi-bin/" <IfModule mod_cgid.c> </IfModule> <Directory "/var/www/cgi-bin"> AllowOverride None Options None Order allow,deny Allow from all </Directory> <Directory "/usr/local/nocat/cgi-bin"> Options +ExecCGI </Directory> IndexOptions FancyIndexing VersionSort NameWidth=* AddIconByEncoding (CMP,/icons/compressed.gif) x-compress x-gzip AddIconByType (TXT,/icons/text.gif) text/* AddIconByType (IMG,/icons/image2.gif) image/* AddIconByType (SND,/icons/sound2.gif) audio/* AddIconByType (VID,/icons/movie.gif) video/*

Step by StepTM Linux Guide. Page 321
AddIcon /icons/binary.gif .bin .exe AddIcon /icons/binhex.gif .hqx AddIcon /icons/tar.gif .tar AddIcon /icons/world2.gif .wrl .wrl.gz .vrml .vrm .iv AddIcon /icons/compressed.gif .Z .z .tgz .gz .zip AddIcon /icons/a.gif .ps .ai .eps AddIcon /icons/layout.gif .html .shtml .htm .pdf AddIcon /icons/text.gif .txt AddIcon /icons/c.gif .c AddIcon /icons/p.gif .pl .py AddIcon /icons/f.gif .for AddIcon /icons/dvi.gif .dvi AddIcon /icons/uuencoded.gif .uu AddIcon /icons/script.gif .conf .sh .shar .csh .ksh .tcl AddIcon /icons/tex.gif .tex AddIcon /icons/bomb.gif core AddIcon /icons/back.gif .. AddIcon /icons/hand.right.gif README AddIcon /icons/folder.gif ^^DIRECTORY^^ AddIcon /icons/blank.gif ^^BLANKICON^^ DefaultIcon /icons/unknown.gif ReadmeName README.html HeaderName HEADER.html IndexIgnore .??* *~ *# HEADER* README* RCS CVS *,v *,t AddEncoding x-compress Z AddEncoding x-gzip gz tgz AddLanguage da .dk AddLanguage nl .nl AddLanguage en .en AddLanguage et .et AddLanguage fr .fr AddLanguage de .de AddLanguage he .he AddLanguage el .el AddLanguage it .it AddLanguage ja .ja AddLanguage pl .po AddLanguage kr .kr AddLanguage pt .pt AddLanguage nn .nn

Step by StepTM Linux Guide. Page 322
AddLanguage no .no AddLanguage pt-br .pt-br AddLanguage ltz .ltz AddLanguage ca .ca AddLanguage es .es AddLanguage sv .se AddLanguage cz .cz AddLanguage ru .ru AddLanguage tw .tw AddLanguage zh-tw .tw AddLanguage hr .hr LanguagePriority en da nl et fr de el it ja kr no pl pt pt-br ltz ca es sv tw ForceLanguagePriority Prefer Fallback AddDefaultCharset ISO-8859-1 AddCharset ISO-8859-1 .iso8859-1 .latin1 AddCharset ISO-8859-2 .iso8859-2 .latin2 .cen AddCharset ISO-8859-3 .iso8859-3 .latin3 AddCharset ISO-8859-4 .iso8859-4 .latin4 AddCharset ISO-8859-5 .iso8859-5 .latin5 .cyr .iso-ru AddCharset ISO-8859-6 .iso8859-6 .latin6 .arb AddCharset ISO-8859-7 .iso8859-7 .latin7 .grk AddCharset ISO-8859-8 .iso8859-8 .latin8 .heb AddCharset ISO-8859-9 .iso8859-9 .latin9 .trk AddCharset ISO-2022-JP .iso2022-jp .jis AddCharset ISO-2022-KR .iso2022-kr .kis AddCharset ISO-2022-CN .iso2022-cn .cis AddCharset Big5 .Big5 .big5 AddCharset WINDOWS-1251 .cp-1251 .win-1251 AddCharset CP866 .cp866 AddCharset KOI8-r .koi8-r .koi8-ru AddCharset KOI8-ru .koi8-uk .ua AddCharset ISO-10646-UCS-2 .ucs2 AddCharset ISO-10646-UCS-4 .ucs4 AddCharset UTF-8 .utf8 AddCharset GB2312 .gb2312 .gb AddCharset utf-7 .utf7 AddCharset utf-8 .utf8 AddCharset big5 .big5 .b5 AddCharset EUC-TW .euc-tw AddCharset EUC-JP .euc-jp AddCharset EUC-KR .euc-kr AddCharset shift_jis .sjis
Step by StepTM Linux Guide. Page 323
AddType application/x-tar .tgz AddHandler cgi-script .cgi .pl AddHandler imap-file map AddHandler type-map var AddOutputFilter INCLUDES .shtml Alias /error/ "/var/www/error/" <IfModule mod_negotiation.c> <IfModule mod_include.c> <Directory "/var/www/error"> AllowOverride None Options IncludesNoExec AddOutputFilter Includes html AddHandler type-map var Order allow,deny Allow from all LanguagePriority en es de fr ForceLanguagePriority Prefer Fallback </Directory> ErrorDocument 400 /error/HTTP_BAD_REQUEST.html.var ErrorDocument 401 /error/HTTP_UNAUTHORIZED.html.var ErrorDocument 403 /error/HTTP_FORBIDDEN.html.var ErrorDocument 404 /error/HTTP_NOT_FOUND.html.var ErrorDocument 405 /error/HTTP_METHOD_NOT_ALLOWED.html.var ErrorDocument 408 /error/HTTP_REQUEST_TIME_OUT.html.var ErrorDocument 410 /error/HTTP_GONE.html.var ErrorDocument 411 /error/HTTP_LENGTH_REQUIRED.html.var ErrorDocument 412 /error/HTTP_PRECONDITION_FAILED.html.var ErrorDocument 413 /error/HTTP_REQUEST_ENTITY_TOO_LARGE.html.var ErrorDocument 414 /error/HTTP_REQUEST_URI_TOO_LARGE.html.var ErrorDocument 415 /error/HTTP_SERVICE_UNAVAILABLE.html.var ErrorDocument 500 /error/HTTP_INTERNAL_SERVER_ERROR.html.var ErrorDocument 501 /error/HTTP_NOT_IMPLEMENTED.html.var ErrorDocument 502 /error/HTTP_BAD_GATEWAY.html.var
Step by StepTM Linux Guide. Page 324
ErrorDocument 503 /error/HTTP_SERVICE_UNAVAILABLE.html.var ErrorDocument 506 /error/HTTP_VARIANT_ALSO_VARIES.html.var </IfModule> </IfModule> BrowserMatch "Mozilla/2" nokeepalive BrowserMatch "MSIE 4\.0b2;" nokeepalive downgrade-1.0 force-response-1.0 BrowserMatch "RealPlayer 4\.0" force-response-1.0 BrowserMatch "Java/1\.0" force-response-1.0 BrowserMatch "JDK/1\.0" force-response-1.0 BrowserMatch "Microsoft Data Access Internet Publishing Provider" redirect-carefully BrowserMatch "^WebDrive" redirect-carefully ssl.conf LoadModule ssl_module modules/mod_ssl.so Listen 443 AddType application/x-x509-ca-cert .crt AddType application/x-pkcs7-crl .crl SSLPassPhraseDialog builtin SSLSessionCache dbm:/var/cache/mod_ssl/scache SSLSessionCacheTimeout 300 SSLMutex file:logs/ssl_mutex SSLRandomSeed startup builtin SSLRandomSeed connect builtin <VirtualHost _default_:443> DocumentRoot "/var/www/html" ServerName 203.94.84.205:443 ServerAdmin [email protected] ErrorLog logs/ssl_error_log TransferLog logs/ssl_access_log SSLEngine on SSLCipherSuite ALL:!ADH:!EXPORT56:RC4+RSA:+HIGH:+MEDIUM:+LOW:+SSLv2:+EXP:+eNULL
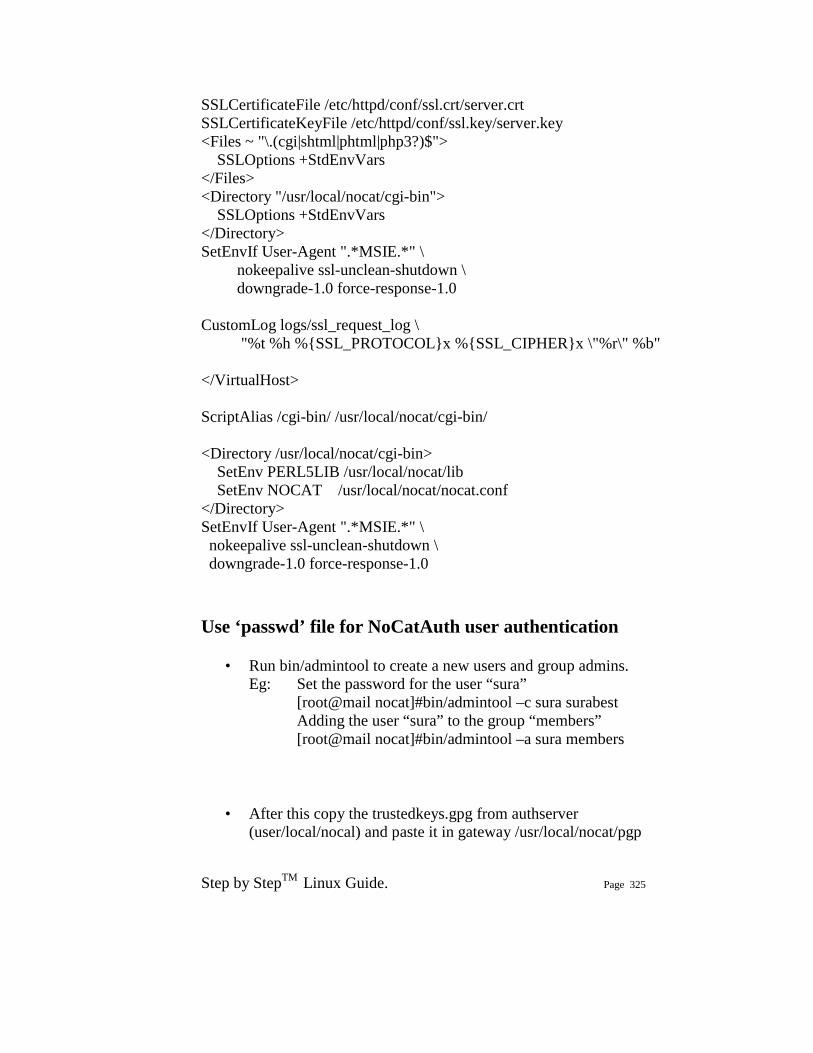
Step by StepTM Linux Guide. Page 325
SSLCertificateFile /etc/httpd/conf/ssl.crt/server.crt SSLCertificateKeyFile /etc/httpd/conf/ssl.key/server.key <Files ~ "\.(cgi|shtml|phtml|php3?)$"> SSLOptions +StdEnvVars </Files> <Directory "/usr/local/nocat/cgi-bin"> SSLOptions +StdEnvVars </Directory> SetEnvIf User-Agent ".*MSIE.*" \ nokeepalive ssl-unclean-shutdown \ downgrade-1.0 force-response-1.0 CustomLog logs/ssl_request_log \ "%t %h %{SSL_PROTOCOL}x %{SSL_CIPHER}x \"%r\" %b" </VirtualHost> ScriptAlias /cgi-bin/ /usr/local/nocat/cgi-bin/ <Directory /usr/local/nocat/cgi-bin> SetEnv PERL5LIB /usr/local/nocat/lib SetEnv NOCAT /usr/local/nocat/nocat.conf </Directory> SetEnvIf User-Agent ".*MSIE.*" \ nokeepalive ssl-unclean-shutdown \ downgrade-1.0 force-response-1.0 Use ‘passwd’ file for NoCatAuth user authentication
• Run bin/admintool to create a new users and group admins. Eg: Set the password for the user “sura”
[root@mail nocat]#bin/admintool –c sura surabest Adding the user “sura” to the group “members” [root@mail nocat]#bin/admintool –a sura members
• After this copy the trustedkeys.gpg from authserver (user/local/nocal) and paste it in gateway /usr/local/nocat/pgp
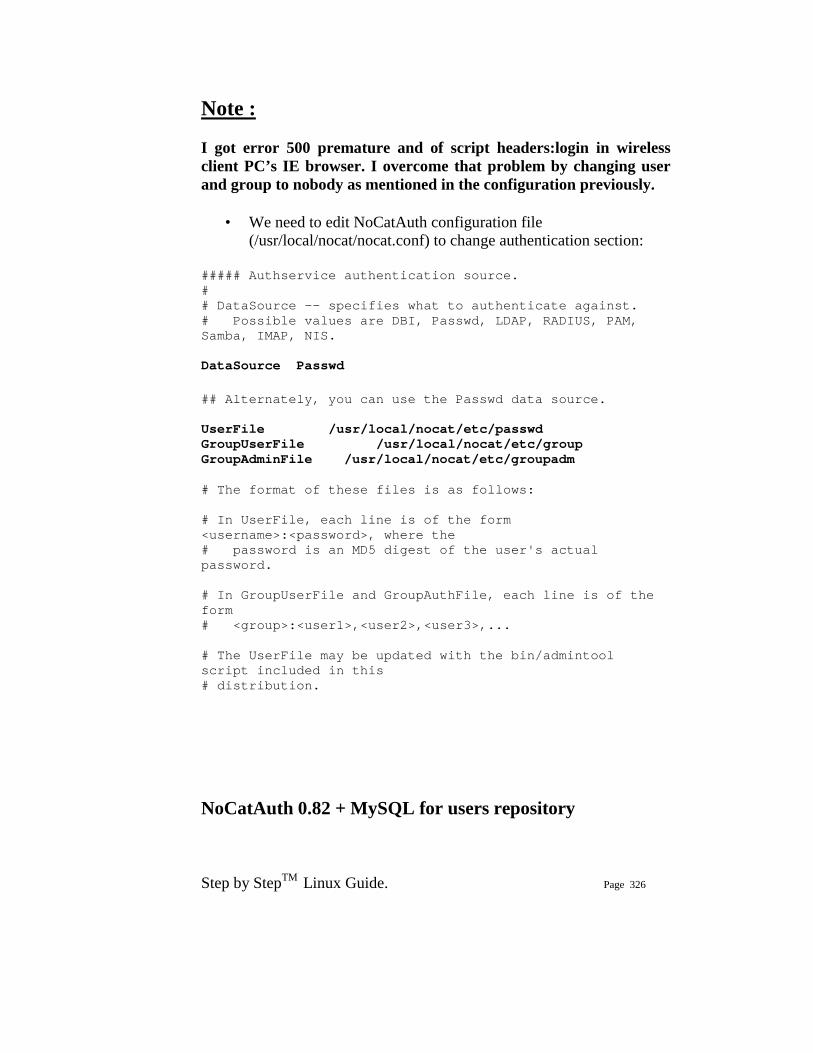
Step by StepTM Linux Guide. Page 326
Note : I got error 500 premature and of script headers:login in wireless client PC’s IE browser. I overcome that problem by changing user and group to nobody as mentioned in the configuration previously.
• We need to edit NoCatAuth configuration file (/usr/local/nocat/nocat.conf) to change authentication section:
##### Authservice authentication source. # # DataSource -- specifies what to authenticate against. # Possible values are DBI, Passwd, LDAP, RADIUS, PAM, Samba, IMAP, NIS. DataSource Passwd ## Alternately, you can use the Passwd data source. UserFile /usr/local/nocat/etc/passwd GroupUserFile /usr/local/nocat/etc/group GroupAdminFile /usr/local/nocat/etc/groupadm # The format of these files is as follows: # In UserFile, each line is of the form <username>:<password>, where the # password is an MD5 digest of the user's actual password. # In GroupUserFile and GroupAuthFile, each line is of the form # <group>:<user1>,<user2>,<user3>,... # The UserFile may be updated with the bin/admintool script included in this # distribution. NoCatAuth 0.82 + MySQL for users repository
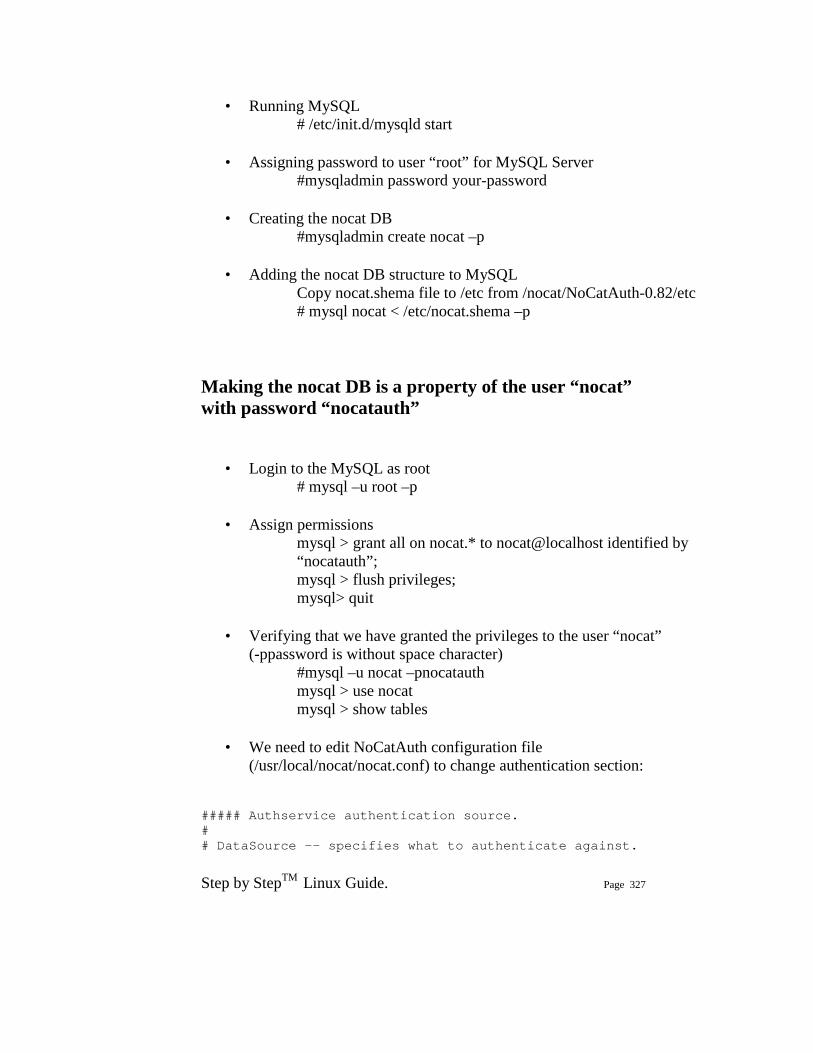
Step by StepTM Linux Guide. Page 327
• Running MySQL # /etc/init.d/mysqld start
• Assigning password to user “root” for MySQL Server #mysqladmin password your-password
• Creating the nocat DB #mysqladmin create nocat –p
• Adding the nocat DB structure to MySQL Copy nocat.shema file to /etc from /nocat/NoCatAuth-0.82/etc # mysql nocat < /etc/nocat.shema –p
Making the nocat DB is a property of the user “nocat” with password “nocatauth”
• Login to the MySQL as root # mysql –u root –p
• Assign permissions mysql > grant all on nocat.* to nocat@localhost identified by “nocatauth”; mysql > flush privileges; mysql> quit
• Verifying that we have granted the privileges to the user “nocat”
(-ppassword is without space character) #mysql –u nocat –pnocatauth mysql > use nocat mysql > show tables
• We need to edit NoCatAuth configuration file (/usr/local/nocat/nocat.conf) to change authentication section:
##### Authservice authentication source. # # DataSource -- specifies what to authenticate against.
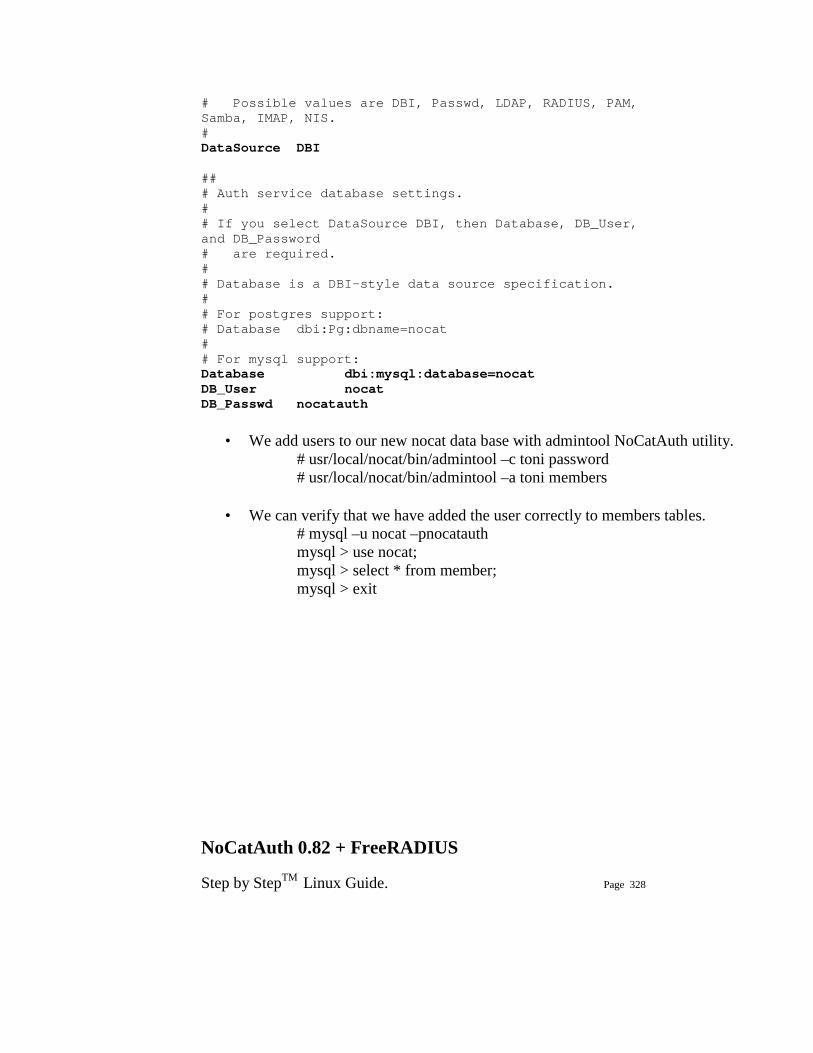
Step by StepTM Linux Guide. Page 328
# Possible values are DBI, Passwd, LDAP, RADIUS, PAM, Samba, IMAP, NIS. # DataSource DBI ## # Auth service database settings. # # If you select DataSource DBI, then Database, DB_User, and DB_Password # are required. # # Database is a DBI-style data source specification. # # For postgres support: # Database dbi:Pg:dbname=nocat # # For mysql support: Database dbi:mysql:database=nocat DB_User nocat DB_Passwd nocatauth
• We add users to our new nocat data base with admintool NoCatAuth utility. # usr/local/nocat/bin/admintool –c toni password # usr/local/nocat/bin/admintool –a toni members
• We can verify that we have added the user correctly to members tables. # mysql –u nocat –pnocatauth mysql > use nocat; mysql > select * from member; mysql > exit NoCatAuth 0.82 + FreeRADIUS
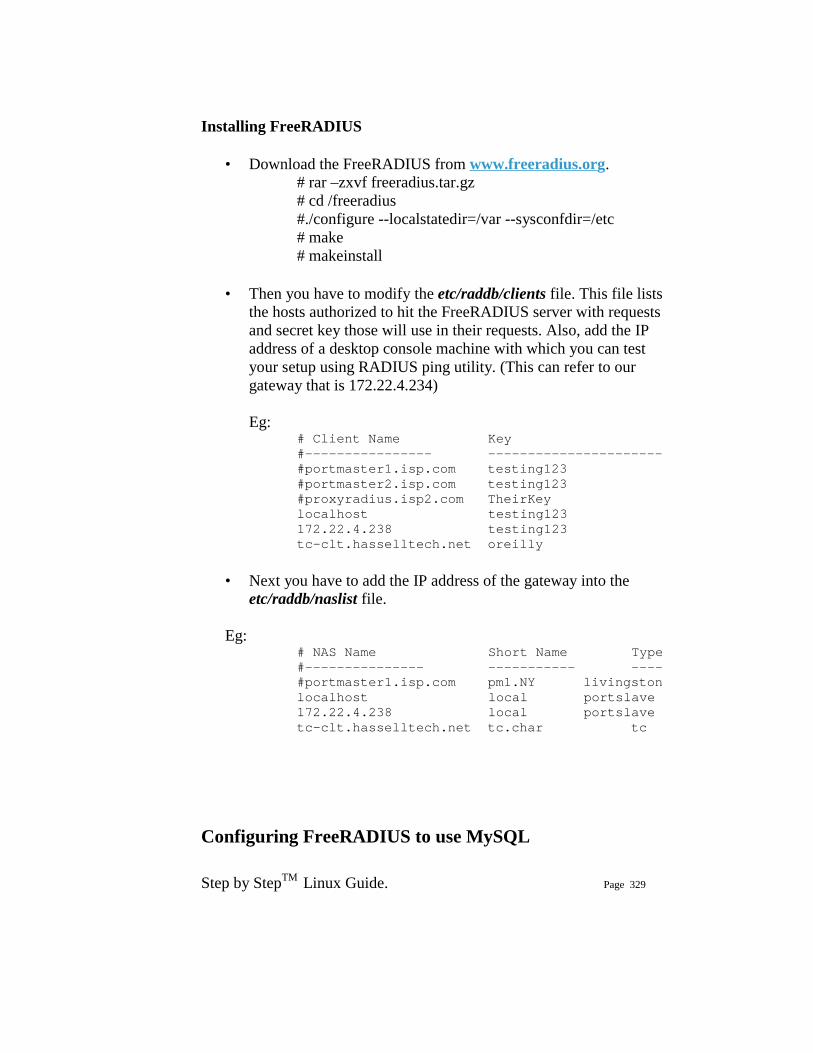
Step by StepTM Linux Guide. Page 329
Installing FreeRADIUS
• Download the FreeRADIUS from www.freeradius.org. # rar –zxvf freeradius.tar.gz # cd /freeradius #./configure --localstatedir=/var --sysconfdir=/etc # make # makeinstall
• Then you have to modify the etc/raddb/clients file. This file lists the hosts authorized to hit the FreeRADIUS server with requests and secret key those will use in their requests. Also, add the IP address of a desktop console machine with which you can test your setup using RADIUS ping utility. (This can refer to our gateway that is 172.22.4.234)
Eg:
# Client Name Key #---------------- ---------------------- #portmaster1.isp.com testing123 #portmaster2.isp.com testing123 #proxyradius.isp2.com TheirKey localhost testing123 172.22.4.238 testing123 tc-clt.hasselltech.net oreilly
• Next you have to add the IP address of the gateway into the
etc/raddb/naslist file. Eg:
# NAS Name Short Name Type #--------------- ----------- ---- #portmaster1.isp.com pm1.NY livingston localhost local portslave 172.22.4.238 local portslave tc-clt.hasselltech.net tc.char tc
Configuring FreeRADIUS to use MySQL
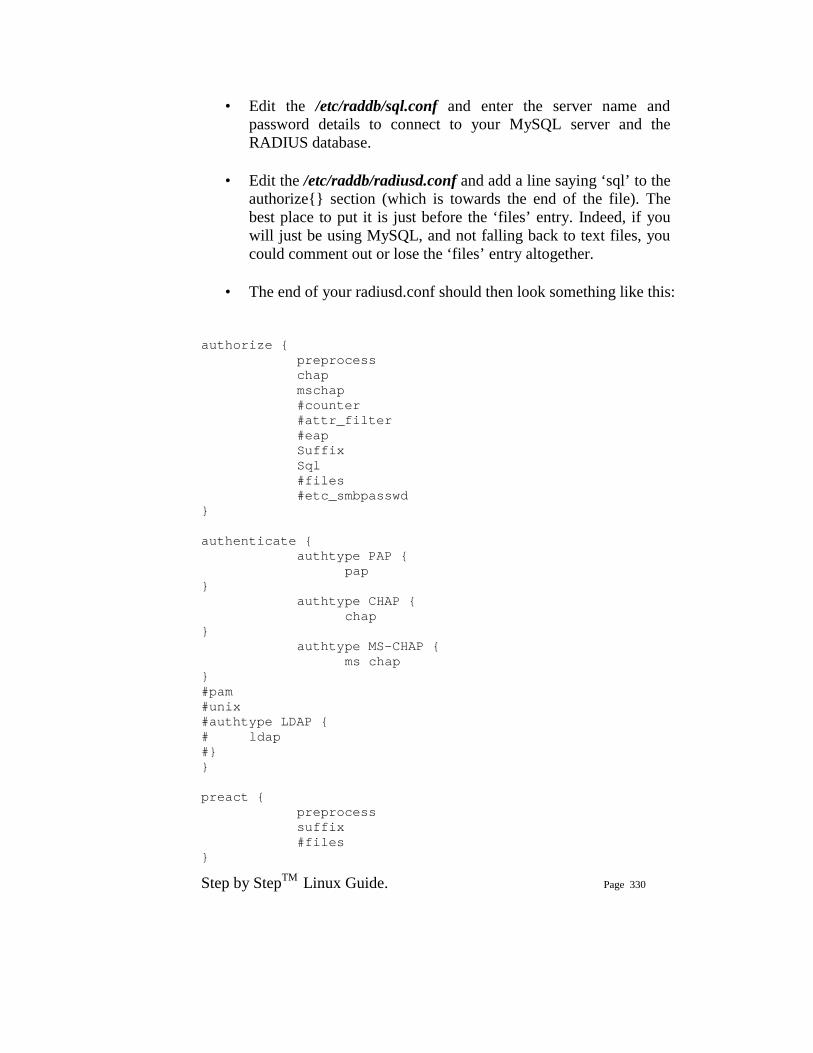
Step by StepTM Linux Guide. Page 330
• Edit the /etc/raddb/sql.conf and enter the server name and password details to connect to your MySQL server and the RADIUS database.
• Edit the /etc/raddb/radiusd.conf and add a line saying ‘sql’ to the
authorize{} section (which is towards the end of the file). The best place to put it is just before the ‘files’ entry. Indeed, if you will just be using MySQL, and not falling back to text files, you could comment out or lose the ‘files’ entry altogether.
• The end of your radiusd.conf should then look something like this:
authorize { preprocess chap mschap #counter #attr_filter #eap Suffix Sql #files #etc_smbpasswd } authenticate { authtype PAP { pap } authtype CHAP { chap } authtype MS-CHAP { ms chap } #pam #unix #authtype LDAP { # ldap #} } preact { preprocess suffix #files }
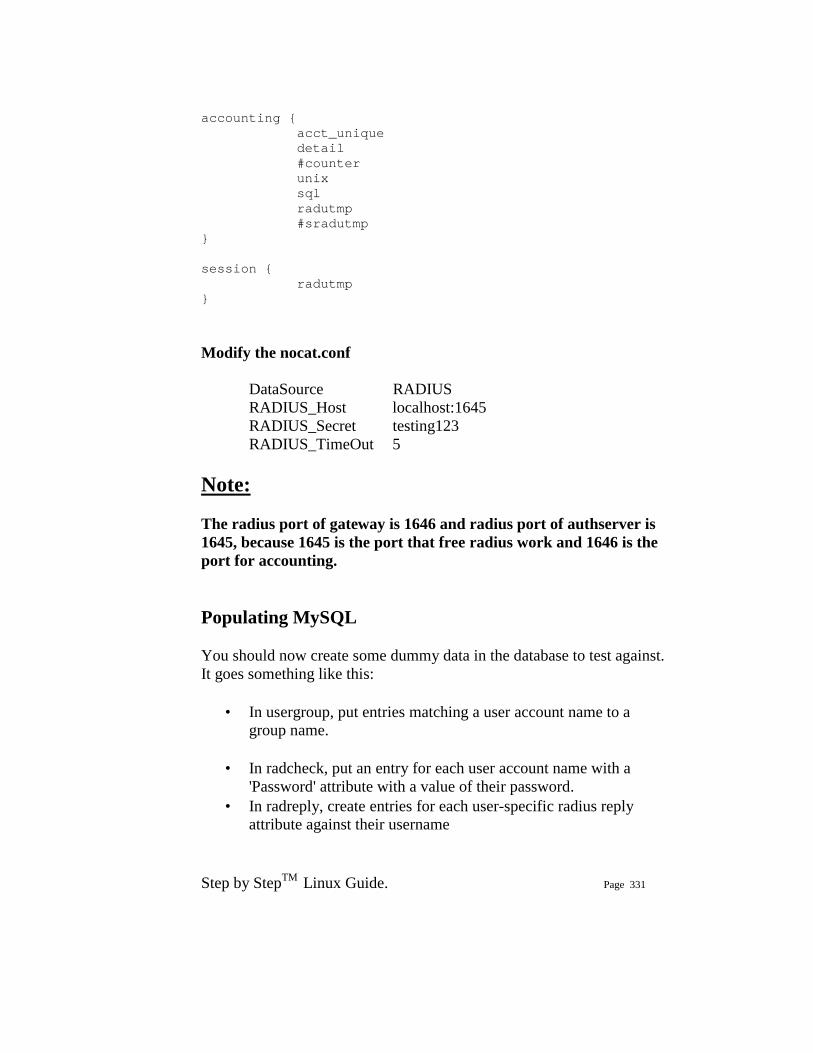
Step by StepTM Linux Guide. Page 331
accounting { acct_unique detail #counter unix sql radutmp #sradutmp } session { radutmp } Modify the nocat.conf DataSource RADIUS RADIUS_Host localhost:1645 RADIUS_Secret testing123 RADIUS_TimeOut 5 Note: The radius port of gateway is 1646 and radius port of authserver is 1645, because 1645 is the port that free radius work and 1646 is the port for accounting. Populating MySQL
You should now create some dummy data in the database to test against. It goes something like this:
• In usergroup, put entries matching a user account name to a group name.
• In radcheck, put an entry for each user account name with a
'Password' attribute with a value of their password. • In radreply, create entries for each user-specific radius reply
attribute against their username
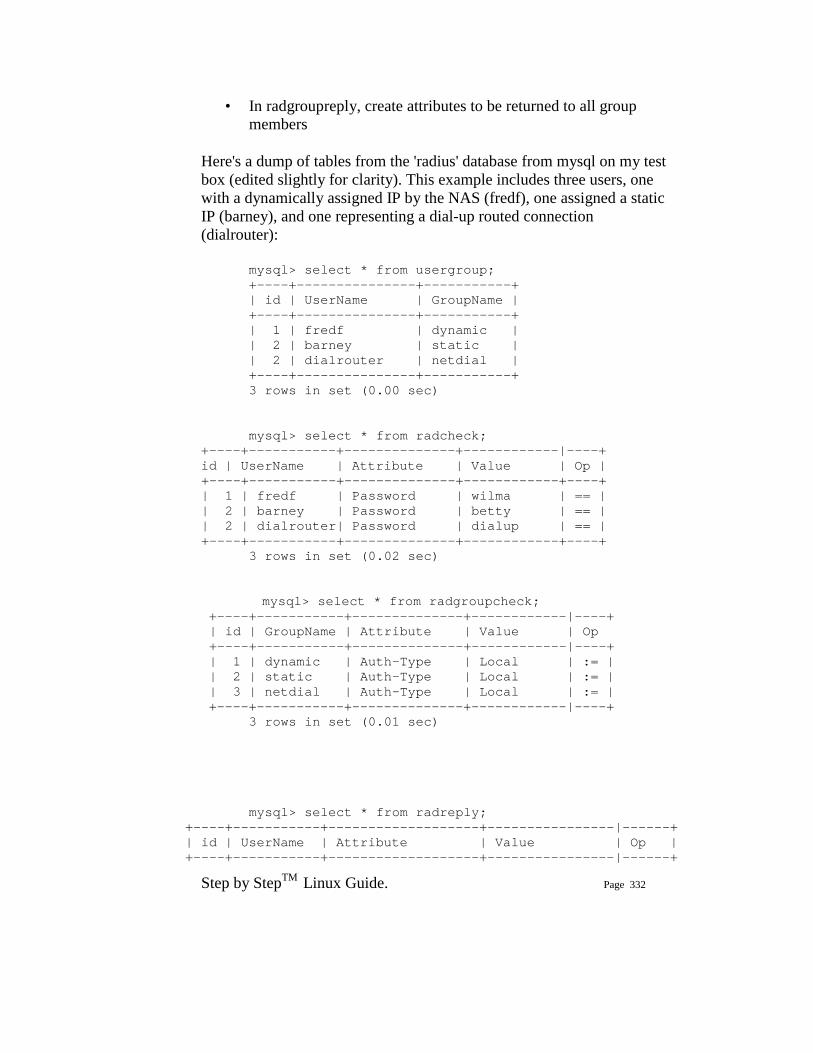
Step by StepTM Linux Guide. Page 332
• In radgroupreply, create attributes to be returned to all group members
Here's a dump of tables from the 'radius' database from mysql on my test box (edited slightly for clarity). This example includes three users, one with a dynamically assigned IP by the NAS (fredf), one assigned a static IP (barney), and one representing a dial-up routed connection (dialrouter):
mysql> select * from usergroup; +----+---------------+-----------+ | id | UserName | GroupName | +----+---------------+-----------+ | 1 | fredf | dynamic | | 2 | barney | static | | 2 | dialrouter | netdial | +----+---------------+-----------+ 3 rows in set (0.00 sec) mysql> select * from radcheck;
+----+-----------+--------------+------------|----+ id | UserName | Attribute | Value | Op |
+----+-----------+--------------+------------+----+ | 1 | fredf | Password | wilma | == | | 2 | barney | Password | betty | == | | 2 | dialrouter| Password | dialup | == | +----+-----------+--------------+------------+----+ 3 rows in set (0.02 sec) mysql> select * from radgroupcheck;
+----+-----------+--------------+------------|----+ | id | GroupName | Attribute | Value | Op +----+-----------+--------------+------------|----+ | 1 | dynamic | Auth-Type | Local | := | | 2 | static | Auth-Type | Local | := | | 3 | netdial | Auth-Type | Local | := |
+----+-----------+--------------+------------|----+ 3 rows in set (0.01 sec) mysql> select * from radreply;
+----+-----------+-------------------+----------------|------+ | id | UserName | Attribute | Value | Op | +----+-----------+-------------------+----------------|------+
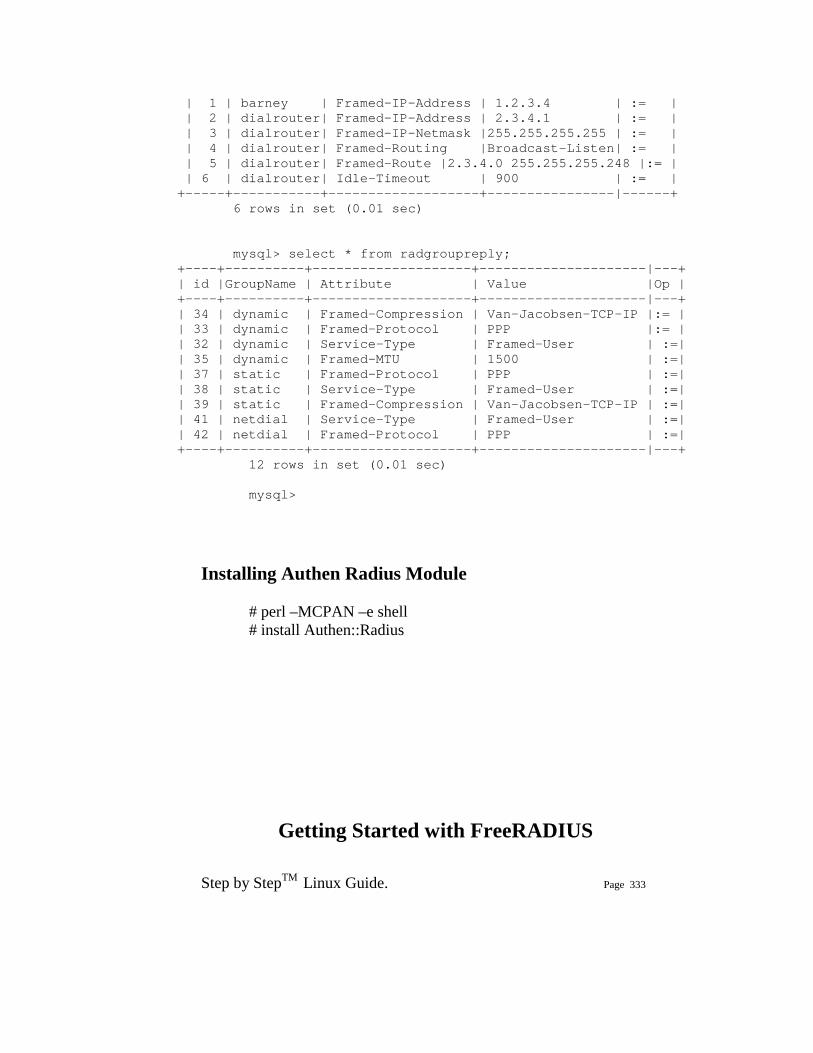
Step by StepTM Linux Guide. Page 333
| 1 | barney | Framed-IP-Address | 1.2.3.4 | := | | 2 | dialrouter| Framed-IP-Address | 2.3.4.1 | := | | 3 | dialrouter| Framed-IP-Netmask |255.255.255.255 | := | | 4 | dialrouter| Framed-Routing |Broadcast-Listen| := | | 5 | dialrouter| Framed-Route |2.3.4.0 255.255.255.248 |:= | | 6 | dialrouter| Idle-Timeout | 900 | := | +-----+-----------+-------------------+----------------|------+
6 rows in set (0.01 sec) mysql> select * from radgroupreply;
+----+----------+--------------------+---------------------|---+ | id |GroupName | Attribute | Value |Op | +----+----------+--------------------+---------------------|---+ | 34 | dynamic | Framed-Compression | Van-Jacobsen-TCP-IP |:= | | 33 | dynamic | Framed-Protocol | PPP |:= | | 32 | dynamic | Service-Type | Framed-User | :=| | 35 | dynamic | Framed-MTU | 1500 | :=| | 37 | static | Framed-Protocol | PPP | :=| | 38 | static | Service-Type | Framed-User | :=| | 39 | static | Framed-Compression | Van-Jacobsen-TCP-IP | :=| | 41 | netdial | Service-Type | Framed-User | :=| | 42 | netdial | Framed-Protocol | PPP | :=| +----+----------+--------------------+---------------------|---+
12 rows in set (0.01 sec) mysql> Installing Authen Radius Module # perl –MCPAN –e shell # install Authen::Radius
Getting Started with FreeRADIUS
Step by StepTM Linux Guide. Page 334
Introduction
[RADIUS covers, among other things,] the theoretical underpinnings of both the authentication-authorization-accounting (AAA) architecture as well as the specific implementation of AAA characteristics that is the RADIUS protocol. [In this excerpt from Chapter 5], I will now focus on practical applications of RADIUS: implementing it, customizing it for your specific needs, and extending its capabilities to meet other needs in your business. First, though, I need a product that talks RADIUS.
Enter FreeRADIUS.
Introduction to FreeRADIUS
The developers of FreeRADIUS speak on their product and its development, from the FreeRADIUS Web site:
FreeRADIUS is one of the most modular and featureful [sic] RADIUS servers available today. It has been written by a team of developers who have more than a decade of collective experience in implementing and deploying RADIUS software, in software engineering, and in Unix package management. The product is the result of synergy between many of the best-known names in free software-based RADIUS implementations, including several developers of the Debian GNU/Linux operating system, and is distributed under the GNU GPL (version 2).
FreeRADIUS is a complete rewrite, ground-up compilation of a RADIUS server. The configuration files exhibit many similarities to the old Livingston RADIUS server. The product includes support for:
• Limiting the maximum number of simultaneous logons, even on a per-user basis
• More than one DEFAULT entry, with each being capable of "falling
through" to the next • Permitting and denying access to users based on the huntgroup
to which they are connected • Setting certain parameters to be huntgroup specific

Step by StepTM Linux Guide. Page 335
• Intelligent "hints" files that select authentication protocols based on the syntax of the username
• Executing external programs upon successful login
• Using the $INCLUDE filename format with configuration, users,
and dictionary files
• Vendor-specific attributes
• Acting as a proxy RADIUS server
FreeRADIUS supports the following popular NAS equipment:
• 3Com/USR Hiper Arc Total Control
• 3Com/USR NetServer
• 3Com/USR TotalControl
• Ascend Max 4000 family
• Cisco Access Server family
• Cistron PortSlave
• Computone PowerRack
• Cyclades PathRAS
• Livingston PortMaster
• Multitech CommPlete Server
• Patton 2800 family
FreeRADIUS is available for a wide range of platforms, including Linux, FreeBSD, OpenBSD, OSF/Unix, and Solaris. For the purposes of this book, I will focus on FreeRADIUS running under Linux. Also, as of this
Step by StepTM Linux Guide. Page 336
printing, a stable Version 1.0 of the product had not been released. However, development of the server is very stable, careful, and somewhat slow, so changes to the procedures mentioned are unlikely. In the event a procedure does change, it's likely to be a relatively small modification. Always check the FreeRADIUS Web site for up-to-date details.
Installing FreeRADIUS
At present, the FreeRADIUS team doesn't offer precompiled binaries. The best way to start off is to grab the latest source code, compressed using tar and gzip, from the FreeRADIUS Web site. Once the file is on your computer, execute the following command to uncompress the file:
tar -zxvf freeradius.tar.gz
Next, you'll need to compile FreeRADIUS. Make sure your system at least has gcc, glibc, binutils, and gmake installed before trying to compile. To begin compiling, change to the directory where your uncompressed source code lies and execute ./configure from the command line. You can also run ./configure -flags and customize the settings for the flags in Table 5-1.
Table 5-1: Optional configuration flags for FreeRADIUS
Flag Purpose Default --enable-shared[=PKGS] Builds shared libraries. Yes
--enable-static[=PKGS] Builds static libraries. Yes
--enable-fast-install[=PKGS]
Optimizes the resulting files for fastest installation.
Yes
--with-gnu-ld Makes the procedure assume the C compiler uses GNU lD.
No
Step by StepTM Linux Guide. Page 337
--disable-libtool-lock
Avoids locking problems. This may break parallel builds.
Not applicable
--with-logdir=DIR Specifies the directory for log files.
LOCALSTATEDIR/log
--with-radacctdir=DIR
Specifies the directory for detail files.
LOGDIR/radacct
--with-raddbdir=DIR Specifies the directory for configuration files.
SYSCONFDIR/raddb
--with-dict-nocase Makes the dictionary case insensitive. Yes
--with-ascend-binary Includes support for attributes provided with the Ascend binary filter.
Yes
--with-threads Uses threads if they're supported and available. Yes
--with-snmp Compiles SNMP support into the binaries. Yes
--with-mysql-include-dir=DIR
Specifies where the include files for MySQL can be found.
Not applicable
--with-mysql-lib-dur=DIR
Specifies where the dictionary files for MySQL can be found.
Not applicable
--with-mysql-dir-DIR Specifies where MySQL is installed on the local system.
Not applicable
--disable-ltdl-install Does not install libltdl. Not applicable
--with-static-modules=QUOTED-MODULE-LIST
Compiles the list of modules statically. Not applicable
--enable-developer Turns on extra developer warnings in the compiler. Not applicable
Commonly, the following locations are used when installing a RADIUS product (these practices go back to the Cistron RADIUS server):
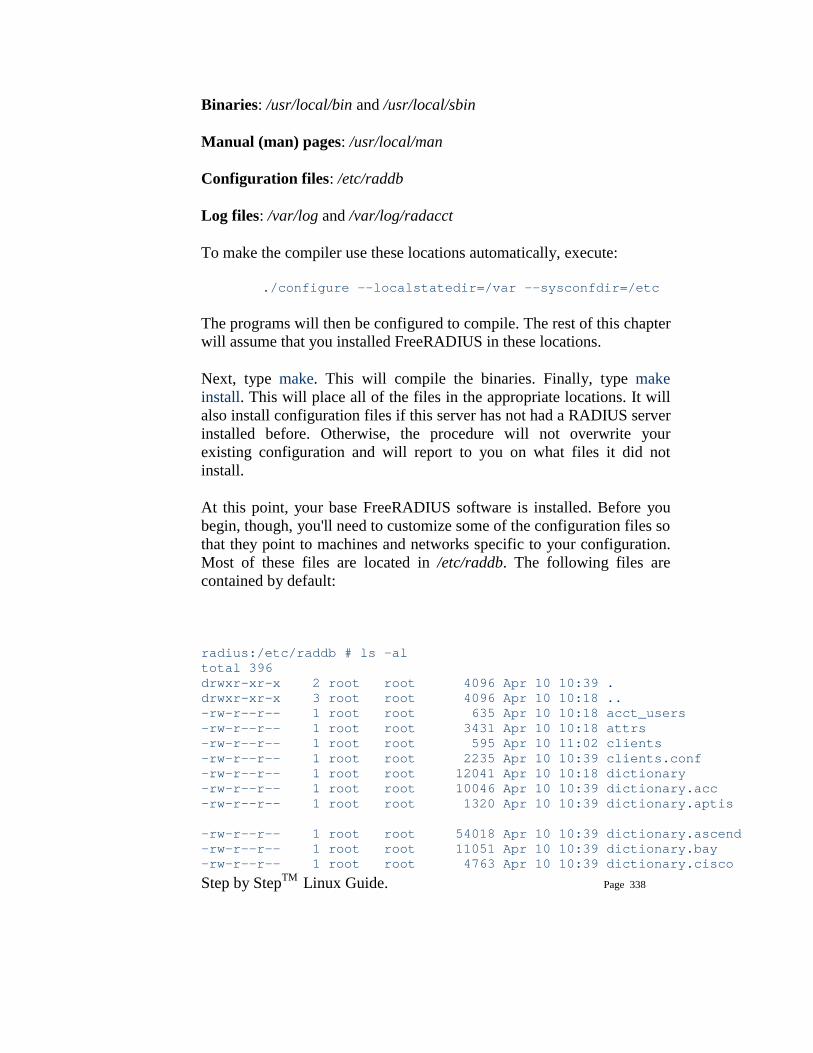
Step by StepTM Linux Guide. Page 338
Binaries: /usr/local/bin and /usr/local/sbin
Manual (man) pages: /usr/local/man
Configuration files: /etc/raddb
Log files: /var/log and /var/log/radacct
To make the compiler use these locations automatically, execute:
./configure --localstatedir=/var --sysconfdir=/etc
The programs will then be configured to compile. The rest of this chapter will assume that you installed FreeRADIUS in these locations.
Next, type make. This will compile the binaries. Finally, type make install. This will place all of the files in the appropriate locations. It will also install configuration files if this server has not had a RADIUS server installed before. Otherwise, the procedure will not overwrite your existing configuration and will report to you on what files it did not install.
At this point, your base FreeRADIUS software is installed. Before you begin, though, you'll need to customize some of the configuration files so that they point to machines and networks specific to your configuration. Most of these files are located in /etc/raddb. The following files are contained by default:
radius:/etc/raddb # ls -al total 396 drwxr-xr-x 2 root root 4096 Apr 10 10:39 . drwxr-xr-x 3 root root 4096 Apr 10 10:18 .. -rw-r--r-- 1 root root 635 Apr 10 10:18 acct_users -rw-r--r-- 1 root root 3431 Apr 10 10:18 attrs -rw-r--r-- 1 root root 595 Apr 10 11:02 clients -rw-r--r-- 1 root root 2235 Apr 10 10:39 clients.conf -rw-r--r-- 1 root root 12041 Apr 10 10:18 dictionary -rw-r--r-- 1 root root 10046 Apr 10 10:39 dictionary.acc -rw-r--r-- 1 root root 1320 Apr 10 10:39 dictionary.aptis -rw-r--r-- 1 root root 54018 Apr 10 10:39 dictionary.ascend -rw-r--r-- 1 root root 11051 Apr 10 10:39 dictionary.bay -rw-r--r-- 1 root root 4763 Apr 10 10:39 dictionary.cisco

Step by StepTM Linux Guide. Page 339
-rw-r--r-- 1 root root 1575 Apr 10 10:39 dictionary.compat -rw-r--r-- 1 root root 1576 Apr 10 10:39 dictionary.erx -rw-r--r-- 1 root root 375 Apr 10 10:39 dictionary.foundry -rw-r--r-- 1 root root 279 Apr 10 10:39 dictionary.freeradius -rw-r--r-- 1 root root 2326 Apr 10 10:39 dictionary.livingston -rw-r--r-- 1 root root 2396 Apr 10 10:39 dictionary.microsoft -rw-r--r-- 1 root root 190 Apr 10 10:39 dictionary.nomadix -rw-r--r-- 1 root root 1537 Apr 10 10:39 dictionary.quintum -rw-r--r-- 1 root root 8563 Apr 10 10:39 dictionary.redback -rw-r--r-- 1 root root 457 Apr 10 10:39 dictionary.shasta -rw-r--r-- 1 root root 2958 Apr 10 10:39 dictionary.shiva -rw-r--r-- 1 root root 1274 Apr 10 10:39 dictionary.tunnel -rw-r--r-- 1 root root 63265 Apr 10 10:39 dictionary.usr -rw-r--r-- 1 root root 2199 Apr 10 10:39 dictionary.versanet -rw-r--r-- 1 root root 1767 Apr 10 10:18 hints -rw-r--r-- 1 root root 1603 Apr 10 10:18 huntgroups -rw-r--r-- 1 root root 2289 Apr 10 10:39 ldap.attrmap -rw-r--r-- 1 root root 830 Apr 10 10:18 naslist -rw-r--r-- 1 root root 856 Apr 10 10:18 naspasswd -rw-r--r-- 1 root root 9533 Apr 10 10:39 postgresql.conf -rw-r--r-- 1 root root 4607 Apr 10 10:39 proxy.conf -rw-r--r-- 1 root root 27266 Apr 10 10:57 radiusd.conf -rw-r--r-- 1 root root 27232 Apr 10 10:39 radiusd.conf.in -rw-r--r-- 1 root root 1175 Apr 10 10:18 realms -rw-r--r-- 1 root root 1405 Apr 10 10:39 snmp.conf -rw-r--r-- 1 root root 9089 Apr 10 10:39 sql.conf -rw-r--r-- 1 root root 6941 Apr 10 10:18 users -rw-r--r-- 1 root root 6702 Apr 10 10:39 x99.conf -rw-r--r-- 1 root root 3918 Apr 10 10:39 x99passwd.sample The clients File
First, take a look at the /etc/raddb/clients file. This file lists the hosts authorized to hit the FreeRADIUS server with requests and the secret key those hosts will use in their requests. Some common entries are already included in the /etc/raddb/clients file, so you may wish to simply
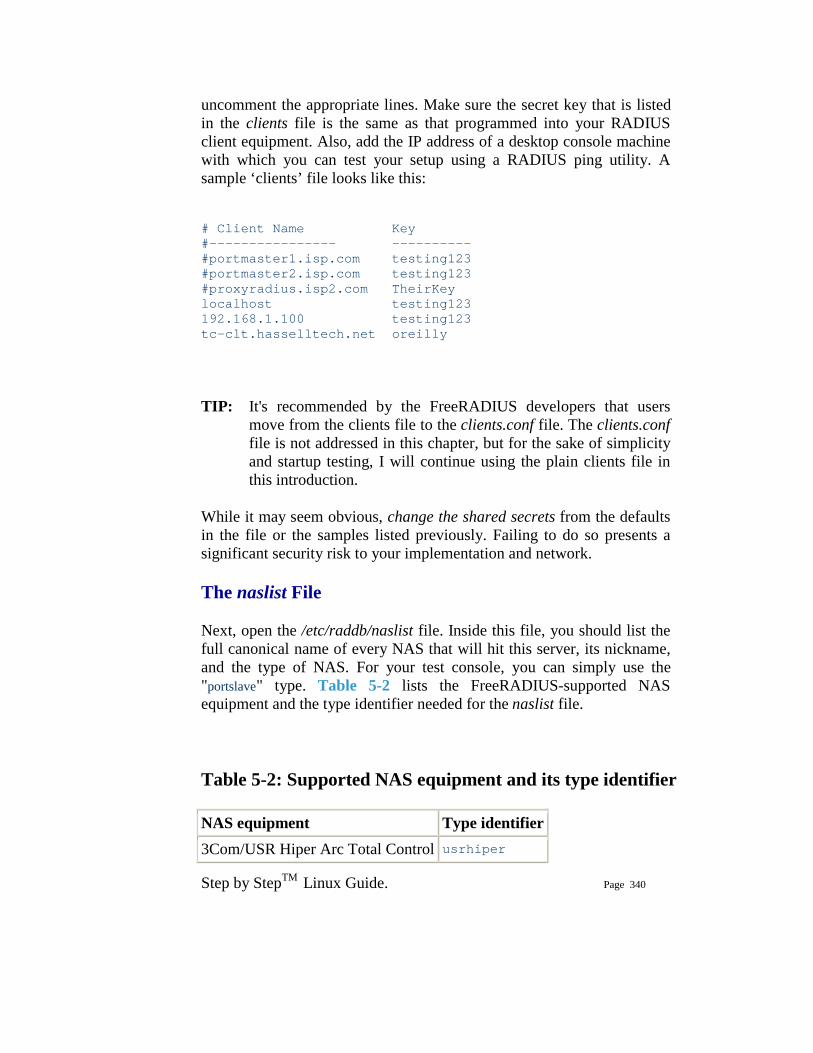
Step by StepTM Linux Guide. Page 340
uncomment the appropriate lines. Make sure the secret key that is listed in the clients file is the same as that programmed into your RADIUS client equipment. Also, add the IP address of a desktop console machine with which you can test your setup using a RADIUS ping utility. A sample ‘clients’ file looks like this:
# Client Name Key #---------------- ---------- #portmaster1.isp.com testing123 #portmaster2.isp.com testing123 #proxyradius.isp2.com TheirKey localhost testing123 192.168.1.100 testing123 tc-clt.hasselltech.net oreilly
TIP: It's recommended by the FreeRADIUS developers that users move from the clients file to the clients.conf file. The clients.conf file is not addressed in this chapter, but for the sake of simplicity and startup testing, I will continue using the plain clients file in this introduction.
While it may seem obvious, change the shared secrets from the defaults in the file or the samples listed previously. Failing to do so presents a significant security risk to your implementation and network.
The naslist File
Next, open the /etc/raddb/naslist file. Inside this file, you should list the full canonical name of every NAS that will hit this server, its nickname, and the type of NAS. For your test console, you can simply use the "portslave" type. Table 5-2 lists the FreeRADIUS-supported NAS equipment and the type identifier needed for the naslist file.
Table 5-2: Supported NAS equipment and its type identifier
NAS equipment Type identifier 3Com/USR Hiper Arc Total Control usrhiper
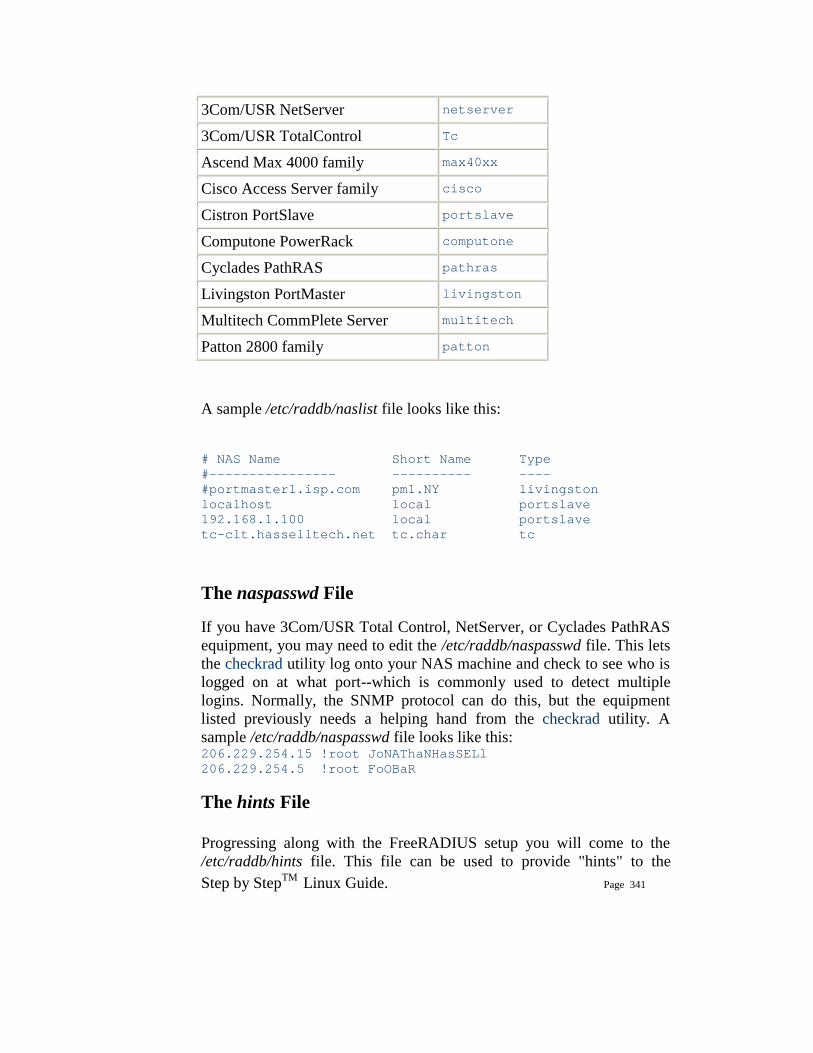
Step by StepTM Linux Guide. Page 341
3Com/USR NetServer netserver
3Com/USR TotalControl Tc
Ascend Max 4000 family max40xx
Cisco Access Server family cisco
Cistron PortSlave portslave
Computone PowerRack computone
Cyclades PathRAS pathras
Livingston PortMaster livingston
Multitech CommPlete Server multitech
Patton 2800 family patton
A sample /etc/raddb/naslist file looks like this:
# NAS Name Short Name Type #---------------- ---------- ---- #portmaster1.isp.com pm1.NY livingston localhost local portslave 192.168.1.100 local portslave tc-clt.hasselltech.net tc.char tc The naspasswd File If you have 3Com/USR Total Control, NetServer, or Cyclades PathRAS equipment, you may need to edit the /etc/raddb/naspasswd file. This lets the checkrad utility log onto your NAS machine and check to see who is logged on at what port--which is commonly used to detect multiple logins. Normally, the SNMP protocol can do this, but the equipment listed previously needs a helping hand from the checkrad utility. A sample /etc/raddb/naspasswd file looks like this: 206.229.254.15 !root JoNAThaNHasSELl 206.229.254.5 !root FoOBaR
The hints File Progressing along with the FreeRADIUS setup you will come to the /etc/raddb/hints file. This file can be used to provide "hints" to the
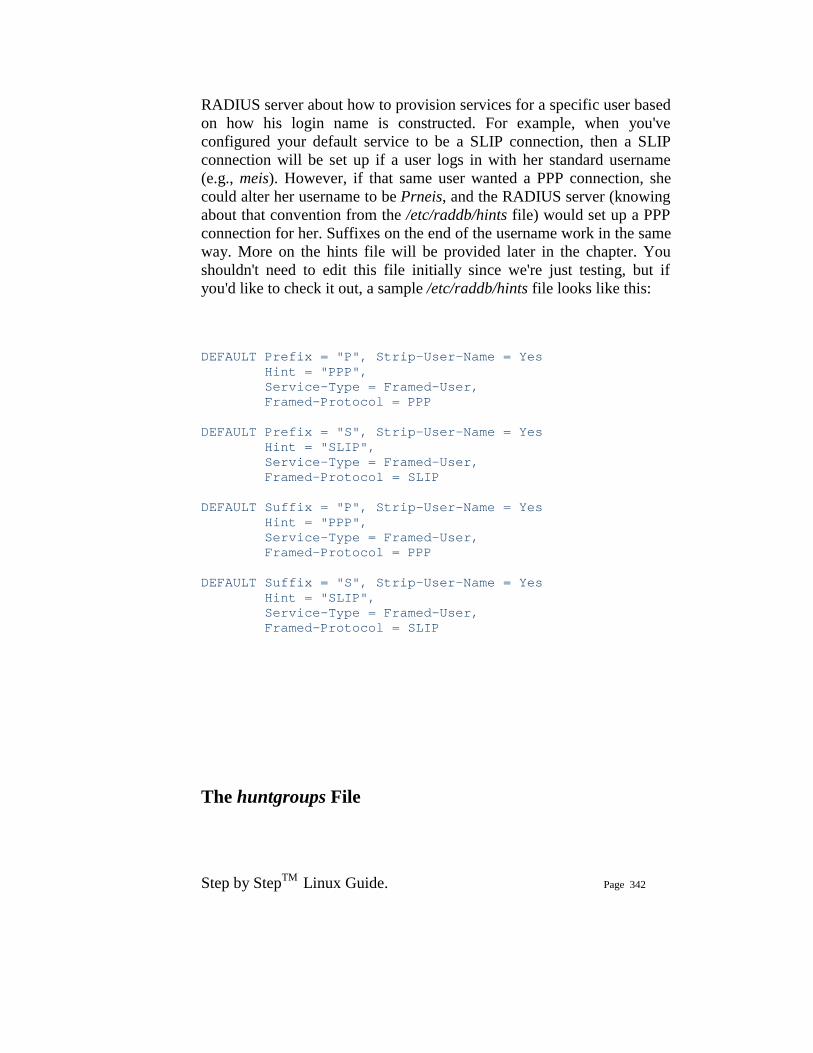
Step by StepTM Linux Guide. Page 342
RADIUS server about how to provision services for a specific user based on how his login name is constructed. For example, when you've configured your default service to be a SLIP connection, then a SLIP connection will be set up if a user logs in with her standard username (e.g., meis). However, if that same user wanted a PPP connection, she could alter her username to be Prneis, and the RADIUS server (knowing about that convention from the /etc/raddb/hints file) would set up a PPP connection for her. Suffixes on the end of the username work in the same way. More on the hints file will be provided later in the chapter. You shouldn't need to edit this file initially since we're just testing, but if you'd like to check it out, a sample /etc/raddb/hints file looks like this: DEFAULT Prefix = "P", Strip-User-Name = Yes Hint = "PPP", Service-Type = Framed-User, Framed-Protocol = PPP DEFAULT Prefix = "S", Strip-User-Name = Yes Hint = "SLIP", Service-Type = Framed-User, Framed-Protocol = SLIP DEFAULT Suffix = "P", Strip-User-Name = Yes Hint = "PPP", Service-Type = Framed-User, Framed-Protocol = PPP DEFAULT Suffix = "S", Strip-User-Name = Yes Hint = "SLIP", Service-Type = Framed-User, Framed-Protocol = SLIP
The huntgroups File
Step by StepTM Linux Guide. Page 343
Let's move on to the /etc/raddb/huntgroups file, where you define certain huntgroups. Huntgroups are sets of ports or other communication outlets on RADIUS client equipment. In the case of FreeRADIUS, a huntgroup can be a set of ports, a specific piece of RADIUS client equipment, or a set of calling station IDs that you want to separate from other ports. You can filter these defined huntgroups to restrict their access to certain users and groups and match a username/password to a specific huntgroup, possibly to assign a static IP address. You define huntgroups based on the IP address of the NAS and a port range. (Keep in mind that a range can be anywhere from 1 to the maximum number of ports you have.) To configure this file, you first specify the terminal servers in each POP. Then, you configure a stanza that defines the restriction and the criteria that a potential user must satisfy to pass the restriction. That criteria is most likely a Unix username or groupname. Again, you shouldn't have to configure this file to get basic functionality enabled for testing; if you would like to peruse the file and its features, however, I've provided a sample /etc/raddb/huntgroups file. It's for an ISP with a POP in Raleigh, North Carolina that wants to restrict the first five ports on its second of three terminal servers in that POP to only premium customers: raleigh NAS-IP-Address == 192.168.1.101 raleigh NAS-IP-Address == 192.168.1.102 raleigh NAS-IP-Address == 192.168.1.103 premium NAS-IP-Address == 192.168.1.101, NAS-Port-Id == 0-4 Group = premium, Group = staff
The users File

Step by StepTM Linux Guide. Page 344
FreeRADIUS allows several modifications to the original RADIUS server's style of treating users unknown to the users file. In the past, if a user wasn't configured in the users file, the server would look in the Unix password file, and then deny him access if he didn't have an account on the machine. There was only one default entry permitted. In contrast, FreeRADIUS allows multiple default entries and can "fall through" each of them to find an optimal match. The entries are processed in the order they appear in the users file, and once a match is found, RADIUS stops processing it. The Fall-Through = Yes attribute can be set to instruct the server to keep processing, even upon a match. The new FreeRADIUS users file can also accept spaces in the username attributes, either by escaping the space with a backslash (\) or putting the entire username inside quotation marks. Additionally, FreeRADIUS will not strip out spaces in usernames received from PortMaster equipment. Since we won't add any users to the users file for our testing purposes, FreeRADIUS will fall back to accounts configured locally on the Unix machine. However, if you want to add a user to the users file to test that functionality, a sample /etc/raddb/users file looks like this: steve Auth-Type := Local, User-Password == "testing" Service-Type = Framed-User, Framed-Protocol = PPP, Framed-IP-Address = 172.16.3.33, Framed-IP-Netmask = 255.255.255.0, Framed-Routing = Broadcast-Listen, Framed-Filter-Id = "std.ppp", Framed-MTU = 1500, Framed-Compression = Van-Jacobsen-TCP-IP DEFAULT Service-Type == Framed-User Framed-IP-Address = 255.255.255.254, Framed-MTU = 576, Service-Type = Framed-User, Fall-Through = Yes DEFAULT Framed-Protocol == PPP Framed-Protocol = PPP, Framed-Compression = Van-Jacobson-TCP-IP There will be much more about the users file later in this chapter. The radiusd.conf File This file is much like Apache's httpd.conf file in that it lists nearly every directive and option for the basic functionality of the FreeRADIUS
Step by StepTM Linux Guide. Page 345
product. You will need to edit the Unix section of this file to make sure that the locations of the passwd, shadow, and group files are not commented out and are correct. FreeRADIUS needs these locations to start up. The appropriate section looks like this: unix { (some content removed) # Define the locations of the normal passwd, shadow, and group files. # # 'shadow' is commented out by default, because not all # systems have shadow passwords. # # To force the module to use the system passwd fnctns, # instead of reading the files, comment out the 'passwd' # and 'shadow' configuration entries. This is required # for some systems, like FreeBSD. # passwd = /etc/passwd shadow = /etc/shadow group = /etc/group (some content removed) } I will cover the radiusd.conf file in more detail later in this chapter. With that done, it's now time to launch the radiusd daemon and test your setup. Execute radiusd from the command line; it should look similar to this: radius:/etc/raddb # radiusd radiusd: Starting - reading configuration files ... radius:/etc/raddb # If you receive no error messages, you now have a functional FreeRADIUS server. Congratulations!
Testing the Initial Setup
Once you have FreeRADIUS running, you need to test the configuration to make sure it is responding to requests. FreeRADIUS starts up
Step by StepTM Linux Guide. Page 346
listening, by default, on the port specified either in the local /etc/services file or in the port directive in radiusd.conf. While RFC 2138 defines the standard RADIUS port to be 1812, historically RADIUS client equipment has used port 1645. Communicating via two different ports is obviously troublesome, so many users start the FreeRADIUS daemon with the -p flag, which overrides the setting in both the /etc/services file and anything set in radiusd.conf. To do this, run the following from the command line:
radius:/etc/raddb # radiusd -p 1645 radiusd: Starting - reading configuration files ... radius:/etc/raddb #
The server is now running; it is listening for and accepting requests on port 1645.
So, what is an easy way to test your configuration to see if it functions properly? It's easier than you might think, in fact. MasterSoft, Inc. has released a Windows desktop RADIUS server testing tool called NTRadPing, available at http://www.dialways.com. The latest version as of this writing is 1.2, and it's a freeware tool. Download and install this utility on a Windows machine, and then run it. The initial application window should look much like Figure 5-1.
Figure 5-1. The NTRadPing 1.2 application window
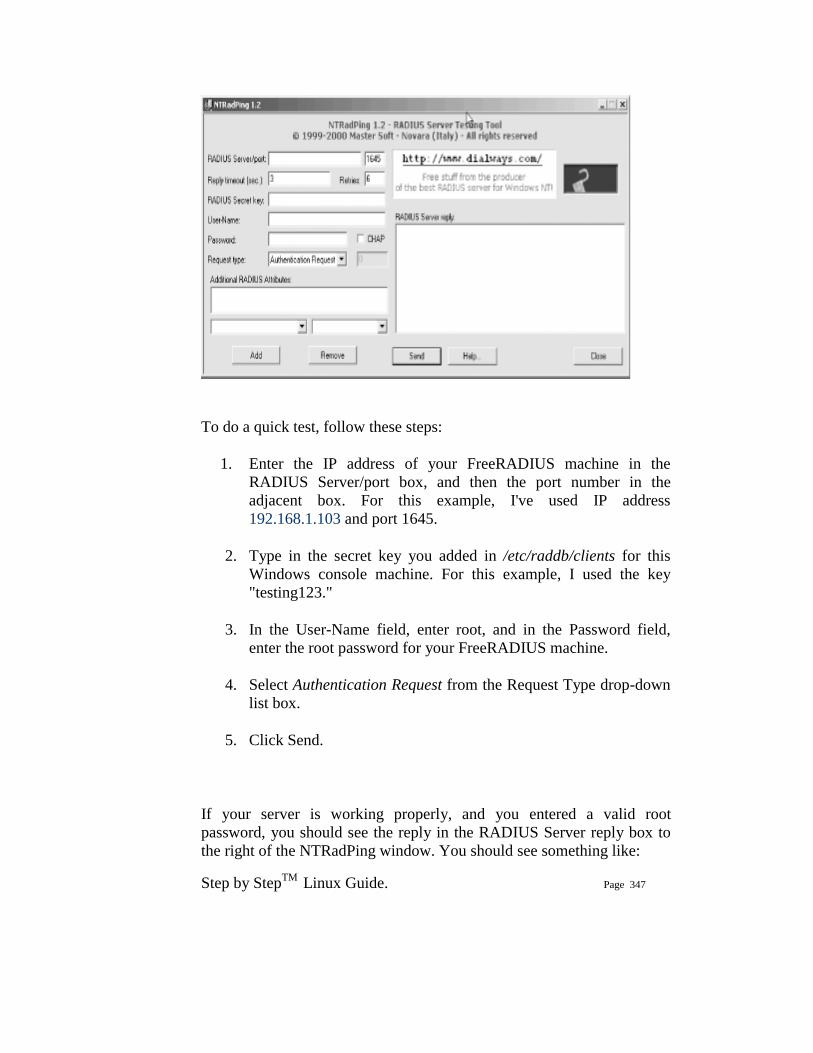
Step by StepTM Linux Guide. Page 347
To do a quick test, follow these steps:
1. Enter the IP address of your FreeRADIUS machine in the RADIUS Server/port box, and then the port number in the adjacent box. For this example, I've used IP address 192.168.1.103 and port 1645.
2. Type in the secret key you added in /etc/raddb/clients for this Windows console machine. For this example, I used the key "testing123."
3. In the User-Name field, enter root, and in the Password field, enter the root password for your FreeRADIUS machine.
4. Select Authentication Request from the Request Type drop-down list box.
5. Click Send.
If your server is working properly, and you entered a valid root password, you should see the reply in the RADIUS Server reply box to the right of the NTRadPing window. You should see something like:
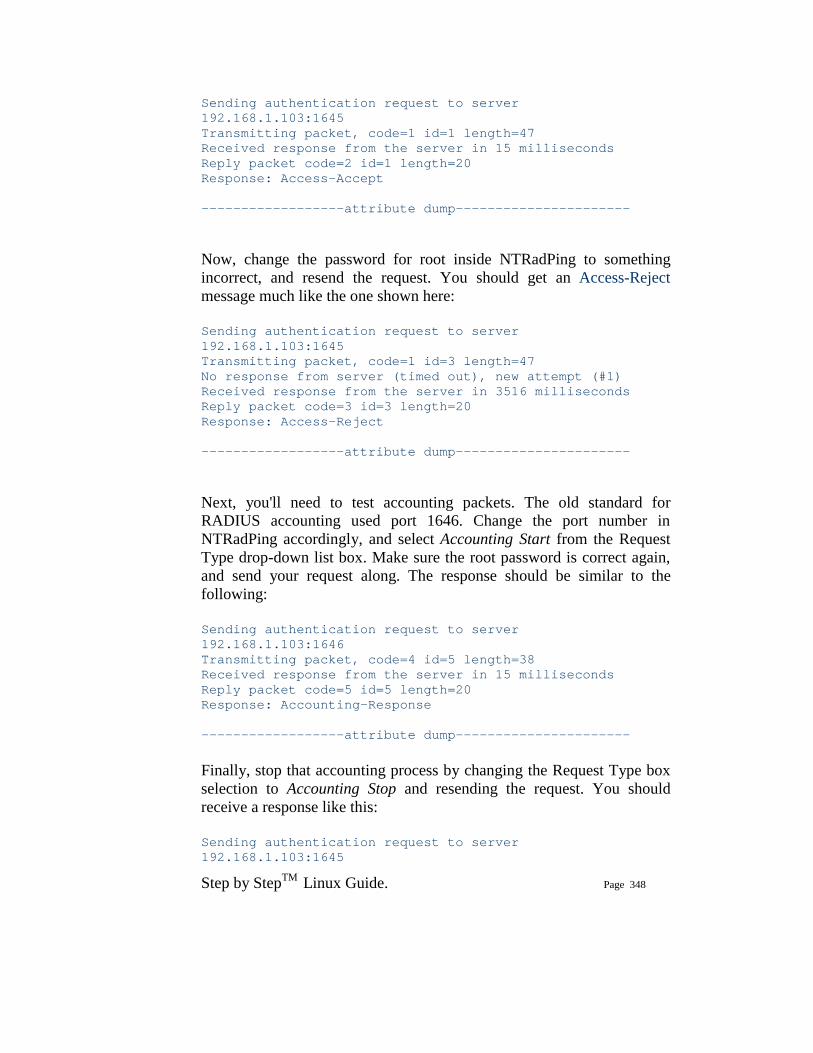
Step by StepTM Linux Guide. Page 348
Sending authentication request to server 192.168.1.103:1645 Transmitting packet, code=1 id=1 length=47 Received response from the server in 15 milliseconds Reply packet code=2 id=1 length=20 Response: Access-Accept ------------------attribute dump----------------------
Now, change the password for root inside NTRadPing to something incorrect, and resend the request. You should get an Access-Reject message much like the one shown here:
Sending authentication request to server 192.168.1.103:1645 Transmitting packet, code=1 id=3 length=47 No response from server (timed out), new attempt (#1) Received response from the server in 3516 milliseconds Reply packet code=3 id=3 length=20 Response: Access-Reject ------------------attribute dump----------------------
Next, you'll need to test accounting packets. The old standard for RADIUS accounting used port 1646. Change the port number in NTRadPing accordingly, and select Accounting Start from the Request Type drop-down list box. Make sure the root password is correct again, and send your request along. The response should be similar to the following:
Sending authentication request to server 192.168.1.103:1646 Transmitting packet, code=4 id=5 length=38 Received response from the server in 15 milliseconds Reply packet code=5 id=5 length=20 Response: Accounting-Response ------------------attribute dump----------------------
Finally, stop that accounting process by changing the Request Type box selection to Accounting Stop and resending the request. You should receive a response like this:
Sending authentication request to server 192.168.1.103:1645
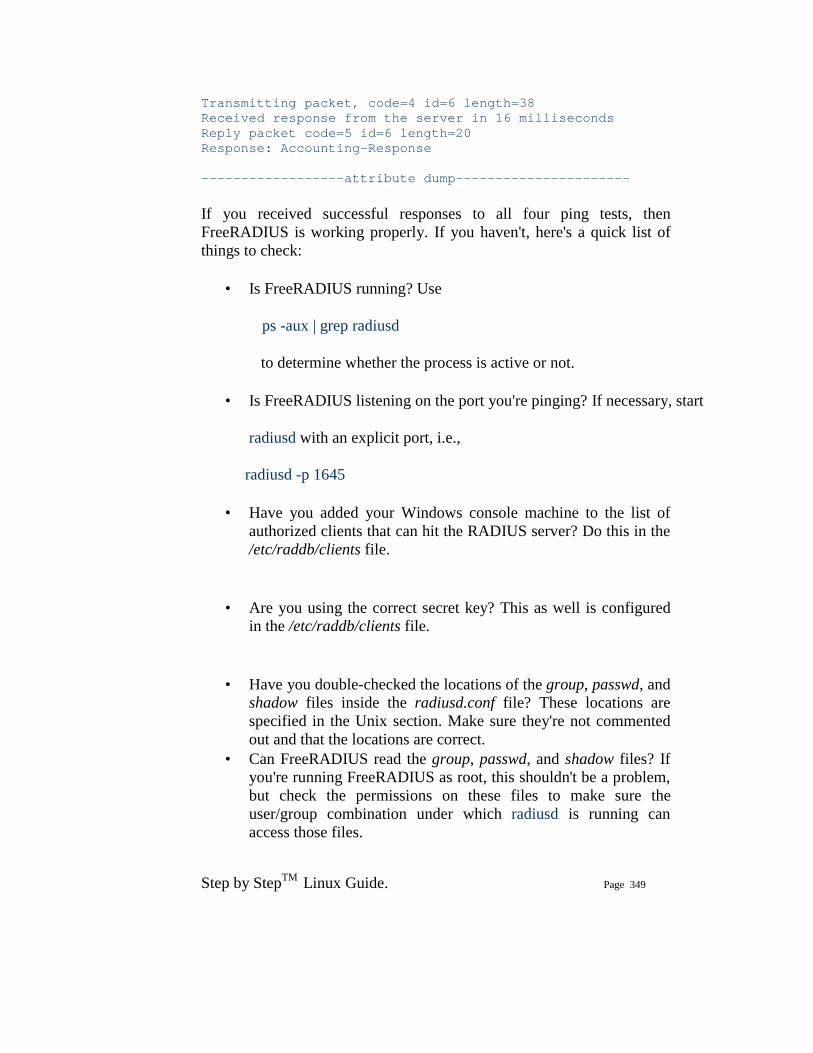
Step by StepTM Linux Guide. Page 349
Transmitting packet, code=4 id=6 length=38 Received response from the server in 16 milliseconds Reply packet code=5 id=6 length=20 Response: Accounting-Response ------------------attribute dump----------------------
If you received successful responses to all four ping tests, then FreeRADIUS is working properly. If you haven't, here's a quick list of things to check:
• Is FreeRADIUS running? Use
ps -aux | grep radiusd
to determine whether the process is active or not.
• Is FreeRADIUS listening on the port you're pinging? If necessary, start
radiusd with an explicit port, i.e.,
radiusd -p 1645
• Have you added your Windows console machine to the list of authorized clients that can hit the RADIUS server? Do this in the /etc/raddb/clients file.
• Are you using the correct secret key? This as well is configured in the /etc/raddb/clients file.
• Have you double-checked the locations of the group, passwd, and shadow files inside the radiusd.conf file? These locations are specified in the Unix section. Make sure they're not commented out and that the locations are correct.
• Can FreeRADIUS read the group, passwd, and shadow files? If you're running FreeRADIUS as root, this shouldn't be a problem, but check the permissions on these files to make sure the user/group combination under which radiusd is running can access those files.
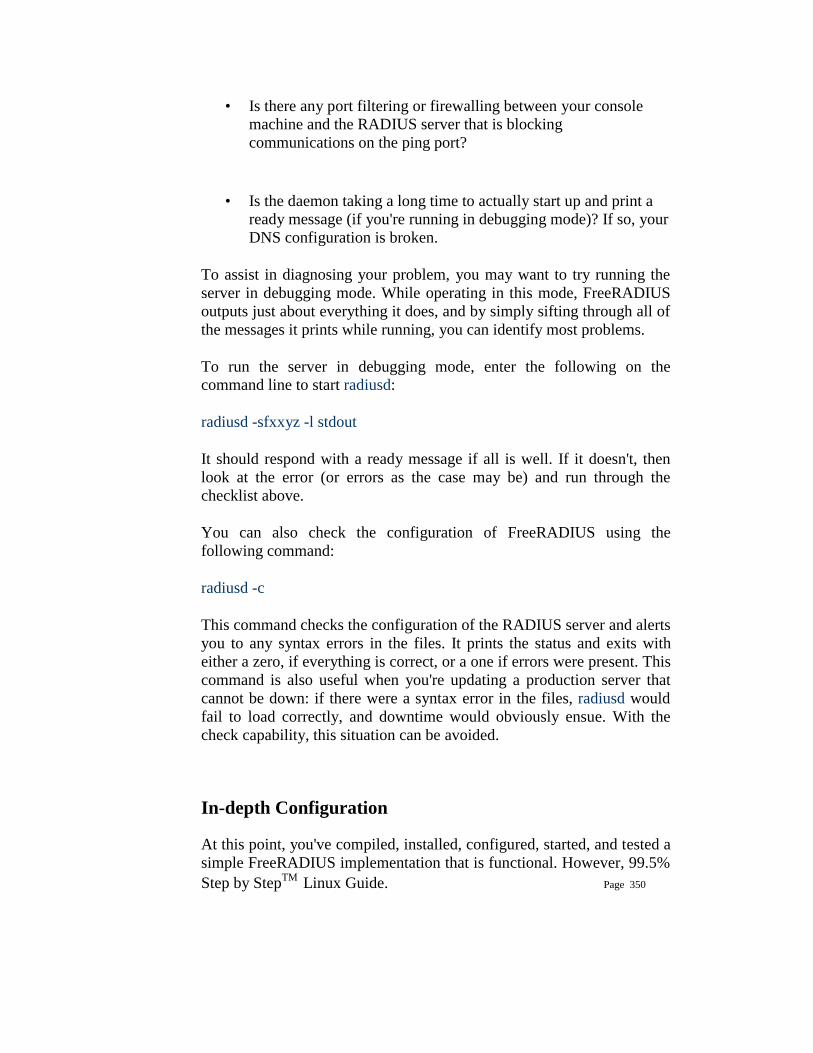
Step by StepTM Linux Guide. Page 350
• Is there any port filtering or firewalling between your console machine and the RADIUS server that is blocking communications on the ping port?
• Is the daemon taking a long time to actually start up and print a ready message (if you're running in debugging mode)? If so, your DNS configuration is broken.
To assist in diagnosing your problem, you may want to try running the server in debugging mode. While operating in this mode, FreeRADIUS outputs just about everything it does, and by simply sifting through all of the messages it prints while running, you can identify most problems.
To run the server in debugging mode, enter the following on the command line to start radiusd:
radiusd -sfxxyz -l stdout
It should respond with a ready message if all is well. If it doesn't, then look at the error (or errors as the case may be) and run through the checklist above.
You can also check the configuration of FreeRADIUS using the following command:
radiusd -c
This command checks the configuration of the RADIUS server and alerts you to any syntax errors in the files. It prints the status and exits with either a zero, if everything is correct, or a one if errors were present. This command is also useful when you're updating a production server that cannot be down: if there were a syntax error in the files, radiusd would fail to load correctly, and downtime would obviously ensue. With the check capability, this situation can be avoided.
In-depth Configuration At this point, you've compiled, installed, configured, started, and tested a simple FreeRADIUS implementation that is functional. However, 99.5%

Step by StepTM Linux Guide. Page 351
of the RADIUS/AAA implementations around the world are just not that simple. In this section, I'll delve into the two major configuration files and discuss how to tweak, tune, customize, and effect change to the default FreeRADIUS installation. Configuring radiusd.conf radiusd.conf file is the central location to configure most aspects of the FreeRADIUS product. It includes configuration directives as well as pointers and two other configuration files that may be located elsewhere on the machine. There are also general configuration options for the multitude of modules available now and in the future for FreeRADIUS. The modules can request generic options, and FreeRADIUS will pass those defined options to the module through its API. Before we begin, some explanation is needed of the operators used in the statements and directives found in these configuration files. The = operator, as you might imagine, sets the value of an attribute. The := operator sets the value of an attribute and overwrites any previous value that was set for that attribute. The == operator compares a state with a set value. It's critical to understand how these operators work in order to obtain your desired configuration. In this chapter, I'll look at several of the general configuration options inside radiusd.conf. Pidfile This file contains the process identification number for the radiusd daemon. You can use this file from the command line to perform any action to a running instance of FreeRADIUS. For example, to shut FreeRADIUS down without any protests, issue: kill -9 `cat /var/run/radiusd.pid' Usage: pidfile = [path] Suggestion: pidfile = ${run_dir}/radiusd.pid user and group
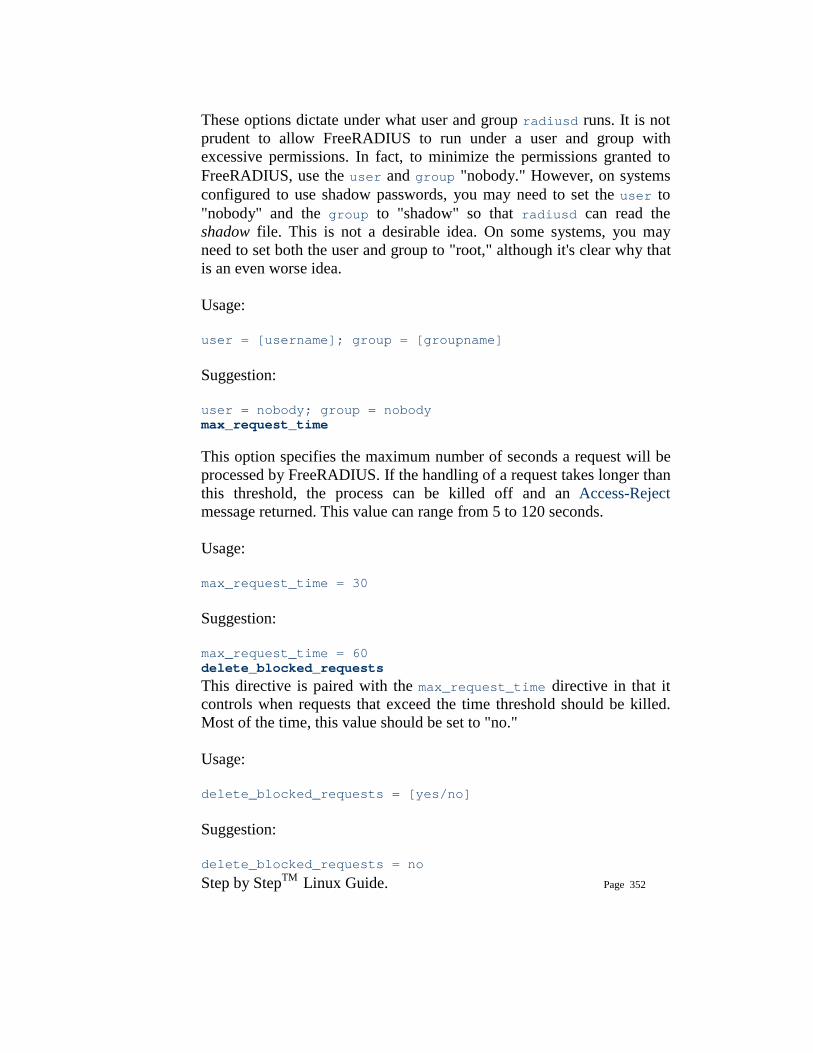
Step by StepTM Linux Guide. Page 352
These options dictate under what user and group radiusd runs. It is not prudent to allow FreeRADIUS to run under a user and group with excessive permissions. In fact, to minimize the permissions granted to FreeRADIUS, use the user and group "nobody." However, on systems configured to use shadow passwords, you may need to set the user to "nobody" and the group to "shadow" so that radiusd can read the shadow file. This is not a desirable idea. On some systems, you may need to set both the user and group to "root," although it's clear why that is an even worse idea. Usage: user = [username]; group = [groupname] Suggestion: user = nobody; group = nobody max_request_time This option specifies the maximum number of seconds a request will be processed by FreeRADIUS. If the handling of a request takes longer than this threshold, the process can be killed off and an Access-Reject message returned. This value can range from 5 to 120 seconds. Usage: max_request_time = 30 Suggestion: max_request_time = 60 delete_blocked_requests
This directive is paired with the max_request_time directive in that it controls when requests that exceed the time threshold should be killed. Most of the time, this value should be set to "no." Usage: delete_blocked_requests = [yes/no] Suggestion: delete_blocked_requests = no
Step by StepTM Linux Guide. Page 353
cleanup_delay When FreeRADIUS sends a reply to RADIUS client equipment, it generally caches that request internally for a few seconds to ensure that the RADIUS client will receive the message (sometimes network problems, offline servers, and large traffic loads might prevent the client from picking up the packet). The client receives a quick reply on its prompting for a second copy of the packet, since the internal cache mechanism for FreeRADIUS is much quicker than processing the request again. This value should be set between 2 and 10: this range is the happy medium between treating every request as a new request and caching so many processed requests that some new requests are turned away. Usage: cleanup_delay = [value] Suggestion: cleanup_delay = 6 max_requests This directive specifies the maximum number of requests FreeRADIUS will keep tabs on during operation. The value starts at 256 and scales with no upper limit, and ideally this is set at the number of RADIUS clients you have multiplied by 256. Setting this value too high causes the server to eat up more system memory, while setting it too low causes a delay in processing new requests once this threshold has been met. New requests must wait for the cleanup delay period to finish before they can be serviced. Usage: max_requests = [value] Suggestion: max_requests = [256 * x number of clients] bind_address This directive specifies the address under which radiusd will accept requests and reply to them. The "address" can be an IP address, fully
Step by StepTM Linux Guide. Page 354
qualified domain name, or the * wildcard character (to instruct the daemon to listen on all interfaces). Usage: bind_address = [value] Suggestion: bind_address = * port This setting instructs FreeRADIUS to listen on a specific port. While the RADIUS RFC specifies that the official RADIUS port is 1812, historically NAS equipment and some RADIUS servers have used port 1645. You should be aware of the port your implementation uses. While you can specify a certain port here, you can also instruct radiusd to use the machine's /etc/services file to find the port to use. Additionally, using the -p switch when executing radiusd will override any port setting provided here. Usage: port = [value] Suggestion: port = 1645 hostname_lookups This directive tells FreeRADIUS whether to look up the canonical names of the requesting clients or simply log their IP address and move on. Much like with Apache, DNS queries take a long time and, especially on highly loaded servers, can be a detriment to performance. Turning this option on also causes radiusd to block the request for 30 seconds while it determines the CNAME associates with that IP address. Only turn this option on if you are sure you need it. Usage:
Step by StepTM Linux Guide. Page 355
hostname_lookups = [yes/no] Suggestion: hostname_lookups = no allow_core_dumps This directive determines whether FreeRADIUS should dump to core when it encounters an error or simply silently quit with the error. Only enable this option if you're developing for FreeRADIUS or attempting to debug a problem with the code. Usage: allow_core_dumps = [yes/no] Suggestion: allow_core_dumps = no regular and extended expressions This set of controls configures regular and extended expression support. Realistically, you shouldn't need to alter these as they're set when running the ./configure command upon initial install. Usage: regular_expressions = [yes/no]; extended_expressions = [yes/no] Suggestion: regular_expressions = yes; extended_expressions = yes log These directives control how access to and requests of the FreeRADIUS server are logged. The log_stripped_names control instructs FreeRADIUS whether to include the full User-Name attribute as it appeared in the packet. The log_auth directive specifies whether to log authentication requests or simply carry them out without logging. The log_auth_badpass control, when set to yes, causes radiusd to log the
Step by StepTM Linux Guide. Page 356
bad password that was attempted, while the log_auth_goodpass logs the password if it's correct. Usage: log_stripped_names = [yes/no]; log_auth = [yes/no]; log_auth_badpass = [yes/no]; log_auth_goodpass = [yes/no] Suggestion: log_stripped_names = no; log_auth = yes; log_auth_badpass = yes; log_auth_goodpass = no lower_user and lower_pass To eliminate case problems that often plague authentication methods such as RADIUS, the FreeRADIUS developers have included a feature that will attempt to modify the User-Name and User-Password attributes to make them all lowercase; this is done either before an authentication request, after a failed authentication request using the values of the attributes as they came, or not at all. Clearly setting the lower_user directive to after makes the most sense: it adds processing time to each request, but unless this particular machine normally carries a high load, the reduced troubleshooting time is worth the extra performance cost. However, a secure password often makes use of a combination of uppercase and lowercase letters, so security dictates leaving the password attribute alone. Usage: lower_user = [before/after/no]; lower_pass = [before/after/no] Suggestion: lower_user = after; lower_pass = no nospace_user and nospace_pass Much like the lower_user and lower_pass controls, these directives preprocess an Access-Request packet and ensure that no spaces are included. The available options are the same: before, after, or no. Again, the most obvious choice is to set nospace_user to after to save helpdesk time. Some administrators have a tendency to not allow spaces in passwords; if this is the case, set nospace_pass to before (since
Step by StepTM Linux Guide. Page 357
there is a system-wide policy against spaces in passwords, testing a request as-is is not required). Usage: nospace_user = [before/after/no]; nospace_password = [before/after/no] Suggestion: nospace_user = after; nospace_password = before
Configuring the users File
The users file, located at /etc/raddb/users, is the home of all authentication security information for each user configured to access the system. Each user has an individual stanza, or entry. The file has a standard format for each stanza:
1. The first field is the username for each user, up to 253 characters.
2. On the same line, the next criteria are a list of required authentication attributes such as protocol type, password, and port number.
3. Following the first line, each user has a set of defined characteristics that allow FreeRADIUS to provision a service best for that user. These characteristics are indented under the first line and separated into one characteristic per line. For example, you might find a Login-Host entry, a dial-back configuration, or perhaps PPP configuration information.
The users file also comes with a default username of--you guessed it--DEFAULT, which is generally the catchall configuration. That is to say, if there is no explicit match for a particular user, or perhaps the attribute information for a user is incomplete, radiusd will configure the session based on the information in the DEFAULT entry. FreeRADIUS processes this file in the order in which the entries are listed. When information received from the RADIUS client equipment matches an entry in the users file, FreeRADIUS stops processing and sets the service up based on that users file entry. However, you can alter
Step by StepTM Linux Guide. Page 358
this behavior by setting the Fall-Through attribute to yes in an entry. When radiusd encounters a positive fall-through entry, it will continue processing the users file and then select the best match for the particular session. The DEFAULT user can also have a Fall-Through attribute, which means you can have multiple DEFAULT entries for various connection scenarios. If you don't want to issue a password for each user via their entry in the users file, then simply set Auth-Type := System on the first line for each user. FreeRADIUS will then query the system password database for the correct password, which saves some administrative headache. A sample complete entry The following is a complete entry for the user jhassell, dialing into a NAS server using PPP. Note that (a) there is no Fall-Through attribute set, so FreeRADIUS will stop processing when it encounters this entry, and (b) no DEFAULT entry will be used to add attribute information to this connection: jhassell Auth-Type := System Service-Type = Framed-User, Framed-Protocol = PPP, Framed-IP-Address = 192.168.1.152, Framed-IP-Netmask = 255.255.255.0, Framed-Routing = Broadcast-Listen, Framed-Filter-Id = "20modun", Framed-MTU = 1500, Framed-Compression = Van-Jacobsen-TCP-IP Next, here's a complete entry for the user Anna Watson. She has a space in her user-name and she also has a password specified in her entry. She also gets a positive fall-through so that she can use some of the DEFAULT user's attributes with her connection: "Anna Watson" Auth-Type := Local, User-Password == "yes123" Reply-Message = "Hello, %u" Service-Type = Framed-User, Framed-Routing = Broadcast-Listen, Framed-Filter-Id = "20modun", Fall-Through = Yes
Step by StepTM Linux Guide. Page 359
DEFAULT entries These DEFAULT user configurations match with all usernames that can get to them (i.e., the individual users must have a positive Fall-Through attribute). Recall from the earlier discussion that DEFAULT entries may also have Fall-Through attributes. First, let's make sure that all users are checked against the system password file unless they have a password explicitly assigned in the entry. DEFAULT Auth-Type := System Fall-Through = Yes Now, include a DEFAULT entry for all users connecting via a framed protocol, such as PPP or SLIP. Note that I tell the RADIUS client to assign the IP address via the Framed-IP-Address attribute's value. DEFAULT Service-Type = Framed-User Framed-IP-Address = 255.255.255.254, Framed-MTU = 576, Service-Type = Framed-User, Fall-Through = Yes Finally, set the DEFAULT entry for PPP users. I've already told FreeRADIUS to assign framed protocol users with a dynamic IP address, so all I need to do is set the compression method and explicitly designate PPP as the framed protocol for this default. DEFAULT Framed-Protocol == PPP Framed-Protocol = PPP, Framed-Compression = Van-Jacobsen-TCP-IP If a user attempts to connect and matches neither any of the explicit user entries nor any of the DEFAULT entries, then he will be denied access. Notice that with the last DEFAULT entry, Fall-Through isn't set: this ensures the user is kicked off if he doesn't match any of the scenarios.
Prefixes and suffixes You can use prefixes and suffixes appended to the user name to determine what kind of service to provision for that particular
Step by StepTM Linux Guide. Page 360
connection. For example, if a user adds .shell to their username, you add the following DEFAULT entry to the users file to provision a shell service for her. FreeRADIUS authenticates her against the system password file, telnets to your shell account machine, and logs her in. DEFAULT Suffix == ".shell", Auth-Type := System Service-Type = Login-User, Login-Service = Telnet, Login-IP-Host = shellacct1.rduinternet.com Similarly, you can set up an entry in the users file where if a user connects with a prefix of "s.", then you can provision SLIP service for him. FreeRADIUS can authenticate him against the system passwords, and then fall through to pick up the SLIP attributes from another DEFAULT entry. Here is an example: DEFAULT Prefix == "s.", Auth-Type := System Service-Type = Framed-User, Framed-Protocol = SLIP, Fall-Through = Yes] Using RADIUS callback The callback feature of the RADIUS protocol is one of the most interesting and useful security measures that you, as an administrator, can enforce. You can configure FreeRADIUS to call a specific user back via his individual entry in the users file. (Of course, you could make a DEFAULT entry that calls every user back, but the application of that technique is more limited and requires many more resources than a standard implementation.) The following is an example of a callback configuration for user rneis: she dials in, is then called back, is authenticated, and then given a session on the shell account machine. rneis Auth-Type := System Service-Type = Callback-Login-User, Login-Service = Telnet, Login-IP-Host = shellacct1.rduinternet.com, Callback-Number = "9,1-919-555-1212" Completely denying access to users
Step by StepTM Linux Guide. Page 361
You can set up a specific user entry to deny access to him. For example, you may have an automated script that takes input from your billing system (a list of usernames that have not paid their bills, possibly) and re-writes user entries to deny access. They would write something like the following, for the user aslyter: aslyter Auth-Type := Reject Reply-Message = "Account disabled for nonpayment." Alternatively, you could also set up a group on your system called "suspended," and FreeRADIUS could detect whether an individual username was contained within that group and reject access as necessary. To do this, create a DEFAULT entry much like the following: DEFAULT Group == "suspended", Auth-Type := Reject Reply-Message = "Account suspended for late payment." Troubleshooting Common Problems In this section, I'll take a look at some of the most frequently occurring problems with a new FreeRADIUS setup and how to fix them.
Linking Errors When Starting FreeRADIUS If you receive an error similar to the following: Module: Loaded SQL rlm_sql: Could not link driver rlm_sql_mysql: file not found rlm_sql: Make sure it (and all its depend libraries!) are in the search path radiusd.conf[50]: sql: Module instantiation failed. It means that some shared libraries on the server are not available. There are a couple of possible causes from this. First, the libraries that are needed by the module listed in the error messages couldn't be found when FreeRADIUS was being compiled. However, if a static version of the module was available, it was built at
Step by StepTM Linux Guide. Page 362
compile time. This would have been indicated with very prominent messages at compile time. The other cause is that the dynamic linker on your server is not configured correctly. This would result in the libraries that are required being found at compile time, but not run time. FreeRADIUS makes use of standard calls to link to these shared libraries, so if these calls fail, the system is misconfigured. This can be fixed by telling the linker where these libraries are on your system, which can be done in one of the following ways:
• Write a script that starts FreeRADIUS and includes the variable LD_LIBRARY_PATH. This sets the paths where these libraries can be found.
• If your system allows it, edit the /etc/ld.so.conf file and add the
directory containing the shared libraries to the list.
• Set the path to these libraries inside radiusd.conf using the libdir configuration directive. The radiusd.conf file has more details on this.
Incoming Request Passwords Are Gibberish Gibberish is usually indicative of an incorrectly formed or mismatched shared secret, the phrase shared between the server and the RADIUS client machine and used to perform secure encryption on packets. To identify the problem, run the server in debugging mode, as described previously. The first password printed to the console screen will be inside a RADIUS attribute (e.g., Password = "rneis\dfkjdf7482odf") and the second will be in a logged message (e.g., Login failed [rneis/dfkjdf7482odf]). If the data after the slash is gibberish--ensure it's not just a really secure password--then the shared secret is not consistent between the server and the RADIUS client. This may even be due to hidden characters, so to be completely sure both are the same, delete and re-enter the secret on both machines. The gibberish may also result from a shared secret that is too long. FreeRADIUS limits the secret length to 16 characters, since some NAS
Step by StepTM Linux Guide. Page 363
equipment has limitations on the length of the secret yet don't make it evident in error logs or the documentation. NAS Machine Ignores a RADIUS Reply You may be seeing duplicate accounting or authentication requests without accompanying successful user logins. In this case, it's likely that you have a multi-homed RADIUS server, or at least a server with multiple IP addresses. If the server receives a request on one IP address, but responds with a different one, even if the reply comes from the machine for which the original packet was destined, the NAS machine will not accept it. To rectify this, launch FreeRADIUS with the -i command-line switch, which binds the daemon to one specific IP address. CHAP Authentication Doesn't Work Correctly If PAP authentication works normally, but users authenticating with the CHAP protocol receive errors and denials, you do not have plain text passwords in the users file. CHAP requires this, while PAP can take passwords from the system or from any other source. For each user who needs CHAP authentication, you must add the Password = changeme check item to his individual entry, of course changing the value of the password as appropriate. Some people may say using CHAP is much more secure, since the user passwords are not transmitted in plain text over the connection between the user and the NAS. This is simply not true in practice. While hiding the password during transmission is beneficial, the CHAP protocol requires you to leave plain text passwords sitting in a file on a server, completely unencrypted. Obviously, it's much more likely that a cracker will gain access to your RADIUS server, grab the users file with all of these plainly available passwords, and wreak havoc and harm on your network than it is that the same cracker would intercept one user's password during the establishment of the connection.
FreeRadius and MySQL
Step by StepTM Linux Guide. Page 364
Scott Bartlett ([email protected]). Last updated February 10th 2003. FreeRadius is currently at version 0.8.1.
This page is an update on my original notes, hopefully now with things in a more readable order to make life easier. The original notes can be found here.
Introduction
In September 2001 I started playing around with FreeRadius (then at version 0.2!) and storing user authorisation details in a MySQL database. I had previously been using a proprietary RADIUS solution and wanted rid of it. Lots of people seemed to be posting to the freeradius-users list that they were trying to do the same and found it tricky due to the lack of documentation. Thus, to help anyone out there who needed it, I wrote down all the snippets of info, tips I'd received, and steps I'd used to make it work. This is the result.
This document assumes that you are familiar with:
• *nix system admin and networking • What RADIUS is and should do
• MySQL administration
• The basics of how to compile and install open source software.
I'm not going to describe any of the above stuff, especially the latter as I'm far from an expert on it. This document focuses on getting FreeRadius running with MySQL. It does NOT describe a basic FreeRadius installation in detail (e.g. getting it up and running with a 'users' text file or other FreeRadius configurations), nor does it cover using multiple authentication methods, fall-through's or any of that stuff. Just plain-old-MySQL-only. If you don't know about RADIUS itself, go
Step by StepTM Linux Guide. Page 365
do some background reading... the O'Reilly book ('RADIUS') is pretty good and covers FreeRadius too.
Please note: This isn't official documentation. It's not even UNofficial documentation. It's not documentation of any type by any stretch of the imagination. So far, it's just my own personal notes, written on the fly. Little editing, little detail. You takes your chances. I will try to improve when I can, or have additional information - don't hold your breath though, as life can get busy around here. The notes focus on the SQL element, NOT generally on getting FreeRadius installed and configured and operational with text files (maybe later!) although there is a little bit on that.
Also note: I'm not a programmer - editing low-level code and compiling stuff is not something I'm particularly familiar with. Ask me to read C code and I'll probably panic. My background and experience on Linux (and other stuff) puts me in the system admin/networking bracket (I'm a network builder and web app developer by day), so please bear that in mind here. Feel free to mail me, especially with suggestions and any info useful to add here, but please don't ask me 'how to I compile' stuff. Thanks.
Lastly for this bit : a big thank you to all those that helped, emailed and generally contributed to me getting this up and going, and thus to the creation of these notes.
System
I did my original testing on SuSe Linux 7.0 on Intel with FreeRadius 0.2 and MySQL 3.23.42 using a Cisco 3640 acting as a test NAS unit. The final deployment was to RedHat 7.1. Today I'm running FreeRadius 0.8.1. If you're running an older version you are strongly recommended to upgrade.
Before You Start
Before starting with FreeRadius, make sure your box is up and configured on your network, that you have MySQL installed and running, and that your NAS is configured to point to your server.

Step by StepTM Linux Guide. Page 366
If you're using Cisco kit as your NAS, here's a quick example snippet of how to configure IOS to authenticate PPP (e.g. dial, DSL etc) users to a RADIUS server:
aaa new-model aaa authentication ppp default if-needed group radius local aaa authorization network default group radius aaa accounting update newinfo aaa accounting exec default start-stop group radius aaa accounting network default wait-start group radius aaa accounting connection default start-stop group radius radius-server host a.b.c.d auth-port 1645 acct-port 1646 radius-server host e.f.g.h auth-port 1645 acct-port 1646 radius-server key YOUR-RADIUS-KEY
[a.b.c.d and e.f.g.h are the IP's of your primary and secondary RADIUS servers. YOUR-RADIUS-KEY is your RADIUS secret key as defined in clients.conf (see below). ]
Make SURE you have included the development headers in your MySQL installation otherwise the FreeRadius installation/compilation will barf. To make my own life easy, I just installed MySQL to the default location.
Just to clarify: ABSOLUTELY MAKE SURE you have the mysql-devel (headers and libraries) package installed with your MySQL, otherwise freeradius won't compile with MySQL support properly. Many people seem to miss having this.
Oh yep, did I mention about having the MySQL development headers installed? No? Make sure you do... ;-)
Getting Started
First off, you should get FreeRadius compiled, installed and running in a basic text file configuration (e.g. using the 'users' file) on your box. This
Step by StepTM Linux Guide. Page 367
I'm not going to describe in details (read the stuff in /docs, etc), but it should basically be the following:
1 . Get the latest FreeRadius source code tarball from ftp://ftp.freeradius.org/pub/radius/freeradius.tar.gz. If you're so minded, get the latest CVS instead.
2. Unpack the tarball and install it. On my own system the basic steps were all that was needed, and everything got dumped in the standard places:
tar xvf freeradius.tar.gz cd freeradius ./configure make make install
Note that you might need to add options to ./configure if you installed MySQL to a non-standard place, or want FreeRadius to a non-standard place, or want or need any other odd bits and pieces. I was keeping it simple and didn't need to.
Then you should configure FreeRadius appropriately. It's best to start with a simple config using the standard text files, if at least only to test that FreeRadius installed OK and will work. To very briefly summarise getting the text files configured :
1. Edit /usr/local/etc/raddb/clients.conf and enter the details of your NAS unit(s). There are examples here, so it should be easy. Tip: You'll also want to enter 'localhost' here for testing purposes (i.e. so you can use radtest).
2. Edit /usr/local/etc/raddb/users and create an example user account. The file is commented on how to do this. I'm not going to repeat that here. If you've previously used another RADIUS server with text-file configuration (e.g. Livingston, Cistron) you'll know what goes here...
3. Edit /usr/local/etc/raddb/realms. I just put a single line 'DEFAULT LOCAL' and that was sufficient to strip any suffix domain names in given user names - if you're using realms or proxing you'll doubtless need to do something else here, but I

Step by StepTM Linux Guide. Page 368
recommend you start with this then come back to setting up realms/ proxying when you know MySQL is working. If you're not using realms, just ignore this.
4. Edit /usr/local/etc/raddb/radiusd.conf and change as needed. For my own installation I changed the default port to run on 1645 (old port) to match what our existing boxes use (but otherwise make sure your NAS and FreeRadius are using the same) and said 'yes' to all the logging options (I'd strongly recommend you do switch on all the logging to start with). At this point I also said 'no' to using proxy to keep stuff simple. I then told it to run under the 'radius' user and group (I'd initially installed FreeRadius as root and didn't want to run it as such, so I created a user account called 'radius' in a group called 'radius' and then just blanket chown'd and chgrp'd the various radius directories to that user just to be sure the account can access all the right stuff. A bit of a sledgehammer there, but it was quick! I'm sure there's a better and/or more elegant way of doing this!). The rest of the radiusd.conf file was left alone.
At this point you should be able to manually fired up /usr/local/sbin/radiusd. You should do this with the debug turned on so you can see what happens:
/usr/local/sbin/radiusd -X
Lots of stuff will scroll to the screen, and it should tell you it's ready to accept requests. If you get an error, READ THE DEBUG, then check the docs, check the above and try again.
You should now be able to use FreeRadius. You can use radtest to test an account from the command line:
radtest username password servername port secret
So, if your example user is 'fred' with password 'wilma', your server is called 'radius.domain.com', is using port 1645, and you put localhost (or
Step by StepTM Linux Guide. Page 369
your localhost's IP) in clients.conf with a secret of 'mysecret', you should use:
radtest fred wilma radius.domain.com 1645 mysecret
And you should get back something like:
Sending Access-Request of id 226 to 127.0.0.1:1645 User-Name = 'fred' User-Password = '\304\2323\326B\017\376\322?K\332\350Z;}' NAS-IP-Address = radius.domain.com NAS-Port = 1645 rad_recv : Access-Accept packet from host 127.0.0.1:1645,id=226, length=56 Framed-IP-Address = 80.84.161.1 Framed-Protocol = PPP Service-Type = Framed-User Framed-Compression = Van-Jacobson-TCP-IP Framed-IP- Netmask = 255.255.255.255
You should get an 'Access Accept' response. If you don't, do not pass Go, do not collect £200. Go back and check everything. Read the docs, READ THE DEBUG!!
Personally, I used NTradPing (downloadable from MasterSoft) on a desktop Windows PC to send test packets towards the radius server - very handy tool. If you do this, or test from any other machine, remember your PC (or other machine) needs to be in your NAS list in clients.conf too!
OK, so at this point you should have text-file authentication working in FreeRadius...
Setting up the RADIUS database in MySQL
Step by StepTM Linux Guide. Page 370
First, you should a new empty 'radius' database in MySQL and login user with permissions to that database. You could of course call the database and the user anything you like but we'll stick to 'radius' for both for the purposes of this discussion
Next up, you need to create the schema for the database. There is a file which describes this and is actually a SQL script file. It can be found at /src/modules/rlm_sql/drivers/rlm_sql_mysql/db_mysql.sql where you untar'd FreeRadius. This is the bit that, at least at the time I originally wrote these notes, wasn't really documented anywhere and was the thing most people seemed to be asking.
How you run that script is up to you and how you like to admin MySQL. The easiest way is to: mysql -uroot -prootpass radius < db_mysql.sql
...where 'root' and 'rootpass' are your mysql root name and password respectively.
I happened to run it using MacSQL 2.0 on my Powerbook G4/OS X machine (Cool...). You could do it on the server, or use a MySQL admin tool from a Windows PC (e.g. MySQL CC, SQLion, dbtools etc) or whatever.
Now you have the database running, albeit empty.
Configuring FreeRadius to use MySQL
Edit /usr/local/etc/raddb/sql.conf and enter the server, name and password details to connect to your MySQL server and the RADIUS database. The database and table names should be left at the defaults if you used the default schema. For testing/debug purposes, switch on sqltrace if you wish - FreeRadius will dump all SQL commands to the debug output with this on.
If you're stripping all realm names (i.e. you want user [email protected] to authenticate as just 'joe'), then in sql.conf, under the 'query config: username' section, you MAY need to adjust the line(s) referring to
Step by StepTM Linux Guide. Page 371
sql_user_name. I needed to do this originally because we want to dump all realms, but you probably won't need to do this with the latest FreeRadius. For example, in our case I needed to uncomment the line:
sql_user_name = '%{Stripped-User-Name}'
...and comment out the following line referring to just User-Name. If you want to see what's happening here, switch on all the logging options in radiusd.conf and run radiusd in debug mode (-X) to see what's happening : you'll see " user@domain" being passed to MySQL when using User-Name, but just "user" when using Stripped-User-Name. Using the latter, realms worked for me (basically, I strip everything, as all user names are unique on the server anyway). Of course, set all your other SQL options as needed (database login details, etc)
Edit /usr/local/etc/raddb/radiusd.conf and add a line saying 'sql' to the authorize{} section (which is towards the end of the file). The best place to put it is just before the 'files' entry. Indeed, if you'll just be using MySQL, and not falling back to text files, you could comment out or lose the 'files' entry altogether.
Also add a line saying 'sql' to the accounting{} section too between 'unix' and 'radutmp'. FreeRadius will now do accounting to MySQL as well.
The end of your radiusd.conf should then look something like this:
authorise { preprocess chap mschap #counter #attr_filter #eap suffix sql #files #etc_smbpasswd } authenticate { authtype PAP { pap

Step by StepTM Linux Guide. Page 372
} authtype CHAP { chap } authtype MS-CHAP{ mschap } #pam #unix #authtype LDAP { # ldap #} } preacct { preprocess suffix #files } accounting { acct_unique detail #counter unix sql radutmp #sradutmp } session { radutmp }
Populating MySQL
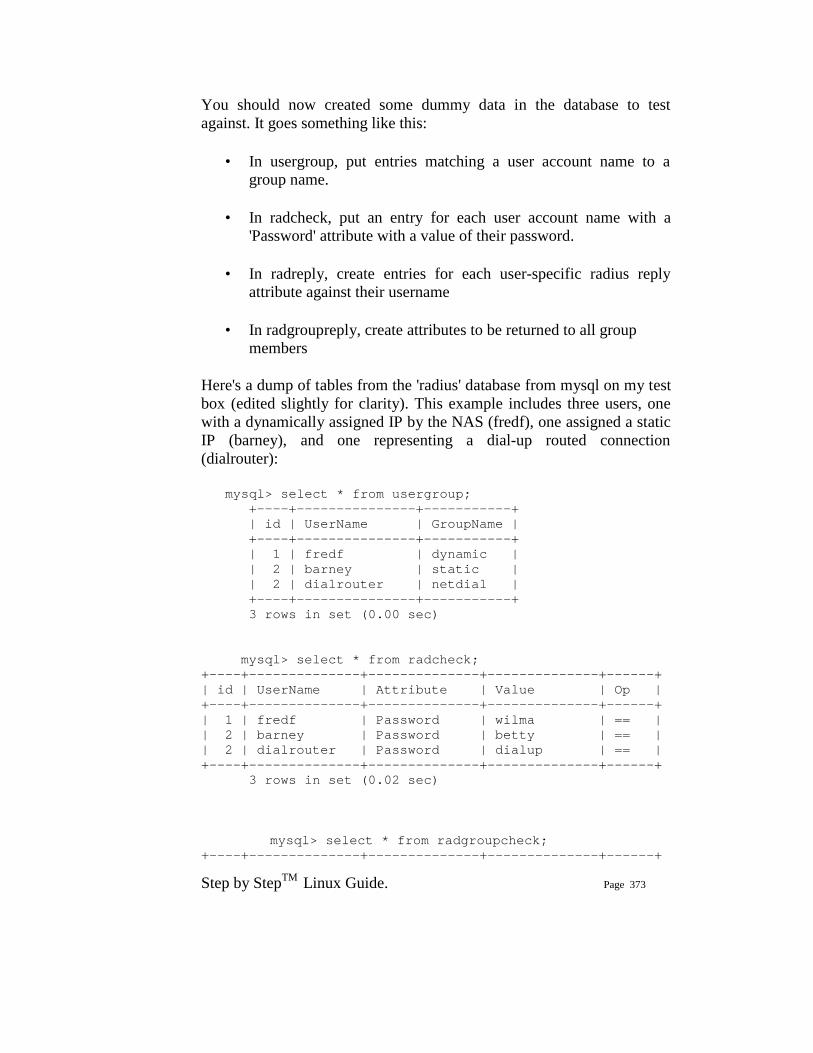
Step by StepTM Linux Guide. Page 373
You should now created some dummy data in the database to test against. It goes something like this:
• In usergroup, put entries matching a user account name to a group name.
• In radcheck, put an entry for each user account name with a
'Password' attribute with a value of their password. • In radreply, create entries for each user-specific radius reply
attribute against their username
• In radgroupreply, create attributes to be returned to all group members
Here's a dump of tables from the 'radius' database from mysql on my test box (edited slightly for clarity). This example includes three users, one with a dynamically assigned IP by the NAS (fredf), one assigned a static IP (barney), and one representing a dial-up routed connection (dialrouter):
mysql> select * from usergroup; +----+---------------+-----------+ | id | UserName | GroupName | +----+---------------+-----------+ | 1 | fredf | dynamic | | 2 | barney | static | | 2 | dialrouter | netdial | +----+---------------+-----------+ 3 rows in set (0.00 sec) mysql> select * from radcheck; +----+--------------+--------------+--------------+------+ | id | UserName | Attribute | Value | Op | +----+--------------+--------------+--------------+------+ | 1 | fredf | Password | wilma | == | | 2 | barney | Password | betty | == | | 2 | dialrouter | Password | dialup | == | +----+--------------+--------------+--------------+------+ 3 rows in set (0.02 sec) mysql> select * from radgroupcheck; +----+--------------+--------------+--------------+------+
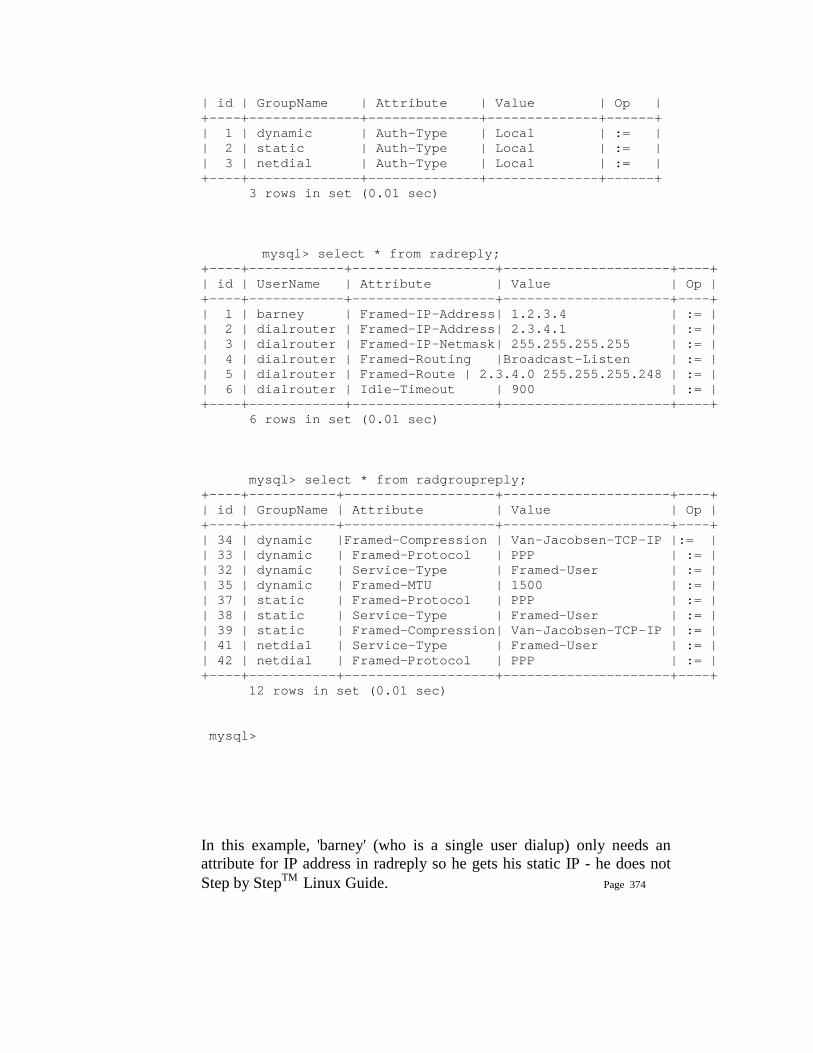
Step by StepTM Linux Guide. Page 374
| id | GroupName | Attribute | Value | Op | +----+--------------+--------------+--------------+------+ | 1 | dynamic | Auth-Type | Local | := | | 2 | static | Auth-Type | Local | := | | 3 | netdial | Auth-Type | Local | := | +----+--------------+--------------+--------------+------+ 3 rows in set (0.01 sec) mysql> select * from radreply; +----+------------+------------------+---------------------+----+ | id | UserName | Attribute | Value | Op | +----+------------+------------------+---------------------+----+ | 1 | barney | Framed-IP-Address| 1.2.3.4 | := | | 2 | dialrouter | Framed-IP-Address| 2.3.4.1 | := | | 3 | dialrouter | Framed-IP-Netmask| 255.255.255.255 | := | | 4 | dialrouter | Framed-Routing |Broadcast-Listen | := | | 5 | dialrouter | Framed-Route | 2.3.4.0 255.255.255.248 | := | | 6 | dialrouter | Idle-Timeout | 900 | := | +----+------------+------------------+---------------------+----+ 6 rows in set (0.01 sec) mysql> select * from radgroupreply; +----+-----------+-------------------+---------------------+----+ | id | GroupName | Attribute | Value | Op | +----+-----------+-------------------+---------------------+----+ | 34 | dynamic |Framed-Compression | Van-Jacobsen-TCP-IP |:= | | 33 | dynamic | Framed-Protocol | PPP | := | | 32 | dynamic | Service-Type | Framed-User | := | | 35 | dynamic | Framed-MTU | 1500 | := | | 37 | static | Framed-Protocol | PPP | := | | 38 | static | Service-Type | Framed-User | := | | 39 | static | Framed-Compression| Van-Jacobsen-TCP-IP | := | | 41 | netdial | Service-Type | Framed-User | := | | 42 | netdial | Framed-Protocol | PPP | := | +----+-----------+-------------------+---------------------+----+ 12 rows in set (0.01 sec) mysql>
In this example, 'barney' (who is a single user dialup) only needs an attribute for IP address in radreply so he gets his static IP - he does not

Step by StepTM Linux Guide. Page 375
need any other attributes here as all the others get picked up from the 'static' group entries in radgroupreply.
'fred' needs no entries in radreply as he is dynamically assigned an IP via the NAS - so he'll just get the 'dynamic' group entries from radgroupreply ONLY.
'dialrouter' is a dial-up router, so as well as needing a static IP it needs route and mask attributes (etc) to be returned. Hence the additional entries.
'dialrouter' also has an idle-timeout attribute so the router gets kicked if it's not doing anything - you could add this for other users too if you wanted to. Of course, if you feel like or need to add any other attributes, that's kind of up to you!
Note the operator ('op') values used in the various tables. The password check attribute should use ==. Most return attributes should have a := operator, although if you're returning multiple attributes of the same type (e.g. multiple Cisco- AVpair's) you should use the += operator instead otherwise only the first one will be returned. Read the docs for more details on operators.
If you're stripping all domain name elements from usernames via realms, remember NOT to include the domain name elements in the usernames you put in the MySQL tables - they should get stripped BEFORE the database is checked, so name@domain will NEVER match if you're realm stripping (assuming you follow point 2 above) – you should just have 'name' as a user in the database. Once it's working without, and if you want more complex realm handling, go back to work out not stripping (and keeping name@domain in the db) if you really want to.
Auth-Type Note, Feb 2003: At the time of writing (i.e. up to and including FreeRadius 0.8.1), FreeRadius will default to an Auth-Type of 'local' if one is not found. This means that you do not need to include this (i.e. the radgroupcheck table above could actually be empty, and indeed is on my own box), but you probably should include it for clarity and for future-proofing in case FreeRadius changes. Please note that a previous version of this page indicated that Auth-Type should be included in the rad(group)reply tables. It appears that this is incorrect and that Auth-Type should be in the rad(group)check tables. Other than Auth-Type, for
Step by StepTM Linux Guide. Page 376
simple setups, you probably need nothing in radgroupcheck - unless you want users dialing certain nas'es, etc etc.
Using FreeRadius and MySQL
Fire up radiusd again in debug mode. The debug output should show it connecting to the MySQL database. Use radtest (or NTradPing) to test again - the user should authenticate and the debug output should show FreeRadius talking to MySQL.
You're done!
Additional Snippets:
To use encrypted passwords in radcheck use the attribute 'Crypt-Password', instead of 'Password', and just put the encrypted password in the value field. ( i.e. UNIX crypt'd password).
To get NTradPing to send test accounting (e.g. stop) packets it needs arguments, namely acct-session-time. Put something like 'Acct-Session-Time=99999' into the 'Additional RADIUS Attributes' box when sending stops. Thanks to JL for the tip.
If you have a Cisco nas, set the cisco-vsa-hack
Running a backup FreeRadius server and need to replicate the RADIUS database to it? I followed Colin Bloch's basic instructions at http://www.ls-l.net/mysql/ and got replication setup between two MySQL servers. Real easy. Read the MySQL docs on replication for more details. Note that MySQL replication is one-way-only.
On the subject of backup servers. If you want to run TWO MySQL servers and have FreeRadius fall over between them, you'll need to do something like this: duplicate your sql.conf and edit the second copy to reflect connecting to your backup server ; then name the files something like sql1.conf and sql2.conf ; in radiusd.conf change and duplicate the include line for sql.conf to include sql1.conf and sql2.conf instead ; in
Step by StepTM Linux Guide. Page 377
the 'authorize' section of radiusd.conf change the 'sql' entry to a 'group' one, like this:
group { sql1 { fail = 1 notfound = return noop = 2 ok = return updated = 3 reject = return userlock = 4 invalid = 5 handled = 6 } sql2 { fail = 1 notfound = return noop = 2 ok = return updated = 3 reject = return userlock = 4 invalid = 5 handled = 6 } }
Note that if FreeRadius fails over to the second MySQL server and tries to update the accounting table (radacct), nasty things might possibly happen to your replication setup and database integrity as the first MySQL server won't have got the updates...
Installing PhpMyAdmin
Step by StepTM Linux Guide. Page 378
Quick Install:
1. Untar or unzip the distribution (be sure to unzip the subdirectories): tar -xzvf phpMyAdmin_x.x.x.tar.gz in your webserver's document root. If you don't have direct access to your document root, put the files in a directory on your local machine, and, after step 3, transfer the directory on your web server using, for example, ftp.
2. Open the file config.inc.php in your favorite editor and change the values
for host, user, password and authentication mode to fit your environment. Here, "host" means the MySQL server. Also insert the correct value for $cfg['PmaAbsoluteUri']. Have a look at Configuration section for an explanation of all values.
3. It is recommended that you protect the directory in which you installed
phpMyAdmin (unless it's on a closed intranet, or you wish to use HTTP or cookie authentication), for example with HTTP-AUTH (in a .htaccess file). See the multi-user sub-section of the FAQ for additional information, especially FAQ 4.4.
4. Open the file <www.your-host.com>/<your-install-dir>/index.php in your
browser. phpMyAdmin should now display a welcome screen and your databases, or a login dialog if using HTTP or cookie authentication mode.
5. For a whole set of new features (bookmarks, comments, SQL-history, PDF-
generation, field contents transformation, etc.) you need to create a set of tables in your database. Please look at your scripts/ directory, where you should find a file called create_tables.sql. (If you are using a Windows server, pay special attention to FAQ 1.23). You can already use your phpMyAdmin to create the tables for you. Please be aware that you may have to have special (administrator) privileges to create the database and tables. After having imported the create_tables.sql file, you should specify the table names in your config.inc.php file. The directives used for that can be found in the Configuration section.
Importing and Exporting MySQL DB using PhpMyAdmin
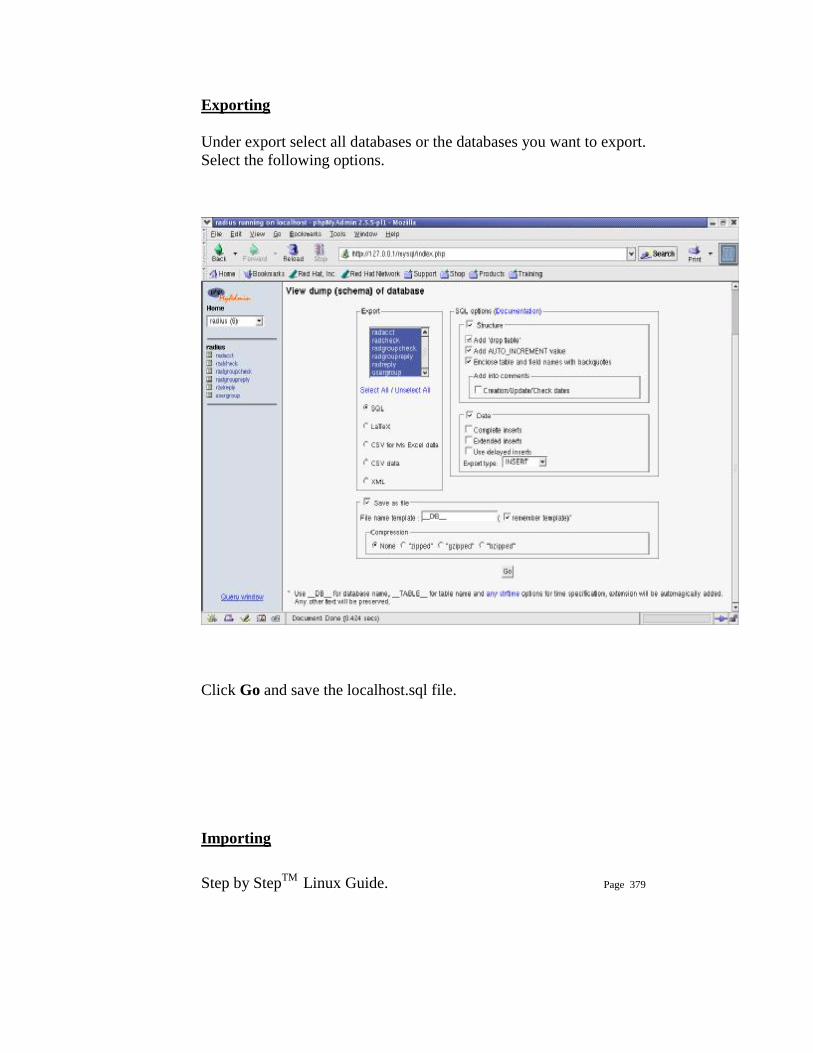
Step by StepTM Linux Guide. Page 379
Exporting
Under export select all databases or the databases you want to export. Select the following options.
Click Go and save the localhost.sql file.
Importing
Step by StepTM Linux Guide. Page 380
In PhpMyAdmin go to the database that you want to export Select “SQL” Click Brows and select the localhost.sql file Click Go.
Nagios
"Nagios is a system and network monitoring application. It watches hosts and services that you specify, alerting you when things go bad and when they get better" (from nagios.org <http://www.nagios.org>). This is the same tool that used to be called NetSaint until recently. Although the NetSaint site is still up, all future development will be done on Nagios. Nagios has an impressive list of features that include:
• Monitoring of network services such as HTTP, SMTP, SSH, Telnet, etc.
• Monitoring of server resources, such as disk usage and load
averages.
• Real time notification of failures via email, pager, etc.
• A very informative Web interface that makes it very easy to identify problem hosts.
• Licensed under the GNU GPL.
Nagios runs on Unix and its variants and optionally requires a Web server to be installed (for the Web interface).
Installing and Configuring Nagios Download the latest Nagios package and the latest Nagios plugins to a temporary location. For this article we will be using ~/tmp/nagios.

Step by StepTM Linux Guide. Page 381
root@ducati:~/tmp/nagios# ls nagios-1.0b5.tar.gz nagiosplug-1.3-beta1.tar.gz First we will install the main Nagios application. Start by decompressing the tar.gz archive. root@ducati:~/tmp/nagios# tar xfvz nagios-1.0b5.tar.gz This will decompress the archive and we will end up with a nagios-1.0b5 directory. (The filename and the name of the directory created will differ, depending on when and which version you download.) Go into this new directory: root@ducati:~/tmp/nagios# cd nagios-1.0b5 root@ducati:~/tmp/nagios/nagios-1.0b5# At this point, we need to decide where on our system we want to install Nagios. You can install Nagios anywhere, but the best approach to selecting the location is to stick with the default installation directory (/usr/local/nagios), because the documentation always refers to this directory. This will make it easier to solve problems that we might have. Create the directory where you would like to install Nagios. root@ducati:~/tmp/nagios/nagios-1.0b5# mkdir /usr/local/nagios At this point, we need to create a user and a group that our Nagios application will run as. You can use "root" for this purpose, but since it's not required, we might as well not use it, for better security. In order to make maintaining Nagios easier, we will dedicate a new username and group to it. The user and the group that we will create are both called "nagios." root@ducati:~/tmp/nagios/nagios-1.0b5# useradd nagios If you don't have the useradd command on your system, try the adduser command. On some systems, adduser is an interactive command that expects you to answer a few questions before creating the account. Please refer to the man page for the command you're using for more information. root@ducati:~/tmp/nagios/nagios-1.0b5# groupadd nagios On some systems, adduser will create the matching group; on other systems you will need to edit the /etc/group file to add the group by hand. Please refer to the documentation on your system for more information. Once we have created the user and the group, we can now start the actual installation process. First we need to specify some parameters and create the Makefile that will be used to compile and install the software. Type the following script on a single line without line breaks: root@ducati:~/tmp/nagios/nagios-1.0b5# ./configure --prefix=/usr/local/nagios

Step by StepTM Linux Guide. Page 382
--with-cgiurl=/nagios/cgi-bin --with-htmurl=/nagios/ --with-nagios-user=nagios --with-nagios-grp=nagios If you have opted to install Nagios in /usr/local/nagios and the user and group you have created are both "nagios," you might as well just run ./configure with no parameters, since the above values are the default values configure will assume. You can also run configure --help to see a lot more options you can use. Once configure completes, it will display a summary of all parameters that were used during the configuration. Make sure everything is OK, and run configure again with the correct options, if necessary. There's also a very high chance of getting a warning about the lack of GD libraries from Boutell <http://www.boutell.com>. You can go back and install GD if it's not installed. If you already have it on your system and configure can't find it, you can use the --with-gd-lib and --with-gd-inc options to specify the exact directories where your gd include and library files are located. If, after trying all of these, you're still getting the warning about GD, the configuration script suggests just giving up on using the components that require GD and living with it. I believe this is a good approach if you're installing Nagios for the first time. The GD library is only used in a few CGIs that create dynamic images from the service statistics. The application is still very useful without these graphics. You can always go back and reinstall the application when you're more comfortable with GD and Nagios. Now it's time to actually compile the software. This is done as follows (if you're not logged in as "root," you need to switch to the "root" user at this point): root@ducati:~/tmp/nagios/nagios-1.0b5# make all This step will take a while to complete, especially on a slower machine. If there were no problems during the compilation, you will receive a "Compile finished" notification. Right now, all of our software is compiled and ready to be installed to the directories that we have specified in configure. We will run three install commands to install various components in place. First we need to install the main program files and directories in /usr/local/nagios. This step is required. root@ducati:~/tmp/nagios/nagios-1.0b5# make install Now, optionally, we can install the startup script so that Nagios starts automatically at boot time. This script will also allow us to start, stop, restart, and reload Nagios conveniently. This is accomplished as follows: root@ducati:~/tmp/nagios/nagios-1.0b5# make install-init
Step by StepTM Linux Guide. Page 383
On my system (which is running Slackware 8.0), this installs a nagios script in /etc/rc.d. Depending on your distribution, this file might also be installed in /etc/rc.d/init.d/. The configurator should take care of this. On my system, I have renamed this file to rc.nagios, which conforms better to the naming structure for Slackware. On FreeBSD, the file would need to live in /usr/local/etc/rc.d and be renamed nagios.sh for it to work properly. If you take a look into the /usr/local/nagios directory right now, you will see that there are four directories. root@ducati:~/tmp/nagios/nagios-1.0b5# ls /usr/local/nagios/ bin sbin share var The bin directory contains a single file, nagios, that is the core of the package. This application does the actual monitoring. The sbin directory contains the CGI scripts that will be used in the Web-based interface. Inside of the share directory, you can find the HTML files and documentation. Finally, the var directory is where Nagios will be storing its information, once it starts running. In order to be able to use Nagios, we need a couple of configuration files. These files go into the etc directory, which will be created when you run the following: root@ducati:~/tmp/nagios/nagios-1.0b5# make install-config This command also creates a sample copy of each required configuration file and puts them into the etc directory. Plugins Installation At this point the Nagios installation is complete. However, it is not very useful at its current state, because it lacks the actual monitoring applications. These applications, the duty of which is to check whether a particular monotired service is functioning properly, are called plugins. Nagios comes with a default set of such plugins, but they have to be downloaded and installed seperately. (Please visit the Nagios Web site <http://www.nagios.org> for the latest download URL.) Download the latest Nagios Plugins package and decompress it. You will need to run the configure script that is provided in order to prepare the package for compilation on your system. You will find that that the plugins are installed in a fashion similar to the actual Nagios program.
Step by StepTM Linux Guide. Page 384
Once again, you can just run configure if you are OK with the default settings for the username, group, and directory where Nagios is installed. Type the following script on a single line: root@ducati:~/tmp/nagios/nagiosplug-1.3-beta1# ./configure --prefix=/usr/local/nagios --with-nagios-user=nagios --with-nagios-group=nagios You might get notifications about missing programs or Perl modules while configure is running. These are mostly OK, unless you specifically need the mentioned application to monitor a service. Once configure is complete, compile all of the plugins. root@ducati:~/tmp/nagios/nagiosplug-1.3-beta1# make all If no errors were reported, you are ready to install the plugins. root@ducati:~/tmp/nagios/nagiosplug-1.3-beta1# make install The plugins will be installed in the libexec directory of your Nagios base directory (/usr/local/nagios/libexec, in my case). root@ducati:~/tmp/nagios/nagiosplug-1.3-beta1# cd /usr/local/nagios/libexec/ There are a few rules that all Nagios plugins should implement, making them suitable for use by Nagios. All plugins provide a --help option that displays information about the plugin and how it works. This feature helps a lot when you're trying to monitor a new service using a plugin you haven't used before. For instance, to learn how the check_ssh plugin works, run the following command. root@ducati:/usr/local/nagios/libexec# ./check_ssh -h check_ssh (nagios-plugins 1.3.0-alpha1) 1.1.1.1 The nagios plugins come with ABSOLUTELY NO WARRANTY. You may redistribute copies of the plugins under the terms of the GNU General Public License. For more information about these matters, see the file named COPYING. Copyright (c) 1999 Remi Paulmier ([email protected]) Usage: check_ssh -t [timeout] -p [port] <host> check_ssh -V prints version info check_ssh -h prints more detailed help by default, port is 22 root@ducati:/usr/local/nagios/libexec# This shows us that the check_ssh plugin accepts one required parameter host, and two optional paramters, timeout and port.
Step by StepTM Linux Guide. Page 385
There's nothing especially complicated about the plugins. In fact, you can run the plugins manually to check services on the console. root@ducati:/usr/local/nagios/libexec# ./check_ssh www.freelinuxcd.org SSH ok - protocol version 1.99- - server version Nagios Post-Install Configuration Now that both Nagios and the plugins are installed, we are almost ready to start monitoring our servers. However, Nagios will not even start before we configure it properly. Let's start by taking a look the sample configuration files. root@ducati:~/tmp/nagios# cd /usr/local/nagios/etc root@ducati:/usr/local/nagios/etc# ls -1 cgi.cfg-sample checkcommands.cfg-sample contactgroups.cfg-sample contacts.cfg-sample dependencies.cfg-sample escalations.cfg-sample hostgroups.cfg-sample hosts.cfg-sample misccommands.cfg-sample nagios.cfg-sample resource.cfg-sample services.cfg-sample timeperiods.cfg-sample Since these are sample files, the Nagios authors added a .cfg-sample suffix to each file. First, we need to copy or rename each one to *.cfg, so that the software can use them properly. (If you don't change the configuration filenames, Nagios will still try to access them with the .cgi extension, and not be able to find them. The authors must have wanted to ensure that everyone create their own custom configuration files.) Before renaming the sample files, I like to take a backup of them, just in case I need to refer to them later. root@ducati:/usr/local/nagios/etc# mkdir sample root@ducati:/usr/local/nagios/etc# cp *.cfg-sample sample/ You can either rename each file manually, or use the following command to take care of them all at once. Type the following script on a single line:
Step by StepTM Linux Guide. Page 386
root@ducati:/usr/local/nagios/etc# for i in *cfg-sample; do mv $i `echo $i | sed -e s/cfg-sample/cfg/`; done; The following is what you should end up with in the etc directory. root@ducati:/usr/local/nagios/etc# ls -1 cgi.cfg checkcommands.cfg contactgroups.cfg contacts.cfg dependencies.cfg escalations.cfg hostgroups.cfg hosts.cfg misccommands.cfg nagios.cfg resource.cfg sample/ services.cfg timeperiods.cfg First we will start with the main configuration file, nagios.cfg. You can pretty much leave everything as is, becasue the Nagios installation process will make sure the file paths used in the configuration file are correct. There's one option, however, that you might want to change. The check_external_commands is set to 0 by default. If you would like to be able to change the way Nagios works, or directly run commands through the Web interface, you might want to set this to 1. There are still some other options you need to set in cgi.cfg to configure which usernames are allowed to run external commands. In order to get Nagios running, you will need to modify all but a few of the sample configuration files. Configuring Nagios to monitor your servers is not as difficult as it looks; I have found that the best approach to configuring Nagios properly the first time is to use the debugging mode of the Nagios binary. You can run Nagios in this mode by running: root@ducati:/usr/local/nagios/etc#../bin/nagios-v nagios.cfg This command will go through the configuration files and report any errors that were found. Start fixing the errors one by one, and run the command again to find the next error. For our purposes, I will disable all

Step by StepTM Linux Guide. Page 387
hosts and services definitions that come with the sample configuration files and merely use the files as templates for our own hosts and services. We will keep most of the files as is, and remove the following (we will create them from scratch): hosts.cfg services.cfg contacts.cfg contactgroups.cfg hostgroups.cfg dependencies.cfg escalations.cfg We will not be going into the more advanced configuration that requires using dependencies.cfg and escalations.cfg, so just remove these two files so that the sample configuration in these do not stop Nagios from starting up. Still, Nagios requires that these files are present in the etc directory, so create two empty files and name them dependencies.cfg and escalations.cfg by running the following as root. root@ducati:/usr/local/nagios/etc# touch dependencies.cfg root@ducati:/usr/local/nagios/etc# touch escalations.cfg We now have all of the configuration files we need and are ready to start configuring them to suit our monitoring needs. In my next article </pub/a/onlamp/2002/09/26/nagios.html>, I will cover the configuration file basics, how to define services to be monitored, how to configure Nagios to notify people when a service is down, and how to configure and use the Web interface that comes with Nagios. Until then, Happy Hacking. Now we will take a look at each configuration file one by one and configure one host 'freelinuxcd.org' and two services on it 'http' and 'ping' to be monitored. If something goes wrong with these services, two users 'oktay' and 'verty' will be notified.
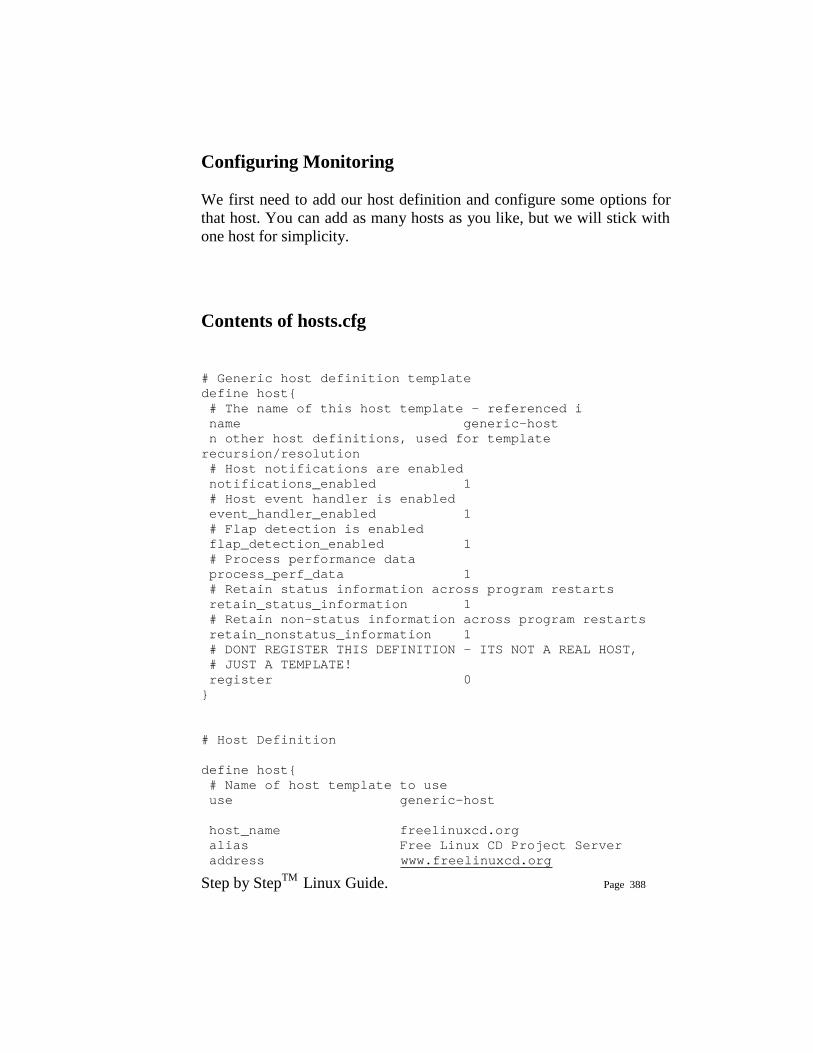
Step by StepTM Linux Guide. Page 388
Configuring Monitoring We first need to add our host definition and configure some options for that host. You can add as many hosts as you like, but we will stick with one host for simplicity. Contents of hosts.cfg # Generic host definition template define host{ # The name of this host template - referenced i name generic-host n other host definitions, used for template recursion/resolution # Host notifications are enabled notifications_enabled 1 # Host event handler is enabled event_handler_enabled 1 # Flap detection is enabled flap_detection_enabled 1 # Process performance data process_perf_data 1 # Retain status information across program restarts retain_status_information 1 # Retain non-status information across program restarts retain_nonstatus_information 1 # DONT REGISTER THIS DEFINITION - ITS NOT A REAL HOST, # JUST A TEMPLATE! register 0 } # Host Definition define host{ # Name of host template to use use generic-host host_name freelinuxcd.org alias Free Linux CD Project Server address www.freelinuxcd.org

Step by StepTM Linux Guide. Page 389
check_command check-host-alive max_check_attempts 10 notification_interval 120 notification_period 24x7 notification_options d,u,r } The first host defined is not a real host but a template which other host definitions are derived from. This mechanism can be seen in other configuration files also and makes configuration based on a predefined set of defaults a breeze. With this setup we are monitoring only one host , 'www.freelinuxcd.org' to see if it is alive. The 'host_name' parameter is important because this server will be referred to by this name from the other configuration files. Now we need to add this host to a hostgroup. Even though we will keep the configuration simple by defining a single host, we still have to associate it with a group so that the application knows which contact group (see below) to send notifications to. Contents of hostgroups.cfg define hostgroup{ hostgroup_name flcd-servers alias The Free Linux CD Project Servers contact_groups flcd-admins members freelinuxcd.org } Above, we have defined a new hostgroup and associate the 'flcd-admins' contact group with it. Now let's look into the contactgroup settings. Contents of contactgroups.cfg define contactgroup{ contactgroup_name flcd-admins
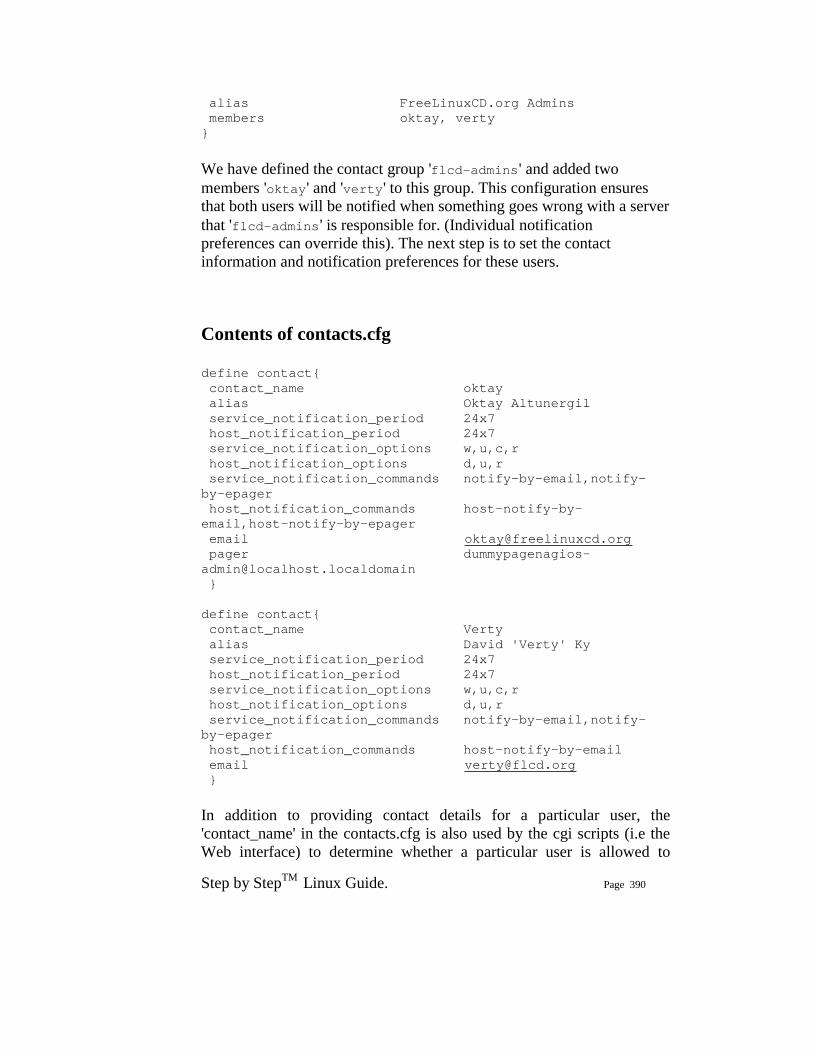
Step by StepTM Linux Guide. Page 390
alias FreeLinuxCD.org Admins members oktay, verty } We have defined the contact group 'flcd-admins' and added two members 'oktay' and 'verty' to this group. This configuration ensures that both users will be notified when something goes wrong with a server that 'flcd-admins' is responsible for. (Individual notification preferences can override this). The next step is to set the contact information and notification preferences for these users. Contents of contacts.cfg define contact{ contact_name oktay alias Oktay Altunergil service_notification_period 24x7 host_notification_period 24x7 service_notification_options w,u,c,r host_notification_options d,u,r service_notification_commands notify-by-email,notify-by-epager host_notification_commands host-notify-by-email,host-notify-by-epager email [email protected] pager [email protected] } define contact{ contact_name Verty alias David 'Verty' Ky service_notification_period 24x7 host_notification_period 24x7 service_notification_options w,u,c,r host_notification_options d,u,r service_notification_commands notify-by-email,notify-by-epager host_notification_commands host-notify-by-email email [email protected] } In addition to providing contact details for a particular user, the 'contact_name' in the contacts.cfg is also used by the cgi scripts (i.e the Web interface) to determine whether a particular user is allowed to
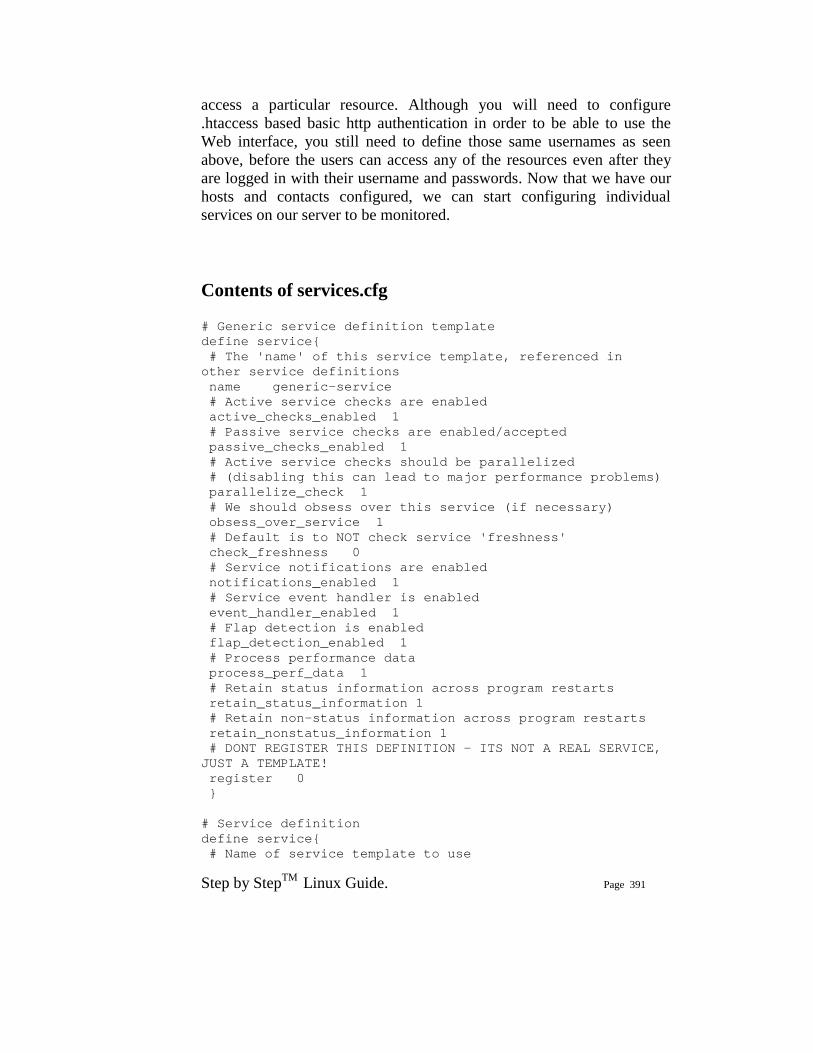
Step by StepTM Linux Guide. Page 391
access a particular resource. Although you will need to configure .htaccess based basic http authentication in order to be able to use the Web interface, you still need to define those same usernames as seen above, before the users can access any of the resources even after they are logged in with their username and passwords. Now that we have our hosts and contacts configured, we can start configuring individual services on our server to be monitored. Contents of services.cfg # Generic service definition template define service{ # The 'name' of this service template, referenced in other service definitions name generic-service # Active service checks are enabled active_checks_enabled 1 # Passive service checks are enabled/accepted passive_checks_enabled 1 # Active service checks should be parallelized # (disabling this can lead to major performance problems) parallelize_check 1 # We should obsess over this service (if necessary) obsess_over_service 1 # Default is to NOT check service 'freshness' check_freshness 0 # Service notifications are enabled notifications_enabled 1 # Service event handler is enabled event_handler_enabled 1 # Flap detection is enabled flap_detection_enabled 1 # Process performance data process_perf_data 1 # Retain status information across program restarts retain_status_information 1 # Retain non-status information across program restarts retain_nonstatus_information 1 # DONT REGISTER THIS DEFINITION - ITS NOT A REAL SERVICE, JUST A TEMPLATE! register 0 } # Service definition define service{ # Name of service template to use
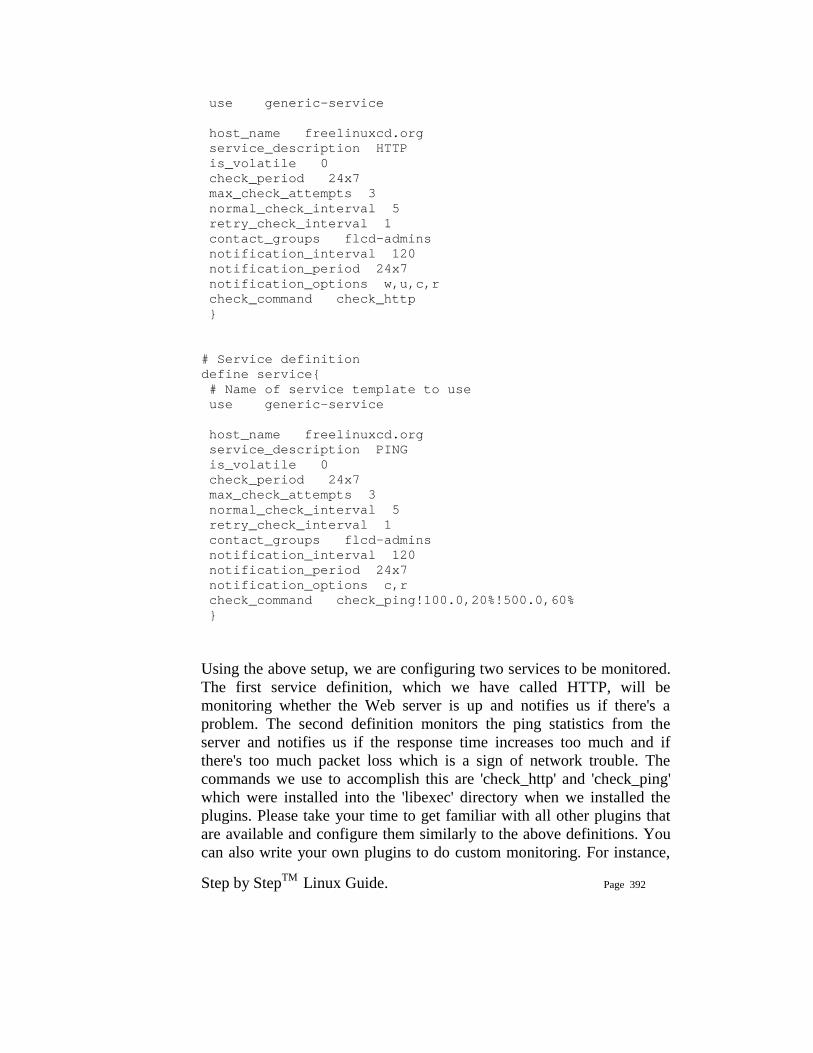
Step by StepTM Linux Guide. Page 392
use generic-service host_name freelinuxcd.org service_description HTTP is_volatile 0 check_period 24x7 max_check_attempts 3 normal_check_interval 5 retry_check_interval 1 contact_groups flcd-admins notification_interval 120 notification_period 24x7 notification_options w,u,c,r check_command check_http } # Service definition define service{ # Name of service template to use use generic-service host_name freelinuxcd.org service_description PING is_volatile 0 check_period 24x7 max_check_attempts 3 normal_check_interval 5 retry_check_interval 1 contact_groups flcd-admins notification_interval 120 notification_period 24x7 notification_options c,r check_command check_ping!100.0,20%!500.0,60% } Using the above setup, we are configuring two services to be monitored. The first service definition, which we have called HTTP, will be monitoring whether the Web server is up and notifies us if there's a problem. The second definition monitors the ping statistics from the server and notifies us if the response time increases too much and if there's too much packet loss which is a sign of network trouble. The commands we use to accomplish this are 'check_http' and 'check_ping' which were installed into the 'libexec' directory when we installed the plugins. Please take your time to get familiar with all other plugins that are available and configure them similarly to the above definitions. You can also write your own plugins to do custom monitoring. For instance,

Step by StepTM Linux Guide. Page 393
there's no plugin to check if Tomcat <http://jakarta.apache.org> is up or down. You could simply write a script that loads a default jsp page on a remote Tomcat server and returns a success or failure status based on the presence or lack of a predefined text value (i.e "Tomcat is up") on the page. (In such a case you would need to add a definition for this custom command in your checkcommand.cfg file which we have not touched) Starting Nagios Now that we have configured the hosts and the services to monitor, we are ready to fire up Nagios and start monitoring. We will start Nagios using the init script that we had installed earlier. root@ducati:/usr/local/nagios/etc# /etc/rc.d/rc.nagios start Starting network monitor: nagios /bin/bash: -l: unrecognized option [ ... ] If you receive the above error message, it means the 'su' command installed on your server does not support the '-l' option. To fix it, open up /etc/rc.d/rc.nagios (or its equivalent on your system) and remove the 'l' where it says 'su -l'. You will end up with 'su -' which means the same thing. After making the change, run the above startup command again. If you receive 'permission denied' errors. Just reset the ownership information on your Nagios installation directory and it will be resolved. root@ducati:/usr/local/nagios# chown -R nagios /usr/local/nagios root@ducati:/usr/local/nagios# chgrp -R nagios /usr/local/nagios If everything went smoothly, Nagios should now be running. The following command will show you whether Nagios is up and running and the process ID associated with it, if it is indeed running. root@ducati:/usr/local/nagios# /etc/rc.d/rc.nagios status PID TTY TIME CMD 22645 ? 00:00:00 nagios
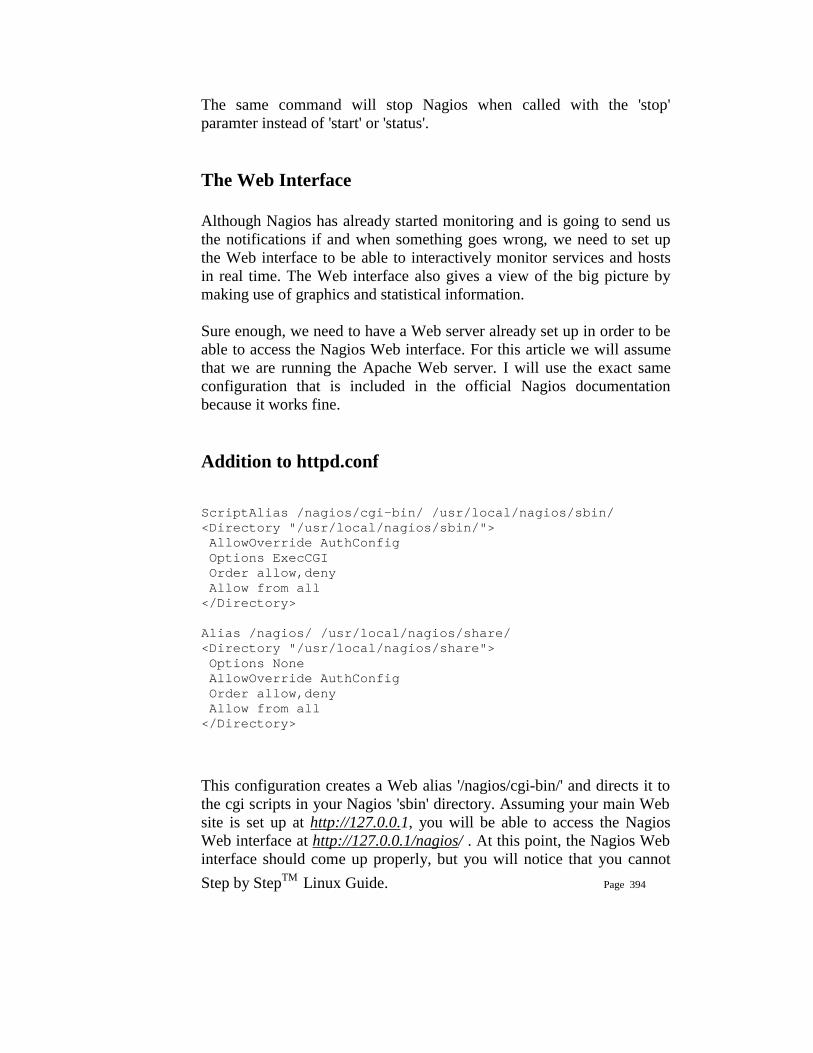
Step by StepTM Linux Guide. Page 394
The same command will stop Nagios when called with the 'stop' paramter instead of 'start' or 'status'. The Web Interface Although Nagios has already started monitoring and is going to send us the notifications if and when something goes wrong, we need to set up the Web interface to be able to interactively monitor services and hosts in real time. The Web interface also gives a view of the big picture by making use of graphics and statistical information. Sure enough, we need to have a Web server already set up in order to be able to access the Nagios Web interface. For this article we will assume that we are running the Apache Web server. I will use the exact same configuration that is included in the official Nagios documentation because it works fine. Addition to httpd.conf ScriptAlias /nagios/cgi-bin/ /usr/local/nagios/sbin/ <Directory "/usr/local/nagios/sbin/"> AllowOverride AuthConfig Options ExecCGI Order allow,deny Allow from all </Directory> Alias /nagios/ /usr/local/nagios/share/ <Directory "/usr/local/nagios/share"> Options None AllowOverride AuthConfig Order allow,deny Allow from all </Directory> This configuration creates a Web alias '/nagios/cgi-bin/' and directs it to the cgi scripts in your Nagios 'sbin' directory. Assuming your main Web site is set up at http://127.0.0.1, you will be able to access the Nagios Web interface at http://127.0.0.1/nagios/ . At this point, the Nagios Web interface should come up properly, but you will notice that you cannot
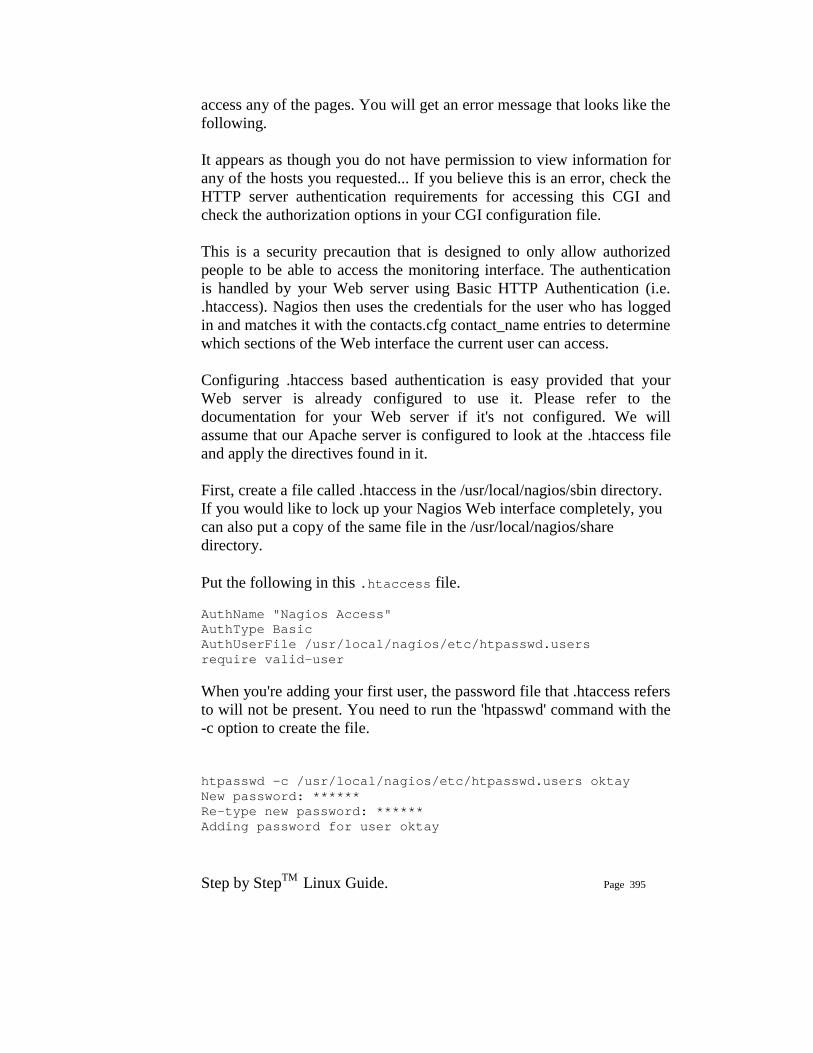
Step by StepTM Linux Guide. Page 395
access any of the pages. You will get an error message that looks like the following. It appears as though you do not have permission to view information for any of the hosts you requested... If you believe this is an error, check the HTTP server authentication requirements for accessing this CGI and check the authorization options in your CGI configuration file. This is a security precaution that is designed to only allow authorized people to be able to access the monitoring interface. The authentication is handled by your Web server using Basic HTTP Authentication (i.e. .htaccess). Nagios then uses the credentials for the user who has logged in and matches it with the contacts.cfg contact_name entries to determine which sections of the Web interface the current user can access. Configuring .htaccess based authentication is easy provided that your Web server is already configured to use it. Please refer to the documentation for your Web server if it's not configured. We will assume that our Apache server is configured to look at the .htaccess file and apply the directives found in it. First, create a file called .htaccess in the /usr/local/nagios/sbin directory. If you would like to lock up your Nagios Web interface completely, you can also put a copy of the same file in the /usr/local/nagios/share directory. Put the following in this .htaccess file. AuthName "Nagios Access" AuthType Basic AuthUserFile /usr/local/nagios/etc/htpasswd.users require valid-user When you're adding your first user, the password file that .htaccess refers to will not be present. You need to run the 'htpasswd' command with the -c option to create the file. htpasswd -c /usr/local/nagios/etc/htpasswd.users oktay New password: ****** Re-type new password: ****** Adding password for user oktay

Step by StepTM Linux Guide. Page 396
For the rest of your users, use the 'htpasswd' command without the '-c' option so as not to overwrite the existing one. After you add all of your users, you can go back to the Web interface which will now pop up an authentication dialog. Upon successful authentication, you can start using the Web interface. I will not go into detail about using the Web interface since it's pretty self explanatory. Notice that your users will only be able to access information for servers that they are associated with in the Nagios configuration files. Also, some sections of the Web interface will be disabled for everyone by default. If you would like to enable those, take a look at 'etc/cgi.cfg'. For instance, in order to allow the user 'oktay' to access the 'Process Info' section, uncomment the 'authorized_for_system_information' line and add 'oktay' to the list of names delimited by commas. This is all you need to install and configure Nagios to do basic monitoring of your servers and individual services on these servers. You can then fine tune your monitoring system by going through all of the configuration files and modifying them to match your needs and requirements. Going through all plugins in the libexec directory will also give you a lot of ideas about what local and remote services you can monitor. Nagios also comes with software that can be used to monitor a server's disk and load status remotely. Finally, Nagios comes with so many features that no single article could explain all of it. Please refer to the official documentation for more advanced topics that aren't covered here.