Embed Size (px)
Citation preview
CISA S.p.A. – User manual - Version 2.0/08
CISA Autoclaves Page 1
SS TT EE AA MM SS TT EE RR II LL II ZZ II NN GG AA UU TT OO CC LL AA VV EE SS
MM AA NN UU AA LL OO FF UU SS EE AA NN DD MM AA II NN TT EE NN AA NN CC EE
SS EE RR II EE SS 22 00 00
CCIISSAA SS..pp..AA..
VViiaa PPoonnttiinnaa KKmm..2288 0000004400 PPOOMMEEZZIIAA ((RRMM)) -- IITTAALLIIAA --
TTeell .. ++ 33 99 ((00 66 )) 9911 11 44 33 77 ..11
FFaaxx ++ 3399 ((00 66 )) 9911 00 77 55 6655
OOffff iiccee AAss ss iiss ttaannccee .. ++ 33 99 ((00 66 )) 9911 22 22 22 8888

CISA S.p.A. – User manual - Version 2.0/08
CISA Autoclaves Page 2
CISA S.p.A. – User manual - Version 2.0/08
CISA Autoclaves Page 3
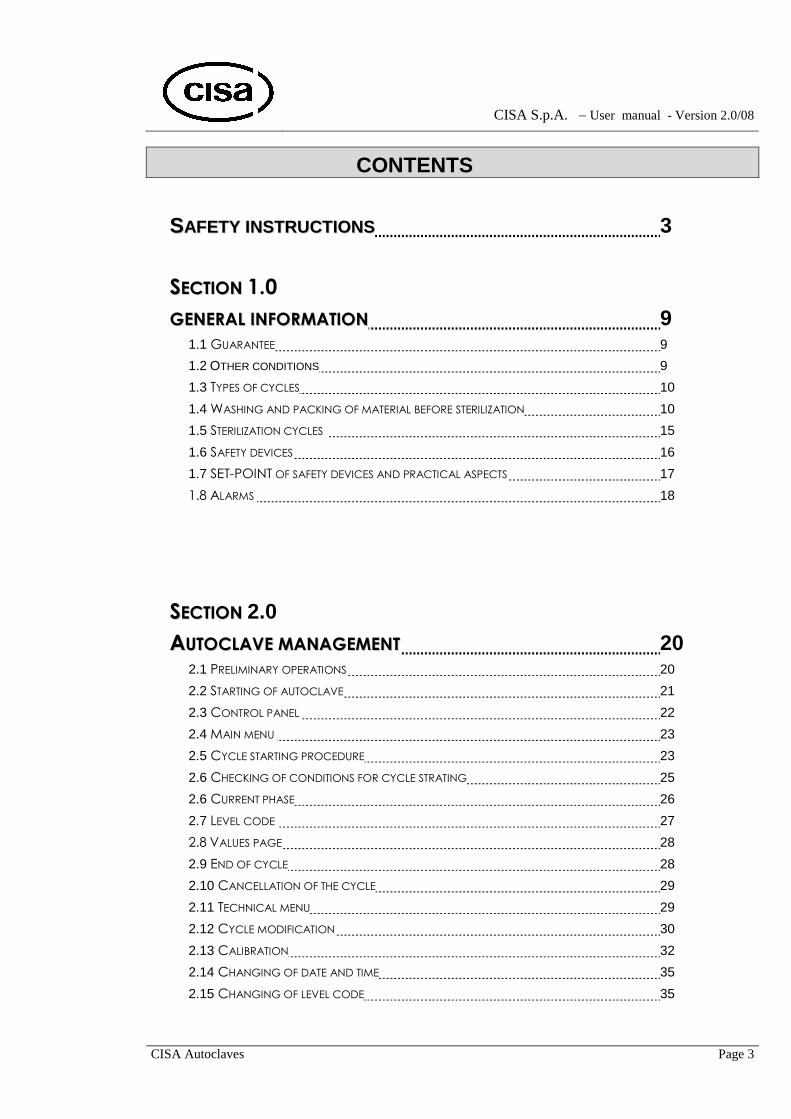
CONTENTS
SSAAFFEETTYY IINNSSTTRRUUCCTTIIOONNSS 3
SSEECCTTIIOONN 1.0
GGEENNEERRAALL IINNFFOORRMMAATTIIOONN 9 1.1 GUARANTEE 9
1.2 OTHER CONDITIONS 9
1.3 TYPES OF CYCLES 10
1.4 WASHING AND PACKING OF MATERIAL BEFORE STERILIZATION 10
1.5 STERILIZATION CYCLES 15
1.6 SAFETY DEVICES 16
1.7 SET-POINT OF SAFETY DEVICES AND PRACTICAL ASPECTS 17
1.8 ALARMS 18
SSEECCTTIIOONN 2.0
AAUUTTOOCCLLAAVVEE MMAANNAAGGEEMMEENNTT 20 2.1 PRELIMINARY OPERATIONS 20
2.2 STARTING OF AUTOCLAVE 21
2.3 CONTROL PANEL 22
2.4 MAIN MENU 23
2.5 CYCLE STARTING PROCEDURE 23
2.6 CHECKING OF CONDITIONS FOR CYCLE STRATING 25
2.6 CURRENT PHASE 26
2.7 LEVEL CODE 27
2.8 VALUES PAGE 28
2.9 END OF CYCLE 28
2.10 CANCELLATION OF THE CYCLE 29
2.11 TECHNICAL MENU 29
2.12 CYCLE MODIFICATION 30
2.13 CALIBRATION 32
2.14 CHANGING OF DATE AND TIME 35
2.15 CHANGING OF LEVEL CODE 35

CISA S.p.A. – User manual - Version 2.0/08
CISA Autoclaves Page 4
SSEECCTTIIOONN 33.0
MMAAIINNTTEENNAANNCCEE 36 3.1 GENERAL INFORMATION 36
3.1 MAINTENANCE ADVICES 36
IIMMMMAAGGIINNII PIC.1 – PHOTO AUTOCLAVE SERIES 200 9
PIC.2 – AUTOCLAVE SERIES 200 21
PIC.3 – CONTROL PANEL 22
PIC.4 – OPEN DOOR VIEW 26
PIC.5 – INTERNAL VIEW 27
PIC.6 – PHOTO OF OPEN DOOR VIEW 36
SAFETY WARNINGS
This instructions aim to reduce the risks for employees and to avoid making the device unsafe because of bad maintenance. All workers and service engineer have to follow the rules posted in this manual for use and maintenance of this sterilizer.
Pay attention to the components, units and points where the “GENERAL DANGER” sign is placed.
Pay attention when opening electric board and connector blocks, where the “DANGER: ELECTRIC CURRENT” sign is placed.
WARNING! The calibration procedure must be carried out by professionals. Incorrect use of this function can damage the sterilization process or workers health.

CISA S.p.A. – User manual - Version 2.0/08
CISA Autoclaves Page 5
The operators using sterilizer must be qualified for this job.
Sterilizer maintenance and repair must be carried out by technical experts.
Sterilizer loading area has be kept clean to avoid dangerous situations due to slippery floor.
Racks, containers, trays, other packaging, internal trolleys must be used only with special gloves to avoid burns at the end of the sterilization cycle.
Wear protective gloves every time when you come into contact with hot sterilization chamber.
Pay attention to all internal unprotected parts of sterilizer, they can cause burns during maintenance or repair procedure of the hot sterilizer.
Wear protective gloves when checking the safety valve.
Turn the power supply off before to start the sterilizer maintenance or repair.
Do not change or tamper with any safety devices of the sterilizer.
Keep clean the sterilizer front panels using a smooth cloth and non aggressive cleaning solution.
Keep clean the chamber using a smooth cloth and non aggressive cleaning solution for stainless steel.
Do not use sharp objects to put in or remove the chamber seals from its place.

CISA S.p.A. - User Manual - Version 2.0/08
CISA Autoclaves Page 7
NOTES ABOUT THIS MANUAL
This manual was planned to help all users of CISA sterilization systems.
INTENDED USE
CISA steam autoclaves are used to sterilize all temperature resistant materials like textiles, steal instruments, rubber materials, fittings and others. This equipment is a Medical Device according to Directive 93/42 EEC concerning Medical Devices, adopted in Italy by DLgs. 46/97 and furter updates. CISA steam autoclaves and the full set of attachments are produced also in according with directive 97/23 CEE (PED).

CISA S.p.A. - User Manual - Version 2.0/08
CISA Autoclaves Page 8
CCIISSAA AAUUTTOOCCLLAAVVEESS
TTEECCHHNNIICCAALL DDEESSCCRRIIPPTTIIOONN

CISA S.p.A. - User manual Version 2.0/08
CISA Autoclaves Pag.9
1.0 GENERAL INFORMATION
1.1 - Guarantee Guarantee is valid for 12 months from the testing date but not over 15 months from the delivery date. Guarantee includes only possible faults or defects of the manufacturing or of the raw materials; all the parts, that could be damaged due to carelessness or incorrect use, are excluded.
1.2 – Other conditions Other conditions have to be agreed upon with CISA S.p.A.
Pic.1 – Photo Autoclave Series 200
CISA S.p.A. - User manual Version 2.0/08
CISA Autoclaves Pag.10
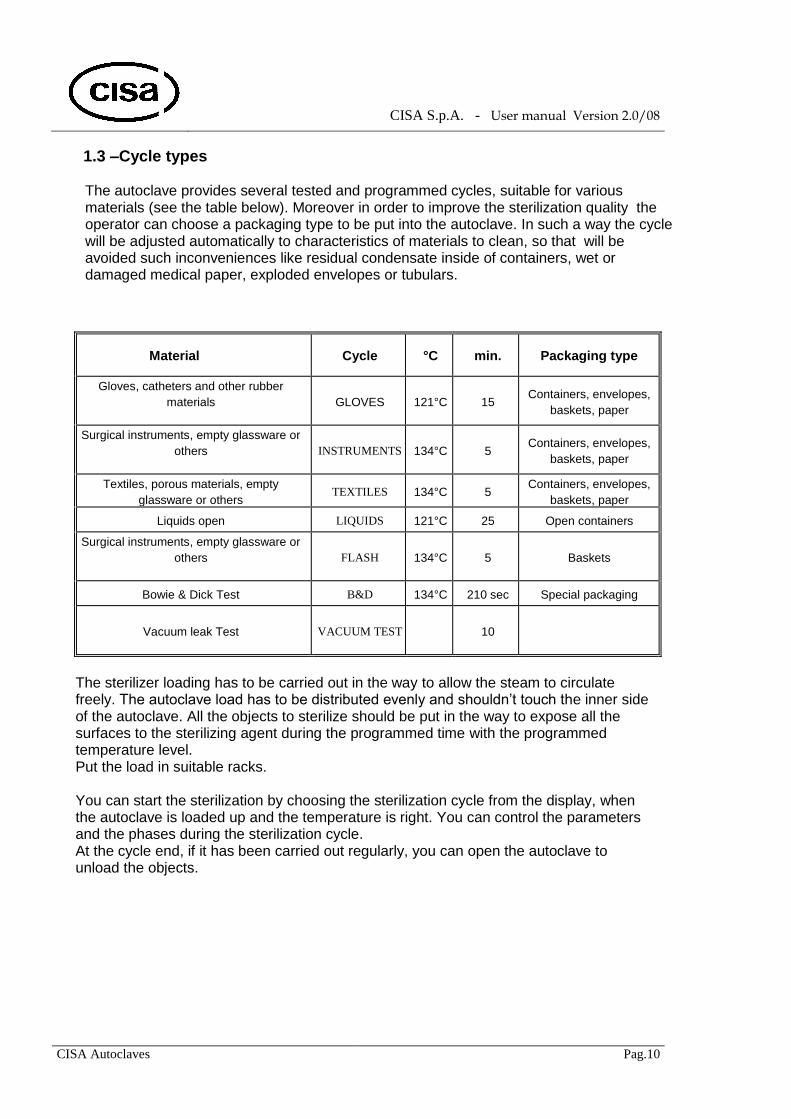
1.3 –Cycle types
The autoclave provides several tested and programmed cycles, suitable for various materials (see the table below). Moreover in order to improve the sterilization quality the operator can choose a packaging type to be put into the autoclave. In such a way the cycle will be adjusted automatically to characteristics of materials to clean, so that will be avoided such inconveniences like residual condensate inside of containers, wet or damaged medical paper, exploded envelopes or tubulars.
Material Cycle °C min. Packaging type
Gloves, catheters and other rubber
materials
GLOVES 121°C 15 Containers, envelopes,
baskets, paper
Surgical instruments, empty glassware or
others
INSTRUMENTS 134°C 5 Containers, envelopes,
baskets, paper
Textiles, porous materials, empty
glassware or others TEXTILES 134°C 5
Containers, envelopes,
baskets, paper
Liquids open LIQUIDS 121°C 25 Open containers
Surgical instruments, empty glassware or
others
FLASH 134°C 5 Baskets
Bowie & Dick Test B&D 134°C 210 sec Special packaging
Vacuum leak Test
VACUUM TEST 10
The sterilizer loading has to be carried out in the way to allow the steam to circulate freely. The autoclave load has to be distributed evenly and shouldn’t touch the inner side of the autoclave. All the objects to sterilize should be put in the way to expose all the surfaces to the sterilizing agent during the programmed time with the programmed temperature level. Put the load in suitable racks. You can start the sterilization by choosing the sterilization cycle from the display, when the autoclave is loaded up and the temperature is right. You can control the parameters and the phases during the sterilization cycle. At the cycle end, if it has been carried out regularly, you can open the autoclave to unload the objects.

CISA S.p.A. - User manual Version 2.0/08
CISA Autoclaves Pag.11
1.4 – Washing and packing of the material before sterilisation The material, before undergoing a sterilisation process, must be correctly washed in all its parts, rinsed possibly with demineralized water and dried so as to reduce the microbiological level present in the material, thereby eliminating the presence of dirt, oily substances and organic material, because they can interfere with the sterilisation process. The factors which determine a correct cleaning process are: chemical (detergent) thermal (the temperature of the water), time (immersion and soaking time) and mechanical (use of machines or brushes). The objects to be sterilised must be cleaned using a detergent with a neutral pH. For operating theatre instruments it is necessary to use a deproteinizing detergents in conformance with the instructions of the manufacturers. The detergents must be used in accordance with the instructions for use, in particular in relation to dilution. A product which needs to be diluted before use must not be used pure, it is necessary to prepare it in an appropriate container in accordance with the defined instructions. Cleaning operations must be carried out separately from packaging operations so as not to cause adulteration of the packaging materials, in practical terms the material requiring sterilisation must be packaged in a separate area from the cleaning area. The personnel involved in this operation must be protected during all cleaning operations to avoid possible wounds, contact with organic material or detergent products, and they must also be particularly careful when dealing with pointed or sharp instruments. The precautions they need to take are: remove the obvious dirt from the object: immerse the instrument (open or dismantled) into a container in which the proteolytic or detergent has already been poured for the amount of time indicated by the manufacturers; scrub the object with appropriate sponges, brushes or cleaning rods internally and externally. Do not use metal brushes or abrasive products; rinse with running water, preferably demineralized water; dry; check the instrument to ensure cleaning effectiveness and finally lubricate it with appropriate products with a neutral pH; after lubrication the surgical instrument must be sprayed with a compressed air pistol to remove excess lubricant. When cleaning has to be done by a machine it is necessary to ensure that the instruments do not move from the instruments holder, thereby eliminating the possibility of them knocking into one another or being damaged. To avoid coagulation of albuminous substances in the cleaning stage, the water temperature must only be superior to 45°C if a sufficiently high volume of cleansing product is used. Disinfection can be of a chemical-thermal or thermal type. In using the cleaning products, or in the combined use of cleaning and disinfection products, the instructions of the manufacturers must be followed very precisely (time required to achieve the desired cleansing, concentration, temperature). Only the exact dosage guarantees a perfect cleaning and disinfection result, as well as treating the materials in the best possible way. An insufficient dosage of an alkaline product (which is a false cost saving) brings the risk of corrosion and must be avoided for pH values superior to 10,5. When using acid based cleaning products corrosion can be caused by the presence of chlorine. This can be avoided only by using demineralised water. Instruments made from coloured anodized aluminium lose their colour when the usual machine cleaning methods are used, and they therefore lose their functional value. In the case of extremely dirty surgical instruments, which are encrusted with material (coagulated blood, secretions or other materials), it can be necessary to carry out further manual or ultrasound cleaning. In this case the instructions for delicate manual handling of microsurgical instruments must be scrupulously followed. When the cleaning is done by machine, the residues of the cleaning phase must be eliminated during the rising phase, otherwise stains or colouration can be caused to the instruments. The use of neutralising product can help this process and improve the results of rinsing. In practice, the best rinsing temperature for the treatment of surgical instruments by cleaning and disinfection machines, has turned out to be between 70 and 75°C.

CISA S.p.A. - User manual Version 2.0/08
CISA Autoclaves Pag.12
If any corrosion takes place the rinsing temperature must be limited to between 70 and 75°C. By using demineralized water for rinsing it is possible to avoid stains and corrosion without limiting the temperature. Surgical instruments must be taken out of the machine immediately after the cleaning programme has finished. If instruments are immersed in a cleaning and disinfecting solution before being cleaned in a machine, they must be rinsed to prevent foam being formed in the machine or a product must be used to avoid the formation of foam. Instruments with long or tight cavities, as for example metal catheters, metallic vacuum cleaners, special cannula tubes etc, must be rinsed internally as well. Machine cleaning of micro-surgical and similarly delicate dental instruments must be carried out in automated machines only if a secure fastening of the instruments is possible during the cleaning process. Knobs and complicated parts can be machine cleaned if that is one of the methods considered by the manufacturer and a secure fastening is assured. As soon as the machine programme has finished it is necessary to carry out the necessary treatment of the instrument using appropriate sprays to eliminate any humidity that has penetrated to the inside. Rotating tools (drills, cutters and abrasive tools) are only suitable for machine cleaning to a limited extent. Treatment with ultrasound is preferable. The same goes for roots instruments for roots. Mirrors covered in rhodium vapours can be machine cleaned. Rigid endoscopes need to be dismantled in accordance with the manufacturers instructions to allow machine cleaning. All seals must be removed. Machine cleaning must only be carried out for the endoscope parts expressly indicated by manufacturers (excluding, for example, the optical part). In any case for machine cleaning the endoscope parts need to be appropriately supported whilst in the machine. It is necessary to ensure that even instruments with internal cavities are properly cleaned internally. Machine cleaning of flexible endoscopes necessitates cleaning and disinfection to be carried out whilst the machine is closed. The usual apparatus for disinfection and cleaning must not be used. For chemical-thermal processes the temperature must not exceed 60°C. For endoscopes which require preparatory cleaning and disinfection before being put into a machine, it is necessary to only use disinfectants, detergents and detergent additives which produce very little foam. Before proceeding with other treatment the capacity tests indicated by the manufacturer must be carried out. In this way it is possible to see perforations and cracks, caused by liquids which have penetrated to the inside of an instrument, on a timely basis, thereby permitting capacity testing before or during the cleaning and disinfection programme. A damaged flexible endoscope must be immediately sent to the manufacturer attaching a description of the cause of the defect. For machine cleaning, only detergents and disinfectants suitable for the specific treatment required must be used. A flexible endoscope must be placed inside the machine in a safe manner. Specific equipment must be used to ensure the complete rinsing of all canals and external surfaces. If the cleaning is by machine the final rinsing should be done using sterile demineralized water. Also, it is appropriate to be equipped with a drying instrument. For cleaning in an ultrasound vessel, surgical instruments must be placed in an open position on the specific sterilisation baskets. Care must be taken to ensure that neither the sterilisation baskets nor instruments with large surface areas (e.g. other types of basket) create shadow zones for the ultrasound. Hot water without any additives does not give satisfactory cleaning results. It is therefore necessary to add an appropriate cleaning product. The instructions of the manufacturer regarding concentration and temperature must be followed. The temperature of cleaning solutions in an ultrasound vessel should be at least 40°C, otherwise the cleaning effect is not assured. A higher temperature assists the de-gasification of the cleaning solution ad the effect of the ultrasound treatment. The appropriate use of a suitable product does not result in the coagulation of albuminous substances even at higher temperatures. At temperatures between 20 and 25°C only cleaning and disinfection products suitable for use at these temperatures must be used. An excessive concentration of dirt in the ultrasound vessel harms cleaning effectiveness. Therefore, the solution must be renewed according to the time intervals indicated by the manufacturer. In practice an ultrasound treatment duration of 3 to 5 minutes with frequencies of at least 35 Khz has proved sufficient (in accordance with those prescribed by the manufacturer).

CISA S.p.A. - User manual Version 2.0/08
CISA Autoclaves Pag.13
The cleaning ultrasound vessel has to be filled up in accordance with the manufacturers instructions (volume of water). To ensure total cleaning of instruments they must be completely covered by the cleaning solution. Instruments cleaned by ultrasound must be carefully rinsed by hand or using a machine. This rinsing must be carried out using clean water at least of an equivalent quality level as ordinary tap water. It would be preferable in any case if the water was demineralized to avoid staining. When rinsing is complete the instruments must be immediately and scrupulously dried. Micro-instrumentation must be placed on special supports to avoid damage. To avoid damage to the surfaces and seams of dental instruments, the ultrasound bath must not contain acidic substances which would remove the cement. The handles, the complicated parts and the turbines must not be treated with ultrasound. Rotating dental instruments must only be treated with appropriate cleaning and disinfection products. They must be placed on special supports specifically designed for them. In this way damage caused by contact between the instruments is avoided (for example, caused by sharp edges, etc). After a quick rinse with water and immediate drying, rotating dental instruments must be treated with a product which acts against sterilisation resistant corrosion. Flexible endoscopes must not be treated with ultrasound. Accessories (valves, covers, PE pincers, catheters) can be cleaned with ultrasound. The packaging of objects requiring sterilisation has the objective of preserving the sterile characteristics of the treated material until it needs to be used, allowing penetration and contact of the sterilizing agent with the object’s surfaces, reduce the risk of contamination of the contents when the packaging is opened, and it must be practical and convenient. Objects requiring sterilisation can be packaged individually or after assembly, in the latter case it is correct to carry out the packaging in accordance with specific requirements(medication sets, sets for operations) rather than packaging according to methods which give less guarantees in terms of hygiene. Packages must be small in size and once opened they must be completely used or else re-sterilised. Before proceeding with packaging: control that the material is clean, intact and that it is dry, dismantle the assembled parts by taking off plugs and covers, protect the end points of needles, arrange plastic and rubber parts so as to preserve their original shape, roll up tubes or very long objects if it is possible to do so without creating bottlenecks. Packaging in containers with filters is recommended for surgical instrument sets, linen, gauzes and medication pads. It is necessary to control the state of the filters every time, replace them frequently by following the suppliers indications, or when you can visually see that they have been altered follow the guarantee procedures of the supplier anyway. Material in containers must not be compressed, linen should be positioned vertically. Packaging in medical paper for steam sterilisation is recommended for linen sets and surgical instruments, not suitable for packaging dressings, small objects or materials which are not of the same type and do not have any supports. The packaging technique must ensure that packages can be opened without affecting the sterilisation of the objects inside, therefore it is necessary to prepare the packages in double orthogonal layers using a method which guarantees adequate protection, easy opening of a package and aseptic extraction of its contents. The double layer orthogonal is necessary since medical paper, due to the presence of micro-holes, is not always a total barrier against micro-organisms. The double packaging also gives the advantage of being able to remove the external layer before the package is brought into a low microbial level area, thereby impeding the microscopic dust deposited on the external parts of the package from falling inside. During packaging activities do not use pins or clips for closing the packages. Packaging in packs or Kraft paper tubes combined with polypropylene/polyester is recommended for steam sterilisation and for individual or small or medium size objects, for surgical instrument, linen and dressing sets. Preparation procedures include the choice of: a suitable pack or tube format considering that the contents must not occupy more than ¾ of the volume. Additionally, the contents must be positioned so as to guarantee correct opening and extraction activities when the package needs to be opened, it must be easy to pick up the instruments, gauzes and the linen garments must remain intact when they are pulled out of the packaging.

CISA S.p.A. - User manual Version 2.0/08
CISA Autoclaves Pag.14
1.5 Sterilization cycle data
Sterilization cycles could be made up of consecutive phases and every phase will be carried out only after reaching the parameters of the previous phase. The phases in chronological order are the following: - Pre-conditioning This phase is carried out systematically and it consists of the chamber (vacuum) depressurization followed by the inflow of water into the chamber and then by heating it. - Conditioning (selectable) This phase allows to make vacuum and steam pulsations for the conditioning of porous materials. - Heating In this phase the sterilization chamber and the materials are heated until reaching to the sterilization temperature. - Sterilization In this phase there is carried out the sterilization with the constant temperature during the set cycle time. - Drying In this phase water and vacuum are blown off from the chamber and then it’s followed by the vacuum phase. - Aeration the baric condition in the chamber are reset in this phase followed by inflow of sterile air.

CISA S.p.A. - User manual Version 2.0/08
CISA Autoclaves Pag.15
Data summary for Textiles and Irons cycles
PR1 vacuum set 250 mbar A PR2 pressure set 2500 mbar A NP1 number of pulsations 3 TR1 temperature 134,0 °C TS1 sterilization time 300 sec PR3 vacuum set 250 mbar TA1 drying time 600 sec PR4 aeration set 980 mbar A
Data summary for Rubber cycle PR1 vacuum set 250 mbar A PR2 pressure set 1500 mbar A NP1 number of pulsations 3 TR1 temperature 121,0 °C TS1 sterilization time 900 sec PR3 vacuum set 250 mbar TA1 drying time 600 sec PR4 aeration set 980 mbar A
Data summary for Flash cycle PR1 vacuum set 250 mbar A PR2 pressure set 2500 mbar A NP1 number of pulsations 1 TR1 temperature 134,0 °C TS1 sterilization time 300 sec PR3 vacuum set 250 mbar TA1 drying time 120 sec PR4 aeration set 980 mbar A
Data summary for B&D cycle PR1 vacuum set 250 mbar A PR2 pressure set 2500 mbar A NP1 number of pulsations 3 TR1 temperature 134,0 °C TS1 sterilization time 210 sec PR3 vacuum set 250 mbar TA1 drying time 600 sec PR4 aeration set 980 mbar A
Data summary for Vacuum test cycle
PR1 vacuum set 250 mbar A PR5 maximum leak 13 mbar A TV1 tempo test 600 sec PR4 aeration set 980 mbar A
Data summary for Liquids cycle PR1 vacuum set 250 mbar A PR2 pressure set 2500 mbar A NP1 number of pulsations 1 TR1 temperature 121,0 °C TS1 sterilization time 900 sec TR1 cooling time 1200 sec PR4 aeration set 980 mbar A PR5 pressure set 1050 mbar A
Legend PR1 = Set vacuum conditioning PR2 = Set pressure conditioning NP1 = Conditioning pulsation number TR1 = Sterilization heating temperature TS1 = Sterilization time PR3 = Set vacuum drying TA1 = Drying time PR4 = Set pressure/vacuum in aeration (baric balance)
CISA S.p.A. - User manual Version 2.0/08
CISA Autoclaves Pag.16
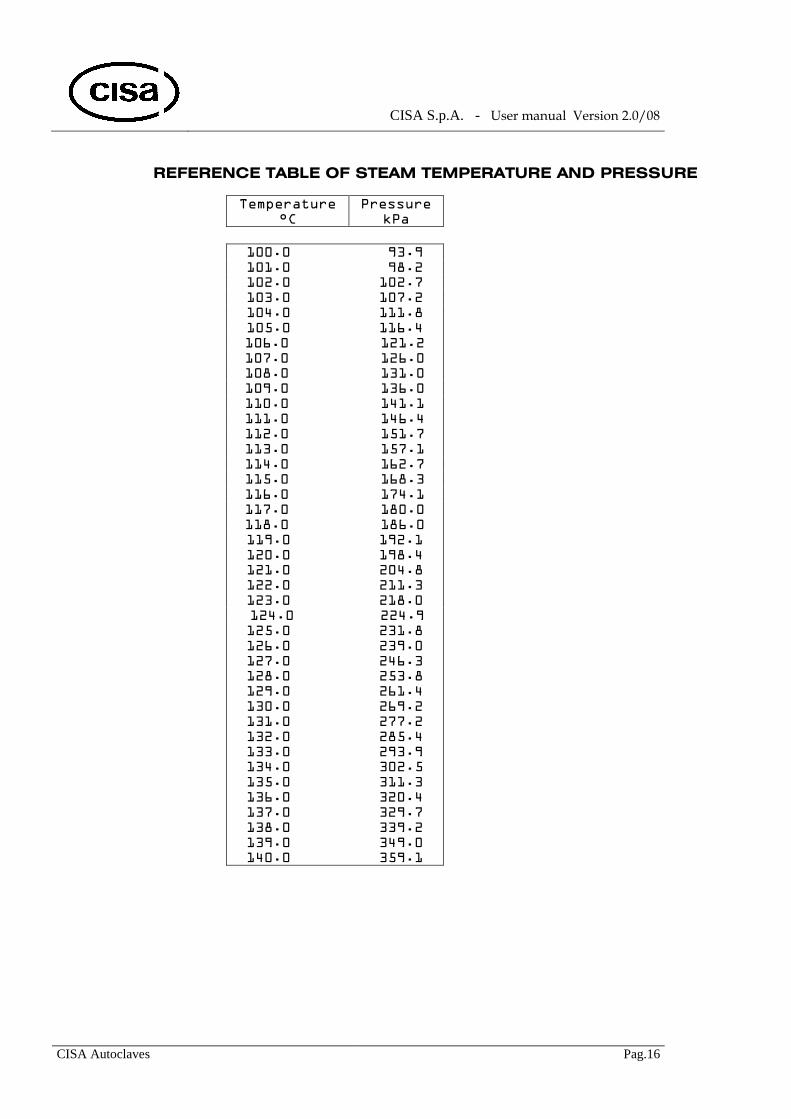
REFERENCE TABLE OF STEAM TEMPERATURE AND PRESSURE
Temperature
°C
Pressure
kPa
100.0 93.9
101.0 98.2 102.0 102.7
103.0 107.2
104.0 111.8
105.0 116.4
106.0 121.2
107.0 126.0 108.0 131.0
109.0 136.0
110.0 141.1
111.0 146.4
112.0 151.7
113.0 157.1
114.0 162.7 115.0 168.3
116.0 174.1
117.0 180.0
118.0 186.0
119.0 192.1
120.0 198.4 121.0 204.8
122.0 211.3
123.0 218.0
124.0 224.9
125.0 231.8
126.0 239.0
127.0 246.3 128.0 253.8
129.0 261.4
130.0 269.2
131.0 277.2
132.0 285.4
133.0 293.9 134.0 302.5
135.0 311.3
136.0 320.4
137.0 329.7
138.0 339.2
139.0 349.0 140.0 359.1

CISA S.p.A. - User manual Version 2.0/08
CISA Autoclaves Pag.17
1.6 Safety devices This system is provided with the following safety devices rendering it extremely reliable:
Mechanical device (with the signalling micro-indicator)against the door opening when there is the
pressure in the chamber.
Device for overtemperature control during the sterilization phase.
It detects the temperature at 3°C above the set temperature of sterilization thanks to two temperature probes.
Device for the temperature fault control during the sterilization cycles. It detects the temperature at -0°C below the set temperature of sterilization thanks to two temperature probes.
Safety device for the maximum pressure.
Safety device for the maximum temperature of the heating elements The thermostat placed in the generator is in the contact with the heating elements.
Fuse and electrical protection for auxiliary components of the electrical installation
Device preventing the door opening during the cycles for liquids in open and closed containers, if
the temperature is above or equal to 90°C (in the autoclaves for the sterilizations of the liquids in bottles).
1.7 Set-point of safety and operating devices The following tables show safety and operating components and their settings. Safety
Component Set-point
Generator safety valve SS3 See attached hydraulic scheme
3 Bar
Heating elements thermostat TC3 See attached hydraulic scheme
300°c
CISA S.p.A. - User manual Version 2.0/08
CISA Autoclaves Pag.18
1.8 - Alarms
The alarms that can be intervenes during the functioning cycle will be signalled and printed. The display will show the phase and the alarm type intervened and i twill be possible to reset them only by level code. The alarms can be the sequent: - Canceled cycle
This alarm activates when the cycle is canceled by using the procedure described on the touch screen.
- Chamber transducer failure This alarm activates when there is detected the failure in the pressure transducer signal.
- Chamber probe failure TC1 This alarm activates when there is detected the failure in the signal of chamber temperature probe.
- Product probe failure TC2 This alarm activates when there is detected failure in the signal of product temperature probe.
- Door opening This alarm activates when the stop position doesn’t indicate the correct closing of the door while the cycle is in progress.
- Vacuum test is non OK This alarm activates when the vacuum test doesn’t coincide with the set parameters (1,3 bar/min).
- Minimum temperature This alarm activates during the sterilization phase, when the chamber temperature drops below the
set point (sterilization temperature).
- Maximum temperature This alarm activates during the sterilization phase, when the chamber temperature rises above the set point (sterilization temperature + 3°C).
- Maximum time phase
This alarm activates when the duration of the phase in progress goes over the set value for this phase.
- Door interlock failure This alarm activates when the door interlock is not working and the door is not locked.
- Emergency temperature This alarm activates when the temperature exceeds 140°C.
- Maximum pressure This alarm activates when the pressure exceeds the maximum value for the chamber pressure (3,5 bar , 450 kPa).
- Communication error This alarm activates when there is non communication between display and plc.

CISA S.p.A. - User manual Version 2.0/08
CISA Autoclaves Pag.19
- Power supply error This alarm activates when there is non power supply. (Warning! This alarm also operates in the case of switching off of the autoclave by the appropriate button)
- Maximum aeration time This alarm activates when the pressure doesn’t get 980mBar during the aeration.
- Unsaturated steam This alarm activates when the pressure doesn’t correspond to the temperature values (shown in the reference table).

CISA S.p.A. - User manual Version 2.0/08
CISA Autoclaves Pag.20
2.0 AUTOCLAVE MANAGEMENT
2.1- PRELIMINARY OPERATIONS
To be done during the starting or restarting phase after the stopping of the autoclave:
The operators using the sterilizer must be qualified for this job.
Sterilizer maintenance and repair must be carried out by technical experts.
To be done when starting the cycle:
- Control if the door gasket is correctly placed in its housing, before closing the door.
- Control the water in the tank by following the procedure described in the chapter 2.6.
Do not use sharp objects to put in or remove the chamber seals from its place.

CISA S.p.A. - User manual Version 2.0/08
CISA Autoclaves Pag.21
AUTOCLAVE SERIE 200
Pic.2 – Autoclave serie 200
2.2 – STARTING OF AUTOCLAVE
- Switch on the autoclave by using the ON-OFF button
The display will show:
CISA S.p.A.
Autoclave Series 200
Software ver X.X.X
X-XX-XX
The display will show the main menu after about 3 seconds.
ON/OFF button
Cap for water tank
Opening/closing door lever
Control panel
CISA S.p.A. - User manual Version 2.0/08
CISA Autoclaves Pag.22
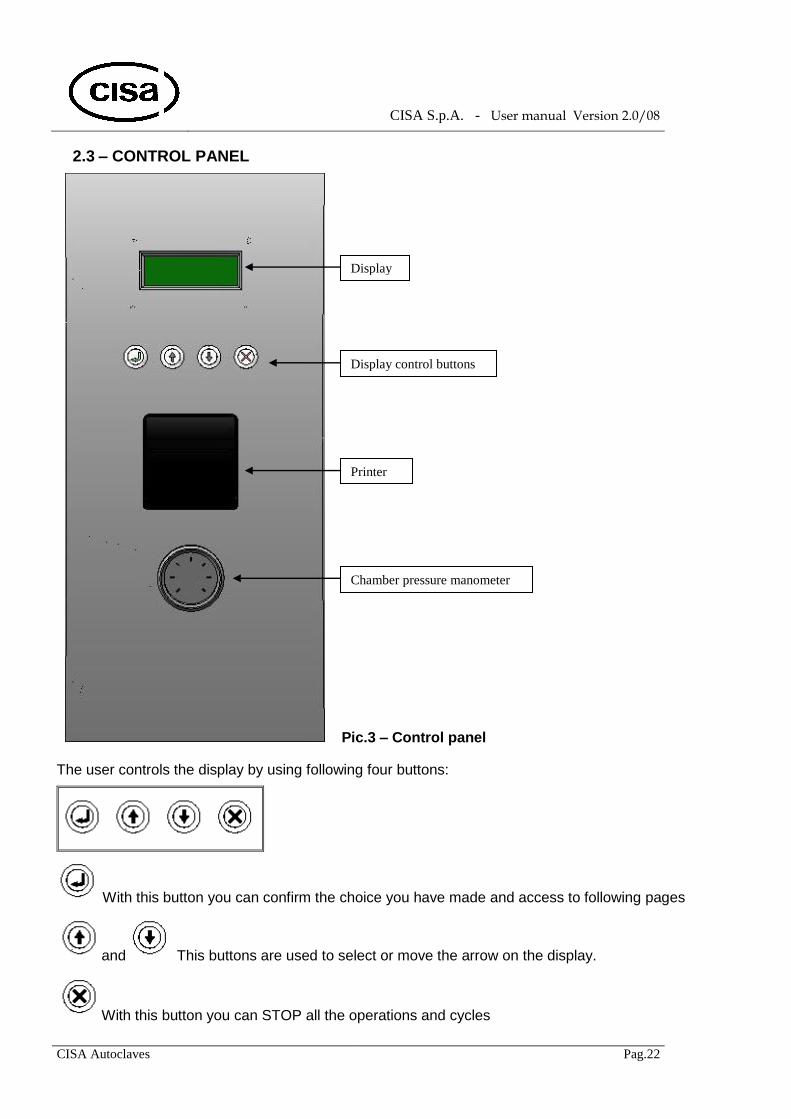
2.3 – CONTROL PANEL
Pic.3 – Control panel
The user controls the display by using following four buttons:
With this button you can confirm the choice you have made and access to following pages
and This buttons are used to select or move the arrow on the display.
With this button you can STOP all the operations and cycles
Display
Printer
Display control buttons
diplay
Chamber pressure manometer

CISA S.p.A. - User manual Version 2.0/08
CISA Autoclaves Pag.23
2.4 – MAIN MENU
The display shows:
::MENU:: 00/00/00
->Cycle 00:00:00
Values Nr:0000
Alarms(?) >
If the symbol (?) is displayed on the display, then the entry “Alarms” will indicate that some alarms remain
in the history list. Follow the procedure described in the next chapter to reset them. The autoclave will not carry out the next cycle until all the alarms are reset.
You can access to different system functions from the main menu:
CYCLE: Choice of the cycle
VALUES: Current values during the cycle
ALARMS: History list of the alarms
The date, the time and the number of the last cycle are on the right of the display.
2.5 - CYCLE STARTING PROCEDURE Select CYCLE from the main menu
The display will show:
::CYCLE SELECTION:::
->Intr. Liquid
Rubber Textiles
Flash B&D <
The first 6 cycles are displayed in this screen, position the arrow on the symbol > and confirm to display the
other cycles. The display will show:
::CYCLE SELECTION:::
->Vacuum
Open:0
And so it will be necessary to chose the cycle to start.

CISA S.p.A. - User manual Version 2.0/08
CISA Autoclaves Pag.24
CYCLE CHOICE FOR DIFFERENT MATERIALS Select the cycle you want to carry out. Following cycles are provided in the autoclave:
- CYCLE INSTRUMENTS at 134°C. EXPOSURE TIME 5’ You can sterilize different surgical instruments by running this cycle
- CYCLE RUBBER at 121°C. EXPOSURE TIME 15’ You can sterilize by running this cycle: gloves, catheters, different rubber materials, etc.
- CYCLE FLASH at 134°C. EXPOSURE TIME 5’ You can sterilize by running this cycle: surgical instruments, empty glassware or others.
- CYCLE LIQUID at 121°C. EXPOSURE TIME 25’ You can sterilize liquids by running this cycle. - CYCLE TEXTILES at 134°C. EXPOSURE TIME 5’ You can sterilize by running this cycle: textiles, porous materials, empty glassware or other temperature resistant materials
- CYCLE TEST BOWIE&DICK EXPOSURE TIME 210’’ You can test the steam penetration by running this cycle - CYCLE VACUUM TEST TEST TIME 10’ Maximum pressure loss 13MBAR (1.3MBAR/MINUTE)
- CYCLE OPEN This cycle consists of 5 programmable cycles that can be programmed thanks to the programmable microcontroller after CISA Advice
Select the chosen cycle and confirm to start it.
There will be shown the current phase during the cycle:
PHASE:STERILIZATION
Cycle Irons
134.2°C 30min
3089mBar 290sec ->>

CISA S.p.A. - User manual Version 2.0/08
CISA Autoclaves Pag.25
You can access to the following page in the case of alarm during the cycle:
:MENU CYCLE:::::::::
->Alarms !
Set point <
The symbol ! near the entry “Alarms” indicates that the cycle is interrupted because of some alarm.
By selecting “Alarms” will be displayed the following page:
:::::::ALARMS::::::
->See Reset
<
The alarms that caused the cycle interruption will be displayed by selecting “See”.
:::::::ALARMS::::::
DOOR OPEN
->>
Whilst the function Reset is used to reset the alarms. The function is active only after typing the
level code, as it’s described in the chapter 2.7.
If you select Set Point the display will show the following page:
PHASE:CONDITIONING
Actual Set Point
01puls. 03puls.
1300mBar 0250mBar <
On this page will be displayed the results of comparison between the current phase value and set up value.
The calibration procedure is described in the chapter 2.13.

CISA S.p.A. - User manual Version 2.0/08
CISA Autoclaves Pag.26
2.6 - CHECKING OF CONDITIONS FOR THE CYCLE STARTING
System conditions will be controlled automatically before starting the chosen cycle of the autoclave.
The display will show:
::::CYCLE START::::
(x) Closed door
(x)Water tank
start ->>
The symbols (x) before the conditions indicate that those conditions allow to start the cycle.
- Closed door
If the door is open, you must close it by the lever.
- Alarm
Check the alarms: there have not be general system alarms or alarms of previous cycle.
- Water in the tank
Fill the tank if there is not enough water.
Make the residual water come out of the tank2 before filling the reservoir with water. Then insert the connector as on Pic. 4 and wait for the water to come out of the tank. It’s possible to blow off the water by using a little tube to be inserted at the connector or by putting an container under the connector.
Disconnect the connector at the end of the procedure.
Pic.4 – Open door view
Water drain connector

CISA S.p.A. - User manual Version 2.0/08
CISA Autoclaves Pag.27
Then the tank can be filled with water, so open the cap on the top part of the autoclave (as is indicated on Pic.5), fill the tank with demineralized water until the level 7/8 cm from the tank edge is reached, and close the cap.
Pic.5 – Internal view
This procedure can be run if needed by the conditions of the cycle starting or a little before the water is out of the tank.
2.7 – LEVEL CODE
The level codes are used by the operator to access to some autoclave functions. There are 2 level codes, the code of the level 1 is required to reset the alarms and to change the cycle parameters; the code of the level 2 can be used only to reset the alarms. The level 1 has the code 1111, whilst the level 2 has the code 2222.
:::::::CODE:::::::::
**** OK
<
Type the level code using two select buttons and the confirm button. The procedure of level code changing is described in the chapter 2.14.
Cap of water tank
Inner water tank

CISA S.p.A. - User manual Version 2.0/08
CISA Autoclaves Pag.28
2.8 – VALUES PAGE
Select VALUES from the main menu. There will be displayed the values of the temperature and of the pressure in the chamber:
:::::::VALUES:::::::
025.7°C Chamber
025.6°C Chamber
1013mBar Chamber <
Select < to go back to the menu .
By selecting > the display will display the following page:
::::::OPTIONS:::::::
->Unlock door
<
This function let the operator to unlock the door electronically if mechanical unlock doesn’t work properly. The door unlock function can be used only when the cycle is not running and the chamber pressure is below 1080 mbar. So select and confirm the unlock by using the buttons.
2.9 – END OF CYCLE
At the end of the cycle there will be displayed:
CYCLE COMPLETED
ATTENTION
HIGH TEMPERATURE
And so you can open the door and put the sterilized materials out, be always careful because of very high temperature inside the chamber.
CISA S.p.A. - User manual Version 2.0/08
CISA Autoclaves Pag.29
2.10 – CANCELLATION OF THE CYCLE By using this function the operator can stop the cycle if there is an autoclave alarm.
Then select > on the current phase page, the display will display:
:MENU CYCLE:::::::::
->Alarms !
Set point <
The symbol ! will be near the entry “Alarms”, select “Alarms”, the display will display:
CONFIRM
STOP CYCLE
->YES NO
By selecting YES the current cycle will be stopped.
By selecting NO you will go back to the previous screen.
2.11 TECHNICAL MENU
Select > from the main menu, the display will show:
::::TECHNICAL MENU::
-> Modify cycle
Calibration >
Date and time <
By using this menu you can change the cycle parameters, do the calibration, set the date and the time. This menu is active only after typing the code of the level 1.

CISA S.p.A. - User manual Version 2.0/08
CISA Autoclaves Pag.30
2.12 – CYCLE MODIFICATION
Select MODIFY CYCLE from the technical menu, there will be displayed:
:VACUUM LEAK TEST:
->Leak :0013mBar
Vacuum :0050mBar >
Select the parameter to change and set it by using the select buttons and the confirm
button. Continue in this way with all the parameters pages by using >:
: VACUUM LEAK TEST:
->Time:0600sec <
[OFF] >
::CONDITIONING:::
->Vacuum:0050mBar >
Press :2500mBar <
::CONDITIONING::::::
->Pulsation:03 >
[ON] <
:::HEATING::::::::::
->Temper.:134.0°C
Time :0030sec >
[ON] <

CISA S.p.A. - User manual Version 2.0/08
CISA Autoclaves Pag.31
:::STERILIZATION::::
->Temper.:134.0°C
Time :0300sec >
[ON] <
:::COOLING:::::::::
->Time:1200sec >
[OFF] <
::::DRYING::::::::::
->Vacuum:0050mBar
Time :0600sec >
[ON] <
NB: You have to page forward to the parameters end to exit from the modify menu. There will be displayed the following page:
CONFIRM ALL THE
DATA?
YES ->NO
Select YES if you want to confirm all the changed values.
Select NO to go back to the technical menu without changing the parameters.
CISA S.p.A. - User manual Version 2.0/08
CISA Autoclaves Pag.32
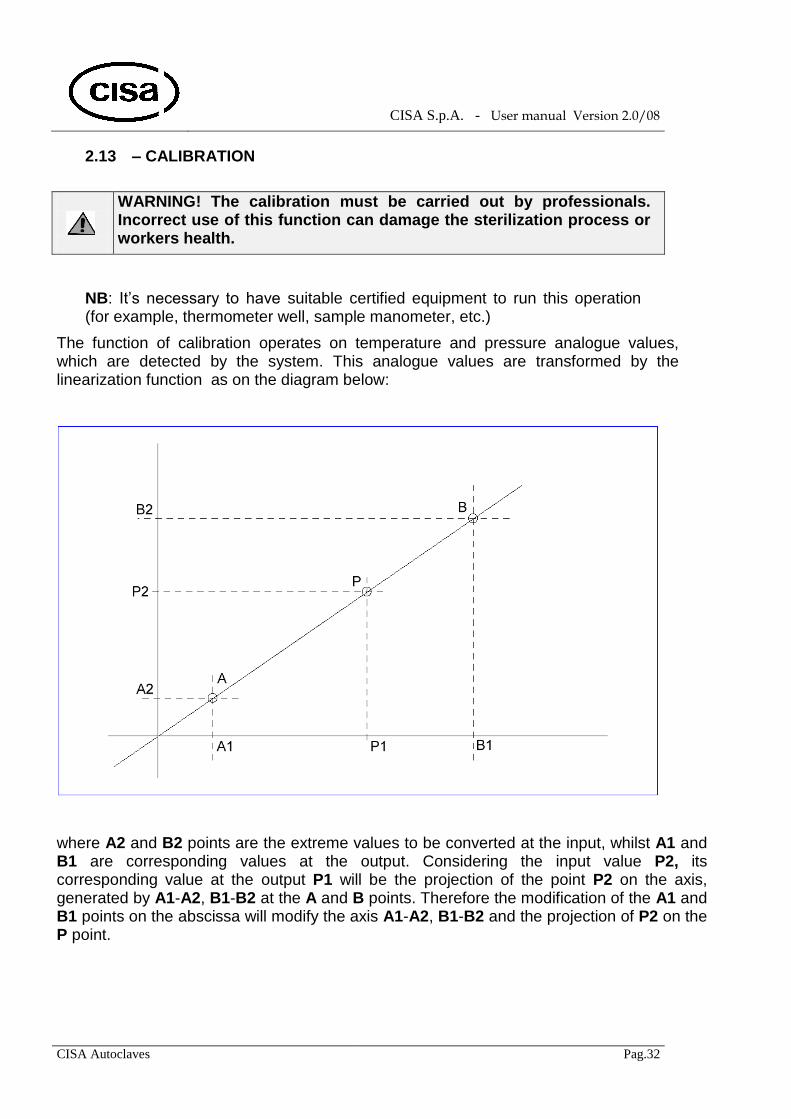
2.13 – CALIBRATION
WARNING! The calibration must be carried out by professionals. Incorrect use of this function can damage the sterilization process or workers health.
NB: It’s necessary to have suitable certified equipment to run this operation (for example, thermometer well, sample manometer, etc.)
The function of calibration operates on temperature and pressure analogue values, which are detected by the system. This analogue values are transformed by the linearization function as on the diagram below:
where A2 and B2 points are the extreme values to be converted at the input, whilst A1 and B1 are corresponding values at the output. Considering the input value P2, its corresponding value at the output P1 will be the projection of the point P2 on the axis, generated by A1-A2, B1-B2 at the A and B points. Therefore the modification of the A1 and B1 points on the abscissa will modify the axis A1-A2, B1-B2 and the projection of P2 on the P point.
CISA S.p.A. - User manual Version 2.0/08
CISA Autoclaves Pag.33
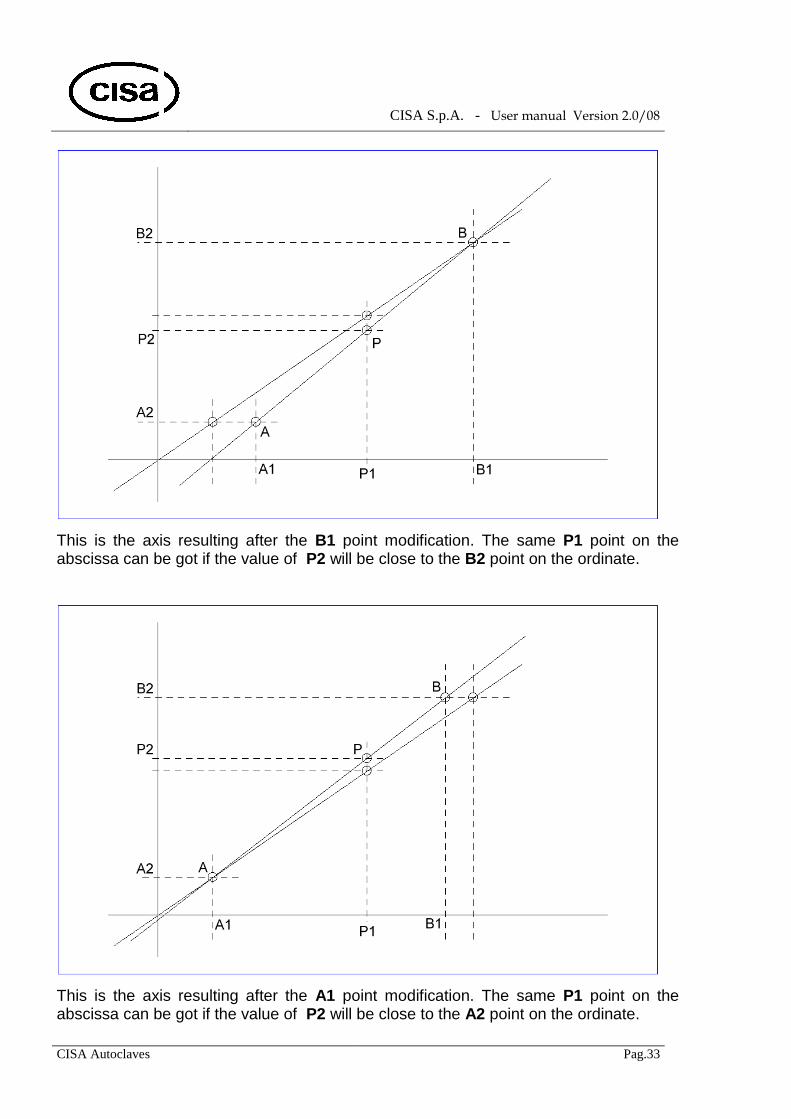
This is the axis resulting after the B1 point modification. The same P1 point on the abscissa can be got if the value of P2 will be close to the B2 point on the ordinate.
This is the axis resulting after the A1 point modification. The same P1 point on the abscissa can be got if the value of P2 will be close to the A2 point on the ordinate.

CISA S.p.A. - User manual Version 2.0/08
CISA Autoclaves Pag.34
The temperature range is from 0 to 200,0 °C, in tenths of degrees is from 0 to 2000.
The values A1 and B1 are added up to the whole value 1000, considering a possible negative error in the conversion of the input signal. The initial value 1000 will be subtracted from the P1 value after having done the interpolation for its calculation. The temperature values of A1 and B1 will be also:
A1 = 1000
B1 = 3000
The pressure range is from 0 to 600 kPa , in millibars is from 0 to 6000.
As for the temperature, the values A1 and B1 are added up to the whole value 1000. The pressure values of A1 and B1 will be also:
A1 = 1000
B1 = 7000
You can see below modification procedure for the values A1 and B1.
Type CALIBRATION in technical menu, there will be displayed:
::::CALIBRATION:::::
->Chamber pressure
Chamber Temper.
<
Select the parameter to calibrate and confirm.
If you choose to calibrate the chamber pressure, the display will show:
::CHAMBER PRESSURE::
->0150 ZERO
1013mBar
4000 SPAM >
Whilst when you choose to calibrate the chamber temperature, the display will show:
::CHAMBER TEMPER.:::
->1250 ZERO
030.0°C
3000 SPAM >

CISA S.p.A. - User manual Version 2.0/08
CISA Autoclaves Pag.35
2.14 – DATE AND TIME SETTING
Select DATE AND TIME from the technical menu, there will be displayed:
:::DATE AND TIME :::
->Date :01/10/07
Time :00:00:00 >
Select the parameter to modify and set it by using the Select and Confirm buttons.
Type > to go back to the technical menu page.
2.15 – CHANGING OF LEVEL CODE
Select > from the technical menu, there will be displayed:
:::::MODIFY CODE::::
->Level 1
Level 2 <
Select the level code to change and confirm, the display will show:
:::::::LEVEL 1::::::
New :****
Confirm:****
Ok <
::::::LEVEL 2:::::
New :****
Confirm:****
Ok <
Type the new code in the NEW field, and confirm it in the CONFIRM field. Select OK to confirm all data and to go back to the technical menu.

CISA S.p.A. - User manual Version 2.0/08
CISA Autoclaves Pag.36
3.0 MAITENANCE 3.1 GENERAL INFORMATION ABOUT MAINTENANCE
All the information in this chapter is intended for professionals who have an appropriate
knowledge of electrical and hydraulic systems to operate in cases of system failure.
WARNING! The autoclave doesn’t have a main switch. Cut off the circuit upstream of the autoclave before doing the electrical maintenance.
WARNING! Several internal autoclave parts (pipes, valves, various surfaces) are at the high temperature.
3.2 MAINTENANCE ADVICES
We suggest to conduct periodically the following operations of the preventive maintenance: VERIFY the integrity of the door gasket every 6 months (pic.6). CONTROL and clean with a brush residual dirt after the cycle end CHANGE bacteriological filter once a year (pic.6). To replace the filter it’s necessary to unscrew it
anticlockwise and to screw clockwise the new one
Pic.6 – Photo of open door view
Bacteriological filter Door gasket