Embed Size (px)
Citation preview

SURGICAL INSTRUMENTS

BTI RIGHT-ANGLED SCREWDRIVER ......................................................... PÁG. 3SCHWERT PERIOSTEAL ELEVATOR ........................................................... PÁG. 4SCHWERT PERIOSTEAL RASP ....................................................................... PÁG. 7SCHWERT MOLT CURETTE ............................................................................. PÁG. 8SCHWERT PAPILLA ELEVATOR ..................................................................... PÁG. 9SCHWERT MOSQUITO FORCEPS ............................................................... PÁG. 10SCHWERT ADSON FORCEPS ......................................................................... PÁG. 11SCHWERT BAKEY DISSECTION FORCEPS ............................................ PÁG. 12SCHWERT SURGICAL COMPASS ................................................................. PÁG. 13SCHWERT SURGICAL RULER ......................................................................... PÁG. 14SCHWERT PROBES ............................................................................................... PÁG. 15SCHWERT SCISSORS FOR MICROSURGERY ....................................... PÁG. 16SCHWERT CURVED SCISSORS FOR MICROSURGERY.................. PÁG. 17SCHWERT TISSUE SCISSORS ......................................................................... PÁG. 18SCHWERT LONG SCISSORS FOR SURGERY ........................................ PÁG. 19SCHWERT CASTROVIEJO NEEDLE HOLDER ....................................... PÁG. 20SCHWERT MIRROR HANDLE AND MIRRORS ..................................... PÁG. 21SCHWERT FARABEUF SEPARATOR ............................................................ PÁG. 22SCHWERT LIP SEPARATOR .............................................................................. PÁG. 23SCHWERT TISSUE SEPARATOR .................................................................... PÁG. 24SCHWERT SINUS ELEVATION KIT ............................................................... PÁG. 25SCHWERT BONE COMPACTORS ................................................................. PÁG. 27SCHWERT SINUS ELEVATION KIT ............................................................... PÁG. 28SCHWERT FIBRIN SHAPER .............................................................................. PÁG. 29BTI EXPANDERS ...................................................................................................... PÁG. 30BTI COMPACTORS................................................................................................. PÁG. 31KIT OF EXPANDERS BTI COMPACTORS ................................................. PÁG. 32SCHWERT FORCEPS FOR BLOCK GRAFTS ANGLED ..................... PÁG. 33SCHWERT PERIODONTAL RASP ................................................................. PÁG. 34SCHWERT GRACEY RASPS .............................................................................. PÁG. 35
INDEX
CLEANING AND STERILISATION PROCEDURE OF BTI EXPANDERS AND COMPACTORS ANNEX I ......................................................................................................................... P. 38CLEANING AND STERILISATION PROCEDURE OF BTI SURGICAL INSTRUMENTSANNEX II ....................................................................................................................... P. 42REPROCESSING OF RESTERILIZABLE SCHWERT HAND-HELD INSTRUMENTS AND THEIR ACCESSORIESANNEX III ..................................................................................................................... P. 44
ANNEX

P. | 3 |
BTI RIGHT-ANGLED SCREWDRIVER
REF. DAR This screwdriver consists of two components: the handpiece with reduction 1.2:1 and the handle that adapts to the handpiece. Turning the handle produces the rotation of the interchangeable screwdriver tips.
They can be used for inserting or removing screws or healing abutments.The components of the handpiece are reinforced so that the application of torque does not deteriorate the splines; its special design enables it to be perfectly cleaned, lubricated and sterilised like any surgical handpiece.It shall be the instrument to choose for unscrewing parts tightened with a high torque.It is an essential instrument in both surgery and prosthetics when working in the rear sector, as it provides easy access and prevents the screwdriver accidentally being swallowed or inhaled.It must never be used as a motorised counterangle.
Length:16 cm

P. | 4 |
Designed for detaching periodontal ligaments and tissue accurately, especially for thin gingival biotypes. Very useful as a root elevator. Its blade is thin and suitably angled for working in both front and rear areas.
Designed for detaching tissue accurately, especially for thin thin gingival biotypes. Very useful as a root elevator.
BLADE BLADE
REF. PER1 REF. PER2
SCHWERT PERIOSTEAL ELEVATOR
Length:16 cm
Length:16 cm

P. | 5 |
Especially for extracting roots. Can be used with the hammer.
Rasp for detaching tissue and recovering the bone from the drills.
BLADE BLADE
REF. PER3 REF. PER4
SCHWERT PERIOSTEAL ELEVATOR
Length:15 cm
Length:16 cm
P. | 6 |
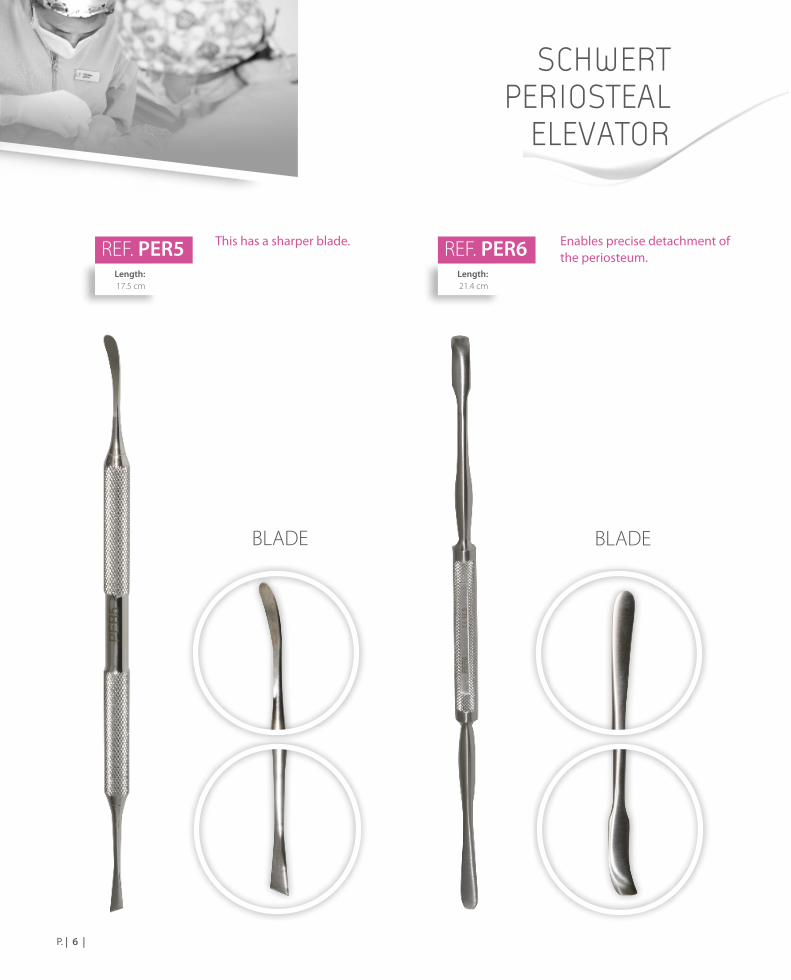
This has a sharper blade. Enables precise detachment of the periosteum.
BLADE BLADE
REF. PER5 REF. PER6
SCHWERT PERIOSTEAL
ELEVATOR
Length:17.5 cm
Length:21.4 cm
P. | 7 |
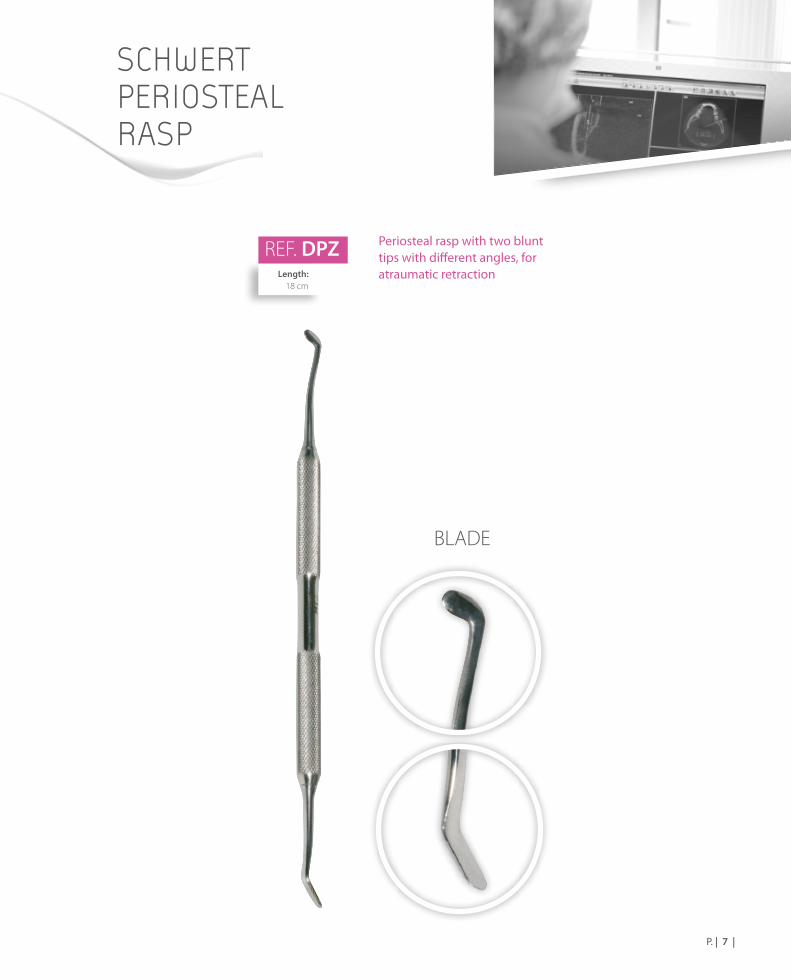
Periosteal rasp with two blunt tips with different angles, for atraumatic retraction
BLADE
REF. DPZ
SCHWERT PERIOSTEAL RASP
Length:18 cm

P. | 8 |
SCHWERT MOLT CURETTE
Particularly indicated for rasping the cortical before placing a graft; also suitable for obtaining bone by scraping.
REF. COMLength:18.2 cm
BLADE

P. | 9 |
SCHWERT PAPILLA ELEVATOR
Designed to detach tissue and the periosteum in microsurgery.Useful for thin gingival biotypes.In cases of connective graft tunnelisation, for detachment.The two ends have blades with different diameters: 1.7 mm and 2.6 mm.
REF. EPALength:
17 cm
BLADE

P. | 10 |
SCHWERT MOSQUITO FORCEPS
TIP
Multi-function forceps with curved tips, essential for clamping blood vessels, removing small apexes and gripping objects.
TIP
REF. MQLength:12.2 cm
P. | 11 |
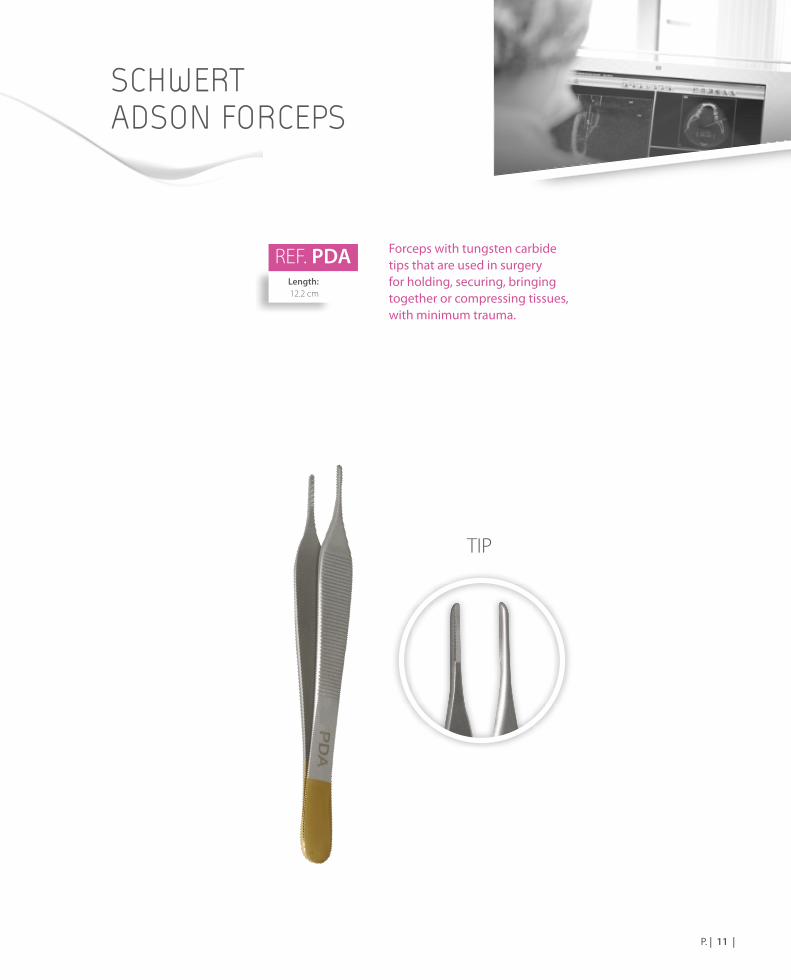
Forceps with tungsten carbide tips that are used in surgery for holding, securing, bringing together or compressing tissues, with minimum trauma.
REF. PDA
SCHWERT ADSON FORCEPS
Length:12.2 cm
TIP

P. | 12 |
SCHWERT BAKEY DISSECTION FORCEPS
Atraumatic forceps with tungsten carbide tips, used in surgery to secure soft tissue firmly without causing any harm.
TIP
REF. PDBLength:14.5 cm
P. | 13 |
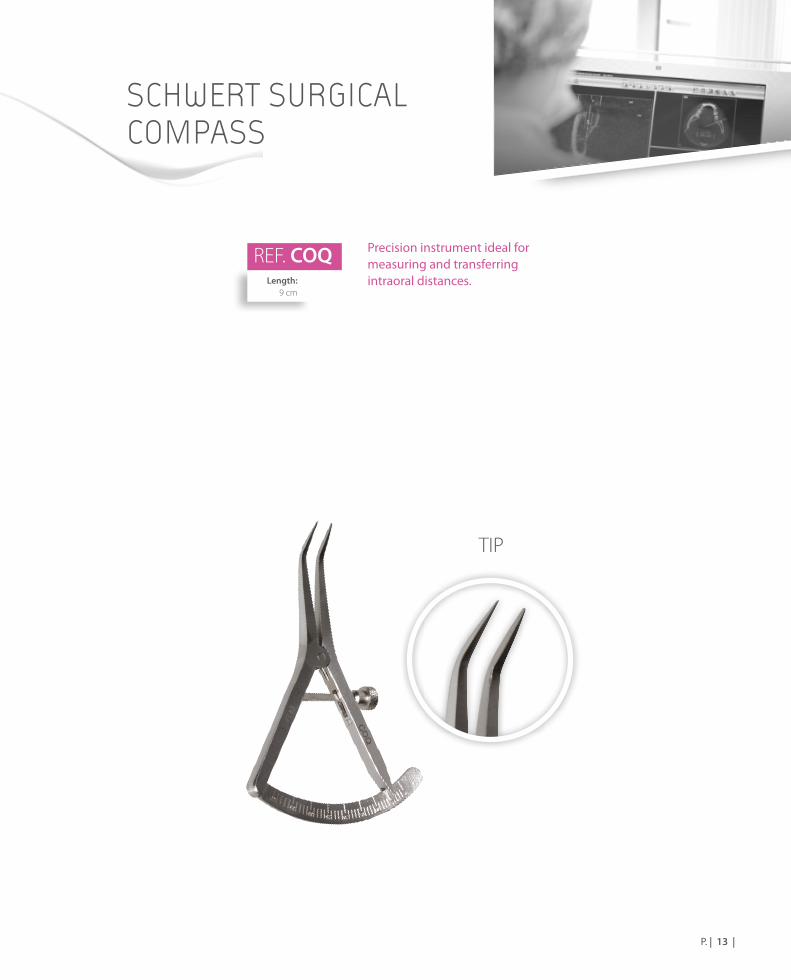
Precision instrument ideal for measuring and transferring intraoral distances.
REF. COQ
SCHWERT SURGICAL COMPASS
Length:9 cm
TIP

P. | 14 |
SCHWERT SURGICAL RULER
indicated for verifying the opening of the compass and other applications.
REF. RQLength:
8.5 cm

P. | 15 |
SCHWERT PROBES
Surgical probe designed to help with the preparation of the alveolus for the insertion of implants. It has an area for measuring the depth of the alveolus prepared with depth marks at 3, 5, 8.5, 10, 13 and 15 mm.Its longitudinal body has a ruler for measuring up to 5.5 cm and a small square with a marked ruler to measure the distance between implants.
REF. SQR

P. | 16 |
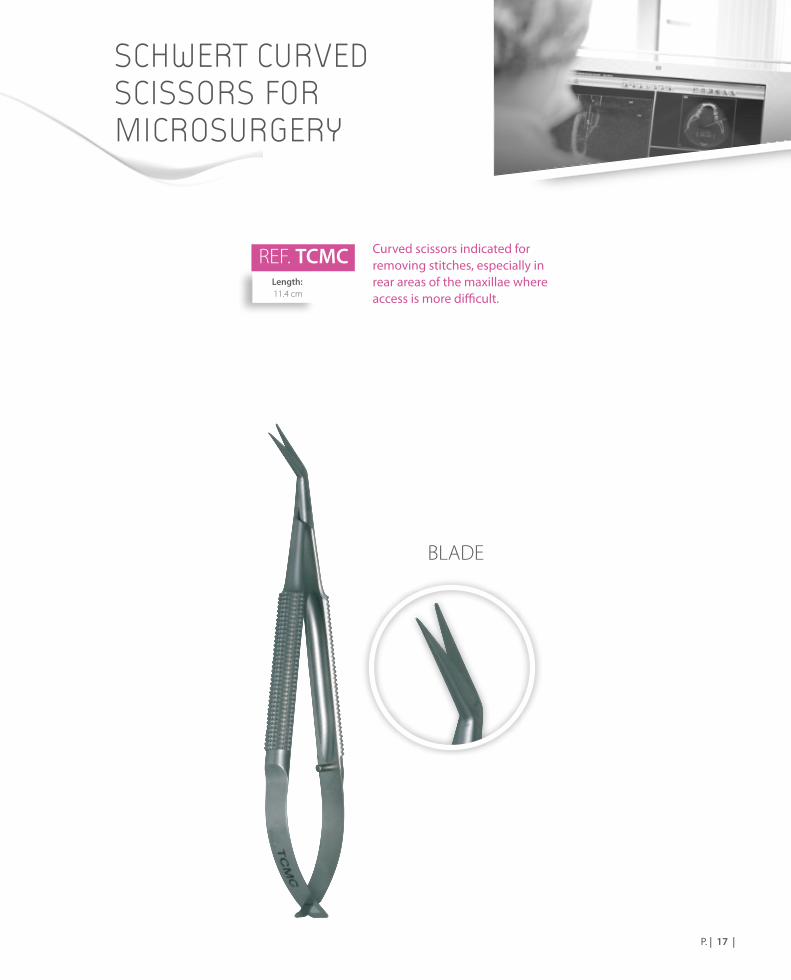
Curved scissors indicated for removing stitches, especially in rear areas of the maxillae where access is more difficult.
REF. T1
SCHWERT SCISSORS FOR MICROSURGERY
Length:16.3 cm
BLADE
P. | 17 |
SCHWERT CURVED SCISSORS FOR MICROSURGERY
Curved scissors indicated for removing stitches, especially in rear areas of the maxillae where access is more difficult.
BLADE
REF. TCMCLength:11.4 cm

P. | 18 |
Curved scissors for tissue, with one tungsten carbide blade, with a high cutting ability, and the other microserrated to secure the affected tissue accurately.
REF. T2
SCHWERT TISSUE SCISSORS
Length:11.4 cm
BLADE
P. | 19 |
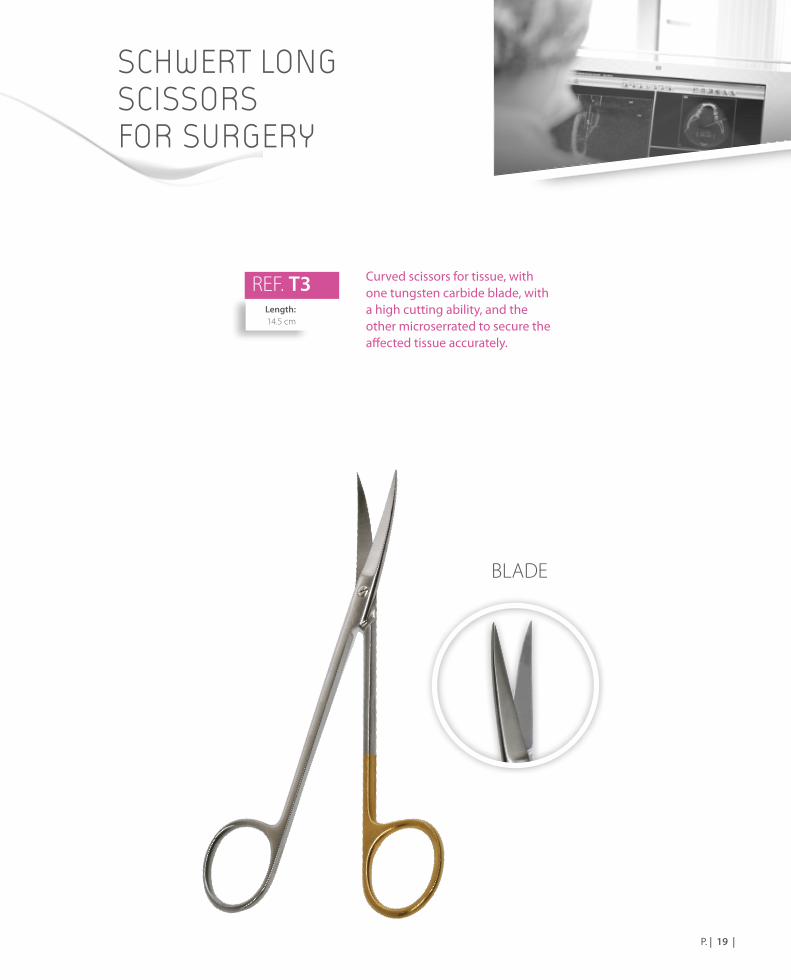
SCHWERT LONG SCISSORS FOR SURGERY
Curved scissors for tissue, with one tungsten carbide blade, with a high cutting ability, and the other microserrated to secure the affected tissue accurately.
BLADE
REF. T3Length:14.5 cm

P. | 20 |
Designed for sutures of 5-6 zeros.REF. CAS
SCHWERT CASTROVIEJO NEEDLE HOLDER
Length:14 cm
BLADE

P. | 21 |
SCHWERT MIRROR HANDLE AND MIRRORS
Flat mirror with a diameter of 24 mm / unit of sale: 12 units.
Conventional mirror handle.Length:12 cm
REF. EP24

P. | 22 |
SCHWERT FARABEUF SEPARATOR
Double lip and tissue separator. Two complementary units.REF. SEF
Length:11.5 cm

P. | 23 |
SCHWERT LIP SEPARATOR
Designed for both upper and lower maxilla, particularly useful in edentulate patients.
REF. SEPLength:12.5 cm
P. | 24 |
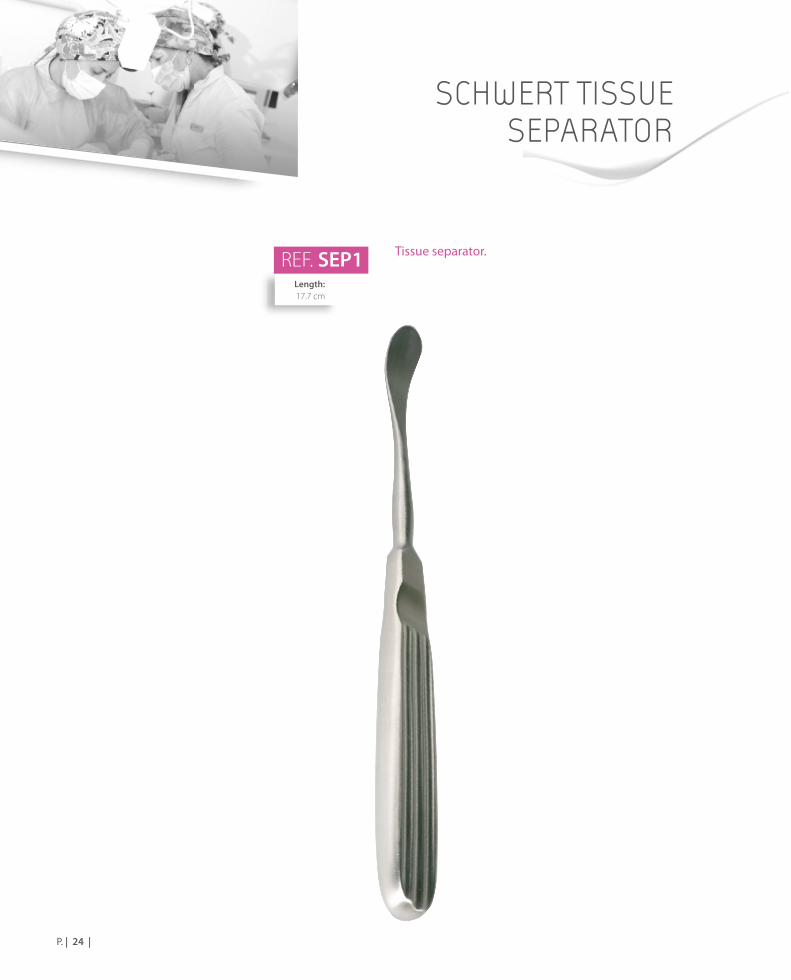
SCHWERT TISSUE SEPARATOR
Tissue separator.REF. SEP1Length:17.7 cm

P. | 25 |
Kit of sinus membrane rasps, with different angles.
SCHWERT SINUS ELEVATION KIT
BLADE BLADE
REF. DMS1 REF. DMS2Length:16.5 cm
Length:17.9 cm

P. | 26 |
Kit of sinus membrane rasps, with different angles.REF. DMS3
SCHWERT SINUS ELEVATION KIT
Length:15.3 cm
BLADE

P. | 27 |
SCHWERT BONE COMPACTORS
Indicated for compacting bone around an implant post-extraction.
Ideal for compacting bone in a traumatic sinus elevation.
BLADE BLADE
REF. CH1 REF. CH2Length:16.7 cm
Length:15.4 cm

P. | 28 |
Ideal for compacting bone in a traumatic sinus elevation.REF. CH3
SCHWERT SINUS ELEVATION KIT
Length:15.6 cm
BLADE

P. | 29 |
REF. CF1
SCHWERT FIBRIN SHAPER
Diameters:4.5 and 5.1 cm
BLADE
For pushing and compacting the fibrin by means of perforations carried out with the front cutting drills at the crestal accesses.Diameter 4.5 and 5.1 mm.Depth marks: 5, 6, 8, 10 and 13 mm.

P. | 30 |
They can be used jointly with the BTI drills.When used with the motor with the CPI22HEX, they must not exceed a torque of 25 Ncm.Material: commercially pure titanium.
· Long ratchet wrench extension
· Long implant mount connector
INDICATIONSCrest expansion in bone type I, II and III. In both anterior and posterior areas in the superior maxilla or mandible. Bone compactation for placing implants inbone type IV in posterior areas of the maxilla or mandible.
REF. ECO1
REF. JEXP REF. ELLCALREF. CPI22
REF. ECO2 REF. ECO3 REF. ECO4
BTI EXPANDERS
Set of Expanders · Metal box with four BTI expanders
P. | 31 |
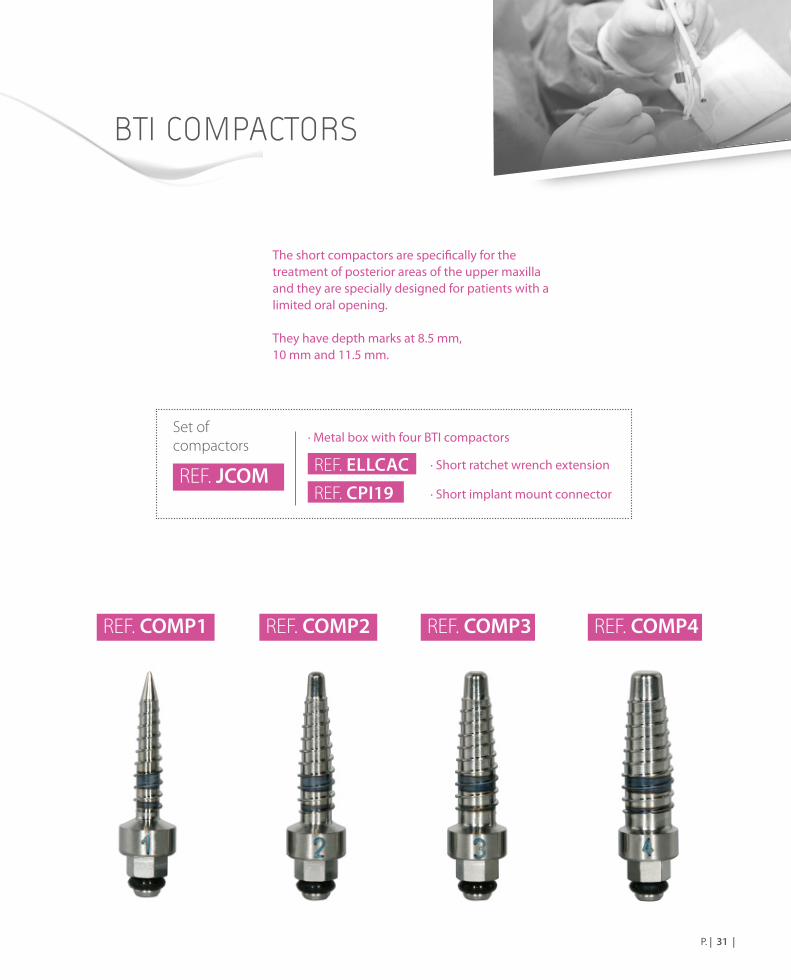
The short compactors are specifically for the treatment of posterior areas of the upper maxilla and they are specially designed for patients with a limited oral opening.
They have depth marks at 8.5 mm, 10 mm and 11.5 mm.
REF. COMP1
REF. JCOM
REF. COMP2 REF. COMP3 REF. COMP4
BTI COMPACTORS
· Short ratchet wrench extension
· Short implant mount connector
REF. ELLCACREF. CPI19
Set of compactors · Metal box with four BTI compactors

P. | 32 |
This consists of the long expanders and the four short compactors, with which all expansion and compactation can be resolved for all types of patients.REF. KEXCO
Set of Expanders and compactors
KIT OF EXPANDERS BTI COMPACTORS

P. | 33 |
SCHWERT FORCEPS FOR BLOCK GRAFTS ANGLED
Angled forceps for maintaining and screw-mounting the block graft in the inferior maxilla.
REF. PIBCLength:18.3 cm
TIP

P. | 34 |
SCHWERT PERIODONTAL
RASP
These are instruments with a curved blade with a flat surface and two cutting edges that converge at a very sharp point, useful for removing the supragingival calculus.
BLADE BLADE
REF. RPE1 REF. RPE2Length:16.5 cm
Length:17.2 cm
P. | 35 |
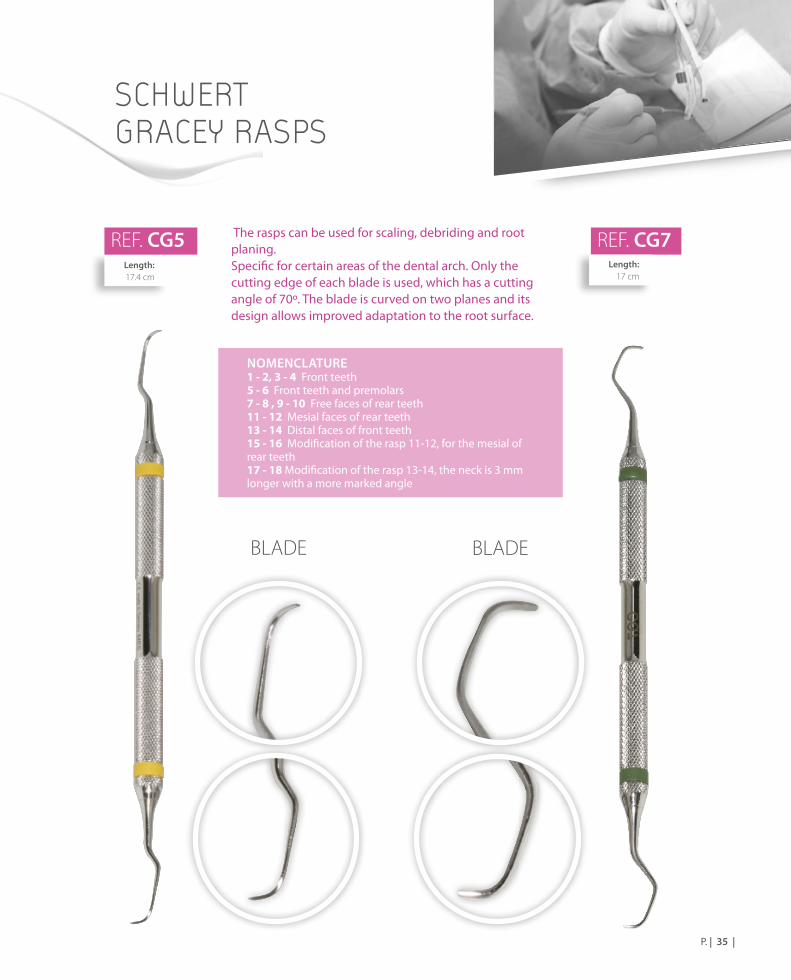
SCHWERT GRACEY RASPS
The rasps can be used for scaling, debriding and root planing.Specific for certain areas of the dental arch. Only the cutting edge of each blade is used, which has a cutting angle of 70º. The blade is curved on two planes and its design allows improved adaptation to the root surface.
BLADE BLADE
REF. CG5 REF. CG7Length:17.4 cm
Length:17 cm
NOMENCLATURE1 - 2, 3 - 4 Front teeth 5 - 6 Front teeth and premolars 7 - 8 , 9 - 10 Free faces of rear teeth 11 - 12 Mesial faces of rear teeth 13 - 14 Distal faces of front teeth 15 - 16 Modification of the rasp 11-12, for the mesial of rear teeth 17 - 18 Modification of the rasp 13-14, the neck is 3 mm longer with a more marked angle

P. | 36 |
SCHWERT GRACEY RASPS
The rasps can be used for scaling, debriding and root planing.Specific for certain areas of the dental arch. Only the cutting edge of each blade is used, which has a cutting angle of 70º. The blade is curved on two planes and its design allows improved adaptation to the root surface.
BLADE BLADE
REF. CG11 REF. CG13Length:
17 cmLength:
17 cm
NOMENCLATURE1 - 2, 3 - 4 Front teeth 5 - 6 Front teeth and premolars 7 - 8 , 9 - 10 Free faces of rear teeth 11 - 12 Mesial faces of rear teeth 13 - 14 Distal faces of front teeth 15 - 16 Modification of the rasp 11-12, for the mesial of rear teeth 17 - 18 Modification of the rasp 13-14, the neck is 3 mm longer with a more marked angle

ANNEX

P. | 38 |
PRE-TREATMENT After each surgical process, every surgical instrument should be placed into a container that will have a cleaning solution (0.5% neodisher MediZym enzymatic, Dr. Weigert; indications for use: 5 mL in 1 L of water) at room temperature, in order to avoid that blood or bodily fluids could dry before decontaminating. Keep the instrument in this way the shortest possible time (within a maximum of 15 minutes) before cleaning and disinfecting.Immediately after this pre-treatment, they must be manually or automatically cleaned and disinfected, then sterilisation in an autoclave.
MANUAL CLEANING AND DISINFECTION
1. Remove the majority of the impurities with a soft-bristle brush using plenty of running water at ambient temperature for at least 3 minutes, paying attention on areas where access is difficult such as seals, an-gles, blind/narrow holes, etc. as well as rough surface or containing laser engraving.
2. Place instruments in an ultrasonic bath (Bandelin, HF power 300 Weff, frequency 35 kHz) with purified water which contains a solution of neutral detergent with enzymatic capacity and no foam development, (0.5% neodisher MediZym enzymatic, Dr. Weigert; indications for use: 5 mL in 1 L of water).Be sure that detergent is suitable for use with instruments and ultrasonic bath.
Use protecting gloves.
Before they are used for the first time they must be sterilised.
Clean the instrumental after each surgical process.
IMPORTANT: do not clean different materials at the same time (chrome cover, aluminium, stain-less steel).
The autoclave cycle should be allowed to finish, without interrupting the drying stage to avoid the risk of oxidation.
Make sure that no oxidated instrument or material is sterilised, as it increases the risk of the rest of the instruments becoming oxidised when sterilised together.
Recommendations for cleaning and sterilization procedure
STAGES OF THE PROCEDURE
CLEANING AND STERILISATION PROCEDURE OF BTI EXPANDERS AND COMPACTORS
ANNEX I

P. | 39 |
CLEANING AND STERILISATION PROCEDURE OF BTI EXPANDERS
AND COMPACTORS
3. 3. Keep instruments on the ultrasonic bath for 20 minutes at 35°C. Be sure that immersion time does not start until the last instrument is placed on the bath and it is completely immersed. The instruments must not have contact among them to prevent possible physical damage. Do not exceed temperatures over 45ºC (risk of coagulation proteins).
The solution should be replaced as soon as turbidity or suspended particles being detected due to clea-ning activity could be inhibited.
IMPORTANT: Cleaning instruments by ultrasonic bath could not be suitable for instruments that contain carbon of tungsten in their composition. It is also not recommended for cleaning of rubber or plastic items as these tend to absorb ultrasounds.
4. Remove instruments from the ultrasonic bath and brush them again with a soft bristle nylon brush rin-sing with tap water at room temperature for at least 1min/piece, paying attention on areas where access is difficult such as seals, angles, blind/narrow holes, etc. as well as rough surface or containing laser en-graving
5. Rinse 5 times with at least 10 mL each of deionized water at room temperature using a single-use syringe.
6. Perform a visual inspection of instruments paying special attention on areas where access is difficult such as seals, angles, blind holes, etc. If trace of impurities were observed, cleaning operation from point 1 to 6 must be repeated.
7. Be sure that every instrument is sufficiently covered and there is no contact among them.
8. Once clean, place instruments in disinfection container which contains disinfectant solution at room temperature (Cidex OPA Solution; indications for use: soak instruments for 15 minutes at room tempe-rature).
9. Ensure all the instruments are submerged and are not touching each other.
10. Remove instruments from the disinfectant container and rinse them soaking into 8 L of distilled water for 1 minute; rinse all lumens 5 times with at least 20 mL each of distilled water at room temperature using a single-use syringe. Repeat this process two more times to get three independent rinses.
ANNEX I
P. | 40 |
IMPORTANT: If Sterilization process could not be possible or recommended after disinfection, be sure to use sterilized water for rinsing in order to avoid recontamination.
10. Dry the instruments at room temperature with filtered compressed air until it is completely dry.
AUTOMATIC CLEANING AND DISINFECTION
Use always a washer-disinfector certified in accordance with ISO 15883 (for example: Miele G 7836 CD; mobile injector unit E 450 for MIC instruments (Miele); accessory parts E 142 mesh tray with lid (Miele) or E 451 mesh tray with lid for small parts (Miele)).
1. Place the instruments in the washer-disinfector according to the manufacturer’s instructions. Load instru-ments such that holes can drain.
2. Add a neutral detergent with enzymatic power and no foam development, (0.5% neodisher MediZym enzymatic, Dr. Weigert; indications for use: 5 mL in 1 L of water) and select a suitable programme for the cleaning and final rinse according to the instructions of the washer/disinfector.
3. Run cleaning program: Pre-cleaning for 4 minutes, cleaning for 10 minutes at 50ºC and final rinsing with deionized water for 3 minutes
4. After cleaning and rinsing, proceed to thermal disinfection: 5 minutes at 90ºC.
5. Dry the instruments at room temperature with filtered compressed air until it is completely dry.
INSPECTIONCheck instruments and ensure that there is no damage, wear or rust, and all of them work properly.
STERILISATION IN AUTOCLAVE
1. Introduce instruments, immediately after the inspection, into sterilization pouches with sterilization in-dicator and seal the bag as specified by the supplier. Ensure that the pack is large enough to contain the instrument without stressing the packaging.
2. If sterilization container is used (for example autoclavable BTI surgical kit box) introduce it into a steriliza-tion bag of sufficient size without stressing the packaging.
IMPORTANT: Only use wrapping materials and systems (sterile barrier systems) that comply with the DIN EN ISO 11607-1 standard. The correct application of suitable wrapping is critical for the success of the sterilization.
ANNEX ICLEANING AND STERILISATION PROCEDURE OF BTI EXPANDERS AND COMPACTORS

P. | 41 |
3. Introduce sterilization pouches into a pre-vacuum autoclave (for example: CELITRON MEDICAL TECHNO-LOGIES, STING 11) with paper up or sideways. Be sure not to exceed the maximum load of the autoclave specified by the supplier and not to stack up bags.
4. Sterilize at 134ºC + 5ºC / (Pressure under autoclave supplier specification, for example: 2 bar) for 6 minu-tes. The changing color of the indicator in the bag shows if the sterilization process has been carried out correctly.
5. Be sure the sterilization requirements (pressure, temperature and time) are the ones described in this instruction for use.
6. After completing the sterilization cycle, let dry and cool bags inside the autoclave for at least 20 minutes, before removing and storing them.
IMPORTANT: Only use steam sterilizers that comply with the EN 13060 standard. Be sure that sterilization program is established according to the temperature, pressure and time indicated. In case of doubt, contact the steam sterilizer supplier.
STORAGE
Place the sealed bags in a closed and dry place. Make sure there is enough space between the instruments and the floor, walls and ceiling for circulate enough air.
ANNEX ICLEANING AND STERILISATION
PROCEDURE OF BTI EXPANDERS AND COMPACTORS

P. | 42 |
All the surgical instruments are supplied clean and hermetically packaged, but not sterilised. Therefore, it is rec-ommended to sterilise all instruments before use. The recommended sterilisation process is described below.
Before being packaged, all instruments are coated with an oily liquid, particularly at articulations, hinges and threads. Before use it is considered to be necessary to carefully clean and rinse the instruments, to avoid compli-cations such as stains, hardening of articulated parts, etc.
After using the instruments, clean and sterilise them according to the procedures described below.
Decontamination:1. Cleaning and rinsing2. Microbicide process (sterilisation)
INTRODUCTION
PROCEDURE
CLEANING AND STERILISATION OF BTI SURGICAL INSTRUMENTS
For the manual cleaning of surgical instruments; BTI recommends:- Using protective gloves.- Cleaning after each surgical use.
1. At the location where they are used, place the instruments on a tray and cover them with a towel mois-tened with distilled water at room temperature, to prevent blood or bodily fluids from drying before being decontaminated. They are later taken to the processing area.
2. Eliminate the largest impurities with a brush with bristles that are not too hard, moistened with tap water at room temperature.
3. Disassemble the instruments (if applicable).
4. Dip the instruments in a detergent with or without disinfectant effects capable of removing the impuri-ties even in the most critical areas. Neutral detergent at a concentration and temperature recommended by the manufacturer. Rinse to remove the traces of detergent with tap water at room temperature.
MANUAL CLEANING
ANNEX II
P. | 43 |
CLEANING AND STERILISATION OF BTI SURGICAL INSTRUMENTS
5. Place the instruments in an ultrasonic bath with a solution of neutral detergent at the correct concen-tration and temperature, following the manufacturer's instructions. Rinse with distilled water at room temperature. The solution must be changed when turbidness or suspended particles are detected, as the impurities inhibit the cleaning action of the equipment.
Cleaning with ultrasound is not recommended for instruments with sharp or tungsten carbide parts.
6. Visual inspection.
7. Lubricate (if applicable) with a hydrosoluble lubricant solution. Do not use silicone or oil-based lubri-cants as they inhibit the subsequent sterilisation process.
8. Carefully dry the instruments manually. Use materials that do not shed fibres. Make sure that all the instruments are completely dry.
9. Assemble the instruments (if applicable).
During the same cleaning process instruments of different materials (chrome, aluminium, stainless steel) should never be mixed.
Products in thermosealable bags- Temperature: 132ºC – 135ºC; Exposure Time: 3-4 min.When sterilising in autoclaves, instruments with closures and joints must never be closed (metal against metal) as they could break due to thermal expansion. In addition, the water would not be able to evaporate between the parts that are touching. The autoclave cycle must be allowed to finish, without interrupting the drying phase to avoid the risk of oxidation.Selection of the packaging material (thermosealable bags) for steam sterilisation taking into account the follow-ing considerations:- Appropriate material for the method and cycle.- Strength of the packaging.- Type of packaging.- Integrity characteristics of the packaging required due to the design of the instruments.The bags must be inserted into the steriliser with the paper up to aid evaporation, and be kept in the same posi-tion when removed from the steriliser to avoid the risk of the contents rusting.It is important to ensure you do not sterilise any rusted instrument or material together with the rest of the appa-ratus, as this increases the risk of the others rusting during sterilisation.
STEAM STERILISATION WITH PRE-VACUUM
ANNEX II

P. | 44 |
Use only a soft brush, with long handle as needed, for manual removal of coarse soiling. Never use metal brushes or steel wool.
As applicable: Flush all hollow spaces in the instruments five times using a single-use syringe (minimum volume: 50ml) or suitable flushing adapter. Remember that the disinfectants used in pre-treatment are for personal safety only and cannot replace the subsequent disinfection step.
AUTOMATIC CLEANING
EQUIPMENT: Cleaning / disinfection device, cleaning agent
1. Place jointed instruments in the device with opened joints so that water can drain out of cannulas and blind holes.
2. Set cycle, wash for at least X minutes* and rinse for at least X minutes* (*see manufacturer’s instructions).
3. When removing the instruments check cannulas, blind holes, etc. for visible soiling. Repeat cycle or clean manually if necessary.
Do not place in NaCI solutions (otherwise risk of pitting or stress corrosion cracking).
Use only a released solution combing cleaning and disinfectant agents, (i.e. with DGHM or RKI approval or CE label) with no protein-fixing effect (be sure to following manufacturer recomme-dations for mixing).
Avoid overfilling instrument sieves and wash trays.
Always reprocess jointed instruments in open position.
PRE-TREATMENT
REPROCESSING OF RESTERILIZABLESCHWERT HAND-HELD INSTRUMENTS
AND THEIR ACCESSORIES
ANNEX III
Remove coarse soiling from instruments immediately after use (within max. 2 hours) before further processing in a tray/cassette system. Contaminated instruments must undergo pre-treatment within a maximum of 2 hours after use.

P. | 45 |
REPROCESSING OF RESTERILIZABLESCHWERT HAND-HELD INSTRUMENTS
AND THEIR ACCESSORIES
MANUAL CLEANING
EQUIPMENT: Cleaning agent, brush, running water.
1. Rinse surface soiling off the instrument thoroughly.
2. Use a brush to apply cleaning solution to all surfaces. Be sure to clean jointed instruments in both the opened and closed positions.
3. Hold instrument under running water. The running water must flow through the cannulas and blind ho-les must be filled and emptied repeatedly.
Comment: Use a brush suitable for reaching the entire surface when cleaning cannulas and blind holes.
DISINFECTION Both neutral pH and alkaline cleaning agents can be used. Disinfectant solutions can be used according to the instructions on the label (see manufacturer information). The automatic cleaning can be followed by thermal disinfection at 93° C / 200° F for 10 minutes (see manufacturer information for thermal disinfector). Use deionized water for the final rinse if possible. This will avoid spots, deposits and corrosion on the rinsed items.
DRYING For a drying phase reached as part of a cleaning / disinfection cycle the temperature should not exceed 93° C / 200° F.
MAINTENANCE Apply a very small amount of high-quality silicone spray or medical white mineral oil to the joints and mova-ble parts. Sort out dull or damaged instruments. Check for cracks and damage. Check for proper functionality.
CONTROL AND FUNCTIONAL TEST
Check jointed instruments for ease of movement (avoid excessive play). Check locking mechanisms (locking wheel) for functionality. All instruments: Carry out visual inspection for damage and wear. Cutting edges should be free of notching and uniform. Check long, narrow instruments (in particular jointed instruments) for damage. Instruments that are part of a larger assembly must be checked together with the respective parts.
ANNEX III

P. | 46 |
PACKAGINGIndividual: Standardized packaging material can be used. The bag must be large enough for the instrument so the closure is not strained. Sets: Sort instruments into appropriated trays or place on all-purpose sterilization trays. Cutting edges must be protected. Package trays using a suitable method.
STERILIZATION
The sterilizer and sterilization method must comply with the valid and applicable standards and directives. EN 13060 Small Steam Sterilizers distinguishes 3 classes of autoclave:
TYPE B for packaged, massive, hollow and porous devicesTYPE N for unpackaged, massive instrumentsTYPE S for devices as listed by small sterilizer manufacturers
• Gravitational method (with sufficient device drying)
• Steam sterilizer acc. to DIN EN 13060 / DIN EN 285
• Validated acc. to DIN EN ISO/ANSI AAMI ISO 17665 (valid commissioning and device-specific performance assessment)
• Maximum sterilization temperature 134° C / 273° F; plus tolerance as per DIN EN ISO/ANSI AAMI ISO 17665
• Sterilization time (exposure time at sterilisation temperature) at least 20 min. at 121° C / 250° F or 5 min. at 134° C / 273° F
IMPORTANT: Rapid sterilization leads to high instrument wear levels. Additional information: When steri-lizing several instruments in a sterilization cycle, the maximum sterilizer charge must not be exceeded (see manufacturer information).
STORAGE
Store instruments in dry rooms to avoid formation of condensation.
EXCEPTIONS!
See the reprocessing specifications for the items in the following list: The instruments listed below are made in part from chrome-plated parts for technical reasons and must not be placed in the thermal disinfector or ultrasound bath.
Mouth mirror, resection mirror and chrome-plated instruments.
ANNEX IIIREPROCESSING OF RESTERILIZABLE
SCHWERT HAND-HELD INSTRUMENTS AND THEIR ACCESSORIES

CAT017 - IN
G - Ed.3/R
ev.0 - OCT2015
BTI APPNEW PRODUCTSiPhone / smartphone versioniPad / Tablets version (Customer Area)
CAT017 - EN
G - V
.02 - MA
RZO
2020
NOTE: consult your distributor for the availability of the product in the different markets.www.bti-biotechnologyinstitute.uk
Subsidiaries
GERMANYMannheimer Str. 1775179 Pforzheim · DeutschlandTel. +49 (0) 7231 428060Fax +49 (0) 7231 [email protected]
FRANCE6 Avenue Neil ArmstrongImmeuble Le Lindbergh33692 Merignac CEDEX · FranceTel: (33) 5 56 18 11 [email protected]
ITALYC/o Regus Milano LinateViale E. Forlanini 2320134 Milano (MI) · ItaliaTel.: +39 [email protected]
MEXICO Ejercito Nacional Mexicano 351, 3ACol. Granada Delegación Miguel HidalgoMessico DF · CP 11520 · MessicoTel: (52) 55 52502964Fax: (52) 55 [email protected]
PORTUGALPraça Mouzinho de Albuquerque, 113, 5º4100-359 Porto · PortogalloTel: (351) 22 120 1373 Fax: (351) 22 120 [email protected]
UK 870 The CrescentColchester Business Park · ColchesterEssex CO49YQ · Regno UnitoTel: (44) 01206580160Fax: (44) [email protected]
USA1730 Walton RoadSuite 110Blue Bell. PA 19422-1802 · USATel: (1) 215 646 4067Fax: (1) 215 646 [email protected]
BTI ComercialSan Antonio, 15 · 5º01005 Vitoria-Gasteiz (Álava) · ESPAÑATel: +34 945 140 024Fax: +34 945 135 [email protected]
B.T.I. Biotechnology Institute S.L. Parque Tecnológico de Álava Leonardo da Vinci ,1401510 Miñano (Álava) España [email protected]


![bti[1]- huka](https://img.pdfslide.tips/doc/110x75/577d26f41a28ab4e1ea2a579/bti1-huka.jpg)