Embed Size (px)
Citation preview
HP Z1 G2 Workstation with Intel® vPro™ Technology Setup & Use Guide
5/2/2014 Page 1
The following guide explains how to setup and use the HP Z1 G2 Intel® vPro™ Technology
workstation SyAM Software, System Client and System Area Manager for performing the AMT
out of band management functions.
System Configuration
HP Z1 G2 Workstation – BIOS L52 v01.11
AMT firmware version - 8.1.0-build 1265
Intel Xeon CPU E3-1245 V3 @ 3.40GHz
2 x 8GB DDR3 1600mhz
Windows 8.1 Professional 64-bit
Network Adapter: Intel 82579LM Gigabit Network Connection 11.15.16.0
Display Adapter: Intel HD Graphics P4600/4700 10.18.10.3412
Intel Management Engine Interface 9.0.21-build 1462
SyAM System Client V4.53 or above
Browser Requirements on a second system - Internet Explorer 10 or above, Firefox v28 or Chrome v34 above
- Java runtime plugin for your web browser – security set to medium
*Note When using NVidia Quadro K610 or K2100M graphics cards they will disable the AMT KVM capability.
HP Z1 G2 Workstation with Intel® vPro™ Technology Setup & Use Guide
5/2/2014 Page 2
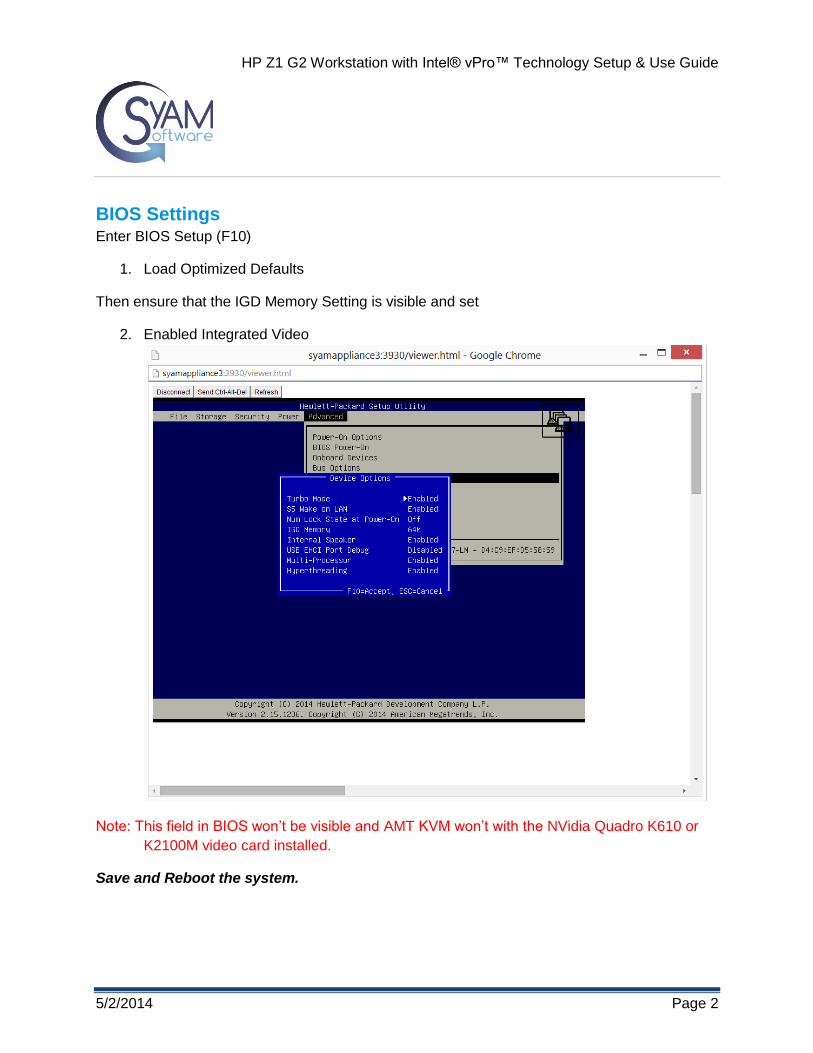
BIOS Settings Enter BIOS Setup (F10)
1. Load Optimized Defaults
Then ensure that the IGD Memory Setting is visible and set
2. Enabled Integrated Video
Note: This field in BIOS won‟t be visible and AMT KVM won‟t with the NVidia Quadro K610 or
K2100M video card installed.
Save and Reboot the system.
HP Z1 G2 Workstation with Intel® vPro™ Technology Setup & Use Guide
5/2/2014 Page 3
AMT ME Setup
As the system boots press Ctrl P to Enter AMT ME setup The default login for AMT ME is Username = admin Password = admin This must be changed to an 8 character strong password (example P@ssw0rd)
Once in, configure the AMT ME settings.
AMT Management Engine Settings
Intel ME General Settings
Change Intel ME Password
FW Update Settings
Set PRTC
Power Control
- Intel ME ON in Host Sleep States Desktop: On in S0, ME Wake in S3, S4-5
Intel AMT Configuration
Manageability Feature Selection
SOL/IDER/KVM
- Username and Password Enable
- SOL Enable
- IDER Enable
- Legacy Redirection Mode Enable
- KVM Enable
User Consent
- User Opt-in None
- Pot-in Configurable from Remote IT Enable Remote Control of KVM Pot-
In Policy
HP Z1 G2 Workstation with Intel® vPro™ Technology Setup & Use Guide
5/2/2014 Page 4
Password Policy
Network Setup
- Intel ME Network Name Settings
o Host Name HPZ1-G2
o Domain Name SYAM
o Shared/Dedicated FQDN Shared
o Dynamic DNS Update Disabled
- TCP/ IP Settings
o Wired LAN IPV4 Configuration
DHCP Mode Disabled
IPV4 Address 192.168.200.18
Subnet Mask Address 255.255.255.0
Default Gateway
Address
192.168.200.1
Preferred DNS Address. 192.168.200.1
Alternate DNS Address 192.168.100.1
o Wired LAN IPV6 Configuration
Remote Setup and Configuration
- Current Provisioning Mode
- Provisioning Record
Save Changes and Exit
Static IP was used for testing but DHCP Mode can be set to enabled
AMT KVM Doesn‟t Work With the NVidia Quadro K610 or K2100M video card installed
HP Z1 G2 Workstation with Intel® vPro™ Technology Setup & Use Guide
5/2/2014 Page 5
SyAM Software System Area Manager Setup
On a separate system install the SyAM System Area Manager v4.53 or above.
On the system running the System Area Manager copy any iso or img images that you wish to
use for AMT IDER to the c:\syam\ider\ folder
Open up a web browser and browse to the System Area Manager.
http://systemname:3930
1. Log in using your Windows username and password. This will become the default
administrator. For adding additional users please see the System Area Manager User
Manual.
2. From the drop down menu at the top right choose “Add Managed System”.
3. Enter the IP address of the HP Z1 G2 system in the From and To boxes, press apply,
this will now add the HP Z1 G2 system to the Management Tree.
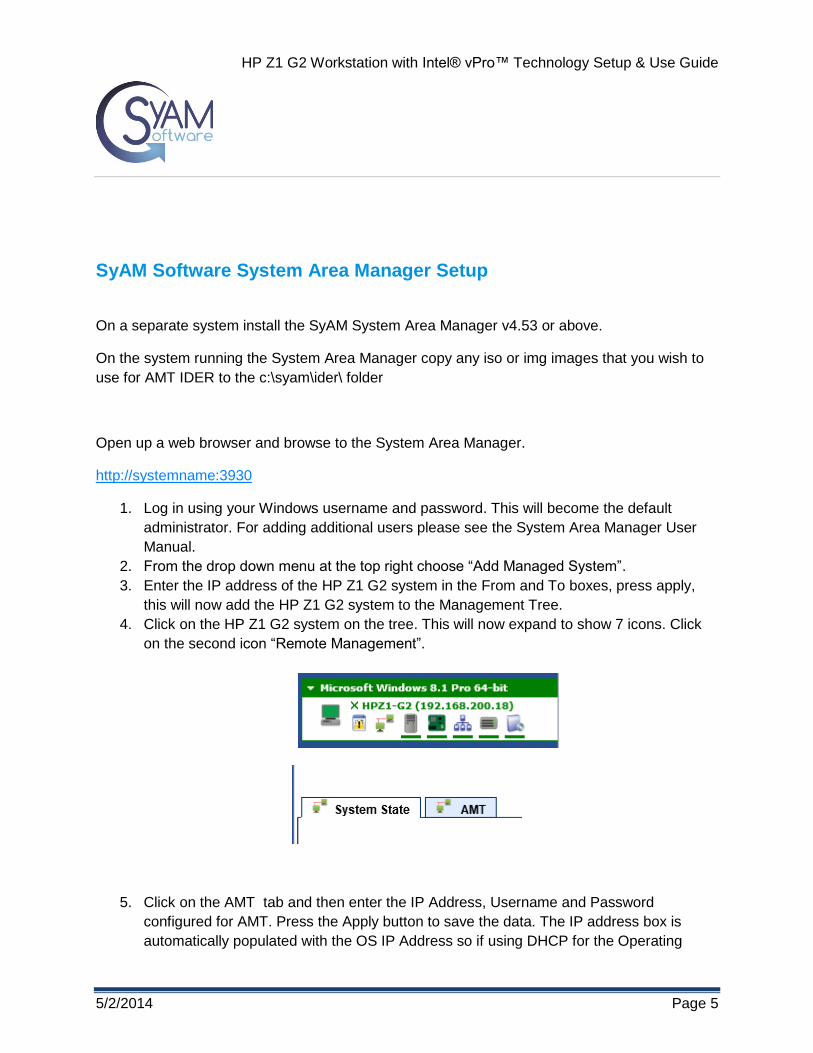
4. Click on the HP Z1 G2 system on the tree. This will now expand to show 7 icons. Click
on the second icon “Remote Management”.
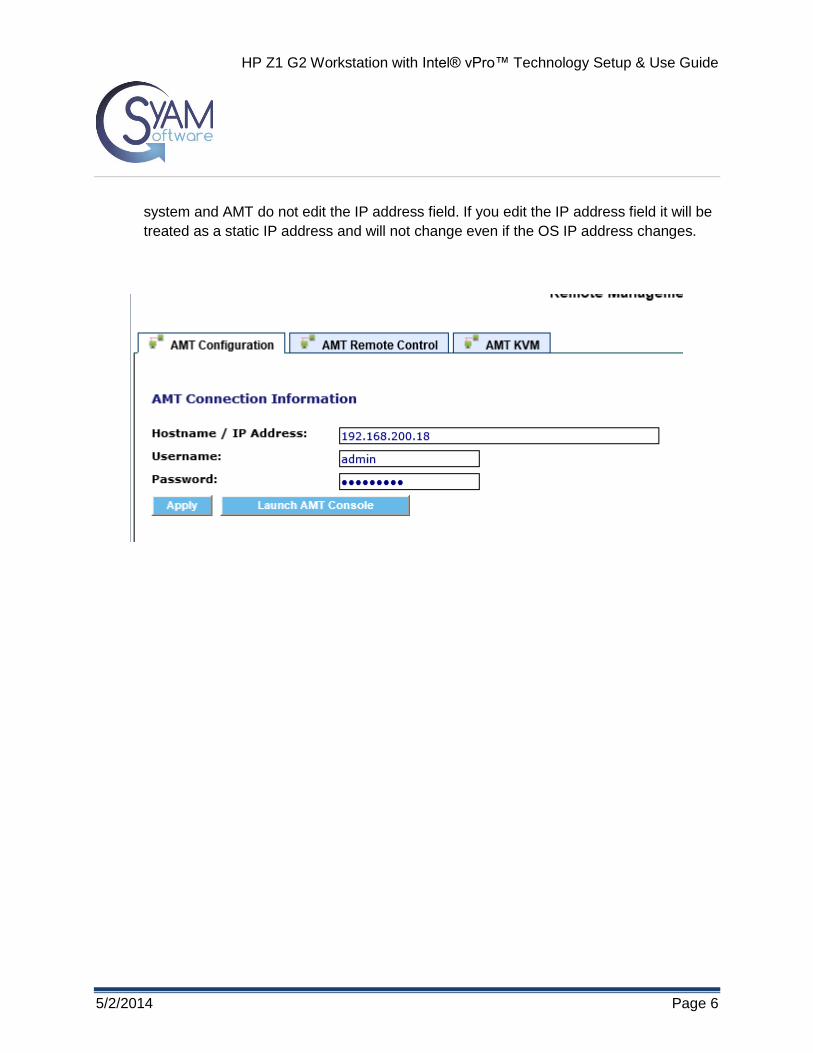
5. Click on the AMT tab and then enter the IP Address, Username and Password
configured for AMT. Press the Apply button to save the data. The IP address box is
automatically populated with the OS IP Address so if using DHCP for the Operating
HP Z1 G2 Workstation with Intel® vPro™ Technology Setup & Use Guide
5/2/2014 Page 6
system and AMT do not edit the IP address field. If you edit the IP address field it will be
treated as a static IP address and will not change even if the OS IP address changes.
HP Z1 G2 Workstation with Intel® vPro™ Technology Setup & Use Guide
5/2/2014 Page 7
AMT Remote Control
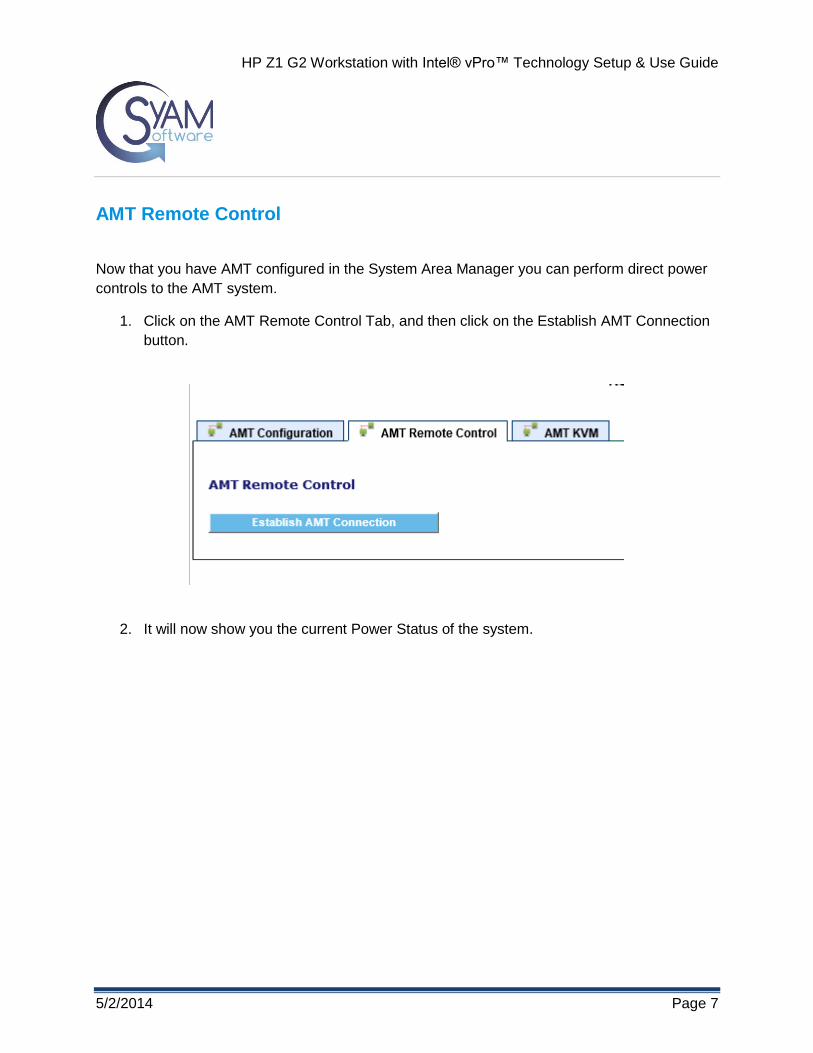
Now that you have AMT configured in the System Area Manager you can perform direct power
controls to the AMT system.
1. Click on the AMT Remote Control Tab, and then click on the Establish AMT Connection
button.
2. It will now show you the current Power Status of the system.
HP Z1 G2 Workstation with Intel® vPro™ Technology Setup & Use Guide
5/2/2014 Page 8
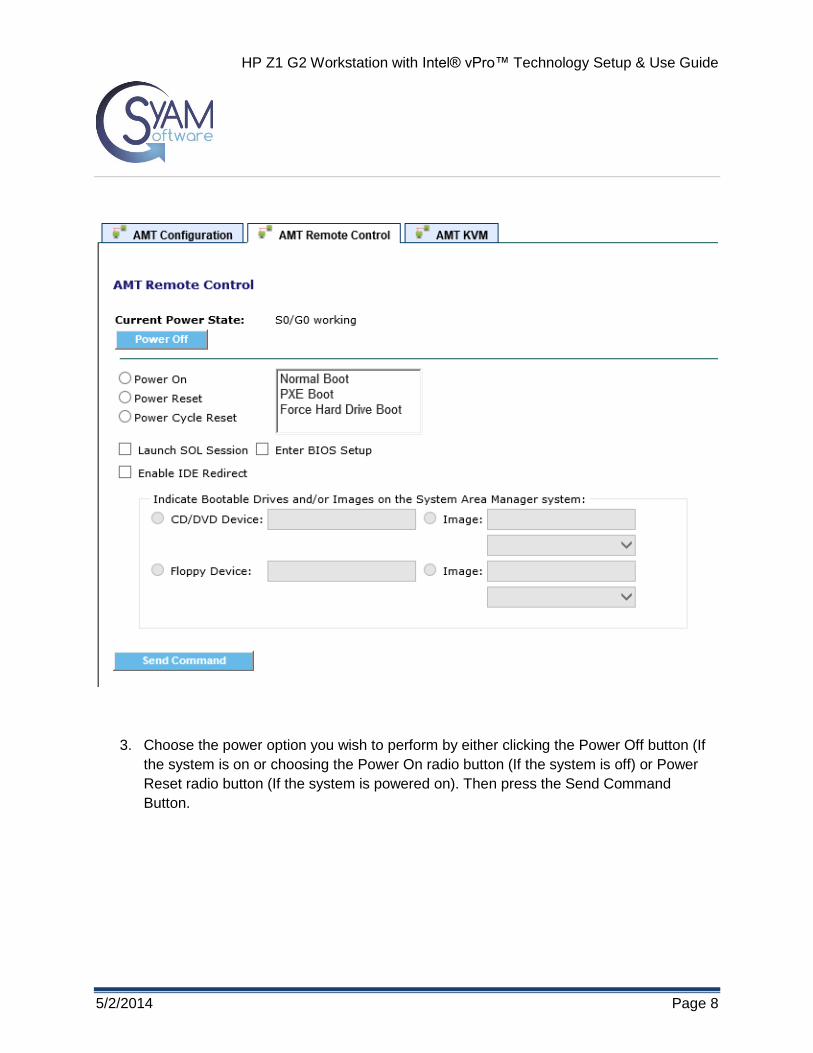
3. Choose the power option you wish to perform by either clicking the Power Off button (If
the system is on or choosing the Power On radio button (If the system is off) or Power
Reset radio button (If the system is powered on). Then press the Send Command
Button.
HP Z1 G2 Workstation with Intel® vPro™ Technology Setup & Use Guide
5/2/2014 Page 9
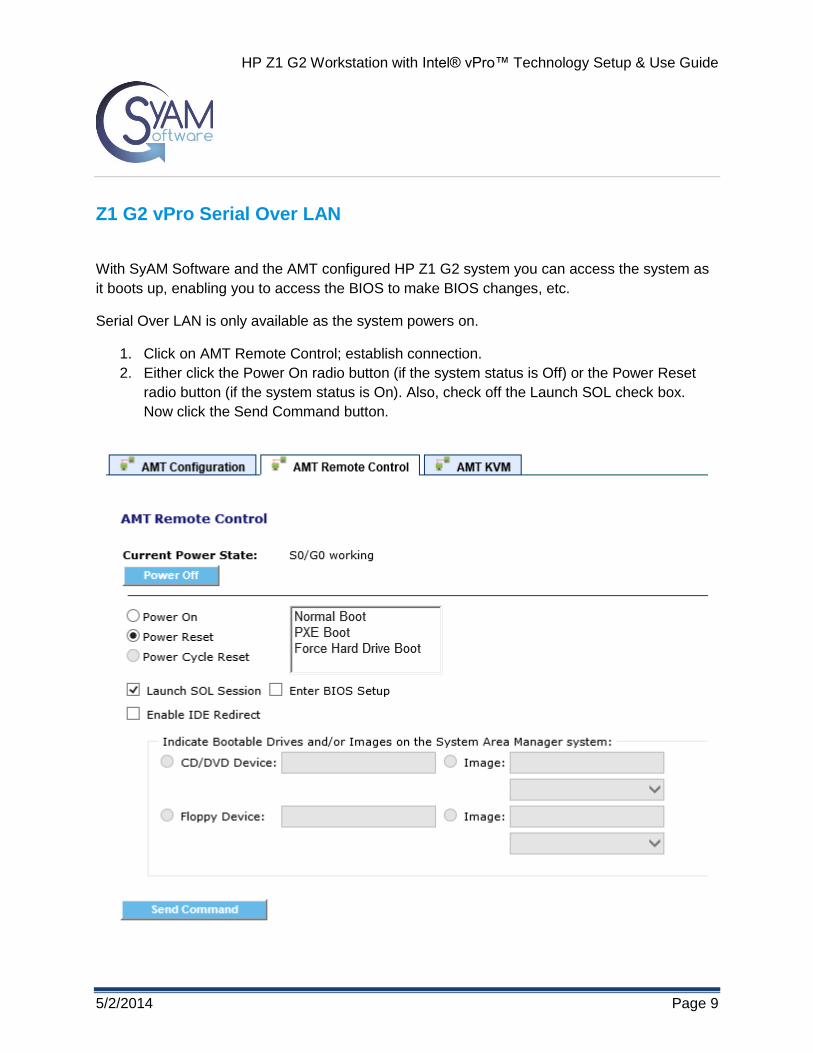
Z1 G2 vPro Serial Over LAN
With SyAM Software and the AMT configured HP Z1 G2 system you can access the system as
it boots up, enabling you to access the BIOS to make BIOS changes, etc.
Serial Over LAN is only available as the system powers on.
1. Click on AMT Remote Control; establish connection.
2. Either click the Power On radio button (if the system status is Off) or the Power Reset
radio button (if the system status is On). Also, check off the Launch SOL check box.
Now click the Send Command button.
HP Z1 G2 Workstation with Intel® vPro™ Technology Setup & Use Guide
5/2/2014 Page 10
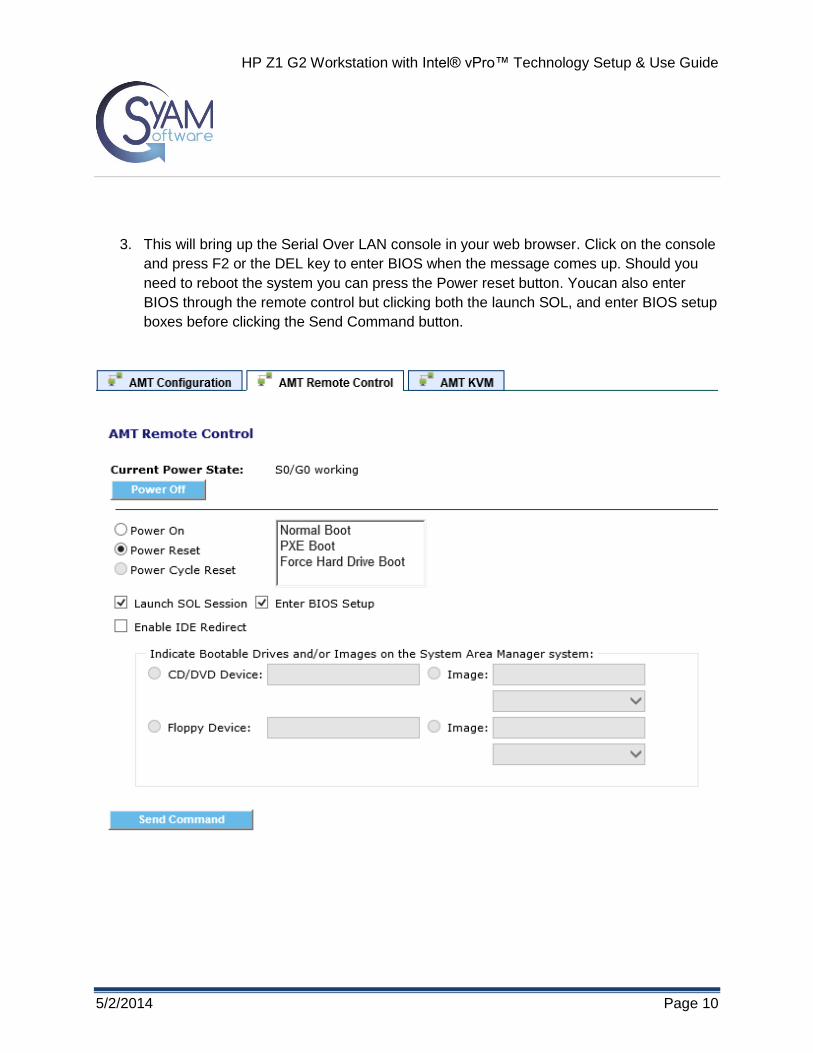
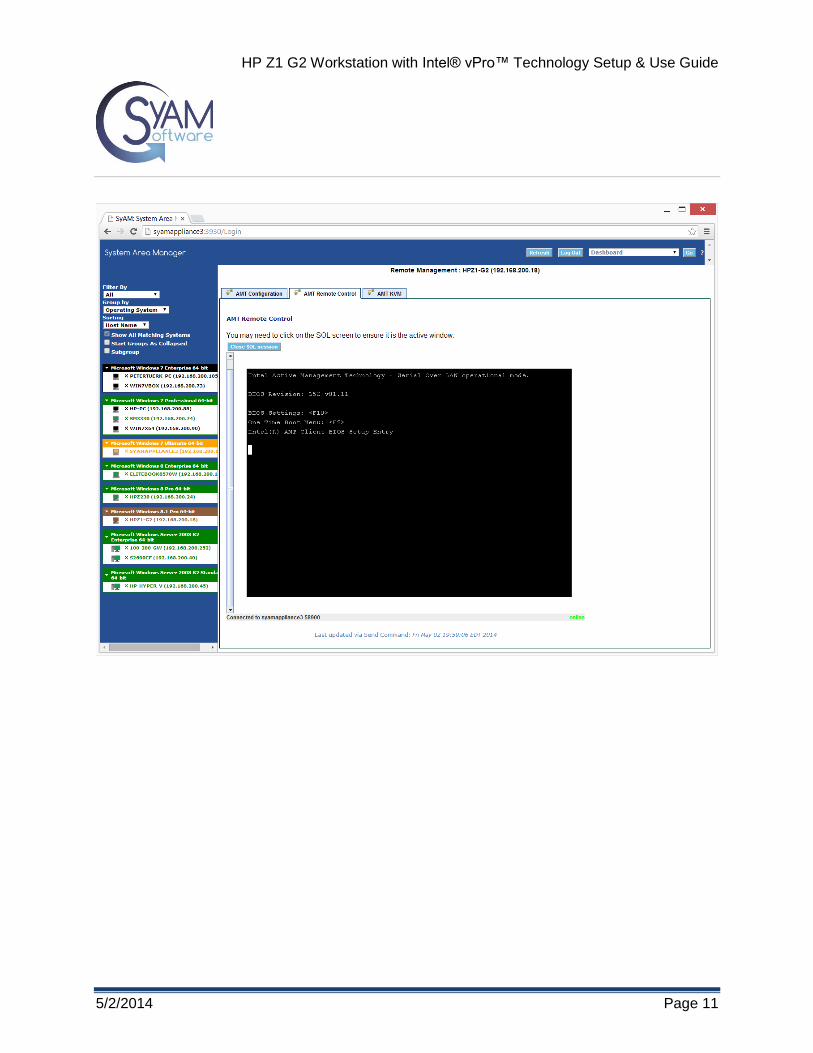
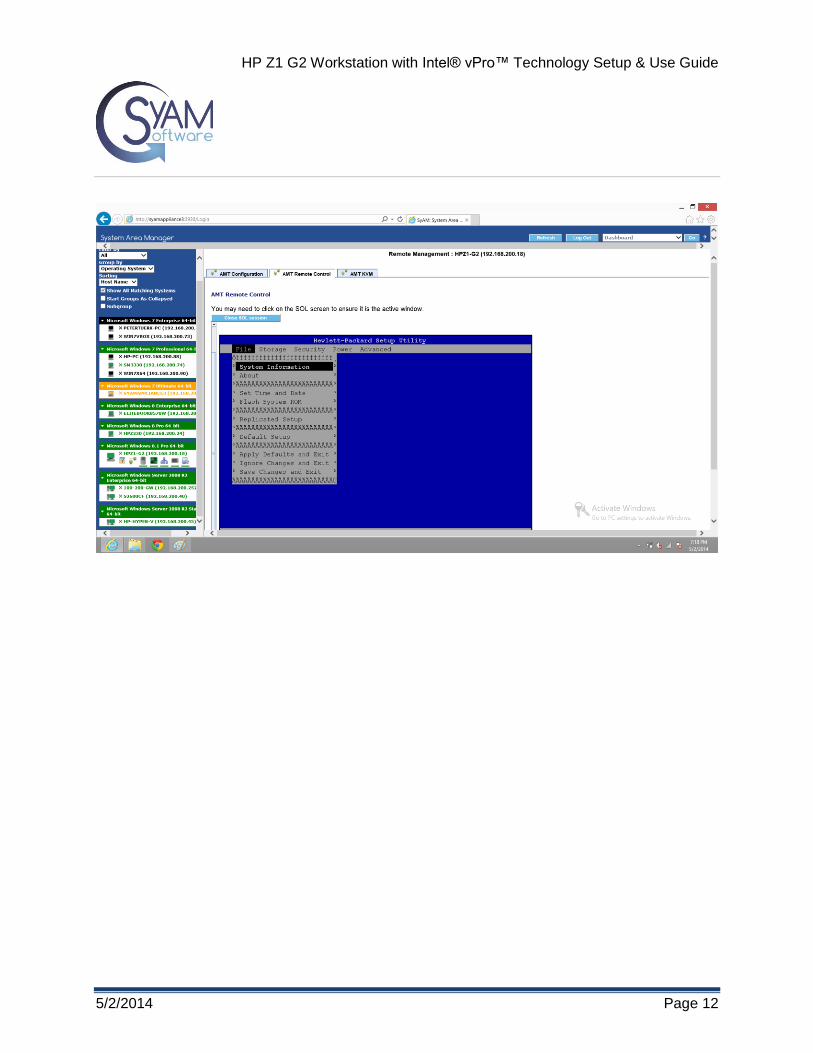
3. This will bring up the Serial Over LAN console in your web browser. Click on the console
and press F2 or the DEL key to enter BIOS when the message comes up. Should you
need to reboot the system you can press the Power reset button. Youcan also enter
BIOS through the remote control but clicking both the launch SOL, and enter BIOS setup
boxes before clicking the Send Command button.
HP Z1 G2 Workstation with Intel® vPro™ Technology Setup & Use Guide
5/2/2014 Page 11
HP Z1 G2 Workstation with Intel® vPro™ Technology Setup & Use Guide
5/2/2014 Page 12
HP Z1 G2 Workstation with Intel® vPro™ Technology Setup & Use Guide
5/2/2014 Page 13
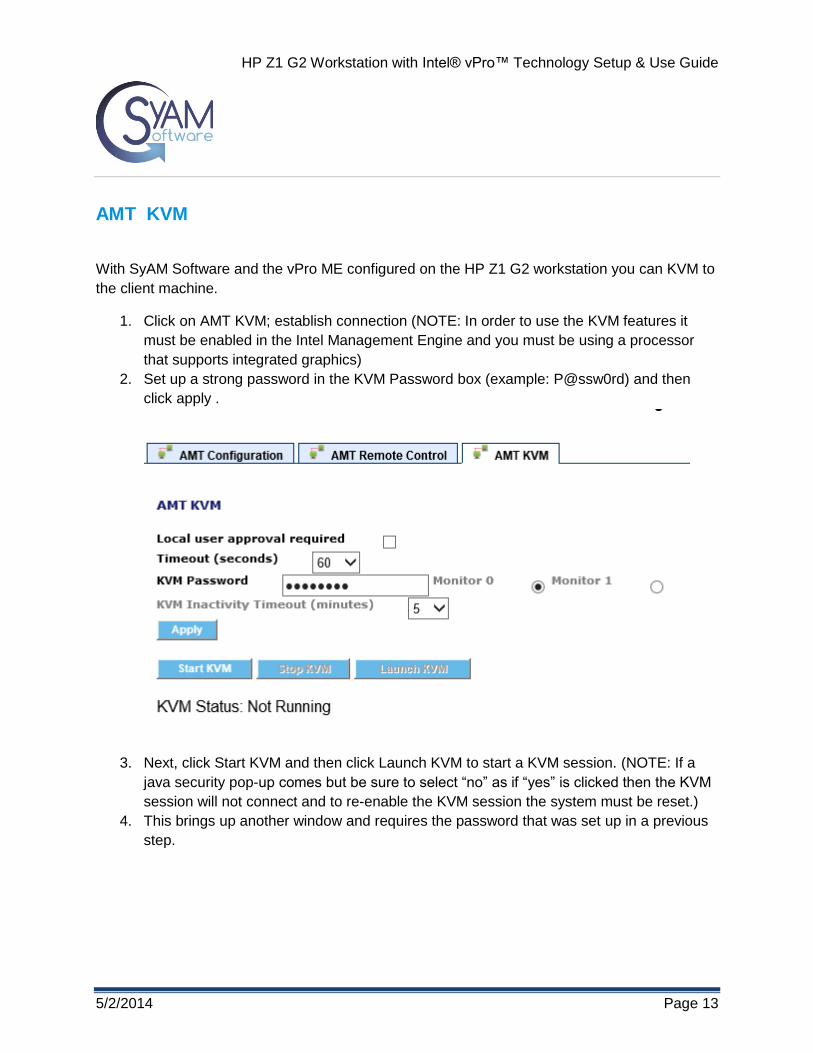
AMT KVM
With SyAM Software and the vPro ME configured on the HP Z1 G2 workstation you can KVM to
the client machine.
1. Click on AMT KVM; establish connection (NOTE: In order to use the KVM features it
must be enabled in the Intel Management Engine and you must be using a processor
that supports integrated graphics)
2. Set up a strong password in the KVM Password box (example: P@ssw0rd) and then
click apply .
3. Next, click Start KVM and then click Launch KVM to start a KVM session. (NOTE: If a
java security pop-up comes but be sure to select “no” as if “yes” is clicked then the KVM
session will not connect and to re-enable the KVM session the system must be reset.)
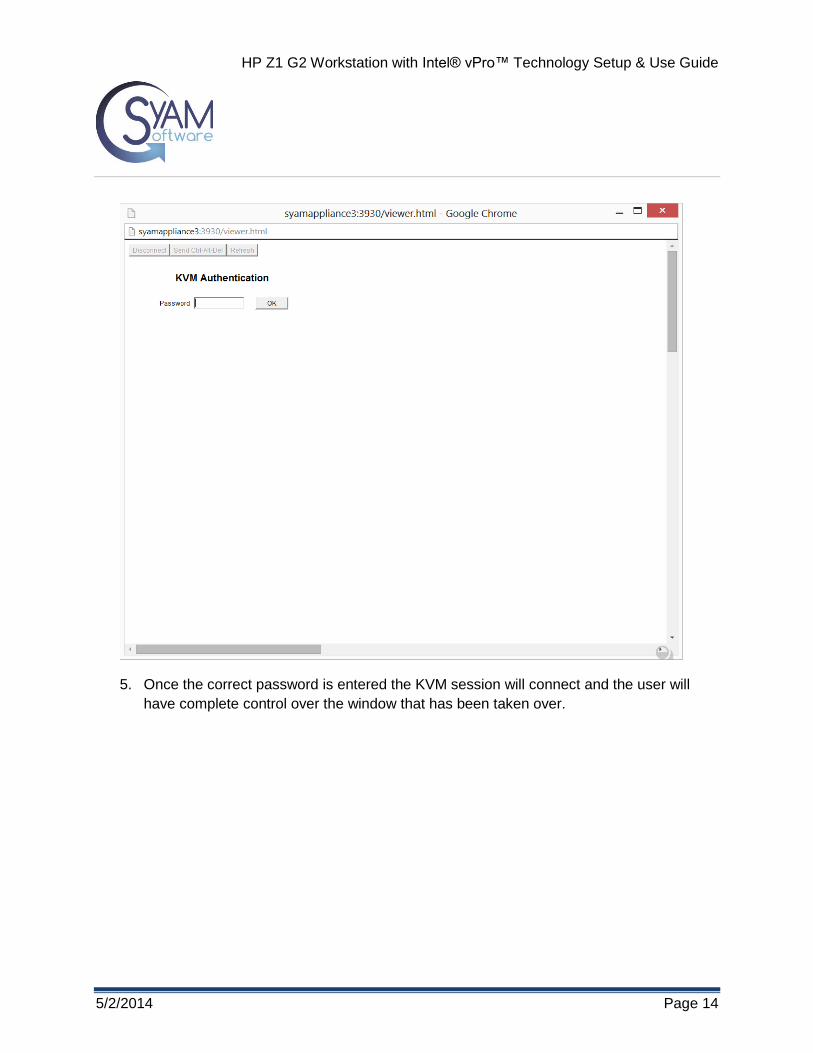
4. This brings up another window and requires the password that was set up in a previous
step.
HP Z1 G2 Workstation with Intel® vPro™ Technology Setup & Use Guide
5/2/2014 Page 14
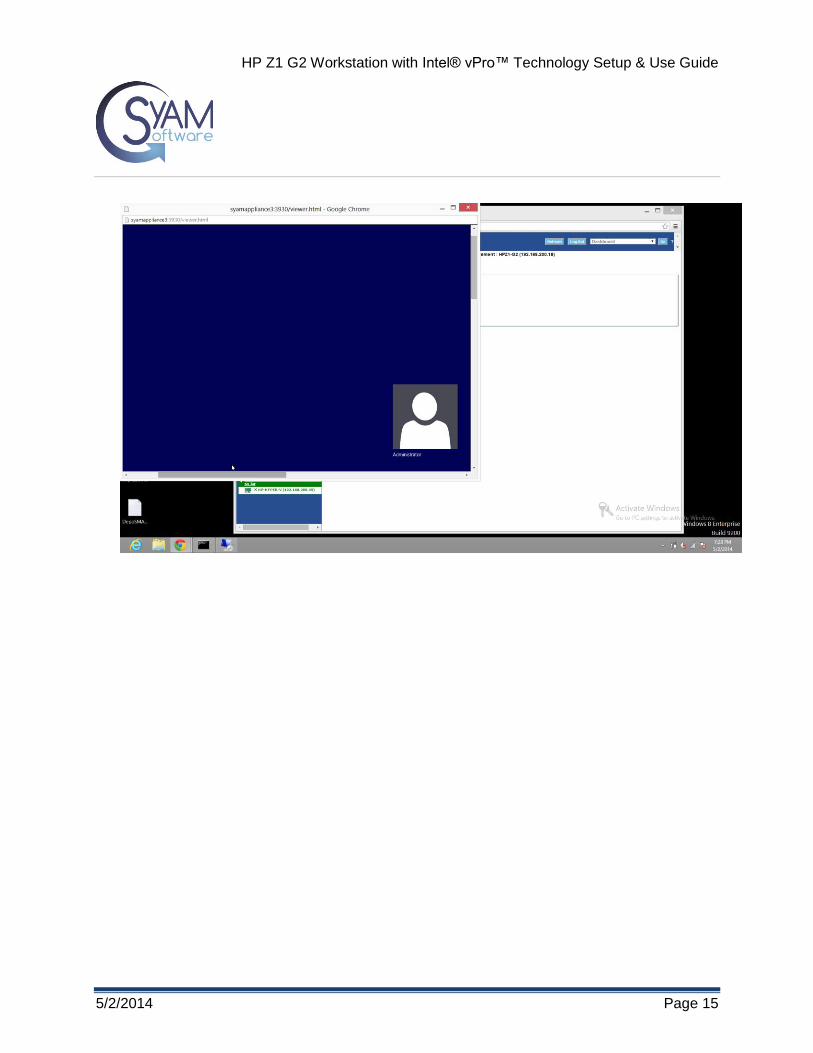
5. Once the correct password is entered the KVM session will connect and the user will
have complete control over the window that has been taken over.
HP Z1 G2 Workstation with Intel® vPro™ Technology Setup & Use Guide
5/2/2014 Page 15
HP Z1 G2 Workstation with Intel® vPro™ Technology Setup & Use Guide
5/2/2014 Page 16
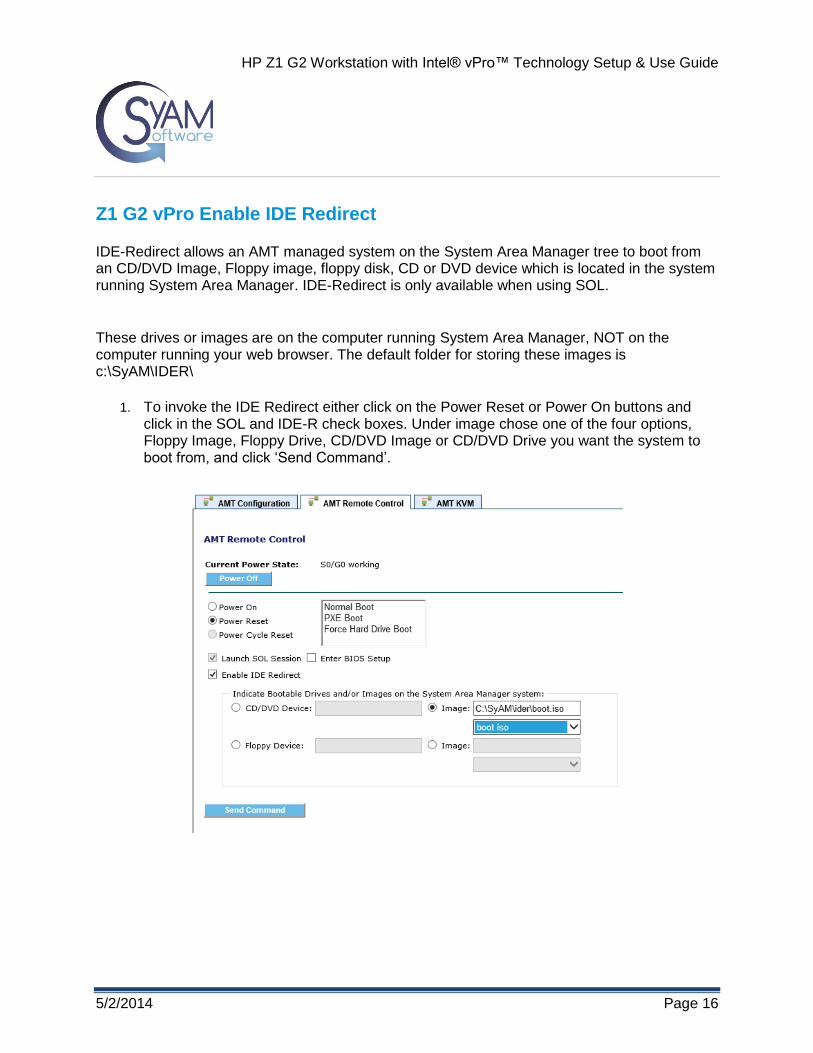
Z1 G2 vPro Enable IDE Redirect
IDE-Redirect allows an AMT managed system on the System Area Manager tree to boot from an CD/DVD Image, Floppy image, floppy disk, CD or DVD device which is located in the system running System Area Manager. IDE-Redirect is only available when using SOL.
These drives or images are on the computer running System Area Manager, NOT on the computer running your web browser. The default folder for storing these images is c:\SyAM\IDER\
1. To invoke the IDE Redirect either click on the Power Reset or Power On buttons and click in the SOL and IDE-R check boxes. Under image chose one of the four options, Floppy Image, Floppy Drive, CD/DVD Image or CD/DVD Drive you want the system to boot from, and click „Send Command‟.
HP Z1 G2 Workstation with Intel® vPro™ Technology Setup & Use Guide
5/2/2014 Page 17
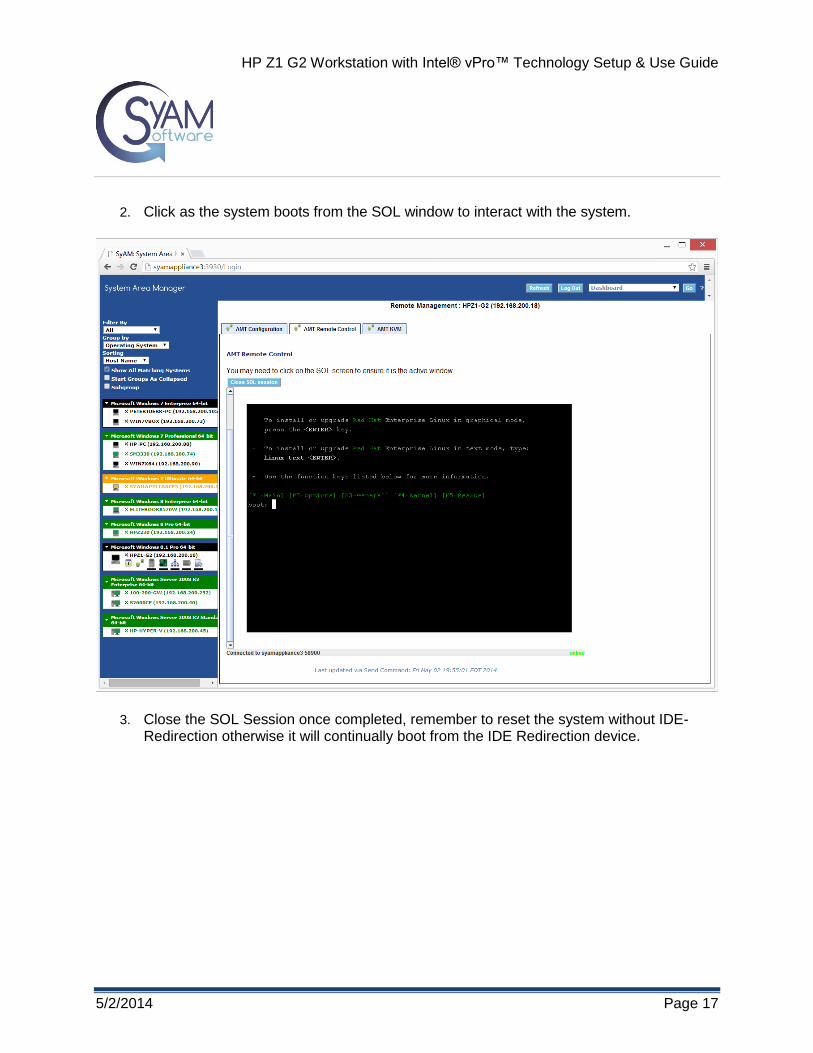
2. Click as the system boots from the SOL window to interact with the system.
3. Close the SOL Session once completed, remember to reset the system without IDE-Redirection otherwise it will continually boot from the IDE Redirection device.
HP Z1 G2 Workstation with Intel® vPro™ Technology Setup & Use Guide
5/2/2014 Page 18
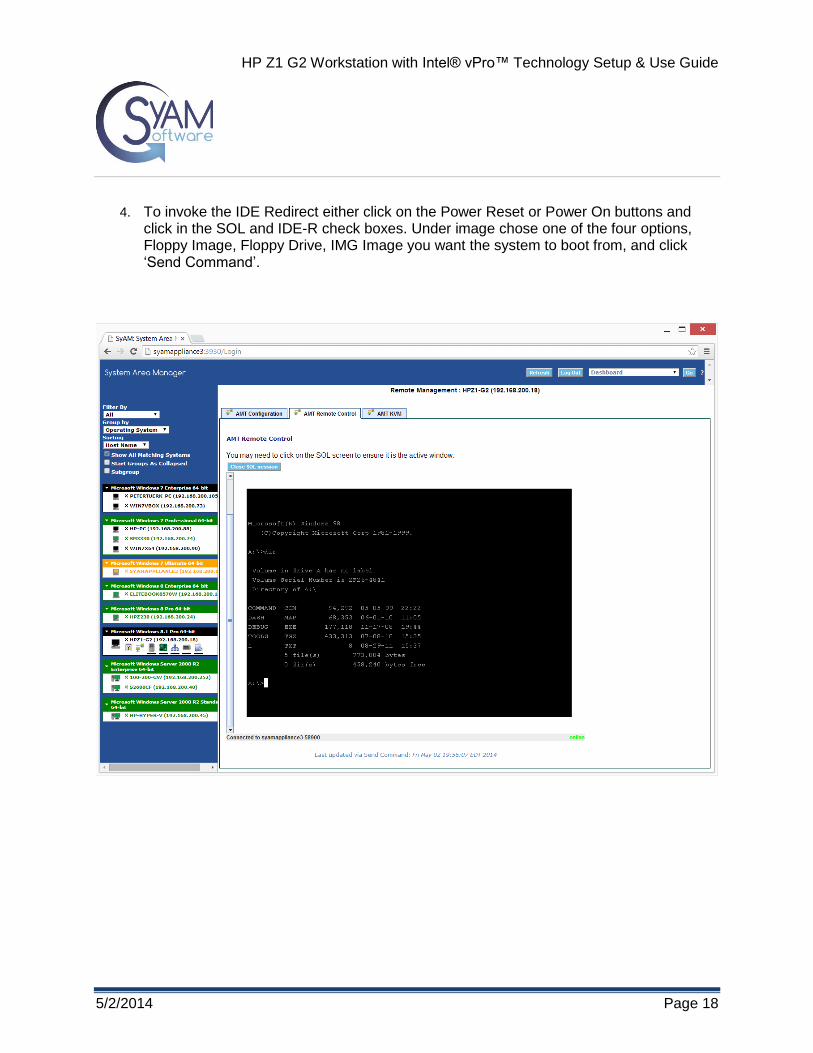
4. To invoke the IDE Redirect either click on the Power Reset or Power On buttons and click in the SOL and IDE-R check boxes. Under image chose one of the four options, Floppy Image, Floppy Drive, IMG Image you want the system to boot from, and click „Send Command‟.