Embed Size (px)
Citation preview
1
Table of Contents1 Turning the Power on and off ........................................................ 2Turning the Power on ........................................................................................ 2Turning the Power off ....................................................................................... 3
2 Paper ............................................................................................. 4Compatible Paper Types and Paper Feed Methods .......................................... 4Incompatible Paper ............................................................................................ 6Printable Areas .................................................................................................. 7Storing Paper ..................................................................................................... 8
3 Loading Paper ............................................................................... 94 Paper Jams (How to Remove Jammed Paper) ...................................13Locating Jammed Paper .................................................................................. 13Procedures for Removing Paper Jams ............................................................ 14After the Paper Jam has been Removed ......................................................... 20
5 Canceling Printing ....................................................................... 22Canceling Operations Currently in Progress (Soft Reset) ................................... 22Canceling All Operations (Hard Reset) .................................................................. 23
6 Checking Operation ..................................................................... 24Test Print ......................................................................................................... 24
2
1 Turning the Power on and offPrinting is enabled as soon as you turn on the power. Please note that all data will be lost when youturn off the printer. The instructions below show the correct way to turn the printer on and off.
Turning the Power onFollow the instructions below to turn the power on.
How to turn the power on
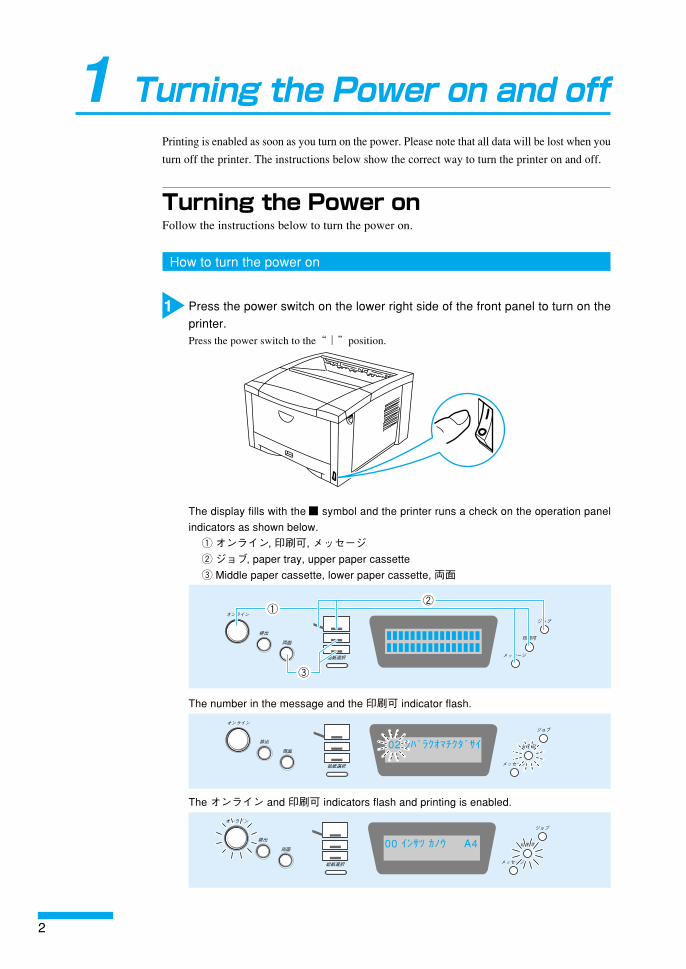
1 Press the power switch on the lower right side of the front panel to turn on theprinter.Press the power switch to the “|” position.
The display fills with the■ symbol and the printer runs a check on the operation panelindicators as shown below.
q オンライン, 印刷可, メッセージw ジョブ, paper tray, upper paper cassettee Middle paper cassette, lower paper cassette, 両面
オンライン�
排出�
両面�
給紙選択�
ジョブ�
メッセージ�
印刷可�
①�②�
③�
The number in the message and the 印刷可 indicator flash.
オンライン�
排出�
両面�
給紙選択�
ジョブ�
メッセージ�
印刷可�
The オンライン and 印刷可 indicators flash and printing is enabled.
オンライン�
排出�
両面�
給紙選択�
ジョブ�
メッセージ�
印刷可�
02 シバラクオマチクダサイ
00 インサツ カノウ A4
3
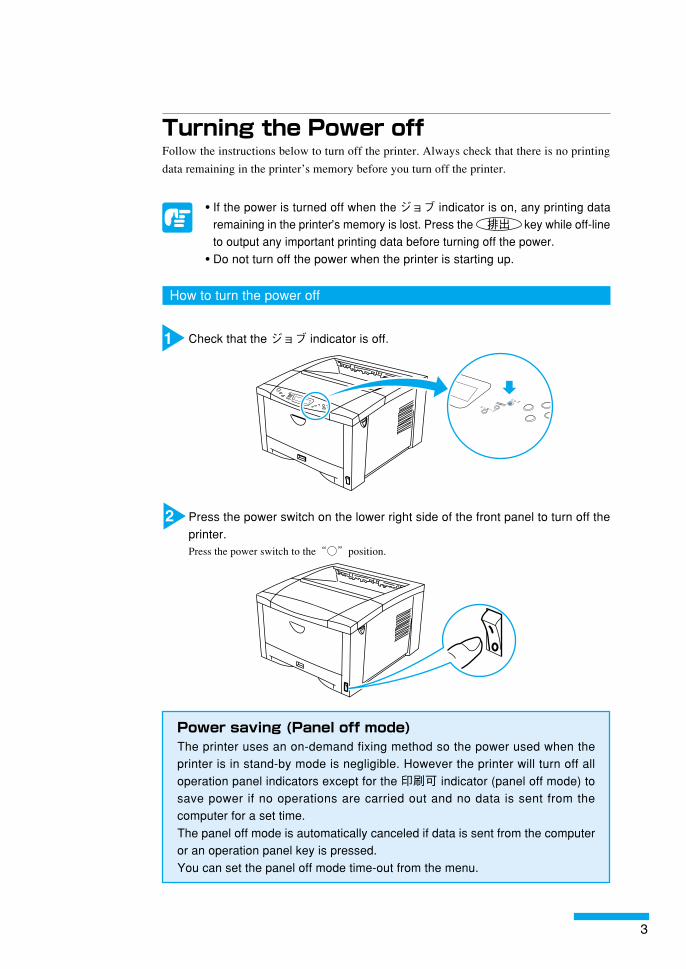
Turning the Power offFollow the instructions below to turn off the printer. Always check that there is no printingdata remaining in the printer’s memory before you turn off the printer.
• If the power is turned off when the ジョブ indicator is on, any printing dataremaining in the printer’s memory is lost. Press the 排出 key while off-lineto output any important printing data before turning off the power.
• Do not turn off the power when the printer is starting up.
How to turn the power off
1 Check that the ジョブ indicator is off.
ジョブ�印刷可�メッセージ�
2 Press the power switch on the lower right side of the front panel to turn off theprinter.Press the power switch to the“○”position.
Power saving (Panel off mode)The printer uses an on-demand fixing method so the power used when theprinter is in stand-by mode is negligible. However the printer will turn off alloperation panel indicators except for the 印刷可 indicator (panel off mode) tosave power if no operations are carried out and no data is sent from thecomputer for a set time.The panel off mode is automatically canceled if data is sent from the computeror an operation panel key is pressed.You can set the panel off mode time-out from the menu.

4
2 PaperUse the correct paper in order to get the best performance from your printer. Usingincompatible paper can lead to reduced printing quality and paper jamming.
Compatible Paper Types and Paper Feed Methods
Paper compatible for the paper cassetteYou can load the following standard size paper into the paper cassette.
Paper type Size (Weight) Max. sheet no. Output sheet no.
Plain paper A3, A4, A5, B4, B5 (64-90 g/m2)approx. 250
approx. 150/64 g/m2
Secondary originaldrawing paper A3, A4, B4, B5 approx. 250 1(Tracing paper)
• You can load Ledger-, Legal-, Letter- and Executive-size paper into theoptional L-shaped paper cassette.
Paper compatible for the paper trayYou can load the following sizes of paper into the paper tray.
Paper type Size (Weight) Max. sheet no. Output sheet no.
Plain paperwidth: 100-297 mm, approx. 100
approx. 150length: 148-432 mm (64-90 g/m2) /64 g/m2
Thick paperwidth: 100-297 mm, approx. 50
approx. 150length: 148-432 mm (90-128 g/m2) /128 g/m2
Secondary originaldrawing paper A3, A4, B4, B5 approx. 100 1(Tracing paper)
TransparenciesA4 (Canon domestic LBP
approx. 50 approx. 100transparencies: 8.7 g)
Label sheet A4 (Canon domestic label sheet: 7.8 g) approx. 40 approx. 100
5
Label sheet• The following types of label sheet can cause paper jams that are hard toremove or damage the printer. Do not use sheet that has adhesivesurfaces exposed or sheet from which labels have been removed to leavethe lower surface exposed.
Transparencies• Transparencies may be difficult to separate from each other. Take severalsheets and loosen them by flexing them several times before loading theminto the printer.
Secondary original drawing paper (Tracing paper)• Sheets of tracing paper may be difficult to separate from each other. Takeseveral sheets and loosen them by flexing them several times beforeloading them into the printer.
• Check which side of the paper is face up and which side is face down.When you load tracing paper into the paper cassette, load it so that theface-up side is face down. When you load tracing paper into the paper tray,load it so that the face-up side is face up.
•When you first open a packet of tracing paper, the paper could be warped.Before loading the paper into the printer, leave it in its packaging for a whileto allow it to straighten out.
• Remove each sheet of tracing paper from the output tray as soon as it isoutputted to prevent paper jams.
- If you want to use recycled paper in the duplex unit-If you use recycled paper that has been stored in extremely humid conditionssuch as during the wet season or in a room without air-conditioning duringsummer this could cause the paper to crease or bend at the corners.If this happens, it should be dealt with in the following ways.・Leave the paper in an air-conditioned room for two hours before using it・Turn the paper over so that the other side is facing up when you load thepaper into the printerIf the paper still creases or bends at the corners after you have tried the abovesolutions, use new paper.
6
Incompatible PaperIn order to avoid paper jams and damaging the printer, do not use the following kinds ofpaper.
Paper that jams easily
• Paper that is too thick or too thin• Non-standard size paper• Wet or damp paper• Torn paper• Coarse or extremely smooth paper• Label sheet with binder holes, serrated paper• Curled paper, creased paper• Specially coated paper• Label sheet with labels that peel off easily• Paper which has already been used for photocopying or laser printing(reverse side also incompatible)
Heat-sensitive paper
• Paper with ink that melts, burns or gives off toxic vapours in the heat of thefixing assembly (approx. 150 ℃)
• Thermal paper• Color paper with a processed surface• Specially coated paper• Paper with adhesive on it
Paper that can cause printer malfunction or damage
• Carbon paper• Paper with staples, clips, ribbons or tape attached• Paper which has already been used for photocopying or laser printing(reverse side also incompatible)
Paper on which toner cannot fix easily
• Coarse paper such as pulp paper and Japanese writing paper• Paper with rough fibers• Specially coated paper
7
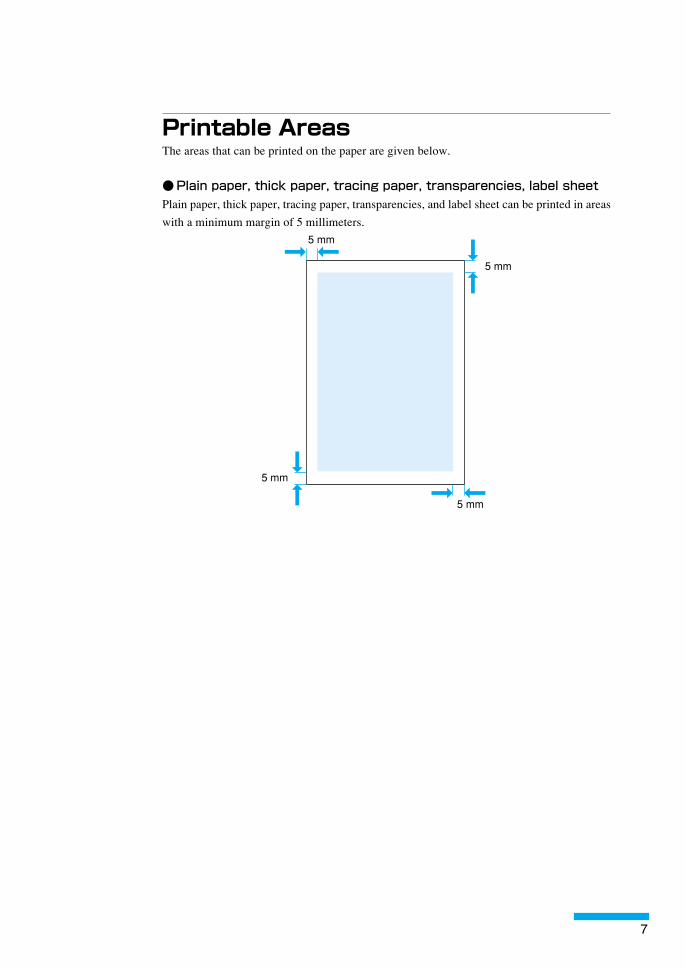
Printable AreasThe areas that can be printed on the paper are given below.
●Plain paper, thick paper, tracing paper, transparencies, label sheetPlain paper, thick paper, tracing paper, transparencies, and label sheet can be printed in areaswith a minimum margin of 5 millimeters.
5 mm
5 mm
5 mm
5 mm
8
Storing PaperEven paper that meets your printer’s specifications can deteriorate if stored improperly. Suchpaper can cause misfeeds or paper jams, and can lead to reduced printing quality.When storing paper, observe the following precautions:
• Paper is particularly sensitive to moisture, and should be kept away fromdamp areas.
• The packaging that the paper is sold in is designed to resist moisture. Keeppaper in its original packaging until you are ready to use it. Return anyunused paper to its packaging.
• Store paper flat.• Avoid storing paper on the floor, because floors are often damp.• Do not position the paper where it might become curled or creased.• Do not store paper vertically, or in excessively high stacks.• Do not store paper in locations that are directly exposed to sunlight or highhumidity.
• If there is a considerable difference in temperature between where thepaper is stored and where the printer is, move the paper in its packaging tothe printer’s location for about a day before using the paper. This allows itto adjust to the new temperature. Rapid changes in temperature andhumidity can cause the paper to curl or crease.
9
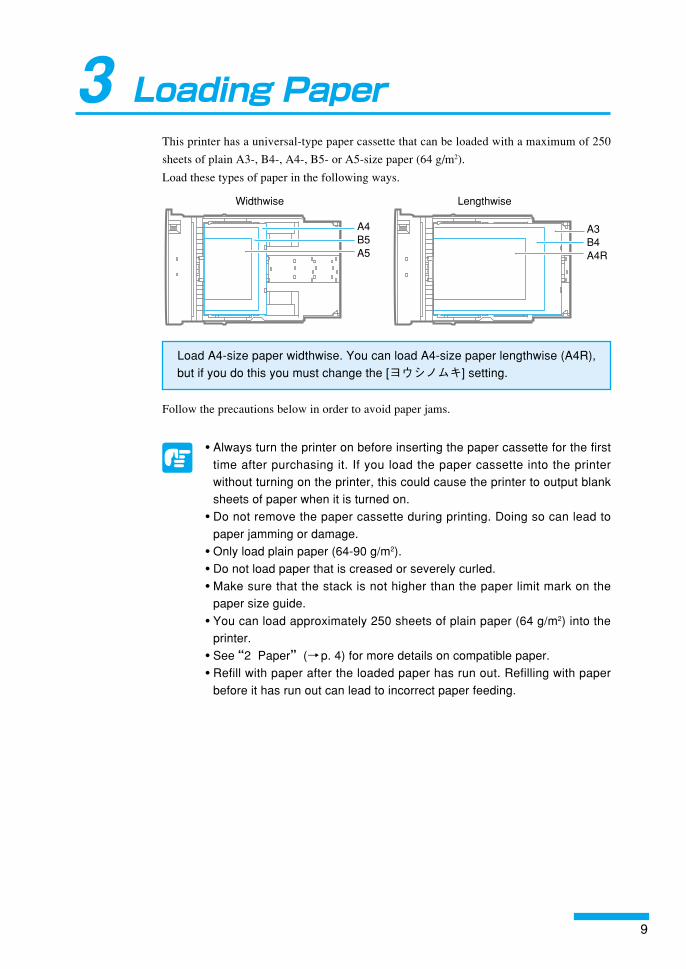
3 Loading PaperThis printer has a universal-type paper cassette that can be loaded with a maximum of 250sheets of plain A3-, B4-, A4-, B5- or A5-size paper (64 g/m2).Load these types of paper in the following ways.
A4�B5�A5
A3�B4�A4R
Widthwise � Lengthwise
Load A4-size paper widthwise. You can load A4-size paper lengthwise (A4R),but if you do this you must change the [ヨウシノムキ] setting.
Follow the precautions below in order to avoid paper jams.
• Always turn the printer on before inserting the paper cassette for the firsttime after purchasing it. If you load the paper cassette into the printerwithout turning on the printer, this could cause the printer to output blanksheets of paper when it is turned on.
• Do not remove the paper cassette during printing. Doing so can lead topaper jamming or damage.
• Only load plain paper (64-90 g/m2).• Do not load paper that is creased or severely curled.• Make sure that the stack is not higher than the paper limit mark on thepaper size guide.
• You can load approximately 250 sheets of plain paper (64 g/m2) into theprinter.
• See“2 Paper” (→p. 4) for more details on compatible paper.• Refill with paper after the loaded paper has run out. Refilling with paperbefore it has run out can lead to incorrect paper feeding.
10
How to load paper into the paper cassette
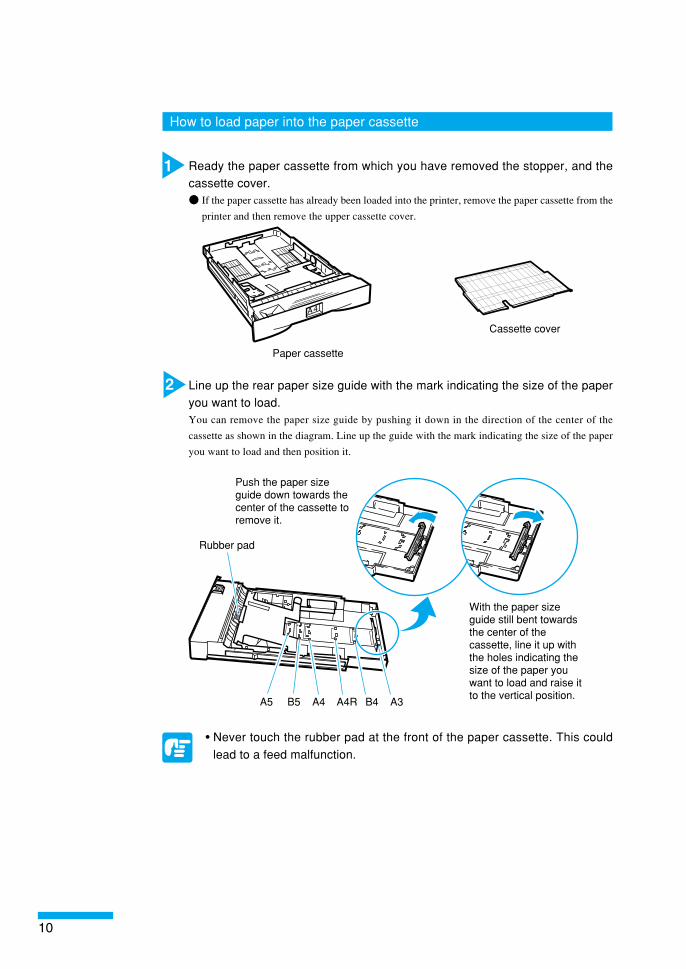
1 Ready the paper cassette from which you have removed the stopper, and thecassette cover.● If the paper cassette has already been loaded into the printer, remove the paper cassette from theprinter and then remove the upper cassette cover.
A4
Paper cassette
Cassette cover
2 Line up the rear paper size guide with the mark indicating the size of the paperyou want to load.You can remove the paper size guide by pushing it down in the direction of the center of thecassette as shown in the diagram. Line up the guide with the mark indicating the size of the paperyou want to load and then position it.
Push the paper size guide down towards the center of the cassette to remove it.
Rubber pad
With the paper size guide still bent towards the center of the cassette, line it up with the holes indicating the size of the paper you want to load and raise it to the vertical position.
A5 B5 A4 A4R B4 A3
• Never touch the rubber pad at the front of the paper cassette. This couldlead to a feed malfunction.
11
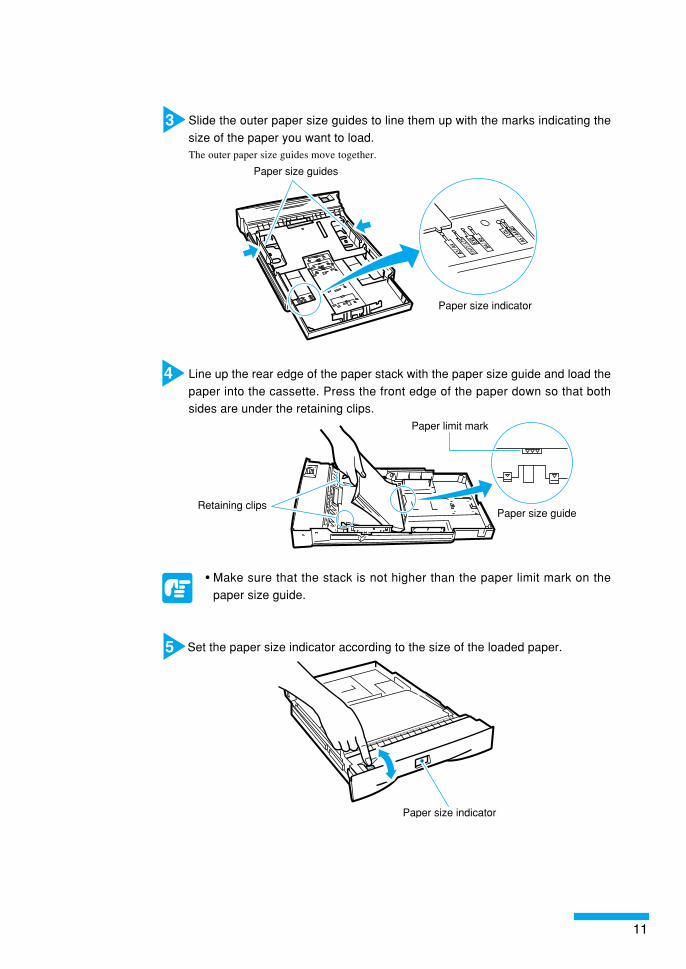
3 Slide the outer paper size guides to line them up with the marks indicating thesize of the paper you want to load.The outer paper size guides move together.
A3 / A4
11x17
/ LTR EXE
B4 / B5
LGL
A5 / A4 R
Paper size guides
Paper size indicator
4 Line up the rear edge of the paper stack with the paper size guide and load thepaper into the cassette. Press the front edge of the paper down so that bothsides are under the retaining clips.
Paper size guide
Paper limit mark
Retaining clips
• Make sure that the stack is not higher than the paper limit mark on thepaper size guide.
5 Set the paper size indicator according to the size of the loaded paper.
Paper size indicator

12
6 Attach the cassette cover and insert the paper cassette into the printer.Insert it slowly until its front surface is flush with the front surface of the printer.
• Make sure you correctly attach the cassette cover to the paper cassette.When an optional duplex unit is attached to the printer, you cannot duplexprint if the cassette cover has not been attached to the paper cassette, isloose or has slipped.
• Always check that the loaded paper size is the same as that shown on thepaper size indicator before inserting the paper cassette into the printer. Ifthe indicated size is different, this could cause a malfunction.
• If the paper overlaps when it is sent through, turn the paper around (the endthat comes into contact with the rubber pad at the front of the papercassette) in the paper cassette and reload the cassette.
13
4 Paper Jams(How to Remove Jammed Paper)
If a paper jam occurs inside the printer for any reason during printing, an alarm sounds, themessage [13 ヨウシガ ツマリマシタ] appears in the first line on the display and amessage indicating the location of the paper jam (the messages [キュウシブ], [ウエ カバー], [コウブ カバー ] and [リョウメン ユニット] (appears only when a duplex unitis attached) ) appears in the second line on the display. If a paper jam occurs, check theposition of the jam as given in the message and remove any jammed paper.
• Leave the printer turned on while removing jammed paper. If you turn thepower off, the printing data will be deleted.
• If there is more than one paper jam, they are all displayed in sequence.Check all the locations given in the message.
Locating Jammed PaperIf a paper jam occurs, check the position of the jam as given in the message on the display.
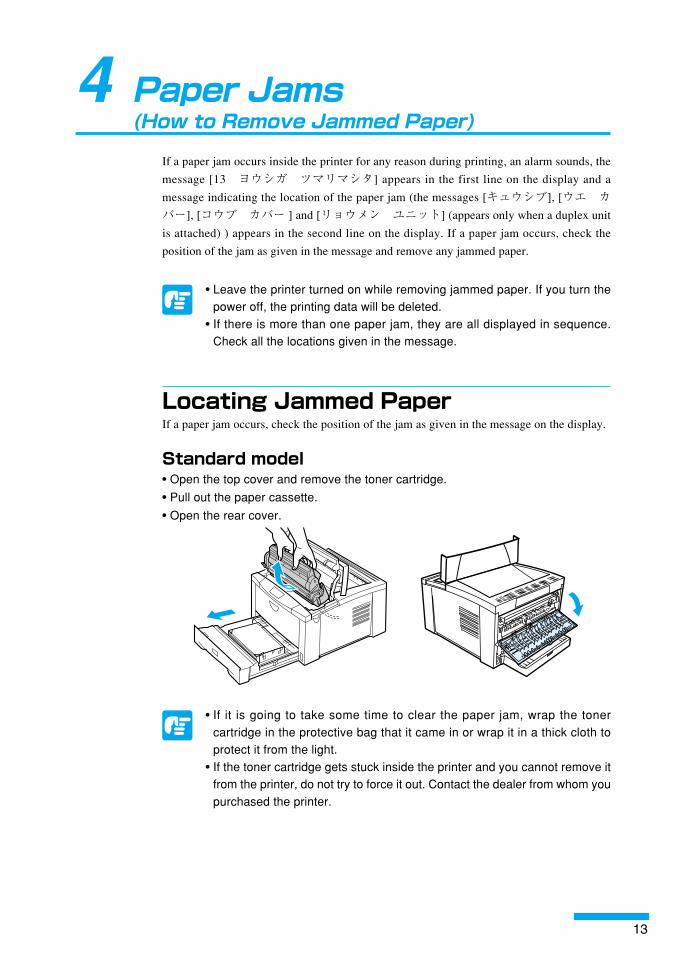
Standard model• Open the top cover and remove the toner cartridge.• Pull out the paper cassette.
• Open the rear cover.
• If it is going to take some time to clear the paper jam, wrap the tonercartridge in the protective bag that it came in or wrap it in a thick cloth toprotect it from the light.
• If the toner cartridge gets stuck inside the printer and you cannot remove itfrom the printer, do not try to force it out. Contact the dealer from whom youpurchased the printer.
14
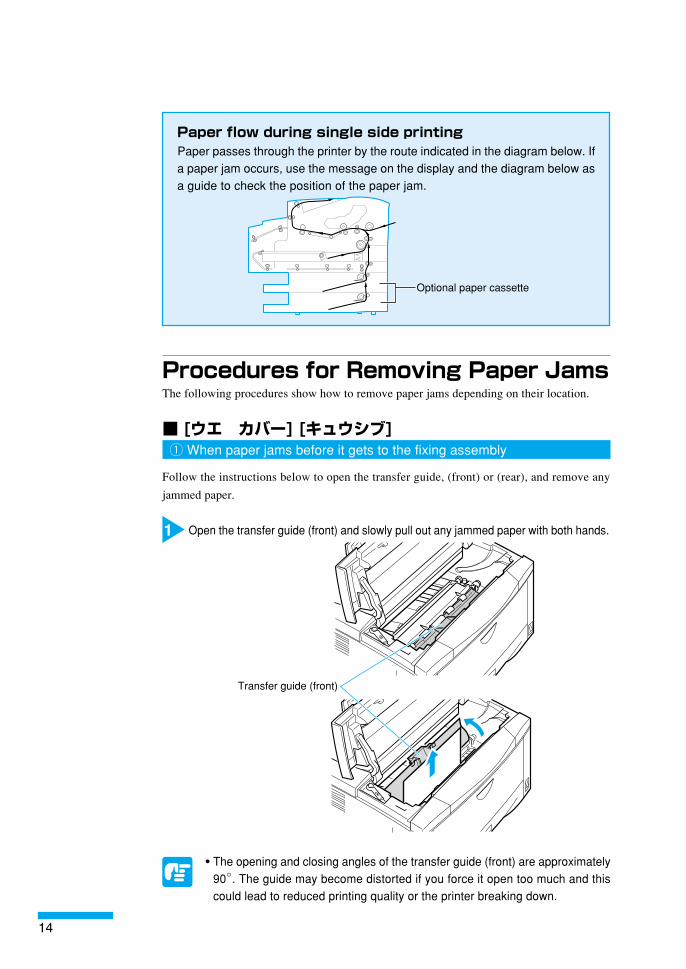
Paper flow during single side printingPaper passes through the printer by the route indicated in the diagram below. Ifa paper jam occurs, use the message on the display and the diagram below asa guide to check the position of the paper jam.
Optional paper cassette
Procedures for Removing Paper JamsThe following procedures show how to remove paper jams depending on their location.
■ [ウエ カバー] [キュウシブ]q When paper jams before it gets to the fixing assembly
Follow the instructions below to open the transfer guide, (front) or (rear), and remove anyjammed paper.
1 Open the transfer guide (front) and slowly pull out any jammed paper with both hands.
�
Transfer guide (front)
• The opening and closing angles of the transfer guide (front) are approximately90。. The guide may become distorted if you force it open too much and this
could lead to reduced printing quality or the printer breaking down.
15
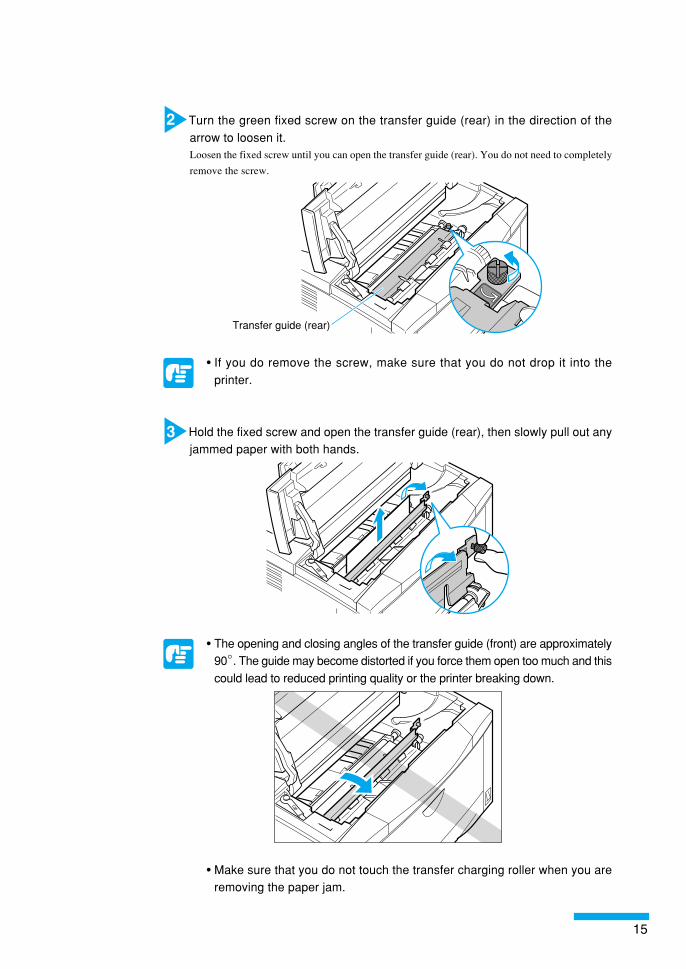
2 Turn the green fixed screw on the transfer guide (rear) in the direction of thearrow to loosen it.Loosen the fixed screw until you can open the transfer guide (rear). You do not need to completelyremove the screw.
Transfer guide (rear)
• If you do remove the screw, make sure that you do not drop it into theprinter.
3 Hold the fixed screw and open the transfer guide (rear), then slowly pull out anyjammed paper with both hands.
• The opening and closing angles of the transfer guide (front) are approximately90。. The guide may become distorted if you force them open too much and this
could lead to reduced printing quality or the printer breaking down.
• Make sure that you do not touch the transfer charging roller when you areremoving the paper jam.

16
4 Close the transfer guide (rear) and turn the fixed screw in the opposite directionto the arrow to tighten it.Firmly tighten the fixed screw.
• When the leading edge of the paper has already been fed as far as thefixing assembly, always remove the paper from the rear door side. (→ [③When the paper has been fed as far as the fixing assembly] p. 18)
• Toner from the part that has been transferred has not been fixed on thepaper yet. If you touch this part of the paper you will get toner on your hand.Take hold of a part of the paper that has not been transferred to pull out thepaper so that you do not get toner on your hands.
• If you get toner on your hands or clothing wash it off with waterimmediately.
• After you have removed the paper, return the transfer guide to its originalposition before you load the toner cartridge.
17
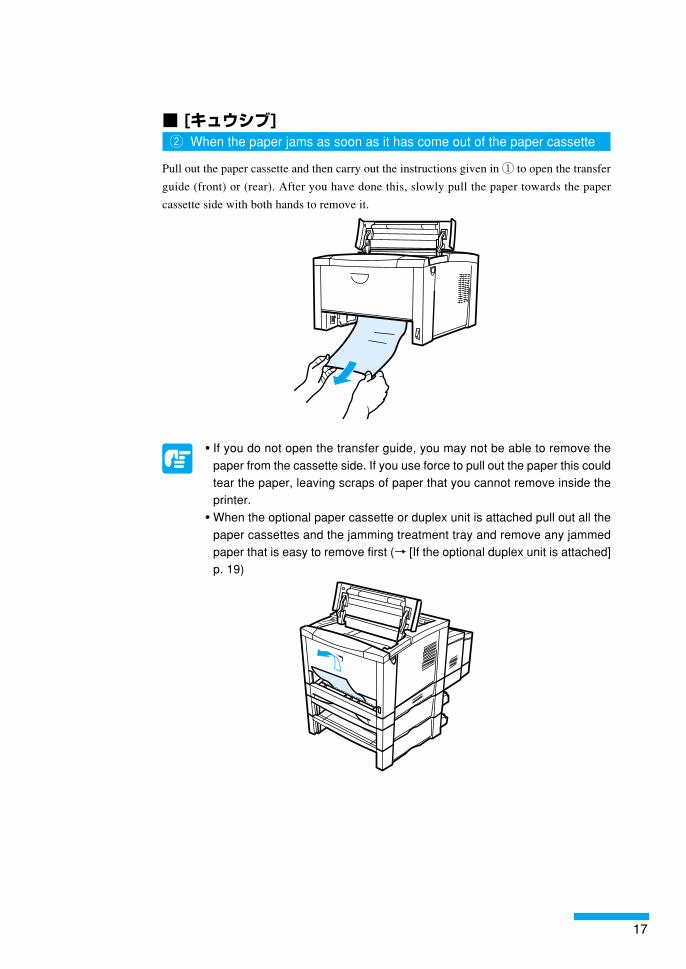
■ [キュウシブ]w When the paper jams as soon as it has come out of the paper cassette
Pull out the paper cassette and then carry out the instructions given in ① to open the transferguide (front) or (rear). After you have done this, slowly pull the paper towards the papercassette side with both hands to remove it.
• If you do not open the transfer guide, you may not be able to remove thepaper from the cassette side. If you use force to pull out the paper this couldtear the paper, leaving scraps of paper that you cannot remove inside theprinter.
• When the optional paper cassette or duplex unit is attached pull out all thepaper cassettes and the jamming treatment tray and remove any jammedpaper that is easy to remove first (→ [If the optional duplex unit is attached]p. 19)
18
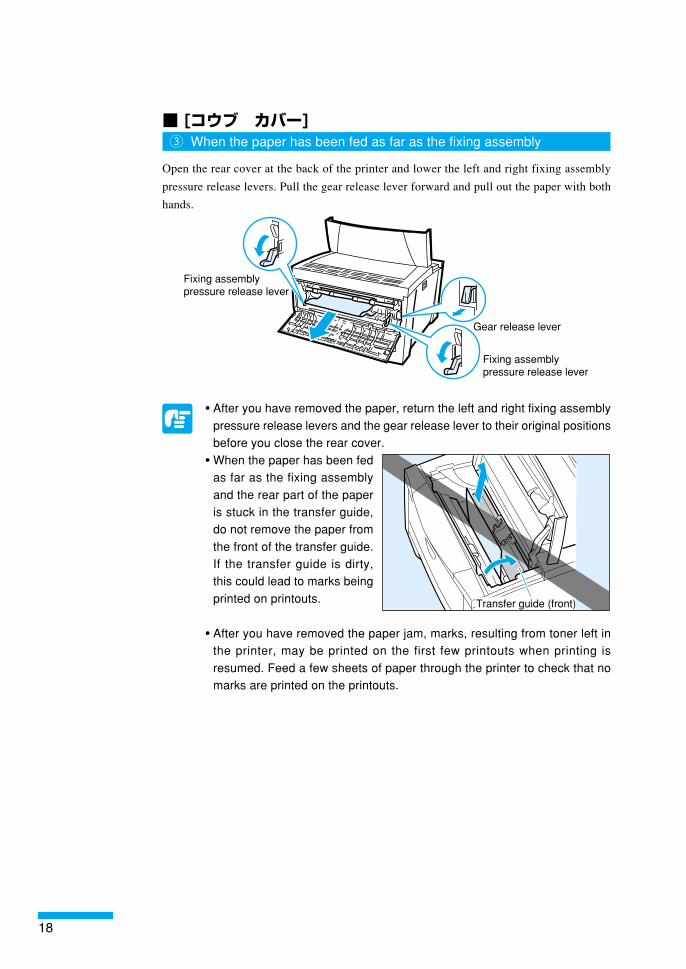
■ [コウブ カバー]e When the paper has been fed as far as the fixing assembly
Open the rear cover at the back of the printer and lower the left and right fixing assemblypressure release levers. Pull the gear release lever forward and pull out the paper with bothhands.
Fixing assembly �pressure release lever
Gear release lever
Fixing assembly �pressure release lever
• After you have removed the paper, return the left and right fixing assemblypressure release levers and the gear release lever to their original positionsbefore you close the rear cover.
• When the paper has been fedas far as the fixing assemblyand the rear part of the paperis stuck in the transfer guide,do not remove the paper fromthe front of the transfer guide.If the transfer guide is dirty,this could lead to marks beingprinted on printouts.
• After you have removed the paper jam, marks, resulting from toner left inthe printer, may be printed on the first few printouts when printing isresumed. Feed a few sheets of paper through the printer to check that nomarks are printed on the printouts.
Transfer guide (front)
19
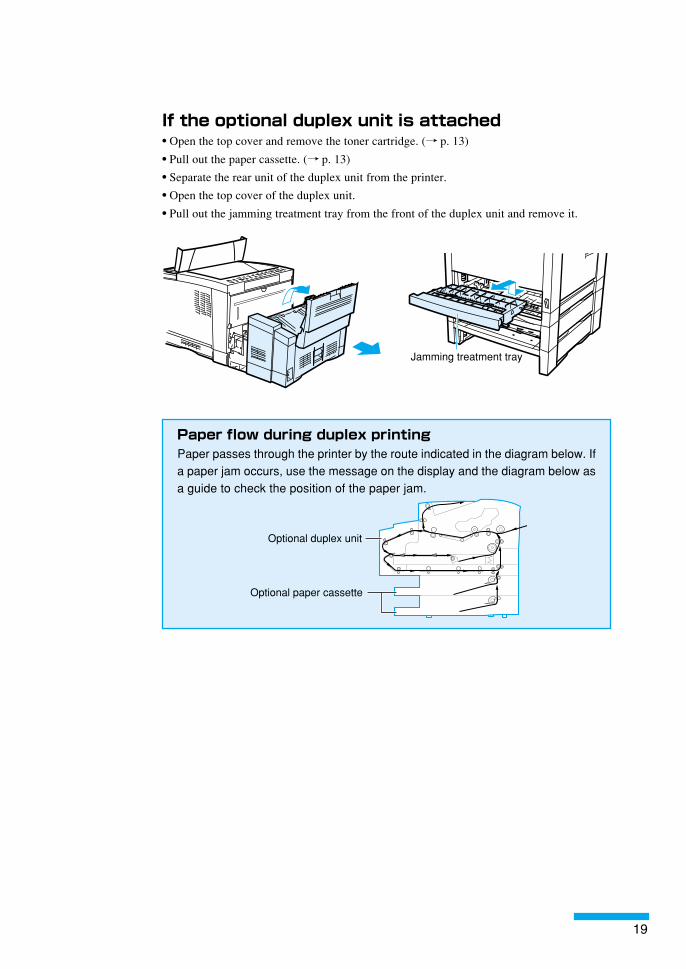
If the optional duplex unit is attached• Open the top cover and remove the toner cartridge. (→ p. 13)• Pull out the paper cassette. (→ p. 13)• Separate the rear unit of the duplex unit from the printer.• Open the top cover of the duplex unit.• Pull out the jamming treatment tray from the front of the duplex unit and remove it.
Jamming treatment tray
Paper flow during duplex printingPaper passes through the printer by the route indicated in the diagram below. Ifa paper jam occurs, use the message on the display and the diagram below asa guide to check the position of the paper jam.
Optional duplex unit
Optional paper cassette
20
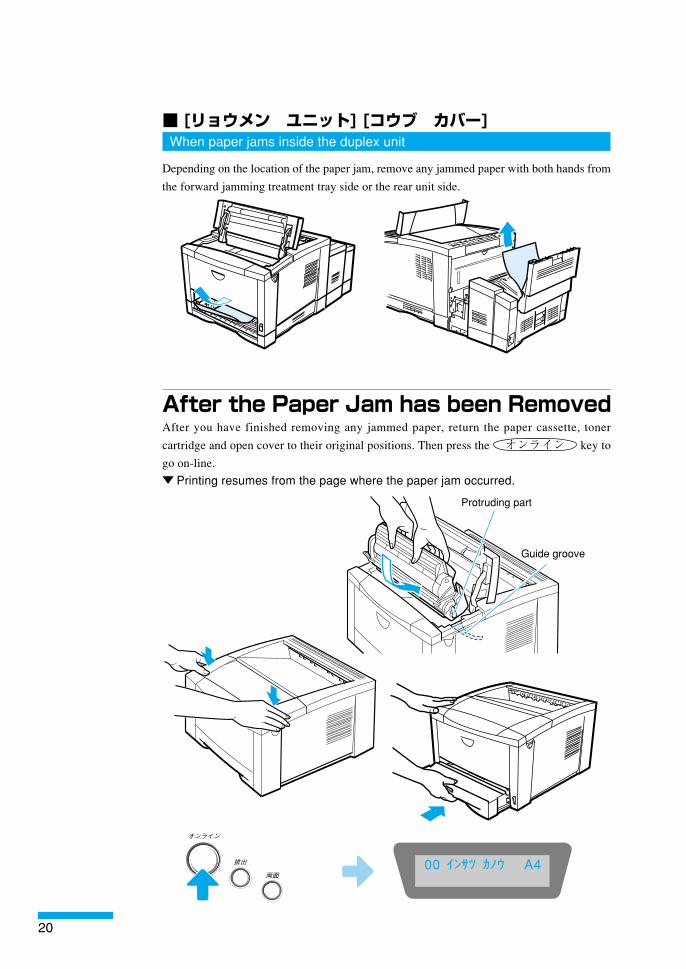
■ [リョウメン ユニット] [コウブ カバー]When paper jams inside the duplex unit
Depending on the location of the paper jam, remove any jammed paper with both hands fromthe forward jamming treatment tray side or the rear unit side.
After the Paper Jam has been RemovedAfter you have finished removing any jammed paper, return the paper cassette, tonercartridge and open cover to their original positions. Then press the オンライン key togo on-line.▼Printing resumes from the page where the paper jam occurred.
オンライン�
排出�
両面�
Protruding part
Guide groove
00 インサツ カノウ A4
21
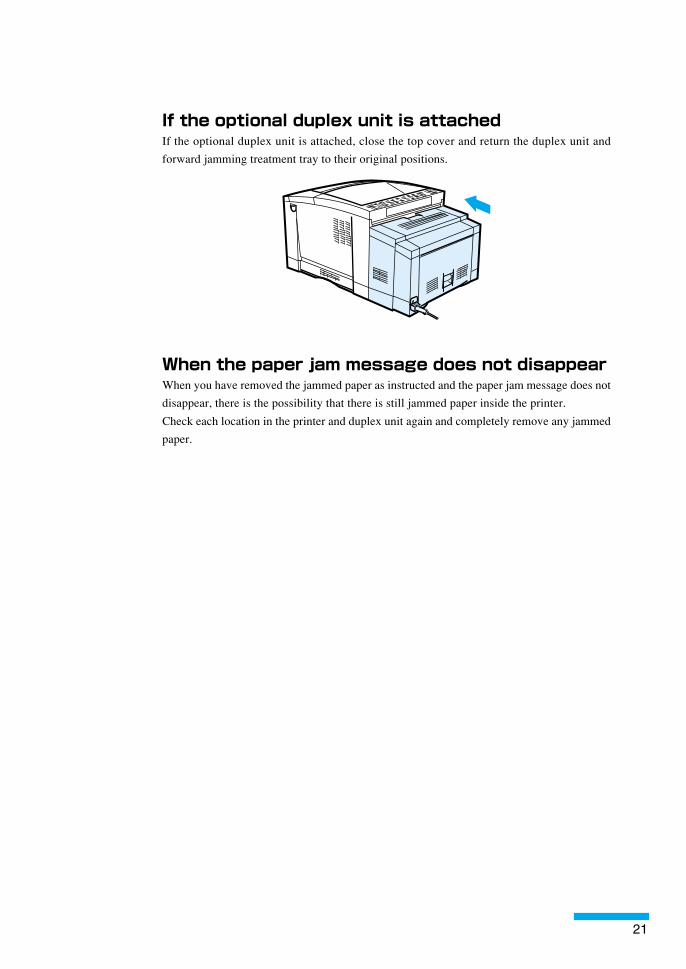
If the optional duplex unit is attachedIf the optional duplex unit is attached, close the top cover and return the duplex unit andforward jamming treatment tray to their original positions.
When the paper jam message does not disappearWhen you have removed the jammed paper as instructed and the paper jam message does notdisappear, there is the possibility that there is still jammed paper inside the printer.Check each location in the printer and duplex unit again and completely remove any jammedpaper.
22
5 Canceling PrintingWhen you want to cancel printing while printing is in progress, carry out a soft reset (onlycancels operations currently in progress) or a hard reset (cancels all operations) after youhave canceled printing from your computer.
Canceling Operations Currently inProgress (Soft Reset)When you only want to cancel operations currently in progress follow the instructions belowto carry out a soft reset.When you carry out a soft reset, you only lose data received by the active interface. Datareceived by non-active interfaces is not affected.
• Always cancel printing from the printer (soft reset) after you have canceledprinting from the computer.
• If data that is in the memory is data from another interface, it will be printedout when the printer goes on-line.
How to carry out a soft reset
1 Press the オンライン key to go off-line.▼ The オンライン indicator goes off.
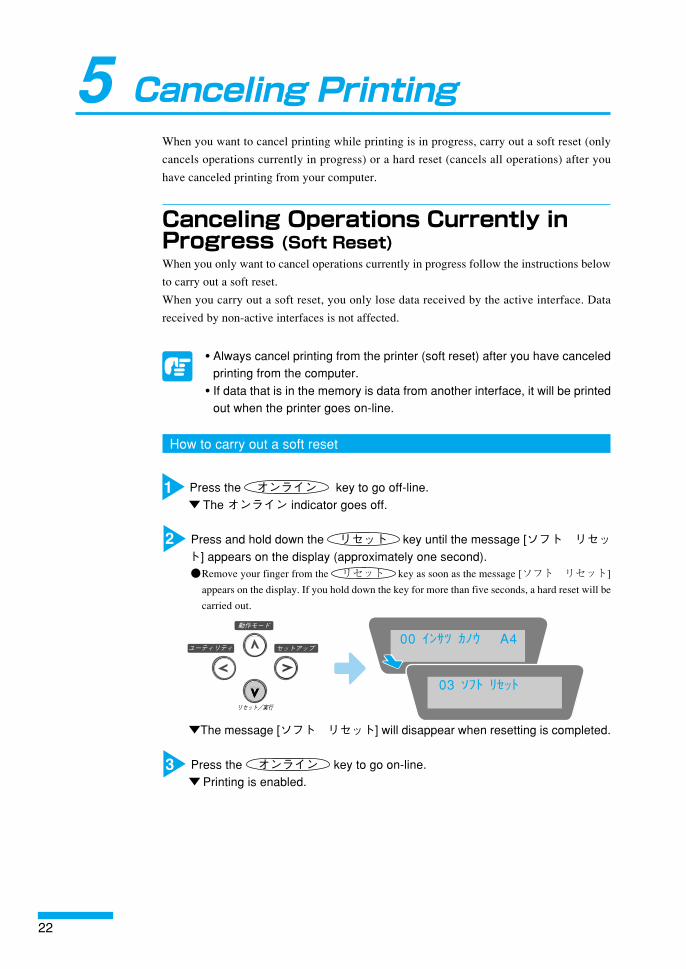
2 Press and hold down the リセット key until the message [ソフト リセット] appears on the display (approximately one second).●Remove your finger from the リセット key as soon as the message [ソフト リセット]appears on the display. If you hold down the key for more than five seconds, a hard reset will becarried out.
動作モード�
動作モード�
セットアップ�ユーティリティ�
リセット/実行�
▼The message [ソフト リセット] will disappear when resetting is completed.
3 Press the オンライン key to go on-line.▼Printing is enabled.
03 ソフト リセット
00 インサツ カノウ A4
23
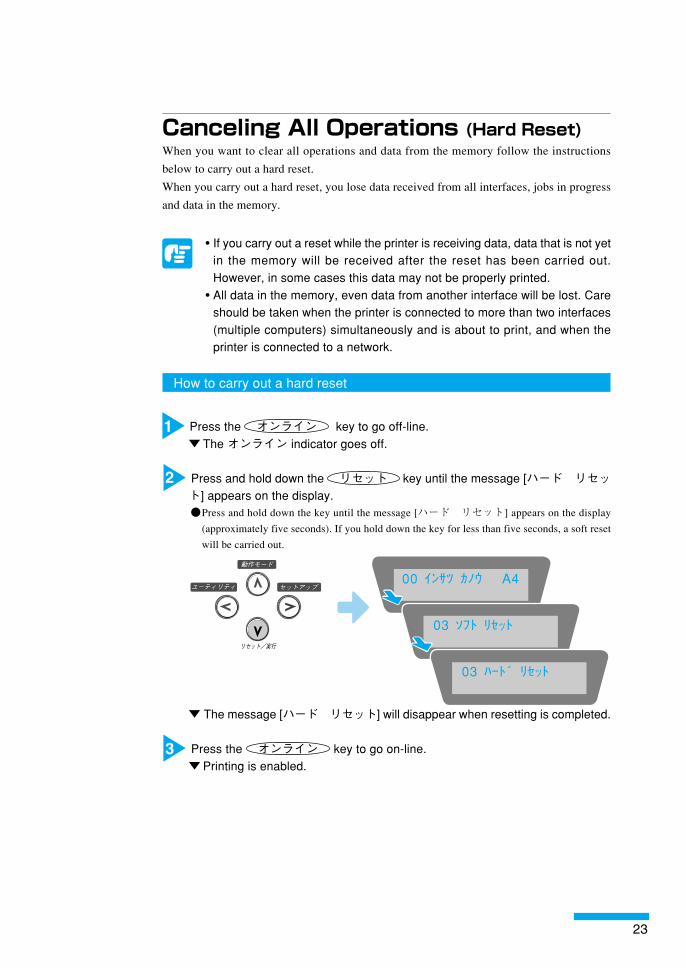
Canceling All Operations (Hard Reset)When you want to clear all operations and data from the memory follow the instructionsbelow to carry out a hard reset.When you carry out a hard reset, you lose data received from all interfaces, jobs in progressand data in the memory.
• If you carry out a reset while the printer is receiving data, data that is not yetin the memory will be received after the reset has been carried out.However, in some cases this data may not be properly printed.
• All data in the memory, even data from another interface will be lost. Careshould be taken when the printer is connected to more than two interfaces(multiple computers) simultaneously and is about to print, and when theprinter is connected to a network.
How to carry out a hard reset
1 Press the オンライン key to go off-line.▼ The オンライン indicator goes off.
2 Press and hold down the リセット key until the message [ハード リセット] appears on the display.●Press and hold down the key until the message [ハード リセット] appears on the display(approximately five seconds). If you hold down the key for less than five seconds, a soft resetwill be carried out.
動作モード�
セットアップ�ユーティリティ�
リセット/実行�
▼ The message [ハード リセット] will disappear when resetting is completed.
3 Press the オンライン key to go on-line.▼Printing is enabled.
00 インサツ カノウ A4
03 ソフト リセット
03 ハード リセット
24
6 Checking Operation
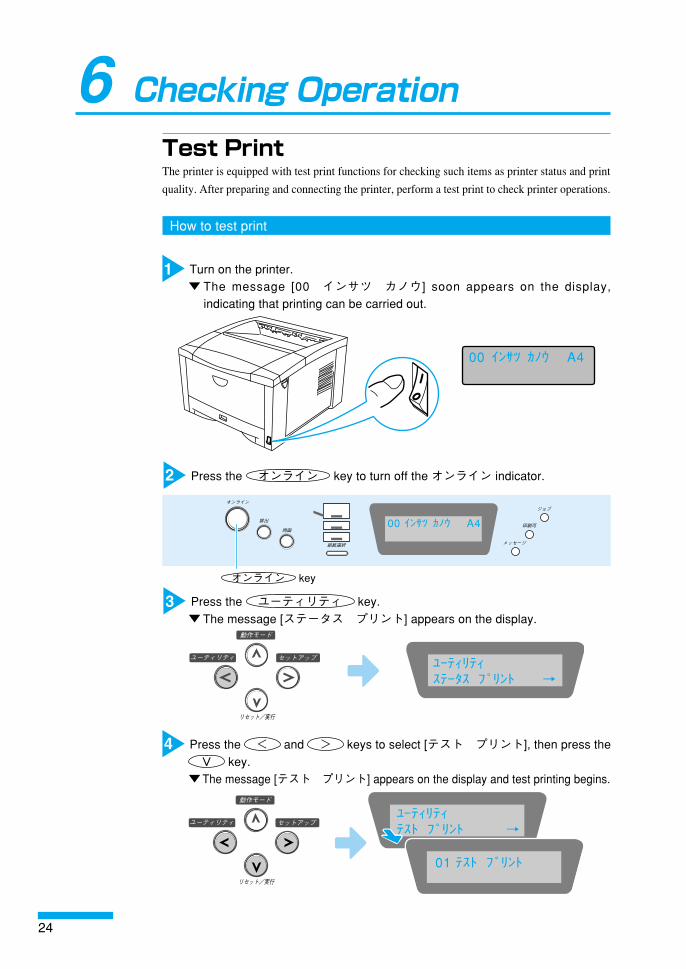
Test PrintThe printer is equipped with test print functions for checking such items as printer status and printquality. After preparing and connecting the printer, perform a test print to check printer operations.
How to test print
1 Turn on the printer.▼ The message [00 インサツ カノウ] soon appears on the display,indicating that printing can be carried out.
2 Press the オンライン key to turn off the オンライン indicator.
オンライン�
排出�
両面�
給紙選択�
ジョブ�
メッセージ�
印刷可�
3 Press the ユーティリティ key.▼ The message [ステータス プリント] appears on the display.
動作モード�
セットアップ�ユーティリティ�
リセット/実行�
4 Press the < and > keys to select [テスト プリント], then press the V key.▼The message [テスト プリント] appears on the display and test printing begins.
動作モード�
セットアップ�ユーティリティ�
リセット/実行�
オンライン key
00 インサツ カノウ A4
00 インサツ カノウ A4
01 テスト プリント
ユーティリティテスト プリント →
ユーティリティステータス プリント →
25
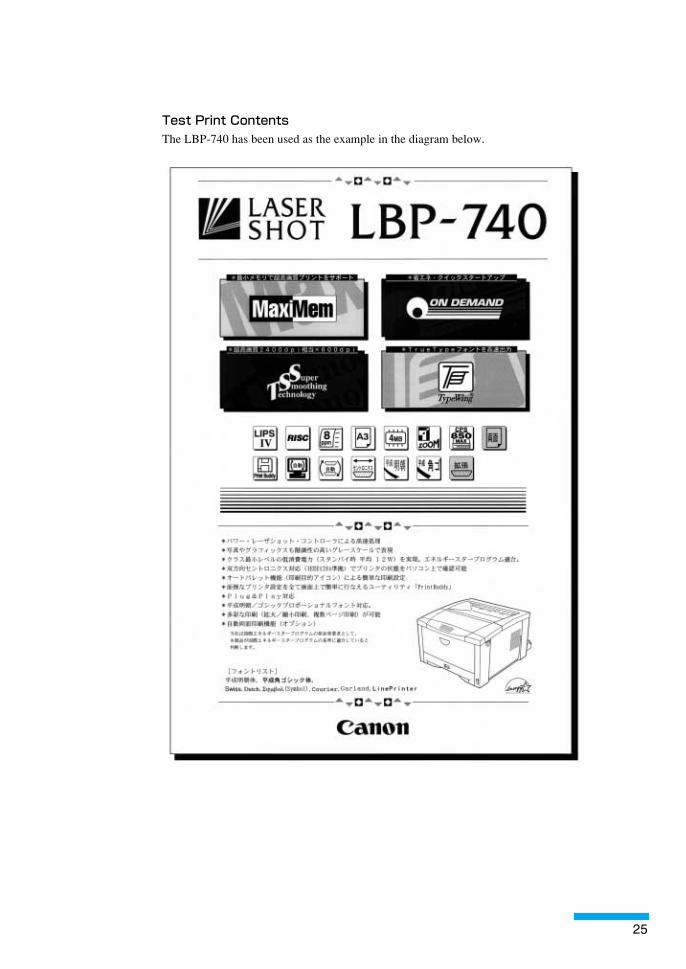
Test Print ContentsThe LBP-740 has been used as the example in the diagram below.