Embed Size (px)
Citation preview
- 1 -
The ‘Bastion’ Host Author Andy Millett Version 1.0 – initial release (Aug 06) Version 1.1 - (Oct 06)
� sbl-xbl.spamhaus.org has now changed to zen.spamhaus.org to include Non-MTA sending IP blocks.
� SuSE Setup procedure errors, thanks to Damien Parker at IP Performance for finding these.
Version 1.2 – (Nov 06) ClamAV version change to 0.88.6 Version 1.3 – (Nov 06) Added Greylisting section
Preamble Hi there. I created this document to bring together all of the components of what I consider to be a fairly effective mail gateway which has the ability to block spam and viruses. I’ve used Linux because it is stable, adaptable and above all free to the net community at large to use (for personal use of course). I use this server to protect my own domains and find it very effective. The components of the system are based on Open Source programs for which I would like to thank the authors of for themselves releasing to us all to use. One final thing I’d like to mention is this document isn’t for the faint hearted user. It assumes you have knowledge of using the programs mentioned or at least are able to figure out what is going on when something doesn’t work. If you aren’t, please feel free to google your issue, error or whatever, I’ve found that the best place to find the answers to the questions I’ve had. You can post a question on my forum if you wish and I’ll attempt to answer it or help you along – http://andymillett.co.uk/andym/forum.
1. Overview
1.1. Before Queue Content Filter 1.2. After Queue Content Filter
2. Hardware Requirements
3. Software Requirements
3.1. Operating System 3.2. Postfix 3.3. SpamAssassin 3.4. ClamAV 3.5. Getadsmtp.pl 3.6. AmavisD 3.7. PolicyD-Weight 3.8. Pflogsumm 3.9. Mailgraph
4. Topology
5. OS Installation
6. Postfix Setup
6.1. Main.cf 6.2. Master.cf 6.3. Transport 6.4. Virtual 6.5. Helo_checks
6.6. Recipients 6.7. MX_Access 6.8. getadsmtp.pl
7. ClamAV Setup
7.1. freshclam.conf 7.2. clamd.conf
8. AmavisD Setup
8.1. amavis.conf 9. PolicyD-Weight Setup
9.1. Whitelisting 10. SpamAssassin Setup
10.1 Whitelisting/Blacklisting 11. Grey-Listing.
11.1 Whitelisting.
12. Starting the Daemons
13. Reporting 13.1 Pflogsumm 13.2 Mailgraph
14. Links
- 2 -
1. Overview Whilst commercial Anti-Spam products are extremely adept at blocking spam and catching viruses sometimes you just wonder if it can be done without the expense. Here’s how, with a little time and a spare computer you can build your own ‘Bastion’ host. Using Postfix, Spam-Assassin and ClamAV on a Linux distribution you can successfully deploy a string-budget anti-spam/anti-virus host by utilizing two areas of the SMTP protocol as it is applied by Postfix (the MTA). 1.1 Before Queue Content Filter By tightening up on rules applied it is possible to block 60-70% of all spam attempts at the initial connection stage. Strict (but fair) application of the SMTP Protocol is used here via Postfix rules and the PolicyD-Weight script. 1.2 After Queue Content Filter Any rules that pass successfully through the Before Queue content-filter pass through Spam-Assassin and ClamAV (After Queue Filter(s)) and are scored against both local rules and SURBL’s and checked for viruses.
2. Hardware requirements 1 x PC or 1U Rack server with a minimum 700mhz P3 CPU, 512mb RAM, 1 IDE disk (preferably two to setup RAID), 1 NIC. A graphics card is recommended but not necessary after the initial setup of the OS. The above hardware will quite happily handle both inbound and outbound email for a small to medium site (50 users / up to 500 messages per hour). For higher volume sites (50-1000+ users / 10000+ messages per hour) a faster processor (preferably dual), more memory (a minimum 2GB) and a dual disk SCSI RAID0 should be considered.
3. Software requirements 3.1 Operating System – pick a distro, any distro you like, Slackware, SuSE, Red-Hat, Debian. All can be downloaded for free but for ease of install and setup use SuSE (9.3 or later). 3.2 Postfix – a secure, highly configurable MTA (Mail Transfer Agent) which accepts email and either delivers it to a local mailbox (local delivery) or forwards it on to a local/remote server (network delivery). 3.3 SpamAssassin – A Perl based Anti-Spam filter with many features. 3.4 ClamAV – An Open Source Anti-Virus server 3.5 Getadsmtp.pl – A free Perl script which contacts you AD/LDAP server for a valid list of recipients. 3.6 AmavisD – A perl based script that integrates a Virus Scanner and Anti-virus program for use within an MTA. 3.7 PolicyD-Weight – A ‘scoring’ perl script which runs prior to the mail being queued and scores based on HELO, MX, and DNSBL inclusion. 3.8 Pflogsumm – A perl script which when run generates a report of mail activities in human readable form.
- 3 -
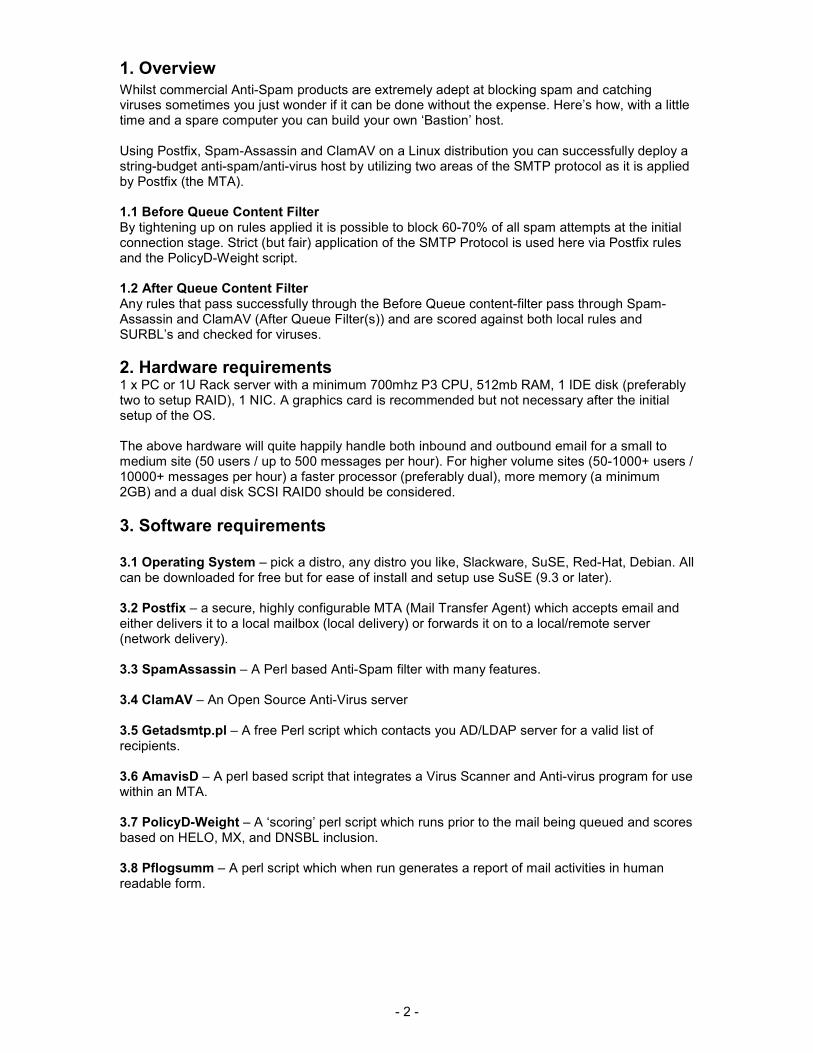
4. Topology The following diagram shows how the Before and After Queue content filters work.
Sending SMTP Server
Mailbox orNetwork Transport
Postfix Master Queue
Before Queue Filter
Postfix Master Queue
After Queue Filter
AmavisD Process
ClamAV Process
SpamD Process
YES
Accept
REJECT
NOPostfix Master Queue
Virus Found
PolicyD-Weight Process
Greylist
GreylistDB
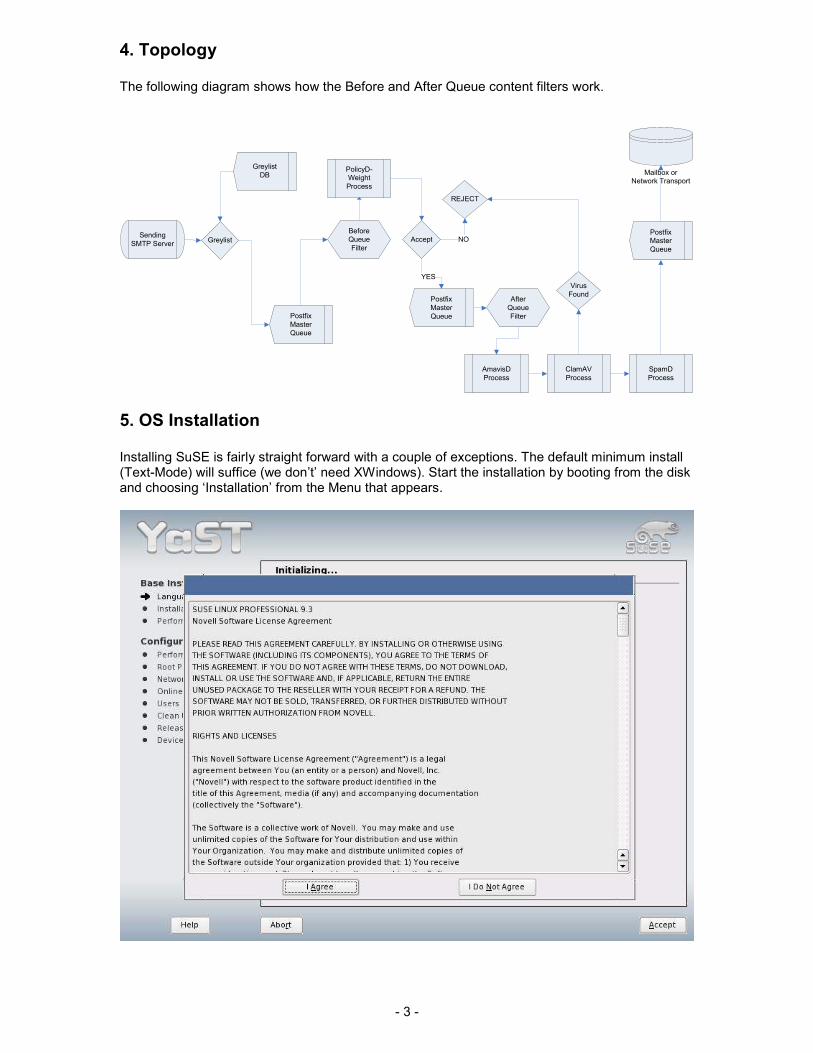
5. OS Installation Installing SuSE is fairly straight forward with a couple of exceptions. The default minimum install (Text-Mode) will suffice (we don’t’ need XWindows). Start the installation by booting from the disk and choosing ‘Installation’ from the Menu that appears.
- 4 -
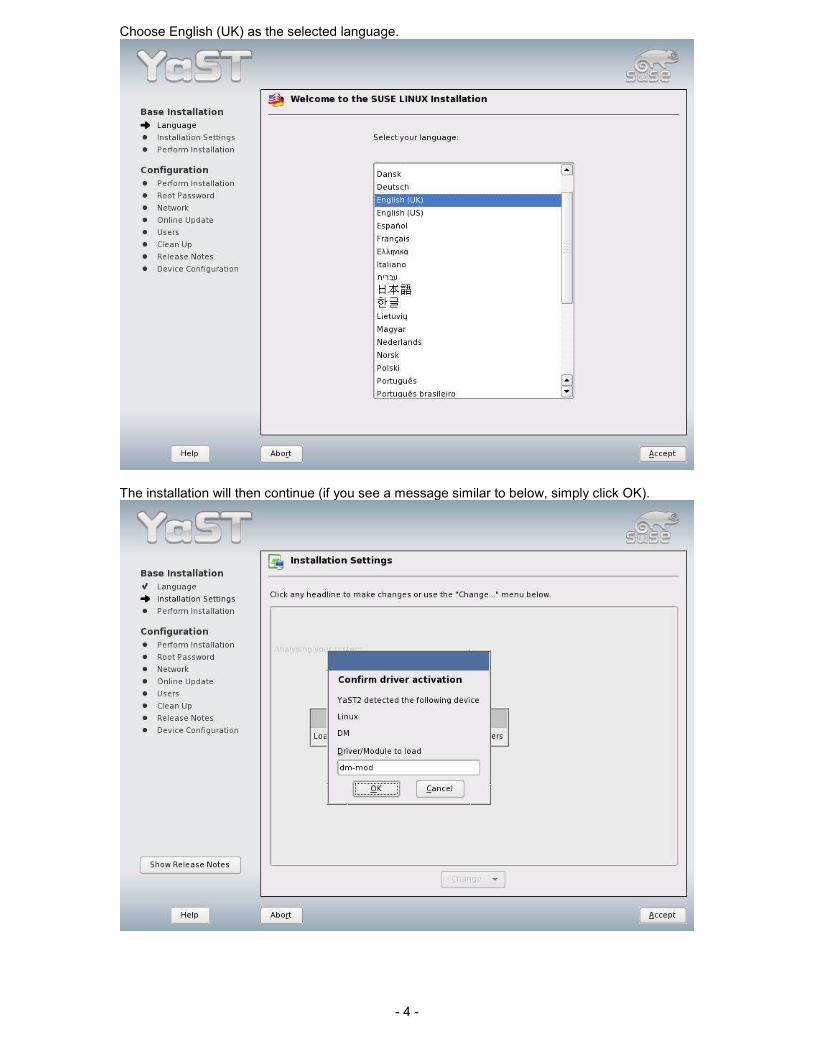
Choose English (UK) as the selected language.
The installation will then continue (if you see a message similar to below, simply click OK).
- 5 -
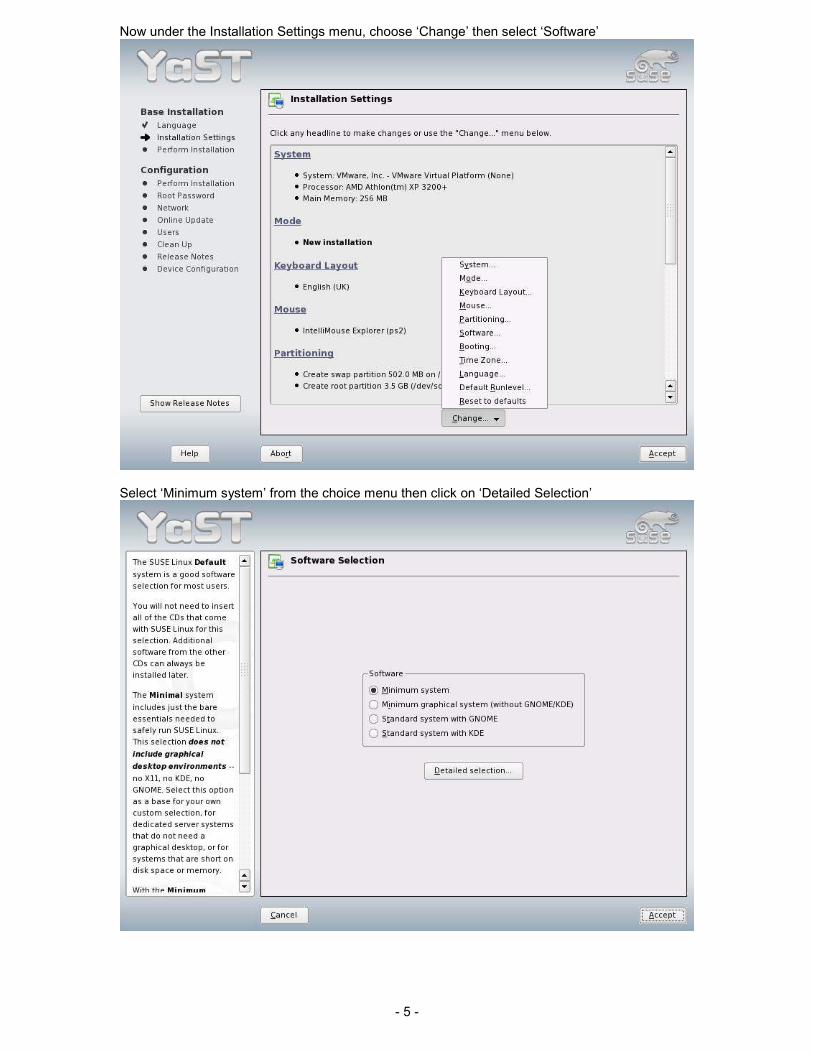
Now under the Installation Settings menu, choose ‘Change’ then select ‘Software’
Select ‘Minimum system’ from the choice menu then click on ‘Detailed Selection’
- 6 -
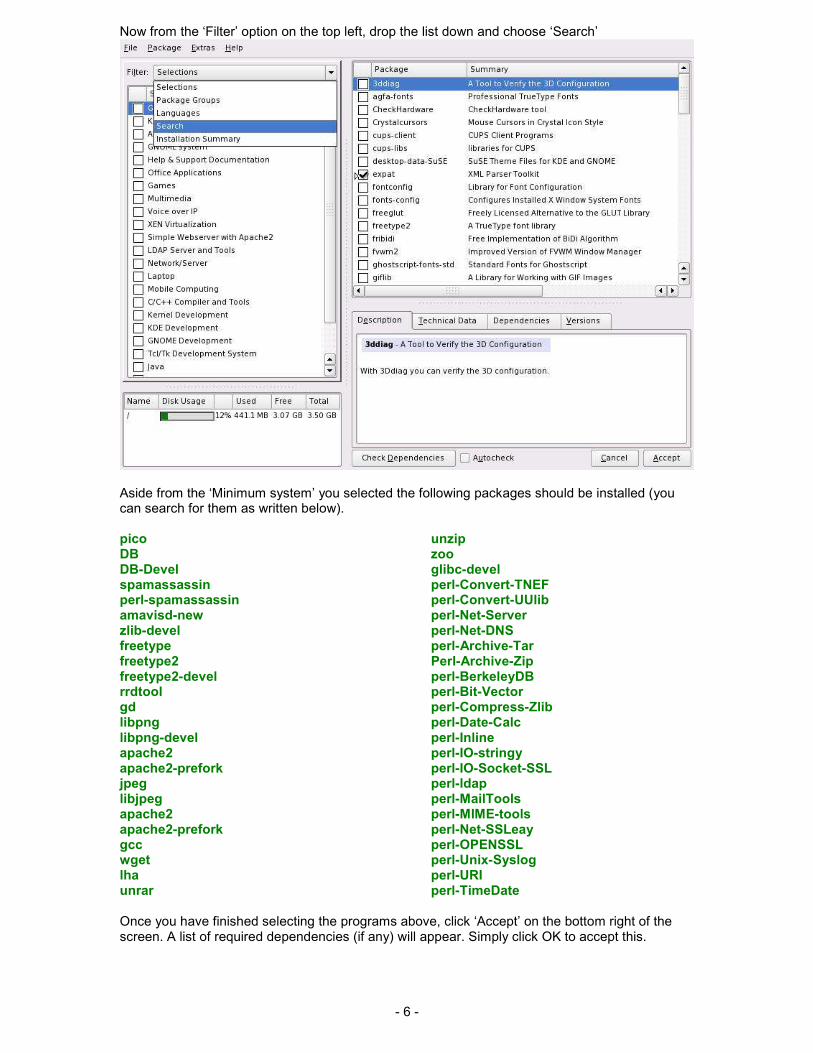
Now from the ‘Filter’ option on the top left, drop the list down and choose ‘Search’
Aside from the ‘Minimum system’ you selected the following packages should be installed (you can search for them as written below). pico DB DB-Devel spamassassin perl-spamassassin amavisd-new zlib-devel freetype freetype2 freetype2-devel rrdtool gd libpng libpng-devel apache2 apache2-prefork jpeg libjpeg apache2 apache2-prefork gcc wget lha unrar
unzip zoo glibc-devel perl-Convert-TNEF perl-Convert-UUlib perl-Net-Server perl-Net-DNS perl-Archive-Tar Perl-Archive-Zip perl-BerkeleyDB perl-Bit-Vector perl-Compress-Zlib perl-Date-Calc perl-Inline perl-IO-stringy perl-IO-Socket-SSL perl-ldap perl-MailTools perl-MIME-tools perl-Net-SSLeay perl-OPENSSL perl-Unix-Syslog perl-URI perl-TimeDate
Once you have finished selecting the programs above, click ‘Accept’ on the bottom right of the screen. A list of required dependencies (if any) will appear. Simply click OK to accept this.
- 7 -
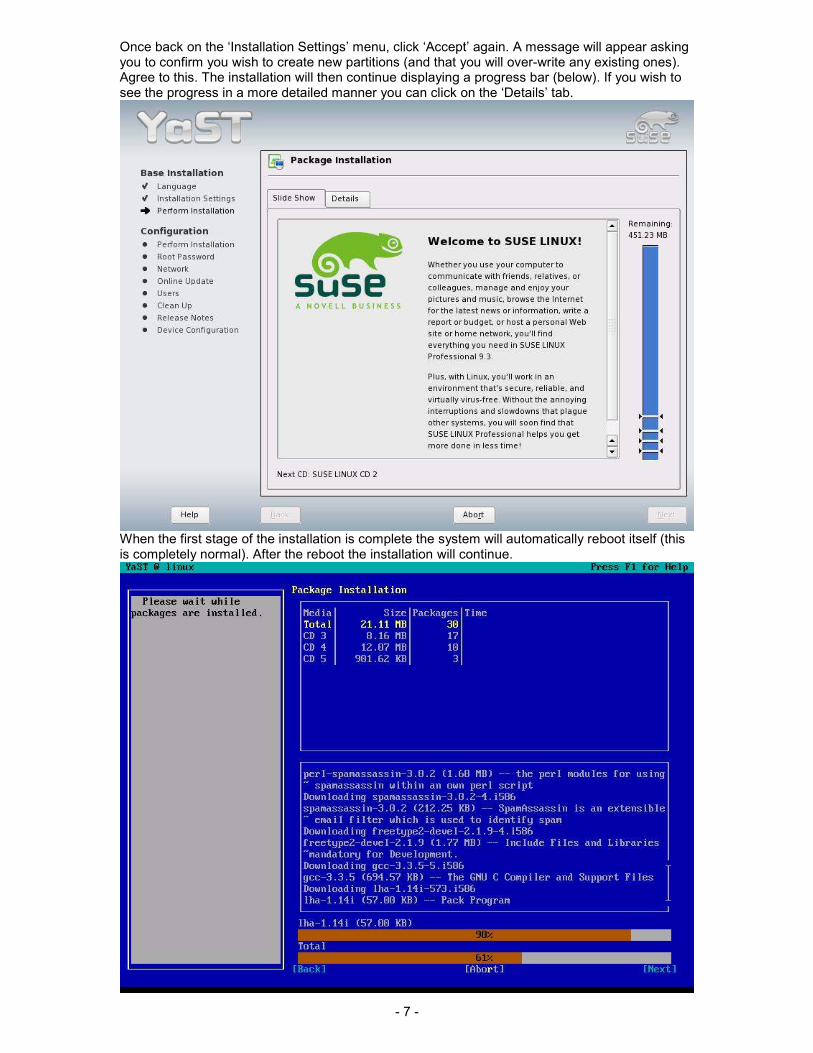
Once back on the ‘Installation Settings’ menu, click ‘Accept’ again. A message will appear asking you to confirm you wish to create new partitions (and that you will over-write any existing ones). Agree to this. The installation will then continue displaying a progress bar (below). If you wish to see the progress in a more detailed manner you can click on the ‘Details’ tab.
When the first stage of the installation is complete the system will automatically reboot itself (this is completely normal). After the reboot the installation will continue.
- 8 -
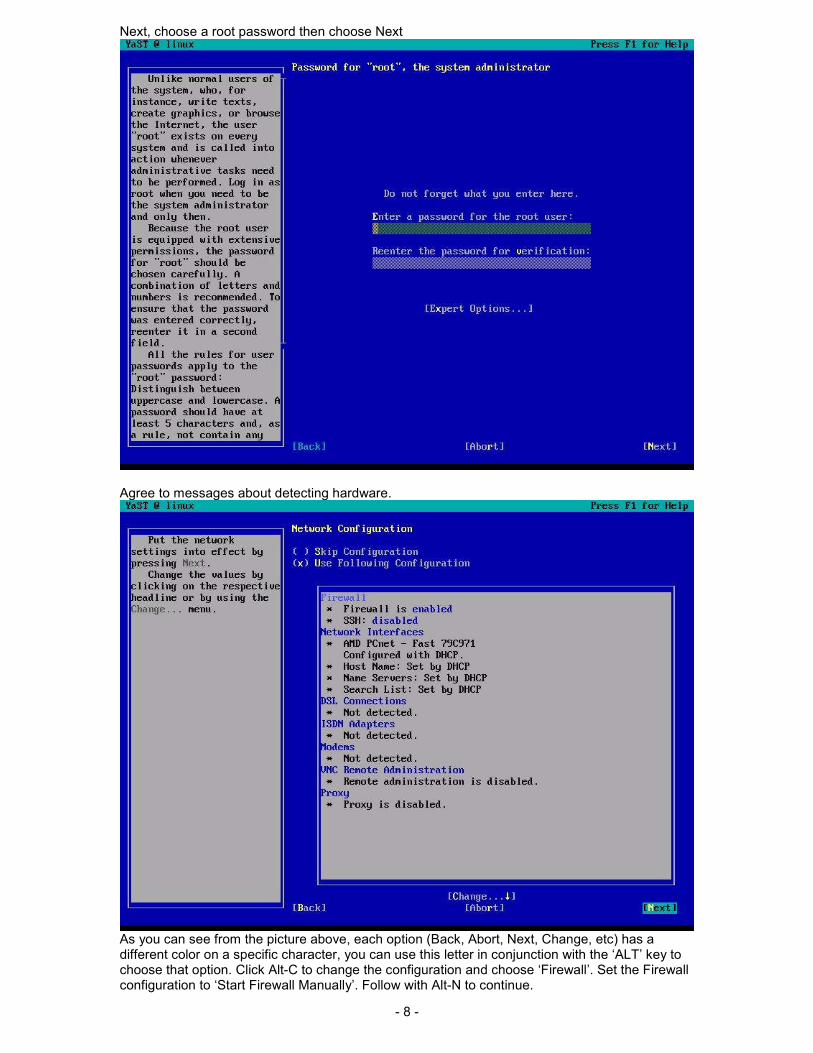
Next, choose a root password then choose Next
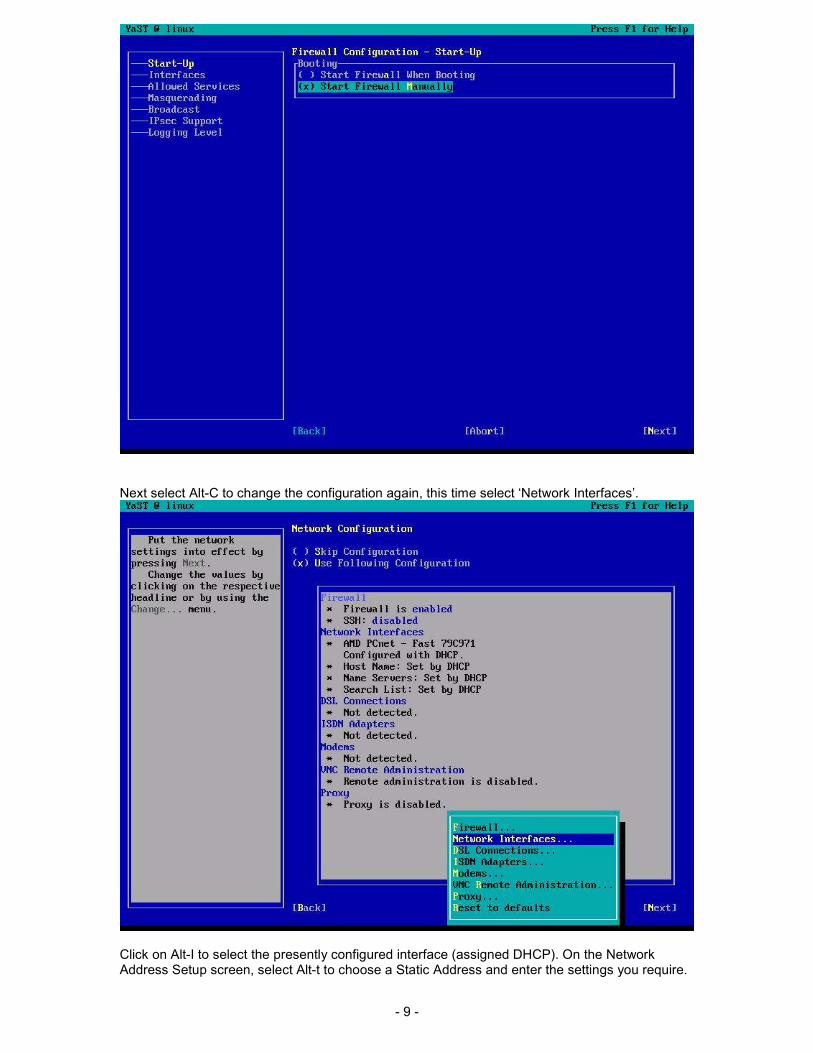
Agree to messages about detecting hardware.
As you can see from the picture above, each option (Back, Abort, Next, Change, etc) has a different color on a specific character, you can use this letter in conjunction with the ‘ALT’ key to choose that option. Click Alt-C to change the configuration and choose ‘Firewall’. Set the Firewall configuration to ‘Start Firewall Manually’. Follow with Alt-N to continue.
- 9 -
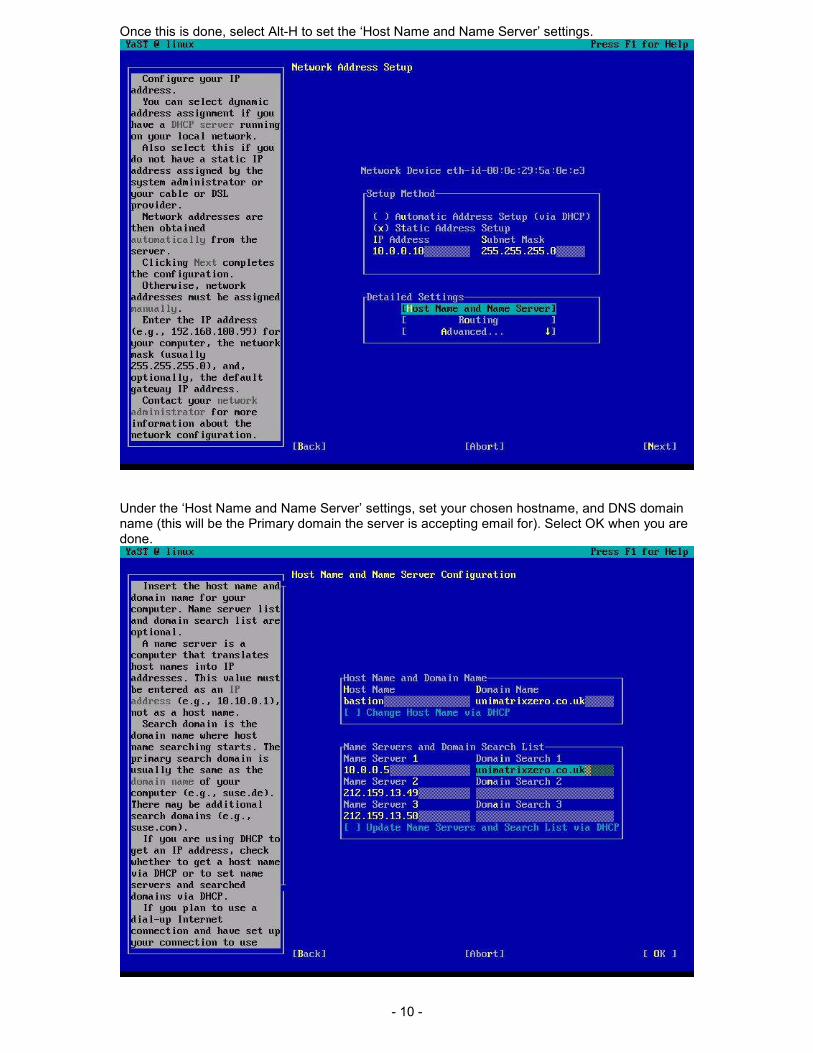
Next select Alt-C to change the configuration again, this time select ‘Network Interfaces’.
Click on Alt-I to select the presently configured interface (assigned DHCP). On the Network Address Setup screen, select Alt-t to choose a Static Address and enter the settings you require.
- 10 -
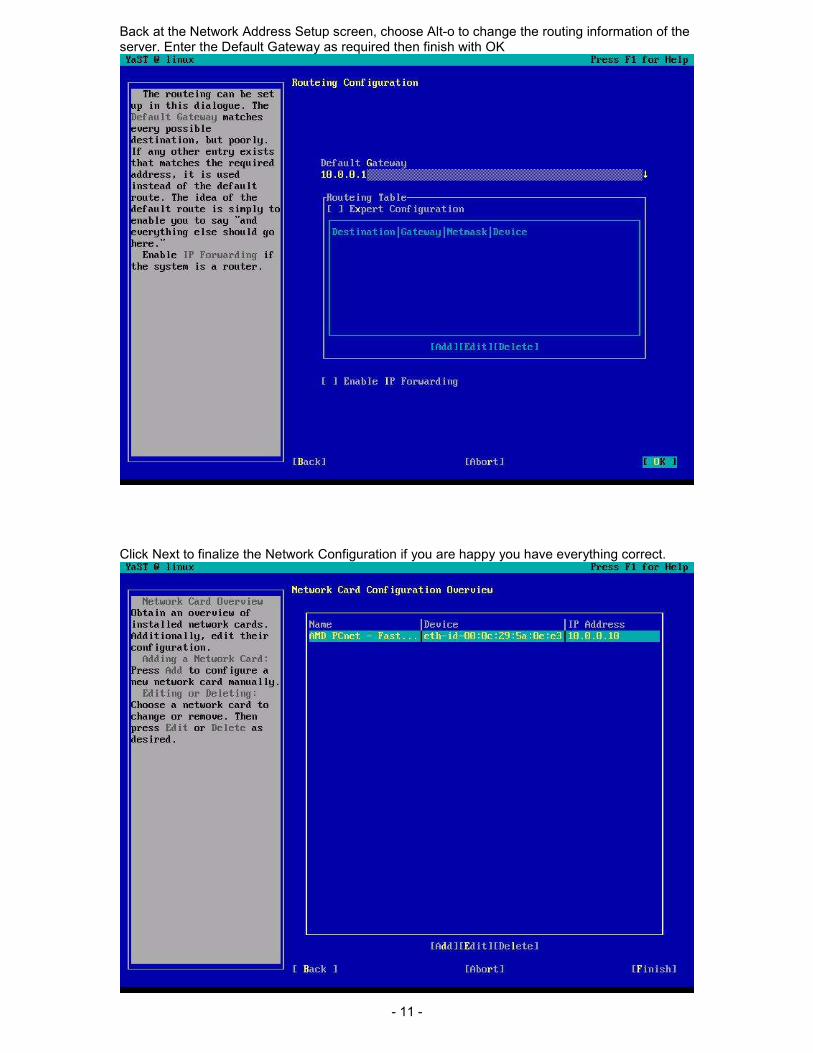
Once this is done, select Alt-H to set the ‘Host Name and Name Server’ settings.
Under the ‘Host Name and Name Server’ settings, set your chosen hostname, and DNS domain name (this will be the Primary domain the server is accepting email for). Select OK when you are done.
- 11 -
Back at the Network Address Setup screen, choose Alt-o to change the routing information of the server. Enter the Default Gateway as required then finish with OK
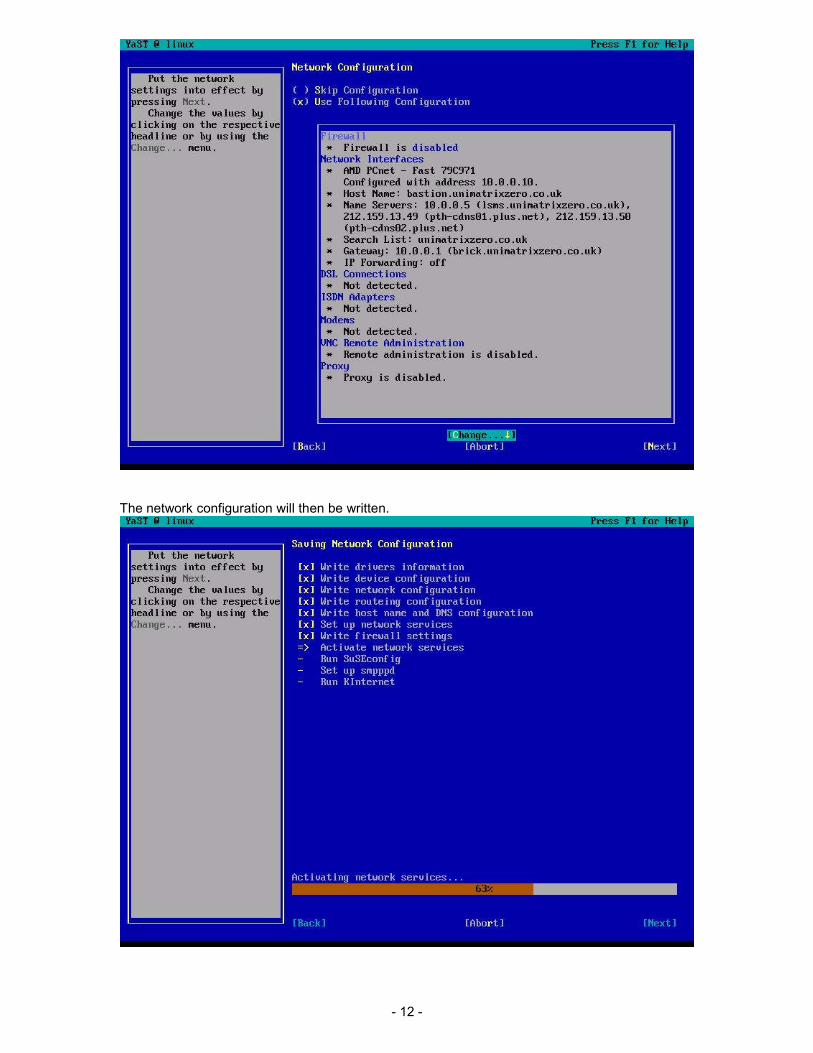
Click Next to finalize the Network Configuration if you are happy you have everything correct.
- 12 -
The network configuration will then be written.
- 13 -
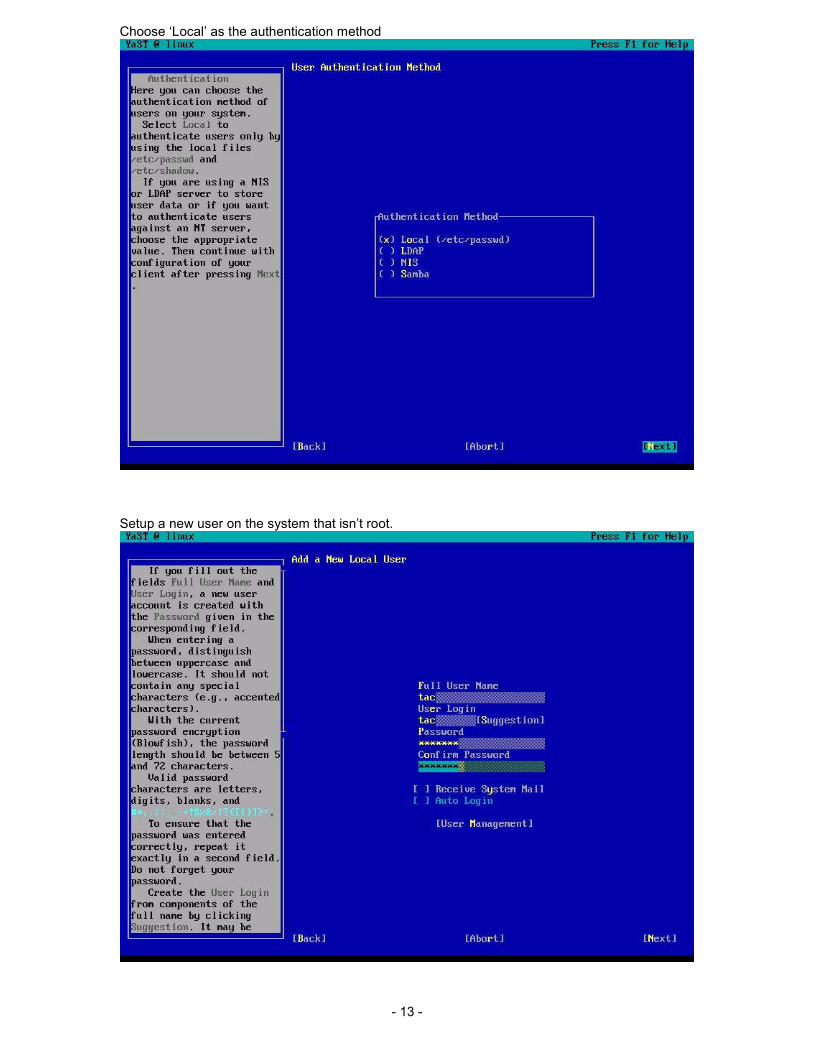
Choose ‘Local’ as the authentication method
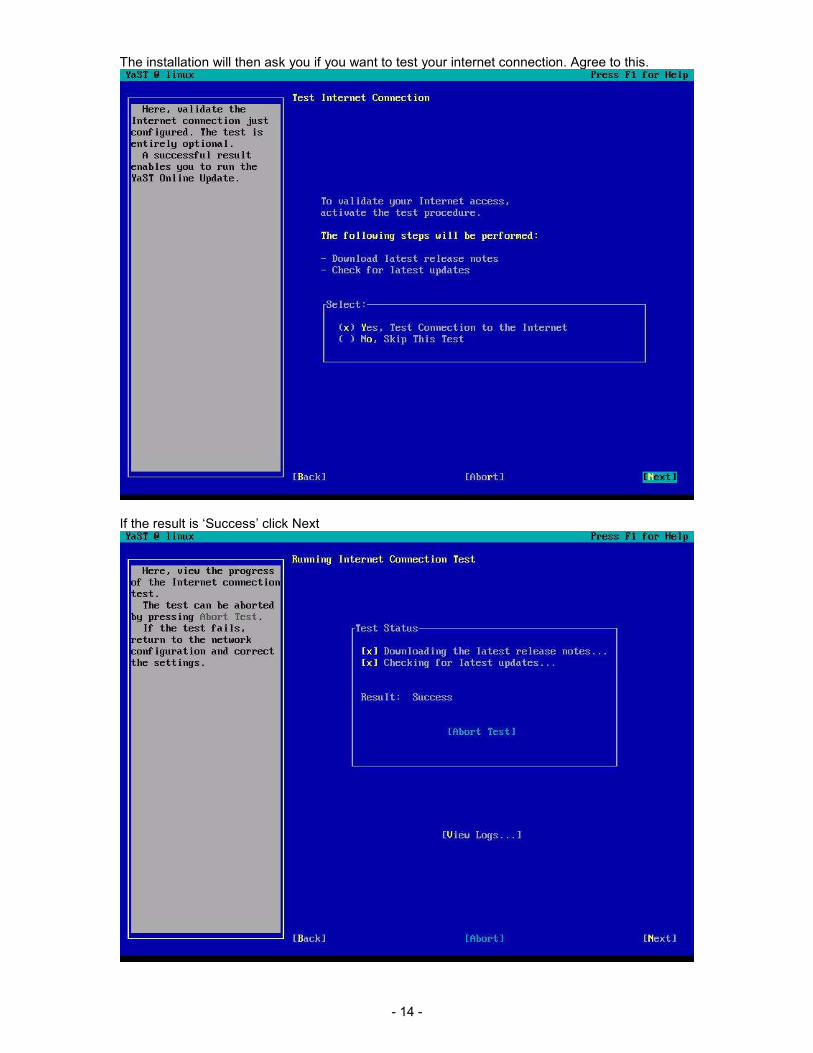
Setup a new user on the system that isn’t root.
- 14 -
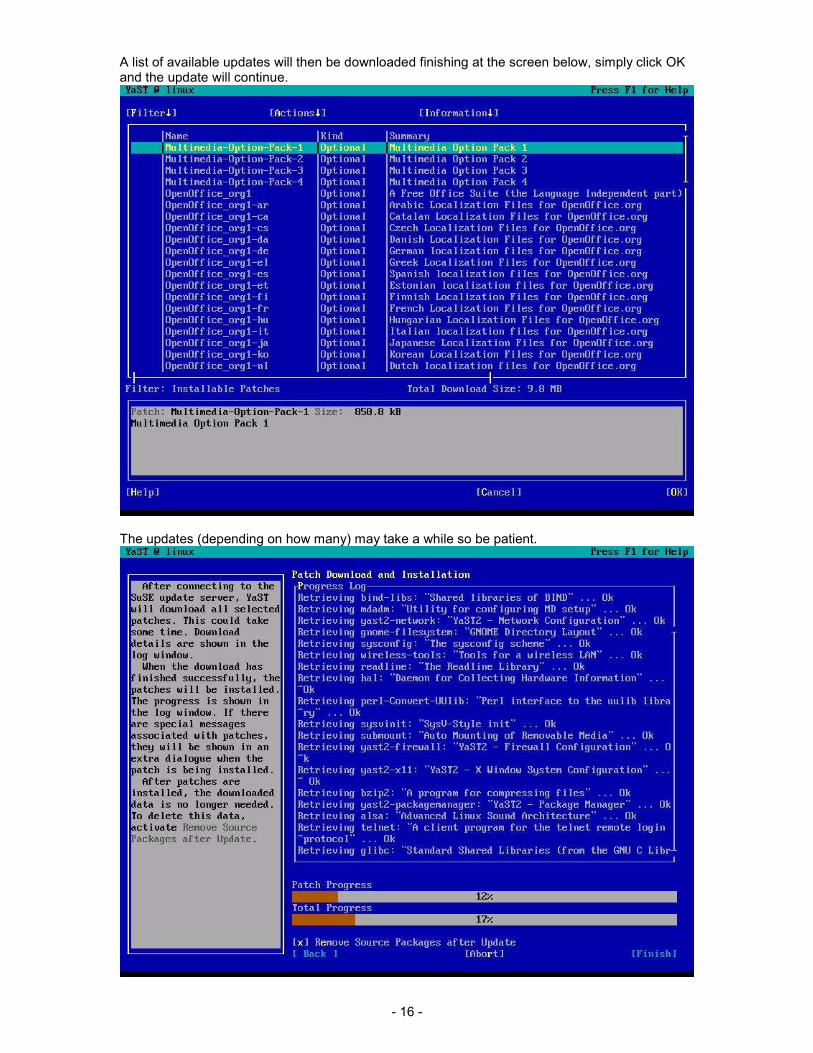
The installation will then ask you if you want to test your internet connection. Agree to this.
If the result is ‘Success’ click Next

- 15 -
You will then be asked if you wish to run Online Update, agree to this.
You will be given a choice of update servers with which to download available updates. You can agree to the first selected or choose another. Click Next when ready.
- 16 -
A list of available updates will then be downloaded finishing at the screen below, simply click OK and the update will continue.
The updates (depending on how many) may take a while so be patient.
- 17 -
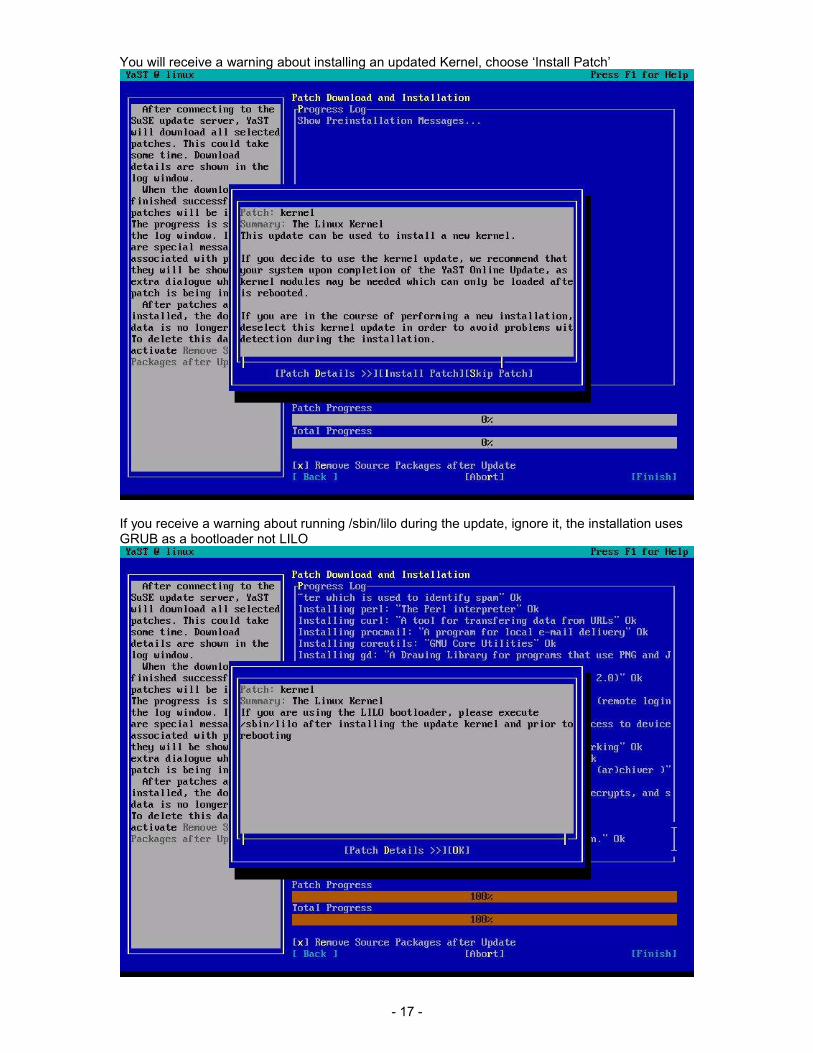
You will receive a warning about installing an updated Kernel, choose ‘Install Patch’
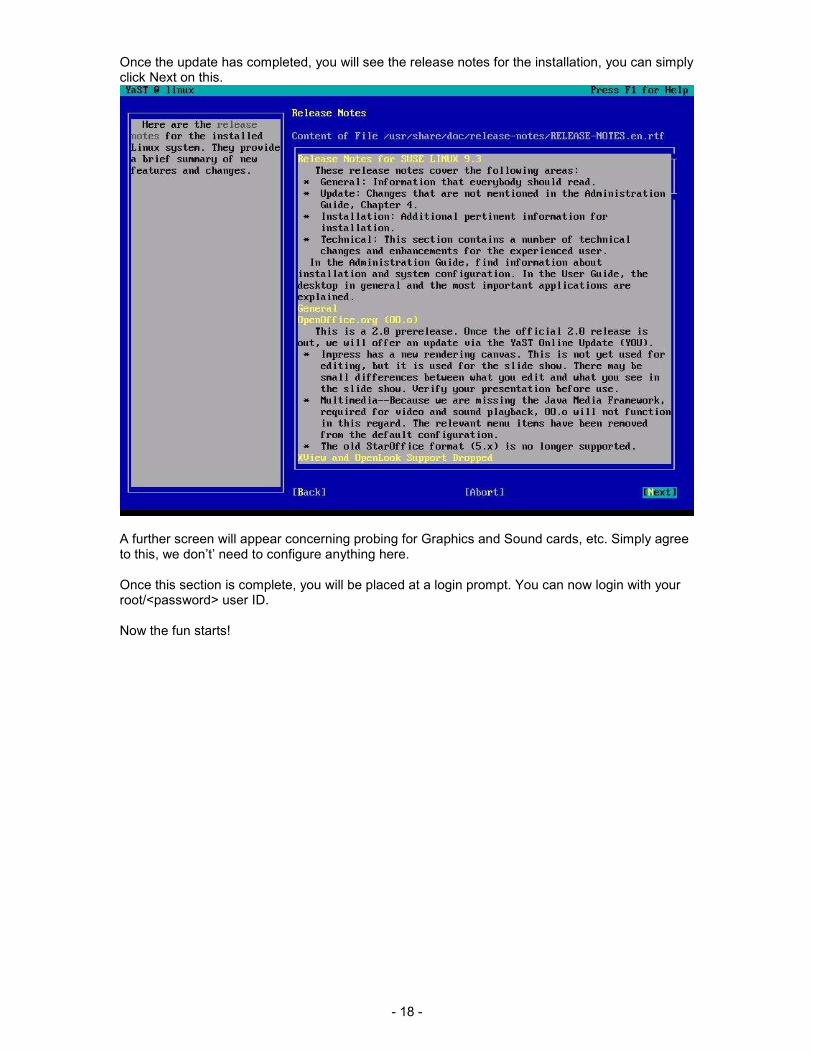
If you receive a warning about running /sbin/lilo during the update, ignore it, the installation uses GRUB as a bootloader not LILO
- 18 -
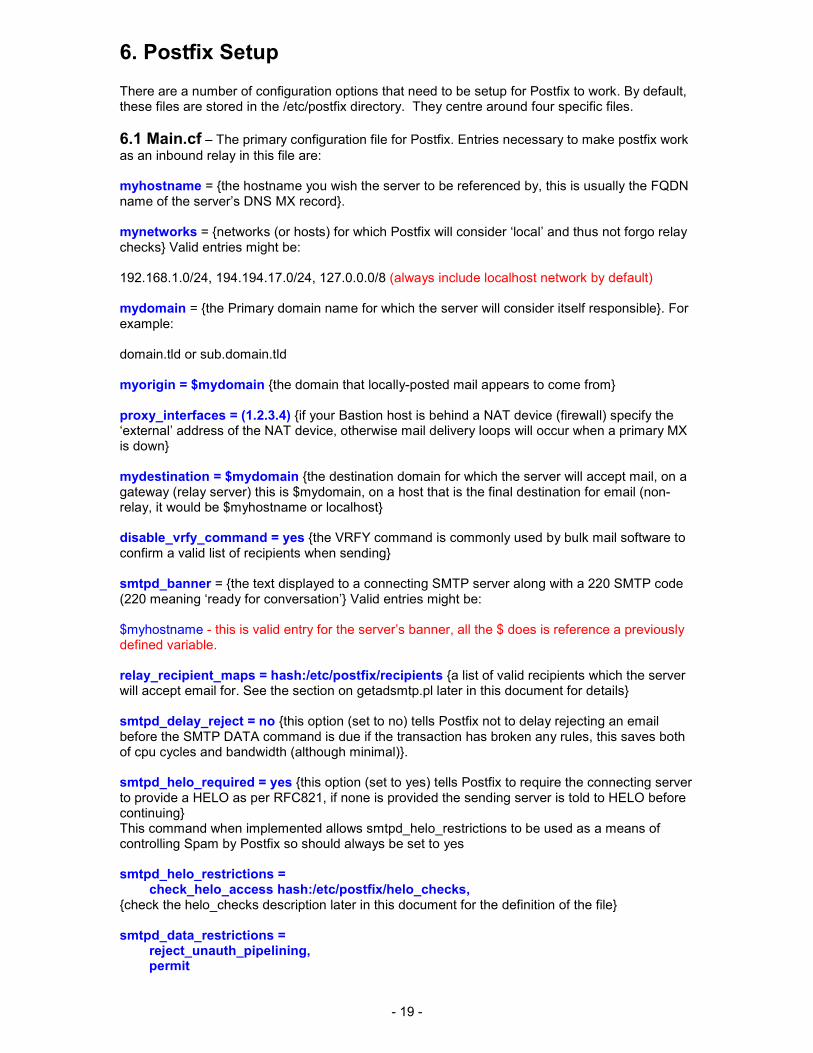
Once the update has completed, you will see the release notes for the installation, you can simply click Next on this.
A further screen will appear concerning probing for Graphics and Sound cards, etc. Simply agree to this, we don’t’ need to configure anything here. Once this section is complete, you will be placed at a login prompt. You can now login with your root/<password> user ID. Now the fun starts!
- 19 -
6. Postfix Setup There are a number of configuration options that need to be setup for Postfix to work. By default, these files are stored in the /etc/postfix directory. They centre around four specific files.
6.1 Main.cf – The primary configuration file for Postfix. Entries necessary to make postfix work as an inbound relay in this file are: myhostname = {the hostname you wish the server to be referenced by, this is usually the FQDN name of the server’s DNS MX record}. mynetworks = {networks (or hosts) for which Postfix will consider ‘local’ and thus not forgo relay checks} Valid entries might be: 192.168.1.0/24, 194.194.17.0/24, 127.0.0.0/8 (always include localhost network by default) mydomain = {the Primary domain name for which the server will consider itself responsible}. For example: domain.tld or sub.domain.tld myorigin = $mydomain {the domain that locally-posted mail appears to come from} proxy_interfaces = (1.2.3.4) {if your Bastion host is behind a NAT device (firewall) specify the ‘external’ address of the NAT device, otherwise mail delivery loops will occur when a primary MX is down} mydestination = $mydomain {the destination domain for which the server will accept mail, on a gateway (relay server) this is $mydomain, on a host that is the final destination for email (non-relay, it would be $myhostname or localhost} disable_vrfy_command = yes {the VRFY command is commonly used by bulk mail software to confirm a valid list of recipients when sending} smtpd_banner = {the text displayed to a connecting SMTP server along with a 220 SMTP code (220 meaning ‘ready for conversation’} Valid entries might be: $myhostname - this is valid entry for the server’s banner, all the $ does is reference a previously defined variable. relay_recipient_maps = hash:/etc/postfix/recipients {a list of valid recipients which the server will accept email for. See the section on getadsmtp.pl later in this document for details} smtpd_delay_reject = no {this option (set to no) tells Postfix not to delay rejecting an email before the SMTP DATA command is due if the transaction has broken any rules, this saves both of cpu cycles and bandwidth (although minimal)}. smtpd_helo_required = yes {this option (set to yes) tells Postfix to require the connecting server to provide a HELO as per RFC821, if none is provided the sending server is told to HELO before continuing} This command when implemented allows smtpd_helo_restrictions to be used as a means of controlling Spam by Postfix so should always be set to yes smtpd_helo_restrictions = check_helo_access hash:/etc/postfix/helo_checks, {check the helo_checks description later in this document for the definition of the file} smtpd_data_restrictions = reject_unauth_pipelining, permit
- 20 -
{smtpd_data_restrictions is the rule here, reject_unauth_pipelining tells Postfix to reject connections from SMTP clients that send commands ahead of time in the transaction. This stops bulk mail software that improperly uses SMTP command pipelining to speed up delivery} smtpd_recipient_restrictions = permit_mynetworks, {always permit mail from your own local network} reject_unauth_destination, {reject if the destination does not match $mydestination} reject_unknown_sender_domain, {reject if no MX record for senders domain} check_sender_mx_access cidr:/etc/postfix/mx_access, {see note later} reject_invalid_hostname, {reject if the HELO contains invalid characters} reject_non_fqdn_sender, {reject if the senders domain is not fully qualified} reject_non_fqdn_recipient, {reject if the recipient domain is not fully qualified} check_recipient_mx_access cidr:/etc/postfix/mx_access, {see note later on mx_access} reject_unknown_recipient_domain, {reject when recipient domain has not DNS MX or A} check_policy_service unix:private/policy, {see note later on PolicyD-weight} delay_warning_time = 4h {how long Postfix will wait before sending an email to the sender advising that the mail is still waiting to be delivered} delay_notice_recipient = {recipient of delay email delivery notifications} relay_recipient_maps = hash:/etc/postfix/recipients {a list of valid recipients for which the Bastion will accept email for, see note later for an example of this file} virtual_maps = hash:/etc/postfix/virtual {the file defining any virtual domains and users the server will accept email for} transport_maps = hash:/etc/postfix/transport {the entry defining how mail is delivered}
6.2 Master.cf – The master Postfix process configuration file. This file is invoked by the ‘master’ process of Postfix. Check out this link for a description of the master.cf file. The entries specific to our ‘Bastion’ host are: # =======================================================================# # service type private unpriv chroot wakeup maxproc command + args # # (yes) (yes) (yes) (never) (100) # # =======================================================================# smtp inet n - n - - smtpd -o smtpd_proxy_filter=127.0.0.1:10024 {this service is used by the ‘master’ queue (the first stage in a connecting mail transaction), the –o smtpd_proxy_filter entry is used by AmavisD which is discussed later in this document. It tells Postfix to pass the email onto an ‘After Queue’ filter. Mail has already passed through the ‘Before queue’ filter by this time (as set in smtpd_recipient_restrictions)} localhost:10025 inet n - n - - smtpd -o smtpd_authorized_xforward_hosts=127.0.0.0/8 -o smtpd_client_restrictions= -o smtpd_helo_restrictions= -o smtpd_sender_restrictions= -o smtpd_recipient_restrictions=permit_mynetworks,reject -o smtpd_data_restrictions= -o mynetworks=127.0.0.0/8 -o receive_override_options=no_unknown_recipient_checks {this service is used to re-inject mail back into the Postfix queue after it has been checked by AmavisD and ClamAV, the –o options tell postfix not to run ‘Before Queue’ checks on the email as it has already been checked by that process} policy unix - n n - - spawn user=polw argv=/usr/bin/perl /usr/lib/postfix/policyd-weight {this service is used by Postfix to pass incoming connections to the ‘Before queue’ content filter process ‘PolicyD-weight’ for scoring}

- 21 -
6.3 Transport – Transport related configuration options (such as local or network). The transport file determines the destination for mail that is to be ‘relayed’ to internal servers (if any). The syntax of the file is: domain.tld smtp:[192.168.1.201] .domain.tld smtp:[192.168.1.201] The above entries tell Postfix that email for the domain and sub-domains thereof (as specified by the .domain.tld entry) should be relayed to smtp:[192.168.1.201]. The smtp: part tells Postfix to use the SMTP protocol. Encapsulating the IP Address in a ‘[]’ tells Postfix not to perform a DNS lookup on the IP address. The main.cf configuration file is told to use this file via the transport_maps = hash:/etc/postfix/transport entry When you have edited this file you need to update Postfix to tell it about the changes. Run the following command: postmap hash:/etc/postfix/transport && postfix reload
6.4 Virtual – The virtual file is for domains that are not considered the server’s Primary DNS domain but are considered domains the server will accept email for. Entries look like so: virtdomain virtual user1@virtdomain user1@realdomain user2@virtdomain user4@realdomain This file tells Postfix that ‘domain’ is virtual and to translate any emails for user@virtualdomain to user@domain. Emails will then be delivered using the transport file entries for that domain (unless email is locally delivered). When you have edited this file you need to update Postfix to tell it about the changes. Run the following command: postmap hash:/etc/postfix/virtual && postfix reload
Other files that determine how Postfix sends and receives email are:
6.5 Helo_checks – a text file containing domains which are local to the server. No connecting SMTP server should HELO with these domain names. An example file might be: localhost REJECT You are not me localhost.localdomain REJECT You are not me virtdomain.tld REJECT You are not me 10.11.12.13 REJECT You are not me domain.tld REJECT You are not me sub.domain.tld REJECT You are not me This file is invoked by the ‘smtpd_helo_restrictions’ rule. It has a 100% no false positive effect on email transfer whilst markedly (in some cases) speeding up the rejection of Spam email.
6.6 Recipients – a text file containing a list of valid recipients (gained via an LDAP lookup). This file is useful for maintaining efficiency of the Bastion host because it rejects email for recipients that are not valid instead of blindly accepting them only for the internal email server (Exchange/Notes) to generate a NDR (Non-Delivery-Report) which is sent back out again (often to an invalid email address). Entries are made like so. user@domain OK user2@virtualdomain OK The ‘getadsmtp.pl’ script is used to generate this file. See notes later on this file.
6.7 Mx_access – a text file containing subnets which should never be listed in an MX record. Some spammers (and occasionally inexperienced Administrators) have created DNS MX records
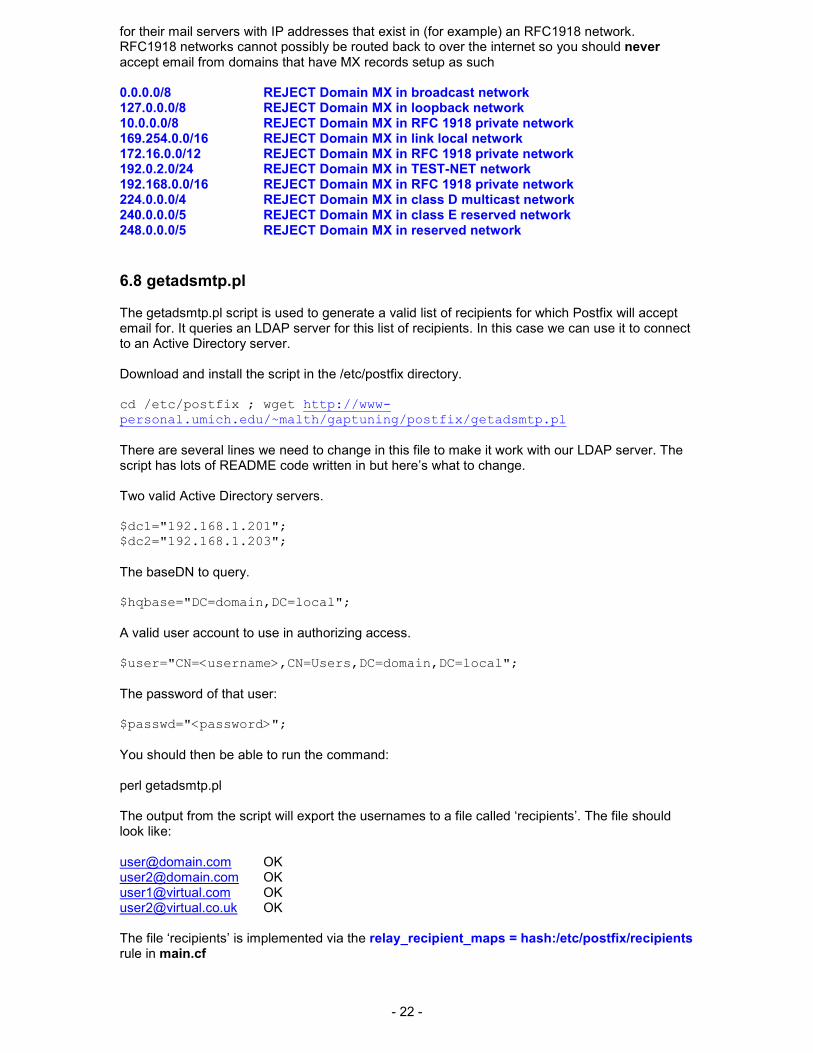
- 22 -
for their mail servers with IP addresses that exist in (for example) an RFC1918 network. RFC1918 networks cannot possibly be routed back to over the internet so you should never accept email from domains that have MX records setup as such 0.0.0.0/8 REJECT Domain MX in broadcast network 127.0.0.0/8 REJECT Domain MX in loopback network 10.0.0.0/8 REJECT Domain MX in RFC 1918 private network 169.254.0.0/16 REJECT Domain MX in link local network 172.16.0.0/12 REJECT Domain MX in RFC 1918 private network 192.0.2.0/24 REJECT Domain MX in TEST-NET network 192.168.0.0/16 REJECT Domain MX in RFC 1918 private network 224.0.0.0/4 REJECT Domain MX in class D multicast network 240.0.0.0/5 REJECT Domain MX in class E reserved network 248.0.0.0/5 REJECT Domain MX in reserved network
6.8 getadsmtp.pl The getadsmtp.pl script is used to generate a valid list of recipients for which Postfix will accept email for. It queries an LDAP server for this list of recipients. In this case we can use it to connect to an Active Directory server. Download and install the script in the /etc/postfix directory. cd /etc/postfix ; wget http://www-personal.umich.edu/~malth/gaptuning/postfix/getadsmtp.pl
There are several lines we need to change in this file to make it work with our LDAP server. The script has lots of README code written in but here’s what to change. Two valid Active Directory servers. $dc1="192.168.1.201"; $dc2="192.168.1.203";
The baseDN to query. $hqbase="DC=domain,DC=local";
A valid user account to use in authorizing access. $user="CN=<username>,CN=Users,DC=domain,DC=local";
The password of that user: $passwd="<password>";
You should then be able to run the command: perl getadsmtp.pl The output from the script will export the usernames to a file called ‘recipients’. The file should look like: [email protected] OK [email protected] OK [email protected] OK [email protected] OK The file ‘recipients’ is implemented via the relay_recipient_maps = hash:/etc/postfix/recipients rule in main.cf
- 23 -
To ensure that the recipients file is always up to date you can implement an hourly crontab script that will check with the LDAP server and generate a new recipients file (even if no new recipients have been added). Here’s the script. Save it as getadperhour #!/bin/sh cd /etc/postfix; perl getadsmtp.pl && postmap recipients postfix reload exit 0
Save it in the /etc/cron.hourly directory and make it executable: chmod +x /etc/cron.hourly/getadperhour
7. ClamAV Setup ClamAV is an Open Source Anti-Virus program freely available for download and use on Linux. It’s setup is fairly simple. Once you have downloaded the source (download from http://kent.dl.sourceforge.net/sourceforge/clamav/clamav-0.88.6.tar.gz) you can start the installation. You can encompass the entire download and unpack of the file in one command-line.
wget http://kent.dl.sourceforge.net/sourceforge/clamav/clamav-0.88.6.tar.gz ;
gzip –d clamav-0.88.6.tar.gz ; tar xvf clamav-0.88.6.tar ; cd clamav-0.88.6 Once it has been downloaded and unpacked run the command (one after the other) ./configure --with-user=vscan –-with-group=vscan make make install
This will install the program into /usr/local/sbin and place the configuration files in /usr/local/etc. By default SuSE does not include /usr/local/sbin/ in it’s $PATH statement so run the following to put it somewhere that is. cd /usr/local/sbin; cp clamd /usr/sbin ; cp freshclam /usr/sbin
We’re now ready to configure the program. The configuration centers around two files: 7.1 fresclam.conf – This file determines the configuration of the freshclam update process of ClamAV. The entries you are most concerned with are: #Example {You MUST comment ‘#’ or remove this line from the file or ClamAV will not work} DatabaseDirectory /usr/local/lib/ {the location of ClamAV’s definitions database} UpdateLogFile /var/log/freshclam.log {the location Freshclam should use for it’s log file} LogVerbose {log all output for debugging purposes} DatabaseOwner vscan {the owner of the definitions database} DNSDatabaseInfo current.cvd.clamav.net {this tells ClamAV to use DNS to verify the database software version} DatabaseMirror db.uk.clamav.net {this tells freshclam which database mirror to use}.

- 24 -
DatabaseMirror database.clamav.net {a fallback mirror in case the primary country mirror is down}. MaxAttempts 5 {the number of times freshclam can attempt to connect to the database service before giving up (until the next scheduled update)}. Checks 12 {the number of database checks per day} When you have finished configuring the file run the following commands to create the freshclam.log file and make it’s owner the vscan user. touch /var/log/freshclam.log ; chown vscan:vscan /var/log/freshclam.log The startup script shipped with ClamAV does not work on SuSE so use the following script to enable you to start freshclam. Create it in the /etc/init.d directory (‘pico –w freshclam’) . /etc/rc.status FCLAM="/usr/local/bin/freshclam" FLAGS="-d" case "$1" in start) echo -n "Starting Freshclam:" $FCLAM $FLAGS if ! checkproc /usr/local/bin/freshclam; then rc_failed 7 fi rc_status -v ;; stop) echo -n "Shutting down Freshclam:" /sbin/killproc freshclam echo rc_status -v ;; restart) $0 stop sleep 5 $0 start ;; *) echo "Useage: $0 {start|stop|restart}" exit 1 ;; esac exit 0
When you have created it run the command chmod +x freshclam
Then add freshclam to the list of daemons that run at startup. chkconfig –a freshclam
You should see the following output telling you that freshclam has been added to runlevel 3 (3:on) freshclam 0:off 1:off 2:off 3:on 4:off 5:off 6:off 7.2 clamd.conf - this file determines what options the clamd process will run with: #Example {You MUST comment ‘#’ or remove this line from the file or ClamAV will not work}
- 25 -
LogFile /var/log/clamd.log {the file clamd should use for logging} LogTime {log the time of each message} LogSyslog {use the system logger} LogFacility LOG_MAIL {which syslog facility to use} LogVerbose {log verbosity} #LocalSocket /tmp/clamd {comment ‘#’ out this line} FixStaleSocket {remove TCP socket after improper shutdown} TCPSocket 3310 {the TCP port the daemon will run on} TCPAddr 127.0.0.1 {which IP address to run on (for a secure system, run on the localhost IP address)} When you have finished configuring the file run the following command to create the clamd.log file and make it’s owner the vscan user. touch /var/log/clamd.log ; chown vscan:vscan /var/log/clamd.log Use the following script to start clamd. Create it in the /etc/init.d directory (‘pico –w clamd’). . /etc/rc.status CLAMD="/usr/local/sbin/clamd" FLAGS="-c /usr/local/etc/clamd.conf" case "$1" in start) echo -n "Starting Clam-AV:" $CLAMD $FLAGS if ! checkproc /usr/local/sbin/clamd; then rc_failed 7 fi rc_status -v ;; stop) echo -n "Shutting down Clam-AV:" /sbin/killproc clamd echo rc_status -v ;; restart) $0 stop sleep 5 $0 start ;; *) echo "Useage: $0 {start|stop|restart}" exit 1 ;; esac exit 0
When you have created the script run the command chmod +x clamd
Then add freshclam to the list of daemons that run at startup. chkconfig –a clamd

- 26 -
You should see the following output telling you that clamd has been added to runlevel 3 (3:on) clamd 0:off 1:off 2:off 3:on 4:off 5:off 6:off When you have finished configuring the file run the following commands to create the clamd.log file and make it’s owner the vscan user. touch /var/log/clamd.log ; chown vscan:vscan /var/log/clamd.log
8. AmavisD Setup Amavisd is an Open Source Perl program which integrates SpamAssassin and ClamD as part of the Postfix After Queue Content Filter. Amavisd-new ships with SuSE so you should have installed it as part of the main OS Installation. The following configuration changes must be made for Amavisd-new to work. 8.1 amavis.conf – the main amavisd-new configuration file located in the /etc directory. {ensure that the following entries are using user ‘vscan’ (change if necessary)} $daemon_user = 'vscan'; $daemon_group = 'vscan'; $mydomain = ‘domain.tld'; {the primary domain name the server runs under} $MYHOME = '/var/spool/amavis'; {a convenient default for other settings} $TEMPBASE = "$MYHOME/tmp"; {working directory, needs to be created manually} $ENV{TMPDIR} = $TEMPBASE; {environment variable TMPDIR} $QUARANTINEDIR = '/var/spool/amavis/virusmails'; {the place to store quarantined items} $db_home = "$MYHOME/db"; $helpers_home = "$MYHOME/var"; $pid_file = "$MYHOME/var/amavisd.pid"; $lock_file = "$MYHOME/var/amavisd.lock"; #NOTE: create directories $MYHOME/tmp, $MYHOME/var, $MYHOME/db manually As the note mentions, you need to create these directories manually then set the owner to user and group vscan (vscan:vscan) mkidr /var/spool/amavis/db ; mkdir /var/spool/amavis/tmp ; /mkdir /var/spool/amavis/var ; chown –R vscan:vscan /var/spool/amavis
$log_level = 5; {set this to 5 initially for debugging, it can be set lower later when we have things running properly} $virus_admin = "virusalert\@$mydomain"; {if you have an alternative email address for virus alerts setup, change it here (change virusalert to av for example} $myhostname = 'host.domain.tld'; {set the fully qualified hostname of the server} {find the following entry for ClamAV in the file (use CLT-W and search for ‘clam’)} # ### http://www.clamav.net/ # ['ClamAV-clamd', # \&ask_daemon, ["CONTSCAN {}\n", "/var/amavisd/clamd.sock"], # qr/\bOK$/, qr/\bFOUND$/, # qr/^.*?: (?!Infected Archive)(.*) FOUND$/ ], {several things need to be changed here, first off comments ‘#’ need to be removed from certain lines to enable ClamAV to be used by amavisd-new}
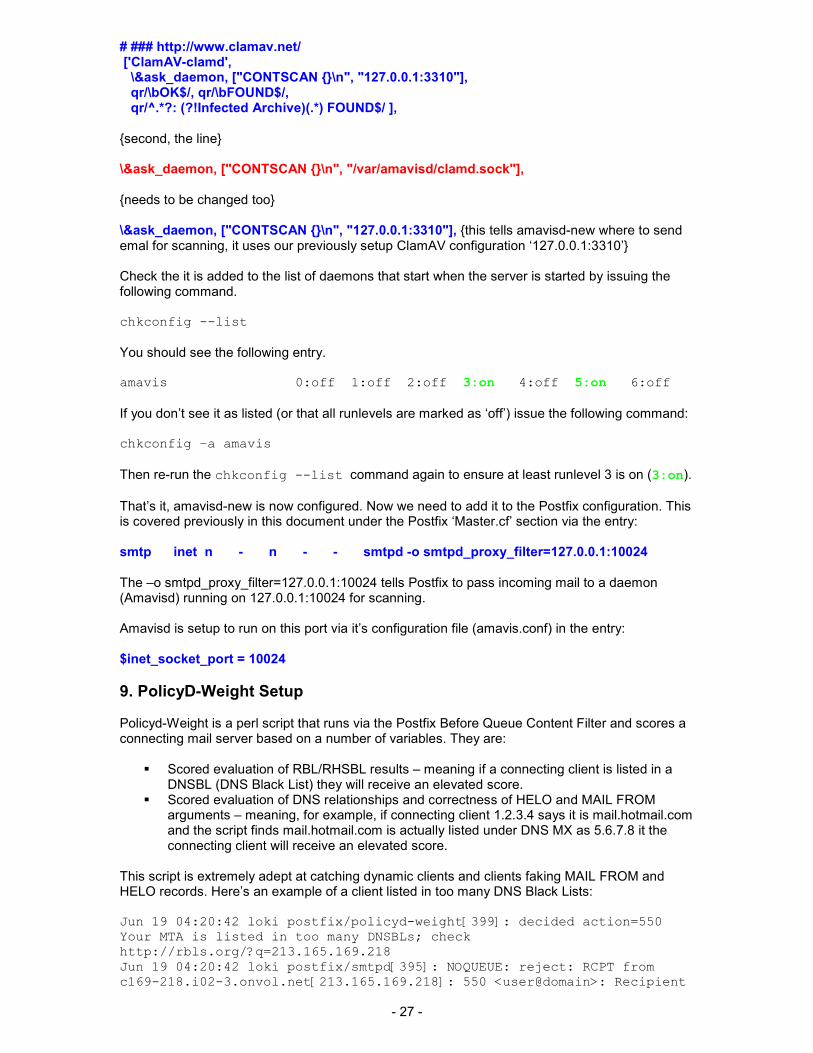
- 27 -
# ### http://www.clamav.net/ ['ClamAV-clamd', \&ask_daemon, ["CONTSCAN {}\n", "127.0.0.1:3310"], qr/\bOK$/, qr/\bFOUND$/, qr/^.*?: (?!Infected Archive)(.*) FOUND$/ ], {second, the line} \&ask_daemon, ["CONTSCAN {}\n", "/var/amavisd/clamd.sock"], {needs to be changed too} \&ask_daemon, ["CONTSCAN {}\n", "127.0.0.1:3310"], {this tells amavisd-new where to send emal for scanning, it uses our previously setup ClamAV configuration ‘127.0.0.1:3310’} Check the it is added to the list of daemons that start when the server is started by issuing the following command. chkconfig --list
You should see the following entry. amavis 0:off 1:off 2:off 3:on 4:off 5:on 6:off If you don’t see it as listed (or that all runlevels are marked as ‘off’) issue the following command: chkconfig –a amavis
Then re-run the chkconfig --list command again to ensure at least runlevel 3 is on (3:on). That’s it, amavisd-new is now configured. Now we need to add it to the Postfix configuration. This is covered previously in this document under the Postfix ‘Master.cf’ section via the entry: smtp inet n - n - - smtpd -o smtpd_proxy_filter=127.0.0.1:10024 The –o smtpd_proxy_filter=127.0.0.1:10024 tells Postfix to pass incoming mail to a daemon (Amavisd) running on 127.0.0.1:10024 for scanning. Amavisd is setup to run on this port via it’s configuration file (amavis.conf) in the entry: $inet_socket_port = 10024
9. PolicyD-Weight Setup Policyd-Weight is a perl script that runs via the Postfix Before Queue Content Filter and scores a connecting mail server based on a number of variables. They are:
� Scored evaluation of RBL/RHSBL results – meaning if a connecting client is listed in a DNSBL (DNS Black List) they will receive an elevated score.
� Scored evaluation of DNS relationships and correctness of HELO and MAIL FROM arguments – meaning, for example, if connecting client 1.2.3.4 says it is mail.hotmail.com and the script finds mail.hotmail.com is actually listed under DNS MX as 5.6.7.8 it the connecting client will receive an elevated score.
This script is extremely adept at catching dynamic clients and clients faking MAIL FROM and HELO records. Here’s an example of a client listed in too many DNS Black Lists: Jun 19 04:20:42 loki postfix/policyd-weight[399]: decided action=550 Your MTA is listed in too many DNSBLs; check http://rbls.org/?q=213.165.169.218 Jun 19 04:20:42 loki postfix/smtpd[395]: NOQUEUE: reject: RCPT from c169-218.i02-3.onvol.net[213.165.169.218]: 550 <user@domain>: Recipient
- 28 -
address rejected: Your MTA is listed in too many DNSBLs; check http://rbls.org/?q=213.165.169.218; from=<[email protected]> to=<user@domain> proto=SMTP helo=<c169-218.i02-3.onvol.net> Here’s another example, this time the connection was rejected because the claimed sender was not listed as a valid MX for the domain it was sending on behalf of. Jun 19 05:41:19 loki postfix/policyd-weight[584]: weighted check: IN_DYN_NJABL=3.25 NOT_IN_BL_NJABL=-1.5 NOT_IN_SPAMCOP=-1.5 NOT_IN_SBL_XBL_SPAMHAUS=-1.5 CL_IP_NE_HELO=1.5 RESOLVED_IP_IS_NOT_HELO=1.5 HELO_NUMERIC=1.5 (check from: .inventec.com. - helo: .150e2748.) FROM_NOT_FAILED_HELO=6.25 FROM_MULTIPARTED=5.34 <client=211.125.199.175> <helo= 150e2748> <[email protected]> <helo_ips: 210.64.20.13 211.20.63.11 218.80.222.222>, rate: 14.84 Jun 19 05:41:19 loki postfix/policyd-weight[584]: decided action=550 Mail appeared to be SPAM or forged.; MTA helo: 150e2748, MTA hostname: hccd37dc7af.bai.ne.jp[211.125.199.175] (helo/hostname mismatch) Jun 19 05:41:19 loki postfix/smtpd[581]: NOQUEUE: reject: RCPT from hccd37dc7af.bai.ne.jp[211.125.199.175]: 550 <user@domain>: Recipient address rejected: Mail appeared to be SPAM or forged.; MTA helo: 150e2748, MTA hostname: hccd37dc7af.bai.ne.jp[211.125.199.175] (helo/hostname mismatch); from=<[email protected]> to=<user@domain> proto=SMTP helo=<150E2748>
Setting up policyd-weight is very simple. Download the following script (http://www.policyd-weight.org/policyd-weight) and save it in directory /usr/lib/postfix/. The easiest way to do this is: cd /usr/lib/postfix/ ; wget http://www.policyd-weight.org/policyd-weight ; chmod 555 /usr/lib/postfix/policyd-weight
Now add a user and group called ‘polw’ useradd –d /usr/lib/postfix –s /bin/false polw ; groupadd polw ; usermod –g polw polw
Now grab the example config file cd /etc && wget –O policyd-weight.conf “http://www.policyd-weight.org/policyd-weight.conf.sample” && chmod 644 policyd-weight.conf
We’ve already setup Postfix to work with this program via the following two entries in the main.cf and master.cf files: Main.cf - check_policy_service unix:private/policy Master.cf – policy unix - n n - - spawn user=polw argv=/usr/bin/perl /usr/lib/postfix/policyd-weight 9.1 Whitelisting Domains or IP addresses CAN be whitelisted even if they receive a high score (causing a reject). This is how it’s done. Create a file in the /etc/postfix directory called ‘policyd_whitelist’ Cd /etc/postfix ; pico –w policyd_whitelist
Add the IP address of the connecting server followed by an OK 1.2.3.4 OK Now run the following command.
- 29 -
postmap policyd_whitelist
Add the following (marked red) entry to the main.cf file smtpd_recipient_restrictions = permit_mynetworks, reject_unauth_destination, reject_unknown_sender_domain, check_sender_mx_access cidr:/etc/postfix/mx_access, reject_invalid_hostname, reject_non_fqdn_sender, reject_non_fqdn_recipient, check_recipient_mx_access cidr:/etc/postfix/mx_access, reject_unknown_recipient_domain, check_client_access hash:/etc/postfix/clients, check_client_access hash:/etc/postfix/policyd_whitelist, check_policy_service unix:private/policy, This entry tells Postfix to check the policyd_whitelist file for valid entries, if an entry is found matching the connecting client processing of the Before Queue Content Filter stops and the client is free to continue it’s transaction. Thus the check_policy_service unix:private/policy entry is bypassed. NOTE: policyd-whitelist is extremely strict on it’s acceptance of inbound email and may or may not require human intervention to whitelist senders regularly. Do not implement policyd-whitelist if you are concerned about dropping legitimate email. Instead, use the following entries under ‘smtpd_recipient_restrictions’ smtpd_recipient_restrictions = permit_mynetworks, reject_unauth_destination, reject_unknown_sender_domain, check_sender_mx_access cidr:/etc/postfix/mx_access, reject_invalid_hostname, reject_non_fqdn_sender, reject_non_fqdn_recipient, check_recipient_mx_access cidr:/etc/postfix/mx_access, reject_unknown_recipient_domain, reject_rbl_client zen.spamhaus.org, reject_rbl_client http.dnsbl.sorbs.net, reject_rbl_client smtp.dnsbl.sorbs.net, reject_rbl_client zombie.dnsbl.sorbs.net, reject_rbl_client dnsbl.ahbl.org, reject_rbl_client dnsbl.njabl.org, reject_rbl_client korea.services.net, reject_rbl_client relays.ordb.org, reject_rbl_client cbl.abuseat.org, reject_rbl_client opm.blitzed.org, reject_rhsbl_sender ex.dnsbl.org reject_rhsbl_sender nomail.rhsbl.sorbs.net, reject_rhsbl_sender rhsbl.sorbs.net, reject_rhsbl_client blackhole.securitysage.com, reject_rhsbl_sender blackhole.securitysage.com,

- 30 -
10. SpamAssassin Setup SpamAssassin is an Open Source Perl based spam scoring system with many features. Setting it up is straight forward. Installation of the program itself is covered in the OS install section (spamassassin perl-spamassassin). The configuration files and rules are stored in /etc/mail/spamassassin. The main configuration file is called local.cf. Nothing actually needs to be setup within the local.cf file as AmavisD uses it’s own variables for scoring. The one thing we do need to do is download some rules. In order to download rules that are fresh on a regular basis we use a script from the Rules Emporium website called RulesDuJour (www.rulesemporium.com). This script can be used within a crontab script to download updates on a daily or weekly basis. Download the script and configure it for use on the server. mkdir /etc/rulesdujour ; cd /etc/rulesdujour ; wget http://sandgnat.com/rdj/rules_du_jour
Now make the file executable: chmod +x rules_du_jour
Edit the rules_du_jour file and change the following entries to look like: [ "${SA_DIR}" ] || SA_DIR="/etc/mail/spamassassin"; {ensure it is /etc/mail/spamassassin} [ "${MAIL_ADDRESS}" ] || MAIL_ADDRESS="[email protected]"; {change the email address} SA_RESTART="/etc/init.d/amavis restart"; {change to this} Now create a file in /etc/rulesdujour called ‘config’ (pico –w config) and add the following (all on one line): TRUSTED_RULESETS="TRIPWIRE EVILNUMBERS ANTIDRUG EVILNUMBERS1 EVILNUMBERS2 BLACKLIST BLACKLIST_URI RANDOMVAL BOGUSVIRUS SARE_ADULT SARE_FRAUD SARE_BML SARE_SPOOF SARE_BAYES_POISON_NXM SARE_OEM SARE_RANDOM SARE_HEADER SARE_HEADER_ABUSE SARE_URI0 SARE_URI1 RANDOMVAL SARE_FRAUD SARE_BML SARE_HEADER_ABUSE SARE_HEADER0 SARE_HEADER1 SARE_HEADER2 SARE_OBFU0 SARE_OBFU1 SARE_OBFU2 SARE_REDIRECT";
Once this is done, run the ‘rules_du_jour’ script to download updates: cd /etc/rulesdujour ; ./rules_du_jour
The rulesets will then be downloaded and Amavisd restarted to include them. You should see the following showing this process has succeeded correctly: restarting SpamAssassin using: sh -c "/etc/init.d/amavis restart"
Now we need to add the rdj script to our crontab to be scheduled for regular download. To do this simply copy the rules_du_jour script to the /etc/cron.daily directory. cd /etc/rulesdujour ; cp rules_du_jour /etc/cron.daily
10.1 Whitelisting/Blacklisting To whitelist or blacklist a sender you need to edit the user_prefs file in the following directory - /var/amavis/.spamassassin (pico –w user_prefs) Whitelist_from *@domain.tld Blacklist_from *@domain.tld Whitelist_from [email protected] Blacklist_from [email protected]
- 31 -
Once you have done this you would need to restart the AmavisD process. /etc/init.d/amavis restart
11. Grey-Listing Grey-listing is a feature available within the Postfix MTA (version 2.1 onwards) which allows your Bastion host to reject (temporarily) emails from a sending MTA when it is the first time the sending host has been seen. The main use for this feature is that most spam sending hosts use a ‘fire and forget’ style of getting spam through to your mailbox (if it isn’t accepted the first time resending isn’t attempted) so rejecting a email in the Grey-List fashion allows you to stem the tide of spam before the email is accepted to the Before Queue content filter. Email is rejected with a 450 SMTP code (temporarily rejected) and the connection information logged in a local database. The sending MTA, if it is determined to send it’s email, will attempt delivery again after a period (this time depends on the sending server configuration) upon which your Bastion will allow the host to complete it’s transfer (and also add the host to the database permanently as having ‘passed’ the grey-list). Implementing Grey-Listing is fairly straight forward. In this document I use a program called Postgrey as the grey-listing daemon of choice. Postgrey is a Perl script written by David Schweikert the creator of Mailgraph used later in this document. First download the program, from the command line enter: wget http://isg.ee.ethz.ch/tools/postgrey/pub/postgrey-1.27.tar.gz
Now deflate, untar and cd to the directory. Gzip –d postgrey-1.27.tar.gz ; tar xvf postgrey-1.27.tar ; cd postgrey-1.27
Run the following commands to install the program. cp postgrey /usr/bin cp postgrey_whitelist_* /etc/postfix useradd postgrey cd /var/spool/postfix mkdir postgrey chown postgrey postgrey In order to run Postgrey we need to install an additional Perl module called IO::Multiplex. You can do this by issuing the command – ‘perl –MCPAN –e “install IO::Multiplex’ from the command line. Once installed you can continue with the configuration. Now we need to create a startup script for our daemon. Create it in the /etc/init.d directory (‘pico
–w postgrey’). The script below can be used. # Postgrey startup script written by: Andy Millett . /etc/rc.status PG="/usr/bin/postgrey" FLAGS="--inet=10023 -d --delay=3600 --auto-whitelist-clients" case "$1" in start) echo -n "Starting Postgrey:" $PG $FLAGS if ! checkproc /usr/local/bin/postgrey; then rc_failed 7 fi rc_status -v ;; stop) echo -n "Shutting down Postgrey:" /sbin/killproc postgrey echo rc_status -v ;;
- 32 -
restart) $0 stop sleep 5 $0 start ;; *) echo "Useage: $0 {start|stop|restart}" exit 1 ;; esac exit 0
Run the following commands to make it executable and run at startup. chmod +x postgrey ; chkconfig –a postgrey
Now we need to call this script within Postfix. Insert the following line in the /etc/postfix/main.cf file (in red). reject_unknown_recipient_domain, check_policy_service inet:127.0.0.1:10023, check_client_access hash:/etc/postfix/policyd_whitelist, Don’t forget to run ‘postfix reload’ when you’ve finished. The daemon (started in the next section) will run on localhost port 10023. 11.1 Whitelisting Earlier, we copied two files into the /etc/postfix directory (postgrey_whitelist_*). These files can be used to bypass greylisting for any known or trusted hosts and recipients. postgrey_whitelist_clients – can be used to whitelist domains or IP addresses. postgrey_whitelist_recipients – can be used to specify recipients which should not have greylisting applied. The postgrey daemon will look at these files every time it is loaded (or restarted).
12. Starting the Daemons If you have added ClamAV and AmavisD to the list of startup daemons (via chkconfig –a) you can start each of them by running: cd /etc/init.d/amavis start ; ./freshclam start; ./clamd start ; ./postgrey start
You should see ‘done’ on each. bastion:/etc/init.d # cd /etc/init.d/; ./amavis start ; ./freshclam start; ./clamd start ; ./postgrey start Starting virus-scanner (amavisd-new): done Starting Freshclam: done Starting Clam-AV: done Starting Postgrey: done If you don’t, check the log files for details of any configuration errors or problems (more /path/to/log/<log name>) For Amavis - /var/spool/amavis/amavis.log For ClamD - /var/log/clamd.log For Freshclam - /var/log/freshclam.log For Postgrey - /var/log/mail
- 33 -
13. Reporting Apart from the normal checking of log files (which can be confusing) there are other ways of reporting on the health of the Bastion host. 13.1 Pflogsumm – Pflogsumm is a Perl script created by Jim Seymor which outputs the Postfix mail log file in human readable form. To install it run the following command. cd /root/; wget http://jimsun.linxnet.com/downloads/pflogsumm-1.1.0.tar.gz ; gzip -d pflogsumm-1.1.0.tar.gz ; tar xvf pflogsumm-1.1.0.tar ; cd pflogsumm-1.1.0/
Now copy the files to the necessary locations and set the permissions on them. cp pflogsumm.pl /usr/local/bin/pflogsumm chown bin:bin /usr/local/bin/pflogsumm chmod 755 /usr/local/bin/pflogsumm cp pflogsumm.1 /usr/local/man/man1/pflogsumm.1 chown bin:bin /usr/local/man/man1/pflogsumm.1 chmod 644 /usr/local/man/man1/pflogsumm.1
The easiest way to implement it is via a crontab script which runs on a daily basis. Create the following script in /etc/cron.daily. Call it pfdaily for example. #!/bin/sh # Don’t forget to change the ‘[email protected]’ to a valid email!!! # If you want to add additional addresses use the –c <address> for # each email you want to add. /usr/loca/bin/pflogsumm –d yesterday –-problems_first /var/log/mail | mail –S “Bastion Daily Mail Log” [email protected]. exit 0
Make the script executable. chomd +x /etc/cron.daily/pfdaily
13.2 Mailgraph Mailgraph is a graphical depiction of mail displayed using RRDtool (Round Robin Database) and is displayed via a web page. Here’s how to set it up. Download and unpack the archive: Cd root/ ; Wget http://people.ee.ethz.ch/~dws/software/mailgraph/pub/mailgraph-1.12.tar.gz ; gzip -d mailgraph-1.12.tar.gz ; tar xvf mailgraph-1.12.tar ; cd mailgraph-1.12
To install this program we require Perl CPAN modules which are required by the mailgraph.pl script, they are File::Tail and Time::HiRes. This requires the setup of a Config.pm module so perl knows where to get it’s CPAN modules. The first time the command is run you will be asked a number of questions in order to configure CPAN access. You can run through this (defaults on all are all that is needed) or you can download it by doing the following: Cd /usr/lib/perl5/5.8.6/CPAN/; rm Config.pm wget http://unimatrixzero.co.uk/ipp/Config.pm
Once this is done run the command perl –MCPAN –e “install File::Tail” ; perl –MCPAN –e “install Time::HiRes”
Now copy the files to the relevant locations.
- 34 -
cd /root/mailgraph-1.12 cp mailgraph.cgi /srv/www/cgi-bin/ chmod +x /srv/www/cgi-bin/mailgraph.cgi cp mailgraph.pl /usr/local/bin/maigraph.pl cp mailgraph-init /etc/init.d chmod +x /etc/init.d/mailgraph-init
Now you need to make some changes to the mailgraph.cgi file: cd /srv/www/cgi-bin ; pico –w mailgraph.cgi
Change the following lines. my $rrd = 'mailgraph.rrd'; {change to /var/lib/mailgraph.rrd} my $rrd_virus = 'mailgraph_virus.rrd'; {change to /var/lib/mailgraph_virus.rrd} Add the mailgraph-init script to the scripts started up at boot time. chkconfig –a /etc/init.d/mailgraph-init
Edit the mailgraph-init script and change the following line so that mailgraph looks at the right mail log file. MAIL_LOG=/var/log/syslog {change it to /var/log/mail} Start the daemons /etc/init.d/apache2 start /etc/init.d/mailgraph-init start
- 35 -
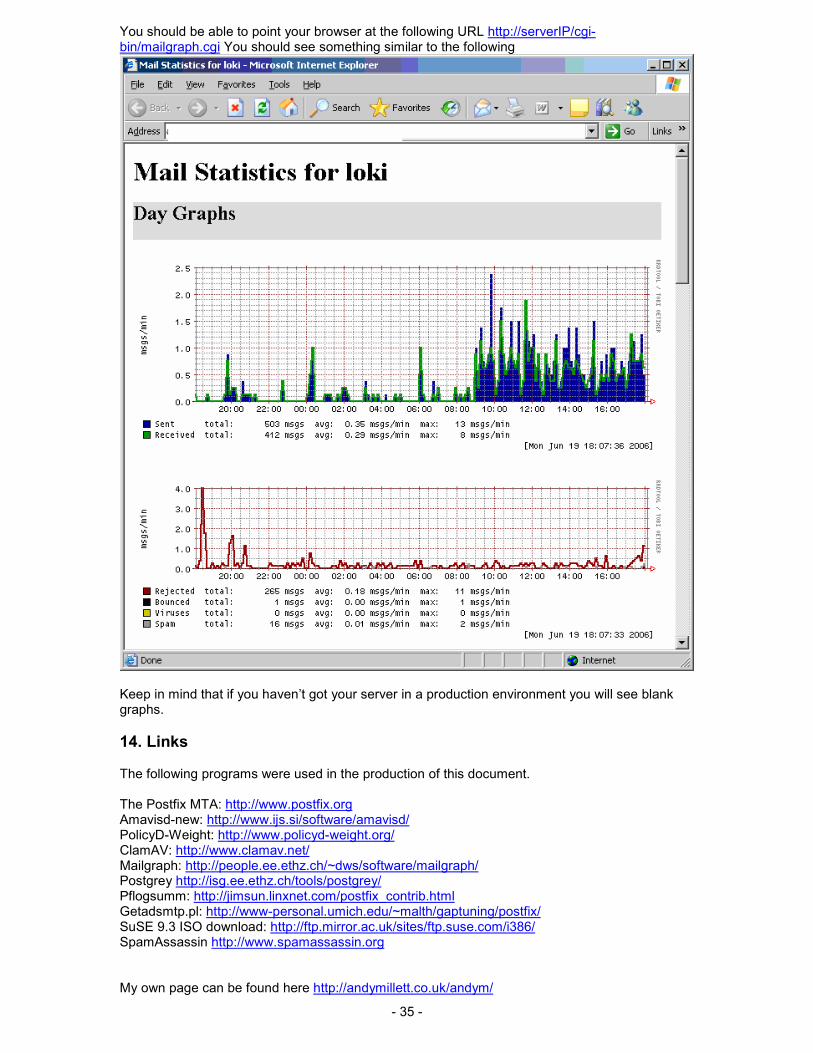
You should be able to point your browser at the following URL http://serverIP/cgi-bin/mailgraph.cgi You should see something similar to the following
Keep in mind that if you haven’t got your server in a production environment you will see blank graphs.
14. Links The following programs were used in the production of this document. The Postfix MTA: http://www.postfix.org Amavisd-new: http://www.ijs.si/software/amavisd/ PolicyD-Weight: http://www.policyd-weight.org/ ClamAV: http://www.clamav.net/ Mailgraph: http://people.ee.ethz.ch/~dws/software/mailgraph/ Postgrey http://isg.ee.ethz.ch/tools/postgrey/ Pflogsumm: http://jimsun.linxnet.com/postfix_contrib.html Getadsmtp.pl: http://www-personal.umich.edu/~malth/gaptuning/postfix/ SuSE 9.3 ISO download: http://ftp.mirror.ac.uk/sites/ftp.suse.com/i386/ SpamAssassin http://www.spamassassin.org My own page can be found here http://andymillett.co.uk/andym/