Embed Size (px)
Citation preview
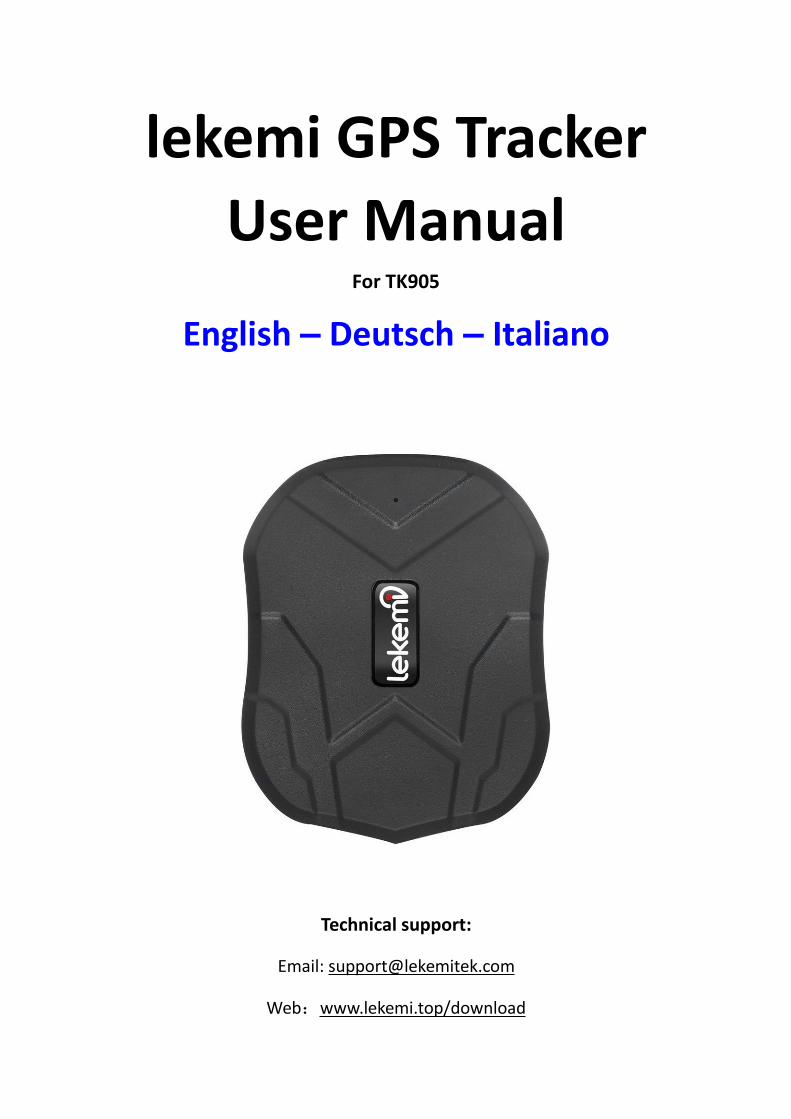
lekemi GPS TrackerUser Manual
For TK905
English – Deutsch – Italiano
Technical support:
Email: [email protected]
Web:www.lekemi.top/download
Table of contents
Quick User Guide ............................................................................................................................................... 3
Welcome ............................................................................................................................................................ 4
Chapter 1 Product overview............................................................................................................................... 4
Introduction ................................................................................................................................................... 4
Specifications.................................................................................................................................................. 4
What's Included ............................................................................................................................................. 5
TK905 diagram ............................................................................................................................................... 5
Charging the device ....................................................................................................................................... 6
Power On/Off ................................................................................................................................................. 6
Indicator light status ...................................................................................................................................... 6
SIM card installation ...................................................................................................................................... 6
APN settings.................................................................................................................................................... 7
Chapter 2 SMS tracking....................................................................................................................................... 9
SMS command list ........................................................................................................................................ 12
Chapter 3 APP tracking..................................................................................................................................... 13
Live tracking ................................................................................................................................................. 14
Historical route playback.............................................................................................................................. 14
Geo-fence alarm .......................................................................................................................................... 15
Alarm notices ............................................................................................................................................... 15
Alarm Switch ................................................................................................................................................ 16
Settings......................................................................................................................................................... 16
Chapter 4 Webpage tracking............................................................................................................................ 17
FAQ ............................................................................................................................................................. 21

Quick User Guide
The configuration of the tracker is very simple, you just need a little patience. It works through sms commandswhich the user sends the device from the own mobile phone number. It can also work through the app or webpage after necessary initial SMS configuration.
1. Prepare a SIM card
The tracker works thanks to a sim card which is put inside the device. Please be assured it has got sufficient creditor a promotion, as it uses sms, calls and a little but necessary quantity of data traffic (about 100mb per month). Beassured that the sim supports the GSM, GPS, GPRS, internet 2g networks, sms and calls. Ask your most trustedcompany for eventual promotions about sim cards for home alarms or security systems.
2. Disable the PIN code
Insert the sim in a smartphone to deactivate PIN, answering service and call transfer. Get from the networksettings the APN information of your company (address and eventual username and password) or get it from thisaddress: http://wiki.apnchanger.org/Main_Page3. Insert the SIM card
Go to an open space. Insert the sim in the tracker. This will shut on showing blue and yellow leds.4. Setup the admin phone number
Set the admin number (your personal cellphone number) sending SMS to the SIM in the tracker:Command: admin123456+space+your number (eg. admin123456 7894561230).Reply: admin ok
You can now send command G123456# or call the tracker to soon receive a sms containing information aboutlatitude, longitude, date, time, tracker battery status and a google maps link which shows the tracker’s actualposition.5. Setup the APN
As the device has to be connected with GPRS network before send location or alarm information to the APPor Internet, APN settings must be done before using APP tracking or webpage tracking.Please setup APN according to this example. Information should be replaced with those of your tracker simcompany
For Tesco Mobile SIM card in the UK, we got APN information below.APN name: prepay.tesco-mobile.comAPN username: tescowapAPN password: passwordSend SMS below to set APN1. gprs1234562. apn123456 prepay.tesco-mobile.com3. apnuser123456 tescowap (no need to send if APN username is empty)4. apnpasswd123456 password (no need to send if APN password is empty)
Now the blue and yellow leds should flash, indicating that the tracker receives gps and gprs signals correctly.6. Install and login the mobile APP

On Android: Search “TKSTAR GPS” in the Google Play StoreOn Apple iOS:Search “TKSTAR GPS” in the Apple APP StoreAfter download and installed the APP, input the below information for login.Select “Log in by IMEI/ID” on the bottom of login screenServer: www.mytkstar.netID: can be found on the back side of devicePassword: 123456
7. Now you can fully use the tracker easily via the mobile APP, webpage and SMS command.
WelcomeThank you for purchasing the Lekemi TK-905 Real-time Car GPS Tracker! This user manual is designed to be areference tool for the installation and operation of your GPS Tracker. Here you can find information aboutthe tracker’s features and functions, as well as information to aid in troubleshooting.For access to other support information, please go to http://www.lekemi.top/downloadTo contact Lekemi support, please send us email: [email protected]
Chapter 1 - Product overview
Introduction:
TK905 is an asset tracking device designed to track car, vehicles, and other assets. With a compact body andsuperior receiving capabilities, TK905 is an inconspicuous and yet powerful tracking solution. It is based onexisting GSM/GPRS network and GPS satellites, and it can locate and monitor any remote targets by SMS,APP and Internet. TK905 adopts the most advanced technology of GPS and AGPS dual mode positioning.With built-in magnet, TK905 can be installed in your car within 10 seconds. With live tracking and historicalroute function, user can check the live track and historical route via smartphone anywhere anytime. With5000 mAh Battery capacity, TK905 can work for over 60 days at most after full charge. You will enjoy a peaceof mind with knowing exactly where your vehicle is.
Specifications
Item Size 90mm x 72mm x 22mm (3.5” x 2.8” x 0.8”)
Weight 168gNetwork GSM/GPRSGSM Band 850/900/1800/1900MhzGPS sensitivity -159dBmGPS accuracy 20-30mCharger 110-220V input
5V-1A outputBattery 3.7V 5000mAh Li-ion battery; 30-60 days standby
Time of GPS signalacquisition
Cold status 45sWarm status 35sHot status 1s
Working Temperature -20C° to +5C°Working Humidity 5% - 95% without condensation
What’s Included
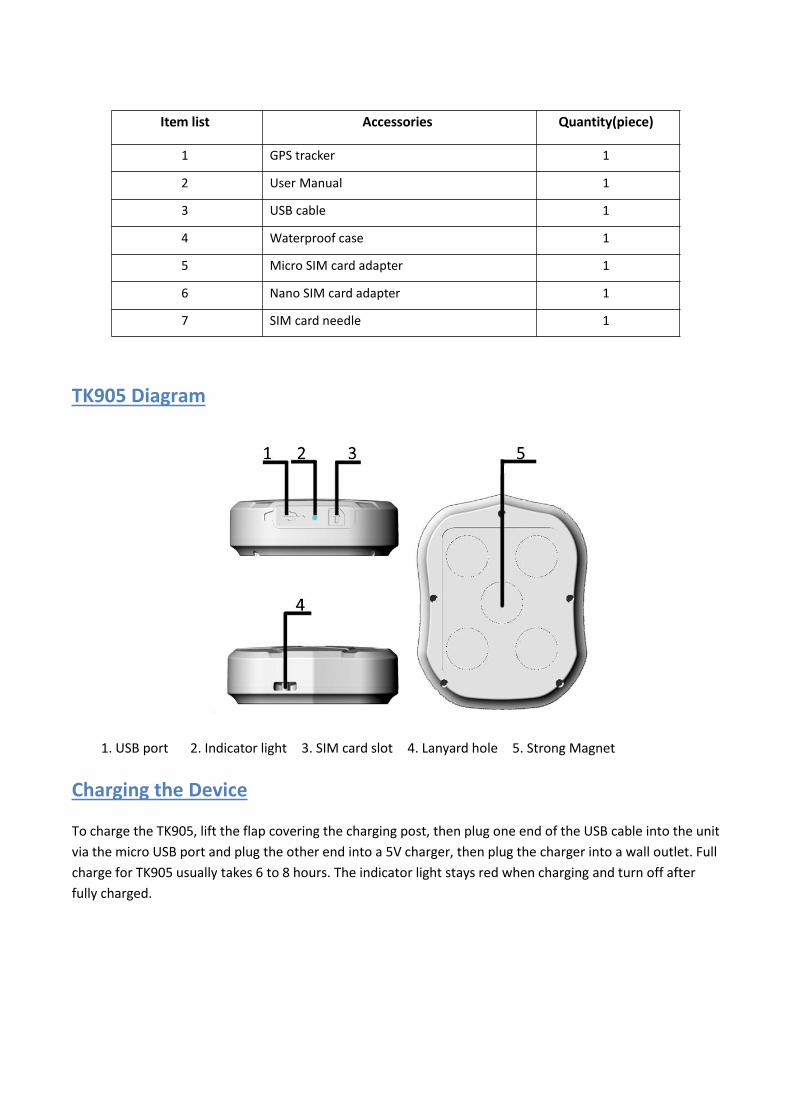
TK905 Diagram
1. USB port 2. Indicator light 3. SIM card slot 4. Lanyard hole 5. Strong Magnet
Charging the Device
To charge the TK905, lift the flap covering the charging post, then plug one end of the USB cable into the unitvia the micro USB port and plug the other end into a 5V charger, then plug the charger into a wall outlet. Fullcharge for TK905 usually takes 6 to 8 hours. The indicator light stays red when charging and turn off afterfully charged.
Item list Accessories Quantity(piece)
1 GPS tracker 1
2 User Manual 1
3 USB cable 1
4 Waterproof case 1
5 Micro SIM card adapter 1
6 Nano SIM card adapter 1
7 SIM card needle 1
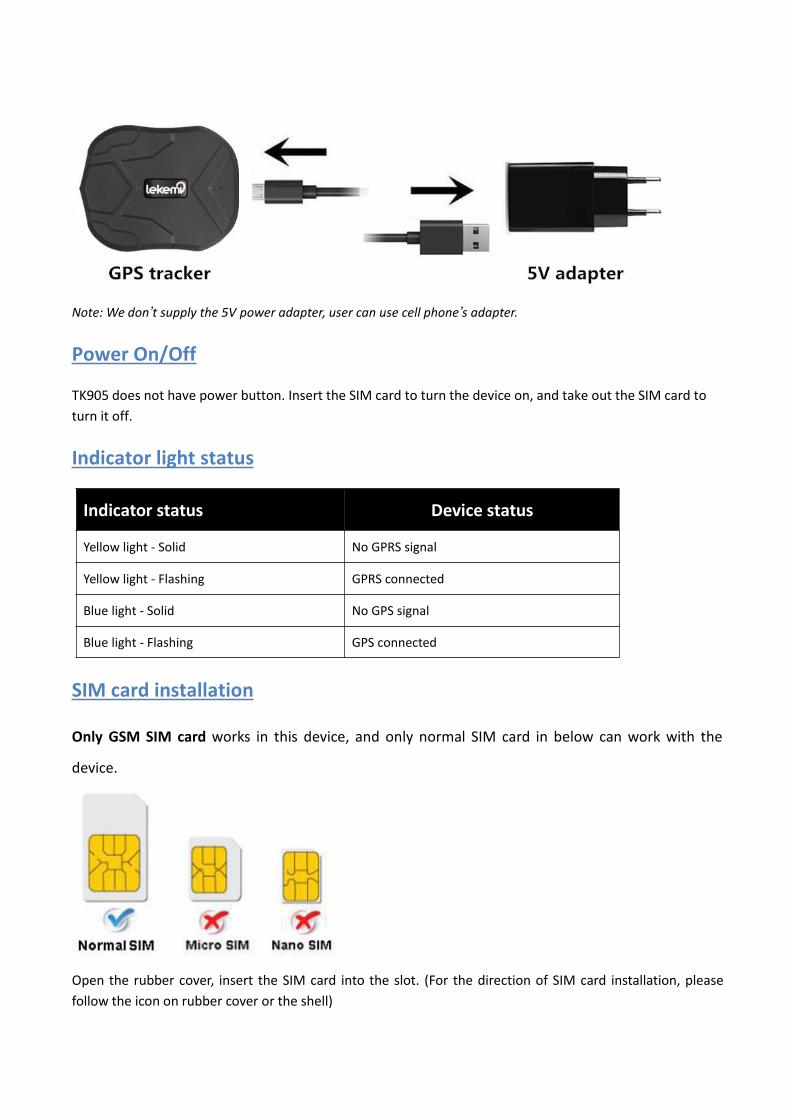
Note: We don’t supply the 5V power adapter, user can use cell phone’s adapter.
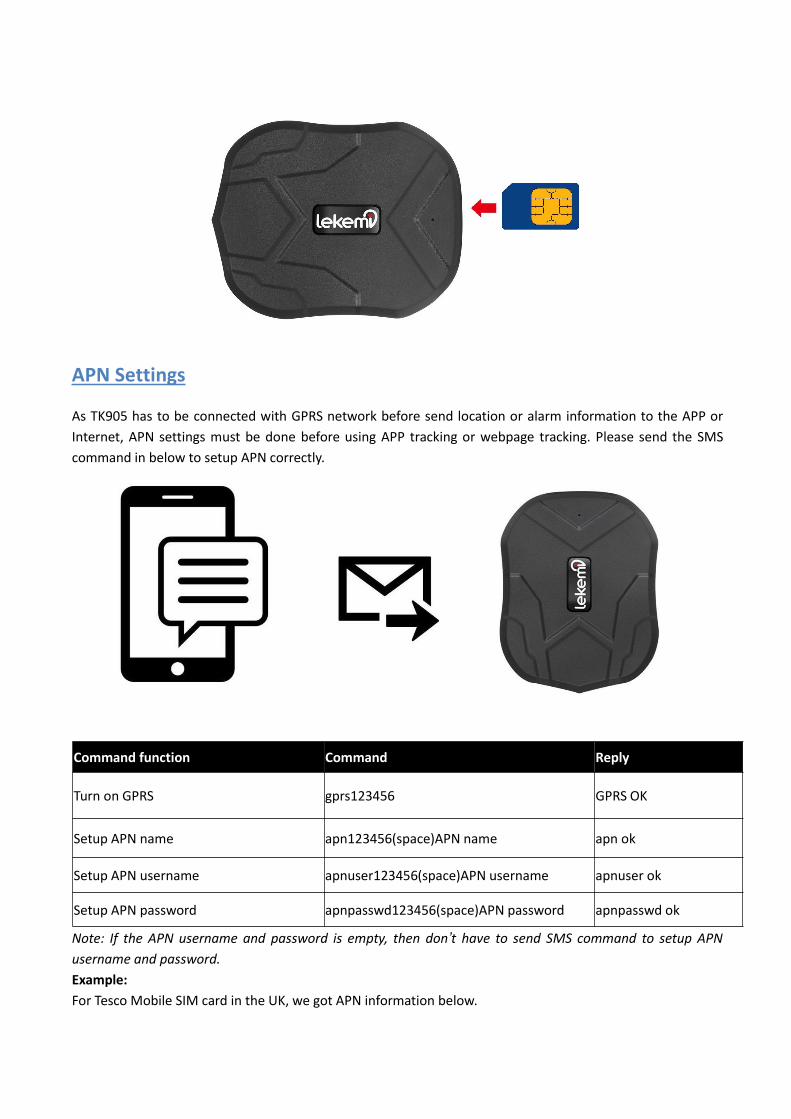
Power On/Off
TK905 does not have power button. Insert the SIM card to turn the device on, and take out the SIM card toturn it off.
Indicator light status
Indicator status Device status
Yellow light - Solid No GPRS signal
Yellow light - Flashing GPRS connected
Blue light - Solid No GPS signal
Blue light - Flashing GPS connected
SIM card installation
Only GSM SIM card works in this device, and only normal SIM card in below can work with the
device.
Open the rubber cover, insert the SIM card into the slot. (For the direction of SIM card installation, pleasefollow the icon on rubber cover or the shell)
APN Settings
As TK905 has to be connected with GPRS network before send location or alarm information to the APP orInternet, APN settings must be done before using APP tracking or webpage tracking. Please send the SMScommand in below to setup APN correctly.
Note: If the APN username and password is empty, then don’t have to send SMS command to setup APNusername and password.Example:For Tesco Mobile SIM card in the UK, we got APN information below.
Command function Command Reply
Turn on GPRS gprs123456 GPRS OK
Setup APN name apn123456(space)APN name apn ok
Setup APN username apnuser123456(space)APN username apnuser ok
Setup APN password apnpasswd123456(space)APN password apnpasswd ok
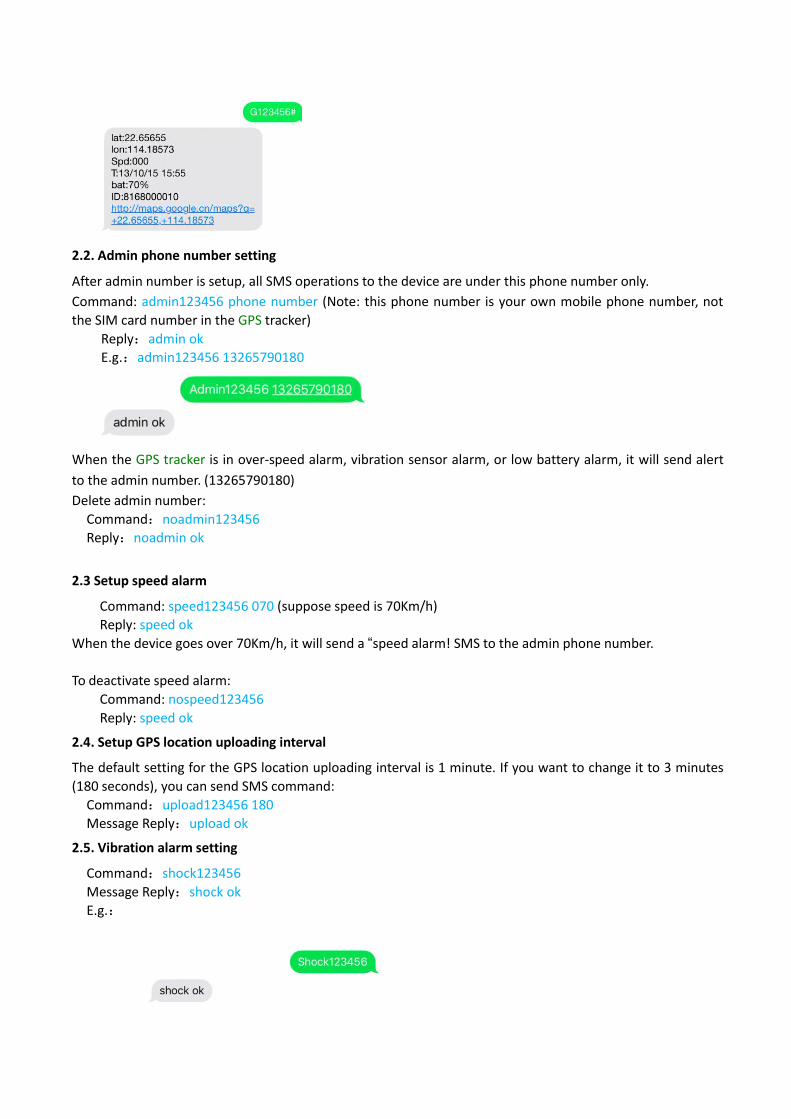
APN name: prepay.tesco-mobile.comAPN username: tescowapAPN password: password
Send SMS in below setup APN, gprs123456 apn123456 prepay.tesco-mobile.com apnuser123456 tescowap (no need to send if APN username is empty) apnpasswd123456 password (no need to send if APN password is empty)
Note: You can also copy the URL below to find out your APN information,http://wiki.apnchanger.org/Main_Page
Warnings:1. Only GSM SIM card with voice call, SMS and GPRS data plan works with the device, please make sure theGSM SIM card supports calling, sending SMS message and GPRS network.2. Please install the SIM card into a cell phone to disable the PIN code, the answering machine and the callalert, then put the SIM card back into the tracker. Please also make sure the GSM card has opened the callshows and turned off the call transfer.3. Please make sure GSM SIM card has got sufficient credit.4. GPS tracking can only work outdoor. As this device depends on the GPS network, GSM (GPRS) networksystem, GIS (geographic information) system, computer system and etc, it must work with good networkflow, due to network failure or other forces causes any losses and service disruption, we will not undertakeany responsibilities for this.5. Keep the product away from fire, high temperature or other extreme environments.6. Don’t disassemble or modify the product, to avoid damage to the product.7. If the product is damaged resulting in a breach of the warnings above, we will not bear any legalresponsibilities.
Chapter 2 - SMS tracking
2.1. Live tracking
Call the tracker or send the message “G123456#” to GPS tracker, you will receive a Google Maps link ofposition.E.g.:
2.2. Admin phone number setting
After admin number is setup, all SMS operations to the device are under this phone number only.Command: admin123456 phone number (Note: this phone number is your own mobile phone number, notthe SIM card number in the GPS tracker)
Reply:admin okE.g.:admin123456 13265790180
When the GPS tracker is in over-speed alarm, vibration sensor alarm, or low battery alarm, it will send alertto the admin number. (13265790180)Delete admin number:
Command:noadmin123456Reply:noadmin ok
2.3 Setup speed alarm
Command: speed123456 070 (suppose speed is 70Km/h)Reply: speed ok
When the device goes over 70Km/h, it will send a “speed alarm! SMS to the admin phone number.
To deactivate speed alarm:Command: nospeed123456Reply: speed ok
2.4. Setup GPS location uploading interval
The default setting for the GPS location uploading interval is 1 minute. If you want to change it to 3 minutes(180 seconds), you can send SMS command:
Command:upload123456 180Message Reply:upload ok
2.5. Vibration alarm setting
Command:shock123456Message Reply:shock okE.g.:

Note: The sensor goes on only if the tracker is kept stationary for 5 minutes. The tracker will send a “sensoralarm!” sms to the admin number when this device get shocked.Deactivate vibration alarm:
Command:noshock123456Reply:noshock ok
2.6. Switch to voice monitoring mode
Send SMS command below to enter to voice monitoring mode.Command:monitor123456Message Reply:monitor ok
After setup, call the device to listen to the environment around it.
Then send SMS command below to get back to tracking mode,Command:tracker123456Message Reply:tracker ok
2.7. Sleep mode: two different settings
Sleep mode includes sleep awoken by command mode and sleep awoken by shock mode.
2.7.1. Sleep awoken by command mode
In sleep awoken by command mode, the tracker works for only 5 minutes after being woken up, then goesback to sleep mode (GPS is shut off, GSM works in low consumption mode). Sending SMS command or callingthe tracker can wake up the tracker again.Sleep awoken by time mode setting:
Command:sleep123456 timeReply:sleep time okE.g.:
2.7.2 Sleep awoken by shock mode
The default working mode for the device is “Sleep awoken by shock mode”, which can help user to savebattery. The tracker will switch to sleep mode if there is no movement detected. Any movement of thedevice will wake up the tracker again.Sleep awoken by shock mode setting:
Command:sleep123456 shockReply:sleep shock okE.g.:
2.7.3. Turn off sleep mode
Turn off sleep mode:Command:sleep123456 off
Reply:sleep off ok
2.8 Time zone settings
The default factory setting for time zone is GMT 0, if it need to be changed to local time zone, send SMScommand below.
Command:timezone123456 local time zoneReply:time ok!E.g: timezone123456 +1 timezone123456 -1 Timezone123456 0
2.9 Reset Hardware
Command:begin123456Reply:begin okE.g:
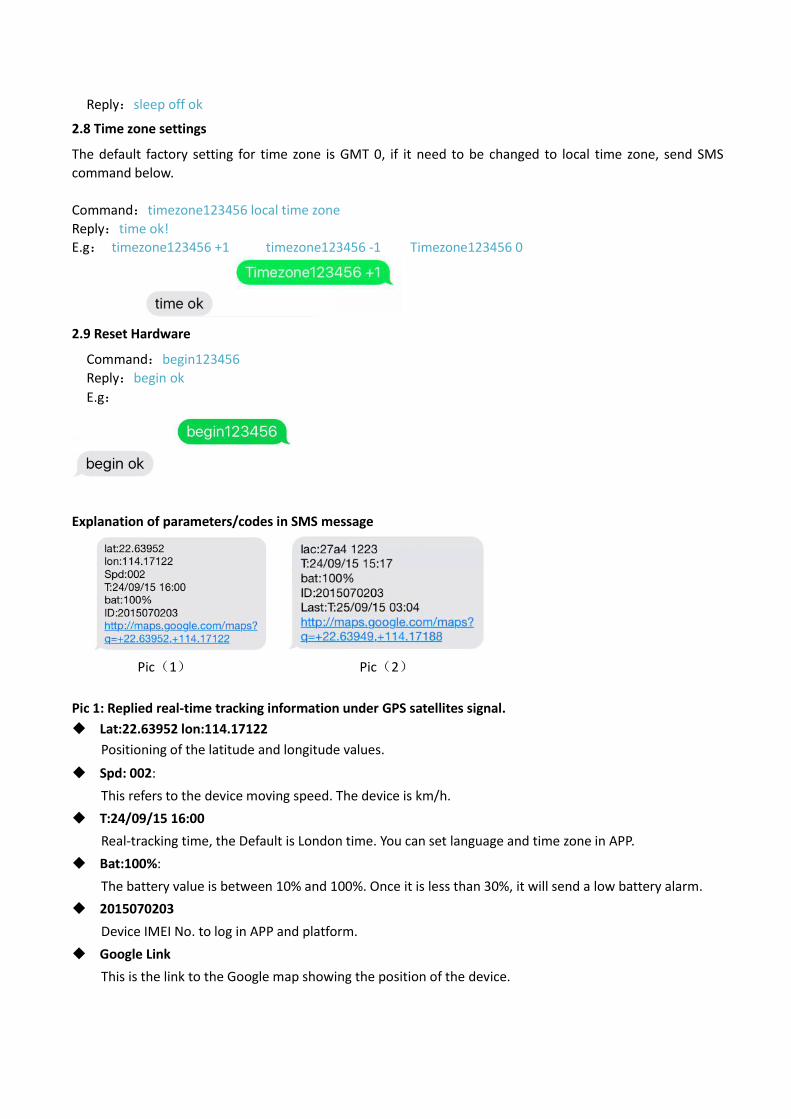
Explanation of parameters/codes in SMS message
Pic(1) Pic(2)
Pic 1: Replied real-time tracking information under GPS satellites signal. Lat:22.63952 lon:114.17122
Positioning of the latitude and longitude values.
Spd: 002:This refers to the device moving speed. The device is km/h.
T:24/09/15 16:00Real-tracking time, the Default is London time. You can set language and time zone in APP.
Bat:100%:The battery value is between 10% and 100%. Once it is less than 30%, it will send a low battery alarm.
2015070203Device IMEI No. to log in APP and platform.
Google LinkThis is the link to the Google map showing the position of the device.
Pic 2: Replied LBS tracking information without GPS satellites signal.
Lac:27a4 1223Real-time LBS positioning data.
T:24/09/15 15:17LBS positioning time.
Bat:100%The battery value is between 10% and 100%. Once it is less than 30%, it will send low battery alarm.
Last:T:25/09/15 03:04This is the time when tracker got last GPS signal
Google LinkThis is the position of last appeared GPS signal.
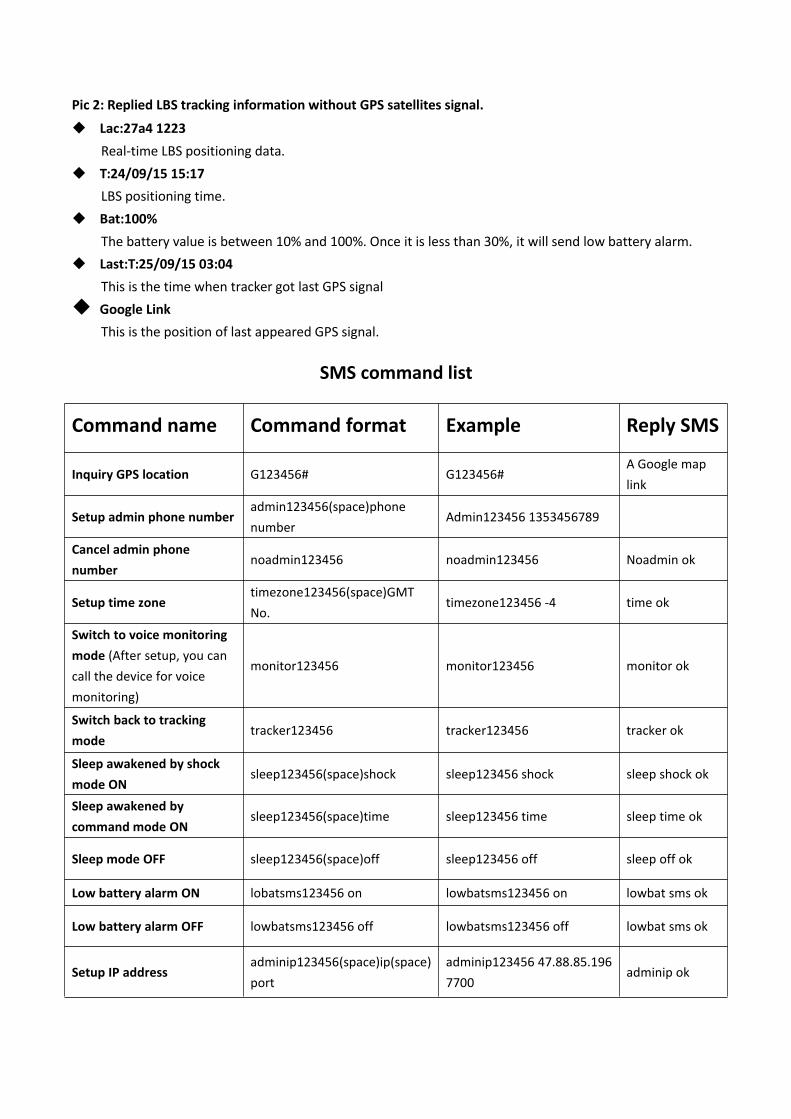
SMS command list
Command name Command format Example Reply SMS
Inquiry GPS location G123456# G123456#A Google maplink
Setup admin phone numberadmin123456(space)phonenumber
Admin123456 1353456789
Cancel admin phonenumber
noadmin123456 noadmin123456 Noadmin ok
Setup time zonetimezone123456(space)GMTNo.
timezone123456 -4 time ok
Switch to voice monitoringmode (After setup, you cancall the device for voicemonitoring)
monitor123456 monitor123456 monitor ok
Switch back to trackingmode
tracker123456 tracker123456 tracker ok
Sleep awakened by shockmode ON
sleep123456(space)shock sleep123456 shock sleep shock ok
Sleep awakened bycommand mode ON
sleep123456(space)time sleep123456 time sleep time ok
Sleep mode OFF sleep123456(space)off sleep123456 off sleep off ok
Low battery alarm ON lobatsms123456 on lowbatsms123456 on lowbat sms ok
Low battery alarm OFF lowbatsms123456 off lowbatsms123456 off lowbat sms ok
Setup IP addressadminip123456(space)ip(space)port
adminip123456 47.88.85.1967700
adminip ok
Setup GPS upload interval upload123456(space)15 upload123456 15 upload ok
Restore factory settings begin123456 begin123456 begin ok
Setup over-speed alarm speed123456(space)080(km/h) speed123456 080 speed ok
Cancel over-speed alarm nospeed123456 nospeed123456 nospeed ok
Vibration alarm ON shock123456 shock123456 shock ok
Vibration alarm OFF noshock123456 noshock123456 noshock ok
Reset to factory settings reset123456 Reset123456 Reset ok
Chapter 3 - Mobile APP tracking
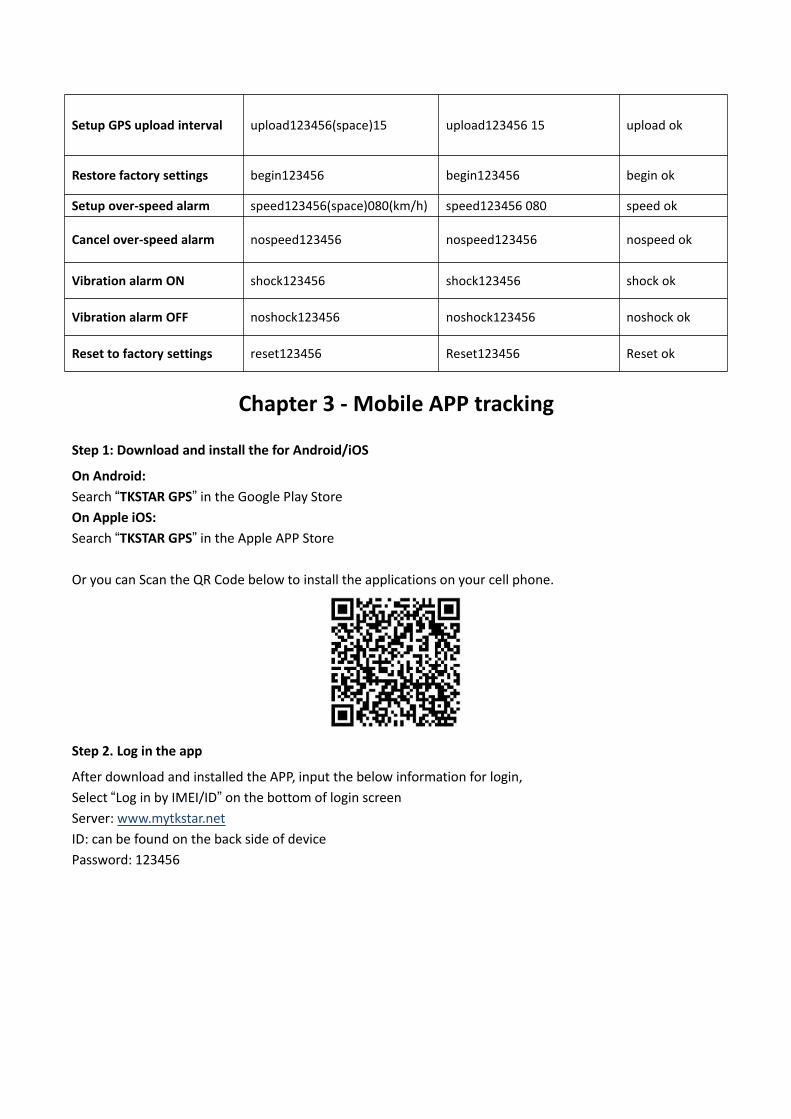
Step 1: Download and install the for Android/iOS
On Android:Search “TKSTAR GPS” in the Google Play StoreOn Apple iOS:Search “TKSTAR GPS” in the Apple APP Store
Or you can Scan the QR Code below to install the applications on your cell phone.
Step 2. Log in the app
After download and installed the APP, input the below information for login,Select “Log in by IMEI/ID” on the bottom of login screenServer: www.mytkstar.netID: can be found on the back side of devicePassword: 123456
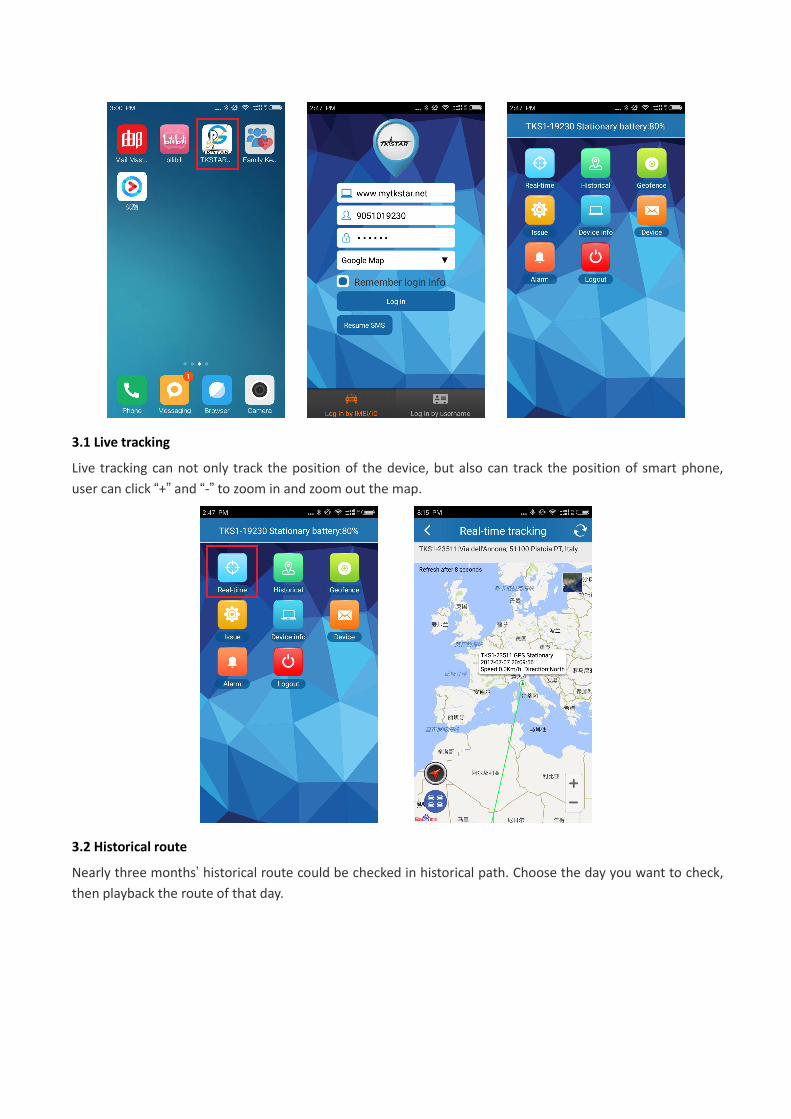
3.1 Live tracking
Live tracking can not only track the position of the device, but also can track the position of smart phone,user can click “+” and “-” to zoom in and zoom out the map.
3.2 Historical route
Nearly three months’ historical route could be checked in historical path. Choose the day you want to check,then playback the route of that day.
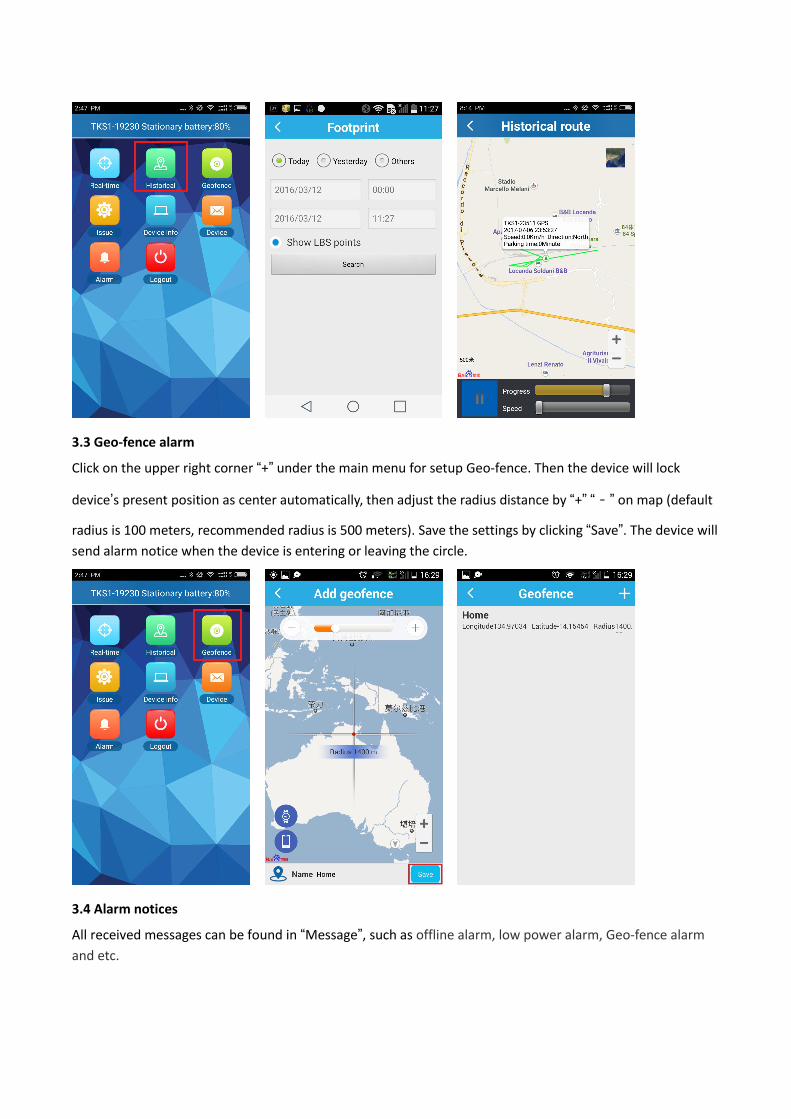
3.3 Geo-fence alarm
Click on the upper right corner “+” under the main menu for setup Geo-fence. Then the device will lock
device’s present position as center automatically, then adjust the radius distance by “+” “-” on map (default
radius is 100 meters, recommended radius is 500 meters). Save the settings by clicking “Save”. The device willsend alarm notice when the device is entering or leaving the circle.
3.4 Alarm notices
All received messages can be found in “Message”, such as offline alarm, low power alarm, Geo-fence alarmand etc.
Note:If you cannot receive alarm notice(Such as Geofence alarm), you need to check if APP is running in
background first, then check if your cellphone allow the APP to show these alarm notifications.
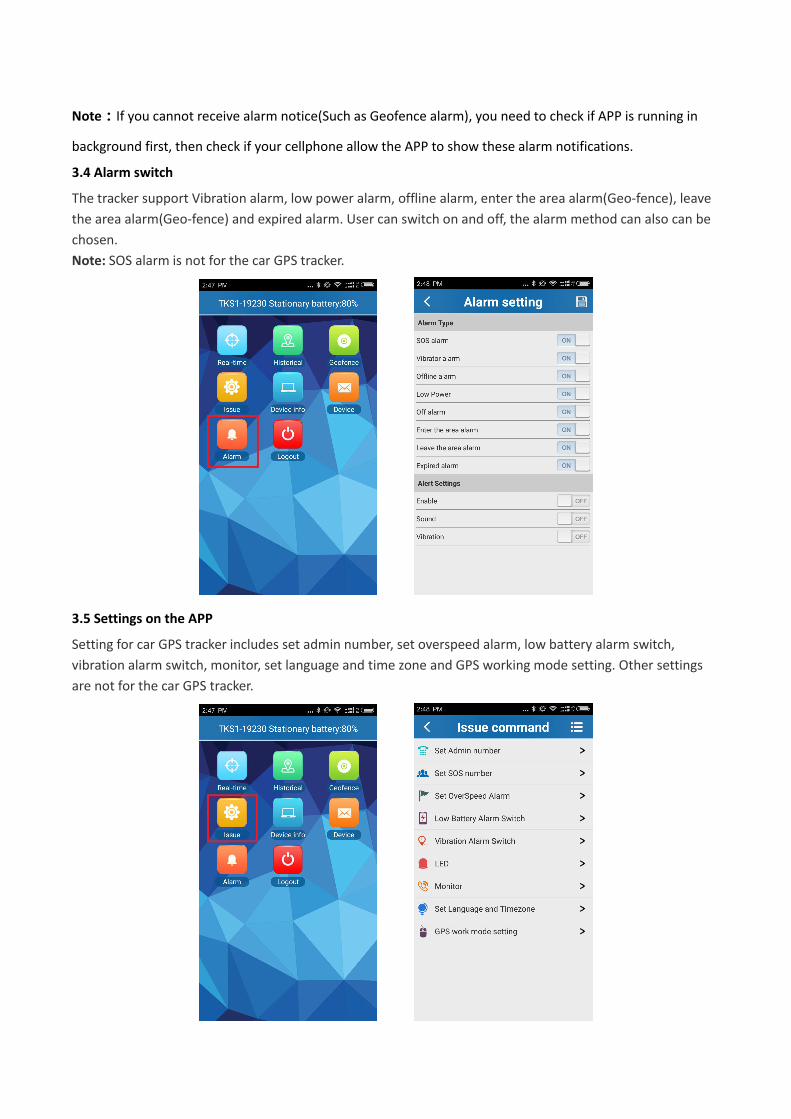
3.4 Alarm switch
The tracker support Vibration alarm, low power alarm, offline alarm, enter the area alarm(Geo-fence), leavethe area alarm(Geo-fence) and expired alarm. User can switch on and off, the alarm method can also can bechosen.Note: SOS alarm is not for the car GPS tracker.
3.5 Settings on the APP
Setting for car GPS tracker includes set admin number, set overspeed alarm, low battery alarm switch,vibration alarm switch, monitor, set language and time zone and GPS working mode setting. Other settingsare not for the car GPS tracker.
3.5.1 Setup admin number
Click “admin number” and input the admin phone number. The device will send the alarm information to thisphone number. The alarm information includes lower power alarm, Geo-fence alarm, SOS call alarm andother alarm notice.
3.5.2 Setup over-speed alarm
The user can also setup the time range, then user will not be disturbed by the tracker.
3.5.3 Setup Low battery alarm switch
The tracker will send low battery alarm when the battery is lower than 10%, which will remind you to chargeit for continuous usage.
3.5.4 Monitor (Setup voice monitoring number)
The voice monitoring phone number can call the device and then listen in to check the voice background ofthe device.
3.5.5 Setup language and time zone
The user must setup the languages for alarm notice and the time zone at the same time. Only digit numbercan be input in time zone, and language means the language of the alarm notice you received, it supportsEnglish and Chinese.3.5.6 Setup GPS working modeThe device can setup GPS data uploading interval in working mode settings, which it is related to the batterystandby time.1. Tracking every 30 seconds: Fast positioning mode.2. Tracking every 1 hour: Standard positioning.3. Tracking every 12 hour: Power saving mode.
Chapter 4 - Webpage and online tracking4. 1. Online tracking portal
Below is the portal that allows you to track your GPS tracker,
www.mytkstar.net
4.2 Login the device
Then select “Log in by IMEI/ID” on the bottom of screen, choose the language you prefer, then input theinformation in below,ID No.: (it can be found on the back side of the cover)Password: 123456
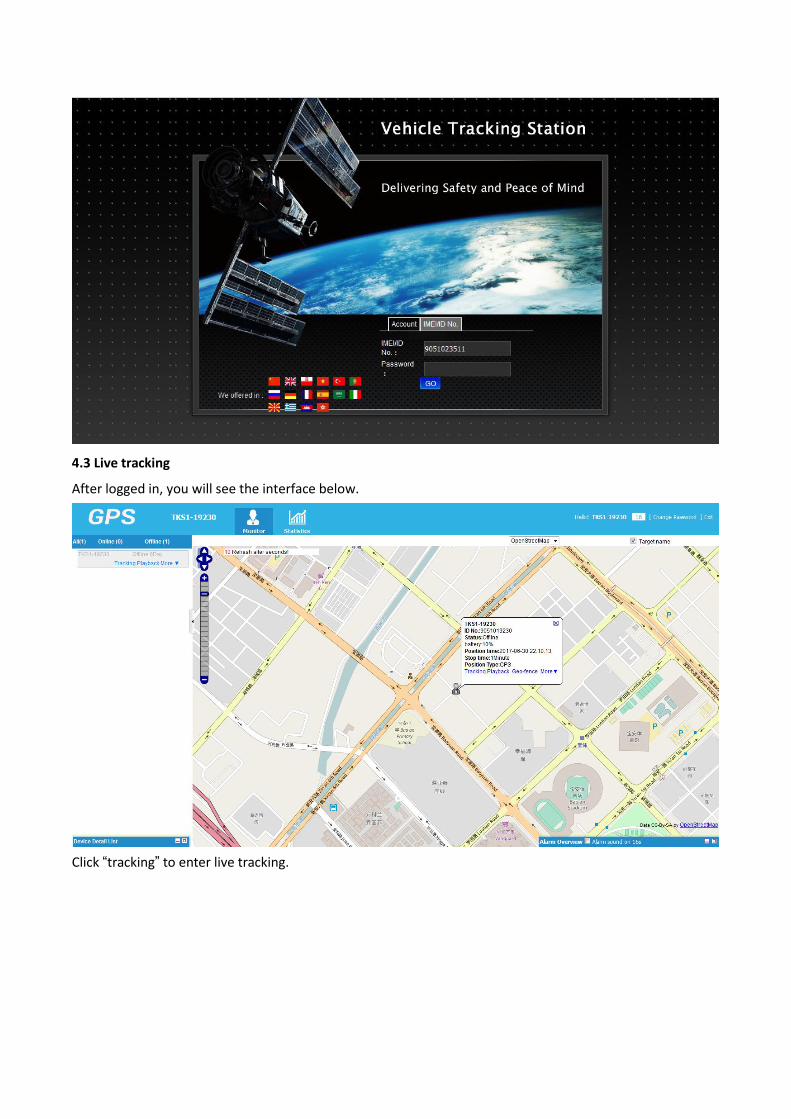
4.3 Live tracking
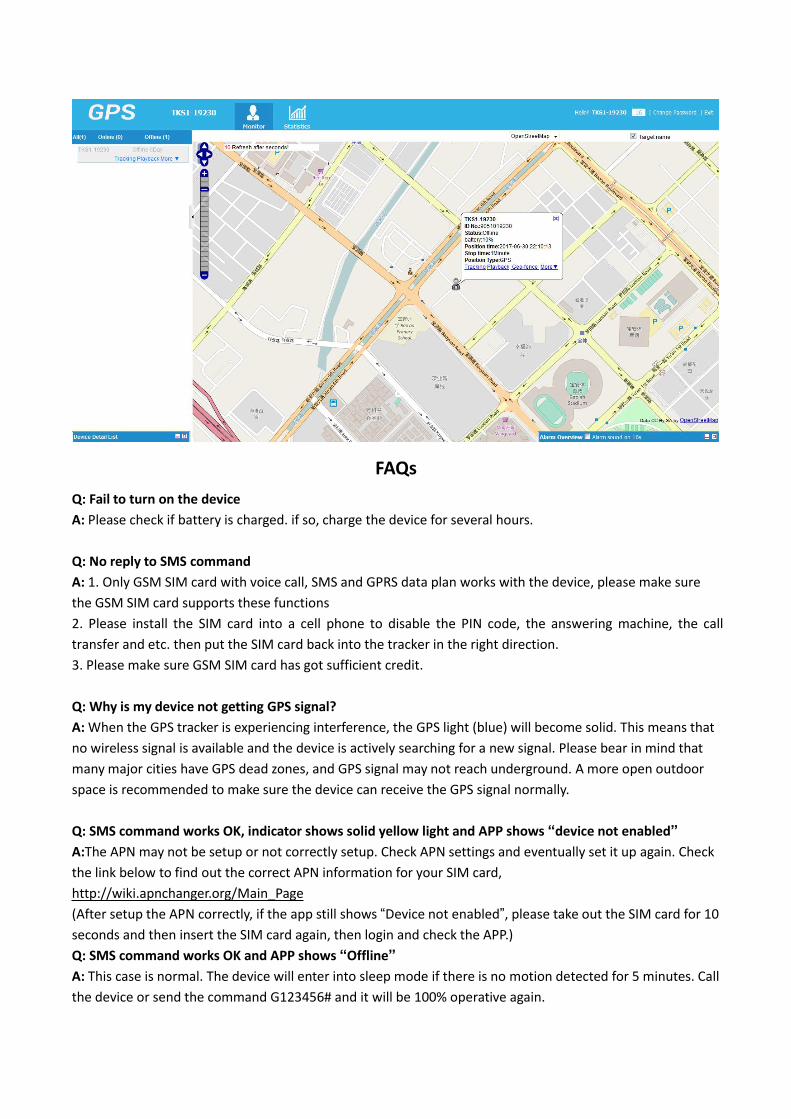
After logged in, you will see the interface below.
Click “tracking” to enter live tracking.
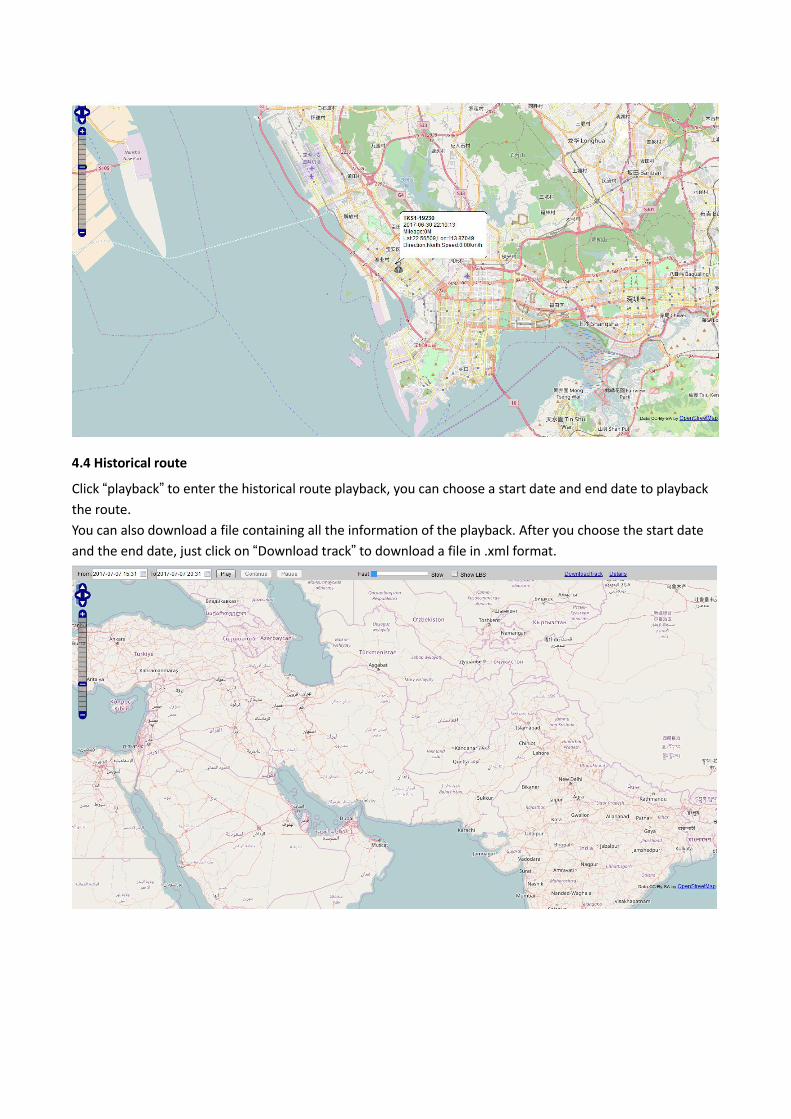
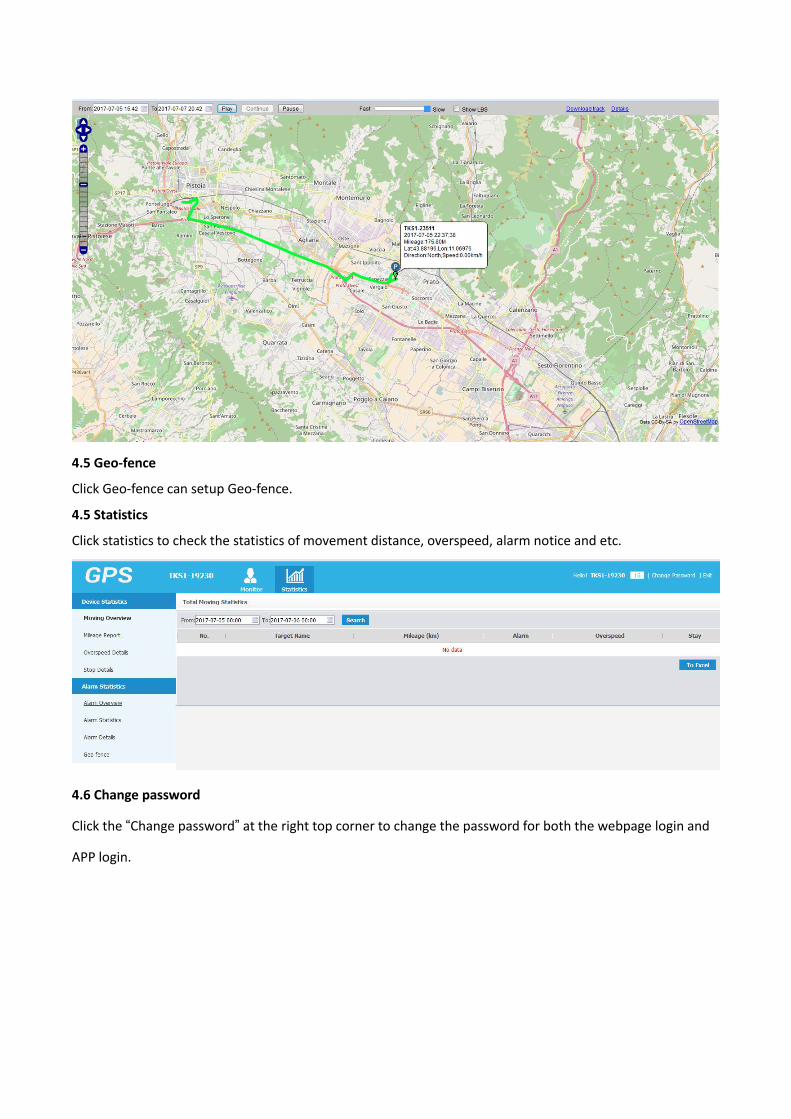
4.4 Historical route
Click “playback” to enter the historical route playback, you can choose a start date and end date to playbackthe route.You can also download a file containing all the information of the playback. After you choose the start dateand the end date, just click on “Download track” to download a file in .xml format.
4.5 Geo-fence
Click Geo-fence can setup Geo-fence.
4.5 Statistics
Click statistics to check the statistics of movement distance, overspeed, alarm notice and etc.
4.6 Change password
Click the “Change password” at the right top corner to change the password for both the webpage login and
APP login.
FAQsQ: Fail to turn on the deviceA: Please check if battery is charged. if so, charge the device for several hours.
Q: No reply to SMS commandA: 1. Only GSM SIM card with voice call, SMS and GPRS data plan works with the device, please make surethe GSM SIM card supports these functions2. Please install the SIM card into a cell phone to disable the PIN code, the answering machine, the calltransfer and etc. then put the SIM card back into the tracker in the right direction.3. Please make sure GSM SIM card has got sufficient credit.
Q: Why is my device not getting GPS signal?A:When the GPS tracker is experiencing interference, the GPS light (blue) will become solid. This means thatno wireless signal is available and the device is actively searching for a new signal. Please bear in mind thatmany major cities have GPS dead zones, and GPS signal may not reach underground. A more open outdoorspace is recommended to make sure the device can receive the GPS signal normally.
Q: SMS command works OK, indicator shows solid yellow light and APP shows “device not enabled”A:The APN may not be setup or not correctly setup. Check APN settings and eventually set it up again. Checkthe link below to find out the correct APN information for your SIM card,http://wiki.apnchanger.org/Main_Page(After setup the APN correctly, if the app still shows “Device not enabled”, please take out the SIM card for 10seconds and then insert the SIM card again, then login and check the APP.)Q: SMS command works OK and APP shows “Offline”A: This case is normal. The device will enter into sleep mode if there is no motion detected for 5 minutes. Callthe device or send the command G123456# and it will be 100% operative again.

Q: Can’t receive alarm notifications on the APPA: 1. APP have to be running in background on Android system. No need for background on iOS.2. Check the settings of your cellphone and make sure the cellphone allow the APP send notifications.
Q: Can I keep the tracker constantly under charge through the car electrical system?A: Yes, you can use it for temporary use, but it is not recommended as the device would highly be worn out.
Q: In sleep mode, will the device keep the GPS and its functions on?A: No. Call the device or send the command G123456# and it will be 100% operative again.
Q: Can I receive alarm SMS on two different phones?A: Yes, you can add a second phone number as SOS number on the APP to receive double alarm SMS.
Q: Position is different from the actual position.A: No uploading position time or no GPS signal: call the device to receive the position message. If it showslike Pic 2, it means no GPS signal. The position is the last GPS positioning location, not the real-time position;If it shows like Pic 1, it means the device doesn’t reach the uploading time. (If GPS uploading time interval is1 hour, it will send GPS position once one hour)
BedienungsanleitungLekemi GPS-Tracker
Für TK905
Technischer Träger:
Email: [email protected]
Web: www.lekemi.top/download

Index
Kurzanleitung……. ............................................................................................................................................... 3
Willkommen........................................................................................................................................................ 4
Kapitel 1 Anblick………………................................................................................................................................. 4
Einführung… ................................................................................................................................................... 4
Technische Daten............................................................................................................................................ 5
Inhalt der Box…. ............................................................................................................................................. 5
TK905 Schnittstelle......................................................................................................................................... 6
Einladung des Gerätes.................................................................................................................................... 6
Ein- und Ausschalten....................................................................................................................................... 7
Led Indikatoren……… ...................................................................................................................................... 7
Installation der Sim-Karte............................................................................................................................... 7
APN-Einstellungen.......................................................................................................................................... 7
Kapitel 2 SMS Tracking....................................................................................................................................... 9
Liste der SMS-Befehle................................................................................................................................... 13
Kapitel 3 APP Tracking.......................................................................................................................................14
Live Tracking ................................................................................................................................................ 15
Chronologische Strecke….............................................................................................................................. 15
Geo-Fence-Alarm ......................................................................................................................................... 16
Nachrichte .................................................................................................................................................... 16
Alarme-Einstellungen.................................................................................................................................... 17
Einstellungen................................................................................................................................................ 17
Kapitel 4 Webpage Tracking............................................................................................................................. 18
FAQ ............................................................................................................................................................. 22
Kurzanleitung
Der Tracker ist sehr einfach zu konfigurieren, nur ein wenig Geduld ist nötig. Es kommuniziert durchSMS-Befehle, die der Benutzer über seine persönliche Nummer an das Gerät sendet. Es kann auch durch Appund Webseite nach der SMS-Konfiguration arbeiten.
1. Der SIM-Karte Vorbereiten
Der Tracker arbeitet mit einer Sim, die darin eingefügt wird. Stellen Sie sicher, dass Sie eine dedizierte Simhaben, die Kredit oder eine Promotion hat, da es SMS, Anrufe und eine riesige Menge an Internet-Daten (ca.100 MB im Monat) verwendet. Stellen Sie sicher, dass die Sim GSM, GPS, GPRS, 2G oder höher Netzwerke,SMS und Anrufe unterstützt. Konsultieren Sie Ihren vertrauenswürdigen Betreiber für alle Promotionen aufsim für Haus-Alarme.
2. Den PIN-Code deaktivieren
Legen Sie die Simu des Trackers in ein Smartphone ein, um den Pin, den Anrufbeantworter und die Meldungvon Anrufen zu deaktivieren. Finden Sie die APN-Informationen des SIM-Betreibers (Adresse und beliebigeBenutzername und Passwort) aus den Netzwerke-Einstellungen
3. Die SIM einsetzen
Holen Sie sich in einer offenen Umgebung. Setzen Sie die Sim in den Tracker, und dies wird eingeschaltet.Gelbe und blaue LED werden auch eingeschaltet.
4. Stellen Sie die Admin-Nummer ein
Stellen Sie die Admin-Nummer (Ihre Handy-Nummer) ein, damit Sie die folgenden SMS an den SIM-Trackersenden.
Befehl: admin123456+Leertaste+Mobiltelefonnummer (z.B. (admin123456 7894561230)Antwort: admin ok
Sie können dann den Befehl G123456# senden oder den Tracker anrufen, um in wenigen Sekunden eine SMSzu erhalten, die Breitengrad, Längengrad, Datum, Zeit, Tracker-Batteriestatus und einen Google Maps Linkenthält, der den Tracker GPS-Position zeigt.
5. Setzen Sie den APN
Da TK905 an das GPRS-Netzwerk angeschlossen werden muss, bevor es Positions- oder Alarminformationenan die APP oder die Website senden kann, müssen Sie den APN einrichten, bevor Sie diese Plattformennutzen können.Setzen Sie den APN wie diesem Beispiel. Die Einträge müssen mit denen des Sim-Operators im Trackerersetzt werden.
Für eine SIM-Karte in Deutschland haben wir die folgenden Einstellungen gefunden.APN-Name: internet.t-mobileBenutzername: t-mobilePasswort: tmDaher sind die Befehle:1. gprs123456
2. apn123456 internet.t-mobile3. apnuser123456 t-mobile (das ist nicht notwendig, wenn es keinen gibt)4. apnpasswd123456 tm (das ist nicht notwendig, wenn es kein gibt)
An diesem Punkt blinken die gelben und blauen LEDs und zeigen an, dass der Tracker korrekt GPRS- undGPS-Signale empfängt.
6. Die APP installieren und Anmeldung
Für Android: Suchen Sie nach "TKSTAR GPS" im Google Play StoreFür Apple iOS: Suchen Sie nach "TKSTAR GPS" im App StoreNach dem Download und Installieren der App geben Sie die folgenden Informationen ein, um sichanzumelden.Wählen Sie "Login mit IMEI/ID" am unteren Rand des BildschirmsServer: www.mytkstar.netID: Sie finden sie auf der Rückseite des GerätesPasswort: 123456
7. Jetzt ist der Tracker betriebsbereit und man kann ihn ganz durch der App verwalten.
Willkommen
Danke für den Kauf unseres Lekemi GP Real-Time Car GPS Trackers TK-905! Dieses Handbuch ist ein
Referenzwerkzeug für die Installation und Bedienung des GPS Trackers. Hier finden Sie Informationen über
Funktionen des Trackers sowie nützliche Informationen, die Ihnen bei der Behebung von Problemen
behilflich sind.
Um auf andere Support-Informationen zuzugreifen, besuchen Sie http://www.lekemi.top/download
Um die Lekemi-Unterstützung zu kontaktieren, mailen Sie uns bitte unter: [email protected]
Kapitel 1 - Anblick
Einführung
Die TK905 ist ein Tracking-Gerät für Autos, Fahrzeuge und andere Waren. Mit einem kompakten Körper undeiner überlegenen Empfangsfähigkeit ist es eine Lösung für ein nicht-blinkendes als leistungsstarkeTracking-Gerät. Dieses Gerät stützt sich auf GSM/GPRS-Netzwerken und GPS-Satelliten und kann durch SMS,APP und Internet bestimmt und kontrolliert werden. Es wendet die modernste GPS- und AGPS-Technologieim Dual-Mode-Modus an. Mit seinem eingebauten Magnet kann das Gerät in wenigen Sekunden im Autoinstalliert werden. Mit seiner Live-Überwachung-Technologie durch Handy oder PC können Sie dieLive-Position und die gemachte Strecke überall und jederzeit kontrollieren. Außerdem kann das Gerät durchseine 5000/10000mAh-Batterie bis zu 60 Tage nach voller Aufladung funktionieren. Sie werden entspanntsein, während Sie wissen, wo Ihr Fahrzeug ist.
Technische Daten
Item Size 90mm x 72mm x 22mm (3.5” x 2.8” x 0.8”)
Weight 168gNetwork GSM/GPRSGSM Band 850/900/1800/1900MhzGPS sensitivity -159dBmGPS accuracy 20-30mCharger 110-220V input
5V-1A outputBattery 3.7V 5000mAh Li-ion battery; 30-60 days standby
Time of GPS signalacquisition
Cold status 45sWarm status 35sHot status 1s
WorkingTemperature
-20C° to +5C°
Working Humidity 5% - 95% without condensation
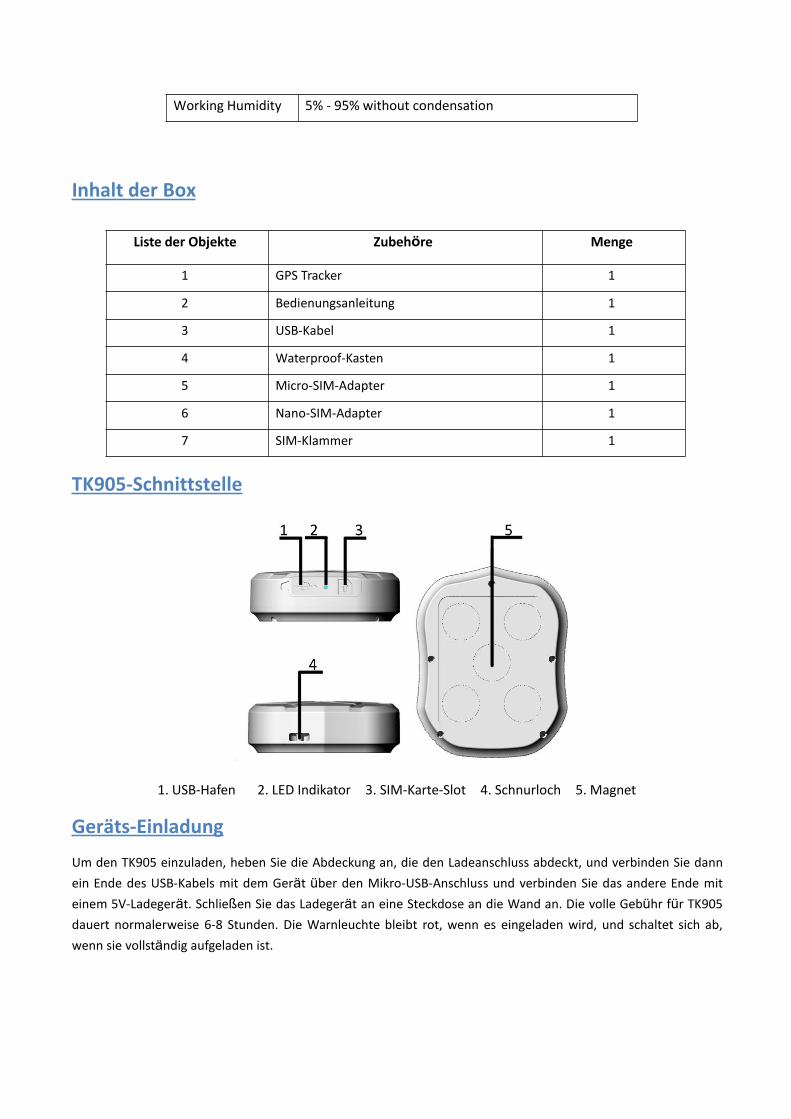
Inhalt der Box
TK905-Schnittstelle
1. USB-Hafen 2. LED Indikator 3. SIM-Karte-Slot 4. Schnurloch 5. Magnet
Geräts-Einladung
Um den TK905 einzuladen, heben Sie die Abdeckung an, die den Ladeanschluss abdeckt, und verbinden Sie dannein Ende des USB-Kabels mit dem Gerät über den Mikro-USB-Anschluss und verbinden Sie das andere Ende miteinem 5V-Ladegerät. Schließen Sie das Ladegerät an eine Steckdose an die Wand an. Die volle Gebühr für TK905dauert normalerweise 6-8 Stunden. Die Warnleuchte bleibt rot, wenn es eingeladen wird, und schaltet sich ab,wenn sie vollständig aufgeladen ist.
Liste der Objekte Zubehöre Menge
1 GPS Tracker 1
2 Bedienungsanleitung 1
3 USB-Kabel 1
4 Waterproof-Kasten 1
5 Micro-SIM-Adapter 1
6 Nano-SIM-Adapter 1
7 SIM-Klammer 1
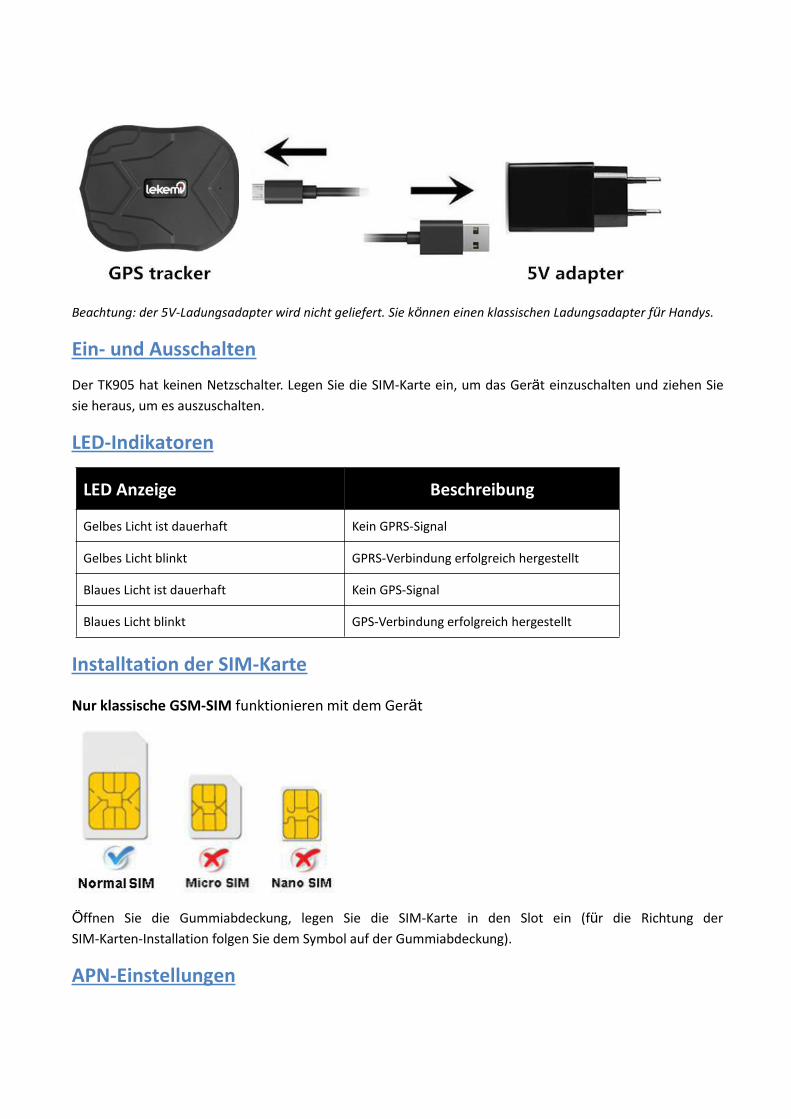
Beachtung: der 5V-Ladungsadapter wird nicht geliefert. Sie können einen klassischen Ladungsadapter für Handys.
Ein- und Ausschalten
Der TK905 hat keinen Netzschalter. Legen Sie die SIM-Karte ein, um das Gerät einzuschalten und ziehen Siesie heraus, um es auszuschalten.
LED-Indikatoren
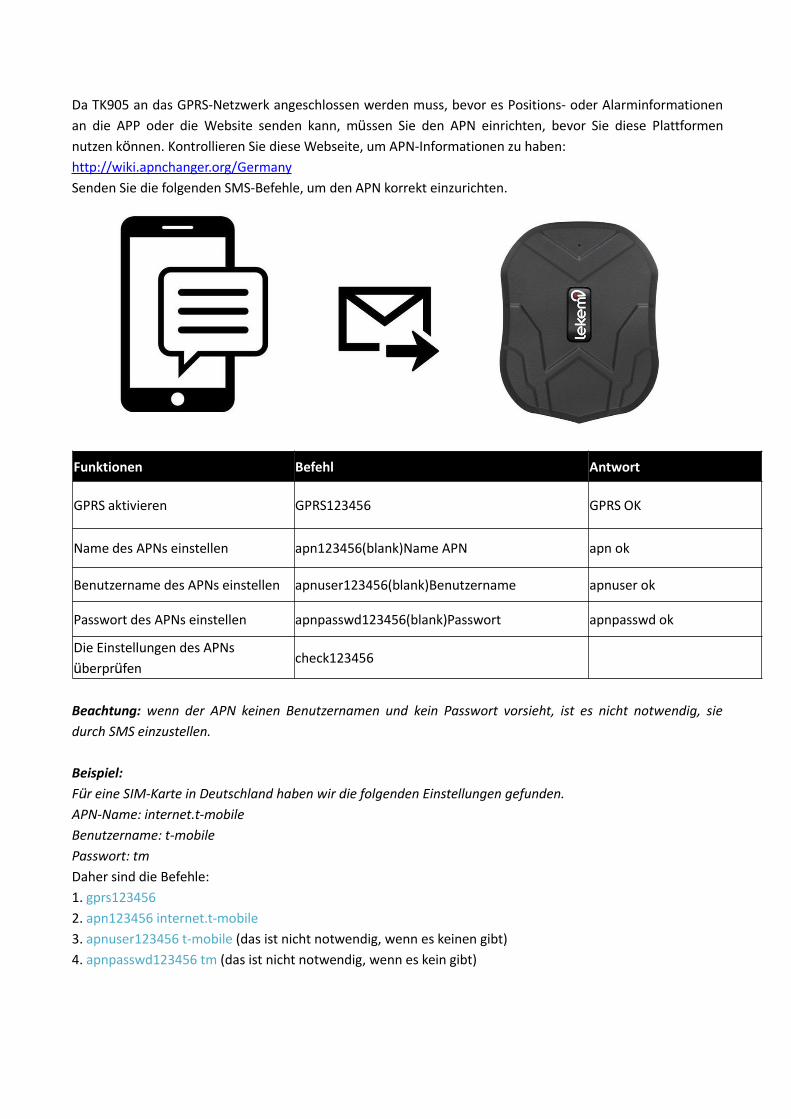
LED Anzeige Beschreibung
Gelbes Licht ist dauerhaft Kein GPRS-Signal
Gelbes Licht blinkt GPRS-Verbindung erfolgreich hergestellt
Blaues Licht ist dauerhaft Kein GPS-Signal
Blaues Licht blinkt GPS-Verbindung erfolgreich hergestellt
Installtation der SIM-Karte
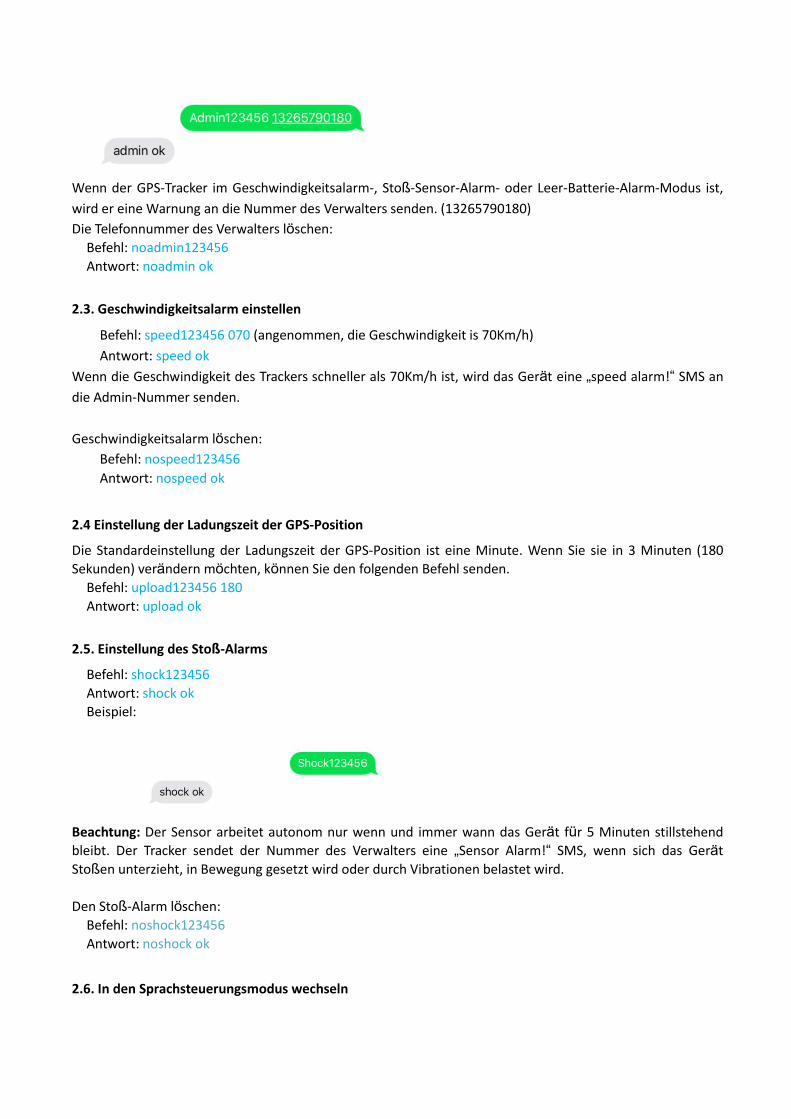
Nur klassische GSM-SIM funktionieren mit dem Gerät
Öffnen Sie die Gummiabdeckung, legen Sie die SIM-Karte in den Slot ein (für die Richtung derSIM-Karten-Installation folgen Sie dem Symbol auf der Gummiabdeckung).
APN-Einstellungen
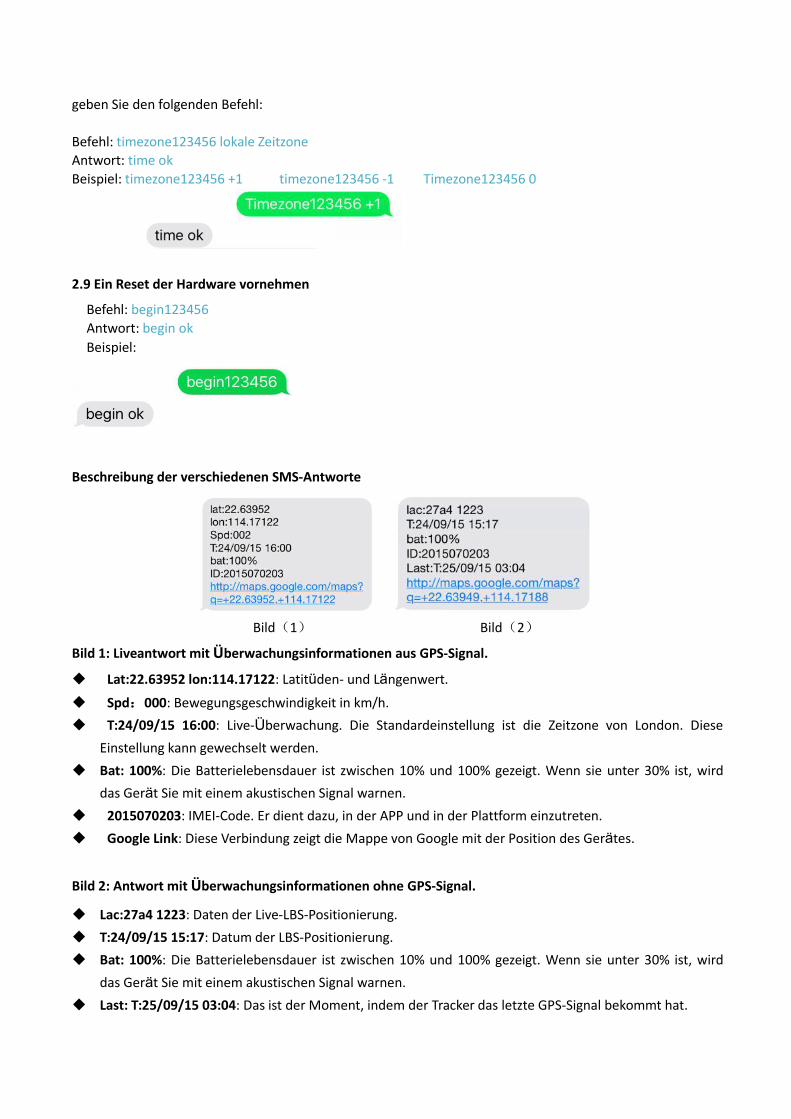
Da TK905 an das GPRS-Netzwerk angeschlossen werden muss, bevor es Positions- oder Alarminformationenan die APP oder die Website senden kann, müssen Sie den APN einrichten, bevor Sie diese Plattformennutzen können. Kontrollieren Sie diese Webseite, um APN-Informationen zu haben:http://wiki.apnchanger.org/GermanySenden Sie die folgenden SMS-Befehle, um den APN korrekt einzurichten.
Beachtung: wenn der APN keinen Benutzernamen und kein Passwort vorsieht, ist es nicht notwendig, siedurch SMS einzustellen.
Beispiel:Für eine SIM-Karte in Deutschland haben wir die folgenden Einstellungen gefunden.APN-Name: internet.t-mobileBenutzername: t-mobilePasswort: tmDaher sind die Befehle:1. gprs1234562. apn123456 internet.t-mobile3. apnuser123456 t-mobile (das ist nicht notwendig, wenn es keinen gibt)4. apnpasswd123456 tm (das ist nicht notwendig, wenn es kein gibt)
Funktionen Befehl Antwort
GPRS aktivieren GPRS123456 GPRS OK
Name des APNs einstellen apn123456(blank)Name APN apn ok
Benutzername des APNs einstellen apnuser123456(blank)Benutzername apnuser ok
Passwort des APNs einstellen apnpasswd123456(blank)Passwort apnpasswd ok
Die Einstellungen des APNsüberprüfen
check123456

Beachtung:1. Nur GSM SIMs mit einem SMS und GPRS Datenplan arbeiten mit dem Gerät, überzeugen Sie sich davon,dass die GSM SIM-Karte Anrufe, das Senden von SMS-Nachrichten und das GPRS-Netzwerk trägt.2. Installieren Sie die SIM-Karte im Telefon, um den PIN-Code, den Anrufbeantworter und die Meldung vonAnrufen zu deaktivieren, dann geben Sie dann die SIM-Karte in den Tracker zurück. Überzeugen Sie sichaußerdem davon, dass die GSM-Karte Anrufe aktiviert hat und die Anrufüsweiterschaltung deaktiviert hat.3. Überzeugen Sie sich davon, dass die GSM-SIM-Karte aktiv ist und genügend Kredit hat, um zufunktionieren.4. Das GPS-Tracking kann nur draußen durchgeführt werden. Dieses Gerät hängt vom GPS-Netzwerk, demGSM-Netz (GPRS) System, dem GIS-System (geographischen System), dem Computersystem und so weiter.Dieses Produkt muss eine gute Netzabdeckung haben, um zu funktionieren. Andere Signale könnenStörungen verursachen, wir übernehmen damit keine Verantwortung.5. Halten Sie das Produkt von Wärmequellen und hohen Temperaturen oder anderen extremenUmgebungen fern.6. Versuchen Sie nicht, das Gerät zu öffnen oder zu modifizieren, es kann beschädigt werden.7. Wenn sich das Gerät aufgrund der Verletzung der vorgenannten Warnungen beschädigt erwiese,übernehmen wir keine Verantwortung dafür.
Kapitel 2 SMS-Tracking
2.1. Live-Tracking
Senden Sie eine Mitteilung mit dem Code „G123456#“ oder rufen Sie den Tracker an, Sie werden eineMitteilung mit einem Google-Maps-Link bekommen, der die Position zeigt.Beispiel:
2.2. Einstellung der Telefonnummer des Verwalters einführenNachdem Sie die Telefonnummer des Verwalters eingeführt haben, können alle SMS-Aktionen dem Gerätdurch diese Telefonnummer ausgeführt werden.
Befehl: admin123456 + Telefonnummer (Beachtung: Diese Nummer ist Ihre eigene, nicht die derSIM-Karte im Tracker)
Antwort: admin okBeispiel: admin123456 13265790180
Wenn der GPS-Tracker im Geschwindigkeitsalarm-, Stoß-Sensor-Alarm- oder Leer-Batterie-Alarm-Modus ist,wird er eine Warnung an die Nummer des Verwalters senden. (13265790180)Die Telefonnummer des Verwalters löschen:
Befehl: noadmin123456Antwort: noadmin ok
2.3. Geschwindigkeitsalarm einstellen
Befehl: speed123456 070 (angenommen, die Geschwindigkeit is 70Km/h)Antwort: speed ok
Wenn die Geschwindigkeit des Trackers schneller als 70Km/h ist, wird das Gerät eine „speed alarm!“ SMS andie Admin-Nummer senden.
Geschwindigkeitsalarm löschen:Befehl: nospeed123456Antwort: nospeed ok
2.4 Einstellung der Ladungszeit der GPS-Position
Die Standardeinstellung der Ladungszeit der GPS-Position ist eine Minute. Wenn Sie sie in 3 Minuten (180Sekunden) verändern möchten, können Sie den folgenden Befehl senden.
Befehl: upload123456 180Antwort: upload ok
2.5. Einstellung des Stoß-Alarms
Befehl: shock123456Antwort: shock okBeispiel:
Beachtung: Der Sensor arbeitet autonom nur wenn und immer wann das Gerät für 5 Minuten stillstehendbleibt. Der Tracker sendet der Nummer des Verwalters eine „Sensor Alarm!“ SMS, wenn sich das GerätStoßen unterzieht, in Bewegung gesetzt wird oder durch Vibrationen belastet wird.
Den Stoß-Alarm löschen:Befehl: noshock123456Antwort: noshock ok
2.6. In den Sprachsteuerungsmodus wechseln

Senden Sie den folgenden Befehl, um in den Sprachsteuerungsmodus zu wechseln.Befehl: monitor123456Antwort: monitor ok
Nach der Konfigurations rufen Sie das Gerät an, um die Umgebung zu hören.
Senden Sie also den SMS-Befehl, um in den Monitor-Modus zurück zu wechseln.Befehl: tracker123456Antwort: tracker ok
2.7. Zwei verschiedene Einstellungen von Sleep-Modus
Die Sleep-Modi sind zwei, ein beim Wechseln aus dem Befehl-Modus und ein beim Wechseln aus demStoß-Modus.
2.7.1. Sleep-Modus aus dem Befehl-Modus
Beim Wechseln in den Sleep-Modus aus dem Befehl-Modus funktioniert der Tracker nur für 5 Minuten,nachdem er eingeschaltet war, und dann geht er zurück in den Sleep-Modus (das GPS schaltet aus, das GSMarbeitet im Low-Power-Modus). Senden Sie eine SMS oder Rufen Sie den Tracker an, um ihn wiedereinzuschalten.Um das einzustellen, geben Sie:
Befehl: sleep123456 timeAntwort: sleep time okBeispiel
2.7.2 Sleep-Modus aus dem Stoß-Modus
Die Standardeinstellung des Gerätes ist „Einschaltung aus Stoß-Modus“. Das kann Ihnen dieBatterielebensdauer zu sparen. Der Tracker wechselt in den Sleep-Modus, wenn keine Bewegung erkanntwird.Um diese Einstellung zu aktivieren, Senden Sie:
Befehl: sleep123456 shockAntwort: sleep shock okBeispiel
2.7.3. Den Sleep-Modus deaktivieren
Geben Sie diesen Befehl, um diese Funktion zu deaktivieren:Befehl: sleep123456 offAntwort: sleep off ok
2.8 Datum und Uhr einstellen
Die Standardeinstellung der Zeitzone ist GMT 0. Wenn Sie sie in die lokale Zeitzone wechseln zu brauchen,
geben Sie den folgenden Befehl:
Befehl: timezone123456 lokale ZeitzoneAntwort: time okBeispiel: timezone123456 +1 timezone123456 -1 Timezone123456 0
2.9 Ein Reset der Hardware vornehmen
Befehl: begin123456Antwort: begin okBeispiel:
Beschreibung der verschiedenen SMS-Antworte
Bild(1) Bild(2)
Bild 1: Liveantwort mit Überwachungsinformationen aus GPS-Signal.
Lat:22.63952 lon:114.17122: Latitüden- und Längenwert. Spd:000: Bewegungsgeschwindigkeit in km/h. T:24/09/15 16:00: Live-Überwachung. Die Standardeinstellung ist die Zeitzone von London. Diese
Einstellung kann gewechselt werden. Bat: 100%: Die Batterielebensdauer ist zwischen 10% und 100% gezeigt. Wenn sie unter 30% ist, wird
das Gerät Sie mit einem akustischen Signal warnen. 2015070203: IMEI-Code. Er dient dazu, in der APP und in der Plattform einzutreten. Google Link: Diese Verbindung zeigt die Mappe von Google mit der Position des Gerätes.
Bild 2: Antwort mit Überwachungsinformationen ohne GPS-Signal.
Lac:27a4 1223: Daten der Live-LBS-Positionierung. T:24/09/15 15:17: Datum der LBS-Positionierung. Bat: 100%: Die Batterielebensdauer ist zwischen 10% und 100% gezeigt. Wenn sie unter 30% ist, wird
das Gerät Sie mit einem akustischen Signal warnen. Last: T:25/09/15 03:04: Das ist der Moment, indem der Tracker das letzte GPS-Signal bekommt hat.
Google Link:Position des letzten GPS-Signals.
Liste der SMS-Befehle
Einstellung Befehl Beispiel SMS-Antwort
GPS-Position anfragen G123456# G123456# Mappe
Telefonnummer des Verwalterseinstellen
admin123456(blank)Telefonnummer
admin1234561353456789
admin ok
Telefonnummer des Verwalterslöschen
noadmin123456 noadmin123456 noadmin ok
Zeitzone einstellentimezone123456(blank)GMT Nu.
timezone123456 -4 time ok
In derSprach-Überwachungsmoduswechseln (nach der Konfiguration,ist es möglich, das Gerät für diesprachliche Überwachunganzurufen)
monitor123456 monitor123456 monitor ok
In den Tracker-Moduszurückkommen
tracker123456 tracker123456 tracker ok
Einschaltung aus Stoß-Modus sleep123456(blank)shock sleep123456 shock sleep shock okDas Gerät aus ON-Modusaktivieren
sleep+123456(blank)time sleep123456 time sleep time ok
Sleep-Modus deaktivieren sleep123456(blank)off sleep123456 off sleep off ok
Akustisches Leer-Batterie-Signalaktivieren
lowbatsms123456(blank)on lowbatsms123456 on lowbat sms ok
Akustisches Leer-Batterie-Signaldeaktivieren
lowbatsms123456(blank)off lowbatsms123456 off lowbat sms ok
IP-Adresse einstellenadminip123456(blank)ip+Blank+Port
adminip12345647.88.85.196 7700
admin ip ok
Ladungszeit der GPS-Positioneinstellen
upload123456(blank)Sekunden
upload123456 300 upload ok
Standard-Dateienwiederherstellen
begin+123456 begin123456 begin ok
Geschwindigkeitsalarm einstellen speed+123456(blank)km/h speed123456 080 speed ok
Geschwindigkeitsalarmdeaktivieren
nospeed123456 nospeed123456 nospeed ok
Stoßalarm aktivieren shock123456 shock123456 shock ok

Stoßalarm deaktivieren noshock123456 noshock123456 noshock ok
Werkseinstellungen zurücksetzen reset123456 reset123456 Reset ok
Kapitel 3 – APP-Tracking
Schritt 1. Downloaden und installieren Sie die APP für Android/iOSFür Android:Suchen Sie „TKSTAR GPS“ im Google Play Store
Für Apple iOS,Suchen Sie „TKSTAR GPS“ im App Store
Oder Sie können den folgenden QR-Code scannen, um die Anwendung auf Ihrem Smartphone zuinstallieren.
Schritt 2. Login in der APP
Nachdem Sie die APP downloadet und installiert haben, füllen Sie mit den folgenden Informationen imunteren Teil des Zugriffsbildschirms aus.Server: www.mytkstar.netID: Sie können sie im Hinterteil des Gerätes finden.Password: 123456
3.1 Live-ÜberwachungDie Live-Überwachung verfolgt nicht nur die Position des Gerätes, sondern auch die Position des Telefons.Klicken Sie auf „+“ und „-“, um die Mappe zu vergrößern und verkleinern.
3.2 Chronologische StreckeSie können die Strecke der letzten drei Monate kontrollieren. Wählen Sie den gewünschten Tag aus, um dieStrecke dieses Tages zu reproduzieren.

3.3 Das vorherbestimmte Gebiet (Geo-Fence) einstellenKlicken Sie auf „+“ rechts oben für die Standortkonfiguration. Das Gerät sperrt seine aktuelle Position in derMitte und stellt, dann regulieren Sie den Kreisabstand mit „+“ und „-“ auf der Mappe (der Standardumkreis ist100 Meter, der empfohlene Umkreis ist 500 Meter). Klicken Sie auf „Speichern“, um die Einstellungen zuspeichern. Das Gerät sendet eine Warnung, wenn das Gerät in das festgelegte Gebiet eintritt oder aus ihmheraustritt.
3.4 NachrichteAlle Nachrichte in Bezuf auf z.B. Offline-Alarme, Leer-Batterie-Alarm, vorherbestimmtes Gebiet usw. könnenim Abschnitt „Nachrichte“ gefunden werden.
Achtung: Wenn Sie keine Benachrichtigungen erhalten (z. B. den Geo-Fence-Alarm), kontrollieren Sie bevor,dass die APP im Hintergrund läuft, und kontrollieren Sie dann, ob das Smartphone dem APP erlaubt,Benachrichtigungen anzuzeigen. Kontaktieren Sie uns, wenn Sie nicht wissen, wie Sie diese Einstellungen aufIhrem Smartphone ändern können.3.4 Alarme einstellenSie können alle Alarme aktivieren oder deaktivieren, und mit Ton oder Vibration einsetzen. Die einstellbarenAlarme sind: der SOS-Alarm, die Vibration, der Offline-Alarm, die Leer-Batterie-Alarm, der Eintritt in oder derHeraustritt aus das Geo-Fence-Gebiet und der Alarm von abwesendem Signal.Beachtung: der SOS-Alarm betrifft den Tracker des Fahrzeugs nicht.
3.5 Einstellungen in der APPDie Einstellungen des GPS-Trackers des Fahrzeugs betreffen die Telefonnummer des Verwalters, denGeschwindigkeitsalarm, den Leer-Batterie-Alarm, die Monitor-Funktion, die Sprache, die Zeitzone und dieAktualisierungszeit des GPS. Andere Einstellungen betreffen den GPS-Tracker des Fahrzeugs nicht.
3.5.1 Die Telefonnummer des Verwalters einstellenKlicken Sie auf „admin number“ und geben Sie die Telefonnummer des Verwalters ein. Das Gerät wird dieserTelefonnummer die Nachrichten über die Alarme senden. Die Nachrichten über die Alarme enthalten denLeer-Batterie-Alarm, den Geo-Fence-Alarm, den SOS-Alarm und andere Alarme.3.5.2 Den Geschwindigkeitsalarm einstellenAuch ein Zeitraum kann eingestellt werden, daher wird der Benutzer nicht gestört, jederzeit dieGeschwindigkeit überschritten wird.3.5.3 Den Leer-Batterie-Alarm einstellenDen Tracker wird Sie warnen, wenn die Batterie unter 10% ist. Es ist ratsam, den Tracker zu laden, um ihn inBetrieb ständig zu lassen.3.5.4 Monitor (eine Telefonnummer für die sprachliche Kontrolle einstellen)Sie können eine Telefonnummer für die sprachliche Überwachung einstellen. Daher können Sie das Gerätanrufen, um die Umgebung zu hören.3.5.5 Sprache und Zeitzone einstellenFür die Zeitzone stellen Sie das GMT Ihres eigenen Landes ein. Die APP trägt nur Englisch und Chinesisch.3.5.6 die Aktualisierungszeit des GPS einstellenSie können die Ladungszeit der GPS-Dateien im „GPS Work Mode Settings“-Abschnitt. Sie ist mit derStandby-Zeit der Batterie verbunden.3. Aktualisierung jede 30 Sekunden: schnelle Aktualisierungszeit der Position.4. Aktualisierung jede Stunde: Standard-Aktualisierungszeit der Position.3. Aktualisierung jede 12 Stunden: Energieeinsparungsmodus.
Kapitel 4 –Webseite und Online-Tracking
4. 1. Treten Sie in der folgenden Webseite von Ihrem Computer ein:
www.mytkstar.net
4.2 Fai il Login del dispositivo
Wählen Sie die gewünschte Sprache, klicken Sie „IMEI Nr.“ im Unterteil des Bildschirms, also geben Sie diefolgenden Informationen ein:ID-Code: (er wird im Unterteil des Gerätes gefunden)Passwort: 123456
4.3 Live-Überwachung
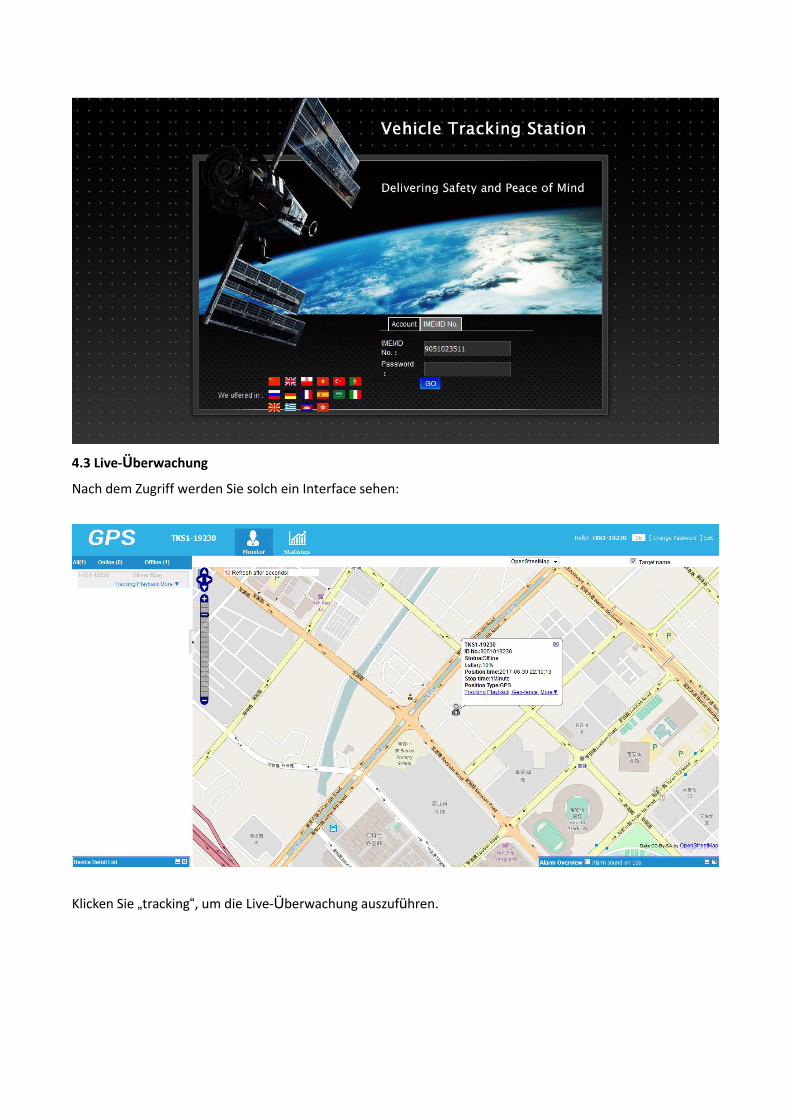
Nach dem Zugriff werden Sie solch ein Interface sehen:
Klicken Sie „tracking“, um die Live-Überwachung auszuführen.
4.4 Chronologische Strecke
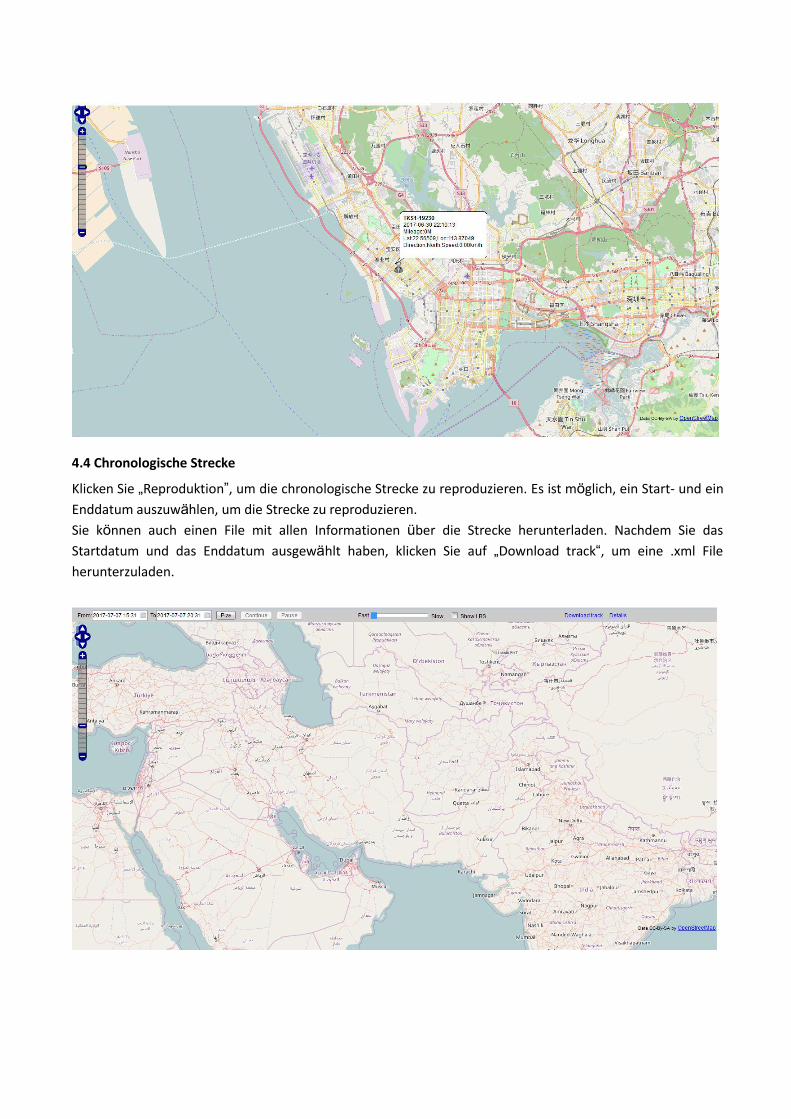
Klicken Sie „Reproduktion”, um die chronologische Strecke zu reproduzieren. Es ist möglich, ein Start- und einEnddatum auszuwählen, um die Strecke zu reproduzieren.Sie können auch einen File mit allen Informationen über die Strecke herunterladen. Nachdem Sie dasStartdatum und das Enddatum ausgewählt haben, klicken Sie auf „Download track“, um eine .xml Fileherunterzuladen.
4.5 Vorherbestimmtes Gebiet (Geo-Fence)
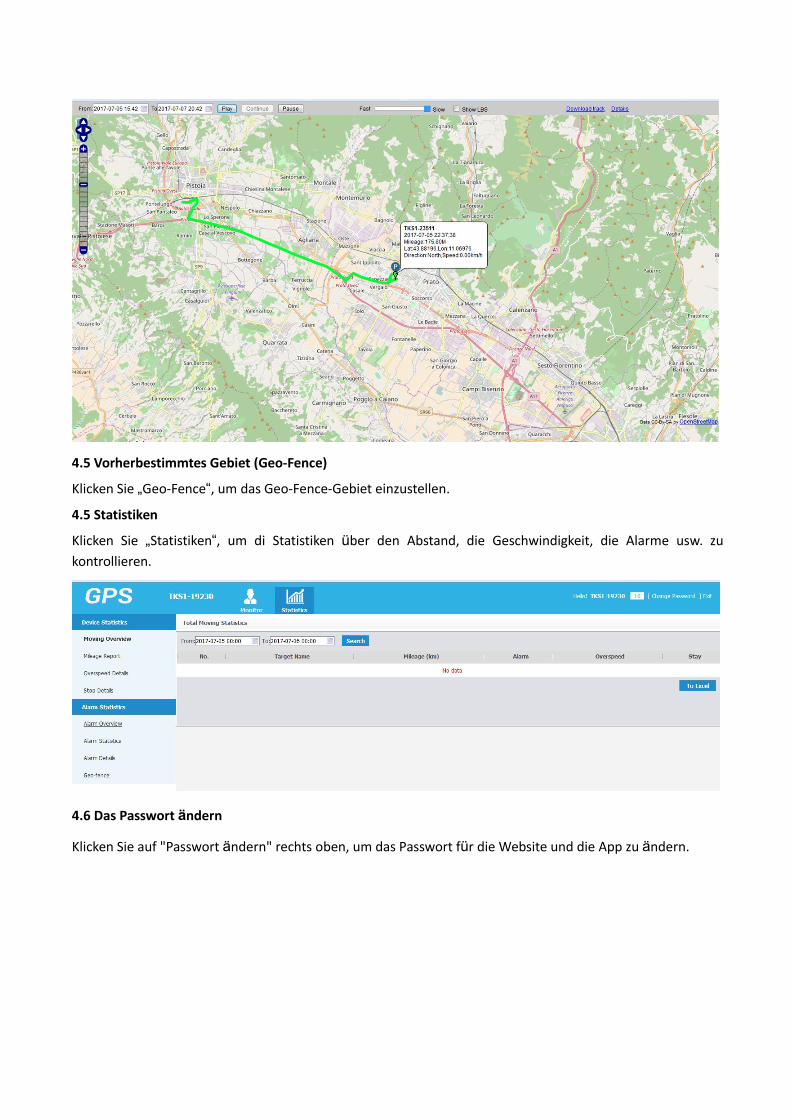
Klicken Sie „Geo-Fence“, um das Geo-Fence-Gebiet einzustellen.
4.5 Statistiken
Klicken Sie „Statistiken“, um di Statistiken über den Abstand, die Geschwindigkeit, die Alarme usw. zukontrollieren.
4.6 Das Passwort ändern
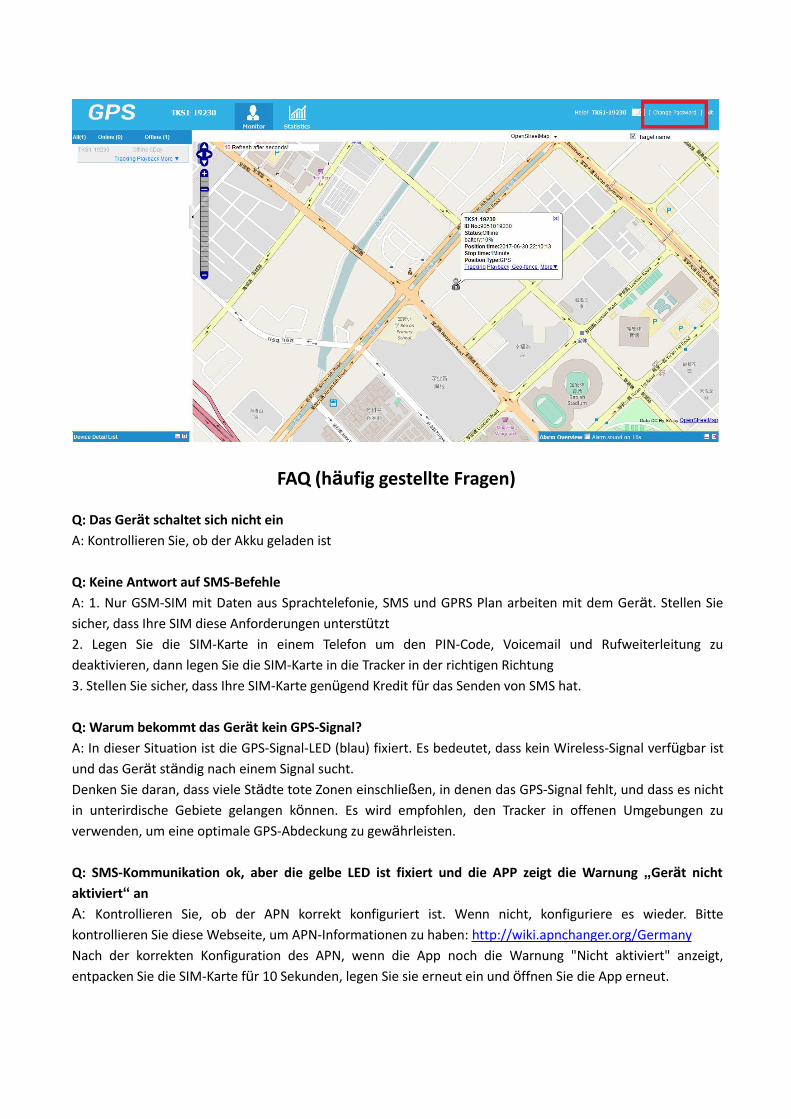
Klicken Sie auf "Passwort ändern" rechts oben, um das Passwort für die Website und die App zu ändern.
FAQ (häufig gestellte Fragen)
Q: Das Gerät schaltet sich nicht einA: Kontrollieren Sie, ob der Akku geladen ist
Q: Keine Antwort auf SMS-BefehleA: 1. Nur GSM-SIM mit Daten aus Sprachtelefonie, SMS und GPRS Plan arbeiten mit dem Gerät. Stellen Siesicher, dass Ihre SIM diese Anforderungen unterstützt2. Legen Sie die SIM-Karte in einem Telefon um den PIN-Code, Voicemail und Rufweiterleitung zudeaktivieren, dann legen Sie die SIM-Karte in die Tracker in der richtigen Richtung3. Stellen Sie sicher, dass Ihre SIM-Karte genügend Kredit für das Senden von SMS hat.
Q: Warum bekommt das Gerät kein GPS-Signal?A: In dieser Situation ist die GPS-Signal-LED (blau) fixiert. Es bedeutet, dass kein Wireless-Signal verfügbar istund das Gerät ständig nach einem Signal sucht.Denken Sie daran, dass viele Städte tote Zonen einschließen, in denen das GPS-Signal fehlt, und dass es nichtin unterirdische Gebiete gelangen können. Es wird empfohlen, den Tracker in offenen Umgebungen zuverwenden, um eine optimale GPS-Abdeckung zu gewährleisten.
Q: SMS-Kommunikation ok, aber die gelbe LED ist fixiert und die APP zeigt die Warnung „Gerät nichtaktiviert“ anA: Kontrollieren Sie, ob der APN korrekt konfiguriert ist. Wenn nicht, konfiguriere es wieder. Bittekontrollieren Sie diese Webseite, um APN-Informationen zu haben: http://wiki.apnchanger.org/GermanyNach der korrekten Konfiguration des APN, wenn die App noch die Warnung "Nicht aktiviert" anzeigt,entpacken Sie die SIM-Karte für 10 Sekunden, legen Sie sie erneut ein und öffnen Sie die App erneut.
Q: SMS-Kommunikation ok, aber die APP zeigt das "Offline-Gerät"A: Das Gerät wechselt in den Schlafmodus, wenn keine Bewegung für 5 Minuten erkannt wird. Das ist einenormale Situation. Rufen Sie das Gerät an oder senden Sie den Befehl G123456#, um ihn wieder zuaktivieren.
Q: Ich bekomme keine Warnmeldungen in APPA: 1. Die APP funktioniert nur, wenn sie im Background auf Android-Systemen ist. Dies ist bei iOS-Systemennicht erforderlich.2. Kontrollieren Sie Ihre Smartphone-Einstellungen und stellen Sie sicher, dass Ihr Smartphone dem APPerlaubt, Benachrichtigungen zu senden.
Q: Kann ich den Tracker ständig unter der Ladung mit der Autobatterie halten?A: Ja, aber nur für kurzer Zeit. Es wird nicht empfohlen, da Sie das Gerät tragen können.
Q: Im Schlafmodus wird der Tracker alle seine Funktionen aktiv halten?A: Nein. Rufen Sie das Gerät an oder senden Sie den Befehl G123456#, um alle Funktionen wiederaufzunehmen.
Q: Kann ich SMS-Benachrichtigungen auf zwei verschiedene Telefone erhalten?A: Ja, Sie können eine zweite Nummer als SOS-Nummer in der App hinzufügen, um zweiSMS-Benachrichtigungen zu erhalten.
Q: Die Position ist anders als die wirkliche PositionKontrollieren Sie die Aktualisierungszeit der Position oder es gibt keinen GPS-Signal. Rufen Sie das Gerät an,um die Mitteilung mit der Position zu bekommen. Wenn die Mitteilung wie Bild 2 ist, dann gibt es keinenGPS-Signal. Die dargestellte Position ist die letzte gespeicherte Position, nicht die Live-Position. Wenn dieMitteilung wie Bild 1 ist, dann aktualisiert das Gerät die Position in den vorherbestimmten Zeiten (wenn dieAktualisierungszeitspanne des GPS ist eine Stunde, wird das Gerät die GPS-Position jede Stunde senden)

Lekemi GPS TrackerManuale Utente
Per TK905
Supporto Tecnico:
Email: [email protected]
Assistenza telefonica: (+39) 3713096439

Indice
Guida rapida…….. ............................................................................................................................................... 3
Benvenuto .......................................................................................................................................................... 4
Capitolo 1 Vista del prodotto.............................................................................................................................. 4
Introduzione ................................................................................................................................................... 4
Specifiche tecniche......................................................................................................................................... 5
Contenuto………. ............................................................................................................................................. 5
Interfaccia…….................................................................................................................................................. 6
Caricare il dispositivo...................................................................................................................................... 6
Power On/Off ................................................................................................................................................. 6
Indicatori LED…………....................................................................................................................................... 7
Installazione della SIM.................................................................................................................................... 7
Impostazioni................................................................................................................................................... 7
Capitolo 2 SMS tracking...................................................................................................................................... 9
Lista comandi SMS........................................................................................................................................ 12
Capitolo 3 APP tracking..................................................................................................................................... 14
Live tracking ................................................................................................................................................. 15
Itinerario cronologico…….............................................................................................................................. 15
Allarme Geo-fence........................................................................................................................................ 15
Messaggi………............................................................................................................................................... 16
Impostazioni degli allarmi............................................................................................................................. 16
Impostazioni................................................................................................................................................. 16
Capitolo 4 Webpage tracking............................................................................................................................ 17
FAQ ............................................................................................................................................................. 21
Guida rapida dell’utenteIl tracker si configura molto facilmente, è necessaria solo un po' di pazienza. Esso comunica tramite comandisms che l'utente invia al dispositivo tramite il suo numero personale. Può funzionare anche tramite app e sitoweb dopo la configurazione tramite sms.
8. Prepara la SIM
Il tracker lavora grazie ad una sim che viene inserita al suo interno. Assicurarsi quindi di avere una simdedicata che abbia credito o disponga di una promozione, in quanto essa utilizza sms, chiamate e unairrisoria quantità di dati internet (circa 100mb al mese). Accertarsi quindi che la sim supporti le reti GSM,GPS, GPRS, internet 2g o superiore, sms e chiamate. Consultare il proprio operatore di fiducia per eventualipromozioni su sim per allarmi.
9. Disabilita il codice PIN
Inserire la sim del tracker in uno smartphone per disattivare il pin, la segreteria telefonica e il trasferimentodi chiamata. Reperire dalle impostazioni di rete le informazioni apn dell'operatore della sim (indirizzo edeventuali nome utente e password) o reperirle successivamente da questoindirizzo http://wiki.apnchanger.org/Italy
10. Inserire la SIM
Portarsi in un ambiente aperto. Inserire la sim nel tracker, e questo si accenderàmostrando dei led giallo eblu.
11. Impostare il numero admin
Impostare il numero admin (il proprio numero di cellulare) inviando il seguente sms alla sim del tracker.Comando: admin123456+spazio+numero di cellulare (ad esempio (admin123456 7894561230)Risposta: admin ok
È possibile quindi inviare il comando G123456# o chiamare il tracker per ricevere entro pochi secondi un smscontenente latitudine, longitudine, data, ora, stato della batteria del tracker e un link di google maps chemostra la posizione gps del tracker.
12. Aprire il GPRS
Da qui in poi questa procedura serve per usare il tracker tramite l’app.Comando: gprs123456Risposta: gprs ok
13. Impostare l'APN
Impostare l'apn seguendo questo esempio. Le voci dovranno essere sostituite con quelle dell'operatore dellasim nel tracker.
Per la scheda SIM TIM, abbiamo ricavato le seguenti informazioni APN.Nome APN: ibox.tim.it

Nome utente APN: (vuoto)Password APN: (vuoto)Inviare i seguenti comandi SMS per impostare l’APN:1. apn123456 ibox.tim.it2. apnuser123456+spazio+nome utente (non è necessario inviare questo comando se l'apn non prevede
un nome utente)3. apnpasswd123456+spazio+password (non è necessario inviare questo comando se l'apn non prevede
una password)A questo punto i led giallo e blu lampeggeranno, indicando che il tracker riceve correttamente i segnali GPRSe GPS.
14. Installare l’APP e login
Per Android: cercare “TKSTAR GPS” nel Google Play StorePer Apple iOS: cercare “TKSTAR GPS” nell’App StoreDopo aver scaricato e installato l’app, inserire le seguenti informazioni per effettuare il login.Selezionare “Accedi da IMEI/ID” sulla parte bassa della schermataServer: www.mytkstar.netID: si trova sul retro del dispositivoPassword: 123456
15. Ora il tracker è operativo e puoi gestirlo completamente dall’app.
BenvenutoGrazie per aver acquistato il Real-time Car GPS Tracker TK-905 di Lekemi! Questo manuale è stato progettatoper essere uno strumento di riferimento per l'installazione e il funzionamento del Tracker GPS. Qui potetetrovare informazioni sulle caratteristiche e le funzioni del tracker, nonché informazioni utili per risolvere iproblemi.Per l'accesso ad altre informazioni di supporto, visitare il sito http://www.lekemi.top/downloadPer contattare il supporto Lekemi, scriveteci a: [email protected]
Assistenza telefonica: (+39) 3713096439
Capitolo 1 – Vista del prodotto
Introduzione:
Il TK905 è un dispositivo di tracking progettato per rintracciare auto, veicoli ed altri beni. Con un corpocompatto e capacità di ricezione superiori, esso è una soluzione per un dispositivo di tracking nonappariscente quanto potente. TK905 è basato su reti GSM / GPRS e sui satelliti GPS e può essere individuatoe monitorato da remoto tramite SMS, APP e Internet. Adotta la tecnologia più avanzata di GPS e AGPS inmodalità dual mode. Grazie al magnete incorporato, il dispositivo può essere installato in auto in 10 secondi.Con la funzione di monitoraggio in tempo reale da remoto, gli utenti possono controllare la posizione indiretta e la cronologia del percorso tramite smartphone ovunque e in qualsiasi momento. Con la batteriaincorporata da 5000 / 10000mAh, il dispositivo può rimanere in funzione fino a 60 giorni con una caricacompleta. Si potrà godere di tranquillità sapendo esattamente dov’è il proprio veicolo.
Specifiche tecniche
Dimensioni 90mm x 72mm x 22mm (3.5” x 2.8” x 0.8”)
Peso 168gReti GSM/GPRSBanda GSM 850/900/1800/1900MhzSensibilità GPS -159dBmPrecisione GPS 20-30mRicarica 110-220V input
5V-1A outputBatteria 3.7V 5000mAh Li-ion battery; 30-60 days standby
Tempo diacquisizione delsegnale GPS
Cold status 45sWarm status 35sHot status 1s
Contenuto della confezione
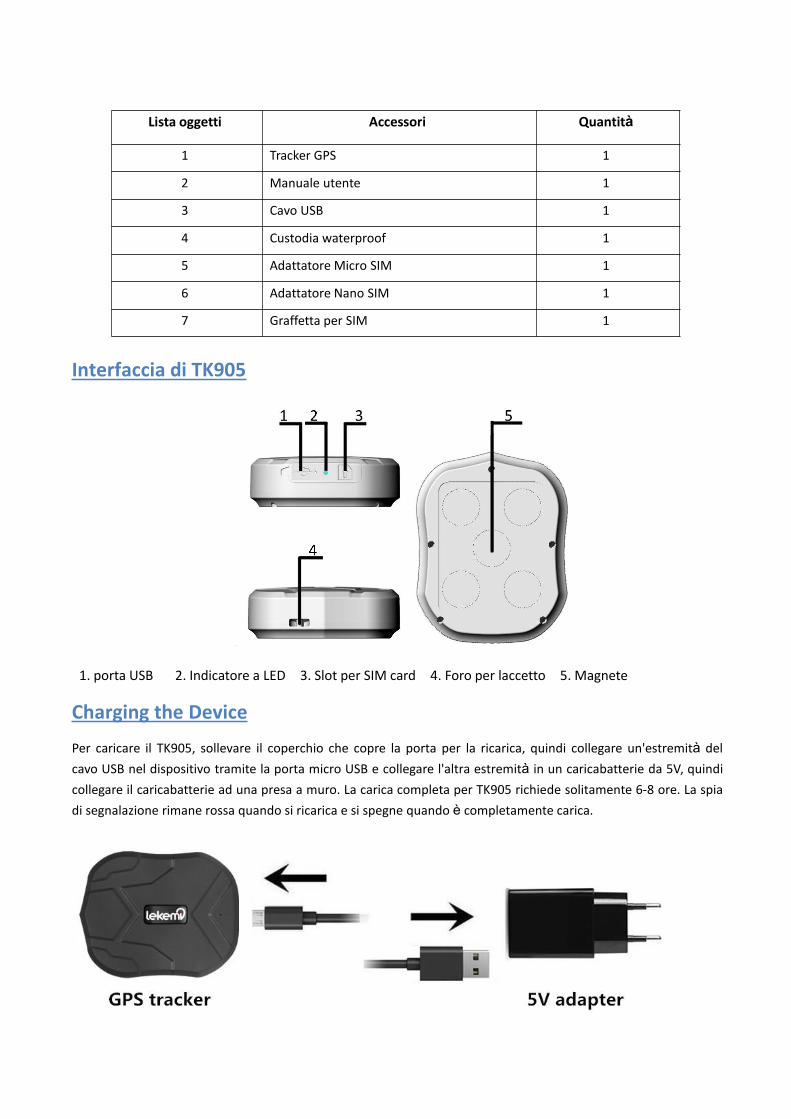
Interfaccia di TK905
1. porta USB 2. Indicatore a LED 3. Slot per SIM card 4. Foro per laccetto 5. Magnete
Charging the Device
Per caricare il TK905, sollevare il coperchio che copre la porta per la ricarica, quindi collegare un'estremità delcavo USB nel dispositivo tramite la porta micro USB e collegare l'altra estremità in un caricabatterie da 5V, quindicollegare il caricabatterie ad una presa a muro. La carica completa per TK905 richiede solitamente 6-8 ore. La spiadi segnalazione rimane rossa quando si ricarica e si spegne quando è completamente carica.
Lista oggetti Accessori Quantità
1 Tracker GPS 1
2 Manuale utente 1
3 Cavo USB 1
4 Custodia waterproof 1
5 Adattatore Micro SIM 1
6 Adattatore Nano SIM 1
7 Graffetta per SIM 1

Not: Non forniamo l’adattatore da 5V. È possibile usare il caricatore di un cellulare.
Accendere/Spegnere il dispositivo
TK905 non ha un tasto di accensione. Inserire la SIM per accendere il dispositivo, ed estrarla per spegnerlo.
Indicatori LED
Stato del Led Stato del dispositivo
Luce gialla fissa Assenza segnale GPRS
Luce gialla lampeggiante Connessione GPRS riuscita
Luce blu fissa Assenza segnale GPS
Luce blu lampeggiante Connessione GPS riuscita
Intallazione della SIM
Solo SIM GSM di dimensioni classiche funzionano con il dispositivo.
Aprire il coperchio in gomma, inserire la scheda SIM nello slot (per la direzione dell'installazione della schedaSIM, seguire l'icona sul coperchio in gomma o sulla guaina)
Impostazioni APN
Dato che TK905 deve essere connesso alla rete GPRS prima di poter inviare informazioni sulla posizione o gliallarmi all’APP o sul sito web, è necessario impostare l’APN prima di poter utilizzare tali piattaforme. Inviare iseguenti comandi SMS per impostare correttamente l’APN.
Nota: se l’APN non prevede un nome utente e una password, non è necessario inviare il comando SMS perimpostarli. Per eventuali cambiamenti delle impostazioni APN rivolgersi al proprio operatore o controllare leimpostazioni sul proprio smartphone.
Esempio:Per la scheda SIM TIM in Italia, abbiamo ricavato le seguenti informazioni APN.Nome APN: ibox.tim.itNome utente APN: (vuoto)Password APN: (vuoto)
Inviare i seguenti comandi SMS per impostare l’APN:1. gprs1234562. apn123456 ibox.tim.it3. check123456È anche possibile reperire le informazioni APN all’indirizzo http://wiki.apnchanger.org/Italy
Attenzione:1. Solo SIM GSM con il piano dati SMS e GPRS funzionano con il dispositivo, assicurarsi che la scheda SIM
Funzioni Comando Risposta
Abilitare il GPRS GPRS123456 GPRS OK
Impostare l’indirizzo APN apn123456(spazio)Nome APN apn ok
Impostare nome utente dell’APN apnuser+123456(spazio)Nome utente APN apnuser ok
Impostare password APN apnpasswd123456(spazio)password APN apnpasswd ok
Controllare le impostazioni APN check123456
GSM supporti le chiamate, l'invio e la ricezione di messaggi SMS e la rete GPRS.2. Installare la scheda SIM in un cellulare per disattivare il codice PIN, la segreteria telefonica e l'avviso dichiamata, quindi riportare la carta SIM nel tracker. Assicurarsi inoltre che la scheda GSM abbia attivato laricezione di chiamate e spento Il trasferimento di chiamata.3. Assicurarsi che la scheda SIM GSM sia attiva e dotata di credito sufficiente per funzionare.4. Il tracking GPS può essere eseguito solo all'esterno, dato che il dispositivo dipende dalla rete GPS, dalsistema di rete GSM (GPRS), dal sistema GIS (sistema geografico), dal sistema informatico e così via. Questoprodotto deve avere una buona copertura di rete per funzionare, altri segnali potrebbero causare disturbi delservizio. Non ci assumiamo alcuna responsabilità in merito.5. Tenere il prodotto lontano da fonti di calore e alte temperature o altro ambiente estremo.6. Non tentare di aprire o modificare il prodotto, si rischia di danneggiarlo.7. Se il prodotto risulta danneggiato a seguito della violazione degli avvertimenti di cui sopra, non ciassumeremo alcuna responsabilità.
Capitolo 2 - SMS tracking
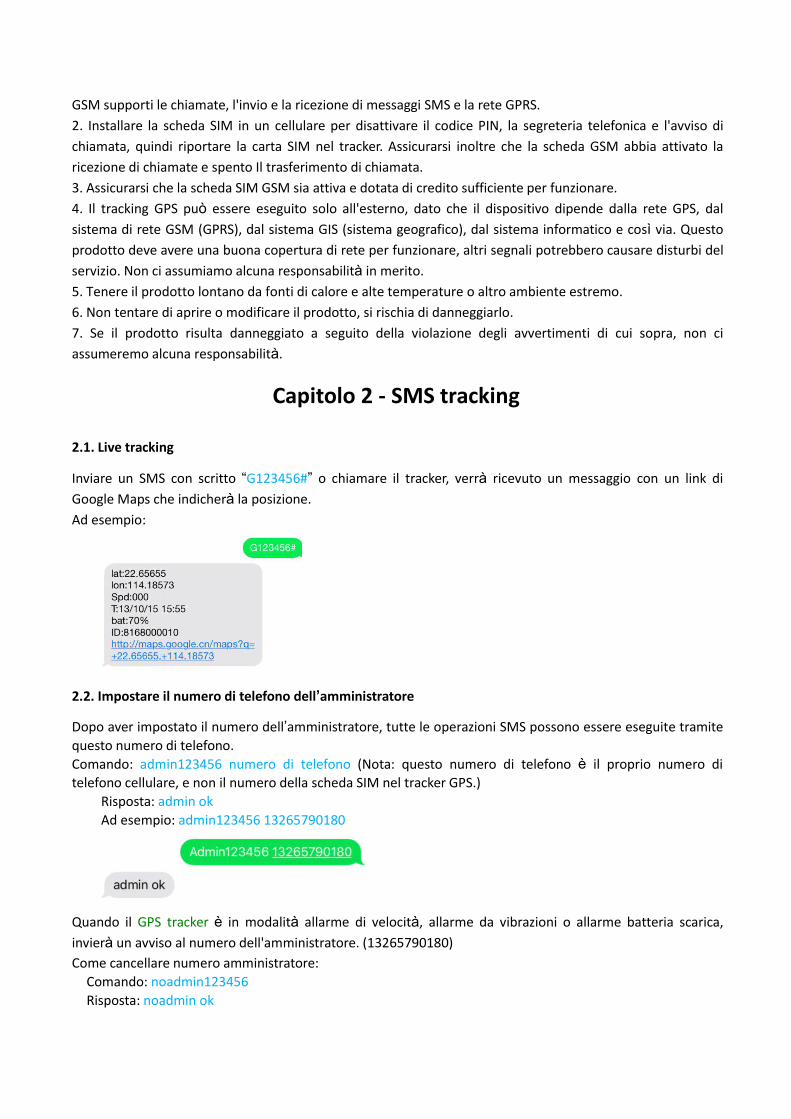
2.1. Live tracking
Inviare un SMS con scritto “G123456#” o chiamare il tracker, verrà ricevuto un messaggio con un link diGoogle Maps che indicherà la posizione.Ad esempio:
2.2. Impostare il numero di telefono dell’amministratore
Dopo aver impostato il numero dell’amministratore, tutte le operazioni SMS possono essere eseguite tramitequesto numero di telefono.Comando: admin123456 numero di telefono (Nota: questo numero di telefono è il proprio numero ditelefono cellulare, e non il numero della scheda SIM nel tracker GPS.)
Risposta: admin okAd esempio: admin123456 13265790180
Quando il GPS tracker è in modalità allarme di velocità, allarme da vibrazioni o allarme batteria scarica,invierà un avviso al numero dell'amministratore. (13265790180)Come cancellare numero amministratore:
Comando: noadmin123456Risposta: noadmin ok
2.3. Impostare l’allarme di velocità
Comando: speed123456 070 (presumendo che la velocità sia 70Km/h)Risposta: speed ok
Quando il dispositivo supererà i 70km/h, invierà un sms “speed alarm!” al numero dell’amministratore.
Per disattivare l’allarme di velocità:Comando: nospeed123456Risposta: nospeed ok
2.4. Impostare la frequenza di aggiornamento della posizione GPS
Le impostazioni predefinite per l'intervallo di caricamento della posizione GPS sono di 1 minuto e vieneespresso in secondi. Se si desidera modificare l’intervallo a 3 minuti (180 secondi), inviare il comando SMS
Comando: upload123456 180Risposta: upload ok
2.5. Impostare l’allarme per vibrazioni
Comando: shock123456Risposta: shock okAd esempio
Nota: il sensore entra in funzione autonomamente solo se ed ogni volta che il dispositivo rimane fermo peralmeno 5 minuti. Il tracker invierà un SMS "sensor alarm!" al numero dell’amministratore quando ildispositivo subisce urti, viene messo in movimento o viene sollecitato da vibrazioni.
Disattivare l’allarme per vibrazioni:Comando: noshock123456Risposta: noshock ok
2.6. Passare alla modalità di controllo vocale
Inviare il seguente comando SMS per entrare in modalità di controllo vocale.Comando: monitor123456Risposta: monitor ok
Quindi chiamare il dispositivo per ascoltare l'ambiente circostante.
Inviare il seguente comando SMS per tornare alla modalità di monitoraggioComando: tracker123456Risposta: tracker ok
2.7. Impostare la modalità Sleep
Le modalità Sleep sono 2, una di passaggio da comando e un’altra di passaggio dalla modalità di allarme pervibrazioni.
2.7.1. Modalità Sleep dalla modalità di comando
Nel passaggio alla modalità Sleep dalla modalità di comando il tracker funziona solo per 5 minuti dopoessere stato riattivato, dopodiché torna nuovamente in modalità Sleep (il GPS si spegne, il GSM funziona inmodalità a basso consumo). Inviare un SMS o chiamare il tracker per riattivarlo di nuovo.Per attivare questa impostazione:
Comando: sleep123456 timeRisposta: sleep time okAd esempio
2.7.2 Modalità Sleep dalla modalità di allarme per vibrazioni
La modalità predefinita del dispositivo è "attivazione da modalità di allarme per vibrazioni". Questa funzionepuò servire ad allungare la durata della batteria. Il tracker passerà alla modalità di sospensione se non vienerilevato alcun movimento. Qualsiasi movimento del dispositivo risveglierà il tracker.Per attivare questa modalità:
Comando: sleep123456 shockRisposta: sleep shock okAd esempio
2.7.3. Disattivare la modalità Sleep
Comando per disattivare tale modalità:Comando: sleep123456 offRisposta: sleep off ok
2.8 Impostare data e ora
L'impostazione predefinita per il fuso orario è GMT 0. Per cambiarla nel fuso orario locale, inviare il comandoSMS seguente:Comando: timezone123456 fuso orario localeRisposta: time okEsempio: timezone123456 +1 timezone123456 -1 Timezone123456 0
2.9 Effettuare un reset dell’hardware
Comando: begin123456Risposta: begin okPer esempio:
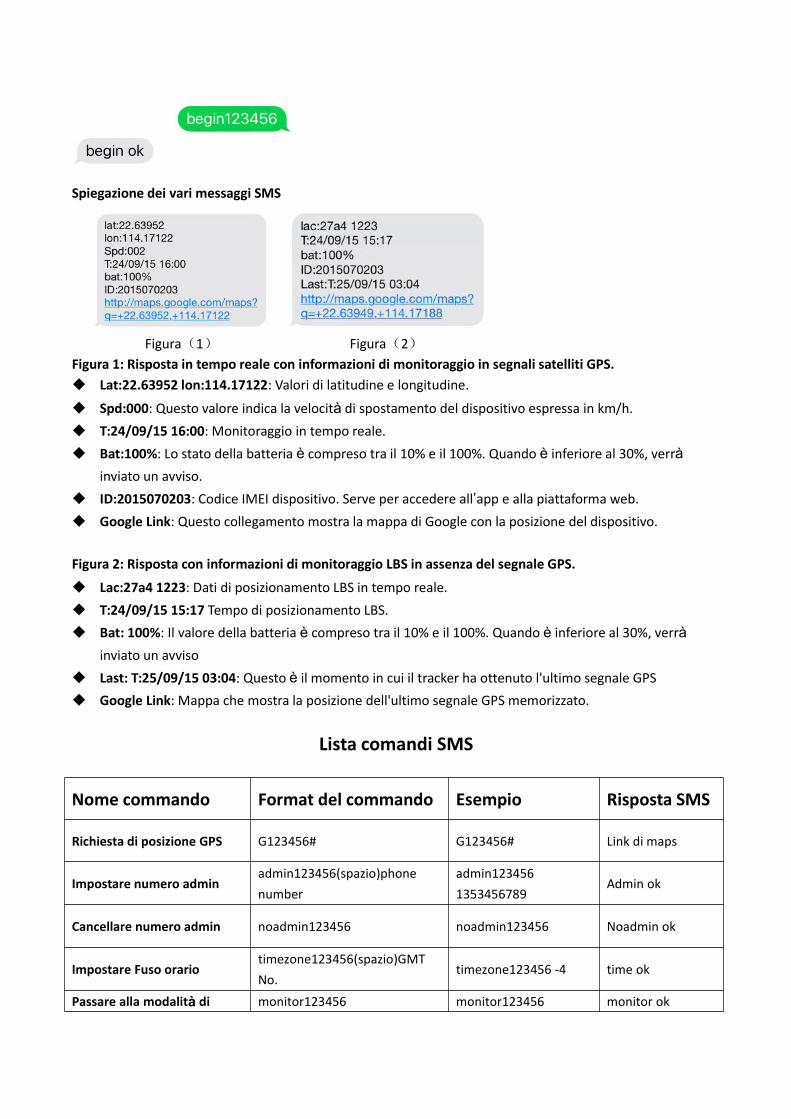
Spiegazione dei vari messaggi SMS
Figura(1) Figura(2)Figura 1: Risposta in tempo reale con informazioni di monitoraggio in segnali satelliti GPS. Lat:22.63952 lon:114.17122: Valori di latitudine e longitudine.
Spd:000: Questo valore indica la velocità di spostamento del dispositivo espressa in km/h. T:24/09/15 16:00: Monitoraggio in tempo reale. Bat:100%: Lo stato della batteria è compreso tra il 10% e il 100%. Quando è inferiore al 30%, verrà
inviato un avviso. ID:2015070203: Codice IMEI dispositivo. Serve per accedere all’app e alla piattaforma web. Google Link: Questo collegamento mostra la mappa di Google con la posizione del dispositivo.
Figura 2: Risposta con informazioni di monitoraggio LBS in assenza del segnale GPS.
Lac:27a4 1223: Dati di posizionamento LBS in tempo reale. T:24/09/15 15:17 Tempo di posizionamento LBS. Bat: 100%: Il valore della batteria è compreso tra il 10% e il 100%. Quando è inferiore al 30%, verrà
inviato un avviso Last: T:25/09/15 03:04: Questo è il momento in cui il tracker ha ottenuto l'ultimo segnale GPS Google Link: Mappa che mostra la posizione dell'ultimo segnale GPS memorizzato.
Lista comandi SMS
Nome commando Format del commando Esempio Risposta SMS
Richiesta di posizione GPS G123456# G123456# Link di maps
Impostare numero adminadmin123456(spazio)phonenumber
admin1234561353456789
Admin ok
Cancellare numero admin noadmin123456 noadmin123456 Noadmin ok
Impostare Fuso orariotimezone123456(spazio)GMTNo.
timezone123456 -4 time ok
Passare alla modalità di monitor123456 monitor123456 monitor ok
controllo vocale (dopo laconfigurazione, è possibilechiamare il dispositivo per ilmonitoraggio vocale)
Ritornare alla modalità dimonitoraggio
tracker123456 tracker123456 tracker ok
Riattivazione dispositivodalla modalità allarme pervibrazioni
sleep123456(spazio)shock sleep123456 shock sleep shock ok
Riattivazione dispositivodalla modalità normale
sleep+123456(spazio)time sleep123456 time sleep time ok
Disattivare modalità sleep sleep+123456(spazio)off sleep123456 off sleep off ok
Attivare segnale acustico dibatteria scarica
lowbatsms123456(spazio)on lowbatsms123456 on lowbat sms ok
Disattivare segnale acusticodi batteria scarica
lowbatsms123456(spazio)off lowbatsms123456 off lowbat sms ok
Impostare indirizzo IPadminip123456(spazio)ip(spazio)porta
adminip12345647.88.85.196 7700
admin ip ok
Impostare frequenza diaggiornamento del segnaleGPS
upload123456(spazio)secondi upload123456 15 upload ok
Ripristino dati di fabbrica begin123456 begin123456 begin ok
Impostare un allarme persuperamento della velocità
speed123456(spazio)080(km/h) speed123456 080 speed ok
Disattivare allarme persuperamento della velocità
nospeed123456 nospeed123456 nospeed ok
Attivare allarme pervibrazioni
shock123456 shock123456 shock ok
Disattivare allarme pervibrazioni
noshock123456 noshock123456 noshock ok
Ripristinare le impostazionidi fabbrica
reset123456 Reset12345 Reset OK
Capitolo 3 – Tracking dall’APP
Passo 1: Scaricare e installare l’app per Android / iOS
Per AndroidCercare "TKSTAR GPS" nel Google Play Store
Per Apple iOS
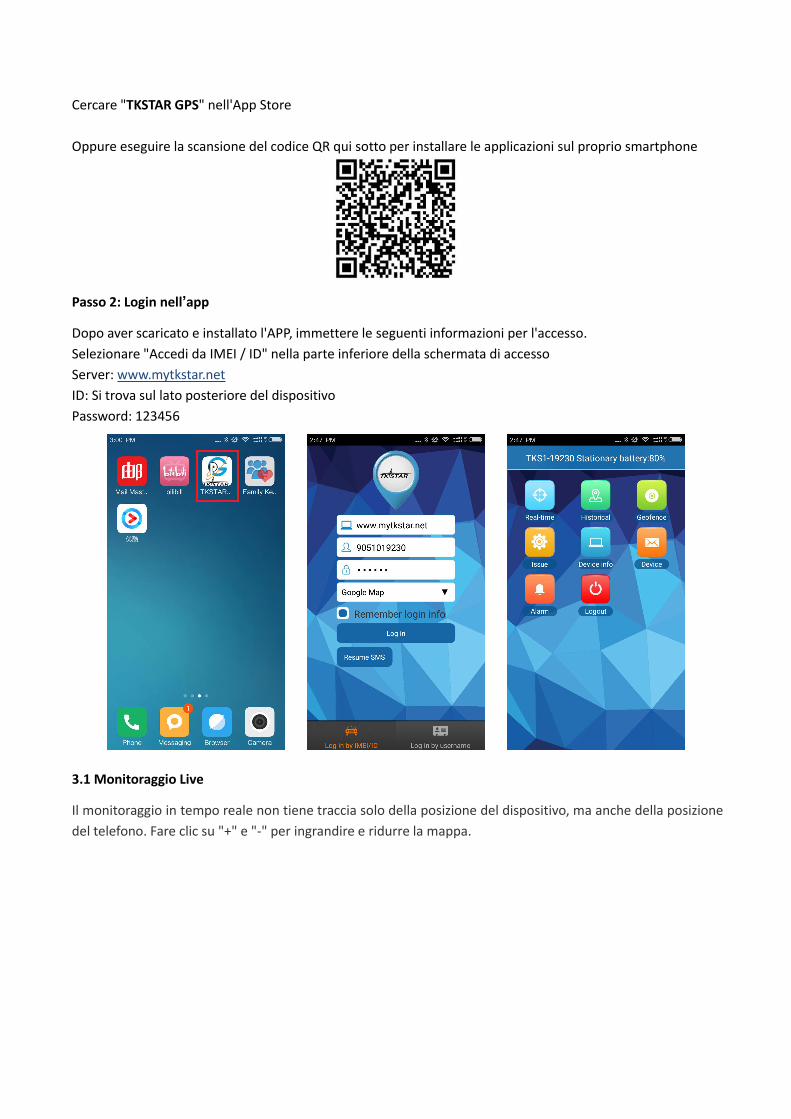
Cercare "TKSTAR GPS" nell'App Store
Oppure eseguire la scansione del codice QR qui sotto per installare le applicazioni sul proprio smartphone
Passo 2: Login nell’app
Dopo aver scaricato e installato l'APP, immettere le seguenti informazioni per l'accesso.Selezionare "Accedi da IMEI / ID" nella parte inferiore della schermata di accessoServer: www.mytkstar.netID: Si trova sul lato posteriore del dispositivoPassword: 123456
3.1 Monitoraggio Live
Il monitoraggio in tempo reale non tiene traccia solo della posizione del dispositivo, ma anche della posizionedel telefono. Fare clic su "+" e "-" per ingrandire e ridurre la mappa.
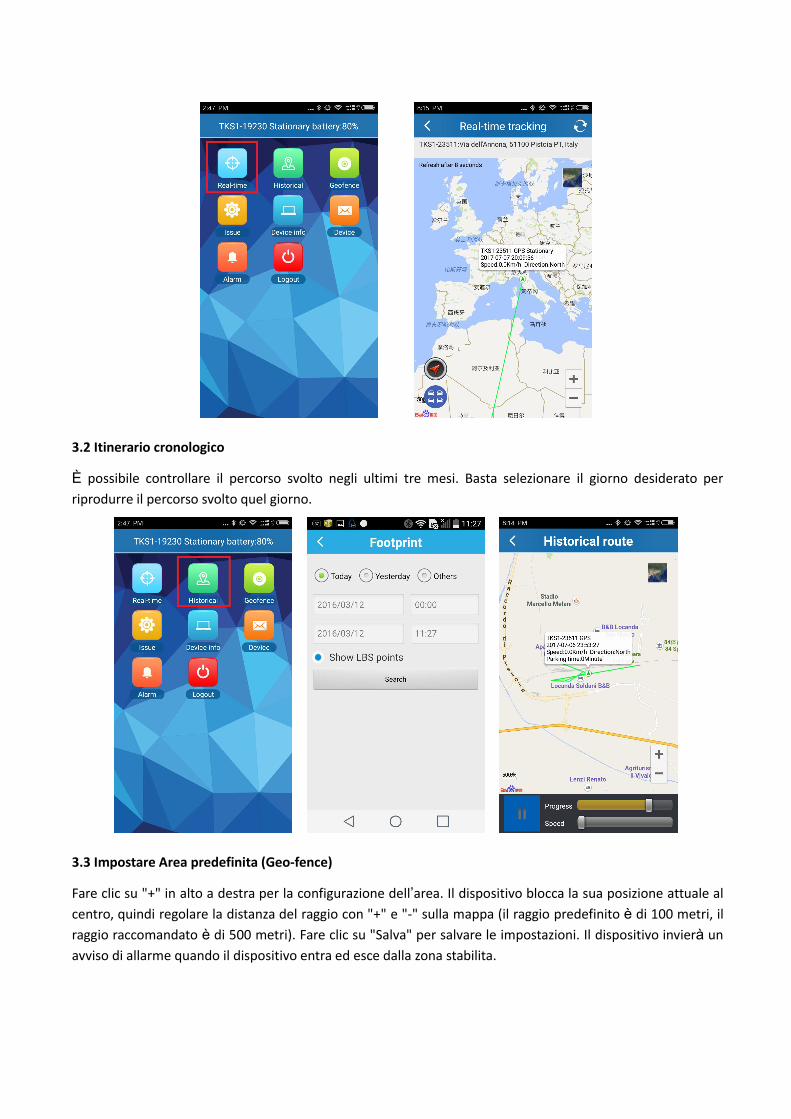
3.2 Itinerario cronologico
È possibile controllare il percorso svolto negli ultimi tre mesi. Basta selezionare il giorno desiderato perriprodurre il percorso svolto quel giorno.
3.3 Impostare Area predefinita (Geo-fence)
Fare clic su "+" in alto a destra per la configurazione dell’area. Il dispositivo blocca la sua posizione attuale alcentro, quindi regolare la distanza del raggio con "+" e "-" sulla mappa (il raggio predefinito è di 100 metri, ilraggio raccomandato è di 500 metri). Fare clic su "Salva" per salvare le impostazioni. Il dispositivo invierà unavviso di allarme quando il dispositivo entra ed esce dalla zona stabilita.
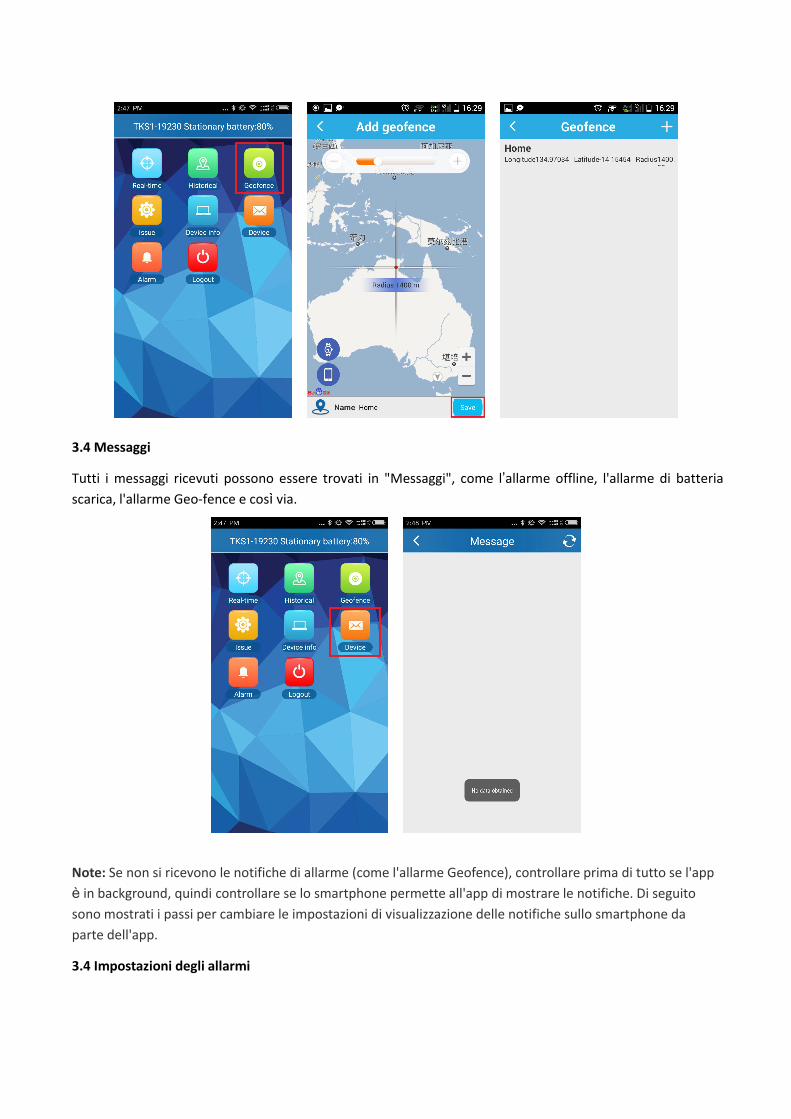
3.4 Messaggi
Tutti i messaggi ricevuti possono essere trovati in "Messaggi", come l’allarme offline, l'allarme di batteriascarica, l'allarme Geo-fence e così via.
Note: Se non si ricevono le notifiche di allarme (come l'allarme Geofence), controllare prima di tutto se l'appè in background, quindi controllare se lo smartphone permette all'app di mostrare le notifiche. Di seguitosono mostrati i passi per cambiare le impostazioni di visualizzazione delle notifiche sullo smartphone daparte dell'app.
3.4 Impostazioni degli allarmi
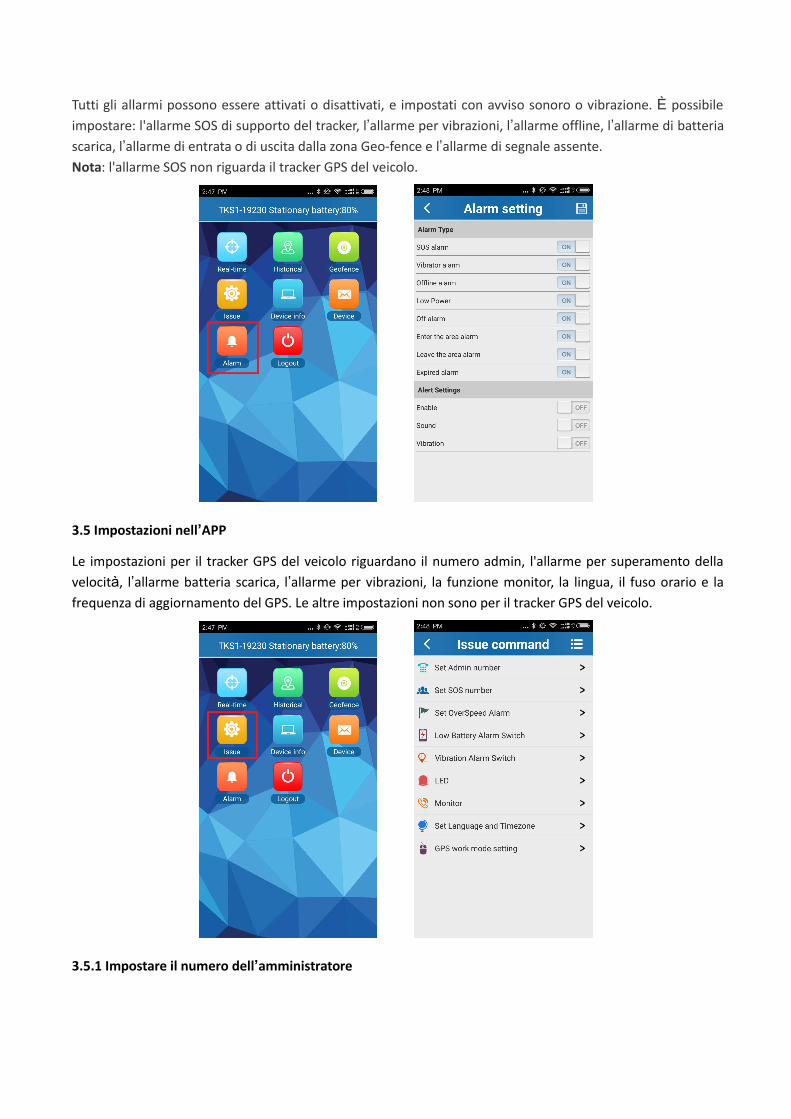
Tutti gli allarmi possono essere attivati o disattivati, e impostati con avviso sonoro o vibrazione. È possibileimpostare: l'allarme SOS di supporto del tracker, l’allarme per vibrazioni, l’allarme offline, l’allarme di batteriascarica, l’allarme di entrata o di uscita dalla zona Geo-fence e l’allarme di segnale assente.Nota: l'allarme SOS non riguarda il tracker GPS del veicolo.
3.5 Impostazioni nell’APP
Le impostazioni per il tracker GPS del veicolo riguardano il numero admin, l'allarme per superamento dellavelocità, l’allarme batteria scarica, l’allarme per vibrazioni, la funzione monitor, la lingua, il fuso orario e lafrequenza di aggiornamento del GPS. Le altre impostazioni non sono per il tracker GPS del veicolo.
3.5.1 Impostare il numero dell’amministratore
Fare clic su "admin number" e inserire il numero di telefono dell'amministratore. Il dispositivo invierà leinformazioni sugli allarmi a questo numero di telefono. Le informazioni sugli allarmi includono l'allarmebatteria scarica, l'allarme Geo-fence, l'allarme SOS e altri avvisi di allarme.
3.5.2 Impostare l’allarme per superamento della velocità
Può essere impostato anche un intervallo di tempo, quindi l'utente non sarà disturbato dal tracker ogni voltache si supera la velocità.
3.5.3 Impostare l’allarme di batteria scarica
Il tracker invierà un avviso di batteria scarica quando la batteria è inferiore al 10%, si consiglia quindi diricaricare il tracker per tenerlo costantemente in funzione.
3.5.4 Monitor (Impostare il numero di controllo vocale)
È possibile impostare il numero telefonico per il monitoraggio vocale. Si può quindi chiamare il dispositivoper ascoltare l’ambiente circostante.
3.5.5 Impostare la lingua e il fuso orario
Per il fuso orario, impostare il GMT del proprio paese. L’app supporta solo le lingue inglese e cinese.
3.5.6 Impostare la frequenza di aggiornamento del GPS
È possibile impostare la frequenza di aggiornamento dei dati GPS nella sezione “GPS Work Mode Settings”.Esso è correlato al tempo di standby della batteria.5. Aggiornamento tracking ogni 30 secondi: modalità di posizionamento veloce.6. Aggiornamento tracking ogni ora: posizionamento standard.3. Aggiornamento tracking ogni 12 ore: modalità risparmio energetico.
Capitolo 4 - Sito internet e tracking online
4.1 Entrare nel sito seguente dal proprio computer,
www.mytkstar.net
4.2 Effettuare il login del dispositivo
Scegliere la lingua desiderata, selezionare "Nr. IMEI" nella parte inferiore dello schermo, quindi inserire leinformazioni riportate di seguito:
Codice identificativo ID: (si trova sul retro del prodotto)Password: 123456
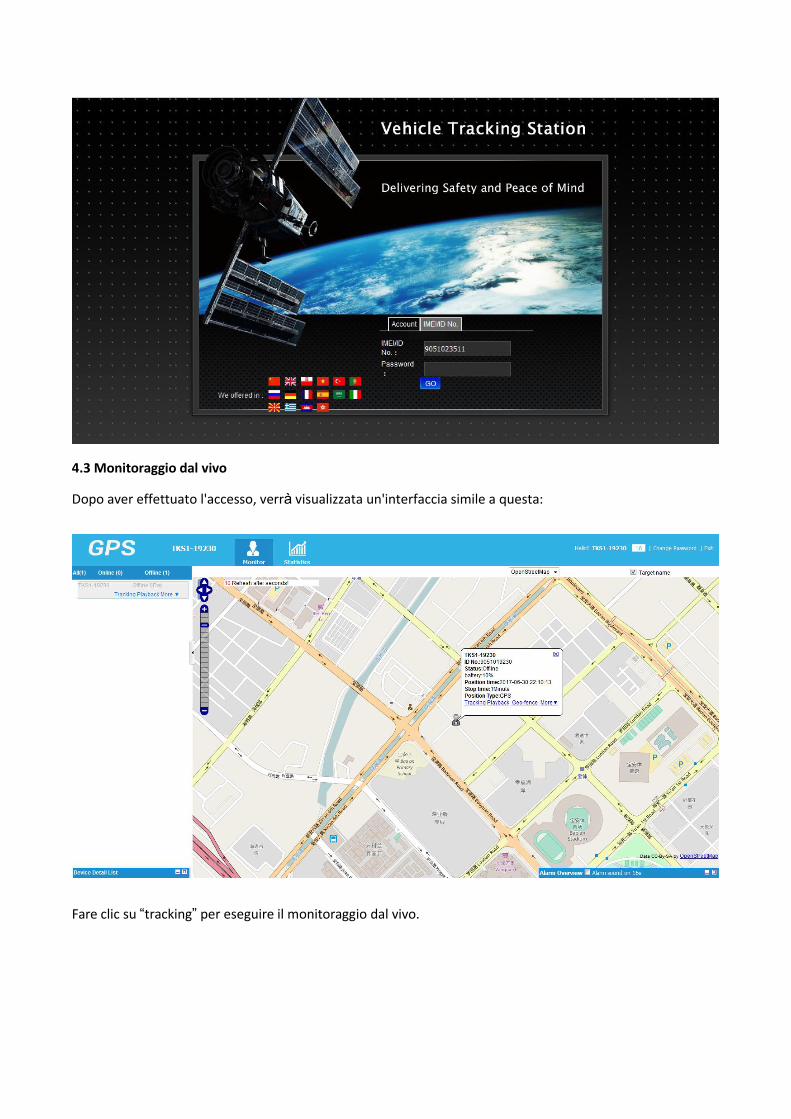
4.3 Monitoraggio dal vivo
Dopo aver effettuato l'accesso, verrà visualizzata un'interfaccia simile a questa:
Fare clic su “tracking” per eseguire il monitoraggio dal vivo.
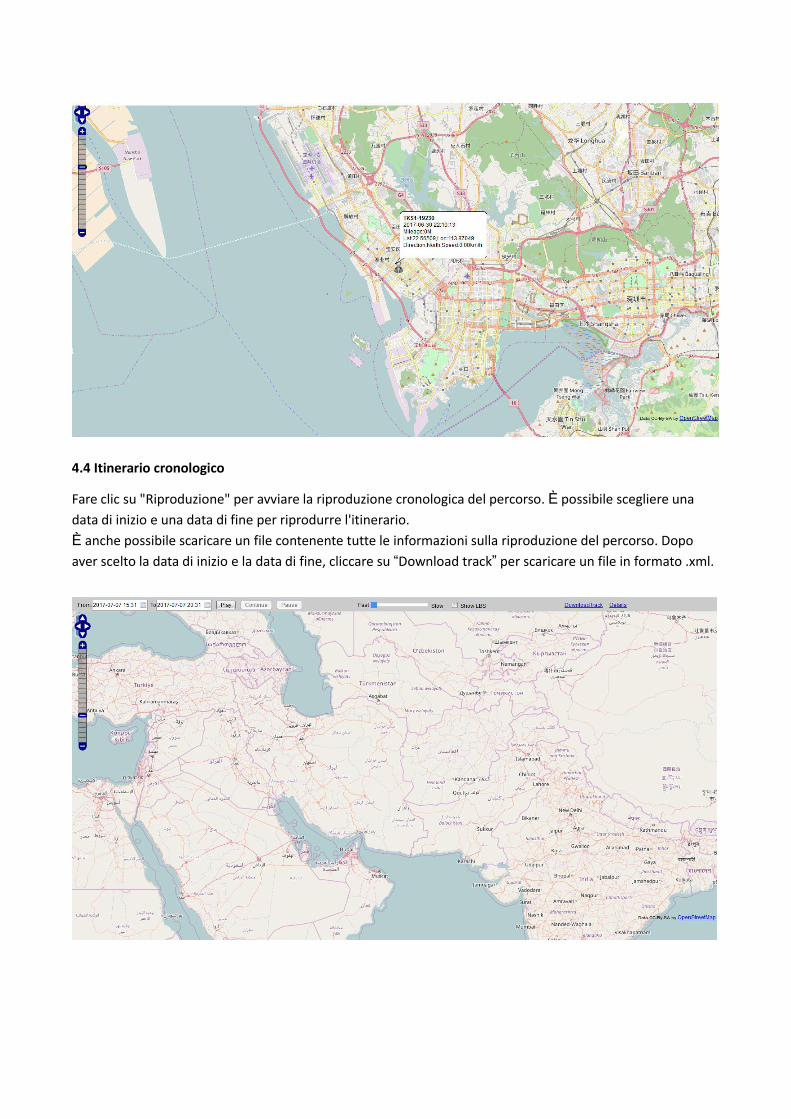
4.4 Itinerario cronologico
Fare clic su "Riproduzione" per avviare la riproduzione cronologica del percorso. È possibile scegliere unadata di inizio e una data di fine per riprodurre l'itinerario.È anche possibile scaricare un file contenente tutte le informazioni sulla riproduzione del percorso. Dopoaver scelto la data di inizio e la data di fine, cliccare su “Download track” per scaricare un file in formato .xml.
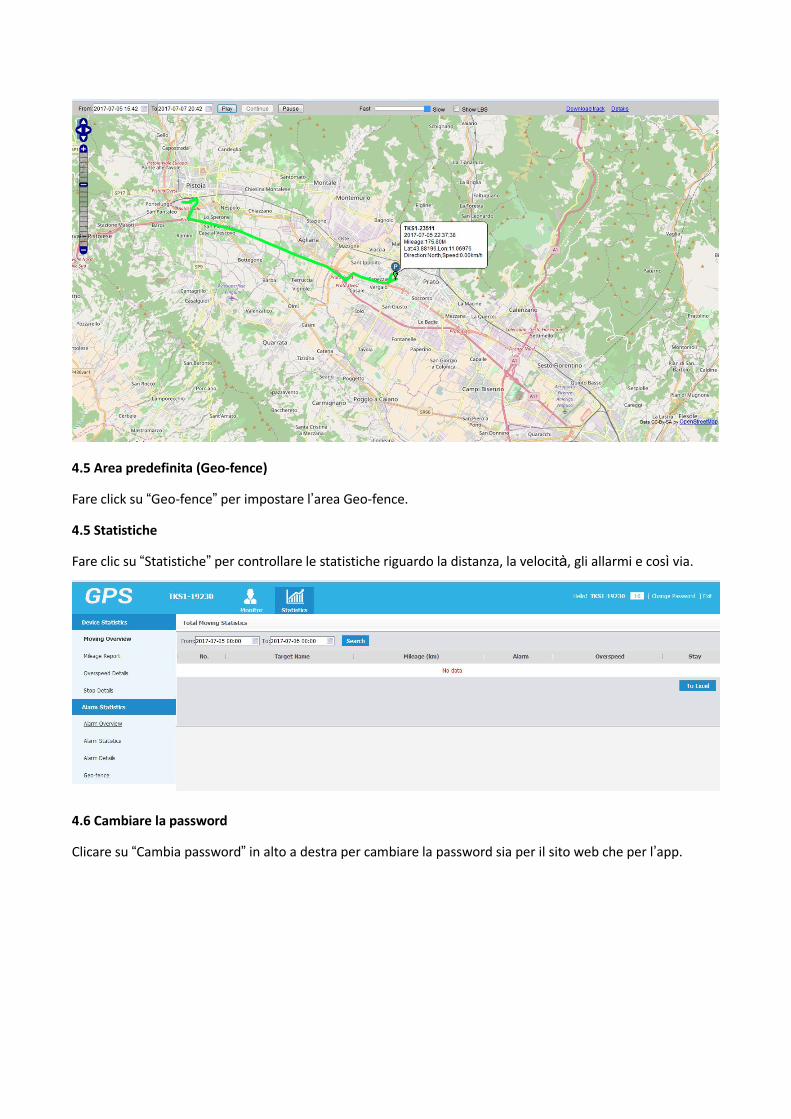
4.5 Area predefinita (Geo-fence)
Fare click su “Geo-fence” per impostare l’area Geo-fence.
4.5 Statistiche
Fare clic su “Statistiche” per controllare le statistiche riguardo la distanza, la velocità, gli allarmi e così via.
4.6 Cambiare la password
Clicare su “Cambia password” in alto a destra per cambiare la password sia per il sito web che per l’app.
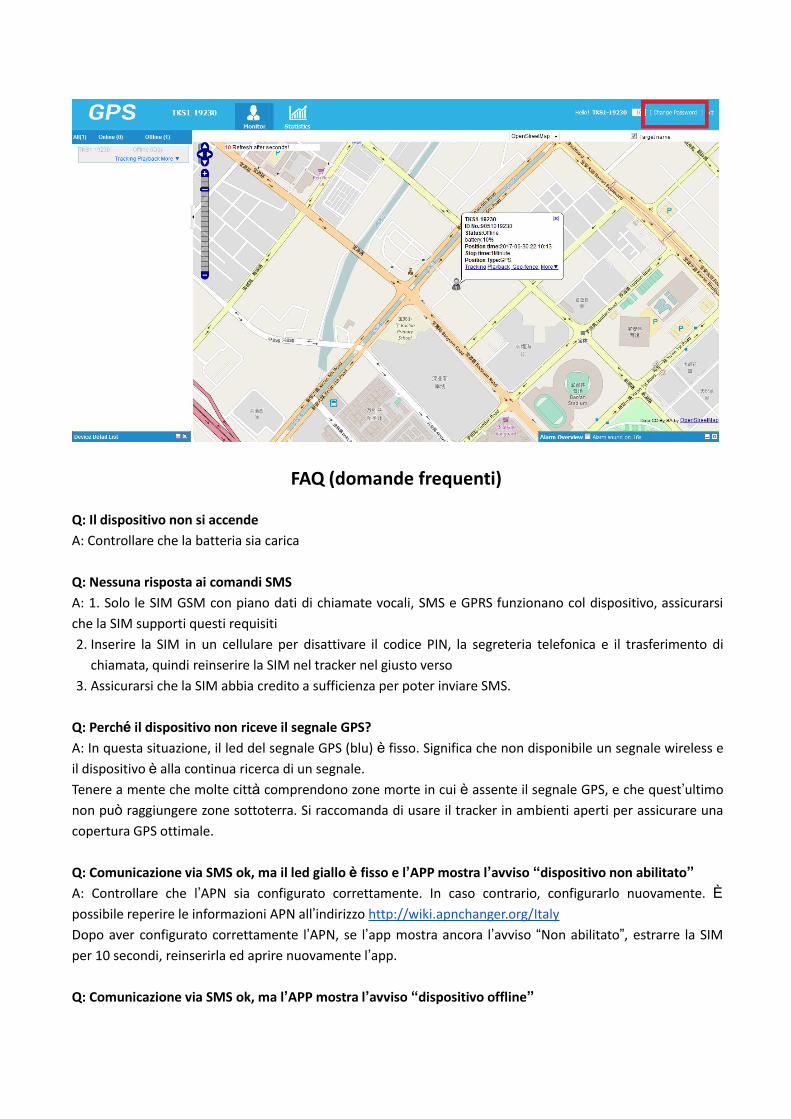
FAQ (domande frequenti)
Q: Il dispositivo non si accendeA: Controllare che la batteria sia carica
Q: Nessuna risposta ai comandi SMSA: 1. Solo le SIM GSM con piano dati di chiamate vocali, SMS e GPRS funzionano col dispositivo, assicurarsiche la SIM supporti questi requisiti2. Inserire la SIM in un cellulare per disattivare il codice PIN, la segreteria telefonica e il trasferimento di
chiamata, quindi reinserire la SIM nel tracker nel giusto verso3. Assicurarsi che la SIM abbia credito a sufficienza per poter inviare SMS.
Q: Perché il dispositivo non riceve il segnale GPS?A: In questa situazione, il led del segnale GPS (blu) è fisso. Significa che non disponibile un segnale wireless eil dispositivo è alla continua ricerca di un segnale.Tenere a mente che molte città comprendono zone morte in cui è assente il segnale GPS, e che quest’ultimonon può raggiungere zone sottoterra. Si raccomanda di usare il tracker in ambienti aperti per assicurare unacopertura GPS ottimale.
Q: Comunicazione via SMS ok, ma il led giallo è fisso e l’APP mostra l’avviso “dispositivo non abilitato”A: Controllare che l’APN sia configurato correttamente. In caso contrario, configurarlo nuovamente. Èpossibile reperire le informazioni APN all’indirizzo http://wiki.apnchanger.org/ItalyDopo aver configurato correttamente l’APN, se l’app mostra ancora l’avviso “Non abilitato”, estrarre la SIMper 10 secondi, reinserirla ed aprire nuovamente l’app.
Q: Comunicazione via SMS ok, ma l’APP mostra l’avviso “dispositivo offline”
A: Il dispositivo entrerà in modalità sleep se non vengono rilevati movimenti per 5 minuti. Questa è unasituazione normale. Chiamare il dispositivo o inviare il comando G123456# per riattivarlo nuovamente.
Q: Non ricevo le notifiche di allarme nell’APPA: 1. L’APP funziona solo se messa in background nei sistemi Android. Ciò non è necessario nei sistemi iOS.2. Controllare le impostazioni del proprio smartphone e assicurarsi che lo smartphone consenta all’APP diinviare le notifiche.
Q: Posso tenere il tracker costantemente sotto carica con la batteria dell’auto?A: Sì, ma solo temporaneamente. Non è raccomandato in quanto si rischia di logorare il dispositivo.
Q: In modalità sleep, il tracker manterrà attive tutte le sue funzioni?A: No. Chiamare il dispositivo o inviare il comando G123456# per riattivare tutte le sue funzioni.
Q: Posso ricevere gli allarmi SMS su due telefoni diversi?A: Sì, è possibile aggiungere un secondo numero come numero SOS nell’app per ricevere due allarmi SMS.
Q: La posizione è diversa dalla posizione effettiva.A: Controllare la frequenza di aggiornamento della posizione oppure non vi è alcun segnale GPS. Chiamare ildispositivo per ricevere il messaggio con la posizione. Se il messaggio è come nella figura 2, allora il GPS èassente. La posizione visualizzata è l'ultima posizione in memoria, e non quella in tempo reale. Se ilmessaggio è come nella figura 1, significa che il dispositivo aggiorna la posizione nei tempi impostati (se lafrequenza di aggiornamento del segnale GPS è di un'ora, esso invierà la posizione GPS una volta ogni ora).