Embed Size (px)
DESCRIPTION
beaded necklace
Citation preview

1
Kett
e - n
eckl
ace
„Tru
e Ro
man
ce“ 2
014
| Cop
yrig
ht U
lrik
e Gü
nthe
r (Pr
etty
Net
t.de)
Tutorial Kette / necklace
„True Romance“
Free Beading Pattern – Freebie
Deutsch/english
www.PrettyNett.de
2
Kett
e - n
eckl
ace
„Tru
e Ro
man
ce“ 2
014
| Cop
yrig
ht U
lrik
e Gü
nthe
r (Pr
etty
Net
t.de)
Verwendete Materialien - Used Material
Bei einer Länge von ca. 40 cm (ohne Verschluss) benötigt man folgendes Material. Für eine längere Kette entsprechend mehr.
RP8: Rund Perle 8 mm / 24 Stück / SWAROVSKI Chrystal Pearl Petrol
RP4: Rund Perle 4 mm / 72 Stück / SWAROVSKI Chrystal Pearl Petrol
Bic3: Bicone 3 mm /25 Stück / SWAROVSKI Elements Jet 2 x AB
Roc11: 11er Rocailles / ca. 1 g / Toho PF 596f
Roc15: 15er Rocailles / ca. 1 g / Miyuki 1053
Fireline 0,12 mm (6,8 kg)
Fädelnadel
2 Biegeringe
Verschluss
For a necklace of about 40 cm (16 in) you need the following material. For a longer necklace you need more material.
RP8: round pearl 8 mm / 24 pc. / SWAROVSKI Chrystal Pearl Petrol
PR4: round pearl 4 mm / 72 pc. / SWAROVSKI Chrystal Pearl Petrol
Bic3: Bicone 3 mm / 25 pc. / SWAROVSKI Elements Jet 2 x AB
Roc11: 11/0 seed beads / ca. 1 g / Toho PF 596f
Roc15: 15/0 seed beads / ca. 1 g / Miyuki 1053
Fireline 0,12 mm (6,8 kg)
beading needle
2 jump rings
1 clasp
3
Kett
e - n
eckl
ace
„Tru
e Ro
man
ce“ 2
014
| Cop
yrig
ht U
lrik
e Gü
nthe
r (Pr
etty
Net
t.de)
WICHTIG ! Beim gesamten Projekt ist es eine feste Fadenspannung sehr wichtig.
IMPORTANT! You need a very tight tread within the whole project.
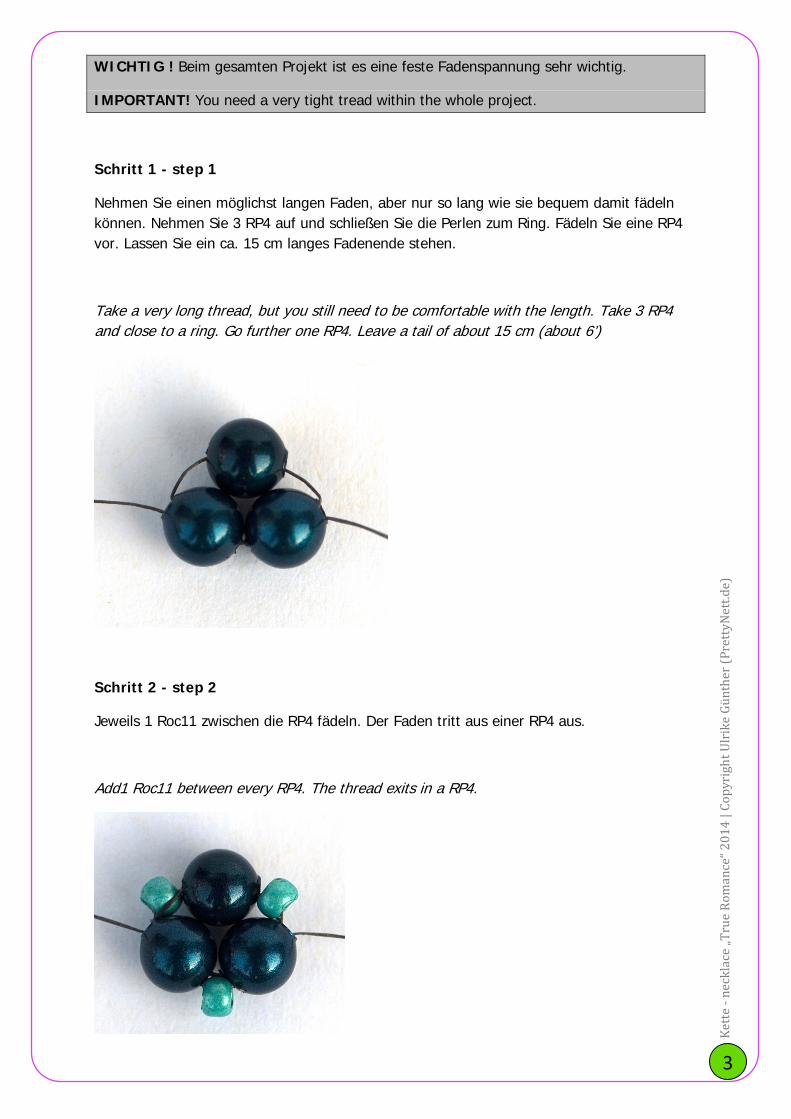
Schritt 1 - step 1
Nehmen Sie einen möglichst langen Faden, aber nur so lang wie sie bequem damit fädeln können. Nehmen Sie 3 RP4 auf und schließen Sie die Perlen zum Ring. Fädeln Sie eine RP4 vor. Lassen Sie ein ca. 15 cm langes Fadenende stehen.
Take a very long thread, but you still need to be comfortable with the length. Take 3 RP4 and close to a ring. Go further one RP4. Leave a tail of about 15 cm (about 6’)
Schritt 2 - step 2
Jeweils 1 Roc11 zwischen die RP4 fädeln. Der Faden tritt aus einer RP4 aus.
Add1 Roc11 between every RP4. The thread exits in a RP4.
4
Kett
e - n
eckl
ace
„Tru
e Ro
man
ce“ 2
014
| Cop
yrig
ht U
lrik
e Gü
nthe
r (Pr
etty
Net
t.de)
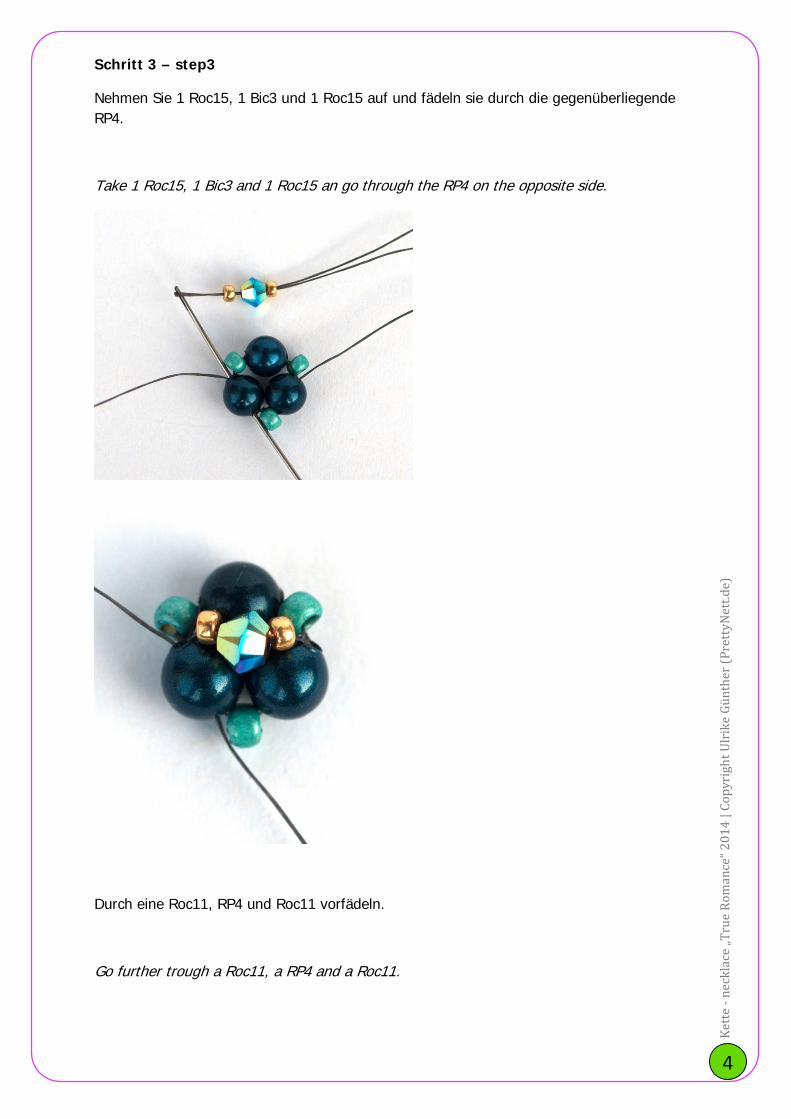
Schritt 3 – step3
Nehmen Sie 1 Roc15, 1 Bic3 und 1 Roc15 auf und fädeln sie durch die gegenüberliegende RP4.
Take 1 Roc15, 1 Bic3 and 1 Roc15 an go through the RP4 on the opposite side.
Durch eine Roc11, RP4 und Roc11 vorfädeln.
Go further trough a Roc11, a RP4 and a Roc11.
5
Kett
e - n
eckl
ace
„Tru
e Ro
man
ce“ 2
014
| Cop
yrig
ht U
lrik
e Gü
nthe
r (Pr
etty
Net
t.de)
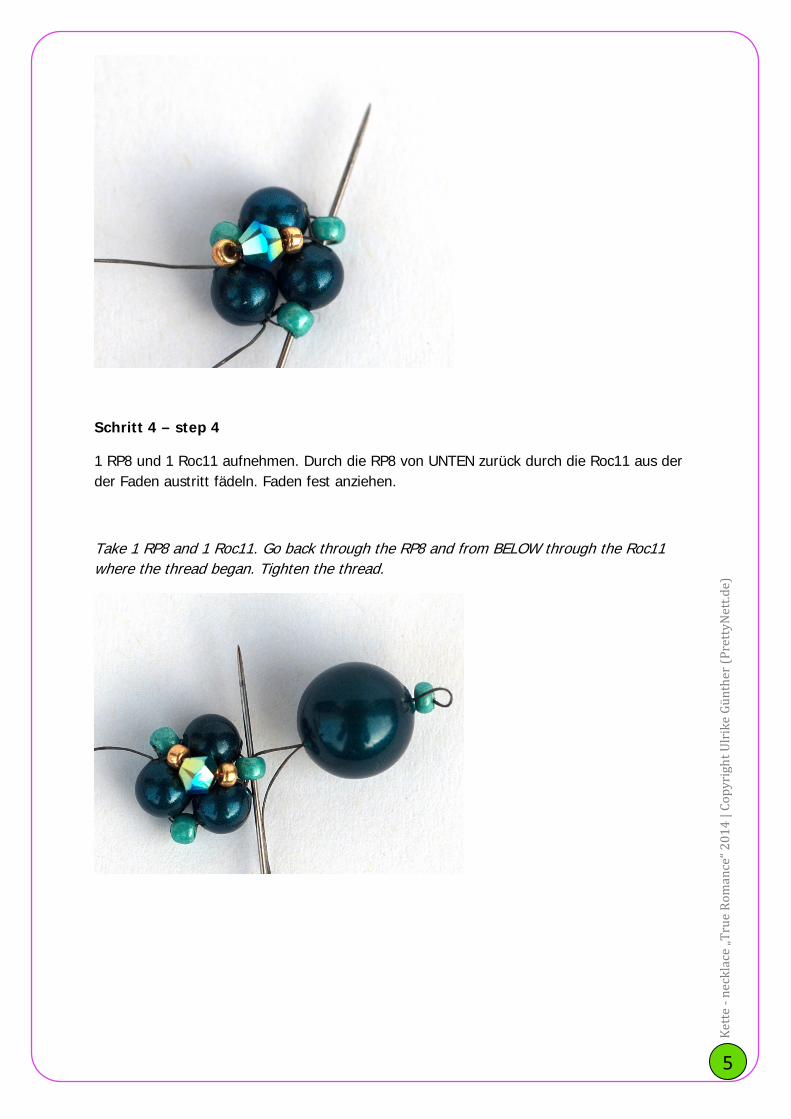
Schritt 4 – step 4
1 RP8 und 1 Roc11 aufnehmen. Durch die RP8 von UNTEN zurück durch die Roc11 aus der der Faden austritt fädeln. Faden fest anziehen.
Take 1 RP8 and 1 Roc11. Go back through the RP8 and from BELOW through the Roc11 where the thread began. Tighten the thread.
6
Kett
e - n
eckl
ace
„Tru
e Ro
man
ce“ 2
014
| Cop
yrig
ht U
lrik
e Gü
nthe
r (Pr
etty
Net
t.de)
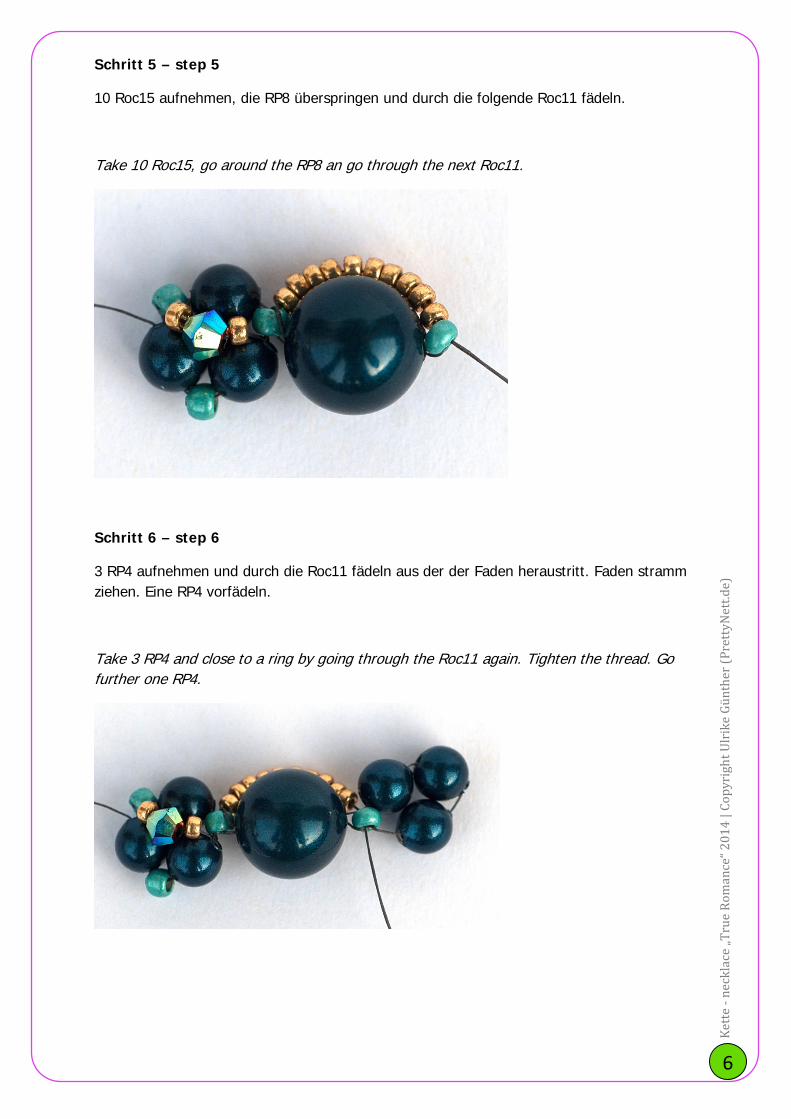
Schritt 5 – step 5
10 Roc15 aufnehmen, die RP8 überspringen und durch die folgende Roc11 fädeln.
Take 10 Roc15, go around the RP8 an go through the next Roc11.
Schritt 6 – step 6
3 RP4 aufnehmen und durch die Roc11 fädeln aus der der Faden heraustritt. Faden stramm ziehen. Eine RP4 vorfädeln.
Take 3 RP4 and close to a ring by going through the Roc11 again. Tighten the thread. Go further one RP4.
7
Kett
e - n
eckl
ace
„Tru
e Ro
man
ce“ 2
014
| Cop
yrig
ht U
lrik
e Gü
nthe
r (Pr
etty
Net
t.de)
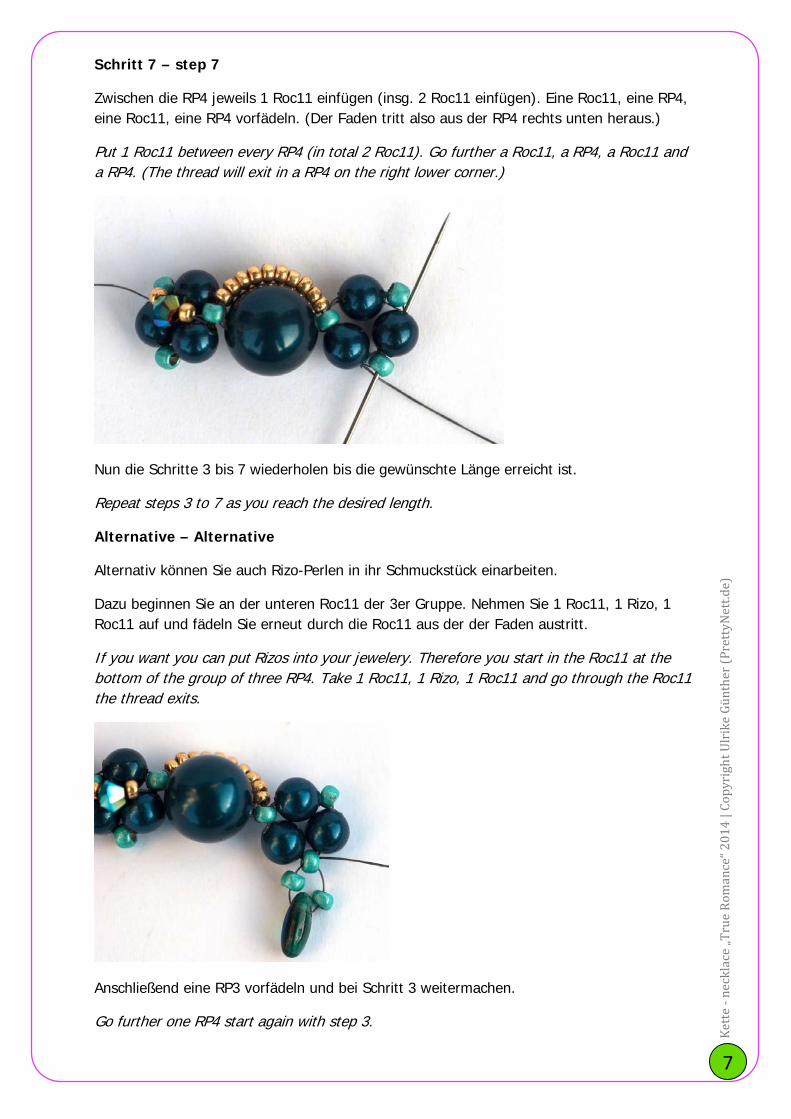
Schritt 7 – step 7
Zwischen die RP4 jeweils 1 Roc11 einfügen (insg. 2 Roc11 einfügen). Eine Roc11, eine RP4, eine Roc11, eine RP4 vorfädeln. (Der Faden tritt also aus der RP4 rechts unten heraus.)
Put 1 Roc11 between every RP4 (in total 2 Roc11). Go further a Roc11, a RP4, a Roc11 and a RP4. (The thread will exit in a RP4 on the right lower corner.)
Nun die Schritte 3 bis 7 wiederholen bis die gewünschte Länge erreicht ist.
Repeat steps 3 to 7 as you reach the desired length.
Alternative – Alternative
Alternativ können Sie auch Rizo-Perlen in ihr Schmuckstück einarbeiten.
Dazu beginnen Sie an der unteren Roc11 der 3er Gruppe. Nehmen Sie 1 Roc11, 1 Rizo, 1 Roc11 auf und fädeln Sie erneut durch die Roc11 aus der der Faden austritt.
If you want you can put Rizos into your jewelery. Therefore you start in the Roc11 at the bottom of the group of three RP4. Take 1 Roc11, 1 Rizo, 1 Roc11 and go through the Roc11 the thread exits.
Anschließend eine RP3 vorfädeln und bei Schritt 3 weitermachen.
Go further one RP4 start again with step 3.

8
Kett
e - n
eckl
ace
„Tru
e Ro
man
ce“ 2
014
| Cop
yrig
ht U
lrik
e Gü
nthe
r (Pr
etty
Net
t.de)
Verschlusselement - Clasp Element
Der Faden tritt aus einer Roc11 oben rechts innerhalb der 3er Gruppe aus.
Nehmen Sie 5 Roc11 auf und fädeln durch die Roc11, aus der der Faden austrat. Erneut durch alle Perlen dieser Runde fädeln. Eine Roc11 vorfädeln.
Take 5 Roc11 and go through the Roc11 the thread just exited from. Go through all beads of this step again. Go further one Roc11.
1 Roc15 aufnehmen und in die nächste Roc11 fädeln. Noch insgesamt 3 x eine Roc15 aufnehmen (Insgesamt 4 Roc15 im Kreis). Faden vernähen und abschneiden. Evtl. noch andere Fäden vernähen und abschneiden. Einen Biegering in den entstandenen Perlenring einfügen und Verschluss befestigen.
Auf der anderen Seite erneut ein entsprechendes Verschlusselement fädeln.
Take 1 Roc15 and go through the next Roc11. Repeat this 3 times (you insert 4 Roc15). Knot the thread and cut it. Take a jump ring and a clasp and attach the jump ring to the beaded ring.
Repeat this step on the other side of your bracelet.
9
Kett
e - n
eckl
ace
„Tru
e Ro
man
ce“ 2
014
| Cop
yrig
ht U
lrik
e Gü
nthe
r (Pr
etty
Net
t.de)
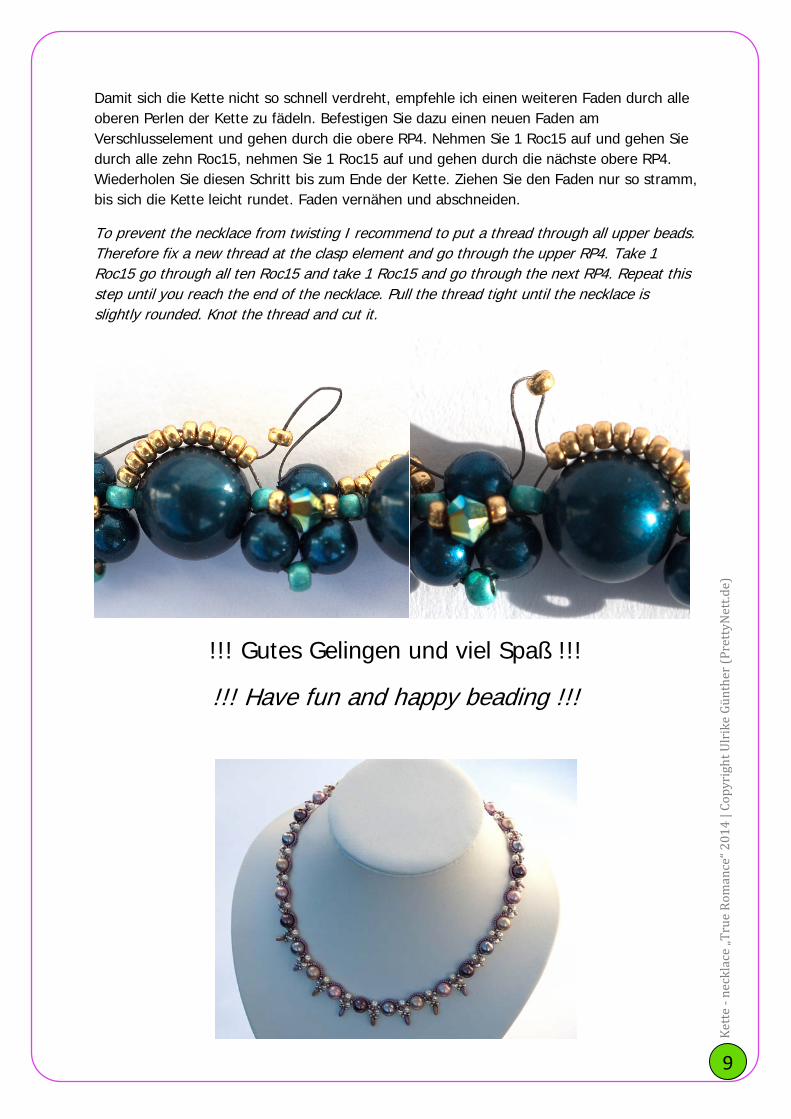
Damit sich die Kette nicht so schnell verdreht, empfehle ich einen weiteren Faden durch alle oberen Perlen der Kette zu fädeln. Befestigen Sie dazu einen neuen Faden am Verschlusselement und gehen durch die obere RP4. Nehmen Sie 1 Roc15 auf und gehen Sie durch alle zehn Roc15, nehmen Sie 1 Roc15 auf und gehen durch die nächste obere RP4. Wiederholen Sie diesen Schritt bis zum Ende der Kette. Ziehen Sie den Faden nur so stramm, bis sich die Kette leicht rundet. Faden vernähen und abschneiden.
To prevent the necklace from twisting I recommend to put a thread through all upper beads. Therefore fix a new thread at the clasp element and go through the upper RP4. Take 1 Roc15 go through all ten Roc15 and take 1 Roc15 and go through the next RP4. Repeat this step until you reach the end of the necklace. Pull the thread tight until the necklace is slightly rounded. Knot the thread and cut it.
!!! Gutes Gelingen und viel Spaß !!!
!!! Have fun and happy beading !!!

10
Kett
e - n
eckl
ace
„Tru
e Ro
man
ce“ 2
014
| Cop
yrig
ht U
lrik
e Gü
nthe
r (Pr
etty
Net
t.de)
Diese Anleitung wurde mit viel Sorgfalt erstellt. Trotzdem kann es sein, dass sich der Fehlerteufel eingeschlichen hat. Falls Ihnen etwas auffallen sollte, kontaktieren Sie mich bitte unter: [email protected]
Dies ist eine freie Anleitung die gerne weitergegeben werden darf.
Nach diesem Muster hergestellte Schmuckstücke dürfen gerne in Kleinauflagen (Massenproduktion ist untersagt) verkauft werden, solange PrettyNett mit Verweis auf die Seite http://www.PrettyNett.de als Designer angegeben wird.
This manual was created with great care. Nevertheless, it may be that the typo has crept. If you should notice something, please contact me at: [email protected]
This is a free tutorial. You are welcome to distribute this tutorial.
You are welcome to sell jewelry made from this pattern in small amounts (mass production is prohibited), as long as you refer to PrettyNett and my homepage http://www.PrettyNett.de as the designer.
If you liked this tutorial see my blog (Prettynett.de) or etsy-shop (https://www.etsy.com/shop/PrettyNett) for more pattern:


![Statistica descrittiva con R - Laboratorio di Statistica ... · voti_sorted >=75 #vettore di TRUE e FALSE ## [1] TRUE TRUE TRUE TRUE TRUE TRUE TRUE TRUE TRUE TRUE TRUE ## [12]](https://img.pdfslide.tips/doc/110x75/5fa7220773f533798518ec4c/statistica-descrittiva-con-r-laboratorio-di-statistica-votisorted-75.jpg)