Embed Size (px)
Citation preview

Using Packet Tracer on a Mac
A guide to installation using Ubuntu and VirtualBox
By Andrew Smith
For the Open University and the
Cisco Academy
Using Packet Tracer on a Mac A guide to installation using Ubuntu and VirtualBox
Version 2.1 [email protected] 2
The Cisco Academy programme in developing the Packet Tracer application had to address impact and utilization in deciding on the operating systems which they could commit in application development. Therefore having a Windows and Linux distribution of the application is to be expected.
Mac users can access the benefits of the Packet Tracer application at no cost when using the Sun Microsystems open source VirtualBox emulator.
Like other counterparts, VirtualBox enables the guest operating system to use the services of a host operating system, with neither operating system being aware of the presence of the other.
It is with this in mind that you could use the Ubuntu Linux distribution with a copy of Packet Tracer installed whilst running on a VirtualBox instance.
You may use other variants of Linux, the Ubuntu operating system which is Debian based has been tested by Cisco Systems and is therefore considered stable (as stable can be with any operating system).
Anyone is welcome to use any of the other commercial and noncommercial operating systems, but it must be with a copy to which you have the appropriate licensed rights to install on your system.
For the many readers who have never as yet completed the installation of a guest operating system on a virtual machine, this guide aims to offer a simple uncomplicated approach.
What do I need?
To get this to work for free, you will need:
• A copy of the latest version of VirtualBox, downloaded from www.virtualbox.org, please ensure that you have the latest stable version for your Mac.
• An ISO image of Ubuntu Desktop, at the time of document release Canonical who support Ubuntu were offering version 8.10, this is likely to have changed. The download is in excess of 600Mb and may take a reasonable time to download depending on your connection speed. This can be found at www.ubuntu.com.
• The current Linux version of Packet Tracer, this can be obtained from the Cisco Academy site at cisco.netacad.net, you will not be able to download this unless you are a registered academy member. Cisco offer two downloads, one with the comprehensive Packet Tracer tutorials and the application only download.
Using Packet Tracer on a Mac A guide to installation using Ubuntu and VirtualBox
Version 2.1 [email protected] 3
How do I …. ?
Whilst the process will take at least an hour, you do not need to sit at your computer whilst the installation process is taking place. A considerable part of this process is automatic and designed to be a user‐friendly process. Each of the steps (five in total) can be completed whilst you are working on other tasks.
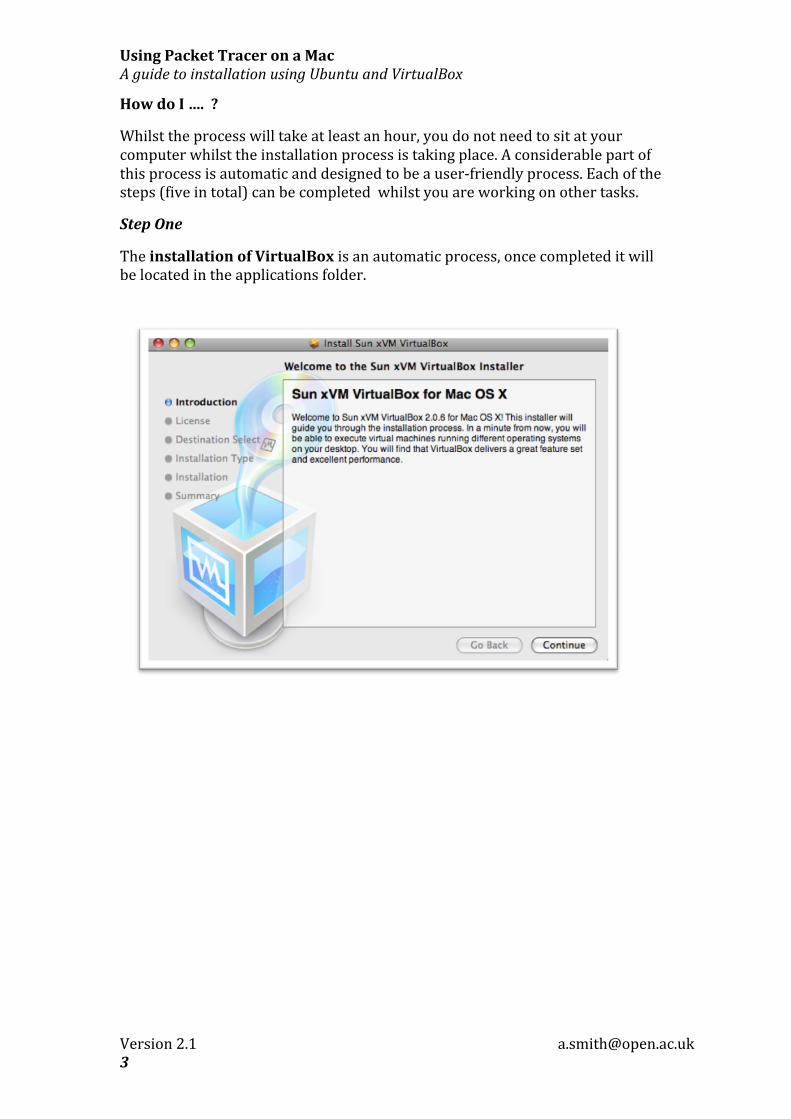
Step One
The installation of VirtualBox is an automatic process, once completed it will be located in the applications folder.
Using Packet Tracer on a Mac A guide to installation using Ubuntu and VirtualBox
Version 2.1 [email protected] 4
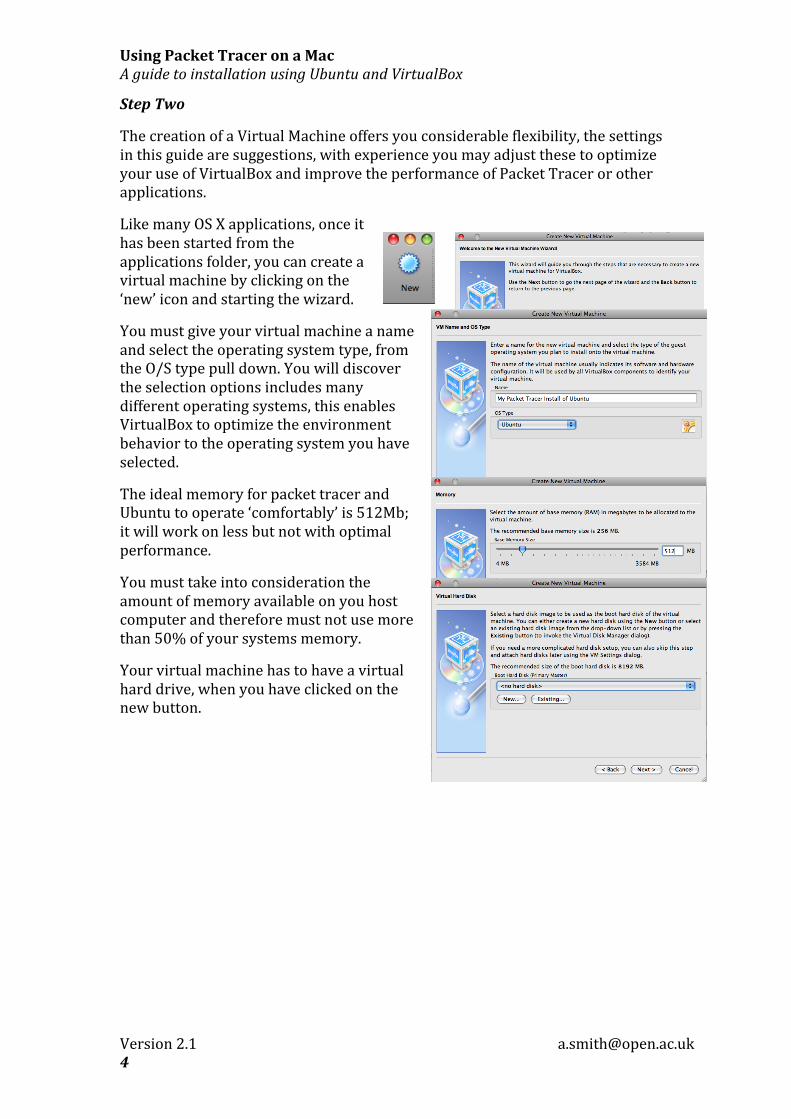
Step Two
The creation of a Virtual Machine offers you considerable flexibility, the settings in this guide are suggestions, with experience you may adjust these to optimize your use of VirtualBox and improve the performance of Packet Tracer or other applications.
Like many OS X applications, once it has been started from the applications folder, you can create a virtual machine by clicking on the ‘new’ icon and starting the wizard.
You must give your virtual machine a name and select the operating system type, from the O/S type pull down. You will discover the selection options includes many different operating systems, this enables VirtualBox to optimize the environment behavior to the operating system you have selected.
The ideal memory for packet tracer and Ubuntu to operate ‘comfortably’ is 512Mb; it will work on less but not with optimal performance.
You must take into consideration the amount of memory available on you host computer and therefore must not use more than 50% of your systems memory.
Your virtual machine has to have a virtual hard drive, when you have clicked on the new button.

Using Packet Tracer on a Mac A guide to installation using Ubuntu and VirtualBox
Version 2.1 [email protected] 5
A new wizard will start to assist in the creation of your virtual disk; your installed copy of Ubuntu and Packet Tracer will eventually reside on this image.
By selecting a dynamically expanding image, your virtual hard drive will only use the space it needs (rather than allocating a large file size and have wasted unused space).
Allocating 4GB ensures that this image will fit on a DVD or most low cost USB sticks.
On completion of the virtual disk wizard, the virtual machine wizard will be ready to create a VDI (virtual disk image) file.
You are now (almost) ready to install Ubuntu, to move to stage three; you will need to start the virtual machine instance (naturally by pressing start).
Using Packet Tracer on a Mac A guide to installation using Ubuntu and VirtualBox
Version 2.1 [email protected] 6
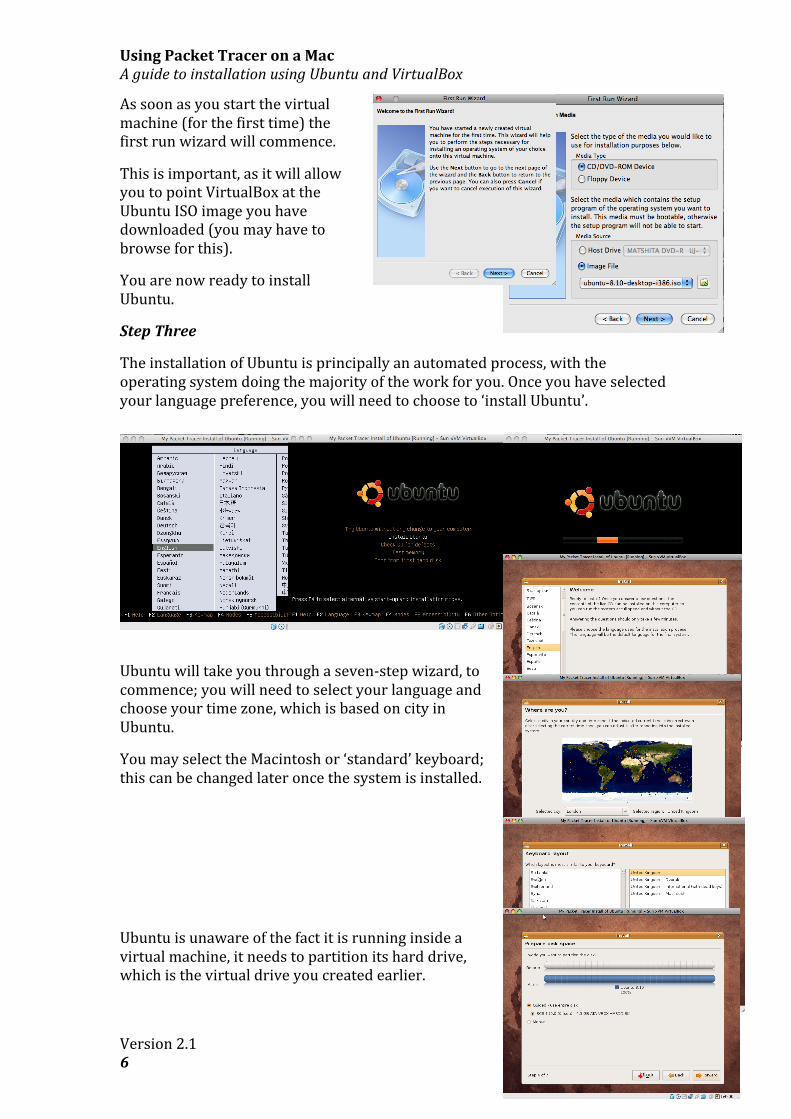
As soon as you start the virtual machine (for the first time) the first run wizard will commence.
This is important, as it will allow you to point VirtualBox at the Ubuntu ISO image you have downloaded (you may have to browse for this).
You are now ready to install Ubuntu.
Step Three
The installation of Ubuntu is principally an automated process, with the operating system doing the majority of the work for you. Once you have selected your language preference, you will need to choose to ‘install Ubuntu’.
Ubuntu will take you through a seven‐step wizard, to commence; you will need to select your language and choose your time zone, which is based on city in Ubuntu.
You may select the Macintosh or ‘standard’ keyboard; this can be changed later once the system is installed.
Ubuntu is unaware of the fact it is running inside a virtual machine, it needs to partition its hard drive, which is the virtual drive you created earlier.

Using Packet Tracer on a Mac A guide to installation using Ubuntu and VirtualBox
Version 2.1 [email protected] 7
The ‘who are you’ section is essential, you must give the Ubuntu image a name, a username, a password and a computer name, these are your choice entirely but YOU MUST ensure that you choose a password which you will easily recall.
As this is running in a virtual machine, it may make life easier if you select the ‘log in automatically’ link.
The final step is confirmation before installation; there is no need to select the advanced tab.
Ubuntu will need to restart, on the restart cycle, for this restart only you will need to hit enter to continue as the virtual machine still believes that the ISO image is in the virtual CD drawer.
Then select ‘English’ followed by ‘boot from first hard disk’.
Using Packet Tracer on a Mac A guide to installation using Ubuntu and VirtualBox
Version 2.1 [email protected] 8
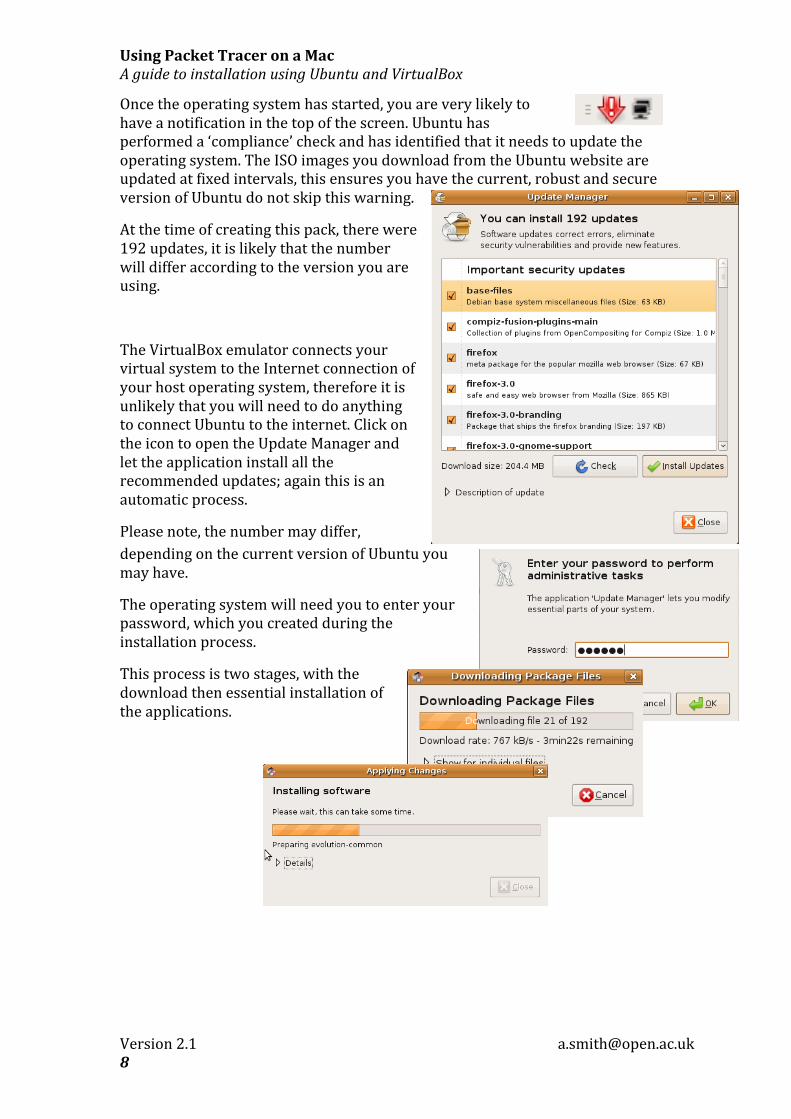
Once the operating system has started, you are very likely to have a notification in the top of the screen. Ubuntu has performed a ‘compliance’ check and has identified that it needs to update the operating system. The ISO images you download from the Ubuntu website are updated at fixed intervals, this ensures you have the current, robust and secure version of Ubuntu do not skip this warning.
At the time of creating this pack, there were 192 updates, it is likely that the number will differ according to the version you are using.
The VirtualBox emulator connects your virtual system to the Internet connection of your host operating system, therefore it is unlikely that you will need to do anything to connect Ubuntu to the internet. Click on the icon to open the Update Manager and let the application install all the recommended updates; again this is an automatic process.
Please note, the number may differ, depending on the current version of Ubuntu you may have.
The operating system will need you to enter your password, which you created during the installation process.
This process is two stages, with the download then essential installation of the applications.
Using Packet Tracer on a Mac A guide to installation using Ubuntu and VirtualBox
Version 2.1 [email protected] 9
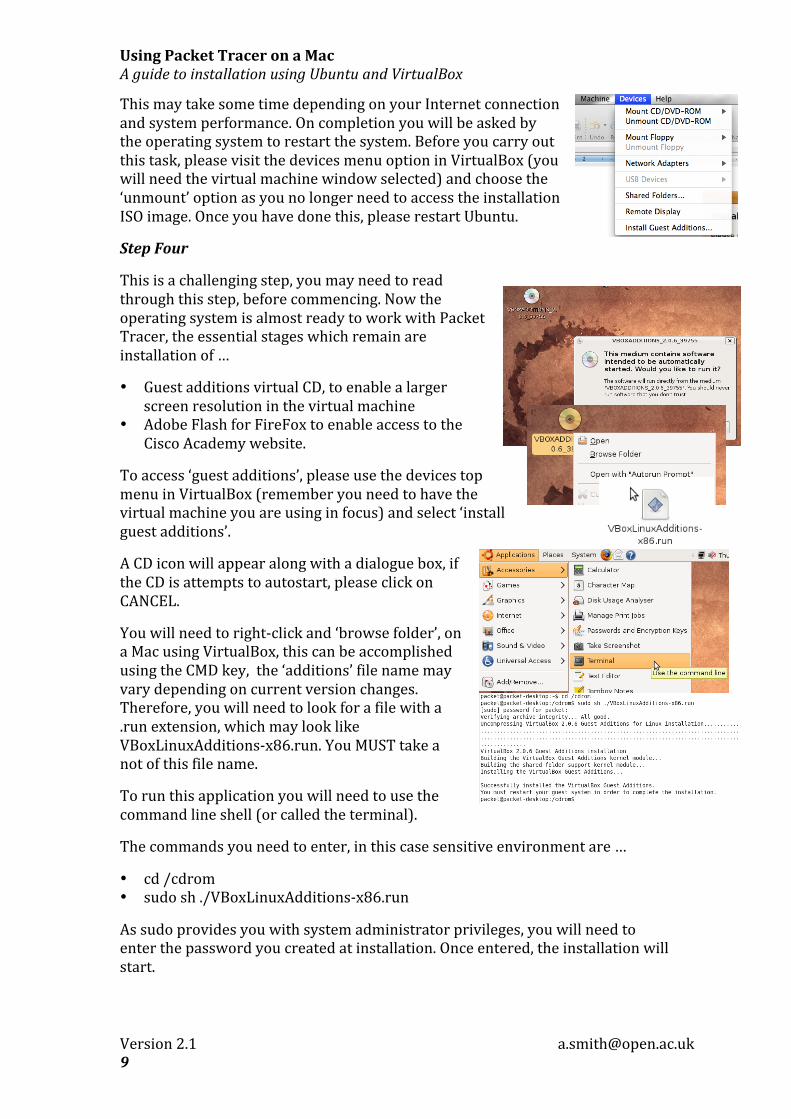
This may take some time depending on your Internet connection and system performance. On completion you will be asked by the operating system to restart the system. Before you carry out this task, please visit the devices menu option in VirtualBox (you will need the virtual machine window selected) and choose the ‘unmount’ option as you no longer need to access the installation ISO image. Once you have done this, please restart Ubuntu.
Step Four
This is a challenging step, you may need to read through this step, before commencing. Now the operating system is almost ready to work with Packet Tracer, the essential stages which remain are installation of …
• Guest additions virtual CD, to enable a larger screen resolution in the virtual machine
• Adobe Flash for FireFox to enable access to the Cisco Academy website.
To access ‘guest additions’, please use the devices top menu in VirtualBox (remember you need to have the virtual machine you are using in focus) and select ‘install guest additions’.
A CD icon will appear along with a dialogue box, if the CD is attempts to autostart, please click on CANCEL.
You will need to right‐click and ‘browse folder’, on a Mac using VirtualBox, this can be accomplished using the CMD key, the ‘additions’ file name may vary depending on current version changes. Therefore, you will need to look for a file with a .run extension, which may look like VBoxLinuxAdditions‐x86.run. You MUST take a not of this file name.
To run this application you will need to use the command line shell (or called the terminal).
The commands you need to enter, in this case sensitive environment are …
• cd /cdrom • sudo sh ./VBoxLinuxAdditions‐x86.run
As sudo provides you with system administrator privileges, you will need to enter the password you created at installation. Once entered, the installation will start.
Using Packet Tracer on a Mac A guide to installation using Ubuntu and VirtualBox
Version 2.1 [email protected] 10
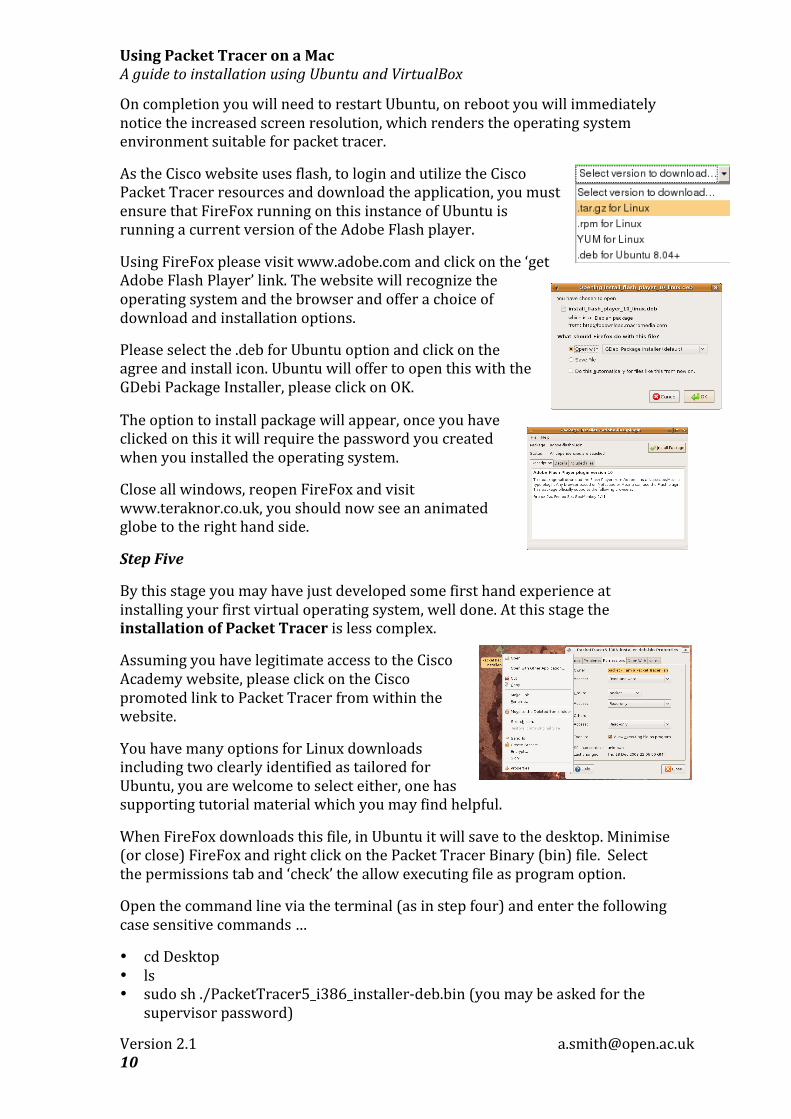
On completion you will need to restart Ubuntu, on reboot you will immediately notice the increased screen resolution, which renders the operating system environment suitable for packet tracer.
As the Cisco website uses flash, to login and utilize the Cisco Packet Tracer resources and download the application, you must ensure that FireFox running on this instance of Ubuntu is running a current version of the Adobe Flash player.
Using FireFox please visit www.adobe.com and click on the ‘get Adobe Flash Player’ link. The website will recognize the operating system and the browser and offer a choice of download and installation options.
Please select the .deb for Ubuntu option and click on the agree and install icon. Ubuntu will offer to open this with the GDebi Package Installer, please click on OK.
The option to install package will appear, once you have clicked on this it will require the password you created when you installed the operating system.
Close all windows, reopen FireFox and visit www.teraknor.co.uk, you should now see an animated globe to the right hand side.
Step Five
By this stage you may have just developed some first hand experience at installing your first virtual operating system, well done. At this stage the installation of Packet Tracer is less complex.
Assuming you have legitimate access to the Cisco Academy website, please click on the Cisco promoted link to Packet Tracer from within the website.
You have many options for Linux downloads including two clearly identified as tailored for Ubuntu, you are welcome to select either, one has supporting tutorial material which you may find helpful.
When FireFox downloads this file, in Ubuntu it will save to the desktop. Minimise (or close) FireFox and right click on the Packet Tracer Binary (bin) file. Select the permissions tab and ‘check’ the allow executing file as program option.
Open the command line via the terminal (as in step four) and enter the following case sensitive commands …
• cd Desktop • ls • sudo sh ./PacketTracer5_i386_installer‐deb.bin (you may be asked for the
supervisor password)

Using Packet Tracer on a Mac A guide to installation using Ubuntu and VirtualBox
Version 2.1 [email protected] 11
If the version of Packet Tracer changes, it is likely that the file name will also change. The ls command enables you to see what the current file name is. Once you have entered the supervisor password you will have to read the End User Licence Agreement and confirm by entering Y at the end (to move through the agreement use the space bar).
On installation, you will find the Packet Tracer launch icon in the Internet folder on the uppermost menu bar. From which you can now launch the packet tracer application.
Using Packet Tracer on a Mac A guide to installation using Ubuntu and VirtualBox
Version 2.1 [email protected] 12
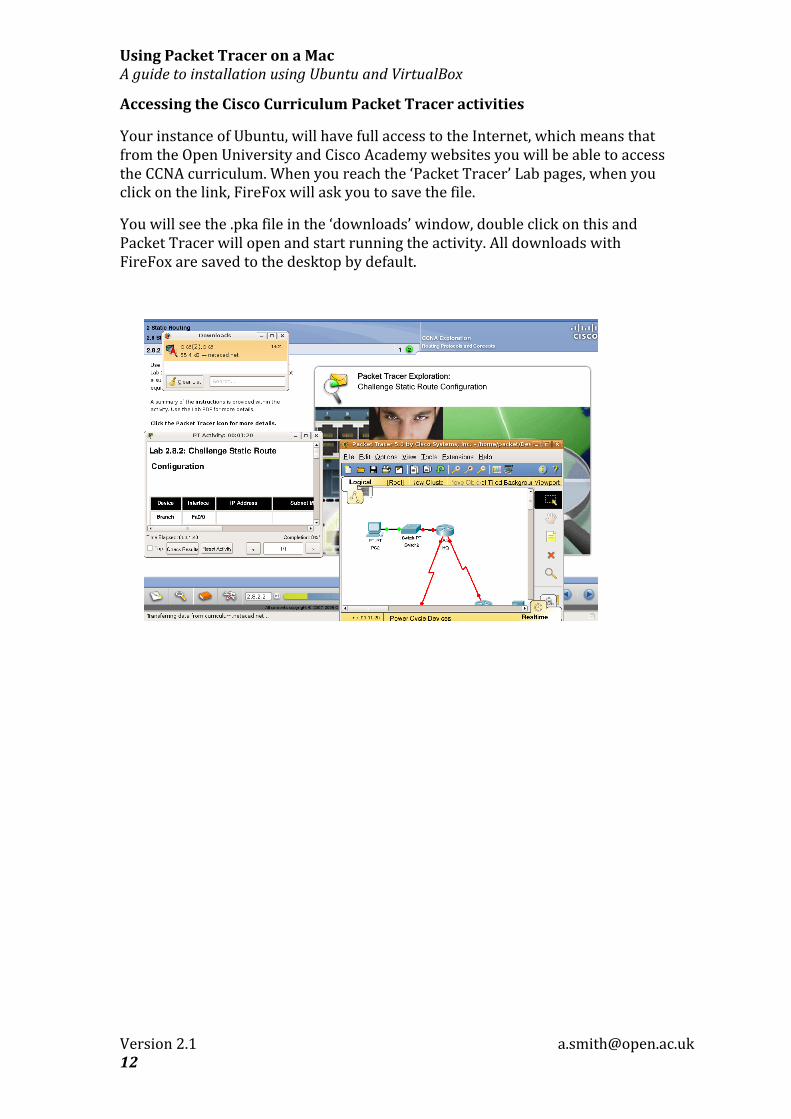
Accessing the Cisco Curriculum Packet Tracer activities
Your instance of Ubuntu, will have full access to the Internet, which means that from the Open University and Cisco Academy websites you will be able to access the CCNA curriculum. When you reach the ‘Packet Tracer’ Lab pages, when you click on the link, FireFox will ask you to save the file.
You will see the .pka file in the ‘downloads’ window, double click on this and Packet Tracer will open and start running the activity. All downloads with FireFox are saved to the desktop by default.

Using Packet Tracer on a Mac A guide to installation using Ubuntu and VirtualBox
Version 2.1 [email protected] 13
File Sharing Between Ubuntu and Mac
On virtual machines such as Virtual Box, file shares are treated as ‘network shares’ where the connection from the ‘machine’ to the ‘host operating system’ is managed via the ‘hypervisor’ a layer of emulation (like simulation, but for real instead of pretence).
As this pack is intended for beginners, the sharing and mounting process for a Linux system is potentially too complex (we are very sure some readers will declare this is easy and others disagree).
Therefore the easiest method of file transfer is to send files via a webmail system such as Gmail or Google Documents.
And is there anything else
Once installed, the files created on this instance of Packet Tracer will work on any system using Linux or Windows.
The multiuser feature can be configured to pass through the host operating system and out to other devices on your network or the Internet. For information on the Packet Tracer multiuser tool, please refer to the Cisco Academy and Cisco Learning Institute material on this resource.
And to help us
This material is an open resource for the students of the Open University in the UK and students worldwide who are part of the greater Cisco Academy community. If there are any errata or changes, which occur in the applications or operating system, please feel welcome to share these.