Embed Size (px)
Citation preview

VDPC145 192-CHANNEL DMX CONTROLLER 192-KANAALS DMX LICHTSTURING RÉGIE DE LUMIÈRE DMX 192 CANAUX CONTROLADOR DMX DE 192 CANALES 192-KANAL-DMX-STEUERGERÄT 192-CIO KANAŁOWY STEROWNIK DMX
USER MANUAL GEBRUIKERSHANDLEIDING NOTICE D’EMPLOI MANUAL DEL USUARIO BEDIENUNGSANLEITUNG INSTRUKCJA OBSŁUGI

VDPC145_v2 VELLEMAN 2
VDPC145 – 192-CHANNEL DMX CONTROLLER 1. Introduction & Features To all residents of the European Union Important environmental information about this product
This symbol on the device or the package indicates that disposal of the device after its lifecycle could harm the environment. Do not dispose of the unit (or batteries) as unsorted municipal waste; it should be taken to a specialized company for recycling.
This device should be returned to your distributor or to a local recycling service. Respect the local environmental rules. If in doubt, contact your local waste disposal authorities. Thank you for buying the VDPC145! Please read the manual carefully before bringing this device into service. This is a 192-channel DMX controller, capable of controlling 12 devices with up to 16 channels. The device features 30 banks of 8 scenes each, 6 chases for scene programming and a 4-digit LED display. Check carefully for damage caused by transportation. Consult your dealer and don’t install this device if it has been damaged in transit. 2. Safety Instructions
• A qualified technician should install and service this device. • Damage caused by disregarding certain guidelines in this manual is not covered by the warranty and the dealer
will not accept responsibility for the ensuing defects or problems. • Do not switch the device on immediately if it has been exposed to changes in temperature. Protect the device
against damage by leaving it switched off until it has reached room temperature. • Make sure that the available voltage does not exceed the voltage stated in the specifications of this manual. • Do not crimp the power cord and protect it against damage from sharp edges. Ask an authorised dealer to replace
the cord if necessary. • Always disconnect the device from the mains when it is not in use or when you wish to clean it. Only handle the
power cord by the plug. Never pull out the plug by tugging the power cord. • Note that damage caused by user modifications to the device are not covered by the warranty. Keep the device
away from children and unauthorised users. 3. General Guidelines • This device is a lighting controller for professional use on stage, in discos, theatres, etc. The VDPC145 should
only be used indoors with the included adapter working on an alternating current of max. 230VAC / 50Hz. • Do not shake the device. Avoid brute force when installing or operating the device. • Select a location where the device will be protected against extreme heat, moisture and dust. • Do not use or transport the device under temperatures < 5°C or > 35°C. • Familiarise yourself with the functions of the device before actually using it. Do not permit operation by unqualified
people. Any damage that may occur will probably be due to unprofessional use of the device. • Use the original packaging if the device is to be transported. • Note that all modifications of the device are forbidden for safety reasons. • Do not remove the serial number sticker from the device as doing so will void the warranty. Only use the device
for its intended purpose. All other uses may cause short circuits, burns, electroshocks, lamp explosions, crashes, etc. Using the device in an unauthorised way will void the warranty.
Be very careful during the installation: touching live wires can cause life-threatening electroshocks.
Keep this device away from rain and moisture.
Unplug the mains lead before opening the housing.

VDPC145_v2 VELLEMAN 3
4. Description
a) Front Panel
1. Scanner Buttons
SCANNERS CHANNEL 1 1-16 2 17-32 3 33-48 4 49-64 5 65-80 6 81-96 7 97-112 8 113-128 9 129-144
10 145-160 11 161-176 12 177-192
Press the button to activate the selected scanner (LED is lit). All appropriate channels are ready for use and can be adjusted.
2. Scene Buttons (1 – 8) Press a button to run or store a scene. The second digit of the LED display shows scenes 1-8.
3. Faders (1 – 8) Use the faders to adjust the output level of a DMX channel from 0 to 255. The value will appear on the
LCD display.
4. Page Select Press this button to switch between page A (the first 8 channels) and page B (the next 8 channels) of
a device.
5. Speed Slider Adjust the chase speed with this slider (0.1 sec. – 10 min.)
6. Fade Time Slider Adjust the fade time with this slider (0 – 30 sec.)
Fig. 1

VDPC145_v2 VELLEMAN 4
7. LED Display Displays all necessary information
8. Bank Buttons Press ▲ or ▼ to select a bank. The third and fourth digit on the LED display make up the bank
number (01 – 30).
9. Chase (1 – 6) Press a button to run or store a chase. The first digit on the LED display is the chase number (1 – 6).
10. Program The device is in MANUAL RUN mode when you turn it on. Hold the PROGRAM button for 2 seconds.
The LED flashes and SCENE and CHASE are ready to be programmed. Hold PROGRAM for 2 seconds again to activate the BLACKOUT mode. The PROGRAM LED extinguishes and the BLACKOUT indication is lit. Press the BLACKOUT button to return to the MANUAL RUN mode. The blackout LED goes out.
11. MIDI / ADD
MIDI : Hold the MIDI button for two seconds when the device is in RUN mode. The third and fourth digit of the LED display start to flash. Select a MIDI channel with ▲ or ▼. Press any button other than ▲ or ▼ to end the MIDI channel setting.
ADD : Push this button to add lines in a program while the device is in the programming mode.
12. AUTO / DEL AUTO : Press this button while the device is in the RUN mode. The AUTO TRIGGER LED is lit,
indicating that the AUTO RUN mode has been activated. Press the AUTO button again to deactivate the auto run mode.
DEL : Push this button to delete a scene or a chase while in the programming mode.
13. MUSIC / BANK COPY MUSIC : Push this button while in the device is in RUN mode. The MUSIC mode is now
activated and the MUSIC TRIGGER LED is lit. Press this button again to deactivate the MUSIC mode.
BANK COPY : Press this button to copy a bank when the device is in the programming mode.
14. TAP SYNC / DISPLAY TAP SYNC : When the device is in the AUTO RUN mode, the running speed depends on the
duration of the interval between the last two times you pressed the TAP SYNC/DISPLAY button.
DISPLAY : Press this button to choose between 00-255 or 0%-100% display for the faders.
15. BLACKOUT Press this button to set the output of all channels to 0%. This does NOT affect the other functions of
the device. Press this button again to deactivate the blackout mode.
b) Back Panel
16. MIDI IN 17. DMX POLARITY SELECT 18. DMX OUT (3-pole XLR) 19. DC input (9-12V, 300mA)
Fig. 2

VDPC145_v2 VELLEMAN 5
c) Connections The manufacturer is not responsible for damage caused by improper connections. Connect the supplied adapter with the DC jack and connect the other end with a mains outlet. The device has a built-in microphone for sound control. Use the MIDI input if you want sound control by an external source. 5. Operating Instructions Programming Scenes Hold the PROGRAM button for 2 seconds to activate the PROGRAM mode. The PROGRAM LED will flash.
a) Scene Programming 1. Press the desired SCANNER button to select a device 2. It is possible to select several devices and control them simultaneously. 3. Adjust the appropriate faders to the desired output level. 4. Press the MIDI/ADD button 5. Select the desired bank with ▲ or ▼. 6. Press a SCENE button to store this scene in the selected bank.
b) Scene Editing 1. Select the desired scene of a bank by pressing the corresponding SCENE button. 2. Adjust the faders 3. Press the MIDI/ADD button 4. Press SCENE again to store the new settings
c) Copying a Scanner 1. Hold the button for the currently selected scanner 2. Press the button for the scanner you want to copy the settings of the first scanner to. 3. Release both buttons.
d) Copying a Scene 1. Press the SCENE button for the scene you wish to copy 2. Press the MIDI/ADD button. 3. Select a bank with ▲ or ▼ and press the button for the scene you want to copy the settings of the first scene to.
e) Deleting a Scene 1. Select the desired scene by pressing the corresponding scene button. 2. Press the button for the scene to be deleted while holding the AUTO/DEL button.
f) Clearing all scenes 1. Press PROGRAM and ▼ while deactivating the device. 2. Turn the device back on.

VDPC145_v2 VELLEMAN 6
g) Copying a Bank 1. Select the desired bank. 2. Press the MIDI/ADD button. 3. Select the bank you wish to copy with ▲ or ▼. 4. Press the MUSIC/BANKCOPY button.
h) Deleting a Bank 1. Select the bank to be deleted. 2. Press AUTO/DEL and MUSIC/BANKCOPY buttons simultaneously. Programming Chases Hold the PROGRAM button for 2 seconds to activate the programming mode. The programming LED will start to flash. One chase can contain up to 240 scenes and the scenes are run in the programmed order. The first scenes to be run will be the first that were programmed. a) Programming a Chase 1. Select a chase containing programmed scenes by pressing the appropriate CHASE button. 2. Select a scene from a bank with ▲ or ▼ and press the corresponding SCENE button. 3. Press the MIDI/ADD button. b) Copying all Scenes from a Bank to a Chase 1. Select the desired bank with ▲ or ▼. 2. Press the MUSIC/BANKCOPY button. 3. Press the MIDI/ADD button. c) Adding a Step to a Chase Example : inserting a scene as step 10 in an existing 15-step chase. 1. Press TAPSYNC/DISPLAY to display the CHASE and its STEP on the LCD. 2. Select STEP 9 with ▲ or ▼. 3. Press MIDI/ADD, making the step turn to 10. 4. Select a scene from the bank with ▲ or ▼ and then press the corresponding SCENE button. 5. Press MIDI/REC to add the new scene to the newly inserted step. The previous step 10 becomes step 11, etc.. d) Deleting a Step from a Chase Example : deleting step 10. 1. Press TAPSYNC/DISPLAY to display the CHASE and its STEP on the LCD. 2. Select step 10 with ▲ or ▼. 3. Press AUTO/DEL : step 11 becomes step 10, step 12 becomes step 11, etc. e) Deleting a Chase 1. Select the desired chase with the CHASE button. 2. Press AUTO/DEL while holding that CHASE button.

VDPC145_v2 VELLEMAN 7
f) Clearing all Chases 1. Press ▼ and AUTO/DEL simultaneously while deactivating the device. 2. Turn the device back on. Running Scenes The device is in RUN mode when it is turned on. Hold the PROGRAM button for 2 seconds to enter the PROGRAM mode. Subsequently, the device automatically switches to the BLACKOUT mode. Press the BLACKOUT button to enter the RUN mode. Only those scenes programmed into a bank can be run. a) Manual Run 1. Make sure AUTO TRIGGER and MUSIC TRIGGER are off. 2. Select a bank with ▲ or ▼ or through MIDI signals. 3. Press the desired SCENE button. b) Auto Run 1. Press AUTO/DEL. The AUTO TRIGGER LED comes on. 2. Press TAPSYNC/DISPLAY. Press it again after an interval of your choice. The interval between the two presses
is the assigned speed of AUTO RUN (max. 10 min.). If you press more than twice, only the last two presses are taken into account.
3. Select a bank with ▲ or ▼ or through MIDI signals. 4. Press AUTO/DEL again to leave the AUTO RUN mode. c) Music Run 1. Press MUSIC/BANKCOPY. The MUSIC TRIGGER LED is lit. 2. Select a bank with ▲ or ▼ or through MIDI signals. 3. Press MUSIC/BANKCOPY again to leave the MUSIC RUN mode. d) Midi Run The scenes from a bank are selected through the MIDI input whenever the device is in the MANUAL RUN, AUTO RUN or MUSIC RUN mode. e) Chase Run To use a chase run you have to make programmes first. A chase run can be activated via the MANUAL RUN, AUTO RUN, MUSIC RUN and MIDI RUN modes. Select the desired chase with the CHASE button. The selected chase is displayed on the LCD. f) Fade Time Control Adjust the fade time with the slider.

VDPC145_v2 VELLEMAN 8
MIDI Channel Settings The correct bank is selected by means of the NOTE ON signal coming from the MIDI device e.g. a keyboard.
BANK NOTE NUMBER FUNCTION
BANK 1
00 Turn on/off SCENE 1 01 Turn on/off SCENE 2 02 Turn on/off SCENE 3 03 Turn on/off SCENE 4 04 Turn on/off SCENE 5 05 Turn on/off SCENE 6 06 Turn on/off SCENE 7 07 Turn on/off SCENE 8
BANK 2
08 Turn on/off SCENE 1 09 Turn on/off SCENE 2 10 Turn on/off SCENE 3 “ “
BANK 15
112 Turn on/off SCENE 1 113 Turn on/off SCENE 2 114 Turn on/off SCENE 3 115 Turn on/off SCENE 4 116 Turn on/off SCENE 5 117 Turn on/off SCENE 6 118 Turn on/off SCENE 7 119 Turn on/off SCENE 8
CHASE
120 Turn on/off SCENE 1 121 Turn on/off SCENE 2 122 Turn on/off SCENE 3 123 Turn on/off SCENE 4 124 Turn on/off SCENE 5 125 Turn on/off SCENE 6
126 BLACKOUT 6. Cleaning and Maintenance 1. All screws for installing the devices or parts of the device have to be screwed down tight and must not be
corroded. 2. The housing, mounting supports and connections should not be modified or tampered with e.g. do not drill extra
holes in mounting supports, do not change the location of the connections, etc. 3. The electric power supply cables must be undamaged. Have the device installed by a qualified technician. 4. Disconnect the device from the mains prior to maintenance activities. 5. Wipe the device regularly with a moist cloth. Do not use alcohol or solvents. 6. Entrust a qualified technician with the maintenance of this device. Contact your dealer for spare parts if
necessary. 7. Technical Specifications Power Supply AC/DC adapter 9-12Vdc/300mA (supplied) Number of DMX Channels 192 Max. Cable Length 100m Music Control via built-in microphone or MIDI interface Dimensions 482 x 132 x 73mm Weight 2.5kg The information in this manual is subject to change without prior notice.

VDPC145_v2 VELLEMAN 9
VDPC145 – 192-KANAALS DMX CONTROLLER 1. Inleiding & Kenmerken Aan alle ingezetenen van de Europese Unie Belangrijke milieu-informatie betreffende dit product
Dit symbool op het toestel of de verpakking geeft aan dat, als het na zijn levenscyclus wordt weggeworpen, dit toestel schade kan toebrengen aan het milieu. Gooi dit toestel (en eventuele batterijen) niet bij het gewone huishoudelijke afval; het moet bij een gespecialiseerd bedrijf terechtkomen voor recyclage.
U moet dit toestel naar uw verdeler of naar een lokaal recyclagepunt brengen. Respecteer de plaatselijke milieuwetgeving. Hebt u vragen, contacteer dan de plaatselijke autoriteiten inzake verwijdering. Dank u voor uw aankoop! Lees de handleiding voor u het toestel in gebruik neemt. Dit is een 192-kanaals DMX controller waarmee u 12 toestellen met elk 16 kanalen kunt aansturen. Het toestel beschikt over 30 geheugenbanken van 8 scènes elk, 6 chases voor de programmering van scènes en een 4-digits LED display. Ga na of het toestel werd beschadigd tijdens het transport. Zo ja, stel dan de installatie van het toestel uit en raadpleeg uw dealer. 2. Veiligheidsinstructies
• Laat dit toestel installeren en onderhouden door een geschoold technicus. • De garantie geldt niet voor schade die werd veroorzaakt door het negeren van bepaalde richtlijnen in deze
handleiding en uw dealer zal de verantwoordelijkheid afwijzen voor defecten of problemen die hier rechtstreeks verband mee houden.
• Om beschadiging te vermijden, mag u het toestel niet onmiddellijk inschakelen indien het werd blootgesteld aan temperatuurschommelingen. Wacht tot het toestel kamertemperatuur heeft bereikt.
• De beschikbare netspanning mag niet hoger zijn dan de spanning die wordt vermeld in de specificaties achteraan de handleiding.
• De voedingskabel mag niet worden gekrimpt of beschadigd door scherpe voorwerpen. Zo ja, laat uw dealer dan een nieuwe voedingskabel aanbrengen.
• Ontkoppel het toestel voor u het reinigt en wanneer het niet in gebruik is. Raak de voedingskabel enkel aan via de plug en trek nooit aan de voedingskabel om de plug los te koppelen.
• Schade veroorzaakt door wijzigingen die de klant heeft aangebracht aan het toestel vallen niet onder de garantie. Houd dit toestel uit de buurt van kinderen en onbevoegden.
3. Algemene richtlijnen • Dit toestel is een dimmerpack voor professioneel podiumgebruik in disco's, theaters, enz. U mag dit toestel enkel
binnenshuis gebruiken met een AC stroom van max. 230VAC / 50Hz. • Schud het toestel niet dooreen. Vermijd brute kracht tijdens de installatie en de bediening van dit toestel. • Bij de keuze van de installatieplaats moet u nagaan of het toestel niet wordt gehinderd door stof, extreme
temperaturen en vochtigheid. • U mag het toestel nooit vervoeren of gebruiken bij een temperatuur van < 5 en > dan 35°C. • Maak u eerst vertrouwd met de werking van dit toestel. Ongeschoolde personen mogen dit toestel niet gebruiken.
Meestal is beschadiging het gevolg van onprofessioneel gebruik.
Wees voorzichtig bij de installatie: raak geen kabels aan die onder stroom staan om dodelijke elektroshocks te vermijden. Bescherm dit toestel tegen regen en vochtigheid.
Verzeker u ervan dat het toestel niet aangesloten is op een stroombron alvorens het te openen.
VDPC145_v2 VELLEMAN 10
• Gebruik de oorspronkelijke verpakking wanneer u het toestel vervoert. • Om veiligheidsredenen mag de gebruiker geen wijzigingen aanbrengen aan het toestel. • De garantie vervalt indien u de sticker met het serienummer verwijdert. Gebruik het toestel enkel voor de
toepassingen die hier worden beschreven om kortsluitingen, brandwonden, elektroshocks, gevaar voor ontploffing van de lampen, enz. te vermijden. U kunt het toestel beschadigen en de garantie vervalt automatisch indien u het toestel op een ongeoorloofde manier gebruikt.
4. Beschrijving
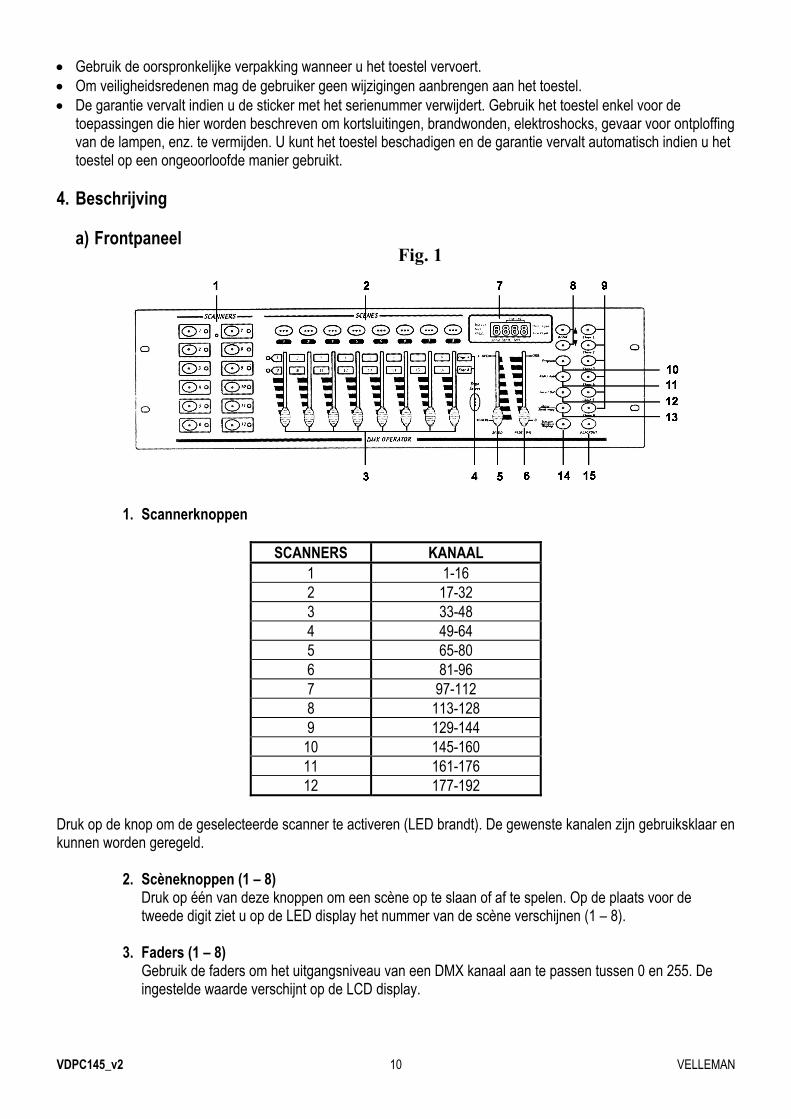
a) Frontpaneel
1. Scannerknoppen
SCANNERS KANAAL 1 1-16 2 17-32 3 33-48 4 49-64 5 65-80 6 81-96 7 97-112 8 113-128 9 129-144
10 145-160 11 161-176 12 177-192
Druk op de knop om de geselecteerde scanner te activeren (LED brandt). De gewenste kanalen zijn gebruiksklaar en kunnen worden geregeld.
2. Scèneknoppen (1 – 8) Druk op één van deze knoppen om een scène op te slaan of af te spelen. Op de plaats voor de
tweede digit ziet u op de LED display het nummer van de scène verschijnen (1 – 8).
3. Faders (1 – 8) Gebruik de faders om het uitgangsniveau van een DMX kanaal aan te passen tussen 0 en 255. De
ingestelde waarde verschijnt op de LCD display.
Fig. 1
VDPC145_v2 VELLEMAN 11
4. Page Select Druk op deze knop om af te wisselen tussen pagina A (de eerste 8 kanalen) en pagina B (de volgende
8 kanalen) van een toestel.
5. Schuifregelaar Speed Regel de snelheid van de chase met deze schuifregelaar (0.1 sec. – 10 min.)
6. Fade Time schuifregelaar Regel de fadetijd met deze schuifregelaar (0 – 30 sec.)
7. LED Display Hier leest u alle belangrijke informatie af
8. Bankknoppen Druk op ▲ of ▼ om een (geheugen)bank te selecteren. Het derde en vierde cijfer op de LED display
vormen het banknummer (01 – 30).
9. Chase (1 – 6) Druk op één van deze knoppen om een chase op te slaan of af te spelen. De eerste digit op de LED
display is het chasenummer (1 – 6).
10. Program Het toestel bevindt zich bij het inschakelen altijd in de MANUAL RUN mode. Houd de PROGRAM
knop gedurende twee seconden ingedrukt tot de LED begint te knipperen. Nu kunt u de SCENE en de CHASE programmeren. Houd PROGRAM weer 2 seconden ingedrukt om de BLACKOUT mode te activeren. De PROGRAM LED dooft uit en de BLACKOUT-aanduiding gaat branden. Druk op de BLACKOUT knop om terug te keren naar de MANUAL RUN mode. De blackout LED dooft uit.
11. MIDI / ADD
MIDI : Houd de MIDI knop in de RUN mode gedurende twee seconden ingedrukt. De derde en vierde digit van de LED display beginnen te knipperen. Kies een MIDI kanaal met ▲ of ▼. Druk op om het even welke andere knop om de instelling van het MIDI kanaal te beëindigen.
ADD : In de programmeermode kunt u deze knop gebruiken om lijnen toe te voegen aan een programma.
12. AUTO / DEL
AUTO : Druk op deze knop terwijl het toestel zich in de RUN mode bevindt. De AUTO TRIGGER LED gaat branden om aan te geven dat de AUTO RUN is geactiveerd. Druk de AUTO knop nogmaals in om de auto run mode uit te schakelen.
DEL : In de programmeermode moet u op deze knop drukken om een scène of een chase te deleten.
13. MUSIC / BANK COPY
MUSIC : Druk op deze knop terwijl het toestel zich in de RUN mode bevindt. De MUSIC mode is nu geactiveerd en de MUSIC TRIGGER LED gaat nu branden. Druk deze knop nogmaals in om de MUSIC mode uit te schakelen.
BANK COPY : Druk op deze knop om een bank te kopiëren wanneer het toestel zich in de programmeermode bevindt.
14. TAP SYNC / DISPLAY
TAP SYNC : In de AUTO RUN mode hangt de afspeelsnelheid af van de lengte van de interval tussen de laatste twee keer dat u de TAP SYNC/DISPLAY button heeft ingedrukt.
DISPLAY : Druk op deze knop om te kiezen tussen 00-255 en 0%-100% display voor de faders.

VDPC145_v2 VELLEMAN 12
15. BLACKOUT Druk op deze knop om de output van alle kanalen op 0% te brengen. Dit heeft GEEN invloed op de
andere functies van het toestel. Druk deze knop nogmaals in om de blackout mode uit te schakelen.
b) Achterpaneel
16. MIDI IN 17. DMX POLARITY SELECT 18. DMX OUT (3-polige XLR) 19. DC ingang (9-12V, 300mA)
c) Aansluitingen
De fabrikant is niet aansprakelijk voor schade veroorzaakt door verkeerde aansluitingen. Sluit de meegeleverde adapter aan op de DC jack en stop het andere uiteinde in een stopcontact. Het toestel heeft een ingebouwde microfoon voor geluidsregeling. Gebruik de MIDI ingang indien u het geluid door een externe bron wilt laten sturen. 5. Bedieningsinstructies Scènes programmeren Houd de PROGRAM knop gedurende 2 seconden ingedrukt om de PROGRAM mode te activeren. De PROGRAM LED begint te knipperen.
a) Programmeren van scènes 1. Druk op de gewenste knop om een SCANNER te selecteren 2. U kunt meerdere toestellen selecteren en deze tezelfdertijd sturen. 3. Stel de faders in kwestie in op het gewenste uitgangsniveau. 4. Druk op de MIDI/ADD knop 5. Selecteer de gewenste bank met ▲ of ▼. 6. Druk op een SCENE knop om deze scène op te slaan in de geselecteerde bank.
b) Scènes bewerken 1. Druk op een SCENE knop om een scène van een bank te selecteren. 2. Regel de faders 3. Druk op de MIDI/ADD knop 4. Druk nogmaals op SCENE om de nieuwe instellingen op te slaan
c) Een scanner kopiëren 1. Houd de knop ingedrukt van de scanner die momenteel is geselecteerd 2. Druk op de knop van de scanner die u wilt voorzien van de instellingen van de eerste scanner. 3. Laat beide knoppen los.
d) Een scène kopiëren 1. Druk op de SCENE knop van de scène die u wilt kopiëren 2. Druk op de MIDI/ADD knop. 3. Selecteer een bank met ▲ of ▼ en druk op de knop van de scène die u wilt voorzien van de instellingen van de
eerste scène.
Fig. 2

VDPC145_v2 VELLEMAN 13
e) Een scène wissen 1. Druk op de knop van de scène die u wilt wissen om deze scène te selecteren. 2. Houd de AUTO/DEL knop ingedrukt terwijl u de knop van de scène indrukt die u wilt wissen.
f) Alle scènes wissen 1. Druk op PROGRAM en ▼ terwijl u het toestel uitschakelt. 2. Schakel het toestel weer in.
g) Een bank kopiëren 1. Selecteer de bank in kwestie. 2. Druk de MIDI/ADD knop in. 3. Selecteer de bank die u wilt kopiëren met de ▲ of ▼ knop. 4. Druk de MUSIC/BANKCOPY knop in.
h) Een bank wissen 1. Selecteer de bank die u wilt wissen. 2. Druk AUTO/DEL en MUSIC/BANKCOPY tezelfder tijd in. Een chase programmeren Houd de PROGRAM knop gedurende 2 seconden ingedrukt om de programmeermode te activeren. De programmeerLED begint te knipperen. Eén enkele chase bevat max. 240 scènes en de scènes worden afgespeeld in de volgorde waarin ze werden geprogrammeerd. De eerste scènes die worden afgespeeld zijn dus de eerste scènes die werden geprogrammeerd. a) Chase programmeren 1. Via de betreffende CHASE knop selecteert u een chase met geprogrammeerde scènes. 2. Kies een scène van een bank met ▲ of ▼ en druk de betreffende SCENE knop in. 3. Druk op de MIDI/ADD knop. b) Alle scènes van een bank kopiëren naar een chase 1. Selecteer de bank met ▲ of ▼. 2. Druk de MUSIC/BANKCOPY knop in. 3. Druk de MIDI/ADD knop in. c) Een stap toevoegen aan een chase Praktisch voorbeeld : In een bestaande chase met 15 stappen voegen we een nieuwe scène in als “stap 10”. 1. Druk op TAPSYNC/DISPLAY om de CHASE en de STEP op de LCD display te doen verschijnen. 2. Selecteer STAP 9 met ▲ of ▼. 3. Druk op MIDI/ADD om over te schakelen naar stap 10. 4. Gebruik ▲ en ▼ en druk op de juiste SCENE knop om een scène in een BANK te selecteren. 5. Druk op MIDI/REC om de nieuwe scène in te voegen in de zonet gecreëerde stap. De voormalige stap 10 wordt
nu stap 11, enz.

VDPC145_v2 VELLEMAN 14
d) Een stap wissen uit een chase Voorbeeld : stap 10 wissen. 1. Druk op TAPSYNC/DISPLAY om de CHASE en de STEP op de LCD display te doen verschijnen. 2. Selecteer stap 10 met ▲ of ▼. 3. Druk op AUTO/DEL : stap 11 wordt stap 10, stap 12 wordt stap 11, enz. e) Een chase wissen 1. Selecteer de chase in kwestie met de CHASE knop. 2. Houd die CHASE knop ingedrukt en druk op AUTO/DEL f) Alle chases wissen 1. Druk tezelfder tijd op ▼ en AUTO/DEL wanneer u het toestel uitschakelt. 2. Schakel het toestel weer in. Scènes afspelen Het toestel staat altijd in RUN mode wanneer u het inschakelt. Houd de PROGRAM knop gedurende 2 seconden ingedrukt om de PROGRAM mode te activeren. Het toestel schakelt vervolgens automatisch over op de BLACKOUT mode. Druk op de BLACKOUT button om de RUN mode te activeren. U kunt enkel die scènes afspelen die in een bank zijn geprogrammeerd. a) Manueel afspelen 1. Ga na of AUTO TRIGGER en MUSIC TRIGGER wel degelijk OFF zijn. 2. Selecteer een bank met ▲ of ▼ of via een MIDI signaal. 3. Druk op de gewenste SCENE knop. b) Automatisch afspelen 1. Druk op AUTO/DEL. De AUTO TRIGGER LED gaat branden. 2. Druk op TAPSYNC/DISPLAY. Druk een tweede keer na een interval van uw keuze. De interval tussen deze twee
bepaalt de snelheid van de AUTO RUN functie (max. 10 min.). Indien u meer dan twee keer drukt, dan houdt het toestel slechts met de laatste twee keer dat u drukte.
3. Selecteer een bank met ▲ of ▼ of via een MIDI signaal. 4. Druk nogmaals op AUTO/DEL om de AUTO RUN mode te verlaten. c) Music Run Mode 1. Druk op MUSIC/BANKCOPY. De MUSIC TRIGGER LED licht op. 2. Selecteer een bank met ▲ of ▼ of via een MIDI signaal. 3. Druk MUSIC/BANKCOPY nogmaals in om de MUSIC RUN mode te verlaten. d) Midi Run Mode De scènes van een bank worden geselecteerd via de MIDI ingang wanneer het toestel zich in de MANUAL RUN, AUTO RUN of MUSIC RUN mode bevindt.
VDPC145_v2 VELLEMAN 15
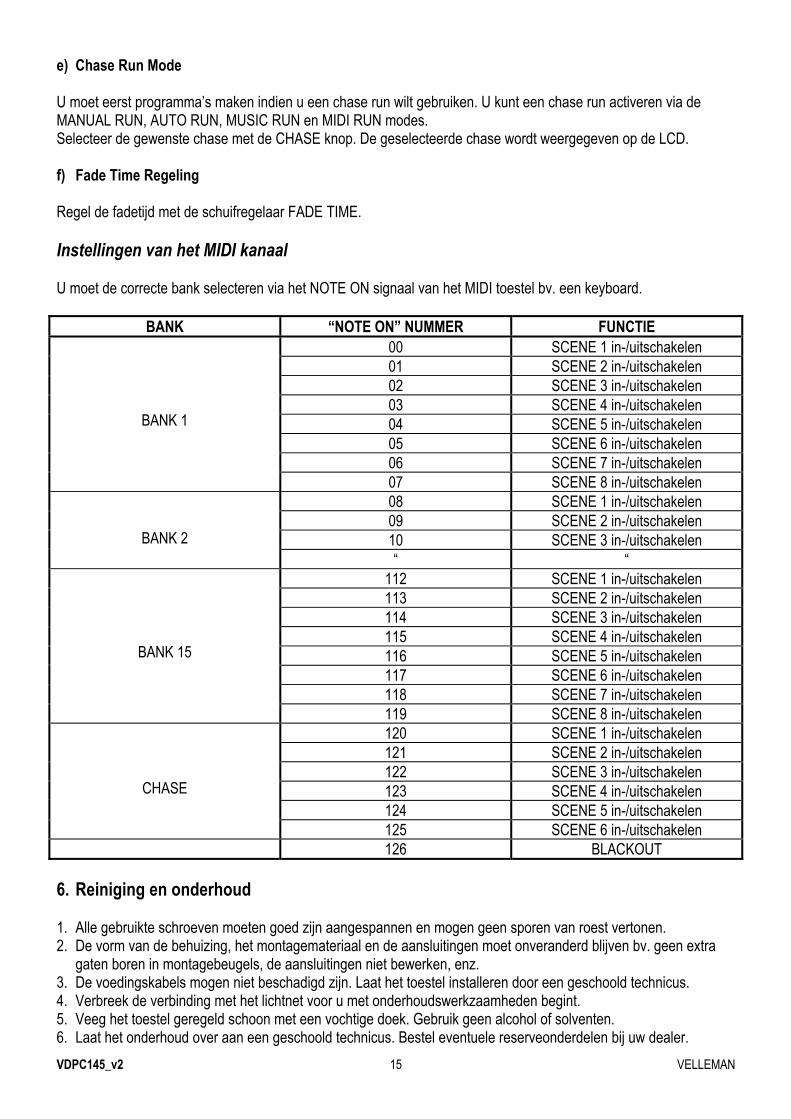
e) Chase Run Mode U moet eerst programma’s maken indien u een chase run wilt gebruiken. U kunt een chase run activeren via de MANUAL RUN, AUTO RUN, MUSIC RUN en MIDI RUN modes. Selecteer de gewenste chase met de CHASE knop. De geselecteerde chase wordt weergegeven op de LCD. f) Fade Time Regeling Regel de fadetijd met de schuifregelaar FADE TIME. Instellingen van het MIDI kanaal U moet de correcte bank selecteren via het NOTE ON signaal van het MIDI toestel bv. een keyboard.
BANK “NOTE ON” NUMMER FUNCTIE
BANK 1
00 SCENE 1 in-/uitschakelen 01 SCENE 2 in-/uitschakelen 02 SCENE 3 in-/uitschakelen 03 SCENE 4 in-/uitschakelen 04 SCENE 5 in-/uitschakelen 05 SCENE 6 in-/uitschakelen 06 SCENE 7 in-/uitschakelen 07 SCENE 8 in-/uitschakelen
BANK 2
08 SCENE 1 in-/uitschakelen 09 SCENE 2 in-/uitschakelen 10 SCENE 3 in-/uitschakelen “ “
BANK 15
112 SCENE 1 in-/uitschakelen 113 SCENE 2 in-/uitschakelen 114 SCENE 3 in-/uitschakelen 115 SCENE 4 in-/uitschakelen 116 SCENE 5 in-/uitschakelen 117 SCENE 6 in-/uitschakelen 118 SCENE 7 in-/uitschakelen 119 SCENE 8 in-/uitschakelen
CHASE
120 SCENE 1 in-/uitschakelen 121 SCENE 2 in-/uitschakelen 122 SCENE 3 in-/uitschakelen 123 SCENE 4 in-/uitschakelen 124 SCENE 5 in-/uitschakelen 125 SCENE 6 in-/uitschakelen
126 BLACKOUT 6. Reiniging en onderhoud 1. Alle gebruikte schroeven moeten goed zijn aangespannen en mogen geen sporen van roest vertonen. 2. De vorm van de behuizing, het montagemateriaal en de aansluitingen moet onveranderd blijven bv. geen extra
gaten boren in montagebeugels, de aansluitingen niet bewerken, enz. 3. De voedingskabels mogen niet beschadigd zijn. Laat het toestel installeren door een geschoold technicus. 4. Verbreek de verbinding met het lichtnet voor u met onderhoudswerkzaamheden begint. 5. Veeg het toestel geregeld schoon met een vochtige doek. Gebruik geen alcohol of solventen. 6. Laat het onderhoud over aan een geschoold technicus. Bestel eventuele reserveonderdelen bij uw dealer.

VDPC145_v2 VELLEMAN 16
7. Technische specificaties Voeding AC/DC adapter 9-12Vdc/300mA (meegeleverd) Aantal DMX kanalen 192 Max. kabellengte 100m Afmetingen 482 x 132 x 73mm Gewicht 2.5kg De gegevens in deze handleiding kunnen te allen tijde worden gewijzigd zonder voorafgaande kennisgeving.
VDPC145 – CONTROLEUR DMX A 192 CANAUX
1. Introduction & Caractéristiques Aux résidents de l'Union européenne Des informations environnementales importantes concernant ce produit
Ce symbole sur l'appareil ou l'emballage indique que l’élimination d’un appareil en fin de vie peut polluer l'environnement. Ne pas jeter un appareil électrique ou électronique (et des piles éventuelles) parmi les déchets municipaux non sujets au tri sélectif ; une déchèterie traitera l’appareil en question.
Renvoyer les équipements usagés à votre fournisseur ou à un service de recyclage local. Il convient de respecter la réglementation locale relative à la protection de l’environnement. En cas de questions, contacter les autorités locales pour élimination. Nous vous remercions de votre achat ! Lisez le présent manuel attentivement avant la mise en service de l'appareil. Le VDPC145 est un contrôleur DMX à 192 canaux, capable de contrôler 12 appareils de 16 canaux chacun. L’appareil est pourvu de 30 BANKS (banques de mémoire) de 8 scènes chacun, 6 chases pour la programmation de scènes et un afficheur LED à 4 digits. Vérifiez si l'appareil n'a pas été endommagé pendant le transport. Si c'est le cas, remettez l'installation de l'appareil à plus tard et consultez votre revendeur. 2. Prescriptions de sécurité
• Un technicien qualifié doit s'occuper de l'installation et du maintien. • Les dommages causés en ignorant les prescriptions de ce manuel ne tombent pas sous la garantie et votre
revendeur déclinera la responsabilité de défauts ou d'autres problèmes qui en résultent. • Ne branchez pas l'appareil quand il a été exposé à des variations de température. Attendez à ce que l'appareil ait
atteint la température de chambre. • La tension réseau ne peut pas dépasser la tension mentionnée dans les spécifications à la fin de ce manuel. • Le câble d'alimentation ne peut pas être serti ou endommagé par des objets tranchants. Demandez à votre
revendeur d'installer un nouveau câble d'alimentation si nécessaire. • Tirez la fiche pour débrancher l'appareil. Débranchez-le avant de le nettoyer. • Les dommages occasionnés par des modifications à l'appareil du côté du client ne tombent pas sous la garantie.
Tenez votre VDPC145 à l'écart d'amateurs et de jeunes enfants.
Être prudent lors de l’installation : toucher un câble sous tension peut causer des électrochocs mortels.
Protéger l’appareil contre la pluie et l’humidité.
Débrancher le câble d'alimentation avant d'ouvrir le boîtier.
VDPC145_v2 VELLEMAN 17
3. Directives générales • Cet appareil est un bloc de puissance pour usage professionnel dans les discothèques, les théâtres, etc.
Employez cet appareil à l'intérieur et uniquement avec une source de courant CA de max. 230Vac/50Hz. • Evitez de secouer l'appareil et traitez l'appareil avec circonspection pendant l'installation et l'opération. • Choisissez un lieu de montage protégé contre les poussières, l’humidité et les extrêmes de température. • Transportez et employez l'appareil lors d'une température de 5 à 35°C. • Familiarisez-vous avec le fonctionnement de l'appareil. Il est interdit aux personnes non qualifiées d'opérer cet
appareil. La plupart des dégâts sont causés par un usage non professionnel. • Transportez l'appareil dans son emballage d'origine. • Il est interdit de modifier l'appareil pour des raisons de sécurité. • La garantie est invalidée si vous enlevez l'autocollant portant le numéro de série. Employez le VDPC145
uniquement pour les applications décrites dans ce manuel afin d'éviter les courts-circuits, les brûlures, les électrochocs, etc. Un usage interdit peut occasionner des dommages et annule d'office la garantie.
4. Description
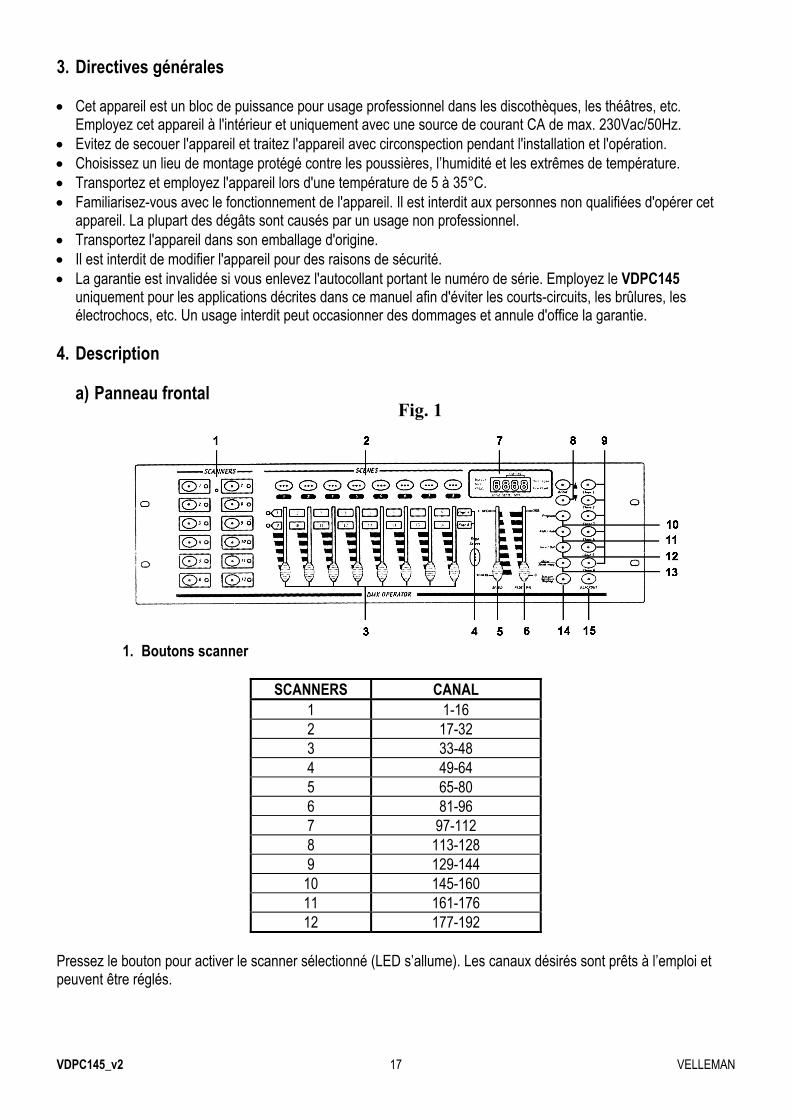
a) Panneau frontal
1. Boutons scanner
SCANNERS CANAL 1 1-16 2 17-32 3 33-48 4 49-64 5 65-80 6 81-96 7 97-112 8 113-128 9 129-144
10 145-160 11 161-176 12 177-192
Pressez le bouton pour activer le scanner sélectionné (LED s’allume). Les canaux désirés sont prêts à l’emploi et peuvent être réglés.
Fig. 1

VDPC145_v2 VELLEMAN 18
2. Boutons scène (1 – 8) Pressez un de ces boutons pour mémoriser ou jouer une scène. Le numéro de la scène (1 – 8) est
affiché sur l’écran LCD à la place du deuxième digit.
3. Faders (1 – 8) Utilisez les faders pour régler le niveau de sortie d’un canal DMX entre 0 et 255. La valeur instaurée
apparaît sur l’afficheur LCD.
4. Page Select (sélection de page) Pressez ce bouton pour alterner entre la page A (les 8 premiers canaux) et la page B (les 8 prochains
canaux) d’un appareil.
5. Glissière Speed Réglez la vitesse du chase avec cette glissière (0.1 sec. – 10 min.)
6. Glissière "Fade Time" Cette glissière permet de régler le fade time (délai de variation) entre 0 et 30 secondes.
7. Afficheur LED Toutes les informations importantes sont affichées sur l’écran LCD
8. Boutons bank (banque de mémoire) Pressez ▲ ou ▼ pour sélectionner une banque. Le numéro de la banque (01 – 30) se compose des
troisième et quatrième digits sur l’afficheur LED.
9. Chase (1 – 6) Pressez un de ces boutons pour mémoriser ou jouer un chase. Le premier digit sur l’afficheur est le
numéro du chase (1 – 6).
10. Programme Lors de l’activation, l’appareil se trouve toujours dans le mode MANUAL RUN. Gardez le bouton
PROGRAM enfoncé pendant 2 secondes jusqu’à ce que la LED se mette à clignoter. Il est maintenant possible de programmer la SCENE et le CHASE. Gardez PROGRAM enfoncé pendant 2 secondes pour activer le mode BLACKOUT. La PROGRAM LED s’éteint et l’indication BLACKOUT s’illumine. Pressez le bouton BLACKOUT pour retourner au mode MANUAL RUN. La LED blackout s’éteint.
11. MIDI / ADD
MIDI : Enfoncez le bouton MIDI pendant 2 secondes dans le mode RUN. Les troisième te quatrième digits de l’afficheur se mettent à clignoter. Choisissez un canal MIDI avec ▲ ou ▼. Pressez n’importe quel autre bouton pour terminer l’instauration du canal MIDI.
ADD : Dans le mode de programmation vous pouvez utiliser ce bouton pour ajouter des lignes à un programme.
12. AUTO / DEL
AUTO : Pressez ce bouton pendant que l’appareil se trouve dans le mode RUN. La LED AUTO TRIGGER s’allume pour indiquer que le mode AUTO RUN a été activé. Pressez le bouton AUTO plusieurs fois pour désactiver le mode auto run.
DEL : Pressez ce bouton dans le mode de programmation pour effacer une scène ou un chase.
13. MUSIC / BANK COPY MUSIC : Pressez ce bouton pendant que le mode RUN est activé. Le mode MUSIC sera
activé et la LED MUSIC TRIGGER s’allume. Pressez ce bouton de nouveau pour désactiver le mode MUSIC.

VDPC145_v2 VELLEMAN 19
BANK COPY : Pressez ce bouton pour copier une banque quand l’appareil est dans le mode de programmation.
14. TAP SYNC / DISPLAY
TAP SYNC : Dans le mode AUTO RUN, la vitesse de défilement dépend du temps écoulé entre les deux dernières fois que vous avez pressé le bouton TAP SYNC/DISPLAY.
DISPLAY : Pressez ce bouton pour choisir entre l’affichage de 00-255 et 0%-100% pour les faders.
15. BLACKOUT Pressez ce bouton pour réduire la sortie de tous les canaux à 0%. Ceci n’a aucune influence sur les
autres fonctions de l’appareil. Pressez ce bouton une nouvelle fois pour désactiver le mode blackout.
b) Panneau arrière
16. MIDI IN 17. DMX POLARITY SELECT 18. DMX OUT (XLR 3 pôles) 19. Entrée CC (9-12V, 300mA)
c) Connexions
Le fabricant n’est pas responsable de dommages causés par des connexions erronées. Connectez l’adaptateur inclus au jack CC et branchez l’autre bout à une prise. L’appareil est pourvu d’un microphone incorporé pour le réglage sonore. Utilisez l’entrée MIDI si vous voulez piloter le son par une source externe. 5. Instructions d’opération Programmer des scènes Enfoncez le bouton PROGRAM pendant 2 secondes pour activer le mode PROGRAM (mode de programmation). La LED de programmation se met à clignoter.
a) Programmation de scènes 1. Pressez un bouton pour sélectionner le SCANNER voulu 2. Il est possible de sélectionner plusieurs appareils et de les piloter en même temps. 3. Réglez les faders en question sur le niveau de sortie désiré. 4. Pressez le bouton MIDI/ADD 5. Sélectionnez la banque désirée avec ▲ ou ▼. 6. Pressez un des boutons SCENE pour mémoriser cette scène dans la banque de votre choix.
b) Modifier des scènes 1. Pressez un bouton SCENE pour sélectionner une scène d’une banque. 2. Réglez les faders 3. Pressez le bouton MIDI/ADD 4. Pressez SCENE une nouvelle fois pour mémoriser les nouveaux réglages
Fig. 2

VDPC145_v2 VELLEMAN 20
c) Copier un scanner 1. Gardez le bouton enfoncé du scanner actuellement sélectionné 2. Pressez le bouton du scanner vers lequel vous volez copier les réglages du premier scanner. 3. Lâchez les deux boutons.
d) Copier une scène 1. Pressez le bouton SCENE de la scène à copier 2. Pressez le bouton MIDI/ADD. 3. Sélectionnez une banque avec ▲ ou ▼ et pressez le bouton de la scène vers laquelle vous voulez copier les
réglages de la première scène.
e) Effacer une scène 1. Sélectionnez la scène en question en pressant le bouton approprié. 2. Gardez le bouton AUTO/DEL enfoncé pendant que vous pressez le bouton de la scène à effacer.
f) Effacer l’ensemble des scènes 1. Pressez PROGRAM et ▼ lors de la désactivation de l’appareil. 2. Réactivez l’appareil.
g) Copier une banque 1. Sélectionnez la banque en question. 2. Pressez le bouton MIDI/ADD. 3. Sélectionnez la banque à copier avec le bouton ▲ ou ▼. 4. Pressez le bouton MUSIC/BANKCOPY.
h) Effacer une banque 1. Sélectionnez la banque à effacer. 2. Pressez AUTO/DEL et MUSIC/BANKCOPY simultanément. Programmer un chase Gardez le bouton PROGRAM enfoncé pendant 2 secondes pour activer le mode de programmation. La LED de programmation se met à clignoter. Un seul chase contient un max. de 240 scènes et les scènes sont jouées dans leur ordre de programmation. Cela veut dire que les premières scènes programmées seront les premières à être joué. a) Programmer un chase 1. Sélectionnez un chase avec des scènes programmées à l’aide du bouton CHASE approprié. 2. Sélectionnez une scène d’une banque avec ▲ ou ▼ et pressez le bouton SCENE correspondant. 3. Pressez le bouton MIDI/ADD. b) Copier toutes les scènes d’une banque vers une chase 1. Sélectionnez la banque avec ▲ ou ▼. 2. Pressez le bouton MUSIC/BANKCOPY. 3. Pressez le bouton MIDI/ADD.
VDPC145_v2 VELLEMAN 21
c) Ajoutez une “step” (une étape) à un chase Exemple pratique : Dans un chase existant de 15 étapes, nous allons ajouter une nouvelle scène sur la
position de l’étape 10. 1. Pressez TAPSYNC/DISPLAY pour afficher le CHASE et le STEP sur l’écran LCD. 2. Sélectionnez STEP 9 avec ▲ ou ▼. 3. Pressez MIDI/ADD pour commuter vers l’étape 10. 4. Utilisez ▲ et ▼ et pressez le bouton SCENE correct pour sélectionner une scène d’une banque. 5. Pressez MIDI/REC pour insérer la nouvelle scène dans l’étape que vous venez de créer. L’ancienne étape 10
devient alors la nouvelle étape 11, etc. d) Effacer une étape d’un chase Exemple : effacer l’étape 10. 1. Pressez TAPSYNC/DISPLAY pour afficher le CHASE et la STEP sur l’écran LCD. 2. Sélectionnez l’étape 10 avec ▲ ou ▼. 3. Pressez AUTO/DEL : l’étape 11 devient l’étape 10, 12 devient 11, etc. e) Effacer un chase 1. Sélectionnez le chase en question avec le bouton CHASE. 2. Gardez ce bouton CHASE enfoncé et pressez AUTO/DEL f) Effacer tous les chases 1. Pressez ▼ et AUTO/DEL simultanément lorsque vous désactivez l’appareil. 2. Réactivez l’appareil. Jouer des scènes Le mode RUN est toujours instauré lors de l’activation de l’appareil. Enfoncez le bouton PROGRAM pendant 2 secondes pour activer le mode de programmation. Ensuite, l’appareil commutera automatiquement vers le mode BLACKOUT. Pressez le bouton BLACKOUT pour activer le mode RUN. Seules les scènes programmées dans une banque peuvent être jouées. a) Jouer une scène manuellement 1. Vérifiez si AUTO TRIGGER et MUSIC TRIGGER sont OFF. 2. Sélectionnez une banque avec ▲ ou ▼ ou à l’aide d’un signal MIDI. 3. Pressez le bouton SCENE en question. b) Jouer une scène automatiquement 1. Pressez AUTO/DEL. La LED AUTO TRIGGER se met à clignoter. 2. Pressez TAPSYNC/DISPLAY. Pressez une deuxième fois après un intervalle de votre choix. Cet intervalle fixe la
vitesse de la fonction AUTO RUN (max. 10 min.). L’appareil ne tient compte qu’avec les deux dernières fois que vous pressez le bouton TAPSYNC/DISPLAY.
3. Sélectionnez une banque avec ▲ ou ▼ ou via un signal MIDI. 4. Pressez AUTO/DEL de nouveau pour quitter le mode AUTO RUN.

VDPC145_v2 VELLEMAN 22
c) Mode Music Run 1. Pressez MUSIC/BANKCOPY. La LED MUSIC TRIGGER s’illumine. 2. Sélectionnez une banque avec ▲ ou ▼ ou à l’aide d’un signal MIDI. 3. Pressez MUSIC/BANKCOPY une nouvelle fois pour quitter le mode MUSIC RUN. d) Mode Midi Run Les scènes d’une banque sont sélectionnées via l’entrée MIDI lorsque l’appareil se trouve dans le mode MANUAL RUN, AUTO RUN ou MUSIC RUN. e) Mode Chase Run Pour utiliser un chase run il faut d’abord créer des programmes. Vous pouvez activer un chase run via les modes MANUAL RUN, AUTO RUN, MUSIC RUN et MIDI RUN. Sélectionnez le chase désiré avec le bouton CHASE. Le chase sélectionné est affiché sur l’écran LCD. f) Réglage Fade Time Réglez la durée de variation avec la glissière FADE TIME. Réglages du canal MIDI Sélectionnez la banque correcte à l’aide du signal NOTE ON de l’appareil MIDI p.ex. un clavier.
BANQUE NUMERO NOTE ON FONCTION
BANQUE 1
00 Activez/désactivez SCENE 1 01 Activez/désactivez SCENE 2 02 Activez/désactivez SCENE 3 03 Activez/désactivez SCENE 4 04 Activez/désactivez SCENE 5 05 Activez/désactivez SCENE 6 06 Activez/désactivez SCENE 7 07 Activez/désactivez SCENE 8
BANQUE 2
08 Activez/désactivez SCENE 1 09 Activez/désactivez SCENE 2 10 Activez/désactivez SCENE 3 “ “
BANQUE 15
112 Activez/désactivez SCENE 1 113 Activez/désactivez SCENE 2 114 Activez/désactivez SCENE 3 115 Activez/désactivez SCENE 4 116 Activez/désactivez SCENE 5 117 Activez/désactivez SCENE 6 118 Activez/désactivez SCENE 7 119 Activez/désactivez SCENE 8
CHASE
120 Activez/désactivez SCENE 1 121 Activez/désactivez SCENE 2 122 Activez/désactivez SCENE 3 123 Activez/désactivez SCENE 4 124 Activez/désactivez SCENE 5 125 Activez/désactivez SCENE 6
126 BLACKOUT
VDPC145_v2 VELLEMAN 23
6. Nettoyage et entretien 1. Serrez les écrous et les vis et vérifiez qu'ils ne rouillent pas. 2. Laissez la forme du boîtier, de supports éventuels et des connexions intacts p.ex. il est interdit de creuser des
trous additionnels dans un support ou de modifier les connexions, etc. 3. Les câbles d'alimentation ne peuvent pas être endommagés. Demandez à un technicien qualifié d'installer
l'appareil. 4. Débranchez l'appareil avant de le nettoyer. 5. Essuyez l'appareil régulièrement avec un chiffon humide. Evitez l'usage d'alcool et de solvants. 6. Un technicien qualifié assure l’entretien. Commandez des pièces de rechange chez votre revendeur. 7. Spécifications techniques Alimentation adaptateur CC/CA 9Vcc/300mA (inclus) Nombre de canaux DMX 192 Longueur max. du câble 100m Dimensions 482 x 132 x 73mm Poids 2.5kg Les données de ce manuel peuvent être modifiées sans notification préalable.
VDPC145 – CONTROLADOR DMX DE 192 CANALES 1. Introducción & características A los ciudadanos de la Unión Europea Importantes informaciones sobre el medio ambiente concerniente este producto
Este símbolo en este aparato o el embalaje indica que, si tira las muestras inservibles, podrían dañar el medio ambiente. No tire este aparato (ni las pilas eventuales) en la basura doméstica; debe ir a una empresa especializada en reciclaje. Devuelva este aparato a su distribuidor o a la unidad de reciclaje local.
Respete las leyes locales en relación con el medio ambiente. Si tiene dudas, contacte las autoridades locales para eliminación. ¡Gracias por haber comprado el VDPC145! Lea cuidadosamente las instrucciones del manual antes de usarlo. El VDPC145 es un controlador DMX de 192 canales, apto para controlar 12 aparatos de 16 canales cada uno. El aparato está provisto de 30 BANKS (bancos de memoria) de 8 escenas cada uno, 6 chase para la programación de escenas y una pantalla LED de 4 dígitos. Verifique si el aparato ha sufrido algún daño en el transporte antes de la puesta en marcha. Si es el caso, no conecte el aparato a la red y póngase en contacto con su distribuidor. 2. Indicaciones de seguridad
• La instalación y el mantenimiento deben ser realizados por personal especializado. • Daños causados por descuido de las instrucciones de seguridad de este manual invalidarán su garantía y su
distribuidor no será responsable de ningún daño u otros problemas resultantes. • No conecte el aparato si ha estado expuesto a grandes cambios de temperatura. Espere hasta que el aparato
llegue a la temperatura ambiente. • Asegúrese de que la tensión de red no sea mayor que la tensión indicada en las especificaciones.
Cuidado durante la instalación: puede sufrir una peligrosa descarga eléctrica al tocar los cables con un voltaje peligroso. No exponga este equipo a lluvia ni humedad.
Desconecte el cable de alimentación de la red antes de abrir la caja.

VDPC145_v2 VELLEMAN 24
• No aplaste el cable de alimentación y protéjalo contra posibles daños causados por algún tipo de superficie afilada. Si es necesario, pida a su distribuidor reemplazar el cable de alimentación.
• Tire siempre del enchufe para desconectar el cable de red, nunca del propio cable. Desconecte siempre el aparato de la red antes de limpiarlo.
• Los daños causados por modificaciones no autorizadas no están cubiertos por la garantía. Mantenga el VDPC145 lejos del alcance de personas no capcitadas y niños.
3. Normas generales • Este aparato es un controlador DMX para controlar los efectos de luz DMX. Ha sido diseñado para uso
profesional en discotecas, teatros, etc. El VDPC145 sólo está permitido para una conexión con una fuente de corriente CA de máx. 230VAC / 50Hz y para el uso en interiores.
• No agite el aparato. Evite usar excesiva fuerza durante la instalación y la reparación. • Seleccione un lugar de montaje donde el aparato no esté expuesto a polvo, humedad y calor extremo. • Transporte y use el aparato con una temperatura entre 5°C y 35°C. • Familiarícese con el funcionamiento del aparato. Sólo personas cualificadas pueden manejar este aparato. La
mayoría de los daños son causados por un uso inadecuado. • Transporte el aparato en su embalaje original. • Por razones de seguridad, las modificaciones no autorizadas del aparato están prohibidas. • No quite el código de barras de serie del aparato. En caso de que esto ocurra la garantía ya no es válida. Utilice
sólo el VDPC145 para las aplicaciones descritas en este manual a fin de evitar p.ej. cortocircuitos, quemaduras, descargas eléctricas, explosión de la lámpara, etc. Un uso desautorizado puede causar daños y anula la garantía completamente.
4. Descripción
a) Panel frontal
1. Botones escáner
ESCÁNERES CANAL 1 1-16 2 17-32 3 33-48 4 49-64 5 65-80 6 81-96 7 97-112 8 113-128 9 129-144
10 145-160 11 161-176 12 177-192
Fig. 1

VDPC145_v2 VELLEMAN 25
Pulse el botón para activar el escáner seleccionado (el LED se ilumina). Los canales deseados están listos para usar y pueden ser ajustados.
2. Botones escena (1 – 8) Pulse uno de estos botones para guardar o reproducir una escena. El segundo dígito de la pantalla
LED visualiza el número de la escena (1 – 8).
3. Fader (1 – 8) Use los fader para ajustar el nivel de salida de un canal DMX entre 0 y 255. El valor seleccionado
aparece en la pantalla LCD.
4. Page Select (selección de la página) Pulse este botón para cambiar entre la página A (los primeros 8 canales) y la página B (los siguientes
8 canales) de un aparato.
5. Conmutador deslizante Speed Ajuste la velocidad del chase con este conmutador deslizante (0.1 seg. – 10 min.)
6. Conmutador deslizante "Fade Time" Este conmutador deslizante permite ajustar el tiempo fade (fade time) entre 0 y 30 segundos.
7. Pantalla LED Todas las informaciones importantes se visualizan en la pantalla LCD
8. Botones bank (banco de memoria) Pulse ▲ o ▼ para seleccionar un banco de memoria. El número del banco de memoria (01 – 30)
consiste en el tercer y cuarto dígito de la pantalla LED.
9. Chase (1 – 6) Pulse uno de estos botones para guardar o reproducir un chase. El primer dígito en la pantalla es el
número del chase (1 – 6).
10. Programa Al activar el aparato, siempre estará en el modo MANUAL RUN. Mantenga pulsado el botón
PROGRAM durante 2 segundos hasta que el LED parpadee. Ahora, es posible programar la SCENE y el CHASE. Mantenga pulsado PROGRAM durante 2 segundos para activar el modo BLACKOUT. El LED PROGRAM se apagará y la indicación BLACKOUT se iluminará. Pulse el botón BLACKOUT para volver al modo MANUAL RUN. El LED BLACKOUT se apagará.
11. MIDI / ADD
MIDI : Mantenga pulsado el botón MIDI durante 2 segundos en el modo RUN. El tercer y el cuarto dígito de la pantalla empiezan a parpadear. Seleccione un canal MIDI con▲ o ▼. Pulse cualquier otro botón para terminar la selección del canal MIDI.
ADD : En el modo de programación puede usar este botón para añadir líneas a un programa.
12. AUTO / DEL AUTO : Pulse el botón mientras que el aparato se encuentra en el modo RUN. El LED AUTO
TRIGGER se iluminará para indicar que el modo AUTO RUN ha sido activado. Pulse el botón AUTO varias veces para desactivar el modo auto run.
DEL : Pulse este botón en el modo de programación para borrar una escena o un chase.

VDPC145_v2 VELLEMAN 26
13. MUSIC / BANK COPY MUSIC : Pulse este botón mientras que el modo RUN está activado. El modo MUSIC se
activa y el LED MUSIC TRIGGER se ilumina. Vuelva a pulsar este botón para desactivar el modo MUSIC.
BANK COPY : Pulse este botón para copiar un banco si el aparato se encuentra en el modo de programación.
14. TAP SYNC / DISPLAY
TAP SYNC : En el modo AUTO RUN, la velocidad de avance depende del tiempo que ha pasado entre las dos últimas veces que ha pulsado el botón TAP SYNC/DISPLAY.
DISPLAY : Pulse este botón para seleccionar entre la visualización de 00-255 y 0%-100% para los faders.
15. BLACK-OUT Pulse este botón para reducir la salida de todos los canales (a 0%). Esto no influye en las otras
funciones del aparato. Vuelva a pulsar este botón para desactivar el modo black-out.
b) Panel trasero
16. MIDI IN 17. DMX POLARITY SELECT 18. DMX OUT (XLR de 3 polos) 19. Entrada CC (9-12V, 300mA)
c) Conexiones
El distribuidor no será responsable de daños causados por conexiones incorrectas. Conecte el adaptador incluido al jack CC y conecte la otra parte a un enchufe. El aparato está provisto de un micrófono incorporado para ajustar el sonido. Use la entrada MIDI si quiere controlar el sonido por una fuente externa. 5. Instrucciones de operación Programar escenas Mantenga pulsado el botón PROGRAM durante 2 segundos para activar el modo PROGRAM (modo de programación). El LED de programación parpadea.
a) Programar escenas 1. Pulse un botón para seleccionar el ESCÁNER deseado 2. Es posible seleccionar varios aparatos y controlarlos al mismo tiempo. 3. Ajuste los fader en cuestión al nivel de salida deseado. 4. Pulse el botón MIDI/ADD 5. Seleccione el banco deseado con ▲ o ▼. 6. Pulse uno de los botones SCENE para almacenar esta escena en el banco deseado.
b) Modificar escenas 1. Pulse un botón SCENE para seleccionar una escena de un banco. 2. Ajuste los fader 3. Pulse el botón MIDI/ADD 4. Pulse SCENE otra vez para guardar los nuevos ajustes
Fig. 2

VDPC145_v2 VELLEMAN 27
c) Copiar un escáner 1. Mantenga pulsado el botón del escáner actualmente seleccionado 2. Pulse el botón del escáner hacia el cual quiere copiar los ajustes del primer escáner. 3. Suelte ambos botones.
d) Copiar una escena 1. Pulse el botón SCENE de la escena que quiere copiar 2. Pulse el botón MIDI/ADD. 3. Seleccione un banco con ▲ o ▼ y pulse el botón de la escena hacia la cual quiere copiar los ajustes de la
primera escena. e) Borrar una escena 1. Seleccione la escena en cuestión al pulsar el botón correspondiente. 2. Mantenga pulsado el botón AUTO/DEL mientras que pulsa el botón de la escena que quiere borrar. f) Borrar todas las escenas 1. Pulse PROGRAM y ▼ durante la desactivación del aparato. 2. Vuelva a activar el aparato. g) Copiar un banco 1. Seleccione el banco en cuestión. 2. Pulse el botón MIDI/ADD. 3. Seleccione el banco que quiere copiar con el botón ▲ o ▼. 4. Pulse el botón MUSIC/BANKCOPY. h) Borrar un banco 1. Seleccione el banco que quiere borrar. 2. Pulse AUTO/DEL y MUSIC/BANKCOPY simultáneamente. Programar un chase Mantenga pulsado PROGRAM durante 2 segundos para activar el modo de programación. El LED de programación parpadea. Un chase contiene máx. 240 escenas y las escenas se reproducen en el orden de programación. Esto quiere decir que las primeras escenas programadas están las primeras que se reproducirán. a) Programar un chase 1. Seleccione un chase con escenas programadas con el botón CHASE correspondiente. 2. Seleccione una escena de un banco con ▲ o ▼ y pulse el botón SCENE correspondiente. 3. Pulse el botón MIDI/ADD. b) Copiar todas las escenas de un banco hacia un chase 1. Seleccione el banco con ▲ o ▼. 2. Pulse el botón MUSIC/BANKCOPY. 3. Pulse el botón MIDI/ADD.

VDPC145_v2 VELLEMAN 28
c) Añadir un “step” (un paso) a un chase Ejemplo : Añadir una nueva escena como paso 10 en un chase que consta de 15 pasos 1. Pulse TAPSYNC/DISPLAY para visualizar el CHASE y el STEP en la pantalla LCD. 2. Seleccione STEP 9 con ▲ o ▼. 3. Pulse MIDI/ADD para conmutar al paso 10. 4. Seleccione una escena de un banco usando ▲ o ▼ y pulse el botón SCENE correcto. 5. Pulse MIDI/REC para introducir la nueva escena en el paso que acaba de crear. El antiguo paso 10 se vuelve el
nuevo paso 11, etc. d) Borrar un paso de un chase Ejemplo: borrar el paso 10. 1. Pulse TAPSYNC/DISPLAY para visualizar el CHASE y el STEP en la pantalla LCD. 2. Seleccione el paso 10 con ▲ o ▼. 3. Pulse AUTO/DEL: el paso 11 se vuelve el paso10, 12 se vuelve 11, etc. e) Borrar un chase 1. Seleccione el chase en cuestión con el botón CHASE. 2. Mantenga pulsado este botón CHASE y pulse AUTO/DEL f) Borrar todos los chase 1. Pulse ▼ y AUTO/DEL simultáneamente al desactivar el aparato. 2. Vuelva a activar el aparato. Reproducir escenas El modo RUN siempre se selecciona durante la activación del aparato. Pulse el botón PROGRAM durante 2 segundos para activar el modo de programación. Luego, el aparato conmutará automáticamente al modo BLACK-OUT. Pulse el botón BLACK-OUT para activar el modo RUN. Se pueden sólo reproducir las escenas programadas en un banco. a) Reproducir una escena manualmente (Manual Run) 1. Verifique si AUTO TRIGGER y MUSIC TRIGGER están en la posición OFF. 2. Seleccione un banco con ▲ o ▼ o con una señal MIDI. 3. Pulse el botón SCENE en cuestión. b) Reproducir una escena automáticamente (Auto Run) 1. Pulse AUTO/DEL. El LED AUTO TRIGGER parpadea. 2. Pulse TAPSYNC/DISPLAY. Vuelva a pulsarlo después de un intervalo que Ud. ha elegido. Este intervalo fija la
velocidad de la función AUTO RUN (máx. 10 min.). El aparato sólo cuenta con las dos últimas veces que ha pulsado el botón TAPSYNC/DISPLAY.
3. Seleccione un banco con ▲ o ▼ o con una señal MIDI. 4. Vuelva a pulsar AUTO/DEL para salirse del modo AUTO RUN.

VDPC145_v2 VELLEMAN 29
c) Modo Music Run 1. Pulse MUSIC/BANKCOPY. El LED MUSIC TRIGGER se ilumina. 2. Seleccione un banco con ▲ o ▼ o con una señal MIDI. 3. Vuelva a pulsar MUSIC/BANKCOPY para salirse del modo MUSIC RUN. d) Modo Midi Run Las escenas de un banco se seleccionan con la entrada MIDI cuando el aparato se encuentra en el modo MANUAL RUN, AUTO RUN o MUSIC RUN. e) Modo Chase Run Para usar un chase run, primero, debe crear programas. Puede activar un chase run por los modos MANUAL RUN, AUTO RUN, MUSIC RUN y MIDI RUN. Seleccione el chase deseado con el botón CHASE. El chase seleccionado se visualiza en la pantalla LCD. f) Ajustar el Fade Time Ajuste el tiempo fade con el conmutador deslizante FADE TIME. Ajustes del canal MIDI Seleccione el banco correcto con la señal NOTE ON del aparato MIDI p.ej. un teclado.
BANCO NÚMERO NOTE ON FUNCIÓN
BANCO 1
00 Activa/desactiva SCENE 1 01 Activa/desactiva SCENE 2 02 Activa/desactiva SCENE 3 03 Activa/desactiva SCENE 4 04 Activa/desactiva SCENE 5 05 Activa/desactiva SCENE 6 06 Activa/desactiva SCENE 7 07 Activa/desactiva SCENE 8
BANCO 2
08 Activa/desactiva SCENE 1 09 Activa/desactiva SCENE 2 10 Activa/desactiva SCENE 3 “ “
BANCO 15
112 Activa/desactiva SCENE 1 113 Activa/desactiva SCENE 2 114 Activa/desactiva SCENE 3 115 Activa/desactiva SCENE 4 116 Activa/desactiva SCENE 5 117 Activa/desactiva SCENE 6 118 Activa/desactiva SCENE 7 119 Activa/desactiva SCENE 8
CHASE
120 Activa/desactiva SCENE 1 121 Activa/desactiva SCENE 2 122 Activa/desactiva SCENE 3 123 Activa/desactiva SCENE 4 124 Activa/desactiva SCENE 5 125 Activa/desactiva SCENE 6
126 BLACKOUT
VDPC145_v2 VELLEMAN 30
6. Limpieza y mantenimiento 1. Apriete bien las tuercas y los tornillos y verifique que no hay señales de oxidación. 2. No modifique la caja, los soportes y las conexiones p.ej. no taladre agujeros adicionales en un soporte o no
modifique las conexiones, etc. 3. No dañe los cables de alimentación. Contacte con un técnico especializado para instalar el aparato. 4. Desconecte el aparato de toda fuente antes de limpiarlo. 5. Limpie el aparato regularmente con un paño húmedo. Evite el uso de alcohol y de disolventes. 6. El mantenimiento debe llevarse a cabo por personal especializado. Contacte con su distribuidor si necesita
piezas de recambio. 7. Especificaciones Alimentación adaptador CC/CA 9Vcc/300mA (incluido) Número de canales DMX 192 Longitud máx. del cable 100m Dimensiones 482 x 132 x 73mm Peso 2.5kg Se pueden modificar las especificaciones y el contenido de este manual sin previo aviso.
VDPC145 – 192-KANAL DMX-CONTROLLER 1. Einführung & Eigenschaften An alle Einwohner der Europäischen Union Wichtige Umweltinformationen über dieses Produkt
Dieses Symbol auf dem Produkt oder der Verpackung zeigt an, dass die Entsorgung dieses Produktes nach seinem Lebenszyklus der Umwelt Schaden zufügen kann. Entsorgen Sie die Einheit (oder verwendeten Batterien) nicht als unsortiertes Hausmüll; die Einheit oder
verwendeten Batterien müssen von einer spezialisierten Firma zwecks Recycling entsorgt werden. Diese Einheit muss an den Händler oder ein örtliches Recycling-Unternehmen retourniert werden. Respektieren Sie die örtlichen Umweltvorschriften. Falls Zweifel bestehen, wenden Sie sich für Entsorgungsrichtlinien an Ihre örtliche Behörde. Wir bedanken uns für den Kauf des VDPC145! Lesen Sie diese Bedienungsanleitung vor Inbetriebnahme sorgfältig durch. Dies ist ein 192-Kanal DMX-Controller, mit dem Sie 12 Geräte mit je 16 Kanälen ansteuern können. Das Gerät verfügt über 30 Speicherbanken mit jedem 8 Szenen, 6 Chase für die Programmierung der Szenen und einem 4-stelligen LED-Display. Überprüfen Sie zuerst, ob Transportschäden vorliegen. In diesem Fall, nehmen Sie das Gerät nicht in Betrieb und setzen Sie sich mit Ihrem Fachhändler in Verbindung. 2. Sicherheitshinweise
• Installation und Wartung sind einer autorisierten Fachkraft vorbehalten. • Bei Schäden, die durch Nichtbeachtung der Bedienungsanleitung verursacht werden, erlischt der
Garantieanspruch. Für daraus resultierende Folgeschäden übernimmt der Hersteller keine Haftung.
Seien Sie während der Installation des Gerätes sehr vorsichtig: das Berühren von unter Spannung stehenden Leitungen könnte zu lebensgefährlichen elektrischen Schlägen führen. Keinem Regen oder keiner Feuchte aussetzen.
Trennen Sie das Gerät vom Netz bevor Sie das Gehäuse öffnen.

VDPC145_v2 VELLEMAN 31
• Nehmen Sie das Gerät nicht sofort in Betrieb, nachdem es von einem kalten in einen warmen Raum gebracht wurde. Lassen Sie das Gerät solange ausgeschaltet, bis es die Zimmertemperatur erreicht hat.
• Vergewissern Sie sich, dass die anzuschließende Netzspannung nicht höher ist als die Netzspannung beschrieben im Punkt 7 “Technische Daten“.
• Achten Sie darauf, dass die Netzleitung nicht gequetscht oder durch scharfe Kanten beschädigt werden kann. Bei Beschädigungen soll eine Fachkraft das Kabel ersetzen.
• Trennen Sie das Gerät bei Nichtbenutzung und vor jeder Reinigung vom Netz. Fassen Sie dazu den Netzstecker an der Grifffläche an und ziehen Sie nie an der Netzleitung.
• Beachten Sie, dass Schäden, die durch manuelle Veränderungen an diesem Gerät verursacht werden, nicht unter den Garantieanspruch fallen. Halten Sie Kinder und Unbefugte vom Gerät fern.
3. Allgemeine Richtlinien • Dieses Gerät ist ein Dimmerpack für den professionellen Einsatz auf Bühnen, in Discotheken, Theater, usw. Der
VDPC145 ist nur für den Anschluss an einen AC-Strom von max. 230Vac/50Hz zugelassen und wurde ausschließlich zur Verwendung in Innenräumen konzipiert.
• Vermeiden Sie Erschütterungen. Vermeiden Sie rohe Gewalt während der Installation und Bedienung des Gerätes.
• Achten Sie bei der Wahl des Installationsortes darauf, dass das Gerät keinem Staub, keiner Feuchtigkeit und extremen Temperaturen ausgesetzt wird.
• Das Gerät darf weder transportiert noch verwendet werden bei Temperaturen von < 5 und > 35°C. • Nehmen Sie das Gerät erst in Betrieb, nachdem Sie sich mit seinen Funktionen vertraut gemacht haben. Lassen
Sie das Gerät nicht von Personen bedienen, die sich nicht mit dem Gerät auskennen. Meist ist die Beschädigung des Gerätes das Ergebnis von unfachmännischer Bedienung.
• Verwenden Sie die Originalverpackung, wenn das Gerät transportiert werden soll. • Eigenmächtige Veränderungen sind aus Sicherheitsgründen verboten. • Verwenden Sie das Gerät nur für Anwendungen beschrieben in dieser Bedienungsanleitung sonst kann dies zu
Schäden am Produkt führen und erlischt der Garantieanspruch. Jede andere Verwendung ist mit Gefahren wie Kurzschluss, Brandwunden, elektrischem Schlag, Lampenexplosion, usw. verbunden.
4. Beschreibung
a) Frontplatte
Abb. 1

VDPC145_v2 VELLEMAN 32
1. Scanner-Tasten
SCANNER KANAL 1 1-16 2 17-32 3 33-48 4 49-64 5 65-80 6 81-96 7 97-112 8 113-128 9 129-144
10 145-160 11 161-176 12 177-192
Drücken Sie die Taste um den ausgewählten Scanner zu aktivieren (LED leuchtet). Die gewünschten Kanäle sind gebrauchsfertig und können geregelt werden.
2. Szene-Tasten (1 – 8) Drücken Sie eine dieser Tasten um eine Szene zu speichern oder aufzurufen. Die zweite Zahl des
LCD- Displays zeigt die Szenennummer (1 – 8) an.
3. Fader (1 – 8) Hiermit stellen Sie die DMX-Werte der jeweiligen Kanäle zwischen 0 und 255 ein. Der eingestellte
Wert erscheint im LCD-Display.
4. Page Select Drücken Sie diese Taste um zwischen der Pagina A (Kanäle 1-8) und der Pagina B (Kanäle 9-16) des
Gerätes umzuschalten.
5. Schiebeschalter Speed Mit diesem Schiebeschalter regeln Sie die Chase-Geschwindigkeit (0.1 Sek. – 10 Min.)
6. Schiebeschalter Fade Time Mit diesem Schiebeschalter regeln Sie die Fade-Zeit (0 – 30 Sek.).
7. LED-Display Zeigt die aktuelle Einstellung an.
8. Bank-Tasten Drücken Sie ▲ oder ▼ um eine Bank auszuwählen. An der dritten und vierten Ziffer im LED-Display
wird die Banknummer (01 – 30) angezeigt.
9. Chaser-Tasten (1 – 6) Drücken Sie eine dieser Tasten um einen Chaser zu speichern oder abzuspielen. Die erste Ziffer im
LED-Display zeigt die Chasenummer (1 – 6) an.
10. Program Das Gerät befindet sich beim Einschalten immer im MANUAL RUN-Modus. Halten Sie die
PROGRAM-Taste zwei Sekunden gedrückt bis die LED blinkt. Nun können Sie die SZENE und den CHASER programmieren. Halten Sie PROGRAM wieder 2 Sekunden gedrückt um den BLACKOUT-

VDPC145_v2 VELLEMAN 33
Modus zu aktivieren. Die PROGRAM-LED erlischt und die BLACKOUT-Anzeige fängt an zu leuchten. Drücken Sie die BLACKOUT-Taste um zum MANUAL RUN-Modus zurückzukehren. Die Blackout-LED erlischt.
11. MIDI / ADD
MIDI : Halten Sie die MIDI-Taste im RUN-Modus zwei Sekunden gedrückt. Die dritte und vierte Ziffer im LED-Display fängt an zu blinken. Wählen Sie einen MIDI-Kanal mit ▲ oder ▼. Drücken Sie irgendeine Taste um die Einstellung des MIDI-Kanals zu beenden.
ADD : Im Programmiermodus können Sie diese Taste verwenden um Linien zu einem Programm hinzuzufügen.
12. AUTO / DEL
AUTO : Drücken Sie diese Taste während das Gerät sich im RUN-Modus befindet. De AUTO TRIGGER-LED leuchtet um anzuzeigen, dass AUTO RUN aktiviert ist. Drücken Sie die AUTO-Taste nochmals um den AUTO RUN-Modus auszuschalten.
DEL : Drücken Sie diese Taste im Programmiermodus um Szenen oder Chaser zu löschen.
13. MUSIC / BANK COPY (kopieren) MUSIC : Drücken Sie diese Taste während das Gerät sich im RUN-Modus befindet. Der
MUSIC-Modus ist jetzt aktiviert und die MUSIC TRIGGER-LED leuchtet. Drücken Sie diese Taste nochmals um den MUSIC-Modus auszuschalten.
BANK COPY : Drücken Sie diese Taste um eine Bank zu kopieren wenn das Gerät sich im Programmiermodus befindet.
14. TAP SYNC / DISPLAY
TAP SYNC : Im AUTO RUN-Modus hängt die Aufrufgeschwindigkeit von der Intervall-Länge zwischen den zwei letzten Malen, dass Sie die TAP SYNC/DISPLAY-Taste gedrückt haben, ab.
DISPLAY : Drücken Sie diese Taste um zwischen 00-255 und 0%-100% Fader-Display zu schalten.
15. BLACKOUT Drücken Sie diese Taste um alle Kanal-Ausgänge auf 0% zu schalten. Dies beeinflusst die anderen
Funktionen des Gerätes NICHT. Drücken Sie diese Taste nochmals um den Blackout-Modus auszuschalten.
b) Rückseite
16. MIDI IN 17. DMX POLARITY SELECT 18. DMX OUT (3-polige XLR) 19. DC Eingang (9-12V, 300mA)
c) Anschlüsse
Der Hersteller übernimmt keine Haftung für Schäden, verursacht durch falsche Anschlüsse. Verbinden Sie den mitgelieferten Adapter mit dem DC-Klinkenstecker und stecken Sie das andere Ende in einer Steckdose. Das Gerät hat ein eingebautes Mikrofon für die Schallregelung. Verwenden Sie den MIDI-Eingang wenn Sie den Ton durch eine externe Quelle ansteuern lassen.
Abb. 2

VDPC145_v2 VELLEMAN 34
5. Bedienungsanleitung Programmierung aktivieren Halten Sie die PROGRAM-Taste während 2 Sekunden gedrückt um den PROGRAM-Modus zu aktivieren. Die PROGRAM-LED blinkt.
a) Szenen erstellen
1. Drücken Sie die gewünschte Taste um einen SCANNER auszuwählen 2. Es können mehrere Scanner gleichzeitig zur Bearbeitung angewählt werden. 3. Stellen Sie mit dem Fader die gewünschte Szene ein. 4. Drücken Sie die MIDI/ADD-Taste. 5. Wählen Sie die gewünschte Bank mit ▲ oder ▼. 6. Drücken Sie die SZENEN-Taste um diese Szene in der ausgewählten Bank zu speichern.
b) Szenen editieren 1. Drücken Sie die SZENEN-Taste um die gewünschte Bank aufzurufen in der die zu editierende Szene liegt. 2. Nehmen Sie mit den Fadern die gewünschten Einstellungen vor. 3. Drücken Sie die MIDI/ADD-Taste 4. Drücken Sie erneut die ausgewählte SZENEN-Taste um die Änderungen abzuspeichern.
c) Scanner kopieren 1. Halten Sie die Taste, welche Sie kopieren möchten gedrückt. 2. Drücken Sie die Scanner-Taste, auf die kopiert werden soll. 3. Lassen Sie beide Tasten los.
d) Szenen kopieren 1. Drücken Sie die SZENEN-Taste der Szene, welche Sie kopieren möchten 2. Drücken Sie die MIDI/ADD-Taste. 3. Wählen Sie mit ▲ oder ▼ die gewünschte Bank und drücken Sie die SZENEN-Taste, auf die kopiert werden
soll. e) Szenen löschen 1. Drücken Sie die gewünschte SZENEN-Taste, welche Sie löschen möchten. 2. Halten Sie die AUTO/DEL-Taste gedrückt und drücken Sie gleichzeitig die SZENEN-Taste in welcher die zu
löschende Szene abgespeichert ist. f) Alle Szenen löschen 1. Drücken Sie PROGRAM und ▼ während Sie das Gerät ausschalten. 2. Schalten Sie das Gerät wieder ein. g) Eine Bank kopieren 1. Wählen Sie die gewünschte Bank. 2. Drücken Sie die MIDI/ADD-Taste. 3. Wählen Sie mit ▲ oder ▼ die gewünschte Bank, die Sie kopieren möchten. 4. Drücken Sie die MUSIC/BANKCOPY-Taste.

VDPC145_v2 VELLEMAN 35
h) Bank löschen 1. Wählen Sie die Bank, die sie löschen möchten. 2. Drücken Sie AUTO/DEL und MUSIC/BANKCOPY gleichzeitig. Chaser programmieren Halten Sie die PROGRAM-Taste 2 Sekunden gedrückt um den Programmiermodus zu aktivieren. Die Programmier-LED blinkt. Es stehen max. 240 Szenen zur Verfügung. Diese Szenen werden in der Reihenfolge, in der Sie programmiert wurden, aufgerufen. Die ersten Szenen, die aufgerufen werden, sind also die Szenen die erst programmiert wurden. a) Chaser programmieren 1. Wählen Sie über die entsprechende CHASER-Taste einen Chaser mit programmierten Szenen. 2. Wählen Sie mit ▲ oder ▼ eine der zuvor auf einer der Bänke abgelegten Szenen aus und drücken Sie diese
SZENEN-Taste. 3. Drücken Sie die MIDI/ADD-Taste. b) Eine Bank von Szenen in einen Chaser kopieren 1. Wählen Sie die Bank mit ▲ oder ▼. 2. Drücken Sie die MUSIC/BANKCOP-Taste. 3. Drücken Sie die MIDI/AD-Taste. c) Einen Schritt (Step) hinzufügen Beispiel : Einem bestehenden Chaser mit 15 Steps eine neue Szene als “Step 10” hinzufügen. 1. Drücken Sie die TAPSYNC/DISPLAY-Taste bis CHASER und STEP im LCD-Display erscheinen. 2. Wählen Sie STEP 9 mit ▲ oder ▼. 3. Drücken Sie die MIDI/ADD-Taste um auf Step 10 umzuschalten. 4. Verwenden Sie ▲ oder ▼ und drücken Sie die richtige SZENEN-Taste um eine der zuvor auf einer der Bänke
abgelegten Szenen auszuwählen. 5. Drücken Sie die MIDI/REC-Taste um die neue Szene dem soeben kreierten Step hinzuzufügen. Es wird nun
einen Step höher als zuvor angezeigt : Step 10 wird Step 11, usw. d) Einen Step im Chaser löschen Beispiel : Step 10 löschen. 1. Drücken Sie die TAPSYNC/DISPLAY-Taste bis CHASER und STEP im LCD-Display erscheinen. 2. Wählen Sie Step 10 mit ▲ oder ▼. 3. Drücken Sie AUTO/DEL : Step 11 wird Step 10, Step 12 wird Step 11, usw. e) Einen Chaser löschen 1. Wählen Sie den gewünschten Chaser mit der CHASER-Taste aus. 2. Halten Sie die CHASER-Taste gedrückt und drücken Sie AUTO/DEL f) Alle Chaser löschen 1. Drücken Sie ▼ und AUTO/DEL im ausgeschalteten Zustand gleichzeitig. 2. Schalten Sie das Gerät wieder ein.
VDPC145_v2 VELLEMAN 36
Szenen aufrufen Das Gerät befindet sich nach dem Einschalten immer im RUN-Modus. Halten Sie die PROGRAM-Taste 2 Sekunden gedrückt um den PROGRAM-Modus zu aktivieren. Das Gerät schaltet danach automatisch auf den BLACKOUT-Modus um. Drücken Sie die BLACKOUT-Taste um den RUN-Modus zu aktivieren. Sie können nur die in einer Bank gespeicherten Szenen aufrufen. a) Manuell Szenen aufrufen 1. Vergewissern Sie sich, dass AUTO TRIGGER und MUSIC TRIGGER aus sind. 2. Wählen Sie eine Bank mit ▲ oder ▼ oder über ein MIDI-Signal. 3. Drücken Sie die gewünschte SZENEN-Taste. b) Automatisch Szenen aufrufen 1. Drücken Sie AUTO/DEL. Die AUTO TRIGGER-LED leuchtet. 2. Drücken Sie TAPSYNC/DISPLAY. Drücken Sie diese Taste nach einem Intervall je nach Wahl nochmals. Der
Takt von einem zweimaligen Drücken bestimmt die Geschwindigkeit der AUTO RUN-Funktion (max. 10 Min.). Drücken Sie die Taste mehr als 2 Mal, so berücksichtigt das Gerät nur die letzten zwei Male, das Sie gedrückt haben.
3. Wählen Sie eine Bank mit ▲ oder ▼ oder über ein MIDI-Signal. 4. Drücken Sie AUTO/DEL erneut um den AUTO RUN-Mode zu verlassen. c) Music Run Mode 1. Drücken Sie MUSIC/BANKCOPY. Die MUSIC TRIGGER-LED leuchtet. 2. Wählen Sie eine Bank mit ▲ oder ▼ oder über ein MIDI-Signal. 3. Drücken Sie MUSIC/BANKCOPY erneut um den MUSIC RUN-Modus zu verlassen. d) Midi Run Mode De Szenen einer Bank werden über den MIDI-Eingang ausgewählt, wenn das Gerät sich im MANUAL RUN, AUTO RUN oder MUSIC RUN-Modus befindet. e) Chaser Run Mode Sie müssen Szenen programmiert haben um Chaser aufrufen zu können. Sie können einen Chaser Run über MANUAL RUN, AUTO RUN, MUSIC RUN und MIDI RUN aktivieren. Wählen Sie den gewünschten Chaser mit der CHASER-Taste. Der ausgewählte Chaser erscheint im LCD-Display. f) Fade Time Regelung Regeln Sie die Fadezeit mit dem Schiebeschalter FADE TIME. Einstellungen des MIDI-Kanals Wählen Sie die richtige Bank über das NOTE ON-Signal des MIDI-Gerätes z.B. Keyboard.
BANK NUMMER “NOTE ON” FUNKTION
BANK 1
00 SZENE 1 ein-/ausschalten 01 SZENE 2 ein-/ausschalten 02 SZENE 3 ein-/ausschalten 03 SZENE 4 ein-/ausschalten 04 SZENE 5 ein-/ausschalten 05 SZENE 6 ein-/ausschalten 06 SZENE 7 ein-/ausschalten 07 SZENE 8 ein-/ausschalten

VDPC145_v2 VELLEMAN 37
BANK 2
08 SZENE 1 ein-/ausschalten 09 SZENE 2 ein-/ausschalten 10 SZENE 3 ein-/ausschalten “ “
BANK 15
112 SZENE 1 ein-/ausschalten 113 SZENE 2 ein-/ausschalten 114 SZENE 3 ein-/ausschalten 115 SZENE 4 ein-/ausschalten 116 SZENE 5 ein-/ausschalten 117 SZENE 6 ein-/ausschalten 118 SZENE 7 ein-/ausschalten 119 SZENE 8 ein-/ausschalten
CHASE
120 SZENE 1 ein-/ausschalten 121 SZENE 2 ein-/ausschalten 122 SZENE 3 ein-/ausschalten 123 SZENE 4 ein-/ausschalten 124 SZENE 5 ein-/ausschalten 125 SZENE 6 ein-/ausschalten
126 BLACKOUT 6. Reinigung und Wartung 1. Alle verwendeten Schrauben müssen fest angespannt werden und dürfen keine Rostspuren zeigen. 2. Das Gehäuse, die Linsen, die Montagebügel und der Montageort (z.B. Decke oder Gebinde) dürfen nicht
angepasst werden, z.B. bohren Sie keine zusätzlichen Löcher in Montagebügel, verändern Sie die Anschlüsse nicht, usw.
3. Sorgen Sie dafür, dass die Netzkabel nicht beschädigt werden. Lassen Sie das Gerät von einer Fachkraft installieren.
4. Trennen Sie das Gerät vom Netz ehe Sie mit den Servicearbeiten anfangen. 5. Verwenden Sie zur Reinigung ein feuchtes Tuch. Verwenden Sie auf keinen Fall Alkohol oder irgendwelche
Lösungsmittel. 6. Die Wartung darf nur von einer Fachkraft durchgeführt werden. Bestellen Sie eventuelle Ersatzunterteile bei
Ihrem Fachhändler. 7. Technische Daten Spannungsversorgung AC/DC-Adapter 9-12Vdc/300mA (mitgeliefert) DMX-Kanäle 192 Max. Kabellänge 100m Abmessungen 482 x 132 x 73mm Gewicht 2.5kg Änderungen in Technik und Ausstattung ohne vorherige Ankündigung vorbehalten.

VDPC145_v2 VELLEMAN 38
VDPC145 – 192-CIO KANAŁOWY STEROWNIK DMX 1. Wstęp. Przeznaczona dla mieszkańców Unii Europejskiej. Ważne informacje dotyczące środowiska.
Ten symbol umieszczony na urządzeniu bądź opakowaniu wskazuje, że wyrzucenie produktu może być szkodliwe dla środowiska. Nie wyrzucaj urządzenia lub baterii do zbiorczego śmietnika, tylko do specjalnie przeznaczonych do tego pojemników na urządzenia elektroniczne lub skontaktuj się z firmą zajmującą się recyklingiem. Urządzenie możesz oddać dystrybutorowi lub firmie zajmującej się recyklingiem. Postępuj
zgodnie z zasadami bezpieczeństwa dotyczącymi środowiska. Jeśli masz wątpliwości skontaktuj się z firmą zajmującą się utylizacją odpadów. Dziękujemy za wybór naszego produktu VDPC145! Zanim zdecydujecie się Państwo dostarczyć produkt do serwisu prosimy o uważne zapoznanie się z jego instrukcją obsługi. VDPC145 jest 192-cio kanałowym kontrolerem DMX, zdolnym do sterowania 12 urządzeń do 16 kanałów każde. Kontroler wyposażony jest w 30 banków pamięci, w których można zapamiętać do 8 scen, 6 programów sekwencji scen chaser oraz 4-ro cyfrowy wyświetlacz LED. Proszę uważnie sprawdzić czy urządzenie nie posiada uszkodzeń wynikających z niewłaściwego transportu. Jeśli urządzenie zostało uszkodzone w transporcie, proszę ten fakt zgłosić dostawcy i nie instalować urządzenia 2. Instrukcje bezpieczeństwa, środki ostrożności.
• Montaż oraz naprawy powinny być przeprowadzone przez wykwalifikowany personel techniczny. • Wszelkie szkody spowodowane użytkowaniem niezgodnym z niniejszą instrukcją nie są objęte gwarancją, a
sprzedawca nie ponosi za nie odpowiedzialności. • Nie włączać urządzenia, gdy było ono narażone na duże zmiany temperatury. Przed włączeniem należy
odczekać, aż urządzenie osiągnie temperaturę otoczenia. • Upewnij się czy dostępne napięcie zasilania z sieci jest zgodne ze specyfikacją techniczną urządzenia. • Nie wiąż przewodu zasilającego, chroń przewód przez ostrymi krawędziami mogącymi go uszkodzić. W razie
konieczności jego wymiany zwróć się do swojego sprzedawcy. • Zawsze gdy nie używasz urządzenia lub będą przeprowadzane czynności konserwacyjne, wyłącz je z sieci
energetycznej. Wyciągaj przewód chwytając za jego wtyczkę sieciową. • Wszelkie szkody powstałe na skutek samodzielnej modyfikacji przez użytkownika nie są objęte gwarancją. • Chronić przed dziećmi oraz użytkownikami nieautoryzowanymi. 3. Wskazówki ogólne • Urządzenie zaprojektowane jest do profesjonalnego użytkowania na scenie, w dyskotekach, teatrach itp.
VDPC145 powinien być używany tylko w pomieszczeniach, napięcie zasilania wynosi max. 230VAC / 50Hz. • Chroń to urządzenie przed wstrząsami i uderzeniami, zwłaszcza w trakcie użytkowania. Nie potrząsaj
urządzeniem, unikaj dużej siły podczas instalacji i obsługi urządzenia. • Wybieraj miejsca pracy wolne od wysokiej temperatury (zobacz specyfikacje techniczne), dużego zapylenia oraz
wilgotności. • Nie używać, nie transportować urządzenia w temperaturach < 5°C i > 35°C. • Zapoznaj się z instrukcją obsługi zanim rozpoczniesz pracę z urządzeniem. Nie pozwalaj obsługiwać urządzenia
osobom nieprzeszkolonym. Wszelkie uszkodzenia wynikają, przeważnie z nieprofesjonalnej obsługi. • Do transportu używaj tylko oryginalnego opakowania.
Proszę zachować wszelką ostrożność podczas instalacji urządzenia. Bezpośrednie dotknięcie elementów będących pod napięciem grozi porażeniem wysokim napięciem. Chronić przed deszczem, wilgocią, oblaniem oraz innym kontaktem z cieczami.
Przed otworzeniem obudowy odłączyć urządzenie z sieci energetycznej.

VDPC145_v2 VELLEMAN 39
• Ze względu na użytkowanie urządzenia zabrania się dokonywania przeróbek. • Nie usuwaj naklejki z numerem seryjnym. Używaj urządzenia tylko i wyłącznie zgodnie z jego przeznaczeniem.
Wszystkie inne sposoby użytkowania mogą prowadzić do spięć elektrycznych, a co za tym idzie do pożarów, porażeń elektrycznych itd. Nie stosowanie się do tych zasad lub korzystanie z urządzenia niezgodnie z powyższymi postanowieniami spowoduje utratę gwarancji.
4. Opis.
a) Panel przedni.
1. Scanners Buttons (1 – 12) – przyciski skanerów.
SKANER KANAŁ 1 1-16 2 17-32 3 33-48 4 49-64 5 65-80 6 81-96 7 97-112 8 113-128 9 129-144
10 145-160 11 161-176 12 177-192
Aby uruchomić skaner naciśnij właściwy przycisk SCANER (1) (sąsiadująca dioda LED zaświeci się). Ustawienia właściwego skanera można regulować.
2. Scene Buttons (1 – 8). Przyciski wyboru sceny od 1 do 8. Używa się je, aby uruchomić, załadować lub zapamiętać stworzone
układy scen. Druga cyfra wyświetlacza LED pokazuje numer sceny 1-8.
3. Faders (1 – 8). Suwaki wykorzystywane są do kontroli intensywności kanałów DMX w zakresie 0 do 255. Wartość
nastawy wyświetlana jest na wyświetlaczu LED.
4. Page Selekt. Przycisk wyboru kontroli kanałów 1 ~ 8 (Page A) lub 9 ~ 16 (Page B).
Fig. 1
VDPC145_v2 VELLEMAN 40
5. Speed Fader. Suwak wykorzystywany do kontroli czasu trwania sceny od 0,1s do 10 min.
6. Fade Time Fader. Suwak wykorzystywany do kontroli czasu przejścia jednej sceny w następną. (0 – 30 sek.)
7. LED Display. Wyświetla niezbędne informacje podczas programowania.
8. Bank Buttons. Przy pomocy przycisków ▲ i ▼ można wybrać właściwy bank pamięci. Numer banku jest
wyświetlany przez trzecia oraz czwartą cyfrę wyświetlacza w zakresie (01 – 30).
9. Chase (1 – 6). Przyciski do wywoływania lub zapamiętania sekwencji scen CHASE. Numer sekwencji sceny
wyświetlany jest przez pierwszą cyfre wyświetlacza w zakresie (1 – 6).
10. Program. Po włączeniu zasilania urządzenie automatycznie uruchamia się w trybie automatycznym. Wciśnij i
przytrzymaj przycisk PROGRAM na czas nie krótszy niż 2 sekundy. Diody LED pulsują. Opcje programowania scen SCENE oraz sekwencji scen CHASE są dostępne. Ponowne wciśnięcie i przytrzymanie przycisku PROGRAM na czas nie krótszy niż 2 sekundy uaktywni funkcje BLACKOUT. Wtedy dioda PROGRAM zgaśnie i zaświeci dioda BLACKOUT. Aby powrócić do trybu RUN MANUAL naciśnij przycisk BLACKOUT. Zgaśnie dioda BLACKOUT.
11. MIDI / ADD
MIDI : W trybie RUN MODE wciśnij i przytrzymaj przycisk MIDI na czas nie krótszy niż 2 sekundy. Trzecia i czwarta cyfra wyświetlacza zacznie pulsować. Przy pomocy przycisków ▲ lub ▼ wybierz numer kanału MIDI, aby zapamiętać naciśnij dowolny przycisk inny niż ▲ lub ▼.
ADD : Naciśnij ten przycisk, aby dodać krok programu, gdy urządzenie jest w trybie programowania.
12. AUTO / DEL AUTO : Naciśnij ten przycisk, gdy urządzenie jest w trybie RUN. Dioda AUTO TRIGGER LED
zaświeci, sygnalizując uruchomienie trybu AUTO RUN. Ponowne naciśnięcie przycisku AUTO wyłącza tryb RUN AUTO.
DEL : Naciskając ten przycisk kasujesz scenę lub sekwencje scen (chaser), gdy jesteś w trybie programowania.
13. MUSIC / BANK COPY
MUSIC : Naciśnij ten przycisk, gdy urządzenie jest w trybie RUN. Dioda MUSIC TRIGGER LED zaświeci, sygnalizując uruchomienie trybu AUTO RUN. Ponowne naciśnięcie przycisku MUSIC wyłącza tryb RUN AUTO.
BANK COPY : Naciskając ten przycisk kopiujesz bank, gdy jesteś w trybie programowania.
14. TAP SYNC / DISPLAY TAP SYNC : Naciśnij ten przycisk, gdy urządzenie jest w trybie RUN, możesz ustawić prędkość
odtwarzania sekwencji naciskając go dwukrotne. Odstęp czasowy pomiędzy naciśnięciami jest automatycznie przeliczany na szybkość działania programu. Czas zostanie przeliczony pomiędzy 2 ostatnimi naciśnięciami.
DISPLAY : Naciskając ten przycisk możesz wybrać sposób wyświetlania wartości poziomów suwaków pomiędzy 00-255 a 0%-100%.

VDPC145_v2 VELLEMAN 41
15. BLACKOUT Naciskając ten przycisk w natychmiastowy sposób na wszystkich kanałach DMX zostanie ustawiony
poziom 0%. BLACKOUT nie wpływa na inne funkcje urządzenia. Naciśnij ten przycisk ponownie, aby wyłączyć tryb BLACKOUT.
b) Panel tylny
16. MIDI IN wejście MIDI. 17. DMX POLARITY SELECT – przełącznik 18. DMX OUT (3-pole XLR) 19. DC input (9-12V, 300mA)
c) Złącza.
Producent nie ponosi odpowiedzialności za szkody powstałe w wyniku niewłaściwego połączenia sterownika. Podłącz zasilacz sieciowy do gniazda DC w sterownika, a następnie do gniazdka 230V AC Sterownik posiada wbudowany mikrofon do sterowania dźwiękiem. Jeżeli jednak chcesz kontrolować pracę sterownika przez zewnętrzne źródło użyj portu MIIDI. 5. Instrukcja obsługi. Programowanie scen. 1. Wejdź w tryb programowania przez naciśniecie i przytrzymanie przycisku PROGRAM (10) przez 2 sekundy
dopóki nie zacznie pulsować dioda PROGRAM LED.
a) Programowanie scen. 1. Wybierz żądany skaner przyciskiem SCANNER (1). 2. Istnieje możliwość wyboru kilku urządzeń i sterowania nimi jednocześnie. 3. Suwakami kanałów FADERS (3) ustawiamy wymagane poziomy parametrów wybranego skanera. 4. Kiedy już są ustawione wszystkie skanery, wciśnij przycisk MIDI/ADD (11) aby przygotować dane do zapisu w
pamięci programu. 5. Przy pomocy przycisków ▲ lub ▼ (8) wybierz numer banku, do którego chcesz wpisać scenę. 6. Wybierz przycisk SCENE (2) z numerem sceny, pod który chcesz ją zapamiętać.
b) Edycja sceny. 1. Wybierz przycisk SCENE (2) z numerem sceny, którą chcesz modyfikować. 2. Suwakami kanałów FADERS (3) ustaw nowe wymagane poziomy parametrów wybranego skanera. 3. Kiedy już są ustawione wszystkie skanery, wciśnij przycisk MIDI/ADD (11) aby przygotować dane do zapisu w
pamięci programu. 4. Wybierz przycisk SCENE (2) z numerem sceny, pod który chcesz zapamiętać zmiany.
c) Kopiowanie skanerów. 1. Wciśnij i przytrzymaj przycisk bieżącego skanera. 2. Wciśnij i przytrzymaj przycisk skanera, na który chcesz skopiować ustawienia wcześniej wybranego skanera. 3. Zwolnij oba przyciski. Dane zostały przekopiowane.
Fig. 2

VDPC145_v2 VELLEMAN 42
d) Kopiowanie scen. 1. Wybierz przycisk SCENE (2) z numerem sceny, która chcesz skopiować. 2. Wciśnij przycisk MIDI/ADD (11). 3. Przy pomocy przycisków ▲ lub ▼ (8) wybierz numer banku, do którego chcesz wpisać scenę.
e) Usuwanie sceny. 1. Wybierz przycisk SCENE (2) z numerem sceny, która chcesz skasować. 2. Aby skasować scenę przytrzymując wcześniej wybrany przycisk sceny naciśnij przycisk AUTO / DEL (12).
f) Usuwanie wszystkich scen. 1. Wyłącz zasilanie urządzenia. 2. Wciśnij i przytrzymaj przycisk PROGRAM (10) i włącz zasilanie urządzenia. Sceny zostały skasowane.
g) Kopiowanie banku.
1. Przy pomocy przycisków ▲ lub ▼ (8) wybierz bank, który chcesz skopiować. 2. Wciśnij przycisk MIDI/ADD (11). 3. Przy pomocy przycisków ▲ lub ▼ (8) wybierz numer banku, do którego chcesz wpisać wcześniej wybrany
bank. 4. Wciśnij przycisk MUSIC/BANKCOPY (13).
h) Usuwanie banku. 1. Przy pomocy przycisków ▲ lub ▼ (8) wybierz bank, który chcesz skasować. 2. Aby skasować bank wciśnij i przytrzymaj jednocześnie przyciski AUTO / DEL (12) oraz MUSIC/BANKCOPY (13). Programowanie sekwencji scen CHASE Wejdź w tryb programowania przez naciśniecie i przytrzymanie przycisku PROGRAM (10) przez 2 sekundy dopóki nie zacznie pulsować dioda PROGRAM LED. W jednej sekwencji scen może się mieścić do 240 scen. Sekwencje są odtwarzane w kolejności ich programowania. a) Programowanie sekwencji scen (chaser). 1. Wybierz przycisk z numerem sekwencji scen CHASER (9), który chcesz zaprogramować. 2. Przy pomocy przycisków ▲ lub ▼ (8) wybierz bank, w którym jest scena i wciśnij właściwy przycisk z numerem
sceny SCENE (2), którą chcesz wstawić. 3. Wciśnij przycisk MIDI/ADD (11). b) Kopiowanie wszystkich scen z banku do sekwencji scen (chaser). 1. Przy pomocy przycisków ▲ lub ▼ (8) wybierz bank, z którego chcesz skasować sceny. 2. Wciśnij przycisk MUSIC/BANKCOPY (13). 3. Wciśnij przycisk MIDI/ADD (11). c) Dodaj krok do sekwencji scen (chaser). Przykład : dodawanie kroku 10 do 15 istniejących scen. 1. Aby wyświetlić CHASE’R i jego krok STEP na wyświetlaczu LCD naciśnij przycisk TAPSYNC/DISPLAY (14). 2. Przy pomocy przycisków ▲ lub ▼ (8) wybierz krok 9.

VDPC145_v2 VELLEMAN 43
3. Wciśnij przycisk MIDI/ADD (11), aby przygotować miejsce na krok 10. 4. Przy pomocy przycisków ▲ lub ▼ (8) wybierz scenę z banku i wciśnij właściwy przycisk z numerem sceny
SCENE (2), którą chcesz wstawić. 5. Aby dodać nową scenę wciśnij przycisk MIDI/ADD (11): krok 10 staje się krokiem 11, etc.. d) Usuwanie kroku z sekwencji scen (chaser). Przykład : Usuwanie kroku step 10. 1. Aby wyświetlić CHASE’R i jego krok STEP na wyświetlaczu LCD naciśnij przycisk TAPSYNC/DISPLAY (14). 2. Przy pomocy przycisków ▲ lub ▼ (8) wybierz krok 10. 3. Aby skasować krok wciśnij przycisk AUTO/DEL (12) : krok 11 staje się krokiem 10, krok 12 staje się krokiem 11,
etc. e) Usuwanie sekwencji scen (chaser). 1. Wybierz przycisk z numerem sekwencji scen CHASER (9), który chcesz skasować. 2. Aby skasować wybraną sekwencje scen (chaser) wciśnij przycisk AUTO/DEL (12) przytrzymując uprzednio
wybrany przycisk CHASER (9). f) Zerowanie wszystkich sekwencji scen CHASE. 1. Przy wyłączonym zasilaniu sterownika wcisnąć jednocześnie i przytrzymać przyciski ▼(8) oraz AUTO/DEL (12). 2. Włącz zasilanie urządzenia. Uruchamianie Scen. Urządzenie uruchamia się automatycznie w trybie AUTO . Wejdź w tryb programowania przez naciśniecie i przytrzymanie przycisku PROGRAM (10) przez 2 sekundy dopóki nie zacznie pulsować dioda PROGRAM LED. Sterownik przełączy się w tryb BLACKOUT. Aby uruchomić odtwarzanie scen wciśnij przycisk BLACKOUT (15).Będą odtwarzane tylko sceny zaprogramowane w banku pamięci. a) Uruchamianie ręczne MANUAL RUN. 1. Upewnij się, że są wyłączone tryby pracy AUTO TRIGGER oraz MUSIC TRIGGER. 2. Przy pomocy przycisków ▲ lub ▼ (8) lub za pośrednictwem MIDI wybierz bank pamięci. 3. Wciśnij właściwy przycisk z numerem sceny SCENE (2), którą chcesz uruchomić. b) Automatyczny tryb odtwarzania Scen AUTO RUN. 1. Wciśnij przycisk AUTO/DEL (12). Zaświeci się dioda AUTO TRIGGER LED. 2. Aby ustawić prędkość odtwarzania sekwencji naciśnij dwukrotne przycisk TAPSYNC/DISPLAY (14). Odstęp
czasowy pomiędzy naciśnięciami jest automatycznie przeliczany na szybkość działania programu (max. do 10 minut). Jeżeli naciśniesz więcej niż dwa razy przycisk TAPSYNC/DISPLAY (14) to tylko czas pomiędzy ostatnimi naciśnięciami zostanie przeliczony.
3. Przy pomocy przycisków ▲ lub ▼ (8) lub za pośrednictwem MIDI wybierz bank pamięci. 4. Aby wyjść z trybu automatycznego AUTO RUN wciśnij ponownie przycisk AUTO/DEL (12). c) Tryb pracy wyzwalany dźwiękiem MUSIC RUN. 1. Wciśnij przycisk MUSIC/BANKCOPY (13). Zaświeci się dioda MUSIC TRIGGER LED. 2. Przy pomocy przycisków ▲ lub ▼ (8) lub za pośrednictwem MIDI wybierz bank pamięci. 3. Aby wyjść z trybu automatycznego MUSIC TRIGGER wciśnij ponownie przycisk MUSIC/BANKCOPY (13).

VDPC145_v2 VELLEMAN 44
d) Tryb pracy sterowany portem MIDI Sceny z banku są wybierane za pośrednictwem portu MIDI w trakcie pracy urządzenia w trybach MANUAL RUN, AUTO RUN lub MUSIC RUN. e) Uruchamianie sekwencji scen CHASE RUN. Aby uruchomić sekwencje scen, musisz ją mieć uprzednio zaprogramowaną. Sekwencje sen mogą być uruchamiane w trybach MANUAL RUN, AUTO RUN, MUSIC RUN oraz MIDI RUN. Wybierz przycisk z numerem sekwencji scen CHASER (9), który chcesz odtworzyć. Numer sceny jest wyświetlany na wyświetlaczu LED.. f) Ustawianie czasu przejścia scen FADE TIME. Czas przejścia scen ustawia się przy pomocy suwaka FADE TIME (6).
Ustawianie kanałów MID. Aby uruchamiać poszczególne sceny posłuż się tabelą adresów. Do sterowania przez port MIDI doskonale nadaje się np. urządzenie klawiszowe.
BANK NOTE NUMBER FUNCTION
BANK 1
00 Włącz / wyłącz SCENE 1 01 Włącz / wyłącz SCENE 2 02 Włącz / wyłącz SCENE 3 03 Włącz / wyłącz SCENE 4 04 Włącz / wyłącz SCENE 5 05 Włącz / wyłącz SCENE 6 06 Włącz / wyłącz SCENE 7 07 Włącz / wyłącz SCENE 8
BANK 2
08 Włącz / wyłącz SCENE 1 09 Włącz / wyłącz SCENE 2 10 Włącz / wyłącz SCENE 3 “ “
BANK 15
112 Włącz / wyłącz SCENE 1 113 Włącz / wyłącz SCENE 2 114 Włącz / wyłącz SCENE 3 115 Włącz / wyłącz SCENE 4 116 Włącz / wyłącz SCENE 5 117 Włącz / wyłącz SCENE 6 118 Włącz / wyłącz SCENE 7 119 Włącz / wyłącz SCENE 8
CHASE
120 Włącz / wyłącz SCENE 1 121 Włącz / wyłącz SCENE 2 122 Włącz / wyłącz SCENE 3 123 Włącz / wyłącz SCENE 4 124 Włącz / wyłącz SCENE 5 125 Włącz / wyłącz SCENE 6
126 BLACKOUT

VDPC145_v2 VELLEMAN 45
6.Czyszczenie i konserwacja. 1. Wszystkie śruby mocujące oraz elementy urządzenia muszą być pewnie skręcone oraz nie mogą być
skorodowane. 2. Zaczepy montażowe oraz złącza nie powinny być modyfikowane ani zmieniane ich położenie. Nie wiercić
dodatkowych otworów w zaczepach. 3. Kable elektryczne muszą być nieuszkodzone. Montaż urządzenia powinien być przeprowadzony prze osoby
wykwalifikowane. 4. Przed przystąpieniem do czynności konserwacyjnych odłącz urządzenie od zasilania. 5. Urządzenie należy regularnie czyścić wilgotną szmatką. Nie używać alkoholu lub rozpuszczalników. 6. Obsługę urządzenia należy powierzać osobom wykwalifikowanym. Naprawiaj zawsze przy pomocy oryginalnych
części. W celu ich nabycia skontaktuj się z dostawcą urządzenia. 7. Specyfikacja techniczna. Zasilanie Zasilacz AC/DC 9-12Vdc/300mA (w zestawie) Liczna kanałów DMX 192 Maksymalna długość kabla danych. 100m Tryb pracy wyzwalany dźwiękiem MUSIC RUN wbudowany mikrofon lub protokół MIDI Wymiary 482 x 132 x 73mm Waga 2.5kg Informacje zawarte w niniejszym podręczniku mogą ulec zmianie bez uprzedzenia.
VDPC145_v2 VELLEMAN 46
Velleman® Service and Quality Warranty Velleman® has over 35 years of experience in the electronics world and distributes its products in more than 85 countries. All our products fulfil strict quality requirements and legal stipulations in the EU. In order to ensure the quality, our products regularly go through an extra quality check, both by an internal quality department and by specialized external organisations. If, all precautionary measures notwithstanding, problems should occur, please make appeal to our warranty (see guarantee conditions). General Warranty Conditions Concerning Consumer Products (for EU): • All consumer products are subject to a 24-month warranty on production flaws and defective material as from the original date of purchase. • Velleman® can decide to replace an article with an equivalent article, or to refund the retail value totally or partially when the complaint is valid and a free repair or replacement of the article is impossible, or if the expenses are out of proportion. You will be delivered a replacing article or a refund at the value of 100% of the purchase price in case of a flaw occurred in the first year after the date of purchase and delivery, or a replacing article at 50% of the purchase price or a refund at the value of 50% of the retail value in case of a flaw occurred in the second year after the date of purchase and delivery. • Not covered by warranty: - all direct or indirect damage caused after delivery to the article (e.g. by oxidation, shocks, falls, dust, dirt, humidity...), and by the article, as well as its contents (e.g. data loss), compensation for loss of profits; - frequently replaced consumable goods, parts or accessories such as batteries, lamps, rubber parts, drive belts... (unlimited list); - flaws resulting from fire, water damage, lightning, accident, natural disaster, etc.; - flaws caused deliberately, negligently or resulting from improper handling, negligent maintenance, abusive use or use contrary to the manufacturer’s instructions; - damage caused by a commercial, professional or collective use of the article (the warranty validity will be reduced to six (6) months when the article is used professionally); - damage resulting from an inappropriate packing and shipping of the article; - all damage caused by modification, repair or alteration performed by a third party without written permission by Velleman®. • Articles to be repaired must be delivered to your Velleman® dealer, solidly packed (preferably in the original packaging), and be completed with the original receipt of purchase and a clear flaw description. • Hint: In order to save on cost and time, please reread the manual and check if the flaw is caused by obvious causes prior to presenting the article for repair. Note that returning a non-defective article can also involve handling costs. • Repairs occurring after warranty expiration are subject to shipping costs. • The above conditions are without prejudice to all commercial warranties. The above enumeration is subject to modification according to the article (see article’s manual).
Velleman® service- en kwaliteitsgarantie Velleman® heeft ruim 35 jaar ervaring in de elektronicawereld en verdeelt in meer dan 85 landen. Al onze producten beantwoorden aan strikte kwaliteitseisen en aan de wettelijke bepalingen geldig in de EU. Om de kwaliteit te waarborgen, ondergaan onze producten op regelmatige tijdstippen een extra kwaliteitscontrole, zowel door onze eigen kwaliteitsafdeling als door externe gespecialiseerde organisaties. Mocht er ondanks deze voorzorgen toch een probleem optreden, dan kunt u steeds een beroep doen op onze waarborg (zie waarborgvoorwaarden). Algemene waarborgvoorwaarden consumentengoederen (voor Europese Unie): • Op alle consumentengoederen geldt een garantieperiode van 24 maanden op productie- en materiaalfouten en dit vanaf de oorspronkelijke aankoopdatum. • Indien de klacht gegrond is en een gratis reparatie of vervanging van een artikel onmogelijk is of indien de kosten hiervoor buiten verhouding zijn, kan Velleman® beslissen het desbetreffende artikel te vervangen door een gelijkwaardig artikel of de aankoopsom van het artikel gedeeltelijk of volledig terug te betalen. In dat geval krijgt u een vervangend product of terugbetaling ter waarde van 100% van de aankoopsom bij ontdekking van een gebrek tot één jaar na aankoop en levering, of een vervangend product tegen 50% van de kostprijs of terugbetaling van 50% bij ontdekking na één jaar tot 2 jaar. • Valt niet onder waarborg: - alle rechtstreekse of onrechtstreekse schade na de levering veroorzaakt aan het toestel (bv. door oxidatie, schokken, val, stof, vuil, vocht...), en door het toestel, alsook zijn inhoud (bv. verlies van data), vergoeding voor eventuele winstderving. - verbruiksgoederen, onderdelen of hulpstukken die regelmatig dienen te worden vervangen, zoals bv. batterijen, lampen, rubberen onderdelen, aandrijfriemen... (onbeperkte lijst). - defecten ten gevolge van brand, waterschade, bliksem, ongevallen, natuurrampen, enz. - defecten veroorzaakt door opzet, nalatigheid of door een onoordeelkundige behandeling, slecht onderhoud of abnormaal gebruik of gebruik van het toestel strijdig met de voorschriften van de fabrikant. - schade ten gevolge van een commercieel, professioneel of collectief gebruik van het apparaat (bij professioneel gebruik wordt de garantieperiode herleid tot 6 maand). - schade veroorzaakt door onvoldoende bescherming bij transport van het apparaat. - alle schade door wijzigingen, reparaties of modificaties uitgevoerd door derden zonder toestemming van Velleman®. • Toestellen dienen ter reparatie aangeboden te worden bij uw Velleman®-verdeler. Het toestel dient vergezeld te zijn van het oorspronkelijke aankoopbewijs. Zorg voor een degelijke verpakking (bij voorkeur de originele verpakking) en voeg een duidelijke foutomschrijving bij. • Tip: alvorens het toestel voor reparatie aan te bieden, kijk nog eens na of er geen voor de hand liggende reden is waarom het toestel niet naar behoren werkt (zie handleiding). Op deze wijze kunt u kosten en tijd besparen. Denk eraan dat er ook voor niet-defecte toestellen een kost voor controle aangerekend kan worden. • Bij reparaties buiten de waarborgperiode zullen transportkosten aangerekend worden. • Elke commerciële garantie laat deze rechten onverminderd. Bovenstaande opsomming kan eventueel aangepast worden naargelang de aard van het product (zie handleiding van het betreffende product).
Garantie de service et de qualité Velleman® Velleman® jouit d’une expérience de plus de 35 ans dans le monde de l’électronique avec une distribution dans plus de 85 pays. Tous nos produits répondent à des exigences de qualité rigoureuses et à des dispositions légales en vigueur dans l’UE. Afin de garantir la qualité, nous soumettons régulièrement nos produits à des contrôles de qualité supplémentaires, tant par notre propre service qualité que par un service qualité externe. Dans le cas improbable d’un défaut malgré toutes les précautions, il est possible d’invoquer notre garantie (voir les conditions de garantie). Conditions générales concernant la garantie sur les produits grand public (pour l’UE) : • tout produit grand public est garanti 24 mois contre tout vice de production ou de matériaux à dater du jour d’acquisition effective ; • si la plainte est justifiée et que la réparation ou le remplacement d’un article est jugé impossible, ou lorsque les coûts s’avèrent disproportionnés, Velleman® s’autorise à remplacer ledit article par un article équivalent ou à rembourser la totalité ou une partie du prix d’achat. Le cas échéant, il vous sera consenti un article de remplacement ou le remboursement complet du prix d’achat lors d’un défaut dans un délai de 1 an après l’achat et la livraison, ou un article de remplacement moyennant 50% du prix d’achat ou le remboursement de 50% du prix d’achat lors d’un défaut après 1 à 2 ans. • sont par conséquent exclus : - tout dommage direct ou indirect survenu à l’article après livraison (p.ex. dommage lié à l’oxydation, choc, chute, poussière, sable, impureté…) et provoqué par l’appareil, ainsi que son contenu (p.ex. perte de données) et une indemnisation éventuelle pour perte de revenus ; - tout bien de consommation ou accessoire, ou pièce qui nécessite un remplacement régulier comme p.ex. piles, ampoules, pièces en caoutchouc, courroies… (liste illimitée) ; - tout dommage qui résulte d’un incendie, de la foudre, d’un accident, d’une catastrophe naturelle, etc. ; - tout dommage provoqué par une négligence, volontaire ou non, une utilisation ou un entretien incorrect, ou une utilisation de l’appareil contraire aux prescriptions du fabricant ; - tout dommage à cause d’une utilisation commerciale, professionnelle ou collective de l’appareil (la période de garantie sera réduite à 6 mois lors d’une utilisation professionnelle) ; - tout dommage à l’appareil qui résulte d’une utilisation incorrecte ou différente que celle pour laquelle il a été initialement prévu comme décrit dans la notice ; - tout dommage engendré par un retour de l’appareil emballé dans un conditionnement non ou insuffisamment protégé ; - toute réparation ou modification effectuée par une tierce personne sans l’autorisation explicite de SA Velleman® ; - frais de transport de et vers Velleman® si l’appareil n’est plus couvert sous la garantie. • toute réparation sera fournie par l’endroit de l’achat. L’appareil doit nécessairement être accompagné du bon d’achat d’origine et être dûment conditionné (de préférence dans l’emballage d’origine avec mention du défaut) ; • conseil : il est conseillé de consulter la notice et de contrôler câbles, piles, etc. avant de retourner l’appareil. Un appareil retourné jugé défectueux qui s’avère en bon état de marche pourra faire l’objet d’une note de frais à charge du consommateur ; • une réparation effectuée en-dehors de la période de garantie fera l’objet de frais de transport ; • toute garantie commerciale ne porte pas atteinte aux conditions susmentionnées. La liste susmentionnée peut être sujette à une complémentation selon le type de l’article et être mentionnée dans la notice d’emploi.
Garantía de servicio y calidad Velleman® Velleman® disfruta de una experiencia de más de 35 años en el mundo de la electrónica con una distribución en más de 85 países. Todos nuestros productos responden a normas de calidad rigurosas y disposiciones legales vigentes en la UE. Para garantizar la calidad, sometimos nuestros productos regularmente a controles de calidad adicionales, tanto por nuestro propio servicio de calidad como por un servicio de calidad externo. En el caso improbable de que surgieran problemas a pesar de todas las precauciones, es posible apelar a nuestra garantía (véase las condiciones de garantía). Condiciones generales referentes a la garantía sobre productos de venta al público (para la Unión Europea):

VDPC145_v2 VELLEMAN 47
• Todos los productos de venta al público tienen un período de garantía de 24 meses contra errores de producción o errores en materiales desde la adquisición original; • Si la queja está fundada y si la reparación o la sustitución de un artículo es imposible, o si los gastos son desproporcionados, Velleman® autoriza reemplazar el artículo por un artículo equivalente o reembolsar la totalidad o una parte del precio de compra. En este caso, recibirá un artículo de recambio o el reembolso completo del precio de compra al descubrir un defecto hasta un año después de la compra y la entrega, o un artículo de recambio al 50% del precio de compra o la sustitución de un 50% del precio de compra al descubrir un defecto después de 1 a 2 años. • Por consiguiente, están excluidos entre otras cosas: - todos los daños causados directamente o indirectamente al aparato y su contenido después de la entrega (p.ej. por oxidación, choques, caída,...) y causados por el aparato, al igual que el contenido (p.ej. pérdida de datos) y una indemnización eventual para falta de ganancias; - partes o accesorios que deban ser reemplazados regularmente, como por ejemplo baterías, lámparas, partes de goma, ... (lista ilimitada); - defectos causados por un incendio, daños causados por el agua, rayos, accidentes, catástrofes naturales, etc.; - defectos causados a conciencia , descuido o por malos tratos, un mantenimiento inapropiado o un uso anormal del aparato contrario a las instrucciones del fabricante; - daños causados por un uso comercial, profesional o colectivo del aparato (el período de garantía se reducirá a 6 meses con uso profesional); - daños causados por un uso incorrecto o un uso ajeno al que est está previsto el producto inicialmente como está descrito en el manual del usuario; - daños causados por una protección insuficiente al transportar el aparato. - daños causados por reparaciones o modificaciones efectuadas por una tercera persona sin la autorización explicita de SA Velleman®; - se calcula gastos de transporte de y a Velleman® si el aparato ya no está cubierto por la garantía. • Cualquier reparación se efectuará por el lugar de compra. Devuelva el aparato con la factura de compra original y transpórtelo en un embalaje sólido (preferentemente el embalaje original). Incluya también una buena descripción del defecto; • Consejo: Lea el manual del usuario y controle los cables, las pilas, etc. antes de devolver el aparato. Si no se encuentra un defecto en el artículo los gastos podrían correr a cargo del cliente; • Los gastos de transporte correrán a carga del cliente para una reparación efectuada fuera del periode de garantía. • Cualquier gesto comercial no disminuye estos derechos. La lista previamente mencionada puede ser adaptada según el tipo de artículo (véase el manual del usuario del artículo en cuestión)
Velleman® Service- und Qualitätsgarantie Velleman® hat gut 35 Jahre Erfahrung in der Elektronikwelt und vertreibt seine Produkte in über 85 Ländern. Alle Produkte entsprechen den strengen Qualitätsforderungen und gesetzlichen Anforderungen in der EU. Um die Qualität zu gewährleisten werden unsere Produkte regelmäßig einer zusätzlichen Qualitätskontrolle unterworfen, sowohl von unserer eigenen Qualitätsabteilung als auch von externen spezialisierten Organisationen. Sollten, trotz aller Vorsichtsmaßnahmen, Probleme auftreten, nehmen Sie bitte die Garantie in Anspruch (siehe Garantiebedingungen). Allgemeine Garantiebedingungen in Bezug auf Konsumgüter (für die Europäische Union): • Alle Produkte haben für Material- oder Herstellungsfehler eine Garantieperiode von 24 Monaten ab Verkaufsdatum. • Wenn die Klage berechtigt ist und falls eine kostenlose Reparatur oder ein Austausch des Gerätes unmöglicht ist, oder wenn die Kosten dafür unverhältnismäßig sind, kann Velleman® sich darüber entscheiden, dieses Produkt durch ein gleiches Produkt zu ersetzen oder die Kaufsumme ganz oder teilweise zurückzuzahlen. In diesem Fall erhalten Sie ein Ersatzprodukt oder eine Rückzahlung im Werte von 100% der Kaufsumme im Falle eines Defektes bis zu 1 Jahr nach Kauf oder Lieferung, oder Sie bekommen ein Ersatzprodukt im Werte von 50% der Kaufsumme oder eine Rückzahlung im Werte von 50 % im Falle eines Defektes im zweiten Jahr. • Von der Garantie ausgeschlossen sind: - alle direkten oder indirekten Schäden, die nach Lieferung am Gerät und durch das Gerät verursacht werden (z.B. Oxidation, Stöße, Fall, Staub, Schmutz, Feuchtigkeit, ...), sowie auch der Inhalt (z.B. Datenverlust), Entschädigung für eventuellen Gewinnausfall. - Verbrauchsgüter, Teile oder Zubehörteile, die regelmäßig ausgewechselt werden, wie z.B. Batterien, Lampen, Gummiteile, Treibriemen, usw. (unbeschränkte Liste). - Schäden verursacht durch Brandschaden, Wasserschaden, Blitz, Unfälle, Naturkatastrophen, usw. - Schäden verursacht durch absichtliche, nachlässige oder unsachgemäße Anwendung, schlechte Wartung, zweckentfremdete Anwendung oder Nichtbeachtung von Benutzerhinweisen in der Bedienungsanleitung. - Schäden infolge einer kommerziellen, professionellen oder kollektiven Anwendung des Gerätes (bei gewerblicher Anwendung wird die Garantieperiode auf 6 Monate zurückgeführt). - Schäden verursacht durch eine unsachgemäße Verpackung und unsachgemäßen Transport des Gerätes. - alle Schäden verursacht durch unautorisierte Änderungen, Reparaturen oder Modifikationen, die von einem Dritten ohne Erlaubnis von Velleman® vorgenommen werden. • Im Fall einer Reparatur, wenden Sie sich an Ihren Velleman®-Verteiler. Legen Sie das Produkt ordnungsgemäß verpackt (vorzugsweise die Originalverpackung) und mit dem Original-Kaufbeleg vor. Fügen Sie eine deutliche Fehlerumschreibung hinzu. • Hinweis: Um Kosten und Zeit zu sparen, lesen Sie die Bedienungsanleitung nochmals und überprüfen Sie, ob es keinen auf de Hand liegenden Grund gibt, ehe Sie das Gerät zur Reparatur zurückschicken. Stellt sich bei der Überprüfung des Geräts heraus, dass kein Geräteschaden vorliegt, könnte dem Kunden eine Untersuchungspauschale berechnet. • Für Reparaturen nach Ablauf der Garantiefrist werden Transportkosten berechnet. • Jede kommerzielle Garantie lässt diese Rechte unberührt. Die oben stehende Aufzählung kann eventuell angepasst werden gemäß der Art des Produktes (siehe Bedienungsanleitung des Gerätes).
Velleman® usługi i gwarancja jakości Velleman® ma ponad 35-letnie doświadczenie w świecie elektroniki. Dystrybuujemy swoje produkty do ponad 85 krajów. Wszystkie nasze produkty spełniają surowe wymagania jakościowe oraz wypełniają normy i dyrektywy obowiązujące w krajach UE. W celu zapewnienia najwyższej jakości naszych produktów, przechodzą one regularne oraz dodatkowo wyrywkowe badania kontroli jakości, zarówno naszego wewnętrznego działu jakości jak również wyspecjalizowanych firm zewnętrznych. Pomimo dołożenia wszelkich starań czasem mogą pojawić się problemy techniczne, prosimy odwołać się do gwarancji (patrz warunki gwarancji). Ogólne Warunki dotyczące gwarancji: Wszystkie produkty konsumenckie podlegają 24-miesięcznej gwarancji na wady produkcyjne i materiałowe od daty zakupu. W przypadku, gdy usterka jest niemożliwa do usunięcia lub koszt usunięcia jest nadmiernie wysoki Velleman® może zdecydować o wymianie artykułu na nowy, wolny od wad lub zwrócić zapłaconą kwotę. Zwrot gotówki może jednak nastąpić z uwzględnieniem poniższych warunków: zwrot 100% ceny zakupu w przypadku, gdy wada wystąpiła w ciągu pierwszego roku od daty zakupu i dostawy wymiana wadliwego artykułu na nowy, wolny od wad z odpłatnością 50% ceny detalicznej lub zwrot 50% kwoty ceny nabycia w przypadku gdy wada wystąpiła w drugim roku od daty zakupu i dostawy. Produkt nie podlega naprawie gwarancyjnej: - gdy wszystkie bezpośrednie lub pośrednie szkody spowodowane są działaniem czynników środowiskowych lub losowych (np. przez utlenianie, wstrząsy, upadki, kurz, brud, ...), wilgotności; - gwarant nie ponosi odpowiedzialności za szkody wynikających z utraty danych; - utrata zysków z tytułu niesprawności produktu; z gwarancji wyłaczone są matriały eksploatacyjne: baterie, żarówki, paski napędowe, gumowe elementy napędowe... (nieograniczona lista); - usterka wynika z działania pożaru, zalania wszelkimi cieczami, uderzenia pioruna, upadku lub klęski żywiołowej, itp.; - usterka wynika z zaniedbań eksploatacyjnych tj. umyślne bądź nieumyślne zaniechanie czyszczenia, konserwacji, wymiany materiałów ekspolatacyjnych, niedbalstwa lub z niewłaściwego obchodzenia się lub niezgodnego użytkowania z instrukcją producenta; - szkody wynikające z nadmiernego użytkowania gdy nie jest do tego celu przeznaczony tj. działalność komerycjna, zawodowa lub wspólne użytkowanie przez wiele osób - okres obowiązywania gwarancji zostanie obniżony do 6 (sześć) miesięcy; - Szkody wynikające ze źle zabezpieczonej wysyłki produktu; - Wszelkie szkody spowodowane przez nieautoryzowaną naprawę, modyfikację, przeróbkę produktu przez osoby trzecie jak również bez pisemnej zgody firmy Velleman®. Uszkodzony produkt musi zostać dostarczony do sprzedawcy Velleman®, solidnie zapakowany (najlepiej w oryginalnym opakowaniu), wraz z wyposażeniem z jakim produkt został sprzedany. W przypadku wysyłki towaru w opakowaniu innym niż oryginalnym ryzyko usterki produktu oraz tego skutki przechodzą na właściciela produktu. Wraz z niesprawnym produktem należy dołączyć jasny i szczegółowy opis jego usterki, wady; Wskazówka: Aby zaoszczędzić na kosztach i czasie, proszę szczegółowo zapoznać się z instrukcja obsługi; czy przyczyną wady są okoliczności techniczne czy też wynikaja wyłącznie z nieznajomości obsługi produktu. W przypadku wysyłki sprawnego produktu do serwisu nabywca może zostać obciążony kosztmi obsługi oraz transportu. W przypadku napraw pogwarancyjnych lub odpłatnych klient ponosi dodatkowo koszt wysyłki produktu do i z serwisu. wymienione wyżej warunki są bez uszczerbku dla wszystkich komercyjnych gwarancji. Powyższe postanowienia mogą podlegać modyfikacji w zależności od wyrobu (patrz art obsługi).