Embed Size (px)
Citation preview
www.CraftProjectCentral.com Email:[email protected]
Artwork © Stampin’ Up!
Vintage Paper Bag Album Designed By: Kristyne Brandt
August 2011
Instructions
You will need five brown paper bags for this project. Any size will do, but I used lunch bags that were 5-1/8” x 3-18”” x 10-5/8”.
Step 1
Trim each bag so that it measures 9-¾” in length.
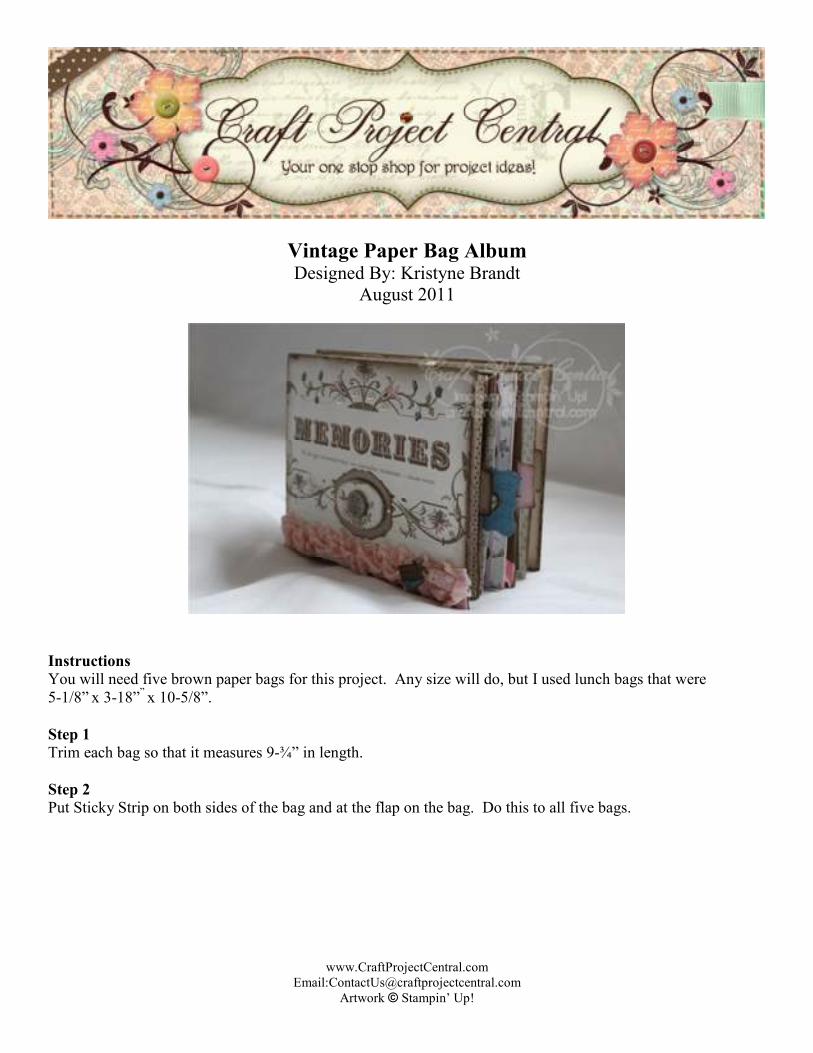
Step 2
Put Sticky Strip on both sides of the bag and at the flap on the bag. Do this to all five bags.
www.CraftProjectCentral.com Email:[email protected]
Artwork © Stampin’ Up!
Step 2a Step 2b
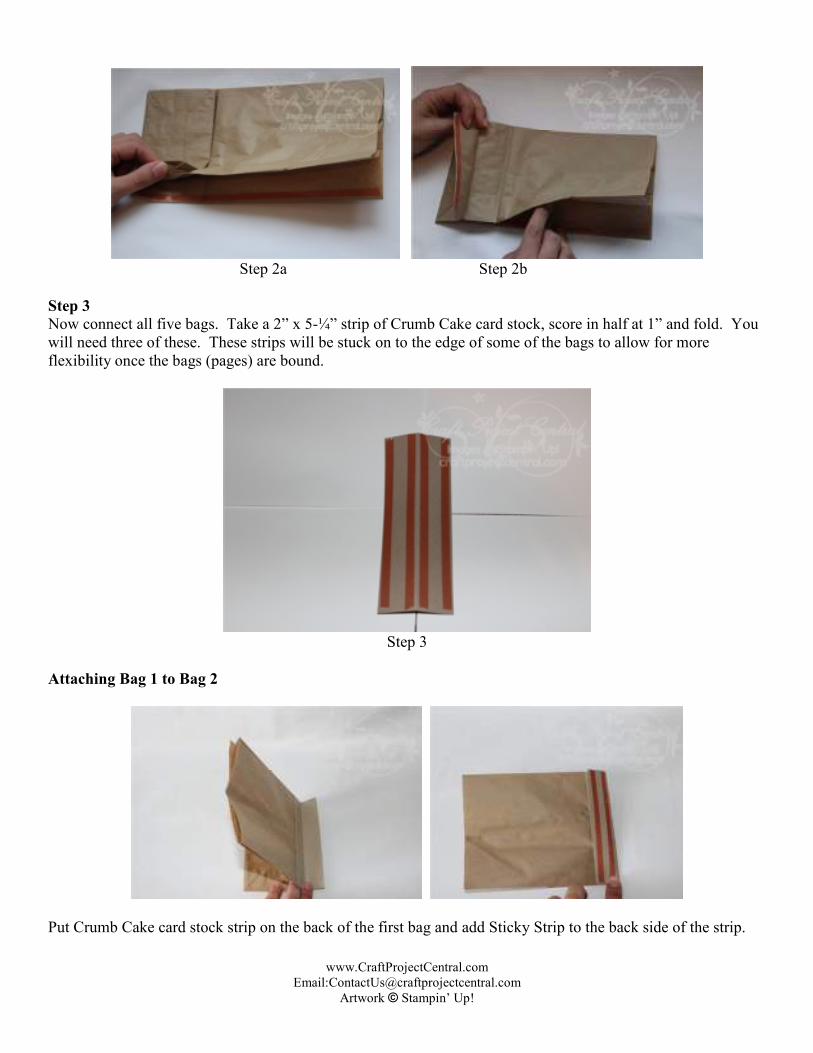
Step 3
Now connect all five bags. Take a 2” x 5-¼” strip of Crumb Cake card stock, score in half at 1” and fold. You will need three of these. These strips will be stuck on to the edge of some of the bags to allow for more flexibility once the bags (pages) are bound.
Step 3
Attaching Bag 1 to Bag 2
Put Crumb Cake card stock strip on the back of the first bag and add Sticky Strip to the back side of the strip.
www.CraftProjectCentral.com Email:[email protected]
Artwork © Stampin’ Up!
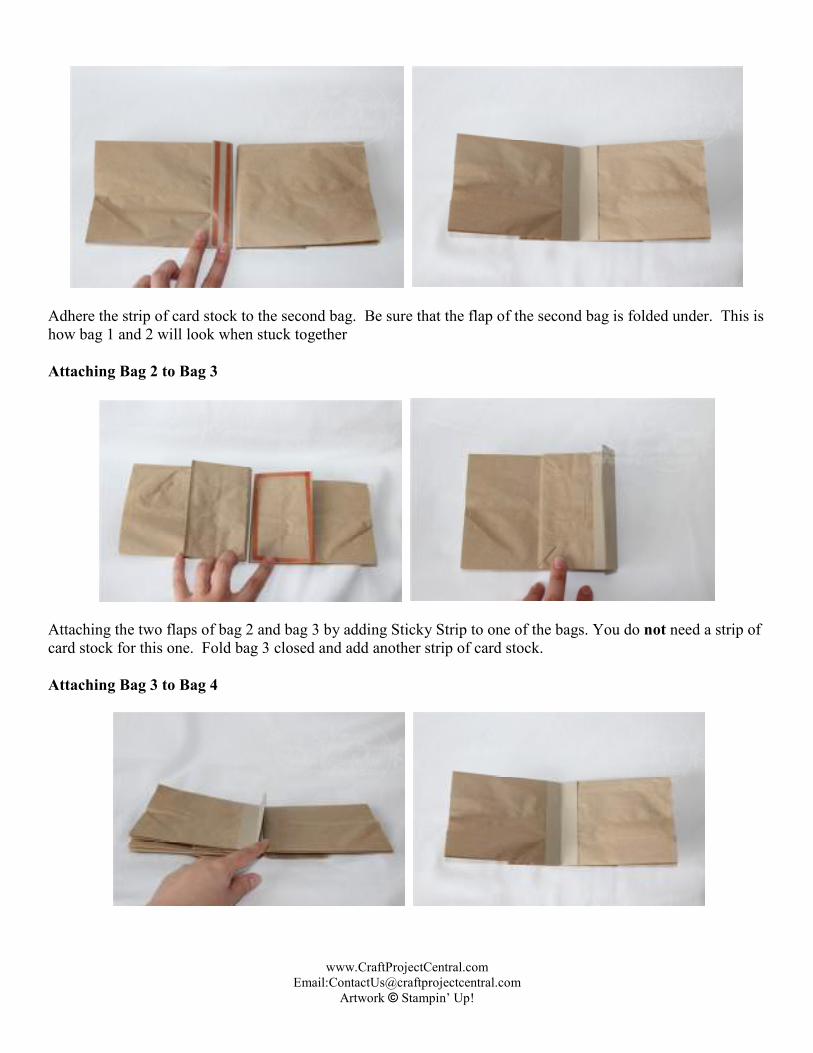
Adhere the strip of card stock to the second bag. Be sure that the flap of the second bag is folded under. This is how bag 1 and 2 will look when stuck together
Attaching Bag 2 to Bag 3
Attaching the two flaps of bag 2 and bag 3 by adding Sticky Strip to one of the bags. You do not need a strip of card stock for this one. Fold bag 3 closed and add another strip of card stock.
Attaching Bag 3 to Bag 4
www.CraftProjectCentral.com Email:[email protected]
Artwork © Stampin’ Up!
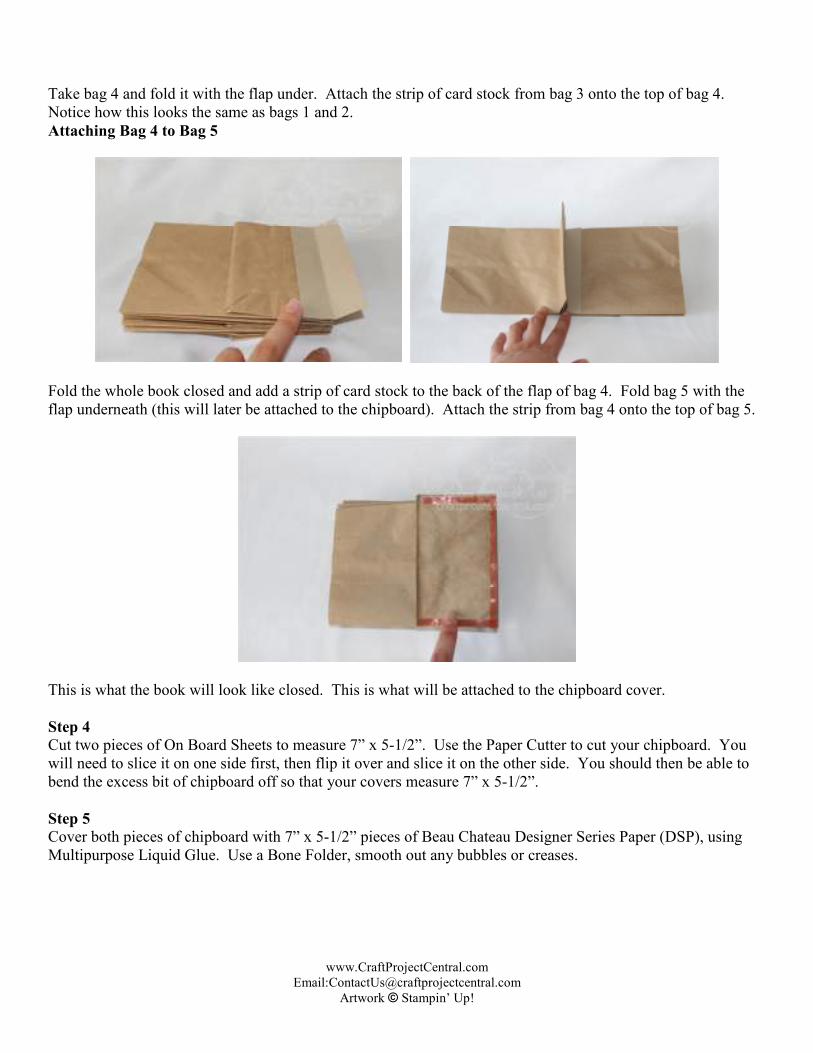
Take bag 4 and fold it with the flap under. Attach the strip of card stock from bag 3 onto the top of bag 4. Notice how this looks the same as bags 1 and 2.
Attaching Bag 4 to Bag 5
Fold the whole book closed and add a strip of card stock to the back of the flap of bag 4. Fold bag 5 with the flap underneath (this will later be attached to the chipboard). Attach the strip from bag 4 onto the top of bag 5.
This is what the book will look like closed. This is what will be attached to the chipboard cover.
Step 4
Cut two pieces of On Board Sheets to measure 7” x 5-1/2”. Use the Paper Cutter to cut your chipboard. You will need to slice it on one side first, then flip it over and slice it on the other side. You should then be able to bend the excess bit of chipboard off so that your covers measure 7” x 5-1/2”.
Step 5
Cover both pieces of chipboard with 7” x 5-1/2” pieces of Beau Chateau Designer Series Paper (DSP), using Multipurpose Liquid Glue. Use a Bone Folder, smooth out any bubbles or creases.
www.CraftProjectCentral.com Email:[email protected]
Artwork © Stampin’ Up!
Step 5
Step 6
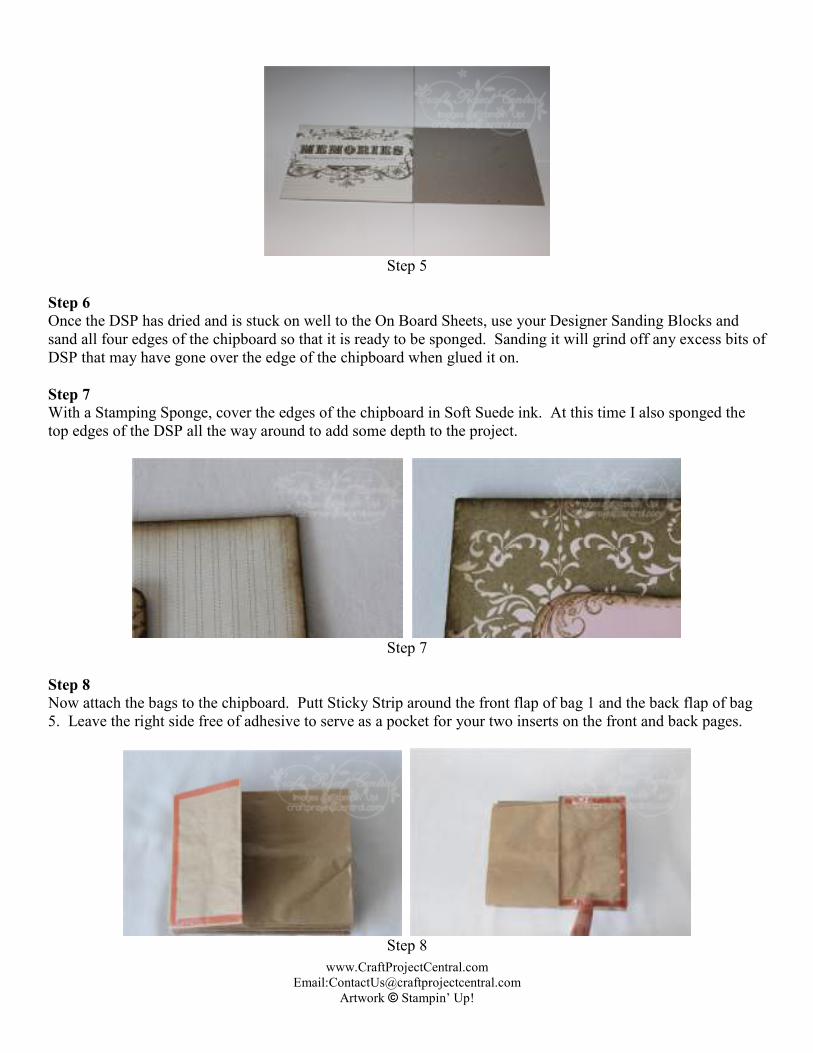
Once the DSP has dried and is stuck on well to the On Board Sheets, use your Designer Sanding Blocks and sand all four edges of the chipboard so that it is ready to be sponged. Sanding it will grind off any excess bits of DSP that may have gone over the edge of the chipboard when glued it on.
Step 7 With a Stamping Sponge, cover the edges of the chipboard in Soft Suede ink. At this time I also sponged the top edges of the DSP all the way around to add some depth to the project.
Step 7
Step 8
Now attach the bags to the chipboard. Putt Sticky Strip around the front flap of bag 1 and the back flap of bag 5. Leave the right side free of adhesive to serve as a pocket for your two inserts on the front and back pages.
Step 8
www.CraftProjectCentral.com Email:[email protected]
Artwork © Stampin’ Up!
Now that you have the base of the book put together, you can start to embellish it! Let’s start with the cover!
Step 9
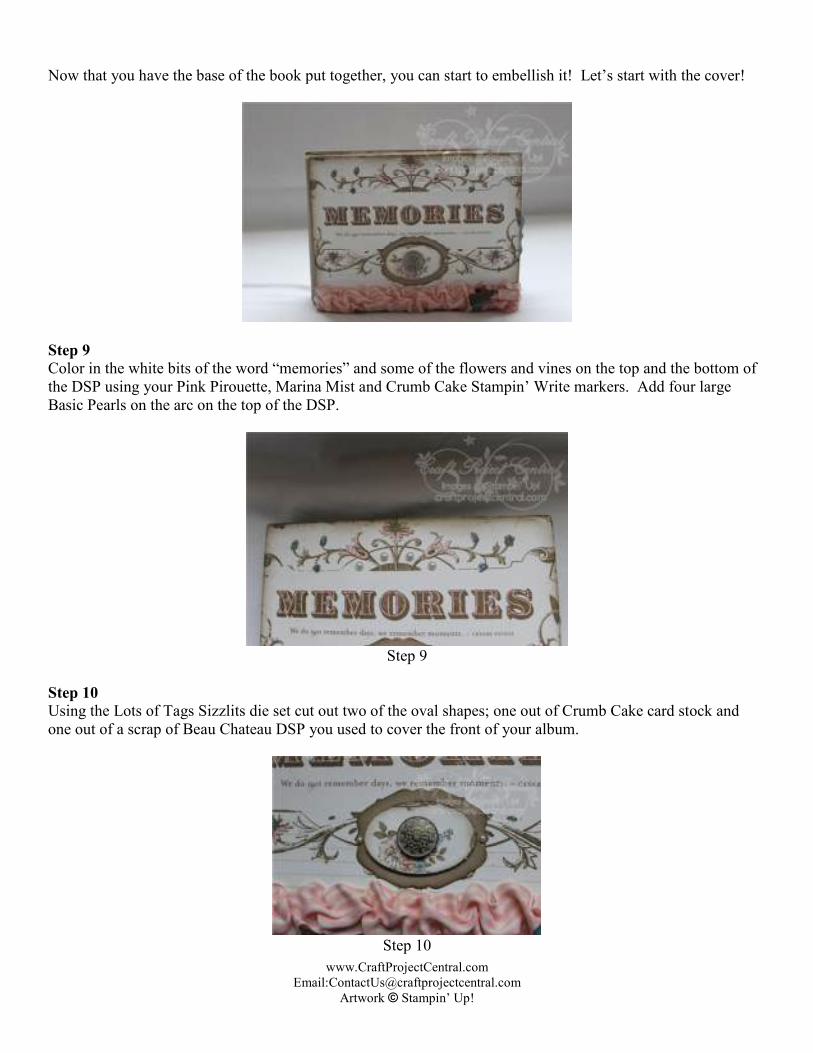
Color in the white bits of the word “memories” and some of the flowers and vines on the top and the bottom of the DSP using your Pink Pirouette, Marina Mist and Crumb Cake Stampin’ Write markers. Add four large Basic Pearls on the arc on the top of the DSP.
Step 9
Step 10 Using the Lots of Tags Sizzlits die set cut out two of the oval shapes; one out of Crumb Cake card stock and one out of a scrap of Beau Chateau DSP you used to cover the front of your album.
Step 10
www.CraftProjectCentral.com Email:[email protected]
Artwork © Stampin’ Up!
Step 11
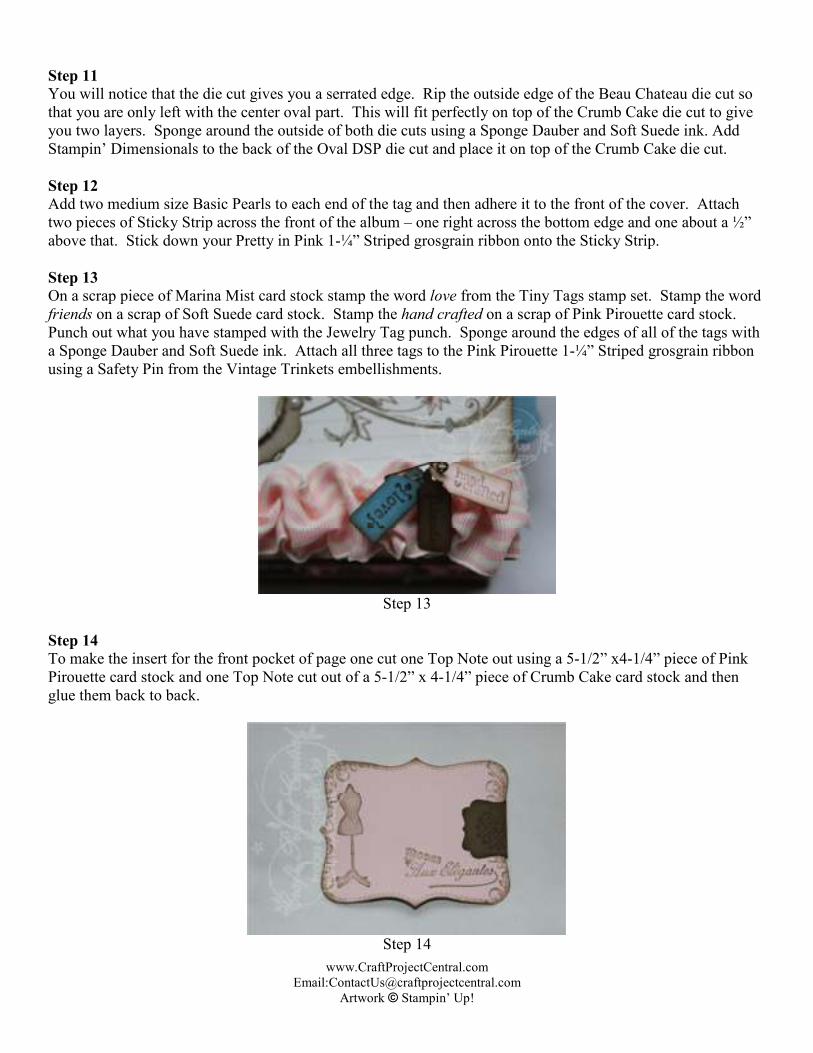
You will notice that the die cut gives you a serrated edge. Rip the outside edge of the Beau Chateau die cut so that you are only left with the center oval part. This will fit perfectly on top of the Crumb Cake die cut to give you two layers. Sponge around the outside of both die cuts using a Sponge Dauber and Soft Suede ink. Add Stampin’ Dimensionals to the back of the Oval DSP die cut and place it on top of the Crumb Cake die cut.
Step 12 Add two medium size Basic Pearls to each end of the tag and then adhere it to the front of the cover. Attach two pieces of Sticky Strip across the front of the album – one right across the bottom edge and one about a ½” above that. Stick down your Pretty in Pink 1-¼” Striped grosgrain ribbon onto the Sticky Strip.
Step 13 On a scrap piece of Marina Mist card stock stamp the word love from the Tiny Tags stamp set. Stamp the word friends on a scrap of Soft Suede card stock. Stamp the hand crafted on a scrap of Pink Pirouette card stock. Punch out what you have stamped with the Jewelry Tag punch. Sponge around the edges of all of the tags with a Sponge Dauber and Soft Suede ink. Attach all three tags to the Pink Pirouette 1-¼” Striped grosgrain ribbon using a Safety Pin from the Vintage Trinkets embellishments.
Step 13
Step 14 To make the insert for the front pocket of page one cut one Top Note out using a 5-1/2” x4-1/4” piece of Pink Pirouette card stock and one Top Note cut out of a 5-1/2” x 4-1/4” piece of Crumb Cake card stock and then glue them back to back.
Step 14
www.CraftProjectCentral.com Email:[email protected]
Artwork © Stampin’ Up!
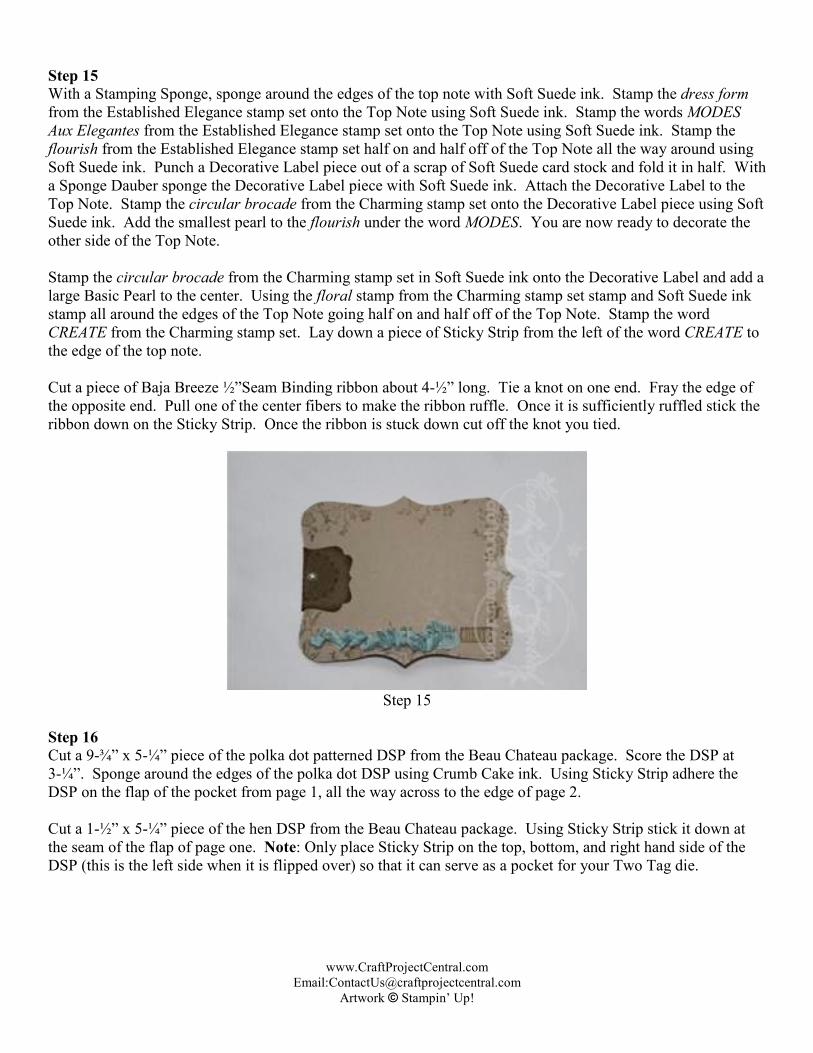
Step 15 With a Stamping Sponge, sponge around the edges of the top note with Soft Suede ink. Stamp the dress form from the Established Elegance stamp set onto the Top Note using Soft Suede ink. Stamp the words MODES
Aux Elegantes from the Established Elegance stamp set onto the Top Note using Soft Suede ink. Stamp the flourish from the Established Elegance stamp set half on and half off of the Top Note all the way around using Soft Suede ink. Punch a Decorative Label piece out of a scrap of Soft Suede card stock and fold it in half. With a Sponge Dauber sponge the Decorative Label piece with Soft Suede ink. Attach the Decorative Label to the Top Note. Stamp the circular brocade from the Charming stamp set onto the Decorative Label piece using Soft Suede ink. Add the smallest pearl to the flourish under the word MODES. You are now ready to decorate the other side of the Top Note. Stamp the circular brocade from the Charming stamp set in Soft Suede ink onto the Decorative Label and add a large Basic Pearl to the center. Using the floral stamp from the Charming stamp set stamp and Soft Suede ink stamp all around the edges of the Top Note going half on and half off of the Top Note. Stamp the word CREATE from the Charming stamp set. Lay down a piece of Sticky Strip from the left of the word CREATE to the edge of the top note. Cut a piece of Baja Breeze ½”Seam Binding ribbon about 4-½” long. Tie a knot on one end. Fray the edge of the opposite end. Pull one of the center fibers to make the ribbon ruffle. Once it is sufficiently ruffled stick the ribbon down on the Sticky Strip. Once the ribbon is stuck down cut off the knot you tied.
Step 15
Step 16
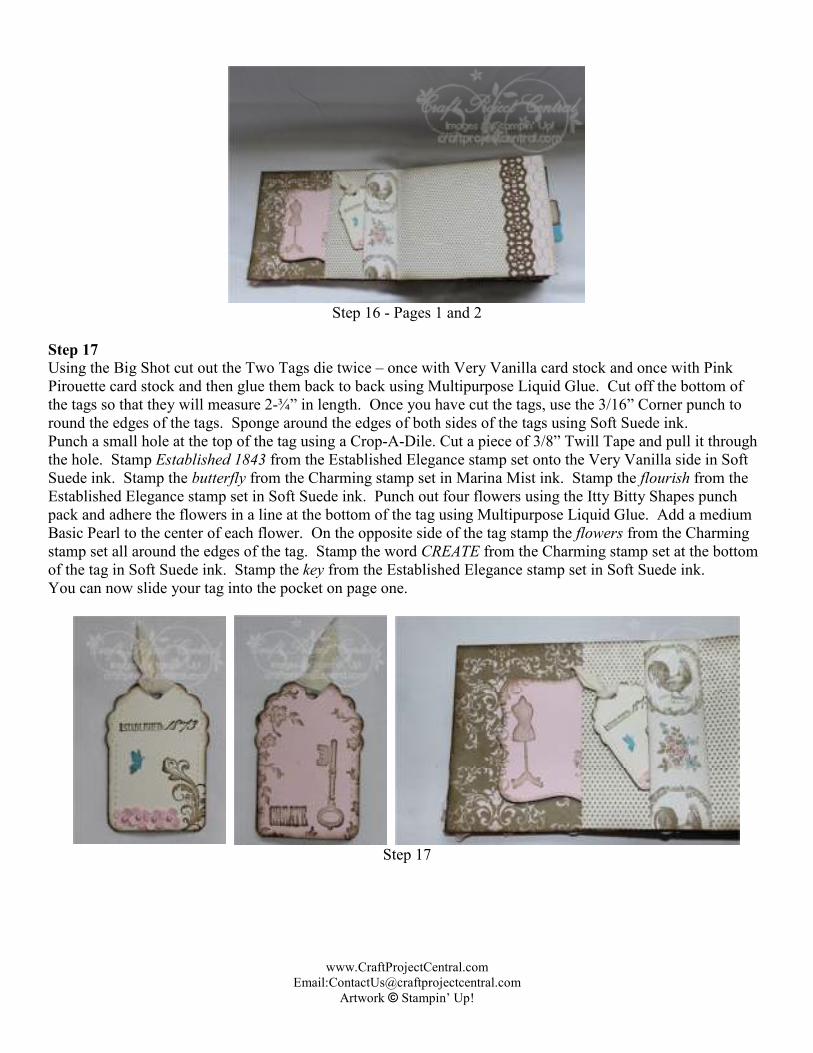
Cut a 9-¾” x 5-¼” piece of the polka dot patterned DSP from the Beau Chateau package. Score the DSP at 3-¼”. Sponge around the edges of the polka dot DSP using Crumb Cake ink. Using Sticky Strip adhere the DSP on the flap of the pocket from page 1, all the way across to the edge of page 2. Cut a 1-½” x 5-¼” piece of the hen DSP from the Beau Chateau package. Using Sticky Strip stick it down at the seam of the flap of page one. Note: Only place Sticky Strip on the top, bottom, and right hand side of the DSP (this is the left side when it is flipped over) so that it can serve as a pocket for your Two Tag die.
www.CraftProjectCentral.com Email:[email protected]
Artwork © Stampin’ Up!
Step 16 - Pages 1 and 2
Step 17 Using the Big Shot cut out the Two Tags die twice – once with Very Vanilla card stock and once with Pink Pirouette card stock and then glue them back to back using Multipurpose Liquid Glue. Cut off the bottom of the tags so that they will measure 2-¾” in length. Once you have cut the tags, use the 3/16” Corner punch to round the edges of the tags. Sponge around the edges of both sides of the tags using Soft Suede ink. Punch a small hole at the top of the tag using a Crop-A-Dile. Cut a piece of 3/8” Twill Tape and pull it through the hole. Stamp Established 1843 from the Established Elegance stamp set onto the Very Vanilla side in Soft Suede ink. Stamp the butterfly from the Charming stamp set in Marina Mist ink. Stamp the flourish from the Established Elegance stamp set in Soft Suede ink. Punch out four flowers using the Itty Bitty Shapes punch pack and adhere the flowers in a line at the bottom of the tag using Multipurpose Liquid Glue. Add a medium Basic Pearl to the center of each flower. On the opposite side of the tag stamp the flowers from the Charming stamp set all around the edges of the tag. Stamp the word CREATE from the Charming stamp set at the bottom of the tag in Soft Suede ink. Stamp the key from the Established Elegance stamp set in Soft Suede ink. You can now slide your tag into the pocket on page one.
Step 17
www.CraftProjectCentral.com Email:[email protected]
Artwork © Stampin’ Up!
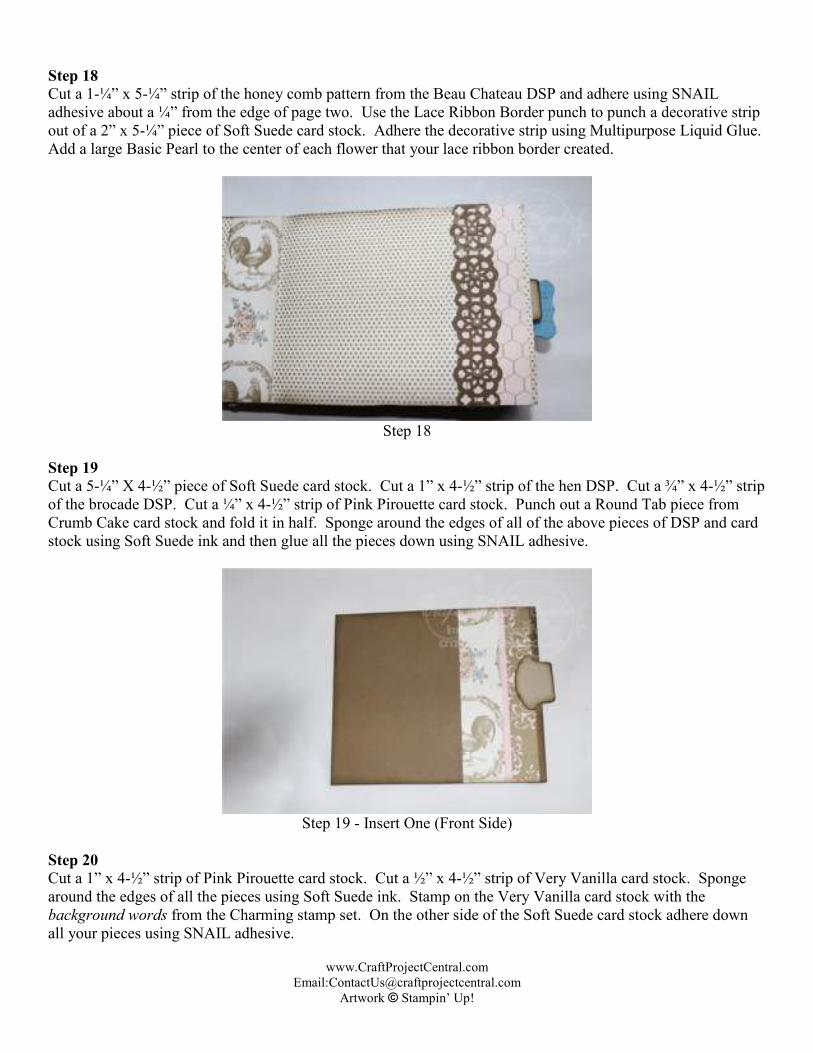
Step 18 Cut a 1-¼” x 5-¼” strip of the honey comb pattern from the Beau Chateau DSP and adhere using SNAIL adhesive about a ¼” from the edge of page two. Use the Lace Ribbon Border punch to punch a decorative strip out of a 2” x 5-¼” piece of Soft Suede card stock. Adhere the decorative strip using Multipurpose Liquid Glue. Add a large Basic Pearl to the center of each flower that your lace ribbon border created.
Step 18
Step 19 Cut a 5-¼” X 4-½” piece of Soft Suede card stock. Cut a 1” x 4-½” strip of the hen DSP. Cut a ¾” x 4-½” strip of the brocade DSP. Cut a ¼” x 4-½” strip of Pink Pirouette card stock. Punch out a Round Tab piece from Crumb Cake card stock and fold it in half. Sponge around the edges of all of the above pieces of DSP and card stock using Soft Suede ink and then glue all the pieces down using SNAIL adhesive.
Step 19 - Insert One (Front Side)
Step 20
Cut a 1” x 4-½” strip of Pink Pirouette card stock. Cut a ½” x 4-½” strip of Very Vanilla card stock. Sponge around the edges of all the pieces using Soft Suede ink. Stamp on the Very Vanilla card stock with the background words from the Charming stamp set. On the other side of the Soft Suede card stock adhere down all your pieces using SNAIL adhesive.

www.CraftProjectCentral.com Email:[email protected]
Artwork © Stampin’ Up!
Step 20 - Insert One (Backside)
Step 21 Cut a 6-¾” x 5-¼” piece of the vanilla/blue Beau Chateau DSP. Sponge around the edges of the DSP using Soft Suede ink adhere the DSP to the paper bag using Sticky Strip around all four sides. Using the Big Shot, the Floral Fusion die, and scraps of card stock, cut out one Soft Suede, one Very Vanilla and one Marina Mist flower. Punch out a Pink Pirouette flower using the flower punch from the Itty Bitty Shapes punch pack. Sponge around the edges of all the flowers using Soft Suede ink. Adhere all the flowers together using Multipurpose Liquid Glue. Add a medium Basic Pearl to the center of the top flower. Take a strip of Marina Mist 1/8” taffeta ribbon measuring about 2-½” and fold it in half. Use a Mini Glue Dot to adhere the ribbon to the back of the flowers. Attach the flowers to the Beau Chateau DSP using Multipurpose Liquid Glue.
Step 21 - Page 3
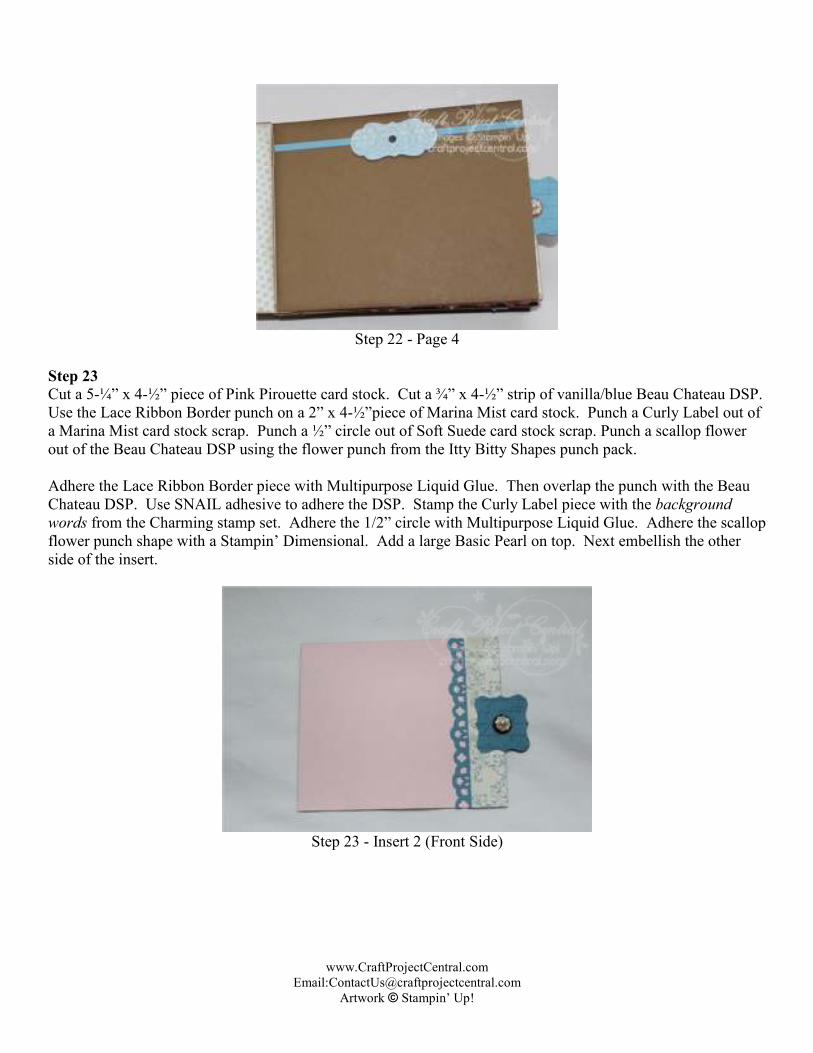
Step 22 Cut a 6-¾” x 5-¼” piece of Soft Suede card stock measuring and adhere to Page 4 using Sticky Strip. Add a ¼” x 6-¾”strip of Marina Mist card stock at the top. Use the Marina Mist DSP in the Beau Chateau pack and cut a tag using the Lots of Tags Sizzlits Set. Use the 1/16” hole punch and punch a hole in the middle of the tag and add a button from the Vintage Trinkets embellishments. Add Stampin’ Dimensionals to the tag and stick down in the top center of the page.
www.CraftProjectCentral.com Email:[email protected]
Artwork © Stampin’ Up!
Step 22 - Page 4
Step 23 Cut a 5-¼” x 4-½” piece of Pink Pirouette card stock. Cut a ¾” x 4-½” strip of vanilla/blue Beau Chateau DSP. Use the Lace Ribbon Border punch on a 2” x 4-½”piece of Marina Mist card stock. Punch a Curly Label out of a Marina Mist card stock scrap. Punch a ½” circle out of Soft Suede card stock scrap. Punch a scallop flower out of the Beau Chateau DSP using the flower punch from the Itty Bitty Shapes punch pack. Adhere the Lace Ribbon Border piece with Multipurpose Liquid Glue. Then overlap the punch with the Beau Chateau DSP. Use SNAIL adhesive to adhere the DSP. Stamp the Curly Label piece with the background words from the Charming stamp set. Adhere the 1/2” circle with Multipurpose Liquid Glue. Adhere the scallop flower punch shape with a Stampin’ Dimensional. Add a large Basic Pearl on top. Next embellish the other side of the insert.
Step 23 - Insert 2 (Front Side)

www.CraftProjectCentral.com Email:[email protected]
Artwork © Stampin’ Up!
Step 24
Cut a 1” x 4-½” strip of vanilla/Marina Mist Beau Chateau DSP. Cut a ½” x 4-½” strip of Marina Mist card stock. Punch a Curly Label out of a scrap piece of Marina Mist card stock. Punch a ½” circle out of Soft Suede card stock. Punch a flower from the Itty Bitty Shapes punch pack out of Crumb Cake card stock. Sponge around the edges of everything using Soft Suede ink. Adhere everything using SNAIL adhesive. Add Basic Pearls.
Step 24 - Insert 2 (Back Side)
Step 25 Cut a 6-¾” x 5-¼” piece of Vanilla/Marina Mist Beau Chateau DSP and adhere with Sticky Strip to the bag. Cut a 3” x 5-¼”piece of Soft Suede card stock. Cut a 2-¾” x 5” piece of polka dot Beau Chateau DSP. Create a pocket out of the Soft Suede card stock by attaching it with Sticky Strip on three sides. Be sure to leave the left side free of adhesive so that you will be able to slide your tags in and out. Using SNAIL adhesive adhere the polka dot Beau Chateau DSP to the Soft Suede card stock.
Step 25 - Page 5

www.CraftProjectCentral.com Email:[email protected]
Artwork © Stampin’ Up!
Step 26 Using the Big Shot cut out the Two Tags die four times – once with Crumb Cake card stock, once with Marina Mist card stock, once with the honey comb DSP and once with the Very Vanilla/Marina Mist DSP. Glue the tags back to back using Multipurpose Liquid Glue. Cut off the bottom of the tags so that they will measure 2-¾” in length. Once you have cut the tags, use the 3/16” Corner punch to round the edges of the tags. Sponge around the edges of both sides using Soft Suede ink. Punch a hole using the Crop-A-Dile at the Top of the tag. Cut a piece of 3/8” Twill Tape and pull it through the hole. On the Marina Mist tag stamp the background words from the Charming stamp set. Cut a 1/8” x 1-¾” strip of Very Vanilla card stock and adhere to the tag using Multipurpose Liquid Glue. Punch three flowers out of Soft Suede, Pink Pirouette and Crumb Cake card stock scraps with the flower punch from the Itty Bitty Shapes punch pack. Adhere the flowers using Multipurpose Liquid Glue and add Basic Pearls. On the Crumb Cake tag stamp the butterfly from the Clearly for You stamp set at the top of the tag. Cut a ¼” x 1-3/4” strip of Pink Pirouette card stock and adhere using Multipurpose Liquid Glue. Stamp the flower from the Established Elegance stamp set on the bottom of the tag and add Basic Pearls. Place the tags in the pocket on page 5.
Two Tag insert Front Side Two Tag insert Back Side
www.CraftProjectCentral.com Email:[email protected]
Artwork © Stampin’ Up!
Step 26
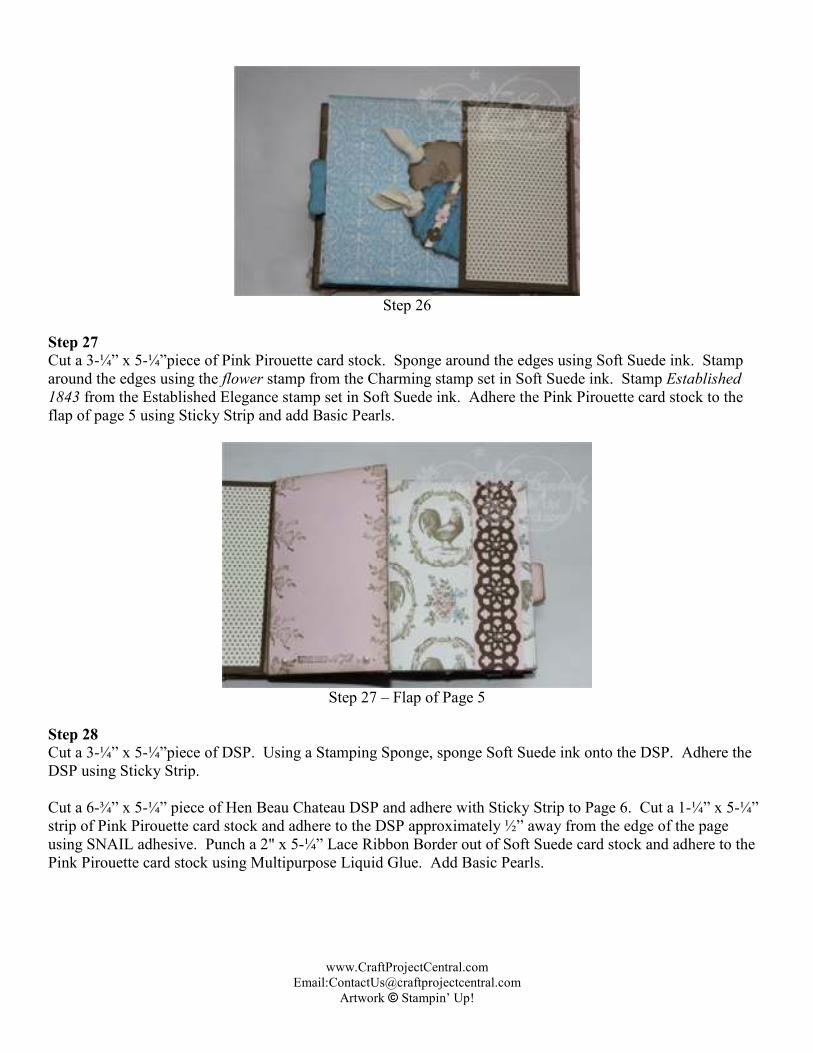
Step 27 Cut a 3-¼” x 5-¼”piece of Pink Pirouette card stock. Sponge around the edges using Soft Suede ink. Stamp around the edges using the flower stamp from the Charming stamp set in Soft Suede ink. Stamp Established 1843 from the Established Elegance stamp set in Soft Suede ink. Adhere the Pink Pirouette card stock to the flap of page 5 using Sticky Strip and add Basic Pearls.
Step 27 – Flap of Page 5
Step 28 Cut a 3-¼” x 5-¼”piece of DSP. Using a Stamping Sponge, sponge Soft Suede ink onto the DSP. Adhere the DSP using Sticky Strip. Cut a 6-¾” x 5-¼” piece of Hen Beau Chateau DSP and adhere with Sticky Strip to Page 6. Cut a 1-¼” x 5-¼” strip of Pink Pirouette card stock and adhere to the DSP approximately ½” away from the edge of the page using SNAIL adhesive. Punch a 2" x 5-¼” Lace Ribbon Border out of Soft Suede card stock and adhere to the Pink Pirouette card stock using Multipurpose Liquid Glue. Add Basic Pearls.
www.CraftProjectCentral.com Email:[email protected]
Artwork © Stampin’ Up!
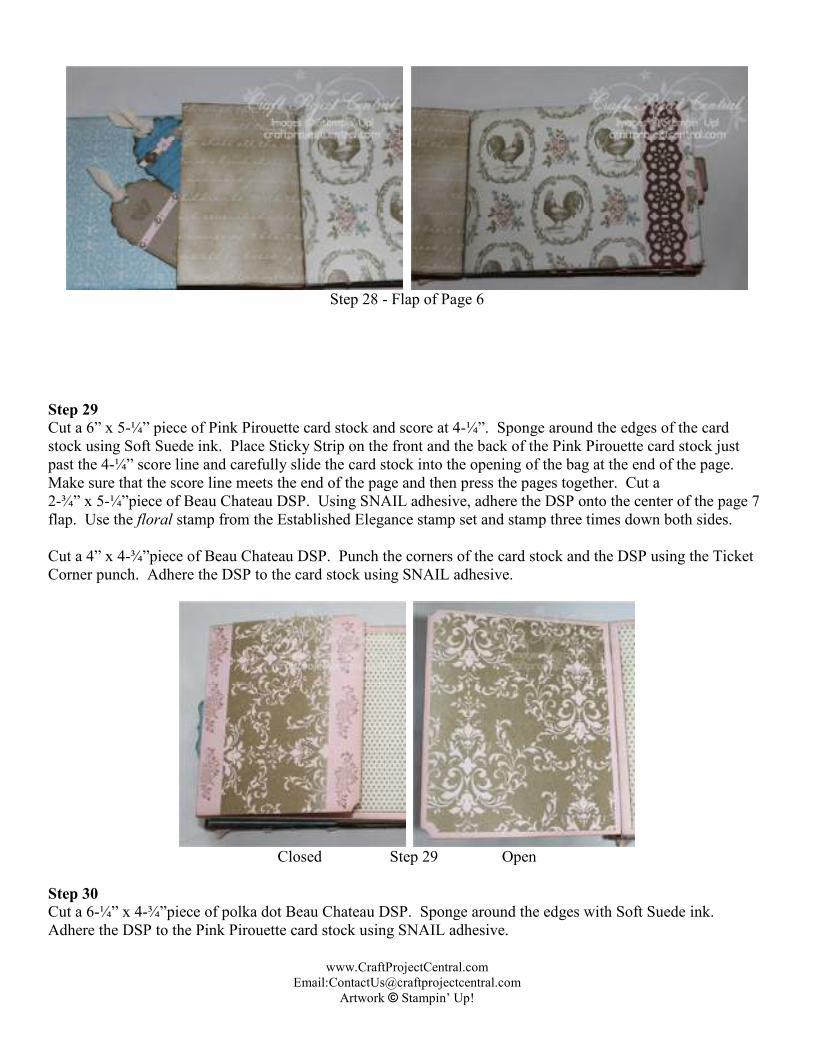
Step 28 - Flap of Page 6
Step 29
Cut a 6” x 5-¼” piece of Pink Pirouette card stock and score at 4-¼”. Sponge around the edges of the card stock using Soft Suede ink. Place Sticky Strip on the front and the back of the Pink Pirouette card stock just past the 4-¼” score line and carefully slide the card stock into the opening of the bag at the end of the page. Make sure that the score line meets the end of the page and then press the pages together. Cut a 2-¾” x 5-¼”piece of Beau Chateau DSP. Using SNAIL adhesive, adhere the DSP onto the center of the page 7 flap. Use the floral stamp from the Established Elegance stamp set and stamp three times down both sides. Cut a 4” x 4-¾”piece of Beau Chateau DSP. Punch the corners of the card stock and the DSP using the Ticket Corner punch. Adhere the DSP to the card stock using SNAIL adhesive.
Closed Step 29 Open
Step 30 Cut a 6-¼” x 4-¾”piece of polka dot Beau Chateau DSP. Sponge around the edges with Soft Suede ink. Adhere the DSP to the Pink Pirouette card stock using SNAIL adhesive.

www.CraftProjectCentral.com Email:[email protected]
Artwork © Stampin’ Up!
Step 30
Step 31 Cut a 6-3/4” x 5-¼” piece of Soft Suede card stock. Adhere to page 8 using Sticky Strip around all the edges. Cut a 2" x 5-¼”piece of hen DSP. Sponge around the edges using Crumb Cake ink. Adhere the DSP to the card stock using SNAIL adhesive. Place a strip of Sticky Strip straight across the bottom, about ½” from the bottom of the page. Cut an 8” long piece of Pretty in Pink 5/8” satin ribbon and adhere the ribbon to the Sticky Strip bunching and ruffling it while you place it.
Step 31
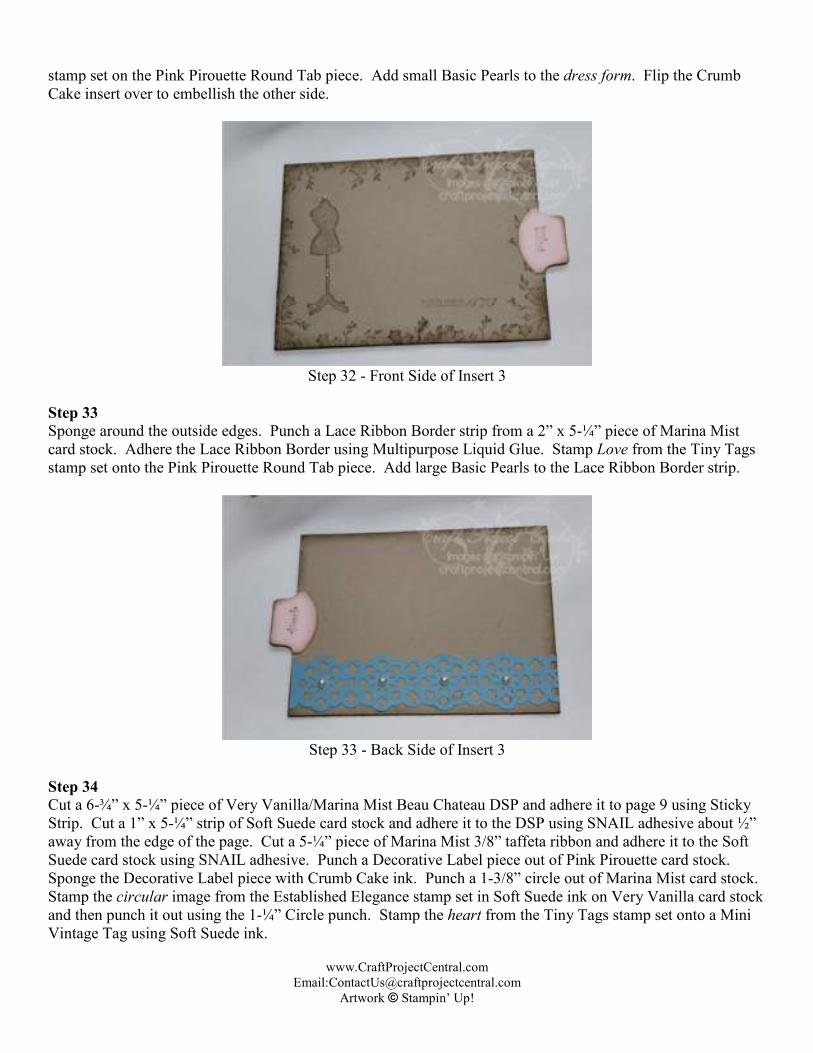
Step 32 Cut a 5-¼” x 4-½” piece of Crumb Cake card stock. Punch a Round Tab piece out of Pink Pirouette card stock. Sponge around the edges of the Crumb Cake and the Pink Pirouette card stock using Soft Suede ink. Stamp around the edges using the floral stamp from the Charming stamp set. Stamp the dress form from the Established Elegance stamp set in Soft Suede ink. Stamp Established 1843 in Soft Suede ink. Fold the Round Tab in half and adhere to the side of the slide using SNAIL adhesive. Stamp Hand Crafted from the Tiny Tags
www.CraftProjectCentral.com Email:[email protected]
Artwork © Stampin’ Up!
stamp set on the Pink Pirouette Round Tab piece. Add small Basic Pearls to the dress form. Flip the Crumb Cake insert over to embellish the other side.
Step 32 - Front Side of Insert 3
Step 33 Sponge around the outside edges. Punch a Lace Ribbon Border strip from a 2” x 5-¼” piece of Marina Mist card stock. Adhere the Lace Ribbon Border using Multipurpose Liquid Glue. Stamp Love from the Tiny Tags stamp set onto the Pink Pirouette Round Tab piece. Add large Basic Pearls to the Lace Ribbon Border strip.
Step 33 - Back Side of Insert 3
Step 34 Cut a 6-¾” x 5-¼” piece of Very Vanilla/Marina Mist Beau Chateau DSP and adhere it to page 9 using Sticky Strip. Cut a 1” x 5-¼” strip of Soft Suede card stock and adhere it to the DSP using SNAIL adhesive about ½” away from the edge of the page. Cut a 5-¼” piece of Marina Mist 3/8” taffeta ribbon and adhere it to the Soft Suede card stock using SNAIL adhesive. Punch a Decorative Label piece out of Pink Pirouette card stock. Sponge the Decorative Label piece with Crumb Cake ink. Punch a 1-3/8” circle out of Marina Mist card stock. Stamp the circular image from the Established Elegance stamp set in Soft Suede ink on Very Vanilla card stock and then punch it out using the 1-¼” Circle punch. Stamp the heart from the Tiny Tags stamp set onto a Mini Vintage Tag using Soft Suede ink.
www.CraftProjectCentral.com Email:[email protected]
Artwork © Stampin’ Up!
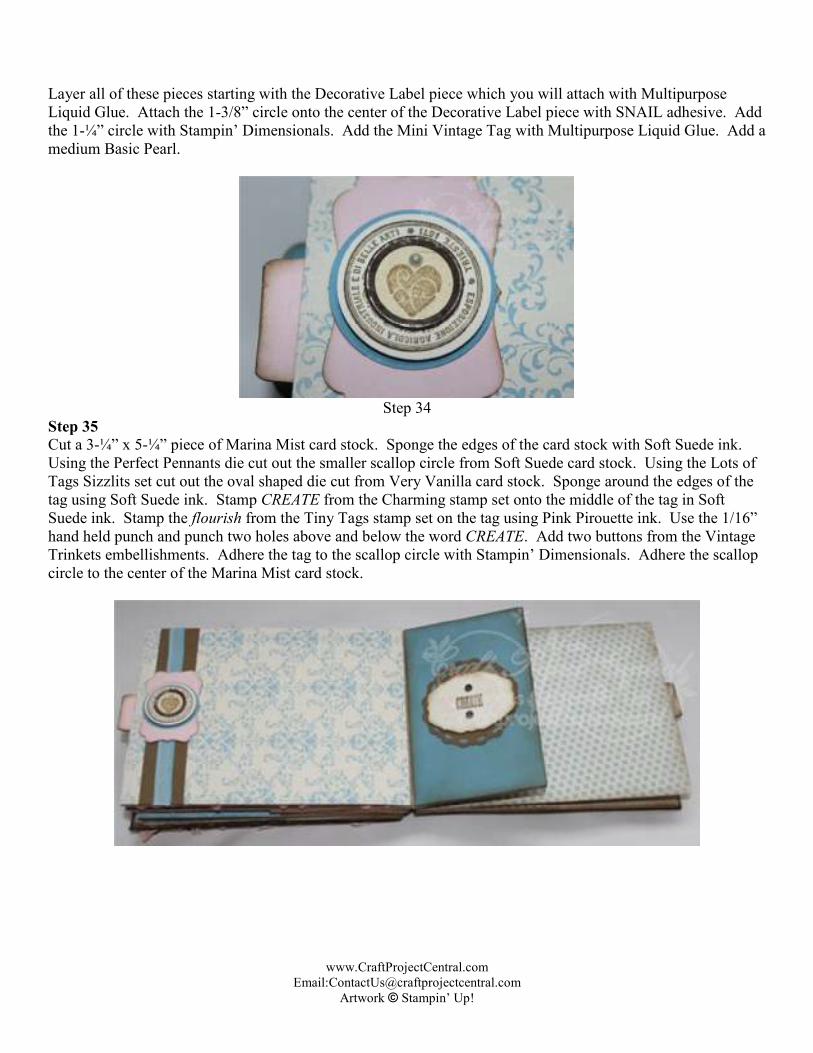
Layer all of these pieces starting with the Decorative Label piece which you will attach with Multipurpose Liquid Glue. Attach the 1-3/8” circle onto the center of the Decorative Label piece with SNAIL adhesive. Add the 1-¼” circle with Stampin’ Dimensionals. Add the Mini Vintage Tag with Multipurpose Liquid Glue. Add a medium Basic Pearl.
Step 34
Step 35
Cut a 3-¼” x 5-¼” piece of Marina Mist card stock. Sponge the edges of the card stock with Soft Suede ink. Using the Perfect Pennants die cut out the smaller scallop circle from Soft Suede card stock. Using the Lots of Tags Sizzlits set cut out the oval shaped die cut from Very Vanilla card stock. Sponge around the edges of the tag using Soft Suede ink. Stamp CREATE from the Charming stamp set onto the middle of the tag in Soft Suede ink. Stamp the flourish from the Tiny Tags stamp set on the tag using Pink Pirouette ink. Use the 1/16” hand held punch and punch two holes above and below the word CREATE. Add two buttons from the Vintage Trinkets embellishments. Adhere the tag to the scallop circle with Stampin’ Dimensionals. Adhere the scallop circle to the center of the Marina Mist card stock.

www.CraftProjectCentral.com Email:[email protected]
Artwork © Stampin’ Up!
Step 35 - Flap of Page 9
Step 36 Cut a 3-¼” x 5-¼” piece of Soft Suede card stock. Sponge the edges of the card stock with Soft Suede ink and then adhere it to the flap of page 10. Run a piece of Sticky Strip across the bottom of the flap. Cut a 6” piece of Chantilly ½” Crochet Trim. Attach the Chantilly ½” Crochet Trim to the Sticky Strip, ruffling while you adhere. Cut a 6-¾” x 5-¼” piece of Beau Chateau DSP. Sponge the DSP with Crumb Cake ink. Adhere the DSP to page 10 using Sticky Strip around all four sides.
Step 36 - Page 9 and the Flap of Page 10
Step 37 Cut a 5-¼” x 4-½” piece of Marina Mist card stock. Sponge around the edges of the card stock using Soft Suede ink. Cut a 1” x 4-½” strip of Crumb Cake card stock. Sponge the edges of the Crumb Cake card stock using Soft Suede ink. Stamp the Crumb Cake card stock using the background words from the Charming stamp set. Adhere the strip of Crumb Cake card stock to the Marina Mist card stock using SNAIL adhesive. Cut a 4-½” piece of Marina Mist ½” Scallop Dots ribbon and adhere it to the Crumb Cake card stock using SNAIL adhesive. Punch a Round Tab out of Crumb Cake card stock. Sponge around the edges of the Round Tab piece using Soft Suede ink. Fold in half and adhere to the insert using SNAIL adhesive. Stamp the word CREATE from the Charming stamp set on the Round Tab piece in Soft Suede ink. Stamp the crown from the
www.CraftProjectCentral.com Email:[email protected]
Artwork © Stampin’ Up!
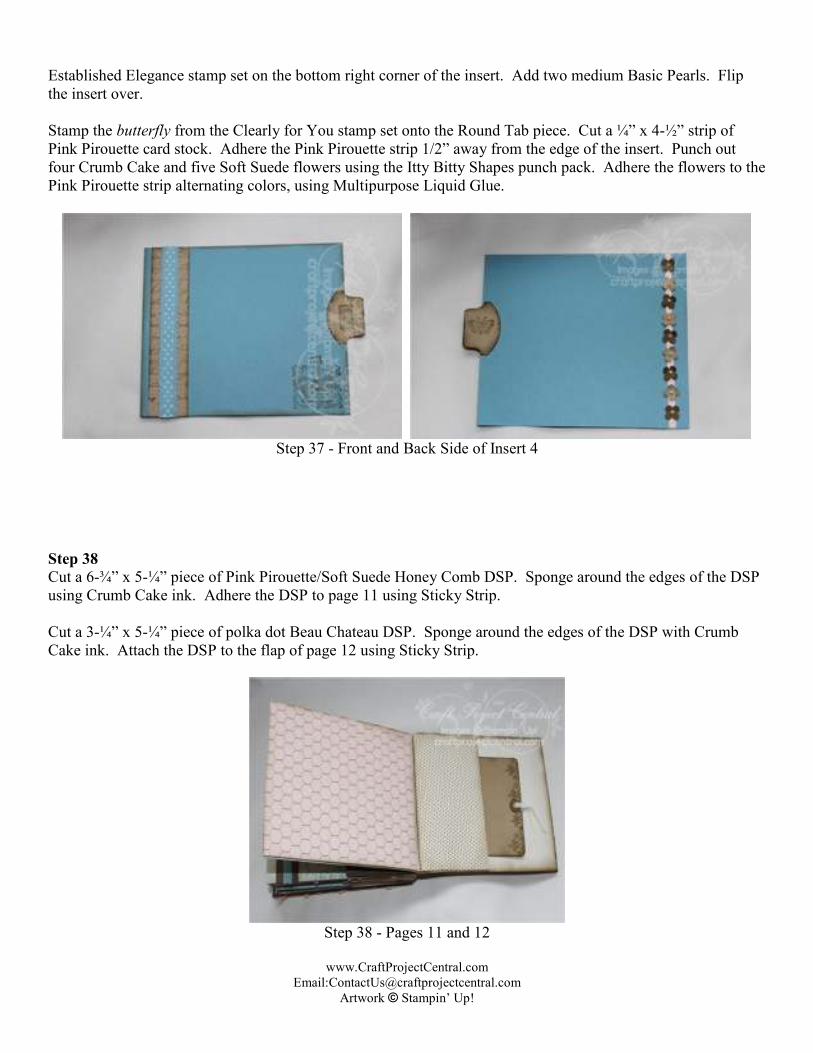
Established Elegance stamp set on the bottom right corner of the insert. Add two medium Basic Pearls. Flip the insert over. Stamp the butterfly from the Clearly for You stamp set onto the Round Tab piece. Cut a ¼” x 4-½” strip of Pink Pirouette card stock. Adhere the Pink Pirouette strip 1/2” away from the edge of the insert. Punch out four Crumb Cake and five Soft Suede flowers using the Itty Bitty Shapes punch pack. Adhere the flowers to the Pink Pirouette strip alternating colors, using Multipurpose Liquid Glue.
Step 37 - Front and Back Side of Insert 4
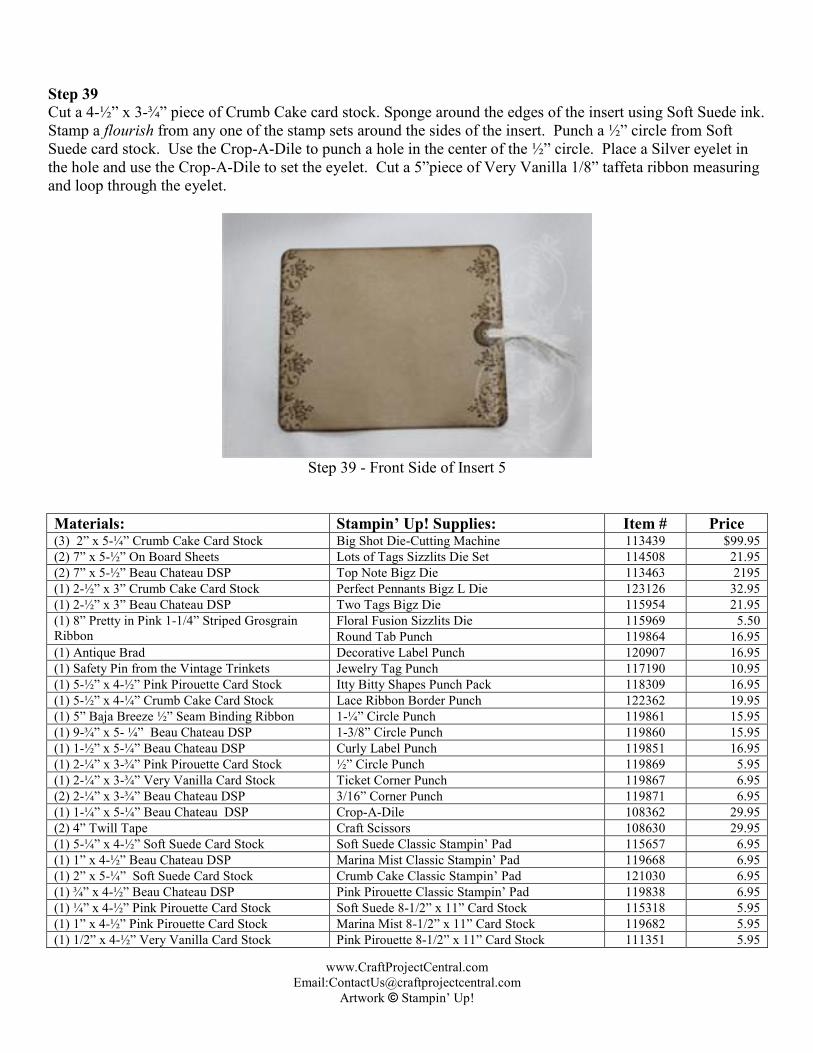
Step 38 Cut a 6-¾” x 5-¼” piece of Pink Pirouette/Soft Suede Honey Comb DSP. Sponge around the edges of the DSP using Crumb Cake ink. Adhere the DSP to page 11 using Sticky Strip. Cut a 3-¼” x 5-¼” piece of polka dot Beau Chateau DSP. Sponge around the edges of the DSP with Crumb Cake ink. Attach the DSP to the flap of page 12 using Sticky Strip.
Step 38 - Pages 11 and 12
www.CraftProjectCentral.com Email:[email protected]
Artwork © Stampin’ Up!
Step 39
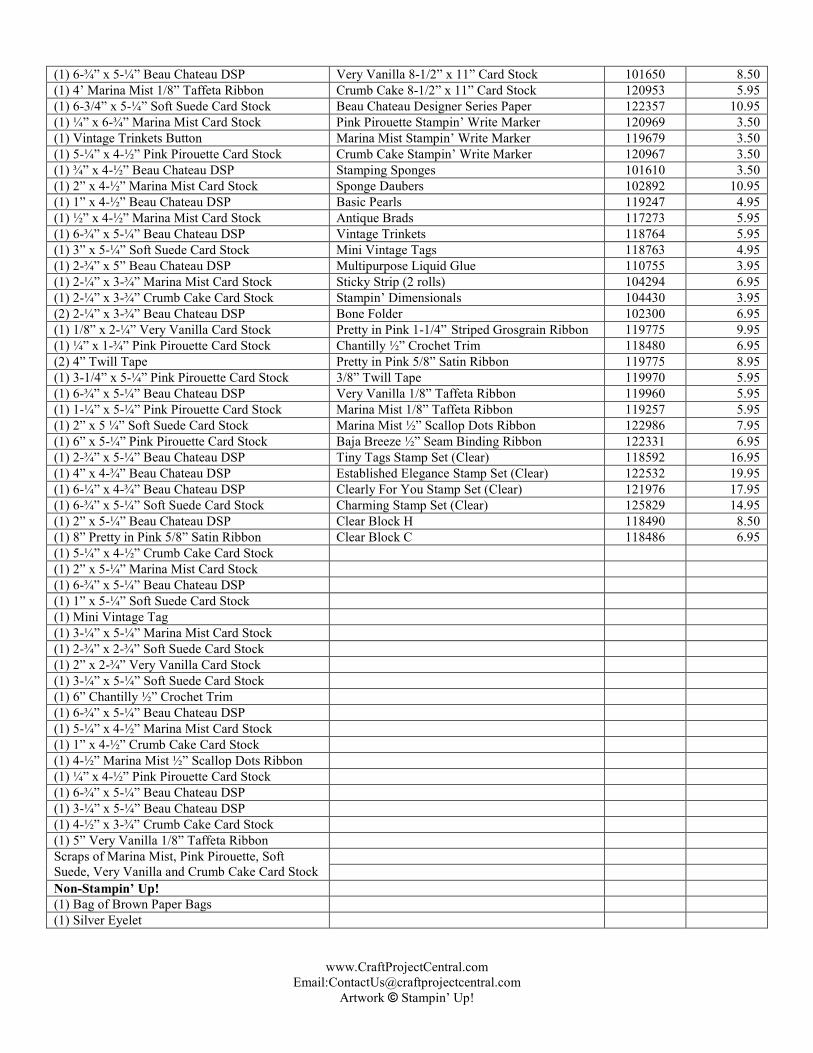
Cut a 4-½” x 3-¾” piece of Crumb Cake card stock. Sponge around the edges of the insert using Soft Suede ink. Stamp a flourish from any one of the stamp sets around the sides of the insert. Punch a ½” circle from Soft Suede card stock. Use the Crop-A-Dile to punch a hole in the center of the ½” circle. Place a Silver eyelet in the hole and use the Crop-A-Dile to set the eyelet. Cut a 5”piece of Very Vanilla 1/8” taffeta ribbon measuring and loop through the eyelet.
Step 39 - Front Side of Insert 5
Materials: Stampin’ Up! Supplies: Item # Price (3) 2” x 5-¼” Crumb Cake Card Stock Big Shot Die-Cutting Machine 113439 $99.95
(2) 7” x 5-½” On Board Sheets Lots of Tags Sizzlits Die Set 114508 21.95
(2) 7” x 5-½” Beau Chateau DSP Top Note Bigz Die 113463 2195
(1) 2-½” x 3” Crumb Cake Card Stock Perfect Pennants Bigz L Die 123126 32.95
(1) 2-½” x 3” Beau Chateau DSP Two Tags Bigz Die 115954 21.95
(1) 8” Pretty in Pink 1-1/4” Striped Grosgrain Ribbon
Floral Fusion Sizzlits Die 115969 5.50
Round Tab Punch 119864 16.95
(1) Antique Brad Decorative Label Punch 120907 16.95
(1) Safety Pin from the Vintage Trinkets Jewelry Tag Punch 117190 10.95
(1) 5-½” x 4-½” Pink Pirouette Card Stock Itty Bitty Shapes Punch Pack 118309 16.95
(1) 5-½” x 4-¼” Crumb Cake Card Stock Lace Ribbon Border Punch 122362 19.95
(1) 5” Baja Breeze ½” Seam Binding Ribbon 1-¼” Circle Punch 119861 15.95
(1) 9-¾” x 5- ¼” Beau Chateau DSP 1-3/8” Circle Punch 119860 15.95
(1) 1-½” x 5-¼” Beau Chateau DSP Curly Label Punch 119851 16.95
(1) 2-¼” x 3-¾” Pink Pirouette Card Stock ½” Circle Punch 119869 5.95
(1) 2-¼” x 3-¾” Very Vanilla Card Stock Ticket Corner Punch 119867 6.95
(2) 2-¼” x 3-¾” Beau Chateau DSP 3/16” Corner Punch 119871 6.95
(1) 1-¼” x 5-¼” Beau Chateau DSP Crop-A-Dile 108362 29.95
(2) 4” Twill Tape Craft Scissors 108630 29.95
(1) 5-¼” x 4-½” Soft Suede Card Stock Soft Suede Classic Stampin’ Pad 115657 6.95
(1) 1” x 4-½” Beau Chateau DSP Marina Mist Classic Stampin’ Pad 119668 6.95
(1) 2” x 5-¼” Soft Suede Card Stock Crumb Cake Classic Stampin’ Pad 121030 6.95
(1) ¾” x 4-½” Beau Chateau DSP Pink Pirouette Classic Stampin’ Pad 119838 6.95 (1) ¼” x 4-½” Pink Pirouette Card Stock Soft Suede 8-1/2” x 11” Card Stock 115318 5.95 (1) 1” x 4-½” Pink Pirouette Card Stock Marina Mist 8-1/2” x 11” Card Stock 119682 5.95 (1) 1/2” x 4-½” Very Vanilla Card Stock Pink Pirouette 8-1/2” x 11” Card Stock 111351 5.95
www.CraftProjectCentral.com Email:[email protected]
Artwork © Stampin’ Up!
(1) 6-¾” x 5-¼” Beau Chateau DSP Very Vanilla 8-1/2” x 11” Card Stock 101650 8.50 (1) 4’ Marina Mist 1/8” Taffeta Ribbon Crumb Cake 8-1/2” x 11” Card Stock 120953 5.95 (1) 6-3/4” x 5-¼” Soft Suede Card Stock Beau Chateau Designer Series Paper 122357 10.95
(1) ¼” x 6-¾” Marina Mist Card Stock Pink Pirouette Stampin’ Write Marker 120969 3.50 (1) Vintage Trinkets Button Marina Mist Stampin’ Write Marker 119679 3.50
(1) 5-¼” x 4-½” Pink Pirouette Card Stock Crumb Cake Stampin’ Write Marker 120967 3.50
(1) ¾” x 4-½” Beau Chateau DSP Stamping Sponges 101610 3.50
(1) 2” x 4-½” Marina Mist Card Stock Sponge Daubers 102892 10.95
(1) 1” x 4-½” Beau Chateau DSP Basic Pearls 119247 4.95
(1) ½” x 4-½” Marina Mist Card Stock Antique Brads 117273 5.95
(1) 6-¾” x 5-¼” Beau Chateau DSP Vintage Trinkets 118764 5.95
(1) 3” x 5-¼” Soft Suede Card Stock Mini Vintage Tags 118763 4.95
(1) 2-¾” x 5” Beau Chateau DSP Multipurpose Liquid Glue 110755 3.95
(1) 2-¼” x 3-¾” Marina Mist Card Stock Sticky Strip (2 rolls) 104294 6.95
(1) 2-¼” x 3-¾” Crumb Cake Card Stock Stampin’ Dimensionals 104430 3.95
(2) 2-¼” x 3-¾” Beau Chateau DSP Bone Folder 102300 6.95
(1) 1/8” x 2-¼” Very Vanilla Card Stock Pretty in Pink 1-1/4” Striped Grosgrain Ribbon 119775 9.95
(1) ¼” x 1-¾” Pink Pirouette Card Stock Chantilly ½” Crochet Trim 118480 6.95
(2) 4” Twill Tape Pretty in Pink 5/8” Satin Ribbon 119775 8.95
(1) 3-1/4” x 5-¼” Pink Pirouette Card Stock 3/8” Twill Tape 119970 5.95
(1) 6-¾” x 5-¼” Beau Chateau DSP Very Vanilla 1/8” Taffeta Ribbon 119960 5.95
(1) 1-¼” x 5-¼” Pink Pirouette Card Stock Marina Mist 1/8” Taffeta Ribbon 119257 5.95
(1) 2” x 5 ¼” Soft Suede Card Stock Marina Mist ½” Scallop Dots Ribbon 122986 7.95
(1) 6” x 5-¼” Pink Pirouette Card Stock Baja Breeze ½” Seam Binding Ribbon 122331 6.95
(1) 2-¾” x 5-¼” Beau Chateau DSP Tiny Tags Stamp Set (Clear) 118592 16.95
(1) 4” x 4-¾” Beau Chateau DSP Established Elegance Stamp Set (Clear) 122532 19.95
(1) 6-¼” x 4-¾” Beau Chateau DSP Clearly For You Stamp Set (Clear) 121976 17.95
(1) 6-¾” x 5-¼” Soft Suede Card Stock Charming Stamp Set (Clear) 125829 14.95
(1) 2” x 5-¼” Beau Chateau DSP Clear Block H 118490 8.50
(1) 8” Pretty in Pink 5/8” Satin Ribbon Clear Block C 118486 6.95
(1) 5-¼” x 4-½” Crumb Cake Card Stock
(1) 2” x 5-¼” Marina Mist Card Stock
(1) 6-¾” x 5-¼” Beau Chateau DSP
(1) 1” x 5-¼” Soft Suede Card Stock
(1) Mini Vintage Tag
(1) 3-¼” x 5-¼” Marina Mist Card Stock
(1) 2-¾” x 2-¾” Soft Suede Card Stock
(1) 2” x 2-¾” Very Vanilla Card Stock
(1) 3-¼” x 5-¼” Soft Suede Card Stock
(1) 6” Chantilly ½” Crochet Trim
(1) 6-¾” x 5-¼” Beau Chateau DSP
(1) 5-¼” x 4-½” Marina Mist Card Stock
(1) 1” x 4-½” Crumb Cake Card Stock
(1) 4-½” Marina Mist ½” Scallop Dots Ribbon
(1) ¼” x 4-½” Pink Pirouette Card Stock
(1) 6-¾” x 5-¼” Beau Chateau DSP
(1) 3-¼” x 5-¼” Beau Chateau DSP
(1) 4-½” x 3-¾” Crumb Cake Card Stock
(1) 5” Very Vanilla 1/8” Taffeta Ribbon
Scraps of Marina Mist, Pink Pirouette, Soft Suede, Very Vanilla and Crumb Cake Card Stock
Non-Stampin’ Up!
(1) Bag of Brown Paper Bags
(1) Silver Eyelet