1
Acerca de esta Guía
Muchas gracias por elegir el Router Inalámbrico de Banda Ancha . Este Router Inalámbrico, de
buen precio, brinda una solución dedicada para la pequeña oficina, hogar y cuarto universitario,
ya que integra una variedad de aplicaciones inalámbricas, como el modelo de puente
inalámbrico, modelo de punto de acceso (AP), etc. Además proporciona una amplia protección
de datos y admite el método de cifrado WEP, WPA, y WPS. Es la mejor opción para disfrutar
navegando por la Internet inalámbrica y mirando videos de alta definición.
El Router Inalámbrico N de Selektro Power es fácil de configurar, aún cuando no esté
familiarizado con sus características. Para aprovechar mejor todas las funciones de este
producto, lea esta guía detenidamente antes de instalar el router.
Marca comercial, declaración de derechos de autor:
Como marca (marca comercial) ha sido registrada por Selektro Power Inc. Los derechos de
autor de todas las piezas de los productos, incluidos sus accesorios, y el software pertenecen a
Selektro Power Inc. Sin la correspondiente autorización, nadie debe de manera arbitraria imitar,
copiar o traducir los productos. Las especificaciones del producto y la información que aparece
en el manual se suministran a los fines de referencia solamente. Su contenido puede
actualizarse sin aviso previo. Lo invitamos a visitar nuestro sitio web: http://www.selektro.us
2
ÍNDICE
Capítulo 1 Instalación del Hardware
1.1 Indicadores del Panel de Descripción--------------------------------------------------------3
1.2 Requisitos del Sistema---------------------------------------------------------------------------3
1.3 Requisitos Ambientales de la Instalación----------------------------------------------------4
1.4 Pasos de la Instalación del Hardware--------------------------------------------------------4
1.5 Características del Producto--------------------------------------------------------------------4
Capítulo 2 Guía de Instalación Rápida
2.1 Cómo configurar Windows XP en la PC-----------------------------------------------------5
2.2 Guía de Instalación Rápida---------------------------------------------------------------------7
Capítulo 3 Configuración del Router
3.1 Estado del Sistema------------------------------------------------------------------------------14
3.2 Modo Operativo-----------------------------------------------------------------------------------14
3.3 Parámetros de la Red ---------------------------------------------------------------------------15
3.4 Parámetros Inalámbricos ----------------------------------------------------------------------20
3.5 Parámetros del Firewall ------------------------------------------------------------------------27
Capítulo 4 Parámetros de la Administración
4.1 Administración del Sistema--------------------------------------------------------------------29
4.2 Actualización del Firmware -------------------------------------------------------------------30
4.3 Administración Remota-------------------------------------------------------------------------31
3
Capítulo 1 Instalación del Hardware
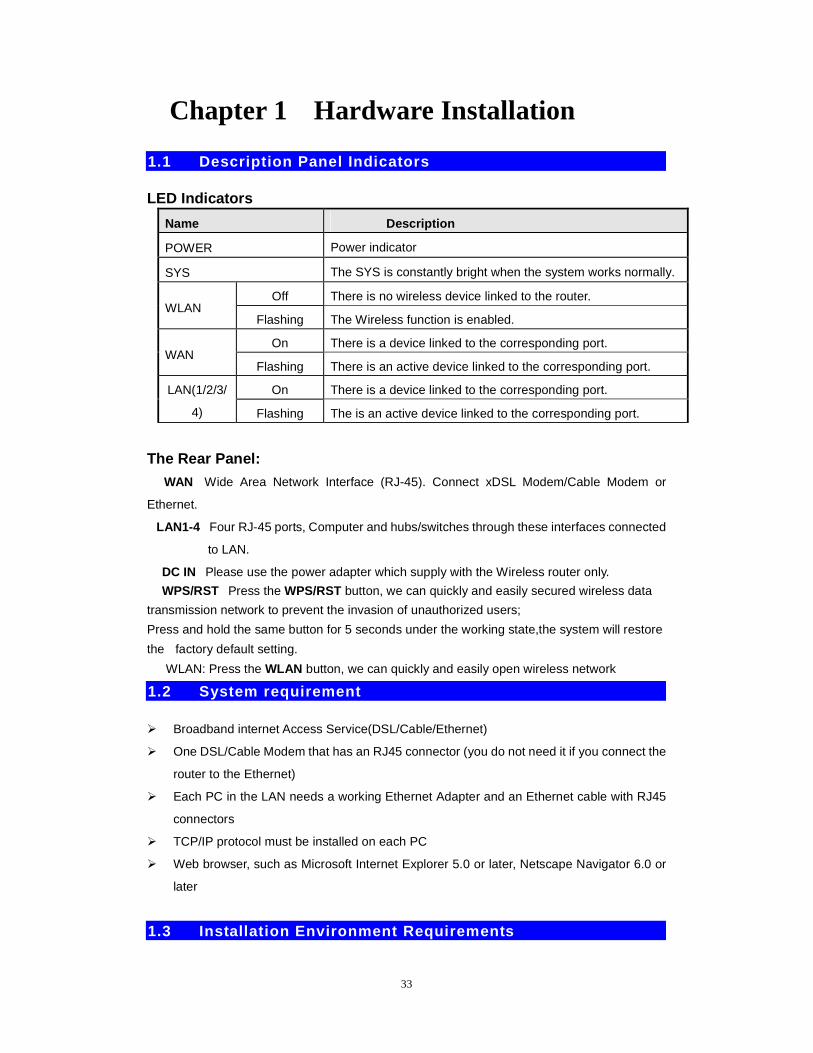
1.1 Indicadores del Panel de Descripción
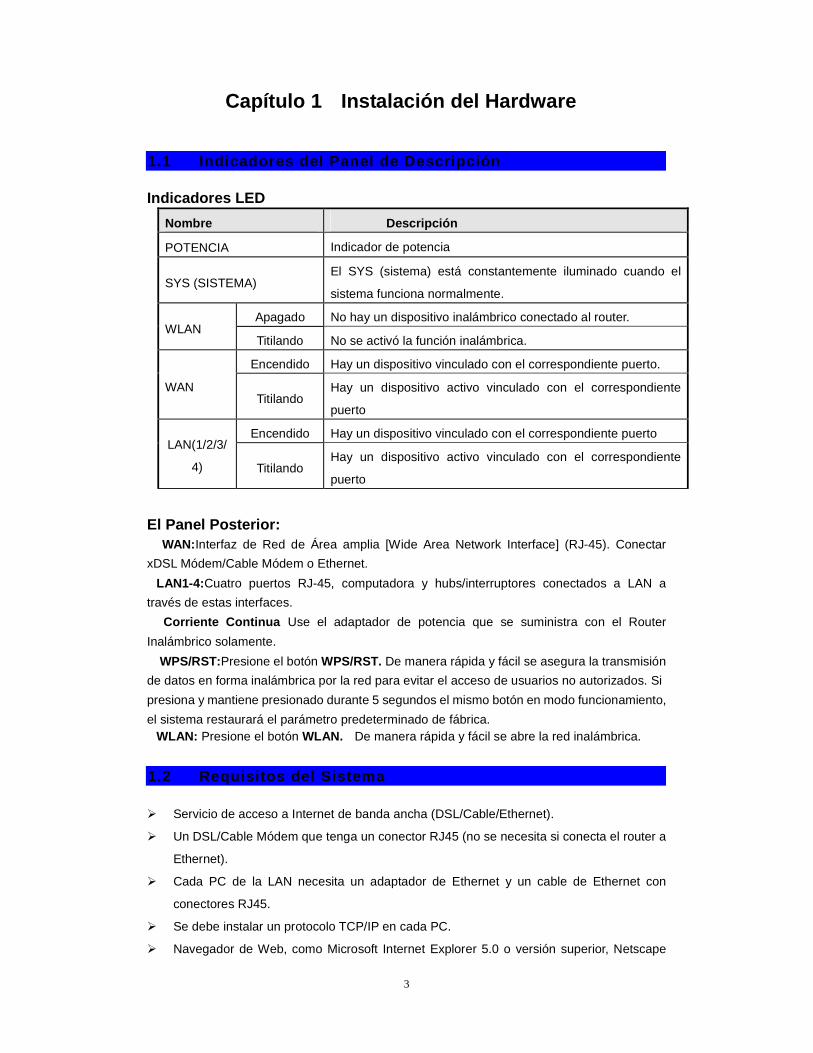
Indicadores LED �
Nombre Descripción
POTENCIA Indicador de potencia
SYS (SISTEMA) El SYS (sistema) está constantemente iluminado cuando el
sistema funciona normalmente.
Apagado No hay un dispositivo inalámbrico conectado al router. WLAN
Titilando No se activó la función inalámbrica.
Encendido Hay un dispositivo vinculado con el correspondiente puerto.
WAN Titilando
Hay un dispositivo activo vinculado con el correspondiente
puerto
Encendido Hay un dispositivo vinculado con el correspondiente puerto LAN(1/2/3/
4) Titilando Hay un dispositivo activo vinculado con el correspondiente
puerto
El Panel Posterior: � WAN: Interfaz de Red de Área amplia [Wide Area Network Interface] (RJ-45). Conectar
xDSL Módem/Cable Módem o Ethernet.
�LAN1-4: Cuatro puertos RJ-45, computadora y hubs/interruptores conectados a LAN a
través de estas interfaces.
� Corriente Continua �Use el adaptador de potencia que se suministra con el Router
Inalámbrico solamente.
� WPS/RST:Presione el botón WPS/RST. De manera rápida y fácil se asegura la transmisión
de datos en forma inalámbrica por la red para evitar el acceso de usuarios no autorizados. Si
presiona y mantiene presionado durante 5 segundos el mismo botón en modo funcionamiento,
el sistema restaurará el parámetro predeterminado de fábrica. �WLAN: Presione el botón WLAN. De manera rápida y fácil se abre la red inalámbrica.
1.2 Requisitos del Sistema
� Servicio de acceso a Internet de banda ancha (DSL/Cable/Ethernet).
� Un DSL/Cable Módem que tenga un conector RJ45 (no se necesita si conecta el router a
Ethernet).
� Cada PC de la LAN necesita un adaptador de Ethernet y un cable de Ethernet con
conectores RJ45.
� Se debe instalar un protocolo TCP/IP en cada PC.
� Navegador de Web, como Microsoft Internet Explorer 5.0 o versión superior, Netscape
4
Navigator 6.0 o versión superior.
1.3 Requisitos Ambientales de la Instalación
� Coloque el Router en posición horizontal.
� Se debe ajustar la antena para que se acomode en el ángulo de dirección.
� Coloque el router tan lejos como pueda de la fuente de calor.
� No coloque el router en lugares demasiados húmedos o con polvo.
1.4 Pasos de la Instalación del Hardware
� Encienda el Router N Inalámbrico
� Conecte el puerto WAN del Router al DSL Módem/Cable Módem.
� Conecta la(s) PC(s) de su LAN al puerto de LAN de su Router. (Si tiene una tarjeta NIC
inalámbrica y desea usar la función inalámbrica, omita este paso)
1.5 Características del Producto
� Cumple las normas IEEE 802.11n , IEEE 802.11g, IEEE 802.11b.
� 1 puerto 10/100M WAN RJ45 de negociación automática, 4 puertos 10/100M LAN RJ45
de negociación automática.
� Admite PPPoE, IP dinámica, funciones de banda ancha de IP estática.
� Discado automático, discado a demanda, discado a tiempo fijo. Cumple casi todos los
requisitos de discado.
� Admite servidor virtual, aplicaciones especiales y host DMZ, ideal para crear un sitio web
dentro de su LAN.
� Admite control de banda ancha SSID y lista de control de acceso MAC (Mandatory Access
control) [Control de Acceso Obligatorio].
� Admite WEP de 64/128/152 bits, cumple la norma WPA de 128 bits (TKIP/AES), admite
MIC, expansión IV , autenticación de clave compartida, IEEE 802.1X.
� El firewall incorporado viene equipado con filtros IP, MAC, URL con controles flexibles
para acceso en línea y tiempo.
� Servidor automático incorporado DHCP con distribución automática de IP dinámica.
� La interfaz de usuario admite mejoras gratis al software de WEB.
� Admite respaldo y restauración de archivo de configuración.
� Elegante exterior, puede montarse sobre la pared o colocarse en forma horizontal sobre
un escritorio o mesa.
� 1 antenas omni direccionales desprendibles.
5
Capítulo 2 Guía de Instalación Rápida
Usted debe configurar el Router correctamente para asegurar su uso normal. Este capítulo
describe cómo configurar las funciones básicas del Router Inalámbrico. Le mostraremos la
configuración detallada en el próximo capítulo.
2.1 Cómo configurar Windows XP en la PC
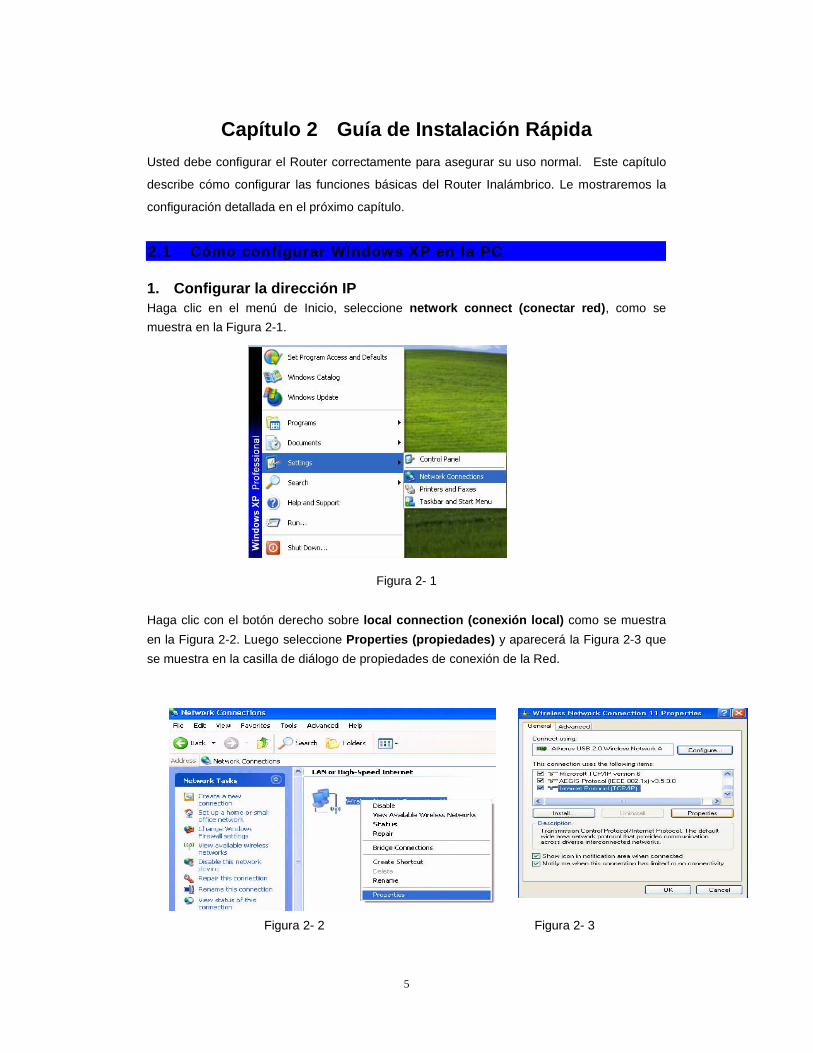
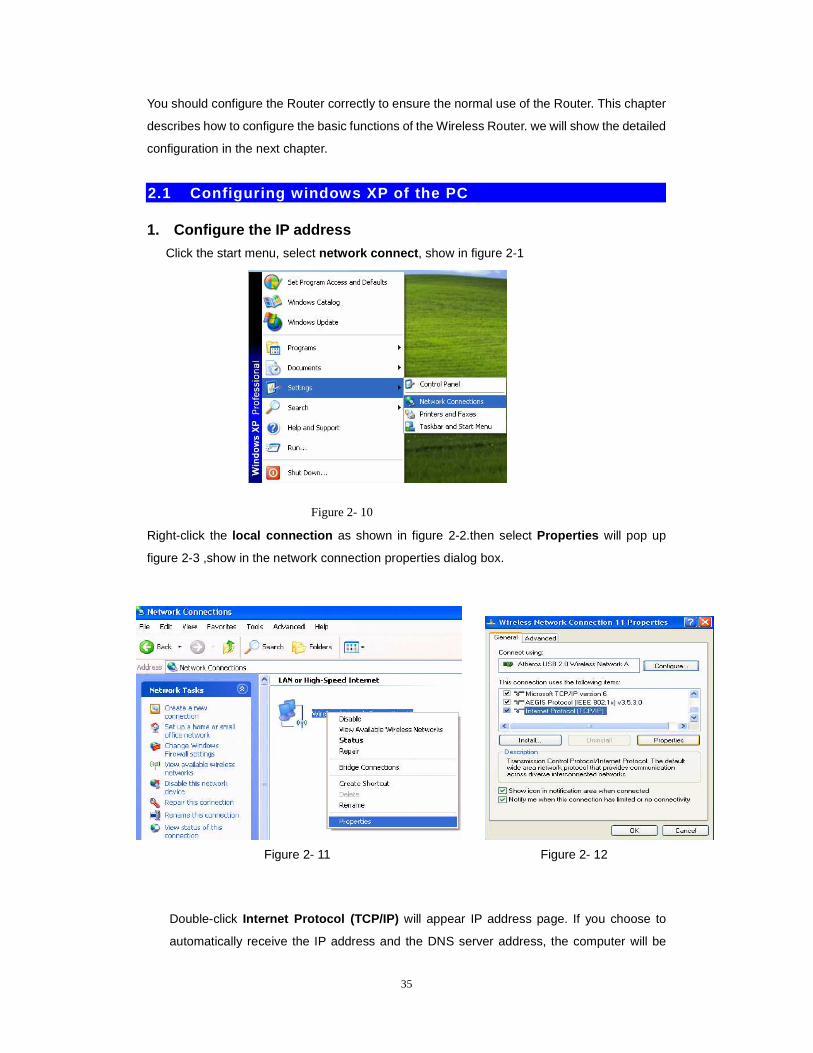
1. Configurar la dirección IP Haga clic en el menú de Inicio, seleccione network connect (conectar red) , como se
muestra en la Figura 2-1.
Figura 2- 1
Haga clic con el botón derecho sobre local connection (conexión local) como se muestra
en la Figura 2-2. Luego seleccione Properties (propiedades) y aparecerá la Figura 2-3 que
se muestra en la casilla de diálogo de propiedades de conexión de la Red.
Figura 2- 2 Figura 2- 3
6
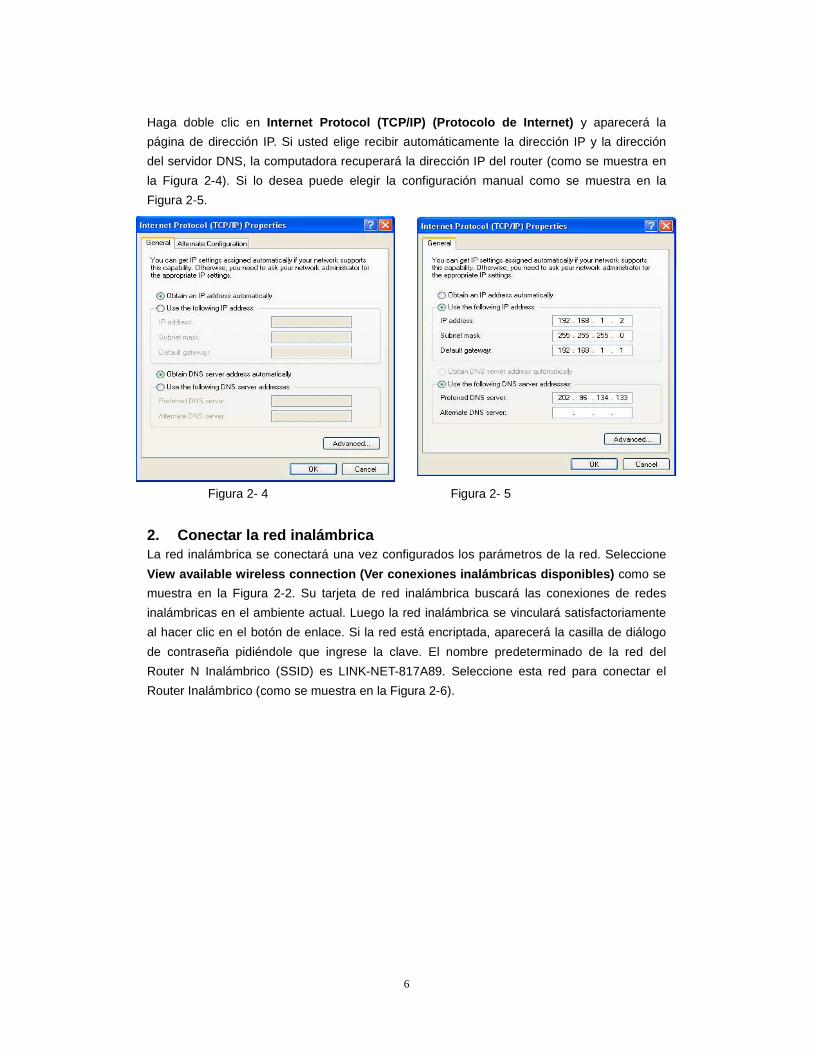
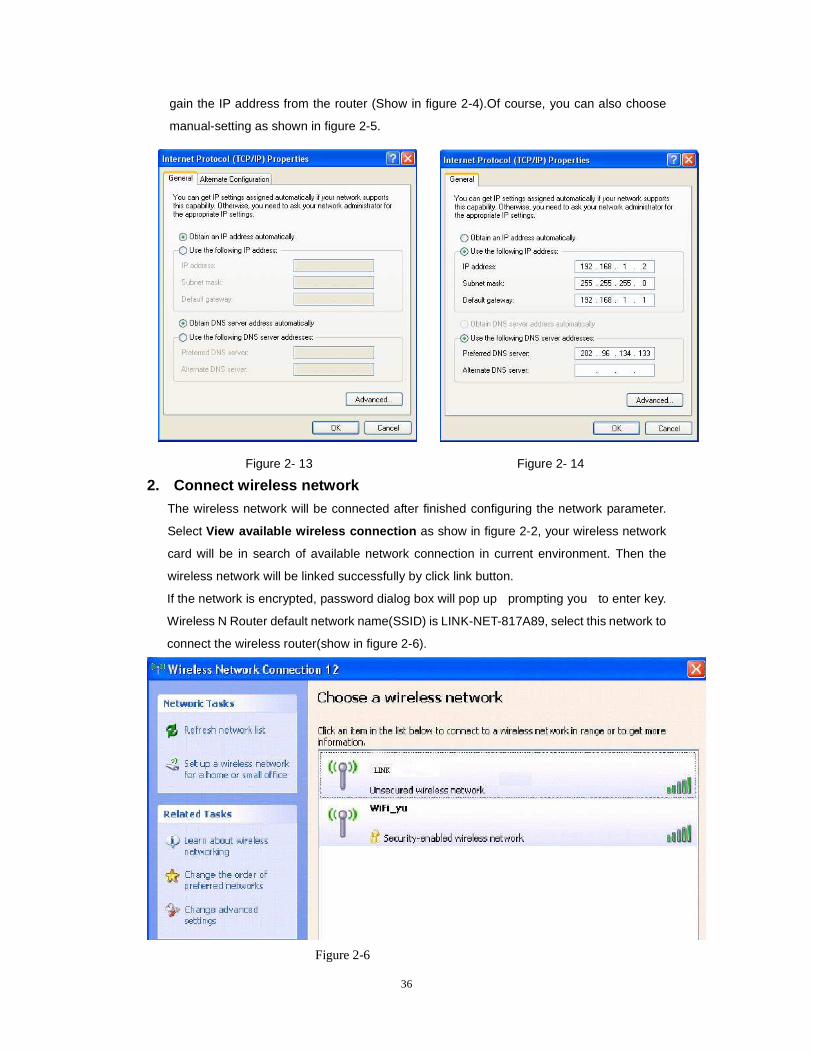
Haga doble clic en Internet Protocol (TCP/IP) (Protocolo de Internet) y aparecerá la
página de dirección IP. Si usted elige recibir automáticamente la dirección IP y la dirección
del servidor DNS, la computadora recuperará la dirección IP del router (como se muestra en
la Figura 2-4). Si lo desea puede elegir la configuración manual como se muestra en la
Figura 2-5.
Figura 2- 4 Figura 2- 5
2. Conectar la red inalámbrica La red inalámbrica se conectará una vez configurados los parámetros de la red. Seleccione
View available wireless connection (Ver conexiones inalámbricas disponibles) como se
muestra en la Figura 2-2. Su tarjeta de red inalámbrica buscará las conexiones de redes
inalámbricas en el ambiente actual. Luego la red inalámbrica se vinculará satisfactoriamente
al hacer clic en el botón de enlace. Si la red está encriptada, aparecerá la casilla de diálogo
de contraseña pidiéndole que ingrese la clave. El nombre predeterminado de la red del
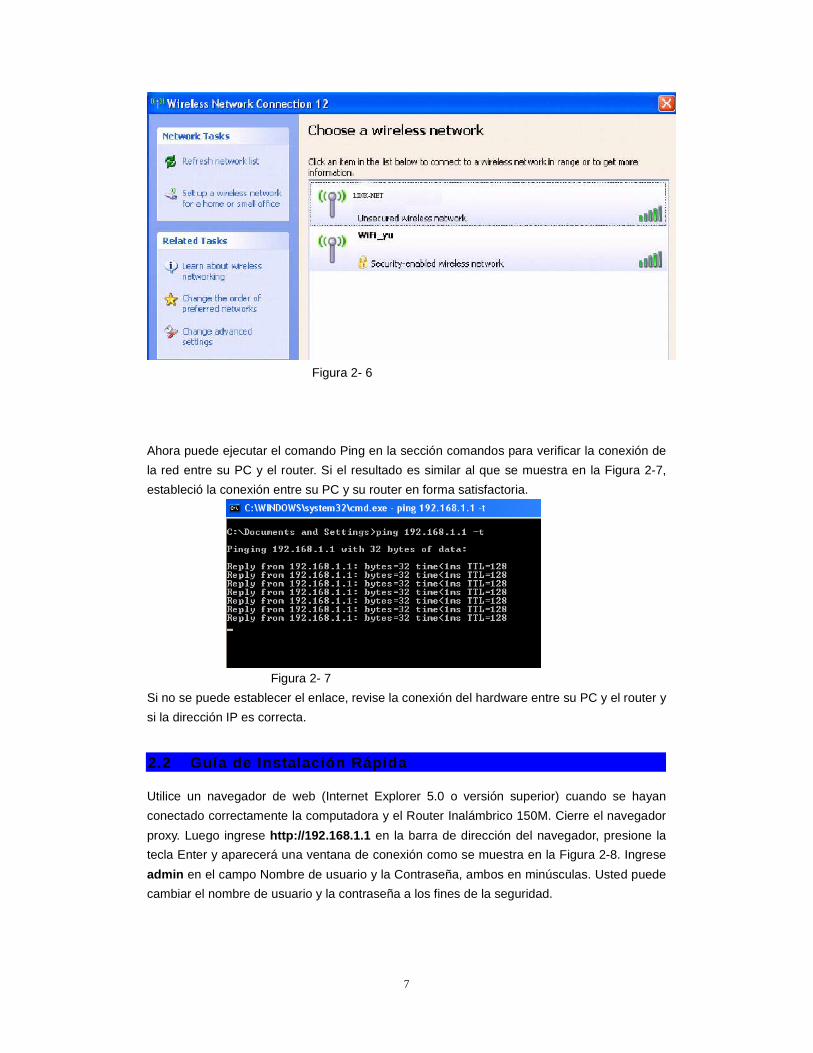
Router N Inalámbrico (SSID) es LINK-NET-817A89. Seleccione esta red para conectar el
Router Inalámbrico (como se muestra en la Figura 2-6).
7
Figura 2- 6
Ahora puede ejecutar el comando Ping en la sección comandos para verificar la conexión de
la red entre su PC y el router. Si el resultado es similar al que se muestra en la Figura 2-7,
estableció la conexión entre su PC y su router en forma satisfactoria.
Figura 2- 7
Si no se puede establecer el enlace, revise la conexión del hardware entre su PC y el router y
si la dirección IP es correcta.
2.2 Guía de Instalación Rápida
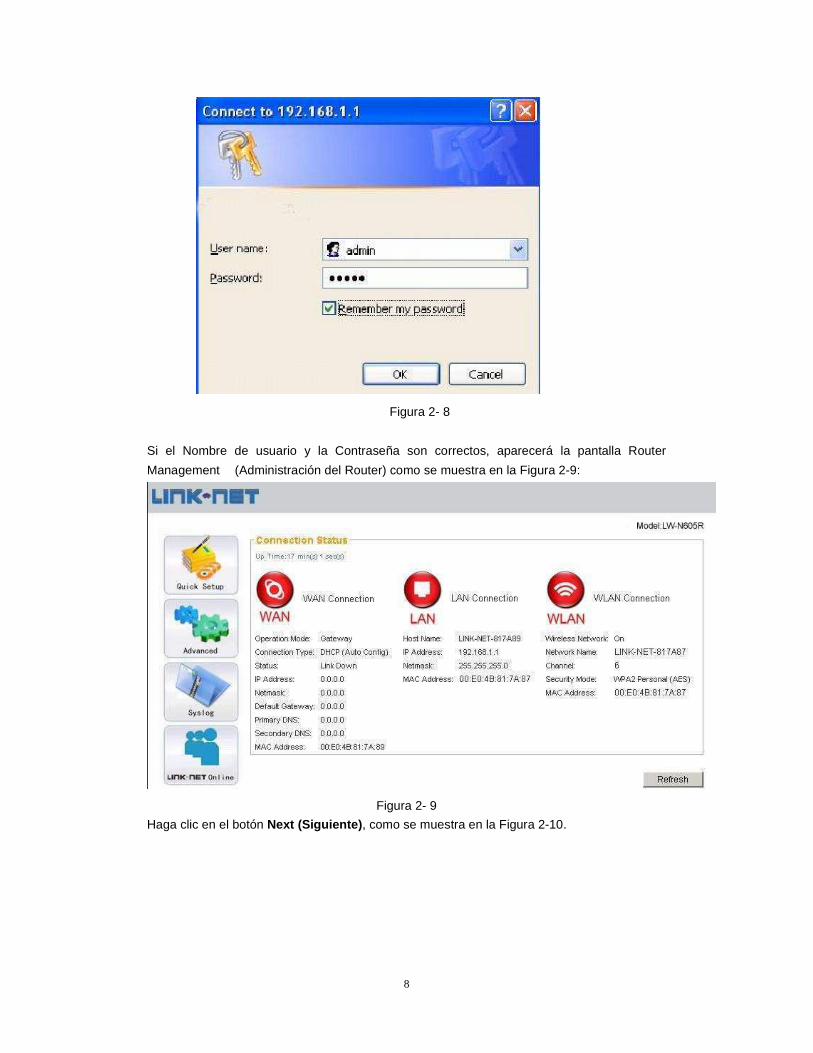
Utilice un navegador de web (Internet Explorer 5.0 o versión superior) cuando se hayan
conectado correctamente la computadora y el Router Inalámbrico 150M. Cierre el navegador
proxy. Luego ingrese http://192.168.1.1 en la barra de dirección del navegador, presione la
tecla Enter y aparecerá una ventana de conexión como se muestra en la Figura 2-8. Ingrese
admin en el campo Nombre de usuario y la Contraseña, ambos en minúsculas. Usted puede
cambiar el nombre de usuario y la contraseña a los fines de la seguridad.
8
Figura 2- 8
Si el Nombre de usuario y la Contraseña son correctos, aparecerá la pantalla Router
Management (Administración del Router) como se muestra en la Figura 2-9:
Figura 2- 9
Haga clic en el botón Next (Siguiente) , como se muestra en la Figura 2-10.
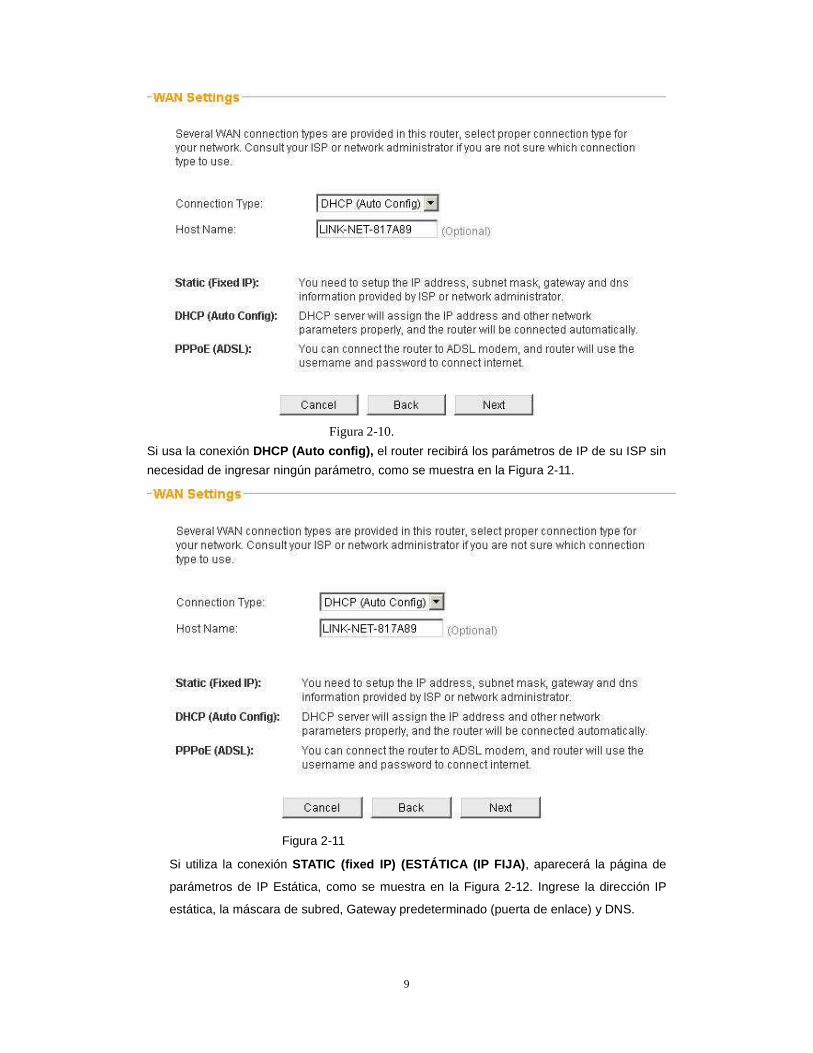
9
Figura 2-10.
Si usa la conexión DHCP (Auto config), el router recibirá los parámetros de IP de su ISP sin
necesidad de ingresar ningún parámetro, como se muestra en la Figura 2-11.
Figura 2-11
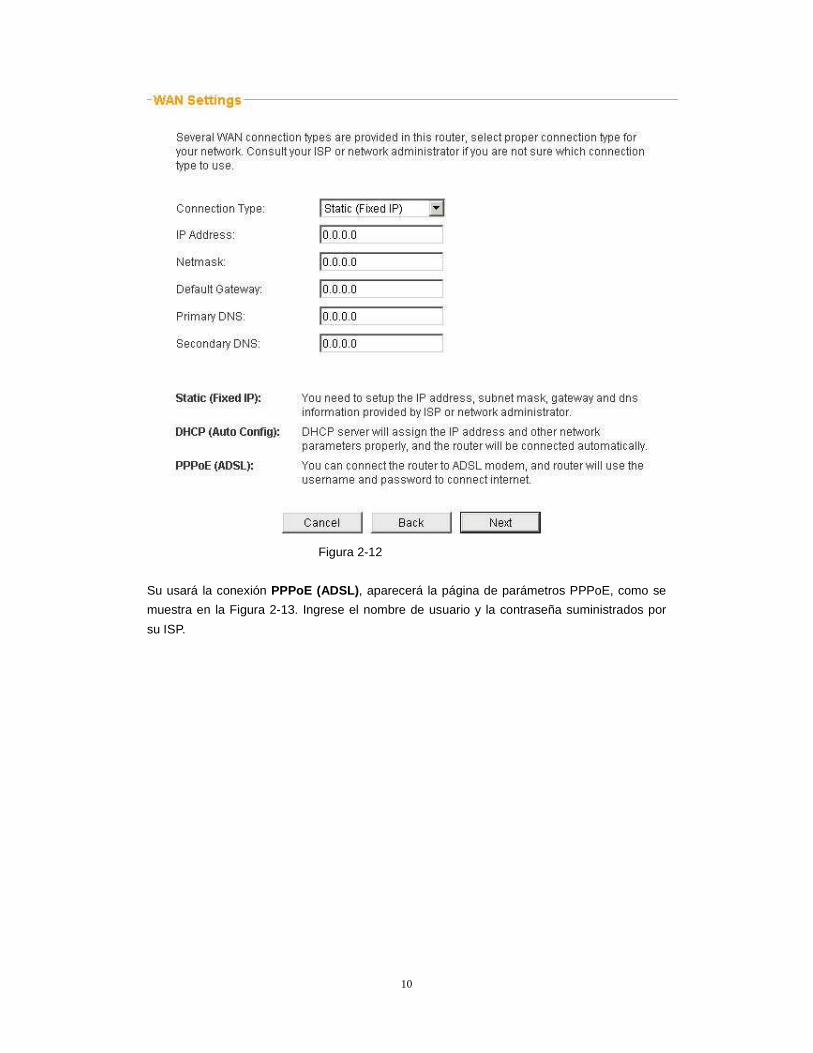
Si utiliza la conexión STATIC (fixed IP) (ESTÁTICA (IP FIJA) , aparecerá la página de
parámetros de IP Estática, como se muestra en la Figura 2-12. Ingrese la dirección IP
estática, la máscara de subred, Gateway predeterminado (puerta de enlace) y DNS.
10
Figura 2-12
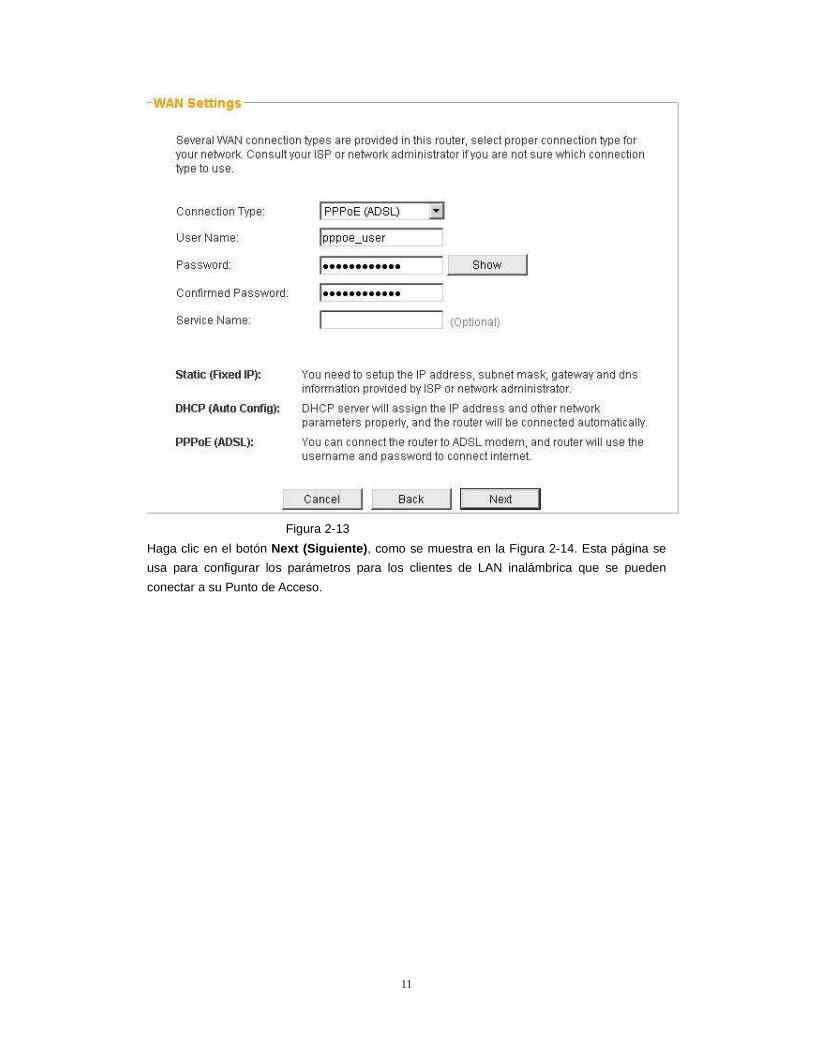
Su usará la conexión PPPoE (ADSL) , aparecerá la página de parámetros PPPoE, como se
muestra en la Figura 2-13. Ingrese el nombre de usuario y la contraseña suministrados por
su ISP.
11
Figura 2-13
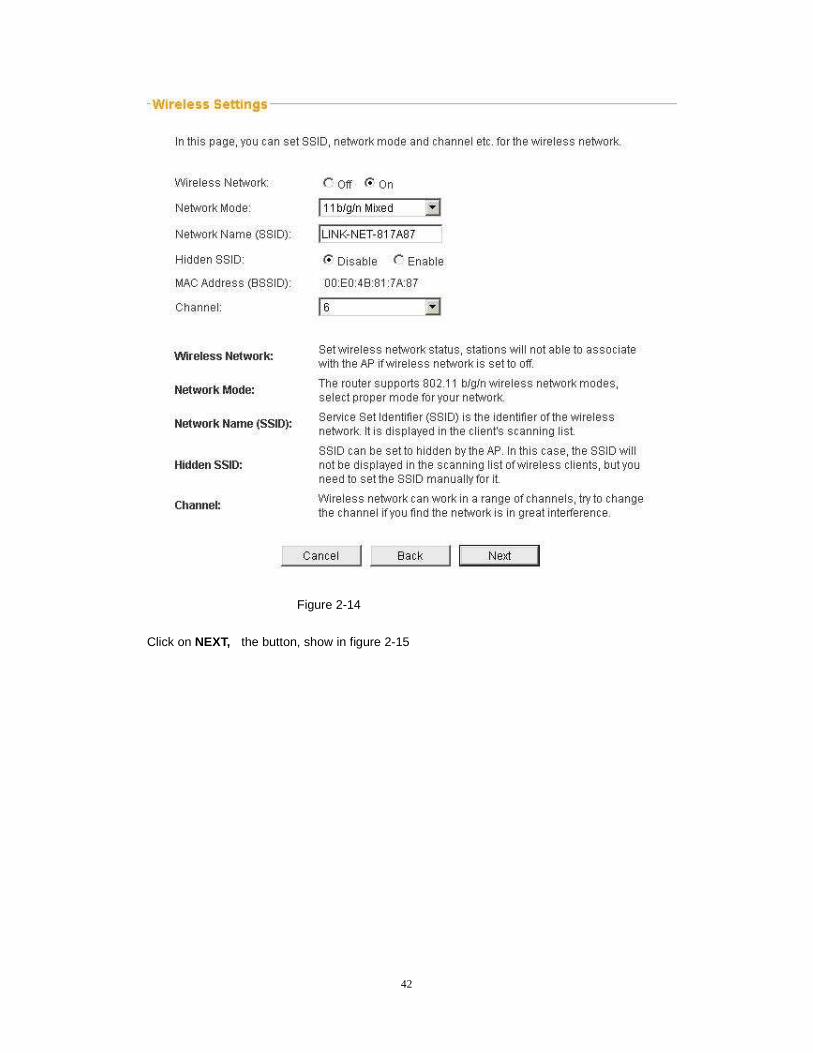
Haga clic en el botón Next (Siguiente) , como se muestra en la Figura 2-14. Esta página se
usa para configurar los parámetros para los clientes de LAN inalámbrica que se pueden
conectar a su Punto de Acceso.

12
Figura 2-14
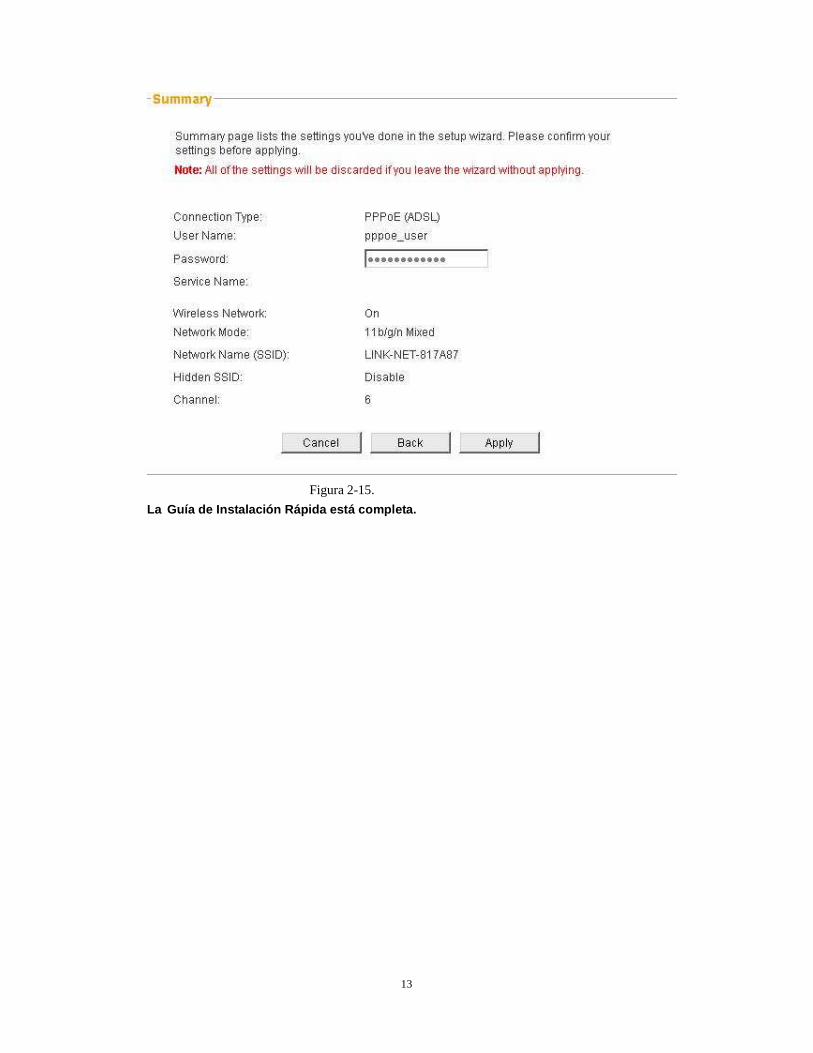
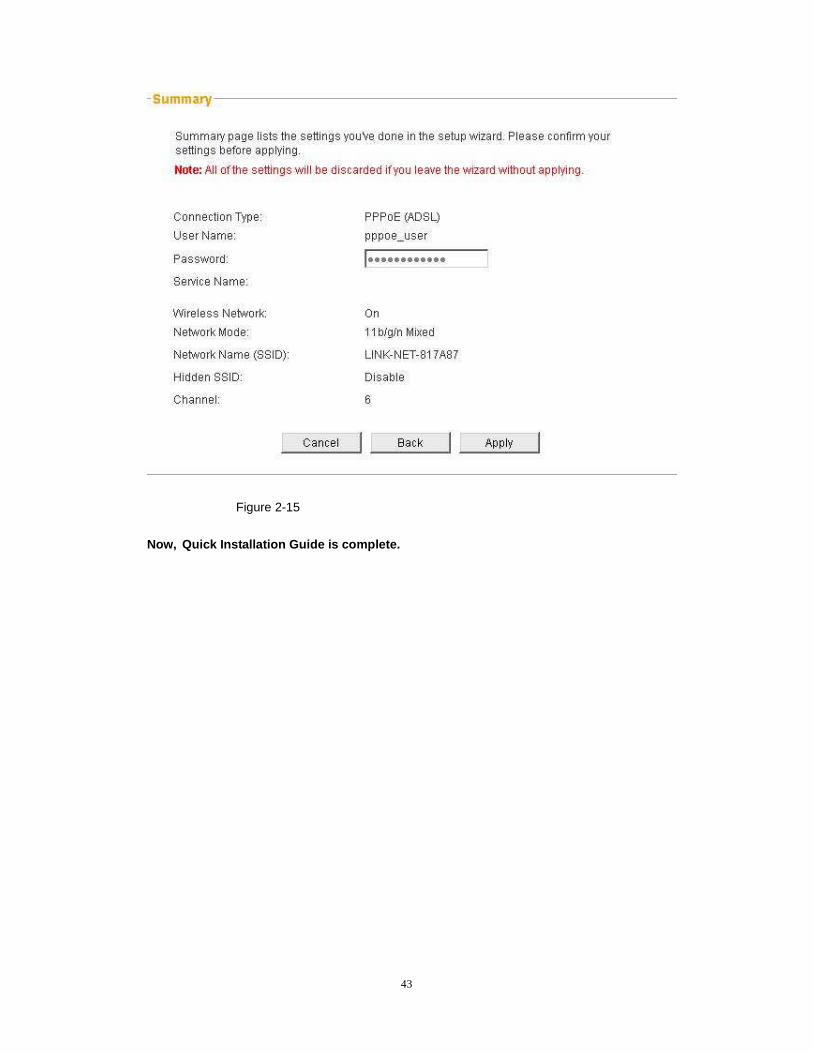
Haga clic en el botón Next (Siguiente) , como se muestra en la Figura 2-15.
13
Figura 2-15.
La Guía de Instalación Rápida está completa.
14
Capítulo 3 Configuración del Router En este Capítulo presentaremos algunos parámetros del router en detalle, como la
configuración inalámbrica avanzada, control de acceso inalámbrico, configuración de
seguridad de la red, mantenimiento del sistema, mejoras, etc.
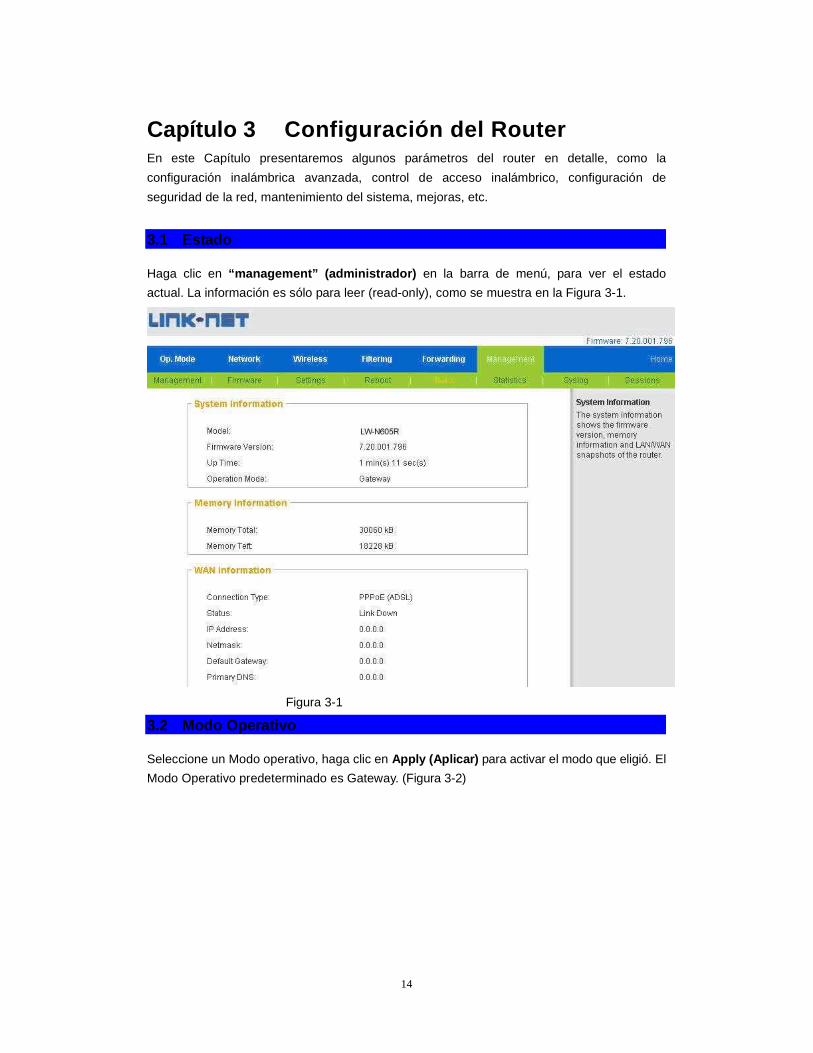
3.1 Estado
Haga clic en “management” (administrador) en la barra de menú, para ver el estado
actual. La información es sólo para leer (read-only), como se muestra en la Figura 3-1.
Figura 3-1
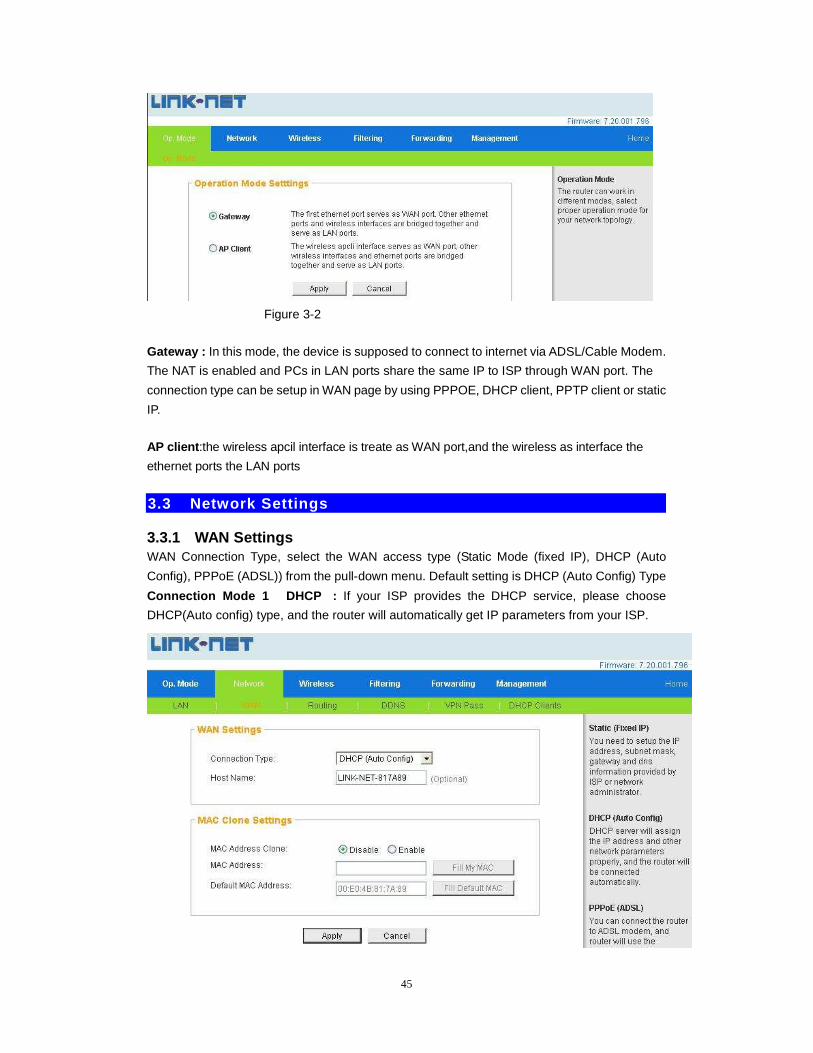
3.2 Modo Operativo
Seleccione un Modo operativo, haga clic en Apply (Aplicar) para activar el modo que eligió. El
Modo Operativo predeterminado es Gateway. (Figura 3-2)
15
Figura 3-2
Gateway: En este modo, el dispositivo se conecta a Internet vía ADSL/Cable Módem. La
NAT se activa y las PCs en los puertos LAN comparten la misma IP a ISP a través del puerto
WAN. El tipo de conexión se puede configurar en la página WAN usando PPPOE, cliente
DHCP, cliente PPTP o IP estática.
Punto de Acceso (AP) del Cliente: La interfaz inalámbrica se trata como un puerto WAN y se
conecta en forma inalámbrica vía un puerto Ethernet o LAN.
3.3 Parámetros de la Red
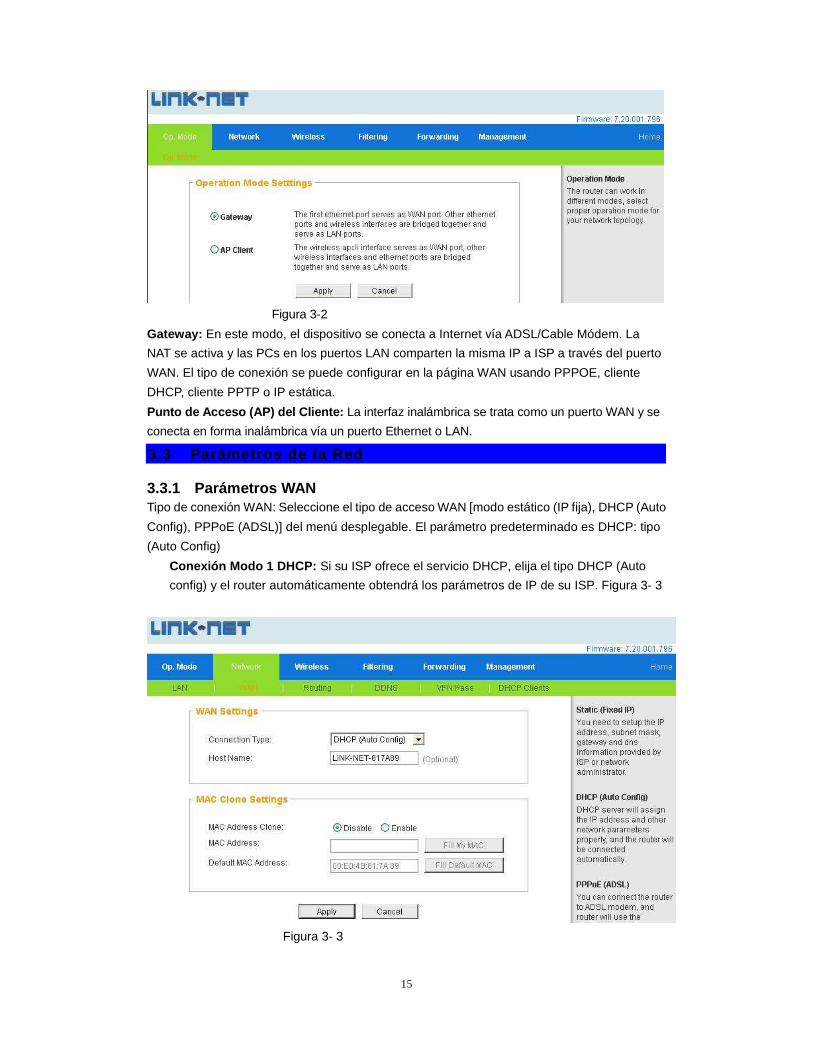
3.3.1 Parámetros WAN Tipo de conexión WAN: Seleccione el tipo de acceso WAN [modo estático (IP fija), DHCP (Auto
Config), PPPoE (ADSL)] del menú desplegable. El parámetro predeterminado es DHCP: tipo
(Auto Config)
� Conexión Modo 1 DHCP: Si su ISP ofrece el servicio DHCP, elija el tipo DHCP (Auto
config) y el router automáticamente obtendrá los parámetros de IP de su ISP. Figura 3- 3
Figura 3- 3
16
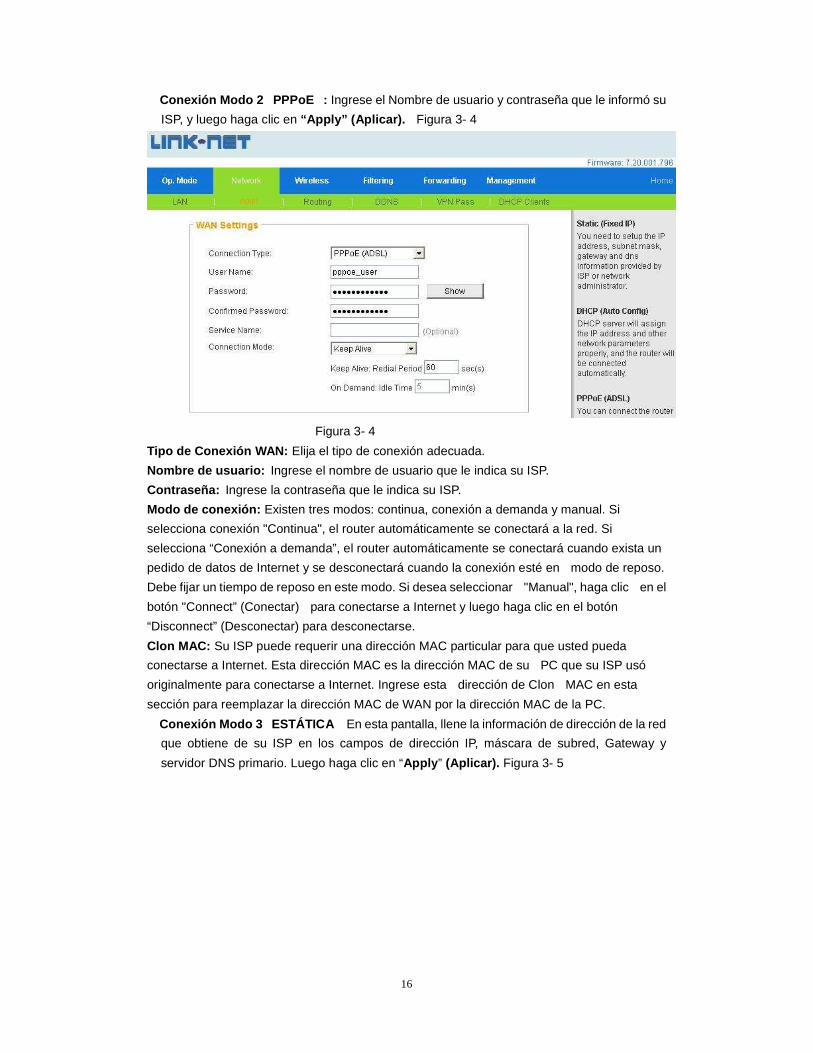
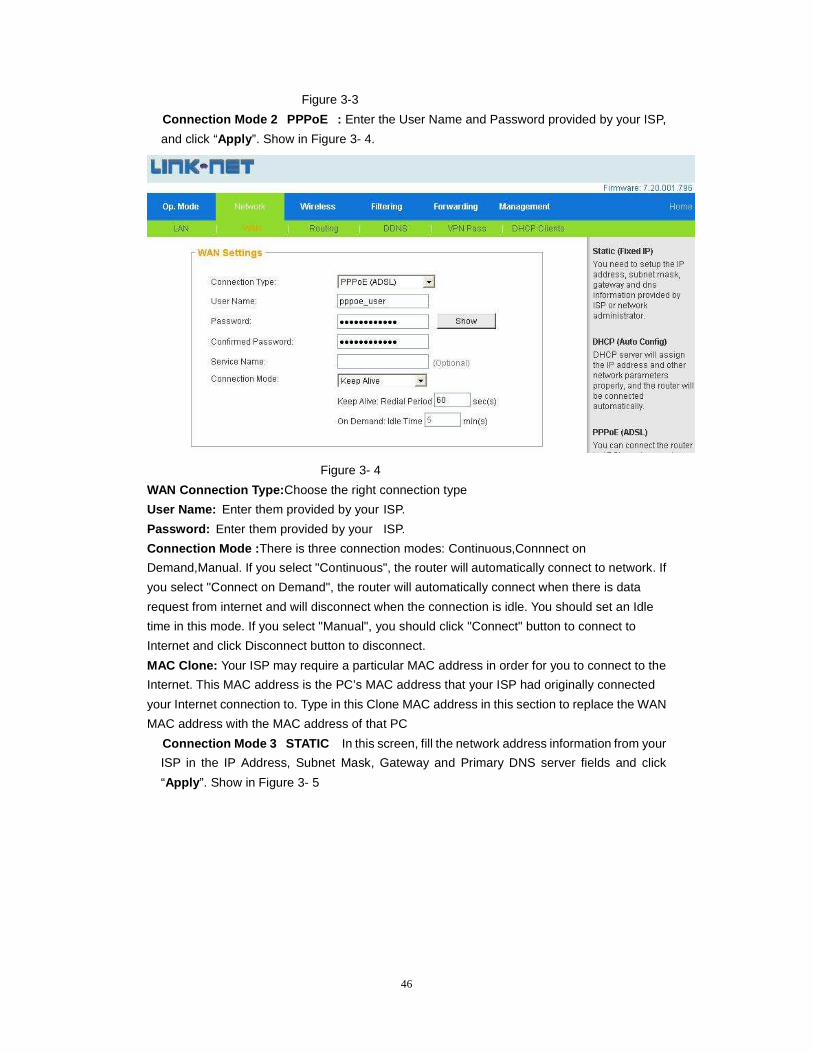
� Conexión Modo 2 �PPPoE�: Ingrese el Nombre de usuario y contraseña que le informó su
ISP, y luego haga clic en “Apply” (Aplicar). Figura 3- 4
Figura 3- 4
Tipo de Conexión WAN: Elija el tipo de conexión adecuada.
Nombre de usuario: Ingrese el nombre de usuario que le indica su ISP.
Contraseña: Ingrese la contraseña que le indica su ISP.
Modo de conexión: Existen tres modos: continua, conexión a demanda y manual. Si
selecciona conexión "Continua", el router automáticamente se conectará a la red. Si
selecciona “Conexión a demanda”, el router automáticamente se conectará cuando exista un
pedido de datos de Internet y se desconectará cuando la conexión esté en modo de reposo.
Debe fijar un tiempo de reposo en este modo. Si desea seleccionar "Manual", haga clic en el
botón "Connect” (Conectar) para conectarse a Internet y luego haga clic en el botón
“Disconnect” (Desconectar) para desconectarse.
Clon MAC: Su ISP puede requerir una dirección MAC particular para que usted pueda
conectarse a Internet. Esta dirección MAC es la dirección MAC de su PC que su ISP usó
originalmente para conectarse a Internet. Ingrese esta dirección de Clon MAC en esta
sección para reemplazar la dirección MAC de WAN por la dirección MAC de la PC.
� Conexión Modo 3 �ESTÁTICA��En esta pantalla, llene la información de dirección de la red
que obtiene de su ISP en los campos de dirección IP, máscara de subred, Gateway y
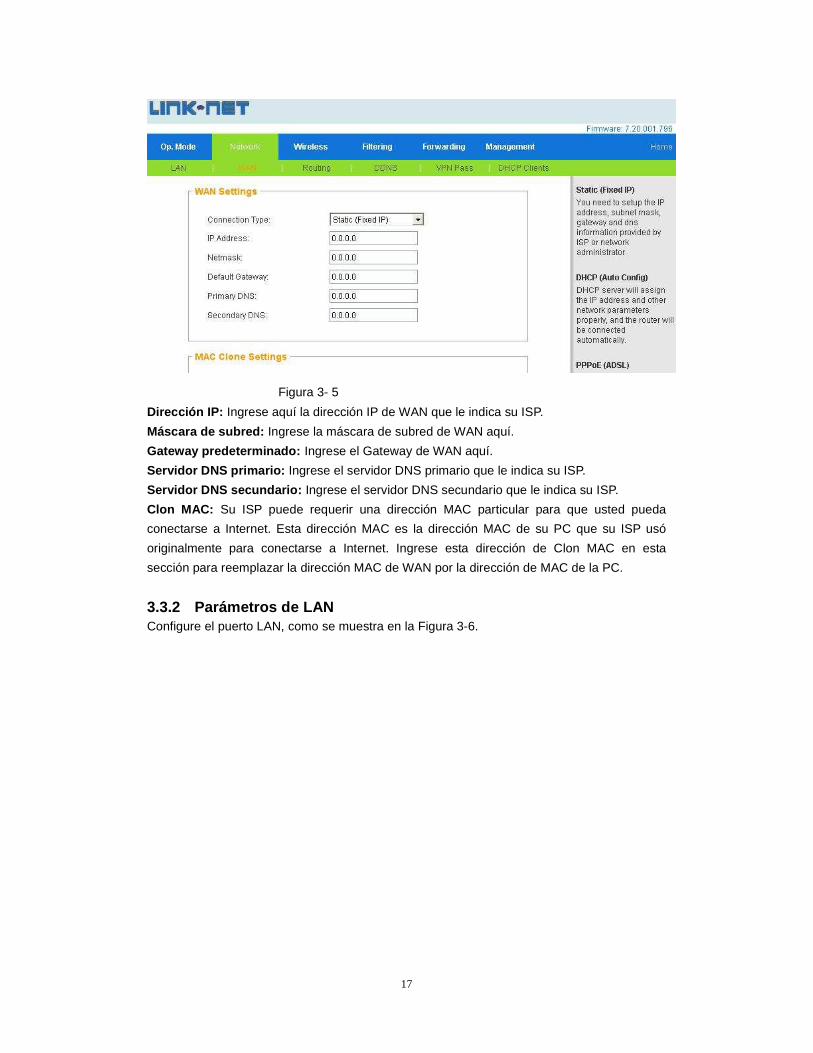
servidor DNS primario. Luego haga clic en “Apply ” (Aplicar). Figura 3- 5
17
Figura 3- 5
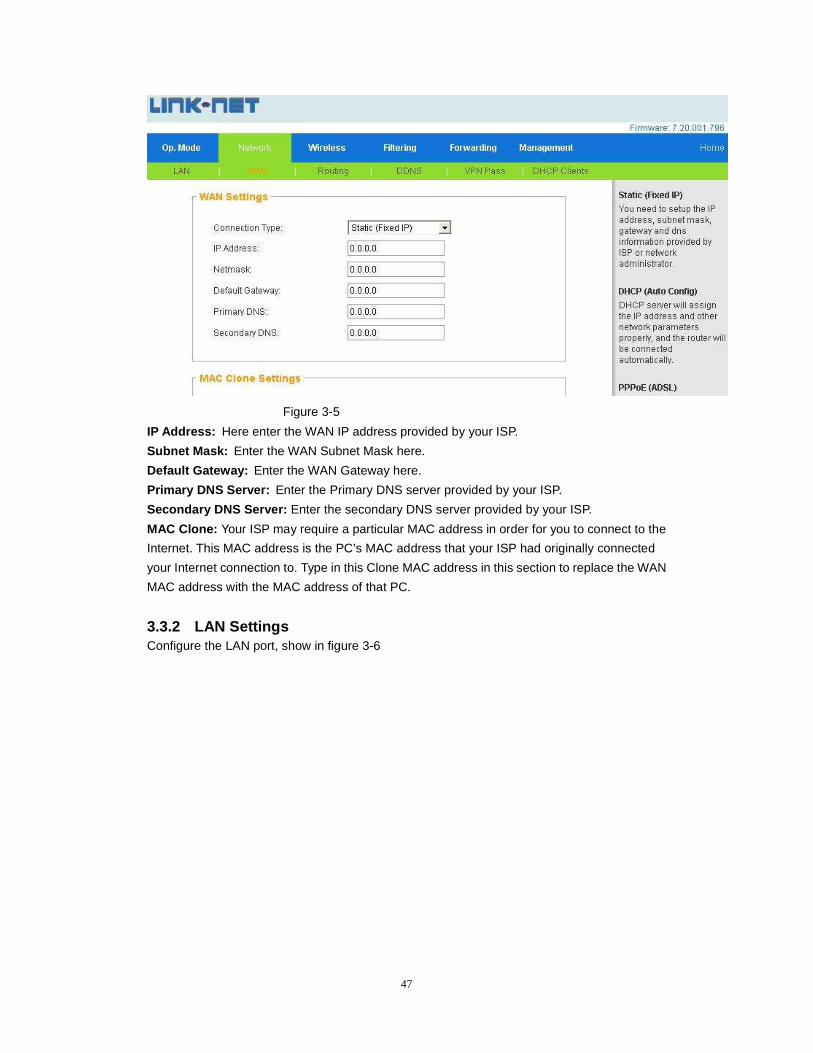
Dirección IP: Ingrese aquí la dirección IP de WAN que le indica su ISP.
Máscara de subred: Ingrese la máscara de subred de WAN aquí.
Gateway predeterminado: Ingrese el Gateway de WAN aquí.
Servidor DNS primario: Ingrese el servidor DNS primario que le indica su ISP.
Servidor DNS secundario: Ingrese el servidor DNS secundario que le indica su ISP.
Clon MAC: Su ISP puede requerir una dirección MAC particular para que usted pueda
conectarse a Internet. Esta dirección MAC es la dirección MAC de su PC que su ISP usó
originalmente para conectarse a Internet. Ingrese esta dirección de Clon MAC en esta
sección para reemplazar la dirección MAC de WAN por la dirección de MAC de la PC.
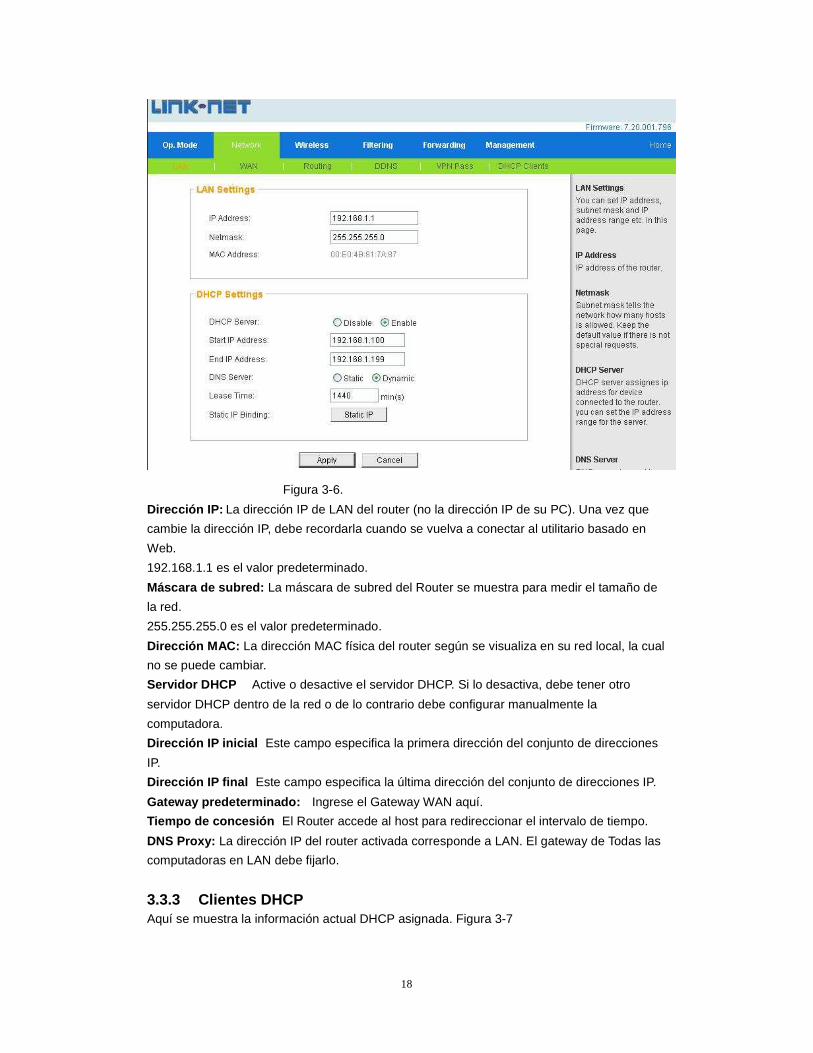
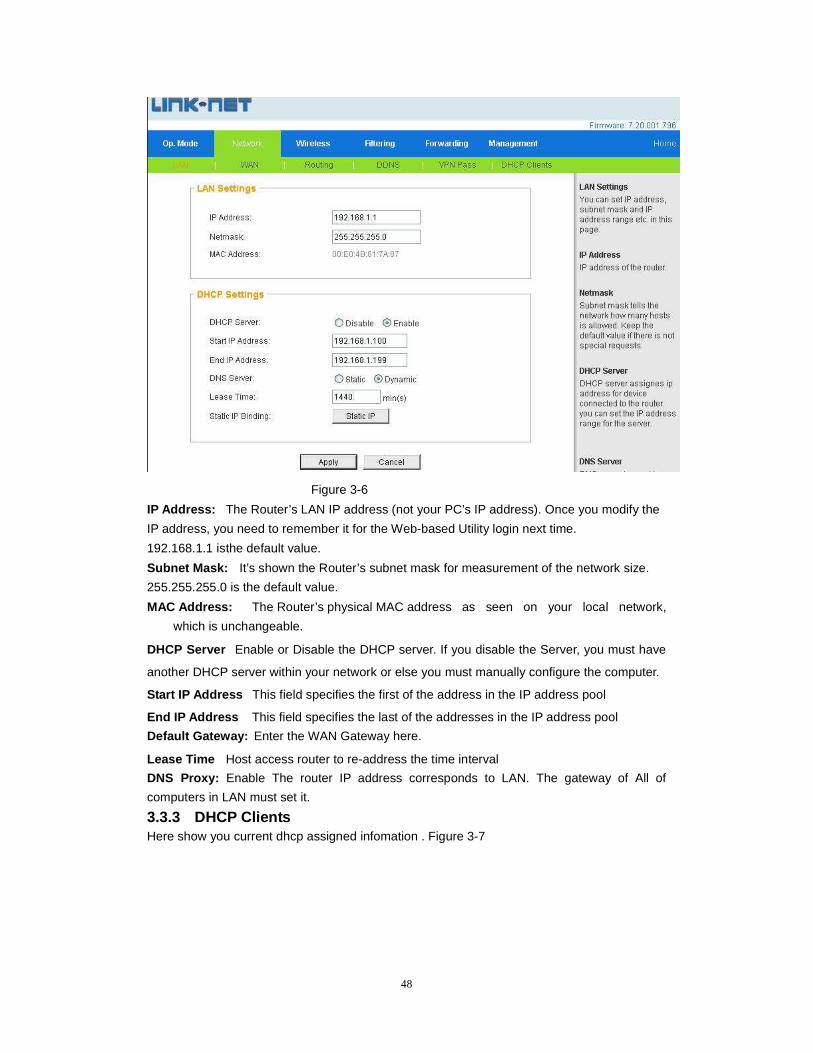
3.3.2 Parámetros de LAN Configure el puerto LAN, como se muestra en la Figura 3-6.
18
Figura 3-6.
Dirección IP: La dirección IP de LAN del router (no la dirección IP de su PC). Una vez que
cambie la dirección IP, debe recordarla cuando se vuelva a conectar al utilitario basado en
Web.
192.168.1.1 es el valor predeterminado.
Máscara de subred: La máscara de subred del Router se muestra para medir el tamaño de
la red.
255.255.255.0 es el valor predeterminado.
Dirección MAC: La dirección MAC física del router según se visualiza en su red local, la cual
no se puede cambiar.
Servidor DHCP � Active o desactive el servidor DHCP. Si lo desactiva, debe tener otro
servidor DHCP dentro de la red o de lo contrario debe configurar manualmente la
computadora.
Dirección IP inicial �Este campo especifica la primera dirección del conjunto de direcciones
IP.
Dirección IP final �Este campo especifica la última dirección del conjunto de direcciones IP.
Gateway predeterminado: Ingrese el Gateway WAN aquí.
Tiempo de concesión �El Router accede al host para redireccionar el intervalo de tiempo.
DNS Proxy: La dirección IP del router activada corresponde a LAN. El gateway de Todas las
computadoras en LAN debe fijarlo.
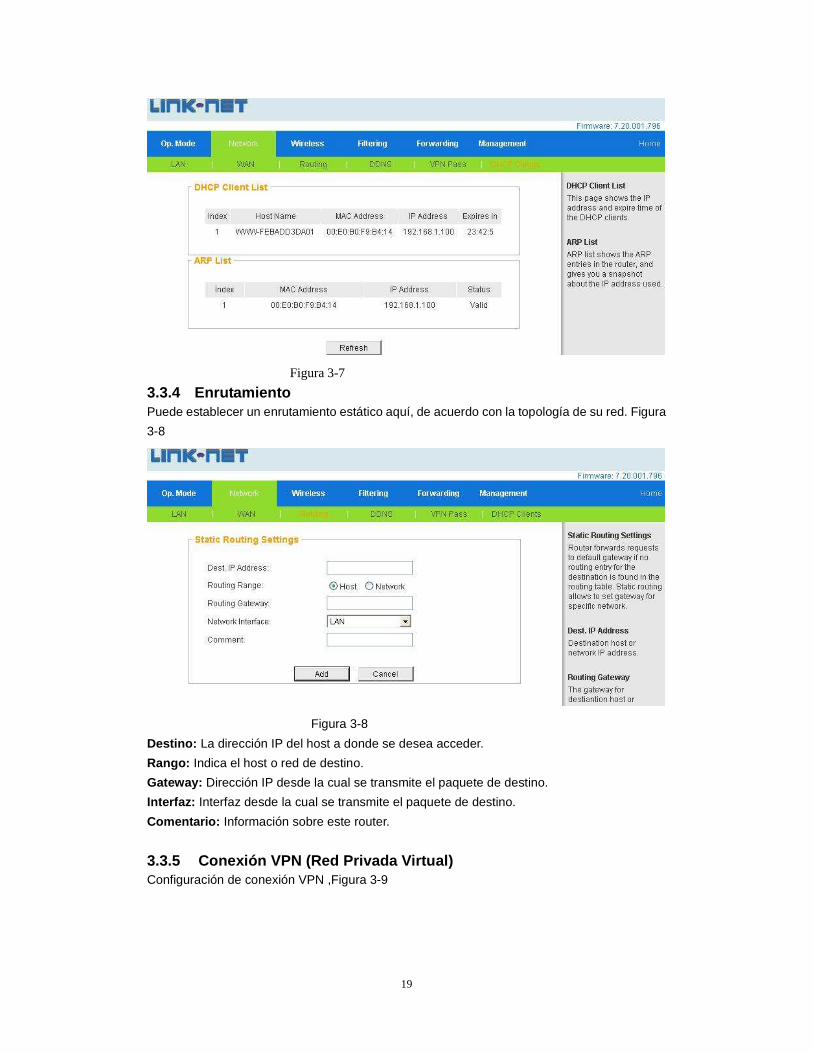
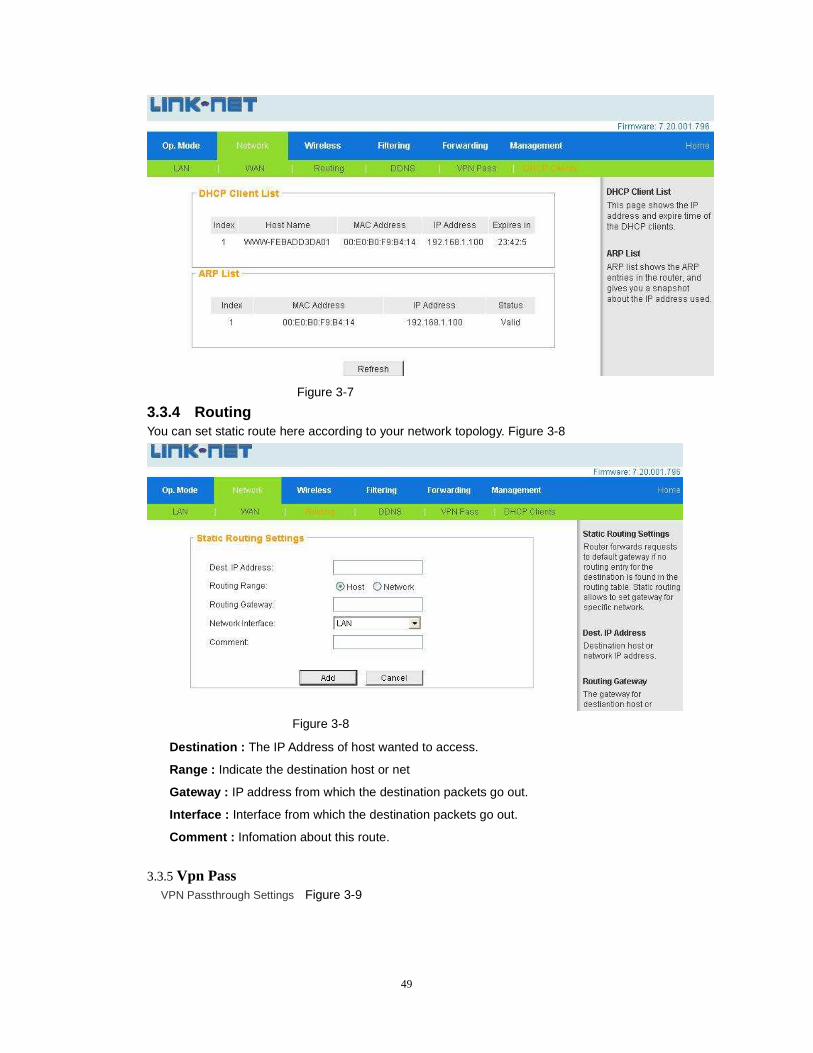
3.3.3 Clientes DHCP Aquí se muestra la información actual DHCP asignada. Figura 3-7
19
Figura 3-7
3.3.4 Enrutamiento Puede establecer un enrutamiento estático aquí, de acuerdo con la topología de su red. Figura
3-8
Figura 3-8
Destino: La dirección IP del host a donde se desea acceder.
Rango: Indica el host o red de destino.
Gateway: Dirección IP desde la cual se transmite el paquete de destino.
Interfaz: Interfaz desde la cual se transmite el paquete de destino.
Comentario: Información sobre este router.
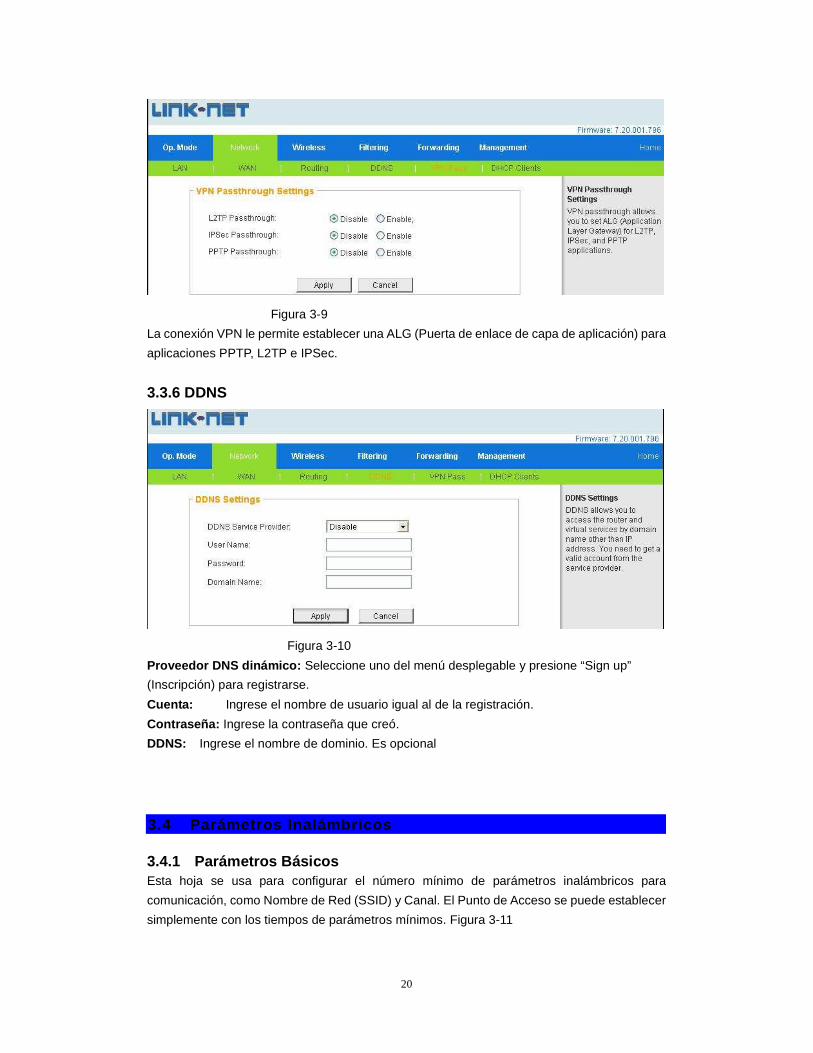
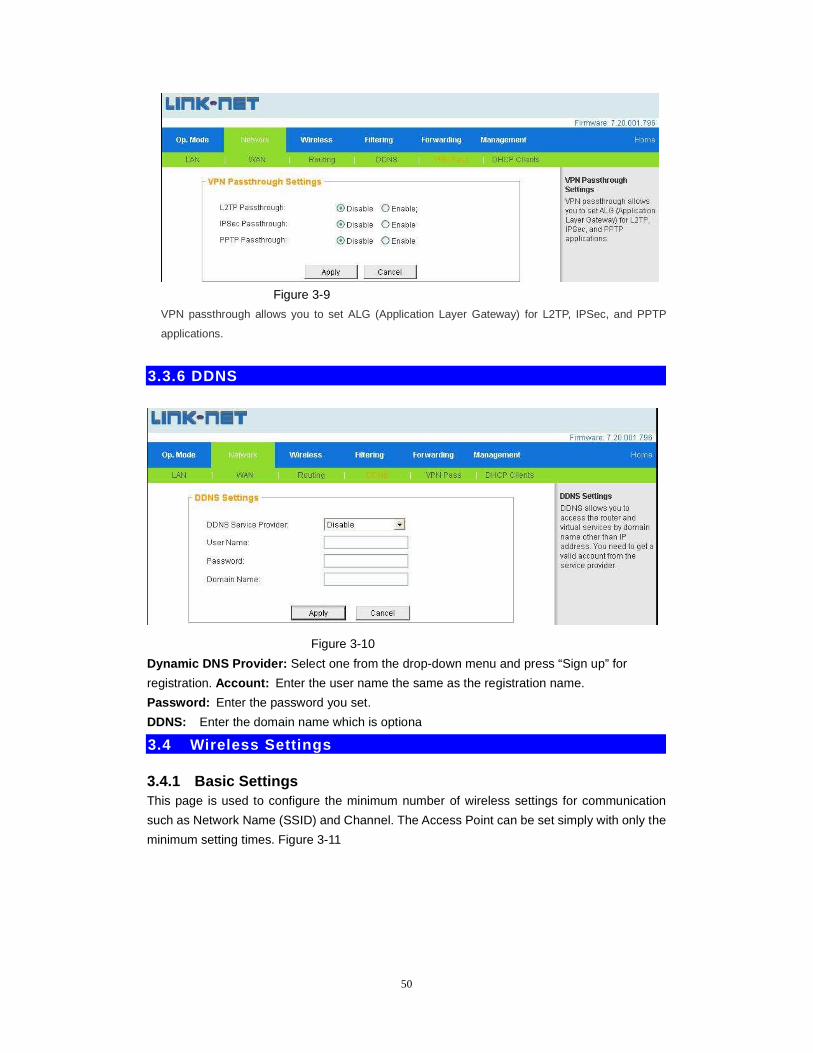
3.3.5 Conexión VPN (Red Privada Virtual) Configuración de conexión VPN ,Figura 3-9
20
Figura 3-9
La conexión VPN le permite establecer una ALG (Puerta de enlace de capa de aplicación) para
aplicaciones PPTP, L2TP e IPSec.
3.3.6 DDNS
Figura 3-10
Proveedor DNS dinámico: Seleccione uno del menú desplegable y presione “Sign up”
(Inscripción) para registrarse.
Cuenta: Ingrese el nombre de usuario igual al de la registración.
Contraseña: Ingrese la contraseña que creó.
DDNS: Ingrese el nombre de dominio. Es opcional
3.4 Parámetros Inalámbricos
3.4.1 Parámetros Básicos Esta hoja se usa para configurar el número mínimo de parámetros inalámbricos para
comunicación, como Nombre de Red (SSID) y Canal. El Punto de Acceso se puede establecer
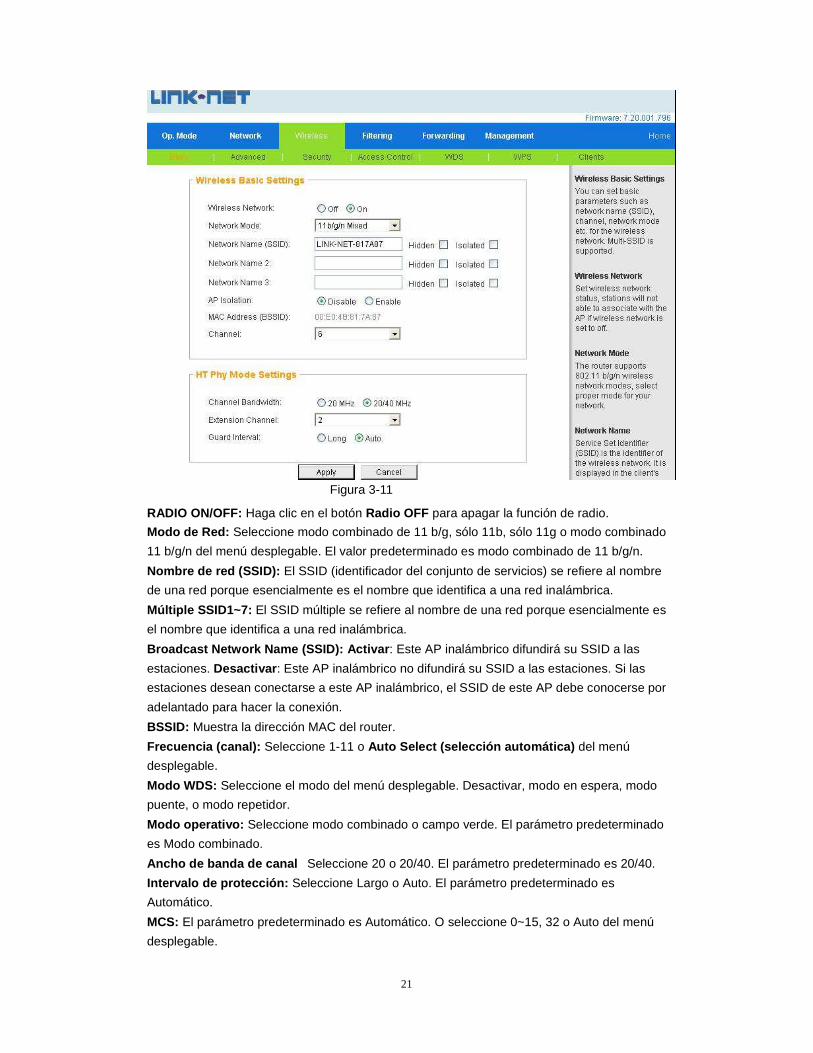
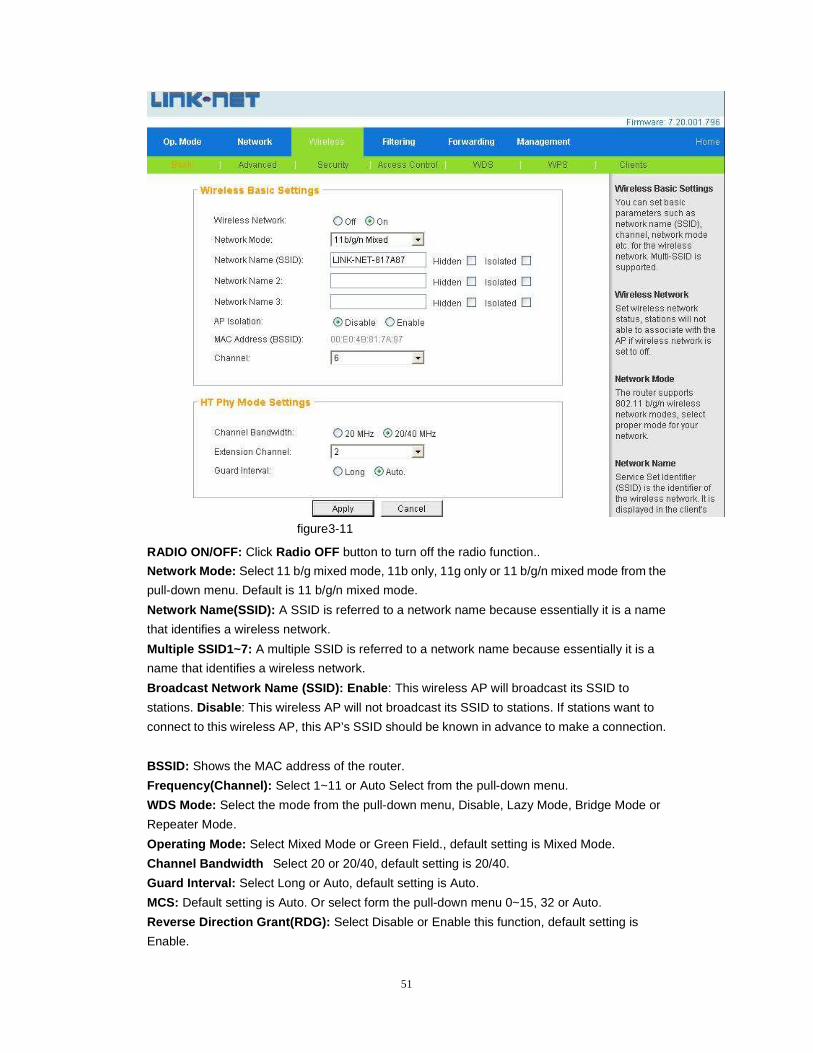
simplemente con los tiempos de parámetros mínimos. Figura 3-11
21
Figura 3-11
RADIO ON/OFF: Haga clic en el botón Radio OFF para apagar la función de radio.
Modo de Red: Seleccione modo combinado de 11 b/g, sólo 11b, sólo 11g o modo combinado
11 b/g/n del menú desplegable. El valor predeterminado es modo combinado de 11 b/g/n.
Nombre de red (SSID): El SSID (identificador del conjunto de servicios) se refiere al nombre
de una red porque esencialmente es el nombre que identifica a una red inalámbrica.
Múltiple SSID1~7: El SSID múltiple se refiere al nombre de una red porque esencialmente es
el nombre que identifica a una red inalámbrica.
Broadcast Network Name (SSID): Activar : Este AP inalámbrico difundirá su SSID a las
estaciones. Desactivar : Este AP inalámbrico no difundirá su SSID a las estaciones. Si las
estaciones desean conectarse a este AP inalámbrico, el SSID de este AP debe conocerse por
adelantado para hacer la conexión.
BSSID: Muestra la dirección MAC del router.
Frecuencia (canal): Seleccione 1-11 o Auto Select (selección automática) del menú
desplegable.
Modo WDS: Seleccione el modo del menú desplegable. Desactivar, modo en espera, modo
puente, o modo repetidor.
Modo operativo: Seleccione modo combinado o campo verde. El parámetro predeterminado
es Modo combinado.
Ancho de banda de canal �Seleccione 20 o 20/40. El parámetro predeterminado es 20/40.
Intervalo de protección: Seleccione Largo o Auto. El parámetro predeterminado es
Automático.
MCS: El parámetro predeterminado es Automático. O seleccione 0~15, 32 o Auto del menú
desplegable.

22
Concesión de dirección reversa (Reverse Direction G rant) (RDG): Seleccione Activar o
Desactivar esta función. El parámetro predeterminado es Activar.
Canal de extensión: Puede seleccionar 2457MHz (Canal 10) o 2417MHz (Canal 2)
Aplicar: Haga clic para guardar los parámetros actuales.
Cancelar: Haga clic para eliminar los parámetros actuales
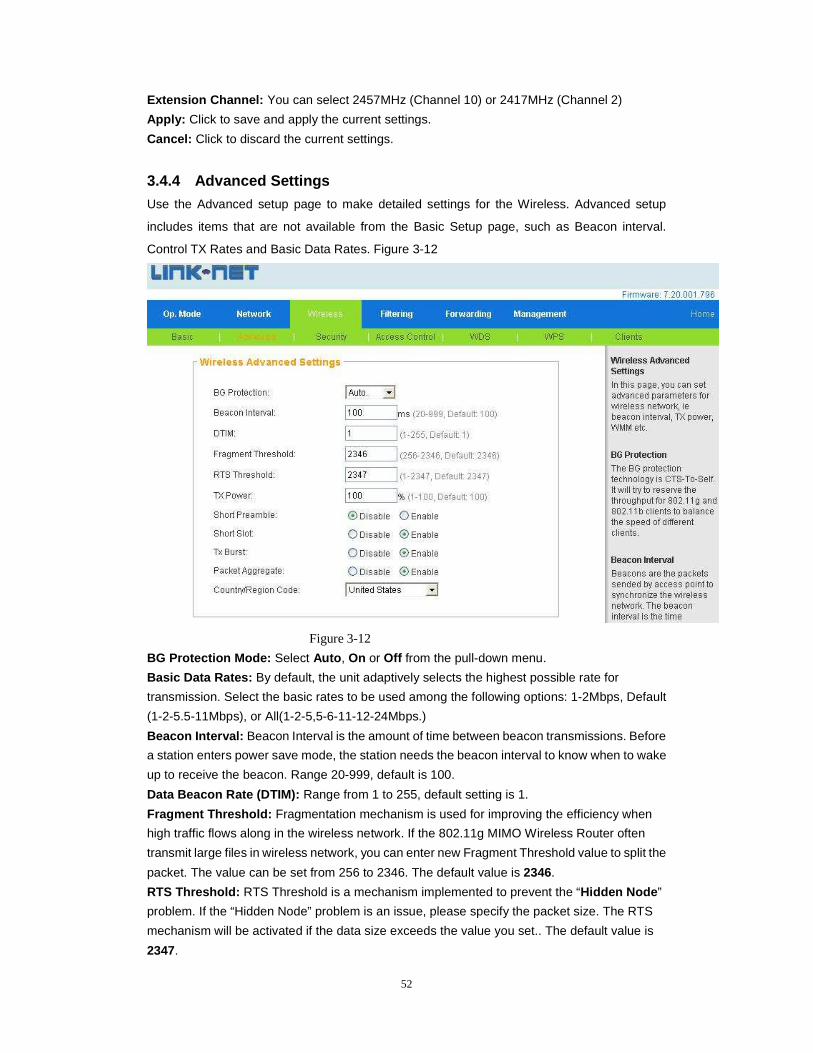
3.4.2 Parámetros avanzados
Use la hoja de configuración avanzada para establecer parámetros detallados para la conexión
inalámbrica. La configuración avanzada incluye elementos que no están disponibles en la
página de Configuración Básica, como Intervalo de baliza (Beacon interval), Velocidad de
Control TX (Control TX Rates) y velocidades de datos básicas. Figura 3-12
Figura 3-12
Modo Protección BG: Seleccione Auto , On u Off del menú desplegable.
Velocidades de datos básicas: En forma predeterminada, la unidad selecciona la velocidad
más alta posible para la transmisión. Seleccione las velocidades básicas para usar entre las
siguientes opciones: 1-2Mbps, predeterminado (1-2-5.5-11Mbps), o Todas
(1-2-5,5-6-11-12-24Mbps.)
Intervalo de baliza: Es la cantidad de tiempo entre las transmisiones de balizas. Antes de que
una estación ingrese al modo de ahorro de energía, necesita el intervalo de baliza para saber
cuándo despertar para recibir la baliza. Rango 20-999. El valor predeterminado es 100.
Velocidad de la baliza de datos (Data Beacon Rate) (DTIM): Rango de 1 a 255. El valor
predeterminado es 1.
Umbral de fragmento: El mecanismo de fragmentación se usa para mejorar la eficiencia
cuando existe un alto flujo de tráfico en la red inalámbrica. Si el Router Inalámbrico 802.11g
MIMO a menudo transmite archivos grandes en la red inalámbrica, puede ingresar un valor
nuevo de Umbral de fragmento para dividir el paquete. El valor se puede establecer desde 256
23
a 2346. El valor predeterminado es 2346.
Umbral RTS: El umbral RTS es un mecanismo que se implementa para prevenir el problema
del “Nodo oculto ”. Si padece del problema del “nodo oculto”, especifique el tamaño del
paquete. Se activará el mecanismo RTS si el tamaño de los datos supera el valor que usted
estableció. El valor predeterminado es 2347.
Preámbulo corto: Seleccione Activar o Desactivar esta función. El parámetro predeterminado
es Desactivar . El preámbulo es una señal que se usa en el entorno inalámbrico para
sincronizar el tiempo de transmisión, incluso la Sincronización y Delimitador de Marco de inicio.
Ranura corta: Seleccione Activar o Desactivar esta función. El parámetro predeterminado es
Activar.
Tx Burst: Seleccione Activar o Desactivar esta función. El parámetro predeterminado es
Activar.
Pkt_Aggregate: Seleccione Activar o Desactivar esta función. El parámetro predeterminado
es Activar.
IGMP Snooping: Seleccione Activar o Desactivar esta función. El parámetro predeterminado
es Desactivar .
WMM Capable: Seleccione Activar o Desactivar esta función. El parámetro predeterminado es
Activar .
APSD Capable: Seleccione Activar o Desactivar esta función. El parámetro predeterminado
es Desactivar.
Parámetros WMM: Haga clic en el botón WMM Configuration (Configuración WMM) para
más parámetros.
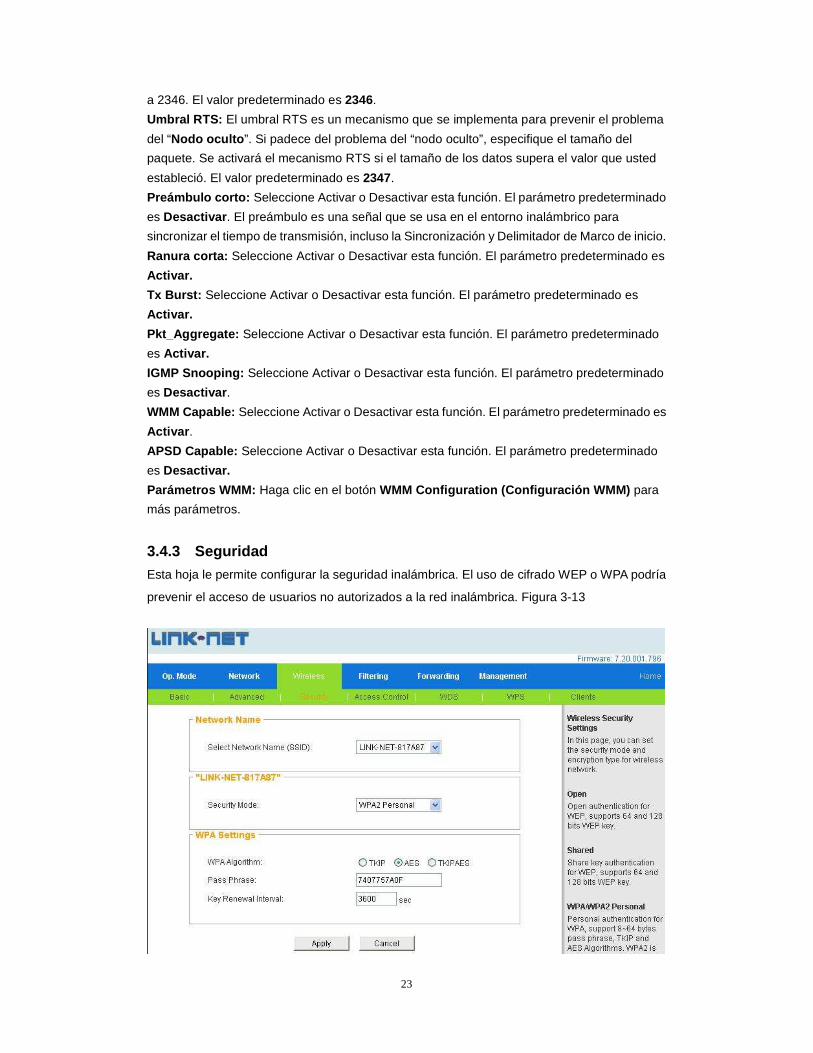
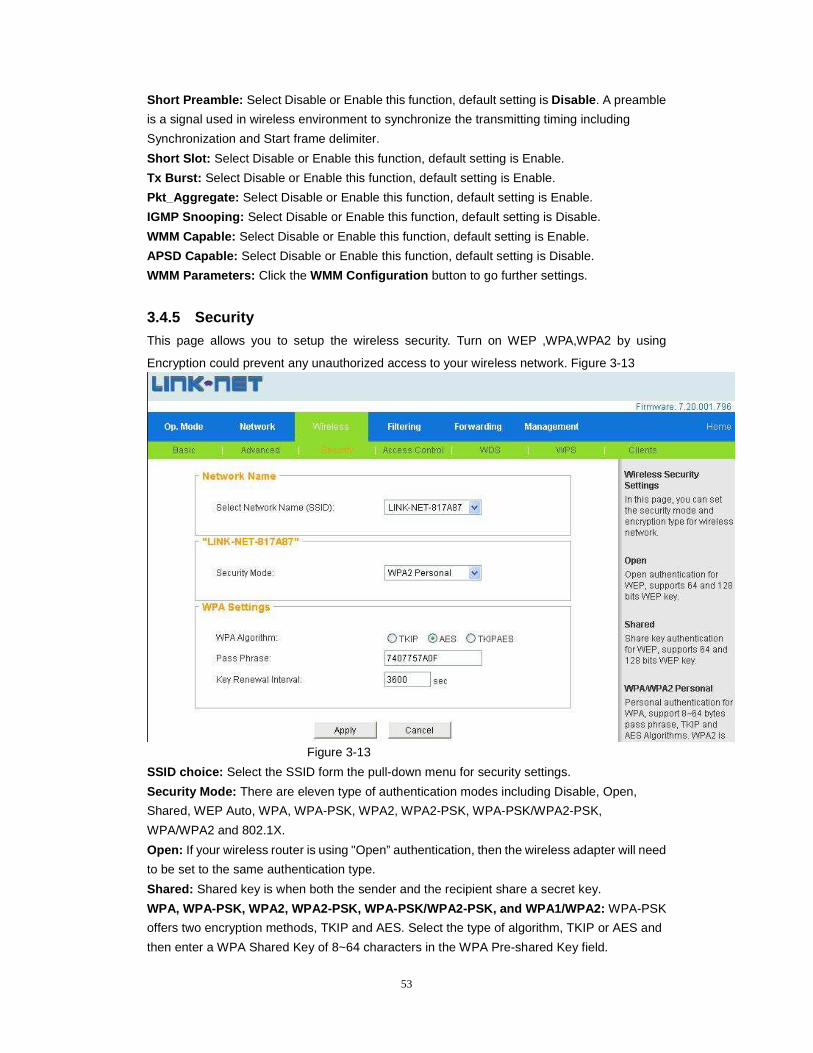
3.4.3 Seguridad
Esta hoja le permite configurar la seguridad inalámbrica. El uso de cifrado WEP o WPA podría
prevenir el acceso de usuarios no autorizados a la red inalámbrica. Figura 3-13
24
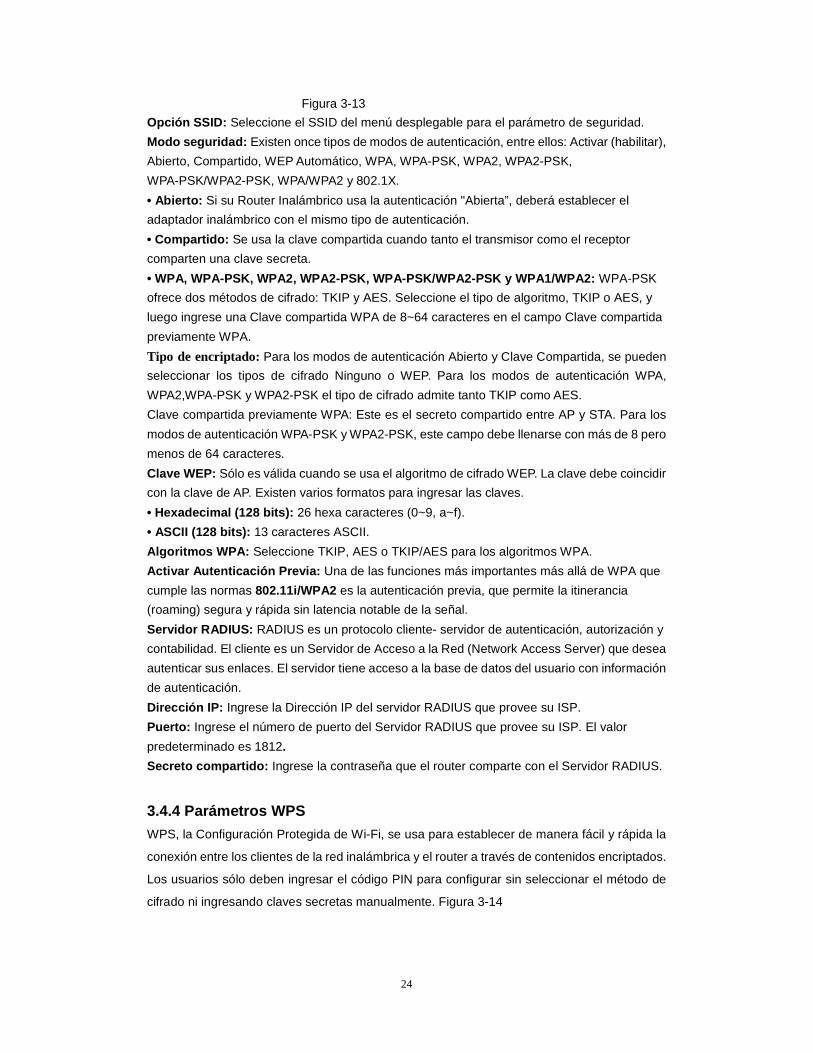
Figura 3-13
Opción SSID: Seleccione el SSID del menú desplegable para el parámetro de seguridad.
Modo seguridad: Existen once tipos de modos de autenticación, entre ellos: Activar (habilitar),
Abierto, Compartido, WEP Automático, WPA, WPA-PSK, WPA2, WPA2-PSK,
WPA-PSK/WPA2-PSK, WPA/WPA2 y 802.1X.
• Abierto: Si su Router Inalámbrico usa la autenticación "Abierta”, deberá establecer el
adaptador inalámbrico con el mismo tipo de autenticación.
• Compartido: Se usa la clave compartida cuando tanto el transmisor como el receptor
comparten una clave secreta.
• WPA, WPA-PSK, WPA2, WPA2-PSK, WPA-PSK/WPA2-PSK y WPA1/WPA2: WPA-PSK
ofrece dos métodos de cifrado: TKIP y AES. Seleccione el tipo de algoritmo, TKIP o AES, y
luego ingrese una Clave compartida WPA de 8~64 caracteres en el campo Clave compartida
previamente WPA.
Tipo de encriptado: Para los modos de autenticación Abierto y Clave Compartida, se pueden
seleccionar los tipos de cifrado Ninguno o WEP. Para los modos de autenticación WPA,
WPA2,WPA-PSK y WPA2-PSK el tipo de cifrado admite tanto TKIP como AES.
Clave compartida previamente WPA: Este es el secreto compartido entre AP y STA. Para los
modos de autenticación WPA-PSK y WPA2-PSK, este campo debe llenarse con más de 8 pero
menos de 64 caracteres.
Clave WEP: Sólo es válida cuando se usa el algoritmo de cifrado WEP. La clave debe coincidir
con la clave de AP. Existen varios formatos para ingresar las claves.
• Hexadecimal (128 bits): 26 hexa caracteres (0~9, a~f).
• ASCII (128 bits): 13 caracteres ASCII.
Algoritmos WPA: Seleccione TKIP, AES o TKIP/AES para los algoritmos WPA.
Activar Autenticación Previa: Una de las funciones más importantes más allá de WPA que
cumple las normas 802.11i/WPA2 es la autenticación previa, que permite la itinerancia
(roaming) segura y rápida sin latencia notable de la señal.
Servidor RADIUS: RADIUS es un protocolo cliente- servidor de autenticación, autorización y
contabilidad. El cliente es un Servidor de Acceso a la Red (Network Access Server) que desea
autenticar sus enlaces. El servidor tiene acceso a la base de datos del usuario con información
de autenticación.
Dirección IP: Ingrese la Dirección IP del servidor RADIUS que provee su ISP.
Puerto: Ingrese el número de puerto del Servidor RADIUS que provee su ISP. El valor
predeterminado es 1812.
Secreto compartido: Ingrese la contraseña que el router comparte con el Servidor RADIUS.
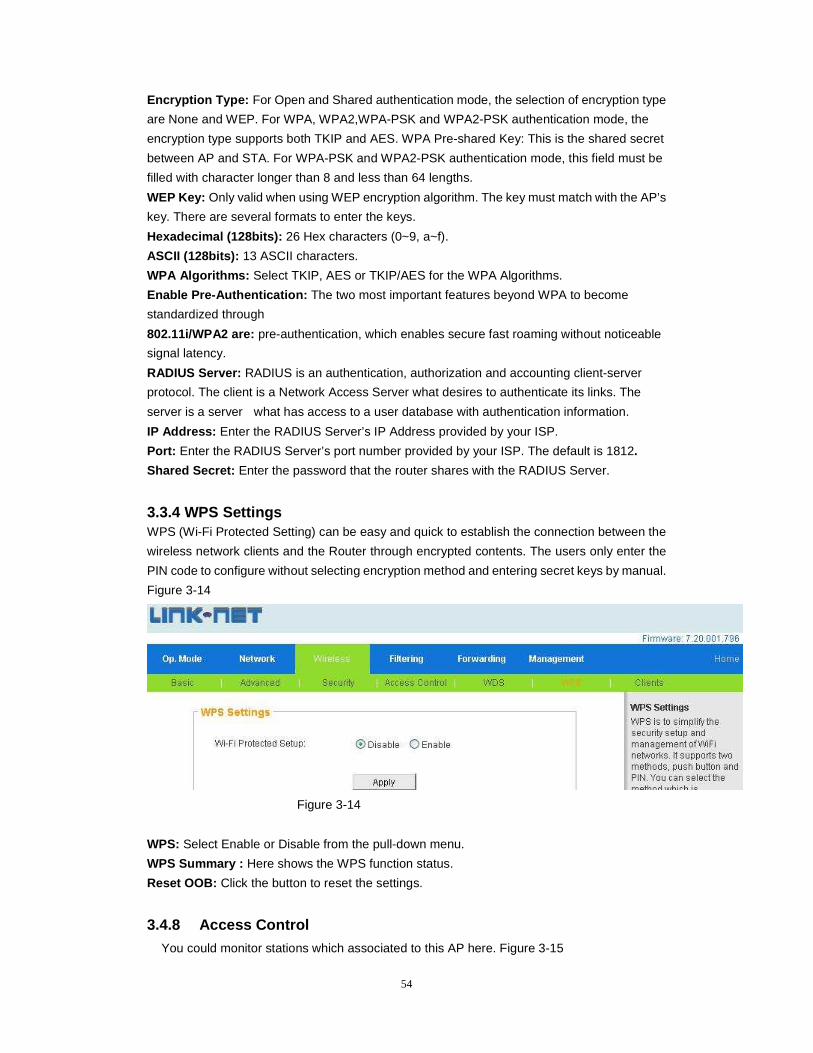
3.4.4 Parámetros WPS
WPS, la Configuración Protegida de Wi-Fi, se usa para establecer de manera fácil y rápida la
conexión entre los clientes de la red inalámbrica y el router a través de contenidos encriptados.
Los usuarios sólo deben ingresar el código PIN para configurar sin seleccionar el método de
cifrado ni ingresando claves secretas manualmente. Figura 3-14
25
Figura 3-14
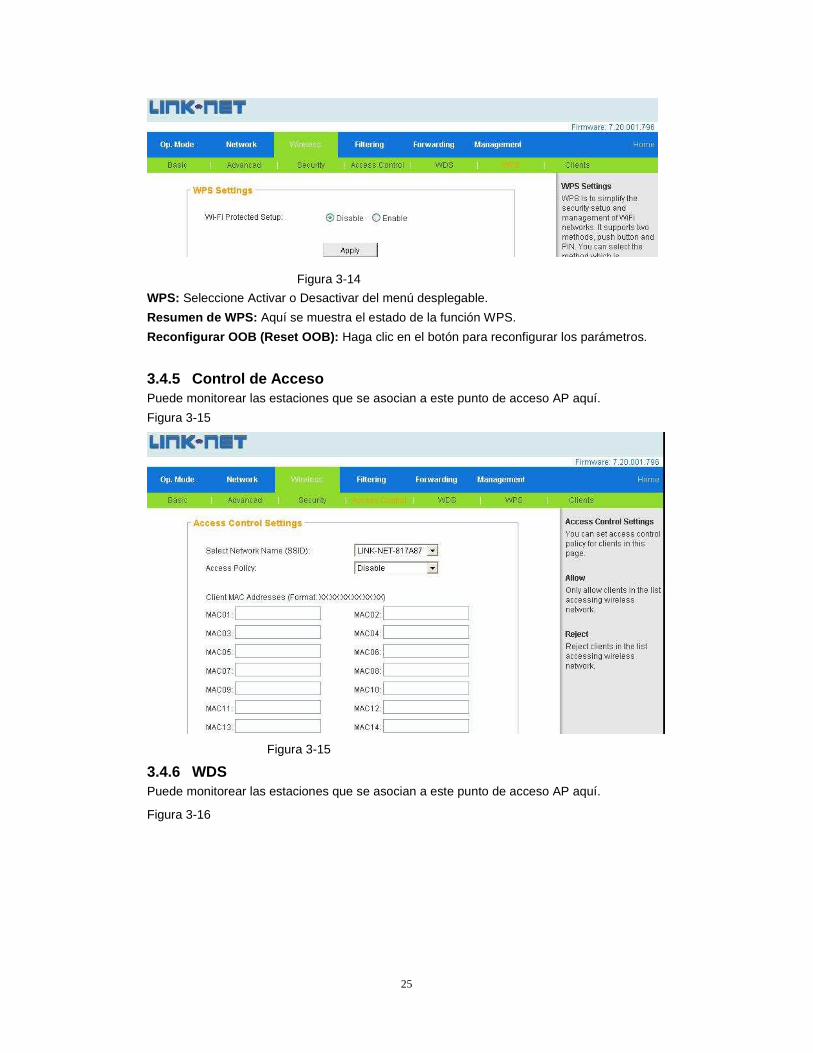
WPS: Seleccione Activar o Desactivar del menú desplegable.
Resumen de WPS: Aquí se muestra el estado de la función WPS.
Reconfigurar OOB (Reset OOB): Haga clic en el botón para reconfigurar los parámetros.
3.4.5 Control de Acceso Puede monitorear las estaciones que se asocian a este punto de acceso AP aquí.
Figura 3-15
Figura 3-15
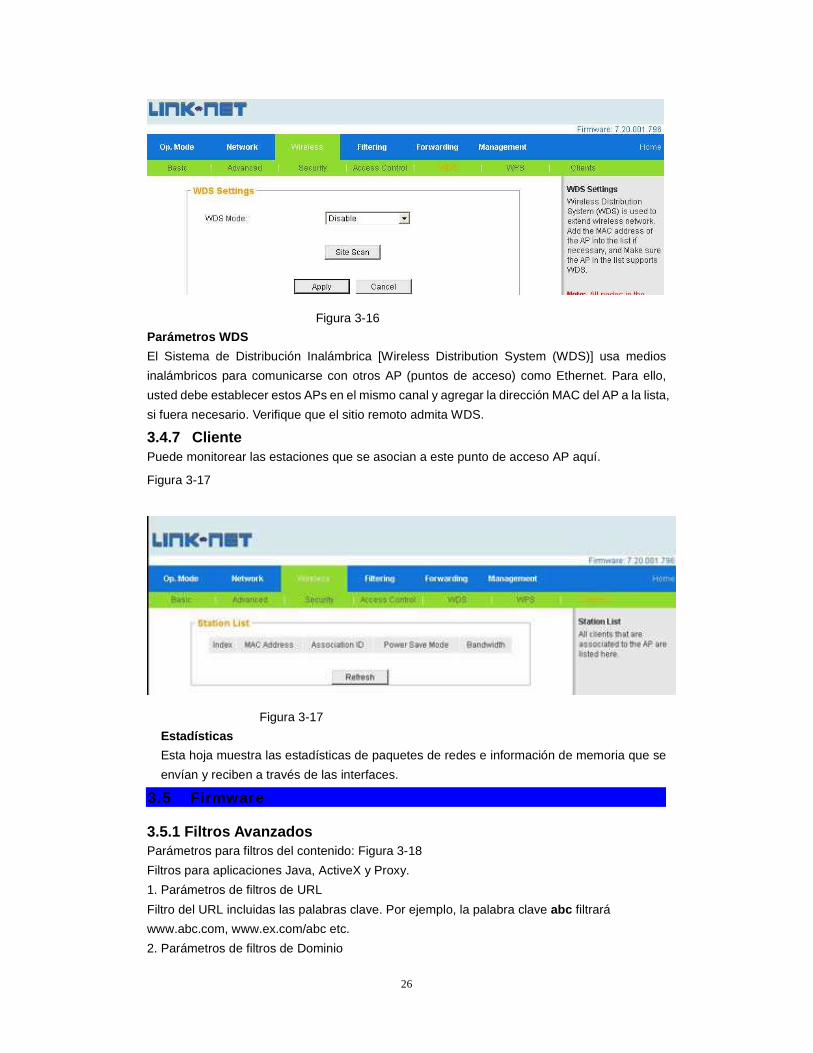
3.4.6 WDS Puede monitorear las estaciones que se asocian a este punto de acceso AP aquí.
Figura 3-16
26
Figura 3-16 Parámetros WDS
El Sistema de Distribución Inalámbrica [Wireless Distribution System (WDS)] usa medios
inalámbricos para comunicarse con otros AP (puntos de acceso) como Ethernet. Para ello,
usted debe establecer estos APs en el mismo canal y agregar la dirección MAC del AP a la lista,
si fuera necesario. Verifique que el sitio remoto admita WDS.
3.4.7 Cliente Puede monitorear las estaciones que se asocian a este punto de acceso AP aquí.
Figura 3-17
Figura 3-17
Estadísticas
Esta hoja muestra las estadísticas de paquetes de redes e información de memoria que se
envían y reciben a través de las interfaces.
3.5 Firmware
3.5.1 Filtros Avanzados Parámetros para filtros del contenido: Figura 3-18
Filtros para aplicaciones Java, ActiveX y Proxy.
1. Parámetros de filtros de URL
Filtro del URL incluidas las palabras clave. Por ejemplo, la palabra clave abc filtrará
www.abc.com, www.ex.com/abc etc.
2. Parámetros de filtros de Dominio
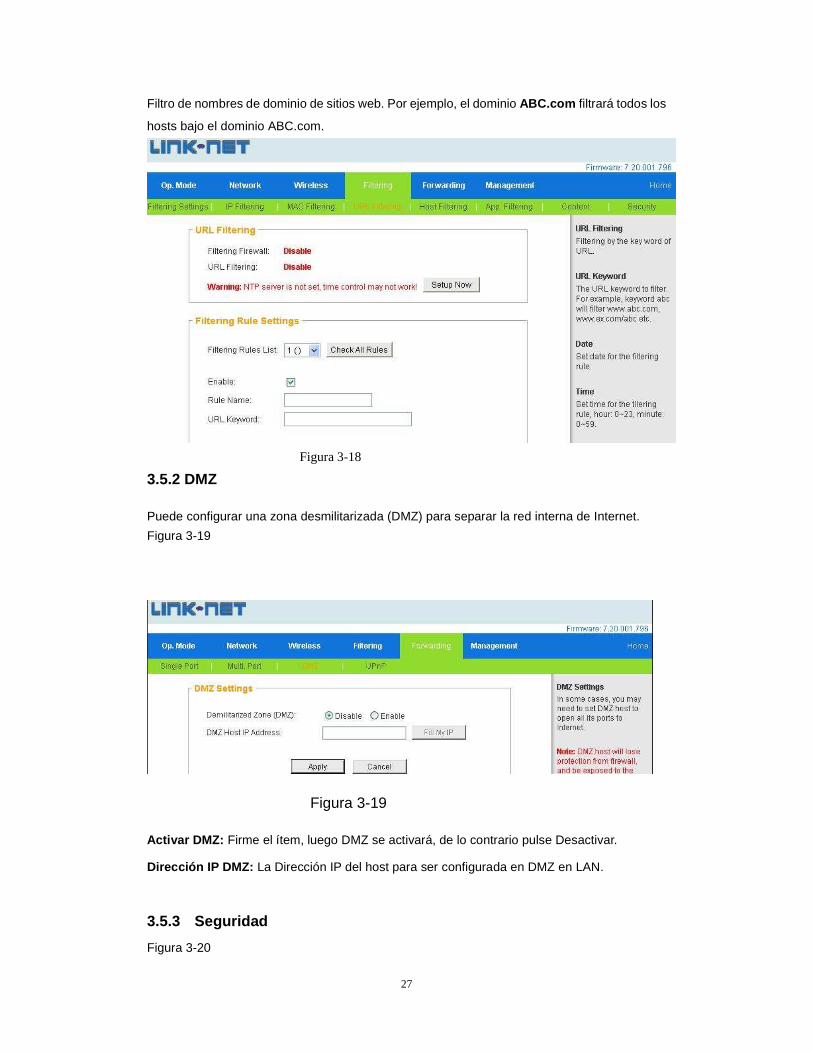
27
Filtro de nombres de dominio de sitios web. Por ejemplo, el dominio ABC.com filtrará todos los
hosts bajo el dominio ABC.com.
Figura 3-18
3.5.2 DMZ
Puede configurar una zona desmilitarizada (DMZ) para separar la red interna de Internet.
Figura 3-19
Figura 3-19
Activar DMZ: Firme el ítem, luego DMZ se activará, de lo contrario pulse Desactivar.
Dirección IP DMZ: La Dirección IP del host para ser configurada en DMZ en LAN.
3.5.3 Seguridad
Figura 3-20
28
Figura 3-20
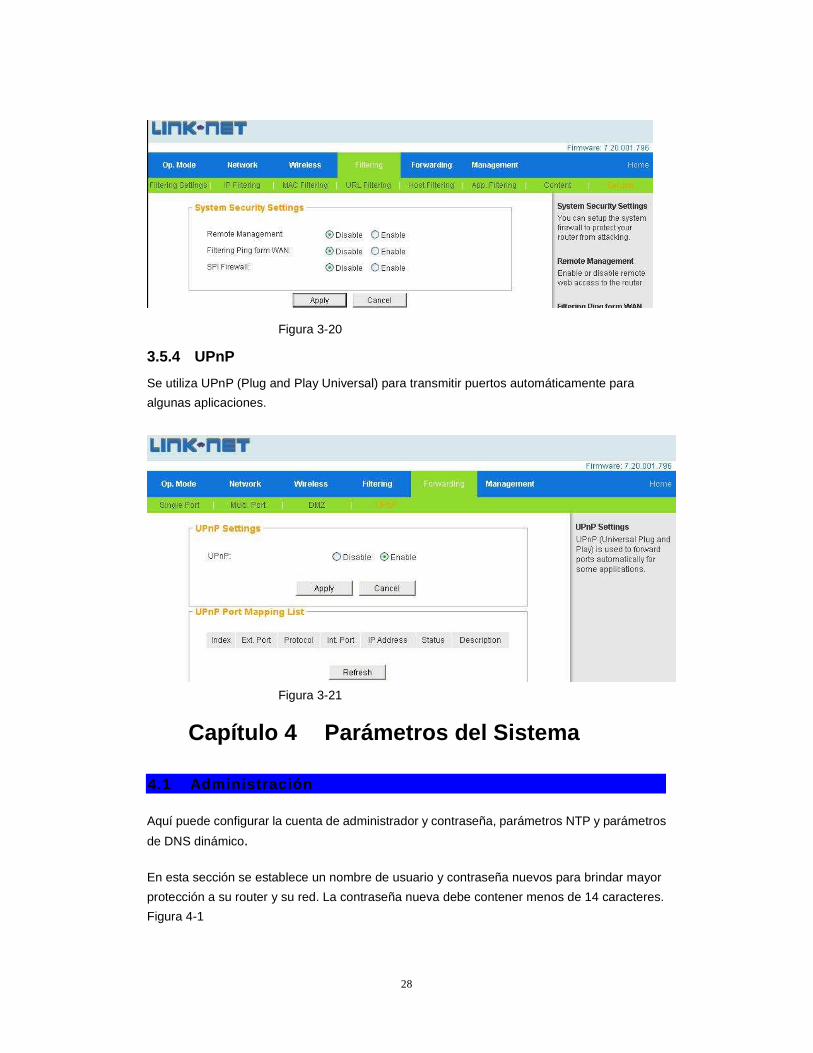
3.5.4 UPnP
Se utiliza UPnP (Plug and Play Universal) para transmitir puertos automáticamente para
algunas aplicaciones.
Figura 3-21
Capítulo 4 Parámetros del Sistema
4.1 Administración
Aquí puede configurar la cuenta de administrador y contraseña, parámetros NTP y parámetros
de DNS dinámico.
En esta sección se establece un nombre de usuario y contraseña nuevos para brindar mayor
protección a su router y su red. La contraseña nueva debe contener menos de 14 caracteres.
Figura 4-1
29
Figura 4-1
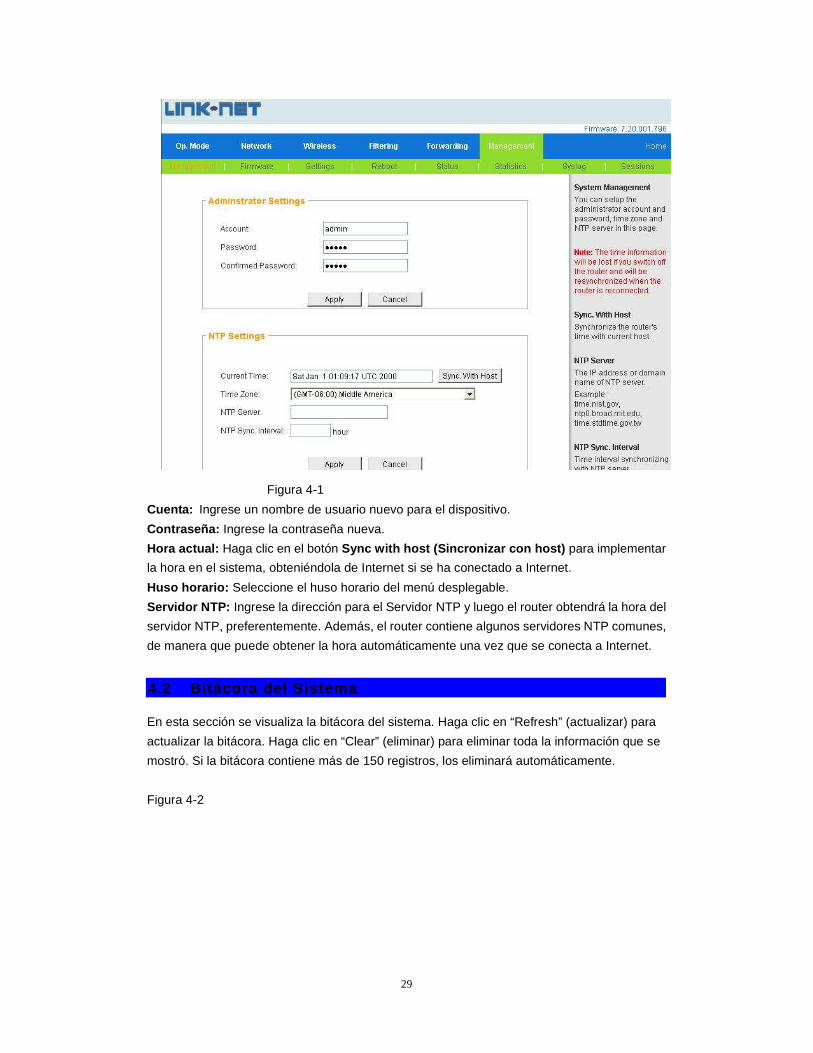
Cuenta: Ingrese un nombre de usuario nuevo para el dispositivo.
Contraseña: Ingrese la contraseña nueva.
Hora actual: Haga clic en el botón Sync with host (Sincronizar con host) para implementar
la hora en el sistema, obteniéndola de Internet si se ha conectado a Internet.
Huso horario: Seleccione el huso horario del menú desplegable.
Servidor NTP: Ingrese la dirección para el Servidor NTP y luego el router obtendrá la hora del
servidor NTP, preferentemente. Además, el router contiene algunos servidores NTP comunes,
de manera que puede obtener la hora automáticamente una vez que se conecta a Internet.
4.2 Bitácora del Sistema
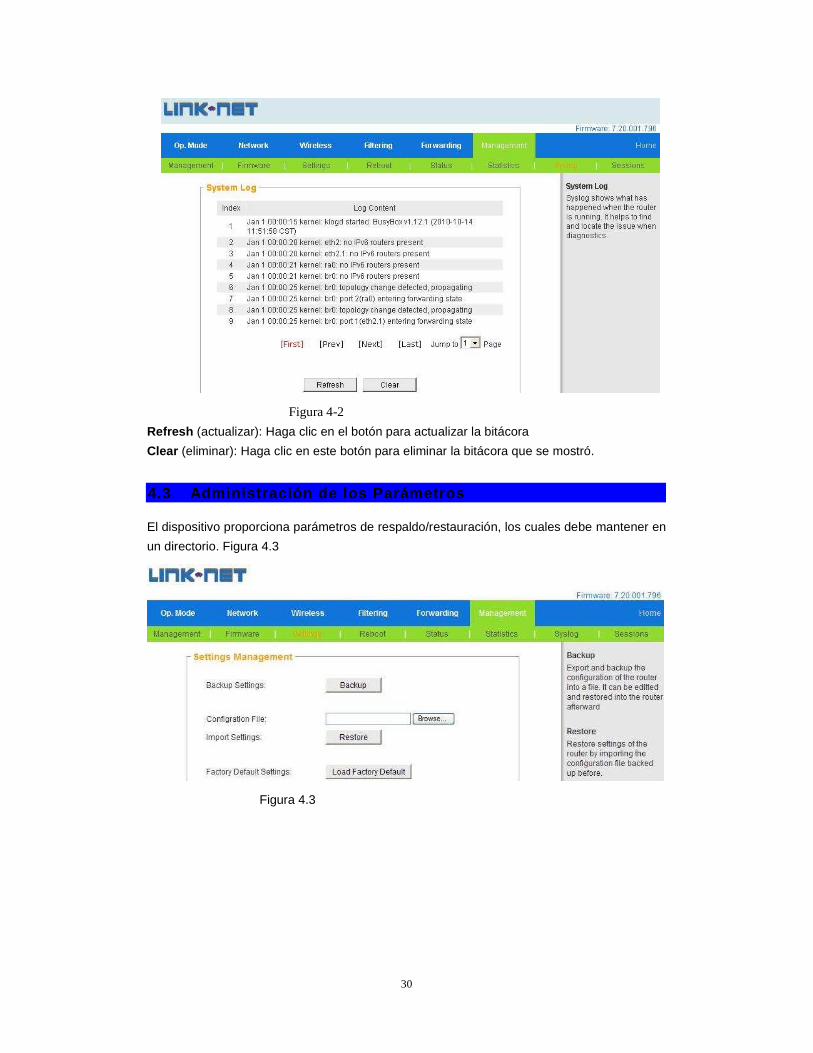
En esta sección se visualiza la bitácora del sistema. Haga clic en “Refresh” (actualizar) para
actualizar la bitácora. Haga clic en “Clear” (eliminar) para eliminar toda la información que se
mostró. Si la bitácora contiene más de 150 registros, los eliminará automáticamente.
Figura 4-2
30
Figura 4-2
Refresh (actualizar): Haga clic en el botón para actualizar la bitácora
Clear (eliminar): Haga clic en este botón para eliminar la bitácora que se mostró.
4.3 Administración de los Parámetros
El dispositivo proporciona parámetros de respaldo/restauración, los cuales debe mantener en
un directorio. Figura 4.3
Figura 4.3
31
About this Guide
Thank you for choosing Wireless Broadband Router. As a cost-effective product, this Wireless
Router provides dedicated solution for small office, home and dormitory. It integrates a variety
of wireless applications, such as wireless bridge model, AP model etc. It provides a wide range
of data security protection, support WEP, WPA, WPA2,WPS Encryption method. It is the best
option of surfing on the wireless Internet and enjoying the fun of the wireless Internet and satisfy
your need to watch high-definition video�
The Wireless N router is easy to configure, even if you are not so familiar with the router. In
order to better use all functions of this product, please read this guide carefully before you
install the router,
32
CONTENTS
Chapter 1 Hardware Installation
1.1 Description Panel Indicator---------------------------------------------------------------------34
1.2 System Requirement-----------------------------------------------------------------------------34
1.3 Installation Environment Requirements-----------------------------------------------------34
1.4 Hardware Installation Steps--------------------------------------------------------------------35
1.5 Product Features---------------------------------------------------------------------------------35
Chapter 2 Quick Installation Guide
2.1 Configuring windows XP of the PC-----------------------------------------------------------36
2.2 Quick Installation Guide-------------------------------------------------------------------------38
Chapter 3 Router Configuration
3.1 System Statas -------------------------------------------------------------------------------------45
3.2 Operation Mode-----------------------------------------------------------------------------------45
3.3 Network Settings ---------------------------------------------------------------------------------46
3.4 Wireless Settings ---------------------------------------------------------------------------------51
3.5 Firewall Settings ---------------------------------------------------------------------------------57 Chapter 4 Administration Settings
4.1 System Management----------------------------------------------------------------------------59
4.2 Firmware Upgrade-------------------------------------------------------------------------------60
4.3 Remote Management---------------------------------------------------------------------------61
33
Chapter 1 Hardware Installation
1.1 Description Panel Indicators
LED Indicators �
Name Description
POWER Power indicator
SYS The SYS is constantly bright when the system works normally.
Off There is no wireless device linked to the router. WLAN
Flashing The Wireless function is enabled.
On There is a device linked to the corresponding port. WAN
Flashing There is an active device linked to the corresponding port.
On There is a device linked to the corresponding port. LAN(1/2/3/
4) Flashing The is an active device linked to the corresponding port.
The Rear Panel:
� WAN�Wide Area Network Interface (RJ-45). Connect xDSL Modem/Cable Modem or
Ethernet.
�LAN1-4�Four RJ-45 ports, Computer and hubs/switches through these interfaces connected
to LAN.
� DC IN�Please use the power adapter which supply with the Wireless router only.
� WPS/RST�Press the WPS/RST button, we can quickly and easily secured wireless data
transmission network to prevent the invasion of unauthorized users;
Press and hold the same button for 5 seconds under the working state,the system will restore
the factory default setting.
� WLAN: Press the WLAN button, we can quickly and easily open wireless network
1.2 System requirement
� Broadband internet Access Service(DSL/Cable/Ethernet)
� One DSL/Cable Modem that has an RJ45 connector (you do not need it if you connect the
router to the Ethernet)
� Each PC in the LAN needs a working Ethernet Adapter and an Ethernet cable with RJ45
connectors
� TCP/IP protocol must be installed on each PC
� Web browser, such as Microsoft Internet Explorer 5.0 or later, Netscape Navigator 6.0 or
later
1.3 Installation Environment Requirements
34
� Place the Router horizontal
� Antenna will be adjusted to fit the angle of the direction
� Place the router as far as possible away from the heat device
� Do not place the router on too dirty or too damp places
1.4 Hardware Installation Steps
� Power on the Wireless N Router
� Connect the Router’s WAN port to the DSL Modem/Cable Modem.
� Connect the PC(s) in your LAN to the LAN port on your Router. (If you have the wireless
NIC and want to use wireless function, you can skip this step.)
1.5 Product Features
� Complies with IEEE 802.11n, IEEE 802.11g, IEEE 802.11b standards
� 1 10/100M Auto-Negotiation RJ45 WAN port, 4 10/100M Auto-Negotiation RJ45 LAN
ports
� Adopts 1 transmitting and 1 receiving infrastructure for wireless rates of up to 150Mbps
� Supports PPPoE, Dynamic IP, Static IP broadband functions
� Automatic dialing, On-demand dialing, fixed time dialing, filling most dialing requirements
� Supports virtual server, special application and DMZ host ideal for creating a website
within your LAN
� Supports SSID broadcast control and MAC access control list
� Supports 64/128/152-bit WEP, complies with 128 bit WPA standard(TKIP/AES), supports
MIC, IV Expansion, Shared Key Authentication, IEEE 802.1X
� Built-in firewall features IP, MAC, URL filtering which flexibly controls online access and
time
� Built-in DHCP server with automatic dynamic IP address distribution
� User interface supports free WEB software updates
� Supports configuration file backup and restore
� Sleek exterior, can be mounted on a wall or placed horizontally on a table or desk
Chapter 2 Quick Installation Guide
35
You should configure the Router correctly to ensure the normal use of the Router. This chapter
describes how to configure the basic functions of the Wireless Router. we will show the detailed
configuration in the next chapter.
2.1 Configuring windows XP of the PC
1. Configure the IP address
Click the start menu, select network connect , show in figure 2-1
Figure 2- 10
Right-click the local connection as shown in figure 2-2.then select Properties will pop up
figure 2-3 ,show in the network connection properties dialog box.
Figure 2- 11 Figure 2- 12
Double-click Internet Protocol (TCP/IP) will appear IP address page. If you choose to
automatically receive the IP address and the DNS server address, the computer will be
36
gain the IP address from the router (Show in figure 2-4).Of course, you can also choose
manual-setting as shown in figure 2-5.
Figure 2- 13 Figure 2- 14
2. Connect wireless network
The wireless network will be connected after finished configuring the network parameter.
Select View available wireless connection as show in figure 2-2, your wireless network
card will be in search of available network connection in current environment. Then the
wireless network will be linked successfully by click link button.
If the network is encrypted, password dialog box will pop up prompting you to enter key.
Wireless N Router default network name(SSID) is LINK-NET-817A89, select this network to
connect the wireless router(show in figure 2-6).
Figure 2-6
37
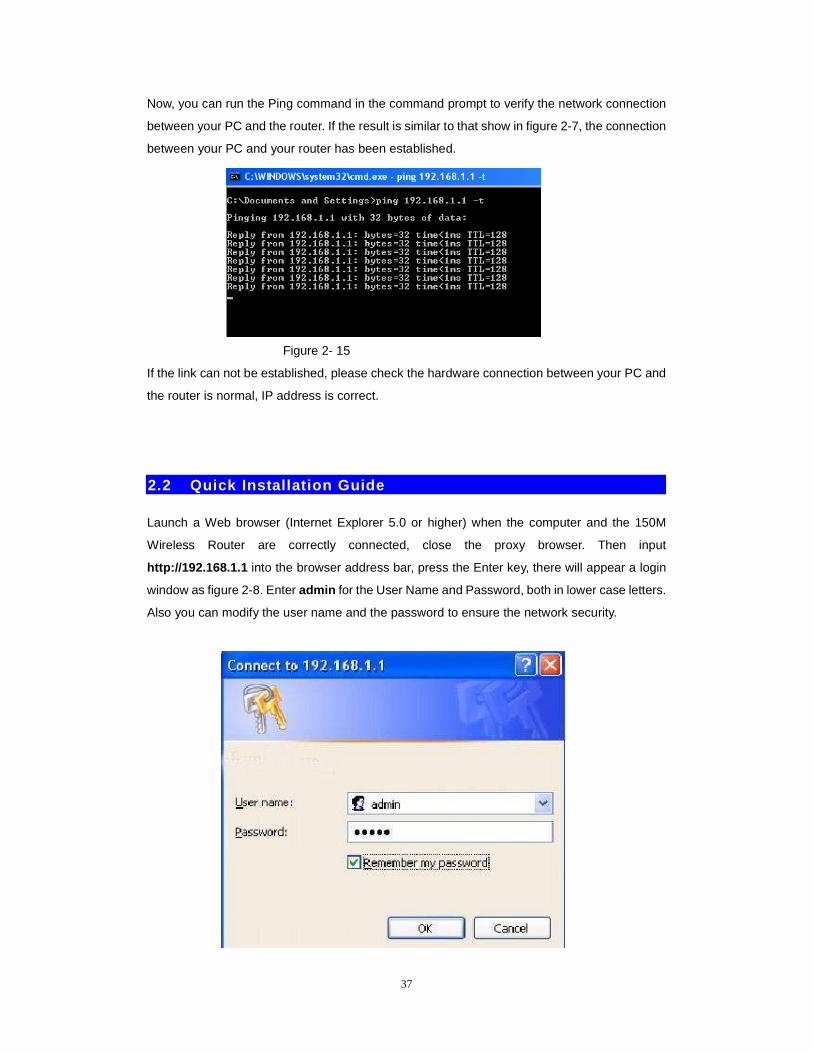
Now, you can run the Ping command in the command prompt to verify the network connection
between your PC and the router. If the result is similar to that show in figure 2-7, the connection
between your PC and your router has been established.
Figure 2- 15
If the link can not be established, please check the hardware connection between your PC and
the router is normal, IP address is correct.
2.2 Quick Installation Guide
Launch a Web browser (Internet Explorer 5.0 or higher) when the computer and the 150M
Wireless Router are correctly connected, close the proxy browser. Then input
http://192.168.1.1 into the browser address bar, press the Enter key, there will appear a login
window as figure 2-8. Enter admin for the User Name and Password, both in lower case letters.
Also you can modify the user name and the password to ensure the network security.

38
Fihure 2-8
If the User Name and Password are correct, Router Management screen will appear, show in
figure 2-9:
Figure 2-9
Click on Quick Setup the button, show in figure 2-10 , the router supports five connection
type to connect to Internet.
figure 2-10
Click on the Next button, show in figure 2-11 ,
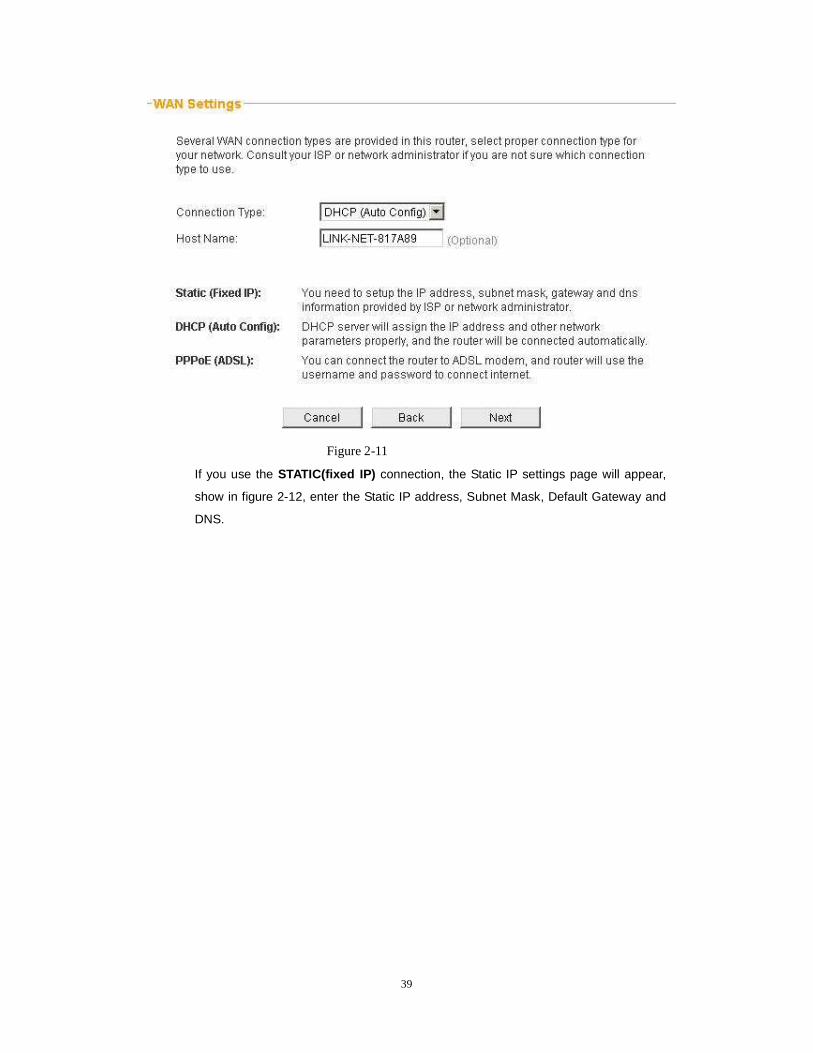
If you use the DHCP(Auto config) connection, the router will receive the IP parameters from
your ISP without needing to enter any parameter, show in figure 2-11�
39
Figure 2-11
� If you use the STATIC(fixed IP) connection, the Static IP settings page will appear,
show in figure 2-12, enter the Static IP address, Subnet Mask, Default Gateway and
DNS.
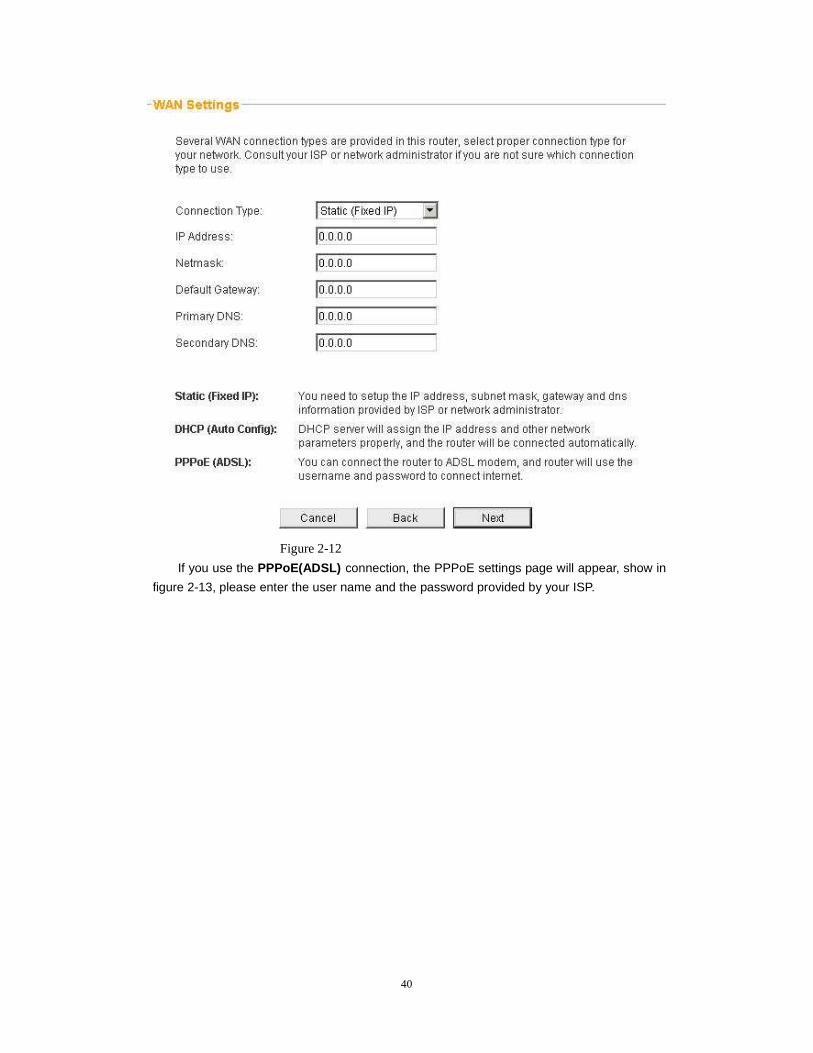
40
Figure 2-12
� If you use the PPPoE(ADSL) connection, the PPPoE settings page will appear, show in
figure 2-13, please enter the user name and the password provided by your ISP.
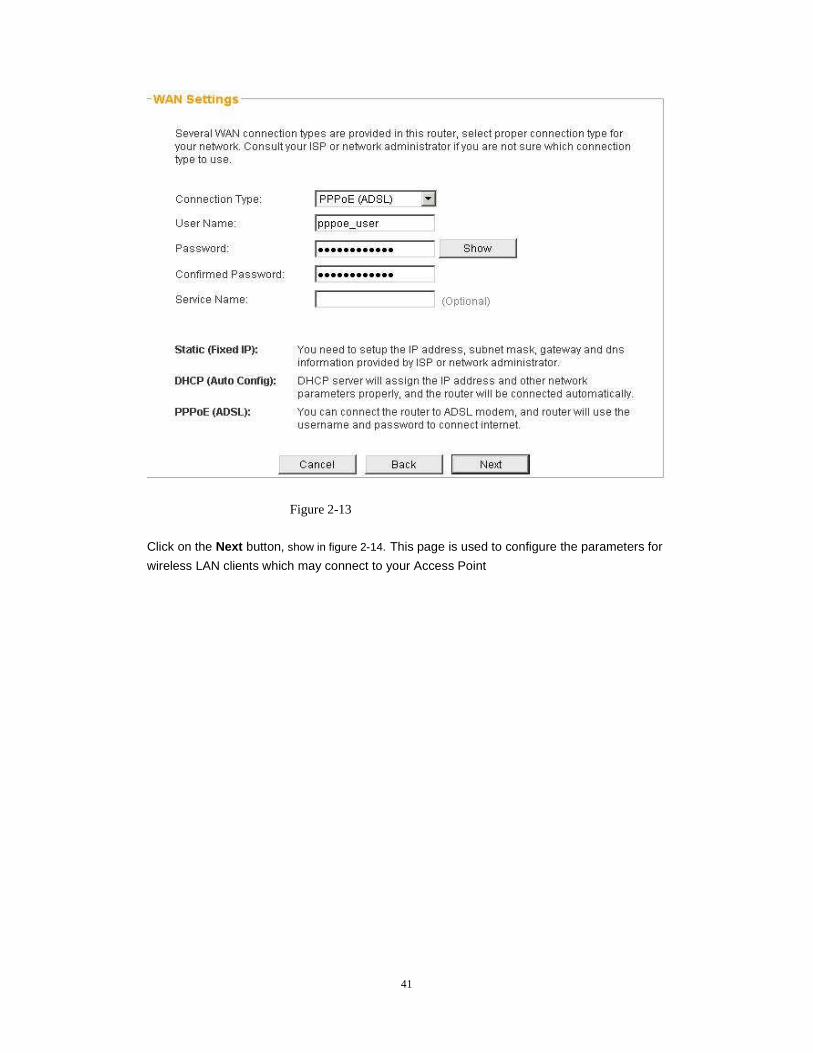
41
Figure 2-13
Click on the Next button, show in figure 2-14. This page is used to configure the parameters for
wireless LAN clients which may connect to your Access Point�
42
Figure 2-14
Click on NEXT, the button, show in figure 2-15�
43
Figure 2-15
Now, Quick Installation Guide is complete.

44
Chapter 3 Router Configuration In this chapter we will introduce some detail router settings, such as wireless advanced
configuration, wireless access control, network security configuration, system maintenance,
upgrades etc
3.1 Status
Click on the “management” in the menu bar, you can see the current status �All information is
read-only(show in the figure 3-1)
figure 3-1
3.2 Operation Mode
Select an operation Opmode then click Apply to enable the mode you preferred Default
operation mode is Gateway mode. (figure 3-2)
45
Figure 3-2
Gateway : In this mode, the device is supposed to connect to internet via ADSL/Cable Modem.
The NAT is enabled and PCs in LAN ports share the same IP to ISP through WAN port. The
connection type can be setup in WAN page by using PPPOE, DHCP client, PPTP client or static
IP.
AP client :the wireless apcil interface is treate as WAN port,and the wireless as interface the
ethernet ports the LAN ports
3.3 Network Settings
3.3.1 WAN Settings WAN Connection Type, select the WAN access type (Static Mode (fixed IP), DHCP (Auto
Config), PPPoE (ADSL)) from the pull-down menu. Default setting is DHCP (Auto Config) Type
Connection Mode 1 �DHCP� : If your ISP provides the DHCP service, please choose
DHCP(Auto config) type, and the router will automatically get IP parameters from your ISP.
46
Figure 3-3
� Connection Mode 2 �PPPoE�: Enter the User Name and Password provided by your ISP,
and click “Apply ”. Show in Figure 3- 4.
Figure 3- 4
WAN Connection Type: Choose the right connection type
User Name: Enter them provided by your ISP.
Password: Enter them provided by your ISP.
Connection Mode : There is three connection modes: Continuous,Connnect on
Demand,Manual. If you select "Continuous", the router will automatically connect to network. If
you select "Connect on Demand", the router will automatically connect when there is data
request from internet and will disconnect when the connection is idle. You should set an Idle
time in this mode. If you select "Manual", you should click "Connect" button to connect to
Internet and click Disconnect button to disconnect.
MAC Clone: Your ISP may require a particular MAC address in order for you to connect to the
Internet. This MAC address is the PC’s MAC address that your ISP had originally connected
your Internet connection to. Type in this Clone MAC address in this section to replace the WAN
MAC address with the MAC address of that PC
� Connection Mode 3 �STATIC��In this screen, fill the network address information from your
ISP in the IP Address, Subnet Mask, Gateway and Primary DNS server fields and click
“Apply ”. Show in Figure 3- 5
47
Figure 3-5
IP Address: Here enter the WAN IP address provided by your ISP.
Subnet Mask: Enter the WAN Subnet Mask here.
Default Gateway: Enter the WAN Gateway here.
Primary DNS Server: Enter the Primary DNS server provided by your ISP.
Secondary DNS Server: Enter the secondary DNS server provided by your ISP.
MAC Clone: Your ISP may require a particular MAC address in order for you to connect to the
Internet. This MAC address is the PC’s MAC address that your ISP had originally connected
your Internet connection to. Type in this Clone MAC address in this section to replace the WAN
MAC address with the MAC address of that PC.
3.3.2 LAN Settings Configure the LAN port, show in figure 3-6
48
Figure 3-6
IP Address: The Router’s LAN IP address (not your PC’s IP address). Once you modify the
IP address, you need to remember it for the Web-based Utility login next time.
192.168.1.1 is the default value.
Subnet Mask: It’s shown the Router’s subnet mask for measurement of the network size.
255.255.255.0 is the default value.
MAC Address: The Router’s physical MAC address as seen on your local network,
which is unchangeable.
DHCP Server�Enable or Disable the DHCP server. If you disable the Server, you must have
another DHCP server within your network or else you must manually configure the computer.
Start IP Address �This field specifies the first of the address in the IP address pool�
End IP Address � This field specifies the last of the addresses in the IP address pool�
Default Gateway: Enter the WAN Gateway here.
Lease Time� Host access router to re-address the time interval
DNS Proxy: Enable The router IP address corresponds to LAN. The gateway of All of
computers in LAN must set it.
3.3.3 DHCP Clients Here show you current dhcp assigned infomation . Figure 3-7
49
Figure 3-7
3.3.4 Routing You can set static route here according to your network topology. Figure 3-8
Figure 3-8
Destination : The IP Address of host wanted to access.
Range : Indicate the destination host or net
Gateway : IP address from which the destination packets go out.
Interface : Interface from which the destination packets go out.
Comment : Infomation about this route.
3.3.5 Vpn Pass VPN Passthrough Settings Figure 3-9
50
Figure 3-9
VPN passthrough allows you to set ALG (Application Layer Gateway) for L2TP, IPSec, and PPTP
applications.
3.3.6 DDNS
Figure 3-10
Dynamic DNS Provider: Select one from the drop-down menu and press “Sign up” for
registration. Account: Enter the user name the same as the registration name.
Password: Enter the password you set.
DDNS: Enter the domain name which is optiona
3.4 Wireless Settings
3.4.1 Basic Settings This page is used to configure the minimum number of wireless settings for communication
such as Network Name (SSID) and Channel. The Access Point can be set simply with only the
minimum setting times. Figure 3-11
51
figure3-11
RADIO ON/OFF: Click Radio OFF button to turn off the radio function..
Network Mode: Select 11 b/g mixed mode, 11b only, 11g only or 11 b/g/n mixed mode from the
pull-down menu. Default is 11 b/g/n mixed mode.
Network Name(SSID): A SSID is referred to a network name because essentially it is a name
that identifies a wireless network.
Multiple SSID1~7: A multiple SSID is referred to a network name because essentially it is a
name that identifies a wireless network.
Broadcast Network Name (SSID): Enable : This wireless AP will broadcast its SSID to
stations. Disable : This wireless AP will not broadcast its SSID to stations. If stations want to
connect to this wireless AP, this AP’s SSID should be known in advance to make a connection.
BSSID: Shows the MAC address of the router.
Frequency(Channel): Select 1~11 or Auto Select from the pull-down menu.
WDS Mode: Select the mode from the pull-down menu, Disable, Lazy Mode, Bridge Mode or
Repeater Mode.
Operating Mode: Select Mixed Mode or Green Field., default setting is Mixed Mode.
Channel Bandwidth �Select 20 or 20/40, default setting is 20/40.
Guard Interval: Select Long or Auto, default setting is Auto.
MCS: Default setting is Auto. Or select form the pull-down menu 0~15, 32 or Auto.
Reverse Direction Grant(RDG): Select Disable or Enable this function, default setting is
Enable.
52
Extension Channel: You can select 2457MHz (Channel 10) or 2417MHz (Channel 2)
Apply: Click to save and apply the current settings.
Cancel: Click to discard the current settings.
3.4.4 Advanced Settings
Use the Advanced setup page to make detailed settings for the Wireless. Advanced setup
includes items that are not available from the Basic Setup page, such as Beacon interval.
Control TX Rates and Basic Data Rates. Figure 3-12
Figure 3-12
BG Protection Mode: Select Auto , On or Off from the pull-down menu.
Basic Data Rates: By default, the unit adaptively selects the highest possible rate for
transmission. Select the basic rates to be used among the following options: 1-2Mbps, Default
(1-2-5.5-11Mbps), or All(1-2-5,5-6-11-12-24Mbps.)
Beacon Interval: Beacon Interval is the amount of time between beacon transmissions. Before
a station enters power save mode, the station needs the beacon interval to know when to wake
up to receive the beacon. Range 20-999, default is 100.
Data Beacon Rate (DTIM): Range from 1 to 255, default setting is 1.
Fragment Threshold: Fragmentation mechanism is used for improving the efficiency when
high traffic flows along in the wireless network. If the 802.11g MIMO Wireless Router often
transmit large files in wireless network, you can enter new Fragment Threshold value to split the
packet. The value can be set from 256 to 2346. The default value is 2346.
RTS Threshold: RTS Threshold is a mechanism implemented to prevent the “Hidden Node ”
problem. If the “Hidden Node” problem is an issue, please specify the packet size. The RTS
mechanism will be activated if the data size exceeds the value you set.. The default value is
2347.
53
Short Preamble: Select Disable or Enable this function, default setting is Disable . A preamble
is a signal used in wireless environment to synchronize the transmitting timing including
Synchronization and Start frame delimiter.
Short Slot: Select Disable or Enable this function, default setting is Enable.
Tx Burst: Select Disable or Enable this function, default setting is Enable.
Pkt_Aggregate: Select Disable or Enable this function, default setting is Enable.
IGMP Snooping: Select Disable or Enable this function, default setting is Disable.
WMM Capable: Select Disable or Enable this function, default setting is Enable.
APSD Capable: Select Disable or Enable this function, default setting is Disable.
WMM Parameters: Click the WMM Configuration button to go further settings.
3.4.5 Security
This page allows you to setup the wireless security. Turn on WEP ,WPA,WPA2 by using
Encryption could prevent any unauthorized access to your wireless network. Figure 3-13
Figure 3-13
SSID choice: Select the SSID form the pull-down menu for security settings.
Security Mode: There are eleven type of authentication modes including Disable, Open,
Shared, WEP Auto, WPA, WPA-PSK, WPA2, WPA2-PSK, WPA-PSK/WPA2-PSK,
WPA/WPA2 and 802.1X.
Open: If your wireless router is using "Open” authentication, then the wireless adapter will need
to be set to the same authentication type.
Shared: Shared key is when both the sender and the recipient share a secret key.
WPA, WPA-PSK, WPA2, WPA2-PSK, WPA-PSK/WPA2-PSK, and WPA1/WPA2: WPA-PSK
offers two encryption methods, TKIP and AES. Select the type of algorithm, TKIP or AES and
then enter a WPA Shared Key of 8~64 characters in the WPA Pre-shared Key field.
54
Encryption Type: For Open and Shared authentication mode, the selection of encryption type
are None and WEP. For WPA, WPA2,WPA-PSK and WPA2-PSK authentication mode, the
encryption type supports both TKIP and AES. WPA Pre-shared Key: This is the shared secret
between AP and STA. For WPA-PSK and WPA2-PSK authentication mode, this field must be
filled with character longer than 8 and less than 64 lengths.
WEP Key: Only valid when using WEP encryption algorithm. The key must match with the AP’s
key. There are several formats to enter the keys.
Hexadecimal (128bits): 26 Hex characters (0~9, a~f).
ASCII (128bits): 13 ASCII characters.
WPA Algorithms: Select TKIP, AES or TKIP/AES for the WPA Algorithms.
Enable Pre-Authentication: The two most important features beyond WPA to become
standardized through
802.11i/WPA2 are: pre-authentication, which enables secure fast roaming without noticeable
signal latency.
RADIUS Server: RADIUS is an authentication, authorization and accounting client-server
protocol. The client is a Network Access Server what desires to authenticate its links. The
server is a server what has access to a user database with authentication information.
IP Address: Enter the RADIUS Server’s IP Address provided by your ISP.
Port: Enter the RADIUS Server’s port number provided by your ISP. The default is 1812.
Shared Secret: Enter the password that the router shares with the RADIUS Server.
3.3.4 WPS Settings WPS (Wi-Fi Protected Setting) can be easy and quick to establish the connection between the
wireless network clients and the Router through encrypted contents. The users only enter the
PIN code to configure without selecting encryption method and entering secret keys by manual.
Figure 3-14
Figure 3-14
WPS: Select Enable or Disable from the pull-down menu.
WPS Summary : Here shows the WPS function status.
Reset OOB: Click the button to reset the settings.
3.4.8 Access Control
You could monitor stations which associated to this AP here. Figure 3-15

55
Figure 3-15
3.4.9 WDS
You could monitor stations which associated to this AP here. Figure 3-16
Figure 3-16
WDS Settings
Wireless Distribution System (WDS) uses wireless media to communicate with other APs, like the
Ethernet dose. To do this, you must set these APs in the same channel and add the MAC address of the
AP into the list if necessary. Please make sure the remote site supports WDS.
3.4.10 Client
You could monitor stations which associated to this AP here. Figure 3-17
56
Figure 3-17
Statistics
This page shows the statistics of memory information and network packets sent and recieved by the
interfaces.
3.5 firewall setting
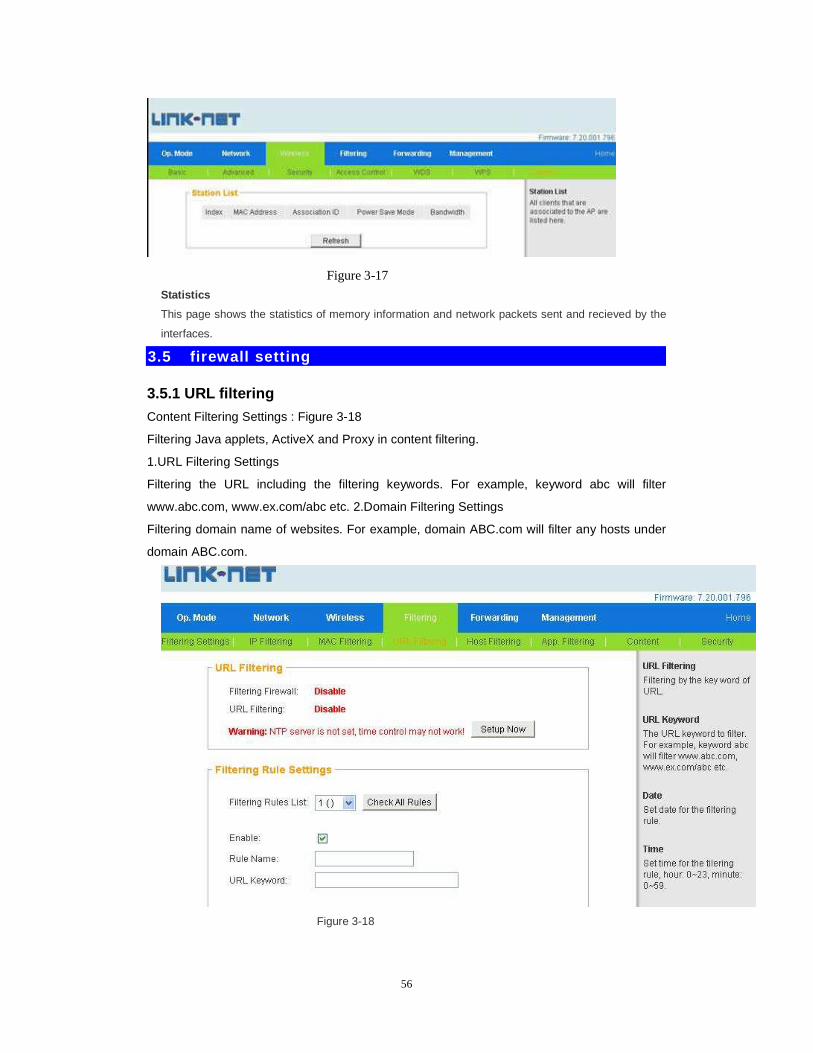
3.5.1 URL filtering
Content Filtering Settings : Figure 3-18
Filtering Java applets, ActiveX and Proxy in content filtering.
1.URL Filtering Settings
Filtering the URL including the filtering keywords. For example, keyword abc will filter
www.abc.com, www.ex.com/abc etc. 2.Domain Filtering Settings
Filtering domain name of websites. For example, domain ABC.com will filter any hosts under
domain ABC.com.
Figure 3-18
57
3.5.2 DMZ
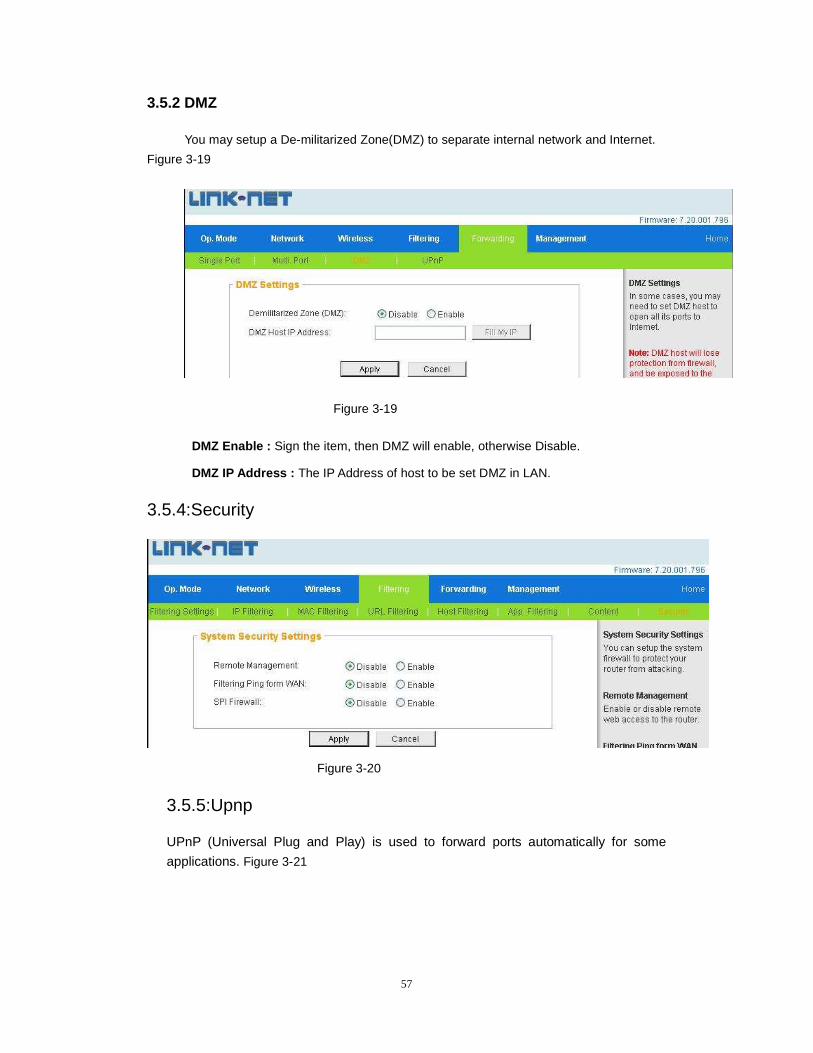
You may setup a De-militarized Zone(DMZ) to separate internal network and Internet.
Figure 3-19
Figure 3-19
DMZ Enable : Sign the item, then DMZ will enable, otherwise Disable.
DMZ IP Address : The IP Address of host to be set DMZ in LAN.
3.5.4:Security
Figure 3-20
3.5.5:Upnp
UPnP (Universal Plug and Play) is used to forward ports automatically for some
applications. Figure 3-21

58
Figure 3-21
Chapter 4 System Settings
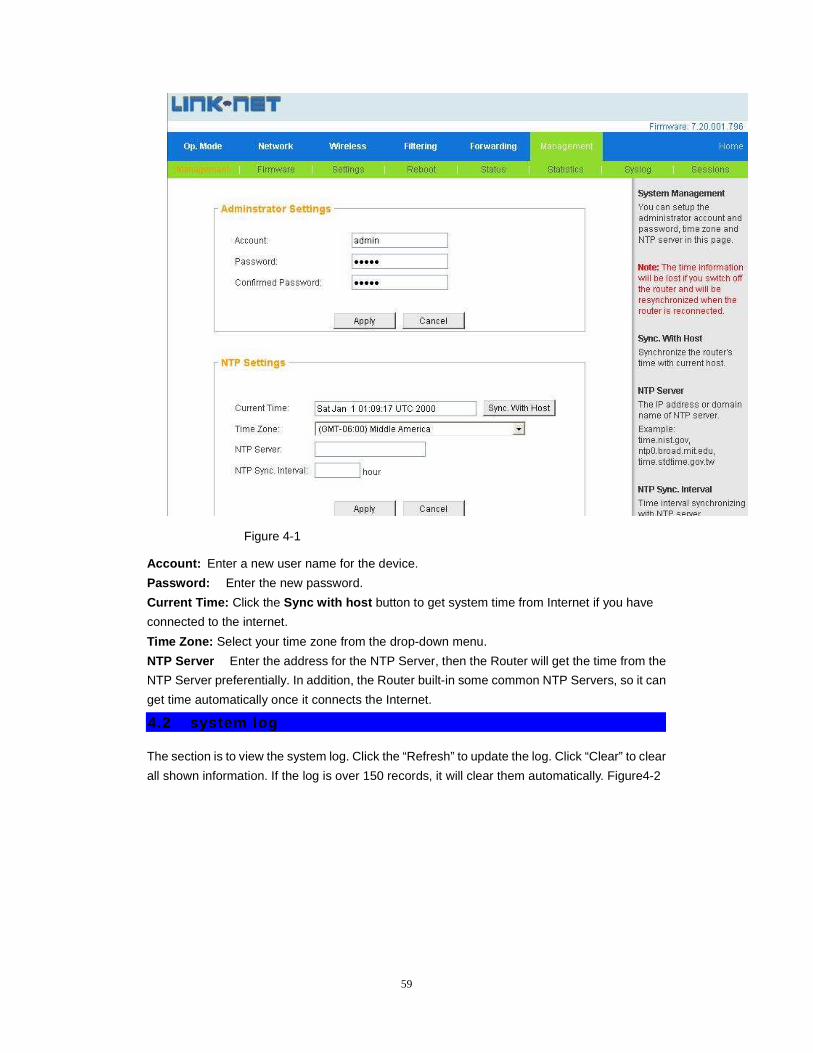
4.1 Management
You may configure administrator account and password, NTP settings, and Dynamic DNS
settings here.
This section is to set a new user name and password to better secure your router and network.
Please Note that the new password should be less than 14 characters. Figure 4-1
59
Figure 4-1
Account: Enter a new user name for the device.
Password: Enter the new password.
Current Time: Click the Sync with host button to get system time from Internet if you have
connected to the internet.
Time Zone: Select your time zone from the drop-down menu.
NTP Server� Enter the address for the NTP Server, then the Router will get the time from the
NTP Server preferentially. In addition, the Router built-in some common NTP Servers, so it can
get time automatically once it connects the Internet.
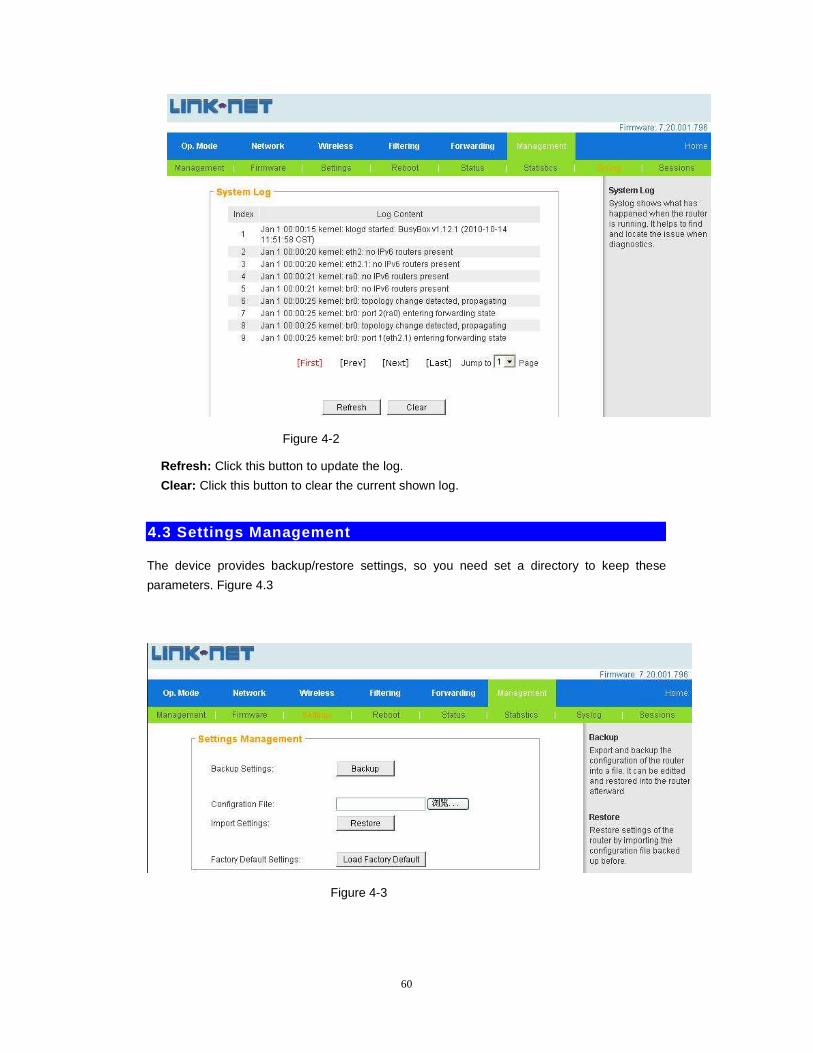
4.2 system log
The section is to view the system log. Click the “Refresh” to update the log. Click “Clear” to clear
all shown information. If the log is over 150 records, it will clear them automatically. Figure4-2
60
Figure 4-2
Refresh: Click this button to update the log.
Clear: Click this button to clear the current shown log.
4.3 Settings Management
The device provides backup/restore settings, so you need set a directory to keep these
parameters. Figure 4.3
Figure 4-3
61
Tarjeta de Garantía
Este producto se garantiza contra los materiales y mano de obra defectuosos por un período de un año a partir de la fecha de compra con la respectiva prueba o recibo de compra. La obligación nuestra al comprador bajo esta garantía se limita a reparar la unidad y reemplazar las partes defectuosas o cambio total de la unidad si es necesario. Esta garantía se anula si el producto se ha manipulado, dañado por un accidente, dañó de cualquier otra manera por el uso inapropiado o se ha comprado de segunda mano y/o usado. Todas las órdenes de producción tienen las etiquetas de inspecciones de calidad. En el evento improbable de una deficiencia, por favor avise al minorista de que este producto fue comprado en su minorista y lleve consigo su prueba de compra.
GARANTÍA PARA EQUIPOS LINK-NET ESTA LIMTADA A 365 DÍAS de la fecha de Compra.
Tipo de Aparato: ____________________________________________________________
Modelo No.:__________________ Fecha de Compra: _________________
El producto fue Comprado en: _________________________________________________
Nombre del Comprador_______________________________________________________
Dirección: _________________________________________________________________
Número de teléfono: _________________________________________________________
¡IMPORTANTE!
Por favor retenga esta tarjeta de garantía junto con su recibo de la compra. Por favor no mande por correo al minorista. Si se requiere servicio o una ejecución de la garantía, los documentos de compra y el aparato defectuoso deben ser devueltos a su minorista. Queda entendido que esta solicitud de Garantía puede generar algún costo extra por revisión y reparación en caso de que la Garantía sea rechazada por las causas escritas anteriormente.
Recommended