TRITON 6 BURNER GRIDDLEModel #: FSODBG1206
Customer Service: (888) 922-2336, 7:00 am to 12:00 am daily CST
Live Chat on Academy Website (www.academy.com) 24/7 or email
(Made in China)
Please keep this instruction manual for future reference
Assembly Instructions
& User’s Manual
Page 2 of 27
Warnings…………………………………………………………………..3-7
Tools and Parts…………………………………………………...………8-9
Exploded View………………………………………………………….....10
Hardware…………………………………………………………………...11
Assembly Instructions………………………………………….……..12-19
Operating Instructions……………………………………………......20-23
Trouble Shooting……………………………………………………..…...23
Care and Maintenance…………………………………………..…...24-25
Frequently asked questions……………………………………...…..….26
Warranty Information………………………………………....................27
Table of Contents
Page 3 of 27
Page 4 of 27
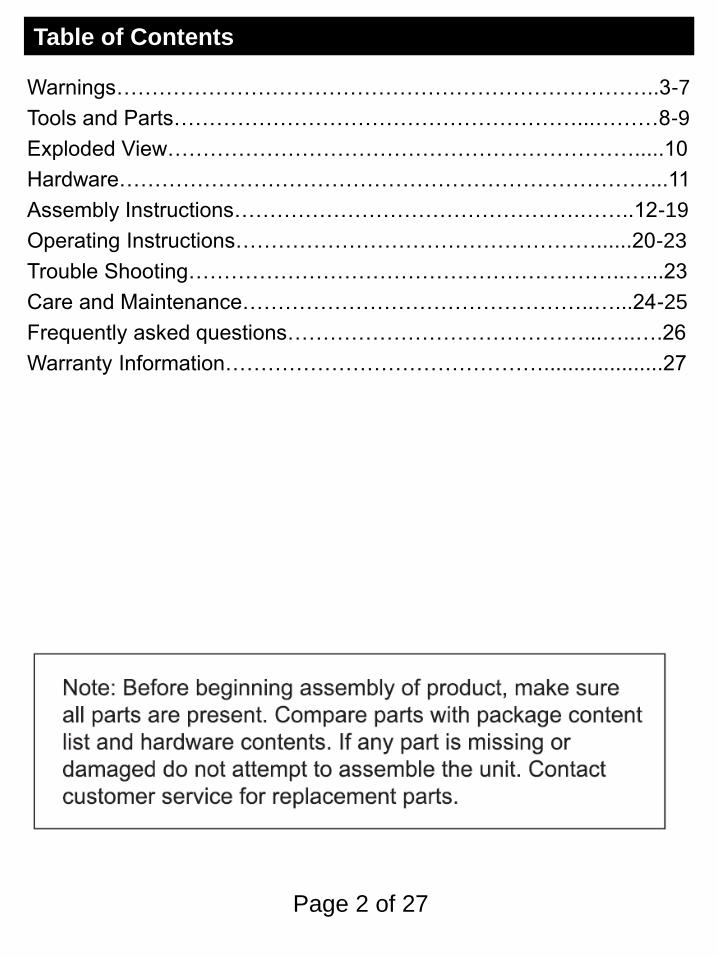
Warnings
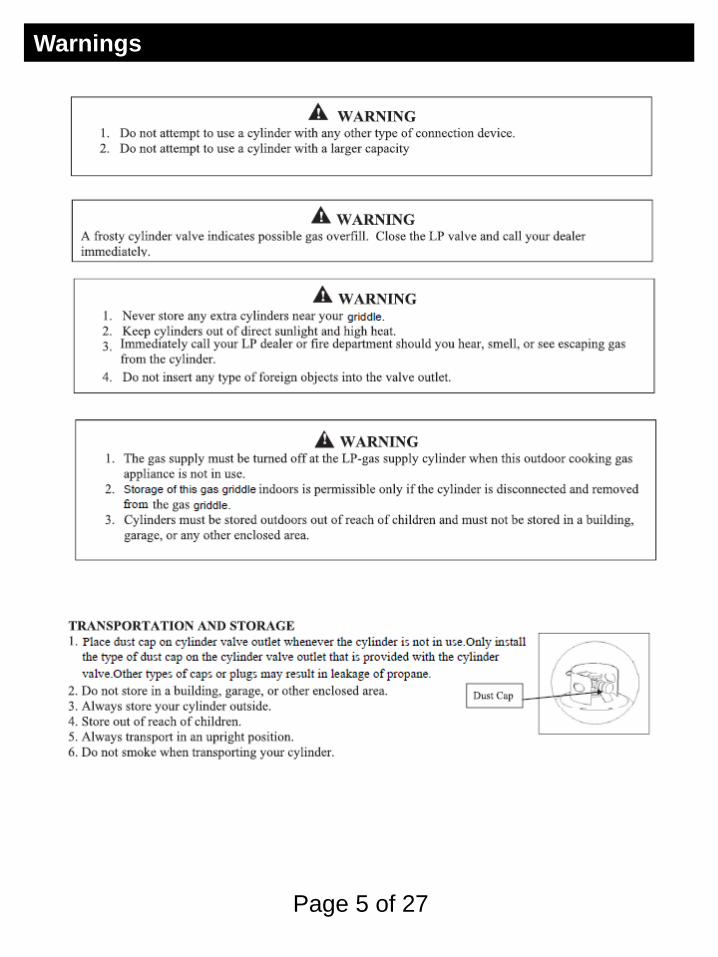
Page 5 of 27
Warnings

Page 6 of 27
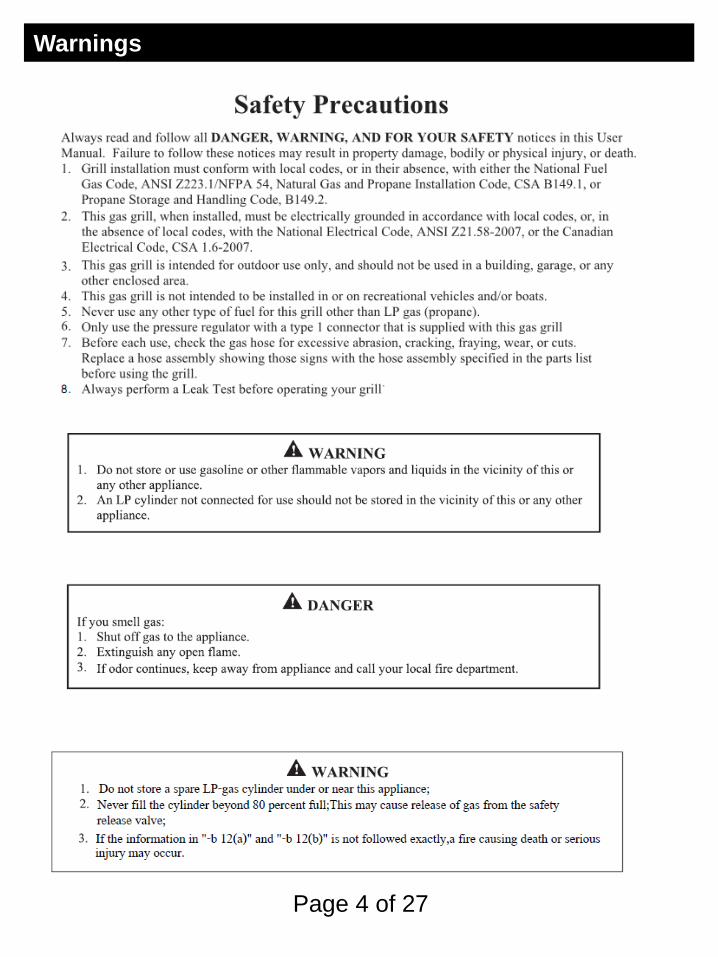
Warnings
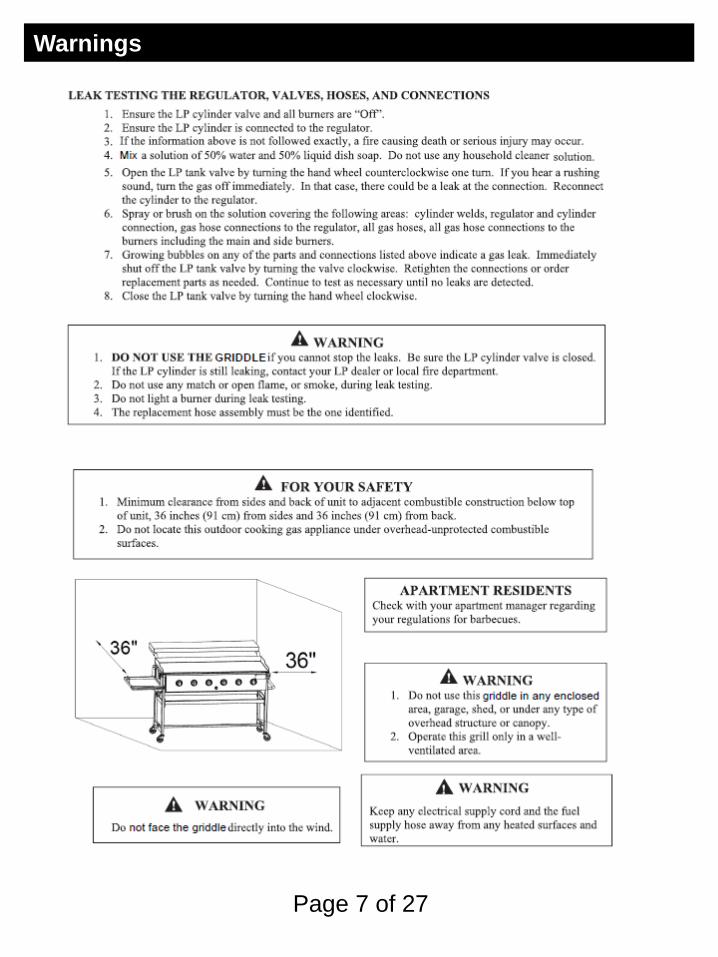
Page 7 of 27
Warnings

1 Adjustable wrench
(not included)
2 Screwdriver
(not included)
Tools Required
Page 8 of 27
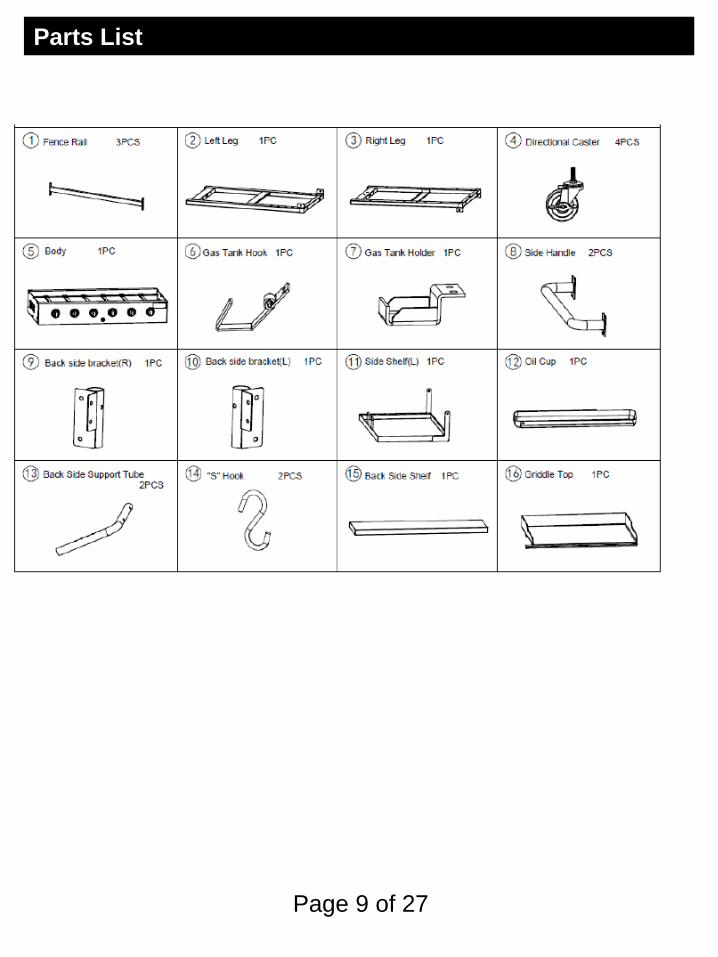
Parts List
Page 9 of 27
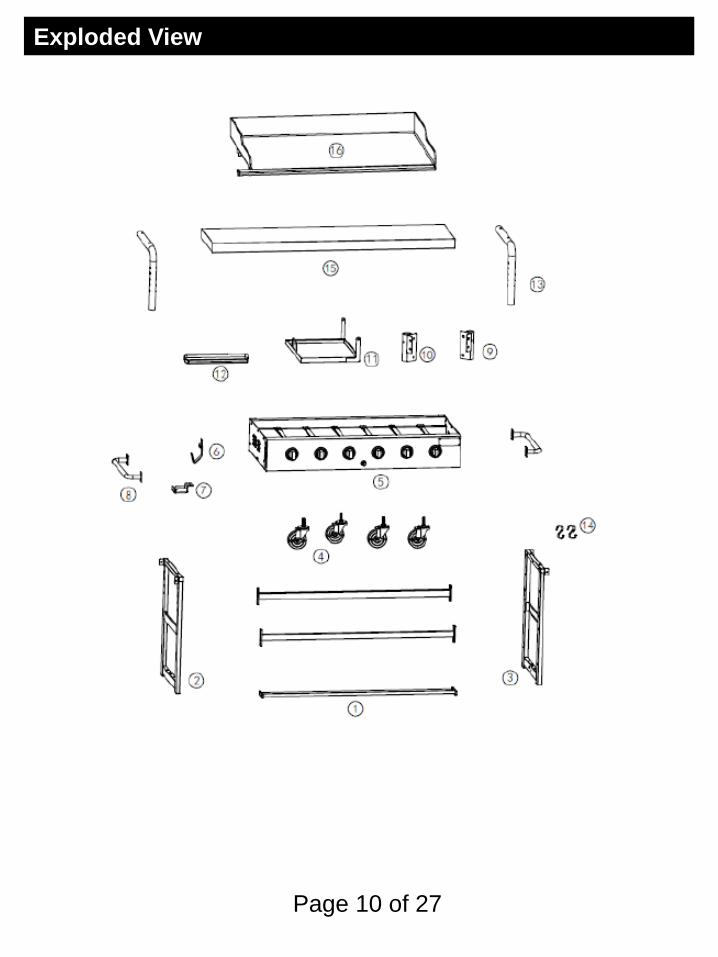
Exploded View
Page 10 of 27
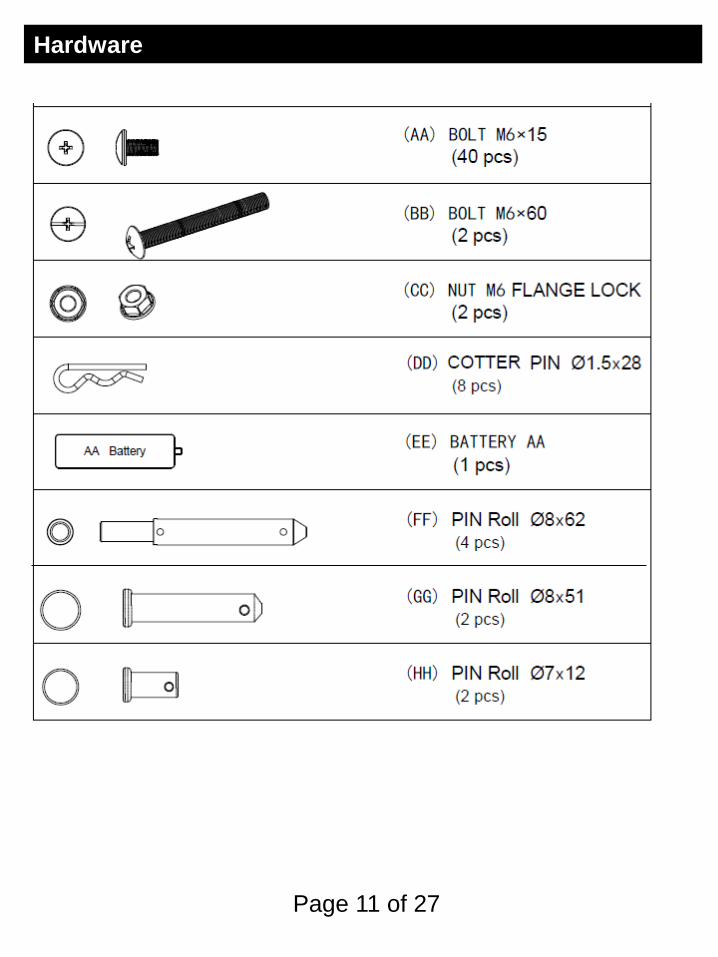
Hardware
Page 11 of 27
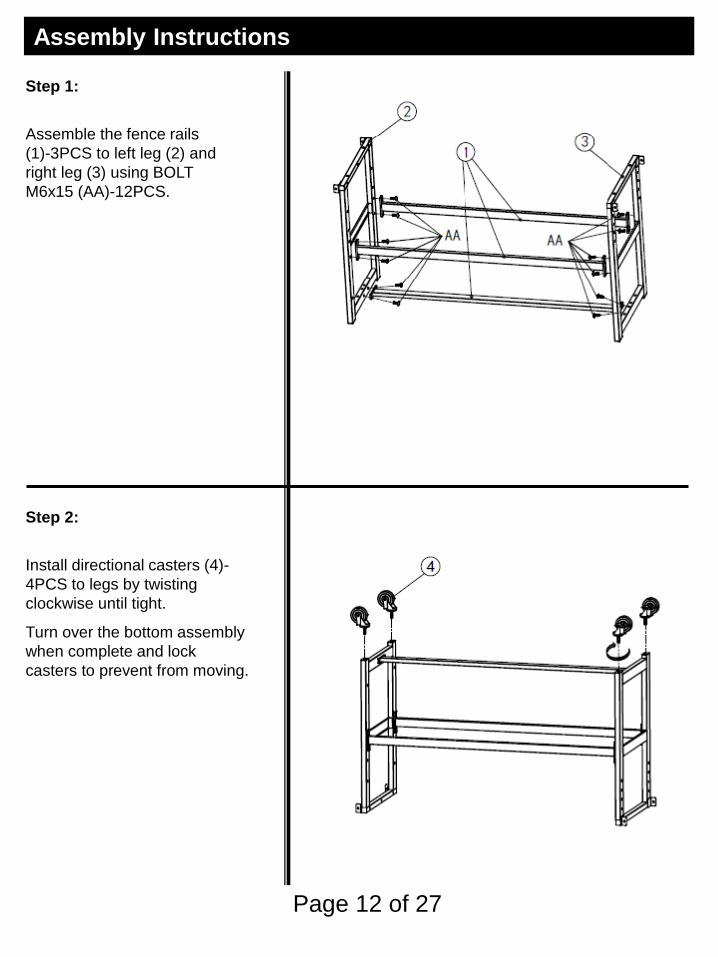
Assembly Instructions
Step 1:
Assemble the fence rails
(1)-3PCS to left leg (2) and
right leg (3) using BOLT
M6x15 (AA)-12PCS.
Step 2:
Install directional casters (4)-
4PCS to legs by twisting
clockwise until tight.
Turn over the bottom assembly
when complete and lock
casters to prevent from moving.
Page 12 of 27
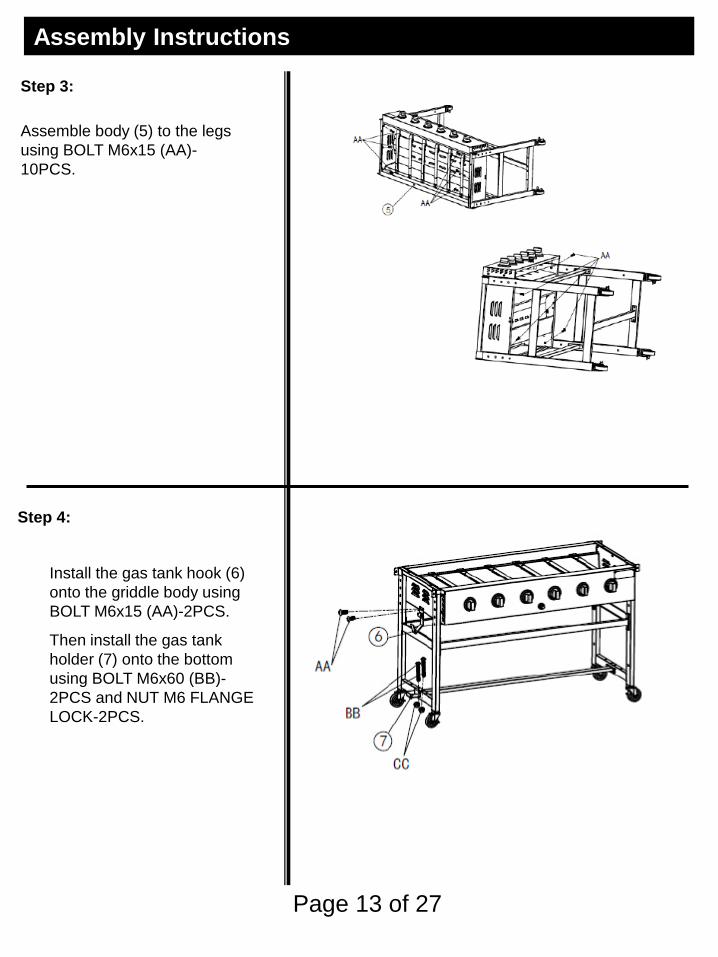
Assembly Instructions
Step 3:
Assemble body (5) to the legs
using BOLT M6x15 (AA)-
10PCS.
Step 4:
Install the gas tank hook (6)
onto the griddle body using
BOLT M6x15 (AA)-2PCS.
Then install the gas tank
holder (7) onto the bottom
using BOLT M6x60 (BB)-
2PCS and NUT M6 FLANGE
LOCK-2PCS.
Page 13 of 27

Assembly Instructions
Step 5:
Assemble the side handle (8)-
2PCS to the each side of the
griddle body using BOLT
M6x15 (AA)-8PCS.
Step 6:
Assemble back side bracket (9)
and back side bracket (10) to
body using BOLT M6x15 (AA)-
8PCS.
Page 14 of 27
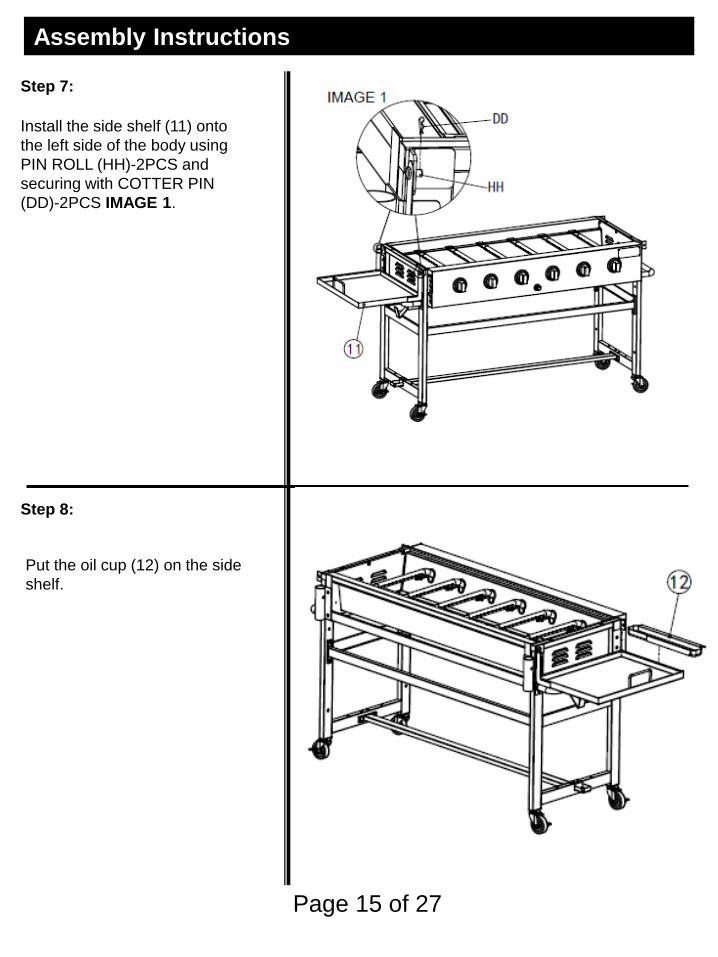
Assembly Instructions
Step 7:
Install the side shelf (11) onto
the left side of the body using
PIN ROLL (HH)-2PCS and
securing with COTTER PIN
(DD)-2PCS IMAGE 1.
Step 8:
Put the oil cup (12) on the side
shelf.
Page 15 of 27
Assembly Instructions
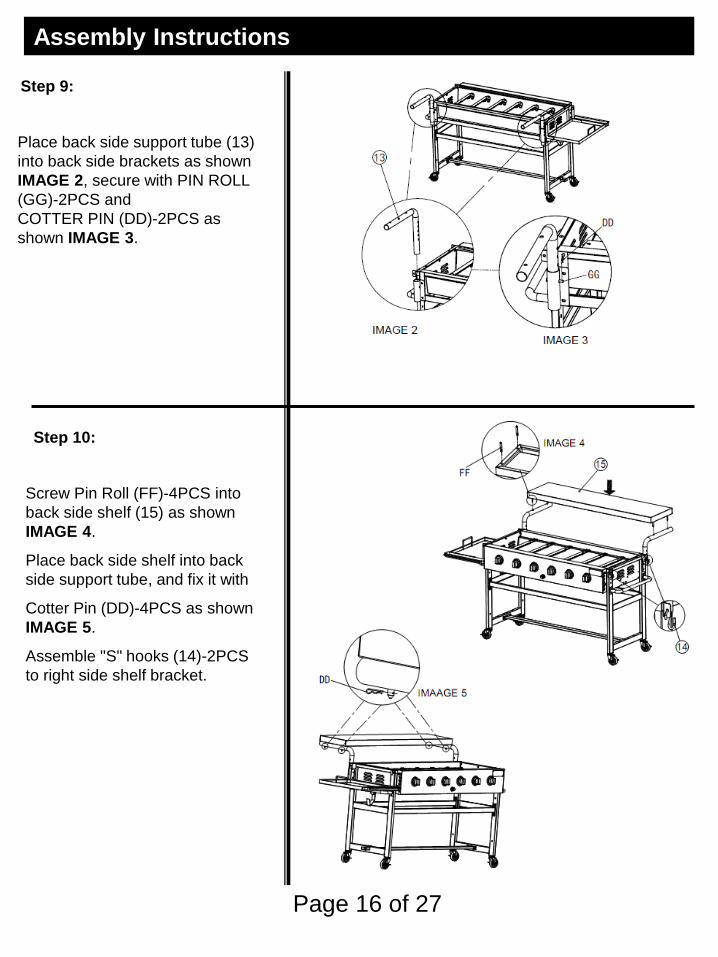
Step 9:
Place back side support tube (13)
into back side brackets as shown
IMAGE 2, secure with PIN ROLL
(GG)-2PCS and
COTTER PIN (DD)-2PCS as
shown IMAGE 3.
Step 10:
Screw Pin Roll (FF)-4PCS into
back side shelf (15) as shown
IMAGE 4.
Place back side shelf into back
side support tube, and fix it with
Cotter Pin (DD)-4PCS as shown
IMAGE 5.
Assemble "S" hooks (14)-2PCS
to right side shelf bracket.
Page 16 of 27
Assembly Instructions
Page 17 of 27
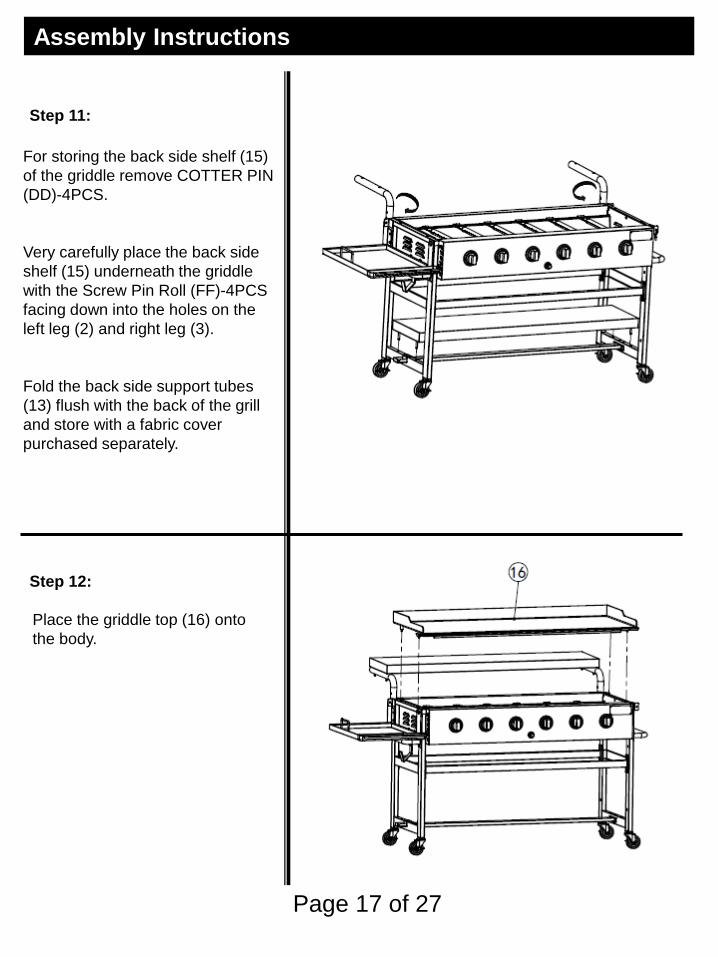
Step 11:
For storing the back side shelf (15)
of the griddle remove COTTER PIN
(DD)-4PCS.
Very carefully place the back side
shelf (15) underneath the griddle
with the Screw Pin Roll (FF)-4PCS
facing down into the holes on the
left leg (2) and right leg (3).
Fold the back side support tubes
(13) flush with the back of the grill
and store with a fabric cover
purchased separately.
Step 12:
Place the griddle top (16) onto
the body.
Assembly Instructions
Page 18 of 27
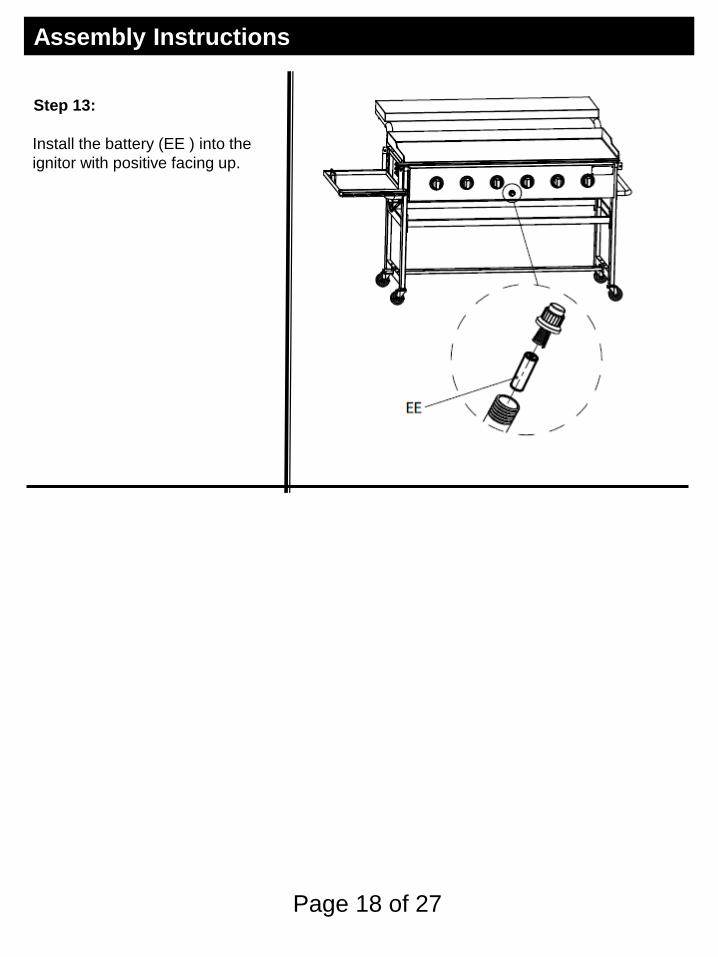
Step 13:
Install the battery (EE ) into the
ignitor with positive facing up.
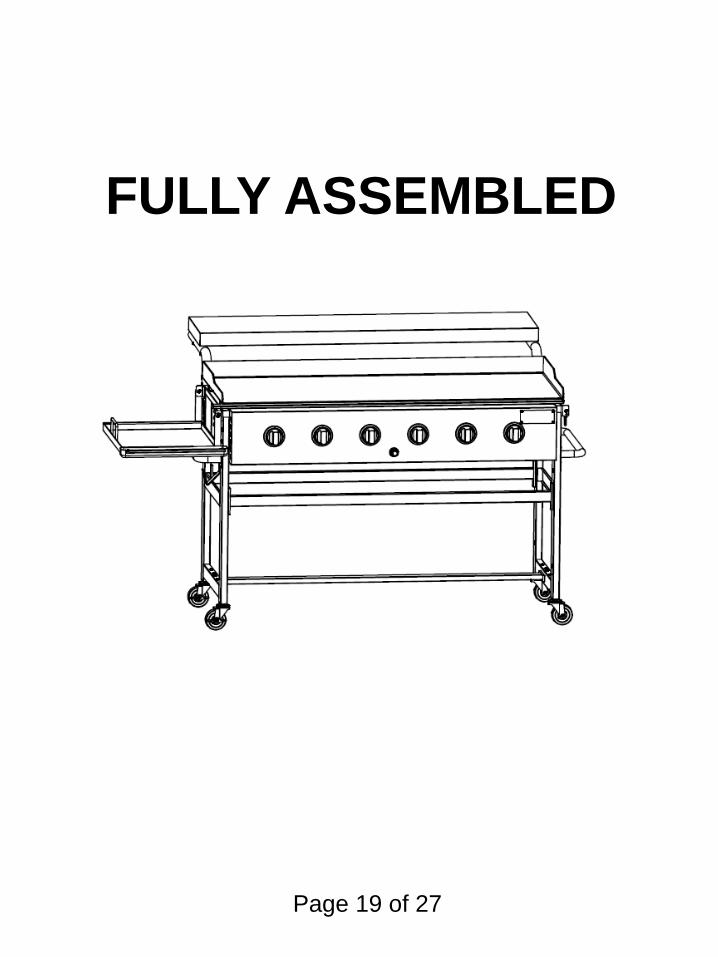
FULLY ASSEMBLED
Page 19 of 27
Operating Instructions
Page 20 of 27
General Information and InstructionsYour new Outdoor Gourmet Griddle has been designed and manufactured to high quality standards. It will
provide you with many years of enjoyment with a minimal amount of maintenance. Please keep in mind the
following FOR YOUR SAFETY.
OPERATION
1. Your gas grill requires reasonable care during operation. It will be hot during cooking and cleaning. You
should never leave the grilddle unattended or move the griddle when in use.
2. Children should never use your gas griiddle. Keep younger children and pets away when in use.
3. Only use your gas griddle outside in a well-ventilated area. Never use indoors in any building, garage, shed,
or under any type of flammable canopy or overhang.
4. Ensure your grill is on level ground and the locking casters are locked before use.
5. Turn all gas valves off should the burners go out when cooking.
6. Do not lean over the grill or touch the edges of the firebox, wind screen or griddle top when in use.
7. Turn the burners off, and shut off the LP cylinder should a grease fire occur.
8. Do not obstruct the flow of combustion and ventilation air to this griddle.
9. Keep the outdoor cooking gas appliance area clear and free from combustible materials, gasoline, and other
flammable vapors and liquids.
10. Keep the ventilation openings of the cylinder enclosure free and clear from debris.
11. Do not put a barbecue cover or other flammable material in the storage area of this griddle.
12. Do not use charcoal briquettes, lava rock, or any type of ceramic product in the gas section of this grill.
13. Do not install or use on or in a recreational vehicle and/or boats.
Your new griddle operates on LP (Liquid Petroleum) Gas. It is odorless, colorless, and non-toxic when
produced. You can smell LP gas as it has been given an odor similar to rotten cabbage for your safety.
Your grill uses the newest and safest LP Gas Cylinder.
1. O.P.D. (Overfill Protection Device) – prevents accidental gas leaks
caused by overfilling of the tank. Each tank contains a float that
closes the input valve when the tank is 80% full. This allows room
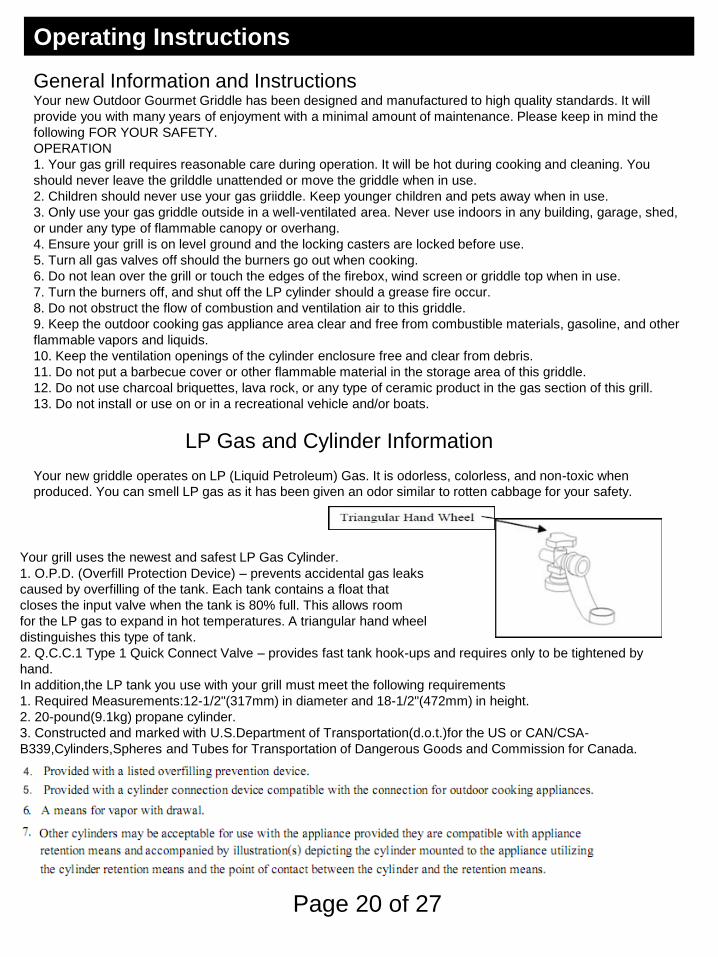
for the LP gas to expand in hot temperatures. A triangular hand wheel
distinguishes this type of tank.
2. Q.C.C.1 Type 1 Quick Connect Valve – provides fast tank hook-ups and requires only to be tightened by
hand.
In addition,the LP tank you use with your grill must meet the following requirements
1. Required Measurements:12-1/2"(317mm) in diameter and 18-1/2"(472mm) in height.
2. 20-pound(9.1kg) propane cylinder.
3. Constructed and marked with U.S.Department of Transportation(d.o.t.)for the US or CAN/CSA-
B339,Cylinders,Spheres and Tubes for Transportation of Dangerous Goods and Commission for Canada.
LP Gas and Cylinder Information
Page 21 of 27
Operating Instructions
Page 22 of 27
Operating Instructions
Page 23 of 27
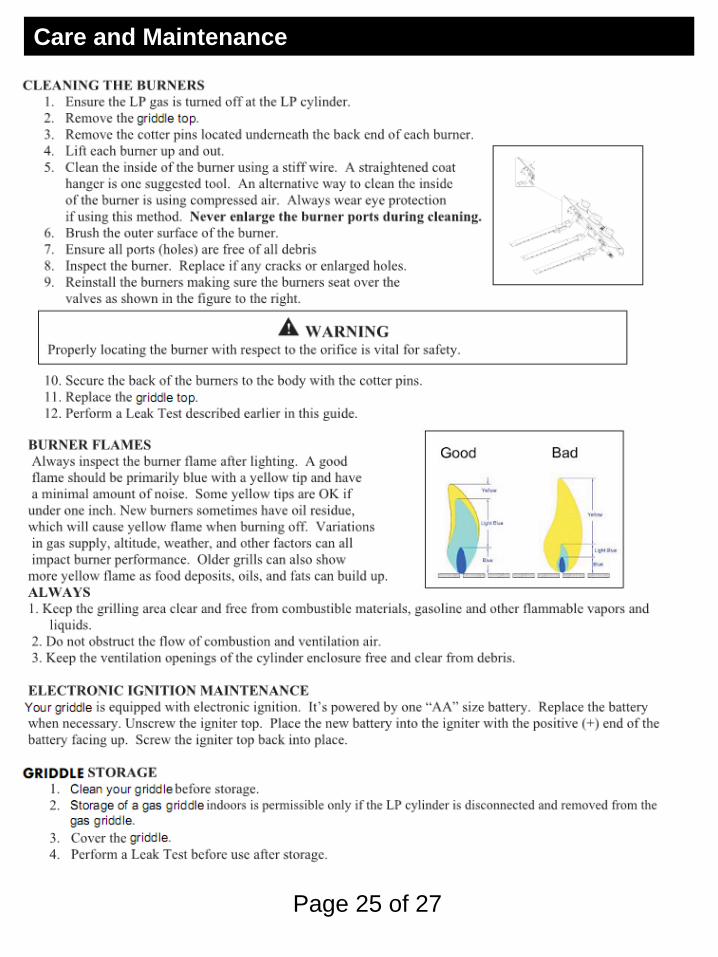
Operating Instructions & Trouble shooting
Page 24 of 27
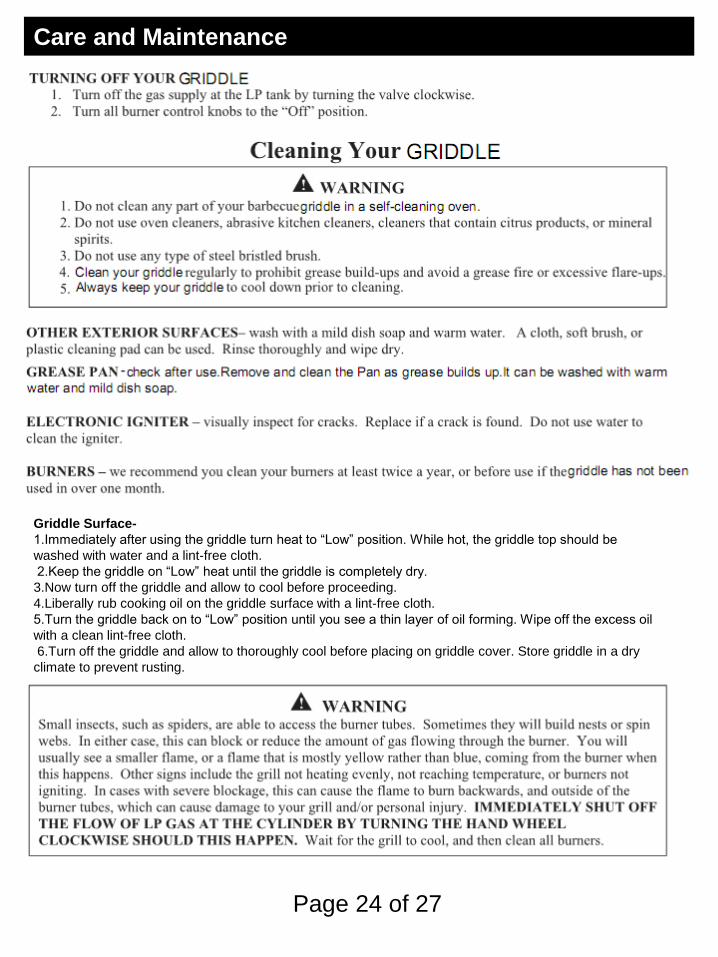
Care and Maintenance
Griddle Surface-
1.Immediately after using the griddle turn heat to “Low” position. While hot, the griddle top should be
washed with water and a lint-free cloth.
2.Keep the griddle on “Low” heat until the griddle is completely dry.
3.Now turn off the griddle and allow to cool before proceeding.
4.Liberally rub cooking oil on the griddle surface with a lint-free cloth.
5.Turn the griddle back on to “Low” position until you see a thin layer of oil forming. Wipe off the excess oil
with a clean lint-free cloth.
6.Turn off the griddle and allow to thoroughly cool before placing on griddle cover. Store griddle in a dry
climate to prevent rusting.
Page 25 of 27
Care and Maintenance
Page 26 of 27
Frequently Asked Questions
Can I restore my griddle if it has gotten rusty?
It is important to maintain griddles and keep them seasoned to minimize rusting. There are
numerous suggested guides to bring a griddle cooking surface back to cooking grade. If the rust is
not to extensive, it usually takes a fine brush. warm water and baking soda and rub vigorously in
circles to begin removing the rust. Clean often and wipe down with paper towels. Repeat the steps
as often as needed to bring the cooking surface back. Re-seasoning is getting the griddle hot and
wiping it down with high temperature cooking oil. Be careful as Griddle surface is hot. Wear a heat
resistant glove. Wipe off the excessive oil. Allow the griddle to cool down completely. There should
be a nice sheen to the surface. Once the griddle surface is fully cooled down keep the griddle
covered while not in use.
Warranty Information
Page 27 of 27
This product has been manufactured under the highest
standards of quality and workmanship. We warrant to the
original consumer purchaser that all aspects of this product
will be free of defects in material and workmanship for one
year from the date of purchase. A replacement for any
defective part will be supplied free of charge for installation
by the consumer. Defects or damage caused by the use of
other than genuine parts are not covered by this warranty.
This warranty shall be effective from the date of purchase as
shown in the purchaser receipt.
This warranty is valid for the original consumer purchaser
only and excludes industrial, commercial or business use of
the product, product damage due to shipment or failure which
results from alteration, product abuse, or product misuse,
whether performed by a contractor , service company , or
consumer. We will not be responsible for labor charges
and/or damage incurred in installation, repair or replacement
nor for incidental or consequential damage.
Recommended