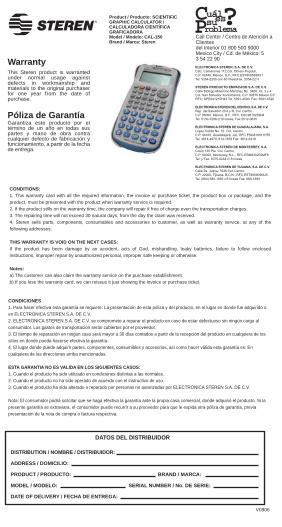
Product / Producto: SCIENTIFIC GRAPHIC CALCULATOR / CALCULADORA CIENTÍFICA GRAFICADORAModel / Modelo: CAL-150Brand / Marca: Steren
CONDICIONES1. Para hacer efectiva esta garantía se requiere: La presentación de esta póliza y del producto, en el lugar en donde fue adquirido o en ELECTRONICA STEREN S.A. DE C.V.2. ELECTRONICA STEREN S.A. DE C.V. se compromete a reparar el producto en caso de estar defectuoso sin ningún cargo al consumidor. Los gastos de transportación serán cubiertos por el proveedor. 3. El tiempo de reparación en ningún caso será mayor a 30 días contados a partir de la recepción del producto en cualquiera de los sitios en donde pueda hacerse efectiva la garantía.4. El lugar donde puede adquirir partes, componentes, consumibles y accesorios, así como hacer válida esta garantía es: En cualquiera de las direcciones arriba mencionadas.
ESTA GARANTIA NO ES VALIDA EN LOS SIGUIENTES CASOS:1. Cuando el producto ha sido utilizado en condiciones distintas a las normales.2. Cuando el producto no ha sido operado de acuerdo con el instructivo de uso.3. Cuando el producto ha sido alterado o reparado por personas no autorizadas por ELECTRONICA STEREN S.A. DE C.V.
Nota: El consumidor podrá solicitar que se haga efectiva la garantía ante la propia casa comercial, donde adquirió el producto. Si la presente garantía se extraviara, el consumidor puede recurrir a su proovedor para que le expida otra póliza de garantía, previa presentación de la nota de compra o factura respectiva.
DATOS DEL DISTRIBUIDOR
DISTRIBUTION / NOMBRE / DISTRIBUIDOR:
ADDRESS / DOMICILIO:
PRODUCT / PRODUCTO: BRAND / MARCA:
MODEL / MODELO: SERIAL NUMBER / No. DE SERIE:
DATE OF DELIVERY / FECHA DE ENTREGA:
Call Center / Centro de Atención a Clientes del Interior 01 800 500 9000Mexico City / Cd. de México: 53 54 22 90Warranty
CONDITIONS:1. This warranty card with all the required information, the invoice or purchase ticket, the product box or package, and the product, must be presented with the product when warranty service is required.2. If the product stills on the warranty time, the company will repair it free of charge even the transportation charges.3. The repairing time will not exceed 30 natural days, from the day the claim was received.4. Steren sells parts, components, consumables and accessories to customer, as well as warranty service, at any of the following addresses:
THIS WARRANTY IS VOID ON THE NEXT CASES:If the product has been damage by an accident, acts of God, mishandling, leaky batteries, failure to follow enclosed instructions, improper repair by unauthorized personal, improper safe keeping or otherwise.
Notes:a) The customer can also claim the warranty service on the purchase establishment.b) If you lose the warranty card, we can reissue it just showing the invoice or purchase ticket.
V0906
Póliza de Garantía
This Steren product is warranted under normal usage against defects in workmanship and materials to the original purchaser for one year from the date of purchase.
Garantiza este producto por el término de un año en todas sus partes y mano de obra contra cualquier defecto de fabricación y funcionamiento, a partir de la fecha de entrega.
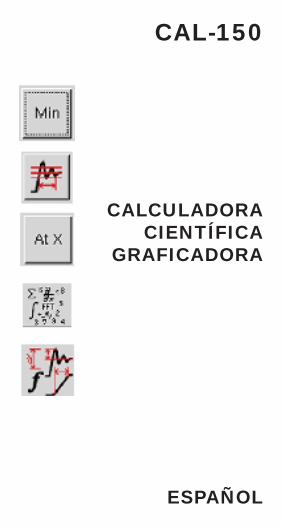
CAL-150
CALCULADORA CIENTÍFICA
GRAFICADORA
ESPAÑOL
INSTRUCTIVO DE USO DE CALCULADORA CIENTÍFICA GRAFICADORA
Modelo: CAL-150Marca: Steren
Antes de utilizar su nueva Calculadora lea este instruc-tivo para evitar cualquier mal funcionamiento. Guárdelo para futuras referencias.
Su nueva calculadora científi ca grafi cadora cuenta con 250
funciones entre las que se encuentran todas las funciones
trigonométricas, calculo binario, calculo estadístico. Permite
crear y programar formulas matemáticas, con opción de
edición en cualquier momento, contando con un sinfín de
operaciones más.
Aprecie nítidamente las gráfi cas en la pantalla de cristal
líquido (LCD) de matriz de puntos. Cuenta con función de
auto-apagado incrementando la vida de la batería.
IMPORTANTENo exponga el equipo a temperaturas extremas.
Siempre utilice un paño suave limpio y seco para limpiar
el equipo.
No use ni almacene este equipo en lugares donde existan
goteras o salpicaduras de agua. Puede causar un mal func-
ionamiento o un choque eléctrico.
No deje caer la calculadora ni tampoco la someta a fuertes
impactos.
No intente abrir el equipo, puede ocasionar malfunciona-
miento y anulación de la garantía.
FUNCIÓN DE AUTO APAGADOEsta función permite que el equipo se apague después de
6 minutos desde la última presión de una tecla (excepto
durante cálculos de programa). Una vez que el equipo se
apague, podrá encenderlo nuevamente, presionando el
botón AC.
REINICIAR LA CALCULADORACargas fuertes de electrostática externas pueden causar un
malfuncionamiento en la calculadora. El caso de que esto
suceda presione el botón de Renicio (Reset), localizado en
la parte trasera de la calculadora. Utilice un objeto punti-
agudo. Este proceso borra todos los datos de la memoria.
Nota:Nunca presione el botón de Reinicio mientras se realizan
operaciones. De otra forma se pueden ocasionar daños ir-
reparables en la memoria de la calculadora.
GUÍA GENERALLos botones mostrados en esta sección pueden tener varias
funciones. El siguiente botón, por ejemplo, es utilizado para
realizar 4 funciones diferentes :
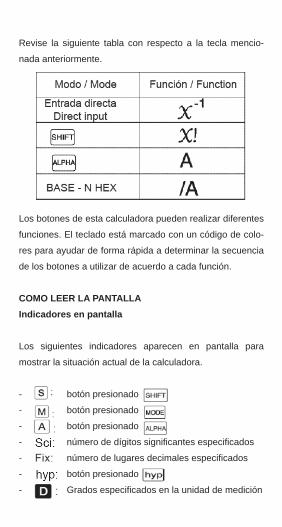
Revise la siguiente tabla con respecto a la tecla mencio-
nada anteriormente.
Los botones de esta calculadora pueden realizar diferentes
funciones. El teclado está marcado con un código de colo-
res para ayudar de forma rápida a determinar la secuencia
de los botones a utilizar de acuerdo a cada función.
COMO LEER LA PANTALLAIndicadores en pantalla
Los siguientes indicadores aparecen en pantalla para
mostrar la situación actual de la calculadora.
- botón presionado
- botón presionado
- botón presionado
- número de dígitos signifi cantes especifi cados
- número de lugares decimales especifi cados
- botón presionado
- Grados especifi cados en la unidad de medición
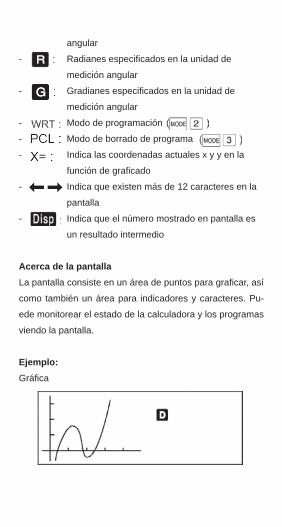
angular
- Radianes especifi cados en la unidad de
medición angular
- Gradianes especifi cados en la unidad de
medición angular
- Modo de programación
- Modo de borrado de programa
- Indica las coordenadas actuales x y y en la
función de grafi cado
- Indica que existen más de 12 caracteres en la
pantalla
- Indica que el número mostrado en pantalla es
un resultado intermedio
Acerca de la pantallaLa pantalla consiste en un área de puntos para grafi car, así
como también un área para indicadores y caracteres. Pu-
ede monitorear el estado de la calculadora y los programas
viendo la pantalla.
Ejemplo:Gráfi ca
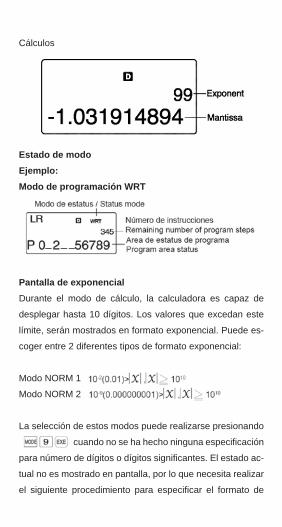
Cálculos
Estado de modoEjemplo:Modo de programación WRT
Pantalla de exponencialDurante el modo de cálculo, la calculadora es capaz de
desplegar hasta 10 dígitos. Los valores que excedan este
límite, serán mostrados en formato exponencial. Puede es-
coger entre 2 diferentes tipos de formato exponencial:
Modo NORM 1
Modo NORM 2
La selección de estos modos puede realizarse presionando
cuando no se ha hecho ninguna especifi cación
para número de dígitos o dígitos signifi cantes. El estado ac-
tual no es mostrado en pantalla, por lo que necesita realizar
el siguiente procedimiento para especifi car el formato de
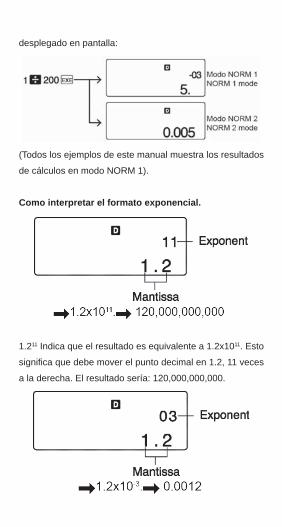
desplegado en pantalla:
(Todos los ejemplos de este manual muestra los resultados
de cálculos en modo NORM 1).
Como interpretar el formato exponencial.
1.211 Indica que el resultado es equivalente a 1.2x10¹¹. Esto
signifi ca que debe mover el punto decimal en 1.2, 11 veces
a la derecha. El resultado sería: 120,000,000,000.
1.2-03 indica que el resultado es equivalente a 1.2x10⁻³.
Esto signifi ca que debe mover el punto decimal en 1.2, tres
lugares a la izquierda, ya que el exponente es negativo. El
resultado sería: 0.0012.
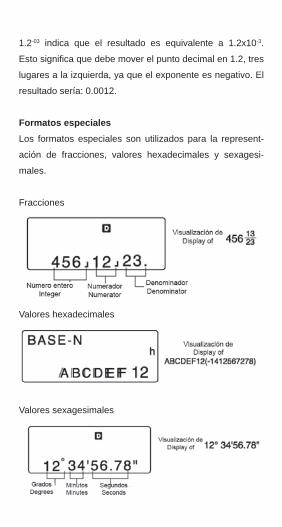
Formatos especialesLos formatos especiales son utilizados para la represent-
ación de fracciones, valores hexadecimales y sexagesi-
males.
Fracciones
Valores hexadecimales
Valores sexagesimales
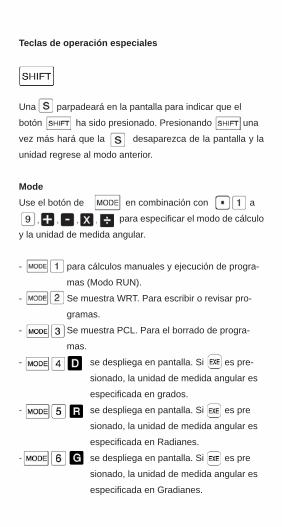
Teclas de operación especiales
Shift
Una parpadeará en la pantalla para indicar que el
botón ha sido presionado. Presionando una
vez más hará que la desaparezca de la pantalla y la
unidad regrese al modo anterior.
ModeUse el botón de en combinación con a
para especifi car el modo de cálculo
y la unidad de medida angular.
- para cálculos manuales y ejecución de progra-
mas (Modo RUN).
- Se muestra WRT. Para escribir o revisar pro-
gramas.
- Se muestra PCL. Para el borrado de progra-
mas.
- se despliega en pantalla. Si es pre-
sionado, la unidad de medida angular es
especifi cada en grados.
- se despliega en pantalla. Si es pre
sionado, la unidad de medida angular es
especifi cada en Radianes.
- se despliega en pantalla. Si es pre
sionado, la unidad de medida angular es
especifi cada en Gradianes.
- En pantalla se muestra el mensaje Fix. Si intro-
duce un número de 0 a 9 seguido por el botón
de especifi cará el número de espacios deci
males de acuerdo al valor introducido.
Ejemplo: 3 espacios decimales
- En pantalla se muestra el mensaje Sci. Intro-
duzca un valor de 0 a 9 seguido por el botón
para introducir el número de dígitos signifi -
cantes del 1 al 10.
Ejemplo: 5 dígitos signifi cantes
10 dígitos signifi cantes
- Presionando cancelará el número especi-
fi cado para los lugares decimales o los dígitos
signifi cantes.
* En caso de que no tenga especifi cado un número para
lugares decimales o dígitos signifi cantes, puede presionar
y cambiar el rango del formato exponencial
(NORM1 / NORM2).
* Con excepción del modo Base-N, los modos 7 al 9 pu-
eden se utilizados en combinación con los modos de cálculo
manual.
* El último modo seleccionado es guardado en memoria aún
después de que la calculadora se apaga.
- En pantalla se muestra el mensaje Defm. Cu-
ando introduce un valor seguido por el botón
especifi cará el número de memorias dis-
ponibles.
Ejemplo: Número de memorias disponibles
incrementado por 10.
- Especifi ca el modo COMP para cálculo aritmé-
ticos funciones de cálculo (ejecución de pro-
gramas es posible en este modo)
- para cálculos o conversiones binarios, octal o
hexadecimal (Modo Base-N).
- para cálculos de desviación estándar (Modo
SD)
- para cálculos de regresión (Modo LR)
- Presionado después de un valor nu-
mérico indicará que el valor será
mostrado en grados (°)
- Presionado después de un valor nu-
mérico indicará que el valor será mos-
trado en radianes
- Presionado después de un valor nu-
mérico indicará que el valor será mos-
trado en gradiantes
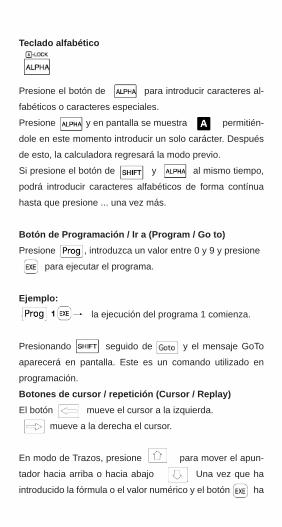
Teclado alfabético
Presione el botón de para introducir caracteres al-
fabéticos o caracteres especiales.
Presione y en pantalla se muestra permitién-
dole en este momento introducir un solo carácter. Después
de esto, la calculadora regresará la modo previo.
Si presione el botón de y al mismo tiempo,
podrá introducir caracteres alfabéticos de forma contínua
hasta que presione ... una vez más.
Botón de Programación / Ir a (Program / Go to)Presione , introduzca un valor entre 0 y 9 y presione
para ejecutar el programa.
Ejemplo: la ejecución del programa 1 comienza.
Presionando seguido de y el mensaje GoTo
aparecerá en pantalla. Este es un comando utilizado en
programación.
Botones de cursor / repetición (Cursor / Replay)El botón mueve el cursor a la izquierda.
mueve a la derecha el cursor.
En modo de Trazos, presione para mover el apun-
tador hacia arriba o hacia abajo Una vez que ha
introducido la fórmula o el valor numérico y el botón ha
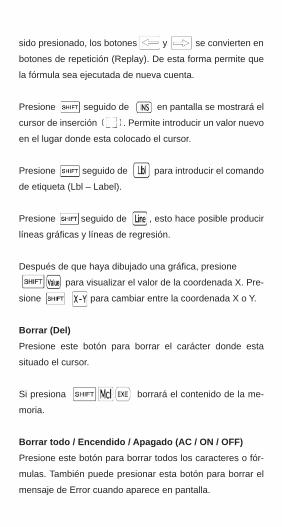
sido presionado, los botones y se convierten en
botones de repetición (Replay). De esta forma permite que
la fórmula sea ejecutada de nueva cuenta.
Presione seguido de en pantalla se mostrará el
cursor de inserción . Permite introducir un valor nuevo
en el lugar donde esta colocado el cursor.
Presione seguido de para introducir el comando
de etiqueta (Lbl – Label).
Presione seguido de , esto hace posible producir
líneas gráfi cas y líneas de regresión.
Después de que haya dibujado una gráfi ca, presione
para visualizar el valor de la coordenada X. Pre-
sione para cambiar entre la coordenada X o Y.
Borrar (Del)Presione este botón para borrar el carácter donde esta
situado el cursor.
Si presiona borrará el contenido de la me-
moria.
Borrar todo / Encendido / Apagado (AC / ON / OFF)Presione este botón para borrar todos los caracteres o fór-
mulas. También puede presionar esta botón para borrar el
mensaje de Error cuando aparece en pantalla.
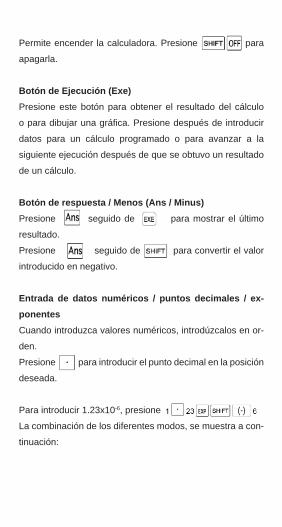
Permite encender la calculadora. Presione para
apagarla.
Botón de Ejecución (Exe)Presione este botón para obtener el resultado del cálculo
o para dibujar una gráfi ca. Presione después de introducir
datos para un cálculo programado o para avanzar a la
siguiente ejecución después de que se obtuvo un resultado
de un cálculo.
Botón de respuesta / Menos (Ans / Minus)Presione seguido de para mostrar el último
resultado.
Presione seguido de para convertir el valor
introducido en negativo.
Entrada de datos numéricos / puntos decimales / ex-ponentesCuando introduzca valores numéricos, introdúzcalos en or-
den.
Presione para introducir el punto decimal en la posición
deseada.
Para introducir 1.23x10⁻⁶, presione
La combinación de los diferentes modos, se muestra a con-
tinuación:
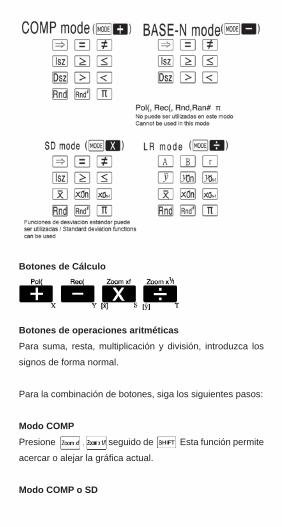
Botones de Cálculo
Botones de operaciones aritméticasPara suma, resta, multiplicación y división, introduzca los
signos de forma normal.
Para la combinación de botones, siga los siguientes pasos:
Modo COMPPresione seguido de Esta función permite
acercar o alejar la gráfi ca actual.
Modo COMP o SD
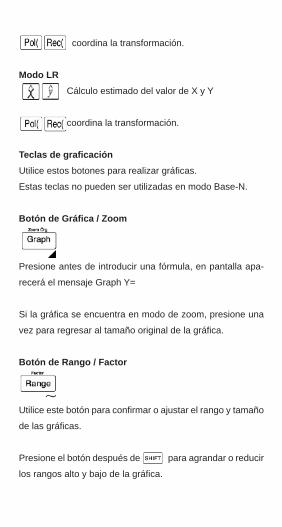
coordina la transformación.
Modo LR Cálculo estimado del valor de X y Y
coordina la transformación.
Teclas de grafi caciónUtilice estos botones para realizar gráfi cas.
Estas teclas no pueden ser utilizadas en modo Base-N.
Botón de Gráfi ca / Zoom
Presione antes de introducir una fórmula, en pantalla apa-
recerá el mensaje Graph Y=
Si la gráfi ca se encuentra en modo de zoom, presione una
vez para regresar al tamaño original de la gráfi ca.
Botón de Rango / Factor
Utilice este botón para confi rmar o ajustar el rango y tamaño
de las gráfi cas.
Presione el botón después de para agrandar o reducir
los rangos alto y bajo de la gráfi ca.
Presione el botón después de para asignar el mismo
valor en más de una posición de la memoria.
Ejemplo:Si desea almacenar el valor 456 en las memorias A a la F:
Botón de trazado
Utilice el botón para trazar sobre una gráfi ca existente y
mostrar el valor de las coordenadas X y Y.
Presione después de para trazar un punto
en la gráfi ca.
Para indicar la entrada de datos dentro de un cálculo pro-
gramado o para repetir el cálculo, presione y
Gráfi ca – Texto / Borrar pantalla
Este botón permite cambiar entre la visualización de Texto
o Gráfi ca.
Presione para borrar la visualización de la
gráfi ca (la palabra DONE aparece en pantalla).
Teclas de funciónUtilice esta opción para cálculos funcionales. Diversas fun-
ciones están disponibles presionando estos botones en
combinación con
Botón multi-resultado
Presione para separar fórmulas o comandos durante la pro-
gramación de cálculos o cálculos consecutivos.
El resultado de dichas combinaciones es conocido como
multi-resultado.
Presione y en modo de Base-N para entrar al
modo de operaciones lógicas para las sumas lógicas de
negación (xor).
Ingeniería / Negación
Presione el botón para convertir el resultado de un cálculo
a un resultado exponencial el cual es un exponente de un
múltiplo de tres.
Cuando obtiene una negación lógica para un valor en modo
Base-N, presione antes de introducir el valor.
Presione después de en modo Base-N para obtener
una suma lógica exclusiva.
Raíz cuadrada / IntegralesPresione antes de introducir un valor numérico para obtener
la raíz cuadrada del valor.
Si presiona el botón después de puede obtener
la porción de la integral de un valor.
En modo Base-N presione después de para especifi -
car el modo de cálculo decimal.
Cuando presione el botón después de en modo Base-
N, los números que se introduzcan posteriormente serán
especifi cados como valor decimal.
Raíz / Fracción
Presione el botón después de introducir un valor numérico
para obtener la raíz de un valor.
Presione después de antes de introducir un valor
numérico a fi n de obtener la fracción de ese valor.
Presione después de en modo Base-N, los números
que se introduzcan posteriormente serán especifi cados
como valor hexadecimal.
Logaritmo común / Antilogaritmo
Presione antes de introducir un valor para obtener el loga-
ritmo común de ese valor.
Cuando presione este botón después de los valores
siguientes introducidos se mostrarán en exponente 10.
Presione seguido de en modo Base-N para especifi car
el modo de cálculo binario.
Cuando presione después de en modo Base-N, los
siguientes valores que se introduzcan se mostrarán como
un valor binario.
Logaritmos naturales / Exponenciales
Presione antes de introducir un valor para obtener el loga-
ritmo natural de ese valor.
Cuando presione después de los valores siguientes
se convierten en exponentes de e.
Presione seguido de en modo Base-N para especifi car
el modo de cálculo octal.
Cuando presione después de los valores siguientes
serán especifi cados en valores octales.
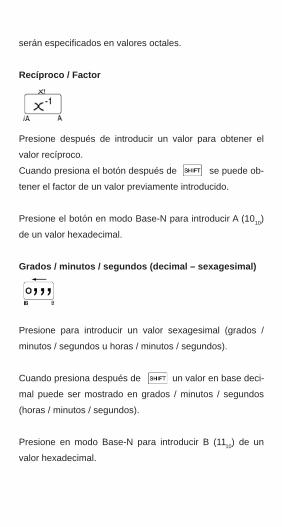
Recíproco / Factor
Presione después de introducir un valor para obtener el
valor recíproco.
Cuando presiona el botón después de se puede ob-
tener el factor de un valor previamente introducido.
Presione el botón en modo Base-N para introducir A (1010)
de un valor hexadecimal.
Grados / minutos / segundos (decimal – sexagesimal)
Presione para introducir un valor sexagesimal (grados /
minutos / segundos u horas / minutos / segundos).
Cuando presiona después de un valor en base deci-
mal puede ser mostrado en grados / minutos / segundos
(horas / minutos / segundos).
Presione en modo Base-N para introducir B (1110) de un
valor hexadecimal.
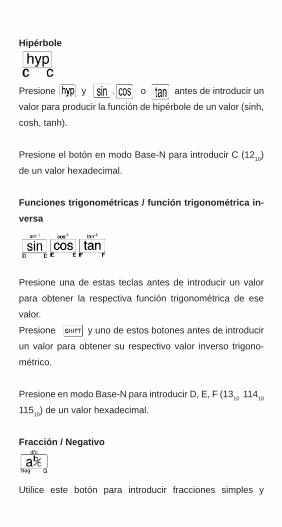
Hipérbole
Presione y o antes de introducir un
valor para producir la función de hipérbole de un valor (sinh,
cosh, tanh).
Presione el botón en modo Base-N para introducir C (1210)
de un valor hexadecimal.
Funciones trigonométricas / función trigonométrica in-versa
Presione una de estas teclas antes de introducir un valor
para obtener la respectiva función trigonométrica de ese
valor.
Presione y uno de estos botones antes de introducir
un valor para obtener su respectivo valor inverso trigono-
métrico.
Presione en modo Base-N para introducir D, E, F (1310 11410
11510) de un valor hexadecimal.
Fracción / Negativo
Utilice este botón para introducir fracciones simples y
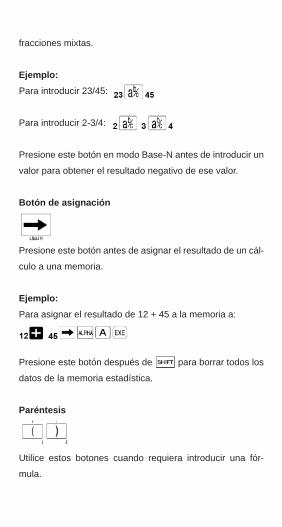
fracciones mixtas.
Ejemplo:Para introducir 23/45:
Para introducir 2-3/4:
Presione este botón en modo Base-N antes de introducir un
valor para obtener el resultado negativo de ese valor.
Botón de asignación
Presione este botón antes de asignar el resultado de un cál-
culo a una memoria.
Ejemplo:Para asignar el resultado de 12 + 45 a la memoria a:
Presione este botón después de para borrar todos los
datos de la memoria estadística.
Paréntesis
Utilice estos botones cuando requiera introducir una fór-
mula.
Presione después de , de una coma o un punto y
coma, para separar los argumentos en cálculos consecu-
tivos.
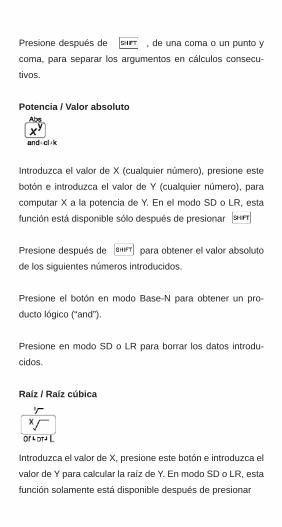
Potencia / Valor absoluto
Introduzca el valor de X (cualquier número), presione este
botón e introduzca el valor de Y (cualquier número), para
computar X a la potencia de Y. En el modo SD o LR, esta
función está disponible sólo después de presionar
Presione después de para obtener el valor absoluto
de los siguientes números introducidos.
Presione el botón en modo Base-N para obtener un pro-
ducto lógico (“and”).
Presione en modo SD o LR para borrar los datos introdu-
cidos.
Raíz / Raíz cúbica
Introduzca el valor de X, presione este botón e introduzca el
valor de Y para calcular la raíz de Y. En modo SD o LR, esta
función solamente está disponible después de presionar

Presione después de para obtener la raíz cúbica de
los siguientes números introducidos.
Presione este botón en modo Base-N para obtener una
suma lógica (“or”).
En modo SD o LR se utiliza para introducir datos.
Ajuste de contrastePresione o después de para ajustar el
contraste de la pantalla. Si presiona hará la pantalla
más clara, si presiona se volverá mas oscura.
Si la pantalla se vuelve oscura y difícil de leer, aún si ha in-
crementado el contraste, es probable que requiera cambiar
las baterías.
ANTES DE COMENZAR A REALIZAR CÁLCULOS
Prioridad de secuencia en los cálculosEsta calculadora emplea lógica algebraica verdadera para
calcular las partes de una fórmula en el siguiente orden:
Transformación de coordenadas:
Funciones tipo ACon estas funciones, introduzca primero el valor y después

presione el botón.
Potencia / Raíz
Fracciones
Formato de multiplicación abreviada en frente de , me-
moria o paréntesis
Funciones tipo BCuando utiliza estas funciones, presione primero el botón y
posteriormente introduzca el valor.
Formato de multiplicación abreviada en frente de funciones
tipo B.
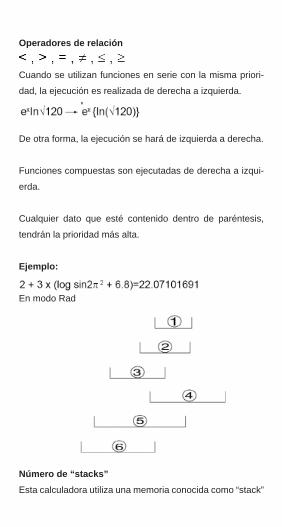
Operadores de relación
Cuando se utilizan funciones en serie con la misma priori-
dad, la ejecución es realizada de derecha a izquierda.
De otra forma, la ejecución se hará de izquierda a derecha.
Funciones compuestas son ejecutadas de derecha a izqui-
erda.
Cualquier dato que esté contenido dentro de paréntesis,
tendrán la prioridad más alta.
Ejemplo:
En modo Rad
Número de “stacks”Esta calculadora utiliza una memoria conocida como “stack”
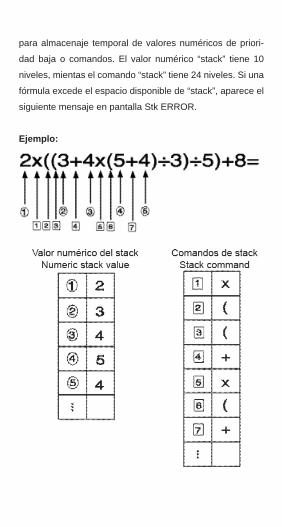
para almacenaje temporal de valores numéricos de priori-
dad baja o comandos. El valor numérico “stack” tiene 10
niveles, mientas el comando “stack” tiene 24 niveles. Si una
fórmula excede el espacio disponible de “stack”, aparece el
siguiente mensaje en pantalla Stk ERROR.
Ejemplo:
Los cálculos están ejecutados de forma secuencial, y la
primera operación tiene la prioridad más alta. Una vez que
el cálculo ha sido realizado, la memoria temporal “stack”
será borrada.
Modos de cálculoEste equipo permite la realización de cálculos de forma
manual, almacenaje de programas, y modos para cálculos
generales y estadísticos.
Modos de operaciónExisten un total de tres modos de operación:
1.- Modo RUN
Elaboración de gráfi cas así como ejecución de programas,
y cálculos de forma manual.
2.- Modo WRT
Almacenaje y edición de programas.
3.- Modo PCL
Borrado de programas almacenados.
Modos de CálculoExisten 6 modos de cálculo que son empleados de acuerdo
al tipo de operación que se desea realizar.
1.- Modo COMP
Cálculos generales, incluyendo cálculos de funciones.
2.- Modo Base-N
Cálculos y conversiones binarios, octal, hexadecimal y deci-
mal, así como operaciones lógicas. Trazado de gráfi cas no
puede ser realizado en este modo.
3.- Modo SD
Cálculo de desviación estándar
4.- Modo LR
Cálculo de regresión
Nota:Cuando el equipo se apaga, automáticamente se regresa al
modo RUN. Sin embargo el modo de cálculo, la colocación
del punto decimal, el número de dígitos signifi cantes, y la
unidad de ángulo (Deg, Rad, Gra) se mantendrán en me-
moria.
Para regresar al modo de normal, presione
Número de dígitos de entrada / salida y dígitos de cál-culos
El rango de dígitos permitidos de entrada y salida es de 10
dígitos para el resultado de un logaritmo o de 2 dígitos para
un exponente.
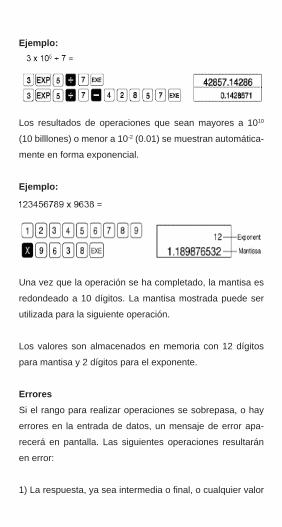
Ejemplo:
Los resultados de operaciones que sean mayores a 1010
(10 billlones) o menor a 10-2 (0.01) se muestran automática-
mente en forma exponencial.
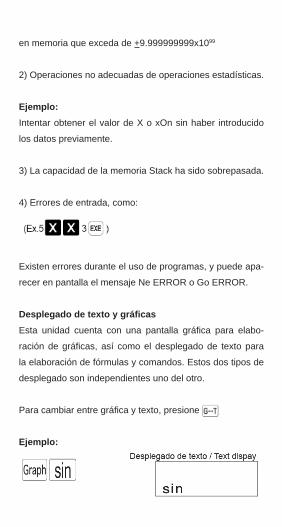
Ejemplo:
Una vez que la operación se ha completado, la mantisa es
redondeado a 10 dígitos. La mantisa mostrada puede ser
utilizada para la siguiente operación.
Los valores son almacenados en memoria con 12 dígitos
para mantisa y 2 dígitos para el exponente.
ErroresSi el rango para realizar operaciones se sobrepasa, o hay
errores en la entrada de datos, un mensaje de error apa-
recerá en pantalla. Las siguientes operaciones resultarán
en error:
1) La respuesta, ya sea intermedia o fi nal, o cualquier valor
en memoria que exceda de +9.999999999x1099
2) Operaciones no adecuadas de operaciones estadísticas.
Ejemplo:Intentar obtener el valor de X o xOn sin haber introducido
los datos previamente.
3) La capacidad de la memoria Stack ha sido sobrepasada.
4) Errores de entrada, como:
Existen errores durante el uso de programas, y puede apa-
recer en pantalla el mensaje Ne ERROR o Go ERROR.
Desplegado de texto y gráfi casEsta unidad cuenta con una pantalla gráfi ca para elabo-
ración de gráfi cas, así como el desplegado de texto para
la elaboración de fórmulas y comandos. Estos dos tipos de
desplegado son independientes uno del otro.
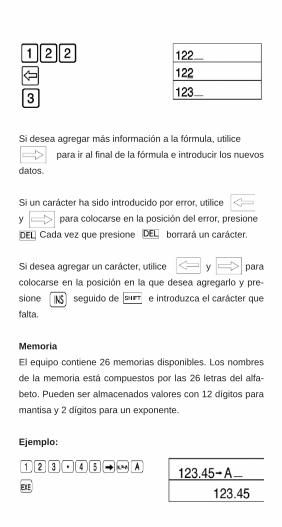
Para cambiar entre gráfi ca y texto, presione ....
Ejemplo:
Xxxxxxxxxxxxxxxxxxx
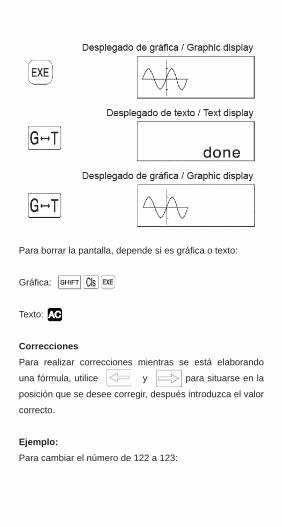
Para borrar la pantalla, depende si es gráfi ca o texto:
Gráfi ca:
Texto:
CorreccionesPara realizar correcciones mientras se está elaborando
una fórmula, utilice y para situarse en la
posición que se desee corregir, después introduzca el valor
correcto.
Ejemplo:Para cambiar el número de 122 a 123:
Si desea agregar más información a la fórmula, utilice
para ir al fi nal de la fórmula e introducir los nuevos
datos.
Si un carácter ha sido introducido por error, utilice
y para colocarse en la posición del error, presione
Cada vez que presione borrará un carácter.
Si desea agregar un carácter, utilice y para
colocarse en la posición en la que desea agregarlo y pre-
sione seguido de e introduzca el carácter que
falta.
MemoriaEl equipo contiene 26 memorias disponibles. Los nombres
de la memoria está compuestos por las 26 letras del alfa-
beto. Pueden ser almacenados valores con 12 dígitos para
mantisa y 2 dígitos para un exponente.
Ejemplo:

Los valores son asignados a una memoria utilizando
seguido del nombre de la memoria.
Ejemplo:Para almacenar la suma de la memoria A + 78.9 en la me-
moria B:
Para agregar 74.12 a la memoria B:
Xxxxx
Para revisar el contenido de una memoria:
Xxxxxxxxxxxxxx
Para borrar el contenido de la memoria A únicamente:
Xxxxxxxxxxxxxx
Para borrar el contenido de todas las memorias:
Xxxxxxxxxxxxx
Para guardar el mismo valor numérico en múltiples me-morias:
Presione seguido de

Ejemplo:Para guardar el número 10 en las memorias de la A a la J:
Expansión de memoriaA pesar de que existen 26 memorias estándar, se puede
expandir cambiando los pasos de almacenaje a memoria.
La expansión de la memoria se realiza convirtiendo 8 pasos
en uno solo.
La memoria se expande en unidades de uno. Un máximo de
50 memorias pueden ser agregadas para un máximo total
de 76 (26+50)
Para expandirla, presione seguido de un valor
representa el tamaño de la expansión y se muestra en pan-
talla, presione para guardar los cambios.
Para revisar el número de memorias actuales, presione
seguido de y fi nalmente
xxxxxxxxxxxxxxxx
Para regresar al número de memorias estándar (26), intro-
duzca un 0 en la secuencia previa.
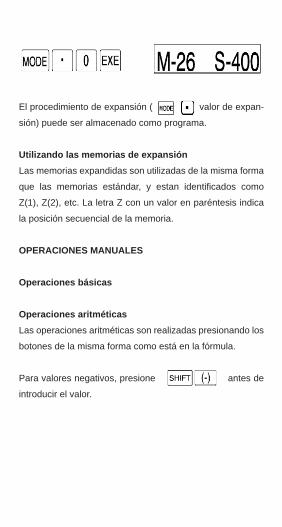
El procedimiento de expansión ( valor de expan-
sión) puede ser almacenado como programa.
Utilizando las memorias de expansiónLas memorias expandidas son utilizadas de la misma forma
que las memorias estándar, y estan identifi cados como
Z(1), Z(2), etc. La letra Z con un valor en paréntesis indica
la posición secuencial de la memoria.
OPERACIONES MANUALES
Operaciones básicas
Operaciones aritméticasLas operaciones aritméticas son realizadas presionando los
botones de la misma forma como está en la fórmula.
Para valores negativos, presione antes de
introducir el valor.
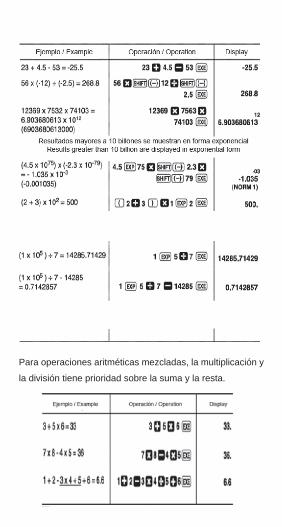
Para operaciones aritméticas mezcladas, la multiplicación y
la división tiene prioridad sobre la suma y la resta.
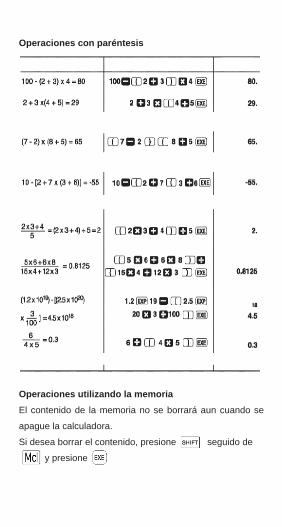
Operaciones con paréntesis
Operaciones utilizando la memoriaEl contenido de la memoria no se borrará aun cuando se
apague la calculadora.
Si desea borrar el contenido, presione seguido de
y presione
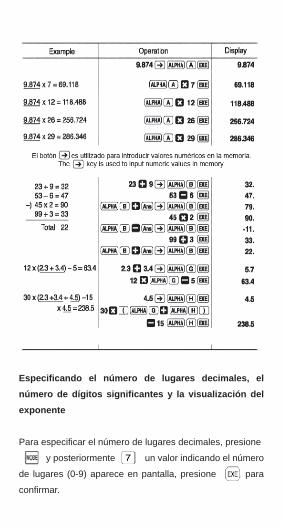
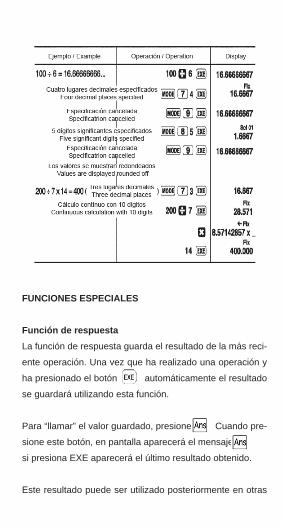
Especifi cando el número de lugares decimales, el número de dígitos signifi cantes y la visualización del exponente
Para especifi car el número de lugares decimales, presione
y posteriormente un valor indicando el número
de lugares (0-9) aparece en pantalla, presione para
confi rmar.

Para especifi car el número de dígitos signifi cantes, presio-
ne y posteriormente , un valor indicando el
número de lugares (0-9 para ajustar de 1 a 10 dígitos) apa-
rece en pantalla, presione para confi rmar.
Si presiona o seguido de , permite que se
muestre en pantalla el exponente de un número en múlti-
plos de 3.
El número especifi cado para posición decimal así como el
número de dígitos signifi cantes no se cambiarán a menos
que sea cancelado por otro valor, o presione ....
Aun cuando el número para la posición decimal y el número
de dígitos signifi cantes hayan sido especifi cados, las op-
eraciones internas se harán en 12 dígitos para mantisa, y
se mostrarán en pantalla como 10 dígitos. Para convertir
estos valores al número especifi cado de lugares decimales
y dígitos signifi cantes, presione seguido de y
presione
Mientras la calculadora esté en mod Base-N no podrá espe-
cifi car el formato de desplegado (Fix, Sci).
FUNCIONES ESPECIALES
Función de respuestaLa función de respuesta guarda el resultado de la más reci-
ente operación. Una vez que ha realizado una operación y
ha presionado el botón automáticamente el resultado
se guardará utilizando esta función.
Para “llamar” el valor guardado, presione Cuando pre-
sione este botón, en pantalla aparecerá el mensaje
si presiona EXE aparecerá el último resultado obtenido.
Este resultado puede ser utilizado posteriormente en otras
operaciones.
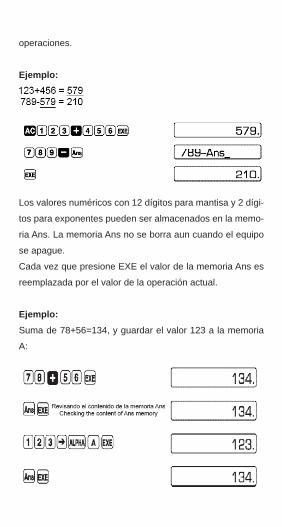
Ejemplo:
Los valores numéricos con 12 dígitos para mantisa y 2 dígi-
tos para exponentes pueden ser almacenados en la memo-
ria Ans. La memoria Ans no se borra aun cuando el equipo
se apague.
Cada vez que presione EXE el valor de la memoria Ans es
reemplazada por el valor de la operación actual.
Ejemplo:Suma de 78+56=134, y guardar el valor 123 a la memoria
A:
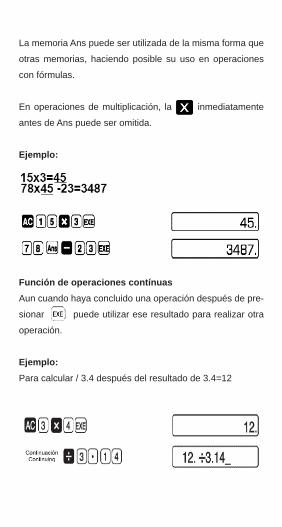
La memoria Ans puede ser utilizada de la misma forma que
otras memorias, haciendo posible su uso en operaciones
con fórmulas.
En operaciones de multiplicación, la inmediatamente
antes de Ans puede ser omitida.
Ejemplo:
Función de operaciones contínuasAun cuando haya concluido una operación después de pre-
sionar puede utilizar ese resultado para realizar otra
operación.
Ejemplo:Para calcular / 3.4 después del resultado de 3.4=12
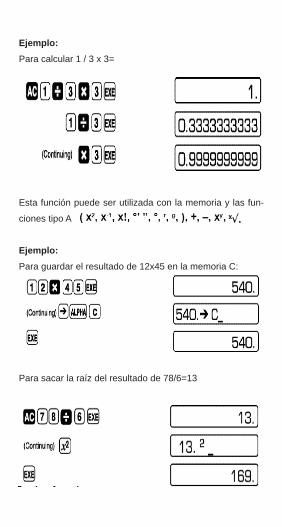
Ejemplo:Para calcular 1 / 3 x 3=
Esta función puede ser utilizada con la memoria y las fun-
ciones tipo A
Ejemplo:Para guardar el resultado de 12x45 en la memoria C:
Para sacar la raíz del resultado de 78/6=13
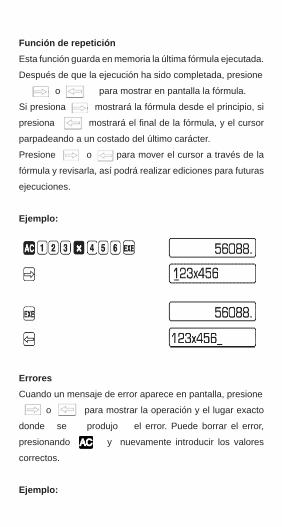
Función de repeticiónEsta función guarda en memoria la última fórmula ejecutada.
Después de que la ejecución ha sido completada, presione
o para mostrar en pantalla la fórmula.
Si presiona mostrará la fórmula desde el principio, si
presiona mostrará el fi nal de la fórmula, y el cursor
parpadeando a un costado del último carácter.
Presione o para mover el cursor a través de la
fórmula y revisarla, así podrá realizar ediciones para futuras
ejecuciones.
Ejemplo:
ErroresCuando un mensaje de error aparece en pantalla, presione
o para mostrar la operación y el lugar exacto
donde se produjo el error. Puede borrar el error,
presionando y nuevamente introducir los valores
correctos.
Ejemplo:
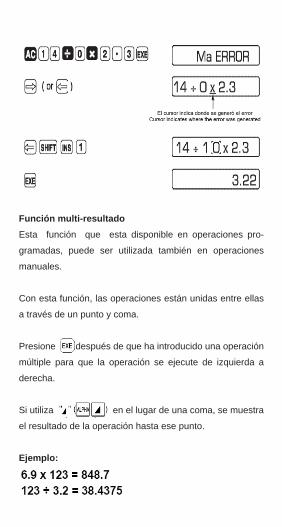
Función multi-resultadoEsta función que esta disponible en operaciones pro-
gramadas, puede ser utilizada también en operaciones
manuales.
Con esta función, las operaciones están unidas entre ellas
a través de un punto y coma.
Presione después de que ha introducido una operación
múltiple para que la operación se ejecute de izquierda a
derecha.
Si utiliza en el lugar de una coma, se muestra
el resultado de la operación hasta ese punto.
Ejemplo:
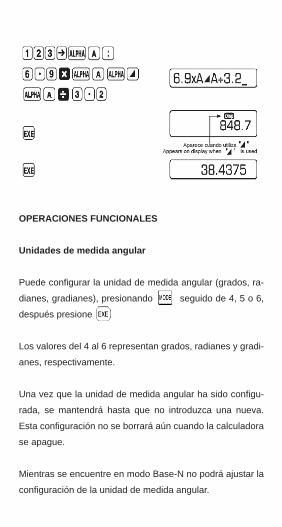
OPERACIONES FUNCIONALES
Unidades de medida angular
Puede confi gurar la unidad de medida angular (grados, ra-
dianes, gradianes), presionando seguido de 4, 5 o 6,
después presione
Los valores del 4 al 6 representan grados, radianes y gradi-
anes, respectivamente.
Una vez que la unidad de medida angular ha sido confi gu-
rada, se mantendrá hasta que no introduzca una nueva.
Esta confi guración no se borrará aún cuando la calculadora
se apague.
Mientras se encuentre en modo Base-N no podrá ajustar la
confi guración de la unidad de medida angular.

Funciones trigonométricas y trigonometría inversa
Antes de realizar estas operaciones, es necesario que pre-

viamente haya confi gurado una unidad de medida angular.
Las siguientes operaciones no pueden ser realizadas en
modo Base-N.
Logaritmos y exponencialesLas siguientes operaciones no pueden ser realizadas en
modo Base-N.
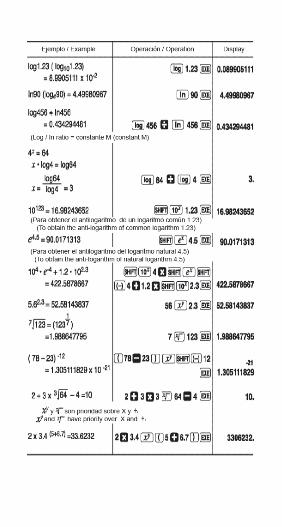
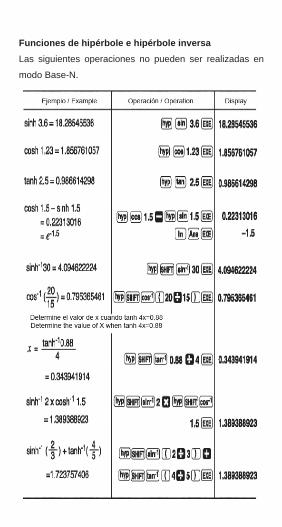
Funciones de hipérbole e hipérbole inversaLas siguientes operaciones no pueden ser realizadas en
modo Base-N.
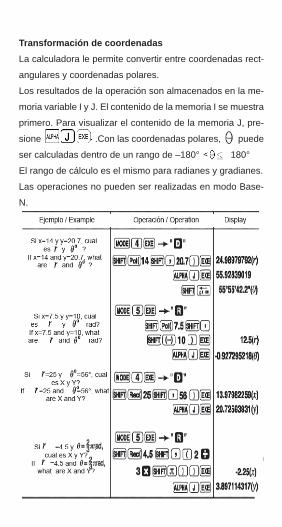
Transformación de coordenadasLa calculadora le permite convertir entre coordenadas rect-
angulares y coordenadas polares.
Los resultados de la operación son almacenados en la me-
moria variable I y J. El contenido de la memoria I se muestra
primero. Para visualizar el contenido de la memoria J, pre-
sione .Con las coordenadas polares, puede
ser calculadas dentro de un rango de –180° 180°
El rango de cálculo es el mismo para radianes y gradianes.
Las operaciones no pueden ser realizadas en modo Base-
N.
Otras funciones Las siguientes operaciones no pueden ser realizadas en
modo Base-N.
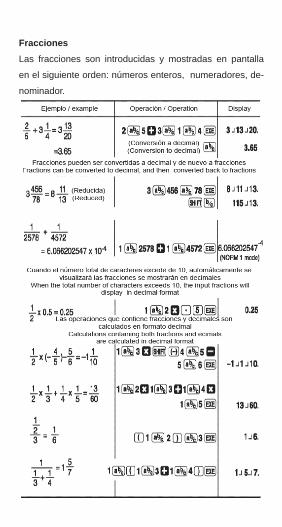
FraccionesLas fracciones son introducidas y mostradas en pantalla
en el siguiente orden: números enteros, numeradores, de-
nominador.
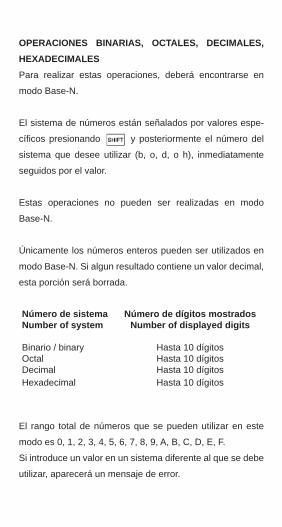
OPERACIONES BINARIAS, OCTALES, DECIMALES, HEXADECIMALESPara realizar estas operaciones, deberá encontrarse en
modo Base-N.
El sistema de números están señalados por valores espe-
cífi cos presionando y posteriormente el número del
sistema que desee utilizar (b, o, d, o h), inmediatamente
seguidos por el valor.
Estas operaciones no pueden ser realizadas en modo
Base-N.
Únicamente los números enteros pueden ser utilizados en
modo Base-N. Si algun resultado contiene un valor decimal,
esta porción será borrada.
El rango total de números que se pueden utilizar en este
modo es 0, 1, 2, 3, 4, 5, 6, 7, 8, 9, A, B, C, D, E, F.
Si introduce un valor en un sistema diferente al que se debe
utilizar, aparecerá un mensaje de error.
Número de sistema Número de dígitos mostradosNumber of system Number of displayed digits Binario / binary Hasta 10 dígitosOctal Hasta 10 dígitosDecimal Hasta 10 dígitosHexadecimal Hasta 10 dígitos
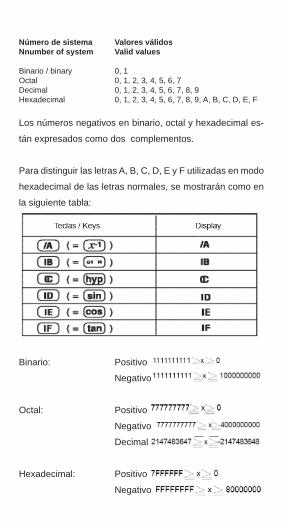
Los números negativos en binario, octal y hexadecimal es-
tán expresados como dos complementos.
Para distinguir las letras A, B, C, D, E y F utilizadas en modo
hexadecimal de las letras normales, se mostrarán como en
la siguiente tabla:
Binario: Positivo
Negativo
Octal: Positivo
Negativo
Decimal
Hexadecimal: Positivo
Negativo
Número de sistema Valores válidosNnumber of system Valid values Binario / binary 0, 1Octal 0, 1, 2, 3, 4, 5, 6, 7Decimal 0, 1, 2, 3, 4, 5, 6, 7, 8, 9Hexadecimal 0, 1, 2, 3, 4, 5, 6, 7, 8, 9, A, B, C, D, E, F
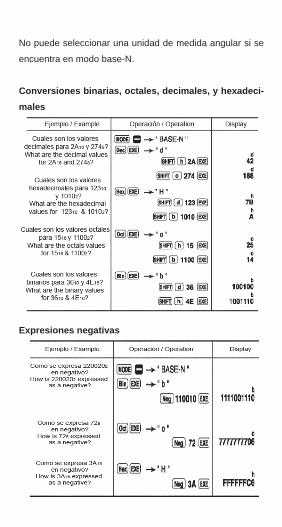
No puede seleccionar una unidad de medida angular si se
encuentra en modo base-N.
Conversiones binarias, octales, decimales, y hexadeci-males
Expresiones negativas
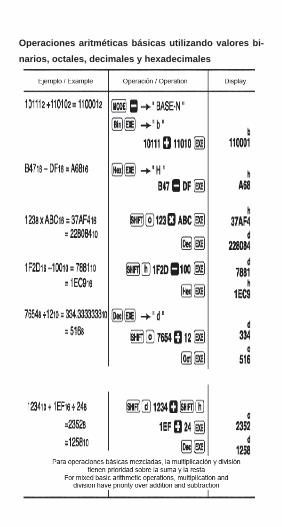
Operaciones aritméticas básicas utilizando valores bi-narios, octales, decimales y hexadecimales
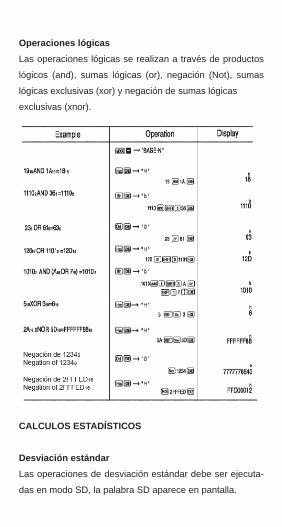
Operaciones lógicasLas operaciones lógicas se realizan a través de productos
lógicos (and), sumas lógicas (or), negación (Not), sumas
lógicas exclusivas (xor) y negación de sumas lógicas
exclusivas (xnor).
CALCULOS ESTADÍSTICOS
Desviación estándarLas operaciones de desviación estándar debe ser ejecuta-
das en modo SD, la palabra SD aparece en pantalla.
Antes de realizar operaciones, la memoria estadística de-
berá ser borrada, presionando y presione
para confi rmar los cambios.
Datos individuales son introducidos utilizando....
Datos múltiples del mismo valor puede ser introducidos
presionando repetidamente o cuando introduzca los
datos, presionando seguido de esto representa
el número de veces que será repetido este valor, después
presione ....
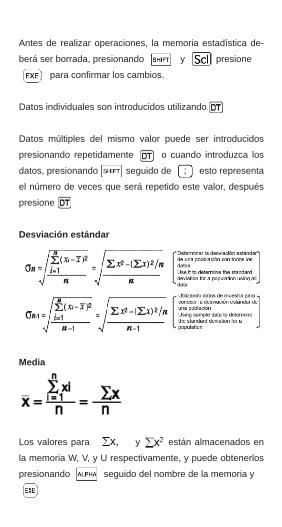
Desviación estándar
Media
Los valores para y están almacenados en
la memoria W, V, y U respectivamente, y puede obtenerlos
presionando seguido del nombre de la memoria y
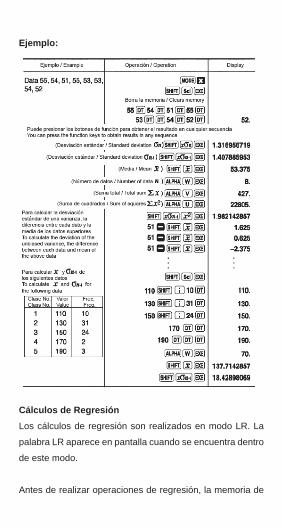
Ejemplo:
Cálculos de RegresiónLos cálculos de regresión son realizados en modo LR. La
palabra LR aparece en pantalla cuando se encuentra dentro
de este modo.
Antes de realizar operaciones de regresión, la memoria de
tabulación deberá ser borrada presionando seguido
de y fi nalmente presione para guardar los cam-
bios.
Los datos individuales son introducidos como X
y Y
Datos múltiples del mismo valor pueden ser introducidos
presionando repetidamente Esta operación puede ser
realizada introduciendo el valor X y el valor Y
seguidos de un valor que representa el número de
veces que deberá ser repetido, presione
Si únicamente repetirá el valor X, presione el valor
de Y o el valor de Y seguido de
un valor que representa el número de veces que desea que
el dato se repita, para concluir presione
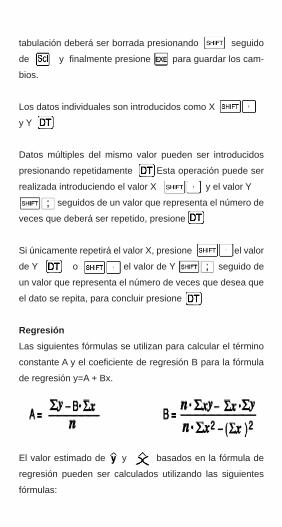
RegresiónLas siguientes fórmulas se utilizan para calcular el término
constante A y el coefi ciente de regresión B para la fórmula
de regresión y=A + Bx.
El valor estimado de y basados en la fórmula de
regresión pueden ser calculados utilizando las siguientes
fórmulas:
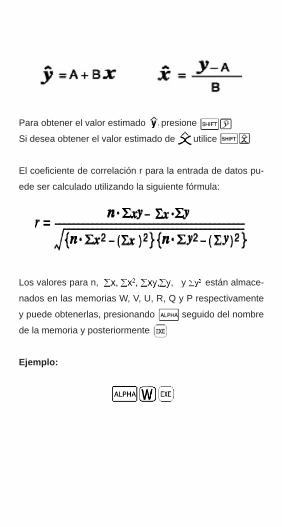
Para obtener el valor estimado presione
Si desea obtener el valor estimado de utilice
El coefi ciente de correlación r para la entrada de datos pu-
ede ser calculado utilizando la siguiente fórmula:
Los valores para n, y están almace-
nados en las memorias W, V, U, R, Q y P respectivamente
y puede obtenerlas, presionando seguido del nombre
de la memoria y posteriormente
Ejemplo:
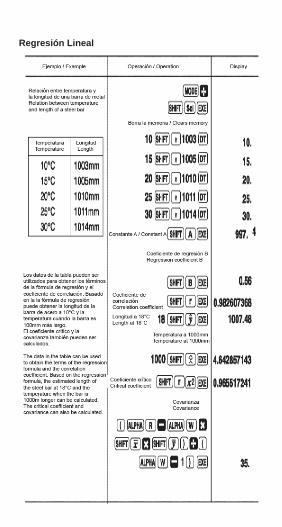
Regresión Lineal
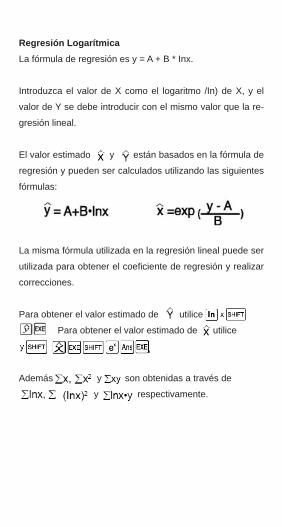
Regresión LogarítmicaLa fórmula de regresión es y = A + B * Inx.
Introduzca el valor de X como el logaritmo /In) de X, y el
valor de Y se debe introducir con el mismo valor que la re-
gresión lineal.
El valor estimado y están basados en la fórmula de
regresión y pueden ser calculados utilizando las siguientes
fórmulas:
La misma fórmula utilizada en la regresión lineal puede ser
utilizada para obtener el coefi ciente de regresión y realizar
correcciones.
Para obtener el valor estimado de utilice
Para obtener el valor estimado de utilice
Además y son obtenidas a través de
y respectivamente.
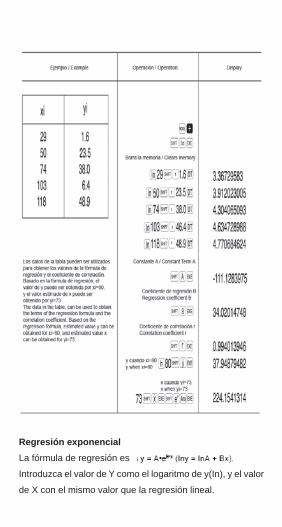
Regresión exponencialLa fórmula de regresión es
Introduzca el valor de Y como el logaritmo de y(In), y el valor
de X con el mismo valor que la regresión lineal.
El valor estimado de y están basados en la fórmula
de regresión y pueden ser calculados utilizando las siguien-
tes fórmulas:
La corrección es realizada al igual que la regresión lineal.
El término de la constante A es obtenido por
el valor de es obtenido mediante
y el valor estimado de es obtenido presio-
nando y son obtenidos
por y respectivamente.
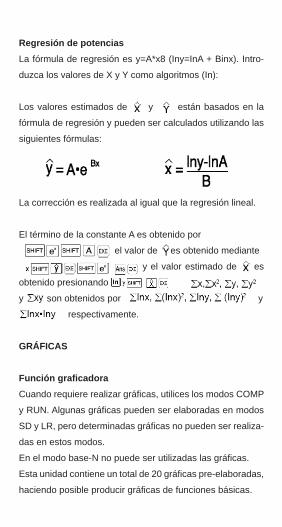
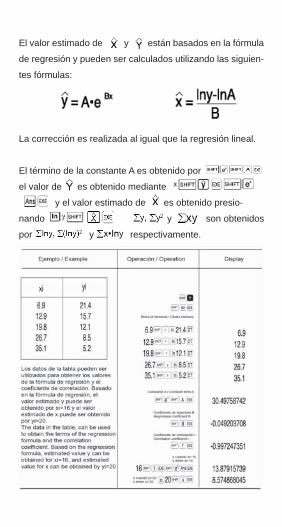
Regresión de potenciasLa fórmula de regresión es y=A*x8 (Iny=InA + Binx). Intro-
duzca los valores de X y Y como algoritmos (In):
Los valores estimados de y están basados en la
fórmula de regresión y pueden ser calculados utilizando las
siguientes fórmulas:
La corrección es realizada al igual que la regresión lineal.
El término de la constante A es obtenido por
el valor de es obtenido mediante
y el valor estimado de es
obtenido presionando
y son obtenidos por y
respectivamente.
GRÁFICAS
Función grafi cadoraCuando requiere realizar gráfi cas, utilices los modos COMP
y RUN. Algunas gráfi cas pueden ser elaboradas en modos
SD y LR, pero determinadas gráfi cas no pueden ser realiza-
das en estos modos.
En el modo base-N no puede ser utilizadas las gráfi cas.
Esta unidad contiene un total de 20 gráfi cas pre-elaboradas,
haciendo posible producir gráfi cas de funciones básicas.
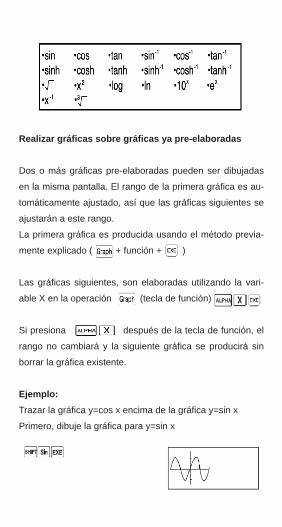
Realizar gráfi cas sobre gráfi cas ya pre-elaboradas
Dos o más gráfi cas pre-elaboradas pueden ser dibujadas
en la misma pantalla. El rango de la primera gráfi ca es au-
tomáticamente ajustado, así que las gráfi cas siguientes se
ajustarán a este rango.
La primera gráfi ca es producida usando el método previa-
mente explicado ( + función + )
Las gráfi cas siguientes, son elaboradas utilizando la vari-
able X en la operación (tecla de función)
Si presiona después de la tecla de función, el
rango no cambiará y la siguiente gráfi ca se producirá sin
borrar la gráfi ca existente.
Ejemplo:Trazar la gráfi ca y=cos x encima de la gráfi ca y=sin x
Primero, dibuje la gráfi ca para y=sin x
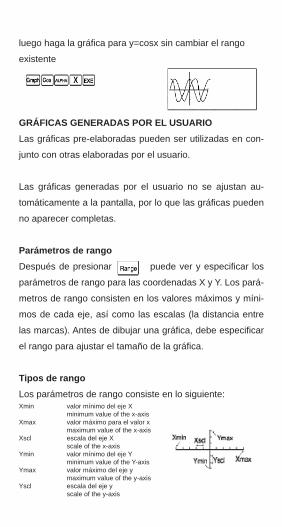
luego haga la gráfi ca para y=cosx sin cambiar el rango
existente
GRÁFICAS GENERADAS POR EL USUARIOLas gráfi cas pre-elaboradas pueden ser utilizadas en con-
junto con otras elaboradas por el usuario.
Las gráfi cas generadas por el usuario no se ajustan au-
tomáticamente a la pantalla, por lo que las gráfi cas pueden
no aparecer completas.
Parámetros de rangoDespués de presionar puede ver y especifi car los
parámetros de rango para las coordenadas X y Y. Los pará-
metros de rango consisten en los valores máximos y míni-
mos de cada eje, así como las escalas (la distancia entre
las marcas). Antes de dibujar una gráfi ca, debe especifi car
el rango para ajustar el tamaño de la gráfi ca.
Tipos de rangoLos parámetros de rango consiste en lo siguiente:Xmin valor mínimo del eje X minimum value of the x-axisXmax valor máximo para el valor x maximum value of the x-axisXscl escala del eje X scale of the x-axisYmin valor mínimo del eje Y minimum value of the Y-axisYmax valor máximo del eje y maximum value of the y-axisYscl escala del eje y scale of the y-axis

Especifi cando un rangoPresione (excepto en modo Base-N), para entrar
a la confi guración de rango. Introduzca el valor deseado y
presione
Ejemplo:Cambiar el parámetro de los rangos de la izquierda a los
rangos de la derecha.
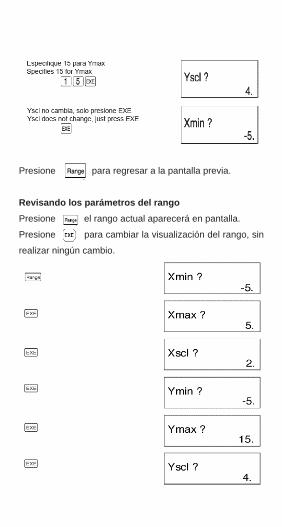
Presione para regresar a la pantalla previa.
Revisando los parámetros del rangoPresione el rango actual aparecerá en pantalla.
Presione para cambiar la visualización del rango, sin
realizar ningún cambio.
Presione para regresar a la pantalla previa.
Puede introducir los valores de rango como expresiones
( ), estas expresiones se convertirán automáticamente
en valores.
El rango a utilizar para gráfi cas va de –9.99999999E+97 a
9.99999999E+97
Si introduce 0 para Xscl o Yscl, no será válido para ajustar
ninguna escala.
Si los valores máximos y mínimos de un eje son iguales,
un error matemático será generado (Ma ERROR) cuando
intente elaborar una gráfi ca.
Si el rango confi gurado es muy amplio, la gráfi ca podría no
desplegarse completamente.
Un error matemático aparecerá si los rangos confi gurados
están demasiado cerca.
Reinicio de rangosLos rangos confi gurados puede ser borrados y los valores
iniciales serán restaurados, presionando mientras
se encuentra en el modo de confi guración de rangos.
Los valores iniciales son:
Xmin: -3.8 Ymin: -2.2
Xmax: 3.8 Ymax : 2.2
Xscl : 1 Yscl : 1
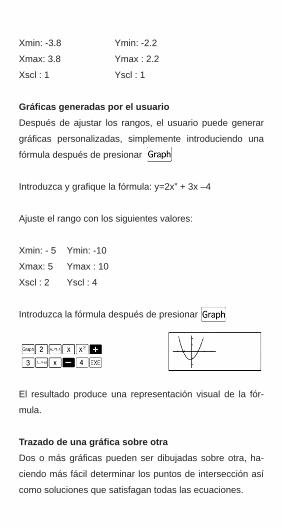
Gráfi cas generadas por el usuarioDespués de ajustar los rangos, el usuario puede generar
gráfi cas personalizadas, simplemente introduciendo una
fórmula después de presionar
Introduzca y grafi que la fórmula: y=2x” + 3x –4
Ajuste el rango con los siguientes valores:
Xmin: - 5 Ymin: -10
Xmax: 5 Ymax : 10
Xscl : 2 Yscl : 4
Introduzca la fórmula después de presionar
El resultado produce una representación visual de la fór-
mula.
Trazado de una gráfi ca sobre otraDos o más gráfi cas pueden ser dibujadas sobre otra, ha-
ciendo más fácil determinar los puntos de intersección así
como soluciones que satisfagan todas las ecuaciones.
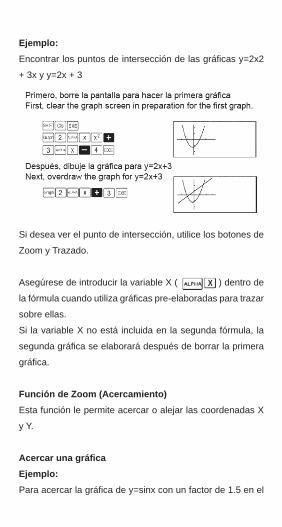
Ejemplo:Encontrar los puntos de intersección de las gráfi cas y=2x2
+ 3x y y=2x + 3
Si desea ver el punto de intersección, utilice los botones de
Zoom y Trazado.
Asegúrese de introducir la variable X ( ) dentro de
la fórmula cuando utiliza gráfi cas pre-elaboradas para trazar
sobre ellas.
Si la variable X no está incluida en la segunda fórmula, la
segunda gráfi ca se elaborará después de borrar la primera
gráfi ca.
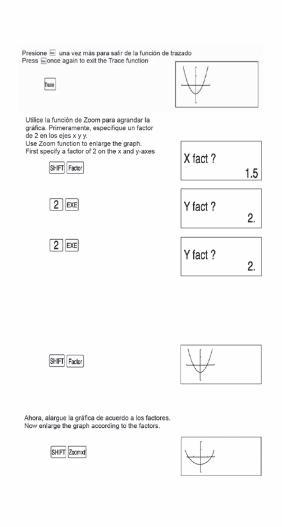
Función de Zoom (Acercamiento)Esta función le permite acercar o alejar las coordenadas X
y Y.
Acercar una gráfi caEjemplo:Para acercar la gráfi ca de y=sinx con un factor de 1.5 en el
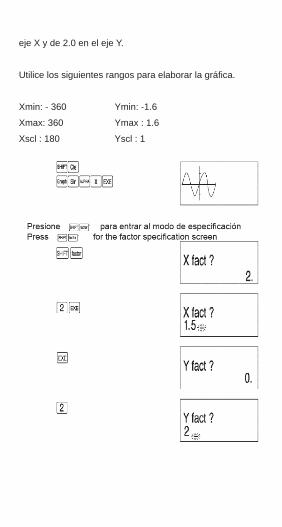
eje X y de 2.0 en el eje Y.
Utilice los siguientes rangos para elaborar la gráfi ca.
Xmin: - 360 Ymin: -1.6
Xmax: 360 Ymax : 1.6
Xscl : 180 Yscl : 1
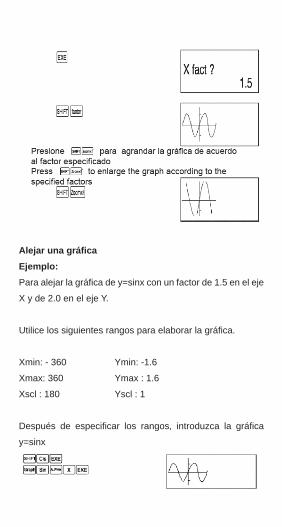
Alejar una gráfi caEjemplo:Para alejar la gráfi ca de y=sinx con un factor de 1.5 en el eje
X y de 2.0 en el eje Y.
Utilice los siguientes rangos para elaborar la gráfi ca.
Xmin: - 360 Ymin: -1.6
Xmax: 360 Ymax : 1.6
Xscl : 180 Yscl : 1
Después de especifi car los rangos, introduzca la gráfi ca
y=sinx
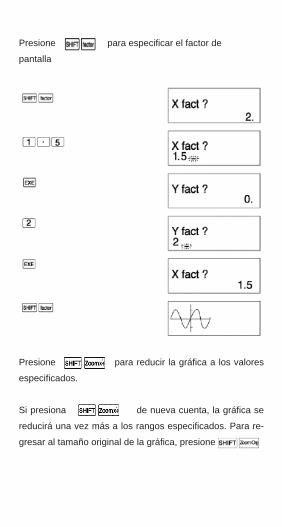
Presione para especifi car el factor de
pantalla
Presione para reducir la gráfi ca a los valores
especifi cados.
Si presiona de nueva cuenta, la gráfi ca se
reducirá una vez más a los rangos especifi cados. Para re-
gresar al tamaño original de la gráfi ca, presione ....
Para especifi car el factor de aumento / reducción dentro de un programaUtilice el siguiente modelo para especifi car el factor de au-
mento / reducción en un programa.
Factor (Xfactor), (Yfactor).
Función de trazado (Trace)Esta función le permite mover un punto alrededor de la
gráfi ca y desplegar las coordenadas X y Y desde el punto
actual.
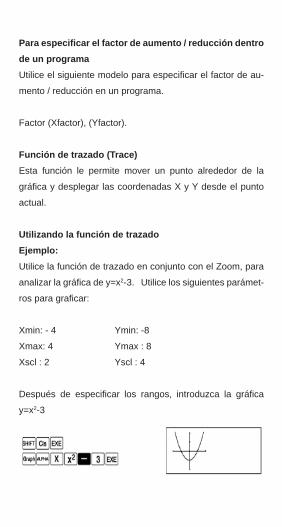
Utilizando la función de trazadoEjemplo:Utilice la función de trazado en conjunto con el Zoom, para
analizar la gráfi ca de y=x2-3. Utilice los siguientes parámet-
ros para grafi car:
Xmin: - 4 Ymin: -8
Xmax: 4 Ymax : 8
Xscl : 2 Yscl : 4
Después de especifi car los rangos, introduzca la gráfi ca
y=x2-3
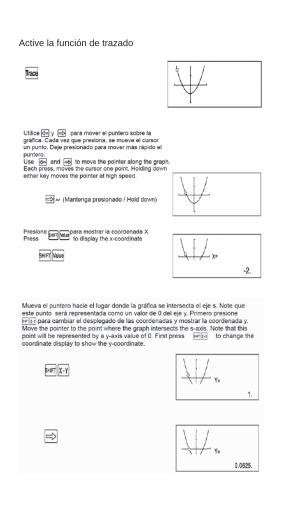
Active la función de trazado

Como puede ver, las funciones de trazado y zoom se utili-
zan para localizar un punto específi co, presione
para producir una salida del valor de las coordenadas.
Para regresar al tamaño original de la gráfi ca,
presione
Nota:Los valores de las coordenadas son aproximados.
La función de trazado sólo puede ser utilizada inmediata-
mente después de que la gráfi ca se desplegó en pantalla.
Esta función no puede ser utilizada en otros modos de cál-
culo, excepto: y
La función de trazado no puede ser guardada dentro de un
programa.
Función de trazado (Plot)Esta función le permite marcar un punto en la pantalla mien-
tras se despliega una gráfi ca. El punto puede ser movido
hacia la izquierda, derecha, arriba o abajo utilizando las
fl echas de movimiento. Las coordenadas de la gráfi ca se
despliegan para su lectura. Dos puntos pueden ser interco-
nectados a través de una línea recta.

Presione y especifi que las coordenadas the X y
Y después de que el mensaje “Plot” aparezca en pantalla.
Función linearEsta función permite generar líneas que pueden ser inclu-
idas en la gráfi ca para hacer más fácil su lectura.
Ejemplo:Dibuje línea perpendiculares desde el punto (2,0) en el eje X
a la intersección con la gráfi ca y=3x. Posteriormente dibuje
una línea desde el punto de intersección hacia el eje Y.
El rango de valores para la gráfi ca son los siguientes:
Xmin: - 2 Ymin: -2
Xmax: 5 Ymax :10
Xscl : 1 Yscl : 2
Borre la pantalla y dibuje la gráfi ca para y=3x
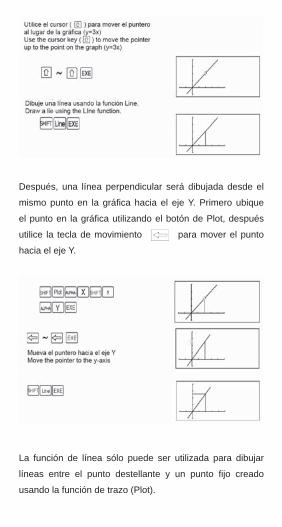
Después, una línea perpendicular será dibujada desde el
mismo punto en la gráfi ca hacia el eje Y. Primero ubique
el punto en la gráfi ca utilizando el botón de Plot, después
utilice la tecla de movimiento para mover el punto
hacia el eje Y.
La función de línea sólo puede ser utilizada para dibujar
líneas entre el punto destellante y un punto fi jo creado
usando la función de trazo (Plot).
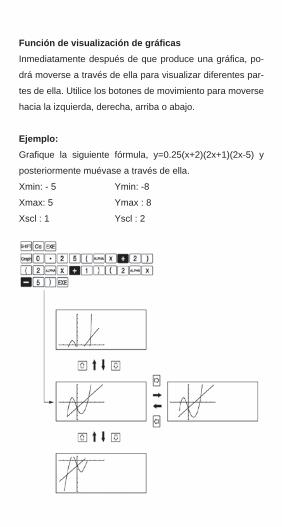
Función de visualización de gráfi casInmediatamente después de que produce una gráfi ca, po-
drá moverse a través de ella para visualizar diferentes par-
tes de ella. Utilice los botones de movimiento para moverse
hacia la izquierda, derecha, arriba o abajo.
Ejemplo:Grafi que la siguiente fórmula, y=0.25(x+2)(2x+1)(2x-5) y
posteriormente muévase a través de ella.
Xmin: - 5 Ymin: -8
Xmax: 5 Ymax : 8
Xscl : 1 Yscl : 2
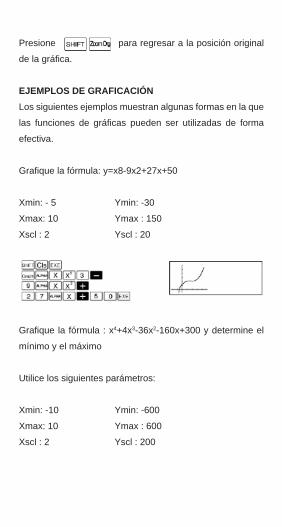
Presione para regresar a la posición original
de la gráfi ca.
EJEMPLOS DE GRAFICACIÓNLos siguientes ejemplos muestran algunas formas en la que
las funciones de gráfi cas pueden ser utilizadas de forma
efectiva.
Grafi que la fórmula: y=x8-9x2+27x+50
Xmin: - 5 Ymin: -30
Xmax: 10 Ymax : 150
Xscl : 2 Yscl : 20
Grafi que la fórmula : x4+4x3-36x2-160x+300 y determine el
mínimo y el máximo
Utilice los siguientes parámetros:
Xmin: -10 Ymin: -600
Xmax: 10 Ymax : 600
Xscl : 2 Yscl : 200
PROGRAMACIÓN
Que es un programa ?Esta calculadora permite hacer programas que facilitan la
repetición de cálculos.
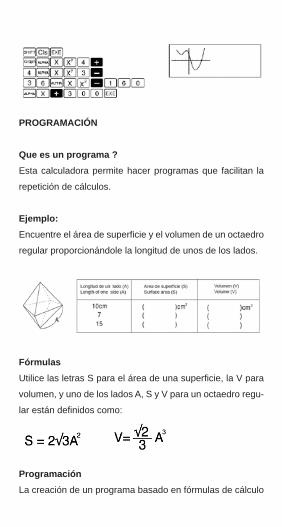
Ejemplo:Encuentre el área de superfi cie y el volumen de un octaedro
regular proporcionándole la longitud de unos de los lados.
FórmulasUtilice las letras S para el área de una superfi cie, la V para
volumen, y uno de los lados A, S y V para un octaedro regu-
lar están defi nidos como:
ProgramaciónLa creación de un programa basado en fórmulas de cálculo
es conocido como programación. En la calculadora puede
creas programas en base a fórmulas. Las bases de un pro-
grama son los cálculos manuales, así que antes de todo,
considere el método operacional utilizado para operaciones
manuales.
El área de la superfi cie (s):
El volumen (V):
En el ejemplo de abajo, el valor numérico de A es utilizado
dos veces, así que debe guardarlo en la memoria A antes
de realizar los cálculos.
Valor numérico A
Con esta calculadora, las operaciones realizadas para cál-
culos manuales pueden ser utilizadas como si estuvieran en
un programa. Una vez que el programa se ejecuta, continu-
ará sin detenerse. Sin embargo, hay comandos que sirven
que se utilizan para solicitar la entrada de datos y mostrar
los resultados. El comando para solicitar la entrada de datos
es “ ?“, mientras que el comando para mostrar el resultado
es ....
El comando “?” indica al programa detenerse un instante.
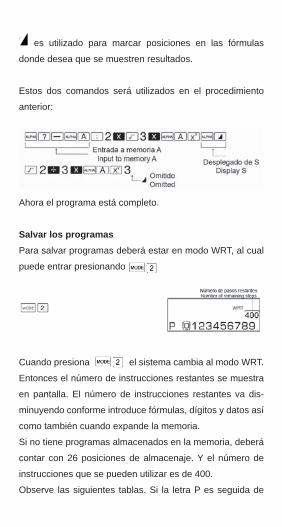
es utilizado para marcar posiciones en las fórmulas
donde desea que se muestren resultados.
Estos dos comandos será utilizados en el procedimiento
anterior:
Ahora el programa está completo.
Salvar los programasPara salvar programas deberá estar en modo WRT, al cual
puede entrar presionando
Cuando presiona el sistema cambia al modo WRT.
Entonces el número de instrucciones restantes se muestra
en pantalla. El número de instrucciones restantes va dis-
minuyendo conforme introduce fórmulas, dígitos y datos así
como también cuando expande la memoria.
Si no tiene programas almacenados en la memoria, deberá
contar con 26 posiciones de almacenaje. Y el número de
instrucciones que se pueden utilizar es de 400.
Observe las siguientes tablas. Si la letra P es seguida de
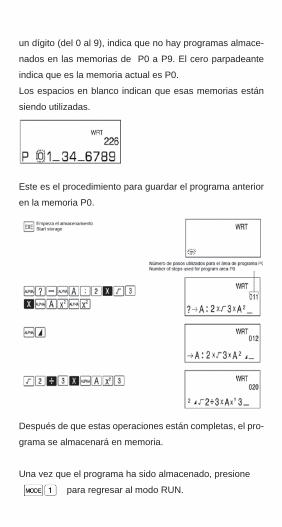
un dígito (del 0 al 9), indica que no hay programas almace-
nados en las memorias de P0 a P9. El cero parpadeante
indica que es la memoria actual es P0.
Los espacios en blanco indican que esas memorias están
siendo utilizadas.
Este es el procedimiento para guardar el programa anterior
en la memoria P0.
Después de que estas operaciones están completas, el pro-
grama se almacenará en memoria.
Una vez que el programa ha sido almacenado, presione
para regresar al modo RUN.
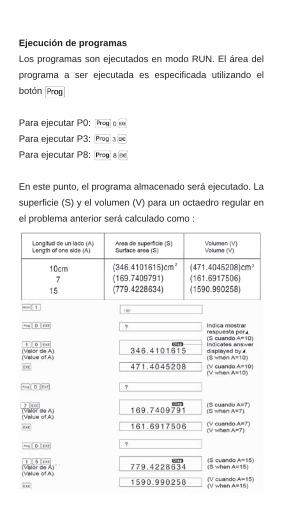
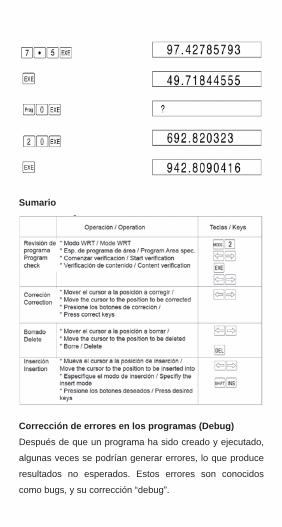
Ejecución de programasLos programas son ejecutados en modo RUN. El área del
programa a ser ejecutada es especifi cada utilizando el
botón
Para ejecutar P0:
Para ejecutar P3:
Para ejecutar P8:
En este punto, el programa almacenado será ejecutado. La
superfi cie (S) y el volumen (V) para un octaedro regular en
el problema anterior será calculado como :
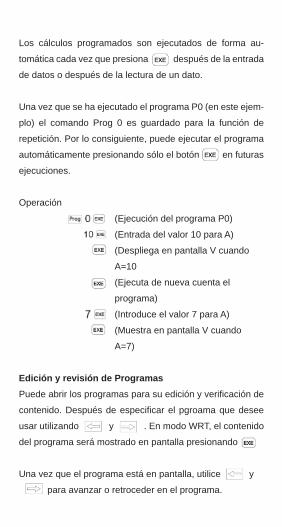
Los cálculos programados son ejecutados de forma au-
tomática cada vez que presiona después de la entrada
de datos o después de la lectura de un dato.
Una vez que se ha ejecutado el programa P0 (en este ejem-
plo) el comando Prog 0 es guardado para la función de
repetición. Por lo consiguiente, puede ejecutar el programa
automáticamente presionando sólo el botón en futuras
ejecuciones.
Operación
(Ejecución del programa P0)
(Entrada del valor 10 para A)
(Despliega en pantalla V cuando
A=10
(Ejecuta de nueva cuenta el
programa)
(Introduce el valor 7 para A)
(Muestra en pantalla V cuando
A=7)
Edición y revisión de ProgramasPuede abrir los programas para su edición y verifi cación de
contenido. Después de especifi car el pgroama que desee
usar utilizando y . En modo WRT, el contenido
del programa será mostrado en pantalla presionando
Una vez que el programa está en pantalla, utilice y
para avanzar o retroceder en el programa.
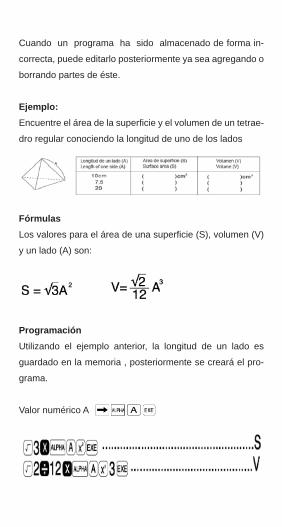
Cuando un programa ha sido almacenado de forma in-
correcta, puede editarlo posteriormente ya sea agregando o
borrando partes de éste.
Ejemplo:Encuentre el área de la superfi cie y el volumen de un tetrae-
dro regular conociendo la longitud de uno de los lados
FórmulasLos valores para el área de una superfi cie (S), volumen (V)
y un lado (A) son:
ProgramaciónUtilizando el ejemplo anterior, la longitud de un lado es
guardado en la memoria , posteriormente se creará el pro-
grama.
Valor numérico A
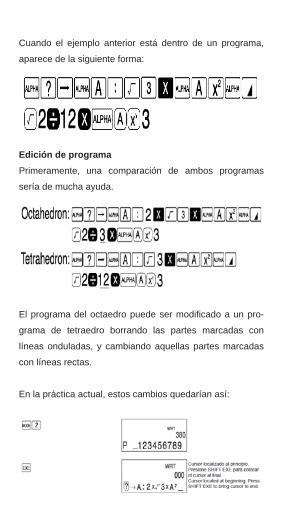
Cuando el ejemplo anterior está dentro de un programa,
aparece de la siguiente forma:
Edición de programaPrimeramente, una comparación de ambos programas
sería de mucha ayuda.
El programa del octaedro puede ser modifi cado a un pro-
grama de tetraedro borrando las partes marcadas con
líneas onduladas, y cambiando aquellas partes marcadas
con líneas rectas.
En la práctica actual, estos cambios quedarían así:
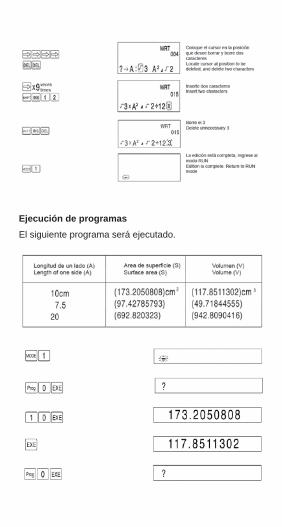
Ejecución de programasEl siguiente programa será ejecutado.
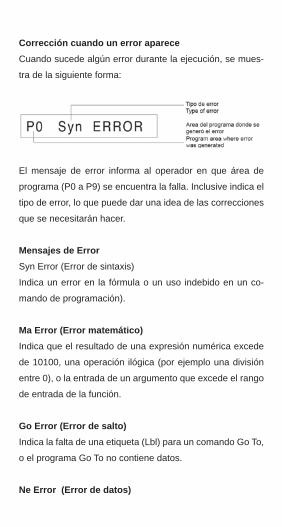
Sumario
Corrección de errores en los programas (Debug)Después de que un programa ha sido creado y ejecutado,
algunas veces se podrían generar errores, lo que produce
resultados no esperados. Estos errores son conocidos
como bugs, y su corrección “debug”.
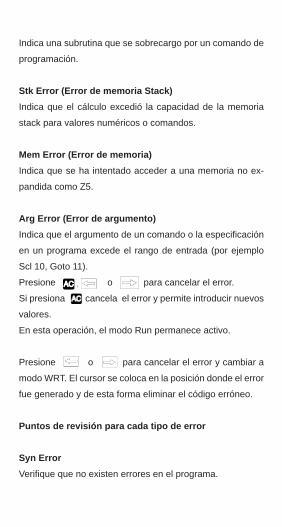
Corrección cuando un error apareceCuando sucede algún error durante la ejecución, se mues-
tra de la siguiente forma:
El mensaje de error informa al operador en que área de
programa (P0 a P9) se encuentra la falla. Inclusive indica el
tipo de error, lo que puede dar una idea de las correcciones
que se necesitarán hacer.
Mensajes de ErrorSyn Error (Error de sintaxis)
Indica un error en la fórmula o un uso indebido en un co-
mando de programación).
Ma Error (Error matemático)Indica que el resultado de una expresión numérica excede
de 10100, una operación ilógica (por ejemplo una división
entre 0), o la entrada de un argumento que excede el rango
de entrada de la función.
Go Error (Error de salto)Indica la falta de una etiqueta (Lbl) para un comando Go To,
o el programa Go To no contiene datos.
Ne Error (Error de datos)
Indica una subrutina que se sobrecargo por un comando de
programación.
Stk Error (Error de memoria Stack)Indica que el cálculo excedió la capacidad de la memoria
stack para valores numéricos o comandos.
Mem Error (Error de memoria)Indica que se ha intentado acceder a una memoria no ex-
pandida como Z5.
Arg Error (Error de argumento)Indica que el argumento de un comando o la especifi cación
en un programa excede el rango de entrada (por ejemplo
Scl 10, Goto 11).
Presione o para cancelar el error.
Si presiona cancela el error y permite introducir nuevos
valores.
En esta operación, el modo Run permanece activo.
Presione o para cancelar el error y cambiar a
modo WRT. El cursor se coloca en la posición donde el error
fue generado y de esta forma eliminar el código erróneo.
Puntos de revisión para cada tipo de error
Syn ErrorVerifi que que no existen errores en el programa.
Ma ErrorPara operaciones que requieren del uso de memorias, re-
vise que los valores numéricos en las memorias no excedan
el rango de los argumentos. Este tipo de error normalmente
ocurre porque se quiere hacer una división entre 0 o hay op-
eraciones para el cálculo de raíces cuadradas negativas.
Go ErrorCompruebe que existen una etiqueta correspondiente (Lbl
n) al comando Go To n.
Ne ErrorRevise que el comando Prog no es utilizado en una división
del programa el cual provoca que se regrese al área original
del programa.
Stk ErrorRevise que la fórmula que se utiliza no es demasiado grande
para provocar una sobrecarga en la memoria. En este caso,
debe dividirse la fórmula en dos o más partes.
Mem ErrorRevise que la memoria ha sido correctamente expandida
utilizando
Cuando utiliza memorias en conjunto, revise que las sub-
rutinas son correctas.
Arg ErrorCompruebe que los valores especifi cados por

o están dentro del rango de 0 a 9.
También revise que los valores especifi cados para Goto,
Lbl, o Prog están dentro del rango 0-9.
CONTANDO EL NÚMERO DE PASOS (INSTRUCCIONES)La capacidad de esta calculadora es de 400 pasos
(instrucciones).
El número de pasos indica la cantidad de espacio de alma-
cenaje disponible para los programas, e irá disminuyendo
conforme se introducen programas. Así mismo, el número
de pasos disponible disminuirá si los pasos se convierten
en memoria.
Existen dos métodos para determinar el número de pasos
disponibles:
En modo RUN, presione , el número de pasos
disponibles se mostrará en pantalla junto con el número de
memorias.
Ejemplo:
Entre al modo WRT ( ) y el número de pasos restan-
tes aparecerá en pantalla. En este momento también puede
ser determinado el estatus de los programas.
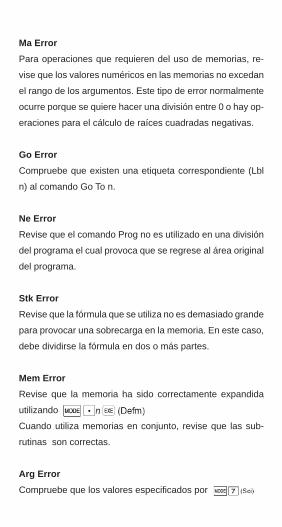
Básicamente, una función requiere un solo paso, pero ex-
isten algunos comandos donde una función requiere dos
pasos.
Una función / un paso: sin, cos, tan, log, (,): A, B, 1, 2, 3,
etc.
Una función / dos pasos: Lbl 1, Goto 2, Prog 8, etc.
Cada paso puede ser verifi cado moviendo el cursor.
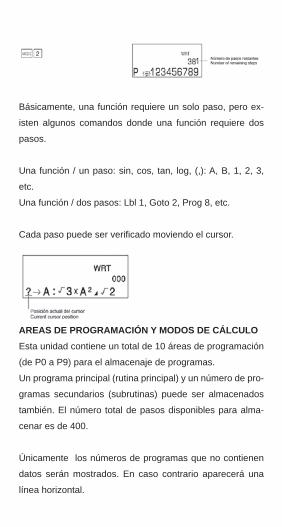
AREAS DE PROGRAMACIÓN Y MODOS DE CÁLCULOEsta unidad contiene un total de 10 áreas de programación
(de P0 a P9) para el almacenaje de programas.
Un programa principal (rutina principal) y un número de pro-
gramas secundarios (subrutinas) puede ser almacenados
también. El número total de pasos disponibles para alma-
cenar es de 400.
Únicamente los números de programas que no contienen
datos serán mostrados. En caso contrario aparecerá una
línea horizontal.
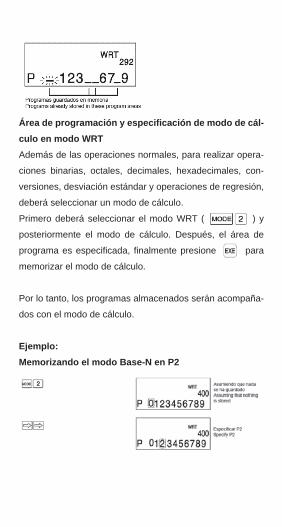
Área de programación y especifi cación de modo de cál-culo en modo WRTAdemás de las operaciones normales, para realizar opera-
ciones binarias, octales, decimales, hexadecimales, con-
versiones, desviación estándar y operaciones de regresión,
deberá seleccionar un modo de cálculo.
Primero deberá seleccionar el modo WRT ( ) y
posteriormente el modo de cálculo. Después, el área de
programa es especifi cada, fi nalmente presione para
memorizar el modo de cálculo.
Por lo tanto, los programas almacenados serán acompaña-
dos con el modo de cálculo.
Ejemplo:Memorizando el modo Base-N en P2
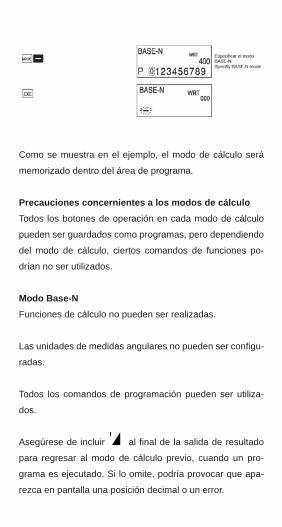
Como se muestra en el ejemplo, el modo de cálculo será
memorizado dentro del área de programa.
Precauciones concernientes a los modos de cálculoTodos los botones de operación en cada modo de cálculo
pueden ser guardados como programas, pero dependiendo
del modo de cálculo, ciertos comandos de funciones po-
drían no ser utilizados.
Modo Base-NFunciones de cálculo no pueden ser realizadas.
Las unidades de medidas angulares no pueden ser confi gu-
radas.
Todos los comandos de programación pueden ser utiliza-
dos.
Asegúrese de incluir al fi nal de la salida de resultado
para regresar al modo de cálculo previo, cuando un pro-
grama es ejecutado. Si lo omite, podría provocar que apa-
rezca en pantalla una posición decimal o un error.
Modo SDEnte otras funciones, Abs y no pueden ser utilizadas.
Entre otros comandos de programa, Dsz, > y < no pueden
ser utilizados.
Modo LREntre otras funciones, Abs y no pueden ser utilizadas.
Entre otros comandos de programa
> y < no pueden ser utilizados.
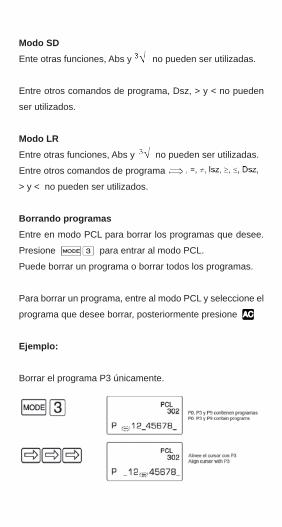
Borrando programasEntre en modo PCL para borrar los programas que desee.
Presione para entrar al modo PCL.
Puede borrar un programa o borrar todos los programas.
Para borrar un programa, entre al modo PCL y seleccione el
programa que desee borrar, posteriormente presione
Ejemplo:
Borrar el programa P3 únicamente.
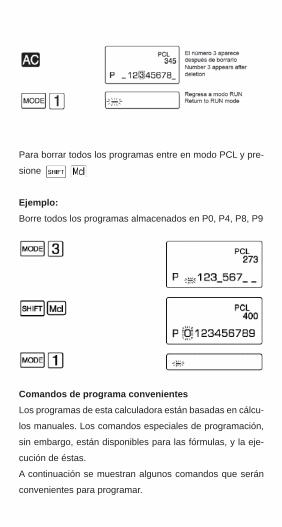
Para borrar todos los programas entre en modo PCL y pre-
sione
Ejemplo:Borre todos los programas almacenados en P0, P4, P8, P9
Comandos de programa convenientesLos programas de esta calculadora están basadas en cálcu-
los manuales. Los comandos especiales de programación,
sin embargo, están disponibles para las fórmulas, y la eje-
cución de éstas.
A continuación se muestran algunos comandos que serán
convenientes para programar.
Comandos de saltoLos comandos de salto son utilizados para cambiar el fl ujo
de la ejecución del programa.
Los programas son ejecutados en el orden en que fueron
creados, desde el paso 1 hasta el fi nal del programa. Este
sistema no es muy conveniente cuando existen opera-
ciones que se repiten o cuando se requiere transferir el
resultado a otra fórmula. Por lo que se recomienda utiliza
comando de salto.
Existen tres tipos de comandos de salto:
- salto incondicional a una subrutina de destino
- saltos condicionales que deciden la subrutina de destino
mediante una condición de verdadero o falso
- cuenta de saltos para incrementar o reducir una memo-
ria específi ca y entonces decidir la subrutina de destino
después de comprobar si el valor almacenado es igual a
cero o no.
Saltos incondicionalesEl salto incondicional está compuesto por el comando Go
to and Lbl. Cuando la ejecución del programa se acerca
al comando Go To n (donde n es un número entre 0 y 9)
la ejecución salta al comando Lbl n (donde n es el mismo
valor especifi cado en Go To).
El salto incondicional es normalmente utilizado en pro-
gramas simples para regresar al inicio del programa y re-
alizar cálculos repetitivos, o para repetir programas de un
punto específi co a otro.

Los saltos incondicionales también son utilizados en combi-
nación con los saltos condicionales y la cuenta de saltos.
Ejemplo:El ejemplo anterior para encontrar el área de superfi cie y
el volumen de un tetraedro regular será re-programados
utilizando GoTo 1, y Lbl1 para permitir la repetición de op-
eraciones.
El programa previo contenía:
Agregue Goto 1 al fi nal del programa y agregue Lbl 1 al
principio.
Sin embargo, el resultado no se mostrará ya que el pro-
grama se repetirá constantemente. Para evitar esto, colo-
que el comando delante de Goto 1 para mostrar el
resultado.
La secuencia completa del programa con el salto incondi-
cional añadido, debe ser parecido a:
Para terminar la repetición, presione
No sólo puede agregar saltos al principio del programa, pu-
ede agregar subrutinas de destino en cualquier punto del
programa.
Ejemplo:Calcule y=ax+b cuando el valor de x cambia cada vez que
se ejecuta, mientras que a y b pueden cambiar depen-
diendo de las operaciones.
Cuando este programa es ejecutado, los valores para a y b
son almacenados en las memorias A y B respectivamente.
Después, únicamente el valor de x puede ser cambiado.
De esta forma, un salto incondicional esta hecho de
acuerdo con los comandos Goto y Lbl y el fl ujo de la eje-
cución del programa es cambiado.
Cuando no existe el comando Lbl n para corresponder al
comando Goto n, aparecerá un mensaje de error en pan-
talla (Go error).
Saltos condicionalesLos saltos condicionales comparan un valor numérico en
memoria con una constante o un valor numérico en otra me-
moria. Si la condición es verdadera , el comando después
de “:” o será ejecutado. Si la condición no es ver-
dadera, el programa salta ese comando y continúa con el
programa.
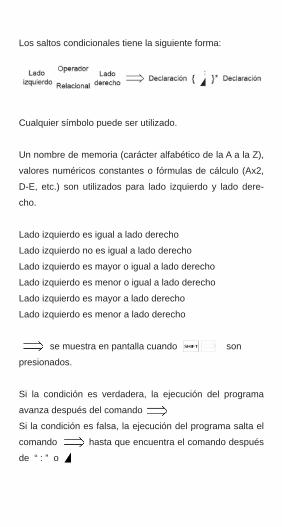
Los saltos condicionales tiene la siguiente forma:
Cualquier símbolo puede ser utilizado.
Un nombre de memoria (carácter alfabético de la A a la Z),
valores numéricos constantes o fórmulas de cálculo (Ax2,
D-E, etc.) son utilizados para lado izquierdo y lado dere-
cho.
Lado izquierdo es igual a lado derecho
Lado izquierdo no es igual a lado derecho
Lado izquierdo es mayor o igual a lado derecho
Lado izquierdo es menor o igual a lado derecho
Lado izquierdo es mayor a lado derecho
Lado izquierdo es menor a lado derecho
se muestra en pantalla cuando son
presionados.
Si la condición es verdadera, la ejecución del programa
avanza después del comando
Si la condición es falsa, la ejecución del programa salta el
comando hasta que encuentra el comando después
de “ : ” o
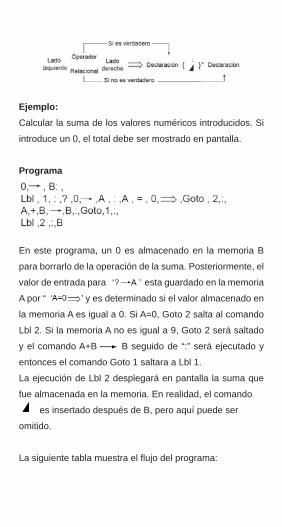
Ejemplo:Calcular la suma de los valores numéricos introducidos. Si
introduce un 0, el total debe ser mostrado en pantalla.
Programa
En este programa, un 0 es almacenado en la memoria B
para borrarlo de la operación de la suma. Posteriormente, el
valor de entrada para esta guardado en la memoria
A por “ ” y es determinado si el valor almacenado en
la memoria A es igual a 0. Si A=0, Goto 2 salta al comando
Lbl 2. Si la memoria A no es igual a 9, Goto 2 será saltado
y el comando A+B B seguido de “:” será ejecutado y
entonces el comando Goto 1 saltara a Lbl 1.
La ejecución de Lbl 2 desplegará en pantalla la suma que
fue almacenada en la memoria. En realidad, el comando
es insertado después de B, pero aquí puede ser
omitido.
La siguiente tabla muestra el fl ujo del programa:

Cuenta de saltosEsta opción permite incrementar o disminuir el valor de una
memoria en específi co 1 vez. Si el valor es igual a 0, el
siguiente comando será omitido, y el siguiente comando a
ejecutar será “ : “ o
El comando “Isz” es utilizado para incrementar el valor en
memoria por 1 y decidir la ejecución siguiente, mientras que
el comando Dsz es utilizado para disminuir en uno el valor
y decidir.
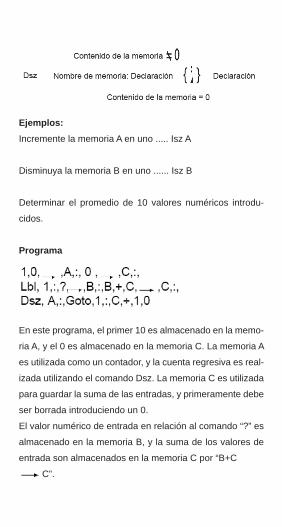
Ejemplos:Incremente la memoria A en uno ..... Isz A
Disminuya la memoria B en uno ...... Isz B
Determinar el promedio de 10 valores numéricos introdu-
cidos.
Programa
En este programa, el primer 10 es almacenado en la memo-
ria A, y el 0 es almacenado en la memoria C. La memoria A
es utilizada como un contador, y la cuenta regresiva es real-
izada utilizando el comando Dsz. La memoria C es utilizada
para guardar la suma de las entradas, y primeramente debe
ser borrada introduciendo un 0.
El valor numérico de entrada en relación al comando “?” es
almacenado en la memoria B, y la suma de los valores de
entrada son almacenados en la memoria C por “B+C
C”.
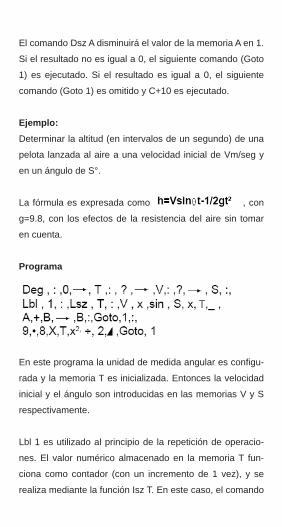
El comando Dsz A disminuirá el valor de la memoria A en 1.
Si el resultado no es igual a 0, el siguiente comando (Goto
1) es ejecutado. Si el resultado es igual a 0, el siguiente
comando (Goto 1) es omitido y C+10 es ejecutado.
Ejemplo:Determinar la altitud (en intervalos de un segundo) de una
pelota lanzada al aire a una velocidad inicial de Vm/seg y
en un ángulo de S°.
La fórmula es expresada como , con
g=9.8, con los efectos de la resistencia del aire sin tomar
en cuenta.
Programa
En este programa la unidad de medida angular es confi gu-
rada y la memoria T es inicializada. Entonces la velocidad
inicial y el ángulo son introducidas en las memorias V y S
respectivamente.
Lbl 1 es utilizado al principio de la repetición de operacio-
nes. El valor numérico almacenado en la memoria T fun-
ciona como contador (con un incremento de 1 vez), y se
realiza mediante la función Isz T. En este caso, el comando
Isz es utilizado únicamente con el propósito de incrementar
el valor almacenado en la memoria T, y los saltos siguientes
no dependen de ninguna comparación o decisión. El co-
mando Isz puede ser utilizado también de la misma manera
que el comando Dsz para saltos que requieren decisiones,
pero como se puede ver aquí, puede ser utilizado también
para incrementar valores.
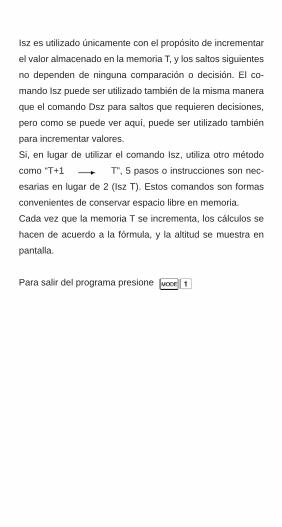
Si, en lugar de utilizar el comando Isz, utiliza otro método
como “T+1 T”, 5 pasos o instrucciones son nec-
esarias en lugar de 2 (Isz T). Estos comandos son formas
convenientes de conservar espacio libre en memoria.
Cada vez que la memoria T se incrementa, los cálculos se
hacen de acuerdo a la fórmula, y la altitud se muestra en
pantalla.
Para salir del programa presione

SubrutinasLas subrutinas pueden ser utilizadas para guardar fórmulas
de operaciones que se repiten como un solo bloque para
sacada vez que se requiera, o para guardar fórmulas que
se utilizan constantemente u operaciones que llaman otras
fórmulas cuando se requieren.
El comando de subrutina Prog seguido de un número (de 0
a 9) indica el área de programación.
Ejemplo:
Prog 0 .......... Salta al área de programa 0
Prog 2 .......... Salta al área de programa 2
Una vez que el salto se ha realizado, la ejecución del pro-
grama continúa desde el principio del programa almace-
nado en el área de programa especifi cada. Una vez que la
ejecución de la subrutina termina , el programa regresa al
comando Prog n en el programa principal.
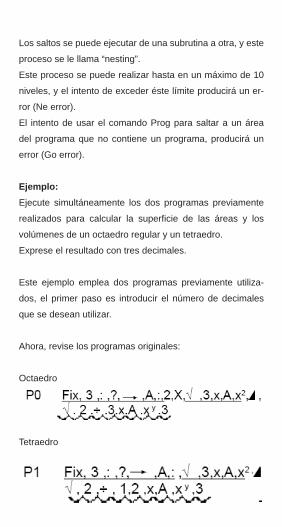
Los saltos se puede ejecutar de una subrutina a otra, y este
proceso se le llama “nesting”.
Este proceso se puede realizar hasta en un máximo de 10
niveles, y el intento de exceder éste límite producirá un er-
ror (Ne error).
El intento de usar el comando Prog para saltar a un área
del programa que no contiene un programa, producirá un
error (Go error).
Ejemplo:Ejecute simultáneamente los dos programas previamente
realizados para calcular la superfi cie de las áreas y los
volúmenes de un octaedro regular y un tetraedro.
Exprese el resultado con tres decimales.
Este ejemplo emplea dos programas previamente utiliza-
dos, el primer paso es introducir el número de decimales
que se desean utilizar.
Ahora, revise los programas originales:
Octaedro
Tetraedro
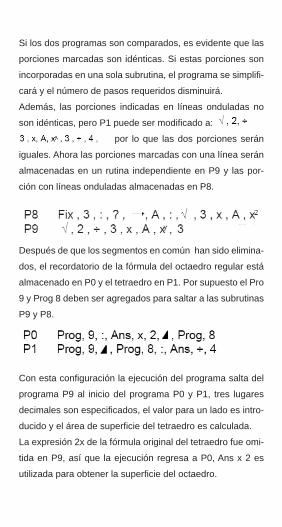
Si los dos programas son comparados, es evidente que las
porciones marcadas son idénticas. Si estas porciones son
incorporadas en una sola subrutina, el programa se simplifi -
cará y el número de pasos requeridos disminuirá.
Además, las porciones indicadas en líneas onduladas no
son idénticas, pero P1 puede ser modifi cado a:
por lo que las dos porciones serán
iguales. Ahora las porciones marcadas con una línea serán
almacenadas en un rutina independiente en P9 y las por-
ción con líneas onduladas almacenadas en P8.
Después de que los segmentos en común han sido elimina-
dos, el recordatorio de la fórmula del octaedro regular está
almacenado en P0 y el tetraedro en P1. Por supuesto el Pro
9 y Prog 8 deben ser agregados para saltar a las subrutinas
P9 y P8.
Con esta confi guración la ejecución del programa salta del
programa P9 al inicio del programa P0 y P1, tres lugares
decimales son especifi cados, el valor para un lado es intro-
ducido y el área de superfi cie del tetraedro es calculada.
La expresión 2x de la fórmula original del tetraedro fue omi-
tida en P9, así que la ejecución regresa a P0, Ans x 2 es
utilizada para obtener la superfi cie del octaedro.

En el caso de P1, el resultado de P9 necesita que no se
hagan modifi caciones, así que inmediatamente se des-
pliega en pantalla, cuando regresa a P1.
El cálculo de volumen, también es realizado de forma simi-
lar. Después de que el salto es realizado hacia P8 para re-
alizar el cálculo, la ejecución se regresa a la rutina principal.
En P0 , el programa termina después de que el volumen del
octaedro es desplegado en pantalla. En P1, sin embargo, el
resultado del cálculo en P8 es dividido entre 4 para obtener
para obtener el volumen del tetraedro.
Utilizando subrutinas de esta forma, los pasos utilizados pu-
eden reducirse y los programas pueden ser leídos de una
mejor manera.
La siguiente ilustración muestra el fl ujo del programa.
Tipos de arreglo de memoriaHasta este punto, todas las memorias utilizadas son referi-
das mediante caracteres tales como A, B, X o Y.
Con el arreglo de las memorias, puede agregar al carácter
alfabético un número.
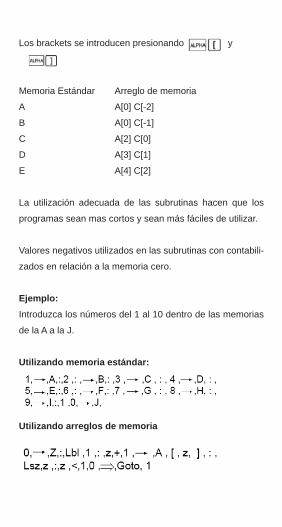
Los brackets se introducen presionando y
Memoria Estándar Arreglo de memoria
A A[0] C[-2]
B A[0] C[-1]
C A[2] C[0]
D A[3] C[1]
E A[4] C[2]
La utilización adecuada de las subrutinas hacen que los
programas sean mas cortos y sean más fáciles de utilizar.
Valores negativos utilizados en las subrutinas con contabili-
zados en relación a la memoria cero.
Ejemplo:Introduzca los números del 1 al 10 dentro de las memorias
de la A a la J.
Utilizando memoria estándar:
Utilizando arreglos de memoria
Cuando introduce valores uno por uno en memoria están-
dar, provoca que sea inefi ciente y haya pérdida de tiempo.
Que pasa si queremos ver un valor almacenado en una me-
moria en específi co?
Utilizando memoria estándar
Utilizando arreglo de memoria
La diferencia puede ser fácilmente identifi cada. Cuando
utiliza memoria estándar, los valores de entrada son com-
parados uno por uno con el valor asignado a cada memoria
(A=1 B=2...).
Con el arreglo de memoria, la entrada de valores es inme-
diatamente almacenada en la memoria adecuada determi-
nada por [z-1]. Las fórmulas (z-1, A+10, etc.) pueden ser
utilizadas con guiones.
Precauciones cuando utiliza arreglos de memoriaCuando utiliza este tipo de memorias, un guión puede ser
anexado al carácter alfabético.
Tenga cuidado de sobrescribir las memorias.
La relación queda de la siguiente forma:
El siguiente ejemplo muestra un caso de sobre-escritura de
memorias.
Ejemplo.Almacene los valores numéricos de 1 a 5 en las memorias
A[1] a A[5) respectivamente.
En este programa, los valores del 1 al 5 son almacenados
en el arreglo de memorias A[1) a A[5], y la memoria C es
utilizada como una memoria contadora. Cuando este pro-
grama es ejecutado, se obtiene el siguiente resultado:
Como puede ver, el segundo valor desplegado (que debe
ser 2) en A[2] es incorrecto.
Este problema es debido a que la memoria [A2) es igual a
la memoria C.
El contenido de la memoria C (A[2]) disminuyó de 5 a 0 en
el paso 1.
Además, el contenido de la memoria A{2] es desplegado
como 0.
Aplicación del arreglo de memoriasCuando se requiere manejar dos tipos diferentes de datos
como un solo grupo. En este caso, la memoria para pro-
cesos de datos y aquellas para almacenaje de datos, pu-
eden ser manejadas por separado.
Ejemplo:Grabe los datos X y Y en memoria. Cuando el valor de X
es introducido, el valor correspondiente de Y se muestra en
pantalla. Debe haber un total de 15 datos.
Ejemplo programa 1
La memoria A es utilizada como memoria de control de da-
tos, y la memoria B es utilizada para el almacenaje temporal
de los datos de X. Los datos de X son almacenados de la
memoria C[1] (memoria D) hasta la memoria C[15] (memo-
ria R), y los datos de Y son guardados de la memoria C[16]
(memoria S) hasta la memoria C[30] (memoria A(7)).
En este programa, las memorias son utilizadas de la
siguiente forma:
Datos de X
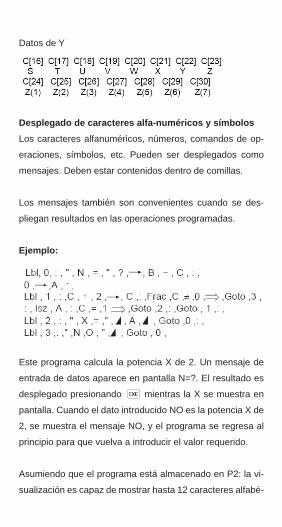
Datos de Y
Desplegado de caracteres alfa-numéricos y símbolosLos caracteres alfanuméricos, números, comandos de op-
eraciones, símbolos, etc. Pueden ser desplegados como
mensajes. Deben estar contenidos dentro de comillas.
Los mensajes también son convenientes cuando se des-
pliegan resultados en las operaciones programadas.
Ejemplo:
Este programa calcula la potencia X de 2. Un mensaje de
entrada de datos aparece en pantalla N=?. El resultado es
desplegado presionando mientras la X se muestra en
pantalla. Cuando el dato introducido NO es la potencia X de
2, se muestra el mensaje NO, y el programa se regresa al
principio para que vuelva a introducir el valor requerido.
Asumiendo que el programa está almacenado en P2: la vi-
sualización es capaz de mostrar hasta 12 caracteres alfabé-
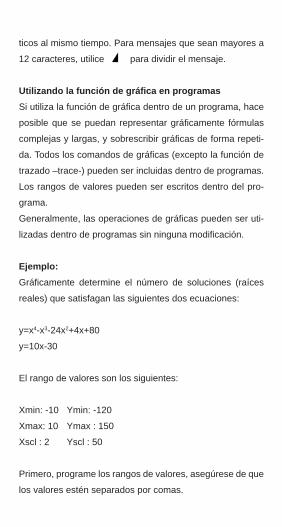
ticos al mismo tiempo. Para mensajes que sean mayores a
12 caracteres, utilice para dividir el mensaje.
Utilizando la función de gráfi ca en programasSi utiliza la función de gráfi ca dentro de un programa, hace
posible que se puedan representar gráfi camente fórmulas
complejas y largas, y sobrescribir gráfi cas de forma repeti-
da. Todos los comandos de gráfi cas (excepto la función de
trazado –trace-) pueden ser incluidas dentro de programas.
Los rangos de valores pueden ser escritos dentro del pro-
grama.
Generalmente, las operaciones de gráfi cas pueden ser uti-
lizadas dentro de programas sin ninguna modifi cación.
Ejemplo:Gráfi camente determine el número de soluciones (raíces
reales) que satisfagan las siguientes dos ecuaciones:
y=x4-x3-24x2+4x+80
y=10x-30
El rango de valores son los siguientes:
Xmin: -10 Ymin: -120
Xmax: 10 Ymax : 150
Xscl : 2 Yscl : 50
Primero, programe los rangos de valores, asegúrese de que
los valores estén separados por comas.
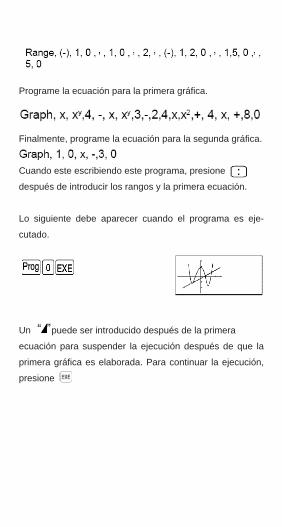
Programe la ecuación para la primera gráfi ca.
Finalmente, programe la ecuación para la segunda gráfi ca.
Cuando este escribiendo este programa, presione
después de introducir los rangos y la primera ecuación.
Lo siguiente debe aparecer cuando el programa es eje-
cutado.
Un puede ser introducido después de la primera
ecuación para suspender la ejecución después de que la
primera gráfi ca es elaborada. Para continuar la ejecución,
presione
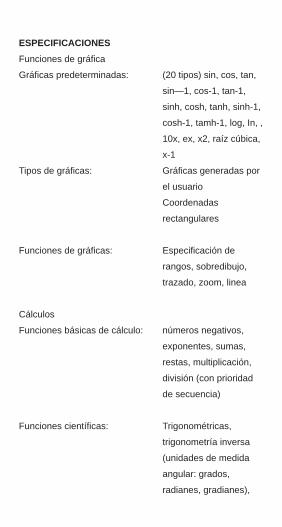
ESPECIFICACIONESFunciones de gráfi ca
Gráfi cas predeterminadas: (20 tipos) sin, cos, tan,
sin—1, cos-1, tan-1,
sinh, cosh, tanh, sinh-1,
cosh-1, tamh-1, log, In, ,
10x, ex, x2, raíz cúbica,
x-1
Tipos de gráfi cas: Gráfi cas generadas por
el usuario
Coordenadas
rectangulares
Funciones de gráfi cas: Especifi cación de
rangos, sobredibujo,
trazado, zoom, linea
Cálculos
Funciones básicas de cálculo: números negativos,
exponentes, sumas,
restas, multiplicación,
división (con prioridad
de secuencia)
Funciones científi cas: Trigonométricas,
trigonometría inversa
(unidades de medida
angular: grados,
radianes, gradianes),
hipérbole, hipérbole
inversa, logaritmos,
funciones
exponenciales,
recíprocos, factoriales,
raíz cuadrada,
conversión decimal-
sexagesimal,conversión
binaria-octal,
transformaciones de
coordenadas, números
aleatorios, valores abso
lutos, integrales, fraccio
nes.
Estadística: Desviación estándar,
número de datos,
suma, suma de cuadra
dos, media. Regresión
linear: número de datos,
suma de x, suma de y,
suma de cuadrados de
x, suma de cuadrados
de y, media de x, media
de y, desviación están
dar de x, desviación
estándar de y,
constantes, coefi ciente
de regresión,
coefi ciente de
correlación, valor
estimado de x, valor
estimado de y.
Funciones especiales: insertar, borrar, funcio
nes de repetición, susti -
tución (=),
multiresultado (: y ....)
Memorias: 26 memorias estándar
(máximo 76), memoria
Ans
Rango de cálculo: +1 x 1099 –
9.999999999 x 1099
y 0.
Operaciones internas
utilizan 12 dígitos
(mantisa).
Redondeo: realizado de acuerdo al
número especifi cado
por los dígitos signifi can
tes o el número especifi
cado de lugares
decimales.
Desplegado exponencial:
Funciones de programación
Número de pasos: 400 máximo
Funciones de salto: Salto incondicional
(Go to), 10 saltos
condicionales
como máximo, conteo
de saltos
Subrutinas: 9 niveles
Número de programas
almacenados: 10 como máximo (p0
a p9)
Funciones de revisión: edición, revisión,
borrado, adición,
inserción, etc.
Entrada: 3V (CR2032)
Auto-apagado: la calculadora se apaga
después de 6 minutos
sin que se presione
ningún botón
Temperatura de ambiente: 0°C – 40°C
Nota: El diseño del producto y las especifi caciones pueden cam-
biar sin previo aviso.
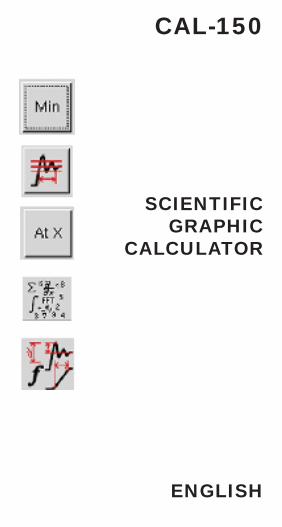
CAL-150
SCIENTIFICGRAPHIC
CALCULATOR
ENGLISH
INSTRUCTION MANUAL FOR SCIENTIFIC GRAPHIC CALCULATORModel: CAL-150Brand: Steren
Before using your new Steren scientifi c graphic calcula-tor, read this instruction manual.
Thank you for purchasing Steren products. You can feel safe knowing that you have purchased the highest quality product available.
Your new STEREN brand scientifi c graphic calculator has
250 functions including all trigonometric functions, binary
calculus, statistical calculus, etc. This calculator allows you
to create and program mathematical formulas with an edit
function for editing at any time. This creation function gives
you an infi nite amount of extra functions for your calculator.
With this calculator’s liquid crystal screen (LCD), you will be
able to completely appreciate your graphs. This calculator
also has an auto-off function which helps you save the bat-
tery life.
Important
· Do not expose this device to extreme temperatures.
· Always use a clean and dry rag in order to clean this de-
vice.
· Do not use or store this device anywhere it might get wet or
anywhere where there is high humidity. Water could cause
malfunctions of the device or the risk of electrical shock.
· Do not drop this device or expose it to strong impacts.
· Do not attempt to open this device. This could cause mal-
functions ant the voiding of the warranty.
Auto-Off Function
This function allows the device to automatically turn off 6
minutes after the last button was pressed (except during
program calculations). Once the device has turned off, you
will be able to turn it back on by pressing the AC button.
Restarting the Calculator
Strong external electrostatic charges could cause a mal-
function to your calculator. If a malfunction were to happen,
you can press the Reset button which is located on the back
of the calculator. In order to press this button you will need
to use an item with a point. This process will delete all data
stored in the memory.
Note:Never press the Reset button while realizing operations. If
you do reset the calculator at this point, you could cause ir-
reparable damage to the calculator’s memory.
General Guide
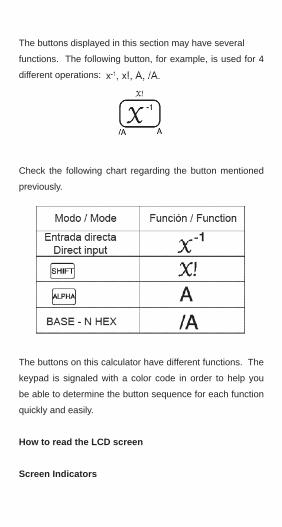
The buttons displayed in this section may have several
functions. The following button, for example, is used for 4
different operations:
Check the following chart regarding the button mentioned
previously.
The buttons on this calculator have different functions. The
keypad is signaled with a color code in order to help you
be able to determine the button sequence for each function
quickly and easily.
How to read the LCD screen
Screen Indicators
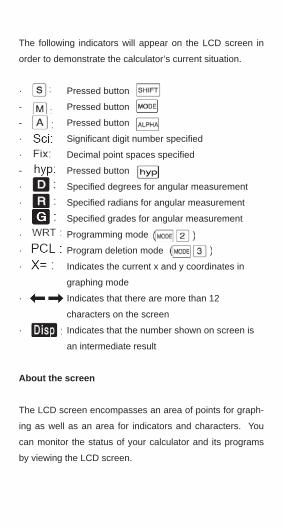
The following indicators will appear on the LCD screen in
order to demonstrate the calculator’s current situation.
· Pressed button
- Pressed button
- Pressed button
· Signifi cant digit number specifi ed
· Decimal point spaces specifi ed
- Pressed button
· Specifi ed degrees for angular measurement
· Specifi ed radians for angular measurement
· Specifi ed grades for angular measurement
· Programming mode
· Program deletion mode
· Indicates the current x and y coordinates in
graphing mode
· Indicates that there are more than 12
characters on the screen
· Indicates that the number shown on screen is
an intermediate result
About the screen
The LCD screen encompasses an area of points for graph-
ing as well as an area for indicators and characters. You
can monitor the status of your calculator and its programs
by viewing the LCD screen.
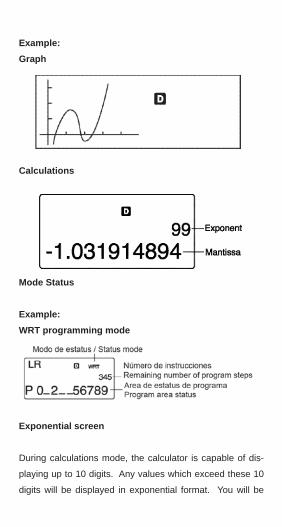
Example:Graph
Calculations
Mode Status
Example:WRT programming mode
Exponential screen
During calculations mode, the calculator is capable of dis-
playing up to 10 digits. Any values which exceed these 10
digits will be displayed in exponential format. You will be
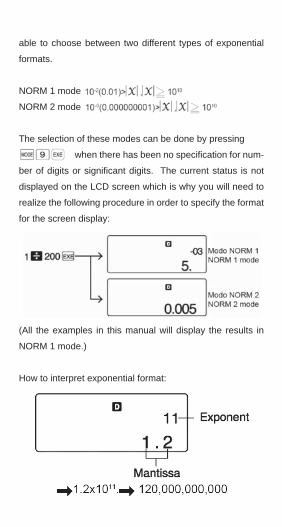
able to choose between two different types of exponential
formats.
NORM 1 mode
NORM 2 mode
The selection of these modes can be done by pressing
when there has been no specifi cation for num-
ber of digits or signifi cant digits. The current status is not
displayed on the LCD screen which is why you will need to
realize the following procedure in order to specify the format
for the screen display:
(All the examples in this manual will display the results in
NORM 1 mode.)
How to interpret exponential format:
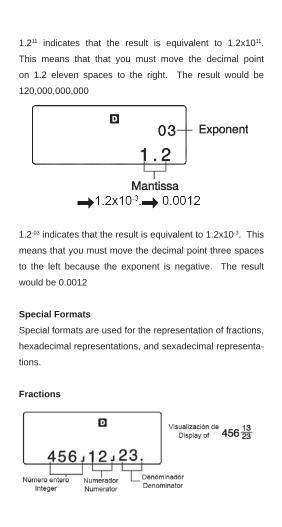
1.211 indicates that the result is equivalent to 1.2x10¹¹.
This means that that you must move the decimal point
on 1.2 eleven spaces to the right. The result would be
120,000,000,000
1.2-03 indicates that the result is equivalent to 1.2x10⁻³. This
means that you must move the decimal point three spaces
to the left because the exponent is negative. The result
would be 0.0012
Special FormatsSpecial formats are used for the representation of fractions,
hexadecimal representations, and sexadecimal representa-
tions.
Fractions
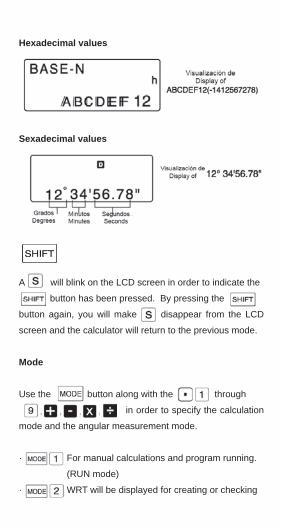
Hexadecimal values
Sexadecimal values
Shift
A will blink on the LCD screen in order to indicate the
button has been pressed. By pressing the
button again, you will make disappear from the LCD
screen and the calculator will return to the previous mode.
Mode
Use the button along with the through
in order to specify the calculation
mode and the angular measurement mode.
· For manual calculations and program running.
(RUN mode)
· WRT will be displayed for creating or checking
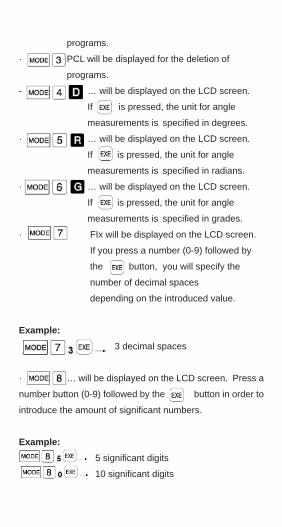
programs.
· PCL will be displayed for the deletion of
programs.
- … will be displayed on the LCD screen.
If is pressed, the unit for angle
measurements is specifi ed in degrees.
· … will be displayed on the LCD screen.
If is pressed, the unit for angle
measurements is specifi ed in radians.
· … will be displayed on the LCD screen.
If is pressed, the unit for angle
measurements is specifi ed in grades.
· FIx will be displayed on the LCD screen.
If you press a number (0-9) followed by
the button, you will specify the
number of decimal spaces
depending on the introduced value.
Example: 3 decimal spaces
· … will be displayed on the LCD screen. Press a
number button (0-9) followed by the button in order to
introduce the amount of signifi cant numbers.
Example: 5 signifi cant digits
10 signifi cant digits
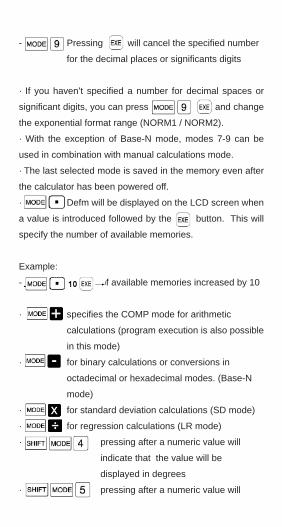
- Pressing will cancel the specifi ed number
for the decimal places or signifi cants digits
· If you haven’t specifi ed a number for decimal spaces or
signifi cant digits, you can press and change
the exponential format range (NORM1 / NORM2).
· With the exception of Base-N mode, modes 7-9 can be
used in combination with manual calculations mode.
· The last selected mode is saved in the memory even after
the calculator has been powered off.
· Defm will be displayed on the LCD screen when
a value is introduced followed by the button. This will
specify the number of available memories.
Example:
- number of available memories increased by 10
· specifi es the COMP mode for arithmetic
calculations (program execution is also possible
in this mode)
· for binary calculations or conversions in
octadecimal or hexadecimal modes. (Base-N
mode)
· for standard deviation calculations (SD mode)
· for regression calculations (LR mode)
· pressing after a numeric value will
indicate that the value will be
displayed in degrees
· pressing after a numeric value will

indicate that the value will be
displayed in radians
· pressing after a numeric value will
indicate that the value will be
displayed in grades
Alphabetic Keypad
Press the button in order to introduce alphabetic
characters or special characters.
Press the button and the LCD screen will display
allowing you at this time to introduce one character.
After this is done, the calculator will return to the previous
mode.
If you press the and buttons at the same time,
you will be able to enter alphabetic characters in a continu-
ous way until you press the … button again.
Programming Button (Program / Go to)
Press the button, press a number button (0-9), and
then press the button in order to run a program.
Example: Program 1 will run.
By pressing the button followed by the button
the Go To message will appear on the LCD screen. This is
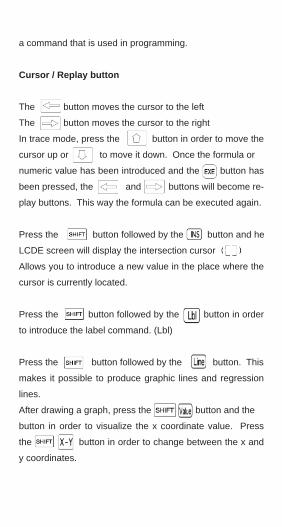
a command that is used in programming.
Cursor / Replay button
The button moves the cursor to the left
The button moves the cursor to the right
In trace mode, press the button in order to move the
cursor up or to move it down. Once the formula or
numeric value has been introduced and the button has
been pressed, the and buttons will become re-
play buttons. This way the formula can be executed again.
Press the button followed by the button and he
LCDE screen will display the intersection cursor
Allows you to introduce a new value in the place where the
cursor is currently located.
Press the button followed by the button in order
to introduce the label command. (Lbl)
Press the button followed by the button. This
makes it possible to produce graphic lines and regression
lines.
After drawing a graph, press the button and the
button in order to visualize the x coordinate value. Press
the button in order to change between the x and
y coordinates.
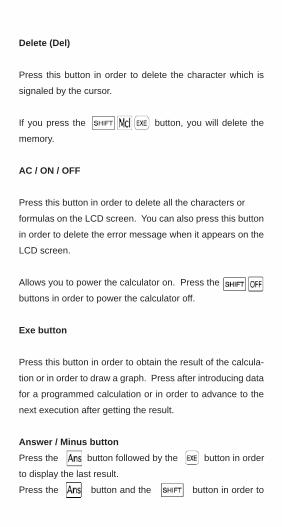
Delete (Del)
Press this button in order to delete the character which is
signaled by the cursor.
If you press the button, you will delete the
memory.
AC / ON / OFF
Press this button in order to delete all the characters or
formulas on the LCD screen. You can also press this button
in order to delete the error message when it appears on the
LCD screen.
Allows you to power the calculator on. Press the
buttons in order to power the calculator off.
Exe button
Press this button in order to obtain the result of the calcula-
tion or in order to draw a graph. Press after introducing data
for a programmed calculation or in order to advance to the
next execution after getting the result.
Answer / Minus buttonPress the button followed by the button in order
to display the last result.
Press the button and the button in order to
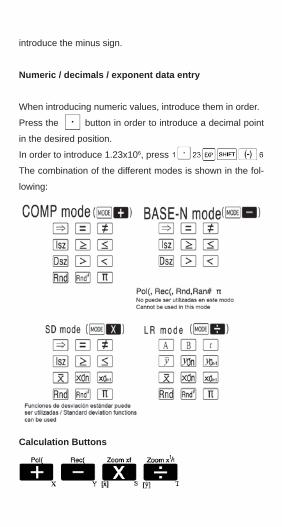
introduce the minus sign.
Numeric / decimals / exponent data entry
When introducing numeric values, introduce them in order.
Press the button in order to introduce a decimal point
in the desired position.
In order to introduce 1.23x10⁶, press
The combination of the different modes is shown in the fol-
lowing:
Calculation Buttons
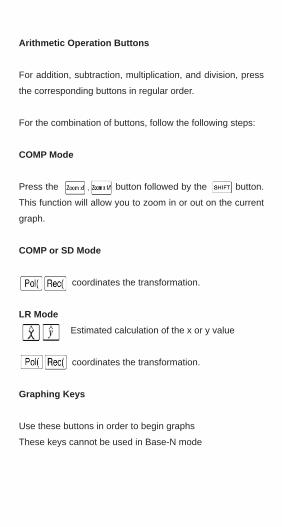
Arithmetic Operation Buttons
For addition, subtraction, multiplication, and division, press
the corresponding buttons in regular order.
For the combination of buttons, follow the following steps:
COMP Mode
Press the button followed by the button.
This function will allow you to zoom in or out on the current
graph.
COMP or SD Mode
coordinates the transformation.
LR Mode Estimated calculation of the x or y value
coordinates the transformation.
Graphing Keys
Use these buttons in order to begin graphs
These keys cannot be used in Base-N mode
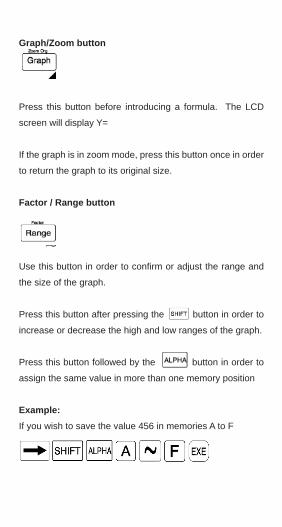
Graph/Zoom button
Press this button before introducing a formula. The LCD
screen will display Y=
If the graph is in zoom mode, press this button once in order
to return the graph to its original size.
Factor / Range button
Use this button in order to confi rm or adjust the range and
the size of the graph.
Press this button after pressing the button in order to
increase or decrease the high and low ranges of the graph.
Press this button followed by the button in order to
assign the same value in more than one memory position
Example:If you wish to save the value 456 in memories A to F
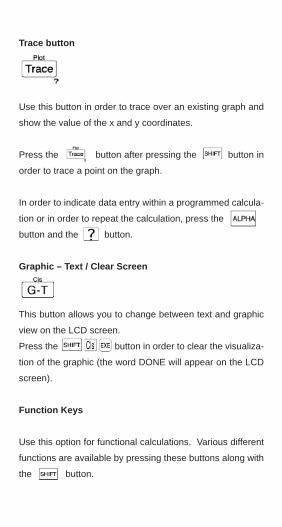
Trace button
Use this button in order to trace over an existing graph and
show the value of the x and y coordinates.
Press the button after pressing the button in
order to trace a point on the graph.
In order to indicate data entry within a programmed calcula-
tion or in order to repeat the calculation, press the
button and the button.
Graphic – Text / Clear Screen
This button allows you to change between text and graphic
view on the LCD screen.
Press the button in order to clear the visualiza-
tion of the graphic (the word DONE will appear on the LCD
screen).
Function Keys
Use this option for functional calculations. Various different
functions are available by pressing these buttons along with
the button.
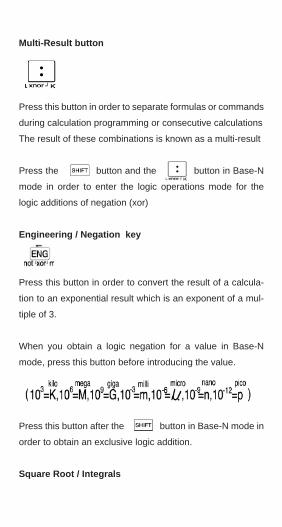
Multi-Result button
Press this button in order to separate formulas or commands
during calculation programming or consecutive calculations
The result of these combinations is known as a multi-result
Press the button and the button in Base-N
mode in order to enter the logic operations mode for the
logic additions of negation (xor)
Engineering / Negation key
Press this button in order to convert the result of a calcula-
tion to an exponential result which is an exponent of a mul-
tiple of 3.
When you obtain a logic negation for a value in Base-N
mode, press this button before introducing the value.
Press this button after the button in Base-N mode in
order to obtain an exclusive logic addition.
Square Root / Integrals
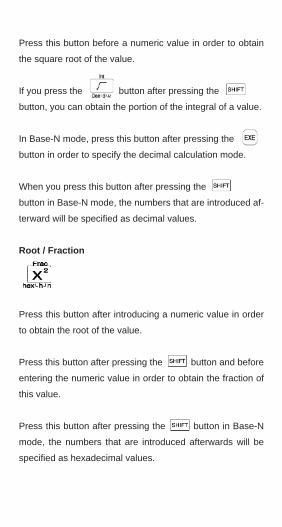
Press this button before a numeric value in order to obtain
the square root of the value.
If you press the button after pressing the
button, you can obtain the portion of the integral of a value.
In Base-N mode, press this button after pressing the
button in order to specify the decimal calculation mode.
When you press this button after pressing the
button in Base-N mode, the numbers that are introduced af-
terward will be specifi ed as decimal values.
Root / Fraction
Press this button after introducing a numeric value in order
to obtain the root of the value.
Press this button after pressing the button and before
entering the numeric value in order to obtain the fraction of
this value.
Press this button after pressing the button in Base-N
mode, the numbers that are introduced afterwards will be
specifi ed as hexadecimal values.
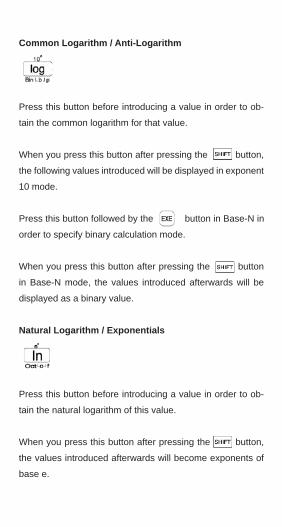
Common Logarithm / Anti-Logarithm
Press this button before introducing a value in order to ob-
tain the common logarithm for that value.
When you press this button after pressing the button,
the following values introduced will be displayed in exponent
10 mode.
Press this button followed by the button in Base-N in
order to specify binary calculation mode.
When you press this button after pressing the button
in Base-N mode, the values introduced afterwards will be
displayed as a binary value.
Natural Logarithm / Exponentials
Press this button before introducing a value in order to ob-
tain the natural logarithm of this value.
When you press this button after pressing the button,
the values introduced afterwards will become exponents of
base e.
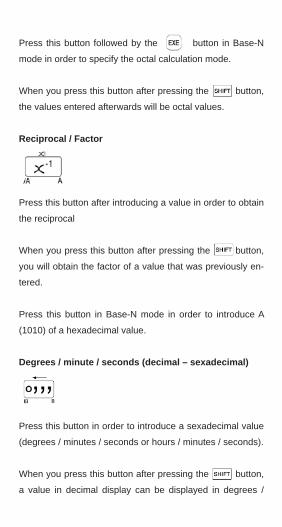
Press this button followed by the button in Base-N
mode in order to specify the octal calculation mode.
When you press this button after pressing the button,
the values entered afterwards will be octal values.
Reciprocal / Factor
Press this button after introducing a value in order to obtain
the reciprocal
When you press this button after pressing the button,
you will obtain the factor of a value that was previously en-
tered.
Press this button in Base-N mode in order to introduce A
(1010) of a hexadecimal value.
Degrees / minute / seconds (decimal – sexadecimal)
Press this button in order to introduce a sexadecimal value
(degrees / minutes / seconds or hours / minutes / seconds).
When you press this button after pressing the button,
a value in decimal display can be displayed in degrees /
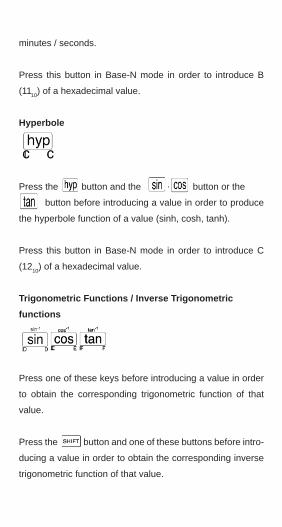
minutes / seconds.
Press this button in Base-N mode in order to introduce B
(1110) of a hexadecimal value.
Hyperbole
Press the button and the button or the
button before introducing a value in order to produce
the hyperbole function of a value (sinh, cosh, tanh).
Press this button in Base-N mode in order to introduce C
(1210) of a hexadecimal value.
Trigonometric Functions / Inverse Trigonometric functions
Press one of these keys before introducing a value in order
to obtain the corresponding trigonometric function of that
value.
Press the button and one of these buttons before intro-
ducing a value in order to obtain the corresponding inverse
trigonometric function of that value.

Press this button in Base-N mode in order to introduce D, E,
F (13101 11401 11510) of a hexadecimal value.
Fraction / Negative
Use this button in order to introduce simple and mixed frac-
tions.
Example:In order to introduce
In order to introduce
Press this button in Base-N mode before introducing a value
in order to obtain the negative result of that value.
Assignment button
Press this button before assigning the result of a calculation
to a memory.
Example:In order to assign the result of 12 + 45 to the memory A:
Press this button after pressing the button in order to
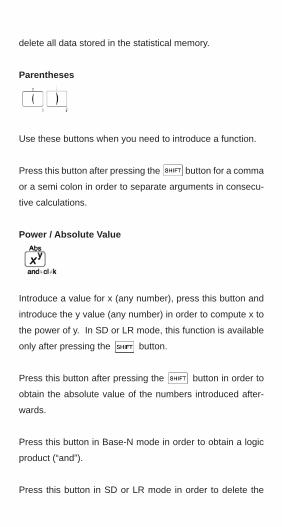
delete all data stored in the statistical memory.
Parentheses
Use these buttons when you need to introduce a function.
Press this button after pressing the button for a comma
or a semi colon in order to separate arguments in consecu-
tive calculations.
Power / Absolute Value
Introduce a value for x (any number), press this button and
introduce the y value (any number) in order to compute x to
the power of y. In SD or LR mode, this function is available
only after pressing the button.
Press this button after pressing the button in order to
obtain the absolute value of the numbers introduced after-
wards.
Press this button in Base-N mode in order to obtain a logic
product (“and”).
Press this button in SD or LR mode in order to delete the
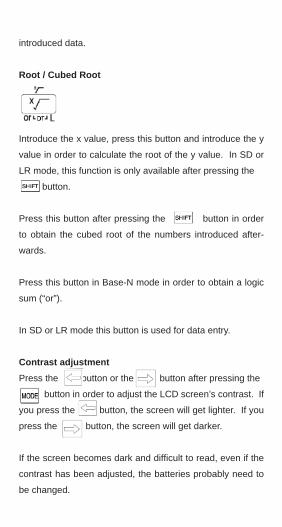
introduced data.
Root / Cubed Root
Introduce the x value, press this button and introduce the y
value in order to calculate the root of the y value. In SD or
LR mode, this function is only available after pressing the
button.
Press this button after pressing the button in order
to obtain the cubed root of the numbers introduced after-
wards.
Press this button in Base-N mode in order to obtain a logic
sum (“or”).
In SD or LR mode this button is used for data entry.
Contrast adjustmentPress the button or the button after pressing the
button in order to adjust the LCD screen’s contrast. If
you press the button, the screen will get lighter. If you
press the button, the screen will get darker.
If the screen becomes dark and diffi cult to read, even if the
contrast has been adjusted, the batteries probably need to
be changed.

Before Beginning to Realize Calculations
Sequence Priority in calculations
This calculator uses true algebraic logic in order to calculate
formulas in the following order:
Transforming coordinates:
Type A functionsWith these functions, introduce the value fi rst and then press
the button.
Xxxxxxxxxx
Power / Root
Fractions
Abbreviated multiplication format in front of memory, or
parentheses
Type B FunctionsWhen using these functions, press the button fi rst and intro-
duce that value afterwards.
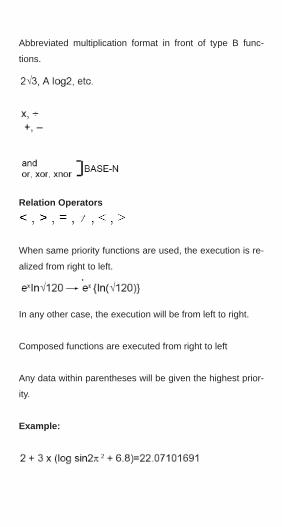
Abbreviated multiplication format in front of type B func-
tions.
Relation Operators
When same priority functions are used, the execution is re-
alized from right to left.
In any other case, the execution will be from left to right.
Composed functions are executed from right to left
Any data within parentheses will be given the highest prior-
ity.
Example:
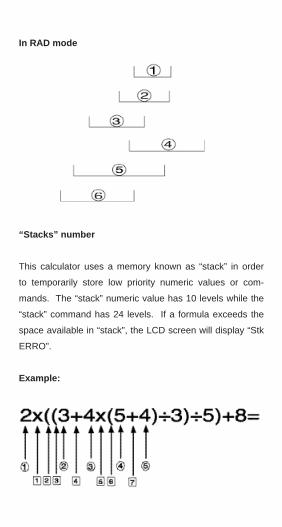
In RAD mode
“Stacks” number
This calculator uses a memory known as “stack” in order
to temporarily store low priority numeric values or com-
mands. The “stack” numeric value has 10 levels while the
“stack” command has 24 levels. If a formula exceeds the
space available in “stack”, the LCD screen will display “Stk
ERRO”.
Example:
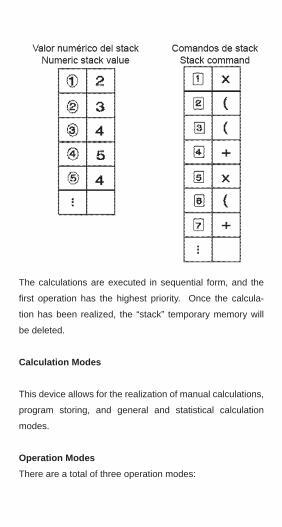
The calculations are executed in sequential form, and the
fi rst operation has the highest priority. Once the calcula-
tion has been realized, the “stack” temporary memory will
be deleted.
Calculation Modes
This device allows for the realization of manual calculations,
program storing, and general and statistical calculation
modes.
Operation ModesThere are a total of three operation modes:
1. RUN Mode
Elaboration of graphs as well as program execution and
manual calculations
2. WRT Mode
Storage and edition of programs
3. PCL Mode
Deletion of stored programs
Calculation Modes
There are 6 calculation modes that can be used depending
on the type of operation you wish to realize.
1. COMP Mode
General calculations including function calculations.
2. Base-N Mode
Binary conversions and calculations, octal, hexadecimal,
decimal and logic operations. Graph tracing cannot be real-
ized in this mode.
3. SD Mode
Standard deviation calculations
4. LR Mode
Regression calculation
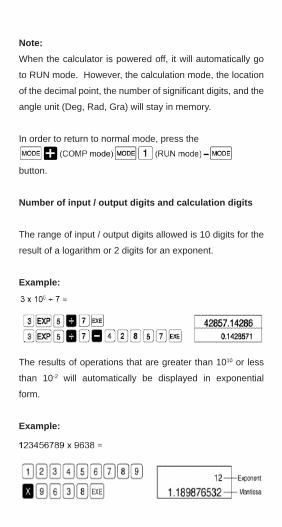
Note:When the calculator is powered off, it will automatically go
to RUN mode. However, the calculation mode, the location
of the decimal point, the number of signifi cant digits, and the
angle unit (Deg, Rad, Gra) will stay in memory.
In order to return to normal mode, press the
button.
Number of input / output digits and calculation digits
The range of input / output digits allowed is 10 digits for the
result of a logarithm or 2 digits for an exponent.
Example:
The results of operations that are greater than 1010 or less
than 10-2 will automatically be displayed in exponential
form.
Example:
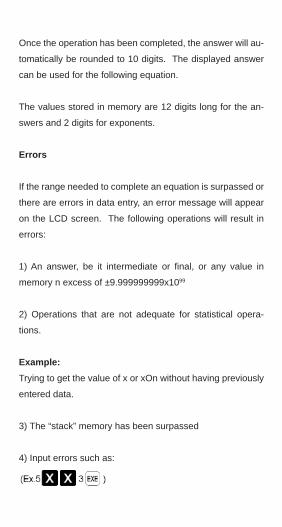
Once the operation has been completed, the answer will au-
tomatically be rounded to 10 digits. The displayed answer
can be used for the following equation.
The values stored in memory are 12 digits long for the an-
swers and 2 digits for exponents.
Errors
If the range needed to complete an equation is surpassed or
there are errors in data entry, an error message will appear
on the LCD screen. The following operations will result in
errors:
1) An answer, be it intermediate or fi nal, or any value in
memory n excess of ±9.999999999x1099
2) Operations that are not adequate for statistical opera-
tions.
Example:Trying to get the value of x or xOn without having previously
entered data.
3) The “stack” memory has been surpassed
4) Input errors such as:
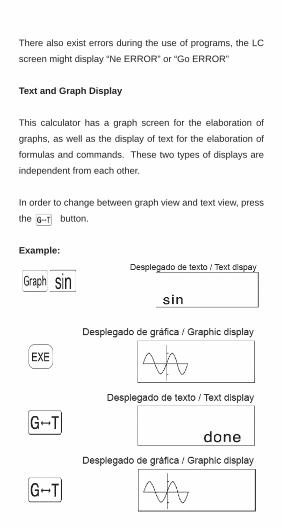
There also exist errors during the use of programs, the LC
screen might display “Ne ERROR” or “Go ERROR”
Text and Graph Display
This calculator has a graph screen for the elaboration of
graphs, as well as the display of text for the elaboration of
formulas and commands. These two types of displays are
independent from each other.
In order to change between graph view and text view, press
the button.
Example:
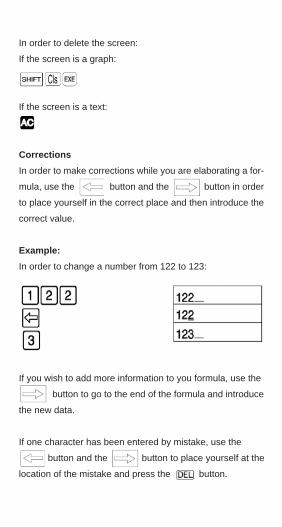
In order to delete the screen:
If the screen is a graph:
If the screen is a text:
CorrectionsIn order to make corrections while you are elaborating a for-
mula, use the button and the button in order
to place yourself in the correct place and then introduce the
correct value.
Example: In order to change a number from 122 to 123:
If you wish to add more information to you formula, use the
button to go to the end of the formula and introduce
the new data.
If one character has been entered by mistake, use the
button and the button to place yourself at the
location of the mistake and press the button.
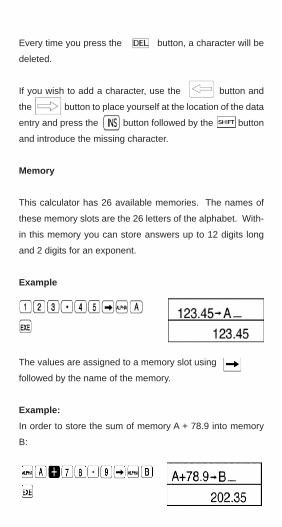
Every time you press the button, a character will be
deleted.
If you wish to add a character, use the button and
the button to place yourself at the location of the data
entry and press the button followed by the button
and introduce the missing character.
Memory
This calculator has 26 available memories. The names of
these memory slots are the 26 letters of the alphabet. With-
in this memory you can store answers up to 12 digits long
and 2 digits for an exponent.
Example
The values are assigned to a memory slot using
followed by the name of the memory.
Example:In order to store the sum of memory A + 78.9 into memory
B:
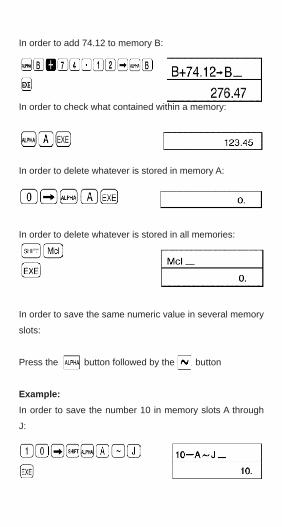
In order to add 74.12 to memory B:
Xxxxxxxxxxxxxxx
In order to check what contained within a memory:
Xxxxxxxxxxxxxxxx
In order to delete whatever is stored in memory A:
Xxxxxxxxxxxxxxx
In order to delete whatever is stored in all memories:
Xxxxxxxxxxxxxxx
In order to save the same numeric value in several memory
slots:
Press the button followed by the button
Example:In order to save the number 10 in memory slots A through
J:

Memory Expansion
Even though there are 26 standard memory slots, this can
be expanded by changing the memory storage steps. The
memory expansion is realized by converting 8 steps into 1.
The memory expands in units of 1. A maximum of 50 mem-
ory slots can be added for a total of 76 (26+50)
In order to expand the memory, press the button
followed by the button, one value will represent the size
of the expansion and will be displayed on the LCD screen,
press the button in order to save the changes
In order to check the number of current memory slots, press
the button followed by the button and fi nally the
button.
In order to return to the standard number of memory slots
(26), enter a 0 in the previous sequence.
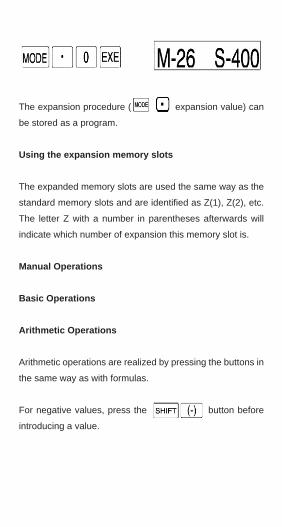
The expansion procedure ( expansion value) can
be stored as a program.
Using the expansion memory slots
The expanded memory slots are used the same way as the
standard memory slots and are identifi ed as Z(1), Z(2), etc.
The letter Z with a number in parentheses afterwards will
indicate which number of expansion this memory slot is.
Manual Operations
Basic Operations
Arithmetic Operations
Arithmetic operations are realized by pressing the buttons in
the same way as with formulas.
For negative values, press the button before
introducing a value.

For mixed arithmetic equations, multiplication and division
will take priority over addition and subtraction.
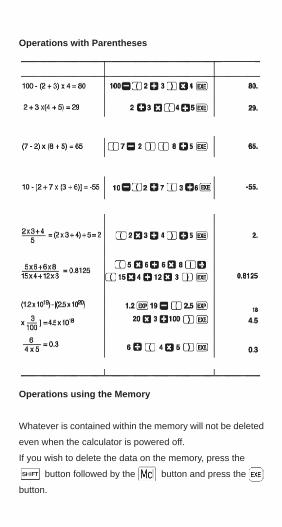
Operations with Parentheses
Operations using the Memory
Whatever is contained within the memory will not be deleted
even when the calculator is powered off.
If you wish to delete the data on the memory, press the
button followed by the button and press the
button.
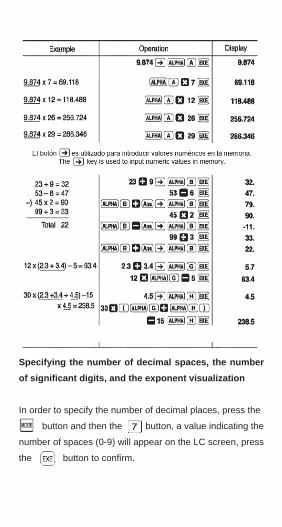
Specifying the number of decimal spaces, the number of signifi cant digits, and the exponent visualization
In order to specify the number of decimal places, press the
button and then the button, a value indicating the
number of spaces (0-9) will appear on the LC screen, press
the button to confi rm.
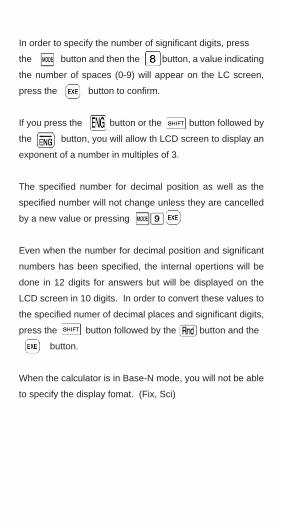
In order to specify the number of signifi cant digits, press
the button and then the button, a value indicating
the number of spaces (0-9) will appear on the LC screen,
press the button to confi rm.
If you press the button or the button followed by
the button, you will allow th LCD screen to display an
exponent of a number in multiples of 3.
The specifi ed number for decimal position as well as the
specifi ed number will not change unless they are cancelled
by a new value or pressing
Even when the number for decimal position and signifi cant
numbers has been specifi ed, the internal opertions will be
done in 12 digits for answers but will be displayed on the
LCD screen in 10 digits. In order to convert these values to
the specifi ed numer of decimal places and signifi cant digits,
press the button followed by the button and the
button.
When the calculator is in Base-N mode, you will not be able
to specify the display fomat. (Fix, Sci)
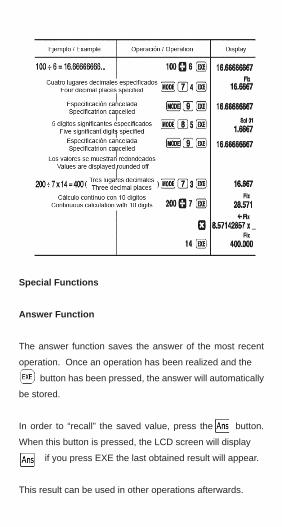
Special Functions
Answer Function
The answer function saves the answer of the most recent
operation. Once an operation has been realized and the
button has been pressed, the answer will automatically
be stored.
In order to “recall” the saved value, press the button.
When this button is pressed, the LCD screen will display
if you press EXE the last obtained result will appear.
This result can be used in other operations afterwards.
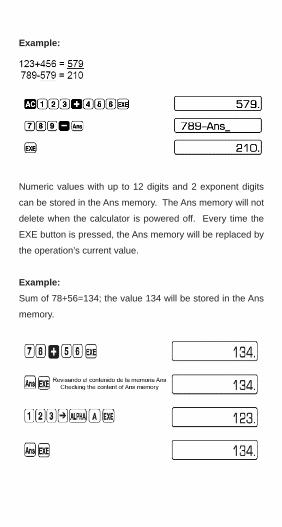
Example:
Numeric values with up to 12 digits and 2 exponent digits
can be stored in the Ans memory. The Ans memory will not
delete when the calculator is powered off. Every time the
EXE button is pressed, the Ans memory will be replaced by
the operation’s current value.
Example:Sum of 78+56=134; the value 134 will be stored in the Ans
memory.
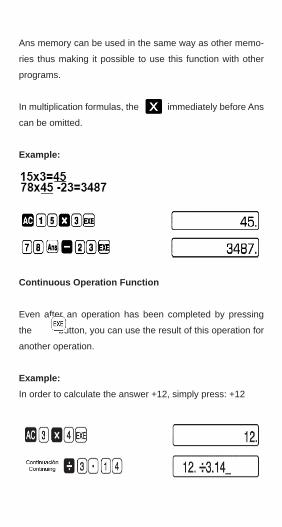
Ans memory can be used in the same way as other memo-
ries thus making it possible to use this function with other
programs.
In multiplication formulas, the immediately before Ans
can be omitted.
Example:
Continuous Operation Function
Even after an operation has been completed by pressing
the button, you can use the result of this operation for
another operation.
Example:In order to calculate the answer +12, simply press: +12
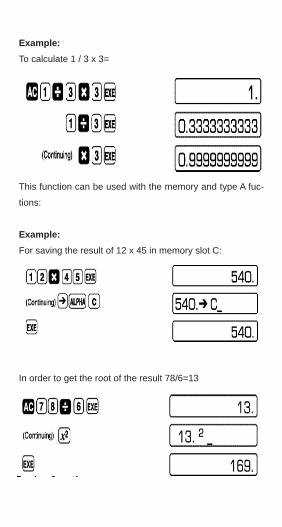
Example:To calculate 1 / 3 x 3=
This function can be used with the memory and type A fuc-
tions:
Example:For saving the result of 12 x 45 in memory slot C:
In order to get the root of the result 78/6=13
Xxxxxxxxxxx
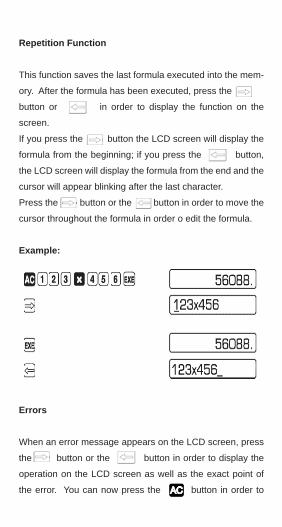
Repetition Function
This function saves the last formula executed into the mem-
ory. After the formula has been executed, press the
button or in order to display the function on the
screen.
If you press the button the LCD screen will display the
formula from the beginning; if you press the button,
the LCD screen will display the formula from the end and the
cursor will appear blinking after the last character.
Press the button or the button in order to move the
cursor throughout the formula in order o edit the formula.
Example:
Errors
When an error message appears on the LCD screen, press
the button or the button in order to display the
operation on the LCD screen as well as the exact point of
the error. You can now press the button in order to
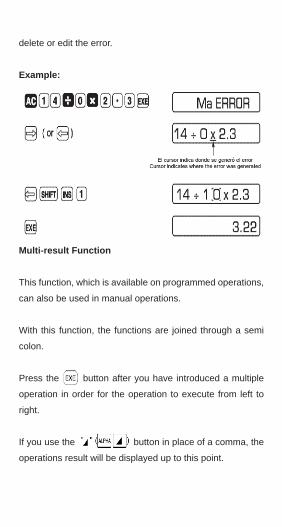
delete or edit the error.
Example:
Multi-result Function
This function, which is available on programmed operations,
can also be used in manual operations.
With this function, the functions are joined through a semi
colon.
Press the button after you have introduced a multiple
operation in order for the operation to execute from left to
right.
If you use the button in place of a comma, the
operations result will be displayed up to this point.
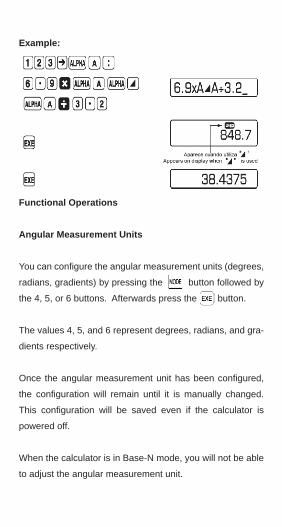
Example:
Functional Operations
Angular Measurement Units
You can confi gure the angular measurement units (degrees,
radians, gradients) by pressing the button followed by
the 4, 5, or 6 buttons. Afterwards press the button.
The values 4, 5, and 6 represent degrees, radians, and gra-
dients respectively.
Once the angular measurement unit has been confi gured,
the confi guration will remain until it is manually changed.
This confi guration will be saved even if the calculator is
powered off.
When the calculator is in Base-N mode, you will not be able
to adjust the angular measurement unit.

Trigonometric and Inverse Trigonometric Functions
Before realizing these operations, you must have previously
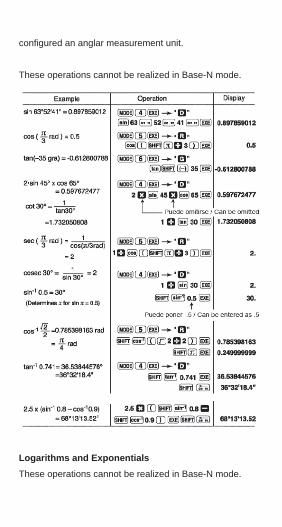
confi gured an anglar measurement unit.
These operations cannot be realized in Base-N mode.
Logarithms and ExponentialsThese operations cannot be realized in Base-N mode.
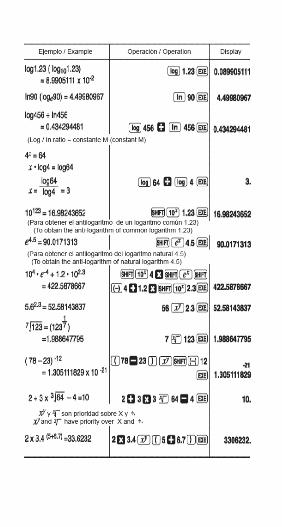
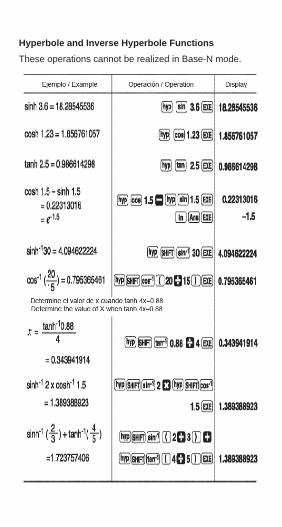
Hyperbole and Inverse Hyperbole FunctionsThese operations cannot be realized in Base-N mode.
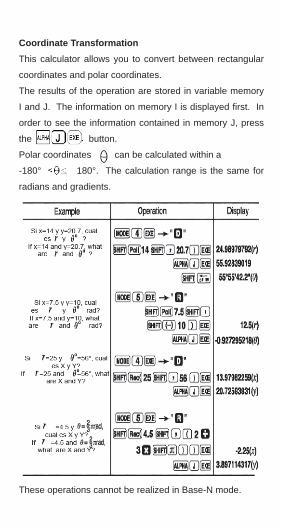
Coordinate TransformationThis calculator allows you to convert between rectangular
coordinates and polar coordinates.
The results of the operation are stored in variable memory
I and J. The information on memory I is displayed fi rst. In
order to see the information contained in memory J, press
the button.
Polar coordinates can be calculated within a
-180° 180°. The calculation range is the same for
radians and gradients.
These operations cannot be realized in Base-N mode.
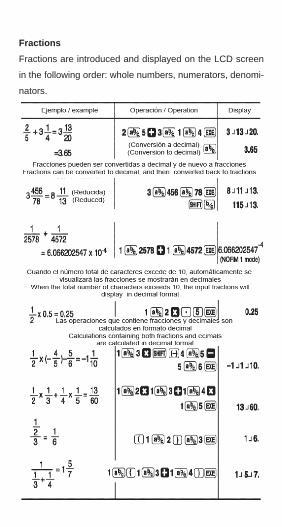
FractionsFractions are introduced and displayed on the LCD screen
in the following order: whole numbers, numerators, denomi-
nators.
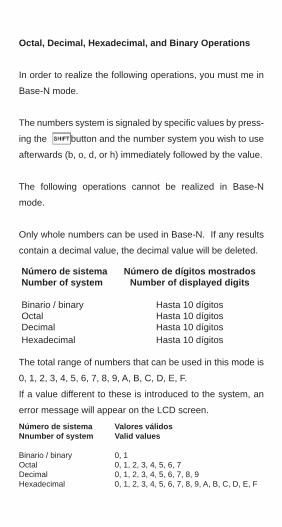
Octal, Decimal, Hexadecimal, and Binary Operations
In order to realize the following operations, you must me in
Base-N mode.
The numbers system is signaled by specifi c values by press-
ing the button and the number system you wish to use
afterwards (b, o, d, or h) immediately followed by the value.
The following operations cannot be realized in Base-N
mode.
Only whole numbers can be used in Base-N. If any results
contain a decimal value, the decimal value will be deleted.
The total range of numbers that can be used in this mode is
0, 1, 2, 3, 4, 5, 6, 7, 8, 9, A, B, C, D, E, F.
If a value different to these is introduced to the system, an
error message will appear on the LCD screen.
Número de sistema Número de dígitos mostradosNumber of system Number of displayed digits Binario / binary Hasta 10 dígitosOctal Hasta 10 dígitosDecimal Hasta 10 dígitosHexadecimal Hasta 10 dígitos
Número de sistema Valores válidosNnumber of system Valid values Binario / binary 0, 1Octal 0, 1, 2, 3, 4, 5, 6, 7Decimal 0, 1, 2, 3, 4, 5, 6, 7, 8, 9Hexadecimal 0, 1, 2, 3, 4, 5, 6, 7, 8, 9, A, B, C, D, E, F
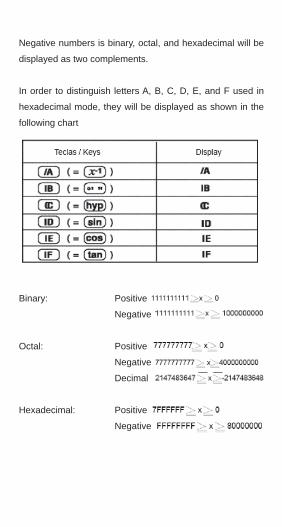
Negative numbers is binary, octal, and hexadecimal will be
displayed as two complements.
In order to distinguish letters A, B, C, D, E, and F used in
hexadecimal mode, they will be displayed as shown in the
following chart
Binary: Positive
Negative
Octal: Positive
Negative
Decimal
Hexadecimal: Positive
Negative
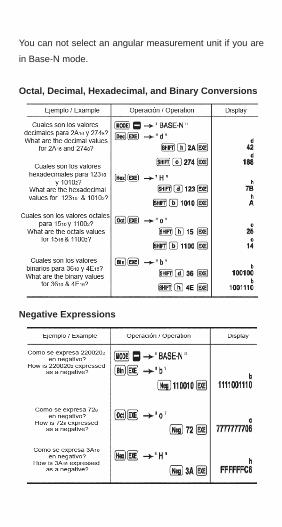
You can not select an angular measurement unit if you are
in Base-N mode.
Octal, Decimal, Hexadecimal, and Binary Conversions
Negative Expressions
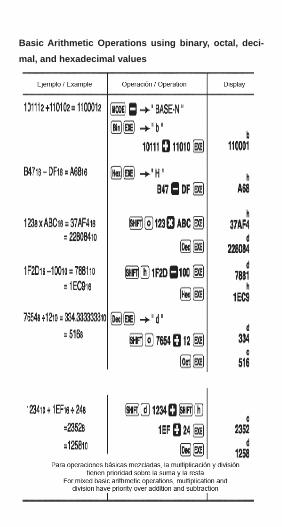
Basic Arithmetic Operations using binary, octal, deci-mal, and hexadecimal values
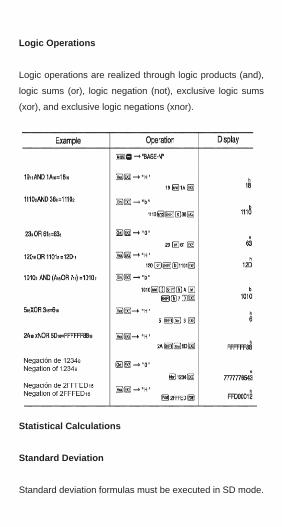
Logic Operations
Logic operations are realized through logic products (and),
logic sums (or), logic negation (not), exclusive logic sums
(xor), and exclusive logic negations (xnor).
Statistical Calculations
Standard Deviation
Standard deviation formulas must be executed in SD mode.
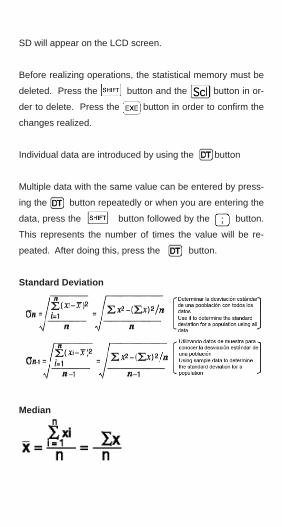
SD will appear on the LCD screen.
Before realizing operations, the statistical memory must be
deleted. Press the button and the button in or-
der to delete. Press the button in order to confi rm the
changes realized.
Individual data are introduced by using the button
Multiple data with the same value can be entered by press-
ing the button repeatedly or when you are entering the
data, press the button followed by the button.
This represents the number of times the value will be re-
peated. After doing this, press the button.
Standard Deviation
Median
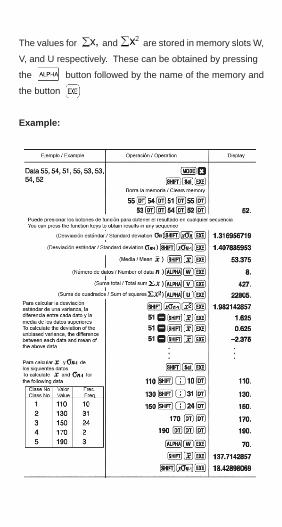
The values for and are stored in memory slots W,
V, and U respectively. These can be obtained by pressing
the button followed by the name of the memory and
the button
Example:
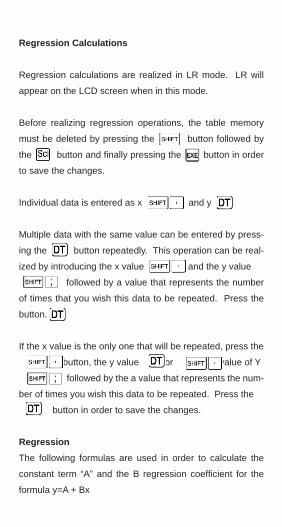
Regression Calculations
Regression calculations are realized in LR mode. LR will
appear on the LCD screen when in this mode.
Before realizing regression operations, the table memory
must be deleted by pressing the button followed by
the button and fi nally pressing the button in order
to save the changes.
Individual data is entered as x and y
Multiple data with the same value can be entered by press-
ing the button repeatedly. This operation can be real-
ized by introducing the x value and the y value
followed by a value that represents the number
of times that you wish this data to be repeated. Press the
button.
If the x value is the only one that will be repeated, press the
button, the y value or , value of Y
followed by the a value that represents the num-
ber of times you wish this data to be repeated. Press the
button in order to save the changes.
RegressionThe following formulas are used in order to calculate the
constant term “A” and the B regression coeffi cient for the
formula y=A + Bx
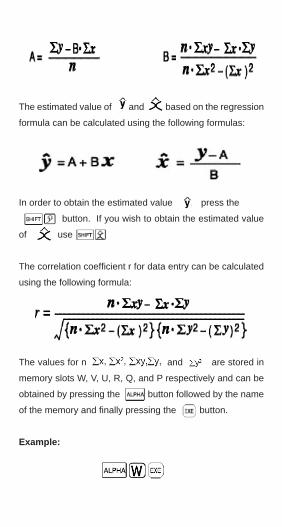
The estimated value of and based on the regression
formula can be calculated using the following formulas:
In order to obtain the estimated value press the
button. If you wish to obtain the estimated value
of use
The correlation coeffi cient r for data entry can be calculated
using the following formula:
The values for n and are stored in
memory slots W, V, U, R, Q, and P respectively and can be
obtained by pressing the button followed by the name
of the memory and fi nally pressing the button.
Example:
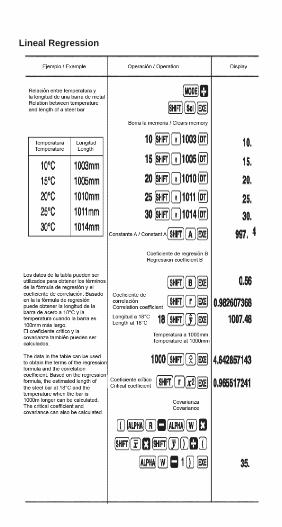
Lineal Regression
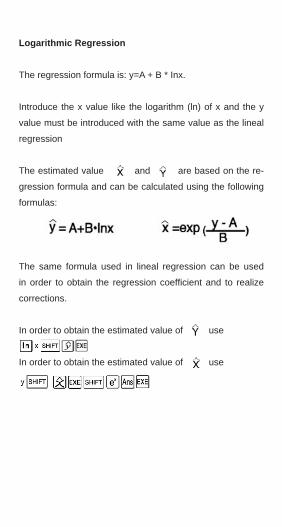
Logarithmic Regression
The regression formula is: y=A + B * Inx.
Introduce the x value like the logarithm (ln) of x and the y
value must be introduced with the same value as the lineal
regression
The estimated value and are based on the re-
gression formula and can be calculated using the following
formulas:
The same formula used in lineal regression can be used
in order to obtain the regression coeffi cient and to realize
corrections.
In order to obtain the estimated value of use
In order to obtain the estimated value of use

Exponential Regression
The regression formula is:
Introduce the y value as the logarithm of y (ln) and the x
value with the same value as the lineal regression.
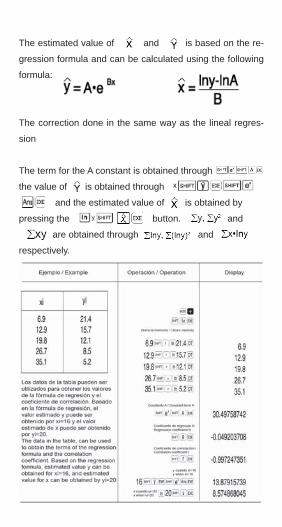
The estimated value of and is based on the re-
gression formula and can be calculated using the following
formula:
The correction done in the same way as the lineal regres-
sion
The term for the A constant is obtained through
the value of is obtained through
and the estimated value of is obtained by
pressing the button. and
are obtained through and
respectively.
Power Regression
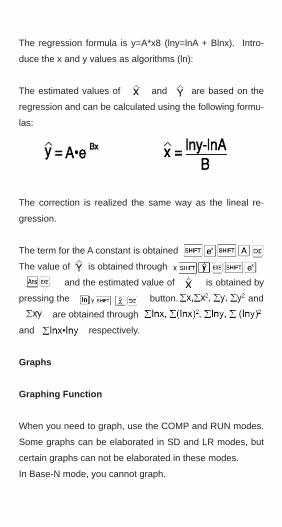
The regression formula is y=A*x8 (lny=lnA + Blnx). Intro-
duce the x and y values as algorithms (ln):
The estimated values of and are based on the
regression and can be calculated using the following formu-
las:
The correction is realized the same way as the lineal re-
gression.
The term for the A constant is obtained
The value of is obtained through
and the estimated value of is obtained by
pressing the button. and
are obtained through
and respectively.
Graphs
Graphing Function
When you need to graph, use the COMP and RUN modes.
Some graphs can be elaborated in SD and LR modes, but
certain graphs can not be elaborated in these modes.
In Base-N mode, you cannot graph.
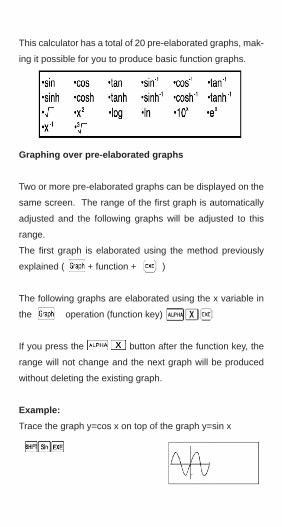
This calculator has a total of 20 pre-elaborated graphs, mak-
ing it possible for you to produce basic function graphs.
Graphing over pre-elaborated graphs
Two or more pre-elaborated graphs can be displayed on the
same screen. The range of the fi rst graph is automatically
adjusted and the following graphs will be adjusted to this
range.
The fi rst graph is elaborated using the method previously
explained ( + function + )
The following graphs are elaborated using the x variable in
the operation (function key)
If you press the button after the function key, the
range will not change and the next graph will be produced
without deleting the existing graph.
Example:Trace the graph y=cos x on top of the graph y=sin x
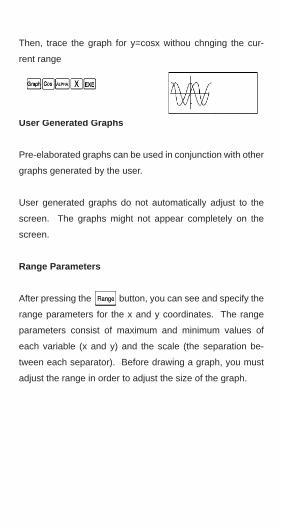
Then, trace the graph for y=cosx withou chnging the cur-
rent range
User Generated Graphs
Pre-elaborated graphs can be used in conjunction with other
graphs generated by the user.
User generated graphs do not automatically adjust to the
screen. The graphs might not appear completely on the
screen.
Range Parameters
After pressing the button, you can see and specify the
range parameters for the x and y coordinates. The range
parameters consist of maximum and minimum values of
each variable (x and y) and the scale (the separation be-
tween each separator). Before drawing a graph, you must
adjust the range in order to adjust the size of the graph.
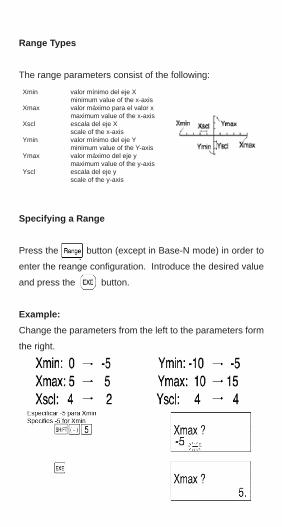
Range Types
The range parameters consist of the following:
Specifying a Range
Press the button (except in Base-N mode) in order to
enter the reange confi guration. Introduce the desired value
and press the button.
Example:Change the parameters from the left to the parameters form
the right.
Xmin valor mínimo del eje X minimum value of the x-axisXmax valor máximo para el valor x maximum value of the x-axisXscl escala del eje X scale of the x-axisYmin valor mínimo del eje Y minimum value of the Y-axisYmax valor máximo del eje y maximum value of the y-axisYscl escala del eje y scale of the y-axis
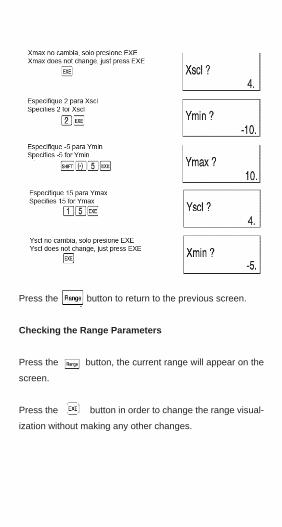
Press the button to return to the previous screen.
Checking the Range Parameters
Press the button, the current range will appear on the
screen.
Press the button in order to change the range visual-
ization without making any other changes.

Press the button in order to return to the previous
screen.
You can introduce range values as expressions ( ),
these expressions will automatically convert into values.
The range that can be used ranges from -9.99999999E+97
to 9.99999999E+97
If you introduce 0 for Xsci or Ysci, this will not be valid for
adjusting any scale.
If the maximum and minimum values on an axis are the

same, a mathematical error is generated (Ma ERROR)
when trying to elaborate a graph.
If the confi gured range is too large, the graph will not be able
to be completely displayed.
A mathematical error will occur if the confi gured ranges are
too close together.
Resetting the Ranges
The confi gured ranges can be deleted and the initial values
restored by pressing the button while in range
confi guration mode.
The initial values are:
Xmin: -3.8 Ymin: -2.2
Xmax: 3.8 Ymax: 2.2
Xscl: 1 Yscl: 1
User Generated Graphs
After adjusting the ranges, the user can generate personal-
ized graphs by simply introducing a formula after pressing
the button.
Introduce and graph the formula: y=2x2 + 3x – 4
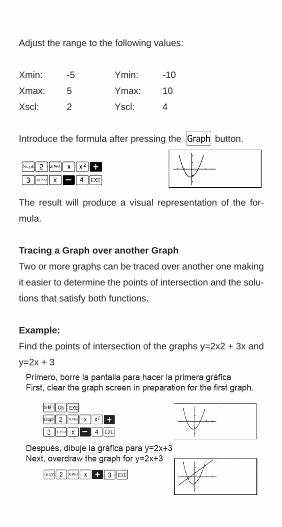
Adjust the range to the following values:
Xmin: -5 Ymin: -10
Xmax: 5 Ymax: 10
Xscl: 2 Yscl: 4
Introduce the formula after pressing the button.
The result will produce a visual representation of the for-
mula.
Tracing a Graph over another GraphTwo or more graphs can be traced over another one making
it easier to determine the points of intersection and the solu-
tions that satisfy both functions.
Example:Find the points of intersection of the graphs y=2x2 + 3x and
y=2x + 3

If you wish to see the point of intersection, use the Zoom
and Trace buttons.
Make sure to introduce the x variable ( ) inside the
formula when using pre-elaborated graphs in order to trace
them.
If the x variable is not included in the second formula, the
second graph will be elaborated after deleting the fi rst
graph.
Zoom Function
This function allows you to zoom in or out from the x and y
coordinates
Zooming in to a Graph
Example:In order to zoom into the graph y=sin x with a factor of 1.5 on
the x-axis and 2.0 on the y-axis.
Use the following ranges to elaborate the graph:
Xmin: -360 Ymin: -1.6
Xmax: 360 Ymax: 1.6
Xscl: 180 Yscl: 1
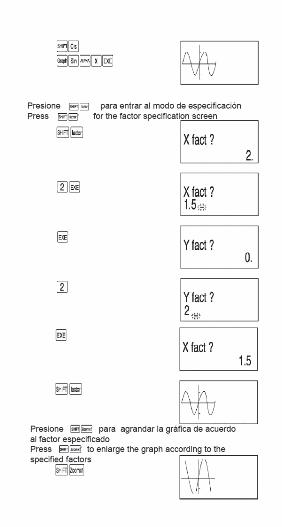
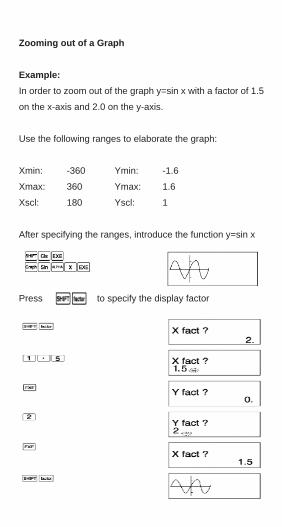
Zooming out of a Graph
Example:In order to zoom out of the graph y=sin x with a factor of 1.5
on the x-axis and 2.0 on the y-axis.
Use the following ranges to elaborate the graph:
Xmin: -360 Ymin: -1.6
Xmax: 360 Ymax: 1.6
Xscl: 180 Yscl: 1
After specifying the ranges, introduce the function y=sin x
Press to specify the display factor
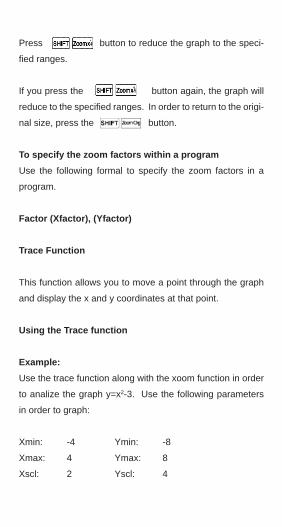
Press button to reduce the graph to the speci-
fi ed ranges.
If you press the button again, the graph will
reduce to the specifi ed ranges. In order to return to the origi-
nal size, press the button.
To specify the zoom factors within a programUse the following formal to specify the zoom factors in a
program.
Factor (Xfactor), (Yfactor)
Trace Function
This function allows you to move a point through the graph
and display the x and y coordinates at that point.
Using the Trace function
Example:Use the trace function along with the xoom function in order
to analize the graph y=x2-3. Use the following parameters
in order to graph:
Xmin: -4 Ymin: -8
Xmax: 4 Ymax: 8
Xscl: 2 Yscl: 4
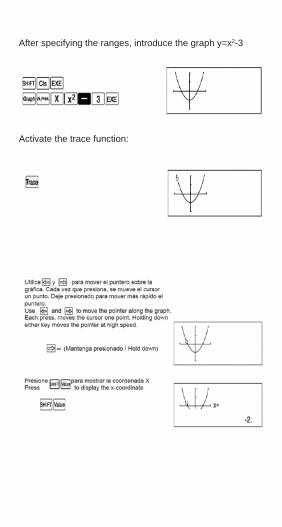
After specifying the ranges, introduce the graph y=x2-3
Activate the trace function:
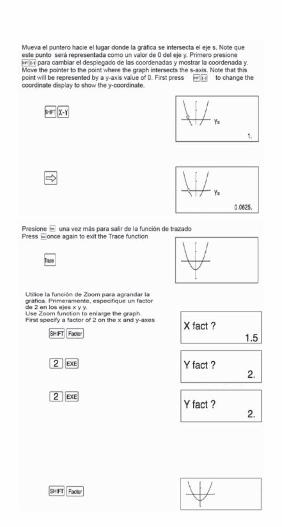
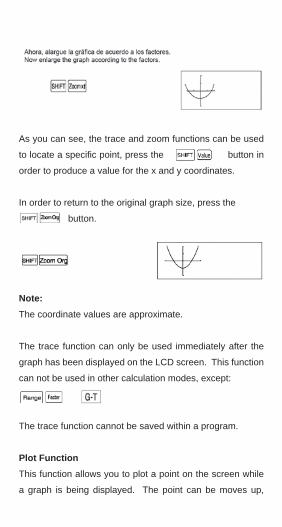
As you can see, the trace and zoom functions can be used
to locate a specifi c point, press the button in
order to produce a value for the x and y coordinates.
In order to return to the original graph size, press the
button.
Note:The coordinate values are approximate.
The trace function can only be used immediately after the
graph has been displayed on the LCD screen. This function
can not be used in other calculation modes, except:
The trace function cannot be saved within a program.
Plot FunctionThis function allows you to plot a point on the screen while
a graph is being displayed. The point can be moves up,
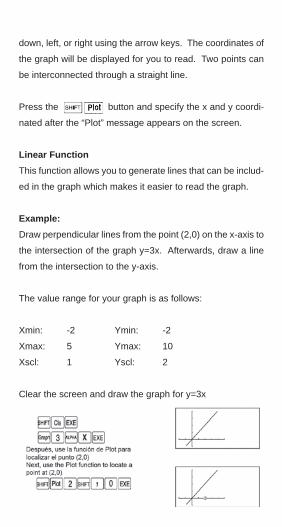
down, left, or right using the arrow keys. The coordinates of
the graph will be displayed for you to read. Two points can
be interconnected through a straight line.
Press the button and specify the x and y coordi-
nated after the “Plot” message appears on the screen.
Linear FunctionThis function allows you to generate lines that can be includ-
ed in the graph which makes it easier to read the graph.
Example:Draw perpendicular lines from the point (2,0) on the x-axis to
the intersection of the graph y=3x. Afterwards, draw a line
from the intersection to the y-axis.
The value range for your graph is as follows:
Xmin: -2 Ymin: -2
Xmax: 5 Ymax: 10
Xscl: 1 Yscl: 2
Clear the screen and draw the graph for y=3x
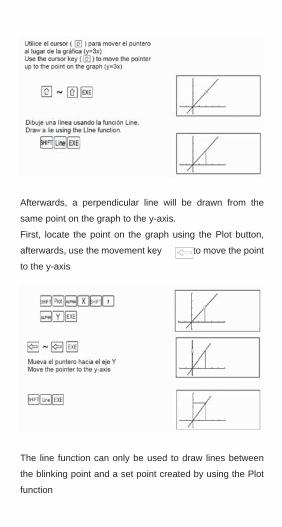
Afterwards, a perpendicular line will be drawn from the
same point on the graph to the y-axis.
First, locate the point on the graph using the Plot button,
afterwards, use the movement key to move the point
to the y-axis
The line function can only be used to draw lines between
the blinking point and a set point created by using the Plot
function
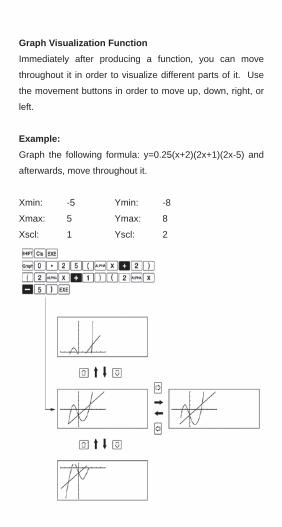
Graph Visualization FunctionImmediately after producing a function, you can move
throughout it in order to visualize different parts of it. Use
the movement buttons in order to move up, down, right, or
left.
Example:Graph the following formula: y=0.25(x+2)(2x+1)(2x-5) and
afterwards, move throughout it.
Xmin: -5 Ymin: -8
Xmax: 5 Ymax: 8
Xscl: 1 Yscl: 2
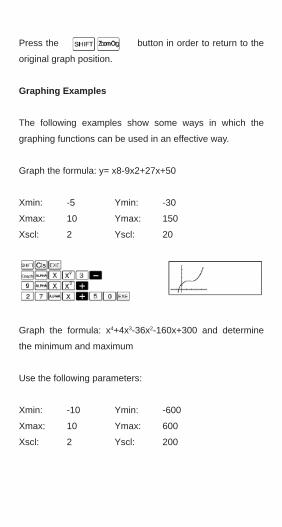
Press the button in order to return to the
original graph position.
Graphing Examples
The following examples show some ways in which the
graphing functions can be used in an effective way.
Graph the formula: y= x8-9x2+27x+50
Xmin: -5 Ymin: -30
Xmax: 10 Ymax: 150
Xscl: 2 Yscl: 20
Graph the formula: x4+4x3-36x2-160x+300 and determine
the minimum and maximum
Use the following parameters:
Xmin: -10 Ymin: -600
Xmax: 10 Ymax: 600
Xscl: 2 Yscl: 200
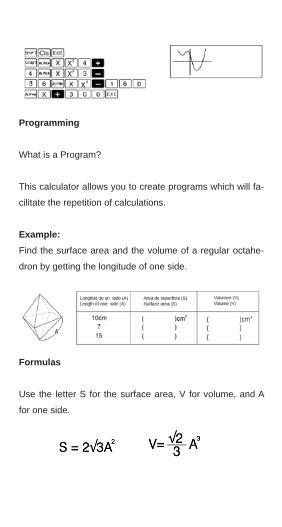
Programming
What is a Program?
This calculator allows you to create programs which will fa-
cilitate the repetition of calculations.
Example:Find the surface area and the volume of a regular octahe-
dron by getting the longitude of one side.
Formulas
Use the letter S for the surface area, V for volume, and A
for one side.
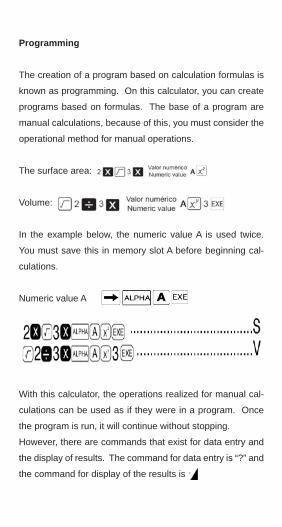
Programming
The creation of a program based on calculation formulas is
known as programming. On this calculator, you can create
programs based on formulas. The base of a program are
manual calculations, because of this, you must consider the
operational method for manual operations.
The surface area:
Volume:
In the example below, the numeric value A is used twice.
You must save this in memory slot A before beginning cal-
culations.
Numeric value A
With this calculator, the operations realized for manual cal-
culations can be used as if they were in a program. Once
the program is run, it will continue without stopping.
However, there are commands that exist for data entry and
the display of results. The command for data entry is “?” and
the command for display of the results is
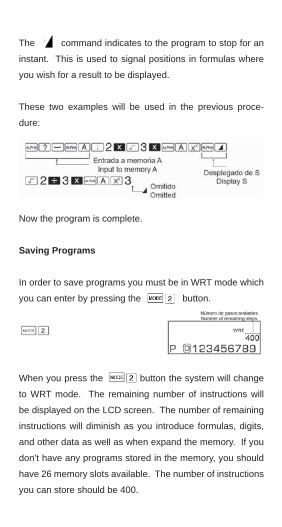
The command indicates to the program to stop for an
instant. This is used to signal positions in formulas where
you wish for a result to be displayed.
These two examples will be used in the previous proce-
dure:
Now the program is complete.
Saving Programs
In order to save programs you must be in WRT mode which
you can enter by pressing the button.
When you press the button the system will change
to WRT mode. The remaining number of instructions will
be displayed on the LCD screen. The number of remaining
instructions will diminish as you introduce formulas, digits,
and other data as well as when expand the memory. If you
don’t have any programs stored in the memory, you should
have 26 memory slots available. The number of instructions
you can store should be 400.
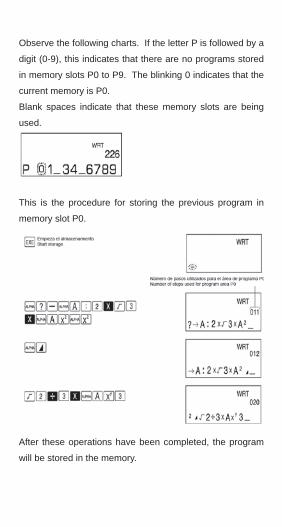
Observe the following charts. If the letter P is followed by a
digit (0-9), this indicates that there are no programs stored
in memory slots P0 to P9. The blinking 0 indicates that the
current memory is P0.
Blank spaces indicate that these memory slots are being
used.
This is the procedure for storing the previous program in
memory slot P0.
After these operations have been completed, the program
will be stored in the memory.
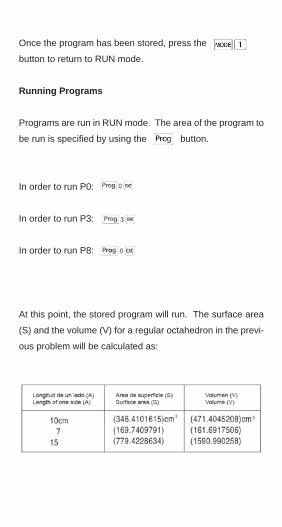
Once the program has been stored, press the
button to return to RUN mode.
Running Programs
Programs are run in RUN mode. The area of the program to
be run is specifi ed by using the button.
In order to run P0:
In order to run P3:
In order to run P8:
At this point, the stored program will run. The surface area
(S) and the volume (V) for a regular octahedron in the previ-
ous problem will be calculated as:
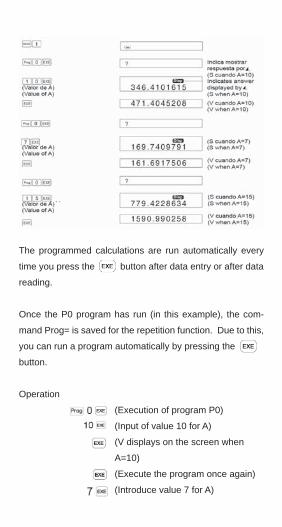
The programmed calculations are run automatically every
time you press the button after data entry or after data
reading.
Once the P0 program has run (in this example), the com-
mand Prog= is saved for the repetition function. Due to this,
you can run a program automatically by pressing the
button.
Operation
(Execution of program P0)
(Input of value 10 for A)
(V displays on the screen when
A=10)
(Execute the program once again)
(Introduce value 7 for A)
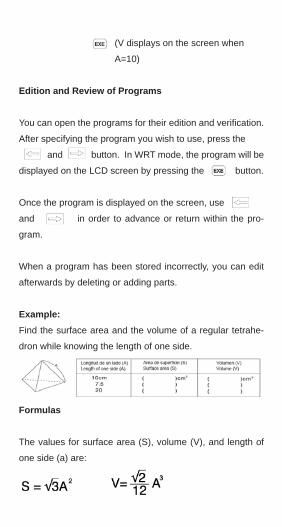
(V displays on the screen when
A=10)
Edition and Review of Programs
You can open the programs for their edition and verifi cation.
After specifying the program you wish to use, press the
and button. In WRT mode, the program will be
displayed on the LCD screen by pressing the button.
Once the program is displayed on the screen, use
and in order to advance or return within the pro-
gram.
When a program has been stored incorrectly, you can edit
afterwards by deleting or adding parts.
Example:Find the surface area and the volume of a regular tetrahe-
dron while knowing the length of one side.
Formulas
The values for surface area (S), volume (V), and length of
one side (a) are:
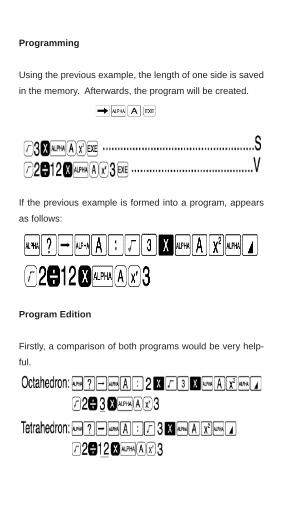
Programming
Using the previous example, the length of one side is saved
in the memory. Afterwards, the program will be created.
If the previous example is formed into a program, appears
as follows:
Program Edition
Firstly, a comparison of both programs would be very help-
ful.

The octahedron program can be modifi es to a tetrahedron
program by deleting the parts labeled with wavy lines and
changing the parts with straight lines.
In the current example, these changes would end like this:
Program ExecutionThe following program will be executed.
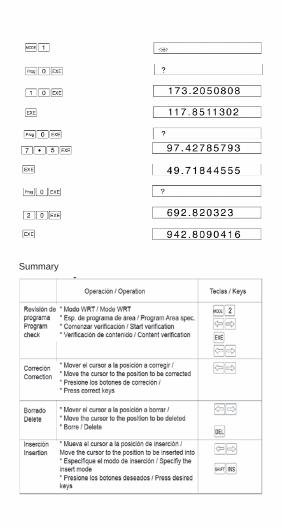
Summary
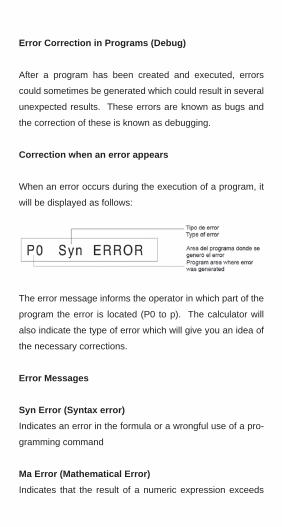
Error Correction in Programs (Debug)
After a program has been created and executed, errors
could sometimes be generated which could result in several
unexpected results. These errors are known as bugs and
the correction of these is known as debugging.
Correction when an error appears
When an error occurs during the execution of a program, it
will be displayed as follows:
The error message informs the operator in which part of the
program the error is located (P0 to p). The calculator will
also indicate the type of error which will give you an idea of
the necessary corrections.
Error Messages
Syn Error (Syntax error)Indicates an error in the formula or a wrongful use of a pro-
gramming command
Ma Error (Mathematical Error)Indicates that the result of a numeric expression exceeds

10100, an illogical expression (example: a number divided
by 0), or the input that exceeds the range of the function.
Go ErrorIndicates a missing label (Lbl) for a Go To command or the
Go To program contains no data
Ne Error (Data error)Indicates a sub-routine that is overcharged because of a
programming command
Stk Error (Stack memory error)Indicates that the calculation exceeds the capacity of the
stack memory for numeric values or commands.
Mem Error (Memory Error)Indicates that there has been an attempt to access a mem-
ory slot that has not been expanded
Arg Error (Argument Error)Indicates that the argument of a command or the specifi ca-
tion of a program exceeds the input range
Press the button or the button in order to
cancel the error.
If you press the button, the error will be canceled and
you will be able to enter new data.
In this operation, RUN mode remains active
Press the button or the button in order to cancel
the error and change to WRT mode. The cursor will position
itself in the position where the error was generated.
Points to check for each type of error
Syn ErrorVerify that there are no errors in the program
Ma ErrorFor operations that require the use of memory, check the nu-
meric values contained in the memory and make sure these
do not exceed the arguments range. This type of error usu-
ally occurs because you are trying to divide by 0 or because
there are negative numbers within roots.
Go ErrorVerify that there exists a corresponding label for the Go To
command.
Ne ErrorVerify that the Prog command is not used in a program divi-
sion.
Stk ErrorVerify that the formula being used is not to large as to pro-
voke an overload in the memory. If this is the case, the for-
mula should be split into two or more parts.

Mem ErrorVerify that the memory has been correctly expanded using
Arg ErrorVerify that the values specifi ed by or
are within the 0-9 range.
Also, verify that the vlues specifi ed for Go to, Lbl, or Prog are
within the 0-9 range.
Counting the number of steps (Instructions)
The capacity for this calculator is 400 steps (instructions)
The number of steps indicates the amount of storage space
available for programs and will diminish as new programs
are introduced.
There are two methods for determining the number of avail-
able steps:
In RUN mode, press the button. The number
of available steps will be displayed on the LCD screen next
to the number of memories.
Example:
Enter WRT mode ( ) and the number of available
steps will be displayed on the LCD screen. At this time you
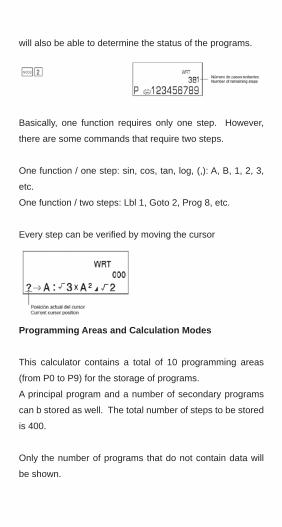
will also be able to determine the status of the programs.
Basically, one function requires only one step. However,
there are some commands that require two steps.
One function / one step: sin, cos, tan, log, (,): A, B, 1, 2, 3,
etc.
One function / two steps: Lbl 1, Goto 2, Prog 8, etc.
Every step can be verifi ed by moving the cursor
Programming Areas and Calculation Modes
This calculator contains a total of 10 programming areas
(from P0 to P9) for the storage of programs.
A principal program and a number of secondary programs
can b stored as well. The total number of steps to be stored
is 400.
Only the number of programs that do not contain data will
be shown.
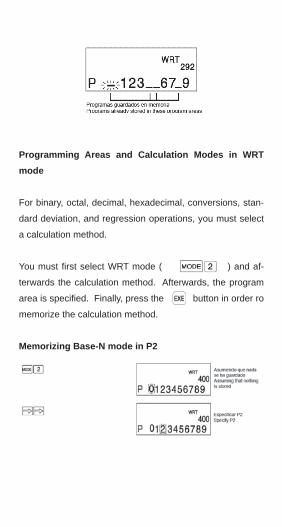
Programming Areas and Calculation Modes in WRT mode
For binary, octal, decimal, hexadecimal, conversions, stan-
dard deviation, and regression operations, you must select
a calculation method.
You must fi rst select WRT mode ( ) and af-
terwards the calculation method. Afterwards, the program
area is specifi ed. Finally, press the button in order ro
memorize the calculation method.
Memorizing Base-N mode in P2
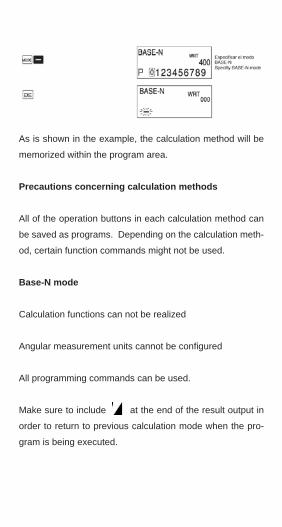
As is shown in the example, the calculation method will be
memorized within the program area.
Precautions concerning calculation methods
All of the operation buttons in each calculation method can
be saved as programs. Depending on the calculation meth-
od, certain function commands might not be used.
Base-N mode
Calculation functions can not be realized
Angular measurement units cannot be confi gured
All programming commands can be used.
Make sure to include at the end of the result output in
order to return to previous calculation mode when the pro-
gram is being executed.
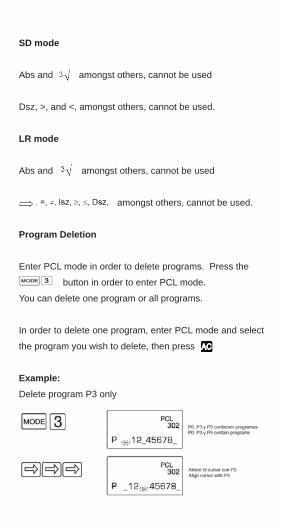
SD mode
Abs and amongst others, cannot be used
Dsz, >, and <, amongst others, cannot be used.
LR mode
Abs and amongst others, cannot be used
amongst others, cannot be used.
Program Deletion
Enter PCL mode in order to delete programs. Press the
button in order to enter PCL mode.
You can delete one program or all programs.
In order to delete one program, enter PCL mode and select
the program you wish to delete, then press
Example:Delete program P3 only
In order to delete all programs, enter PCL mode and press
the button.
Example:
Convenient Program Commands
The programs on this calculator are based on manual cal-
culations. The special program commands, however, are
available for formulas and the execution of formulas.
In the next section, a few convenient programs will be
shown.
Skip Command
Skip commands are used in order to change the fl ow of the
execution of programs.
Programs are executed in the order in which they were cre-
ated, starting from step 1 until the fi nal step. This system is
not very convenient when there are operations that repeat
themselves or when a transfer of results to another formula
is necessary. In these cases, a skip command is recom-
mended.
There are three types of skip commands:
- Unconditional skip to sub-routine destination
- Conditional skips which decide the sub-routine destination
through a true/false condition
- Counting of skips for incrementing or reducing a specifi c
memory and then deciding the sub-routine destination after
proving if the stored value is equal to zero or not.
Unconditional Skips
The unconditional skip is composed by the Go to command
and Lbl. When the execution of the program is approaching
Go to n (where n is a number between 0 and 9), the execu-
tion will skip to the command Lbl n (where n is he same
number as specifi ed in the Go to command).
The unconditional skip is normally used in simple programs
for returning to the beginning of the program and being able
to realize repetitive calculations.
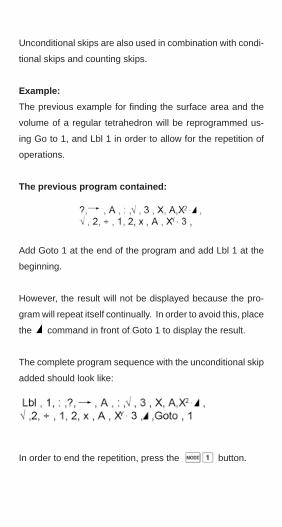
Unconditional skips are also used in combination with condi-
tional skips and counting skips.
Example:The previous example for fi nding the surface area and the
volume of a regular tetrahedron will be reprogrammed us-
ing Go to 1, and Lbl 1 in order to allow for the repetition of
operations.
The previous program contained:
Add Goto 1 at the end of the program and add Lbl 1 at the
beginning.
However, the result will not be displayed because the pro-
gram will repeat itself continually. In order to avoid this, place
the command in front of Goto 1 to display the result.
The complete program sequence with the unconditional skip
added should look like:
In order to end the repetition, press the button.
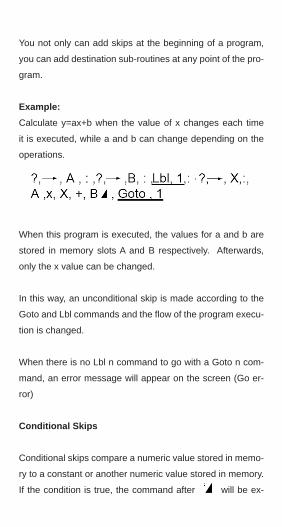
You not only can add skips at the beginning of a program,
you can add destination sub-routines at any point of the pro-
gram.
Example:Calculate y=ax+b when the value of x changes each time
it is executed, while a and b can change depending on the
operations.
When this program is executed, the values for a and b are
stored in memory slots A and B respectively. Afterwards,
only the x value can be changed.
In this way, an unconditional skip is made according to the
Goto and Lbl commands and the fl ow of the program execu-
tion is changed.
When there is no Lbl n command to go with a Goto n com-
mand, an error message will appear on the screen (Go er-
ror)
Conditional Skips
Conditional skips compare a numeric value stored in memo-
ry to a constant or another numeric value stored in memory.
If the condition is true, the command after will be ex-
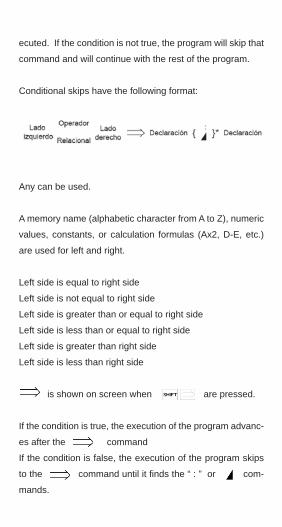
ecuted. If the condition is not true, the program will skip that
command and will continue with the rest of the program.
Conditional skips have the following format:
Any can be used.
A memory name (alphabetic character from A to Z), numeric
values, constants, or calculation formulas (Ax2, D-E, etc.)
are used for left and right.
Left side is equal to right side
Left side is not equal to right side
Left side is greater than or equal to right side
Left side is less than or equal to right side
Left side is greater than right side
Left side is less than right side
is shown on screen when are pressed.
If the condition is true, the execution of the program advanc-
es after the command
If the condition is false, the execution of the program skips
to the command until it fi nds the “ : ” or com-
mands.
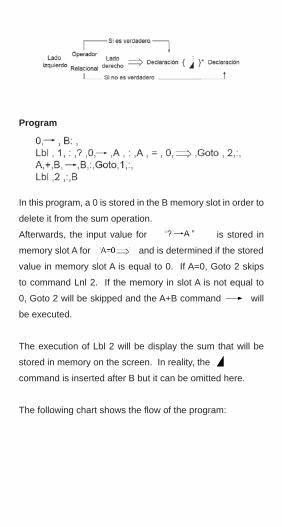
Program
In this program, a 0 is stored in the B memory slot in order to
delete it from the sum operation.
Afterwards, the input value for is stored in
memory slot A for and is determined if the stored
value in memory slot A is equal to 0. If A=0, Goto 2 skips
to command Lnl 2. If the memory in slot A is not equal to
0, Goto 2 will be skipped and the A+B command will
be executed.
The execution of Lbl 2 will be display the sum that will be
stored in memory on the screen. In reality, the
command is inserted after B but it can be omitted here.
The following chart shows the fl ow of the program:
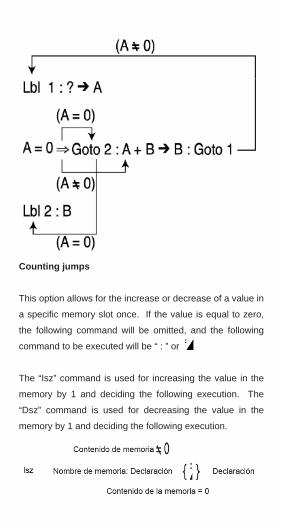
Counting jumps
This option allows for the increase or decrease of a value in
a specifi c memory slot once. If the value is equal to zero,
the following command will be omitted, and the following
command to be executed will be “ : ” or
The “Isz” command is used for increasing the value in the
memory by 1 and deciding the following execution. The
“Dsz” command is used for decreasing the value in the
memory by 1 and deciding the following execution.
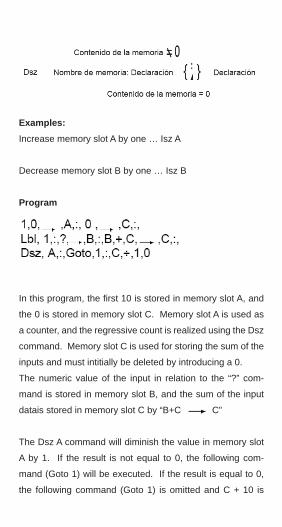
Examples:Increase memory slot A by one … Isz A
Decrease memory slot B by one … Isz B
Program
In this program, the fi rst 10 is stored in memory slot A, and
the 0 is stored in memory slot C. Memory slot A is used as
a counter, and the regressive count is realized using the Dsz
command. Memory slot C is used for storing the sum of the
inputs and must intitially be deleted by introducing a 0.
The numeric value of the input in relation to the “?” com-
mand is stored in memory slot B, and the sum of the input
datais stored in memory slot C by “B+C C”
The Dsz A command will diminish the value in memory slot
A by 1. If the result is not equal to 0, the following com-
mand (Goto 1) will be executed. If the result is equal to 0,
the following command (Goto 1) is omitted and C + 10 is
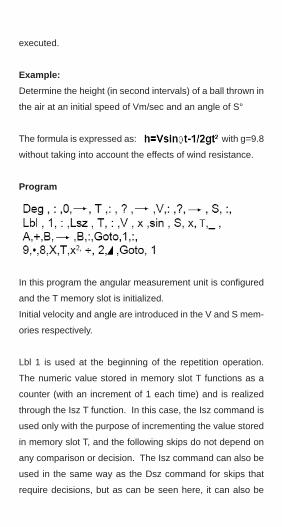
executed.
Example:Determine the height (in second intervals) of a ball thrown in
the air at an initial speed of Vm/sec and an angle of S°
The formula is expressed as: with g=9.8
without taking into account the effects of wind resistance.
Program
In this program the angular measurement unit is confi gured
and the T memory slot is initialized.
Initial velocity and angle are introduced in the V and S mem-
ories respectively.
Lbl 1 is used at the beginning of the repetition operation.
The numeric value stored in memory slot T functions as a
counter (with an increment of 1 each time) and is realized
through the Isz T function. In this case, the Isz command is
used only with the purpose of incrementing the value stored
in memory slot T, and the following skips do not depend on
any comparison or decision. The Isz command can also be
used in the same way as the Dsz command for skips that
require decisions, but as can be seen here, it can also be

used to increase values.
If, instead of using the Isz command, you use another
method such as “T+1 T”, 5 steps or instructions are
necessary instead of two (Isz T). These commands are a
convenient way of conserving free space in the memory.
Each time that the T memory slot is increased, the calcula-
tions are made according to the formula, and the height is
displayed on the screen.
To exit this program, press the button.
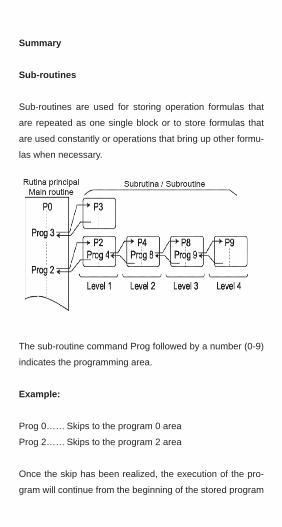
Summary
Sub-routines
Sub-routines are used for storing operation formulas that
are repeated as one single block or to store formulas that
are used constantly or operations that bring up other formu-
las when necessary.
The sub-routine command Prog followed by a number (0-9)
indicates the programming area.
Example:
Prog 0…… Skips to the program 0 area
Prog 2…… Skips to the program 2 area
Once the skip has been realized, the execution of the pro-
gram will continue from the beginning of the stored program
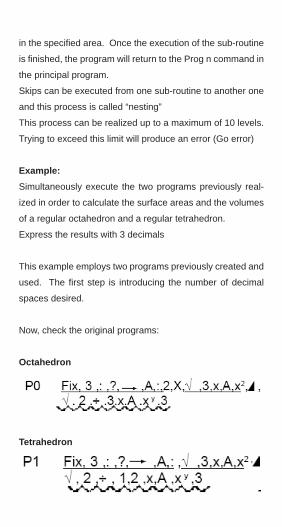
in the specifi ed area. Once the execution of the sub-routine
is fi nished, the program will return to the Prog n command in
the principal program.
Skips can be executed from one sub-routine to another one
and this process is called “nesting”
This process can be realized up to a maximum of 10 levels.
Trying to exceed this limit will produce an error (Go error)
Example:Simultaneously execute the two programs previously real-
ized in order to calculate the surface areas and the volumes
of a regular octahedron and a regular tetrahedron.
Express the results with 3 decimals
This example employs two programs previously created and
used. The fi rst step is introducing the number of decimal
spaces desired.
Now, check the original programs:
Octahedron
Tetrahedron
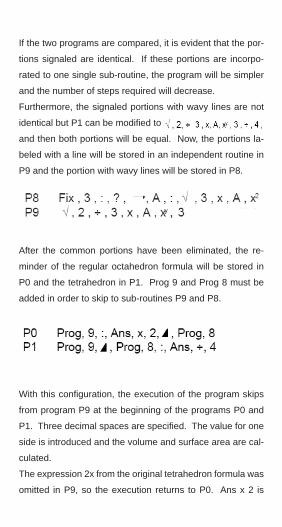
If the two programs are compared, it is evident that the por-
tions signaled are identical. If these portions are incorpo-
rated to one single sub-routine, the program will be simpler
and the number of steps required will decrease.
Furthermore, the signaled portions with wavy lines are not
identical but P1 can be modifi ed to
and then both portions will be equal. Now, the portions la-
beled with a line will be stored in an independent routine in
P9 and the portion with wavy lines will be stored in P8.
After the common portions have been eliminated, the re-
minder of the regular octahedron formula will be stored in
P0 and the tetrahedron in P1. Prog 9 and Prog 8 must be
added in order to skip to sub-routines P9 and P8.
With this confi guration, the execution of the program skips
from program P9 at the beginning of the programs P0 and
P1. Three decimal spaces are specifi ed. The value for one
side is introduced and the volume and surface area are cal-
culated.
The expression 2x from the original tetrahedron formula was
omitted in P9, so the execution returns to P0. Ans x 2 is
used in order to obtain the octahedron surface area.
In the case of P1, the result of P9 needs to be unmodifi ed.
The volume calculation is also realized in a similar form. Af-
ter the skip is realized to P8 in order to realize the calcula-
tion, the execution returns to the principal routine. In P0,
the program fi nishes after the volume of the octahedron is
displayed on the screen. In P1, however, the result of the
P8 calculation is divided by 4 in order to obtain the volume
of the tetrahedron.
Using subroutines in this way, the used steps can be re-
duced and the programs can be read in an easier way.
The following illustration shows the fl ow of the program.
Types of Memory Fixes
Up until this point, all memories are referred to by characters
such as A, B, X, or Y.

With the fi xing of the memories, you can add a number to
the alphabetic character.
Brackets are introduced by pressing the button and
the button.
Standard Memory Memory FixA A[0] C[-2]
B A[0] C[-1]
C A[2] C[0]
D A[3] C[1]
E A[4] C[2]
The adequate use of the sub-routines make the programs
shorter and easier to use.
Negative values used in sub-routines are counted in relation
to the zero memory.
Example:Introduce a number 1-10 in the A-J memory slots.
Using standard memory:
Using fi xed memories
When you introduce values one by one in standard memory,
you will provoke it to be ineffi cient and you will have wasted
time.
What happens if you want to view a stored value in a specifi c
memory?
Using standard memory
Using fi xed memory
The difference can be easily identifi ed. When you use stan-
dard memory, the input values are compared one by one
to the assigned value of each memory (A=1 B=2…). With
fi xed memory, the value input is immediately stored in the
correct memory.
Precautions when using fi xed memory
When using this type of memory, a guide can be annexed to
the alphabetic character.
Be careful when overwriting memories.
The relation will be this way:
The following example shows a case of memory overwrit-
ing.
Example:Store the numeric values 1-5 in meory slots A [1] to A [5]
respectively.
In this program, the values 1-5 are stored in fi xed memories
A [1] to A [5] and memory slot C is used as a memory coun-
ter. When this program is executed, the following result is
obtained:
Ass you can see, the second value displayed (which should
be 2) in A [2] is incorrect. This problem is because [A2]
memory is the same as memory C.
The data in memory c ([A2]) diminished from 5 to 0 in step
1.
Also, the data in memory [A2] is displayed as 0.
Memory Fix Applications
When you need to manage two different types of data in a
single group. In this case, the memory for data processes
and for data storage can be managed separately.
Example:Record the data x and y in memory. When the value of x is
introduced, the corresponding value of y is displayed on the
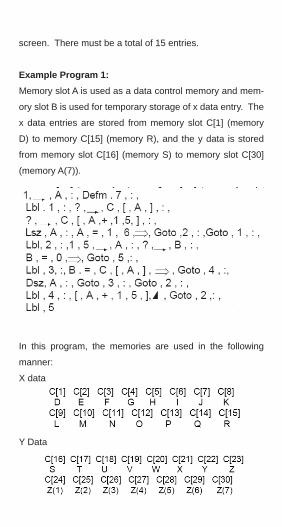
screen. There must be a total of 15 entries.
Example Program 1:Memory slot A is used as a data control memory and mem-
ory slot B is used for temporary storage of x data entry. The
x data entries are stored from memory slot C[1] (memory
D) to memory C[15] (memory R), and the y data is stored
from memory slot C[16] (memory S) to memory slot C[30]
(memory A(7)).
In this program, the memories are used in the following
manner:
X data
Y Data
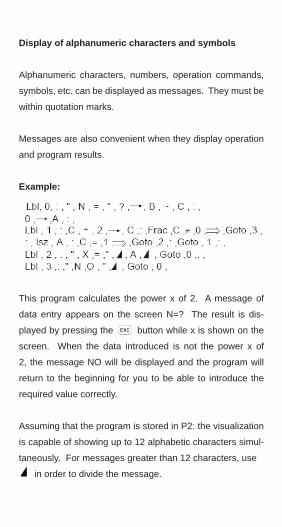
Display of alphanumeric characters and symbols
Alphanumeric characters, numbers, operation commands,
symbols, etc. can be displayed as messages. They must be
within quotation marks.
Messages are also convenient when they display operation
and program results.
Example:
This program calculates the power x of 2. A message of
data entry appears on the screen N=? The result is dis-
played by pressing the button while x is shown on the
screen. When the data introduced is not the power x of
2, the message NO will be displayed and the program will
return to the beginning for you to be able to introduce the
required value correctly.
Assuming that the program is stored in P2: the visualization
is capable of showing up to 12 alphabetic characters simul-
taneously. For messages greater than 12 characters, use
in order to divide the message.
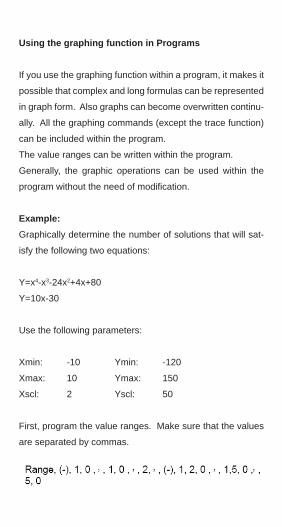
Using the graphing function in Programs
If you use the graphing function within a program, it makes it
possible that complex and long formulas can be represented
in graph form. Also graphs can become overwritten continu-
ally. All the graphing commands (except the trace function)
can be included within the program.
The value ranges can be written within the program.
Generally, the graphic operations can be used within the
program without the need of modifi cation.
Example:Graphically determine the number of solutions that will sat-
isfy the following two equations:
Y=x4-x3-24x2+4x+80
Y=10x-30
Use the following parameters:
Xmin: -10 Ymin: -120
Xmax: 10 Ymax: 150
Xscl: 2 Yscl: 50
First, program the value ranges. Make sure that the values
are separated by commas.

Program the equation for the fi rst graph
Finally, program the equation for the second graph
When writing this program, press the button after intro-
ducing the ranges and the fi rst equation.
The following should appear when the program is
executed.
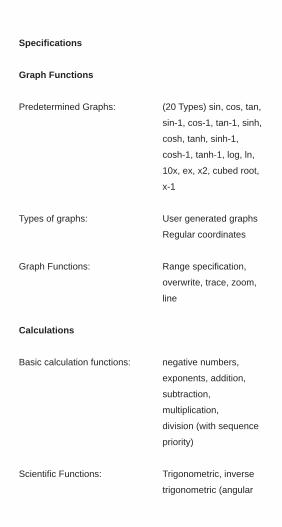
Specifi cations
Graph Functions
Predetermined Graphs: (20 Types) sin, cos, tan,
sin-1, cos-1, tan-1, sinh,
cosh, tanh, sinh-1,
cosh-1, tanh-1, log, ln,
10x, ex, x2, cubed root,
x-1
Types of graphs: User generated graphs
Regular coordinates
Graph Functions: Range specifi cation,
overwrite, trace, zoom,
line
Calculations
Basic calculation functions: negative numbers,
exponents, addition,
subtraction,
multiplication,
division (with sequence
priority)
Scientifi c Functions: Trigonometric, inverse
trigonometric (angular

measurement units:
degrees, radians,
gradients), hyperbole,
inverse hyperbole,
logarithms, exponential
functions, reciprocals,
factors, square root,
decimal-sexadecimal
conversion, binary-octal
conversion, coordinate
transformation, random
numbers, absolute
values, integrals,
fractions.
Statistical functions: Standard deviation,
number of data entries,
sum, sum of squares,
median. Linear
regression: number
of data entries, sum of
x, sum of y, sum of
squares of x, sum of
squares of y, median of
x, median of y, standard
deviation of x, standard
deviation of y, constants,
regression coeffi cients,
correlation coeffi cient,
estimated value of x,
estimated value of y.
Special functions: Insert, delete, repetition
functions, substitution
(=), multi-result
Memories: 26 standard memories
(76 maximum), Ans
memory
Calculation range: ±1 x 1099 – 9.999999999
x 1099 and 0. Intenal
operations use 12 digits.
Rounding: Realized based on the
number of specifi ed
signifi cant digitsor
number of specifi ed
decimal places.
Exponential Display
Programming Functions
Number of steps: 400 maximum
Skip functions: Unconditional skip (Go
to), 10 unconditional
skips maximum,
skip count.
Sub-routines: 9 levels
Number of Stored Programs: Maximum 10
Verifi cation functions: Edition, verifi cation,
deletion, addition,
insertion, etc.
Input: 3V (CR2032)
Auto-Off: The calculator will turn
off after 6 minutes of
inactivity.
Working Temperature: 0°C-40°C
Note:Product details and specifi cations are subject to change
without previous notice.
Recommended