Embed Size (px)
Citation preview
1
DEVELOPING ANDROID BASED APPS TUTORIALS ON NP, NP
COMPLETE, NP-HARD COMPLEXITY CLASSES
REPORT OF PROJECT SUBMITTED FOR PARTIAL FULFILLMENT OF THE REQUIREMENT FOR
THE DEGREE OF BACHELOR OF TECHNOLOGY
IN
COMPUTER SCIENCE & ENGINEERING
SUBMITTED BY
Piu Hazra UNIVERSITY ROLL NO – 11500112176
REGISTRATION NO – 121150120017
Pushpa Kumari UNIVERSITY ROLL NO – 11500112179
REGISTRATION NO – 121150120020
Subha Deb UNIVERSITY ROLL NO – 11500112188
REGISTRATION NO – 121150120029
Sudipa Shil UNIVERSITY ROLL NO – 11500112190
REGISTRATION NO – 121150120031
UNDER THE SUPERVISION OF
Somenath Roy Choudhury
DEPARTMENT OF COMPUTER SCIENCE & ENGINEERING,
B. P. PODDAR INSTITUTE OF MANAGEMENT AND TECHNOLOGY
AT
B. P. PODDAR INSTITUTE OF MANAGEMENT AND TECHNOLOGY [Affiliated to West Bengal
University of Technology]137, V.I.P. ROAD, PODDAR VIHAR, KOLKATA – 700052

2
CERTIFICATE
The report of the Project titled Developing Android Based Apps Tutorial on NP, NP Complete, NP-Hard
Complexity Classes submitted by Piu Hazra(Roll No.:11500112176), Pushpa Kumari(Roll No.:11500112179),
Subha Deb(Roll No.:11500112188), Sudipa Shil (Roll No.:11500112190), has been prepared under my
supervision for the partial fulfillment of the requirements for B Tech degree in Computer Science &
Engineering under the West Bengal University of Technology
The report is hereby forwarded.
…………………………………….
Mr. Somenath Roy Choudhury
Assistant Professor, Dept. of Computer Science & Engineering
B. P. PODDAR INSTITUTE OF MANAGEMENT & TECHNOLOGY
Countersigned by
……………………………………
Dr. Ananya Kanjilal
Head, Department of CSE
B. P. PODDAR INSTITUTE OF MANAGEMENT & TECHNOLOGY
3
ACKNOWLEDGEMENT
We express my sincere gratitude to Mr. Somenath Roy Choudhury of Department of
Computer Science and Engineering, BPPIMT and for extending his valuable times for me to take up this
problem as a Project.
Date: 20/05/2015
……………………………………
Piu Hazra
Reg. No.: 121150120017
Roll No.: 11500112176
……………………………………
Pushpa Kumari
Reg. No.: 121150120020
Roll No.: 11500112179
……………………………………
Subha Deb
Reg. No.: 121150120029
Roll No.: 11500112188
……………………………………
Sudipa Shil
Reg. No.: 121150120031
Roll No.: 11500112190
4
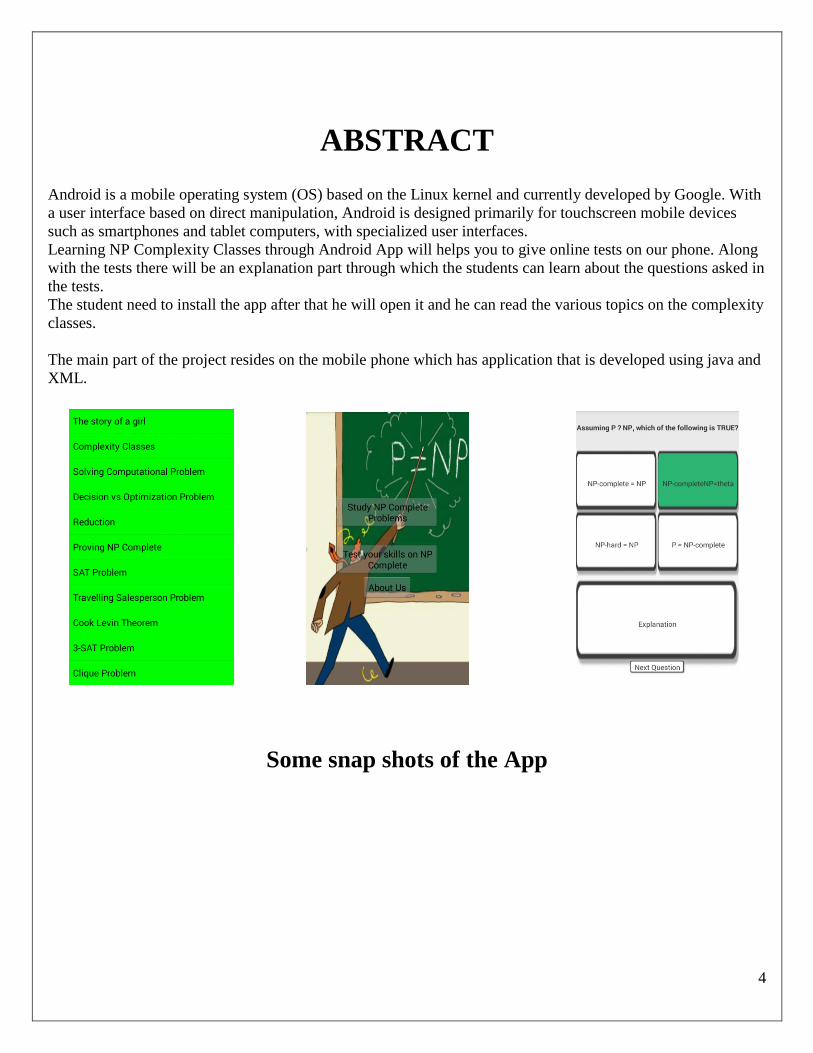
ABSTRACT
Android is a mobile operating system (OS) based on the Linux kernel and currently developed by Google. With
a user interface based on direct manipulation, Android is designed primarily for touchscreen mobile devices
such as smartphones and tablet computers, with specialized user interfaces.
Learning NP Complexity Classes through Android App will helps you to give online tests on our phone. Along
with the tests there will be an explanation part through which the students can learn about the questions asked in
the tests.
The student need to install the app after that he will open it and he can read the various topics on the complexity
classes.
The main part of the project resides on the mobile phone which has application that is developed using java and
XML.
Some snap shots of the App
5
TABLE OF CONTENTS
Topics Page No.
1. Introduction……………………………………………………………………….6
2. Requirement Analysis and System Specification…………………..…………..…..9
3. Review of Literature………………………………………..……………………...11
4. Design………………………………………………………………………………12
5. Implementation Details……………………………………………………………..20
6 Testing……………….……………………………………………………………….75
7.Proposed Work……………………………………………………………………….78
8.Experimental Result………………………………………………………………….79
9 Conclusion……………………………………………………………………………80
10 References……………………………………………………………………………81
6
Introduction
This project is about the developing an android application. Nowadays, the gadgets are rolling the world. Many
people cannot imagine even one day without their favorite mobile device. We use them for everything: find
information, stay connected with our friends and families, find the way around, decide what to do, and many
other things. But very often we come to the point when we would like to have an application for particular
situation or for certain need, but there is no such one. Developing of an application usually takes lots of time
and needs professional knowledge of software. And then as people do not find the application they tend to wait
until somebody is developing one, or they have to go to the web and ask people to implement their ideas. On
different forums there are tons of brilliant ideas but they will wait until developers will see them. On the other
hand there are lots of enthusiastic developers who are looking for ideas to implement them.
Mobile technology has shown greater advancement from past few years, and Mobile phones are the backbone o
f this technology. Today’s mobile phones are lot more than a communication device, there are around 2‐Billion
mobile phones working presently and their usage is increasing drastically. A mobile phone is functionally divid
ed in to two parts: communication part and application part. The later part offers a revolutionary use of a mobile
phone. Present 3‐G phones have applications for anything such as an application for tracking your parked car, l
ocating near by coffee shop, finding a hotel in town. Providing applications to increase the functionality of the
mobile phones will be a serious Business idea. Targeting in providing applications, which integrate much usabil
ity will be in strong demand among the Mobile phone users and service providers.
Purpose
Technology is ubiquitous, and therefore has become a vital part of everyday life; however, the focus of
education and educators should not be on the technology that teachers and students are using, but rather the
educational opportunities and experiences that are available.
Currently, teachers utilize, and the technology department supports, a wide variety of technology tools. This
requires a significant investment in time and training with each tool and reduces the time available for teachers
and support staff to spend on curriculum development and classroom support.
This app will ensure the students to master the topic on their own.
7
Scope The scope defines project limits and identifies the products and/or services delivered by the project. The scope
establishes the boundaries of the project and should describe products and/or services that are outside of the
project scope.
The project Includes:
1. Studying on the various topics within NP complete
2. User Friendly interface
3. Ability to read the contents offline
4. Testing the skills at the end
The project Excludes
1. Any type of test that with marks count.
Need for the application
In my opinion it is a shame that there is no such an application that will keep the user and developers connected
that is why good ideas tend to be lost. For this reason we need to develop application that will satisfy both
groups and help them to share their ideas. Of course there are several sources on the web which might offer
nearly similar services. Good example of it is the Best Ideas web site http://www.bestappideas.com/. But unique
of our idea is to unite the end user and developer; on the other hand goal of Best Ideas is to join designer and
investor though they can design an application. Such an approach might be more commercially effective but not
so creative. No doubts that around whole ideas some can be silly but on the other hand can be brilliant. There
are also many separate forums where people can share their ideas. But there are no dedicated ones which can
serve as one source for the projects. And of course there is not a single application for Android where users can
share their ideas. Based on this we can conclude that our application is needed for today's developing
environment and it will be well demanded around android users. Goals The goals of this project are to develop
application which will team up android developers and user. The application must have simple interface, server
connectivity, group all applications into categories, inform any group of users about certain event and etc. Also
in this thesis project we aim to learn Android development process on example of this application development.
In this thesis we about to learn: how to create an Android application, how to set up application layout, how to
program in Java language for Android framework and also how to run the application on Emulator and any
physical Android device.
8
Why Android is better ? Applications
- google applications
Android includes most of the time many Google applications like Gmail, YouTube or Maps.
These applications are delivered with the machine most of the time, except in certain cases, such as some
phones running android on which the provider has replaced Google applications by its own applications.
-widgets
With android, it is possible to use widgets which are small tools that can most often get
information. These widgets are directly visible on the main window.
-Android Market
This is an online software store to buy applications. Developers who created applications
can add them into the store, and these applications can be downloaded by users, they can be both free and
paid.
• Multitasking
Android allows multitasking in the sense that multiple applications can run simultaneously.
With Task Manager it is possible view all running tasks and to switch from one to another easily.
• SDK
A development kit has been put at disposal of everybody. Accordingly, any developer can
create their own applications, or change the android platform. This kit contains a set of libraries, powerful
tools for debugging and development, a phone emulator, thorough documentation, FAQs and tutorials.
• Modifiability:
This allows everyone to use, improve or transform the functions of Android for example transform
the interface in function of uses , to transform the platform in a real system embedded Linux.
9
Requirement Analysis and System Specification
Feasibility Study Depending on the results of the initial investigation, the survey is expanded to a more detailed feasibility study.
Feasibility study is a test of system proposal according to its work ability, impact on the organization, ability to
meet user needs, and effective use of resources. The objective for this phase is not to solve the problem but to
acquire a sense of scope. During the study, the problem definition is crystallized and aspects of the problem to
be included in the system are deter- mined. Mobile Application Development Systems are capital investments
because resources are being spent currently in order to achieve benefits to be received over a period of time
following completion. There should be a careful assessment of each project before it is begun in terms of
economic justification, technical feasibility, operational impact and adherence to the master development plan.
We started the project by listing the possible queries that the user might want to be satisfied. And on these lines
we guided the project further.
The three main points, kept in mind at the time of project, are :
_ Possible (To build it with the given technology and resources)
_ Affordable (given the time and cost constraints of the organization)
_ Acceptable (for use by the eventual users of the system
The three major areas to be considered while determining the feasibility of a project are:
1. Technical Feasibility:
The technical issue usually raised during the feasibility stage of the investigation includes the
following:
_ Does the necessary technology exist to do what is suggested?
_ Do the proposed equipment have the technical capacity to hold the data required to use the new
system?
_ Will the proposed system provide adequate response to inquiries, regardless of the number or location
of users?
_ Can the system be upgraded if developed?
_ Are there technical guarantees of accuracy, reliability, ease of access and data security?
Earlier no system existed to cater to the needs of Secure Infrastructure Implementation System.
The current system developed is technically feasible. It is a web based user interface. Thus it provides
an easy access to the users. The databases purpose is to create, establish and maintain a work- flow
among various entities in order to facilitate all concerned users in their various capacities or roles.
Permission to the users would be granted based on the roles specified. Therefore, it provides the
technical guarantee of accuracy, reliability and security. The software and hardware requirements for
the development of this project are not many and are already available as free as open source. The work
10
for the project is done with the current equipment and existing softwarebtechnology. Necessary
bandwidth exists for providing a fast feed- back to the users irrespective of the number of users using
the system.
2. Operational Feasibility: Under this category of service we conduct a study to analysis and determine whether your need can be
fulfilled by using a proposed solution. The result of our operational feasibility Study will clearly outline
that the solution proposed for your business is operationally workable and conveniently solves your
problems under consideration after the proposal is implemented.
We would precisely describe how the system will interact with the systems and persons around. Our
feasibility report would provide results of interest to all stakeholders. It will do as per the needs of the
business requirements.
3. Timeline Feasibility: It is important to understand that a need must be fulfilled when it has to be. Some otherwise feasible
and highly desirable projects can become non-feasible due to very restrictive timeline constraints. This
fact makes it imperative that milestones are clearly linked to the timeline and projects are well
conceived with safe unforeseen margins. We make sure that we strictly follow what has been stated
above.
11
Review of Literature
The literature review method is an examination of information on specific subject. It is reviewing what is
known and not what is assumed. It aims to create the final, precise representation of the knowledge and
research-based theory available topic.
12
Design
Design Approach
A design approach is a general philosophy that may or may not include a guide for specific methods.
Some are to guide the overall goal of the design. Other approaches are to guide the tendencies of the designer. A
combination of approaches may be used if they don’t conflict.
Function Oriented Design Approach:
Function Oriented Design Approach is partitioning of a design into subsystems and modules, with each one
handling one or more functions. Contrast with object-oriented design, data-structure-oriented design.
This application project uses function oriented design approach. Every module and sub modules are made,
based on their functionality. These modules are designed and implemented separately and then they are
integrated together to form the desired application.
Detail Design The detailed design of this application is as follow:
The user will open the app and then he will start the examination
He will be shown the answer will be correct or wrong with red and green
If he will answer correctly then there will be a green color on the answer he marked
Else there will be red color on the answer he marked
Along with these there is an explanation part in each question it will help the students to get an explanation of
the problem or question that was asked.
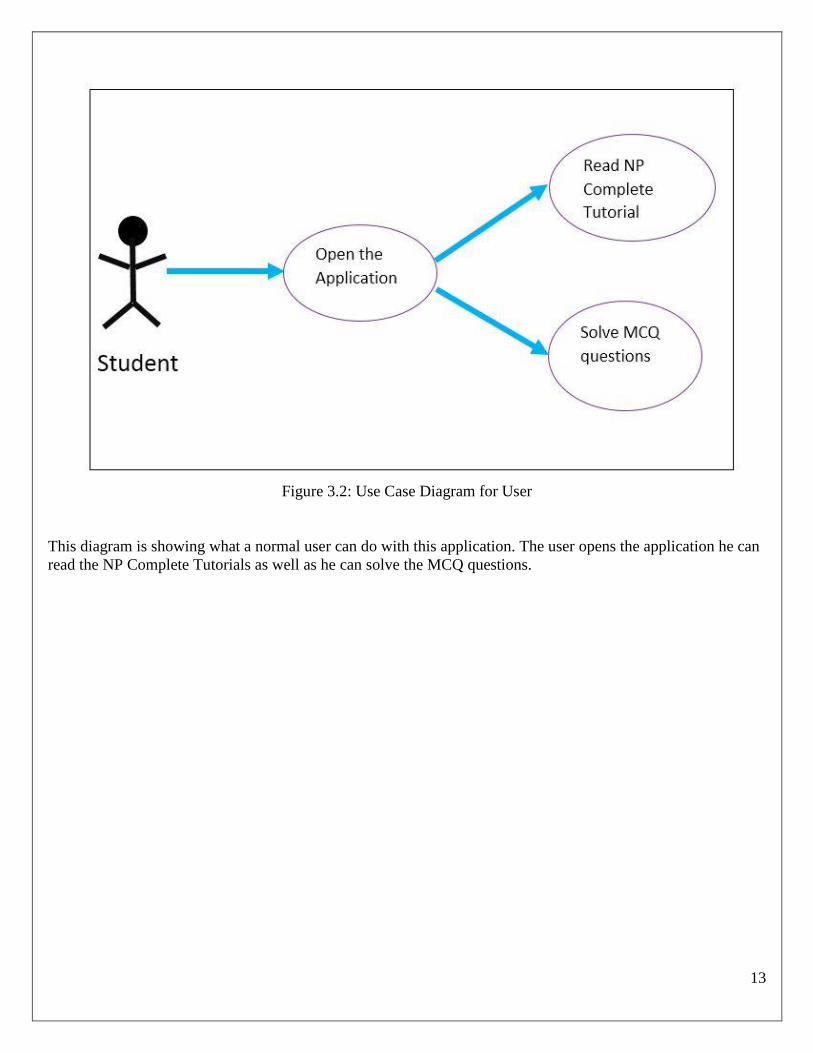
System Design The system design can be clearly explained from the following diagrams: Use Case Diagram:
A Use Case diagram at its simplest is a representation of a user’s interaction with the system and depicting the
specifications of a use case. A use case diagram can portray the different types of users of a system and the
various ways that they interact with the system. This type of diagram is typically used in conjunction with the
textual use case and will often be accompanied by other types of diagrams as well.
. Following depicts their use case diagram:
13
Figure 3.2: Use Case Diagram for User
This diagram is showing what a normal user can do with this application. The user opens the application he can
read the NP Complete Tutorials as well as he can solve the MCQ questions.

14
Figure 3.2: Use Case Diagram for Administrator
This diagram is showing what a normal user can do with this application. The user opens the application he can
add tutorial notes, update Tutorials, Add question-Answers and Remove the question answers..

15
User Interface Design
User Interface Design means the design of application with which the user interacts. So it should be kept in
mind that UI should be very simple and easy to use. It should be simple enough in look and feel also.
Left: Home page of the app Right: the index of topics

16
Here the tutorial of NP Starts
17
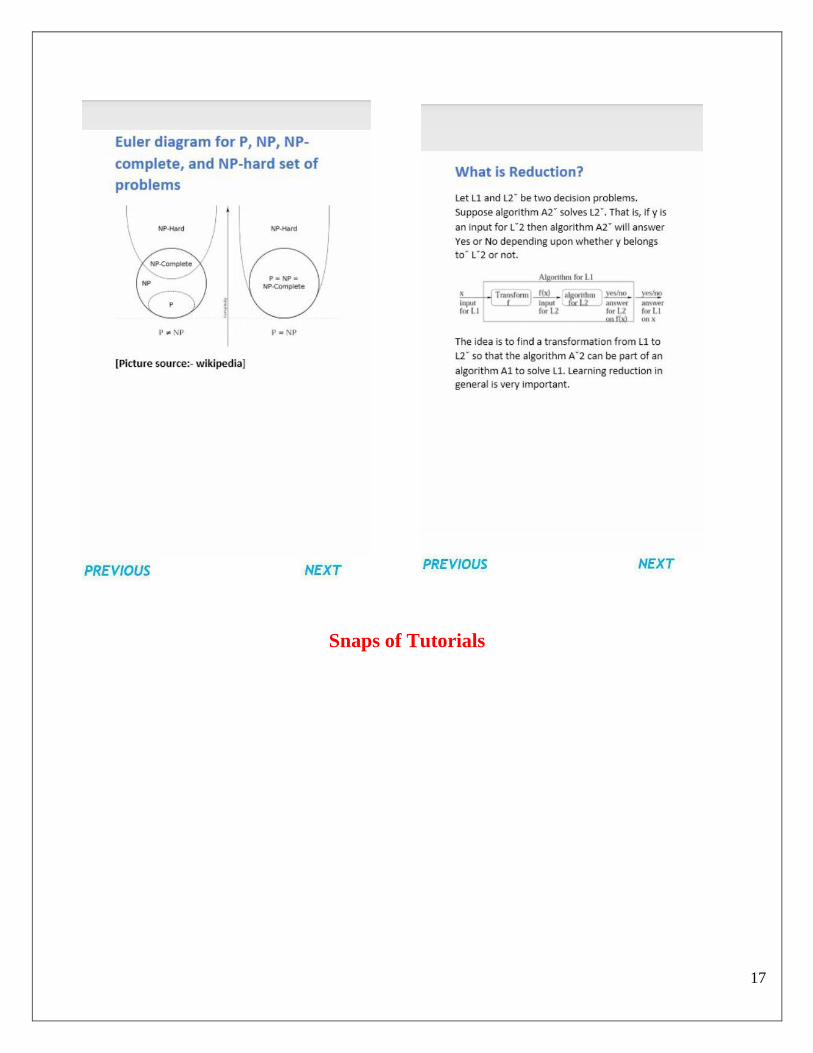
Snaps of Tutorials
18
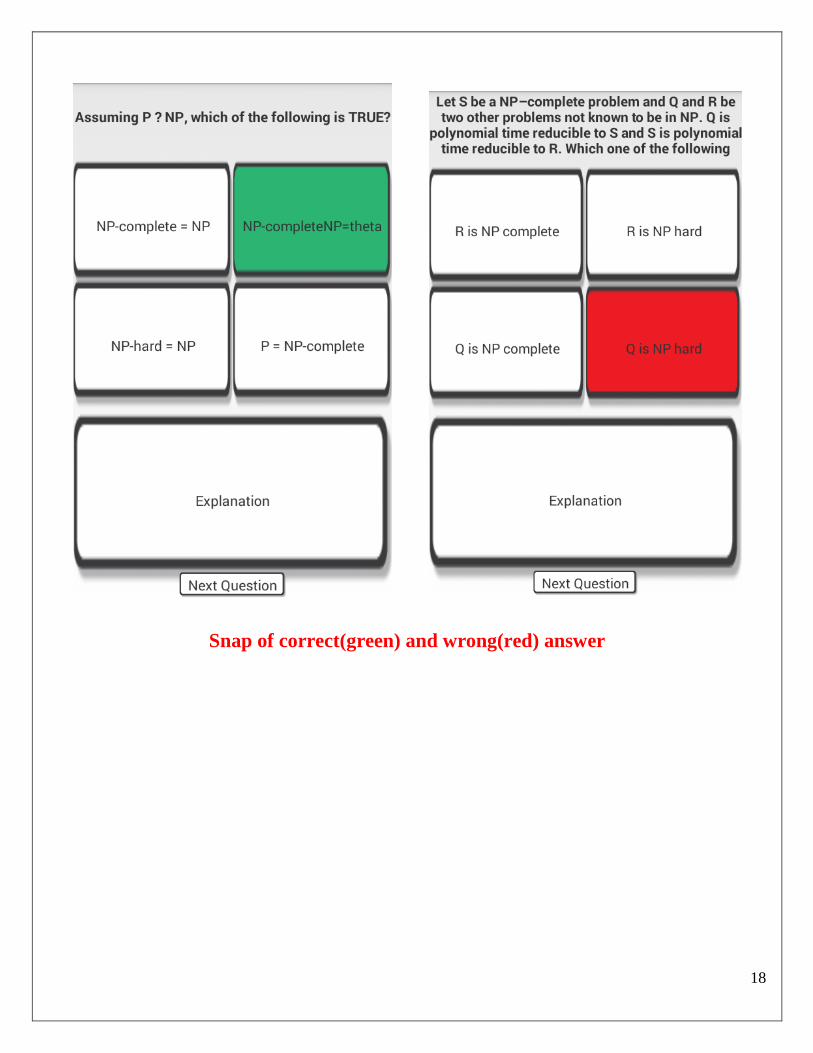
Snap of correct(green) and wrong(red) answer

19
Snaps of the app taken from Google Play Store
20
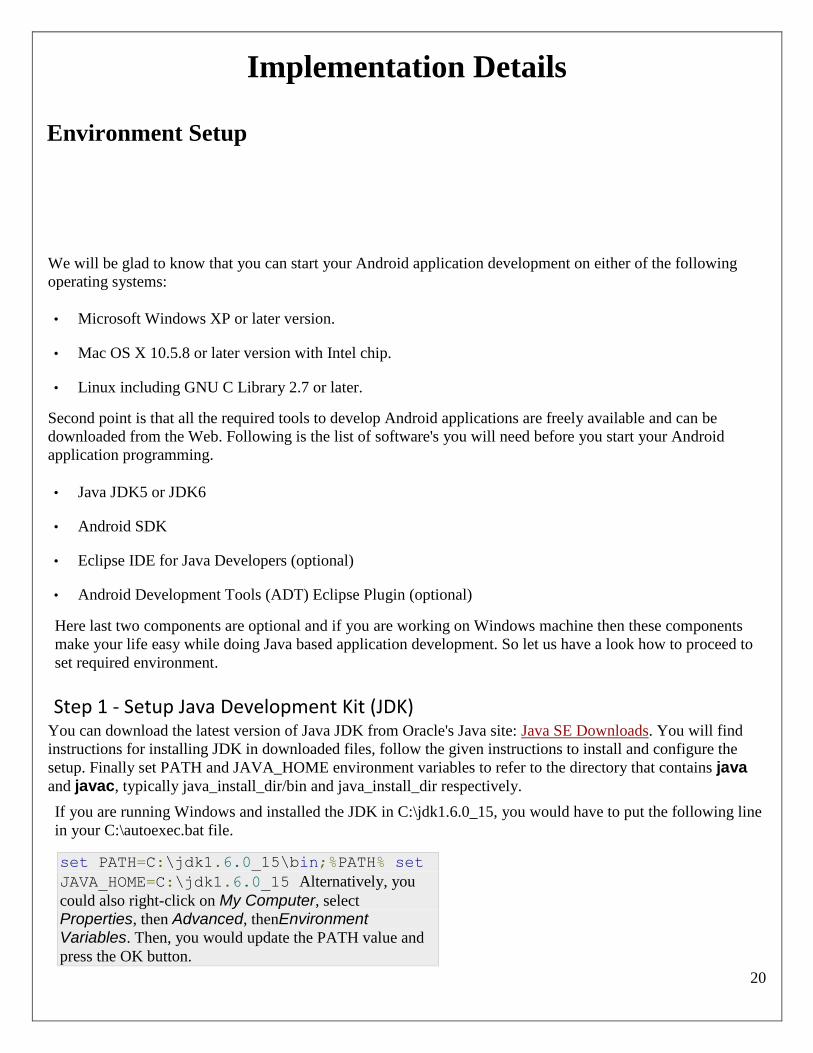
Implementation Details
Environment Setup
We will be glad to know that you can start your Android application development on either of the following
operating systems:
• Microsoft Windows XP or later version.
• Mac OS X 10.5.8 or later version with Intel chip.
• Linux including GNU C Library 2.7 or later.
Second point is that all the required tools to develop Android applications are freely available and can be
downloaded from the Web. Following is the list of software's you will need before you start your Android
application programming.
• Java JDK5 or JDK6
• Android SDK
• Eclipse IDE for Java Developers (optional)
• Android Development Tools (ADT) Eclipse Plugin (optional)
Here last two components are optional and if you are working on Windows machine then these components
make your life easy while doing Java based application development. So let us have a look how to proceed to
set required environment.
Step 1 - Setup Java Development Kit (JDK) You can download the latest version of Java JDK from Oracle's Java site: Java SE Downloads. You will find
instructions for installing JDK in downloaded files, follow the given instructions to install and configure the
setup. Finally set PATH and JAVA_HOME environment variables to refer to the directory that contains java
and javac, typically java_install_dir/bin and java_install_dir respectively.
If you are running Windows and installed the JDK in C:\jdk1.6.0_15, you would have to put the following line
in your C:\autoexec.bat file.
set PATH=C:\jdk1.6.0_15\bin;%PATH% set
JAVA_HOME=C:\jdk1.6.0_15 Alternatively, you
could also right-click on My Computer, select
Properties, then Advanced, thenEnvironment Variables. Then, you would update the PATH value and
press the OK button.
21
On Linux, if the SDK is installed in /usr/local/jdk1.6.0_15 and you use the C shell, you would put the
following code into your .cshrc file.
setenv PATH /usr/local/jdk1.6.0_15/bin:$PATH
setenv JAVA_HOME /usr/local/jdk1.6.0_15
Alternatively, if you use an Integrated Development Environment (IDE) Eclipse, then it will know
automatically where you have installed your Java.
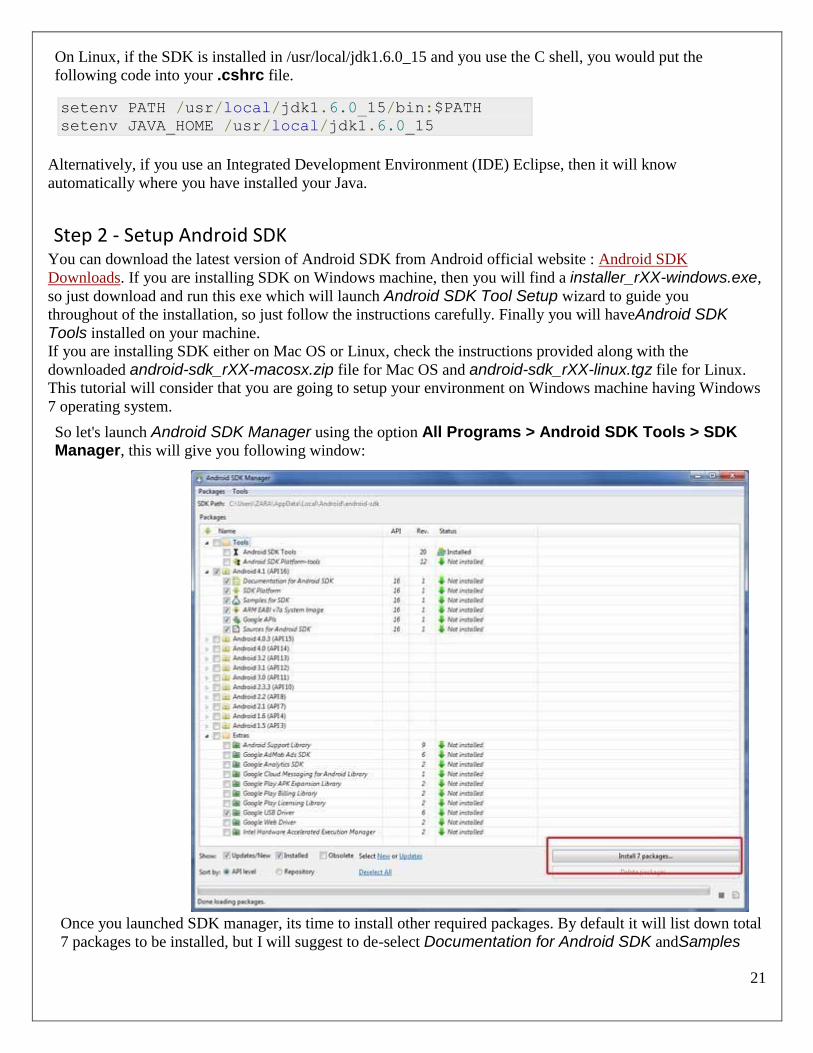
Step 2 - Setup Android SDK You can download the latest version of Android SDK from Android official website : Android SDK
Downloads. If you are installing SDK on Windows machine, then you will find a installer_rXX-windows.exe,
so just download and run this exe which will launch Android SDK Tool Setup wizard to guide you
throughout of the installation, so just follow the instructions carefully. Finally you will haveAndroid SDK Tools installed on your machine.
If you are installing SDK either on Mac OS or Linux, check the instructions provided along with the
downloaded android-sdk_rXX-macosx.zip file for Mac OS and android-sdk_rXX-linux.tgz file for Linux.
This tutorial will consider that you are going to setup your environment on Windows machine having Windows
7 operating system.
So let's launch Android SDK Manager using the option All Programs > Android SDK Tools > SDK Manager, this will give you following window:
Once you launched SDK manager, its time to install other required packages. By default it will list down total
7 packages to be installed, but I will suggest to de-select Documentation for Android SDK andSamples
22
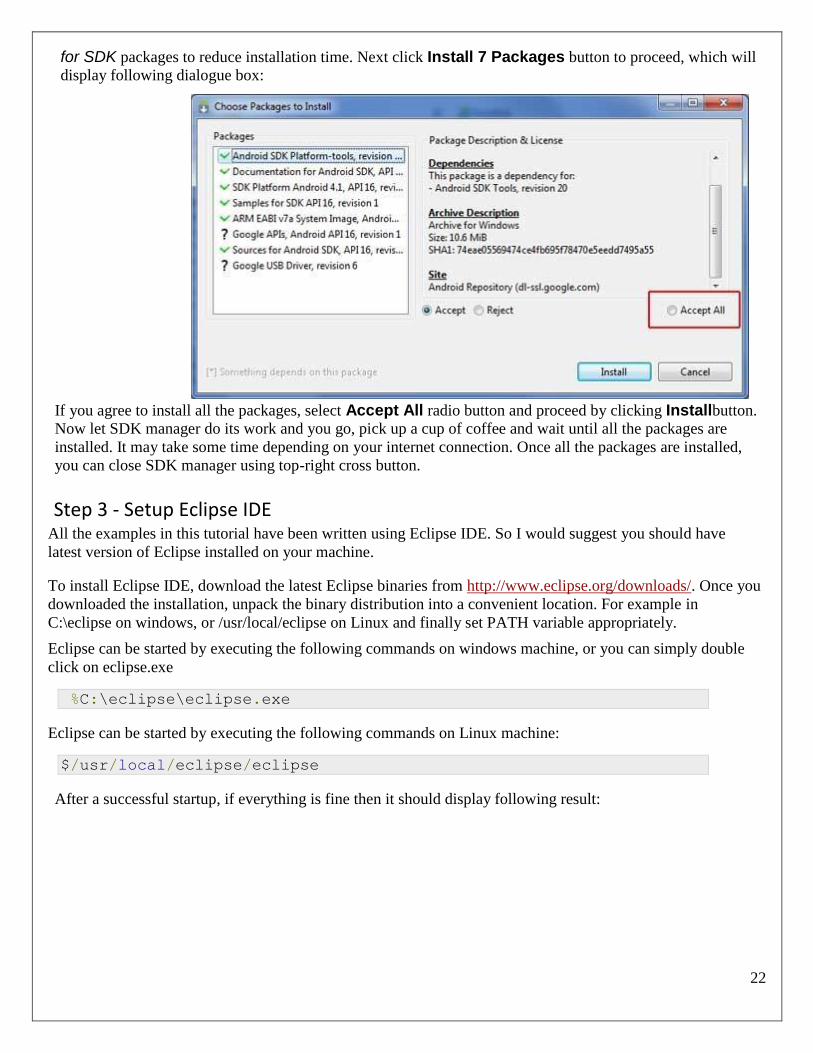
for SDK packages to reduce installation time. Next click Install 7 Packages button to proceed, which will
display following dialogue box:
If you agree to install all the packages, select Accept All radio button and proceed by clicking Installbutton.
Now let SDK manager do its work and you go, pick up a cup of coffee and wait until all the packages are
installed. It may take some time depending on your internet connection. Once all the packages are installed,
you can close SDK manager using top-right cross button.
Step 3 - Setup Eclipse IDE All the examples in this tutorial have been written using Eclipse IDE. So I would suggest you should have
latest version of Eclipse installed on your machine.
To install Eclipse IDE, download the latest Eclipse binaries from http://www.eclipse.org/downloads/. Once you
downloaded the installation, unpack the binary distribution into a convenient location. For example in
C:\eclipse on windows, or /usr/local/eclipse on Linux and finally set PATH variable appropriately.
Eclipse can be started by executing the following commands on windows machine, or you can simply double
click on eclipse.exe
%C:\eclipse\eclipse.exe
Eclipse can be started by executing the following commands on Linux machine:
$/usr/local/eclipse/eclipse
After a successful startup, if everything is fine then it should display following result:

23
Step 4 - Setup Android Development Tools (ADT) Plugin This step will help you in setting Android Development Tool plugin for Eclipse. Let's start with launching
Eclipse and then, choose Help > Software Updates > Install New Software. This will display the
following dialogue box.

24
Now use Add button to add ADT Plugin as name and https://dl-ssl.google.com/android/eclipse/ as the
location. Then click OK to add this location, as soon as you will click OK button to add this location, Eclipse
starts searching for the plug-in available the given location and finally lists down the found plugins.

25
Now select all the listed plug-ins using Select All button and click Next button which will guide you ahead
to install Android Development Tools and other required plugins.
Step 5 - Create Android Virtual Device To test your Android applications you will need a virtual Android device. So before we start writing our
code, let us create an Android virtual device. Launch Android AVD Manager using Eclipse menu
optionsWindow > AVD Manager> which will launch Android AVD Manager. Use New button to create a
new Android Virtual Device and enter the following information, before clicking Create AVD button.
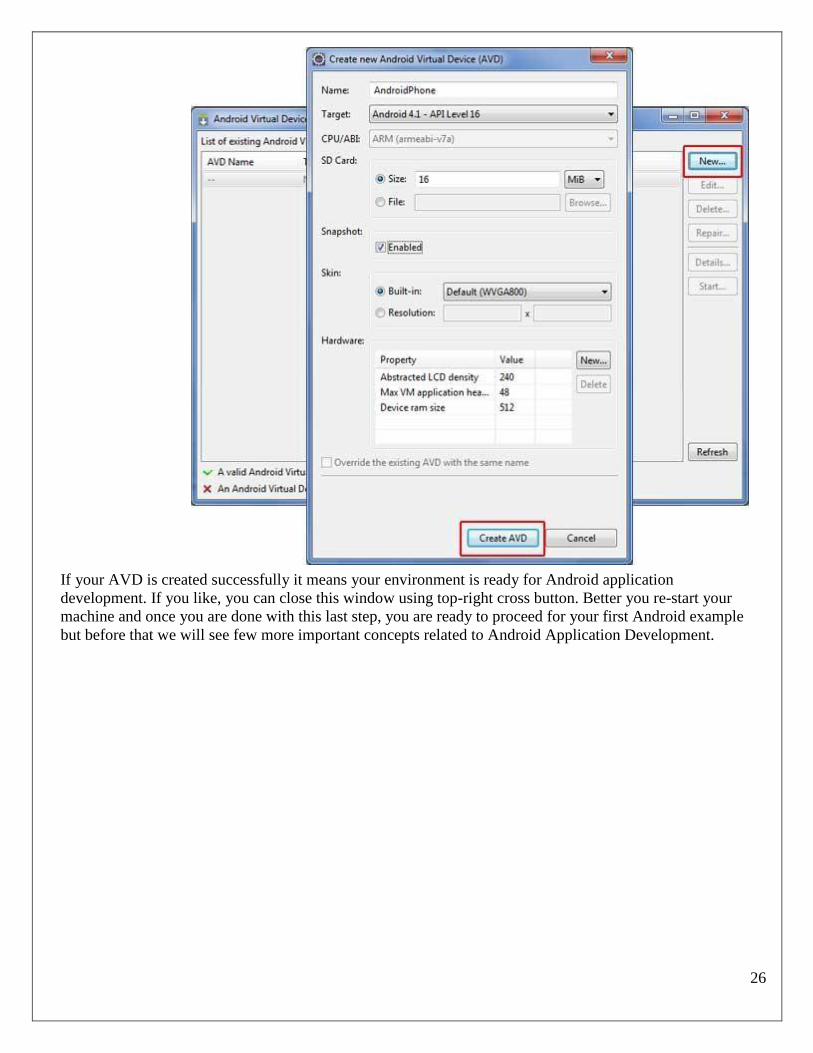
26
If your AVD is created successfully it means your environment is ready for Android application
development. If you like, you can close this window using top-right cross button. Better you re-start your
machine and once you are done with this last step, you are ready to proceed for your first Android example
but before that we will see few more important concepts related to Android Application Development.

27
Application Components
Application components are the essential building blocks of an Android application. These components are
loosely coupled by the application manifest file AndroidManifest.xml that describes each component of the
application and how they interact.
There are following four main components that can be used within an Android application:
Components Description
Activities They they dictate the UI and handle the user interaction to the smartphone
screen
Services They handle background processing associated with an application.
Broadcast Receivers They handle communication between Android OS and applications.
Content Providers They handle data and database management issues.
Activities An activity represents a single screen with a user interface. For example, an email application might have
one activity that shows a list of new emails, another activity to compose an email, and another activity for
reading emails. If an application has more than one activity, then one of them should be marked as the
activity that is presented when the application is launched.
An activity is implemented as a subclass of Activity class as follows:
public class MainActivity extends Activity {
}
Services A service is a component that runs in the background to perform long-running operations. For example, a
service might play music in the background while the user is in a different application, or it might fetch data
over the network without blocking user interaction with an activity.
A service is implemented as a subclass of Service class as follows:

28
public class MyService extends Service
{ }
Broadcast Receivers Broadcast Receivers simply respond to broadcast messages from other applications or from the system. For
example, applications can also initiate broadcasts to let other applications know that some data has been
downloaded to the device and is available for them to use, so this is broadcast receiver who will intercept this
communication and will initiate appropriate action.
A broadcast receiver is implemented as a subclass of BroadcastReceiver class and each message is
broadcasted as an Intent object.
public class MyReceiver extends BroadcastReceiver {
}
Content Providers A content provider component supplies data from one application to others on request. Such requests are
handled by the methods of the ContentResolver class. The data may be stored in the file system, the database
or somewhere else entirely.
A content provider is implemented as a subclass of ContentProvider class and must implement a standard set
of APIs that enable other applications to perform transactions.
public class MyContentProvider extends ContentProvider {
}
We will go through these tags in detail while covering application components in individual chapters.
Additional Components There are additional components which will be used in the construction of above mentioned entities, their logic,
and wiring between them. These components are:
Components Description
Fragments Represents a behavior or a portion of user interface in an Activity.
Views UI elements that are drawn onscreen including buttons, lists forms etc.
Layouts View hierarchies that control screen format and appearance of the views.
Intents Messages wiring components together.
Resources External elements, such as strings, constants and drawables pictures.
29
Manifest Configuration file for the application.
30
Activities
An activity represents a single screen with a user interface. For example, an email application might have
one activity that shows a list of new emails, another activity to compose an email, and another activity for
reading emails. If an application has more than one activity, then one of them should be marked as the
activity that is presented when the application is launched.
If you have worked with C, C++ or Java programming language then you must have seen that your program
starts from main() function. Very similar way, Android system initiates its program with in anActivity
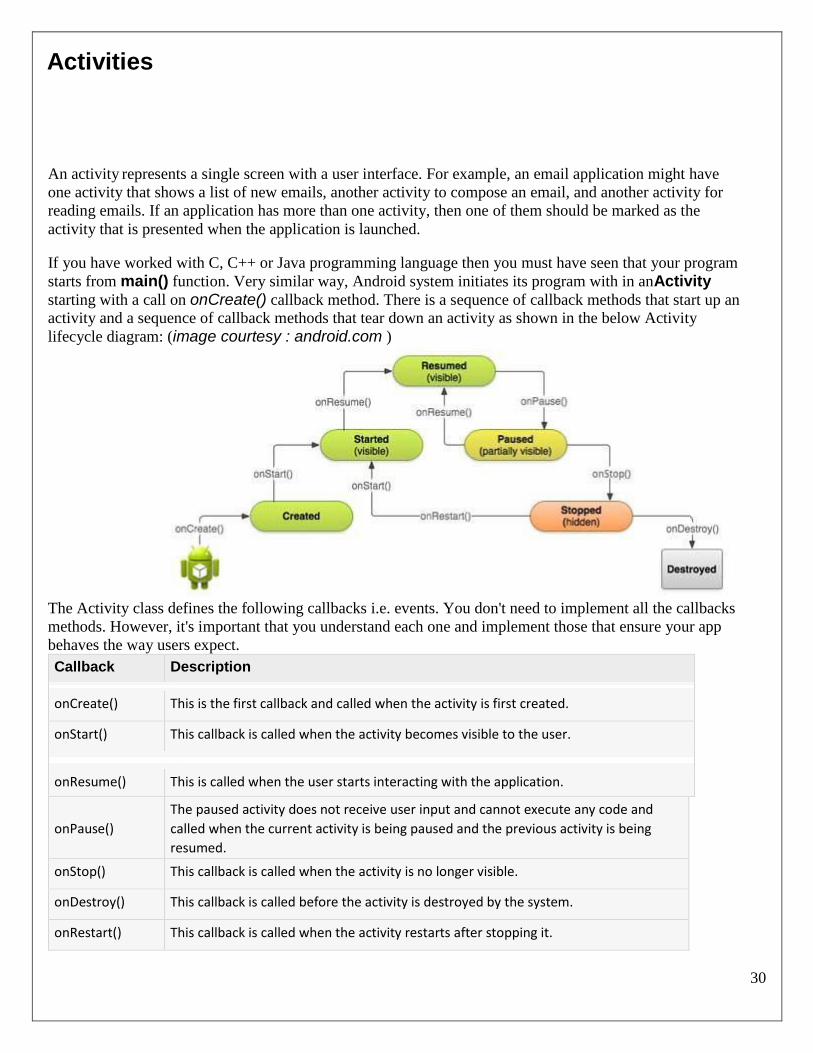
starting with a call on onCreate() callback method. There is a sequence of callback methods that start up an
activity and a sequence of callback methods that tear down an activity as shown in the below Activity
lifecycle diagram: (image courtesy : android.com )
The Activity class defines the following callbacks i.e. events. You don't need to implement all the callbacks
methods. However, it's important that you understand each one and implement those that ensure your app
behaves the way users expect.
Callback Description
onCreate() This is the first callback and called when the activity is first created.
onStart() This callback is called when the activity becomes visible to the user.
onResume() This is called when the user starts interacting with the application.
onPause()
The paused activity does not receive user input and cannot execute any code and
called when the current activity is being paused and the previous activity is being
resumed.
onStop() This callback is called when the activity is no longer visible.
onDestroy() This callback is called before the activity is destroyed by the system.
onRestart() This callback is called when the activity restarts after stopping it.
31
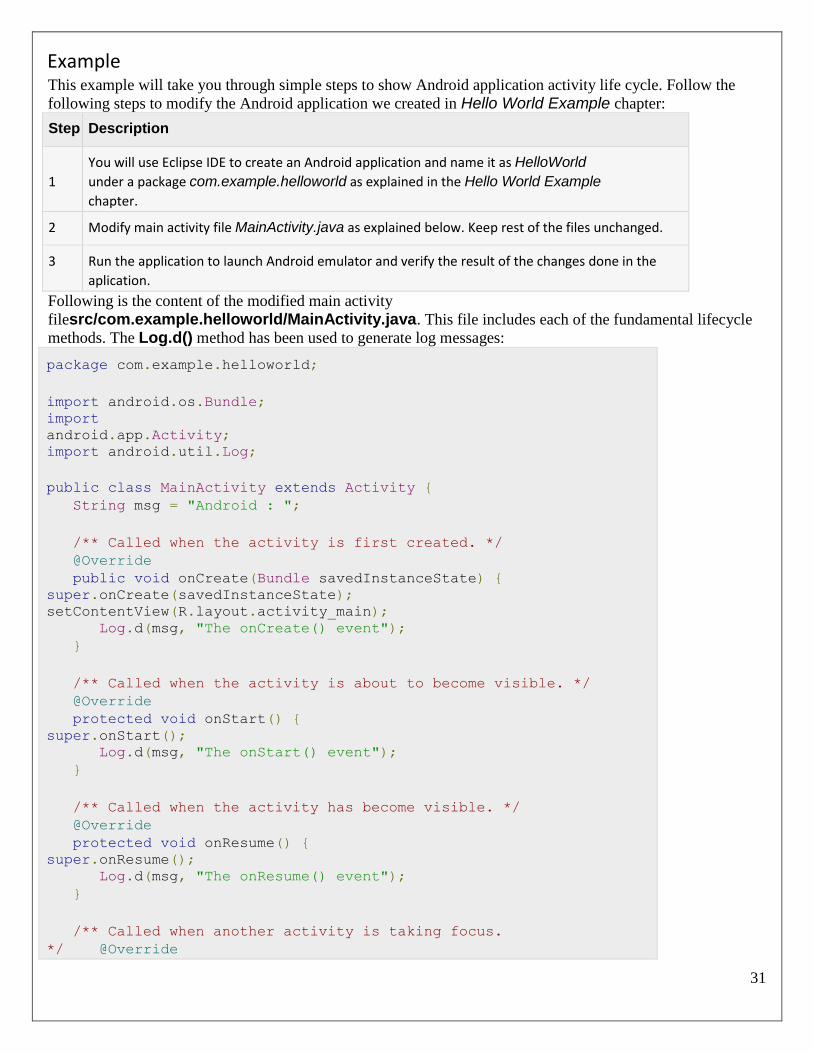
Example This example will take you through simple steps to show Android application activity life cycle. Follow the
following steps to modify the Android application we created in Hello World Example chapter:
Step Description
1
You will use Eclipse IDE to create an Android application and name it as HelloWorld
under a package com.example.helloworld as explained in the Hello World Example
chapter.
2 Modify main activity file MainActivity.java as explained below. Keep rest of the files unchanged.
3 Run the application to launch Android emulator and verify the result of the changes done in the
aplication.
Following is the content of the modified main activity
filesrc/com.example.helloworld/MainActivity.java. This file includes each of the fundamental lifecycle
methods. The Log.d() method has been used to generate log messages:
package com.example.helloworld;
import android.os.Bundle;
import
android.app.Activity;
import android.util.Log; public class MainActivity extends Activity { String msg = "Android : ";
/** Called when the activity is first created. */ @Override public void onCreate(Bundle savedInstanceState) {
super.onCreate(savedInstanceState);
setContentView(R.layout.activity_main); Log.d(msg, "The onCreate() event"); }
/** Called when the activity is about to become visible. */ @Override protected void onStart() {
super.onStart(); Log.d(msg, "The onStart() event"); }
/** Called when the activity has become visible. */ @Override protected void onResume() {
super.onResume(); Log.d(msg, "The onResume() event"); }
/** Called when another activity is taking focus.
*/ @Override
32
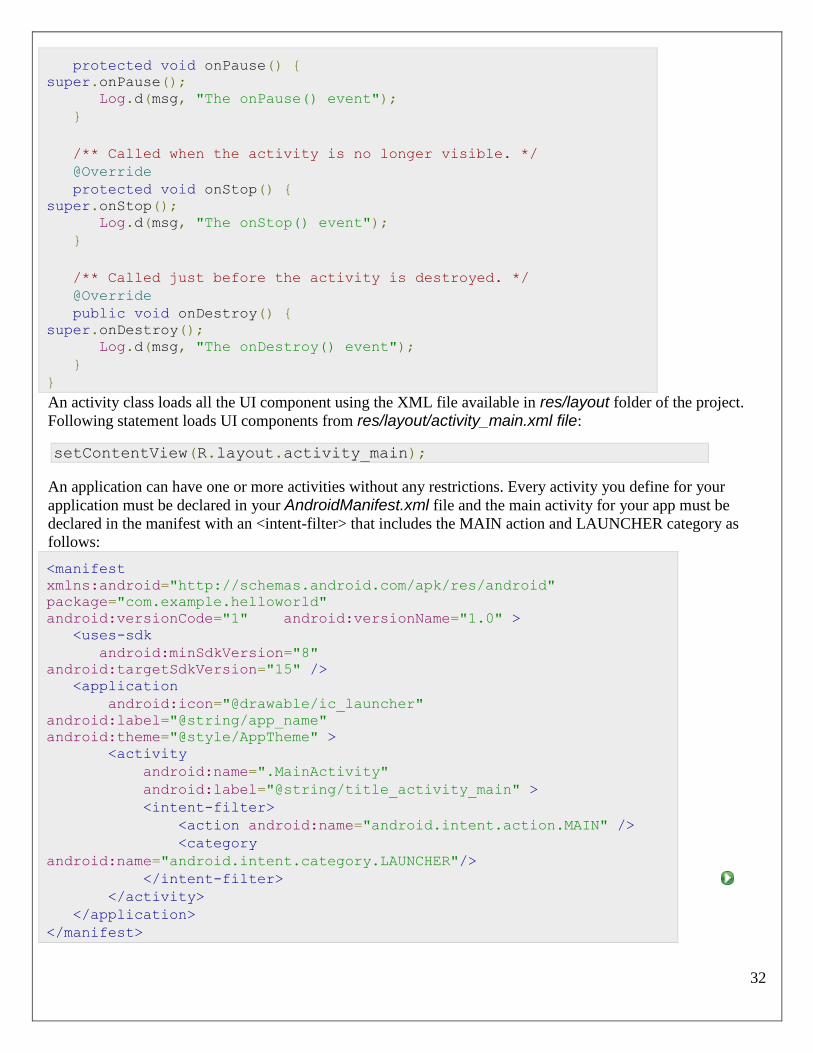
protected void onPause() {
super.onPause(); Log.d(msg, "The onPause() event"); }
/** Called when the activity is no longer visible. */ @Override protected void onStop() {
super.onStop(); Log.d(msg, "The onStop() event"); }
/** Called just before the activity is destroyed. */ @Override public void onDestroy() {
super.onDestroy(); Log.d(msg, "The onDestroy() event"); } }
An activity class loads all the UI component using the XML file available in res/layout folder of the project.
Following statement loads UI components from res/layout/activity_main.xml file:
setContentView(R.layout.activity_main);
An application can have one or more activities without any restrictions. Every activity you define for your
application must be declared in your AndroidManifest.xml file and the main activity for your app must be
declared in the manifest with an <intent-filter> that includes the MAIN action and LAUNCHER category as
follows:
<manifest
xmlns:android="http://schemas.android.com/apk/res/android"
package="com.example.helloworld"
android:versionCode="1" android:versionName="1.0" > <uses-sdk android:minSdkVersion="8"
android:targetSdkVersion="15" /> <application android:icon="@drawable/ic_launcher"
android:label="@string/app_name"
android:theme="@style/AppTheme" > <activity android:name=".MainActivity" android:label="@string/title_activity_main" > <intent-filter> <action android:name="android.intent.action.MAIN" /> <category
android:name="android.intent.category.LAUNCHER"/> </intent-filter> </activity> </application> </manifest>
33
If either the MAIN action or LAUNCHER category are not declared for one of your activities, then your app
icon will not appear in the Home screen's list of apps.
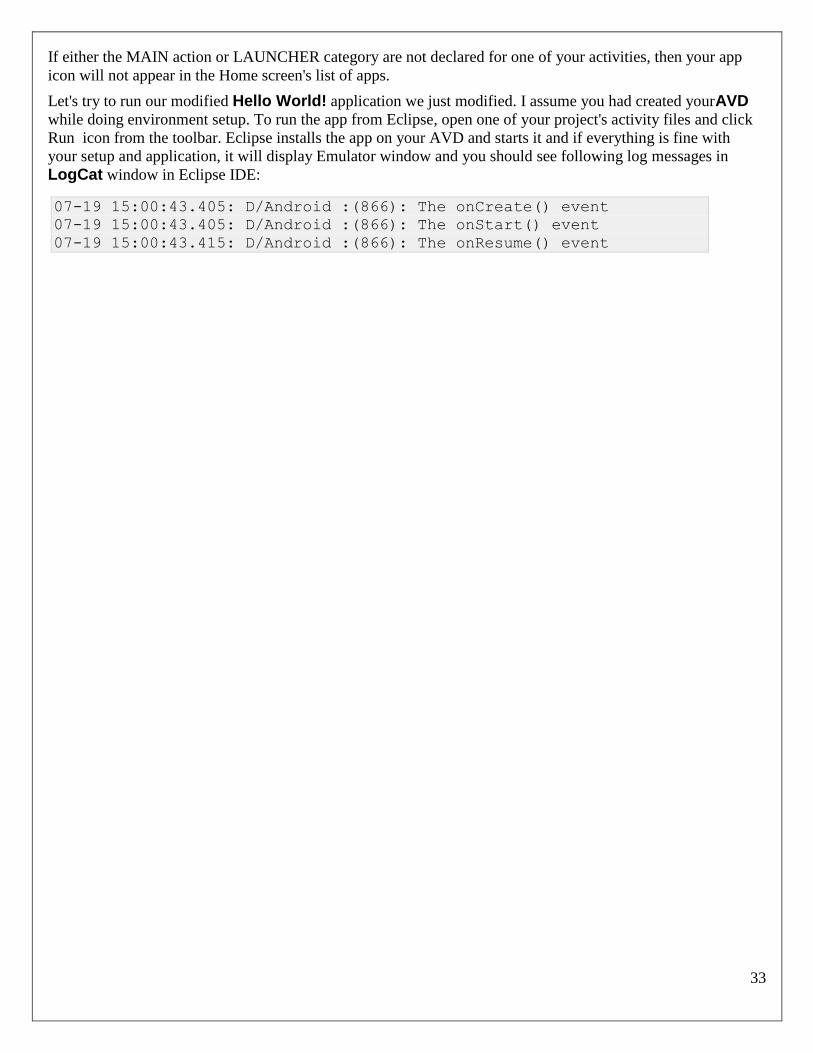
Let's try to run our modified Hello World! application we just modified. I assume you had created yourAVD
while doing environment setup. To run the app from Eclipse, open one of your project's activity files and click
Run icon from the toolbar. Eclipse installs the app on your AVD and starts it and if everything is fine with
your setup and application, it will display Emulator window and you should see following log messages in
LogCat window in Eclipse IDE:
07-19 15:00:43.405: D/Android :(866): The onCreate() event 07-19 15:00:43.405: D/Android :(866): The onStart() event
07-19 15:00:43.415: D/Android :(866): The onResume() event
34
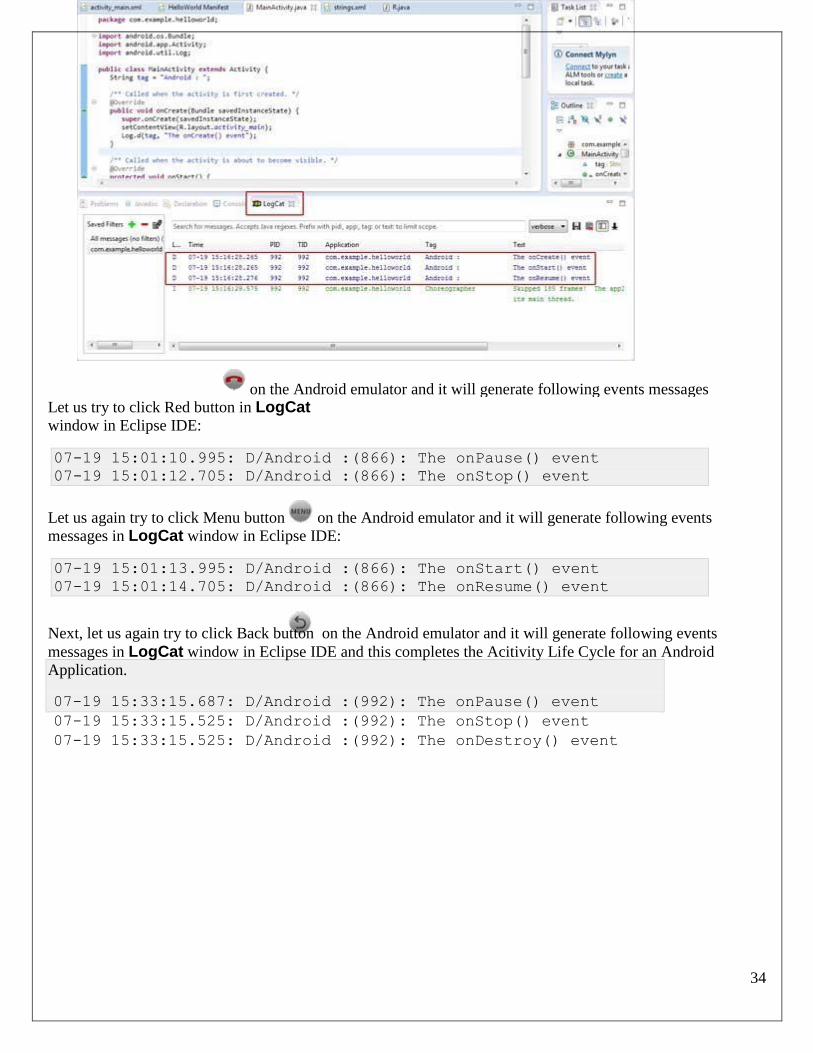
Let us try to click Red button in LogCat window in Eclipse IDE:
07-19 15:01:10.995: D/Android :(866): The onPause() event 07-19 15:01:12.705: D/Android :(866): The onStop() event
Let us again try to click Menu button on the Android emulator and it will generate following events
messages in LogCat window in Eclipse IDE:
07-19 15:01:13.995: D/Android :(866): The onStart() event
07-19 15:01:14.705: D/Android :(866): The onResume() event
Next, let us again try to click Back button on the Android emulator and it will generate following events
messages in LogCat window in Eclipse IDE and this completes the Acitivity Life Cycle for an Android
Application.
07-19 15:33:15.687: D/Android :(992): The onPause() event
07-19 15:33:15.525: D/Android :(992): The onStop() event
07-19 15:33:15.525: D/Android :(992): The onDestroy() event
on the Android emulator and it will generate following events messages
35
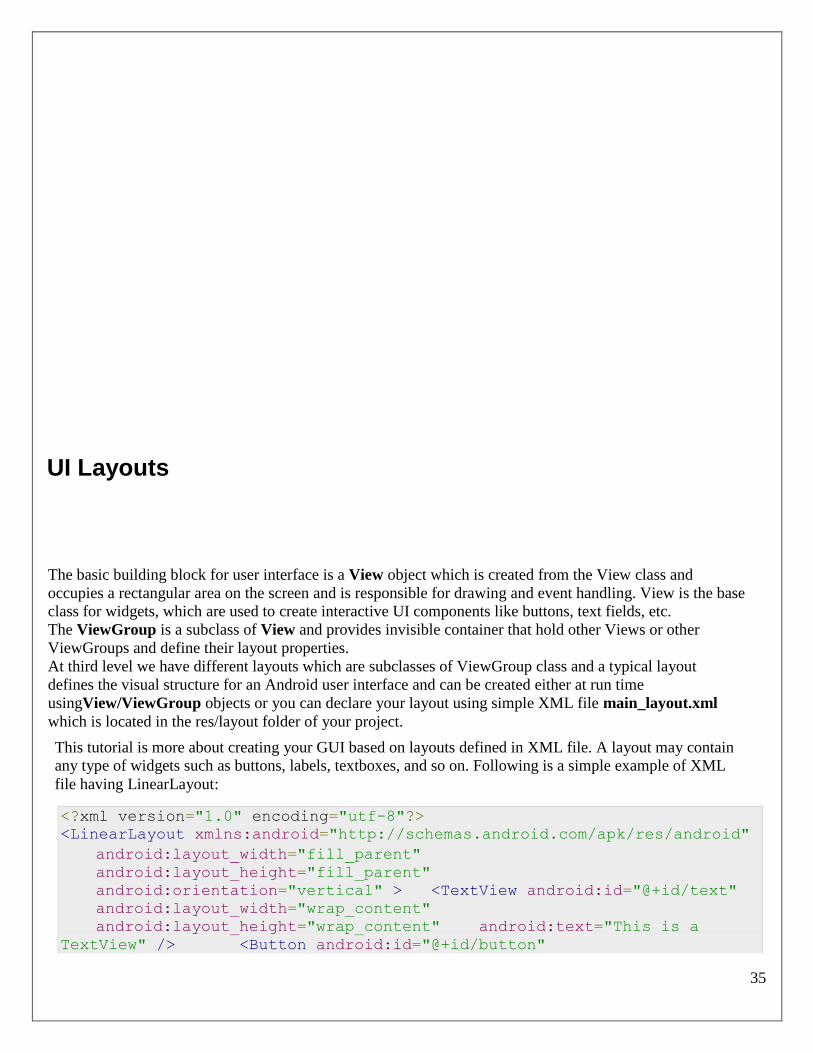
UI Layouts
The basic building block for user interface is a View object which is created from the View class and
occupies a rectangular area on the screen and is responsible for drawing and event handling. View is the base
class for widgets, which are used to create interactive UI components like buttons, text fields, etc.
The ViewGroup is a subclass of View and provides invisible container that hold other Views or other
ViewGroups and define their layout properties.
At third level we have different layouts which are subclasses of ViewGroup class and a typical layout
defines the visual structure for an Android user interface and can be created either at run time
usingView/ViewGroup objects or you can declare your layout using simple XML file main_layout.xml
which is located in the res/layout folder of your project.
This tutorial is more about creating your GUI based on layouts defined in XML file. A layout may contain
any type of widgets such as buttons, labels, textboxes, and so on. Following is a simple example of XML
file having LinearLayout:
<?xml version="1.0" encoding="utf-8"?> <LinearLayout xmlns:android="http://schemas.android.com/apk/res/android"
android:layout_width="fill_parent"
android:layout_height="fill_parent"
android:orientation="vertical" > <TextView android:id="@+id/text"
android:layout_width="wrap_content"
android:layout_height="wrap_content" android:text="This is a
TextView" /> <Button android:id="@+id/button"
36
android:layout_width="wrap_content"
android:layout_height="wrap_content"
android:text="This is a Button" />
<!-- More GUI components go here -->
</LinearLayout>
Once your layout is defined, you can load the layout resource from your application code, in
yourActivity.onCreate() callback implementation as shown below:
public void onCreate(Bundle
savedInstanceState) {
super.onCreate(savedInstanceState);
setContentView(R.layout.activity_main); }
Android Layout Types There are number of Layouts provided by Android which you will use in almost all the Android applications to
provide different view, look and feel.
S.N. Layout & Description
1 Linear Layout
LinearLayout is a view group that aligns all children in a single direction, vertically or horizontally.
2 Relative Layout
RelativeLayout is a view group that displays child views in relative positions.
3 Table Layout
TableLayout is a view that groups views into rows and columns.
4 Absolute Layout
AbsoluteLayout enables you to specify the exact location of its children.
5 Frame Layout
The FrameLayout is a placeholder on screen that you can use to display a single view.
6 List View
ListView is a view group that displays a list of scrollable items.
7 Grid View
GridView is a ViewGroup that displays items in a two-dimensional, scrollable grid.
Linear Layout Android LinearLayout is a view group that aligns all children in a single direction, vertically orhorizontally.
LinearLayout Attributes Following are the important attributes specific to LinearLayout:
Attribute Description
37
This is the ID which uniquely identifies the layout.
android:id
android:baselineAligned This must be a boolean value, either "true" or "false" and prevents the layout
from aligning its children's baselines.
android:divider This is drawable to use as a vertical divider between buttons. You use a color
value, in the form of "#rgb", "#argb", "#rrggbb", or "#aarrggbb".
android:gravity
This specifies how an object should position its content, on both the X and Y
axes.
Possible values are top, bottom, left, right, center, center_vertical,
center_horizontal etc.
android:orientation This specifies the direction of arrangmet and you will use "horizontal" for a row,
"vertical" for a column. The default is horizontal.
Example This example will take you through simple steps to show how to create your own Android application using
Linear Layout. Follow the following steps to modify the Android application we created in Hello World
Example chapter:
Step Description
1 You will use Eclipse IDE to create an Android application and name it as HelloWorld under
a package com.example.helloworld as explained in the Hello World Example chapter.
2 Modify the detault content of res/layout/activity_main.xml file to include few buttons in linear
layout.
3 Define required constants start_service, pause_service and stop_service
inres/values/strings.xml file
4 Run the application to launch Android emulator and verify the result of the changes done in
the aplication.
Following is the content of the modified main activity filesrc/com.example.helloworld/MainActivity.java.
This file can include each of the fundamental lifecycle methods.
package com.example.helloworld;
import android.os.Bundle;
import
android.app.Activity;
import android.view.Menu; public class MainActivity extends Activity {
@Override protected void onCreate(Bundle savedInstanceState) {
super.onCreate(savedInstanceState);
setContentView(R.layout.activity_main); }
@Override public boolean onCreateOptionsMenu(Menu menu)
{ getMenuInflater().inflate(R.menu.main,

38
menu); return true; }
}
Following will be the content of res/layout/activity_main.xml file:
<?xml version="1.0" encoding="utf-8"?> <LinearLayout
xmlns:android="http://schemas.android.com/apk/res/android"
android:layout_width="fill_parent"
android:layout_height="fill_parent"
android:orientation="vertical" > <Button android:id="@+id/btnStartService"
android:layout_width="150px"
android:layout_height="wrap_content"
android:text="@string/start_service" <Button android:id="@+id/btnPauseService"
android:layout_width="150px"
android:layout_height="wrap_content"
android:text="@string/pause_service" <Button android:id="@+id/btnStopService"
android:layout_width="150px"
android:layout_height="wrap_content"
android:text="@string/stop_service" </LinearLayout>
Following will be the content of res/values/strings.xml to define two new constants:
<?xml version="1.0" encoding="utf-8"?> <resources>
<string name="app_name">HelloWorld</string>
<string name="action_settings">Settings</string>
<string name="start_service">Start</string>
<string name="pause_service">Pause</string>
<string name="stop_service">Stop</string>

39
</resources>
Let's try to run our modified Hello World! application we just modified. I assume you had created yourAVD
while doing environment setup. To run the app from Eclipse, open one of your project's activity files and click
Run icon from the toolbar. Eclipse installs the app on your AVD and starts it and if everything is fine with
your setup and application, it will display following Emulator window:
Now let's change the orientation of Layout as android:orientation="horizontal" and try to run the same
application, it will give following screen:
Relative Layout Android RelativeLayout enables you to specify how child views are positioned relative to each other. The
position of each view can be specified as relative to sibling elements or relative to the parent.
RelativeLayout Attributes Following are the important attributes specific to RelativeLayout:
40
Attribute Description
android:id This is the ID which uniquely identifies the layout.
android:gravity
This specifies how an object should position its content, on both the X and Y axes.
Possible values are top, bottom, left, right, center, center_vertical,
center_horizontal etc.
android:ignoreGravity This indicates what view should not be affected by gravity.
Using RelativeLayout, you can align two elements by right border, or make one below another, centered in the
screen, centered left, and so on. By default, all child views are drawn at the top-left of the layout, so you must
define the position of each view using the various layout properties available
fromRelativeLayout.LayoutParams and few of the important attributes are given below:
Attribute Description
android:layout_above
Positions the bottom edge of this view above the given anchor
view ID and must be a reference to another resource, in the form
"@[+][package:]type:name"
android:layout_alignBottom
Makes the bottom edge of this view match the bottom edge of the
given anchor view ID and must be a reference to another resource,
in the form "@[+][package:]type:name".
android:layout_alignLeft
Makes the left edge of this view match the left edge of the given
anchor view ID and must be a reference to another resource, in
the form
"@[+][package:]type:name".
android:layout_alignParentBottom
If true, makes the bottom edge of this view match the bottom
edge of the parent. Must be a boolean value, either "true" or
"false".
android:layout_alignParentEnd If true, makes the end edge of this view match the end edge of the
parent. Must be a boolean value, either "true" or "false".
android:layout_alignParentLeft If true, makes the left edge of this view match the left edge of the
parent. Must be a boolean value, either "true" or "false".
android:layout_alignParentRight
If true, makes the right edge of this view match the right edge of
the parent. Must be a boolean value, either "true" or "false".
android:layout_alignParentStart If true, makes the start edge of this view match the start edge of
the parent. Must be a boolean value, either "true" or "false".
android:layout_alignParentTop If true, makes the top edge of this view match the top edge of the
parent. Must be a boolean value, either "true" or "false".
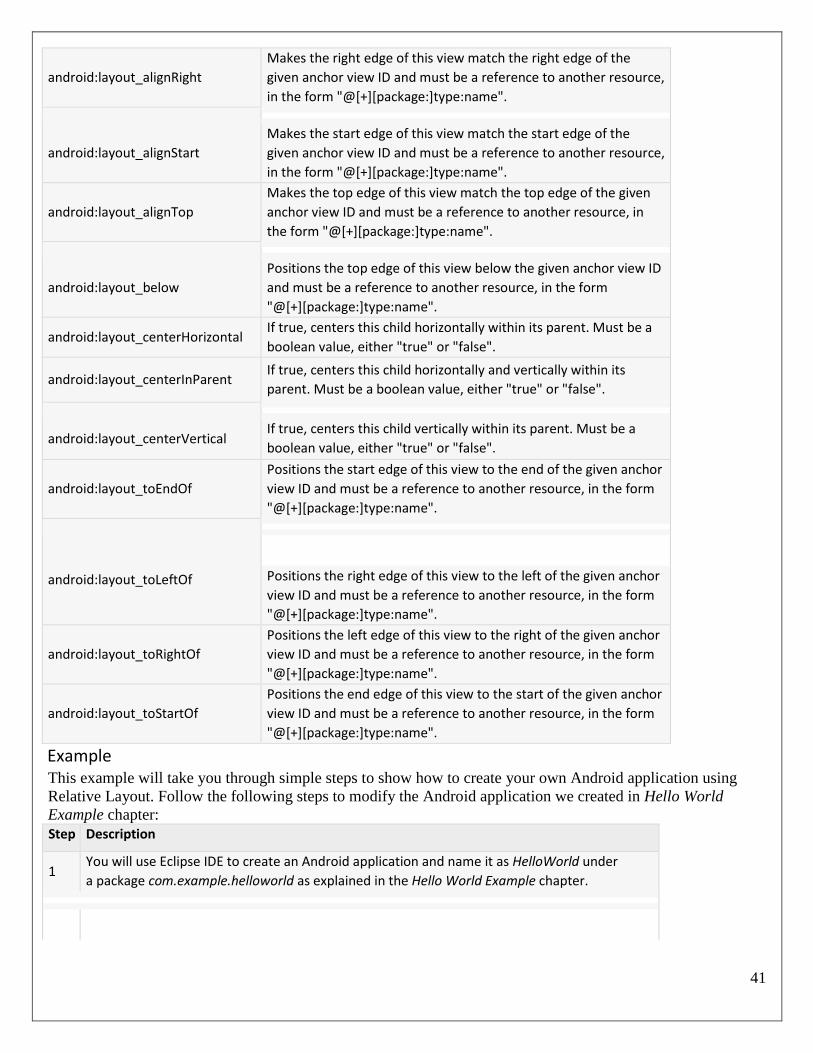
41
android:layout_alignRight
Makes the right edge of this view match the right edge of the
given anchor view ID and must be a reference to another resource,
in the form "@[+][package:]type:name".
android:layout_alignStart
Makes the start edge of this view match the start edge of the
given anchor view ID and must be a reference to another resource,
in the form "@[+][package:]type:name".
android:layout_alignTop
Makes the top edge of this view match the top edge of the given
anchor view ID and must be a reference to another resource, in
the form "@[+][package:]type:name".
android:layout_below
Positions the top edge of this view below the given anchor view ID
and must be a reference to another resource, in the form
"@[+][package:]type:name".
android:layout_centerHorizontal If true, centers this child horizontally within its parent. Must be a
boolean value, either "true" or "false".
android:layout_centerInParent If true, centers this child horizontally and vertically within its
parent. Must be a boolean value, either "true" or "false".
android:layout_centerVertical If true, centers this child vertically within its parent. Must be a
boolean value, either "true" or "false".
android:layout_toEndOf
Positions the start edge of this view to the end of the given anchor
view ID and must be a reference to another resource, in the form
"@[+][package:]type:name".
android:layout_toLeftOf
Positions the right edge of this view to the left of the given anchor
view ID and must be a reference to another resource, in the form
"@[+][package:]type:name".
android:layout_toRightOf
Positions the left edge of this view to the right of the given anchor
view ID and must be a reference to another resource, in the form
"@[+][package:]type:name".
android:layout_toStartOf
Positions the end edge of this view to the start of the given anchor
view ID and must be a reference to another resource, in the form
"@[+][package:]type:name".
Example This example will take you through simple steps to show how to create your own Android application using
Relative Layout. Follow the following steps to modify the Android application we created in Hello World
Example chapter:
Step Description
1 You will use Eclipse IDE to create an Android application and name it as HelloWorld under
a package com.example.helloworld as explained in the Hello World Example chapter.
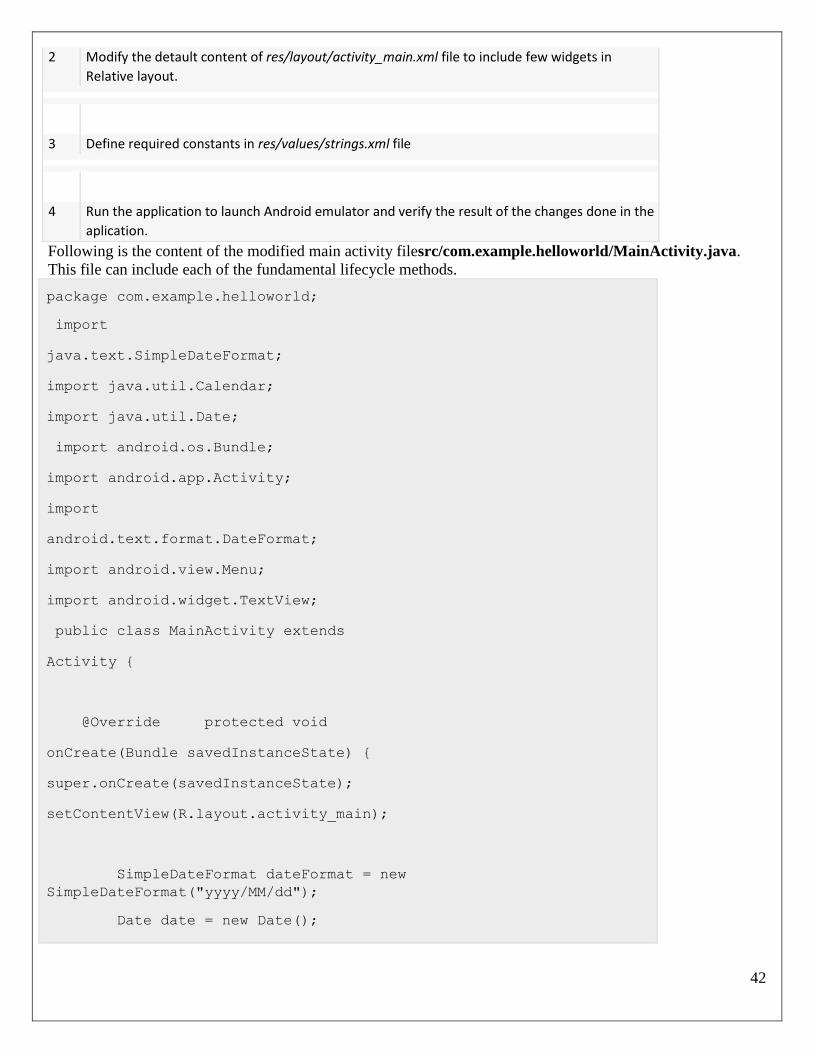
42
2 Modify the detault content of res/layout/activity_main.xml file to include few widgets in
Relative layout.
3 Define required constants in res/values/strings.xml file
4 Run the application to launch Android emulator and verify the result of the changes done in the
aplication.
Following is the content of the modified main activity filesrc/com.example.helloworld/MainActivity.java.
This file can include each of the fundamental lifecycle methods.
package com.example.helloworld;
import
java.text.SimpleDateFormat;
import java.util.Calendar;
import java.util.Date;
import android.os.Bundle;
import android.app.Activity;
import
android.text.format.DateFormat;
import android.view.Menu;
import android.widget.TextView;
public class MainActivity extends
Activity {
@Override protected void
onCreate(Bundle savedInstanceState) {
super.onCreate(savedInstanceState);
setContentView(R.layout.activity_main);
SimpleDateFormat dateFormat = new
SimpleDateFormat("yyyy/MM/dd");
Date date = new Date();
43
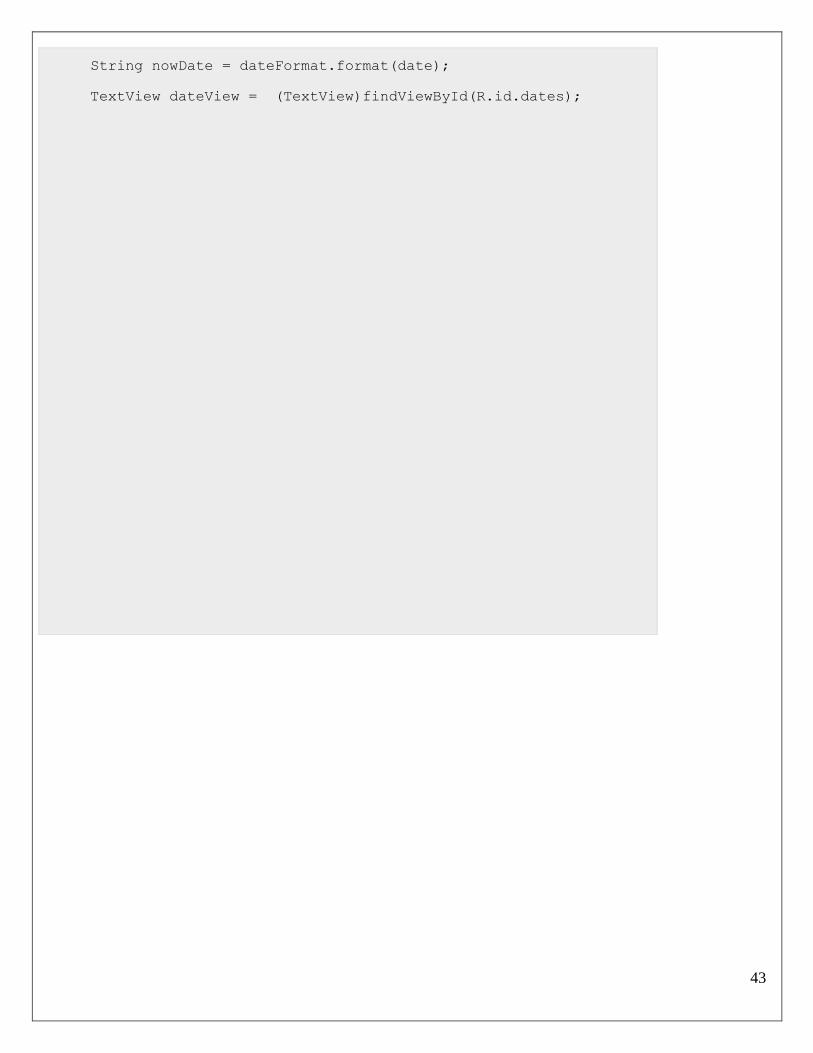
String nowDate = dateFormat.format(date);
TextView dateView = (TextView)findViewById(R.id.dates);
44
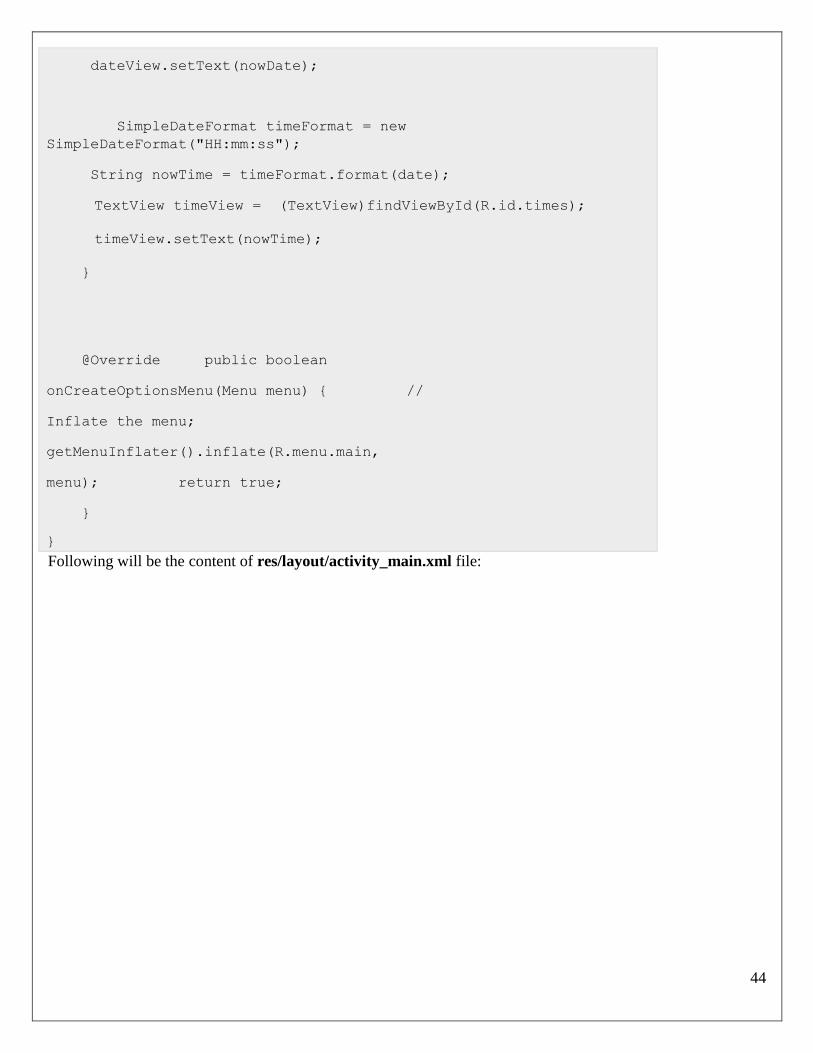
dateView.setText(nowDate);
SimpleDateFormat timeFormat = new
SimpleDateFormat("HH:mm:ss");
String nowTime = timeFormat.format(date);
TextView timeView = (TextView)findViewById(R.id.times);
timeView.setText(nowTime);
}
@Override public boolean
onCreateOptionsMenu(Menu menu) { //
Inflate the menu;
getMenuInflater().inflate(R.menu.main,
menu); return true;
}
}
Following will be the content of res/layout/activity_main.xml file:
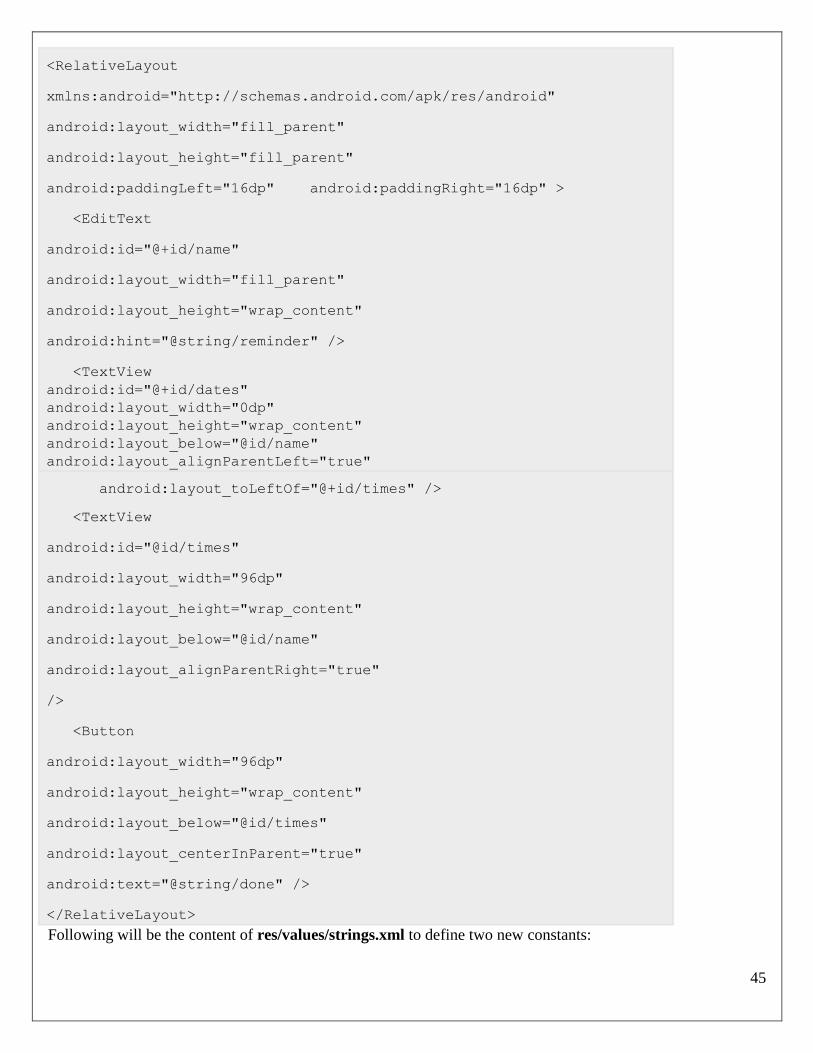
45
<RelativeLayout
xmlns:android="http://schemas.android.com/apk/res/android"
android:layout_width="fill_parent"
android:layout_height="fill_parent"
android:paddingLeft="16dp" android:paddingRight="16dp" >
<EditText
android:id="@+id/name"
android:layout_width="fill_parent"
android:layout_height="wrap_content"
android:hint="@string/reminder" />
<TextView
android:id="@+id/dates"
android:layout_width="0dp"
android:layout_height="wrap_content"
android:layout_below="@id/name"
android:layout_alignParentLeft="true"
android:layout_toLeftOf="@+id/times" />
<TextView
android:id="@id/times"
android:layout_width="96dp"
android:layout_height="wrap_content"
android:layout_below="@id/name"
android:layout_alignParentRight="true"
/>
<Button
android:layout_width="96dp"
android:layout_height="wrap_content"
android:layout_below="@id/times"
android:layout_centerInParent="true"
android:text="@string/done" />
</RelativeLayout>
Following will be the content of res/values/strings.xml to define two new constants:
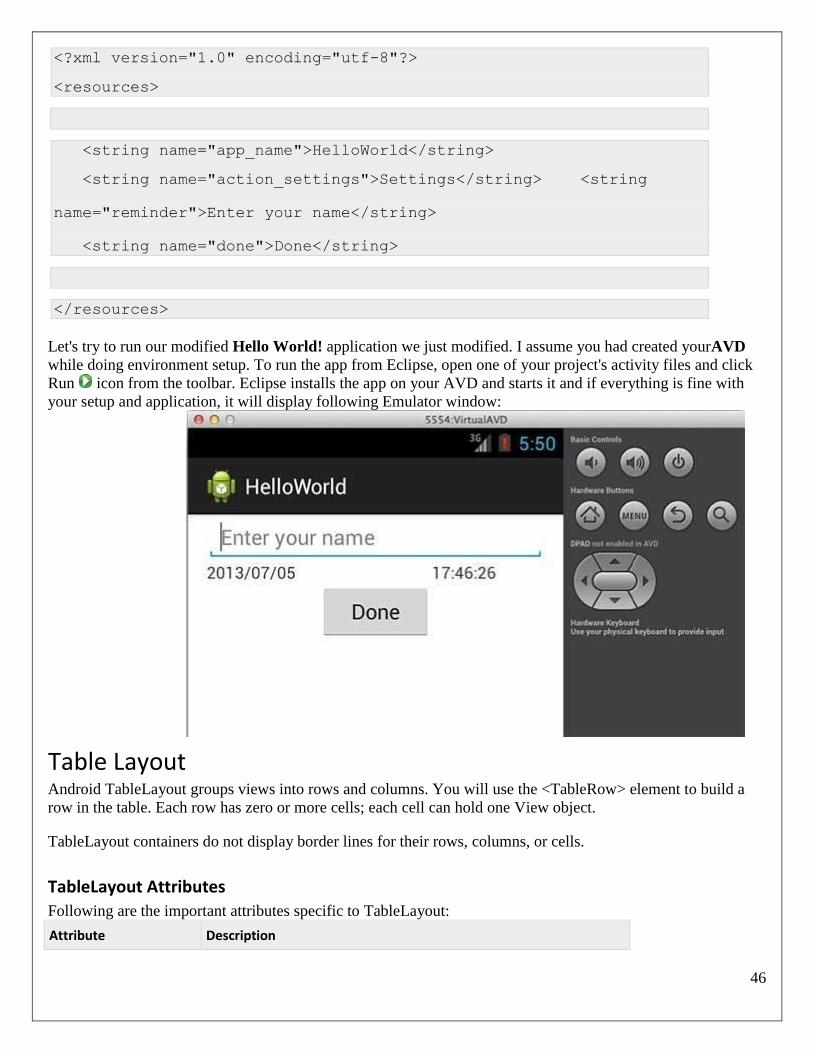
46
<?xml version="1.0" encoding="utf-8"?>
<resources>
<string name="app_name">HelloWorld</string>
<string name="action_settings">Settings</string> <string
name="reminder">Enter your name</string>
<string name="done">Done</string>
</resources>
Let's try to run our modified Hello World! application we just modified. I assume you had created yourAVD
while doing environment setup. To run the app from Eclipse, open one of your project's activity files and click
Run icon from the toolbar. Eclipse installs the app on your AVD and starts it and if everything is fine with
your setup and application, it will display following Emulator window:
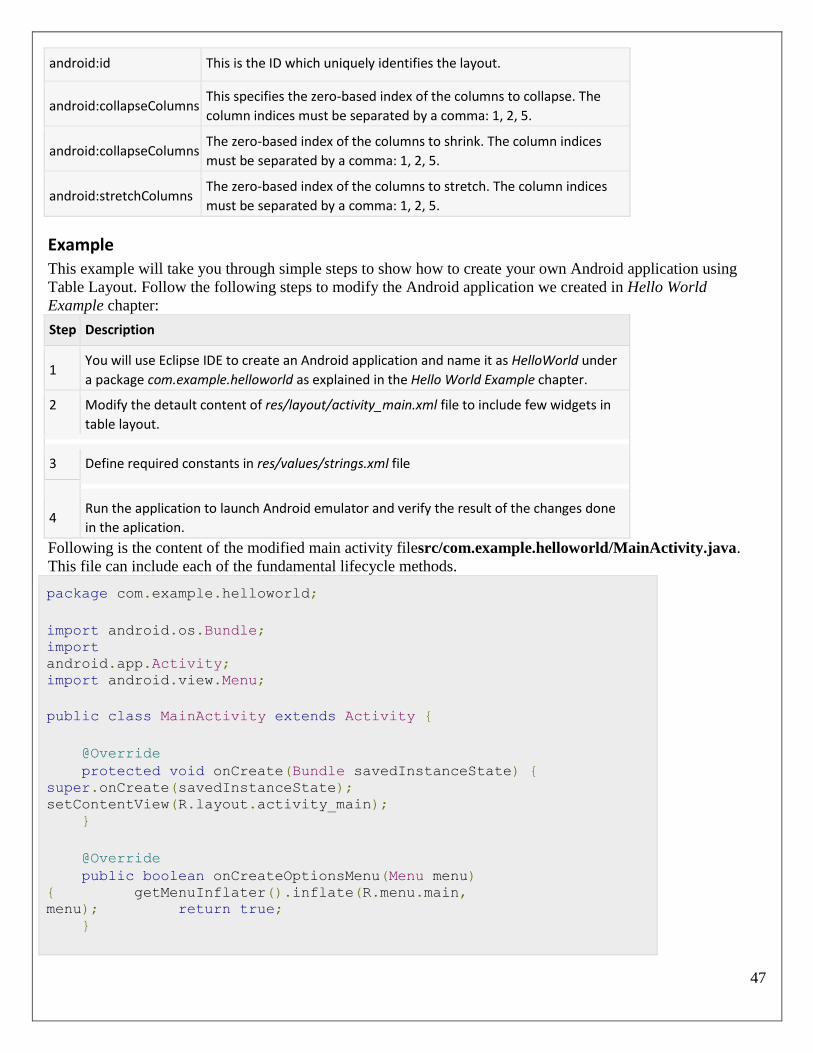
Table Layout Android TableLayout groups views into rows and columns. You will use the <TableRow> element to build a
row in the table. Each row has zero or more cells; each cell can hold one View object.
TableLayout containers do not display border lines for their rows, columns, or cells.
TableLayout Attributes
Following are the important attributes specific to TableLayout:
Attribute Description
47
android:id This is the ID which uniquely identifies the layout.
android:collapseColumns This specifies the zero-based index of the columns to collapse. The
column indices must be separated by a comma: 1, 2, 5.
android:collapseColumns The zero-based index of the columns to shrink. The column indices
must be separated by a comma: 1, 2, 5.
android:stretchColumns The zero-based index of the columns to stretch. The column indices
must be separated by a comma: 1, 2, 5.
Example This example will take you through simple steps to show how to create your own Android application using
Table Layout. Follow the following steps to modify the Android application we created in Hello World
Example chapter:
Step Description
1 You will use Eclipse IDE to create an Android application and name it as HelloWorld under
a package com.example.helloworld as explained in the Hello World Example chapter.
2 Modify the detault content of res/layout/activity_main.xml file to include few widgets in
table layout.
3 Define required constants in res/values/strings.xml file
4 Run the application to launch Android emulator and verify the result of the changes done
in the aplication.
Following is the content of the modified main activity filesrc/com.example.helloworld/MainActivity.java.
This file can include each of the fundamental lifecycle methods.
package com.example.helloworld;
import android.os.Bundle;
import
android.app.Activity;
import android.view.Menu; public class MainActivity extends Activity {
@Override protected void onCreate(Bundle savedInstanceState) {
super.onCreate(savedInstanceState);
setContentView(R.layout.activity_main); }
@Override public boolean onCreateOptionsMenu(Menu menu)
{ getMenuInflater().inflate(R.menu.main,
menu); return true; }

48
}
Following will be the content of res/layout/activity_main.xml file:
<TableLayout
xmlns:android="http://schemas.android.com/apk/res/android"
android:layout_width="fill_parent"
android:layout_height="fill_parent"> <TableRow>
<Button android:id="@+id/backbutton"
android:text="Back" android:layout_width="wrap_content"
android:layout_height="wrap_content" /> </TableRow> <TableRow>
<TextView android:text="First Name"
android:layout_width="wrap_content"
android:layout_height="wrap_content"
android:layout_column="1" /> <EditText android:width="100px" android:layout_width="wrap_content"
android:layout_height="wrap_content" /> </TableRow> <TableRow>
<TextView android:text="Last Name" android:layout_width="wrap_content"
android:layout_height="wrap_content"
android:layout_column="1" />
<EditText android:width="100px"
android:layout_width="wrap_content"
android:layout_height="wrap_content" /> </TableRow>
</TableLayout>

49
Following will be the content of res/values/strings.xml to define two new constants:
<?xml version="1.0" encoding="utf-8"?>
<resources>
<string name="app_name">HelloWorld</string>
<string name="action_settings">Settings</string>
</resources>
Let's try to run our modified Hello World! application we just modified. I assume you had created yourAVD
while doing environment setup. To run the app from Eclipse, open one of your project's activity files and click
Run icon from the toolbar. Eclipse installs the app on your AVD and starts it and if everything is fine with
your setup and application, it will display following Emulator window:
Absolute Layout An Absolute Layout lets you specify exact locations (x/y coordinates) of its children. Absolute layouts are less
flexible and harder to maintain than other types of layouts without absolute positioning.
AbsoluteLayout Attributes Following are the important attributes specific to AbsoluteLayout:
Attribute Description
android:id This is the ID which uniquely identifies the layout.
android:layout_x This specifies the x-coordinate of the view.
android:layout_y This specifies the y-coordinate of the view.
50
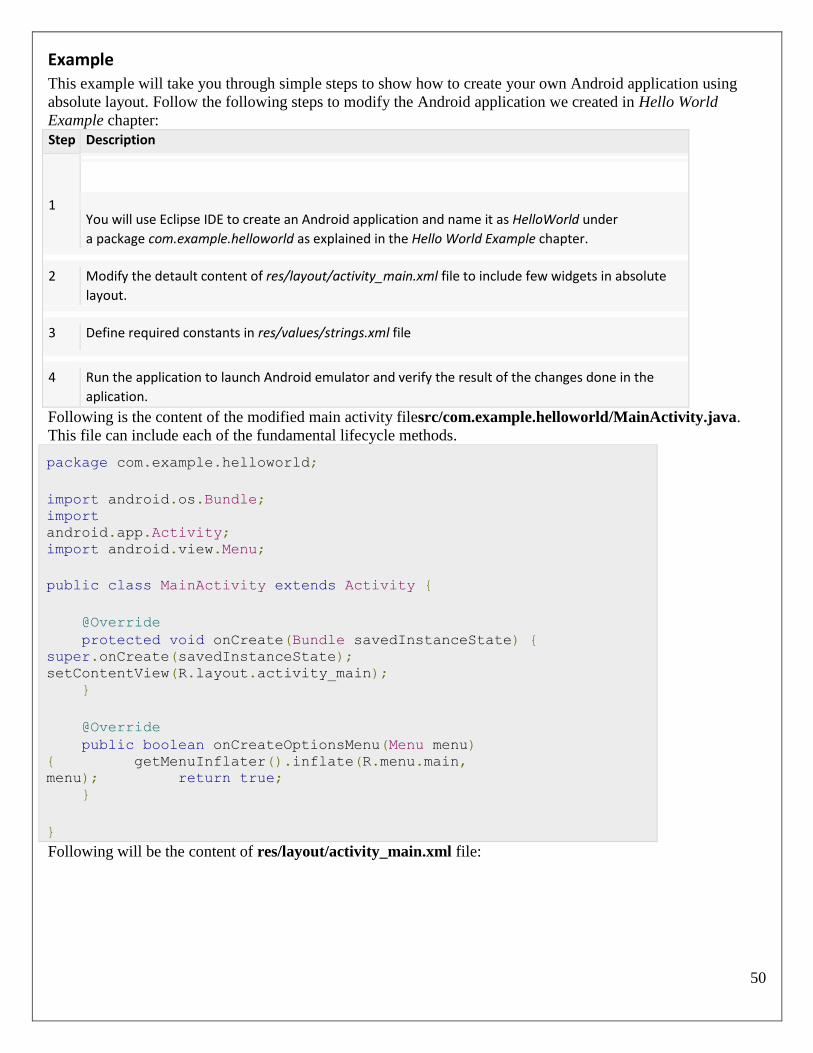
Example This example will take you through simple steps to show how to create your own Android application using
absolute layout. Follow the following steps to modify the Android application we created in Hello World
Example chapter:
Step Description
1
You will use Eclipse IDE to create an Android application and name it as HelloWorld under
a package com.example.helloworld as explained in the Hello World Example chapter.
2 Modify the detault content of res/layout/activity_main.xml file to include few widgets in absolute
layout.
3 Define required constants in res/values/strings.xml file
4 Run the application to launch Android emulator and verify the result of the changes done in the
aplication.
Following is the content of the modified main activity filesrc/com.example.helloworld/MainActivity.java.
This file can include each of the fundamental lifecycle methods.
package com.example.helloworld;
import android.os.Bundle;
import
android.app.Activity;
import android.view.Menu; public class MainActivity extends Activity {
@Override protected void onCreate(Bundle savedInstanceState) {
super.onCreate(savedInstanceState);
setContentView(R.layout.activity_main); }
@Override public boolean onCreateOptionsMenu(Menu menu)
{ getMenuInflater().inflate(R.menu.main,
menu); return true; }
}
Following will be the content of res/layout/activity_main.xml file:
51
<AbsoluteLayout
xmlns:android="http://schemas.android.com/apk/res/android"
android:layout_width="fill_parent"
android:layout_height="fill_parent">
<Button android:layout_width="100dp"
android:layout_height="wrap_content"
android:text="OK"
android:layout_x="50px"
android:layout_y="361px" /> <Button android:layout_width="100dp"
android:layout_height="wrap_content" android:text="Cancel"
android:layout_x="225px" android:layout_y="361px" />
</AbsoluteLayout>
Following will be the content of res/values/strings.xml to define two new constants:
<?xml version="1.0" encoding="utf-8"?>
<resources>
<string name="app_name">HelloWorld</string>
<string name="action_settings">Settings</string>
</resources>
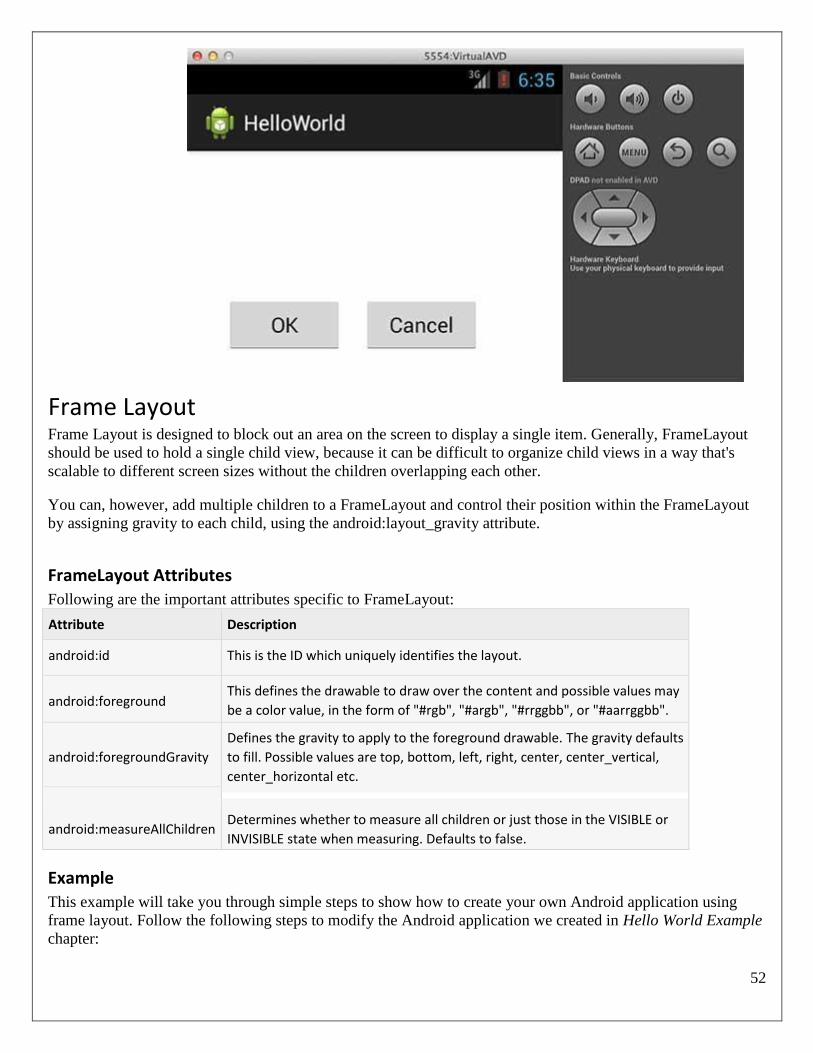
Let's try to run our modified Hello World! application we just modified. I assume you had created yourAVD
while doing environment setup. To run the app from Eclipse, open one of your project's activity files and click
Run icon from the toolbar. Eclipse installs the app on your AVD and starts it and if everything is fine with
your setup and application, it will display following Emulator window:
52
Frame Layout Frame Layout is designed to block out an area on the screen to display a single item. Generally, FrameLayout
should be used to hold a single child view, because it can be difficult to organize child views in a way that's
scalable to different screen sizes without the children overlapping each other.
You can, however, add multiple children to a FrameLayout and control their position within the FrameLayout
by assigning gravity to each child, using the android:layout_gravity attribute.
FrameLayout Attributes Following are the important attributes specific to FrameLayout:
Attribute Description
android:id This is the ID which uniquely identifies the layout.
android:foreground This defines the drawable to draw over the content and possible values may
be a color value, in the form of "#rgb", "#argb", "#rrggbb", or "#aarrggbb".
android:foregroundGravity
Defines the gravity to apply to the foreground drawable. The gravity defaults
to fill. Possible values are top, bottom, left, right, center, center_vertical,
center_horizontal etc.
android:measureAllChildren Determines whether to measure all children or just those in the VISIBLE or
INVISIBLE state when measuring. Defaults to false.
Example This example will take you through simple steps to show how to create your own Android application using
frame layout. Follow the following steps to modify the Android application we created in Hello World Example
chapter:

53
Step Description
1
You will use Eclipse IDE to create an Android application and name it as HelloWorld under
a package com.example.helloworld as explained in the Hello World Example chapter.
2 Modify the detault content of res/layout/activity_main.xml file to include few widgets in frame
layout.
3 Define required constants in res/values/strings.xml file
4 Run the application to launch Android emulator and verify the result of the changes done in the
aplication.
Following is the content of the modified main activity filesrc/com.example.helloworld/MainActivity.java.
This file can include each of the fundamental lifecycle methods.
package com.example.helloworld;
import android.os.Bundle;
import
android.app.Activity;
import android.view.Menu; public class MainActivity extends Activity {
@Override protected void onCreate(Bundle savedInstanceState) {
super.onCreate(savedInstanceState);
setContentView(R.layout.activity_main); }
@Override public boolean onCreateOptionsMenu(Menu menu)
{ getMenuInflater().inflate(R.menu.main,
menu); return true; }
}
Following will be the content of res/layout/activity_main.xml file:
<FrameLayout xmlns:android="http://schemas.android.com/apk/res/android"
android:layout_width="fill_parent"
android:layout_height="fill_parent">
<ImageView
android:src="@drawable/ic_launcher"
android:scaleType="fitCenter"
android:layout_height="250px"
android:layout_width="250px"/>

54
<TextView
android:text="Frame Demo" android:textSize="30px"
android:textStyle="bold"
android:layout_height="fill_parent"
android:layout_width="fill_parent"
android:gravity="center"/> </FrameLayout>
Following will be the content of res/values/strings.xml to define two new constants:
<?xml version="1.0" encoding="utf-8"?>
<resources>
<string name="app_name">HelloWorld</string>
<string name="action_settings">Settings</string>
</resources>
Let's try to run our modified Hello World! application we just modified. I assume you had created yourAVD
while doing environment setup. To run the app from Eclipse, open one of your project's activity files and click
Run icon from the toolbar. Eclipse installs the app on your AVD and starts it and if everything is fine with
your setup and application, it will display following Emulator window:
List View Android ListView is a view which groups several items and display them in vertical scrollable list. The list
items are automatically inserted to the list using an Adapter that pulls content from a source such as an array or
database.
An adapter actually bridges between UI components and the data source that fill data into UI Component.
Adapter can be used to supply the data to like spinner, list view, grid view etc.
55
The ListView and GridView are subclasses of AdapterView and they can be populated by binding them to an
Adapter, which retrieves data from an external source and creates a View that represents each data entry.
Android provides several subclasses of Adapter that are useful for retrieving different kinds of data and
building views for an AdapterView ( ie. ListView or GridView). The two most common adapters
areArrayAdapter and SimpleCursorAdapter. We will see separate examples for both the adapters.
ListView Attributes
Following are the important attributes specific to GridView:
Attribute Description
android:id This is the ID which uniquely identifies the layout.
android:divider This is drawable or color to draw between list items. .
android:dividerHeight This specifies height of the divider. This could be in px, dp, sp, in, or mm.
android:entries Specifies the reference to an array resource that will populate the
ListView.
android:footerDividersEnabled When set to false, the ListView will not draw the divider before each
footer view. The default value is true.
android:headerDividersEnabled When set to false, the ListView will not draw the divider after each
header view. The default value is true.
ArrayAdapter You can use this adapter when your data source is an array. By default, ArrayAdapter creates a view for each
array item by calling toString() on each item and placing the contents in a TextView. Consider you have an
array of strings you want to display in a ListView, initialize a new ArrayAdapter using a constructor to
specify the layout for each string and the string array:
ArrayAdapter adapter = new ArrayAdapter<String>(this, R.layout.ListView, StringArray);
Here are arguments for this constructor:
• First argument this is the application context. Most of the case, keep it this.
• Second argument will be layout defined in XML file and having TextView for each string in the array.
• Final argument is an array of strings which will be populated in the text view.
Once you have array adaptor created, then simply call setAdapter() on your ListView object as follows:
ListView listView = (ListView) findViewById(R.id.listview);
listView.setAdapter(adapter);
You will define your list view under res/layout directory in an XML file. For our example we are going to
using activity_main.xml file.
56
EXAMPLE
Following is the example which will take you through simple steps to show how to create your own Android
application using ListView. Follow the following steps to modify the Android application we created in Hello
World Example chapter:
Step Description
1 You will use Eclipse IDE to create an Android application and name it as HelloWorld under
a package com.example.helloworld as explained in the Hello World Example chapter.
2 Modify the detault content of res/layout/activity_main.xml file to include ListView content with the
self explanatory attributes.
3 Define required constants in res/values/strings.xml file.
4
Create a Text View file res/layout/activity_listview.xml. This file will have setting to display all the list
items. So you can customize its fonts, padding, color etc. using this file.
6 Run the application to launch Android emulator and verify the result of the changes done in the
aplication.
Following is the content of the modified main activity filesrc/com.example.helloworld/MainActivity.java.
This file can include each of the fundamental lifecycle methods.
package com.example.helloworld;
import android.os.Bundle;
import android.app.Activity;
import android.view.Menu;
import
android.widget.ArrayAdapter;
import
android.widget.ListView; public class MainActivity extends Activity {
// Array of strings... String[] countryArray = {"India", "Pakistan",
"USA", "UK"}; @Override protected void onCreate(Bundle savedInstanceState) {
super.onCreate(savedInstanceState);
setContentView(R.layout.activity_main); ArrayAdapter adapter = new ArrayAdapter<String>(this, R.layout.activity_listview, countryArray);
ListView listView = (ListView)
findViewById(R.id.country_list); listView.setAdapter(adapter);

57
} }
Following will be the content of res/layout/activity_main.xml file:
<LinearLayout xmlns:android="http://schemas.android.com/apk/res/android"
xmlns:tools="http://schemas.android.com/tools"
android:layout_width="match_parent" android:layout_height="match_parent"
android:orientation="vertical" tools:context=".ListActivity" >
<ListView
android:id="@+id/country_list" android:layout_width="match_parent"
android:layout_height="wrap_content" >
</ListView>
</LinearLayout>
Following will be the content of res/values/strings.xml to define two new constants:
<?xml version="1.0" encoding="utf-8"?>
<resources>
<string name="app_name">HelloWorld</string>
<string name="action_settings">Settings</string>
</resources>
Following will be the content of res/layout/activity_listview.xml file:
58
<?xml version="1.0" encoding="utf-8"?> <!-- Single List Item Design --> <TextView xmlns:android="http://schemas.android.com/apk/res/android"
android:id="@+id/label" android:layout_width="fill_parent"
android:layout_height="fill_parent"
android:padding="10dip"
android:textSize="16dip"
android:textStyle="bold" > </TextView>
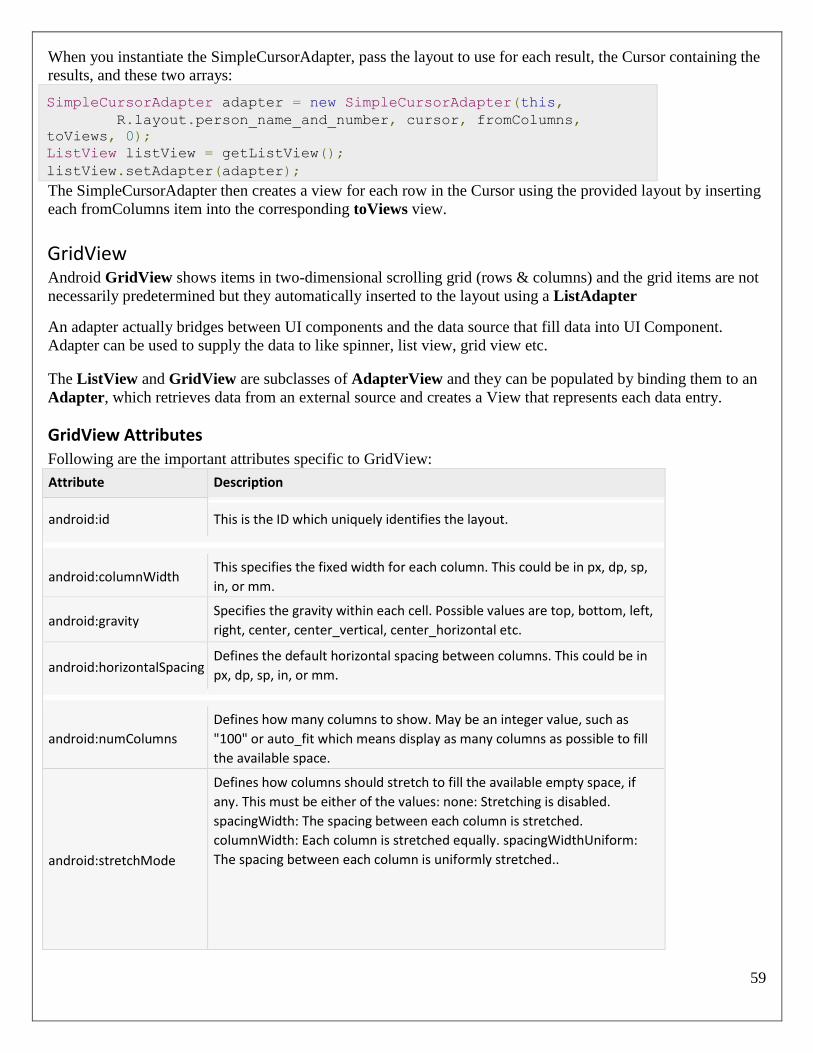
Let's try to run our modified Hello World! application we just modified. I assume you had created yourAVD
while doing environment setup. To run the app from Eclipse, open one of your project's activity files and click
Run icon from the toolbar. Eclipse installs the app on your AVD and starts it and if everything is fine with
your setup and application, it will display following Emulator window:
SimpleCursorAdapter
You can use this adapter when your data source is a database Cursor. When usingSimpleCursorAdapter, you
must specify a layout to use for each row in the Cursor and which columns in the Cursor should be inserted
into which views of the layout.
For example, if you want to create a list of people's names and phone numbers, you can perform a query that
returns a Cursor containing a row for each person and columns for the names and numbers. You then create a
string array specifying which columns from the Cursor you want in the layout for each result and an integer
array specifying the corresponding views that each column should be placed:
String[] fromColumns = {ContactsContract.Data.DISPLAY_NAME,
ContactsContract.CommonDataKinds.Phone.NUMBER}; int[]
toViews = {R.id.display_name, R.id.phone_number};
59
When you instantiate the SimpleCursorAdapter, pass the layout to use for each result, the Cursor containing the
results, and these two arrays:
SimpleCursorAdapter adapter = new SimpleCursorAdapter(this, R.layout.person_name_and_number, cursor, fromColumns,
toViews, 0); ListView listView = getListView();
listView.setAdapter(adapter);
The SimpleCursorAdapter then creates a view for each row in the Cursor using the provided layout by inserting
each fromColumns item into the corresponding toViews view.
GridView Android GridView shows items in two-dimensional scrolling grid (rows & columns) and the grid items are not
necessarily predetermined but they automatically inserted to the layout using a ListAdapter
An adapter actually bridges between UI components and the data source that fill data into UI Component.
Adapter can be used to supply the data to like spinner, list view, grid view etc.
The ListView and GridView are subclasses of AdapterView and they can be populated by binding them to an
Adapter, which retrieves data from an external source and creates a View that represents each data entry.
GridView Attributes Following are the important attributes specific to GridView:
Attribute Description
android:id This is the ID which uniquely identifies the layout.
android:columnWidth This specifies the fixed width for each column. This could be in px, dp, sp,
in, or mm.
android:gravity Specifies the gravity within each cell. Possible values are top, bottom, left,
right, center, center_vertical, center_horizontal etc.
android:horizontalSpacing Defines the default horizontal spacing between columns. This could be in
px, dp, sp, in, or mm.
android:numColumns
Defines how many columns to show. May be an integer value, such as
"100" or auto_fit which means display as many columns as possible to fill
the available space.
android:stretchMode
Defines how columns should stretch to fill the available empty space, if
any. This must be either of the values: none: Stretching is disabled.
spacingWidth: The spacing between each column is stretched.
columnWidth: Each column is stretched equally. spacingWidthUniform:
The spacing between each column is uniformly stretched..
60
android:verticalSpacing Defines the default vertical spacing between rows. This could be in px, dp,
sp, in, or mm.
Example This example will take you through simple steps to show how to create your own Android application using
GridView. Follow the following steps to modify the Android application we created in Hello World Example
chapter:
Step Description
1
You will use Eclipse IDE to create an Android application and name it as HelloWorld under
a package com.example.helloworld as explained in the Hello World Example chapter.
2 Modify the detault content of res/layout/activity_main.xml file to include GridView content with
the self explanatory attributes.
3 Define required constants in res/values/strings.xml file.
4 Let's put few pictures in res/drawable-hdpi folder. I have put sample0.jpg, sample1.jpg,
sample2.jpg, sample3.jpg, sample4.jpg, sample5.jpg, sample6.jpg and sample7.jpg.
5 Create a new class called ImageAdapter under a package com.example.helloworld that extends
BaseAdapter. This class will implement functionality of an adaptor to be used to fill the view.
6 Run the application to launch Android emulator and verify the result of the changes done in the
aplication.
Following is the content of the modified main activity filesrc/com.example.helloworld/MainActivity.java.
This file can include each of the fundamental lifecycle methods.
package com.example.helloworld;
import
android.os.Bundle; import
android.app.Activity;
import android.view.Menu;
import
android.widget.GridView;
public class MainActivity extends
Activity {
@Override
61
protected void onCreate(Bundle savedInstanceState) {
super.onCreate(savedInstanceState);
setContentView(R.layout.activity_main);
GridView gridview = (GridView) findViewById(R.id.gridview);
gridview.setAdapter(new ImageAdapter(this));
}
@Override public boolean
onCreateOptionsMenu(Menu menu) {
getMenuInflater().inflate(R.menu.main,
menu); return true;
}
}
Following will be the content of res/layout/activity_main.xml file:
<?xml version="1.0" encoding="utf-8"?>
<GridView xmlns:android="http://schemas.android.com/apk/res/android"
android:id="@+id/gridview" android:layout_width="fill_parent"
android:layout_height="fill_parent" android:columnWidth="90dp"
android:numColumns="auto_fit" android:verticalSpacing="10dp"
android:horizontalSpacing="10dp"
android:stretchMode="columnWidth" android:gravity="center"
/>
Following will be the content of res/values/strings.xml to define two new constants:
<?xml version="1.0" encoding="utf-8"?>
<resources>
<string name="app_name">HelloWorld</string>
<string name="action_settings">Settings</string>
62
</resources>
Following will be the content of src/com.example.helloworld/ImageAdapter.java file:
package com.example.helloworld;
import
android.content.Context;
import android.view.View;
import
android.view.ViewGroup;
import
android.widget.BaseAdapter;
import
android.widget.GridView;
import
android.widget.ImageView;
public class ImageAdapter extends
BaseAdapter { private Context
mContext;
// Constructor public
ImageAdapter(Context c) {
mContext = c;
} public int
getCount() {
return mThumbIds.length;
} public Object
getItem(int position) {
return null;
} public long
63
getItemId(int position) {
return 0;
}

64
// create a new ImageView for each item referenced by the
Adapter public View getView(int position, View convertView,
ViewGroup parent) { ImageView imageView; if
(convertView == null) { imageView = new
ImageView(mContext); imageView.setLayoutParams(new
GridView.LayoutParams(85, 85));
imageView.setScaleType(ImageView.ScaleType.CENTER_CROP);
imageView.setPadding(8, 8, 8, 8);
} else { imageView =
(ImageView) convertView;
}
imageView.setImageResource(mThumbIds[position]);
return imageView;
}
// Keep all Images in array
public Integer[] mThumbIds = {
R.drawable.sample_2, R.drawable.sample_3,
R.drawable.sample_4, R.drawable.sample_5,
R.drawable.sample_6, R.drawable.sample_7,
R.drawable.sample_0, R.drawable.sample_1,
R.drawable.sample_2, R.drawable.sample_3,
R.drawable.sample_4, R.drawable.sample_5,
R.drawable.sample_6, R.drawable.sample_7,
R.drawable.sample_0, R.drawable.sample_1,
R.drawable.sample_2, R.drawable.sample_3,
R.drawable.sample_4, R.drawable.sample_5,
R.drawable.sample_6, R.drawable.sample_7
};
}

65
Let's try to run our modified Hello World! application we just modified. I assume you had created yourAVD
while doing environment setup. To run the app from Eclipse, open one of your project's activity files and click
Run icon from the toolbar. Eclipse installs the app on your AVD and starts it and if everything is fine with
your setup and application, it will display following Emulator window:
Sub-Activity Example Let's extend the functionality of above example where we will show selected grid image in full screen. To
achieve this we need to introduce a new activity. Just keep in mind for any activity we need perform all the
steps like we have to implement an activity class, define that activity in AndroidManifest.xml file, define
related layout and finally link that sub-activity with the main activity by it in the main activity class. So let's
follow the steps to modify above example:
Step Description

66
1 You will use Eclipse IDE to create an Android application and name it as HelloWorld under
a package com.example.helloworld as explained in the Hello World Example chapter.
2 Create a new Activity class as SingleViewActivity.java under a packagecom.example.helloworld as
shown below.
3 Create new layout file for the new activity under res/layout/ folder. Let's name this XML file as
single_view.xml.
4 Define your new activity in AndroidManifest.xml file using tag. An application can have one or more
activities without any restrictions.
5 Run the application to launch Android emulator and verify the result of the changes done in the
aplication.
Following is the content of the modified main activity filesrc/com.example.helloworld/MainActivity.java.
This file can include each of the fundamental lifecycle methods.
package com.example.helloworld;
import android.app.Activity; import
android.content.Intent; import
android.os.Bundle; import android.view.Menu;
import android.view.View; import
android.widget.AdapterView; import
android.widget.AdapterView.OnItemClickListener;
import android.widget.GridView;
public class MainActivity extends
Activity {
@Override protected void onCreate(Bundle
savedInstanceState) {
super.onCreate(savedInstanceState);
setContentView(R.layout.activity_main);
GridView gridview = (GridView) findViewById(R.id.gridview);
gridview.setAdapter(new ImageAdapter(this));
gridview.setOnItemClickListener(new
OnItemClickListener() { public void
onItemClick(AdapterView<?> parent, View v,

67
int position, long id) {
// Send intent to SingleViewActivity
Intent i = new Intent(getApplicationContext(),
SingleViewActivity.class);
// Pass image index
i.putExtra("id", position);
startActivity(i);
}
});
}
@Override public boolean
onCreateOptionsMenu(Menu menu) {
getMenuInflater().inflate(R.menu.main,
menu); return true;
}
}
Following will be the content of new activity file src/com.example.helloworld/SingleViewActivity.javafile:
package com.example.helloworld;
import
android.app.Activity;
import
android.content.Intent;
import android.os.Bundle;
import
android.widget.ImageView;
public class SingleViewActivity
extends Activity {
68
@Override public void
onCreate(Bundle savedInstanceState) {
super.onCreate(savedInstanceState);
setContentView(R.layout.single_view);
// Get intent data
Intent i = getIntent();
// Selected image id int
position = i.getExtras().getInt("id");
ImageAdapter imageAdapter = new
ImageAdapter(this);
ImageView imageView = (ImageView)
findViewById(R.id.SingleView);
imageView.setImageResource(imageAdapter.mThumbIds[position]);
}
}
Following will be the content of res/layout/single_view.xml file:
<?xml version="1.0" encoding="utf-8"?>
<LinearLayout
xmlns:android="http://schemas.android.com/apk/res/android"
android:layout_width="match_parent"
69
android:layout_height="match_parent"
android:orientation="vertical" >
<ImageView android:id="@+id/SingleView"
android:layout_width="fill_parent"
android:layout_height="fill_parent"/>
</LinearLayout>
Following will be the content of AndroidManifest.xml to define two new constants:
<?xml version="1.0" encoding="utf-8"?>
<manifest
xmlns:android="http://schemas.android.com/apk/res/android"
package="com.example.helloworld"
android:versionCode="1" android:versionName="1.0" >
<uses-sdk
android:minSdkVersion="8"
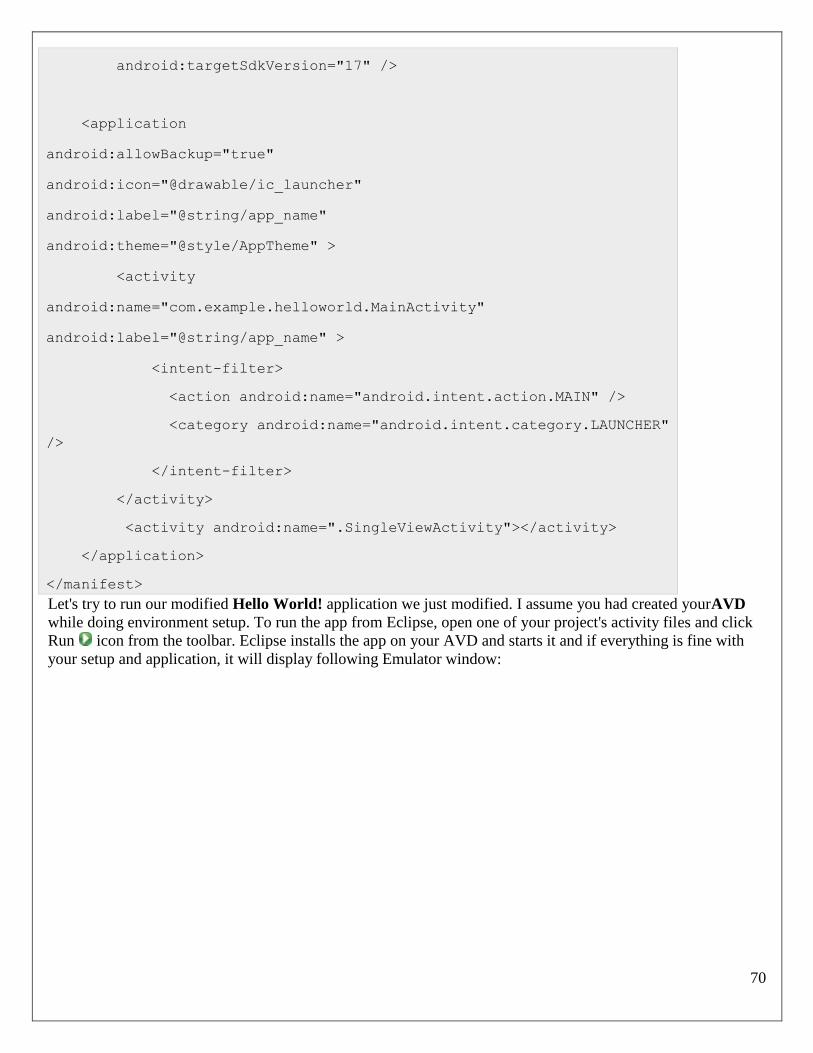
70
android:targetSdkVersion="17" />
<application
android:allowBackup="true"
android:icon="@drawable/ic_launcher"
android:label="@string/app_name"
android:theme="@style/AppTheme" >
<activity
android:name="com.example.helloworld.MainActivity"
android:label="@string/app_name" >
<intent-filter>
<action android:name="android.intent.action.MAIN" />
<category android:name="android.intent.category.LAUNCHER"
/>
</intent-filter>
</activity>
<activity android:name=".SingleViewActivity"></activity>
</application>
</manifest>
Let's try to run our modified Hello World! application we just modified. I assume you had created yourAVD
while doing environment setup. To run the app from Eclipse, open one of your project's activity files and click
Run icon from the toolbar. Eclipse installs the app on your AVD and starts it and if everything is fine with
your setup and application, it will display following Emulator window:
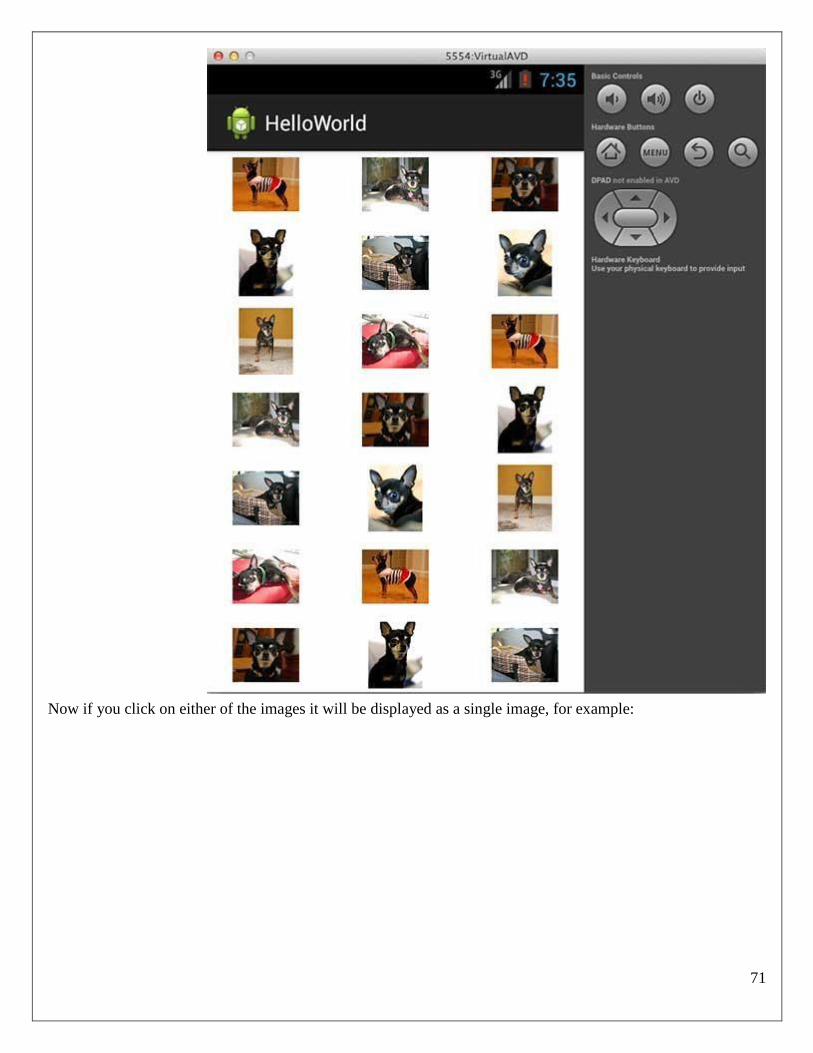
71
Now if you click on either of the images it will be displayed as a single image, for example:
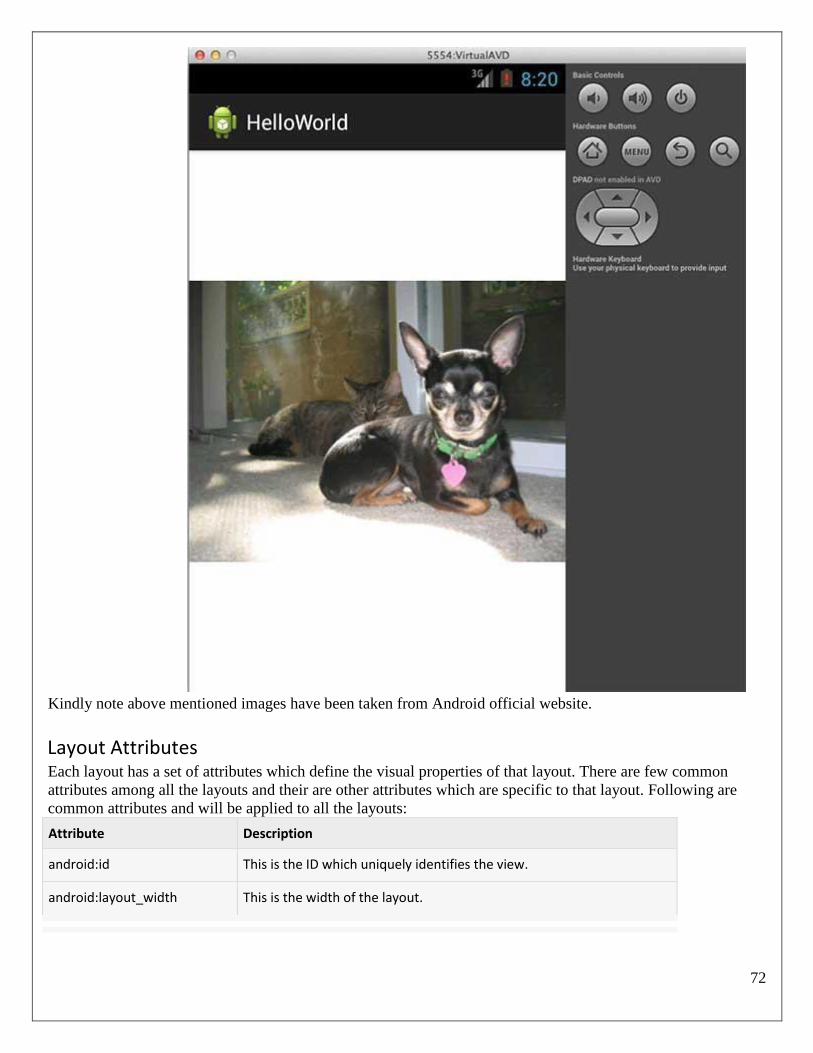
72
Kindly note above mentioned images have been taken from Android official website.
Layout Attributes Each layout has a set of attributes which define the visual properties of that layout. There are few common
attributes among all the layouts and their are other attributes which are specific to that layout. Following are
common attributes and will be applied to all the layouts:
Attribute Description
android:id This is the ID which uniquely identifies the view.
android:layout_width This is the width of the layout.
73
android:layout_height This is the height of the layout
android:layout_marginTop This is the extra space on the top side of the layout.
android:layout_marginBottom This is the extra space on the bottom side of the layout.
android:layout_marginLeft This is the extra space on the left side of the layout.
android:layout_marginRight This is the extra space on the right side of the layout.
android:layout_gravity This specifies how child Views are positioned.
android:layout_weight This specifies how much of the extra space in the layout should be
allocated to the View.
android:layout_x This specifies the x-coordinate of the layout.
android:layout_y This specifies the y-coordinate of the layout.
android:layout_width This is the width of the layout.
android:layout_width This is the width of the layout.
android:paddingLeft This is the left padding filled for the layout.
android:paddingRight This is the right padding filled for the layout.
android:paddingTop This is the top padding filled for the layout.
android:paddingBottom This is the bottom padding filled for the layout.
Here width and height are the dimension of the layout/view which can be specified in terms of dp
(Densityindependent Pixels), sp ( Scale-independent Pixels), pt ( Points which is 1/72 of an inch), px( Pixels),
mm ( Millimeters) and finally in (inches).
You can specify width and height with exact measurements but more often, you will use one of these constants
to set the width or height:
android:layout_width=wrap_content tells your view to size itself to the dimensions required by its
content. android:layout_width=fill_parent tells your view to become as big as its parent view.
Gravity attribute plays important role in positioning the view object and it can take one or more (separated by
'|') of the following constant values.
Constant Value Description
top 0x30 Push object to the top of its container, not changing its size.
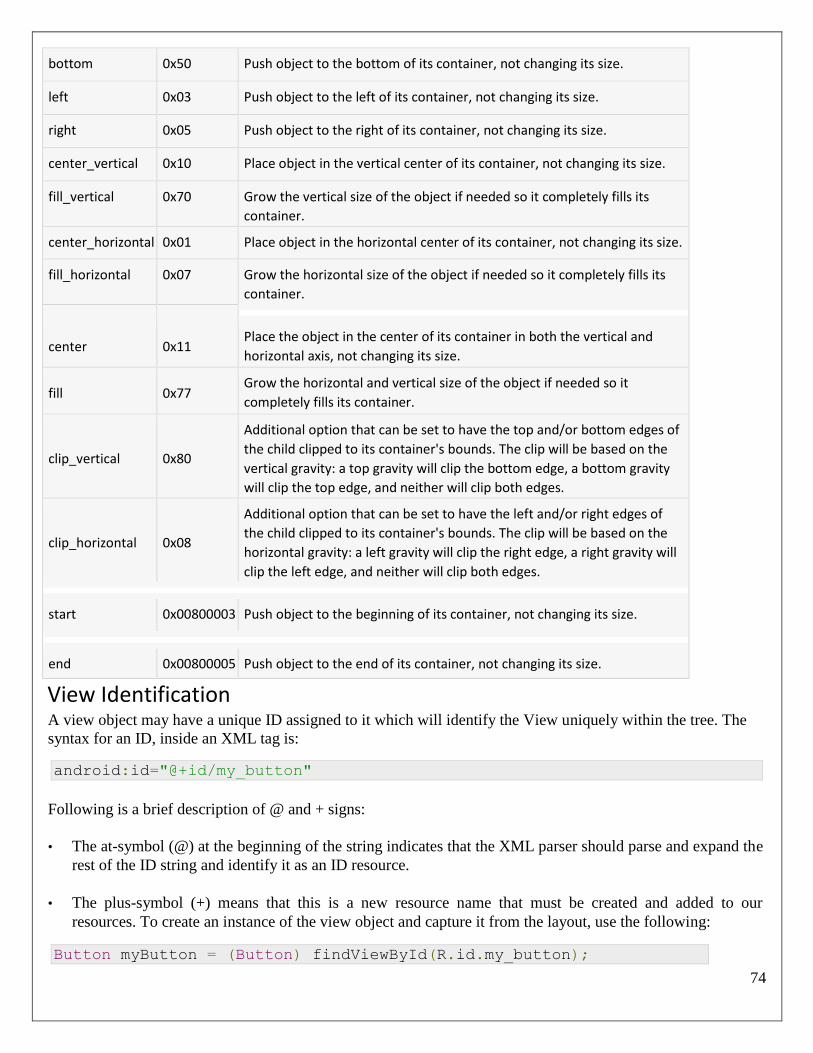
74
bottom 0x50 Push object to the bottom of its container, not changing its size.
left 0x03 Push object to the left of its container, not changing its size.
right 0x05 Push object to the right of its container, not changing its size.
center_vertical 0x10 Place object in the vertical center of its container, not changing its size.
fill_vertical 0x70 Grow the vertical size of the object if needed so it completely fills its
container.
center_horizontal 0x01 Place object in the horizontal center of its container, not changing its size.
fill_horizontal 0x07 Grow the horizontal size of the object if needed so it completely fills its
container.
center 0x11 Place the object in the center of its container in both the vertical and
horizontal axis, not changing its size.
fill 0x77 Grow the horizontal and vertical size of the object if needed so it
completely fills its container.
clip_vertical 0x80
Additional option that can be set to have the top and/or bottom edges of
the child clipped to its container's bounds. The clip will be based on the
vertical gravity: a top gravity will clip the bottom edge, a bottom gravity
will clip the top edge, and neither will clip both edges.
clip_horizontal 0x08
Additional option that can be set to have the left and/or right edges of
the child clipped to its container's bounds. The clip will be based on the
horizontal gravity: a left gravity will clip the right edge, a right gravity will
clip the left edge, and neither will clip both edges.
start 0x00800003 Push object to the beginning of its container, not changing its size.
end 0x00800005 Push object to the end of its container, not changing its size.
View Identification A view object may have a unique ID assigned to it which will identify the View uniquely within the tree. The
syntax for an ID, inside an XML tag is:
android:id="@+id/my_button"
Following is a brief description of @ and + signs:
• The at-symbol (@) at the beginning of the string indicates that the XML parser should parse and expand the
rest of the ID string and identify it as an ID resource.
• The plus-symbol (+) means that this is a new resource name that must be created and added to our
resources. To create an instance of the view object and capture it from the layout, use the following:
Button myButton = (Button) findViewById(R.id.my_button);
75
Testing
Test Plan A test plan can be defined as a document describing the scope, approach, resources, and schedule of intended
testing activities. It identifies test items, the features to be tested, the testing tasks, who will do each task, and
any risks requiring contingency planning. In software testing, a test plan gives detailed
testing information regarding an upcoming testing effort, including
_ Scope of testing
_ Schedule
_ Test Deliverables
_ Release Criteria
_ Risks and Contingencies
It is also be described as a detail of how the testing will proceed, who will do the testing, what will be tested, in
how much time the test will take place, and to what quality level the test will be performed.
The process of defining a test project so that it can be properly measured and controlled. The test planning
process generates a high level test plan document that identifies the software items to be tested, the degree of
tester independence, the test environment, the test case design and test measurement techniques to be used, and
the rationale for their choice.
A testing plan is a methodological and systematic approach to testing a system such as a machine or software. It
can be effective in finding errors and flaws in a system. In order to find relevant results, the plan typically
contains experiments with a range of operations and values, including an understanding of what the eventual
workflow will be.
Test plan is a document which includes, introduction, assumptions, list of test cases, list of features to be tested,
approach, deliverables, resources, risks and scheduling. A test plan is a systematic approach to testing a system
such as a machine or software. The plan typically contains a detailed understanding of what the eventual
workflow will be. A record of the test planning process detailing the degree of tester independence, the test
environment, the test case design techniques and test measurement techniques to be used, and the rationale for
their choice.
Evaluation of results
Due to the tight schedule we did not have enough time to develop application that would contain full features
which were stated in the goals chapter but the prototype of the application is representing the scope of the thesis
project and host properties which were defined in the scope.
Test Activities
Various Testing Activities are as follow:
1. Black box testing - Internal system design is not considered in this type of testing. Tests are based on
requirements and functionality.

76
2. White box testing -This testing is based on knowledge of the internal logic of an applications code.Also
known as Glass box Testing. Internal software and code working should be known for thistype of testing. Tests
are based on coverage of code statements, branches, paths, conditions.
3. Unit testing - Testing of individual software components or modules. Typically done by the programmer and
not by testers, as it requires detailed knowledge of the internal program design and code. may require
developing test driver modules or test harnesses.
4. Incremental integration testing Bottom up approach for testing i.e continuous testing of an application as new
functionality is added; Application functionality and modules should be independent enough to test separately.
done by programmers or by testers.
5. Integration testing - Testing of integrated modules to verify combined functionality after integration.
Modules are typically code modules, individual applications, client and server applications on a network, etc.
This type of testing is especially relevant to client/server and distributed systems.
6. Functional testing- This type of testing ignores the internal parts and focus on the output is as per requirement
or not. Black-box type testing geared to functional requirements of an application.
7. System testing Entire system is tested as per the requirements. Black-box type testing that is based on overall
requirements specifications, covers all combined parts of a system.
8. End-to-end testing Similar to system testing, involves testing of a complete application environment in a
situation that mimics real-world use, such as interacting with a database, using network communications, or
interacting with other hardware, applications, or systems if appropriate.
9. Acceptance testing - Normally this type of testing is done to verify if system meets the customer specified
requirements. User or customer do this testing to determine whether to accept application.
10. Usability testing User-friendliness check. Application flow is tested, Can new user understand the
application easily, Proper help documented whenever user stuck at any point. Basically system navigation is
checked in this testing.
Source evaluation
The android platform which is chosen for the application has lots of information and tutorials which can help us
while developing the application.
Such source as http://developer.android.com was one of the bases for further development. This web source is
very informative and guides how to build application from scratch. Same source
http://developer.android.com/sdk/ can help us to build the important environment. What we have seen during
creating the prototype application that the information which is needed the most and described in most clear
way can be found from the forums. The web forum like StackOverflow can supply more useful information
than the particular book about Android development. Besides this, information which is available in the forums
can be accessed with no limits when the book must be purchased in advance. Based on this we can conclude
that during development of the application, forums were more efficient than books.

77
Evaluation of methods The methods which were used in this thesis work were very useful. The main theoretical method was literature
review. Literature review method allows us to review different sources like books and articles and present our
knowledge based on ideas described by other scientists.
The development methods were represented by rapid application development method and software testing
method. As rapid application development method was used on any stage of development during this project we
always had working prototype. Periodically we add more and more functionality to our prototype until it could
satisfy the requirements, which were defined in the scope of this project. System testing methodology was
represented by Specification-based testing. With this method we could test the prototype on the base of
requirements analyzes
78
Proposed Work
Proposed System will be able to do the following:
1. Master NP Complete problems
Students can learn the topic Complexity Classes such as NP Hard and NP Complete which is one of the hardest
topic in computer science and engineering.
2. To eliminate wastage of time and energy:
Learning Through android app will help the students to study in their mobile phones rather than opening the
internet.
3. Students can know their position
Students can test their skills and thus students can know what their position is.
4. Students can get a valuable explanation.
Students can get a valuable explanation which will help them to prepare for their entrance examinations
5. Students can correct errors
With the help of learning through android app students can correct their errors(if any) by reading the
explanation part
79
Experimental Result
User Interface Representation
In order to make user interface, many controls are used. Some of which are as follow:
1. TextView:
Text View displays text to the user and optionally allows them to edit it. A TextView is a complete text editor,
however the basic class is configured to not allow editing.
2. EditText:
EditText is a thin veneer over TextView that configures itself to be editable.
3. Button:
A button consists of text or an icon (or both text and an icon) that communicates what action occurs when the
user touches it.
4. List View:
ListView is a view group that displays a list of scrollable items. The list items are automatically inserted to the
list using an Adapter that pulls content from a source such as an array or database query and converts each item
result into a view that’s placed into the list.
5. Check Boxes:
Checkbox is a control or widget that can be activated with a finger touch and can be polled in the application’s
code for a checked and uncheckked state.

80
Conclusion Before this project, we had no idea about how the android apps are being made. But after completion of the
project we have gathered a huge knowledge of android and how to develop its apps.
The project helped us in mastering the topic of the complexity classes such as P, NP, NP-Hard, NP-Complete
etc. As we worked on this topic we have learnt many concepts of these complexity classes.
Thanks to our team mates for selecting, our project guide, and our department for giving us the opportunity of
doing our final year project in such a nice topic.
Overall this project has been a great learning experience.
81
References [1] Basic Android Tutorials, available at http://www.tutorialspoint.com/android
[2] Android Development Tutorials, available at http://www.developer.android.com
[3] Shuchi Chawla, Robert Krauthgamer, Ravi Kumar, Yuval Rabani, and D. Sivakumar.On the hardness of
approximating multicut and sparsest-cut. Computational Complexity
[4] Lars Engebretsen and Jonas Holmerin. More efficient queries in PCPs for NP and improved approximation
hardness of maximum CSP. In Volker Diekert and Bruno Durand, editors, STACS, volume 3404 of Lecture
Notes in Computer Science, pages 194–205. Springer, 2005.
[5] P, NP, and NP-Completeness The Basics of Computational Complexity By Oded Goldreich.
[6]Algorithms by Aho Sethi and Ulman.


![· a-aso l.uz CIO CCD CCD u.lZ tuz w9 CIC]3 dN np W!orpv np np W!orpy np êUlOW!ned np np W!orpv np np np W!orpv W!0fpv an b!uqoal 101 tua,p a.lpeo 91.10 el wunp 91.pneqwa e uone30A](https://img.pdfslide.tips/doc/110x75/5b9a179409d3f2c3468c949e/-a-aso-luz-cio-ccd-ccd-ulz-tuz-w9-cic3-dn-np-worpv-np-np-worpy-np-eulowned.jpg)

![V.ARVIND J.K M - RAIRO: ITA · 156 V. ARVIND, J. KÖBLER AND M. MUNDHENK if any NP-complete set many-one reduces to a sparse set then P = NP [28]. Related work has been done in [8,](https://img.pdfslide.tips/doc/110x75/5edef480ad6a402d666a50f4/varvind-jk-m-rairo-ita-156-v-arvind-j-kbler-and-m-mundhenk-if-any-np-complete.jpg)


![[11] Np Complete](https://img.pdfslide.tips/doc/110x75/55cf8ce75503462b139065ba/11-np-complete.jpg)
