Embed Size (px)
Citation preview
Open vSwitch와 Mininet을 이용한 가상 네트워크 생성과
OpenDaylight를 사용한 네트워크 제어실험
2015.03.16
㈜파이오링크
SDN개발실 백승훈 ([email protected])
© PIOLINK, Inc. SDN No.1
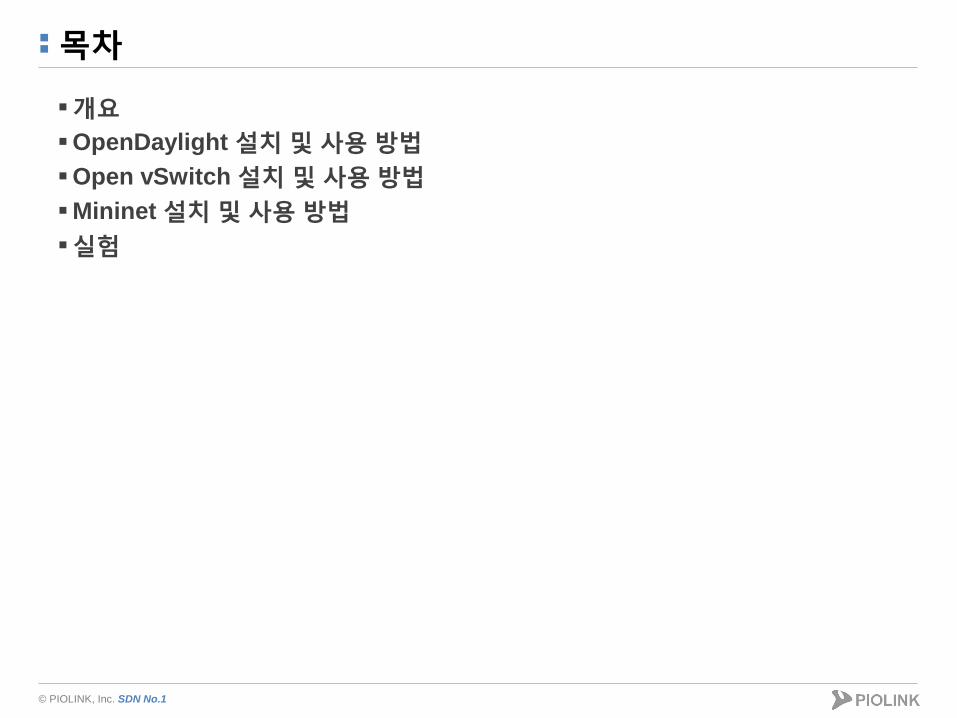
목차
개요
OpenDaylight 설치 및 사용 방법
Open vSwitch 설치 및 사용 방법
Mininet 설치 및 사용 방법
실험
© PIOLINK, Inc. SDN No.1
개요
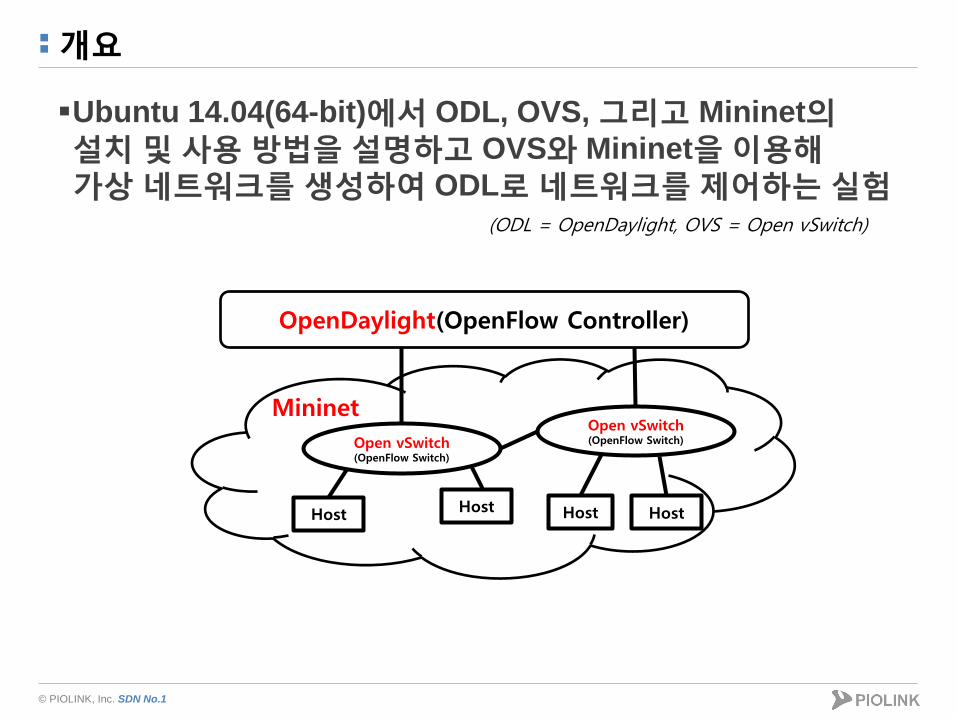
Ubuntu 14.04(64-bit)에서 ODL, OVS, 그리고 Mininet의
설치 및 사용 방법을 설명하고 OVS와 Mininet을 이용해
가상 네트워크를 생성하여 ODL로 네트워크를 제어하는 실험
(ODL = OpenDaylight, OVS = Open vSwitch)
Host
Open vSwitch (OpenFlow Switch)
Host Host
Mininet
OpenDaylight(OpenFlow Controller)
Open vSwitch (OpenFlow Switch)
Host
© PIOLINK, Inc. SDN No.1
OpenDaylight
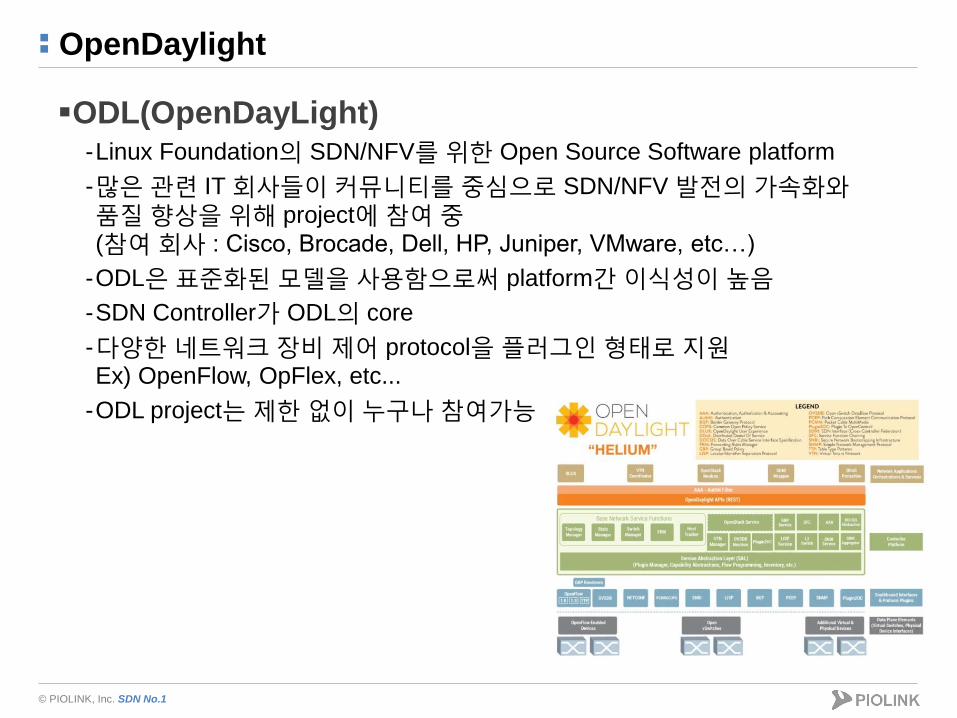
ODL(OpenDayLight) -Linux Foundation의 SDN/NFV를 위한 Open Source Software platform
-많은 관련 IT 회사들이 커뮤니티를 중심으로 SDN/NFV 발전의 가속화와
품질 향상을 위해 project에 참여 중
(참여 회사 : Cisco, Brocade, Dell, HP, Juniper, VMware, etc…)
-ODL은 표준화된 모델을 사용함으로써 platform간 이식성이 높음
-SDN Controller가 ODL의 core
-다양한 네트워크 장비 제어 protocol을 플러그인 형태로 지원
Ex) OpenFlow, OpFlex, etc...
-ODL project는 제한 없이 누구나 참여가능

© PIOLINK, Inc. SDN No.1
설치 방법(ODL)
Pre-Built (방법 1)
- http://www.opendaylight.org/software/downloads -> 다운로드 후 압축 해제
-압축 해제된 경로로 이동 후 Karaf 실행 슬라이드로 이동
Source build (방법 2)
1. $ sudo apt-get install git maven python-dev python-virtualenv openjdk-7-jdk build-essential
2. $ git clone https://github.com/sdnhub/SDNHub_Opendaylight_Tutorial
3. $ cd SDNHub_Opendaylight_Tutorial
4. $ mvn install
- mvn(=maven) : Java 기반의 프로젝트를 관리 및 build 하기 위한 tool
5. $ cd ./distribution/opendaylight-karaf/target
6. $ tar xzvf distribution-karaf-0.5.0-SNAPSHOT.tar.gz
7. $ cd ./distribution-karaf-0.5.0-SNAPSHOT
© PIOLINK, Inc. SDN No.1
설치 방법(ODL)
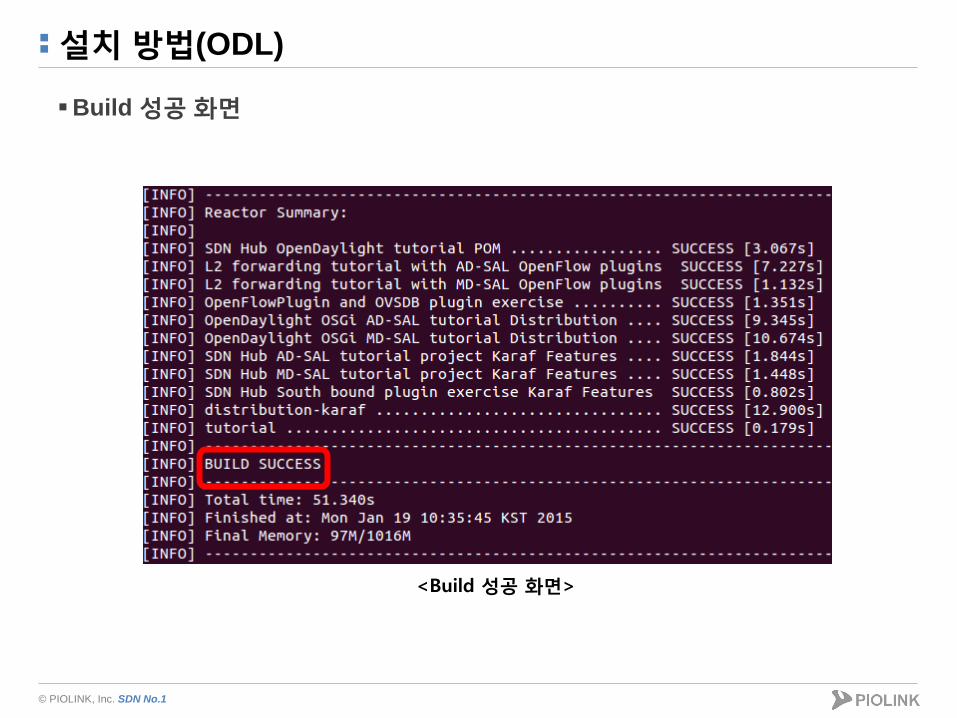
Build 성공 화면
<Build 성공 화면>
© PIOLINK, Inc. SDN No.1
Karaf 실행(ODL)
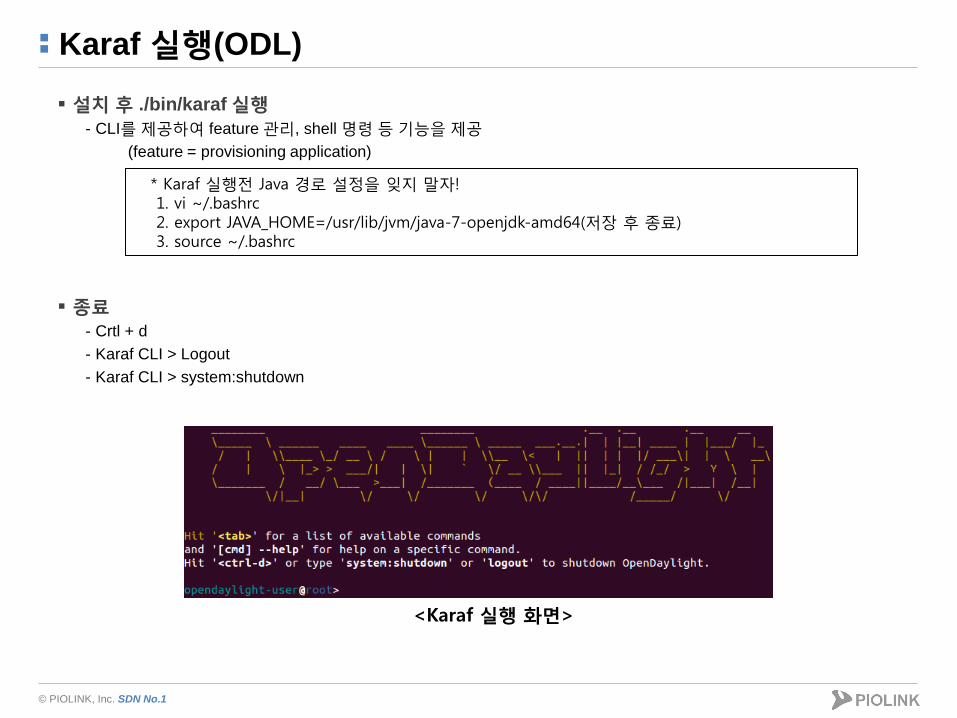
설치 후 ./bin/karaf 실행
- CLI를 제공하여 feature 관리, shell 명령 등 기능을 제공
(feature = provisioning application)
종료
- Crtl + d
- Karaf CLI > Logout
- Karaf CLI > system:shutdown
* Karaf 실행전 Java 경로 설정을 잊지 말자! 1. vi ~/.bashrc 2. export JAVA_HOME=/usr/lib/jvm/java-7-openjdk-amd64(저장 후 종료) 3. source ~/.bashrc
<Karaf 실행 화면>
© PIOLINK, Inc. SDN No.1
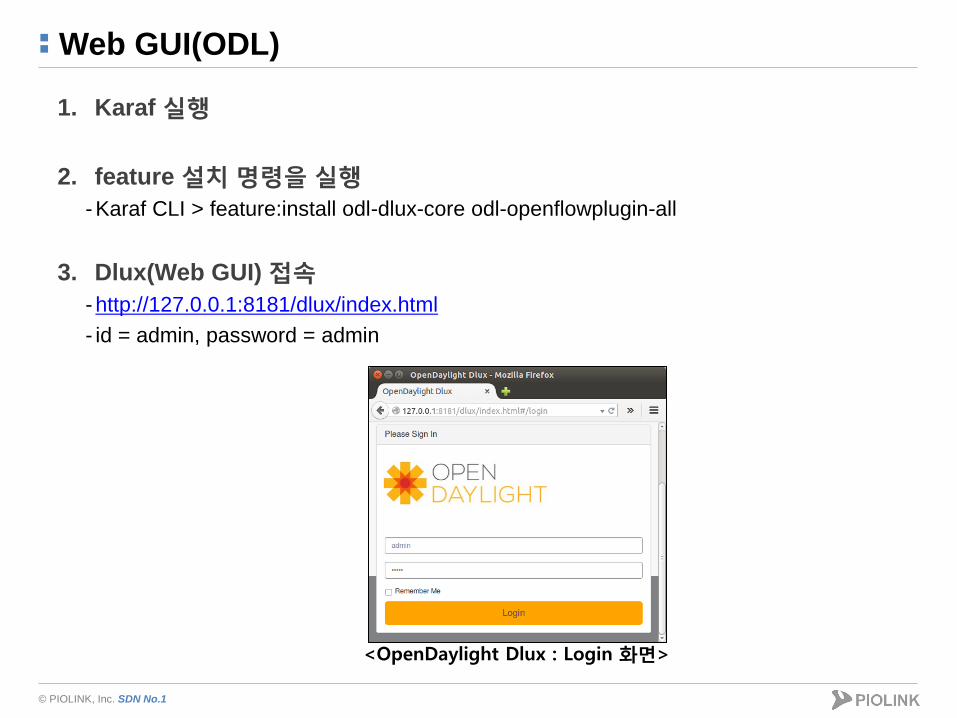
Web GUI(ODL)
1. Karaf 실행
2. feature 설치 명령을 실행
- Karaf CLI > feature:install odl-dlux-core odl-openflowplugin-all
3. Dlux(Web GUI) 접속
- http://127.0.0.1:8181/dlux/index.html
- id = admin, password = admin
<OpenDaylight Dlux : Login 화면>
© PIOLINK, Inc. SDN No.1
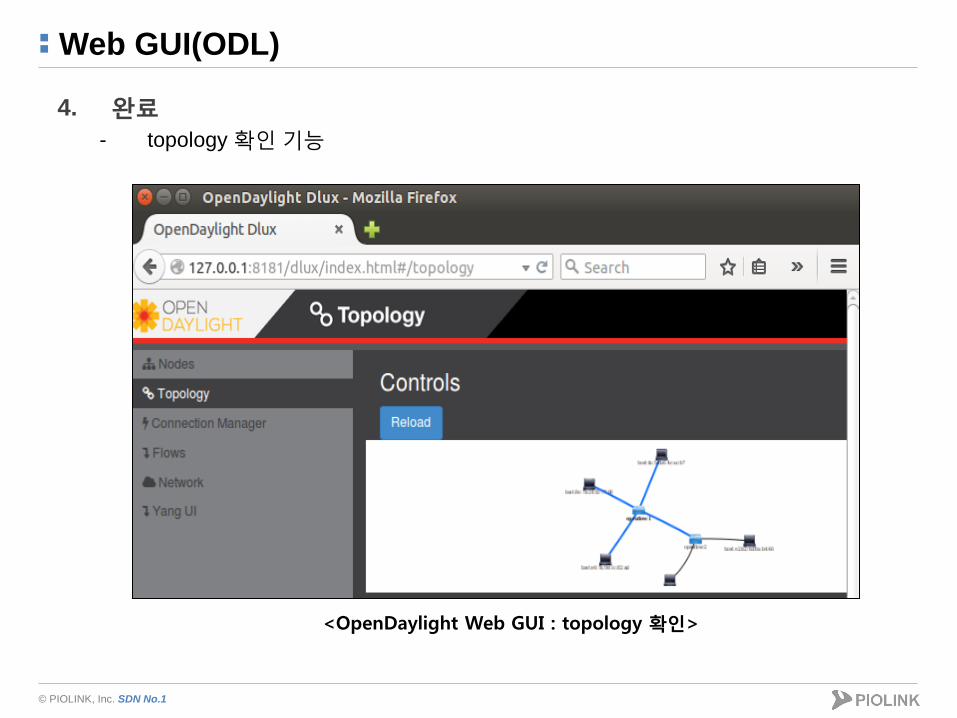
Web GUI(ODL)
4. 완료
- topology 확인 기능
<OpenDaylight Web GUI : topology 확인>
© PIOLINK, Inc. SDN No.1
Flow table 관리(ODL)
Flow란?
-Packet data의 protocol, src/dst IP, src/dst port 정보
Flow table
-Packet data 전달 경로와 방식에 대한 정보의 집합
REST(ODL Northbound interface)를 이용한
flow table 관리
*Example은 cURL을 사용했지만 필수는 아님
-cURL : 다양한 프로토콜로 데이터를 전송하기 위한 명령어 기반의
프로그램
© PIOLINK, Inc. SDN No.1
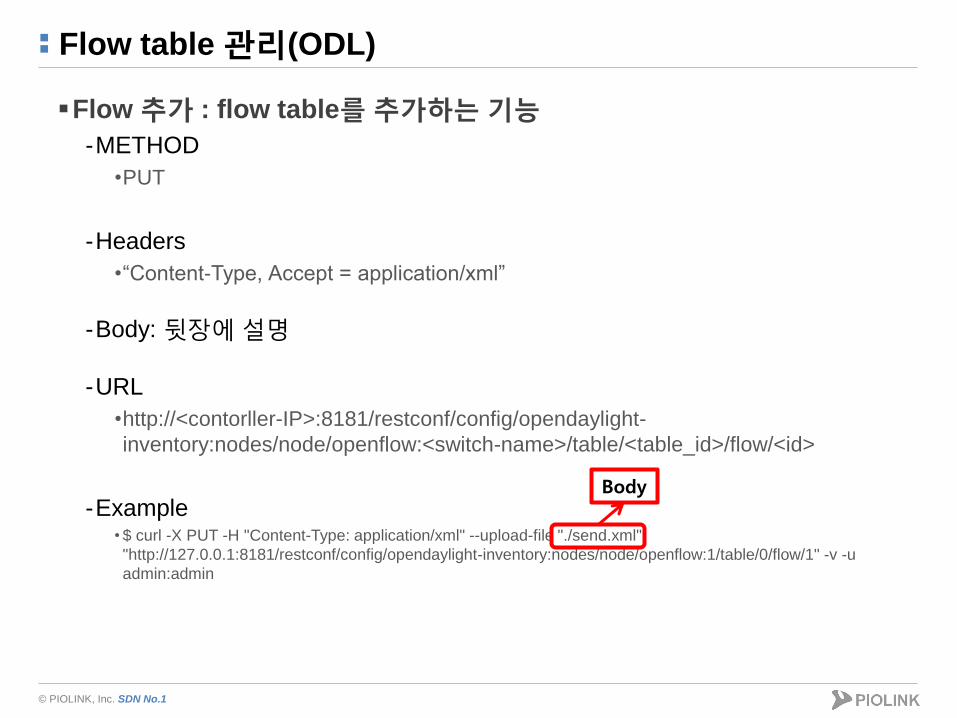
Flow table 관리(ODL)
Flow 추가 : flow table를 추가하는 기능
-METHOD
•PUT
-Headers
•“Content-Type, Accept = application/xml”
-Body: 뒷장에 설명
-URL
•http://<contorller-IP>:8181/restconf/config/opendaylight-
inventory:nodes/node/openflow:<switch-name>/table/<table_id>/flow/<id>
-Example • $ curl -X PUT -H "Content-Type: application/xml" --upload-file "./send.xml"
"http://127.0.0.1:8181/restconf/config/opendaylight-inventory:nodes/node/openflow:1/table/0/flow/1" -v -u
admin:admin
Body
© PIOLINK, Inc. SDN No.1
Flow table 관리(ODL)
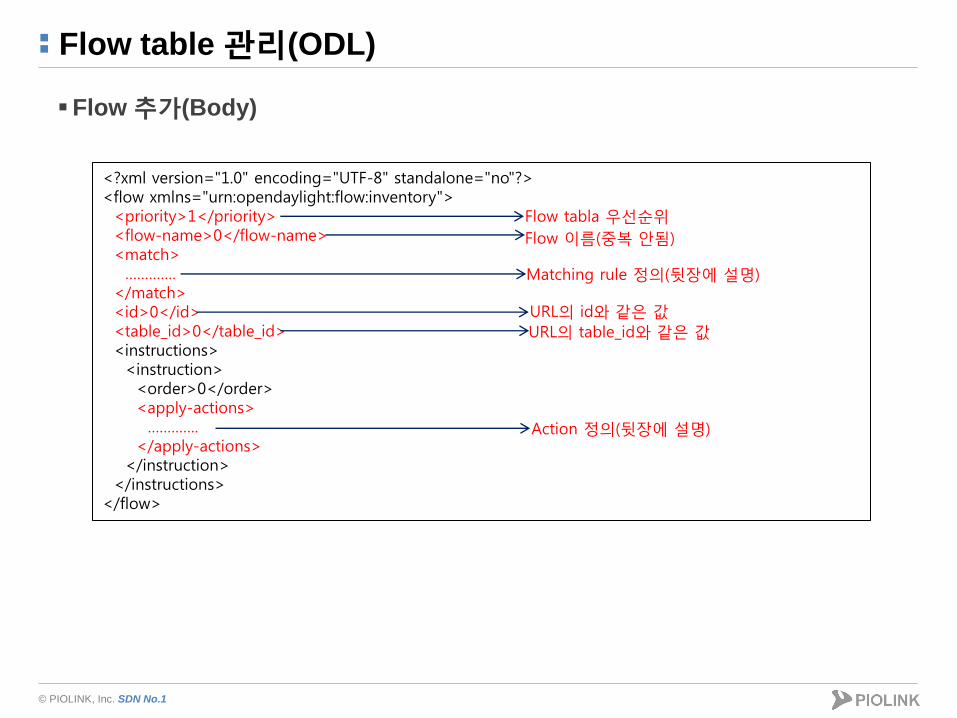
Flow 추가(Body)
<?xml version="1.0" encoding="UTF-8" standalone="no"?> <flow xmlns="urn:opendaylight:flow:inventory"> <priority>1</priority> <flow-name>0</flow-name> <match> …………. </match> <id>0</id> <table_id>0</table_id> <instructions> <instruction> <order>0</order> <apply-actions> …………. </apply-actions> </instruction> </instructions> </flow>
Flow tabla 우선순위
Flow 이름(중복 안됨)
Matching rule 정의(뒷장에 설명)
URL의 id와 같은 값
URL의 table_id와 같은 값
Action 정의(뒷장에 설명)
© PIOLINK, Inc. SDN No.1
Flow table 관리(ODL)
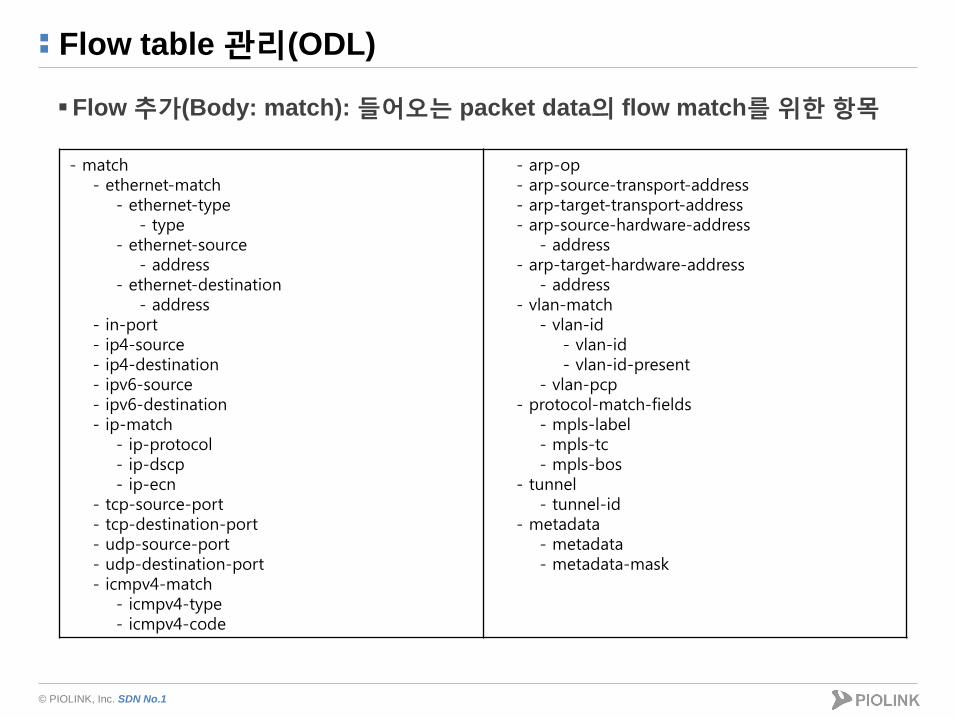
Flow 추가(Body: match): 들어오는 packet data의 flow match를 위한 항목
- match - ethernet-match - ethernet-type - type - ethernet-source - address - ethernet-destination - address - in-port - ip4-source - ip4-destination - ipv6-source - ipv6-destination - ip-match - ip-protocol - ip-dscp - ip-ecn - tcp-source-port - tcp-destination-port - udp-source-port - udp-destination-port - icmpv4-match - icmpv4-type - icmpv4-code
- arp-op - arp-source-transport-address - arp-target-transport-address - arp-source-hardware-address - address - arp-target-hardware-address - address - vlan-match - vlan-id - vlan-id - vlan-id-present - vlan-pcp - protocol-match-fields - mpls-label - mpls-tc - mpls-bos - tunnel - tunnel-id - metadata - metadata - metadata-mask
© PIOLINK, Inc. SDN No.1
Flow table 관리(ODL)
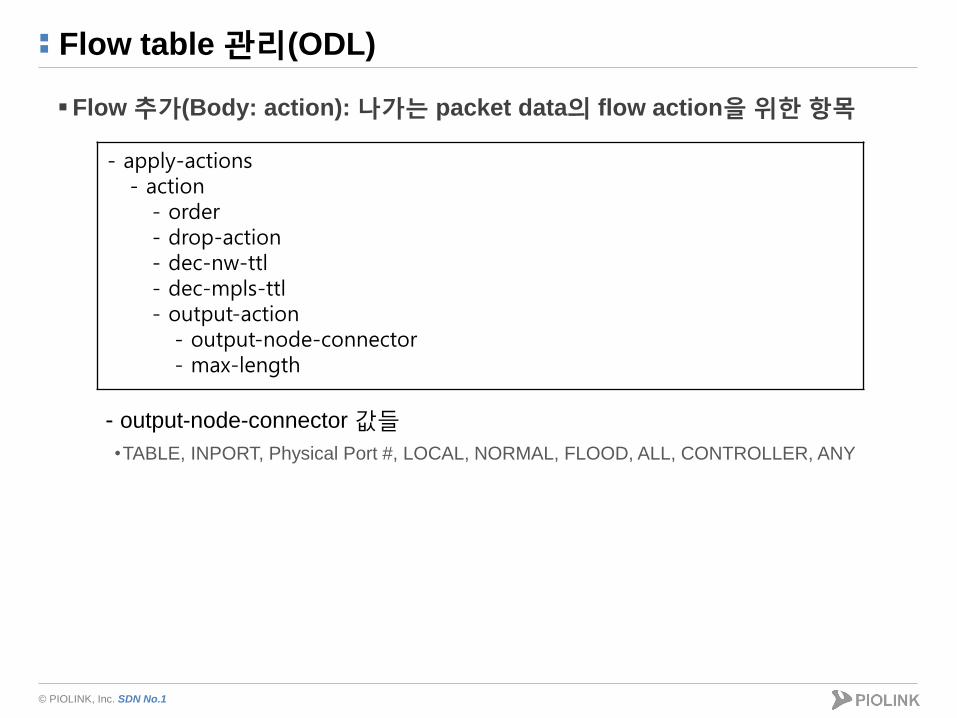
Flow 추가(Body: action): 나가는 packet data의 flow action을 위한 항목
- output-node-connector 값들
•TABLE, INPORT, Physical Port #, LOCAL, NORMAL, FLOOD, ALL, CONTROLLER, ANY
- apply-actions - action - order - drop-action - dec-nw-ttl - dec-mpls-ttl - output-action - output-node-connector - max-length
© PIOLINK, Inc. SDN No.1
Flow table 관리(ODL)
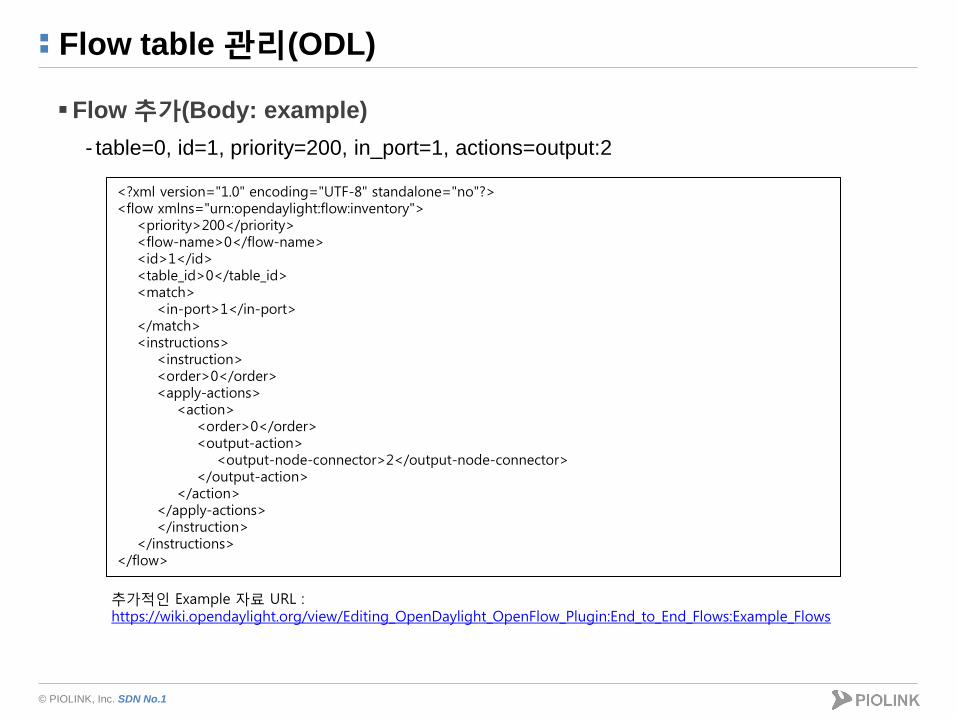
Flow 추가(Body: example)
- table=0, id=1, priority=200, in_port=1, actions=output:2
<?xml version="1.0" encoding="UTF-8" standalone="no"?> <flow xmlns="urn:opendaylight:flow:inventory"> <priority>200</priority> <flow-name>0</flow-name> <id>1</id> <table_id>0</table_id> <match> <in-port>1</in-port> </match> <instructions> <instruction> <order>0</order> <apply-actions> <action> <order>0</order> <output-action> <output-node-connector>2</output-node-connector> </output-action> </action> </apply-actions> </instruction> </instructions> </flow>
추가적인 Example 자료 URL : https://wiki.opendaylight.org/view/Editing_OpenDaylight_OpenFlow_Plugin:End_to_End_Flows:Example_Flows
© PIOLINK, Inc. SDN No.1
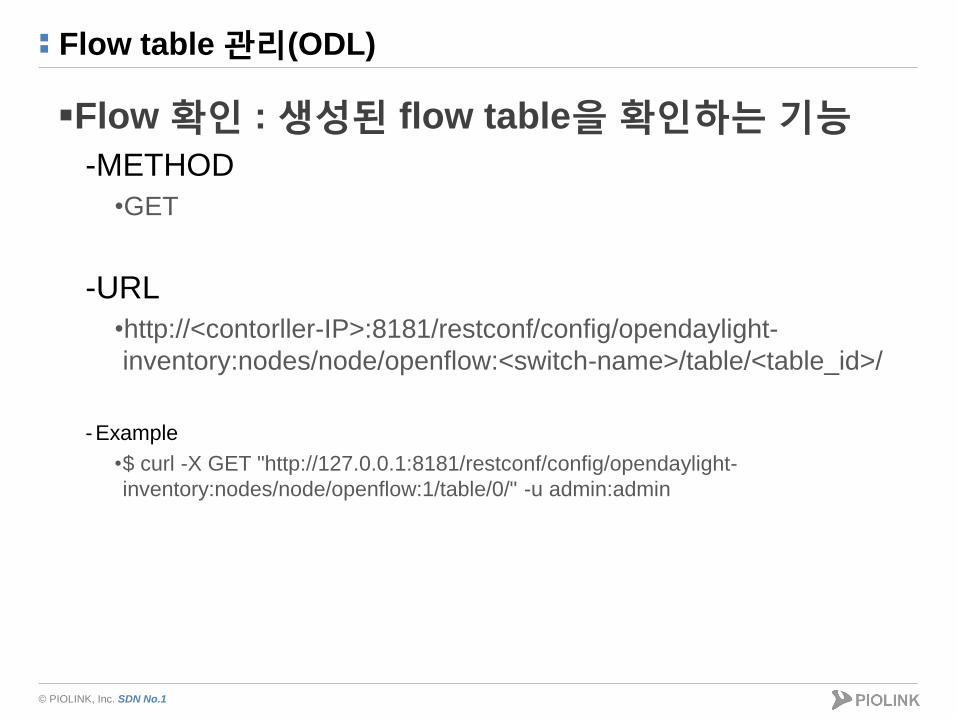
Flow table 관리(ODL)
Flow 확인 : 생성된 flow table을 확인하는 기능
-METHOD
•GET
-URL
•http://<contorller-IP>:8181/restconf/config/opendaylight-
inventory:nodes/node/openflow:<switch-name>/table/<table_id>/
- Example
•$ curl -X GET "http://127.0.0.1:8181/restconf/config/opendaylight-
inventory:nodes/node/openflow:1/table/0/" -u admin:admin
© PIOLINK, Inc. SDN No.1
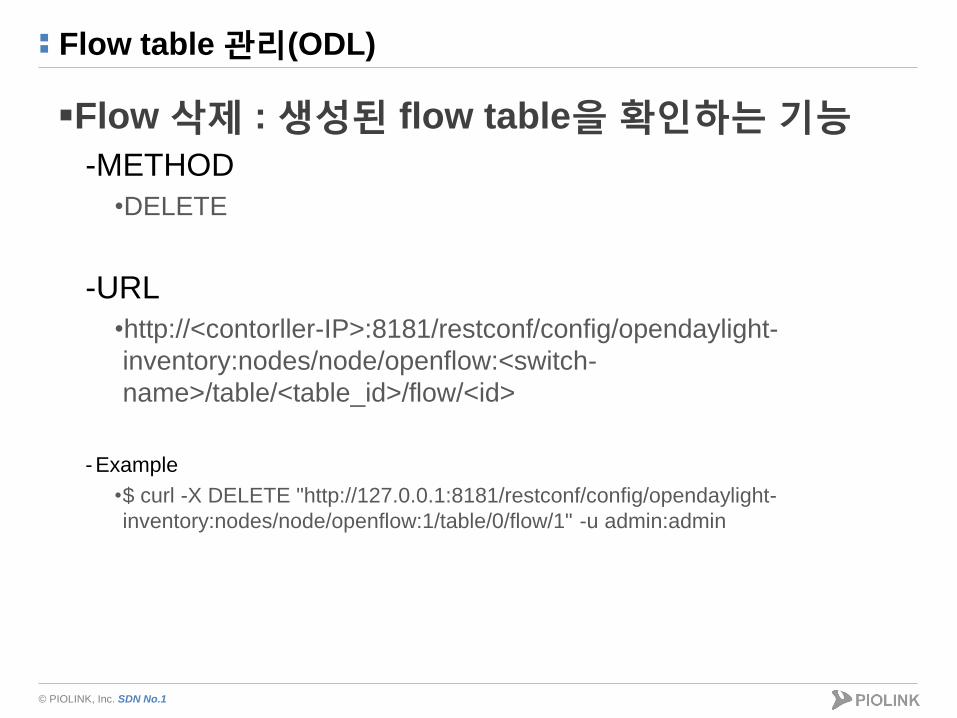
Flow table 관리(ODL)
Flow 삭제 : 생성된 flow table을 확인하는 기능
-METHOD
•DELETE
-URL
•http://<contorller-IP>:8181/restconf/config/opendaylight-
inventory:nodes/node/openflow:<switch-
name>/table/<table_id>/flow/<id>
- Example
•$ curl -X DELETE "http://127.0.0.1:8181/restconf/config/opendaylight-
inventory:nodes/node/openflow:1/table/0/flow/1" -u admin:admin
© PIOLINK, Inc. SDN No.1
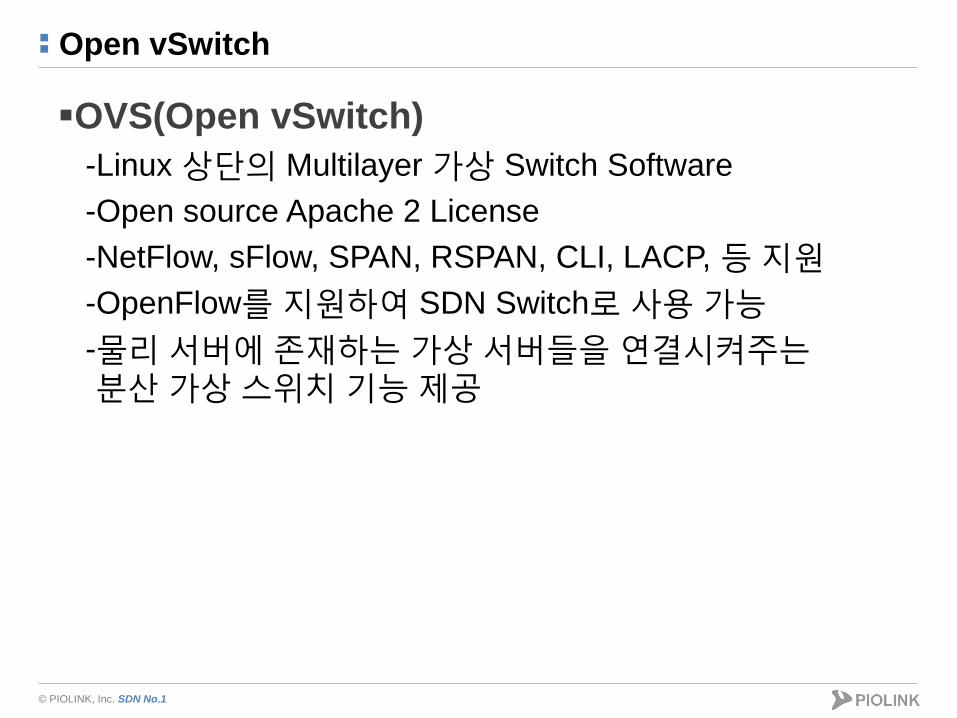
Open vSwitch
OVS(Open vSwitch)
-Linux 상단의 Multilayer 가상 Switch Software
-Open source Apache 2 License
-NetFlow, sFlow, SPAN, RSPAN, CLI, LACP, 등 지원
-OpenFlow를 지원하여 SDN Switch로 사용 가능
-물리 서버에 존재하는 가상 서버들을 연결시켜주는
분산 가상 스위치 기능 제공

© PIOLINK, Inc. SDN No.1
설치 방법(OVS)
Source build
1. # sudo apt-get install git automake autoconf uml-utilities libtool build-essential
2. # git clone https://github.com/openvswitch/ovs
3. # cd ovs
4. # ./boot.sh
5. # ./configure --with-linux=/lib/modules/$(uname -r)/build
6. # make && make install
7. # make modules_install
8. # modprobe openvswitch
9. # mkdir –p /usr/local/etc/openvswitch
10. # ovsdb-tool create /usr/local/etc/openvswitch/conf.db vswitchd/vswitch.ovsschema
© PIOLINK, Inc. SDN No.1
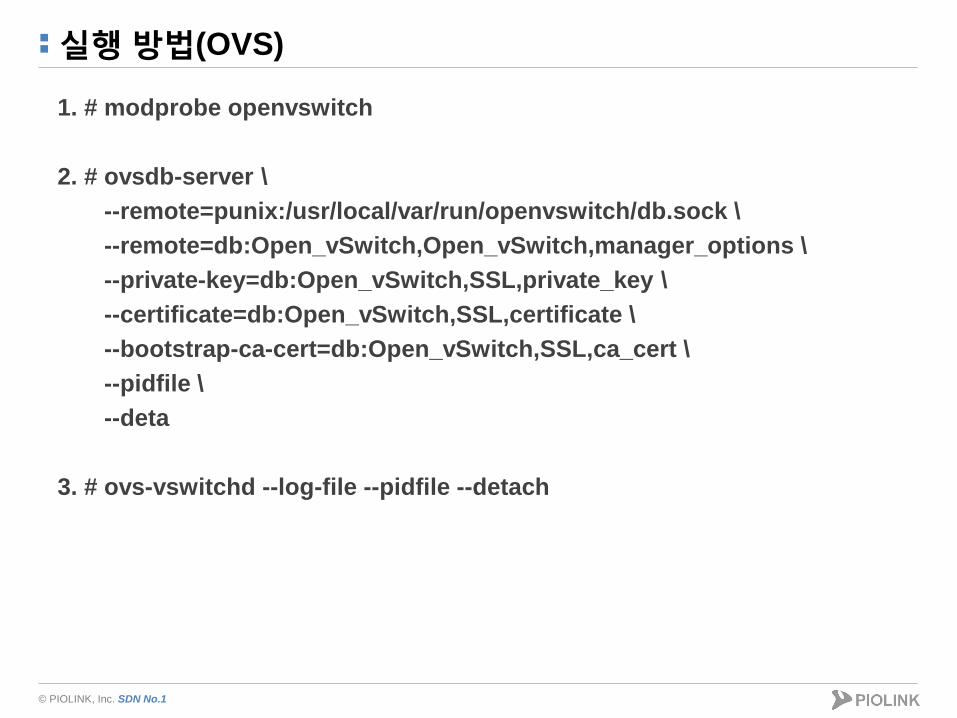
실행 방법(OVS)
1. # modprobe openvswitch
2. # ovsdb-server \
--remote=punix:/usr/local/var/run/openvswitch/db.sock \
--remote=db:Open_vSwitch,Open_vSwitch,manager_options \
--private-key=db:Open_vSwitch,SSL,private_key \
--certificate=db:Open_vSwitch,SSL,certificate \
--bootstrap-ca-cert=db:Open_vSwitch,SSL,ca_cert \
--pidfile \
--deta
3. # ovs-vswitchd --log-file --pidfile --detach
© PIOLINK, Inc. SDN No.1
Utility(OVS)
ovs-vsctl : ovs-vswitchd(OVS daemon) 관리
-ovs-vsctl show : switch 상태 보기
(Controller, switch, host 연결 정보)
ovs-ofctl : OpenFlow Switch 관리
-ovs-ofctl dump-flows <switch name> : flow table 확인
ovs-controller
-OpenFlow Controller (OVS를 설치 시 기본 제공)
© PIOLINK, Inc. SDN No.1
Mininet
Mininet?
-Open source의 네트워크 emulator software
-네트워크 테스트, 디버깅 등의 용도로 사용 가능
-단일 Linux kernel에 수 백 개의 가상 host, switch, router로 구성된
가상 네트워크 환경을 구성할 수 있음
-가상 네트워크를 생성하는 속도가 빠름
-각 node에서 Linux 프로그램을 실행할 수 있음
Ex) wireshark, tcpdump, web server, etc…
-OpenFlow 지원
-Python API를 이용한 custom topology 생성
-사용에 편의를 위한 CLI 제공
© PIOLINK, Inc. SDN No.1
설치 및 실행 방법(Mininet)
Pre-built()
- # apt-get install mininet
Source build()
1. $ git clone git://github.com/mininet/mininet.git
2. $ ./mininet/util/install.sh –nfw
(Option : n=Mininet dependencies + core files, f=OpenFlow, w=OpenFlow Wireshark dissector)
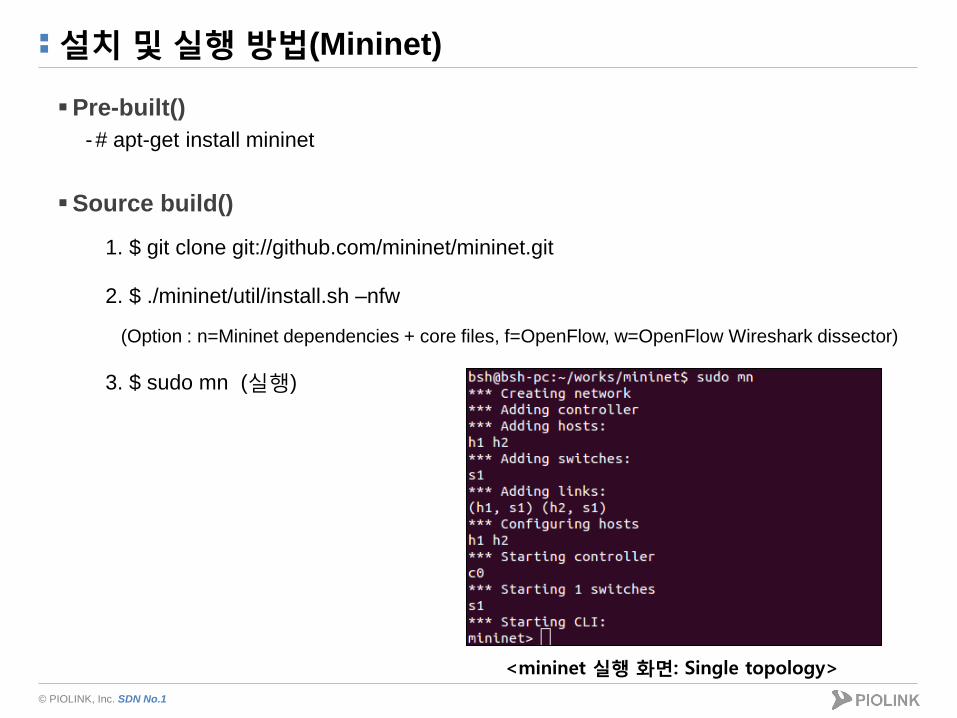
3. $ sudo mn (실행)
<mininet 실행 화면: Single topology>
© PIOLINK, Inc. SDN No.1
자주 사용되는 CLI 명령어(Mininet)
help
xterm : node의 terminal 접속
- xterm <node name>
ifconfig : node 정보 출력
- <node name> ifconfig
ping
- <source node> ping <destination node>
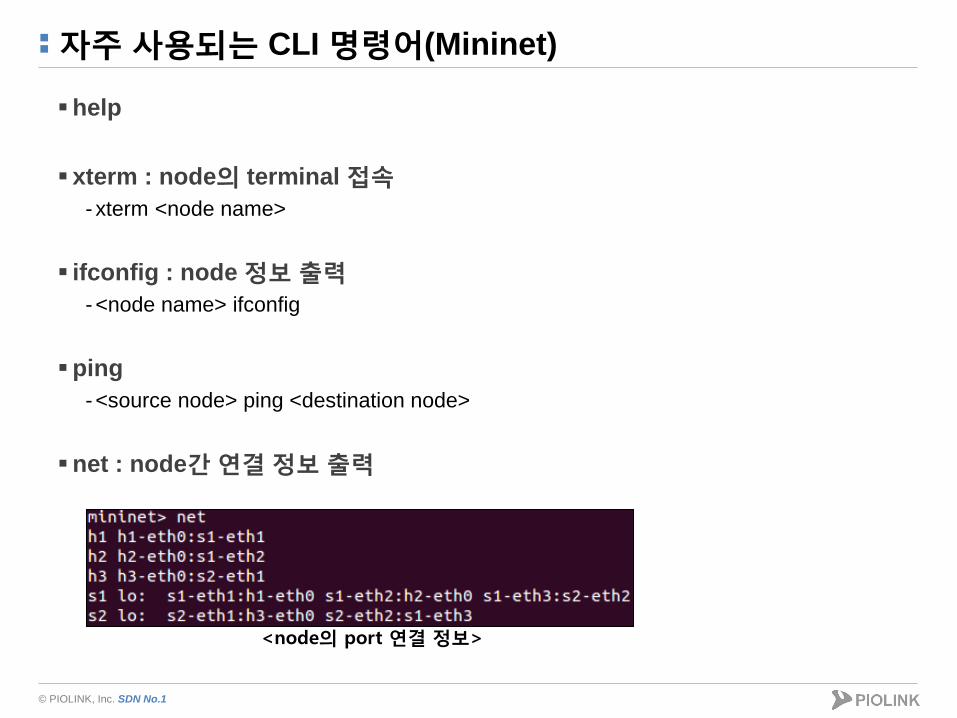
net : node간 연결 정보 출력
<node의 port 연결 정보>
© PIOLINK, Inc. SDN No.1
Topology 구성(Mininet)
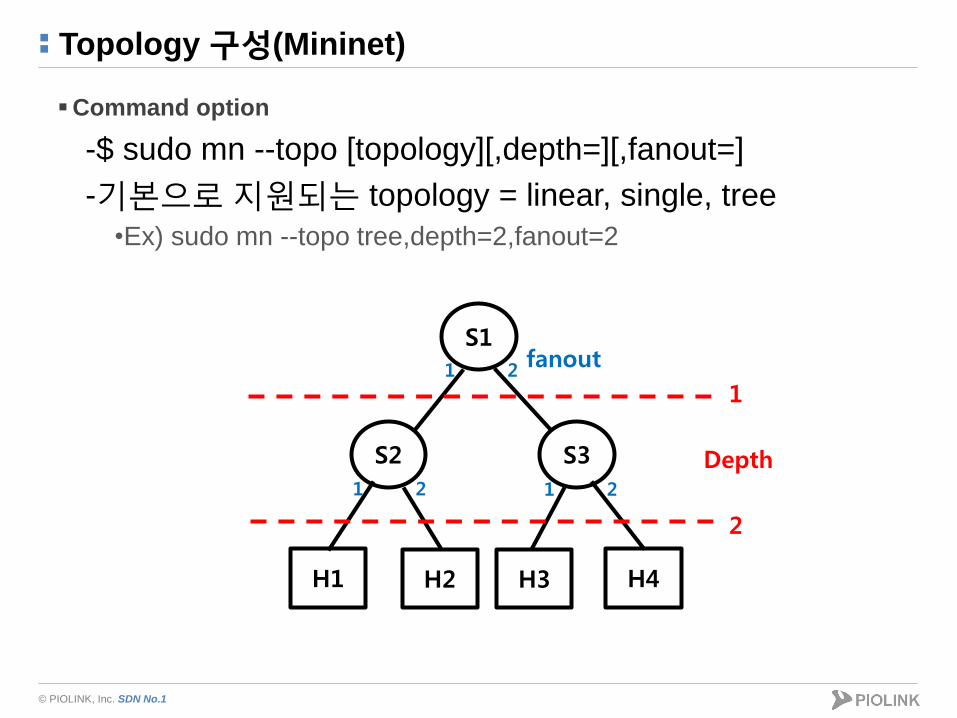
Command option
-$ sudo mn --topo [topology][,depth=][,fanout=]
-기본으로 지원되는 topology = linear, single, tree
•Ex) sudo mn --topo tree,depth=2,fanout=2
S1
S2 S3
1
Depth
2
1 2 fanout
1 2 1 2
H1 H2 H3 H4
© PIOLINK, Inc. SDN No.1
Topology 구성(Mininet)
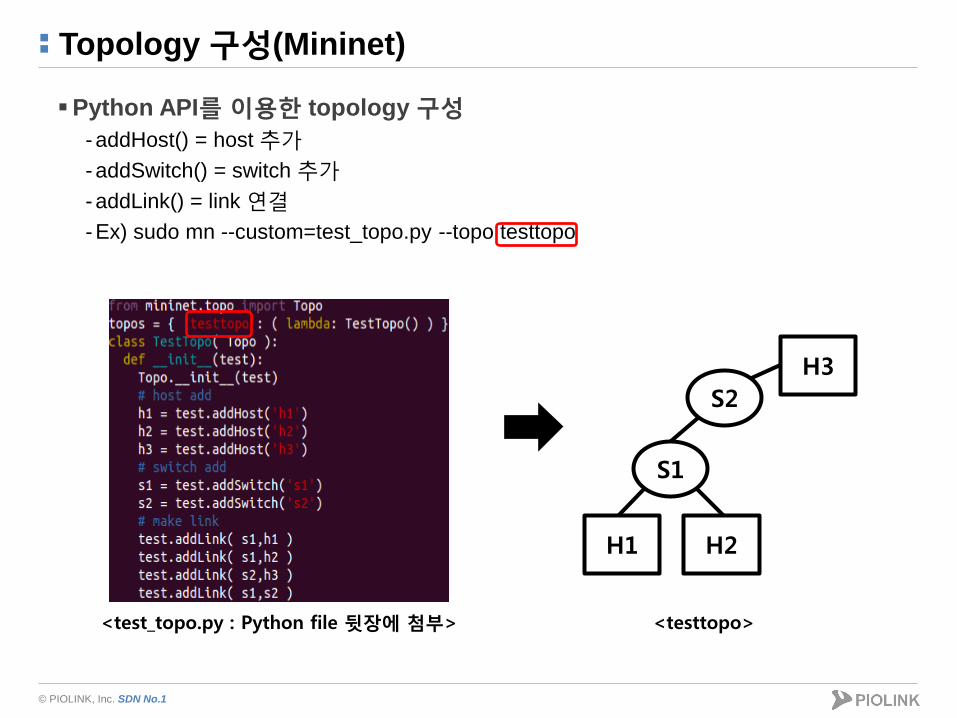
Python API를 이용한 topology 구성
- addHost() = host 추가
- addSwitch() = switch 추가
- addLink() = link 연결
- Ex) sudo mn --custom=test_topo.py --topo testtopo
<test_topo.py : Python file 뒷장에 첨부> <testtopo>
S1
S2
H1 H2
H3

© PIOLINK, Inc. SDN No.1
test_topo.py(Mininet)
from mininet.topo import Topo topos = { 'testtopo': ( lambda: TestTopo() ) } class TestTopo( Topo ): def __init__(test): Topo.__init__(test) # host add h1 = test.addHost('h1') h2 = test.addHost('h2') h3 = test.addHost('h3') # switch add s1 = test.addSwitch('s1') s2 = test.addSwitch('s2') # make link test.addLink( s1,h1 ) test.addLink( s1,h2 ) test.addLink( s2,h3 ) test.addLink( s1,s2 )
© PIOLINK, Inc. SDN No.1
실험
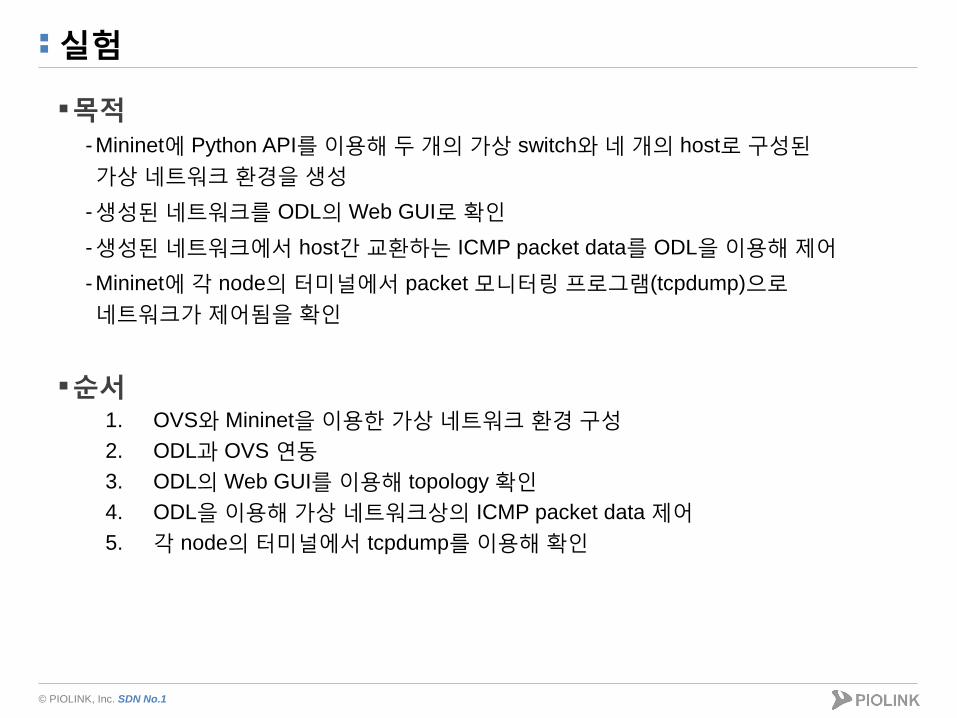
목적
- Mininet에 Python API를 이용해 두 개의 가상 switch와 네 개의 host로 구성된
가상 네트워크 환경을 생성
-생성된 네트워크를 ODL의 Web GUI로 확인
-생성된 네트워크에서 host간 교환하는 ICMP packet data를 ODL을 이용해 제어
- Mininet에 각 node의 터미널에서 packet 모니터링 프로그램(tcpdump)으로
네트워크가 제어됨을 확인
순서
1. OVS와 Mininet을 이용한 가상 네트워크 환경 구성
2. ODL과 OVS 연동
3. ODL의 Web GUI를 이용해 topology 확인
4. ODL을 이용해 가상 네트워크상의 ICMP packet data 제어
5. 각 node의 터미널에서 tcpdump를 이용해 확인
© PIOLINK, Inc. SDN No.1
실험
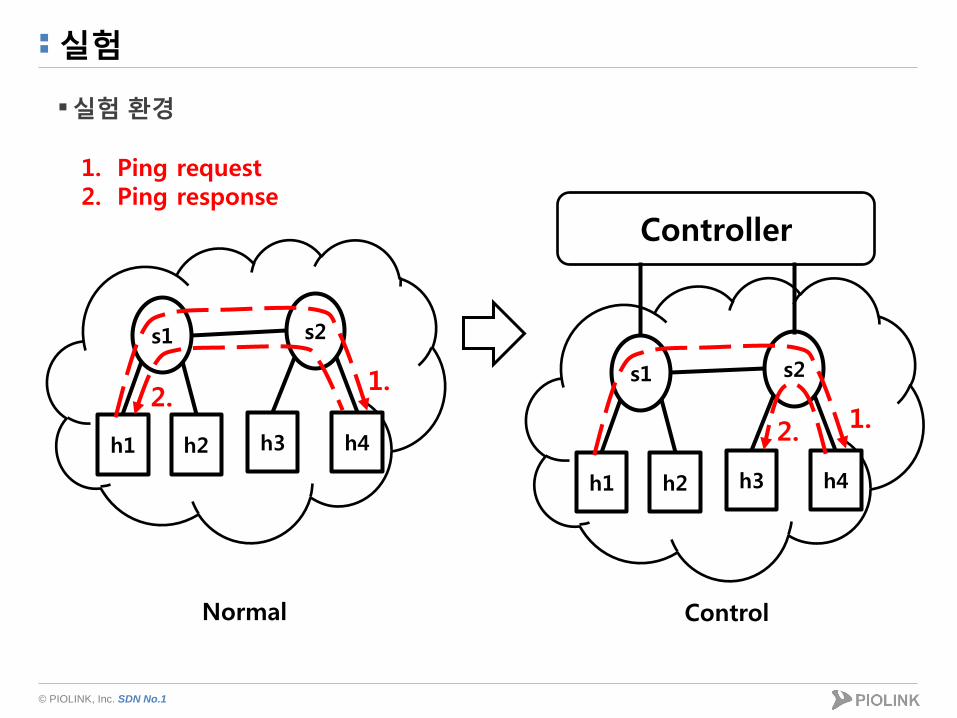
실험 환경
s1
h1
Controller
s2
h2 h3 h4
1. 2.
s1
h1
s2
h2 h3 h4
1. 2.
Normal Control
1. Ping request 2. Ping response

© PIOLINK, Inc. SDN No.1
실험
Topology 구성(Mininet)
1. ODL와 OVS 실행
2. $ sudo mn --custom=./ex_topo.py --topo extopo --controller remote,port=6633
(ex_topo.py는 뒷장에 첨부)
3. $ sudo ovs-vsctl show (새로운 터미널에서 controller와 switch 연결 확인)
<Switch와 controller 연결 확인>
© PIOLINK, Inc. SDN No.1
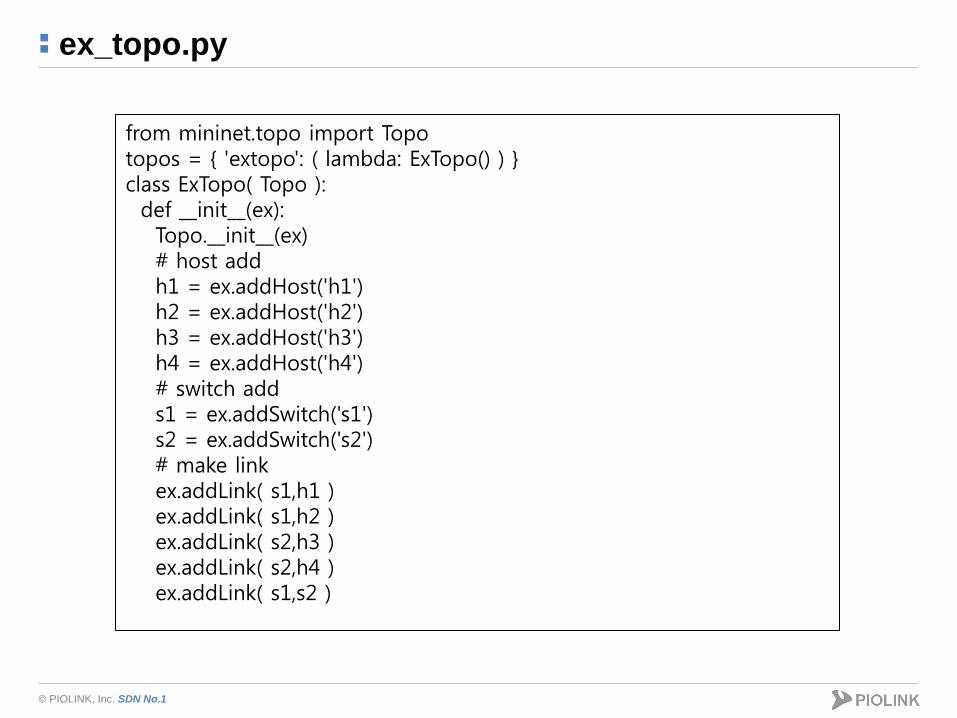
ex_topo.py
from mininet.topo import Topo topos = { 'extopo': ( lambda: ExTopo() ) } class ExTopo( Topo ): def __init__(ex): Topo.__init__(ex) # host add h1 = ex.addHost('h1') h2 = ex.addHost('h2') h3 = ex.addHost('h3') h4 = ex.addHost('h4') # switch add s1 = ex.addSwitch('s1') s2 = ex.addSwitch('s2') # make link ex.addLink( s1,h1 ) ex.addLink( s1,h2 ) ex.addLink( s2,h3 ) ex.addLink( s2,h4 ) ex.addLink( s1,s2 )
© PIOLINK, Inc. SDN No.1
실험
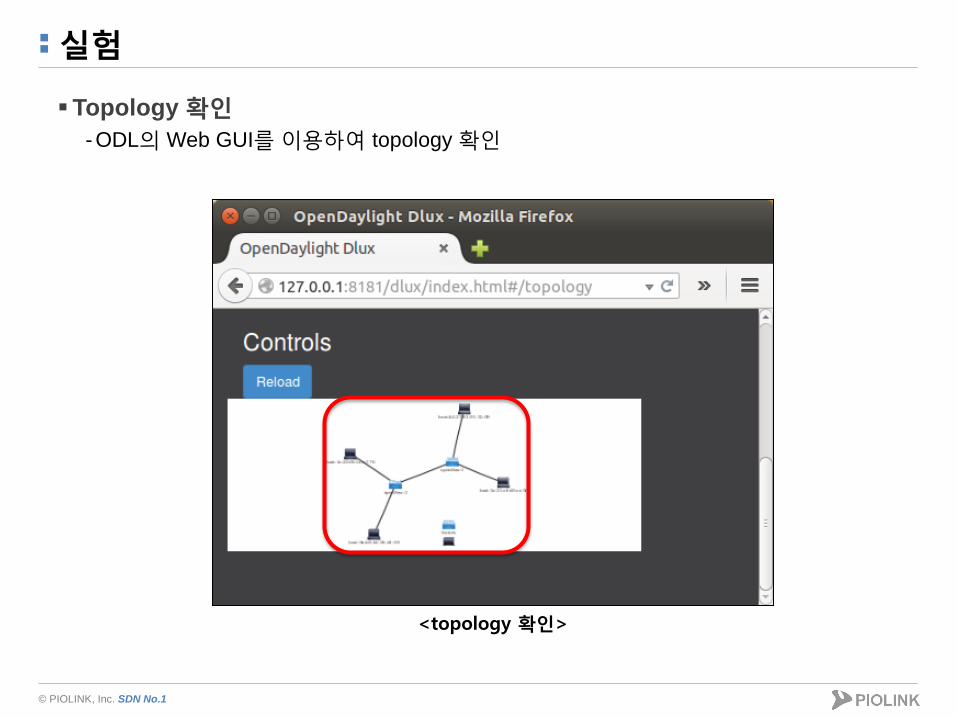
Topology 확인
- ODL의 Web GUI를 이용하여 topology 확인
<topology 확인>
© PIOLINK, Inc. SDN No.1
실험
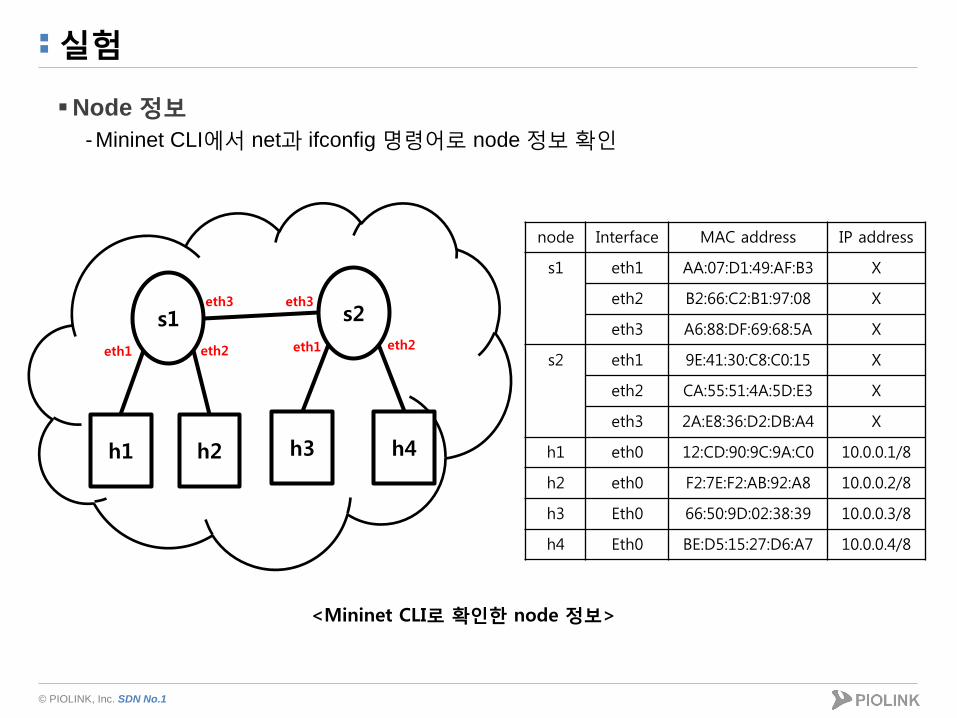
Node 정보
- Mininet CLI에서 net과 ifconfig 명령어로 node 정보 확인
<Mininet CLI로 확인한 node 정보>
s1
h1
s2
h2 h3 h4
eth1 eth2
eth3 eth3
eth1 eth2
node Interface MAC address IP address
s1 eth1 AA:07:D1:49:AF:B3 X
eth2 B2:66:C2:B1:97:08 X
eth3 A6:88:DF:69:68:5A X
s2 eth1 9E:41:30:C8:C0:15 X
eth2 CA:55:51:4A:5D:E3 X
eth3 2A:E8:36:D2:DB:A4 X
h1 eth0 12:CD:90:9C:9A:C0 10.0.0.1/8
h2 eth0 F2:7E:F2:AB:92:A8 10.0.0.2/8
h3 Eth0 66:50:9D:02:38:39 10.0.0.3/8
h4 Eth0 BE:D5:15:27:D6:A7 10.0.0.4/8
© PIOLINK, Inc. SDN No.1
실험
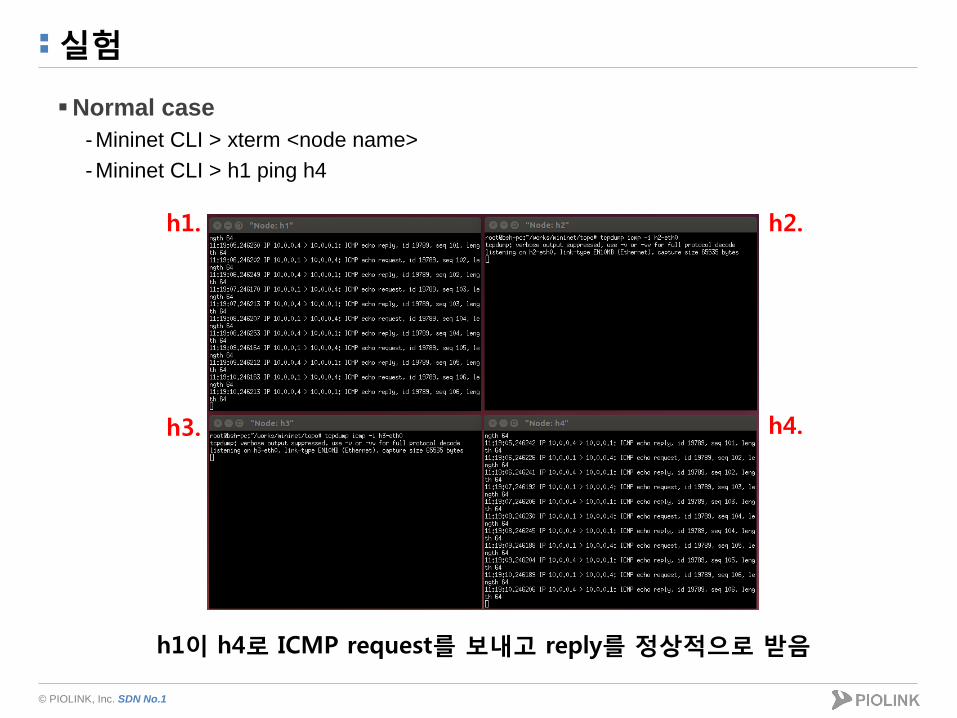
Normal case
- Mininet CLI > xterm <node name>
- Mininet CLI > h1 ping h4
h1.
h3. h4.
h2.
h1이 h4로 ICMP request를 보내고 reply를 정상적으로 받음
© PIOLINK, Inc. SDN No.1
실험
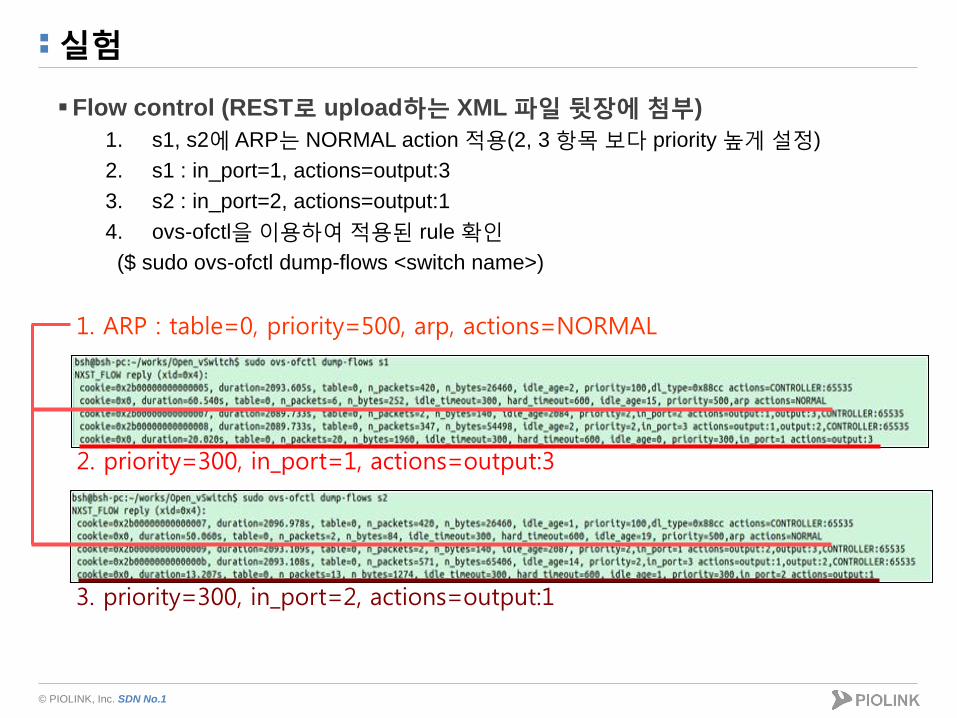
Flow control (REST로 upload하는 XML 파일 뒷장에 첨부)
1. s1, s2에 ARP는 NORMAL action 적용(2, 3 항목 보다 priority 높게 설정)
2. s1 : in_port=1, actions=output:3
3. s2 : in_port=2, actions=output:1
4. ovs-ofctl을 이용하여 적용된 rule 확인
($ sudo ovs-ofctl dump-flows <switch name>)
1. ARP : table=0, priority=500, arp, actions=NORMAL
3. priority=300, in_port=2, actions=output:1
2. priority=300, in_port=1, actions=output:3
© PIOLINK, Inc. Optimizing Your Cloud Data Center.
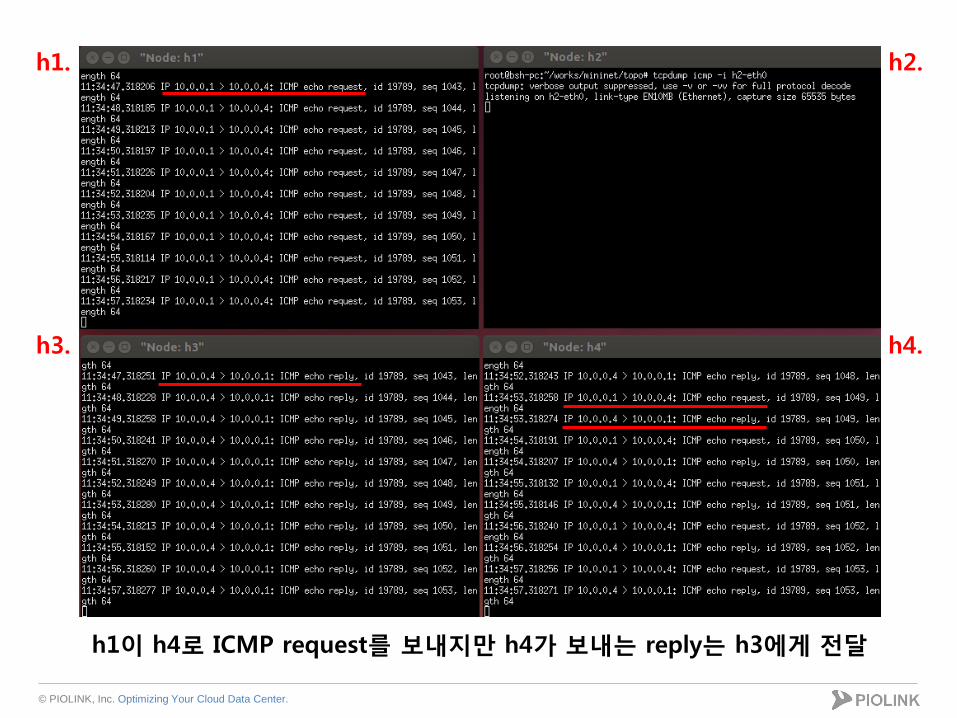
h1.
h3. h4.
h2.
h1이 h4로 ICMP request를 보내지만 h4가 보내는 reply는 h3에게 전달
© PIOLINK, Inc. SDN No.1
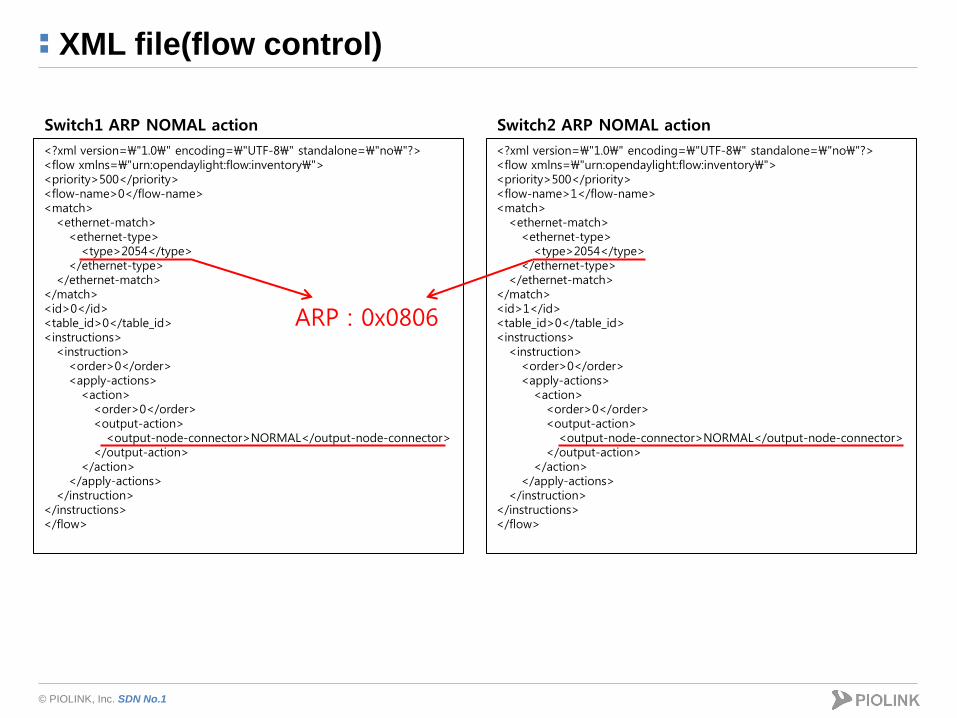
XML file(flow control)
<?xml version=\"1.0\" encoding=\"UTF-8\" standalone=\"no\"?> <flow xmlns=\"urn:opendaylight:flow:inventory\"> <priority>500</priority> <flow-name>0</flow-name> <match> <ethernet-match> <ethernet-type> <type>2054</type> </ethernet-type> </ethernet-match> </match> <id>0</id> <table_id>0</table_id> <instructions> <instruction> <order>0</order> <apply-actions> <action> <order>0</order> <output-action> <output-node-connector>NORMAL</output-node-connector> </output-action> </action> </apply-actions> </instruction> </instructions> </flow>
<?xml version=\"1.0\" encoding=\"UTF-8\" standalone=\"no\"?> <flow xmlns=\"urn:opendaylight:flow:inventory\"> <priority>500</priority> <flow-name>1</flow-name> <match> <ethernet-match> <ethernet-type> <type>2054</type> </ethernet-type> </ethernet-match> </match> <id>1</id> <table_id>0</table_id> <instructions> <instruction> <order>0</order> <apply-actions> <action> <order>0</order> <output-action> <output-node-connector>NORMAL</output-node-connector> </output-action> </action> </apply-actions> </instruction> </instructions> </flow>
Switch1 ARP NOMAL action Switch2 ARP NOMAL action
ARP : 0x0806
© PIOLINK, Inc. SDN No.1
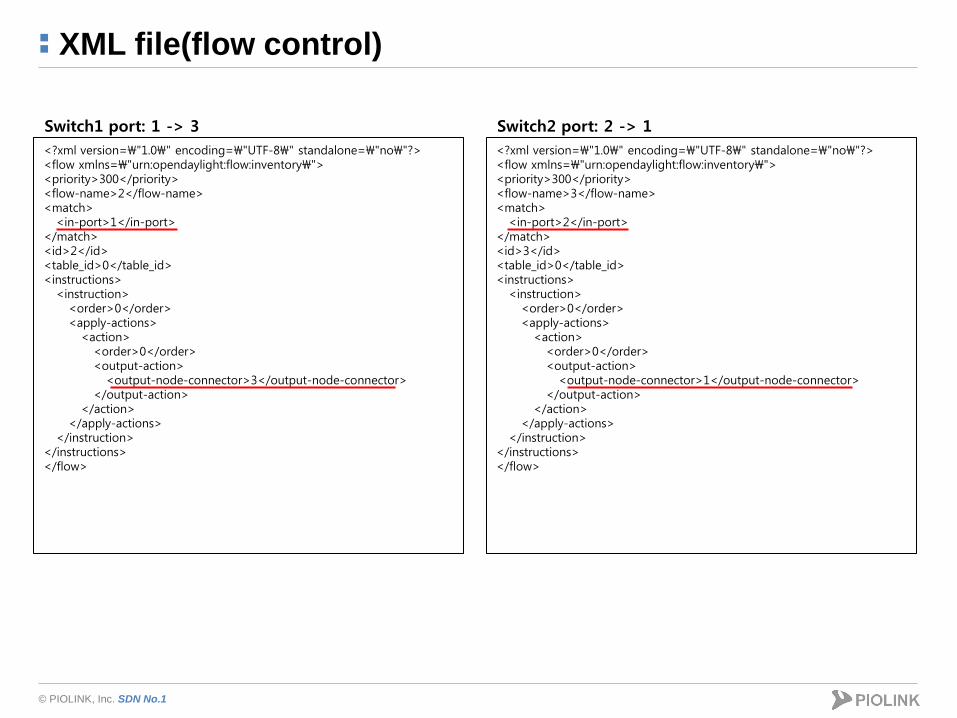
XML file(flow control)
<?xml version=\"1.0\" encoding=\"UTF-8\" standalone=\"no\"?> <flow xmlns=\"urn:opendaylight:flow:inventory\"> <priority>300</priority> <flow-name>2</flow-name> <match> <in-port>1</in-port> </match> <id>2</id> <table_id>0</table_id> <instructions> <instruction> <order>0</order> <apply-actions> <action> <order>0</order> <output-action> <output-node-connector>3</output-node-connector> </output-action> </action> </apply-actions> </instruction> </instructions> </flow>
<?xml version=\"1.0\" encoding=\"UTF-8\" standalone=\"no\"?> <flow xmlns=\"urn:opendaylight:flow:inventory\"> <priority>300</priority> <flow-name>3</flow-name> <match> <in-port>2</in-port> </match> <id>3</id> <table_id>0</table_id> <instructions> <instruction> <order>0</order> <apply-actions> <action> <order>0</order> <output-action> <output-node-connector>1</output-node-connector> </output-action> </action> </apply-actions> </instruction> </instructions> </flow>
Switch1 port: 1 -> 3 Switch2 port: 2 -> 1
© PIOLINK, Inc. SDN No.1
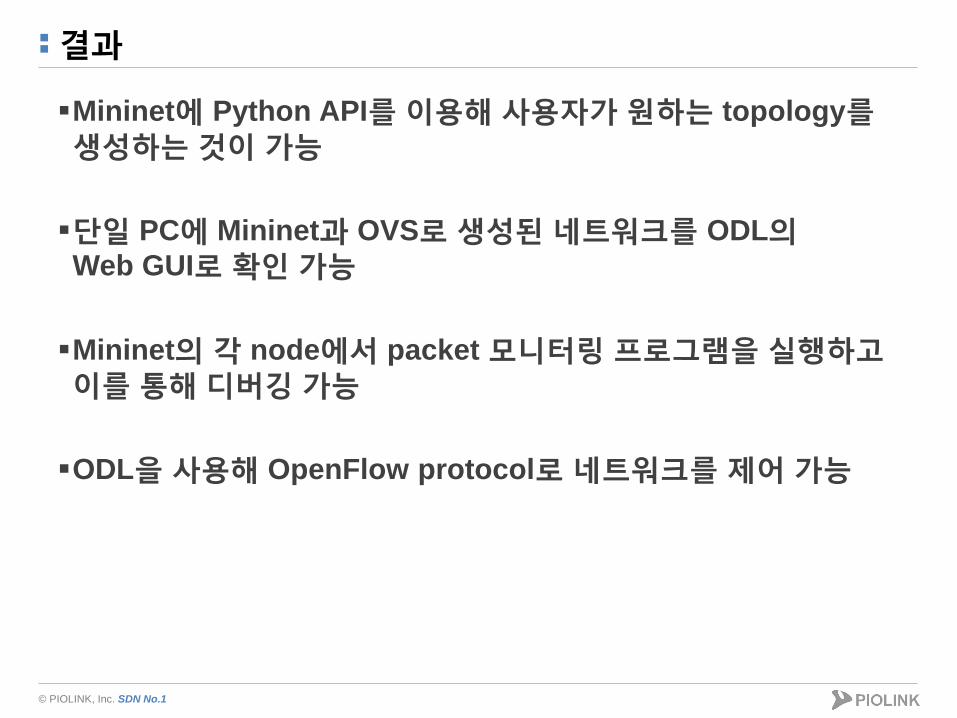
결과
Mininet에 Python API를 이용해 사용자가 원하는 topology를
생성하는 것이 가능
단일 PC에 Mininet과 OVS로 생성된 네트워크를 ODL의
Web GUI로 확인 가능
Mininet의 각 node에서 packet 모니터링 프로그램을 실행하고
이를 통해 디버깅 가능
ODL을 사용해 OpenFlow protocol로 네트워크를 제어 가능
© PIOLINK, Inc. SDN No.1
참조
http://www.opendaylight.org
https://wiki.opendaylight.org/
http://www.openvswitch.org/
http://mininet.org/
http://wikipedia.org/
http://sdnhub.org/

감사합니다. ㈜파이오링크
서울시 금천구 가산디지털2로 98
(가산동 550-1) IT캐슬 1동 401호
TEL: 02-2025-6900
FAX: 02-2025-6901
www.PIOLINK.com