Embed Size (px)
Citation preview
To change update alternatives add entry in java.dpkg-tmp file.to check whether the java path is changed check below command:arun@ubuntu:~$update-alternatives –config javaarun@ubuntu:~$update-alternatives –config javacarun@ubuntu:~$update-alternatives –config javaws
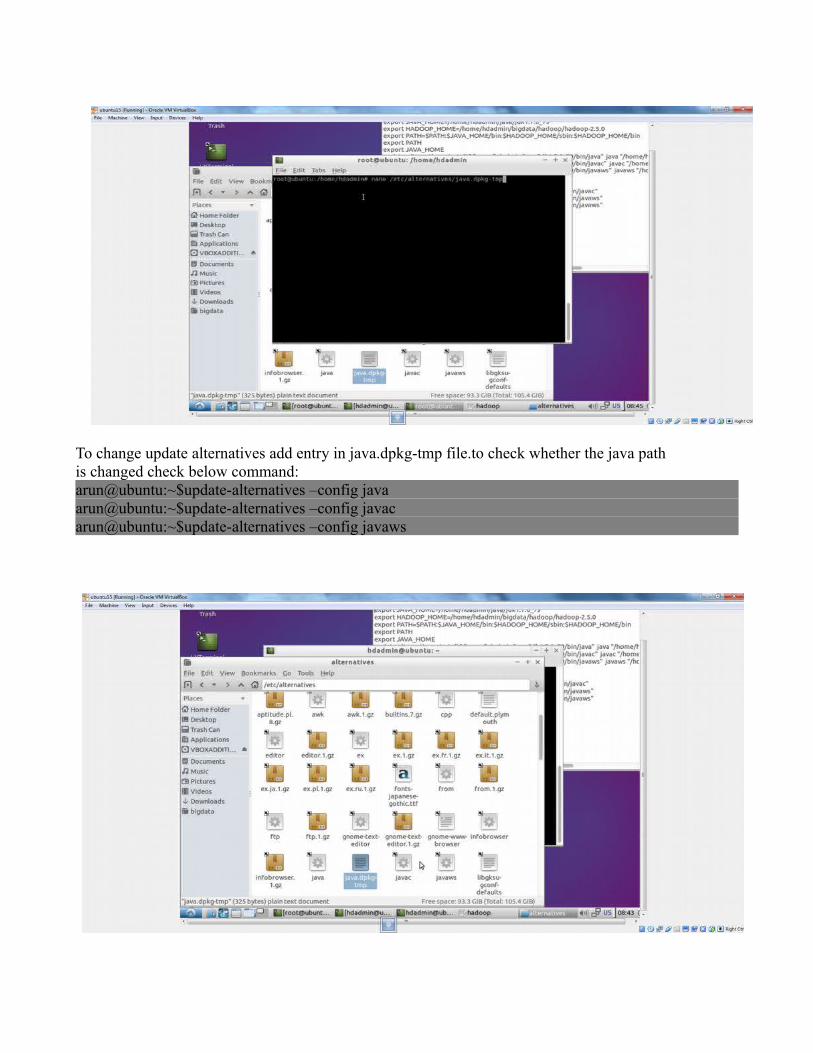
see highlighted text it is not allowing to change past entry to change it change /etc/alternatives/java.pkg-tmp file
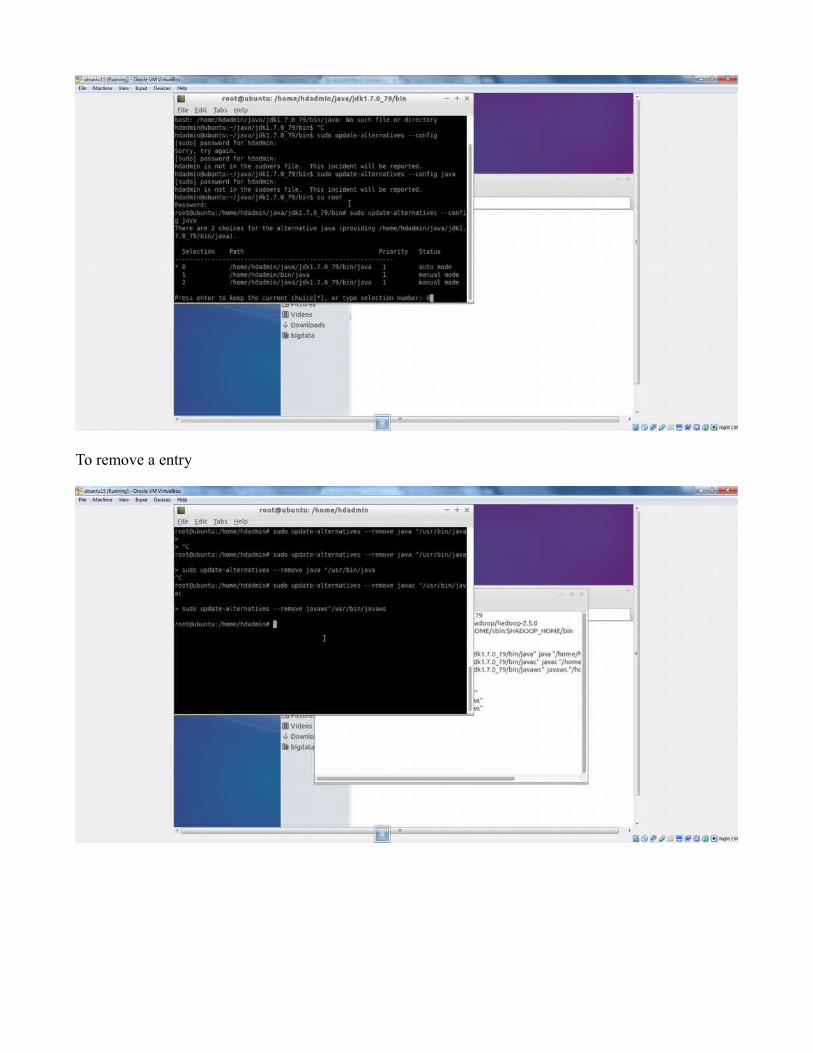
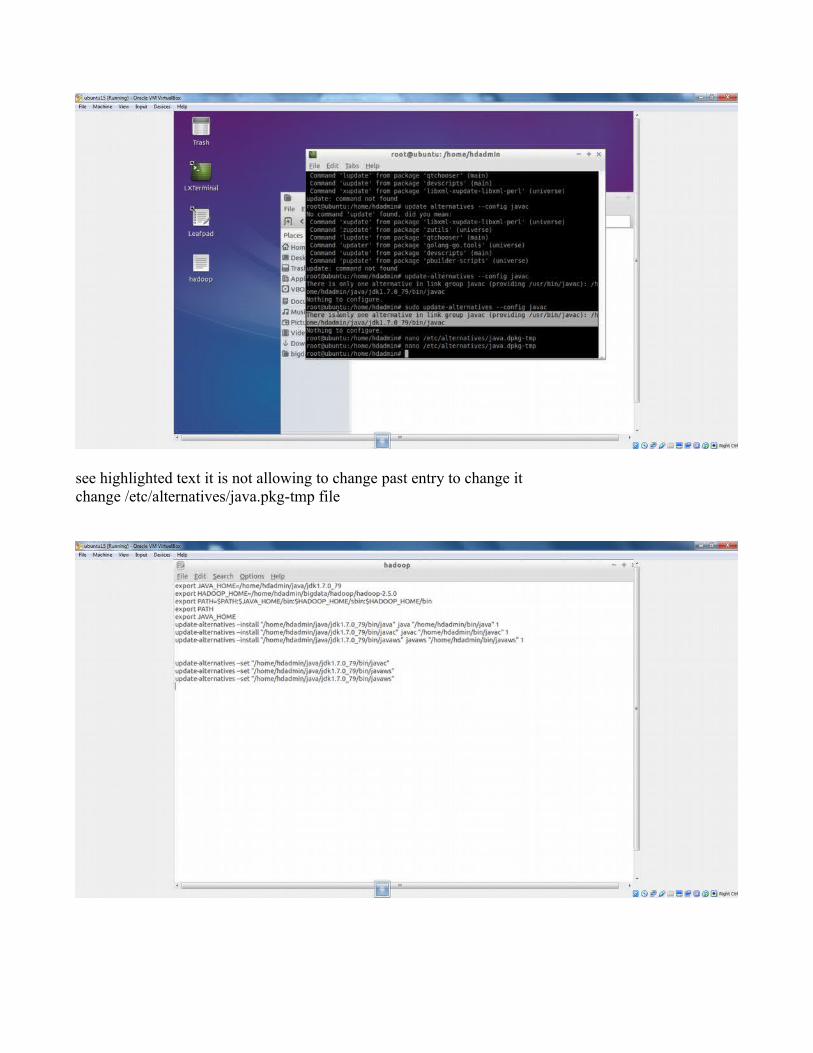
To remove a entry

To remove all entry see below alternatives config java return no alternatives for java
to which java is in use
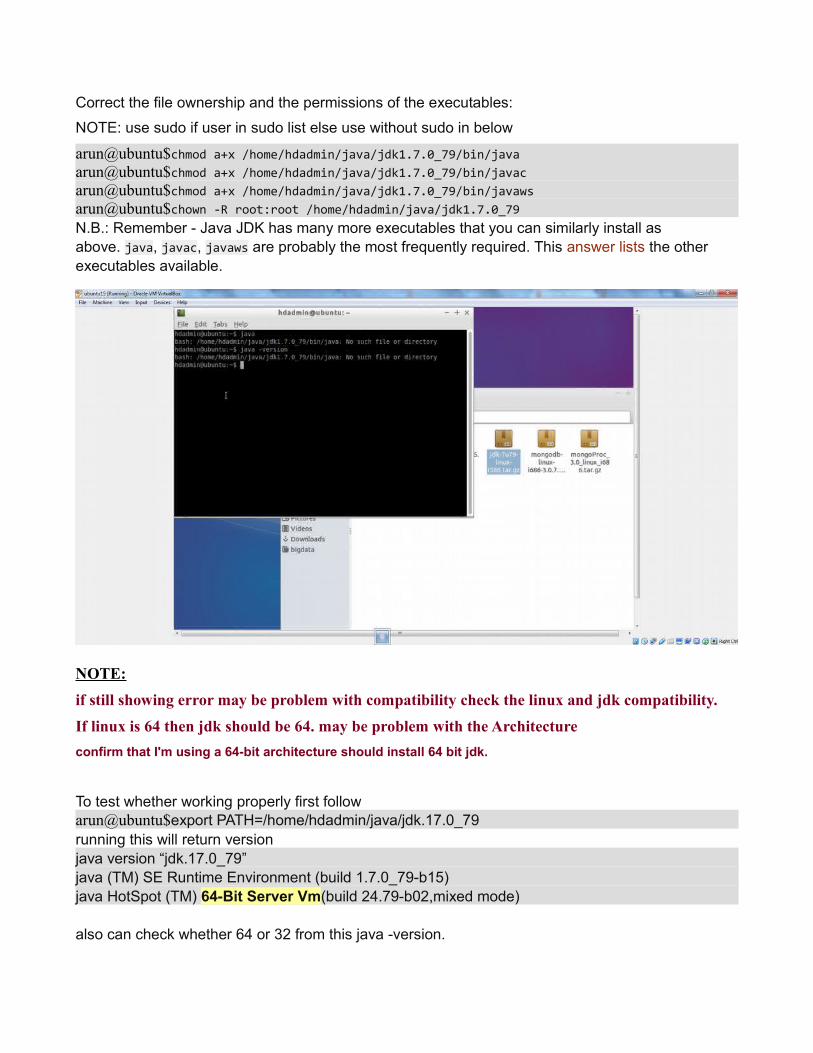
Correct the file ownership and the permissions of the executables:
NOTE: use sudo if user in sudo list else use without sudo in below
arun@ubuntu$chmod a+x /home/hdadmin/java/jdk1.7.0_79/bin/javaarun@ubuntu$chmod a+x /home/hdadmin/java/jdk1.7.0_79/bin/javacarun@ubuntu$chmod a+x /home/hdadmin/java/jdk1.7.0_79/bin/javawsarun@ubuntu$chown -R root:root /home/hdadmin/java/jdk1.7.0_79N.B.: Remember - Java JDK has many more executables that you can similarly install as above. java, javac, javaws are probably the most frequently required. This answer lists the other executables available.
NOTE:
if still showing error may be problem with compatibility check the linux and jdk compatibility.
If linux is 64 then jdk should be 64. may be problem with the Architecture
confirm that I'm using a 64-bit architecture should install 64 bit jdk.
To test whether working properly first followarun@ubuntu$export PATH=/home/hdadmin/java/jdk.17.0_79running this will return versionjava version “jdk.17.0_79”java (TM) SE Runtime Environment (build 1.7.0_79-b15)java HotSpot (TM) 64-Bit Server Vm(build 24.79-b02,mixed mode)
also can check whether 64 or 32 from this java -version.
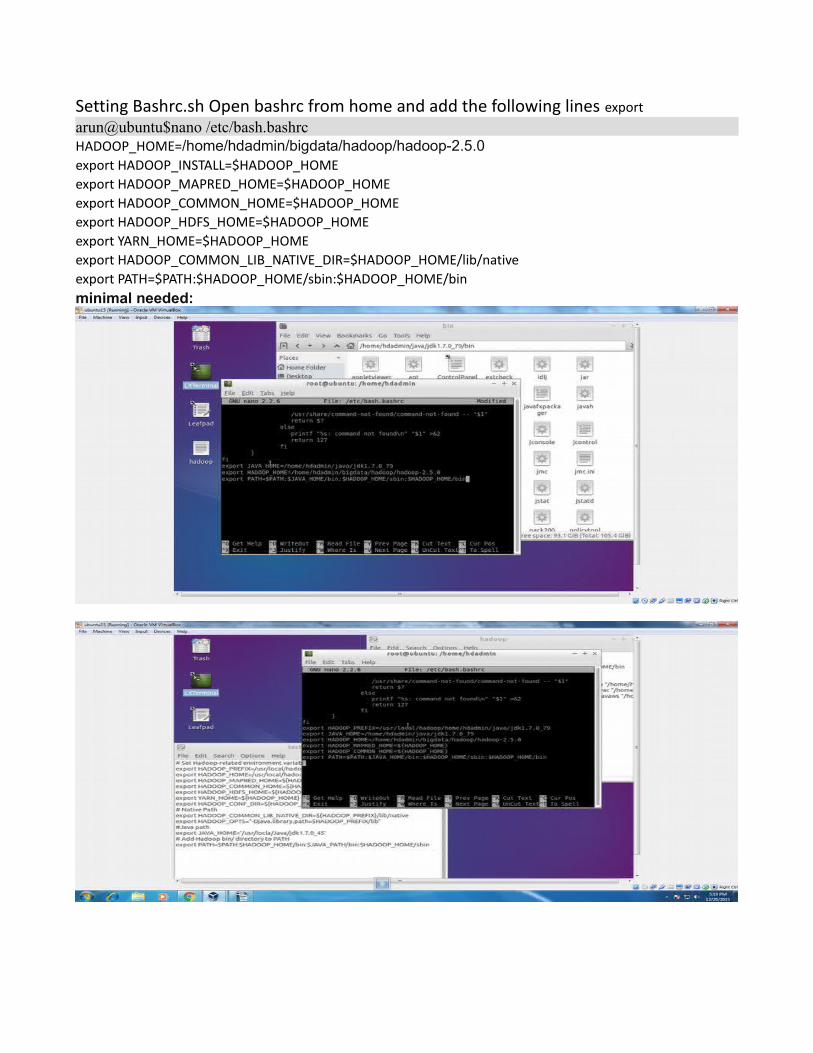
Setting Bashrc.sh Open bashrc from home and add the following lines exportarun@ubuntu$nano /etc/bash.bashrcHADOOP_HOME=/home/hdadmin/bigdata/hadoop/hadoop-2.5.0 export HADOOP_INSTALL=$HADOOP_HOME export HADOOP_MAPRED_HOME=$HADOOP_HOME export HADOOP_COMMON_HOME=$HADOOP_HOME export HADOOP_HDFS_HOME=$HADOOP_HOME export YARN_HOME=$HADOOP_HOME export HADOOP_COMMON_LIB_NATIVE_DIR=$HADOOP_HOME/lib/native export PATH=$PATH:$HADOOP_HOME/sbin:$HADOOP_HOME/bin minimal needed:
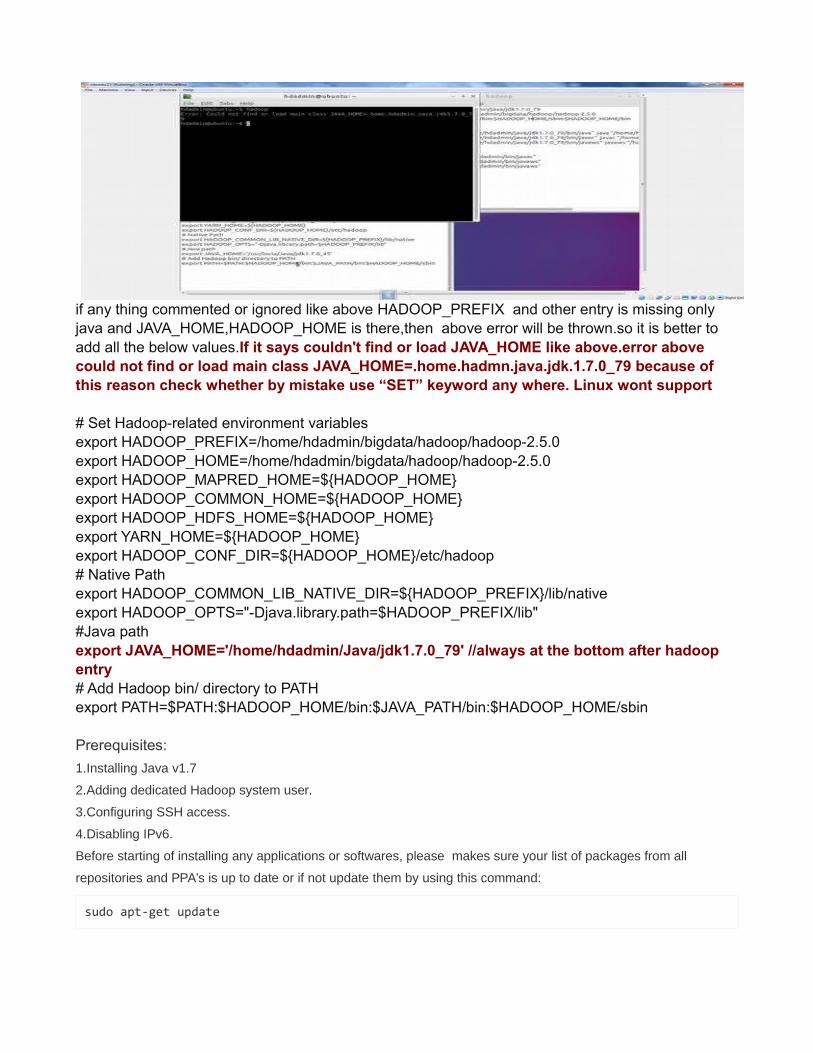
if any thing commented or ignored like above HADOOP_PREFIX and other entry is missing only java and JAVA_HOME,HADOOP_HOME is there,then above error will be thrown.so it is better to add all the below values.If it says couldn't find or load JAVA_HOME like above.error above could not find or load main class JAVA_HOME=.home.hadmn.java.jdk.1.7.0_79 because of this reason check whether by mistake use “SET” keyword any where. Linux wont support
# Set Hadoop-related environment variablesexport HADOOP_PREFIX=/home/hdadmin/bigdata/hadoop/hadoop-2.5.0export HADOOP_HOME=/home/hdadmin/bigdata/hadoop/hadoop-2.5.0export HADOOP_MAPRED_HOME=${HADOOP_HOME}export HADOOP_COMMON_HOME=${HADOOP_HOME}export HADOOP_HDFS_HOME=${HADOOP_HOME}export YARN_HOME=${HADOOP_HOME}export HADOOP_CONF_DIR=${HADOOP_HOME}/etc/hadoop# Native Pathexport HADOOP_COMMON_LIB_NATIVE_DIR=${HADOOP_PREFIX}/lib/nativeexport HADOOP_OPTS="-Djava.library.path=$HADOOP_PREFIX/lib"#Java pathexport JAVA_HOME='/home/hdadmin/Java/jdk1.7.0_79' //always at the bottom after hadoop entry# Add Hadoop bin/ directory to PATHexport PATH=$PATH:$HADOOP_HOME/bin:$JAVA_PATH/bin:$HADOOP_HOME/sbin
Prerequisites:
1.Installing Java v1.7
2.Adding dedicated Hadoop system user.
3.Configuring SSH access.
4.Disabling IPv6.
Before starting of installing any applications or softwares, please makes sure your list of packages from all
repositories and PPA’s is up to date or if not update them by using this command:
sudo apt-get update
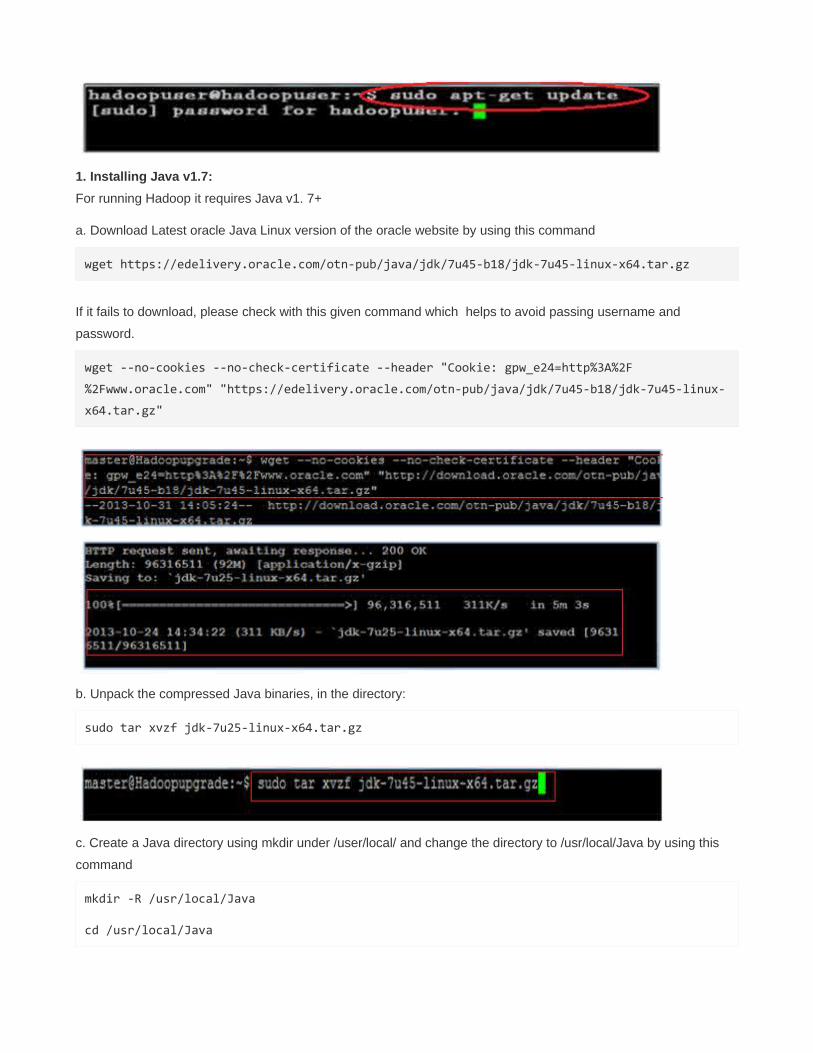
1. Installing Java v1.7:
For running Hadoop it requires Java v1. 7+
a. Download Latest oracle Java Linux version of the oracle website by using this command
wget https://edelivery.oracle.com/otn-pub/java/jdk/7u45-b18/jdk-7u45-linux-x64.tar.gz
If it fails to download, please check with this given command which helps to avoid passing username and
password.
wget --no-cookies --no-check-certificate --header "Cookie: gpw_e24=http%3A%2F
%2Fwww.oracle.com" "https://edelivery.oracle.com/otn-pub/java/jdk/7u45-b18/jdk-7u45-linux-
x64.tar.gz"
b. Unpack the compressed Java binaries, in the directory:
sudo tar xvzf jdk-7u25-linux-x64.tar.gz
c. Create a Java directory using mkdir under /user/local/ and change the directory to /usr/local/Java by using this
command
mkdir -R /usr/local/Java
cd /usr/local/Java

d. Copy the Oracle Java binaries into the /usr/local/Java directory.
sudo cp -r jdk-1.7.0_45 /usr/local/java
e. Edit the system PATH file /etc/profile and add the following system variables to your system path
sudo nano /etc/profile or sudo gedit /etc/profile
f. Scroll down to the end of the file using your arrow keys and add the following lines below to the end of your
/etc/profile file:
JAVA_HOME=/usr/local/Java/jdk1.7.0_45
PATH=$PATH:$HOME/bin:$JAVA_HOME/bin
export JAVA_HOME
export PATH
g. Inform your Ubuntu Linux system where your Oracle Java JDK/JRE is located. This will tell the system that the
new Oracle Java version is available for use.
sudo update-alternatives --install "/usr/bin/javac" "javac"
"/usr/local/java/jdk1.7.0_45/bin/javac" 1
sudo update-alternatvie --set javac /usr/local/Java/jdk1.7.0_45/bin/javac
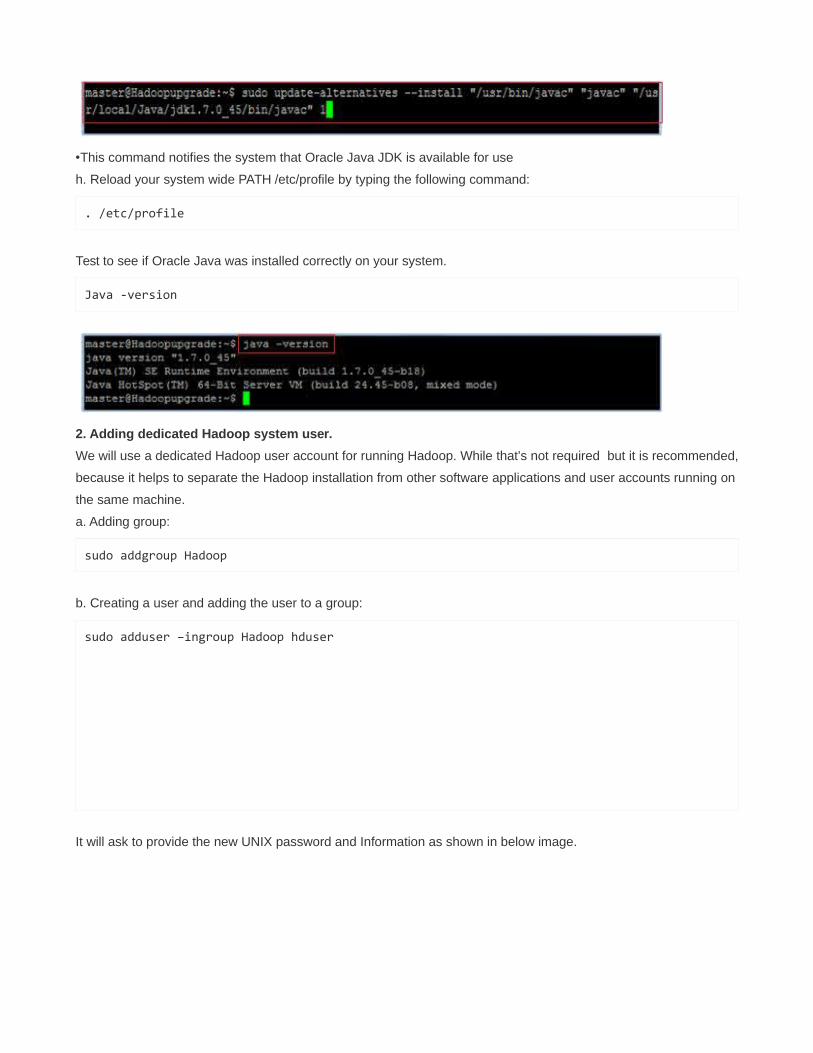
•This command notifies the system that Oracle Java JDK is available for use
h. Reload your system wide PATH /etc/profile by typing the following command:
. /etc/profile
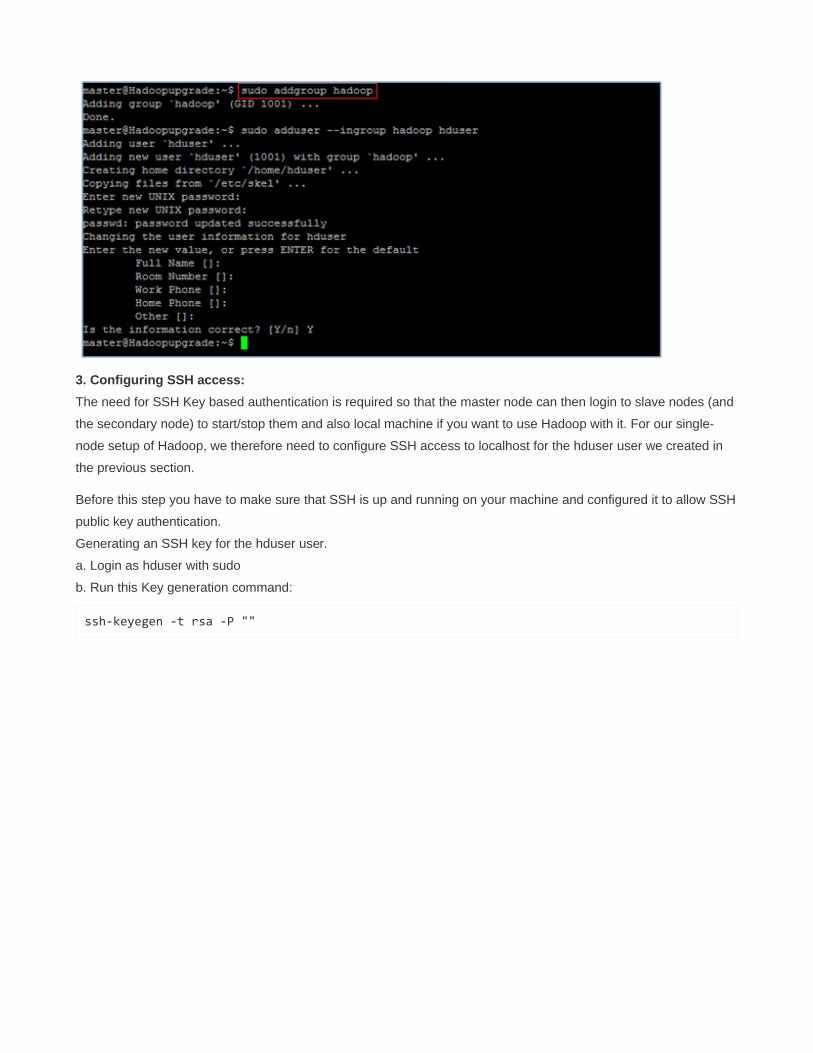
Test to see if Oracle Java was installed correctly on your system.
Java -version
2. Adding dedicated Hadoop system user.
We will use a dedicated Hadoop user account for running Hadoop. While that’s not required but it is recommended,
because it helps to separate the Hadoop installation from other software applications and user accounts running on
the same machine.
a. Adding group:
sudo addgroup Hadoop
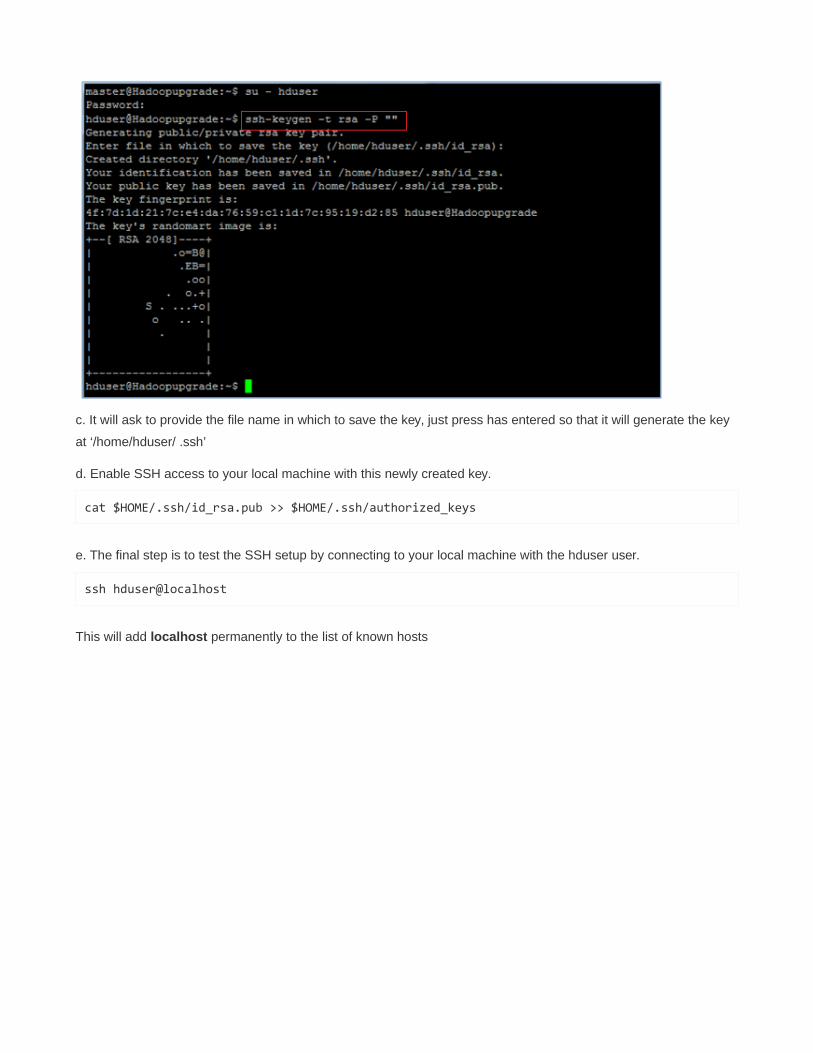
b. Creating a user and adding the user to a group:
sudo adduser –ingroup Hadoop hduser
It will ask to provide the new UNIX password and Information as shown in below image.
3. Configuring SSH access:
The need for SSH Key based authentication is required so that the master node can then login to slave nodes (and
the secondary node) to start/stop them and also local machine if you want to use Hadoop with it. For our single-
node setup of Hadoop, we therefore need to configure SSH access to localhost for the hduser user we created in
the previous section.
Before this step you have to make sure that SSH is up and running on your machine and configured it to allow SSH
public key authentication.
Generating an SSH key for the hduser user.
a. Login as hduser with sudo
b. Run this Key generation command:
ssh-keyegen -t rsa -P ""
c. It will ask to provide the file name in which to save the key, just press has entered so that it will generate the key
at ‘/home/hduser/ .ssh’
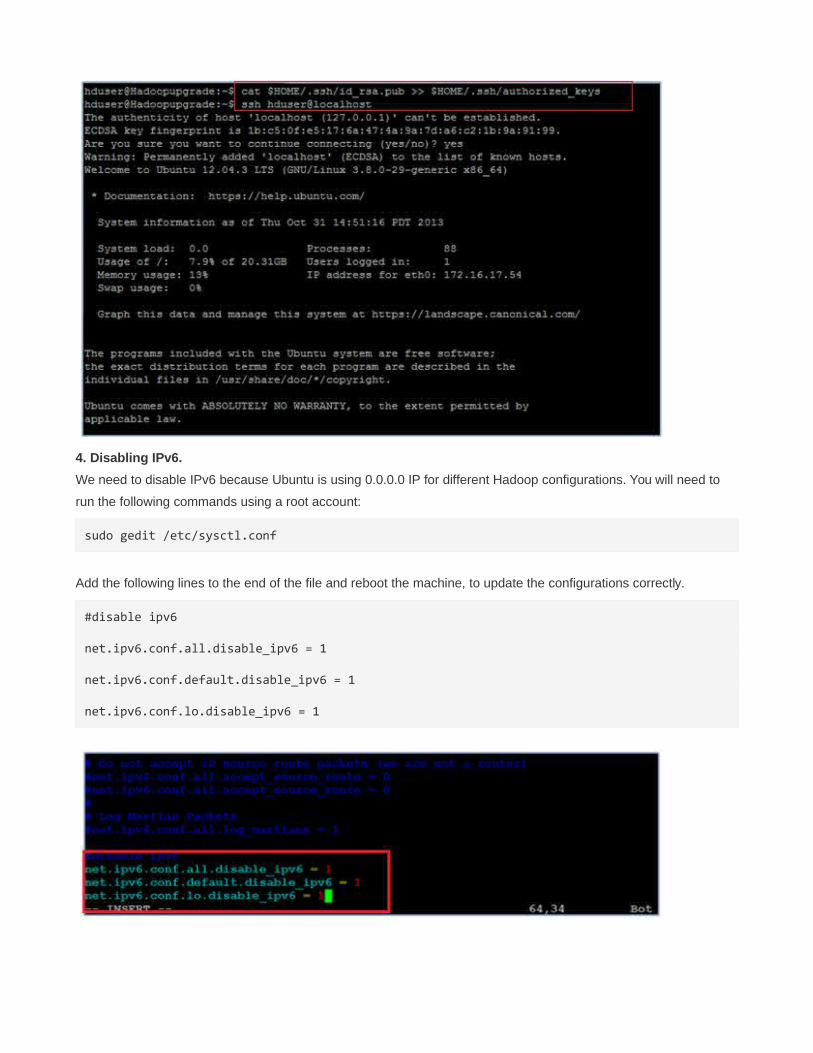
d. Enable SSH access to your local machine with this newly created key.
cat $HOME/.ssh/id_rsa.pub >> $HOME/.ssh/authorized_keys
e. The final step is to test the SSH setup by connecting to your local machine with the hduser user.
ssh hduser@localhost
This will add localhost permanently to the list of known hosts
4. Disabling IPv6.
We need to disable IPv6 because Ubuntu is using 0.0.0.0 IP for different Hadoop configurations. You will need to
run the following commands using a root account:
sudo gedit /etc/sysctl.conf
Add the following lines to the end of the file and reboot the machine, to update the configurations correctly.
#disable ipv6
net.ipv6.conf.all.disable_ipv6 = 1
net.ipv6.conf.default.disable_ipv6 = 1
net.ipv6.conf.lo.disable_ipv6 = 1
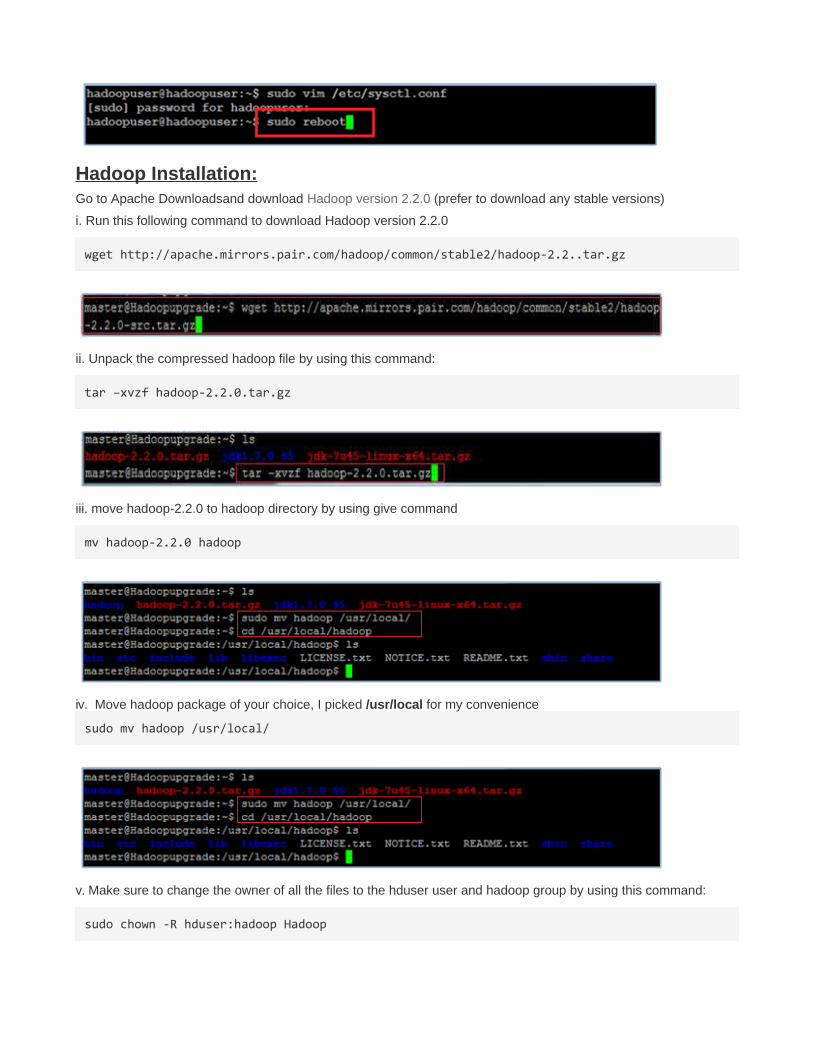
Hadoop Installation:Go to Apache Downloadsand download Hadoop version 2.2.0 (prefer to download any stable versions)
i. Run this following command to download Hadoop version 2.2.0
wget http://apache.mirrors.pair.com/hadoop/common/stable2/hadoop-2.2..tar.gz
ii. Unpack the compressed hadoop file by using this command:
tar –xvzf hadoop-2.2.0.tar.gz
iii. move hadoop-2.2.0 to hadoop directory by using give command
mv hadoop-2.2.0 hadoop
iv. Move hadoop package of your choice, I picked /usr/local for my convenience
sudo mv hadoop /usr/local/
v. Make sure to change the owner of all the files to the hduser user and hadoop group by using this command:
sudo chown -R hduser:hadoop Hadoop
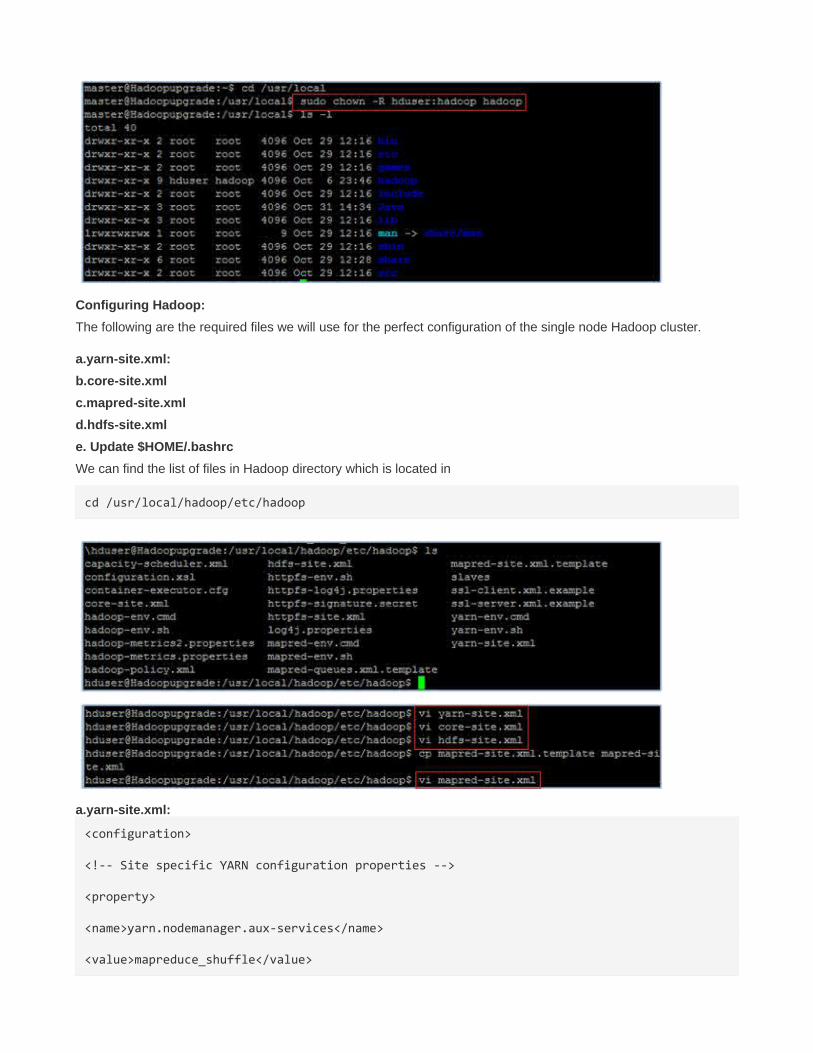
Configuring Hadoop:
The following are the required files we will use for the perfect configuration of the single node Hadoop cluster.
a.yarn-site.xml:
b.core-site.xml
c.mapred-site.xml
d.hdfs-site.xml
e. Update $HOME/.bashrc
We can find the list of files in Hadoop directory which is located in
cd /usr/local/hadoop/etc/hadoop
a.yarn-site.xml:
<configuration>
<!-- Site specific YARN configuration properties -->
<property>
<name>yarn.nodemanager.aux-services</name>
<value>mapreduce_shuffle</value>
</property>
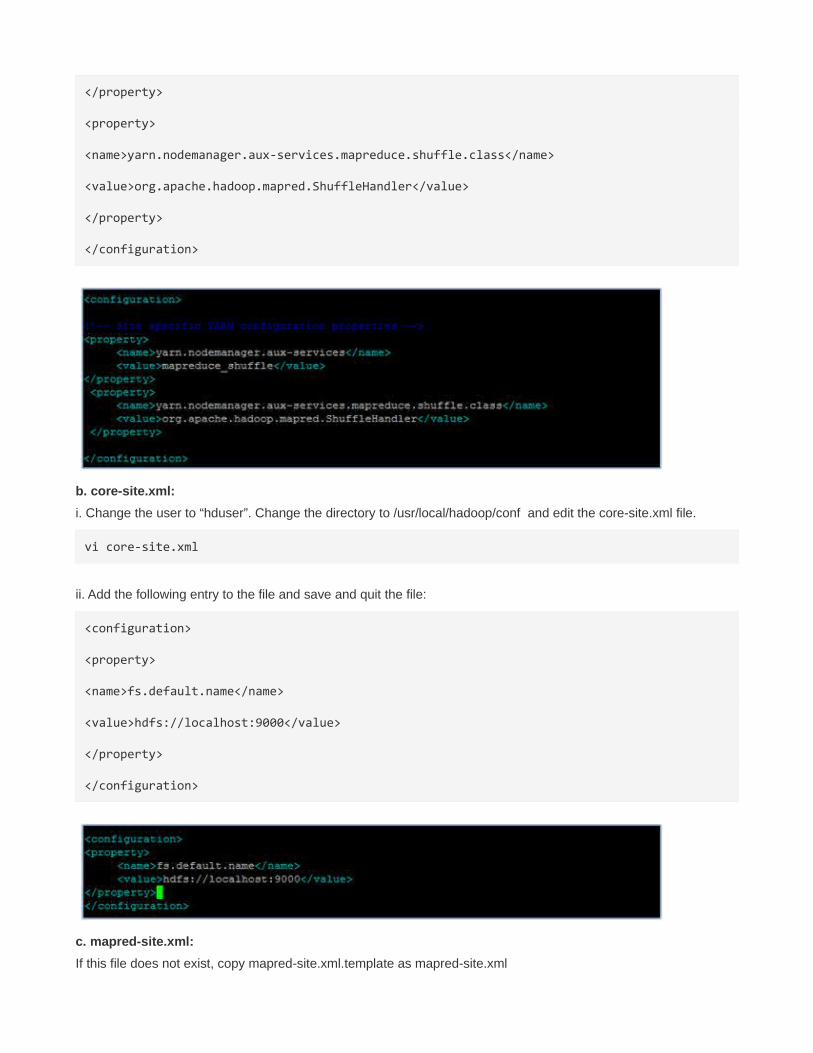
<property>
<name>yarn.nodemanager.aux-services.mapreduce.shuffle.class</name>
<value>org.apache.hadoop.mapred.ShuffleHandler</value>
</property>
</configuration>
b. core-site.xml:
i. Change the user to “hduser”. Change the directory to /usr/local/hadoop/conf and edit the core-site.xml file.
vi core-site.xml
ii. Add the following entry to the file and save and quit the file:
<configuration>
<property>
<name>fs.default.name</name>
<value>hdfs://localhost:9000</value>
</property>
</configuration>
c. mapred-site.xml:
If this file does not exist, copy mapred-site.xml.template as mapred-site.xml
i. Edit the mapred-site.xml file
vi mapred-site.xml
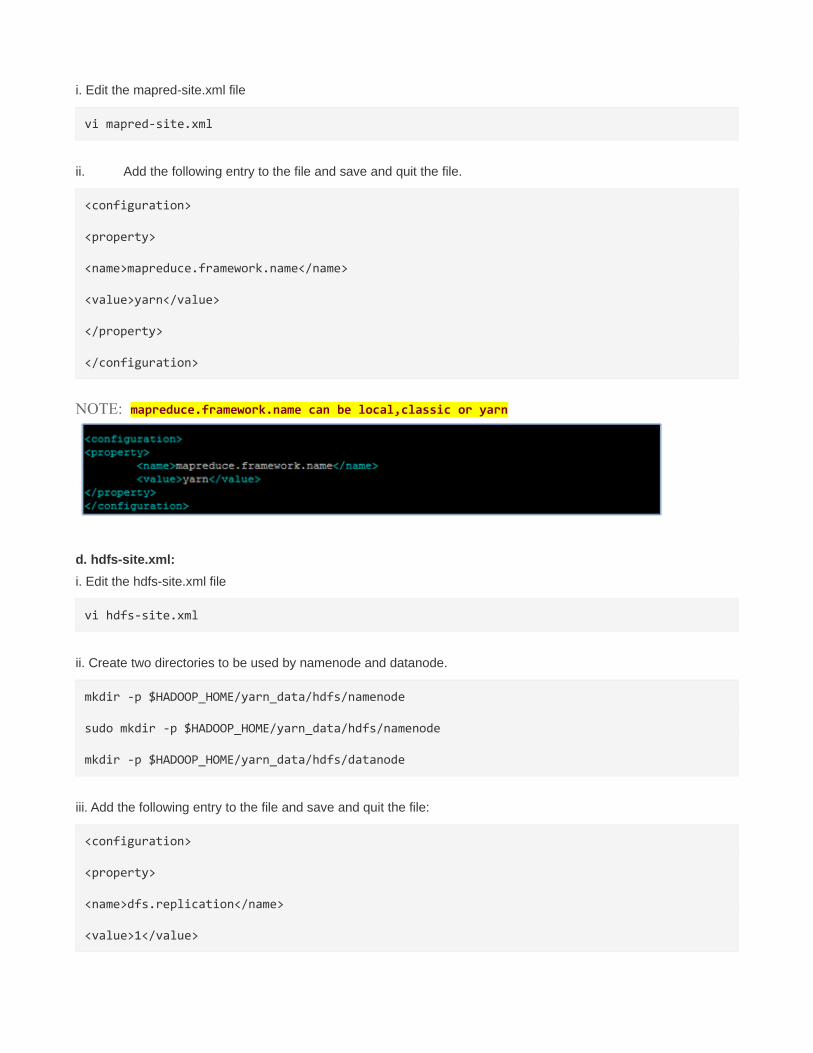
ii. Add the following entry to the file and save and quit the file.
<configuration>
<property>
<name>mapreduce.framework.name</name>
<value>yarn</value>
</property>
</configuration>
NOTE: mapreduce.framework.name can be local,classic or yarn
d. hdfs-site.xml:
i. Edit the hdfs-site.xml file
vi hdfs-site.xml
ii. Create two directories to be used by namenode and datanode.
mkdir -p $HADOOP_HOME/yarn_data/hdfs/namenode
sudo mkdir -p $HADOOP_HOME/yarn_data/hdfs/namenode
mkdir -p $HADOOP_HOME/yarn_data/hdfs/datanode
iii. Add the following entry to the file and save and quit the file:
<configuration>
<property>
<name>dfs.replication</name>
<value>1</value>
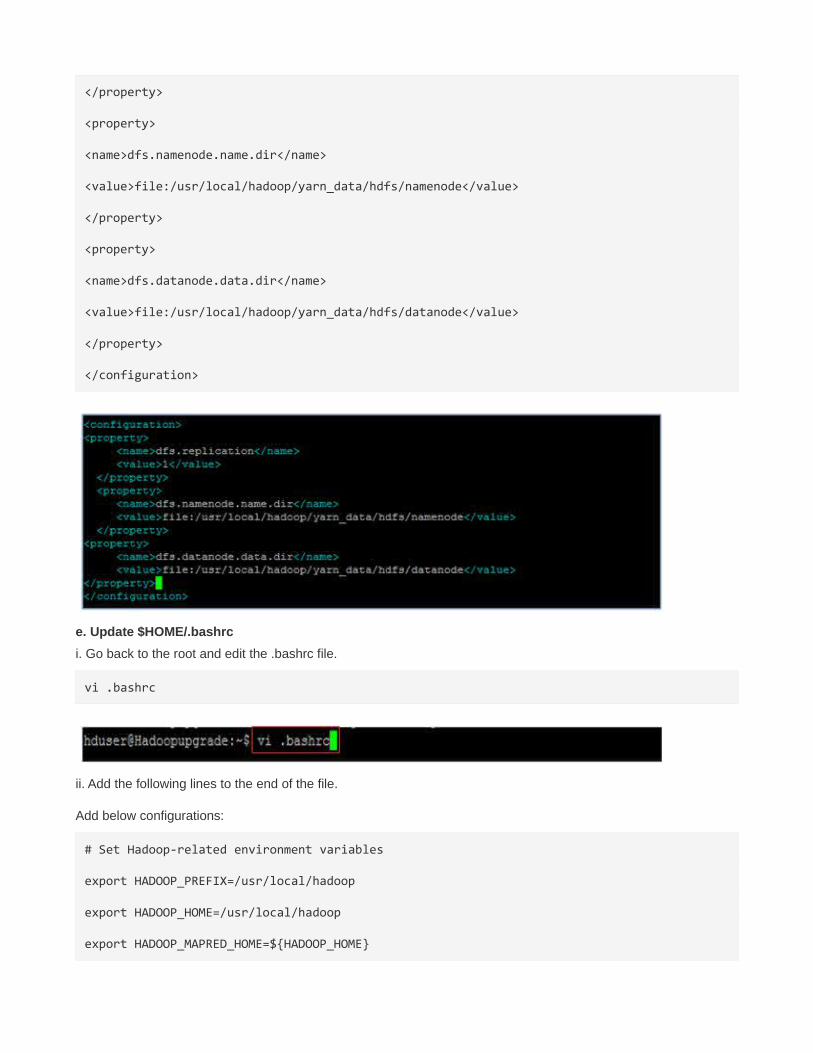
</property>
<property>
<name>dfs.namenode.name.dir</name>
<value>file:/usr/local/hadoop/yarn_data/hdfs/namenode</value>
</property>
<property>
<name>dfs.datanode.data.dir</name>
<value>file:/usr/local/hadoop/yarn_data/hdfs/datanode</value>
</property>
</configuration>
e. Update $HOME/.bashrc
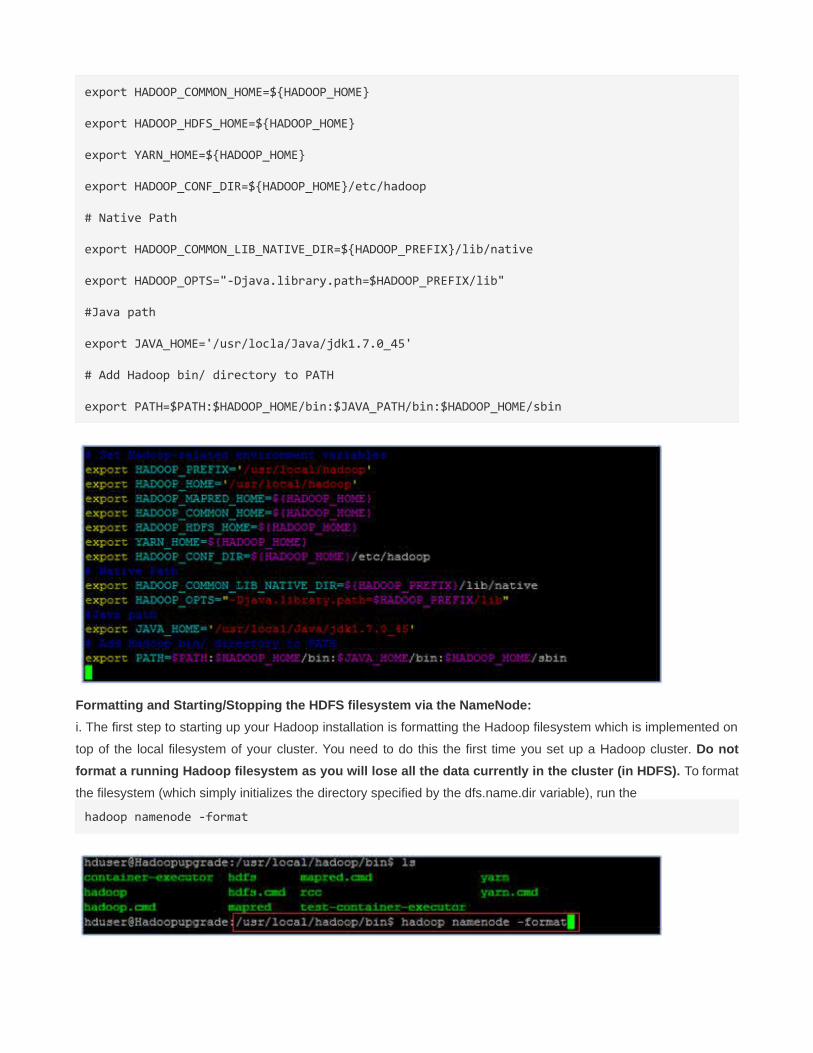
i. Go back to the root and edit the .bashrc file.
vi .bashrc
ii. Add the following lines to the end of the file.
Add below configurations:
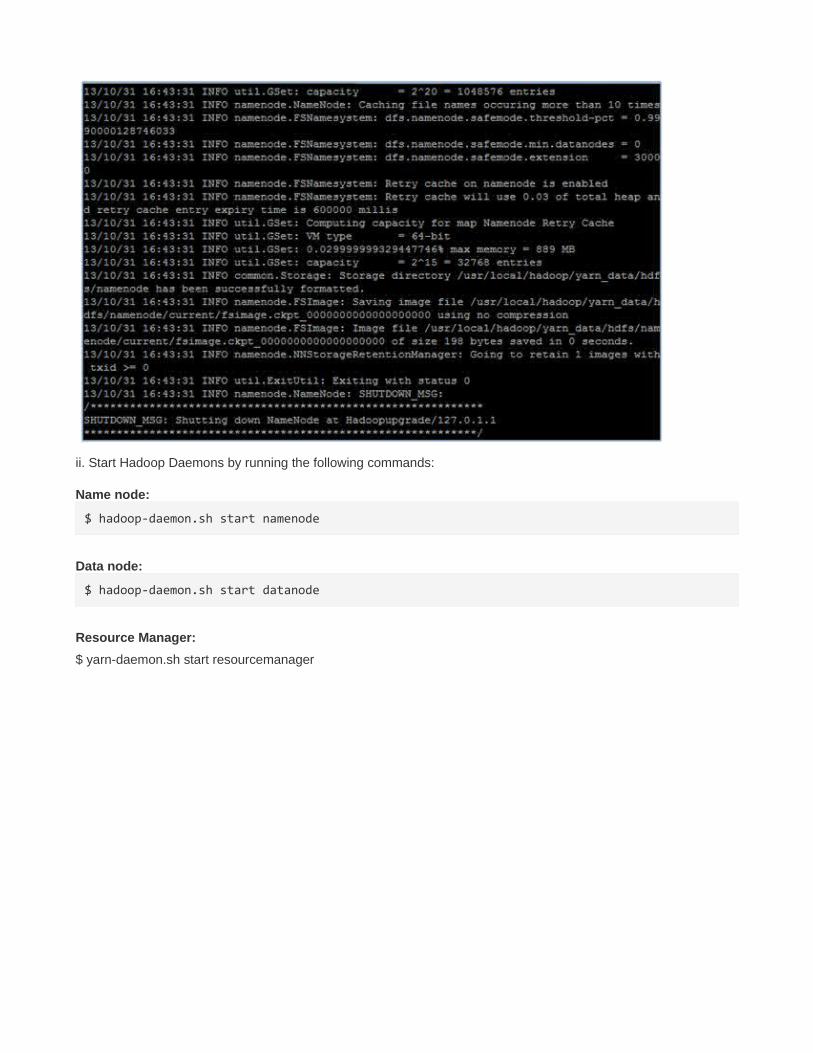
# Set Hadoop-related environment variables
export HADOOP_PREFIX=/usr/local/hadoop
export HADOOP_HOME=/usr/local/hadoop
export HADOOP_MAPRED_HOME=${HADOOP_HOME}
export HADOOP_COMMON_HOME=${HADOOP_HOME}
export HADOOP_HDFS_HOME=${HADOOP_HOME}
export YARN_HOME=${HADOOP_HOME}
export HADOOP_CONF_DIR=${HADOOP_HOME}/etc/hadoop
# Native Path
export HADOOP_COMMON_LIB_NATIVE_DIR=${HADOOP_PREFIX}/lib/native
export HADOOP_OPTS="-Djava.library.path=$HADOOP_PREFIX/lib"
#Java path
export JAVA_HOME='/usr/locla/Java/jdk1.7.0_45'
# Add Hadoop bin/ directory to PATH
export PATH=$PATH:$HADOOP_HOME/bin:$JAVA_PATH/bin:$HADOOP_HOME/sbin
Formatting and Starting/Stopping the HDFS filesystem via the NameNode:
i. The first step to starting up your Hadoop installation is formatting the Hadoop filesystem which is implemented on
top of the local filesystem of your cluster. You need to do this the first time you set up a Hadoop cluster. Do not
format a running Hadoop filesystem as you will lose all the data currently in the cluster (in HDFS). To format
the filesystem (which simply initializes the directory specified by the dfs.name.dir variable), run the
hadoop namenode -format
ii. Start Hadoop Daemons by running the following commands:
Name node:
$ hadoop-daemon.sh start namenode
Data node:
$ hadoop-daemon.sh start datanode
Resource Manager:
$ yarn-daemon.sh start resourcemanager
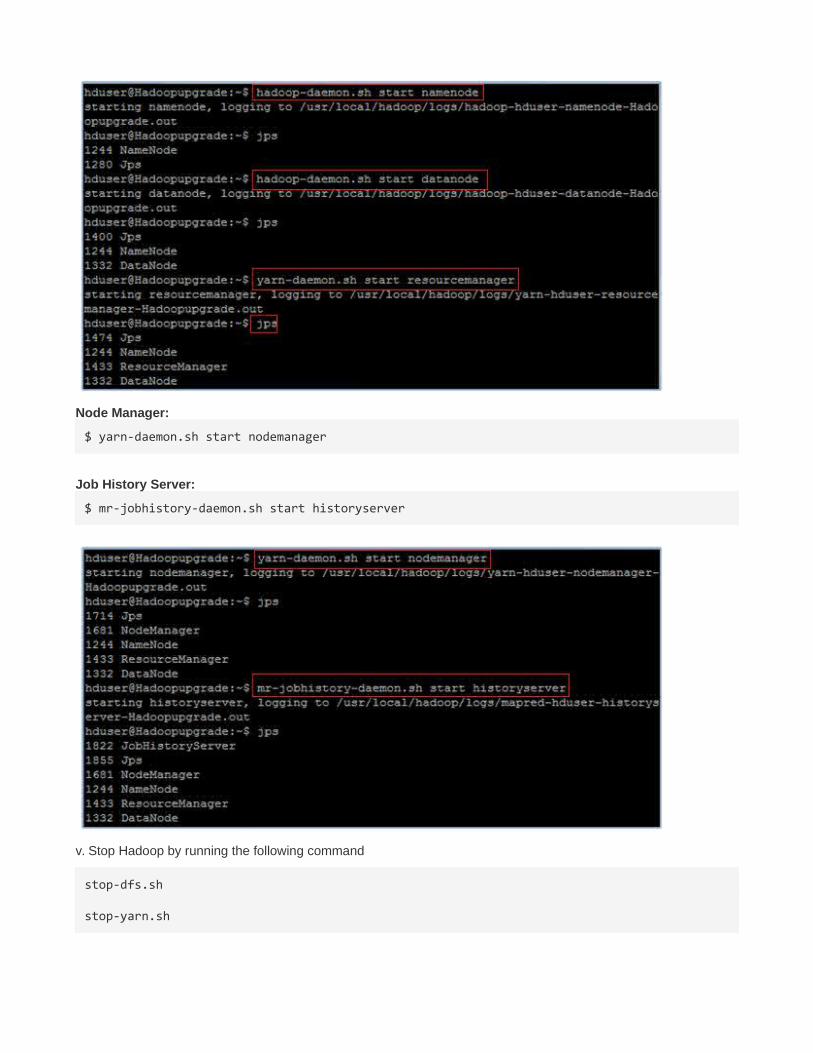
Node Manager:
$ yarn-daemon.sh start nodemanager
Job History Server:
$ mr-jobhistory-daemon.sh start historyserver
v. Stop Hadoop by running the following command
stop-dfs.sh
stop-yarn.sh
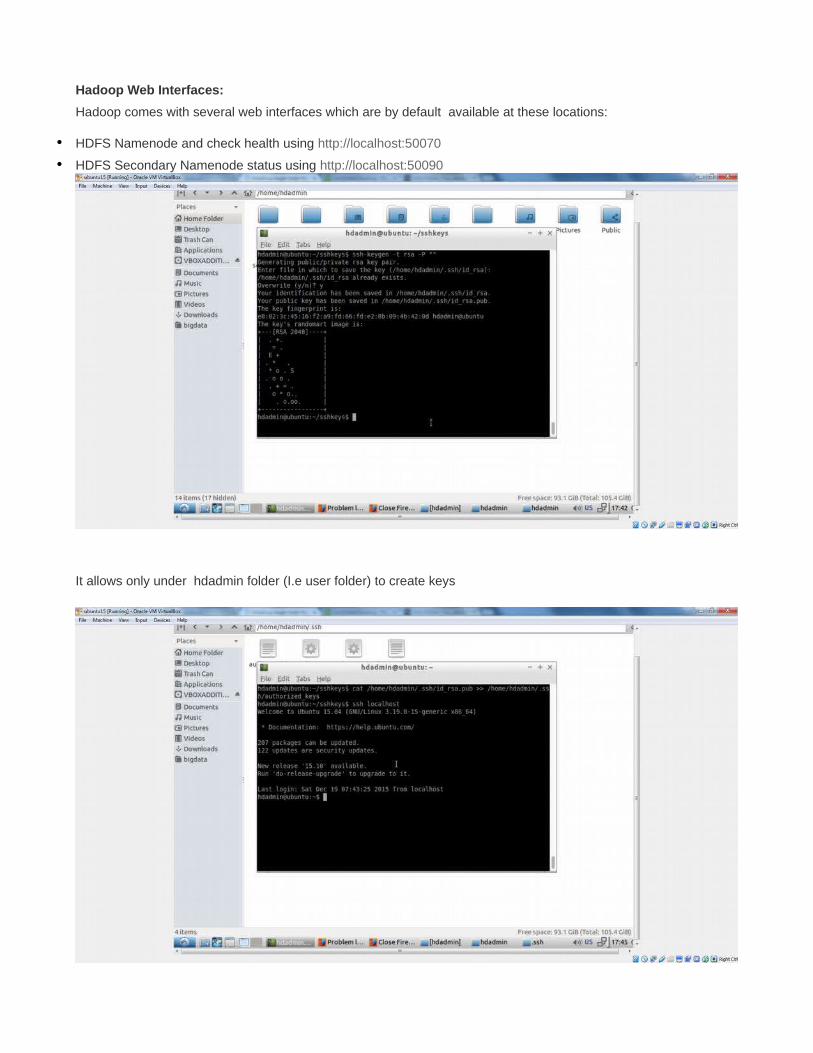
Hadoop Web Interfaces:
Hadoop comes with several web interfaces which are by default available at these locations:
• HDFS Namenode and check health using http://localhost:50070
• HDFS Secondary Namenode status using http://localhost:50090
It allows only under hdadmin folder (I.e user folder) to create keys
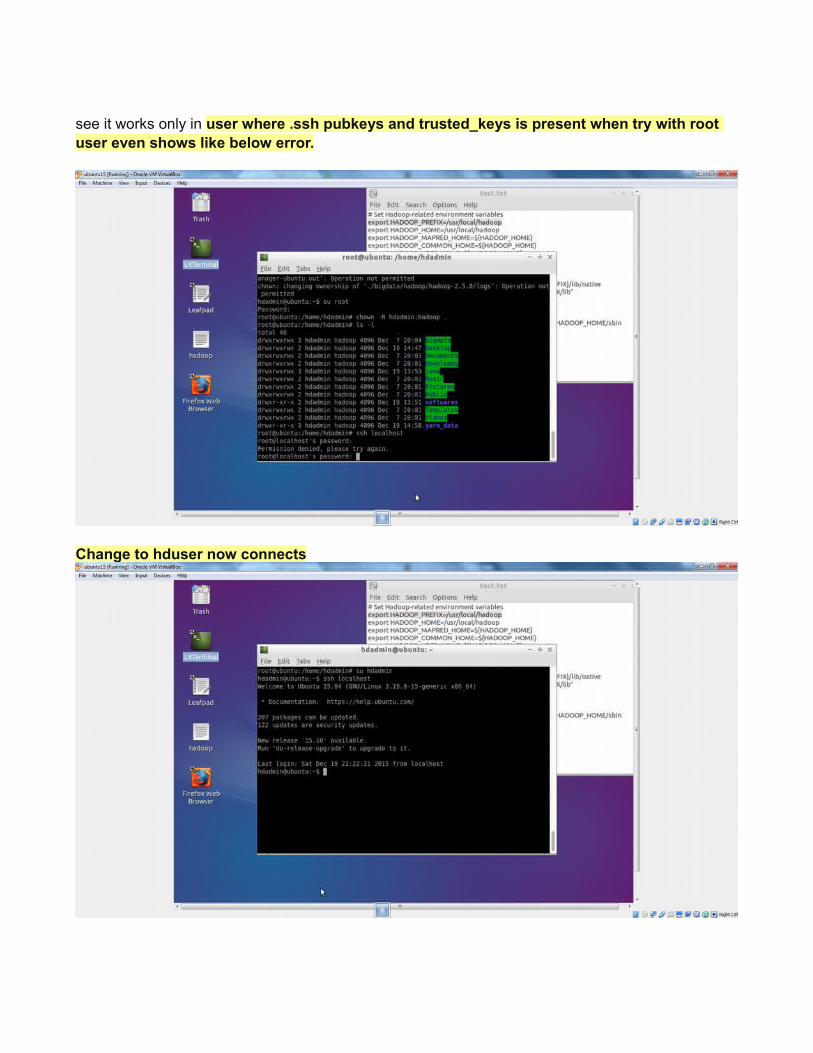
see it works only in user where .ssh pubkeys and trusted_keys is present when try with root user even shows like below error.
Change to hduser now connects
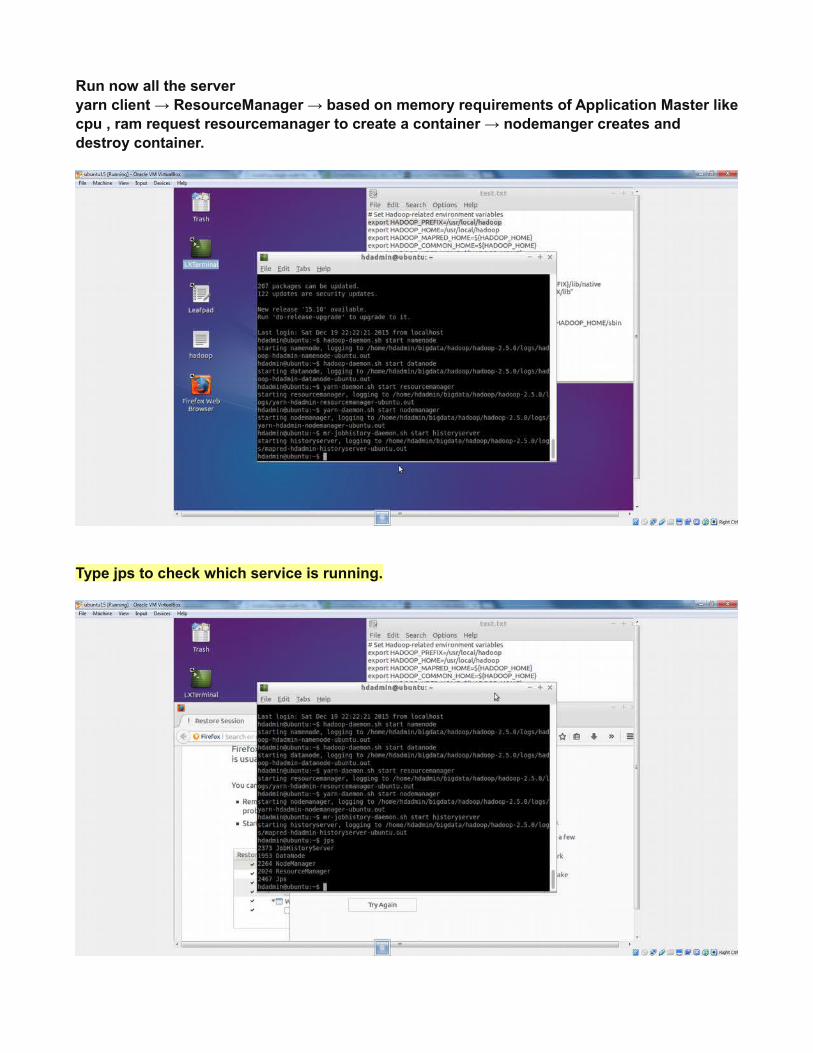
Run now all the serveryarn client → ResourceManager → based on memory requirements of Application Master likecpu , ram request resourcemanager to create a container → nodemanger creates anddestroy container.
Type jps to check which service is running.
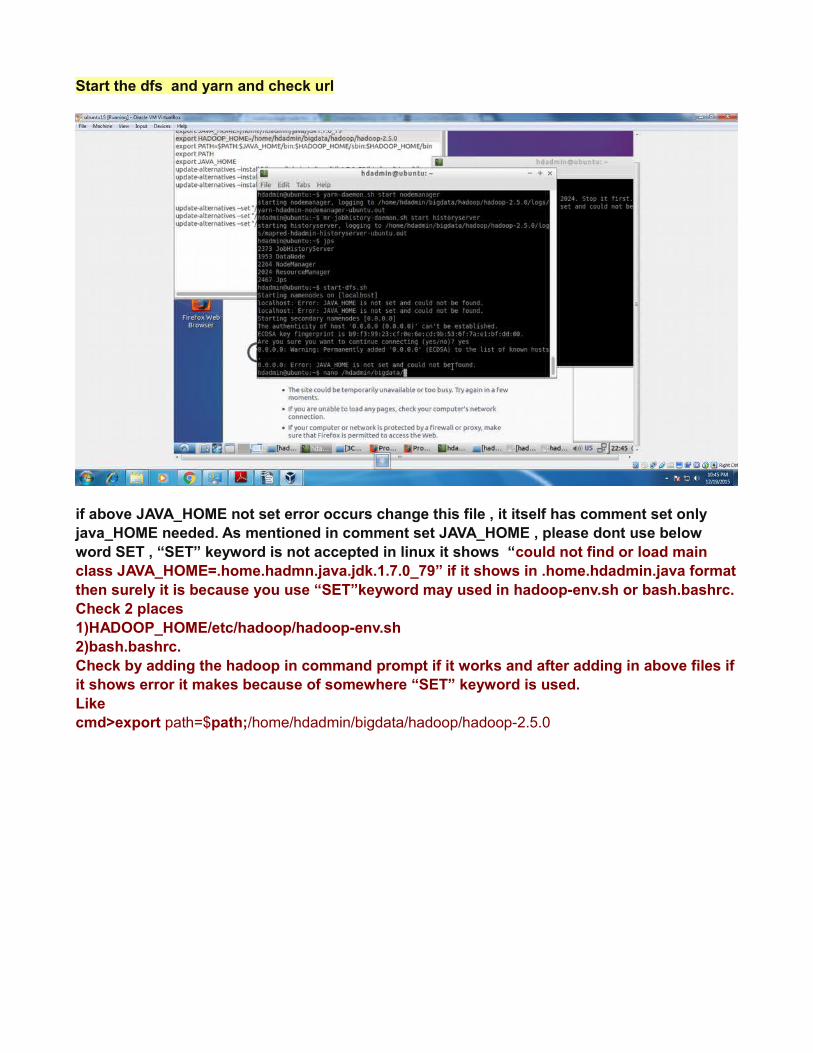
Start the dfs and yarn and check url
if above JAVA_HOME not set error occurs change this file , it itself has comment set only java_HOME needed. As mentioned in comment set JAVA_HOME , please dont use below word SET , “SET” keyword is not accepted in linux it shows “could not find or load main class JAVA_HOME=.home.hadmn.java.jdk.1.7.0_79” if it shows in .home.hdadmin.java formatthen surely it is because you use “SET”keyword may used in hadoop-env.sh or bash.bashrc.Check 2 places 1)HADOOP_HOME/etc/hadoop/hadoop-env.sh2)bash.bashrc.Check by adding the hadoop in command prompt if it works and after adding in above files ifit shows error it makes because of somewhere “SET” keyword is used.Like cmd>export path=$path;/home/hdadmin/bigdata/hadoop/hadoop-2.5.0
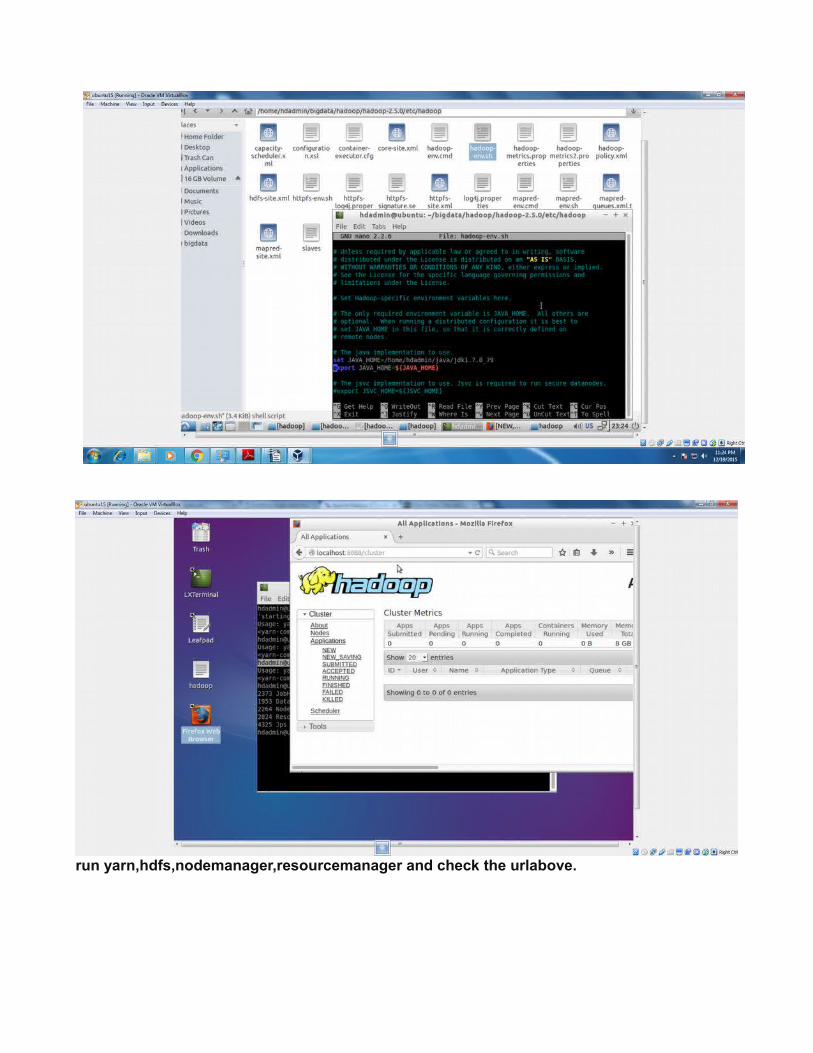
run yarn,hdfs,nodemanager,resourcemanager and check the urlabove.

On click on RM Home(RESOURCE MANAGER)
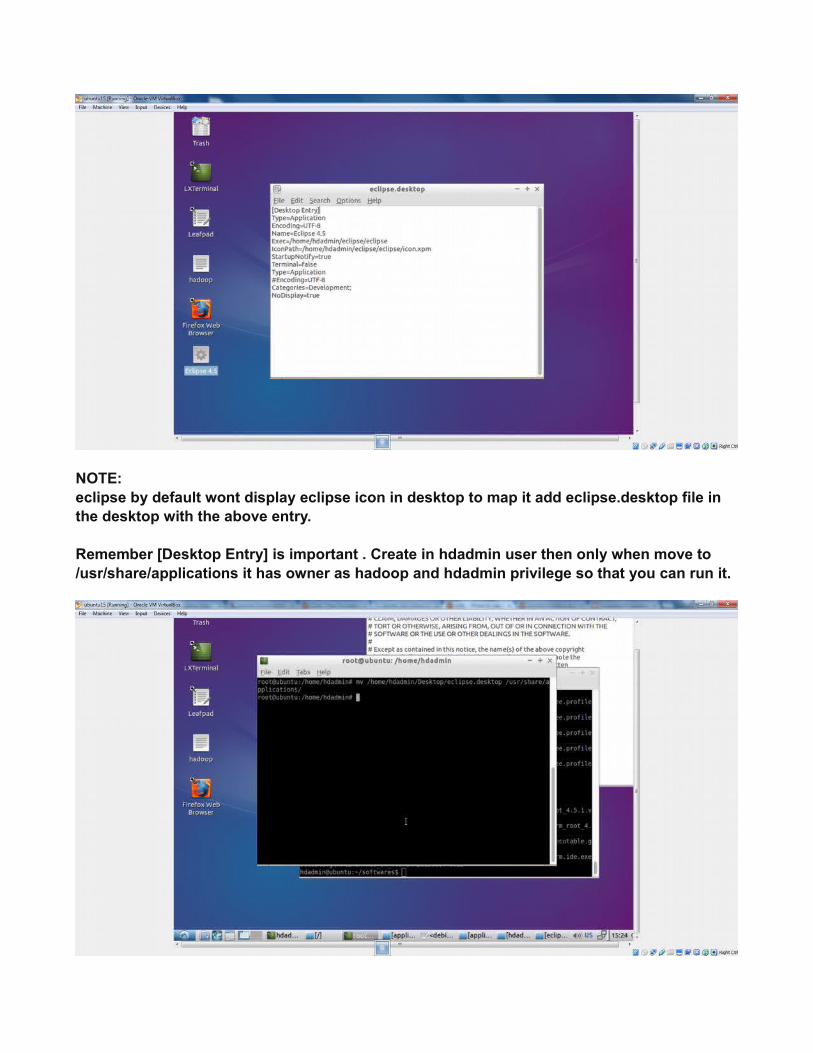
NOTE:eclipse by default wont display eclipse icon in desktop to map it add eclipse.desktop file in the desktop with the above entry.
Remember [Desktop Entry] is important . Create in hdadmin user then only when move to /usr/share/applications it has owner as hadoop and hdadmin privilege so that you can run it.
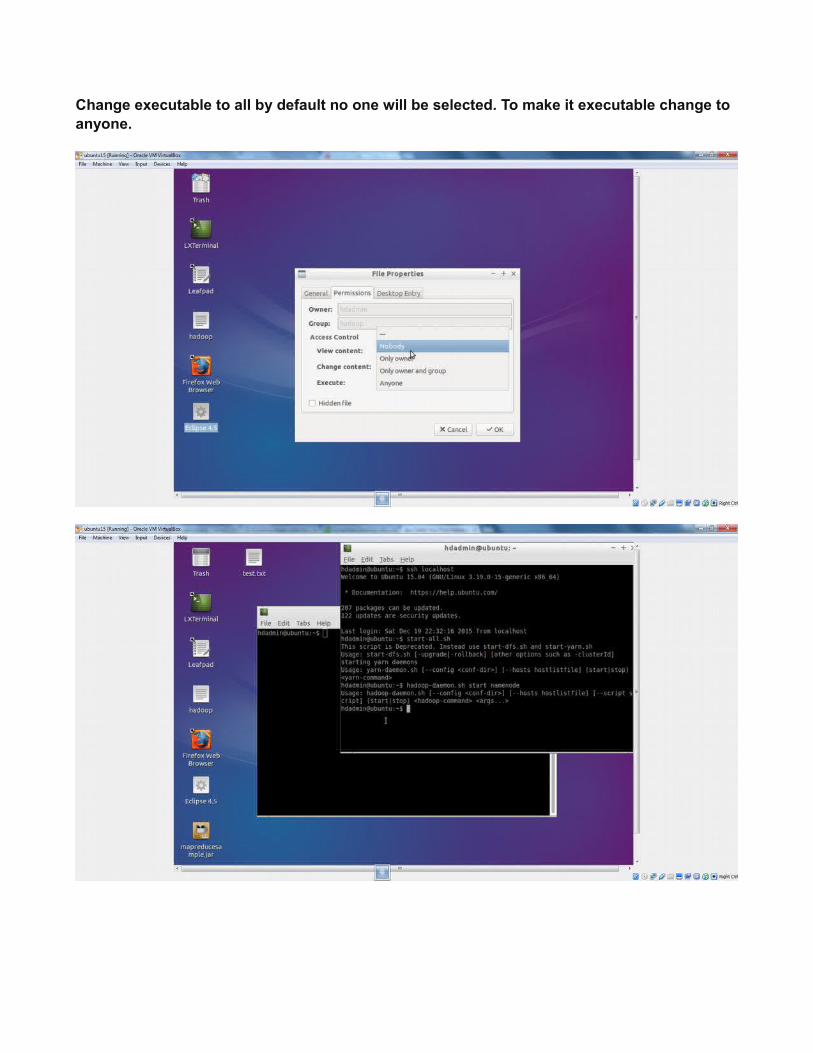
Change executable to all by default no one will be selected. To make it executable change to anyone.
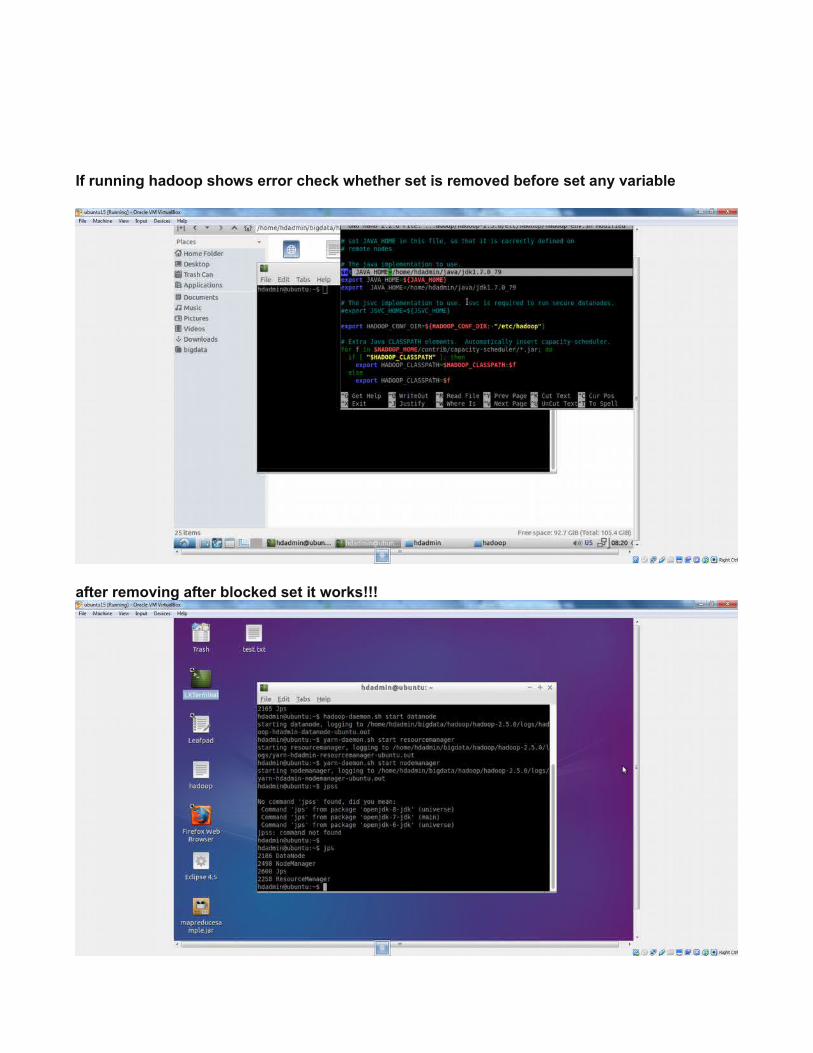
If running hadoop shows error check whether set is removed before set any variable
after removing after blocked set it works!!!
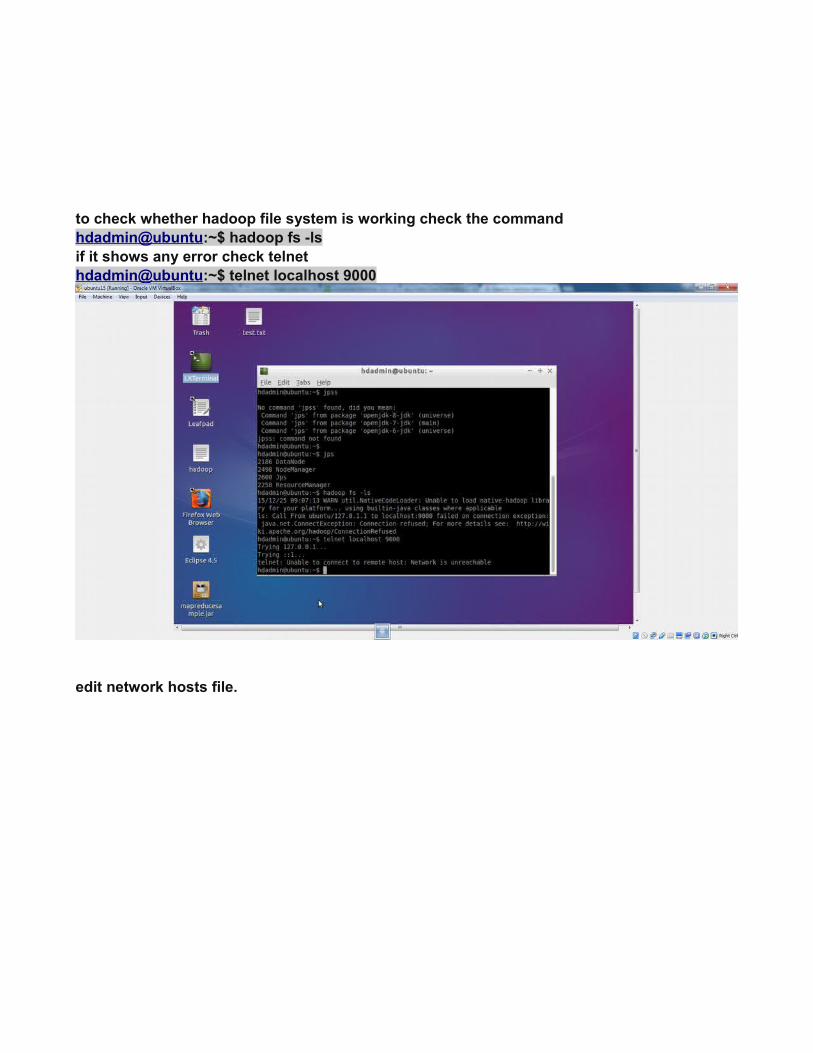
to check whether hadoop file system is working check the commandhdadmin@ubuntu:~$ hadoop fs -lsif it shows any error check telnet hdadmin@ubuntu:~$ telnet localhost 9000
edit network hosts file.
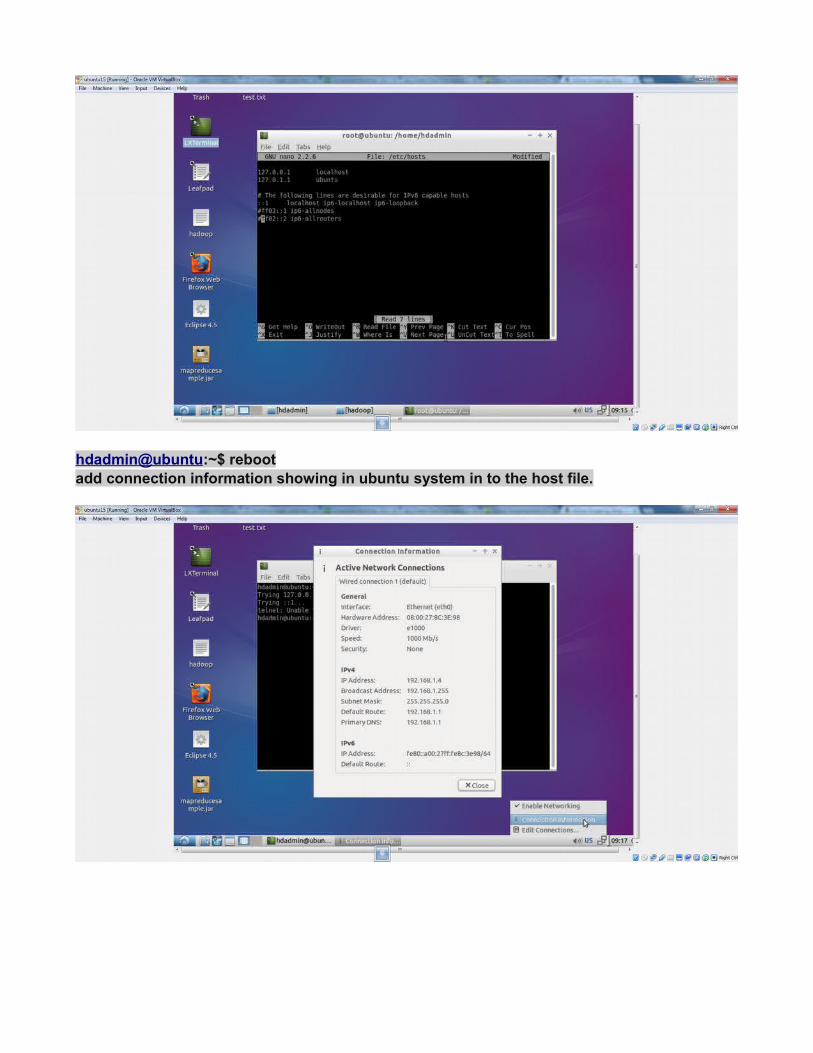
hdadmin@ubuntu:~$ rebootadd connection information showing in ubuntu system in to the host file.
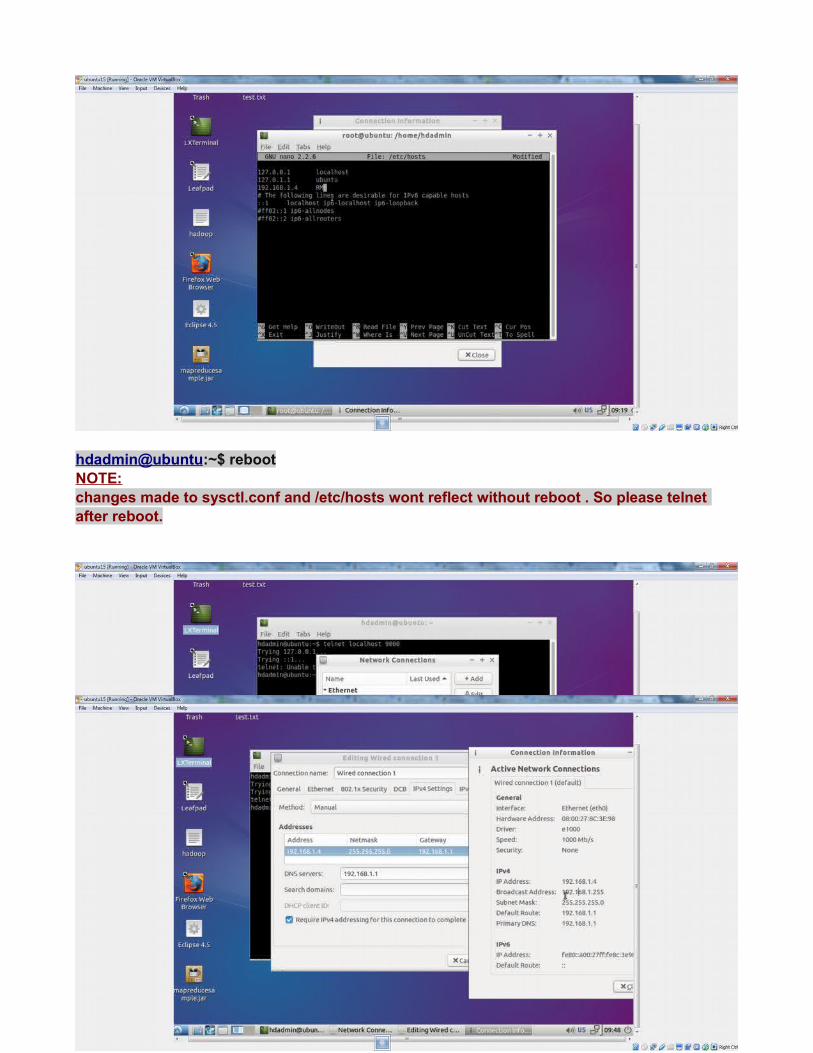
hdadmin@ubuntu:~$ rebootNOTE:changes made to sysctl.conf and /etc/hosts wont reflect without reboot . So please telnet after reboot.
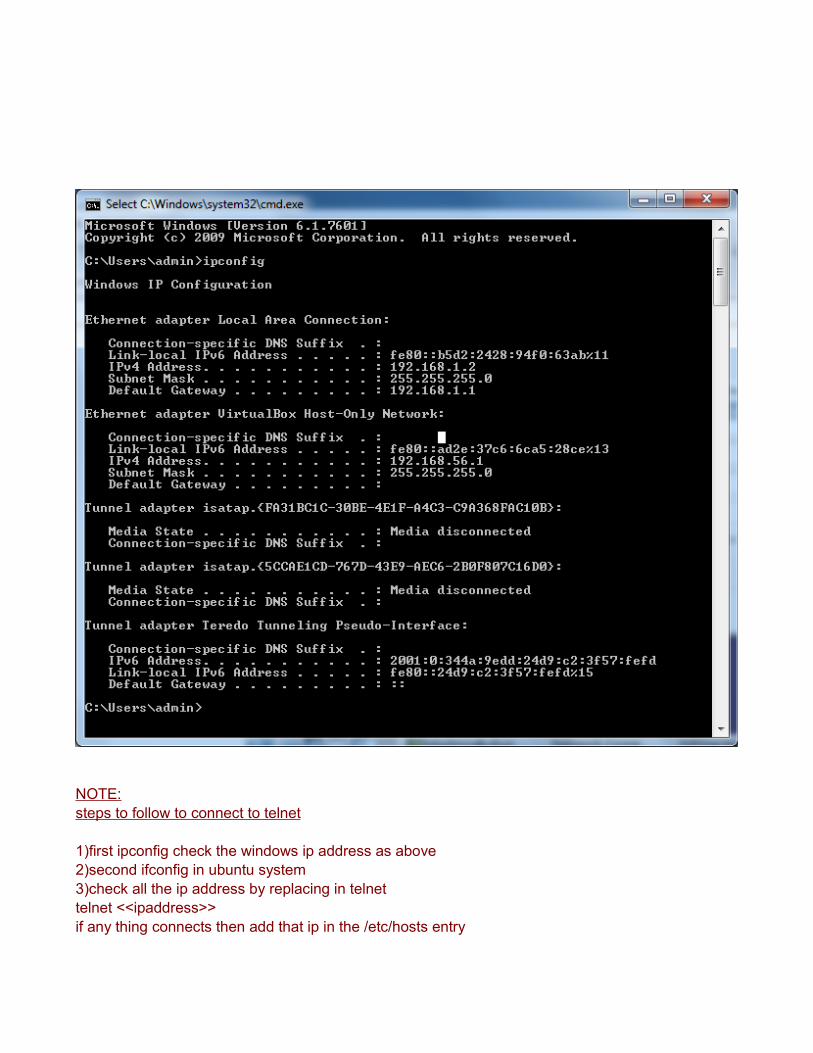
NOTE:steps to follow to connect to telnet
1)first ipconfig check the windows ip address as above2)second ifconfig in ubuntu system3)check all the ip address by replacing in telnet telnet <<ipaddress>> if any thing connects then add that ip in the /etc/hosts entry
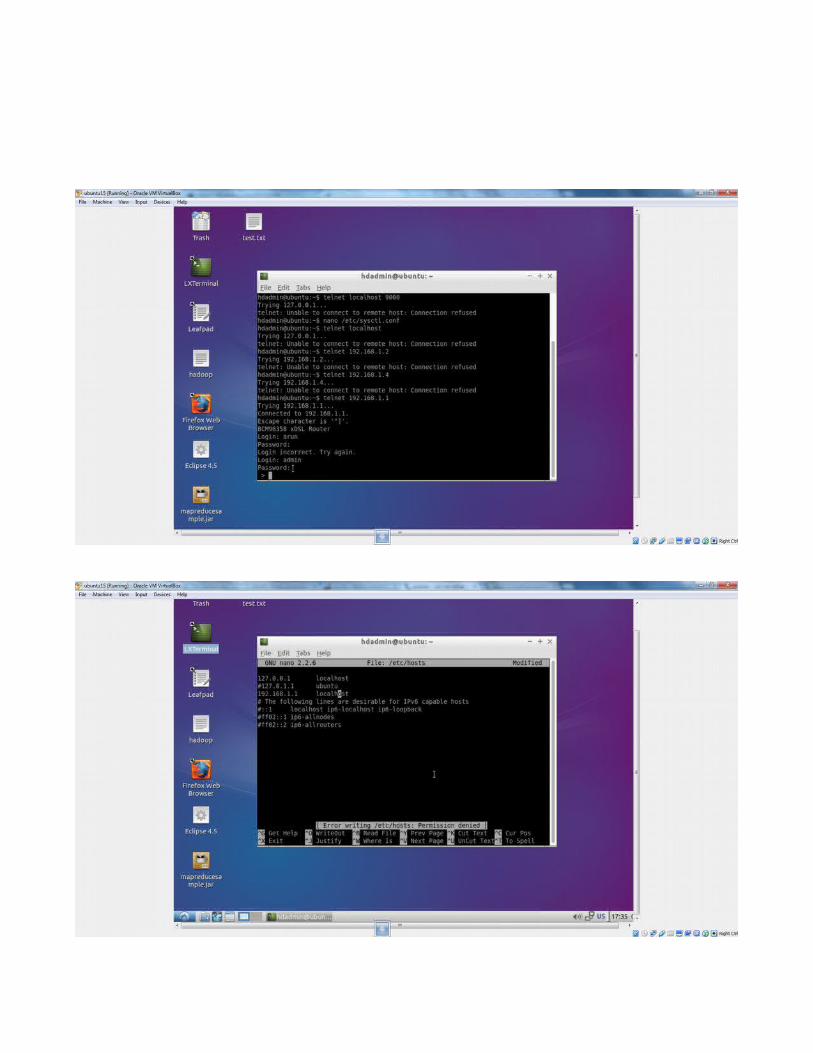
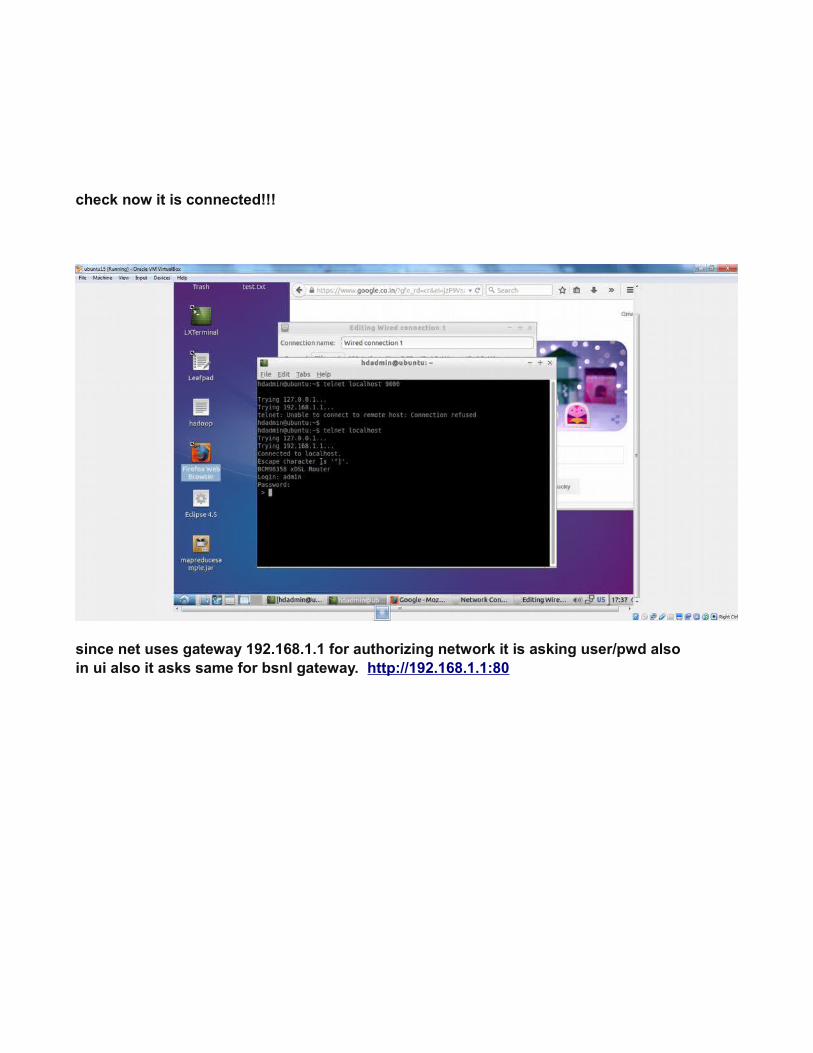
check now it is connected!!!
since net uses gateway 192.168.1.1 for authorizing network it is asking user/pwd alsoin ui also it asks same for bsnl gateway. http://192.168.1.1:80
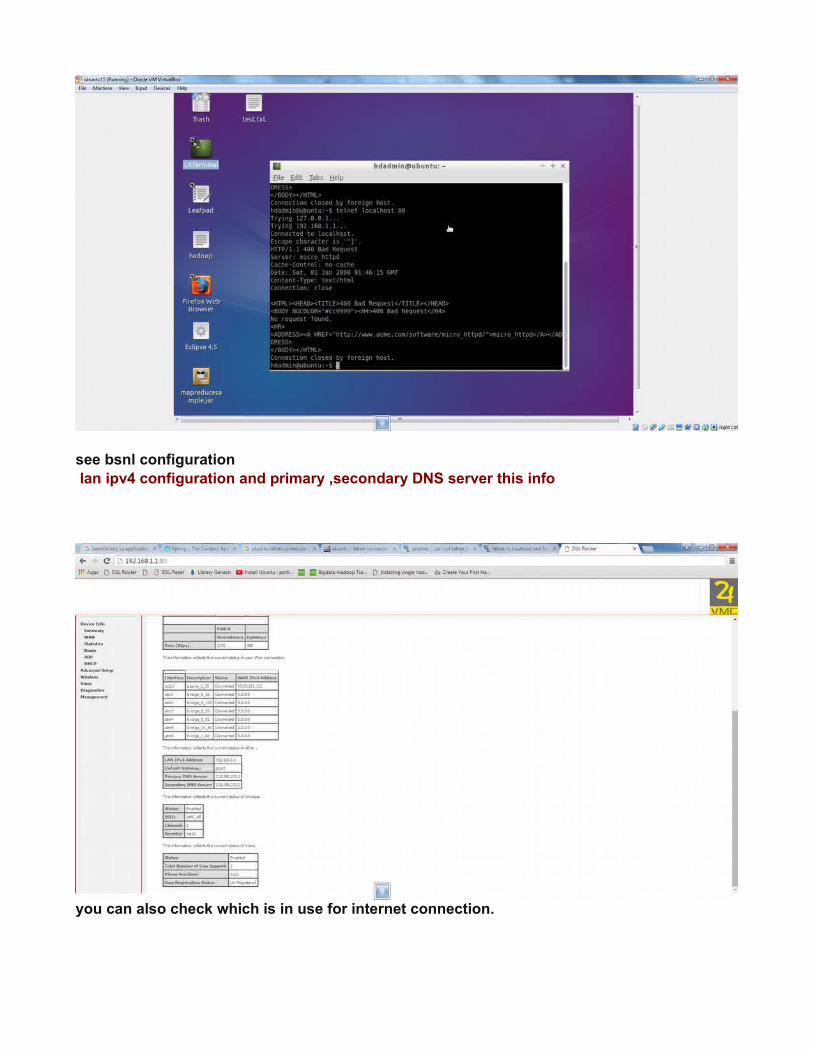
see bsnl configuration lan ipv4 configuration and primary ,secondary DNS server this info
you can also check which is in use for internet connection.
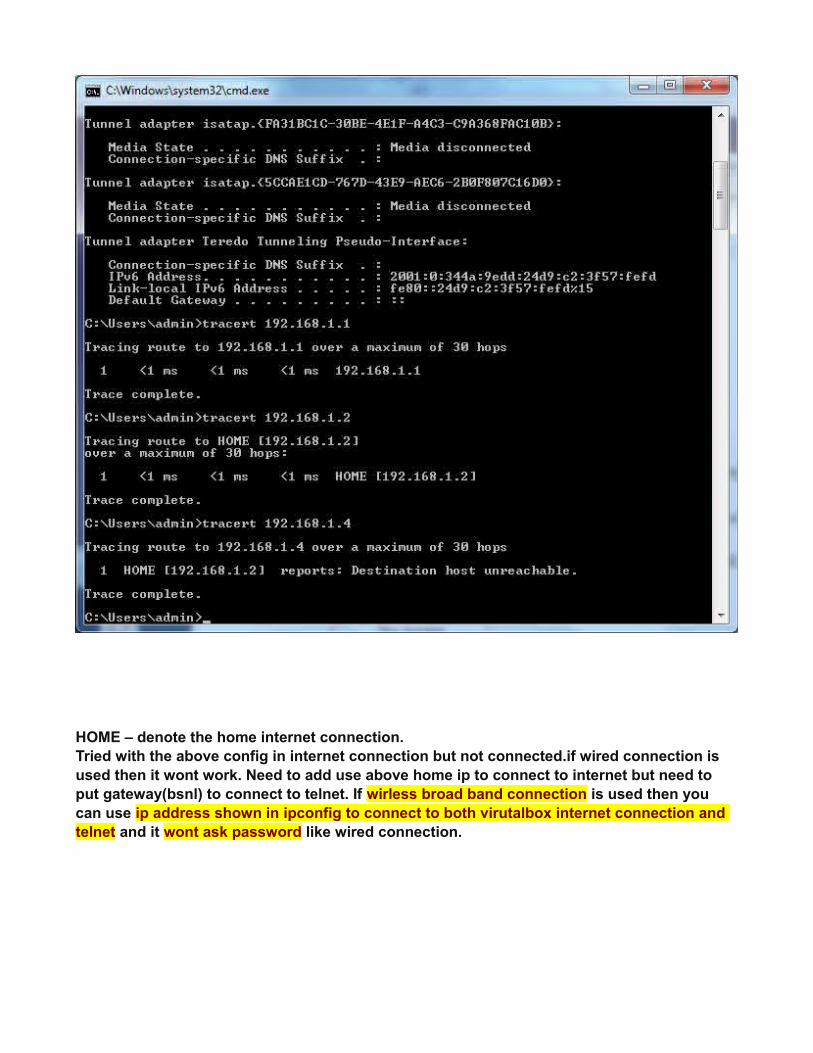
HOME – denote the home internet connection.Tried with the above config in internet connection but not connected.if wired connection is used then it wont work. Need to add use above home ip to connect to internet but need to put gateway(bsnl) to connect to telnet. If wirless broad band connection is used then you can use ip address shown in ipconfig to connect to both virutalbox internet connection and telnet and it wont ask password like wired connection.
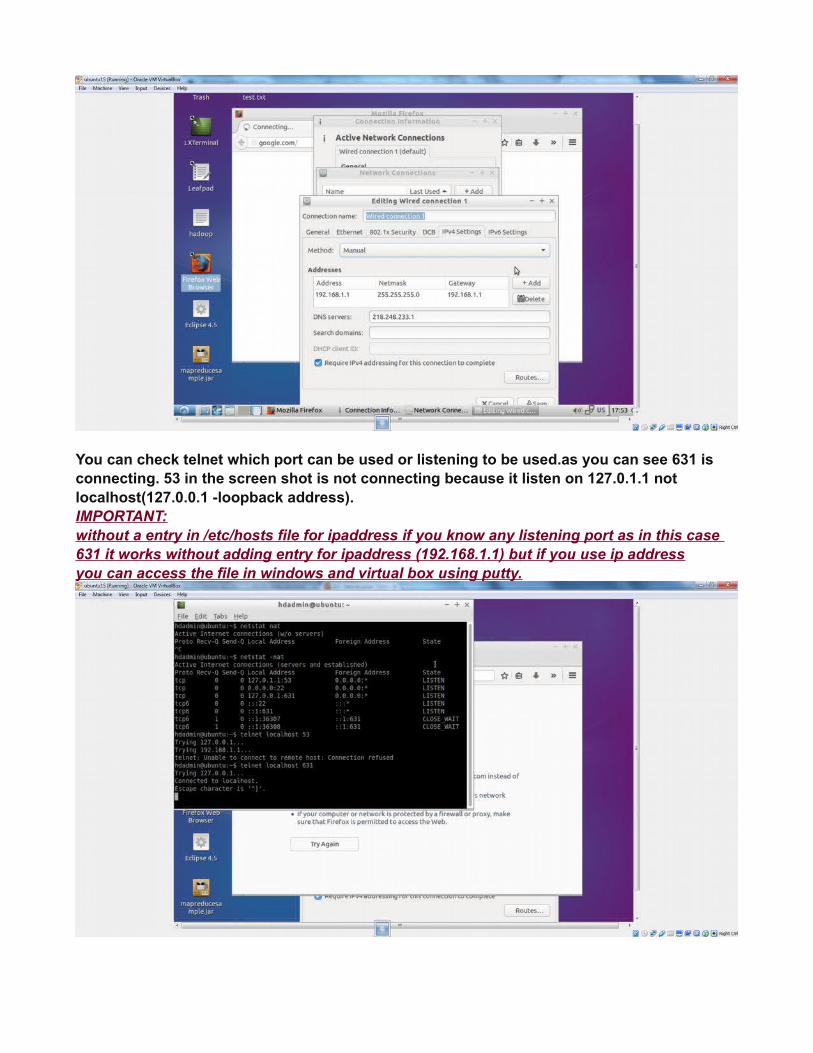
You can check telnet which port can be used or listening to be used.as you can see 631 is connecting. 53 in the screen shot is not connecting because it listen on 127.0.1.1 not localhost(127.0.0.1 -loopback address). IMPORTANT:without a entry in /etc/hosts file for ipaddress if you know any listening port as in this case 631 it works without adding entry for ipaddress (192.168.1.1) but if you use ip addressyou can access the file in windows and virtual box using putty.
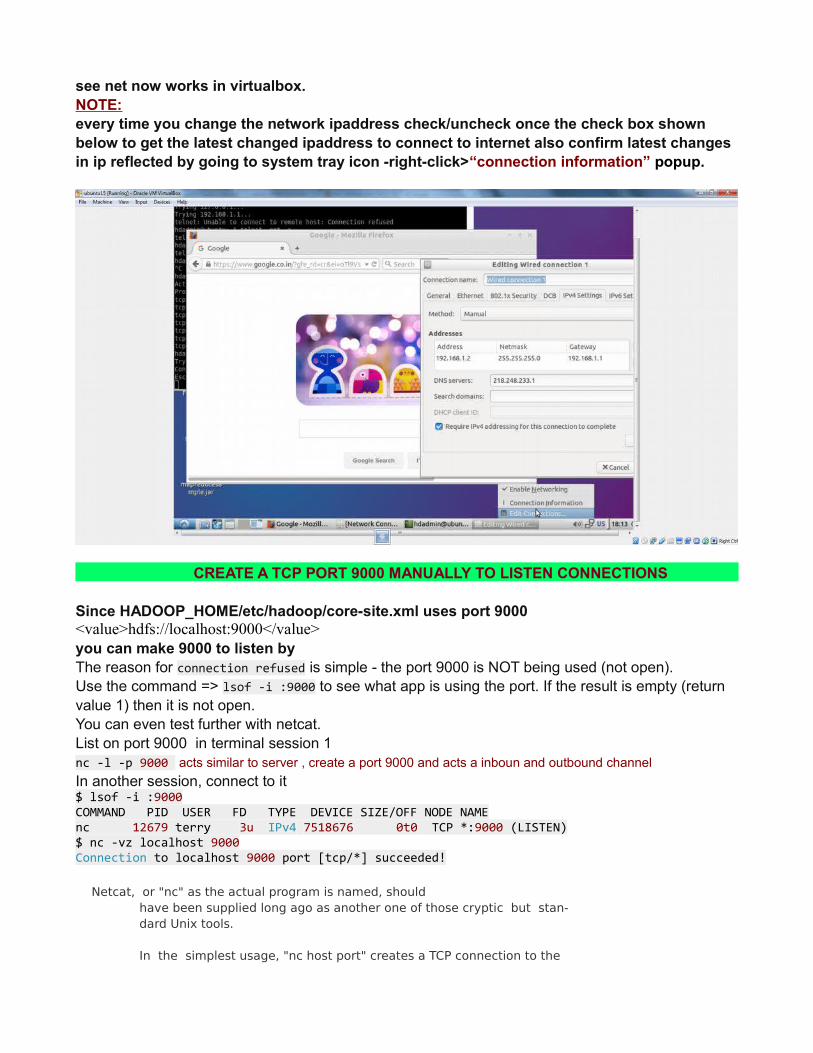
see net now works in virtualbox.NOTE:every time you change the network ipaddress check/uncheck once the check box shown below to get the latest changed ipaddress to connect to internet also confirm latest changes in ip reflected by going to system tray icon -right-click>“connection information” popup.
CREATE A TCP PORT 9000 MANUALLY TO LISTEN CONNECTIONS
Since HADOOP_HOME/etc/hadoop/core-site.xml uses port 9000<value>hdfs://localhost:9000</value>you can make 9000 to listen byThe reason for connection refused is simple - the port 9000 is NOT being used (not open).Use the command => lsof -i :9000 to see what app is using the port. If the result is empty (return value 1) then it is not open.You can even test further with netcat.List on port 9000 in terminal session 1nc -l -p 9000 acts similar to server , create a port 9000 and acts a inboun and outbound channel
In another session, connect to it$ lsof -i :9000COMMAND PID USER FD TYPE DEVICE SIZE/OFF NODE NAMEnc 12679 terry 3u IPv4 7518676 0t0 TCP *:9000 (LISTEN)$ nc -vz localhost 9000Connection to localhost 9000 port [tcp/*] succeeded!
Netcat, or "nc" as the actual program is named, should have been supplied long ago as another one of those cryptic but stan‐ dard Unix tools. In the simplest usage, "nc host port" creates a TCP connection to the
given port on the given target host. Your standard input is then sent to the host, and anything that comes back across the connection is sent to your standard output. This continues indefinitely, until the net‐ work side of the connection shuts down. Note that this behavior is different from most other applications which shut everything down and exit after an end-of-file on the standard input. Netcat can also function as a server, by listening for inbound connec‐ tions on arbitrary ports and then doing the same reading and writing. With minor limitations, netcat doesn’t really care if it runs in "client" or "server" mode -- it still shovels data back and forth until there isn’t any more left. In either mode, shutdown can be forced after a configurable time of inactivity on the network side.
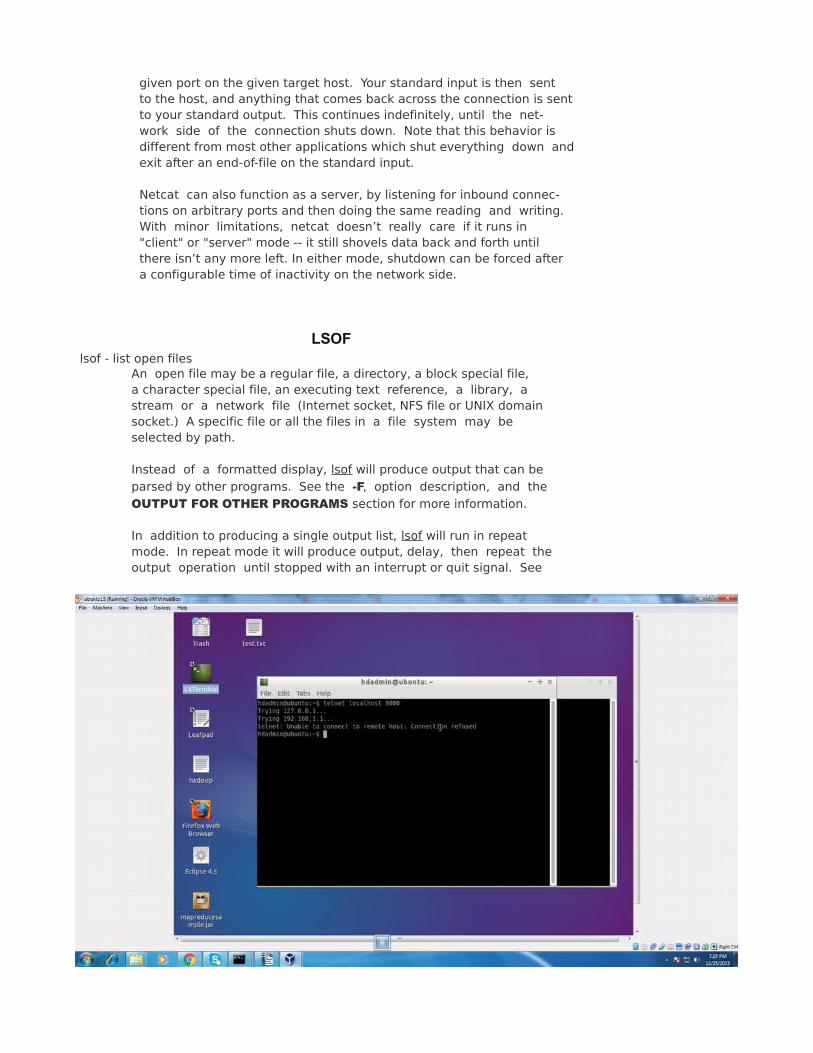
LSOF lsof - list open files An open file may be a regular file, a directory, a block special file, a character special file, an executing text reference, a library, a stream or a network file (Internet socket, NFS file or UNIX domain socket.) A specific file or all the files in a file system may be selected by path.
Instead of a formatted display, lsof will produce output that can be parsed by other programs. See the -F, option description, and the OUTPUT FOR OTHER PROGRAMS section for more information.
In addition to producing a single output list, lsof will run in repeat mode. In repeat mode it will produce output, delay, then repeat the output operation until stopped with an interrupt or quit signal. See
see 9000 port showing error
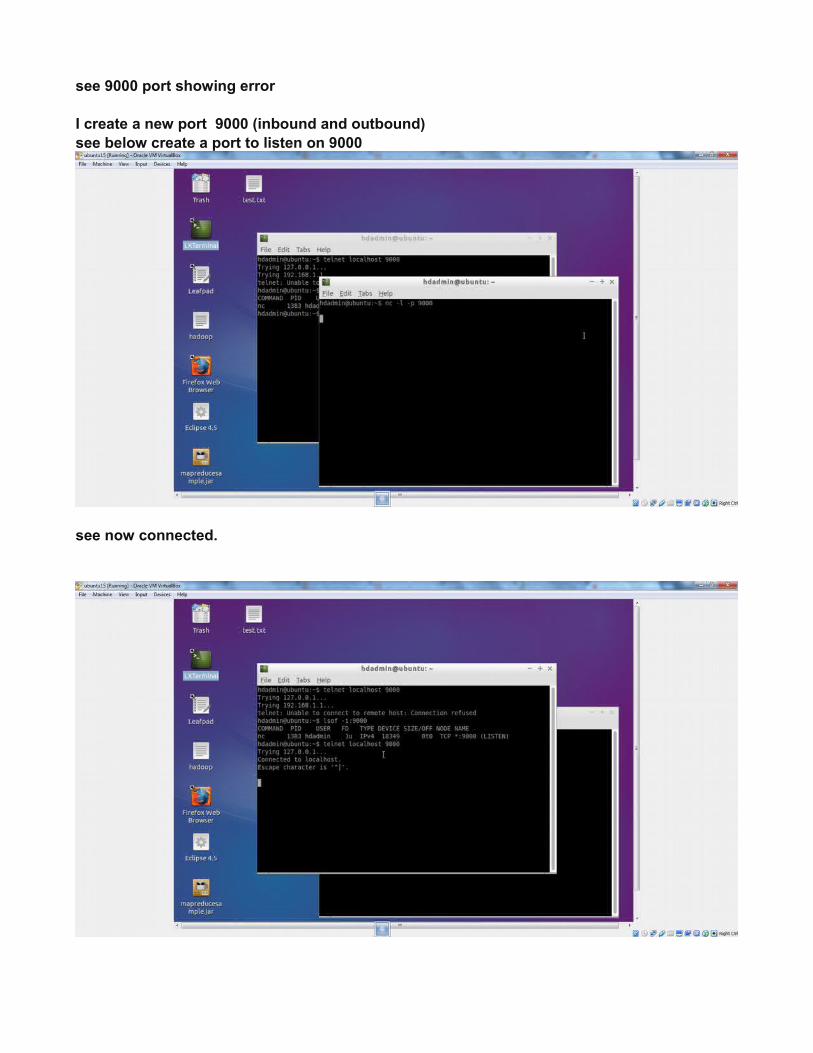
I create a new port 9000 (inbound and outbound)see below create a port to listen on 9000
see now connected.
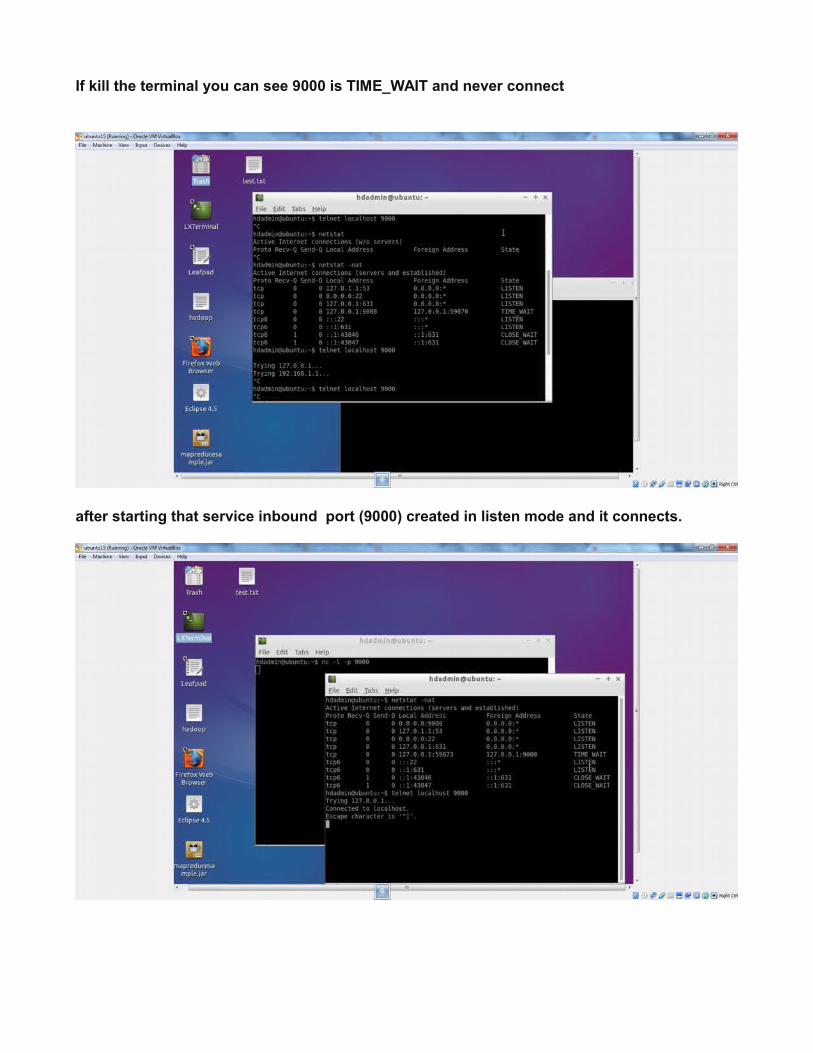
If kill the terminal you can see 9000 is TIME_WAIT and never connect
after starting that service inbound port (9000) created in listen mode and it connects.
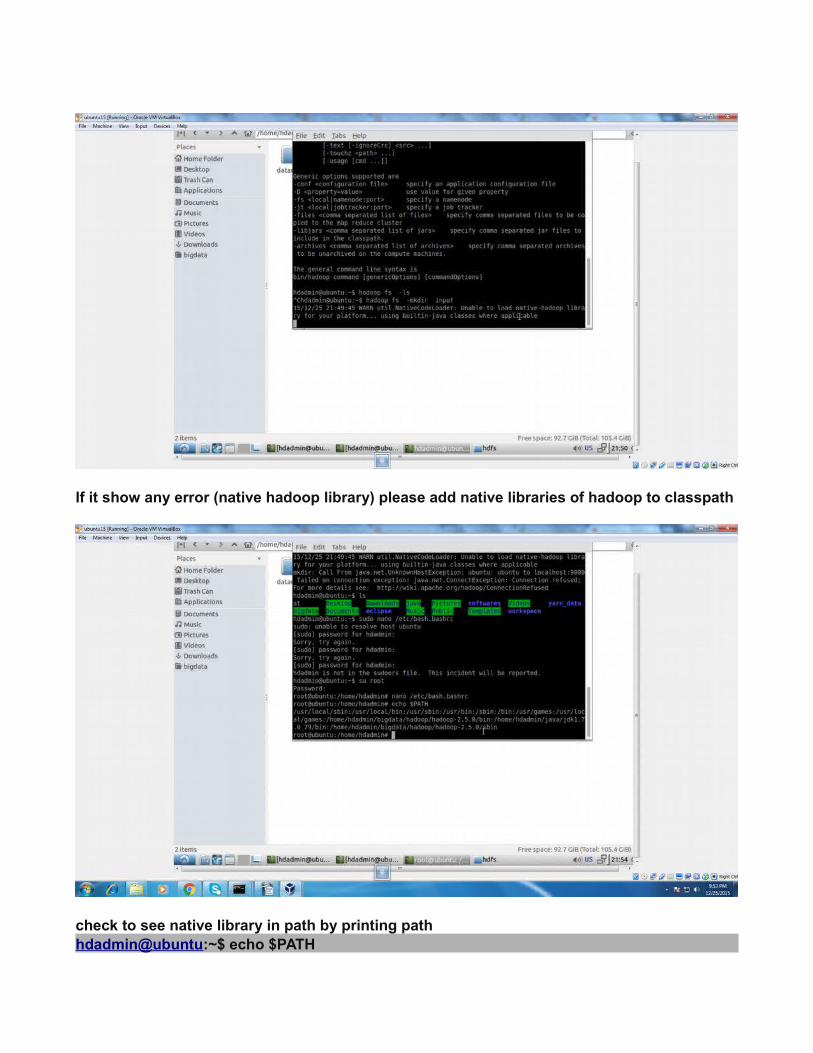
If it show any error (native hadoop library) please add native libraries of hadoop to classpath
check to see native library in path by printing path hdadmin@ubuntu:~$ echo $PATH
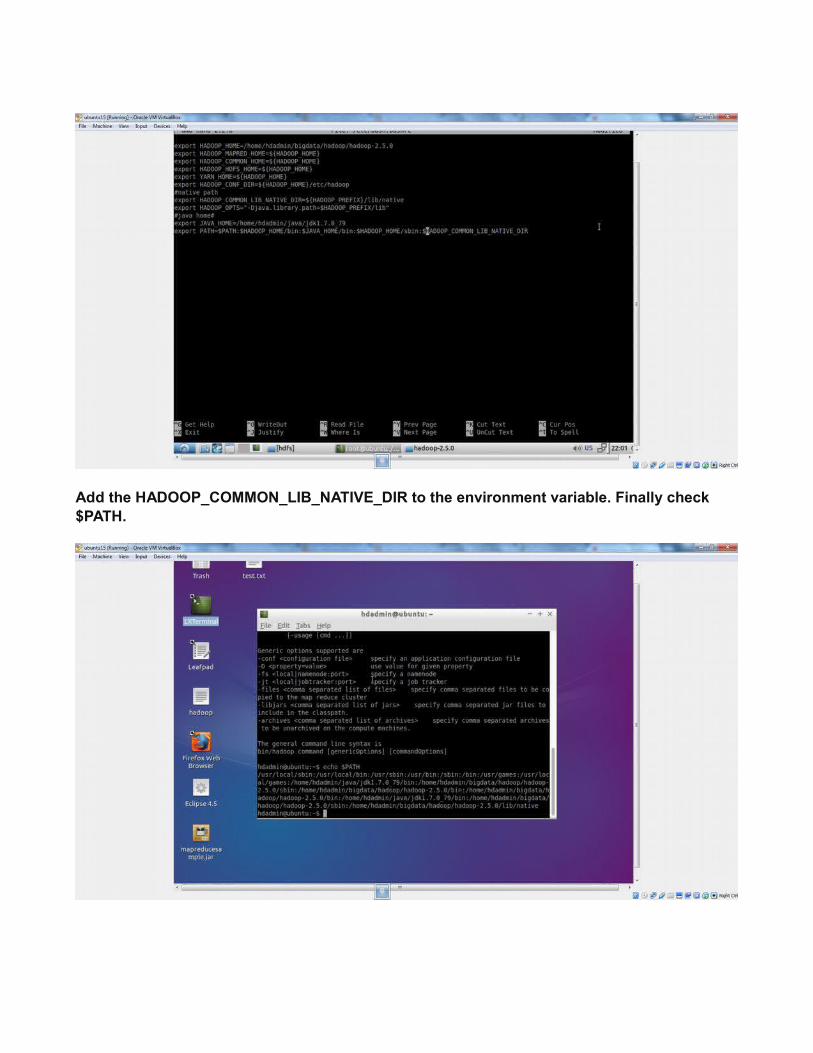
Add the HADOOP_COMMON_LIB_NATIVE_DIR to the environment variable. Finally check $PATH.
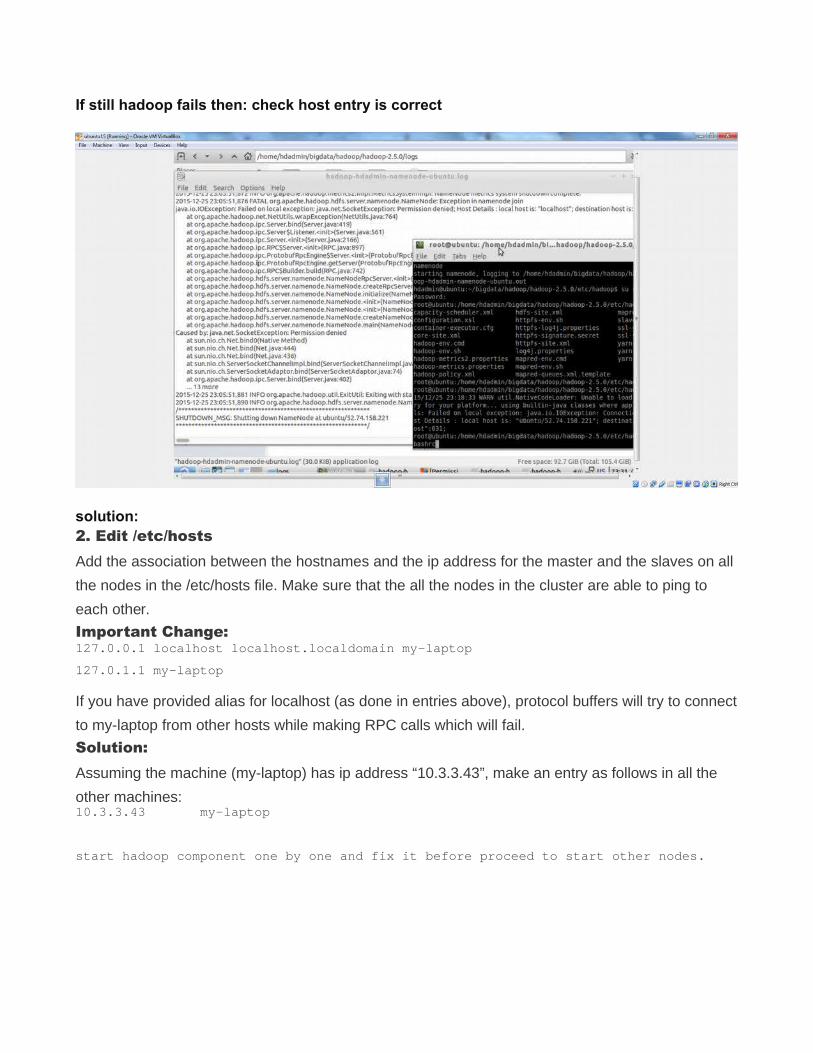
If still hadoop fails then: check host entry is correct
solution:2. Edit /etc/hostsAdd the association between the hostnames and the ip address for the master and the slaves on all
the nodes in the /etc/hosts file. Make sure that the all the nodes in the cluster are able to ping to
each other.
Important Change:127.0.0.1 localhost localhost.localdomain my-laptop
127.0.1.1 my-laptop
If you have provided alias for localhost (as done in entries above), protocol buffers will try to connect
to my-laptop from other hosts while making RPC calls which will fail.
Solution:Assuming the machine (my-laptop) has ip address “10.3.3.43”, make an entry as follows in all the
other machines:10.3.3.43 my-laptop
start hadoop component one by one and fix it before proceed to start other nodes.
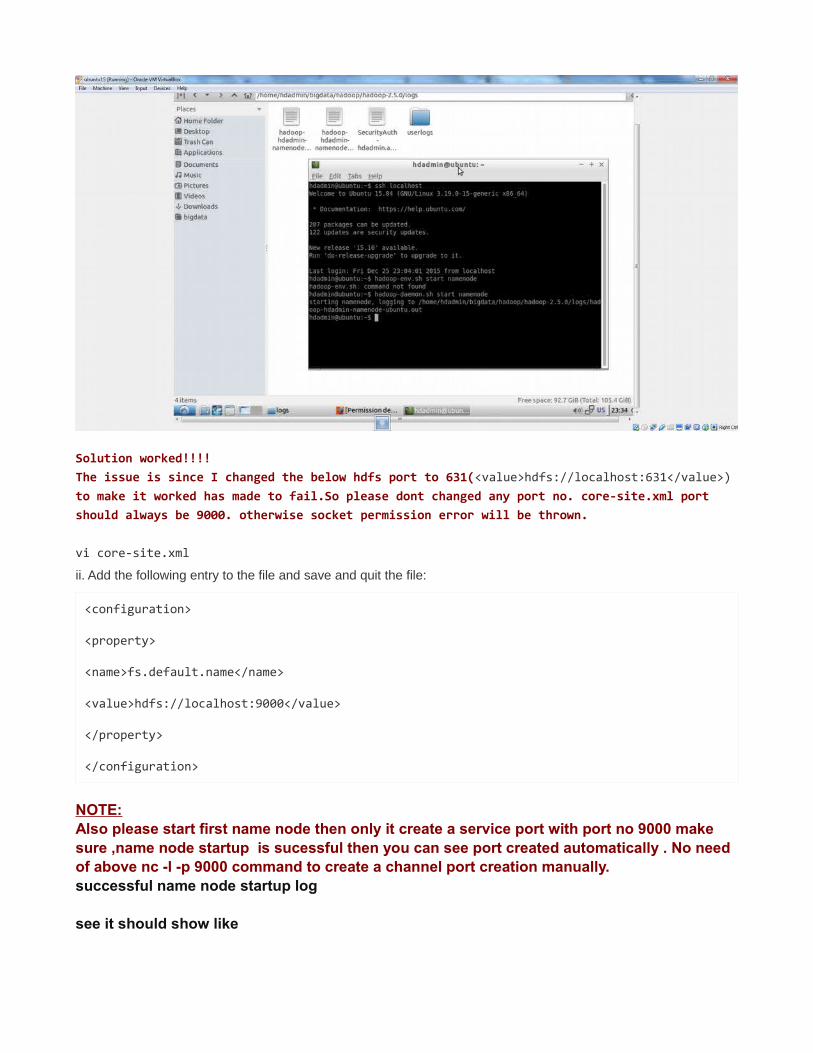
Solution worked!!!!The issue is since I changed the below hdfs port to 631(<value>hdfs://localhost:631</value>) to make it worked has made to fail.So please dont changed any port no. core-site.xml port should always be 9000. otherwise socket permission error will be thrown.
vi core-site.xml
ii. Add the following entry to the file and save and quit the file:
<configuration>
<property>
<name>fs.default.name</name>
<value>hdfs://localhost:9000</value>
</property>
</configuration>
NOTE:Also please start first name node then only it create a service port with port no 9000 make sure ,name node startup is sucessful then you can see port created automatically . No need of above nc -l -p 9000 command to create a channel port creation manually.successful name node startup log
see it should show like
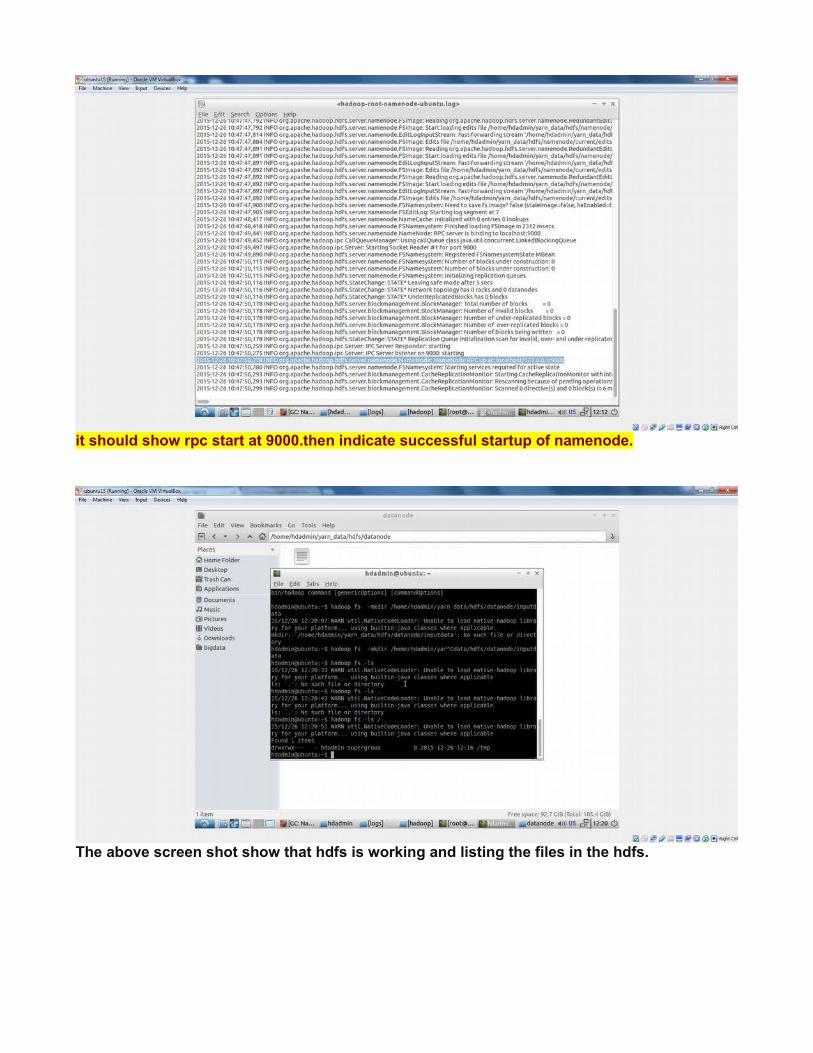
it should show rpc start at 9000.then indicate successful startup of namenode.
The above screen shot show that hdfs is working and listing the files in the hdfs.
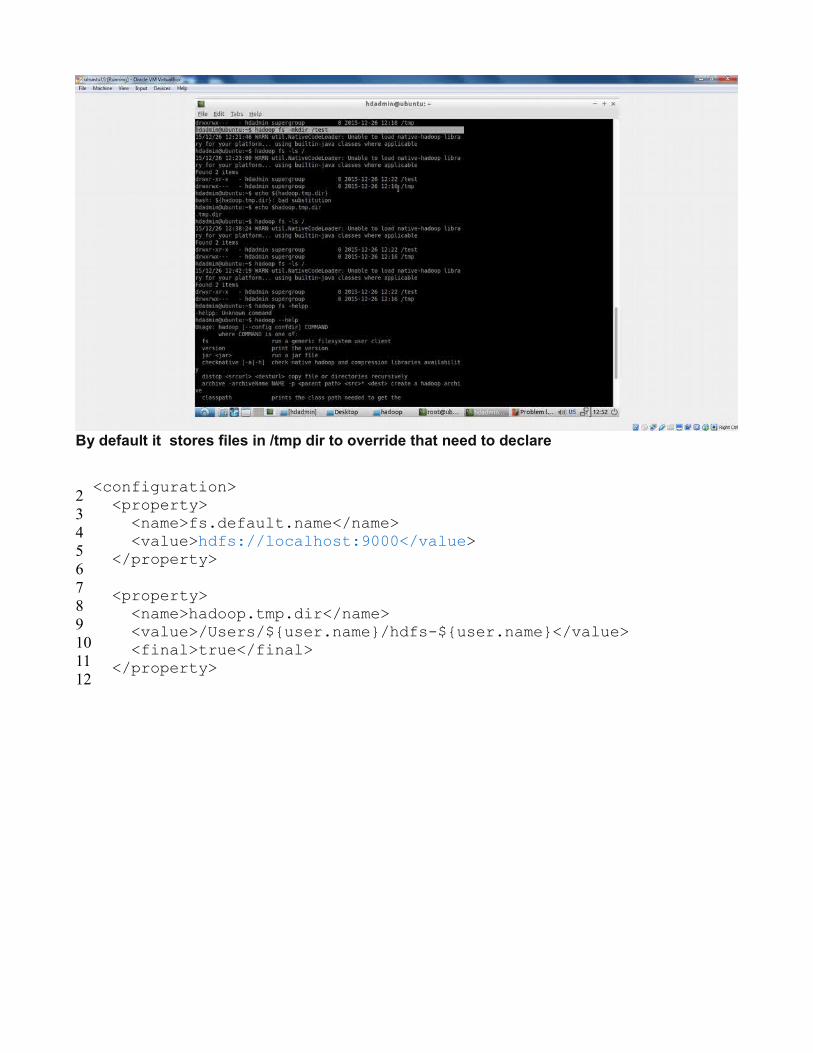
By default it stores files in /tmp dir to override that need to declare
23456789101112
<configuration> <property> <name>fs.default.name</name> <value>hdfs://localhost:9000</value> </property> <property> <name>hadoop.tmp.dir</name> <value>/Users/${user.name}/hdfs-${user.name}</value> <final>true</final> </property>
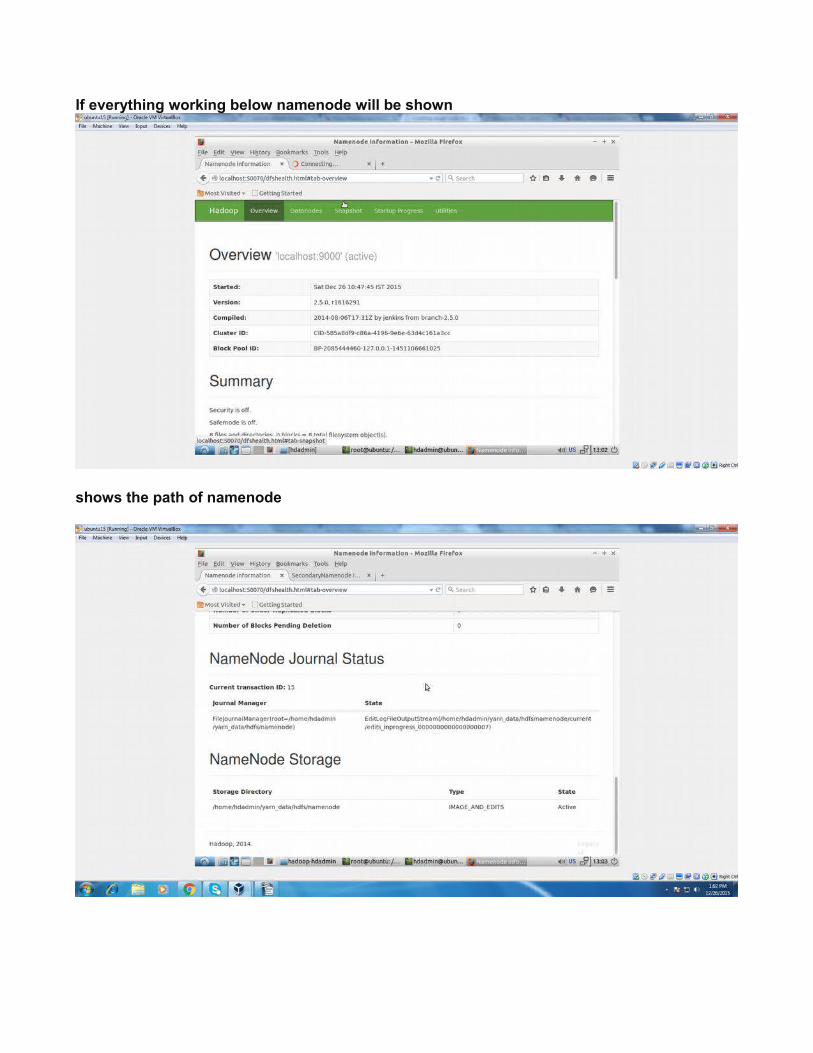
If everything working below namenode will be shown
shows the path of namenode

secondary name node:
after data node running completed -arun folder gets created instead of default /tmp
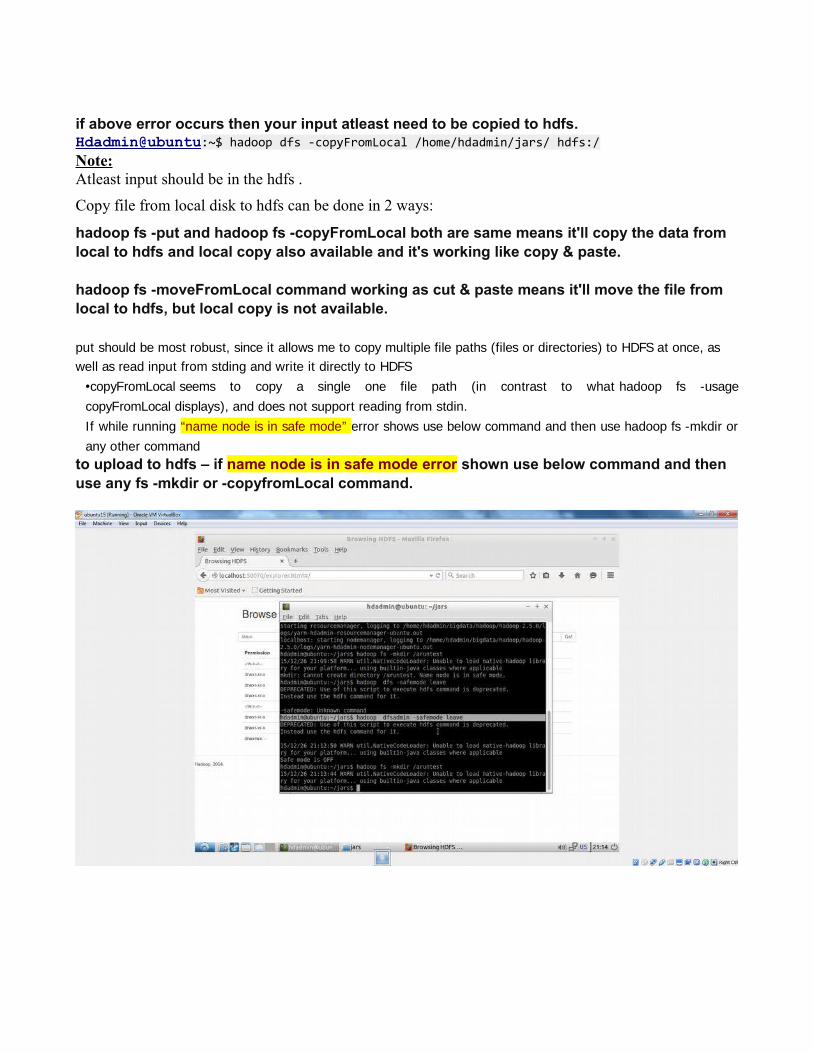
if above error occurs then your input atleast need to be copied to hdfs.Hdadmin@ubuntu:~$ hadoop dfs -copyFromLocal /home/hdadmin/jars/ hdfs:/Note:Atleast input should be in the hdfs .
Copy file from local disk to hdfs can be done in 2 ways:
hadoop fs -put and hadoop fs -copyFromLocal both are same means it'll copy the data from local to hdfs and local copy also available and it's working like copy & paste.
hadoop fs -moveFromLocal command working as cut & paste means it'll move the file from local to hdfs, but local copy is not available.
put should be most robust, since it allows me to copy multiple file paths (files or directories) to HDFS at once, as
well as read input from stding and write it directly to HDFS
•copyFromLocal seems to copy a single one file path (in contrast to what hadoop fs -usage
copyFromLocal displays), and does not support reading from stdin.
If while running “name node is in safe mode” error shows use below command and then use hadoop fs -mkdir or
any other commandto upload to hdfs – if name node is in safe mode error shown use below command and then use any fs -mkdir or -copyfromLocal command.
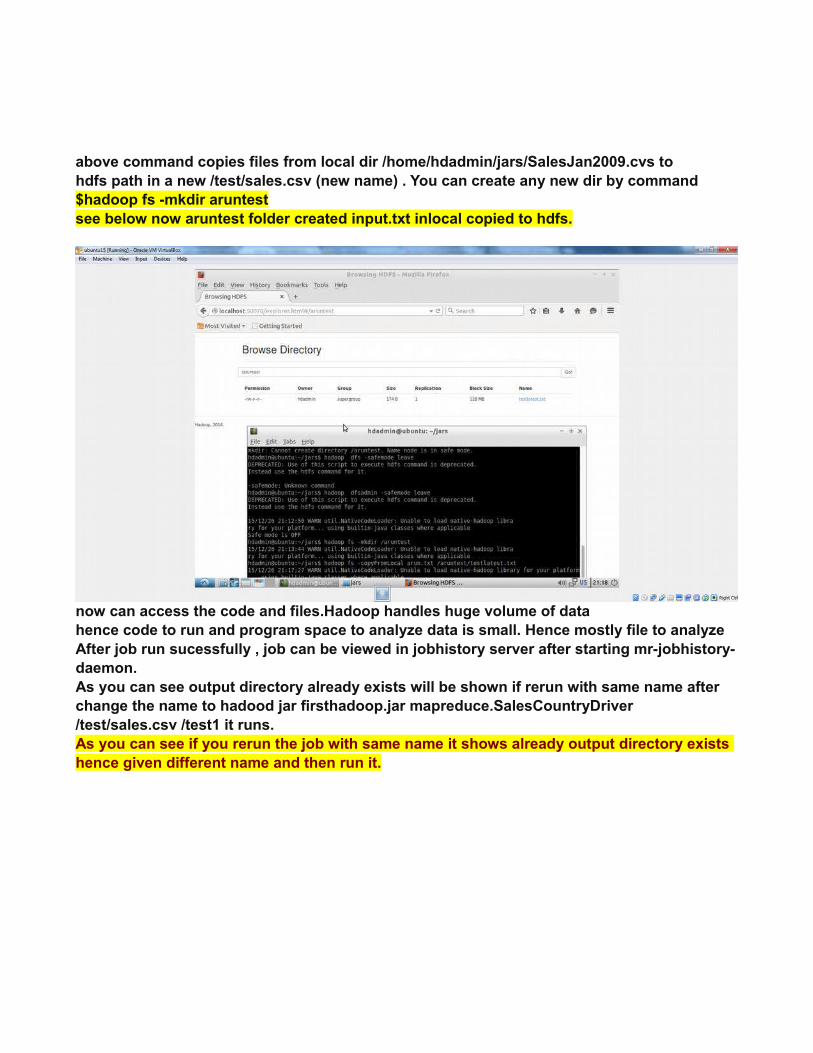
above command copies files from local dir /home/hdadmin/jars/SalesJan2009.cvs tohdfs path in a new /test/sales.csv (new name) . You can create any new dir by command$hadoop fs -mkdir aruntestsee below now aruntest folder created input.txt inlocal copied to hdfs.
now can access the code and files.Hadoop handles huge volume of datahence code to run and program space to analyze data is small. Hence mostly file to analyze After job run sucessfully , job can be viewed in jobhistory server after starting mr-jobhistory-daemon.As you can see output directory already exists will be shown if rerun with same name after change the name to hadood jar firsthadoop.jar mapreduce.SalesCountryDriver /test/sales.csv /test1 it runs.As you can see if you rerun the job with same name it shows already output directory exists hence given different name and then run it.
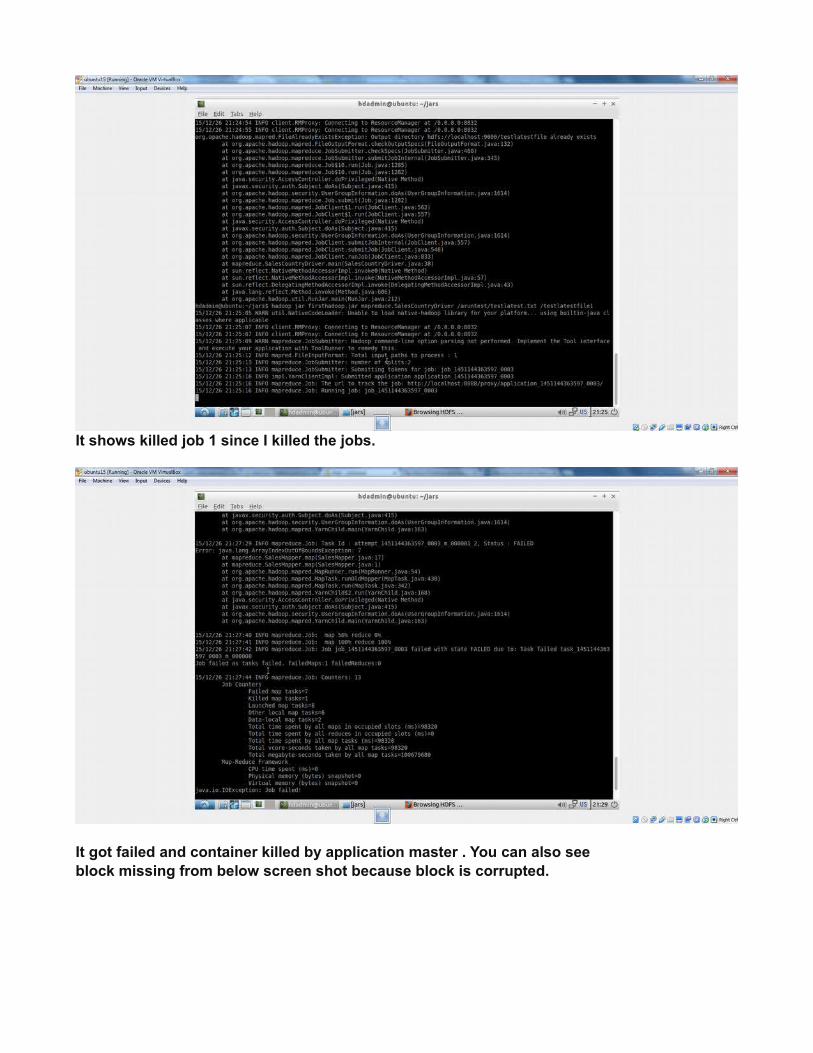
It shows killed job 1 since I killed the jobs.
It got failed and container killed by application master . You can also see block missing from below screen shot because block is corrupted.
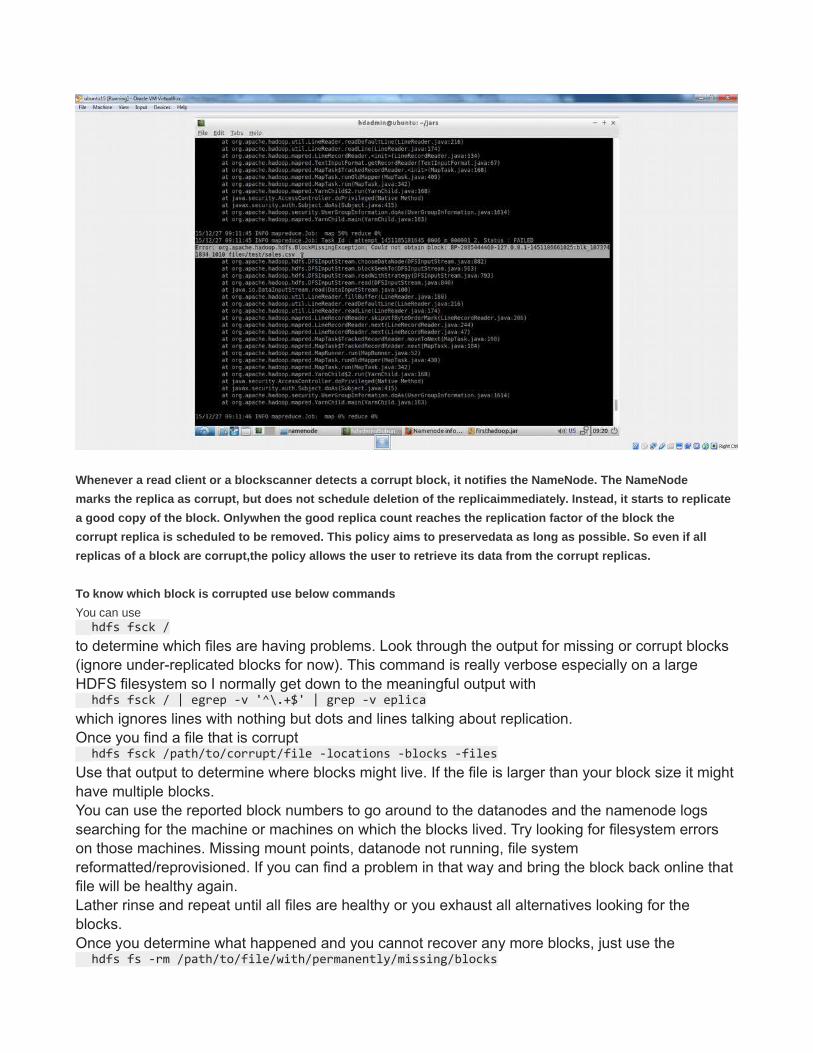
Whenever a read client or a blockscanner detects a corrupt block, it notifies the NameNode. The NameNode
marks the replica as corrupt, but does not schedule deletion of the replicaimmediately. Instead, it starts to replicate
a good copy of the block. Onlywhen the good replica count reaches the replication factor of the block the
corrupt replica is scheduled to be removed. This policy aims to preservedata as long as possible. So even if all
replicas of a block are corrupt,the policy allows the user to retrieve its data from the corrupt replicas.
To know which block is corrupted use below commands
You can use hdfs fsck /
to determine which files are having problems. Look through the output for missing or corrupt blocks (ignore under-replicated blocks for now). This command is really verbose especially on a large HDFS filesystem so I normally get down to the meaningful output with hdfs fsck / | egrep -v '^\.+$' | grep -v eplica
which ignores lines with nothing but dots and lines talking about replication.Once you find a file that is corrupt hdfs fsck /path/to/corrupt/file -locations -blocks -files
Use that output to determine where blocks might live. If the file is larger than your block size it might have multiple blocks.You can use the reported block numbers to go around to the datanodes and the namenode logs searching for the machine or machines on which the blocks lived. Try looking for filesystem errors on those machines. Missing mount points, datanode not running, file system reformatted/reprovisioned. If you can find a problem in that way and bring the block back online that file will be healthy again.Lather rinse and repeat until all files are healthy or you exhaust all alternatives looking for the blocks.Once you determine what happened and you cannot recover any more blocks, just use the hdfs fs -rm /path/to/file/with/permanently/missing/blocks
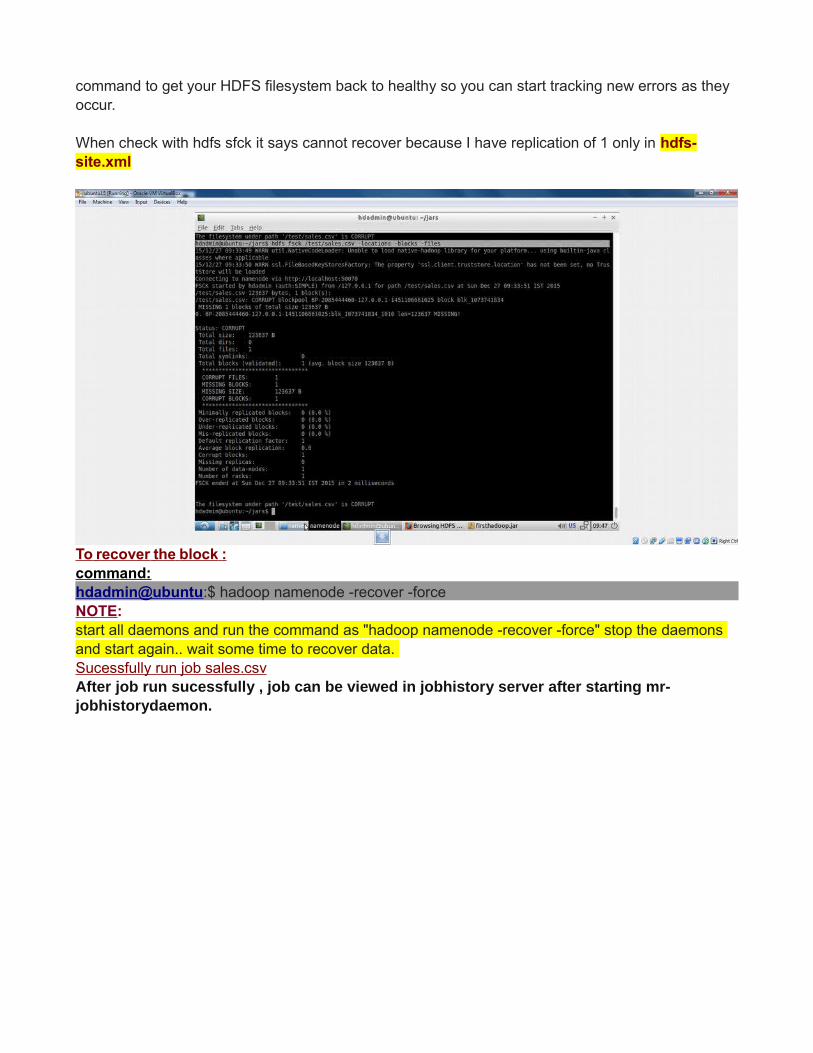
command to get your HDFS filesystem back to healthy so you can start tracking new errors as they occur.
When check with hdfs sfck it says cannot recover because I have replication of 1 only in hdfs-site.xml
To recover the block :command:hdadmin@ubuntu:$ hadoop namenode -recover -force NOTE:start all daemons and run the command as "hadoop namenode -recover -force" stop the daemons and start again.. wait some time to recover data. Sucessfully run job sales.csv After job run sucessfully , job can be viewed in jobhistory server after starting mr-jobhistorydaemon.
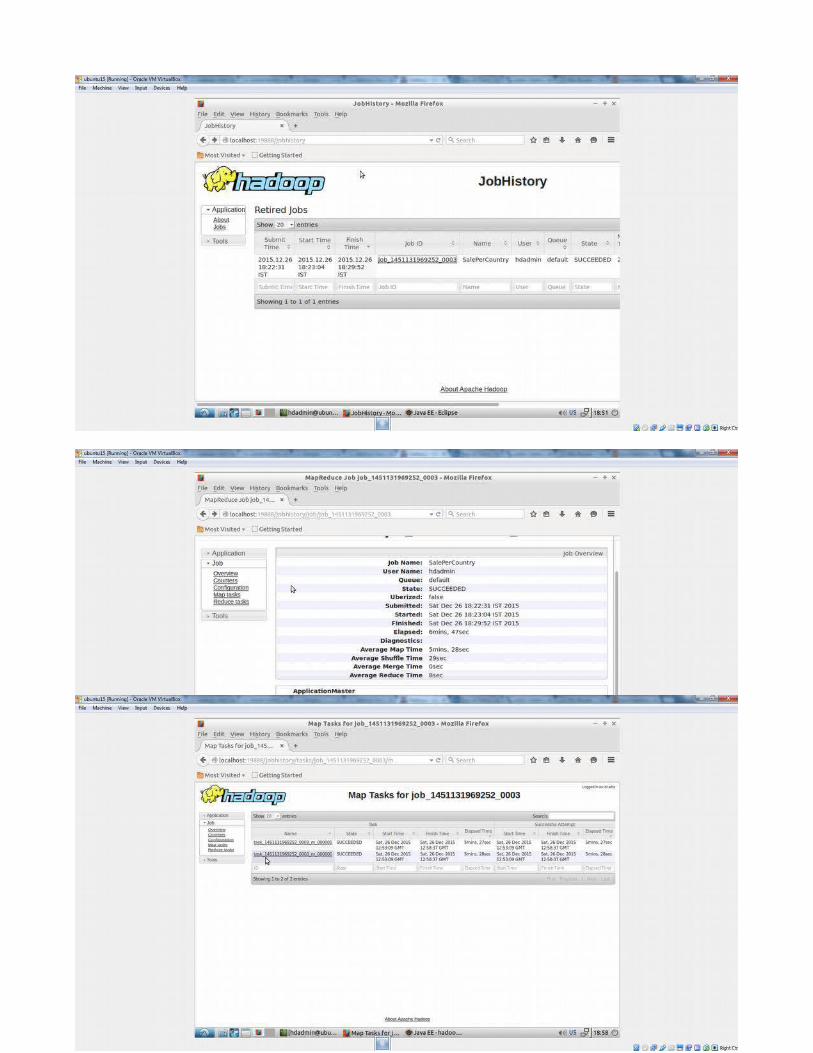
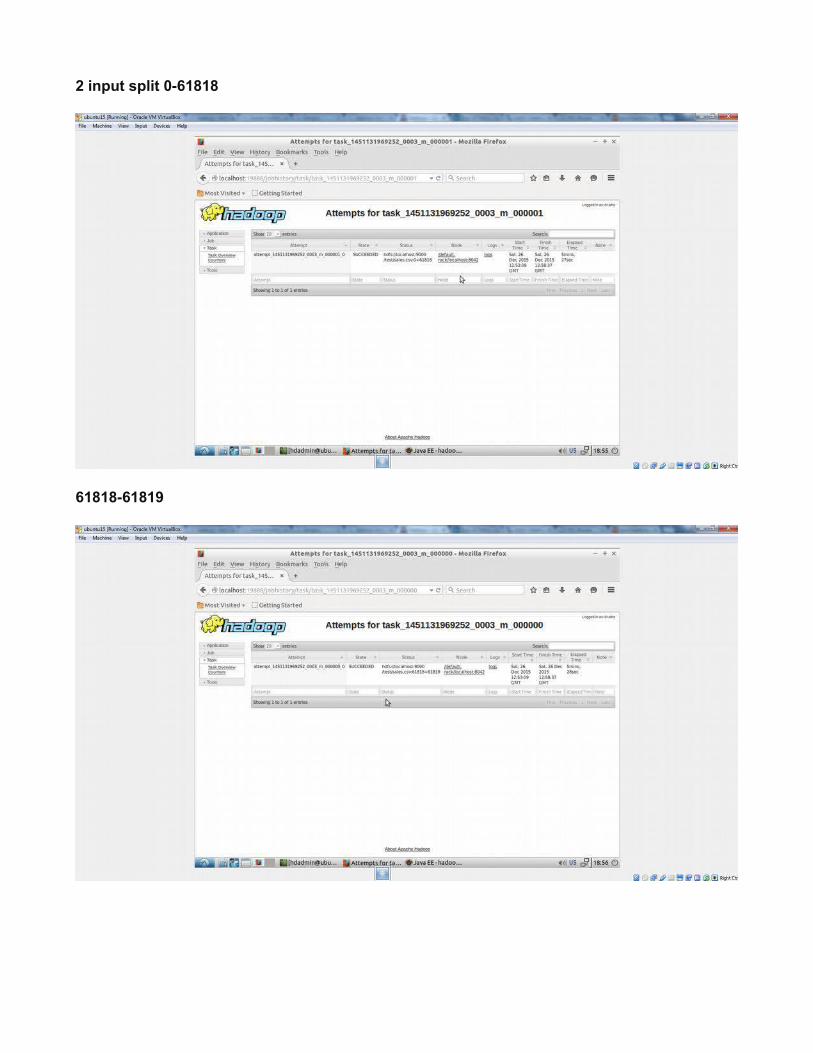
2 input split 0-61818
61818-61819

reduce
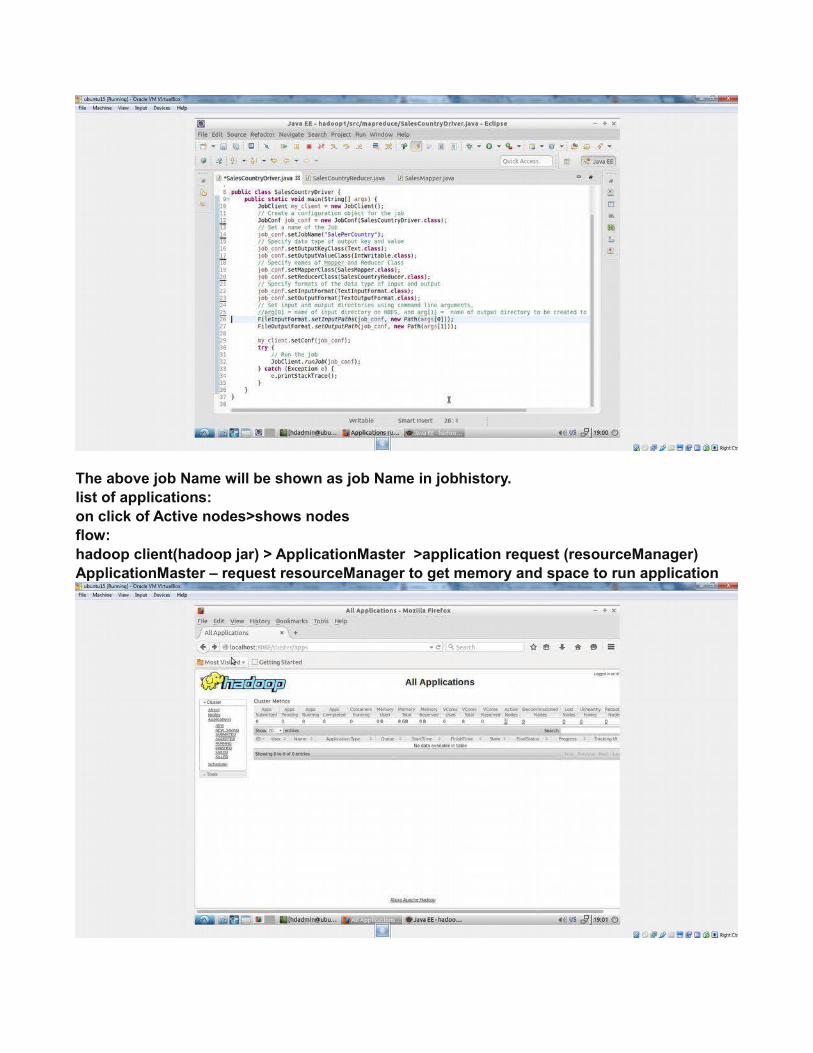
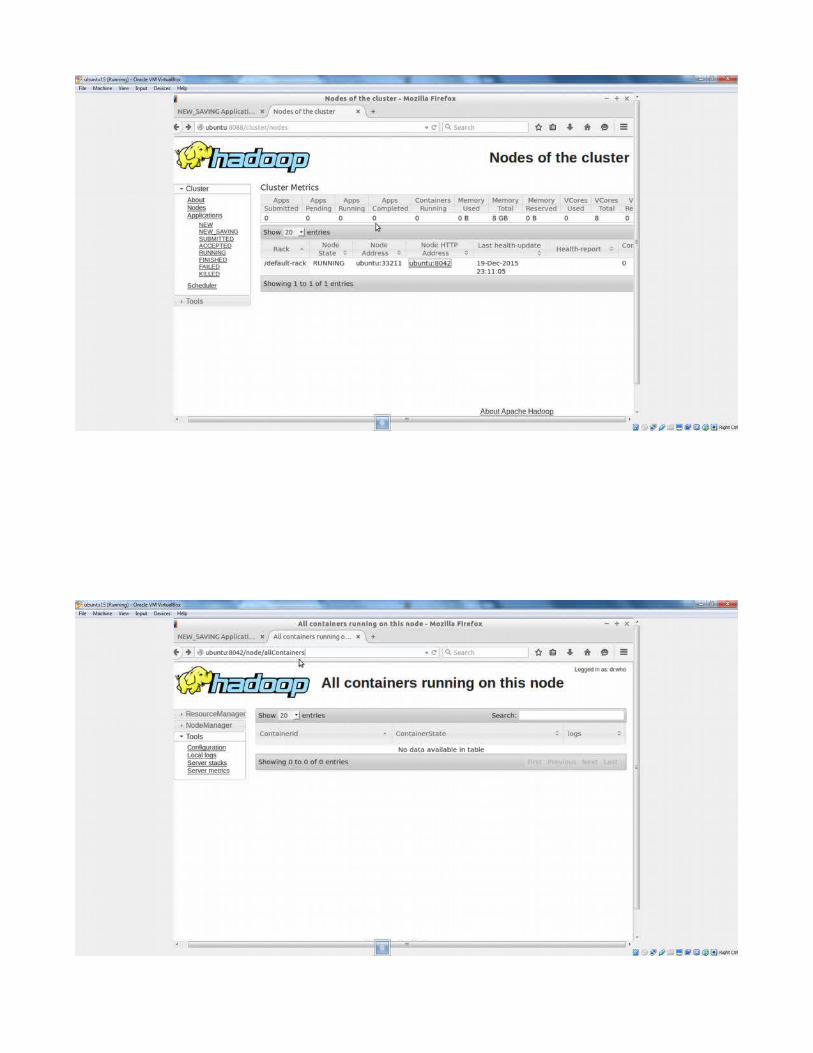
The above job Name will be shown as job Name in jobhistory.list of applications:on click of Active nodes>shows nodesflow:hadoop client(hadoop jar) > ApplicationMaster >application request (resourceManager)ApplicationMaster – request resourceManager to get memory and space to run application
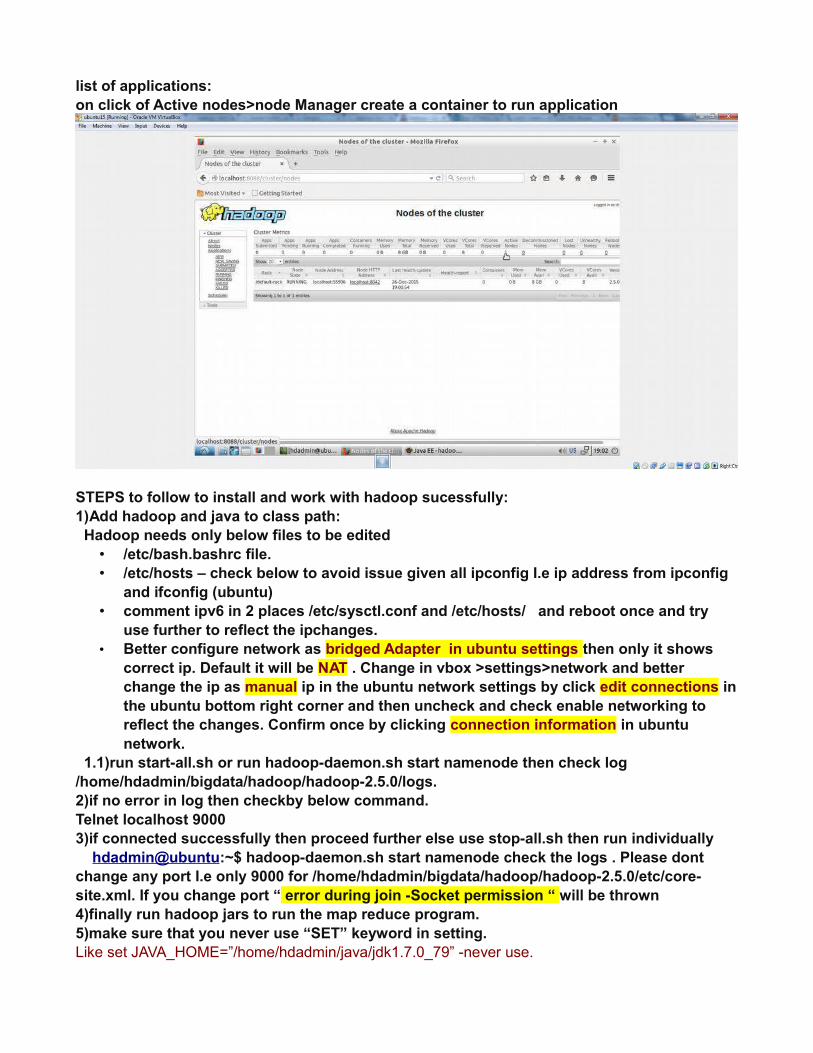
list of applications:on click of Active nodes>node Manager create a container to run application
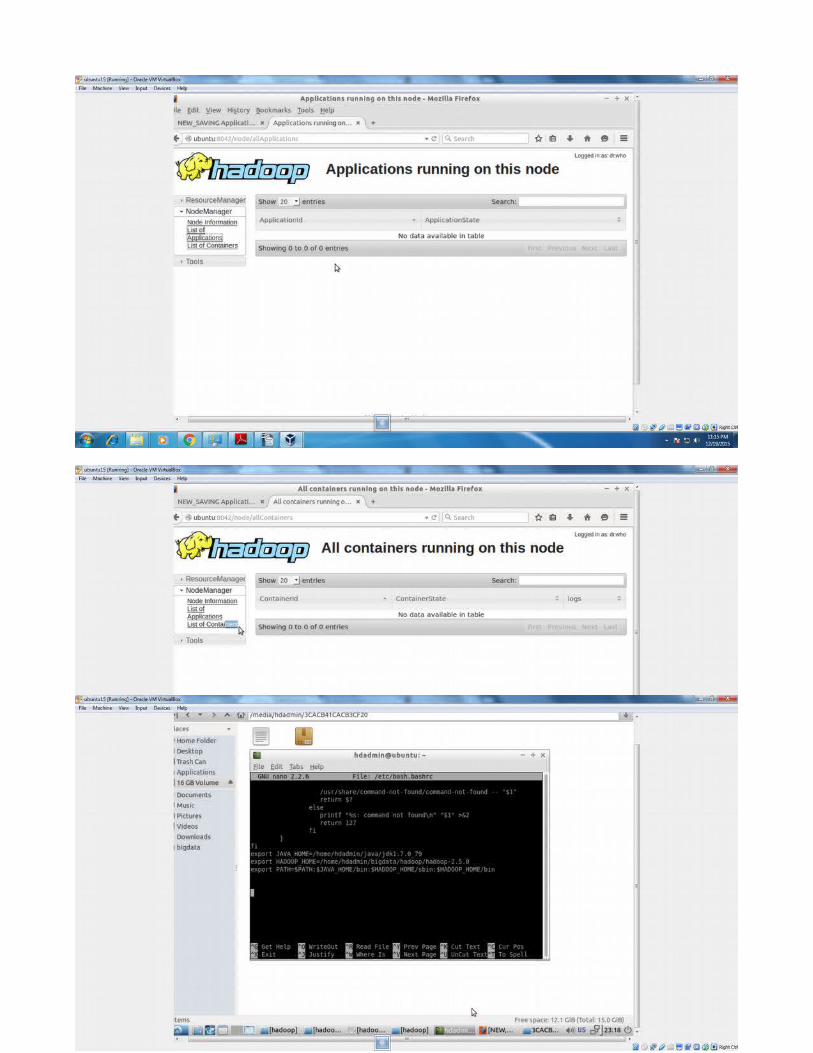
STEPS to follow to install and work with hadoop sucessfully:1)Add hadoop and java to class path: Hadoop needs only below files to be edited
• /etc/bash.bashrc file.• /etc/hosts – check below to avoid issue given all ipconfig I.e ip address from ipconfig
and ifconfig (ubuntu)• comment ipv6 in 2 places /etc/sysctl.conf and /etc/hosts/ and reboot once and try
use further to reflect the ipchanges.• Better configure network as bridged Adapter in ubuntu settings then only it shows
correct ip. Default it will be NAT . Change in vbox >settings>network and better change the ip as manual ip in the ubuntu network settings by click edit connections inthe ubuntu bottom right corner and then uncheck and check enable networking to reflect the changes. Confirm once by clicking connection information in ubuntu network.
1.1)run start-all.sh or run hadoop-daemon.sh start namenode then check log/home/hdadmin/bigdata/hadoop/hadoop-2.5.0/logs.2)if no error in log then checkby below command.Telnet localhost 90003)if connected successfully then proceed further else use stop-all.sh then run individually hdadmin@ubuntu:~$ hadoop-daemon.sh start namenode check the logs . Please dont change any port I.e only 9000 for /home/hdadmin/bigdata/hadoop/hadoop-2.5.0/etc/core-site.xml. If you change port “ error during join -Socket permission “ will be thrown4)finally run hadoop jars to run the map reduce program.5)make sure that you never use “SET” keyword in setting.Like set JAVA_HOME=”/home/hdadmin/java/jdk1.7.0_79” -never use.
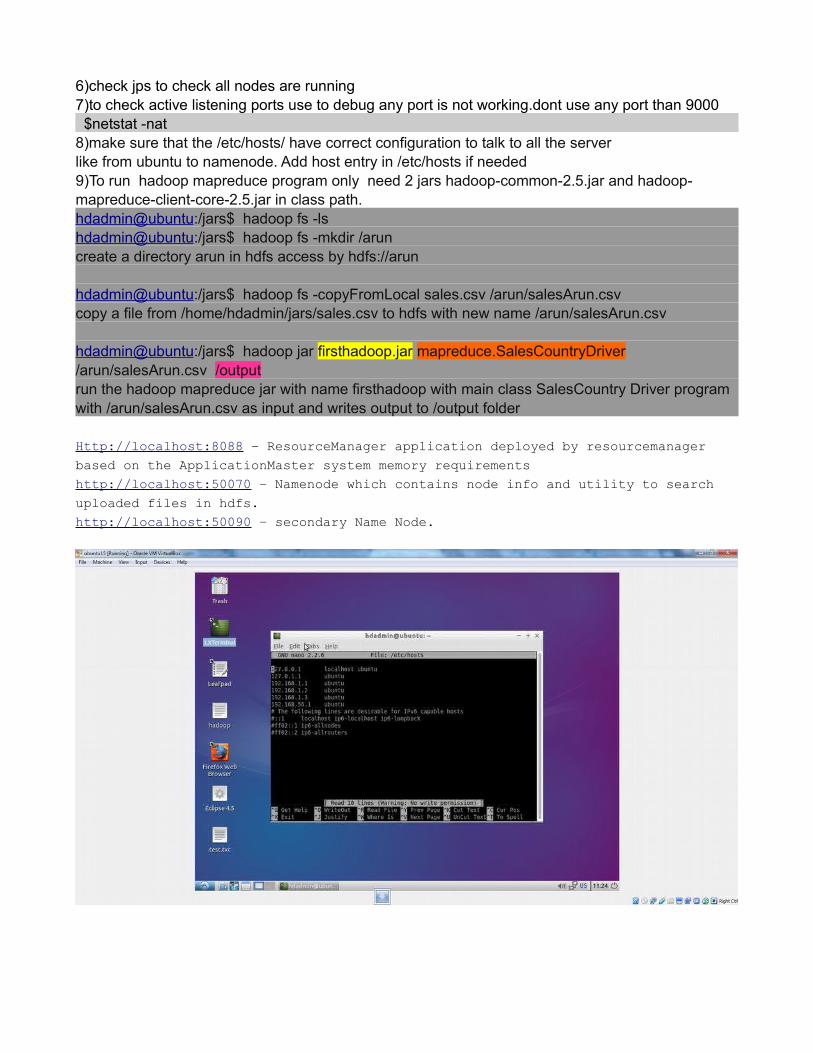
6)check jps to check all nodes are running7)to check active listening ports use to debug any port is not working.dont use any port than 9000 $netstat -nat8)make sure that the /etc/hosts/ have correct configuration to talk to all the serverlike from ubuntu to namenode. Add host entry in /etc/hosts if needed9)To run hadoop mapreduce program only need 2 jars hadoop-common-2.5.jar and hadoop-mapreduce-client-core-2.5.jar in class path.hdadmin@ubuntu:/jars$ hadoop fs -lshdadmin@ubuntu:/jars$ hadoop fs -mkdir /arun create a directory arun in hdfs access by hdfs://arun
hdadmin@ubuntu:/jars$ hadoop fs -copyFromLocal sales.csv /arun/salesArun.csvcopy a file from /home/hdadmin/jars/sales.csv to hdfs with new name /arun/salesArun.csv
hdadmin@ubuntu:/jars$ hadoop jar firsthadoop.jar mapreduce.SalesCountryDriver /arun/salesArun.csv /outputrun the hadoop mapreduce jar with name firsthadoop with main class SalesCountry Driver program with /arun/salesArun.csv as input and writes output to /output folder
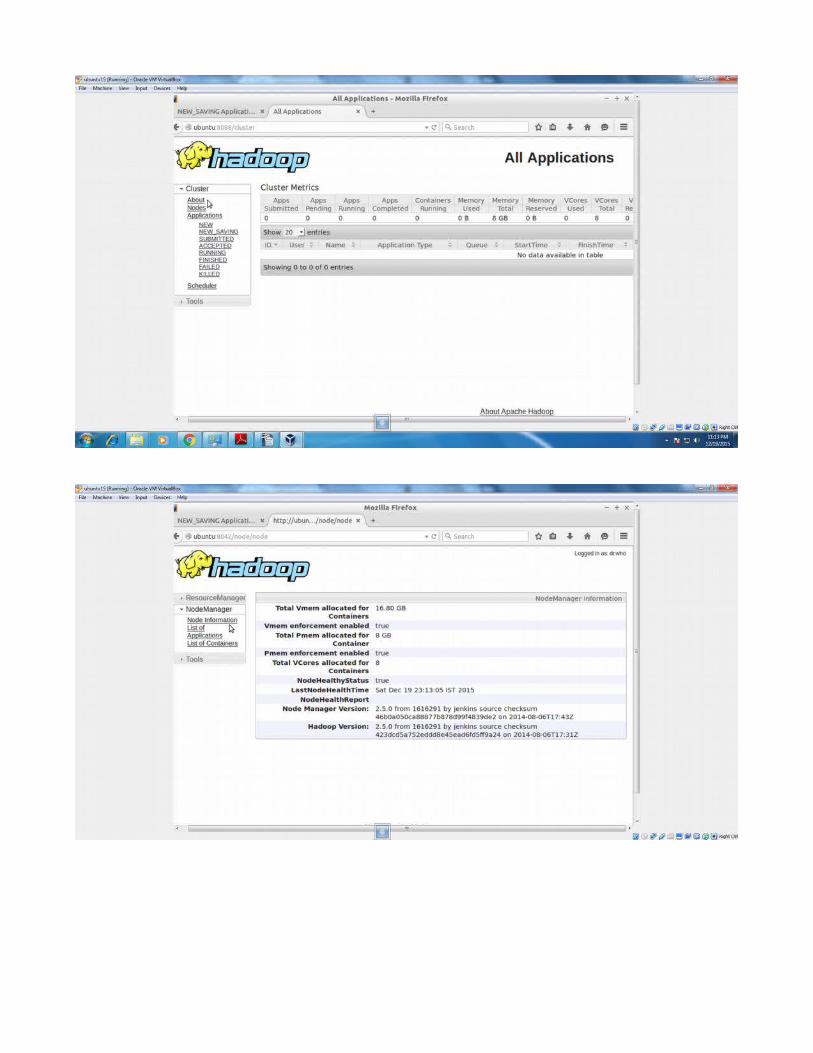
Http://localhost:8088 – ResourceManager application deployed by resourcemanager
based on the ApplicationMaster system memory requirements
http://localhost:50070 – Namenode which contains node info and utility to search
uploaded files in hdfs.
http://localhost:50090 – secondary Name Node.
NOTE:
Make sure open-ssh server & client is installed by using command below:apt-get install openssh-server
Also make sure before start the namenode ,format the namenode other wise namenode cannot be started.if not installed then, when starting namenode using hadoop-daemon.sh it shows -unable to connect 22 port.ssh client is used to push files to hdfs and retrieve files from push using ssh server.since /home/hdadmin/yarn_data/namenode,/home/hdadmin/yarn_data/datanode persist files from to hdfs locally. it internally usues ssh client using ssh trust_keys,RSA keys to connect to server to push files. and hadoop uses ssh server to connect to hdfs using ssh to process files put in hdfs. so both uses ssh client ,server to do analysis of data.In hdfs-site.xml no namenode , datanode path given default takes /tmp/yarn_data/namenode,
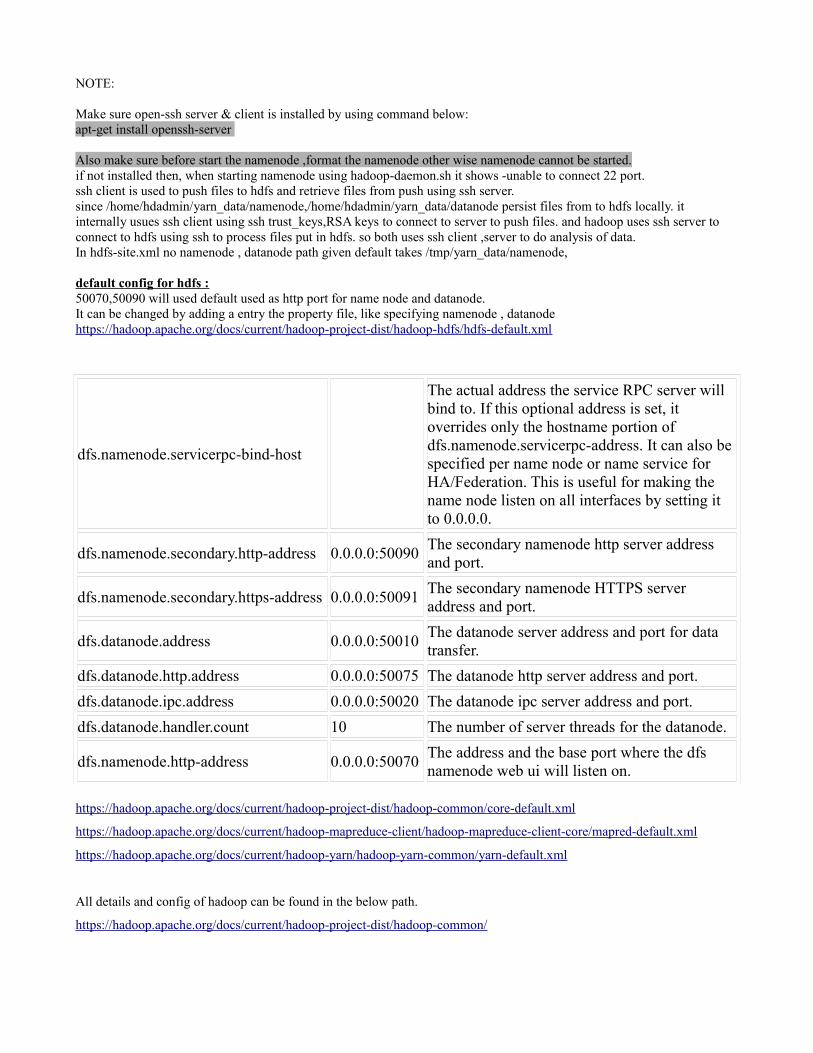
default config for hdfs :50070,50090 will used default used as http port for name node and datanode.It can be changed by adding a entry the property file, like specifying namenode , datanodehttps://hadoop.apache.org/docs/current/hadoop-project-dist/hadoop-hdfs/hdfs-default.xml
dfs.namenode.servicerpc-bind-host
The actual address the service RPC server will bind to. If this optional address is set, it overrides only the hostname portion of dfs.namenode.servicerpc-address. It can also be specified per name node or name service for HA/Federation. This is useful for making the name node listen on all interfaces by setting it to 0.0.0.0.
dfs.namenode.secondary.http-address 0.0.0.0:50090The secondary namenode http server address and port.
dfs.namenode.secondary.https-address 0.0.0.0:50091The secondary namenode HTTPS server address and port.
dfs.datanode.address 0.0.0.0:50010The datanode server address and port for data transfer.
dfs.datanode.http.address 0.0.0.0:50075 The datanode http server address and port.
dfs.datanode.ipc.address 0.0.0.0:50020 The datanode ipc server address and port.
dfs.datanode.handler.count 10 The number of server threads for the datanode.
dfs.namenode.http-address 0.0.0.0:50070The address and the base port where the dfs namenode web ui will listen on.
https://hadoop.apache.org/docs/current/hadoop-project-dist/hadoop-common/core-default.xml
https://hadoop.apache.org/docs/current/hadoop-mapreduce-client/hadoop-mapreduce-client-core/mapred-default.xml
https://hadoop.apache.org/docs/current/hadoop-yarn/hadoop-yarn-common/yarn-default.xml
All details and config of hadoop can be found in the below path.
https://hadoop.apache.org/docs/current/hadoop-project-dist/hadoop-common/
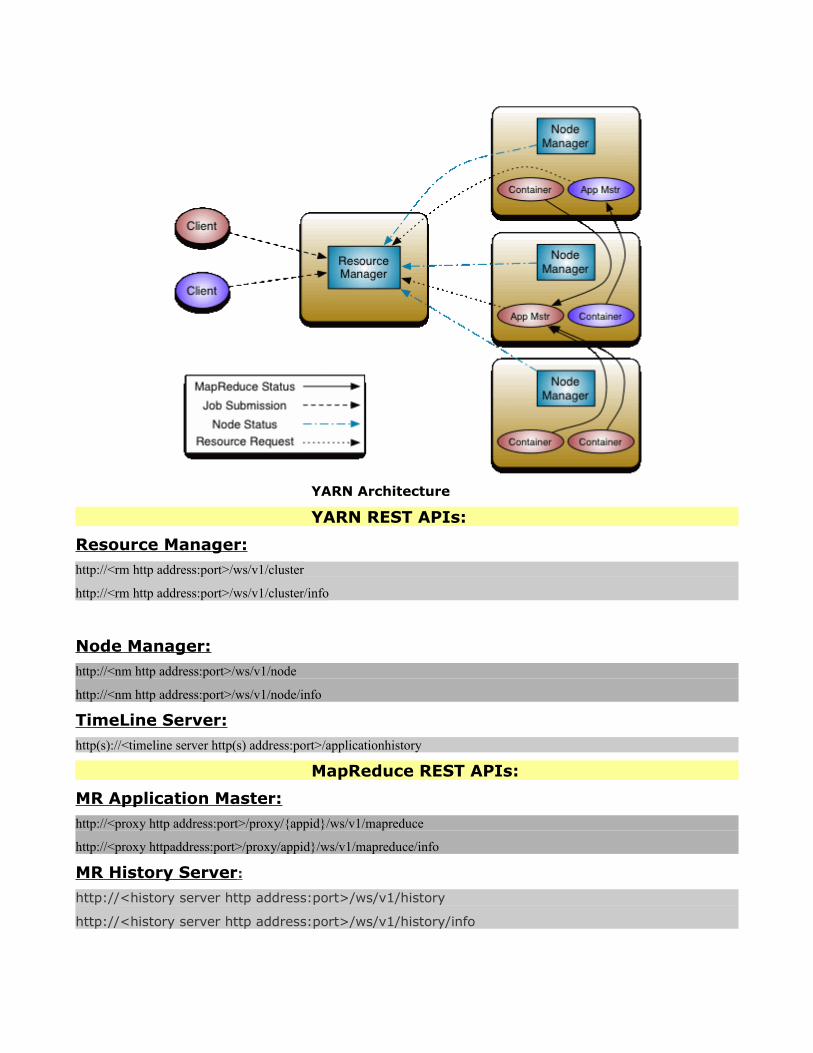
YARN Architecture
YARN REST APIs:
Resource Manager:http://<rm http address:port>/ws/v1/cluster
http://<rm http address:port>/ws/v1/cluster/info
Node Manager:http://<nm http address:port>/ws/v1/node
http://<nm http address:port>/ws/v1/node/info
TimeLine Server:http(s)://<timeline server http(s) address:port>/applicationhistory
MapReduce REST APIs:
MR Application Master:http://<proxy http address:port>/proxy/{appid}/ws/v1/mapreduce
http://<proxy httpaddress:port>/proxy/appid}/ws/v1/mapreduce/info
MR History Server :
http://<history server http address:port>/ws/v1/history
http://<history server http address:port>/ws/v1/history/info
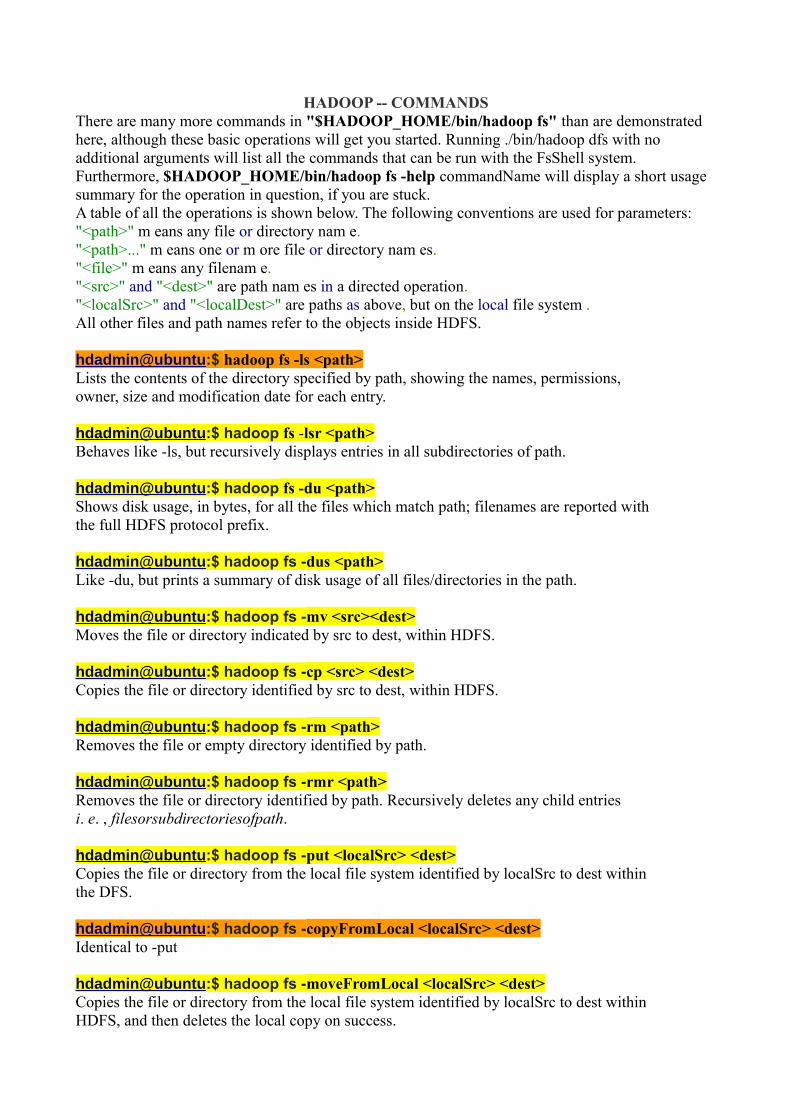
HADOOP -- COMMANDSThere are many more commands in "$HADOOP_HOME/bin/hadoop fs" than are demonstratedhere, although these basic operations will get you started. Running ./bin/hadoop dfs with noadditional arguments will list all the commands that can be run with the FsShell system.Furthermore, $HADOOP_HOME/bin/hadoop fs -help commandName will display a short usagesummary for the operation in question, if you are stuck.A table of all the operations is shown below. The following conventions are used for parameters:"<path>" m eans any file or directory nam e."<path>..." m eans one or m ore file or directory nam es."<file>" m eans any filenam e."<src>" and "<dest>" are path nam es in a directed operation."<localSrc>" and "<localDest>" are paths as above, but on the local file system .All other files and path names refer to the objects inside HDFS.
hdadmin@ubuntu:$ hadoop fs -ls <path>Lists the contents of the directory specified by path, showing the names, permissions,owner, size and modification date for each entry.
hdadmin@ubuntu:$ hadoop fs -lsr <path>Behaves like -ls, but recursively displays entries in all subdirectories of path.
hdadmin@ubuntu:$ hadoop fs -du <path>Shows disk usage, in bytes, for all the files which match path; filenames are reported withthe full HDFS protocol prefix.
hdadmin@ubuntu:$ hadoop fs -dus <path>Like -du, but prints a summary of disk usage of all files/directories in the path.
hdadmin@ubuntu:$ hadoop fs -mv <src><dest>Moves the file or directory indicated by src to dest, within HDFS.
hdadmin@ubuntu:$ hadoop fs -cp <src> <dest>Copies the file or directory identified by src to dest, within HDFS.
hdadmin@ubuntu:$ hadoop fs -rm <path>Removes the file or empty directory identified by path.
hdadmin@ubuntu:$ hadoop fs -rmr <path>Removes the file or directory identified by path. Recursively deletes any child entriesi. e. , filesorsubdirectoriesofpath.
hdadmin@ubuntu:$ hadoop fs -put <localSrc> <dest>Copies the file or directory from the local file system identified by localSrc to dest withinthe DFS.
hdadmin@ubuntu:$ hadoop fs -copyFromLocal <localSrc> <dest>Identical to -put
hdadmin@ubuntu:$ hadoop fs -moveFromLocal <localSrc> <dest>Copies the file or directory from the local file system identified by localSrc to dest withinHDFS, and then deletes the local copy on success.

hdadmin@ubuntu:$ hadoop fs -get [-crc] <src> <localDest>Copies the file or directory in HDFS identified by src to the local file system path identifiedby localDest.
hdadmin@ubuntu:$ hadoop getmerge <src> <localDest>Retrieves all files that match the path src in HDFS, and copies them to a single, merged filein the local file system identified by localDest.
hdadmin@ubuntu:$ hadoop fs -cat <filen-ame>Displays the contents of filename on stdout.
hdadmin@ubuntu:$ hadoop fs -copyToLocal <src> <localDest>Identical to -get
hdadmin@ubuntu:$ hadoop fs -moveToLocal <src> <localDest>Works like -get, but deletes the HDFS copy on success.
hdadmin@ubuntu:$ hadoop fs -mkdir <path>Creates a directory named path in HDFS.Creates any parent directories in path that are missing e. g. , mkdir − pinLinux.
hdadmin@ubuntu:$ hadoop fs -setrep [-R] [-w] rep <path>Sets the target replication factor for files identified by path to rep.Theactualreplicationfactorwillmovetowardthetargetovertime
hdadmin@ubuntu:$ hadoop fs -touchz <path>Creates a file at path containing the current time as a timestamp. Fails if a file alreadyexists at path, unless the file is already size 0.
hdadmin@ubuntu:$ hadoop fs -test -[ezd] <path>Returns 1 if path exists; has zero length; or is a directory or 0 otherwise.
hdadmin@ubuntu:$ hadoop fs -stat [format] <path>Prints information about path. Format is a string which accepts file size in blocks , filename, block size , replication , and modification date .
hdadmin@ubuntu:$ hadoop fs -tail [-f] <file2name>Shows the last 1KB of file on stdout.
hdadmin@ubuntu:$ hadoop fs -chmod [-R] mode,mode,... <path>...Changes the file permissions associated with one or more objects identified by path....Performs changes recursively with R. mode is a 3-digit octal mode, or {augo}+/-{rwxX}.Assumes if no scope is specified and does not apply an umask.
hdadmin@ubuntu:$ hadoop fs -chown [-R] [owner][:[group]] <path>...Sets the owning user and/or group for files or directories identified by path.... Sets ownerrecursively if -R is specified.
hdadmin@ubuntu:$ hadoop fs -chgrp [-R] group <path>...Sets the owning group for files or directories identified by path.... Sets group recursively if -R is specified.

hdadmin@ubuntu:$ hadoop fs -help <cmd-name>Returns usage information for one of the commands listed above. You must omit theleading '-' character in cmd.
hdadmin@ubuntu:$ hadoop dfsadmin -safemode leave
If while running “name node is in safe mode” error shows use below command and then use hadoop fs -mkdir or any other commandto upload to hdfs – if name node is in safe mode error shown use below command and then use any fs -mkdir or -copyfromLocal command.