Embed Size (px)
Citation preview

1
Nursing Education
Module (Hospital Nurses Only)
12/09

2
Table of Contents
Infection Control: Aseptic Technique…...……………………………………………
Infection Control: Vancomycin Resistant and Multidrug Resistant Organisms………
Wound Care: Skin Care Initiative……………………………………………………..
Wound Care: Braden Score Risk Assessment ………………………………………..
Wound Care: Wound Care Assessment and Staging………………………………….
Wound Care: Wound Prevention……………………………………………………...
Blood Administration………………………………………….………………….…...
TRALI………………………………………………………………………………….
Conscious Sedation…………………………………………………………………….
Restraints………………………………….…………………………………………..
Organ Donation/ Organ Procurement.…………………………………………………
Pain Assessment and Management…………………………………………………….
Patient Education: Documentation in Meditech………………………………………
Blood Glucose Waived Testing………………………………………………………..
Thank You……………………………………………………………………………..
3
4-5
6
7-12
13
14
15-17
18
19-24
25-38
39-41
42-48
49
50-55
56

3
What is aseptic technique?
Aseptic means "without microorganisms." Aseptic technique refers to practices that help reduce
the risk of post procedure infections in clients by decreasing the likelihood that microorganisms
will enter the body during clinical procedures. Some of these practices are also designed to
reduce service providers' risk of exposure to potentially infectious blood and tissue during
clinical procedures.
Aseptic techniques are those that do some or all of the following:
• Remove or kill microorganisms from hands and objects.
• Employ sterile technique.
• Reduce clients' risk of exposure to microorganisms that cannot be removed.
Principles of Asepsis 1. All items used within the sterile field must be sterile.
2. Edges of sterile package/container are not considered sterile once opened.
3. Gowns are considered sterile in front from the nipple line to the level of the table or
sterile field. Sleeves are sterile to 2” above elbow.
4. Tables are sterile only at table level.
5. Sterile persons and items only contact sterile areas.
6. Movement within and around the sterile field must not cause contamination of the field.
Non-sterile persons should maintain a distance of at least 30cm (1 foot) from any area of
the sterile field. Never walk between two sterile areas.
7. Contamination occurs whenever bacterial barriers are permeated.
8. Articles of doubtful sterilely are considered non sterile.
Donning Sterile Gloves
Step 1 Prepare a large, clean, dry area for opening the package of gloves. Either open the outer glove
package and then perform a surgical scrub or perform a surgical scrub and ask someone else to
open the package of gloves for you.
_____________________________________________________________________________

4
Meadows Regional Medical Center complies with CDC recommendations for preventing the
spread of Vancomycin resistant and Multidrug-Resistant organisms, specifically Staphylococcus
aureus and Enterococci species, among its patients and staff.
PROCEDURE:
A. Role of the Microbiology Laboratory in the Detection, Reporting, and Control of Vancomycin
resistant and multi-drug resistant microorganisms .
1. Identification: Presumptively identify colonies on primary isolation plates by
using colonial morphology, Gram stain and PYR test.
2. Antimicrobial susceptibility testing: Determin Vancomycin or multi-drug
resistance.
3. Confirmation: Confirm Vancomycin resistance by repeating antimicrobial
susceptibility testing. Send isolates to State Health Department for confirmation
of Vancomycin resistance.
4. Reporting: Immediately, while performing the confirmatory susceptibility tests,
notify the patient's primary physician, patient care personnel on the unit where
the patient is housed, and the Infection Control Practitioner regarding the
presumptive identification of Vancomycin resistance
B. Precautions to Prevent Transmission of Vancomycin Resistant Microorganisms (VRO):
1. The R.N. in charge of the patient's care places the VRO infected or colonized
patient(s) in a private room or cohorts them in the same room (if more than one
patient identified). He/She flags the chart for VRO by placing RESISTANT
ORGANISM stickers on the chart, Kardex, MAR, etc, as needed.
2. A STOP ALERT sign is place on the door and VANCOMYCIN RESISTANCE
PRECAUTIONS are implemented. Visitors are limited.
3. The Infection Control Practitioner (ICP) or, in her absence, the Vice President of
Patient Care Services, is notified that a VRO patient has been identified.
4. Environmental Service is notified to provide linen and trash containers within the
room (red bags not needed).
C. VANCOMYCIN RESISTANT PRECAUTIONS:
1. Wear gloves when entering the room of a VRO infected or colonized patient.
2. Change gloves after any contact with material that may contain VRO.
3. Wear a gown or protective apron when entering the room of a VRO infected or
colonized patient.
4. Remove gloves and gown before leaving the patient's room and wash hands
immediately with antiseptic soap and water.
5. Obtain a disposable stethoscope, sphygmomanometer and thermometer for use by
infected or colonized patients.

5
6. If devices must be removed from the room for use on other patients, adequately
clean and disinfect them first, using the approved hospital disinfectant.
7. The Infection Control Practitioner (or designee) is to obtain orders for culture of
stools, wounds, urine, and sputum of roommates of patients newly found to be
VRM infected or colonized. Apply these same precautions if they are infected or
colonized.
8. The Infection Control Practitioner will notify the nursing area when patients may
be removed from Vancomycin Resistance Precautions. VRO negative results on
three consecutive occasions, one or more weeks apart, for all cultures from
multiple body sites (stool, perineal area, axilla or umbilicus, wound, urine) must
have been obtained before Vancomycin Resistance Precautions can be terminated.
9. The Infection Control Practitioner flags the closed medical record of VRO
infected or colonized patients so that they can be recognized and placed on VR
Precautions promptly upon readmission. The ICP also flags the patient's
electronic data so as to facilitate identification upon future presentation as an
outpatient or inpatient.
10. The individual arranging transfer informs receiving facilities (other hospitals,
long-term care facilities, and home-health care agencies) that the patient is
infected or colonized with a Vancomycin resistant organism.
11. Refer to "MULTIPLY DRUG RESISTANT BACTERIA" policy for patient and
family teaching instructions.
12. Refer to "TRANSPORTATION OF INFECTIOUS INMATES/PATIENTS BY
PUBLIC SAFETY OFFICERS" policy for instructions regarding the transfer of
infected patients by a public safety officer.
D. Readmission of Vancomycin Resistance Infected or Colonized Patients:
1. Admitting personnel must immediately notify the House Supervisor, Chief
Nursing Executive or designee and the Infection Control Practitioner of any VRO
patient presenting for treatment, whether as an outpatient or as an inpatient. (VR
patients are electronically flagged by their data base.)
2. Vancomycin Resistance Precautions are initiated immediately by the R.N. in
charge of the patient's care.
E. MULTI-DRUG RESISTANT ORGANISMS (OTHER THAN VRO OR MRSA)
1. Implement Contact Precautions according to hospital policy
2. Notify Infection Control Practitioner
______________________________________________________________________________

6
I. Braden Score Risk
Assessment
II. Wound Care Assessment/
Staging
III. Wound Prevention All patients are screened on admission for impaired skin integrity. The Pressure Sore Risk Assessment (Braden Score) is completed on all patients that are assessed at risk for skin breakdown. If the patient is scored as moderate or high risk, the following interventions are implemented: 1. Skin/Wound Care protocol initiated 2. Nutritional Evaluation ordered 3. Pressure sore risk screen completed every 72 hours Patients with a score of 5 or less are evaluated to determine the need for placement on a specialty bed.

7
• The Braden Risk Assessment Scale has 6 categories that are used to assess patients for
risk of pressure ulcer development
• Incorrect scoring can result in insufficient interventions to prevent skin breakdown
• In this module, patient examples are used to demonstrate proper scoring using the Braden
Risk Assessment Scale
• Ability to respond meaningfully to pressure-related discomfort
• Keep in mind the following patient conditions for this category
– Sedation
– Altered mental status
– Neuropathy
– Diabetes
No Impairment - 4 points – Responds to verbal commands
– No sensory deficit that limits ability to feel or voice pain or discomfort
Examples
Patient is awake and alert, able to feel pain or discomfort. Can voice need for
pain medication or repositioning
Slightly limited - 3 points – Responds to verbal commands
– Cannot always communicate discomfort or need to be turned
– Has some sensory impairment limiting ability to feel pain or discomfort in 1 or 2
extremities
Examples
Brain injury or Stroke patient
Diabetic or vascular insufficiency with peripheral neuropathy Very Limited- 2 points
– Responds only to verbal stimuli
– Cannot communicate discomfort except by moaning or restlessness
– Sensory impairment limiting ability to feel pain or discomfort over half of the
body
Examples
Brain injury; Alcohol withdrawal; Paraplegic Completely Limited- 1 point
– Unresponsive (does not moan, flinch, or grasp) to painful stimuli due to
diminished LOC or sedation
– Limited ability to feel pain over most of the body surface
Examples
Sedated/Obtunded/Comatose/Quadraplegic
Hepatic Encephalopathy

8
• Degree to which skin is exposed to moisture
• Keep in mind the following patient conditions for this category
– Number of underpads used
– Excess linen changes
– SCDs
– Splints
Rarely Moist - 4 points
– Skin is usually dry
– Linen changes at routine intervals (24 - 48 hours)
Examples
Continent patient
No draining wounds
Afebrile / Not diaphoretic
Occasionally moist – 3 points – Skin occasionally moist
– Linen change every 12 hours
Examples
Incontinent once or twice per day
Very moist - 2 points – Skin is often, but not always, moist
– Linen changes at least every 8 hours
Examples
Incontinent 3 times per day
Patients with diarrhea needing cleaning
Obese patient with skin folds occasionally moist Constantly moist – 1 point
– Skin is moist almost constantly by perspiration, urine, etc
– Dampness detected every time patient is moved or turned
Examples
Diaphoretic patients from fever, alcohol withdrawal, brain injury
Frequent incontinence
Large draining wounds

9
• Degree of physical activity
• Keep in mind the following patient conditions for this category
– Orders not to turn
– Medically unstable when turned
– Bed rest order
– Paralytics in the ICU
Walks frequently – 4 points
– Walks outside room at least twice/day
– Walks inside room at least once every 2 hours while awake
Examples
No restriction to activity & patient is out of bed as needed
Walks occasionally – 3 points – Walks occasionally during day for short distance, with or without assistance
– Spends majority of each shift in bed or chair
Examples
Post-op patients on 1st or 2nd day
PT required to assist with walking patient
Orthopedic injury with toe touch weight bearing
Chairfast – 2 points – Ability to walk severely limited or nonexistent
– Cannot bear own weight
– Must be assisted into chair or wheelchair
Examples
OOB to chair with Max Assistance; Brain Injury/Stroke patient; Orthopedic
injuries with no weight bearing
Bedfast – 1 point – Confined to bed
Examples
Patients in Traction
ICU patients with no order to sit in chair
Unstable patients
Immediate post-op, angio, or cardiac cath patients
10
• Ability to change and control body position
• Keep in mind the following patient conditions for this category
– Patients in restraints
– ICU patients on paralytics
– Sedated patients
No limitations – 4 points
– Makes major and frequent changes in position without assistance
Examples
Able to turn self side to side
Able to get out of bed by self
Slightly limited – 3 points – Makes frequent though slight changes in body or extremity position
independently
Examples
May require some assistance with turning
Some Stroke patients
Patient with lower or upper extremity fractures
Very limited – 2 points
– Makes occasional slight changes in body or extremity position
– Unable to make frequent or significant changes independently
Examples
Brain Injury/Stroke patient
Upper or lower extremity fractures with limited movement due to pain; Morbid
obese patients who require multiple personnel to reposition; 2 point restraint
Completely immobile – 1 point
– Does not make even slight changes in body or extremity position without
assistance
Examples
Brain Injury
Sedated/Obtunded/Comatose patient
4 point restraints

11
Usual food intake pattern
(Assess patient for dietary intake within last week)
Keep in mind the following patient conditions for this category
– Enteral or parenteral feedings
– Nausea/Vomiting
– NPO
– Patients with cancer
– Patients with frequent alcohol intake or drug addiction
– Severe COPD
Excellent – 4 points
– Eats most of every meal
– Never refuses meal
– Usually eats a total of 4 or more servings of meat/dairy products
– Occasionally eats between meals
– Does not require supplements
Examples
Active adult admitted to the hospital after a MVA Adequate – 3 points
– Eats over half of most meals
– Eats total of 4 servings of protein each day
– Occasionally refuses meals but will take supplement
– Is on tube feeding or TPN that meets most nutritional needs
Examples
Able to tolerate tube feedings without high residuals and is progressing to goal
rate
Probably inadequate – 2 points
– Rarely eats complete meal or half of any food offered
– Eats total of 3 servings of protein per day
– Occasionally will take a dietary supplement
– Receives less than optimal amount of liquid diet or tube feeding
Examples
Tube feedings held on occasion for high residuals
Cancer patient receiving chemotherapy
Very poor – 1 point – Never eats complete meal or less than 1/3 of meal
– Eats 2 servings or less of protein per day
– Takes fluids poorly
– Does not take liquid supplements
– NPO and/or maintained on clear liquids or IVs for more than 5 days
Examples
Extended ileus, not yet on TPN
Patient has had persistent nausea/vomiting over several days
12
• Friction – occurs when skin is moved against surfaces
• Shear – occurs when skin and adjacent bones slide across one another (deep tissue injury)
• Keep in mind the following patient conditions for this category
– Obese; Restless/agitated; Total care/dependent patient
Friction and Shear No apparent problem – 3 points
– Moves in bed or chair independently and is able to sit up completely during move
– Maintains good position in bed or chair at all times
Examples
Needs no assistance to get out of bed or chair
Potential problem – 2 points – Moves feeble or requires minimal assistance
– During move skin probably slide against sheets, chair, restraints, or other devices
– Maintains relatively good positions in chair or bed most of the time but
occasionally slides down
Examples
Needs assistance when moving, even with overhead trapeze
Obese patients
Problem – 1 point – Requires moderate to maximum assistance in moving or repositioning
– Complete lifting without sliding against sheets is impossible
– Frequently slides down in bed or chair
– Spasticity, contractions or agitation leads to almost constant friction
Examples
Requires 2 or more people to reposition
Constantly agitated and moving in bed

13
Classification of wounds
o Stage I - non-blanching erythema or redness that remains visible for more than 30
minutes o Stage II – partial thickness; loss of the epidermal skin layer, possible loss of dermis but
not through the dermis o Stage III – full thickness; loss through dermis and into the hypodermis but not through
the hypodermis
o Stage IV – tissue loss through the hypodermis o Suspected Deep Tissue Injury - Deep tissue injury may be characterized by a purple or
maroon localized area of discolored intact skin or a blood-filled blister due to damage of
underlying soft tissue from pressure and/or shear. Presentation may be preceded by tissue
that is painful, firm, mushy, boggy, and warmer or cooler as compared to adjacent tissue. o Unstageable - Full-thickness tissue loss in which the base of the ulcer is covered by
slough (yellow, tan, gray, green or brown) and/or eschar (tan, brown or black) in the
wound bed may render a wound unstageable. Cannot stage if wound is covered with dry
thick black eschar
Never reverse stage a decubitus wound!
14
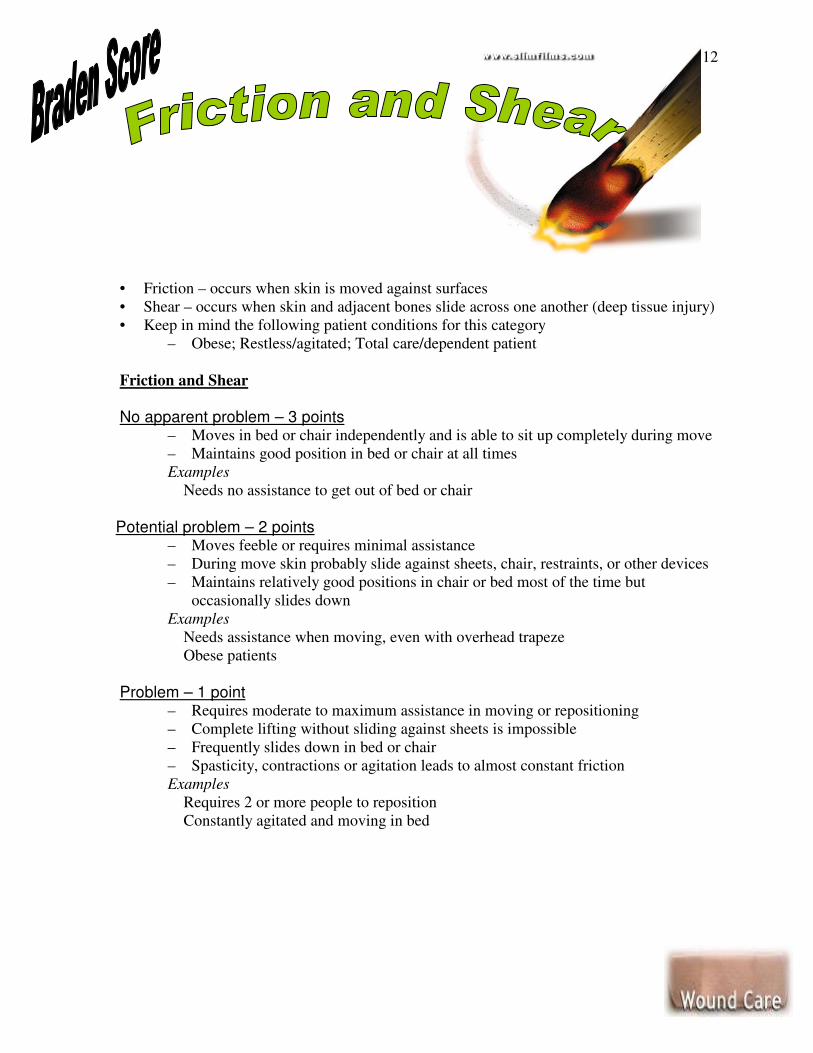
� Reduce or eliminate causative factors
• Pressure (Turn and Reposition Frequently)
• Shear and Friction
• Moisture
• Inadequate blood flow
Measures to promote blood flow
• Monitor hydration status
• Monitor lab values and vital signs
• Decrease use of caffeine and nicotine
• Avoid cold, keep patient warm
• Elevate legs
• Monitor medication compliance
� Provide Systemic Support
� Cardiovascular and pulmonary support
• Assess vital signs
• Assess peripheral circulation
• Manage edema
� Nutritional support
� Maintain optimal blood glucose levels
� Treat infection
15
MRMC follows standardized guidelines for the administration of blood and blood products in accordance with laboratory and infection control practices. Licensed Nursing Personnel are responsible for the administration and monitoring of patients receiving blood/blood products, [i.e., blood transfusion/administration of packed cells; blood products- fresh frozen plasma, platelets, cryoprecipitate]. PROCEDURE: PRE-TRANSFUSION:
I. Verify physician’s order for type and crossmatch/order to transfuse. II. Verify that “Consent to Administer Blood/Blood Products” has been obtained. Consent for Administration for Rhogam and albumin is not required. III. Educate the patient of the intended transfusion therapy or blood product to be given the approximate length of time, and desired outcome of transfusion or blood product. Explain patient education sheet and emphasize to the patient/family to notify the nurse of any of the following symptoms of a reaction as listed below:
• Chills
• Abdominal/Low back pain
• Rash/itching
• Fever (Increase in baseline temperature of more than 2 degrees.)
• Rapid heart rate
• Nausea/vomiting
• Difficulty breathing
• Flushing
• Chest pain
• Hematuria
• Rise or drop in systolic blood pressure from baseline greater than 30 mm Hg
• Tachycardia (greater than 40/min. rise from baseline)
• Hemoglobinuria (dark urine)
• Chest pain

16
IV. Ascertain patent IV access with Normal Saline only. (Maintain KVO rate or physician’s orders). Adults -- 18-20 gauge needle preferred Pediatrics – 22-25 gauge Central Line Catheters may be used
V. Obtain and review baseline vital signs within an hour of transfusion (unexpected abnormalities notify physician before proceeding to next step.)
VI. Collect equipment needed.
• Blood/solution set with standard blood filter (must use blood set to administer whole blood, packed red blood cells, and fresh frozen plasma) IV pump if needed. Use of a special IV set for cryo/platelet is needed.
VII. Retrieve Blood/Blood Products from Lab Blood Bank. (Use patient ID sticker)
• A RN must sign out blood/blood products from the Laboratory blood bank and verify all information on the blood/product bag. The Medical Technologist will verify the information on the Blood Bank Issue Card. Signatures of both on the Blood Bank issue card indicate all of the information is correct. *Exception a LPN may obtain RhoGam or Albumin from the blood bank.
• NOTE: If there is any discrepancy in numbers or patient identification at any point, immediately interrupt the process, obtain clarification and correct the issue before proceeding
• NOTE: Blood Bank products should be returned to the LAB within 20 minutes of signing them out if the product is not going to be utilized.
TRANSFUSION of BLOOD/BLOOD PRODUCTS VIII. Verify Right Patient/Right Unit at bedside (RN and LPN or Paramedic) check specifically and sign blood issue sheet.
1. Ask the patient to state his/her name/DOB and check against patient’s armband and blood issue card. (All patients receiving blood products will have a red blood armband).
2. Compare red blood armband on patient against blood bag with R number and medical records number.
3. “R” number, group and type, expiration dates of product (bag against issue sheet)
IX. Start transfusion slowly 75 cc/hr (peds rate per physician’s directive)
1. RN must stay at bedside for 15 minutes (v/s q 5 minutes X 3) 2. Compatible with NS only – Never transfer blood in same line with other
medication. 3. If no signs/symptoms of reaction (refer to section III), then increase infusion
rate. 4. Transfusion must be completed within 4 hours of signing out from Lab 5. Vital Signs taken q 1 hour until completed

17
X. Post Transfusion:
1. Return Blood Bag and tubing in Biohazard Bag to Lab to designated area. 2. Obtain post-transfusion vital signs 45 minutes to 1 hour and 15 minutes and
document. • NOTE: If there is any discrepancy in numbers or patient identification at
any point, immediately interrupt the process, obtain clarification and correct the issue before proceeding.
**During an emergency situation and upon order of the physician, blood may be infused in less than one hour, i.e. Emergency Room, Critical Care Unit, Surgical Services, or Labor and Delivery upon direction of physician. **Emergency Blood Issue Request must be signed by the physician prior to infusion of the least incompatible blood or when time will not permit for compatibility studies to be performed. The signed Emergency Blood Issue Request must be on the patient’s chart. **Exceptions to documentation are as follows: Rapid Infusion or uncross- matched blood XI. SUSPECTED TRANSFUSION REACTION In the event a suspected reaction occurs (refer to signs/symptoms in Section III) during the transfusion, do the following:
• Stop Blood – Keep IV line open
• Provide emergency patient care as needed
• Notify Lab [DO NOT RESUME TRANSFUSION UNLESS ADVISED BY LAB]
• Verify patient ID with bag and document
• Contact physician
• Complete Suspected Transfusion Reaction Form
• Notify Nursing Supervisor/Department Director
• If directed to discontinue transfusion, return Blood bag with tubing with completed Suspected Transfusion Reaction Form to Lab.
Note: If a post-transfusion reaction occurs, follow steps as described above. Physician and Lab need to be in agreement about continuing infusion. XIII. Other Blood Products: Fresh Frozen, Platelets, and Cryo
• Baseline and post-infusion vital signs
• Complete sections in Blood Issue Sheet as asterisk notes (admission and verified volume given)
*Exception: Document RhoGam and Albumin dose on Medication Administration Record (MAR) treat as medication. ____________________________________________________________________________

18
What is TRALI?
Transfusion-related acute lung injury, or TRALI, is a blood transfusion reaction that occurs in
the recipient within six hours of the transfusion. Fluid rapidly fills the lungs making it very
difficult for the patient to breathe. TRALI occurs in about 1 in 5000 transfusions and 5-10% of
these reactions are fatal. Although millions of patients receive transfusions each year, only a few
hundred incidents of TRALI are reported annually.
No one knows exactly what causes TRALI. As scientific understanding of TRALI grows the
strategies to minimize its risk will change. Today, certain antibodies, names HLA and HNA
antibodies, produced by some women who have been pregnant and people who have been
transfused are under study as a prime cause. Plasma and plasma-rich blood products such as
aspheresis platelets have the highest quantities of these antibodies.
TRALI and Blood Donation
TRALI is not entirely preventable, but the Red Cross believes that blood products, particularly
plasma and platelets, from most male donors and donors who have not been exposed to foreign
HLA antigens through pregnancy or transfusion are less likely to carry the suspect antibodies.
For the above reasons, the Red Cross will preferentially recruit these donors to donate aphresis
platelets.
Blood Group Compatibility Chart
O -** O + B - B + A - A + AB - AB
AB
AB -
A +
A -
B +
B -
O +
B L O O D
T Y P E
O -

19
I. Definitions
II. Credentialing
III. Equipment Needs
IV. Administration
V. Post Procedure/Discharge
VI. Aldrete Scoring System
VII. Conscious Sedation Medication

20
Conscious Sedation provides a minimally reduced level of consciousness in which the patient
retains the ability to independently and continuously maintain an airway and respond
appropriately to physical stimulation or verbal command.
MRMC policy does not apply to sedation used for sleeping disorders, diagnostic EEG
monitoring, therapeutic management of pain control, seizures, anxiety, patients on
mechanical ventilation, or monitored anesthesiology care provided by an anesthesiologist.
DEFINITION OF TYPES OF SEDATION/ ANESTHESIA: Minimal Sedation (Anxiolysis): A drug-induced state during which patients respond normally to verbal commands. Cognitive function and co-ordination may be impaired, ventilatory and cardiovascular functions are unaffected. Moderate sedation/analgesia ("conscious sedation") A drug-induced depression of consciousness during which patients respond purposefully to verbal commands, either alone or accompanied by light tactile stimulation. No interventions are required to maintain a patent airway, and spontaneous ventilation is adequate. (Cardiovascular function is usually maintained). Deep Sedation/Analgesia A drug-induced depression of consciousness during which patients cannot be easily aroused but respond purposefully following repeated or painful stimulation. The ability to independently maintain ventilatory function may be impaired. Patients may require assistance in maintaining a patent airway and spontaneous ventilation may be inadequate. Cardiovascular function is usually maintained. Anesthesia Consists of general anesthesia and spinal or major regional anesthesia. It does not include local anesthesia. General anesthesia is a drug-induced loss of consciousness during which patients are not arousable, even by painful stimulation. The ability to independently maintain ventilatory function is often impaired. Patients often require assistance in maintaining a patent airway, and positive pressure ventilation may be required because of depressed spontaneous ventilation or drug induced depression of neuromuscular function. Cardiovascular function may be impaired. PRECAUTIONS: Because sedation is a continuum, it is not always possible to predict how an individual patient will respond. Practitioners intending to produce a given level of sedation should be able to rescue patients whose level of sedation becomes deeper than initially intended. Individuals administering Moderate Sedation/Analgesia should be able to rescue patients who enter a state of Deep Sedation/Analgesia, while those administering Deep Sedation/Analgesia should be able to rescue patients who enter a state of General Anesthesia.

21
Physician: Conscious sedation administered to patients undergoing invasive, manipulative or constraining procedures must be ordered and supervised by a physician credentialed for the specific procedure and for the administration of sedation. Clinical privileges in Conscious Sedation/Rapid Sequence Intubation are granted to physicians at appointment and reappointment by Meadows Regional Medical Center after certification by the Director of Anesthesiology that the practitioner is adequately trained and credentialed in airway management and in safe use of drugs causing sedation. ** MD credentials may be checked by accessing MIDAS (located on desktops throughout the facility) Registered Nurse:
• Graduate of accredited School of Nursing and licensed as RN in the state of Georgia with no restrictions.
• A qualified RN can administer only medications ordered by a physician. This medication must be given under the direct supervision of a physician.
• Must have a working knowledge of the resuscitation equipment and be certified in Basic Life Support, although ACLS is recommended.
• Competency of qualified RN managing the care of the patient receiving sedation is demonstrated by successful completion of a competency program in sedation, as well as a written exam to include pharmacology of conscious sedation.
• RN must have no other responsibilities when providing conscious sedation. CONSCIOUS SEDATION EMERGENCY MANAGEMENT: The following equipment must be readily available in all locations where conscious sedation is administered:
• Defibrillator
• Crash Cart
• Suction
• Oxygen and oxygen delivery devices
• Airways and endotracheal intubation equipment (adult/pediatric)
• Ambu bags or anesthesia ventilation bags (adult/pediatric)
• Emergency drugs (adult/pediatric)
• Telephone
• Electrical outlets connected to emergency power system
• Blood Pressure monitoring equipment
• ECG monitoring If complications occur, emergency personnel who are experts in airway management will be available to provide emergency endotracheal intubation and Advanced Cardiac Life Support procedures. ACLS trained personnel and an Emergency Room physician are available within the hospital twenty-four hours a day. Facility-wide alert for code blue may be initiated by dialing 5884.

22
A qualified physician or Registered Nurse will administer the medications under the supervision of the physician. All Patients will have intravenous access prior to the administration of sedation. The nurse managing the sedation of the patient may not leave the patient unattended or engage in tasks that would compromise monitoring. Immediate access to oxygen and emergency equipment must be available, including the ability to provide positive pressure ventilation. Conscious Sedation -Assessment, Monitoring and Documentation: Documentation shall reflect evidence of continuous assessment, diagnosis, outcome identification, planning implementation and evaluation of care. Documentation shall reflect care planning and prioritization of patient needs pre-procedure, intraprocedure and post-procedure. Assessment, monitoring, patient response, etc. will be documented on the Conscious Sedation Record or Anesthesia Record. All patients receiving conscious sedation shall receive the same care, regardless of documentation method. Pre-Procedure Documentation:
• Prior to the administration of conscious sedation medications, an appropriate nursing assessment must be completed and informed consent verified. The review of relevant diagnostic data includes, but is not limited to:
• Vital signs: temperature, blood pressure, pulse, respirations, SaO2
• Level of Consciousness
• Current History and Physical with in 24 hours.
• Past medical history, allergies and medication history, previous surgeries with anesthesia The physician ordering and/or administering the conscious sedation ensures that an H&P is complete, informed consent obtained, current data has been reviewed, the patient has been assessed for needs that develop the anesthesia plan. The physician assesses previous surgery/anesthesia history of complications, review relevant diagnostic data, determine ASA patient status, and establish anesthesia plan of care. The Physician also must have discussed the options and risks with the patient and family before administration, and must do an immediate re-assessment before patient is medicated for sedation.
Intra-procedure Monitoring and Documentation The patient will be monitored continuously for early signs of hypoventilation or apnea. The monitoring of patients during the use of drugs for conscious sedation includes: pulse oximetry, blood pressure and vital signs. These are obtained and recorded at least every five minutes. Continuous Cardiac Monitoring is maintained on all patients. The patient is monitored continuously for potential adverse reactions to the medications being administered. Any adverse effects are to be documented on the Conscious Sedation Record. The physician is notified promptly of any changes in the patient’s condition or an Aldrete score < 8. Documentation includes: The medication given with the dosage, route, time and person administering Level of consciousness (pediatric patients are evaluated according to development and age appropriate response). Pre-procedure, post-procedure and discharge scoring, using the Aldrete Score System (page 8). Significant events, their corrective action, and the result of the action are documented when the event is untoward or adverse.

23
Conscious Sedation Post-Procedure: Pulse oximetry, respiratory rate and blood pressure are obtained and recorded every fifteen minutes for no less than thirty minutes until an Aldrete score of at least 8 is met or at the discretion of the physician. Any score of 0, or total of < 8 must be reported to the physician who makes the determination regarding patient's placement. The level of consciousness is documented. Patients receiving conscious sedation must meet the approved discharge criteria as established on the Conscious Sedation Record before post procedure monitoring is discontinued. The RN signs twice: first when the patient has met the approved discharge criteria and again when the patient leaves the recovery setting. DISCHARGE: The patient may be discharged from conscious sedation monitoring after returning to a safe functional level, outcomes have been met, and documented using the following medical staff approved criteria for discharge:
• Blood pressure within 20% of baseline
• Pulse oximetry and respiration within 10% of baseline
• Respiratory rate > 12 but < 22 in adults, and appropriate for age in pediatric patients.
• Patient alert and answering questions appropriately (or return to pre-procedure level of alertness)
• Aldrete score greater than or equal to 8. Patients who have received reversal agents must be monitored for a minimum of two hours after the last administration of reversal agent, in order to ensure patients do not become re-sedated after reversal affects have abated. Written discharge instructions are given to outpatients, and include how to contact the physician for questions or complications. Emergency telephone numbers are included on the discharge instructions. Home care instructions are explained to the patient and responsible adult, both of who have verbalized an understanding of these instructions. A responsible adult must accompany the patient if discharged within 24 hours of receiving the medication for conscious sedation. Patients cannot be discharged unless safe transportation is arranged. _________________________________________________________________________ The Department of Anesthesiology through Performance Improvement review monitors all conscious sedation practices throughout the hospital for outcomes. The QRM Department reviews care of all patients who receive conscious sedation; cases that require further review are to be reported to the Department of Anesthesiology. The Department of Anesthesiology, through Performance Improvement review, is responsible for monitoring patient outcomes associated with the administration of Conscious Sedation. Patient outcomes will be monitored for the following criteria:
• Loss of protective reflexes
• Use of reversal agents
• Any adverse outcomes resulting from administration of conscious sedation.

24
Patient's total sum of all scores to determine Aldrete Score. __________________________________________________________________________________________________________________________________________________
Conscious Sedation Medication: The doses listed below are for healthy adults. Medication Dosage Comments
Versed (midazolam) 0.5 to 1 mg not to exceed 2.5mg for initial dose
Slow IV over 2 minutes
Valium (diazepam) 2 to 10 mg IM or IV Slow IV
Ativan (lorazepam) 0.05mg/kg IM or IV Maximum total dose = 4mg
When given IV, must be diluted with equal volume of diluent and given not to exceed 2mg/minute.
Noctec (chloral hydrate) 500mg PO or PR Note: Pediatric dose is weight based
30 minutes prior to procedure
Morphine 2.5mg to 15mg IV Diluted in 4 to 5ml of sterile water & given slowly over 4 to 5 minutes
Demerol 50 to 100mg IM or IV Slow IV
Sublimaze (fentanyl) 50 to 100mcg IM or IV Slow over 1 to 2 minutes
Medication Antagonists for Conscious Sedation
Medication Dosage Comments
Romazicon (Flumazenil) 0.2mg initially After waiting 45 seconds, additional 0.2mg doses may be given @ 1 minute intervals to a max of 4 more doses
Rapid IV over 15 to 30 seconds
Narcan (Naloxone)
0.1mg to 0.2mg IV Given at 2 to 3 minute intervals until desired response obtained

25
The staff of Meadows Regional Medical Center recognizes that the patient has the right to expect continuity of care throughout the facility. The use of restraints is discouraged and restraints are utilized only as a last resort after assessment of the patient when it is necessary to protect the patient from harm to self or to others or to prevent significant, continued disruption of the therapeutic environment. Essential elements govern how Meadows Regional Medical Center uses restraints. These elements are:
• The organizational goal is to be restraint-free.
• A safe and clean environment is maintained.
• Patients are allowed to continue his/her care and participate in the care process.
• Modesty, visibility to others, and comfortable body temperature are maintained.
• The use of restraints is based on the assessed needs of the patient.
• Decisions are made about least restrictive methods that continue to ensure the patient's safety and the safety of others.
• Safe application and removal by competent staff is assured.
• The patient is monitored and reassessed during use to protect him/her from harm, feelings of isolation, deterioration of well-being and limitations of their rights and dignity. Smoking materials will be removed from restrained patients
access. Patients have a right to be free from physical or mental abuse and corporal punishment. This includes that restraints will only be used when
necessary and not as coercion, discipline, convenience or retaliation.
• Time limits, not to exceed 24 hours, are set forth in physician's orders
• Usage of restraints is documented in the medical record when restraint orders are written.
• Use of restraints is discussed with the patient/family prior to or at the time restraints are applied (if the patient has agreed to family participation in his plan of care).
I. Definitions
II. Exceptions to Restraints
III. Complications of Restraints
IV. Medical/Surgical Restraints
V. Behavioral Restraints
VI. Documentation
VII. Death Reporting

26
RESTRAINT: Any manual method, physical or mechanical device, material equipment that
immobilizes or reduces the ability of a patient to move his or her arms, legs, body, or head
freely; or a drug or medication when it is used as a restriction of movement and is not a standard
treatment or dosage for the patient's condition.
(examples include: vest restraint, wrist and ankle restraint, including physical force when
indicated for behavioral health purposes.) This is done with or without the patient's
permission. Physical force may be human/mechanical device/or a combination of the
two.
• Standards that do not apply are:
1. Limitation of mobility or temporary immobilization related to medical, dental,
diagnostic or surgical procedures including post-procedure processes and
2. Adaptive support in response to assessed patient needs.
� RESTRAINT FOR MEDICAL/SURGICAL STANDARDS: Application of restraints
when the primary reason for use directly supports medical healing.
Example: A patient diagnosed with Alzheimer's repeatedly attempts to remove an IV.
� RESTRAINT FOR BEHAVIORAL HEALTH CARE: Application of physical force to a
patient (by human, mechanical devices, or both) in an emergency situation when there is
imminent risk of the patient physically harming himself/herself or others, or staff due to
an emotional or behavioral disorder.
Example: An inebriated patient presents in the emergency department displaying
combative behavior
� PROTECTIVE DEVICE: A device designed to protect a person from falling and
is indicated for confused or disoriented patients. Example: geri chairs.
� CHEMICAL RESTRAINT: A drug or medication used as restriction to manage the
patient's behavior or restrict the patient's freedom of movement, and is not a standard
treatment for the dosage for the patient's medical or psychiatric condition.
� SECLUSION: The involuntary confinement of a patient alone in a room or area from
which the patient is physically prevented from leaving. Seclusion may only be used for
the management of violent or self-destructive behavior that jeopardizes the immediate
physical safety of the patient, a staff member, or others.
� MEDICAL IMMOBILIZATION: Devices employed during medical, diagnostic or
surgical procedures that are normally considered part of the treatment.
Examples include arm board during surgery and use during post-operative/post-anesthetic
care, IV arm board. ER may employ immobilization during special procedures on a short-
term only basis.
� ADAPTIVE SUPPORT: Devices intended to permit a patient to achieve normative
bodily functions. Examples include orthopedic appliances, braces and/or other devices
that support the patient's posture.
� TIME-OUT: A procedure used to assist the individual to regain emotional control by
removing the individual from his or her immediate environment and restricting the
individual to a quiet area or unlocked quiet room.
� EMERGENCY: An emergency is an instance in which there is imminent risk of an
individual harming himself/herself or others, including staff; when non-physical
interventions are not viable; and safety issues require an immediate physical response.
� FAMILY: The person(s) who plays a significant role in an individual's life, which may
include a person(s) not legally related to the individual receiving care.

27
Medical/Surgical:
� Restraint standards are not applicable when restraints are associated with standard
practices that include temporary immobilization for medical, dental, diagnostic, and
surgical procedures, i.e. surgical positioning, IV armboards, radiotherapy procedures,
protection surgical/treatment sites for peds.
� Adaptive support in response to assessed patient needs, i.e., postural support, orthopedic
appliances, tabletop chairs
� Helmets
� Therapeutic holding or comforting of children or adolescents, or pediatric behavior
management methods time-out if prevented from leaving a room for 15 minutes or less
and used with behavior management standards.
� Restraint of patients hospitalized on psychiatric units or for psychiatric purposes.
� Forensic and correction restrictions used for security purposes.
� Bed rails are not considered restraint devices unless they are involuntary. If the patient
requests the side rail to be up, it is not considered a restraint.
Behavioral:
Restraint standards are not applicable when restraints associated with:
� Temporary immobilization for medical/dental/diagnostic/surgical procedures i.e., IV
armboards, radiotherapy procedures, protection surgical/treatment sites for peds.
� Adaptive support in response to assessed patient needs, i.e., postural support, orthopedic
appliances, tabletop chairs.
� Therapeutic holding or comforting of children or time-out if prevented from leaving a
room for 15 minutes or less and used with behavior management standards.
� Forensic and correction restrictions used for security purposes.
� Helmets
� Adaptive support in response to assessed patient needs, i.e., postural support, orthopedic
appliances\

28
The use of restraints may cause complications. Injuries occur as the person tries to get free of the restraint. Cuts, bruises, and fractures are common. Injuries also occur from using the wrong restraint, applying it wrong, or keeping it on too long. The most serious risk is death from strangulation. There are also mental effects. Restraints affect dignity and self-esteem. Depression, anger, and agitation are common. So are embarrassment, humiliation, and mistrust.
Complications of Restraint Use
Emotional Complications
Psychological Distress
Agitation
Anger
Depression
Embarrassment
Humiliation
Mistrust
Physical Complications
Positional Asphyxia
Bruises
Constipation
Cuts
Dehydration
Fetal incontinence
Fractures
Nerve Injuries
Hospital-acquired infection
Pneumonia
Pressure ulcers
Strangulation
Urinary incontinence
Urinary tract infection
Psychological Distress: Try to imagine yourself in the person’s situation. Then you can better understand how
the person feels. Treat the person as you would want to be treated— with kindness, care, respect, and dignity.
Imagine what it is like to be restrained:
• Your nose itches, but your hands and arms are restrained. You cannot scratch your nose.
• You need to use the bathroom. Your hands and arms are restrained. You cannot get up. You cannot reach your signal light. You soil yourself with urine or a bowel movement.
• Your phone is ringing. You cannot answer it because your hands and arms are restrained.
• You are not wearing your eyeglasses. You cannot identify people coming into and going out of your room and you cannot speak because of a stroke. You have a vest restraint. You cannot move or turn in bed.
• You are thirsty. The water glass is within your reach but your hands and arms are restrained.
• You hear the fire alarm. You have on a restraint. You cannot get up to move to a safe place. You must wait until someone rescues you.
What would you try to do if you were restrained?
• Would you calmly lie or sit there?
• Would you try to get free from the restraint?
• Would you cry out for help?
• What would the nursing staff think?
• Would they think that you are uncomfortable? Or would they think that you are agitated and uncooperative?
• Would they think your behavior is improving or getting worse?
• Would you feel anger, embarrassment, or humiliation?
29
Positional Asphyxia There are a number of potential adverse effects related to the application of restraints. These include; being unable to breathe, feeling sick or vomiting, developing swelling to the face and neck, and the developments of petechiae (small blood-spots associated with asphyxiation) to the head, neck and chest. Restraining an individual in a position that compromises the airway or expansion of the lungs (i.e. in the prone position) may seriously impair an individual’s ability to breathe and can lead to asphyxiation. This includes pressure to the neck region, restriction of the chest wall and impairments of the diaphragm. When the head is forced below the level of the heart, drainage of the blood from the head is reduced. Swelling and bloodspots to the head and neck are signs of increased pressure to the head and neck which are often seen in asphyxiation. Pressure should not be placed on the neck, especially around the angle of the jaw or the windpipe. Pressure on the neck, particularly in the region below the angle of the jaw (carotid sinus) can disturb the nervous controls to the heart and lead to a sudden slowing or even stoppage of the heart. This effect is even more liable to occur in persons:
� With angina � Who have had a heart attack � With high blood pressure � With diabetes � In older people, especially those with hardening of the arteries
A degree of positional asphyxia can result from any restraint position in which there is restriction of the neck, chest wall or diaphragm, particularly in those where the head is forced downward towards the knees. Restraints where the subject is seated require caution, since the angle between the chest wall and the lower limbs is already decreased. Compression of the torso against or towards the thighs restricts the diaphragm and further compromises lung inflation. This also applies to prone restraints, where the body weight of the individual acts to restrict the chest wall and the abdomen, restricting diaphragm movement. Factors that predispose a person to positional asphyxia and sudden death under restraint include:
� Drug/alcohol intoxication (because sedative drugs and alcohol act to depress breathing so reducing oxygen taken into the body)
� Physical exhaustion (or any factors that increase the body’s oxygen requirements, for example a physical struggle or anxiety)
� Obesity Warning signs related to positional asphyxia
� An individual struggling to breathe � Complaining of being unable to breathe � Evidence or report of an individual feeling sick or vomiting � Swelling, redness or bloodspots to the face or neck � Marked expansion of the veins in the neck � Individual becoming limp or unresponsive � Changes in behaviour (both escalative and de-escalative) � Loss of, or reduced levels of, consciousness � Respiratory or cardiac arrest.
ACTION: Immediately release or modify the restraint as far as practicable to effect the reduction in body wall restriction, and summon medical attention. There is a common misconception that if an individual can talk then they are able to breathe, this is NOT the case. An individual dying from positional asphyxia may well be able to speak or shout prior to collapse.

30
Medical Surgical Restraint Standards apply to patients hospitalized in the ED, inpatient, medical
observation, or in same day surgery for medical or surgical services
(nonpsychiatric/nonbehavioral health reasons)
I. Initial assessment of need for restraint:
Patients are assessed for restraint risk on admission and at least every shift. The assessment includes level
of disturbance and any precipitating events. Least restrictive strategies will be implemented for patients
who are at risk, based on the assessment.
Initial assessment of patient includes: • Techniques/methods/tools that would help patient control his behavior.
• Pre-existing medical conditions/physical disabilities/limitations that would place the patient
at greater risk during restraint.
• Any history of sexual or physical abuse that would place the patient at greater psychological
risk during restraint.
• If family has been identified as participants in the patient's care (done in conjunction with
patient's right to confidentiality):
a. Family may assist with the identification of techniques that help to control the
patient's behavior
b. Family's role, if the patient is placed in restraints (notification, sitting with
patient)
c. Notify family promptly of initiation of restraints, if they are participating in the
treatment plan
• Patient/family informed of hospital’s restraint philosophy.
• Patinet/family approached regarding patient’s advance directive with respect to behavioral
health care (if appropriate, noted on chart).
II. Consideration of least restrictive strategies
Based on the Registered Nurse's assessment of the patient, strategies may include, but are not limited to:
• Comfort assessment/interventions/reduce environmental stimuli
• Medication review
• Providing explanations of the limits on patient's actions and the risk and potential consequence of
exceeding those actions.
• Techniques/methods/tools that would help patient control his behavior:
a. Use of frequent reminders
b. Reorientation/Redirection
• Placing patient under increased observation.
• Moving patient to a room closer to the nurse’s station
• Assistance of family members to help in reducing patient’s risk behaviors, inclusive of sitters.
• Discussion with patient and family regarding preferences and insights into possible preventive
and alternative measures

31
II. Consideration of least restrictive strategies: (cont.)
• Ensure that the patient’s needs are met (adequate nutrition, toileting, pain control, etc.)
• Use strategies to identify staff and patient behaviors, events, and environmental factors that may
trigger circumstances that require restraint or seclusion. Often there are causes and reasons for
harmful behaviors. Knowing and treating the cause can prevent restraint use. The nurse tries to
find out what the behavior means. This is very important for persons who have speech or
cognitive problems. To find out the patient’s specific problem, ask the following questions.
Problems that can Cause Harmful Behaviors How to Find out More: Questions to Ask
Pain
o Is the person in pain?
o Is the person ill or injured?
o Is the person short of breath? Are cells
getting enough oxygen?
o Is the person afraid in a new setting?
o Does the person need to urinate or have a
bowel movement?
o Is a dressing, bandage, or binder tight or
causing other discomfort?
Discomfort
o Is clothing tight or causing other discomfort?
o Is the person’s position uncomfortable?
o Is the person too hot or too cold?
o Is the person hungry? Is the person thirsty?
o Are body fluids, secretions, or excretions
causing skin irritation?
Confusion
o Is the person seeing, hearing, or feeling
things that are not real?
o Is the person confused or disoriented? o Are drugs causing the behaviors?
Some older persons have dementia. Restraints may increase their confusion and agitation. They do not
understand what you are doing. They may resist staff efforts to apply a restraint and actively try to get
free from it. This can cause serious injury and even death. It decreases quality of life.
Never use force to apply a restraint. Always ask a co-worker to help apply a restraint to a
person who is confused and agitated. Report any problems to the nurse at once.
32
III. Making the decision to apply medical/surgical restraints: Medical/Surgical restraint may be instituted for the following criteria including but not limited to:
• Ensure the immediate physical safety of the patient, a staff member or others;
• When less restrictive interventions have been determined to be ineffective to protect the patient, a
staff member or others from harm;
• In accordance with a written modification to the patient’s plan of care;
• When the type or technique used is the least restrictive intervention that will be effective to
protect the patient, a staff member or others from harm.
• In accordance with safe and appropriate restraint and seclusion techniques as determined by
hospital policy in accordance with state law and;
• Discontinued at the earliest possible time;
• Interfering with treatment (pulling at or on lines, tubes, catheter or dressings);
• Attempts to remove medical devices;
• Self discontinuation of IV or Central Lines with medications or blood products infusing;
• Self-discontinuation or contamination of any tube/site necessary for therapeutic interventions
(chest tubes, artificial airways, keofeed, etc.)
• Aggitation/Excesssive movement that could result in negative clinical outcome, such as
dislodgement of device resulting in increased risk if infection, pain or trauma.
Use restraints for as short a time as possible. The care plan must show how restraint use is reduced. The
goal is to meet the person’s needs with as little restraint as possible. You must meet the person’s physical
and psychosocial needs. Visit with the person and explain the reason for restraints.
IV. Implementing the restraint: • A qualified RN may initiate the restraint after assessment for the above criteria. A physician’s
order will be obtained within 12 hours of restraint or seclusion. If the initiation of restraint is
based on significant change in the patient’s condition, the RN should immediately notify the
physician.
• If clinically justified after 24 hours, the physician may issue a new order. Orders must be
renewed/issued at least each calendar day based on an exam by the primary care provider or his
designee. Restraint Orders are never written on an as needed (PRN) basis and
restraint orders are never appropriate for staff convenience.
• The physician reviews the patient's physical and cognitive status with the nursing staff. He/She
will determine whether the restraints are to be continued or will supply the nursing staff with
guidance in identifying ways to help the patient regain control.
• The RN assesses for release of protective devices and discontinue guidelines when one or more of
the following conditions apply:
1. Patient is free of agitation, alert and able to follow commands consistently.
2. Less restrictive interventions have been proven effective for maintaining tubes and/or
lines.
3. Tubes, drains or lines have been discontinued.
• Monitoring during use of restraint: Psychological and physical assessment at least every 2 hours
to include:
1. Assessing for signs of any injury associated with application of restraint
2. Offering/evaluating needs for nutrition/hydration
3. Checking circulation and range of motion in extremities
4. Vital signs as ordered
5. Hygiene and assistance with elimination
6. Physical comfort and mental status
7. Readiness for discontinuation of restraints

33
Most Common Types of Wrist Restraints Used at
MRMC…
Ι. Ι. Ι. Ι. WRIST RESTRINTS
Wrist Restraint Application 1. Attach the strap with the female end of the quick-release buckle to the
movable portion of the bed. Ensure that the buckle is outside the
patient’s reach.
2. Wrap the limb holder cuff around the wrist so the slide harness and
connecting strap is on the ulnar side of the wrist.
3. Secure with hook and loop tab.
4. Close the quick-release buckle and adjust the strap. Pull the strap snug,
but not so tight as to compromise circulation. You should be able to
easily insert one finger between the device and the patient’s limb.
5. Insert the male end of the quick-release buckle from the cuff into the
female end of the quick-release buckle from the strap secured to the
bed. Ensure connection is secure by listening for a “snapping” sound
when connecting male and female ends. Pull firmly on straps to verify a
secure connection.
Wrist Restraints….What NOT to do. • Don't restrain an arm that's weak or paralyzed.
• Don't attach the restraint to the side rail; lowering the rail could injure
the patient.
• Don't tie restraints too tightly. Restraints that are tied too tightly can
impede circulation. Make sure you can slip one or two fingers between
the restraint and the patient's skin.
34
II. VEST RESTRAINTS
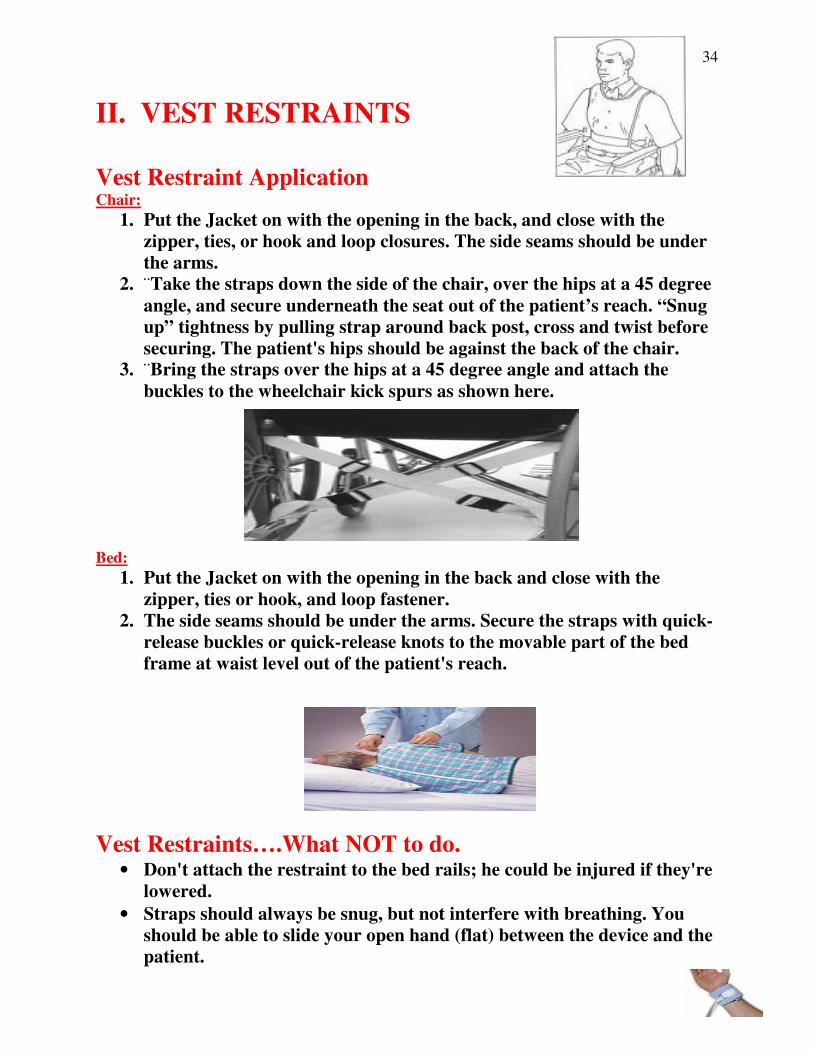
Vest Restraint Application Chair:
1. Put the Jacket on with the opening in the back, and close with the
zipper, ties, or hook and loop closures. The side seams should be under
the arms.
2. ¨Take the straps down the side of the chair, over the hips at a 45 degree
angle, and secure underneath the seat out of the patient’s reach. “Snug
up” tightness by pulling strap around back post, cross and twist before
securing. The patient's hips should be against the back of the chair. 3. ¨Bring the straps over the hips at a 45 degree angle and attach the
buckles to the wheelchair kick spurs as shown here.
Bed:
1. Put the Jacket on with the opening in the back and close with the
zipper, ties or hook, and loop fastener.
2. The side seams should be under the arms. Secure the straps with quick-
release buckles or quick-release knots to the movable part of the bed
frame at waist level out of the patient's reach.
Vest Restraints….What NOT to do. • Don't attach the restraint to the bed rails; he could be injured if they're
lowered.
• Straps should always be snug, but not interfere with breathing. You
should be able to slide your open hand (flat) between the device and the
patient.

35
I. Initial assessment of need for restraint: A licensed nurse assesses patients for restraint risk at least every shift. The assessment includes
level of disturbance and any precipitating events. Least restrictive strategies will be
implemented for patients who are at risk, based on the assessment. Initials assessment of patient
at risk of harming himself or others includes:
1. Techniques/methods/tools that would help patient control his behavior.
2. Pre-existing medical conditions/physical disabilities/limitations that would place the
patient at greater risk during restraint.
3. Any history of sexual or physical abuse that would place the patient at greater
psychological risk during restraint.
4. If family has been identified as participants in the patient’s care:
a. Family may assist with the identification of techniques that help to control the
patient’s behavior.
b. Family’s role, if the patient is placed in restraints (notification, sitting with
patient)
c. Notify family promptly of initiation of restraints, if they are participating in the
treatment plan.
5. Patient/family informed about hospital’s restraint philosophy.
6. Patient/family approached regarding patient’s advance directive with respect to
behavioral health care (if appropriate, noted on chart).
II. Consideration of least restrictive strategies: Based on the licensed nurse’s assessment of the patient, strategies may include, but are not
limited to:
1. Comfort assessment/ interventions
2. Discussion with patient and family regarding preferences and insights into possible
preventive and alternative measures.
3. Offer choices when appropriate but set options for patient response.
4. Consequences of behavior discussed/Talking with patient and remaining calm.
5. Increased staff presence/Allow most effective staff to take lead
6. Decrease environmental stimuli
7. Physical activity/modify daily activities
8. Redirection/Diversion/Use of frequent reminders
9. Medication for identified need

36
III. Making the decision to apply medical/surgical restraints: The use of behavioral restraints may be initiated only after a registered nurse has assessed the
patient and determined that the patient is at risk of harming self or others. A physician involved
in the care of the patient must order restraint or seclusion. If the ordering physician is not the
attending, the attending must be consulted ASAP. In an emergency, a trained RN can initiate
Restraint or Seclusion but a physician order must be immediately obtained; and if the attending
is not the ordering physician the attending is consulted ASAP. The physician must be notified as
soon as possible after the application of restraints and must perform a face-to-face within one (1)
hour.
� Criteria for Restraint - The patient is exhibiting behavior that, if not controlled
immediately, may result in serious injury to self or others (emergency situation), and the
patient does not respond to less restrictive strategies.
� The physician will review the patient’s physical and cognitive status with the nursing
staff. He will determine whether the restraints are to be continued or will supply the
nursing staff with guidance in identifying ways to help the patient regain control.
Physician signs behavior restraint order.
IV. Implementing the restraint:
• Behavioral restraint orders will be time limited and not exceed:
1) Four (4) hours for adults 18 years and older
2) Two (2) hours for children aged 9 to 17 years of age
3) One (1) hour for children under 9 years of age
� Before the original order expires, the patient’s physician or a qualified
individual must evaluate the patient in person authorized by the hospital.
The physician may reorder the restraints for the assigned limits, however,
at the time of renewal, the registered nurse will report results of recent
assessments and obtain order from physician for renewal.
� Original orders may be renewed for a maximum of 24 hours. Restraint
Orders are never written on an as needed (PRN) basis and restraint orders
are never appropriate for staff convenience.
� Another face-to-face assessment is required at least every 8 hours after
the original order for adults and every 4 hours after the original order for
individuals younger than 17 years.
• When the registered nurse identifies an assessed need for continued restraint
episode, the registered nurse and physician will re-evaluate the efficacy of the
individual treatment plan. The registered nurse will work to actively identify ways
to help the individual regain control.
• The registered nurse will perform evaluation for earliest possible release during
monitoring. Trial releases are documented in the patient's record. Behavior
criteria for release may include but are not limited to:
1) Patient's ability to contract for safety
2) Whether a patient is oriented to the environment
3) Cessation of verbal threats
4) Cessation of violent behavior
*Continuous in person observation may be by video and audio equipment after the
first hour.

37
Documentation in the patient's record must include the following:
1. Alternatives or other less restrictive interventions attempted (as applicable)
2. The patient's condition or symptom(s) that warranted the use of the Restraint and
Seclusion and
3. The patient's response to the intervention(s) used, including the rationale for the
continued use of the intervention
The "Restraint Orders" form is utilized for restraint orders (printed from Forms Fast). Restraint
documentation will be through Meditech utilizing the following forms:
� "Initial Restraint Assessment"
� "Restraint Flow Sheet"
� "Restraint Frequent Checks"
**Assessment and flow sheets found in process interventions menu.**
MEDITECH RESTRAINT DOCUMENTATION PROCESS:
1. Secure ORDER
� Print restraint order from FORMS FAST and place on chart.
Category: PHYSICIAN’S ORDERS
� RESTRAINT 1 (Behavioral)
� RESTRAINT 2 (Acute Medical/Surgical)
2. Go to PROCESS INTERVENTIONS – Add Intervention (A-I)
� Add Initial Restraint Assessment
� Add Restraint Flow Sheets
� Add Restraint Frequent Checks
3. Go to PROCESS INTERVENTIONS – Document Intervention (D-I)
� Initials restraint assessment when restraint initiated
� Restraint flow sheet once each shift
� Restraint frequent checks every 2 hours unless behavior then
every 15 minutes.
4. Chart Patient Education Given – Add and Document as above
5. Add intervention to care plan – Go to Plan of Care to add care plan
__________________________________________________________________________
REVIEW OF MEDICAL/SURGICAL AND BEHAVIORAL RESTRAINT
Review of Medical/Surgical and Behavioral restraints (through the PI process) will be done
quarterly and presented to IDPC. The PI process seeks to identify opportunities to reduce the risk
of restraint use through preventive strategies, innovative alternatives, and process improvements.

38
DEATH REPORTING
Report any injuries and deaths to the hospital's leadership and appropriate external agencies
consistent with applicable law and regulations for patient death that occurs:
1. During restraint or seclusion
2. Within 24 hours after removal from restraint or seclusion
3. Within one week after restraint or seclusion where it is reasonable to assume (includes
but not limited to deaths related to restrictions of movement, death related to chest
compression, restriction of breathing or asphyxiation) that use of restraint or secluion
directly or indirectly contributed to a death. The death report will capture this information
and will be forwarded to the Nursing Supervisor. He/She will in turn notify Risk
Management.
4. Reports must be made by phone or by a secure and dedicated fax or e-mail to the CMS'
regional office by close of the next business day and will be completed by Risk
Management.
5. The date and time of the report must be recorded in the medical record

39
POLICY:
1. Meadows Regional Medical Center has entered into cooperative working relationships
with Georgia Eye Bank, Inc. (eyes) and Lifelink of Georgia (organ and tissue) to ensure
that the option of anatomical donation is presented to the individual(s) authorized to grant
consent on all medically suitable hospital deaths.
2. All anatomical referrals and requests are to be documented in the patient’s medical record
and maintained in the Anatomical Gift Log as required by state law. The Eye, Organ, and
Tissue Donation Checklist serves as the information source for the Anatomical Gift Log
and will be maintained in Health Information Management.
3. There will be no additional charge(s) to the donor family for any procedures or supplies
related to the donation process.
4. All information related to donation will remain confidential except when release of
information is authorized by the person granting consent or by court order.
5. Only representatives from Lifelink of Georgia, Georgia Eye Bank, or a designated
trained requestor from the hospital may discuss the potential for donation with the family. ___________________________________________________________________________
DETERMINATION OF REFERRAL COMPLIANCE Appropriate hospital staff will work in conjunction with Georgia Eye Bank and Lifelink of
Georgia representatives to review the hospital’s death log and/or medical records to assess the
hospital’s donation potential and compliance with required referral legislation.
EDUCATION OF HOSPITAL STAFF Georgia Eye Bank and Lifelink representatives will routinely provide hospital staff with
appropriate education on donation-related issues.
CADAVERIC ORGAN PROCUREMENT The House Supervisor will notify the OR Director or designee if procurement is eminent during
working hours of 0700 to 1530. After hours the House Supervisor will notify the on-call staff as
follows:
Tissue only----- Circulator on-call
Eyes only------- Circulator on-call
Organ Procurement------ Circulator and Scrub Tech on-call
40
PROCEDURE: 1. Determination of Medical Suitability at or Near Time of Death
� The Eye, Organ, and Tissue Donation Checklist is initiated by a hospital staff
representative at the time of death or when death is imminent.
� Medical suitability for donation is to be determined on every death with the assistance of
Georgia Eye Bank/Lifelink of Georgia before the family is presented the option of
donation. Call the Donation Referral Line at 1-800-882-7177 as soon as possible after an
individual has died (for cardiac deaths), has been placed on a ventilator due to a severe
brain injury, or who has been declared brain dead.
2. Eye, Organ, and Tissue Donation:
� Georgia Eye Bank and/or Lifelink will contact the hospital by telephone to determine
initial medical suitability.
� If the patient is not eligible for donation, the Donation Referral Line operator, Eye Bank,
or Lifelink representative will communicate this and the reason for ineligibility to the
healthcare professional for documentation on the Eye, Organ, and Tissue Donation
Checklist.
� When a death falls under the jurisdiction of the medical examiner/coroner, the recovery
agency representative shall seek release from the medical examiner/coroner. This release
will be documented on the Eye, Organ, and Tissue Donation Checklist and in the donor’s
medical record.
3. Unsolicited Donations
� If a patient expresses intent about making an anatomical gift, it must be documented. (A
patient’s unsolicited expression might be made upon admission. However, Georgia Eye
Bank and Lifelink of Georgia discourage requests for donation upon admission.) Any
such unsolicited expression shall be recorded in the medical record by placing an organ
donor sticker on the face sheet and this information shall be kept on file in Health
Information Management. (Note: unless a patient has stated no to eye, organ, and tissue
donation, families must still be approached for consent
� The expression is valid for the current admission only and is nullified upon discharge.
4. Presenting the Option of Donation
� The option of eye, organ, and tissue donation is to be presented to the authorized
individual for all medically suitable hospital deaths.
� Solely Eyes: If the patient is determined to be medically suitable for solely eye donation,
the option for eye donation will be presented to the authorized individual by a Georgia
Eye Bank representative or a designated requestor from the hospital who has been trained
according to federal regulations and state law.
� Organs and/or Tissue (including eyes): If the patient is determined to be medically
suitable for organs and/or tissue (including eyes), the option for eye, organ, and/or tissue
donation will be presented to the authorized individual by a Lifelink representative.
� Persons making requests for anatomical donations shall communicate with the families or
agents of potential donors in a sensitive and caring manner.

41
5. Documentation
� Upon death or imminent death, the Eye, Organ, and Tissue Donation Checklist will be
placed on the patient’s chart. The bank or storage facility that was notified, whether or
not a request for donation was made, the name of the authorized individual, his/her
relationship to the patient, and whether or not he/she consented to donation must be
recorded.
� Solely Eye Donation: If the authorized individual consents to solely eye donation, the
joint Georgia Eye Bank/Lifelink consent form shall be completed by a Georgia Eye Bank
representative or a trained designated requestor from the hospital. The original will be
placed on the patient’s medical record, and one copy will remain with the body. Taped
telephone consents will be kept on file at Georgia Eye Bank.
� Organ, and/or Tissue Donation (including eyes): If the authorized individual consents to
organ and/or tissue donation, the Lifelink representative will complete the joint Georgia
Eye Bank/Lifelink consent form for organs, tissue, and eyes. The original will be placed
on the patient’s medical record, and one copy will remain with the body. Taped telephone
consents will be kept on file at Lifelink of Georgia.
� The Eye, Organ, and Tissue Donation Checklist shall be completed for all patient deaths.
This original copy will remain with the medical record. Information will be recorded in
the hospital’s Anatomical Gift Log.
� Hospital policy shall be followed for completing all other forms required by the hospital.
6. Recovery of Anatomical Gifts
� Solely Eye Donation: Once a consent for eye donation is granted by the authorized
individual, a Georgia Eye Bank coordinator will arrange for the recovery and
transportation of donor eyes.
� Organ and Eye Donation: The Lifelink coordinator will arrange for the recovery of
organs. The surgeons and recovery team removing the organs will be granted temporary
operating privileges for this purpose. If eyes are also to be recovered, the Lifelink
representative will coordinate recovery of the eyes with the Georgia Eye Bank
representative.
� Tissue and Eye Donation: Tissue donation takes place under sterile conditions in an
operating room. All arrangements for the use of the operating room, autopsy, and (if
necessary) transportation of the body will be coordinated by the Lifelink representative.
If eyes are also to be recovered, the Lifelink representative will coordinate recovery of
the eyes with the Georgia Eye Bank representative.
� The physician and/or recovery team performing the removal of eyes, organs, and/or
tissues will document the recovery procedures in the medical record.
Hospital policy and procedure for release and preparation of the body should be followed after
the donation procedure.

42
Meadows Regional Medical Center believes that all patients have the right to have their pain
appropriately and aggressively managed. Pain is a sensory experience associated with actual or
potential tissue damage as well as physiological and psychological responses. Pain is a very personal
experience and will vary from person to person. It is very important to realize that pain is
whatever the patient says it is and occurs whenever the patient says it does. Pain is considered the
fifth vial sign because its assessment is as important to a patient’s overall care as the assessment of
temperature, pulse, respiration, and blood pressure
The nursing process is utilized to assess and reassess the patient who is experiencing pain. The
assessment of pain is an interdisciplinary process including physicians, nurses, physical therapists,
pharmacists, and other clinical involved with the patient’s care. Meadows Regional follows
procedures outlined in Patient Care Policy # 1.35 in the management and assessment of pain.
STAFF RESPONSIBILITIES IN MANGING PAIN:
� Believe the patient’s report of pain. Recognize barriers that may prevent patients from
reporting pain and using analgesics (
� Teach the patient about pain and relief.
� Know and use analgesic drugs and adjuvants for optimal safety and efficacy.
� Recognize safety needs of the patient after pain medication is administered (side rails elevated,
bed in low position, assist ambulation as needed).
� Encourage the use of a wide variety of pain management interventions including non-
pharmacological techniques.
� Include what the patient believes will be effective in the plan of care.
� Offer pain medications or interventions frequently and/or as ordered rather than waiting for
the patient to ask for relief.
� Discuss fears and other feelings related to accepting pain management interventions.
� Request further intervention orders if pain management is ineffective.
� Incorporate “pain” into the care planning process by adding it to the Interdisciplinary Master
Problem List.
� Ensure that unresolved pain present at discharge or transfer is addressed for continuity of care.
PAIN ASSESSMENT: � A Registered Nurse is responsible for an assessment of pain on admission to the hospital or
nursing center as an inpatient or through the day surgery or ER Triage.
� A Registered Nurse or a Licensed Nurse who has demonstrated competency in pain
management reassesses pain with each shift assessment.
� Response to pain intervention is reassessed to monitor effectiveness and to determine
whether further intervention is needed.
� Interaction occurs with the physician when it becomes evident that current pain
management regimens are ineffective.

43
ASSESSMENT FACOTRS IN THE NON-VERBAL OR COGNITIVELY IMPAIRED PATIENT
INCLUDE: (below factors may be present in any age group)
� Facial grimacing/distorted face, clenched jaw/teeth, frowning/scowling, glazed eyes
� Writhing, wrinkled brow, tightly shut lips,
� Withdrawal of limb, altered breathing, fidgeting, irritability, knees pulled up, altered
gait/posture
� Moaning, crying, cursing, gasping, grunting, screaming
� Tearing, pounding, rocking, rubbing body parts, thrashing, wringing hands
� Striking out at otheres
ASSESSMENT FACTORS IN THE PRE-VERBAL/INFANT AGED CHILD INCLUDE:
� Facial expressions: brow bulge, eye squeezes, grimace, chins quiver, restlessness/inability to
sleep, and inability to console
� Cry: Moaning, crying, scream
� Torso: neutral, shifting, tense, shivering, legs squirming/kicking, drawn up tensed.
� Touch: child is reaching, but not touching wound, child is gently touching wound area, child
is grabbing vigorously at wound area
In the Meditech documentation system, a “yes” answer to the question, “Do you have pain now?”
or a positive assessment of pain related behaviors, will generate an entry and goal in the care plan
which can be realistically individualized to the patient as appropriate. An appropriate pain goal is
one in which pain may be noticeable, but not distressing and still enables patient to sleep, eat and
perform other required or desired physical activities and activities of daily living.
The personal successful methods of pain management of the patient, as well as cultural, spiritual,
and/or ethical beliefs are considered when planning the patient’s pain management interventions.
REASSESSMENT:
Reassessment following intervention is performed to determine response to care and if
further intervention is indicated. The documentation is found in C/O Pain Response Screen nursing
notes documentation (enter note – F4/F9).
Questions asked on reassessment are:
� Pain location
� Pain quality (radiation and character)
� Pain Scale Rating
� Medicated with
Pain Reassessment also occurs each shift with the nursing shift assessment.
PATIENT/FAMILY EDUCATION
The patient and/or family members are educated regarding:
� Their role in assisting in pain management.
� Interventions toward alleviating patient barriers or fears to participation in effective pain
management.
� The limitations and side effects of pain treatments.
� The pain rating scale being utilized.
� Alternative methods of intervention as appropriate and employed, which may include oral,
IM, IV, PCA or spinal medication.
� The pain medications that are employed.
� Potential food/drug interactions.
� Rehabilitative techniques.

44
PATIENT/FAMILY EDUCATION
The patient and/or family members are educated regarding:
� Available community resources.
� Parents of pediatric patients are educated about their role in assisting to interpret
behavioral changes of their child that may indicate pain or discomfort.
� The reporting of inadequate pain relief.
� The use of warm compress, cold compress, diversion activities, and/or positional comfort
measures.
� The reporting of lethargy, respiratory depression, urinary retention, or constipation.
� Discharge instructions—to ensure that patient/family understands correct dosage and
schedule or medication administration before discharge; safe and effective use of medical
equipment.
STAFF EDUCATION
Nursing staff is educated on the pain management process in the initial orientation period as a new
hire and on an annual basis with the skill competency renewals.
POSTOPERATIVE ASSESSMENT
Pain intensity and quality, and responses to treatment are monitored during the post procedure
period.
� Assess the patient’s mental status and physiologic responses.
� Observations of behavior and vital signs are used instead of self-report if the patient is
unable to communicate.
� Monitor the status of findings related to pathological conditions, such as drainage from
incisions.
� Assess for impairment and functional status.
� Assess and reassess pain frequently. Determine the frequency of assessment based on the
operation performed, the severity of the pain, and the management techniques selected.
� Increase the frequency of assessment and reassessment if pain is poorly controlled or if
interventions are changing or unusual events of past operation combinations are occurring.
� Record the pain intensity and response to interventions.
MANAGEMENT OPTIONS
Appropriate use of patient controlled analgesic (PCA), spinal/epidural or intravenous
administration of medications, and other pain management techniques are utilized in the
care of patients with pain.
Use one or more of these options:
� Administration of analgesics.
� Patient-controlled analgesia (PCA) usually denotes self-medication with intravenous
opioids, but may include oral or other routes of administration. PCA offers patients a sense
of control over their pain.
� Epidural analgesia, usually with epidural opioids and/or local anesthetic injected
intermittently or infused continuously by patient-controlled epidural analgesia (PCEA)
pump.
� Physical agents such as massage or application of heat or cold.
� Psychosocial techniques (i.e. relaxation, comfort measures)
� Notify the physician if the treatment is not effective, or if patient exhibits any untoward
effects such as hemodynamic instability or respiratory depression. Other reportable
conditions include ineffective pain relief, nausea and vomiting, respiratory depression,
rash/itching, and anaphylactic reaction.

45
Recognizing Barriers to Effective Pain Management
Both patients and providers establish barriers
Provider Barriers
1. Health care professionals often fail to routinely assess and document pain. 2. Due to inadequate training, health care professionals often lack knowledge and skills to assess
and manage pain effectively. 3. Health care professionals may have exaggerated concerns related to the side effects of opiods,
especially about tolerance and addiction. 4. Health care professionals may undertreat pain because of belief in common misconceptions
regarding pain:
o Myth: A patient’s pain perception can accurately be correlated with vital sign changes and evidence of injury.
o Myth: Patients in pain readily express their pain to health care providers. o Myth: Patients of certain cultural, ethnic, or socioeconomic backgrounds consistently
underreport or over-report their pain.
o Myth: Opioids are addictive and a treatment of last resort because of unmanageable side effects.
o Myth: Patients experiencing chronic pain over-report pain because they are addicted to opioids.
o Myth: Older patients, and cognitively impaired patients do not perceive pain as intensely as other patients.
o Myth: If a patient is able to sleep, they must not be in very much pain. o Myth: The goal of chronic pain management is to keep the dose of medication as low as
possible. o Myth: Patients with a history of substance abuse who require IV opioids should never be
allowed to control their own dose of medication (i.e. patient controlled analgesia). o Myth: There is no physiological basis for the moderating effects of emotions on pain
perception.
Patient Barriers
Patients often share similar concerns and all too often seem willing to "tough it out" rather than complain about their pain. A patient may be reluctant to report pain because of a belief in these myths:
o Myth: Severe or chronic pain cannot be effectively controlled. o Myth: Opioids are always addictive and a treatment of last resort ( "I must really be
dying."). o Myth: Pain is always evidence of disease progression. o Myth: It is more admirable or socially acceptable to ignore pain. o Myth: Pain is an unavoidable result of aging or disease. o Myth: Pain is a deserved punishment.
Reference:
University of Michigan Health System
1500 E. Medical Center Drive Ann Arbor, MI 48109 734-936-4000
(c) copyright 2009 Regents of the University of Michigan
Developed & maintained by: Public Relations & Marketing Communications

46
Basic Concepts Of Pain Management
1. The patient is the authority on his own pain.
It is very important to know and recognize the patient’s physiological, psychological, and emotional responses to pain when developing a pain management plan. Without addressing these important issues, it is often difficult to develop an adequate pain treatment plan.
Changes in vital signs do not occur with all patients who are experiencing severe pain. Do not rely on vital signs to determine the severity of a patient’s pain.
Patients with pain, even severe pain, can be distracted from thinking about their pain, and may even be able to sleep. Don’t trust that a patient isn’t having pain because he "looks comfortable." Always ask, and believe the patient’s assessment of his own pain.
2. The patient has the right to expect a rapid and effective response to a complaint of pain.
Treat the pain, reassess frequently, and continue to treat until the patient is comfortable or side effects prevent further treatment. If this occurs, consult a pain expert- don’t leave a patient in pain without a treatment plan.
3. A history and physical examination of the pain is very helpful. Details of the pain’s location, duration, radiation, and character often provide valuable clues about how to treat the pain most effectively.
4. Medications are best given orally for long-term management of pain. For short-term management, like postoperative pain, the IV route is preferred (especially with severe pain).
5. Most pain medications have side effects. Effective pain relief is often accompanied by at least some of these side effects. Be prepared to treat the side effects of opioids if they occur (e.g., nausea or itching).
6. A balanced approach to pain management combines nonpharmacologic and pharmacologic therapy, and frequently utilizes multiple analgesics which work by different mechanisms.
7. Chronic pain patients are usually on a specific regimen of pharmacologic and nonpharmacologic therapy. This regimen must be continued during their hospitalization. Superimposed acute pain (e.g. acute postoperative pain) should be treated with additional opioids.
Reference:
University of Michigan Health System
1500 E. Medical Center Drive Ann Arbor, MI 48109 734-936-4000
(c) copyright 2009 Regents of the University of Michigan
Developed & maintained by: Public Relations & Marketing Communications

47
Fast Fact and Concept #78: Cultural aspects of pain management
Title: Fast Fact and Concept #78: Cultural aspects of pain management
Author(s): Weissman, David E; Gordon, Deborah; Bidar-Sielaff, Shiva
Studies have shown that patients from ethnic minorities and cultures different from the health care professionals treating them, receive inadequate pain management. Each of us has the impression that people from distinct cultures are more or less likely to express their pain experience in a manner that is somewhere between quietly enduring (stoic) or very expressive. Just ask yourself this question-what populations do you regularly encounter that are more likely to be stoic, to be expressive? Now ask yourself a second question-do you treat such patients who are stoic differently from those who are expressive? Ideally, the answer would be no, we should treat everyone the same. However, in truth, we are likely to provide more attentive and compassionate care to the patient who is stoic compared to the expressive patient. This is because the culture of pain in Western Civilization tends to honor the stoic person (no pain = no gain; the football player who makes a touchdown despite a broken leg).
What is it about people that directs them to express their pain experience in different ways? Culture is the framework that directs human behavior in a given situation. The meaning and expression of pain are influenced by people's cultural background. Pain is not just a physiologic response to tissue damage but also includes emotional and behavioral responses based on individuals' past experiences and perceptions of pain (e.g. when you were a child was your expressive behavior tolerated or were you expected to be stoic). Note: Not everyone in every culture conforms to a set of expected behaviors or beliefs, so trying to categorize a person into a particular cultural stereotype (e.g. all North Dakota farmers are stoic) will lead to inaccuracies. On the other hand, knowledge of a patient's culture may help you better understand their behavior.
Even more important than understanding the culture of others, is understanding how your own upbringing effects your attitude about pain. We are likely to believe that our reaction to pain is "normal" and that other reactions are "abnormal". Thus a doctor or nurse from a stoic family may not know how to react to a patient who responds to pain by loud verbal complaints (or discount the pain because of the apparent mismatch between the injury and the verbal response). Even subtle cultural and individual differences, particularly in nonverbal, spoken, and written language, between health care providers and patients impact care.

48
To be Culturally Competent, you must:
• Be aware of your own cultural and family values • Be aware of your personal biases and assumptions about people with different
values than yours • Be aware and accept cultural differences between yourself and individual
patients • Be capable of understanding the dynamics of the difference • Be able to adapt to diversity
You must Listen with empathy to the patient's perception of their pain; Explain your perception of the pain problem; Acknowledge the differences and similarities in perceptions; Recommend treatment; and Negotiate agreement. Questions that staff can use to help assess cultural differences include:
• What do you call your pain? Do you have a name for it? • What do you think caused your [pain]?; Why do you think it started when it did? • What does your [pain] do to you?; How does it work? • How severe is your pain? Will it have a long or short course? • What are the most important results you hope to receive from the treatment? • What are the main problems your [pain] has caused you? • What do you fear most about your [pain]?
References:
Bates M.S., Rankin-Hill, L., & Sanchez-Ayendez, M. (1997) The Effects of the Cultural Context of Health Care on Treatment of and Response to Chronic Pain and Illness. Social Science and Medicine, 45(9). 1433-1447.
Berlin EA Fowkes WC. A teaching framework for cross-cultural health care. WJMed 1983;139:934-938.
Kleinman AK, Eisenberg L, Good B. Culture illness and care. Clinical lessons from Anthropologic and cross-cultural research. Ann Int Med 1978;88:251-258.
Morrison RS, Wallenstein S, Natale DK, Senzel RS, Huang LL. "We don't carry that" - failure of pharmacies in predominantly nonwhite neighborhoods to stock opioid analgesics. N Engl J Med 2000;342:1023-1026.
University of Wisconsin Hospital & Clinics, Pain Patient Care Team.
Copyright/Referencing Information: Users are free to download and distribute Fast Facts for educational purposes only. Citation for referencing. Fast Facts and Concepts #78 Cultural aspects of pain management. Weissman D Gordon D, and Bidar-Sielaff S. October 2002. End-of-Life Physician Education Resource Center www.eperc.mcw.edu.
Creation Date: 10/2002

49
Patient Education – Documentation in the Meditech System
Patient/Family education is an integral portion of the healthcare experience. Provision of
adequate education adds to the patient’s comfort and security and builds trust between the
healthcare provider and patient. MRMC recognizes the importance of patient/family education.
Healthcare providers at MRMC document patient education through the use of the Process
Intervention routine in the Meditech system.
Instructions:
1. Access Meditech’s status board screen. You will use your Meditech code to access
Meditech then choose the nursing menu NUR.MRE. After entering your facility (MRE
for hospital – MNC for Meadows Nursing Center), you will see the status board.
2. Identify your patient. You may do this by pressing (L) and F9 for location to choose the
patient’s location, or press the (D) key on the keyboard to look up the patient by last
name.
3. At the Status Board Screen, select Process Interventions from the right hand side of the
screen. You may click on the Process Interventions tab OR press (I) on the keyboard to
access this function.
4. ADD Intervention: Type (AI) in the verb strip function box and press ENTER.
� The cursor stops in the description field. Enter the intervention to be added by
typing in the first few letters of the intervention (ie. EDU) then F9 key to show all
interventions in related to inquiry.
EDUCATION, AMI 900805
Education, Blood Educ/Consent/Doc 910500
EDUCATION, CHF 900801
Education, Interdisciplinary Pt/Family 900180 – to provide document general education
Education, OB/Newborn Interdisciplinary 900190
EDUCATION, Pneumonia 900804
EDUCATION, Smoking Cessation 900806
EDUCATION: Forensic (Print from FF) 900896
EDUCATION: Lovenox Injections 900899
� Press control key to choose the intervention. Press F12 then File to add the
intervention.
5. DOCUMENT Intervention: Type (DI) in the verb strip function box. Then type in (Y)
for Yes in the OK box on the document intervention screen. The screen will then display
for the user to complete the questions or document as needed. When finished, press F12
to save/file the content.

50
Subject: Blood Glucose (NOVA StatStrip) ------------------------------------------------------------------------------------------------------------ SPECIMEN COLLECTION AND HANDLING: Personal Protective Equipment (PPE) such as gloves, gown and/or goggles must be worn when handling patient blood samples and quality control samples as per MRMC Infection Control Policy. When not analyzing from a lancing device, whole blood should be analyzed within 30 minutes of collection. Storing samples on ice is not recommended. Sodium, lithium, and ammonium heparin are the recommended anticoagulants when sampling with syringes or vacutainer tubes Storage Requirements:
A. Store the StatStrip Glucose Test Strips at 15 to 30° C.
B. Store the StatStrip Glucose Control Solutions at 15 to 30° C. Refer to Springhouse PROCEDURES, Version 2.1 for information on specimen collection. LIMITATIONS AND INTERFERING SUBSTANCES: A. The operating range of the StatStrip Glucose Meter is 20 - 600 mg/dL or 1.1 - 33.3 mmol/L. For samples exhibiting values at or above 600 mg/dL or 33.3 mmol/L, the screen displays Hi. B. All values in the critical ranges of less than 35 mg/dl and greater than 525mg/dl are repeated and/or a sample sent to the Laboratory for confirmation. C. When quality control results are outside the expected range, the meter is cleaned and the test is repeated. D. If needed, sodium, lithium, and ammonium heparin are the recommended
anticoagulants for use with the StatStrip Glucose Meter. 1. Depending on the amount of heparin used in the collection syringe and whether it is filled to capacity with blood, the concentrations of heparin may be 20 International Units per mL to over 100 International Units per mL. When liquid heparin is present in excess, it may cause dilution errors. 2. A lyophilized lithium heparin giving a final concentration in blood of not more than 20 International Units per mL is acceptable.
E. EDTA, citrate, oxalate, and sodium fluoride are not recommended for use.

51
F. Glucose Interferences: The StatStrip Glucose Meter exhibits no interference from the following substances up to the following concentration levels: Tested Tested
Interfering Substances Concentration Level Acetaminophen 10.0 mg/dL Ascorbic Acid 10.0 mg/dL Bilirubin 15.0 mg/dL Cholesterol 500.0 mg/dL Creatinine 6.0 mg/dL Dopamine 10.0 mg/dL Ephedrine 0.9 mg/dL D(+) Galactose 350.0 mg/dL Hematocrit (RBC) 30% - 60% Ibuprofen 48.0 mg/dL L-Dopa 100.0 mg/dL D(+) Maltose Monohydrate 240.0 mg/dL D(+) Maltotetraose 240.0 mg/dL D(+) Maltotetriose 240.0 mg/dL Methyl-Dopa 1.0 mg/dL Oxygen All Concentrations Salicylate 30.0 mg/dL Tetracycline 30.0 mg/dL Tolazamide 15.0 mg/dL Tolbutamide 45.0 mg/dL Triglycerides 750.0 mg/dL Uric Acid 20.0 mg/dL
Troubleshooting: Out-of-range control test results Repeat the test for that control solution to make sure that the operator Meets the conditions in this checklist:
A. Scan the correct lot number for the control solutions. B. Check storage temperatures:
1. Store the StatStrip Glucose Test Strips at 15 to 30° C.
2. Store the StatStrip Glucose Control Solutions at 15 to 30° C. If test results are out of range despite the above criteria, repeat the test using a new box of control solutions and/or a new test strip. If the results are still out of range, remove monitor from use and send (along with explanation) to Jennifer Sutton (Patient Care Services) for service or return to manufacture.

52
Display Screen Alerts
� Battery Low – Change the battery and/or place the meter onto the Charging Station.
� Test Strip was removed – The test has been cancelled.
� Temperature – Meter will only work within the temperature range of 59 degrees F to 104 degrees F (15 degrees C to 40 degrees C).
� Bad Sample – Insert a new strip and rerun the test.
� Bad Strip – Occurs after insertion of strip or occurs during analysis. Insert another strip.
� Flow Error – Either insufficient sample was put onto the strip to fill the measuring well or the sample was applies incorrectly. Redo the test with a new strip.
� Transfer Failed – The meter is unable to connect to the transfer computer. Notify Jennifer Sutton (check the network settings and/or network status). The second notification is due to the meter being removed before data transfer was complete. Re-dock meter to complete data transfer. DEPARTMENTAL RESPONSIBILITIES REGARDING BLOOD GLUCOSE MONITORING: Nursing Responsibilities: Nursing Units are responsible for the following: A. Control Testing B. Patient Testing C. Maintenance: cleaning and batteries D. Proficiency Testing E. Orientation to the NOVA StatStrip Blood Glucose Monitor and ongoing competency assessments. F. Linearity Testing G. System Setup H. Data Upload and Data Management. I. Proficiency Testing
I. PROCEDURE: I. Control Test: A. Control testing is performed once per 24 hours in order to verify the performance of the StatStrip Monitor and StatStrip Test Strips. The
StatStrip Glucose Control Solutions have known glucose values that are used to confirm that the meter and test strips are working correctly. The control solution test results should fall within the range of results printed on the control solution insert sheets. B. Additional control tests are performed when blood glucose results are questioned (and with a change in StatStrips Test Strips lot number). C. Monthly, the Laboratory prints and reviews the quality controls to observe for shifts or trends.

53
D. Control solution must be dated upon opening a new bottle. Dispose of unused solution after 90 days. II. Observe the following guidelines to obtain optimal quality control result while using the NOVA StatStrip system. A. Use only StatStrip Glucose Control Solutions to verify the performance or the StatStrip Test Strips and the NOVA StatStrip Monitor. Date new control solution on the designated area of the bottle upon opening. B. Discard all unused, opened solutions 90 days after opening. Document current date on new bottle at time of first use. Each bottle of control solution is stable for 90 days after opening (replace cap tightly after each use). Do not use control solutions after the expiration date printed on the bottles and on the box. C. Discard all unused, opened test strips 90 days after opening. Do no use test strips after expiration date printed on bottles and on the box. D. Invert the control solution bottle several times to ensure thorough mixing before use. E. Invert and tap the capped control solution bottle to remove air bubbles from the nozzle of the bottle. F. Perform the quality control test following the instructions on pages QR-3 through QR-10 in the NOVA Quick Reference Guide. G. The glucometer cannot used to determine patient's glucose values without current, correct control testing. III. Patient Test: A. The NOVA StatStrip Glucose Monitor accepts the patient's wristband bar code only. To scan the Patient ID, press the Scan soft key on the screen. Press one of the side Scan buttons. Then scan the patient’s barcode ID with the bottom of the meter. B. Blood glucose monitoring is to be performed only on fresh whole blood obtained from a capillary source, venous or arterial blood sample (or from a collection tube containing sodium heparin, lithium heparin - DO NOT use collection tubes that contain EDTA, fluoride or oxalate). C. The test strip lot number will automatically be entered into the glucometer. Verify the number in the glucometer and the number on the test strip bottle are the same. D. The Insert Strip screen displays. Insert a test strip as shown on the meter screen. E. Perform the patient test following the instructions on pages QR-12 through QR- 21 in the NOVA Quick Reference Guide (copies of pages are attached to this policy). F. WARNING – The test strip must fill completely upon touching the blood droplet. If the test strip does not fill completely, do not touch the test strip to the blood droplet a second time. Discard the test strip and repeat the test with a new strip.

54
G. The test result will appear in 6 seconds.
1. NOTE: Do not remove the test strip while the countdown is in progress.
2. NOTE: A single up arrow displays for abnormal high result and 2 up arrows for critical high value. H. To accept the result, press the Accept soft key. To reject the result, press the Reject soft key. To add a comment, press the Comment soft key. All data is stored into memory and downloaded when monitor is docked I. Document result in the patient's medical record: on the Diabetic Flow Sheet and on the Medical Administration Record (if sliding scale insulin is administered). IV. Maintenance of the NOVA StatStrip monitor: A. Cleaning the Exterior Surface
1. Clean the meter with a cloth that has been dampened with a 10% bleach solution or disinfectant wipe. Immediately follow with a water-dampened cloth to remove all cleaning residue. Dry thoroughly with a soft cloth or lint-free tissue.
a. CAUTION: DO NOT immerse the meter or hold the meter under running water. b. CAUTION: DO NOT spray the meter with a disinfectant solution.
B. Docking/Charging Station When the meter is not in use, place it into the Docking/Charging Station. This enables the meter to stay fully charged and connects the meter to the computer network. When the Battery LOW symbol displays on the screen, place the meter into the Docking/Charging Station.
1. The left, green light is on if the station is connected to the network. 2. The middle, green light is on if data is transferring 3. The right light is green for fully charged or amber for charging.
C. Changing the Battery 1. If you have a spare fully charged battery, it can be changed to allow for
continuous operation. a. Replace the battery with NOVA P/N 42215 only. Using another battery may present a risk of fire or
explosion. Batteries not holding a charge are sent to biomedical. 2. Press the Power button to enter the Sleep Mode. This will allow the operator
approximately 20 seconds to change the battery and not lose date/time settings.
a. NOTE: If it takes longer than 20 seconds to change the battery, power up the meter, re-login, and set the date and time (contact Jennifer Sutton for assistance setting date/time).

55
3. Push down on the 2 cover latches to release the cover. Take the battery cover off the back of the meter. 4. Push up on the battery latch. Remove the drained battery. 5. Replace with a fully charged battery.
a. The battery is keyed to allow only insertion from bottom first then push push in top.
6. Replace the battery cover. 7. Place the drained battery into the Charging Station.
D. Record monitor cleaning and battery change on the Maintenance Log. V. Proficiency Testing The Laboratory performs proficiency Testing. STAFF ORIENTATION/COMPETENCY ASSESSMENTS A nurse educator, in conjunction with the unit director, conducts orientation. Monitor orientation includes:
A. Introduction to the monitor and accompanying manual B. Overview and hands on performance of control testing C. Overview of patient testing D. Monitor maintenance (cleaning and batteries) E. Review of blood glucose monitoring policy
Competency assessment is performed annually. Annual assessments include either a written test or proficiency testing. Ongoing education occurs as the time questions or problems are identified. EQUIPMENT PERFORMANCE EVALUATION Patient Care Services performs linearity testing:
A. Before a blood glucose monitor is put into use. B. Anytime the blood glucose monitor has been repaired or the meter cradle has been replaced. C. When controls begin to reflect an unusual trend or are consistently
out of range. D. At least every 6 months.

56
Complete policies may be found on the Meadows Regional Medical
Center “Shared Drive” throughout the facility.


![ISPE - Aseptic Filling Line - NJChapterPaulMelamudPres[1]](https://img.pdfslide.tips/doc/110x75/577c7ab81a28abe054960133/ispe-aseptic-filling-line-njchapterpaulmelamudpres1.jpg)