Embed Size (px)
Citation preview

1U Rail Installation Guide

2
Contents
Precautions . . . . . . . . . . . . . . . . . . . . . . . . . . . . . . . . . . . . . . . . . . . 3
Install the System into a Rack . . . . . . . . . . . . . . . . . . . . . . . . . . . . . 4

PrecautionsFollow these rack-mount precautions:
• Ensure that the leveling jacks on the bottom of the rack are fully extended to the floor with the full weight of the rack resting on them.
• In single-rack installations, stabilizers should be attached to the rack. In multiple-rack installations, the racks should be coupled together.
• Always make sure that the rack is stable before extending a component from the rack.
• You should extend only one component at a time; extending two or more simultaneously might cause the rack to become unstable.
• Determine the placement of each component in the rack before you install the rails.
• Install the heaviest components on the bottom of the rack first and work up.
• Use a regulating uninterruptible power supply (UPS) to protect the product family from power surges and voltage spikes and to keep your system operating in case of a power failure.
• Allow any hot-plug drives and power supply modules to cool before touching them.
• Always keep the rack’s front door and all panels and components on the servers closed when not servicing them to maintain proper cooling.
3

Install the System into a RackWhen installing the system into a rack, make sure that the middle rail is securely locked in the extended position.
Warning: A storage system with installed drives can weigh more than 30 pounds. To avoid injury or damage to the equipment, perform the rack-mount installation with appropriate assistance.
Read these instructions in their entirety before you begin.
To install the system into a rack:1. Pull out the inner and middle rails until they are securely locked in
the extended position.
Inner rail
Middle rail
4
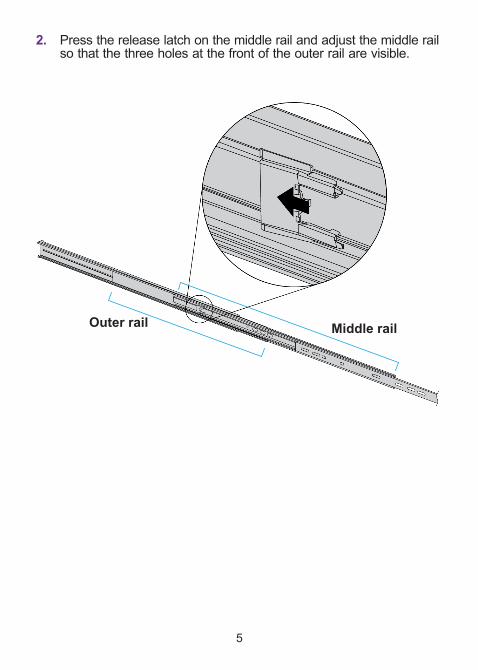
2. Press the release latch on the middle rail and adjust the middle rail so that the three holes at the front of the outer rail are visible.
Outer rail Middle rail
5

3. Attach the front bracket to the outer rail.a Place the front bracket against the outer rail so that the first
hole on the outer rail aligns with the sixth hole on the bracket.b Secure the front bracket and outer rail through the aligned
holes using a nut and bolt as shown.
Frontbracket
Outer rail
6

c Align the long oval hole on the front bracket with the third hole on the outer rail.
d Secure the front bracket and outer rail through the aligned holes using a nut and bolt as shown.
7
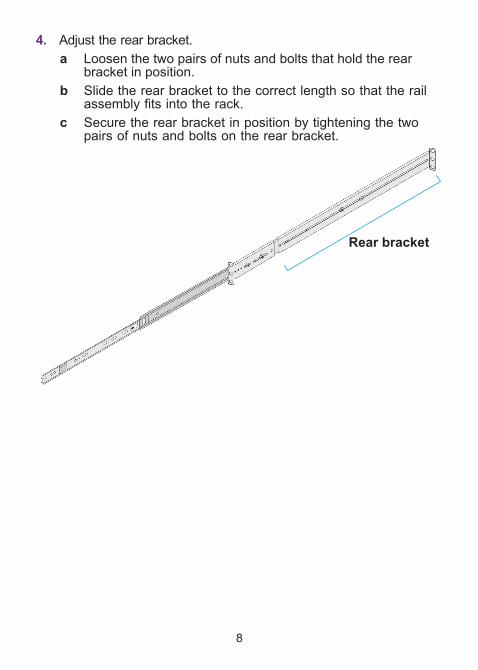
4. Adjust the rear bracket.a Loosen the two pairs of nuts and bolts that hold the rear
bracket in position.b Slide the rear bracket to the correct length so that the rail
assembly fits into the rack.c Secure the rear bracket in position by tightening the two
pairs of nuts and bolts on the rear bracket.
Rear bracket
Rear bracket
8
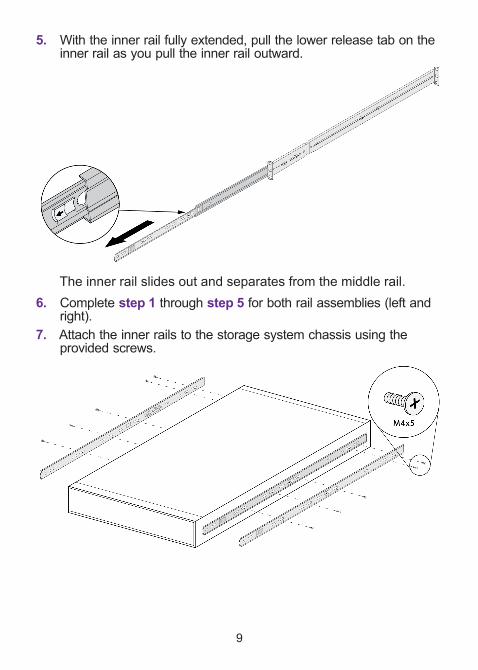
5. With the inner rail fully extended, pull the lower release tab on the inner rail as you pull the inner rail outward.
The inner rail slides out and separates from the middle rail.6. Complete step 1 through step 5 for both rail assemblies (left and
right).7. Attach the inner rails to the storage system chassis using the
provided screws.
9
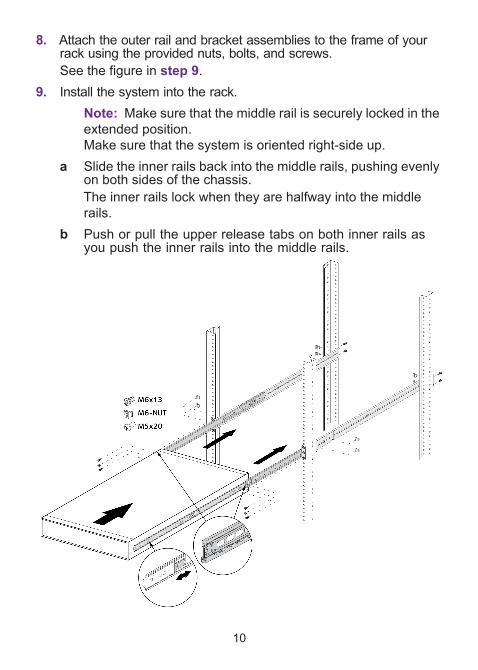
8. Attach the outer rail and bracket assemblies to the frame of your rack using the provided nuts, bolts, and screws.See the figure in step 9.
9. Install the system into the rack.Note: Make sure that the middle rail is securely locked in the extended position. Make sure that the system is oriented right-side up.
a Slide the inner rails back into the middle rails, pushing evenly on both sides of the chassis. The inner rails lock when they are halfway into the middle rails.
b Push or pull the upper release tabs on both inner rails as you push the inner rails into the middle rails.
10

The inner rails continue sliding into the middle rails.c Continue pushing the chassis into the rack until it is
completely supported by the outer rail and bracket assemblies.
10. (Optional) Secure the system in position using the screws attached to the front ears of the chassis.
11

NETGEAR, Inc.350 East Plumeria Drive
San Jose, CA 95134 USA
August 2013
Support
Thank you for purchasing this NETGEAR product.
After installing your device, locate the serial number on the label of your product and use it to register your product at https://my.netgear.com. You must register your product before you can use NETGEAR telephone support. NETGEAR recommends registering your product through the NETGEAR website.
For product updates, additional documentation, and support, visit http://support.netgear.com.
NETGEAR recommends that you use only the official NETGEAR support resources.
You can get the user manual online at http://downloadcenter.netgear.com or through a link in the product’s user interface.
TrademarksNETGEAR, the NETGEAR logo, and Connect with Innovation are trademarks and/or registered trademarks of NETGEAR, Inc. and/or its subsidiaries in the United States and/or other countries. Information is subject to change without notice. © NETGEAR, Inc. All rights reserved.
ComplianceFor the current EU Declaration of Conformity, visit http://support.netgear.com/app/answers/detail/a_id/11621/.