Embed Size (px)
Citation preview
1
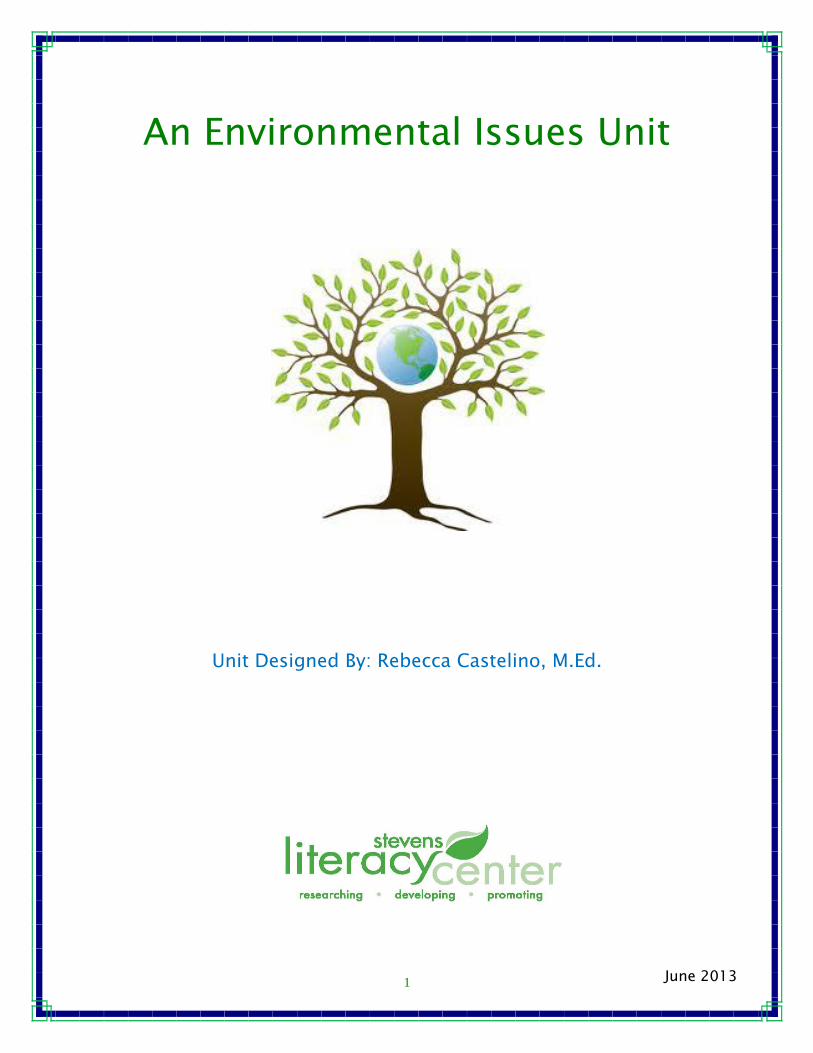
An Environmental Issues Unit
Unit Designed By: Rebecca Castelino, M.Ed.
June 2013
2
A Unit of Study for Adult Learners
Table of Contents Key features of this unit…………………………………………………………….. 2
Science Objectives for this unit…………………………………………………………. 3
Graphic Organizer for the unit………………………………………………………... 4
Lesson 1: Introduction to Environmental Issues……………………………………….. 5
Lesson 2: Pollution– Building a water filtration model………………………………… 10
Lesson 3: Pollution- Analyzing local water and air quality reports………………….. .. 15
Lesson 4: Pollution– An acid rain investigation……………………………………….. 18
Lesson 5: Energy Problems– Defending a position on global warming or fracking…... 24
Lesson 6: Energy Solutions– A bio-fuels investigation……………………………….. 28
Lesson 7: Energy Solutions- Explaining the pros and cons of various energy sources.. 31
Lesson 8: Conservation - Comparing ecological footprints…………………………… 34
Lesson 9: Conservation - Teaching others about recycling, reducing, and reusing……. 37
Lesson 10: Culminating Activities……………………………………………………… 38
3
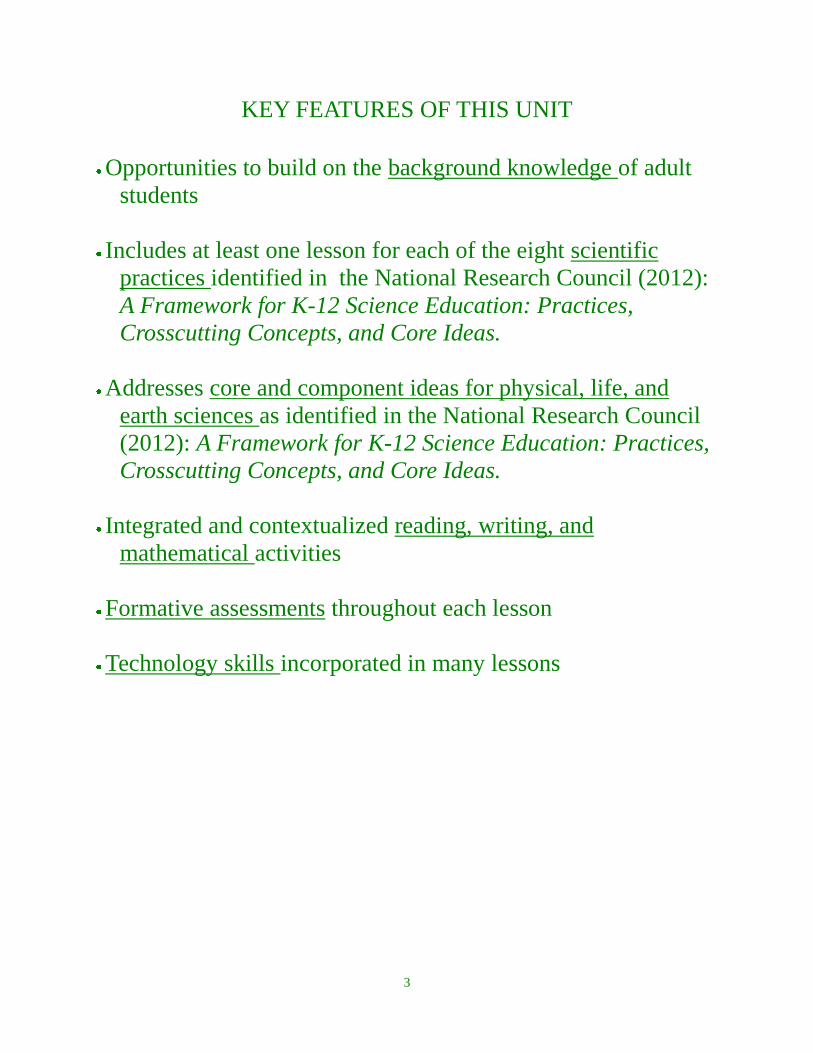
KEY FEATURES OF THIS UNIT
Opportunities to build on the background knowledge of adult
students
Includes at least one lesson for each of the eight scientific
practices identified in the National Research Council (2012):
A Framework for K-12 Science Education: Practices,
Crosscutting Concepts, and Core Ideas.
Addresses core and component ideas for physical, life, and
earth sciences as identified in the National Research Council
(2012): A Framework for K-12 Science Education: Practices,
Crosscutting Concepts, and Core Ideas.
Integrated and contextualized reading, writing, and
mathematical activities
Formative assessments throughout each lesson
Technology skills incorporated in many lessons
4
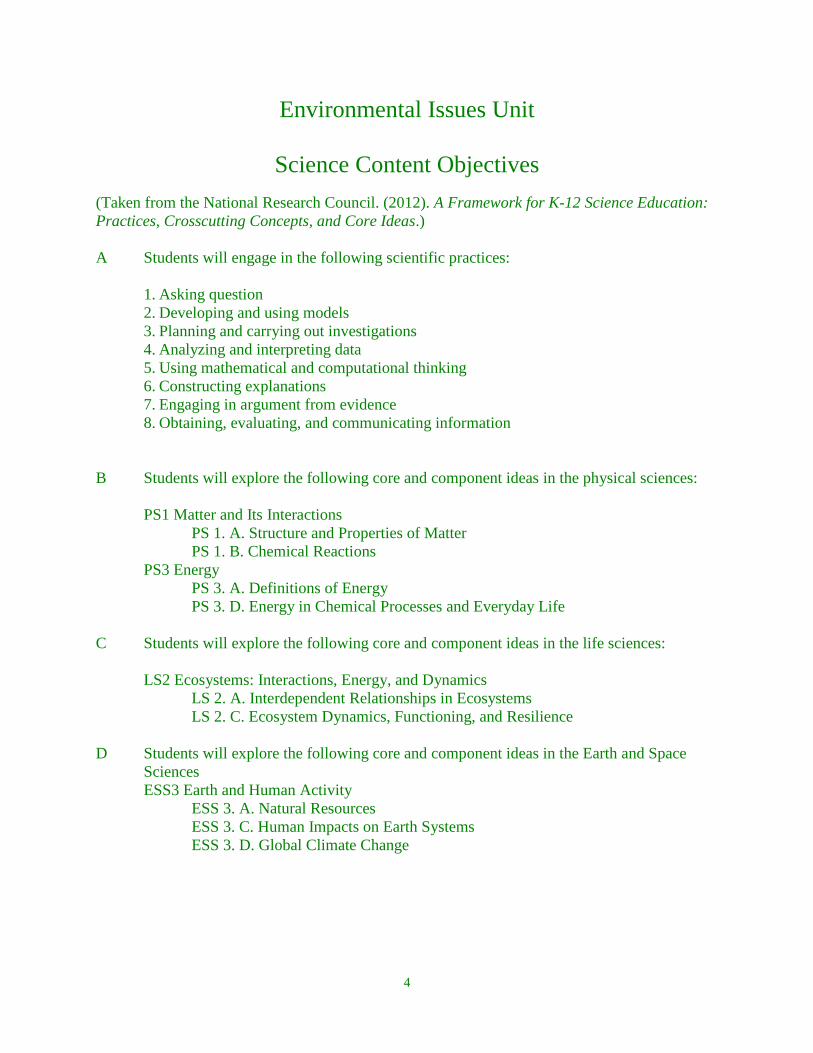
Environmental Issues Unit
Science Content Objectives
(Taken from the National Research Council. (2012). A Framework for K-12 Science Education:
Practices, Crosscutting Concepts, and Core Ideas.)
A Students will engage in the following scientific practices:
1. Asking question
2. Developing and using models
3. Planning and carrying out investigations
4. Analyzing and interpreting data
5. Using mathematical and computational thinking
6. Constructing explanations
7. Engaging in argument from evidence
8. Obtaining, evaluating, and communicating information
B Students will explore the following core and component ideas in the physical sciences:
PS1 Matter and Its Interactions
PS 1. A. Structure and Properties of Matter
PS 1. B. Chemical Reactions
PS3 Energy
PS 3. A. Definitions of Energy
PS 3. D. Energy in Chemical Processes and Everyday Life
C Students will explore the following core and component ideas in the life sciences:
LS2 Ecosystems: Interactions, Energy, and Dynamics
LS 2. A. Interdependent Relationships in Ecosystems
LS 2. C. Ecosystem Dynamics, Functioning, and Resilience
D Students will explore the following core and component ideas in the Earth and Space
Sciences
ESS3 Earth and Human Activity
ESS 3. A. Natural Resources
ESS 3. C. Human Impacts on Earth Systems
ESS 3. D. Global Climate Change
5
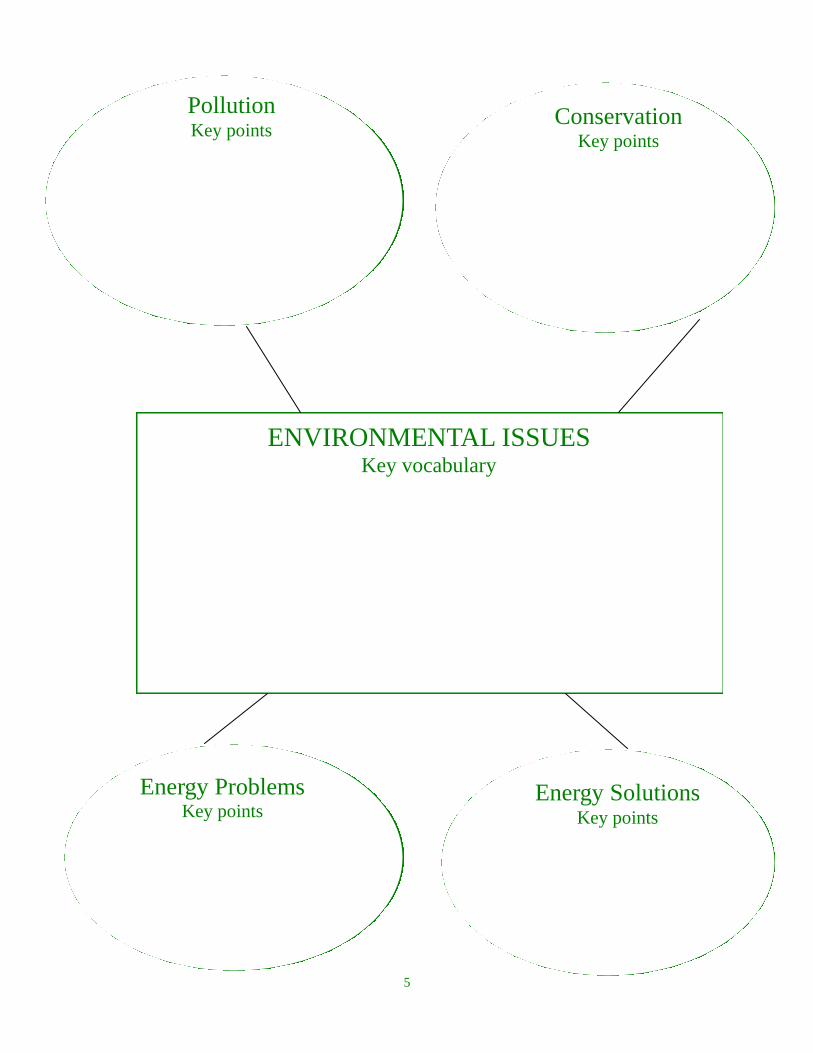
Pollution Key points
Conservation Key points
ENVIRONMENTAL ISSUES Key vocabulary
Energy Problems Key points
Energy Solutions Key points
6
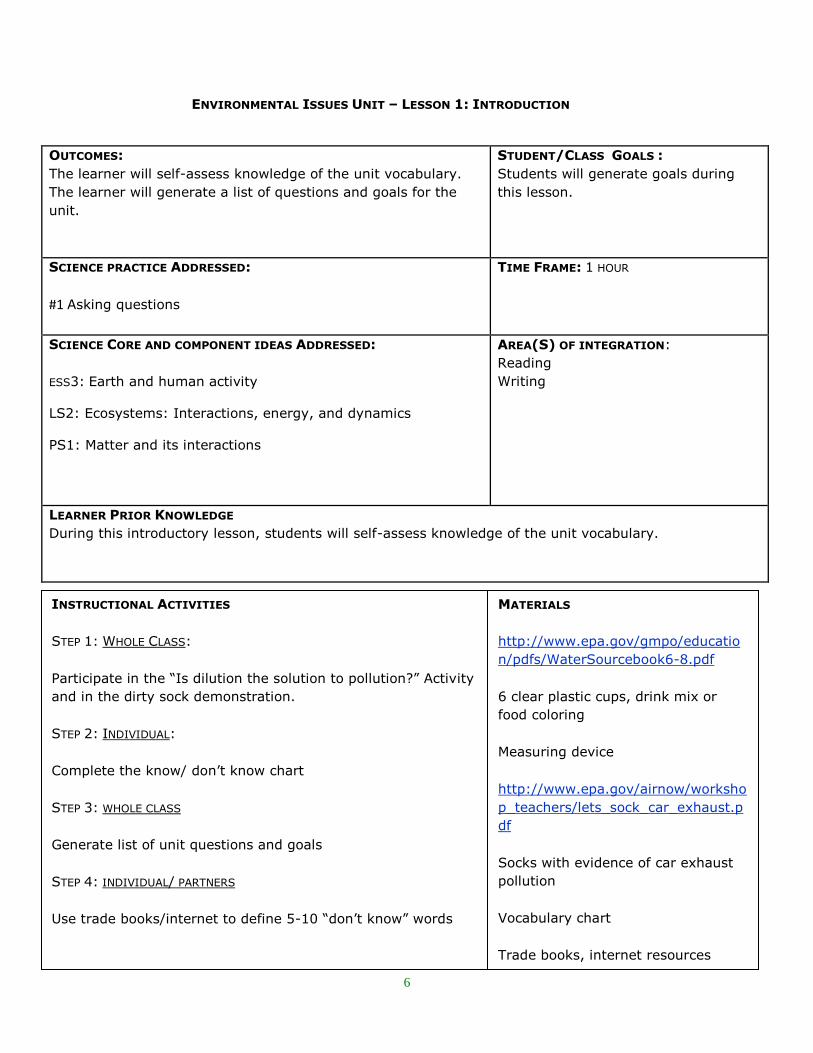
ENVIRONMENTAL ISSUES UNIT – LESSON 1: INTRODUCTION
OUTCOMES:
The learner will self-assess knowledge of the unit vocabulary.
The learner will generate a list of questions and goals for the
unit.
STUDENT/CLASS GOALS : Students will generate goals during
this lesson.
SCIENCE PRACTICE ADDRESSED:
#1 Asking questions
TIME FRAME: 1 HOUR
SCIENCE CORE AND COMPONENT IDEAS ADDRESSED:
ESS3: Earth and human activity
LS2: Ecosystems: Interactions, energy, and dynamics
PS1: Matter and its interactions
AREA(S) OF INTEGRATION:
Reading
Writing
LEARNER PRIOR KNOWLEDGE
During this introductory lesson, students will self-assess knowledge of the unit vocabulary.
INSTRUCTIONAL ACTIVITIES
STEP 1: WHOLE CLASS:
Participate in the “Is dilution the solution to pollution?” Activity
and in the dirty sock demonstration.
STEP 2: INDIVIDUAL:
Complete the know/ don’t know chart
STEP 3: WHOLE CLASS
Generate list of unit questions and goals
STEP 4: INDIVIDUAL/ PARTNERS
Use trade books/internet to define 5-10 “don’t know” words
MATERIALS
http://www.epa.gov/gmpo/educatio
n/pdfs/WaterSourcebook6-8.pdf
6 clear plastic cups, drink mix or
food coloring
Measuring device
http://www.epa.gov/airnow/worksho
p_teachers/lets_sock_car_exhaust.p
df
Socks with evidence of car exhaust
pollution
Vocabulary chart
Trade books, internet resources
7
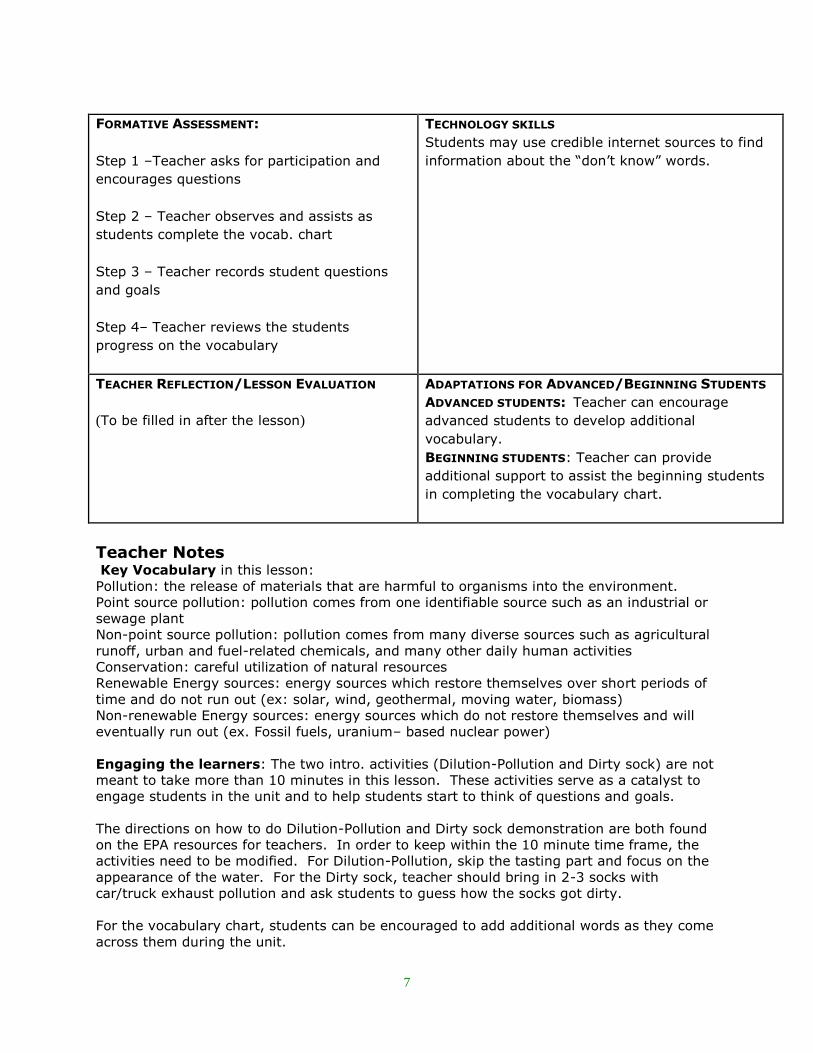
FORMATIVE ASSESSMENT:
Step 1 –Teacher asks for participation and
encourages questions
Step 2 – Teacher observes and assists as
students complete the vocab. chart
Step 3 – Teacher records student questions
and goals
Step 4– Teacher reviews the students
progress on the vocabulary
TECHNOLOGY SKILLS
Students may use credible internet sources to find
information about the “don’t know” words.
TEACHER REFLECTION/LESSON EVALUATION
(To be filled in after the lesson)
ADAPTATIONS FOR ADVANCED/BEGINNING STUDENTS
ADVANCED STUDENTS: Teacher can encourage
advanced students to develop additional
vocabulary.
BEGINNING STUDENTS: Teacher can provide
additional support to assist the beginning students
in completing the vocabulary chart.
Teacher Notes Key Vocabulary in this lesson:
Pollution: the release of materials that are harmful to organisms into the environment.
Point source pollution: pollution comes from one identifiable source such as an industrial or
sewage plant
Non-point source pollution: pollution comes from many diverse sources such as agricultural
runoff, urban and fuel-related chemicals, and many other daily human activities
Conservation: careful utilization of natural resources
Renewable Energy sources: energy sources which restore themselves over short periods of
time and do not run out (ex: solar, wind, geothermal, moving water, biomass)
Non-renewable Energy sources: energy sources which do not restore themselves and will
eventually run out (ex. Fossil fuels, uranium– based nuclear power)
Engaging the learners: The two intro. activities (Dilution-Pollution and Dirty sock) are not
meant to take more than 10 minutes in this lesson. These activities serve as a catalyst to
engage students in the unit and to help students start to think of questions and goals.
The directions on how to do Dilution-Pollution and Dirty sock demonstration are both found
on the EPA resources for teachers. In order to keep within the 10 minute time frame, the
activities need to be modified. For Dilution-Pollution, skip the tasting part and focus on the
appearance of the water. For the Dirty sock, teacher should bring in 2-3 socks with
car/truck exhaust pollution and ask students to guess how the socks got dirty.
For the vocabulary chart, students can be encouraged to add additional words as they come
across them during the unit.
8
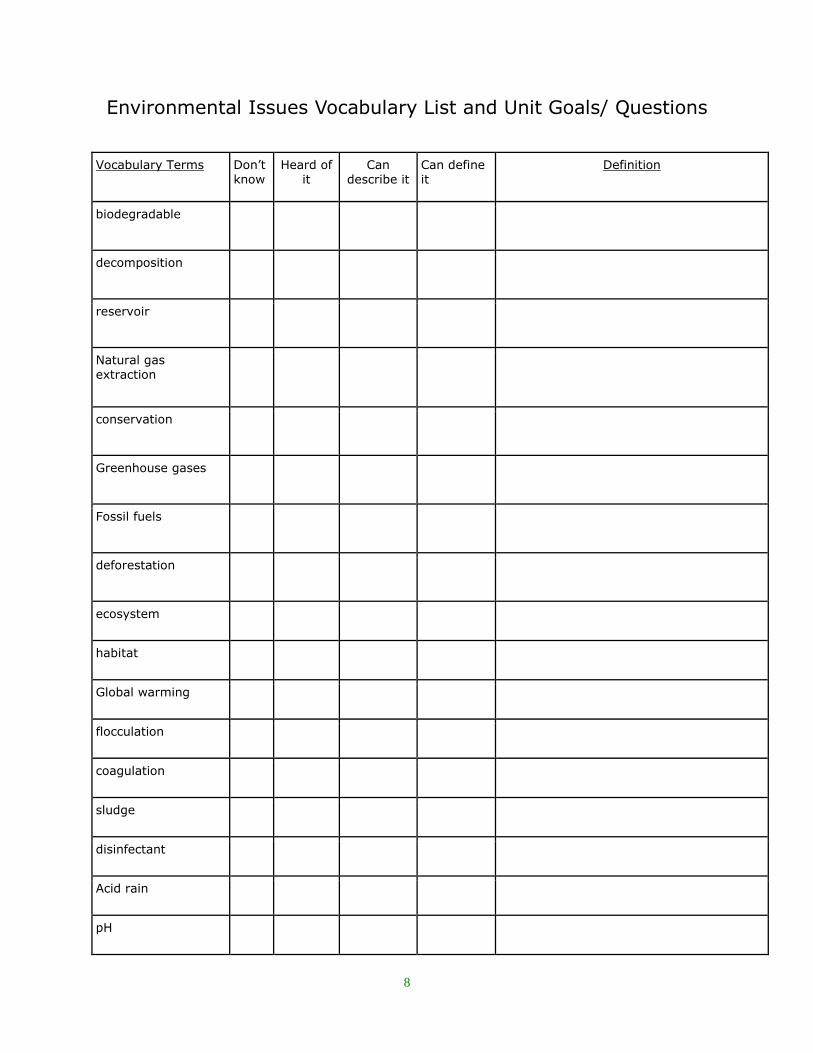
Environmental Issues Vocabulary List and Unit Goals/ Questions
Vocabulary Terms Don’t know
Heard of it
Can describe it
Can define it
Definition
biodegradable
decomposition
reservoir
Natural gas extraction
conservation
Greenhouse gases
Fossil fuels
deforestation
ecosystem
habitat
Global warming
flocculation
coagulation
sludge
disinfectant
Acid rain
pH
9
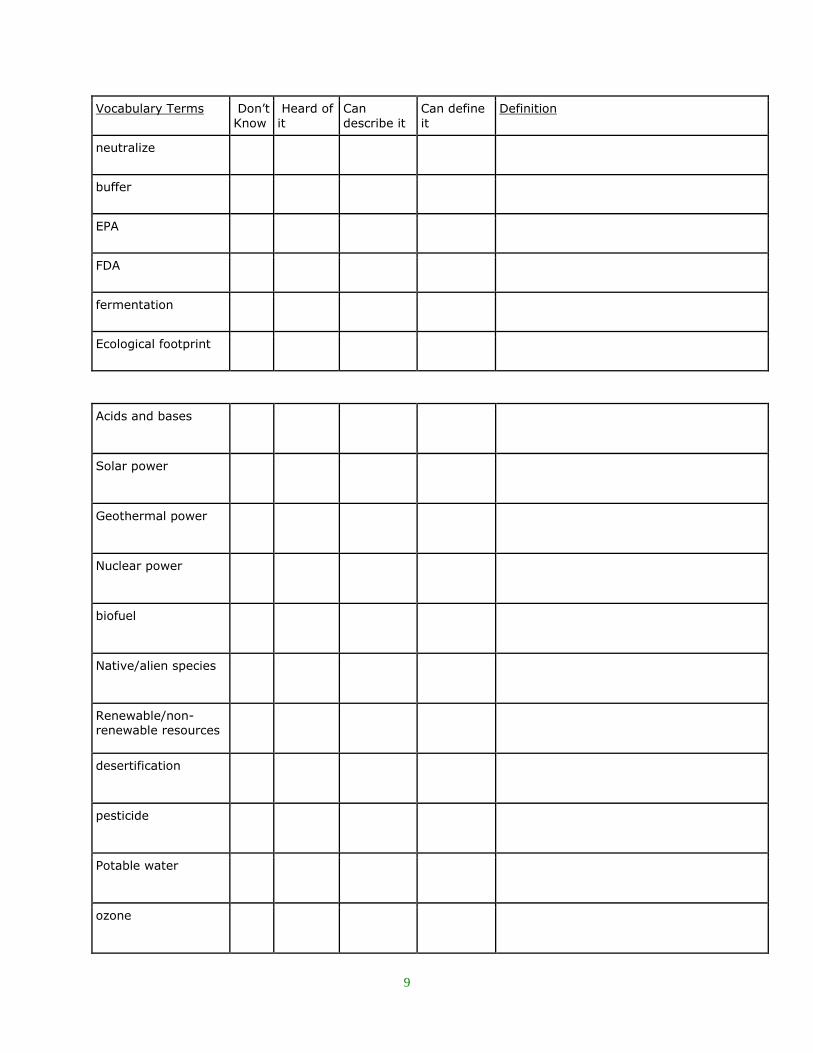
Vocabulary Terms Don’t
Know
Heard of
it
Can
describe it
Can define
it
Definition
neutralize
buffer
EPA
FDA
fermentation
Ecological footprint
Acids and bases
Solar power
Geothermal power
Nuclear power
biofuel
Native/alien species
Renewable/non-
renewable resources
desertification
pesticide
Potable water
ozone
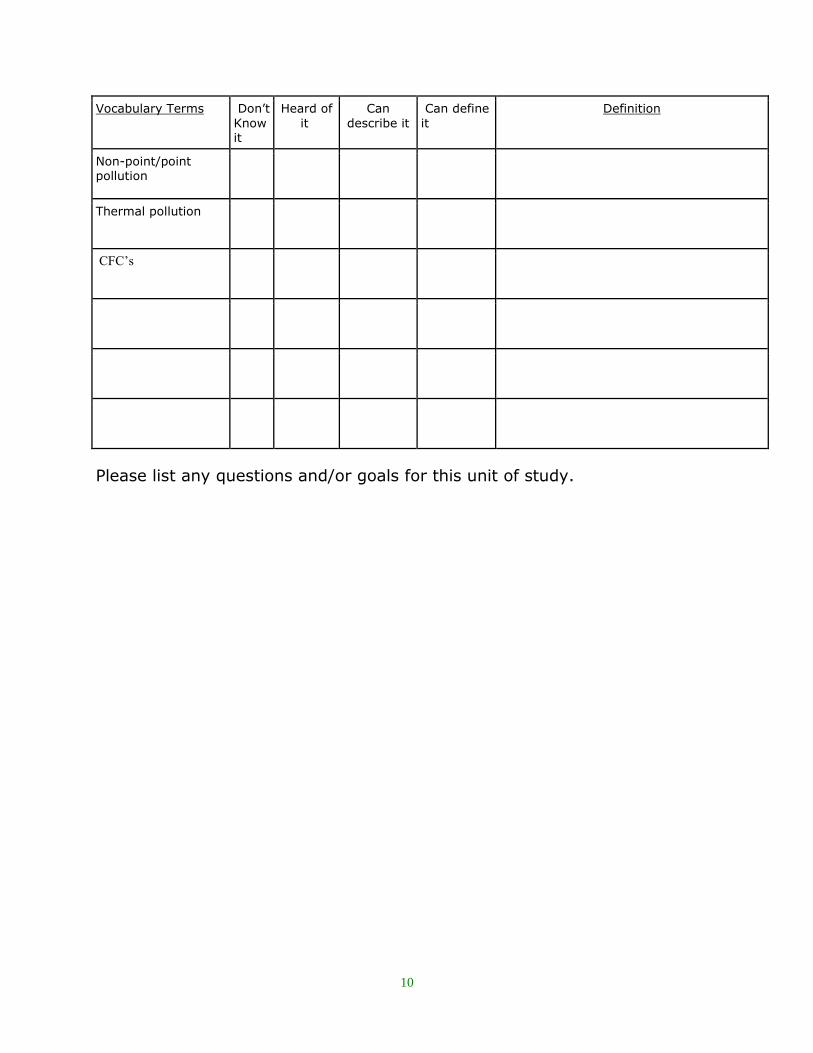
10
Vocabulary Terms Don’t
Know it
Heard of
it
Can
describe it
Can define
it
Definition
Non-point/point pollution
Thermal pollution
CFC’s
Please list any questions and/or goals for this unit of study.
11
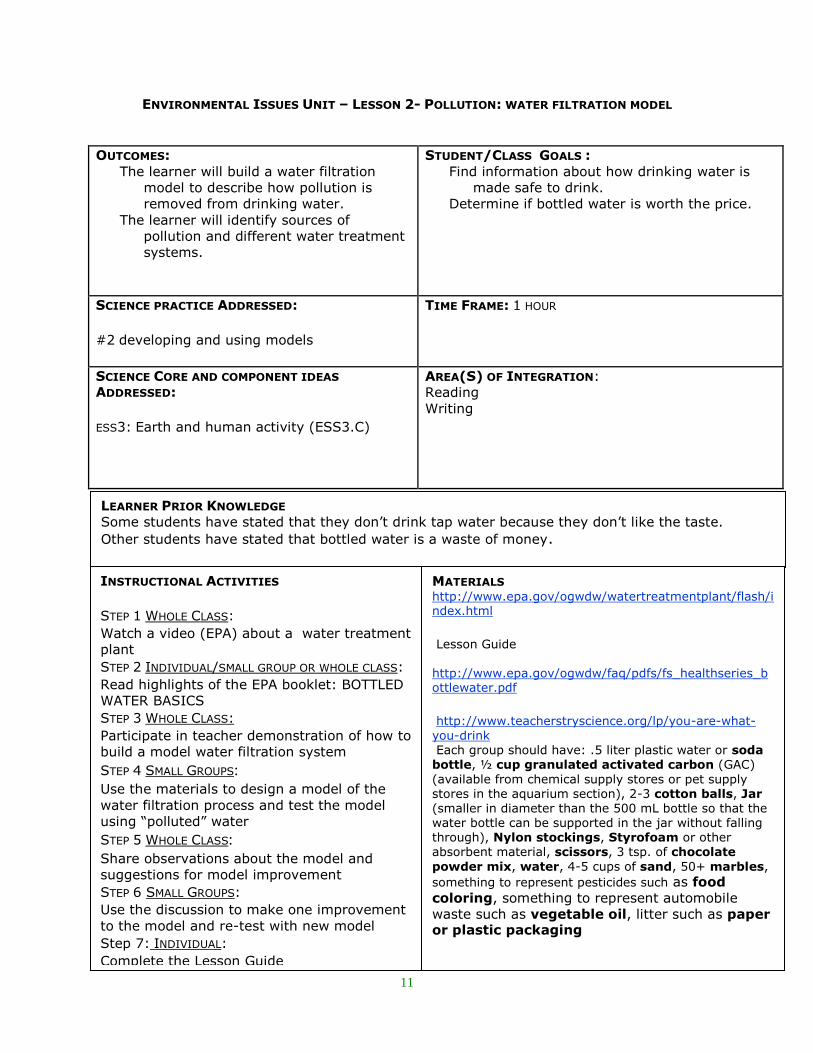
ENVIRONMENTAL ISSUES UNIT – LESSON 2- POLLUTION: WATER FILTRATION MODEL
OUTCOMES: The learner will build a water filtration
model to describe how pollution is
removed from drinking water. The learner will identify sources of
pollution and different water treatment
systems.
STUDENT/CLASS GOALS : Find information about how drinking water is
made safe to drink. Determine if bottled water is worth the price.
SCIENCE PRACTICE ADDRESSED:
#2 developing and using models
TIME FRAME: 1 HOUR
SCIENCE CORE AND COMPONENT IDEAS
ADDRESSED:
ESS3: Earth and human activity (ESS3.C)
AREA(S) OF INTEGRATION: Reading Writing
LEARNER PRIOR KNOWLEDGE Some students have stated that they don’t drink tap water because they don’t like the taste. Other students have stated that bottled water is a waste of money.
INSTRUCTIONAL ACTIVITIES
STEP 1 WHOLE CLASS:
Watch a video (EPA) about a water treatment
plant
STEP 2 INDIVIDUAL/SMALL GROUP OR WHOLE CLASS:
Read highlights of the EPA booklet: BOTTLED
WATER BASICS
STEP 3 WHOLE CLASS:
Participate in teacher demonstration of how to
build a model water filtration system
STEP 4 SMALL GROUPS:
Use the materials to design a model of the
water filtration process and test the model
using “polluted” water
STEP 5 WHOLE CLASS:
Share observations about the model and
suggestions for model improvement
STEP 6 SMALL GROUPS:
Use the discussion to make one improvement
to the model and re-test with new model
Step 7: INDIVIDUAL:
Complete the Lesson Guide
MATERIALS http://www.epa.gov/ogwdw/watertreatmentplant/flash/index.html
Lesson Guide http://www.epa.gov/ogwdw/faq/pdfs/fs_healthseries_bottlewater.pdf
http://www.teacherstryscience.org/lp/you-are-what-
you-drink Each group should have: .5 liter plastic water or soda bottle, ½ cup granulated activated carbon (GAC)
(available from chemical supply stores or pet supply stores in the aquarium section), 2-3 cotton balls, Jar (smaller in diameter than the 500 mL bottle so that the water bottle can be supported in the jar without falling through), Nylon stockings, Styrofoam or other absorbent material, scissors, 3 tsp. of chocolate
powder mix, water, 4-5 cups of sand, 50+ marbles,
something to represent pesticides such as food
coloring, something to represent automobile
waste such as vegetable oil, litter such as paper or plastic packaging
12
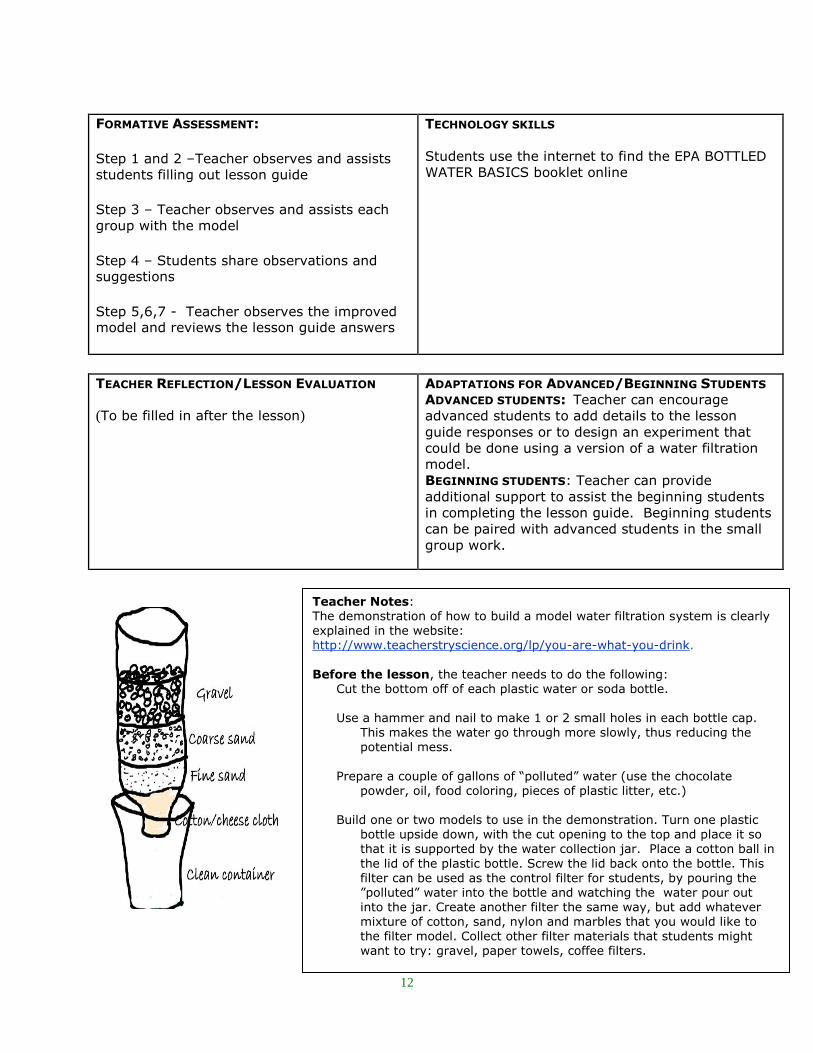
FORMATIVE ASSESSMENT:
Step 1 and 2 –Teacher observes and assists
students filling out lesson guide
Step 3 – Teacher observes and assists each
group with the model
Step 4 – Students share observations and suggestions
Step 5,6,7 - Teacher observes the improved model and reviews the lesson guide answers
TECHNOLOGY SKILLS Students use the internet to find the EPA BOTTLED
WATER BASICS booklet online
TEACHER REFLECTION/LESSON EVALUATION (To be filled in after the lesson)
ADAPTATIONS FOR ADVANCED/BEGINNING STUDENTS ADVANCED STUDENTS: Teacher can encourage
advanced students to add details to the lesson
guide responses or to design an experiment that
could be done using a version of a water filtration
model. BEGINNING STUDENTS: Teacher can provide
additional support to assist the beginning students
in completing the lesson guide. Beginning students
can be paired with advanced students in the small
group work.
Teacher Notes: The demonstration of how to build a model water filtration system is clearly explained in the website: http://www.teacherstryscience.org/lp/you-are-what-you-drink.
Before the lesson, the teacher needs to do the following: Cut the bottom off of each plastic water or soda bottle. Use a hammer and nail to make 1 or 2 small holes in each bottle cap.
This makes the water go through more slowly, thus reducing the potential mess.
Prepare a couple of gallons of “polluted” water (use the chocolate powder, oil, food coloring, pieces of plastic litter, etc.)
Build one or two models to use in the demonstration. Turn one plastic
bottle upside down, with the cut opening to the top and place it so that it is supported by the water collection jar. Place a cotton ball in
the lid of the plastic bottle. Screw the lid back onto the bottle. This filter can be used as the control filter for students, by pouring the ”polluted” water into the bottle and watching the water pour out into the jar. Create another filter the same way, but add whatever mixture of cotton, sand, nylon and marbles that you would like to
the filter model. Collect other filter materials that students might want to try: gravel, paper towels, coffee filters.
13
Teacher Notes Continued:
Key Vocabulary
Coagulation: part of water treatment process when a coagulant chemical is added to cause
unwanted particles to come together
Flocculation: part of water treatment process when the water is gently mixed to allow the
coagulated material to come together in large particles called floc.
Sludge: solid waste material collected during water treatment process
Disinfectant: chemical (mostly chlorine-based) added during water treatment process to kill
pathogens
Potable water: water that is safe to drink
Engaging the Learners: Teacher can take a quick poll of who likes bottled water versus
who prefers to drink tap water. This can begin a conversation about water treatment and
water pollution.
14
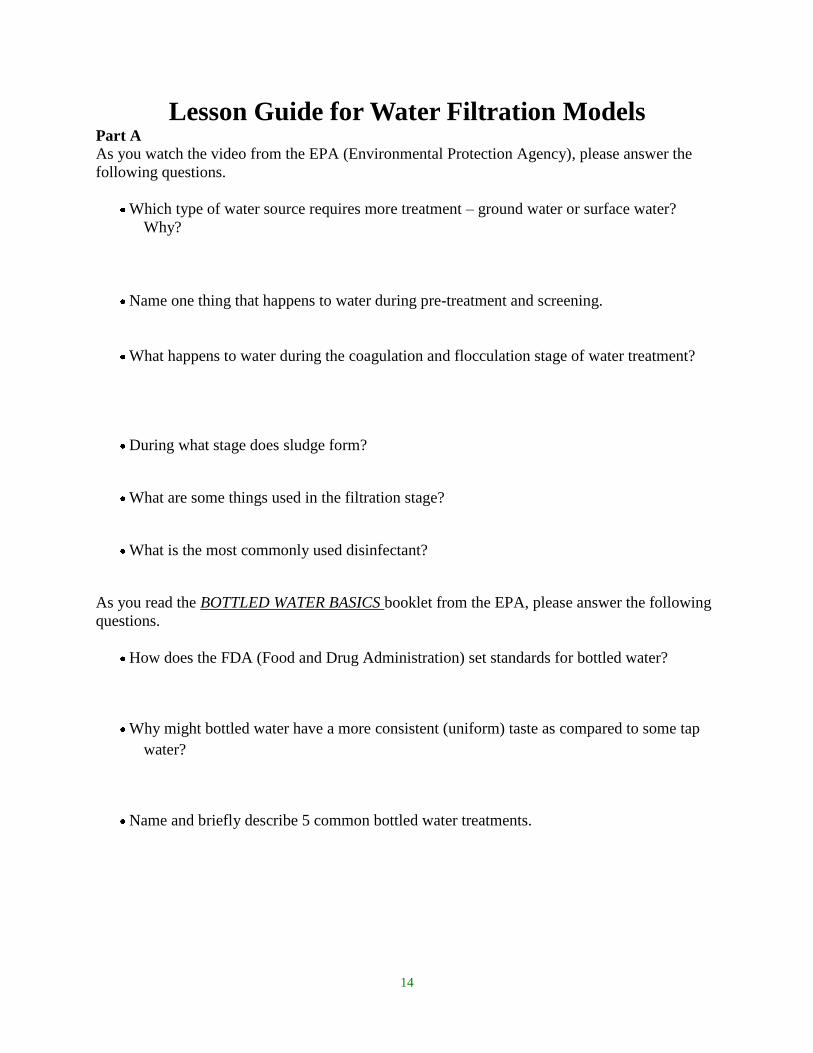
Lesson Guide for Water Filtration Models Part A
As you watch the video from the EPA (Environmental Protection Agency), please answer the
following questions.
Which type of water source requires more treatment – ground water or surface water?
Why?
Name one thing that happens to water during pre-treatment and screening.
What happens to water during the coagulation and flocculation stage of water treatment?
During what stage does sludge form?
What are some things used in the filtration stage?
What is the most commonly used disinfectant?
As you read the BOTTLED WATER BASICS booklet from the EPA, please answer the following
questions.
How does the FDA (Food and Drug Administration) set standards for bottled water?
Why might bottled water have a more consistent (uniform) taste as compared to some tap
water?
Name and briefly describe 5 common bottled water treatments.
15
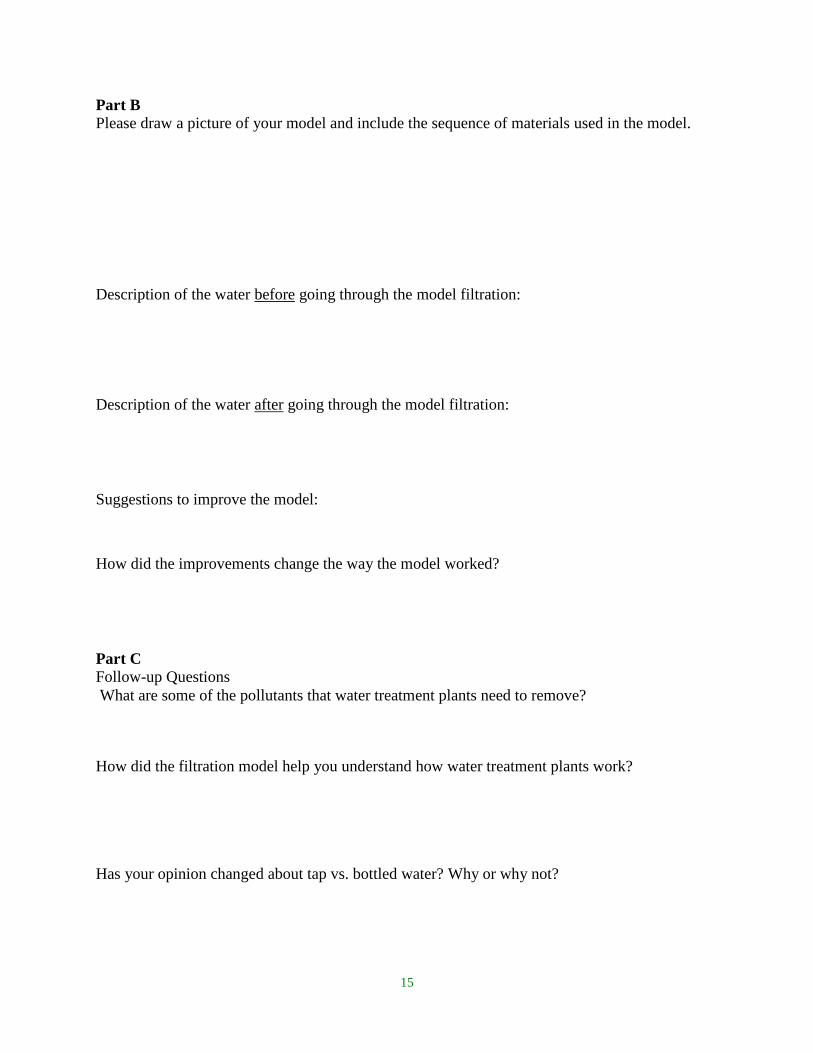
Part B
Please draw a picture of your model and include the sequence of materials used in the model.
Description of the water before going through the model filtration:
Description of the water after going through the model filtration:
Suggestions to improve the model:
How did the improvements change the way the model worked?
Part C
Follow-up Questions
What are some of the pollutants that water treatment plants need to remove?
How did the filtration model help you understand how water treatment plants work?
Has your opinion changed about tap vs. bottled water? Why or why not?
16
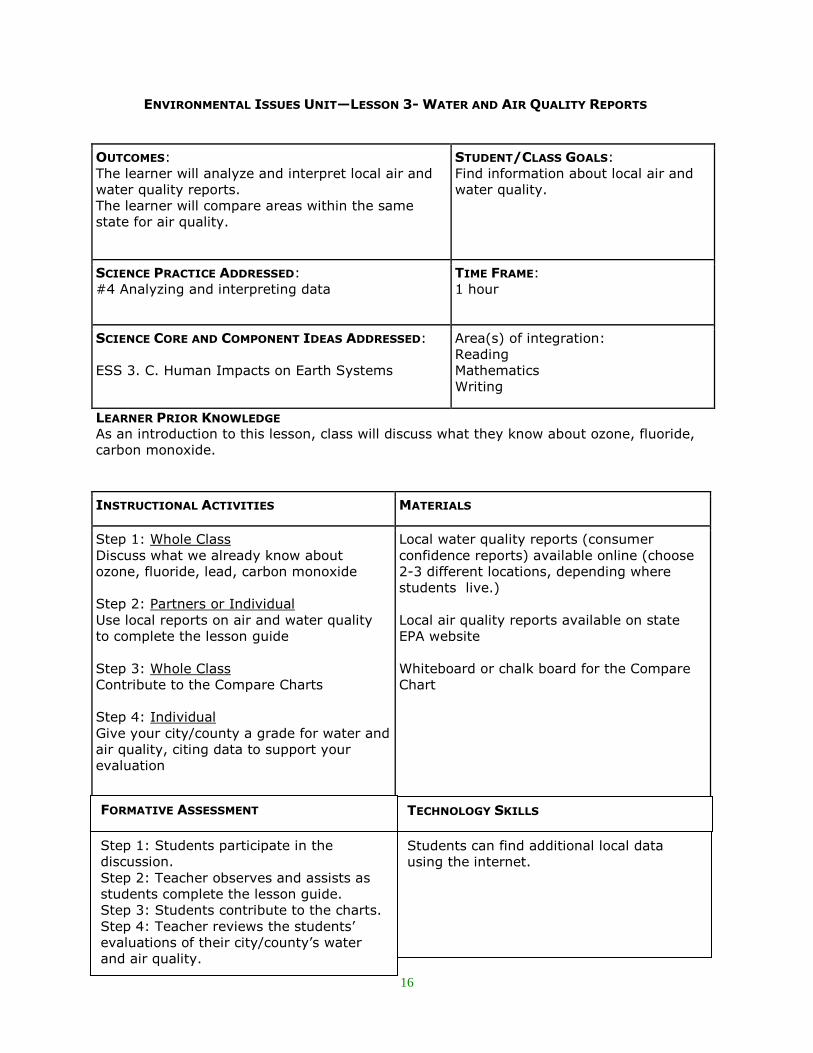
ENVIRONMENTAL ISSUES UNIT—LESSON 3- WATER AND AIR QUALITY REPORTS
OUTCOMES:
The learner will analyze and interpret local air and
water quality reports.
The learner will compare areas within the same
state for air quality.
STUDENT/CLASS GOALS:
Find information about local air and
water quality.
SCIENCE PRACTICE ADDRESSED:
#4 Analyzing and interpreting data
TIME FRAME:
1 hour
SCIENCE CORE AND COMPONENT IDEAS ADDRESSED:
ESS 3. C. Human Impacts on Earth Systems
Area(s) of integration:
Reading
Mathematics
Writing
LEARNER PRIOR KNOWLEDGE
As an introduction to this lesson, class will discuss what they know about ozone, fluoride,
carbon monoxide.
INSTRUCTIONAL ACTIVITIES MATERIALS
Step 1: Whole Class
Discuss what we already know about
ozone, fluoride, lead, carbon monoxide
Step 2: Partners or Individual
Use local reports on air and water quality
to complete the lesson guide
Step 3: Whole Class
Contribute to the Compare Charts
Step 4: Individual
Give your city/county a grade for water and
air quality, citing data to support your
evaluation
Local water quality reports (consumer
confidence reports) available online (choose
2-3 different locations, depending where
students live.)
Local air quality reports available on state
EPA website
Whiteboard or chalk board for the Compare
Chart
FORMATIVE ASSESSMENT
TECHNOLOGY SKILLS
Step 1: Students participate in the
discussion.
Step 2: Teacher observes and assists as
students complete the lesson guide.
Step 3: Students contribute to the charts.
Step 4: Teacher reviews the students’
evaluations of their city/county’s water
and air quality.
Students can find additional local data
using the internet.
17
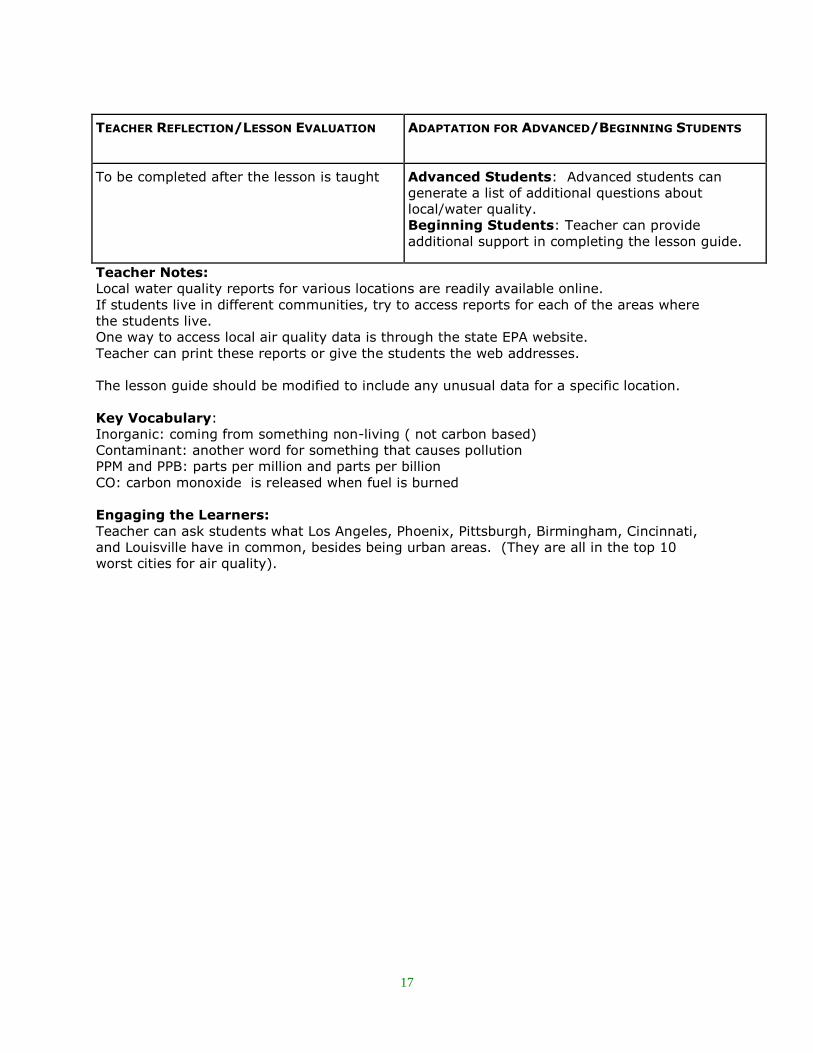
TEACHER REFLECTION/LESSON EVALUATION ADAPTATION FOR ADVANCED/BEGINNING STUDENTS
To be completed after the lesson is taught Advanced Students: Advanced students can
generate a list of additional questions about
local/water quality.
Beginning Students: Teacher can provide
additional support in completing the lesson guide.
Teacher Notes:
Local water quality reports for various locations are readily available online.
If students live in different communities, try to access reports for each of the areas where
the students live.
One way to access local air quality data is through the state EPA website.
Teacher can print these reports or give the students the web addresses.
The lesson guide should be modified to include any unusual data for a specific location.
Key Vocabulary:
Inorganic: coming from something non-living ( not carbon based)
Contaminant: another word for something that causes pollution
PPM and PPB: parts per million and parts per billion
CO: carbon monoxide is released when fuel is burned
Engaging the Learners:
Teacher can ask students what Los Angeles, Phoenix, Pittsburgh, Birmingham, Cincinnati,
and Louisville have in common, besides being urban areas. (They are all in the top 10
worst cities for air quality).
18
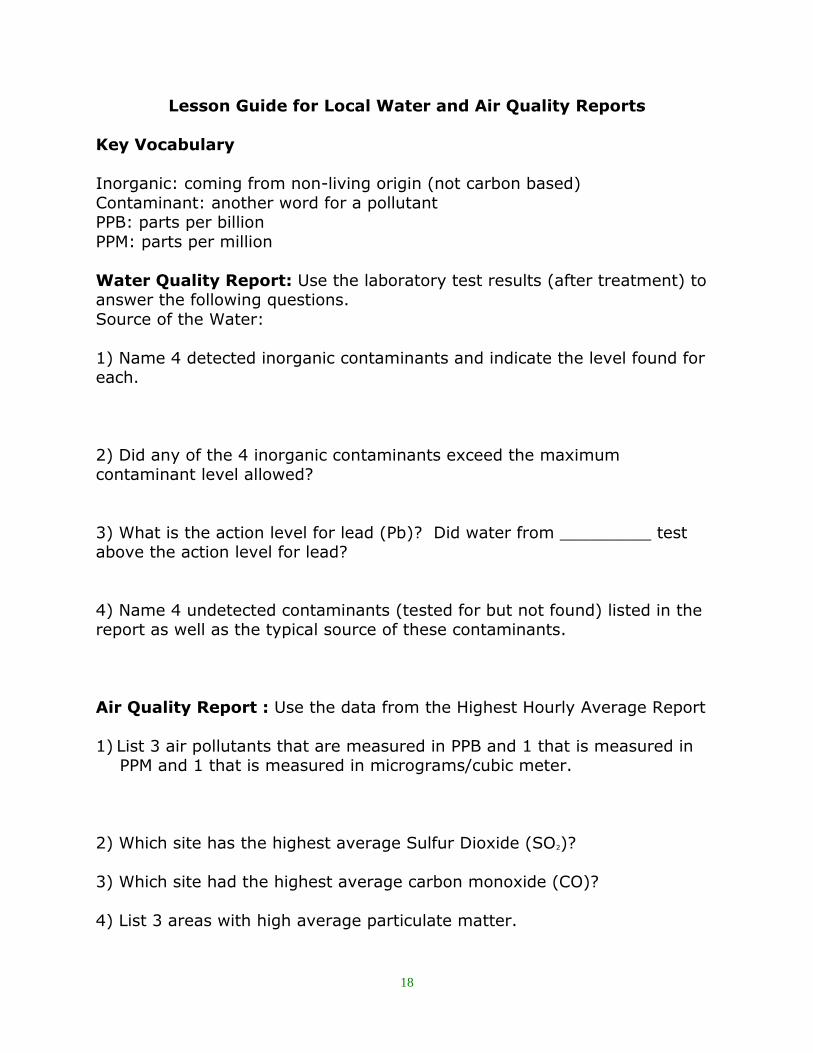
Lesson Guide for Local Water and Air Quality Reports
Key Vocabulary
Inorganic: coming from non-living origin (not carbon based)
Contaminant: another word for a pollutant PPB: parts per billion
PPM: parts per million
Water Quality Report: Use the laboratory test results (after treatment) to answer the following questions.
Source of the Water:
1) Name 4 detected inorganic contaminants and indicate the level found for each.
2) Did any of the 4 inorganic contaminants exceed the maximum contaminant level allowed?
3) What is the action level for lead (Pb)? Did water from _________ test above the action level for lead?
4) Name 4 undetected contaminants (tested for but not found) listed in the report as well as the typical source of these contaminants.
Air Quality Report : Use the data from the Highest Hourly Average Report
1) List 3 air pollutants that are measured in PPB and 1 that is measured in PPM and 1 that is measured in micrograms/cubic meter.
2) Which site has the highest average Sulfur Dioxide (SO2)?
3) Which site had the highest average carbon monoxide (CO)?
4) List 3 areas with high average particulate matter.
19
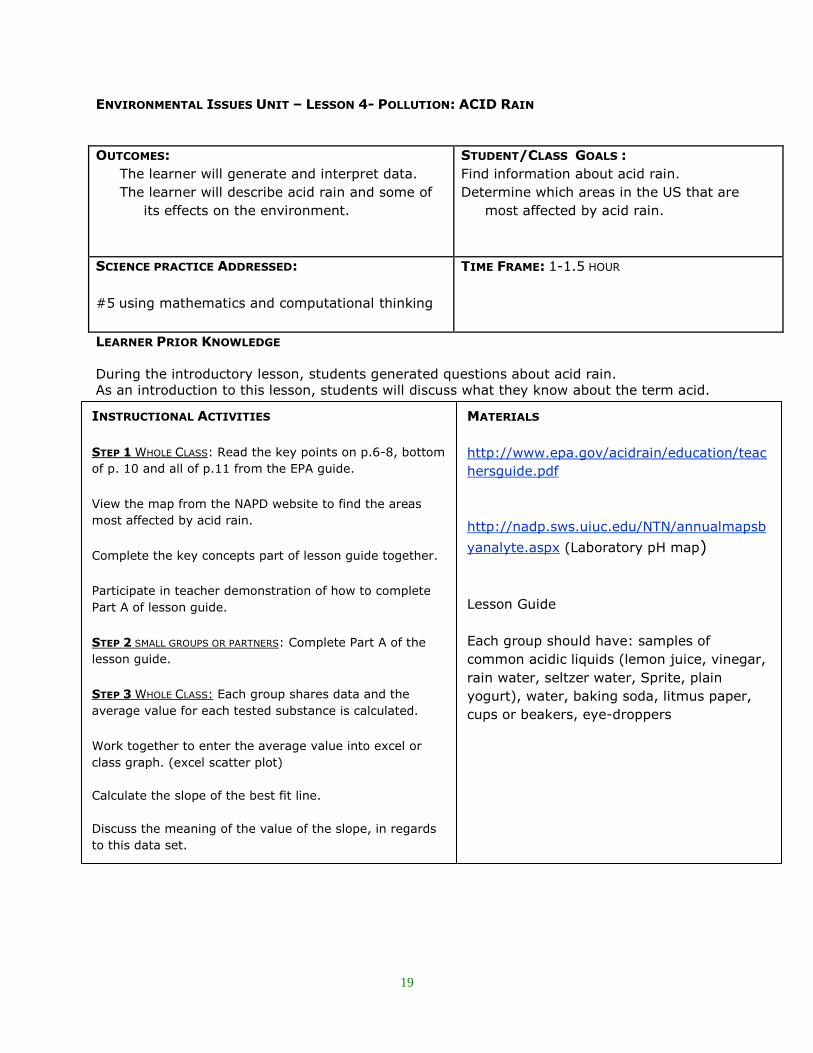
ENVIRONMENTAL ISSUES UNIT – LESSON 4- POLLUTION: ACID RAIN
OUTCOMES:
The learner will generate and interpret data.
The learner will describe acid rain and some of
its effects on the environment.
STUDENT/CLASS GOALS :
Find information about acid rain.
Determine which areas in the US that are
most affected by acid rain.
SCIENCE PRACTICE ADDRESSED:
#5 using mathematics and computational thinking
TIME FRAME: 1-1.5 HOUR
LEARNER PRIOR KNOWLEDGE
During the introductory lesson, students generated questions about acid rain.
As an introduction to this lesson, students will discuss what they know about the term acid.
INSTRUCTIONAL ACTIVITIES
STEP 1 WHOLE CLASS: Read the key points on p.6-8, bottom
of p. 10 and all of p.11 from the EPA guide.
View the map from the NAPD website to find the areas
most affected by acid rain.
Complete the key concepts part of lesson guide together.
Participate in teacher demonstration of how to complete
Part A of lesson guide.
STEP 2 SMALL GROUPS OR PARTNERS: Complete Part A of the
lesson guide.
STEP 3 WHOLE CLASS: Each group shares data and the
average value for each tested substance is calculated.
Work together to enter the average value into excel or
class graph. (excel scatter plot)
Calculate the slope of the best fit line.
Discuss the meaning of the value of the slope, in regards
to this data set.
MATERIALS http://www.epa.gov/acidrain/education/teac
hersguide.pdf
http://nadp.sws.uiuc.edu/NTN/annualmapsb
yanalyte.aspx (Laboratory pH map)
Lesson Guide Each group should have: samples of
common acidic liquids (lemon juice, vinegar,
rain water, seltzer water, Sprite, plain
yogurt), water, baking soda, litmus paper,
cups or beakers, eye-droppers
20
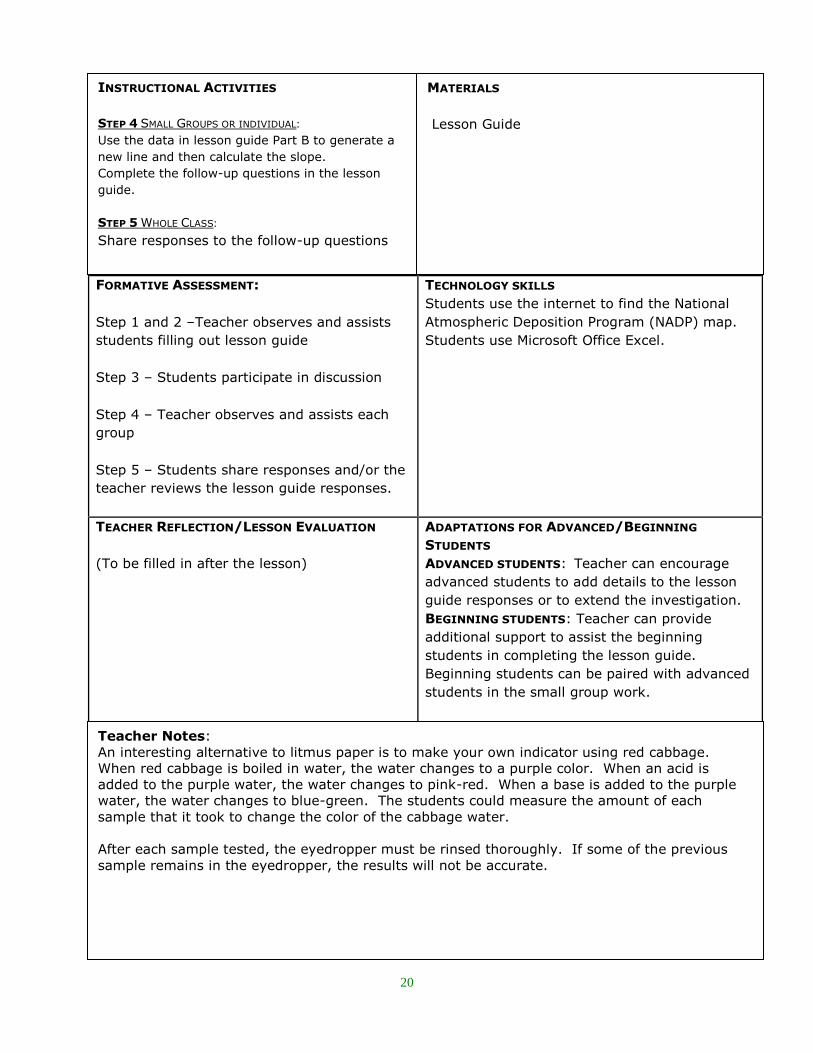
FORMATIVE ASSESSMENT:
Step 1 and 2 –Teacher observes and assists
students filling out lesson guide
Step 3 – Students participate in discussion
Step 4 – Teacher observes and assists each
group
Step 5 – Students share responses and/or the
teacher reviews the lesson guide responses.
TECHNOLOGY SKILLS
Students use the internet to find the National
Atmospheric Deposition Program (NADP) map.
Students use Microsoft Office Excel.
TEACHER REFLECTION/LESSON EVALUATION
(To be filled in after the lesson)
ADAPTATIONS FOR ADVANCED/BEGINNING
STUDENTS
ADVANCED STUDENTS: Teacher can encourage
advanced students to add details to the lesson
guide responses or to extend the investigation.
BEGINNING STUDENTS: Teacher can provide
additional support to assist the beginning
students in completing the lesson guide.
Beginning students can be paired with advanced
students in the small group work.
INSTRUCTIONAL ACTIVITIES
STEP 4 SMALL GROUPS OR INDIVIDUAL:
Use the data in lesson guide Part B to generate a
new line and then calculate the slope.
Complete the follow-up questions in the lesson
guide.
STEP 5 WHOLE CLASS:
Share responses to the follow-up questions
MATERIALS Lesson Guide
Teacher Notes:
An interesting alternative to litmus paper is to make your own indicator using red cabbage.
When red cabbage is boiled in water, the water changes to a purple color. When an acid is
added to the purple water, the water changes to pink-red. When a base is added to the purple
water, the water changes to blue-green. The students could measure the amount of each
sample that it took to change the color of the cabbage water.
After each sample tested, the eyedropper must be rinsed thoroughly. If some of the previous
sample remains in the eyedropper, the results will not be accurate.
21
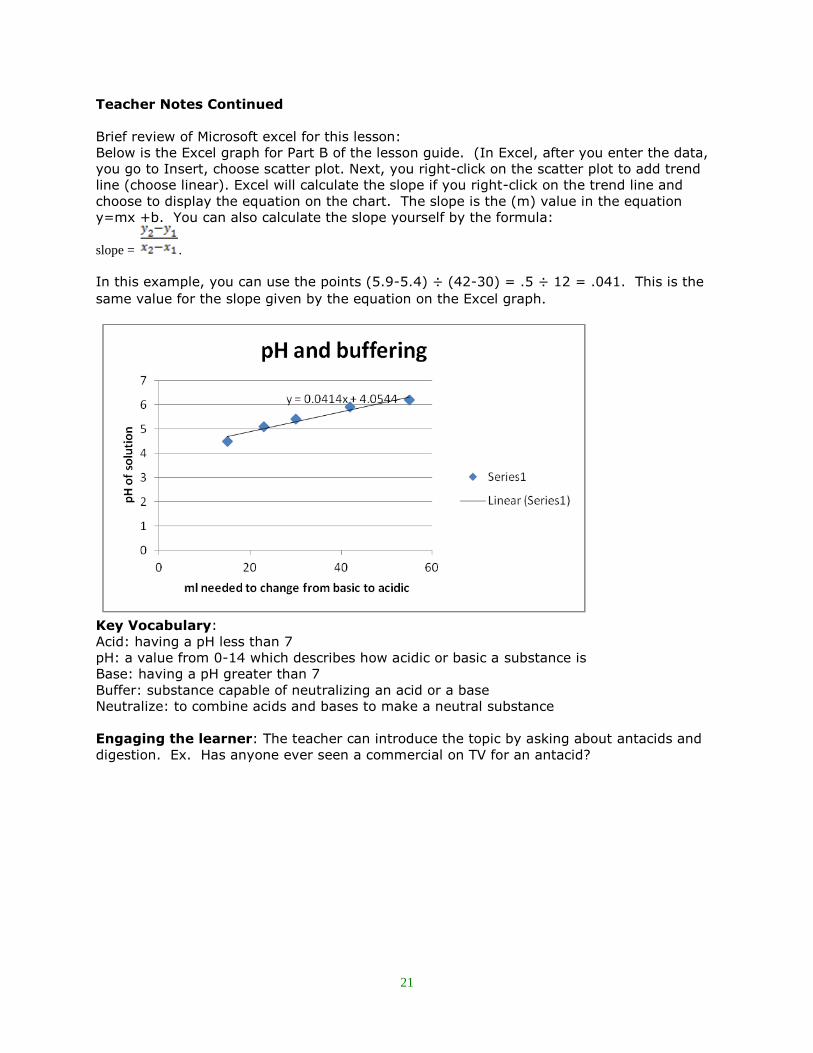
Teacher Notes Continued
Brief review of Microsoft excel for this lesson:
Below is the Excel graph for Part B of the lesson guide. (In Excel, after you enter the data,
you go to Insert, choose scatter plot. Next, you right-click on the scatter plot to add trend
line (choose linear). Excel will calculate the slope if you right-click on the trend line and
choose to display the equation on the chart. The slope is the (m) value in the equation
y=mx +b. You can also calculate the slope yourself by the formula:
slope = .
In this example, you can use the points (5.9-5.4) ÷ (42-30) = .5 ÷ 12 = .041. This is the
same value for the slope given by the equation on the Excel graph.
Key Vocabulary:
Acid: having a pH less than 7
pH: a value from 0-14 which describes how acidic or basic a substance is
Base: having a pH greater than 7
Buffer: substance capable of neutralizing an acid or a base
Neutralize: to combine acids and bases to make a neutral substance
Engaging the learner: The teacher can introduce the topic by asking about antacids and
digestion. Ex. Has anyone ever seen a commercial on TV for an antacid?
22
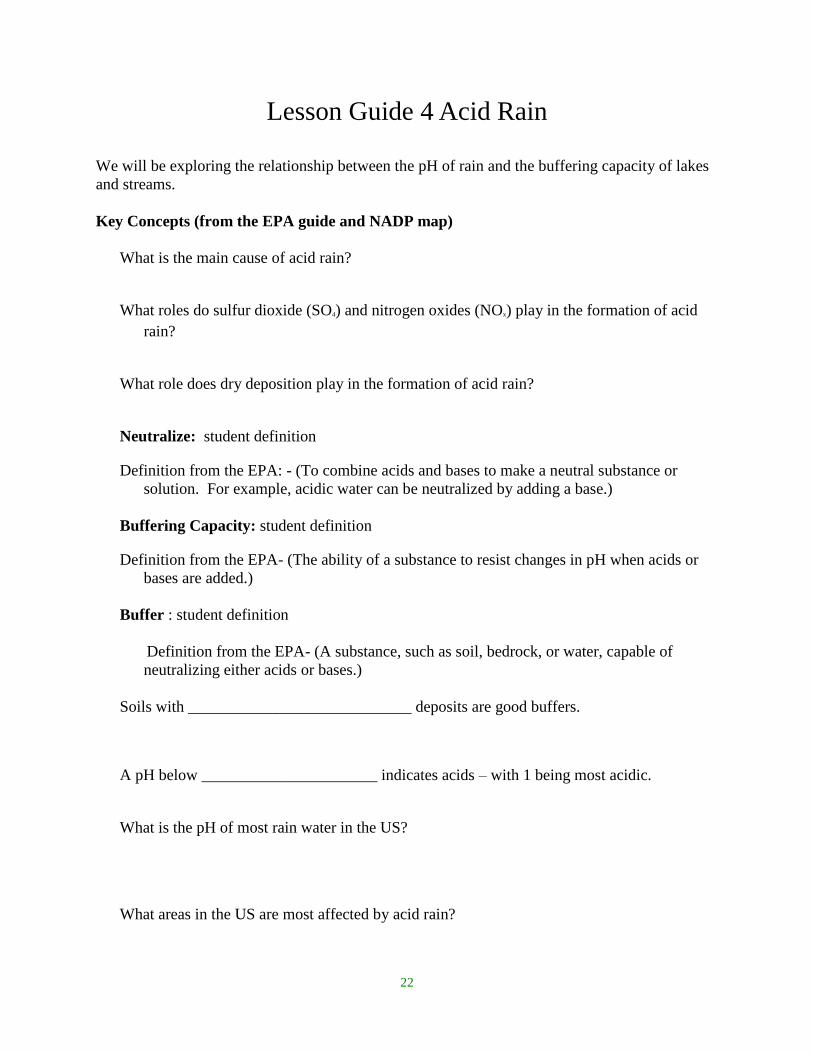
Lesson Guide 4 Acid Rain
We will be exploring the relationship between the pH of rain and the buffering capacity of lakes
and streams.
Key Concepts (from the EPA guide and NADP map)
What is the main cause of acid rain?
What roles do sulfur dioxide (SO4) and nitrogen oxides (NOx) play in the formation of acid
rain?
What role does dry deposition play in the formation of acid rain?
Neutralize: student definition
Definition from the EPA: - (To combine acids and bases to make a neutral substance or
solution. For example, acidic water can be neutralized by adding a base.)
Buffering Capacity: student definition
Definition from the EPA- (The ability of a substance to resist changes in pH when acids or
bases are added.)
Buffer : student definition
Definition from the EPA- (A substance, such as soil, bedrock, or water, capable of
neutralizing either acids or bases.)
Soils with ____________________________ deposits are good buffers.
A pH below ______________________ indicates acids – with 1 being most acidic.
What is the pH of most rain water in the US?
What areas in the US are most affected by acid rain?
23
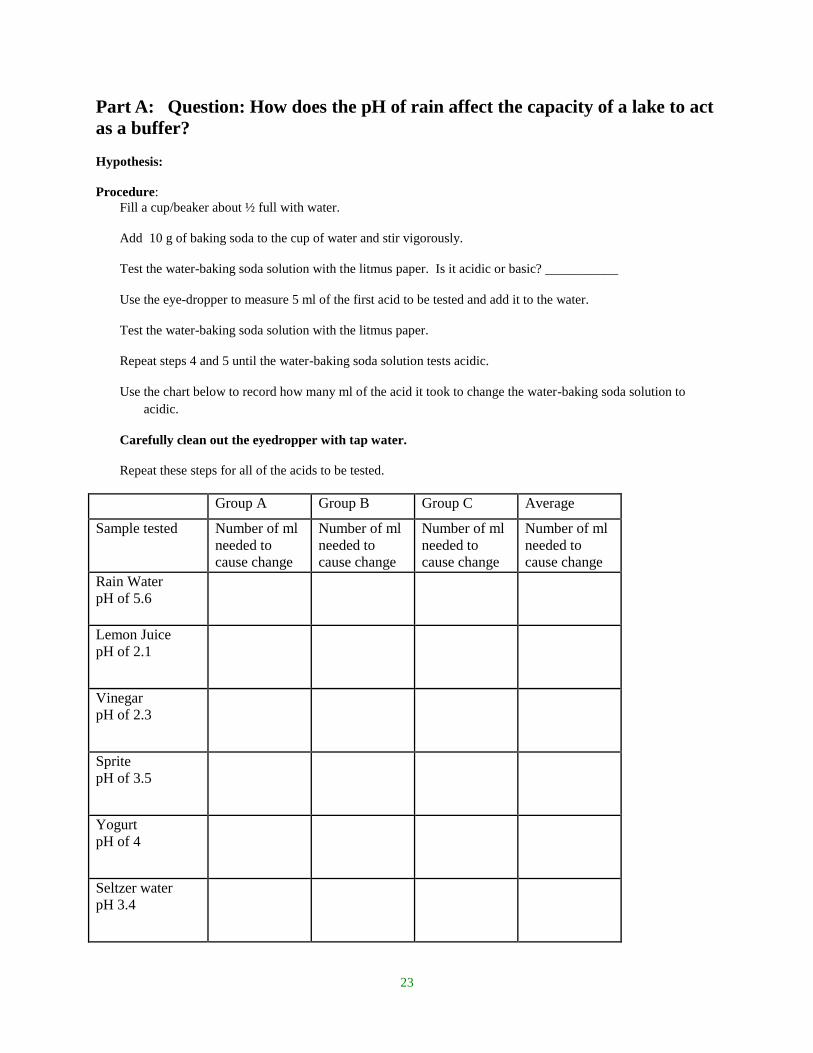
Part A: Question: How does the pH of rain affect the capacity of a lake to act
as a buffer?
Hypothesis:
Procedure:
Fill a cup/beaker about ½ full with water.
Add 10 g of baking soda to the cup of water and stir vigorously.
Test the water-baking soda solution with the litmus paper. Is it acidic or basic? ___________
Use the eye-dropper to measure 5 ml of the first acid to be tested and add it to the water.
Test the water-baking soda solution with the litmus paper.
Repeat steps 4 and 5 until the water-baking soda solution tests acidic.
Use the chart below to record how many ml of the acid it took to change the water-baking soda solution to
acidic.
Carefully clean out the eyedropper with tap water.
Repeat these steps for all of the acids to be tested.
Group A Group B Group C Average
Sample tested Number of ml
needed to
cause change
Number of ml
needed to
cause change
Number of ml
needed to
cause change
Number of ml
needed to
cause change
Rain Water pH of 5.6
Lemon Juice pH of 2.1
Vinegar pH of 2.3
Sprite pH of 3.5
Yogurt pH of 4
Seltzer water
pH 3.4

24
Part B Water from ABC lake was tested to determine its buffering capacity. Graph this new data
and answer the following questions. Use the pH for the y-axis and the ml for the x-axis.
pH 4.5 pH 5.1 pH 5.4 pH 5.9 pH 6.2
15 ml 23 ml 30 ml 42 ml 55 ml
Follow-up Questions
Use the formula: slope = .
What is the slope of the new line?
What is the slope of the line from our water-baking soda data?
Is the ABC lake a better or worse buffer than the water-baking soda solution that we tested?
How can you tell?
What are some possible reasons why some ecosystems are more affected by acid rain than
others?
What other questions could we investigate with water samples and pH?
25
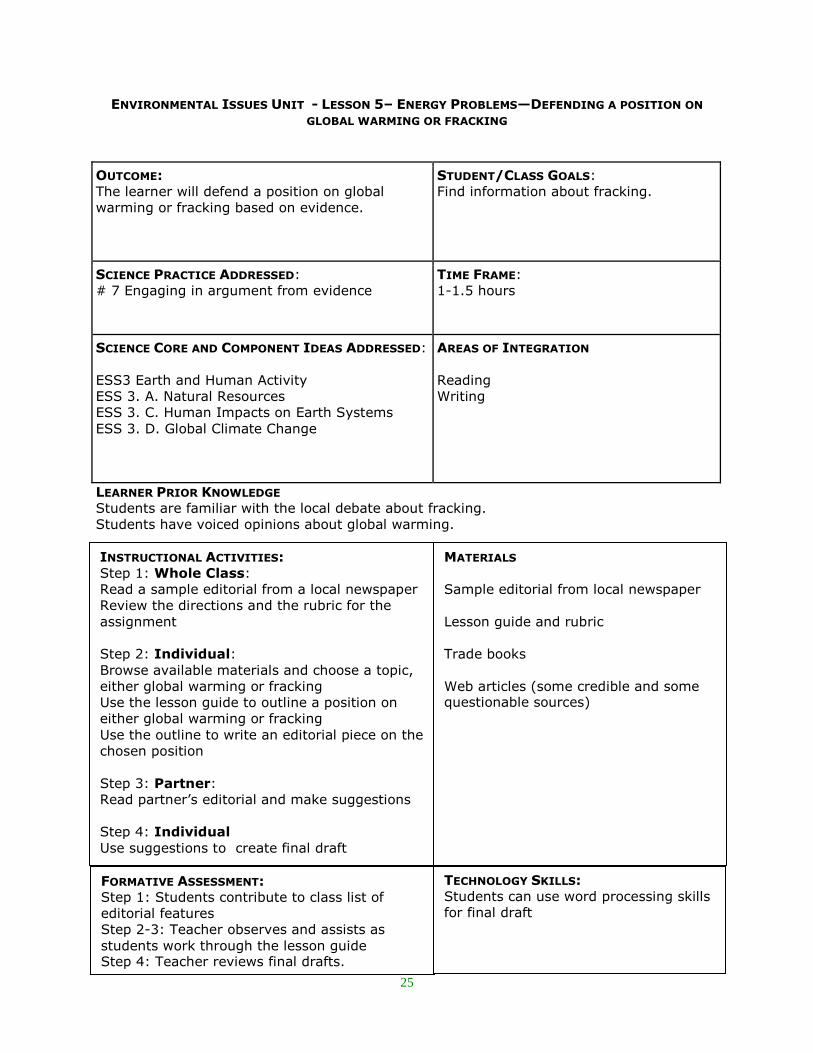
ENVIRONMENTAL ISSUES UNIT - LESSON 5– ENERGY PROBLEMS—DEFENDING A POSITION ON
GLOBAL WARMING OR FRACKING
OUTCOME:
The learner will defend a position on global
warming or fracking based on evidence.
STUDENT/CLASS GOALS:
Find information about fracking.
SCIENCE PRACTICE ADDRESSED:
# 7 Engaging in argument from evidence
TIME FRAME:
1-1.5 hours
SCIENCE CORE AND COMPONENT IDEAS ADDRESSED:
ESS3 Earth and Human Activity
ESS 3. A. Natural Resources
ESS 3. C. Human Impacts on Earth Systems
ESS 3. D. Global Climate Change
AREAS OF INTEGRATION
Reading
Writing
LEARNER PRIOR KNOWLEDGE
Students are familiar with the local debate about fracking.
Students have voiced opinions about global warming.
INSTRUCTIONAL ACTIVITIES:
Step 1: Whole Class:
Read a sample editorial from a local newspaper
Review the directions and the rubric for the
assignment
Step 2: Individual:
Browse available materials and choose a topic,
either global warming or fracking
Use the lesson guide to outline a position on
either global warming or fracking
Use the outline to write an editorial piece on the
chosen position
Step 3: Partner:
Read partner’s editorial and make suggestions
Step 4: Individual
Use suggestions to create final draft
MATERIALS
Sample editorial from local newspaper
Lesson guide and rubric
Trade books
Web articles (some credible and some questionable sources)
FORMATIVE ASSESSMENT:
Step 1: Students contribute to class list of
editorial features
Step 2-3: Teacher observes and assists as
students work through the lesson guide Step 4: Teacher reviews final drafts.
TECHNOLOGY SKILLS:
Students can use word processing skills
for final draft
26
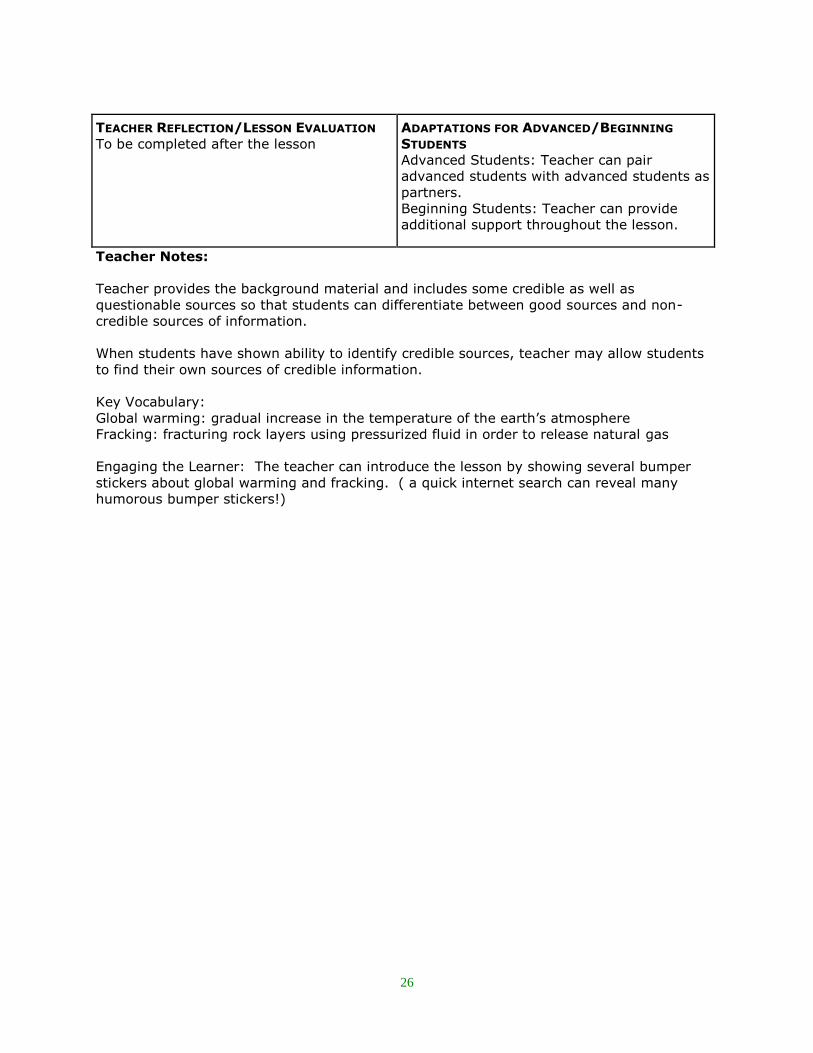
TEACHER REFLECTION/LESSON EVALUATION
To be completed after the lesson
ADAPTATIONS FOR ADVANCED/BEGINNING
STUDENTS
Advanced Students: Teacher can pair
advanced students with advanced students as
partners.
Beginning Students: Teacher can provide
additional support throughout the lesson.
Teacher Notes:
Teacher provides the background material and includes some credible as well as
questionable sources so that students can differentiate between good sources and non-
credible sources of information.
When students have shown ability to identify credible sources, teacher may allow students
to find their own sources of credible information.
Key Vocabulary:
Global warming: gradual increase in the temperature of the earth’s atmosphere
Fracking: fracturing rock layers using pressurized fluid in order to release natural gas
Engaging the Learner: The teacher can introduce the lesson by showing several bumper
stickers about global warming and fracking. ( a quick internet search can reveal many
humorous bumper stickers!)
27
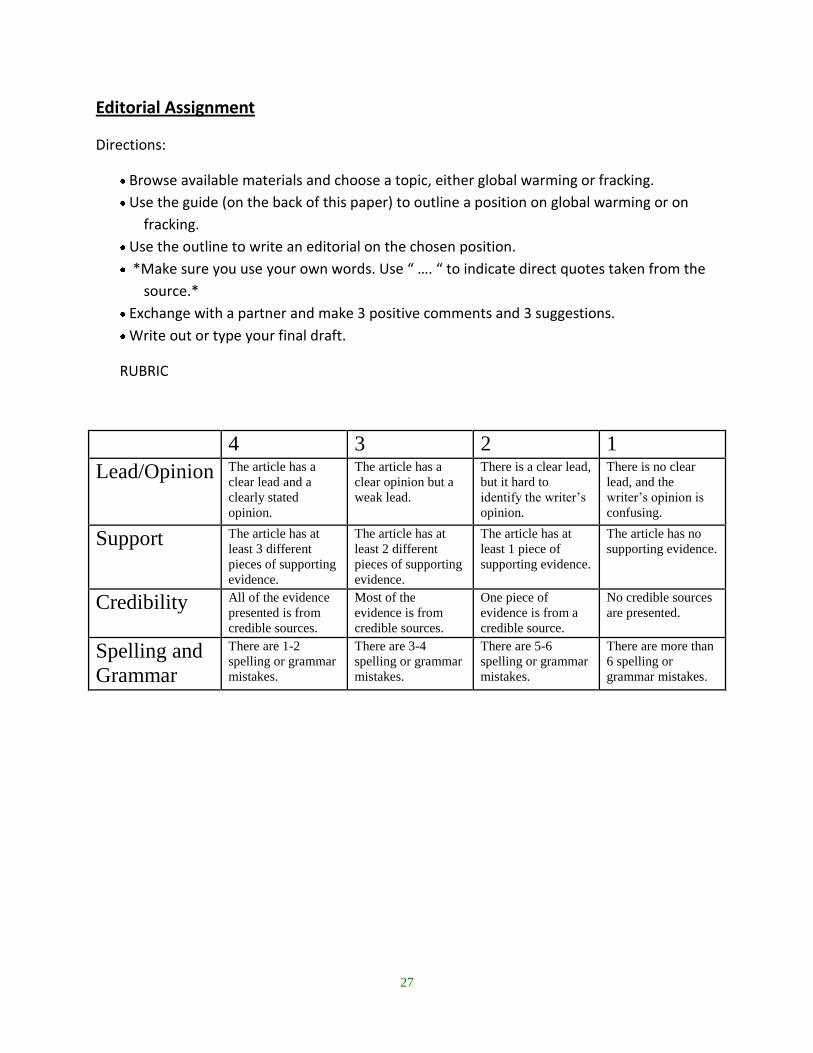
Editorial Assignment
Directions:
Browse available materials and choose a topic, either global warming or fracking.
Use the guide (on the back of this paper) to outline a position on global warming or on
fracking.
Use the outline to write an editorial on the chosen position.
*Make sure you use your own words. Use “ …. “ to indicate direct quotes taken from the
source.*
Exchange with a partner and make 3 positive comments and 3 suggestions.
Write out or type your final draft.
RUBRIC
4 3 2 1
Lead/Opinion
The article has a
clear lead and a
clearly stated
opinion.
The article has a
clear opinion but a
weak lead.
There is a clear lead,
but it hard to
identify the writer’s
opinion.
There is no clear
lead, and the
writer’s opinion is
confusing.
Support
The article has at
least 3 different
pieces of supporting
evidence.
The article has at
least 2 different
pieces of supporting
evidence.
The article has at
least 1 piece of
supporting evidence.
The article has no
supporting evidence.
Credibility
All of the evidence
presented is from
credible sources.
Most of the
evidence is from
credible sources.
One piece of
evidence is from a
credible source.
No credible sources
are presented.
Spelling and
Grammar
There are 1-2
spelling or grammar
mistakes.
There are 3-4
spelling or grammar
mistakes.
There are 5-6
spelling or grammar
mistakes.
There are more than
6 spelling or
grammar mistakes.
28
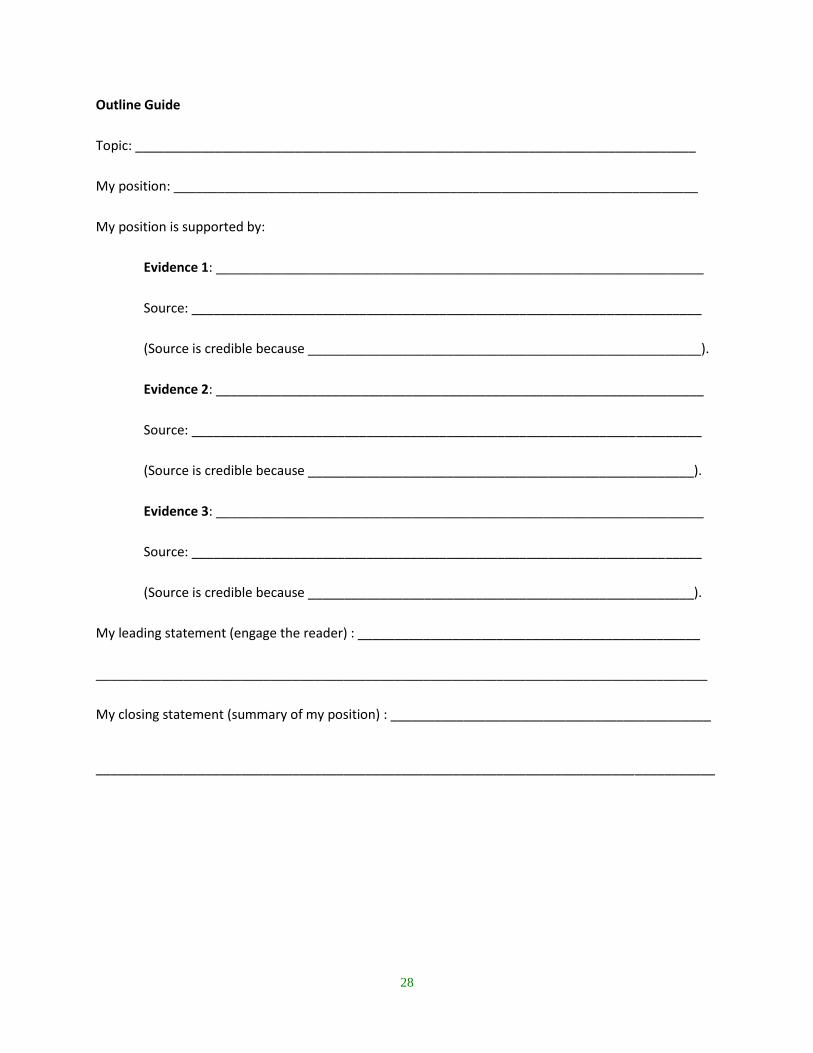
Outline Guide
Topic: _____________________________________________________________________________
My position: ________________________________________________________________________
My position is supported by:
Evidence 1: ___________________________________________________________________
Source: ______________________________________________________________________
(Source is credible because ______________________________________________________).
Evidence 2: ___________________________________________________________________
Source: ______________________________________________________________________
(Source is credible because _____________________________________________________).
Evidence 3: ___________________________________________________________________
Source: ______________________________________________________________________
(Source is credible because _____________________________________________________).
My leading statement (engage the reader) : _______________________________________________
____________________________________________________________________________________
My closing statement (summary of my position) : ____________________________________________
_____________________________________________________________________________________
29
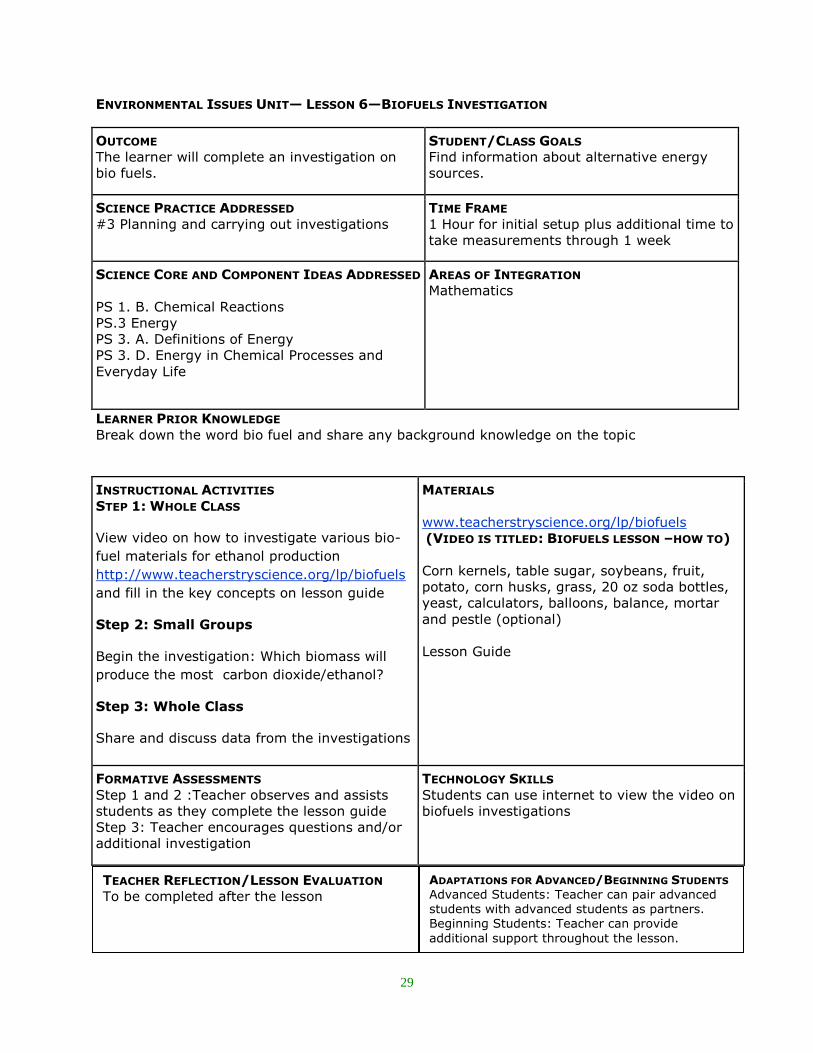
ENVIRONMENTAL ISSUES UNIT— LESSON 6—BIOFUELS INVESTIGATION
OUTCOME
The learner will complete an investigation on
bio fuels.
STUDENT/CLASS GOALS
Find information about alternative energy
sources.
SCIENCE PRACTICE ADDRESSED
#3 Planning and carrying out investigations
TIME FRAME
1 Hour for initial setup plus additional time to
take measurements through 1 week
SCIENCE CORE AND COMPONENT IDEAS ADDRESSED
PS 1. B. Chemical Reactions
PS.3 Energy
PS 3. A. Definitions of Energy
PS 3. D. Energy in Chemical Processes and
Everyday Life
AREAS OF INTEGRATION
Mathematics
LEARNER PRIOR KNOWLEDGE
Break down the word bio fuel and share any background knowledge on the topic
INSTRUCTIONAL ACTIVITIES
STEP 1: WHOLE CLASS
View video on how to investigate various bio-
fuel materials for ethanol production
http://www.teacherstryscience.org/lp/biofuels
and fill in the key concepts on lesson guide
Step 2: Small Groups
Begin the investigation: Which biomass will
produce the most carbon dioxide/ethanol?
Step 3: Whole Class
Share and discuss data from the investigations
MATERIALS
www.teacherstryscience.org/lp/biofuels
(VIDEO IS TITLED: BIOFUELS LESSON –HOW TO)
Corn kernels, table sugar, soybeans, fruit,
potato, corn husks, grass, 20 oz soda bottles,
yeast, calculators, balloons, balance, mortar
and pestle (optional)
Lesson Guide
FORMATIVE ASSESSMENTS
Step 1 and 2 :Teacher observes and assists
students as they complete the lesson guide
Step 3: Teacher encourages questions and/or
additional investigation
TECHNOLOGY SKILLS
Students can use internet to view the video on
biofuels investigations
TEACHER REFLECTION/LESSON EVALUATION
To be completed after the lesson
ADAPTATIONS FOR ADVANCED/BEGINNING STUDENTS Advanced Students: Teacher can pair advanced students with advanced students as partners. Beginning Students: Teacher can provide
additional support throughout the lesson.

30
Teacher Notes:
Key Vocabulary
Biomass: Organic material
Biofuel: fuel derived from organic material
Fermentation: Sugar (in plant) + Enzyme Found in Yeast = Ethanol + (carbon dioxide).
Engaging the Learner: The teacher can introduce the lesson by showing the crushed
grass, corn, fruit, etc. and asking if anyone can make a connection to fuel.

31
Initial balloon
circumference
Second measurement
of balloon
circumference
Third measurement
of balloon
circumference
Fourth measurement
of balloon
circumference
Control
Test 1
Test 2
Bio-fuel Investigation
Question: Which biomass will produce the most ethanol?
Key Concepts
Bio-fuels are a renewable form of fuel that biochemical engineers have created from (biological material)
Sugar (in plant) + Enzyme Found in Yeast = Ethanol + (carbon dioxide).
One environmental problem with bio-fuels is that: ( pesticides are used to grow the corn.)
One environmental positive of bio-fuels is that : (the carbon dioxide released in ethanol production is
potentially absorbed by the next crop of plants.)
Scientists are looking for other plants, that do not need pesticides to grow, to use for ethanol production.
o The products of the fermentation reaction are carbon dioxide (gas) and ethanol (liquid).
o Carbon dioxide, not ethanol, is what causes the balloon to expand in the investigation.
o By measuring the expansion of the balloon, we can get a comparative sense of how much ethanol is
being produced by the breakdown of each biomass.
Initial Hypothesis:
Amount of yeast used in control and test 1 and test 2: ____________________________________
Amount of warm water used in control and test 1 and test 2:_______________________________
Biomass used for Test 1 and Test 2 : _____________________________________________________
Notes from other groups:
In our investigation, which biomass produced the most carbon dioxide/ ethanol?
32
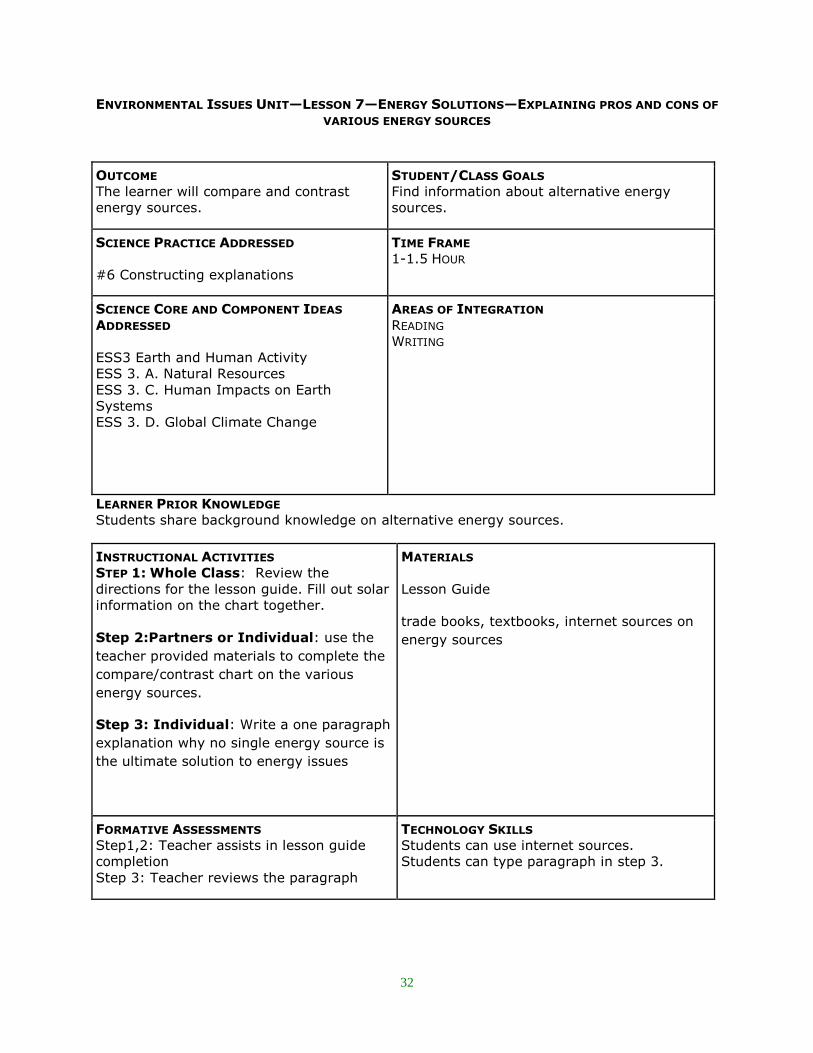
ENVIRONMENTAL ISSUES UNIT—LESSON 7—ENERGY SOLUTIONS—EXPLAINING PROS AND CONS OF
VARIOUS ENERGY SOURCES
OUTCOME
The learner will compare and contrast
energy sources.
STUDENT/CLASS GOALS
Find information about alternative energy
sources.
SCIENCE PRACTICE ADDRESSED
#6 Constructing explanations
TIME FRAME
1-1.5 HOUR
SCIENCE CORE AND COMPONENT IDEAS
ADDRESSED
ESS3 Earth and Human Activity
ESS 3. A. Natural Resources
ESS 3. C. Human Impacts on Earth
Systems
ESS 3. D. Global Climate Change
AREAS OF INTEGRATION
READING
WRITING
LEARNER PRIOR KNOWLEDGE
Students share background knowledge on alternative energy sources.
INSTRUCTIONAL ACTIVITIES
STEP 1: Whole Class: Review the
directions for the lesson guide. Fill out solar
information on the chart together.
Step 2:Partners or Individual: use the
teacher provided materials to complete the
compare/contrast chart on the various
energy sources.
Step 3: Individual: Write a one paragraph
explanation why no single energy source is
the ultimate solution to energy issues
MATERIALS
Lesson Guide
trade books, textbooks, internet sources on
energy sources
FORMATIVE ASSESSMENTS
Step1,2: Teacher assists in lesson guide
completion
Step 3: Teacher reviews the paragraph
TECHNOLOGY SKILLS
Students can use internet sources.
Students can type paragraph in step 3.
33
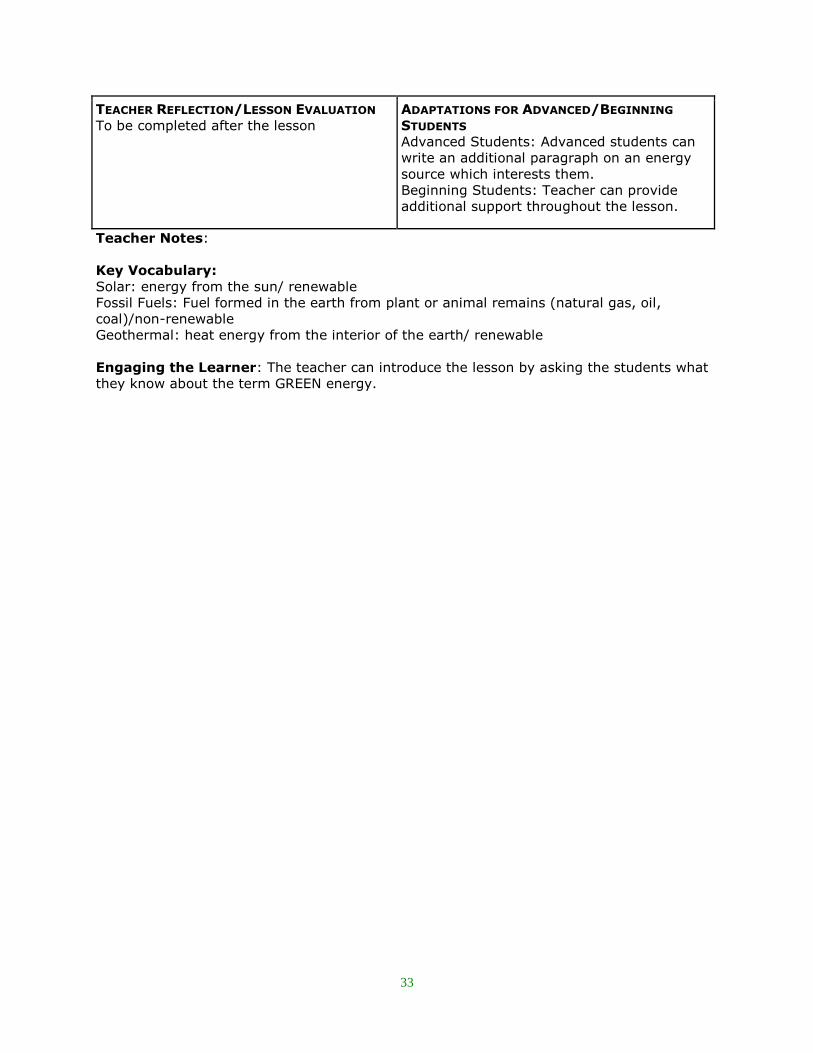
TEACHER REFLECTION/LESSON EVALUATION
To be completed after the lesson
ADAPTATIONS FOR ADVANCED/BEGINNING
STUDENTS
Advanced Students: Advanced students can
write an additional paragraph on an energy
source which interests them.
Beginning Students: Teacher can provide
additional support throughout the lesson.
Teacher Notes:
Key Vocabulary:
Solar: energy from the sun/ renewable
Fossil Fuels: Fuel formed in the earth from plant or animal remains (natural gas, oil,
coal)/non-renewable
Geothermal: heat energy from the interior of the earth/ renewable
Engaging the Learner: The teacher can introduce the lesson by asking the students what
they know about the term GREEN energy.
34
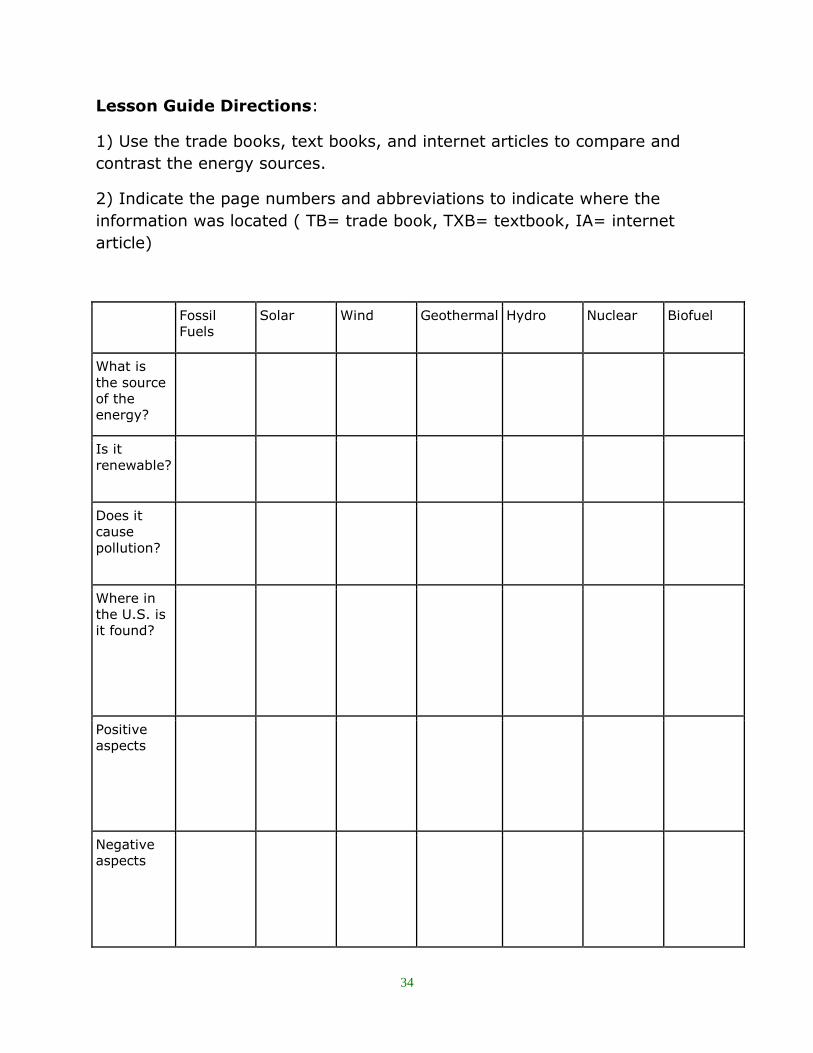
Lesson Guide Directions:
1) Use the trade books, text books, and internet articles to compare and
contrast the energy sources.
2) Indicate the page numbers and abbreviations to indicate where the
information was located ( TB= trade book, TXB= textbook, IA= internet
article)
Fossil
Fuels
Solar Wind Geothermal Hydro Nuclear Biofuel
What is
the source
of the
energy?
Is it
renewable?
Does it
cause
pollution?
Where in
the U.S. is
it found?
Positive
aspects
Negative
aspects
35
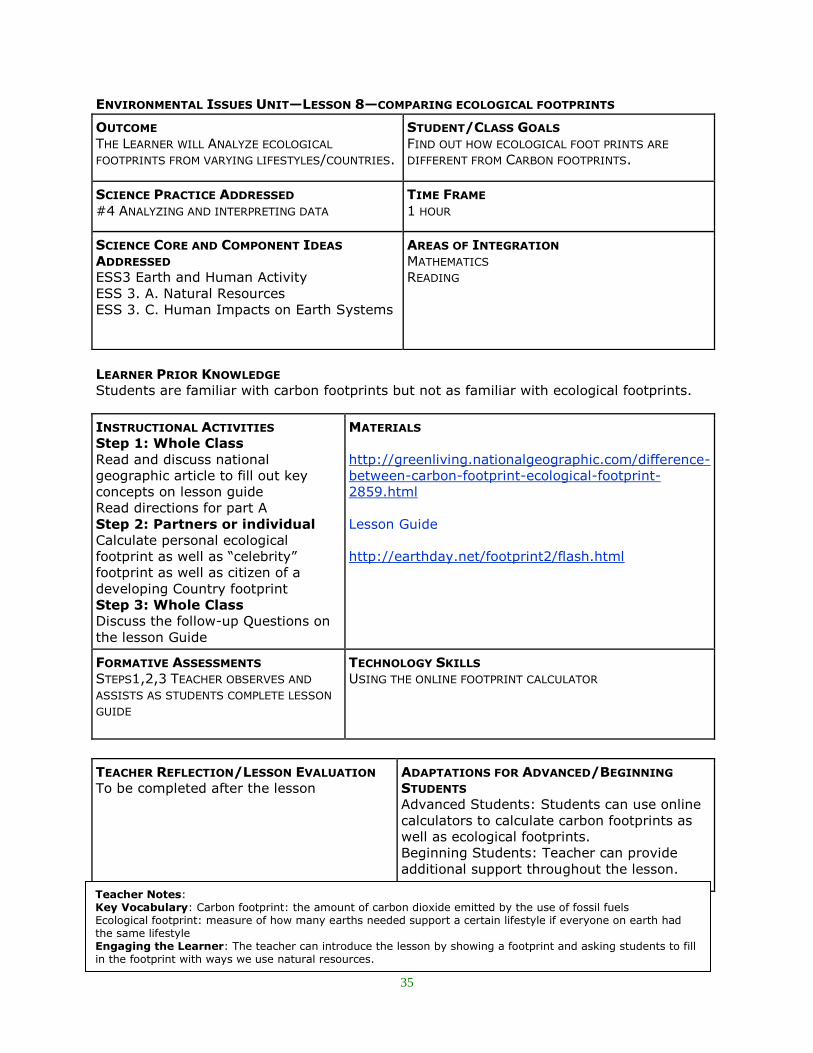
ENVIRONMENTAL ISSUES UNIT—LESSON 8—COMPARING ECOLOGICAL FOOTPRINTS
LEARNER PRIOR KNOWLEDGE
Students are familiar with carbon footprints but not as familiar with ecological footprints.
INSTRUCTIONAL ACTIVITIES
Step 1: Whole Class
Read and discuss national
geographic article to fill out key
concepts on lesson guide
Read directions for part A
Step 2: Partners or individual
Calculate personal ecological
footprint as well as “celebrity”
footprint as well as citizen of a
developing Country footprint
Step 3: Whole Class
Discuss the follow-up Questions on
the lesson Guide
MATERIALS
http://greenliving.nationalgeographic.com/difference-
between-carbon-footprint-ecological-footprint-
2859.html
Lesson Guide
http://earthday.net/footprint2/flash.html
FORMATIVE ASSESSMENTS
STEPS1,2,3 TEACHER OBSERVES AND
ASSISTS AS STUDENTS COMPLETE LESSON
GUIDE
TECHNOLOGY SKILLS
USING THE ONLINE FOOTPRINT CALCULATOR
TEACHER REFLECTION/LESSON EVALUATION
To be completed after the lesson
ADAPTATIONS FOR ADVANCED/BEGINNING
STUDENTS
Advanced Students: Students can use online
calculators to calculate carbon footprints as
well as ecological footprints.
Beginning Students: Teacher can provide
additional support throughout the lesson.
Lesson Guide for Ecological Footprints
OUTCOME
THE LEARNER WILL ANALYZE ECOLOGICAL
FOOTPRINTS FROM VARYING LIFESTYLES/COUNTRIES.
STUDENT/CLASS GOALS
FIND OUT HOW ECOLOGICAL FOOT PRINTS ARE
DIFFERENT FROM CARBON FOOTPRINTS.
SCIENCE PRACTICE ADDRESSED
#4 ANALYZING AND INTERPRETING DATA
TIME FRAME
1 HOUR
SCIENCE CORE AND COMPONENT IDEAS
ADDRESSED
ESS3 Earth and Human Activity
ESS 3. A. Natural Resources
ESS 3. C. Human Impacts on Earth Systems
AREAS OF INTEGRATION
MATHEMATICS
READING
Teacher Notes: Key Vocabulary: Carbon footprint: the amount of carbon dioxide emitted by the use of fossil fuels Ecological footprint: measure of how many earths needed support a certain lifestyle if everyone on earth had the same lifestyle Engaging the Learner: The teacher can introduce the lesson by showing a footprint and asking students to fill in the footprint with ways we use natural resources.
36
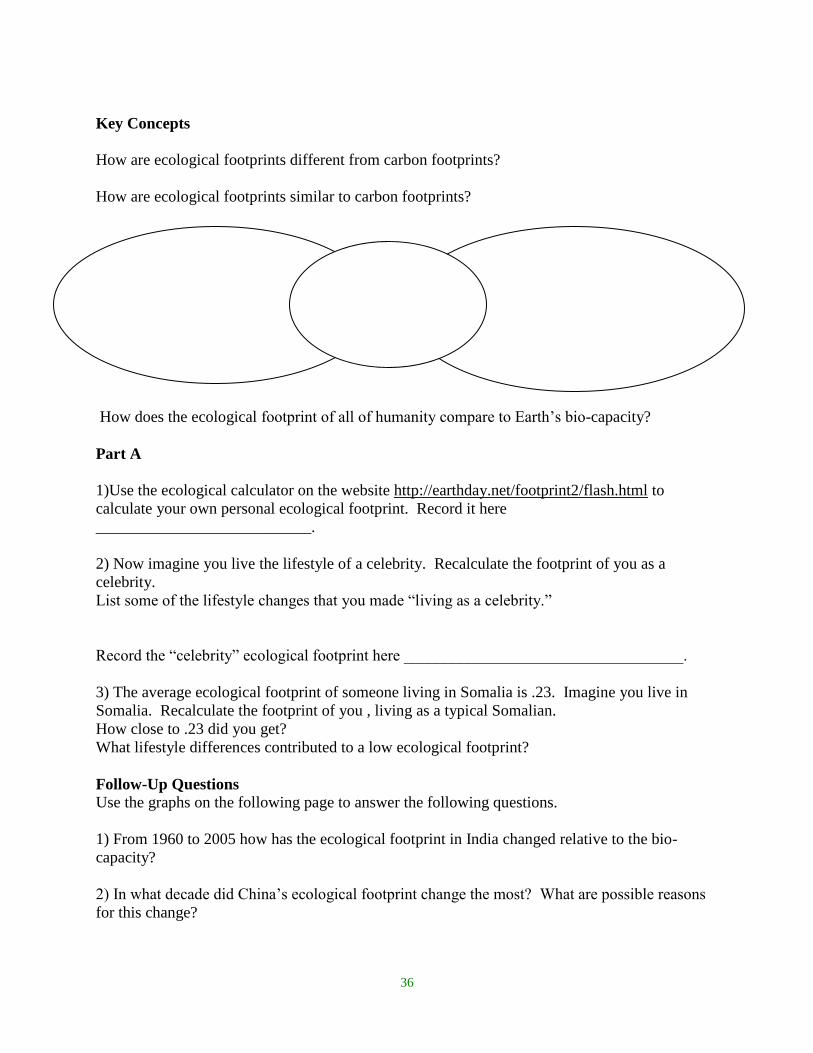
Key Concepts
How are ecological footprints different from carbon footprints?
How are ecological footprints similar to carbon footprints?
How does the ecological footprint of all of humanity compare to Earth’s bio-capacity?
Part A
1)Use the ecological calculator on the website http://earthday.net/footprint2/flash.html to
calculate your own personal ecological footprint. Record it here
___________________________.
2) Now imagine you live the lifestyle of a celebrity. Recalculate the footprint of you as a
celebrity.
List some of the lifestyle changes that you made “living as a celebrity.”
Record the “celebrity” ecological footprint here ___________________________________.
3) The average ecological footprint of someone living in Somalia is .23. Imagine you live in
Somalia. Recalculate the footprint of you , living as a typical Somalian.
How close to .23 did you get?
What lifestyle differences contributed to a low ecological footprint?
Follow-Up Questions
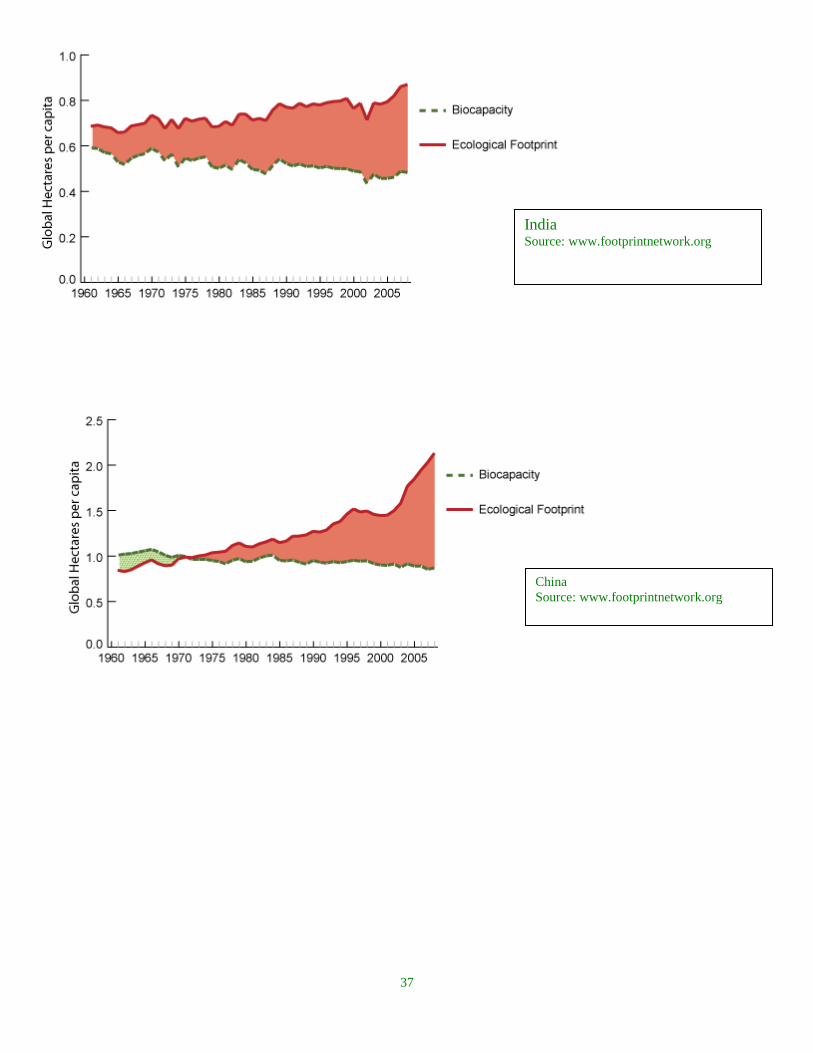
Use the graphs on the following page to answer the following questions.
1) From 1960 to 2005 how has the ecological footprint in India changed relative to the bio-
capacity?
2) In what decade did China’s ecological footprint change the most? What are possible reasons
for this change?
37
India Source: www.footprintnetwork.org
China
Source: www.footprintnetwork.org
38
ENVIRONMENTAL ISSUES UNIT—LESSON 9—CONSERVATION—TEACHING OTHERS ABOUT THE 3 R’S
OUTCOME
THE LEARNER WILL CREATE WAYS TO TEACH
OTHERS ABOUT REDUCING, REUSING, AND
RECYCLING IN A CLASSROOM “MUSEUM”.
STUDENT/CLASS GOALS
TEACH CHILDREN ABOUT RECYCLING, REDUCING,
REUSING.
SCIENCE PRACTICE ADDRESSED
#8 OBTAINING, EVALUATING, AND
COMMUNICATING INFORMATION
TIME FRAME
1-2 HOURS PREPARATION + 1 HOUR FOR
CHILDREN TO VISIT
SCIENCE CORE AND COMPONENT IDEAS
ADDRESSED:
ESS3 Earth and Human Activity
ESS 3. A. Natural Resources
ESS 3. C. Human Impacts on Earth
Systems
ESS 3. D. Global Climate Change
AREAS OF INTEGRATION
READING
WRITING
LEARNER PRIOR KNOWLEDGE
STUDENTS RECOGNIZE THE IMPORTANCE OF RECYCLING. STUDENTS HAVE BEEN TO MUSEUMS.
INSTRUCTIONAL ACTIVITIES
STEP 1: WHOLE CLASS: BRAINSTORM BEST
PARTS OF MUSEUM VISITS.
DIVIDE INTO GROUPS BASED ON INTERESTS.
POSSIBLE GROUPS: EXHIBITS, INTERACTIVE
SESSION, GIFT SHOP, HANDS-ON STATIONS,
TICKETS AND INVITATIONS.
STEP 2: GROUPS: CREATE CHOSEN PARTS OF
THE CLASSROOM MUSEUM
STEP 3: WHOLE CLASS: SHARE CREATIONS
WITH CLASSMATES AND MAKE SUGGESTIONS.
STEP 4: WHOLE CLASS: INVITE CHILDREN TO
COME TO THE CLASSROOM MUSEUM.
MATERIALS
TEACHER NEEDS TO HAVE VARIETY OF POSSIBLE
MATERIALS AVAILABLE FOR THE MUSEUM. SOME
OF THE MATERIALS FROM THE UNIT (ACID RAIN
MATERIALS, BIOFUELS MATERIALS, WATER
FILTRATION) MAY BE RE-USED FOR THE MUSEUM.
FORMATIVE ASSESSMENTS
TEACHER OBSERVES AND ASSISTS
THROUGHOUT THE MUSEUM PROCESS.
TECHNOLOGY SKILLS
STUDENTS WILL LIKELY USE VARIOUS
TECHNOLOGIES TO CREATE THE MUSEUM.
TEACHER REFLECTION/LESSON
EVALUATION To be completed after the lesson
ADAPTATIONS FOR
ADVANCED/BEGINNING STUDENTS
Advanced Students: Encourage
creativity in expanding ideas for the
museum.
Beginning Students: Teacher can
provide additional support throughout the lesson.
39
ENVIRONMENTAL ISSUES UNIT—LESSON 10—CULMINATING ACTIVITIES
OUTCOME
THE LEARNER WILL REVIEW AND DEMONSTRATE
UNDERSTANDING OF THE UNIT OBJECTIVES.
STUDENT/CLASS GOALS
DEMONSTRATE INCREASED UNDERSTANDING OF
ENVIRONMENTAL ISSUES.
SCIENCE PRACTICE ADDRESSED
ALL, DEPENDING ON THE CHOSEN CULMINATING
ACTIVITY.
TIME FRAME
1-1.5 HOURS
SCIENCE CORE AND COMPONENT IDEAS
ADDRESSED
ALL OF THE UNIT CORE AND COMPONENT IDEAS
AREAS OF INTEGRATION
READING
WRITING
MATHEMATICS
LEARNER PRIOR KNOWLEDGE
STUDENTS WILL USE THE KNOWLEDGE GAINED THROUGHOUT THE UNIT OF STUDY IN COMPLETING THE CHOSEN
CULMINATING ACTIVITY.
INSTRUCTIONAL ACTIVITIES
STEP 1: WHOLE CLASS: REVIEW OPTIONS FOR
CULMINATING ACTIVITIES
STEP 2: INDIVIDUAL: CHOICE ONE OPTION TO
COMPLETE
STEP 3: WHOLE CLASS: SHARE ONE PART OF
THE CHOSEN CULMINATING ACTIVITY
MATERIALS
LIST OF OPTIONS FOR CULMINATING ACTIVITY
VARIOUS MATERIALS FROM THE UNIT
FORMATIVE ASSESSMENTS
TEACHER OBSERVES AND ASSISTS THROUGHOUT
THE LESSON.
TECHNOLOGY SKILLS
STUDENTS MAY CHOOSE TO USE COMPUTER TO
COMPLETE THE ACTIVITY
TEACHER REFLECTION/LESSON
EVALUATION
To be completed after the lesson
ADAPTATIONS FOR ADVANCED/BEGINNING
STUDENTS
Advanced Students: Teacher encourage a
more challenging choice of culminating
activity.
Beginning Students: Teacher can provide
additional support throughout the lesson.
Teacher Notes
Possible Culminating Activity Choices may include:
Making their own quiz/test for the environmental studies unit with an answer key.
Revisit the model filtration activity and video-tape a how-to demonstration .
Revisit the editorial on global warming/ fracking and find additional evidence to strengthen
position.
Calculate their carbon footprint on 3 different online calculators and explain any differing
scores.
Design a brochure advertising the classroom museum on Environmental issues.