Embed Size (px)
Citation preview
Android System
User Manual
Notes: Please read this user manual carefully before operation.
www.autopumpkin.com

第 2 页 共22页
Content
SAFETY PRECAUTION .............................................................................................3
BASIC OPERATION...................................................................................................5
MAIN INTERFACE OPEARION ...............................................................................7
SYSTEM SETTING.....................................................................................................8
1. WIFI setting:...................................................................................................8
2. System setting: ..............................................................................................8
3. Display setting: ..............................................................................................8
4. Printscreen setting :......................................................................................8
5. Storage setting:..............................................................................................8
6. Application Management..................................................................................9
7. Safety Setting: ...............................................................................................9
8. Language and input method setting ..............................................................9
9. Backup and Reset:........................................................................................9
10. Add Account: ...............................................................................................9
11. Date and Time Setting: ..............................................................................10
12. Auxiliary Function.........................................................................................10
13. GPS Setting .................................................................................................10
14. Color setting of button light: ......................................................................10
15. Driving Setting..............................................................................................10
16. Amplifier Sound Setting ...............................................................................10
17. Steering Wheel Setting: ...........................................................................10
18. Factory Set...................................................................................................10
19. About the device...........................................................................................10
RADIO FUNCTION OPERATION.............................................................................11
DVD PLAYING BASIC OPERATION .......................................................................12
BLUETOOTH HANDS-FREE OPERATION.............................................................13
MEDIA PLAYING ADVANCED OPERATION ..........................................................15
CAR DVR OPERATION (OPTIONAL)…………………………………………………17
FILES MANAGEMENT OPERAION ........................................................................17
SOFTWARE INSTALLATION MANAGEMENT .......................................................18
GPS NAVIGATION APK FILE INSTALLATION SETTING…………………………..19
STEERING WHEEL LEARNING..............................................................................20
WIRING DIAGRAM...................................................................................................21
TROUBLE SHOOTING.............................................................................................22
www.autopumpkin.com
第 3 页 共22页
SAFETY PRECAUTION
Thanks for choosing vehicle multimedia audio & video series products from our company. Please read this user manual carefully before use and keep it properly for future reference.
To avoid human injury or other hazards, please read the following
precautions carefully before installation. Please follow the instructions as below, or your machine may be damaged, for which we assume no responsibility. 1. Avoid water or other liquids coming into this product. 2. Do not place or install this product in humid and high-temperature places exposed to direct sunlight; prevent this product from touching chemicals for a long time and prevent fire or other hazards; otherwise, this product may be damaged. 3. If liquid crystal splashes due to sudden LCD breakage, prevent it from touching your skin as well as getting into your eyes and mouth and contact the maintenance man as soon as possible to replace the LCD. Comply with local laws and regulations in replacing LCD. 4. Do not crush, press or scratch this product with hard objects.Clean its surface with dry cloth and paper tower; do not wipe LCD screen with dry flax or paper; to avoid any damage to this product. 5.If any abnormalities occur during operation, turn off the power immediately and refer to “Trouble Shooting” for solving the problems; if the trouble can not be cleared, contact dealer or local maintenance station. 6. Replace fuse with a new one in the same size (current grade); it is dangerous to use different fuses or wires, as damage may be caused. 7. This product includes AUX、SD、BT、IPOD、USB、GPS、DVD、VCD、 CD、MP3、
MP4,It also supports to receive TV and radio.
Installation Location Do not install this product in the following positions: a. In the position where driver’s view is blocked. b. In the position where operations of steering wheel, gear lever and brake pedal may be affected. Installation: 1. Professional is required to install this product. 2. If you try to install it by yourself, please strictly follow the installation instructions and connection diagram, as improper installation may cause a fire. 3. Turn off or pull out the ignition key before installation, as battery current leakage or short circuit may be caused when the engine is running. 4. Make sure not to damage any pipe or wire and electronic parts of fuel cell during installation; otherwise, it may cause fire. Be careful not to damage any parts of car when digging holes on instrument panel.
5.Do not use nuts or screws to connect safety devices such as steering
connection device, fuel supply or brake system, as it may cause a fire or
www.autopumpkin.com
第 4 页 共22页
accident. Condensate water: In case of environment and temperature change, optical head of mechanism may produce water vapor which then forms water drop causing failure of loading disk. To restore to be normal, just turn off the product until it become dry.
Water vapor condensation:
In rainy or very humid environment, steam condensation to water mist on dvd loader will make it failed to read DVD. Please turn off the DVD player till the inside moisture totally disperse,let it dry then turn on it and operate.
About LCD Do not crush LCD panel, as it may cause image distortion or failure. The image may become blurred and LCD may be damaged.
Precautions on cleaning LCD: * Wipe display screen gently with wet soft cloth. * Do not use such reagents as gasoline, diluents, detergent or anti-static spraying agent at the market.
* Do not use this product in the temperature lower than -15℃ or higher
than 60 ℃.
* The image may be blurred when parking the car in extreme cold or heat place, which is not display fault. After the temperature in the car restores to be normal, the image will become clear. * Few “bright spots” may appear on LCD screen, which is acceptable in the aspect of LCD technology. About DVD player * Only use conventional round disks, as irregular, non-circular or deformed disks may be blocked or can not be read. Prior to playing disk, check if it is scratched or sticked with any labels; if such conditions are found, stop using this product to avoid any damage to it. * Hold the edge of disk and do not touch its recording surface (without printing side). * Please put disks into disk box if not used. * Do not put disks in the high-temperature place exposed to sunlight. * Neither stick labels on the surface of disk, nor scribble or use chemicals on it. * Wipe disks with soft cloth from middle to edges. * Water vapor may form inside the DVD player when using radiator in winter and vapor condensation may cause player failure. In case of such problems, turn off the player for some one hour to let it dry and wipe the disk with dry soft cloth. * Disk playing may be broken off in case of strong vibration.
www.autopumpkin.com

第 5 页 共22页
Safety Precaution You are recommended to read all the instructions carefully before installation and have it installed by a professional dealer of auto audio devices.
This machine is applicable to vehicle power system of 12V (connected with earth wire). Do not install this machine in truck or bus with 24V power system, which may cause damage to this product. Please use genuine disc rather than non-standard or poor-quality discs, or else it may cause machine failure or affect service life. Do not replace the power fuse or use inappropriate fuse without the guidance of professional, or else it may cause damage to this product or trigger fire alarm. For fear of violating traffic regulations, drivers are forbidden to watch program and operate this product to avoid traffic accident. For consideration of safety and normal operation, please have this product installed by the professional staff who sells this product to avoid machine damage and accident. For details, please consult the local professional dealer of auto audio devices. Do not place this product in damp surroundings or in water to avoid electric shock caused by short circuit and prevent unnecessary damage and fire hazard.
Do not use the player in strong magnetic environment,,,,GPS, Bluetooth, digital TV will be affected. Please turn off the player before switching off the ignition switch of your car,since power switch will consume the car's battery.
Tips: For fear of short circuit, please remember to turn off the engine
and disconnect ACC from B+ before installation.
www.autopumpkin.com
第 6 页 共22页
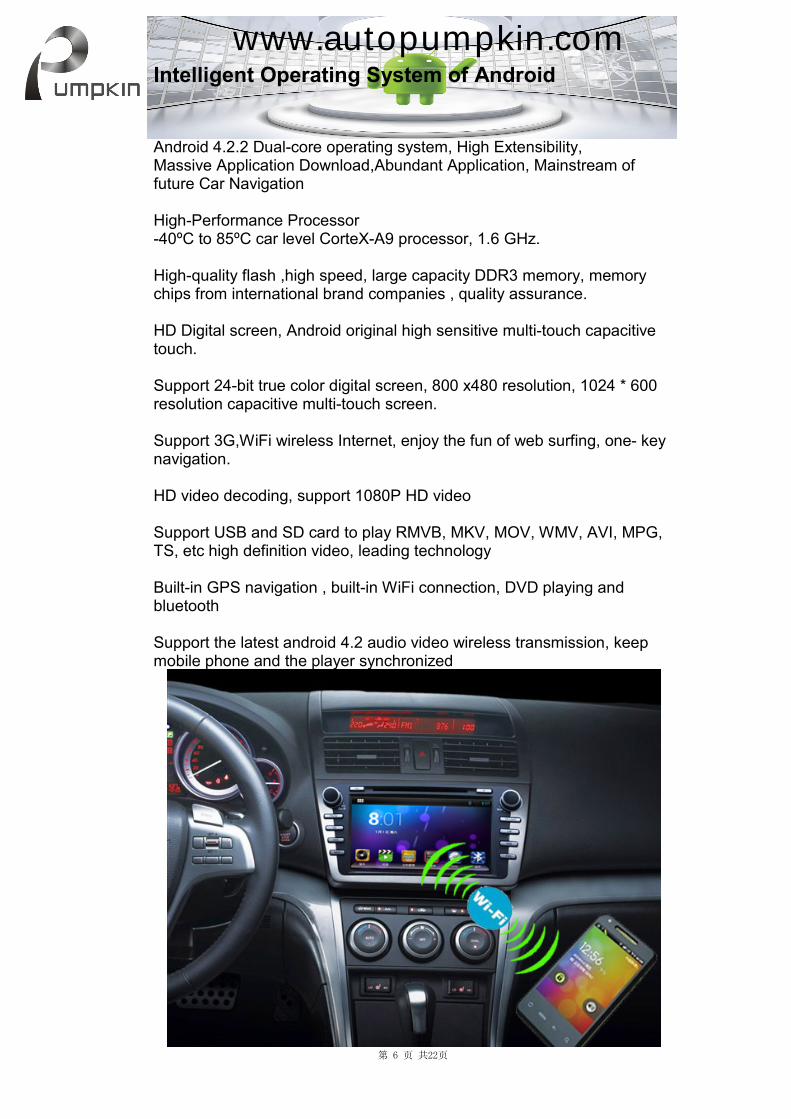
Intelligent Operating System of Android
Android 4.2.2 Dual-core operating system, High Extensibility, Massive Application Download,Abundant Application, Mainstream of future Car Navigation High-Performance Processor -40ºC to 85ºC car level CorteX-A9 processor, 1.6 GHz. High-quality flash ,high speed, large capacity DDR3 memory, memory chips from international brand companies , quality assurance. HD Digital screen, Android original high sensitive multi-touch capacitive touch. Support 24-bit true color digital screen, 800 x480 resolution, 1024 * 600 resolution capacitive multi-touch screen. Support 3G,WiFi wireless Internet, enjoy the fun of web surfing, one- key navigation. HD video decoding, support 1080P HD video Support USB and SD card to play RMVB, MKV, MOV, WMV, AVI, MPG, TS, etc high definition video, leading technology Built-in GPS navigation , built-in WiFi connection, DVD playing and bluetooth Support the latest android 4.2 audio video wireless transmission, keep mobile phone and the player synchronized
www.autopumpkin.com
第 7 页 共22页
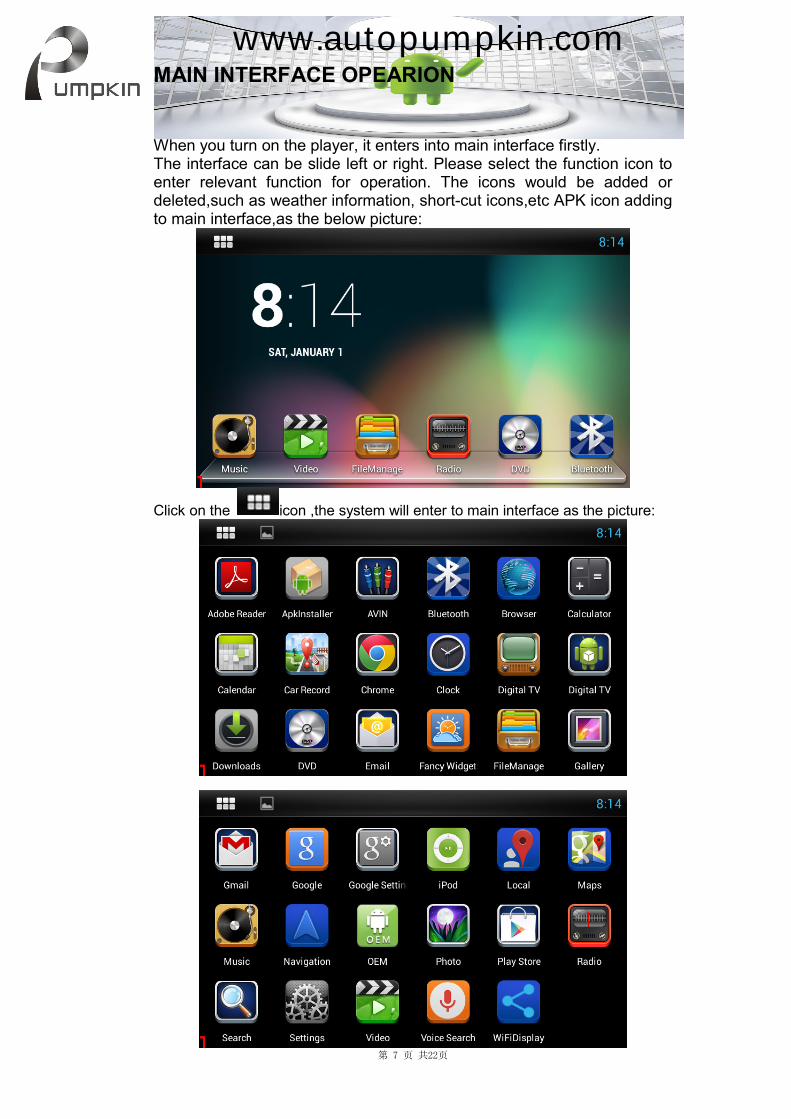
MAIN INTERFACE OPEARION When you turn on the player, it enters into main interface firstly. The interface can be slide left or right. Please select the function icon to enter relevant function for operation. The icons would be added or deleted,such as weather information, short-cut icons,etc APK icon adding to main interface,as the below picture:
Click on the icon ,the system will enter to main interface as the picture:
www.autopumpkin.com
第 8 页 共22页
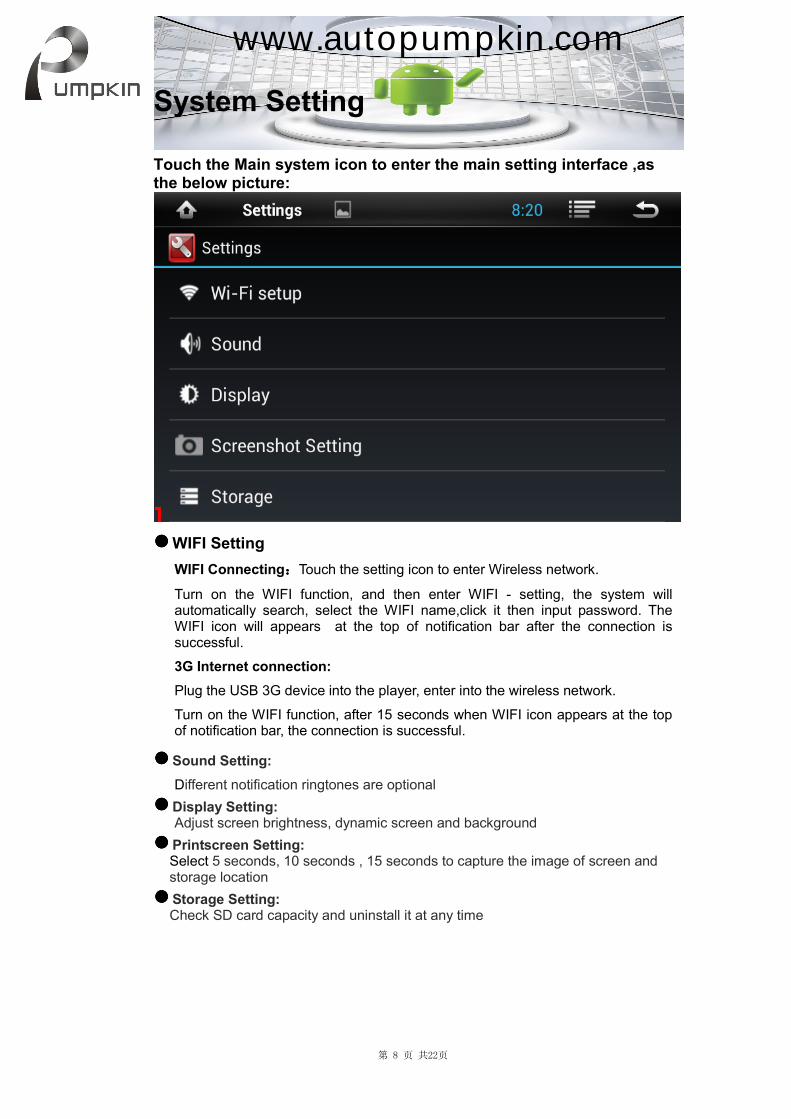
System Setting
Touch the Main system icon to enter the main setting interface ,as the below picture:
���� WIFI Setting
WIFI Connecting::::Touch the setting icon to enter Wireless network.
Turn on the WIFI function, and then enter WIFI - setting, the system will automatically search, select the WIFI name,click it then input password. The WIFI icon will appears at the top of notification bar after the connection is successful.
3G Internet connection:
Plug the USB 3G device into the player, enter into the wireless network.
Turn on the WIFI function, after 15 seconds when WIFI icon appears at the top of notification bar, the connection is successful.
���� Sound Setting: Different notification ringtones are optional
���� Display Setting: Adjust screen brightness, dynamic screen and background
���� Printscreen Setting: Select 5 seconds, 10 seconds , 15 seconds to capture the image of screen and storage location
���� Storage Setting: Check SD card capacity and uninstall it at any time
www.autopumpkin.com
第 9 页 共22页
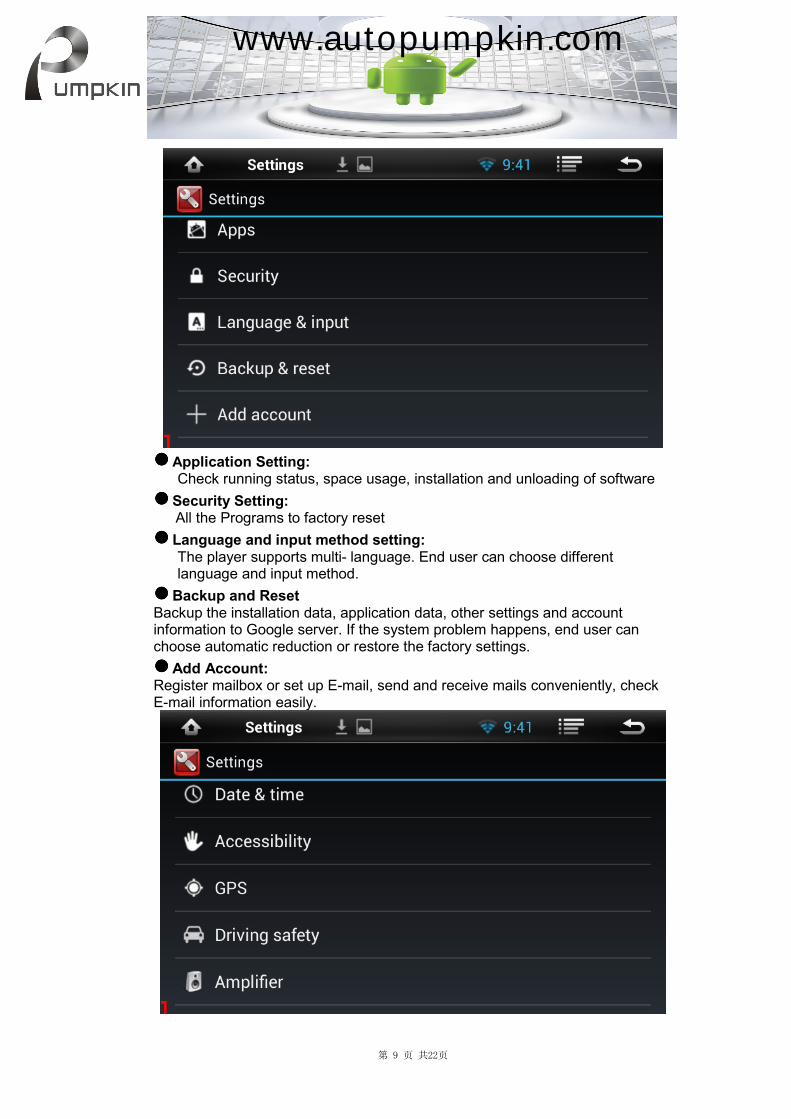
���� Application Setting: Check running status, space usage, installation and unloading of software
���� Security Setting: All the Programs to factory reset
���� Language and input method setting: The player supports multi- language. End user can choose different language and input method.
���� Backup and Reset Backup the installation data, application data, other settings and account information to Google server. If the system problem happens, end user can choose automatic reduction or restore the factory settings.
���� Add Account: Register mailbox or set up E-mail, send and receive mails conveniently, check E-mail information easily.
www.autopumpkin.com
第 10 页 共22页
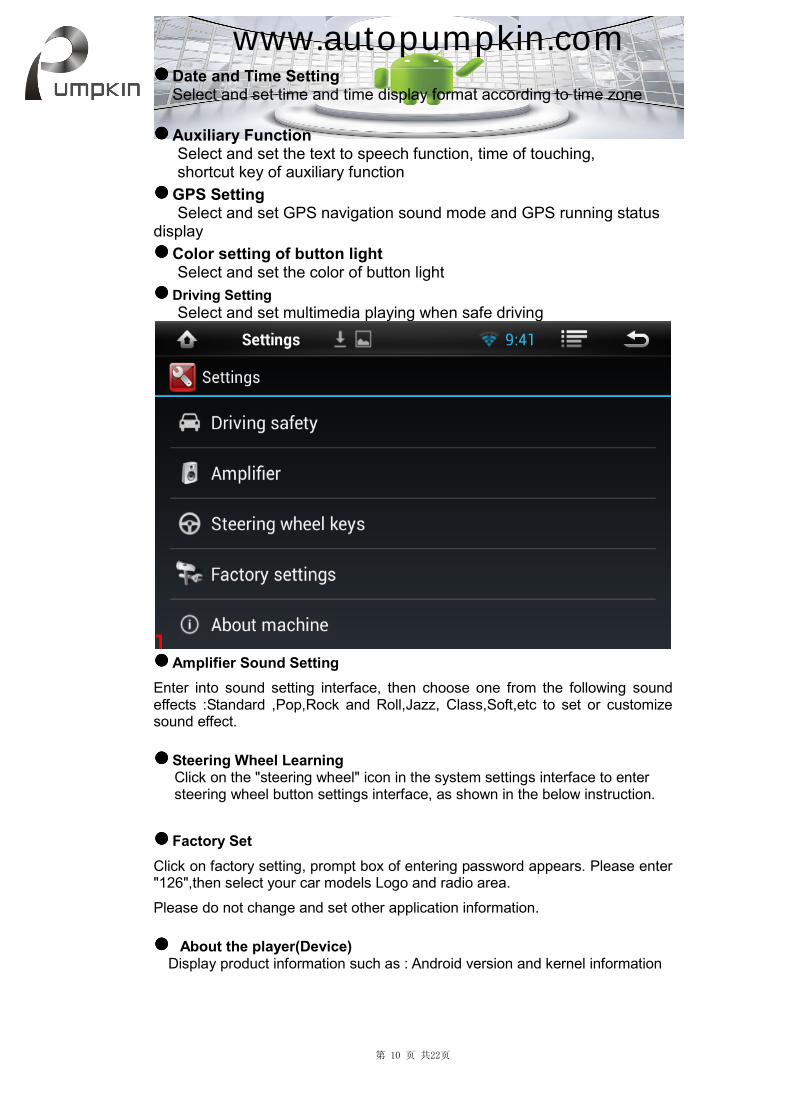
���� Date and Time Setting Select and set time and time display format according to time zone
���� Auxiliary Function Select and set the text to speech function, time of touching, shortcut key of auxiliary function
���� GPS Setting Select and set GPS navigation sound mode and GPS running status
display
���� Color setting of button light Select and set the color of button light
���� Driving Setting Select and set multimedia playing when safe driving
���� Amplifier Sound Setting
Enter into sound setting interface, then choose one from the following sound effects :Standard ,Pop,Rock and Roll,Jazz, Class,Soft,etc to set or customize sound effect.
���� Steering Wheel Learning Click on the "steering wheel" icon in the system settings interface to enter steering wheel button settings interface, as shown in the below instruction.
���� Factory Set
Click on factory setting, prompt box of entering password appears. Please enter "126",then select your car models Logo and radio area.
Please do not change and set other application information.
���� About the player(Device) Display product information such as : Android version and kernel information
www.autopumpkin.com
第 11 页 共22页
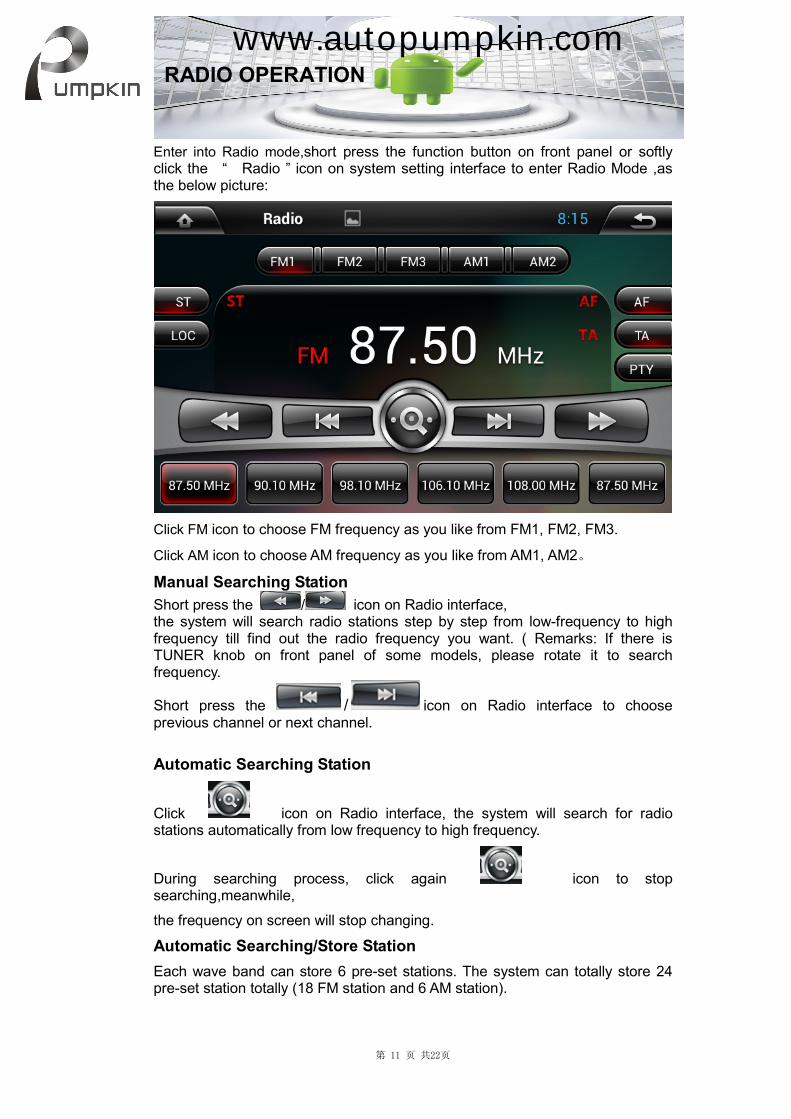
RADIO OPERATION
Enter into Radio mode,short press the function button on front panel or softly click the “ Radio ” icon on system setting interface to enter Radio Mode ,as the below picture:
Click FM icon to choose FM frequency as you like from FM1, FM2, FM3.
Click AM icon to choose AM frequency as you like from AM1, AM2。
Manual Searching Station
Short press the / icon on Radio interface, the system will search radio stations step by step from low-frequency to high frequency till find out the radio frequency you want. ( Remarks: If there is TUNER knob on front panel of some models, please rotate it to search frequency.
Short press the / icon on Radio interface to choose previous channel or next channel.
Automatic Searching Station
Click icon on Radio interface, the system will search for radio stations automatically from low frequency to high frequency.
During searching process, click again icon to stop searching,meanwhile,
the frequency on screen will stop changing.
Automatic Searching/Store Station
Each wave band can store 6 pre-set stations. The system can totally store 24 pre-set station totally (18 FM station and 6 AM station).
www.autopumpkin.com
第 12 页 共22页
ST for stereo/mono conversion FM radio signal is stronger at the center of the city, usually receive in stereo way, however in the remote area, the radio signal is not stable, usually switch to mono mode to improve the effect of radio. In FM band, click on the "ST" icon to turn on or turn off stereo effect. (note: when stereo is off ,the mono mode is on)
LOC for local/remote radio receiving transformation
FM radio signal is stronger at the center of the city, usually receive in local mode,
however in the remote area, the radio signal is not stable, usually switch to remote mode
improve the effect of radio. This system can automatically switch between local
and remote radio mode according to the strength of the radio signal .
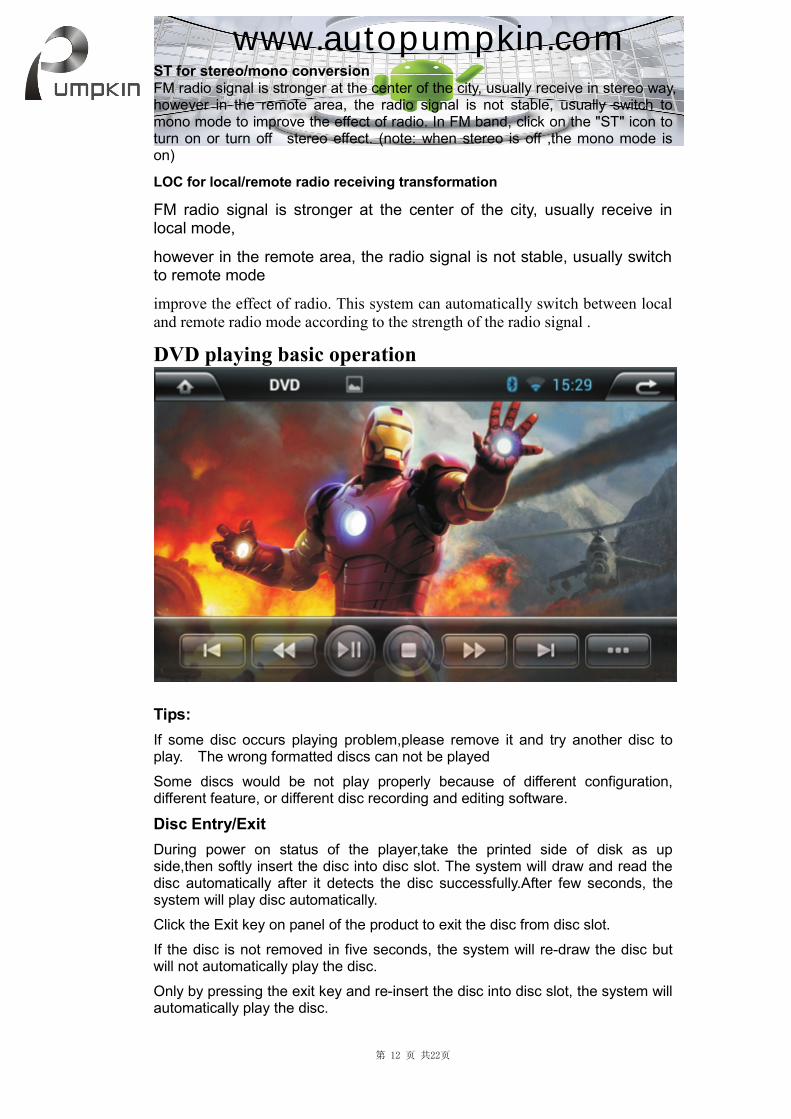
DVD playing basic operation
Tips:
If some disc occurs playing problem,please remove it and try another disc to play. The wrong formatted discs can not be played
Some discs would be not play properly because of different configuration, different feature, or different disc recording and editing software.
Disc Entry/Exit
During power on status of the player,take the printed side of disk as up side,then softly insert the disc into disc slot. The system will draw and read the disc automatically after it detects the disc successfully.After few seconds, the system will play disc automatically.
Click the Exit key on panel of the product to exit the disc from disc slot.
If the disc is not removed in five seconds, the system will re-draw the disc but will not automatically play the disc.
Only by pressing the exit key and re-insert the disc into disc slot, the system will automatically play the disc.
www.autopumpkin.com
第 13 页 共22页
Playing/Pause
In the state of playing the disc, USB disc or SD card, softly click the key at the bottom of media control interface to pause playing or continue playing.
Chapter Selection
In the state of playing the disc, USB disc or SD card,softly click the
/ keys to play the previous or next chapter of current-playing chapter.
High-speed Fast Forward/ Fast Backward control
Fast Forward Operation
In the state of playing,click the key at the bottom of media control interface continuously to enter fast forward x2/fast forward x4/ fast forward x8/ fast forward x20 playing.
In the state of fast forward playing, press key to resume to normal playing state.
Fast Backward Operation。
In the state of playing,click the key at the bottom of media control interface continuously to enter fast backward x2/fast backward x4/ fast backward x8/ fast backward x20 playing..
In the state of fast backward playing, press key to resume to normal playing state.
Softly click the key of media playing control interface to enter and operate next
chapter,subtitle switch, language switch, or repeat of current chapter.
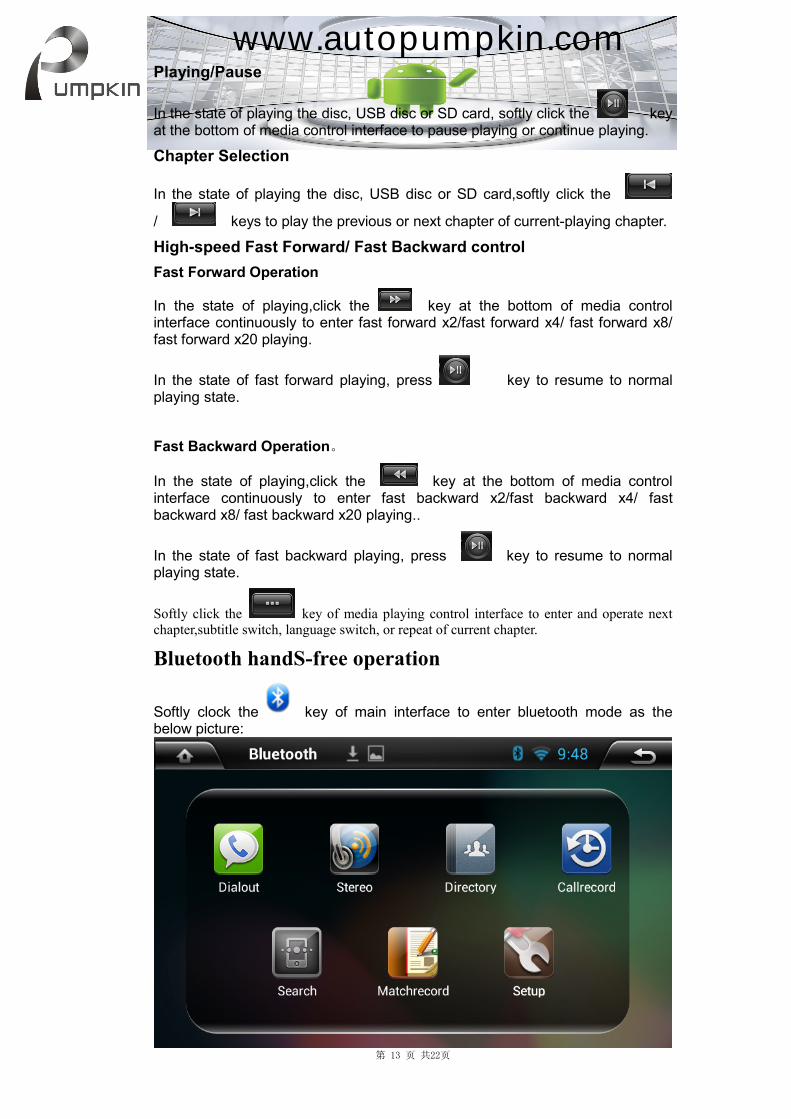
Bluetooth handS-free operation
Softly clock the key of main interface to enter bluetooth mode as the below picture:
www.autopumpkin.com
第 14 页 共22页
Bluetooth Matching and Connecting
Firstly match the Bluetooth of mobile phone and the product before using bluetooth hands-free function.
Turn on the bluetooth function of mobile phone and search for the Bluetooth equipment. After the product gets the signal of mobile phone, its name will appear on the mobile phone. When connecting with mobile phone, input the universal code “0000”and confirm it.
After the mobile phone has been matched and connected with the product successfully, the
Bluetooth icon will appear on the top of interface.Otherwise, the Bluetooth icon will not
appear.
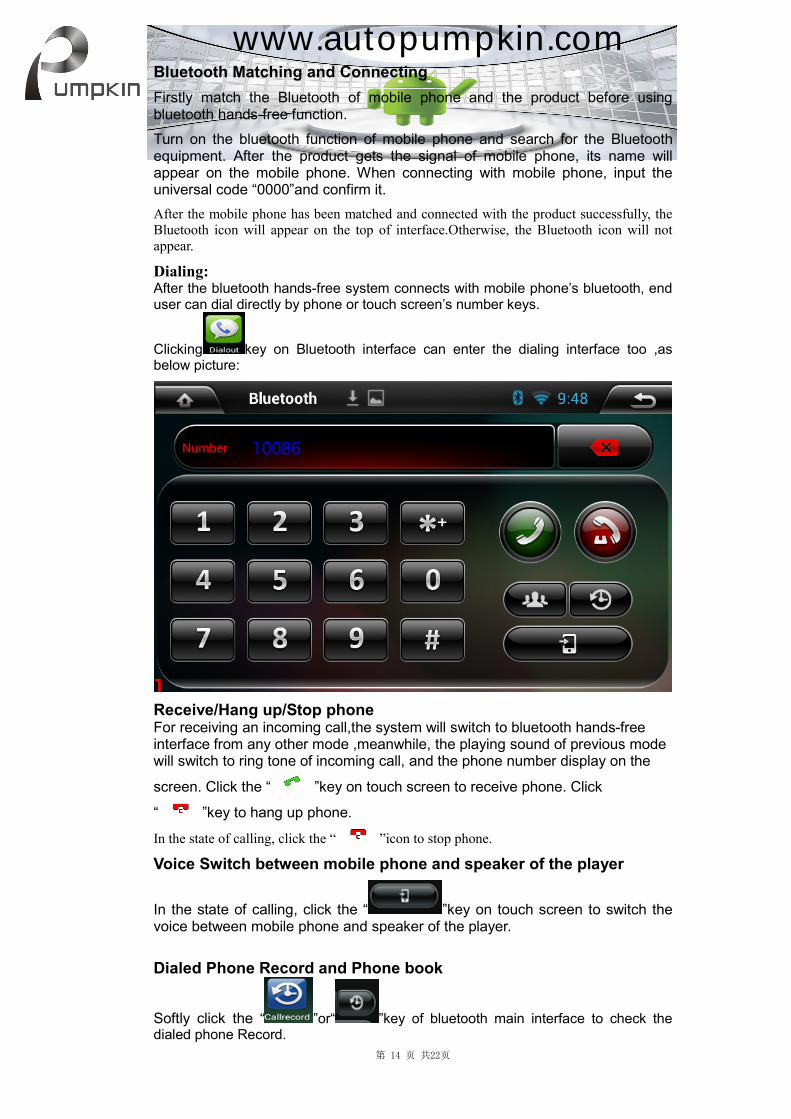
Dialing: After the bluetooth hands-free system connects with mobile phone’s bluetooth, end user can dial directly by phone or touch screen’s number keys.
Clicking key on Bluetooth interface can enter the dialing interface too ,as below picture:
Receive/Hang up/Stop phone For receiving an incoming call,the system will switch to bluetooth hands-free interface from any other mode ,meanwhile, the playing sound of previous mode will switch to ring tone of incoming call, and the phone number display on the
screen. Click the “ ”key on touch screen to receive phone. Click
“ ”key to hang up phone.
In the state of calling, click the “ ”icon to stop phone.
Voice Switch between mobile phone and speaker of the player
In the state of calling, click the “ ”key on touch screen to switch the voice between mobile phone and speaker of the player.
Dialed Phone Record and Phone book
Softly click the “ ”or“ ”key of bluetooth main interface to check the dialed phone Record.
www.autopumpkin.com
第 15 页 共22页
Softly click the “ ”or“ ”key of bluetooth main interface to enter into phone book interface
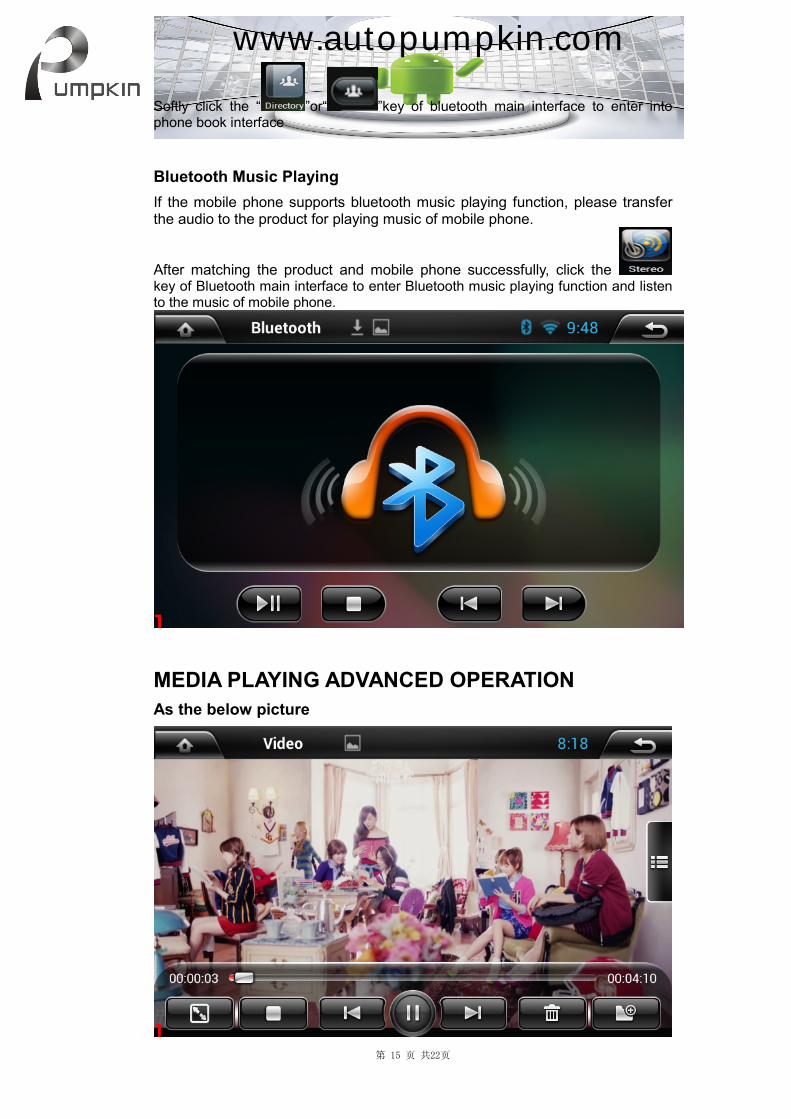
Bluetooth Music Playing
If the mobile phone supports bluetooth music playing function, please transfer the audio to the product for playing music of mobile phone.
After matching the product and mobile phone successfully, click the key of Bluetooth main interface to enter Bluetooth music playing function and listen to the music of mobile phone.
MEDIA PLAYING ADVANCED OPERATION
As the below picture
www.autopumpkin.com
第 16 页 共22页
Click on the media playing icon to play the video files and files from SD card or USB
disc. It supports MP4、AVI and 1080P HD video playing format.
Touch icon to enter full-screen playing, click icon to stop playing.
Click / icon to select previous or next chapter.Click icon
to play or stop playing, icon to delete files,
icon to add video files, icons to check video files list and click to select and play the file.
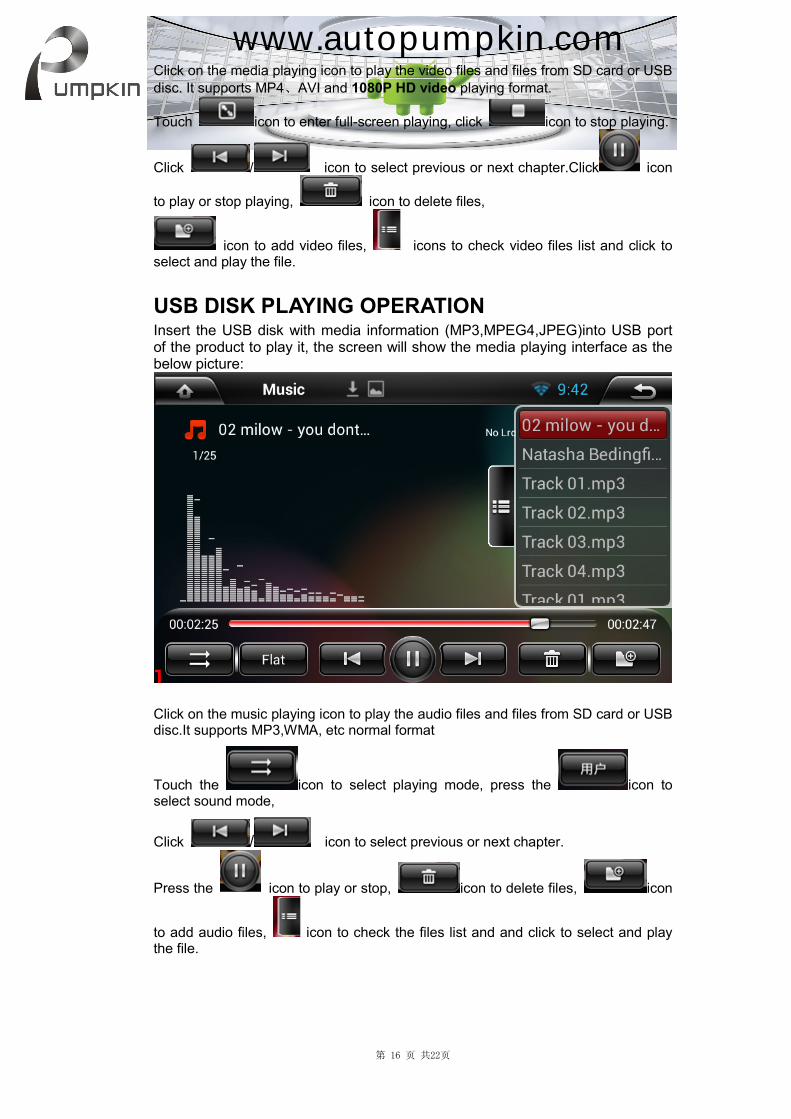
USB DISK PLAYING OPERATION Insert the USB disk with media information (MP3,MPEG4,JPEG)into USB port of the product to play it, the screen will show the media playing interface as the below picture:
Click on the music playing icon to play the audio files and files from SD card or USB disc.It supports MP3,WMA, etc normal format
Touch the icon to select playing mode, press the icon to select sound mode,
Click / icon to select previous or next chapter.
Press the icon to play or stop, icon to delete files, icon
to add audio files, icon to check the files list and and click to select and play the file.
www.autopumpkin.com

第 17 页 共22页
CAR DVR OPERATION (optional)
The video of car DVR are stored in TF card and most files are big, so please use at least 8 GB TF card to record the video for long time automatically.
The product can automatically detect the car DVR when it is connected via USB interface.
Click the icon to start recording video,the files can be stored automatically after stop recording.
Click the icon to check the recorded video list. The displays time, longitude, latitude and speed are displayed on the left side of video playing interface
Click the icon to switch multi-cameras video recording.
FILES MANAGEMENT OPERAION
Enter into file management operation interface, as the below picture:
www.autopumpkin.com
第 18 页 共22页
Click the icon to select the files to remove, select the copy icon ,then
the paste icon to copy and paste files. When you don’t need the file, press
the deleting icon to delete it.
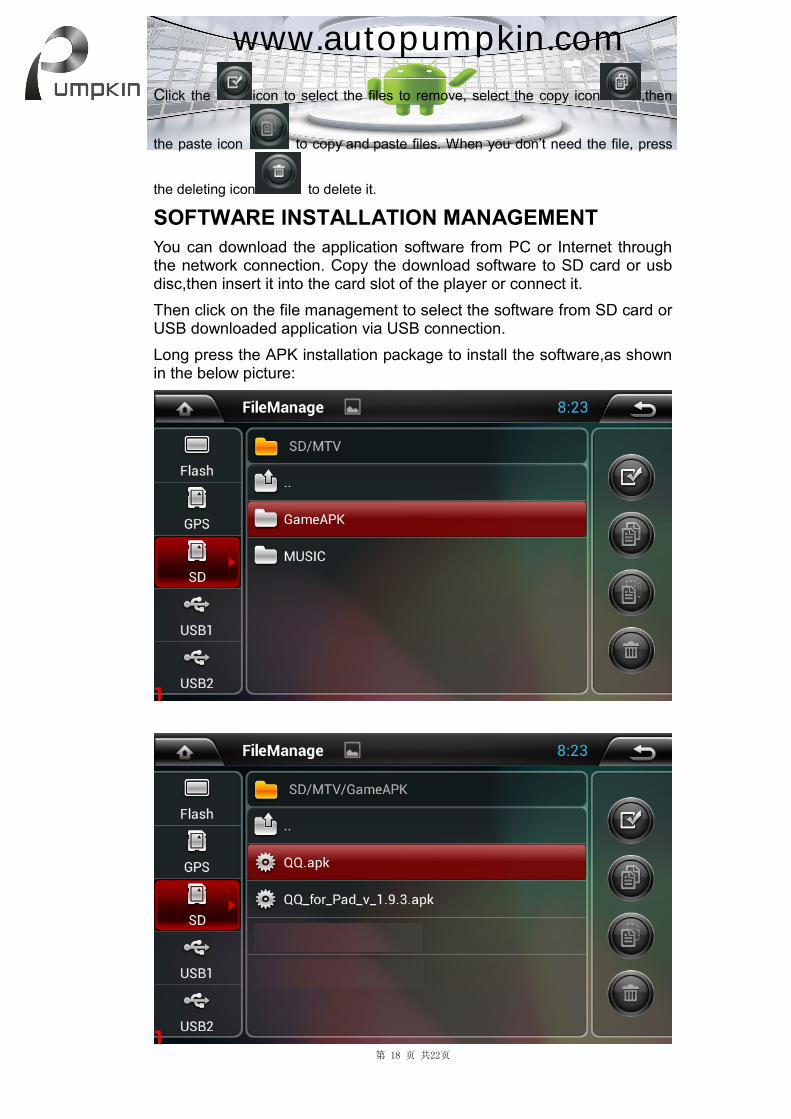
SOFTWARE INSTALLATION MANAGEMENT
You can download the application software from PC or Internet through the network connection. Copy the download software to SD card or usb disc,then insert it into the card slot of the player or connect it.
Then click on the file management to select the software from SD card or USB downloaded application via USB connection.
Long press the APK installation package to install the software,as shown in the below picture:
www.autopumpkin.com
第 19 页 共22页
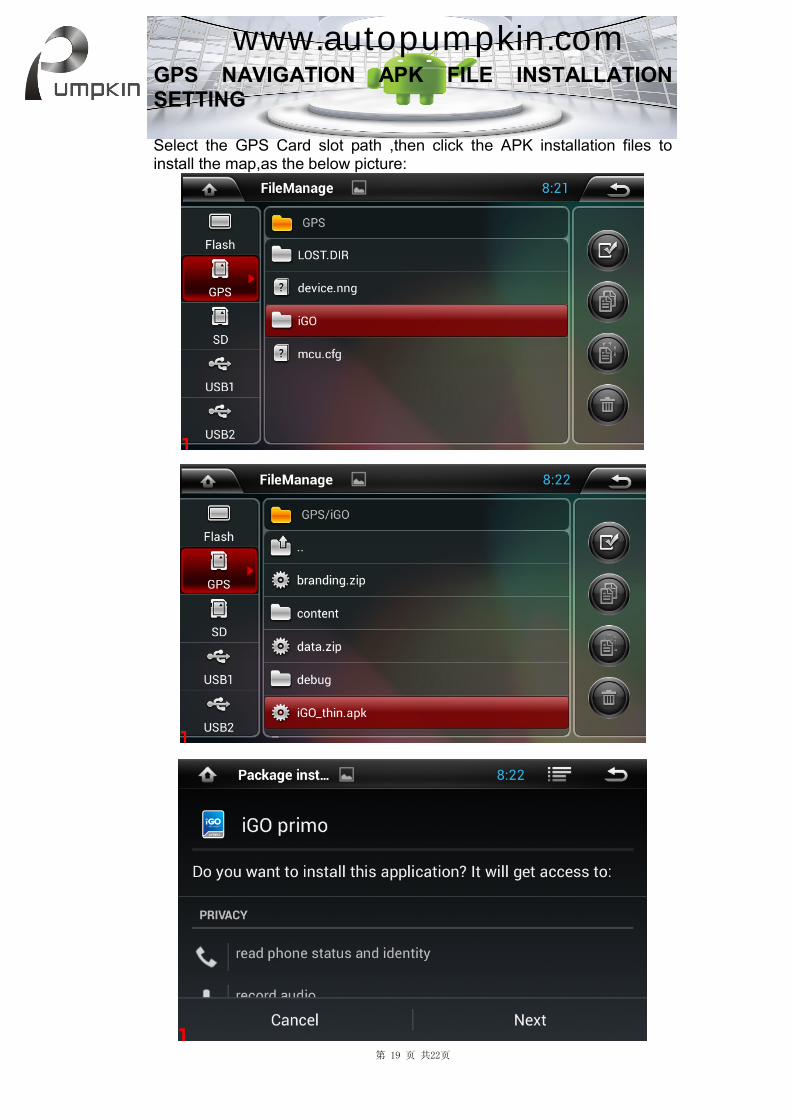
GPS NAVIGATION APK FILE INSTALLATION SETTING Select the GPS Card slot path ,then click the APK installation files to install the map,as the below picture:
www.autopumpkin.com
第 20 页 共22页
STEERING WHEEL LEARNING
The steering wheel buttons of the product are appropriate for the original car steering wheel with non-bus control mode.
The original car's steering wheel buttons should be voltage input control, that is,when operating each button, the corresponding inputs of original car audio input different voltage. Before installation, find out the ground wire, original car steering wheel cables (Caution: some cars have three wires and others have two) , and the steering wheel button power supply line (+ 5 v),then connect with the corresponding steering wheel cables which are supplied together with the product we offered.
(Remarks: After removing the the original car audio host, if the steering wheel buttons power line still have power, no need to connect power line again. Otherwise,please connect it with the "+5 V output of our product's steering wheel cables.
Please connect the "keying line 1" as priority when connecting them.If key control works abnormally,please select "keying line 2" then and reset the steering wheel buttons function to use.)
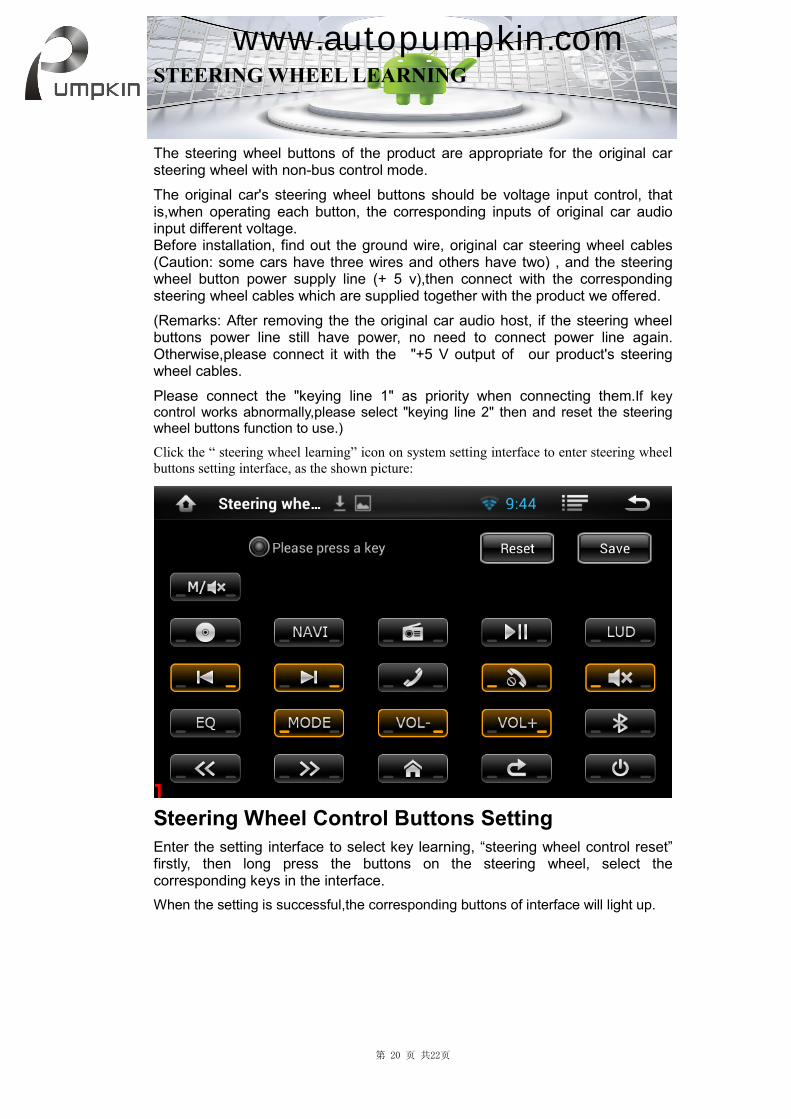
Click the “ steering wheel learning” icon on system setting interface to enter steering wheel
buttons setting interface, as the shown picture:
Steering Wheel Control Buttons Setting
Enter the setting interface to select key learning, “steering wheel control reset” firstly, then long press the buttons on the steering wheel, select the corresponding keys in the interface.
When the setting is successful,the corresponding buttons of interface will light up.
www.autopumpkin.com
第 21 页 共22页
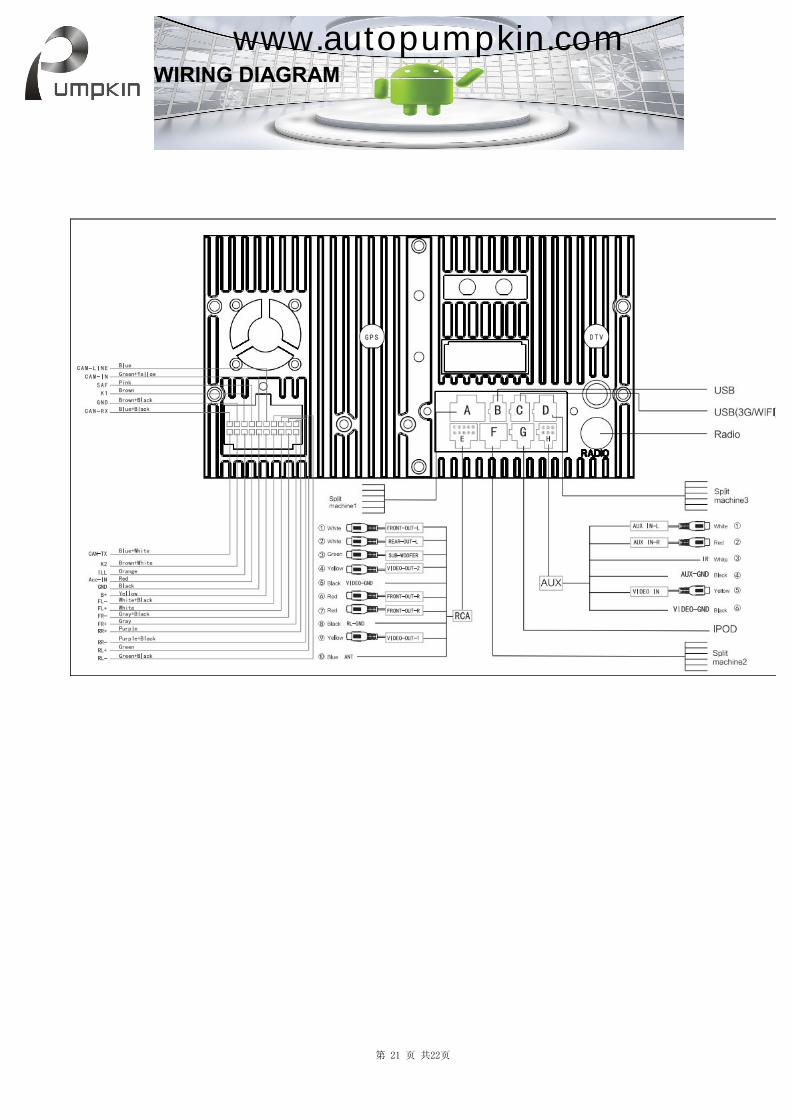
WIRING DIAGRAM
www.autopumpkin.com
第 22 页 共22页
Trouble-shooting
Before sending the product to maintain, please firstly read the below trouble shooting table and make simple checking or adjustment to solve the problem according to the instruction.
If the problem of the product could not be solved effectively after following the table and checking, please contact with professional service center or us.
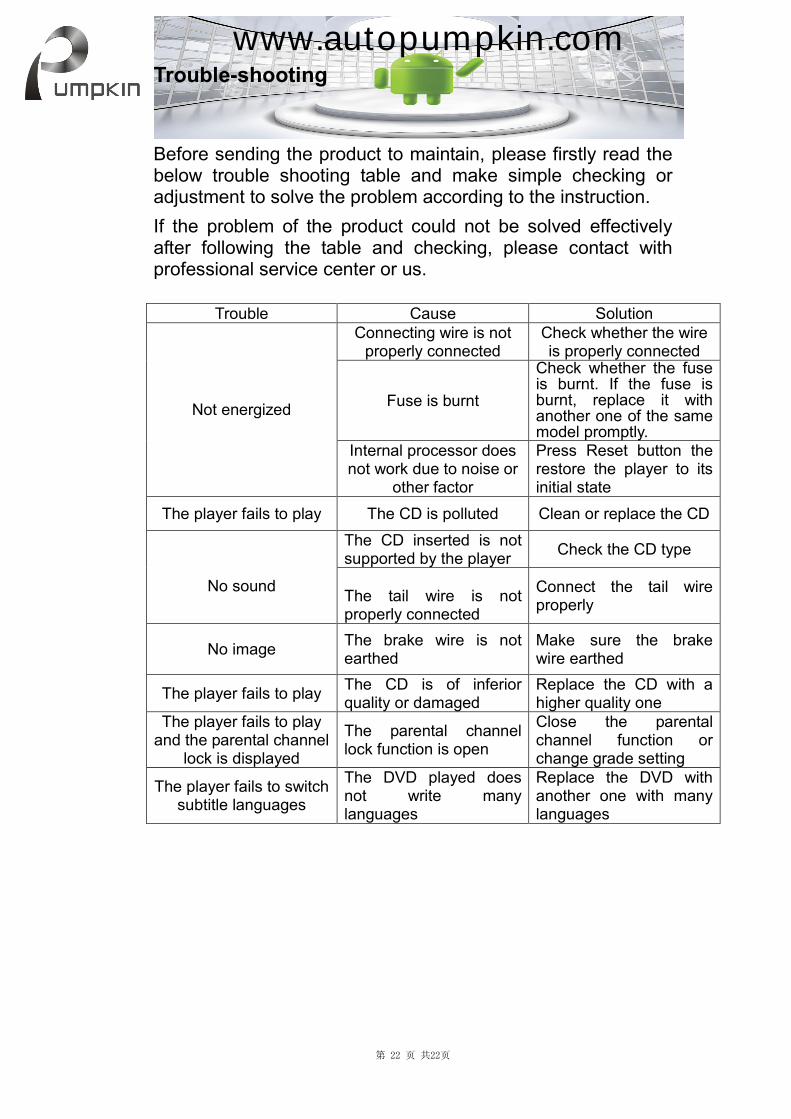
Trouble Cause Solution
Connecting wire is not properly connected
Check whether the wire is properly connected
Fuse is burnt
Check whether the fuse is burnt. If the fuse is burnt, replace it with another one of the same model promptly.
Not energized
Internal processor does not work due to noise or
other factor
Press Reset button the restore the player to its initial state
The player fails to play The CD is polluted Clean or replace the CD
The CD inserted is not supported by the player
Check the CD type
No sound The tail wire is not properly connected
Connect the tail wire properly
No image The brake wire is not earthed
Make sure the brake wire earthed
The player fails to play The CD is of inferior quality or damaged
Replace the CD with a higher quality one
The player fails to play and the parental channel
lock is displayed
The parental channel lock function is open
Close the parental channel function or change grade setting
The player fails to switch subtitle languages
The DVD played does not write many languages
Replace the DVD with another one with many languages
www.autopumpkin.com


![ISI KANDUNGAN - utem.edu.my · Masukkan “User ID” dan “Password” [Bagi pengguna kali pertama, User ID adalah System ID yang diberikan oleh system semasa pendaftaran]. ii)](https://img.pdfslide.tips/doc/110x75/5d2042e388c993a5378c54b0/isi-kandungan-utemedumy-masukkan-user-id-dan-password-bagi.jpg)


![WEIHONG® WATERJET MACHINE’S MOTION CONTROL …¾ User can customize step-size under [Manual] interface. ¾ [System maintenance], user can maintain the system, and also can make](https://img.pdfslide.tips/doc/110x75/6103918f501bd113971b9da7/weihong-waterjet-machineas-motion-control-user-can-customize-step-size-under.jpg)