Embed Size (px)
Citation preview

CARBIDE SERIES®
INSTALLATION GUIDE n GUIDE D’INSTALLATIONINSTALLATIONSANLEITUNG n Guía de instalación
РУКОВОДСТВО ПО УСТАНОВКЕ n GUIA DE INSTALAÇÃOインストールガイド
47100 Bayside Parkway • Fremont • California • 94538 • USA | corsair.com
© 2015 Corsair Components, Inc.All rights reserved. Corsair, the sails logo, and Carbide Series areregistered trademarks of Corsair in the United States and/or othercountries. All other trademarks are the property of their respectiveowners. Product may vary slightly from those pictured.
PN: 49-001445 rev AA

English: ...................................................................................................5-14
Français: .............................................................................................. 15-24
Deutsch: .............................................................................................. 25-34
Español: ............................................................................................... 35-44
Россию: ................................................................................................. 45-54
Português: .......................................................................................... 55-64
日本人:.................................................................................................. 65-74
CARBIDE SERIES® SPEC-ALPHA
65
EN
GLISH
Table of Contents Case Specifications
Congratulations!
Congratulations: ..........................................................................................................................................................5
Case specifications:....................................................................................................................................................6
Accessory kit contents:.............................................................................................................................................7
Case features: ...............................................................................................................................................................8
Removing the side panels: ......................................................................................................................................9
Installing the motherboard: ....................................................................................................................................9
Installing PCI-E/PCI card(s): ................................................................................................................................10
Installing the power supply: .................................................................................................................................10
Removing the front fascia: ....................................................................................................................................11
Removing the top panel:........................................................................................................................................11
Installing HDDs and SSDs: .....................................................................................................................................12
Installing additional SSDs: ....................................................................................................................................12
Connecting the fan controller: ............................................................................................................................13
Installing the front I/O connectors: ..................................................................................................................13
Frequently asked questions: ................................................................................................................................14
Thank you for purchasing the Carbide Series SPEC-ALPHA Mid-Tower Gaming Case.
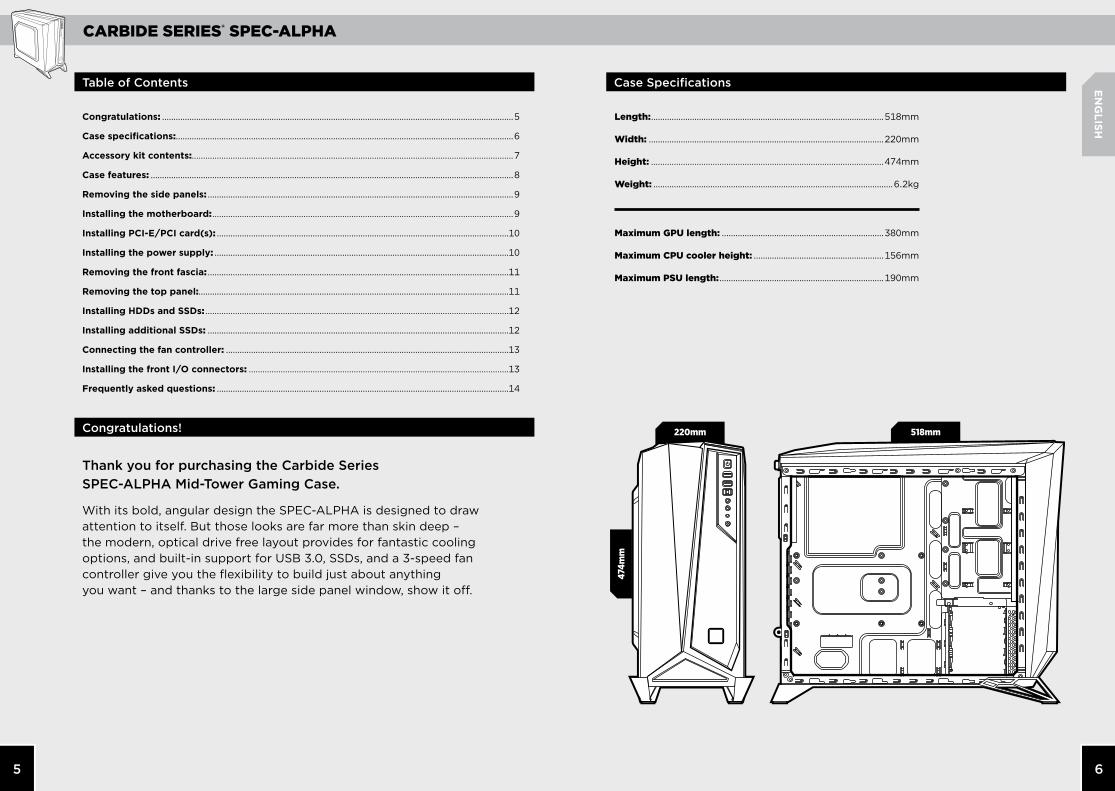
With its bold, angular design the SPEC-ALPHA is designed to draw attention to itself. But those looks are far more than skin deep – the modern, optical drive free layout provides for fantastic cooling options, and built-in support for USB 3.0, SSDs, and a 3-speed fan controller give you the flexibility to build just about anything you want – and thanks to the large side panel window, show it off.
Length: ......................................................................................................518mm
Width: .......................................................................................................220mm
Height: ......................................................................................................474mm
Weight: .........................................................................................................6.2kg
Maximum GPU length: .......................................................................380mm
Maximum CPU cooler height: .........................................................156mm
Maximum PSU length: ........................................................................190mm
474m
m
220mm 518mm

CARBIDE SERIES® SPEC-ALPHA
87
EN
GLISH
Case FeaturesAccessory Kit Contents
I/O Panel (x2 USB 3.0, Headphone/Mic, and Power/Reset)
Removable front fascia
x2 Front 120mm LED fans (room for 3)
Rear 120mm LED fan
x2 Top 120mm fan mounts
Windowed side panel
Bottom PSU mount and dust filter
x2 Tool-free 2.5" drive mounts
CPU backplate cutout
A
B
C
D
E
F
G
H
I
A B
C
D EF
G H
I
a x6Cable ties
g x1Motherboard standoff
e x16Short fan screws
d x4SSD pan head screws
f x4Long fan screws
b
MBD/HDD screwsx16 c x16
SSD/ODD screws

CARBIDE SERIES® SPEC-ALPHA
109
EN
GLISH
4. Installing the Power Supply
3. Installing PCI-E/PCI Card(s)
2. Installing the Motherboard
1. Removing the Side Panels
Simply remove the thumbscrews then slide the side panels back and out.
Note: Corsair recommends removing both side panels and setting them aside when building your system to avoid accidental damage. Both side panels are interchangeable and should be removed to reduce clutter.
Remove slot cover, install expansion card, and secure with screw(s) as necessary.
Position the PSU on the bottom of the case then align the case holes and secure the PSU with screws provided with your power supply.
SPEC-ALPHA STEP2
First, install your motherboard’s I/O shield (see your motherboard’s manual for guidance).
Align your motherboard with the pre-installed standoffs.
Use the provided screws to secure the motherboard to the motherboard tray.
b
SPEC-ALPHA STEP1
SPEC-ALPHA Step 3SPEC-ALPHA Step 3
SPEC-ALPHA STEP4SPEC-ALPHA STEP4

CARBIDE SERIES® SPEC-ALPHA
1211
EN
GLISH
8. Installing Additional SSDs
7. Installing HDDs and SSDs
6. Removing the Top Panel
5. Removing the Front Fascia
Simply pull back retention arm and slide in the 2.5" SSD or 3.5" HDD until the retention arm snaps back into place.
Align the 2.5” drive to the mid-panel of the case, and secure with the included screws from the accessory box.
SPEC-ALPHA STEP5
SPEC-ALPHA Step 8
SPEC-ALPHA STEP6
SPEC-ALPHA Step 7
SPEC-ALPHA Step 7
To remove the front fascia, gently pull the front away from the case while pressing on the tabs securing it.
Remove the screws from the top rear of the case, and slide top panel backwards gently until you can lift it off.
CARBIDE SERIES® SPEC-ALPHA
1413
EN
GLISH
Frequently Asked Questions
10. Installing the Front I/O Connectors
9. Connecting the Fan Controller
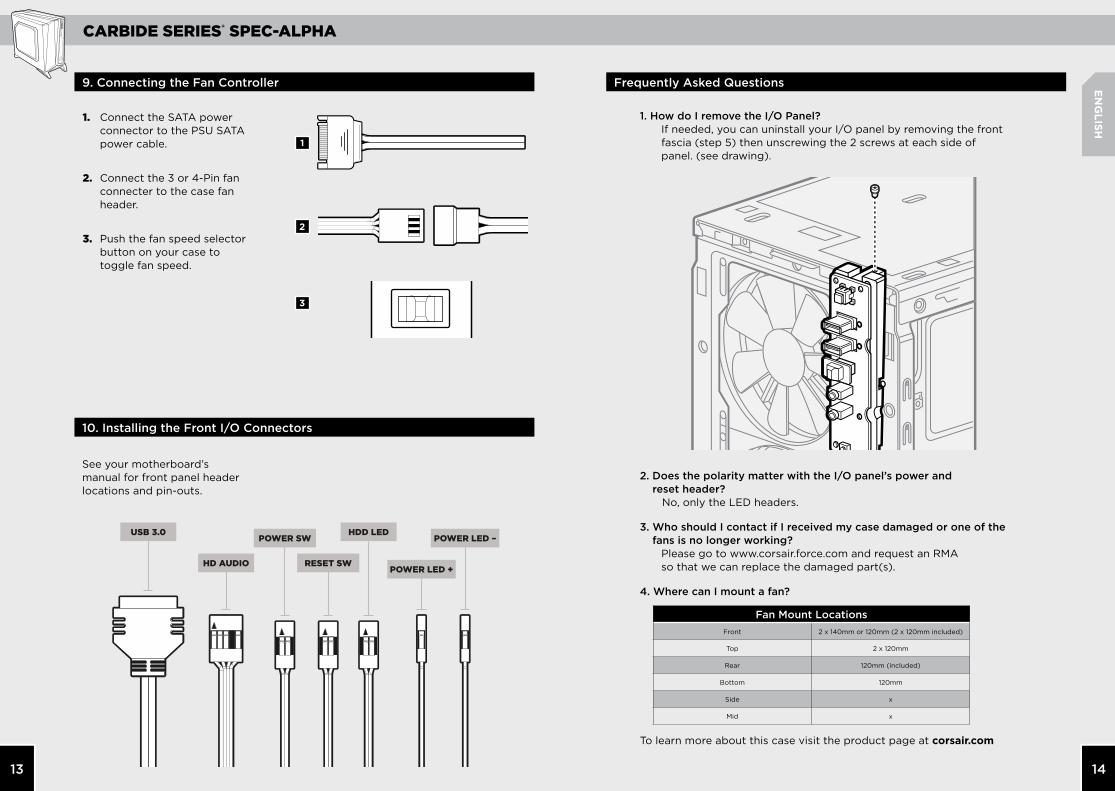
1. Connect the SATA power connector to the PSU SATA power cable.
2. Connect the 3 or 4-Pin fan connecter to the case fan header.
3. Push the fan speed selector button on your case to toggle fan speed.
1. How do I remove the I/O Panel ? If needed, you can uninstall your I/O panel by removing the front
fascia (step 5) then unscrewing the 2 screws at each side of panel. (see drawing).
2. Does the polarity matter with the I/O panel’s power and reset header? No, only the LED headers.
3. Who should I contact if I received my case damaged or one of the fans is no longer working? Please go to www.corsair.force.com and request an RMA
so that we can replace the damaged part(s).
4. Where can I mount a fan?
To learn more about this case visit the product page at corsair.com
Fan Mount LocationsFront 2 x 140mm or 120mm (2 x 120mm included)
Top 2 x 120mm
Rear 120mm (included)
Bottom 120mm
Side x
Mid x
1
2
3
See your motherboard’s manual for front panel header locations and pin-outs.
USB 3.0
HD AUDIO RESET SWPOWER LED +
POWER LED –POWER SWHDD LED
SPEC-ALPHA FAQ
CARBIDE SERIES® SPEC-ALPHA
1615
FRA
NÇ
AIS
Table des matières Caractéristiques techniques du boîtier
Félicitations!
Félicitations: ................................................................................................................................................................15
Caractéristiques techniques du boîtier: ..........................................................................................................16
Contenu du kit d’accessoires: ..............................................................................................................................17
Caractéristiques du boîtier: ..................................................................................................................................18
Retrait des panneaux latéraux: ...........................................................................................................................19
Installation de la carte mère: ...............................................................................................................................19
Installation des cartes PCI-E/PCI: ......................................................................................................................20
Installation du bloc d'alimentation: ..................................................................................................................20
Retrait de la façade: .................................................................................................................................................21
Retrait du panneau supérieur: .............................................................................................................................21
Installation des disques durs et des disques SSD: ......................................................................................22
Installation de disques SSD supplémentaires:..............................................................................................22
Raccordement du contrôleur de ventilateur: ................................................................................................23
Installation des connecteurs E/S avant: ..........................................................................................................23
Foire aux questions: .................................................................................................................................................24
Merci d'avoir acheté le boîtier de jeu mi-tour Carbide Series SPEC-ALPHA.
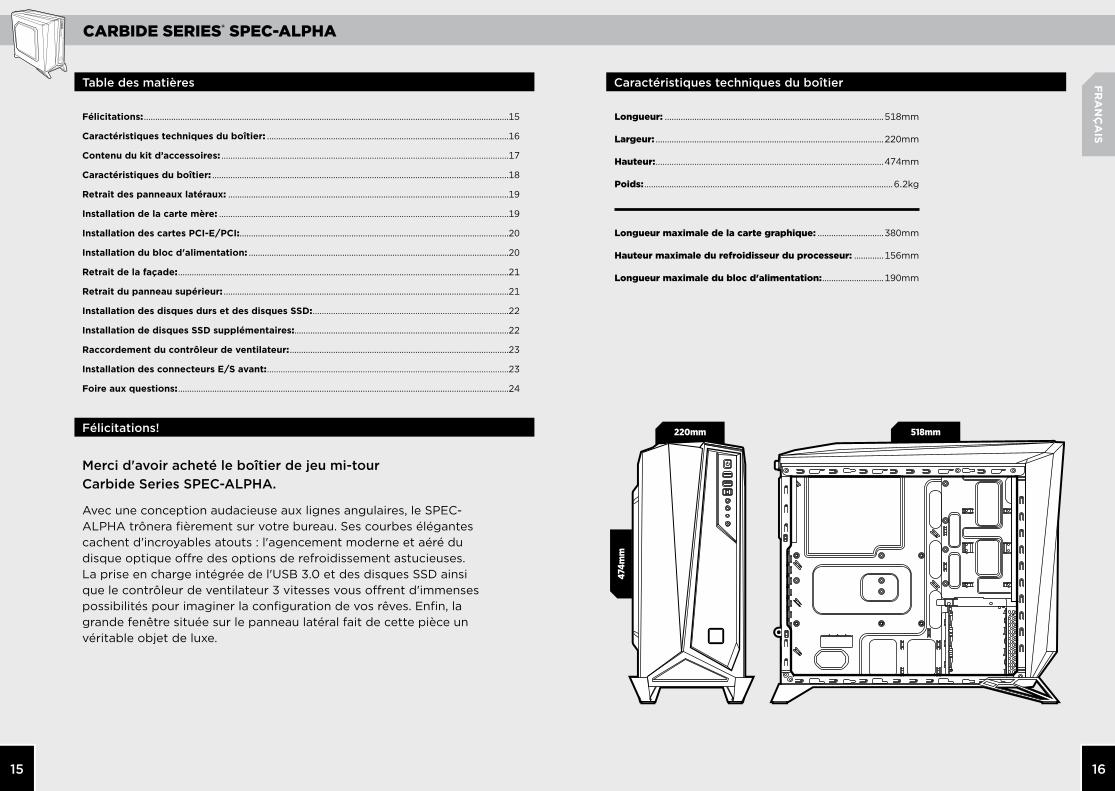
Avec une conception audacieuse aux lignes angulaires, le SPEC-ALPHA trônera fièrement sur votre bureau. Ses courbes élégantes cachent d'incroyables atouts : l'agencement moderne et aéré du disque optique offre des options de refroidissement astucieuses. La prise en charge intégrée de l'USB 3.0 et des disques SSD ainsi que le contrôleur de ventilateur 3 vitesses vous offrent d'immenses possibilités pour imaginer la configuration de vos rêves. Enfin, la grande fenêtre située sur le panneau latéral fait de cette pièce un véritable objet de luxe.
Longueur: ................................................................................................518mm
Largeur: ....................................................................................................220mm
Hauteur: ....................................................................................................474mm
Poids: .............................................................................................................6.2kg
Longueur maximale de la carte graphique: .............................380mm
Hauteur maximale du refroidisseur du processeur: .............156mm
Longueur maximale du bloc d'alimentation: ...........................190mm
474m
m
220mm 518mm

CARBIDE SERIES® SPEC-ALPHA
1817
FRA
NÇ
AIS
Caractéristiques du boîtierContenu du kit d’accessoires
a x6Attaches de câbles
g x1Entretoise de carte mère
e x16Vis de ventilateur courtes
d x4Vis à tête cylindrique pour disque SSD
f x4Vis de ventilateur longues
b
Vis de carte mère/disque dur
x16 c x16Vis de SSD/lecteur optique
Panneau E/S (x2 USB 3.0, Casque/Mic, et Alimentation/Réinitialisation)
Façade amovible
x2 ventilateurs frontaux à LED de 120 mm (3 possible)
Arrière – Ventilateur à LED de 120 mm
x2 fixations supérieures pour ventilateur de 120 mm
Panneau latéral à fenêtre
Montage en bas du bloc d'alimentation et filtre à poussière
x2 supports pour disque de 2,5 po - sans outil
Découpage dans la plaque arrière du processeur
A
B
C
D
E
F
G
H
I
A B
C
D EF
G H
I
CARBIDE SERIES® SPEC-ALPHA
2019
FRA
NÇ
AIS
4. Installation du bloc d'alimentation
3. Installation des cartes PCI-E/PCI
2. Installation de la carte mère
1. Retrait des panneaux latéraux
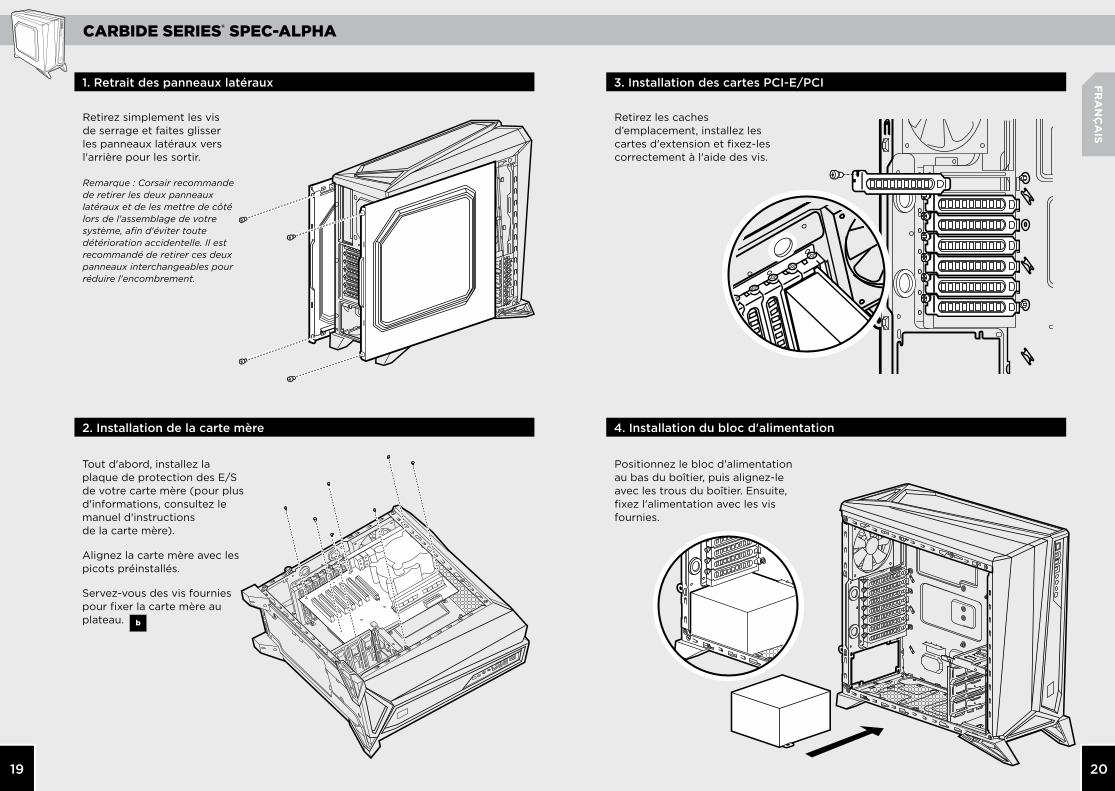
Retirez simplement les vis de serrage et faites glisser les panneaux latéraux vers l'arrière pour les sortir.
Remarque : Corsair recommande de retirer les deux panneaux latéraux et de les mettre de côté lors de l'assemblage de votre système, afin d'éviter toute détérioration accidentelle. Il est recommandé de retirer ces deux panneaux interchangeables pour réduire l'encombrement.
Retirez les caches d’emplacement, installez les cartes d'extension et fixez-les correctement à l'aide des vis.
Positionnez le bloc d'alimentation au bas du boîtier, puis alignez-le avec les trous du boîtier. Ensuite, fixez l'alimentation avec les vis fournies.
SPEC-ALPHA STEP2
Tout d'abord, installez la plaque de protection des E/S de votre carte mère (pour plus d'informations, consultez le manuel d'instructions de la carte mère).
Alignez la carte mère avec les picots préinstallés.
Servez-vous des vis fournies pour fixer la carte mère au plateau. b
SPEC-ALPHA STEP1
SPEC-ALPHA Step 3SPEC-ALPHA Step 3
SPEC-ALPHA STEP4SPEC-ALPHA STEP4

CARBIDE SERIES® SPEC-ALPHA
2221
FRA
NÇ
AIS
8. Installation de disques SSD supplémentaires
7. Installation des disques durs et des disques SSD
6. Retrait du panneau supérieur
5. Retrait de la façade
Tirez simplement sur le bras de retenue et glissez le disque SSD de 2,5 po ou le disque dur de 3,5 po jusqu'à ce que vous entendiez un déclic annonçant le réenclenchement du bras.
Alignez le disque 2,5 po sur le panneau du milieu du boîtier et fixez-le avec les vis fournies dans le kit d'accessoires.
SPEC-ALPHA STEP5
SPEC-ALPHA Step 8
SPEC-ALPHA STEP6
SPEC-ALPHA Step 7
SPEC-ALPHA Step 7
Pour retirer la façade, appuyez sur les languettes qui la sécurisent et retirez-la doucement du boitier.
Retirez les vis situées en haut à l'arrière du boîtier, et faites glisser soigneusement le panneau supérieur en le faisant reculer jusqu'à le détacher.
CARBIDE SERIES® SPEC-ALPHA
2423
FRA
NÇ
AIS
Foire aux questions
10. Installation des connecteurs E/S avant
9. Raccordement du contrôleur de ventilateur
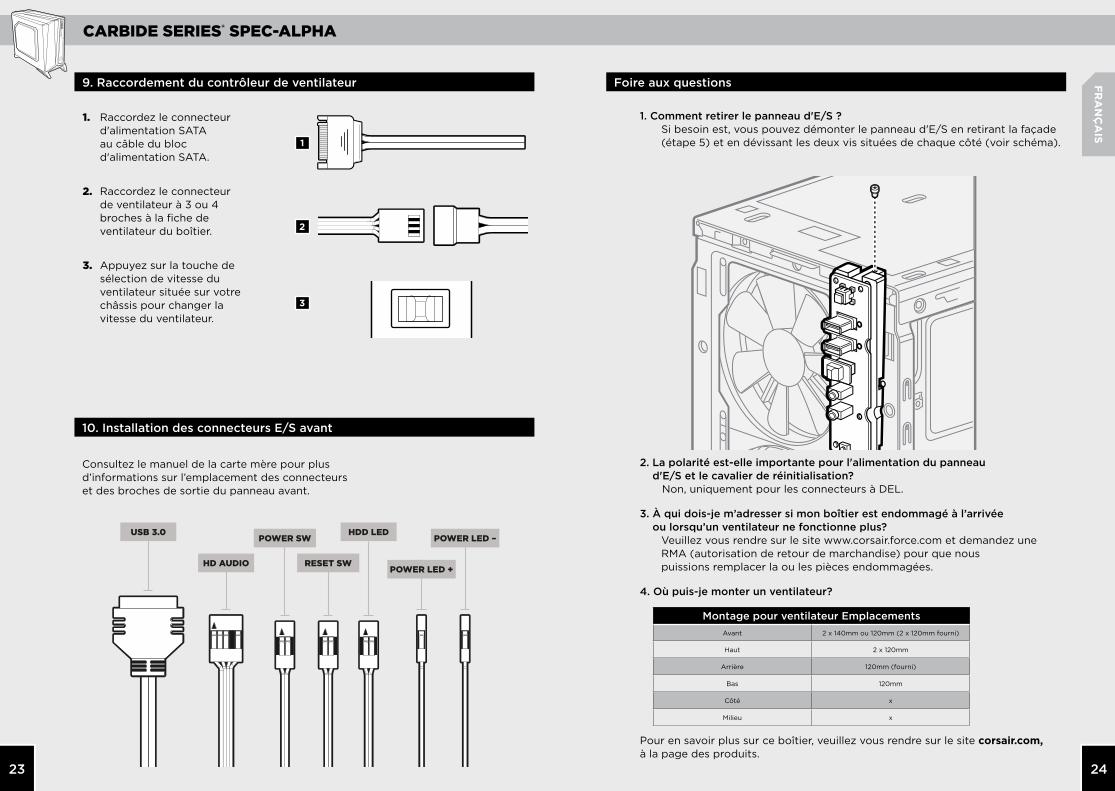
1. Raccordez le connecteur d'alimentation SATA au câble du bloc d'alimentation SATA.
2. Raccordez le connecteur de ventilateur à 3 ou 4 broches à la fiche de ventilateur du boîtier.
3. Appuyez sur la touche de sélection de vitesse du ventilateur située sur votre châssis pour changer la vitesse du ventilateur.
1. Comment retirer le panneau d'E/S ? Si besoin est, vous pouvez démonter le panneau d'E/S en retirant la façade
(étape 5) et en dévissant les deux vis situées de chaque côté (voir schéma).
2. La polarité est-elle importante pour l'alimentation du panneau d'E/S et le cavalier de réinitialisation? Non, uniquement pour les connecteurs à DEL.
3. À qui dois-je m’adresser si mon boîtier est endommagé à l’arrivée ou lorsqu’un ventilateur ne fonctionne plus? Veuillez vous rendre sur le site www.corsair.force.com et demandez une
RMA (autorisation de retour de marchandise) pour que nous puissions remplacer la ou les pièces endommagées.
4. Où puis-je monter un ventilateur?
Pour en savoir plus sur ce boîtier, veuillez vous rendre sur le site corsair.com, à la page des produits.
1
2
3
Consultez le manuel de la carte mère pour plus d’informations sur l’emplacement des connecteurs et des broches de sortie du panneau avant.
USB 3.0
HD AUDIO RESET SWPOWER LED +
POWER LED –POWER SWHDD LED
SPEC-ALPHA FAQ
Montage pour ventilateur EmplacementsAvant 2 x 140mm ou 120mm (2 x 120mm fourni)
Haut 2 x 120mm
Arrière 120mm (fourni)
Bas 120mm
Côté x
Milieu x

CARBIDE SERIES® SPEC-ALPHA
2625
DE
UTSC
H
Inhaltsverzeichnis Technische Daten des Gehäuses
Herzlichen Glückwunsch!
Vielen Dank:.................................................................................................................................................................25
Technische Daten des Gehäuses: .......................................................................................................................26
Inhalt des Zubehörkits: ...........................................................................................................................................27
Funktionsmerkmale des Gehäuses: ...................................................................................................................28
Abnehmen der Seitenplatten: ..............................................................................................................................29
Installation des Motherboards: ...........................................................................................................................29
Installation der PCI-E-/PCI-Karte(n): ...............................................................................................................30
Installation des Netzteils: ......................................................................................................................................30
Entfernen der Frontplatte: ....................................................................................................................................31
Entfernen der oberen Abdeckung: ....................................................................................................................31
Installation von HDD-und SSD-Laufwerken: ..................................................................................................32
Installation von weiteren SSD-Laufwerken: ...................................................................................................32
Anschließen der Lüftersteuerung: .....................................................................................................................33
Installation der vorderen I/O-Anschlüsse: .....................................................................................................33
Häufig gestellte Fragen: .........................................................................................................................................34
Vielen Dank, dass Sie sich für das Carbide Series SPEC-ALPHA Mid-Tower Gaming-Gehäuse entschieden haben.
Mit seinem modernen, kantigen Design sticht das SPEC-ALPHA aus der Masse hervor. Aber das Aussehen ist nicht alles – das moderne Layout ohne optische Laufwerke bietet überragende Kühloptionen, und die integrierte Unterstützung von USB 3.0 und SSDs sowie ein dreistufiger Lüfterregler geben Ihnen die Flexibilität, alles zu bauen, was Sie sich vorstellen. Und dank des großen Seitenfensters können Sie das auch allen zeigen.
Länge:........................................................................................................518mm
Breite: ........................................................................................................220mm
Höhe: .........................................................................................................474mm
Gewicht: .......................................................................................................6.2kg
Maximale GPU-Länge: ........................................................................380mm
Maximale Höhe des CPU-Kühlsystems: ......................................156mm
Maximale Netzgerät-Länge: ............................................................190mm
474m
m
220mm 518mm
CARBIDE SERIES® SPEC-ALPHA
2827
DE
UTSC
H
Funktionsmerkmale des GehäusesInhalt des Zubehörkits
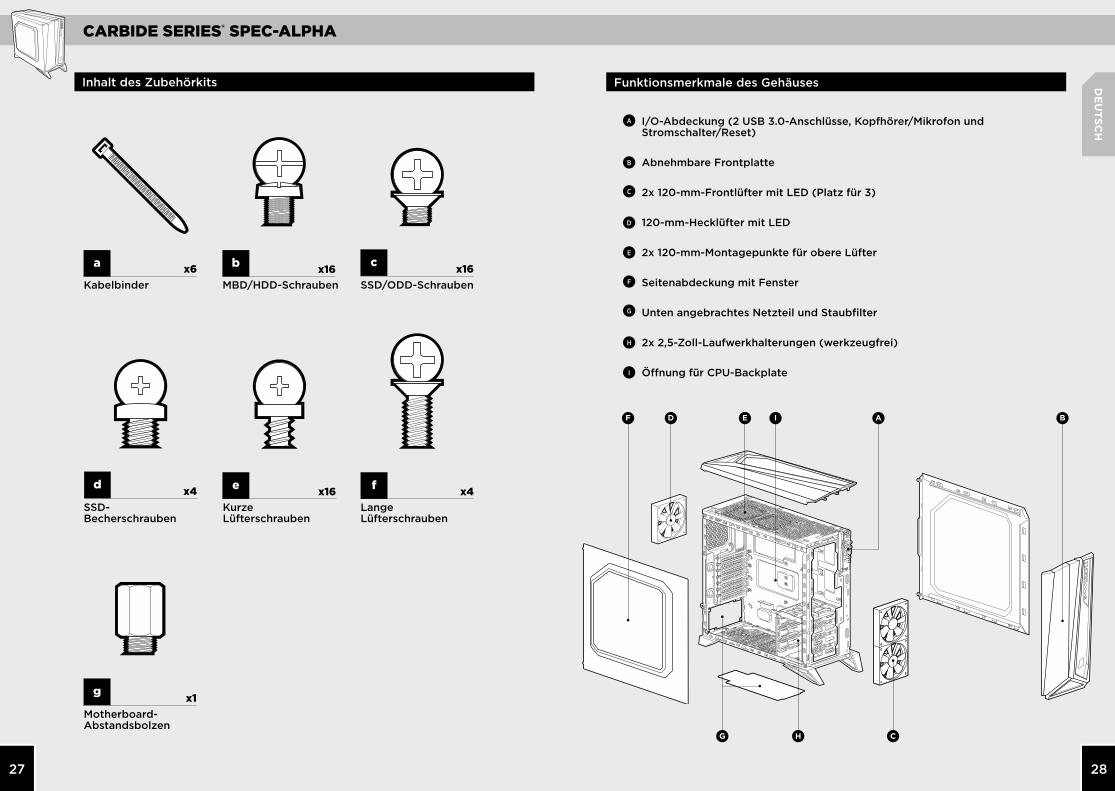
I/O-Abdeckung (2 USB 3.0-Anschlüsse, Kopfhörer/Mikrofon und Stromschalter/Reset)
Abnehmbare Frontplatte
2x 120-mm-Frontlüfter mit LED (Platz für 3)
120-mm-Hecklüfter mit LED
2x 120-mm-Montagepunkte für obere Lüfter
Seitenabdeckung mit Fenster
Unten angebrachtes Netzteil und Staubfilter
2x 2,5-Zoll-Laufwerkhalterungen (werkzeugfrei)
Öffnung für CPU-Backplate
A
B
C
D
E
F
G
H
I
a x6Kabelbinder
g x1Motherboard-Abstandsbolzen
e x16Kurze Lüfterschrauben
d x4SSD-Becherschrauben
f x4Lange Lüfterschrauben
b
MBD/HDD-Schraubenx16 c x16
SSD/ODD-Schrauben
A B
C
D EF
G H
I

CARBIDE SERIES® SPEC-ALPHA
3029
DE
UTSC
H
4. Installation des Netzteils
3. Installation der PCI-E-/PCI-Karte(n)
2. Installation des Motherboards
1. Abnehmen der Seitenplatten
Entfernen Sie einfach die Rändelschrauben und schieben Sie die Seitenplatte nach hinten heraus.
Hinweis: Sie sollten beim Bau Ihres Systems beide Seitenplatten entfernen und beiseite legen, um zu vermeiden, dass sie beschädigt werden. Beide Seitenplatten sind austauschbar und sollten zur besseren Übersicht abgenommen werden.
Nehmen Sie die Steckplattenabdeckung ab, installieren Sie eine Erweiterungskarte und sichern Sie sie gegebenenfalls mit Schrauben.
Platzieren Sie das Netzteil auf dem Gehäuseboden, richten Sie es an den Gehäuseöffnungen aus und befestigen Sie es mit den im Lieferumfang des Netzteils enthaltenen Schrauben.
SPEC-ALPHA STEP2
Installieren Sie zuerst die I/O-Blende des Motherboards (befolgen Sie die Anleitung des Motherboard-Herstellers).
Richten Sie das Motherboard an den vorinstallierten Abstandsbolzen aus.
Befestigen Sie das Motherboard mit den mitgelieferten Schrauben am Einschub. b
SPEC-ALPHA STEP1
SPEC-ALPHA Step 3SPEC-ALPHA Step 3
SPEC-ALPHA STEP4SPEC-ALPHA STEP4

CARBIDE SERIES® SPEC-ALPHA
3231
DE
UTSC
H
8. Installation von weiteren SSD-Laufwerken
7. Installation von HDD- und SSD-Laufwerken
6. Entfernen der oberen Abdeckung
5. Entfernen der Frontplatte
Ziehen Sie einfach den Haltearm zurück und schieben Sie die 2,5-Zoll SSD oder 3,5-Zoll HDD hinein, bis der Haltearm zurück an seinen Platz schnappt.
Richten Sie das 2,5-Zoll-Laufwerk über der Mittelplatte des Gehäuses aus und sichern Sie es mit den im Lieferumfang enthaltenen Schrauben aus der Zubehörbox.
SPEC-ALPHA STEP5
SPEC-ALPHA Step 8
SPEC-ALPHA STEP6
SPEC-ALPHA Step 7
SPEC-ALPHA Step 7
Um die Frontblende zu entfernen, ziehen Sie die Front leicht nach vorne vom Gehäuse weg, während Sie gleichzeitig die Sicherungszungen herunterdrücken.
Entfernen Sie die Schrauben an der oberen Rückseite des Gehäuses und schieben Sie die obere Abdeckung leicht nach hinten, bis Sie sie abnehmen können.

CARBIDE SERIES® SPEC-ALPHA
3433
DE
UTSC
H
Häufig gestellte Fragen
10. Installation der vorderen I/O-Anschlüsse
9. Anschließen der Lüftersteuerung
1. Schließen Sie den SATA-Netzanschluss an das SATA-Netzteilkabel an.
2. Schließen Sie den 3- oder 4-Pin-Lüfteranschluss an die Lüfterstiftleiste des Gehäuses an.
3. Drücken Sie zur Regelung der Lüftergeschwindigkeit den Auswahlschalter am Gehäuse.
1. Wie entferne ich die I/O-Abdeckung? Falls erforderlich können Sie die I/O-Abdeckung entfernen, indem
Sie zuerst die Frontplatte abnehmen (Schritt 5) und dann die beiden Schrauben an jeder Seite der Abdeckung lösen (siehe Abbildung).
2. Muss beim Strom- und Reset-Header der I/O-Abdeckung die Polarität beachtet werden? Nein, nur bei den LED-Headern.
3. An wen kann ich mich wenden, wenn ich ein beschädigtes Gehäuse erhalten habe oder einer der Lüfter nicht mehr funktioniert? Gehen Sie zu www.corsair.force.com und fordern Sie eine RMA an,
damit wir die beschädigten Teile ersetzen können.
4. Wo kann ich einen Lüfter anbringen?
Weitere Informationen über dieses Gehäuse finden Sie auf der Produktseite bei corsair.com
Punkte für LüfterhalterungenFront 2 x 140mm oder 120mm (2 x 120mm werkseitig)
Oberseite 2 x 120mm
Rückseite 120mm (werkseitig)
Unterseite 120mm
Seite x
Mitte x
1
2
3
Die Position der Frontplatten-Header und die Pinbelegung finden Sie in der Anleitung Ihres Motherboards.
USB 3.0
HD AUDIO RESET SWPOWER LED +
POWER LED –POWER SWHDD LED
SPEC-ALPHA FAQ

CARBIDE SERIES® SPEC-ALPHA
3635
ESPA
ÑO
L
Contenido Especificaciones del chasis
¡Felicitaciones!
Felicitaciones: .............................................................................................................................................................35
Especificaciones del chasis: .................................................................................................................................36
Contenido del conjunto de accesorios: ...........................................................................................................37
Características del chasis: .....................................................................................................................................38
Cómo remover los paneles laterales: ...............................................................................................................39
Cómo instalar la placa base: ................................................................................................................................39
Cómo instalar la(s) tarjeta(s) de PCI-E/PCI: .................................................................................................40
Cómo instalar la fuente de alimentación: .......................................................................................................40
Cómo remover la fascia delantera: ....................................................................................................................41
Cómo remover el panel superior: .......................................................................................................................41
Cómo instalar unidades HDD y SSD: .................................................................................................................42
Cómo instalar unidades SSD adicionales: ......................................................................................................42
Cómo conectar el controlador del ventilador: .............................................................................................43
Cómo instalar los conectores frontales de I/O (E/S): ..............................................................................43
Preguntas frecuentes: .............................................................................................................................................44
Gracias por comprar un chasis Carbide Series SPEC-ALPHA de torre mediana para juegos.
El modelo SPEC-ALPHA tiene un diseño angular y atrevido pensado para llamar la atención. Pero las mejoras no se limitan a la apariencia: el diseño moderno y sin unidades ópticas ofrece unas excelentes opciones para el enfriamiento. Además, es compatible con puertos USB 3.0, discos SSD y cuenta con un controlador del ventilador de 3 velocidades que le brinda la flexibilidad para construir lo que se le ocurra y mostrarlo, gracias al gran panel lateral transparente.
Largo: ........................................................................................................518mm
Ancho: .......................................................................................................220mm
Ancho: .......................................................................................................474mm
Peso: ..............................................................................................................6.2kg
Longitud máxima de la GPU: ..........................................................380mm
Altura máxima del ventilador de la CPU: ..................................156mm
Longitud máxima de la PSU: ...........................................................190mm
474m
m
220mm 518mm

CARBIDE SERIES® SPEC-ALPHA
3837
ESPA
ÑO
L
Características del chasisContenido del conjunto de accesorios
Panel de E/S (2 puertos USB 3.0, auricular y micrófono, y alimentación y reinicio)
Fascia frontal desmontable
2 ventiladores de 120 mm con luces LED (espacio para 3)
Un ventilador posterior de 120 mm con luces LED
2 montajes superiores para ventiladores de 120 mm
Panel lateral transparente
Montaje inferior de la PSU y filtros para polvo
2 montajes para discos de 6,4 cm sin necesidad de herramientas
Recorte para placa posterior del CPU
A
B
C
D
E
F
G
H
I
a x6Ataduras para cables
g x1Apoyo para placa base
e x16Tornillos cortos para ventiladores
d x4Tornillos de cabeza troncocónica para SSD
f x4Tornillos largos para ventiladores
b
Tornillos para MBD/HDD
x16 c x16Tornillos para SSD/ODD
A B
C
D EF
G H
I

CARBIDE SERIES® SPEC-ALPHA
4039
ESPA
ÑO
L
4. Cómo instalar la fuente de alimentación
3. Cómo instalar la(s) tarjeta(s) de PCI-E/PCI
2. Cómo instalar la placa base
1. Cómo remover los paneles laterales
Simplemente retire los tornillos mariposa y deslice los paneles laterales hacia atrás y hacia afuera.
Nota: Corsair recomienda remover ambos paneles laterales y ponerlos en un lugar seguro cuando monte su sistema para que no se dañen. Los paneles laterales se pueden intercambiar y deben removerse para mantener el orden.
Extraiga la cubierta de la ranura, instale la tarjeta de expansión y asegúrela con los tornillos, según sea necesario.
Coloque el PSU en el fondo del chasis y, después, alinee los huecos del chasis. Asegure la PSU con los tornillos que se suministran con la fuente de alimentación.
SPEC-ALPHA STEP2
Primero, instale la protección de E/S de su placa base (vea el manual de su placa base para obtener instrucciones).
Alinee su placa base con los apoyos instalados.
Use los tornillos que se proporcionan para asegurar la placa base a su bandeja. b
SPEC-ALPHA STEP1
SPEC-ALPHA Step 3SPEC-ALPHA Step 3
SPEC-ALPHA STEP4SPEC-ALPHA STEP4

CARBIDE SERIES® SPEC-ALPHA
4241
ESPA
ÑO
L
8. Cómo instalar unidades SSD adicionales
7. Cómo instalar unidades HDD y SSD
6. Cómo remover el panel superior
5. Cómo remover la fascia delantera
Simplemente tire hacia atrás el brazo de retención y deslice la unidad SSD de 6,4 cm o la unidad HDD de 8,9 cm hasta que el brazo de retención encaje nuevamente en su lugar.
Alinee la unidad de 6,4 cm en el panel medio del chasis y asegúrela con los tornillos que se incluyen en la caja de accesorios.
SPEC-ALPHA STEP5
SPEC-ALPHA Step 8
SPEC-ALPHA STEP6
SPEC-ALPHA Step 7
SPEC-ALPHA Step 7
Para extraer la fascia delantera, presione los pestillos que aseguran la parte delantera del chasis y extráigala con cuidado.
Extraiga los tornillos de la parte superior trasera del chasis y deslice con cuidado el panel superior hacia atrás hasta que pueda levantarlo.

CARBIDE SERIES® SPEC-ALPHA
4443
ESPA
ÑO
L
Preguntas frecuentes
10. Cómo instalar los conectores frontales de I/O (E/S)
9. Cómo conectar el controlador del ventilador
1. Enchufe el conector de energía SATA al cable de energía SATA de la PSU.
2. Enchufe el conector de 3 o 4 clavijas del ventilador al cabezal del ventilador del chasis.
3. Presione el botón selector de velocidad del ventilador en el chasis para alternar la velocidad del ventilador.
1. ¿Cómo quito el panel I/O? Si es necesario, puede desmontar su panel I/O retirando la fascia
frontal (paso 5) y, después, destornillando los 2 tornillos en cada lado del panel (consulte el diagrama).
2. ¿Es importante la polaridad al instalar el cabezal de reinicio y de encendido del panel I/O? No, sólo los cabezales LED.
3. ¿Con quién me debo poner en contacto si recibo mi chasis dañado o uno de los ventiladores ya no funciona? Por favor, diríjase a www.corsair.force.com y pida un RMA
para que podamos reemplazar las piezas dañadas.
4. ¿Dónde puedo montar un ventilador?
Para obtener más información sobre este chasis, visite la página del producto en corsair.com
Puntos de montaje para ventiladoresParte delantera 2 x 140mm o 120mm (2 x 120mm incluido)
Parte superior 2 x 120mm
Parte trasera 120mm (incluido)
Parte inferior 120mm
Parte lateral x
Parte del medio x
1
2
3
Vea el manual de su placa base para localizar la ubicación de las cabezas del panel frontal y de los pernos de salida.
USB 3.0
HD AUDIO RESET SWPOWER LED +
POWER LED –POWER SWHDD LED
SPEC-ALPHA FAQ

CARBIDE SERIES® SPEC-ALPHA
4645
РУССКИ
Й
Содержание Технические характеристики корпуса
Поздравляем!
Поздравления: .............................................................................................................................................................45
Технические характеристики корпуса: ..................................................................................................................46
Содержимое комплекта аксессуаров: ....................................................................................................................47
Особенности корпуса: ................................................................................................................................................48
Снятие боковых панелей: ..........................................................................................................................................49
Установка материнской платы: ................................................................................................................................49
Установка плат PCI-E/PCI: ......................................................................................................................................50
Установка блока питания: .........................................................................................................................................50
Снятие передней панели: ..........................................................................................................................................51
Снятие верхней панели: .............................................................................................................................................51
Установка жестких дисков и твердотельных накопителей: ............................................................................52
Установка дополнительных твердотельных накопителей: .............................................................................52
Подключение контроллера вентилятора: ............................................................................................................53
Установка передних разъемов ввода/вывода: ...................................................................................................53
Часто задаваемые вопросы: ....................................................................................................................................54
Благодарим за приобретение корпуса игрового компьютера Carbide Series SPEC-ALPHA формата Mid Tower.
Корпус SPEC-ALPHA привлекает к себе внимание благодаря смелому геометрическому дизайну. Но внешний вид не всегда свидетельствует о функциональных возможностях — современная технология установки оптических приводов в любом месте корпуса обеспечивает фантастические возможности охлаждения, а встроенный держатель для разъемов USB 3.0, твердотельных накопителей и трехрежимного контроллера вентилятора позволяет собрать систему именно так, как вы хотите, подчеркнув аккуратность сборки боковой панелью с большим окном
Длина: ........................................................................................................518mm
Ширина: .....................................................................................................220mm
Высота: .......................................................................................................474mm
Масса: .............................................................................................................6.2kg
Максимальная длина графического процессора: .........................380mm
Максимальная высота охладителя центрального процессора: 156mm
Максимальная длина блока питания: ...............................................190mm
474m
m
220mm 518mm
CARBIDE SERIES® SPEC-ALPHA
4847
РУССКИ
Й
Особенности корпусаСодержимое комплекта аксессуаров
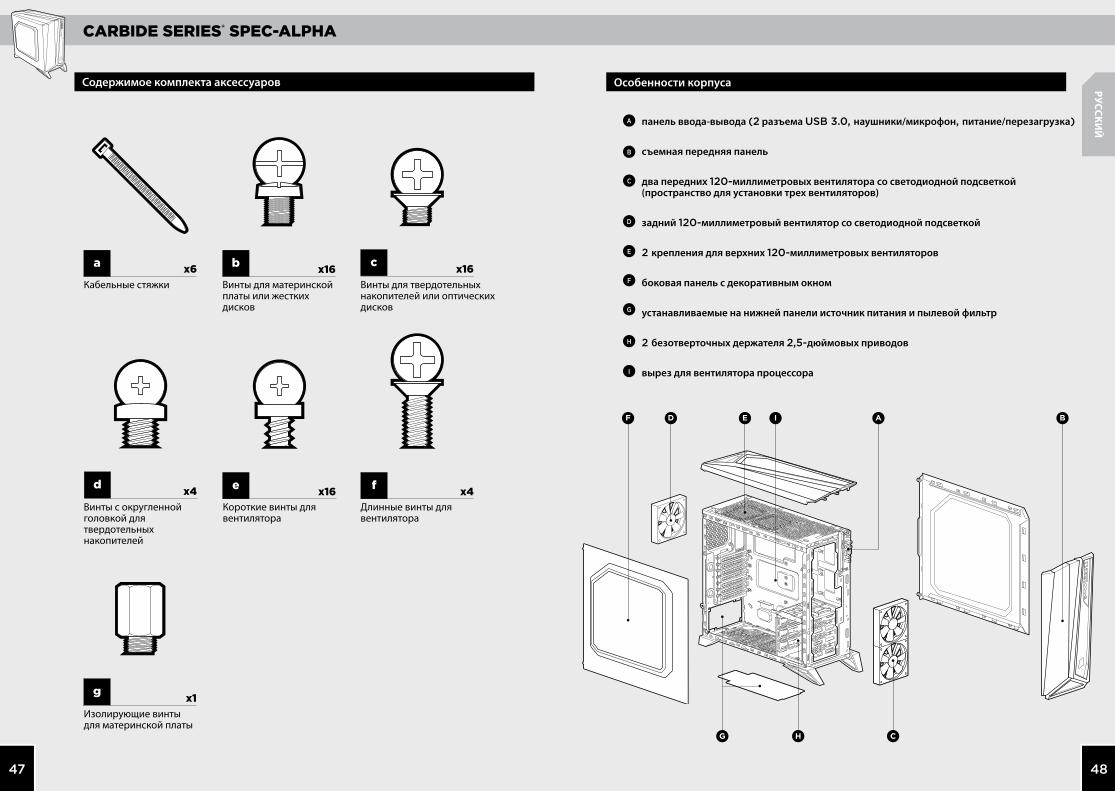
панель ввода-вывода (2 разъема USB 3.0, наушники/микрофон, питание/перезагрузка)
съемная передняя панель
два передних 120-миллиметровых вентилятора со светодиодной подсветкой (пространство для установки трех вентиляторов)
задний 120-миллиметровый вентилятор со светодиодной подсветкой
2 крепления для верхних 120-миллиметровых вентиляторов
боковая панель с декоративным окном
устанавливаемые на нижней панели источник питания и пылевой фильтр
2 безотверточных держателя 2,5-дюймовых приводов
вырез для вентилятора процессора
A
B
C
D
E
F
G
H
I
a x6Кабельные стяжки
g x1Изолирующие винты для материнской платы
e x16Короткие винты для вентилятора
d x4Винты с округленной головкой для твердотельных накопителей
f x4Длинные винты для вентилятора
b
Винты для материнской платы или жестких дисков
x16 c x16Винты для твердотельных накопителей или оптических дисков
A B
C
D EF
G H
I

CARBIDE SERIES® SPEC-ALPHA
5049
РУССКИ
Й
4. Установка блока питания
3. Установка плат PCI-E/PCI
2. Установка материнской платы
1. Снятие боковых панелей
Отвинтите барашковые винты, сдвиньте боковые панели назад и снимите их.
Примечание. Во избежание случайных повреждений при сборке системы компания Corsair рекомендует снять и отложить в сторону обе боковые панели. Обе боковые панели взаимозаменяемы и должны быть сняты во избежание путаницы.
Снимите крышку разъема, установите плату расширения и при необходимости закрепите ее винтами.
Поместите блок питания на нижнюю панель корпуса, совместите его с отверстиями в корпусе и закрепите винтами из комплекта.
SPEC-ALPHA STEP2
Сначала установите заглушку портов ввода-вывода материнской платы (информацию см. в руководстве по эксплуатации материнской платы).
Поместите материнскую плату на предварительно установленные опорные изолирующие винты.
Используйте винты из комплекта для крепления материнской платы в соответствующем отсеке.
b
SPEC-ALPHA STEP1
SPEC-ALPHA Step 3SPEC-ALPHA Step 3
SPEC-ALPHA STEP4SPEC-ALPHA STEP4

CARBIDE SERIES® SPEC-ALPHA
5251
РУССКИ
Й
8. Установка дополнительных твердотельных накопителей
7. Установка жестких дисков и твердотельных накопителей
6. Снятие верхней панели
5. Снятие передней панели
Просто потяните фиксатор назад и задвигайте 2,5-дюймовый твердотельный накопитель или 3,5-дюймовый жесткий диск, пока фиксатор не защелкнется на месте.
Поместите привод 2,5 дюйма на среднюю панель корпуса и закрепите входящими в комплект винтами из коробки для аксессуаров.
SPEC-ALPHA STEP5
SPEC-ALPHA Step 8
SPEC-ALPHA STEP6
SPEC-ALPHA Step 7
SPEC-ALPHA Step 7
Чтобы снять переднюю панель, осторожно сдвиньте ее с корпуса, надавив на фиксирующие защелки.
Извлеките винты из верхней задней части корпуса и осторожно сдвигайте верхнюю панель назад, пока не снимете ее.
CARBIDE SERIES® SPEC-ALPHA
5453
РУССКИ
Й
Часто задаваемые вопросы
10. Установка передних разъемов ввода-вывода
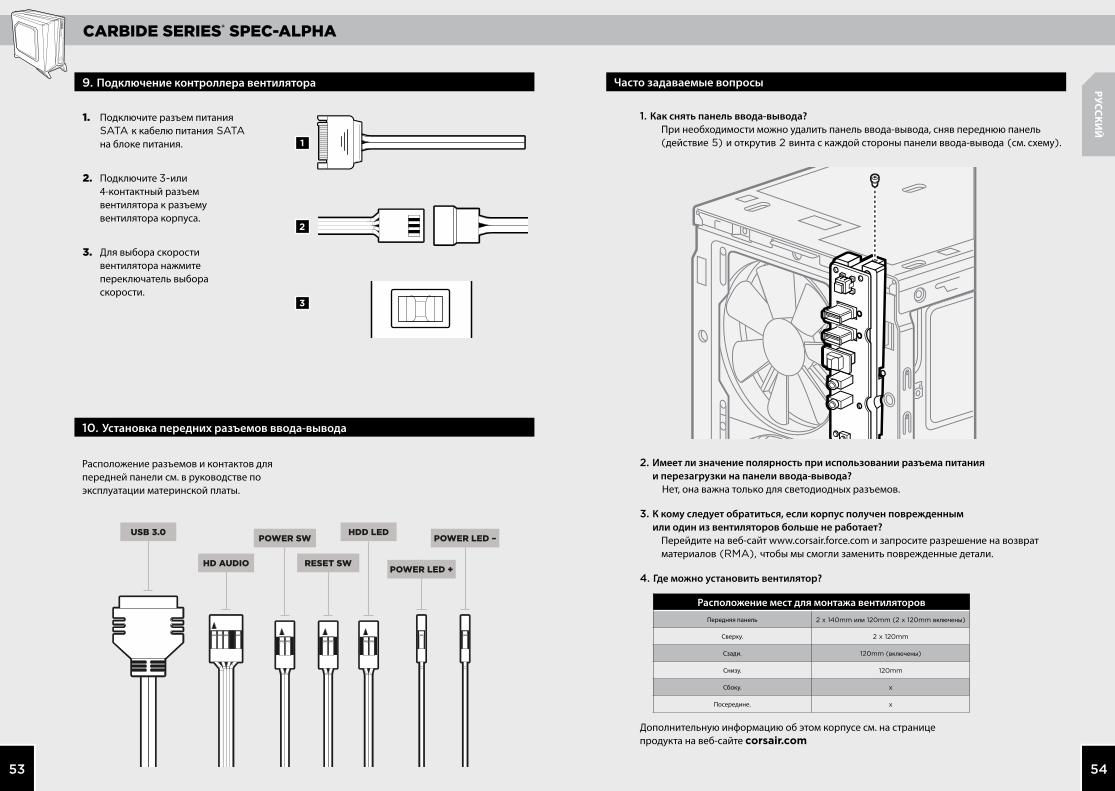
9. Подключение контроллера вентилятора
1. Подключите разъем питания SATA к кабелю питания SATA на блоке питания.
2. Подключите 3-или 4-контактный разъем вентилятора к разъему вентилятора корпуса.
3. Для выбора скорости вентилятора нажмите переключатель выбора скорости.
1. Как снять панель ввода-вывода? При необходимости можно удалить панель ввода-вывода, сняв переднюю панель
(действие 5) и открутив 2 винта с каждой стороны панели ввода-вывода (см. схему).
2. Имеет ли значение полярность при использовании разъема питания и перезагрузки на панели ввода-вывода? Нет, она важна только для светодиодных разъемов.
3. К кому следует обратиться, если корпус получен поврежденным или один из вентиляторов больше не работает? Перейдите на веб-сайт www.corsair.force.com и запросите разрешение на возврат
материалов (RMA), чтобы мы смогли заменить поврежденные детали.
4. Где можно установить вентилятор?
Дополнительную информацию об этом корпусе см. на странице продукта на веб-сайте corsair.com
Расположение мест для монтажа вентиляторовПередняя панель 2 x 140mm или 120mm (2 x 120mm включены)
Сверху. 2 x 120mm
Сзади. 120mm (включены)
Снизу. 120mm
Сбоку. x
Посередине. x
1
2
3
Расположение разъемов и контактов для передней панели см. в руководстве по эксплуатации материнской платы.
USB 3.0
HD AUDIO RESET SWPOWER LED +
POWER LED –POWER SWHDD LED
SPEC-ALPHA FAQ

CARBIDE SERIES® SPEC-ALPHA
5655
PO
RTU
GU
ÊS
Índice Especificações do gabinete
Parabéns!
Parabéns: ......................................................................................................................................................................55
Especificações do gabinete: ................................................................................................................................56
Conteúdo do kit de acessórios: ..........................................................................................................................57
Recursos do gabinete: ............................................................................................................................................58
Remover os painéis laterais: .................................................................................................................................59
Instalar a placa-mãe: ...............................................................................................................................................59
Instalar placa(s) PCI-E/PCI: ..................................................................................................................................60
Instalar a fonte de alimentação: .........................................................................................................................60
Remover o painel dianteiro: .................................................................................................................................61
Remover o painel superior: ...................................................................................................................................61
Instalar HDDs e SSDs: ..............................................................................................................................................62
Instalar SSDs adicionais: ........................................................................................................................................62
Conectar o controlador da ventoinha: .............................................................................................................63
Instalar os conectores de E/S dianteiros:.......................................................................................................63
Perguntas frequentes: .............................................................................................................................................64
Obrigado por ter adquirido o gabinete para jogos mid-tower Carbide Series SPEC-ALPHA.
Com o seu design arrojado e angular, o SPEC-ALPHA foi concebido para ser o centro das atenções. Mas essa aparência não é apenas superficial – o layout moderno e sem unidade óptica permite opções de resfriamento fantásticas, bem como o suporte integrado para USB 3.0, SSDs e um controlador de ventoinha de três velocidades dão-lhe a flexibilidade para criar praticamente tudo o que quiser – e exibi-lo, graças à grande janela de painel lateral.
Comprimento: ........................................................................................518mm
Largura: ....................................................................................................220mm
Altura: .......................................................................................................474mm
Peso: ..............................................................................................................6.2kg
Comprimento máximo da GPU: .....................................................380mm
Altura máxima da ventoinha da CPU: .........................................156mm
Comprimento máximo da PSU:......................................................190mm
474m
m
220mm 518mm
CARBIDE SERIES® SPEC-ALPHA
5857
PO
RTU
GU
ÊS
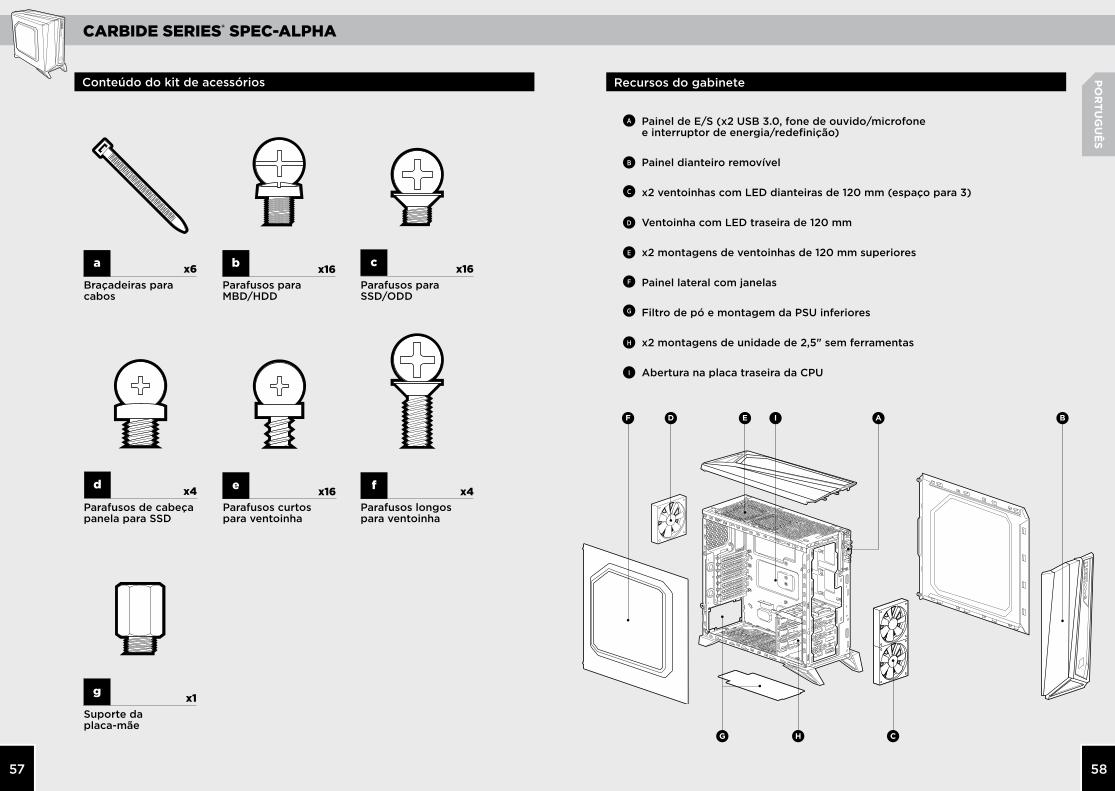
Recursos do gabineteConteúdo do kit de acessórios
Painel de E/S (x2 USB 3.0, fone de ouvido/microfone e interruptor de energia/redefinição)
Painel dianteiro removível
x2 ventoinhas com LED dianteiras de 120 mm (espaço para 3)
Ventoinha com LED traseira de 120 mm
x2 montagens de ventoinhas de 120 mm superiores
Painel lateral com janelas
Filtro de pó e montagem da PSU inferiores
x2 montagens de unidade de 2,5" sem ferramentas
Abertura na placa traseira da CPU
A
B
C
D
E
F
G
H
I
a x6Braçadeiras para cabos
g x1Suporte da placa-mãe
e x16Parafusos curtos para ventoinha
d x4Parafusos de cabeça panela para SSD
f x4Parafusos longos para ventoinha
b
Parafusos para MBD/HDD
x16 c x16Parafusos para SSD/ODD
A B
C
D EF
G H
I

CARBIDE SERIES® SPEC-ALPHA
6059
PO
RTU
GU
ÊS
4. Instalar a fonte de alimentação
3. Instalar placa(s) PCI-E/PCI
2. Instalar a placa-mãe
1. Remover os painéis laterais
Simplesmente remova os parafusos e deslize os painéis laterais para trás e para fora.
Observação: A Corsair recomenda remover os dois painéis laterais e reservá-los enquanto constrói o seu sistema para evitar danos acidentais. Os dois painéis laterais são intercambiáveis e devem ser removidos para reduzir a desordem.
Remova a tampa do slot, instale a placa de expansão e prenda com parafuso(s), conforme necessário.
Posicione a PSU na parte inferior do gabinete e, em seguida, alinhe os orifícios do gabinete e prenda a PSU com os parafusos fornecidos com sua fonte de alimentação.
SPEC-ALPHA STEP2
Primeiro, instale a blindagem de E/S da sua placa-mãe (consulte o manual de sua placa-mãe para instruções).
Alinhe sua placa-mãe com os suportes pré-instalados.
Use os parafusos fornecidos para prender a placa-mãe à bandeja da placa-mãe. b
SPEC-ALPHA STEP1
SPEC-ALPHA Step 3SPEC-ALPHA Step 3
SPEC-ALPHA STEP4SPEC-ALPHA STEP4
CARBIDE SERIES® SPEC-ALPHA
6261
PO
RTU
GU
ÊS
8. Instalar SSDs adicionais
7. Instalar HDDs e SSDs
6. Remover o painel superior
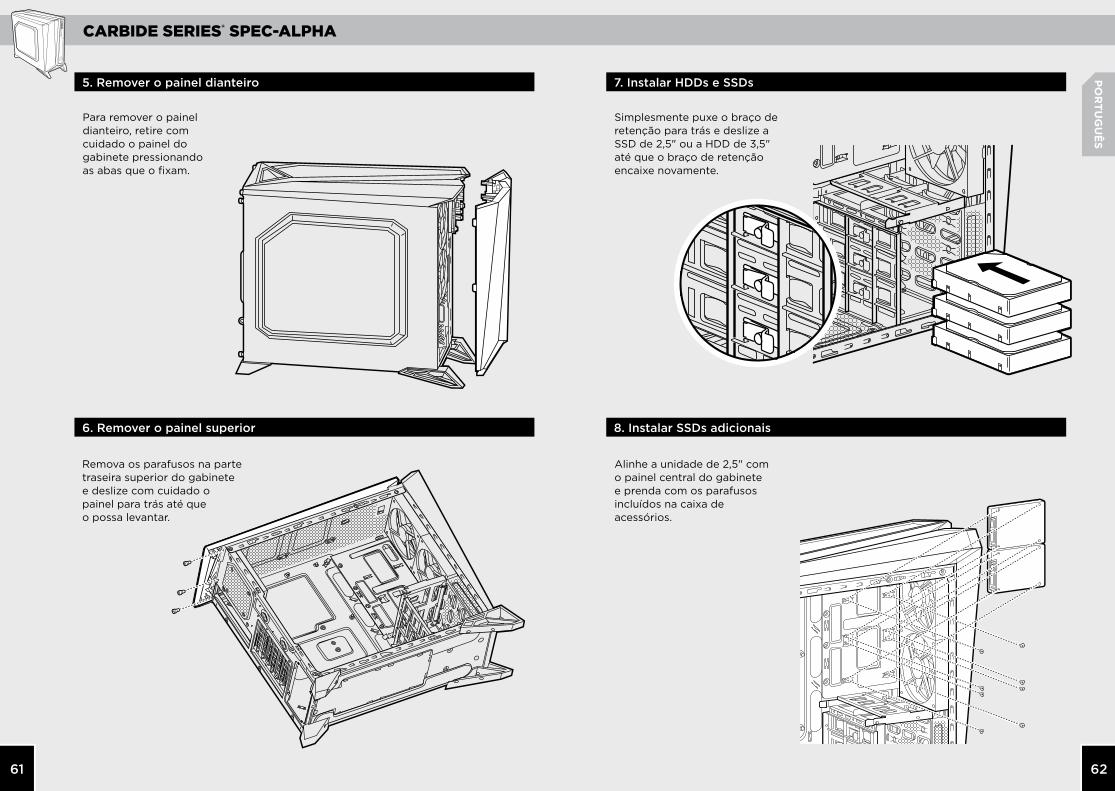
5. Remover o painel dianteiro
Simplesmente puxe o braço de retenção para trás e deslize a SSD de 2,5" ou a HDD de 3,5" até que o braço de retenção encaixe novamente.
Alinhe a unidade de 2,5" com o painel central do gabinete e prenda com os parafusos incluídos na caixa de acessórios.
SPEC-ALPHA STEP5
SPEC-ALPHA Step 8
SPEC-ALPHA STEP6
SPEC-ALPHA Step 7
SPEC-ALPHA Step 7
Para remover o painel dianteiro, retire com cuidado o painel do gabinete pressionando as abas que o fixam.
Remova os parafusos na parte traseira superior do gabinete e deslize com cuidado o painel para trás até que o possa levantar.

CARBIDE SERIES® SPEC-ALPHA
6463
PO
RTU
GU
ÊS
Perguntas frequentes
10. Instalar os conectores de E/S dianteiros
9. Conectar o controlador da ventoinha
1. Conecte o conector de energia SATA ao cabo de alimentação SATA da PSU.
2. Conecte o conector de 3 ou 4 pinos da ventoinha na haste da ventoinha do gabinete.
3. Pressione o botão de seleção de velocidade da ventoinha no gabinete para alternar a velocidade da ventoinha.
1. Como remover o painel de E/S? Se necessário, você pode desinstalar seu painel de E/S removendo
o painel dianteiro (etapa 5) e desparafusando os dois parafusos em cada lado do painel (ver desenho).
2. A polaridade é importante quando o painel de E/S alimenta e reinicia a haste? Não, apenas as hastes do LED.
3. Quem devo contatar caso receba meu gabinete danificado ou uma das ventoinhas não estiver mais funcionando? Acesse www.corsair.force.com e solicite um RMA, para que
possamos substituir a(s) peça(s) danificada(s).
4. Onde posso montar uma ventoinha?
Para saber mais sobre este gabinete, visite a página do produto em corsair.com
1
2
3
Consulte o manual da sua placa-mãe para obter as localizações e a pinagem da haste do painel dianteiro.
USB 3.0
HD AUDIO RESET SWPOWER LED +
POWER LED –POWER SWHDD LED
SPEC-ALPHA FAQ
Montar um fãFrente 2 x 140mm ou 120mm (2 x 120mm incluída)
Topo 2 x 120mm
Traseira 120mm (incluída)
Fundo 120mm
Lateral x
Centro x
CARBIDE SERIES® SPEC-ALPHA
6665
日本
語
目次 ケースの仕様
ご購入いただき、ありがとうございます。
ご購入いただき, ありがとうございます: .................................................................................................................65
ケースの仕様: .................................................................................................................................................................66
アクセサリーキットの内容: ........................................................................................................................................67
ケースの特徴: .................................................................................................................................................................68
サイドパネルの取り外し: ............................................................................................................................................69
マザーボードの取り付け: ............................................................................................................................................69
PCI-E/PCI カードの取り付け: ..................................................................................................................................70
電源ユニットの取り付け: ............................................................................................................................................70
前面パネルの取り外し:.................................................................................................................................................71
天板の取り外し: .............................................................................................................................................................71
HDD と SSD の取り付け: ...........................................................................................................................................72
追加 SSD の取り付け: ..................................................................................................................................................72
ファンコントローラの接続: ........................................................................................................................................73
フロント I/O コネクタの取り付け: ...........................................................................................................................73
よくあるご質問: .............................................................................................................................................................74
Carbide シリーズ SPEC-ALPHA ミッドタワー・ゲームケースをご購
入いただき, ありがとうございます。
すっきりとして角ばったデザインで, SPEC-ALPHA は注目を集めます。しかし
その見た目は見せかけだけではありません。モダンで, 光学ドライブのないレイ
アウトによって, 優れた冷却機能を可能にし, USB 3.0, SSDs, 3速ファンコント
ローラのビルトインサポートによって, 好きなように柔軟に構築を行うことがで
きます。そして大きなサイドパネルウィンドウが, その注目を集めます。
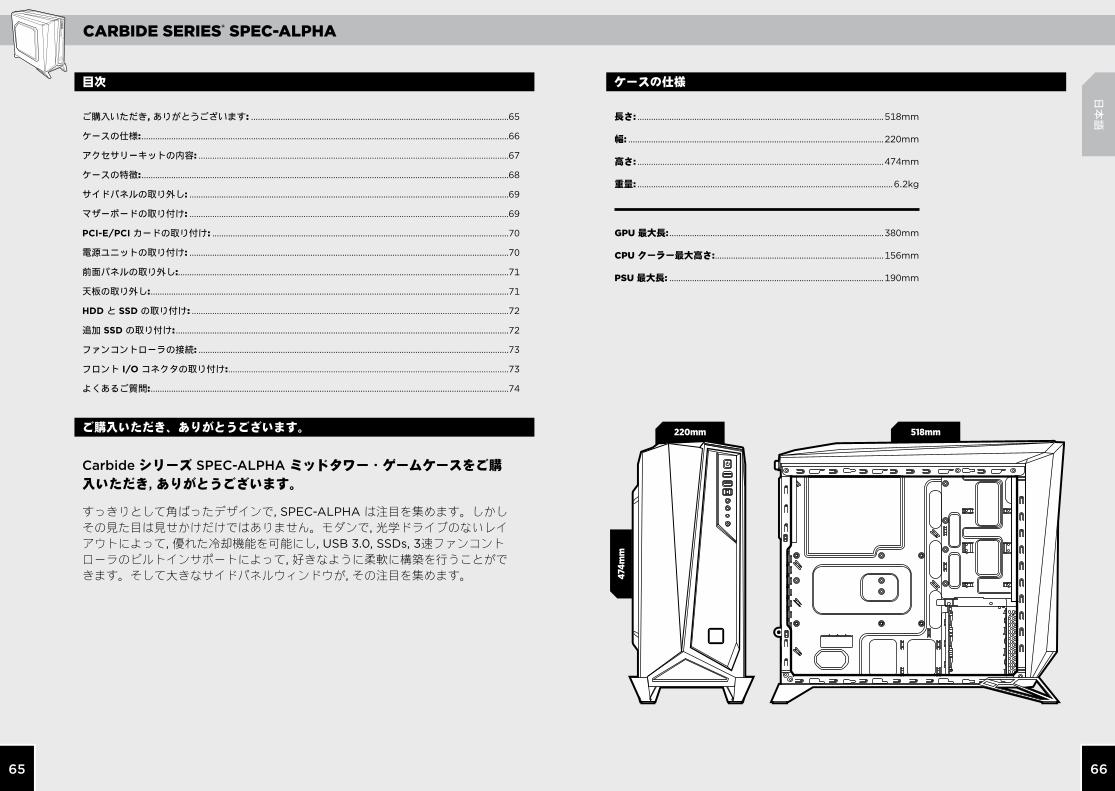
長さ: ............................................................................................................518mm
幅: ................................................................................................................220mm
高さ: ............................................................................................................474mm
重量: ................................................................................................................6.2kg
GPU 最大長: ..............................................................................................380mm
CPU クーラー最大高さ: ..........................................................................156mm
PSU 最大長: ..............................................................................................190mm
474m
m
220mm 518mm

CARBIDE SERIES® SPEC-ALPHA
6867
日本
語
ケースの特徴アクセサリーキットの内容
I/O パネル (USB 3.0 x2, ヘッドフォン/マイク, 電源/リセット)
取り外し可能前面パネル
前部の 120mm の換気ファン (3 つ分) x2
後部の 120mm の換気ファン
上部の 120mm ファンマウント x2
窓付きのサイドパネル
底部の PSU マウントとダストフィルタ
工具不要の 2.5 インチドライブマウント x2
CPU バックプレートの切り抜き
A
B
C
D
E
F
G
H
I
a x6ケーブル結束バンド
g x1マザーボード用絶縁ネジ
e x16冷却ファン用ネジ (短)
d x4SSD 用なべ頭ネジ
f x4冷却ファン用ネジ (長)
b
マザーボード/HDD 用ネジ
x16 c x16SSD/光学ドライブ用ネジ
A B
C
D EF
G H
I

CARBIDE SERIES® SPEC-ALPHA
7069
日本
語
4. 電源ユニットの取り付け
3. PCI-E/PCI カードの取り付け
2. マザーボードの取り付け
1. サイドパネルの取り外し
蝶ねじを取り外してから、サイドパネルを後ろにスライドさせて、取り外します。
注:Corsair では、システムを構築する際、事故による破損を避けるために、両サイドのパネルを取り外して、それらを脇に置くよう推奨します。 両側のパネルは左右関係ありません。変形を防ぐため、作業時には取り外してください。
スロット カバーを取り外し、拡張カードを取り付けます。必要に応じてネジで固定します。
ケースの底面に電源ユニットを置き、ケースの穴位置に合わせます。その後、電源ユニットに付属のネジで固定します。
SPEC-ALPHA STEP2
最初に、マザーボード用の I/O プレートを取り付けます(マザーボード付属の取扱説明書を参照してください)。
マザーボードを取り付け済みの絶縁体と揃えます。
同梱のねじを使用して、マザーボードをマザーボードトレイに固定します。 b
SPEC-ALPHA STEP1
SPEC-ALPHA Step 3SPEC-ALPHA Step 3
SPEC-ALPHA STEP4SPEC-ALPHA STEP4

CARBIDE SERIES® SPEC-ALPHA
7271
日本
語
8. 追加 SSD の取り付け
7. HDD と SDD の取り付け
6. 天板の取り外し
5. 前面パネルの取り外し
リテンションアームを後ろに引いて、リテンションアームが元の位置に戻るまで、2.5 インチ SSD または 3.5 インチ HDD をスライドさせるだけです。
2.5 インチのドライブをケースの中心のパネルに合わせ、付属のネジで固定します。
SPEC-ALPHA STEP5
SPEC-ALPHA Step 8
SPEC-ALPHA STEP6
SPEC-ALPHA Step 7
SPEC-ALPHA Step 7
前面パネルを取り外すには、タブをしっかりと押さえながら、ケースから前面をそっと引っ張ってください。
ケースの上部からねじを外し、天板が外せるまでそっと後ろにずらしてください。
CARBIDE SERIES® SPEC-ALPHA
7473
日本
語
よくあるご質問
10. フロント I/O コネクターの取り付け
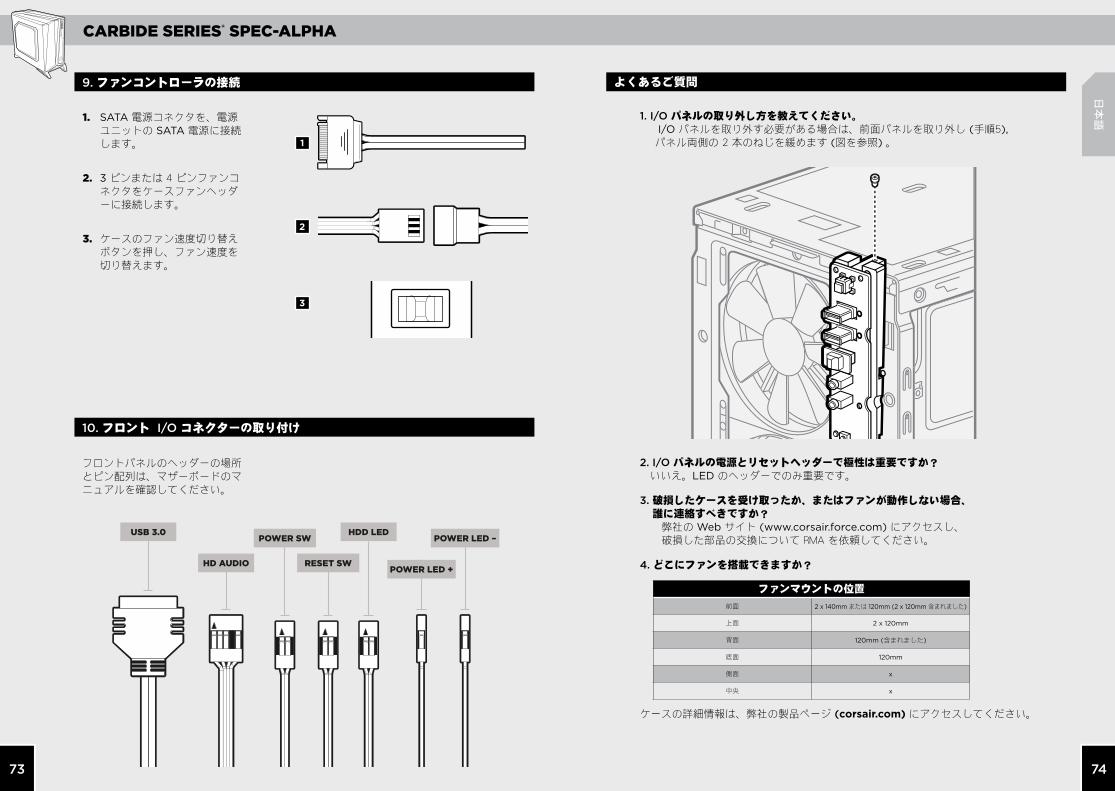
9. ファンコントローラの接続
1. SATA 電源コネクタを、電源ユニットの SATA 電源に接続します。
2. 3 ピンまたは 4 ピンファンコネクタをケースファンヘッダーに接続します。
3. ケースのファン速度切り替えボタンを押し、ファン速度を切り替えます。
1. I/O パネルの取り外し方を教えてください。 I/O パネルを取り外す必要がある場合は、前面パネルを取り外し (手順5),
パネル両側の 2 本のねじを緩めます (図を参照) 。
2. I/O パネルの電源とリセットヘッダーで極性は重要ですか? いいえ。LED のヘッダーでのみ重要です。
3. 破損したケースを受け取ったか、またはファンが動作しない場合、 誰に連絡すべきですか? 弊社の Web サイト (www.corsair.force.com) にアクセスし、
破損した部品の交換について RMA を依頼してください。
4. どこにファンを搭載できますか?
ケースの詳細情報は、弊社の製品ページ (corsair.com) にアクセスしてください。
ファンマウントの位置
前面 2 x 140mm または 120mm (2 x 120mm 含まれました)
上面 2 x 120mm
背面 120mm (含まれました)
底面 120mm
側面 x
中央 x
1
2
3
フロントパネルのヘッダーの場所とピン配列は、マザーボードのマニュアルを確認してください。
USB 3.0
HD AUDIO RESET SWPOWER LED +
POWER LED –POWER SWHDD LED
SPEC-ALPHA FAQ

CARBIDE SERIES® SPEC-ALPHA
7675
Notes Notes