Embed Size (px)
Citation preview

CHAPTER 12.
QUERY, AJAX, JSON
jQuery
jQuery- 일종의 자바 스크립트 라이브러리
jQuery를 사용하면 자바 스크립트 프로그래밍의 양을 상당히 줄일
수 있다.
jQuery는 배우기 쉽다.
무료이다.

jQuery의 역사
jQuery는 존 레식(John Resig)이 2006년에 BarCamp NYC에서 발표
MIT 라이센스하에 배포되는 자유 오픈 소프트웨어

jQuery 사용방법
jQuery.com에서 jQuery 파일을 다운로드하는 방법
- jQuery는 http://www.jquery.com에서 다운로드
실행시마다 구글이나 마이크로소프트에서 jQuery 파일을 포함하는
방법
공개 서버로부터 네트워크를 통하여 웹페이지를 실행할 때마다
다운로드받을 수도 있다
최근에 1.9.1버전은 사용불가->1.10.1버전으로 변경
<head>
<script src="http://code.jquery.com/jquery-
1.10.1.min.js"></script>
</head>

첫 번째 jQuery 프로그램 <!DOCTYPE html> <html> <head> <script src="http://code.jquery.com/jquery-1.10.1.min.js"></script> </script> <script> $(document).ready(function () { $("h2").click(function () { $(this).hide(); }); }); </script> </head> <body> <h2>클릭하면 사라집니다.</h2> </body> </html>
웹브라우저로 보기
jQuery 문장의 구조
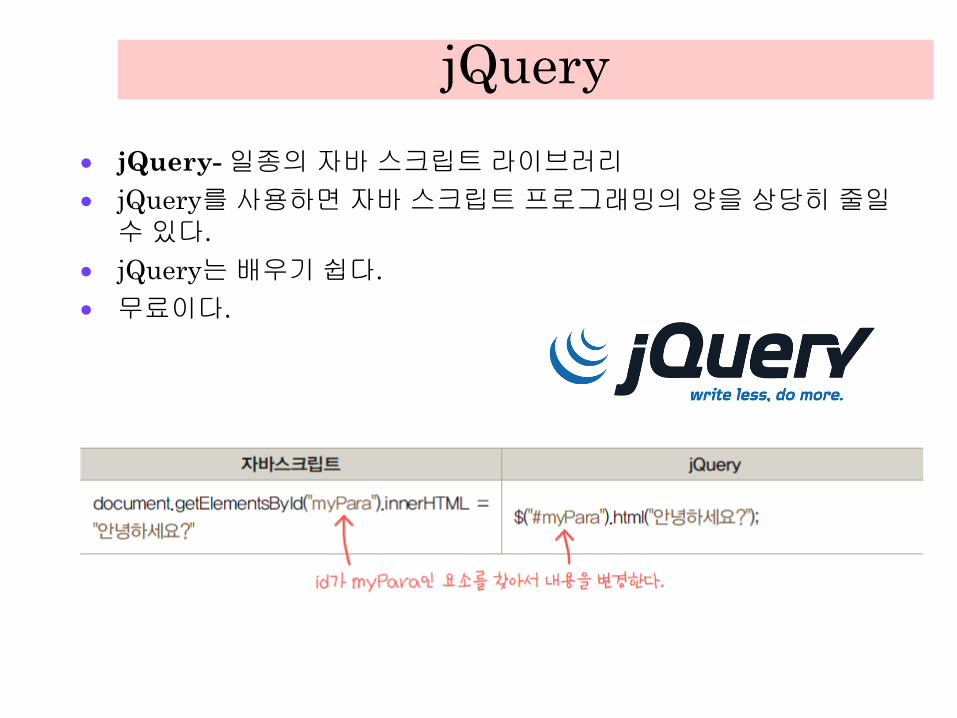
$(...) 안에 선택자를 넣어서 원하는 요소를 선택하고, 선택된 요소에
대하여 여러 가지 조작을 한다.
$(“p”).show() - 모든 <p> 요소들을 찾아서 화면에 표시한다.
$(“.group1”).slideup() - class=group1인 요소를 슬라이드업 방식으로 표시한다.
$(“#id9”).hide() - id=id9인 요소를 화면에서 감춘다.

선택자
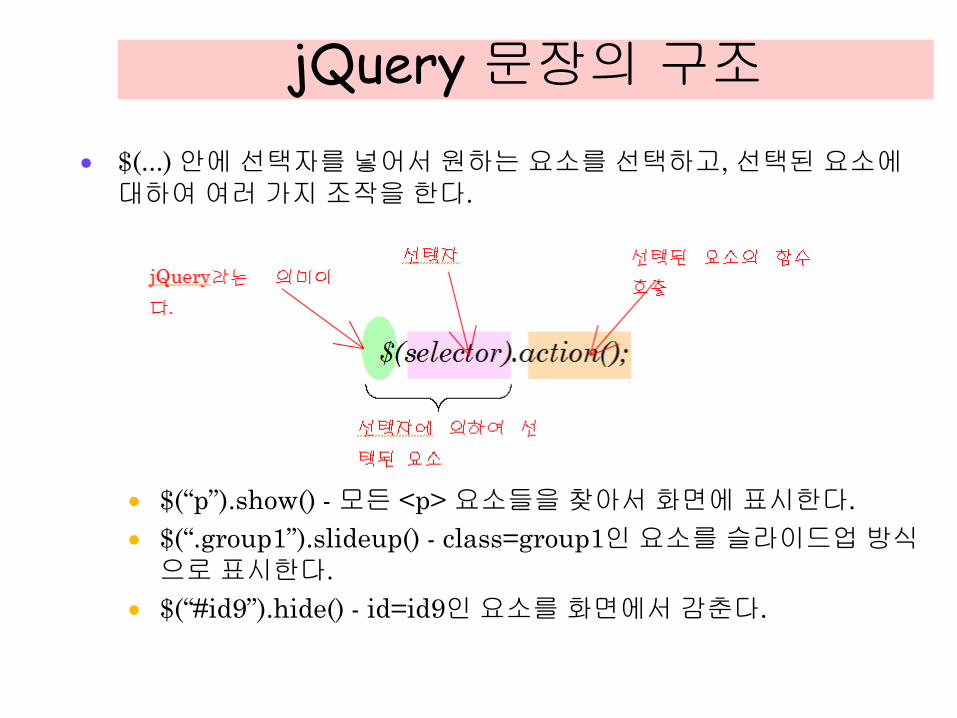
일반적인 구조

jQuery를 이용한 이벤트 처리

마우스 이벤트
<!DOCTYPE html> <html> <head> <style> div.out { width: 200px; height: 60px; background-color: yellow; } </style> <script src="http://code.jquery.com/jquery-1.10.1.js"></script> </head> <body> <div class="out"> <p>마우스를 여기로 움직이세요.</p> <p>0</p> </div>

마우스 이벤트 <script> var i = 0; $("div.out").mouseover(function () { $("p:first", this).text("mouse over"); $("p:last", this).text(++i); }) </script> </body> </html>
웹브라우저로 보기

focus와 blur 이벤트 <!DOCTYPE html> <html> <head> <script src="http://code.jquery.com/jquery-1.10.1.js"></script> <script> $(document).ready(function () { $("input").focus(function () { $(this).css("background-color", "yellow"); }); $("input").blur(function () { $(this).css("background-color", "white"); }); }); </script> </head> <body> 아이디:<input type="text" name="name"><br> </body> </html>

focus와 blur 이벤트
웹브라우저로 보기

이벤트 정보
<!DOCTYPE html> <html> <head> <style> body { background-color: #eef; } div { padding: 20px; } </style> <script src="http://code.jquery.com/jquery-1.10.1.js"></script> </head> <body> <div id="log"></div> <script> $(document).mousemove( function (e) { $("#log").text("e.pageX: " + e.pageX + ", e.pageY: " + e.pageY); }); </script> </body> </html>

jQuery를 이용한 애니메이션
show()와 hide()
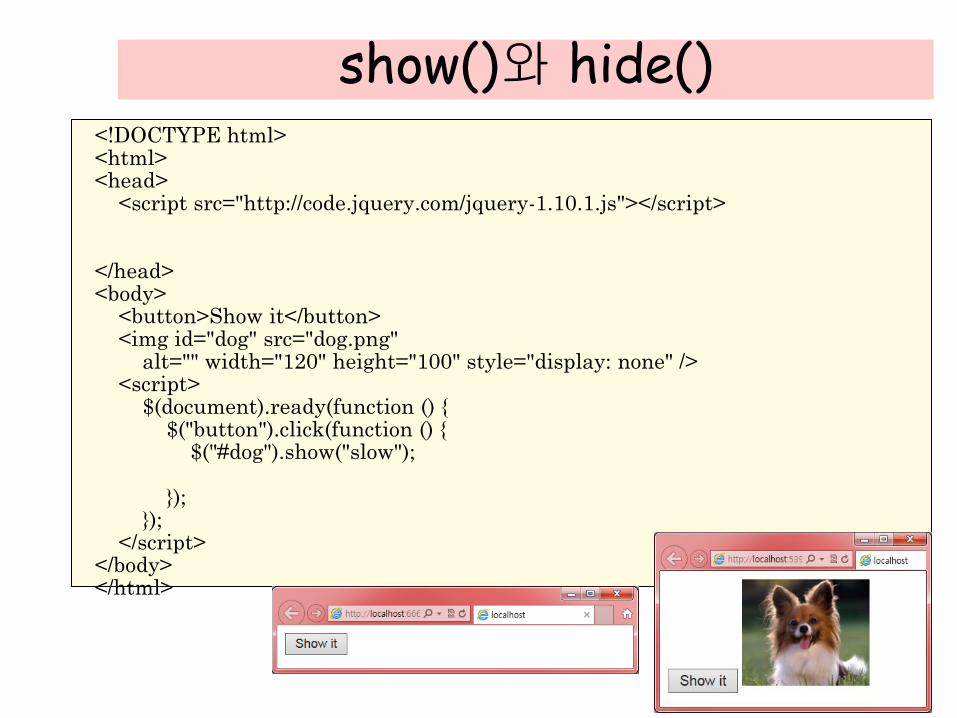
show()와 hide()
<!DOCTYPE html> <html> <head> <script src="http://code.jquery.com/jquery-1.10.1.js"></script> </head> <body> <button>Show it</button> <img id="dog" src="dog.png" alt="" width="120" height="100" style="display: none" /> <script> $(document).ready(function () { $("button").click(function () { $("#dog").show("slow"); }); }); </script> </body> </html>

animate()
<!DOCTYPE html> <html> <head> <script src="http://code.jquery.com/jquery-1.10.1.js"></script> <script> $(document).ready(function () { $("button").click(function () { $("#dog").animate({ left: '100px' }); }); }); </script> </head> <body> <img id="dog" src="dog.png" alt="" width="120" height="100" style="position: relative" /><br /> <button>animate()</button> </body> </html>

fadeIn()/ fadeOut()
<!DOCTYPE html> <html> <head> <script src="http://code.jquery.com/jquery-1.10.1.js"></script> <script> $(document).ready(function () { $("#fadeIn").click(function () { $("#dog").fadeIn("slow"); }); $("#fadeOut").click(function () { $("#dog").fadeOut("slow"); }); }); </script> </head> <body> <button id="fadeIn">fadeIn()</button> <button id="fadeOut">fadeOut()</button><br /> <img id="dog" src="dog.png" alt="" width="120" height="100" style="display: none; position: relative;" /> </body> </html>
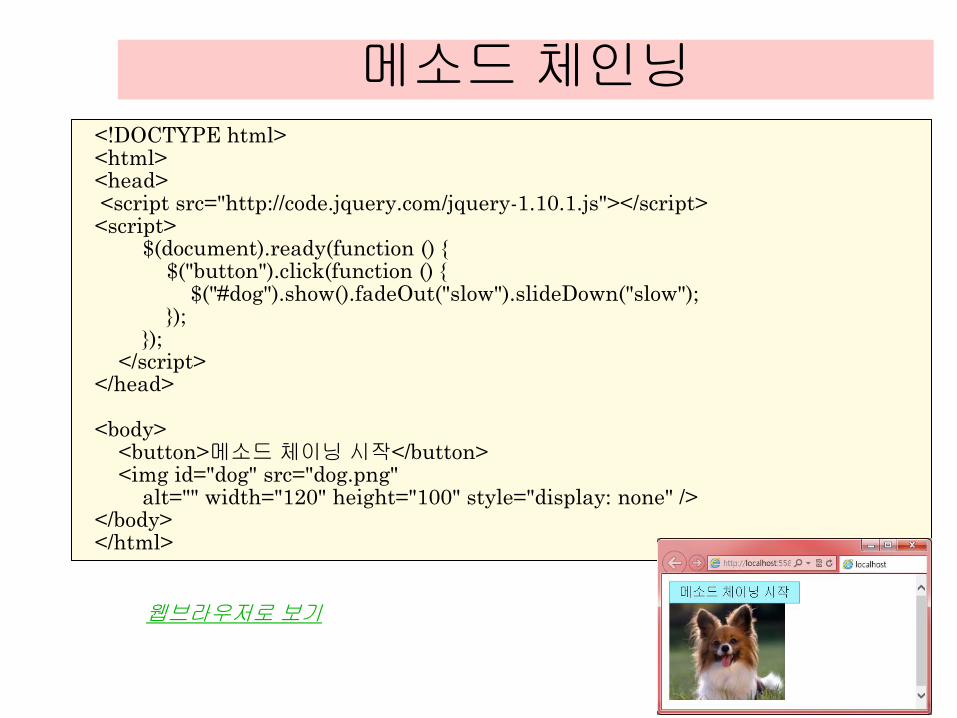
메소드 체인닝
<!DOCTYPE html> <html> <head> <script src="http://code.jquery.com/jquery-1.10.1.js"></script> <script> $(document).ready(function () { $("button").click(function () { $("#dog").show().fadeOut("slow").slideDown("slow"); }); }); </script> </head> <body> <button>메소드 체이닝 시작</button> <img id="dog" src="dog.png" alt="" width="120" height="100" style="display: none" /> </body> </html>
웹브라우저로 보기

jQuery를 이용한 DOM 변경
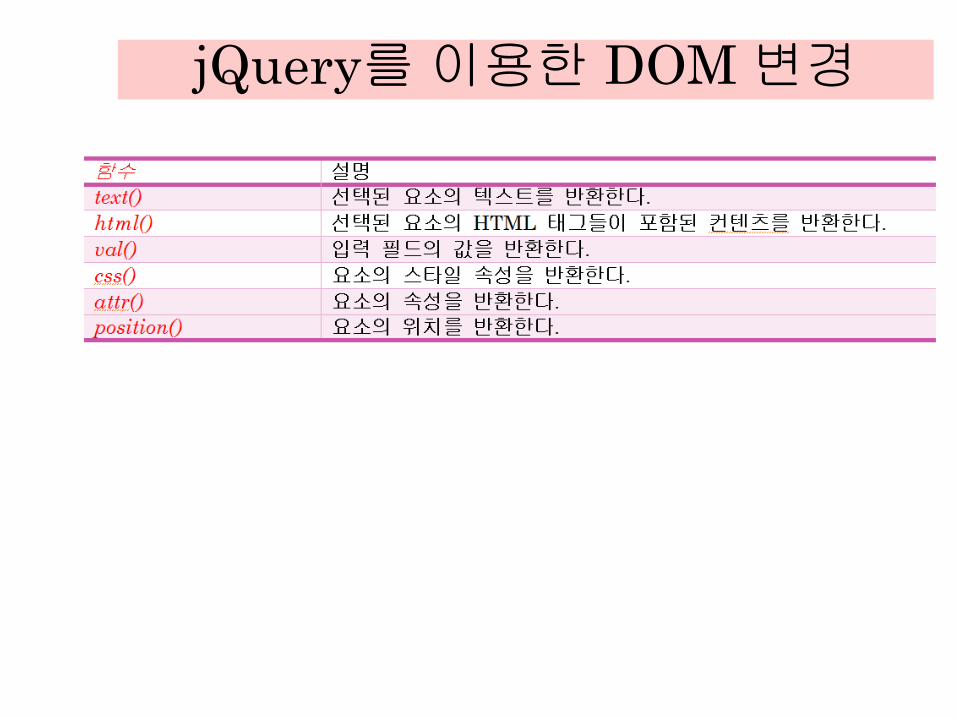
jQuery를 이용한 DOM 변경
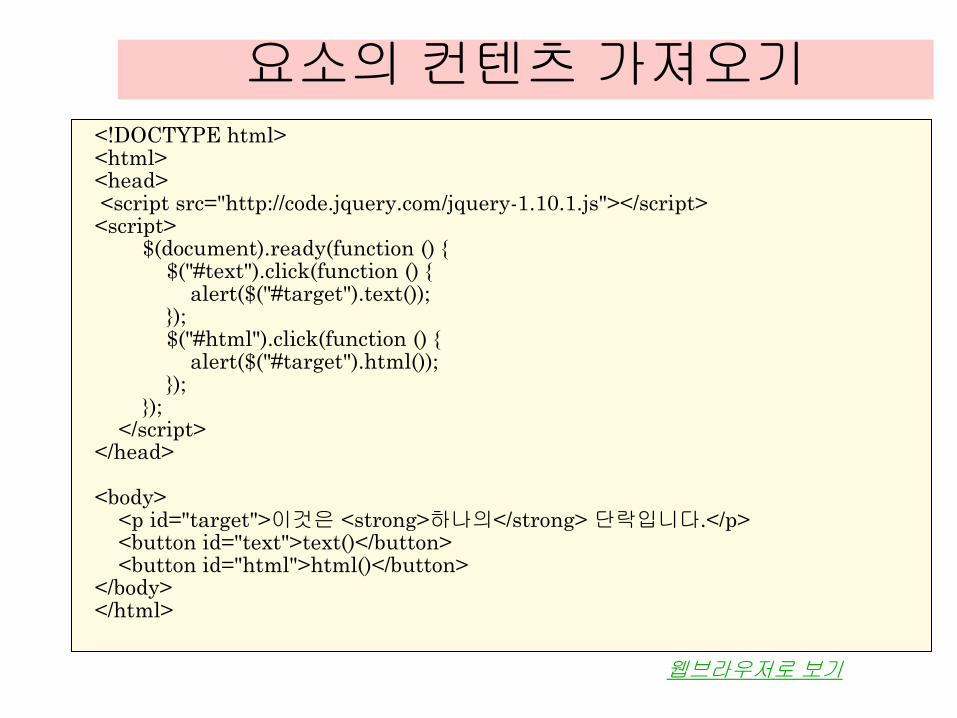
요소의 컨텐츠 가져오기
<!DOCTYPE html> <html> <head> <script src="http://code.jquery.com/jquery-1.10.1.js"></script> <script> $(document).ready(function () { $("#text").click(function () { alert($("#target").text()); }); $("#html").click(function () { alert($("#target").html()); }); }); </script> </head> <body> <p id="target">이것은 <strong>하나의</strong> 단락입니다.</p> <button id="text">text()</button> <button id="html">html()</button> </body> </html>
웹브라우저로 보기

입력 필드의 값 읽어오기 <!DOCTYPE html> <html> <head> <script src="http://code.jquery.com/jquery-1.10.1.js"></script> <script> $(document).ready(function () { $("button").click(function () { alert($("#target").val()); }); }); </script> </head> <body> 이름: <input type="text" id="target" value =""><br /> <button id="text">val()</button> </body> </html>

요소의 속성 가져오기 <!DOCTYPE html> <html> <head> <script src="http://code.jquery.com/jquery-1.10.1.js"></script> <script> $(document).ready(function () { $("button").click(function () { alert($("#dog").attr("src")); }); }); </script> </head> <body> <img id="dog" src="dog.png" alt="" width="120" height="100" /><br /> <button>attr()</button> </body> </html>

DOM에 요소 추가하기 <!DOCTYPE html> <html> <head> <script src="http://code.jquery.com/jquery-1.10.1.js"></script> <script> $(document).ready(function () { $("#button1").click(function () { $("p").append("<b style='color:red'>Hello! </b>."); }); $("#button2").click(function () { $("p").prepend("<b style='color:red'>Hello! </b>."); }); }); </script> </head> <body> <p>I would like to say: </p> <button id="button1">append()</button> <button id="button2">prepend()</button> </body> </html>

DOM의 요소 삭제하기 <!DOCTYPE html> <html> <head> <script src="http://code.jquery.com/jquery-1.10.1.js"></script> <style> p{ background-color:yellow; } .container { height: 80px; width: 200px; border: 1px dotted red; } </style> <script> $(document).ready(function () { $("#button1").click(function () { $(".container").remove(); }); }); $(document).ready(function () { $("#button2").click(function () { $(".container").empty(); }); }); </script> </head>

DOM의 요소 삭제하기 <body> <button id="button1">remove()</button> <button id="button2">empty()</button><br /> <div class="container"> <p class="hello">Hello</p> <p class="goodbye">Goodbye</p> </div> <br> </body> </html>

jQuery를 이용한 CSS 조작
css() - 선택된 요소의 스타일 속성을 설정하거나 반환한다.
addClass() - 선택된 요소에 하나 이상의 클래스를 추가한다.
removeClass() - 선택된 요소에 하나 이상의 클래스를 삭제한다.
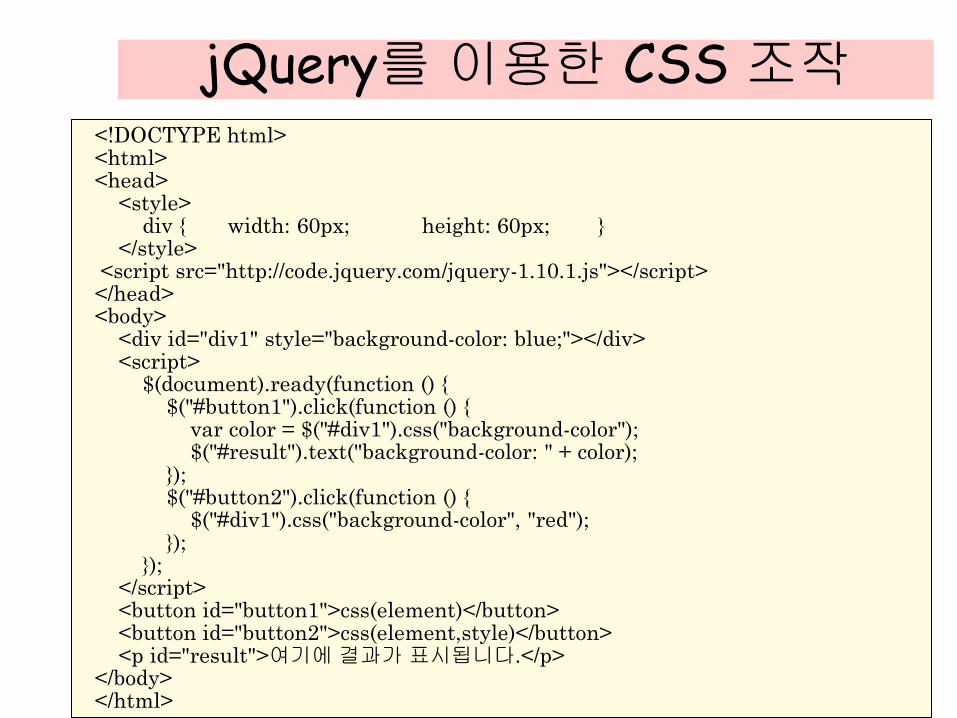
jQuery를 이용한 CSS 조작 <!DOCTYPE html> <html> <head> <style> div { width: 60px; height: 60px; } </style> <script src="http://code.jquery.com/jquery-1.10.1.js"></script> </head> <body> <div id="div1" style="background-color: blue;"></div> <script> $(document).ready(function () { $("#button1").click(function () { var color = $("#div1").css("background-color"); $("#result").text("background-color: " + color); }); $("#button2").click(function () { $("#div1").css("background-color", "red"); }); }); </script> <button id="button1">css(element)</button> <button id="button2">css(element,style)</button> <p id="result">여기에 결과가 표시됩니다.</p> </body> </html>
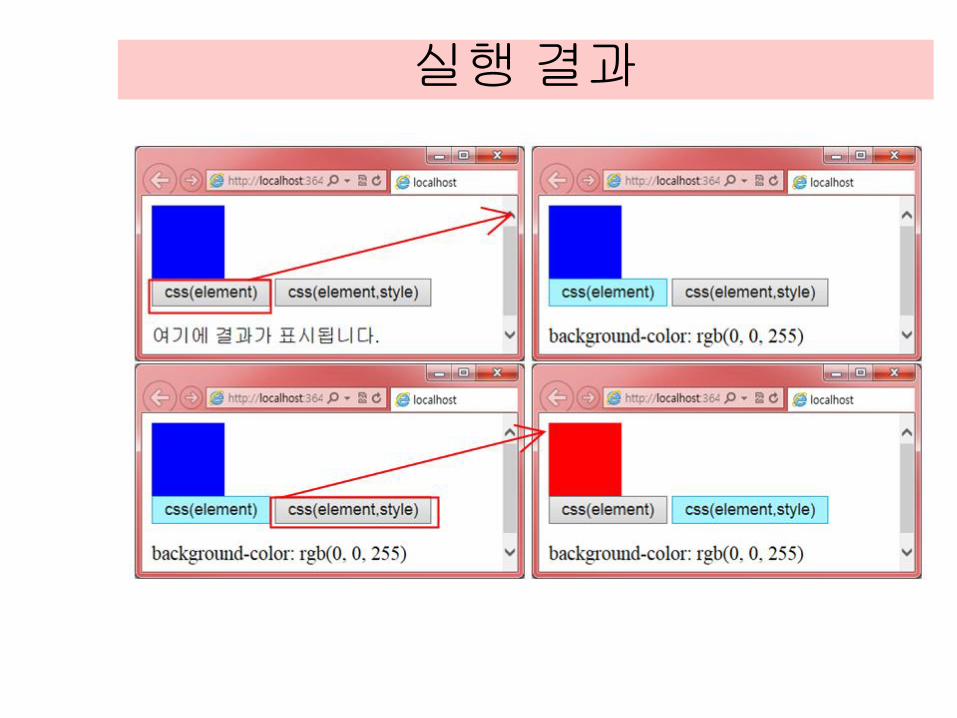
실행 결과
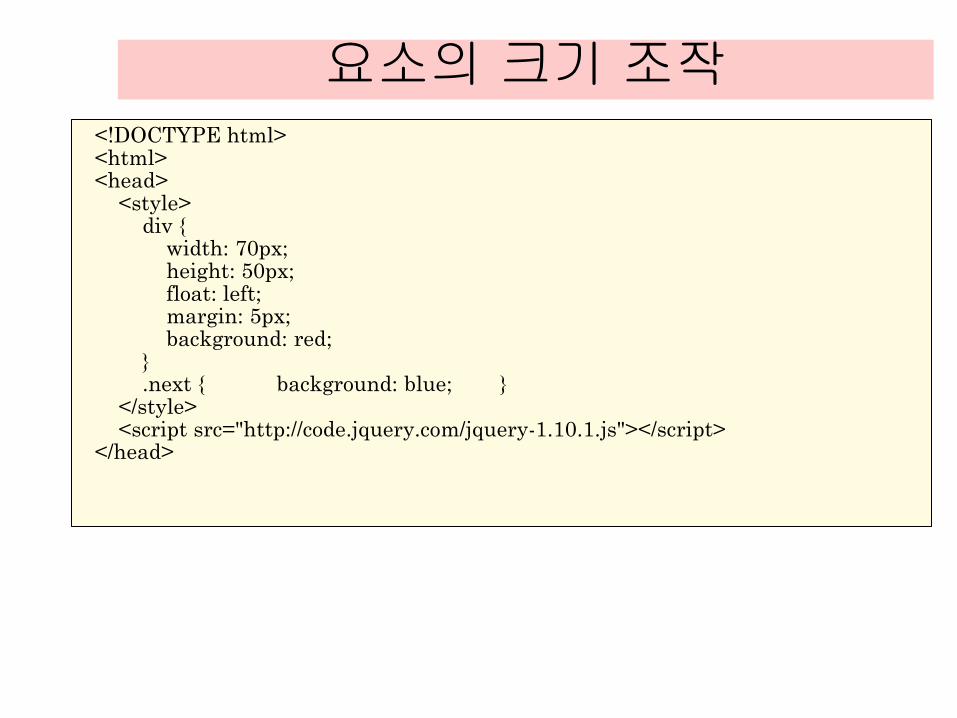
요소의 크기 조작 <!DOCTYPE html> <html> <head> <style> div { width: 70px; height: 50px; float: left; margin: 5px; background: red; } .next { background: blue; } </style> <script src="http://code.jquery.com/jquery-1.10.1.js"></script> </head>
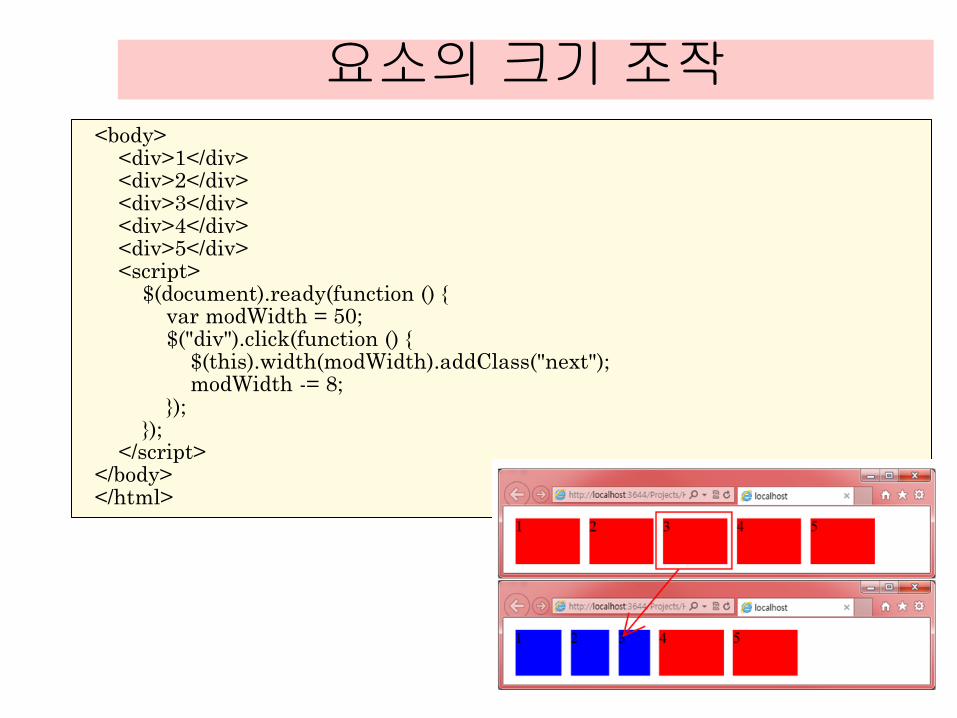
요소의 크기 조작 <body> <div>1</div> <div>2</div> <div>3</div> <div>4</div> <div>5</div> <script> $(document).ready(function () { var modWidth = 50; $("div").click(function () { $(this).width(modWidth).addClass("next"); modWidth -= 8; }); }); </script> </body> </html>
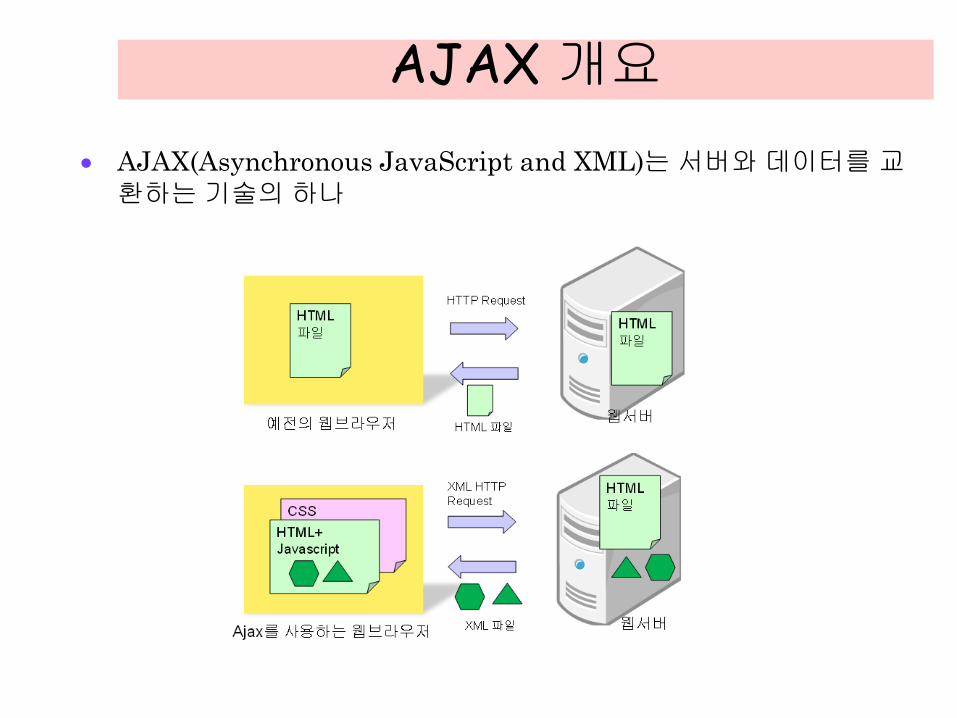
AJAX 개요
AJAX(Asynchronous JavaScript and XML)는 서버와 데이터를 교환하는 기술의 하나
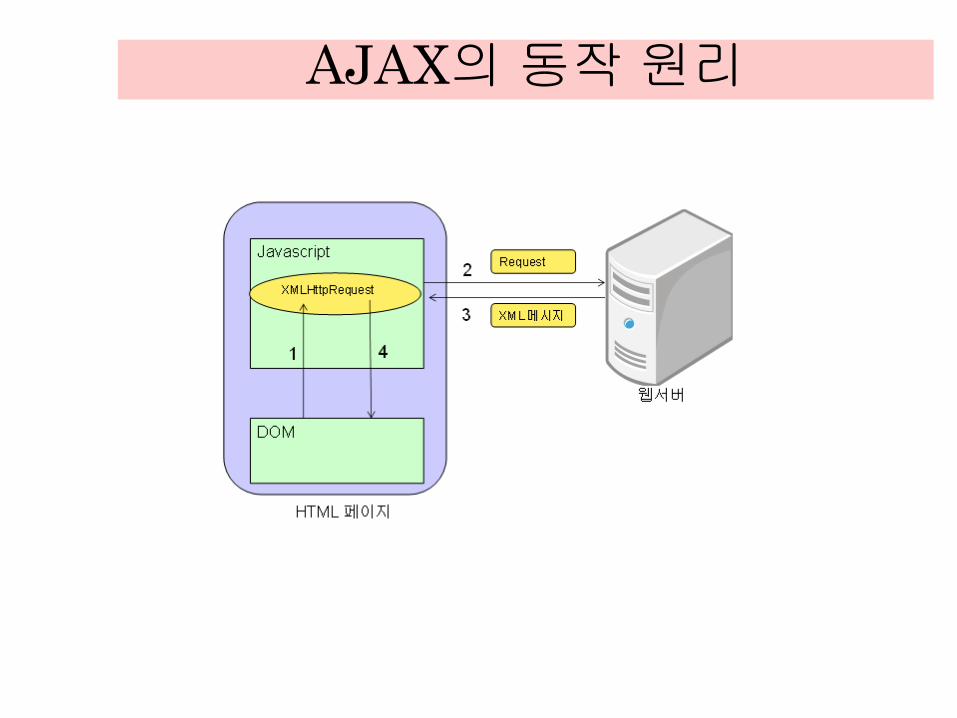
AJAX의 동작 원리
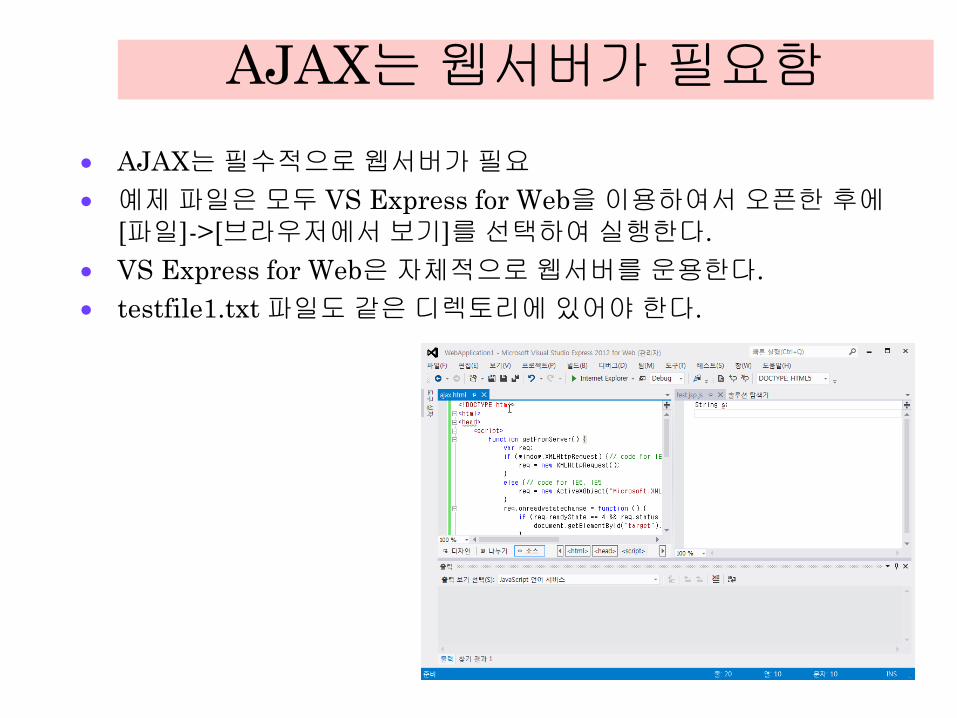
AJAX는 웹서버가 필요함
AJAX는 필수적으로 웹서버가 필요
예제 파일은 모두 VS Express for Web을 이용하여서 오픈한 후에
[파일]->[브라우저에서 보기]를 선택하여 실행한다.
VS Express for Web은 자체적으로 웹서버를 운용한다.
testfile1.txt 파일도 같은 디렉토리에 있어야 한다.
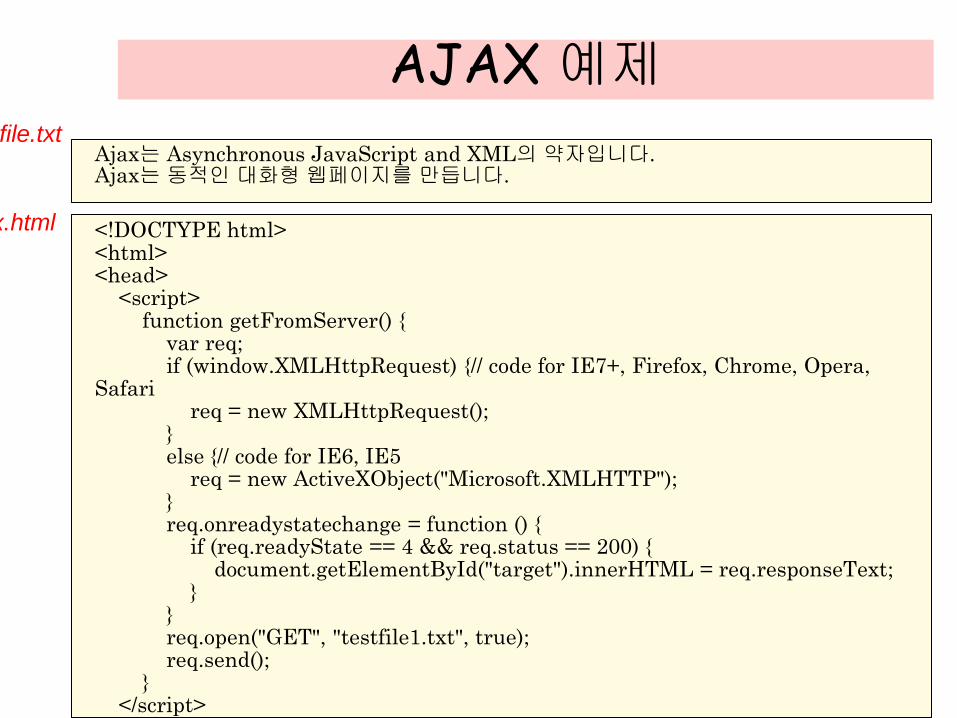
AJAX 예제
<!DOCTYPE html> <html> <head> <script> function getFromServer() { var req; if (window.XMLHttpRequest) {// code for IE7+, Firefox, Chrome, Opera, Safari req = new XMLHttpRequest(); } else {// code for IE6, IE5 req = new ActiveXObject("Microsoft.XMLHTTP"); } req.onreadystatechange = function () { if (req.readyState == 4 && req.status == 200) { document.getElementById("target").innerHTML = req.responseText; } } req.open("GET", "testfile1.txt", true); req.send(); } </script>
Ajax는 Asynchronous JavaScript and XML의 약자입니다. Ajax는 동적인 대화형 웹페이지를 만듭니다.
testfile.txt
ajax.html

AJAX 예제 </head> <body> <div id="target" style="width: 300px; height: 60px; border: solid; 1px black;"> </div> <button type="button" onclick="getFromServer()">GET DATA</button> </body> </html>
반드시 VS for Web을 사용한다!

jQuery를 이용한 AJAX
jQuery를 사용하면 좀 더 쉽게 Ajax를 사용할 수 있다.

AJAX 예제
<!DOCTYPE html> <html> <head> <script src="http://code.jquery.com/jquery-1.10.1.js"></script> <script> $(document).ready(function () { $("button").click(function () { $("#target").load("testfile1.txt"); }); }); </script> </head> <body> <div id="target" style="width: 300px; height: 60px; border: solid 1px black"> </div> <button>Get Data</button> </body> </html>
Ajax는 Asynchronous JavaScript and XML의 약자입니다. Ajax는 동적인 대화형 웹페이지를 만듭니다.
testfile.txt
ajax.html

JSON
JSON (JavaScript Object Notation)은 텍스트-기반의 데이터 교환
형식
JSON은 자바 스크립트 언어에서 유래
JSON 형식은 Douglas Crockford에 의하여 처음으로 지정되었으며,
RFC 4627에 기술
공식적인 인터넷 미디어 타입은 application/json이며 파일 이름 확장자는 .json
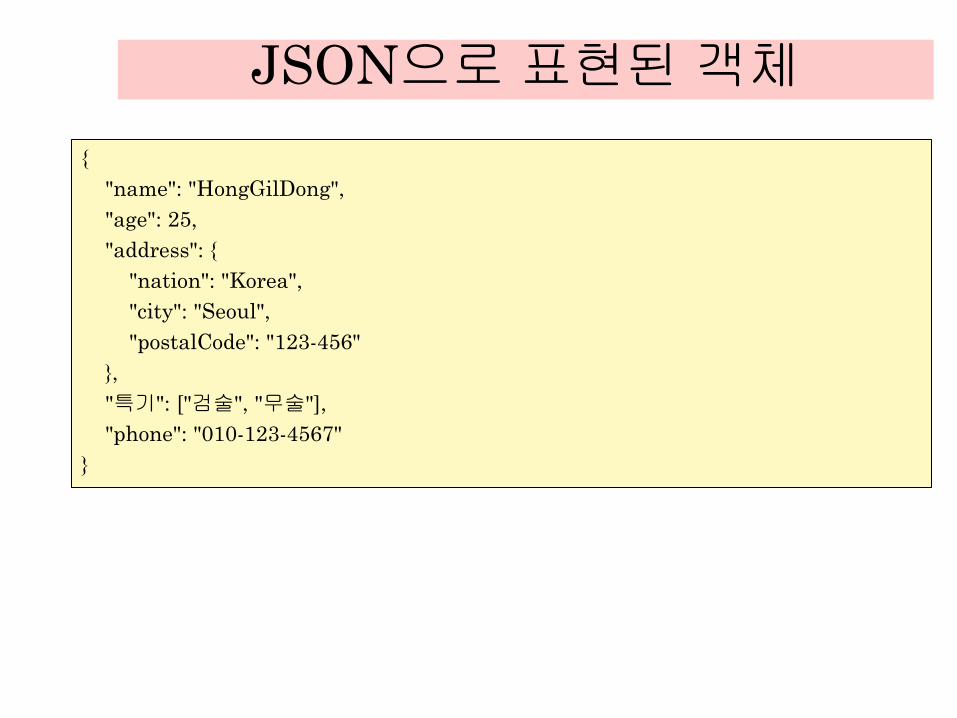
JSON으로 표현된 객체
{
"name": "HongGilDong",
"age": 25,
"address": {
"nation": "Korea",
"city": "Seoul",
"postalCode": "123-456"
},
"특기": ["검술", "무술"],
"phone": "010-123-4567"
}
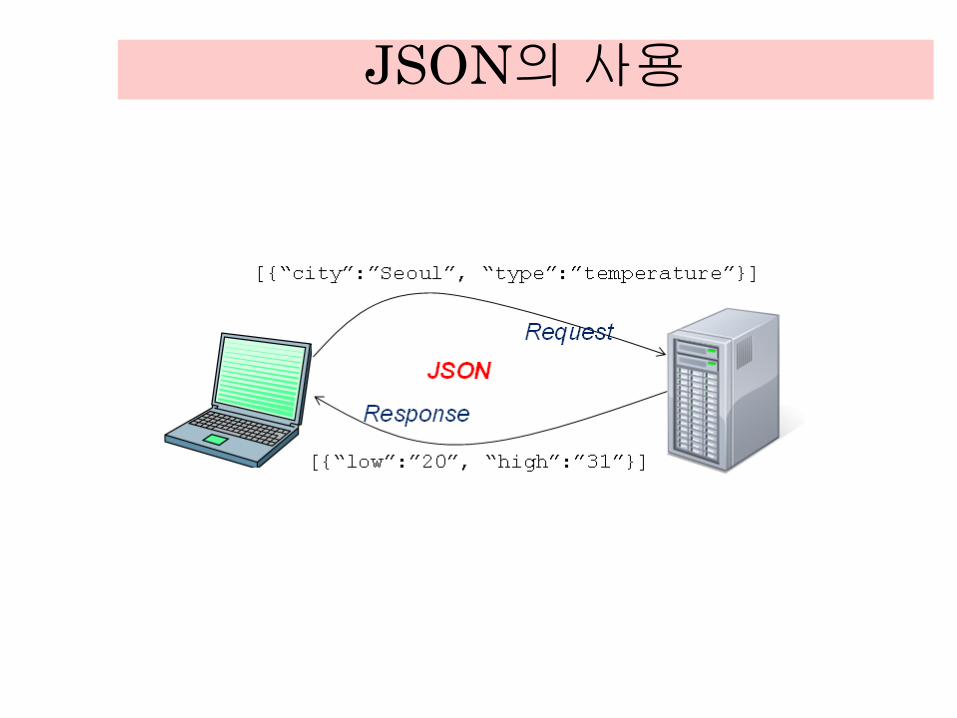
JSON의 사용
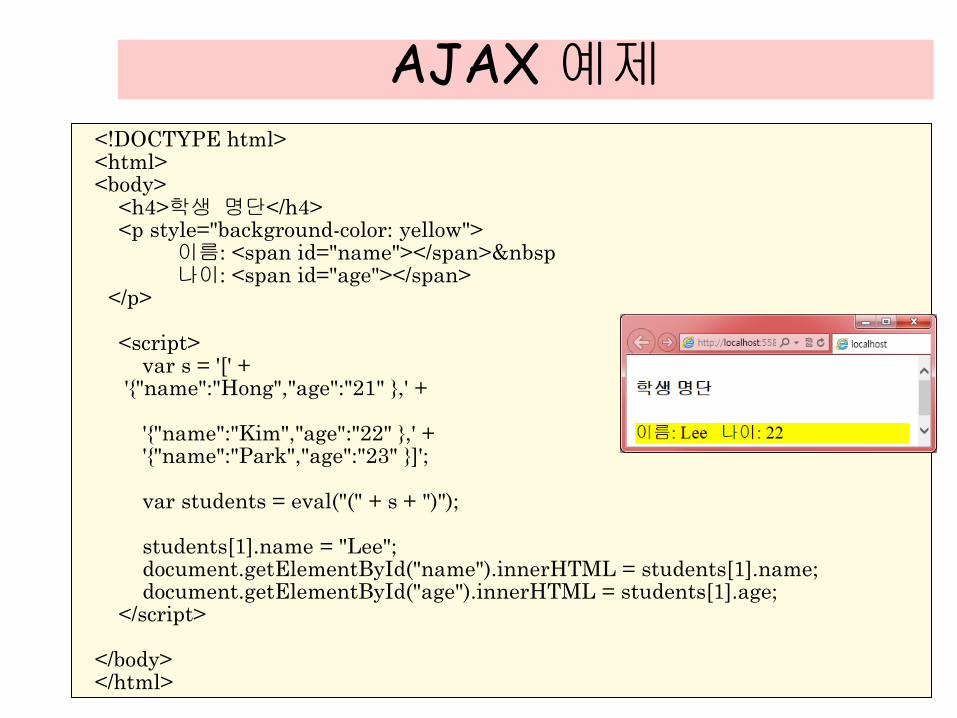
AJAX 예제 <!DOCTYPE html> <html> <body> <h4>학생 명단</h4> <p style="background-color: yellow"> 이름: <span id="name"></span>  나이: <span id="age"></span> </p> <script> var s = '[' + '{"name":"Hong","age":"21" },' + '{"name":"Kim","age":"22" },' + '{"name":"Park","age":"23" }]'; var students = eval("(" + s + ")"); students[1].name = "Lee"; document.getElementById("name").innerHTML = students[1].name; document.getElementById("age").innerHTML = students[1].age; </script> </body> </html>
![Chapter 04.leeck/IS/ch04.pdfChapter 04. 웹 보안 : 웹, ... [그림 4-1] UCLA의 최초의 네트워크 노드 ... 웹 서비스에 이용되는 스크립트에는 자바 스크립트(JavaScript)나](https://img.pdfslide.tips/doc/110x75/5e4eaf0ed01a333d2873f7e1/chapter-04-leeckisch04pdf-chapter-04-e-ee-4-1-ucla.jpg)

![(jQuery Fundamentals) Fundamentos de jQuery191.13.234.92/.../Arquivos/LPA/JQuery/apostilas/apostila-jquery-br.pdf · Fundamentos de jQuery (jQuery Fundamentals) Rebecca Murphey []](https://img.pdfslide.tips/doc/110x75/6077fbbcb4f4d25f0363d510/jquery-fundamentals-fundamentos-de-jquery1911323492arquivoslpajqueryapostilasapostila-jquery-brpdf.jpg)


![[액션스크립트] 1부 액션 스크립트 2.0](https://img.pdfslide.tips/doc/110x75/55851599d8b42aff298b4e44/-1-20-5585e51d15f8f.jpg)


![[150124 박민근] 모바일 게임 개발에서 루아 스크립트 활용하기](https://img.pdfslide.tips/doc/110x75/55a82d9a1a28ab01238b45f6/150124-.jpg)


![[액션스크립트] 2부 액션 스크립트 2.0](https://img.pdfslide.tips/doc/110x75/557bd8dfd8b42aac4c8b49e7/-2-20.jpg)
![[명우니닷컴]자바 스레드에 대해](https://img.pdfslide.tips/doc/110x75/5882754d1a28ab470c8b7913/-5882754d1a28ab470c8b7913.jpg)