Embed Size (px)
Citation preview

Pacemaker 1.1
Clusters from ScratchCrearea de Clustere Active/Pasive și Active/Active pe Fedora
Andrew Beekhof

Clusters from Scratch
Pacemaker 1.1 Clusters from ScratchCrearea de Clustere Active/Pasive și Active/Active pe FedoraEdiție 5
Author Andrew Beekhof [email protected] Raoul Scarazzini [email protected] Dan Frîncu [email protected]
Copyright © 2009-2012 Andrew Beekhof.
The text of and illustrations in this document are licensed under a Creative Commons Attribution–Share Alike 3.0 Unported license ("CC-BY-SA")1.
In accordance with CC-BY-SA, if you distribute this document or an adaptation of it, you must providethe URL for the original version.
In addition to the requirements of this license, the following activities are looked upon favorably:1. If you are distributing Open Publication works on hardcopy or CD-ROM, you provide email
notification to the authors of your intent to redistribute at least thirty days before your manuscriptor media freeze, to give the authors time to provide updated documents. This notification shoulddescribe modifications, if any, made to the document.
2. All substantive modifications (including deletions) be either clearly marked up in the document orelse described in an attachment to the document.
3. Finally, while it is not mandatory under this license, it is considered good form to offer a free copyof any hardcopy or CD-ROM expression of the author(s) work.
Scopul acestui document este de a furniza un ghid de la început-la-sfârșit despre cum să construiți unexemplu de cluster activ/pasiv cu Pacemaker și de a arăta cum poate fi convertit la unul de tip activ/activ.
Clusterul din exemplu va folosi:1. Fedora 13 ca sistem de operare gazdă
2. Corosync pentru a furniza servicii de mesagerie și apartenență,
3. Pacemaker pentru a efectua gestiunea resurselor,
4. DRBD ca o alternativă eficientă ca și cost pentru spațiu de stocare partajat,
5. GFS2 ca și sistem de fișiere de cluster (în mod activ/activ)
6. Shell-ul crm pentru vizualizarea configurației și pentru realizarea de modificări
Dată fiind natura grafică a procesului de instalare al Fedora, un număr de capturi de ecran suntincluse. Însă ghidul este compus în mod primar din comenzi, motivele pentru care sunt executate șirezultatele de ieșire așteptate ale acestora.
1 An explanation of CC-BY-SA is available at http://creativecommons.org/licenses/by-sa/3.0/
iii
CuprinsPrefață vii
1. Document Conventions ................................................................................................... vii1.1. Typographic Conventions ..................................................................................... vii1.2. Pull-quote Conventions ....................................................................................... viii1.3. Notes and Warnings ............................................................................................. ix
2. We Need Feedback! ....................................................................................................... ix
1. Citeşte-mă-Întâi-pe-Mine 11.1. Domeniul de Aplicare al acestui Document .................................................................... 11.2. Ce Este Pacemaker? .................................................................................................... 11.3. Arhitectura Pacemaker .................................................................................................. 2
1.3.1. Componente Interne ........................................................................................... 41.4. Tipuri de Clustere Pacemaker ....................................................................................... 6
2. Instalare 92.1. Instalarea Sistemului de Operare ................................................................................... 92.2. Instalarea Software-ului de Cluster .............................................................................. 37
2.2.1. Scurtături de Securitate .................................................................................... 372.2.2. Instalați Software-ul de Cluster ......................................................................... 38
2.3. Înainte de a Continua .................................................................................................. 422.4. Setup .......................................................................................................................... 42
2.4.1. Finalizați Rețelistica .......................................................................................... 422.4.2. Configurați SSH ............................................................................................... 432.4.3. Numele Scurte ale Nodurilor ............................................................................. 442.4.4. Configurarea Corosync ..................................................................................... 452.4.5. Propagarea Configurației .................................................................................. 46
3. Verificați Instalarea Clusterului 473.1. Verificați Instalarea Corosync ...................................................................................... 473.2. Verificați Instalarea Pacemaker .................................................................................... 47
4. Pacemaker Tools 514.1. Folosirea Utilitarelor Pacemaker .................................................................................. 51
5. Crearea unui Cluster Activ/Pasiv 555.1. Explorarea Configurației Existente ............................................................................... 555.2. Adăugarea unei Resurse ............................................................................................. 565.3. Efectuați un Failover ................................................................................................... 58
5.3.1. Quorum și Clusterele Formate din Două Noduri ................................................. 585.3.2. Prevenirea Mutării Resurselor după Recuperare ................................................ 60
6. Apache - Adăugarea mai Multor Servicii 636.1. Forward ...................................................................................................................... 636.2. Instalare ..................................................................................................................... 636.3. Pregătire ..................................................................................................................... 656.4. Activați status URL-ul Apache-ului ............................................................................... 656.5. Actualizarea Configurației ............................................................................................ 656.6. Asigurarea că Resursele Rulează pe Aceeași Gazdă .................................................... 666.7. Controlarea Ordinii de Pornire/Oprire a Resursei .......................................................... 676.8. Specificarea unei Locații Preferate ............................................................................... 686.9. Mutarea Manuală a Resurselor Prin Jurul Clusterului .................................................... 69
6.9.1. Returnarea Controlului Înapoi Clusterului ........................................................... 69
7. Stocare Replicată cu DRBD 717.1. Background ................................................................................................................ 71

Clusters from Scratch
iv
7.2. Instalarea Pachetelor DRBD ........................................................................................ 717.3. Configurarea DRBD .................................................................................................... 72
7.3.1. Crearea Unei Partiții Pentru DRBD .................................................................... 727.3.2. Scrierea Config-ului DRBD ............................................................................... 727.3.3. Inițializarea și Încărcarea DRBD-ului ................................................................. 737.3.4. Popularea DRBD-ului cu Date ........................................................................... 74
7.4. Configurarea Clusterului pentru DRBD ......................................................................... 757.4.1. Testarea Migrării .............................................................................................. 77
8. Conversia la Activ/Activ 798.1. Cerințe ........................................................................................................................ 798.2. Adăugarea de Suport pentru CMAN ............................................................................. 79
8.2.1. Instalarea Soft-ului necesar .............................................................................. 808.2.2. Configurarea CMAN ......................................................................................... 848.2.3. Redundant Rings ............................................................................................. 858.2.4. Configurarea Evacuării Forțate în CMAN ........................................................... 858.2.5. Aducerea Clusterului Online cu CMAN .............................................................. 86
8.3. Creați un Sistem de Fișiere GFS2 ............................................................................... 878.3.1. Pregătire .......................................................................................................... 878.3.2. Crearea și Popularea unei Partiții GFS2 ............................................................ 87
8.4. Reconfigurarea Clusterului pentru GFS2 ...................................................................... 888.5. Reconfigurarea Pacemaker pentru Activ/Activ ............................................................... 89
8.5.1. Testarea Recuperării ........................................................................................ 92
9. Configurarea STONITH 939.1. What Is STONITH ....................................................................................................... 939.2. Ce Dispozitiv STONITH Ar Trebui Să Folosiţi ............................................................... 939.3. Configurarea STONITH ............................................................................................... 939.4. Exemplu ..................................................................................................................... 94
A. Recapitularea Configurației 97A.1. Configurația Finală a Clusterului .................................................................................. 97A.2. Lista Nodurilor ............................................................................................................ 98A.3. Opțiunile Clusterului .................................................................................................... 98A.4. Resurse ..................................................................................................................... 98
A.4.1. Opțiuni Implicite ............................................................................................... 98A.4.2. Evacuarea Forțată ........................................................................................... 98A.4.3. Adresa Serviciului ............................................................................................ 99A.4.4. DRBD - Stocare Partajată ................................................................................ 99A.4.5. Sistem de Fișiere de Cluster ............................................................................ 99A.4.6. Apache ............................................................................................................ 99
B. Exemplu de Configurație al Corosync 101
C. Documentație Suplimentară 103
D. Istoricul Reviziilor 105
Index 107

v
Listă de figuri1.1. Vederea Conceptuală a Stivei ............................................................................................... 31.2. Stiva Pacemaker ................................................................................................................... 41.3. Componente Interne ............................................................................................................. 51.4. Redundanţă Activă/Pasivă ..................................................................................................... 71.5. Redundanţă N la N ............................................................................................................... 82.1. Installation: Good choice ..................................................................................................... 102.2. Instalarea Fedora - Dispozitive de Stocare ........................................................................... 112.3. Instalarea Fedora - Nume de gazdă .................................................................................... 132.4. Instalarea Fedora - Tipul de Instalare .................................................................................. 152.5. Instalarea Fedora - Partiționarea Implicită ............................................................................ 172.6. Instalarea Fedora - Customizarea Partiționării ...................................................................... 192.7. Instalarea Fedora - Bootloader ............................................................................................ 202.8. Instalarea Fedora - Software ............................................................................................... 222.9. Instalarea Fedora - Instalează ............................................................................................. 242.10. Instalarea Fedora - Instalarea a Terminat ........................................................................... 252.11. Instalarea Fedora - Primul Boot ......................................................................................... 272.12. Instalarea Fedora - Creați un Utilizator Neprivilegiat ............................................................ 282.13. Instalarea Fedora - Data și Ora ......................................................................................... 302.14. Instalarea Fedora - Personalizați Rețeaua .......................................................................... 322.15. Instalarea Fedora - Specificați Preferințele de Rețea ........................................................... 342.16. Instalarea Fedora - Activați Rețeaua .................................................................................. 352.17. Instalarea Fedora - Porniți Terminalul ................................................................................. 36

vi

vii
Prefață
Cuprins1. Document Conventions ........................................................................................................... vii
1.1. Typographic Conventions ............................................................................................. vii1.2. Pull-quote Conventions ............................................................................................... viii1.3. Notes and Warnings ..................................................................................................... ix
2. We Need Feedback! ............................................................................................................... ix
1. Document ConventionsThis manual uses several conventions to highlight certain words and phrases and draw attention tospecific pieces of information.
In PDF and paper editions, this manual uses typefaces drawn from the Liberation Fonts1 set. TheLiberation Fonts set is also used in HTML editions if the set is installed on your system. If not,alternative but equivalent typefaces are displayed. Note: Red Hat Enterprise Linux 5 and later includethe Liberation Fonts set by default.
1.1. Typographic ConventionsFour typographic conventions are used to call attention to specific words and phrases. Theseconventions, and the circumstances they apply to, are as follows.
Mono-spaced Bold
Used to highlight system input, including shell commands, file names and paths. Also used to highlightkeys and key combinations. For example:
To see the contents of the file my_next_bestselling_novel in your currentworking directory, enter the cat my_next_bestselling_novel command at theshell prompt and press Enter to execute the command.
The above includes a file name, a shell command and a key, all presented in mono-spaced bold andall distinguishable thanks to context.
Key combinations can be distinguished from an individual key by the plus sign that connects each partof a key combination. For example:
Press Enter to execute the command.
Press Ctrl+Alt+F2 to switch to a virtual terminal.
The first example highlights a particular key to press. The second example highlights a keycombination: a set of three keys pressed simultaneously.
If source code is discussed, class names, methods, functions, variable names and returned valuesmentioned within a paragraph will be presented as above, in mono-spaced bold. For example:
1 https://fedorahosted.org/liberation-fonts/
Prefață
viii
File-related classes include filesystem for file systems, file for files, and dir fordirectories. Each class has its own associated set of permissions.
Proportional Bold
This denotes words or phrases encountered on a system, including application names; dialog box text;labeled buttons; check-box and radio button labels; menu titles and sub-menu titles. For example:
Choose System → Preferences → Mouse from the main menu bar to launch MousePreferences. In the Buttons tab, select the Left-handed mouse check box and clickClose to switch the primary mouse button from the left to the right (making the mousesuitable for use in the left hand).
To insert a special character into a gedit file, choose Applications → Accessories→ Character Map from the main menu bar. Next, choose Search → Find… fromthe Character Map menu bar, type the name of the character in the Search fieldand click Next. The character you sought will be highlighted in the Character Table.Double-click this highlighted character to place it in the Text to copy field and then
click the Copy button. Now switch back to your document and choose Edit → Pastefrom the gedit menu bar.
The above text includes application names; system-wide menu names and items; application-specificmenu names; and buttons and text found within a GUI interface, all presented in proportional bold andall distinguishable by context.
Mono-spaced Bold Italic or Proportional Bold Italic
Whether mono-spaced bold or proportional bold, the addition of italics indicates replaceable orvariable text. Italics denotes text you do not input literally or displayed text that changes depending oncircumstance. For example:
To connect to a remote machine using ssh, type ssh [email protected] ata shell prompt. If the remote machine is example.com and your username on thatmachine is john, type ssh [email protected].
The mount -o remount file-system command remounts the named filesystem. For example, to remount the /home file system, the command is mount -oremount /home.
To see the version of a currently installed package, use the rpm -q packagecommand. It will return a result as follows: package-version-release.
Note the words in bold italics above — username, domain.name, file-system, package, version andrelease. Each word is a placeholder, either for text you enter when issuing a command or for textdisplayed by the system.
Aside from standard usage for presenting the title of a work, italics denotes the first use of a new andimportant term. For example:
Publican is a DocBook publishing system.
1.2. Pull-quote ConventionsTerminal output and source code listings are set off visually from the surrounding text.
Output sent to a terminal is set in mono-spaced roman and presented thus:
Notes and Warnings
ix
books Desktop documentation drafts mss photos stuff svnbooks_tests Desktop1 downloads images notes scripts svgs
Source-code listings are also set in mono-spaced roman but add syntax highlighting as follows:
package org.jboss.book.jca.ex1;
import javax.naming.InitialContext;
public class ExClient{ public static void main(String args[]) throws Exception { InitialContext iniCtx = new InitialContext(); Object ref = iniCtx.lookup("EchoBean"); EchoHome home = (EchoHome) ref; Echo echo = home.create();
System.out.println("Created Echo");
System.out.println("Echo.echo('Hello') = " + echo.echo("Hello")); }}
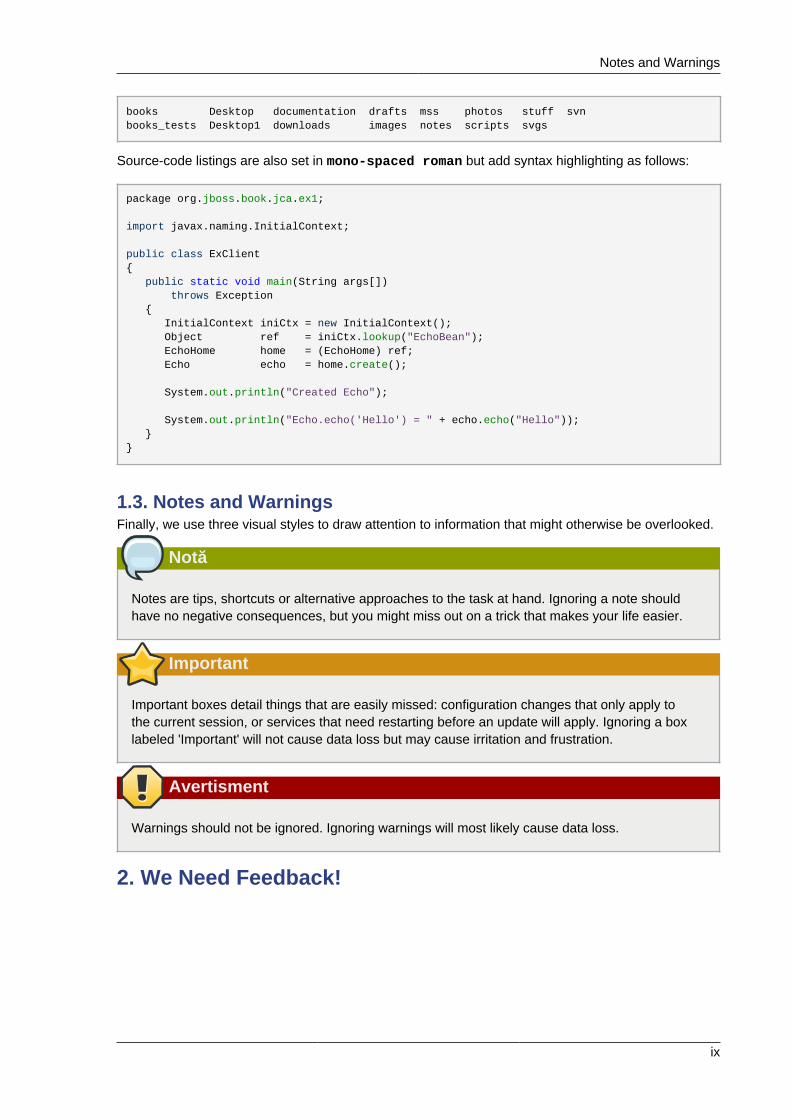
1.3. Notes and WarningsFinally, we use three visual styles to draw attention to information that might otherwise be overlooked.
Notă
Notes are tips, shortcuts or alternative approaches to the task at hand. Ignoring a note shouldhave no negative consequences, but you might miss out on a trick that makes your life easier.
Important
Important boxes detail things that are easily missed: configuration changes that only apply tothe current session, or services that need restarting before an update will apply. Ignoring a boxlabeled 'Important' will not cause data loss but may cause irritation and frustration.
Avertisment
Warnings should not be ignored. Ignoring warnings will most likely cause data loss.
2. We Need Feedback!

Prefață
x
If you find a typographical error in this manual, or if you have thought of a way to make this manualbetter, we would love to hear from you! Please submit a report in Bugzilla2 against the productPacemaker.
When submitting a bug report, be sure to mention the manual's identifier: Clusters_from_Scratch
If you have a suggestion for improving the documentation, try to be as specific as possible whendescribing it. If you have found an error, please include the section number and some of thesurrounding text so we can find it easily.
2 http://bugs.clusterlabs.org
1
Citeşte-mă-Întâi-pe-Mine
Cuprins1.1. Domeniul de Aplicare al acestui Document ............................................................................ 11.2. Ce Este Pacemaker? ............................................................................................................ 11.3. Arhitectura Pacemaker .......................................................................................................... 2
1.3.1. Componente Interne ................................................................................................... 41.4. Tipuri de Clustere Pacemaker ............................................................................................... 6
1.1. Domeniul de Aplicare al acestui DocumentClusterele de calculatoare pot fi folosite pentru a furniza servicii sau resurse cu disponibilitatecrescută. Redundanța mai multor mașini este folosită pentru a proteja împotriva eșecurilor de multefeluri.
This document will walk through the installation and setup of simple clusters using the Fedoradistribution, version 14.
The clusters described here will use Pacemaker and Corosync to provide resource management andmessaging. Required packages and modifications to their configuration files are described along withthe use of the Pacemaker command line tool for generating the XML used for cluster control.
Pacemaker este o componentă centrală și furnizează gestiunea resurselor necesară în acestesisteme. Această gestiune include detectarea și recuperarea de la eșecul diverselor noduri, resurselorși serviciilor care sunt sub controlul acestuia.
Când sunt necesare informații mai aprofundate și pentru utilizarea în lumea reală, vă rugăm să facețireferință la manualul Pacemaker Explained1.
1.2. Ce Este Pacemaker?Pacemaker is a cluster resource manager. It achieves maximum availability for your cluster services(aka. resources) by detecting and recovering from node and resource-level failures by making use ofthe messaging and membership capabilities provided by your preferred cluster infrastructure (eitherCorosync or Heartbeat).
Pacemaker’s key features include:
• Detectarea şi recuperarea eşecurilor la nivel de nod şi serviciu
• Agnostic d.p.d.v. al stocării, nu sunt cerinţe pentru spaţiu de stocare partajat
• Agnostic d.p.d.v. al resurselor, orice poate fi scriptat poate fi folosit într-un cluster
• Supports STONITH for ensuring data integrity
• Suportă clustere mici şi mari
1 http://www.clusterlabs.org/doc/
Cap. 1. Citeşte-mă-Întâi-pe-Mine
2
• Supports both quorate and resource driven clusters
• Supports practically any redundancy configuration
• Configuraţie replicată în mod automat care poate fi actualizată de pe orice nod
• Abilitatea de a specifica ordonare, colocare şi anti-colocare la nivelul întregului cluster
• Suport pentru tipuri de servicii avansate
• Clone: pentru servicii care trebuie să fie active pe mai multe noduri
• Stări-multiple: pentru servicii cu mai multe moduri de operare (ex. master/slave, primar/secundar)
• Shell de cluster unificat, scriptabil
1.3. Arhitectura PacemakerLa cel mai înalt nivel, clusterul este compus din trei părţi:
• Non-cluster aware components (illustrated in green). These pieces include the resourcesthemselves, scripts that start, stop and monitor them, and also a local daemon that masks thedifferences between the different standards these scripts implement.
• Resource management Pacemaker provides the brain (illustrated in blue) that processes and reactsto events regarding the cluster. These events include nodes joining or leaving the cluster; resourceevents caused by failures, maintenance, scheduled activities; and other administrative actions.Pacemaker will compute the ideal state of the cluster and plot a path to achieve it after any of theseevents. This may include moving resources, stopping nodes and even forcing them offline withremote power switches.
• Low level infrastructure Corosync provides reliable messaging, membership and quorum informationabout the cluster (illustrated in red).

Arhitectura Pacemaker
3
Fig. 1.1. Vederea Conceptuală a Stivei
When combined with Corosync, Pacemaker also supports popular open source cluster filesystems. 2
Due to recent standardization within the cluster filesystem community, they make use of a commondistributed lock manager which makes use of Corosync for its messaging capabilities and Pacemakerfor its membership (which nodes are up/down) and fencing services.
2 Even though Pacemaker also supports Heartbeat, the filesystems need to use the stack for messaging and membership andCorosync seems to be what they’re standardizing on. Technically it would be possible for them to support Heartbeat as well,however there seems little interest in this.

Cap. 1. Citeşte-mă-Întâi-pe-Mine
4
Fig. 1.2. Stiva Pacemaker
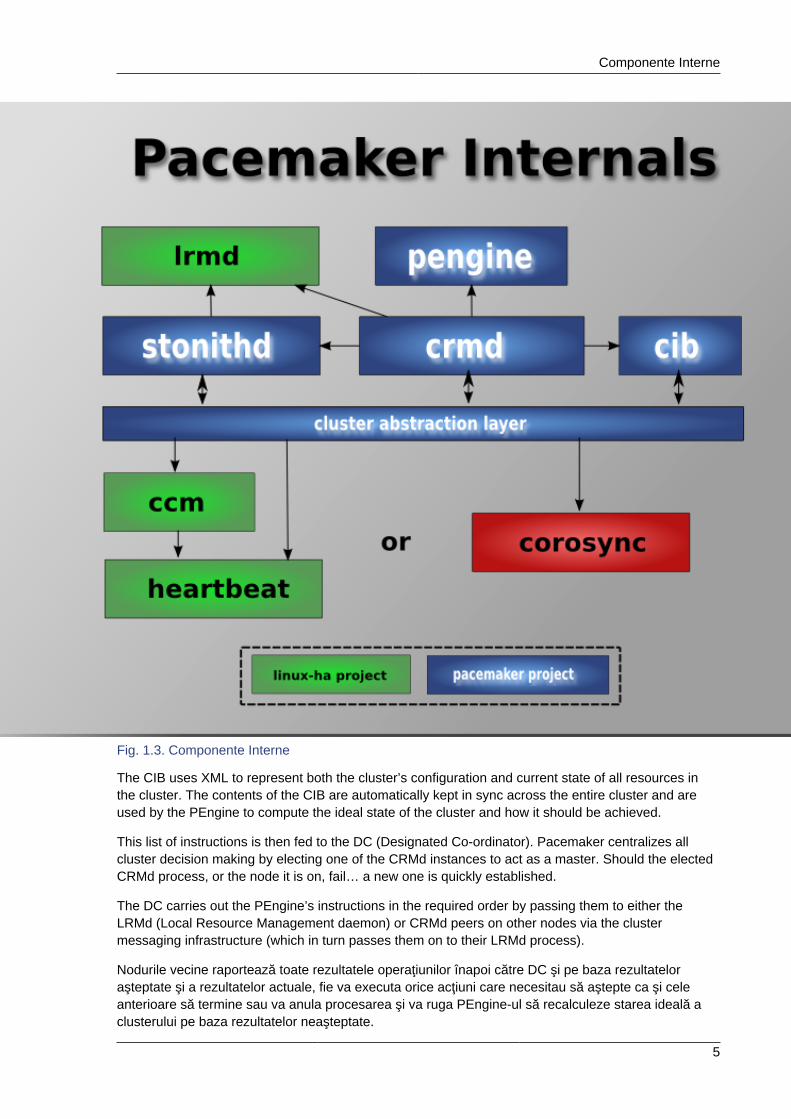
1.3.1. Componente InternePacemaker însuşi este compus din patru componente cheie (ilustrate mai jos cu aceeaşi schemă deculori ca şi în diagrama anterioară):
• CIB (aka. Cluster Information Base)
• CRMd (aka. Cluster Resource Management daemon)
• PEngine (aka. PE sau Policy Engine)
• STONITHd
Componente Interne
5
Fig. 1.3. Componente Interne
The CIB uses XML to represent both the cluster’s configuration and current state of all resources inthe cluster. The contents of the CIB are automatically kept in sync across the entire cluster and areused by the PEngine to compute the ideal state of the cluster and how it should be achieved.
This list of instructions is then fed to the DC (Designated Co-ordinator). Pacemaker centralizes allcluster decision making by electing one of the CRMd instances to act as a master. Should the electedCRMd process, or the node it is on, fail… a new one is quickly established.
The DC carries out the PEngine’s instructions in the required order by passing them to either theLRMd (Local Resource Management daemon) or CRMd peers on other nodes via the clustermessaging infrastructure (which in turn passes them on to their LRMd process).
Nodurile vecine raportează toate rezultatele operaţiunilor înapoi către DC şi pe baza rezultateloraşteptate şi a rezultatelor actuale, fie va executa orice acţiuni care necesitau să aştepte ca şi celeanterioare să termine sau va anula procesarea şi va ruga PEngine-ul să recalculeze starea ideală aclusterului pe baza rezultatelor neaşteptate.

Cap. 1. Citeşte-mă-Întâi-pe-Mine
6
În anumite cazuri, ar putea fi necesar să oprească alimentarea nodurilor pentru a proteja datelepartajate sau pentru a termina recuperarea resurselor. Pentru acest lucru Pacemaker vine cuSTONITHd. STONITH este un acronim pentru Shoot-The-Other-Node-In-The-Head (împuşcă celălaltnod în cap) şi este implementat de obicei cu un switch de alimentare cu curent controlat de la distanţă.În Pacemaker, dispozitivele STONITH sunt modelate precum resursele (şi configurate în CIB) pentrua permite monitorizarea facilă a acestora în caz de eşec, totuşi STONITHd se ocupă de înţelegereatopologiei STONITH astfel încât clienţii acestuia să solicite pur şi simplu ca un nod să fie evacuat forțatşi acesta se va ocupa de rest.
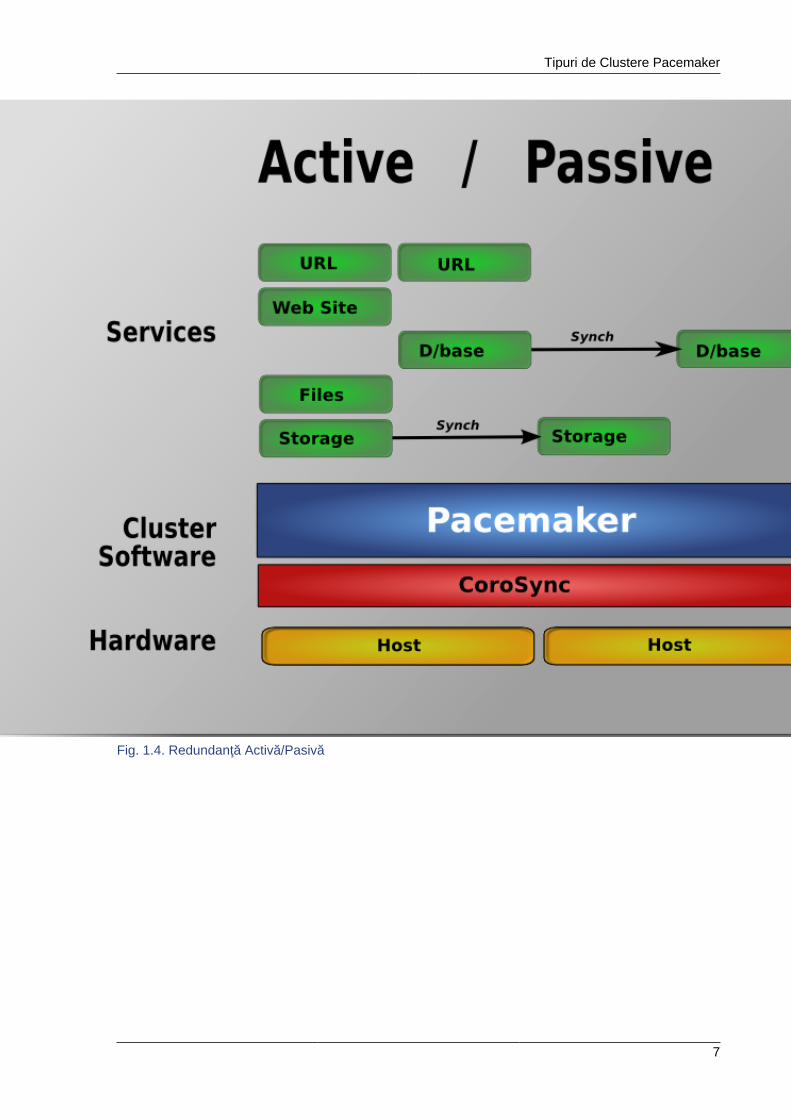
1.4. Tipuri de Clustere PacemakerPacemaker nu face nici un fel de presupuneri despre mediul vostru, acest aspect îi permite să suportepractic orice configuraţie redundantă3 incluzând Activ/Activ, Activ/Pasiv, N+1, N+M, N-la-1 şi N-la-N.
În acest document ne vom concentra pe setarea unui server web Apache cu disponibilitate crescutăcu un cluster Activ/Pasiv folosind DRBD și Ext4 pentru a stoca datele. Apoi, vom actualiza clusterul laActiv/Activ folosind GFS2.
3 http://en.wikipedia.org/wiki/High-availability_cluster#Node_configurations
Tipuri de Clustere Pacemaker
7
Fig. 1.4. Redundanţă Activă/Pasivă

Cap. 1. Citeşte-mă-Întâi-pe-Mine
8
Fig. 1.5. Redundanţă N la N
9
Instalare
Cuprins2.1. Instalarea Sistemului de Operare ........................................................................................... 92.2. Instalarea Software-ului de Cluster ...................................................................................... 37
2.2.1. Scurtături de Securitate ............................................................................................ 372.2.2. Instalați Software-ul de Cluster ................................................................................. 38
2.3. Înainte de a Continua .......................................................................................................... 422.4. Setup .................................................................................................................................. 42
2.4.1. Finalizați Rețelistica .................................................................................................. 422.4.2. Configurați SSH ....................................................................................................... 432.4.3. Numele Scurte ale Nodurilor ..................................................................................... 442.4.4. Configurarea Corosync ............................................................................................. 452.4.5. Propagarea Configurației .......................................................................................... 46
2.1. Instalarea Sistemului de OperareDetailed instructions for installing Fedora are available at http://docs.fedoraproject.org/install-guide/f13/ in a number of languages. The abbreviated version is as follows…
Point your browser to http://fedoraproject.org/en/get-fedora-all, locate the Install Media section anddownload the install DVD that matches your hardware.
Burn the disk image to a DVD 1 and boot from it. Or use the image to boot a virtual machine as I havedone here. After clicking through the welcome screen, select your language and keyboard layout 2
1 http://docs.fedoraproject.org/readme-burning-isos/en-US.html2 http://docs.fedoraproject.org/install-guide/f13/en-US/html/s1-langselection-x86.html

Cap. 2. Instalare
10
Fig. 2.1. Installation: Good choice
Instalarea Sistemului de Operare
11
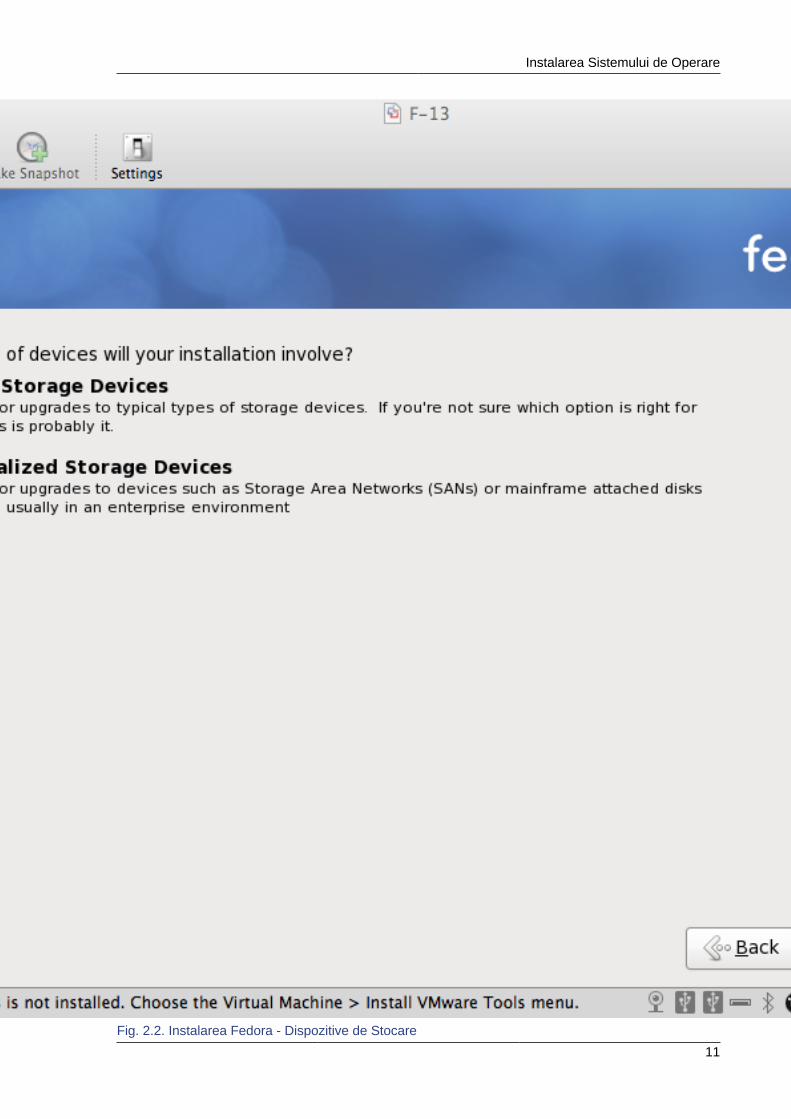
Fig. 2.2. Instalarea Fedora - Dispozitive de Stocare

Cap. 2. Instalare
12
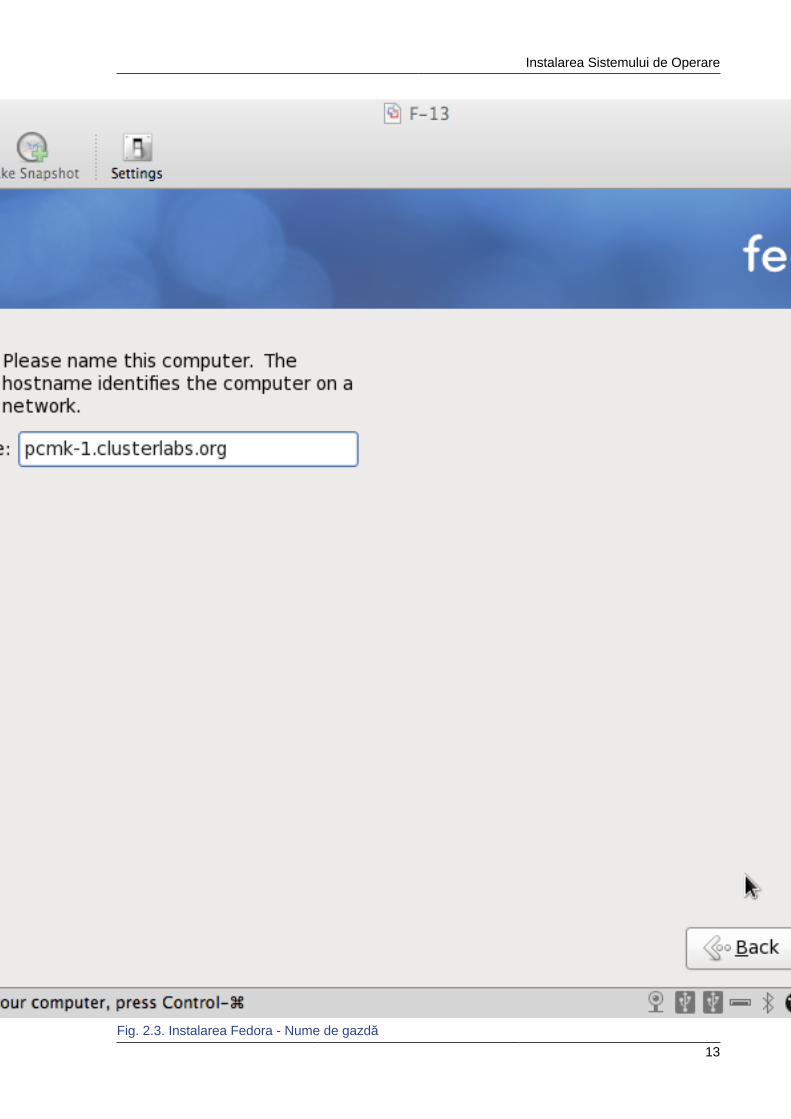
Assign your machine a host name. 3 I happen to control the clusterlabs.org domain name, so I will usethat here.
3 http://docs.fedoraproject.org/install-guide/f13/en-US/html/sn-networkconfig-fedora.html
Instalarea Sistemului de Operare
13
Fig. 2.3. Instalarea Fedora - Nume de gazdă

Cap. 2. Instalare
14
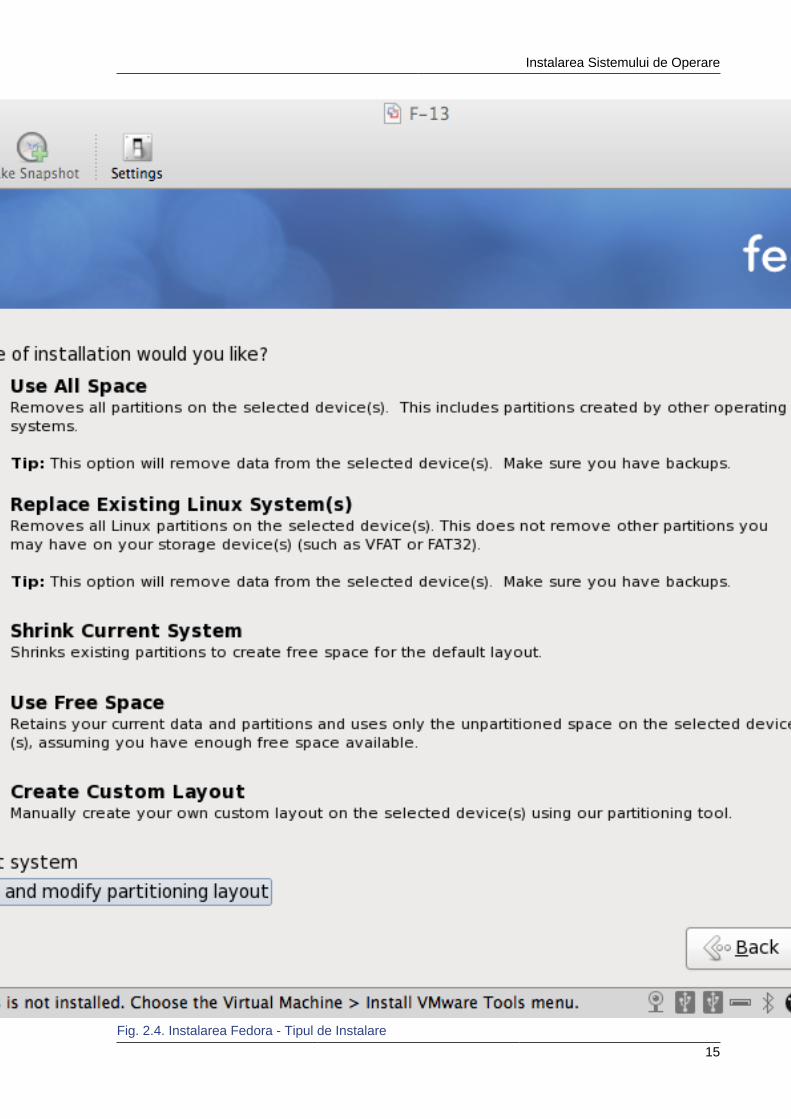
You will then be prompted to indicate the machine’s physical location and to supply a root password. 4
Now select where you want Fedora installed. 5
As I don’t care about any existing data, I will accept the default and allow Fedora to use the completedrive. However I want to reserve some space for DRBD, so I’ll check the Review and modifypartitioning layout box.
4 http://docs.fedoraproject.org/install-guide/f13/en-US/html/sn-account_configuration.html5 http://docs.fedoraproject.org/install-guide/f13/en-US/html/s1-diskpartsetup-x86.html
Instalarea Sistemului de Operare
15
Fig. 2.4. Instalarea Fedora - Tipul de Instalare

Cap. 2. Instalare
16
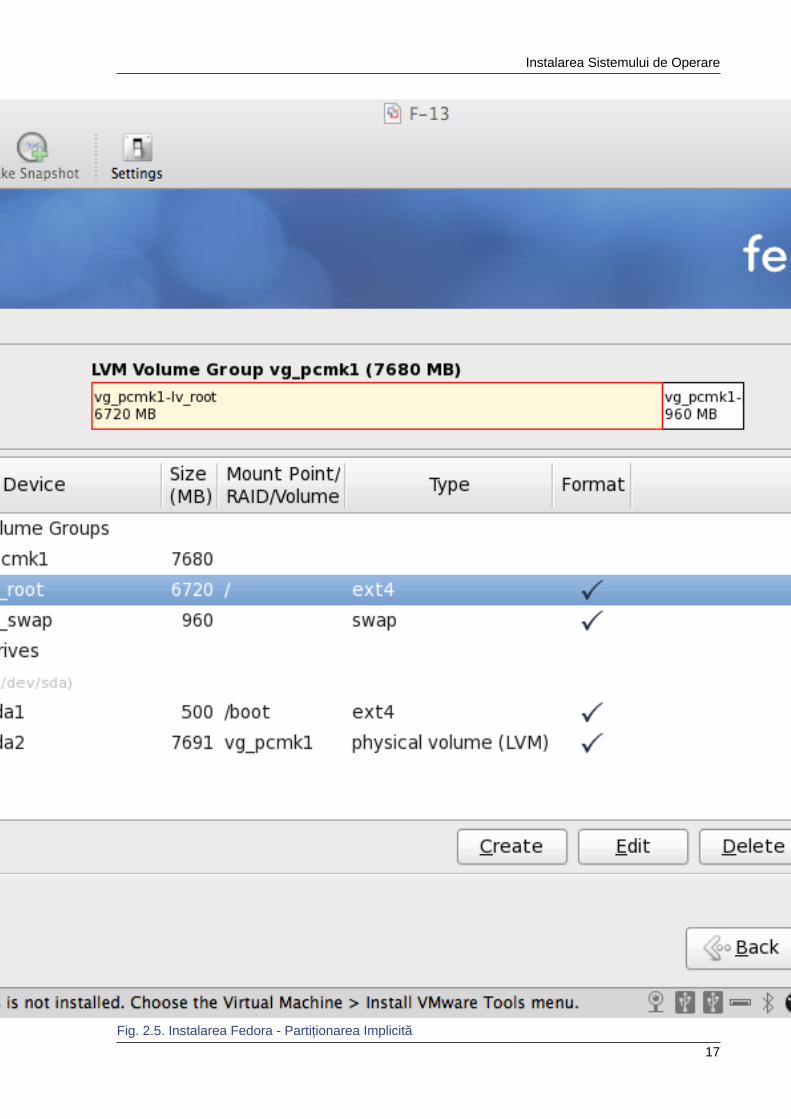
By default, Fedora will give all the space to the / (aka. root) partition. Wel’ll take some back so we canuse DRBD.
Instalarea Sistemului de Operare
17
Fig. 2.5. Instalarea Fedora - Partiționarea Implicită

Cap. 2. Instalare
18
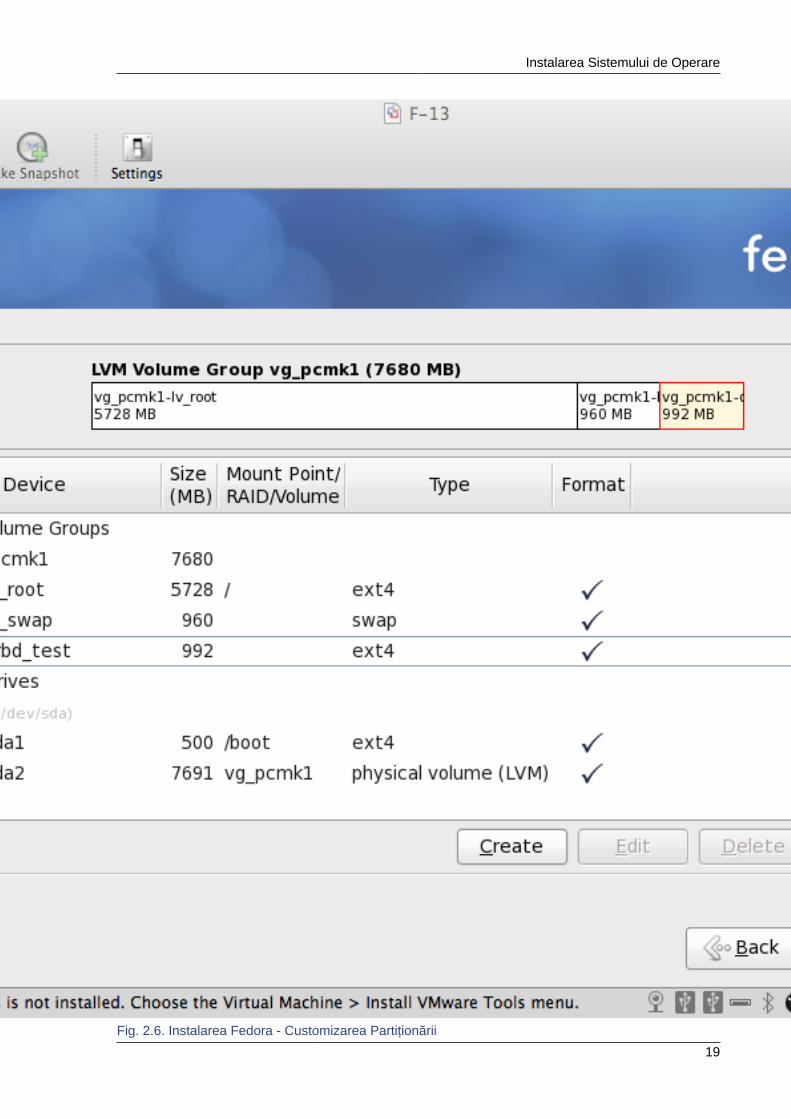
Așezarea finalizată a partițiilor ar trebui să arate asemănător cu diagrama de mai jos.
Important
If you plan on following the DRBD or GFS2 portions of this guide, you should reserve at least 1Gbof space on each machine from which to create a shared volume. Fedora Installation - CustomizePartitioningFedora Installation: Create a partition to use (later) for website data
Instalarea Sistemului de Operare
19
Fig. 2.6. Instalarea Fedora - Customizarea Partiționării
Cap. 2. Instalare
20
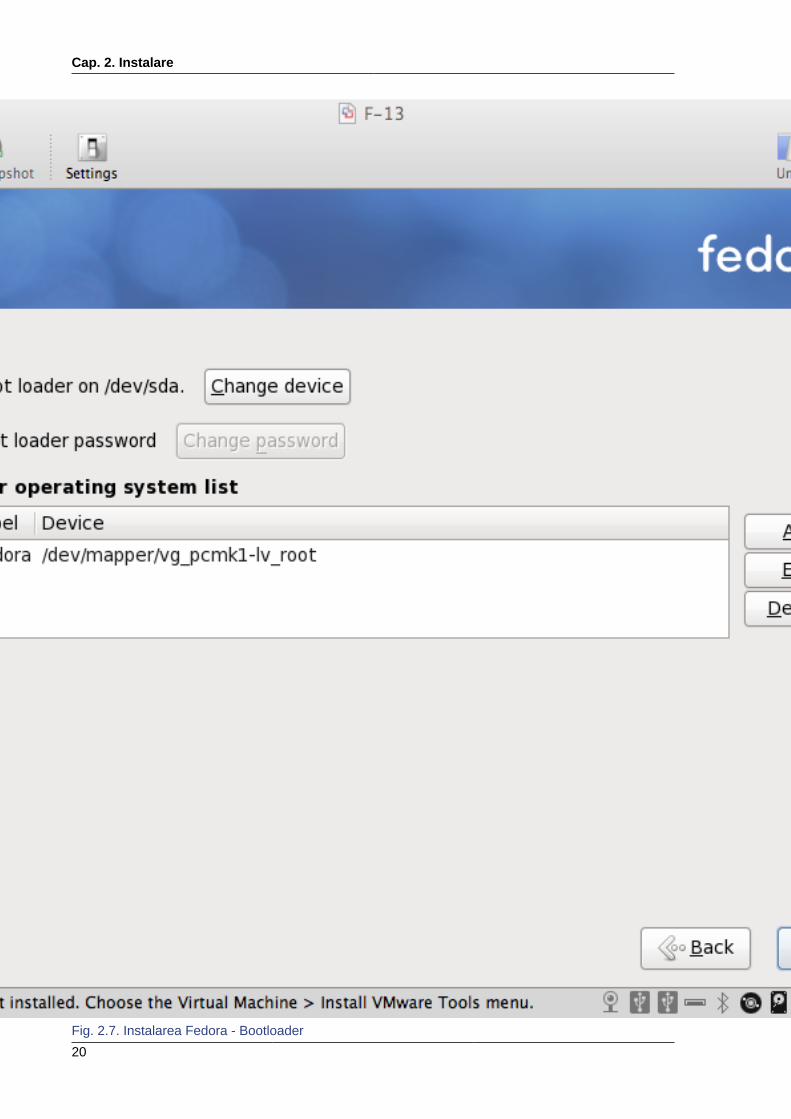
Fig. 2.7. Instalarea Fedora - Bootloader

Instalarea Sistemului de Operare
21
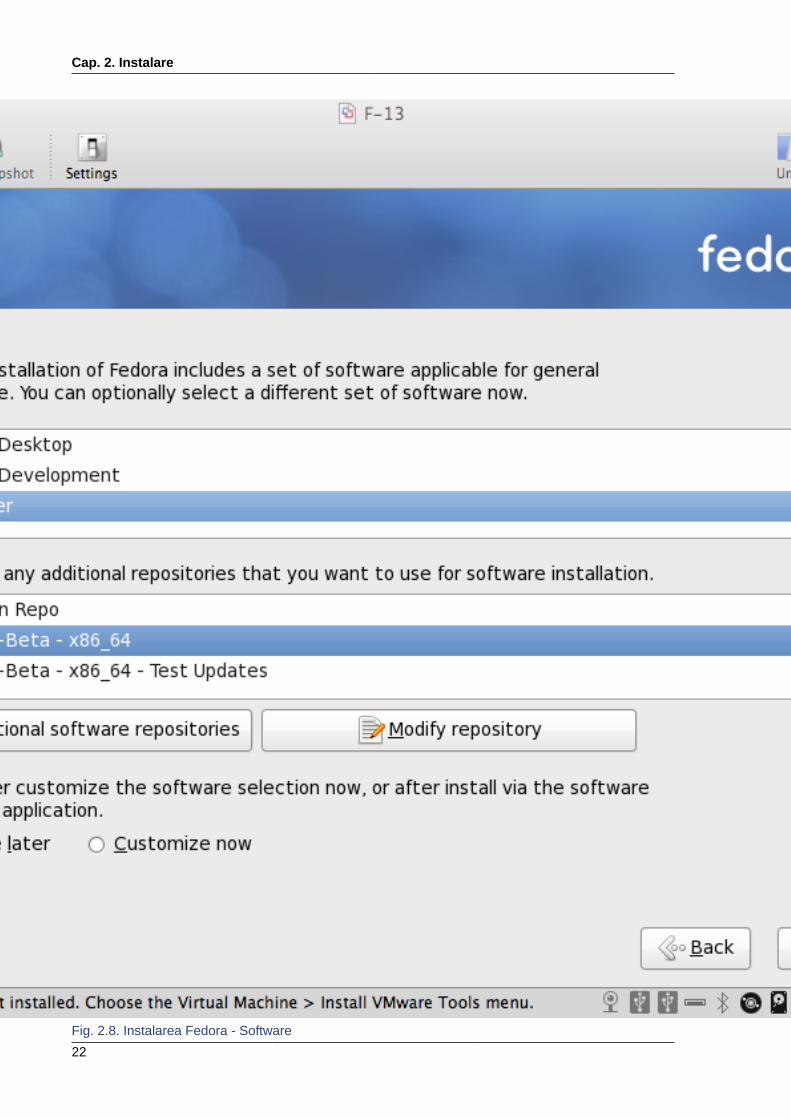
Next choose which software should be installed. Change the selection to Web Server since we planon using Apache. Don’t enable updates yet, we’ll do that (and install any extra software we need) later.After you click next, Fedora will begin installing.
Cap. 2. Instalare
22
Fig. 2.8. Instalarea Fedora - Software

Instalarea Sistemului de Operare
23
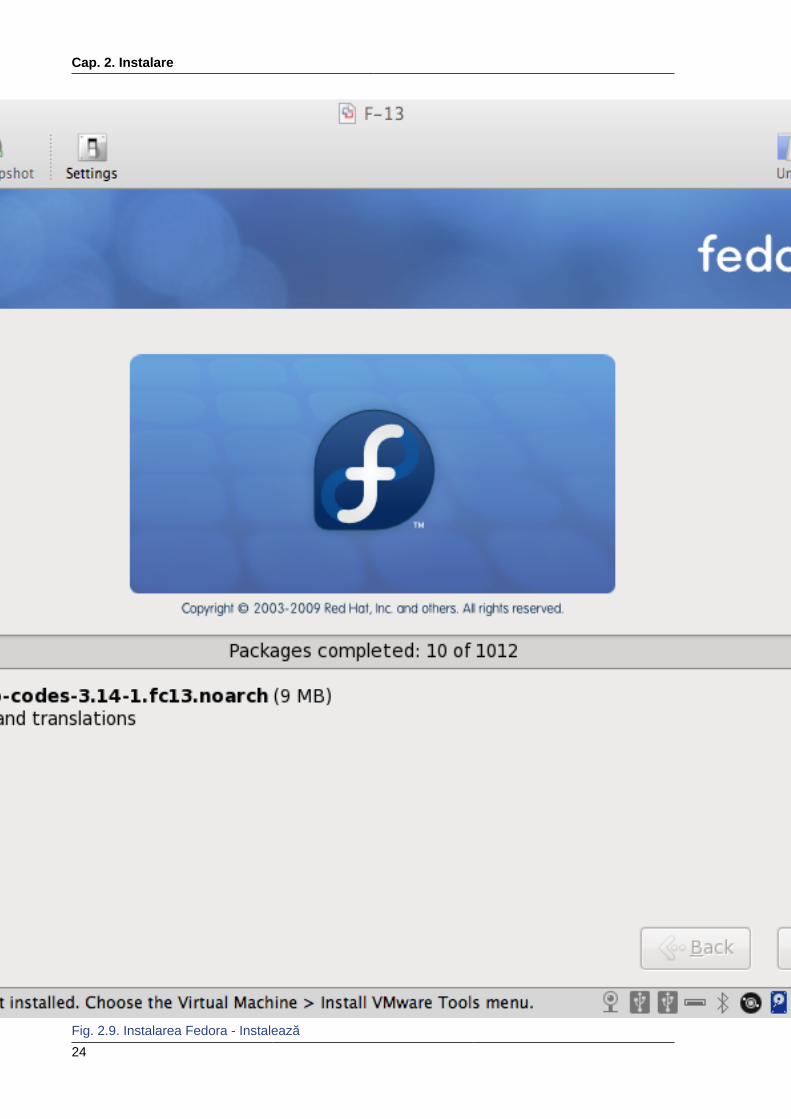
Go grab something to drink, this may take a while
Cap. 2. Instalare
24
Fig. 2.9. Instalarea Fedora - Instalează
Instalarea Sistemului de Operare
25
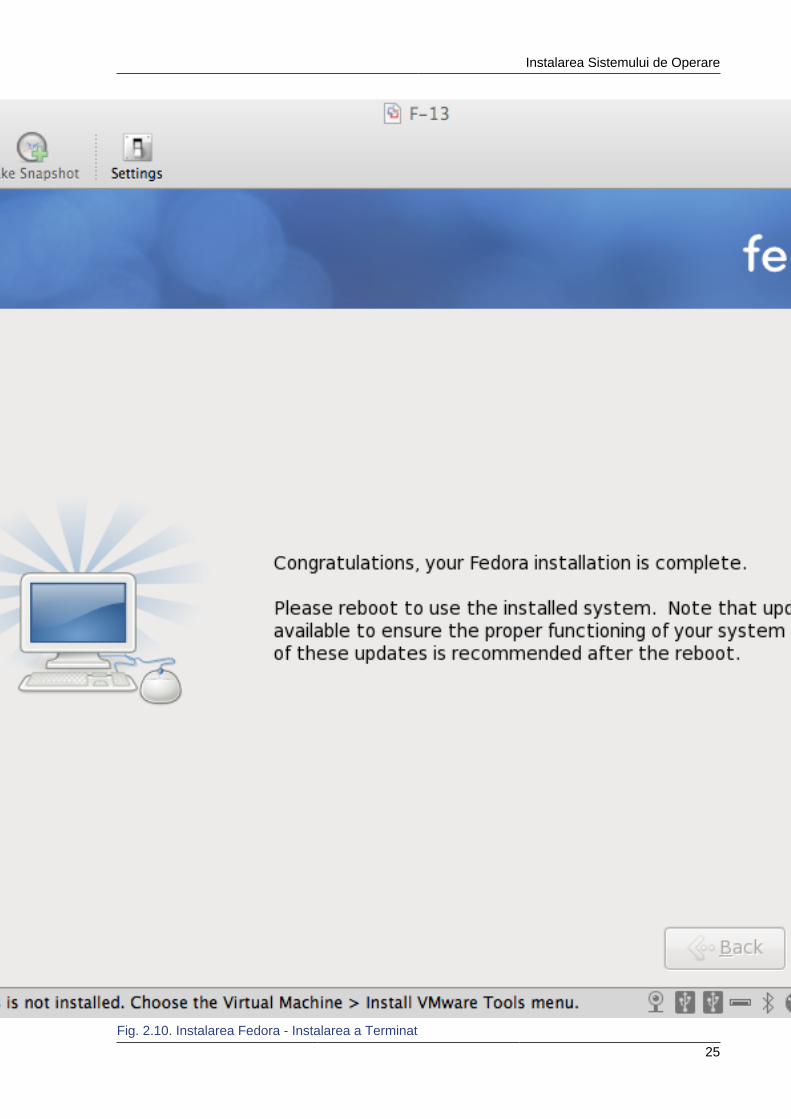
Fig. 2.10. Instalarea Fedora - Instalarea a Terminat

Cap. 2. Instalare
26
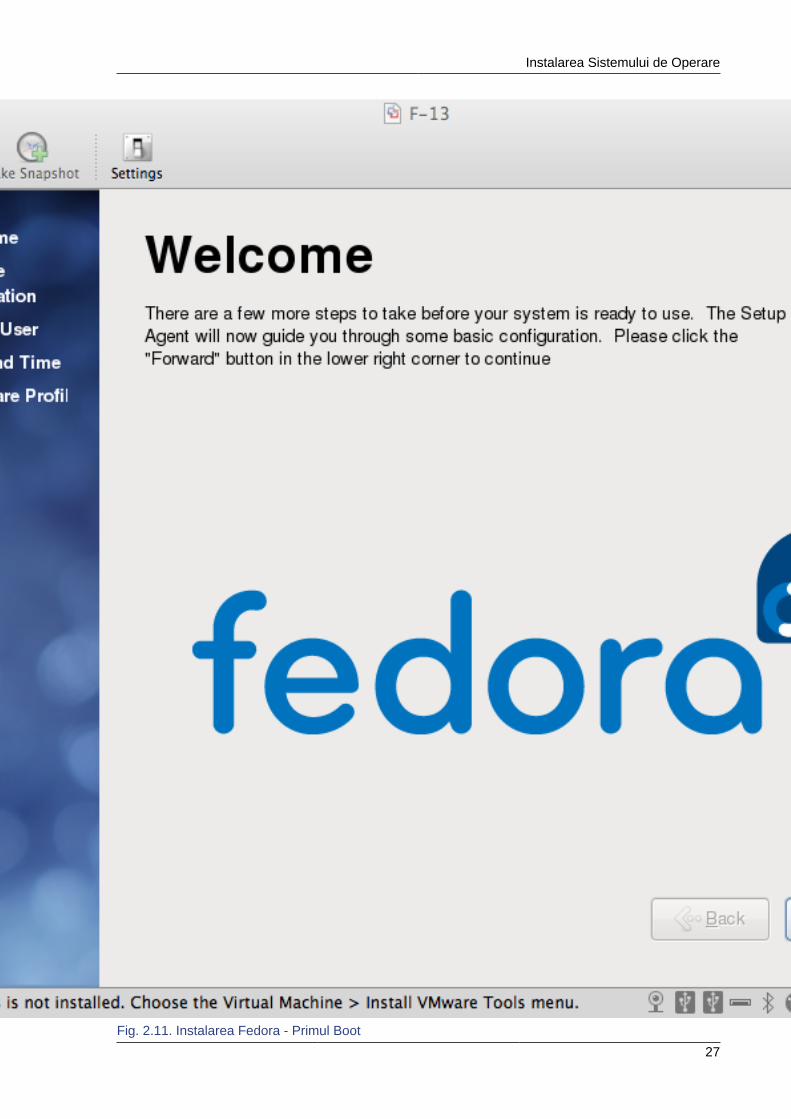
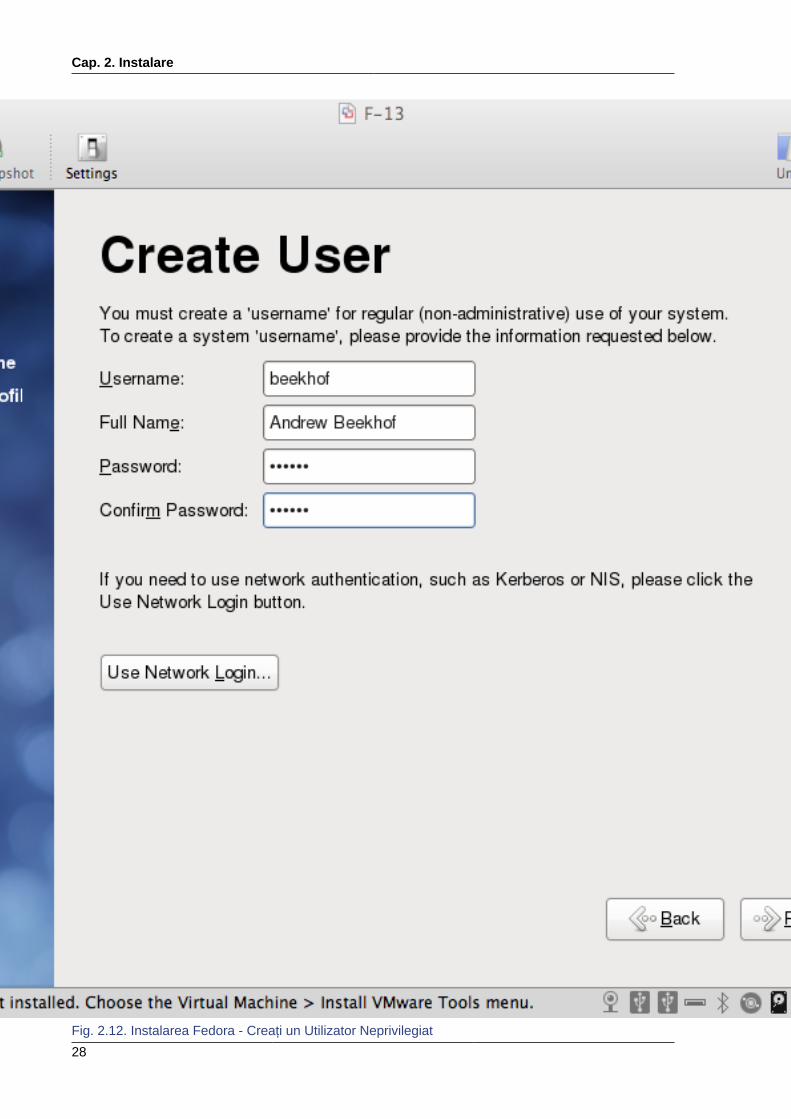
Once the node reboots, follow the on screen instructions 6 to create a system user and configure thetime.
6 http://docs.fedoraproject.org/install-guide/f13/en-US/html/ch-firstboot.html
Instalarea Sistemului de Operare
27
Fig. 2.11. Instalarea Fedora - Primul Boot
Cap. 2. Instalare
28
Fig. 2.12. Instalarea Fedora - Creați un Utilizator Neprivilegiat

Instalarea Sistemului de Operare
29
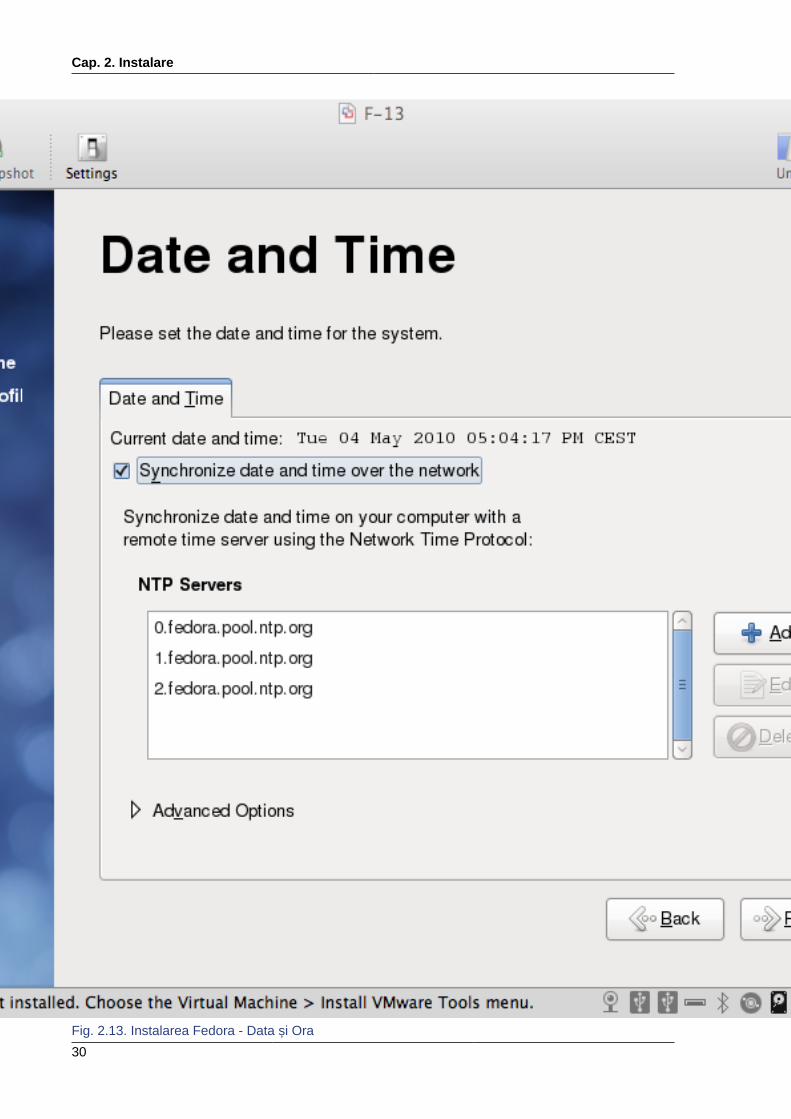
Notă
It is highly recommended to enable NTP on your cluster nodes. Doing so ensures all nodes agreeon the current time and makes reading log files significantly easier. Fedora Installation - Date andTimeFedora Installation: Enable NTP to keep the times on all your nodes consistent
Cap. 2. Instalare
30
Fig. 2.13. Instalarea Fedora - Data și Ora

Instalarea Sistemului de Operare
31
Selectați cu mouse-ul prin următorul ecran până ajungeți la fereastra de login. Selectați utilizatorul pecare l-ați creat și furnizați parola pe care ați ales-o mai devreme.
Cap. 2. Instalare
32
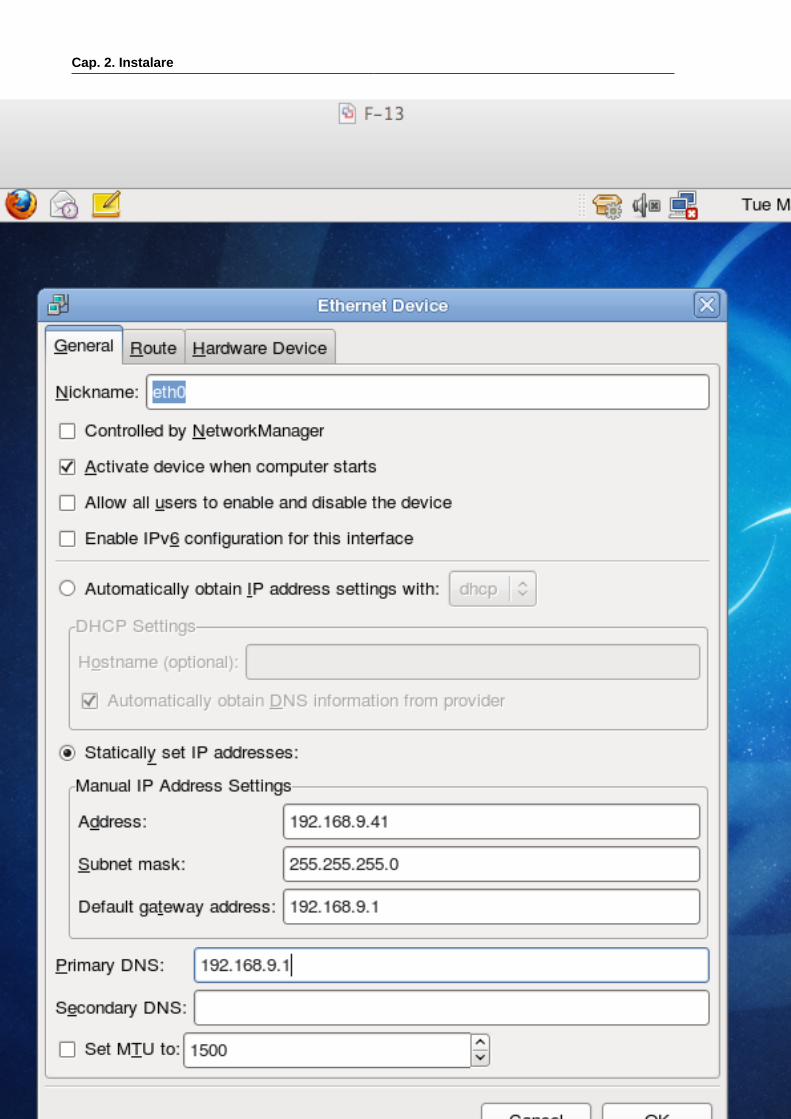
Fig. 2.14. Instalarea Fedora - Personalizați Rețeaua

Instalarea Sistemului de Operare
33
Important
Do not accept the default network settings. Cluster machines should never obtain an ip addressvia DHCP. Here I will use the internal addresses for the clusterlab.org network.
Cap. 2. Instalare
34
Fig. 2.15. Instalarea Fedora - Specificați Preferințele de Rețea
Instalarea Sistemului de Operare
35
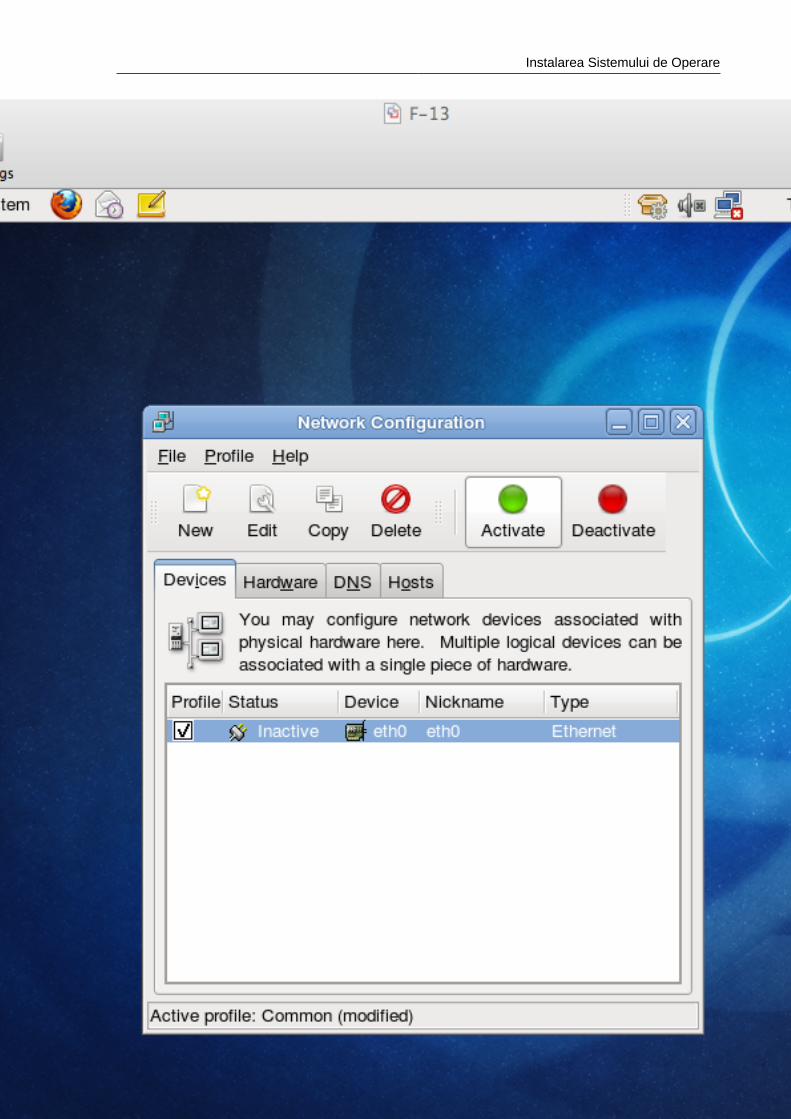
Fig. 2.16. Instalarea Fedora - Activați Rețeaua
Cap. 2. Instalare
36
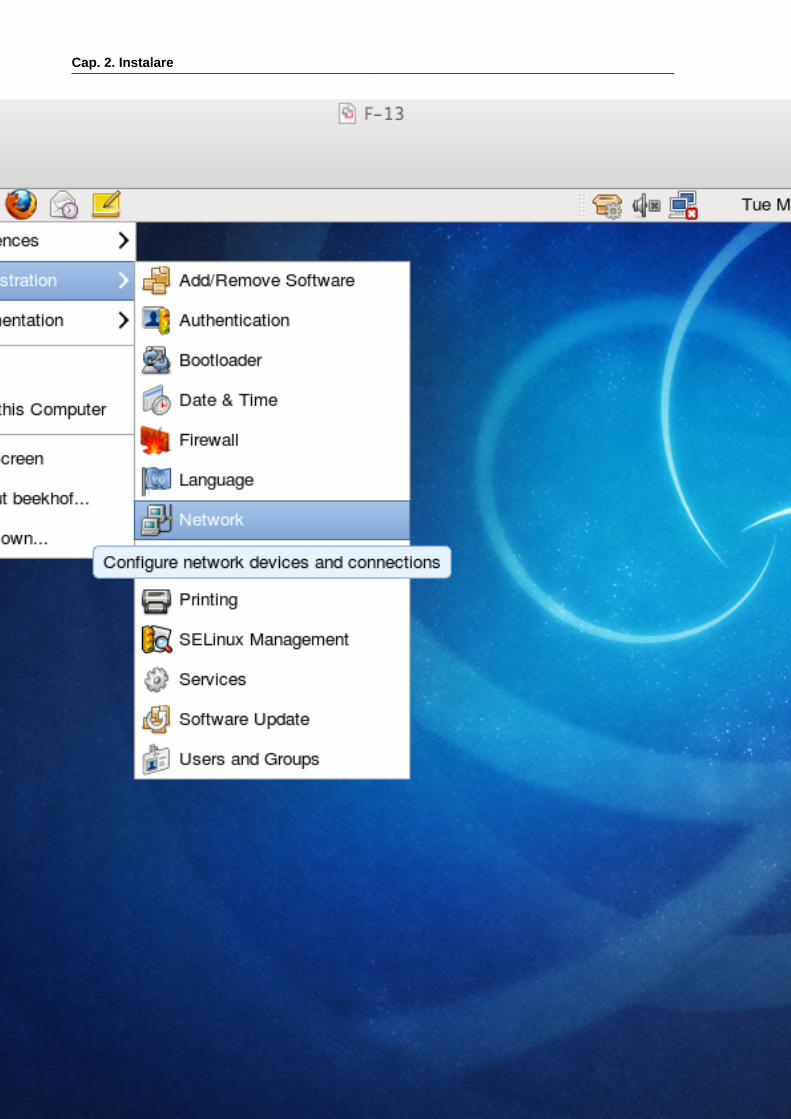
Fig. 2.17. Instalarea Fedora - Porniți Terminalul
Instalarea Software-ului de Cluster
37
Notă
Aceea a fost ultima captură de ecran, de aici înainte vom lucra de la terminal.
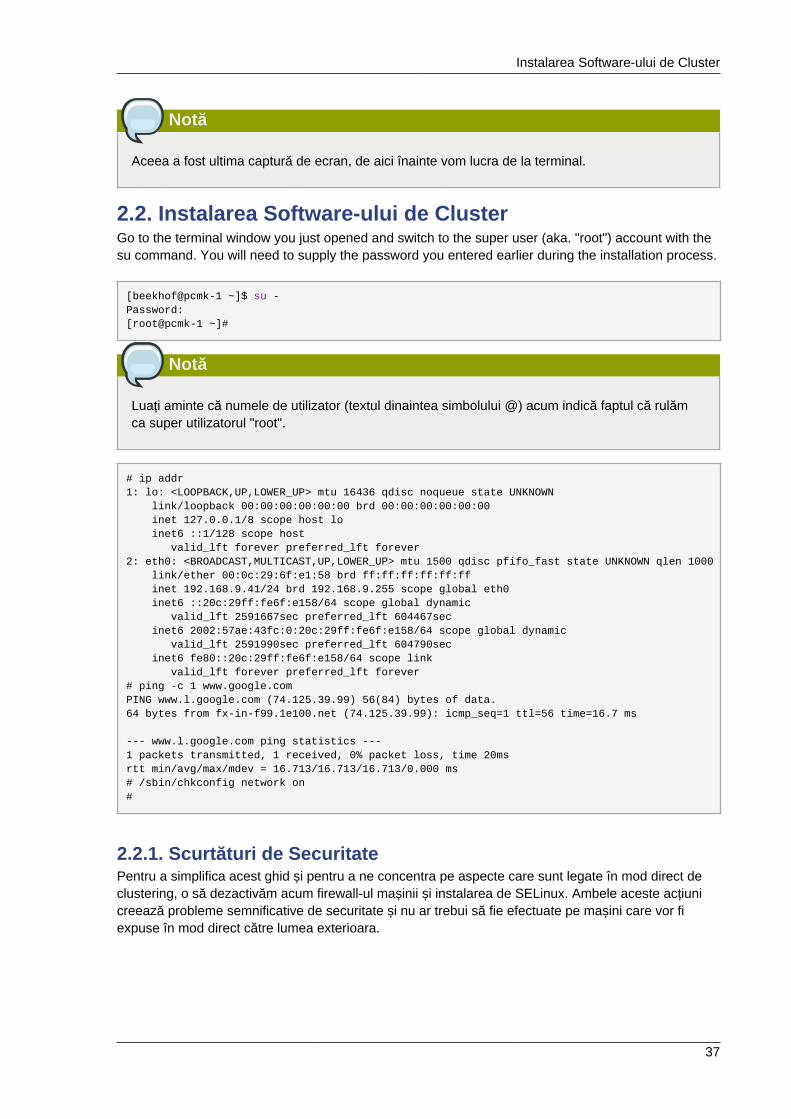
2.2. Instalarea Software-ului de ClusterGo to the terminal window you just opened and switch to the super user (aka. "root") account with thesu command. You will need to supply the password you entered earlier during the installation process.
[beekhof@pcmk-1 ~]$ su -Password:[root@pcmk-1 ~]#
Notă
Luați aminte că numele de utilizator (textul dinaintea simbolului @) acum indică faptul că rulămca super utilizatorul "root".
# ip addr1: lo: <LOOPBACK,UP,LOWER_UP> mtu 16436 qdisc noqueue state UNKNOWN link/loopback 00:00:00:00:00:00 brd 00:00:00:00:00:00 inet 127.0.0.1/8 scope host lo inet6 ::1/128 scope host valid_lft forever preferred_lft forever2: eth0: <BROADCAST,MULTICAST,UP,LOWER_UP> mtu 1500 qdisc pfifo_fast state UNKNOWN qlen 1000 link/ether 00:0c:29:6f:e1:58 brd ff:ff:ff:ff:ff:ff inet 192.168.9.41/24 brd 192.168.9.255 scope global eth0 inet6 ::20c:29ff:fe6f:e158/64 scope global dynamic valid_lft 2591667sec preferred_lft 604467sec inet6 2002:57ae:43fc:0:20c:29ff:fe6f:e158/64 scope global dynamic valid_lft 2591990sec preferred_lft 604790sec inet6 fe80::20c:29ff:fe6f:e158/64 scope link valid_lft forever preferred_lft forever# ping -c 1 www.google.comPING www.l.google.com (74.125.39.99) 56(84) bytes of data.64 bytes from fx-in-f99.1e100.net (74.125.39.99): icmp_seq=1 ttl=56 time=16.7 ms
--- www.l.google.com ping statistics ---1 packets transmitted, 1 received, 0% packet loss, time 20msrtt min/avg/max/mdev = 16.713/16.713/16.713/0.000 ms# /sbin/chkconfig network on#
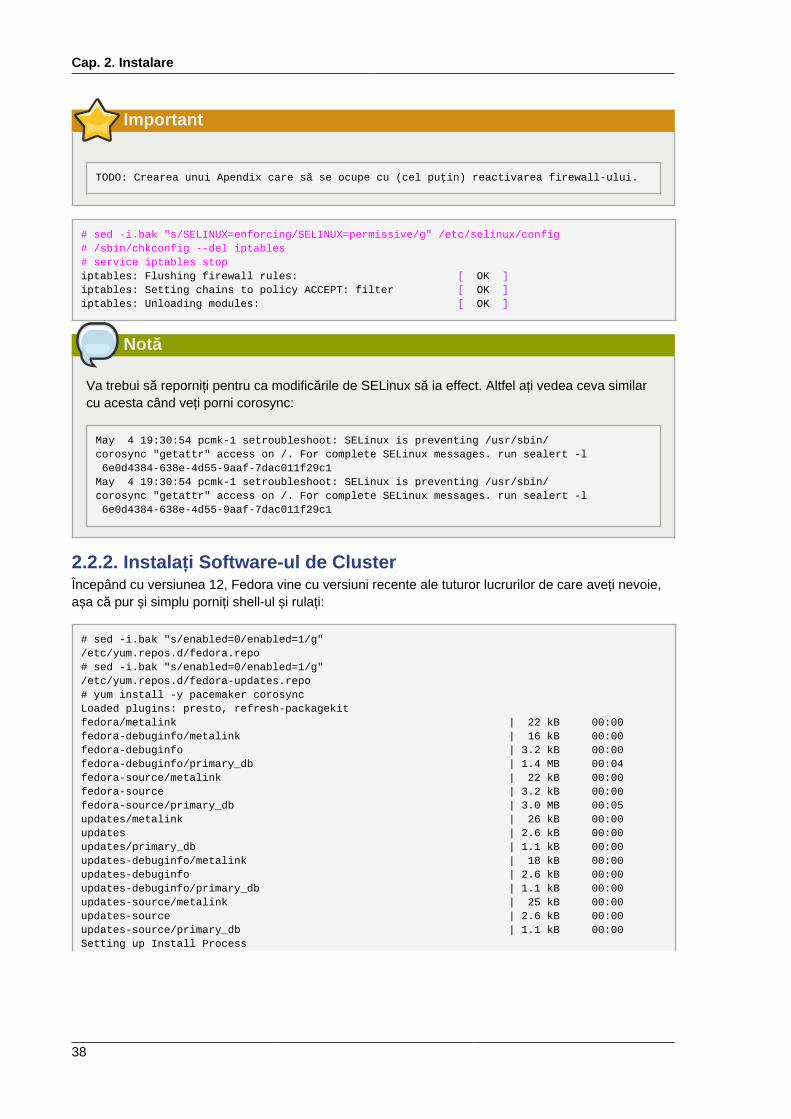
2.2.1. Scurtături de SecuritatePentru a simplifica acest ghid și pentru a ne concentra pe aspecte care sunt legate în mod direct declustering, o să dezactivăm acum firewall-ul mașinii și instalarea de SELinux. Ambele aceste acțiunicreează probleme semnificative de securitate și nu ar trebui să fie efectuate pe mașini care vor fiexpuse în mod direct către lumea exterioara.
Cap. 2. Instalare
38
Important
TODO: Crearea unui Apendix care să se ocupe cu (cel puțin) reactivarea firewall-ului.
# sed -i.bak "s/SELINUX=enforcing/SELINUX=permissive/g" /etc/selinux/config# /sbin/chkconfig --del iptables# service iptables stopiptables: Flushing firewall rules: [ OK ]iptables: Setting chains to policy ACCEPT: filter [ OK ]iptables: Unloading modules: [ OK ]
Notă
Va trebui să reporniți pentru ca modificările de SELinux să ia effect. Altfel ați vedea ceva similarcu acesta când veți porni corosync:
May 4 19:30:54 pcmk-1 setroubleshoot: SELinux is preventing /usr/sbin/corosync "getattr" access on /. For complete SELinux messages. run sealert -l 6e0d4384-638e-4d55-9aaf-7dac011f29c1May 4 19:30:54 pcmk-1 setroubleshoot: SELinux is preventing /usr/sbin/corosync "getattr" access on /. For complete SELinux messages. run sealert -l 6e0d4384-638e-4d55-9aaf-7dac011f29c1
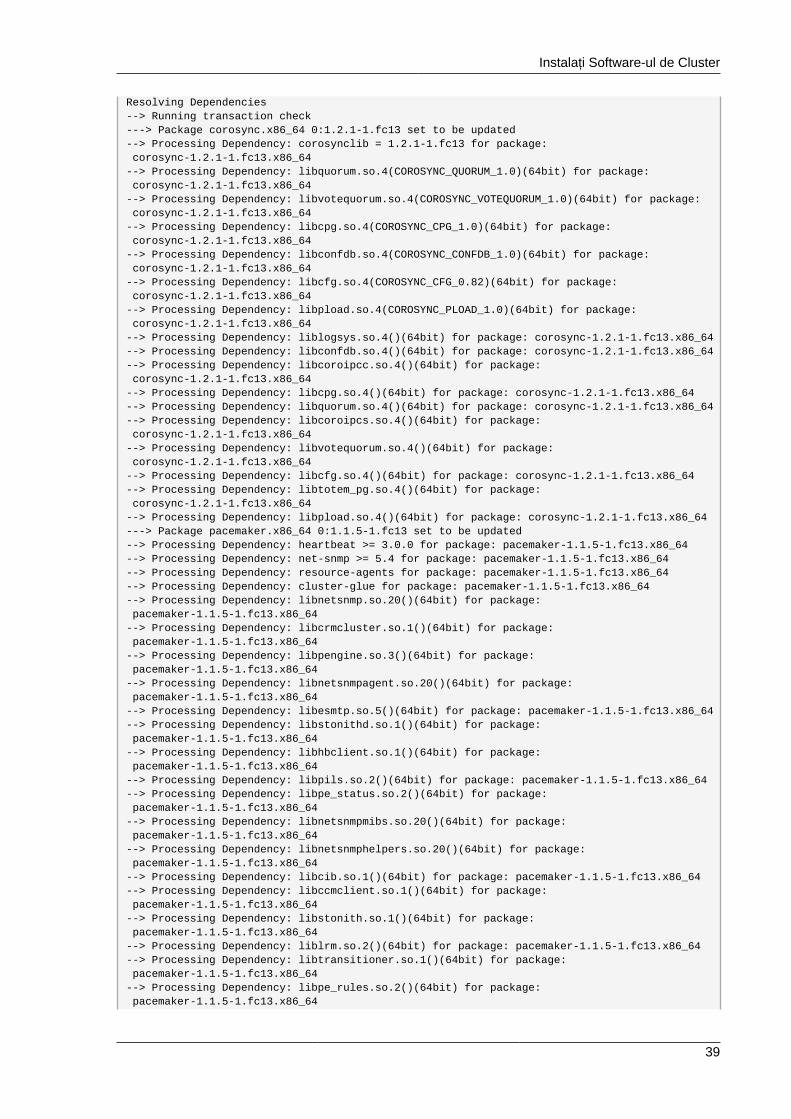
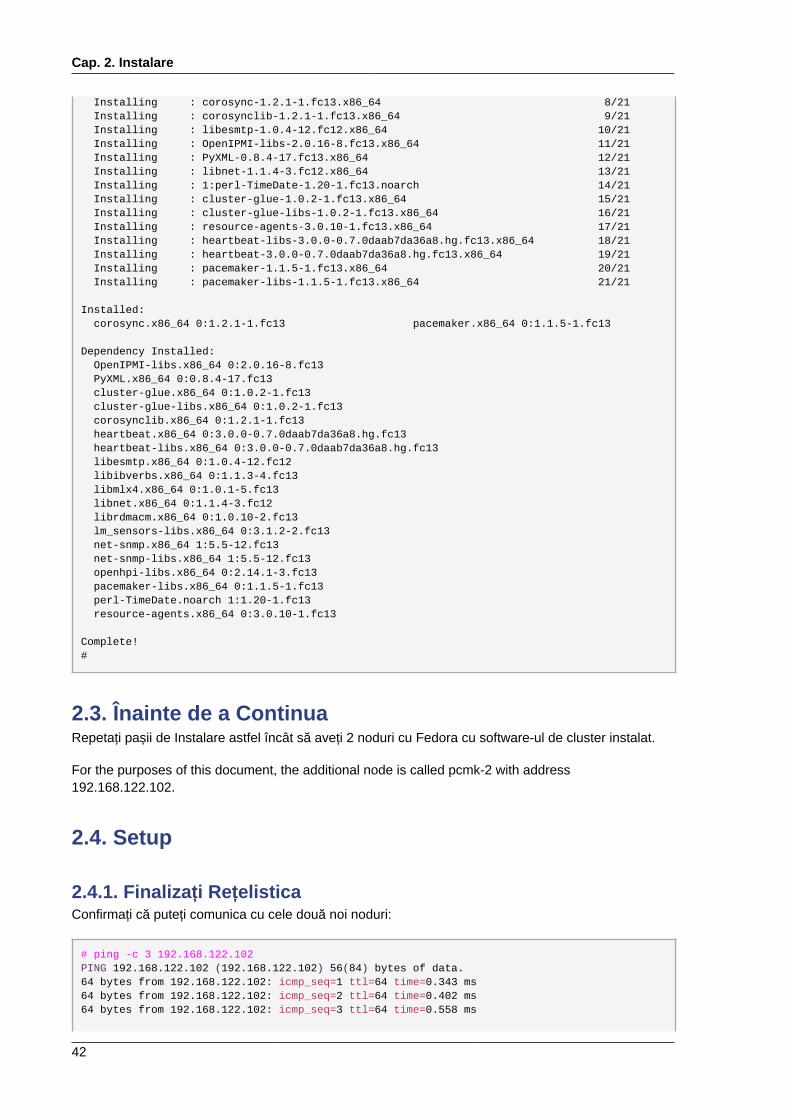
2.2.2. Instalați Software-ul de ClusterÎncepând cu versiunea 12, Fedora vine cu versiuni recente ale tuturor lucrurilor de care aveți nevoie,așa că pur și simplu porniți shell-ul și rulați:
# sed -i.bak "s/enabled=0/enabled=1/g"/etc/yum.repos.d/fedora.repo# sed -i.bak "s/enabled=0/enabled=1/g"/etc/yum.repos.d/fedora-updates.repo# yum install -y pacemaker corosyncLoaded plugins: presto, refresh-packagekitfedora/metalink | 22 kB 00:00fedora-debuginfo/metalink | 16 kB 00:00fedora-debuginfo | 3.2 kB 00:00fedora-debuginfo/primary_db | 1.4 MB 00:04fedora-source/metalink | 22 kB 00:00fedora-source | 3.2 kB 00:00fedora-source/primary_db | 3.0 MB 00:05updates/metalink | 26 kB 00:00updates | 2.6 kB 00:00updates/primary_db | 1.1 kB 00:00updates-debuginfo/metalink | 18 kB 00:00updates-debuginfo | 2.6 kB 00:00updates-debuginfo/primary_db | 1.1 kB 00:00updates-source/metalink | 25 kB 00:00updates-source | 2.6 kB 00:00updates-source/primary_db | 1.1 kB 00:00Setting up Install Process
Instalați Software-ul de Cluster
39
Resolving Dependencies--> Running transaction check---> Package corosync.x86_64 0:1.2.1-1.fc13 set to be updated--> Processing Dependency: corosynclib = 1.2.1-1.fc13 for package: corosync-1.2.1-1.fc13.x86_64--> Processing Dependency: libquorum.so.4(COROSYNC_QUORUM_1.0)(64bit) for package: corosync-1.2.1-1.fc13.x86_64--> Processing Dependency: libvotequorum.so.4(COROSYNC_VOTEQUORUM_1.0)(64bit) for package: corosync-1.2.1-1.fc13.x86_64--> Processing Dependency: libcpg.so.4(COROSYNC_CPG_1.0)(64bit) for package: corosync-1.2.1-1.fc13.x86_64--> Processing Dependency: libconfdb.so.4(COROSYNC_CONFDB_1.0)(64bit) for package: corosync-1.2.1-1.fc13.x86_64--> Processing Dependency: libcfg.so.4(COROSYNC_CFG_0.82)(64bit) for package: corosync-1.2.1-1.fc13.x86_64--> Processing Dependency: libpload.so.4(COROSYNC_PLOAD_1.0)(64bit) for package: corosync-1.2.1-1.fc13.x86_64--> Processing Dependency: liblogsys.so.4()(64bit) for package: corosync-1.2.1-1.fc13.x86_64--> Processing Dependency: libconfdb.so.4()(64bit) for package: corosync-1.2.1-1.fc13.x86_64--> Processing Dependency: libcoroipcc.so.4()(64bit) for package: corosync-1.2.1-1.fc13.x86_64--> Processing Dependency: libcpg.so.4()(64bit) for package: corosync-1.2.1-1.fc13.x86_64--> Processing Dependency: libquorum.so.4()(64bit) for package: corosync-1.2.1-1.fc13.x86_64--> Processing Dependency: libcoroipcs.so.4()(64bit) for package: corosync-1.2.1-1.fc13.x86_64--> Processing Dependency: libvotequorum.so.4()(64bit) for package: corosync-1.2.1-1.fc13.x86_64--> Processing Dependency: libcfg.so.4()(64bit) for package: corosync-1.2.1-1.fc13.x86_64--> Processing Dependency: libtotem_pg.so.4()(64bit) for package: corosync-1.2.1-1.fc13.x86_64--> Processing Dependency: libpload.so.4()(64bit) for package: corosync-1.2.1-1.fc13.x86_64---> Package pacemaker.x86_64 0:1.1.5-1.fc13 set to be updated--> Processing Dependency: heartbeat >= 3.0.0 for package: pacemaker-1.1.5-1.fc13.x86_64--> Processing Dependency: net-snmp >= 5.4 for package: pacemaker-1.1.5-1.fc13.x86_64--> Processing Dependency: resource-agents for package: pacemaker-1.1.5-1.fc13.x86_64--> Processing Dependency: cluster-glue for package: pacemaker-1.1.5-1.fc13.x86_64--> Processing Dependency: libnetsnmp.so.20()(64bit) for package: pacemaker-1.1.5-1.fc13.x86_64--> Processing Dependency: libcrmcluster.so.1()(64bit) for package: pacemaker-1.1.5-1.fc13.x86_64--> Processing Dependency: libpengine.so.3()(64bit) for package: pacemaker-1.1.5-1.fc13.x86_64--> Processing Dependency: libnetsnmpagent.so.20()(64bit) for package: pacemaker-1.1.5-1.fc13.x86_64--> Processing Dependency: libesmtp.so.5()(64bit) for package: pacemaker-1.1.5-1.fc13.x86_64--> Processing Dependency: libstonithd.so.1()(64bit) for package: pacemaker-1.1.5-1.fc13.x86_64--> Processing Dependency: libhbclient.so.1()(64bit) for package: pacemaker-1.1.5-1.fc13.x86_64--> Processing Dependency: libpils.so.2()(64bit) for package: pacemaker-1.1.5-1.fc13.x86_64--> Processing Dependency: libpe_status.so.2()(64bit) for package: pacemaker-1.1.5-1.fc13.x86_64--> Processing Dependency: libnetsnmpmibs.so.20()(64bit) for package: pacemaker-1.1.5-1.fc13.x86_64--> Processing Dependency: libnetsnmphelpers.so.20()(64bit) for package: pacemaker-1.1.5-1.fc13.x86_64--> Processing Dependency: libcib.so.1()(64bit) for package: pacemaker-1.1.5-1.fc13.x86_64--> Processing Dependency: libccmclient.so.1()(64bit) for package: pacemaker-1.1.5-1.fc13.x86_64--> Processing Dependency: libstonith.so.1()(64bit) for package: pacemaker-1.1.5-1.fc13.x86_64--> Processing Dependency: liblrm.so.2()(64bit) for package: pacemaker-1.1.5-1.fc13.x86_64--> Processing Dependency: libtransitioner.so.1()(64bit) for package: pacemaker-1.1.5-1.fc13.x86_64--> Processing Dependency: libpe_rules.so.2()(64bit) for package: pacemaker-1.1.5-1.fc13.x86_64

Cap. 2. Instalare
40
--> Processing Dependency: libcrmcommon.so.2()(64bit) for package: pacemaker-1.1.5-1.fc13.x86_64--> Processing Dependency: libplumb.so.2()(64bit) for package: pacemaker-1.1.5-1.fc13.x86_64--> Running transaction check---> Package cluster-glue.x86_64 0:1.0.2-1.fc13 set to be updated--> Processing Dependency: perl-TimeDate for package: cluster-glue-1.0.2-1.fc13.x86_64--> Processing Dependency: libOpenIPMIutils.so.0()(64bit) for package: cluster-glue-1.0.2-1.fc13.x86_64--> Processing Dependency: libOpenIPMIposix.so.0()(64bit) for package: cluster-glue-1.0.2-1.fc13.x86_64--> Processing Dependency: libopenhpi.so.2()(64bit) for package: cluster-glue-1.0.2-1.fc13.x86_64--> Processing Dependency: libOpenIPMI.so.0()(64bit) for package: cluster-glue-1.0.2-1.fc13.x86_64---> Package cluster-glue-libs.x86_64 0:1.0.2-1.fc13 set to be updated---> Package corosynclib.x86_64 0:1.2.1-1.fc13 set to be updated--> Processing Dependency: librdmacm.so.1(RDMACM_1.0)(64bit) for package: corosynclib-1.2.1-1.fc13.x86_64--> Processing Dependency: libibverbs.so.1(IBVERBS_1.0)(64bit) for package: corosynclib-1.2.1-1.fc13.x86_64--> Processing Dependency: libibverbs.so.1(IBVERBS_1.1)(64bit) for package: corosynclib-1.2.1-1.fc13.x86_64--> Processing Dependency: libibverbs.so.1()(64bit) for package: corosynclib-1.2.1-1.fc13.x86_64--> Processing Dependency: librdmacm.so.1()(64bit) for package: corosynclib-1.2.1-1.fc13.x86_64---> Package heartbeat.x86_64 0:3.0.0-0.7.0daab7da36a8.hg.fc13 set to be updated--> Processing Dependency: PyXML for package: heartbeat-3.0.0-0.7.0daab7da36a8.hg.fc13.x86_64---> Package heartbeat-libs.x86_64 0:3.0.0-0.7.0daab7da36a8.hg.fc13 set to be updated---> Package libesmtp.x86_64 0:1.0.4-12.fc12 set to be updated---> Package net-snmp.x86_64 1:5.5-12.fc13 set to be updated--> Processing Dependency: libsensors.so.4()(64bit) for package: 1:net-snmp-5.5-12.fc13.x86_64---> Package net-snmp-libs.x86_64 1:5.5-12.fc13 set to be updated---> Package pacemaker-libs.x86_64 0:1.1.5-1.fc13 set to be updated---> Package resource-agents.x86_64 0:3.0.10-1.fc13 set to be updated--> Processing Dependency: libnet.so.1()(64bit) for package: resource-agents-3.0.10-1.fc13.x86_64--> Running transaction check---> Package OpenIPMI-libs.x86_64 0:2.0.16-8.fc13 set to be updated---> Package PyXML.x86_64 0:0.8.4-17.fc13 set to be updated---> Package libibverbs.x86_64 0:1.1.3-4.fc13 set to be updated--> Processing Dependency: libibverbs-driver for package: libibverbs-1.1.3-4.fc13.x86_64---> Package libnet.x86_64 0:1.1.4-3.fc12 set to be updated---> Package librdmacm.x86_64 0:1.0.10-2.fc13 set to be updated---> Package lm_sensors-libs.x86_64 0:3.1.2-2.fc13 set to be updated---> Package openhpi-libs.x86_64 0:2.14.1-3.fc13 set to be updated---> Package perl-TimeDate.noarch 1:1.20-1.fc13 set to be updated--> Running transaction check---> Package libmlx4.x86_64 0:1.0.1-5.fc13 set to be updated--> Finished Dependency Resolution
Dependencies Resolved
========================================================================================== Package Arch Version Repository Size==========================================================================================Installing: corosync x86_64 1.2.1-1.fc13 fedora 136 k pacemaker x86_64 1.1.5-1.fc13 fedora 543 kInstalling for dependencies: OpenIPMI-libs x86_64 2.0.16-8.fc13 fedora 474 k PyXML x86_64 0.8.4-17.fc13 fedora 906 k cluster-glue x86_64 1.0.2-1.fc13 fedora 230 k cluster-glue-libs x86_64 1.0.2-1.fc13 fedora 116 k corosynclib x86_64 1.2.1-1.fc13 fedora 145 k

Instalați Software-ul de Cluster
41
heartbeat x86_64 3.0.0-0.7.0daab7da36a8.hg.fc13 updates 172 k heartbeat-libs x86_64 3.0.0-0.7.0daab7da36a8.hg.fc13 updates 265 k libesmtp x86_64 1.0.4-12.fc12 fedora 54 k libibverbs x86_64 1.1.3-4.fc13 fedora 42 k libmlx4 x86_64 1.0.1-5.fc13 fedora 27 k libnet x86_64 1.1.4-3.fc12 fedora 49 k librdmacm x86_64 1.0.10-2.fc13 fedora 22 k lm_sensors-libs x86_64 3.1.2-2.fc13 fedora 37 k net-snmp x86_64 1:5.5-12.fc13 fedora 295 k net-snmp-libs x86_64 1:5.5-12.fc13 fedora 1.5 M openhpi-libs x86_64 2.14.1-3.fc13 fedora 135 k pacemaker-libs x86_64 1.1.5-1.fc13 fedora 264 k perl-TimeDate noarch 1:1.20-1.fc13 fedora 42 k resource-agents x86_64 3.0.10-1.fc13 fedora 357 k
Transaction Summary=========================================================================================Install 21 Package(s)Upgrade 0 Package(s)
Total download size: 5.7 MInstalled size: 20 MDownloading Packages:Setting up and reading Presto delta metadataupdates-testing/prestodelta | 164 kB 00:00fedora/prestodelta | 150 B 00:00Processing delta metadataPackage(s) data still to download: 5.7 M(1/21): OpenIPMI-libs-2.0.16-8.fc13.x86_64.rpm | 474 kB 00:00(2/21): PyXML-0.8.4-17.fc13.x86_64.rpm | 906 kB 00:01(3/21): cluster-glue-1.0.2-1.fc13.x86_64.rpm | 230 kB 00:00(4/21): cluster-glue-libs-1.0.2-1.fc13.x86_64.rpm | 116 kB 00:00(5/21): corosync-1.2.1-1.fc13.x86_64.rpm | 136 kB 00:00(6/21): corosynclib-1.2.1-1.fc13.x86_64.rpm | 145 kB 00:00(7/21): heartbeat-3.0.0-0.7.0daab7da36a8.hg.fc13.x86_64.rpm | 172 kB 00:00(8/21): heartbeat-libs-3.0.0-0.7.0daab7da36a8.hg.fc13.x86_64.rpm | 265 kB 00:00(9/21): libesmtp-1.0.4-12.fc12.x86_64.rpm | 54 kB 00:00(10/21): libibverbs-1.1.3-4.fc13.x86_64.rpm | 42 kB 00:00(11/21): libmlx4-1.0.1-5.fc13.x86_64.rpm | 27 kB 00:00(12/21): libnet-1.1.4-3.fc12.x86_64.rpm | 49 kB 00:00(13/21): librdmacm-1.0.10-2.fc13.x86_64.rpm | 22 kB 00:00(14/21): lm_sensors-libs-3.1.2-2.fc13.x86_64.rpm | 37 kB 00:00(15/21): net-snmp-5.5-12.fc13.x86_64.rpm | 295 kB 00:00(16/21): net-snmp-libs-5.5-12.fc13.x86_64.rpm | 1.5 MB 00:01(17/21): openhpi-libs-2.14.1-3.fc13.x86_64.rpm | 135 kB 00:00(18/21): pacemaker-1.1.5-1.fc13.x86_64.rpm | 543 kB 00:00(19/21): pacemaker-libs-1.1.5-1.fc13.x86_64.rpm | 264 kB 00:00(20/21): perl-TimeDate-1.20-1.fc13.noarch.rpm | 42 kB 00:00(21/21): resource-agents-3.0.10-1.fc13.x86_64.rpm | 357 kB 00:00
Total 539 kB/s | 5.7 MB 00:10warning: rpmts_HdrFromFdno: Header V3 RSA/SHA256 Signature, key ID e8e40fde: NOKEYfedora/gpgkey | 3.2 kB 00:00 ...Importing GPG key 0xE8E40FDE "Fedora (13) <[email protected]%gt;" from /etc/pki/rpm-gpg/RPM-GPG-KEY-fedora-x86_64
Running rpm_check_debugRunning Transaction TestTransaction Test SucceededRunning Transaction Installing : lm_sensors-libs-3.1.2-2.fc13.x86_64 1/21 Installing : 1:net-snmp-libs-5.5-12.fc13.x86_64 2/21 Installing : 1:net-snmp-5.5-12.fc13.x86_64 3/21 Installing : openhpi-libs-2.14.1-3.fc13.x86_64 4/21 Installing : libibverbs-1.1.3-4.fc13.x86_64 5/21 Installing : libmlx4-1.0.1-5.fc13.x86_64 6/21 Installing : librdmacm-1.0.10-2.fc13.x86_64 7/21
Cap. 2. Instalare
42
Installing : corosync-1.2.1-1.fc13.x86_64 8/21 Installing : corosynclib-1.2.1-1.fc13.x86_64 9/21 Installing : libesmtp-1.0.4-12.fc12.x86_64 10/21 Installing : OpenIPMI-libs-2.0.16-8.fc13.x86_64 11/21 Installing : PyXML-0.8.4-17.fc13.x86_64 12/21 Installing : libnet-1.1.4-3.fc12.x86_64 13/21 Installing : 1:perl-TimeDate-1.20-1.fc13.noarch 14/21 Installing : cluster-glue-1.0.2-1.fc13.x86_64 15/21 Installing : cluster-glue-libs-1.0.2-1.fc13.x86_64 16/21 Installing : resource-agents-3.0.10-1.fc13.x86_64 17/21 Installing : heartbeat-libs-3.0.0-0.7.0daab7da36a8.hg.fc13.x86_64 18/21 Installing : heartbeat-3.0.0-0.7.0daab7da36a8.hg.fc13.x86_64 19/21 Installing : pacemaker-1.1.5-1.fc13.x86_64 20/21 Installing : pacemaker-libs-1.1.5-1.fc13.x86_64 21/21
Installed: corosync.x86_64 0:1.2.1-1.fc13 pacemaker.x86_64 0:1.1.5-1.fc13
Dependency Installed: OpenIPMI-libs.x86_64 0:2.0.16-8.fc13 PyXML.x86_64 0:0.8.4-17.fc13 cluster-glue.x86_64 0:1.0.2-1.fc13 cluster-glue-libs.x86_64 0:1.0.2-1.fc13 corosynclib.x86_64 0:1.2.1-1.fc13 heartbeat.x86_64 0:3.0.0-0.7.0daab7da36a8.hg.fc13 heartbeat-libs.x86_64 0:3.0.0-0.7.0daab7da36a8.hg.fc13 libesmtp.x86_64 0:1.0.4-12.fc12 libibverbs.x86_64 0:1.1.3-4.fc13 libmlx4.x86_64 0:1.0.1-5.fc13 libnet.x86_64 0:1.1.4-3.fc12 librdmacm.x86_64 0:1.0.10-2.fc13 lm_sensors-libs.x86_64 0:3.1.2-2.fc13 net-snmp.x86_64 1:5.5-12.fc13 net-snmp-libs.x86_64 1:5.5-12.fc13 openhpi-libs.x86_64 0:2.14.1-3.fc13 pacemaker-libs.x86_64 0:1.1.5-1.fc13 perl-TimeDate.noarch 1:1.20-1.fc13 resource-agents.x86_64 0:3.0.10-1.fc13
Complete!#
2.3. Înainte de a ContinuaRepetați pașii de Instalare astfel încât să aveți 2 noduri cu Fedora cu software-ul de cluster instalat.
For the purposes of this document, the additional node is called pcmk-2 with address192.168.122.102.
2.4. Setup
2.4.1. Finalizați RețelisticaConfirmați că puteți comunica cu cele două noi noduri:
# ping -c 3 192.168.122.102PING 192.168.122.102 (192.168.122.102) 56(84) bytes of data.64 bytes from 192.168.122.102: icmp_seq=1 ttl=64 time=0.343 ms64 bytes from 192.168.122.102: icmp_seq=2 ttl=64 time=0.402 ms64 bytes from 192.168.122.102: icmp_seq=3 ttl=64 time=0.558 ms
Configurați SSH
43
--- 192.168.122.102 ping statistics ---3 packets transmitted, 3 received, 0% packet loss, time 2000msrtt min/avg/max/mdev = 0.343/0.434/0.558/0.092 ms
Figure 2.18. Verify Connectivity by IP address
Acum trebuie să ne asigurăm că putem comunica cu mașinile după numele acestora. Dacă aveți unserver DNS, adăugați intrări adiționale pentru cele două mașini. În caz contrar, va trebui să adăugațimașinile în /etc/hosts. Mai jos sunt intrările pentru nodurile mele de cluster:
# grep pcmk /etc/hosts192.168.122.101 pcmk-1.clusterlabs.org pcmk-1192.168.122.102 pcmk-2.clusterlabs.org pcmk-2
Figure 2.19. Set up /etc/hosts entries
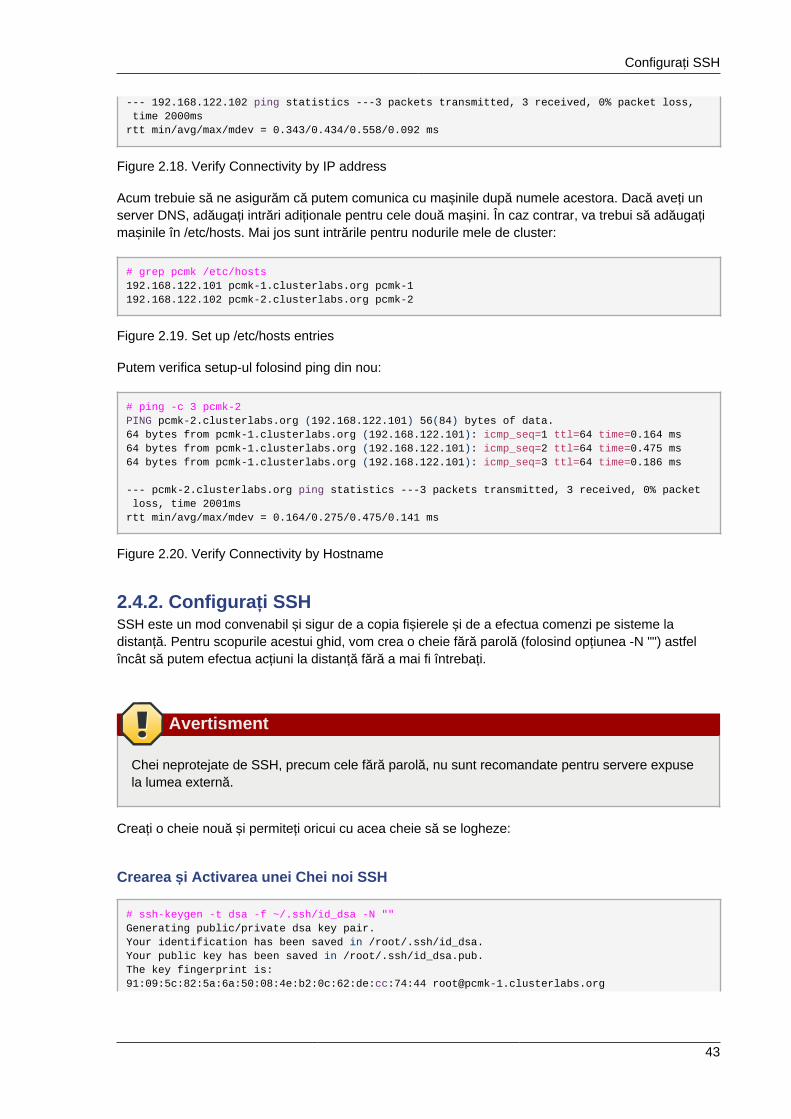
Putem verifica setup-ul folosind ping din nou:
# ping -c 3 pcmk-2PING pcmk-2.clusterlabs.org (192.168.122.101) 56(84) bytes of data.64 bytes from pcmk-1.clusterlabs.org (192.168.122.101): icmp_seq=1 ttl=64 time=0.164 ms64 bytes from pcmk-1.clusterlabs.org (192.168.122.101): icmp_seq=2 ttl=64 time=0.475 ms64 bytes from pcmk-1.clusterlabs.org (192.168.122.101): icmp_seq=3 ttl=64 time=0.186 ms
--- pcmk-2.clusterlabs.org ping statistics ---3 packets transmitted, 3 received, 0% packet loss, time 2001msrtt min/avg/max/mdev = 0.164/0.275/0.475/0.141 ms
Figure 2.20. Verify Connectivity by Hostname
2.4.2. Configurați SSHSSH este un mod convenabil și sigur de a copia fișierele și de a efectua comenzi pe sisteme ladistanță. Pentru scopurile acestui ghid, vom crea o cheie fără parolă (folosind opțiunea -N "") astfelîncât să putem efectua acțiuni la distanță fără a mai fi întrebați.
Avertisment
Chei neprotejate de SSH, precum cele fără parolă, nu sunt recomandate pentru servere expusela lumea externă.
Creați o cheie nouă și permiteți oricui cu acea cheie să se logheze:
Crearea și Activarea unei Chei noi SSH
# ssh-keygen -t dsa -f ~/.ssh/id_dsa -N ""Generating public/private dsa key pair.Your identification has been saved in /root/.ssh/id_dsa.Your public key has been saved in /root/.ssh/id_dsa.pub.The key fingerprint is:91:09:5c:82:5a:6a:50:08:4e:b2:0c:62:de:cc:74:44 [email protected]
Cap. 2. Instalare
44
The key's randomart image is:+--[ DSA 1024]----+|==.ooEo.. ||X O + .o o || * A + || + . || . S || || || || |+-----------------+
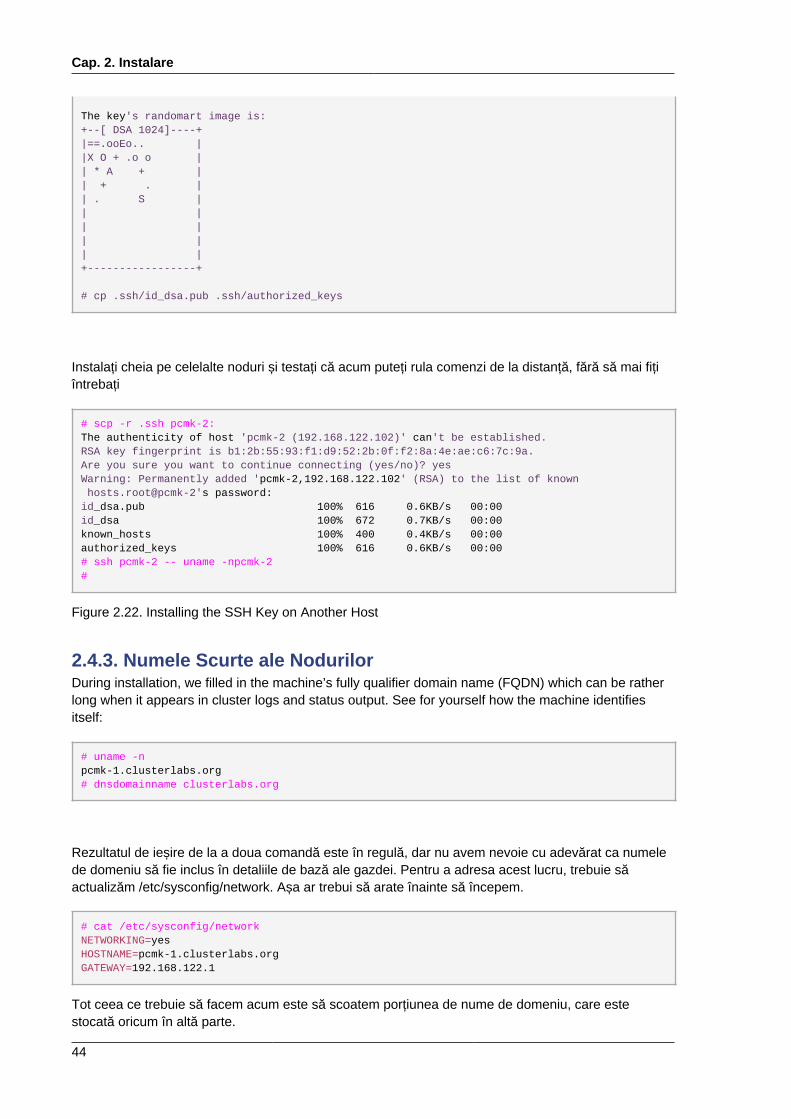
# cp .ssh/id_dsa.pub .ssh/authorized_keys
Instalați cheia pe celelalte noduri și testați că acum puteți rula comenzi de la distanță, fără să mai fițiîntrebați
# scp -r .ssh pcmk-2:The authenticity of host 'pcmk-2 (192.168.122.102)' can't be established.RSA key fingerprint is b1:2b:55:93:f1:d9:52:2b:0f:f2:8a:4e:ae:c6:7c:9a.Are you sure you want to continue connecting (yes/no)? yesWarning: Permanently added 'pcmk-2,192.168.122.102' (RSA) to the list of known hosts.root@pcmk-2's password:id_dsa.pub 100% 616 0.6KB/s 00:00id_dsa 100% 672 0.7KB/s 00:00known_hosts 100% 400 0.4KB/s 00:00authorized_keys 100% 616 0.6KB/s 00:00# ssh pcmk-2 -- uname -npcmk-2#
Figure 2.22. Installing the SSH Key on Another Host
2.4.3. Numele Scurte ale NodurilorDuring installation, we filled in the machine’s fully qualifier domain name (FQDN) which can be ratherlong when it appears in cluster logs and status output. See for yourself how the machine identifiesitself:
# uname -npcmk-1.clusterlabs.org# dnsdomainname clusterlabs.org
Rezultatul de ieșire de la a doua comandă este în regulă, dar nu avem nevoie cu adevărat ca numelede domeniu să fie inclus în detaliile de bază ale gazdei. Pentru a adresa acest lucru, trebuie săactualizăm /etc/sysconfig/network. Așa ar trebui să arate înainte să începem.
# cat /etc/sysconfig/networkNETWORKING=yesHOSTNAME=pcmk-1.clusterlabs.orgGATEWAY=192.168.122.1
Tot ceea ce trebuie să facem acum este să scoatem porțiunea de nume de domeniu, care estestocată oricum în altă parte.
Configurarea Corosync
45
# sed -i.bak 's/\.[a-z].*//g' /etc/sysconfig/network
Acum confirmați că modificarea a fost realizată cu succes. Conținutul fișierului revizuit ar trebui săarate ceva de genul acesta.
# cat /etc/sysconfig/networkNETWORKING=yesHOSTNAME=pcmk-1GATEWAY=192.168.122.1
However we’re not finished. The machine wont normally see the shortened host name until about itreboots, but we can force it to update.
# source /etc/sysconfig/network# hostname $HOSTNAME
Acum verificați că mașina folosește numele corecte
# uname -npcmk-1# dnsdomainname clusterlabs.org
Acum repetați pe pcmk-2.
2.4.4. Configurarea CorosyncChoose a port number and multi-cast 7 address. 8 Be sure that the values you chose do not conflictwith any existing clusters you might have. For advice on choosing a multi-cast address, see http://www.29west.com/docs/THPM/multicast-address-assignment.html For this document, I have chosenport 4000 and used 226.94.1.1 as the multi-cast address.
Important
Instrucțiunile de mai jos se aplică numai pentru o mașină cu o singură placă de rețea. Dacă avețiun setup mai complicat, ar trebui să editați configurația manual.
# export ais_port=4000# export ais_mcast=226.94.1.1
În continuare determinăm în mod automat adresa gazdelor. Nefolosind adresa completă, facemconfigurația fezabilă pentru a fi copiată pe alte noduri.
# export ais_addr=`ip addr | grep "inet " | tail -n 1 | awk '{print $4}' | sed s/255/0/`
Listați și verificați opțiunile de configurare
7 http://en.wikipedia.org/wiki/Multicast8 http://en.wikipedia.org/wiki/Multicast_address
Cap. 2. Instalare
46
# env | grep ais_ais_mcast=226.94.1.1ais_port=4000ais_addr=192.168.122.0
Once you’re happy with the chosen values, update the Corosync configuration
# cp /etc/corosync/corosync.conf.example /etc/corosync/corosync.conf# sed -i.bak "s/.*mcastaddr:.*/mcastaddr:\ $ais_mcast/g" /etc/corosync/corosync.conf# sed -i.bak "s/.*mcastport:.*/mcastport:\ $ais_port/g" /etc/corosync/corosync.conf# sed -i.bak "s/.*bindnetaddr:.*/bindnetaddr:\ $ais_addr/g" /etc/corosync/corosync.conf
În sfârșit, spuneți Corosync-ului să încarce plugin-ul de Pacemaker.
# cat <<-END >>/etc/corosync/service.d/pcmkservice { # Load the Pacemaker Cluster Resource Manager name: pacemaker ver: 1}END
The final configuration should look something like the sample in Appendix B, Sample CorosyncConfiguration.
Important
When run in version 1 mode, the plugin does not start the Pacemaker daemons. Instead it justsets up the quorum and messaging interfaces needed by the rest of the stack. Starting thedameons occurs when the Pacemaker init script is invoked. This resolves two long standingissues:
a. Forking-ul înăuntrul unui proces multi-threaded precum Corosync cauzează tot felul deprobleme. Acest lucru a fost problematic pentru Pacemaker din moment ce acesta are nevoiede un număr de daemoni să fie lansați în execuție.
b. Corosync nu a fost niciodată conceput pentru închiderea în pași - un aspect necesar anteriorpentru a preveni clusterul din a ieși înainte ca Pacemaker să poată opri toate resurseleactive.
2.4.5. Propagarea ConfigurațieiAcum trebuie să copiem modificările făcute până acum pe celălalt nod:
# for f in /etc/corosync/corosync.conf /etc/corosync/service.d/pcmk /etc/hosts; do scp $f pcmk-2:$f ; donecorosync.conf 100% 1528 1.5KB/s 00:00hosts 100% 281 0.3KB/s 00:00#
47
Verificați Instalarea Clusterului
Cuprins3.1. Verificați Instalarea Corosync .............................................................................................. 473.2. Verificați Instalarea Pacemaker ............................................................................................ 47
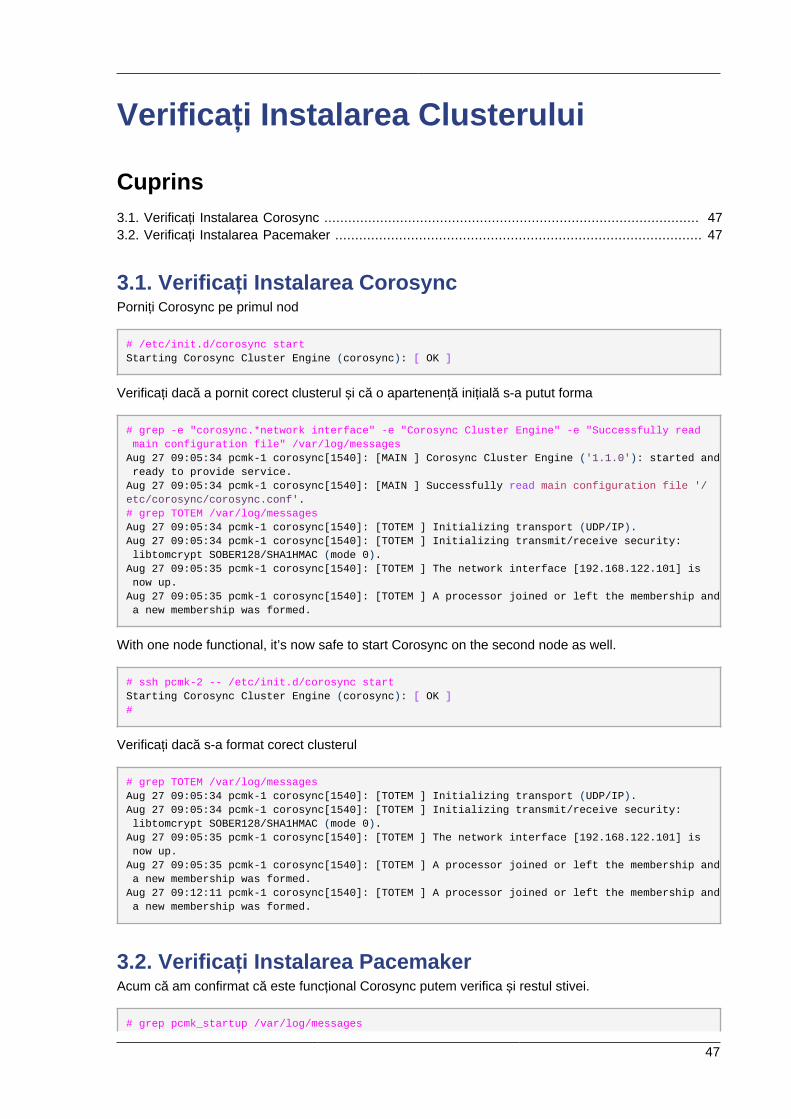
3.1. Verificați Instalarea CorosyncPorniți Corosync pe primul nod
# /etc/init.d/corosync startStarting Corosync Cluster Engine (corosync): [ OK ]
Verificați dacă a pornit corect clusterul și că o apartenență inițială s-a putut forma
# grep -e "corosync.*network interface" -e "Corosync Cluster Engine" -e "Successfully read main configuration file" /var/log/messagesAug 27 09:05:34 pcmk-1 corosync[1540]: [MAIN ] Corosync Cluster Engine ('1.1.0'): started and ready to provide service.Aug 27 09:05:34 pcmk-1 corosync[1540]: [MAIN ] Successfully read main configuration file '/etc/corosync/corosync.conf'.# grep TOTEM /var/log/messagesAug 27 09:05:34 pcmk-1 corosync[1540]: [TOTEM ] Initializing transport (UDP/IP).Aug 27 09:05:34 pcmk-1 corosync[1540]: [TOTEM ] Initializing transmit/receive security: libtomcrypt SOBER128/SHA1HMAC (mode 0).Aug 27 09:05:35 pcmk-1 corosync[1540]: [TOTEM ] The network interface [192.168.122.101] is now up.Aug 27 09:05:35 pcmk-1 corosync[1540]: [TOTEM ] A processor joined or left the membership and a new membership was formed.
With one node functional, it’s now safe to start Corosync on the second node as well.
# ssh pcmk-2 -- /etc/init.d/corosync startStarting Corosync Cluster Engine (corosync): [ OK ]#
Verificați dacă s-a format corect clusterul
# grep TOTEM /var/log/messagesAug 27 09:05:34 pcmk-1 corosync[1540]: [TOTEM ] Initializing transport (UDP/IP).Aug 27 09:05:34 pcmk-1 corosync[1540]: [TOTEM ] Initializing transmit/receive security: libtomcrypt SOBER128/SHA1HMAC (mode 0).Aug 27 09:05:35 pcmk-1 corosync[1540]: [TOTEM ] The network interface [192.168.122.101] is now up.Aug 27 09:05:35 pcmk-1 corosync[1540]: [TOTEM ] A processor joined or left the membership and a new membership was formed.Aug 27 09:12:11 pcmk-1 corosync[1540]: [TOTEM ] A processor joined or left the membership and a new membership was formed.
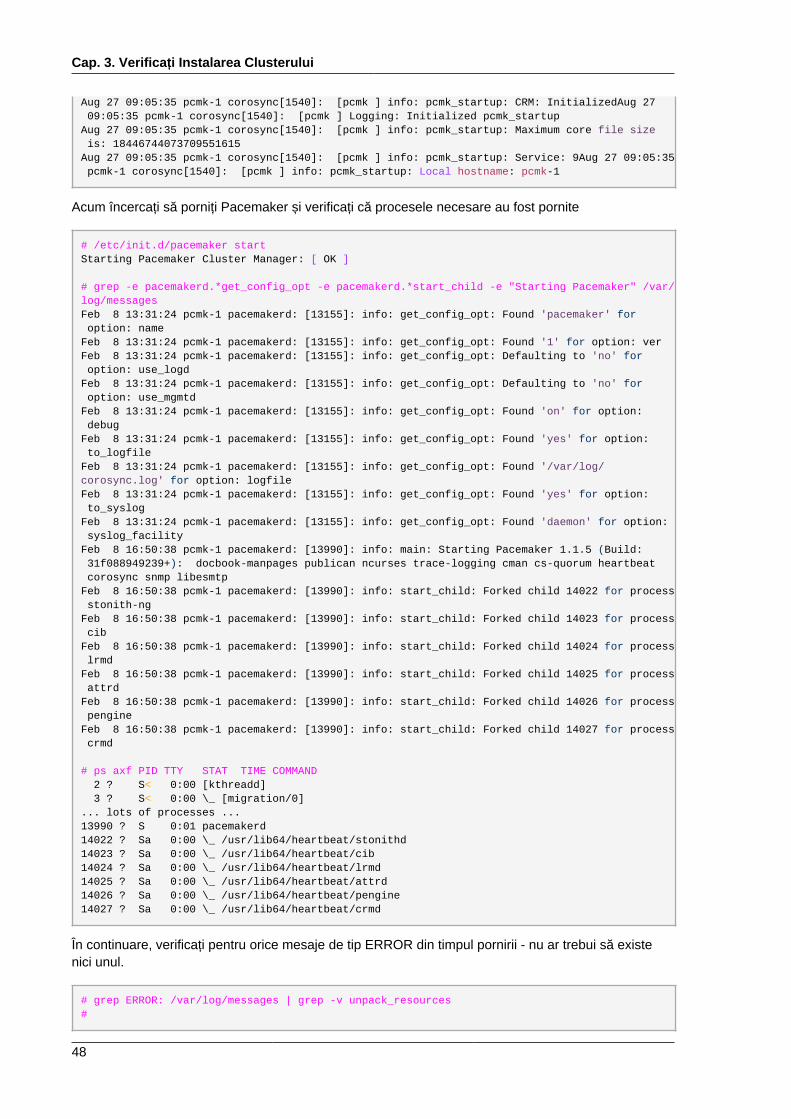
3.2. Verificați Instalarea PacemakerAcum că am confirmat că este funcțional Corosync putem verifica și restul stivei.
# grep pcmk_startup /var/log/messages
Cap. 3. Verificați Instalarea Clusterului
48
Aug 27 09:05:35 pcmk-1 corosync[1540]: [pcmk ] info: pcmk_startup: CRM: InitializedAug 27 09:05:35 pcmk-1 corosync[1540]: [pcmk ] Logging: Initialized pcmk_startupAug 27 09:05:35 pcmk-1 corosync[1540]: [pcmk ] info: pcmk_startup: Maximum core file size is: 18446744073709551615Aug 27 09:05:35 pcmk-1 corosync[1540]: [pcmk ] info: pcmk_startup: Service: 9Aug 27 09:05:35 pcmk-1 corosync[1540]: [pcmk ] info: pcmk_startup: Local hostname: pcmk-1
Acum încercați să porniți Pacemaker și verificați că procesele necesare au fost pornite
# /etc/init.d/pacemaker startStarting Pacemaker Cluster Manager: [ OK ]
# grep -e pacemakerd.*get_config_opt -e pacemakerd.*start_child -e "Starting Pacemaker" /var/log/messagesFeb 8 13:31:24 pcmk-1 pacemakerd: [13155]: info: get_config_opt: Found 'pacemaker' for option: nameFeb 8 13:31:24 pcmk-1 pacemakerd: [13155]: info: get_config_opt: Found '1' for option: verFeb 8 13:31:24 pcmk-1 pacemakerd: [13155]: info: get_config_opt: Defaulting to 'no' for option: use_logdFeb 8 13:31:24 pcmk-1 pacemakerd: [13155]: info: get_config_opt: Defaulting to 'no' for option: use_mgmtdFeb 8 13:31:24 pcmk-1 pacemakerd: [13155]: info: get_config_opt: Found 'on' for option: debugFeb 8 13:31:24 pcmk-1 pacemakerd: [13155]: info: get_config_opt: Found 'yes' for option: to_logfileFeb 8 13:31:24 pcmk-1 pacemakerd: [13155]: info: get_config_opt: Found '/var/log/corosync.log' for option: logfileFeb 8 13:31:24 pcmk-1 pacemakerd: [13155]: info: get_config_opt: Found 'yes' for option: to_syslogFeb 8 13:31:24 pcmk-1 pacemakerd: [13155]: info: get_config_opt: Found 'daemon' for option: syslog_facilityFeb 8 16:50:38 pcmk-1 pacemakerd: [13990]: info: main: Starting Pacemaker 1.1.5 (Build: 31f088949239+): docbook-manpages publican ncurses trace-logging cman cs-quorum heartbeat corosync snmp libesmtpFeb 8 16:50:38 pcmk-1 pacemakerd: [13990]: info: start_child: Forked child 14022 for process stonith-ngFeb 8 16:50:38 pcmk-1 pacemakerd: [13990]: info: start_child: Forked child 14023 for process cibFeb 8 16:50:38 pcmk-1 pacemakerd: [13990]: info: start_child: Forked child 14024 for process lrmdFeb 8 16:50:38 pcmk-1 pacemakerd: [13990]: info: start_child: Forked child 14025 for process attrdFeb 8 16:50:38 pcmk-1 pacemakerd: [13990]: info: start_child: Forked child 14026 for process pengineFeb 8 16:50:38 pcmk-1 pacemakerd: [13990]: info: start_child: Forked child 14027 for process crmd
# ps axf PID TTY STAT TIME COMMAND 2 ? S< 0:00 [kthreadd] 3 ? S< 0:00 \_ [migration/0]... lots of processes ...13990 ? S 0:01 pacemakerd14022 ? Sa 0:00 \_ /usr/lib64/heartbeat/stonithd14023 ? Sa 0:00 \_ /usr/lib64/heartbeat/cib14024 ? Sa 0:00 \_ /usr/lib64/heartbeat/lrmd14025 ? Sa 0:00 \_ /usr/lib64/heartbeat/attrd14026 ? Sa 0:00 \_ /usr/lib64/heartbeat/pengine14027 ? Sa 0:00 \_ /usr/lib64/heartbeat/crmd
În continuare, verificați pentru orice mesaje de tip ERROR din timpul pornirii - nu ar trebui să existenici unul.
# grep ERROR: /var/log/messages | grep -v unpack_resources#

Verificați Instalarea Pacemaker
49
Repeat on the other node and display the cluster’s status.
# ssh pcmk-2 -- /etc/init.d/pacemaker startStarting Pacemaker Cluster Manager: [ OK ]# crm_mon============Last updated: Thu Aug 27 16:54:55 2009Stack: openaisCurrent DC: pcmk-1 - partition with quorumVersion: 1.1.5-bdd89e69ba545404d02445be1f3d72e6a203ba2f2 Nodes configured, 2 expected votes0 Resources configured.============Online: [ pcmk-1 pcmk-2 ]

50
51
Pacemaker Tools
Cuprins4.1. Folosirea Utilitarelor Pacemaker .......................................................................................... 51
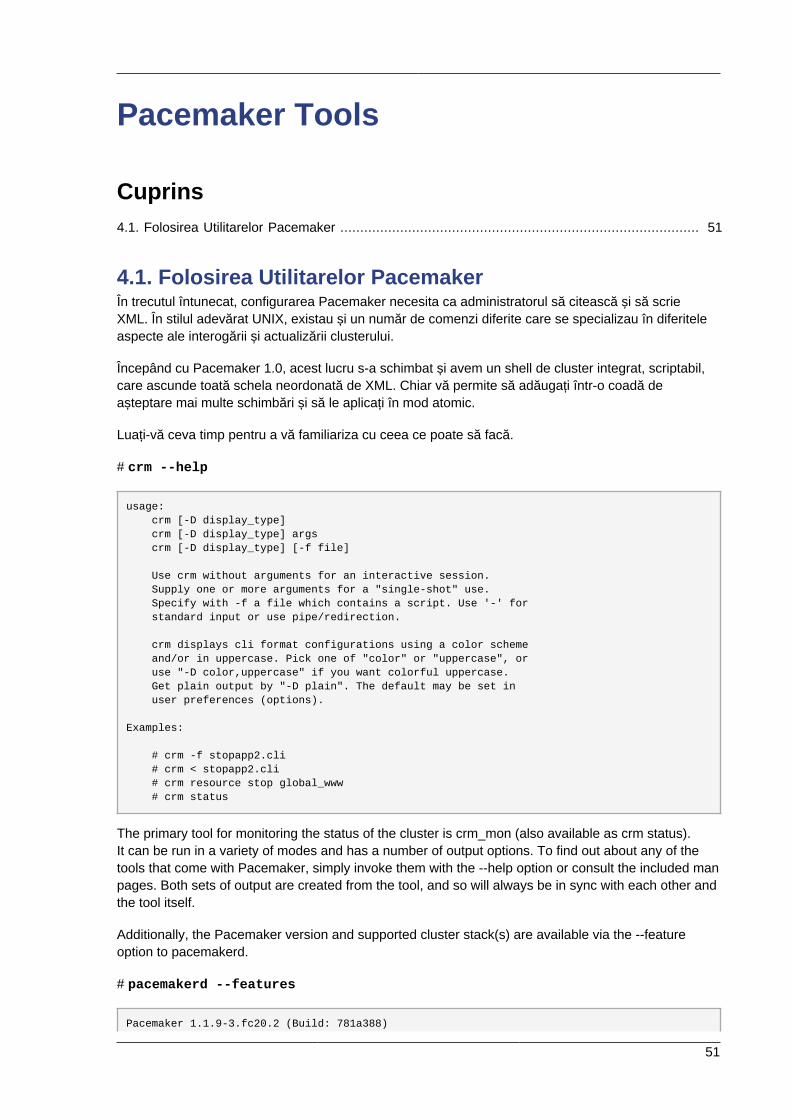
4.1. Folosirea Utilitarelor PacemakerÎn trecutul întunecat, configurarea Pacemaker necesita ca administratorul să citească și să scrieXML. În stilul adevărat UNIX, existau și un număr de comenzi diferite care se specializau în diferiteleaspecte ale interogării și actualizării clusterului.
Începând cu Pacemaker 1.0, acest lucru s-a schimbat și avem un shell de cluster integrat, scriptabil,care ascunde toată schela neordonată de XML. Chiar vă permite să adăugați într-o coadă deașteptare mai multe schimbări și să le aplicați în mod atomic.
Luați-vă ceva timp pentru a vă familiariza cu ceea ce poate să facă.
# crm --help
usage: crm [-D display_type] crm [-D display_type] args crm [-D display_type] [-f file]
Use crm without arguments for an interactive session. Supply one or more arguments for a "single-shot" use. Specify with -f a file which contains a script. Use '-' for standard input or use pipe/redirection.
crm displays cli format configurations using a color scheme and/or in uppercase. Pick one of "color" or "uppercase", or use "-D color,uppercase" if you want colorful uppercase. Get plain output by "-D plain". The default may be set in user preferences (options).
Examples:
# crm -f stopapp2.cli # crm < stopapp2.cli # crm resource stop global_www # crm status
The primary tool for monitoring the status of the cluster is crm_mon (also available as crm status).It can be run in a variety of modes and has a number of output options. To find out about any of thetools that come with Pacemaker, simply invoke them with the --help option or consult the included manpages. Both sets of output are created from the tool, and so will always be in sync with each other andthe tool itself.
Additionally, the Pacemaker version and supported cluster stack(s) are available via the --featureoption to pacemakerd.
# pacemakerd --features
Pacemaker 1.1.9-3.fc20.2 (Build: 781a388)
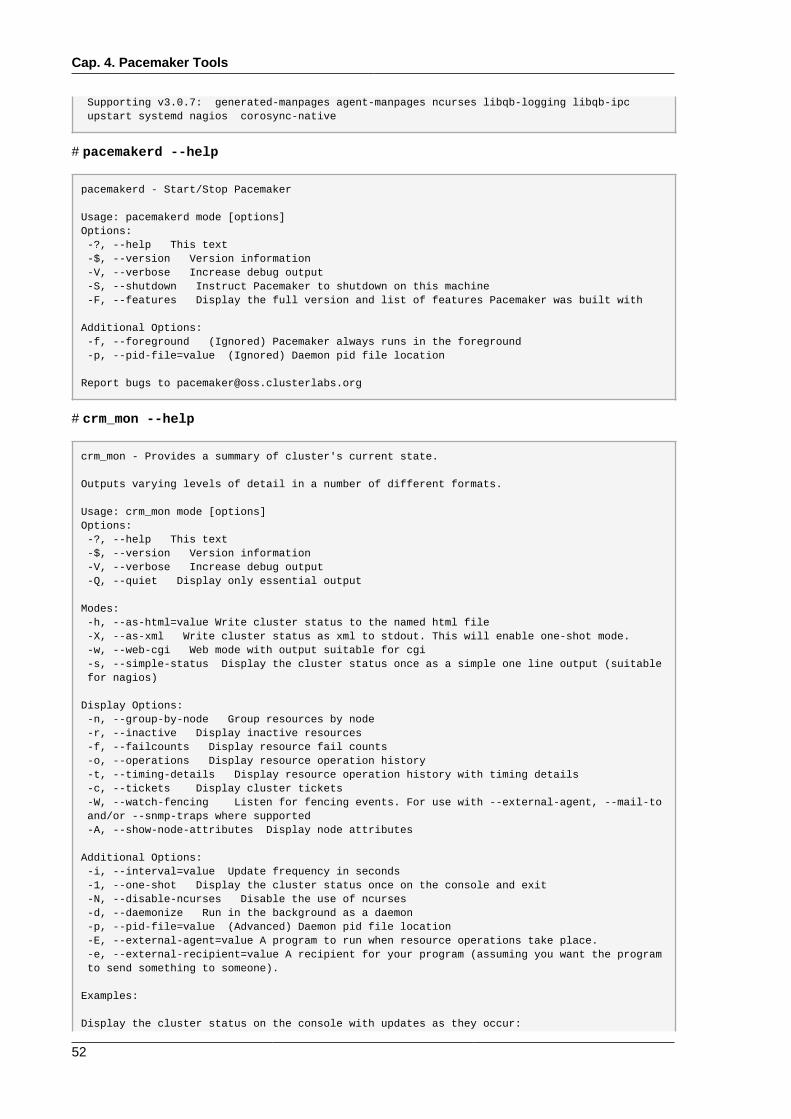
Cap. 4. Pacemaker Tools
52
Supporting v3.0.7: generated-manpages agent-manpages ncurses libqb-logging libqb-ipc upstart systemd nagios corosync-native
# pacemakerd --help
pacemakerd - Start/Stop Pacemaker
Usage: pacemakerd mode [options]Options: -?, --help This text -$, --version Version information -V, --verbose Increase debug output -S, --shutdown Instruct Pacemaker to shutdown on this machine -F, --features Display the full version and list of features Pacemaker was built with
Additional Options: -f, --foreground (Ignored) Pacemaker always runs in the foreground -p, --pid-file=value (Ignored) Daemon pid file location
Report bugs to [email protected]
# crm_mon --help
crm_mon - Provides a summary of cluster's current state.
Outputs varying levels of detail in a number of different formats.
Usage: crm_mon mode [options]Options: -?, --help This text -$, --version Version information -V, --verbose Increase debug output -Q, --quiet Display only essential output
Modes: -h, --as-html=value Write cluster status to the named html file -X, --as-xml Write cluster status as xml to stdout. This will enable one-shot mode. -w, --web-cgi Web mode with output suitable for cgi -s, --simple-status Display the cluster status once as a simple one line output (suitable for nagios)
Display Options: -n, --group-by-node Group resources by node -r, --inactive Display inactive resources -f, --failcounts Display resource fail counts -o, --operations Display resource operation history -t, --timing-details Display resource operation history with timing details -c, --tickets Display cluster tickets -W, --watch-fencing Listen for fencing events. For use with --external-agent, --mail-to and/or --snmp-traps where supported -A, --show-node-attributes Display node attributes
Additional Options: -i, --interval=value Update frequency in seconds -1, --one-shot Display the cluster status once on the console and exit -N, --disable-ncurses Disable the use of ncurses -d, --daemonize Run in the background as a daemon -p, --pid-file=value (Advanced) Daemon pid file location -E, --external-agent=value A program to run when resource operations take place. -e, --external-recipient=value A recipient for your program (assuming you want the program to send something to someone).
Examples:
Display the cluster status on the console with updates as they occur:
Folosirea Utilitarelor Pacemaker
53
# crm_mon
Display the cluster status on the console just once then exit:
# crm_mon -1
Display your cluster status, group resources by node, and include inactive resources in the list:
# crm_mon --group-by-node --inactive
Start crm_mon as a background daemon and have it write the cluster status to an HTML file:
# crm_mon --daemonize --as-html /path/to/docroot/filename.html
Start crm_mon and export the current cluster status as xml to stdout, then exit.:
# crm_mon --as-xml
Report bugs to [email protected]
Notă
Dacă opțiunile de SNMP și/sau email nu sunt listate, atunci Pacemaker nu a fost construit pentrua le suporta. Acest lucru s-ar putea întâmpla din alegerea făcută de distribuția folosită saulibrăriile necesare ar putea să nu fie disponibile. Vă rugăm să contactați pe oricine v-a furnizatpachetele pentru mai multe detalii.

54
55
Crearea unui Cluster Activ/Pasiv
Cuprins5.1. Explorarea Configurației Existente ....................................................................................... 555.2. Adăugarea unei Resurse ..................................................................................................... 565.3. Efectuați un Failover ........................................................................................................... 58
5.3.1. Quorum și Clusterele Formate din Două Noduri ......................................................... 585.3.2. Prevenirea Mutării Resurselor după Recuperare ........................................................ 60
5.1. Explorarea Configurației ExistenteCând Pacemaker pornește, înregistrează în mod automat numărul și detaliile nodurilor din cluster lafel ca și care stivă este folosită și care versiune de Pacemaker este folosită.
Așa ar trebui să arate configurația de bază.
# crm configure shownode pcmk-1node pcmk-2property $id="cib-bootstrap-options" \ dc-version="1.1.5-bdd89e69ba545404d02445be1f3d72e6a203ba2f" \ cluster-infrastructure="openais" \ expected-quorum-votes="2"
Pentru cei care nu se tem de XML, puteți vedea configurația în stare brută adăugând "xml" lacomanda anterioară.
Ultimul XML pe care îl veți vedea în acest document.
# crm configure show xml<?xml version="1.0" ?><cib admin_epoch="0" crm_feature_set="3.0.1" dc-uuid="pcmk-1" epoch="13" have-quorum="1" num_updates="7" validate-with="pacemaker-1.0"> <configuration> <crm_config> <cluster_property_set id="cib-bootstrap-options"> <nvpair id="cib-bootstrap-options-dc-version" name="dc-version" value="1.1.5-bdd89e69ba545404d02445be1f3d72e6a203ba2f"/> <nvpair id="cib-bootstrap-options-cluster-infrastructure" name="cluster-infrastructure" value="openais"/> <nvpair id="cib-bootstrap-options-expected-quorum-votes" name="expected-quorum-votes" value="2"/> </cluster_property_set> </crm_config> <rsc_defaults/> <op_defaults/> <nodes> <node id="pcmk-1" type="normal" uname="pcmk-1"/> <node id="pcmk-2" type="normal" uname="pcmk-2"/> </nodes> <resources/> <constraints/> </configuration></cib>
Before we make any changes, its a good idea to check the validity of the configuration.
Cap. 5. Crearea unui Cluster Activ/Pasiv
56
# crm_verify -Lcrm_verify[2195]: 2009/08/27_16:57:12 ERROR: unpack_resources: Resource start-up disabled since no STONITH resources have been definedcrm_verify[2195]: 2009/08/27_16:57:12 ERROR: unpack_resources: Either configure some or disable STONITH with the stonith-enabled optioncrm_verify[2195]: 2009/08/27_16:57:12 ERROR: unpack_resources: NOTE: Clusters with shared data need STONITH to ensure data integrityErrors found during check: config not valid -V may provide more details#
După cum puteți vedea, utilitarul a găsit câteva erori.
In order to guarantee the safety of your data 1 , Pacemaker ships with STONITH 2 enabled. Howeverit also knows when no STONITH configuration has been supplied and reports this as a problem (sincethe cluster would not be able to make progress if a situation requiring node fencing arose).
Momentan, vom dezactiva această funcționalitate și o vom configura mai târziu în secțiuneaConfigurarea STONITH. Este important de reținut că utilizarea STONITH este puternic încurajată,oprirea acestuia îi spune clusterului să se prefacă pur și simplu că nodurile care au eșuat sunt opriteîn siguranță. Unii comercianți vor refuza chiar să ofere suport pentru clustere care îl au dezactivat.
Pentru a dezactiva STONITH, setăm opțiunea clusterului stonith-enabled pe false.
# crm configure property stonith-enabled=false# crm_verify -L
Cu noua opțiune a clusterului setată, configurația este acum validă.
Avertisment
The use of stonith-enabled=false is completely inappropriate for a production cluster. We use ithere to defer the discussion of its configuration which can differ widely from one installation to thenext. See Secțiune 9.1, „What Is STONITH” for information on why STONITH is important anddetails on how to configure it.
5.2. Adăugarea unei ResurseThe first thing we should do is configure an IP address. Regardless of where the cluster service(s)are running, we need a consistent address to contact them on. Here I will choose and add192.168.122.101 as the floating address, give it the imaginative name ClusterIP and tell the cluster tocheck that its running every 30 seconds.
Important
Adresa aleasă nu trebuie să fie una deja asociată cu un nod fizic
1 If the data is corrupt, there is little point in continuing to make it available2 A common node fencing mechanism. Used to ensure data integrity by powering off "bad" nodes
Adăugarea unei Resurse
57
# crm configure primitive ClusterIP ocf:heartbeat:IPaddr2 \ params ip=192.168.122.101 cidr_netmask=32 \ op monitor interval=30s
The other important piece of information here is ocf:heartbeat:IPaddr2.
This tells Pacemaker three things about the resource you want to add. The first field, ocf, is thestandard to which the resource script conforms to and where to find it. The second field is specificto OCF resources and tells the cluster which namespace to find the resource script in, in this caseheartbeat. The last field indicates the name of the resource script.
Pentru a obține o listă a claselor de resurse disponibile, rulați
# crm ra classesheartbeatlsb ocf / heartbeat pacemakerstonith
Pentru a găsi mai apoi toți agenții de resursă OCF furnizați de Pacemaker și Heartbeat, rulați
# crm ra list ocf pacemakerClusterMon Dummy Stateful SysInfo SystemHealth controldping pingd# crm ra list ocf heartbeatAoEtarget AudibleAlarm ClusterMon DelayDummy EvmsSCC Evmsd FilesystemICP IPaddr IPaddr2 IPsrcaddrLVM LinuxSCSI MailTo ManageRAIDManageVE Pure-FTPd Raid1 RouteSAPDatabase SAPInstance SendArp ServeRAIDSphinxSearchDaemon Squid Stateful SysInfoVIPArip VirtualDomain WAS WAS6WinPopup Xen Xinetd anythingapache db2 drbd eDir88iSCSILogicalUnit iSCSITarget ids iscsildirectord mysql mysql-proxy nfsserveroracle oralsnr pgsql pingdportblock rsyncd scsi2reservation sfextomcat vmware#
Acum verificați că resursa IP a fost adăugată și listați status-ul clusterului pentru a vedea că acumeste activă.
# crm configure shownode pcmk-1node pcmk-2primitive ClusterIP ocf:heartbeat:IPaddr2 \ params ip="192.168.122.101" cidr_netmask="32" \ op monitor interval="30s"property $id="cib-bootstrap-options" \ dc-version="1.1.5-bdd89e69ba545404d02445be1f3d72e6a203ba2f" \ cluster-infrastructure="openais" \ expected-quorum-votes="2" \ stonith-enabled="false" \# crm_mon============Last updated: Fri Aug 28 15:23:48 2009Stack: openaisCurrent DC: pcmk-1 - partition with quorumVersion: 1.1.5-bdd89e69ba545404d02445be1f3d72e6a203ba2f2 Nodes configured, 2 expected votes1 Resources configured.============

Cap. 5. Crearea unui Cluster Activ/Pasiv
58
Online: [ pcmk-1 pcmk-2 ]ClusterIP (ocf::heartbeat:IPaddr): Started pcmk-1
5.3. Efectuați un FailoverFiind un cluster de tip high-availability, ar trebui să testăm failover-ul noii noastre resurse înainte de amerge mai departe.
Întâi, găsiți nodul pe care rulează adresa IP.
# crm resource status ClusterIPresource ClusterIP is running on: pcmk-1#
Opriți Pacemaker și Corosync pe acea mașină.
# ssh pcmk-1 -- /etc/init.d/pacemaker stopSignaling Pacemaker Cluster Manager to terminate: [ OK ]Waiting for cluster services to unload:. [ OK ]# ssh pcmk-1 -- /etc/init.d/corosync stopStopping Corosync Cluster Engine (corosync): [ OK ]Waiting for services to unload: [ OK ]#
Odată ce Corosync nu mai rulează, mergeți pe celălalt nod și verificați status-ul clusterului cucrm_mon.
# crm_mon============Last updated: Fri Aug 28 15:27:35 2009Stack: openaisCurrent DC: pcmk-2 - partition WITHOUT quorumVersion: 1.1.5-bdd89e69ba545404d02445be1f3d72e6a203ba2f2 Nodes configured, 2 expected votes1 Resources configured.============
Online: [ pcmk-2 ]OFFLINE: [ pcmk-1 ]
Sunt trei aspecte de ținut cont în legătură cu starea curentă a clusterului. Primul este acela că, așacum ne așteptam, pcmk-1 este acum offline. Totodată putem vedea că, ClusterIP nu rulează nicăieri!
5.3.1. Quorum și Clusterele Formate din Două NoduriAcest lucru este datorită faptului că, clusterul nu mai are quorum, după cum poate fi observat dintextul "partition WITHOUT quorum" (ieșind în evidență în verde) în rezultatul de ieșire de mai sus.Pentru a reduce posibilitatea coruperii datelor, comportamentul implicit al Pacemaker-ului este săoprească toate resursele dacă clusterul nu are quorum.
Un cluster este considerat că are quorum când mai mult de jumătate din nodurile cunoscute sauașteptate sunt online, sau pentru cei cu înclinație către matematică, în orice moment în care ecuațiaurmătoare este adevărată:
numărul_total_de_noduri < 2 * numărul_de_noduri_active
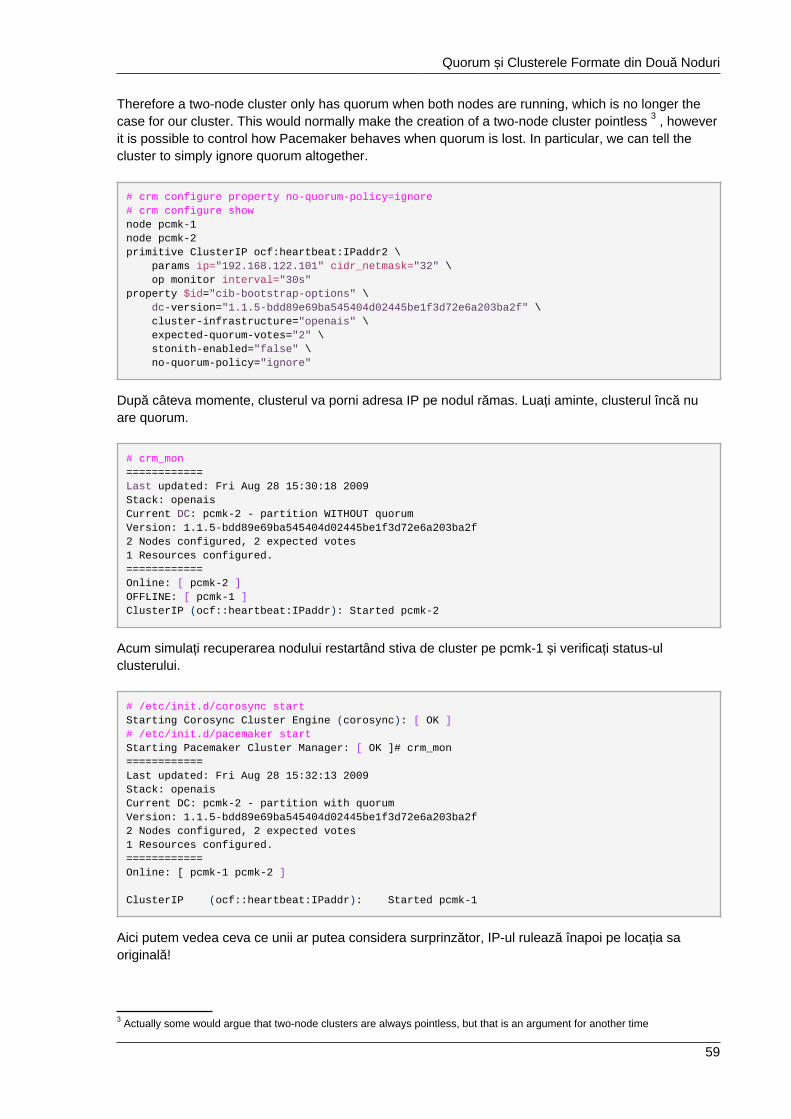
Quorum și Clusterele Formate din Două Noduri
59
Therefore a two-node cluster only has quorum when both nodes are running, which is no longer thecase for our cluster. This would normally make the creation of a two-node cluster pointless 3 , howeverit is possible to control how Pacemaker behaves when quorum is lost. In particular, we can tell thecluster to simply ignore quorum altogether.
# crm configure property no-quorum-policy=ignore# crm configure shownode pcmk-1node pcmk-2primitive ClusterIP ocf:heartbeat:IPaddr2 \ params ip="192.168.122.101" cidr_netmask="32" \ op monitor interval="30s"property $id="cib-bootstrap-options" \ dc-version="1.1.5-bdd89e69ba545404d02445be1f3d72e6a203ba2f" \ cluster-infrastructure="openais" \ expected-quorum-votes="2" \ stonith-enabled="false" \ no-quorum-policy="ignore"
După câteva momente, clusterul va porni adresa IP pe nodul rămas. Luați aminte, clusterul încă nuare quorum.
# crm_mon============Last updated: Fri Aug 28 15:30:18 2009Stack: openaisCurrent DC: pcmk-2 - partition WITHOUT quorumVersion: 1.1.5-bdd89e69ba545404d02445be1f3d72e6a203ba2f2 Nodes configured, 2 expected votes1 Resources configured.============Online: [ pcmk-2 ]OFFLINE: [ pcmk-1 ]ClusterIP (ocf::heartbeat:IPaddr): Started pcmk-2
Acum simulați recuperarea nodului restartând stiva de cluster pe pcmk-1 și verificați status-ulclusterului.
# /etc/init.d/corosync startStarting Corosync Cluster Engine (corosync): [ OK ]# /etc/init.d/pacemaker startStarting Pacemaker Cluster Manager: [ OK ]# crm_mon============Last updated: Fri Aug 28 15:32:13 2009Stack: openaisCurrent DC: pcmk-2 - partition with quorumVersion: 1.1.5-bdd89e69ba545404d02445be1f3d72e6a203ba2f2 Nodes configured, 2 expected votes1 Resources configured.============Online: [ pcmk-1 pcmk-2 ]
ClusterIP (ocf::heartbeat:IPaddr): Started pcmk-1
Aici putem vedea ceva ce unii ar putea considera surprinzător, IP-ul rulează înapoi pe locația saoriginală!
3 Actually some would argue that two-node clusters are always pointless, but that is an argument for another time
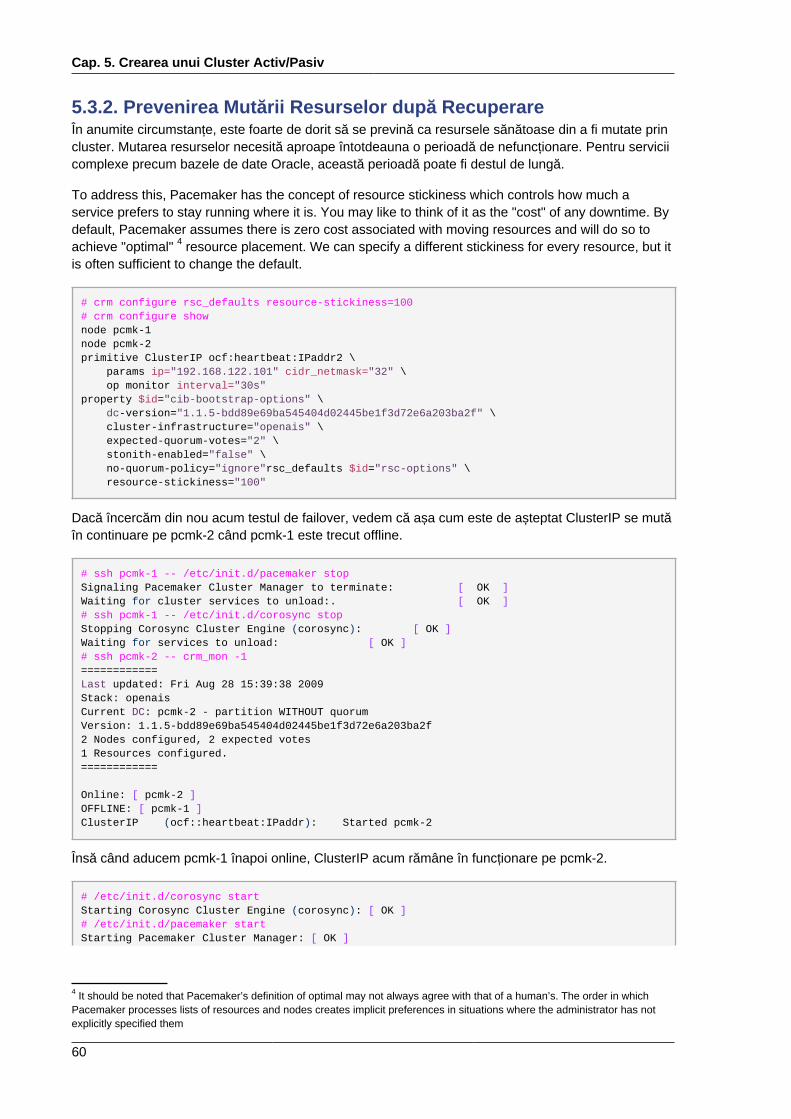
Cap. 5. Crearea unui Cluster Activ/Pasiv
60
5.3.2. Prevenirea Mutării Resurselor după RecuperareÎn anumite circumstanțe, este foarte de dorit să se prevină ca resursele sănătoase din a fi mutate princluster. Mutarea resurselor necesită aproape întotdeauna o perioadă de nefuncționare. Pentru serviciicomplexe precum bazele de date Oracle, această perioadă poate fi destul de lungă.
To address this, Pacemaker has the concept of resource stickiness which controls how much aservice prefers to stay running where it is. You may like to think of it as the "cost" of any downtime. Bydefault, Pacemaker assumes there is zero cost associated with moving resources and will do so toachieve "optimal" 4 resource placement. We can specify a different stickiness for every resource, but itis often sufficient to change the default.
# crm configure rsc_defaults resource-stickiness=100# crm configure shownode pcmk-1node pcmk-2primitive ClusterIP ocf:heartbeat:IPaddr2 \ params ip="192.168.122.101" cidr_netmask="32" \ op monitor interval="30s"property $id="cib-bootstrap-options" \ dc-version="1.1.5-bdd89e69ba545404d02445be1f3d72e6a203ba2f" \ cluster-infrastructure="openais" \ expected-quorum-votes="2" \ stonith-enabled="false" \ no-quorum-policy="ignore"rsc_defaults $id="rsc-options" \ resource-stickiness="100"
Dacă încercăm din nou acum testul de failover, vedem că așa cum este de așteptat ClusterIP se mutăîn continuare pe pcmk-2 când pcmk-1 este trecut offline.
# ssh pcmk-1 -- /etc/init.d/pacemaker stopSignaling Pacemaker Cluster Manager to terminate: [ OK ]Waiting for cluster services to unload:. [ OK ]# ssh pcmk-1 -- /etc/init.d/corosync stopStopping Corosync Cluster Engine (corosync): [ OK ]Waiting for services to unload: [ OK ]# ssh pcmk-2 -- crm_mon -1============Last updated: Fri Aug 28 15:39:38 2009Stack: openaisCurrent DC: pcmk-2 - partition WITHOUT quorumVersion: 1.1.5-bdd89e69ba545404d02445be1f3d72e6a203ba2f2 Nodes configured, 2 expected votes1 Resources configured.============
Online: [ pcmk-2 ]OFFLINE: [ pcmk-1 ]ClusterIP (ocf::heartbeat:IPaddr): Started pcmk-2
Însă când aducem pcmk-1 înapoi online, ClusterIP acum rămâne în funcționare pe pcmk-2.
# /etc/init.d/corosync startStarting Corosync Cluster Engine (corosync): [ OK ]# /etc/init.d/pacemaker startStarting Pacemaker Cluster Manager: [ OK ]
4 It should be noted that Pacemaker’s definition of optimal may not always agree with that of a human’s. The order in whichPacemaker processes lists of resources and nodes creates implicit preferences in situations where the administrator has notexplicitly specified them

Prevenirea Mutării Resurselor după Recuperare
61
# crm_mon============Last updated: Fri Aug 28 15:41:23 2009Stack: openaisCurrent DC: pcmk-2 - partition with quorumVersion: 1.1.5-bdd89e69ba545404d02445be1f3d72e6a203ba2f2 Nodes configured, 2 expected votes1 Resources configured.============
Online: [ pcmk-1 pcmk-2 ]
ClusterIP (ocf::heartbeat:IPaddr): Started pcmk-2

62

63
Apache - Adăugarea mai Multor Servicii
Cuprins6.1. Forward .............................................................................................................................. 636.2. Instalare ............................................................................................................................. 636.3. Pregătire ............................................................................................................................. 656.4. Activați status URL-ul Apache-ului ....................................................................................... 656.5. Actualizarea Configurației .................................................................................................... 656.6. Asigurarea că Resursele Rulează pe Aceeași Gazdă ............................................................ 666.7. Controlarea Ordinii de Pornire/Oprire a Resursei .................................................................. 676.8. Specificarea unei Locații Preferate ....................................................................................... 686.9. Mutarea Manuală a Resurselor Prin Jurul Clusterului ............................................................ 69
6.9.1. Returnarea Controlului Înapoi Clusterului ................................................................... 69
6.1. ForwardNow that we have a basic but functional active/passive two-node cluster, we’re ready to add some realservices. We’re going to start with Apache because its a feature of many clusters and relatively simpleto configure.
6.2. InstalareBefore continuing, we need to make sure Apache is installed on both hosts.
# yum install -y httpdSetting up Install ProcessResolving Dependencies--> Running transaction check---> Package httpd.x86_64 0:2.2.13-2.fc12 set to be updated--> Processing Dependency: httpd-tools = 2.2.13-2.fc12 for package: httpd-2.2.13-2.fc12.x86_64--> Processing Dependency: apr-util-ldap for package: httpd-2.2.13-2.fc12.x86_64--> Processing Dependency: /etc/mime.types for package: httpd-2.2.13-2.fc12.x86_64--> Processing Dependency: libaprutil-1.so.0()(64bit) for package: httpd-2.2.13-2.fc12.x86_64--> Processing Dependency: libapr-1.so.0()(64bit) for package: httpd-2.2.13-2.fc12.x86_64--> Running transaction check---> Package apr.x86_64 0:1.3.9-2.fc12 set to be updated---> Package apr-util.x86_64 0:1.3.9-2.fc12 set to be updated---> Package apr-util-ldap.x86_64 0:1.3.9-2.fc12 set to be updated---> Package httpd-tools.x86_64 0:2.2.13-2.fc12 set to be updated---> Package mailcap.noarch 0:2.1.30-1.fc12 set to be updated--> Finished Dependency Resolution
Dependencies Resolved
=======================================================================================Package Arch Version Repository Size=======================================================================================Installing:httpd x86_64 2.2.13-2.fc12 rawhide 735 kInstalling for dependencies:apr x86_64 1.3.9-2.fc12 rawhide 117 kapr-util x86_64 1.3.9-2.fc12 rawhide 84 kapr-util-ldap x86_64 1.3.9-2.fc12 rawhide 15 khttpd-tools x86_64 2.2.13-2.fc12 rawhide 63 kmailcap noarch 2.1.30-1.fc12 rawhide 25 k
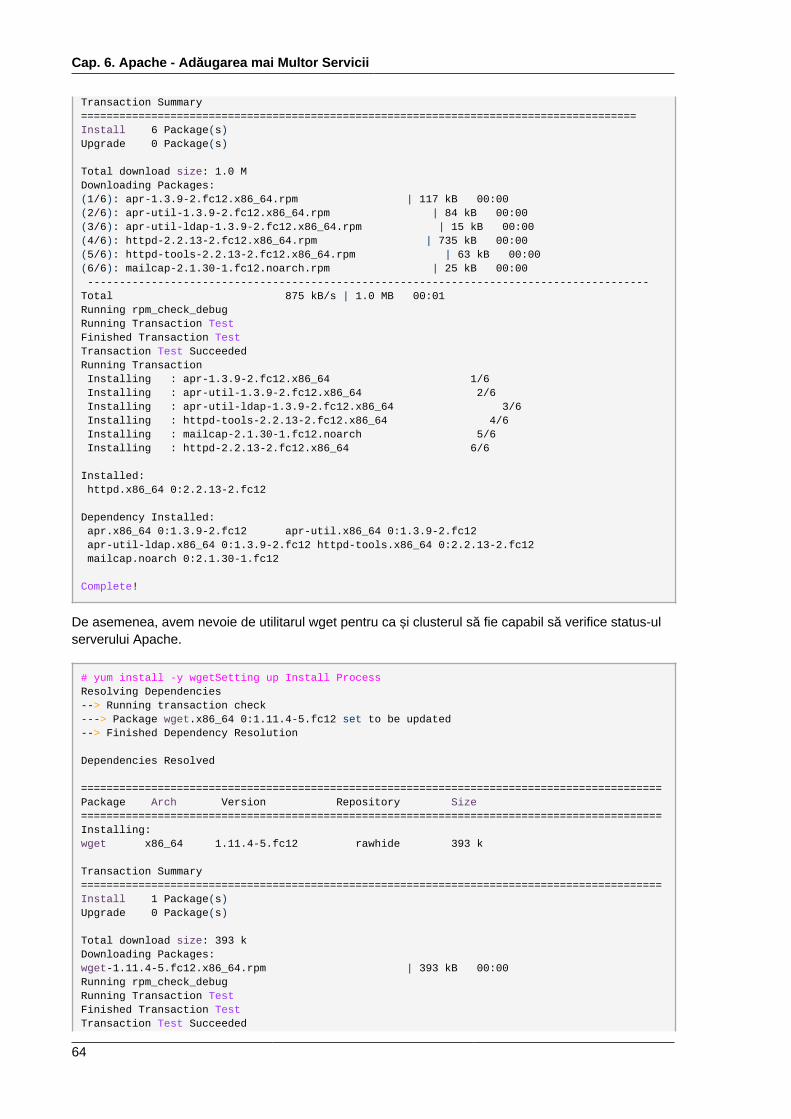
Cap. 6. Apache - Adăugarea mai Multor Servicii
64
Transaction Summary=======================================================================================Install 6 Package(s)Upgrade 0 Package(s)
Total download size: 1.0 MDownloading Packages:(1/6): apr-1.3.9-2.fc12.x86_64.rpm | 117 kB 00:00(2/6): apr-util-1.3.9-2.fc12.x86_64.rpm | 84 kB 00:00(3/6): apr-util-ldap-1.3.9-2.fc12.x86_64.rpm | 15 kB 00:00(4/6): httpd-2.2.13-2.fc12.x86_64.rpm | 735 kB 00:00(5/6): httpd-tools-2.2.13-2.fc12.x86_64.rpm | 63 kB 00:00(6/6): mailcap-2.1.30-1.fc12.noarch.rpm | 25 kB 00:00 ----------------------------------------------------------------------------------------Total 875 kB/s | 1.0 MB 00:01Running rpm_check_debugRunning Transaction TestFinished Transaction TestTransaction Test SucceededRunning Transaction Installing : apr-1.3.9-2.fc12.x86_64 1/6 Installing : apr-util-1.3.9-2.fc12.x86_64 2/6 Installing : apr-util-ldap-1.3.9-2.fc12.x86_64 3/6 Installing : httpd-tools-2.2.13-2.fc12.x86_64 4/6 Installing : mailcap-2.1.30-1.fc12.noarch 5/6 Installing : httpd-2.2.13-2.fc12.x86_64 6/6
Installed: httpd.x86_64 0:2.2.13-2.fc12
Dependency Installed: apr.x86_64 0:1.3.9-2.fc12 apr-util.x86_64 0:1.3.9-2.fc12 apr-util-ldap.x86_64 0:1.3.9-2.fc12 httpd-tools.x86_64 0:2.2.13-2.fc12 mailcap.noarch 0:2.1.30-1.fc12
Complete!
De asemenea, avem nevoie de utilitarul wget pentru ca și clusterul să fie capabil să verifice status-ulserverului Apache.
# yum install -y wgetSetting up Install ProcessResolving Dependencies--> Running transaction check---> Package wget.x86_64 0:1.11.4-5.fc12 set to be updated--> Finished Dependency Resolution
Dependencies Resolved
===========================================================================================Package Arch Version Repository Size===========================================================================================Installing:wget x86_64 1.11.4-5.fc12 rawhide 393 k
Transaction Summary===========================================================================================Install 1 Package(s)Upgrade 0 Package(s)
Total download size: 393 kDownloading Packages:wget-1.11.4-5.fc12.x86_64.rpm | 393 kB 00:00Running rpm_check_debugRunning Transaction TestFinished Transaction TestTransaction Test Succeeded
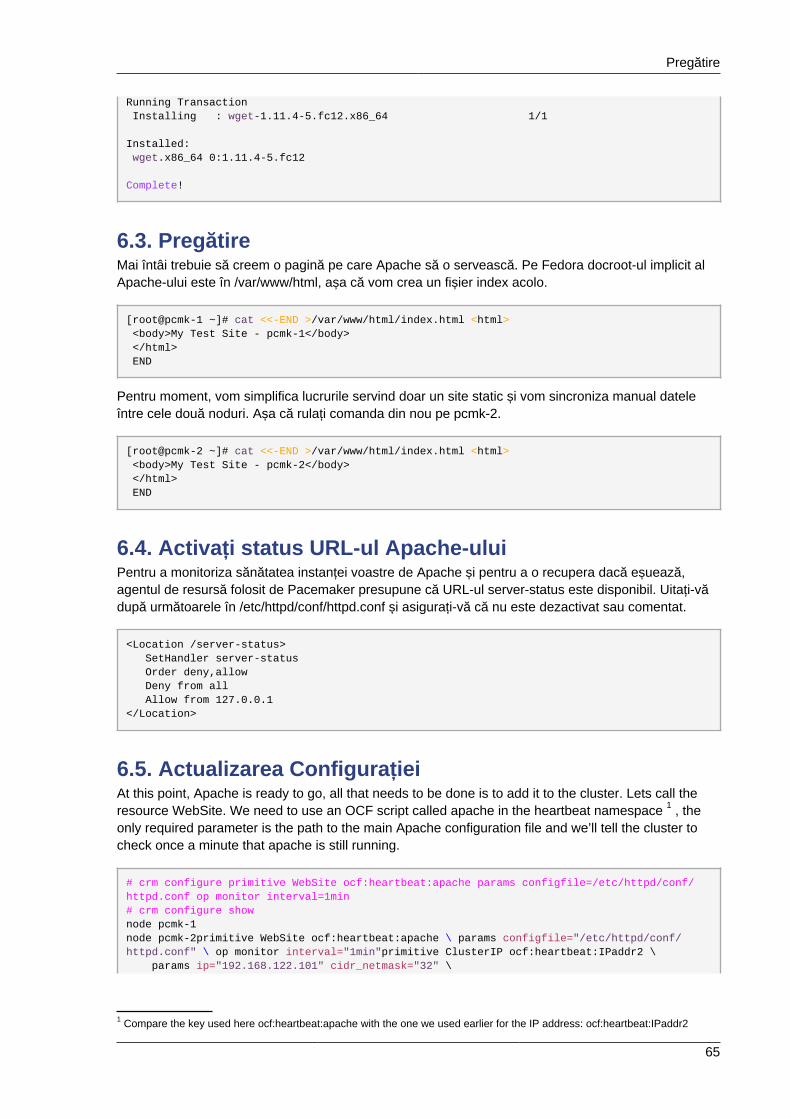
Pregătire
65
Running Transaction Installing : wget-1.11.4-5.fc12.x86_64 1/1
Installed: wget.x86_64 0:1.11.4-5.fc12
Complete!
6.3. PregătireMai întâi trebuie să creem o pagină pe care Apache să o servească. Pe Fedora docroot-ul implicit alApache-ului este în /var/www/html, așa că vom crea un fișier index acolo.
[root@pcmk-1 ~]# cat <<-END >/var/www/html/index.html <html> <body>My Test Site - pcmk-1</body> </html> END
Pentru moment, vom simplifica lucrurile servind doar un site static și vom sincroniza manual dateleîntre cele două noduri. Așa că rulați comanda din nou pe pcmk-2.
[root@pcmk-2 ~]# cat <<-END >/var/www/html/index.html <html> <body>My Test Site - pcmk-2</body> </html> END
6.4. Activați status URL-ul Apache-uluiPentru a monitoriza sănătatea instanței voastre de Apache și pentru a o recupera dacă eșuează,agentul de resursă folosit de Pacemaker presupune că URL-ul server-status este disponibil. Uitați-vădupă următoarele în /etc/httpd/conf/httpd.conf și asigurați-vă că nu este dezactivat sau comentat.
<Location /server-status> SetHandler server-status Order deny,allow Deny from all Allow from 127.0.0.1</Location>
6.5. Actualizarea ConfigurațieiAt this point, Apache is ready to go, all that needs to be done is to add it to the cluster. Lets call theresource WebSite. We need to use an OCF script called apache in the heartbeat namespace 1 , theonly required parameter is the path to the main Apache configuration file and we’ll tell the cluster tocheck once a minute that apache is still running.
# crm configure primitive WebSite ocf:heartbeat:apache params configfile=/etc/httpd/conf/httpd.conf op monitor interval=1min# crm configure shownode pcmk-1node pcmk-2primitive WebSite ocf:heartbeat:apache \ params configfile="/etc/httpd/conf/httpd.conf" \ op monitor interval="1min"primitive ClusterIP ocf:heartbeat:IPaddr2 \ params ip="192.168.122.101" cidr_netmask="32" \
1 Compare the key used here ocf:heartbeat:apache with the one we used earlier for the IP address: ocf:heartbeat:IPaddr2
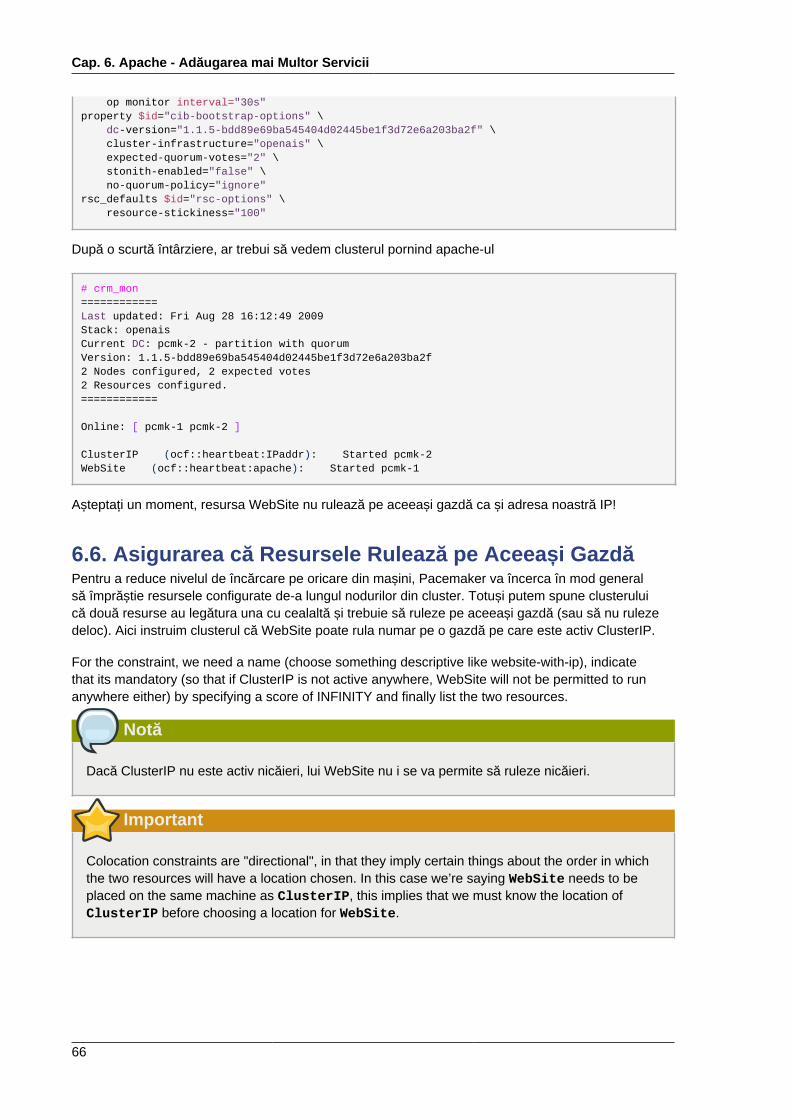
Cap. 6. Apache - Adăugarea mai Multor Servicii
66
op monitor interval="30s"property $id="cib-bootstrap-options" \ dc-version="1.1.5-bdd89e69ba545404d02445be1f3d72e6a203ba2f" \ cluster-infrastructure="openais" \ expected-quorum-votes="2" \ stonith-enabled="false" \ no-quorum-policy="ignore"rsc_defaults $id="rsc-options" \ resource-stickiness="100"
După o scurtă întârziere, ar trebui să vedem clusterul pornind apache-ul
# crm_mon============Last updated: Fri Aug 28 16:12:49 2009Stack: openaisCurrent DC: pcmk-2 - partition with quorumVersion: 1.1.5-bdd89e69ba545404d02445be1f3d72e6a203ba2f2 Nodes configured, 2 expected votes2 Resources configured.============
Online: [ pcmk-1 pcmk-2 ]
ClusterIP (ocf::heartbeat:IPaddr): Started pcmk-2WebSite (ocf::heartbeat:apache): Started pcmk-1
Așteptați un moment, resursa WebSite nu rulează pe aceeași gazdă ca și adresa noastră IP!
6.6. Asigurarea că Resursele Rulează pe Aceeași GazdăPentru a reduce nivelul de încărcare pe oricare din mașini, Pacemaker va încerca în mod generalsă împrăștie resursele configurate de-a lungul nodurilor din cluster. Totuși putem spune clusteruluică două resurse au legătura una cu cealaltă și trebuie să ruleze pe aceeași gazdă (sau să nu rulezedeloc). Aici instruim clusterul că WebSite poate rula numar pe o gazdă pe care este activ ClusterIP.
For the constraint, we need a name (choose something descriptive like website-with-ip), indicatethat its mandatory (so that if ClusterIP is not active anywhere, WebSite will not be permitted to runanywhere either) by specifying a score of INFINITY and finally list the two resources.
Notă
Dacă ClusterIP nu este activ nicăieri, lui WebSite nu i se va permite să ruleze nicăieri.
Important
Colocation constraints are "directional", in that they imply certain things about the order in whichthe two resources will have a location chosen. In this case we’re saying WebSite needs to beplaced on the same machine as ClusterIP, this implies that we must know the location ofClusterIP before choosing a location for WebSite.
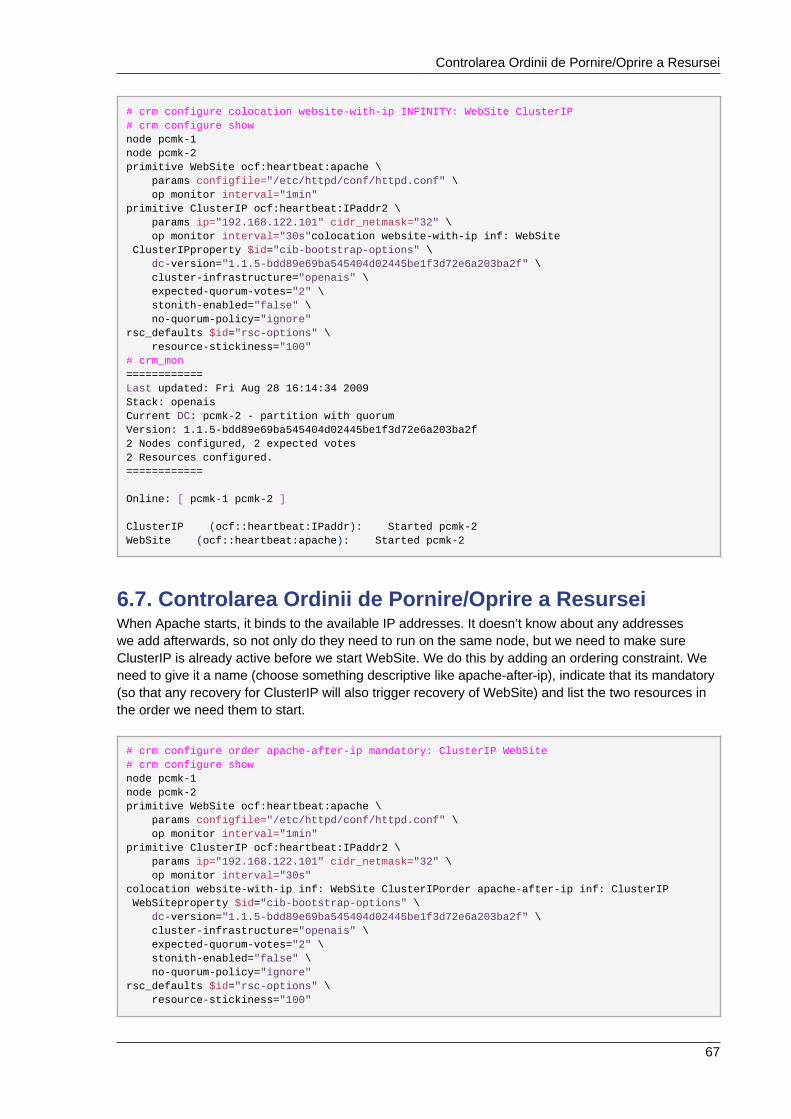
Controlarea Ordinii de Pornire/Oprire a Resursei
67
# crm configure colocation website-with-ip INFINITY: WebSite ClusterIP# crm configure shownode pcmk-1node pcmk-2primitive WebSite ocf:heartbeat:apache \ params configfile="/etc/httpd/conf/httpd.conf" \ op monitor interval="1min"primitive ClusterIP ocf:heartbeat:IPaddr2 \ params ip="192.168.122.101" cidr_netmask="32" \ op monitor interval="30s"colocation website-with-ip inf: WebSite ClusterIPproperty $id="cib-bootstrap-options" \ dc-version="1.1.5-bdd89e69ba545404d02445be1f3d72e6a203ba2f" \ cluster-infrastructure="openais" \ expected-quorum-votes="2" \ stonith-enabled="false" \ no-quorum-policy="ignore"rsc_defaults $id="rsc-options" \ resource-stickiness="100"# crm_mon============Last updated: Fri Aug 28 16:14:34 2009Stack: openaisCurrent DC: pcmk-2 - partition with quorumVersion: 1.1.5-bdd89e69ba545404d02445be1f3d72e6a203ba2f2 Nodes configured, 2 expected votes2 Resources configured.============
Online: [ pcmk-1 pcmk-2 ]
ClusterIP (ocf::heartbeat:IPaddr): Started pcmk-2WebSite (ocf::heartbeat:apache): Started pcmk-2
6.7. Controlarea Ordinii de Pornire/Oprire a ResurseiWhen Apache starts, it binds to the available IP addresses. It doesn’t know about any addresseswe add afterwards, so not only do they need to run on the same node, but we need to make sureClusterIP is already active before we start WebSite. We do this by adding an ordering constraint. Weneed to give it a name (choose something descriptive like apache-after-ip), indicate that its mandatory(so that any recovery for ClusterIP will also trigger recovery of WebSite) and list the two resources inthe order we need them to start.
# crm configure order apache-after-ip mandatory: ClusterIP WebSite# crm configure shownode pcmk-1node pcmk-2primitive WebSite ocf:heartbeat:apache \ params configfile="/etc/httpd/conf/httpd.conf" \ op monitor interval="1min"primitive ClusterIP ocf:heartbeat:IPaddr2 \ params ip="192.168.122.101" cidr_netmask="32" \ op monitor interval="30s"colocation website-with-ip inf: WebSite ClusterIPorder apache-after-ip inf: ClusterIP WebSiteproperty $id="cib-bootstrap-options" \ dc-version="1.1.5-bdd89e69ba545404d02445be1f3d72e6a203ba2f" \ cluster-infrastructure="openais" \ expected-quorum-votes="2" \ stonith-enabled="false" \ no-quorum-policy="ignore"rsc_defaults $id="rsc-options" \ resource-stickiness="100"
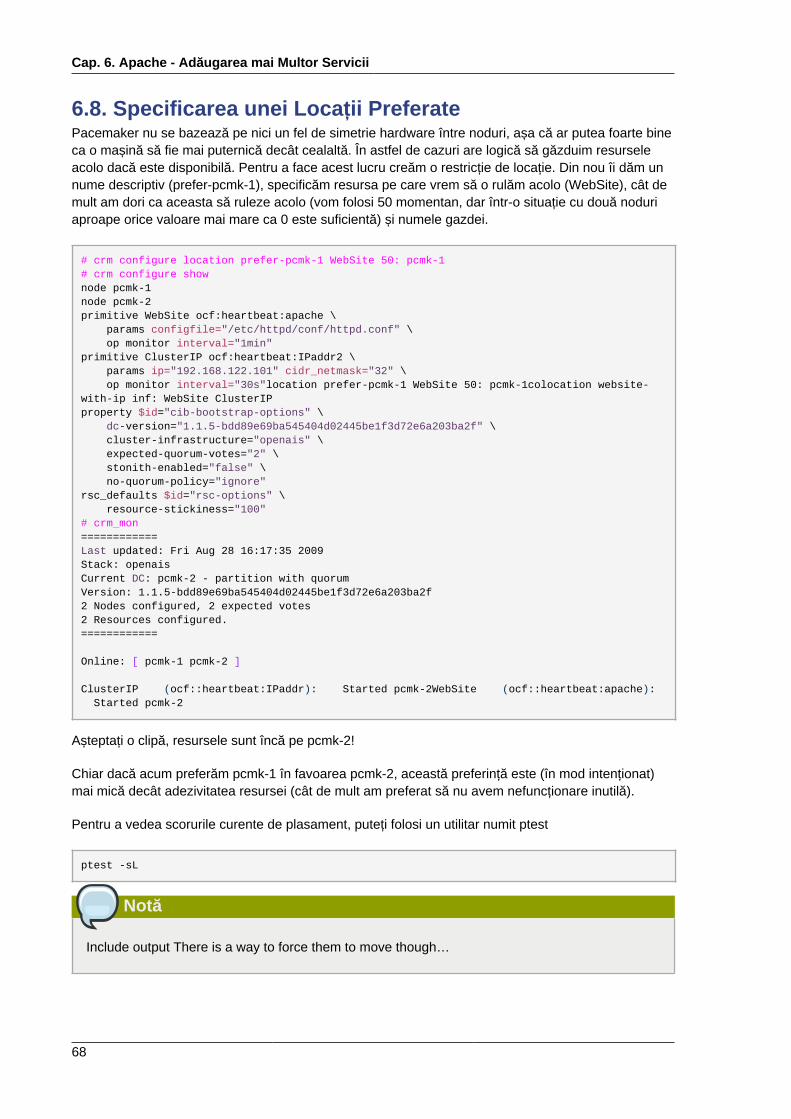
Cap. 6. Apache - Adăugarea mai Multor Servicii
68
6.8. Specificarea unei Locații PreferatePacemaker nu se bazează pe nici un fel de simetrie hardware între noduri, așa că ar putea foarte bineca o mașină să fie mai puternică decât cealaltă. În astfel de cazuri are logică să găzduim resurseleacolo dacă este disponibilă. Pentru a face acest lucru creăm o restricție de locație. Din nou îi dăm unnume descriptiv (prefer-pcmk-1), specificăm resursa pe care vrem să o rulăm acolo (WebSite), cât demult am dori ca aceasta să ruleze acolo (vom folosi 50 momentan, dar într-o situație cu două noduriaproape orice valoare mai mare ca 0 este suficientă) și numele gazdei.
# crm configure location prefer-pcmk-1 WebSite 50: pcmk-1# crm configure shownode pcmk-1node pcmk-2primitive WebSite ocf:heartbeat:apache \ params configfile="/etc/httpd/conf/httpd.conf" \ op monitor interval="1min"primitive ClusterIP ocf:heartbeat:IPaddr2 \ params ip="192.168.122.101" cidr_netmask="32" \ op monitor interval="30s"location prefer-pcmk-1 WebSite 50: pcmk-1colocation website-with-ip inf: WebSite ClusterIPproperty $id="cib-bootstrap-options" \ dc-version="1.1.5-bdd89e69ba545404d02445be1f3d72e6a203ba2f" \ cluster-infrastructure="openais" \ expected-quorum-votes="2" \ stonith-enabled="false" \ no-quorum-policy="ignore"rsc_defaults $id="rsc-options" \ resource-stickiness="100"# crm_mon============Last updated: Fri Aug 28 16:17:35 2009Stack: openaisCurrent DC: pcmk-2 - partition with quorumVersion: 1.1.5-bdd89e69ba545404d02445be1f3d72e6a203ba2f2 Nodes configured, 2 expected votes2 Resources configured.============
Online: [ pcmk-1 pcmk-2 ]
ClusterIP (ocf::heartbeat:IPaddr): Started pcmk-2WebSite (ocf::heartbeat:apache): Started pcmk-2
Așteptați o clipă, resursele sunt încă pe pcmk-2!
Chiar dacă acum preferăm pcmk-1 în favoarea pcmk-2, această preferință este (în mod intenționat)mai mică decât adezivitatea resursei (cât de mult am preferat să nu avem nefuncționare inutilă).
Pentru a vedea scorurile curente de plasament, puteți folosi un utilitar numit ptest
ptest -sL
Notă
Include output There is a way to force them to move though…
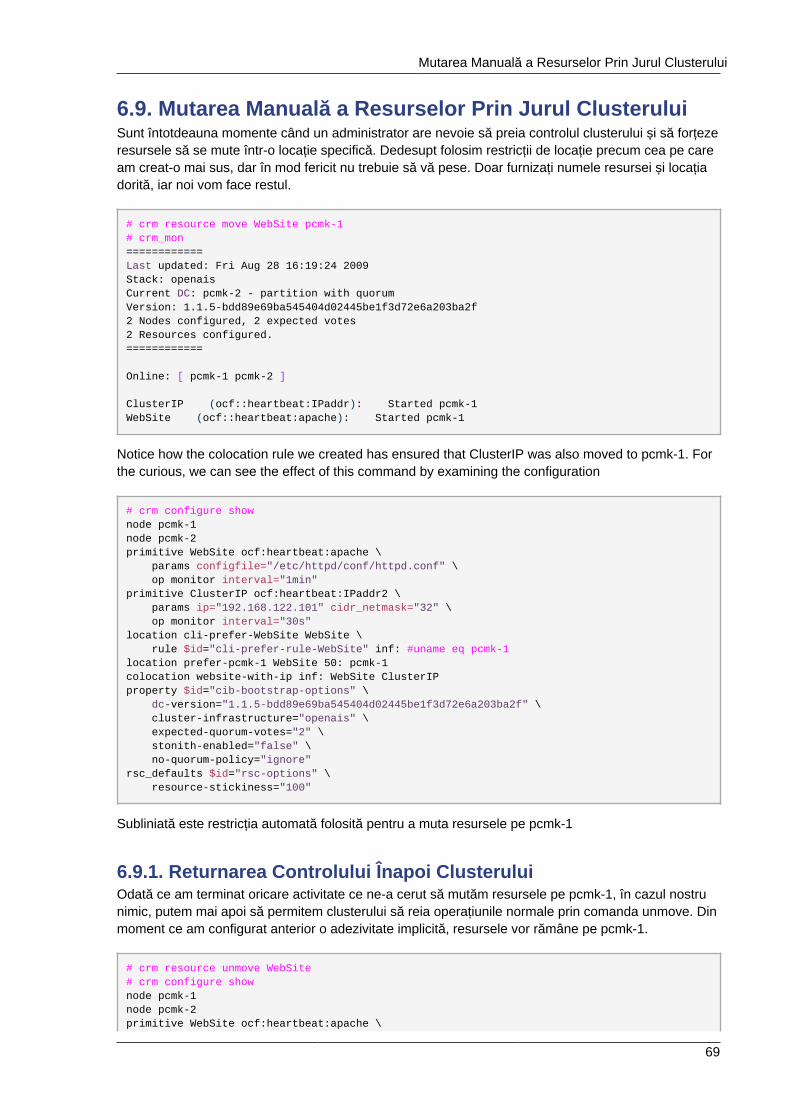
Mutarea Manuală a Resurselor Prin Jurul Clusterului
69
6.9. Mutarea Manuală a Resurselor Prin Jurul ClusteruluiSunt întotdeauna momente când un administrator are nevoie să preia controlul clusterului și să forțezeresursele să se mute într-o locație specifică. Dedesupt folosim restricții de locație precum cea pe caream creat-o mai sus, dar în mod fericit nu trebuie să vă pese. Doar furnizați numele resursei și locațiadorită, iar noi vom face restul.
# crm resource move WebSite pcmk-1# crm_mon============Last updated: Fri Aug 28 16:19:24 2009Stack: openaisCurrent DC: pcmk-2 - partition with quorumVersion: 1.1.5-bdd89e69ba545404d02445be1f3d72e6a203ba2f2 Nodes configured, 2 expected votes2 Resources configured.============
Online: [ pcmk-1 pcmk-2 ]
ClusterIP (ocf::heartbeat:IPaddr): Started pcmk-1WebSite (ocf::heartbeat:apache): Started pcmk-1
Notice how the colocation rule we created has ensured that ClusterIP was also moved to pcmk-1. Forthe curious, we can see the effect of this command by examining the configuration
# crm configure shownode pcmk-1node pcmk-2primitive WebSite ocf:heartbeat:apache \ params configfile="/etc/httpd/conf/httpd.conf" \ op monitor interval="1min"primitive ClusterIP ocf:heartbeat:IPaddr2 \ params ip="192.168.122.101" cidr_netmask="32" \ op monitor interval="30s"location cli-prefer-WebSite WebSite \ rule $id="cli-prefer-rule-WebSite" inf: #uname eq pcmk-1location prefer-pcmk-1 WebSite 50: pcmk-1colocation website-with-ip inf: WebSite ClusterIPproperty $id="cib-bootstrap-options" \ dc-version="1.1.5-bdd89e69ba545404d02445be1f3d72e6a203ba2f" \ cluster-infrastructure="openais" \ expected-quorum-votes="2" \ stonith-enabled="false" \ no-quorum-policy="ignore"rsc_defaults $id="rsc-options" \ resource-stickiness="100"
Subliniată este restricția automată folosită pentru a muta resursele pe pcmk-1
6.9.1. Returnarea Controlului Înapoi ClusteruluiOdată ce am terminat oricare activitate ce ne-a cerut să mutăm resursele pe pcmk-1, în cazul nostrunimic, putem mai apoi să permitem clusterului să reia operațiunile normale prin comanda unmove. Dinmoment ce am configurat anterior o adezivitate implicită, resursele vor rămâne pe pcmk-1.
# crm resource unmove WebSite# crm configure shownode pcmk-1node pcmk-2primitive WebSite ocf:heartbeat:apache \
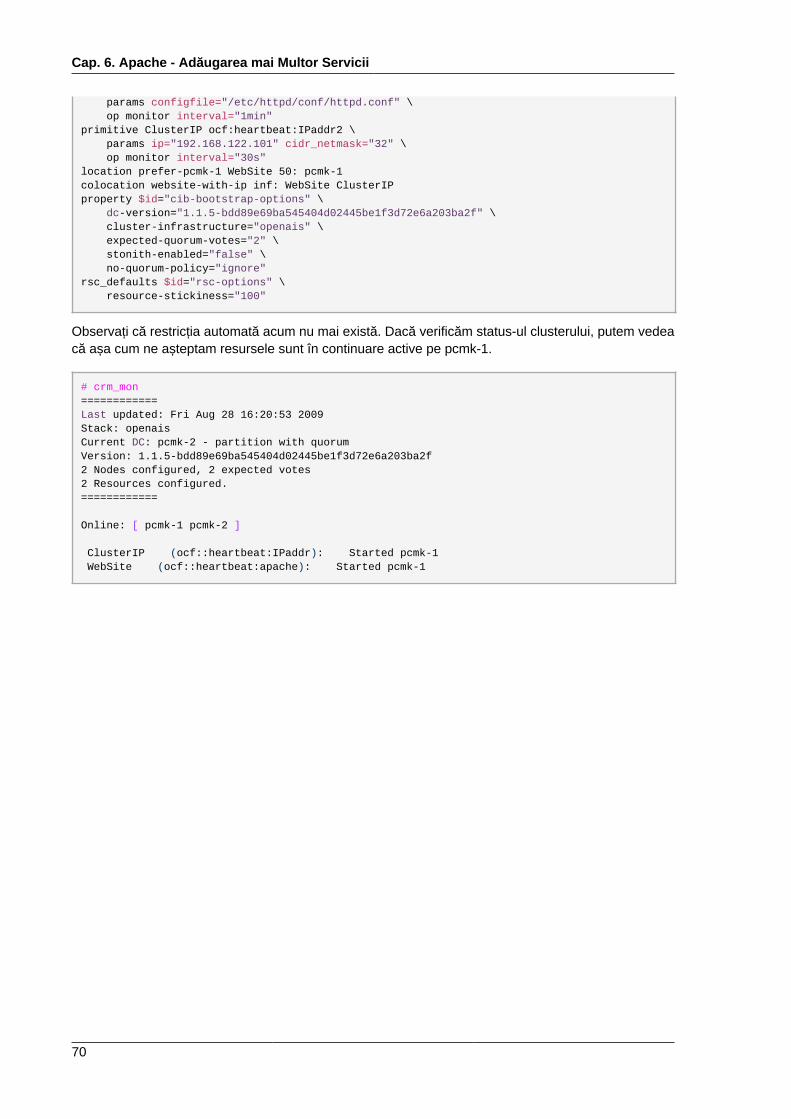
Cap. 6. Apache - Adăugarea mai Multor Servicii
70
params configfile="/etc/httpd/conf/httpd.conf" \ op monitor interval="1min"primitive ClusterIP ocf:heartbeat:IPaddr2 \ params ip="192.168.122.101" cidr_netmask="32" \ op monitor interval="30s"location prefer-pcmk-1 WebSite 50: pcmk-1colocation website-with-ip inf: WebSite ClusterIPproperty $id="cib-bootstrap-options" \ dc-version="1.1.5-bdd89e69ba545404d02445be1f3d72e6a203ba2f" \ cluster-infrastructure="openais" \ expected-quorum-votes="2" \ stonith-enabled="false" \ no-quorum-policy="ignore"rsc_defaults $id="rsc-options" \ resource-stickiness="100"
Observați că restricția automată acum nu mai există. Dacă verificăm status-ul clusterului, putem vedeacă așa cum ne așteptam resursele sunt în continuare active pe pcmk-1.
# crm_mon============Last updated: Fri Aug 28 16:20:53 2009Stack: openaisCurrent DC: pcmk-2 - partition with quorumVersion: 1.1.5-bdd89e69ba545404d02445be1f3d72e6a203ba2f2 Nodes configured, 2 expected votes2 Resources configured.============
Online: [ pcmk-1 pcmk-2 ]
ClusterIP (ocf::heartbeat:IPaddr): Started pcmk-1 WebSite (ocf::heartbeat:apache): Started pcmk-1

71
Stocare Replicată cu DRBD
Cuprins7.1. Background ........................................................................................................................ 717.2. Instalarea Pachetelor DRBD ................................................................................................ 717.3. Configurarea DRBD ............................................................................................................ 72
7.3.1. Crearea Unei Partiții Pentru DRBD ............................................................................ 727.3.2. Scrierea Config-ului DRBD ....................................................................................... 727.3.3. Inițializarea și Încărcarea DRBD-ului ......................................................................... 737.3.4. Popularea DRBD-ului cu Date ................................................................................... 74
7.4. Configurarea Clusterului pentru DRBD ................................................................................. 757.4.1. Testarea Migrării ...................................................................................................... 77
7.1. BackgroundEven if you’re serving up static websites, having to manually synchronize the contents of that websiteto all the machines in the cluster is not ideal. For dynamic websites, such as a wiki, it’s not even anoption. Not everyone care afford network-attached storage but somehow the data needs to be keptin sync. Enter DRBD which can be thought of as network based RAID-1. See http://www.drbd.org/ formore details.
7.2. Instalarea Pachetelor DRBDSince its inclusion in the upstream 2.6.33 kernel, everything needed to use DRBD ships with Fedora13. All you need to do is install it:
# yum install -y drbd-pacemaker drbd-udevLoaded plugins: presto, refresh-packagekitSetting up Install ProcessResolving Dependencies--> Running transaction check---> Package drbd-pacemaker.x86_64 0:8.3.7-2.fc13 set to be updated--> Processing Dependency: drbd-utils = 8.3.7-2.fc13 for package: drbd-pacemaker-8.3.7-2.fc13.x86_64--> Running transaction check---> Package drbd-utils.x86_64 0:8.3.7-2.fc13 set to be updated--> Finished Dependency Resolution
Dependencies Resolved
================================================================================= Package Arch Version Repository Size=================================================================================Installing: drbd-pacemaker x86_64 8.3.7-2.fc13 fedora 19 kInstalling for dependencies: drbd-utils x86_64 8.3.7-2.fc13 fedora 165 k
Transaction Summary=================================================================================Install 2 Package(s)Upgrade 0 Package(s)
Total download size: 184 kInstalled size: 427 k
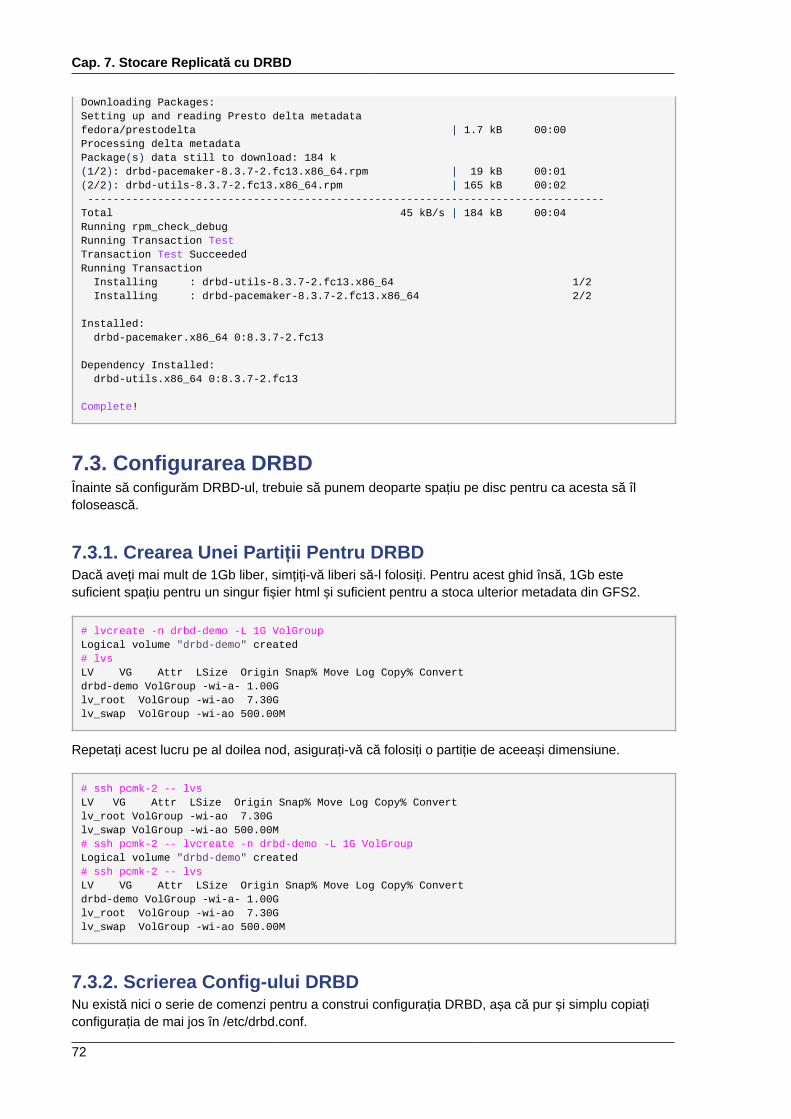
Cap. 7. Stocare Replicată cu DRBD
72
Downloading Packages:Setting up and reading Presto delta metadatafedora/prestodelta | 1.7 kB 00:00Processing delta metadataPackage(s) data still to download: 184 k(1/2): drbd-pacemaker-8.3.7-2.fc13.x86_64.rpm | 19 kB 00:01(2/2): drbd-utils-8.3.7-2.fc13.x86_64.rpm | 165 kB 00:02 ---------------------------------------------------------------------------------Total 45 kB/s | 184 kB 00:04Running rpm_check_debugRunning Transaction TestTransaction Test SucceededRunning Transaction Installing : drbd-utils-8.3.7-2.fc13.x86_64 1/2 Installing : drbd-pacemaker-8.3.7-2.fc13.x86_64 2/2
Installed: drbd-pacemaker.x86_64 0:8.3.7-2.fc13
Dependency Installed: drbd-utils.x86_64 0:8.3.7-2.fc13
Complete!
7.3. Configurarea DRBDÎnainte să configurăm DRBD-ul, trebuie să punem deoparte spațiu pe disc pentru ca acesta să îlfolosească.
7.3.1. Crearea Unei Partiții Pentru DRBDDacă aveți mai mult de 1Gb liber, simțiți-vă liberi să-l folosiți. Pentru acest ghid însă, 1Gb estesuficient spațiu pentru un singur fișier html și suficient pentru a stoca ulterior metadata din GFS2.
# lvcreate -n drbd-demo -L 1G VolGroupLogical volume "drbd-demo" created# lvsLV VG Attr LSize Origin Snap% Move Log Copy% Convertdrbd-demo VolGroup -wi-a- 1.00Glv_root VolGroup -wi-ao 7.30Glv_swap VolGroup -wi-ao 500.00M
Repetați acest lucru pe al doilea nod, asigurați-vă că folosiți o partiție de aceeași dimensiune.
# ssh pcmk-2 -- lvsLV VG Attr LSize Origin Snap% Move Log Copy% Convertlv_root VolGroup -wi-ao 7.30Glv_swap VolGroup -wi-ao 500.00M# ssh pcmk-2 -- lvcreate -n drbd-demo -L 1G VolGroupLogical volume "drbd-demo" created# ssh pcmk-2 -- lvsLV VG Attr LSize Origin Snap% Move Log Copy% Convertdrbd-demo VolGroup -wi-a- 1.00Glv_root VolGroup -wi-ao 7.30Glv_swap VolGroup -wi-ao 500.00M
7.3.2. Scrierea Config-ului DRBDNu există nici o serie de comenzi pentru a construi configurația DRBD, așa că pur și simplu copiațiconfigurația de mai jos în /etc/drbd.conf.
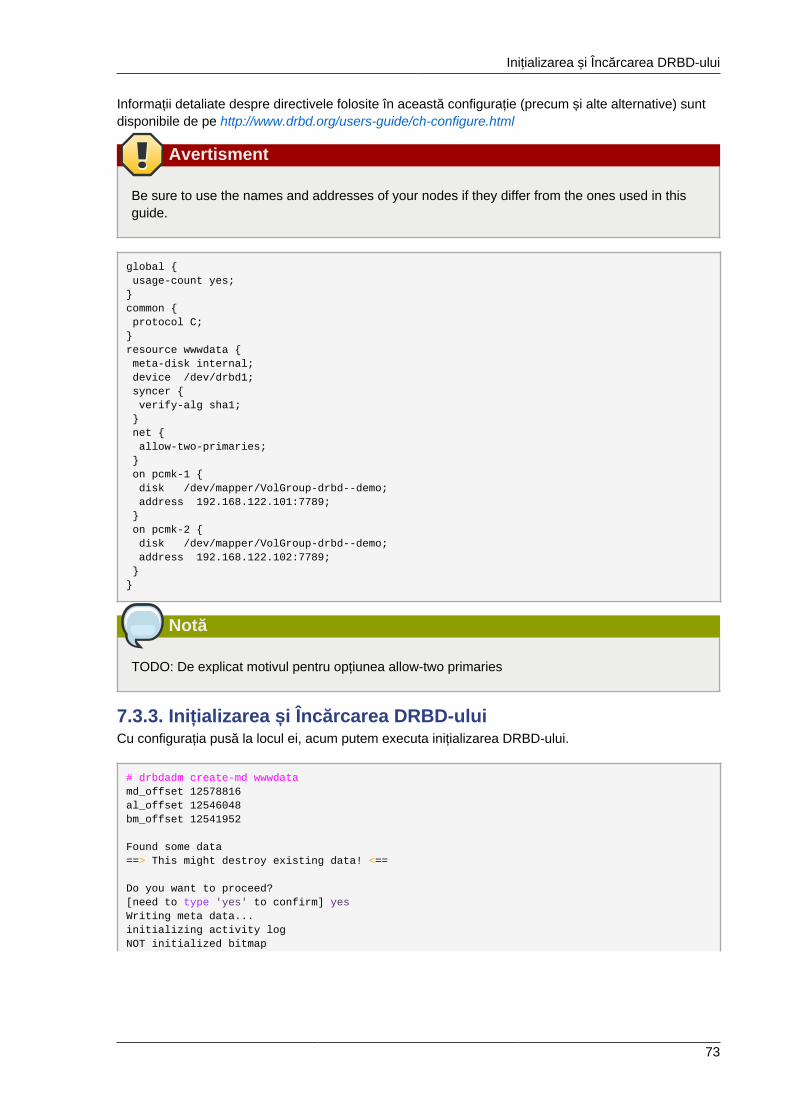
Inițializarea și Încărcarea DRBD-ului
73
Informații detaliate despre directivele folosite în această configurație (precum și alte alternative) suntdisponibile de pe http://www.drbd.org/users-guide/ch-configure.html
Avertisment
Be sure to use the names and addresses of your nodes if they differ from the ones used in thisguide.
global { usage-count yes;}common { protocol C;}resource wwwdata { meta-disk internal; device /dev/drbd1; syncer { verify-alg sha1; } net { allow-two-primaries; } on pcmk-1 { disk /dev/mapper/VolGroup-drbd--demo; address 192.168.122.101:7789; } on pcmk-2 { disk /dev/mapper/VolGroup-drbd--demo; address 192.168.122.102:7789; }}
Notă
TODO: De explicat motivul pentru opțiunea allow-two primaries
7.3.3. Inițializarea și Încărcarea DRBD-uluiCu configurația pusă la locul ei, acum putem executa inițializarea DRBD-ului.
# drbdadm create-md wwwdatamd_offset 12578816al_offset 12546048bm_offset 12541952
Found some data==> This might destroy existing data! <==
Do you want to proceed?[need to type 'yes' to confirm] yesWriting meta data...initializing activity logNOT initialized bitmap
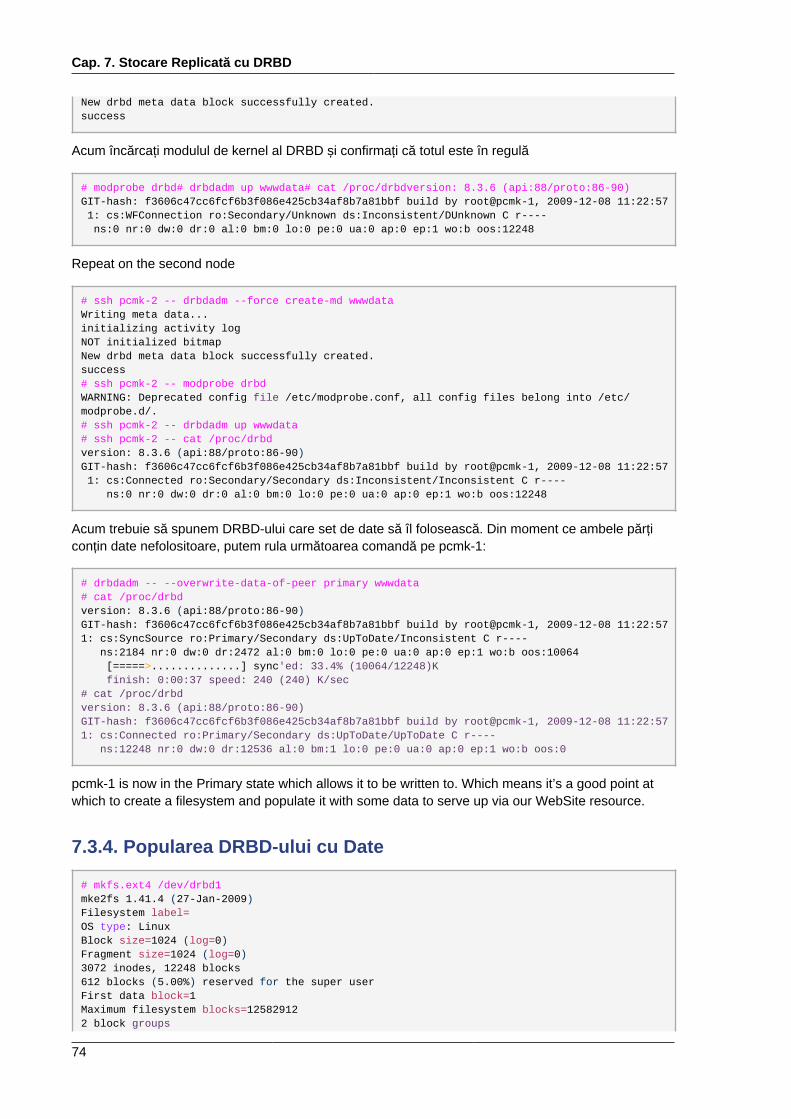
Cap. 7. Stocare Replicată cu DRBD
74
New drbd meta data block successfully created.success
Acum încărcați modulul de kernel al DRBD și confirmați că totul este în regulă
# modprobe drbd# drbdadm up wwwdata# cat /proc/drbdversion: 8.3.6 (api:88/proto:86-90)GIT-hash: f3606c47cc6fcf6b3f086e425cb34af8b7a81bbf build by root@pcmk-1, 2009-12-08 11:22:57 1: cs:WFConnection ro:Secondary/Unknown ds:Inconsistent/DUnknown C r---- ns:0 nr:0 dw:0 dr:0 al:0 bm:0 lo:0 pe:0 ua:0 ap:0 ep:1 wo:b oos:12248
Repeat on the second node
# ssh pcmk-2 -- drbdadm --force create-md wwwdataWriting meta data...initializing activity logNOT initialized bitmapNew drbd meta data block successfully created.success# ssh pcmk-2 -- modprobe drbdWARNING: Deprecated config file /etc/modprobe.conf, all config files belong into /etc/modprobe.d/.# ssh pcmk-2 -- drbdadm up wwwdata# ssh pcmk-2 -- cat /proc/drbdversion: 8.3.6 (api:88/proto:86-90)GIT-hash: f3606c47cc6fcf6b3f086e425cb34af8b7a81bbf build by root@pcmk-1, 2009-12-08 11:22:57 1: cs:Connected ro:Secondary/Secondary ds:Inconsistent/Inconsistent C r---- ns:0 nr:0 dw:0 dr:0 al:0 bm:0 lo:0 pe:0 ua:0 ap:0 ep:1 wo:b oos:12248
Acum trebuie să spunem DRBD-ului care set de date să îl folosească. Din moment ce ambele părțiconțin date nefolositoare, putem rula următoarea comandă pe pcmk-1:
# drbdadm -- --overwrite-data-of-peer primary wwwdata# cat /proc/drbdversion: 8.3.6 (api:88/proto:86-90)GIT-hash: f3606c47cc6fcf6b3f086e425cb34af8b7a81bbf build by root@pcmk-1, 2009-12-08 11:22:571: cs:SyncSource ro:Primary/Secondary ds:UpToDate/Inconsistent C r---- ns:2184 nr:0 dw:0 dr:2472 al:0 bm:0 lo:0 pe:0 ua:0 ap:0 ep:1 wo:b oos:10064 [=====>..............] sync'ed: 33.4% (10064/12248)K finish: 0:00:37 speed: 240 (240) K/sec# cat /proc/drbdversion: 8.3.6 (api:88/proto:86-90)GIT-hash: f3606c47cc6fcf6b3f086e425cb34af8b7a81bbf build by root@pcmk-1, 2009-12-08 11:22:571: cs:Connected ro:Primary/Secondary ds:UpToDate/UpToDate C r---- ns:12248 nr:0 dw:0 dr:12536 al:0 bm:1 lo:0 pe:0 ua:0 ap:0 ep:1 wo:b oos:0
pcmk-1 is now in the Primary state which allows it to be written to. Which means it’s a good point atwhich to create a filesystem and populate it with some data to serve up via our WebSite resource.
7.3.4. Popularea DRBD-ului cu Date
# mkfs.ext4 /dev/drbd1mke2fs 1.41.4 (27-Jan-2009)Filesystem label=OS type: LinuxBlock size=1024 (log=0)Fragment size=1024 (log=0)3072 inodes, 12248 blocks612 blocks (5.00%) reserved for the super userFirst data block=1Maximum filesystem blocks=125829122 block groups
Configurarea Clusterului pentru DRBD
75
8192 blocks per group, 8192 fragments per group1536 inodes per groupSuperblock backups stored on blocks: 8193
Writing inode tables: doneCreating journal (1024 blocks): doneWriting superblocks and filesystem accounting information: done
This filesystem will be automatically checked every 26 mounts or180 days, whichever comes first. Use tune2fs -c or -i to override.
Now mount the newly created filesystem so we can create our index file
# mount /dev/drbd1 /mnt/# cat <<-END >/mnt/index.html <html> <body>My Test Site - drbd</body> </html> END# umount /dev/drbd1
7.4. Configurarea Clusterului pentru DRBDO funcționalitate utilă a shell-ului crm este aceea că îl puteți folosi în mod interactiv pentru a realizamai multe modificări în mod atomic.
Întâi lansăm shell-ul. Promptul se va schimba pentru a indica faptul că sunteți în mod interactiv.
# crm cibcrm(live) #
Next we must create a working copy of the current configuration. This is where all our changes will go.The cluster will not see any of them until we say it’s ok. Notice again how the prompt changes, thistime to indicate that we’re no longer looking at the live cluster.
cib crm(live) # cib new drbdINFO: drbd shadow CIB createdcrm(drbd) #
Acum putem crea clona noastră de DRBD și să listăm configurația revizuită.
crm(drbd) # configure primitive WebData ocf:linbit:drbd params drbd_resource=wwwdata \ op monitor interval=60scrm(drbd) # configure ms WebDataClone WebData meta master-max=1 master-node-max=1 \ clone-max=2 clone-node-max=1 notify=truecrm(drbd) # configure shownode pcmk-1node pcmk-2primitive WebData ocf:linbit:drbd \ params drbd_resource="wwwdata" \ op monitor interval="60s"primitive WebSite ocf:heartbeat:apache \ params configfile="/etc/httpd/conf/httpd.conf" \ op monitor interval="1min"primitive ClusterIP ocf:heartbeat:IPaddr2 \ params ip="192.168.122.101" cidr_netmask="32" \ op monitor interval="30s"ms WebDataClone WebData \ meta master-max="1" master-node-max="1" clone-max="2" clone-node-max="1" notify="true"location prefer-pcmk-1 WebSite 50: pcmk-1colocation website-with-ip inf: WebSite ClusterIPorder apache-after-ip inf: ClusterIP WebSiteproperty $id="cib-bootstrap-options" \ dc-version="1.1.5-bdd89e69ba545404d02445be1f3d72e6a203ba2f" \
Cap. 7. Stocare Replicată cu DRBD
76
cluster-infrastructure="openais" \ expected-quorum-votes="2" \ stonith-enabled="false" \ no-quorum-policy="ignore"rsc_defaults $id="rsc-options" \ resource-stickiness="100"
Odată ce suntem multumiți cu modificările realizate, putem spune clusterului să înceapă să lefolosească și vom folosi crm_mon pentru a verifica faptul că totul funcționează.
crm(drbd) # cib commit drbdINFO: commited 'drbd' shadow CIB to the clustercrm(drbd) # quitbye# crm_mon============Last updated: Tue Sep 1 09:37:13 2009Stack: openaisCurrent DC: pcmk-1 - partition with quorumVersion: 1.1.5-bdd89e69ba545404d02445be1f3d72e6a203ba2f2 Nodes configured, 2 expected votes3 Resources configured.============
Online: [ pcmk-1 pcmk-2 ]
ClusterIP (ocf::heartbeat:IPaddr): Started pcmk-1WebSite (ocf::heartbeat:apache): Started pcmk-1Master/Slave Set: WebDataClone Masters: [ pcmk-2 ] Slaves: [ pcmk-1 ]
Notă
Include detalii despre adăugarea unei resurse secundare DRBD
Acum că DRBD funcționează putem configura o resursă Filesystem pentru a îl folosi. Suplimentar fațăde definiția sistemului de fișiere, trebuie să spunem clusterului de asemenea unde poate fi plasată(doar pe DRBD-ul Primar) și când îi este permis să pornească (după ce nodul a fost promovat la acestrol - Primar).
Încă o dată vom folosi modul interactiv al shell-ului
# crmcrm(live) # cib new fsINFO: fs shadow CIB createdcrm(fs) # configure primitive WebFS ocf:heartbeat:Filesystem \ params device="/dev/drbd/by-res/wwwdata" directory="/var/www/html" fstype="ext4"crm(fs) # configure colocation fs_on_drbd inf: WebFS WebDataClone:Mastercrm(fs) # configure order WebFS-after-WebData inf: WebDataClone:promote WebFS:start
We also need to tell the cluster that Apache needs to run on the samemachine as the filesystem and that it must be active before Apache canstart.
crm(fs) # configure colocation WebSite-with-WebFS inf: WebSite WebFScrm(fs) # configure order WebSite-after-WebFS inf: WebFS WebSite
E timpul să revizuim configurația actualizată:
crm(fs) # crm configure show
Testarea Migrării
77
node pcmk-1node pcmk-2primitive WebData ocf:linbit:drbd \ params drbd_resource="wwwdata" \ op monitor interval="60s"primitive WebFS ocf:heartbeat:Filesystem \ params device="/dev/drbd/by-res/wwwdata" directory="/var/www/html" fstype="ext4"primitive WebSite ocf:heartbeat:apache \ params configfile="/etc/httpd/conf/httpd.conf" \ op monitor interval="1min"primitive ClusterIP ocf:heartbeat:IPaddr2 \ params ip="192.168.122.101" cidr_netmask="32" \ op monitor interval="30s"ms WebDataClone WebData \ meta master-max="1" master-node-max="1" clone-max="2" clone-node-max="1" notify="true"location prefer-pcmk-1 WebSite 50: pcmk-1colocation WebSite-with-WebFS inf: WebSite WebFScolocation fs_on_drbd inf: WebFS WebDataClone:Mastercolocation website-with-ip inf: WebSite ClusterIPorder WebFS-after-WebData inf: WebDataClone:promote WebFS:startorder WebSite-after-WebFS inf: WebFS WebSiteorder apache-after-ip inf: ClusterIP WebSiteproperty $id="cib-bootstrap-options" \ dc-version="1.1.5-bdd89e69ba545404d02445be1f3d72e6a203ba2f" \ cluster-infrastructure="openais" \ expected-quorum-votes="2" \ stonith-enabled="false" \ no-quorum-policy="ignore"rsc_defaults $id="rsc-options" \ resource-stickiness="100"
După ce am revizuit configurația nouă, o încărcăm din nou și urmărim clusterul cum o pune înfolosință.
crm(fs) # cib commit fsINFO: commited 'fs' shadow CIB to the clustercrm(fs) # quitbye# crm_mon============Last updated: Tue Sep 1 10:08:44 2009Stack: openaisCurrent DC: pcmk-1 - partition with quorumVersion: 1.1.5-bdd89e69ba545404d02445be1f3d72e6a203ba2f2 Nodes configured, 2 expected votes4 Resources configured.============
Online: [ pcmk-1 pcmk-2 ]
ClusterIP (ocf::heartbeat:IPaddr): Started pcmk-1WebSite (ocf::heartbeat:apache): Started pcmk-1Master/Slave Set: WebDataClone Masters: [ pcmk-1 ] Slaves: [ pcmk-2 ]WebFS (ocf::heartbeat:Filesystem): Started pcmk-1
7.4.1. Testarea MigrăriiWe could shut down the active node again, but another way to safely simulate recovery is to put thenode into what is called "standby mode". Nodes in this state tell the cluster that they are not allowedto run resources. Any resources found active there will be moved elsewhere. This feature can beparticularly useful when updating the resources' packages.
Cap. 7. Stocare Replicată cu DRBD
78
Puneți nodul local în mod standby și observați cum clusterul mută toate resursele pe nodul celălalt.Observați de asemenea că status-ul nodului se va schimba pentru a indica faptul că nu mai poategăzdui resurse.
# crm node standby# crm_mon============Last updated: Tue Sep 1 10:09:57 2009Stack: openaisCurrent DC: pcmk-1 - partition with quorumVersion: 1.1.5-bdd89e69ba545404d02445be1f3d72e6a203ba2f2 Nodes configured, 2 expected votes4 Resources configured.============Node pcmk-1: standbyOnline: [ pcmk-2 ]
ClusterIP (ocf::heartbeat:IPaddr): Started pcmk-2WebSite (ocf::heartbeat:apache): Started pcmk-2Master/Slave Set: WebDataClone Masters: [ pcmk-2 ] Stopped: [ WebData:1 ]WebFS (ocf::heartbeat:Filesystem): Started pcmk-2
Odată ce am făcut tot ceea ce era nevoie să facem pe pcmk-1 (în acest caz nimic, vroiam doar săvedem resursele mutându-se), putem permite nodului să fie din nou un membru întreg al clusterului.
# crm node online# crm_mon============Last updated: Tue Sep 1 10:13:25 2009Stack: openaisCurrent DC: pcmk-1 - partition with quorumVersion: 1.1.5-bdd89e69ba545404d02445be1f3d72e6a203ba2f2 Nodes configured, 2 expected votes4 Resources configured.============Online: [ pcmk-1 pcmk-2 ]ClusterIP (ocf::heartbeat:IPaddr): Started pcmk-2WebSite (ocf::heartbeat:apache): Started pcmk-2Master/Slave Set: WebDataClone Masters: [ pcmk-2 ] Slaves: [ pcmk-1 ]WebFS (ocf::heartbeat:Filesystem): Started pcmk-2
Observați că setările noastre de adezivitate a resurselor previn serviciile din a migra înapoi pe pcmk-1.
79
Conversia la Activ/Activ
Cuprins8.1. Cerințe ............................................................................................................................... 798.2. Adăugarea de Suport pentru CMAN ..................................................................................... 79
8.2.1. Instalarea Soft-ului necesar ...................................................................................... 808.2.2. Configurarea CMAN ................................................................................................. 848.2.3. Redundant Rings ..................................................................................................... 858.2.4. Configurarea Evacuării Forțate în CMAN ................................................................... 858.2.5. Aducerea Clusterului Online cu CMAN ...................................................................... 86
8.3. Creați un Sistem de Fișiere GFS2 ....................................................................................... 878.3.1. Pregătire .................................................................................................................. 878.3.2. Crearea și Popularea unei Partiții GFS2 .................................................................... 87
8.4. Reconfigurarea Clusterului pentru GFS2 .............................................................................. 888.5. Reconfigurarea Pacemaker pentru Activ/Activ ....................................................................... 89
8.5.1. Testarea Recuperării ................................................................................................ 92
8.1. CerințeCerința primară pentru un cluster Activ/Activ este ca datele necesare pentru serviciile voastre să fiedisponibile, în mod simultan, pe ambele mașini. Pacemaker nu face nici o cerință asupra modului încare este atins acest scop, ați putea folosi un SAN dacă ați fi avut unul disponibil, însă din moment ceDRBD suportă noduri multiple Primare, putem să le folosim pe acestea de asemenea.
The only hitch is that we need to use a cluster-aware filesystem. The one we used earlier with DRBD,ext4, is not one of those. Both OCFS2 and GFS2 are supported, however here we will use GFS2which comes with Fedora.
We’ll also need to use CMAN for Cluster Membership and Quorum instead of our Corosync plugin.
8.2. Adăugarea de Suport pentru CMANCMAN v31 este un plugin al Corosync care monitorizează numele și numărul de noduri active dincluster pentru a livra informații de apartenență și quorum clienților (cum ar fi daemonii Pacemaker).
In a traditional Corosync-Pacemaker cluster, a Pacemaker plugin is loaded to provide membershipand quorum information. The motivation for wanting to use CMAN for this instead, is to ensure allelements of the cluster stack are making decisions based on the same membership and quorum data.2
In the case of GFS2, the key pieces are the dlm_controld and gfs_controld helpers which act asthe glue between the filesystem and the cluster software. Supporting CMAN enables us to use theversions already being shipped by most distributions (since CMAN has been around longer thanPacemaker and is part of the Red Hat cluster stack).
1 http://docs.redhat.com/docs/en-US/Red_Hat_Enterprise_Linux/6/html-single/Cluster_Suite_Overview/index.html#s2-clumembership-overview-CSO2 A failure to do this can lead to what is called internal split-brain - a situation where different parts of the stack disagree aboutwhether some nodes are alive or dead - which quickly leads to unnecessary down-time and/or data corruption.
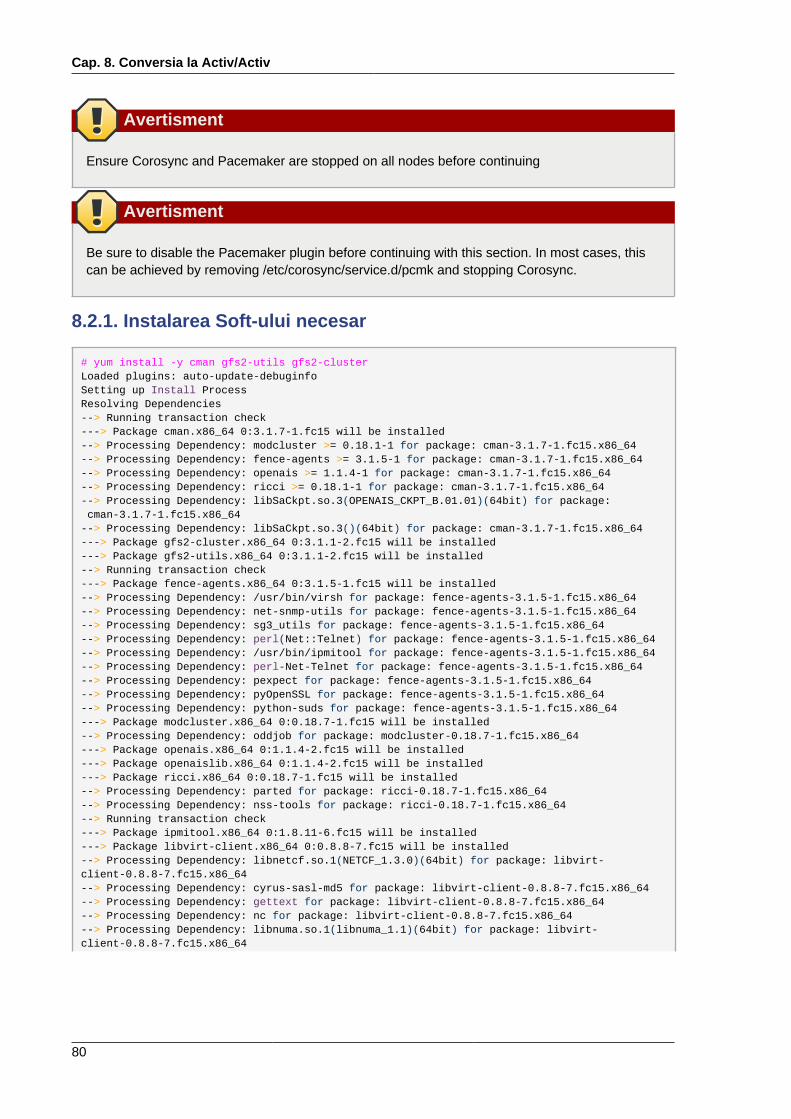
Cap. 8. Conversia la Activ/Activ
80
Avertisment
Ensure Corosync and Pacemaker are stopped on all nodes before continuing
Avertisment
Be sure to disable the Pacemaker plugin before continuing with this section. In most cases, thiscan be achieved by removing /etc/corosync/service.d/pcmk and stopping Corosync.
8.2.1. Instalarea Soft-ului necesar
# yum install -y cman gfs2-utils gfs2-clusterLoaded plugins: auto-update-debuginfoSetting up Install ProcessResolving Dependencies--> Running transaction check---> Package cman.x86_64 0:3.1.7-1.fc15 will be installed--> Processing Dependency: modcluster >= 0.18.1-1 for package: cman-3.1.7-1.fc15.x86_64--> Processing Dependency: fence-agents >= 3.1.5-1 for package: cman-3.1.7-1.fc15.x86_64--> Processing Dependency: openais >= 1.1.4-1 for package: cman-3.1.7-1.fc15.x86_64--> Processing Dependency: ricci >= 0.18.1-1 for package: cman-3.1.7-1.fc15.x86_64--> Processing Dependency: libSaCkpt.so.3(OPENAIS_CKPT_B.01.01)(64bit) for package: cman-3.1.7-1.fc15.x86_64--> Processing Dependency: libSaCkpt.so.3()(64bit) for package: cman-3.1.7-1.fc15.x86_64---> Package gfs2-cluster.x86_64 0:3.1.1-2.fc15 will be installed---> Package gfs2-utils.x86_64 0:3.1.1-2.fc15 will be installed--> Running transaction check---> Package fence-agents.x86_64 0:3.1.5-1.fc15 will be installed--> Processing Dependency: /usr/bin/virsh for package: fence-agents-3.1.5-1.fc15.x86_64--> Processing Dependency: net-snmp-utils for package: fence-agents-3.1.5-1.fc15.x86_64--> Processing Dependency: sg3_utils for package: fence-agents-3.1.5-1.fc15.x86_64--> Processing Dependency: perl(Net::Telnet) for package: fence-agents-3.1.5-1.fc15.x86_64--> Processing Dependency: /usr/bin/ipmitool for package: fence-agents-3.1.5-1.fc15.x86_64--> Processing Dependency: perl-Net-Telnet for package: fence-agents-3.1.5-1.fc15.x86_64--> Processing Dependency: pexpect for package: fence-agents-3.1.5-1.fc15.x86_64--> Processing Dependency: pyOpenSSL for package: fence-agents-3.1.5-1.fc15.x86_64--> Processing Dependency: python-suds for package: fence-agents-3.1.5-1.fc15.x86_64---> Package modcluster.x86_64 0:0.18.7-1.fc15 will be installed--> Processing Dependency: oddjob for package: modcluster-0.18.7-1.fc15.x86_64---> Package openais.x86_64 0:1.1.4-2.fc15 will be installed---> Package openaislib.x86_64 0:1.1.4-2.fc15 will be installed---> Package ricci.x86_64 0:0.18.7-1.fc15 will be installed--> Processing Dependency: parted for package: ricci-0.18.7-1.fc15.x86_64--> Processing Dependency: nss-tools for package: ricci-0.18.7-1.fc15.x86_64--> Running transaction check---> Package ipmitool.x86_64 0:1.8.11-6.fc15 will be installed---> Package libvirt-client.x86_64 0:0.8.8-7.fc15 will be installed--> Processing Dependency: libnetcf.so.1(NETCF_1.3.0)(64bit) for package: libvirt-client-0.8.8-7.fc15.x86_64--> Processing Dependency: cyrus-sasl-md5 for package: libvirt-client-0.8.8-7.fc15.x86_64--> Processing Dependency: gettext for package: libvirt-client-0.8.8-7.fc15.x86_64--> Processing Dependency: nc for package: libvirt-client-0.8.8-7.fc15.x86_64--> Processing Dependency: libnuma.so.1(libnuma_1.1)(64bit) for package: libvirt-client-0.8.8-7.fc15.x86_64

Instalarea Soft-ului necesar
81
--> Processing Dependency: libnuma.so.1(libnuma_1.2)(64bit) for package: libvirt-client-0.8.8-7.fc15.x86_64--> Processing Dependency: libnetcf.so.1(NETCF_1.2.0)(64bit) for package: libvirt-client-0.8.8-7.fc15.x86_64--> Processing Dependency: gnutls-utils for package: libvirt-client-0.8.8-7.fc15.x86_64--> Processing Dependency: libnetcf.so.1(NETCF_1.0.0)(64bit) for package: libvirt-client-0.8.8-7.fc15.x86_64--> Processing Dependency: libxenstore.so.3.0()(64bit) for package: libvirt-client-0.8.8-7.fc15.x86_64--> Processing Dependency: libyajl.so.1()(64bit) for package: libvirt-client-0.8.8-7.fc15.x86_64--> Processing Dependency: libnl.so.1()(64bit) for package: libvirt-client-0.8.8-7.fc15.x86_64--> Processing Dependency: libnuma.so.1()(64bit) for package: libvirt-client-0.8.8-7.fc15.x86_64--> Processing Dependency: libaugeas.so.0()(64bit) for package: libvirt-client-0.8.8-7.fc15.x86_64--> Processing Dependency: libnetcf.so.1()(64bit) for package: libvirt-client-0.8.8-7.fc15.x86_64---> Package net-snmp-utils.x86_64 1:5.6.1-7.fc15 will be installed---> Package nss-tools.x86_64 0:3.12.10-6.fc15 will be installed---> Package oddjob.x86_64 0:0.31-2.fc15 will be installed---> Package parted.x86_64 0:2.3-10.fc15 will be installed---> Package perl-Net-Telnet.noarch 0:3.03-12.fc15 will be installed---> Package pexpect.noarch 0:2.3-6.fc15 will be installed---> Package pyOpenSSL.x86_64 0:0.10-3.fc15 will be installed---> Package python-suds.noarch 0:0.3.9-3.fc15 will be installed---> Package sg3_utils.x86_64 0:1.29-3.fc15 will be installed--> Processing Dependency: sg3_utils-libs = 1.29-3.fc15 for package: sg3_utils-1.29-3.fc15.x86_64--> Processing Dependency: libsgutils2.so.2()(64bit) for package: sg3_utils-1.29-3.fc15.x86_64--> Running transaction check---> Package augeas-libs.x86_64 0:0.9.0-1.fc15 will be installed---> Package cyrus-sasl-md5.x86_64 0:2.1.23-18.fc15 will be installed---> Package gettext.x86_64 0:0.18.1.1-7.fc15 will be installed--> Processing Dependency: libgomp.so.1(GOMP_1.0)(64bit) for package: gettext-0.18.1.1-7.fc15.x86_64--> Processing Dependency: libgettextlib-0.18.1.so()(64bit) for package: gettext-0.18.1.1-7.fc15.x86_64--> Processing Dependency: libgettextsrc-0.18.1.so()(64bit) for package: gettext-0.18.1.1-7.fc15.x86_64--> Processing Dependency: libgomp.so.1()(64bit) for package: gettext-0.18.1.1-7.fc15.x86_64---> Package gnutls-utils.x86_64 0:2.10.5-1.fc15 will be installed---> Package libnl.x86_64 0:1.1-14.fc15 will be installed---> Package nc.x86_64 0:1.100-3.fc15 will be installed--> Processing Dependency: libbsd.so.0(LIBBSD_0.0)(64bit) for package: nc-1.100-3.fc15.x86_64--> Processing Dependency: libbsd.so.0(LIBBSD_0.2)(64bit) for package: nc-1.100-3.fc15.x86_64--> Processing Dependency: libbsd.so.0()(64bit) for package: nc-1.100-3.fc15.x86_64---> Package netcf-libs.x86_64 0:0.1.9-1.fc15 will be installed---> Package numactl.x86_64 0:2.0.7-1.fc15 will be installed---> Package sg3_utils-libs.x86_64 0:1.29-3.fc15 will be installed---> Package xen-libs.x86_64 0:4.1.1-3.fc15 will be installed--> Processing Dependency: xen-licenses for package: xen-libs-4.1.1-3.fc15.x86_64---> Package yajl.x86_64 0:1.0.11-1.fc15 will be installed--> Running transaction check---> Package gettext-libs.x86_64 0:0.18.1.1-7.fc15 will be installed---> Package libbsd.x86_64 0:0.2.0-4.fc15 will be installed---> Package libgomp.x86_64 0:4.6.1-9.fc15 will be installed---> Package xen-licenses.x86_64 0:4.1.1-3.fc15 will be installed--> Finished Dependency Resolution
Dependencies Resolved
============================================================================= Package Arch Version Repository Size=============================================================================
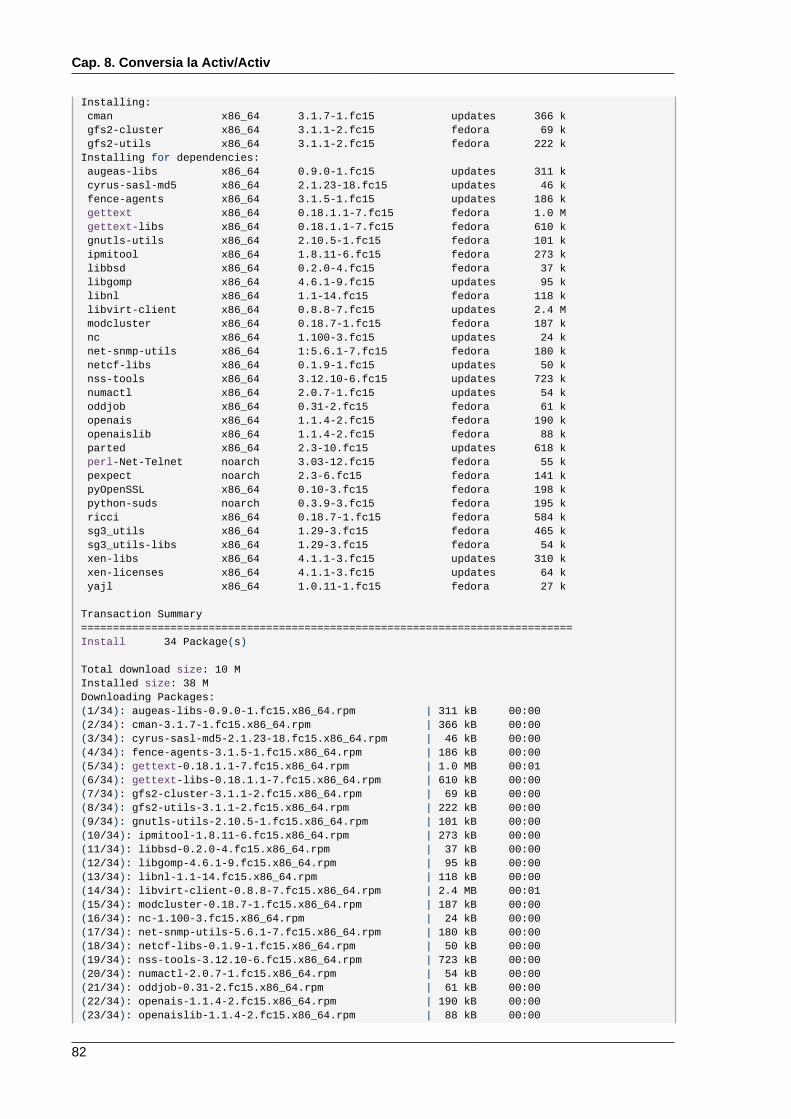
Cap. 8. Conversia la Activ/Activ
82
Installing: cman x86_64 3.1.7-1.fc15 updates 366 k gfs2-cluster x86_64 3.1.1-2.fc15 fedora 69 k gfs2-utils x86_64 3.1.1-2.fc15 fedora 222 kInstalling for dependencies: augeas-libs x86_64 0.9.0-1.fc15 updates 311 k cyrus-sasl-md5 x86_64 2.1.23-18.fc15 updates 46 k fence-agents x86_64 3.1.5-1.fc15 updates 186 k gettext x86_64 0.18.1.1-7.fc15 fedora 1.0 M gettext-libs x86_64 0.18.1.1-7.fc15 fedora 610 k gnutls-utils x86_64 2.10.5-1.fc15 fedora 101 k ipmitool x86_64 1.8.11-6.fc15 fedora 273 k libbsd x86_64 0.2.0-4.fc15 fedora 37 k libgomp x86_64 4.6.1-9.fc15 updates 95 k libnl x86_64 1.1-14.fc15 fedora 118 k libvirt-client x86_64 0.8.8-7.fc15 updates 2.4 M modcluster x86_64 0.18.7-1.fc15 fedora 187 k nc x86_64 1.100-3.fc15 updates 24 k net-snmp-utils x86_64 1:5.6.1-7.fc15 fedora 180 k netcf-libs x86_64 0.1.9-1.fc15 updates 50 k nss-tools x86_64 3.12.10-6.fc15 updates 723 k numactl x86_64 2.0.7-1.fc15 updates 54 k oddjob x86_64 0.31-2.fc15 fedora 61 k openais x86_64 1.1.4-2.fc15 fedora 190 k openaislib x86_64 1.1.4-2.fc15 fedora 88 k parted x86_64 2.3-10.fc15 updates 618 k perl-Net-Telnet noarch 3.03-12.fc15 fedora 55 k pexpect noarch 2.3-6.fc15 fedora 141 k pyOpenSSL x86_64 0.10-3.fc15 fedora 198 k python-suds noarch 0.3.9-3.fc15 fedora 195 k ricci x86_64 0.18.7-1.fc15 fedora 584 k sg3_utils x86_64 1.29-3.fc15 fedora 465 k sg3_utils-libs x86_64 1.29-3.fc15 fedora 54 k xen-libs x86_64 4.1.1-3.fc15 updates 310 k xen-licenses x86_64 4.1.1-3.fc15 updates 64 k yajl x86_64 1.0.11-1.fc15 fedora 27 k
Transaction Summary=============================================================================Install 34 Package(s)
Total download size: 10 MInstalled size: 38 MDownloading Packages:(1/34): augeas-libs-0.9.0-1.fc15.x86_64.rpm | 311 kB 00:00(2/34): cman-3.1.7-1.fc15.x86_64.rpm | 366 kB 00:00(3/34): cyrus-sasl-md5-2.1.23-18.fc15.x86_64.rpm | 46 kB 00:00(4/34): fence-agents-3.1.5-1.fc15.x86_64.rpm | 186 kB 00:00(5/34): gettext-0.18.1.1-7.fc15.x86_64.rpm | 1.0 MB 00:01(6/34): gettext-libs-0.18.1.1-7.fc15.x86_64.rpm | 610 kB 00:00(7/34): gfs2-cluster-3.1.1-2.fc15.x86_64.rpm | 69 kB 00:00(8/34): gfs2-utils-3.1.1-2.fc15.x86_64.rpm | 222 kB 00:00(9/34): gnutls-utils-2.10.5-1.fc15.x86_64.rpm | 101 kB 00:00(10/34): ipmitool-1.8.11-6.fc15.x86_64.rpm | 273 kB 00:00(11/34): libbsd-0.2.0-4.fc15.x86_64.rpm | 37 kB 00:00(12/34): libgomp-4.6.1-9.fc15.x86_64.rpm | 95 kB 00:00(13/34): libnl-1.1-14.fc15.x86_64.rpm | 118 kB 00:00(14/34): libvirt-client-0.8.8-7.fc15.x86_64.rpm | 2.4 MB 00:01(15/34): modcluster-0.18.7-1.fc15.x86_64.rpm | 187 kB 00:00(16/34): nc-1.100-3.fc15.x86_64.rpm | 24 kB 00:00(17/34): net-snmp-utils-5.6.1-7.fc15.x86_64.rpm | 180 kB 00:00(18/34): netcf-libs-0.1.9-1.fc15.x86_64.rpm | 50 kB 00:00(19/34): nss-tools-3.12.10-6.fc15.x86_64.rpm | 723 kB 00:00(20/34): numactl-2.0.7-1.fc15.x86_64.rpm | 54 kB 00:00(21/34): oddjob-0.31-2.fc15.x86_64.rpm | 61 kB 00:00(22/34): openais-1.1.4-2.fc15.x86_64.rpm | 190 kB 00:00(23/34): openaislib-1.1.4-2.fc15.x86_64.rpm | 88 kB 00:00
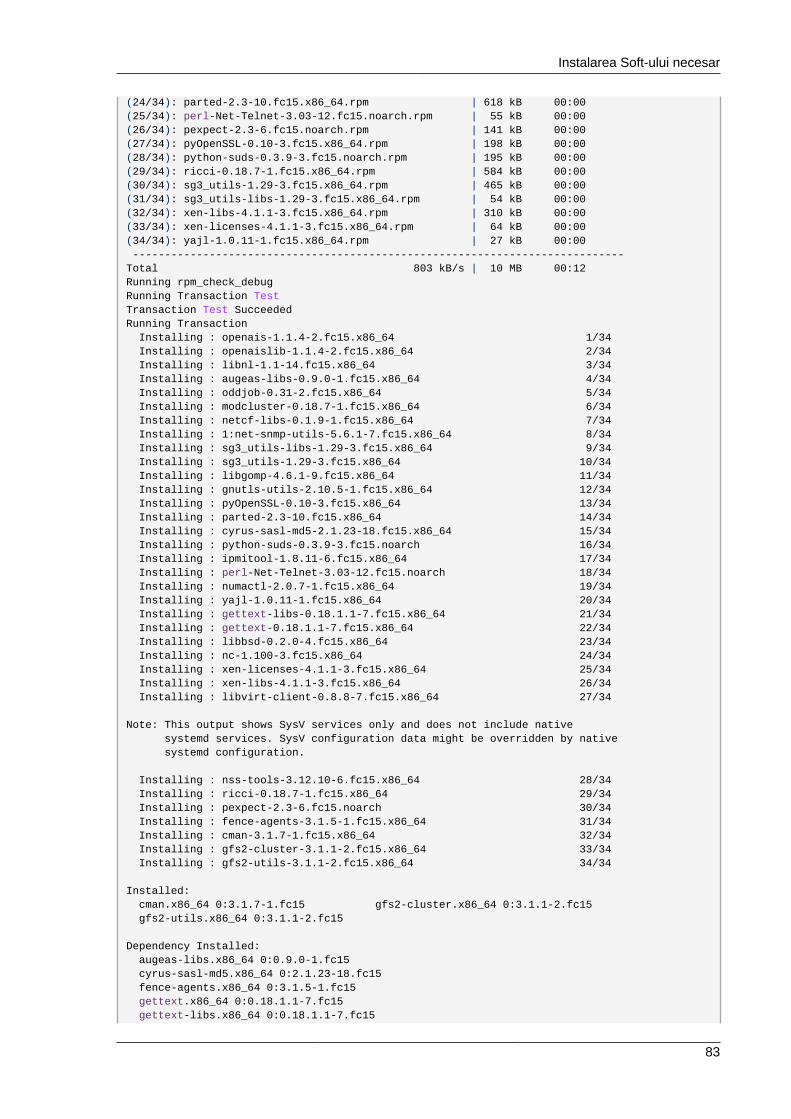
Instalarea Soft-ului necesar
83
(24/34): parted-2.3-10.fc15.x86_64.rpm | 618 kB 00:00(25/34): perl-Net-Telnet-3.03-12.fc15.noarch.rpm | 55 kB 00:00(26/34): pexpect-2.3-6.fc15.noarch.rpm | 141 kB 00:00(27/34): pyOpenSSL-0.10-3.fc15.x86_64.rpm | 198 kB 00:00(28/34): python-suds-0.3.9-3.fc15.noarch.rpm | 195 kB 00:00(29/34): ricci-0.18.7-1.fc15.x86_64.rpm | 584 kB 00:00(30/34): sg3_utils-1.29-3.fc15.x86_64.rpm | 465 kB 00:00(31/34): sg3_utils-libs-1.29-3.fc15.x86_64.rpm | 54 kB 00:00(32/34): xen-libs-4.1.1-3.fc15.x86_64.rpm | 310 kB 00:00(33/34): xen-licenses-4.1.1-3.fc15.x86_64.rpm | 64 kB 00:00(34/34): yajl-1.0.11-1.fc15.x86_64.rpm | 27 kB 00:00 -----------------------------------------------------------------------------Total 803 kB/s | 10 MB 00:12Running rpm_check_debugRunning Transaction TestTransaction Test SucceededRunning Transaction Installing : openais-1.1.4-2.fc15.x86_64 1/34 Installing : openaislib-1.1.4-2.fc15.x86_64 2/34 Installing : libnl-1.1-14.fc15.x86_64 3/34 Installing : augeas-libs-0.9.0-1.fc15.x86_64 4/34 Installing : oddjob-0.31-2.fc15.x86_64 5/34 Installing : modcluster-0.18.7-1.fc15.x86_64 6/34 Installing : netcf-libs-0.1.9-1.fc15.x86_64 7/34 Installing : 1:net-snmp-utils-5.6.1-7.fc15.x86_64 8/34 Installing : sg3_utils-libs-1.29-3.fc15.x86_64 9/34 Installing : sg3_utils-1.29-3.fc15.x86_64 10/34 Installing : libgomp-4.6.1-9.fc15.x86_64 11/34 Installing : gnutls-utils-2.10.5-1.fc15.x86_64 12/34 Installing : pyOpenSSL-0.10-3.fc15.x86_64 13/34 Installing : parted-2.3-10.fc15.x86_64 14/34 Installing : cyrus-sasl-md5-2.1.23-18.fc15.x86_64 15/34 Installing : python-suds-0.3.9-3.fc15.noarch 16/34 Installing : ipmitool-1.8.11-6.fc15.x86_64 17/34 Installing : perl-Net-Telnet-3.03-12.fc15.noarch 18/34 Installing : numactl-2.0.7-1.fc15.x86_64 19/34 Installing : yajl-1.0.11-1.fc15.x86_64 20/34 Installing : gettext-libs-0.18.1.1-7.fc15.x86_64 21/34 Installing : gettext-0.18.1.1-7.fc15.x86_64 22/34 Installing : libbsd-0.2.0-4.fc15.x86_64 23/34 Installing : nc-1.100-3.fc15.x86_64 24/34 Installing : xen-licenses-4.1.1-3.fc15.x86_64 25/34 Installing : xen-libs-4.1.1-3.fc15.x86_64 26/34 Installing : libvirt-client-0.8.8-7.fc15.x86_64 27/34
Note: This output shows SysV services only and does not include native systemd services. SysV configuration data might be overridden by native systemd configuration.
Installing : nss-tools-3.12.10-6.fc15.x86_64 28/34 Installing : ricci-0.18.7-1.fc15.x86_64 29/34 Installing : pexpect-2.3-6.fc15.noarch 30/34 Installing : fence-agents-3.1.5-1.fc15.x86_64 31/34 Installing : cman-3.1.7-1.fc15.x86_64 32/34 Installing : gfs2-cluster-3.1.1-2.fc15.x86_64 33/34 Installing : gfs2-utils-3.1.1-2.fc15.x86_64 34/34
Installed: cman.x86_64 0:3.1.7-1.fc15 gfs2-cluster.x86_64 0:3.1.1-2.fc15 gfs2-utils.x86_64 0:3.1.1-2.fc15
Dependency Installed: augeas-libs.x86_64 0:0.9.0-1.fc15 cyrus-sasl-md5.x86_64 0:2.1.23-18.fc15 fence-agents.x86_64 0:3.1.5-1.fc15 gettext.x86_64 0:0.18.1.1-7.fc15 gettext-libs.x86_64 0:0.18.1.1-7.fc15
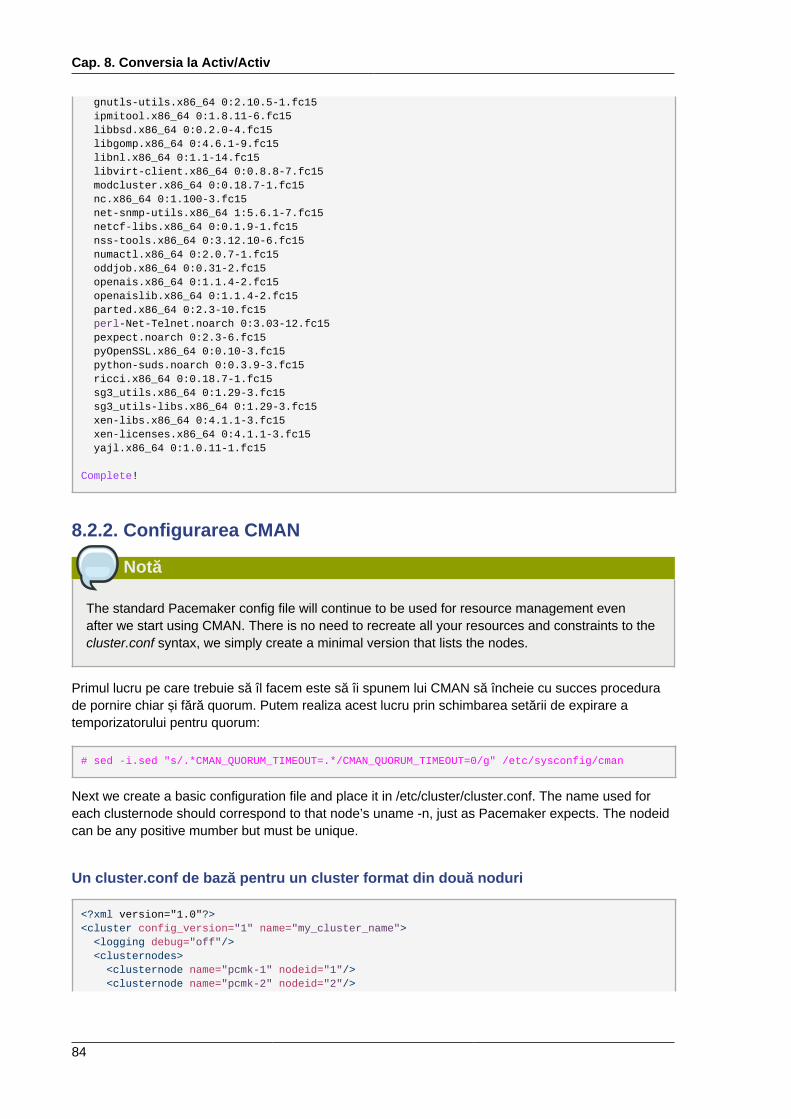
Cap. 8. Conversia la Activ/Activ
84
gnutls-utils.x86_64 0:2.10.5-1.fc15 ipmitool.x86_64 0:1.8.11-6.fc15 libbsd.x86_64 0:0.2.0-4.fc15 libgomp.x86_64 0:4.6.1-9.fc15 libnl.x86_64 0:1.1-14.fc15 libvirt-client.x86_64 0:0.8.8-7.fc15 modcluster.x86_64 0:0.18.7-1.fc15 nc.x86_64 0:1.100-3.fc15 net-snmp-utils.x86_64 1:5.6.1-7.fc15 netcf-libs.x86_64 0:0.1.9-1.fc15 nss-tools.x86_64 0:3.12.10-6.fc15 numactl.x86_64 0:2.0.7-1.fc15 oddjob.x86_64 0:0.31-2.fc15 openais.x86_64 0:1.1.4-2.fc15 openaislib.x86_64 0:1.1.4-2.fc15 parted.x86_64 0:2.3-10.fc15 perl-Net-Telnet.noarch 0:3.03-12.fc15 pexpect.noarch 0:2.3-6.fc15 pyOpenSSL.x86_64 0:0.10-3.fc15 python-suds.noarch 0:0.3.9-3.fc15 ricci.x86_64 0:0.18.7-1.fc15 sg3_utils.x86_64 0:1.29-3.fc15 sg3_utils-libs.x86_64 0:1.29-3.fc15 xen-libs.x86_64 0:4.1.1-3.fc15 xen-licenses.x86_64 0:4.1.1-3.fc15 yajl.x86_64 0:1.0.11-1.fc15
Complete!
8.2.2. Configurarea CMAN
Notă
The standard Pacemaker config file will continue to be used for resource management evenafter we start using CMAN. There is no need to recreate all your resources and constraints to thecluster.conf syntax, we simply create a minimal version that lists the nodes.
Primul lucru pe care trebuie să îl facem este să îi spunem lui CMAN să încheie cu succes procedurade pornire chiar și fără quorum. Putem realiza acest lucru prin schimbarea setării de expirare atemporizatorului pentru quorum:
# sed -i.sed "s/.*CMAN_QUORUM_TIMEOUT=.*/CMAN_QUORUM_TIMEOUT=0/g" /etc/sysconfig/cman
Next we create a basic configuration file and place it in /etc/cluster/cluster.conf. The name used foreach clusternode should correspond to that node’s uname -n, just as Pacemaker expects. The nodeidcan be any positive mumber but must be unique.
Un cluster.conf de bază pentru un cluster format din două noduri
<?xml version="1.0"?><cluster config_version="1" name="my_cluster_name"> <logging debug="off"/> <clusternodes> <clusternode name="pcmk-1" nodeid="1"/> <clusternode name="pcmk-2" nodeid="2"/>
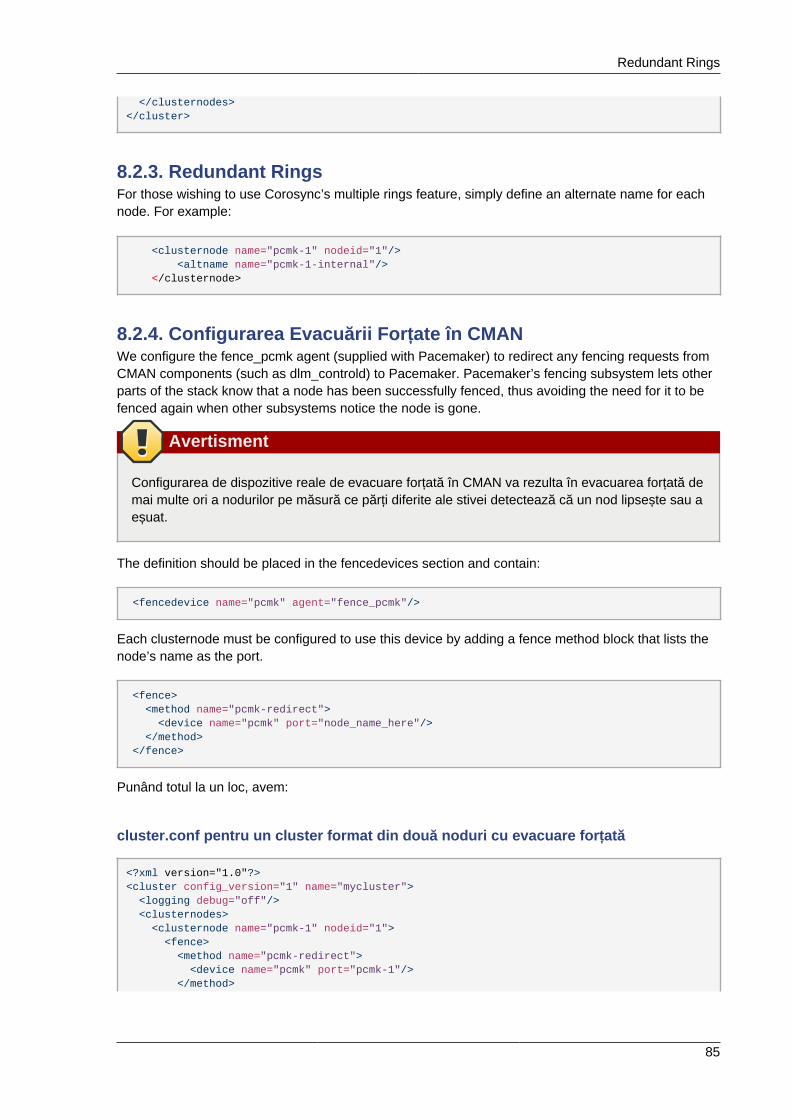
Redundant Rings
85
</clusternodes></cluster>
8.2.3. Redundant RingsFor those wishing to use Corosync’s multiple rings feature, simply define an alternate name for eachnode. For example:
<clusternode name="pcmk-1" nodeid="1"/> <altname name="pcmk-1-internal"/> </clusternode>
8.2.4. Configurarea Evacuării Forțate în CMANWe configure the fence_pcmk agent (supplied with Pacemaker) to redirect any fencing requests fromCMAN components (such as dlm_controld) to Pacemaker. Pacemaker’s fencing subsystem lets otherparts of the stack know that a node has been successfully fenced, thus avoiding the need for it to befenced again when other subsystems notice the node is gone.
Avertisment
Configurarea de dispozitive reale de evacuare forțată în CMAN va rezulta în evacuarea forțată demai multe ori a nodurilor pe măsură ce părți diferite ale stivei detectează că un nod lipsește sau aeșuat.
The definition should be placed in the fencedevices section and contain:
<fencedevice name="pcmk" agent="fence_pcmk"/>
Each clusternode must be configured to use this device by adding a fence method block that lists thenode’s name as the port.
<fence> <method name="pcmk-redirect"> <device name="pcmk" port="node_name_here"/> </method> </fence>
Punând totul la un loc, avem:
cluster.conf pentru un cluster format din două noduri cu evacuare forțată
<?xml version="1.0"?><cluster config_version="1" name="mycluster"> <logging debug="off"/> <clusternodes> <clusternode name="pcmk-1" nodeid="1"> <fence> <method name="pcmk-redirect"> <device name="pcmk" port="pcmk-1"/> </method>
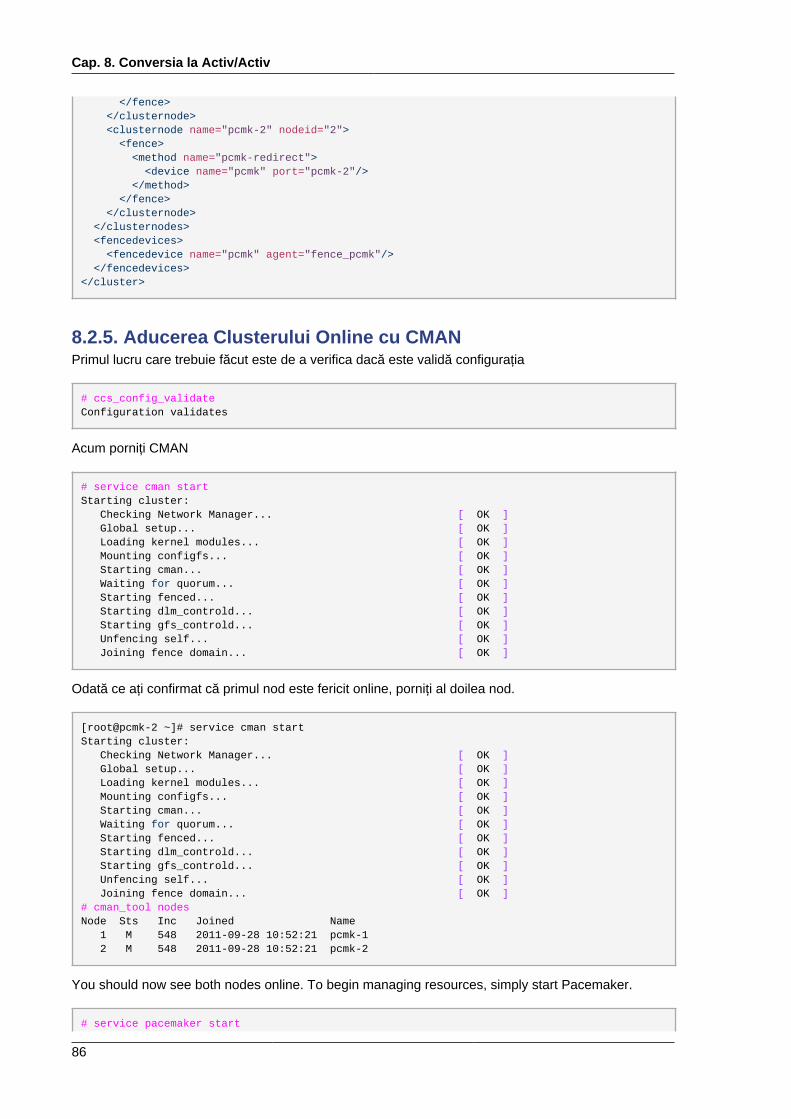
Cap. 8. Conversia la Activ/Activ
86
</fence> </clusternode> <clusternode name="pcmk-2" nodeid="2"> <fence> <method name="pcmk-redirect"> <device name="pcmk" port="pcmk-2"/> </method> </fence> </clusternode> </clusternodes> <fencedevices> <fencedevice name="pcmk" agent="fence_pcmk"/> </fencedevices></cluster>
8.2.5. Aducerea Clusterului Online cu CMANPrimul lucru care trebuie făcut este de a verifica dacă este validă configurația
# ccs_config_validateConfiguration validates
Acum porniți CMAN
# service cman startStarting cluster: Checking Network Manager... [ OK ] Global setup... [ OK ] Loading kernel modules... [ OK ] Mounting configfs... [ OK ] Starting cman... [ OK ] Waiting for quorum... [ OK ] Starting fenced... [ OK ] Starting dlm_controld... [ OK ] Starting gfs_controld... [ OK ] Unfencing self... [ OK ] Joining fence domain... [ OK ]
Odată ce ați confirmat că primul nod este fericit online, porniți al doilea nod.
[root@pcmk-2 ~]# service cman startStarting cluster: Checking Network Manager... [ OK ] Global setup... [ OK ] Loading kernel modules... [ OK ] Mounting configfs... [ OK ] Starting cman... [ OK ] Waiting for quorum... [ OK ] Starting fenced... [ OK ] Starting dlm_controld... [ OK ] Starting gfs_controld... [ OK ] Unfencing self... [ OK ] Joining fence domain... [ OK ]# cman_tool nodesNode Sts Inc Joined Name 1 M 548 2011-09-28 10:52:21 pcmk-1 2 M 548 2011-09-28 10:52:21 pcmk-2
You should now see both nodes online. To begin managing resources, simply start Pacemaker.
# service pacemaker start

Creați un Sistem de Fișiere GFS2
87
Starting Pacemaker Cluster Manager: [ OK ]
and again on the second node, after which point you can use crm_mon as you normally would.
[root@pcmk-2 ~]# service pacemaker start Starting Pacemaker Cluster Manager: [ OK ]# crm_mon -1
8.3. Creați un Sistem de Fișiere GFS2
8.3.1. PregătireÎnainte de a face orice partiției existente, trebuie să ne asigurăm că este nemontată. Realizăm acestlucru spunând clusterului să oprească resursa WebFS. Acest lucru va asigura că alte resurse (în cazulnostru, Apache) care folosesc WebFS nu sunt doar oprite, ci sunt oprite în ordinea corectă.
# crm_resource --resource WebFS --set-parameter target-role --meta --parameter-value Stopped# crm_mon============Last updated: Thu Sep 3 15:18:06 2009Stack: openaisCurrent DC: pcmk-1 - partition with quorumVersion: 1.1.5-bdd89e69ba545404d02445be1f3d72e6a203ba2f2 Nodes configured, 2 expected votes6 Resources configured.============
Online: [ pcmk-1 pcmk-2 ]
Master/Slave Set: WebDataClone Masters: [ pcmk-1 ] Slaves: [ pcmk-2 ]ClusterIP (ocf::heartbeat:IPaddr): Started pcmk-1
Notă
Luați aminte că atât Apache cât și WebFS au fost oprite.
8.3.2. Crearea și Popularea unei Partiții GFS2Acum că stiva de cluster și componentele de integrare rulează fără piedici, putem crea o partițieGFS2.
Avertisment
Această acțiune va șterge tot conținutul stocat anterior pe dispozitivul DRBD. Asigurați-vă căaveți o copie a oricăror date importante.
Trebuie să specificăm un număr de parametri adiționali când creem o partiție GFS2.

Cap. 8. Conversia la Activ/Activ
88
Întâi trebuie să folosim opțiunea -p pentru a specifica faptul că vrem să folosim DLM-ul Kernel-ului.În continuare folosim -j pentru a indica faptul că trebuie să rezerve destul spațiu pentru două jurnale(unul pentru fiecare nod care accesează sistemul de fișiere).
În cele din urmă, folosim -t pentru a specifica numele tabelei de blocare. Formatul acestui câmp esteclustername:fsname. Pentru fsname, nu trebuie decât să alegem ceva unic și descriptiv și din momentce nu am specificat un clustername încă, vom folosi valoarea implicită (pcmk).
To specify an alternate name for the cluster, locate the service section containing name: pacemakerin corosync.conf and insert the following line anywhere inside the block:
clustername: myname
Realizați acest lucru pe fiecare nod din cluster și asigurați-vă că le-ați repornit înainte de a continua.
# mkfs.gfs2 -p lock_dlm -j 2 -t pcmk:web /dev/drbd1This will destroy any data on /dev/drbd1.It appears to contain: data
Are you sure you want to proceed? [y/n] y
Device: /dev/drbd1Blocksize: 4096Device Size 1.00 GB (131072 blocks)Filesystem Size: 1.00 GB (131070 blocks)Journals: 2Resource Groups: 2Locking Protocol: "lock_dlm"Lock Table: "pcmk:web"UUID: 6B776F46-177B-BAF8-2C2B-292C0E078613
Apoi (re)populați noul sistem de fișiere cu date (pagini web). Momentan vom crea o nouă variație pepagina noastră principală.
# mount /dev/drbd1 /mnt/# cat <<-END >/mnt/index.html<html><body>My Test Site - GFS2</body></html>END# umount /dev/drbd1# drbdadm verify wwwdata#
8.4. Reconfigurarea Clusterului pentru GFS2
# crmcrm(live) # cib new GFS2INFO: GFS2 shadow CIB createdcrm(GFS2) # configure delete WebFScrm(GFS2) # configure primitive WebFS ocf:heartbeat:Filesystem params device="/dev/drbd/by-res/wwwdata" directory="/var/www/html" fstype="gfs2"
Acum că am creat resursa, trebuie să recreem și toate restricțiile care o foloseau. Acest lucru estedatorită faptului că shell-ul va înlătura în mod automat orice restricție care referențiază WebFS..
crm(GFS2) # configure colocation WebSite-with-WebFS inf: WebSite WebFScrm(GFS2) # configure colocation fs_on_drbd inf: WebFS WebDataClone:Mastercrm(GFS2) # configure order WebFS-after-WebData inf: WebDataClone:promote WebFS:startcrm(GFS2) # configure order WebSite-after-WebFS inf: WebFS WebSitecrm(GFS2) # configure show

Reconfigurarea Pacemaker pentru Activ/Activ
89
node pcmk-1node pcmk-2primitive WebData ocf:linbit:drbd \ params drbd_resource="wwwdata" \ op monitor interval="60s"primitive WebFS ocf:heartbeat:Filesystem \ params device="/dev/drbd/by-res/wwwdata" directory="/var/www/html" fstype="gfs2"primitive WebSite ocf:heartbeat:apache \ params configfile="/etc/httpd/conf/httpd.conf" \ op monitor interval="1min"primitive ClusterIP ocf:heartbeat:IPaddr2 \ params ip="192.168.122.101" cidr_netmask="32" \ op monitor interval="30s"ms WebDataClone WebData \ meta master-max="1" master-node-max="1" clone-max="2" clone-node-max="1" notify="true"colocation WebSite-with-WebFS inf: WebSite WebFScolocation fs_on_drbd inf: WebFS WebDataClone:Mastercolocation website-with-ip inf: WebSite ClusterIPorder WebFS-after-WebData inf: WebDataClone:promote WebFS:startorder WebSite-after-WebFS inf: WebFS WebSiteorder apache-after-ip inf: ClusterIP WebSiteproperty $id="cib-bootstrap-options" \ dc-version="1.1.5-bdd89e69ba545404d02445be1f3d72e6a203ba2f" \ cluster-infrastructure="openais" \ expected-quorum-votes="2" \ stonith-enabled="false" \ no-quorum-policy="ignore"rsc_defaults $id="rsc-options" \ resource-stickiness="100"
Revizuiți configurația înainte de a o încărca pe cluster, părăsind shell-ul și urmărind răspunsulclusterului
crm(GFS2) # cib commit GFS2INFO: commited 'GFS2' shadow CIB to the clustercrm(GFS2) # quitbye# crm_mon============Last updated: Thu Sep 3 20:49:54 2009Stack: openaisCurrent DC: pcmk-2 - partition with quorumVersion: 1.1.5-bdd89e69ba545404d02445be1f3d72e6a203ba2f2 Nodes configured, 2 expected votes6 Resources configured.============
Online: [ pcmk-1 pcmk-2 ]
WebSite (ocf::heartbeat:apache): Started pcmk-2Master/Slave Set: WebDataClone Masters: [ pcmk-1 ] Slaves: [ pcmk-2 ]ClusterIP (ocf::heartbeat:IPaddr): Started pcmk-2WebFS (ocf::heartbeat:Filesystem): Started pcmk-1
8.5. Reconfigurarea Pacemaker pentru Activ/ActivAproape totul este la locul său. Versiunile recente de DRBD sunt capabile să opereze în mod Primar/Primar și sistemul de fișiere pe care îl folosim este conștient de cluster. Tot ce trebuie să facem aumeste să reconfigurăm clusterul pentru a profita de acest lucru.
Acest lucru va implica un număr de modificări, așa că vom folosi din nou modul interactiv.
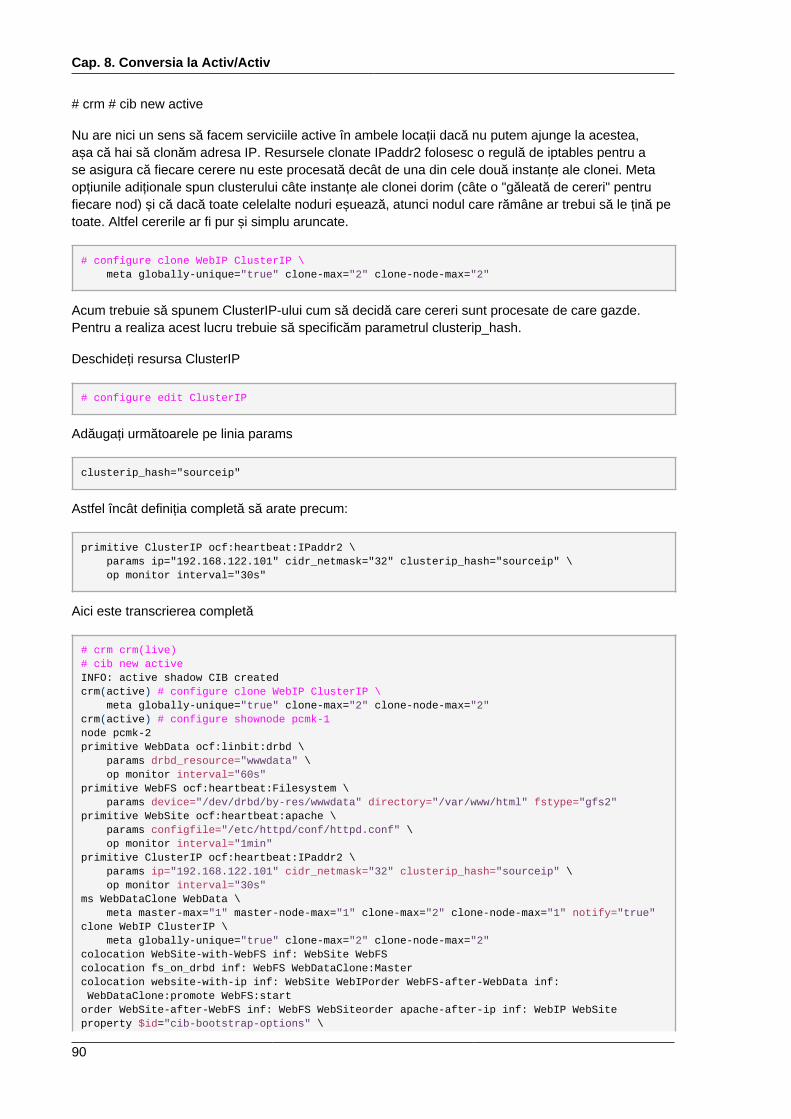
Cap. 8. Conversia la Activ/Activ
90
# crm # cib new active
Nu are nici un sens să facem serviciile active în ambele locații dacă nu putem ajunge la acestea,așa că hai să clonăm adresa IP. Resursele clonate IPaddr2 folosesc o regulă de iptables pentru ase asigura că fiecare cerere nu este procesată decât de una din cele două instanțe ale clonei. Metaopțiunile adiționale spun clusterului câte instanțe ale clonei dorim (câte o "găleată de cereri" pentrufiecare nod) și că dacă toate celelalte noduri eșuează, atunci nodul care rămâne ar trebui să le țină petoate. Altfel cererile ar fi pur și simplu aruncate.
# configure clone WebIP ClusterIP \ meta globally-unique="true" clone-max="2" clone-node-max="2"
Acum trebuie să spunem ClusterIP-ului cum să decidă care cereri sunt procesate de care gazde.Pentru a realiza acest lucru trebuie să specificăm parametrul clusterip_hash.
Deschideți resursa ClusterIP
# configure edit ClusterIP
Adăugați următoarele pe linia params
clusterip_hash="sourceip"
Astfel încât definiția completă să arate precum:
primitive ClusterIP ocf:heartbeat:IPaddr2 \ params ip="192.168.122.101" cidr_netmask="32" clusterip_hash="sourceip" \ op monitor interval="30s"
Aici este transcrierea completă
# crm crm(live)# cib new activeINFO: active shadow CIB createdcrm(active) # configure clone WebIP ClusterIP \ meta globally-unique="true" clone-max="2" clone-node-max="2"crm(active) # configure shownode pcmk-1node pcmk-2primitive WebData ocf:linbit:drbd \ params drbd_resource="wwwdata" \ op monitor interval="60s"primitive WebFS ocf:heartbeat:Filesystem \ params device="/dev/drbd/by-res/wwwdata" directory="/var/www/html" fstype="gfs2"primitive WebSite ocf:heartbeat:apache \ params configfile="/etc/httpd/conf/httpd.conf" \ op monitor interval="1min"primitive ClusterIP ocf:heartbeat:IPaddr2 \ params ip="192.168.122.101" cidr_netmask="32" clusterip_hash="sourceip" \ op monitor interval="30s"ms WebDataClone WebData \ meta master-max="1" master-node-max="1" clone-max="2" clone-node-max="1" notify="true"clone WebIP ClusterIP \ meta globally-unique="true" clone-max="2" clone-node-max="2"colocation WebSite-with-WebFS inf: WebSite WebFScolocation fs_on_drbd inf: WebFS WebDataClone:Mastercolocation website-with-ip inf: WebSite WebIPorder WebFS-after-WebData inf: WebDataClone:promote WebFS:startorder WebSite-after-WebFS inf: WebFS WebSiteorder apache-after-ip inf: WebIP WebSiteproperty $id="cib-bootstrap-options" \
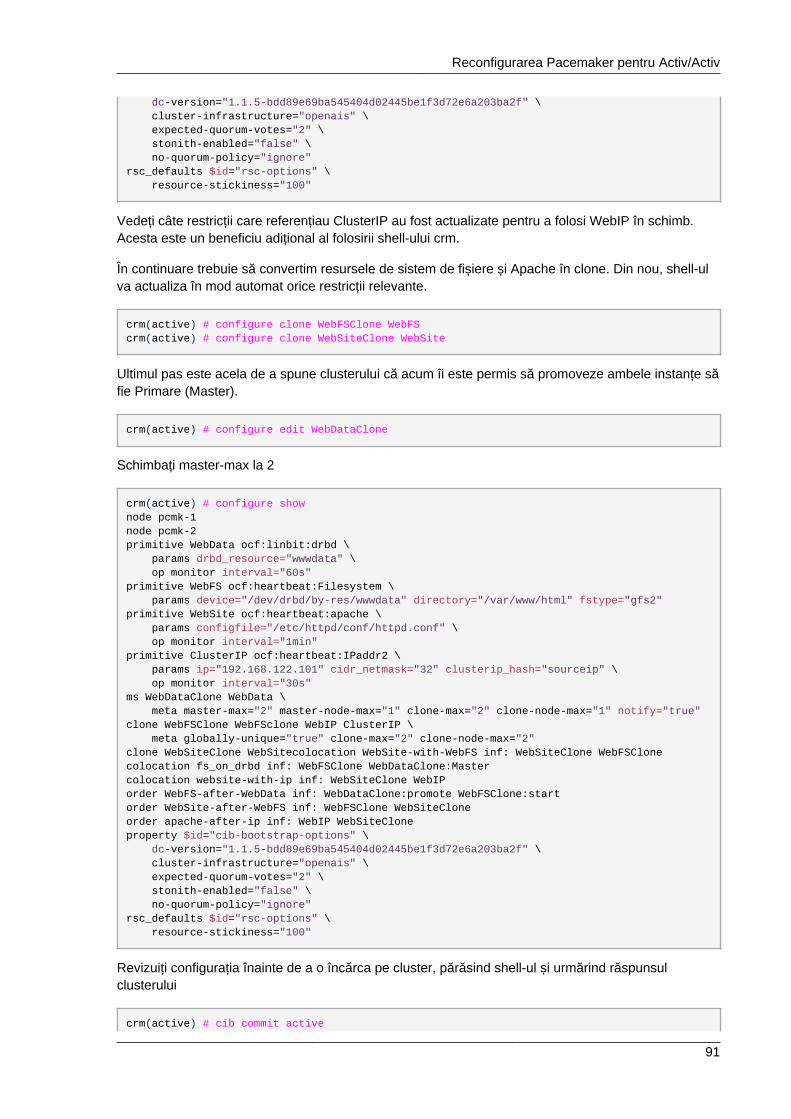
Reconfigurarea Pacemaker pentru Activ/Activ
91
dc-version="1.1.5-bdd89e69ba545404d02445be1f3d72e6a203ba2f" \ cluster-infrastructure="openais" \ expected-quorum-votes="2" \ stonith-enabled="false" \ no-quorum-policy="ignore"rsc_defaults $id="rsc-options" \ resource-stickiness="100"
Vedeți câte restricții care referențiau ClusterIP au fost actualizate pentru a folosi WebIP în schimb.Acesta este un beneficiu adițional al folosirii shell-ului crm.
În continuare trebuie să convertim resursele de sistem de fișiere și Apache în clone. Din nou, shell-ulva actualiza în mod automat orice restricții relevante.
crm(active) # configure clone WebFSClone WebFScrm(active) # configure clone WebSiteClone WebSite
Ultimul pas este acela de a spune clusterului că acum îi este permis să promoveze ambele instanțe săfie Primare (Master).
crm(active) # configure edit WebDataClone
Schimbați master-max la 2
crm(active) # configure shownode pcmk-1node pcmk-2primitive WebData ocf:linbit:drbd \ params drbd_resource="wwwdata" \ op monitor interval="60s"primitive WebFS ocf:heartbeat:Filesystem \ params device="/dev/drbd/by-res/wwwdata" directory="/var/www/html" fstype="gfs2"primitive WebSite ocf:heartbeat:apache \ params configfile="/etc/httpd/conf/httpd.conf" \ op monitor interval="1min"primitive ClusterIP ocf:heartbeat:IPaddr2 \ params ip="192.168.122.101" cidr_netmask="32" clusterip_hash="sourceip" \ op monitor interval="30s"ms WebDataClone WebData \ meta master-max="2" master-node-max="1" clone-max="2" clone-node-max="1" notify="true"clone WebFSClone WebFSclone WebIP ClusterIP \ meta globally-unique="true" clone-max="2" clone-node-max="2"clone WebSiteClone WebSitecolocation WebSite-with-WebFS inf: WebSiteClone WebFSClonecolocation fs_on_drbd inf: WebFSClone WebDataClone:Mastercolocation website-with-ip inf: WebSiteClone WebIPorder WebFS-after-WebData inf: WebDataClone:promote WebFSClone:startorder WebSite-after-WebFS inf: WebFSClone WebSiteCloneorder apache-after-ip inf: WebIP WebSiteCloneproperty $id="cib-bootstrap-options" \ dc-version="1.1.5-bdd89e69ba545404d02445be1f3d72e6a203ba2f" \ cluster-infrastructure="openais" \ expected-quorum-votes="2" \ stonith-enabled="false" \ no-quorum-policy="ignore"rsc_defaults $id="rsc-options" \ resource-stickiness="100"
Revizuiți configurația înainte de a o încărca pe cluster, părăsind shell-ul și urmărind răspunsulclusterului
crm(active) # cib commit active
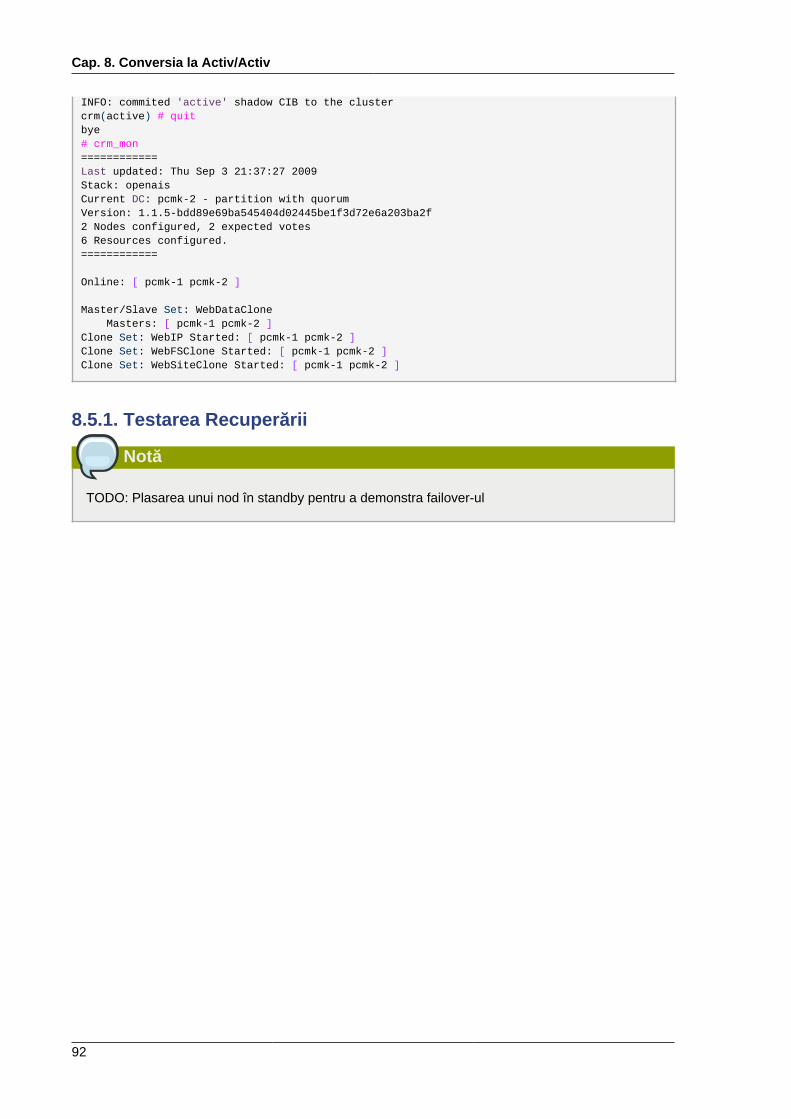
Cap. 8. Conversia la Activ/Activ
92
INFO: commited 'active' shadow CIB to the clustercrm(active) # quitbye# crm_mon============Last updated: Thu Sep 3 21:37:27 2009Stack: openaisCurrent DC: pcmk-2 - partition with quorumVersion: 1.1.5-bdd89e69ba545404d02445be1f3d72e6a203ba2f2 Nodes configured, 2 expected votes6 Resources configured.============
Online: [ pcmk-1 pcmk-2 ]
Master/Slave Set: WebDataClone Masters: [ pcmk-1 pcmk-2 ]Clone Set: WebIP Started: [ pcmk-1 pcmk-2 ]Clone Set: WebFSClone Started: [ pcmk-1 pcmk-2 ]Clone Set: WebSiteClone Started: [ pcmk-1 pcmk-2 ]
8.5.1. Testarea Recuperării
Notă
TODO: Plasarea unui nod în standby pentru a demonstra failover-ul
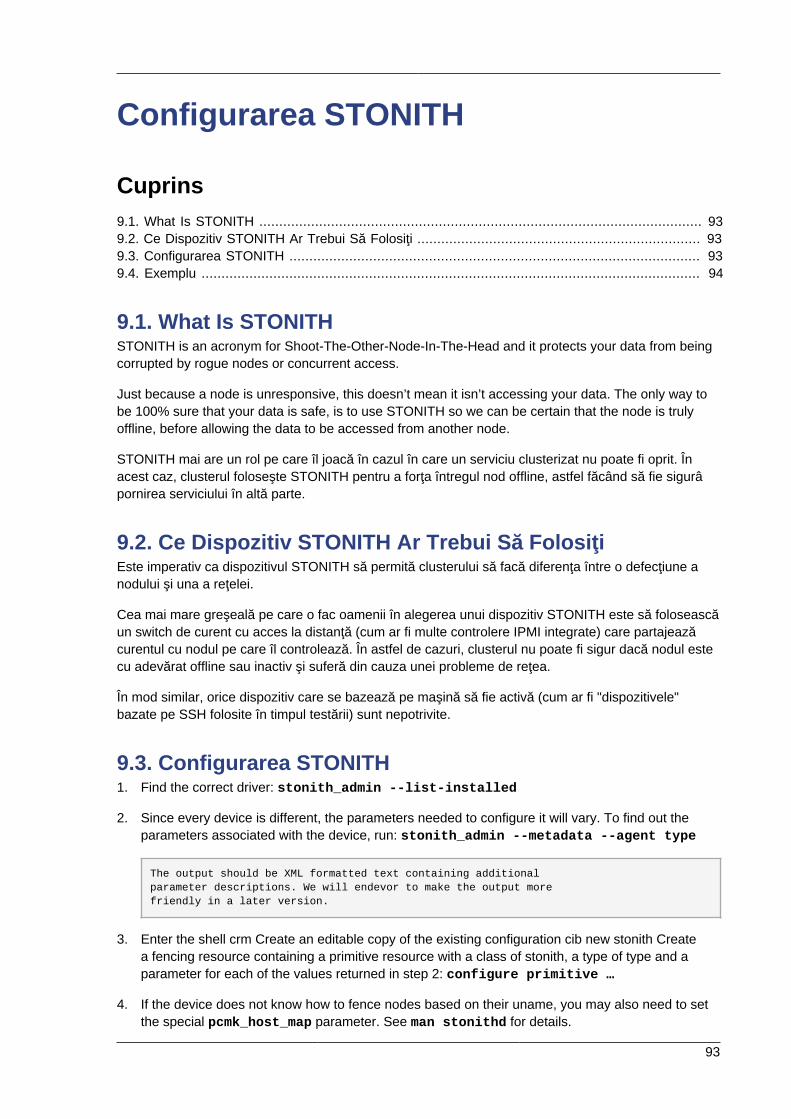
93
Configurarea STONITH
Cuprins9.1. What Is STONITH ............................................................................................................... 939.2. Ce Dispozitiv STONITH Ar Trebui Să Folosiţi ....................................................................... 939.3. Configurarea STONITH ....................................................................................................... 939.4. Exemplu ............................................................................................................................. 94
9.1. What Is STONITHSTONITH is an acronym for Shoot-The-Other-Node-In-The-Head and it protects your data from beingcorrupted by rogue nodes or concurrent access.
Just because a node is unresponsive, this doesn’t mean it isn’t accessing your data. The only way tobe 100% sure that your data is safe, is to use STONITH so we can be certain that the node is trulyoffline, before allowing the data to be accessed from another node.
STONITH mai are un rol pe care îl joacă în cazul în care un serviciu clusterizat nu poate fi oprit. Înacest caz, clusterul foloseşte STONITH pentru a forţa întregul nod offline, astfel făcând să fie sigurâpornirea serviciului în altă parte.
9.2. Ce Dispozitiv STONITH Ar Trebui Să FolosiţiEste imperativ ca dispozitivul STONITH să permită clusterului să facă diferenţa între o defecţiune anodului şi una a reţelei.
Cea mai mare greşeală pe care o fac oamenii în alegerea unui dispozitiv STONITH este să foloseascăun switch de curent cu acces la distanţă (cum ar fi multe controlere IPMI integrate) care partajeazăcurentul cu nodul pe care îl controlează. În astfel de cazuri, clusterul nu poate fi sigur dacă nodul estecu adevărat offline sau inactiv şi suferă din cauza unei probleme de reţea.
În mod similar, orice dispozitiv care se bazează pe maşină să fie activă (cum ar fi "dispozitivele"bazate pe SSH folosite în timpul testării) sunt nepotrivite.
9.3. Configurarea STONITH1. Find the correct driver: stonith_admin --list-installed
2. Since every device is different, the parameters needed to configure it will vary. To find out theparameters associated with the device, run: stonith_admin --metadata --agent type
The output should be XML formatted text containing additionalparameter descriptions. We will endevor to make the output morefriendly in a later version.
3. Enter the shell crm Create an editable copy of the existing configuration cib new stonith Createa fencing resource containing a primitive resource with a class of stonith, a type of type and aparameter for each of the values returned in step 2: configure primitive …
4. If the device does not know how to fence nodes based on their uname, you may also need to setthe special pcmk_host_map parameter. See man stonithd for details.
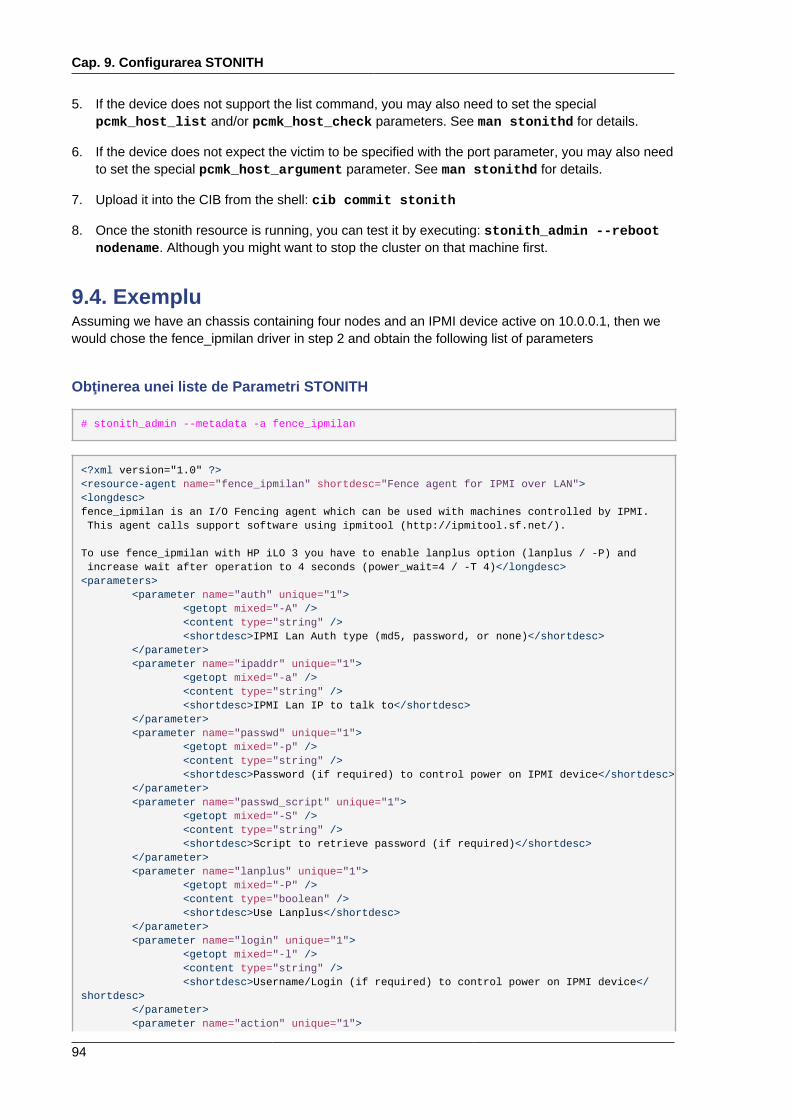
Cap. 9. Configurarea STONITH
94
5. If the device does not support the list command, you may also need to set the specialpcmk_host_list and/or pcmk_host_check parameters. See man stonithd for details.
6. If the device does not expect the victim to be specified with the port parameter, you may also needto set the special pcmk_host_argument parameter. See man stonithd for details.
7. Upload it into the CIB from the shell: cib commit stonith
8. Once the stonith resource is running, you can test it by executing: stonith_admin --rebootnodename. Although you might want to stop the cluster on that machine first.
9.4. ExempluAssuming we have an chassis containing four nodes and an IPMI device active on 10.0.0.1, then wewould chose the fence_ipmilan driver in step 2 and obtain the following list of parameters
Obţinerea unei liste de Parametri STONITH
# stonith_admin --metadata -a fence_ipmilan
<?xml version="1.0" ?><resource-agent name="fence_ipmilan" shortdesc="Fence agent for IPMI over LAN"><longdesc>fence_ipmilan is an I/O Fencing agent which can be used with machines controlled by IPMI. This agent calls support software using ipmitool (http://ipmitool.sf.net/).
To use fence_ipmilan with HP iLO 3 you have to enable lanplus option (lanplus / -P) and increase wait after operation to 4 seconds (power_wait=4 / -T 4)</longdesc><parameters> <parameter name="auth" unique="1"> <getopt mixed="-A" /> <content type="string" /> <shortdesc>IPMI Lan Auth type (md5, password, or none)</shortdesc> </parameter> <parameter name="ipaddr" unique="1"> <getopt mixed="-a" /> <content type="string" /> <shortdesc>IPMI Lan IP to talk to</shortdesc> </parameter> <parameter name="passwd" unique="1"> <getopt mixed="-p" /> <content type="string" /> <shortdesc>Password (if required) to control power on IPMI device</shortdesc> </parameter> <parameter name="passwd_script" unique="1"> <getopt mixed="-S" /> <content type="string" /> <shortdesc>Script to retrieve password (if required)</shortdesc> </parameter> <parameter name="lanplus" unique="1"> <getopt mixed="-P" /> <content type="boolean" /> <shortdesc>Use Lanplus</shortdesc> </parameter> <parameter name="login" unique="1"> <getopt mixed="-l" /> <content type="string" /> <shortdesc>Username/Login (if required) to control power on IPMI device</shortdesc> </parameter> <parameter name="action" unique="1">
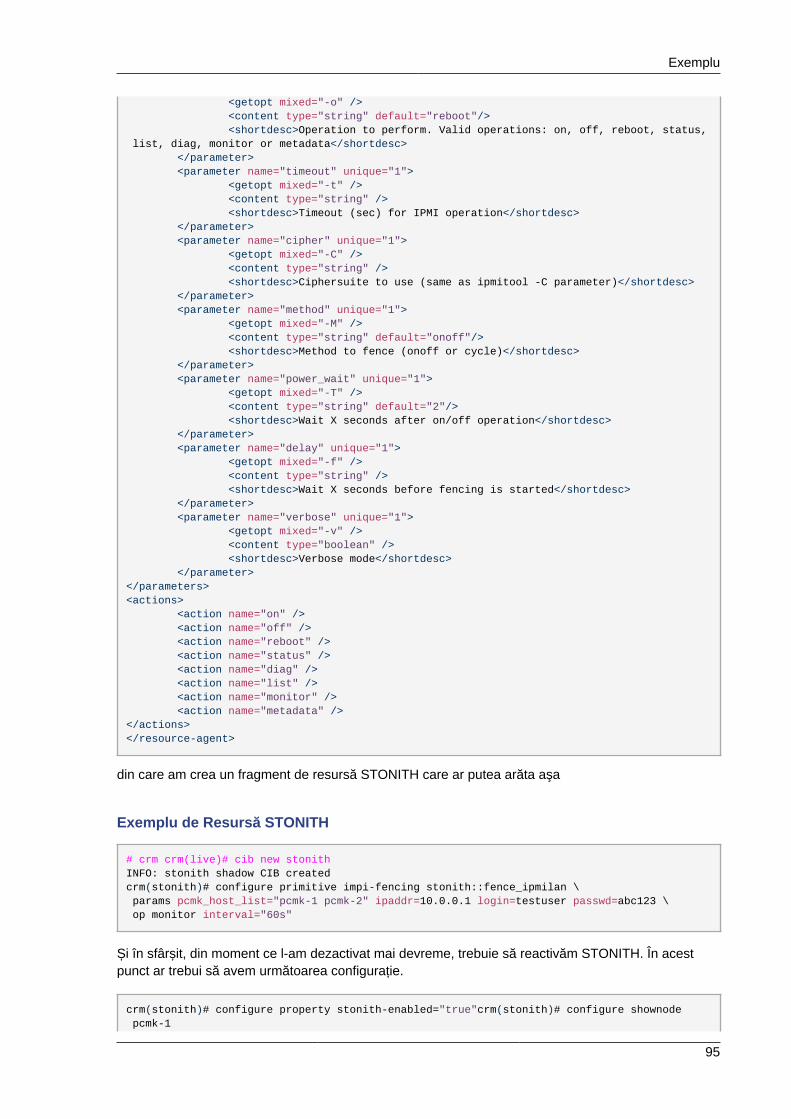
Exemplu
95
<getopt mixed="-o" /> <content type="string" default="reboot"/> <shortdesc>Operation to perform. Valid operations: on, off, reboot, status, list, diag, monitor or metadata</shortdesc> </parameter> <parameter name="timeout" unique="1"> <getopt mixed="-t" /> <content type="string" /> <shortdesc>Timeout (sec) for IPMI operation</shortdesc> </parameter> <parameter name="cipher" unique="1"> <getopt mixed="-C" /> <content type="string" /> <shortdesc>Ciphersuite to use (same as ipmitool -C parameter)</shortdesc> </parameter> <parameter name="method" unique="1"> <getopt mixed="-M" /> <content type="string" default="onoff"/> <shortdesc>Method to fence (onoff or cycle)</shortdesc> </parameter> <parameter name="power_wait" unique="1"> <getopt mixed="-T" /> <content type="string" default="2"/> <shortdesc>Wait X seconds after on/off operation</shortdesc> </parameter> <parameter name="delay" unique="1"> <getopt mixed="-f" /> <content type="string" /> <shortdesc>Wait X seconds before fencing is started</shortdesc> </parameter> <parameter name="verbose" unique="1"> <getopt mixed="-v" /> <content type="boolean" /> <shortdesc>Verbose mode</shortdesc> </parameter></parameters><actions> <action name="on" /> <action name="off" /> <action name="reboot" /> <action name="status" /> <action name="diag" /> <action name="list" /> <action name="monitor" /> <action name="metadata" /></actions></resource-agent>
din care am crea un fragment de resursă STONITH care ar putea arăta aşa
Exemplu de Resursă STONITH
# crm crm(live)# cib new stonithINFO: stonith shadow CIB createdcrm(stonith)# configure primitive impi-fencing stonith::fence_ipmilan \ params pcmk_host_list="pcmk-1 pcmk-2" ipaddr=10.0.0.1 login=testuser passwd=abc123 \ op monitor interval="60s"
Și în sfârșit, din moment ce l-am dezactivat mai devreme, trebuie să reactivăm STONITH. În acestpunct ar trebui să avem următoarea configurație.
crm(stonith)# configure property stonith-enabled="true"crm(stonith)# configure shownode pcmk-1
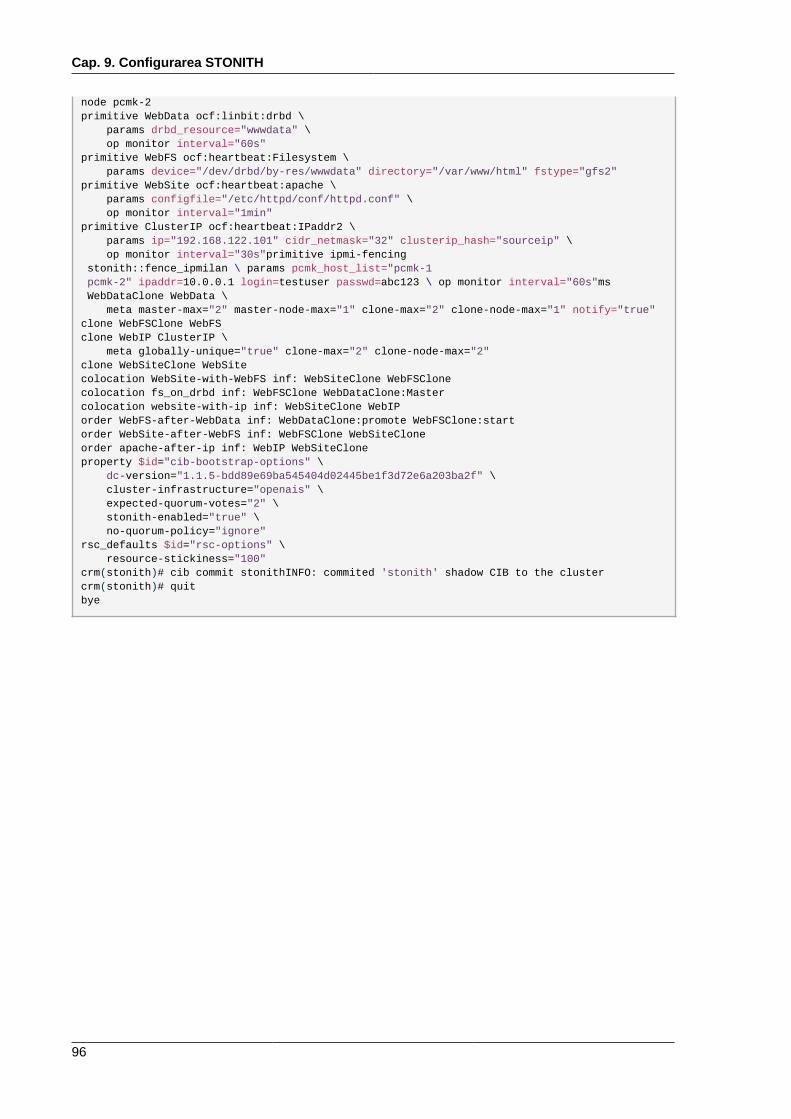
Cap. 9. Configurarea STONITH
96
node pcmk-2primitive WebData ocf:linbit:drbd \ params drbd_resource="wwwdata" \ op monitor interval="60s"primitive WebFS ocf:heartbeat:Filesystem \ params device="/dev/drbd/by-res/wwwdata" directory="/var/www/html" fstype="gfs2"primitive WebSite ocf:heartbeat:apache \ params configfile="/etc/httpd/conf/httpd.conf" \ op monitor interval="1min"primitive ClusterIP ocf:heartbeat:IPaddr2 \ params ip="192.168.122.101" cidr_netmask="32" clusterip_hash="sourceip" \ op monitor interval="30s"primitive ipmi-fencing stonith::fence_ipmilan \ params pcmk_host_list="pcmk-1 pcmk-2" ipaddr=10.0.0.1 login=testuser passwd=abc123 \ op monitor interval="60s"ms WebDataClone WebData \ meta master-max="2" master-node-max="1" clone-max="2" clone-node-max="1" notify="true"clone WebFSClone WebFSclone WebIP ClusterIP \ meta globally-unique="true" clone-max="2" clone-node-max="2"clone WebSiteClone WebSitecolocation WebSite-with-WebFS inf: WebSiteClone WebFSClonecolocation fs_on_drbd inf: WebFSClone WebDataClone:Mastercolocation website-with-ip inf: WebSiteClone WebIPorder WebFS-after-WebData inf: WebDataClone:promote WebFSClone:startorder WebSite-after-WebFS inf: WebFSClone WebSiteCloneorder apache-after-ip inf: WebIP WebSiteCloneproperty $id="cib-bootstrap-options" \ dc-version="1.1.5-bdd89e69ba545404d02445be1f3d72e6a203ba2f" \ cluster-infrastructure="openais" \ expected-quorum-votes="2" \ stonith-enabled="true" \ no-quorum-policy="ignore"rsc_defaults $id="rsc-options" \ resource-stickiness="100"crm(stonith)# cib commit stonithINFO: commited 'stonith' shadow CIB to the clustercrm(stonith)# quitbye
97
Anexa A. Recapitularea Configurației
CuprinsA.1. Configurația Finală a Clusterului .......................................................................................... 97A.2. Lista Nodurilor .................................................................................................................... 98A.3. Opțiunile Clusterului ............................................................................................................ 98A.4. Resurse ............................................................................................................................. 98
A.4.1. Opțiuni Implicite ....................................................................................................... 98A.4.2. Evacuarea Forțată ................................................................................................... 98A.4.3. Adresa Serviciului .................................................................................................... 99A.4.4. DRBD - Stocare Partajată ........................................................................................ 99A.4.5. Sistem de Fișiere de Cluster .................................................................................... 99A.4.6. Apache .................................................................................................................... 99
A.1. Configurația Finală a Clusterului
# crm configure shownode pcmk-1node pcmk-2primitive WebData ocf:linbit:drbd \ params drbd_resource="wwwdata" \ op monitor interval="60s"primitive WebFS ocf:heartbeat:Filesystem \ params device="/dev/drbd/by-res/wwwdata" directory="/var/www/html" fstype="gfs2"primitive WebSite ocf:heartbeat:apache \ params configfile="/etc/httpd/conf/httpd.conf" \ op monitor interval="1min"primitive ClusterIP ocf:heartbeat:IPaddr2 \ params ip="192.168.122.101" cidr_netmask="32" clusterip_hash="sourceip" \ op monitor interval="30s"primitive ipmi-fencing stonith::fence_ipmilan \ params pcmk_host_list="pcmk-1 pcmk-2" ipaddr=10.0.0.1 login=testuser passwd=abc123 \ op monitor interval="60s"ms WebDataClone WebData \ meta master-max="2" master-node-max="1" clone-max="2" clone-node-max="1" notify="true"clone WebFSClone WebFSclone WebIP ClusterIP \ meta globally-unique="true" clone-max="2" clone-node-max="2"clone WebSiteClone WebSitecolocation WebSite-with-WebFS inf: WebSiteClone WebFSClonecolocation fs_on_drbd inf: WebFSClone WebDataClone:Mastercolocation website-with-ip inf: WebSiteClone WebIPorder WebFS-after-WebData inf: WebDataClone:promote WebFSClone:startorder WebSite-after-WebFS inf: WebFSClone WebSiteCloneorder apache-after-ip inf: WebIP WebSiteCloneproperty $id="cib-bootstrap-options" \ dc-version="1.1.5-bdd89e69ba545404d02445be1f3d72e6a203ba2f" \ cluster-infrastructure="openais" \ expected-quorum-votes="2" \ stonith-enabled="true" \ no-quorum-policy="ignore"rsc_defaults $id="rsc-options" \ resource-stickiness="100"
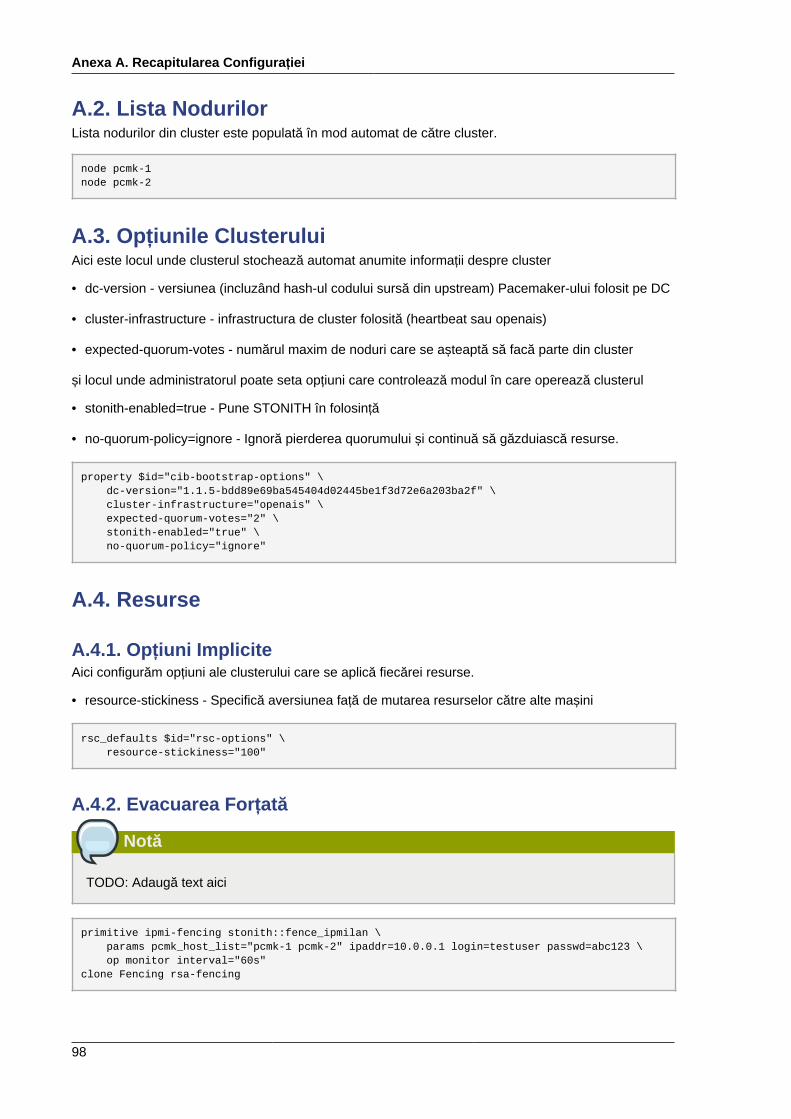
Anexa A. Recapitularea Configurației
98
A.2. Lista NodurilorLista nodurilor din cluster este populată în mod automat de către cluster.
node pcmk-1node pcmk-2
A.3. Opțiunile ClusteruluiAici este locul unde clusterul stochează automat anumite informații despre cluster
• dc-version - versiunea (incluzând hash-ul codului sursă din upstream) Pacemaker-ului folosit pe DC
• cluster-infrastructure - infrastructura de cluster folosită (heartbeat sau openais)
• expected-quorum-votes - numărul maxim de noduri care se așteaptă să facă parte din cluster
și locul unde administratorul poate seta opțiuni care controlează modul în care operează clusterul
• stonith-enabled=true - Pune STONITH în folosință
• no-quorum-policy=ignore - Ignoră pierderea quorumului și continuă să găzduiască resurse.
property $id="cib-bootstrap-options" \ dc-version="1.1.5-bdd89e69ba545404d02445be1f3d72e6a203ba2f" \ cluster-infrastructure="openais" \ expected-quorum-votes="2" \ stonith-enabled="true" \ no-quorum-policy="ignore"
A.4. Resurse
A.4.1. Opțiuni ImpliciteAici configurăm opțiuni ale clusterului care se aplică fiecărei resurse.
• resource-stickiness - Specifică aversiunea față de mutarea resurselor către alte mașini
rsc_defaults $id="rsc-options" \ resource-stickiness="100"
A.4.2. Evacuarea Forțată
Notă
TODO: Adaugă text aici
primitive ipmi-fencing stonith::fence_ipmilan \ params pcmk_host_list="pcmk-1 pcmk-2" ipaddr=10.0.0.1 login=testuser passwd=abc123 \ op monitor interval="60s"clone Fencing rsa-fencing
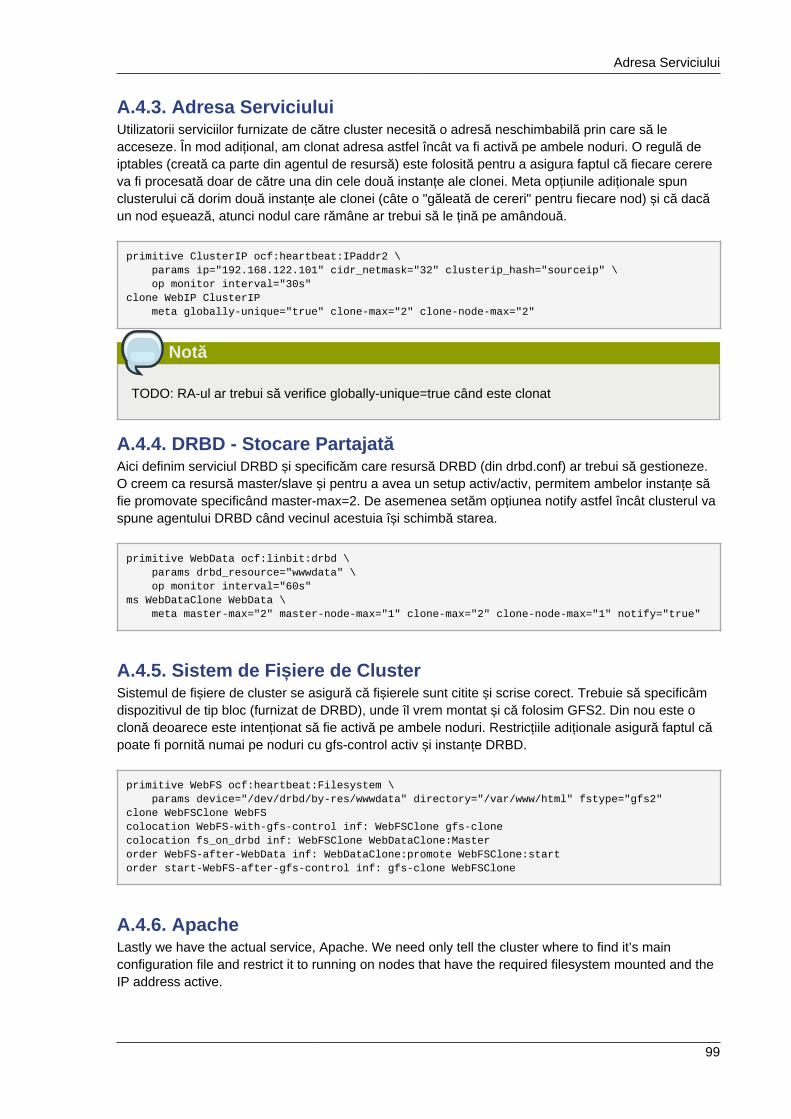
Adresa Serviciului
99
A.4.3. Adresa ServiciuluiUtilizatorii serviciilor furnizate de către cluster necesită o adresă neschimbabilă prin care să leacceseze. În mod adițional, am clonat adresa astfel încât va fi activă pe ambele noduri. O regulă deiptables (creată ca parte din agentul de resursă) este folosită pentru a asigura faptul că fiecare cerereva fi procesată doar de către una din cele două instanțe ale clonei. Meta opțiunile adiționale spunclusterului că dorim două instanțe ale clonei (câte o "găleată de cereri" pentru fiecare nod) și că dacăun nod eșuează, atunci nodul care rămâne ar trebui să le țină pe amândouă.
primitive ClusterIP ocf:heartbeat:IPaddr2 \ params ip="192.168.122.101" cidr_netmask="32" clusterip_hash="sourceip" \ op monitor interval="30s"clone WebIP ClusterIP meta globally-unique="true" clone-max="2" clone-node-max="2"
Notă
TODO: RA-ul ar trebui să verifice globally-unique=true când este clonat
A.4.4. DRBD - Stocare PartajatăAici definim serviciul DRBD și specificăm care resursă DRBD (din drbd.conf) ar trebui să gestioneze.O creem ca resursă master/slave și pentru a avea un setup activ/activ, permitem ambelor instanțe săfie promovate specificând master-max=2. De asemenea setăm opțiunea notify astfel încât clusterul vaspune agentului DRBD când vecinul acestuia își schimbă starea.
primitive WebData ocf:linbit:drbd \ params drbd_resource="wwwdata" \ op monitor interval="60s"ms WebDataClone WebData \ meta master-max="2" master-node-max="1" clone-max="2" clone-node-max="1" notify="true"
A.4.5. Sistem de Fișiere de ClusterSistemul de fișiere de cluster se asigură că fișierele sunt citite și scrise corect. Trebuie să specificâmdispozitivul de tip bloc (furnizat de DRBD), unde îl vrem montat și că folosim GFS2. Din nou este oclonă deoarece este intenționat să fie activă pe ambele noduri. Restricțiile adiționale asigură faptul căpoate fi pornită numai pe noduri cu gfs-control activ și instanțe DRBD.
primitive WebFS ocf:heartbeat:Filesystem \ params device="/dev/drbd/by-res/wwwdata" directory="/var/www/html" fstype="gfs2"clone WebFSClone WebFScolocation WebFS-with-gfs-control inf: WebFSClone gfs-clonecolocation fs_on_drbd inf: WebFSClone WebDataClone:Masterorder WebFS-after-WebData inf: WebDataClone:promote WebFSClone:startorder start-WebFS-after-gfs-control inf: gfs-clone WebFSClone
A.4.6. ApacheLastly we have the actual service, Apache. We need only tell the cluster where to find it’s mainconfiguration file and restrict it to running on nodes that have the required filesystem mounted and theIP address active.

Anexa A. Recapitularea Configurației
100
primitive WebSite ocf:heartbeat:apache \ params configfile="/etc/httpd/conf/httpd.conf" \ op monitor interval="1min"clone WebSiteClone WebSitecolocation WebSite-with-WebFS inf: WebSiteClone WebFSClonecolocation website-with-ip inf: WebSiteClone WebIPorder apache-after-ip inf: WebIP WebSiteCloneorder WebSite-after-WebFS inf: WebFSClone WebSiteClone
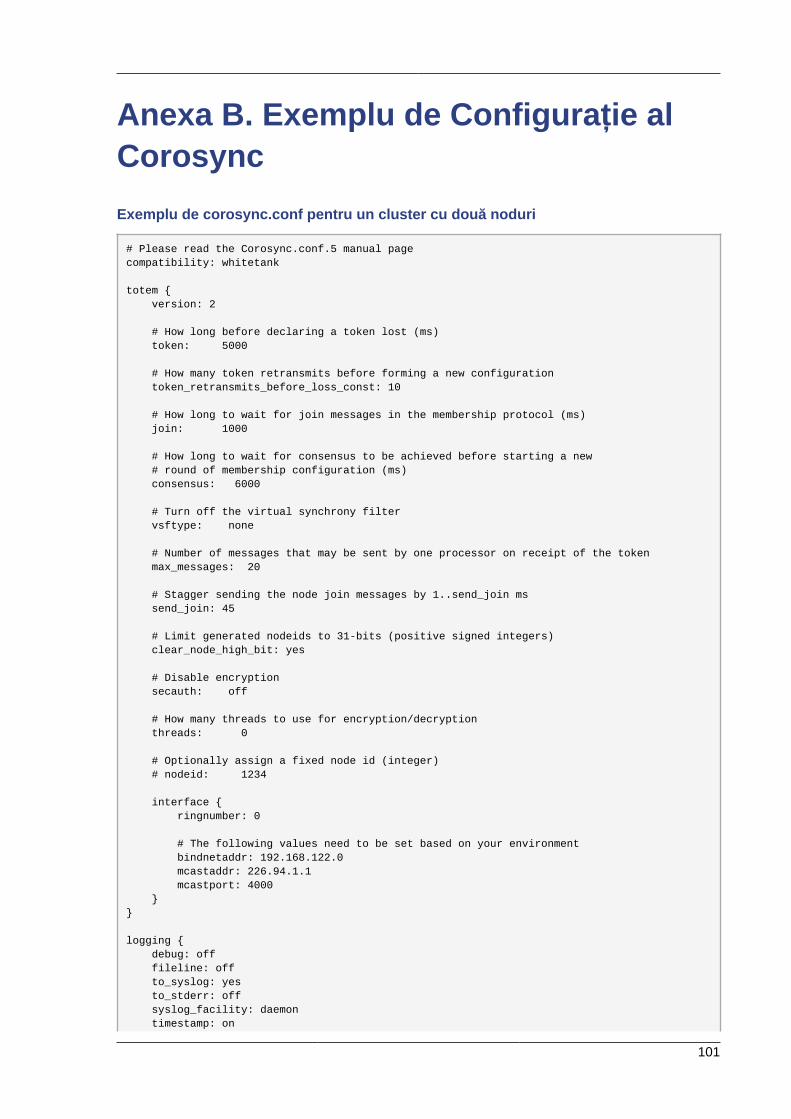
101
Anexa B. Exemplu de Configurație alCorosyncExemplu de corosync.conf pentru un cluster cu două noduri
# Please read the Corosync.conf.5 manual pagecompatibility: whitetank
totem { version: 2
# How long before declaring a token lost (ms) token: 5000
# How many token retransmits before forming a new configuration token_retransmits_before_loss_const: 10
# How long to wait for join messages in the membership protocol (ms) join: 1000
# How long to wait for consensus to be achieved before starting a new # round of membership configuration (ms) consensus: 6000
# Turn off the virtual synchrony filter vsftype: none
# Number of messages that may be sent by one processor on receipt of the token max_messages: 20
# Stagger sending the node join messages by 1..send_join ms send_join: 45
# Limit generated nodeids to 31-bits (positive signed integers) clear_node_high_bit: yes
# Disable encryption secauth: off
# How many threads to use for encryption/decryption threads: 0
# Optionally assign a fixed node id (integer) # nodeid: 1234
interface { ringnumber: 0
# The following values need to be set based on your environment bindnetaddr: 192.168.122.0 mcastaddr: 226.94.1.1 mcastport: 4000 }}
logging { debug: off fileline: off to_syslog: yes to_stderr: off syslog_facility: daemon timestamp: on

Anexa B. Exemplu de Configurație al Corosync
102
}
amf { mode: disabled}

103
Anexa C. Documentație Suplimentară• Project Website http://www.clusterlabs.org
• Cluster Commands A comprehensive guide to cluster commands has been written by Novell andcan be found at: http://www.novell.com/documentation/sles11/book_sleha/index.html?page=/documentation/sles11/book_sleha/data/book_sleha.html
• Corosync http://www.corosync.org

104

105
Anexa D. Istoricul ReviziilorVersiune 1-1 Mon May 17 2010 Andrew Beekhof [email protected]
Import din Pages.app
Versiune 2-1 Wed Sep 22 2010 Raoul [email protected]
Italian translation
Versiune 3-1 Wed Feb 9 2011 Andrew Beekhof [email protected] for Fedora 13
Versiune 4-1 Wed Oct 5 2011 Andrew Beekhof [email protected] the GFS2 section to use CMAN
Versiune 5-1 Fri Feb 10 2012 Andrew Beekhof [email protected] docbook content from asciidoc sources

106
107
Index
CCreating and Activating a new SSH Key, 44
DDomain name (Query), 44Domain name (Remove from host name), 45
Ffeedback
contact information for this manual, ix
NNodes
Domain name (Query), 44Domain name (Remove from host name), 45short name, 44
Sshort name, 44SSH, 43

108