Embed Size (px)
Citation preview
Deploying an Exchange 2007 SP1 CCR
Cluster on a Windows Server 2008 Failover
Cluster – Part 1: Prerequisites & Configuring
the failover cluster nodes
How to deploy an Exchange 2007 SP1 CCR based clustered mailbox server on a Windows Server 2008 failover cluster.
• Published: Feb 21, 2008 • Updated: May 08, 2008 • Section: High Availability & Recovery • Author: Henrik Walther • Company: Timengo Consulting A/S
• Printable Version • Adjust font size: • Rating: 4.4/5 - 37 Votes
Back in October 2006 when Exchange Server 2007 still was a beta 2 product (at least to the general public), I wrote an article series that walked you through how to deploy an Exchange 2007 clustered mailbox server (CMS) based on cluster continuous replication (CCR) cluster technology. Unlike a traditional Exchange cluster, a CCR cluster not only provides redundancy on the hardware level, but also provides redundancy on the storage level.
Since then clustered mailbox servers based on CCR clusters have become a very popular method for providing a cost effective high availability messaging solution that matches the service level agreement (SLA) in many of the Enterprise organizations around the world. Now that both Exchange Server 2007 Service Pack 1 (SP1) and Windows Server 2008 have been released to manufacturing (RTM), I thought it would be good timing to provide you with an article series that walks you through how to deploy an Exchange 2007 SP1 clustered mailbox server based on cluster continuous replication on Windows Server 2008, so you are prepared for those real world deployments that lie on the horizon.
Before we move on, let me first explain why it is advantageous to deploy an Exchange 2007 clustered mailbox server based on CCR cluster technology using Windows Server 2008 failover clusters instead of sticking with the well tested clustering functionality included with Windows Server 2003. First, Exchange Server 2007 SP1 can take advantage of the heavily improved failover cluster (formerly known as server cluster) component in Windows Server 2008. The Windows Server 2008 failover cluster component makes it even simpler to deploy CCR clusters and enhances the stability of the failover cluster solution as well as makes it more secure than in previous versions of Window Server. In addition, because the new failover cluster included with Windows Server 2008 supports multiple subnets, unlike Exchange 2007 RTM, Exchange 2007 SP1 includes support for geographically dispersed clusters (GeoClusters) for failover across two subnets (although the nodes must still be in the same Active Directory site). Moreover, Exchange 2007 SP1 CCR clusters support both Internet Protocol version 4 (IPv4) as well as IPv6 and DHCP assigned IP addresses (both IPv4 and IPv6 although IPv4 is not recommended unless the DHCP server is set to grant leases for an unlimited length).
Note: Get a complete list of failover cluster improvements in Windows Server 2008.
Prerequisites
Before you can follow along with the steps provided in this article series, you must have a lab environment consisting of the following:
• 1 Windows 2003 SP1 (preferably SP2) or Windows Server 2008 Standard edition server configured as a domain controller in an Active directory forest with a domain functional level of at least 2000 Native.
• 1 Windows 2003 SP1 (preferably SP2) or Windows Server 2008 Standard edition server with the Exchange 2007 SP1 Client Access and Hub Transport server roles installed (optionally you can install these roles on the domain controller).
• 2 Windows Server 2008 Enterprise edition servers that will become the nodes in the failover cluster.
The 2 Windows Server 2008 Enterprise edition servers should be equipped with 2 network interfaces (one for the public network and one for the private heartbeat network) and at least 2 disks – 1 for the System partition, 1 for Exchange databases and optionally 1 for transaction log files (in a lab environment these could also be located together with the Exchange databases).
I used the 32-bit edition of Exchange 2007 SP1 and Windows Server 2008, which meant I could get along with allocating a lot less memory to each box (500 MB for the Domain Controller, 700 MB for the server where the Client Access and Hub Transport server roles are installed, and 700 MB for each failover cluster node) than would have been the case if I used 64-bit editions.
Although the above configuration recommendations are sufficient for a lab environment, please bear in mind that the 32-bit bit edition of Exchange 2007 is not supported in production environment and that best practice recommendations for Exchange 2007 CCR clusters in a production environment are very different from what I used here.
If you, like me, only have a limited set of test boxes it is highly recommended you deploy this lab environment using a virtualization solution. If you choose to use the 32-bit editions of Exchange 2007 and Windows Server 2008, you can use anything from Microsoft Virtual PC, Microsoft Virtual Server, VMWare workstation/server or a real enterprise virtualization platform such as VMWare ESX Server or Microsoft’s new HyperVisor (HyperV) included with Windows Server 2008. Just pick your favorite! :-)
Configuring the Failover Cluster Nodes
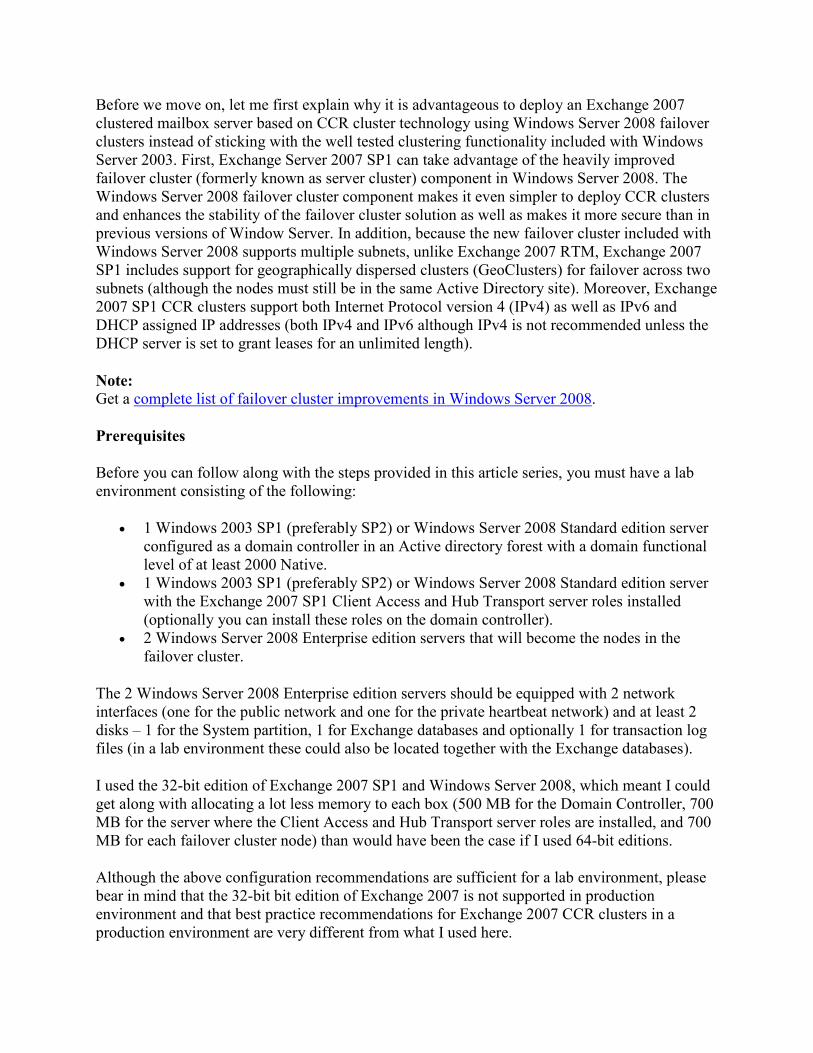
Alright, when you have an Active Directory forest consisting of a domain controller and a member server with the Exchange 2007 Client Access and Hub Transport server roles installed we are ready to configure the two servers that will be the nodes in our failover cluster. The first thing we want to do when the servers have been turned on is to partition the disks and configure the network interfaces appropriately. To partition the disks, open the Windows 2008 Server Manager and expand Storage and then select Disk Management. Now right-click on each LUN that is offline and then select Online in the context menu as shown in Figure 1.
Figure 1: Bringing disks online
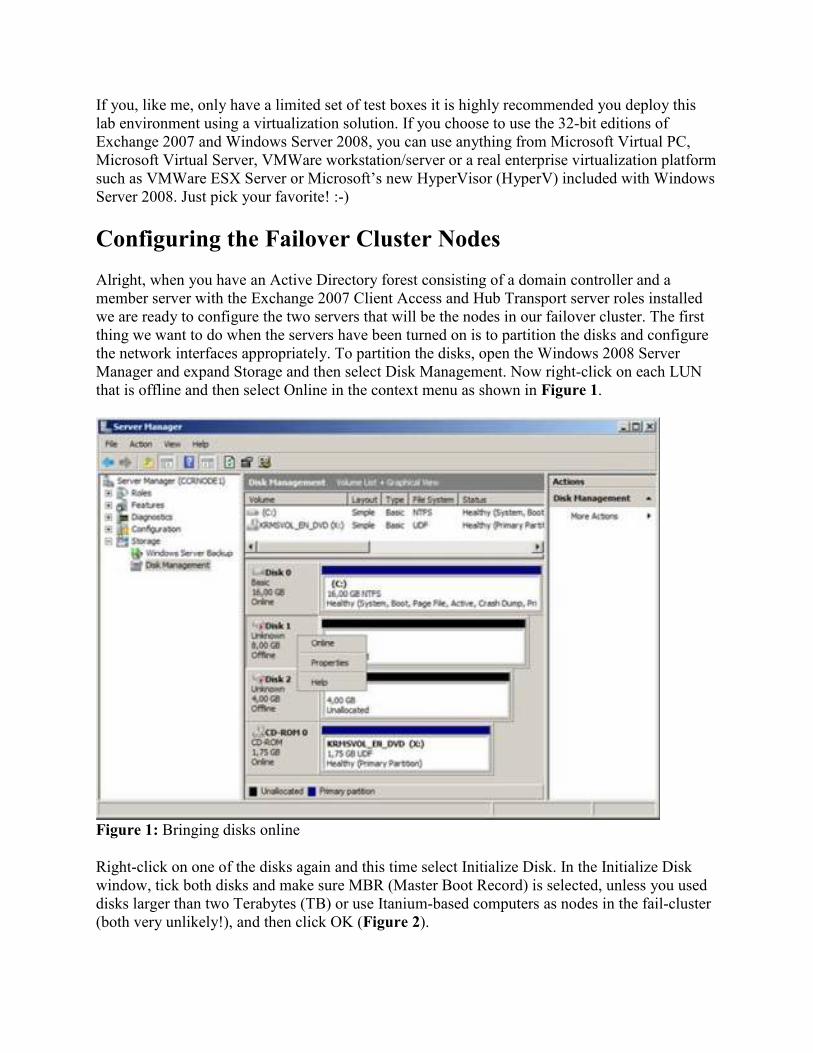
Right-click on one of the disks again and this time select Initialize Disk. In the Initialize Disk window, tick both disks and make sure MBR (Master Boot Record) is selected, unless you used disks larger than two Terabytes (TB) or use Itanium-based computers as nodes in the fail-cluster (both very unlikely!), and then click OK (Figure 2).
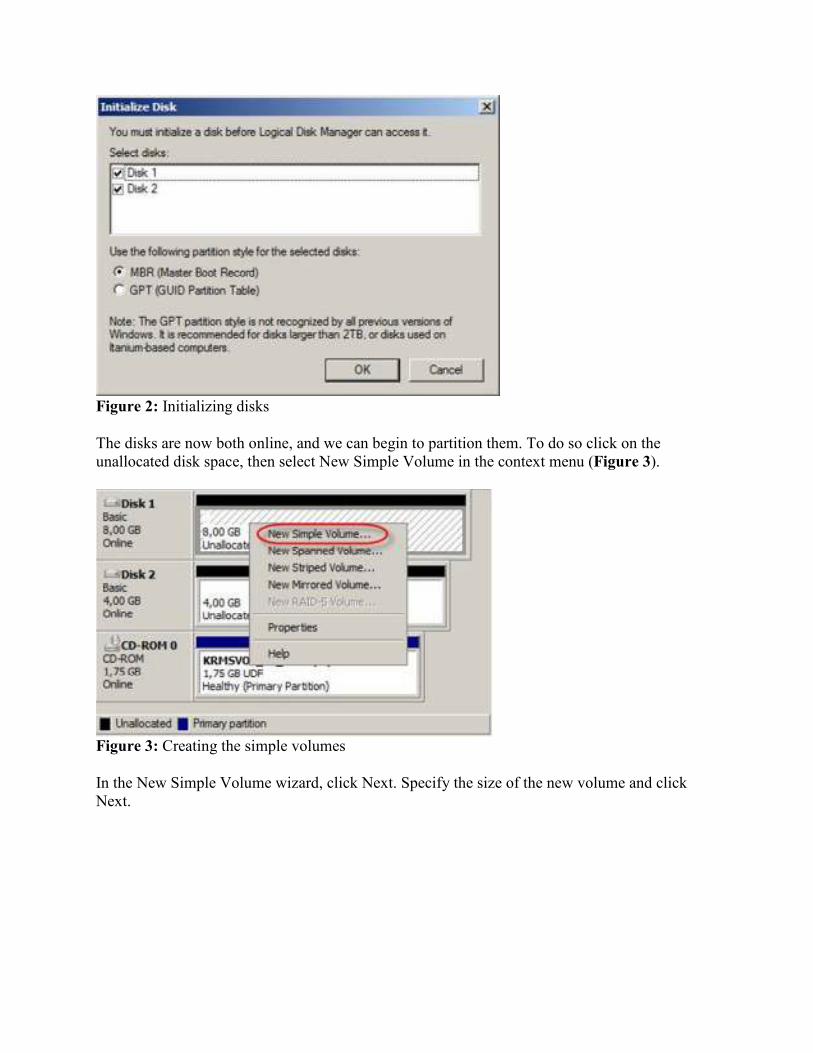
Figure 2: Initializing disks
The disks are now both online, and we can begin to partition them. To do so click on the unallocated disk space, then select New Simple Volume in the context menu (Figure 3).
Figure 3: Creating the simple volumes
In the New Simple Volume wizard, click Next. Specify the size of the new volume and click Next.

Figure 4: Specifying the size of the volume
We now need to assign a drive letter to the volume. When ready click Next (Figure 5).
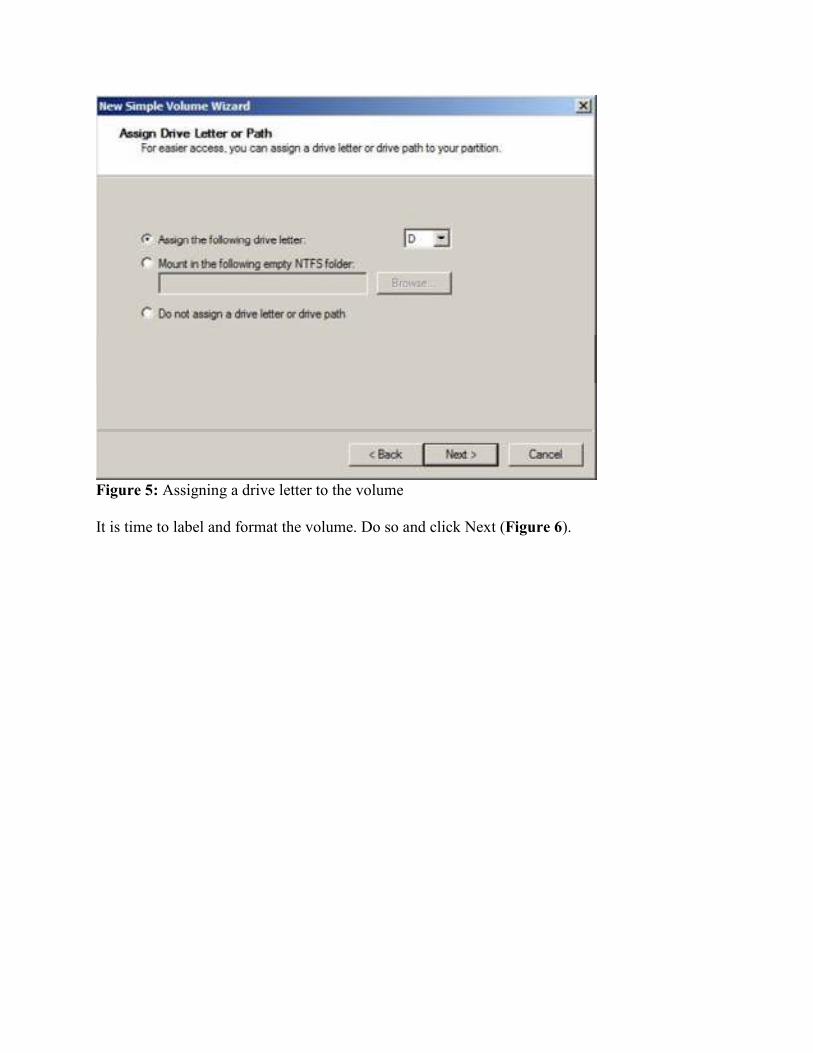
Figure 5: Assigning a drive letter to the volume
It is time to label and format the volume. Do so and click Next (Figure 6).
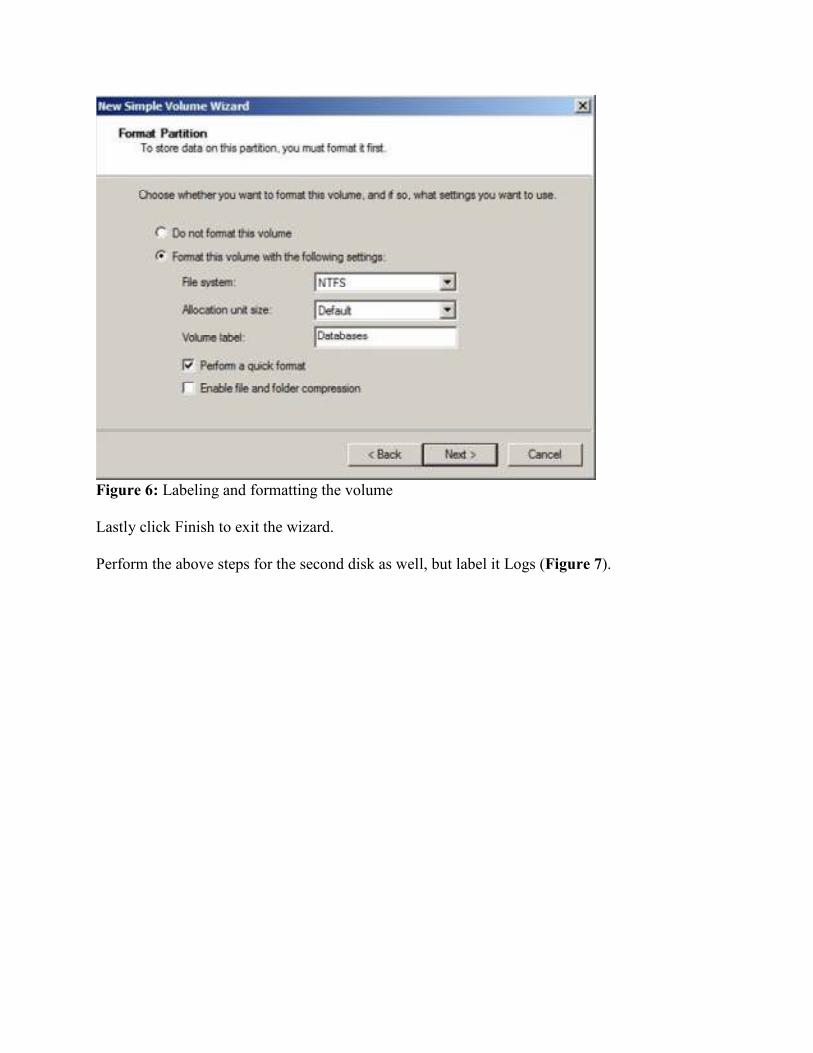
Figure 6: Labeling and formatting the volume
Lastly click Finish to exit the wizard.
Perform the above steps for the second disk as well, but label it Logs (Figure 7).
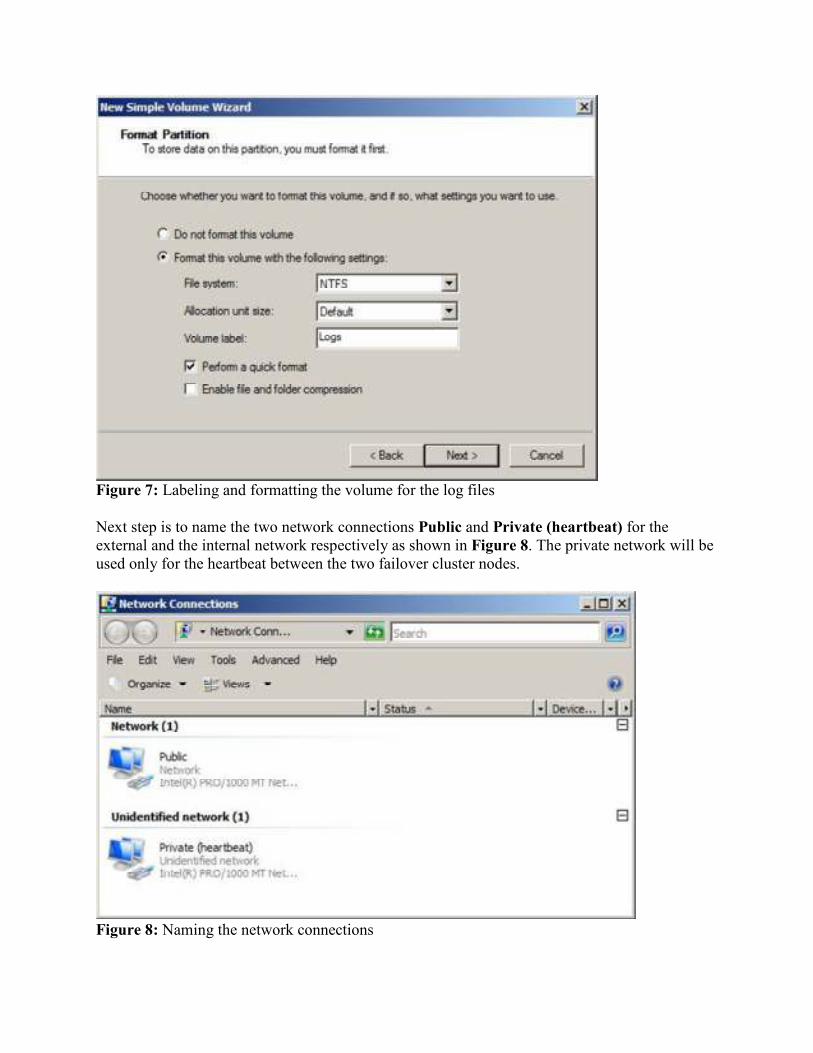
Figure 7: Labeling and formatting the volume for the log files
Next step is to name the two network connections Public and Private (heartbeat) for the external and the internal network respectively as shown in Figure 8. The private network will be used only for the heartbeat between the two failover cluster nodes.
Figure 8: Naming the network connections
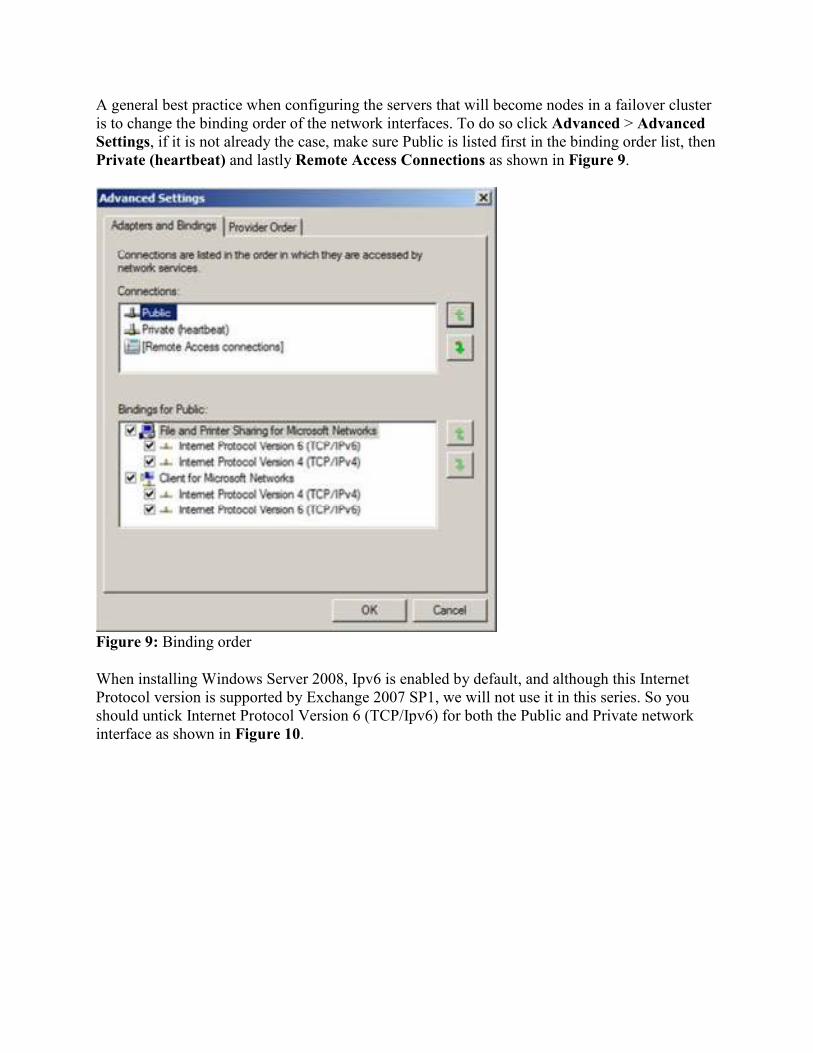
A general best practice when configuring the servers that will become nodes in a failover cluster is to change the binding order of the network interfaces. To do so click Advanced > Advanced Settings, if it is not already the case, make sure Public is listed first in the binding order list, then Private (heartbeat) and lastly Remote Access Connections as shown in Figure 9.
Figure 9: Binding order
When installing Windows Server 2008, Ipv6 is enabled by default, and although this Internet Protocol version is supported by Exchange 2007 SP1, we will not use it in this series. So you should untick Internet Protocol Version 6 (TCP/Ipv6) for both the Public and Private network interface as shown in Figure 10.
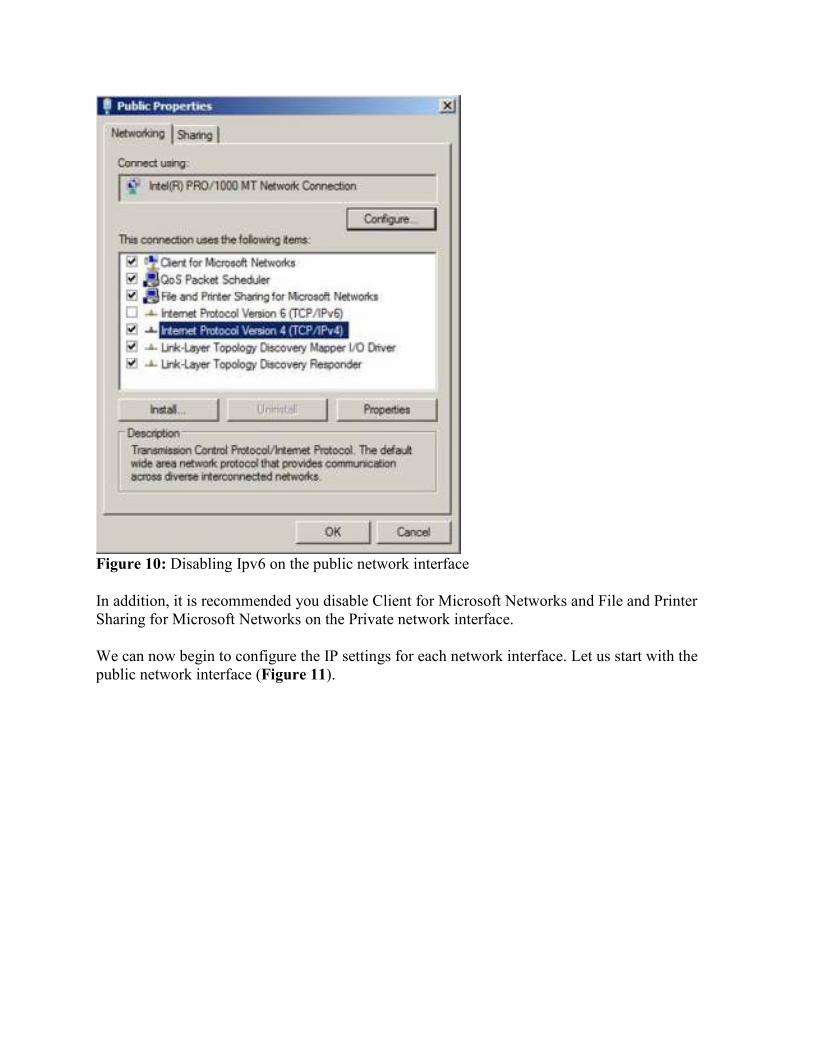
Figure 10: Disabling Ipv6 on the public network interface
In addition, it is recommended you disable Client for Microsoft Networks and File and Printer Sharing for Microsoft Networks on the Private network interface.
We can now begin to configure the IP settings for each network interface. Let us start with the public network interface (Figure 11).
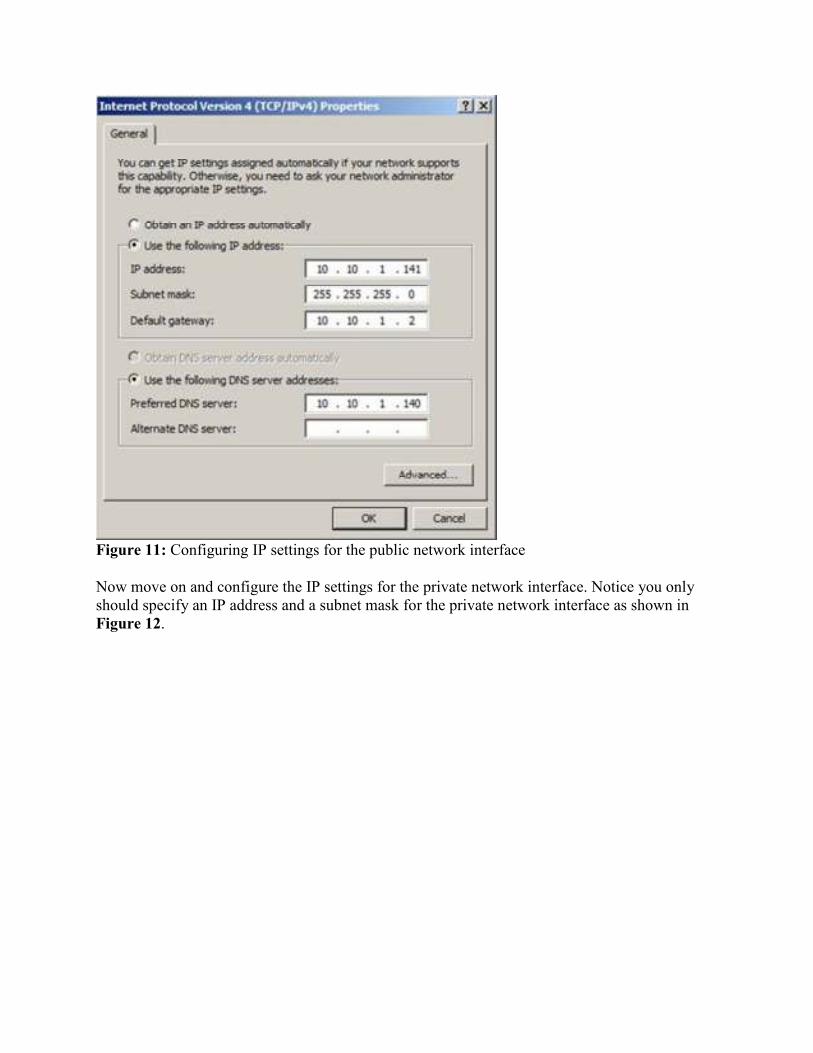
Figure 11: Configuring IP settings for the public network interface
Now move on and configure the IP settings for the private network interface. Notice you only should specify an IP address and a subnet mask for the private network interface as shown in Figure 12.

Figure 12: Configuring IP settings for the private network interface
Also make sure you untick Append parent suffixes of the primary DNS suffixes and Register this connection’s addresses in DNS (Figure 13).
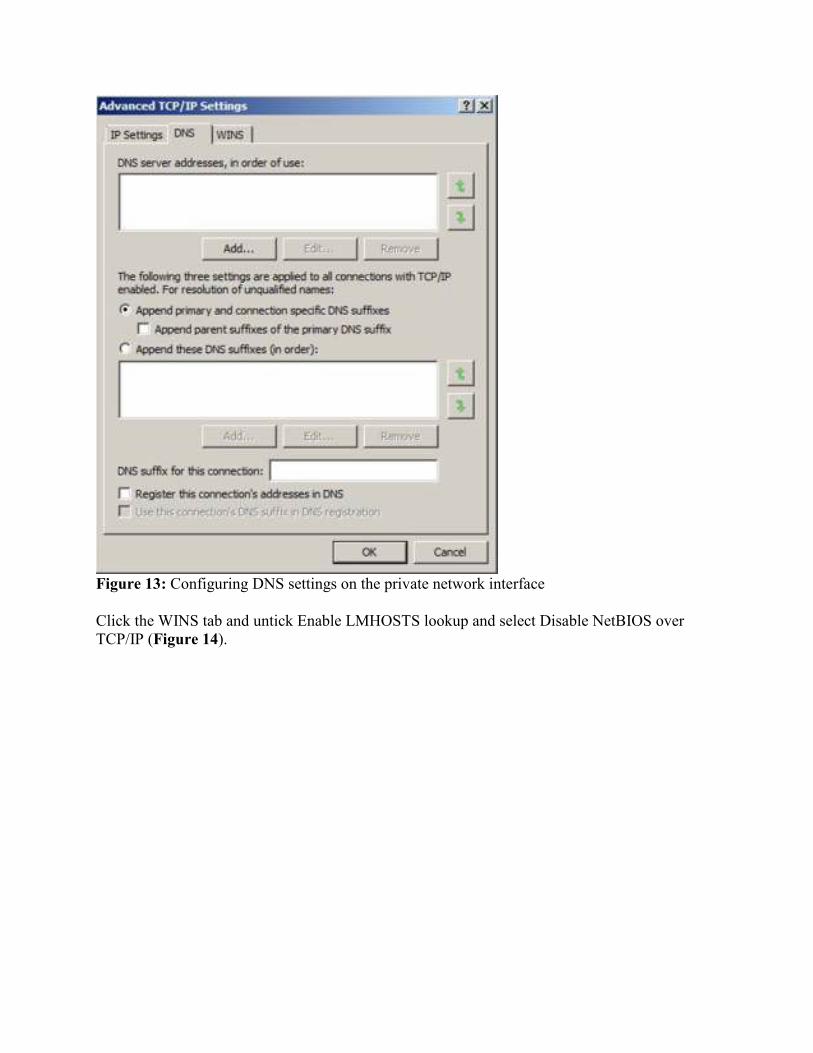
Figure 13: Configuring DNS settings on the private network interface
Click the WINS tab and untick Enable LMHOSTS lookup and select Disable NetBIOS over TCP/IP (Figure 14).
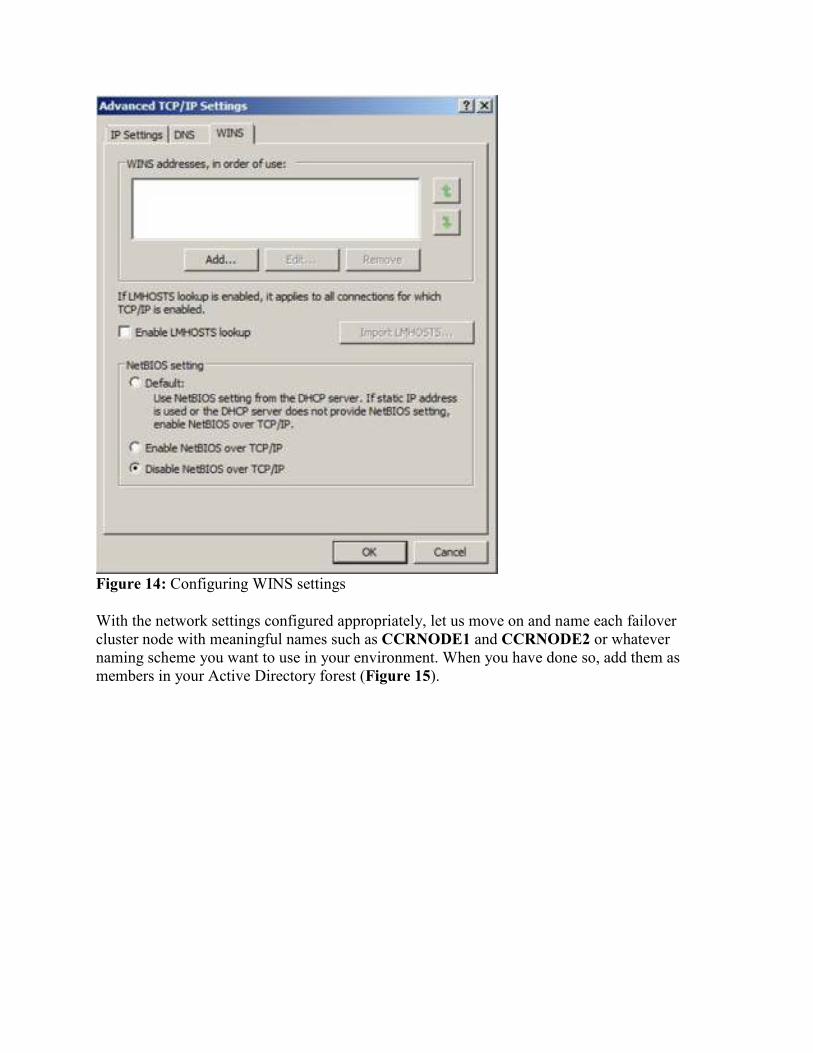
Figure 14: Configuring WINS settings
With the network settings configured appropriately, let us move on and name each failover cluster node with meaningful names such as CCRNODE1 and CCRNODE2 or whatever naming scheme you want to use in your environment. When you have done so, add them as members in your Active Directory forest (Figure 15).
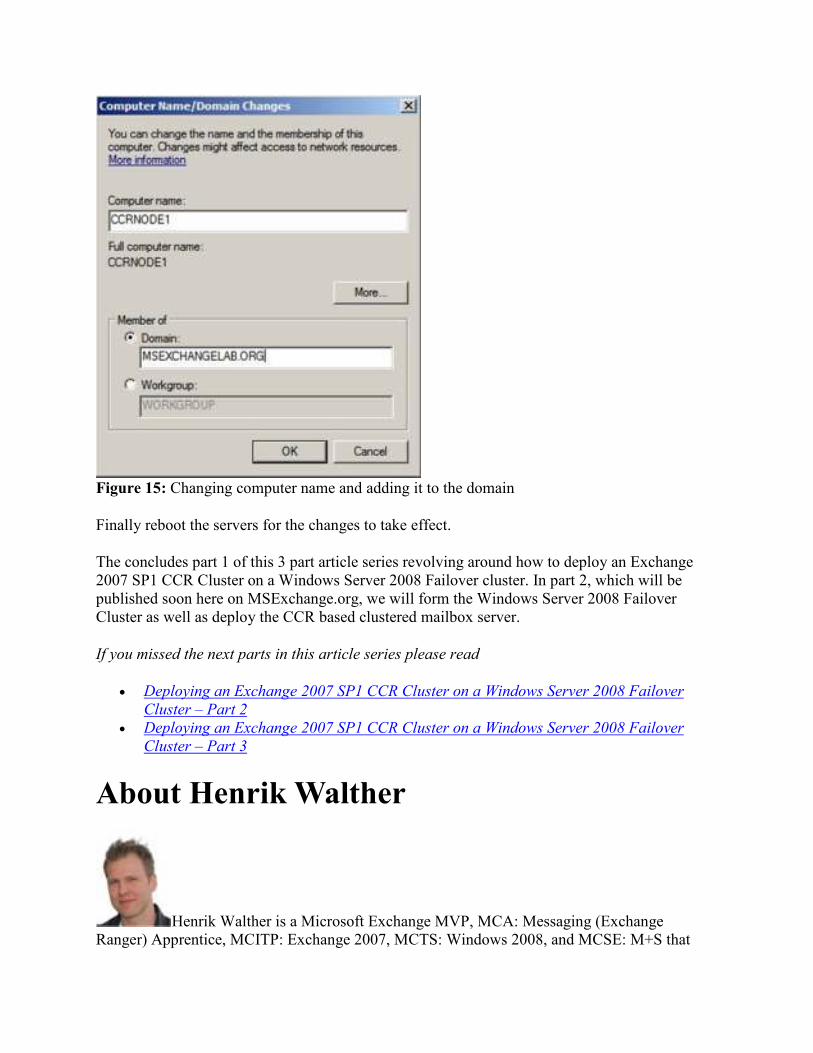
Figure 15: Changing computer name and adding it to the domain
Finally reboot the servers for the changes to take effect.
The concludes part 1 of this 3 part article series revolving around how to deploy an Exchange 2007 SP1 CCR Cluster on a Windows Server 2008 Failover cluster. In part 2, which will be published soon here on MSExchange.org, we will form the Windows Server 2008 Failover Cluster as well as deploy the CCR based clustered mailbox server.
If you missed the next parts in this article series please read
• Deploying an Exchange 2007 SP1 CCR Cluster on a Windows Server 2008 Failover
Cluster – Part 2 • Deploying an Exchange 2007 SP1 CCR Cluster on a Windows Server 2008 Failover
Cluster – Part 3
About Henrik Walther
Henrik Walther is a Microsoft Exchange MVP, MCA: Messaging (Exchange Ranger) Apprentice, MCITP: Exchange 2007, MCTS: Windows 2008, and MCSE: M+S that
works as a Technology Architect for Timengo Consulting A/S, a Microsoft Gold Partner based in Denmark. You can visit his website at: www.exchange-faq.dk (danish).
Click here for Henrik Walther's section.
Receive all the latest articles by email!
Get all articles delivered directly to your mailbox as and when they are released on MSExchange.org! Choose between receiving instant updates with the Real-Time Article Update, or a monthly summary with the Monthly Article Update. Sign up to the MSExchange.org Monthly Newsletter, written by Exchange MVP Henrik Walther, containing news, the hottest tips, Exchange links of the month and much more. Subscribe today and don't miss a thing!
• Real-Time Article Update (click for sample)
• Monthly Article Update (click for sample)
• Monthly Newsletter (click for sample)
Enter email
Latest articles by Henrik Walther
• Eliminating Traditional Backups using native Exchange 2010 Functionality (Part 1) • Eliminating Traditional Backups using native Exchange 2010 Functionality (Part 2) • Eliminating Traditional Backups using native Exchange 2010 Functionality (Part 3) • Load Balancing Exchange 2010 Client Access Servers using an Hardware Load Balancer
Solution (Part 2) • Uncovering the new RPC Client Access Service in Exchange 2010 (Part 4)
Related links
• Clustered Continuous Replication Failover with Standby Continuous Replication (Part 1) • Installing, Configuring and Testing an Exchange 2007 Cluster Continuous Replication
(CCR) Based Mailbox Server (Part 1) • Installing, Configuring and Testing an Exchange 2007 Cluster Continuous Replication
(CCR) Based Mailbox Server (Part 3) • Installing, Configuring and Testing an Exchange 2007 Cluster Continuous Replication
(CCR) Based Mailbox Server (Part 2)
• Deploying an Exchange 2007 SP1 CCR Cluster on a Windows Server 2008 Failover Cluster – Part 2: Forming and Validating the Failover Cluster
Installing the Required Windows Server 2008 Role and
Features
In Part 1, we configured the 2 servers that will be the nodes in the Windows Server 2008 Failover Cluster as well as added them to the domain. The next step is to install the required Windows Server 2008 role and features. A clustered Mailbox Server requires the following role and features on each failover cluster node:
• Web Server (IIS) • PowerShell • Fail-Over Clustering
The simplest way to install the role and features is to use the new Windows Server 2008 command-line based ServerManagerCMD.exe tool which lets you perform the installation via command prompt window or using a custom script. To install each role or feature individually, run the following commands in a command prompt window:
ServerManagerCmd -i PowerShell
ServerManagerCmd -i Failover-Clustering
ServerManagerCmd -i Web-Server
ServerManagerCmd -i Web-ISAPI-Ext
ServerManagerCmd -i Web-Metabase
ServerManagerCmd -i Web-Lgcy-Mgmt-Console
ServerManagerCmd -i Web-Basic-Auth
ServerManagerCmd -i Web-Windows-Auth
If you would rather install them using one command, you can create an XML answer file with the following content:
<ServerManagerConfiguration Action="Install"
xmlns="http://schemas.microsoft.com/sdm/Windows/ServerManager/Configuration/2007/1">
<Feature Id="Failover-Clustering"/>
<Feature Id="PowerShell"/>
<Role Id="Web-Server"/>
<RoleService Id="Web-Metabase"/>
<RoleService Id="Web-Lgcy-Mgmt-Console"/>
<RoleService Id=" Web-ISAPI-Ext "/> <RoleService Id="Web-Basic-Auth"/>
<RoleService Id="Web-Windows-Auth"/>
</ServerManagerConfiguration>
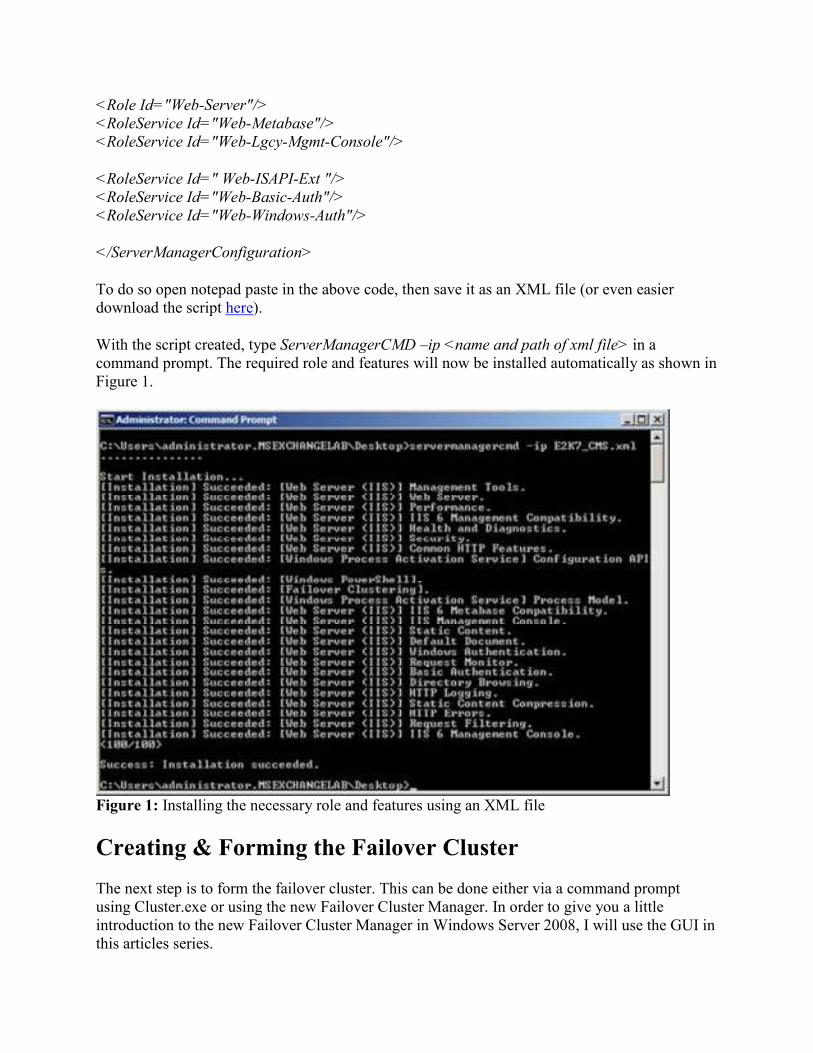
To do so open notepad paste in the above code, then save it as an XML file (or even easier download the script here).
With the script created, type ServerManagerCMD –ip <name and path of xml file> in a command prompt. The required role and features will now be installed automatically as shown in Figure 1.
Figure 1: Installing the necessary role and features using an XML file
Creating & Forming the Failover Cluster
The next step is to form the failover cluster. This can be done either via a command prompt using Cluster.exe or using the new Failover Cluster Manager. In order to give you a little introduction to the new Failover Cluster Manager in Windows Server 2008, I will use the GUI in this articles series.
Note:
If you want to use Cluster.exe, please see the respective Exchange 2007 documentation on TechNet.
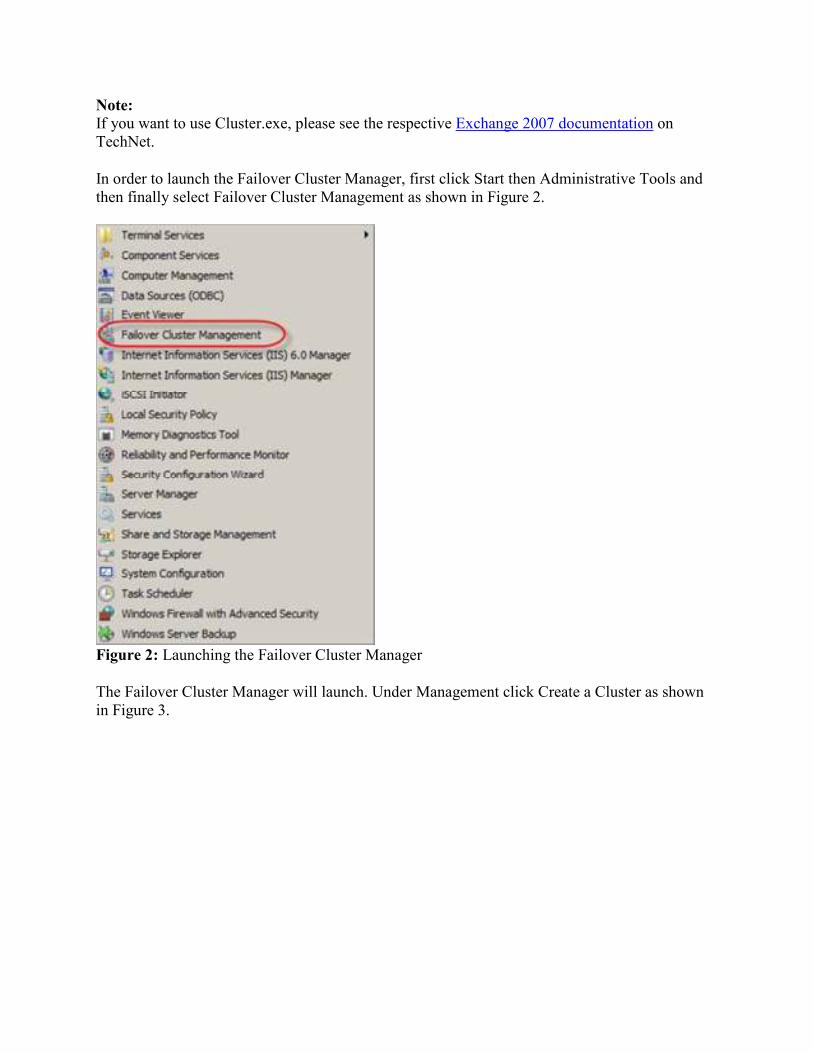
In order to launch the Failover Cluster Manager, first click Start then Administrative Tools and then finally select Failover Cluster Management as shown in Figure 2.
Figure 2: Launching the Failover Cluster Manager
The Failover Cluster Manager will launch. Under Management click Create a Cluster as shown in Figure 3.
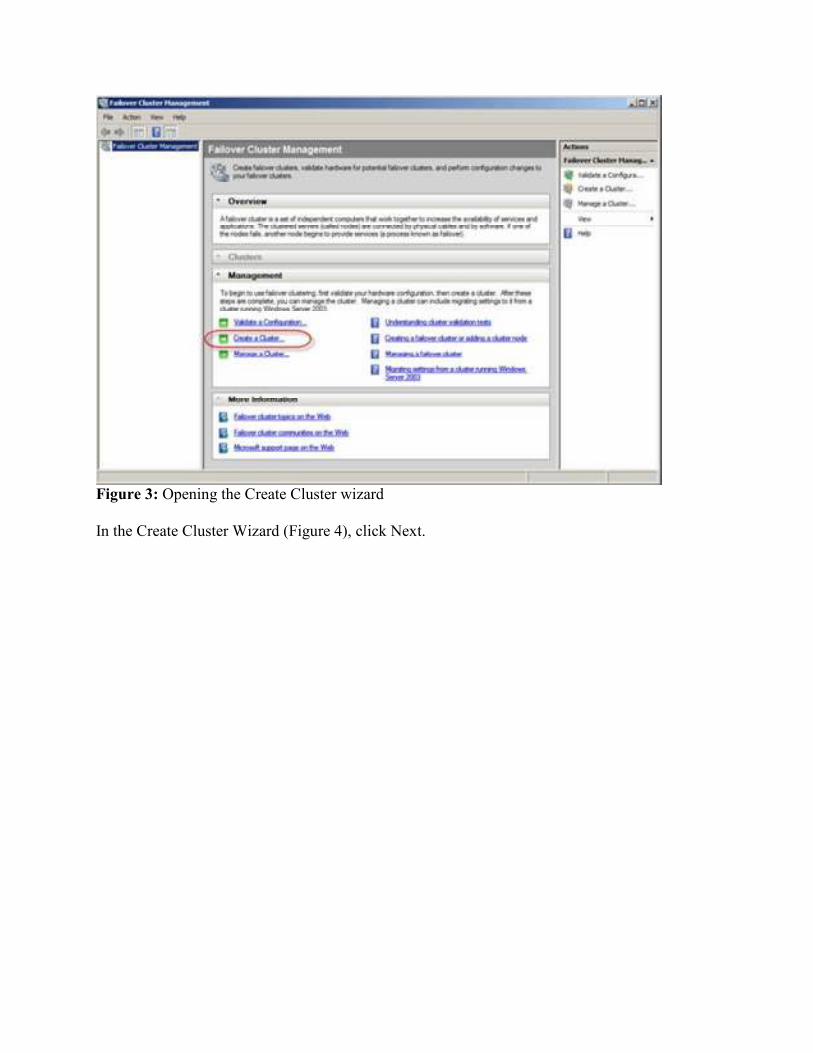
Figure 3: Opening the Create Cluster wizard
In the Create Cluster Wizard (Figure 4), click Next.
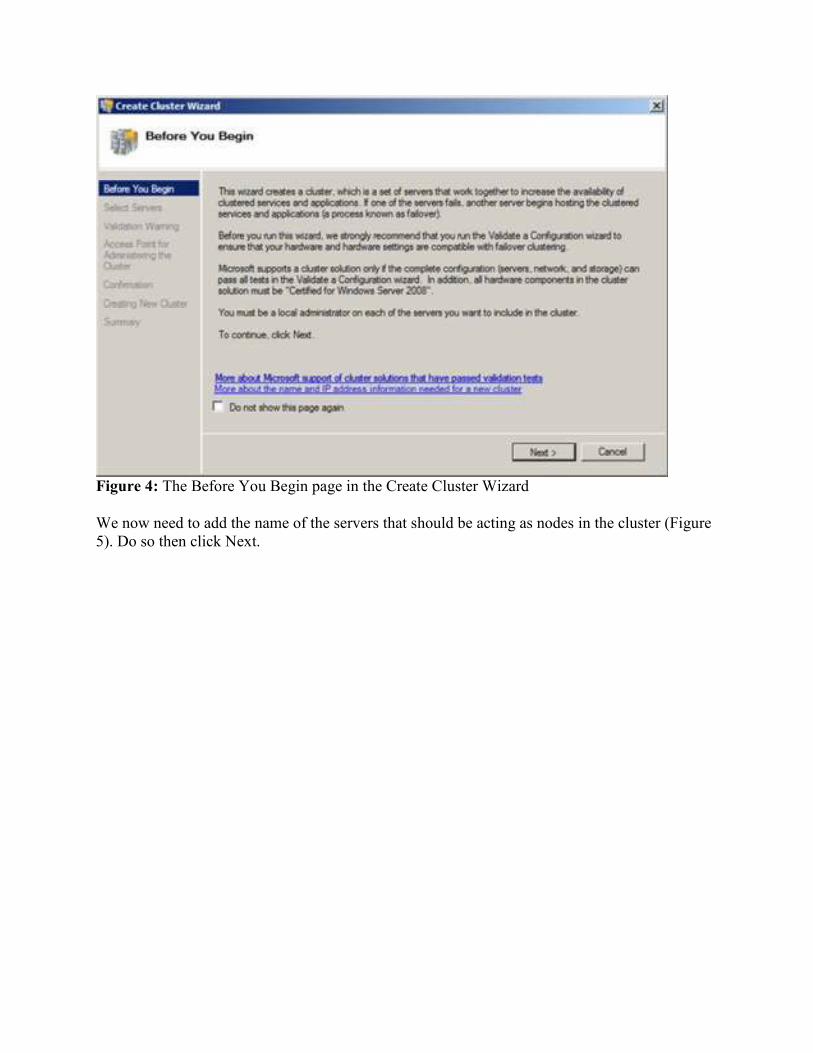
Figure 4: The Before You Begin page in the Create Cluster Wizard
We now need to add the name of the servers that should be acting as nodes in the cluster (Figure 5). Do so then click Next.
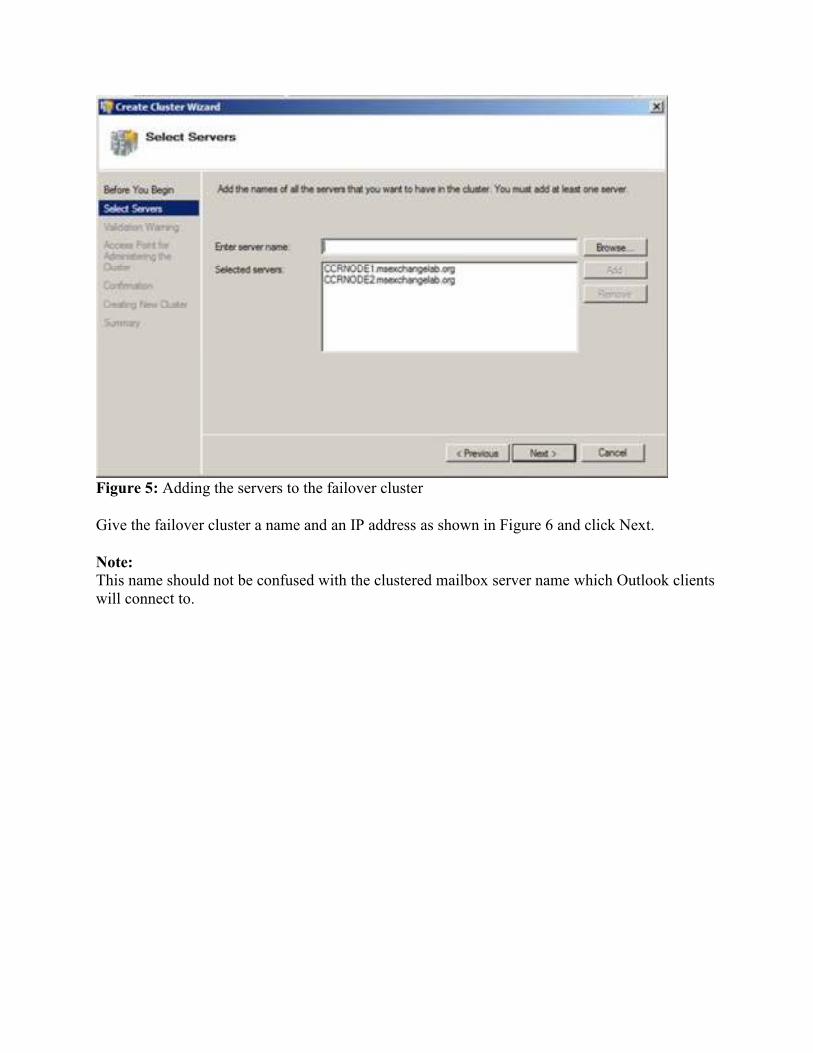
Figure 5: Adding the servers to the failover cluster
Give the failover cluster a name and an IP address as shown in Figure 6 and click Next.
Note: This name should not be confused with the clustered mailbox server name which Outlook clients will connect to.
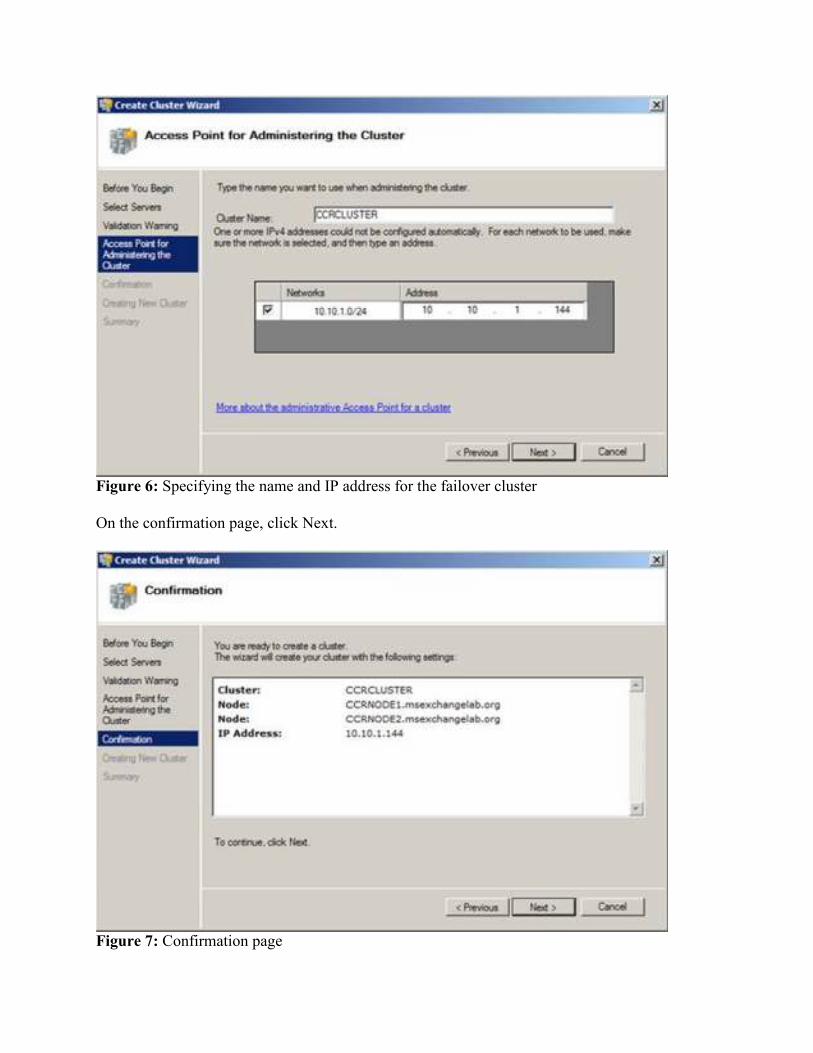
Figure 6: Specifying the name and IP address for the failover cluster
On the confirmation page, click Next.
Figure 7: Confirmation page
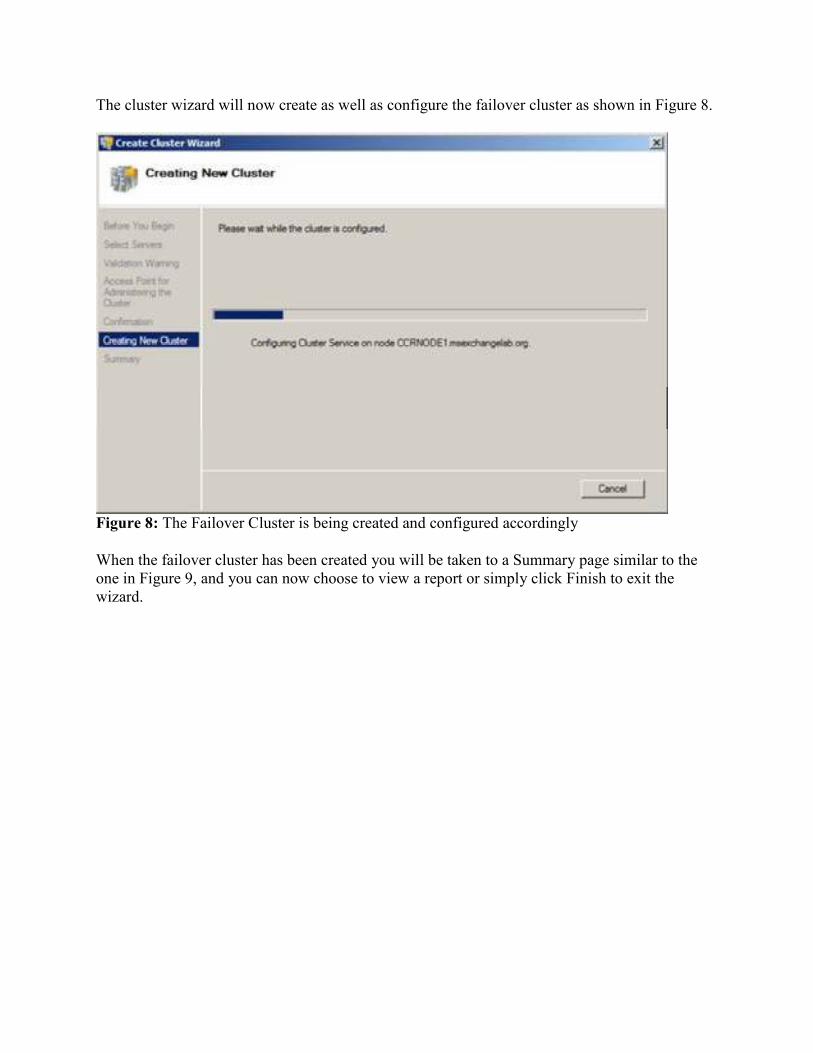
The cluster wizard will now create as well as configure the failover cluster as shown in Figure 8.
Figure 8: The Failover Cluster is being created and configured accordingly
When the failover cluster has been created you will be taken to a Summary page similar to the one in Figure 9, and you can now choose to view a report or simply click Finish to exit the wizard.
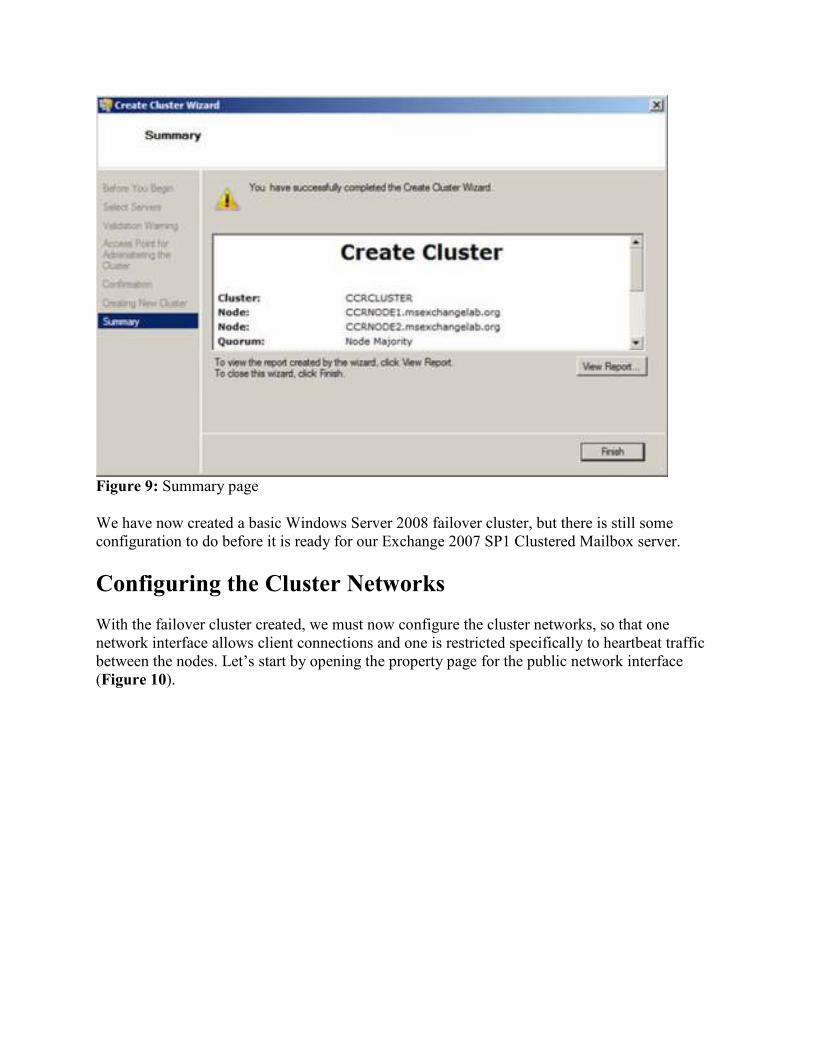
Figure 9: Summary page
We have now created a basic Windows Server 2008 failover cluster, but there is still some configuration to do before it is ready for our Exchange 2007 SP1 Clustered Mailbox server.
Configuring the Cluster Networks
With the failover cluster created, we must now configure the cluster networks, so that one network interface allows client connections and one is restricted specifically to heartbeat traffic between the nodes. Let’s start by opening the property page for the public network interface (Figure 10).
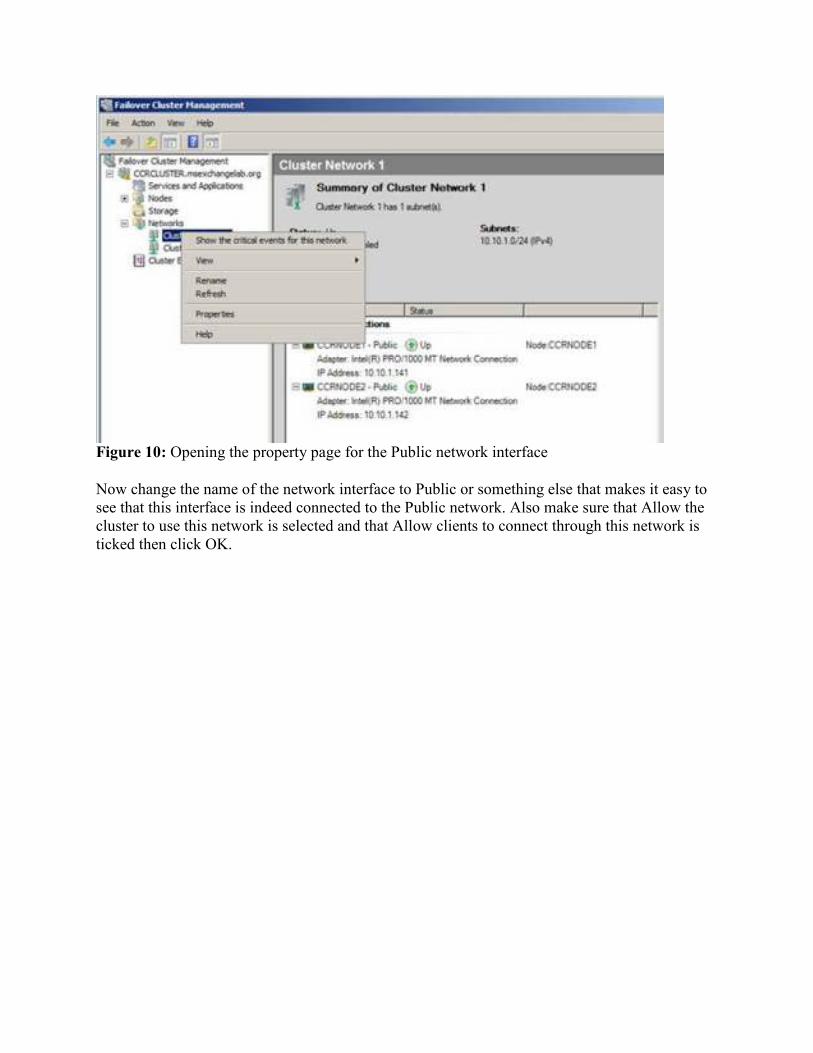
Figure 10: Opening the property page for the Public network interface
Now change the name of the network interface to Public or something else that makes it easy to see that this interface is indeed connected to the Public network. Also make sure that Allow the cluster to use this network is selected and that Allow clients to connect through this network is ticked then click OK.
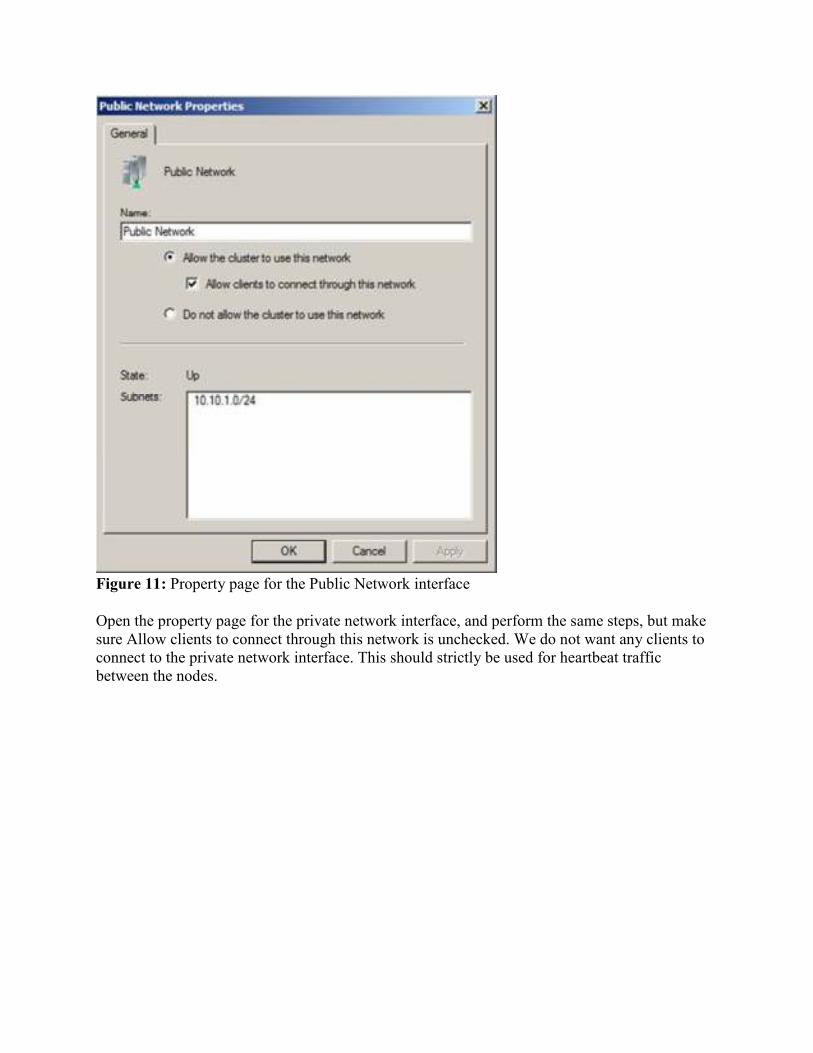
Figure 11: Property page for the Public Network interface
Open the property page for the private network interface, and perform the same steps, but make sure Allow clients to connect through this network is unchecked. We do not want any clients to connect to the private network interface. This should strictly be used for heartbeat traffic between the nodes.

Figure 12: Property page for Private network interface
Note:
With Exchange Server 2007 SP1 any network that is configured for cluster use and accepts client connections can also be used for CCR seeding, log shipping as well as reseeding. To configure this use the new Enable-ContinuousReplicationHostName cmdlet. You can also read more about how this is accomplished in the Exchange 2007 documentation on TechNet.
Configuring the File Share Majority Quorum
We must now configure the failover cluster quorum. That is, create the file share on a separate server (best practice is to use a Hub Transport server in the same AD site as the failover cluster nodes). To do so, log on to the server in your lab environment on which the Client Access and Hub Transport server roles are installed, then open a command prompt and create a new folder by typing:
MKDIR FSM_DIR_MBX
Where MBX is the name you plan to use for the clustered mailbox server. It does not really matter what you call it but in case you plan to use a Hub Transport server as file share majority
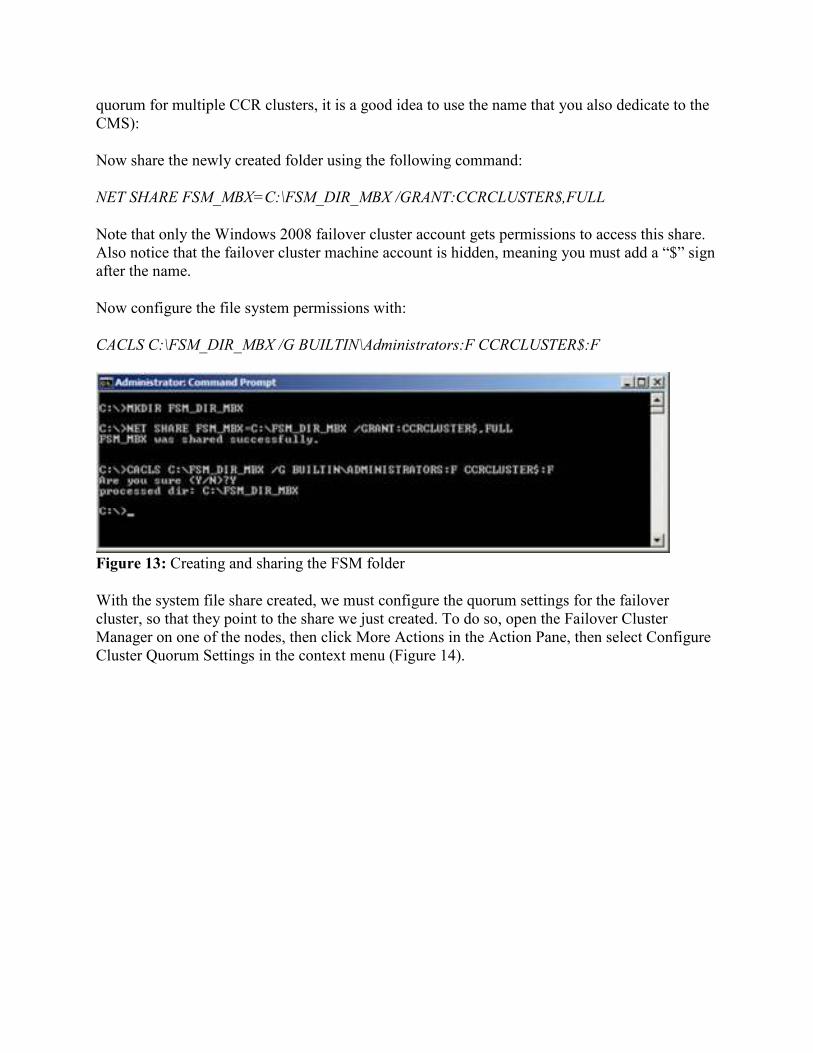
quorum for multiple CCR clusters, it is a good idea to use the name that you also dedicate to the CMS):
Now share the newly created folder using the following command:
NET SHARE FSM_MBX=C:\FSM_DIR_MBX /GRANT:CCRCLUSTER$,FULL
Note that only the Windows 2008 failover cluster account gets permissions to access this share. Also notice that the failover cluster machine account is hidden, meaning you must add a “$” sign after the name.
Now configure the file system permissions with:
CACLS C:\FSM_DIR_MBX /G BUILTIN\Administrators:F CCRCLUSTER$:F
Figure 13: Creating and sharing the FSM folder
With the system file share created, we must configure the quorum settings for the failover cluster, so that they point to the share we just created. To do so, open the Failover Cluster Manager on one of the nodes, then click More Actions in the Action Pane, then select Configure Cluster Quorum Settings in the context menu (Figure 14).
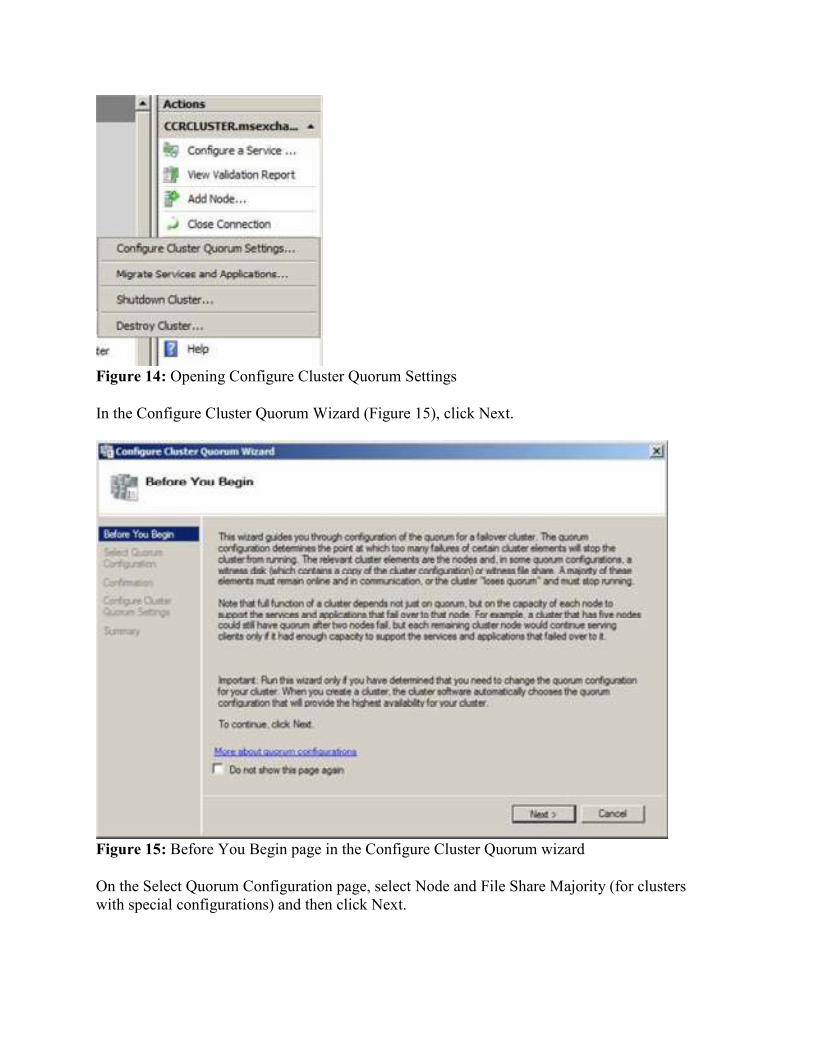
Figure 14: Opening Configure Cluster Quorum Settings
In the Configure Cluster Quorum Wizard (Figure 15), click Next.
Figure 15: Before You Begin page in the Configure Cluster Quorum wizard
On the Select Quorum Configuration page, select Node and File Share Majority (for clusters with special configurations) and then click Next.
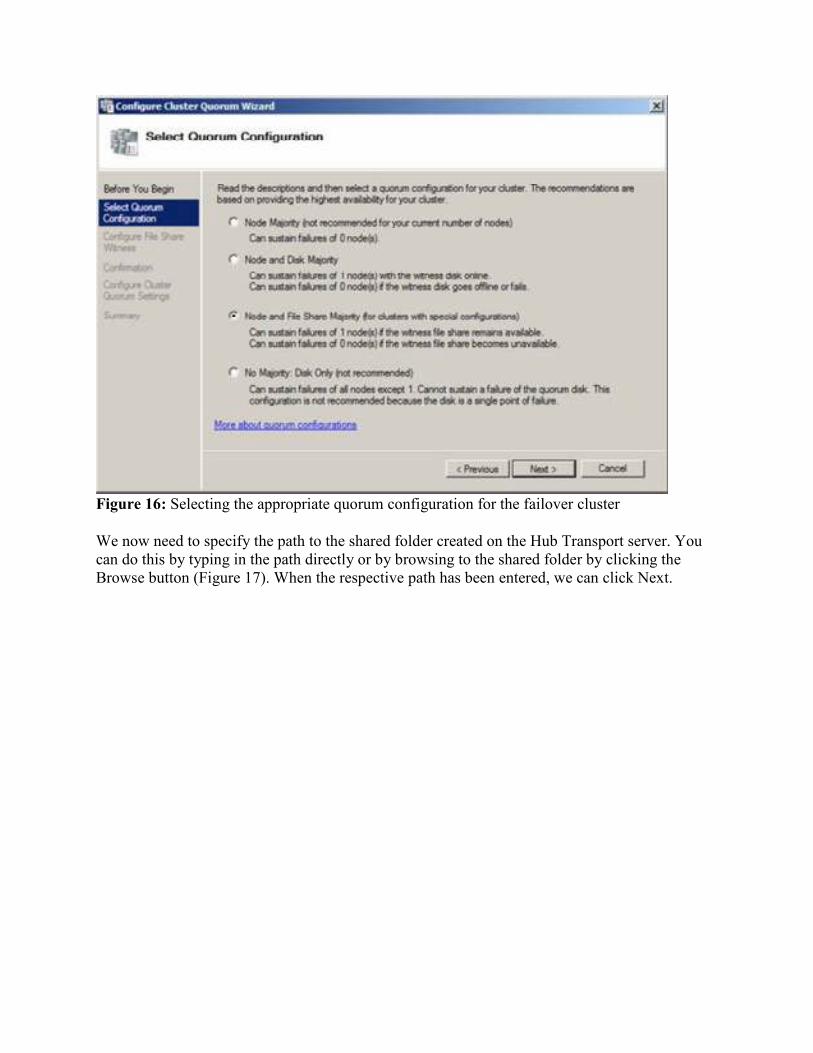
Figure 16: Selecting the appropriate quorum configuration for the failover cluster
We now need to specify the path to the shared folder created on the Hub Transport server. You can do this by typing in the path directly or by browsing to the shared folder by clicking the Browse button (Figure 17). When the respective path has been entered, we can click Next.
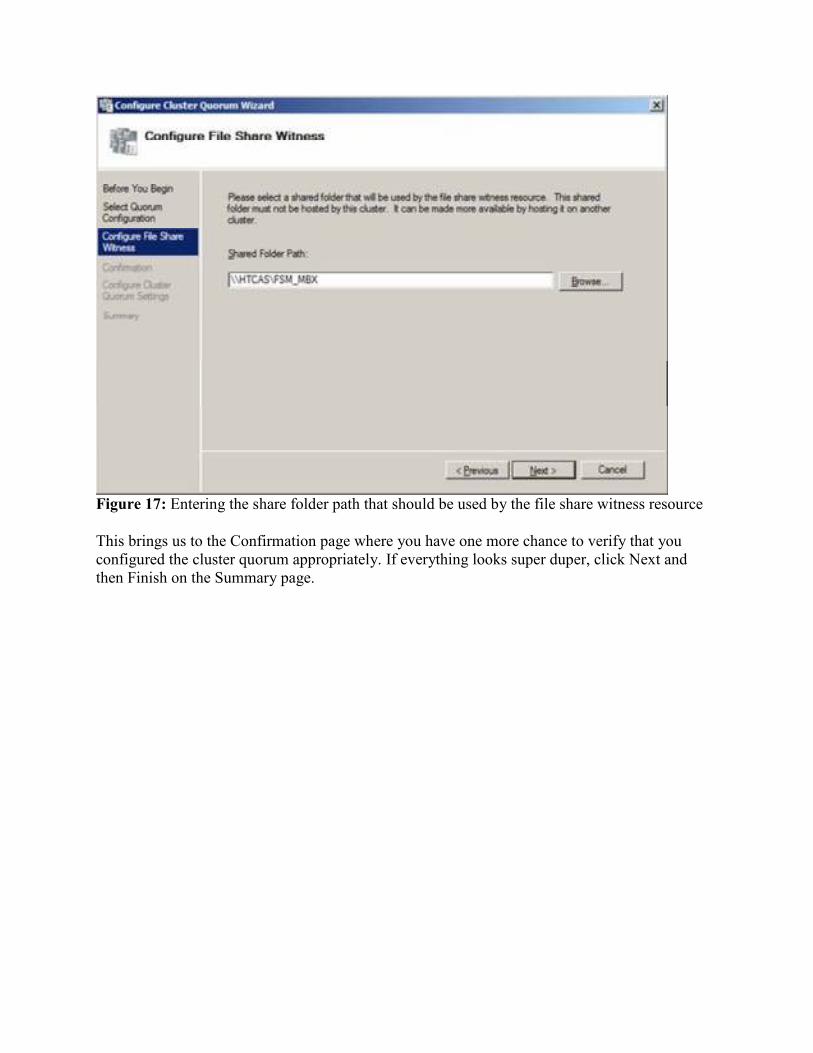
Figure 17: Entering the share folder path that should be used by the file share witness resource
This brings us to the Confirmation page where you have one more chance to verify that you configured the cluster quorum appropriately. If everything looks super duper, click Next and then Finish on the Summary page.
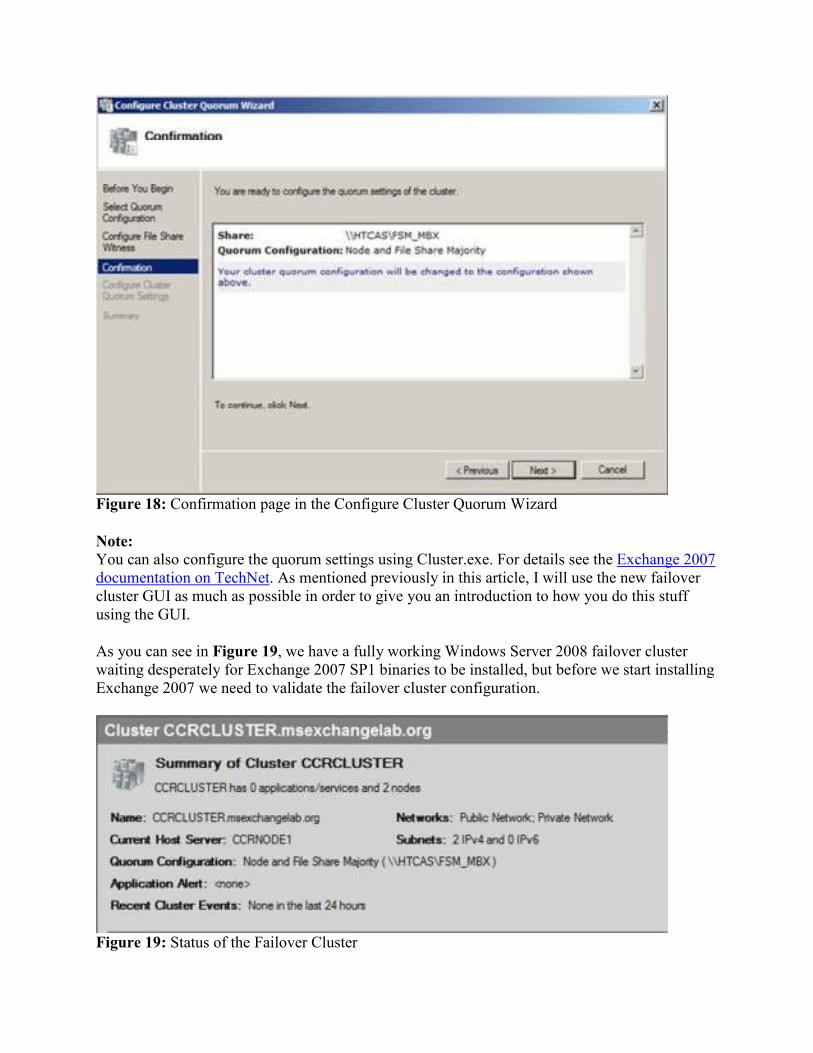
Figure 18: Confirmation page in the Configure Cluster Quorum Wizard
Note: You can also configure the quorum settings using Cluster.exe. For details see the Exchange 2007 documentation on TechNet. As mentioned previously in this article, I will use the new failover cluster GUI as much as possible in order to give you an introduction to how you do this stuff using the GUI.
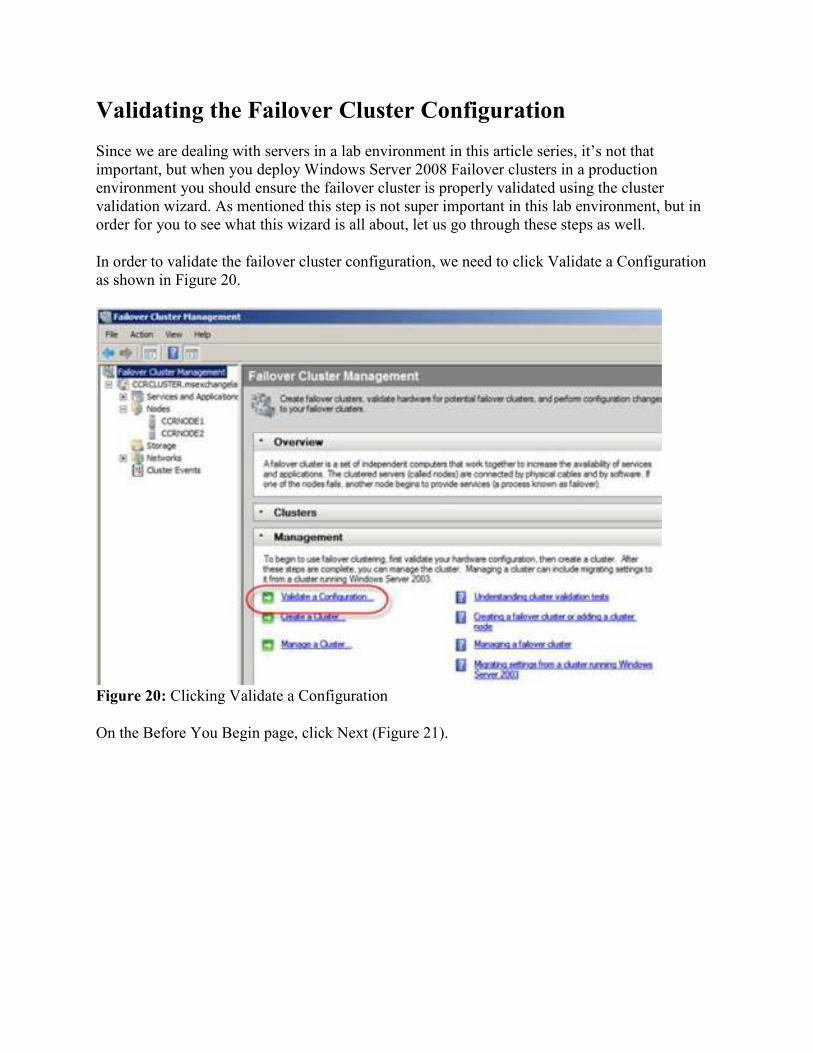
As you can see in Figure 19, we have a fully working Windows Server 2008 failover cluster waiting desperately for Exchange 2007 SP1 binaries to be installed, but before we start installing Exchange 2007 we need to validate the failover cluster configuration.
Figure 19: Status of the Failover Cluster
Validating the Failover Cluster Configuration
Since we are dealing with servers in a lab environment in this article series, it’s not that important, but when you deploy Windows Server 2008 Failover clusters in a production environment you should ensure the failover cluster is properly validated using the cluster validation wizard. As mentioned this step is not super important in this lab environment, but in order for you to see what this wizard is all about, let us go through these steps as well.
In order to validate the failover cluster configuration, we need to click Validate a Configuration as shown in Figure 20.
Figure 20: Clicking Validate a Configuration
On the Before You Begin page, click Next (Figure 21).
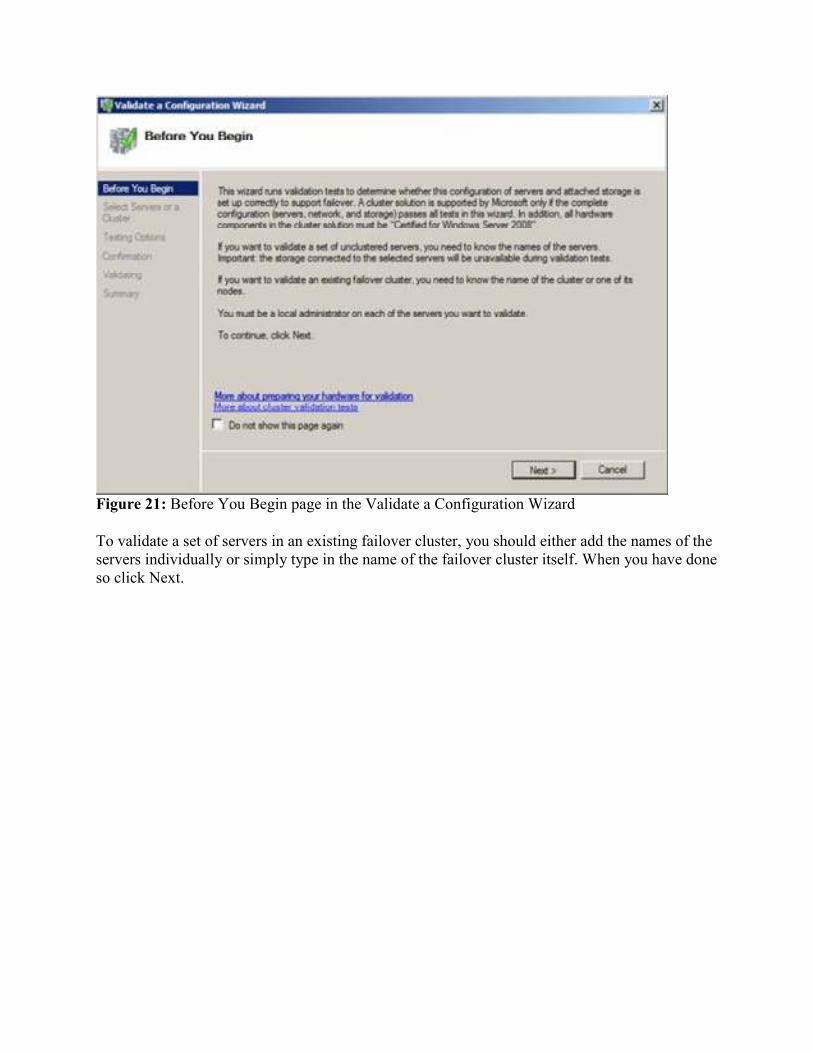
Figure 21: Before You Begin page in the Validate a Configuration Wizard
To validate a set of servers in an existing failover cluster, you should either add the names of the servers individually or simply type in the name of the failover cluster itself. When you have done so click Next.
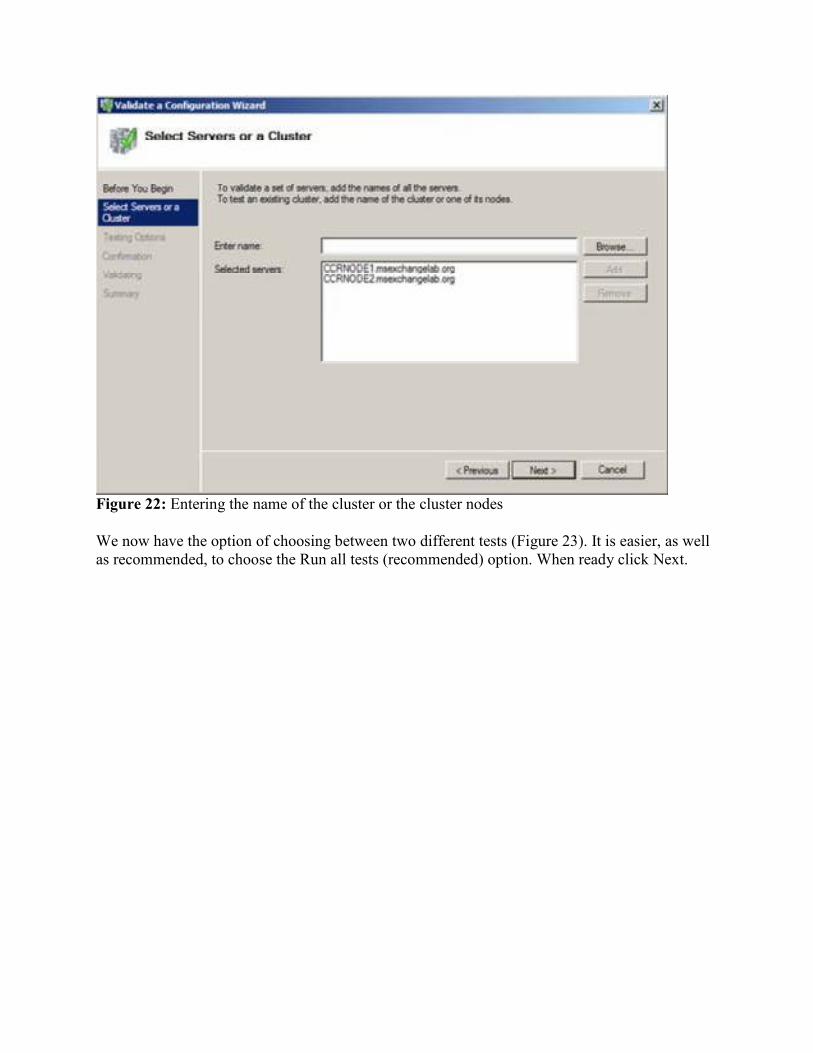
Figure 22: Entering the name of the cluster or the cluster nodes
We now have the option of choosing between two different tests (Figure 23). It is easier, as well as recommended, to choose the Run all tests (recommended) option. When ready click Next.
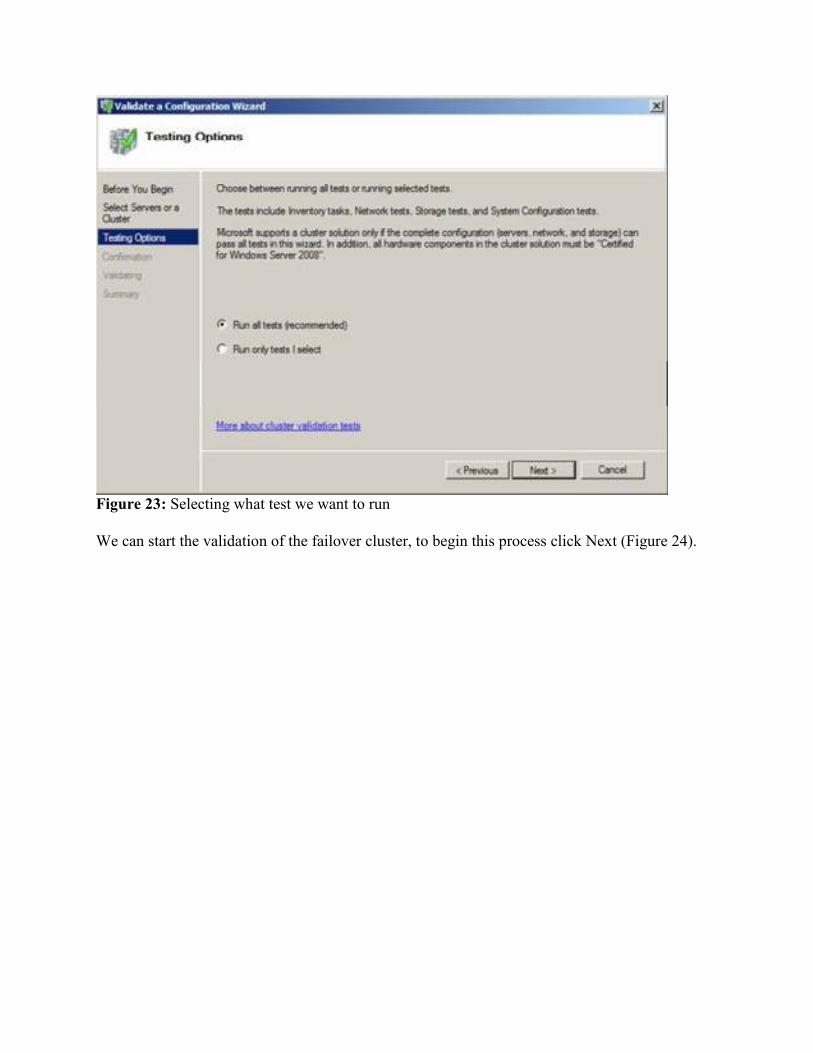
Figure 23: Selecting what test we want to run
We can start the validation of the failover cluster, to begin this process click Next (Figure 24).

Figure 24: Confirmation page in the Validate a Configuration Wizard
The validation wizard will go through several tests; some will take longer than others (Figure 25). Depending on the hardware specs of your cluster nodes, you need to have patience while the configuration is validated as this can take quite a few minutes.
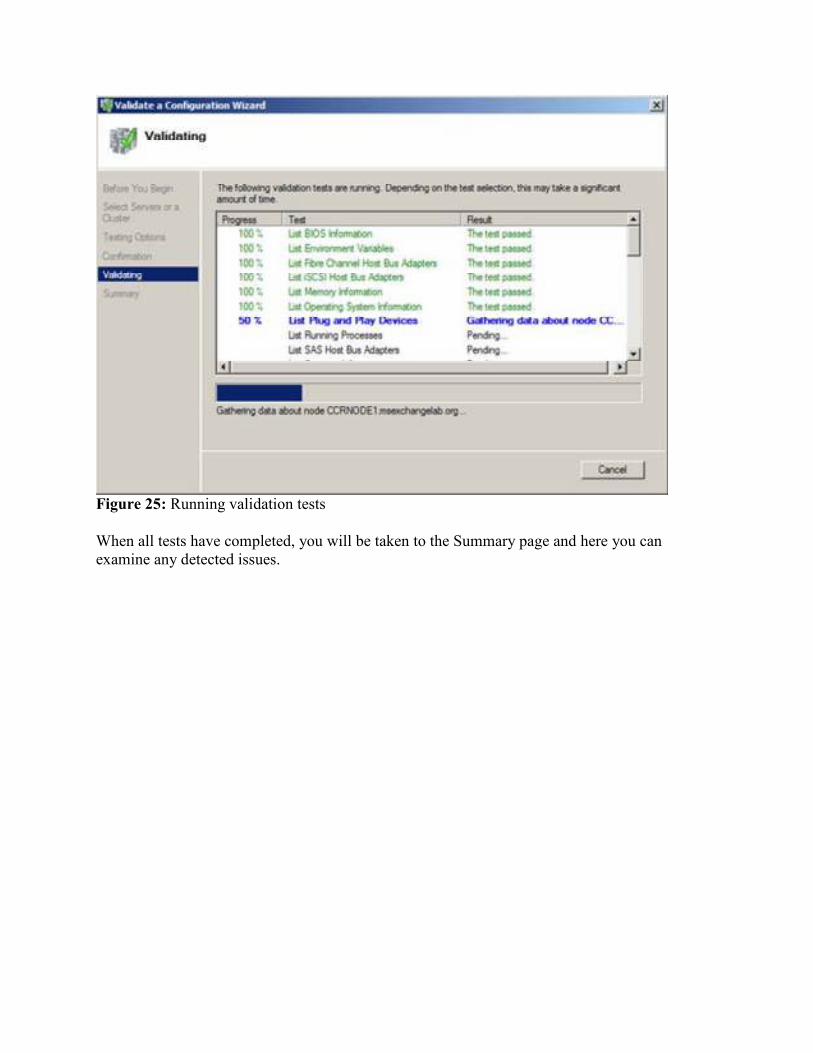
Figure 25: Running validation tests
When all tests have completed, you will be taken to the Summary page and here you can examine any detected issues.
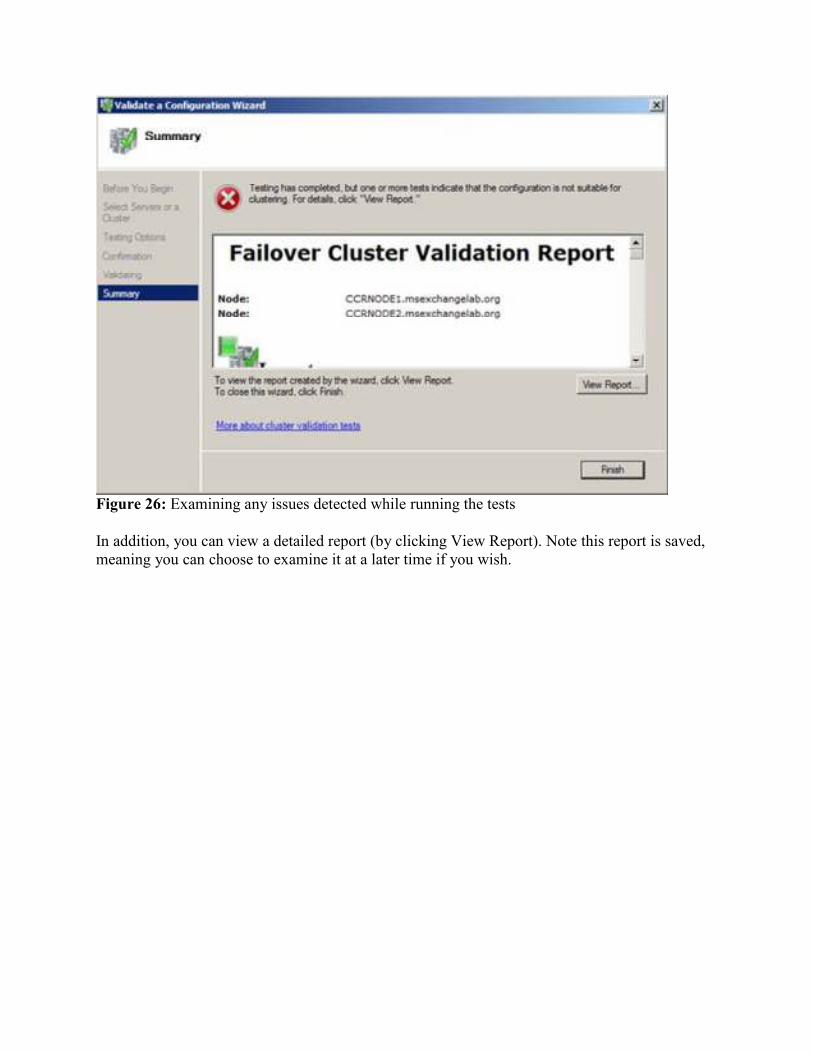
Figure 26: Examining any issues detected while running the tests
In addition, you can view a detailed report (by clicking View Report). Note this report is saved, meaning you can choose to examine it at a later time if you wish.
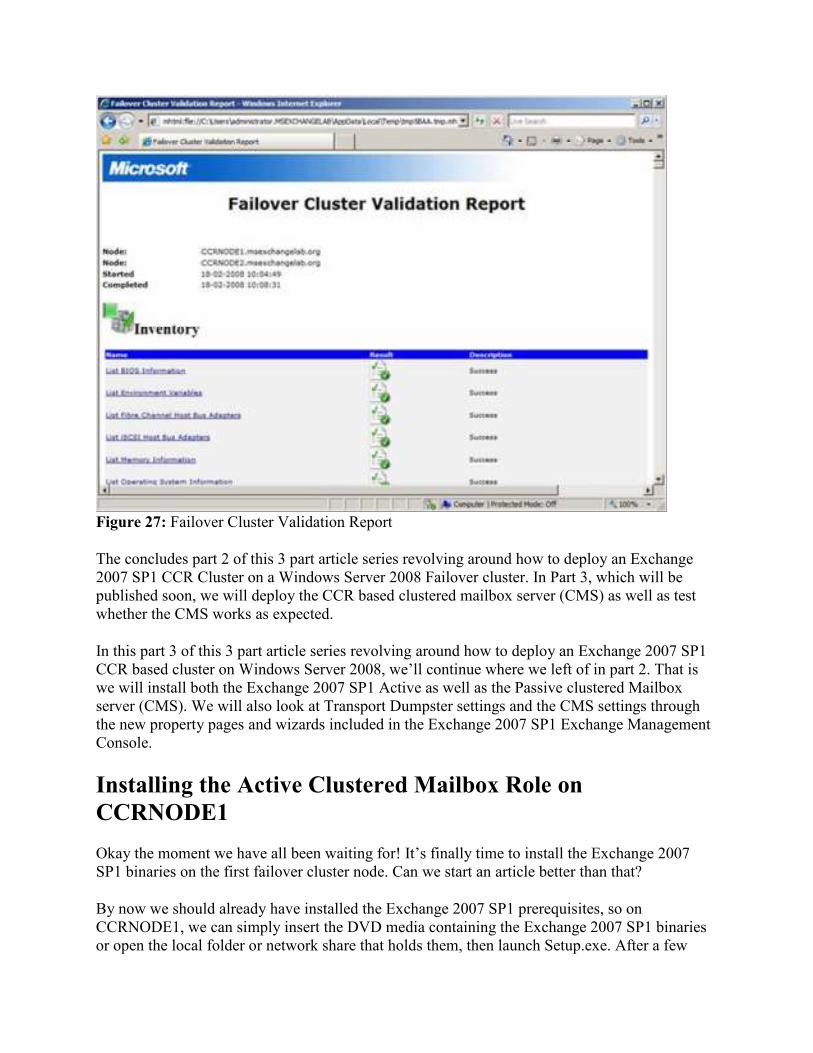
Figure 27: Failover Cluster Validation Report
The concludes part 2 of this 3 part article series revolving around how to deploy an Exchange 2007 SP1 CCR Cluster on a Windows Server 2008 Failover cluster. In Part 3, which will be published soon, we will deploy the CCR based clustered mailbox server (CMS) as well as test whether the CMS works as expected.
In this part 3 of this 3 part article series revolving around how to deploy an Exchange 2007 SP1 CCR based cluster on Windows Server 2008, we’ll continue where we left of in part 2. That is we will install both the Exchange 2007 SP1 Active as well as the Passive clustered Mailbox server (CMS). We will also look at Transport Dumpster settings and the CMS settings through the new property pages and wizards included in the Exchange 2007 SP1 Exchange Management Console.
Installing the Active Clustered Mailbox Role on
CCRNODE1
Okay the moment we have all been waiting for! It’s finally time to install the Exchange 2007 SP1 binaries on the first failover cluster node. Can we start an article better than that?
By now we should already have installed the Exchange 2007 SP1 prerequisites, so on CCRNODE1, we can simply insert the DVD media containing the Exchange 2007 SP1 binaries or open the local folder or network share that holds them, then launch Setup.exe. After a few
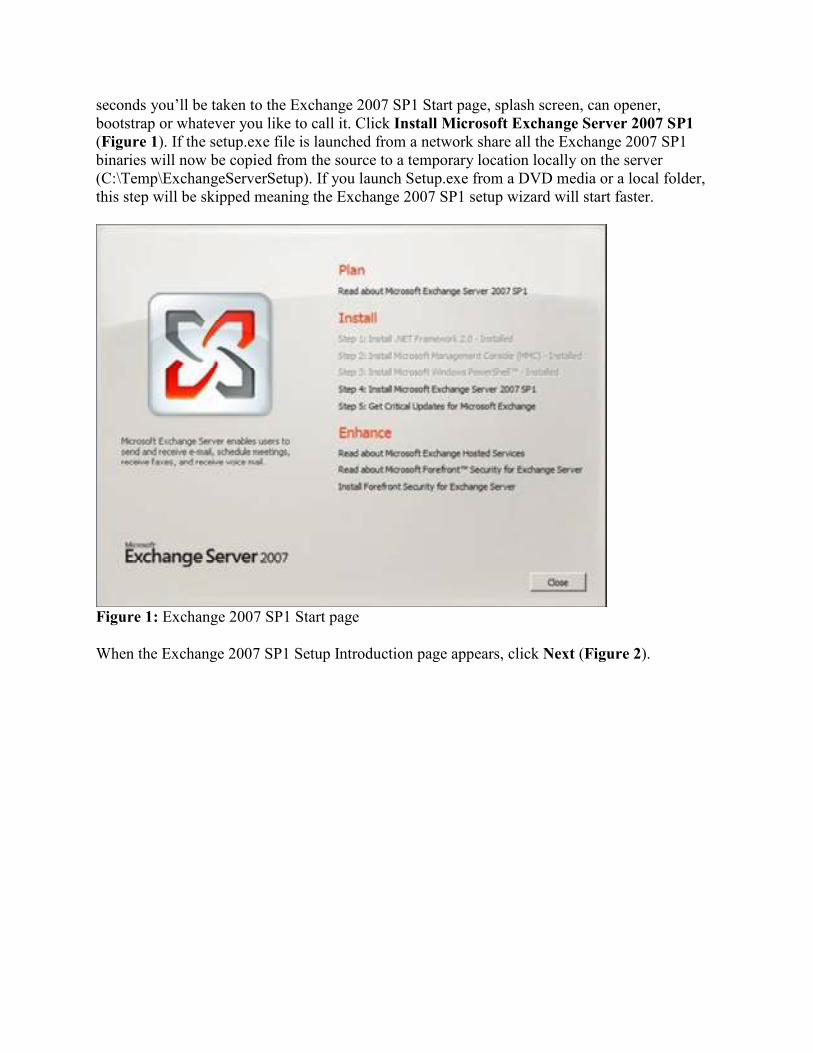
seconds you’ll be taken to the Exchange 2007 SP1 Start page, splash screen, can opener, bootstrap or whatever you like to call it. Click Install Microsoft Exchange Server 2007 SP1 (Figure 1). If the setup.exe file is launched from a network share all the Exchange 2007 SP1 binaries will now be copied from the source to a temporary location locally on the server (C:\Temp\ExchangeServerSetup). If you launch Setup.exe from a DVD media or a local folder, this step will be skipped meaning the Exchange 2007 SP1 setup wizard will start faster.
Figure 1: Exchange 2007 SP1 Start page
When the Exchange 2007 SP1 Setup Introduction page appears, click Next (Figure 2).
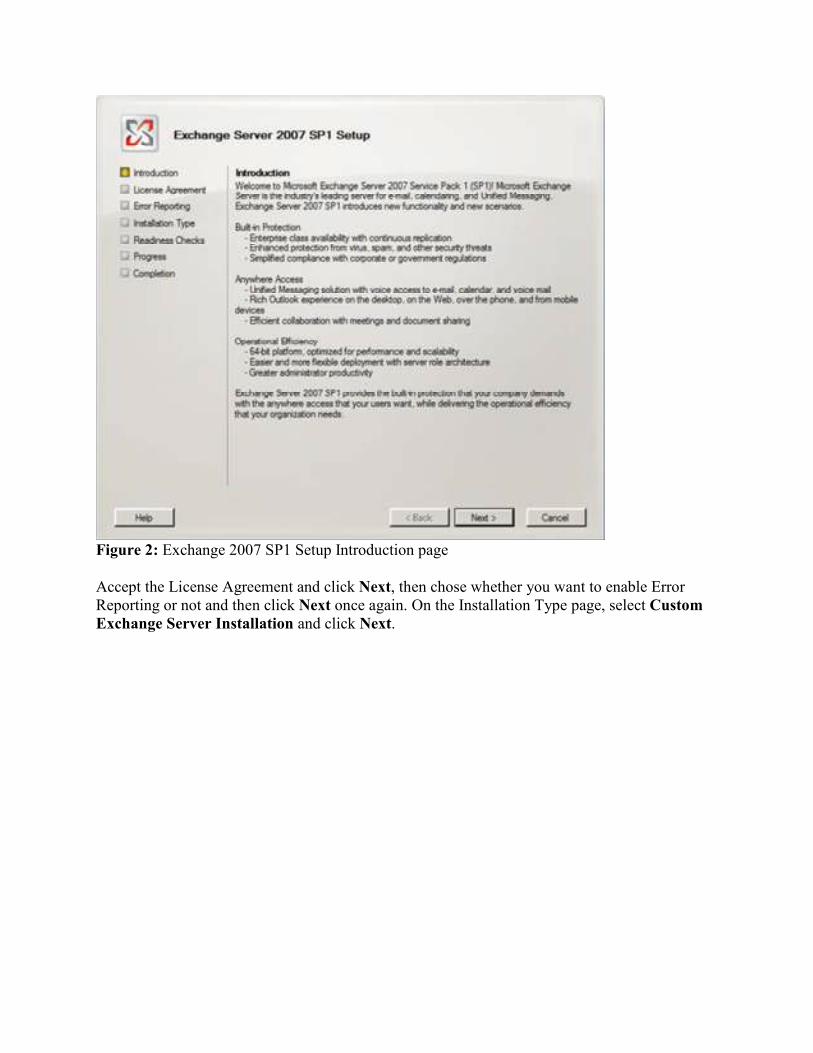
Figure 2: Exchange 2007 SP1 Setup Introduction page
Accept the License Agreement and click Next, then chose whether you want to enable Error Reporting or not and then click Next once again. On the Installation Type page, select Custom
Exchange Server Installation and click Next.

Figure 3: Exchange 2007 SP1 Installation Type page
Now tick Active Clustered Mailbox Server role and click Next (Figure 4). If you’re installing an Exchange 2007 SP1 CCR cluster on a server in a production environment, this is also the place where you specify where the Exchange 2007 SP1 binaries should be installed. Large enterprise organizations with plenty of LUNs available for the Exchange server often chooses to install these binaries on a partition separate from the System partition.
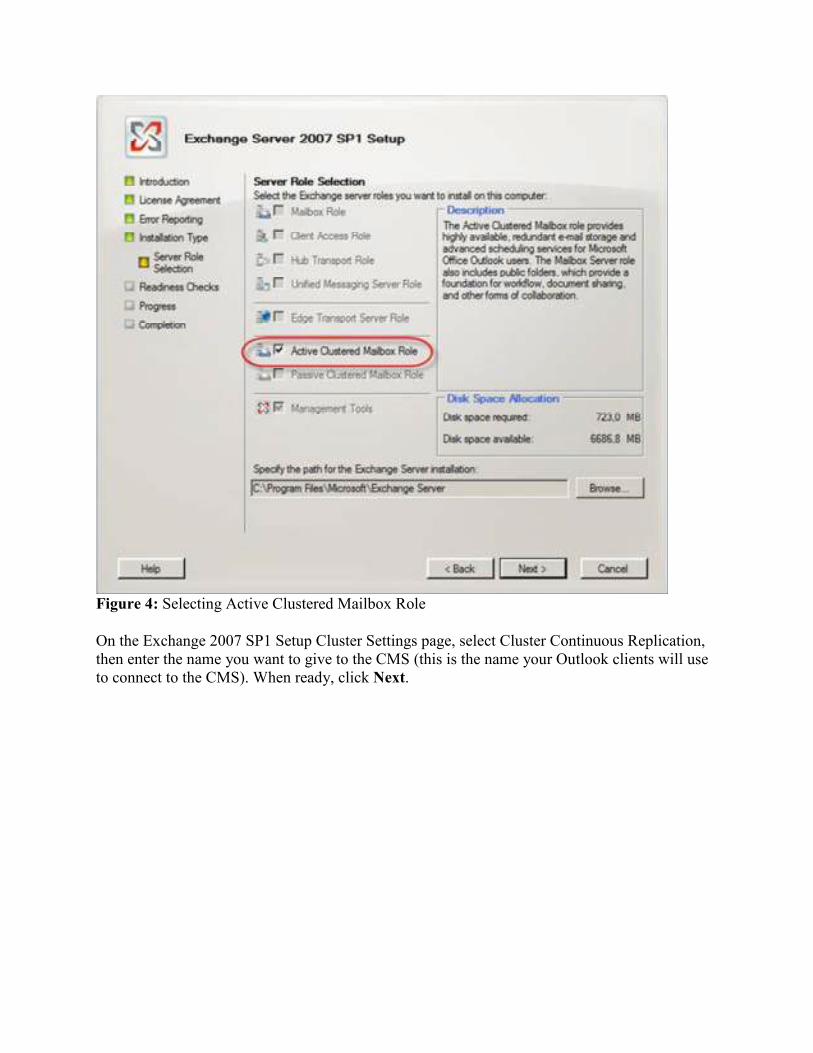
Figure 4: Selecting Active Clustered Mailbox Role
On the Exchange 2007 SP1 Setup Cluster Settings page, select Cluster Continuous Replication, then enter the name you want to give to the CMS (this is the name your Outlook clients will use to connect to the CMS). When ready, click Next.

Figure 5: Exchange 2007 SP1 Cluster Settings
Now we need to pay extra attention as this page is new. This is where you specify what type of IP network you want to use as well as whether the IP address(es) should be assigned dynamically using DHCP. For the purpose of this article series we’ll choose a single static IPv4 address as shown in Figure 6 below. When ready, click Next.
Note: As mentioned in Part 1 of this series, a combination of Exchange 2007 SP1 and Windows Server 2008 let us deploy the active and passive clustered mailbox servers on different subnets. With Exchange 2007 RTM and Windows Server 2003 we had to stretch a single subnet between locations in order to deploy the cluster nodes in geographically dispersed locations.
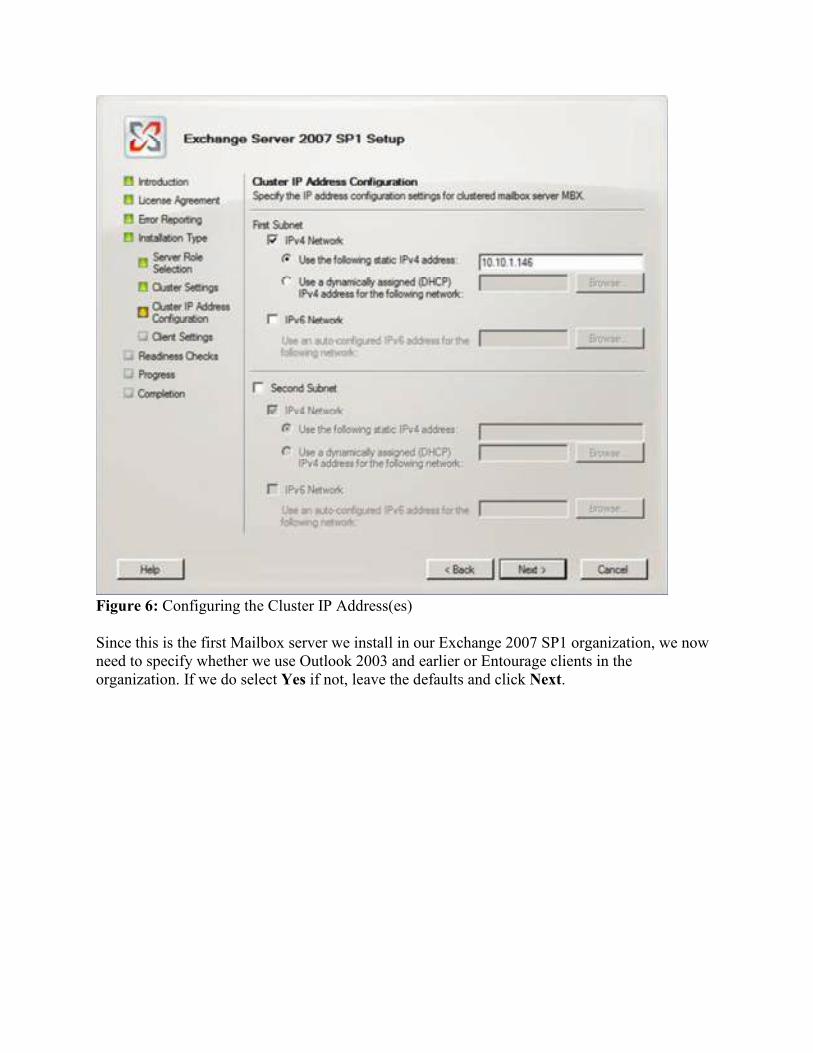
Figure 6: Configuring the Cluster IP Address(es)
Since this is the first Mailbox server we install in our Exchange 2007 SP1 organization, we now need to specify whether we use Outlook 2003 and earlier or Entourage clients in the organization. If we do select Yes if not, leave the defaults and click Next.

Figure 7: Specify whether Outlook 2003 and earlier or Entourage clients are used in the organization
Let the readiness check complete. Hopefully you shouldn’t see other issues than the ones in Figure 8. If the readiness check completed without series warnings or errors, click Install in order to begin the installation of the Active Clustered Mailbox server.
Warning!
Although this article is based on a lab environment, I must stress that the 32-bit of Exchange Server 2007 is not supported for use in a production environment, unless it is for management of servers, user mailboxes, etc.
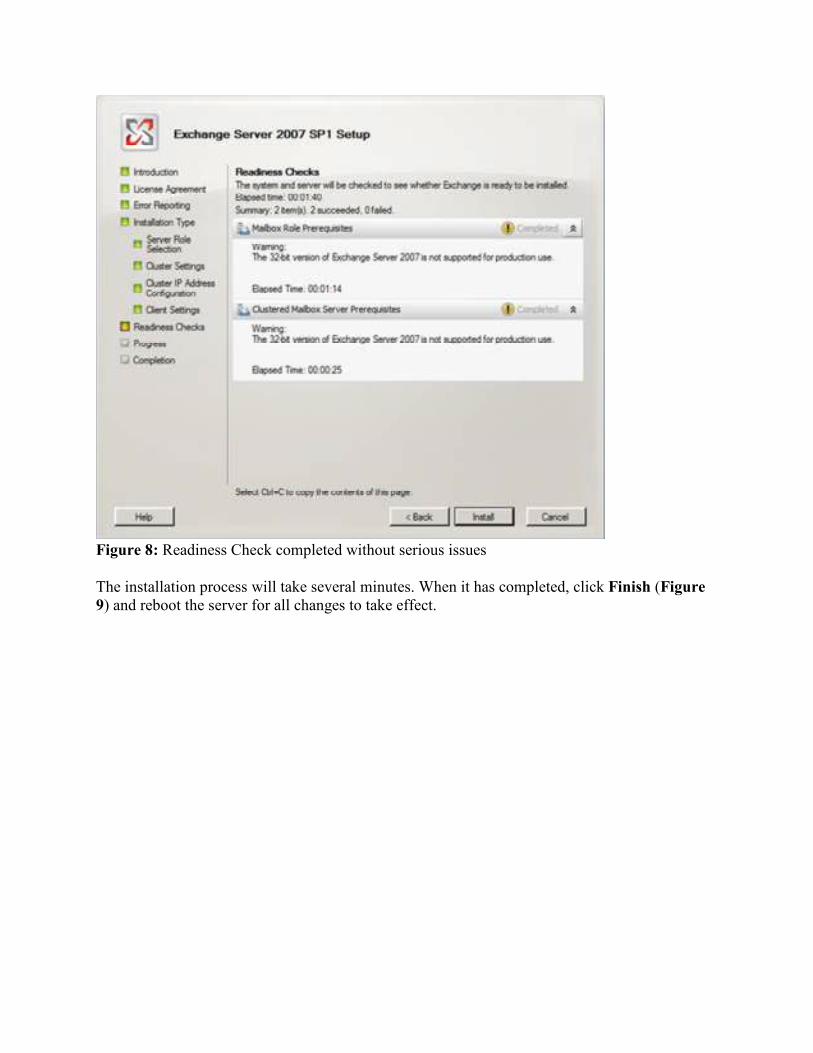
Figure 8: Readiness Check completed without serious issues
The installation process will take several minutes. When it has completed, click Finish (Figure 9) and reboot the server for all changes to take effect.
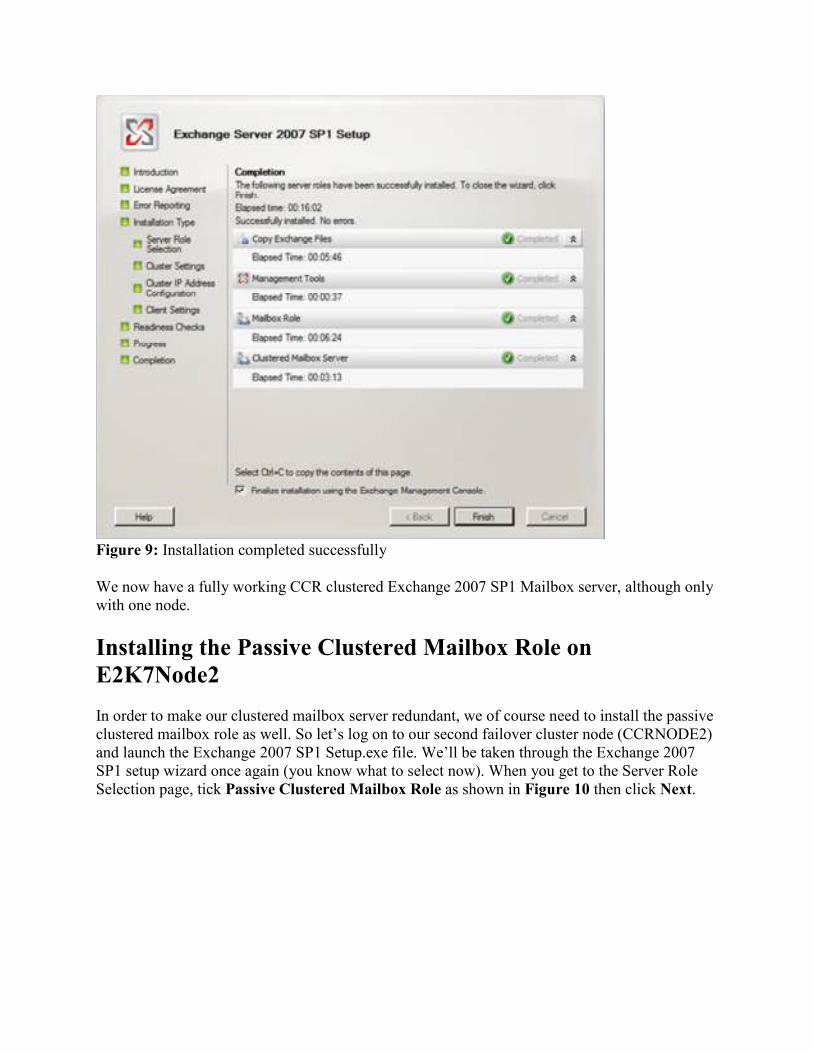
Figure 9: Installation completed successfully
We now have a fully working CCR clustered Exchange 2007 SP1 Mailbox server, although only with one node.
Installing the Passive Clustered Mailbox Role on
E2K7Node2
In order to make our clustered mailbox server redundant, we of course need to install the passive clustered mailbox role as well. So let’s log on to our second failover cluster node (CCRNODE2) and launch the Exchange 2007 SP1 Setup.exe file. We’ll be taken through the Exchange 2007 SP1 setup wizard once again (you know what to select now). When you get to the Server Role Selection page, tick Passive Clustered Mailbox Role as shown in Figure 10 then click Next.
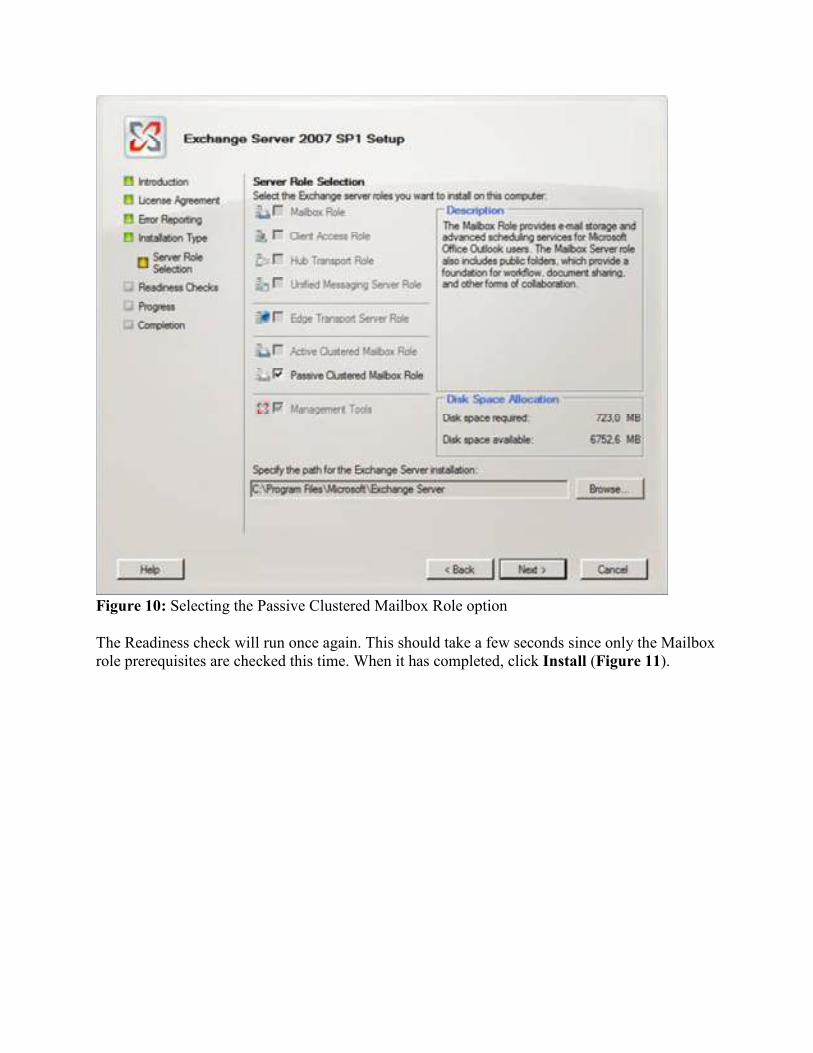
Figure 10: Selecting the Passive Clustered Mailbox Role option
The Readiness check will run once again. This should take a few seconds since only the Mailbox role prerequisites are checked this time. When it has completed, click Install (Figure 11).
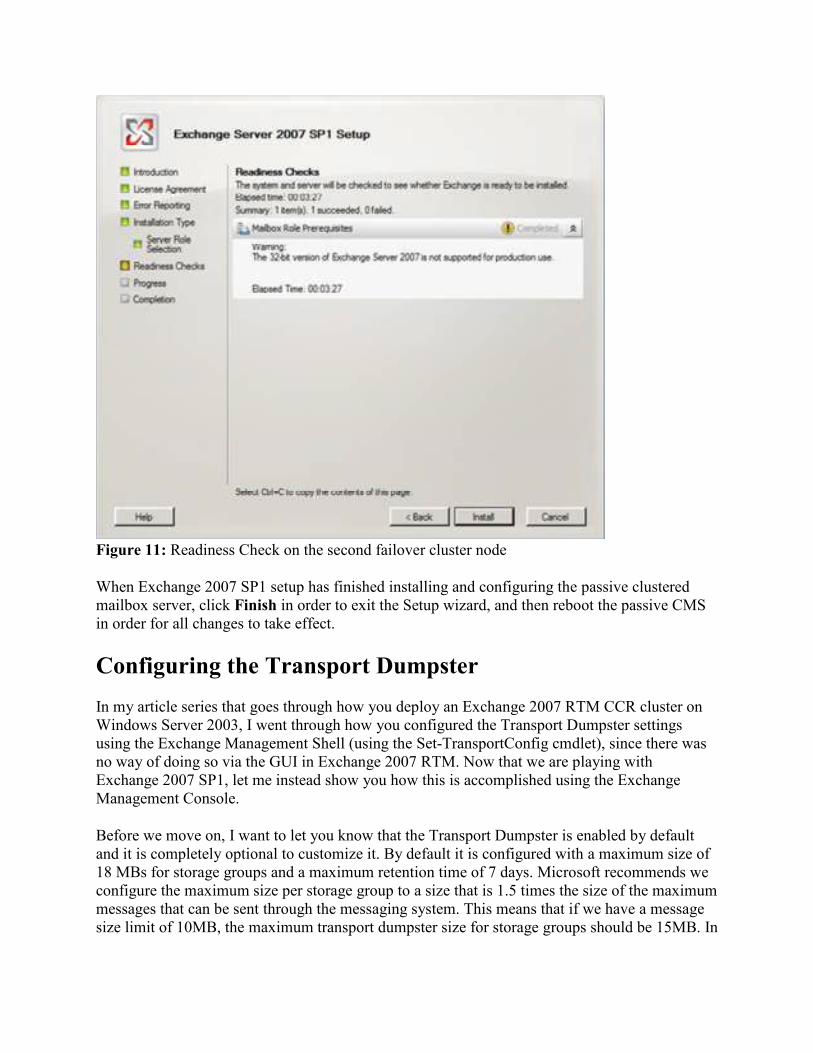
Figure 11: Readiness Check on the second failover cluster node
When Exchange 2007 SP1 setup has finished installing and configuring the passive clustered mailbox server, click Finish in order to exit the Setup wizard, and then reboot the passive CMS in order for all changes to take effect.
Configuring the Transport Dumpster
In my article series that goes through how you deploy an Exchange 2007 RTM CCR cluster on Windows Server 2003, I went through how you configured the Transport Dumpster settings using the Exchange Management Shell (using the Set-TransportConfig cmdlet), since there was no way of doing so via the GUI in Exchange 2007 RTM. Now that we are playing with Exchange 2007 SP1, let me instead show you how this is accomplished using the Exchange Management Console.
Before we move on, I want to let you know that the Transport Dumpster is enabled by default and it is completely optional to customize it. By default it is configured with a maximum size of 18 MBs for storage groups and a maximum retention time of 7 days. Microsoft recommends we configure the maximum size per storage group to a size that is 1.5 times the size of the maximum messages that can be sent through the messaging system. This means that if we have a message size limit of 10MB, the maximum transport dumpster size for storage groups should be 15MB. In
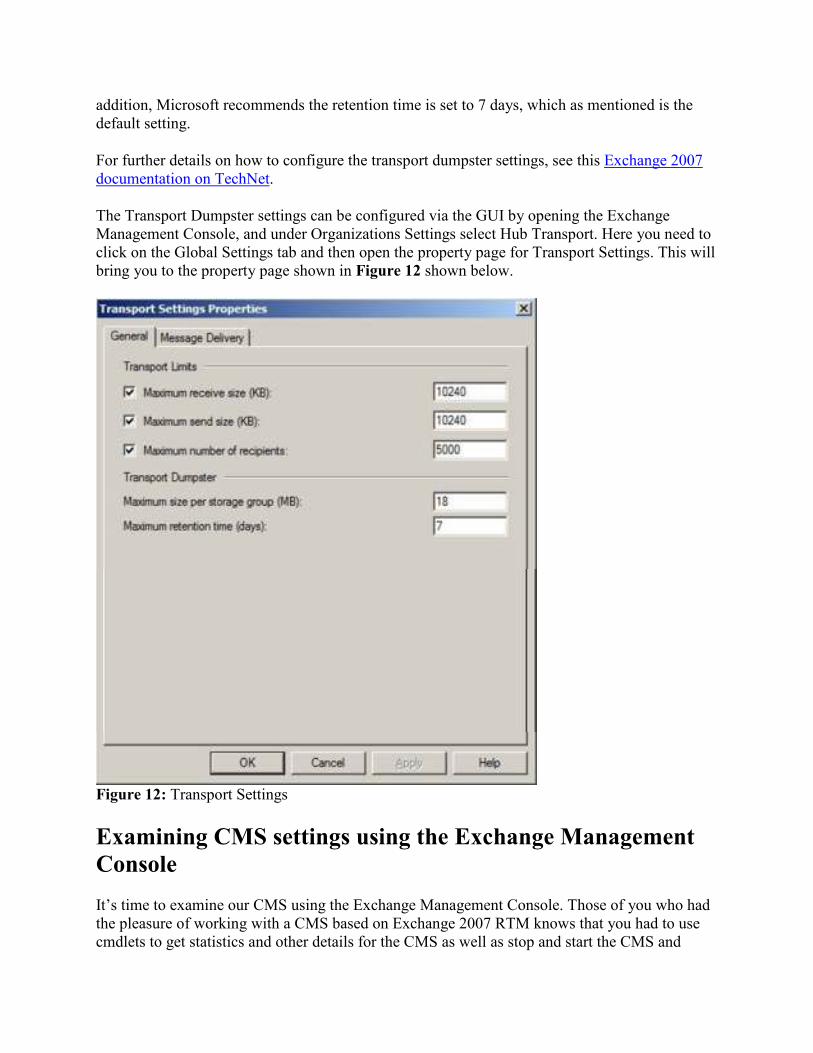
addition, Microsoft recommends the retention time is set to 7 days, which as mentioned is the default setting.
For further details on how to configure the transport dumpster settings, see this Exchange 2007 documentation on TechNet.
The Transport Dumpster settings can be configured via the GUI by opening the Exchange Management Console, and under Organizations Settings select Hub Transport. Here you need to click on the Global Settings tab and then open the property page for Transport Settings. This will bring you to the property page shown in Figure 12 shown below.
Figure 12: Transport Settings
Examining CMS settings using the Exchange Management
Console
It’s time to examine our CMS using the Exchange Management Console. Those of you who had the pleasure of working with a CMS based on Exchange 2007 RTM knows that you had to use cmdlets to get statistics and other details for the CMS as well as stop and start the CMS and
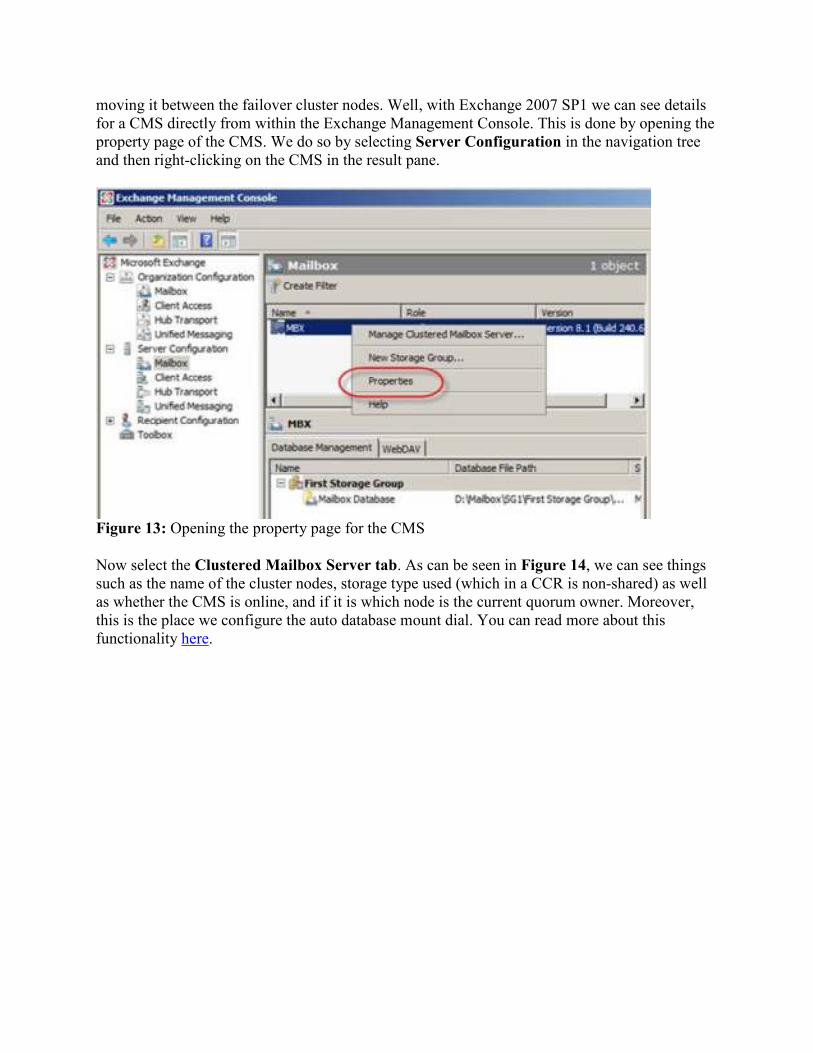
moving it between the failover cluster nodes. Well, with Exchange 2007 SP1 we can see details for a CMS directly from within the Exchange Management Console. This is done by opening the property page of the CMS. We do so by selecting Server Configuration in the navigation tree and then right-clicking on the CMS in the result pane.
Figure 13: Opening the property page for the CMS
Now select the Clustered Mailbox Server tab. As can be seen in Figure 14, we can see things such as the name of the cluster nodes, storage type used (which in a CCR is non-shared) as well as whether the CMS is online, and if it is which node is the current quorum owner. Moreover, this is the place we configure the auto database mount dial. You can read more about this functionality here.
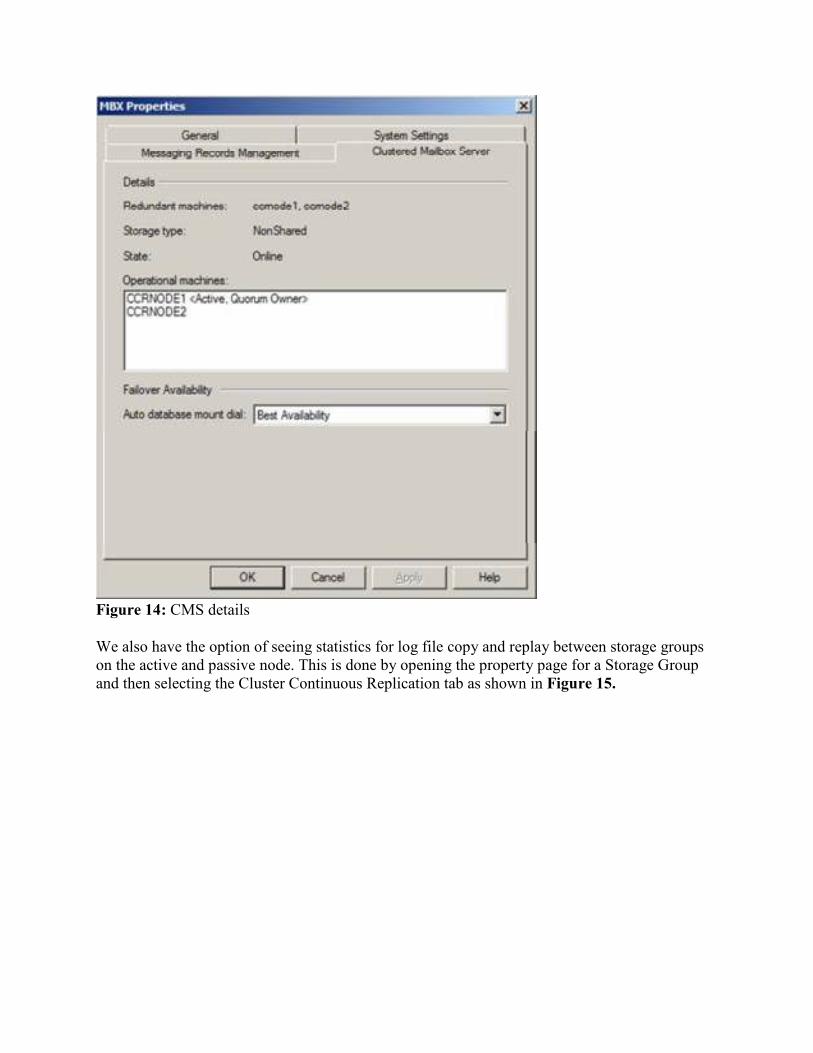
Figure 14: CMS details
We also have the option of seeing statistics for log file copy and replay between storage groups on the active and passive node. This is done by opening the property page for a Storage Group and then selecting the Cluster Continuous Replication tab as shown in Figure 15.
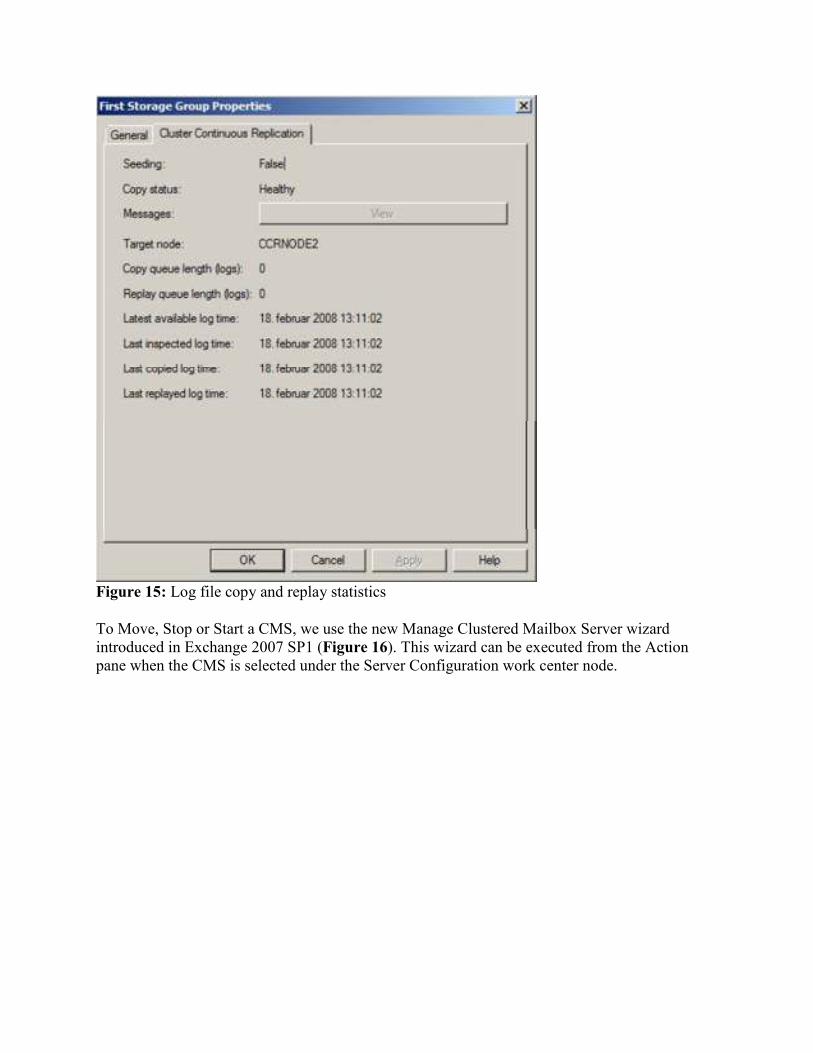
Figure 15: Log file copy and replay statistics
To Move, Stop or Start a CMS, we use the new Manage Clustered Mailbox Server wizard introduced in Exchange 2007 SP1 (Figure 16). This wizard can be executed from the Action pane when the CMS is selected under the Server Configuration work center node.
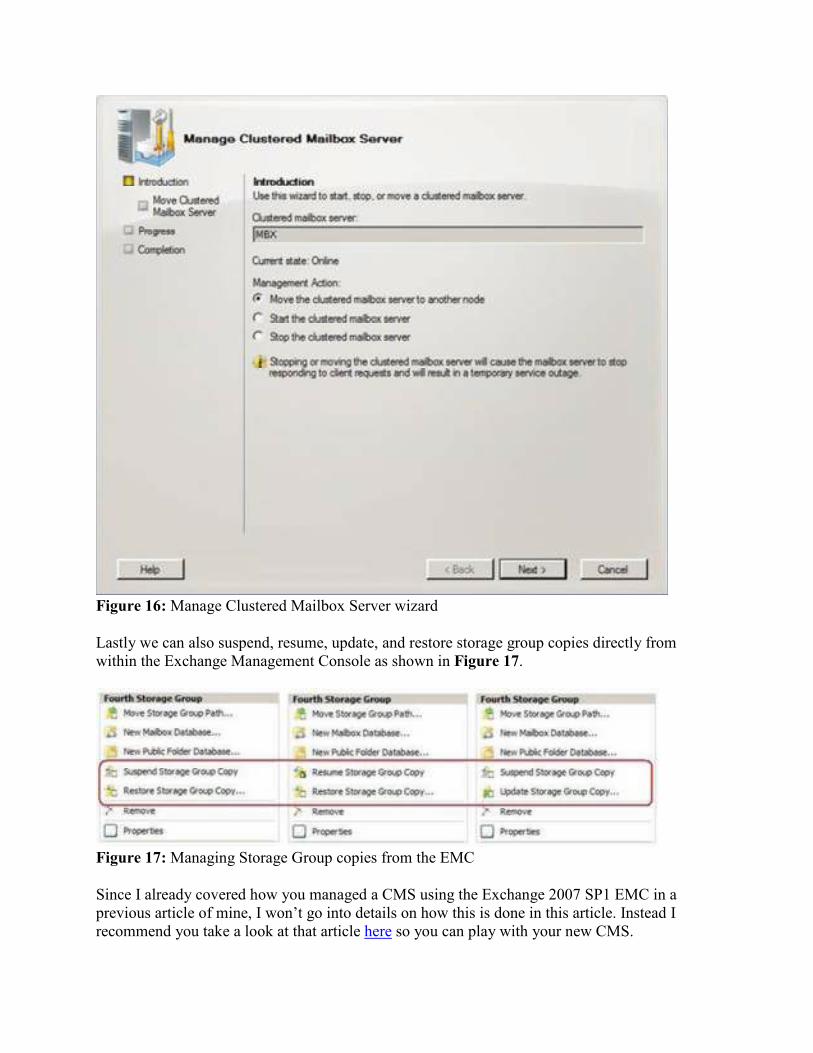
Figure 16: Manage Clustered Mailbox Server wizard
Lastly we can also suspend, resume, update, and restore storage group copies directly from within the Exchange Management Console as shown in Figure 17.
Figure 17: Managing Storage Group copies from the EMC
Since I already covered how you managed a CMS using the Exchange 2007 SP1 EMC in a previous article of mine, I won’t go into details on how this is done in this article. Instead I recommend you take a look at that article here so you can play with your new CMS.

Alright this concludes this article series revolving around how to deploy an Exchange 2007 SP1 CCR based cluster on Windows Server 2008. I hope you enjoyed it!
If you would like to read the other parts in this article series please go to: