Embed Size (px)
Citation preview

DUO QUADRATO
ToiletSANITARIO
INSTRUCTIVO DE INSTALACIÓN
Installation Instructions
2
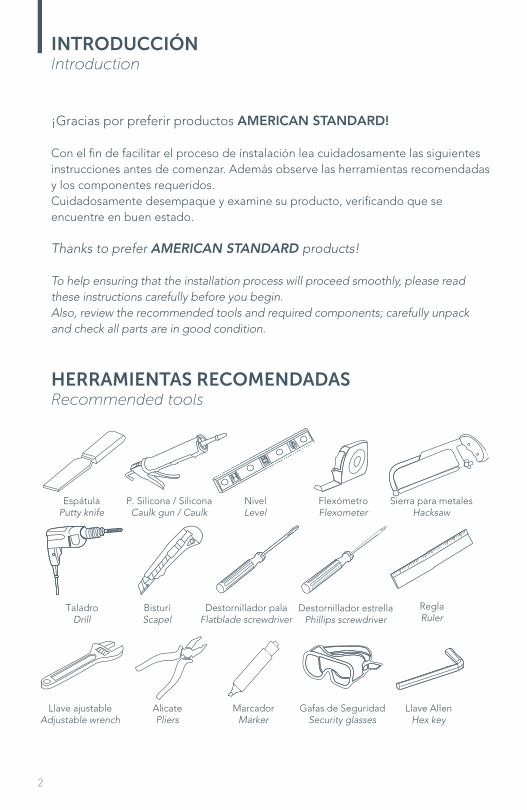
INTRODUCCIÓNIntroduction
HERRAMIENTAS RECOMENDADASRecommended tools
¡Gracias por preferir productos AMERICAN STANDARD!
Con el fin de facilitar el proceso de instalación lea cuidadosamente las siguientes instrucciones antes de comenzar. Además observe las herramientas recomendadas y los componentes requeridos.Cuidadosamente desempaque y examine su producto, verificando que se encuentre en buen estado.
Thanks to prefer AMERICAN STANDARD products!
To help ensuring that the installation process will proceed smoothly, please read these instructions carefully before you begin.Also, review the recommended tools and required components; carefully unpack and check all parts are in good condition.
BisturíScapel
TaladroDrill
Destornillador palaFlatblade screwdriver
Llave ajustableAdjustable wrench
ReglaRuler
EspátulaPutty knife
P. Silicona / SiliconaCaulk gun / Caulk
Sierra para metalesHacksaw
NivelLevel
FlexómetroFlexometer
Gafas de SeguridadSecurity glasses
MarcadorMarker
Destornillador estrellaPhillips screwdriver
AlicatePliers
Llave AllenHex key

3
Taza suspendida DUO QUADRATODUO QUADRATO suspended Bowl
ref. 630121001
Pulsador Doble DescargaDual Flush Push-button
Asiento sanitario Toilet seat
Tanque Oculto DUO QUADRATO DUO QUADRATO Half hidden Tank
ref. 121571001
PRODUCTOS COMPLEMENTARIOSComplementary products
TANQUE OCULTOHidden Tank
ref. 121571001
Planos Técnicos:Technical Drawing:
580 185
230 180
120 170
10-90
120
100
35
100011
50
Ø90 -110 Piso Terminado / Finished floor
*Dimensiones consideradas en milímetros (mm).*Dimensions considered in milimeters (mm).
4
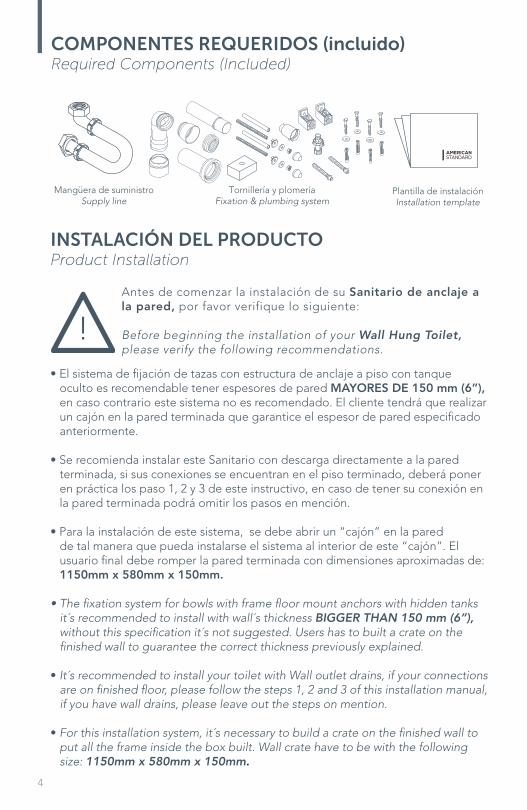
COMPONENTES REQUERIDOS (incluido)Required Components (Included)
Mangüera de suministroSupply line
Tornillería y plomeríaFixation & plumbing system
Plantilla de instalaciónInstallation template
INSTALACIÓN DEL PRODUCTOProduct Installation
Antes de comenzar la instalación de su Sanitario de anclaje a la pared, por favor verifique lo siguiente:
Before beginning the installation of your Wall Hung Toilet, please verify the following recommendations.
• El sistema de fijación de tazas con estructura de anclaje a piso con tanque oculto es recomendable tener espesores de pared MAYORES DE 150 mm (6”), en caso contrario este sistema no es recomendado. El cliente tendrá que realizar un cajón en la pared terminada que garantice el espesor de pared especificado anteriormente.
• Se recomienda instalar este Sanitario con descarga directamente a la pared terminada, si sus conexiones se encuentran en el piso terminado, deberá poner en práctica los paso 1, 2 y 3 de este instructivo, en caso de tener su conexión en la pared terminada podrá omitir los pasos en mención.
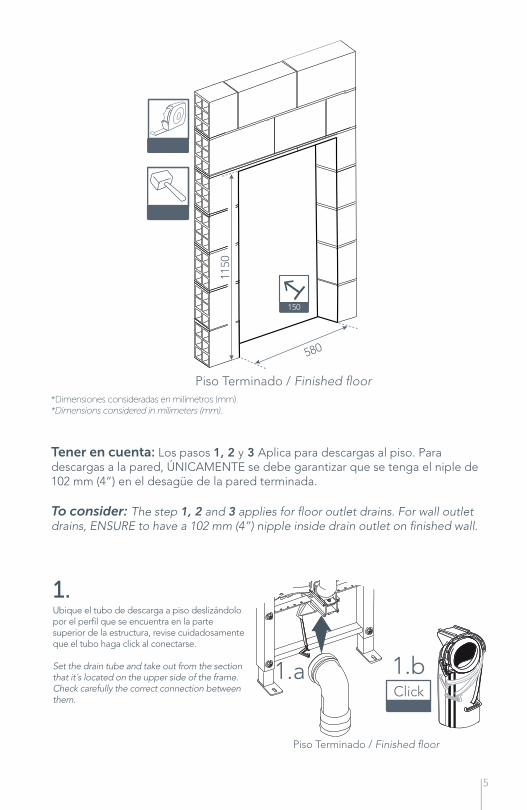
• Para la instalación de este sistema, se debe abrir un “cajón” en la pared de tal manera que pueda instalarse el sistema al interior de este “cajón”. El usuario final debe romper la pared terminada con dimensiones aproximadas de: 1150mm x 580mm x 150mm.
• The fixation system for bowls with frame floor mount anchors with hidden tanks it´s recommended to install with wall´s thickness BIGGER THAN 150 mm (6”), without this specification it´s not suggested. Users has to built a crate on the finished wall to guarantee the correct thickness previously explained.
• It´s recommended to install your toilet with Wall outlet drains, if your connections are on finished floor, please follow the steps 1, 2 and 3 of this installation manual, if you have wall drains, please leave out the steps on mention.
• For this installation system, it´s necessary to build a crate on the finished wall to put all the frame inside the box built. Wall crate have to be with the following size: 1150mm x 580mm x 150mm.
5
Tener en cuenta: Los pasos 1, 2 y 3 Aplica para descargas al piso. Para descargas a la pared, ÚNICAMENTE se debe garantizar que se tenga el niple de 102 mm (4”) en el desagüe de la pared terminada.
To consider: The step 1, 2 and 3 applies for floor outlet drains. For wall outlet drains, ENSURE to have a 102 mm (4”) nipple inside drain outlet on finished wall.
1.
1.a
Piso Terminado / Finished floor
1.bClick
Ubique el tubo de descarga a piso deslizándolo por el perfil que se encuentra en la parte superior de la estructura, revise cuidadosamente que el tubo haga click al conectarse.
Set the drain tube and take out from the section that it´s located on the upper side of the frame. Check carefully the correct connection between them.
Piso Terminado / Finished floor
1150
580
150
*Dimensiones consideradas en milímetros (mm).*Dimensions considered in milimeters (mm).

6
Llave AllenHex key
0 - 200mm
2.
Revise la altura la cual tendrá su taza la entrada de agua, de esta manera podrá regular la estructura al mover el sistema mediante una llave Allen. Si su descarga es a pared, revise la altura del tubo de salida de agua y ajuste la estructura según lo necesario.
Check the height for the drain outlet, move the adjustable tubes using a hex key just to find the correct installation height. (User must define Standard or ADA installation height). If your drain outlet it´s on the finished wall, check the height and adjust the frame moving the adjustable tubes according to the correct installation position.
3.Ponga los niples en el tubo de entrada y de salida en las conexiones.
IMPORTANTE: Se debe tener niple de 102 mm (4”) en la pared terminada, verifique antes de comenzar la conexión que este se encuentre debidamente instalado, de lo contrario ponga el niple de 102 mm (4”) antes de continuar.
Put the nipples on the inlet and outlet drain connections.
IMPORTANT: It´s necessary to have 102 mm (4”) nipple on the outlet drain connection on the finished wall. Verify before beginning your installation, otherwise put a 102 mm (4”) nipple on the outlet drain to continue the installation process.
Clack
4.Retire la llave de suministro de agua como lo indica la gráfica.Take out the water supply lines like shown on the image.
7
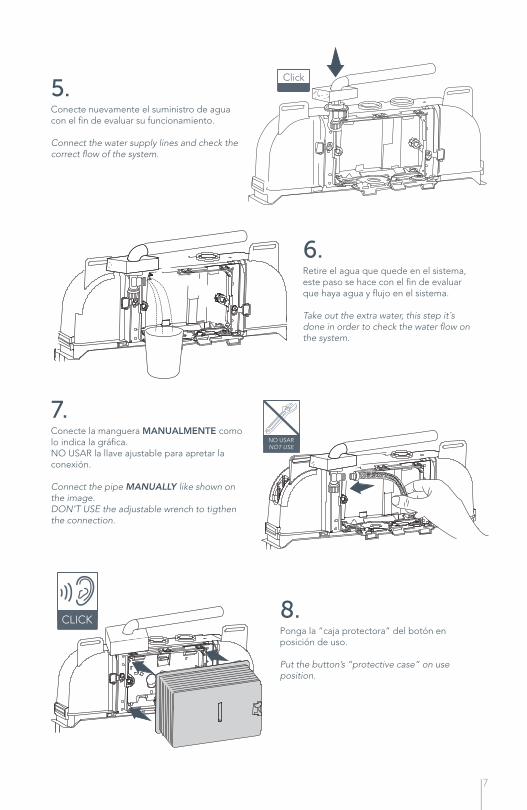
5.Conecte nuevamente el suministro de agua con el fin de evaluar su funcionamiento.
Connect the water supply lines and check the correct flow of the system.
Click
6.Retire el agua que quede en el sistema, este paso se hace con el fin de evaluar que haya agua y flujo en el sistema.
Take out the extra water, this step it´s done in order to check the water flow on the system.
7.Conecte la manguera MANUALMENTE como lo indica la gráfica.NO USAR la llave ajustable para apretar la conexión.
Connect the pipe MANUALLY like shown on the image.DON’T USE the adjustable wrench to tigthen the connection.
NO USARNOT USE
8.Ponga la “caja protectora” del botón en posición de uso.
Put the button’s “protective case” on use position.
CLICK

8
9.
Ubique el tornillo pasante a través de los agujeros de la estructura ubicados en la parte superior de los perfiles. Monte ambos tornillos hasta hacer CLICK, escuche el sonido mientras realiza la instalación. Ubique el accesorio separador de la pared en posición de uso tal como lo muestra la ilustración, revise que quede correctamente instalado.
Set the screw through the holes located on the upper side of the frame tube sections. Put both screws tighten them until the “CLICK” sound, set the wall divider device on correct position like shown on the image. Check the correct installation of both wall divider devices.
9.b
9.c
9.d9.a
Click
10.
*
230 *
10.a
180*
10.b
10.c
*
La separación de los agujeros de la taza es de 180 mm (7,1”), revise que la separación de los tornillos que se encuentran previamente instalados en la estructura sea la misma.
Holes installation located on the rear side of the bowl, must be 180 mm (7,1”) separated between them, first check that screws on the frame must be on the frame separated between centered set screw edges.
9
x2
Ø 10mm
x4*
Piso Terminado / Finished floor
*
*
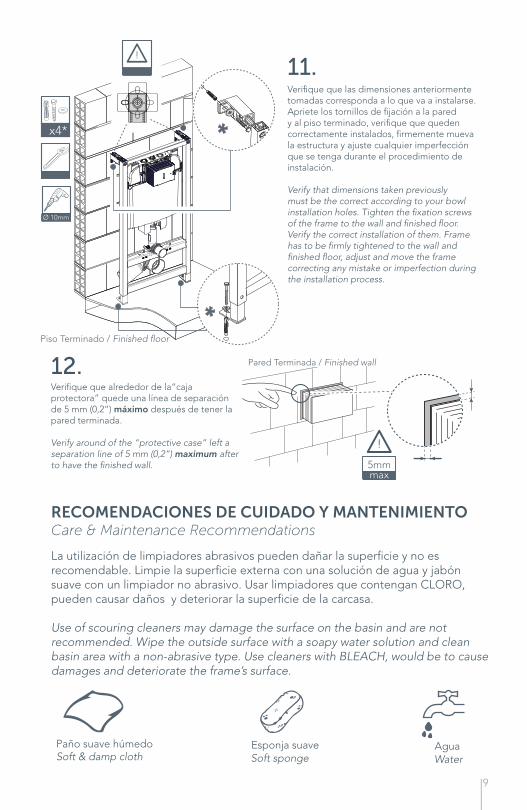
11.Verifique que las dimensiones anteriormente tomadas corresponda a lo que va a instalarse. Apriete los tornillos de fijación a la pared y al piso terminado, verifique que queden correctamente instalados, firmemente mueva la estructura y ajuste cualquier imperfección que se tenga durante el procedimiento de instalación.
Verify that dimensions taken previously must be the correct according to your bowl installation holes. Tighten the fixation screws of the frame to the wall and finished floor. Verify the correct installation of them. Frame has to be firmly tightened to the wall and finished floor, adjust and move the frame correcting any mistake or imperfection during the installation process.
12.
5mmmax
Pared Terminada / Finished wall
RECOMENDACIONES DE CUIDADO Y MANTENIMIENTOCare & Maintenance Recommendations
La utilización de limpiadores abrasivos pueden dañar la superficie y no es recomendable. Limpie la superficie externa con una solución de agua y jabón suave con un limpiador no abrasivo. Usar limpiadores que contengan CLORO, pueden causar daños y deteriorar la superficie de la carcasa.
Use of scouring cleaners may damage the surface on the basin and are not recommended. Wipe the outside surface with a soapy water solution and clean basin area with a non-abrasive type. Use cleaners with BLEACH, would be to cause damages and deteriorate the frame’s surface.
Paño suave húmedo Soft & damp cloth
Esponja suave Soft sponge
AguaWater
Verifique que alrededor de la“caja protectora” quede una línea de separación de 5 mm (0,2”) máximo después de tener la pared terminada.
Verify around of the “protective case” left a separation line of 5 mm (0,2”) maximum after to have the finished wall.
10
Pare
d T
erm
inad
a
Fini
shed
wal
l15
5 250
520
120 400
270
85
250
335
177 310
45095
Ø 1
00
140
Ø 5
5
350
PP
5
EPS
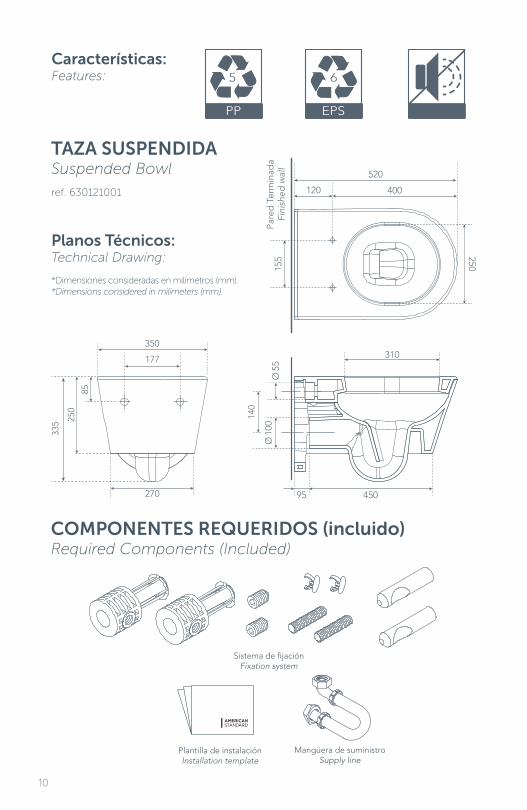
6Características: Features:
ref. 630121001
TAZA SUSPENDIDASuspended Bowl
Planos Técnicos:Technical Drawing:
*Dimensiones consideradas en milímetros (mm).*Dimensions considered in milimeters (mm).
COMPONENTES REQUERIDOS (incluido)Required Components (Included)
Sistema de fijaciónFixation system
Plantilla de instalaciónInstallation template
Mangüera de suministroSupply line
11
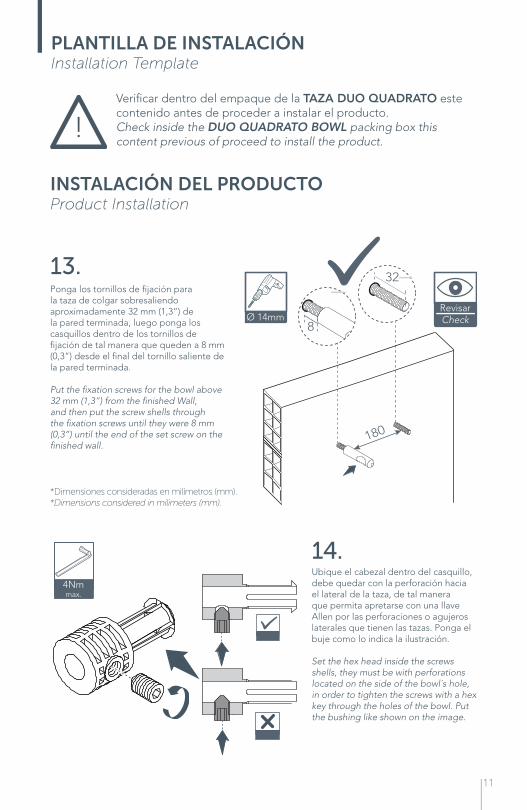
PLANTILLA DE INSTALACIÓNInstallation Template
Verificar dentro del empaque de la TAZA DUO QUADRATO este contenido antes de proceder a instalar el producto.Check inside the DUO QUADRATO BOWL packing box this content previous of proceed to install the product.
INSTALACIÓN DEL PRODUCTOProduct Installation
13.Ponga los tornillos de fijación para la taza de colgar sobresaliendo aproximadamente 32 mm (1,3”) de la pared terminada, luego ponga los casquillos dentro de los tornillos de fijación de tal manera que queden a 8 mm (0,3”) desde el final del tornillo saliente de la pared terminada.
Put the fixation screws for the bowl above 32 mm (1,3”) from the finished Wall, and then put the screw shells through the fixation screws until they were 8 mm (0,3”) until the end of the set screw on the finished wall.
14.Ubique el cabezal dentro del casquillo, debe quedar con la perforación hacia el lateral de la taza, de tal manera que permita apretarse con una llave Allen por las perforaciones o agujeros laterales que tienen las tazas. Ponga el buje como lo indica la ilustración.
Set the hex head inside the screws shells, they must be with perforations located on the side of the bowl´s hole, in order to tighten the screws with a hex key through the holes of the bowl. Put the bushing like shown on the image.
32
Ø 14mmRevisarCheck
8
180
*Dimensiones consideradas en milímetros (mm).*Dimensions considered in milimeters (mm).
4Nmmax.
12
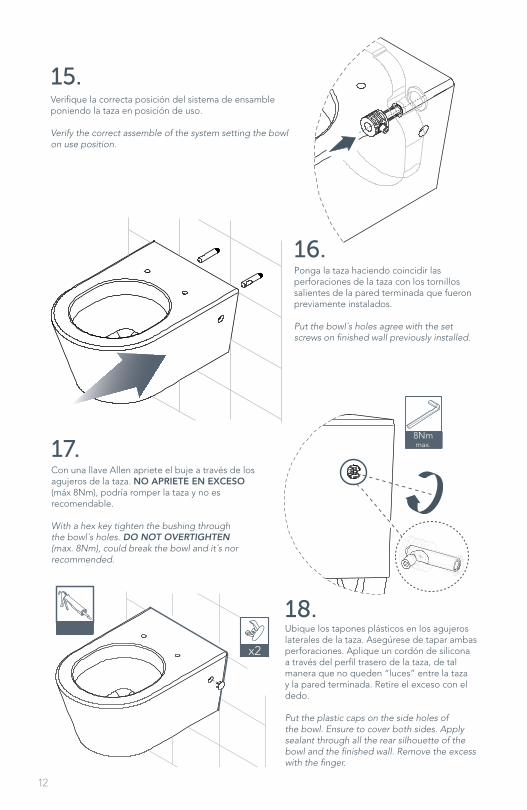
15.Verifique la correcta posición del sistema de ensamble poniendo la taza en posición de uso.
Verify the correct assemble of the system setting the bowl on use position.
16.Ponga la taza haciendo coincidir las perforaciones de la taza con los tornillos salientes de la pared terminada que fueron previamente instalados.
Put the bowl´s holes agree with the set screws on finished wall previously installed.
8Nmmax.17.
Con una llave Allen apriete el buje a través de los agujeros de la taza. NO APRIETE EN EXCESO (máx 8Nm), podría romper la taza y no es recomendable.
With a hex key tighten the bushing through the bowl´s holes. DO NOT OVERTIGHTEN (max. 8Nm), could break the bowl and it´s nor recommended.
18.Ubique los tapones plásticos en los agujeros laterales de la taza. Asegúrese de tapar ambas perforaciones. Aplique un cordón de silicona a través del perfil trasero de la taza, de tal manera que no queden “luces” entre la taza y la pared terminada. Retire el exceso con el dedo.
Put the plastic caps on the side holes of the bowl. Ensure to cover both sides. Apply sealant through all the rear silhouette of the bowl and the finished wall. Remove the excess with the finger.
x2
13
13.b
13.c
13.a
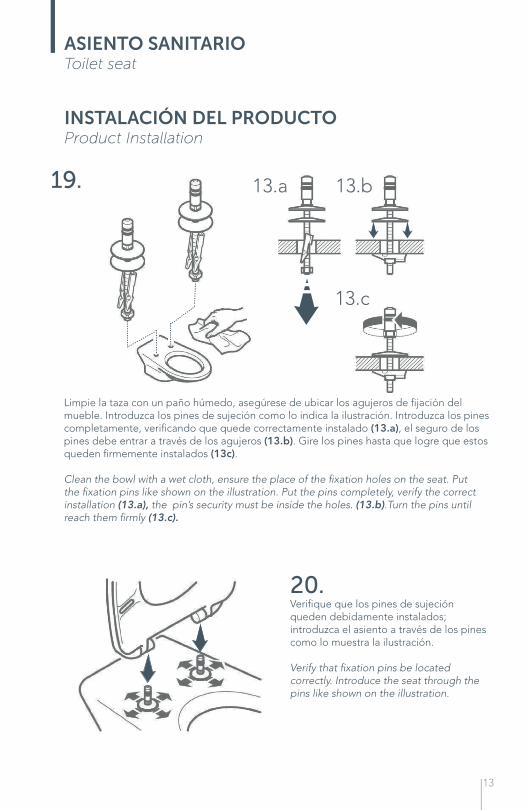
ASIENTO SANITARIOToilet seat
19.
Limpie la taza con un paño húmedo, asegúrese de ubicar los agujeros de fijación del mueble. Introduzca los pines de sujeción como lo indica la ilustración. Introduzca los pines completamente, verificando que quede correctamente instalado (13.a), el seguro de los pines debe entrar a través de los agujeros (13.b). Gire los pines hasta que logre que estos queden firmemente instalados (13c).
Clean the bowl with a wet cloth, ensure the place of the fixation holes on the seat. Put the fixation pins like shown on the illustration. Put the pins completely, verify the correct installation (13.a), the pin’s security must be inside the holes. (13.b).Turn the pins until reach them firmly (13.c).
20.Verifique que los pines de sujeción queden debidamente instalados; introduzca el asiento a través de los pines como lo muestra la ilustración.
Verify that fixation pins be located correctly. Introduce the seat through the pins like shown on the illustration.
INSTALACIÓN DEL PRODUCTOProduct Installation
14
4Nmmax.
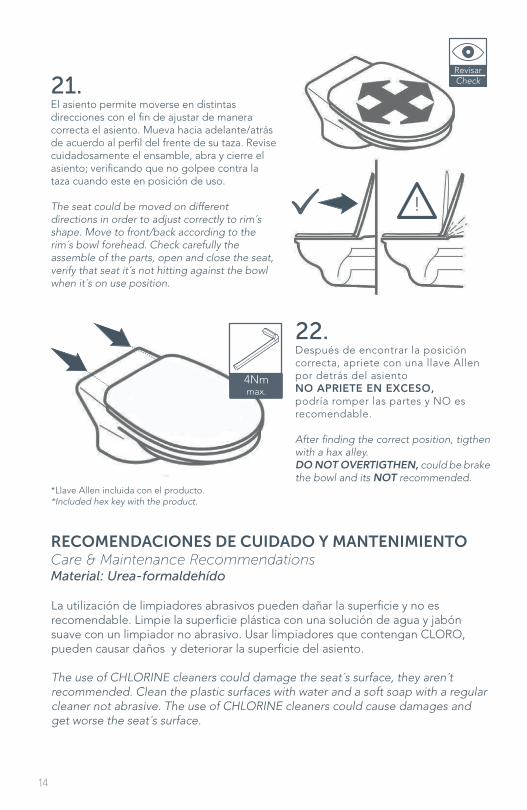
21.El asiento permite moverse en distintas direcciones con el fin de ajustar de manera correcta el asiento. Mueva hacia adelante/atrás de acuerdo al perfil del frente de su taza. Revise cuidadosamente el ensamble, abra y cierre el asiento; verificando que no golpee contra la taza cuando este en posición de uso.
The seat could be moved on different directions in order to adjust correctly to rim´s shape. Move to front/back according to the rim´s bowl forehead. Check carefully the assemble of the parts, open and close the seat, verify that seat it´s not hitting against the bowl when it´s on use position.
RevisarCheck
22.Después de encontrar la posición correcta, apriete con una llave Allen por detrás del asientoNO APRIETE EN EXCESO, podría romper las partes y NO es recomendable.
After finding the correct position, tigthen with a hax alley. DO NOT OVERTIGTHEN, could be brake the bowl and its NOT recommended.
RECOMENDACIONES DE CUIDADO Y MANTENIMIENTOCare & Maintenance RecommendationsMaterial: Urea-formaldehído
La utilización de limpiadores abrasivos pueden dañar la superficie y no es recomendable. Limpie la superficie plástica con una solución de agua y jabón suave con un limpiador no abrasivo. Usar limpiadores que contengan CLORO, pueden causar daños y deteriorar la superficie del asiento.
The use of CHLORINE cleaners could damage the seat´s surface, they aren´t recommended. Clean the plastic surfaces with water and a soft soap with a regular cleaner not abrasive. The use of CHLORINE cleaners could cause damages and get worse the seat´s surface.
*Llave Allen incluida con el producto.*Included hex key with the product.
15
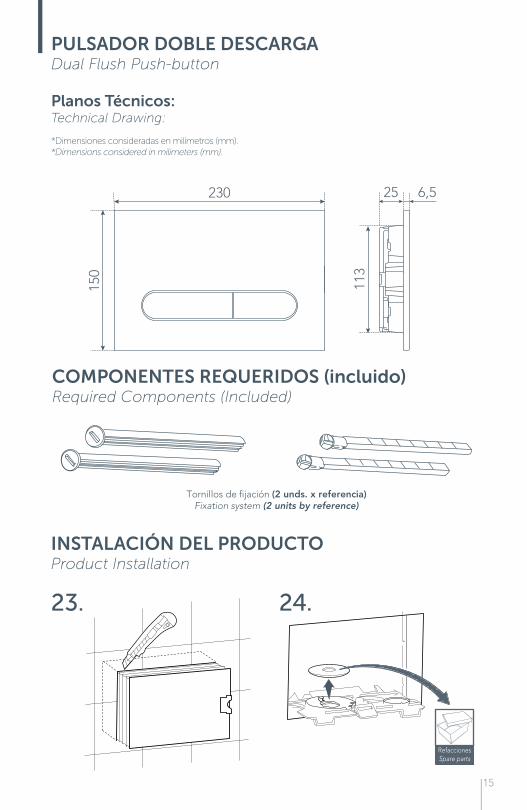
PULSADOR DOBLE DESCARGADual Flush Push-button
Planos Técnicos:Technical Drawing:
*Dimensiones consideradas en milímetros (mm).*Dimensions considered in milimeters (mm).
150
230
113
25 6,5
COMPONENTES REQUERIDOS (incluido)Required Components (Included)
Tornillos de fijación (2 unds. x referencia)Fixation system (2 units by reference)
INSTALACIÓN DEL PRODUCTOProduct Installation
23. 24.
RefaccionesSpare parts

16
26. x < 20 mm
RefaccionesSpare parts
27. x2
X + 10 mm
x2
X + 30 mm
RevisarCheck
25.a
25.bx
x2x2
25.
17
90°
x2
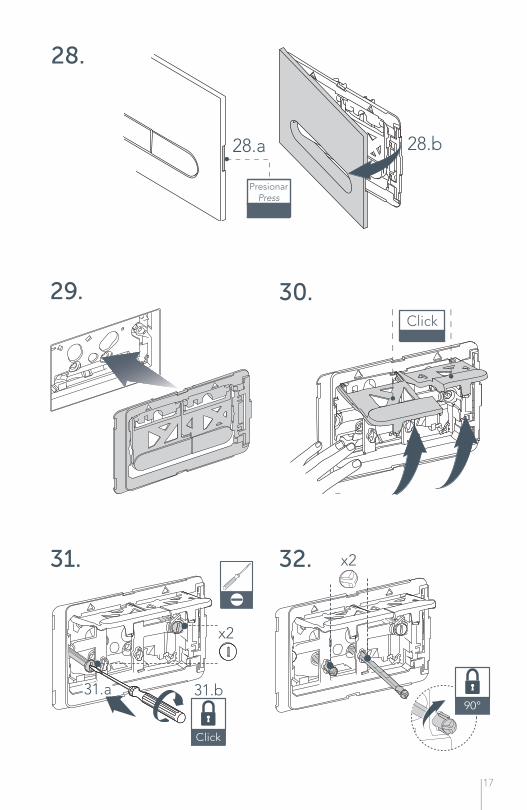
29. 30.Click
31.
x2
Click
31.a 31.b
32.
28.
28.a 28.b
PresionarPress
18
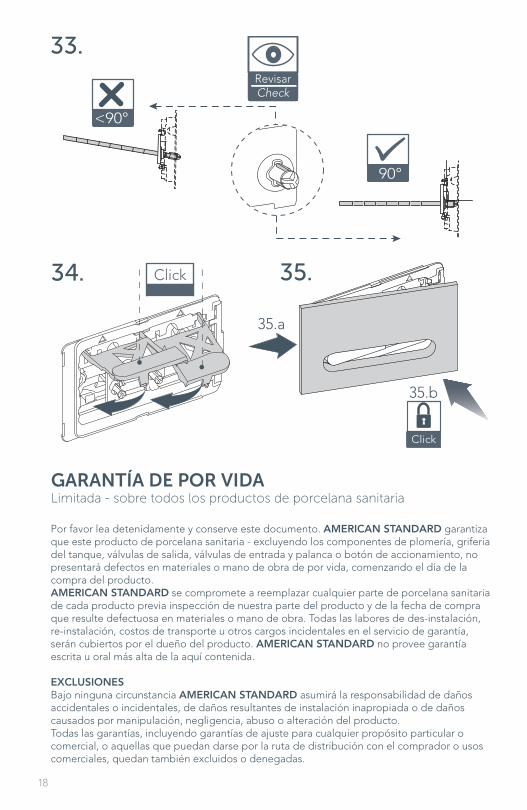
Click
35.a
35.b
33.
90°
RevisarCheck
<90°
34. Click 35.
GARANTÍA DE POR VIDALimitada - sobre todos los productos de porcelana sanitaria
Por favor lea detenidamente y conserve este documento. AMERICAN STANDARD garantiza que este producto de porcelana sanitaria - excluyendo los componentes de plomería, grifería del tanque, válvulas de salida, válvulas de entrada y palanca o botón de accionamiento, no presentará defectos en materiales o mano de obra de por vida, comenzando el día de la compra del producto.AMERICAN STANDARD se compromete a reemplazar cualquier parte de porcelana sanitaria de cada producto previa inspección de nuestra parte del producto y de la fecha de compra que resulte defectuosa en materiales o mano de obra. Todas las labores de des-instalación, re-instalación, costos de transporte u otros cargos incidentales en el servicio de garantía, serán cubiertos por el dueño del producto. AMERICAN STANDARD no provee garantía escrita u oral más alta de la aquí contenida.
EXCLUSIONESBajo ninguna circunstancia AMERICAN STANDARD asumirá la responsabilidad de daños accidentales o incidentales, de daños resultantes de instalación inapropiada o de daños causados por manipulación, negligencia, abuso o alteración del producto.Todas las garantías, incluyendo garantías de ajuste para cualquier propósito particular o comercial, o aquellas que puedan darse por la ruta de distribución con el comprador o usos comerciales, quedan también excluidos o denegadas.
19
LIFETIME WARRANTYAll vitreous china products
GARANTÍA LIMITADA
Se ofrece una garantía de diez (10) años para el tanque, la estructura metálica y partes plásticas incluidas. Se recomienda realizar el mantenimiento y limpieza dentro de las consideraciones anteriormente expuestas.Cualquier reparación o cambio de elementos del tanque usando partes de otros fabricantes, es considerado motivo para la cancelación de la garantía ofrecida.
Componentes Internos:
Se ofrece una garantía de dos (2) años para la carcasa de fibra de vidrio y el pulsador. Se recomienda realizar el mantenimiento y limpieza dentro de las consideraciones anteriormente expuestas.Cualquier incidente ajeno al funcionamiento o la calidad del producto, como golpes con elementos macizos, punzonados o rayados posteriores a la instalación no serán considerados dentro de la garantía ofrecida.
Componentes Externos:
Please read carefully and reatain for your records. AMERICAN STANDARD warrants this product - excluding plumbing fittings and toilet tank trim including fill valve, flush valve and push botton, to be free from defects in material or workmanship for hte lifetime of this product to the purchaser starting from the date of purchase, and AMERICAN STANDARD promises to provide a replacement part for any part of this product that proves, upon inspection and from the date of purchase, to be defective in material or workmanship. All labor for de-installation and re-installation AMERICAN STANDARD provides NO warranties, written or oral, beyond those contained on the face here of.
EXCLUSIONSIn no event shall AMERICAN STANDARD be liable for incidental or consequential dameges, for damages resulting from improper installation, or for damages caused by handling, neglect, abuse or alteration.
AMERICAN STANDARD no será responsable de daños que presente su porcelana sanitaria, causadas por el uso de cloramidas o altas concentraciones de cloro, sedimentos de hierro/cal y/o de otros minerales no renovados del agua pública por el tratamientos de agua del acueducto, o causados por limpiadores de tanque que contengan cloro, hipoclorito de
NOTAAlgunos estados no permiten limitaciones a garantías implícitas y algunos estados no permiten exclusiones o limitaciones sobre daños incidentales por tanto las limitaciones expresadas anteriormente podrían no aplicar para usted.Esta garantía le otorga derechos legales específicos, y usted puede tener otros derechos que varían de un estado a otro. Ninguna persona está autorizada para cambiar, añadir o crear garantías u obligaciones diferentes incluidas en este documento.Para obtener el servicio de garantía o una copia de esta garantía, contacte a su distribuidor local y/o al contratista al cual le compró el producto.
calcio y/o otros químicos.
20
Etiqueta / Sticker
LIMITED WARRANTY
It´s provided 2 years warranty for the frame and the push button. It´s recommended to give maintenance and cleaning on care recommendations previously presented. Any event unaware of functuonality or quality of the product, like blows with solid elements, punchings or scratches after the installation are not considered on warranty provided.
Internal Components:
It´s provided 10 years warranty for the metalic tank´s structure and plastic parts included. It´s recommended to give maintenance and cleaning on care recommendations prevously presented. Any reparation or changes on tank´s elements using other manufactures spare parts it´s considered like a warranty cancellation provided.
External Components:
AMERICAN STANDARD shall NOT be responsible or liable for any failure or damage to china products caused by the use of either chloramines or high concentration of chlorine, lime/iron sediments and/or other minerals not removed from public water during the treatment of public water supplies or caused by toilet tank type cleaners containing chlorine, calcium hypochlorite or other chemicals. All implied warranties, including any implied warrantly of fitness for any particular purpose or merchantability, or those that might arise a course of dealing with the purchaser or usages of trade, are hereby disclaimed and excluded.
NOTESome states do not allow limitations on an implied warrantly, ando some states do not allow exclusions or limitations regarding incidental or consequential damages so the above limitations may not apply to you. This warranty gives you specific legal rights and you may have other rights which vary from state to state. No person is authorized to change, add to, create any warranty or obligation other than that set forth herein. To obtain warranty service or a copy of this document, contact your local dealer and/or the contractor from whom your purchased this product.


![Duo-Scherzo Duo En cours Brahms Musorgskii …shop.kawai.jp/umeda/floor/pdf/concert2017030_alumni.pdfAlumni Concerto Duo-Scherzo primo & 37 Duo-Scherzo] . . (Duo-Scherzo official site:](https://img.pdfslide.tips/doc/110x75/5e708faf92f2ea21071ee302/duo-scherzo-duo-en-cours-brahms-musorgskii-shopkawaijpumedafloorpdfconcert2017030.jpg)


![3-test del chi quadrato [modalità compatibilità]](https://img.pdfslide.tips/doc/110x75/588c657f1a28ab7a208b74c9/3-test-del-chi-quadrato-modalita-compatibilita.jpg)