Embed Size (px)
DESCRIPTION
Special section devoted to improvements to homes in the autumn
Citation preview

����� ������� �� ������ ������
���� ��� ��� � ����
����� ���� � ����� �� � ���� �� � ���������� ��������� ���� � ����� � ���� � ��������� ����� � ����� ����!�� � "��� ��� � �� ������
�� ��������� � ���!������"�������#��� � $$$#������"�������#��������������� ��
ADVERTISING SUPPLEMENTSeptember 24, 2010
���������������
������� ���
� ����������� ����
������������ ��
2B September 24, 2010 THISWEEK NEWSPAPERS ADVERTISING SUPPLEMENT
Simple ways to update an outdated basement
Photo illustration
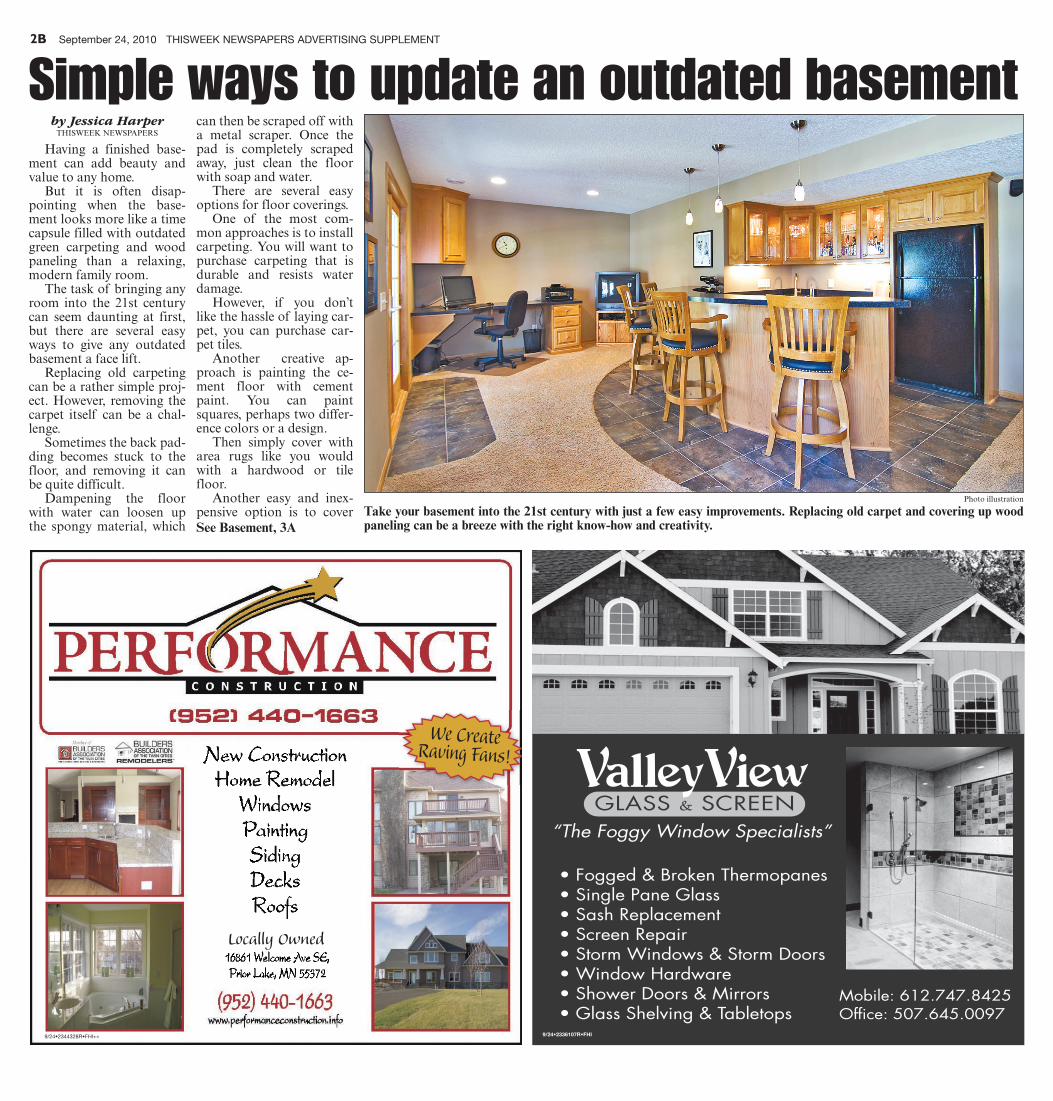
Take your basement into the 21st century with just a few easy improvements. Replacing old carpet and covering up wood paneling can be a breeze with the right know-how and creativity.
by Jessica HarperTHISWEEK NEWSPAPERS
Having a finished base-ment can add beauty and value to any home. But it is often disap-pointing when the base-ment looks more like a time capsule filled with outdated green carpeting and wood paneling than a relaxing, modern family room. The task of bringing any room into the 21st century can seem daunting at first, but there are several easy ways to give any outdated basement a face lift. Replacing old carpeting can be a rather simple proj-ect. However, removing the carpet itself can be a chal-lenge. Sometimes the back pad-ding becomes stuck to the floor, and removing it can be quite difficult. Dampening the floor with water can loosen up the spongy material, which
can then be scraped off with a metal scraper. Once the pad is completely scraped away, just clean the floor with soap and water. There are several easy options for floor coverings. One of the most com-mon approaches is to install carpeting. You will want to purchase carpeting that is durable and resists water damage. However, if you don’t like the hassle of laying car-pet, you can purchase car-pet tiles. Another creative ap-proach is painting the ce-ment floor with cement paint. You can paint squares, perhaps two differ-ence colors or a design. Then simply cover with area rugs like you would with a hardwood or tile floor. Another easy and inex-pensive option is to cover See Basement, 3A
����
����
���
��
�
�������� ����� � ��������� � ����������� ���� ������
� ���������� ���������� ���!� "�����#���
������� � �� � ������
��#����$�%�&'�%(
�������������� ���� ���
����
����
���(
��
�
������ ������� ���������
� � �������� ����
� ��������� � ����
� �������
���� ������� � �� �������
�����������
����)�*#!�����+����������
�����������������
THISWEEK NEWSPAPERS ADVERTISING SUPPLEMENT September 24, 2010 3B
the floor with vinyl tiles. Vinyl tiles cost between 50 cents and $4 a square foot, depending on size and quality, and are often less expense than carpeting or stone tile. Most tiles are about 12-inches by 12-inches, which cover exactly one square foot of floor. The easiest type of vinyl tile to install is the “peel and stick” variety, which comes with an adhesive on the back. All you need to do is peel off the paper backing and press the tile in place. To determine how much tile will be needed, measure the length and width of the room and multiply the mea-surements together. The tiles come in pre-packaged boxes of varying quantities — usually up to 45 tiles, and can be found at any home improvement store. Before installing tiles, re-pair any cracks, bumps and dips in the concrete, and re-
move trim around the floor edges. Bumps can be removed with a chisel or heavy grit sand paper on a belt sander. Sanding the entire floor, es-pecially if it has been previ-ously painted, will help the tiles adhere. When laying the tiles, you will want the pattern to be centered on the most noticeable part of the floor so whole tiles will be in the center of the floor. Find the center of the room and work your way out to the walls, pressing each tile firmly. Once you have installed a few rows, use a tile roller to bond them firmly in place. Install all the whole tiles be-fore starting to work around the edges. A utility knife or tin snips are effective tools for cut-ting the tiles to fit around edges. Cutting a tile to fit along the edges of a room can be made easy by laying a loose tile over the set tiles closest to the wall. Using a ruler or
another tile as a guide, draw a line across the top tile where the bottom tile ends. This should allow it to fit into place. Sprucing up a basement is not limited to the floor. Covering up old paneling is another way to beautify an outdated room. This can easily be done by placing a wallpaper liner over the paneling. Wallpa-per liners are a heavy-duty, unprinted paper that can be painted or be covered with printed wallpaper. Prepare your walls by nailing down loose panels, pulling out any loose nails and replacing them with drywall screws. Fill in the grooves with a surfacing compound to pro-vide a more level surface to adhere the liner to the wall. From there, paint or paste printed wall paper as you would to drywall. Then enjoy your newly updated basement.
E-mail Jessica Harper at: [email protected]
Basement/from 2A
����
����
���
��
�
������������
�������� � ��� ��� �� ��������� ���� ������� ������
���������� ���� ����� �� ������ ��� ����
���! ��� �� � ��� ������ �������� �� �� ��
���� ������ ������ ��� ����� ���� ��� ���������
������������������ �������������������������� ����������������������
��� ��� ���������� ����� �� ������ ����
�������
������ ���
����� � ����������� ���
� �� �� ����
��� ���
���������������
4B September 24, 2010 THISWEEK NEWSPAPERS ADVERTISING SUPPLEMENT
Small enhancements can lead to big savingsHome energy audits can help reduce energy use, save money
by Andy RogersTHISWEEK NEWSPAPERS
One of the first benefits people look for when buy-ing a car is how many miles it gets per gallon. Yet concern about their home energy bill doesn’t come as instinctively. Most people think they have no control. They pay the electrical and heating bills with a long sigh. But it’s easy for a homeowner to shave 10 to 25 percent off their energy bill with a few changes in habits and a few inexpensive improvements to their home. A home energy audit through your utility com-pany or a private contractor can show you things about your house that will save energy without sacrificing comfort. There a few com-mon issues almost anyone can solve on their own.
Installing a programma-ble thermostat is an upgrade that allows homeowners to set the temperature lower when they’re away from the house or sleeping. “Homeowners don’t seem to mind if the ther-mostat is turned down any-where from 72 to 60 degrees at night as long as it’s warm when they get up,” said Bob Williams, owner of energy audit business EZBNgreen.com. Another easy way to save on your bills is switching out your shower head. Most re-tail shower heads release 2.5 gallons of water per minute, and some reach upwards of five gallons. Heating that water can amount to 20 percent of an electric or gas bill, and 90 percent of that water goes down the drain. Switching to a low-flow shower head
releasing 1.5 gallons per minute can save money. “I found that few people really notice the difference,” Williams said. “You save a lot of energy money from the water you’re not heat-
ing.” There’s another thermo-stat that could use a little tweak as well. Most families don’t need their hot water heater turned up to 140 de-
Photo by Andy Rogers
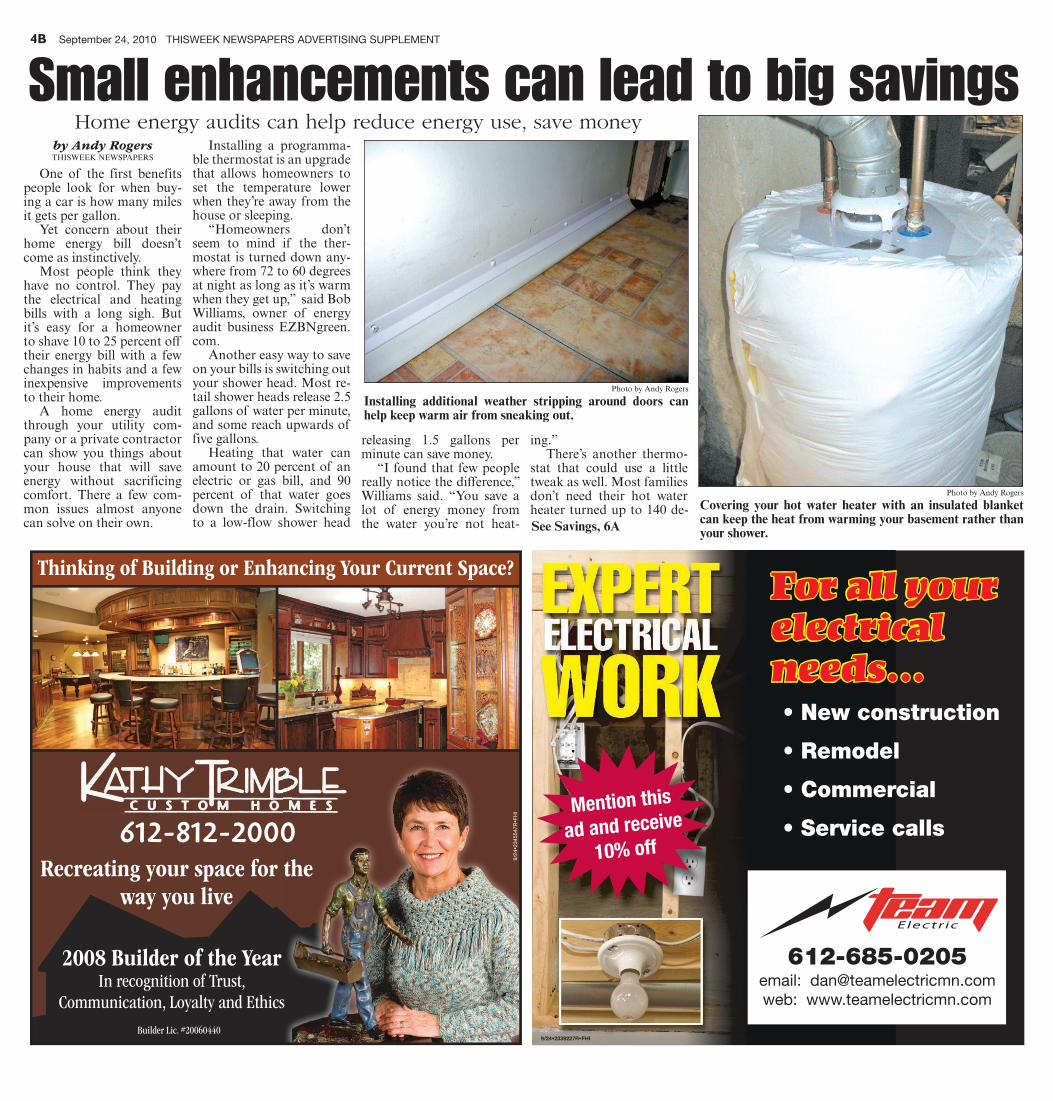
Covering your hot water heater with an insulated blanket can keep the heat from warming your basement rather than your shower.
Photo by Andy Rogers
Installing additional weather stripping around doors can help keep warm air from sneaking out.
See Savings, 6A

�������������������� �����������������
�
����� ������� ��������������������� �� ��� �� ��
�� ��� ����� ������������� �������������� ����� ��������� ����������� �������� ��������� � �������� ������������ ������ ���� ���������������� ���� ������� �� ���� ��� ��� ������ �������� ������� !���������"�
!�� � ��� ������ ��
���"
���� ��������� ��� �������� ������������ ���������� �� ����������������������� �� � ���� � �������� �� ��������� ��������� ������� ��� ����� �������� ���� ���� ��� ����������! ��"��������� �� ��� ��� ������ ����� ������� #$� � ��� %������� &�'���� ���� �� ������� �! ��� �������� &���'��! ��� &���'������� ��� � #��)� �������� ���������� ���! ���� �������� ���� ���� ��� ��� ������ ��� ������� ��������� �������� ����� �� �������������! �� '��������� �� ��������� ��� ��� ������ ��� ��������! ��������� ��! �������������! �� ����������� ������� � ���������� �������� �� ����������� "������� �� ��� ��� ������� *������+ �������� ���� ��� ������ �� ��� �� ��� ���'����� ����� �� ��� ��'��� ��� ���������� ���� ���������� ������� ����� ��� ��� ��'���� �� ��� %&� �� ��������� ������� ��� �������� ���! �������� �� � ���������� ����������� "���� ! �� ��� ��� ������� ,��������- ��� ��� ����� ����� ����� ������� ��� ���������� � �������� ������������. #�/� �������� ������������ ��� ������ �����'���
$�%� $�������� &� '��()*+* %������� ����
,*(-./,-00(�$������2 ��' %����
$�%� $�34�56�3&78��36�9 ����� ���� )(:0):(�)�
���������������
������ ���� � ������� � ��� ��������� �������� ��
��� ������ �� ������������ ������ ���������������� ������ �������������� ������ ��������
������ ��������
�� ����
���������
� �� ���
����� ����� ��� �� ������ ����� �� � ������!����"###$�%�����&��'#'(�)$�
�*� *�����+,-.�/�
��� ����� ��! "���#��� �$���%
�
����������� ���
THISWEEK NEWSPAPERS ADVERTISING SUPPLEMENT September 24, 2010 5B
Tough economic times call for even tougher mea-sures – and for many ho-meowners this means get-ting hands-on with home improvement projects. Al-though DIY projects can save money in theory, they also may result in a trip to the hospital if safety precau-tions aren’t followed. According to recent sta-tistics, 85 percent of hom-eowners are tackling projects around the house rather than hiring outside contractors. In this difficult economy, emergency rooms are seeing an influx of people com-ing in with injuries ranging from lacerations to puncture wounds from nail guns. John or Jane Do-It-Yourselfer has easy access to home-improvement supplies and tools at the local home center. He or she also may be inspired by any of the myr-iad shows on television in-structing individuals to give renovations a try. However, many homeowners are not
schooled in proper safety procedures or do not know how to use tools correctly. This is a recipe for injury. Common injuries include: • falls from ladders or scaffolding; • hand and finger injuries – including amputation – from power saws and grind-er/sanders; • nail gun injuries; since 1991, these injuries have in-creased by 200 percent; • eye injuries and breath-ing difficulties. Homeowners should con-sider the risks of improve-ments before beginning. They should also take pre-cautions to do improvements in the safest manner possible. • Always read the manu-facturers’ safety information and usage guidelines for any tools before the are put to use. • Turn off electrical cur-rent to rooms and outlets prior to doing any electrical repairs. • Wear proper safety
equipment, including gog-gles, dust masks or respira-tors, boots, and gloves. • Store chemicals in a locked cabinet or on a high shelf out of reach of chil-dren and pets. • Be cautious of power cords. Always unplug tools and turn off the switches when the item is not in use. • Do not climb past the top rung of ladders. Do not use furniture or stacked items as a ladder. • Jobs such as electri-cal work, roof work, gas projects, or major plumb-ing issues are better left to a skilled contractor. • Make sure drill bits and saw blades are sharp. Dull tools can result in injuries. • Keep fire extinguishers and a good first aid kit read-ily available at all times. There is no cost savings that make risking a disabil-ity worth it. If a project is beyond an individual’s scope of ability, hire a professional instead.
How to avoid do-it-yourself project injuries
������������ ��������������
�� �������
�������������������� ������ ������� ����
!����"������#�������$�%�������� �&���������������'������� ���#�����&�����#�� ������������&���� ������������������������)������'�� ������������������������ ���������%����'�����#
��"����$���� �$�����&���� �������$������#�������$������%
�������������''����*���������&����+���,-+-
��������������
���������������
������� ������ � �� �� ��������� ������ ������� �������
���� � ������ � ������� �� ��� ����� ���� � ���� ������
��������������
��������� ����� ���
���������
������ ����� ��������
��� ��� �� � ��������������� ��������
����������������������� ������
������ ������ � � ��� � � ��� � � ������� ��������� �� ��� ���� ! ���� �" �#������
����� ��������� ������ ������������
�� �����
��$$ �$���%&' ()(&*
�� ���� ������� ��������� ����� ������� ����
���� ��� � � �� ��� ������
6B September 24, 2010 THISWEEK NEWSPAPERS ADVERTISING SUPPLEMENT
grees – most are fine at 120 degrees or lower. Another inexpensive option to is to wrap it in a blanket. Hom-eowners can also insulate the hot water pipes with Styrofoam in the form of a tube to keep the water in the pipes warm. Once the temperature drops below freezing, that’s when the furnace goes to work. A home energy audit commonly includes a fur-nace inspection to test for efficiency and carbon mon-oxide. You’re paying for the warm, comfortable air, so it’s best to keep it inside. Sealing windows with plas-tic can improve the bar-rier substantially, and more weather stripping will keep the 70-degree air from walk-ing out the door. An eighth-of-an-inch opening around a door is equal to a 2.5-inch hole in the wall. But air can get out of the smallest places. Pay atten-tion to cable TV and electri-
cal sockets, dryer vents, and the area around pipes to see if cold air is finding its way in. A bigger project that can save big money is install-ing more insulation. It’s like putting a thicker hat on your head during winter. One of the best selling points of an energy audit is the use of a thermal imag-ing camera to see where the weak spots in insulation are located. “I’ve seen new houses where there’s 12 inches in one place and three in the others,” Williams said. “They’re certainly losing warm air and it’s just gone for good.” The problem is that when the insulation was initially installed, there were cracks left open and insulation set-tles. “You can spend $15-$20 on a bag of insulation and spread it around yourself,” Williams said. An energy audit can show how much you’d save by upgrading to energy-
saving appliances. For ap-pliances more than 15 years old, there’s a good chance you can save a substantial amount of money because of major advances in effi-ciency. Here are other cost-sav-ing measures homeowners can take while limiting their energy usage: • Close doors. You don’t want to heat a room you’re not using. • Keep vents clear. Check
to see if a couch or drapes are covering up floor or wall vents, then clean them so air can flow freely. • Use a microwave or crock pot instead of a stove. • Dishwashers are noto-riously inefficient. Don’t use the electric dry setting. Let dishes dry on their own. • Clean off the coils on the fridge. They won’t dis-sipate heat as well if they’re dirty. • Watch for faucet leaks
or you’ll pay for water you never even see. • Install Compact Fluo-rescent Light (CFL) light bulbs. The long-term sav-ings are worth the price. • If you’re going on a vacation, drop the tempera-ture on both the thermostat and the water heater. • Limit use of ventilation fans in the bathroom and kitchen during winter as it
draws out warm air. Home energy audits can be performed by public util-ity companies such as Xcel Energy and other local util-ity providers. There are also several private sector companies that provide the service.
Andy Rogers is at [email protected].
Savings/from 4A
Photo by Andy Rogers
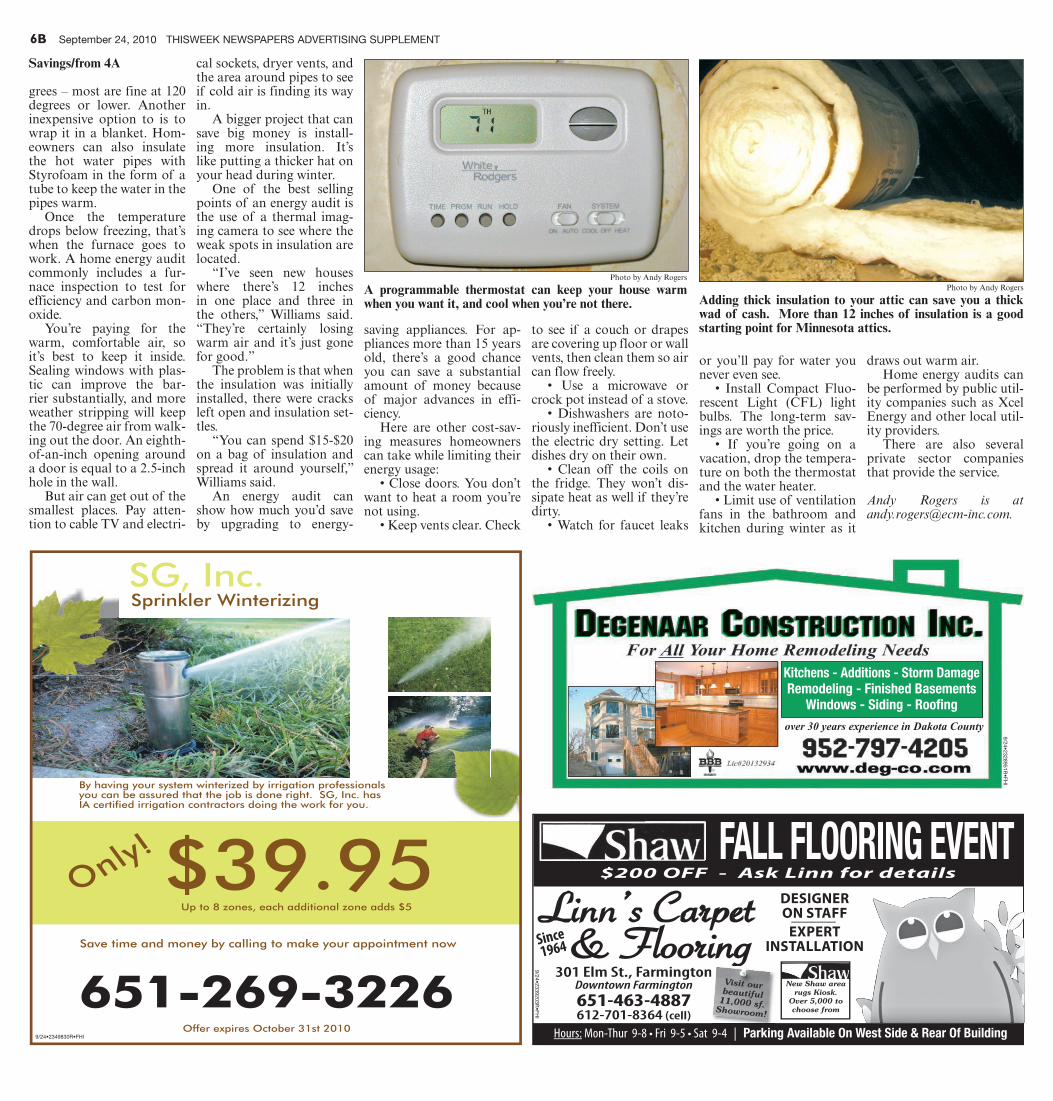
A programmable thermostat can keep your house warm when you want it, and cool when you’re not there.
Photo by Andy Rogers
Adding thick insulation to your attic can save you a thick wad of cash. More than 12 inches of insulation is a good starting point for Minnesota attics.
������� �� �� � ���� ���
���� ����� � ������ �� �����
���������������������������
���� �������� �������
��� ������������ � �������� ���� ����� ���
��� ���� ���� ���� �� ������ �
���� ����������� !"� ��# ����������� ���� !"� ��# ��������� �
��������������������������
� ���� �! "�� #������� $��� � %������ & %��'� $�(�������� )��#������ *���+�� � ,��� & -���� "���/��� %��'�� ,��� 0������ � 0������ )������ 0������
����������� ���
���������� ����
����� ���� ��� ��������� ��
� � � � � � � � � � � �������� ������������� ������������ � ������ ���� ����� � � �� ������ ���! ��"� � $� ���%� � &������ $� �� � '��� ������ � ���%��"�� $���� ����� � � �(��� " � ����
) � � � � � � � � � � * *
+,-./+0./12,
������������
���������������
THISWEEK NEWSPAPERS ADVERTISING SUPPLEMENT September 24, 2010 7B
Homeowners who have spent many years in one home likely raised a family and shared many memories inside of those walls. When the kids grow and move on it can be somewhat bitter-sweet. Being left with vacat-ed rooms – especially ones still decked out in children’s decor – can cause the house to feel more empty than it has to be. Now is the time to turn those empty rooms into adult spaces. Homeowners shouldn’t feel guilty about taking down band posters and packing away Little League baseball caps. Chances are the children made good use of their rooms and now it’s time for the adults to re-claim the spaces for their very own. There are easy ways to turn children’s bedrooms into spaces adults can enjoy. With a few fixes, the room can be a man’s space, a woman’s retreat, or a room both can enjoy. Because the room will reflect the adult homeown-ers’ interests, it should be designed with their needs in mind. Comfortable fur-niture and items that please the residents should be in-corporated. Lighting should be used to set the mood. If the room will be used for televi-sion watching, have dimmer switches so that the bright-ness can be tuned down. For reading or office work, have overhead lights and task lighting, such as a desk lamp.
For the “man cave” the room can reflect interests, such as sports or fishing, but be decorated in a subtle way to complement the rest of the home’s decor. For ex-ample, if a guy likes a sports team, he can paint the walls in a subdued shade of the team colors instead of hanging pennants or player jerseys on the walls.
Homeowners should re-member to include extra seating and space so that they can entertain friends or family in their newly adapted specialized rooms. A table for snacks or even a small refrigerator hidden within a decorative piece of furniture can keep snacks and beverages available.
Converting that empty nest
Photo submitted
Once the kids have left home for good, homeowners often look to convert rooms once devoted to the kids into something more in tune with the needs of an adult.
���� �������� � �������� ������ ������� �� ��� �� ���������� �� ���� ��� �����
������ � ������ ��� � ����� � ��
����������� � ������
��������������������������������
���������� ��������� �����
��������������
����������� ��
�� ���������� �������������������������������������� ����
� ���� ���������� � ���� � �������� � ����������������
����� ����� ��� ��� �������� �� ����� ������ ����! "��� �� �� ���# $��� �� �% ��� ��#��� ������
������� ���� � ������
���������������
�������� ����� ���� ������� ��� ��� ���������
����� � ���������
����������������������
���� ���������� ���� ������������������ ���������
��������������������
���� ���������� ���� �����
�� ���������������!" #����$
���� �%& '&���& !(
�������������������� ����
��������������������
���� ���������� ���� �����
�� �������������)*�! #���$
���� �%& '&���& !(
���������������
��� ����� ��� � ������
������������ � ������������ � ������������
� ����� ������� �� ����� �������������� � ������ � ������� ����� � �������� � ��������
� ����� ���� � ���� ���� � ���� ������� � ���� ����
�� �� ��������� ������ ����
���������������� � ����
��������� � � ������
����
����
���
��
�
8B September 24, 2010 THISWEEK NEWSPAPERS ADVERTISING SUPPLEMENT
Homes that were built prior to 1978 may have the presence of lead. Ho-meowners thinking about home improvement renova-tions may want to consider taking extra safety precau-tions to prevent lead con-tamination. Consumption of lead can result in many health problems, affecting the ner-vous system and kidneys and possibly interfering with fertility and reproduc-tion. High doses of lead can cause mental retardation, behavior problems, brain damage, and even death. Older homes may con-tain a good deal of lead. Lead used to be added to paint to make the product last longer and flow easier. Water pipes used to be made from lead, as was the solder used to connect the pipes. Lead may even be in the soil surrounding the home. Because of the dangers
lead presents, many home-owners are interested in ret-rofitting their homes to re-move traces of old lead, or at least prevent future con-tamination. Homeowners who are just doing minor renovations may actually stir up lead and introduce it into the environment. That is why caution must be tak-en with older homes. Whether one is hiring a contractor for renovations or doing the work him- or herself, a lead-safe manner should be followed. • Cover entryways, vent-ing, ductwork, flooring and other items in the room with an impermeable cov-ering to prevent the release of lead dust outside of the work area. • Use wet-scraping and wet-sanding methods to minimize the amount of dust generated that could contain lead. • Make sure tools, per-
sonnel and other equipment are cleaned before exiting the room so that dust is not spread. • Use containers to se-curely store waste and de-bris so it can safely be re-moved from the house. • Follow applicable laws for the proper disposal of lead-containing materials.
• Use HEPA-equipped vacuums to remove dust in a final clean-up of the work area. Wash down areas with water and an all-purpose cleaner so that settled dust is removed. • Be sure all workers are wearing appropriate safety equipment, such as ventila-tors, masks, gloves and eye-
wear for protection. • Hire a lead professional to do testing in the home to make sure lead is not pres-ent. Consumers can buy a do-it-yourself kit to test for lead-based paints in their homes. However, there may be false test results. There-fore, hiring a professional tester is the best option. • The Environmental Protection Agency requires that firms performing reno-vation in pre-1978 buildings use certified renovators for lead-safe work. Individuals can become certified reno-vators by taking an eight-hour training course from an EPA-approved training provider.
What you should know about lead-based paint Lead-based paint is par-ticularly dangerous because older paint can chip and de-
teriorate, causing lead dust in the home. Children may eat lead paint chips, and res-idents may inhale the dust. Actions should be taken to protect homeowners from lead-based paints in older homes. • Painted items, such as doors, can be replaced. If a lot of debris will be gener-ated, consult a professional. • Covering up lead-based paint is a short-term solu-tion. Sealants or gypsum wallboard can cover the paint. However, the old paint may continue to chip. Painting over the old paint may temporarily lock in the lead, but once the new paint deteriorates, lead dust may be released. • Removal is the best op-tion. Professionals experi-enced in lead paint removal can do it safely. Homeown-ers should not try to remove a large area of lead-based paint on their own.
How to renovate your home the lead-safe way
Photo submitted
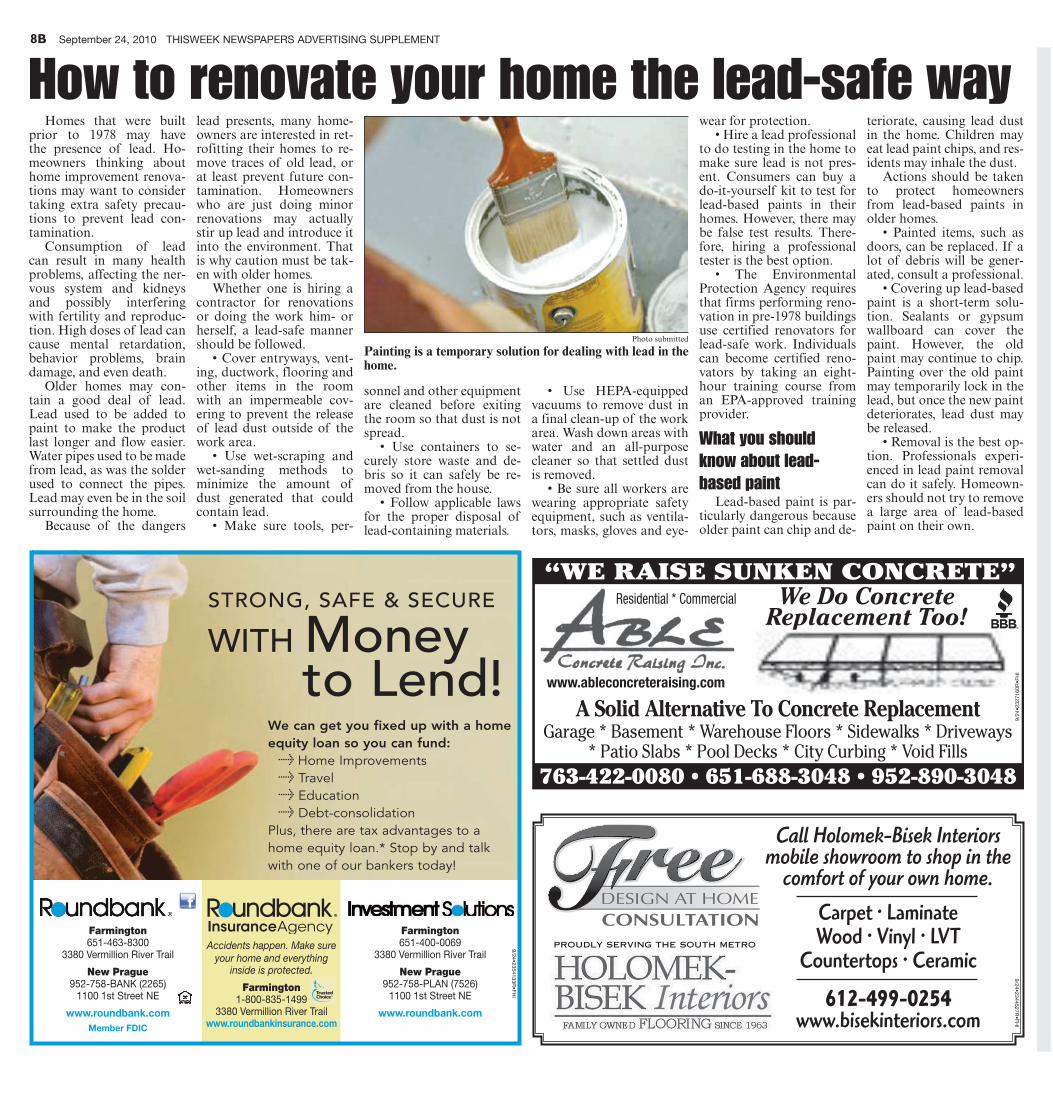
Painting is a temporary solution for dealing with lead in the home.