Embed Size (px)
Citation preview
KOMPERNASS GMBHBURGSTRASSE 21 ⋅ D-44867 BOCHUM
www.kompernass.comID-Nr.: SFB 10.1 A1-10/10-V2
SFB 10.1 A1
H O M E T E C H
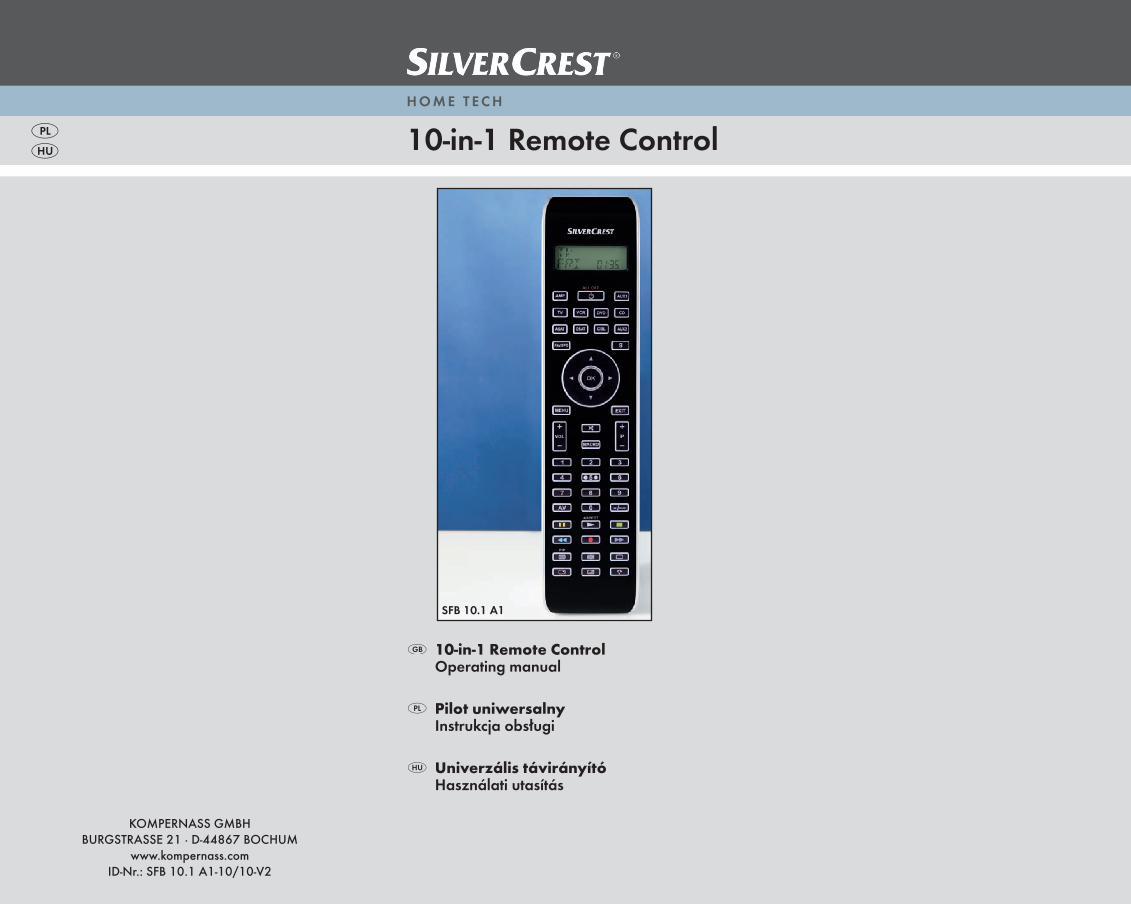
10-in-1 Remote Control Operating manual
Pilot uniwersalny Instrukcja obsługi
Univerzális távirányító Használati utasítás
10-in-1 Remote Control
CV_SFB 10.1 A1 - DT-55975.indd 7 11.10.2010 10:37:02
SFB 10.1 A1
CV_SFB 10.1 A1 - DT-55975.indd 12 27.09.2010 10:34:25
- 1 -
INDEX PAGEImportant safety instructions 2Device summary 3Initial use 4
Unpacking the device/checking the package contents 4Inserting the batteries 4
Operating components 5LCD display 5Buttons 6
SETUP - System settings 9Code Setup (Programming the remote control) 11
Programming by brand code search 11Programming by manual code input 12Programming by automatic code search 12
System-Setup 14Setting the time 14Setting the date 14Adjust contrast 15Background Illumination 15Setting the global volume/mute switching 15Setting the lock function 16System reset 17
Timer Setup 17Sleep timer 17Event timer 17
Learn Setup 18Code learn function 19
Macro Setup 20Favourites channel 21Volume control 23
Vol +/—, (Mute switching) 23For operation 23
All OFF 23Cleaning and storage 24Faults / Remedies 24Disposal 25Technical data 25Note regarding conformity 26Importer 26Warranty & Service 26
BDA_SFB 10.1 A1 - DT-55975_gb.indd 1 08.10.2010 15:15:00
- 2 -
UNIVERSAL REMOTE CONTROL SFB 10.1 A1This documentation is copyright protected. All rights includ-ing those of photographic reproduction, duplication and distribution by means of particular methods (for example data processing, data carriers and data networks), wholly or partially as well as substantive and technical changes are reserved.Read the operating instructions carefully before using the de-vice for the first time and preserve this booklet for later refer-ence. Pass this manual on to whoever might acquire the device at a future date.
Important safety instructionsProper useChildren may only operate the remote control under adult supervision. The universal remote control can replace a maximum of ten remote controls. It can only be used for entertainment elec-tronics with infrared receivers. The functions of the Universal remote control essentially correspond to those of the original remote control. The universal remote control is intended for private use. It is not suitable for commercial use. Any other use is considered improper use. The manufacturer accepts no responsibility for damage caused by improper handling or unauthorized reconstruction.
WarningA warning of this danger level signifies a possible dangerous situation. If the dangerous situation is not avoided it can lead to injuries. The directives in this warning are there to avoid personal injuries.
ImportantA warning of this danger level signifies possible property damage. If the situation is not avoided it can lead to property damage. The directives in this warning are there to avoid property damage.
NoteA note signifies additional information that assists in the handling of the device.
Warning of injury danger as a result of improper handling of batteries!
Batteries must be handled with special care. Take note of the following safety instructions:• Keep batteries well away from children. Children can
put batteries into their mouths and swallow them. If a bat-tery is swallowed medical assistance must be sought IM-MEDIATELY.
• Do not throw batteries into a fire. Never subject batteries to high temperatures.
BDA_SFB 10.1 A1 - DT-55975_gb.indd 2 08.10.2010 15:15:00
- 3 -
• Explosion hazard! Non-rechargeable batteries must never be recharged.
• Do not open the batteries or short-circuit them.• Battery acid leaking from a battery can cause inflamma-
tion of the skin. In event of contact with the skin, rinse with large amounts of water. If the liquid comes into contact with your eyes, rinse thoroughly with water, do not rub and immediately consult a doctor.
Attention!The Universal remote control contains an infrared diode of laser class 1. In order to avoid eye injuries do not look at the diode with optical devices.
Damage to the device• If the device is defective, do not attempt to repair it your-
self. In case of damage, contact the manufacturer or the manufacturer's service hotline (see Warranty information).
• If liquid escapes from the device or if the device has been otherwise damaged, it must be inspected by the manu-facturer or the manufacturer's service hotline. Contact the manufacturer or the manufacturer's service hotline (see Warranty information).
• Take the batteries out of the battery compartment as soon as they are depleted.
• If you will not be using the device for a long period of time, remove the batteries to prevent them from discharging.
• Always change all batteries at the same time and always use batteries of the same type.
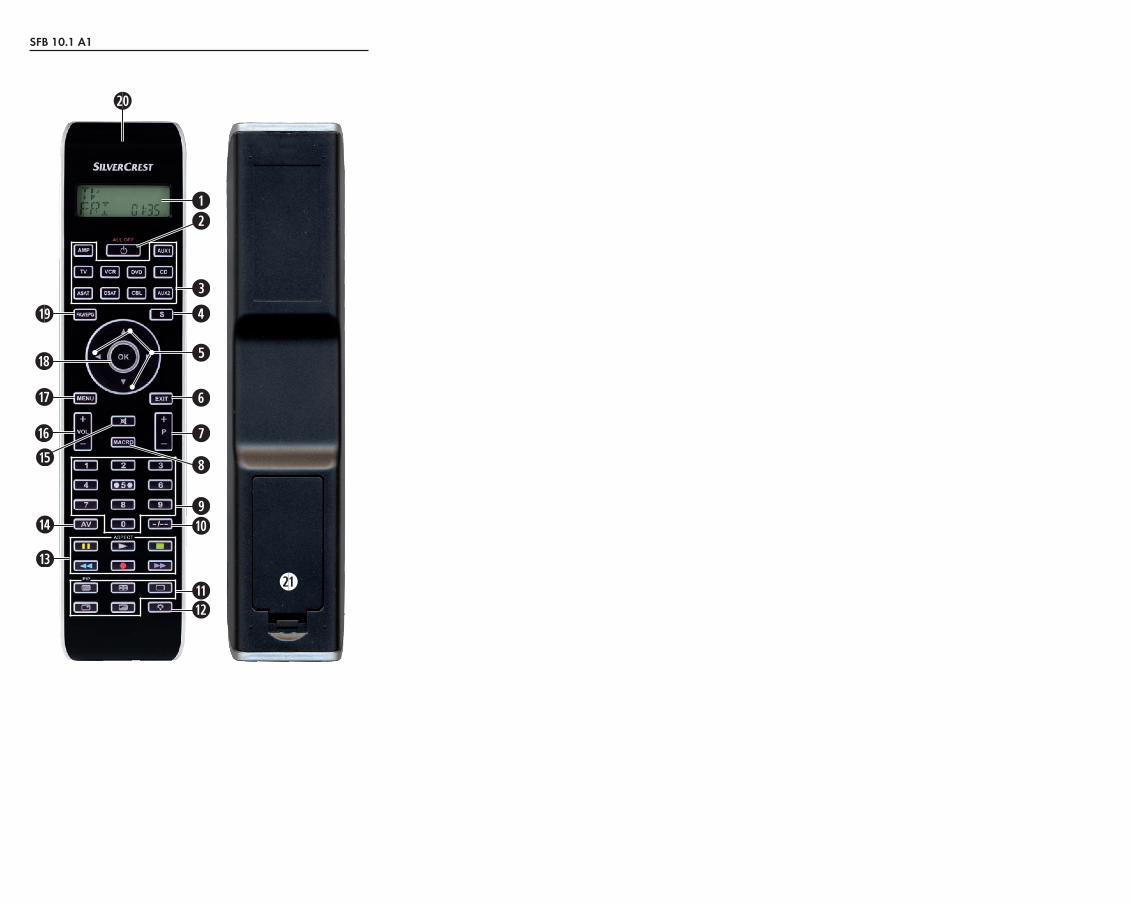
Device summaryq LCD displayw /ALL OFF buttone Device buttonsr S buttont Arrow buttonsy EXIT buttonu P +/— buttonsi MACRO buttono Number buttonsa Button for one or two digit programme numberss Teletext function buttonsd Illumination buttonf AV buttong Record/Playback buttonsh Mute switchingj VOL +/— buttonsk MENU buttonl OK button1( FAV / EPG button2) Infrared sender/receiver2! Battery compartment cover
BDA_SFB 10.1 A1 - DT-55975_gb.indd 3 08.10.2010 15:15:00
- 4 -
Tips:• The functions described here pertain to the theoretically
ideal circumstance that the button structure of the respec-tive original remote control is identical to this universal remote control. This only occurs, however, in rare cases. If, therefore, not all of the original remote control's functions can be reproduced it is not due to a dificiency in the Uni-versal remote control.
• All the brand names used in these instructions or in the accompanying code list are trademarks of the correspond-ing companies.
Initial use
Unpacking the device/checking the package contents
Warning!Keep the plastic packaging well away from small children. There is a risk of suffocation!• Unpack the device and accessories.• Check the package contents
- Universal remote control (URC), - Operating instructions, - Manufacturers directory with device code list: - 2 x 1,5 V Batteries, type AAA/LR03 (Micro)
Note: Transport damageIf you notice any transport damage contact the manufacturer or the manufacturer's Service-Hotline (see warranty information).
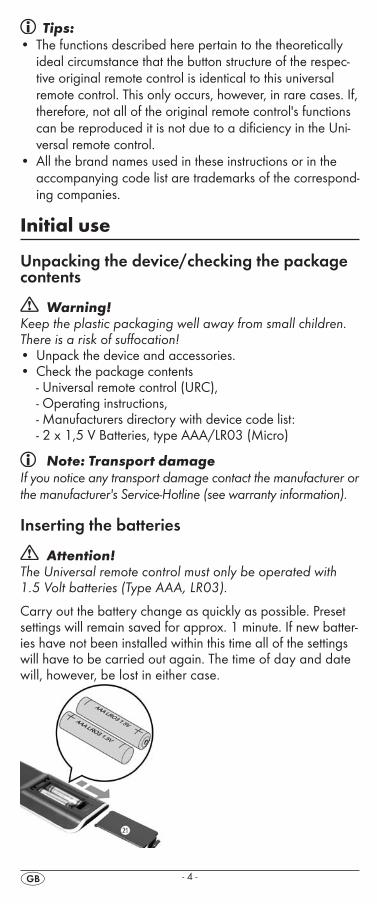
Inserting the batteries
Attention!The Universal remote control must only be operated with 1.5 Volt batteries (Type AAA, LR03).
Carry out the battery change as quickly as possible. Preset settings will remain saved for approx. 1 minute. If new batter-ies have not been installed within this time all of the settings will have to be carried out again. The time of day and date will, however, be lost in either case.
BDA_SFB 10.1 A1 - DT-55975_gb.indd 4 08.10.2010 15:15:00
- 5 -
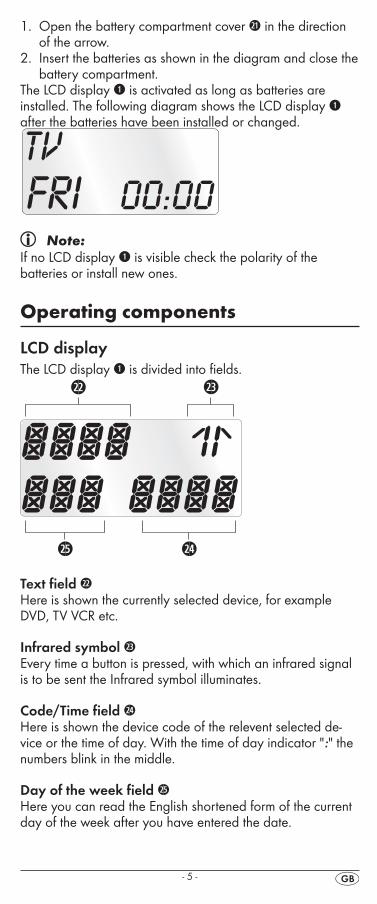
1. Open the battery compartment cover 2! in the direction of the arrow.
2. Insert the batteries as shown in the diagram and close the battery compartment.
The LCD display q is activated as long as batteries are installed. The following diagram shows the LCD display q after the batteries have been installed or changed.
Note:If no LCD display q is visible check the polarity of the batteries or install new ones.
Operating components
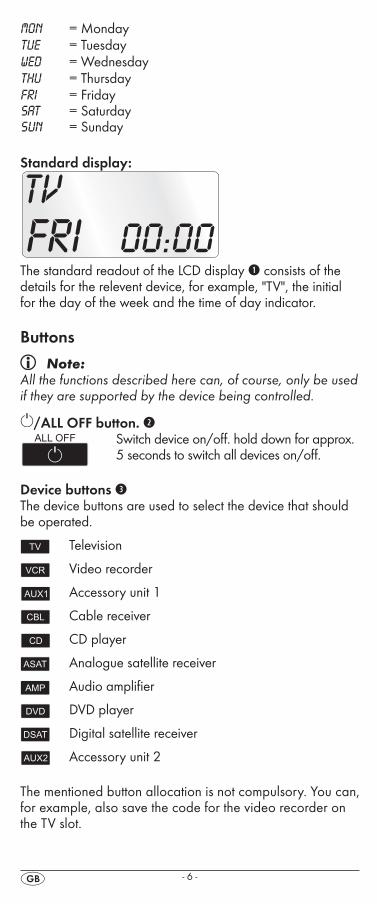
LCD displayThe LCD display q is divided into fields.
Text field 2@Here is shown the currently selected device, for example DVD, TV VCR etc.
Infrared symbol 2#Every time a button is pressed, with which an infrared signal is to be sent the Infrared symbol illuminates.
Code/Time field 2$Here is shown the device code of the relevent selected de-vice or the time of day. With the time of day indicator ":" the numbers blink in the middle.
Day of the week field 2%Here you can read the English shortened form of the current day of the week after you have entered the date.
BDA_SFB 10.1 A1 - DT-55975_gb.indd 5 08.10.2010 15:15:00
- 6 -
MON = MondayTue = TuesdayWED = WednesdayTHU = ThursdayFRI = FridaySAT = SaturdaySUN = Sunday
Standard display:
The standard readout of the LCD display q consists of the details for the relevent device, for example, "TV", the initial for the day of the week and the time of day indicator.
Buttons
Note:All the functions described here can, of course, only be used if they are supported by the device being controlled.
/ALL OFF button. w Switch device on/off. hold down for approx.
5 seconds to switch all devices on/off.
Device buttons eThe device buttons are used to select the device that should be operated.
Television
Video recorder
Accessory unit 1
Cable receiver
CD player
Analogue satellite receiver
Audio amplifier
DVD player
Digital satellite receiver
Accessory unit 2
The mentioned button allocation is not compulsory. You can, for example, also save the code for the video recorder on the TV slot.
BDA_SFB 10.1 A1 - DT-55975_gb.indd 6 08.10.2010 15:15:01
- 7 -
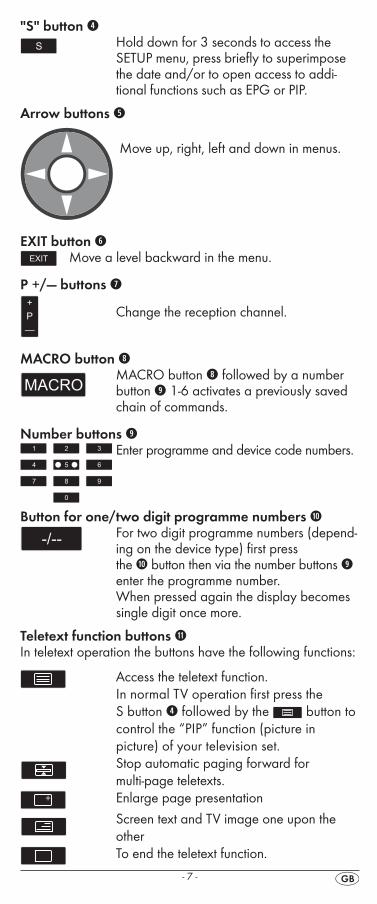
"S" button r Hold down for 3 seconds to access the
SETUP menu, press briefly to superimpose the date and/or to open access to addi-tional functions such as EPG or PIP.
Arrow buttons t
Move up, right, left and down in menus.
EXIT button y Move a level backward in the menu.
P +/— buttons u
Change the reception channel.
MACRO button i MACRO button i followed by a number
button o 1-6 activates a previously saved chain of commands.
Number buttons o Enter programme and device code numbers.
Button for one/two digit programme numbers a For two digit programme numbers (depend-
ing on the device type) first press the a button then via the number buttons o enter the programme number. When pressed again the display becomes single digit once more.
Teletext function buttons sIn teletext operation the buttons have the following functions:
Access the teletext function. In normal TV operation first press the S button r followed by the button to control the “PIP” function (picture in picture) of your television set.
Stop automatic paging forward for multi-page teletexts.
Enlarge page presentation Screen text and TV image one upon the
other To end the teletext function.
BDA_SFB 10.1 A1 - DT-55975_gb.indd 7 08.10.2010 15:15:01
- 8 -
Note:• The teletext function is only available in the European TV
mode and your TV device must have a teletext module.• In addition the P +/- buttons u control the following
teletext functions: P + Leaf one page forwardP — Leaf one page backwards
Record/playback buttons fThe playback buttons f control devices such as DVD/CD players and video recorders:
Start playbackASPECT Image format switching with TV operation.
Record
Stop Playback/Record/Wind
Pause playback
Rewind
Wind forward
AV button g
Switch to the AV input.
Mute switching h
Switch sound on/off.
VOL+/— buttons j
Set volume (Volume).
MENU button k Access the menu of the controlled device.
OK button l You can confirm a menu selection with the OK
button.
FAV/EPG button 1( Press the FAV/EPG button to access your
previously programmed favourite station. To access the electronic programme guide of the target device first press briefly the S button r and then the FAV/EPG button.
BDA_SFB 10.1 A1 - DT-55975_gb.indd 8 08.10.2010 15:15:02
- 9 -
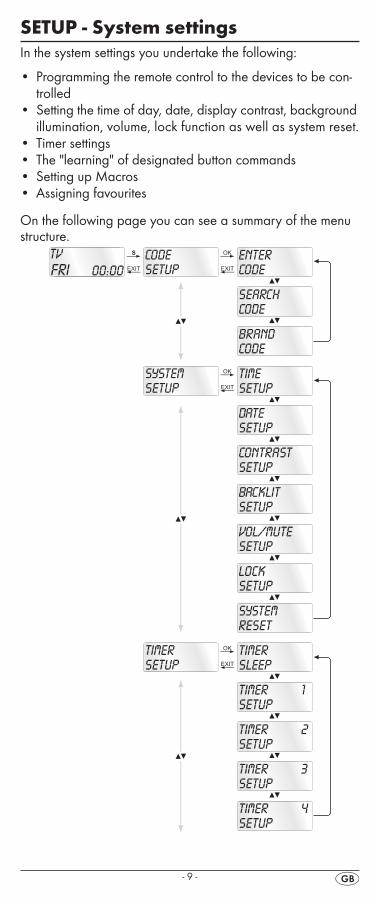
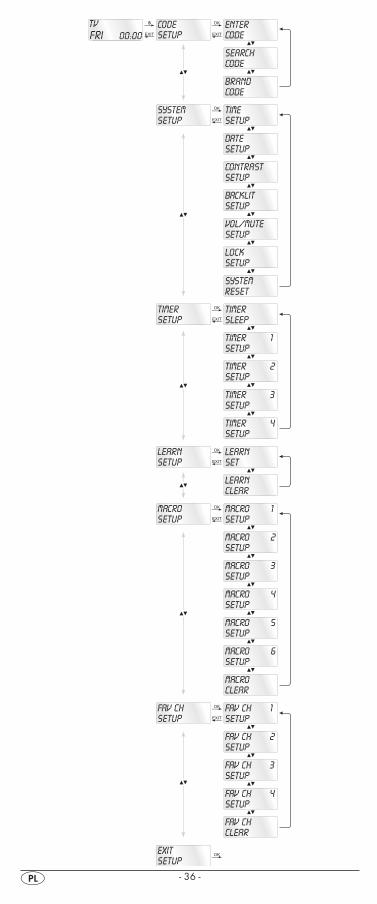
SETUP - System settingsIn the system settings you undertake the following:
• Programming the remote control to the devices to be con-trolled
• Setting the time of day, date, display contrast, background illumination, volume, lock function as well as system reset.
• Timer settings• The "learning" of designated button commands• Setting up Macros• Assigning favourites
On the following page you can see a summary of the menu structure.
BDA_SFB 10.1 A1 - DT-55975_gb.indd 9 08.10.2010 15:15:02
- 10 -
BDA_SFB 10.1 A1 - DT-55975_gb.indd 10 08.10.2010 15:15:02
- 11 -
Code Setup (Programming the remote control)
3 Programming methods are available for the remote control: Programming by brand code search, by automatic code search and by direct code input (manual).
First you should use the brand code search since this method is the fastest way of programming if the manufacturer of your de-vice is itemized in the code list. As second is recommended the direct code input followed by the automatic code search.
Programming by brand code searchWith this method you select the brand and code direct via the LCD display q.
Observe the following operational references to programme the remote control:
1. Press the device button e for the device that you want to programme the remote control.
2. Hold down the S button r for a little longer than 3 sec-onds. Carry out entries in the menu quickly because after approx. 15 seconds without an entry the menu will be ended.
3. In the LCD display q "CODE SETUP" appears. Press the OK button l. "ENTER CODE" now appears in the LCD display q. With the buttons t select "BRAND CODE" and confirm with the OK button l.
4. Now appears the alphabetical first brand name from the list of pre-programmed devices.
5. With the 34 buttons t select the various brand names.6. To make access easier you can skip directly to specific let-
ters of the alphabet with the number buttons o:2 => A 3 => D 4 => G 5 => J6 => M 7 => P 8 => T 9 => WExample With button number 5 the display skips to the letter "J". The first brand is "JVC"*. If, for example, you own a "Kenwood"* brand device, continue leafing with the 4 button t until this brand name appears. (* All brand names used here are trademarks of the corre-sponding manufacturer.)
7. The majority of manufacturers use several different codes for the remote control. You must now ascertain which of the available codes is best suited to your device. On the right underneath the brand name the relevent code will be shown in the LCD display q.
8. Point the remote control to the relevent device and pressthe function buttons to test the code (except 34t, OK l, EXIT y, or the number buttons o).
BDA_SFB 10.1 A1 - DT-55975_gb.indd 11 08.10.2010 15:15:02
- 12 -
9. If most of the buttons function press the OK button l to save the setting. In the LCD display q "OK" appears. Subsequently the menu will close automatically.
10. If, however, none or only a few of the buttons function select with the or button t the next code and test again as described in step 8.
11. With the EXIT button y you will move one level upwards in the menu.
Repeat these operational steps for all devices that you would like to control with the remote control.
Programming by manual code inputIn this mode the remote control can be programmed by direct input of a code number. You can obtain the necessary code number from the enclosed manufacturers directory with device code list. In the event that the new code is invalid the last valid programmed code will be restored.
1. Press the device button e for the device that you want to programme the remote control.
2. Hold down the S button r for a little longer than 3 sec-onds.
3. In the LCD display q "CODE SETUP" appears. Press the OK button l. "ENTER CODE" now appears in the LCD display q. To access this function press the OK button l.
4. In the LCD display q appears the presently used code for the selected device. Now the first digit of the code blinks and waits for your code input. Enter the new four digit code via the number buttons o.
5. If the entered CODE is valid the code will be saved. In the LCD display q "OK" appears briefly. Subsequently the menu will close automatically. In the event of failure the LCD display q shows briefly "ERROR" and waits for a new code entry. Then you repeat step 4.
6. With the EXIT button y you will move one level upwards in the menu.
Programming by automatic code searchThis process can take several minutes per device since all codes for the selected device have to be gone through. Therefore this method should only be used when the device cannot be programmed via brand code search or direct code input or if your device is not listed at all in the manufac-turers directory with device code list.
Follow the steps listed below to carry out programming by means of the automatic code search.
BDA_SFB 10.1 A1 - DT-55975_gb.indd 12 08.10.2010 15:15:02
- 13 -
1. Press the device button e for the device that is to be con-trolled (i.e. VCR).
2. Switch the device that is to be controlled with the remote control on. With VCR/DVD/CD devices please insert a tape and/or disc.
3. Hold down the S button r for a little longer than 3 sec-onds.
4. In the LCD display q "CODE SETUP" appears. Press the OK button l. "ENTER CODE" now appears in the LCD display q. Press the or button t until "SEARCH CODE" is shown in the LCD display q. Point the remote control to the device and then press the OK button l to access the mode "automatic code search".
5. The search begins. Thereby the device sends, one after the other, the code numbers in ascending order. The infra-red symbol 2# indicates this.
6. When the device reacts by switching off press immedi-ately the OK button l to save the relevent code. The LCD display q shows briefly "OK".
7. Check to see if the majority of your device's functions can now be controlled with the remote contol. If yes you have most probably found the correct code. In the event that a few functions are not working you can start the automatic code search again beginning with step 1.
Note: However, with a renewed code search, point the URC
first to the target device after the previously found inad-equate code has run its course.
8. However if the device does not react any more you prob-ably did not press the OK button l quick enough in step 6. Then press repeatedly the EXIT button y to exit the menu and return to the standard display.
9. Now hold down the device button e of the device for which you have just sought the relevent code. Below on the right in the LCD display q will thereby be shown the relevent code. Make a note of this number.
10. Then proceed as described in the preceding chapter "Programming by manual code entry" and check to see if the code with the next lowest number combination will function.
Tips:1. When code search is activated all buttons except OK l
and EXIT y are ignored.2. If the automatic search has reached the end of the code
list it stops there. The display then returns to "SEARCH CODE".
BDA_SFB 10.1 A1 - DT-55975_gb.indd 13 08.10.2010 15:15:02
- 14 -
System-Setup
Setting the timeThe LCD display q shows you the time of day. You set this as follows:
1. Hold down the S button r for a little longer than 3 seconds. The notice "CODE SETUP" appears. If appox. 15 seconds passes without an entry the device exits the menu and returns to the standard display.
2. With the or button t select "SYSTEM SETUP" and confirm with the OK button l.
3. In the LCD display q "TIME SETUP" appears. Confirm with the OK button l. The LCD display q now shows "TIME" and the time format (24 HR) blinks.
4. With the or button t you can switch to the other time format (12 HR). After which the time display for the time of day will show an “A” or “P” before the time. „A“ stands fpr “AM” = “ante meridium” (Morning, 0:00 o’clock midnight to 12:00 o’clock midday). „P“ stands for “PM” = “post meridium” (Afternoon and evening, 12:00 o’clock midday to 0:00 o’clock midnight). Press the OK button l to confirm.
5. Now the hour indicator blinks. With the or button t select the hour number for the present time of day and press the OK button l.
6. Now the minute indicator blinks. With the or button t select the minute number for the present time of day and press the OK button l to save. The "TIME SETUP" notice appears again.
7. To exit this or the following menus press repeatedly the EXIT button y until the standard display appears in the LCD display q.
Setting the dateThe LCD display q shows you the date when you press the S button r. You set the date in this way:
1. Hold down the S button r for a little longer than 3 sec-onds. The notice "CODE SETUP" appears.
2. With the or button t select "SYSTEM SETUP" and confirm with the OK button l.
3. In the LCD display q "TIME SETUP" appears. Press the button t to change to "DATE SETUP". Confirm with the OK button l.
4. In the display the year "2010" blinks. With the or button t you can change the year and confirm with the OK button l. With the or button t you can change the now blinking month and confirm with the OK button l. Now the day indicator blinks which you can also change with the or button t.
5. To save press the OK button l. The "DATE SETUP" notice appears again.
BDA_SFB 10.1 A1 - DT-55975_gb.indd 14 08.10.2010 15:15:03
- 15 -
Adjust contrastYou can set the display's contrast as follows:
1. Hold down the S button r for a little longer than 3 sec-onds. The notice "CODE SETUP" appears.
2. With the or button t select "SYSTEM SETUP" and confirm with the OK button l.
3. With the or button t select "CONTRAST SETUP" and confirm with the OK button l.
4. In the LCD display q the contrast value now blinks which you can set with the or button t.Display readout: 0 = highest contrast: 15 = lowest contrast
5. With the OK button l you can save the desired setting. The notice "CONTRAST SETUP" appears again.
Background IlluminationYou can set how long the LCD display’s q background and the button illuminations remain alight after completion of the operation.. Thereby taking into account that the longer the il-lumination remains lit the shorter the battery life will be.
1. Hold down the S button r for a little longer than 3 sec-onds. The notice "CODE SETUP" appears.
2. With the or button t select "SYSTEM SETUP" and confirm with the OK button l.
3. With the or button t select "BACKLIT SETUP" and confirm with the OK button l.
4. In the LCD display q now blinks the second count for the length of time that the light is to be left on which you can set with the buttons t from 0 to 60. If you select "0" the background illumination will shut off completely.
5. With the OK button l you can save the desired setting. The notice "BACKLIT SETUP" appears again.
Setting the global volume/mute switchingSo that you don’t always have to first press a device button for the volume control and mute switching, for these functions the URC always only responds to an individual device, by default the television set. You can determine this target device yourself.
1. Hold the S button r down for a little longer than 3 seconds. The notice „CODE SETUP“ appears.
2. With the or button t select “SYSTEM SETUP” and confirm with the OK button l.
3. With the or button t select “VOL/MUTE SETUP” and confirm with the OK button l.
4. The LCD display q shows “ALL VOL SET”. Press the OK button l, the display changes to „ALL VOL MODE“.
5. Now press the device button e for the device that is to be controlled by the global volume control.
BDA_SFB 10.1 A1 - DT-55975_gb.indd 15 08.10.2010 15:15:03
- 16 -
6. If the specified device is equipped with a volume control, “SUCCESS” will be displayed briefly and the menu will close. From now on the volume control functions on the device just specified.
7. If this device is not equipped with its own volume control the URC will not allow this selection and shows “VOLUME ERROR”. Even then the menu will close. The volume con-trol will then continue to function on the former device.
You can also deactivate the global volume control for specific devices.
1. For this purpose select in the VOL/MUTE SETUP with the or button t the function MODE VOL SET and confirm with the OK button l.
2. Now press the device button e for the device that is to be excluded from the global volume control. The LCD display q shows „SUCCESS“ and the global volume control is deactivated if the URC is working in the opera-tional mode of one of the selected devices.
You can also cancel the settings again in VOL/MUTE SETUP.
1. For this purpose select in the VOL/MUTE SETUP with the or button t the function VOL/MUTE RESET and confirm with the OK button l.
2. The LCD display q prompts you, with CONFIRM RESET, to a confirmation which is done by pressing the OK but-ton l. Press the OK button l If you want to delete the settings, the SUCCESS indicator then confirms the dele-tion. Otherwise you press the EXIT button y to abort the deletion.
Note:If you press, in this menu, the EXIT button y the entire menu will close immediately.
Setting the lock functionWith the lock function you can block access to all setup menus.
1. Hold down the S button r for a little longer than 3 sec-onds.
2. With the or button t select „SYSTEM SETUP“ and confirm with the OK button l.
3. With the or button t select “LOCK SETUP and confirm with the OK button l. The LCD display q shows the current settings.
4. With the or button t now select between „LOCK“ (Block) or „UNLOCK“ (Unblock).
5. With the OK button l you save the setting. In the LCD display q „LOCK SETUP“ then appears again.
BDA_SFB 10.1 A1 - DT-55975_gb.indd 16 08.10.2010 15:15:03
- 17 -
System resetVia this function you can reset the URC to its factory default settings. Thereby all settings made by you will be deleted.
1. Hold down the S button r for a little longer than 3 sec-onds. The notice "CODE SETUP" appears.
2. With the or button t select "SYSTEM SETUP" and confirm with the OK button l.
3. With the or button t select "SYSTEM RESET" and confirm with the OK button l.
4. In the LCD display q now appears "CONFIRM RESET". Confirm the reset with the OK button l. Then the LCD display q shows “SUCCESS RESET”. All settings are now deleted and the menu is closed. Otherwise you can exit the menu by pressing the EXIT button y. Then the set-tings remain preserved.
Timer SetupThe URC offers 2 timer modes, sleep timer and event timer.
Sleep timer1. Press the device button e for the device that is to be con-
trolled (i.e. VCR).2. Hold down the S button r for a little longer than 3 sec-
onds. The notice "CODE SETUP" appears.3. Press the or button t until "TIMER SETUP" is
shown. Press the OK button l "TIMER SLEEP" appears in the LCD display q. Confirm the selection of this function with the OK button l.
4. Now, below to the right in the LCD display q blinks the minutes for the remaining time of the selected device. Set with the or button t the desired value from 1 to 99 minutes. Press the OK button l to confirm. With programmed sleep-timer the LCD display q shows “zz” on the right next to the time.
5. Position the remote control in such a way that your infra-red signal can reach the device to be switched off. After expiration of the set time the remote control will switch the device off.
6. If you now press the S button r “SL” is shown in the dis-play q below on the left.
Event timerThe remote control has 4 event timers available via which you are allowed to send out specific series of button combi-nations at designated times.1. Hold down the S button r for a little longer than 3 sec-
onds. The notice "CODE SETUP" appears.2. With the or button t select "TIMER SETUP" and
confirm with the OK button l. "TIMER SLEEP" appears in the LCD display q. With the or button t select the desired memory slot "TIMER SETUP 1" to "TIMER SETUP 4" and confirm with the OK button l.
BDA_SFB 10.1 A1 - DT-55975_gb.indd 17 08.10.2010 15:15:03
- 18 -
3. Now the hour of the time of day, to which the desired button combinations are to be carried out, blinks. Set with the or button t the desired hour and press for con-firmation the OK button l.
4. Now the minutes of the time of day, to which the desired button combinations are to be carried out, blinks. Set with the or button t the desired minutes and press for confirmation the OK button l.
5. In the LCD display q you will see "TIMER X KEY" (X stands for the desired timer). Now press the desired device button e followed by the desired sequence of the button commands.
6. Press the S button r to save your entry and to return to the timer menu.
7. Procede in a similar manner in order to, if required, programme the other timer memory slots also.
8. With programmed event timer the LCD display q shows the timer symbol „ ” on the right next to the time.
Tips:1. Per timer memory slot a maximum of 14 buttons can be
programmed. After entry of the 14th button the sequence will be automatically saved and "FULL" is shown in the LCD display q.
2. In this menu also the device will return to the standard dis-play after approx. 15 seconds without an entry.
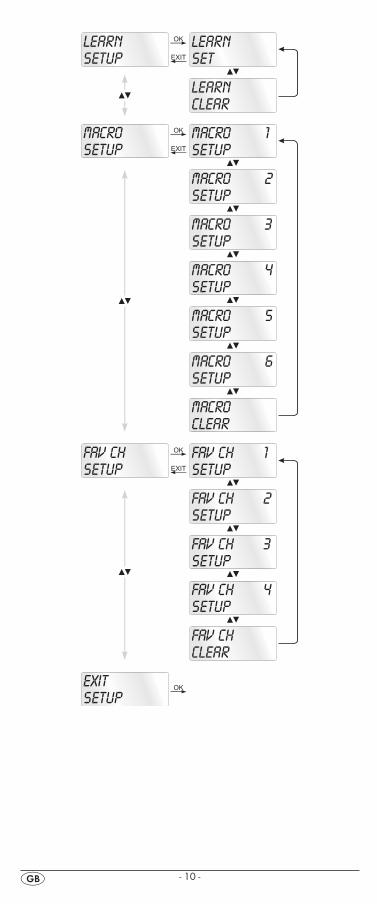
Learn SetupThe Universal remote control (URC) can learn and save but-ton signals of an original remote control. If the URC does not work after applying the programming methods already de-scribed or cannot carry out all commands please attempt to teach the URC with the help of the original remote control.
• Use new batteries for the URC and the original remote control.
• Maintain a distance of at least one metre from other light sources. The light sources could disrupt the infrared trans-mission.
• Place the URC and the original remote control at a dis-tance of 20 to 50 mm from each other on an even surface so that the infrared diodes 2) are facing each other.
Tips:1. Do not use the following buttons for the learn function: all
device buttons e, MACRO i, S button r, EXIT y.2. Press briefly the button of the original RC. When “SUC-
CESS” appears in the LCD display q the button com-mand has been successfully learnt. However, if „LEARN ERROR” (Failure) appears you must repeat the procedure.
3. If when teaching, during the notice "LEARNING", no button is pressed on the original RC after 25 seconds the learn menu will end. This mode can not be ended by pressing a button on the URC.
BDA_SFB 10.1 A1 - DT-55975_gb.indd 18 08.10.2010 15:15:03
- 19 -
4. The memory can accommodate 150 button commands. If the memory is full the LCD display q shows "LEARN FULL" and the learn mode will end.
5. With the EXIT button y you return to the previous status (except with a notice of "LEARN KEY" and/or "LEARN-ING").
Code learn function1. Press the device button e for the device that the URC
should learn a button code.2. Hold down the S button r for a little longer than 3 sec-
onds. The notice "CODE SETUP" appears.3. With the or button t select the menu "LEARN
SETUP" and then press the OK button l.4. In the LCD display q "LEARN SET" appears. Then press
the OK button l. In the LCD display q "LEARN KEY" ap-pears.
5. First press the button on the URC that is to be taught. In the LCD display q "LEARNING" appears. The URC now waits for the infrared signal from the original remote control.
Note:Should the notice not change to "LEARNING" you have selected a button for which no button code can be taught.
6. Point the infrared sensors 2) of both remote controls towards each other.
7. Now hold down the desired button of the original remote control until "SUCCESS" or "LEARN ERROR" appears in the display q of the URC.
8. If in the LCD display q "SUCCESS" appears (process successful), you can teach further buttons begining with step 5. If "LEARN ERROR" appears (process unsuccessful) repeat the process in any case from step 5.
9. To cancel/terminate the learning process, during the display “LEARN SET”, repeatedly the EXIT button y until the standard display is show in the LCD display q. Dur-ing the notice "LEARN KEY" and/or "LEARNING" simply allow 30 seconds to pass without any operation then the device will end the menu.
Delete all programmed buttons of all devices1. Hold down the S button r for a little longer than 3 sec-
onds. The notice "CODE SETUP" appears.2. With the or button t select the menu "LEARN
SETUP" and then press the OK button l. In the LCD display q "LEARN SET" appears.
3. With the or button t select "LEARN CLEAR" (taught delete) and confirm with the OK button l. In the LCD display q "CONFIRM CLEAR" (confirm delete) appears.
4. Confirm with the OK button l. In the LCD display q "SUCCESS" appears. All programmed buttons are de-leted. Finally the menu will automatically end.
BDA_SFB 10.1 A1 - DT-55975_gb.indd 19 08.10.2010 15:15:03
- 20 -
Note:When the LCD display shows “CONFIRM CLEAR” you can stop the deletion with the EXIT button y.
Macro SetupWith the MACRO function up to 16 button commands can be carried out with the press of a single button, that is to say, several previously saved control commands can be deleted with one MACRO button. There are 6 Macro memory slots available for you.
To programme a MacroFor Macro programming proceed as follows:
1. Hold down the S button r for a little longer than 3 sec-onds. The notice "CODE SETUP" appears.
2. With the or button t select "MACRO SETUP" and confirm with the OK button l. In the display "MACRO SETUP 1" appears.
3. With the or button t select the memory slot to be programmed (MACRO SETUP 1 - 6) and confirm with the OK button l.
4. In the LCD display q "MACRO STEP" appears. Now press, one after the other, the desired buttons (max. 16). The sequence should begin with a device button e.
5. By default the Macro commands are sent in intervals of 1 every second. Since many devices react sluggishly it is possible that the sequence of the Macro commands are sent too quickly to the device. Then you have the option of programming, before a button command, a pause of between 5 - 21 seconds. For this purpose press, if nec-essary repeatedly, the MACRO button i. Below and to the right the LCD display q shows the current pause length in seconds.
6. When the maximum number of button commands is reached the LCD display q shows "FULL".
7. Save the entry with the S button r. In the LCD display q "MACRO SETUP" appears.
8. If, with the selection of the Macros to be programmed (step 3), you select a memory slot that is already occupied the existing Macro will be overwritten.
9. Repeat the process from step 3 to create further Macros.10. With the EXIT button y you move a level upwards in the
menu except during the entry of the button commands.
Tips:1. A maximum of 16 button commands can be saved in a
Macro. After input of the 16th button command, “FULL” appears in the LCD display q.
2. To exit the mode without saving allow approx. 15 sec-onds to pass without an entry.
3. In the mode "MACRO STEP" you can only return to the previous status with the S button r.
BDA_SFB 10.1 A1 - DT-55975_gb.indd 20 08.10.2010 15:15:03
- 21 -
Example: You want to save a command chain in a Macro. We begin in the mode "MACRO STEP".
Desired command chain: Switch on TV => PAUSE => switch to the AV input => switch on DVD => PAUSE => Playback DVD.
In the mode "MACRO STEP", for this you enter the following button commands:
=> => (Pause time) => => => => (Pause time) =>
Execute a MacroTo execute a pre-programmed Macro proceed as follows:
1. Press the MACRO button i.2. With the corresponding number button o you access the
desired Macro (1-6). Example: If Macro 3 is to be imple-mented press first the Macro button i and then, within 5 seconds, the number button " ".
To delete all MacrosTo delete all pre-programmed Macros proceed as follows:
1. Hold down the S button r for a little longer than 3 sec-onds. The notice "CODE SETUP" appears.
2. With the or button t select "MACRO SETUP" and confirm with the OK button l. In the display "MACRO SETUP 1" appears.
3. With the or button t select "MACRO CLEAR" and confirm with the OK button l.
4. In the LCD display q "CONFIRM CLEAR" (confirm delete) appears. Confirm the delete process with the OK button l. The LCD display q shows "SUCCESS". All Macros are now deleted and the menu will end.
Tips:1. When the LCD display q shows "CONFIRM CLEAR" you
can stop the delete process with the EXIT button y.2. Individual Macros can not be deleted they can only be
overwritten.
Favourites channel
Note:With this function you can save your preferred stations as favourites.
To programme favouritesYour favourite stations are saved as follows:
1. Press the device button e for the device that you want to save a favourite.
2. Hold down the S button r for a little longer than 3 sec-onds. The notice "CODE SETUP" appears.
BDA_SFB 10.1 A1 - DT-55975_gb.indd 21 08.10.2010 15:15:03
- 22 -
3. With the or button t select "FAV CH SETUP" and confirm with the OK button l. In the display "FAV CH SETUP 1" appears.
4. With the or button t select the memory slot to be programmed (FAV CH SETUP 1 - 4) and confirm with the OK button l.
5. In the LCD display q "FAV CH STEP" appears. Now press, one after the other, the buttons (max. 4) for access to your desired favourite stations.
6. When the maximum number of button commands is reached the LCD display q shows "FULL".
7. Save the entry with the S button r. In the LCD display q "FAV CH SETUP" appears.
8. If, with the selection of the favourites to be programmed (step 4), you select a memory slot that is already occu-pied the existing favourite will be overwritten.
9. Repeat the steps to apply further favourites.10. With the EXIT button y you move a level backwards in the
menu except during the entry of the button commands.
Note:The input of the channel numbers can vary according to the model and brand of the selected devices. If necessary, with multi-digit channel numbers you must first press the button a.
To access favouritesTo access a pre-programmed favourite press the FAV/EPG button 1( followed by the corresponding number button for the desired memory slot (1 - 4).
Delete All FAV channelsTo delete all pre-programmed favourites proceed as follows:
1. Hold down the S button r for a little longer than 3 sec-onds.
2. With the or button t select "FAV CH SETUP" and confirm with the OK button l. In the display "FAV CH SETUP 1" appears.
3. With the or button t select "FAV CH CLEAR" and confirm with the OK button l.
4. In the LCD display q "CONFIRM CLEAR" (confirm delete) appears. Confirm the delete process with the OK button l. The LCD display q shows "SUCCESS". All favourites are now deleted and the menu will end.
Tips:1. When the LCD display q shows "CONFIRM CLEAR" you
can stop the delete process with the EXIT button y.2. Individual favourites can not be deleted they can only be
overwritten.
BDA_SFB 10.1 A1 - DT-55975_gb.indd 22 08.10.2010 15:15:03
- 23 -
Volume control
Vol +/—, (Mute switching)Press the "VOL+" button to increase the volume. With the "VOL —" button you reduce the volume. To mute the sound press the -button h. A further press of this button turns the sound back on.
When you activate the VOL +/— buttons j on the URC basi-cally the volume adjustment on the TV device is addressed, regardless thereof, which device button e was pressed previously. However, this does not apply to the following devices: “AMP”, “DVD”, “ASAT”, and “DSAT” since it can be assumed that these devices are equipped with their own volume control.
For operation > To operate one of the programmed devices with the URC first press the corresponding device button e. Then point the URC to this device and press the desired button.
> Put the number buttons o exactly as you do with the original remote control. Before you make a two digit entry press, if necessary, the button a.
> Press the FAV/EPG button 1( to start the electronic pro-gramme guide of a device equipped with this function.
> If you press the S button r the date is superimposed for 10 seconds in the LCD display q below and on the right.
> Whilst you hold down one of the device buttons e the active code for this device will be superimposed below to the right in the LCD display q.
> Via the MENU button k you access the dialogue for the setting of the respective target device.
> Press the illumination button d to switch the display and button illuminations on and/or off.
All OFF Tips:
With the button ALL OFF (all off) w all devices that are switched on can be automatically switched off. This func-tion can switch on again devices that have already been switched off (depending on the device). For this hold down the ALL OFF button w for approx. 5 seconds. This will only function under the following circumstances:
1. A visible connection exists between all the devices and the URC.
2. Automatic code search, brand code search and MACRO function are not active.
3. All target devices must be suitable for remote control switch off.
BDA_SFB 10.1 A1 - DT-55975_gb.indd 23 08.10.2010 15:15:03
- 24 -
To again switch on all devices automatically hold down once more the button w until all devices are switched on.
Cleaning and storage
Attention!Ensure that moisture cannot permeate into the device during cleaning! Otherwise there is the danger of causing irreparable damage to the device!
> Clean the housing of the device exclusively with a soft moist cloth and a mild dishwashing detergent.
> Store the device exclusively in an environment that com-plies with the specifications given in the technical data.
> Before storing remove the batteries so that they will not cause damage to the device if, during storage, they happen to leak.
Faults / Remedies
Your device does not react to the URC. > Check the batteries. They must have enough voltage and be properly installed.
> Firstly have you pressed the correct device button e for the desired target device?
> Check to see that the correct code is programmed in for the target device (see section "Code Setup").
The URC is transmitting the commands incorrectly. > Press the corresponding device button e to set the URC to the correct mode.
> The batteries must have enough voltage and be properly installed.
> It is possible that you are using the wrong code. Start the brand code search, the automatic code search or the di-rect code input (manual).
The URC does not change the station on the device. > Press the corresponding device button e to set the URC to the correct mode.
> In the event that the original RC does not have a "-/- -" button, change the programme with the P +/— buttons u or the number buttons o.
> If this also does not work the child protection for the target device could be activated.
Some buttons on the URC do not function properly. > It is possible that your URC does not have all of the func-tions that are on the device's original remote control.
> It is possible that you have not programmed in the optimal code. Search for a code that supports more of the target device's functions.
BDA_SFB 10.1 A1 - DT-55975_gb.indd 24 08.10.2010 15:15:03
- 25 -
The URC stops reacting after a button is pressed. > The batteries must have enough voltage and be properly installed.
> Point the URC towards your device.
The LCD display q shows nothing. > The batteries must have enough voltage and be properly installed.
> The contrast could be set too low. Increase the contrast setting.
Disposal Do not dispose of the device in your normal domestic waste. This product is subject to the European directive 2002/96/EC.
Universal remote control• Have the universal remote control or parts of it disposed
of by a professional disposal company or by your commu-nal disposal facility.
• Observe the currently applicable regulations. In case of doubt contact your disposal facility.
Batteries/rechargeable batteries• Used batteries/rechargeable batteries may not be dis-
posed of in household waste.• Batteries can contain poisons which are damaging to the
environment. Therefore, dispose of the batteries/recharge-able batteries in accordance with statutory regulations.
• Every consumer is legally obliged to surrender batteries/rechargeable batteries to a community collection centre in their district or to a dealer. The purpose of this obliga-tion is to ensure that batteries are disposed of in a non-polluting manner.
• Only dispose of batteries when they are fully discharged.Dispose of packaging materials in an environmentally responsible manner.
Technical dataControllable devices: 10 Dimensions L x W x H: 217 x 50 x 22 mm Weight : 102 g (without batteries) Infrared LED: Laser class 1 Power supply Batteries: 2 x 1.5 V, type AAA/LR03 (micro) (supplied)Operating temperature: + 5 – +35°C Storage temperature : -20 - +50 °CHumidity: 5 - 90 % (No condensation)
BDA_SFB 10.1 A1 - DT-55975_gb.indd 25 08.10.2010 15:15:03
- 26 -
Note regarding conformityThis device satisfies the fundamental requirements and other relevant regulations of the EMC Directive 2004/108/EC.
ImporterKOMPERNASS GMBH BURGSTRASSE 21 44867 BOCHUM, GERMANY
www.kompernass.com
Warranty & ServiceYou receive a 3-year warranty for this appliance as of the purchase date. This appliance has been manufactured with care and meticulously examined before delivery.
Please retain your receipt as proof of purchase. In the case of a warranty claim, please make contact by telephone with our service department. Only in this way can a post-free des-patch for your goods be assured.
The warranty covers only claims for material and manufactur-ing defects, but not for transport damage, wearing parts or for damage to fragile components, e.g. buttons or batteries.
This product is for private use only and is not intended for commercial use. The warranty is void in the case of abusive and improper handling, use of force and internal modifica-tions not carried out by our authorized Service Centre.
Your statutory rights are not restricted in any way by this war-ranty.
The warranty period is not extended through repairs made under warranty. This applies also for replaced or repaired parts. Any damages or deficiencies found on purchase must be reported as soon as possible after unpacking, at the lat-est two days after purchase. On expiry of the warranty, all repairs carried out are subject to payment.
DES UK LTDTel.: 0871 5000 700 (£ 0.10 / minute)
e-mail: [email protected]
BDA_SFB 10.1 A1 - DT-55975_gb.indd 26 08.10.2010 15:15:03
- 27 -
SPIS TREŚCI STRONAWażne zasady bezpieczeństwa 28Przegląd urządzenia 30Uruchomienie 30
Rozpakowanie urządzenia/sprawdzenie zakresu dostawy 30Wkładanie baterii 31
Elementy obsługi 32Wyświetlacz LCD 32Przyciski 33
SETUP - ustawienia systemowe 35Code Setup (programowanie pilota zdalnego sterowania) 37
Programowanie przez wyszukiwanie kodu marki 37Programowanie przez ręczne wpisywanie kodu 38Programowanie przez automatyczne wyszukiwanie kodu 38
System-Setup 40Ustawianie godziny 40Ustawianie daty 40Ustawianie kontrastu 41Podświetlenie 41Ustawianie wspólnej głośności/wyłączenia dźwięku 42Ustawianie funkcji Lock 43System-Reset 43
Timer Setup 44Licznik funkcji Sleep 44Licznik zdarzenia 44
Learn Setup 45Funkcja uczenia kodów 46
Makro Setup 47Ulubiony kanał 49Regulacja głośności 50
Vol +/-, (wyciszenie) 50Informacje dotyczące obsługi 51
Wyłącz wszystkie (ALL OFF) 51Czyszczenie i przechowywanie 51Błędy i sposoby ich usuwania 52Utylizacja 53Dane techniczne 53Wskazówka dotycząca zgodności 54Importer 54Gwarancja i serwis 54
BDA_SFB 10.1 A1 - DT-55975_pl.indd 27 10.10.2010 15:46:05
- 28 -
UNIWERSALNY PILOT ZDALNEGO STEROWANIA SFB 10.1 A1
Niniejsza dokumentacja jest prawnie chroniona. Wszelkie prawa, także te dotyczące odtwarzania fotomechanicz-nego, powielania i rozpowszechniania innymi metodami (np. obróbka danych, nośniki danych i sieci danych), także częściowo, jak również zmian zawartości i techniki zastrze-żone.Przed pierwszym użyciem zapoznaj się z instrukcją obsługi i zachowaj ją w celu późniejszego wykorzystania. W przy-padku przekazania urządzenia osobom trzecim należy przekazać im także instrukcję.
Ważne zasady bezpieczeństwaUżycie zgodne z przeznaczeniemDzieci mogą korzystać z pilota zdalnego sterowania wy-łącznie pod nadzorem osoby dorosłej. Uniwersalny pilot zdalnego sterowania może zastępować maksymalnie dziesięć różnych pilotów zdalnego sterowania. Można go używać wyłącznie do sprzętu elektronicznego wy-posażonego w odbiornik na podczerwień. Funkcje w uniwer-salnym pilocie zdalnego sterowania odpowiadają przeważ-nie funkcjom w oryginalnych pilotach zdalnego sterowania. Uniwersalny pilot zdalnego sterowania jest przeznaczony do użytku prywatnego. Nie można go używać do celów komer-cyjnych. Zastosowanie do jakiegokolwiek innego celu niż opisany uważane jest za niezgodne z przeznaczeniem. Producent nie ponosi odpowiedzialności za szkody, spowodowane użyt-kowaniem urządzenia niezgodnie z jego przeznaczeniem lub samodzielnymi przeróbkami.
OstrzeżenieWskazówka ostrzegawcza tego stopnia zagrożenia oznacza możliwą do wystąpienia sytuację niebezpieczną. W razie braku możliwości uniknięcia niebezpiecznej sytuacji, może to doprowadzić do odniesienia obrażeń. Instrukcje w niniejszej wskazówce ostrzegawczej stosuje się, by uniknąć odniesienia obrażeń osób.
UwagaWskazówka ostrzegawcza tego stopnia zagrożenia ozna-cza możliwą szkodę materialna. W razie braku możliwości uniknięcia niebezpiecznej sytuacji, może to doprowadzić do szkód materialnych. Instrukcje w niniejszej wskazówce ostrzegawczej stosuje się, by uniknąć szkód materialnych.
WskazówkaWskazówka oznacza dodatkowe informacje, ułatwiające korzystanie z urządzenia.
BDA_SFB 10.1 A1 - DT-55975_pl.indd 28 10.10.2010 15:46:05
- 29 -
Ostrzeżenie przed odniesieniem obrażeń na skutek niewłaściwego obchodzenia się z bateriami!
Przy wymianie baterii należy postępować z największą ostrożnością. Należy przestrzegać następujących wskazó-wek bezpieczeństwa:
• Baterie należy trzymać w miejscu niedostępnym dla dzieci. Dziecko może połknąć baterię. W wypadku połknięcia baterii należy jak najszybciej skorzystać z pomocy medycznej.
• Nie wrzucaj baterii do ognia. Nie wystawiaj baterii na działanie wysokich temperatur.
• Niebezpieczeństwo wybuchu! Baterii nie można ponow-nie ładować.
• Nie podgrzewać i nie zwierać baterii• Kwas wydostający się z baterii może powodować po-
drażnienia skóry. W przypadku kontaktu ze skórą, spłu-kać obficie wodą. W przypadku przedostania się cieczy do oczu, spłukać obficie wodą, nie trzeć i jak najszybciej skorzystać z pomocy lekarza.
Uwaga!Uniwersalny pilot zdalnego sterowania jest wyposażony w diodę podczerwieni o klasie lasera 1. W celu uniknięcia obrażeń oczu, nie używaj w połączeniu z urządzeniami optycznymi.
Uszkodzenia urządzenia• Jeżeli urządzenie nie działa prawidłowo, nie należy pró-
bować naprawiać go samodzielnie. W razie uszkodzenia skontaktuj się z producentem lub jego infolinią serwisową (patrz karta gwarancyjna).
• W razie dostania się cieczy do wnętrza urządzenia lub jeżeli urządzenie zostało uszkodzone w inny sposób, ko-nieczne jest sprawdzenie urządzenia przez producenta lub jego serwis. Skontaktuj się z producentem lub jego info-linią serwisową (patrz wskazówki dotyczące gwarancji).
• Wyjmij baterie z komory baterii, jeżeli są zużyte. • Jeżeli nie będziesz używał urządzenia przez dłuższy
czas, to wyjmij baterie, aby zapobiec rozładowaniu.• Przy wymianie należy wymieniać wszystkie baterie za
jednym razem i nie należy używać jednocześnie różnego typu baterii.
BDA_SFB 10.1 A1 - DT-55975_pl.indd 29 10.10.2010 15:46:05
- 30 -
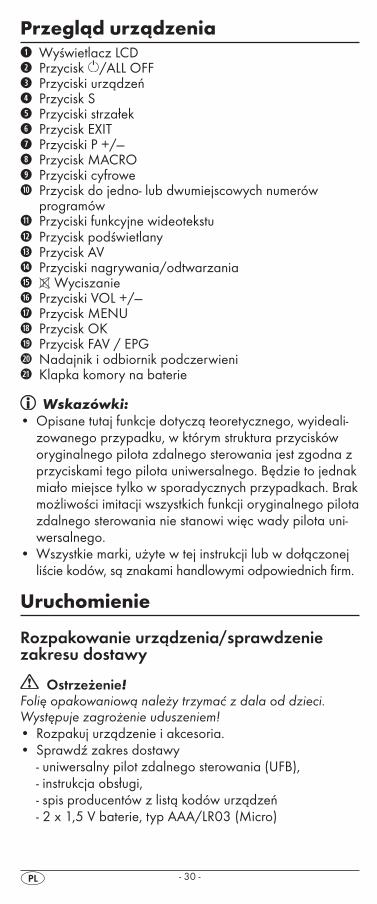
Przegląd urządzeniaq Wyświetlacz LCDw Przycisk /ALL OFFe Przyciski urządzeńr Przycisk St Przyciski strzałeky Przycisk EXITu Przyciski P +/—i Przycisk MACROo Przyciski cyfrowea Przycisk do jedno- lub dwumiejscowych numerów
programóws Przyciski funkcyjne wideotekstud Przycisk podświetlanyf Przycisk AVg Przyciski nagrywania/odtwarzaniah Wyciszaniej Przyciski VOL +/—k Przycisk MENUl Przycisk OK1( Przycisk FAV / EPG2) Nadajnik i odbiornik podczerwieni2! Klapka komory na baterie
Wskazówki:• Opisane tutaj funkcje dotyczą teoretycznego, wyideali-
zowanego przypadku, w którym struktura przycisków oryginalnego pilota zdalnego sterowania jest zgodna z przyciskami tego pilota uniwersalnego. Będzie to jednak miało miejsce tylko w sporadycznych przypadkach. Brak możliwości imitacji wszystkich funkcji oryginalnego pilota zdalnego sterowania nie stanowi więc wady pilota uni-wersalnego.
• Wszystkie marki, użyte w tej instrukcji lub w dołączonej liście kodów, są znakami handlowymi odpowiednich firm.
Uruchomienie
Rozpakowanie urządzenia/sprawdzenie zakresu dostawy
Ostrzeżenie!Folię opakowaniową należy trzymać z dala od dzieci. Występuje zagrożenie uduszeniem!• Rozpakuj urządzenie i akcesoria.• Sprawdź zakres dostawy
- uniwersalny pilot zdalnego sterowania (UFB),- instrukcja obsługi, - spis producentów z listą kodów urządzeń - 2 x 1,5 V baterie, typ AAA/LR03 (Micro)
BDA_SFB 10.1 A1 - DT-55975_pl.indd 30 10.10.2010 15:46:05
- 31 -
Wskazówka: Uszkodzenia podczas transportu
W przypadku stwierdzenia uszkodzenia transportowego skontaktuj się z producentem lub udostępnianą przez niego infolinią (patrz informacje dotyczące gwarancji).
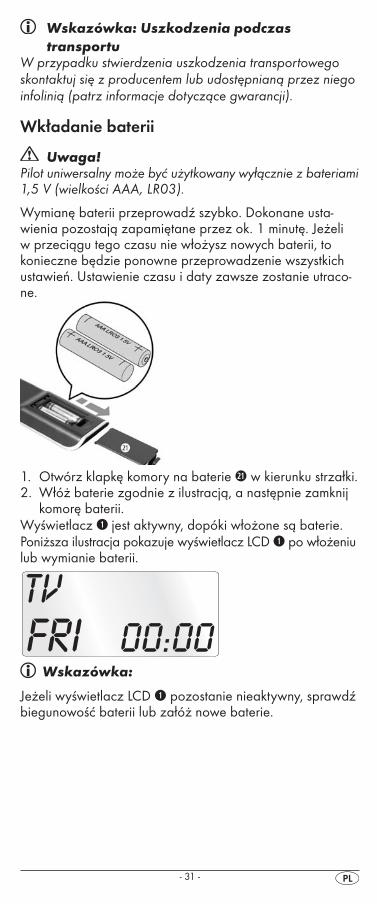
Wkładanie baterii
Uwaga!Pilot uniwersalny może być użytkowany wyłącznie z bateriami 1,5 V (wielkości AAA, LR03).
Wymianę baterii przeprowadź szybko. Dokonane usta-wienia pozostają zapamiętane przez ok. 1 minutę. Jeżeli w przeciągu tego czasu nie włożysz nowych baterii, to konieczne będzie ponowne przeprowadzenie wszystkich ustawień. Ustawienie czasu i daty zawsze zostanie utraco-ne.
1. Otwórz klapkę komory na baterie 2! w kierunku strzałki.2. Włóż baterie zgodnie z ilustracją, a następnie zamknij
komorę baterii.Wyświetlacz q jest aktywny, dopóki włożone są baterie. Poniższa ilustracja pokazuje wyświetlacz LCD q po włożeniu lub wymianie baterii.
Wskazówka:
Jeżeli wyświetlacz LCD q pozostanie nieaktywny, sprawdź biegunowość baterii lub załóż nowe baterie.
BDA_SFB 10.1 A1 - DT-55975_pl.indd 31 10.10.2010 15:46:05

- 32 -
Elementy obsługi
Wyświetlacz LCDWyświetlacz LCD q jest podzielony na pola.
Pole tekstowe 2@
Pokazywane jest tutaj aktualnie wybrane urządzenie, na przykład DVD, TV, VCR itp.
Symbol podczerwieni 2#Przy każdym naciśnięciu przycisku, powodującym wysłanie podczerwonego sygnału, zaświeca symbol podczerwieni.
Pole z kodem/czasem 2$Tutaj wyświetla się kod wybranego urządzenia lub czas. Przy wyświetlaniu czasu miga „:” między cyframi.
Pole dni tygodnia 2%Tutaj wyświetlają się skrócone nazwy angielskich dni tygodnia po wprowadzeniu daty.
MON = Monday = PoniedziałekTUE = Tuesday = WtorekWED = Wednesday = ŚrodaTHU = Thursday = CzwartekFRI = Friday = PiątekSUN = Saturday = SobotaSun = Sunday = Niedziela
Wskazanie standardowe:
Standardowe wskazanie na wyświetlaczu LCD q składa się z informacji o aktualnym urządzeniu, np. „TV”, skrótowej nazwy dnia tygodnia i wskazania godziny.
BDA_SFB 10.1 A1 - DT-55975_pl.indd 32 10.10.2010 15:46:05

- 33 -
Przyciski
Wskazówka:Wszystkie opisane tutaj funkcje mogą być oczywiście uży-wane tylko pod warunkiem, że są one obsługiwane przez sterowane urządzenie.
Przycisk /ALL OFF w Włączanie/wyłączanie urządzenia; naciśnij
i przytrzymaj przez 5 sekund, by włączyć/wyłączyć urządzenie.
Przyciski urządzeń eZa pomocą przycisków urządzeń możesz wybrać to urzą-dzenie, które będzie obsługiwane:
telewizor magnetowid urządzenie dodatkowe 1 dekoder telewizji kablowej odtwarzacz płyt CD analogowy dekoder telewizji satelitarnej wzmacniacz dźwiękowy odtwarzacz płyt DVD cyfrowy dekoder telewizji satelitarnej urządzenie dodatkowe 2
Przedstawione przyporządkowanie klawiszy nie jest ob-ligatoryjne. Tak więc możesz też przykładowo zaprogra-mować kod magnetowidu również na miejscu odbiornika telewizyjnego.
Przycisk „S” r Naciśnij przycisk i przytrzymaj 3 sekundy,
by wybrać menu SETUP (KONFIGURACJA), naciśnij krótko, by wyświetlić datę, wzgl. wybrać funkcję dodatkowe, takie jak EPG lub PIP.
Przyciski strzałek t
Poruszanie po menu do góry, w prawo, w dół i w lewo.
Przycisk EXIT y W menu powrót o jeden poziom.
Przyciski P +/— u
Zmienia kanał odbioru.
BDA_SFB 10.1 A1 - DT-55975_pl.indd 33 10.10.2010 15:46:05
- 34 -
Przycisk MACRO i Naciśnięcie przycisku MACRO i, a na-
stępnie po nim przycisku cyfrowego o 1-6, uruchamia poprzednio zarejestrowany ciąg poleceń.
Przyciski cyfrowe o Wprowadź numery programu i kodu
urządzenia.
Przycisk do jedno/lub dwumiejscowych numerów programów a
W celu wpisania dwumiejscowego numeru programu (w zależności od typu urządze-nia), naciśnij przycisk a, a następnie przyci-skami cyfrowymi o wpisz numer programu.Ponowne naciśnięcie tego przycisku prze-łącza wyświetlacz z powrotem na wskaza-nia jednocyfrowe.
Przyciski funkcyjne wideotekstu sW trybie teletekstu przyciski mają następujące funkcje:
Wyświetl funkcję wideotekstu. Podczas zwykłego oglądania telewizji naciśnij najpierw przycisk S r, a następnie przycisk , by móc korzystać z funkcji „PIP” (obraz w obrazie) odbiornika telewizyjnego.
Zatrzymaj automatyczne przechodzenie do następnej strony wideotekstu.
Powiększenie widoku strony.
Widok tekstu nałożonego na obraz. Zakończenie funkcji wideotekstu.
Wskazówki:• Funkcja wideotekstu jest dostępna tylko w europejskim
trybie TV, a odbiornik TV musi posiadać moduł teletekstu.• Ponadto przyciski P +/- u sterują następującymi funkcja-
mi teletekstu: P + Przejście na następną stronę.P — Przejście na poprzednią stronę.
Przyciski nagrywania/odtwarzania fPrzyciski odtwarzania f sterują urządzeniami takimi jak odtwarzacze DVD/CD czy magnetowidy:
OdtwarzanieASPECT Zmiana formatu obrazu w obsłudze TV
BDA_SFB 10.1 A1 - DT-55975_pl.indd 34 10.10.2010 15:46:05

- 35 -
Nagrywanie
Zatrzymywanie odtwarzania/nagrywania
Zatrzymanie odtwarzania
Cofanie
Przewijanie do przodu
Przycisk AV g
Przełączanie na wejście AV.
Wyciszanie h
Włącz/wyłącz dźwięk.
Przyciski VOL+/— j
Ustawianie głośności (Volume).
Przycisk MENU k Wywołuje menu sterowanego urządzenia.
Przycisk OK l Za pomocą przycisku OK zatwierdź wybór menu.
Przycisk FAV/EPG 1( Naciśnij przycisk FAV/EPG, by wybrać wcześnie
zaprogramowane ulubione stacje. Następnie naci-śnij krótko przycisk S r, a następnie przycisk FAV/EPG, by wybrać funkcję elektronicznego przewod-nika programowego (EPG).
SETUP - ustawienia systemoweUstawienia systemowe zawierają następujące możliwości:
• Zaprogramowanie pilota zdalnego sterowania do stero-wanych urządzeń
• Ustawianie czasu, daty, kontrastu wyświetlacza, podświetlenia, głośności, funkcji Lock i resetu
• Ustawienia licznika czasu• ”Uczenie” określonych poleceń przycisków• Tworzenie poleceń makro• Ustalanie ulubionych
Na następnej stronie przedstawiono przegląd struktury menu.
BDA_SFB 10.1 A1 - DT-55975_pl.indd 35 10.10.2010 15:46:05
- 36 -
BDA_SFB 10.1 A1 - DT-55975_pl.indd 36 10.10.2010 15:46:05
- 37 -
Code Setup (programowanie pilota zdalnego sterowania)
Programowanie pilota jest możliwe na trzy sposoby: Programowanie przez wyszukiwanie kodu marki, przez automatyczne wyszukiwanie kodu lub przez bezpośrednie (ręczne) wprowadzenie kodu.
Na początek najlepiej skorzystaj z kodu marki, gdyż jest to najszybsza metoda programowania, jeżeli producent Two-jego urządzenia znajduje się na liście kodów. W drugiej kolejności zalecane jest bezpośrednie wprowadzenie kodu, a dopiero na końcu automatyczne wyszukiwanie kodu.
Programowanie przez wyszukiwanie kodu markiW przypadku tej metody wybierasz na wyświetlaczu LCD q markę i kod.
Aby zaprogramować pilota zdalnego sterowania wykonaj poniższe operacje:
1. Naciśnij przycisk tego urządzenia e, do którego chcesz zaprogramować pilota.
2. Naciśnij i przytrzymaj przycisk S r przez nieco ponad 3 sekundy. Nie przerywaj edycji menu, ponieważ po około 15 sekundach bezczynności menu zostanie zamknięte.
3. Na wyświetlaczu LCD q pojawia się napis „CODE SE-TUP”. Naciśnij przycisk OK l. Na wyświetlaczu LCD q wyświetla się teraz napis „ENTER CODE”. Za pomocą przycisków t wybierz pozycję „BRAND CODE” i zatwierdź wybór przyciskiem OK l.
4. Pojawia się pierwsza nazwa marki z posegregowanej alfabetycznie listy predefiniowanych urządzeń.
5. Za pomocą przycisków 34 t możesz wybrać po-szczególne marki.
6. Dla ułatwienia dostępu za pomocą przycisków cyfro-wych o możesz przejść bezpośrednio do wybranej litery początkowej:2 => A 3 => D 4 => G 5 => J6 => M 7 => P 8 => T 9 => WPrzykład: Przycisk 5 przesuwa wskazanie do litery „J”. Pierwszą marką jest „JVC”*. Jeżeli posiadasz na przy-kład urządzenie marki „Kenwood”*, to przyciskiem 4 t poruszaj się w do przodu, aż pojawi się ta nazwa marki. (* Wszystkie wymienione tutaj nazwy marek są znakami handlowymi odpowiednich firm.)
7. Większość producentów stosuje kilka różnych kodów dla pilotów zdalnego sterowania. Musisz teraz stwier-dzić, który z dostępnych kodów najlepiej pasuje do Twojego urządzenia. Z prawej strony pod nazwą marki na wyświetlaczu LCD q wyświetla się aktualny kod.
BDA_SFB 10.1 A1 - DT-55975_pl.indd 37 10.10.2010 15:46:05
- 38 -
8. Skieruj pilota zdalnego sterowania na dane urządzenie i naciskaj przyciski funkcyjne, aby przetestować kod (za wyjątkiem przycisków 34t, OK l, EXIT y lub przycisków cyfrowych o).
9. Jeżeli większość przycisków działa, naciśnij OK l, aby zapisać ustawienia. Na wyświetlaczu LCD q wyświetla się „OK”. Na końcu menu automatycznie się zamyka.
10. Jeżeli nie działają żadne przyciski lub działa tylko kilka z nich, to za pomocą przycisku lub przycisku t wybierz następny kod i przeprowadź test, opisany w punkcie 8.
11. Przyciskiem EXIT y możesz przejść w menu o jeden poziom wyżej.
Powtarzaj te operacje dla wszystkich urządzeń, które chcesz sterować za pomocą pilota.
Programowanie przez ręczne wpisywanie koduW tym trybie możesz zaprogramować pilota zdalnego stero-wania przez bezpośrednie wprowadzenie numeru kodu. Potrzebny numer kodu możesz sprawdzić w dołączonym spisie producentów z listą kodów urządzeń. Jeżeli nowy kod jest niedopuszczalny, to urządzenie odtworzy ostatnio zaprogramowany, dopuszczalny kod.
1. Naciśnij przycisk tego urządzenia e, do którego chcesz zaprogramować pilota.
2. Naciśnij i przytrzymaj przycisk S r przez nieco ponad 3 sekundy.
3. Na wyświetlaczu LCD q pojawia się „CODE SETUP”. Naciśnij przycisk OK l. Na wyświetlaczu LCD q wy-świetla się teraz napis. W celu wyświetlenia tej funkcji naciśnij przycisk OK l.
4. Na wyświetlaczu LCD q wyświetla się dotychczasowy kod wybranego urządzenia. Miga teraz pierwsze miejsce kodu, które czeka na wprowadzenie cyfry. Za pomocą przycisków cyfrowych o wpisz nowy cztero-miejscowy kod.
5. Po wprowadzeniu prawidłowego KODU, zostanie on zapamiętany. Na wyświetlaczu LCD q wyświetla się na chwilę napis „OK”. Na końcu menu automatycznie się zamyka. W razie niepowodzenia na wyświetlaczu q wyświetla się na chwilę napis „ERROR” (błąd) i czeka na ponowne wpisanie kodu. Powtórz wtedy krok 4.
6. Za pomocą przycisku EXIT y możesz przejść w menu o jeden poziom wyżej.
Programowanie przez automatyczne wyszukiwanie koduTen proces może potrwać do kilku minut na urządzenie, gdyż konieczne jest wypróbowanie wszystkich kodów dla wybra-nego urządzenia. Dlatego powinieneś korzystać z tej meto-dy tylko wtedy, jeżeli zaprogramowanie urządzenia przez wyszukiwanie kodu marki lub bezpośrednie wprowadzanie
BDA_SFB 10.1 A1 - DT-55975_pl.indd 38 10.10.2010 15:46:05
- 39 -
kodu jest niemożliwe, albo jeżeli Twoje urządzenie nie jest w ogóle podane na wykazie producentów z listą kodów urządzeń.
Wykonaj poniższe operacje, aby przeprowadzić progra-mowanie za pomocą automatycznego wyszukiwania kodu.
1. Naciśnij przycisk urządzenia e, którym chcesz sterować (np. VCR).
2. Włącz urządzenie, które ma być sterowane za pomocą pilota zdalnego sterowania. W przypadku urządzeń VCR/ DVD/CD włóż ponadto kasetę lub płytę do urządzenia.
3. Naciśnij i przytrzymaj przycisk S r przez nieco ponad 3 sekundy.
4. Na wyświetlaczu LCD q pojawia się „CODE SETUP”. Naciśnij przycisk OK l. Na wyświetlaczu LCD q wyświetla się teraz napis „ENTER CODE”. Naciskaj przycisk lub przycisk t, aż na wyświetlaczu q wyświetli się napis „SEARCH CODE”. Skieruj pilota zdalnego sterowania na dane urządzenie, a następnie naciśnij przycisk OK l, by wyświetlić tryb „automatycz-nego wyszukiwania kodu”.
5. Wyszukiwanie rozpoczyna się. Urządzenie rozpocznie wysyłanie kolejno liczb kodów w kolejności rosnącej. Jest to sygnalizowane miganiem symbolu podczerwieni 2#.
6. Gdy urządzenie zareaguje wyłączeniem się, naciśnij od razu przycisk OK l, by zapisać aktualny kod. Na wy-świetlaczu LCD q wyświetla się na chwilę napis „OK”.
7. Sprawdź, czy teraz większość funkcji urządzenia może być sterowana za pomocą pilota. Jeśli tak jest, prawdo-podobnie wybrałeś prawidłowy kod. Jeżeli kilka funkcji nie działa, to możesz ponownie rozpocząć automatycz-ne wyszukiwanie kodu od kroku 1.
Wskazówka: Przy ponownym wyszukiwaniu kodu skieruj pilota zdal-
nego sterowania na urządzenie docelowe dopiero wtedy, gdy wcześniej znaleziony, nieodpowiedni kod będzie już nieaktualny.
8. Gdy jednak urządzenie nie będzie reagowało, prawdo-podobnie w kroku 6 nie nacisnąłeś dostatecznie szybko przycisku OK l. Następnie naciśnij kilka razy przycisk EXIT y, by zakończyć menu i powrócić do standardo-wego widoku wyświetlacza.
9. Teraz naciśnij i przytrzymaj przycisk urządzenia e, do którego szukasz pasującego kodu. Na dole z prawej strony na wyświetlaczu LCD q wyświetla się aktualny kod. Zapamiętaj tę liczbę.
10. Następnie postępuj zgodnie z opisem podanym w po-przednim rozdziale „Programowanie przez ręczne wpi-sywanie kodu” i sprawdź, czy działa kod z następną niższą kombinacją liczb.
BDA_SFB 10.1 A1 - DT-55975_pl.indd 39 10.10.2010 15:46:05
- 40 -
Wskazówki:1. Przy wybranej funkcji wyszukiwania kodu wszystkie przy-
ciski z wyjątkiem przycisku OK l i EXIT y nie działają.2. Gdy automatyczne wyszukiwanie dotrze do końca listy, to
proces zostaje tam zatrzymany. Widok na wyświetlaczu powraca do napisu „SEARCH CODE”.
System-Setup
Ustawianie godzinyWyświetlacz LCD q pokazuje godzinę. Sposób ustawiania godziny:
1. Naciśnij i przytrzymaj przycisk S r przez nieco ponad 3 sekundy. Na wyświetlaczu wyświetla się napis „CODE SETUP”. Jeżeli przerwiesz edycję na około 15 sekund, menu zostanie zamknięte i ponownie wyświetli się widok standardowy.
2. Za pomocą przycisku lub przycisku t wybierz „SYSTEM SETUP” i zatwierdź wybór przyciskiem OK l.
3. Na wyświetlaczu LCD q pojawia się „TIME SETUP”. Zatwierdź wybór przyciskiem OK l. Na wyświetlaczu LCD q wyświetla się teraz napis „TIME” i miga format czasu (24 HR).
4. Za pomocą przycisku lub przycisku t możesz przełączyć na inny format czasu (12 HR). Następnie w widoku czasu przed godziną wyświetla się wskazanie pory dnia „A” lub „P”. „A” oznacza „AM” = „ante me-ridium” (przedpołudnie, 0:00–12:00 godz.). „P” ozna-cza „PM” = „post meridium” (popołudniu, 12:00–0:00 godz.). Naciśnij przycisk OK l, by zatwierdzić wybór.
5. W tym momencie miga wskazanie godzin. Za pomocą przycisku lub przycisku t wybierz liczbę godzin aktualnego czasu, a następnie naciśnij przycisk OK l.
6. W tym momencie miga wskazanie minut. Za pomocą przycisku lub przycisku t wybierz liczbę minut aktualnego czasu, a następnie naciśnij przycisk OK l. Ponownie wyświetla się napis „TIME SETUP”.
7. By zakończyć to lub następne menu, naciskaj przycisk EXIT y dotąd, aż na wyświetlaczu LCD q wyświetli się widok standardowy.
Ustawianie datyNa wyświetlaczu LCD q wyświetla się data po naciśnięciu przycisku S r. Ustawianie daty:
1. Naciśnij i przytrzymaj przycisk S r przez nieco ponad 3 sekundy. Na wyświetlaczu wyświetla się napis „CODE SETUP”.
2. Za pomocą przycisku lub przycisku t wybierz menu „SYSTEM SETUP” i zatwierdź wybór przyciskiem OK l.
3. Na wyświetlaczu LCD q pojawia się „TIME SETUP”. Naciśnij przycisk t, aby przejść do menu „DATE
BDA_SFB 10.1 A1 - DT-55975_pl.indd 40 10.10.2010 15:46:06
- 41 -
SETUP”. Zatwierdź wybór przyciskiem OK l.4. Na wyświetlaczu miga liczba roku „2010”. Za pomocą
przycisku lub przycisku t możesz zmienić liczbę roku i zatwierdzić przyciskiem OK l. Za pomocą przy-cisku lub przycisku t możesz teraz zmienić mi-gającą liczbę miesięcy i zatwierdzić wybór przyciskiem OK l. Zaczyna migać wskazanie dni, które również możesz zmienić za pomocą przycisku lub przycisku t.
5. Naciśnij przycisk OK l w celu zapisania nowych usta-wień. Ponownie wyświetla się napis „DATE SETUP”.
Ustawianie kontrastuKontrast wyświetlacza możesz ustawić w następujący sposób:
1. Naciśnij i przytrzymaj przycisk S r przez nieco ponad 3 sekundy. Na wyświetlaczu wyświetla się napis „CODE SETUP”.
2. Za pomocą przycisku lub przycisku t wybierz menu „SYSTEM SETUP” i zatwierdź wybór przyciskiem OK l.
3. Za pomocą przycisku lub przycisku t wybierz menu „CONTRAST SETUP” i zatwierdź wybór przyci-skiem OK l.
4. Na wyświetlaczu LCD q miga teraz wartość kontrastu, którą możesz ustawić za pomocą przycisku lub przy-cisku t:Wskazanie na wyświetlaczu: 0 = największy kontrast 15 = najniższy kontrast
5. Przyciskiem OK l zapisz wybrane ustawienie. Ponownie wyświetla się napis „CONTRAST SETUP”.
PodświetlenieMożesz ustawić czas podświetlenia wyświetlacza LCD q i przycisków po zakończeniu obsługi. Pamiętaj, że dłuższy czas podświetlenia oznacza krótszy czas pracy baterii.
1. Naciśnij i przytrzymaj przycisk S r przez nieco ponad3 sekundy. Na wyświetlaczu wyświetla się napis „CODE SETUP”.
2. Za pomocą przycisku lub przycisku t wybierz menu „SYSTEM SETUP” i zatwierdź wybór przyciskiem OK l.
3. Za pomocą przycisku lub przycisku t wybierz menu „BACKLIT SETUP” i zatwierdź wybór przyciskiem OK l.
4. Na wyświetlaczu LCD q miga teraz wskazanie sekund czasu podświetlenia, które możesz ustawić za pomocą przycisków t w zakresie od 0 do 60 sekund. W przypadku wybrania ustawienie „0”, podświetlenie jest wyłączone.
5. Przyciskiem OK l zapisz wybrane ustawienie. Ponownie wyświetla się napis „BACKLIT SETUP”.
BDA_SFB 10.1 A1 - DT-55975_pl.indd 41 10.10.2010 15:46:06
- 42 -
Ustawianie wspólnej głośności/wyłączenia dźwiękuAby za każdym razem podczas ustawiania głośności i wyłączania głosu nie trzeba było dodatkowo najpierw naciskać przycisku urządzenia, piolot zdalnego sterowa-nia w tych funkcjach będzie zawsze uruchamiał jedno i to samo urządzenie, standardowo odbiornik telewizyjny. Urządzenie docelowe w tych funkcjach możesz dowolnie zdefiniować.
1. Naciśnij i przytrzymaj przycisk S r przez nieco ponad 3 sekundy. Na wyświetlaczu wyświetla się napis „CODE SETUP”.
2. Za pomocą przycisku lub przycisku t wybierz menu „SYSTEM SETUP” i zatwierdź wybór przyciskiem OK l.
3. Za pomocą przycisku lub przycisku t wybierz menu „VOL/MUTE SETUP” i zatwierdź wybór przyciskiem OK l.
4. Wyświetlacz LCD q wyświetla napis „ALL VOL SET”. Naciśnij przycisk OK l, na wyświetlaczu wyświetla się „ALL VOL MODE”.
5. Teraz naciśnij przycisk e w urządzeniu, które będzie sterowane za pośrednictwem funkcji wspólnej regulacji głośności.
6. Gdy podane urządzenie będzie wyposażone w funkcję regulacji głośności, przez chwilę wyświetli się napis „SUCCESS” (= POWODZENIE) u menu zostanie za-mknięte. Od tej chwili regulacja głośności będzie działa-ła na zdefiniowane urządzenie.
7. Gdy zdefiniowane urządzenie nie będzie wyposażone w niezależną regulację głośności, pilot zdalnego sterowa-nia nie zezwoli na wybranie tego urządzenia i wyświetli się komunikat „VOLUME ERROR” (= BŁĄD). Wtedy rów-nież menu zostanie zamknięte. Od tej chwili regulacja głośności będzie działała na dotychczas zdefiniowane urządzenie.
Możesz też wyłączyć funkcję wspólnej regulacji głośności w konkretnych urządzeniach.
1. W tym celu w menu VOL/MUTE SETUP przyciskiem lub przyciskiem t wybierz funkcję MODE VOL SET i zatwierdź wybór przyciskiem OK l.
2. Teraz naciśnij przycisk e w urządzeniu, które będzie wyłączone ze sterowania za pośrednictwem funkcji wspólnej regulacji głośności. Na wyświetlaczu LCD q wyświetla się komunikat „SUCCESS” (POWODZENIE) i funkcja wspólnej regulacji głośności wyłączy się, gdy pilot zdalnego sterowania będzie pracował w trybie pracy jednego z wybranych urządzeń.
W menu VOL/MUTE SETUP możesz też ponownie skasować ustawienia.
BDA_SFB 10.1 A1 - DT-55975_pl.indd 42 10.10.2010 15:46:06
- 43 -
1. W tym celu w menu VOL/MUTE SETUP przyciskiem lub przyciskiem t wybierz funkcję VOL/MUTE RESET i zatwierdź wybór przyciskiem OK l.
2. Komunikat na wyświetlaczu LCD q CONFIRM RESET informuje o konieczności zatwierdzenia skasowania ustawień przyciskiem OK l. Naciśnij przycisk OK l, by usunąć ustawienia, wyświetlenie komunikatu SUCCESS oznacza pomyślne usunięcie ustawień. Albo też naciśnij przycisk EXIT y, by anulować usuwanie.
Wskazówka:W przypadku naciśnięcia w tym menu przycisku EXIT y, nastąpi zamknięcie całego menu.
Ustawianie funkcji LockZa pomocą funkcji Lock możesz zablokować dostęp do wszystkich menu konfiguracji.
1. Naciśnij i przytrzymaj przycisk S r przez nieco ponad 3 sekundy.
2. Za pomocą przycisku lub przycisku t wybierz menu „SYSTEM SETUP” i zatwierdź wybór przyciskiem l.
3. Za pomocą przycisku lub przycisku t wybierz menu „LOCK SETUP” i zatwierdź wybór przyciskiem OK l. Na wyświetlaczu LCD q wyświetla się aktualne ustawienie.
4. Za pomocą przycisku lub przycisku t wybierz teraz opcję „LOCK” (blokada włączona) lub „UNLOCK” (blokada wyłączona).
5. Przyciskiem OK l zapisz ustawienie. Na wyświetlaczu LCD q wyświetla się ponownie napis „LOCK SETUP”.
System-ResetZa pomocą tej funkcji możesz przywrócić ustawienia fabryczne uniwersalnego pilota zdalnego sterowania. Wszystkie dotychczas dokonane ustawienia zostaną skaso-wane.
1. Naciśnij i przytrzymaj przycisk S r przez nieco ponad3 sekundy. Na wyświetlaczu wyświetla się napis „CODE SETUP”.
2. Za pomocą przycisku lub przycisku t wybierz menu „SYSTEM SETUP” i zatwierdź wybór przyciskiem OK l.
3. Za pomocą przycisku lub przycisku t wybierz menu „SYSTEM RESET” i zatwierdź wybór przyciskiem OK l.
4. Na wyświetlaczu LCD q wyświetla się teraz napis „CONFIRM RESET”. Skasowanie zatwierdź przyciskiem OK l. Następnie na wyświetlaczu LCD q wyświetla się komunikat „SUCCESS RESET”. Wszystkie ustawienia zostaną teraz skasowane a menu zamknięte. Lub też zamknij menu, naciskając przycisk EXIT y. Ustawienia pozostaną wtedy zachowane.
BDA_SFB 10.1 A1 - DT-55975_pl.indd 43 10.10.2010 15:46:06
- 44 -
Timer SetupW uniwersalnym pilocie zdalnego sterowania są dostępne 2 tryby licznika czasu, licznik funkcji Sleep i licznik zdarzenia.
Licznik funkcji Sleep1. Naciśnij przycisk urządzenia e, którym chcesz sterować
(np. VCR).2. Naciśnij i przytrzymaj przycisk S r przez nieco ponad
3 sekundy. Na wyświetlaczu wyświetla się napis „CODE SETUP”.
3. Naciskaj przycisk lub przycisk t dotąd, aż wy-świetli się napis „TIMER SETUP”. Naciśnij przycisk OK l, na wyświetlaczu LCD q wyświetla się napis „TIMER SLEEP”. Wybór tej funkcji zatwierdź przyciskiem OK l.
4. Teraz w prawym dolnym rogu wyświetlacza LCD q miga liczba minut pozostałego czasu pracy wybranego urządzenia. Za pomocą przycisku lub przycisku t ustaw odpowiednią wartość w zakresie od 1 do 99 mi-nut. Naciśnij przycisk OK l, by zatwierdzić wybór. Przy zaprogramowanym zegarze funkcji Sleep na wyświetla-czu LCD q wyświetla się z prawej strony czasu symbol „zz”.
5. Skieruj pilota w taki sposób, by jego sygnały podczer-wieni mogły dojść do wyłączanego urządzenia. Po upływie ustawionego czasu pilot zdalnego sterowania wyłączy urządzenie.
6. Gdy teraz naciśniesz przycisk S r, w lewym dolnym rogu wyświetlacza LCD wyświetli się napis q „SL”.
Licznik zdarzeniaPilot zdalnego sterowania obsługuje 4 liczniki zdarzenia, za pośrednictwem których można o określonym czasie wysłać ustalone serie kombinacje przycisków.1. Naciśnij i przytrzymaj przycisk S r przez nieco ponad
3 sekundy. Na wyświetlaczu wyświetla się napis „CODE SETUP”.
2. Za pomocą przycisku lub przycisku t wybierz menu „TIMER SETUP” i zatwierdź wybór przyciskiem OK l. Na wyświetlaczu LCD q. Wyświetla się teraz napis „ENTER CODE”. Za pomocą przycisku lub przycisku t wybierz wolne miejsce w pamięci od „TIMER SETUP 1” do „TIMER SETUP 4” i zatwierdź wybór przyciskiem OK l.
3. Teraz miga liczba godzin czasu, po upływie którego uruchomi się żądana kombinacja przycisków. Za po-mocą przycisku lub przycisku t ustaw godzinę i naciśnij przycisk OK l w celu zatwierdzenia wyboru.
4. Teraz miga liczba minut czasu, po upływie którego uru-chomi się żądana kombinacja przycisków. Za pomocą przycisku lub przycisku t ustaw minuty i naciśnij przycisk OK l w celu zatwierdzenia wyboru.
BDA_SFB 10.1 A1 - DT-55975_pl.indd 44 10.10.2010 15:46:06
- 45 -
5. Na wyświetlaczu LCD q wyświetla się napis „TIMER X KEY” (X oznacza żądany licznik czasu). Teraz naciśnij żądany przycisk urządzenia e i zaraz po tym żądaną sekwencję poleceń przycisków.
6. Naciśnij przycisk S r, by zapisać zmiany i powrócić do przeglądu licznika czasów.
7. Wykonaj analogiczne czynności, by w razie potrzeby za-programować pozostałe miejsca w pamięci licznika czasu.
8. Przy zaprogramowanym zegarze funkcji przypinania o zdarzeniach, na wyświetlaczu q wyświetla się z prawej strony czasu symbol zegara „ ”.
Wskazówki:1. W każdym miejscu pamięci licznika czasu możesz za-
programować maksymalnie 14 przycisków. Po wprowa-dzeniu 14 przycisku sekwencja zostanie automatycznie zaprogramowania i na wyświetlaczu LCD q wyświetla się napis „FULL”.
2. Również tym menu urządzenie po upływie około 15 sekund przerwy w edycji powróci do widoku standardo-wego.
Learn SetupUniwersalny pilot zdalnego sterowania (PU) może odczytać i zapamiętać sygnały oryginalnego pilota zdalnego sterowa-nia. Jeżeli opisane powyżej metody nie zapewnią działania PU lub nie pozwolą mu wykonywać wszystkich funkcji, to spróbuj nauczyć PU odpowiednich poleceń przy użyciu oryginalnego pilota lub pilotów.
• Załóż nowe baterie do PU i do oryginalnego pilota zdal-nego sterowania.
• Zachowaj co najmniej jeden metr odstępu od innych źródeł światła. Źródła światła mogą zakłócić wysyłanie promieni podczerwieni.
• Połóż uniwersalnego pilota zdalnego sterowania i ory-ginalnego pilot urządzenia w odległości 20–50 cm od siebie na płaskim podłożu tak, by diody podczerwieni 2) były skierowane do siebie.
Wskazówki:1. Podczas funkcji uczenia nie używaj następujących przy-
cisków: wszystkie przyciski urządzenia e, MACRO i, przycisk S r, EXIT y.
2. Naciśnij krótko przycisk na oryginalnym pilocie zdalne-go sterowania. Gdy na wyświetlaczu LCD q wyświetli się ponownie komunikat „SUCCESS”, polecenie przy-cisku zostało pomyślnie zaprogramowane. Gdy jednak wyświetli się komunikat „LEARN ERROR” (BŁĄD PRO-GRAMOWANIA), musisz powtórzyć operację.
3. Gdy podczas trwania uczenia i wyświetlania napisu „LEARNING” (uczenie) po 30 sekundach nie zostanie naciśnięty żaden przycisk na oryginalnym pilocie zdal-
BDA_SFB 10.1 A1 - DT-55975_pl.indd 45 10.10.2010 15:46:06
- 46 -
nego sterowania, menu uczenia zostanie zakończone. Tego menu nie można zakończyć poprzez naciśnięcie przycisku na uniwersalnym pilocie zdalnego sterowania.
4. W pamięci mieści się łącznie 150 poleceń. Jeżeli pa-mięć jest pełna, to na wyświetlaczu LCD q wyświetli się napis „MEM FULL”, a tryb uczenia zostaje zakończony.
5. Za pomocą przycisku EXIT y przywróć poprzedni stan (wyjątek stanowi wyświetlanie napisu „LEARN KEY” wzgl. „LEARNING”).
Funkcja uczenia kodów1. Naciśnij przycisk urządzenia e, do którego uniwersalny
pilot zdalnego sterowania nauczy się kodu przycisku.2. Naciśnij i przytrzymaj przycisk S r przez nieco ponad
3 sekundy. Na wyświetlaczu wyświetla się napis „CODE SETUP”.
3. Za pomocą przycisku lub przycisku t wybierz menu „LEARN SETUP” (uczenie) i naciśnij przycisk OK l.
4. Na wyświetlaczu LCD q wyświetla się napis „LEARN SET”. Następnie naciśnij przycisk OK l. Na wyświetla-czu LCD q wyświetla się napis „LEARN KEY” (wybierz przycisk).
5. Naciśnij najpierw ten przycisk PU, który ma zostać za-programowany (”nauczony”). Na wyświetlaczu LCD q wyświetla się napis „LEARNING”. Uniwersalny pilot zdal-nego sterowania czeka teraz na sygnał podczerwieni od oryginalnego pilota zdalnego sterowania.
Wskazówka:Jeżeli napis na wyświetlaczu nie zmieni się na „LEAR-NING”, wybrałeś przycisk, do którego uniwersalny pilot zdalnego sterowania nie może się nauczyć kodu.
6. Ustaw czujniki podczerwieni 2) obu pilotów zdalnego sterowania naprzeciwko siebie.
7. Naciśnij i przytrzymaj teraz wymagany przycisk orygi-nalnego pilota, aż na wyświetlaczu LCD q uniwersal-nego pilota zdalnego sterowania wyświetli się napis „SUCCESS” lub „LEARN ERROR”.
8. Gdy na wyświetlaczu LCD q pojawi się „SUCCESS” (operacja zakończona pomyślnie), to możesz progra-mować następne przyciski, rozpoczynając od kroku 5. Jeżeli pojawi się „LEARN ERROR” (proces nie powiódł się), to powtórz operację również od kroku 5.
9. W celu przerwania/zakonczenia operacji programowa-nia, przy wskazaniu „LEARN SET” naciskaj przycisk EXIT y dotąd, aż na wyświetlaczu q wyświetli się wskaza-nie standardowe. Przy wyświetlanym napisie „LEARN KEY” wzgl. „LEARNING” zaczekaj 30 sekund bez naci-skania żadnego przycisku, aż do zamknięcia menu.
Usunac wszystkie zaprogramowane przyciski wszyst-kich urzadzen1. Naciśnij i przytrzymaj przycisk S r przez nieco ponad
3 sekundy. Na wyświetlaczu wyświetla się napis „CODE SETUP”.
BDA_SFB 10.1 A1 - DT-55975_pl.indd 46 10.10.2010 15:46:06

- 47 -
2. Za pomocą przycisku lub przycisku t wybierz menu „LEARN SETUP” i naciśnij przycisk OK l. Na wy-świetlaczu LCD q wyświetla się napis „LEARN SET”.
3. Za pomocą przycisku lub przycisku t wybierz menu „LEARN CLEAR” (usuń nauczone) i zatwierdź wybór przyciskiem OK l. Na wyświetlaczu LCD q wyświetla się napis „CONFIRM CLEAR” (zatwierdź usu-nięcie).
4. Zatwierdź wybór przyciskiem OK l. Na wyświetlaczu LCD q wyświetla się napis „SUCCESS”. Wszystkie zaprogramowane przycisku zostały usunięte. Na końcu menu automatycznie się zamyka.
Wskazówka:Gdy na wyświetlaczu LCD wyświetli się napis „CONFIRM CLEAR”, możesz przerwać usuwanie przyciskiem EXIT y.
Makro SetupZa pomocą funkcji MAKRO można wykonywać razem do 16 pojedynczych poleceń przez naciśnięcie jednego przy-cisku. Oznacza to, że jeden przycisk MAKRO może wyko-nać kilka zapamiętanych wcześniej poleceń sterujących. Masz do dyspozycji 6 pamięci makr.
Rejestrowanie makraW celu zaprogramowania makro postępuj w następujący sposób:
1. Naciśnij i przytrzymaj przycisk S r przez nieco ponad3 sekundy. Na wyświetlaczu wyświetla się napis „CODE SETUP”.
2. Za pomocą przycisku lub przycisku t wybierz menu „MACRO SETUP” i zatwierdź wybór przyciskiem OK l. Na wyświetlaczu wyświetla się napis „MACRO SETUP 1”.
3. Za pomocą przycisku lub przycisku t wybierz miejsce w pamięci do zarejestrowania makra (MACRO SETUP 1 - 6) i zatwierdź wybór przyciskiem OK l.
4. Na wyświetlaczu LCD q wyświetla się napis „MACRO STEP”. Następnie naciśnij kolejno żądane przyciski (maks. 16). Sekwencja powinna rozpoczynać się od przycisku urządzenia e.
5. Standardowo polecenia makr są wysyłane w odstępach czasowych co 1 sekundę. Ponieważ niektóre urządze-nia reagują z pewnym opóźnieniem, może się zdarzyć, że sekwencja poleceń makro będzie wysyłana do urzą- dzenia zbyt szybko. Można wtedy zaprogramować przerwę 5–21 sekund przed wysłaniem polecenia przyciskiem. W tym celu ponownie naciśnij przycisk MACRO i. W dolnym prawym rogu wyświetlacza LCD q wyświetla się bieżąca długość przerwy w sekundach.
6. Po osiągnięciu maksymalnej ilości poleceń przycisków, na wyświetlaczu LCD q wyświetla się napis „FULL”.
BDA_SFB 10.1 A1 - DT-55975_pl.indd 47 10.10.2010 15:46:06
- 48 -
7. Zapisz wprowadzoną sekwencję przyciskiem S r. Na wyświetlaczu LCD q wyświetla się napis „MACRO SETUP”.
8. Jeżeli wybierając zarejestrowane makro (krok 3) za-znaczysz już zajęte miejsce w pamięci, istniejące makro zostanie nadpisane.
9. Powtarzaj operacje od kroku 3, aby zaprogramować inne makra.
10. Za pomocą przycisku EXIT y przejdziesz do poziomu wyżej menu, z wyjątkiem funkcji wprowadzania pole-ceń przycisków.
Wskazówki:1. W ramach jednego makro możesz zapamiętać maksy-
malnie 16 pojedynczych poleceń przycisków. Po wpro-wadzeniu 16 polecenia przycisku, na wyświetlaczu LCD wyświetla się komunikat „FULL” q.
2. By zakończyć tryb bez wprowadzenia zmian, zaczekaj około 15 sekund bez naciskania żadnego przycisku.
3. W trybie „MACRO STEP” możesz teraz za pomocą przycisku S r powrócić do poprzedniego stanu.
Przykład: Chcesz zapisać ciąg poleceń w makro. Zacznij od trybu „MACRO STEP”.
Wymagany ciąg poleceń: Włącz TV => PRZERWA => przełącz na wejście AV => włącz DVD => PRZERWA => odtwarzaj DVD.
W trybie „MACRO STEP” wprowadź w tym celu przyciskami następujące polecenia:
=> => (czas przerwy) => => => => (czas przerwy) =>
Wykonywanie makraAby wykonać zaprogramowane wcześniej makro postępuj w następujący sposób:
1. Naciśnij przycisk MACRO i.2. Za pomocą odpowiedniego przycisku cyfrowego o
otwórz żądane makro (1-6). Przykład: By wykonać makro 3, naciśnij przycisk MACRO i, a następnie w ciągu 5 sekund przycisk cyfrowy „ ”.
Usuwanie wszystkich makrAby skasować zaprogramowane wcześniej wszystkie makra postępuj w następujący sposób:
1. Naciśnij i przytrzymaj przycisk S r przez nieco ponad3 sekundy. Na wyświetlaczu wyświetla się napis „CODE SETUP”.
2. Za pomocą przycisku lub przycisku t wybierz menu „MACRO SETUP” i zatwierdź wybór przyciskiem OK l. Na wyświetlaczu wyświetla się napis „MACRO SETUP 1”.
BDA_SFB 10.1 A1 - DT-55975_pl.indd 48 10.10.2010 15:46:06
- 49 -
3. Za pomocą przycisku lub przycisku t wybierz menu „MACRO CLEAR” i zatwierdź wybór przyciskiem l.
4. Na wyświetlaczu LCD q wyświetla się napis „CON-FIRM CLEAR” (zatwierdź usunięcie). Zatwierdź usunię-cie przyciskiem OK l. Na wyświetlaczu LCD q wy-świetli się napis „SUCCESS”. Wszystkie makra zostaną skasowane a menu zamknięte.
Wskazówki:1. Gdy na wyświetlaczu LCD q wyświetli się napis „CON-
FIRM CLEAR”, możesz przerwać usuwanie przyciskiem EXIT y.
2. Pojedynczych makr nie możesz usuwać, tylko możesz je nadpisywać.
Ulubiony kanał
Wskazówka:Za pomocą tej funkcji możesz zapisywać wybrane stacje jako ulubione.
Programowanie ulubionychUlubione stacje możesz zapamiętać w następujący sposób:
1. Naciśnij przycisk tego urządzenia e, do którego chcesz zapisać ulubione stacje.
2. Naciśnij i przytrzymaj przycisk S r przez nieco po-nad 3 sekundy. Na wyświetlaczu wyświetla się napis „CODE SETUP”.
3. Za pomocą przycisku lub przycisku t wybierz menu „FAV CH SETUP” i zatwierdź wybór przyciskiem OK l. Na wyświetlaczu wyświetla się napis „FAV CH SETUP 1”.
4. Za pomocą przycisku lub przycisku t wybierz miejsce w pamięci do zarejestrowania makra (FAV CH SETUP 1 - 4) i zatwierdź wybór przyciskiem OK l.
5. Na wyświetlaczu LCD q wyświetla się napis „FAV CH STEP”. Teraz naciśnij kolejno przyciski (maks. 4) w celu wybrania ulubionej stacji.
6. Po osiągnięciu maksymalnej ilości poleceń przycisków, na wyświetlaczu LCD q wyświetla się napis „FULL”.
7. Zapisz wprowadzoną sekwencję przyciskiem S r. Na wyświetlaczu LCD q wyświetla się napis „FAV CH SETUP”.
8. Jeżeli wybierając zapamiętaną ulubioną stację (krok 4) zaznaczysz już zajęte miejsce w pamięci, istniejąca ulubiona stacja zostanie nadpisana.
9. Powtórz kolejne kroki przy tworzeniu dalszych ulubionych.10. Za pomocą przycisku EXIT y przejdziesz do poziomu
niżej menu, z wyjątkiem funkcji wprowadzania poleceń przycisków.
BDA_SFB 10.1 A1 - DT-55975_pl.indd 49 10.10.2010 15:46:06
- 50 -
Wskazówka:W zależności od modelu i marki wybranego urządzenia sposób wprowadzania numerów kanałów może być różny. Ewentualnie w przypadku kanałów o złożonych numerach najpierw musisz nacisnąć przycisk a.
Wybieranie ulubionychW celu wybrania uprzednio zapamiętanej ulubionej stacji, naciśnij przycisk FAV/EPG 1(, a następnie odpowiedni przycisk cyfrowy żądanego miejsca w pamięci (1 - 4).
Kasowanie wszystkich kanałów FAVAby skasować zaprogramowane ulubione stacje, postępuj w następujący sposób:
1. Naciśnij i przytrzymaj przycisk S r przez nieco ponad 3 sekundy.
2. Za pomocą przycisku lub przycisku t wybierz menu „FAV CH SETUP” i zatwierdź wybór przyciskiem OK l. Na wyświetlaczu wyświetla się napis „FAV CH SETUP 1”.
3. Za pomocą przycisku lub przycisku t wybierz menu „FAV CH CLEAR” i zatwierdź wybór przyciskiem OK l.
4. Na wyświetlaczu LCD q wyświetla się napis „CON-FIRM CLEAR” (zatwierdź usunięcie). Zatwierdź usunię-cie przyciskiem OK l. Na wyświetlaczu LCD q wy-świetli się napis „SUCCESS”. Wszystkie ulubione stacje zostaną skasowane a menu zamknięte.
Wskazówki:1. Gdy na wyświetlaczu LCD q wyświetli się napis „CON-
FIRM CLEAR”, możesz przerwać usuwanie przyciskiem EXIT y.
2. Pojedynczych ulubionych stacji nie możesz usuwać, tylko możesz je nadpisywać.
Regulacja głośności
Vol +/-, (wyciszenie)Naciśnij przycisk „VOL +”, aby zwiększyć głośność. Przyciskiem „VOL -” możesz zmniejszać głośność. W celu wyciszenia dźwięku, naciśnij przycisk h. Ponowne naciśnięcie tego przycisku włącza dźwięk z powrotem.
Naciśnięcie przycisków VOL +/— j na uniwersalnym pi-locie zdalnego sterowania powinno uruchamiać regulację głośności odbiornika TV, niezależnie od tego, który przy-cisk urządzeń e został uprzednio naciśnięty. Nie dotyczy to jednakże urządzeń „AMP”, „DVD”, „ASAT” i „DSAT”, gdy można wyjść z założenia, że urządzenia te mają wła-sną regulację głosu.
BDA_SFB 10.1 A1 - DT-55975_pl.indd 50 10.10.2010 15:46:06
- 51 -
Informacje dotyczące obsługi > Aby móc obsługiwać jedno z zaprogramowanych urzą-dzeń za pomocą uniwersalnego pilota zdalnego stero-wania musisz najpierw nacisnąć odpowiedni przycisk urządzenia e. Następnie skieruj pilota na urządzenie i naciśnij wymagany przycisk.
> Korzystaj z przycisków cyfrowych o dokładnie w taki sam sposób, jak przy korzystaniu z oryginalnego pilota. Przed wprowadzeniem dwucyfrowej pozycji naciśnij ewentualnie przycisk a.
> Naciśnij przycisk FAV/EPG 1(, aby uruchomić elektro-niczny przewodnik programowy urządzenia, wyposażo-nego w tę funkcję.
> Gdy naciśniesz przycisk S r, w prawym dolnym rogu wyświetlacza LCD q przez 10 sekund będzie wyświe-tlała się data.
> Przy naciśniętym i przytrzymanym przycisku urządzenia e, w prawym dolnym rogu wyświetlacza LCD q wy-świetla się kod uaktywniony do tego urządzenia.
> Przyciskiem MENU k możesz wyświetlić ekran usta-wień danego urządzenia docelowego.
> Naciśnij przycisk podświetlany d, by włączyć wzgl. wyłączyć podświetlenie wyświetlacza i przycisków.
Wyłącz wszystkie (ALL OFF) Wskazówki:
Przyciskiem ALL OFF (wyłącz wszystkie) w możesz automatycznie wyłączyć wszystkie włączone urządzenia. Za pomocą tej funkcji możesz ponownie włączyć wyłączo-ne wcześniej urządzenia (w zależności od urządzenia). W tym celu naciśnij i przytrzymaj przez około 5 sekund przy-cisk ALL OFF w. Powyższe działa tylko pod następującymi warunkami:
1. Uniwersalny pilot zdalnego sterowania ma zapewnioną widzialność wszystkich urządzeń.
2. Funkcje automatycznego wyszukiwania kodu, wyszuki-wania kodu marki i funkcje MAKRO nie są aktywne.
3. Wszystkie urządzenia docelowe muszą obsługiwać wyłączanie za pomocą pilota zdalnego sterowania.
By ponownie włączyć automatycznie wszystkie urządze-nia, ponownie naciśnij i przytrzymaj przycisk w, aż wszystkie urządzenia zostaną włączone.
Czyszczenie i przechowywanie
Uwaga!Podczas czyszczenia należy pamiętać o tym, aby do wnętrza obudowy nie przedostała się wilgoć! W przeciwnym razie powstaje niebezpieczeństwo nieodwracalnego uszkodzenia urządzenia!
BDA_SFB 10.1 A1 - DT-55975_pl.indd 51 10.10.2010 15:46:06

- 52 -
> Obudowę urządzenia czyść wyłącznie lekko wilgotną szmatką z delikatnym płynem do mycia.
> Urządzenie przechowuj wyłącznie w otoczeniu spełniają-cym wymogi podane w rozdziale Dane techniczne.
> Przed odłożeniem urządzenia na dłuższy czas, wyjmij baterie, by nie spowodowały uszkodzenia urządzenia gdy wyleją w trakcie przerwy w użytkowaniu.
Błędy i sposoby ich usuwaniaUrządzenie nie reaguje na działanie uniwersalnego pilota zdalnego sterowania.
> Sprawdzić baterie. Muszą mieć wystarczające napięcie i być prawidłowo włożone.
> Nacisnąłeś wcześniej prawidłowy przycisk e urządze-nia docelowego?
> Sprawdź, czy dla urządzenie docelowego został za-programowany prawidłowy kod (patrz rozdział „Code Setup”).
Uniwersalny pilot zdalnego sterowania nieprawidłowo przesyła polecenia.
> Naciśnij odpowiedni przycisk urządzenia e, aby prze-łączyć uniwersalnego pilota zdalnego sterowania na prawidłowy tryb.
> Baterie muszą mieć wystarczające napięcie i być prawi-dłowo włożone.
> Być może używasz nieprawidłowego kodu. Rozpocznij wyszukiwanie kodu marki, automatyczne wyszukiwanie kodu lub bezpośrednie (ręczne) wprowadzenie kodu.
Uniwersalny pilot zdalnego sterowania nie przełącza stacji w urządzeniu.
> Naciśnij odpowiedni przycisk urządzenia e, aby prze-łączyć uniwersalnego pilota zdalnego sterowania na prawidłowy tryb.
> Jeżeli oryginalny pilot zdalnego sterowania nie posiada przycisku „-/- -“, to przełączaj programy przyciskami P +/— u lub przyciskami cyfrowymi o.
> Jeżeli to nie działa, to być może jest aktywna blokada rodzicielska danego urządzenia.
Niektóre przyciski uniwersalnego pilota zdalnego sterowania nie działają prawidłowo.
> Uniwersalny pilot zdalnego sterowania może nie obsłu-giwać wszystkich funkcji oryginalnego pilota.
> Być może nie zaprogramowałeś optymalnego kodu. Wyszukaj kodu, który będzie obsługiwał więcej funkcji docelowego urządzenia.
Uniwersalny pilot zdalnego sterowania nie reaguje na naciskanie przycisków.
> Baterie muszą mieć wystarczające napięcie i być prawi-dłowo włożone.
BDA_SFB 10.1 A1 - DT-55975_pl.indd 52 10.10.2010 15:46:06
- 53 -
> Skieruj pilota na urządzenie.
Wyświetlacz LCD q niczego nie pokazuje. > Baterie muszą mieć wystarczające napięcie i być prawi-dłowo włożone.
> Ustawiony jest zbyt niski kontrast. Zwiększ ustawienie kontrastu.
Utylizacja W żadnym przypadku nie należy wyrzucać urządzenia do normalnych śmieci domowych. Produkt jest zgodny z dyrektywą 2002/96/EC.
Uniwersalny pilot zdalnego sterowania• Uniwersalnego pilota zdalnego sterowania należy utyli-
zować tylko przez właściwe przedsiębiorstwo utylizacji odpadów lub przez komunalny zakład oczyszczania.
• Przestrzegaj aktualnie obowiązujących przepisów. W razie pytań i wątpliwości należy skontaktować się z miej-scowym przedsiębiorstwem usuwania odpadów.
Baterie i akumulatorki• Baterii i akumulatorów nie wolno wyrzucać razem ze
śmieciami domowymi.• Baterie mogą zawierać substancje trujące, szkodliwe dla
środowiska naturalnego. Bateria/akumulatory utylizuj zawsze zgodnie z obowiązującymi przepisami.
• Każdy konsument jest ustawowo zobowiązany do od-dawania wszystkich baterii i akumulatorów w punktach zbiorczych gminy, dzielnicy lub w sklepie. Obowiązek ten został wprowadzony, aby baterie/akumulatory były usu-wane w sposób nieszkodliwy dla środowiska naturalnego.
• Baterie / akumulatory oddawaj zawsze w stanie całko-witego rozładowania.
Wszystkie materiały wchodzące w skład opakowa-nia należy przekazać do odpowiednich punktów zbiórki odpadów.
Dane techniczneObsługiwane urządzenia: 10 Wymiary D x S x W: 217 x 50 x 22 mm Masa: 102 g (bez baterii) Dioda podczerwieni: Klasa lasera 1 Zasilanie baterie: 2 x 1,5 V typ AAA/ LR03 (Micro) (znajdują się w zestawie) Temperatura robocza : + 5 – +35°C Temperatura przechowywania: -20 – +50 °C
Wilgotność: 5 - 90 % (przy braku kondensacji)
BDA_SFB 10.1 A1 - DT-55975_pl.indd 53 10.10.2010 15:46:08

- 54 -
Wskazówka dotycząca zgodnościUrządzenie zostało przetestowane i posiada do-puszczenie w zakresie podstawowych wymagań i innych obowiązujących przepisów dyrektywy w sprawie kompatybilności elektromagnetycznej 2004/108/EC .
ImporterKOMPERNASS GMBH BURGSTRASSE 21 44867 BOCHUM, GERMANY
www.kompernass.com
Gwarancja i serwisUrządzenie objęte jest trzyletnią gwarancją, licząc od daty zakupu. Urządzenie zostało starannie wyprodukowane i poddane skrupulatnej kontroli przed wysyłką. Paragon należy zachować jako dowód dokonania zakupu. W przy-padku napraw gwarancyjnych skontaktuj się telefonicznie z najbliższym punktem serwisowym. Tylko w ten sposób można zagwarantować bezpłatną wysyłkę zakupionego produktu.
Gwarancja obejmuje wyłącznie wady materiałowe i fa-bryczne, natomiast nie obejmuje części ulegających zuży-ciu ani uszkodzeń części łatwo łamliwych, np. wyłącznika lub akumulatorów.
Produkt przeznaczony jest wyłącznie do użytku domowe-go, a nie do zastosowań przemysłowych i profesjonalnych. Gwarancja traci ważność w przypadku niewłaściwego uży-wania urządzenia, używania niezgodnego z przeznacze-niem, użycia siły lub ingerencji w urządzenie, dokonywanej poza naszymi autoryzowanymi punktami serwisowymi.
Niniejsza gwarancja nie ogranicza ustawowych praw na-bywcy urządzenia.
Usługa gwarancyjna nie przedłuża czasu trwania gwa-rancji. Dotyczy to również wymienionych i naprawionych części. Szkody i wady wykryte ewentualnie podcza zakupu należy zgłosić niezwłocznie po rozpakowaniu urządzenia, nie później niż dwa od daty zakupu. Wszystkie naprawy wykonane po upływie okresu gwarancyjnego będą wykonywane odpłat-nie.
Kompernass Service PolskaTel.: 022 / 3972212 E-mail: [email protected]
BDA_SFB 10.1 A1 - DT-55975_pl.indd 54 10.10.2010 15:46:09
- 55 -
TARTALOMJEGYZÉK OLDALSZÁMFontos biztonsági utasítások 56A készülék áttekintése 57Üzembevétel 58
A készülék kicsomagolása/A szállítási terjedelem ellenőrzése 58Elemek behelyezése 58
Kezelőelemek 59LCDkijelző 59Gombok 60
SETUP - rendszerbeállítások 62Code Setup (a távirányító programozása) 64
A márkakód keresés beprogramozása 64A kézi kódbeadás beprogramozása 65Az automatikus kódkeresés beprogramozása 65
Rendszerbeállítás 66Időbeállítása 66Dátum beállítása 67Kontraszt beállítása 67Háttér megvilágítás 68Globálishangerő/némításbeállítása 68Zárfunkcióbeállítása 69Rendszervisszahelyezése(reset) 69
Timer Setup 70Sleeptimer(alvásidőzítő) 70Eseményidőzítő 70
Learn Setup 71Kódtanulási funkció 71
Makro Setup 72Kedvenc csatornák 74Hangerőszabályozás 75
Vol +/—, (némítás) 75A kezeléshez 76
Valamennyi KI 76Tisztítás és tárolás 76Hiba / Hibakezelés 77Ártalmatlanítás 78Műszakiadatok 78Megfelelőségrevonatkozótudnivalók 78Gyártja 79Garanciaésszerviz 79
BDA_SFB 10.1 A1 - DT-55975_hu.indd 55 10.10.2010 15:50:55
- 56 -
UNIVERZÁLIS TÁVIRÁNYÍTÓ SFB 10.1 A1Ez a dokumentáció szerzői jogvédelem alatt áll. Valemennyi jog, a fotomechanikai lejátszásra, sokszorosításra és különéeges eljárással történő sokszorosítása (például adatfeldolgozással, adathordozóval és adathálózattal) vonatkozóak is még részlegesen is, valamint a tartalmi és módosítások joga fenntartva.Az első használat előtt figyelmesen olvassa el a használati utasítást majd későbbi használatra tegye el. A készülék har-madik fél részére történő továbbadásakor adja át a leírást is.
Fontos biztonsági utasításokRendeltetésszerű használatGyermekek csak felnőtt felügyelete mellett kezelheti a táv-irányítót. Az univerzális távirányító legfeljebb tíz távirányítót helyet-tesíthet. Csak infravörös vevővel rendelkező szórakozta-tóelektronikai készülékhez lehet használni. Az univerzális távirányító funkciói lényegében megegyeznek az eredeti távirányítók funkcióival. Az univerzális távirányító magánjel-legű, nem pedig kereskedelmi használatra való. Minden egyéb felhasználás nem számít rendeltetésszerűnek. A nem rendeltetésszerű használatból vagy önkényes átsze-relésből eredő károkért a gyártó nem vállal felelősséget.
FigyelmeztetésEnnek a veszélyességi fokozatnak a figyelmeztető jele lehetséges veszélyes helyzetet jelöl. Sérülést okozhat, ha nem tudjuk elkerülni ezeket a veszélyes helyzeteket. Tartsa be a használati útmutatóban lévő figyelmeztető utasításokat, hogy elkerülje a személyi kárt.
FigyelemEzen veszélyességi fokozat figyelmeztető utasítása lehetséges anyagi kárt jelöl. Anyagi kárt okozhat, ha nem tudjuk elkerülni ezeket a veszélyes helyzeteket. Az anyagi kár elkerülése érdekében tartsa be a figyelmeztető utasításban szereplő felszólítást.
TudnivalóTudnivaló jelöli a kiegészítő információkat, melyek megköny-nyítik a készülék kezelését.
Vigyázat, az elemek hibás kezelése balesetveszélyes!
Az elemeket különösen elővigyázatosan kell kezelni. Vegye figyelembe az alábbi biztonsági tudnivalókat:• Ne engedje, hogy az elemek gyermek kezébe jussanak.
A gyermekek a szájukba vehetik az elemeket és lenyel-hetik őket. Ha valaki lenyelné az elemeket, azonnal or-voshoz kell fordulni.
BDA_SFB 10.1 A1 - DT-55975_hu.indd 56 10.10.2010 15:50:55
- 57 -
• Az elemeket ne dobja tűzbe. Az elemek ilyenkor nagy hőmérsékletnek vannak kitéve.
• Robbanásveszély! Az elemeket nem szabad tölteni.• Az elemeket nem szabad felnyitni vagy rövidre zárni.• Az elemből kifolyó elemsav irritálhatja a bőrt. Bőrrel
érintkezve bő vízzel le kell öblíteni. Ha a folyadék a szembe jutna, alaposan bő vízzel ki kell öblíteni, nem szabad dörzsölni és azonnal orvoshoz kell fordulni.
Figyelem!Az univerzális távirányító 1. lézerosztályú infravörös diódá-val rendelkezik. A szemsérülések elkerülése végett ne néz-zen bele optikai készülékekkel.
A készülék sérülései• Ha a készülék elromlana, ne próbálja meg önmaga
megszerelni. Kár esetén keresse meg a gyártót vagy annak szerviz forródrótját (lásd a Garancialapot).
• Ha folyadék kerülne a készülék belsejébe vagy más mó-don sérült volna meg, a gyártónak, vagy annak szerviz forródrótjának kell ellenőriznie. Vegye fel a kapcsolatot a gyártóval vagy annak szerviz forródrótjával (lásd a Garancialapot).
• Vegye ki az elhasznált elemeket az elemrekeszből. • Ha hosszabb ideig nem használja a készüléket, vegye
ki belőle az elemeket, nehogy kisüljenek.• Szükség esetén mindig az összes elemet egyszerre
cserélje ki és mindig azonos típusú elemet használjon.
A készülék áttekintéseq LCD kijelzőw /ALL OFF gomb e készülékgombokr S gombt nyílgomboky EXIT gombu P +/— gomboki MACRO gombo számgomboka egy- vagy kétjegyű programszámok gombjas teletext funkciógombokd megvilágítás gombf felvevő/lejátszó gombokg AV gombh némításj VOL +/— gombokk MENU gombokl OK gomb1( FAV / EPG gomb2) infravörös adó/vevő2! elemrekesz fedele
BDA_SFB 10.1 A1 - DT-55975_hu.indd 57 10.10.2010 15:50:55
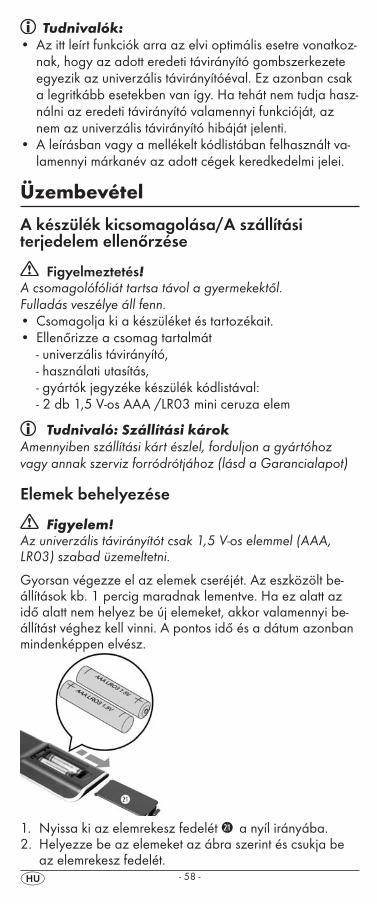
- 58 -
Tudnivalók:• Az itt leírt funkciók arra az elvi optimális esetre vonatkoz-
nak, hogy az adott eredeti távirányító gombszerkezete egyezik az univerzális távirányítóéval. Ez azonban csak a legritkább esetekben van így. Ha tehát nem tudja hasz-nálni az eredeti távirányító valamennyi funkcióját, az nem az univerzális távirányító hibáját jelenti.
• A leírásban vagy a mellékelt kódlistában felhasznált va-lamennyi márkanév az adott cégek keredkedelmi jelei.
Üzembevétel
A készülék kicsomagolása/A szállítási terjedelem ellenőrzése
Figyelmeztetés!A csomagolófóliát tartsa távol a gyermekektől. Fulladás veszélye áll fenn.• Csomagolja ki a készüléket és tartozékait.• Ellenőrizze a csomag tartalmát
- univerzális távirányító, - használati utasítás, - gyártók jegyzéke készülék kódlistával: - 2 db 1,5 V-os AAA /LR03 mini ceruza elem
Tudnivaló: Szállítási károkAmennyiben szállítási kárt észlel, forduljon a gyártóhoz vagy annak szerviz forródrótjához (lásd a Garancialapot)
Elemek behelyezése
Figyelem!Az univerzális távirányítót csak 1,5 V-os elemmel (AAA, LR03) szabad üzemeltetni.
Gyorsan végezze el az elemek cseréjét. Az eszközölt be-állítások kb. 1 percig maradnak lementve. Ha ez alatt az idő alatt nem helyez be új elemeket, akkor valamennyi be-állítást véghez kell vinni. A pontos idő és a dátum azonban mindenképpen elvész.
1. Nyissa ki az elemrekesz fedelét 2! a nyíl irányába.2. Helyezze be az elemeket az ábra szerint és csukja be
az elemrekesz fedelét.
BDA_SFB 10.1 A1 - DT-55975_hu.indd 58 10.10.2010 15:50:55
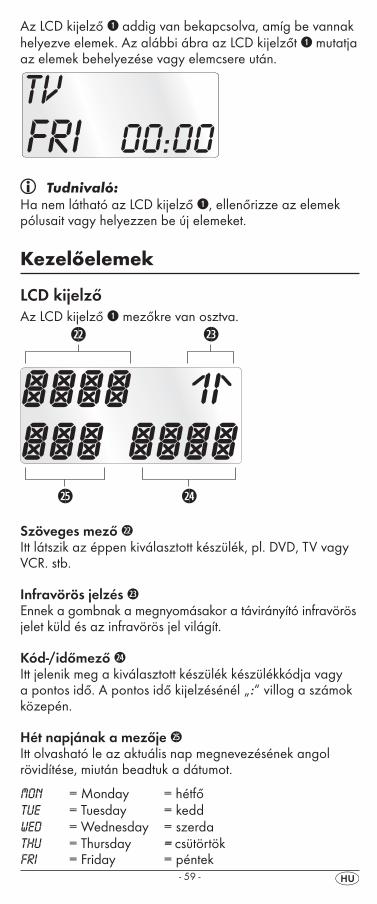
- 59 -
Az LCD kijelző q addig van bekapcsolva, amíg be vannak helyezve elemek. Az alábbi ábra az LCD kijelzőt q mutatja az elemek behelyezése vagy elemcsere után.
Tudnivaló:Ha nem látható az LCD kijelző q, ellenőrizze az elemek pólusait vagy helyezzen be új elemeket.
Kezelőelemek
LCD kijelzőAz LCD kijelző q mezőkre van osztva.
Szöveges mező 2@Itt látszik az éppen kiválasztott készülék, pl. DVD, TV vagy VCR. stb.
Infravörös jelzés 2#Ennek a gombnak a megnyomásakor a távirányító infravörös jelet küld és az infravörös jel világít.
Kód-/időmező 2$Itt jelenik meg a kiválasztott készülék készülékkódja vagy a pontos idő. A pontos idő kijelzésénél „:“ villog a számok közepén.
Hét napjának a mezője 2%Itt olvasható le az aktuális nap megnevezésének angol rövidítése, miután beadtuk a dátumot.
MON = Monday = hétfőTUE = Tuesday = keddWED = Wednesday = szerdaTHU = Thursday = csütörtökFRI = Friday = péntek
BDA_SFB 10.1 A1 - DT-55975_hu.indd 59 10.10.2010 15:50:55
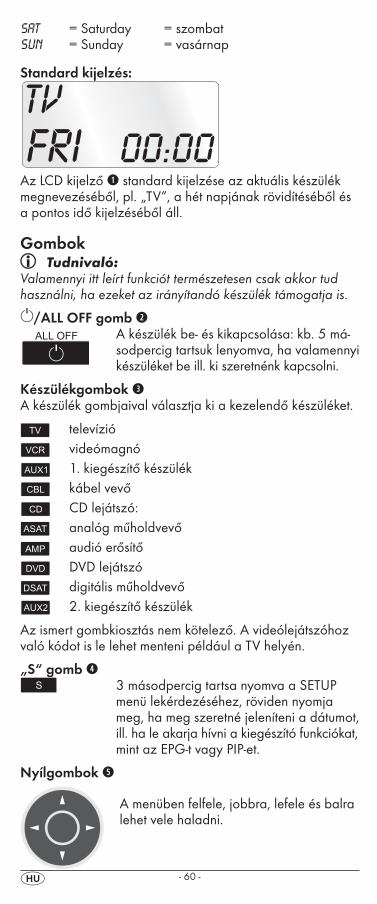
- 60 -
SAT = Saturday = szombatSUN = Sunday = vasárnap
Standard kijelzés:
Az LCD kijelző q standard kijelzése az aktuális készülék megnevezéséből, pl. „TV“, a hét napjának rövidítéséből és a pontos idő kijelzéséből áll.
Gombok Tudnivaló:
Valamennyi itt leírt funkciót természetesen csak akkor tud használni, ha ezeket az irányítandó készülék támogatja is.
/ALL OFF gomb w A készülék be- és kikapcsolása: kb. 5 má-
sodpercig tartsuk lenyomva, ha valamennyi készüléket be ill. ki szeretnénk kapcsolni.
Készülékgombok eA készülék gombjaival választja ki a kezelendő készüléket.
televízió videómagnó 1. kiegészítő készülék kábel vevő CD lejátszó: analóg műholdvevő audió erősítő DVD lejátszó digitális műholdvevő 2. kiegészítő készülék
Az ismert gombkiosztás nem kötelező. A videólejátszóhoz való kódot is le lehet menteni például a TV helyén.
„S“ gomb r 3 másodpercig tartsa nyomva a SETUP
menü lekérdezéséhez, röviden nyomja meg, ha meg szeretné jeleníteni a dátumot, ill. ha le akarja hívni a kiegészító funkciókat, mint az EPG-t vagy PIP-et.
Nyílgombok t
A menüben felfele, jobbra, lefele és balra lehet vele haladni.
BDA_SFB 10.1 A1 - DT-55975_hu.indd 60 10.10.2010 15:50:55

- 61 -
EXIT gomb y A menüben egy szintet visszalép.
P +/— gombok u
A vételi csatorna átváltása.
MACRO gomb i A MACRO gomb i utána számgombbal o
1-6, aktiválja az előtte lementett parancssort.
Számgombok o Az adók és készülékkód számainak
beadása.
Az egy-/kétjegyű programszámok gombja a A kétjegyű programszámokhoz (a készülék
típusától függően) nyomja meg először a a gombot, majd a számgombokkal o adja be a program számát. Ha ismét megnyomjuk, a kijelzés megint egyjegyű lesz.
Teletext funkció gombok sTeletext üzemmódban a gomboknak az alábbi funkciójuk van:
a teletext funkció lehívása Normál TV üzemmódban először nyomja
meg az S-gombot r, majd a -gombot, hogy irányítsa televízió készüléke „PIP“-funkcióját (kép a képben).
többoldalas teletextoldalak esetén megállítja az automatikus lapozást
az oldal megjelenítésének nagyítása
a szöveg és a televízió képének egymás fölötti megjelenítése
a teletext funkció befejezése
Tudnivalók:• A teletext funkció csak európai TV üzemmódban áll
rendelkezésre és a TV-nek rendelkeznie kell teletext modullal.
• Ezenkívül a P +/- gombok u az alábbi teletext funkció-kat vezérlik: P + egy oldallal tovább lapozP — egy oldallal vissza lapoz
BDA_SFB 10.1 A1 - DT-55975_hu.indd 61 10.10.2010 15:50:55
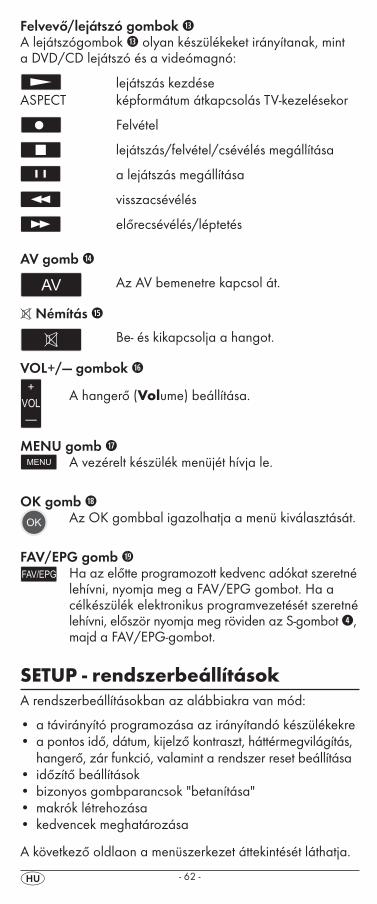
- 62 -
Felvevő/lejátszó gombok fA lejátszógombok f olyan készülékeket irányítanak, mint a DVD/CD lejátszó és a videómagnó:
lejátszás kezdéseASPECT képformátum átkapcsolás TV-kezelésekor
Felvétel
lejátszás/felvétel/csévélés megállítása
a lejátszás megállítása
visszacsévélés
előrecsévélés/léptetés
AV gomb g
Az AV bemenetre kapcsol át.
Némítás h
Be- és kikapcsolja a hangot.
VOL+/— gombok j
A hangerő (Volume) beállítása.
MENU gomb k A vezérelt készülék menüjét hívja le.
OK gomb l Az OK gombbal igazolhatja a menü kiválasztását.
FAV/EPG gomb 1( Ha az előtte programozott kedvenc adókat szeretné
lehívni, nyomja meg a FAV/EPG gombot. Ha a célkészülék elektronikus programvezetését szeretné lehívni, először nyomja meg röviden az S-gombot r, majd a FAV/EPG-gombot.
SETUP - rendszerbeállításokA rendszerbeállításokban az alábbiakra van mód:
• a távirányító programozása az irányítandó készülékekre• a pontos idő, dátum, kijelző kontraszt, háttérmegvilágítás,
hangerő, zár funkció, valamint a rendszer reset beállítása• időzítő beállítások• bizonyos gombparancsok "betanítása"• makrók létrehozása• kedvencek meghatározása
A következő oldlaon a menüszerkezet áttekintését láthatja.
BDA_SFB 10.1 A1 - DT-55975_hu.indd 62 10.10.2010 15:50:55
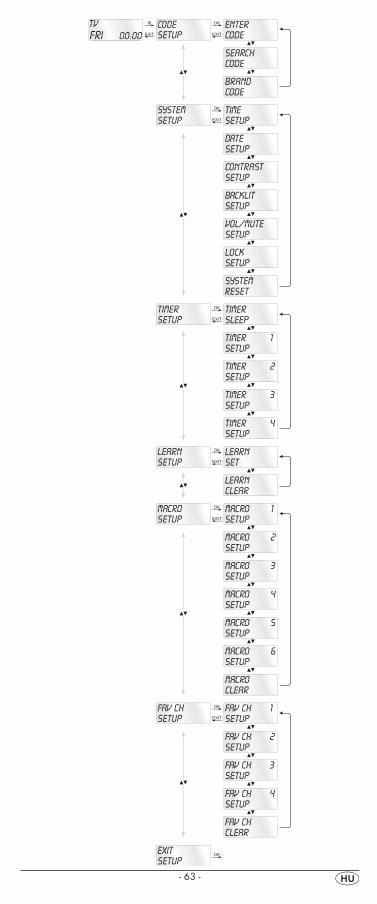
- 63 -
BDA_SFB 10.1 A1 - DT-55975_hu.indd 63 10.10.2010 15:50:56
- 64 -
Code Setup (a távirányító programozása)
A távirányítóhoz 3 beprogramozási mód áll rendelkezésre: márkakód keresés, automatikus kódkeresés és közvetlen kódbeadás (kézi) szerinti beprogramozás.
Először a márkakód keresést használja, mivel ez a leggyor-sabb programozási mód, ha készüléke gyártója szerepel a kódlistában. Másodikként a közvetlen kódbeadást javasol-juk, utána pedig az automatikus kódkeresést.
A márkakód keresés beprogramozásaEnnél az eljárási módnál követlenül választja ki az LCD kijelzőn q keresztül a márkát és a kódot.
Kövesse az alábbi kezelési tudnivalókat, hogy beprogra-mozza a távirányítót:
1. Nyomja meg a készülékgombot e ahhoz a készülék-hez, amelyre be szeretné programozni a távirányítót.
2. 3 másodpercnél tovább nyomja le az S gombot r. Gyorsan tegye meg a beállításokat a menüben, mert kb. 15 másodperc elteltével a menü ismét befejeződik.
3. Az LCD kijelzőn q „CODE SETUP“ jelenik meg. Nyomja meg az OK gombot l. Az LCD kijelzőn q „ENTER CODE“ jelenik meg. A gombokkal t válassza ki a „BRAND CODE“ feliratot és az OK gombbal l nyug-tázza.
4. Ekkor a beprogramozott készülékek listájából az ABC-ben elsőként következő márkanév jelenik meg.
5. A 34 gombokkal t választja ki a különböző márka-neveket.
6. A hozzáférés megkönnyítése érdeklben a számgombok-kal o közvetlenül átugorhat bizonyos kezdőbetűkhöz:2 => A 3 => D 4 => G 5 => J 6=>M 7=>P 8=>T 9=>WPélda: az 5-ös gombbal a kijelző a „J“-re ugrik át. Az első márka a „JVC“*. Ha például „Kenwood“* márkájú készüléke van, a 4 gombbal t lefele haladhat, amíg ez a márkanév nem jelenik meg. (* Valamennyi itt fel-használt márkanév az adott cég kereskedelmi jegye.)
7. A legtöbb gyártó több különböző kódot használ a távirá-nyítóhoz. Csak azt kell kitalálnia, hogy a rendelkezésre álló kódok közül melyik illik legjobban a készülékéhez. Jobbra a márkanév alatt az LCD kijelzőn q az aktuális márkanév jelenik meg.
8. Irányítsa a távirányítót a szóban forgó készülékre és nyomja meg a funkciós gombokat, hogy letesztelje a kódot (kivéve 34t, OK l, EXIT y vagy a szám-gombok o).
9. Ha a legtöbb gomb működik, nyomja meg az OK gom-bot l a beállítások mentésére. Az LCD kijelzőn q „OK“ jelenik meg. Ezután automatikusan befejeződik a menü.
BDA_SFB 10.1 A1 - DT-55975_hu.indd 64 10.10.2010 15:50:56

- 65 -
10. Ha egyik gomb se, vagy csak kevés gomb működik, válassza ki a vagy gombbal t a következő kódot és ellenőrizze a 8. pontban leírtak alapján.
11. Az EXIT gombbal y a menüben egy szinttel feljebb juthat.Ismételje meg az 1-10. lépéseket valamennyi készülékhez, amelyet a távirányítóval szeretne vezérelni.
A kézi kódbeadás beprogramozásaEbben az üzemmódban a távirányítót kódszámok közvetlen beadásával lehet beprogramozni. A szükséges kódszámot a mellékelt gyártók jegyzékében találja meg a készülékek kódjának listájával. Amennyiben az új kód érvénytelen, a legutoljára beprogramozott érvényes kód áll be.
1. Nyomja meg a készülékgombot e ahhoz a készülék-hez, amelyre be szeretné programozni a távirányítót.
2. 3 másodpercnél tovább nyomja le az S gombot r.3. Az LCD kijelzőn q „CODE SETUP“ jelenik meg. Nyomja
meg az OK gombot l. Az LCD kijelzőn q „ENTER CODE“ jelenik meg. Ennek a funkciónak a lehívásához nyomja meg az OK gombot l.
4. Az LCD kijelzőn q a kiválasztott készülékhez felhasznált kód jelenik meg. A kód első helyiértéke villog és arra vár, hogy Ön beadja a kódot. A számgombokkal o adja be a négyjegyű kódot.
5. Ha a beadott CODE érvényes, lementi a kódot. Az LCD kijelzőn q röviden „OK“. Ezután automatikusan befe-jeződik a menü.. Sikertelen próbálkozás után az LCD kijelző q „ERROR“-t (hiba) jelez ki és a kód ismételt be-adására vár. Ezután ismételje meg a 4. lépést.
6. Az EXIT gombbal y a menüben egy szinttel feljebb juthat.
Az automatikus kódkeresés beprogramozásaEz a folyamat készülékenként több percig is eltarthat, mivel valamennyi kódon át kell menni a kiválasztott készülékhez. Ezért ezt az eljárást csak akkor szabad használni, ha a készüléket márkakód keresésen vagy közvetlen kódbeadás-sal nem lehet beprogramozni, vagy ha az Ön készüléke egyáltalán nem szerepel a gyártók készülékkódlistás jegy-zékében.
Kövesse az alábbi lépéseket, ha a programozást automatikus kódkereséssel szeretné végrehajtani.
1. Nyomja meg a vezérelni kívánt készülékhez tartozó készülékgombot e (pl. VCR).
2. Kapcsolja be azt a készüléket, melyet a távirányítóval vezérelni szeretne. VCR/DVD/CD készülékek esetén helyezzen be egy kazettát vagy lemezt.
3. 3 másodpercnél tovább nyomja le az S gombot r.4. Az LCD kijelzőn q „CODE SETUP“ jelenik meg. Nyomja
meg az OK gombot l. Az LCD kijelzőn q „ENTER CODE“ jelenik meg. Nyomja meg a vagy gombot t, amíg „SEARCH CODE“ nem jelenik meg az LCD
BDA_SFB 10.1 A1 - DT-55975_hu.indd 65 10.10.2010 15:50:56
- 66 -
kijelzőn q. Irányítsa a távirányítót a készülékre, majd nyomja meg az OK gombot l, ha le szeretné hívni az „automatikus kódkeresés" üzemmódot.
5. Kezdődik a keresés. Közben a készülék emelkedő sor-rendben egymás után küldi a kódszámokat. Ezt az infra-vörös jel 2# jelzi ki.
6. Ha a készülék azzal reagál, hogy kikapcsol, nyomja meg azonnal az OK gombot l, hogy lementse az aktuális kódot. Az LCD kijelző q röviden „OK“-t jelez ki.
7. Ellenőrizze, hogy készüléke funkcióinak nagy része most vezérelhető-e a távirányítóval. Ha igen, akkor valószínű, hogy megtalálta a helyes kódot. Amennyiben néhány funkció nem működne, az 1. lépésnél kezdve ismét elin-díthatja az automatikus kódkeresést.
Tudnivaló: Ismételt kódkereséskor az univerzális távirányítót csak
akkor irányítsuk a célkészülékre, miután az előtte megtalált, elégtelen kód átfutott.
8. Ha a készülék nem reagál, valószínűleg nem nyomta meg elég gyorsan a 6. lépésben az OK gombot l. Ekkor többször nyomja meg az EXIT gombot y, hogy elhagyja a menüt és visszatérjen a standard kijelzéshez.
9. Ekkor tartsa lenyomva annak a készüléknek készülék-gombját e, amelyhez éppen a hozzávaló kódot keresi. Jobbra a márkanév alatt az LCD kijelzőn q az aktuális márkanév jelenik meg. Jegyezze meg ezt a számot.
10. Ezután az előző „Programozás kézi kódbeadással“ című fejezetben leírtak szerint járjon el és ellenőrizze, hogy a kód működik-e a következző legkisebb szám-kombinációval.
Tudnivalók:1. Ha be van kapcsolva a kódkeresés, akkor az OK l és
EXIT gombon y kívül egyik sem működik.2. Ha az automatikus keresés a kódlista végére ért, akkor
ott megáll. A kijelzés „SEARCH CODE“-ra tér vissza.
Rendszerbeállítás
Idő beállításaAz LCD kijelző q a pontos időt jelzi ki. Így lehet beállítani a pontos időt:
1. 3 másodpercnél tovább nyomja le az S gombot r. A „CODE SETUP“ felirat jelenik meg. Ha kb. 15 másodper-cig semmit nem ad be, a készülék elhagyja a menüt és a standard kijelzéshez tér vissza.
2. A vagy gombbal t válassza ki a „SYSTEM SETUP“ pontot és nyugtázza az OK gombbal l.
3. Az LCD kijelzőn q „TIME SETUP“ jelenik meg. Az OK gombbal l igazolja. Az LCD kijelző q most „TIME“-ot mutat ki és az idő formátuma (24 HR) villog.
BDA_SFB 10.1 A1 - DT-55975_hu.indd 66 10.10.2010 15:50:56
- 67 -
4. A vagy gombbal t lehet átkapcsolni a másik időformátumra (12 HR). Ezután később az idő kijelzésénél a nappali idő kijelzésénél „A“ vagy „P“ áll a pontos idő előtt. „A“ az „AM“ = „ante meridium“ (délelőtt, 0:00-tól 12:00 óráig) rövidítése. A „P“ a „PM“ = „post meridium“ (délután, 12:00-től 0:00 óráig) rövidítése. Nyugtázás-ként nyomja meg az OK gombot l.
5. Most az órák helye villog. A vagy gombbal t válassza ki a pontos idő óráinak számát és nyomja meg az OK gombot l.
6. Most a percek helye villog. A vagy gombbal t válassza ki a pontos idő perceinek számát és a men-téshez nyomja meg az OK gombot l. Megint a „TIME SETUP“ felirat jelenik meg.
7. Ha ezt vagy a következő menüket el szerenté hagyni, nyomja meg annyiszor az EXIT gombot y, míg az LCD kijelzőn q a standard kijelzés nem jelenik meg.
Dátum beállításaHa megnyomja az S gombot r, az LCD kijelző q a dátumot jelzi ki. Így állíthatja be a dátumot:
1. 3 másodpercnél tovább nyomja le az S gombot r. A „CODE SETUP“ felirat jelenik meg.
2. A vagy gombbal t válassza ki a „SYSTEM SETUP“ pontot és nyugtázza az OK gombbal l.
3. Az LCD kijelzőn q „TIME SETUP“ jelenik meg. Nyomja meg a gombot t, ha „DATE SETUP“-ra szeretne át-váltani. Az OK gombbal l igazolja.
4. A kijelzőn a „2010“ dátumkijelzés villog. A vagy gombbal t változtathatja az évszámot és az OK gomb-bal l nyugtázhatja.A vagy gombbal t változtat-hatja a villogó hónapot és az OK gombbal l nyugtáz-hatja. Ekkor a napok kijelzése villog, melyet ismét a vagy gombbal t változtathat meg.
5. Mentéshez nyomja meg az OK gombot l. Megint a „DATE SETUP“ felirat jelenik meg.
Kontraszt beállításaA kijelző kontrasztját az alábbi módon lehet beállítani:
1. 3 másodpercnél tovább nyomja le az S gombot r. A „CODE SETUP“ felirat jelenik meg.
2. A vagy gombbal t válassza ki a „SYSTEM SETUP“ pontot és nyugtázza az OK gombbal l.
3. A vagy gombbal t válassza ki a „CONTRAST SETUP“ pontot és nyugtázza az OK gombbal l.
4. Az LCD kijelzőn q a kontraszt értéke villog, melyet a vagy gombbal t állíthat be:A kijelzőn: 0 = legnagyobb kontaszt 15 = legkisebb kontaszt
5. Az OK gombbal l mentheti le a kívánt beállítást. Megint a „CONTRAST SETUP“ felirat jelenik meg.
BDA_SFB 10.1 A1 - DT-55975_hu.indd 67 10.10.2010 15:50:56
- 68 -
Háttér megvilágításBeállíthatja, hogy az irányítás befejeztével mennyi ideig ma-radjon megvilágítva az LCD kijelző q háttere. Gondoljon közben arra is, hogy a hosszabb megvilágítási idő csökkenti az elemek élettartamát.
1. 3 másodpercnél tovább nyomja le az S gombot r. A „CODE SETUP“ felirat jelenik meg.
2. A vagy gombbal t válassza ki a „SYSTEM SETUP“ pontot és nyugtázza az OK gombbal l.
3. A vagy gombbal t válassza ki a „BACKLIT SETUP“ pontot és nyugtázza az OK gombbal l.
4. Az LCD kijelzőn q ekkor az éjszakai megvilágítási idő-tartam másodperceinek a száma villog, melyet a gombokkal t lehet beállítani 0 és 60 közötti értékre. Ha a „0“-t választja, akkor teljesen kikapcsolja a háttér megvilágítást.
5. Az OK gombbal l mentheti le a kívánt beállítást. Megint a „BACKLIT SETUP“ felirat jelenik meg.
Globális hangerő/némítás beállításaAnnak érdekében, hogy ne kelljen mindig megnyomni egy készülékgombot a hangerő szabályzásához vagy a némí-táshoz, az univerzális távirányító ezekhez a funkciókhoz mindig csak egy külön készüléket szólít meg, alapban a televíziót. Ezt a célkészüléket maga is meghatározza.
1. 3 másodpercnél tovább nyomja le az S-gombot r. A „CODE SETUP“ felirat jelenik meg.
2. A vagy gombbal t válassza ki a „SYSTEM SETUP“ pontot és nyugtázza az OK gombbal l.
3. A vagy gombbal t válassza ki a „VOL/MUTE SETUP“ pontot és nyugtázza az OK gombbal l.
4. Az LCD kijelzés q „ALL VOL SET“-et jelez ki. Ha meg-nyomja meg az OK-gombot l, a kijelzés „ALL VOL MODE“-ra vált át.
5. Most nyomja meg a készülékgombot e ahhoz a készü-lékhez, melyet a globális hangerőszabályozással szeretne irányítani.
6. Ha a megadott készülék hangerőszabályozással rendel-kezik, röviden a „SUCCESS“ (= siker) jelenik meg és a menü befejeződik. A hangerőszabályozás mostantól az imént meghatározott készülékre hat.
7. Ha a készülék nem rendelkezik saját hangerőszabályo- zással, az univerzális távirányító nem engedélyezi ezt a választást és „VOLUME ERROR“-t (= hiba) jelez ki. Ekkor is befejeződik a menü. A hangerőszabályozás továbbra is az eddig készülékre hat ki.
A bizonyos készülékekre vonatkozó globális hangerőszabályozást ki is lehet kapcsolni.
1. Ehhez válassza ki a VOL/MUTE SETUP-ban a vagy gombbal t a MODE VOL SET funkciót és nyugtázza az OK-gombbal l.
BDA_SFB 10.1 A1 - DT-55975_hu.indd 68 10.10.2010 15:50:56
- 69 -
2. Most nyomja meg a készülékgombot e ahhoz a készülék-hez, melyet ki szeretne venni a globális hangerőszabá- lyozásból. Az LCD-kijelzés q „SUCCESS“-t jelez ki és a globális hangerőszabályozás kikapcsol, ha az univerzális távirányító valamelyik kiválasztott készülék működési üzemmódjában működik.
A beállításokat VOL/MUTE SETUP-ban is megint meg lehet szüntetni.
1. Ehhez válassza ki a VOL/MUTE SETUP-ban a vagy gombbal t a VOL/MUTE RESET funkciót és nyugtázza az OK-gombbal l.
2. Az LCD-kijelzés q CONFIRM RESET-tel szólítja fel az OK-gombbal l történő nyugtázáshoz. Nyomja meg az OK-gombot l, ha törölni akarja a beállításokat, a SUCCESS-kijelzés igazolja a törlést. Vagy nyomja meg az EXIT-gombot y, ha meg akarja szakítani a törlést.
Tudnivaló:Ha ebben a menüben megnyomja az EXIT-gombot y, a teljes menü azonnal befejeződik.
Zár funkció beállításaA záró funkcióval valamennyi Setup menühöz zárolhatja a hozzáférést.
1. 3 másodpercnél tovább nyomja le az S gombot r.2. A vagy gombbal t válassza ki a „SYSTEM
SETUP“ pontot és nyugtázza az OK gombbal l.3. A vagy gombbal t válassza ki a „LOCK SETUP“
pontot és nyugtázza az OK gombbal l. Az LCD kijelző q az aktuális beállítást jelzi ki.4. A vagy gombbal t válasszon a „LOCK“ (zár be)
vagy „UNLOCK“ (zár ki) közül.5. Az OK gombbal l mentheti le a beállítást. Az LCD-
kijelzőn q ekkor megint „LOCK SETUP“ jelenik meg.
Rendszer visszahelyezése (reset)Ezzel a funkcióval az univerzális távirányítót kiszállítási ál-lapotába helyezheti vissza. Eközben valamennyi Ön által megtett beállítás törlődik.
1. 3 másodpercnél tovább nyomja le az S gombot r. A „CODE SETUP“ felirat jelenik meg.
2. A vagy gombbal t válassza ki a „SYSTEM SETUP“ pontot és nyugtázza az OK gombbal l.
3. A vagy gombbal t válassza ki a „SYSTEM RESET“ pontot és nyugtázza az OK gombbal l.
4. Az LCD kijelzőn q ekkor „CONFIRM RESET“ jelenik meg. Visszahelyezéshez nyomja meg az OK gombot l. Ezután az LCD-kijelzés q „SUCCESS RESET“-et jelez ki. Valamennyi beállítás törlődik és a menü befejeződik. Vagy az EXIT gomb y megnyomásával elhagyja a me-nüt. Ekkor a beállítások megmaradnak.
BDA_SFB 10.1 A1 - DT-55975_hu.indd 69 10.10.2010 15:50:56
- 70 -
Timer SetupAz univerzális távirányító két különböző időzítést kínál: az alvás időzítést és az esemény időzítést.
Sleep timer (alvás időzítő)1. Nyomja meg a vezérelni kívánt készülékhez tartozó
készülékgombot e (pl. VCR).2. 3 másodpercnél tovább nyomja le az S gombot r.
A „CODE SETUP“ felirat jelenik meg.3. Nyomja meg a vagy gombot t, míg a „TIMER
SETUP“ nem jelenik meg. Ha megnyomja az OK gom-bot l, „TIMER SLEEP“ jelenik meg az LCD kijelzőn q. Nyugtázza ennek a funkciónak a kiválasztását az OK gombbal l.
4. Most jobbra lent az LCD kijelzőn q a kiválasztott készü-lékhez tartozó fennmaradó idő percei villognak. Állítsa be a vagy gombbal t az 1 és 99 perc közötti kívánt értéket. Nyugtázásként nyomja meg az OK gom-bot l. Ha be van programozva a Sleep időzítő, az LCD-kijelző q „zz“-t jelez ki jobbra az idő mellett.
5. Úgy helyezze el a távirányítót, hogy infravörös jelei el-érjék a kikapcsolandó készüléket. A beállított idő lejárta után ki kell kapcsolni a készüléket.
6. Ha most megnyomja az S-gombot r, az LCD-kijelzőn q balra lent „SL“ jelenik meg.
Esemény időzítőA távirányító 4 esemény időzítővel rendelkezik, melyekkel gombkombinációk különböző sorozatát lehet elindítani egy bizonyos időben. 1. 3 másodpercnél tovább nyomja le az S gombot r.
A „CODE SETUP“ felirat jelenik meg.2. A vagy gombbal t válassza ki a „TIMER SETUP“
pontot és nyugtázza az OK gombbal l. Az LCD kijelzőn q „TIMER SLEEP“ jelenik meg. A vagy gombbal t válassza ki a kívánt memóriahelyet „TIMER SETUP 1“-től „TIMER SETUP 4“-ig és az OK gombbal l nyugtázza.
3. Most annak a beállított időnek az órahelye villog, amikor a kívánt gombkombinációt véghez szeretnénk vinni. Állítsa be a vagy gombbal t a kívánt időpont óráinak számát és nyugtázásul nyomja meg az OK gombot l.
4. Most annak a beállított időnek a perchelye villog, amikor a kívánt gombkombinációt véghez szeretnénk vinni. Állítsa be a vagy gombbal t a kívánt időpont perceinek a számát és nyugtázásul nyomja meg az OK gombot l.
5. Az LCD kijelzőn q „TIMER X KEY“ olvasható (az X a kívánt időzítőt jelöli). Nyomja meg a kívánt készülék-gombot e, majd a gombparancsok kívánt sorrendjét.
6. Nyomja meg az S gombot r, hogy lementse a beadott értékeket és visszatérjen az időzítő áttekintéséhez.
7. Ugyanilyen módon járjon el, ha más időzítő memóriahe-lyeket szeretne még beprogramozni.
BDA_SFB 10.1 A1 - DT-55975_hu.indd 70 10.10.2010 15:50:56
- 71 -
8. Ha be van programozva az esemény időzítő, az LCD kijelző q a „ “ időzítő jelet mutatja jobbra az idő mellett.
Tudnivalók:1. Időzítő memóriahelyként legfeljebb 14 gombot lehet
beprogramozni. A 14. gomb beadása után a sorrend automatikusan mentődik és az LCD kijelzőn q „FULL“ jelenik meg.
2. Ebben a menüben is kb. 5 másodperc elteltével a készülék visszatér a standard kijelzéshez, ha nem ad be mást.
Learn SetupAz univerzális távirányító képes megtanulni és lementeni az eredeti távirányító gombjeleit. Ha az univerzális távirányító nem működne az előbb leírt beprogramozási eljárások alapján vagy nem képes végrehajtani valamennyi paran-csot, akkor az eredeti távirányítóval be lehet tanítani.• Használjon az univerzális távirányítóhoz és az eredeti
távirányítóhoz új elemeket.• Tartson más fényforrásokhoz képest legalább 1 m távol-
ságot. A fényforrás zavarhatja az infravörös átvitelt.• Helyezze egymástól 20-50 mm távolságra az eredeti és
az univerzális távirányítót, hogy az infravörös diódák 2) egymásra mutassanak.
Tudnivalók:1. Ne használja az alábbi gombokat betanítási funkcióhoz:
valamennyi készülékgomb e, MACRO i, S gomb r, EXIT y.
2. Nyomja meg röviden az eredeti távirányító gombját. Ha az LCD-kijelzőn q „SUCCESS“ jelenik meg, a gomb parancsát sikeresen megtanulta. Ha azonban „LEARN ERROR“ (hiba) jelenik meg, akkor meg kell ismételnie a folyamatot.
3. Ha betanításkor a „LEARNING“ (tanulj) kijelzése után 30 másodpercig egy gombot sem nyom meg az eredeti távirányítón, akkor befejeződik a betanítási menü. Ezt az üzemmódot az univerzális távirányító valamelyik gomb-jának megnyomásával lehet befejezni.
4. A memória összesen 150 gombparancsot tartalmaz. Ha tele van a memória, az LCD kijelzőn q „LEARN FULL“ jelenik meg és a betanítási üzemmód befejeződik.
5. Az EXIT gombbal y térhet vissza az előző státuszhoz (kivéve a „LEARN KEY“ ill. „LEARNING“ megjelenésekor).
Kódtanulási funkció1. Nyomja meg annak a készüléknek a készülékgombját e,
amelyikhez az univerzális távirányítót gombkódra szeretné tanítani.
2. 3 másodpercnél tovább nyomja le az S gombot r. A „CODE SETUP“ felirat jelenik meg.
BDA_SFB 10.1 A1 - DT-55975_hu.indd 71 10.10.2010 15:50:56
- 72 -
3. A vagy gombbal t válassza ki a „LEARNING SETUP“ (tanulás) menüt, majd nyomja meg az OK gombot l.
4. Az LCD kijelzőn q „LEARN SET" jelenik meg. Ezután nyomja meg az OK gombot l. Az LCD kijelzőn q „LEARN KEY“ (gomb kiválasztása) jelenik meg.
5. Először nyomja meg az univerzális távirányítón lévő betanítandó gombot. Az LCD kijelzőn q „LEARNING“ jelenik meg. Az univerzális táriványító ekkor az eredeti távirányító infravörös jelzésére vár.
Tudnivaló:Ha a kijelzés nem vált át „LEARNING“-re, olyan gombot választott ki, melyre nem lehet gombkódot betanítani.
6. Irányítsa egymásra mindkét távirányító infravörös érzé-kelőjét 2).
7. Most tartsa lenyomva az eredeti távirányító kívánt gomb-ját, amíg az univerzális távirányító LCD kijelzőjén q „SUCCESS“ vagy „LEARN ERROR“ nem jelenik meg.
8. Ha az LCD kijlezőn q „SUCCESS“ jelenik meg (a fo-lyamat sikeres), az 5. lépéstől kezdve több gombot is betaníthat. Ha „LEARN ERROR“ jelenik meg (a folyamat sikertelen volt), ismételje meg a folyamatot az 5. lépéstől.
9. Haabetanításifolyamatotmegszeretnészakítani/beszeretné fejezni, nyomja meg a „LEARN SET“ kijelzése kö-zben annyiszor az EXIT gombot y,mígazLCDkijelzőnq meg nem jelenik a szabvány kijelzés. A „LEARN KEY“ ill.„LEARNING“kijelzéseközbenegyszerűen30másod-percnek kell eltelnie irányítás nélkül, hogy befejezze a készülék a menüt.
Valamennyi készülék összes beprogramozott gombjá-nak törlése1. 3 másodpercnél tovább nyomja le az S gombot r.
A „CODE SETUP“ felirat jelenik meg.2. A vagy gombbal t válassza ki a „LEARNING
SETUP“ tanulásmenüt, majd nyomja meg az OK gombot l. Az LCD kijelzőn q „LEARN SET" jelenik meg.
3. A vagy gombbal t válassza ki a „LEARN CLEAR“-t (a tanultak törlése) és nyugtázza az OK gombbal l. Az LCD kijelzőn q „CONFIRM CLEAR“ (törlés nyugtázása) jelenik meg.
4. Az OK gombbal l igazolja. Az LCD kijelzőn q „SUCCESS" jelenik meg. Valamennyi programozott gomb törlődött. Ezután a menü automatikusan befejeződik.
Tudnivaló:Ha az LCD kijelző „CONFIRM CLEAR“-t jelez ki, szakítsa meg a törlést az EXIT y gombbal.
Makro SetupA MAKRO funkcióval maximum 16 gombparancsot hajthat végre egyetlen gombnyomásra, azaz több előtte lementett vezérlési parancsot egy MAKRO gombbal adhat ki. Erre 6 makro memóriahely áll rendelkezésre.
BDA_SFB 10.1 A1 - DT-55975_hu.indd 72 10.10.2010 15:50:56
- 73 -
Egy makró programozásaMakró programozásához az alábbiak szerint járjon el:
1. 3 másodpercnél tovább nyomja le az S gombot r. A „CODE SETUP“ felirat jelenik meg.
2. A vagy gombbal t válassza ki a „MACRO SETUP pontot és nyugtázza az OK gombbal l. A kijelzőn „MACRO SETUP 1” jelenik meg.
3. A vagy gombbal t válassza ki a kívánt memó-riahelyet (MACRO SETUP 1-6) és az OK gombbal l nyugtázza.
4. Az LCD kijelzőn q „MACRO STEP" jelenik meg. Nyomjameg egymás után a kívánt gombokat (legfeljebb 16-ot). A sorozat egy készülékgombbal e kezdődjön.
5. Alapban a makró parancsok 1 mp-es távolságokban kerülnek küldésre. Mivel néhány készülék kicsit lassabban reagál, előfordulhat, hogy a makró parancsok sora túl gyors egymásutánban kerül küldésre a készülékhez. Ekkor megvan a lehetősége arra, hogy egy gombparancs előtt 5-21 mp-es szünetet tartson programozás közben. Ehhez nyomja meg ismételten a MACRO-gombot i. Az LCD-kijelző q jobbra lent az aktuális szünethosszokat jelzi ki másodpercekben.
6. Ha elértük a gombparancsok maximálisan megengedett számát, az LCD kijelzőn q „FULL“ jelenik meg.
7. Mentse le az adatokat az S gombbal r. Az LCD kijel-zőn q „MACRO SETUP" jelenik meg.
8. Ha a programozandó makrók kiválasztásakor (3. lépés) már foglalt memóriahelyet választ ki, a meglévő makró felülíródik.
9. A 3. lépéstől ismételje meg a folyamatot a további makrók létrehozásához.
10. Az EXIT gombbal y egy szinttel felfele jut a menüben, kivéve a gombparancsok beadása közben.
Tudnivalók:1. Legfeljebb 16 gombparancsot menthet el egy makróban.
A 16. gombparancs beadása után „FULL” jelenik meg az LCD-kijelzőn q.
2. Ha mentés nélkül szeretné elhagyni az üzemmódot, kb. 15 másodpercig ne adjon be semmit.
3. „MACRO STEP“ üzemmódban csak az S gombbal r térhet vissza az előző státuszhoz.
Példa: parancssort szeretne lementeni egy makróban. „MACRO STEP” üzemmódban kezd.
Kívánt parancssor: TV bekapcsolása => PAUSE => átkapcso-lás az AV-bemenetre => DVD bekapcsolása => PAUSE => DVD lejátszása.
„MACRO STEP" üzemmódban ehhez az alábbi gombparancsokat adja be:
=> => (szünetidő) => => => => (szünetidő) =>
BDA_SFB 10.1 A1 - DT-55975_hu.indd 73 10.10.2010 15:50:56
- 74 -
Makró kivitelezéseHa előtte beprogramozott makrót szeretne végrehajtani, az alábbiak szerint járjon el:
1. Nyomja meg a MACRO gombot i.2. Az adott számgombbal o hívja le a kívánt makrót (1-6).
Példa: Ha a 3. makrót szeretné végrehajtani, nyomja meg először a MACRO gombot i, majd 5 másodpercen belül a „ “számgombot.
Valamennyi makró törléseHa valamennyi előtte beprogramozott makrót törölni szeretne, az alábbiak szerint járjon el:
1. 3 másodpercnél tovább nyomja le az S gombot r. A „CODE SETUP“ felirat jelenik meg.
2. A vagy gombbal t válassza ki a „MACRO SETUP” pontot és nyugtázza az OK gombbal l. A kijelzőn „MACRO SETUP 1” jelenik meg.
3. A vagy gombbal t válassza ki a „MACRO CLEAR“ pontot és nyugtázza az OK gombbal l.
4. Az LCD kijelzőn q „CONFIRM CLEAR“ jelenik meg (biztos benne, hogy törli?) Az OK gombbal l nyugtáz-hatja a törlést. Az LCD kijelző q röviden „SUCCESS“-t je-lez ki. Valamennyi makró törlődik és a menü befejeződik.
Tudnivalók:1. Ha az LCD kijelző q „CONFIRM CLEAR“-t jelez ki,
szakítsa meg a törlést az EXIT y gombbal.2. Az egyes makrókat nem lehet külön törölni, csak felülírni.
Kedvenc csatornák
Tudnivaló:Ezzel a funkcióval kedvelt adóját a kedvencnek mentheti le.
A kedvencek programozásaKedvenc adóit az alábbiak szerint mentheti le:
1. Nyomja meg a készülékgombot e ahhoz a készülék-hez, amelyre be szeretné programozni a kedvencet.
2. 3 másodpercnél tovább nyomja le az S gombot r. A „CODE SETUP“ felirat jelenik meg.
3. A vagy gombbal t válassza ki a „FAV CH SETUP" pontot és nyugtázza az OK gombbal l. A kijelzőn „FAV CH SETUP” jelenik meg.
4. A vagy gombbal t válassza ki a kívánt memória-helyet (FAV CH SETUP 14) és az OK gombbal l nyug-tázza.
5. Az LCD kijelzőn q „FAVO CH STEP" jelenik meg. Nyomja meg egymás után a gombokat (legfeljebb 4-et) a kívánt kedvenc adó lehívásához.
6. Ha elértük a gombparancsok maximálisan megengedett számát, az LCD kijelzőn q „FULL“ jelenik meg.
7. Mentse le az adatokat az S gombbal r. Az LCD kijel-zőn q „FAVO CH SETUP" jelenik meg.
BDA_SFB 10.1 A1 - DT-55975_hu.indd 74 10.10.2010 15:50:56
- 75 -
8. Ha a programozandó makrók kiválasztásakor (4. lépés) már foglalt memóriahelyet választ ki, a meglévő kedvenc felülíródik.
9. Ismételje meg a lépéseket, ha további kedvenceket sze-retne lementeni.
10. Az EXIT gombbal y egy szinttel vissza jut a menüben, kivéve a gombparancsok beadása közben.
Tudnivaló:A csatornaszámok beadása a kiválasztott készülék modellje és márkája szerint változhat. Adott esetben többjegyű csator-naszám esetén először a gombot a kell megnyomni.
Kedvencek lehívásaHa előtte programozott kedvencet szeretne lehívni, nyomja meg a FAV/EPG gombot 1(, majd a kívánt memóriahelyhez (1 - 4) tartozó számgombot.
Valamennyi FAV (kedvencek) csatorna törléseAz alábbiak szerint járjunk el, ha valamennyi előtte beprog-ramozott kedvencet törölni szeretnénk:
1. 3 másodpercnél tovább nyomja le az S gombot r.2. A vagy gombbal t válassza ki a „FAV CH SETUP"
pontot és nyugtázza az OK gombbal l. A kijelzőn „FAV CH SETUP” jelenik meg.
3. A vagy gombbal t válassza ki a „FAV CH CLEAR“ pontot és nyugtázza az OK gombbal l.
4. Az LCD kijelzőn q „CONFIRM CLEAR“ jelenik meg (biztos benne, hogy törli?) Az OK gombbal l nyugtáz-hatja a törlést. Az LCD kijelző q röviden „SUCCESS“-t jelez ki. Valamennyi kedvenc törlődik és a menü befeje-ződik.
Tudnivalók:1. Ha az LCD kijelző q „CONFIRM CLEAR“-t jelez ki,
szakítsa meg a törlést az EXIT y gombbal.2. Az egyes kedvenceket nem lehet külön törölni, csak
felülírni.
Hangerő szabályozás
Vol +/—, (némítás)Nyomja meg a „Vol+" gombot a hangerő fokozásához. A „VOL —“ gombbal visszavehet a hangerőből. Ha némítani szeretné a hangot, nyomja meg a gombot h. Ha még egyszer megnyomja ezt a gombot, akkor visszatér a hang.
Ha megnyomja az univerzális távirányító VOL +/— gombja-it j, alapvetően a tévékészülék hangjára vonatkozik, füg-getlenül attól, hogy melyik készülékgombot e nyomta meg előtte. Ez azonban nem vonatkozik az „AMP“, „DVD“, „ASAT“ és „DSAT“ készülékekre, mert abból indulhatunk ki, hogy ezeknek a készülékeknek saját hangerő szabályozá-sa van.
BDA_SFB 10.1 A1 - DT-55975_hu.indd 75 10.10.2010 15:50:56

- 76 -
A kezeléshez > Ha valamelyik beprogramozott készüléket az univerzális távirányítóval szeretne vezérelni, először nyomja meg a készülékgombot e. Ezután irányítsa az univerzális távirá-nyítót erre a készülékre és nyomja meg a kívánt gombot.
> A számgombokat o pontosan úgy adja be, mint ahogy ezt az eredeti távirányítón is teszi. Mielőtt kétjegyű számot adna be, nyomja meg előtte a gombot a.
> Nyomja meg a FAV/EPG gombot 1(, ha el szeretné in-dítani az ezzel a funkcióval ellátott készülék elektronikus műsorkalauzát.
> Ha megnyomja az S-gombot r , jobbra lent az LCD-kijelzőn q 10 másodpercre a dátum jelenik meg.
> Miközben valamelyik készülékgombot e nyomja le, az LCD kijelzőn q lent jobbra ennek a készüléknek az aktív kódja jelenik meg.
> A MENU gombon k keresztül lehet lehívni az adott célkészülék beállításához tartozó párbeszédet.
> Nyomja meg a megvilágítás gombot d, hogy be- illetve kikapcsolja a kijelző és a gomb megvilágítását.
Valamennyi KI Tudnivalók:
Az ALL OFF (valamennyi ki) gombbal w valamennyi bekapcsolt készüléket automatikusan kikapcsolhatjuk. Ez a funkció kikapcsolt készülékeket is kikapcsol (a készüléktől függően). Ehhez kb. 5 másodpercig tartsa lenyomva az ALL OFF gombot w. Ez csak az alábbi feltételek mellett működik:
1. Valamennyi készülék és az univerzális távirányító között szabad a tér.
2. Nincsen bekapcsolva az automatikus kódkeresés, a már-kakód keresés és a MACRO funkciók.
3. Valamennyi célkészüléknek alkalmasnak kell lenni arra, hogy távirányítóval ki lehessen kapcsolni őket.
Ha valamennyi készüléket automatikusan be szeretné kap-csolni, tartsa megint lenyomva a gombot w, míg vala-mennyi készülék be nem kapcsol.
Tisztítás és tárolás
Figyelem!Vigyázzon arra, hogy tisztítás közben ne kerüljön folya-dék a házba! Ellenkező esetben a készülék helyrehoz-hatatlan módon megsérülhet!
> A készülék burkolatát kizárólag enyhén nedves rongy-gyal és gyenge mosószerrel tisztítsa.
> A készüléket kizárólag olyan helyen tárolja, mely megfelel a műszaki adatokban szereplő adatoknak.
> Vegye ki az elemeket a készülékből, mielőtt elpakolná a készüléket, hogy ne tegyenek kárt a készülékben, ha tárolás közben kifolynának.
BDA_SFB 10.1 A1 - DT-55975_hu.indd 76 10.10.2010 15:50:56
- 77 -
Hiba / Hibakezelés
A készülék nem reagál az univerzális távirányítóra. > Ellenőrizze az elemeket. Legyen bennük elegendő feszültség és megfelelően legyenek behelyezve.
> Jó készülékgombot e nyomott meg a kívánt készülékhez? > Ellenőrizze, hogy a célkészülékhez a megfelelő kód van-e beprogramozva (lásd a „Code setup“ részt).
Az univerzális távirányító nem továbbítja megfelelően a parancsokat.
> Nyomja meg a megfelelő készülékgombot e, hogy az univerzális távirányítót a megfelelő üzemmódba kapcsolja.
> Az elemekben legyen elegendő feszültség és megfelelően legyenek behelyezve.
> Lehet, hogy rossz kódot használt. Indítsa el a márkakód keresést, az automatikus kódkeresését vagy a közvetlen kódbeadást (kézileg).
Az univerzális távirányító nem kapcsolja át a készülé-ken az adót.
> Nyomja meg a megfelelő készülékgombot e, hogy az univerzális távirányítót a megfelelő üzemmódba kapcsolja.
> Amennyiben az eredeti távirányítón nincsen „-/- -“ gomb, a P +/— gombbal u vagy a számgombokkal o váltson adót.
> Ha ez sem működne, lehet, hogy be van kapcsolva erre a célkészülékre a gyermekzár.
Az univerzális távirányító néhány gombja nem műkö-dik megfelelően.
> Az univerzális távirányító esetleg nem rendelkezik a ké-szülék eredeti távirányítójának valamennyi funkciójával.
> Lehet, hogy nem az optimális kódot programozta be. Keressen olyan kódot, mely a célkészülék több funkcióját támogatja.
Az univerzális távirányító nem reagál, ha lenyomom valamenyik gombot.
> Az elemekben legyen elegendő feszültség és megfelelően legyenek behelyezve.
> Irányítsa az univerzális távirányítót a készülékre.
Az LCD kijelzőn q semmi sem jelenik meg. > Az elemekben legyen elegendő feszültség és megfelelő-en legyenek behelyezve.
> Lehet, hogy a kontraszt túl kicsire van beállítva. Növelje a kontraszt beállítását.
BDA_SFB 10.1 A1 - DT-55975_hu.indd 77 10.10.2010 15:50:56
- 78 -
Ártalmatlanítás Semmi esetre se dobja a készüléket a háztar-tási hulladékba. Ez a termék a 2002/96/EC európai irányelv hatálya alá tartozik.
Uiverzális távirányító• Az univerzális távirányítót vagy annak részeit engedélye-
zett hulladékhasznosító cégnek, vagy a helyi hulladék-gazdálkodó szervnek adja át.
• Vegye figyelembe az érvényben lévő idevonatkozó előírásokat. Kétség esetén vegye fel a kapcsolatot a hulladékfeldolgozó vállalattal.
Elemek/akkuk• Az elemeket/akkukat nem szabad a háztartási hulladékba
dobni.• Az elemek mérgezőanyagokat tartalmazhatnak, melyek
káros hatással vannak a környezetre. Az elemeket/akku-kat ezért mindenképpen az érvényes törvényes előírások-nak megfelelően selejtezze ki.
• Minden felhasználó törvényes kötelessége, hogy az elemeket/akkukat leadja lakóhelye gyűjtőhelyén vagy a kereskedőnél. Ez a kötelezettség azt a célt szolgálja, hogy az elemek/akkuk környezetkímélő ártalmatlanítás-ra kerülhessenek.
• Az elemeket és akkukat csak lemerült állapotban adják le.Valamennyi csomagolóanyagot juttasson el a környezetbarát hulladékhasznosítóhoz.
Műszaki adatokVezérelhető készülékek: 10Mérete H x Sz x M: 217 x 50 x 22 mm Súly : 102 g (elem nélkül) Infravörös LED: 1-es lézerosztály
Az elemek áramellátása: 2 db 1,5 V-os AAA / LR03 mini ceruza elem (nem tartozik a csomagba)
Üzemelési hőmérséklet: + 5 – +35°C Tárolási hőmérséklet : -20 - +50 °C
Nedvesség: 5 - 90 % (nem kondenzálódó)
Megfelelőségre vonatkozó tudnivalókA készülék megfelel 2004/108/EC irányelv alapvető elvá-rásainak és más idevonatkozó előírásoknak.
BDA_SFB 10.1 A1 - DT-55975_hu.indd 78 10.10.2010 15:50:57
- 79 -
GyártjaKOMPERNASS GMBH BURGSTRASSE 21 44867 BOCHUM, GERMANY
www.kompernass.com
Garancia és szervizA készülékre 3 év garanciát adunk a vásárlás dátumától számítva. A készüléket gondosan gyártottuk, és szállítás előtt lelkiismeretesen ellenőriztük. Kérjük, a vásárlás iga-zolására őrizze meg a pénztári blokkot. Kérjük, garan-ciaigény esetén vegye fel a kapcsolatot telefonon az Ön közelében lévő szervizzel. Csak ebben az esetben garan-tálhatjuk, hogy ingyen tudja beküldeni az árut.
A garancia csak anyag- és gyártási hibára vonatkozik, nem pedig szállítási kárra, kopó alkatrészekre vagy a törékeny részek (pl. kapcsoló vagy elem) sérülésére.
A termék csak magán és nem pedig kereskedelmi haszná-latra készült. A garancia érvényét veszti visszaélésszerű vagy szakavatatlan kezelés, erőszak alkalmazása vagy olyan beavatkozások esetén, amelyeket nem engedélyezte-tett szervizelő üzleteink hajtottak végre.
Az ön törvényes jogait ez a garancia nem korlátozza.
A garanciális idő nem hosszabbodik meg a jótállással. Ez a kicserélt vagy javított részekre is vonatkozik. Az esetlegesen már a vételkor meglévő hibákat és hiányosságokat azonnal a kicsomagolás után , de legkésőbb két nappal a vásárlás dátumától számítva jelenteni kell. A garanciális idő lejárta után esedékes javítások költségvonzatúak.
Kompernass Service HungaryTel.: 06 40 104680 e-mail: [email protected]
BDA_SFB 10.1 A1 - DT-55975_hu.indd 79 10.10.2010 15:50:57

- 80 -
BDA_SFB 10.1 A1 - DT-55975_hu.indd 80 10.10.2010 15:50:57