Embed Size (px)
Citation preview

Kit
Musicmaker's Kits Inc.
P.O. Box 2117 Stillwater, MN 55082
(651) 439 9120 www.harpkit.com
LIMERICK LAP HARP

2
PARTS LIST: 1 Set of Assembly Instructions
1 Neck/Pillar piece 2 Sides 1 Base 1 Top 1 Back (lam. cherry/walnut) 1 Soundboard (lam. birch) 1 Reinforcement bar 2 Bottom trim pieces (¼ x ¾ x about 14)
HARDWARE:
22 Standard zither tuning pins 4 Enlarged hole zither tuning pins 26 Threaded bridge pins Allen wrench 5/64" 23 Medium brass eyelets 3 Large brass eyelets 1/2 oz. Tiny nails 5 Wood screws, 1-5/8" 2 Wood screws, 3” 2 Drill bits 1/8” and #24 1 L-shaped tuning wrench 1 Set of strings, low-C tuning (Nylon or Wire) 1 Scrap piece Spacing Guide
DO NOT ASSEMBLE THIS PROJECT WITH SUPERGLUE OR HOT MELT GLUE!
Find a good woodworking glue such as Elmer's Carpenter's Wood Glue or Titebond. Be sure to put enough glue on the joint to wet the entire surfaces to be joined. A good sign of proper gluing is that a little excess will squeeze out around the joint when clamping pressure is applied. Too little glue may cause the parts to separate later, whereas too much glue makes things messy. We always keep a damp rag handy for quick cleanup, as necessary. It is especially helpful to keep your fingers clean while gluing, because gluey fingerprints have the embarrassing tendency to appear on the finished product in places you never expected. Most woodworking adhesives "set" sufficiently after 30 minutes of clamping to allow you to proceed. Check your dispenser for recommended drying times.
BEFORE YOU BEGIN Please take the time to check over the parts of our kit now, to make sure everything is there. If you discover a problem, call us right away so we can rectify it quickly without causing you much delay in your project. We also suggest skimming through the entire directions before beginning, just to get an overview of the project. You may decide that you need to gather more tools or purchase a few optional decorations or accessories to enhance the finished instrument. Now is a good time to decide so you can avoid delays when you reach those steps of construction.
If you have any questions about the assembly process – please visit our
online Builder’s Forum at www.harpkit.com/forum

3
ASSEMBLY INSTRUCTIONS: _____1. You will use the two SIDES, the TOP and the BASE for assembling the main frame of the soundchamber. Notice that the two SIDES are right and left, and you'll want to arrange the pieces so that they will fit the TOP and BASE pieces properly. Set it up without glue first to make sure everything fits well (we even like to screw the frame pieces together dry in order to check the fit of the NECK/PILLAR piece before proceeding with glue). See Step 16 if the parts need some adjustment.
NOTE: The TOP piece has an arch sanded in the front side, just for looks. Make sure that faces forward on the harp frame. When satisfied with the fit, use a 1/8" drill bit to bore pilot holes through the TOP piece into the SIDES at the positions of the two holes pre-drilled into the TOP. Use 3" screws to fasten the TOP to the SIDES.
NOTE: The BASE has five holes already drilled through, and they are countersunk on the outside, so when you put the BASE on, the countersunk side should be facing outward. The BASE piece is meant to fit between the slots in the sides. This will allow you to slide the BACK and the SOUNDBOARD up into place from the bottom. Use four 1-5/8" screws to fasten the BASE to the SIDES. When satisfied with the fit of all four parts, re-assemble them all with glue and screws. Allow about 30 minutes drying time. _____2. Select which face of the BACK that you want to show outward on the harp and test-fit the BACK by sliding it into place in the SIDES, from the bottom up. It should overlap the BASE slightly, but you can trim off the excess later.
HINT: Be careful when drilling the pilot holes. We want the screws to be closer to the inside of the harp than the outside, but you may need to drill the pilot holes at a slight angle in order to get the screws to enter the sides firmly without cracking the surface of the wood.

4
When satisfied with the fit, remove the BACK and squeeze a bead of glue into the slots of the frame. You will save yourself some mess by squirting the glue into the slots so it does not run down the SIDES of the frame. Put a little glue near the corners of the BASE also, as shown. Then slide the BACK into place again.
Now you can lift the bottom lip of the BACK and squirt some glue along the edge of the BASE. Use weights, clamps, or the small nails provided to secure the BACK to the BASE until the glue dries (the nails will be covered over later). NOTE: Pound the nails in fully so that there is a slight dimple in the wood. This will keep them from interfering with the BOTTOM TRIM strip to be installed later.
_____3. Lay the SOUNDBOARD on your work table with the better side facing down (the side with the punch marks), and mark a center line from the top to the notch at the bottom. Center the REINFORCEMENT BAR on the back of the SOUNDBOARD, starting at the notch. Draw a pencil line around it to mark the proper position, and then take the time to lightly sand the REINFORCEMENT BAR to remove any rough edges.

5
When satisfied, glue the REINFORCEMENT BAR to the inside of the SOUNDBOARD, using some clamps or weights to hold the parts together firmly until dry (about 30 minutes).
_____4. Drill the top 23 holes with the 1/8" (smallest) drill bit provided, all the way through the SOUNDBOARD and the REINFORCEMENT BAR. These holes are drilled straight down, not at an angle.
Drill the bottom three holes with the #24 drill bit to fit larger eyelets. _____5. It is best to sand the front of the SOUNDBOARD before installing it. Sand with the grain, using a fine grade sandpaper (320 - 400 grit), or use an electric orbital sander to remove any roughness, being careful not to sand through the top veneer of wood. NOTE: We suggest that you sign your name and the date on the back of the soundboard so that you will be able to see it through the access holes in the BACK.
_____6. Test fit the SOUNDBOARD to the harp frame. You may have a little difficulty slipping the edges of the SOUNDBOARD into the slots of the SIDES. Reach through the access holes in the BACK to help align the parts. You may also need to taper the edges of the SOUNDBOARD a little to get them to fit the slots. Use coarse paper (80 - 100 grit) to sand the backside of these edges until they fit – it is important to be able to slide this panel easily into place quickly once the glue is applied. _____7. When satisfied with the fit, squirt glue into the slots of both sides and the top, as well as putting some near the corners of the base. DON’T SKIMP ON GLUE HERE --YOU DON’T WANT THE FRONT TO GET PULLED OUT BY THE STRING TENSION! Use a nail to spread it into the slots, working as quickly as you can. Then slide the SOUNDBOARD into place just as you did the BACK panel. Lift the bottom lip of the SOUNDBOARD and squirt some glue under that as well. Then use several of the small nails provided to secure the SOUNDBOARD to the BASE. It's a good idea to add a couple of extra nails near the notch, as shown, because there is a lot of tension and stress at this point.
#24

6
_____8. Use the scrap piece of soundboard material to fill the gap at the bottom of the harp. Just glue and nail it to the BASE, as shown. _____9. Now you can cover the ugly nails at both front and back of the soundchamber, using the BOTTOM TRIM piece provided. You will need to carefully trim it to proper length (we use a disk-sander for careful trimming), as well as sand the upper edges to match the angle of the notches into which they are to fit. Leave any excess width to be trimmed off after they are glued in place. When satisfied with the fit, glue these TRIM pieces into place, holding them with clamps or tape until dry. _____10. Voila! The gluing is all done. Now comes the majority of the sanding. The two most troublesome spots are at the bottom, where you need to trim off any extra wood that hangs down below the BASE, and at the TOP, where you'll want to trim off any extra wood that hangs out over the SIDES. We use electric sanders for these tasks. A belt sander with coarse paper works best for removing wood, and an orbital sander with medium paper is best for smoothing the surfaces. If elbow grease is your only option, wrap coarse (80 - 100 grit) sandpaper around a wood block (scrap of 2 X 4) for wood removal. Then switch to medium (150 - 180 grit) paper for removing the scratches left by the coarse paper. _____11. Now you can spend a quiet evening with final sanding. We recommend rounding over all sharp edges and corners so they feel smooth to the touch. Look also for any machine marks left by our saws, planers and routers. Medium sandpaper, worked with the grain of the wood, will do the job nicely in time. NOTE: Watch closely for any glue residue (runs, drips, smudges) that may be visible on the outside of the instrument. They are hard to see now, but will show up like bugs on your windshield when you apply finish to the wood. Use sandpaper, sharp chisel, scraper, or knife to remove all traces of visible glue. Nothing identifies an amateur more clearly than glue smudges on a finished product.

7
_____12. Test fit the PILLAR/NECK to the soundchamber. THIS PART WILL NOT BE GLUED TO THE HARP. We designed this instrument so that the strings literally hold the harp together. If, at some time in the future, you wish to disassemble the harp for repair or refinishing, all you will need to do is remove the strings and one screw -- the entire NECK/PILLAR assembly will come off again.
The top "knuckle joint" is meant to hold the NECK firmly while allowing a small amount of movement as the harp responds to the tension of the strings.
The bottom of the PILLAR should fit part way into the notch of the SOUNDBOARD, but it will hang out over the front of the BASE by a half inch or so. This joint will be held by one screw, just to prevent the PILLAR from sliding out of position. We try to maintain an even amount of open space around the notch, so the SOUNDBOARD does not touch the PILLAR. Contact here may dampen the sound of the lower strings. We glued the NECK/PILLAR together to fit one of the kits from the same batch of parts as your kit, so it should fit quite well. A slight (1/8") gap at the top or bottom is OK, as the string tension will draw them together, but a larger gap may require some preparation work before proceeding.
If you have a large gap at the top of the soundchamber, where the rounded "knuckle joint" is located, then you'll need to remove some wood from the bottom of the PILLAR. This is not difficult if you have a disk sander, but you must be careful to maintain the same angle and tilt that is already there. The PILLAR does not stand vertically, but is purposely canted to one side so the strings remain centered. Hopefully, you'll not have to monkey with this joint. If there is a large gap at the bottom of the PILLAR, a simple solution would be to fill the space with a scrap of wood. Left over pieces from the access holes in the BACK might work perfectly for this.

8
_____13. Lay the harp body on its back (put down a towel down to protect the wood), with the base facing you. Hold the PILLAR/NECK in position so it is centered in the notch, not touching the SOUNDBOARD.
You'll want to drill a 1/8" pilot hole up into the bottom of the PILLAR through this hole. Insert a 1-5/8" screw into that hole and tighten. Now your harp is assembled! The strings will draw the joints more firmly together.
NOTE: Do not use any glue here.
_____14. This is a good time to decorate your harp before the final finish is applied. Decorative inlay, hand painting, drawing or wood burning, etc. can add a special creative and personal touch. Note that you can remove the NECK/PILLAR from the SOUNDCHAMBER for sanding, decorating, and finishing.
_____15. Dust the harp with a clean rag before applying the finish.
_____16. Apply the finish of your choice. It will be easier to apply the finish if you remove the NECK/PILLAR assembly from the harp body. Here are a few guidelines for selecting a good protective coating:
STAIN -- STAINS are coloring agents and should only be used if you dislike the natural color of the wood. We usually do not apply stains to our projects, especially when they are made with naturally beautiful hardwoods such as cherry or walnut. These woods look very nice with just a clear finish. But, if you want to color the wood differently, your staining should be accomplished before applying a surface finish such as oil, varnish, or lacquer. OIL -- An oil finish will give your wood a low luster appearance, bringing out the natural color of the grain, but it tends soak into the wood and appear dry and "thirsty" after awhile. The principal advantage of an oil finish is that it can be applied and wiped dry immediately, so you can proceed to installing hardware (and strings) right away. The disadvantages of oil are that it usually does not give much surface protection or sheen, although there are some brands that include waxes and/or varnishes to give more surface build-up and luster. VARNISH -- Any regular varnish will work fine on this project, but we recommend our wipe-on gel urethane called MUSICMAKER'S INSTRUMENT FINISH. The advantages of this finish are its simple application, durability, and deep, soft luster. LACQUER -- Many professional instrument makers still use lacquer for their finish. The most readily available lacquer is called Deft Clear Wood Finish. It is best to purchase a can of liquid to brush on as a sealer coat first, and then use an aerosol can of the same product to spray on the final coats. The advantage of this finish is its quick drying time, but the disadvantage is the strong odor of the toxic lacquer fumes. CAUTION: Lacquer finish will not work over Heat Transfer decorations -- it dissolves the toner.
1/8" bit

9
INSTALLING HARDWARE CAUTION: It is smart to make yourself a couple protective pads out of scrap wood that you can place around the area where you are pounding with a hammer. One slip of the tool can cause significant damage to the finished surface of your beautiful instrument. Or, if you have a drill press available, you can “press” the pins into place (with the machine turned off) without using a hammer at all.
_____17. Attaching the hardware is easier to do if the PILLAR/NECK piece is separated from the body of the harp. Place a towel on your work table (under the NECK) to protect the wood while you pound.
Lubricate the threaded BRIDGE PINS by scraping the threads across some candle wax. Pound (or press) them into the lower row of holes drilled into the neck, until the head of the pin is about 5/8" above the wood. Use the 5/8” SPACING GUIDE to double-check the pin height, using the 5/64" Allen wrench to adjust them if necessary.
NOTE: Our THREADED BRIDGE PINS are adjustable in depth, allowing you to change the space between the harp string and the wood surface of the neck, using a 5/64" Allen wrench. This will be important later when you want to install sharping levers. _____18. DO NOT LUBRICATE THE THREADS OF THE TUNING PINS! Please find the four TUNING PINS that have the small holes enlarged for the thickest strings. These pins should be located nearest the end of the NECK where the longest strings will be attached. Pound (or press) the TUNING PINS into the upper row of the holes into the neck. Be sure the threaded end goes into the wood. Insert them so they stand about 1" above the wood, as shown above. NOTE: If you pound a tuning pin in too deeply, you can raise it back up by turning it counter-clockwise with the tuning wrench.
_____19. Find the brass EYELETS and push them into the holes in the front of the SOUNDBOARD. These act as string guides. Note that there are three large size (5/32") for the thickest bottom strings. The rest are 1/8" diameter for the other 23 string holes. STRINGING
_____20. Stringing a harp is somewhat of an art. We recommend that you read through these last pages of directions completely before beginning, so you know what to expect. It is not uncommon for people to call us in a panic because their harp either: a) won’t stay in tune; or b) keeps breaking its strings. Careful installation will do much to eliminate these problems. We string this model harp regularly and tune it up to concert pitch right away with rarely a broken string, but it takes a little patience and concentration.
The strings are numbered from 1 (for the smallest) to 26 (for the longest), and they are color-coded to help guide you as you play. "C" strings are all red, and "F" strings are blue.
IF STRINGING WITH WIRE SKIP TO PAGE 15

10
Gather the following tools for this operation:
Set of harp strings with plastic beads Scissors
NOTE: If the color on the strings happens to fade, you can restore it with permanent marker.
_____ 21. Start at the bass (longest) end of the harp with #26 (red). Push the end of the string through the lowest hole in the SOUNDBOARD from back to front.
_____ 22. If it is a tight fit through the eyelet, you may need to flare the end of the eyelet as shown (right). Work the eyelet carefully over any bulky spots. These lowest 9 strings are already knotted for you, so just pull the string through completely until the knot is tight against the inside of the SOUNDBOARD.
NOTE: PULL STRAIGHT THROUGH THE HOLE, NOT AT AN ANGLE, SO AS TO AVOID SCRATCHING THE NYLON AGAINST THE BRASS EYELET.
Thread the other end of the string through the last TUNING PIN at the point of the NECK. Pull it through the PIN until there is some slack below the pin. Turn the PIN clockwise with the tuning wrench. As the string begins to tighten, place it in the groove of the BRIDGE PIN.
HINT: Do not accumulate a lot of windings of string around the TUNING PINS, especially in the bass. They become bulky and cumbersome. If you find yourself with that problem, turn the TUNING PIN backwards to unwind the string then pull more slack through the hole before tightening again. Your goal is to have the string come off the TUNING PIN at about the same height as the groove in the BRIDGE PIN.
_____23. When you come to the .050” and higher strings, tie a knot in the end to hold the string inside the soundboard. Start with a simple overhand knot, but before tightening it, push the loose end part way back into the knot, just to add one more thickness of string to the knot, as shown.
HINT: Smooth nylon is very slippery. We've seen knots slowly untie themselves when the strings are tightened up to pitch. For this reason,
we like to put a tiny drop of Superglue on top of each knot to bind the nylon to itself a little. This will save you much tuning frustration later on.
Tube of Superglue or Krazy glue Tuning wrench

11
_____24. For the rest of the strings (sizes .040” and higher), thread a small plastic bead onto each string before tying the knot. The bead will prevent the knotted string from pulling through the hole in the SOUNDBOARD.
ANOTHER HINT: We also like to anchor the tops of these lighter strings securely to the tuning pins, as follows: Make one or two windings of string around the tuning pin, then cross the next winding over the others so the string is holding itself tightly around the PIN. Otherwise you could experience string slippage and breakage at the tuning pins, especially in the upper half of the instrument.
CAUTION: Nylon strings are somewhat fragile, especially in the upper octaves. Try to avoid scratching them as you install them. Most string breakage occurs at the tuning pin, when the string is pulled forcefully around the sharp corner of the small hole in the metal. You can minimize the problem by installing the string carefully and by anchoring (crossing) the windings before applying too much tension to the strings, so the nylon does not begin to slip back through the hole under tension and become weakened.
_____25. When you come to the lightest strings (.025” diameter), you will need to add a short piece of heavier string into the knot in order to make the knot bulky enough to keep from pulling through the hole in the plastic bead. Just use some scraps of excess nylon from the bottom strings.
When all the strings are installed, tighten them to pitch and allow the instrument to adjust itself to the tension.
TUNING
The strings should all be tuned to the natural C major scale (white keys on the piano). All the red strings will be C notes and the blue ones F notes. Middle C is string number 19 from the top, or the eighth string from the bottom.
Many people are not certain if they are tuning their harp strings to the correct octave. Tuning the strings an octave too low will result in flabby harp strings that don't provide much volume. Tuning the strings too high will cause strings to break. To make sure you are tuning your harp strings to the correct octave, you can double-check the pitch on our website with our "online tuner". www.harpkit.com/freetuner
NOTE: It will take several tunings before the harp will stay in tune. Be patient! It should get better each day.
CONGRATULATIONS! We hope you have enjoyed building this harp and that you enjoy many years of musical pleasure from playing it. We stock a good number of teaching materials and accessories for your instrument to help you get started. Just call us for more information or for placing an order.

12
SHARPING LEVERS Sharping levers are used on folk harps to facilitate key changes. Installing a lever at a string allows you to raise the pitch of that string one-half step by lifting the handle. Thus an F-string can be raised to F# by a simple flick of the lever. Similarly, a B-string may be tuned to Bb so that the lever will raise it to B-natural and release it back to B-flat, as needed. Most folk harp players set the key signature (sharps or flats) on the harp before starting each piece of music. For the key of G, you would engage the levers on all the F strings to produce the F# notes needed for that key (making sure all other notes on the harp are natural). If the following piece were then to be played in the key of F, you would then release the levers on all the F strings to produce F-natural, and also release all the B-string levers to produce Bb. You may install a lever at every string on the harp, or, if you think you won’t use all of them, it would be more cost-effective to select which keys you think you are most likely to use, and then install only the levers necessary for those keys.
Please see our website for current Sharping Lever pricing and availability:
ACCESSORIES FOR YOUR HARP LIMBAG Padded gig Bag for Limerick harp BONES C or W Knee Bones to help hold the harp on your lap CA-30 Chromatic electronic Tuner TUNERCORD External pickup & cord for tuner
See Website or Catalog for Current Pricing
KEY OF E: requires F# and C# and G# and D# KEY OF A: requires F# and C# and G# KEY OF D: requires F# and C# KEY OF G: requires F# KEY OF C: requires no sharps or flats KEY OF F: requires Bb KEY OF Bb: requires Bb and Eb KEY OF Eb: requires Bb and Eb and Ab
13
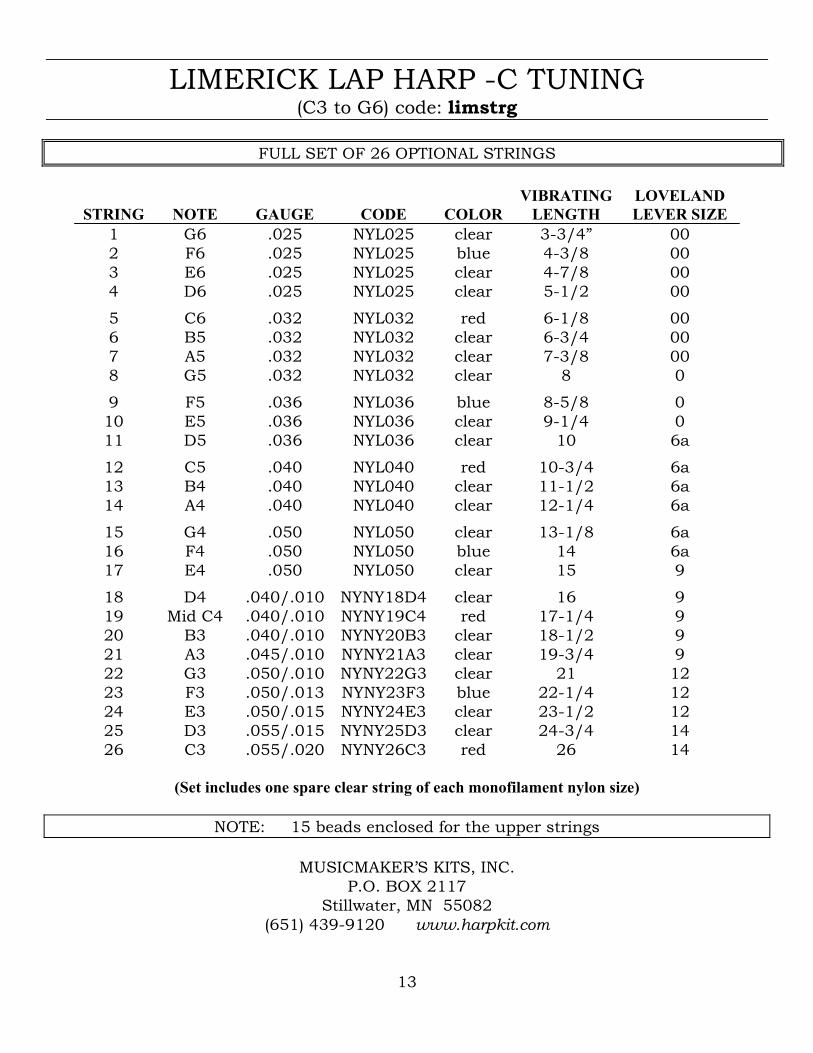
LIMERICK LAP HARP -C TUNING (C3 to G6) code: limstrg
FULL SET OF 26 OPTIONAL STRINGS
STRING
NOTE
GAUGE
CODE
COLOR VIBRATING
LENGTH LOVELAND LEVER SIZE
1 G6 .025 NYL025 clear 3-3/4” 00 2 F6 .025 NYL025 blue 4-3/8 00 3 E6 .025 NYL025 clear 4-7/8 00 4 D6 .025 NYL025 clear 5-1/2 00
5 C6 .032 NYL032 red 6-1/8 00 6 B5 .032 NYL032 clear 6-3/4 00 7 A5 .032 NYL032 clear 7-3/8 00 8 G5 .032 NYL032 clear 8 0
9 F5 .036 NYL036 blue 8-5/8 0 10 E5 .036 NYL036 clear 9-1/4 0 11 D5 .036 NYL036 clear 10 6a
12 C5 .040 NYL040 red 10-3/4 6a 13 B4 .040 NYL040 clear 11-1/2 6a 14 A4 .040 NYL040 clear 12-1/4 6a
15 G4 .050 NYL050 clear 13-1/8 6a 16 F4 .050 NYL050 blue 14 6a 17 E4 .050 NYL050 clear 15 9
18 D4 .040/.010 NYNY18D4 clear 16 9 19 Mid C4 .040/.010 NYNY19C4 red 17-1/4 9 20 B3 .040/.010 NYNY20B3 clear 18-1/2 9 21 A3 .045/.010 NYNY21A3 clear 19-3/4 9 22 G3 .050/.010 NYNY22G3 clear 21 12 23 F3 .050/.013 NYNY23F3 blue 22-1/4 12 24 E3 .050/.015 NYNY24E3 clear 23-1/2 12 25 D3 .055/.015 NYNY25D3 clear 24-3/4 14 26 C3 .055/.020 NYNY26C3 red 26 14
(Set includes one spare clear string of each monofilament nylon size)
NOTE: 15 beads enclosed for the upper strings
MUSICMAKER’S KITS, INC.
P.O. BOX 2117 Stillwater, MN 55082
(651) 439-9120 www.harpkit.com
14
LIMERICK LAP HARP
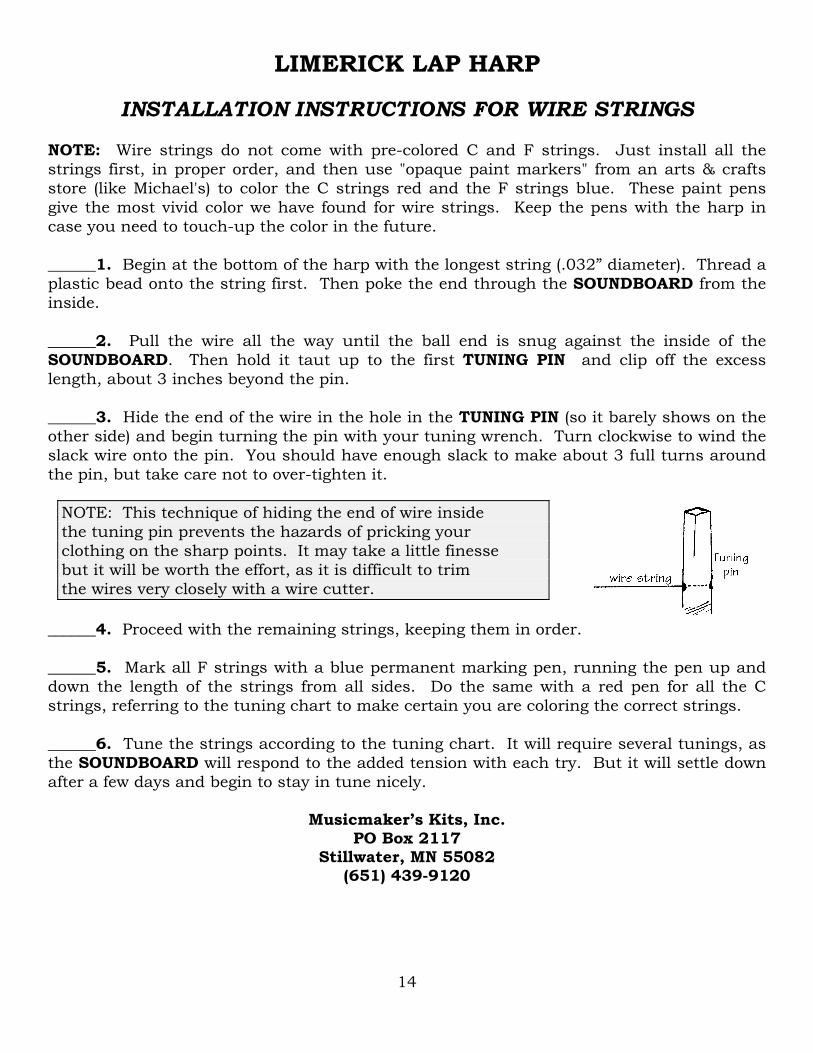
INSTALLATION INSTRUCTIONS FOR WIRE STRINGS NOTE: Wire strings do not come with pre-colored C and F strings. Just install all the strings first, in proper order, and then use "opaque paint markers" from an arts & crafts store (like Michael's) to color the C strings red and the F strings blue. These paint pens give the most vivid color we have found for wire strings. Keep the pens with the harp in case you need to touch-up the color in the future. ______1. Begin at the bottom of the harp with the longest string (.032” diameter). Thread a plastic bead onto the string first. Then poke the end through the SOUNDBOARD from the inside. ______2. Pull the wire all the way until the ball end is snug against the inside of the SOUNDBOARD. Then hold it taut up to the first TUNING PIN and clip off the excess length, about 3 inches beyond the pin. ______3. Hide the end of the wire in the hole in the TUNING PIN (so it barely shows on the other side) and begin turning the pin with your tuning wrench. Turn clockwise to wind the slack wire onto the pin. You should have enough slack to make about 3 full turns around the pin, but take care not to over-tighten it.
______4. Proceed with the remaining strings, keeping them in order. ______5. Mark all F strings with a blue permanent marking pen, running the pen up and down the length of the strings from all sides. Do the same with a red pen for all the C strings, referring to the tuning chart to make certain you are coloring the correct strings. ______6. Tune the strings according to the tuning chart. It will require several tunings, as the SOUNDBOARD will respond to the added tension with each try. But it will settle down after a few days and begin to stay in tune nicely.
Musicmaker’s Kits, Inc. PO Box 2117
Stillwater, MN 55082 (651) 439-9120
NOTE: This technique of hiding the end of wire inside the tuning pin prevents the hazards of pricking your clothing on the sharp points. It may take a little finesse but it will be worth the effort, as it is difficult to trim the wires very closely with a wire cutter.

15
LIMERICK LAP HARP -C TUNING (C3 to G6) WIRE STRINGS code: limstrgwr
FULL SET OF 26 STRINGS
STRING
NOTE
GAUGE
CODE
COLOR
VIBRATING LENGTH
LOVELAND LEVER SIZE
1 G6 .010 BALL010 clear 3-3/4” 00 2 F6 .010 BALL010 blue 4-3/8 00 3 E6 .010 BALL010 clear 4-7/8 00
4 D6 .012 BALL012 clear 5-1/2 00 5 C6 .012 BALL012 red 6-1/8 00 6 B5 .012 BALL012 clear 6-3/4 00
7 A5 .014 BALL014 clear 7-3/8 00 8 G5 .014 BALL014 clear 8 0
9 F5 .016 BALL016 blue 8-5/8 0 10 E5 .016 BALL016 clear 9-1/4 0
11 D5 .018 BALL018 clear 10 0 12 C5 .018 BALL018 red 10-3/4 0
13 B4 .020 BALL020 clear 11-1/2 2 14 A4 .020 BALL020 clear 12-1/4 2
15 G4 .023 BALL023 clear 13-1/8 2 16 F4 .023 BALL023 blue 14 4 17 E4 .023 BALL023 clear 15 4 18 D4 .023 BALL023 clear 16 4
19 Mid C4 .025 BALL025 red 17-1/4 4 20 B3 .025 BALL025 clear 18-1/2 4 21 A3 .025 BALL025 clear 19-3/4 4 22 G3 .025 BALL025 clear 21 5
23 F3 .032 BALL032 blue 22-1/4 5 24 E3 .032 BALL032 clear 23-1/2 5 25 D3 .032 BALL032 clear 24-3/4 5 26 C3 .032 BALL032 red 26 5
(Set includes one spare string of each plain wire size)
NOTE: 26 beads (8mm size, clear plastic) enclosed for all strings
MUSICMAKER’S KITS, INC. P.O. BOX 2117
Stillwater, MN 55082 (651) 439-9120 www.harpkit.com


![Introduction - University of California, Riversidemath.ucr.edu/~kelliher/papers/StokesEigenvalues.pdf · To prove Theorem 1.1 we adapt Filonov’s proof in [6] ... Let n be the outward-directed](https://img.pdfslide.tips/doc/110x75/5a8886f87f8b9a882e8e4456/introduction-university-of-california-kelliherpapersstokeseigenvaluespdfto.jpg)