Embed Size (px)
Citation preview

Le manuel complet
Par les développeurs
V 2.4
Copyright © 2007-2009 The Open Source Geospatial Foundation

GeoNetwork opensource V 2.4 ii
Table of Contents
Préface ..................................................................................................................................... viI. Guide utilisateur ...................................................................................................................... 1
1. A Geographic Information Management System for all ..................................................... 21.1. Introduction ......................................................................................................... 2
What is GeoNetwork opensource ........................................................................ 2Background and evolution .................................................................................. 2The use of International Standards ..................................................................... 3Harvesting geospatial data in a shared environment ............................................. 3
1.2. GeoNetwork and the Open Source Community Development ................................. 32. Pour démarrer ............................................................................................................... 5
2.1. Recherche par défaut .......................................................................................... 52.2. Recherche par catégories .................................................................................... 62.3. Recherche avancée ............................................................................................. 72.4. Analyser les résultats de la recherche ................................................................ 102.5. Privilèges, rôles and groupes d'utilisateurs .......................................................... 12
3. Viewing and Analyzing the Data .................................................................................... 133.1. Meta Data Description ....................................................................................... 13
Identification Section ......................................................................................... 13Distribution Section ........................................................................................... 16Reference System Section ................................................................................ 16Data Quality Section ......................................................................................... 17Metadata Information Section ............................................................................ 17
4. Ajout d'une nouvelle métadonnée et saisie de l'information ............................................. 184.1. Utilisation de l'éditeur en ligne pour la création d'une nouvelle métadonnée ............ 18
The steps in more details ................................................................................. 19Switching Editing Views from Default to Advanced to XML View .......................... 19Utiliser les commandes basiques de la métadonnée champs de l'éditeur .............. 22
4.2. Entering Metadata for your Map ......................................................................... 23Entering Metadata For Your Map ...................................................................... 23Creating a Thumbnail ....................................................................................... 25Linking data for download ................................................................................. 26Assigning Privileges for a Map .......................................................................... 27Assigning Categories for a Map ........................................................................ 29
4.3. Uploading a New Record using the XML Metadata Insert Tool .............................. 295. Métadonnées dans la gestion des données ................................................................... 32
5.1. Qu'est ce que les métadonnées ? ....................................................................... 325.2. Quels sont les standards sur les métadonnées ? ................................................. 325.3. Pourquoi avons nous besoin de standards ? ....................................................... 325.4. Les standards pour les métadonnées géographiques ........................................... 325.5. Profile de métadonnées ..................................................................................... 335.6. Transition entre les standards de métadonnée .................................................... 33
6. Installing the software ................................................................................................... 346.1. New version - New funtionalities ......................................................................... 346.2. Where do I get the installer? .............................................................................. 356.3. System requirements ......................................................................................... 35
Additional Software ........................................................................................... 35Supported browsers ......................................................................................... 35

GeoNetwork opensource V 2.4 iii
6.4. How do I install GeoNetwork opensource? .......................................................... 36On Windows .................................................................................................... 36Installation using the platform independent installer ............................................ 37Commandline installation .................................................................................. 37
II. Guide des administrateurs .................................................................................................... 397. Configuration simple ..................................................................................................... 40
7.1. Configuration du système ................................................................................... 40Paramètre général du site. .............................................................................. 42Serveur. ........................................................................................................... 42Connection distante (CSW, Z39.50) .................................................................. 42Configuration du proxy ...................................................................................... 43Notification email .............................................................................................. 43Métadonnées supprimées ................................................................................. 43Authentification LDAP ....................................................................................... 43
8. User and Group Administration ..................................................................................... 448.1. Creating new user Groups ................................................................................. 448.2. Creating new Users ........................................................................................... 468.3. User Profiles ..................................................................................................... 47
9. Import facilities ............................................................................................................. 499.1. Batch import ...................................................................................................... 49
Structured import .............................................................................................. 5010. Moissonnage .............................................................................................................. 52
10.1. Introduction ..................................................................................................... 5210.2. Présentation du mécanisme ............................................................................. 5210.3. Cycle de vie du moissonnage ........................................................................... 5310.4. Moissonnages multiples et hiérarchie ................................................................ 5310.5. Autres remarques ............................................................................................ 53
Principes .......................................................................................................... 53Moissonnage de catalogue GeoNetwork ............................................................ 54Moissonnage de répertoire WebDAV ................................................................. 54Moissonnage de service CSW .......................................................................... 54Moissonnage de serveur OAI-PMH ................................................................... 54Moissonnage de service OGC .......................................................................... 54
10.6. La page principale ........................................................................................... 54Info bulle présentant les résultats du moissonnage ............................................. 56
10.7. Ajouter de nouveaux noeuds ............................................................................ 57Ajouter un noeud GeoNetwork .......................................................................... 58Ajouter un noeud de type Web DAV .................................................................. 60Ajouter un noeud de type CSW ........................................................................ 62Ajouter un noeud de type OAI-PMH .................................................................. 63Ajouter un noeud de type service OGC (ie. WMS, WFS, WCS, WPS) .................. 65
11. Metadata ownership ................................................................................................... 6711.1. Introduction ..................................................................................................... 6711.2. Access policy .................................................................................................. 67
Visualization ..................................................................................................... 67Editing ............................................................................................................. 67
11.3. Privileges ........................................................................................................ 6711.4. Ownership transfer ........................................................................................... 68
12. Thesaurus .................................................................................................................. 7012.1. Introduction ..................................................................................................... 70

GeoNetwork opensource V 2.4 iv
12.2. Thesaurus / SKOS format ................................................................................ 7012.3. Thesaurus administration ................................................................................. 70
Creation of a new thesaurus ............................................................................. 71Import existing thesaurus .................................................................................. 71
12.4. Editing/browsing thesaurus: add/remove/browse keywords ................................. 7212.5. Metadata editing: adding keywords ................................................................... 7212.6. Search criteria: keywords ................................................................................. 73
13. GeoNetwork’s Administrator Survival Tool - GAST ........................................................ 7413.1. What is GAST? ............................................................................................... 7413.2. Starting GAST ................................................................................................. 7413.3. Operating modes ............................................................................................. 7413.4. Tools subdivision ............................................................................................. 7513.5. Server and Account configuration dialog ........................................................... 75
14. Localization ................................................................................................................ 7714.1. Localization of dynamic user interface elements ................................................ 77
15. Import / export tools .................................................................................................... 7915.1. Introduction ..................................................................................................... 7915.2. Import ............................................................................................................. 7915.3. Export ............................................................................................................. 80
III. Documentation serveur ........................................................................................................ 8116. Software development ................................................................................................ 82
16.1. System Requirements ...................................................................................... 8216.2. Running the software with a servlet engine ....................................................... 8216.3. Development ................................................................................................... 82
Compiling GeoNetwork ..................................................................................... 82Source code documentation .............................................................................. 83Creating the installer ........................................................................................ 83
17. Harvesting .................................................................................................................. 8417.1. Structure ......................................................................................................... 84
Javascript code ................................................................................................ 84Java code ........................................................................................................ 84XSL stylesheets ............................................................................................... 84
17.2. Data storage ................................................................................................... 8517.3. Guidelines ....................................................................................................... 85
18. Metadata Exchange Format v1.1 ................................................................................. 8718.1. Introduction ..................................................................................................... 8718.2. File format ....................................................................................................... 8718.3. The info.xml file ............................................................................................... 88
Date format ...................................................................................................... 8919. XML Services ............................................................................................................. 91
19.1. Calling specifications ........................................................................................ 91Calling XML services ........................................................................................ 91Exception handling ........................................................................................... 92
19.2. General services .............................................................................................. 94xml.info ............................................................................................................ 94xml.forward ...................................................................................................... 99
19.3. Harvesting services .......................................................................................... 99Introduction ...................................................................................................... 99xml.harvesting.get ........................................................................................... 100xml.harvesting.add .......................................................................................... 103

GeoNetwork opensource V 2.4 v
xml.harvesting.update ..................................................................................... 108xml.harvesting.remove/start/stop/run ................................................................ 109
19.4. System configuration ...................................................................................... 110Introduction .................................................................................................... 110xml.config.get ................................................................................................. 110xml.config.update ............................................................................................ 113
19.5. MEF services ................................................................................................. 115Introduction .................................................................................................... 115mef.export ...................................................................................................... 115mef.import ...................................................................................................... 115Metadata ownership ....................................................................................... 116
19.6. Relations ....................................................................................................... 116Introduction .................................................................................................... 116xml.relation.get ............................................................................................... 116
19.7. Schema information ....................................................................................... 118Introduction .................................................................................................... 118xml.schema.info .............................................................................................. 118
20. Settings hierarchy ..................................................................................................... 12120.1. Introduction .................................................................................................... 12120.2. The system hierarchy ..................................................................................... 12120.3. Harvesting nodes ........................................................................................... 122
Nodes of type geonetwork .............................................................................. 123Nodes of type geonetwork20 ........................................................................... 124Nodes of type webdav .................................................................................... 125Nodes of type csw .......................................................................................... 125
A. Frequently Asked Questions ............................................................................................... 126B. Glossary of Metadata Fields Description .............................................................................. 128C. ISO Topic Categories ......................................................................................................... 132D. Logiciel libre pour les Systèmes d'Information Géographique ................................................ 135
D.1. Serveurs cartographiques ........................................................................................ 135D.2. SIG ........................................................................................................................ 135D.3. Cartographie sur Internet ......................................................................................... 135
Index ..................................................................................................................................... 136

GeoNetwork opensource V 2.4 vi
PréfaceA propos de ce projet. Ce document présente comment utiliser et personnaliser le catalogueGeoNetwork opensource. L'initiative à l'origine de ce projet est la mise en place du cataloguede données spatiales pour l' Organisation pour l'Agriculture et l'Alimentation de l'ONU (FAO)1, leProgramme d'Alimentation Mondial (WFP)2 et le United Nations Environmental Programme (UNEP)3.Actuellement le projet est largement utilisé dans les Infrastructures de données spatial (SDI) dans lemonde entier. Le projet est également un des projets de Open Source Geospatial Foundation (OSGeo)et est disponible sur http://geonetwork-opensource.org.
Information sur la license. Copyright (c) 2007-2008 Open Source Geospatial Foundation (OSGeo4).
You are free to Share — to copy, distribute and transmit the work. Under the following conditions:
• Attribution. You must attribute the work in the manner specified by the author or licensor (but not inany way that suggests that they endorse you or your use of the work).
• No Derivative Works. You may not alter, transform, or build upon this work.
• For any reuse or distribution, you must make clear to others the license terms of this work. The bestway to do this is with a link to this web page.
• Any of the above conditions can be waived if you get permission from the copyright holder.
• Nothing in this license impairs or restricts the author's moral rights.
You may obtain a copy of the License at Creative Commons5
Ce document est au format DocBook.
Information sur les auteurs. Cette documentation a été rédigée par les développeurs du projetGeoNetwork opensource. Si vous avez des questions, vous trouvez des erreurs ou avez desaméliorations à proposer , contactez-nous via la liste de diffusion de GeoNetwork opensource<[email protected]>
1 http://www.fao.org2 http://vam.wfp.org3 http://www.unep.org4 http://www.osgeo.org5 http://creativecommons.org/licenses/by-nd/3.0/

Part I. Guide utilisateurCette section du document présente l'utilisation générale de GeoNetwork pour les utilisateurs ainsi queles gestionnaires de données souhaitant publier les données et les métadonnées.

GeoNetwork opensource V 2.4 2
1. A Geographic Information Management Systemfor all
1.1 Introduction
What is GeoNetwork opensource
GeoNetwork opensource is a standard based and decentralized spatial information managementsystem, designed to enable access to geo-referenced databases and cartographic products from avariety of data providers through descriptive metadata, enhancing the spatial information exchange andsharing between organizations and their audience, using the capacities and the power of the Internet.The system provides a broad community of users with easy and timely access to available spatial dataand thematic maps from multidisciplinary sources, that may in the end support informed decision making.The main goal of the software is to increase collaboration within and between organizations for reducingduplication and enhancing information consistency and quality and to improve the accessibility of a widevariety of geographic information along with the associated information, organized and documented ina standard and consistent way.
Main Features
• Instant search on local and distributed geospatial catalogues
• Uploading and downloading of data, documents, PDF's and any other content
• An interactive Web map viewer that combines Web Map Services from distributed servers aroundthe world
• Online map layout generation and export in PDF format
• Online editing of metadata with a powerful template system
• Scheduled harvesting and syncronization of metadata between distributed catalogues
• Groups and users management
• Fine grained access control
Background and evolution
The prototype of the GeoNetwork catalog was developed by the Food and Agriculture Organizationof the United Nations (FAO) in 2001 to systematically archive and publish the geographic datasetsproduced within the Organization. The prototype was built on experiences within and outside theorganization. It used metadata content available from legacy systems that was transformed into whatwas then only a draft metadata standard, the ISO 19115. Later on, another UN agency, the WorldFood Programme (WFP) joined the project and with its contribution the first version of the software wasreleased in 2003 and operational catalogues were established in FAO and WFP. The system was basedon the ISO19115:DIS metadata standard and embedded the Web Map Client InterMap that supportedOpen Geospatial Consortium (OGC) compliant Web Map Services. Distributed searches were possibleusing the standard Z39.50 catalog protocol. At that moment it was decided to develop the program asa Free and Open Source Software to allow the whole geospatial users community to benefit from thedevelopment results and to contribute to the further advancement of the software.

A Geographic Information Management System for all
GeoNetwork opensource V 2.4 3
Jointly with the UN Environmental Programme (UNEP), FAO developed a second version in 2004. Thenew release allowed users to work with multiple metadata standards (ISO 19115, FGDC and DublinCore) in a transparent manner. It also allowed metadata to be shared between catalogues through acaching mechanism, improving reliability when searching in multiple catalogues.
In 2006, the GeoNetwork team dedicated efforts to develop a DVD containing the GeoNetwork version2.0.3 and the best free and open source software in the field of Geoinformatics. The DVD was producedand distributed in hard copy to over three thousand people and is now also available for download fromthe GeoNetwork Community website1.
The latest release of GeoNetwork opensource is the result of another round of critical improvements,supported by FAO, the UN Office for the Coordination of Humanitarian Affairs (UNOCHA), theConsultative Group on International Agricultural Research (CSI-CGIAR), UNEP and other donors.Support for the final metadata standard ISO19115:2003 has been enabled by using the ISO19139:2007implementation specification schema published in May 2007. The release also serves as the opensource reference implementation of the OGC Catalog Service for the Web (CSW 2.0.1) specification.Improvements to give users a more responsive and interactive experience have been substantial andinclude a new Web map viewer and a complete revision of search interface.
The use of International Standards
GeoNetwork has been developed following the principles of a Free and Open Source Software (FOSS)and based on International and Open Standards for services and protocols, like the ISO-TC211 and theOpen Geospatial Consortium (OGC) specifications. The architecture is largely compatible with the OGCPortal Reference Architecture, i.e. the OGC guide for implementing standardized geospatial portals.Indeed the structure relies on the same three main modules identified by the OGC Portal ReferenceArchitecture, that are focused on spatial data, metadata and interactive map visualization. The systemis also fully compliant with the OGC specifications for querying and retrieving information from Webcatalogues (CSW). It supports the most common standards to specifically describe geographic data(ISO19139 and FGDC) and the international standard for general documents (Dublin Core). It usesstandards (OGS WMS) also for visualizing maps through the Internet.
Harvesting geospatial data in a shared environment
Within the geographic information environment, the increased collaboration between data providersand their efforts to reduce duplication have stimulated the development of tools and systems tosignificantly improve the information sharing and guarantee an easier and quicker access of data from avariety of sources without undermining the ownership of the information. The harvesting funcionality inGeoNetwork is a mechanism of data collection in perfect accordance with both rights to data access anddata ownership protection. Through the harvesting functionality it is possible to collect public informationfrom the different GeoNetwork nodes installed around the world and to copy and store periodically thisinformation locally. In this way a user from a single entry point can get information also from distributedcatalogues. The logo posted on top each harvested record informs the user about the data source.
1.2 GeoNetwork and the Open Source Community Development
The community of users and developers of the GeoNetwork software has increased dramatically sincethe release of version 2.0 in December 2005 and the subsequent releases. At present, the user anddeveloper mailing lists count well over 250 subscriptions each. Subscription to these lists is open to
1 http://geonetwork-opensource.org

A Geographic Information Management System for all
GeoNetwork opensource V 2.4 4
anyone interested. The archive of the mailing lists provides an important resource for users and can befreely browsed online. Members provide feedback within the community and provide translations, newfunctionalities, bug reports, fixes and instructions to the project as a whole. Building a self sustainingcommunity of users and developers is one of the biggest challenges for the project. This community-building process relies on active participation and interaction of its members. It also relies on buildingtrust and operating in a transparent manner, thereby agreeing on the overall objectives, prioritizationand long term direction of the project. A number of actions have been taken by the project team tofacilitate this process.
The foundation for the establishment of a GeoNetwork Advisory Board was laid at the 2006 workshopin Rome and membership criteria were defined.
A work plan is presented and discussed at the yearly GeoNetwork workshop; subsequently, the plan ismaintained and updated throughout the year where needed. The project management team reports backto the advisory board about the reached developments and objectives during the annual workshops.
Two public Websites have been established. One focuses on the users of the software (http://geonetwork-opensource.org), while the other one is dedicated to the developers (http://trac-osgeo.org/geonetwork). Both can be updated and maintained online by trusted members of the community. Theyprovide documentation, bug reporting and tracking, Wiki pages et cetera. A small part of the communityconnects through Internet Relay Chat (IRC) on a public #geonetwork2 channel. But most interactiontakes place on the user3 and the developer4 mailing lists.
During the 2006 workshop, the Project Advisory Board decided to propose the GeoNetwork opensourceproject as an incubator project to the newly founded Open Source Geospatial Foundation (OSGeo)5.This incubation process is currently ongoing but close to conclusions. The project Websites have beenmoved to servers accessible under the umbrella of the OSGeo foundation. Web pages have beenupdated to reflect the OSGeo principles and a source code review performed.
Source code is maintained in a publicly accessible code repository, hosted at an independent serviceprovider, SourceForge.net6 that hosts thousands of FOSS projects. Developers and users have fullaccess to all sections of the source code, while trusted developers can make changes in the repositoryitself. A special mailing list has been established to monitor changes in the code repository. This so-called "commit mailing list" delivers change reports by email to its subscribers.
The documentation is written in DocBook7 format to ensure versioning and support of multiple outputformats (e.g. HTML and PDF).
2 irc://irc.freenode.net/geonetwork3 https://lists.sourceforge.net/mailman/listinfo/geonetwork-users4 https://lists.sourceforge.net/mailman/listinfo/geonetwork-devel5 http://www.osgeo.org6 http://sourceforge.net/projects/geonetwork7 http://www.docbook.org

GeoNetwork opensource V 2.4 5
2. Pour démarrer
Veuillez vous assurer que vous avez ouvert la page d'accueil de votre catalogue GeoNetwork. 1
Il existe plusieurs méthodes pour rechercher des cartes ou d'autres données géographiques dans lecatalogue. Ce guide va vous présenter les méthodes de recherche les plus populaires : recherchepar défaut, recherche avancée et recherche par catégorie. Quelle que soit la méthode que vous avezchoisie, n'oubliez pas que les résultats que vous verrez sont fonction de vos privilèges (Section 2.5,“Privilèges, rôles and groupes d'utilisateurs”) et du groupe auquel vous appartenez.
Le terme données dans ce progamme désigne indifféremment les jeux de données, cartes, tableaux,documents, etc. qui sont liés aux métadonnées d'un enregistrement donné.
2.1 Recherche par défaut
Le mode de recherche par défaut vous permet de chercher du texte (par exemple des mots-clefs ouun nom de lieu) dans l'ensemble du catalogue.
Recherche en texte intégral. Entrez les termes que vous recherchez dans le champ Recherche.Pour rechercher une séquence précise de mots, mettez votre texte entre guillemets.
Le texte et les opérateurs (and, or, not) ne sont pas sensibles à la casse. (Ref. Figure 2.1, “Le champde recherche”).
Figure 2.1. Le champ de recherche
Recherche géographique. Lors d'une recherche géographque, deux options permettent desélectionner une région afin de restreindre l'étendue de la recherche :
Vous pouvez sélectionner une région dans une liste prédéfinie (Figure 2.2, “Le champ région”);
1Si vous avez installé et démarré le logiciel sur votre ordinateur, l'adresse par défaut est http://localhost:8080/geonetwork

Pour démarrer
GeoNetwork opensource V 2.4 6
Figure 2.2. Le champ région
Vous pouvez définir votre propre zone d'intérêt de manière plus interactive. Il vous suffit de la dessinersur la carte du monde miniature affichée sur l'écran. Pour cela, cliquez sur le bouton en haut à droitede la carte (Figure 2.3, “Carte interactive où définir les zones d'intérêt”);
Figure 2.3. Carte interactive où définir les zones d'intérêt
Effectuer une recherche. Les deux types de recherche (texte intégral et géographique) peuvent êtrecombinées pour affiner la requête.
Cliquez sur le bouton Rechercher pour lancer la recherche et afficher les résultats. (Figure 2.4, “Lebouton Rechercher”).
Figure 2.4. Le bouton Rechercher
2.2 Recherche par catégories
Une autre méthode pour rechercher des données dans GeoNetwork depuis la page d'accueil consiste àeffectuer une recherche par catégorie. L'accès à la liste des catégories permet à l'utilisateur d'identifierdes données de manière plus générique : Applications, Autres ressources, Cartes & graphiques,Conférences, Étude de cas, meilleures pratiques, Jeux de données, Photographies, Répertoires,Ressources interactives, Vidéo/Audio.

Pour démarrer
GeoNetwork opensource V 2.4 7
Pour rechercher uniquement des cartes, cliquez sur Cartes & graphiques (Figure 2.5, “Recherche parcatégorie”). À partir de la liste des cartes affichée, vous pouvez accéder à la description d'une carte encliquant sur le bouton Plus d'information qui y est associé.
Figure 2.5. Recherche par catégorie
2.3 Recherche avancée
L'option de recherche avancée (Figure 2.6, “Options de recherche avancée”) fonctionne de manièresemblable à la recherche par défaut. Cependant vous pouvez affiner vos recherches en profitant desdifférents critères proposés, chacun étant axé sur un thème particulier : Quoi ?, Où ?, Quand ?
Figure 2.6. Options de recherche avancée
Pour effectuer une recherche avancée depuis la page d'accueil, cliquez sur Avancée situé sous lebouton Rechercher (ref. Figure 2.7, “Afficher les options de recherche avancée”).
Figure 2.7. Afficher les options de recherche avancée
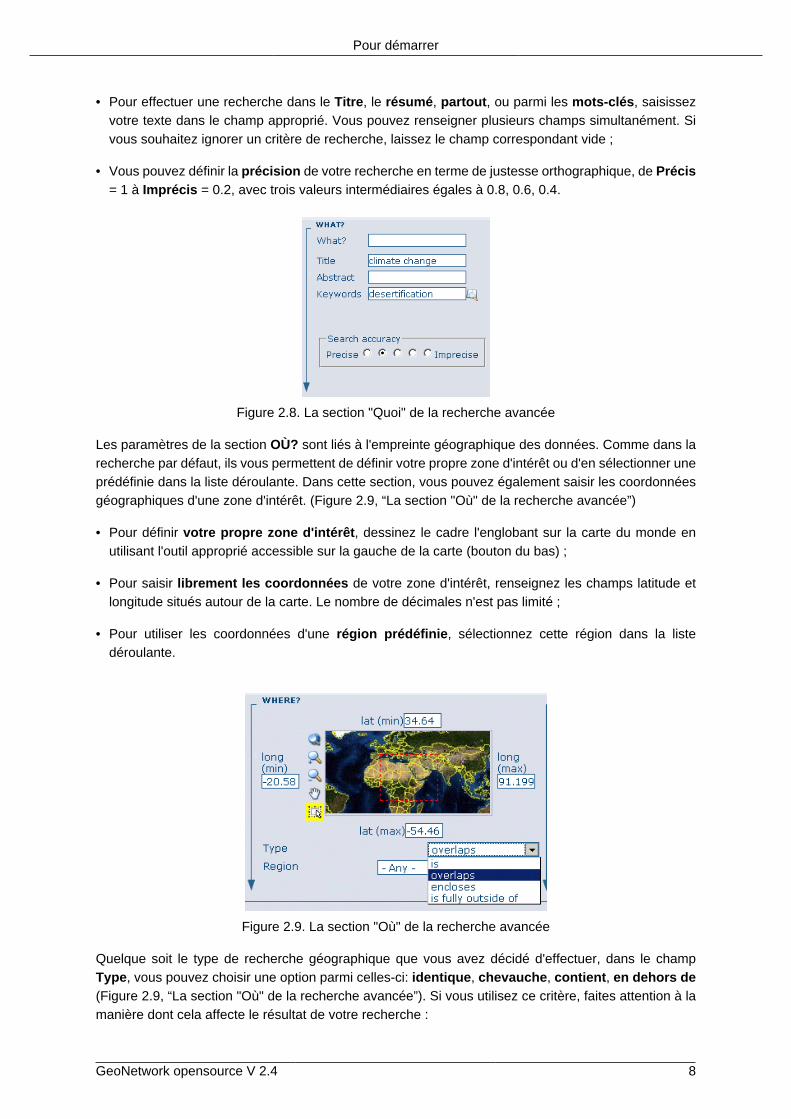
Dans la section QUOI ? tous les éléments sont liés au contenu des données. Par leur intermédiaire,au lieu de chercher uniquement des mots dans l'ensemble des métadonnées, vous pouvez chercherdirectement dans le titre ou le résumé et ajouter des mots-clefs pour affiner votre recherche. Vouspouvez également ajuster le niveau de précision que vous souhaitez atteindre lors de l'exécution devotre requête (Figure 2.8, “La section "Quoi" de la recherche avancée”).
Pour démarrer
GeoNetwork opensource V 2.4 8
• Pour effectuer une recherche dans le Titre, le résumé, partout, ou parmi les mots-clés, saisissezvotre texte dans le champ approprié. Vous pouvez renseigner plusieurs champs simultanément. Sivous souhaitez ignorer un critère de recherche, laissez le champ correspondant vide ;
• Vous pouvez définir la précision de votre recherche en terme de justesse orthographique, de Précis= 1 à Imprécis = 0.2, avec trois valeurs intermédiaires égales à 0.8, 0.6, 0.4.
Figure 2.8. La section "Quoi" de la recherche avancée
Les paramètres de la section OÙ? sont liés à l'empreinte géographique des données. Comme dans larecherche par défaut, ils vous permettent de définir votre propre zone d'intérêt ou d'en sélectionner uneprédéfinie dans la liste déroulante. Dans cette section, vous pouvez également saisir les coordonnéesgéographiques d'une zone d'intérêt. (Figure 2.9, “La section "Où" de la recherche avancée”)
• Pour définir votre propre zone d'intérêt, dessinez le cadre l'englobant sur la carte du monde enutilisant l'outil approprié accessible sur la gauche de la carte (bouton du bas) ;
• Pour saisir librement les coordonnées de votre zone d'intérêt, renseignez les champs latitude etlongitude situés autour de la carte. Le nombre de décimales n'est pas limité ;
• Pour utiliser les coordonnées d'une région prédéfinie, sélectionnez cette région dans la listedéroulante.
Figure 2.9. La section "Où" de la recherche avancée
Quelque soit le type de recherche géographique que vous avez décidé d'effectuer, dans le champType, vous pouvez choisir une option parmi celles-ci: identique, chevauche, contient, en dehors de(Figure 2.9, “La section "Où" de la recherche avancée”). Si vous utilisez ce critère, faites attention à lamanière dont cela affecte le résultat de votre recherche :

Pour démarrer
GeoNetwork opensource V 2.4 9
• Si vous choisissez le type de recherche spatiale identique “Pays”, seules les cartes du payssélectionné seront affichées. En d'autres termes, la carte d'une ville de ce pays ne sera pas affichéedans la liste des résultats de la recherche.
• Si vous choisissez le type de recherche spatiale chevauche “Pays”, toutes les cartes dont l'emprisechevauche ce pays seront affichées dans la liste des résultats : c.-à-d. les pays limitrophes, lecontinent du pays en question et les cartes du monde.
• Si vous choisissez le type de recherche spatiale contient “Pays” vous obtiendrez en premier dans laliste des résultats les cartes du pays suivies de toutes les cartes incluses dans ce dernier.
• De la même manière, si vous choisissez le type de recherche spatiale en dehors d'une régionsélectionnée, seules les cartes répondant strictement à ce critère sont affichées dans la liste desrésultats.
La section QUAND ? vous donne la possibilité de restreindre votre recherche en fonction de critèrestemporels en indiquant une période pour la création ou la publication des données (Figure 2.10, “Lasection "Quand" de la recherche avancée”).
• Pour définir une période, cliquez sur le bouton représentant un calendrier à côté des champs Début- Fin. Utilisez les symboles > et >> en haut du calendrier pour choisir d'abord le mois et l'année avantde cliquer sur le jour ; une date complète est formatée de la manière suivant : AA-MM-JJ.
• Pour effacer les champs de début et fin de période, cliquez sur la croix blanche à la droite du champfin ; l'option N'importe quand sera sélectionnée automatiquement et la recherche sera exécutéesans aucune restriction temporelle.
Figure 2.10. La section "Quand" de la recherche avancée
Enfin, la recherche avancée permet de restreindre la recherche en appliquant des critèressupplémentaires à la source des données, leur catégorie et leur format (Figure 2.11, “Autres optionsde la recherche avancée”).
• Pour limiter vos requêtes à un seul Catalogue parmi ceux rendus accessibles au moment del'installation grâce au mécanisme de moissonnage, cliquez sur le catalogue qui vous intéresse.Autrement, sélectionnez Tous pour chercher dans tous les catalogues. (Pour en savoir plus sur lemoissonnage de métadonnées, veuillez vous référer à la Section 4 Chapitre 1 de ce manuel).
• Pour rechercher des données organisées en Catégories telles que Applications, Jeux de données,etc., sélectionnez dans la liste déroulante la catégorie dans laquelle vous souhaitez effectuer votrerecherche. Autrement, nous vous suggérons de laisser sélectionnée la valeur Tous dans le champCatégories.
• Vous pouvez chercher des cartes numériques ou imprimées. Pour cela, sélectionnez la case àcocher correspondant au type de carte que vous souhaitez rechercher. Si aucune case n'est cochée,la recherche sera effectuée pour les deux types de cartes.
Enfin, vous pouvez personnaliser le nombre de résultats affichés par page dans le champ Nombre derésultats par page.
• Cliquez sur le bouton Rechercher.

Pour démarrer
GeoNetwork opensource V 2.4 10
Figure 2.11. Autres options de la recherche avancée
2.4 Analyser les résultats de la recherche
Le résultat d'une recherche est constitué d'une liste de métadonnées qui devraient correspondre à votrerequête. Pour chaque élément dans cette liste, le titre, un résumé et les mots-clefs sont affichés dans lapage de résultats. En fonction des privilèges qui ont été associés à chaque métadonnée, au maximumquatre sections peuvent être consultées comme le montre la capture d'écran ci-dessous. (Figure 2.12,“Résultats de la recherche”)
Figure 2.12. Résultats de la recherche
1. Métadonnées : La section relative aux métadonnées décrit le jeu de données (par exemple : citation,propriétaire de la donnée, information temporelle / spatiale / méthodologique) et peut éventuellementcontenir des liens vers d'autres sites internet susceptibles de fournir de plus amples informations surle jeu de données.
2. Télécharger : Selon les privilèges associés à chaque résultat, lorsque ce bouton est présent, le jeude données est disponible et téléchargeable. Accéder aux données est simple et rapide puisqu'ilsuffit de cliquer sur le bouton de téléchargement (Figure 2.13, “Un résultat de recherche”) ou d'utiliser

Pour démarrer
GeoNetwork opensource V 2.4 11
le lien approprié dans la section Distribution des métadonnées lorsqu'elles sont affichées en entier(Figure 2.14, “Services disponibles associés à cette ressource”).
Figure 2.13. Un résultat de recherche
Figure 2.14. Services disponibles associés à cette ressource
3. Carte interactive : Le service cartographique est également optionnel. Lorsque ce bouton est visible,une carte interactive pour cette couche d'information est disponible et, par défaut, sera affichée surla carte associée à la recherche simple. Pour mieux voir la carte, cliquez sur Afficher la carte situéen bas à droite de la carte miniature (Figure 2.15, “La carte interactive”).
Figure 2.15. La carte interactive
4. Aperçu visuel : Des aperçus visuels de la donnée de petite et de grande taille permettent d'évaluerson utilité, en particulier lorsque la carte interactive n'est pas disponible. Il suffit de cliquer sur la petiteimage pour l'agrandir. (Figure 2.16, “Aperçu visuel de grande taille”)

Pour démarrer
GeoNetwork opensource V 2.4 12
Figure 2.16. Aperçu visuel de grande taille
2.5 Privilèges, rôles and groupes d'utilisateurs
GeoNetwork utilise un système constitué de Privilèges, de Rôles et de groupes d'utilisateurs.
Il n'y a pas de restrictions imposées aux utilisateurs désireux de rechercher ou d'accéder à desinformations publiques contenues dans un catalogue GeoNetwork opensource. Pour accéder à desinformations à accès restreint ou à des fonctionnalités avancées, il est nécessaire de posséder uncompte afin de se connecter sur le site. Celui-ci devrait être fourni par l'administrateur de Geonetwork.
Pour se connecter, il suffit de se rendre sur la page d'accueil, de saisir son nom d'utilisateur et sonmot de passe dans l'angle en haut à droite et de cliquer sur le bouton de connexion. (Ref. Figure 2.17,“Bouton de connexion au catalogue”)
Figure 2.17. Bouton de connexion au catalogue
Privilèges. En fonction des privilèges associés à un enregistrement de métadonnées et de votre rôleen tant qu'utilisateur authentifié, vous serez à même de lire des informations qui y sont liées et aurez lapossibilité de télécharger ou de visualiser interactivement les données associées à cet enregistrement.
Rôles. Les utilisateurs avec un rôle d'Éditeur peuvent créer, importer et éditer des enregistrementsde métadonnées. Ils peuvent également charger des données et configurer les liens vers les servicesde cartographie interactive.
Groupes d'utilisateurs. Chaque utilisateur authentifié est membre d'un groupe de travail particulieret a la possibilité de visualiser des données au sein de ce groupe.

GeoNetwork opensource V 2.4 13
3. Viewing and Analyzing the Data
Once you have completed your search, you view details of a particular record by clicking on theMetadata button.
The metadata profiles used by GNos to present and describe geographic data and general documentsstored in the catalogue are based on the International Standard ISO 19115:2003, encoded accordingto the implementation schema 19139:2007, the FGDC and the international standard Dublin Core.
In this guide the ISO 19139 metadata implementation will be described in details since it is alsosuggested as profile for the creation of new metadata records.
3.1 Meta Data Description
The metadata ISO 19139 profile used by GeoNetwork opensource to describe the geographic data andservices is based on the ISO standard 19115:2003 and provides information related to the identification,the maintenance and constraints, the spatial and temporal extent, the spatial representation andreference, the quality and distribution of a geographic dataset.
The metadata profile is organized in sections and the most important, illustrated in Figure 3.1,“Main metadata sections”, are the: Identification Section, Distribution Section, Reference SystemSection, Data Quality Section and Metadata Section. These sections are described here in details.
Figure 3.1. Main metadata sections
Identification Section
This section includes information on the citation of the resource (title, date of creation or publication,edition, presentation form), the abstract, the purpose and the present status of the resource thatcan be defined among the options: completed, historical archive, obsolete, ongoing, planned, requiredor under development. (Figure 3.2, “Identification information”).

Viewing and Analyzing the Data
GeoNetwork opensource V 2.4 14
Figure 3.2. Identification information
This section also contains information about the person or organization responsible for the data andwho is considered to be a point of contact for the resource i.e. the dataset owner, originator, distributor,publisher, etc. and it provides information on data maintenance i.e. annually, monthly, daily, notplanned, as needed, etc. (Figure 3.3, “Point of Contact”)
Figure 3.3. Point of Contact

Viewing and Analyzing the Data
GeoNetwork opensource V 2.4 15
Elements for keywords and for describing restrictions on data access and use are also included inthis section in addition to spatial representation info like data type (vector, raster, text table, etc.)(Figure 3.4, “Descriptive keywords”).
Figure 3.4. Descriptive keywords
The identification section provides information about the scale, the language and character set usedwithin the resource and the list of ISO categories through which your map could be classified (Figure 3.5,“Scale and other data properties”).
Figure 3.5. Scale and other data properties
Finally, the temporal and spatial extent are also defined in this section. The temporal extent is definedthrough the starting and ending date of data validation (Figure 3.6, “ Temporal extent ”);
Figure 3.6. Temporal extent
The spatial extent of the interested area is defined through geographic coordinates or through theselection of a country or region from a predefined list (Figure 3.7, “ Geographic bounding box ”). Freetext supplemental information can be added to complete the data identification section.

Viewing and Analyzing the Data
GeoNetwork opensource V 2.4 16
Figure 3.7. Geographic bounding box
Distribution Section
This section provides metadata elements for accessing other useful on-line resources availablethrough the web. The distribution elements allow for on-line access using an URL address or similaraddressing scheme and provide the protocol for the proper connection for accessing geographic dataor any other types of digital documents using the download function. Furthermore, it is possible to linka metadata with a predefined map service through the on line resource and see the map interactively(Figure 3.8, “Distribution information”).
Figure 3.8. Distribution information
Reference System Section
The Spatial Reference System section defines metadata required to describe the spatial referencesystem of a dataset. It contains one element to identify the name of the reference system used(Figure 3.9, “Reference system”). Using elements from the advanced form, this section may bemodified to provide more details on data projection, ellipsoid and datum. Note that if this informationis provided, a reference system identifier is not mandatory.

Viewing and Analyzing the Data
GeoNetwork opensource V 2.4 17
Figure 3.9. Reference system
Data Quality Section
The Data Quality section provides a general assessment of the quality of the data. It describes thedifferent hierarchical levels of data quality, namely a dataset series, dataset, features, attributes,etc. This section also contains information about sources of the input data, and a general explanationof the production processes (lineage) used for creating the data (Figure 3.10, “Data quality”).
Figure 3.10. Data quality
Metadata Information Section
This section contains information about the metadata itself: the Global Unique Identifier (GUID)assigned to the record (this is the ‘File identifier’), language and character set used, date of last edit(‘Date stamp’) and the metadata standard and version name of the record. It also contains informationon the metadata author responsible for the metadata record; this person can also be a point of contactfor the resource described. Information on the Metadata author is mandatory (Figure 3.11, “Metadataproperties”).
Figure 3.11. Metadata properties

GeoNetwork opensource V 2.4 18
4. Ajout d'une nouvelle métadonnée et saisie del'information
Cette partie présente la manière de créer et saisir des métadonnées dans le catalogue en utilisant soitl'éditeur en ligne, soit l'outil d'insertion basé sur les documents XML. Dans les deux cas, vous utiliserezle système de modèles (templates), l'ajout d'aperçu, le téléchargement de données, le lien vers desservices et la gestion des privilèges pour l'accès aux données et aux métadonnées.
Pour ajouter et éditer une métadonnée, vous devez être enregistré comme Editeur dans le groupedans lequel vous souhaitez l'ajouter. Si ce n'est pas le cas, contactez l'administrateur.
Pour la création d'une métadonnée utilisant l'éditeur en ligne, Géosource fournit un certain nombrede modèles de métadonnées basés sur les normes ISO 19115/119. Ces modèles permettent dedécrire divers types de ressource (données vecteur ou raster, services WMS/MFS, service detéléchargement...) avec un nombre minimal d'éléments pré-remplis dans la vue découverte. Cesmodèles peuvent être complétés avec des éléments de la vue avancée.
Afin de saisir correctement une métadonnée, vous devez donner un maximum de détails pour décrirela ressource en prenant en compte les éléments qui ont été présentés dans le chapitre précédent.
Les champs les plus importants à remplir sont les suivants :Le titre, la date de création et depublication, le résumé, la langue utilisée pour documenter la donnée, le thème, l'échelle, lamaintenance et la fréquence de mise à jour, la langue de la métadonnée.
En plus des champs obligatoires, nous recommandons de remplir ces champs optionnels maisimportants (si ces informations sont disponibles) :l'objectif, les mots-clés, la forme, l'état, le typede erprésentation spatiale, la localisation géographique, les informations sur le système deréférence, l'étendue temporelle, les informations sur la qualité, les contraintes d'accès etd'utilisation, le point de contact, les informations sur la distribution (ressource en ligne)
Vous avez également la possibilité de fournir un aperçu de la ressource, qui apparaîtra dans les résultatsde la recherche.
La prochaine section vous guidera vers le processus de création utilisant l'éditeur en ligne.
4.1 Utilisation de l'éditeur en ligne pour la création d'une nouvellemétadonnée
1. Dans la page d'accueil, cliquez sur l'l'onglet "administration".
2. Selectionner"nouvelle métadonnée" ) partir de la liste dans la page d'administration.
3. Selectionner le modèle de métadonnée Modèle, if possible, using the preferred ones (Figure 4.3,“Sélection du modèle”)For the ISO standard, two templates have been developed; one for vector andone for raster data. Both contain a relevant set of elements to describe the respective types of data.More templates can be developed online.
4. Selectionner leGroupe auquel sera rattaché la métadonnée. Les groupes proposés sont ceuxautorisés par l'administrateur.
5. Cliquez sur "créer".

Ajout d'une nouvelle métadonnée et saisie de l'information
GeoNetwork opensource V 2.4 19
The steps in more details
1. Entrez votre identifiant et mot de passe et cliquez sur le bouton "Connecter" (Figure 4.1, “Login”). Lesystème vous identifiera et vous assignera les privilèges correspondant à votre compte.
Figure 4.1. Login
2. Ouvrez la page d'administration en cliquant sur le bouton "Administration" puis cliquez sur le lien dela nouvelle métadonnée (Figure 4.2, “Administration panel”).
Figure 4.2. Administration panel
3. A partir de la page de création de métadonnée, sélectionnez le standardon page, select the metadatastandard to use from the dropdown list (Figure 4.3, “Sélection du modèle”)
Figure 4.3. Sélection du modèle
4. Après avoir sélectionné le modèle correct, vous devez identifier à quel groupe d'utilisateurs serattachera la métadonnée créée (Figure 4.4, “Sélection du groupe”)puis cliquez sur "Créer".
Figure 4.4. Sélection du groupe
Une nouvelle métadonnée basée sur le modèle sélectionné est ensuite chargée.
Switching Editing Views from Default to Advanced to XML View
Lorsque vous créez un nouvel enregistrement, vous pouvez choisir entre Vue découverte, Vueavancée, Vue complète ou Vue XML. Pour charger la vue, cliquez simplement sur la vuecorrespondante dans la colonne de gauche de la page. La vue en gras correspond à la vue courante(Figure 4.5, “Options sur la vue de métadonnée”).

Ajout d'une nouvelle métadonnée et saisie de l'information
GeoNetwork opensource V 2.4 20
Figure 4.5. Options sur la vue de métadonnée
Dans le chapitre précédent, vous avez analysé la structure de la métadonnée présentée dans la Vuedécouverte. A selection of the main fields from different categories of information is shown in one singleview. The minimum set of metadata required to serve the full range of metadata applications (datadiscovery, determination of data fitness for use, data access, data transfer and use of digital data) isdefined here, along with optional metadata elements to allow for a more extensive standard descriptionof geographic data, if required. However, if should be there a need to add more metadata elements,you can switch to the advanced view at any time while editing.
Dans la Vue complète, le profil ISO donne la possibilté de visualiser et éditer la métadonnée dont lastructure est organisée dans des sections dans la colonne de gauche. Vous pouvez utiliser cette vuepour écrire des descriptions supplémentaires sur la métadonnée ou des modèles selon vos besoins.(Figure 4.6, “Vue complète”)
Figure 4.6. Vue complète
La Vue XML montre l'ensemble du contenu de la métadonnée dans la structure hiérarchique d'origine;des couleurs différentes permettent de distinguer le nom de l'élément et sa valeur. La structure XMLest composée de balises, à chacune des balises doit correspondre une balise fermée (Figure 4.7, “VueXML”). Le contenu est entièrement placé entre les deux balises, i.e.
<gmd:language>
<gco:CharacterString>eng</gco:CharacterString>

Ajout d'une nouvelle métadonnée et saisie de l'information
GeoNetwork opensource V 2.4 21
</gmd:language>
Figure 4.7. Vue XML
Cependant, l'utilisation de la vue XML requiert une connaissance minimale du langage XML.
Les deux vues Avancée et complète sont composées d' obligatoires, conditionnels etoptionnels champs de métadonnées. La signification d'obligatoire et optionnel est assez intuitif;Les champs obligatoires sont requis, comme le titre et le résumé par exemple, alors que leschamps optionnels peuvent être renseignés mais ne sont pas fondamentaux, et dépend de l'auteur dela métadonnée. Les champs conditionnels peuvent être considérés comme obligatoires dans certainescirconstances : essentiellement un champ conditionnel indique que sa présence est dépendante de lavaleur ou de la présence d'autres éléments dans la même section, par exemple, le Nom individuelde l'élément Point de contact, qui est un élément conditionnel de la section Identification devientobligatoire si un autre élément de la même section, le nom de l'organisation ou la positionn'est pas déjà défini (Figure 4.8, “Point de contact”).

Ajout d'une nouvelle métadonnée et saisie de l'information
GeoNetwork opensource V 2.4 22
Figure 4.8. Point de contact
Les champs obligatoires aussi bien que ceux fortement recommendés sont annotés d'unastérisque rouge [*]. La définition de chacun des champs peut être lu en passant la souris sur cemême champ.
Lavue avancée is the preferred view as it provides a selection of the available metadata elements,facilitating both the user and the editor in reading and editing a metadata record, and at the same timeit ensures that a geospatial data can be properly described, through :
• the minimum set of metadata required to serve the full range of metadata applications (data discovery,determination of data fitness for use, data access, data transfer, and use of digital data);
• optional metadata elements - to allow for a more extensive standard description of geographic data,if required;
• a method for extending metadata to fit specialized needs.
Utiliser les commandes basiques de la métadonnée champs de l'éditeur
Les champs ont soit des domaines de texte libre soit des lstes de codes. Texte libre signifie quevous pouvez écrire n'importe quel texte dans ce champ. Drop down lists allow you to select only oneoption from the list. You can add multiple fields of the same kind by clicking on the [+] symbol next to theelement. Every new field that you will add in the advanced view will then be visible in the default view.You can also delete existing fields by clicking on the [x] symbol next to the element. Clearly, mandatoryfields cannot be deleted. One example of the need to add multiple fields can arise if the content of yourdataset has some text written in two different languages (Figure 4.9, “Describing multilingual data”).

Ajout d'une nouvelle métadonnée et saisie de l'information
GeoNetwork opensource V 2.4 23
Figure 4.9. Describing multilingual data
4.2 Entering Metadata for your Map
As we mentioned in the introduction to this guide, GNos provides tools to describe any type of geographicdata (vector layers, raster, tables, map services, etc.) as well as general document like reports, projects,papers, etc. For the purpose of this Quick Start Guide, an example of required and useful metadataelements to properly describe a thematic map will be provided hereafter. You should gather as muchinformation as possible to identify and understand the map’s resource and characteristics you want todescribe. Use the default view to start. If necessary, you can always switch to advanced view or comeback later and edit the record with the additonal information collected.
Entering Metadata For Your Map
Please follow these steps to enter your map's metadata. Note that we will only go through the fields thathave been identified as compulsory (i.e. those fields marked with the asterix [*], mandatory or highlyrecommended).
Titre * : Dans les informations d'identification donnez un nomà vos données. Il s'agit d'un nom pardéfaut de votre jeu de données. Utilisez un texte libre pour décrire vos données.
Date * : Indique la date exacte de création, publication ou révision de votre jeu de données
Forme de présentation: spécifie le type de présentation i.e. digital, document papier, table, etc.
résumé * : description du jeu de données
Objectifs: un court résumé des objectifs du jeu de données.
Etat: Spécifie l'état de votre jeu de données, avec différents choix possibles : complété, archivehistorique, obsolète, en cours, planifié, requis, en cours de développement.
Point de Contact: Saisir l'information sur le contact sur la ressource. A noter que certains champs sontconditionnels, comme le nom de l'organisation si le nom individuel ou la position ne sont pas renseignés.
Maintenance and update frequency * : Specify the frequency with which you expect to make changesand additions to your map after the initial version is completed. If any changes are scheduled you canleave As Needed selected from the drop-down list.
Descriptive Keywords: Enter keywords that describe your map. Also specify the type of keyword youare entering, i.e. place, theme, etc. Remember that you can add another keyword field if you need toadd different types of keywords.

Ajout d'une nouvelle métadonnée et saisie de l'information
GeoNetwork opensource V 2.4 24
Access Constraints: Enter an access constraint here, such as a copyright, trademark, etc. to assurethe protection of privacy and intellectual property.
User Constraints: Enter a user constraint here to assure the protection of privacy and intellectualproperty.
Other Constraints * : Enter other constraint here to assure the protection of privacy and intellectualproperty. Note that this field is conditionally mandatory if Access and Use constraints are not entered.
Spatial representation type: Select, from the drop-down list the method used to spatially representyour data. The options are: vector, grid, text table, stereo model, video.
Scale Denominator * : Enter the denominator for an equivalent scale of a hard copy of the map.
Language * : Select the language used within your map
Topic category * : Specify the main ISO category/ies through which your map could be classified (seeAnnex for the complete list of ISO topic categories).
Temporal Extent * : Enter the starting and ending date of the validity period.
Geographic Bounding Box * : Enter the longitude and latitude for the map or select a region fromthe predefined drop-down list. Make sure you use degrees for the unit of the geographic coordinatesas they are the basis for the geographic searches.
Supplemental Information: Enter any other descriptive information about your map that can help theuser to better understand its content.
Distribution Info: Enter information about the distributor and about options for obtaining your map.
Online Resource: Enter information about online resources for the map, such as where a user maydownload it, etc. This information should include a link, the link type (protocol) and a description of theresource.
Reference System Info: Enter information about the spatial reference system of your map. The defaultview contains one element to provide the alphanumeric value identifying the reference system used.GNos uses the EPSG codes which are numeric codes associated with coordinate system definitions.For instance, EPSG:4326 is Geographic lat-long WGS84, and EPSG:32611 is "UTM zone 11 North,WGS84". Using elements from the advanced view, you may add more details on data projection,ellipsoid and datum. Note that if this information is provided, a reference system identifier is notmandatory.
Data Quality: Specify the hierarchal level of the data (dataset series, dataset, features, attributes,etc.) and provide a general explanation on the production processes (lineage) used for creatingthe data. The statement element is mandatory if the hierarchical level element is equal to dataset orseries. Detailed information on completeness, logical consistency and positional, thematic andtemporal accuracy can be directly added into the advanced form.
Metadata Author * : Provide information about the author of the map, including the person’s name,organization, position, role and any other contact information available.
After completion of this section, you may select the Type of document that you are going to save in thecatalogue. You have three options: Metadata, Template, Sub-template. By default Metadata is set up.

Ajout d'une nouvelle métadonnée et saisie de l'information
GeoNetwork opensource V 2.4 25
When done, you may click Save or Save and Close to close the editing session.
Creating a Thumbnail
Next, you need to create a graphic overview of your map which will be for a double purpose; as smallthumbnail will be displayed in search results and as large thumbnail with much more details, to allowusers to properly evaluate the data usefulness. As for the latest, the image that you will use as sourceshould be a significant reproduction of the real dataset, possibly inclusive of the legend.
To create a thumbnail, go to the editing menu for your map. If you are no longer in editing mode, retrievethe map from one of the search options then click on Edit. Then follow these simple steps:
• From the editing menu, click on the Thumbnails button on the top or bottom of the page. (Figure 4.10,“The thumbnail wizard button”)
Figure 4.10. The thumbnail wizard button
• You will be taken to the Thumbnail Management wizard (Figure 4.11, “Thumbnail wizard”).
• To create a small or large thumbnail, click on the Browse button next to either one. It is recommendedthat you use 180 pixels for small thumbnails and 800x600 for large thumbnails. Using the ‘Largethumbnail’ option allows you to create both a small and large thumbnail in one go.
• You can use GIF, PNG and JPEG images as input for the thumbnails.
• A pop up window will appear allowing you to browse your files on your computer. Select the file youwish to create a thumbnail with by double-clicking on it.
• Click on Add.
• Your thumbnail will be added and displayed on the following page.
• You can then click on Back to Editing and save your record (Figure 4.12, “Completed thumbnailwizard”).

Ajout d'une nouvelle métadonnée et saisie de l'information
GeoNetwork opensource V 2.4 26
Figure 4.11. Thumbnail wizard
Figure 4.12. Completed thumbnail wizard
Linking data for download
Finally, you can upload the dataset stored on your local computer and then create a link between dataand related description. Files in whatever format can be uploaded: doc, PDF, images, vector layers,etc. For the latter the distribution in a compressed file is recommended. You can include the vectordata, the legend, any documentation that can help the interpretation of the data, related reports, detaileddescriptions of the data processing, base data used to create the dataset specified and/or other relevantinformation. Follow these guidelines for uploading datasets:
• Make sure the total size of the compressed file is reasonable (less than 50 MB). Should your data bebigger than 50MB, consider a different mechanism to serve this data, e.g. through an FTP or HTTPserver and than link the resource through an online resource ‘Web address (URL)’.

Ajout d'une nouvelle métadonnée et saisie de l'information
GeoNetwork opensource V 2.4 27
• You can create several smaller files when appropriate and upload them sequentially.
• You add the size of the file at the end of the description field.
To Upload a Dataset, follow these steps (Figure 4.13, “An online resource”):
1. The URL field can be left empty when uploading a file. The system will automatically fill this field out;
2. Select the correct protocol to be used. If you do not see the buttons to browse and upload when Filefor download is selected, save the metadata and return to the upload section. Both buttons shouldappear;
3. Provide a short description of the data;
4. Click the Browse button and navigate to the folder where the file to be released is stored. Considerif you want to upload multiple files as one unique zip file or as multiple separate downloads. It is agood idea to add additional documentation with the datasets that provide the user with informationrelated to the data described. Remind: the size of a single file to upload can't exceed 50 Mbytes;
5. Click Upload and then Save.
Figure 4.13. An online resource
Assigning Privileges for a Map
As an important step of entering metadata to your map, you need to assign privileges for each map.This means that you will identify which work groups have which privileges, i.e. view, download, etc. foryour particular map.
For instance, you can define if the information and related services is visible to all (Internet users) orjust to internal users only (Intranet). Privileges are assigned on a per group basis. Depending on theuser profile (Guest, Registered User, Editor, Admin etc.) access to these functions may differ on a peruser basis.
To assign privileges for your map, follow these steps:
• Find your map by using the search option. Whether you have multiple or single results from the search,on top of the individual record or next to the record you will always see a row of buttons including aPrivileges button (Figure 4.14, “The editing toolbar with Privileges button”).

Ajout d'une nouvelle métadonnée et saisie de l'information
GeoNetwork opensource V 2.4 28
Figure 4.14. The editing toolbar with Privileges button
• Click on the Privileges button. This will take you to a new page. You can assign certain privileges tospecific groups by selecting or deselecting them from this page. Simply click on the small box next tothe privilege to place or remove a checkmark. Set All and Clear All buttons allow you to place andremove the checkmarks all at once (Figure 4.15, “Privileges settings”).
Figure 4.15. Privileges settings
Below is a brief description for each privilege to help you identify which ones you should assign to whichgroup(s).
Publish: Users in the specified group/s are able to see the map, i.e. if searching with matching criteria.
Download: Users in the specified group/s are able to download the map.
Interactive Map: Users in the specified group/s are able to get an interactive map. The interactive maphas to be created separately using a Web Map Server, which is part of the GeoNetwork opensourceapplication.
Featured: When selected, the map is placed in the Features Maps of the home page and it appearsthere randomly.
Editing: When selected, the editors of the group(s) concerned can edit the respective metadata record.
Notify: A notification email is send to the emailaddress of the group, informing that the map has beendownloaded.

Ajout d'une nouvelle métadonnée et saisie de l'information
GeoNetwork opensource V 2.4 29
Assigning Categories for a Map
As a final step to entering metadata for a map, you should assign categories for it. The assignedcategories will determine the categories the map will display under on the home page. To assigncategories for a map, follow these steps:
• Find your map by using the search option. Whether you have multiple or single results from yoursearch, on top of the individual record or next to the record, you will always see a row of buttonsincluding a Categories button.
• Click on the Categories button. This will take you to a new page. You can assign one or multiplecategories selecting or deselecting them from this page. Simply click on the small box next to thecategory to place or remove a checkmark. (Figure 4.16, “Category management”)
Figure 4.16. Category management
4.3 Uploading a New Record using the XML Metadata Insert Tool
A more advanced procedure to upload a new metadata record in the GeoNetwork system is usingan XML document. This procedure is particularly useful for users who already have metadata in XMLformat, for instance created by some GIS application. To this regard, it has to be noted that the metadatamust be in one of the standards used by GeoNetwork: ISO19115, FGDC and Dublin Core.
To start the metadata uploading process through the XML Metadata Insert tool, you should log in (seeStep. 1. in paragraph 7.1.1) and select the appropriate option from the Administration page (Figure 4.17,“Administration panel”).

Ajout d'une nouvelle métadonnée et saisie de l'information
GeoNetwork opensource V 2.4 30
Figure 4.17. Administration panel
The main part of the page Import XML Formatted Metadata that is displayed (Figure 4.18, “XMLmetadata import tool”) is the Metadata text area, where the user can paste the XML metadata to import.Below this, there is the Type choise, which allows you select the type of record that you are goingto create (Metadata, Template and Subtemplate). Then you can apply a stylesheet to convert yourmetadata input from ArcCatalog8 to ISO1915 or from ISO19115 to ISO19139, if required. Otherwise youcan just leave none selected. The Destination schema list provides you with four options to choose thefinal standard layout for your metadata (ISO19115, ISO19139, FDGDC and Dublin Core). Finally youshould select the Group as main group in charge of the metadata and the Category that you want toassign to your metadata. By clicking the Insert button the metadata is imported into the system; pleasenote that all links to external files, for istance to thumbnails or data for download, have to be removedfrom the metadata input, to avoid any conflict within the data repository.
Figure 4.18. XML metadata import tool

Ajout d'une nouvelle métadonnée et saisie de l'information
GeoNetwork opensource V 2.4 31
If your metadata is already in ISO19115 format, the main actions to be performed are the following(Figure 4.19, “XML metadata import 2”):
1. Paste the XML file that contains the metadata information in the Metadata text area;
2. Select Metadata as type of record that you are going to create
3. Select the metadata schema ISO19139 that will be the final destination schema;
4. Select the validate check box if you want your metadata to be validated according to the relatedschema.
5. Select the group in charge of the metadata from the drop down list;
6. Select Maps and Graphics from the list of categories;
7. Click the Insert button and the metadata will be imported into the system.
Figure 4.19. XML metadata import 2

GeoNetwork opensource V 2.4 32
5. Métadonnées dans la gestion des données
5.1 Qu'est ce que les métadonnées ?
Les métadonnées sont généralement définies comme “données sur les données” ou "information surles données". Les métadonnées sont une liste structurée d'information qui décrivent les données oules services (incluant les données numériques ou non) stockés dans les systèmes d'information. Lesmétadonnées peuvent contenir une brève description sur le contenu, les objectifs, la qualité et lalocalisation de la donnée ainsi que les informations relatives à sa création.
5.2 Quels sont les standards sur les métadonnées ?
Pour les gestionnaires de données, les standards sur les métadonnées décrivent le format d'échange etle contenu pour décrire leurs données ou services. Ceci permet aux utilisateurs d'évaluer la pertinencedes données par rapport à leurs besoins.
Les standards fournissent un ensemble commun de descripteurs et leur définition.
5.3 Pourquoi avons nous besoin de standards ?
L'utilisation de standards permet aux utilisateurs d'avoir une terminologie commune permettantla réalisation de recherche efficace pour la découverte des données dans les catalogues. Lesmétadonnées reposant sur les standards permettent d'avoir un même niveau d'information et d'éviterla perte de connaissance sur les données.
5.4 Les standards pour les métadonnées géographiques
Les données géographiques sont souvent produites par des organisations ou des indépendants etpeuvent répondre aux besoins de différents types d'utilisateurs (opérateurs SIG, analyse d'image,politiques, ...). Une documentation adéquate sur les données aide à mieux définir la pertinence de cesinformations pour la production, l'utilisation et la mise à jour.
Les standards de métadonnées supportés par GeoNetwork opensource sont l'ISO 19115:2003 -approuvé par l'ISO en avril 2003 comme l'outil pour définir les métadonnées dans le domaine del'information géographique - et le FGDC - le standard de métadonnée adopté par les Etats-Unis /Federal Geographic Data Committee. En complément, GeoNetwork supporte également le standardinternational Dublin Core pour la description d'autres types de ressource.
L'ISO définit en détail comment décrire les ressources dans le domaine de l'information géographiquetel que les données ou les services. Ce standard précise les descripteurs obligatoires et conditionels. Ils'applique aux séries de données, aux données, aux objets géographiques ainsi qu'à leurs propriétés.Bien que l'ISO 19115:2003 ai été conçu pour les données numériques, ces principes peuvent êtreétendus à d'autres type de ressources tel que les cartes, graphiques, documents ou données nongéographiques.
Le format d'échange de l'ISO19115:2003 est XML. GeoNetwork utilise ISO Technical
Specification 19139 Geographic information - Metadata - XML schema
implementation pour l'encodage XML de l'ISO19115.

Métadonnées dans la gestion des données
GeoNetwork opensource V 2.4 33
5.5 Profile de métadonnées
GeoNetwork supporte plusieurs profiles de métadonnées. Les profiles peuvent prendre la forme demodèle ou Templates qu'il est possible de créer via l'éditeur. En utilisant la vue avancée de l'éditeur,potentiellement l'ensemble des éléments sont accessibles à l'utilisateur.
Le support d'extensions ou de profil spécifique peut également être mis en place par des développeursconnaissant les langages XML/XSL.
5.6 Transition entre les standards de métadonnée
Avec le standard ISO19115:2003 actuellement le principale standard utilisé, il est nécessaire dedisposer d'outil de migration.
Pour cela, GeoNetwork permet d'importer et d'exporter différents formats. Il est également simplepour un administrateur d'ajouter de nouvelles transformations dans son catalogue via l'utilisation detransformation XSLT.

GeoNetwork opensource V 2.4 34
6. Installing the software
6.1 New version - New funtionalities
The new GeoNetwork opensource comes with substantial upgrades of different components for amore intuitive and responsive user-system interaction. Web 2.0 technologies have been adopted, inparticular AJAX techniques, to allow for more interactive and faster services in the web interface andfor the integration of the existing web map viewer in the home page. Similar functionalities have beenimplemented in the administrative part of the system, to provide an easier access to the configurationpages related to site settings, catalogue harvesting, scheduling and maintenance.
The search interface has been completely overhauled to provide highly interactive searchingcapabilities. Furthermore, the new version of GNos embeds GeoServer as map server. Users can nownot only overlay OGC web map services available on the web, but also create their own map servicesfor other users to browse without having to download additional plugins. Maps created with web mapservices can be now saved as PDF and sent to others.
The metadata catalogue handles the latest ISO19115:2003 geographic metadata format based on theISO19139:2007 schemas, as well as the older ISO19115 final draft format, FGDC and Dublin Core. Themetadata editor is able to handle the majority of these complex standards, providing default, advancedand XML editing online tools.
The new version has a number of different harvesting interfaces allowing users to connect their ownserver to many other catalogues around the world. This is the result of the implementation of the opensource reference for the web catalog services according to OGC specifications. Harvesting in the newversion is fully compatible with GeoNetwork 2.0 and higher nodes.
We have added avanced online and offline administration funcionalities to configure, backup and migratethe application. We have also added a convenient import and export format "MEF" or MetadataExchange Format, that allows the users to move metadata, previews and even data in a convenientsingle file. GNos can be easily expanded with plugins to export/import metadata to/from other softwaresupporting MEF.
Figure 6.1. Standard home page of GeoNetwork opensource

Installing the software
GeoNetwork opensource V 2.4 35
6.2 Where do I get the installer?
You can find the software on the Internet at the GeoNetwork opensource Community website1. Thesoftware is also distributed through the SourceForge.net Website at http://sourceforge.net/projects/geonetwork.
Use the platform independent installer (.jar) if you need anything more than a plain Windows installation.
6.3 System requirements
GeoNetwork can run either on MS Windows, Linux or Mac OS X.
Some general system requirements for the software to run without problems are listed below:
Processor: 1 GHz or higher
Memory (RAM): 512 MB or higher
Disk Space: 30 MB minimum. However, it is suggested to have a minimum of 250 MB of free diskspace. Additional space is required depending on the amount of spatial data that you expect to uploadinto the internal geodatabse.
Other Software requirements: A Java Runtime Environment (JRE 1.5.0). For server installations,Apache Tomcat and a dedicated JDBC compliant DBMS (MySQL, Postgresql, Oracle) can be usedinstead of Jetty and McKoiDB respectively.
Additional Software
The software listed here is not required to run GeoNetwork, but can be used for custom installations.
1. MySQL DBMS v5.5+ (All)2
2. Postgresql DBMS v7+ (All)2
3. Apache Tomcat v5.5+ (All)2
4. Druid v3.8 (All)2 to inspect the database
Supported browsers
GeoNetwork should work normally with the following browsers:
1. Firefox v1.5+ (All)2
2. Internet Explorer v6+ (Windows)
3. Safari v3+ (Mac OS X Leopard)2
1 http://geonetwork-opensource.org

Installing the software
GeoNetwork opensource V 2.4 36
6.4 How do I install GeoNetwork opensource?
Before running the GeoNetwork installer, make sure that all system requirements are satisfied, and inparticular that the Java Runtime Environment version 1.5.0 is set up on your machine.
On Windows
If you use Windows, the following steps will guide you to complete the installation (other FOSS willfollow):
1. Double click on geonetwork-install-2.2.0.exe to start the GeoNetwok opensource desktop installer
2. Follow the instructions on screen (Figure 6.2, “Installer”). You can choose to install sample data,install the embedded map server (based on GeoServer3 and the CSW 2.0.1 test client. Developersmay be interested in installing the source code and installer building tools. Full source code can befound in the GeoNetwork SubVersion code repository.
3. After completion of the installation process, a 'GeoNetwork desktop' menu will be added to yourWindows Start menu under 'Programs'
4. Click Start > Programs > GeoNetwork desktop > Start server to start the Geonetwork opensourceWeb server. The first time you do this, the system will require about 1 minute to complete startup.
5. Click Start > Programs > Geonetwork desktop > Open GeoNetwork opensource to start usingGeoNetwork opensource, or connect your Web browser to http://localhost:8080/geonetwork/
Figure 6.2. Installer
Figure 6.3. Packages to be installed

Installing the software
GeoNetwork opensource V 2.4 37
Installation using the platform independent installer
If you downloaded the platform independent installer (a .jar file), you can in most cases start the installerby simply double clicking on it.
Follow the instructions on screen (see also the section called “On Windows”).
At the end of the installation process you can choose to save the installation script (Figure 6.4, “Savethe installation script for commandline installations”).
Figure 6.4. Save the installation script for commandline installations
Commandline installation
If you downloaded the platform independent installer (a .jar file), you can perform commandlineinstallations on computers without a graphical interface. You first need to generate an install script (seeFigure 6.4, “Save the installation script for commandline installations”). This install script can be editedin a text editor to change some installation parameters.
To run the installation from the commandline, issue the following command in a terminal window andhit enter to start:
java -jar geonetwork-install-2.2.0-0.jar install.xml
[ Starting automated installation ]
[ Starting to unpack ]
[ Processing package: Core (1/3) ]
[ Processing package: Sample metadata (2/3) ]
[ Processing package: GeoServer web map server (3/3) ]
[ Unpacking finished ]
[ Writing the uninstaller data ... ]
[ Automated installation done ]

Installing the software
GeoNetwork opensource V 2.4 38
You can also run the installation with lots of debug output. To do so run the installer with the flag -DTRACE=true:
java -DTRACE=true -jar geonetwork-install-2.2.0-0.jar

Part II. Guide des administrateursCette section explique comment configurer et administrer les applications reposant sur GeoNetwork.L'outil est divisé en 2 catégories :
1. Application web : cette interface est accessible directement à partir du web et permet aux utilisateursde paramètrer la majorité des options de GeoNetwork.
2. Outil GAST : cette application fournie des tâches spécifiques à l'administration du catalogue.

GeoNetwork opensource V 2.4 40
7. Configuration simple
7.1 Configuration du système
La majorité des options de configuration du système GeoNetwork peut être modifiée via l'interface web .Les paramètres ne pouvant pas être modifés via l'application web sont modifiables en utilisant l'outilGAST.
Pour aller à la configuration du système, vous devez tout d'abord vous identifier en tantqu'administrateur. Ouvrir la page d'Administration et choisissez Configuration du système (Figure 7.1,“Liens vers la page d'administration”).
Important
Les nouvelles installations de GeoNetwork utilisent admin pour le nom d'utilisateur et le motde passe. Il est important de changer ces informations à partir de la page d'Administrationune fois identifié!
Figure 7.1. Liens vers la page d'administration
En cliquant sur le lien vous obtenez la liste des paramètres que vous pouvez modifier (Figure 7.2,“Options de configuration”). Ces paramètres sont décris de la manière suivante :

Configuration simple
GeoNetwork opensource V 2.4 41
Figure 7.2. Options de configuration
Au bas de la page, les boutons permettent de réaliser les principales actions :
1. Retour : Retourner à la page d'administration principale.
2. Sauver : Sauver les options en cours. Le système valide les principales options, une boîte de dialogueapparaît en cas d'erreur et indique l'option erronée.
3. Rafraîchir : Rappel les options (cette option peut être utile lorsqu'un autre utilisateur à modifier lesoptions).

Configuration simple
GeoNetwork opensource V 2.4 42
Utilisation des options hôte public et port
Ces paramètres sont utilisés dans les cas suivant :
1. Au cours d'une session d'édition, lors de l'ajout d'un lien dans une métadonnée : Le Nom d'hôte etle port seront utilisés pour construire l'URL pour le téléchargement des informations.
2. Au cours de requêtes CSW : Le document retourné par l'opération GetCapabilities est un documentXML contenant des liens HTTP vers le service CSW. Ces liens sont créés dynamiquement en utilisantces 2 paramètres.
Paramètre général du site.
1. nom : Le nom de l'installation de GeoNetwork. Ce nom sera utilisé pour identifier le noeud dans lesopérations tel que le moissonage.
2. organisation : L'organisation à laquelle le noeud appartient. Uniquement informatif.
Serveur.
1. hôte : L'adresse du noeud GeoNetwork. Cette adresse est importante car utilisée pour l'accèsau catalogue. L'adresse du noeud ou son adresse IP peut être saisie. Si le noeud est public (ie.accessible sur Internet) vous devez utiliser le nom de domaine du serveur. Si le noeud est placé surun réseau privé et que vous avez un parfeu ou un serveur web s'occupant des redirections (ie. reverseproxy) dans ce cas vous devez saisir l'adresse du parfeu ou serveur web accessible depuis Internet.
2. Port : Le numéro du port (habituellement 80 ou 8080).
Intranet : Un besoin fréquent est de pouvoir distinguer un utilisateur Internet d'un utilisateur Intranet(ie. sur le réseau local). Les privilèges sur les métadonnées peuvent être définis pour ces 2 typesd'utilisateurs. Pour cela, les paramètres suivants doivent être renseignés.
1. réseau : L'adresse IP du réseau.
2. masque de sous réseau.
Connection distante (CSW, Z39.50)
Configuration du service CSW
Lors de l'utilisation du service CSW, les clients demandent une description du service. Cette descriptionest accessible via le document GetCapabilities transmis par le service. La configuration du service CSWpermet la définition des propriétés suivantes :
1. Activer permet d'activer ou pas le service. Si inactif, les autres catalogues ne peuvent se connecterau catalogue via CSW.
2. Contact permet de définir le contact pour le service. Ce contact est un utilisateur définit dans lesutilisateurs du catalogue.
3. Titre permet de décrire le service.
4. Abstract correspond au résumé. Il peut indiquer la couverture géographique et thématique ducatalogue.

Configuration simple
GeoNetwork opensource V 2.4 43
5. Fees
6. Access constraints / Contrainte d'accès
La description du service contient également des mots clés. Ces mots-clés sont automatiquementdéfinis par le catalogue à partir des mots clés les plus fréquent dans le catalogue.
Serveur Z39.50
Serveur Z39.50 : GeoNetwork peut être un serveur Z39.50. Activez cette option en cochant la case.
1. Cochez cette option pour activer le module. Attention, vous devez redémarrer GeoNetwork pouractiver cette fonction.
2. port : Cette option définie le port sur lequel GeoNetwork écoute les requêtes Z39.50. En général, lavaleur est 2100. Celle-ci est la plus commune pour le serveur Z39.50. Cependant, si vous souhaitezdéployer plusieurs noeuds GeoNetwork, vous devez utiliser des ports différents afin d'éviter lesconflits de ports. Par ailleurs, dans le cas où le noeud est localisé derrière un proxy, il est nécessairede le configurer afin de router les requêtes.
Configuration du proxy
1. host : Le nom ou l'adresse IP du proxy.
2. port : Le port à utiliser.
Notification email
Alerte par email : GeoNetwork peut envoyer des messages à l'administrateur du noeud sur certainsévénements tel que le téléchargement des données ou l'utilisation du formulaire Contact. Pour cela,vous devez configurer GeoNetwork.
1. email : L'adresse email à laquelle les alertes sont envoyées.
2. serveur SMTP : Le serveur SMTP devant être utilisé.
3. port SMTP : Le port SMTP devant être utilisé (en général 25).
Métadonnées supprimées
Définir le répertoire utilisé pour stocker les métadonnées supprimées.
Authentification LDAP
Propriété de la connection à un serveur LDAP.

GeoNetwork opensource V 2.4 44
8. User and Group Administration
GeoNetwork uses the concept of Users, Groups and User Profiles. A User can be part of several Groups.A User also has a User Profile1. The combination of User Profile and Group defines what tasks the Usercan perform on the system or on specific metadata records.
8.1 Creating new user Groups
The administrator can create new groups of users. User groups can correspond to logical units withinan organization. For example groups for Fisheries, Agriculture, Land and Water, Health etcetera.
To create new groups you should be logged on with an account that has administrative privileges. Tolog in, simply go to the homepage and enter your username and password in the top right corner fields,then click on the login button (Figure 8.1, “Login form”).
Important
New installations of GeoNetwork use admin for both username and password. It isimportant to change this from the Administration page once you logged on!
Figure 8.1. Login form
• Select the Administration button in the menu. On the Administration page, select Groupmanagement (Figure 8.2, “Administration page”).
Figure 8.2. Administration page
1. Select Add a new group2;
1A User can only have one User Profile associated.

User and Group Administration
GeoNetwork opensource V 2.4 45
Figure 8.3. Group management
2. Fill out the details. The email address will be used to send feedback on data downloads when theyoccur for resources that are part of the Group.
Figure 8.4. Group edit form
3. Click on Save
Important
The Name should NOT contain spaces! You can use the localization functions to providelocalised names for groups.
Access privileges can be set per metadata record. You can define privileges on a per Group basis.Privileges that can be set relate to visibility of the Metadata (Publish), data Download, Interactive Mapaccess and display of the record in the Featured section of the home page. Notify defines what groupsare notified when a file managed by GeoNetwork is downloaded.
Below is an example of the privileges management table related to a dataset (Figure 8.5, “Privilegesettings”).

User and Group Administration
GeoNetwork opensource V 2.4 46
Figure 8.5. Privilege settings
8.2 Creating new Users
To add a new user to the GeoNetwork system you do the following:
1. Select User Management from the Administration link in the toolbar (Figure 8.2, “Administrationpage”);
2. Click the button Add a new user (Figure 8.6, “User administration form”);
Figure 8.6. User administration form
3. Provide the information required for the new user (Figure 8.7, “User information form”);

User and Group Administration
GeoNetwork opensource V 2.4 47
Figure 8.7. User information form
4. Assign the correct profile (Section 8.3, “User Profiles”);
5. Assign the user to a group;
6. Click on Save.
8.3 User Profiles
Users can have different profiles depending on their role in the GeoNetwork system. A profile defineswhat tasks the user can perform.
User profiles are hierarchical and based on inheritance. This means that a user with an Editor profilecan create and modify new metadata records, but can also use all functions a Registered user can use.
Rights associated with the profiles are illustrated in detail in the list below:
1. Administrator Profile
The Administrator has special privileges that give access to all available functions. These include:
• Full rights for creating new groups and new users
• Rights to change users/groups’ profiles
• Full rights for creating/editing/deleting new/old metadata
• Perform system administration and configuration tasks.
2. User Administrator Profile
The User Administrator is the administrator of his/her own group with the following privileges:
• Full rights on creating new users within the own group
• Rights to change users profiles within the own group

User and Group Administration
GeoNetwork opensource V 2.4 48
• Full rights on creating/editing/ deleting new/old data within the own group
3. Content Reviewer Profile
The content reviewer is the only person allowed to give final clearance on the metadata publicationon the Intranet and/or on the Internet:
• Rights on reviewing metadata content within the own group and authorizing its publication
4. Editor Profile
The editor works on metadata with following privileges:
• Full rights on creating/editing/ deleting new/old data within the own group
5. Registered User Profile
The Registred User has more access privileges than unlogged users:
• Right to download protected data

GeoNetwork opensource V 2.4 49
9. Import facilities
9.1 Batch import
The batch import facility allows you to import a set of metadata into the system all at once. In order to usethis facility, you have to be logged in as an administrator. After the login step, go to the administrationpage and select the batch import’s link (Figure 9.1, “ How to reach the batch import page ”. The link issurrounded with a red rectangle).
Figure 9.1. How to reach the batch import page
Clicking the link, you will reach the batch import’s page as illustrated in Figure 9.2, “ The batch importoptions ”. You have to specify a set of parameters to make the import working. They are:
Directory This is the full path on the server’s file system of the directory to scan. GeoNetwork will look forand try to import all XML files present into this directory. It is important to notice that this is the directoryon the server machine and not on the client of the user that is doing the import. All metadata files presentinto the import directory must have the same schema format. Schema GeoNetwork supports only somemetadata formats so you have to specify the schema of the metadata you want to import. If a metadatadoes not belong to the selected schema, the entire operation will be aborted. Validate This is a simplevalidation step that you can choose to perform. The metadata is validated against its schema. GroupYou have to select a group to associate to the imported metadata. Usually the group is the creator of themetadata set. Category You can specify one category to associate to your metadata in order to simplifythe search. Stylesheet This is a powerfull option because allows you to specify a stylesheet for an XSLtransformation. The drop down control is filled with files taken from the web/xsl/conversion/import folder :all XSL files you put there will be made available. This is a dymanic process so you don’t have to restartGeoNetwork. The purpose of this option is to allow the conversion of a metadata into a suitable formatthat is supported by GeoNetwork. Therefore, it is important that the result of the transformation matchesthe schema format selected above.
Below the page, there are the following buttons:
Back Goes back to the administration form. Upload Starts the import process. When the process ends,the total count of imported metadata will be shown. Please notice that the import is transactional: themetadata set will be fully imported or fully discarded (there are no partial imports). Files that starts with’.’ or that do not end with ’.xml’ are ignored.

Import facilities
GeoNetwork opensource V 2.4 50
Figure 9.2. The batch import options
Structured import
An hidden feature of the batch import is the possibility to specify some import parameters in more detail.This feature is triggered when the specified folder contains the import-config.xml file. When this happen,this file is read and the standard import switches to the structured one.
The import-config.xml file has a config root element with the following children:
1. categoryMapping [1] : this element specifies the mapping of directories to categories.
a. mapping [0..n] : This element can appear 0 or more times and maps one directory name to acategory name. It must have a dir attribute that indicates the directory and a to attribute thatindicates the category name.
b. default [1] : This element specifies a default mapping of categories for all directories that do notmatch the other mapping elements. It must have only the to attribute.
2. schemaMapping [1] : this element specifies the mapping of directories to metadata schemas.
a. mapping [0..n] : This element can appear 0 or more times and maps one directory to the schemaname that must be used when importing. The provided schema must match the one used by themetadata contained into the specified directory, which must all have the same schema. It musthave a dir attribute that indicates the directory and a to attribute that indicates the schema name.
b. default [1] : default behaviour to use when all other mapping elements do not match. It must haveonly the to attribute.
Here is an example of the import-config.xml file:
<config>
<categoryMapping>
<mapping dir="1" to="maps" />
<mapping dir="3" to="datasets" />
<mapping dir="6" to="interactiveResources" />
<mapping dir="30" to="photo" />
<default to="maps" />
</categoryMapping>
<schemaMapping>
<mapping dir="3" to="fgdc-std" />
<default to="dublin-core" />
</schemaMapping>

Import facilities
GeoNetwork opensource V 2.4 51
</config>
The import procedure starts by scanning the provided directory. This can contain, beside the import-config.xml file, only subdirectories which name will be ignored but used only as a container. Insideeach directory, there is another level made only by directories that represent a metadata grouping forcategories. Each directory name will be used as the dir attribute in the mapping scheme previouslydescribed.

GeoNetwork opensource V 2.4 52
10. Moissonnage
10.1 Introduction
Depuis le début du projet en 2000, le besoin de partage des métadonnées entre différents noeudsétait présent. En général, chaque noeud se focalise sur une région d'intérêt, il est donc nécessaire depouvoir réaliser des recherches sur ces différents catalogues. Ce mécanisme est appelé recherchedécentralisée et utilise le réseau Internet. Dans notre cas, cette recherche distribuée peut être complexeà réaliser dans le cas ou de nombreuses données et imagettes doivent être échangées. De plus,GeoNetwork est fréquemment utilisé dans des régions (tel que l'Afrique, l'Asie) où la connectivité peutêtre limité rendant les recherches décentralisées impossible ou du moins délicates.
Le moissonnage et un mécanisme permettant de collecter des métadonnées sur un catalogue distantet de les stocker sur le noeud local pour un accès plus rapide. Cette action de moissonnage est uneaction périodique, par exemple, une fois par semaine. Le moissonnage n'est pas un import simple :les métadonnées locale et celle du catalogue distant sont synchronisées. En effet, un catalogueGeoNetwork est capable de découvrir quelles sont les métadonnées ayant été ajoutée, supprimée oumise à jour dans le noeud distant.
GeoNetwork peut moissoner les ressources suivantes (pour plus de détail, voir plus bas):
1. Un noeud GeoNetwork (version 2.1 ou plus).
2. Un noeud GeoNetwork 2.0.
3. Un serveur WebDAV.
4. Un catalogue supportant CSW 2.0.1 or 2.0.2.
5. Un serveur OAI-PMH.
6. Un service OGC en utilisant le document GetCapabilities. Incluant les services WMS, WFS, WPSet WCS.
10.2 Présentation du mécanisme
Le moissonnage repose sur le concept d'identifiant unique (uuid). Cet identifiant est en effet particuliercar il n'est pas seulement unique au sein du catalogue mais dans le monde entier. Celui-ci est unecombinaison entre l'adresse MAC, la date et l'heure ainsi qu'un nombre aléatoire. Chaque fois que vouscréz des métadonnées dans GeoNetwork, un nouvel uuid est généré puis assigné à la métadonnée.
Un autre concept important derrière la notion de moissonnage est la date de dernière mise à jour.Chaque fois que vous modifiez une métadonnée, la date est mise à jour. En comparant cette information,il est possible de savoir si la métadonnée a été mise à jour.
Ces deux concepts permettent à GeoNetwork de récupérer les métadonnées distantes, vérifier leurmise à jour et les supprimer si elles ont été supprimées. Par ailleurs, grâce aux identifiants uniques,une hiérarchie de noeuds peut être moissonée où un noeud B moissone un noeud C C et un noeudA moissonne B. Des boucles peuvent être créées car les métadonnées moissonnées ne peuvent pasêtre modifiées.

Moissonnage
GeoNetwork opensource V 2.4 53
10.3 Cycle de vie du moissonnage
Lors de la configuration d'un noeud, il n'y a pas de métadonnées. Pendant la première itération , toutesles métadonnées qui correspondent au paramétrage sont récupérées et stockées localement. Ensuite,seulement les changements sont retournés. Les métadonnées moissonées ne sont pas éditable :
1. Le moissonnage est périodique donc les changements sur le noeud local seraient perdus.
2. La date de mise à jour est utilisée pour garder trace des changements, à chaque édition elle est miseà jour en dehors du site originel, le mécanisme de moissonnage serait compromi.
Au delà des métadonnées, ceci implique que l'utilisateur ne peut pas changer les autres propriétés (egcatégories, privilèges etc...).
Le moissonnage fonctionne jusqu'à rencontrer un des cas suivantes :
1. Un administrateur arrête le noeud.
2. Une exception.
Lorsqu'un noeud est supprimé, toutes les métadonnées associées sont également supprimées.
10.4 Moissonnages multiples et hiérarchie
Les catalogues fournissant des identifiants uniques (par exemple un noeud GeoNetwork et un serveurCSW) peuvent être moissoné plusieurs fois sans craindre les doublons.
Ce mécanisme permet aux différents types de moissonnage de GeoNetwork de réaliser desmoissonnages avec des hiérarchies complexes de noeuds. De cette façon, un métadonnée peut êtremoissonée à partir de différents noeuds. Par exemple, dans les cas suivants :
1. Noeud (A) créé la métadonnée (a)
2. Noeud (B) moissone (a) depuis (A)
3. Noeud (C) moissone (a) depuis (B)
4. Noeud (D) moissone depuis (A), (B) et (C)
Dans ce scénario, le noeud (D) aura la même métadonnée (a) à partir des 3 noeuds (A), (B), (C). Lamétadonnée va remonter dans le noeud (D) en suivant 3 voies différentes mais les uuid permettent destocker une seule copie. Lorsque la métadonnée (a) change au sein du noeud (A), une nouvelle versionremonte au noeud (D) mais, en utilisant la date de mise à jour, la copie dans le noeud (D) sera miseà jour avec la version la plus récente.
10.5 Autres remarques
Principes
1. Le moteur de moissonnage ne stocke pas les métadonnées.
2. Un changement des paramètres du moissonnage (par exemple les privilèges et catégories) sera prisen compte au prochain moissonnage.

Moissonnage
GeoNetwork opensource V 2.4 54
Moissonnage de catalogue GeoNetwork
1. Au cours du moissonnage, les icônes sont moissonées et les copies locales mises à jour. Les icônessont également propagées aux autres noeuds.
2. L'identifiant unique des métadonnées est récupéré dans le fichier info.xml du format MEF. Tout uuidstocké dans les métadonnées est remplacé par celui-ci.
Moissonnage de répertoire WebDAV
1. La même métadonnée peut être moissonée plusieurs fois sur différents noeuds. Cependant, ce n'estpas une bonne pratique car chaque copie auront un uuid différent et le système se rempliera de lamême copie de métadonnées.
Moissonnage de service CSW
1. Si le champ dct:modified est absent de la réponse GetRecords la métadonnées sera toujoursmoissonée.
2. Toute exception ayant lieu lors de l'opération getRecordById est annulée et la métadonnée passée.
Moissonnage de serveur OAI-PMH
1. L'identifiant du serveur distant doit être un uuid. Dans le cas contraire, la métadonnée peut êtremoissonée mais des problèmes peuvent se produire dans le cas de hiérarchie.
2. Au cours du moissonnage, GeoNetwork essaye de détecter automatiquement le schéma de chaquemétadonnée. Si le schéma est inconnu, la métadonnée n'est pas importée.
Moissonnage de service OGC
1. Chaque fois que le moissonnage fonctionne, GeoNetwork supprime les informations moissonéesauparavant et en crée de nouvelles. GeoNetwork génére les identifiants pour toutes les métadonnées(aussi bien pour les services que les données). Cependant, pour les données, si la métadonnée estcréée en utilisant document XML distant si un attribut MetadataUrl est présent dans le documentGetCapability), l'identifiant de ce document est conservé.
2. Les imagettes sont générées pour les services WMS uniquement. Le service doit de plus supporterla projection WGS84.
10.6 La page principale
Pour accéder à l'interface de configuration du moissonnage, vous devez vous identifier en tantqu'administrateur. A partir de la page d'administration, cliquer sur le lien Figure 10.1, “Interface deconfiguration du moissonnage” Gestion du moissonnage.

Moissonnage
GeoNetwork opensource V 2.4 55
Figure 10.1. Interface de configuration du moissonnage
Figure 10.2, “La page de moissonnage” présente l'interface de configuration du moissonnage. Cettepage présente la liste des noeuds moissonés qui ont été créés. Au bas de la page, les buttons permettentde gérer les actions des noeuds. La définition des colonnes est la suivante :
1. Sélectionner: Case à cocher pour la sélection d'un noeud. Fonction des actions lancées (Activer,Désactiver, Lancer, ...), le noeud sélectionné sera impacté. Par exemple, si vous sélectionnez 3noeuds, ceux là seront supprimés.
2. Nom: Nom du noeud tel que défini par l'administrateur.
3. Type: Type de noeud (GeoNetwork, CSW, WebDav, ...).
4. Status: Icône représentant l'état du noeud. Voir Table 10.1, “Icône représentant les différents états”pour les différents status possibles.
5. Erreur: Status du dernier moissonnage joué. Les informations sur le moissonnage (nombre derésultats, ajouts, suppression sont disponibles dans l'info bulle de l'icône. Voir See Table 10.2, “Icônepour les erreurs”.
6. Fréquence (j:h:m): Fréquence de moissonnage.
7. Dernière exécution: Date du dernier moissonnage.
8. Opération: Opérations possibles sur le noeud dont l'édition des propriétés.
Figure 10.2. La page de moissonnage
Le bas de la page présente deux rangés de bouttons. La première ligne peuvent réaliser des actionssur un ou plusieurs noeuds. Vous pouvez sélectionner les noeuds en utilisant les case à cocher dans la

Moissonnage
GeoNetwork opensource V 2.4 56
première colonne et presser sur le bouton correspondant à l'action souhaitée. Lorsque le bouton termineson action, la case à cocher est désactivée. La deuxième ligne contient des boutons correspondant àdes actions générales. Les actions possibles sont les suivantes :
Activer : Lors de la création d'un noeud, son état est inactif. L'utilisation de ce bouton le rend actif etpermet de commencer le moissonnage du noeud distant. Désactiver permet l'arrêt du moissonnagepériodique du noeud. Ceci ne signifie pas qu'un moissonnage en cours sera arrêté mais que le noeudsera ignoré lors des moissonnages futurs. Lancer permet de réaliser le moissonnage immédiatement.Ceci permet de tester facilement les paramètres de configuration d'un noeud. Supprimer permet lasuppression d'un ou plueiurs noeuds. Un message demande confirmation avant suppression. Retourpermet de retourner à la page d'administration. Ajouter permet la création d'un nouveau noeud.Rafraîchir permet de mettre à jour la liste des noeuds et leur état.
Table 10.1. Icône représentant les différents états
Icône Etat Description
Inactif Le moissonnage est désactivé pour ce noeud.
Actif Le moteur de moissonnage attend la prochaine exécution pour cenoeud. Lorsque l'heure est arrivée, le moissonnage est lancé.
En cours Le moteur de moissonnage est en cours, récupérant lesmétadonnées depuis le noeud distant. Lorsque le processus estterminé, l'état revient à actif.
Table 10.2. Icône pour les erreurs
Icônes Description
Le moissonnage s'est bien déroulé, pas d'erreur rencontrée. Dans ce cas, une infobulle présente une synthèse du moissonnage (nombre de métadonnées ...).
Le moissonnage a été annulé suite à une erreur. L'info bulle présente alors l'erreurrencontrée.
Info bulle présentant les résultats du moissonnage
Si le moissonnage s'est déroulé correctement, une info-bulle présente les informations détaillée au sujetdu processus. De cette façon il est possible de vérifier que le moissoneur a fonctionné ou s'il y a desparamètres à préciser. L'info bulle est un tableau présentant :
Total est le nombre total de métadonnées trouvées dans le noeud distant. Les métadonnées avec lemême identifiant sont considérées comme une seule. Ajouté correspond au nombre de métadonnéesajoutées au système car elle n'était pas présente localement. Supprimé correspond au nombred'enregistrement supprimés car non présent dans le noeud distant. Mis à jour indique le nombre demétadonnées mises à jour du fait d'un changement de date de dernière mise à jour. Inchangé présentele nombre de métadonnées non modifiées. Schema inconnu indique le nombre de métadonnées nonintégrées du fait d'un schéma non reconnu par GeoNetwork. Inrécupérable correspond à des erreurs detransfert d'information lors du moissonnage. Mauvais format correspond à des métadonnées ayant undocument XML invalide. Validation correspond aux métadonnées invalides par rapport à leur schéma.

Moissonnage
GeoNetwork opensource V 2.4 57
Table 10.3. Types d'information selon le type de moissonnage
Résultat vs Type demoissonnage
GeoNetwork WebDAV CSW OAI-PMH ServiceOGC
Total x x x x x
Ajouté x x x x x
Supprimé x x x x x
Mis à jour x x x x
Inchangé x x x x
Schema inconnu x x x x x
Irrécupérable x x x x x
Mauvais Format x x
Non valide x x
Imagettes x
Utilisation de l'attributMetadataURL
x
10.7 Ajouter de nouveaux noeuds
Le bouton ajouter de la page principale permet l'ajout de nouveaux noeuds. En cliquant sur ce bouton,vous accèdez à la page présentée Figure 10.3, “Ajouter un nouveau noeud”. Lors de la créationd'un nouveau noeud, vous devez choisir le type de moissonnage du serveur distant. Les protocolessupportés sont les suivants :
1. Geonetwork est le protocole le plus avancé utilisé dans GeoNetwork. Celui-ci permet de se connecterà un noeud distant et de réaliser une recherche utilisant les critères de recherche et importerles métadonnées correspondantes. De plus, ce protocol permet de transférer les privilèges et lescatégories des métadonnées moissonées si ils existent localement. Notez que depuis la version 2.1de GeoNetwork protocole de moissonnage s'est amélioré. Il n'est pas possible de moissoner lesanciennes version de GeoNetwork.
2. Web DAV permet d'utiliser les répertoires Web DAV (Distributed Authoring and Versioning) . Ilpeut être pratique pour des utilisateurs souhaitant publier leurs métadonnées via un serveur websupportant l'interface DAV. Le protocole permet de récupérer le contenu d'une page (la liste desfichiers présent sur le webdav) avec leur date de mise à jour.
3. CSW correspond à Catalogue Services for the Web et est une interface de recherche pour lescatalogues développé par l'Open Geospatial Consortium. GeoNetwork est compatible avec la version2.0.1 et 2.0.2 de ce protocole.
4. Ancienne version de GeoNetwork permet de moissoner d'ancien noeud GeoNetwork car depuis laversion 2.1 le mécanisme de moissonnage a fortement évolué. Un catalogue en version 2.0 peuttoujours moissoner un catalogue en version 2.1 mais un catalogue 2.1 doit utiliser ce protocole pourmoissoner un ancien noeud. Ce mécanisme est conservé tant que les versions 2.1 et sup. ne sontpas largement déployée.

Moissonnage
GeoNetwork opensource V 2.4 58
5. L'acronyme OAI-PMH correspond à Open Archive Initiative Protocol for Metadata Harvesting. C'estun protocole largement utilisé. GeoNetwork est compatible avec la version 2.0 de ce protocole.
La liste déroulante présente la liste des protocoles disponibles. En cliquant sur Ajouter, vous accédezla page d'édition des paramètres qui dépend du type de protocole choisi. Le bouton retour permet derevenir à la page principale.
Figure 10.3. Ajouter un nouveau noeud
Ajouter un noeud GeoNetwork
Ce type de moissonnage permet de se connecter à un catalogue et GeoNetwork et de réaliser desrecherches simples. La recherche permet ainsi d'obtenir les métadonnées utiles uniquement. Une foisle noeud ajouté, vous accédez à une page du type Figure 10.4, “Paramètre pour les noeuds de typeGeoNetwork”. La définition des paramètres est la suivante :

Moissonnage
GeoNetwork opensource V 2.4 59
Figure 10.4. Paramètre pour les noeuds de type GeoNetwork
Site permet d'attribuer un nom au noeud moissoné en précisant le nom d'hôte, le port et le nom duservlet (en général geonetwork). Si vous souhaitez accéder à des métadonnées protégées, vous devezspécifier un compte utilisateur. Dans la section recherche, les paramètres présentés correspondent àceux disponibles dans l'interface de recherche du catalogue. Avant de paramètrer cette informationvous devez vous rappeler qu'un catalogue GeoNetwork peut moissoner de manière hierarchique etdonc que les catalogues sont susceptibles de contenir à la fois leur métadonnée mais aussi cellesmoissonées à partir d'autres noeuds. Le bouton obtenir les sources permet d'avoir la liste des noeuds

Moissonnage
GeoNetwork opensource V 2.4 60
du catalogue distant. Une fois obtenu, vous pouvez donc restreindre votre recherche à cette sourceuniquement. Sinon la recherche portera sur l'ensemble des métadonnées (moissonées ou non). Ilest possible d'ajouter plusieurs critères de recherche avec le bouton ajouter. Les recherches serontréalisées et les résultats conbinés. Le bouton à la gauche du bloc de critère permet la suppresion dechaque bloc. Si aucun critère n'est défini, la recherche récupérer l'ensemble du catalogue distant. Lasection Option correspond aux options générales.
La fréquence permet de définir l'interval entre chaque itération du moissonnage. Elle peut être définientre 1 min et 100 jours maximum. Une seule éxecution permet de faire la recherche une fois etde désactiver le moissonnage ensuite. La section privilèges permet de définir les privilèges selon lesgroupes. Il est possible de copier des privilèges pour chaque groupe. Le groupe Intranet n'est pas prisen compte car ça n'a pas de sens de copier les privilèges pour ce groupe. Le groupe Internet a desprivilèges différents :
1. Copier : copier les privilèges.
2. Copier pour le groupe Intranet : Les privilèges sont copiés mais pour le groupe Intranet. De cettefaçon les métadonnées ne sont pas publiques.
3. Ne pas copier : Les privilèges ne sont pas copiés et les métadonnées ne seront pas publiques.
Pour les autres groupes :
1. Copier : Les privilèges sont copiés uniquement si un groupe ayant exactement le même nom existedans le catalogue.
2. Créer et copier : Les privilèges sont copiés. Si le groupe n'existe pas, celui-ci est également créé.
3. Ne pas copier : Les privilèges ne sont pas copiés.
En bas de page le bouton retour permet de revenir à la page de configuration du moissonnage. Lebouton sauver permet de sauver la configuration en cours. Lors de la création d'un noeud, le noeudsera créé lors de cette action de sauvegarde.
Ajouter un noeud de type Web DAV
Dans ce cas, les métadonnées sont récupérées depuis un page web. Les options disponibles seprésentent de la manière suivante Figure 10.5, “Ajouter un noeud de type Web DAV” et sont définiespar :

Moissonnage
GeoNetwork opensource V 2.4 61
Figure 10.5. Ajouter un noeud de type Web DAV
La section site donne les informations de connexion :
Le nom permet d'attribuer un nom au noeud distant L'URL correspond à l'URL du répertoire Web DAVPour chaque fichier ayant une extension .xml sera considéré comme une métadonnée et sera importé.L'icône permet d'assigner une icône aux métadonnées moissonées . Celle-ci sera visible dans lesrésultats de recherche. La section compte utilisateur permet de définir les paramétres d'identificationnécessaire à une authorisation basique HTTP. Les options générales sont :
Les paramètres fréquence et une seule éxecution sont présentés dans le type de moissonnageGeoNetwork. L'option valider permet de valider les métadonnées pendant l'import. Si la validation estréussie, la métadonnée est importée sinon elle est rejetée. Lorsque le moteur de moissonnage rencontreun répertoire, il parcourt le répertoire si l'option récursif est sélectionnée. Les privilèges peuvent êtreassignés aux différents groupes du catalogue locale. Pour cela, sélectionnez un ou plusieurs groupes,cliquez sur ajouter puis définissez les privilèges pour chacun. La section catégories permet d'attribuerune catégorie à l'ensemble des métadonnées récupérées.

Moissonnage
GeoNetwork opensource V 2.4 62
En bas de page le bouton retour permet de revenir à la page de configuration du moissonnage. Lebouton sauver permet de sauver la configuration en cours. Lors de la création d'un noeud, le noeudsera créé lors de cette action de sauvegarde.
Ajouter un noeud de type CSW
Ce type permet de se connecter à un catalogue supportant le protocle CSW . Les métadonnées doiventavoir un schéma connu par GeoNetwork. Figure 10.6, “Ajouter un noeud de type CSW” présente lesoptions de configuration :
Figure 10.6. Ajouter un noeud de type CSW

Moissonnage
GeoNetwork opensource V 2.4 63
Le site permet de définir les paramètres de connexion de la même manière que pour le type Web DAV .Dans ce cas, l'URL pointe vers le document GetCapabilities du serveur CSW. Ce document permetd'obtenir les adresses pour réaliser les recherches distantes. Ajouter des critères de recherche de lamême manière que pour les catalogues de type GeoNetwork en cliquant sur le bouton ajouter. Pour lesoptions générales ou les catégories, reportez-vous à la description dans la section Web DAV.
En bas de page le bouton retour permet de revenir à la page de configuration du moissonnage. Lebouton sauver permet de sauver la configuration en cours. Lors de la création d'un noeud, le noeudsera créé lors de cette action de sauvegarde.
Ajouter un noeud de type OAI-PMH
OAI-PMH est un protocole que GeoNetwork, en tant que client, est capable de moissonner. Si vousdemandez un format oai_dc, GeoNetwork le convertira en dublin core. D'autres formats peuvent êtremoissonés si et seulement si GeoNetwork connait le schéma. Figure 10.7, “Ajouter un noeud de typeOAI-PMH” présente les différentes options :

Moissonnage
GeoNetwork opensource V 2.4 64
Figure 10.7. Ajouter un noeud de type OAI-PMH
Pour la section site les options sont les mêmes que pour le moissonnage de type web DAV. La seuledifférence est que l'URL pointe vers le serveur OAI. Cette URL est le point d'entrée pour les commandesPMH que GeoNetwork exécute. La section recherche permet de définir les critères de recherche.Plusieurs recherches peuvent être renseignée. et les résultats combinés. Dans chaque recherche, lesparamètres suivants peuvent être définis :
La date de début et de fin correspondant à la date de mise à jour des métadonnées. Pour cela utiliser
le calendrier en cliquant sur l'icône pour le faire apparaître. Ce champ est optionel. Utiliser l'icône pour effacer le critère. Jusqu'à fonctionne de la même manière mais ajoute un contraint sur

Moissonnage
GeoNetwork opensource V 2.4 65
la date de dernier changement. Les ensembles permettent de classifier les métadonnées dans desgroupes hierarchiques. Vous pouvez donc filtrer les métadonnées n'appartenant qu'à un seul ensemble(et ses sous-ensembles). Par défaut, un option vide définie aucun ensemble. En cliquant sur obtenirdes information vous pouvez obtenir la liste des ensembles ainsi que la liste des préfixes. La notionde préfixe détermine ici le format de métadonnée. Le préfixe oai_dc est obligatoire pour les serveursOAI-PMH..
Vous pouvez utiliser le bouton ajouter pour ajouter des critères de recherches. Les options, les privilègeset les catégories sont similaires aux autres type de moissonnage.
En bas de page le bouton retour permet de revenir à la page de configuration du moissonnage. Lebouton sauver permet de sauver la configuration en cours. Lors de la création d'un noeud, le noeudsera créé lors de cette action de sauvegarde.
Noter que lors d'un retour à la page édition, les listes sur les ensembles et les préfixes sont vides. Ellesne contiendront que les entrées précédemment sélectionnées. Vous devez cliquer sur le bouton obtenirles info pour récupérer l'ensemble des valeurs possibles.
Ajouter un noeud de type service OGC (ie. WMS, WFS, WCS, WPS)
Un service OGC implément une opération GetCapabilities que GeoNetwork, en tant que client, peututiliser pour produire des métadonnées. Le document GetCapabilities fourni des informations sur leservice et les données (layers/feature types/coverages/process) diffusées. GeoNetwork converti cesdonnées au format ISO19139/119. Figure 10.8, “Ajouter un noeud de type service OGC (ie. WMS, WFS,WCS, WPS)” présente les différentes options :
Figure 10.8. Ajouter un noeud de type service OGC (ie. WMS, WFS, WCS, WPS)
La section site permet de définir le nom. Le type de service OGC indique au moteur de moissonnagele type de version pour le service. Les types supportés sont WMS (1.0.0 et 1.1.1), WFS (1.0.0 et1.1.0, WCS (1.0.0) et WPS (0.4.0 et 1.0.0). L'URL du service est l'URL permettant de se connecterau service (sans paramètres tel que "REQUEST=GetCapabilities", "VERSION=", ...). Cette url doit êtrevalide http://your.preferred.ogcservice/type_wms. La langue des métadonnées doit être spécifiée étantdonnée qu'aucune information n'est disponible sur ce point dans un document GetCapabilities. Cette

Moissonnage
GeoNetwork opensource V 2.4 66
langue sera la langue par défaut des métadonnées. Elle doit correspondre à la langue utilisée parl'administrateur du service OGC. Le topic ISO est ajouté à la métadonnée. Il est recommandé d'enchoisir un car ce champ est obligatoire dans le standard ISO si le niveau de hiérarchie est "datasets".
Le type d'import permet de définir si le moissonnage doit produire seulement une fiche de métadonnéepour le service ou si il doit également créer les métadonnées pour chaque donnée disponible au sein duservice. Pour chaque jeux de données, la deuxième option permet d'utiliser l'attribut MetadataURL dudocument GetCapabilities pour générer la métadonnée. Le document référencé dans cet attribut doitêtre un document XML valide dans un format connu par GeoNetwork. Pour les WMS, les imagettespeuvent être créées automatiquement.
Les icônes et les privilèges sont définis de la même manière que les autres types de moisson.
La métadonnée du service peut être associée à une catégorie (en générale "interactive resources").Pour chaque données, il est également possible de choisir une catégorie.

GeoNetwork opensource V 2.4 67
11. Metadata ownership
11.1 Introduction
Starting from release 2.1.0, GeoNetwork has a new metadata access policy. The old edit and adminprivileges have been removed and the concept of reviewer has been introduced. The purpose of thisnew profile is to control when a metadata can be published outside or not. In previous releases, all usersbelonging to a group with edit privileges could edit the same metadata. Now, a metadata is only visibleto its creator, to a reviewer which has access to the group owner and to an administrator.
11.2 Access policy
A public metadata is a metadata that has the view privilege for the group named all.
Visualization
An administrator can view any metadata.
A reviewer can view a metadata if:
1. The group owner is one of the groups assigned to the reviewer.
2. He is the metadata owner.
A user administrator or an editor can view:
1. All metadata that have the view privilege in one of the groups visible to them.
2. All metadata created by theirself.
A registered user can view:
1. All metadata that have the view privilege in one of the groups visible to them.
Public metadata can be viewed by any user (logged in or not).
Editing
An administrator can edit any metadata.
A reviewer can edit a metadata if:
1. The group owner is one of the groups assigned to the reviewer.
2. He is the metadata owner.
A user administrator or an editor can edit only metadata created by theirself.
11.3 Privileges
The privileges administration page is accessible only by:
1. All administrators
2. All reviewers that have access to the metadata’s group owner.

Metadata ownership
GeoNetwork opensource V 2.4 68
3. The owner of the metadata
Regarding privileges for the all and intranet groups, only administrators and reviewers can edit them.
11.4 Ownership transfer
A typical need that arises when a user is dismissed is to transfer all their metadata to another userinto another group. To fill this need, the transfer ownership functionality has been introduced. This islocated in the administration page (Figure 11.1, “ How to reach the transfer ownership page ”) and onceselected, leads to the page shown in Figure 11.2, “ The transfer ownership page ”.
Figure 11.1. How to reach the transfer ownership page
Initially, the page shows only a drop down for a Source editor. The drop down is filled with allGeoNetwork’s users which are editors and own some metadata. Selecting an editor means selecting allmetadata that belong to that editor. An empty drop down means that there are no editors with metadataassociated and hence no transfer is possible.
Note The drop down will be filled with all editors visible to you. If you are not an administrator, you willview only a subset of all editors.
Figure 11.2. The transfer ownership page
Once a source editor has been selected, a set of rows is displayed. Each row refers to an editor’s groupfor which there are privileges. The meaning of each column is the following:
Source group This is a group that has privileges in the metadata that belong to the source editor. Putin another way, if one of the editor’s metadata has privileges for one group, that group is listed here.Target group This is the destination group of the transfering process. All privileges relative to the sourcegroup are transferred to the target group. The target group drop down is filled with all groups visibleto the logged user (tipically an administrator or a user administrator). By default, the source group isselected in the target drop down. Privileges to groups All and Intranet are not transferrable. Target editor

Metadata ownership
GeoNetwork opensource V 2.4 69
Once a target group is selected, this drop down is filled with all editors that belong to that target group.Operation Actually only the Transfer operation is possible.
By selecting the Transfer operation, if the source group is different than the target group, the systemperforms the ownership transfer, shows a brief summary and removes the current row because nowthere are no privileges to transfer anymore.

GeoNetwork opensource V 2.4 70
12. Thesaurus
12.1 Introduction
Thesaurus support in GeoNetwork allows:
• Metadata editing: controlled vocabulary on the metadata editing interface for ISO and Dublin Core
• Administration interface allows import/export/creation/browse thesaurus
• Search interface: a list of keyword is proposed for the keyword criteria
On a node, thesaurus types could be defined as:
• External: When a thesaurus is imported, it is flagged to ”external” which means that users are notallowed to edit the thesaurus. This thesaurus is managed by an external organisation.
• Local: When a thesaurus is created, it is flagged to ”local” which means that users are allowed toedit the thesaurus.
12.2 Thesaurus / SKOS format
The Simple Knowledge Organisation Systems (SKOS) http://www.w3.org/2004/02/skos/ is anarea of work developing specifications and standards to support the use of knowledge organisationsystems (KOS) such as thesauri, classification schemes. This format is used by GeoNetwork to storethesaurus information.
A concept is defined by an identifier, a prefered label, a definition and links with other concepts. Labelsand definitions could be stored in multiple languages (using the xml:lang attributes). Three type of linksbetween concepts have been defined in the SKOS format:
• related terms
• broader terms
• narrower terms
For example, a concept ”ABLETTE” could be defined as follow with a label in french and english, linkedto broader concept:
<skos:Concept rdf:about="http://www.oieau.org/concept#c4fc54576dc00227b82a709287ac3681">
<skos:prefLabel xml:lang="fr">ABLETTE</skos:prefLabel>
<skos:prefLabel xml:lang="en">BLEAK</skos:prefLabel>
<skos:broader rdf:resource="http://www.oieau.org/concept#9f25ece36d04776e09492c66627cccb9"/>
</skos:Concept>
GeoNetwork support multilingual thesaurus (e.g. Agrovoc). Search and edition are made based oncurrent user interface language (i.e. if the interface is in english, when editing metadata, GeoNetworkwill only search for concept in english).
12.3 Thesaurus administration
To reach the thesaurus administration page you have to be logged in as an administrator. From theadministration page, click the link ”Manage thesaurii”. Figure 5.3 shows the list of thesaurus available

Thesaurus
GeoNetwork opensource V 2.4 71
in the GeoNetwork node. The page shows a list of thesaurus that have been created or imported. Theupper part of the page allows user to edit/add/modify/consult thesaurus. The lower part allows uploadof thesaurus in SKOS format.
Creation of a new thesaurus
To create a new thesaurus, click the ”+” sign in the category you want your thesaurus to be in. Oncecreated, the thesaurus could be updated through the edit interface. The meaning of each column isas follows:
Type The type allows to classify thesaurus according to its type. First, is defined the type of the thesaurusfollowing ISO category list, then the type indicates if the thesaurus is a local one or an external one.Name This is the thesaurus’s name provided by the administrator on creation or filename on upload.When creating a thesaurus, the name of the thesaurus will be the filename of the thesaurus.
Figure 12.1. Administration interface for thesaurus
For each thesaurus the following buttons are available:
Download Link to the rdf file. Delete Remove thesaurus from the current node. View If type is external,the view button allows to search and view concepts. Edit If type is local, the edit button allows to search,add, remove and view concepts.
Import existing thesaurus
GeoNetwork allows thesaurus import in SKOS format. Once uploaded, an external thesaurus could notbe updated. Select the category, browse for the thesaurus file and click upload. The file is located in /web/xml/codelist/external/thesauri/category/.
Figure 12.2. Upload interface for thesaurus
At the bottom of the page there are the following buttons:
Back Go back to the main administration page. Upload Upload the selected rdf file to the node. Thenit will list all thesaurus available on the node.

Thesaurus
GeoNetwork opensource V 2.4 72
12.4 Editing/browsing thesaurus: add/remove/browse keywords
From the thesaurus administration interface, click on the edit button for a local thesaurus or the viewbutton for an external thesaurus. This interface allows:
• keywords search
• add/remove keywords for local thesaurus.
Use the textbox and the type of search in order to search for keywords.
Figure 12.3. Browse interface for thesaurus
Figure 12.4. Keyword description
12.5 Metadata editing: adding keywords
When editing metadata in ISO or Dublin core, the keyword fields autocomplete when editor fill the fields.Keywords available in all thesaurus know by the current node are returned. Editor could select one ofthe list or could type any other keywords.

Thesaurus
GeoNetwork opensource V 2.4 73
Figure 12.5. Autocomplete in keywords editor
12.6 Search criteria: keywords
In the advanced search interface, the keyword field will proposed all keywords used in the metadata.These keywords are indexed by Lucene on creation/update of metadata. The number of metadata linkedto all keywords available in the index are display. User could type in the keyword field or click the iconto get the list of keywords available.
Figure 12.6. Thesaurus search interface
Figure 12.7. Autocomplete function in thesaurus search interface

GeoNetwork opensource V 2.4 74
13. GeoNetwork’s Administrator Survival Tool -GAST
13.1 What is GAST?
GAST stands for GeoNetwork’s Administrator Survival Tool and is a standalone applicationwhose purpose is to simplify some low level tasks like change of the servlet, configuration of the JDBCaccount, setup the database and so on. Most of the GAST’s facilities work only for the GeoNetwork’sinstallation where GAST is in. This implies that if you are using a servlet container other than Jetty (likeTomcat) you will not be able to change some options (like the servlet’s name). Other facilities workfor any servlet container but you have to specify the GeoNetwork’s URL into the GAST’s configurationdialog.
13.2 Starting GAST
GAST belongs to the core components so it is installed by default.
On Windows computers, simply select the Start GAST option under the GeoNetwork opensourceprogram group under Start > Programs > GeoNetwork opensource
Other options to start GAST are either to use a java command from a terminal window or just click itsjar’s icon. To issue the java command you have to:
1. change directory to the GeoNetwork installation folder
2. issue the command java -jar gast/gast.jar
GAST will be in current system language if any translation is available. If you want to force GAST GUIlanguage, you could start GAST using the -Duser.language option (e.g. ./gast.sh -Duser.language=fr).
You can also try to simply open the GeoNetwork installation folder, go to the gast folder and doubleclickon the gast.jar file. If you have Java installed, GAST should start in a few seconds.
To run, GAST requires Java 1.5. It will not work on Java 1.4 and it should run on Java 1.6 (this hasnot been tested!).
13.3 Operating modes
When you start GAST, you get an application window like the one in Figure 13.1, “ GAST’s main windowwith a tool selected ”. On the left side you have a panel with the tools you can use. After selecting atool, on the right side you get the tool’s options panel.

GeoNetwork’s Administrator Survival Tool - GAST
GeoNetwork opensource V 2.4 75
Figure 13.1. GAST’s main window with a tool selected
Every function has an operating mode, which defines the condition under which the tool can be used.The tool’s mode is shown with an icon on the right side of the tool’s name. The operating modes, withtheir icons are summarized in the following table:
Mode Icon Description
Restarted The tool can be always used, but GeoNetwork must berestarted in order to make the change effective.
Running The tool can be used only if GeoNetwork is running.
Stopped The tool can be used only if GeoNetwork is stopped. This isimportant because some tools change the database’s accountor create the database from scratch. These are sensitiveoperations that cannot be performed while GeoNetwork isrunning.
13.4 Tools subdivision
All GAST tools present into the left panel are logically subdivided into groups. Each group represents aGeoNetwork’s aspect for which GAST allows you a graphic interface. The groups are:
Configuration You can change some configuration parameters, like the servlet’s name, JDBC accountetc... Management General purpose tools related to the site’s administration. Database Operations thatregard the database. Here you can find tools to create a database from scratch, creating the schemaand filling it with proper data. Migration Tools that allow you to migrate metadata from old installation.
13.5 Server and Account configuration dialog
Some of the GAST’s tools access a running GeoNetwork application. Usually, GAST connects toGeoNetwork using the connection parameters it finds on the installation folder but you can specify otherparameters in order to connect to other instances. This is required when the GeoNetwork instance is not
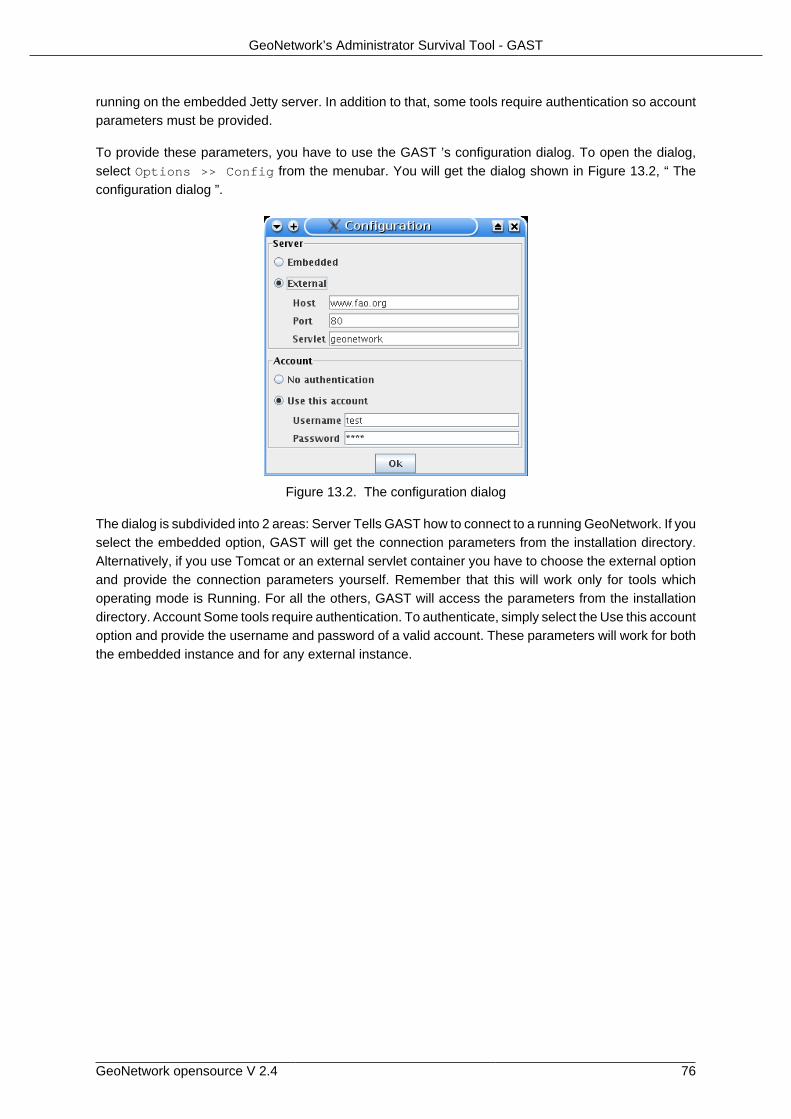
GeoNetwork’s Administrator Survival Tool - GAST
GeoNetwork opensource V 2.4 76
running on the embedded Jetty server. In addition to that, some tools require authentication so accountparameters must be provided.
To provide these parameters, you have to use the GAST ’s configuration dialog. To open the dialog,select Options >> Config from the menubar. You will get the dialog shown in Figure 13.2, “ Theconfiguration dialog ”.
Figure 13.2. The configuration dialog
The dialog is subdivided into 2 areas: Server Tells GAST how to connect to a running GeoNetwork. If youselect the embedded option, GAST will get the connection parameters from the installation directory.Alternatively, if you use Tomcat or an external servlet container you have to choose the external optionand provide the connection parameters yourself. Remember that this will work only for tools whichoperating mode is Running. For all the others, GAST will access the parameters from the installationdirectory. Account Some tools require authentication. To authenticate, simply select the Use this accountoption and provide the username and password of a valid account. These parameters will work for boththe embedded instance and for any external instance.

GeoNetwork opensource V 2.4 77
14. Localization
14.1 Localization of dynamic user interface elements
The user interface of GeoNetwork can be localized into several languages through XML language files.But beside static text, there is also more dynamic text that can be added and changed interactively. Thistext is stored in the database and is translated using the localization form that is part of the administrativefunctions (Figure 14.1, “How to open the localization form”).
Figure 14.1. How to open the localization form
The form allows you to localize the following entities: Groups, Categories, Operations and Regions. Theform (Figure 14.2, “The localization form”) subdivided in a left and a right panel.
The left panel allows you to choose which elements you want to edit. On the top, a dropdown let youchoose which entity to edit. All elements of the selected type are shown in a list.
When you select an element from the list, the right panel will show the text as it will be displayed inthe user interface. The text in the source language is read only while you can update the text in thetarget language field.
Note
You can change the source and target languages to best suit your needs. Some users mayfor instance prefer to translate from French to Spanish, others prefer to work with Englishas the source language.
Use the Save button to store the updated label and move to the next element.
Important
If the user changes a label and chooses another target language without saving, the labelchange is lost.

Localization
GeoNetwork opensource V 2.4 78
Figure 14.2. The localization form

GeoNetwork opensource V 2.4 79
15. Import / export tools
15.1 Introduction
Using GAST, you can import and export metadata at will. It allows you to:
1. Create a backup of the entire metadata set. Each metadata has its own file, including maps andother data files. Once you have the backup, you can decide to import all or only some of them.
2. Move your metadata from one GeoNetwork catalog to another. This can be done to mirror yourmetadata or to upgrade an old installation. In the last case, you export your metadata from your oldinstallation and then reimport them into the new one.
3. Fill the system with test data. Using the ’skip uuid’ option, you can reimport the same metadata overand over again. This is usefull, for example, if you want to perform stress tests.
Metadata are exported using the MEF format.
Ownership
Please, consider that the MEF format version 1.0 does not take into account user andgroup ownership. When exporting metadata, you loose this information. When importingmetadata, the new owner becomes the user that is performing the import while the groupownership is set to null.
15.2 Import
This tool is located under Management tools on the left panel and allows you to import a set of metadatathat have been previously exported using the export facility (see Section 15.3, “Export”). Selecting theImport tool opens the option panel on the right (Figure 15.1, “The metadata import panel”).
Figure 15.1. The metadata import panel
• Input folder. the source folder in your system that GAST will scan to collect metadata to import.GAST will try to import all files with the mef extension.
Note
Subfolders are not scanned.

Import / export tools
GeoNetwork opensource V 2.4 80
• Browse button. Navigate through your file system to choose an output location or enter it manuallyinto the textfield.
• Import. This will start the process. A progress dialog will be opened to show the import status.
15.3 Export
This tool is located under the Management tool on the left panel and allows you to export a setof metadata using the MEF format. Selecting the Export tool opens the option panel on the right(Figure 15.2, “The metadata export panel”).
Figure 15.2. The metadata export panel
• Output folder. The target folder in your file system where GAST will put the exported metadata. Youcan either select the Browse button to navigate through your file system to choose a better locationor enter it manually in the text field.
• Format. Here you can specify the metadata’s output format. See the MEF specification for moreinformation.
• Skip UUID. Normally this option is not required (see Warning). If you select it, you will loose themetadata’s unique identifier (uuid) but you will be able to reimport that metadata over and over again.This is usefull to fill the system with test data.
• Search. Allows to specify free text search criteria to limit the set of exported records.
Note
the export result will depend on the metadata visible to the searching user. If you do notauthenticate, you will get only public metadata.
• Export. This will start the export process. A progress dialog will be opened to show the exportstatus.
Warning
Skipping the UUID on import or export can cause metadata to be duplicated. This shouldnormally always be avoided

Part III. Documentation serveurCette section présente la structure interne de GeoNetwork opensource. Les opérations tel que lacompilation, les protocoles utilisés, les services XML, les paramètres du catalogue et le lancement del'application sont décrites.
Si vous êtes un développeur et que vous souhaitez personnaliser ou intégrer les services deGeoNetwork , cette section est pour vous.

GeoNetwork opensource V 2.4 82
16. Software development
16.1 System Requirements
GeoNetwork is a Java application that runs as a servlet so the Java Runtime Environment (JRE) mustbe installed in order to run it. You can get the JRE from the following address http://java.sun.com andyou have to download the Java 5 Standard Edition (SE). GeoNetwork won’t run with Java 1.4 and Java6 has some problems with it so we recommend to use Java 5. Being written in Java, GeoNetwork canrun on any platform that supports Java, so it can run on Windows, Linux and Mac OSX. For the latterone, make sure to use version 10.4 (Tiger) or newer. Version 10.3 (Panther) has only Java 1.4 so itcannot run GeoNetwork.
Next, you need a servlet container. GeoNetwork comes with an embedded one (Jetty) which is fastand well suited for most applications. If you need a stronger one, you can install Tomcat from theApache Software Foundation (http://tomcat.apache.org). It provides load balance, fault tolerance andother corporate needed stuff. If you work for an organization, it is probable that you already have it upand running. The tested version is 5.5 but GeoNetwork should work with all other versions.
Regarding storage, you need a Database Management System (DBMS) like Oracle, MySQL,PostgreSQL and so on. GeoNetwork comes with an embedded one (McKoi) which is used by defaultduring installation. This DBMS can be used for small or desktop installations, where the speed is notan issue. You can use this DBMS for several thousands of metadata. If you manage more than 10.000metadata it is better to use a professional, stand alone DBMS. In this case, using a separate DBMSalso frees up some memory for the application.
GeoNetwork does not require a strong machine to run. A good performance can be obtained even with128 Mb of RAM. The suggested amount is 512 Mb. For the hard disk space, you have to consider thespace required for the application itself (about 40 Mb) and the space required for data maps, which canrequire 50 Gb or more. A simple disk of 250 Gb should be ok. Maybe you can choose a fast one toreduce backup time but GeoNetwork itself does not speed up on a faster disk. You also need somespace for the search index which is located in web/WEB-INF/lucene. Even with a lot of metadata theindex is small so usually 10-20 Mb of space is enough.
16.2 Running the software with a servlet engine
The software is run in different ways depending on the servlet container you are using:
Tomcat You can use the manager web application to start/stop GeoNetwork. You can also use thestartup.* and shutdown.* scripts located into Tomcat’s bin folder (.* means .sh or .bat depending on yourOS) but this way you restart all applications you are running, not only GeoNetwork. After installation andbefore running GeoNetwork you must link it to Tomcat. Jetty If you use the provided container you canuse the scripts into GeoNetwork’s bin folder. The scripts are start-geonetwork.* and stop-geonetwork.*and you must be inside the bin folder to run them. You can use these scripts just after installation.
16.3 Development
Compiling GeoNetwork
To compile GeoNetwork you first need to install the source code during installation. If you do so, youget a build.xml script and a src folder with the full source.

Software development
GeoNetwork opensource V 2.4 83
You also need the Ant tool to run the build script. You can download Ant from http://ant.apache.org.Version 1.6.5 works but any other recent version should be ok. Once installed, you should have the antcommand in your path (on Windows systems, you have to open a shell to check).
When all is in place, go inside the GeoNetwork’s root folder (the one where the build.xml file is located)and issue the ant command. You should see an output like this one:
gemini:/geonetwork/trunk# ant
Buildfile: build.xml
compile:
[delete] Deleting: /geonetwork/trunk/web/WEB-INF/lib/geonetwork.jar
[delete] Deleting: /geonetwork/trunk/csw/lib/csw-client.jar
[delete] Deleting: /geonetwork/trunk/csw/lib/csw-common.jar
[delete] Deleting: /geonetwork/trunk/gast/gast.jar
[mkdir] Created dir: /geonetwork/trunk/.build
[javac] Compiling 267 source files to /geonetwork/trunk/.build
[javac] Note: Some input files use or override a deprecated API.
[javac] Note: Recompile with -Xlint:deprecation for details.
[javac] Note: Some input files use unchecked or unsafe operations.
[javac] Note: Recompile with -Xlint:unchecked for details.
[copy] Copying 1 file to /geonetwork/trunk/.build
[jar] Building jar: /geonetwork/trunk/web/WEB-INF/lib/geonetwork.jar
[jar] Building jar: /geonetwork/trunk/csw/lib/csw-client.jar
[jar] Building jar: /geonetwork/trunk/csw/lib/csw-common.jar
[jar] Building jar: /geonetwork/trunk/gast/gast.jar
[delete] Deleting directory /geonetwork/trunk/.build
BUILD SUCCESSFUL
Total time: 9 seconds
gemini:/geonetwork/trunk#
The compilation phase, if it has success, puts all jars into the proper place (most of them will becopied into web/geonetwork/WEB-INF/lib and web/intermap/WEB-INF/lib). After this phase, simplyrestart GeoNetwork to see the effects.
Source code documentation
The GeoNetwork Java source code is based on Javadoc. Javadoc is a tool for generating APIdocumentation in HTML format from doc comments in source code. To see documentation generatedby the Javadoc tool, go to:
• GeoNetwork opensource Javadoc1
• InterMap opensource Javadoc2
Creating the installer
You can generate an installer by running the ant command inside the installer directory.
Both platform independent and Windows specific installers are generated by default.
Make sure you update version number and other relevant properties in the installer/build.xml file
You can also create an installer that includes a Java Runtime Environment (JRE) for Windows. Thiswill allow GeoNetwork to run on a compatible, embedded JRE and thus avoid error messages causedby JRE incompatibilities on the PC.
Creating an installer with an embedded JRE requires you to first download and unzip the JRE in a folderjre1.5.0_12 at the project root level. Refer to the installer-config-win-jre.xml file for exactconfiguration.

GeoNetwork opensource V 2.4 84
17. Harvesting
17.1 Structure
The harvesting capability is built around 3 areas: Javascript code, Java code and XSL stylesheets (onboth the server and client side).
Javascript code
This refers to the web interface. The code is located in the web/geonetwork/scripts/harvesting folder.Here, there is a subfolder for each harvesting type plus some classes for the main page. These are:
1. harvester.js : This is an abstract class that must be implemented by harvesting types. It defines someinformation retrieval methods (getType, getLabel, etc...) used to handle the harvesting type, plus onegetUpdateRequest method used to build the XML request to insert or update entries.
2. harvester-model.js : Another abstract class that must be implemented by harvesting types. Whencreating the XML request, the only method substituteCommon takes care of adding commoninformation like privileges and categories taken from the user interface.
3. harvester-view.js : This is an important abstract class that must be implemented by harvesting types.It takes care of many common aspects of the user interface. It provides methods to add group’sprivileges, to select categories, to check data for validity and to set and get common data from theuser interface.
4. harvesting.js : This is the main Javascript file that takes care of everything. It starts all the submodules,loads XML strings from the server and displays the main page that lists all harvesting nodes.
5. model.js : Performs all XML requests to the server, handles errors and decode responses.
6. view.js : Handles all updates and changes on the main page.
7. util.js : just a couple of utility methods.
Java code
The harvesting package is located in src/org/fao/geonet/kernel/harvest. Here too, there is one subfolderfor each harvesting type. The most important classes for the implementor are:
1. AbstractHarvester : This is the main class that a new harvesting type must extends. It takes care ofall aspects like adding, updating, removing, starting, stopping of harvesting nodes. Some abstractmethods must be implemented to properly tune the behaviour of a particular harvesting type.
2. AbstractParams : All harvesting parameters must be enclosed in a class that extends this abstractone. Doing so, all common parameters can be transparently handled by this abstract class.
All others are small utility classes used by harvesting types.
XSL stylesheets
Stylesheets are spread in some foders and are used by both the Javascript code and the server. Themain folder is located at web/geonetwork/xsl/harvesting. Here there are some general stylesheets, plusone subfolder for each harvesting type. The general stylesheets are:

Harvesting
GeoNetwork opensource V 2.4 85
1. buttons.xsl : Defines all button present in the main page (activate, deactivate, run, remove, back,add, refresh), buttons present in the "add new harvesting" page (back and add) and at the bottomof the edit page (back and save).
2. client-error-tip.xsl : This stylesheet is used by the browser to build tooltips when an harvesting erroroccured. It will show the error class, the message and the stacktrace.
3. client-node-row.xsl : This is also used by the browser to add one row to the list of harvesting nodesin the main page.
4. harvesting.xsl : This is the main stylesheet. It generates the html page of the main page and includesall panels from all the harvesting nodes.
In each subfolder, there are usually 4 files:
1. xxx.xsl : This is the server stylesheets who builds all panels for editing the parameters. XXX isthe harvesting type. Usually, it has the following panels: site information, search criteria, options,privileges and categories.
2. client-privil-row.xsl : This is used by the Javascript code to add rows in the group’s privileges panel.
3. client-result-tip.xsl : This is used by the Javascript code (which inherits from harvester-view.js) toshow the tooltip when the harvesting has been successfull.
4. client-search-row.xsl : Used in some harvesting types to generate the html for the search criteriapanel.
As you may have guessed, all client side stylesheets (those used by Javascript code) start with theprefix client-.
Another set of stylesheets are located in web/geonetwork/xsl/xml/harvesting and are used by thexml.harvesting.get service. This service is used by the Javascript code to retrieve all the nodes thesystem is currently harvesting from. This implies that a stylesheet (one for each harvesting type) mustbe provided to convert from the internal setting structure to an XML structure suitable to clients.
The last file to take into consideration contains all localized strings and is located at web/geonetwork/loc/XX/xml/harvesting.xml (where XX refers to a language code). This file is used by both Javascriptcode and the server.
17.2 Data storage
Harvesting nodes are stored inside the Settings table. Further useful information can be found inchapters ?? and ??.
The SourceNames table is used to keep track of the uuid/name couple when metadata get migratedto different sites.
17.3 Guidelines
To add a new harvesting type, follows these steps:
1. Add the proper folder in web/scripts/harvesting, maybe copying an already existing one.
2. Edit the harvesting.js file to include the new type (edit both constructor and init methods).

Harvesting
GeoNetwork opensource V 2.4 86
3. Add the proper folder in web/xsl/harvesting (again, it is easy to copy from an already existing one).
4. Edit the stylesheet web/xsl/harvesting/harvesting.xsl and add the new type
5. Add the transformation stylesheet in web/xsl/xml/harvesting. Its name must match the string usedfor the harvesting type.
6. Add the Java code in a package inside org.fao.geonet.kernel.harvest.harvester.
7. Add proper strings in web/geonetwork/loc/XX/xml/harvesting.xml.
Here follows a list of general notes to follow when adding a new harvesting type:
1. Every harvesting node (not type) must generate its UUID. This uuid is used to remove metadatawhen the harvesting node is removed and to check if a metadata (which has another uuid) has beenalready harvested by another node.
2. If a harvesting type supports multiple searches on a remote site, these must be done sequentiallyand results merged.
3. Every harvesting type must save in the folder images/logos a GIF image whose name is the node’suuid. This image must be deleted when the harvesting node is removed. This is necessary topropagate harvesting information to other GeoNetwork nodes.
4. When a harvesting node is removed, all collected metadata must be removed too.
5. During harvesting, take in mind that a metadata could have been removed just after being added tothe result list. In this case the metadata should be skipped and no exception raised.
6. The only settable privileges are: view, dynamic, featured. It does not make sense to use the others.
7. If a node raises an exception during harvesting, that node will be deactivated.
8. If a metadata already exists (its uuid exists) but belong to another node, it must not be updated evenif it has been changed. This way the harvesting will not conflict with the other one. As a side effect,this prevent locally created metadata from being changed.
9. The harvesting engine does not store results on disk so they will get lost when the server will berestarted.
10.When some harvesting parameters are changed, the new harvesting type must use them during thenext harvesting without requiring to reboot the server.

GeoNetwork opensource V 2.4 87
18. Metadata Exchange Format v1.1
18.1 Introduction
The metadata exchange format (MEF in short) is a special designed file format whose purpose is to allowmetadata exchange between different platforms. A metadata exported into this format can be importedby any platform which is able to understand it. This format has been developed with GeoNetwork in mindso the information it contains is mainly related to it. Nevertheless, it can be used as an interoperabilityformat between any platform.
This format has been designed with these needs in mind:
1. Export a metadata record for backup purposes
2. Import a metadata record from a previous backup
3. Import a metadata record from a different GeoNetwork version to allow a smooth migration from oneversion to another.
All these operations regard the metadata and its related data as well.
In the paragraphs below, some terms should be intended as follows:
1. the term actor is used to indicate any system (application, service etc...) that operates on metadata.
2. the term reader will be used to indicate any actor that can import metadata from a MEF file.
3. the term writer will be used to indicate any actor that can generate a MEF file.
18.2 File format
A MEF file is simply a ZIP file which contains the following files:
1. metadata.xml : this file contains the metadata itself, in XML format. The text encoding of the metadatais that one specified into the XML declaration.
2. info.xml : this is a special XML file which contains information related to the metadata but that cannotbe stored into it. Examples of such information are the creation date, the last change date, privilegeson the metadata and so on. Now this information is related to the GeoNetwork’s architecture.
3. public : this is a directory used to store the metadata thumbnails and other public files. There areno restrictions on the images’ format but it is strongly recommended to use the portable networkgraphics (PNG), the JPEG or the GIF formats.
4. private : this is a directory used to store all data (maps, shape files etc...) associated to the metadata.Files in this directory are private in the sense that an authorization is required to access them. Thereare no restrictions on the file types that can be stored into this directory.
Any other file or directory present into the MEF file should be ignored by readers that don’t recognizethem. This allows actors to add custom extensions to the MEF file.
A MEF file can have empty public and private folders depending on the export format, which can be:
1. simple : both public and private are omitted.
2. partial : only public files are provided.

Metadata Exchange Format v1.1
GeoNetwork opensource V 2.4 88
3. full : both public and private files are provided.
It is recommended to use the .mef extension when naming MEF files.
18.3 The info.xml file
This file contains general information about a metadata. It must have an info root element with amandatory version attribute. This attribute must be in the X.Y form, where X represents the major versionand Y the minor one. The purpose of this attribute is to allow future changes of this format maintainingcompatibility with older readers. The policy behind the version is this:
1. A change to Y means a minor change. All existing elements in the previous version must be leftunchanged: only new elements or attributes may be added. A reader capable of reading version X.Yis also capable of reading version X.Y’ with Y’>Y.
2. A change to X means a major change. Usually, a reader of version X.Y is not able to read versionX’.Y with X’>X.
The root element must have the following children:
1. general : a container for general information. It must have the following children:
a. uuid : this is the universally unique identifier assigned to the metadata and must be a valid uuid.This element is optional and, when omitted, the reader should generate one. A metadata without auuid can be imported several times into the same system without breaking uniqueness constraints.When missing, the reader should also generate the siteId value.
b. createDate : This date indicates when the metadata was created.
c. changeDate : This date keeps track of the most recent change to the metadata.
d. siteId : This is an uuid that identifies the actor that created the metadata and must be a valid uuid.When the uuid element is missing, this element should be missing too. If present, it will be ignored.
e. siteName : This is a human readable name for the actor that created the metadata. It must bepresent only if the siteId is present.
f. schema : Indicates the metadata’s schema. The value can be assigned as will but if the schemais one of those describe below, that value must be used:
i. dublin-core : A metadata in the dublin core format as described in http://dublincore.org
ii. fgdc-std : A metadata in the Federal Geographic Data Committee.
iii. iso19115 : A metadata in the ISO 19115 format
iv. iso19139 : A metadata in the ISO 19115/2003 format for which the ISO19139 is the XMLencoding.
g. format : Indicates the MEF export format. The element’s value must belong to the following set:{ simple, partial, full }.
h. localId : This is an optional element. If present, indicates the id used locally by the sourceId actorto store the metadata. Its purpose is just to allow the reuse of the same local id when reimportinga metadata.

Metadata Exchange Format v1.1
GeoNetwork opensource V 2.4 89
i. isTemplate : A boolean field that indicates if this metadata is a template used to create new ones.There is no real distinction between a real metadata and a template but some actors use it to allowfast metadata creation. The value must be: { true, false }.
j. rating : This is an optional element. If present, indicates the users’ rating of the metadata rangingfrom 1 (a bad rating) to 5 (an excellent rating). The special value 0 means that the metadata hasnot been rated yet. Can be used to sort search results.
k. popularity : Another optional value. If present, indicates the popularity of the metadata. The valuemust be positive and high values mean high popularity. The criteria used to set the popularity isleft to the writer. Its main purpose is to provide a metadata ordering during a search.
2. categories : a container for categories associated to this metadata. A category is just a name, like’audio-video’ that classifies the metadata to allow an easy search. Each category is specified by acategory element which must have a name attribute. This attribute is used to store the category’sname. If there are no categories, the categories element will be empty.
3. privileges : a container for privileges associated to this metadata. Privileges are operations that agroup (which represents a set of users) can do on a metadata and are specified by a set of groupelements. Each one of these, has a mandatory name attribute to store the group’s name and a set ofoperation elements used to store the operations allowed on the metadata. Each operation elementmust have a name attribute which value must belong to the following set: { view, download, notify,dynamic, featured }. If there are no groups or the actor does not have the concept of group, theprivileges element will be empty. A group element without any operation element must be ignoredby readers.
4. public : All metadata thumbnails (and any other public file) must be listed here. This container containsa file element for each file. Mandatory attributes of this element are name, which represents the file’sname and changeDate, which contains the date of the latest change to the file. The public elementis optional but, if present, must contain all the files present in the metadata’s public directory and anyreader that imports these files must set the latest change date on these using the provided ones.The purpose of this element is to provide more information in the case the MEF format is used formetadata harvesting.
5. private : This element has the same purpose and structure of the public element but is related tomaps and all other private files.
Any other element or attribute should be ignored by readers that don’t understand them. This allowsactors to add custom attributes or subtrees to the XML.
Figure 18.1, “Example of info file” shows an example of info file.
Date format
Unless differently specified, all dates in this file must be in the ISO/8601 format. The pattern must beYYYY-MM-DDTHH:mm:SS and the timezone should be the local one.

Metadata Exchange Format v1.1
GeoNetwork opensource V 2.4 90
<info version="1.0">
<general>
<uuid>0619abc0-708b-eeda-8202-000d98959033</uuid>
<createDate>2006-12-11T10:33:21</createDate>
<changeDate>2006-12-14T08:44:43</changeDate>
<siteId>0619cc50-708b-11da-8202-000d9335906e</siteId>
<siteName>FAO main site</siteName>
<schema>iso19139</schema>
<format>full</format>
<localId>204</localId>
<isTemplate>false</isTemplate>
</general>
<categories>
<category name="maps"/>
<category name="datasets"/>
</categories>
<privileges>
<group name="editors">
<operation name="view"/>
<operation name="download"/>
</group>
</privileges>
<public>
<file name="small.png" changeDate="2006-10-07T13:44:32"/>
<file name="large.png" changeDate="2006-11-11T09:33:21"/>
</public>
<private>
<file name="map.zip" changeDate="2006-11-12T13:23:01"/>
</private>
</info>
Figure 18.1. Example of info file

GeoNetwork opensource V 2.4 91
19. XML Services
19.1 Calling specifications
Calling XML services
GeoNetwork provides access to several internal structures through the use of XML services. These aremuch like HTML addresses but return XML instead. As an example, consider the xml.info service: youcan use this service to get some system’s information without fancy styles and graphics. In GeoNetwork,XML services have usually the xml. prefix in their address.
Request
Each service accepts a set of parameters, which must be embedded into the request. A service can becalled using different HTTP methods, depending on the structure of its request:
GET The parameters are sent using the URL address. On the server side, these parameters are groupedinto a flat XML document with one root and several simple children. A service can be called this wayonly if the parameters it accepts are not structured. Figure 19.1, “A GET request to a XML service andits request encoding” shows an example of such request and the parameters encoded in XML. POSTThere are 3 variants of this method:
ENCODED The request has one of the following content types: application/x-www-form-urlencoded or multipart/form-data. The first case is very common when sending web formswhile the second one is used to send binary data (usually files) to the server. In these cases, theparameters are not structured so the rules of the GET method applies. Even if the second case couldbe used to send XML documents, this possibility is not considered on the server side. XML The contenttype is application/xml. This is the common case when the client is not a browser but a specializedclient. The request is a pure XML document in string form, encoded using the encoding specified intothe prologue of the XML document. Using this form, any type of request can be made (structured or not)so any service can be called. SOAP The content type is application/soap+xml. SOAP is a simpleprotocol used to access objects and services using XML. Clients that use this protocol can embed XMLrequests into a SOAP structure. On the server side, GeoNetwork will remove the SOAP structure andfeed the content to the service. Its response will be embedded again into a SOAP structure and sentback to the caller. It makes sense to use this protocol if it is the only protocol understood by the client.
<request>
<hitsPerPage>10</hitsPerPage>
<any />
</request>
Figure 19.1. A GET request to a XML service and its request encoding
Response
The response of an XML service always has a content type of application/xml (the only exceptionare those services which return binary data). The document encoding is the one specified into thedocument’s prologue. Anyway, all GeoNetwork services return documents in the UTF-8 encoding.
On a GET request, the client can force a SOAP response adding the application/soap+xml contenttype to the Accept header parameter.

XML Services
GeoNetwork opensource V 2.4 92
Exception handling
A response document having an error root element means that the XML service raised an exception.This can happen under several conditions: bad parameters, internal errors et cetera. In this cases thereturned XML document has the following structure:
• error: This is the root element of the document. It has a mandatory id attribute that represents anidentifier of the error from a common set. See Table 19.1, “Summary of error ids” for a list of all idvalues.
• message: A message related to the error. It can be a short description about the error type or it cancontain some other information that completes the id code.
• class: The Java class of the raised error (name without package information).
• stack: The server’s stacktrace up to the point that generated the exception. It contains several atchildren, one for each nested level. Useful for debugging purposes.
• at: Information about a nested level of called code. It has the following mandatory attributes:
class Java class of the called method. method Java called method. line Line, inside the calledmethod’s source code where there the method call of the next nested level. file Source file wherethe class is defined.
• object: An optional container for parameters or other values that caused the exception. In case aparameter is an XML object, this container will contain that object in XML form.
• request: A container for some useful information that can be needed to debug the service.
• language: Language used when the service was called.
• service: Name of the called service.

XML Services
GeoNetwork opensource V 2.4 93
Table 19.1. Summary of error ids
id Meaning of message element Meaning of object element
error General message, humanreadable
bad-format Reason -
bad-parameter Name of the parameter Parameter’s bad value
file-not-found - File’s name
file-upload-too-big - -
missing-parameter Name of the parameter XML container where the parameter shouldhave been present.
object-not-found - Object’s name
operation-aborted Reason of abort If present, the object that caused the abort
operation-not-allowed
- -
resource-not-found - Resource’s name
service-not-allowed - Service’s name
service-not-found - Service’s name
user-login User login failed message User’s name
user-not-found - User’s id or name
metadata-not-found The requested metadata wasnot found
Metadata’s id
Figure 19.2, “An example of generated exception” shows an example of exception generated by themef.export service. The service complains about a missing parameter, as you can see from the contentof the id attribute. The object element contains the xml request with an unknown test paremeter whilethe mandatory uuid parameter (as specified by the message element) is missing.

XML Services
GeoNetwork opensource V 2.4 94
<error>
<message>uuid</message>
<class>MissingParameterEx</class>
<stack>
<at class="jeeves.utils.Util" file="Util.java" line="66"
method="getParam"/>
<at class="org.fao.geonet.services.mef.Export" file="Export.java"
line="60" method="exec"/>
<at class="jeeves.server.dispatchers.ServiceInfo" file="ServiceInfo.java"
line="226" method="execService"/>
<at class="jeeves.server.dispatchers.ServiceInfo" file="ServiceInfo.java"
line="129" method="execServices"/>
<at class="jeeves.server.dispatchers.ServiceManager" file="ServiceManager.java"
line="370" method="dispatch"/>
</stack>
<object>
<request>
<asd>ee</asd>
</request>
</object>
<request>
<language>en</language>
<service>mef.export</service>
</request>
</error>
Figure 19.2. An example of generated exception
19.2 General services
xml.info
The xml.info service can be used to query the site about its configuration, services, status and so on.For example, it is used by the harvesting web interface to retrieve information about a remote node.
Request
The xml request should contain at least one type element to indicates the kind of information to retrieve.More type elements can be specified to obtain more information at once. The set of allowed values are:
site Returns general information about the site like its name, id, etc... categories Returns all site’scategories groups Returns all site’s groups visible to the requesting user. If the user does notauthenticate theirselves, only the intranet and the all groups are visible. operations Returns all possibleoperations on metadata regions Returns all geographical regions usable for queries sources Returnsall geonetwork sources that the remote site knows. The result will contain:
• The remote node’s name and siteId
• All source uuids and names that have been discovered through harvesting.
• All source uuids and names of metadata that have been imported into the remote node through theMEF format.
• Administrators can see all users into the system (normal, other administrators, etc...)
• User administrators can see all users they can administrate and all other user administrators in thesame group set. The group set is defined by all groups visible to the user administration, beside theAll and the intranet groups.

XML Services
GeoNetwork opensource V 2.4 95
• A logged user can se only theirself.
• A guest cannot see any user.
<request>
<type>site</type>
<type>groups</type>
</request>
Figure 19.3. Request example
Response
Each type element produces an XML subtree so the response to the previous request is like this:
<info>
<site>...</site>
<categories>...</categories>
<groups>...</groups>
...
</info>
Figure 19.4. Response example
Here follows the structure of each subtree:
• site: This is the container
• name: Human readable site name
• siteId: Universal unique identifier of the site
• platform: This is just a container to hold the site’s backend
• name: Plaform name. For GeoNetwork installations it must be geonetwork.
• version: Platform version, given in the X.Y.Z format
• subVersion: Additional version notes, like ’alpha-1’ or ’beta-2’.
Example:
<site>
<name>My site</name>
<organization>FAO</organization>
<siteId>0619cc50-708b-11da-8202-000d9335906e</siteId>
<platform>
<name>geonetwork</name>
<version>2.2.0</version>
</platform>
</site>
Figure 19.5. Example site information
• categories: This is the container for categories.
• category [0..n]: A single GeoNetwork’s category. This element has an id attribute which representsthe local identifier for the category. It can be usefull to a client to link back to this category.

XML Services
GeoNetwork opensource V 2.4 96
• name: Category’s name
• label: The localized labels used to show the category on screen. See Figure 19.6, “Exampleresponse for categories”.
<categories>
<category id="1">
<name>datasets</name>
<label>
<en>Datasets</en>
<fr>Jeux de données</fr>
</label>
</category>
</categories>
Figure 19.6. Example response for categories
• groups: This is the container for groups
• group [2..n]: This is a Geonetwork group. There are at least the internet and intranet groups. Thiselement has an id attribute which represents the local identifier for the group.
• name: Group’s name
• description: Group’s description
• referrer: The user responsible for this group
• email: The email address to notify when a map is downloaded
• label: The localized labels used to show the group on screen. See Figure 19.7, “Exampleresponse for groups”.
<groups>
<group id="1">
<name>editors</name>
<label>
<en>Editors</en>
<fr>Éditeurs</fr>
</label>
</group>
</groups>
Figure 19.7. Example response for groups
• operations: This is the container for the operations
• operation [0..n]: This is a possible operation on metadata. This element has an id attribute whichrepresents the local identifier for the operation.
• name: Short name for the operation.
• reserved: Can be y or n and is used to distinguish between system reserved and user definedoperations.
• label: The localized labels used to show the operation on screen. See Figure 19.8, “Exampleresponse for operations”.

XML Services
GeoNetwork opensource V 2.4 97
<operations>
<operation id="0">
<name>view</name>
<label>
<en>View</en>
<fr>Voir</fr>
</label>
</operation>
</operations>
Figure 19.8. Example response for operations
• regions: This is the container for geographical regions
• region [0..n]: This is a region present into the system. This element has an id attribute whichrepresents the local identifier for the operation.
• north: North coordinate of the bounding box.
• south: South coordinate of the bounding box.
• west: West coordinate of the bounding box.
• east: east coordinate of the bounding box.
• label: The localized labels used to show the region on screen. See Figure 19.9, “Exampleresponse for regions”.
<regions>
<region id="303">
<north>82.99</north>
<south>26.92</south>
<west>-37.32</west>
<east>39.24</east>
<label>
<en>Western Europe</en>
<fr>Western Europe</fr>
</label>
</region>
</regions>
Figure 19.9. Example response for regions
• sources: This is the container.
• source [0..n]: A source known to the remote node.
• name: Source’s name
• uuid: Source’s unique identifier
<sources>
<source>
<name>My Host</name>
<uuid>0619cc50-708b-11da-8202-000d9335906e</uuid>
</source>
</sources>
Figure 19.10. Example response for a source

XML Services
GeoNetwork opensource V 2.4 98
• users: This is the container for user information
• user [0..n]: A user of the system
• id: The local identifier of the user
• username: The login name
• surname: The user’s surname. Used for display purposes.
• name: The user’s name. Used for display purposes.
• profile: User’s profile, like Administrator, Editor, UserAdmin etc...
• address:
• state:
• zip:
• country:
• email:
• organisation:
• kind:
<users>
<user>
<id>3</id>
<username>eddi</username>
<surname>Smith</surname>
<name>John</name>
<profile>Editor</profile>
<address/>
<state/>
<zip/>
<country/>
<email/>
<organisation/>
<kind>gov</kind>
</user>
</users>
Figure 19.11. Example response for a user
Localized entities
Localized entities have a general label element which contains the localized strings in all supportedlanguages. This element has as many children as the supported languages. Each child has a name thatreflect the language code while its content is the localized text. Here is an example of such elements:
<label>
<en>Editors</en>
<fr>Éditeurs</fr>
<es>Editores</es>
</label>

XML Services
GeoNetwork opensource V 2.4 99
xml.forward
This is just a router service. It is used by Javascript code to connect to a remote host because aJavascript program cannot access a machine other than its server. For example, it is used by theharvesting web interface to query a remote host and retrieve the list of site ids.
Request
<request>
<site>
<url>...</url>
<type>...</type>
<account>
<username>...</username>
<password>...</password>
</account>
</site>
<params>...</params>
</request>
Figure 19.12. The service’s request
where:
site A container for site information where the request will be forwarded.
url Indicates the remote url to connect to. Usually points to a GeoNetwork’s xml service but can pointto any XML service. type Its only purpose is to discriminate geonetwork nodes which use a differentauthentication scheme. The value geonetwork indicates these nodes. Any other value, or if the elementis missing, indicate a generic node. account This element is optional. If present, the provided credentialswill be used to authenticate to the remote site. params This is just a container for the request that mustbe executed remotely.
<request>
<site>
<url>http://mynode.org:8080/geonetwork/srv/en/xml.info</url>
</site>
<params>
<request>
<type>site<type>
</request>
</params>
</request>
Figure 19.13. Request for info from a remote server
Please note that this service uses the GeoNetwork’s proxy configuration.
Response
The response is just the response from the remote service.
19.3 Harvesting services
Introduction
This chapter provides a detailed explanation of the GeoNetwork’s harvesting services. These servicesallow a complete control over the harvesting behaviour. They are used by the web interface and canbe used by any other client.
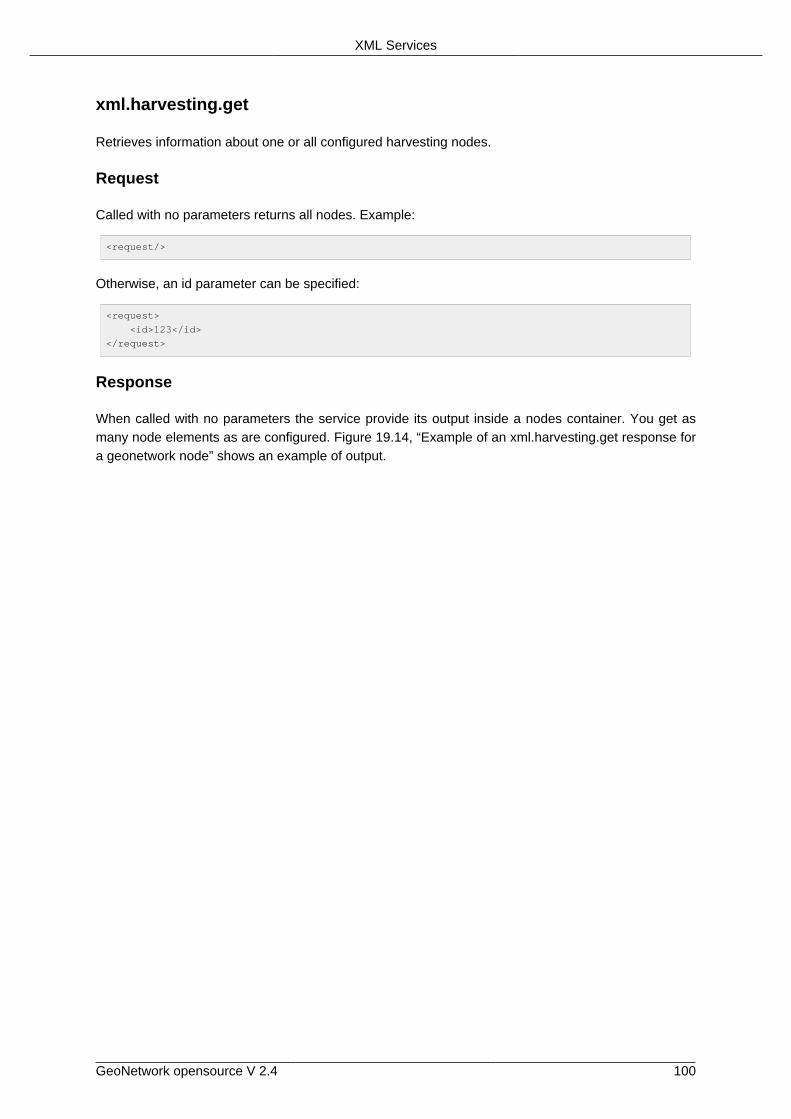
XML Services
GeoNetwork opensource V 2.4 100
xml.harvesting.get
Retrieves information about one or all configured harvesting nodes.
Request
Called with no parameters returns all nodes. Example:
<request/>
Otherwise, an id parameter can be specified:
<request>
<id>123</id>
</request>
Response
When called with no parameters the service provide its output inside a nodes container. You get asmany node elements as are configured. Figure 19.14, “Example of an xml.harvesting.get response fora geonetwork node” shows an example of output.

XML Services
GeoNetwork opensource V 2.4 101
<nodes>
<node id="125" type="geonetwork">
<site>
<name>test 1</name>
<uuid>0619cc50-708b-11da-8202-000d9335aaae</uuid>
<host>localhost</host>
<port>8080</port>
<servlet>geonetwork</servlet>
<account>
<use>false</use>
<username />
<password />
</account>
</site>
<searches>
<search>
<freeText />
<title />
<abstract />
<keywords />
<digital>false</digital>
<hardcopy>false</hardcopy>
<source>
<uuid>0619cc50-708b-11da-8202-000d9335906e</uuid>
<name>Food and Agriculture Organization</name>
</source>
</search>
</searches>
<options>
<every>90</every>
<oneRunOnly>false</oneRunOnly>
<status>inactive</status>
</options>
<info>
<lastRun />
<running>false</running>
</info>
<groupsCopyPolicy>
<group name="all" policy="copy"/>
<group name="mygroup" policy="createAndCopy"/>
</groupsCopyPolicy>
<categories>
<category id="4"/>
</categories>
</node>
</nodes>
Figure 19.14. Example of an xml.harvesting.get response for a geonetwork node
If you specify an id, you get a response like that one in Figure 19.15, “Example of an xml.harvesting.getresponse for a WebDAV node” (for a web DAV node).

XML Services
GeoNetwork opensource V 2.4 102
<node id="165" type="webdav">
<site>
<name>test 1</name>
<uuid>0619cc50-708b-11da-8202-000d9335aaae</uuid>
<url>http://www.mynode.org/metadata</url>
<icon>default.gif</icon>
<account>
<use>true</use>
<username>admin</username>
<password>admin</password>
</account>
</site>
<options>
<every>90</every>
<oneRunOnly>false</oneRunOnly>
<recurse>false</recurse>
<validate>true</validate>
<status>inactive</status>
</options>
<privileges>
<group id="0">
<operation name="view" />
</group>
<group id="14">
<operation name="download" />
</group>
</privileges>
<categories>
<category id="2"/>
</categories>
<info>
<lastRun />
<running>false</running>
</info>
</node>
Figure 19.15. Example of an xml.harvesting.get response for a WebDAV node
The node’s structure has a common XML format, plus some additional information provided by theharvesting types. In the following structure, each element has a cardinality specified using the [x..y]notation, where x and y denote the minimum and the maximum values. The cardinality [1..1] is omittedfor clarity.
• node: The root element. It has a mandatory id attribute that represents the internal identifier and amandatory type attribute which indicates the harvesting type.
• site: A container for site information.
• name (string): The node’s name used to describe the harvesting.
• uuid (string): This is a system generated unique identifier associated to the harvesting node. Thisis used as the source field into the Metadata table to group all metadata from the remote node.
• account: A container for account information.
• use (boolean): true means that the harvester will use the provided username and password toauthenticate itself. The authentication mechanism depends on the harvesting type.
• username (string): Username on the remote node.
• password (string): Password on the remote node.

XML Services
GeoNetwork opensource V 2.4 103
• options: A container for generic options.
• every (integer): Harvesting interval in minutes.
• oneRunOnly (boolean): After the first run, the entry’s status will be set to inactive.
• status (string): Indicates if the harvesting from this node is stopped (inactive) or if the harvesteris waiting for the timeout (active).
• privileges [0..1]: A container for privileges that must be associated to the harvested metadata. Thisoptional element is present only if the harvesting type supports it.
• group [0..n]: A container for allowed operations associated to this group. It has the id attributewhich value is the identifier of a GeoNetwork group.
• operation [0..n]: Specifies an operation to associate to the containing group. It has a nameattribute which value is one of the supported operation names. The only supported operationsare: view, dynamic, featured.
• categories [0..1]: This is a container for categories to assign to each imported metadata. Thisoptional element is present if the harvesting type supports it.
• category (integer) [0..n]: Represents a local category and the id attribute is its local identifier.
• info: A container for general information.
• lastRun (string): The lastRun element will be filled as soon as the harvester starts harvestingfrom this entry. The value is the
• running (boolean): True if the harvester is currently running.
• error: This element will be present if the harvester encounters an error during harvesting.
• code (string): The error code, in string form.
• message (string): The description of the error.
• object (string): The object that caused the error (if any). This element can be present or notdepending on the case.
Errors
• ObjectNotFoundEx If the id parameter is provided but the node cannot be found.
xml.harvesting.add
Create a new harvesting node. The node can be of any type supported by GeoNetwork (GeoNetworknode, web folder etc...). When a new node is created, its status is set to inactive. A call to thexml.harvesting.start service is required to start harvesting.
Request
The service requires an XML tree with all information the client wants to add. In the following sections,default values are given in parenthesis (after the parameter’s type) and are used when the parameter

XML Services
GeoNetwork opensource V 2.4 104
is omitted. If no default is provided, the parameter is mandatory. If the type is boolean, only the trueand false strings are allowed.
All harvesting nodes share a common XML structure that must be honored. Please, refer to the previoussection for elements explanation. Each node type can add extra information to that structure. Thecommon structure is here described:
• node: The root container. The type attribute is mandatory and must be one of the supported harvestingtypes.
• site [0..1]
• name (string, ”)
• account [0..1]
• use (boolean, ’false’)
• username (string, ”)
• password (string, ”)
• options [0..1]
• every (integer, ’90’)
• oneRunOnly (boolean, ’false’)
• privileges [0..1]: Can be omitted but doing so the harvested metadata will not be visible. Pleasenote that privileges are taken into account only if the harvesting type supports them.
• group [0..n]: It must have the id attribute which value should be the identifier of a GeoNetworkgroup. If the id is not a valid group id, all contained operations will be discarded.
• operation [0..n]: It must have a name attribute which value must be one of the supportedoperation names.
• categories [0..1]: Please, note that categories will be assigned to metadata only if the harvestingtype supports them.
• category (integer) [0..n]: The mandatory id attribute is the category’s local identifier.
Please note that even if clients can store empty values (”) for many parameters, before starting theharvesting entry those parameters should be properly set in order to avoid errors.
In the following sections, the XML structures described inherit from this one here so the commonelements have been removed for clarity reasons (unless they are containers and contain new children).
Standard GeoNetwork harvesting
To create a node capable of harvesting from another GeoNetwork node, the following XML informationshould be provided:
• node: The type attribute is mandatory and must be geonetwork.
• site

XML Services
GeoNetwork opensource V 2.4 105
• host (string, ”): The GeoNetwork node’s host name or IP address.
• port (string, ’80’): The port to connect to.
• servlet (string, ’geonetwork’). The servlet name choosen in the remote site.
• searches [0..1]: A container for search parameters.
• search [0..n]: A container for a single search on a siteID. You can specify 0 or more searches. Ifno search element is provided, an unconstrained search is performed.
• freeText (string, ”) : Free text to search. This and the following parameters are the same usedduring normal search using the web interface.
• title (string, ”): Search the title field.
• abstract (string, ”) : Search the abstract field.
• keywords (string, ”) : Search the keywords fields.
• digital (boolean, ’false’): Search for metadata in digital form.
• hardcopy (boolean, ’false’): Search for metadata in printed form.
• source (string, ”): One of the sources present on the remote node.
• groupsCopyPolicy [0..1]: Container for copy policies of remote groups. This mechanism is used toretain remote metadata privileges.
• group: There is one copy policy for each remote group. This element must have 2 mandatoryattributes: name and policy. The name attribute is the remote group’s name. If the remote groupis renamed, it is not found anymore and the copy policy is skipped. The policy attribute representsthe policy itself and can be: copy, createAndCopy, copyToIntranet. copy means that remoteprivileges are copied locally if there is locally a group with the same name as the name attribute.createAndCopy works like copy but the group is created locally if it does not exist. copyToIntranetworks only for the remote group named all, which represents the public group. This policy copiesprivileges of the remote group named all to the local intranet group. This is usefull to restrictmetadata access.
Figure 19.16, “Example of an xml.harvesting.add request for a geonetwork node” shows an example ofan XML request to create a GeoNetwork node.

XML Services
GeoNetwork opensource V 2.4 106
<node type="geonetwork">
<site>
<name>South Africa</name>
<host>south.africa.org</host>
<port>8080</port>
<servlet>geonetwork</servlet>
<account>
<use>true</use>
<username>admin</username>
<password>admin</password>
</account>
</site>
<searches>
<search>
<freeText />
<title />
<abstract />
<keywords />
<digital>true</digital>
<hardcopy>false</hardcopy>
<source>0619cc50-708b-11da-8202-000d9335906e</source>
</search>
</searches>
<options>
<every>90</every>
<oneRunOnly>false</oneRunOnly>
</options>
<groupsCopyPolicy>
<group name="all" policy="copy"/>
<group name="mygroup" policy="createAndCopy"/>
</groupsCopyPolicy>
<categories>
<category id="4"/>
</categories>
</node>
Figure 19.16. Example of an xml.harvesting.add request for a geonetwork node
WebDAV harvesting
To create a web DAV node, the following XML information should be provided.
• node: The type attribute is mandatory and must be webdav.
• site
• url (string, ”): The URL to harvest from. If provided, must be a valid URL starting with ’HTTP://’.
• icon (string, ’default.gif’) : Icon file used to represent this node in the search results. The iconmust be present into the images/harvesting folder.
• options
• recurse (boolean, ’false’): When true, folders are scanned recursively to find metadata.
• validate (boolean, ’false’): When true, GeoNetwork will validate every metadata against itsschema. If the metadata is not valid, it will not be imported.
This type supports both privileges and categories assignment.
Figure 19.17, “Example of an xml.harvesting.add request for a WebDAV node” shows an example ofan XML request to create a web DAV entry.
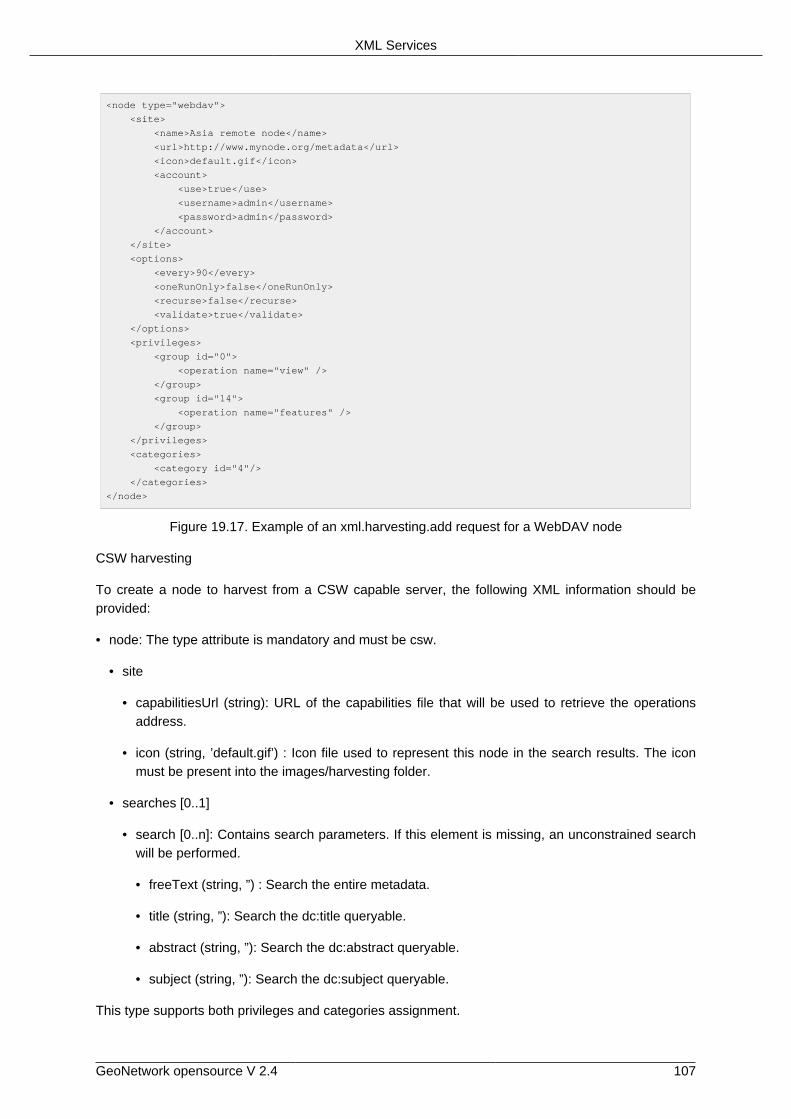
XML Services
GeoNetwork opensource V 2.4 107
<node type="webdav">
<site>
<name>Asia remote node</name>
<url>http://www.mynode.org/metadata</url>
<icon>default.gif</icon>
<account>
<use>true</use>
<username>admin</username>
<password>admin</password>
</account>
</site>
<options>
<every>90</every>
<oneRunOnly>false</oneRunOnly>
<recurse>false</recurse>
<validate>true</validate>
</options>
<privileges>
<group id="0">
<operation name="view" />
</group>
<group id="14">
<operation name="features" />
</group>
</privileges>
<categories>
<category id="4"/>
</categories>
</node>
Figure 19.17. Example of an xml.harvesting.add request for a WebDAV node
CSW harvesting
To create a node to harvest from a CSW capable server, the following XML information should beprovided:
• node: The type attribute is mandatory and must be csw.
• site
• capabilitiesUrl (string): URL of the capabilities file that will be used to retrieve the operationsaddress.
• icon (string, ’default.gif’) : Icon file used to represent this node in the search results. The iconmust be present into the images/harvesting folder.
• searches [0..1]
• search [0..n]: Contains search parameters. If this element is missing, an unconstrained searchwill be performed.
• freeText (string, ”) : Search the entire metadata.
• title (string, ”): Search the dc:title queryable.
• abstract (string, ”): Search the dc:abstract queryable.
• subject (string, ”): Search the dc:subject queryable.
This type supports both privileges and categories assignment.

XML Services
GeoNetwork opensource V 2.4 108
Figure 19.18, “Example of an xml.harvesting.add request for a CSW node” shows an example of anXML request to create a CSW entry.
<node type="csw">
<site>
<name>Minos CSW server</name>
<capabilitiesUrl>http://www.minos.org/csw?request=GetCapabilities
&amp;service=CSW&amp;acceptVersions=2.0.1</capabilitiesUrl>
<icon>default.gif</icon>
<account>
<use>true</use>
<username>admin</username>
<password>admin</password>
</account>
</site>
<options>
<every>90</every>
<oneRunOnly>false</oneRunOnly>
<recurse>false</recurse>
<validate>true</validate>
</options>
<privileges>
<group id="0">
<operation name="view" />
</group>
<group id="14">
<operation name="features" />
</group>
</privileges>
<categories>
<category id="4"/>
</categories>
</node>
Figure 19.18. Example of an xml.harvesting.add request for a CSW node
Response
The service’s response is the output of the xml.harvesting.get service of the newly created node.
Summary
The following table:
Table 19.2. Summary of features of the supported harvesting types
Harvesting type Authentication Privileges ? Categories ?
GeoNetwork native through policies yes
Web DAV HTTP digest yes yes
CSW HTTP Basic yes yes
xml.harvesting.update
This service is responsible for changing the node’s parameters. A typical request has a node rootelement and must include the id attribute:
<node id="24">
...

XML Services
GeoNetwork opensource V 2.4 109
</node>
The body of the node element depends on the node’s type. The update policy is this:
• If an element is specified, the associated parameter is updated.
• If an element is not specified, the associated parameter will not be changed.
So, you need to specify only the elements you want to change. However, there are some exceptions:
privileges If this element is omitted, privileges will not be changed. If specified, new privileges willreplace the old ones. categories Like the previous one. searches Some harvesting types support multiplesearches on the same remote note. When supported, the updated behaviour should be like the previousones.
Note that you cannot change the type of an node once it has been created.
Request
The request is the same as that used to add an entry. Only the id attribute is mandatory.
Response
The response is the same as the xml.harvesting.get called on the updated entry.
xml.harvesting.remove/start/stop/run
These services are put together because they share a common request interface. Their purpose isobviously to remove, start, stop or run a harvesting node. In detail:
start When created, a node is in the inactive state. This operation makes it active, that is the countdownis started and the harvesting will be performed at the timeout. stop Makes a node inactive. Inactivenodes are never harvested. run Just start the harvester now. Used to test the harvesting.
Request
A set of ids to operate on. Example:
<request>
<id>123</id>
<id>456</id>
<id>789</id>
</request>
If the request is empty, nothing is done.
Response
The same as the request but every id has a status attribute indicating the success or failure of theoperation. For example, the response to the previous request could be:
<request>
<id status="ok">123</id>
<id status="not-found">456</id>
<id status="inactive">789</id>
</request>
Table 19.3, “Summary of status values” summarizes, for each service, the possible status values.

XML Services
GeoNetwork opensource V 2.4 110
Table 19.3. Summary of status values
Status value remove start stop run
ok + + + +
not-found + + + +
inactive - - - +
already-inactive - - + -
already-active - + - -
already-running - - - +
19.4 System configuration
Introduction
The GeoNetwork’s configuration is made up of a set of parameters that can be changed to accomodateany installation need. These parameters are subdivided into 2 groups:
• parameters that can be easily changed through a web interface.
• parameters not accessible from a web interface and that must be changed when the system is notrunning.
The first group of parameters can be queried or changed through 2 services: xml.config.get andxml.config.update. The second group of parameters can be changed using the GAST tool.
xml.config.get
This service returns the system configuration’s parameters.
Request
No parameters are needed.
Response
The response is an XML tree similar to the system hierarchy into the settings structure. See ?? for moreinformation. The response has the following elements:
• site: A container for site information.
• name: Site’s name.
• organization: Site’s organization name.
• server: A container for server information.
• host: Name of the host from which the site is reached.
• port: Port number of the previous host.
• intranet: Information about the intranet of the organization.
• network: IP address that specifies the network.
XML Services
GeoNetwork opensource V 2.4 111
• netmask: netmask of the network.
• z3950: Configuration about Z39.50 protocol.
• enable: true means that the server component is running.
• port: Port number to use to listen for incoming Z39.50 requests.
• proxy: Proxy configuration
• use: true means that the proxy is used when connecting to external nodes.
• host: Proxy’s server host.
• port: Proxy’s server port.
• username: Proxy’s credentials.
• password: Proxy’s credentials.
• feedback: A container for feeback information
• email: Administrator’s email address
• mailServer: Email server to use to send feedback
• host: Email’s host address
• port: Email’s port to use in host address
• removedMetadata: A container for removed metadata information
• dir: Folder used to store removed metadata in MEF format
• ldap: A container for LDAP parameters
• use:
• host:
• port:
• defaultProfile:
• login:
• userDN:
• password:
• distinguishedNames:
• base:
• users:
• userAttribs:

XML Services
GeoNetwork opensource V 2.4 112
• name:
• password:
• profile:
Figure 19.19, “Example of xml.config.get response” shows an example of xml.config.get response.
<config>
<site>
<name>dummy</name>
<organization>dummy</organization>
</site>
<server>
<host>localhost</host>
<port>8080</port>
</server>
<intranet>
<network>127.0.0.1</network>
<netmask>255.255.255.0</netmask>
</intranet>
<z3950>
<enable>true</enable>
<port>2100</port>
</z3950>
<proxy>
<use>false</use>
<host/>
<port/>
<username>proxyuser</username>
<password>proxypass</password>
</proxy>
<feedback>
<email/>
<mailServer>
<host/>
<port>25</port>
</mailServer>
</feedback>
<removedMetadata>
<dir>WEB-INF/removed</dir>
</removedMetadata>
<ldap>
<use>false</use>
<host />
<port />
<defaultProfile>RegisteredUser</defaultProfile>
<login>
<userDN>cn=Manager</userDN>
<password />
</login>
<distinguishedNames>
<base>dc=fao,dc=org</base>
<users>ou=people</users>
</distinguishedNames>
<userAttribs>
<name>cn</name>
<password>userPassword</password>
<profile>profile</profile>
</userAttribs>
</ldap>
</config>
Figure 19.19. Example of xml.config.get response

XML Services
GeoNetwork opensource V 2.4 113
xml.config.update
This service is used to update the system’s information and so it is restricted to administrators.
Request
The request format must have the same structure returned by the xml.config.get service and cancontain only elements that the caller wants to be updated. If an element is not included, it will not beupdated. However, when included some elements require mandatory information (i.e. the value cannotbe empty). Please, refer to Table 19.4, “Mandatory and optional parameters for the xml.config.updateservice”.

XML Services
GeoNetwork opensource V 2.4 114
Table 19.4. Mandatory and optional parameters for the xml.config.update service
Parameter Type Mandatory
site/name string yes
site/organization string -
server/host string yes
server/port integer -
intranet/network string yes
intranet/netmask string yes
z3950/enable bool yes
z3950/port integer -
proxy/use bool yes
proxy/host string -
proxy/port integer -
proxy/username string -
proxy/password string -
feedback/email string -
feedback/mailServer/host string -
feedback/mailServer/port integer -
removedMetadata/dir string yes
ldap/use bool yes
ldap/host string -
ldap/port integer -
ldap/defaultProfile string yes
ldap/login/userDN string yes
ldap/login/password string -
ldap/distinguishedNames/base string yes
ldap/distinguishedNames/users string yes
ldap/userAttribs/name string yes
ldap/userAttribs/password string yes
ldap/userAttribs/profile string -
XML Services
GeoNetwork opensource V 2.4 115
Response
On success, the service returns a response element with the ok text. Example:
<response>ok</response>
Otherwise a proper error element is returned.
19.5 MEF services
Introduction
This chapter describes the services related to the Metadata Exchange Format. These services allow toimport/export metadata using the MEF format.
mef.export
As the name suggests, this service exports a GeoNetwork’s metadata using the MEF file format.
This service is public but metadata access rules apply. For a partial export, the view privilege is enoughbut for a full export the download privilege is also required. Without a login step, only partial exportson public metadata are allowed.
This service uses the system’s temporary directory to build the MEF file. With full exports of big datamaybe it is necessary to change this directory. In this case, use the Java’s -D command line option toset the new directory before running GeoNetwork (if you use Jetty, simply change the script into thebin directory).
Request
This service accepts requests in GET/POST and XML form. The input parameters are:
uuid the universal unique identifier of the metadata format which format to use. Can be one of: simple,partial, full. skipUuid If provided, tells the exporter to not export the metadata’s uuid. Without the uuid(which is a unique key inside the database) the metadata can be imported over and over again. Canbe one of: true, false. The default value is false.
Response
The service’s response is a MEF file with these characteristics:
• the name of the file is the metadata’s uuid
• the extension of the file is mef
mef.import
This service is reserved to administrators and is used to import a metadata provided in the MEF format.
Request
The service accepts a multipart/form-data POST request with a single mefFile parameter thatmust contain the MEF information.

XML Services
GeoNetwork opensource V 2.4 116
Response
If all goes well, the service returns an ok element containing the local id of the created metadata.Example:
<ok>123</ok>
Metadata ownership
Version 1.0 of the MEF format does not take into account the metadata owner (the creator) and thegroup owner. This implies that this information is not contained into the MEF file. During import, the userthat is performing this operation will become the metadata owner and the group owner will be set to null.
19.6 Relations
Introduction
This chapter describes general services used to get and set relations between metadata records insideGeoNetwork. The association is performed by a Relations table which stores a metadata id and ametadata relatedId fields (see Table 19.5, “Structure of table Relations”).
Table 19.5. Structure of table Relations
Field Datatype Description
id foreign key to Metadata(id) Source metadata whose relation is beingdescribed.
relatedId foreign key to Metadata(id) Metadata related to the source one
xml.relation.get
This service retrieves all relations between metadata.
Request
The request accepts an id and a relation parameters, whose meaning is this:
• id (integer): This is the local GeoNetwork identifier of the metadata whose relations are requested.
• relation (string, ’normal’): This optional parameter identifies the kind of relation that the client wantsto be returned. It can be one of these values:
• normal: The service performs a query into the id field and returns all relatedId records.
• reverse: The service performs a query into the relatedId field and returns all id records.
• full: Includes both normal and reverse queries (duplicated ids are removed).
Here is an example of POST/XML request:
<request>
<id>10</id>
<relation>full</relation>
</request>

XML Services
GeoNetwork opensource V 2.4 117
Response
The response has a response root element with several metadata children depending on the relationsfound. Example:
<response>
<metadata>...</metadata>
<metadata>...</metadata>
...
</response>
Each metadata element has the following structure:
• title: Metadata title
• abstract: A brief explanation of the metadata
• keyword: Keywords found inside the metadata
• image: Information about thumbnails
• link: A link to the source site
• geoBox: coordinates of the bounding box
• geonet:info: A container for GeoNetwork related information
<metadata>
<title>Globally threatened species of the world</title>
<abstract> Contains information on animals.</abstract>
<keyword>biodiversity</keyword>
<keyword>endangered animal species</keyword>
<keyword>endangered plant species</keyword>
<link type="url">http://www.mysite.org</link>
<geoBox>
<westBL>-180.0</westBL>
<eastBL>180.0</eastBL>
<southBL>-90.0</southBL>
<northBL>90.0</northBL>
</geoBox>
<geonet:info>
<id>11</id>
<schema>fgdc-std</schema>
<createDate>2005-03-31T19:13:31</createDate>
<changeDate>2007-03-12T14:52:46</changeDate>
<isTemplate>n</isTemplate>
<title/>
<source>38b75c1b-634b-443e-9c36-a12e89b4c866</source>
<uuid>84b4190b-de43-4bd7-b25f-6ed47eb239ac</uuid>
<isHarvested>n</isHarvested>
<view>true</view>
<admin>false</admin>
<edit>false</edit>
<notify>false</notify>
<download>true</download>
<dynamic>false</dynamic>
<featured>false</featured>
</geonet:info>
</metadata>
Figure 19.20. Example of a metadata record

XML Services
GeoNetwork opensource V 2.4 118
19.7 Schema information
Introduction
GeoNetwork is able to handle several metadata schema formats. Up to now, the supported schemasare:
• ISO-19115 (iso19115): GeoNetwork implements an old version of the draft, which uses short namesfor elements. This is not so standard so this schema is obsolete and will be removed in future releases.
• ISO-19139 (iso19139): This is the XML encoding of the ISO 19115:2007 metadata specification.
• Dublin core (dublin-core): This is a simple metadata schema based on a set of elements capable ofdescribing any metadata.
• FGDC (fgdc-std): It stands for Federal Geographic Data Committee and it is a metadata schema usedin North America.
In parenthesis is indicated the name used by GeoNetwork to refer to that schema. These schemas arehandled through their XML schema files (XSD), which GeoNetwork loads and interprets to allow theeditor to add and remove elements. Beside its internal use, GeoNetwork provides some useful XMLservices to find out some element properties, like label, description and so on.
xml.schema.info
This service returns information about a set of schema elements or codelists. The returned informationconsists of a localized label, a description, conditions that the element must satisfy etc...
Request
Due to its nature, this service accepts only the POST binding with application/XML content type. Therequest can contain several element and codelist elements. Each element indicate the will to retrieveinformation for that element. Here follows the element descriptions:
• element: It must contain a schema and a name attribute. The first one must be one of the supportedschemas (see the section above). The second must be the qualified name of the element whichinformation must be retrieved. The namespace must be declared into this element or into the rootelement of the request.
• codelist: Works like the previous one but returns information about codelists.
<request xmlns:gmd="http://www.isotc211.org/2005/gmd">
<element schema="iso19139" name="gmd:constraintLanguage" />
<codelist schema="iso19115" name="DateTypCd" />
</request>
Note
The returned text is localized depending on the language specified during the service call. A call to /geonetwork/srv/en/xml.schema.info will return text in the English language.
Response
The response’s root element will be populated with information of the elements/codelists specified intothe request. The structure is the following:

XML Services
GeoNetwork opensource V 2.4 119
• element: A container for information about an element. It has a name attribute which contains thequalified name of the element.
• label: The human readable name of the element, localized into the request’s language.
• description: A generic description of the element.
• condition [0..1]: This element is optional and indicates if the element must satisfy a condition, likethe element is always mandatory or is mandatory if another one is missing.
• codelist: A container for information about a codelist. It has a name attribute which contains thequalified name of the codelist.
• entry [1..n]: A container for a codelist entry. There can be many entries.
• code: The entry’s code. This is the value that will be present inside the metadata.
• label: This is a human readable name, used to show the entry into the user interface. It is localized.
• description: A generic localized description of the codelist.
<response>
<element name="gmd:constraintLanguage">
<label>Constraint language</label>
<description>language used in Application Schema</description>
<condition>mandatory</condition>
</element>
<codelist name="DateTypCd">
<entry>
<code>creation</code>
<label>Creation</label>
<description>date when the resource was brought into existence</description>
</entry>
<entry>
<code>publication</code>
<label>Publication</label>
<description>date when the resource was issued</description>
</entry>
<entry>
<code>revision</code>
<label>Revision</label>
<description>date identifies when the resource was examined
or re-examined and improved or amended</description>
</entry>
</codelist>
</response>
Error management
Beside the normal exceptions management discussed in section ??, the service can encounter someerrors trying to retrieve an element/codelist information. In this case, the object is copied verbatim tothe response with the addition of an error attribute that describes the encountered error. The returnederrors are described in Table 19.6, “Possible errors returned by xml.schema.info service”. Here followsan example of such response:
<response>
<element schemma="iso19139" name="blablabla" error="not-found"/>
</response>

XML Services
GeoNetwork opensource V 2.4 120
Table 19.6. Possible errors returned by xml.schema.info service
Error code Description
unknown-schema The specified schema is not supported
unknown-namespace The namespace of the specified prefix was not found
not-found The requested element / codelist was not found

GeoNetwork opensource V 2.4 121
20. Settings hierarchy
20.1 Introduction
GeoNetwork stores many options and information inside the Settings table. Information is grouped intohierarchies where each node has a key/value pair and can have many children. Each key is limited to32 characters while each value is limited to 250. The 2 top level hierarchies are system and harvesting.
In the following sections, the indentation is used to show hierarchies. Names in bold represent keyswith the value’s datatype in parenthesys. An italic font is used to indicate basic types (string, integer,boolean) while normal font with a | is used to represent a set of allowed values. Regarding the booleantype, value can be only true or false. A missing datatype means that the value of the node is not used.Square brackets indicate cardinality. If they are missing, a cardinality of [1..1] should be considered.
20.2 The system hierarchy
• site : Contains information about the site
• name (string) : Name used to present this site to other sites. Used to fill comboboxes or lists.
• organization (string) : Name of the organization/company/institute that is running GeoNetwork
• siteId (string) : A UUID that uniquely identifies the site. It is generated by the installer.
• platform : Contains information about the current version
• version (string) : GeoNetwork’s version in the X.Y.Z format
• subVersion (string) : A small description about the version, like ’alpha-1’, ’beta’ etc...
• server : Used when it is necessary to build absolute URLs to the GeoNetwork server. This is the case,for example, when creating links inside a metadata or when providing CS/W capabilities.
• host (string) : Main HTTP server’s address
• port (integer) : Main HTTP server’s port (can be empty)
• intranet : specify the network of the intranet
• network (string) : Network’s address
• netmask (string) : Network’s netmask
• z3950 : A container for Z39.50 server parameters
• enable (boolean) : If true, GeoNetwork will start the Z30.50 server
• port (integer) : The port opened by GeoNetwork to listen to Z39.50 requests. Usually is 2100.
• proxy : This container speficy proxy configuration to use
• use (boolean) : If true, GeoNetwork will use the given proxy for outgoing connections
• host (string) : Proxy’s host
• port (integer) : Proxy’s port

Settings hierarchy
GeoNetwork opensource V 2.4 122
• username (string) : Proxy’s credentials.
• password (string) : Proxy’s credentials.
• feedback : Feedback is sent with proper web form or when downloading a resource.
• email (string) : email address of a GeoNetwork administrator or someone else
• mailServer : This container represents the mail server that will be used to send emails
• host (string) : Address of the SMTP server to use
• port (string) : SMTP port to use
• removedMetadata : This container contains settings about removed metadata.
• dir : This folder will contain removed metadata in MEF format. It gets populated when the userdeletes a metadata using the web interface.
• ldap : Parameters for LDAP authentication
• use (boolean)
• host (string)
• port (integer)
• defaultProfile (string) : Default GeoNetwork’s profile to use when the profile user attribute does notexist.
• login
• userDN (string)
• password (string)
• distinguishedNames
• base (string)
• users (string)
• userAttribs : A container for user attributes present into the LDAP directory that must be retrievedand used to create the user in GeoNetwork.
• name (string)
• password (string)
• profile (string)
20.3 Harvesting nodes
The second top level hierarchy is harvesting. All nodes added using the web interface are stored here.Each child has node in its key and its value can be geonetwork, webdav, csw or another dependingon the node’s type.

Settings hierarchy
GeoNetwork opensource V 2.4 123
All harvesting nodes share a common setting structure, which is used by the harvesting engine to retrievethese common parameters. This imply that any new harvesting type must honor this structure, whichis the following:
• site : A container for site information.
• name (string) : Node’s name as shown in the harvesting list.
• uuid (string) : A unique identifier assigned by the system when the harvesting node is created.
• useAccount (boolean) : Indicates if the harvester has to authenticate to access the data.
• username (string) :
• password (string) :
• options :
• every (integer) : Timeout, in minutes, between 2 consecutive harvesting.
• oneRunOnly (boolean) : If true, the harvester will harvest one time from this node and then it willset the status to inactive.
• status (active|inactive) : Indicates if the harvesting from this node is stopped (inactive) or if theharvester is waiting until the timeout comes.
• privileges [0..1] : This is a container for privileges to assign to each imported metadata
• group (integer) [0..n] : Indicate a local group. The node’s value is its local identifier. There can beseveral group nodes each with its set of privileges.
• operation (integer) [0..n] : Privilege to assign to the group. The node’s value is the numeric id ofthe operation like 0=view, 1=download, 2=edit etc...
• categories [0..1] : This is a container for categories to assign to each imported metadata
• category (integer) [0..n] : Indicate a local category and the node’s value is its local identifier.
• info : Just a container for some information about harvesting from this node.
• lastRun (string) : If not empty, tells when the harvester harvested from this node. The value is thecurrent time in millis since 1 January, 1970.
Privileges and categories nodes can or cannot be present depending on the harvesting type. In thefollowing structures, this common structure is not shown. Only extra information specific to the harvestingtype is described.
Nodes of type geonetwork
This is the native harvesting supported by geonetwork 2.1 and above.
• site : Contains host and account information
• host (string)
• port (integer)

Settings hierarchy
GeoNetwork opensource V 2.4 124
• servlet (string)
• search [0..n] : Contains the search parameters. If this element is missing, an unconstrained searchwill be performed.
• freeText (string)
• title (string)
• abstract (string)
• keywords (string)
• digital (boolean)
• hardcopy (boolean)
• source (string)
• groupsCopyPolicy [0..n] : Represents a copy policy for a remote group. It is used to maintain remoteprivileges on harvested metadata.
• name (string) : Internal name (not localized) of a remote group.
• policy (string) : Copy policy. For the group all, policies are: copy, copyToIntranet. For all othergroups, policies are: copy, createAndCopy. The intranet group is not considered.
Nodes of type geonetwork20
This type allows harvesting from old geonetwork 2.0.x nodes.
• site : Contains host and account information
• host (string)
• port (integer)
• servlet (string)
• search [0..n] : Contains the search parameters. If this element is missing no harvesting will beperformed but the host’s parameters will be used to connect to the remote node.
• freeText (string)
• title (string)
• abstract (string)
• keywords (string)
• digital (boolean)
• hardcopy (boolean)
• siteId (string)

Settings hierarchy
GeoNetwork opensource V 2.4 125
Nodes of type webdav
This harvesting type is capable of connecting to a web server which is WEB DAV enabled.
• site : Contains the URL to connect to and account information
• url (string) : URL to connect to. Must be well formed, starting with ’http://’, ’file://’ or a supportedprotocol.
• icon (string) : This is the icon that will be used as the metadata source’s logo. The image is takenfrom the images/harvesting folder and copied to the images/logos folder.
• options
• recurse (boolean) : Indicates if the remote folder must be recursively scanned for metadata.
• validate (boolean) : If set, the harvester will validate the metadata against its schema and themetadata will be harvested only if it is valid.
Nodes of type csw
This type of harvesting is capable of querying a Catalogue Services for the Web (CSW) server andretrieving all found metadata.
• site
• capabUrl (string) : URL of the capabilities file that will be used to retrieve the operations address.
• icon (string) : This is the icon that will be used as the metadata source’s logo. The image is takenfrom the images/harvesting folder and copied to the images/logos folder.
• search [0..n] : Contains search parameters. If this element is missing, an unconstrained search willbe performed.
• freeText (string)
• title (string)
• abstract (string)
• subject (string)

GeoNetwork opensource V 2.4 126
Appendix A. Frequently AskedQuestionsA.1. Users FAQ
A.1.1.Where do I learn more about the use and functionality of the GeoNetwork opensource catalog?
The Quick Start Guide will provide you with an excellent first introduction. The Guide can bedownloaded from the GeoNetwork Community website1
A.2. Administrators FAQ
A.2.1.I am having difficulty installing multiple instances of GeoNetwork on the same server
To run multiple installation you have to change the ports that GeoNetwork uses in order to avoidconflicts. The port are:
• Z39.50 listening port. This is the most probable source of conflicts. You have to edit theweb/WEB-INF/config.xml file of the second installation and choose a value other than thedefault one, which is 2100. Use for example 2101 but keep in mind that remote nodes usuallyuse 2100 so your second node will not be reachable. You cannot use the system configurationweb form the first time because if the port conflicts, the server won't start.
• If you are using Jetty.
• Jetty's listening port. This can be modified using GAST and its default value is usually8080. To run a second installation use a different value, like 8081. The affected file is bin/jetty.xml.
• Jetty's stop port. This is defined into the scripts bin/start-geonetwork.* and bin/stop-geonetwork.* (for both Windows and Linux). The provided value is 8079 as the valueof the STOP.PORT parameter. Use another value for the second installation, like 8078. If youdon't change this value, the stop script will stop all instances.
• If you are using the embedded McKoi DBMS.
• McKoi listening port. This can be easily modified using GAST. The default value is 9157.For other installations you can use 9158, 9159 and so on. The affected files are web/WEB-INF/config.xml and web/WEB-INF/db/db.conf.
A.2.2.What is normally logged when running GeoNetwork opensource?
GeoNetwork has its own internal logging based on log4j Logging services2 (written to the filejeeves.log). Additionaly there are log files generated by the web server (Jetty3 , Apache Tomcat4
etc..) and by the DBMS used (for example by the internal McKoi SQL5 ).
A.2.3.How do I control what is written to the GeoNetwork internal log file?
The logging is configured in the file ../web/WEB-INF/log4j.cfg . You can change the settingsby editing the file in a text editor. For operational systems it is suggested to put all log options toOFF or FATAL. The log options are, with increasing log intensity:

Frequently Asked Questions
GeoNetwork opensource V 2.4 127
• OFF - The OFF Level has the highest possible rank and is intended to turn off logging.
• FATAL - The FATAL level designates very severe error events that will presumably lead theapplication to abort.
• ERROR - The ERROR level designates error events that might still allow the application tocontinue running.
• WARN - The WARN level designates potentially harmful situations.
• INFO - The INFO level designates informational messages that highlight the progress of theapplication at coarse-grained level.
• DEBUG - The DEBUG Level designates fine-grained informational events that are most usefulto debug an application.
• ALL - The ALL Level has the lowest possible rank and is intended to turn on all logging.
A.3. Developers FAQ
A.3.1.What is Free and Open Source Software (FOSS) and how can I use, participate and contributeto the GeoNetwork opensource project?
The book "Producing Open Source Software" (shown in Figure A.1, “Producing Open SourceSoftware”) is a highly recommended book for anyone working on open source software projects.It provides insight in all aspects of FOSS development and on how to make a project successful.If you are interested in participating in the GeoNetwork opensource project, please spend sometime reading through this book. It's definitely worth the time and money (so buy the hardcopy ifyou can afford it!).
Producing Open Source Software is a book about the human side of open source development.It describes how successful projects operate, the expectations of users and developers, and theculture of free software.
The book is available in bookstores and from the publisher (O'Reilly Media6), or you can browseor download it from http://producingoss.com/. Producing Open Source Software is released underan open copyright that allows everyone to share and modify the book freely. The latest versionis always available on the website. The online version is the same as the commercially availableprint version ? in other words, you can buy a printed copy and know that it's up-to-date.
Figure A.1. Producing Open Source Software

GeoNetwork opensource V 2.4 128
Appendix B. Glossary of MetadataFields DescriptionThis glossary provides you with brief descriptions of the minimum set of metadata fields required toproperly describe a geoghaphical data as well as some optional elements highly suggested for a moreextensive standard description.
Contraintes d'accès. Contraintes d'accès appliquées pour assurer la protection de la propriétéprivée et intellectuelle, et autres restrictions spéciales ou limitations pour obtenir les métadonnées oula ressource
Résumé. Court résumé explicatif du contenu de la donnée
Administrative area. State, province of the location
Etendue temporelle - Date de début. Date de début (YYYY-MM-DDTHH:mm:ss)
Jeu de caractères. Nom de l'encodage utilisé dans la métadonnée
Type de raster. Identification du type de raster (point ou cellule)
Ville. Nom de la ville
Code du système. Code. Par exemple, le code epsg.
Pays. Pays
Information sur la qualité de la donnée. Information sur la qualité de la donnée
Date. Date(s) de référence pour la ressource en question
Date de mise à jour. Date de mise à jour de la métadonnée (YYYY-MM-DDThh:mm:ss)
Type de date. Définit l'événement sur lequel porte la date
Adresse courrier. Adresse du point de distribution
Dénominateur de l'échelle. Dénominateur de l'échelle
Qualité de la donnée - Desciption. Description of the event, including related parameters ortolerances
Ressource en ligne - Description. Texte descriptif détaillé sur ce que la ressource en ligne est/fait
Mots-clés. Classe pour les mots clés, leur type et leur source de référence
Représentation spatiale du raster - Noms des axes. Nom de l'axe (i.e. lignes, colonnes)
Représentation spatiale du raster - Nombre de pixels. Nombre d'éléments le long de cet axe
Résolution. Degré de détail dans le jeu de données de type raster
Informations sur la distribution. Fournit des informations sur le distributeur et sur la manièred'obtenir la ressource

Glossary of Metadata Fields Description
GeoNetwork opensource V 2.4 129
Rectangle englobant - Longitude est. coordonnée la plus à l'est de la limite de l'étendue du jeu dedonnées, exprimée en longitude avec des degrés décimaux (EST positif)
Edition. Version de la ressource
Adresse mel. Adresse mel de l'organisation ou de la personne responsable
Etendue temporelle - Date de fin. Date de fin (YYYY-MM-DDTHH:mm:ss)
Echelle comparative. échelle d'un graphique ou carte papier exprimé par son dénominateur (ex25000 pour une carte au 1/25000)
Emprise. Extension de la ressource. Type de données pour l'information sur l'étendue horizontale,verticale et temporelle du jeu de données
Fax. Numéro du fax permettant de contacter l'organisme et/ou le contact
Identifiant du fichier. Identifiant unique pour le fichier de métadonnées
Représentation spatiale du vecteur - Type d'objet géométrique. Nom des types d’objets spatiauxutilisés pour localiser les données : lignes, polygones,…
Représentation spatiale du vecteur - Nombre d'objets géométriques. Nombre total d'objets detype point ou vecteur intervenant dans le jeu de données
Rectangle englobant. Coordonnées des quatre points cardinaux constituant le rectangle englobantl’ensemble des données. Dans ce cas, les coordonnées s’expriment toujours en longitude / Latitude.
Représentation spatiale du raster. Classe contenant l'information sur les objets spatiaux de typeraster du jeu de données
Représentation spatiale du raster - Résolution. Degré de détail dans le jeu de données de typeraster
Représentation spatiale du raster - Disponibilité des paramètres de transformation. Indicationsi oui ou non des paramètres de transformation existent (booléen)
Qualité de la donnée - Niveau hiérarchique. Niveau hiérarchique des données spécifiées parl'attribut scope (79) du domaine d'applicabilité (B.5.25)
Informations d'identification. Informations de base sur la ressource
Point de contact - Nom. Nom de la personne responsable
Mot-clé. Mots ou notions courants utilisés pour décrire le sujet
Langue de la donnée. Langue utilisée pour la donnée documentée
Langue de la métadonnée. Langue utilisée pour la métadonnée
Qualité de la donnée - Généalogie. Informations de qualité concernant la provenance des données
Ressource en ligne - Adresse (URL). URL ou indication semblable d'une adresse Internet pour unaccès en ligne, par exemple http://www.isotc211.org
Maintenance et fréquence de mise à jour. Informations sur la fréquence de mise à jour des données

Glossary of Metadata Fields Description
GeoNetwork opensource V 2.4 130
Auteur de la métadonnée. Personne/équipe responsable pour l’information sur la métadonnée.(Point de contact) (Ci-citation et adresse)
Norme de métadonnée. Norme de la métadonnée utilisée
Version de la norme de métadonnée. Version de la norme de métadonnée utilisée
Ressource en ligne - Nom. Nom de la ressource en ligne
Rectangle englobant - Latitude nord. Coordonnée la plus au nord de la limite de l'étendue du jeude données, exprimée en latitude avec des degrés décimaux (NORD positif)
Représentation du raster - Nombre de dimensions. Nombre d'axes spatio-temporels indépendants
Informations de distribution - Ressource en ligne. Informations sur les sources en ligne à partirdesquelles la ressource peut être obtenue
Point de contact - Nom de l'organisation. Nom de l'organisation responsable
Autres contraintes. Autres restrictions et prérequis légaux pour accéder et utiliser les métadonnéesou la ressource
Point de contact. Identification, et mode de communication avec, des personnes ou desorganisations devant servir de point de contact pour la ressource
Point de contact - Position. Rôle de la personne responsable dans l'organisation
Code postal. Code postal
Type de représentation. Type de représentation de la ressource
Ressource en ligne - protocole. Protocole de connection utilisé
Objectifs. Résumé des intentions pour lesquelles la donnée a été créée
Informations sur le système de localisation. Description du système de projection spatial ettemporel utilisé par la ressource
Rapport sur la qualité de la donnée. Description d'un rapport sur la qualité sur l'une des 5composantes de la qualité
Représentation spatiale du raster - Résolution. Degré de détail dans le jeu de données de typeraster
Point de contact - Rôle. Fonction de la personne sur la ressource
Rectangle englobant - latitude sud. Coordonnée la plus au sud de la limite de l'étendue du jeu dedonnées, exprimée en latitude avec des degrés décimaux (NORD positif)
Informations sur la représentation spatiale. Informations sur la représentation spatiale
Type de représentation spatiale. Méthode utilisée pour représenter spatialement l'informationgéographique
Qualité de la donnée - Généralités sur la provenance. Explication générale sur les connaissancesdu producteur de données sur la généalogie du jeu de données

Glossary of Metadata Fields Description
GeoNetwork opensource V 2.4 131
Etat. Etat de la ressource
Information supplémentaire. Toute autre information descriptive sur le jeu de données
Etendue temporelle. Période de temps couverte par le jeu de données
Titre. Nom par lequel la ressource est connue
Thématique. thème(s) principal(aux) du jeu de données (voir liste fermée de la norme) (B.5.27)
Représentation spatiale du raster - Disponibilité des paramètres de transformation. Indicationsi oui ou non des paramètres de transformation existent (booléen)
Représentation spatiale du vecteur - Niveau topologique. Information qui identifie le degré decomplexité des relations spatiales : topologie, planaire, (B.5.28)
Type de mots-clés. Thèmes utilisés pour grouper des mots clés similaires
URL. Unified Resource Locator
Contraintes d'utilisation. Contraintes appliquées pour assurer la protection des sphères privéeset intellectuelles, et autres restrictions spéciales ou limitations ou mises en garde pour utiliser lesmétadonnées ou la ressource
Représentation spatiale du vecteur. Classe qui contient l'information sur les objets géographiquesde type vecteur du jeu de données
Numéro de téléphone. Numéro de téléphone
Rectangle englobant - Longitude ouest. Coordonnée la plus à l'ouest de la limite de l'étendue dujeu de données, exprimée en longitude avec des degrés décimaux (EST positif)

GeoNetwork opensource V 2.4 132
Appendix C. ISO Topic CategoriesIsotopic Categories and Keywords

ISO Topic Categories
GeoNetwork opensource V 2.4 133

ISO Topic Categories
GeoNetwork opensource V 2.4 134

GeoNetwork opensource V 2.4 135
Appendix D. Logiciel libre pourles Systèmes d'InformationGéographiqueUne suite de logiciel peut être utilisé en complément de GeoNetwork opensource pour déployer uneinfrastructure de données spatiales complète. Ceci inclu les outils pour la mise en place de serveurscartographiques sur Internet, les SIG bureautiques et les outils de visualisation.
Ci-dessous, vous trouverez quelques exemples pour chacune des catégories.
D.1 Serveurs cartographiques
• GeoServer (All)1 http://www.geoserver.org
• MapServer (All) http://www.mapserver.org/
• MapGuide Open Source (Windows & Linux) http://www.osgeo.org/mapguide
D.2 SIG
• GRASS (All) http://www.osgeo.org/grass
• gvSIG (All) http://www.gvsig.gva.es/
• uDig (All) http://udig.refractions.net
• Quantum GIS (All) http://www.osgeo.org/qgis
• OSSIM (Windows & OSX) http://www.osgeo.org/ossim
D.3 Cartographie sur Internet
• OpenLayers (All) http://www.osgeo.org/openlayers
• MapBender (All) http://www.osgeo.org/mapbender
• MapBuilder (All) http://www.osgeo.org/mapbuilder
GeoNetwork opensource V 2.4 136
IndexAaccess constraints, 24
Ddata quality, 24Date, 23descriptive keywords, 23distribution info, 24
EEtat, 23
FForme de présentation, 23
Ggeographic bounding box, 24
Llanguage, 24login,
MMaintenance et fréquence de mise à jour, 23metadata author, 24métadonnée, Métadonnée
Dublin Core, 32FGDC, 32ISO19139, 32migration, 33standards, 32transformation, 33
MétadonnéesISO19115, 32profiles, 33
OObjectifs, 23online resource, 24other constraints, 24
PPoint de contact, 23
Rreference system info, 24résumé, 23
Sscale denominator, 24security
groupes d'utilisateurs, 12privilèges, 12restrictions d'accès, 12rôles, 12
spatial representation type, 24supplemental information, 24
Ttemporal extent, 24Titre, 23topic category, 24
Uuser constraints, 24