Embed Size (px)
Citation preview
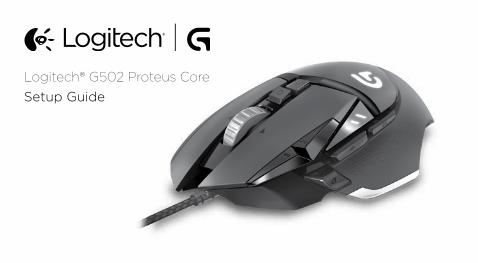
Logitech® G502 Proteus Core
Setup Guide
2
English 3
繁體中文 13
한국어 23
www.logitech.com/support 33
English 3
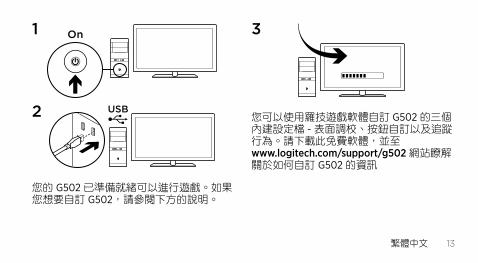
1
2
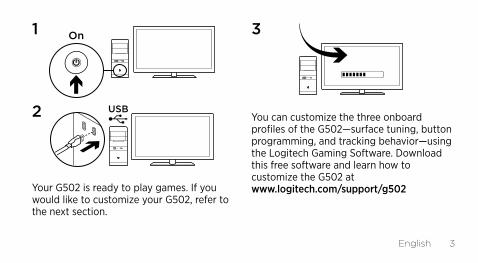
Your G502 is ready to play games. If you would like to customize your G502, refer to the next section.
3
You can customize the three onboard profiles of the G502—surface tuning, button programming, and tracking behavior—using the Logitech Gaming Software. Download this free software and learn how to customize the G502 at www.logitech.com/support/g502
On
USB
4 English
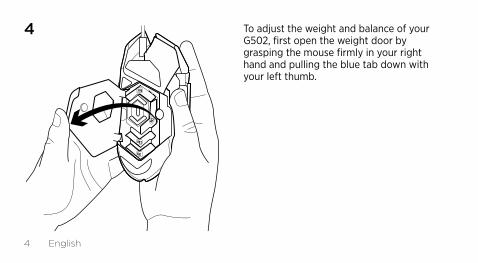
4 To adjust the weight and balance of your G502, first open the weight door by grasping the mouse firmly in your right hand and pulling the blue tab down with your left thumb.
3.6g
3.6g
3.6g
3.6g
English 5
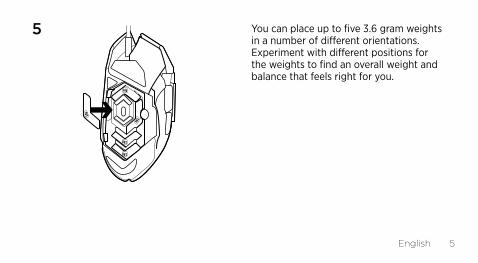
5 You can place up to five 3.6 gram weights in a number of different orientations. Experiment with different positions for the weights to find an overall weight and balance that feels right for you.
3.6g
3.6g
3.6g
3.6g
3.6g
6 English
6
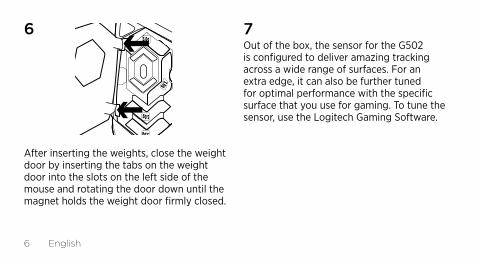
After inserting the weights, close the weight door by inserting the tabs on the weight door into the slots on the left side of the mouse and rotating the door down until the magnet holds the weight door firmly closed.
7 Out of the box, the sensor for the G502 is configured to deliver amazing tracking across a wide range of surfaces. For an extra edge, it can also be further tuned for optimal performance with the specific surface that you use for gaming. To tune the sensor, use the Logitech Gaming Software.
3.6g
3.6g
3.6g
3.6g
English 7
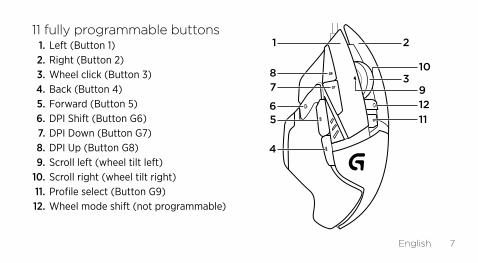
11 fully programmable buttons1. Left (Button 1)2. Right (Button 2)3. Wheel click (Button 3)4. Back (Button 4)5. Forward (Button 5)6. DPI Shift (Button G6)7. DPI Down (Button G7)8. DPI Up (Button G8)9. Scroll left (wheel tilt left)
10. Scroll right (wheel tilt right)11. Profile select (Button G9)12. Wheel mode shift (not programmable)
56
78
1
1112
39
10
2
4
8 English
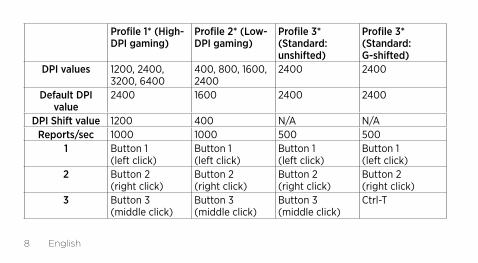
Profile 1* (High-DPI gaming)
Profile 2* (Low-DPI gaming)
Profile 3* (Standard: unshifted)
Profile 3* (Standard: G-shifted)
DPI values 1200, 2400, 3200, 6400
400, 800, 1600, 2400
2400 2400
Default DPI value
2400 1600 2400 2400
DPI Shift value 1200 400 N/A N/AReports/sec 1000 1000 500 500
1 Button 1 (left click)
Button 1 (left click)
Button 1 (left click)
Button 1 (left click)
2 Button 2 (right click)
Button 2 (right click)
Button 2 (right click)
Button 2 (right click)
3 Button 3 (middle click)
Button 3 (middle click)
Button 3 (middle click)
Ctrl-T
English 9
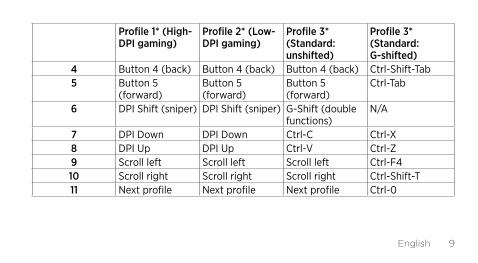
Profile 1* (High-DPI gaming)
Profile 2* (Low-DPI gaming)
Profile 3* (Standard: unshifted)
Profile 3* (Standard: G-shifted)
4 Button 4 (back) Button 4 (back) Button 4 (back) Ctrl-Shift-Tab5 Button 5
(forward)Button 5 (forward)
Button 5 (forward)
Ctrl-Tab
6 DPI Shift (sniper) DPI Shift (sniper) G-Shift (double functions)
N/A
7 DPI Down DPI Down Ctrl-C Ctrl-X8 DPI Up DPI Up Ctrl-V Ctrl-Z9 Scroll left Scroll left Scroll left Ctrl-F410 Scroll right Scroll right Scroll right Ctrl-Shift-T11 Next profile Next profile Next profile Ctrl-0
10 English
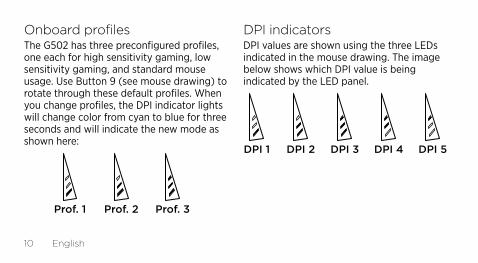
Onboard profilesThe G502 has three preconfigured profiles, one each for high sensitivity gaming, low sensitivity gaming, and standard mouse usage. Use Button 9 (see mouse drawing) to rotate through these default profiles. When you change profiles, the DPI indicator lights will change color from cyan to blue for three seconds and will indicate the new mode as shown here:
DPI indicatorsDPI values are shown using the three LEDs indicated in the mouse drawing. The image below shows which DPI value is being indicated by the LED panel.
Prof. 1 Prof. 2 Prof. 3
DPI 1 DPI 2 DPI 3 DPI 4 DPI 5
English 11
Hyperfast Scroll WheelThe G502 features Logitech’s exclusive dual-mode hyperfast scroll wheel. Click the button right below the wheel (Button G12) to switch between the two modes.
TipsWeight and balance tuning is very much an exercise in personal preference. Generally speaking, more weight makes it easier to control high DPI settings, while less weight makes low-DPI gaming less fatiguing.Centering weights along an imaginary line between your thumb and right-side grip finger(s) will help maintain optimal front-to-back balance
The effects of changing weights may not be immediately apparent. After changing the position or number of weights, give yourself some time to experience the difference before changing them again.Try the default profile settings in practice games before changing these settings.Advanced gamers can customize each game according to their specific button configuration and sensitivity switching needs. The Logitech Gaming Software stores this information and applies it automatically when the game is detected.
12 English
If the mouse doesn’t work•Unplug and re-plug the USB cable to
ensure a good connection.•Try the mouse USB cable in another USB
port on the computer.•Use only a powered USB port.•Try rebooting the computer.•If possible, test the mouse on another
computer.•Visit www.logitech.com/support/g502 for
more suggestions and assistance.
What do you think?Please take a minute to tell us. Thank you for purchasing our product.www.logitech.com/ithink
繁體中文 13
1
2
您的 G502 已準備就緒可以進行遊戲。如果您想要自訂 G502,請參閱下方的說明。
3
您可以使用羅技遊戲軟體自訂 G502 的三個內建設定檔 - 表面調校、按鈕自訂以及追蹤行為。請下載此免費軟體,並至 www.logitech.com/support/g502 網站瞭解關於如何自訂 G502 的資訊
On
USB
14 繁體中文
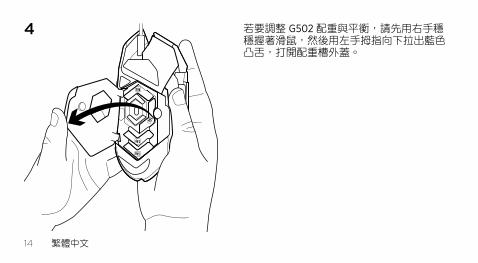
4 若要調整 G502 配重與平衡,請先用右手穩穩握著滑鼠,然後用左手拇指向下拉出藍色凸舌,打開配重槽外蓋。
3.6g
3.6g
3.6g
3.6g
繁體中文 15
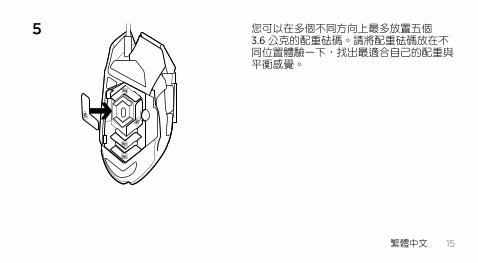
5 您可以在多個不同方向上最多放置五個 3.6 公克的配重砝碼。請將配重砝碼放在不同位置體驗一下,找出最適合自己的配重與平衡感覺。
3.6g
3.6g
3.6g
3.6g
3.6g
16 繁體中文
6
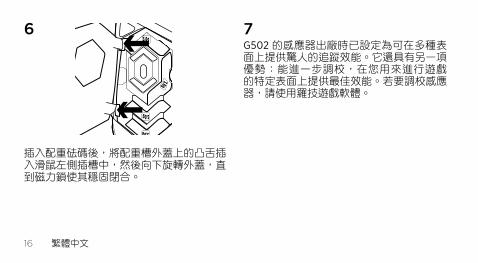
插入配重砝碼後,將配重槽外蓋上的凸舌插入滑鼠左側插槽中,然後向下旋轉外蓋,直到磁力鎖使其穩固閉合。
7 G502 的感應器出廠時已設定為可在多種表面上提供驚人的追蹤效能。它還具有另一項優勢:能進一步調校,在您用來進行遊戲的特定表面上提供最佳效能。若要調校感應器,請使用羅技遊戲軟體。
3.6g
3.6g
3.6g
3.6g
繁體中文 17
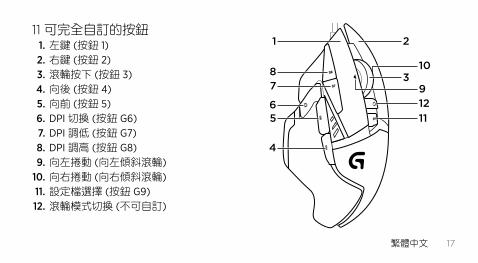
11 可完全自訂的按鈕1. 左鍵 (按鈕 1)2. 右鍵 (按鈕 2)3. 滾輪按下 (按鈕 3)4. 向後 (按鈕 4)5. 向前 (按鈕 5)6. DPI 切換 (按鈕 G6)7. DPI 調低 (按鈕 G7)8. DPI 調高 (按鈕 G8)9. 向左捲動 (向左傾斜滾輪)
10. 向右捲動 (向右傾斜滾輪)11. 設定檔選擇 (按鈕 G9)12. 滾輪模式切換 (不可自訂)
56
78
1
1112
39
10
2
4
18 繁體中文
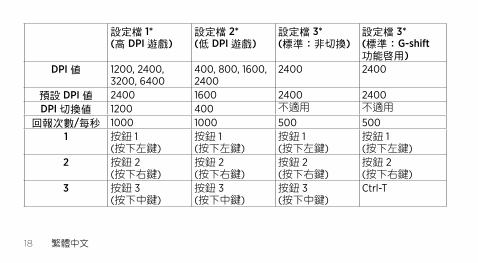
設定檔 1* (高 DPI 遊戲)
設定檔 2* (低 DPI 遊戲)
設定檔 3* (標準:非切換)
設定檔 3* (標準:G-shift 功能啟用)
DPI 值 1200, 2400, 3200, 6400
400, 800, 1600, 2400
2400 2400
預設 DPI 值 2400 1600 2400 2400DPI 切換值 1200 400 不適用 不適用
回報次數/每秒 1000 1000 500 5001 按鈕 1
(按下左鍵)按鈕 1 (按下左鍵)
按鈕 1 (按下左鍵)
按鈕 1 (按下左鍵)
2 按鈕 2 (按下右鍵)
按鈕 2 (按下右鍵)
按鈕 2 (按下右鍵)
按鈕 2 (按下右鍵)
3 按鈕 3 (按下中鍵)
按鈕 3 (按下中鍵)
按鈕 3 (按下中鍵)
Ctrl-T
繁體中文 19
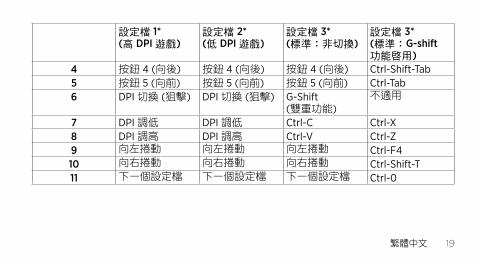
設定檔 1* (高 DPI 遊戲)
設定檔 2* (低 DPI 遊戲)
設定檔 3* (標準:非切換)
設定檔 3* (標準:G-shift 功能啟用)
4 按鈕 4 (向後) 按鈕 4 (向後) 按鈕 4 (向後) Ctrl-Shift-Tab5 按鈕 5 (向前) 按鈕 5 (向前) 按鈕 5 (向前) Ctrl-Tab6 DPI 切換 (狙擊) DPI 切換 (狙擊) G-Shift
(雙重功能)不適用
7 DPI 調低 DPI 調低 Ctrl-C Ctrl-X8 DPI 調高 DPI 調高 Ctrl-V Ctrl-Z9 向左捲動 向左捲動 向左捲動 Ctrl-F410 向右捲動 向右捲動 向右捲動 Ctrl-Shift-T11 下一個設定檔 下一個設定檔 下一個設定檔 Ctrl-0
20 繁體中文
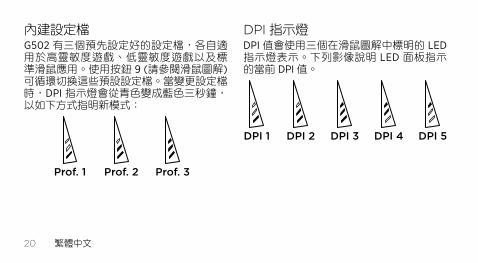
內建設定檔G502 有三個預先設定好的設定檔,各自適用於高靈敏度遊戲、低靈敏度遊戲以及標準滑鼠應用。使用按鈕 9 (請參閱滑鼠圖解) 可循環切換這些預設設定檔。當變更設定檔時,DPI 指示燈會從青色變成藍色三秒鐘,以如下方式指明新模式:
DPI 指示燈DPI 值會使用三個在滑鼠圖解中標明的 LED 指示燈表示。下列影像說明 LED 面板指示的當前 DPI 值。
Prof. 1 Prof. 2 Prof. 3
DPI 1 DPI 2 DPI 3 DPI 4 DPI 5
繁體中文 21
超高速滾輪G502 具有羅技獨家的雙重模式超高速滾輪。 按下滾輪下方的按鈕 (按鈕 G12) 可在兩種模式間切換。
秘訣配重與平衡調整屬於個人喜好操作。一般來說,較高的配重會讓滑鼠在高 DPI 設定下更易操控,較低的配重則能減輕低 DPI 遊戲中的疲勞度。
沿著您拇指與右側抓握手指間的假想線居中放置配重法碼,會有助於保持最佳的前後方平衡
變更配重的效果並不會立即顯現。在變更配重砝碼的位置或數量後,請花些時間體驗一下,然後再繼續進行變更。
變更設定前,請先在遊戲中實際試用預設設定檔設定。
進階的遊戲愛好者可依照其特定按鈕設定與靈敏度切換需求,自訂每個遊戲。羅技遊戲軟體會儲存此項資訊,並在偵測到遊戲時自動套用該資訊。
22 繁體中文
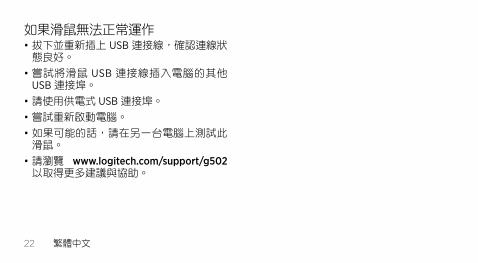
如果滑鼠無法正常運作•拔下並重新插上 USB 連接線,確認連線狀
態良好。
•嘗試將滑鼠 USB 連接線插入電腦的其他 USB 連接埠。
•請使用供電式 USB 連接埠。
•嘗試重新啟動電腦。
•如果可能的話,請在另一台電腦上測試此滑鼠。
•請瀏覽 www.logitech.com/support/g502 以取得更多建議與協助。
한국어 23
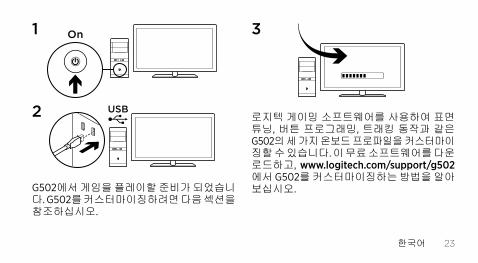
1
2
G502에서 게임을 플레이할 준비가 되었습니 다. G502를 커스터마이징하려면 다음 섹션을 참조하십시오.
3
로지텍 게이밍 소프트웨어를 사용하여 표면 튜닝, 버튼 프로그래밍, 트래킹 동작과 같은 G502의 세 가지 온보드 프로파일을 커스터마이 징할 수 있습니다. 이 무료 소프트웨어를 다운 로드하고, www.logitech.com/support/g502에서 G502를 커스터마이징하는 방법을 알아 보십시오.
On
USB
24 한국어
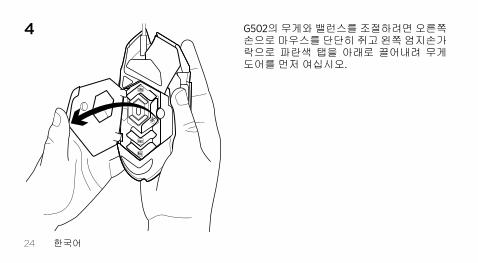
4 G502의 무게와 밸런스를 조절하려면 오른쪽 손으로 마우스를 단단히 쥐고 왼쪽 엄지손가락으로 파란색 탭을 아래로 끌어내려 무게 도어를 먼저 여십시오.
3.6g
3.6g
3.6g
3.6g
한국어 25
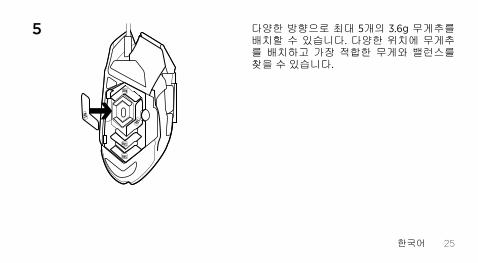
5 다양한 방향으로 최대 5개의 3.6g 무게추를 배치할 수 있습니다. 다양한 위치에 무게추를 배치하고 가장 적합한 무게와 밸런스를 찾을 수 있습니다.
3.6g
3.6g
3.6g
3.6g
3.6g
26 한국어
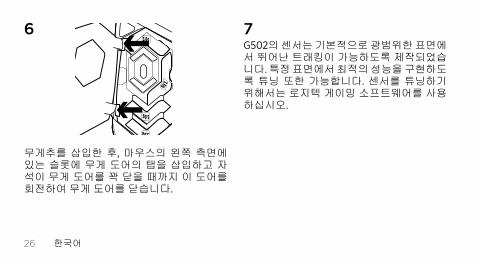
6
무게추를 삽입한 후, 마우스의 왼쪽 측면에 있는 슬롯에 무게 도어의 탭을 삽입하고 자석이 무게 도어를 꽉 닫을 때까지 이 도어를 회전하여 무게 도어를 닫습니다.
7 G502의 센서는 기본적으로 광범위한 표면에 서 뛰어난 트래킹이 가능하도록 제작되었습니다. 특정 표면에서 최적의 성능을 구현하도 록 튜닝 또한 가능합니다. 센서를 튜닝하기 위해서는 로지텍 게이밍 소프트웨어를 사용하십시오.
3.6g
3.6g
3.6g
3.6g
한국어 27
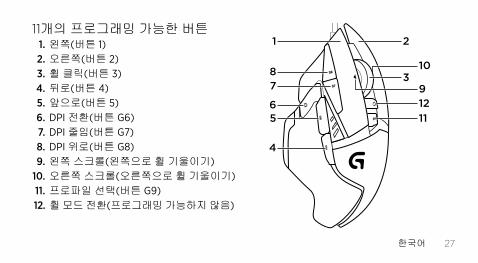
11개의 프로그래밍 가능한 버튼1. 왼쪽(버튼 1)2. 오른쪽(버튼 2)3. 휠 클릭(버튼 3)4. 뒤로(버튼 4)5. 앞으로(버튼 5)6. DPI 전환(버튼 G6)7. DPI 줄임(버튼 G7)8. DPI 위로(버튼 G8)9. 왼쪽 스크롤(왼쪽으로 휠 기울이기)
10. 오른쪽 스크롤(오른쪽으로 휠 기울이기)11. 프로파일 선택(버튼 G9)12. 휠 모드 전환(프로그래밍 가능하지 않음)
56
78
1
1112
39
10
2
4
28 한국어
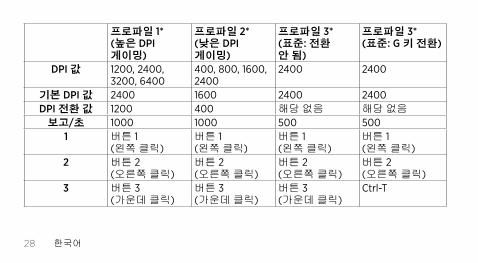
프로파일 1* (높은 DPI 게이밍)
프로파일 2* (낮은 DPI 게이밍)
프로파일 3* (표준: 전환 안 됨)
프로파일 3* (표준: G 키 전환)
DPI 값 1200, 2400, 3200, 6400
400, 800, 1600, 2400
2400 2400
기본 DPI 값 2400 1600 2400 2400DPI 전환 값 1200 400 해당 없음 해당 없음
보고/초 1000 1000 500 5001 버튼 1
(왼쪽 클릭)버튼 1 (왼쪽 클릭)
버튼 1 (왼쪽 클릭)
버튼 1 (왼쪽 클릭)
2 버튼 2 (오른쪽 클릭)
버튼 2 (오른쪽 클릭)
버튼 2 (오른쪽 클릭)
버튼 2 (오른쪽 클릭)
3 버튼 3 (가운데 클릭)
버튼 3 (가운데 클릭)
버튼 3 (가운데 클릭)
Ctrl-T
한국어 29
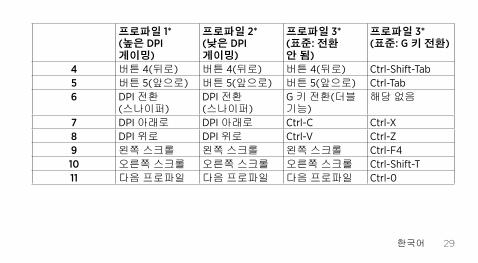
프로파일 1* (높은 DPI 게이밍)
프로파일 2* (낮은 DPI 게이밍)
프로파일 3* (표준: 전환 안 됨)
프로파일 3* (표준: G 키 전환)
4 버튼 4(뒤로) 버튼 4(뒤로) 버튼 4(뒤로) Ctrl-Shift-Tab5 버튼 5(앞으로) 버튼 5(앞으로) 버튼 5(앞으로) Ctrl-Tab6 DPI 전환
(스나이퍼)DPI 전환 (스나이퍼)
G 키 전환(더블 기능)
해당 없음
7 DPI 아래로 DPI 아래로 Ctrl-C Ctrl-X8 DPI 위로 DPI 위로 Ctrl-V Ctrl-Z9 왼쪽 스크롤 왼쪽 스크롤 왼쪽 스크롤 Ctrl-F410 오른쪽 스크롤 오른쪽 스크롤 오른쪽 스크롤 Ctrl-Shift-T11 다음 프로파일 다음 프로파일 다음 프로파일 Ctrl-0
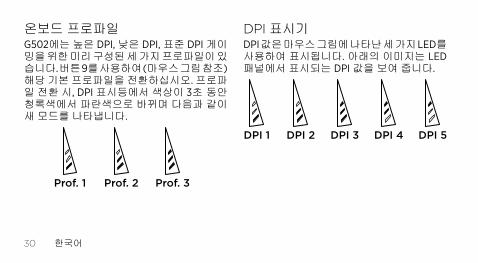
30 한국어
온보드 프로파일G502에는 높은 DPI, 낮은 DPI, 표준 DPI 게이밍을 위한 미리 구성된 세 가지 프로파일이 있 습니다. 버튼 9를 사용하여 (마우스 그림 참조) 해당 기본 프로파일을 전환하십시오. 프로파일 전환 시, DPI 표시등에서 색상이 3초 동안 청록색에서 파란색으로 바뀌며 다음과 같이 새 모드를 나타냅니다.
DPI 표시기DPI 값은 마우스 그림에 나타난 세 가지 LED를 사용하여 표시됩니다. 아래의 이미지는 LED 패널에서 표시되는 DPI 값을 보여 줍니다.
Prof. 1 Prof. 2 Prof. 3
DPI 1 DPI 2 DPI 3 DPI 4 DPI 5
한국어 31
초고속 스크롤 휠G502는 로지텍 고유의 듀얼 모드 초고속 스크롤 휠을 탑재하고 있습니다. 휠 바로 아래의 버튼(버튼 G12)을 클릭하여 두 모드간을 전환할 수 있습니다.
팁무게와 밸런스 튜닝은 개인 기호에 따라 많은 연습이 필요합니다. 일반적으로 말해서, 무게가 높을 수록 보다 쉽게 높은 DPI 설정을 제어할 수 있지만, 무게가 낮을 수록 낮은 DPI 게이밍의 피로감이 줄어듭니다.엄지손가락과 오른쪽 쥔 손가락 사이 가상선을 따라 가운데에 무게 중심을 놓으면 최적의 앞뒤 밸런스를 유지할 수 있습니다.
무게추 변경 효과가 바로 확실히 나타나지 않 을 수 있습니다. 무게추의 위치 또는 개수를 변경한 후, 다시 변경하기 전에 시간을 두고 차이를 경험해 보십시오.이러한 설정을 변경하기 전에 연습 게임에서 기본 프로파일 설정을 시험해 보십시오.숙련된 게이머들은 특정 버튼 구성 및 감도 전환 요구 사항에 따라 각 게임을 커스터마이징할 수 있습니다. 로지텍 게이밍 소프트웨어는 이 정보를 저장하여 게임이 감지될 때 자동으로 설정을 적용합니다.
32 한국어
마우스가 작동하지 않는 경우•USB 케이블을 뽑았다가 다시 연결하여 연
결 상태가 양호한지 확인합니다.•마우스 USB 케이블을 컴퓨터의 다른 USB 포
트에 연결해 봅니다.•전원이 공급되는 USB 포트만 사용합니다.•컴퓨터를 재부팅해 봅니다.•가능한 경우 다른 컴퓨터에서 마우스를 테
스트해 봅니다.•추가 제안 사항 및 지원을 받으려면
www.logitech.com/support/g502를 방문하 십시오.
33
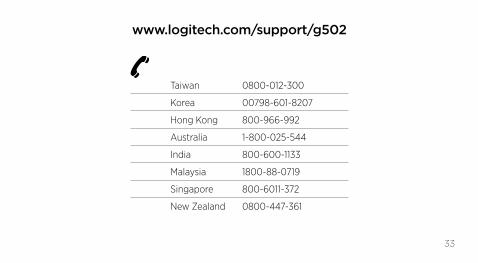
www.logitech.com/support/g502
Taiwan 0800-012-300
Korea 00798-601-8207
Hong Kong 800-966-992
Australia 1-800-025-544
India 800-600-1133
Malaysia 1800-88-0719
Singapore 800-6011-372
New Zealand 0800-447-361

34

35
www.logitech.com
© 2014 Logitech. All rights reserved. Logitech, the Logitech logo, and other Logitech marks are owned by Logitech and may be registered. All other trademarks are the property of their respective owners. Logitech assumes no responsibility for any errors that may appear in this manual. Information contained herein is subject to change without notice.
621-000321.002