Embed Size (px)
Citation preview
Manual PI Website for RPAs
PI Support Centre (PI-SC), Haid-und-Neu-Strasse 7, 76131 Karlsruhe Tel: +49 (0)721 9658-590, Fax: +49 (0) 721 9658-589, E-Mail: [email protected]
www.profibus.com www.profinet.com 1
Table of Contents Overview: Basic Content Rules for the PI Website...................................................................................2 Editing your RPA pages .....................................................................................................................................3 Changing the address data of the RPA..................................................................................................... 14 Creating a member .......................................................................................................................................... 15 Assigning user logins....................................................................................................................................... 18 Creating events and press releases............................................................................................................ 20 Right Column and Banner ............................................................................................................................. 20 Downloads........................................................................................................................................................... 23
Manual PI Website for RPAs
PI Support Centre (PI-SC), Haid-und-Neu-Strasse 7, 76131 Karlsruhe
Tel: +49 (0)721 9658-590, Fax: +49 (0) 721 9658-589, E-Mail: [email protected] www.profibus.com www.profinet.com
2
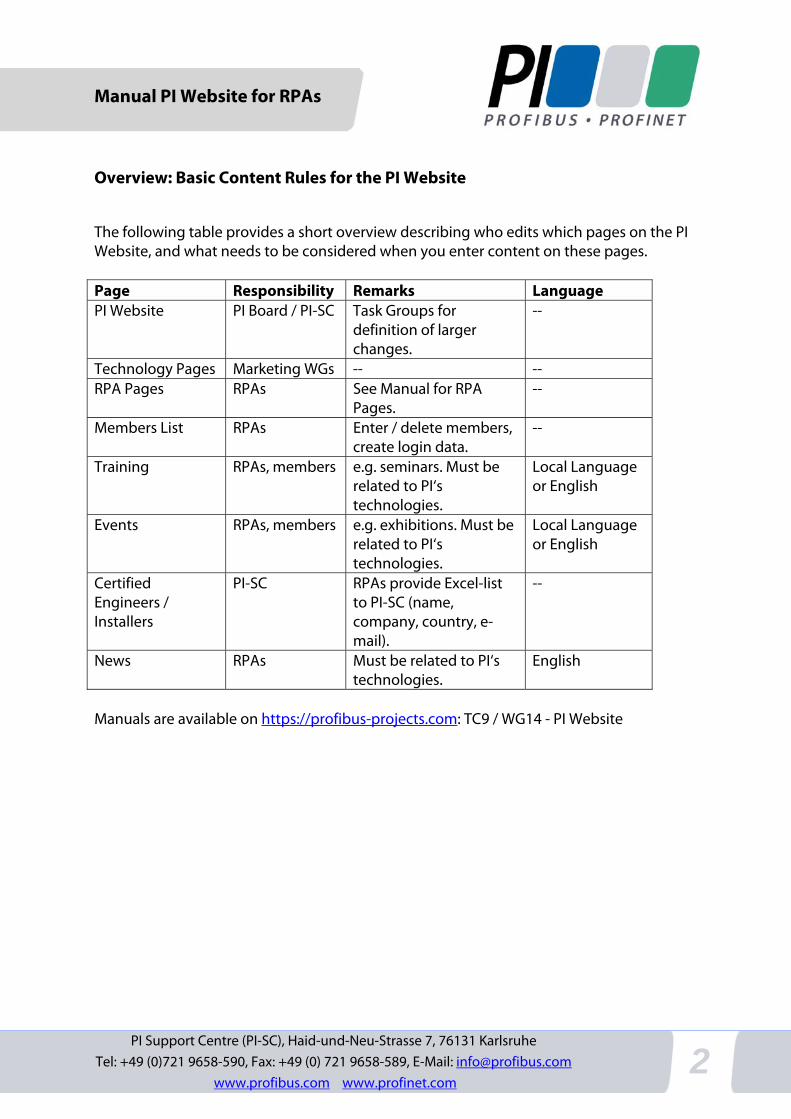
Overview: Basic Content Rules for the PI Website
The following table provides a short overview describing who edits which pages on the PI Website, and what needs to be considered when you enter content on these pages. Page Responsibility Remarks Language PI Website PI Board / PI-SC Task Groups for
definition of larger changes.
--
Technology Pages Marketing WGs -- -- RPA Pages RPAs See Manual for RPA
Pages. --
Members List RPAs Enter / delete members, create login data.
--
Training RPAs, members e.g. seminars. Must be related to PI‘s technologies.
Local Language or English
Events RPAs, members e.g. exhibitions. Must be related to PI‘s technologies.
Local Language or English
Certified Engineers / Installers
PI-SC RPAs provide Excel-list to PI-SC (name, company, country, e-mail).
--
News RPAs Must be related to PI‘s technologies.
English
Manuals are available on https://profibus-projects.com: TC9 / WG14 - PI Website
Manual PI Website for RPAs
PI Support Centre (PI-SC), Haid-und-Neu-Strasse 7, 76131 Karlsruhe Tel: +49 (0)721 9658-590, Fax: +49 (0) 721 9658-589, E-Mail: [email protected]
www.profibus.com www.profinet.com 3
Editing your RPA pages
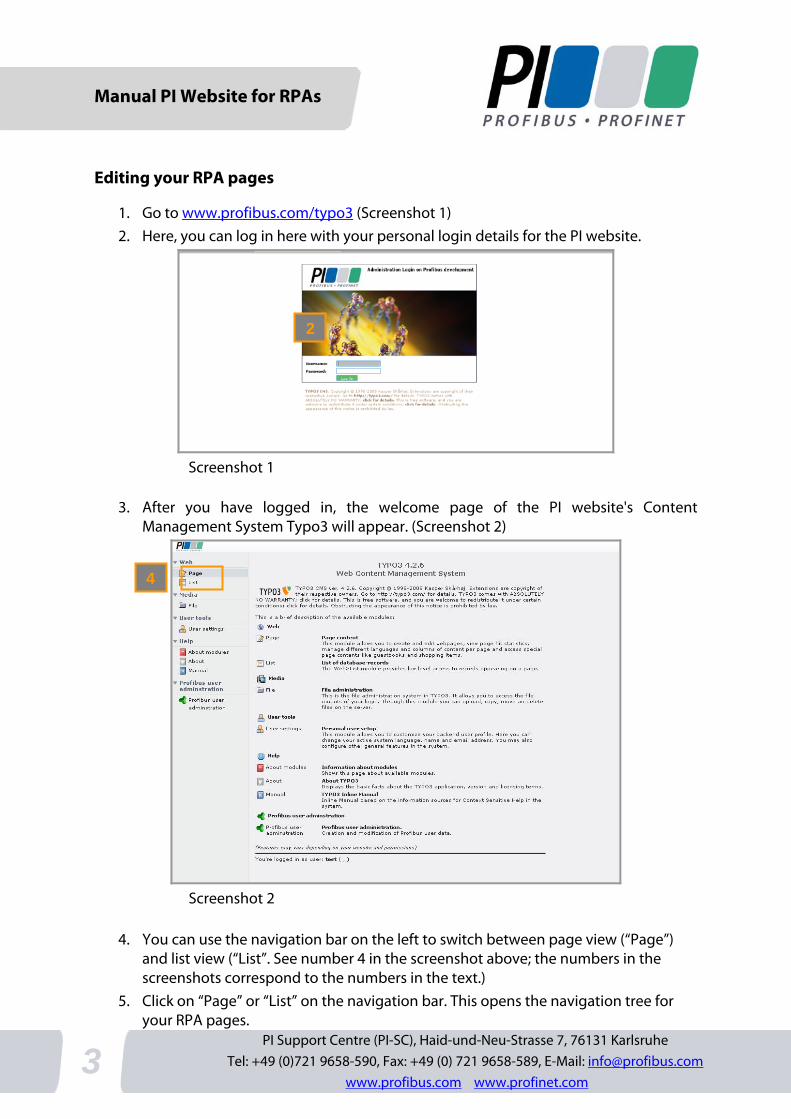
1. Go to www.profibus.com/typo3 (Screenshot 1) 2. Here, you can log in here with your personal login details for the PI website.
Screenshot 1
3. After you have logged in, the welcome page of the PI website's Content Management System Typo3 will appear. (Screenshot 2)
Screenshot 2
4. You can use the navigation bar on the left to switch between page view (“Page”) and list view (“List”. See number 4 in the screenshot above; the numbers in the screenshots correspond to the numbers in the text.)
5. Click on “Page” or “List” on the navigation bar. This opens the navigation tree for your RPA pages.
2
4
Manual PI Website for RPAs
PI Support Centre (PI-SC), Haid-und-Neu-Strasse 7, 76131 Karlsruhe
Tel: +49 (0)721 9658-590, Fax: +49 (0) 721 9658-589, E-Mail: [email protected] www.profibus.com www.profinet.com
4
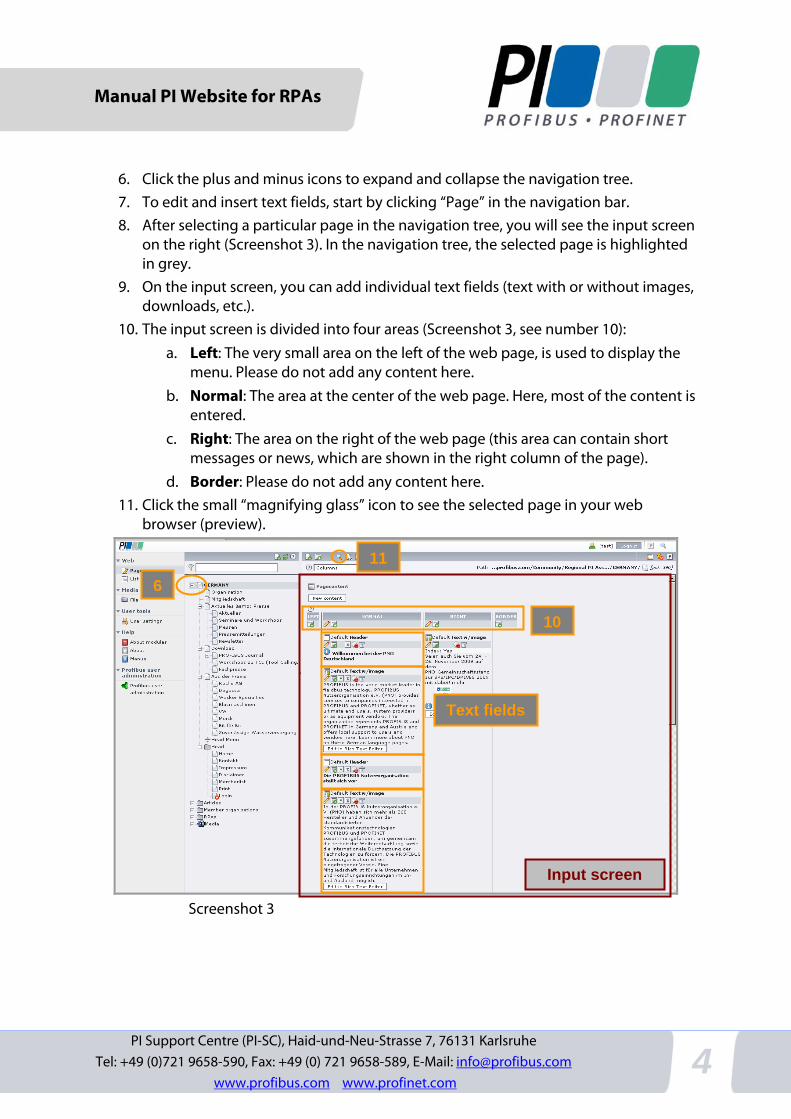
6. Click the plus and minus icons to expand and collapse the navigation tree. 7. To edit and insert text fields, start by clicking “Page” in the navigation bar. 8. After selecting a particular page in the navigation tree, you will see the input screen
on the right (Screenshot 3). In the navigation tree, the selected page is highlighted in grey.
9. On the input screen, you can add individual text fields (text with or without images, downloads, etc.).
10. The input screen is divided into four areas (Screenshot 3, see number 10): a. Left: The very small area on the left of the web page, is used to display the
menu. Please do not add any content here. b. Normal: The area at the center of the web page. Here, most of the content is
entered. c. Right: The area on the right of the web page (this area can contain short
messages or news, which are shown in the right column of the page). d. Border: Please do not add any content here.
11. Click the small “magnifying glass” icon to see the selected page in your web browser (preview).
Screenshot 3
Text fields
6
Input screen
11
10
Manual PI Website for RPAs
PI Support Centre (PI-SC), Haid-und-Neu-Strasse 7, 76131 Karlsruhe Tel: +49 (0)721 9658-590, Fax: +49 (0) 721 9658-589, E-Mail: [email protected]
www.profibus.com www.profinet.com 5
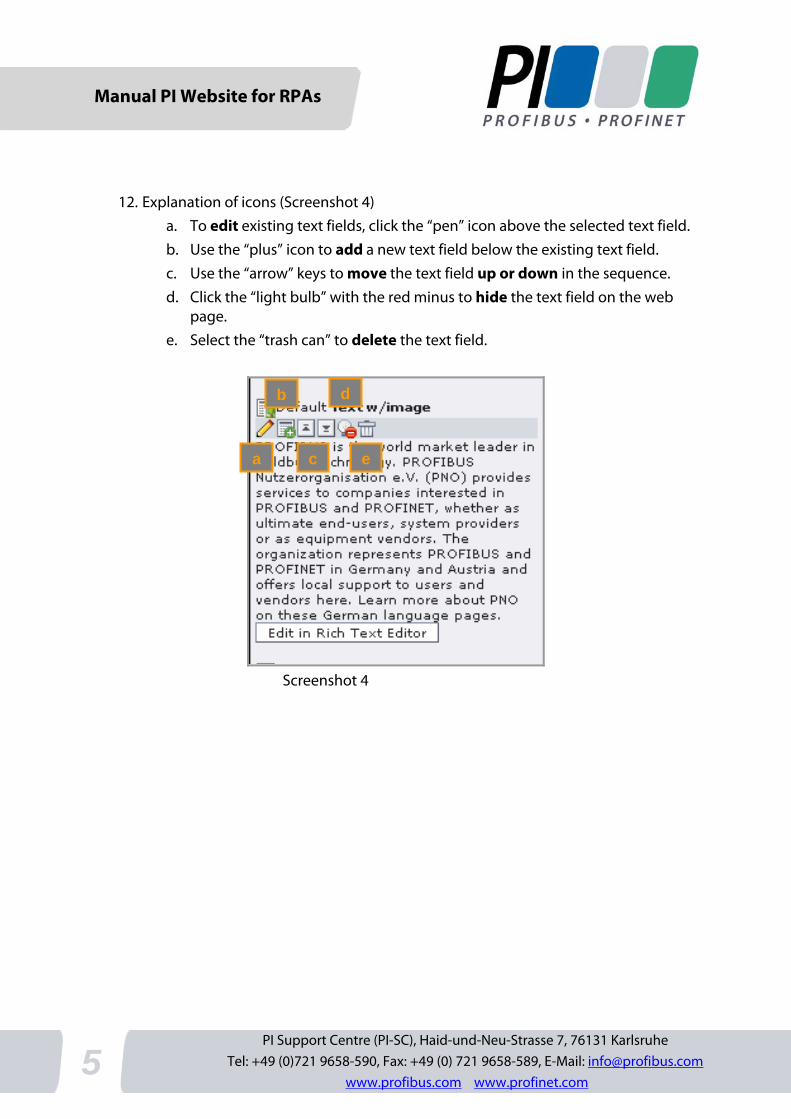
12. Explanation of icons (Screenshot 4)
a. To edit existing text fields, click the “pen” icon above the selected text field. b. Use the “plus” icon to add a new text field below the existing text field. c. Use the “arrow” keys to move the text field up or down in the sequence. d. Click the “light bulb” with the red minus to hide the text field on the web
page. e. Select the “trash can” to delete the text field.
Screenshot 4
a
b
c
d
e
Manual PI Website for RPAs
PI Support Centre (PI-SC), Haid-und-Neu-Strasse 7, 76131 Karlsruhe
Tel: +49 (0)721 9658-590, Fax: +49 (0) 721 9658-589, E-Mail: [email protected] www.profibus.com www.profinet.com
6
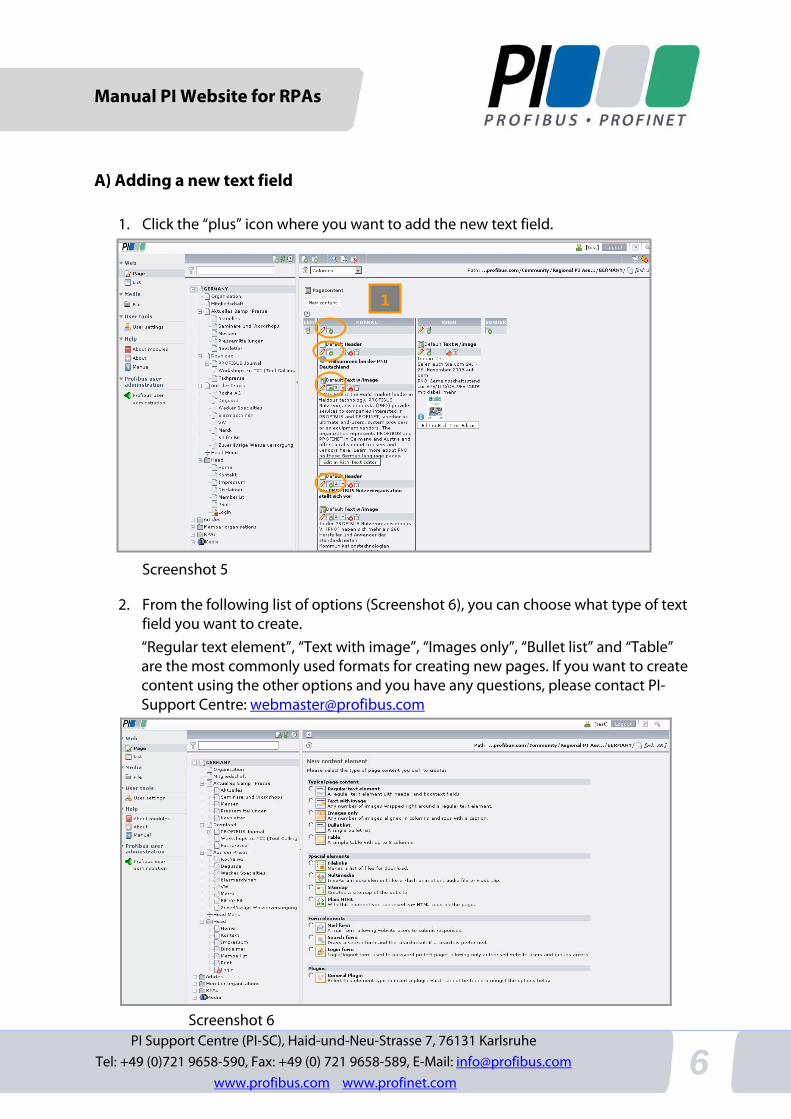
A) Adding a new text field
1. Click the “plus” icon where you want to add the new text field.
Screenshot 5
2. From the following list of options (Screenshot 6), you can choose what type of text field you want to create. “Regular text element”, “Text with image”, “Images only”, “Bullet list” and “Table” are the most commonly used formats for creating new pages. If you want to create content using the other options and you have any questions, please contact PI-Support Centre: [email protected]
Screenshot 6
1
Manual PI Website for RPAs
PI Support Centre (PI-SC), Haid-und-Neu-Strasse 7, 76131 Karlsruhe Tel: +49 (0)721 9658-590, Fax: +49 (0) 721 9658-589, E-Mail: [email protected]
www.profibus.com www.profinet.com 7
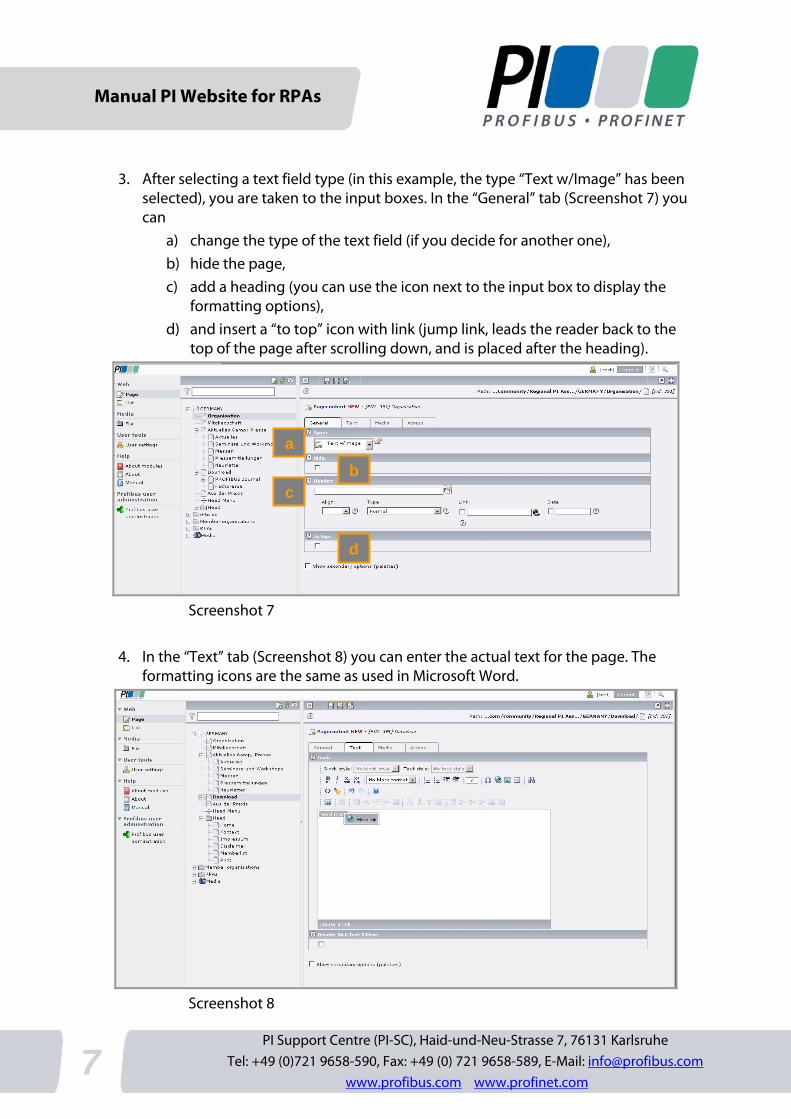
3. After selecting a text field type (in this example, the type “Text w/Image” has been selected), you are taken to the input boxes. In the “General” tab (Screenshot 7) you can
a) change the type of the text field (if you decide for another one), b) hide the page, c) add a heading (you can use the icon next to the input box to display the
formatting options), d) and insert a “to top” icon with link (jump link, leads the reader back to the
top of the page after scrolling down, and is placed after the heading).
Screenshot 7
4. In the “Text” tab (Screenshot 8) you can enter the actual text for the page. The formatting icons are the same as used in Microsoft Word.
Screenshot 8
a
c
d
b
Manual PI Website for RPAs
PI Support Centre (PI-SC), Haid-und-Neu-Strasse 7, 76131 Karlsruhe
Tel: +49 (0)721 9658-590, Fax: +49 (0) 721 9658-589, E-Mail: [email protected] www.profibus.com www.profinet.com
8
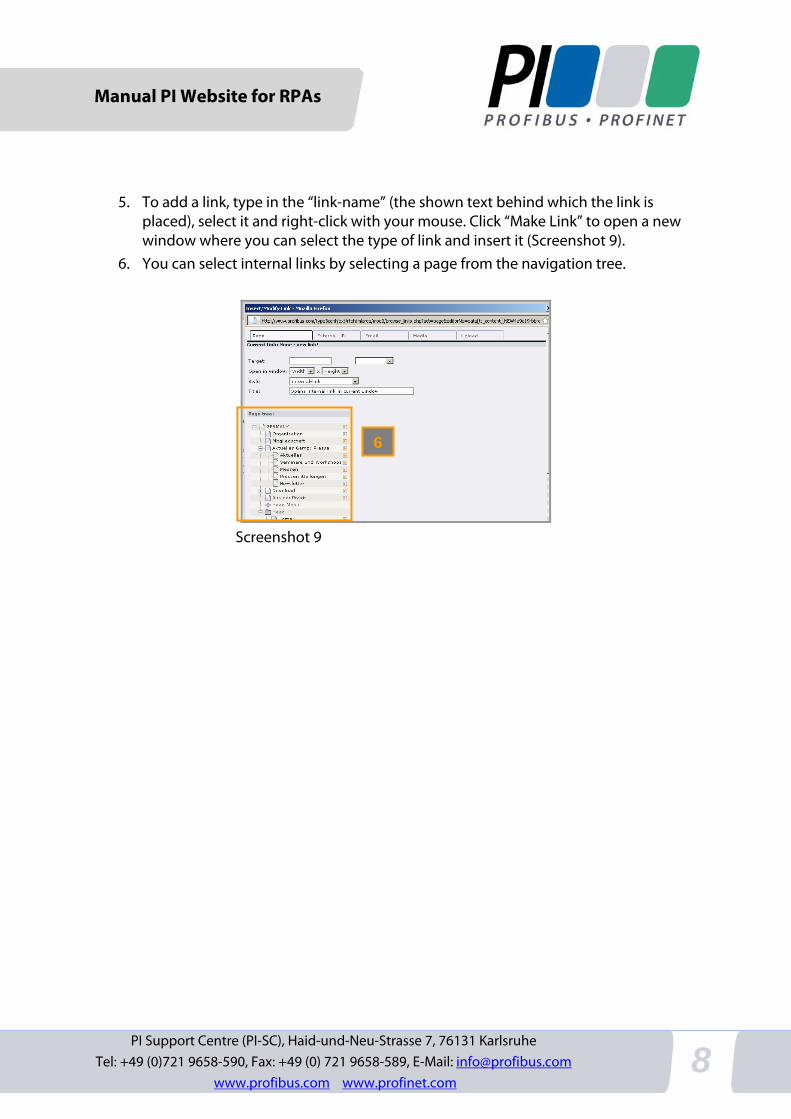
5. To add a link, type in the “link-name” (the shown text behind which the link is
placed), select it and right-click with your mouse. Click “Make Link” to open a new window where you can select the type of link and insert it (Screenshot 9).
6. You can select internal links by selecting a page from the navigation tree.
Screenshot 9
6
Manual PI Website for RPAs
PI Support Centre (PI-SC), Haid-und-Neu-Strasse 7, 76131 Karlsruhe Tel: +49 (0)721 9658-590, Fax: +49 (0) 721 9658-589, E-Mail: [email protected]
www.profibus.com www.profinet.com 9
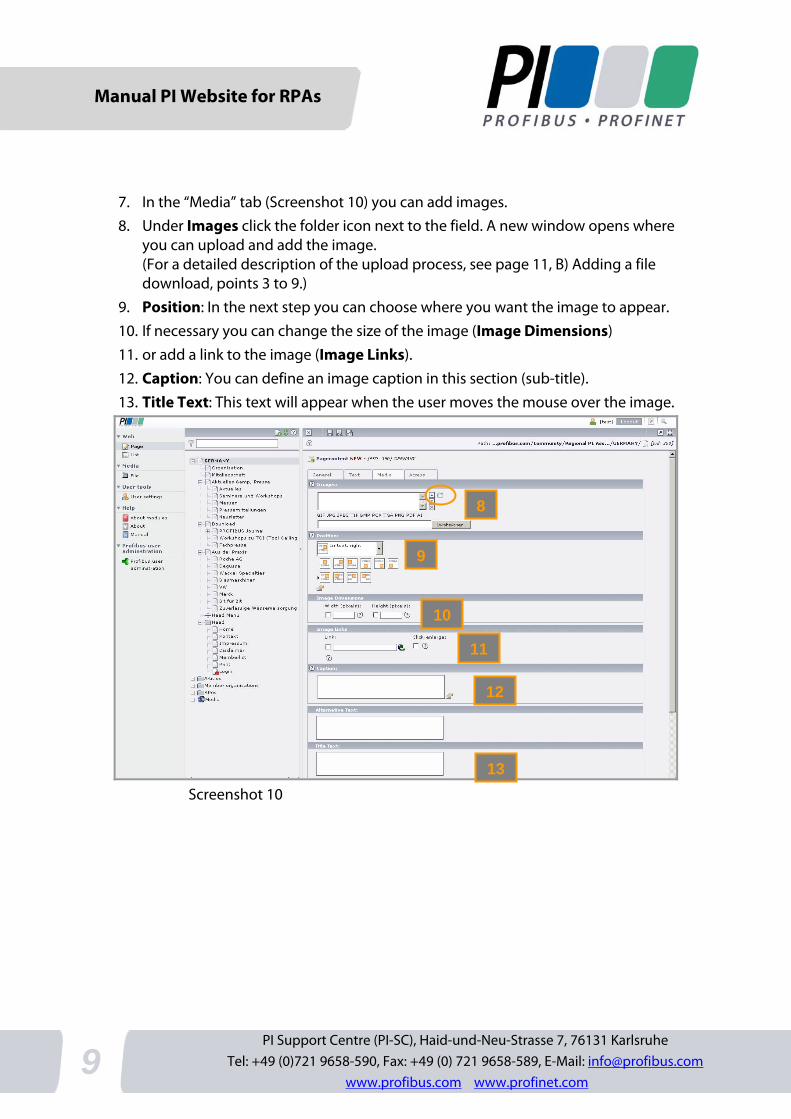
7. In the “Media” tab (Screenshot 10) you can add images. 8. Under Images click the folder icon next to the field. A new window opens where
you can upload and add the image. (For a detailed description of the upload process, see page 11, B) Adding a file download, points 3 to 9.)
9. Position: In the next step you can choose where you want the image to appear. 10. If necessary you can change the size of the image (Image Dimensions) 11. or add a link to the image (Image Links). 12. Caption: You can define an image caption in this section (sub-title). 13. Title Text: This text will appear when the user moves the mouse over the image.
Screenshot 10
9
8
10
11
12
13
Manual PI Website for RPAs
PI Support Centre (PI-SC), Haid-und-Neu-Strasse 7, 76131 Karlsruhe
Tel: +49 (0)721 9658-590, Fax: +49 (0) 721 9658-589, E-Mail: [email protected] www.profibus.com www.profinet.com
10
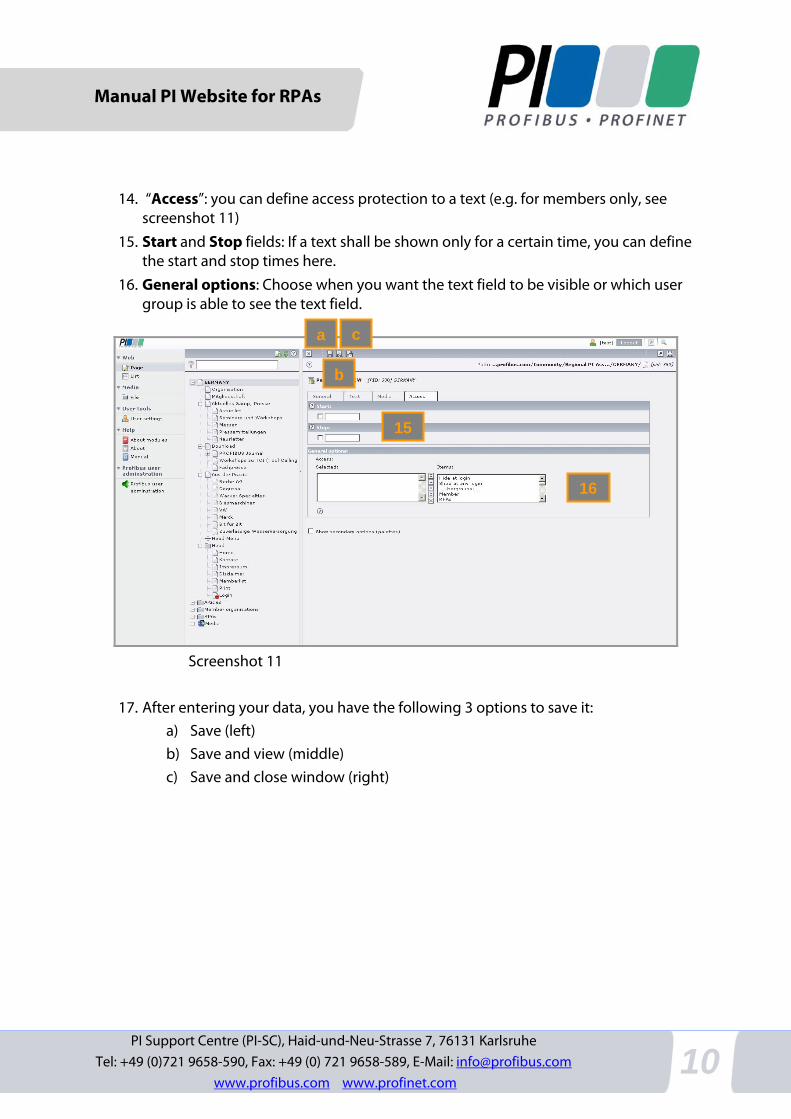
14. “Access”: you can define access protection to a text (e.g. for members only, see screenshot 11)
15. Start and Stop fields: If a text shall be shown only for a certain time, you can define the start and stop times here.
16. General options: Choose when you want the text field to be visible or which user group is able to see the text field.
Screenshot 11
17. After entering your data, you have the following 3 options to save it:
a) Save (left) b) Save and view (middle) c) Save and close window (right)
a
b
c
15
16
Manual PI Website for RPAs
PI Support Centre (PI-SC), Haid-und-Neu-Strasse 7, 76131 Karlsruhe Tel: +49 (0)721 9658-590, Fax: +49 (0) 721 9658-589, E-Mail: [email protected]
www.profibus.com www.profinet.com 11
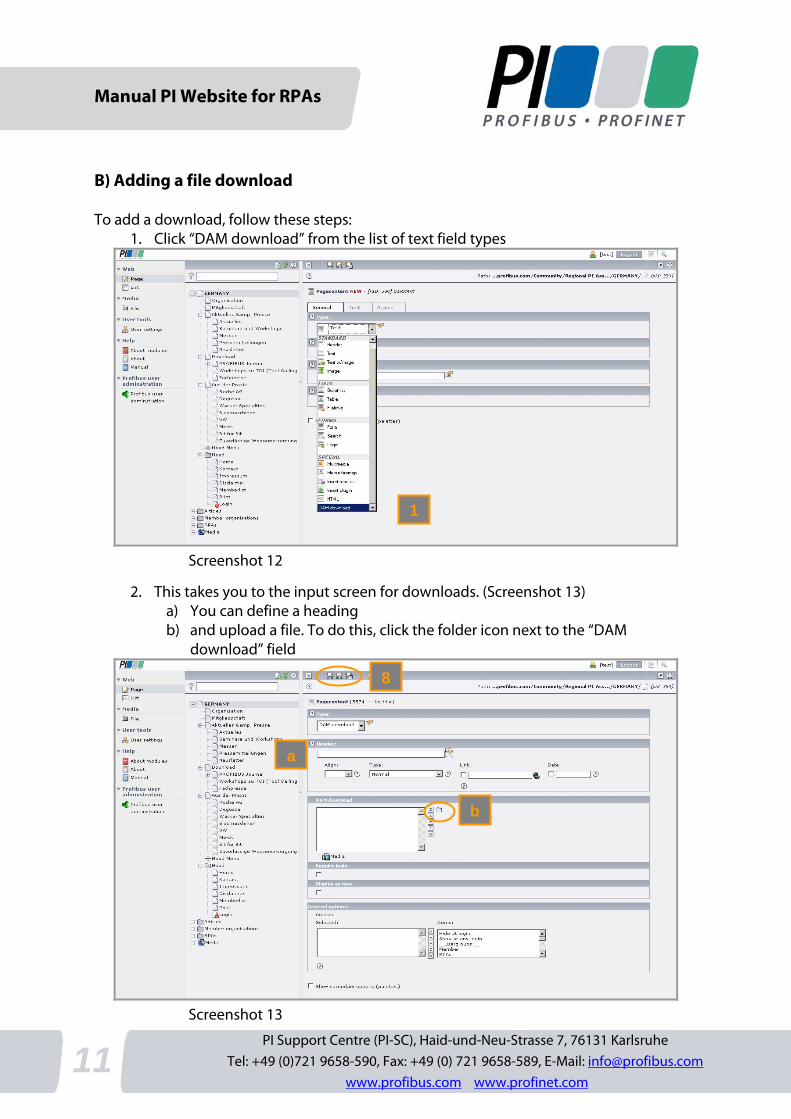
B) Adding a file download To add a download, follow these steps:
1. Click “DAM download” from the list of text field types
Screenshot 12
2. This takes you to the input screen for downloads. (Screenshot 13) a) You can define a heading b) and upload a file. To do this, click the folder icon next to the “DAM
download” field
Screenshot 13
b
a
8
1
Manual PI Website for RPAs
PI Support Centre (PI-SC), Haid-und-Neu-Strasse 7, 76131 Karlsruhe
Tel: +49 (0)721 9658-590, Fax: +49 (0) 721 9658-589, E-Mail: [email protected] www.profibus.com www.profinet.com
12
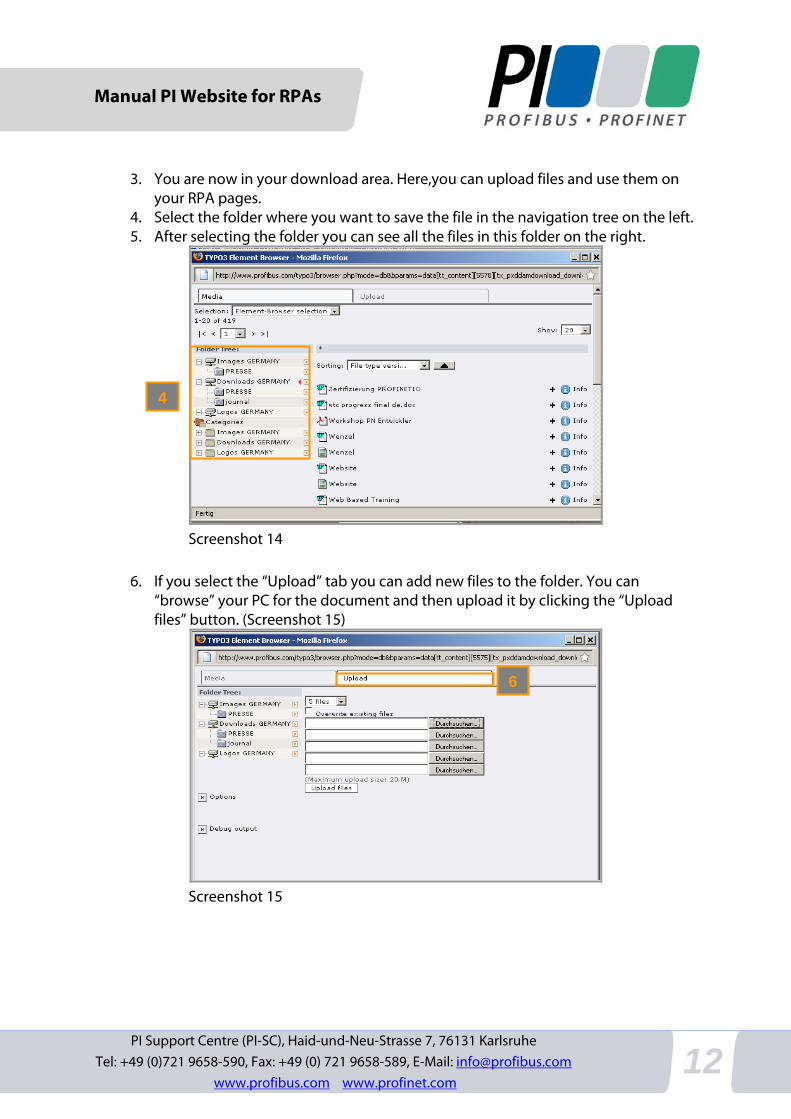
3. You are now in your download area. Here,you can upload files and use them on your RPA pages.
4. Select the folder where you want to save the file in the navigation tree on the left. 5. After selecting the folder you can see all the files in this folder on the right.
Screenshot 14
6. If you select the “Upload” tab you can add new files to the folder. You can
“browse” your PC for the document and then upload it by clicking the “Upload files” button. (Screenshot 15)
Screenshot 15
4
6
Manual PI Website for RPAs
PI Support Centre (PI-SC), Haid-und-Neu-Strasse 7, 76131 Karlsruhe Tel: +49 (0)721 9658-590, Fax: +49 (0) 721 9658-589, E-Mail: [email protected]
www.profibus.com www.profinet.com 13
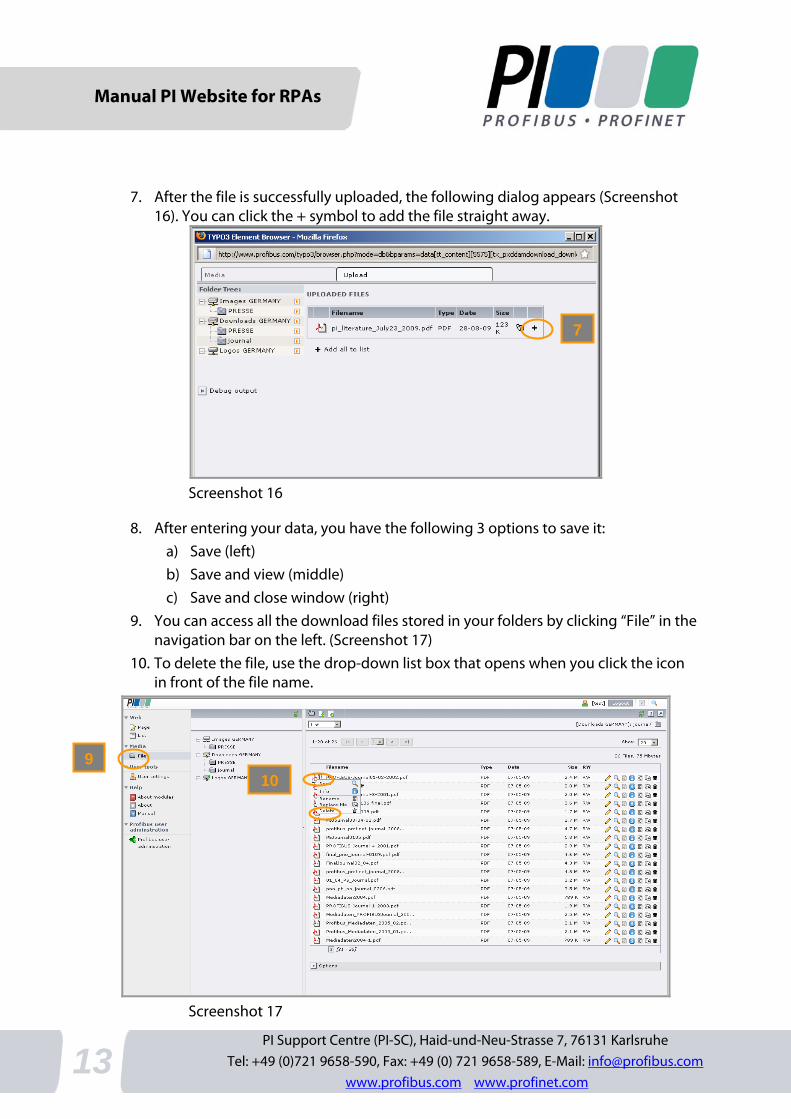
7. After the file is successfully uploaded, the following dialog appears (Screenshot 16). You can click the + symbol to add the file straight away.
Screenshot 16
8. After entering your data, you have the following 3 options to save it: a) Save (left) b) Save and view (middle) c) Save and close window (right)
9. You can access all the download files stored in your folders by clicking “File” in the navigation bar on the left. (Screenshot 17)
10. To delete the file, use the drop-down list box that opens when you click the icon in front of the file name.
Screenshot 17
7
9 10
Manual PI Website for RPAs
PI Support Centre (PI-SC), Haid-und-Neu-Strasse 7, 76131 Karlsruhe
Tel: +49 (0)721 9658-590, Fax: +49 (0) 721 9658-589, E-Mail: [email protected] www.profibus.com www.profinet.com
14
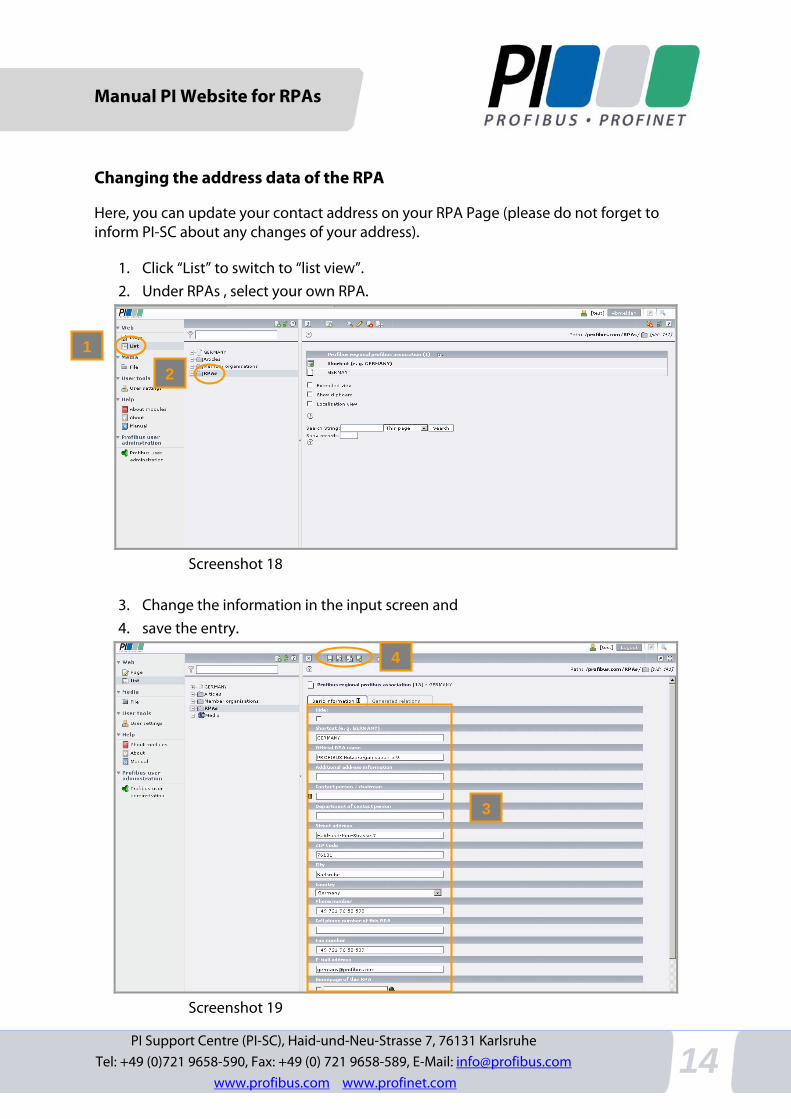
Changing the address data of the RPA
Here, you can update your contact address on your RPA Page (please do not forget to inform PI-SC about any changes of your address).
1. Click “List” to switch to “list view”. 2. Under RPAs , select your own RPA.
Screenshot 18
3. Change the information in the input screen and 4. save the entry.
Screenshot 19
1
2
4
3
Manual PI Website for RPAs
PI Support Centre (PI-SC), Haid-und-Neu-Strasse 7, 76131 Karlsruhe Tel: +49 (0)721 9658-590, Fax: +49 (0) 721 9658-589, E-Mail: [email protected]
www.profibus.com www.profinet.com 15
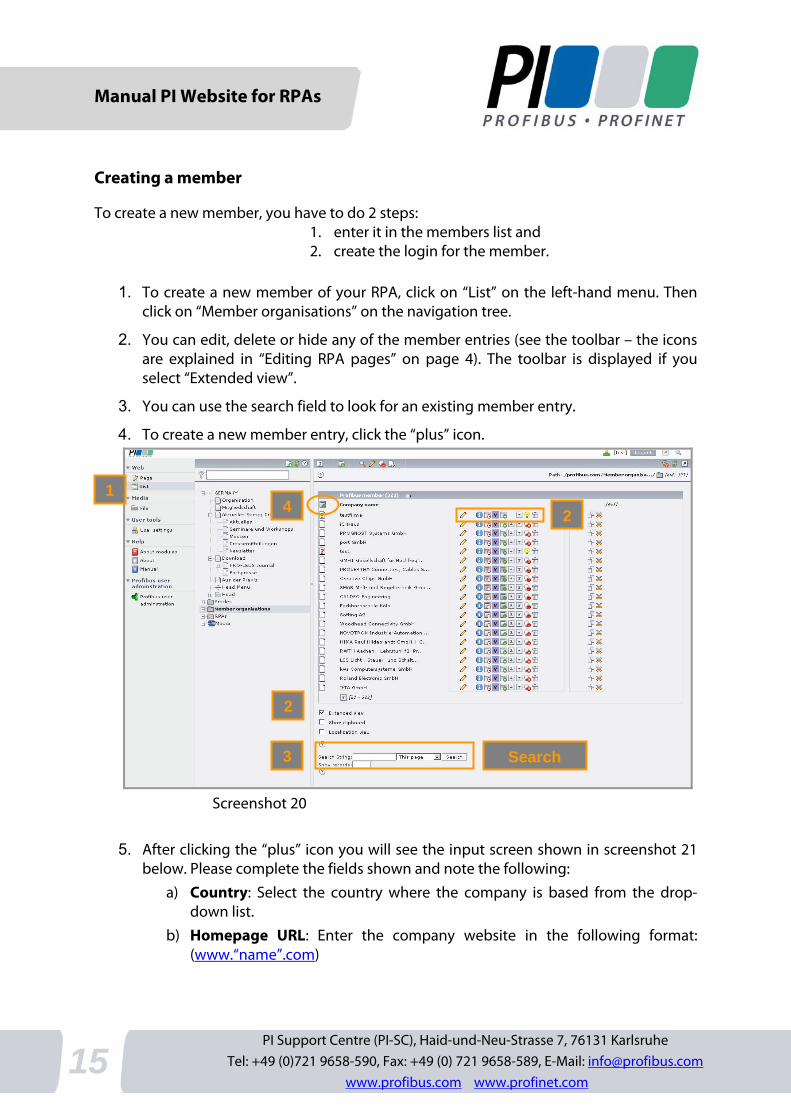
Creating a member
To create a new member, you have to do 2 steps: 1. enter it in the members list and 2. create the login for the member.
1. To create a new member of your RPA, click on “List” on the left-hand menu. Then click on “Member organisations” on the navigation tree.
2. You can edit, delete or hide any of the member entries (see the toolbar – the icons are explained in “Editing RPA pages” on page 4). The toolbar is displayed if you select “Extended view”.
3. You can use the search field to look for an existing member entry.
4. To create a new member entry, click the “plus” icon.
Screenshot 20
5. After clicking the “plus” icon you will see the input screen shown in screenshot 21 below. Please complete the fields shown and note the following:
a) Country: Select the country where the company is based from the drop-down list.
b) Homepage URL: Enter the company website in the following format: (www.“name”.com)
Search
2
2
3
4 1
Manual PI Website for RPAs
PI Support Centre (PI-SC), Haid-und-Neu-Strasse 7, 76131 Karlsruhe
Tel: +49 (0)721 9658-590, Fax: +49 (0) 721 9658-589, E-Mail: [email protected] www.profibus.com www.profinet.com
16
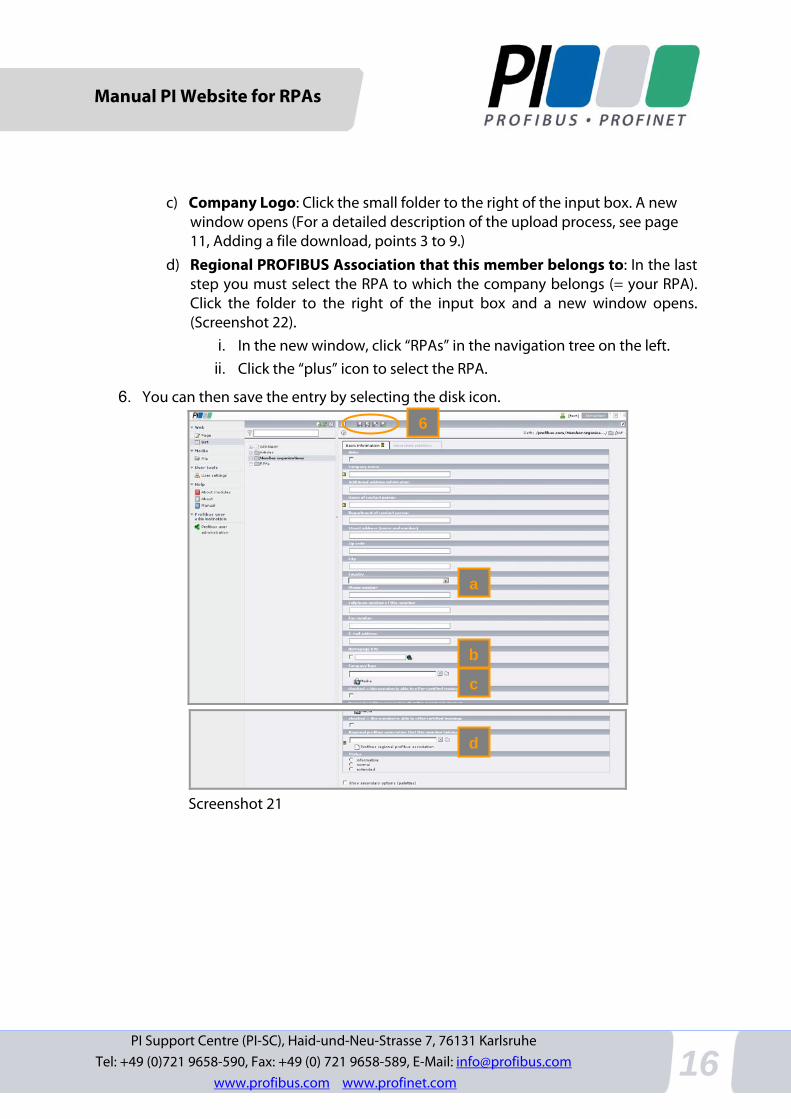
c) Company Logo: Click the small folder to the right of the input box. A new
window opens (For a detailed description of the upload process, see page 11, Adding a file download, points 3 to 9.)
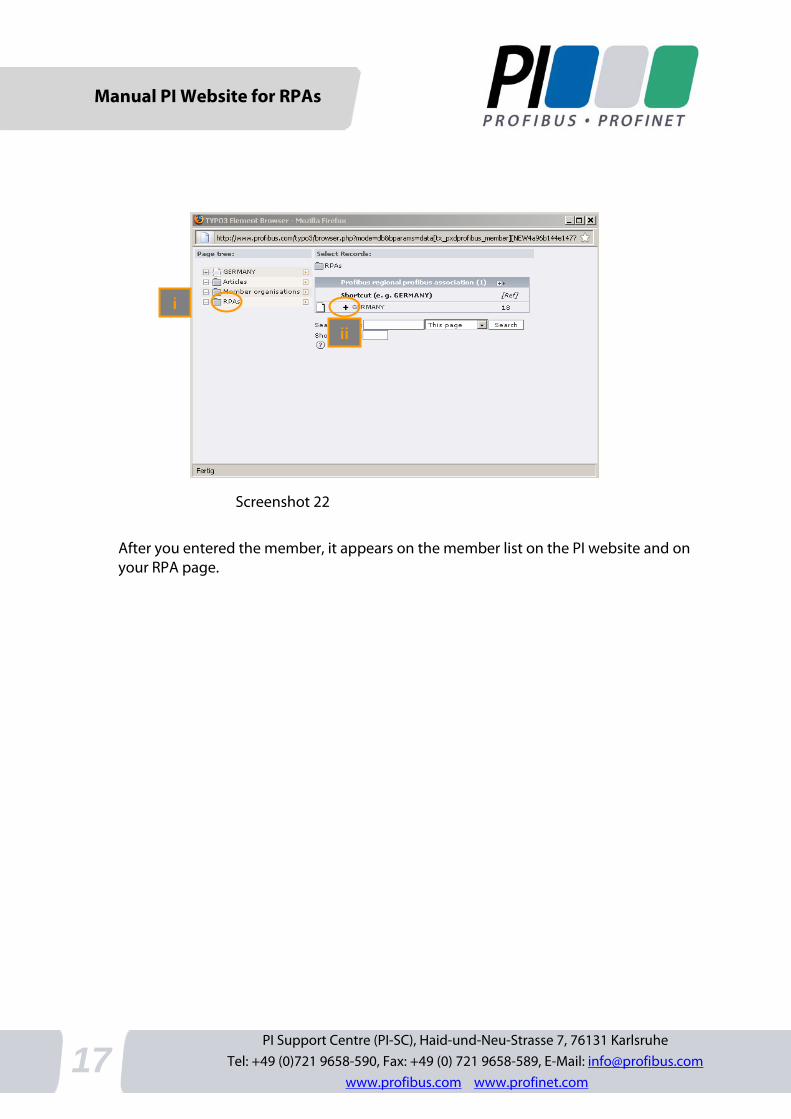
d) Regional PROFIBUS Association that this member belongs to: In the last step you must select the RPA to which the company belongs (= your RPA). Click the folder to the right of the input box and a new window opens. (Screenshot 22).
i. In the new window, click “RPAs” in the navigation tree on the left. ii. Click the “plus” icon to select the RPA.
6. You can then save the entry by selecting the disk icon.
Screenshot 21
a
b
c
d
6
Manual PI Website for RPAs
PI Support Centre (PI-SC), Haid-und-Neu-Strasse 7, 76131 Karlsruhe Tel: +49 (0)721 9658-590, Fax: +49 (0) 721 9658-589, E-Mail: [email protected]
www.profibus.com www.profinet.com 17
Screenshot 22
After you entered the member, it appears on the member list on the PI website and on your RPA page.
i
ii
Manual PI Website for RPAs
PI Support Centre (PI-SC), Haid-und-Neu-Strasse 7, 76131 Karlsruhe
Tel: +49 (0)721 9658-590, Fax: +49 (0) 721 9658-589, E-Mail: [email protected] www.profibus.com www.profinet.com
18
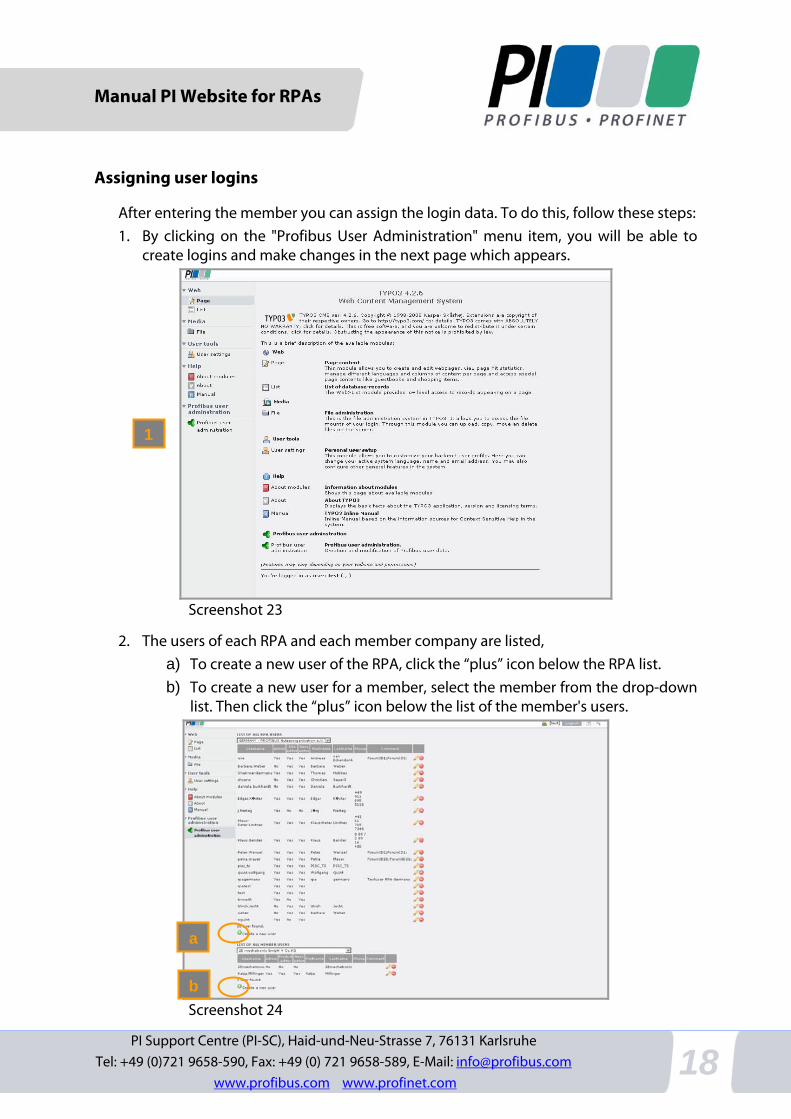
Assigning user logins
After entering the member you can assign the login data. To do this, follow these steps: 1. By clicking on the "Profibus User Administration" menu item, you will be able to
create logins and make changes in the next page which appears.
Screenshot 23
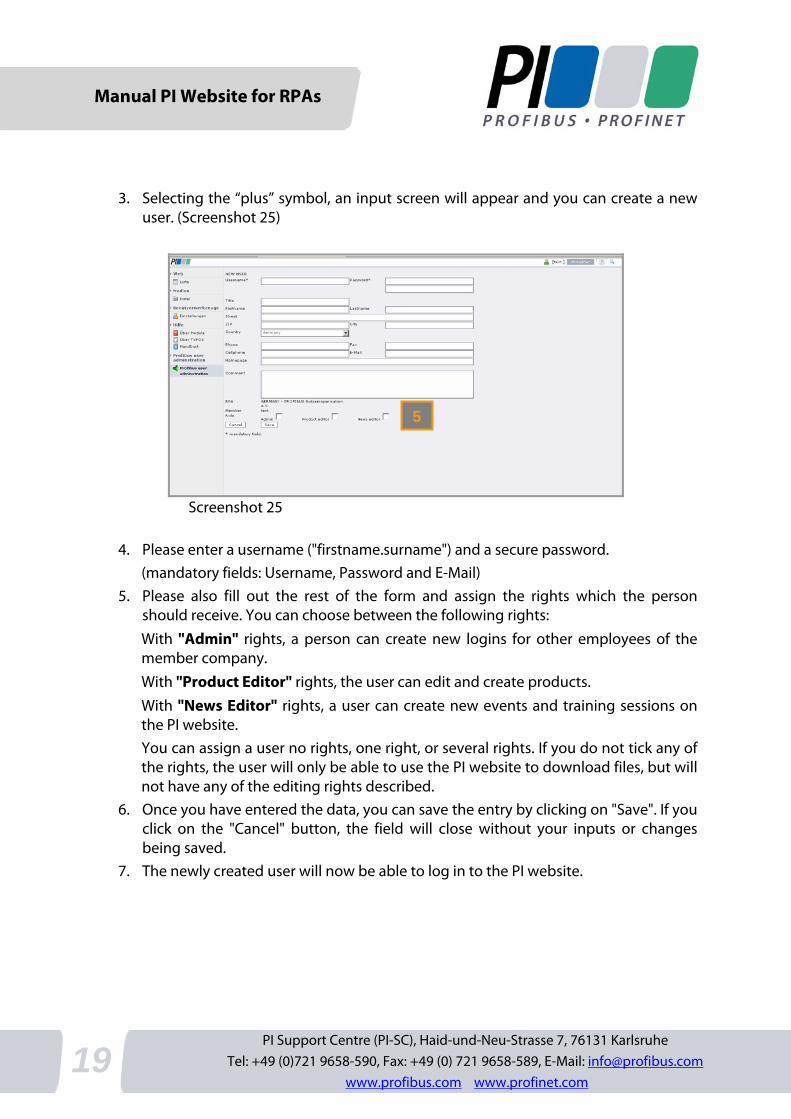
2. The users of each RPA and each member company are listed, a) To create a new user of the RPA, click the “plus” icon below the RPA list. b) To create a new user for a member, select the member from the drop-down
list. Then click the “plus” icon below the list of the member's users.
Screenshot 24
1
a
b
Manual PI Website for RPAs
PI Support Centre (PI-SC), Haid-und-Neu-Strasse 7, 76131 Karlsruhe Tel: +49 (0)721 9658-590, Fax: +49 (0) 721 9658-589, E-Mail: [email protected]
www.profibus.com www.profinet.com 19
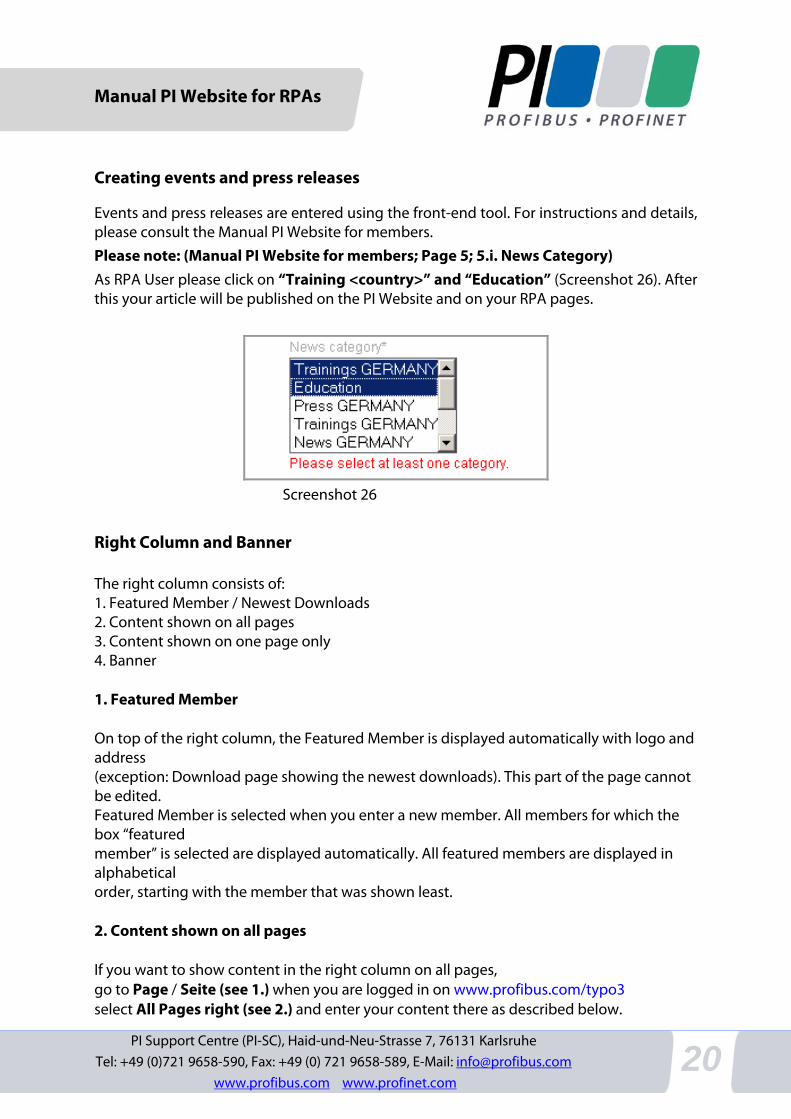
3. Selecting the “plus” symbol, an input screen will appear and you can create a new user. (Screenshot 25)
Screenshot 25
4. Please enter a username ("firstname.surname") and a secure password.
(mandatory fields: Username, Password and E-Mail) 5. Please also fill out the rest of the form and assign the rights which the person
should receive. You can choose between the following rights: With "Admin" rights, a person can create new logins for other employees of the member company. With "Product Editor" rights, the user can edit and create products. With "News Editor" rights, a user can create new events and training sessions on the PI website. You can assign a user no rights, one right, or several rights. If you do not tick any of the rights, the user will only be able to use the PI website to download files, but will not have any of the editing rights described.
6. Once you have entered the data, you can save the entry by clicking on "Save". If you click on the "Cancel" button, the field will close without your inputs or changes being saved.
7. The newly created user will now be able to log in to the PI website.
5
Manual PI Website for RPAs
PI Support Centre (PI-SC), Haid-und-Neu-Strasse 7, 76131 Karlsruhe
Tel: +49 (0)721 9658-590, Fax: +49 (0) 721 9658-589, E-Mail: [email protected] www.profibus.com www.profinet.com
20
Creating events and press releases
Events and press releases are entered using the front-end tool. For instructions and details, please consult the Manual PI Website for members. Please note: (Manual PI Website for members; Page 5; 5.i. News Category) As RPA User please click on “Training <country>” and “Education” (Screenshot 26). After this your article will be published on the PI Website and on your RPA pages.
Screenshot 26
Right Column and Banner The right column consists of: 1. Featured Member / Newest Downloads 2. Content shown on all pages 3. Content shown on one page only 4. Banner 1. Featured Member On top of the right column, the Featured Member is displayed automatically with logo and address (exception: Download page showing the newest downloads). This part of the page cannot be edited. Featured Member is selected when you enter a new member. All members for which the box “featured member” is selected are displayed automatically. All featured members are displayed in alphabetical order, starting with the member that was shown least. 2. Content shown on all pages If you want to show content in the right column on all pages, go to Page / Seite (see 1.) when you are logged in on www.profibus.com/typo3 select All Pages right (see 2.) and enter your content there as described below.
Manual PI Website for RPAs
PI Support Centre (PI-SC), Haid-und-Neu-Strasse 7, 76131 Karlsruhe Tel: +49 (0)721 9658-590, Fax: +49 (0) 721 9658-589, E-Mail: [email protected]
www.profibus.com www.profinet.com 21
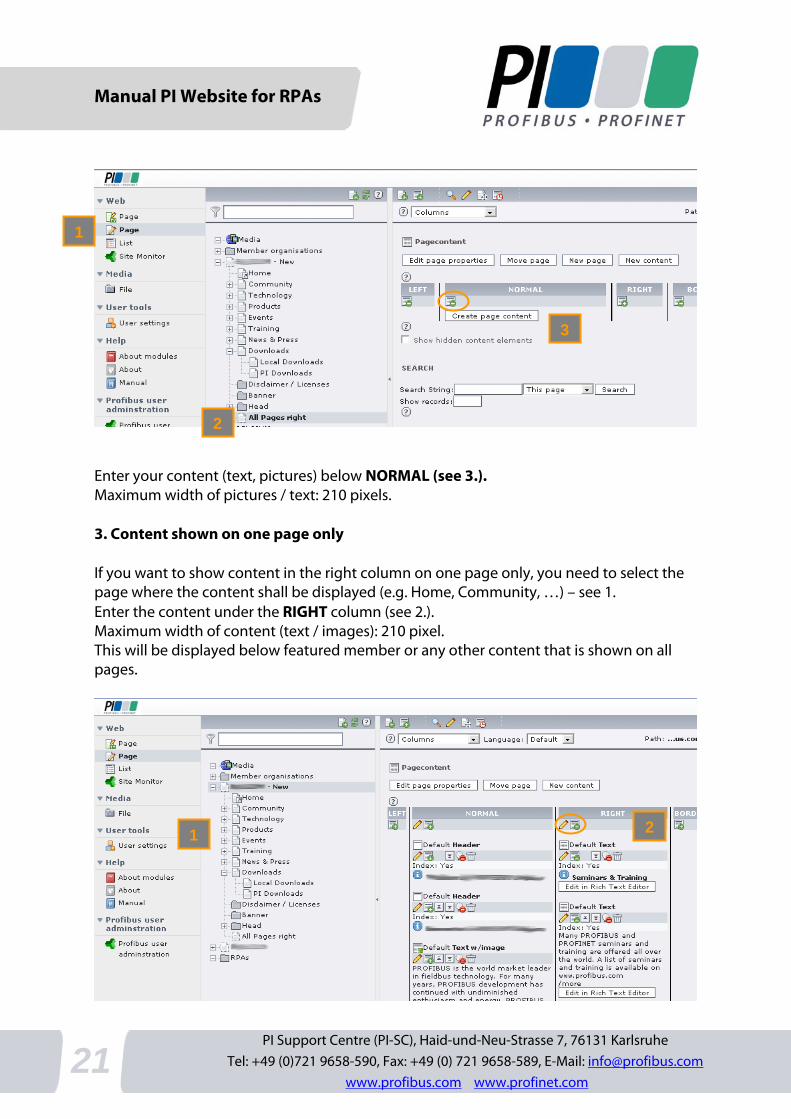
Enter your content (text, pictures) below NORMAL (see 3.). Maximum width of pictures / text: 210 pixels. 3. Content shown on one page only If you want to show content in the right column on one page only, you need to select the page where the content shall be displayed (e.g. Home, Community, …) – see 1. Enter the content under the RIGHT column (see 2.). Maximum width of content (text / images): 210 pixel. This will be displayed below featured member or any other content that is shown on all pages.
2
3
1
1 2
Manual PI Website for RPAs
PI Support Centre (PI-SC), Haid-und-Neu-Strasse 7, 76131 Karlsruhe
Tel: +49 (0)721 9658-590, Fax: +49 (0) 721 9658-589, E-Mail: [email protected] www.profibus.com www.profinet.com
22
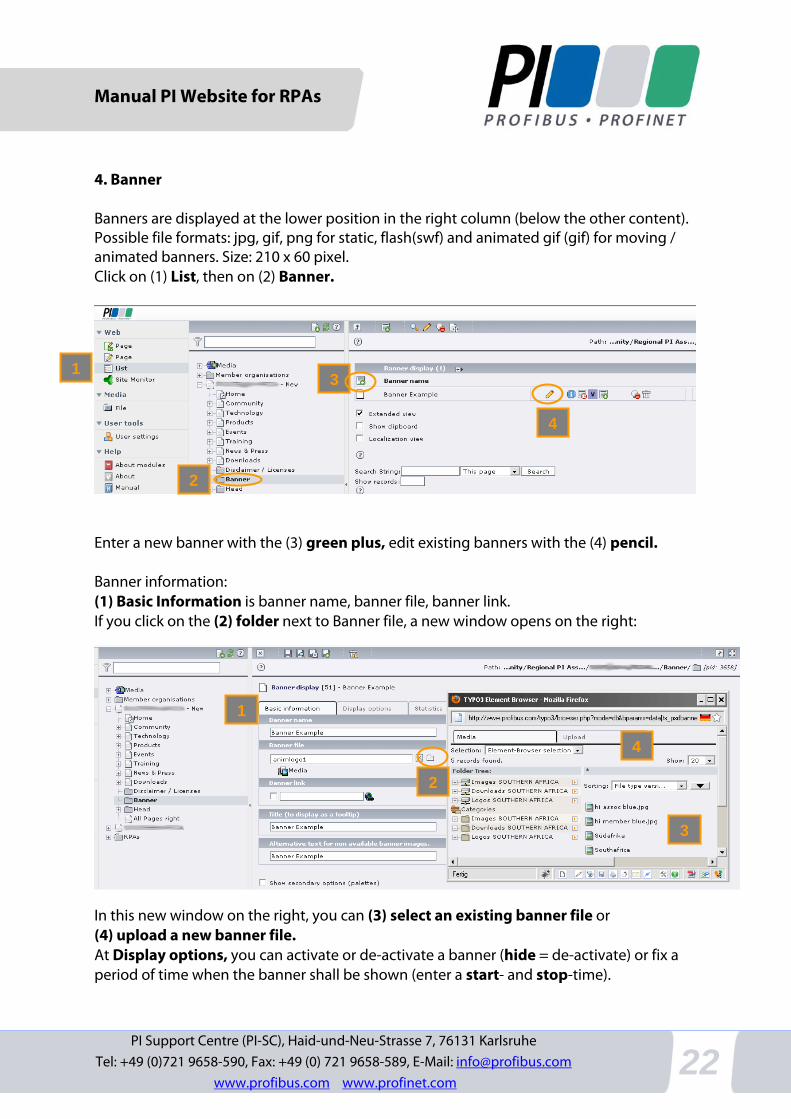
4. Banner Banners are displayed at the lower position in the right column (below the other content). Possible file formats: jpg, gif, png for static, flash(swf) and animated gif (gif) for moving / animated banners. Size: 210 x 60 pixel. Click on (1) List, then on (2) Banner.
Enter a new banner with the (3) green plus, edit existing banners with the (4) pencil. Banner information: (1) Basic Information is banner name, banner file, banner link. If you click on the (2) folder next to Banner file, a new window opens on the right:
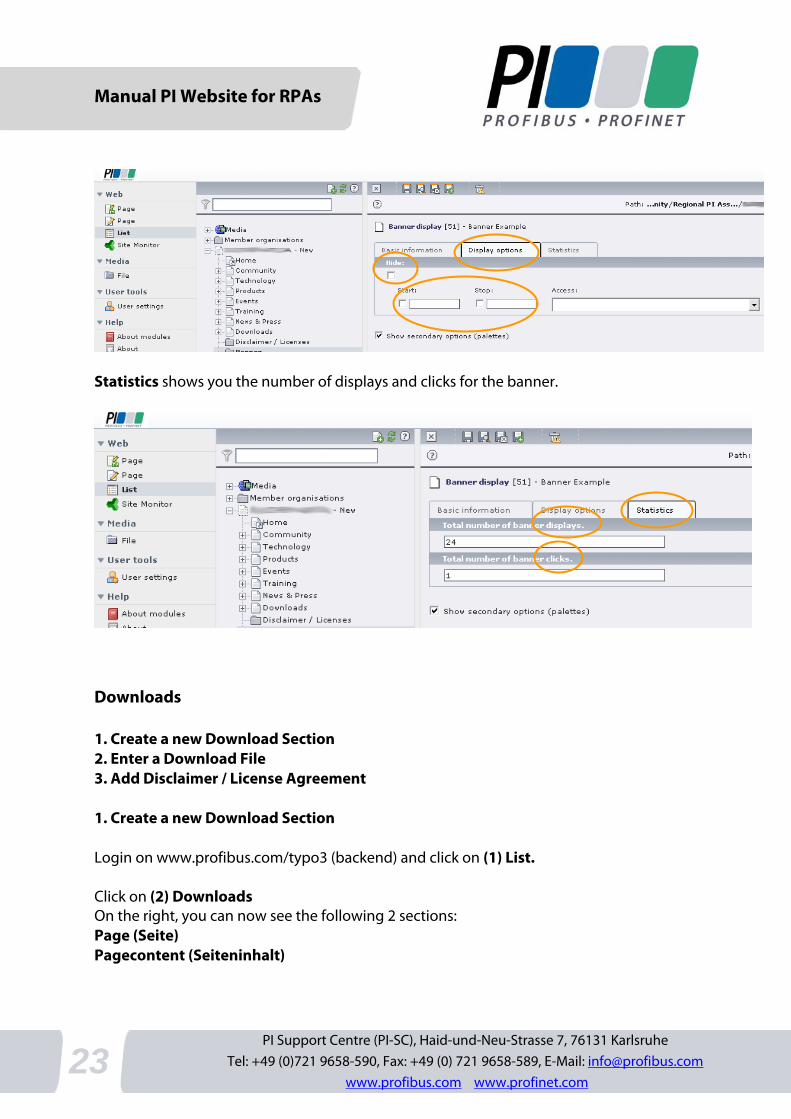
In this new window on the right, you can (3) select an existing banner file or (4) upload a new banner file. At Display options, you can activate or de-activate a banner (hide = de-activate) or fix a period of time when the banner shall be shown (enter a start- and stop-time).
1
2
3
4
1
2
4
3
Manual PI Website for RPAs
PI Support Centre (PI-SC), Haid-und-Neu-Strasse 7, 76131 Karlsruhe Tel: +49 (0)721 9658-590, Fax: +49 (0) 721 9658-589, E-Mail: [email protected]
www.profibus.com www.profinet.com 23
Statistics shows you the number of displays and clicks for the banner.
Downloads 1. Create a new Download Section 2. Enter a Download File 3. Add Disclaimer / License Agreement 1. Create a new Download Section Login on www.profibus.com/typo3 (backend) and click on (1) List. Click on (2) Downloads On the right, you can now see the following 2 sections: Page (Seite) Pagecontent (Seiteninhalt)
Manual PI Website for RPAs
PI Support Centre (PI-SC), Haid-und-Neu-Strasse 7, 76131 Karlsruhe
Tel: +49 (0)721 9658-590, Fax: +49 (0) 721 9658-589, E-Mail: [email protected] www.profibus.com www.profinet.com
24
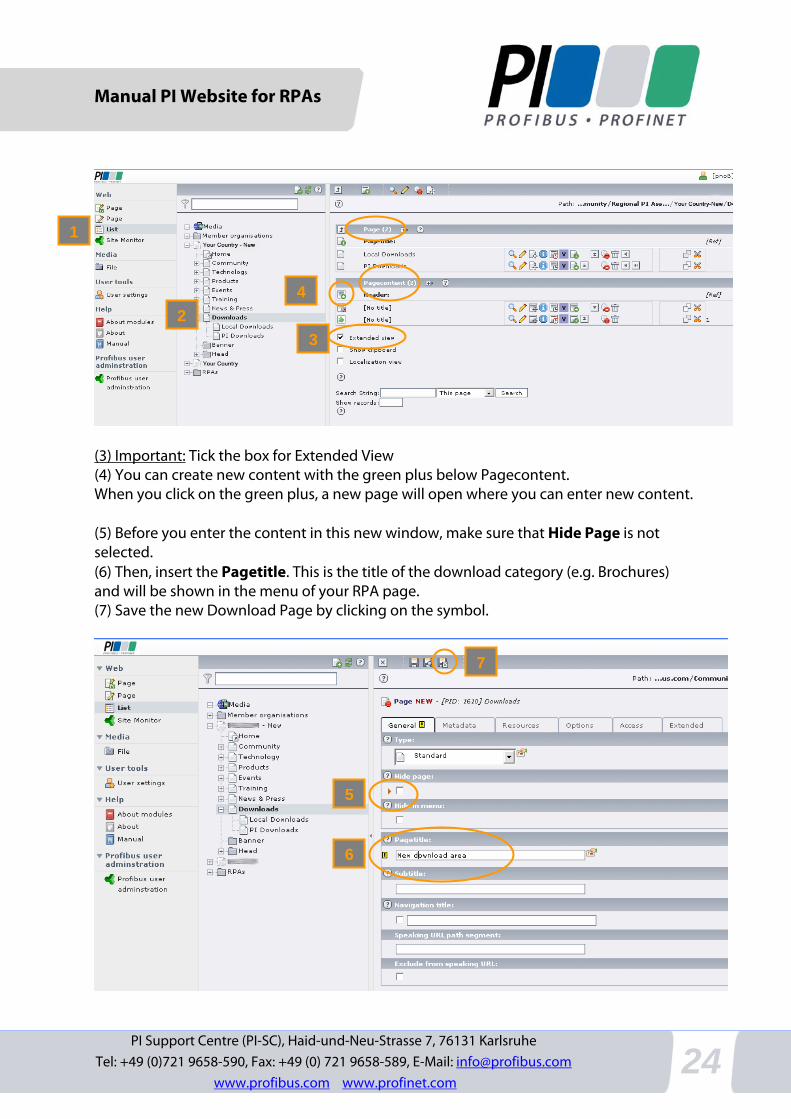
(3) Important: Tick the box for Extended View (4) You can create new content with the green plus below Pagecontent. When you click on the green plus, a new page will open where you can enter new content. (5) Before you enter the content in this new window, make sure that Hide Page is not selected. (6) Then, insert the Pagetitle. This is the title of the download category (e.g. Brochures) and will be shown in the menu of your RPA page. (7) Save the new Download Page by clicking on the symbol.
4
3
1
2
7
6
5
Manual PI Website for RPAs
PI Support Centre (PI-SC), Haid-und-Neu-Strasse 7, 76131 Karlsruhe Tel: +49 (0)721 9658-590, Fax: +49 (0) 721 9658-589, E-Mail: [email protected]
www.profibus.com www.profinet.com 25
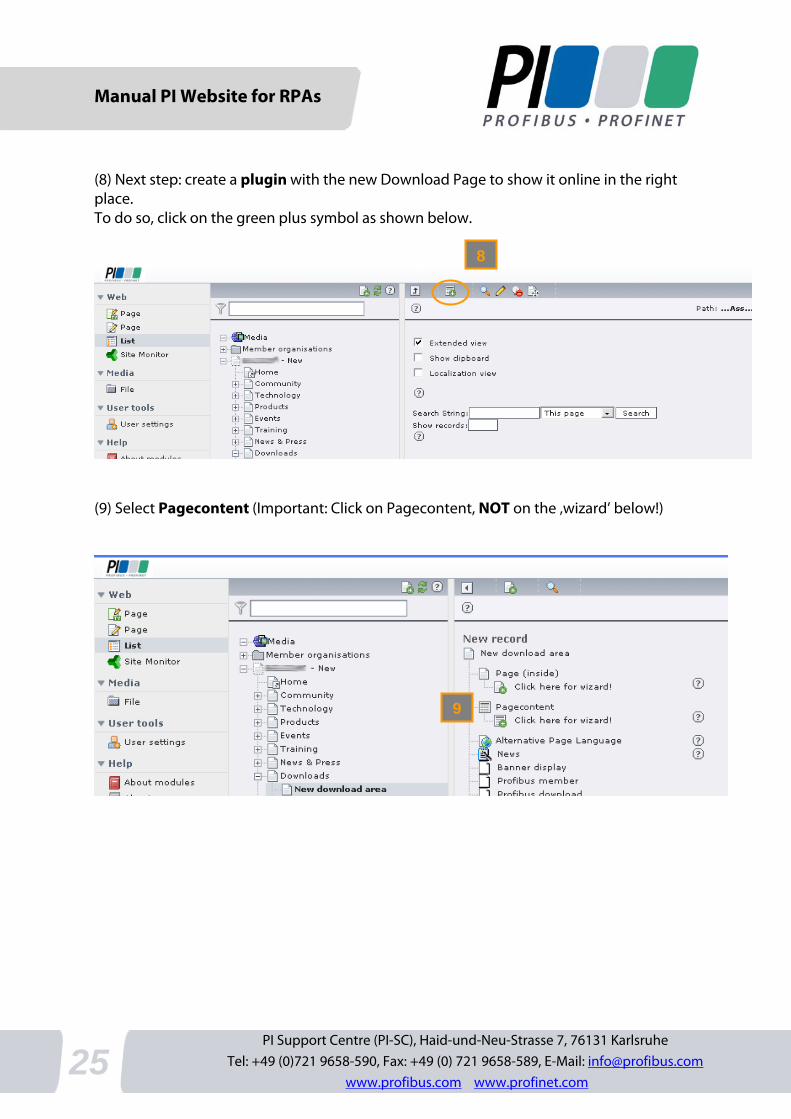
(8) Next step: create a plugin with the new Download Page to show it online in the right place. To do so, click on the green plus symbol as shown below.
(9) Select Pagecontent (Important: Click on Pagecontent, NOT on the ‚wizard’ below!)
9
8
Manual PI Website for RPAs
PI Support Centre (PI-SC), Haid-und-Neu-Strasse 7, 76131 Karlsruhe
Tel: +49 (0)721 9658-590, Fax: +49 (0) 721 9658-589, E-Mail: [email protected] www.profibus.com www.profinet.com
26
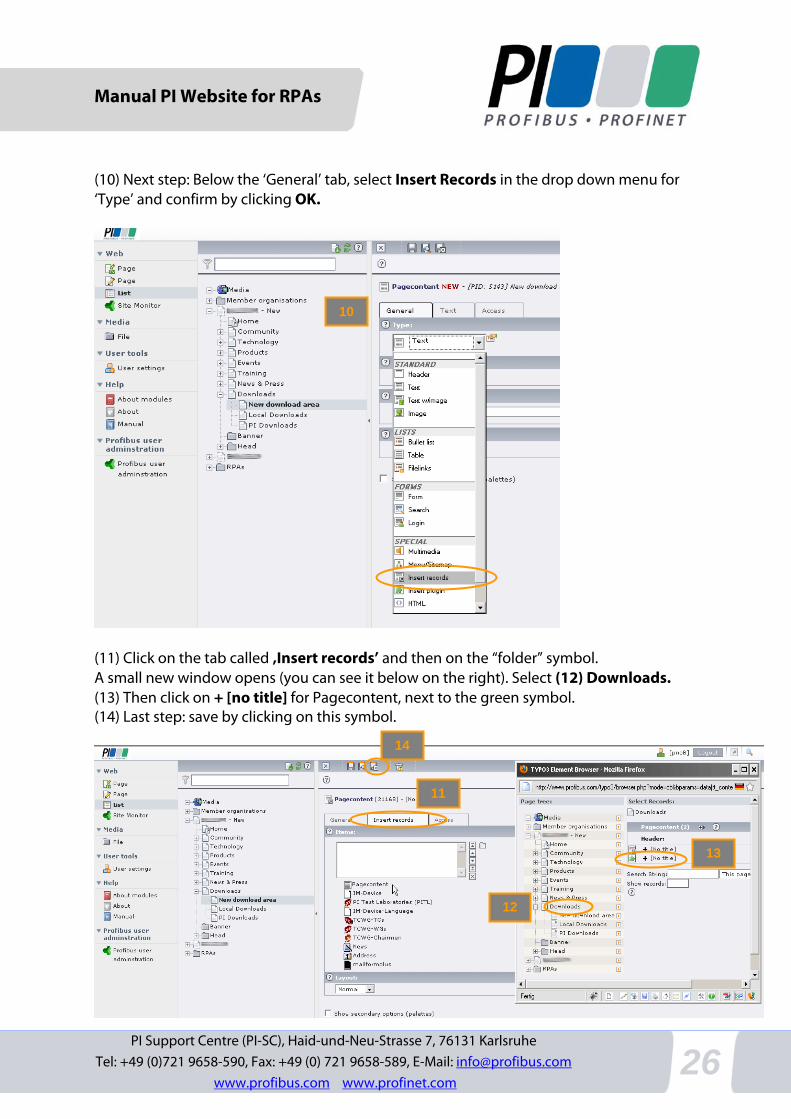
(10) Next step: Below the ‘General’ tab, select Insert Records in the drop down menu for ‘Type’ and confirm by clicking OK.
(11) Click on the tab called ‚Insert records’ and then on the “folder” symbol. A small new window opens (you can see it below on the right). Select (12) Downloads. (13) Then click on + [no title] for Pagecontent, next to the green symbol. (14) Last step: save by clicking on this symbol.
10
11
14
13
12
Manual PI Website for RPAs
PI Support Centre (PI-SC), Haid-und-Neu-Strasse 7, 76131 Karlsruhe Tel: +49 (0)721 9658-590, Fax: +49 (0) 721 9658-589, E-Mail: [email protected]
www.profibus.com www.profinet.com 27
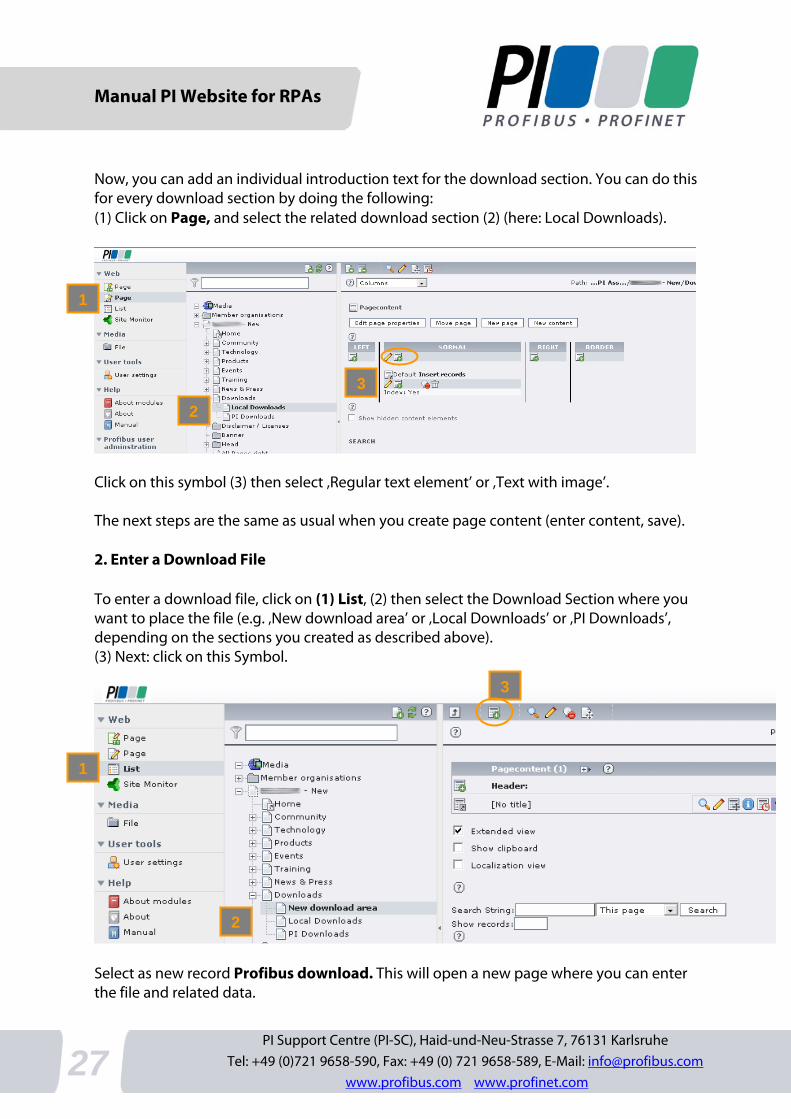
Now, you can add an individual introduction text for the download section. You can do this for every download section by doing the following: (1) Click on Page, and select the related download section (2) (here: Local Downloads).
Click on this symbol (3) then select ‚Regular text element’ or ‚Text with image’. The next steps are the same as usual when you create page content (enter content, save). 2. Enter a Download File To enter a download file, click on (1) List, (2) then select the Download Section where you want to place the file (e.g. ‚New download area’ or ‚Local Downloads’ or ‚PI Downloads’, depending on the sections you created as described above). (3) Next: click on this Symbol.
Select as new record Profibus download. This will open a new page where you can enter the file and related data.
3
2
1
3
2
1
Manual PI Website for RPAs
PI Support Centre (PI-SC), Haid-und-Neu-Strasse 7, 76131 Karlsruhe
Tel: +49 (0)721 9658-590, Fax: +49 (0) 721 9658-589, E-Mail: [email protected] www.profibus.com www.profinet.com
28
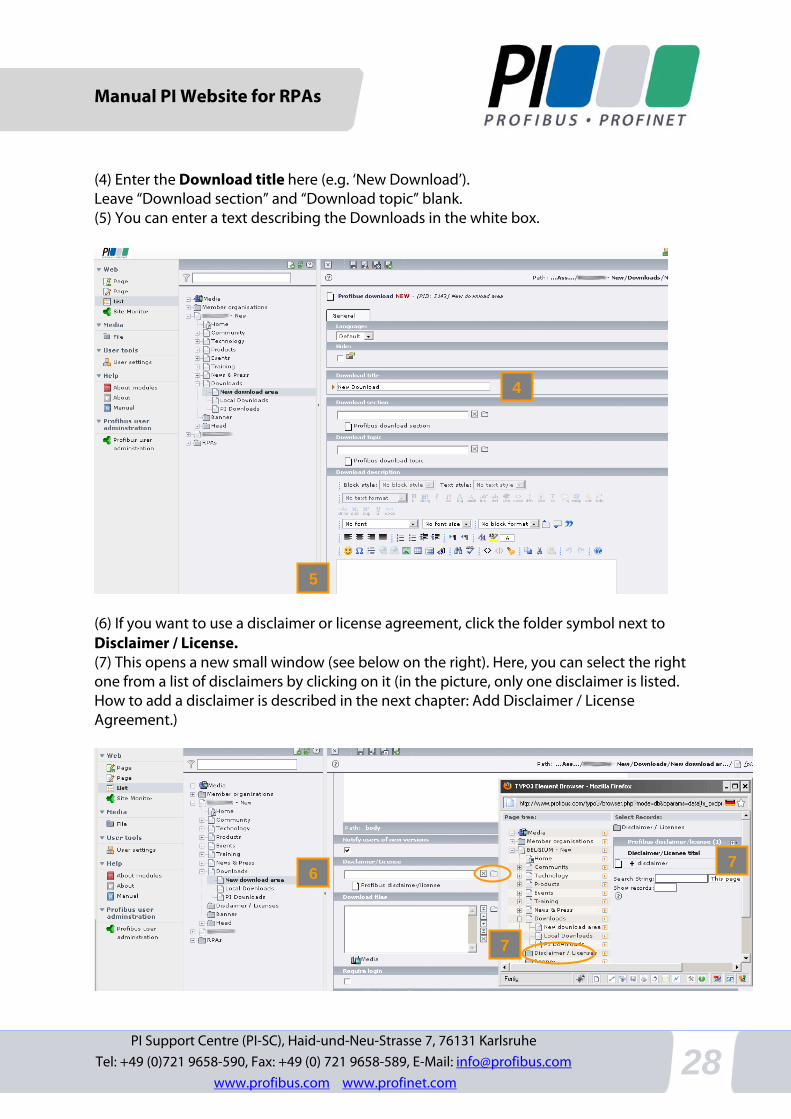
(4) Enter the Download title here (e.g. ‘New Download’). Leave “Download section” and “Download topic” blank. (5) You can enter a text describing the Downloads in the white box.
(6) If you want to use a disclaimer or license agreement, click the folder symbol next to Disclaimer / License. (7) This opens a new small window (see below on the right). Here, you can select the right one from a list of disclaimers by clicking on it (in the picture, only one disclaimer is listed. How to add a disclaimer is described in the next chapter: Add Disclaimer / License Agreement.)
5
4
7
7
6
Manual PI Website for RPAs
PI Support Centre (PI-SC), Haid-und-Neu-Strasse 7, 76131 Karlsruhe Tel: +49 (0)721 9658-590, Fax: +49 (0) 721 9658-589, E-Mail: [email protected]
www.profibus.com www.profinet.com 29
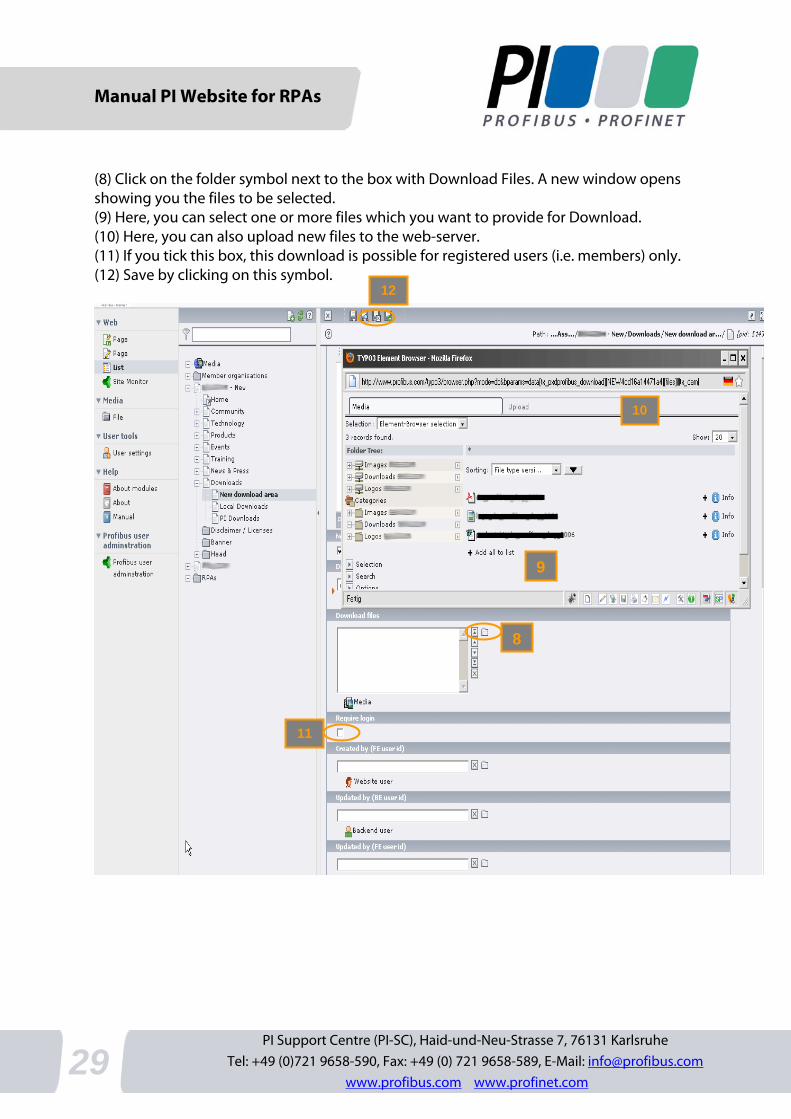
(8) Click on the folder symbol next to the box with Download Files. A new window opens showing you the files to be selected. (9) Here, you can select one or more files which you want to provide for Download. (10) Here, you can also upload new files to the web-server. (11) If you tick this box, this download is possible for registered users (i.e. members) only. (12) Save by clicking on this symbol.
11
10
9
8
12
Manual PI Website for RPAs
PI Support Centre (PI-SC), Haid-und-Neu-Strasse 7, 76131 Karlsruhe
Tel: +49 (0)721 9658-590, Fax: +49 (0) 721 9658-589, E-Mail: [email protected] www.profibus.com www.profinet.com
30
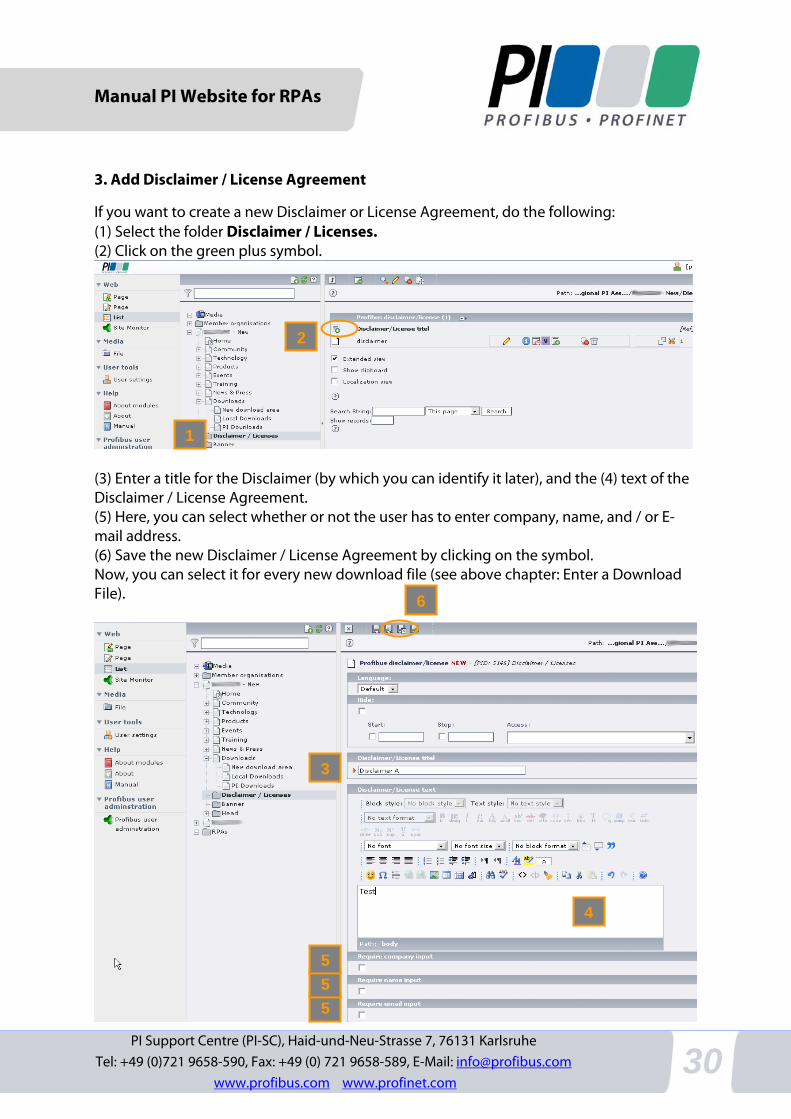
3. Add Disclaimer / License Agreement
If you want to create a new Disclaimer or License Agreement, do the following: (1) Select the folder Disclaimer / Licenses. (2) Click on the green plus symbol.
(3) Enter a title for the Disclaimer (by which you can identify it later), and the (4) text of the Disclaimer / License Agreement. (5) Here, you can select whether or not the user has to enter company, name, and / or E-mail address. (6) Save the new Disclaimer / License Agreement by clicking on the symbol. Now, you can select it for every new download file (see above chapter: Enter a Download File).
2
1
6
3
5
5
5
4
Manual PI Website for RPAs
PI Support Centre (PI-SC), Haid-und-Neu-Strasse 7, 76131 Karlsruhe Tel: +49 (0)721 9658-590, Fax: +49 (0) 721 9658-589, E-Mail: [email protected]
www.profibus.com www.profinet.com 31
We hope you enjoy investigating and working with the PI website! If you have any questions on these instructions or the PI website, please do not hesitate to contact us - we would be pleased to help you! PI Support Center (PI-SC)
Tel.: 0049 (0) 721 9658 590 Silke Glasstetter [email protected] Wolfgang Quint [email protected]