Embed Size (px)
Citation preview
8/14/2019 Manual Recarga de Cartuchos (Bom e Completo, Mas Nao Tem Toner)
http://slidepdf.com/reader/full/manual-recarga-de-cartuchos-bom-e-completo-mas-nao-tem-toner 1/36
8/14/2019 Manual Recarga de Cartuchos (Bom e Completo, Mas Nao Tem Toner)
http://slidepdf.com/reader/full/manual-recarga-de-cartuchos-bom-e-completo-mas-nao-tem-toner 2/36
InkJet Refill Kit InkJet Cartridge Refilling Manual
Quickstart Guide
Get started in three easy steps
Prepare – Read the important informationon pages 3 , 4 , and 5
Identify – Find your cartridge on the tableof contents on pages 6 -7
Refill – Follow the directions on the pagefor your cartridge
Trouble Reading This Manual?
www.easyinkjetrefill.com View the full size color manual & updates onlineor call our Customer Solution Center at 316.618.3500
This manual is copyright 2003-2006 Stratitec, Inc. Stratitec and the Stratitec logo are registered trademarks, and the Stratitec rainbow mark is a trademark of Stratitec, Inc. HP is a registered trademark of Hewlett-Packard Company. Apple is a registered trademark of Apple Computer, Inc. Canon is a registeredtrademark of Canon, Inc. Epson is a registered trademark of Seiko Epson Corporation. Lexmark is a registered trademark of Lexmark International, Inc. All
other trademarks are registered to their respective owners.
060905
Page 2 Free Technical Support at 316.618.3500
8/14/2019 Manual Recarga de Cartuchos (Bom e Completo, Mas Nao Tem Toner)
http://slidepdf.com/reader/full/manual-recarga-de-cartuchos-bom-e-completo-mas-nao-tem-toner 3/36
InkJet Refill Kit InkJet Cartridge Refilling Manual
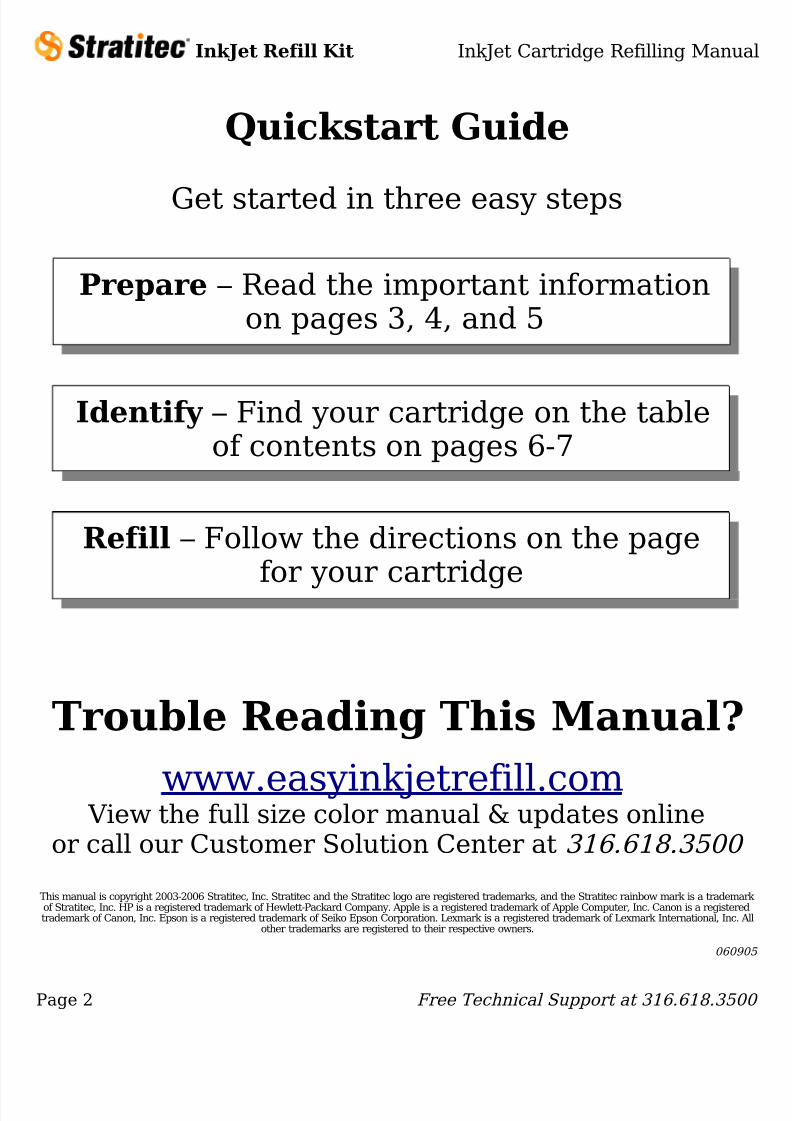
Tool Identification and Reference
Optional Tools
www.easyinkjetrefill.com Page 3
The rubber sealing pad isused to temporarily seal a
vent hole or ink outlet. Applythe smooth side of the rubberto the surface to be sealedand maintain pressure with athumb or forefinger.
Rubber Sealing Pad*
The small priming tip is usedfor priming individual nozzles.It may also be used to createpressure or a vacuum in certaincartridges.Small
Priming Tip
*Tools in light gray areincluded with some refill kits.
The screw tool is used toremove plugs and enlarge refillholes.
The drill bit is used to enlargeor create new refill holes. Applyfirm pressure when drilling tominimize debris and to make
drilled holes smooth for aproper seal.
Screw Tool
Drill Bit
The small plug is for use withthe standard 3mm drilled fillhole.
Plugs may come in a sheetas indicated at left. Pullfirmly to remove them foruse.
The large plug is used for thepre-existing holes in somecartridges. The large plug canalso be used to make a tightseal when a small plug doesnot seal properly.
Small Plug
Large Plug
The cartridge opening tool isused to remove the tops fromspecific HP and Lexmark color cartridges.
Cartridge Opening
Tool*
The large priming tip is usedto prime print heads andcartridges. It fits on the endof an empty syringe, and candraw ink, air, or clogs fromthe cartridge or print head.Large
Priming Tip
Screw Tool 3mm Drill Bit Priming Tips CartridgeOpening Tool* Rubber SealingPad*Plugs
The cartridge refill clip is usedto refill and prime HP 15 and45 style cartridges. It doublesas a priming and evacuatingtool for HP 17, 23, 25 and 78color cartridges.
To assemble, insert therubber tip into the hole atthe base end of the clip.
Cartridge Refill Clip
with Rubber Tip*
Cartridge RefillClip*
8/14/2019 Manual Recarga de Cartuchos (Bom e Completo, Mas Nao Tem Toner)
http://slidepdf.com/reader/full/manual-recarga-de-cartuchos-bom-e-completo-mas-nao-tem-toner 4/36
InkJet Refill Kit InkJet Cartridge Refilling Manual
General Refill GuidelinesWHEN USING CUTTING OR DRILLING EQUIPMENT, WEAR SAFETY GOGGLES AND
FOLLOW ALL OPERATING AND SAFETY INSTRUCTIONS. KEEP INK OUT OF REACHOF CHILDREN. MAY BE HARMFUL IF SWALLOWED. DO NOT INGEST. IN CASE OF
INGESTION, SEEK IMMEDIATE MEDICAL ATTENTION. AVOID CONTACT WITH SKINAND EYES. SAFETY INFORMATION AT WWW.STRATITEC.COM.
Successfully refilling ink cartridges may take some practice, but the process gets easier eachtime. It is extremely important that you read these refill guidelines and the instructions for yourcartridge carefully to ensure desired results and avoid mishaps.
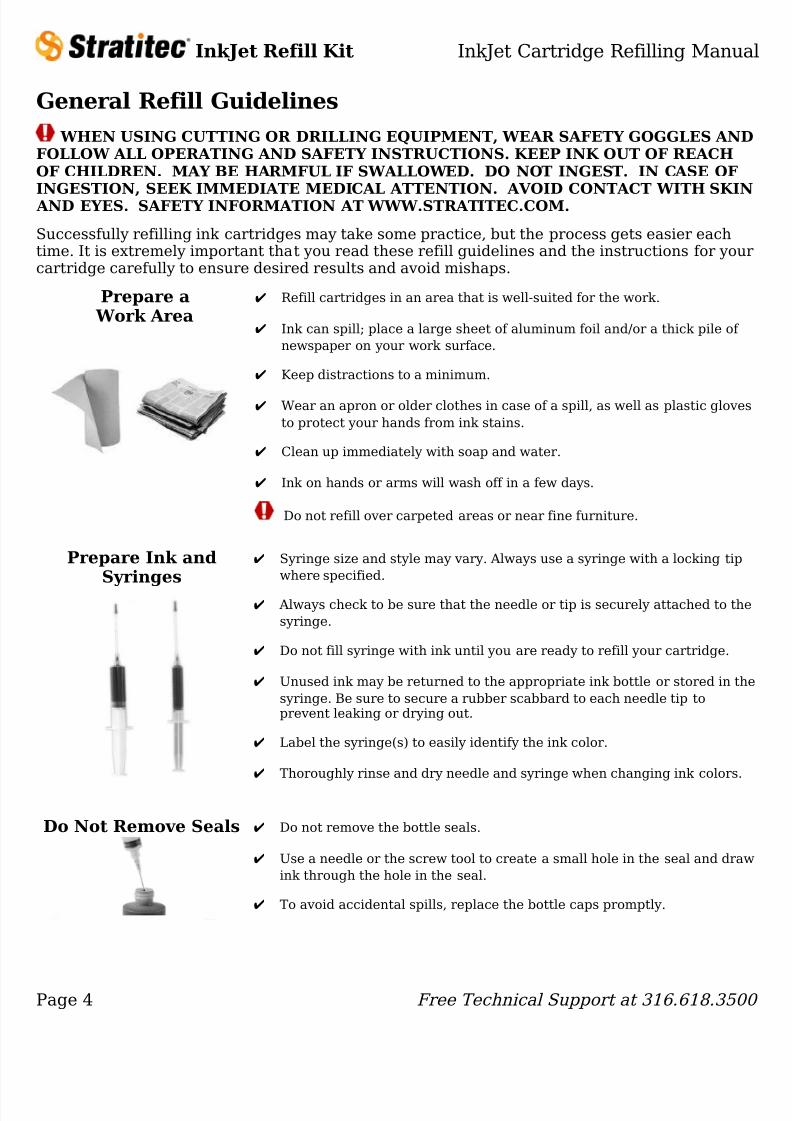
✔ Refill cartridges in an area that is well-suited for the work.
✔ Ink can spill; place a large sheet of aluminum foil and/or a thick pile of newspaper on your work surface.
✔ Keep distractions to a minimum.
✔ Wear an apron or older clothes in case of a spill, as well as plastic glovesto protect your hands from ink stains.
✔ Clean up immediately with soap and water.
✔ Ink on hands or arms will wash off in a few days.
Do not refill over carpeted areas or near fine furniture.
✔ Syringe size and style may vary. Always use a syringe with a locking tipwhere specified.
✔ Always check to be sure that the needle or tip is securely attached to thesyringe.
✔ Do not fill syringe with ink until you are ready to refill your cartridge.
✔ Unused ink may be returned to the appropriate ink bottle or stored in thesyringe. Be sure to secure a rubber scabbard to each needle tip toprevent leaking or drying out.
✔ Label the syringe(s) to easily identify the ink color.
✔ Thoroughly rinse and dry needle and syringe when changing ink colors.
✔ Do not remove the bottle seals.
✔ Use a needle or the screw tool to create a small hole in the seal and drawink through the hole in the seal.
✔ To avoid accidental spills, replace the bottle caps promptly.
Page 4 Free Technical Support at 316.618.3500
Prepare a Work Area
Prepare Ink andSyringes
Do Not Remove Seals
8/14/2019 Manual Recarga de Cartuchos (Bom e Completo, Mas Nao Tem Toner)
http://slidepdf.com/reader/full/manual-recarga-de-cartuchos-bom-e-completo-mas-nao-tem-toner 5/36
InkJet Refill Kit InkJet Cartridge Refilling Manual
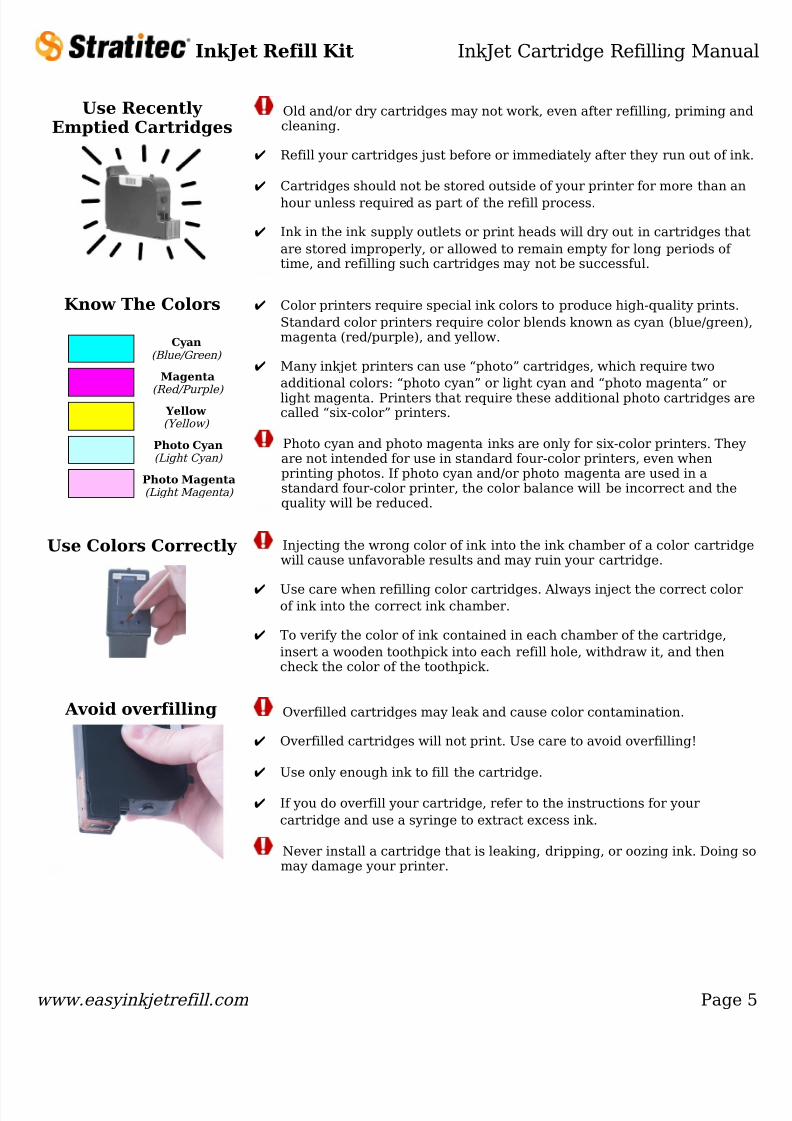
Old and/or dry cartridges may not work, even after refilling, priming andcleaning.
✔ Refill your cartridges just before or immediately after they run out of ink.
✔ Cartridges should not be stored outside of your printer for more than anhour unless required as part of the refill process.
✔ Ink in the ink supply outlets or print heads will dry out in cartridges thatare stored improperly, or allowed to remain empty for long periods of time, and refilling such cartridges may not be successful.
✔ Color printers require special ink colors to produce high-quality prints.Standard color printers require color blends known as cyan (blue/green),magenta (red/purple), and yellow.
✔ Many inkjet printers can use “photo” cartridges, which require twoadditional colors: “photo cyan” or light cyan and “photo magenta” orlight magenta. Printers that require these additional photo cartridges arecalled “six-color” printers.
Photo cyan and photo magenta inks are only for six-color printers. Theyare not intended for use in standard four-color printers, even whenprinting photos. If photo cyan and/or photo magenta are used in astandard four-color printer, the color balance will be incorrect and thequality will be reduced.
Injecting the wrong color of ink into the ink chamber of a color cartridgewill cause unfavorable results and may ruin your cartridge.
✔ Use care when refilling color cartridges. Always inject the correct colorof ink into the correct ink chamber.
✔ To verify the color of ink contained in each chamber of the cartridge,insert a wooden toothpick into each refill hole, withdraw it, and thencheck the color of the toothpick.
Overfilled cartridges may leak and cause color contamination.
✔ Overfilled cartridges will not print. Use care to avoid overfilling!
✔ Use only enough ink to fill the cartridge.
✔ If you do overfill your cartridge, refer to the instructions for yourcartridge and use a syringe to extract excess ink.
Never install a cartridge that is leaking, dripping, or oozing ink. Doing somay damage your printer.
www.easyinkjetrefill.com Page 5
Use Recently Emptied Cartridges
Know The Colors
Photo Magenta(Light Magenta)
Photo Cyan(Light Cyan)
Yellow (Yellow)
Magenta
(Red/Purple)
Cyan(Blue/Green)
Use Colors Correctly
Avoid overfilling
8/14/2019 Manual Recarga de Cartuchos (Bom e Completo, Mas Nao Tem Toner)
http://slidepdf.com/reader/full/manual-recarga-de-cartuchos-bom-e-completo-mas-nao-tem-toner 6/36
InkJet Refill Kit InkJet Cartridge Refilling Manual
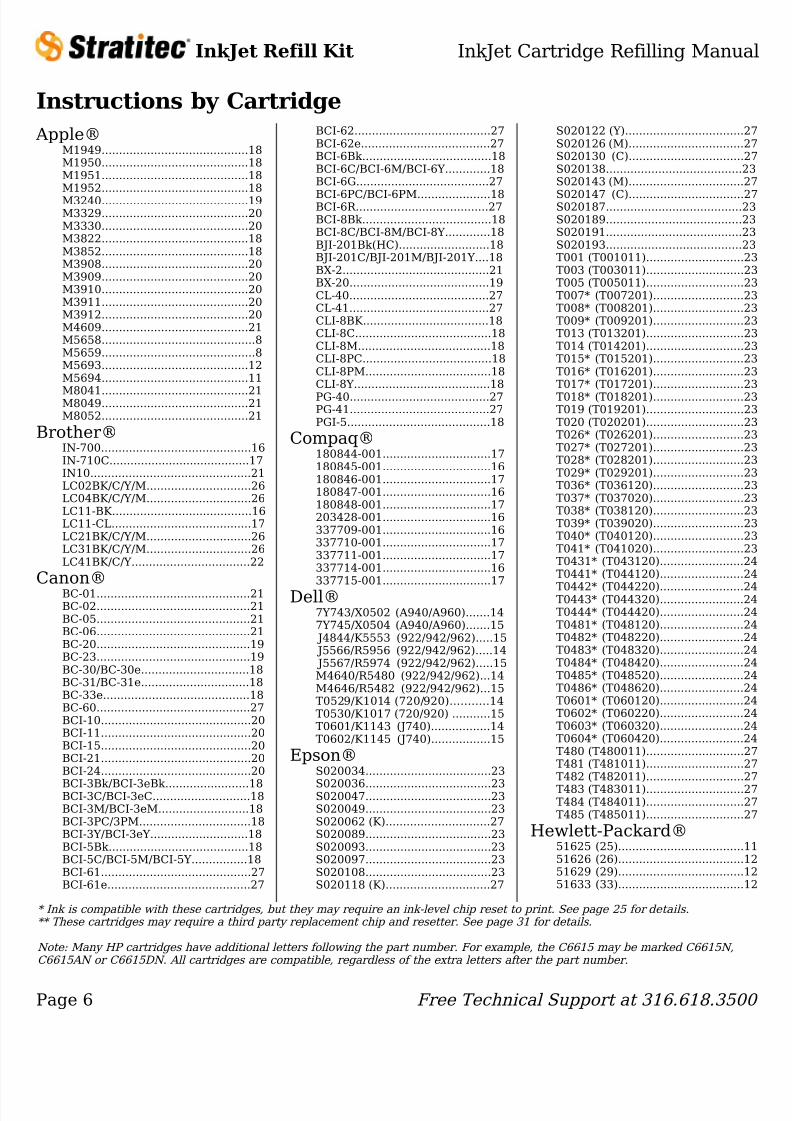
Instructions by CartridgeApple®
M1949..........................................18M1950..........................................18M1951..........................................18M1952..........................................18M3240..........................................19M3329..........................................20M3330..........................................20M3822..........................................18M3852..........................................18M3908..........................................20M3909..........................................20M3910..........................................20M3911..........................................20M3912..........................................20M4609..........................................21M5658............................................8M5659............................................8M5693..........................................12M5694..........................................11
M8041..........................................21M8049..........................................21M8052..........................................21
Brother®IN-700...........................................16IN-710C........................................17IN10..............................................21LC02BK/C/Y/M..............................26LC04BK/C/Y/M..............................26LC11-BK........................................16LC11-CL........................................17LC21BK/C/Y/M..............................26LC31BK/C/Y/M..............................26LC41BK/C/Y..................................22
Canon®BC-01............................................21BC-02............................................21BC-05............................................21BC-06............................................21BC-20............................................19BC-23............................................19BC-30/BC-30e...............................18BC-31/BC-31e...............................18BC-33e..........................................18BC-60............................................27BCI-10...........................................20BCI-11...........................................20BCI-15...........................................20BCI-21...........................................20BCI-24...........................................20
BCI-3Bk/BCI-3eBk........................18BCI-3C/BCI-3eC............................18BCI-3M/BCI-3eM..........................18BCI-3PC/3PM................................18BCI-3Y/BCI-3eY............................18BCI-5Bk........................................18BCI-5C/BCI-5M/BCI-5Y................18BCI-61...........................................27BCI-61e.........................................27
BCI-62.......................................27BCI-62e.....................................27BCI-6Bk.....................................18BCI-6C/BCI-6M/BCI-6Y.............18BCI-6G......................................27
BCI-6PC/BCI-6PM.....................18BCI-6R......................................27BCI-8Bk.....................................18BCI-8C/BCI-8M/BCI-8Y.............18BJI-201Bk(HC)..........................18BJI-201C/BJI-201M/BJI-201Y....18BX-2..........................................21BX-20........................................19CL-40........................................27CL-41........................................27CLI-8BK....................................18CLI-8C.......................................18CLI-8M......................................18CLI-8PC.....................................18CLI-8PM....................................18CLI-8Y.......................................18PG-40........................................27PG-41........................................27PGI-5.........................................18
Compaq®180844-001...............................17180845-001...............................16180846-001...............................17180847-001...............................16180848-001...............................17203428-001...............................16337709-001...............................16337710-001...............................17337711-001...............................17337714-001...............................16337715-001...............................17
Dell®7Y743/X0502 (A940/A960).......147Y745/X0504 (A940/A960).......15
J4844/K5553 (922/942/962).....15 J5566/R5956 (922/942/962).....14 J5567/R5974 (922/942/962).....15M4640/R5480 (922/942/962)...14M4646/R5482 (922/942/962)...15T0529/K1014 (720/920)...........14T0530/K1017 (720/920) ...........15T0601/K1143 (J740).................14T0602/K1145 (J740).................15
Epson®S020034....................................23
S020036....................................23S020047....................................23S020049....................................23S020062 (K)..............................27S020089....................................23S020093....................................23S020097....................................23S020108....................................23S020118 (K)..............................27
S020122 (Y)..................................27S020126 (M).................................27S020130 (C).................................27S020138.......................................23S020143 (M).................................27
S020147 (C).................................27S020187.......................................23S020189.......................................23S020191.......................................23S020193.......................................23T001 (T001011)............................23T003 (T003011)............................23T005 (T005011)............................23T007* (T007201)..........................23T008* (T008201)..........................23T009* (T009201)..........................23T013 (T013201)............................23T014 (T014201)............................23T015* (T015201)..........................23T016* (T016201)..........................23T017* (T017201)..........................23T018* (T018201)..........................23T019 (T019201)............................23T020 (T020201)............................23T026* (T026201)..........................23T027* (T027201)..........................23T028* (T028201)..........................23T029* (T029201)..........................23T036* (T036120)..........................23T037* (T037020)..........................23T038* (T038120)..........................23T039* (T039020)..........................23T040* (T040120)..........................23T041* (T041020)..........................23T0431* (T043120)........................24T0441* (T044120)........................24
T0442* (T044220)........................24T0443* (T044320)........................24T0444* (T044420)........................24T0481* (T048120)........................24T0482* (T048220)........................24T0483* (T048320)........................24T0484* (T048420)........................24T0485* (T048520)........................24T0486* (T048620)........................24T0601* (T060120)........................24T0602* (T060220)........................24T0603* (T060320)........................24T0604* (T060420)........................24T480 (T480011)............................27T481 (T481011)............................27T482 (T482011)............................27T483 (T483011)............................27T484 (T484011)............................27T485 (T485011)............................27
Hewlett-Packard®51625 (25)....................................1151626 (26)....................................1251629 (29)....................................1251633 (33)....................................12
Page 6 Free Technical Support at 316.618.3500
* Ink is compatible with these cartridges, but they may require an ink-level chip reset to print. See page 25 for details.** These cartridges may require a third party replacement chip and resetter. See page 31 for details.
Note: Many HP cartridges have additional letters following the part number. For example, the C6615 may be marked C6615N,C6615AN or C6615DN. All cartridges are compatible, regardless of the extra letters after the part number.
8/14/2019 Manual Recarga de Cartuchos (Bom e Completo, Mas Nao Tem Toner)
http://slidepdf.com/reader/full/manual-recarga-de-cartuchos-bom-e-completo-mas-nao-tem-toner 7/36
InkJet Refill Kit InkJet Cartridge Refilling Manual
51640a (40)....................................851640c (40)....................................851640m (40)...................................851640y (40)....................................851641 (41)......................................951644c/51644m/51644y (44).........851645a (45)....................................851645c (45)....................................8
51645m (45)...................................851645y (45)....................................851649 (49)....................................1151650c/51650m/51650y (50).........8C1816 (16)....................................11C1823 (23)......................................9C3844A (844).................................9C3845A (845).................................9C4836 (11)**................................27C4837 (11)**................................27C4838 (11)**................................27C4841 (10)**................................27C4842 (10)**................................27C4843 (10)**................................27C4844 (10)**................................27C5010AN (14)...............................13C5011AN (14)...............................13C6578 (78)......................................9C6614 (20)....................................12C6615 (15)......................................8C6625 (17)......................................9C6628 (19)....................................12C6634 (34)....................................11C6635 (35)....................................11C6656 (56)....................................10C6657 (57)....................................10C6658 (58)....................................10C8727 (27)....................................10C8728 (28)....................................10C8765 (94)....................................10C8766 (95)....................................10
C8767 (96)....................................10C9351 (21)....................................10C9352 (22)....................................10C9359 (59)....................................27
C9361 (93)................................10C9362 (92)................................10C9363 (97)................................10C9368 (100)..............................27C9369 (99)................................10
Lexmark®10N0016 (16)............................1410N0026 (26)............................1510N0217 (17)...........................1410N0227 (27)...........................1510N0510/10N610.....................1510N500/10N600.......................1412A1970 (70)............................1612A1975 (75)............................1612A1980 (80)............................1712A1985 (85)............................1712A1990 (90)............................1713400HC...................................161361400....................................161361760....................................1713619HC...................................1713620HC...................................161380619....................................17
1380620....................................161381400....................................161382050....................................161382060....................................1715M0120 (20)...........................1715M0125 (25)...........................1715M2971 (71)...........................1616G0055 (55)............................1616G0065 (65)............................1717G0050 (50)............................1617G0060 (60)............................1718C0031 (31)............................1518C0032 (32)............................1418C0033 (33)............................1518C0034 (34)............................1418C0035 (35)............................1518C0500...................................1418C0510...................................1518C0520...................................15
18C0690.......................................1418C0700.......................................1518C0781 (1)..................................1518L0032 (82)................................1418L0042 (83)................................1518L0380.......................................1418L0390.......................................1518L0500/18L0590........................14
MiscCartridge Top Removal.................32Check / Correct Overfill................33Color Cartridge Troubleshooting. .28General Cartridge Priming...........30HP Cartridge Priming...................29Ink-level Chip Reset Details..........25Troubleshooting Table............... ...35
Okidata®52109301......................................1652109302......................................17
Olivetti®84431............................................1684433............................................16
Sharp® AJ-C50B........................................16 AJ-C50C........................................17FO-C60B.......................................14UX-22BC.......................................16UX-27CC.......................................17UX-C70B.......................................14
Sony®IJC-B1...........................................12IJC-C1...........................................11
Xerox®8R12591.......................................178R7879.........................................168R7880.........................................178R7881.........................................168R7882.........................................178R7903.........................................148R7904.........................................15
www.easyinkjetrefill.com Page 7
Note: Many HP cartridges have additional letters following the part number. For example, the C6615 may be marked C6615N,C6615AN or C6615DN. All cartridges are compatible, regardless of the extra letters after the part number.
Trouble Reading This Manual?
www.easyinkjetrefill.com View the full size color manual & updates online
or call our Customer Solution Center at 316.618.3500
(Instructions for cartridges not listed may be available online)
8/14/2019 Manual Recarga de Cartuchos (Bom e Completo, Mas Nao Tem Toner)
http://slidepdf.com/reader/full/manual-recarga-de-cartuchos-bom-e-completo-mas-nao-tem-toner 8/36
InkJet Refill Kit InkJet Cartridge Refilling Manual
Page 8 Free Technical Support at 316.618.3500
Recommended Tools
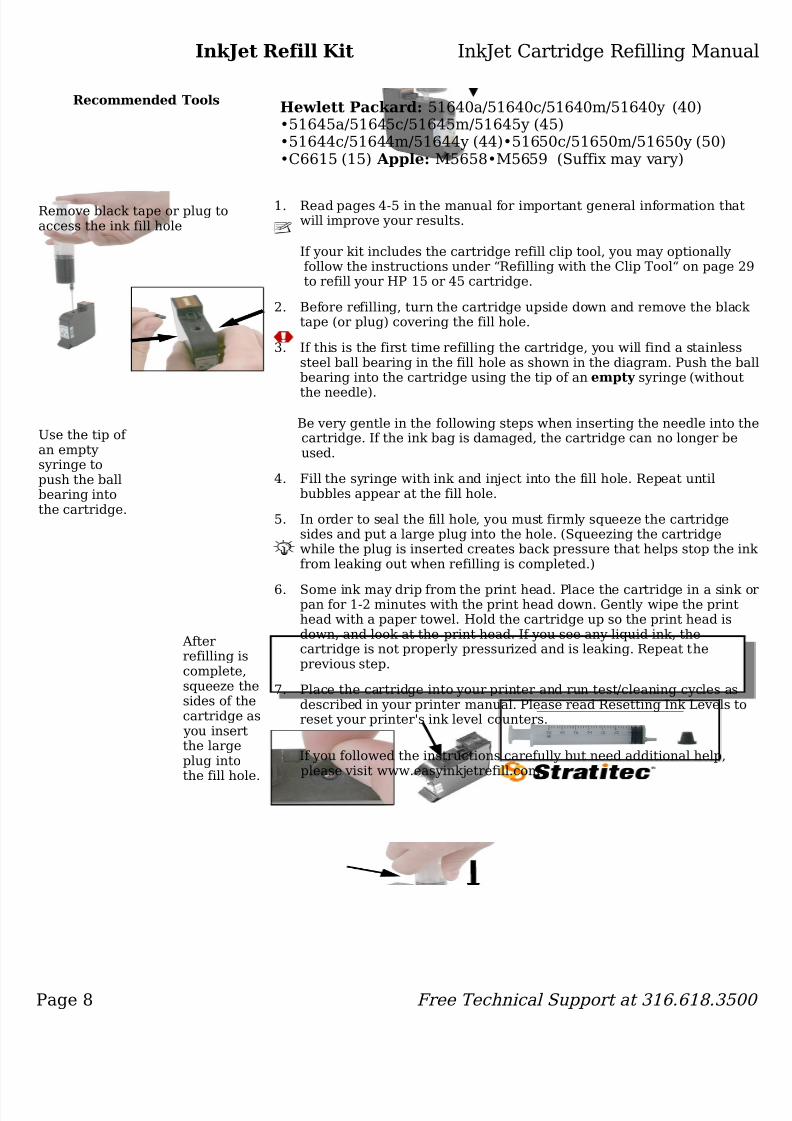
1. Read pages 4-5 in the manual for important general information thatwill improve your results.
If your kit includes the cartridge refill clip tool, you may optionallyfollow the instructions under “ Refilling with the Clip Tool “ on page 29 to refill your HP 15 or 45 cartridge.
2. Before refilling, turn the cartridge upside down and remove the black tape (or plug) covering the fill hole.
3. If this is the first time refilling the cartridge, you will find a stainlesssteel ball bearing in the fill hole as shown in the diagram. Push the ballbearing into the cartridge using the tip of an empty syringe (without
the needle).
Be very gentle in the following steps when inserting the needle into thecartridge. If the ink bag is damaged, the cartridge can no longer beused.
4. Fill the syringe with ink and inject into the fill hole. Repeat untilbubbles appear at the fill hole.
5. In order to seal the fill hole, you must firmly squeeze the cartridgesides and put a large plug into the hole. (Squeezing the cartridgewhile the plug is inserted creates back pressure that helps stop the ink from leaking out when refilling is completed.)
6. Some ink may drip from the print head. Place the cartridge in a sink orpan for 1-2 minutes with the print head down. Gently wipe the printhead with a paper towel. Hold the cartridge up so the print head isdown, and look at the print head. If you see any liquid ink, thecartridge is not properly pressurized and is leaking. Repeat theprevious step.
7. Place the cartridge into your printer and run test/cleaning cycles asdescribed in your printer manual. Please read Resetting Ink Levels toreset your printer's ink level counters.
If you followed the instructions carefully but need additional help,please visit www.easyinkjetrefill.com
Hewlett Packard: 51640a/51640c/51640m/51640y (40)•51645a/51645c/51645m/51645y (45)•51644c/51644m/51644y (44)•51650c/51650m/51650y (50)•C6615 (15) Apple: M5658•M5659 (Suffix may vary)
Remove black tape or plug toaccess the ink fill hole
Use the tip of an emptysyringe topush the ballbearing intothe cartridge.
Afterrefilling iscomplete,squeeze thesides of thecartridge as
you insertthe largeplug intothe fill hole.
8/14/2019 Manual Recarga de Cartuchos (Bom e Completo, Mas Nao Tem Toner)
http://slidepdf.com/reader/full/manual-recarga-de-cartuchos-bom-e-completo-mas-nao-tem-toner 9/36
InkJet Refill Kit InkJet Cartridge Refilling Manual
www.easyinkjetrefill.com Page 9
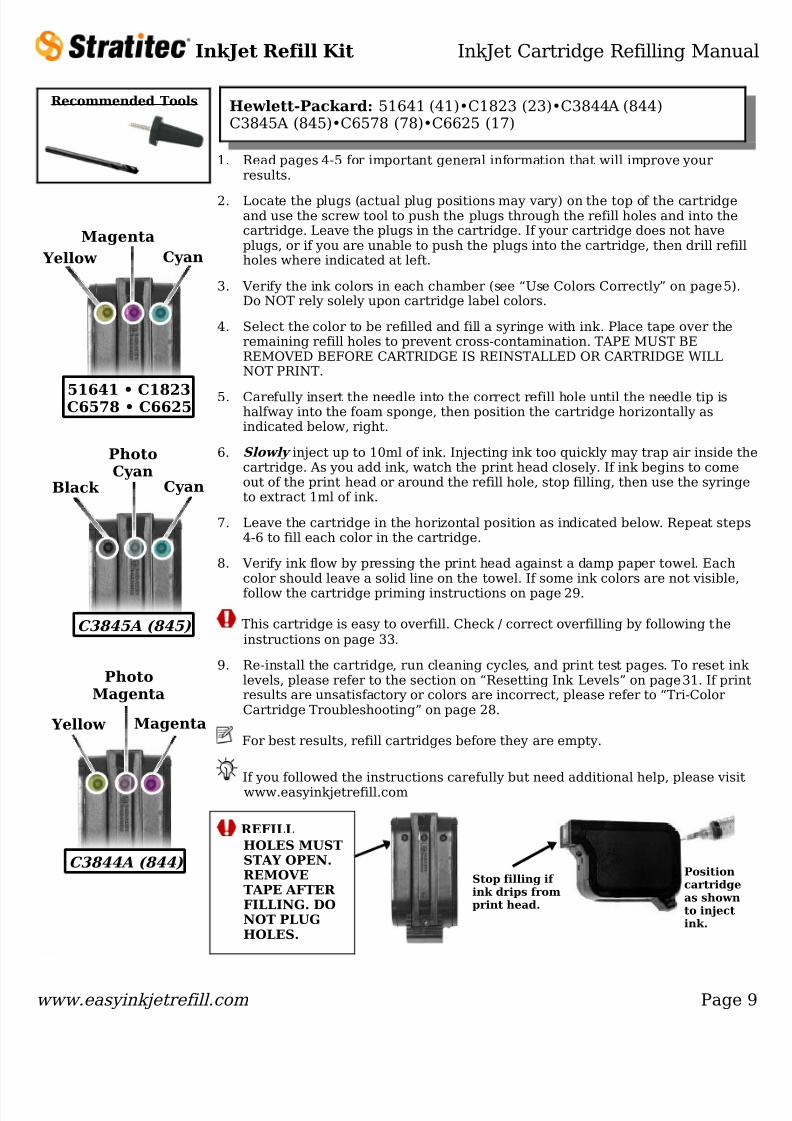
Hewlett-Packard: 51641 (41)•C1823 (23)•C3844A (844)C3845A (845)•C6578 (78)•C6625 (17)
PhotoMagenta
Magenta Yellow
PhotoCyan
CyanBlack
Magenta Yellow Cyan
C3845A (845)
C3844A (844)
51641 • C1823C6578 • C6625
REFILLHOLES MUSTSTAY OPEN.REMOVETAPE AFTER FILLING. DONOT PLUGHOLES.
Stop filling if ink drips fromprint head.
Positioncartridgeas shownto injectink.
Recommended Tools
1. Read pages 4-5 for important general information that will improve yourresults.
2. Locate the plugs (actual plug positions may vary) on the top of the cartridgeand use the screw tool to push the plugs through the refill holes and into thecartridge. Leave the plugs in the cartridge. If your cartridge does not haveplugs, or if you are unable to push the plugs into the cartridge, then drill refillholes where indicated at left.
3. Verify the ink colors in each chamber (see “Use Colors Correctly” on page 5 ).Do NOT rely solely upon cartridge label colors.
4. Select the color to be refilled and fill a syringe with ink. Place tape over theremaining refill holes to prevent cross-contamination. TAPE MUST BEREMOVED BEFORE CARTRIDGE IS REINSTALLED OR CARTRIDGE WILLNOT PRINT.
5. Carefully insert the needle into the correct refill hole until the needle tip ishalfway into the foam sponge, then position the cartridge horizontally asindicated below, right.
6. Slowly inject up to 10ml of ink. Injecting ink too quickly may trap air inside thecartridge. As you add ink, watch the print head closely. If ink begins to comeout of the print head or around the refill hole, stop filling, then use the syringeto extract 1ml of ink.
7. Leave the cartridge in the horizontal position as indicated below. Repeat steps4-6 to fill each color in the cartridge.
8. Verify ink flow by pressing the print head against a damp paper towel. Eachcolor should leave a solid line on the towel. If some ink colors are not visible,follow the cartridge priming instructions on page 29 .
This cartridge is easy to overfill. Check / correct overfilling by following theinstructions on page 33 .
9. Re-install the cartridge, run cleaning cycles, and print test pages. To reset ink levels, please refer to the section on “Resetting Ink Levels” on page 31 . If printresults are unsatisfactory or colors are incorrect, please refer to “Tri-ColorCartridge Troubleshooting” on page 28 .
For best results, refill cartridges before they are empty.
If you followed the instructions carefully but need additional help, please visitwww.easyinkjetrefill.com
8/14/2019 Manual Recarga de Cartuchos (Bom e Completo, Mas Nao Tem Toner)
http://slidepdf.com/reader/full/manual-recarga-de-cartuchos-bom-e-completo-mas-nao-tem-toner 10/36
InkJet Refill Kit InkJet Cartridge Refilling Manual
Page 10 Free Technical Support at 316.618.3500
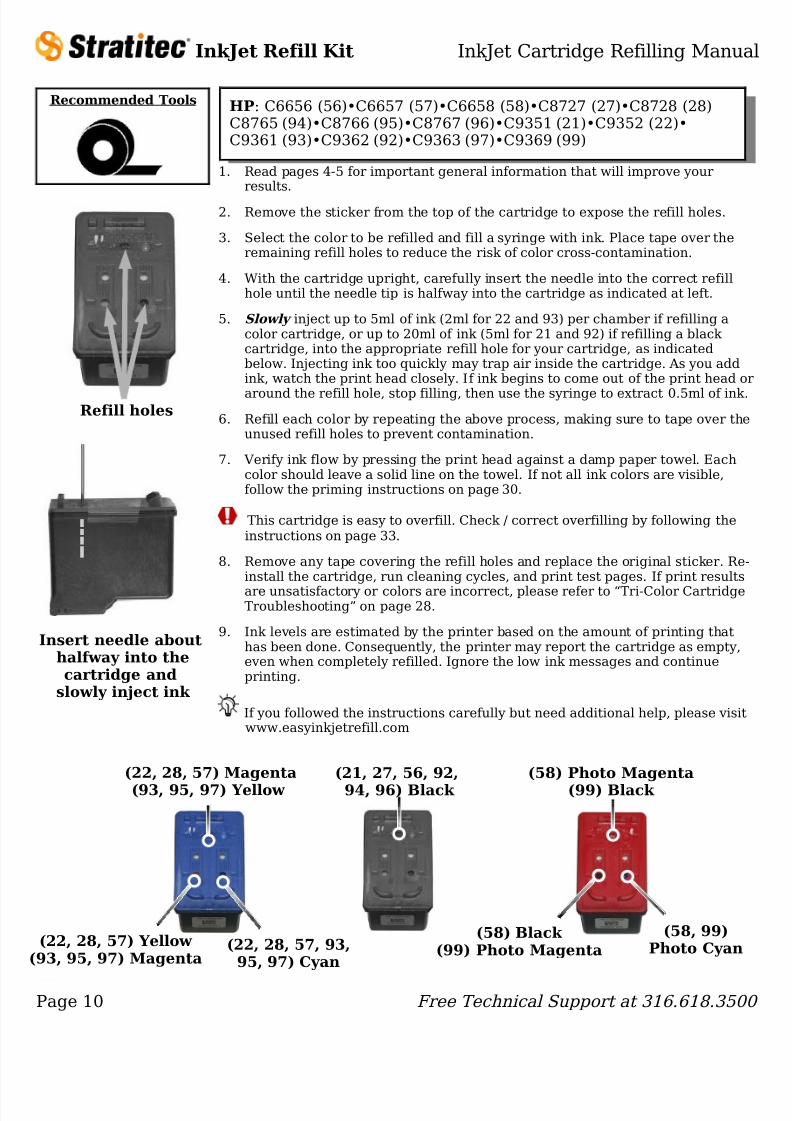
Refill holes
Insert needle abouthalfway into the
cartridge andslowly inject ink
HP : C6656 (56)•C6657 (57)•C6658 (58)•C8727 (27)•C8728 (28)C8765 (94)•C8766 (95)•C8767 (96)•C9351 (21)•C9352 (22)•C9361 (93)•C9362 (92)•C9363 (97)•C9369 (99)
(58) Black (99) Photo Magenta
(58, 99)Photo Cyan
(58) Photo Magenta(99) Black
(22, 28, 57, 93,95, 97) Cyan
(22, 28, 57) Yellow 93, 95, 97) Magenta
(22, 28, 57) Magenta(93, 95, 97) Yellow
(21, 27, 56, 92,94, 96) Black
Recommended Tools
1. Read pages 4 -5 for important general information that will improve yourresults.
2. Remove the sticker from the top of the cartridge to expose the refill holes.
3. Select the color to be refilled and fill a syringe with ink. Place tape over theremaining refill holes to reduce the risk of color cross-contamination.
4. With the cartridge upright, carefully insert the needle into the correct refillhole until the needle tip is halfway into the cartridge as indicated at left.
5. Slowly inject up to 5ml of ink (2ml for 22 and 93) per chamber if refilling acolor cartridge, or up to 20ml of ink (5ml for 21 and 92) if refilling a black cartridge, into the appropriate refill hole for your cartridge, as indicatedbelow. Injecting ink too quickly may trap air inside the cartridge. As you addink, watch the print head closely. If ink begins to come out of the print head oraround the refill hole, stop filling, then use the syringe to extract 0.5ml of ink.
6. Refill each color by repeating the above process, making sure to tape over theunused refill holes to prevent contamination.
7. Verify ink flow by pressing the print head against a damp paper towel. Eachcolor should leave a solid line on the towel. If not all ink colors are visible,follow the priming instructions on page 30 .
This cartridge is easy to overfill. Check / correct overfilling by following theinstructions on page 33 .
8. Remove any tape covering the refill holes and replace the original sticker. Re-install the cartridge, run cleaning cycles, and print test pages. If print resultsare unsatisfactory or colors are incorrect, please refer to “Tri-Color CartridgeTroubleshooting” on page 28 .
9. Ink levels are estimated by the printer based on the amount of printing thathas been done. Consequently, the printer may report the cartridge as empty,even when completely refilled. Ignore the low ink messages and continueprinting.
If you followed the instructions carefully but need additional help, please visitwww.easyinkjetrefill.com
8/14/2019 Manual Recarga de Cartuchos (Bom e Completo, Mas Nao Tem Toner)
http://slidepdf.com/reader/full/manual-recarga-de-cartuchos-bom-e-completo-mas-nao-tem-toner 11/36
InkJet Refill Kit InkJet Cartridge Refilling Manual
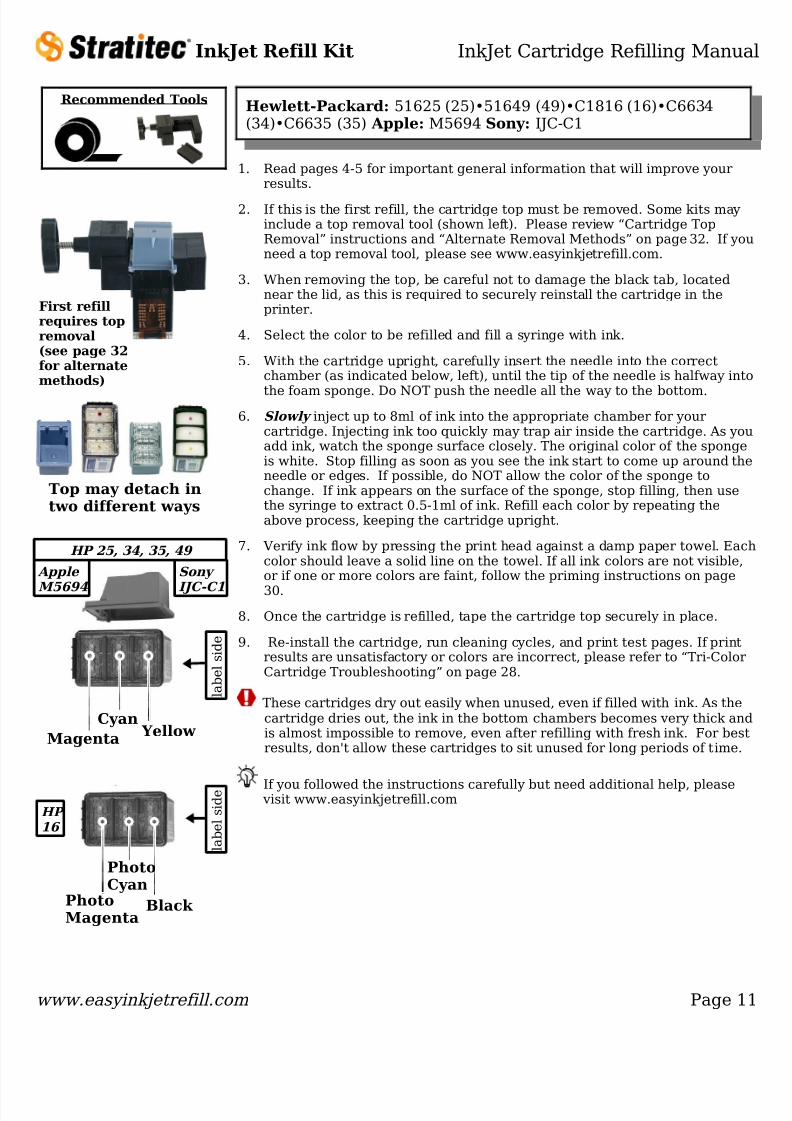
1. Read pages 4 -5 for important general information that will improve yourresults.
2. If this is the first refill, the cartridge top must be removed. Some kits mayinclude a top removal tool (shown left). Please review “Cartridge TopRemoval” instructions and “Alternate Removal Methods” on page 32 . If youneed a top removal tool, please see www.easyinkjetrefill.com.
3. When removing the top, be careful not to damage the black tab, locatednear the lid, as this is required to securely reinstall the cartridge in theprinter.
4. Select the color to be refilled and fill a syringe with ink.
5. With the cartridge upright, carefully insert the needle into the correctchamber (as indicated below, left), until the tip of the needle is halfway into
the foam sponge. Do NOT push the needle all the way to the bottom.6. Slowly inject up to 8ml of ink into the appropriate chamber for your
cartridge. Injecting ink too quickly may trap air inside the cartridge. As youadd ink, watch the sponge surface closely. The original color of the spongeis white. Stop filling as soon as you see the ink start to come up around theneedle or edges. If possible, do NOT allow the color of the sponge tochange. If ink appears on the surface of the sponge, stop filling, then usethe syringe to extract 0.5-1ml of ink. Refill each color by repeating theabove process, keeping the cartridge upright.
7. Verify ink flow by pressing the print head against a damp paper towel. Eachcolor should leave a solid line on the towel. If all ink colors are not visible,or if one or more colors are faint, follow the priming instructions on page30 .
8. Once the cartridge is refilled, tape the cartridge top securely in place.
9. Re-install the cartridge, run cleaning cycles, and print test pages. If printresults are unsatisfactory or colors are incorrect, please refer to “Tri-ColorCartridge Troubleshooting” on page 28 .
These cartridges dry out easily when unused, even if filled with ink. As thecartridge dries out, the ink in the bottom chambers becomes very thick andis almost impossible to remove, even after refilling with fresh ink. For bestresults, don't allow these cartridges to sit unused for long periods of time.
If you followed the instructions carefully but need additional help, please visit www.easyinkjetrefill.com
www.easyinkjetrefill.com Page 11
l a b
e l
s i d
e
l a b
e l
s i d
e
HP 16
Top may detach intwo different ways
Hewlett-Packard: 51625 (25)•51649 (49)•C1816 (16)•C6634(34)•C6635 (35) Apple: M5694 Sony: IJC-C1
Recommended Tools
First refillrequires topremoval(see page 32 for alternatemethods)
HP 25, 34, 35, 49
PhotoCyan
Black PhotoMagenta
Apple
M5694
Sony
IJC-C1
Cyan Yellow Magenta
8/14/2019 Manual Recarga de Cartuchos (Bom e Completo, Mas Nao Tem Toner)
http://slidepdf.com/reader/full/manual-recarga-de-cartuchos-bom-e-completo-mas-nao-tem-toner 12/36
InkJet Refill Kit InkJet Cartridge Refilling Manual
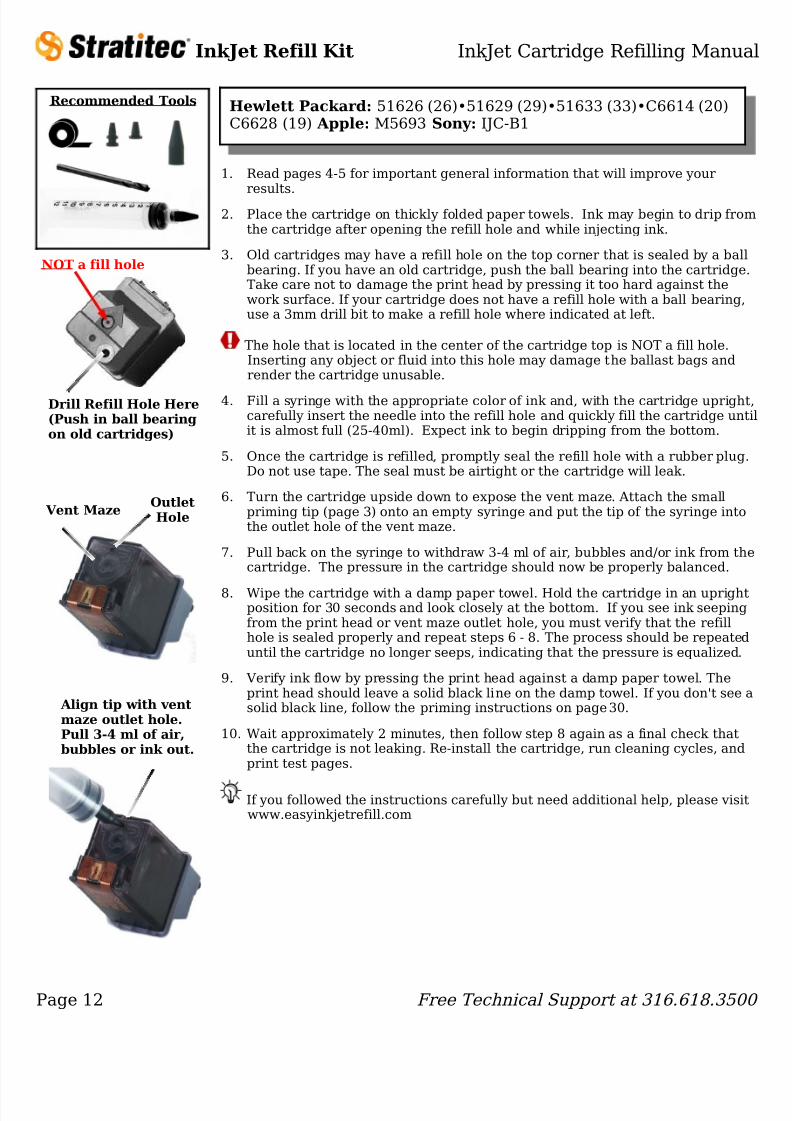
1. Read pages 4 -5 for important general information that will improve yourresults.
2. Place the cartridge on thickly folded paper towels. Ink may begin to drip fromthe cartridge after opening the refill hole and while injecting ink.
3. Old cartridges may have a refill hole on the top corner that is sealed by a ballbearing. If you have an old cartridge, push the ball bearing into the cartridge.Take care not to damage the print head by pressing it too hard against thework surface. If your cartridge does not have a refill hole with a ball bearing,use a 3mm drill bit to make a refill hole where indicated at left.
The hole that is located in the center of the cartridge top is NOT a fill hole.Inserting any object or fluid into this hole may damage the ballast bags andrender the cartridge unusable.
4. Fill a syringe with the appropriate color of ink and, with the cartridge upright,carefully insert the needle into the refill hole and quickly fill the cartridge untilit is almost full (25-40ml). Expect ink to begin dripping from the bottom.
5. Once the cartridge is refilled, promptly seal the refill hole with a rubber plug.Do not use tape. The seal must be airtight or the cartridge will leak.
6. Turn the cartridge upside down to expose the vent maze. Attach the smallpriming tip (page 3 ) onto an empty syringe and put the tip of the syringe intothe outlet hole of the vent maze.
7. Pull back on the syringe to withdraw 3-4 ml of air, bubbles and/or ink from thecartridge. The pressure in the cartridge should now be properly balanced.
8. Wipe the cartridge with a damp paper towel. Hold the cartridge in an uprightposition for 30 seconds and look closely at the bottom. If you see ink seepingfrom the print head or vent maze outlet hole, you must verify that the refillhole is sealed properly and repeat steps 6 - 8. The process should be repeateduntil the cartridge no longer seeps, indicating that the pressure is equalized.
9. Verify ink flow by pressing the print head against a damp paper towel. Theprint head should leave a solid black line on the damp towel. If you don't see asolid black line, follow the priming instructions on page 30 .
10. Wait approximately 2 minutes, then follow step 8 again as a final check thatthe cartridge is not leaking. Re-install the cartridge, run cleaning cycles, andprint test pages.
If you followed the instructions carefully but need additional help, please visitwww.easyinkjetrefill.com
Page 12 Free Technical Support at 316.618.3500
Recommended Tools Hewlett Packard: 51626 (26)•51629 (29)•51633 (33)•C6614 (20)C6628 (19) Apple: M5693 Sony: IJC-B1
Align tip with ventmaze outlet hole.Pull 3-4 ml of air,bubbles or ink out.
Drill Refill Hole Here(Push in ball bearingon old cartridges)
Vent Maze OutletHole
NOT a fill hole
8/14/2019 Manual Recarga de Cartuchos (Bom e Completo, Mas Nao Tem Toner)
http://slidepdf.com/reader/full/manual-recarga-de-cartuchos-bom-e-completo-mas-nao-tem-toner 13/36
InkJet Refill Kit InkJet Cartridge Refilling Manual
1. Read pages 4 -5 for important general information that will improve yourresults.
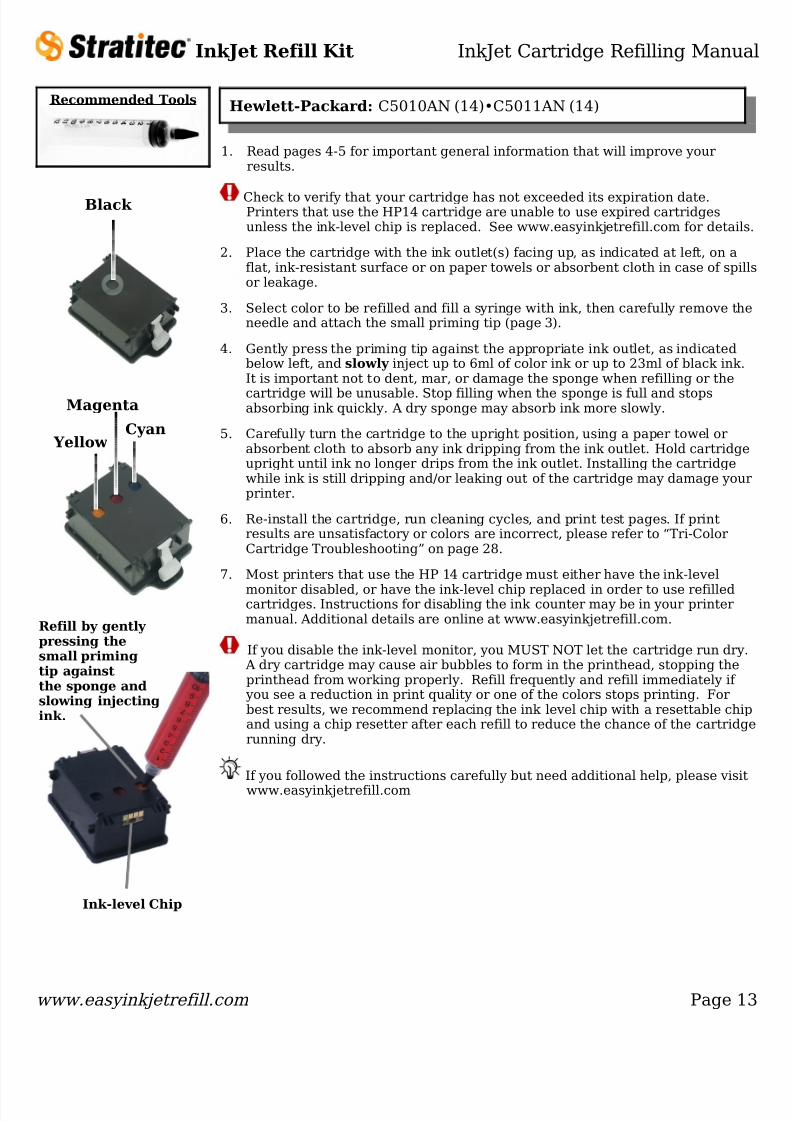
Check to verify that your cartridge has not exceeded its expiration date.Printers that use the HP14 cartridge are unable to use expired cartridgesunless the ink-level chip is replaced. See www.easyinkjetrefill.com for details.
2. Place the cartridge with the ink outlet(s) facing up, as indicated at left, on aflat, ink-resistant surface or on paper towels or absorbent cloth in case of spillsor leakage.
3. Select color to be refilled and fill a syringe with ink, then carefully remove theneedle and attach the small priming tip (page 3 ).
4. Gently press the priming tip against the appropriate ink outlet, as indicatedbelow left, and slowly inject up to 6ml of color ink or up to 23ml of black ink.It is important not to dent, mar, or damage the sponge when refilling or thecartridge will be unusable. Stop filling when the sponge is full and stopsabsorbing ink quickly. A dry sponge may absorb ink more slowly.
5. Carefully turn the cartridge to the upright position, using a paper towel orabsorbent cloth to absorb any ink dripping from the ink outlet. Hold cartridgeupright until ink no longer drips from the ink outlet. Installing the cartridgewhile ink is still dripping and/or leaking out of the cartridge may damage yourprinter.
6. Re-install the cartridge, run cleaning cycles, and print test pages. If printresults are unsatisfactory or colors are incorrect, please refer to “Tri-ColorCartridge Troubleshooting” on page 28 .
7. Most printers that use the HP 14 cartridge must either have the ink-level
monitor disabled, or have the ink-level chip replaced in order to use refilledcartridges. Instructions for disabling the ink counter may be in your printermanual. Additional details are online at www.easyinkjetrefill.com.
If you disable the ink-level monitor, you MUST NOT let the cartridge run dry. A dry cartridge may cause air bubbles to form in the printhead, stopping theprinthead from working properly. Refill frequently and refill immediately if
you see a reduction in print quality or one of the colors stops printing. Forbest results, we recommend replacing the ink level chip with a resettable chipand using a chip resetter after each refill to reduce the chance of the cartridgerunning dry.
If you followed the instructions carefully but need additional help, please visitwww.easyinkjetrefill.com
www.easyinkjetrefill.com Page 13
Recommended Tools Hewlett-Packard: C5010AN (14)•C5011AN (14)
Refill by gently pressing thesmall primingtip againstthe sponge andslowing injectingink.
Ink-level Chip
Black
Magenta
Yellow Cyan

8/14/2019 Manual Recarga de Cartuchos (Bom e Completo, Mas Nao Tem Toner)
http://slidepdf.com/reader/full/manual-recarga-de-cartuchos-bom-e-completo-mas-nao-tem-toner 14/36
InkJet Refill Kit InkJet Cartridge Refilling Manual
1. Read pages 4 -5 for important general information that will improve yourresults.
2. Some cartridges have a hard top, while others have a flat top with a sticker.For cartridges with a sticker, simply peel it back to reveal the fill holes.Cartridges with a hard top must have a hole drilled in the top of the cartridgewith a 3mm drill bit. Drill all the way through the plastic top.
3. Fill a syringe with black ink. With the cartridge upright, carefully insert theneedle into the refill hole, as indicated below, left, until the needle tip is abouthalfway into cartridge.
4. Slowly inject ink into the cartridge. Injecting ink too quickly may trap airinside the cartridge. Amount of ink needed varies by cartridge and depends onhow empty the cartridge is before refilling. Fill until ink appears at the fillhole, then remove 1ml from the cartridge near the surface of the fill hole.
5. Verify ink flow by pressing the print head against a damp paper towel. Theprint head should leave a solid black line on the towel. If ink is not visible,follow the priming instructions on page 30 .
This cartridge is easy to overfill. After filling, drain excess ink by placing thecartridge upside-down in a sink on a thickly folded stack of paper towels.When ink stops draining from the cartridge, check / correct any remainingoverfill condition by following the instructions on page 33 .
6. Re-install the cartridge, run cleaning cycles, and print test pages. If printresults are unsatisfactory, the cartridge may be overfilled. Remove anadditional 1-2ml of ink and try again.
For best results, refill cartridges before they are empty.
If you followed the instructions carefully but need additional help, please visitwww.easyinkjetrefill.com
Page 14 Free Technical Support at 316.618.3500
Lexmark : 10N0016 (16)•10N0217 (17)•10N500/10N600•18C0032(32)•18C0034 (34)•18C0500•18C0690•18L0032 (82)•18L0380•18L0500/18L0590 Dell: 7Y743/X0502 (A940/A960)•J5566/R5956(922/942/962)•M4640/R5480 (922/942/962)•T0601/K1143(J740)•T0529/K1014 (720/920)
Sharp: UX-C70B•FO-C60B Xerox: 8R7903
Enlarge the vent holeor remove the label toaccess fill holes
Insert theneedle abouthalfway intothe cartridge.
Recommended Tools
Some Cartridges contain an emptychamber, as shown.
This chamber may accidentally fill with ink.To correct this, do not remove the lid. Drill ahole directly above the empty chamber,completely drain the chamber of ink, andplug the hole with the small rubber plug.
If excess ink remains in this chamber, theused cartridge may seem full when it is not.
Empty Chamber Lexmark 10N0217 (17)Sharp UX-C70B
Drill, drainand plug here
Use any of these holesto fill thiscartridge
with black
ink.
8/14/2019 Manual Recarga de Cartuchos (Bom e Completo, Mas Nao Tem Toner)
http://slidepdf.com/reader/full/manual-recarga-de-cartuchos-bom-e-completo-mas-nao-tem-toner 15/36
InkJet Refill Kit InkJet Cartridge Refilling Manual
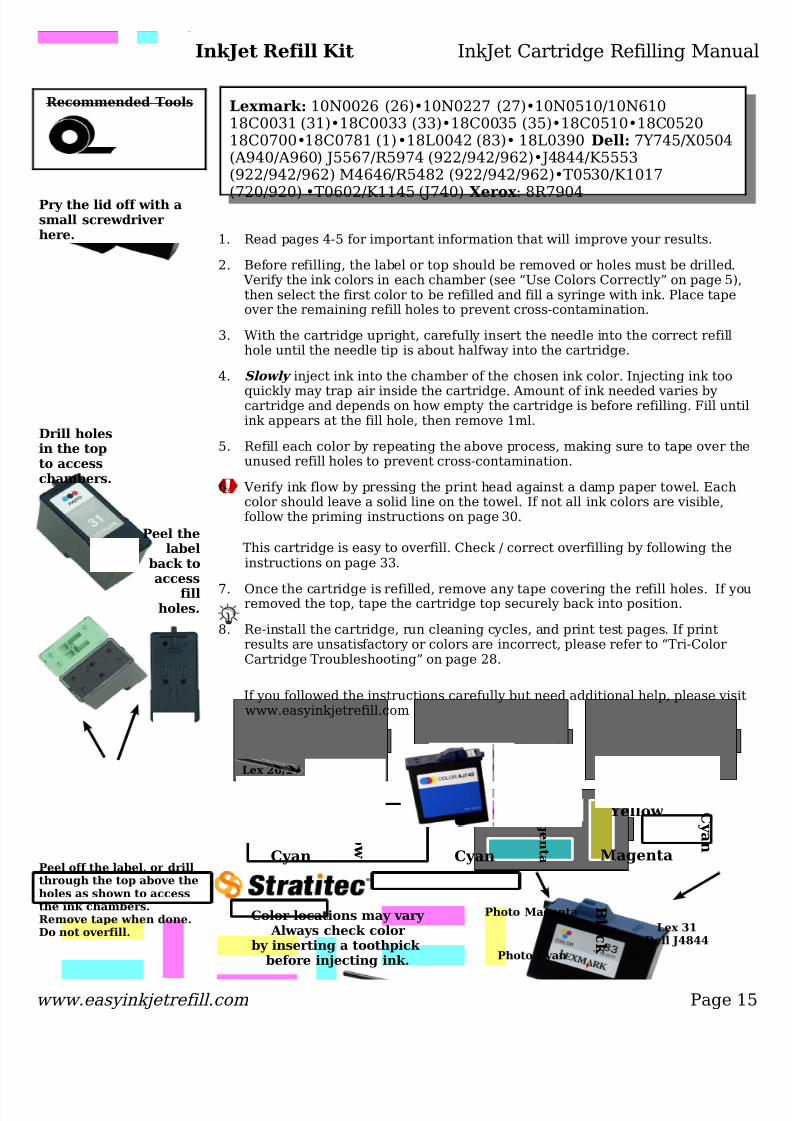
1. Read pages 4 -5 for important information that will improve your results.
2. Before refilling, the label or top should be removed or holes must be drilled. Verify the ink colors in each chamber (see “Use Colors Correctly” on page 5 ),then select the first color to be refilled and fill a syringe with ink. Place tapeover the remaining refill holes to prevent cross-contamination.
3. With the cartridge upright, carefully insert the needle into the correct refillhole until the needle tip is about halfway into the cartridge.
4. Slowly inject ink into the chamber of the chosen ink color. Injecting ink too
quickly may trap air inside the cartridge. Amount of ink needed varies bycartridge and depends on how empty the cartridge is before refilling. Fill untilink appears at the fill hole, then remove 1ml.
5. Refill each color by repeating the above process, making sure to tape over theunused refill holes to prevent cross-contamination.
6. Verify ink flow by pressing the print head against a damp paper towel. Eachcolor should leave a solid line on the towel. If not all ink colors are visible,follow the priming instructions on page 30 .
This cartridge is easy to overfill. Check / correct overfilling by following theinstructions on page 33 .
7. Once the cartridge is refilled, remove any tape covering the refill holes. If youremoved the top, tape the cartridge top securely back into position.
8. Re-install the cartridge, run cleaning cycles, and print test pages. If printresults are unsatisfactory or colors are incorrect, please refer to “Tri-ColorCartridge Troubleshooting” on page 28 .
If you followed the instructions carefully but need additional help, please visitwww.easyinkjetrefill.com
www.easyinkjetrefill.com Page 15
Peel off the label, or drillthrough the top above theholes as shown to accessthe ink chambers.Remove tape when done.Do not overfill.
Recommended Tools Lexmark: 10N0026 (26)•10N0227 (27)•10N0510/10N61018C0031 (31)•18C0033 (33)•18C0035 (35)•18C0510•18C052018C0700•18C0781 (1)•18L0042 (83)• 18L0390 Dell: 7Y745/X0504(A940/A960) J5567/R5974 (922/942/962)•J4844/K5553(922/942/962) M4646/R5482 (922/942/962)•T0530/K1017
(720/920) •T0602/K1145 (J740) Xerox : 8R7904
Color locations may vary Always check color
by inserting a toothpick before injecting ink.
Lex 31Dell J4844
Photo Magenta
Photo Cyan
Bl a ck
Y el l owCyan
Magenta C y an
Yellow
Magenta
Yellow M a g en t aCyan
Xerox 8R7904Lex 1/33/35/83 • Dell T0602
7Y745/M4646/J5567Lex 26/27 • Dell T0530
Pry the lid off with asmall screwdriver here.
Drill holesin the topto accesschambers.
Peel thelabel
back toaccess
fillholes.
8/14/2019 Manual Recarga de Cartuchos (Bom e Completo, Mas Nao Tem Toner)
http://slidepdf.com/reader/full/manual-recarga-de-cartuchos-bom-e-completo-mas-nao-tem-toner 16/36
InkJet Refill Kit InkJet Cartridge Refilling Manual
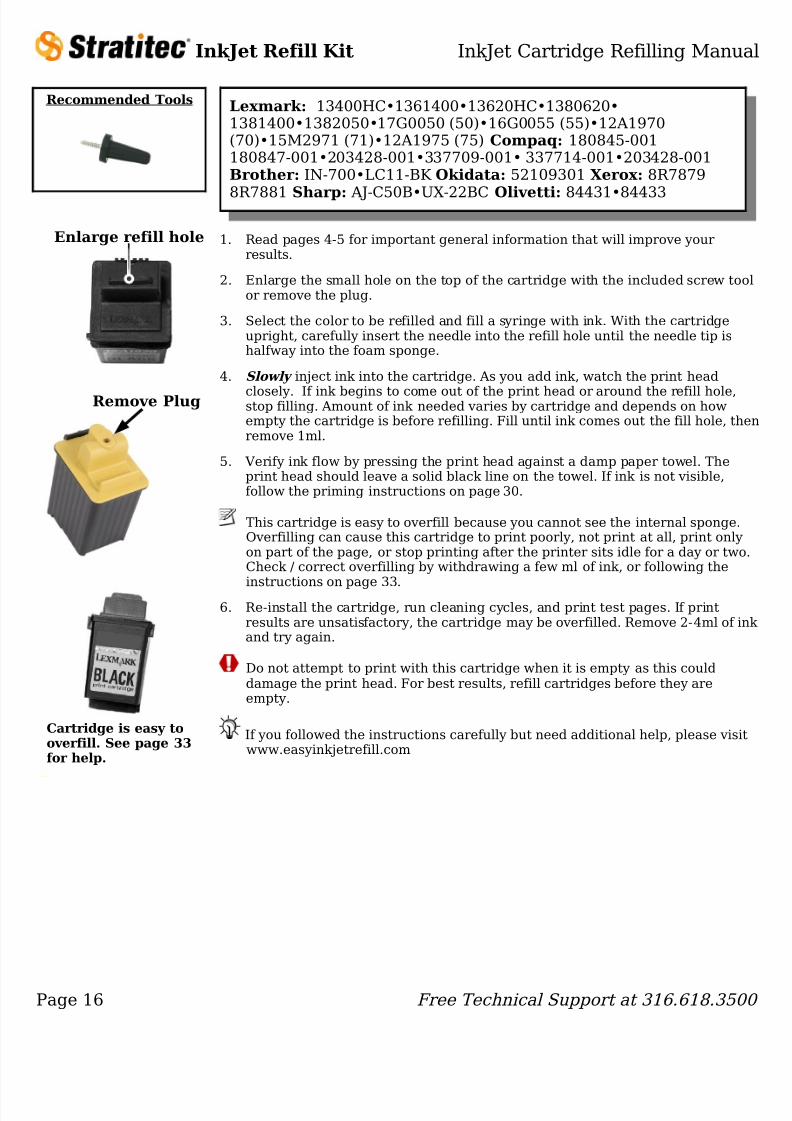
1. Read pages 4 -5 for important general information that will improve yourresults.
2. Enlarge the small hole on the top of the cartridge with the included screw toolor remove the plug.
3. Select the color to be refilled and fill a syringe with ink. With the cartridgeupright, carefully insert the needle into the refill hole until the needle tip ishalfway into the foam sponge.
4. Slowly inject ink into the cartridge. As you add ink, watch the print head
closely. If ink begins to come out of the print head or around the refill hole,stop filling. Amount of ink needed varies by cartridge and depends on howempty the cartridge is before refilling. Fill until ink comes out the fill hole, thenremove 1ml.
5. Verify ink flow by pressing the print head against a damp paper towel. Theprint head should leave a solid black line on the towel. If ink is not visible,follow the priming instructions on page 30 .
This cartridge is easy to overfill because you cannot see the internal sponge.Overfilling can cause this cartridge to print poorly, not print at all, print onlyon part of the page, or stop printing after the printer sits idle for a day or two.Check / correct overfilling by withdrawing a few ml of ink, or following theinstructions on page 33 .
6. Re-install the cartridge, run cleaning cycles, and print test pages. If printresults are unsatisfactory, the cartridge may be overfilled. Remove 2-4ml of ink and try again.
Do not attempt to print with this cartridge when it is empty as this coulddamage the print head. For best results, refill cartridges before they areempty.
If you followed the instructions carefully but need additional help, please visitwww.easyinkjetrefill.com
Page 16 Free Technical Support at 316.618.3500
Lexmark: 13400HC•1361400•13620HC•1380620•1381400•1382050•17G0050 (50)•16G0055 (55)•12A1970(70)•15M2971 (71)•12A1975 (75) Compaq: 180845-001180847-001•203428-001•337709-001• 337714-001•203428-001Brother: IN-700•LC11-BK Okidata: 52109301 Xerox: 8R7879
8R7881 Sharp: AJ-C50B•UX-22BC Olivetti: 84431•84433
Recommended Tools
Cartridge is easy tooverfill. See page 33 for help.
Enlarge refill hole
Remove Plug
8/14/2019 Manual Recarga de Cartuchos (Bom e Completo, Mas Nao Tem Toner)
http://slidepdf.com/reader/full/manual-recarga-de-cartuchos-bom-e-completo-mas-nao-tem-toner 17/36
8/14/2019 Manual Recarga de Cartuchos (Bom e Completo, Mas Nao Tem Toner)
http://slidepdf.com/reader/full/manual-recarga-de-cartuchos-bom-e-completo-mas-nao-tem-toner 18/36
InkJet Refill Kit InkJet Cartridge Refilling Manual
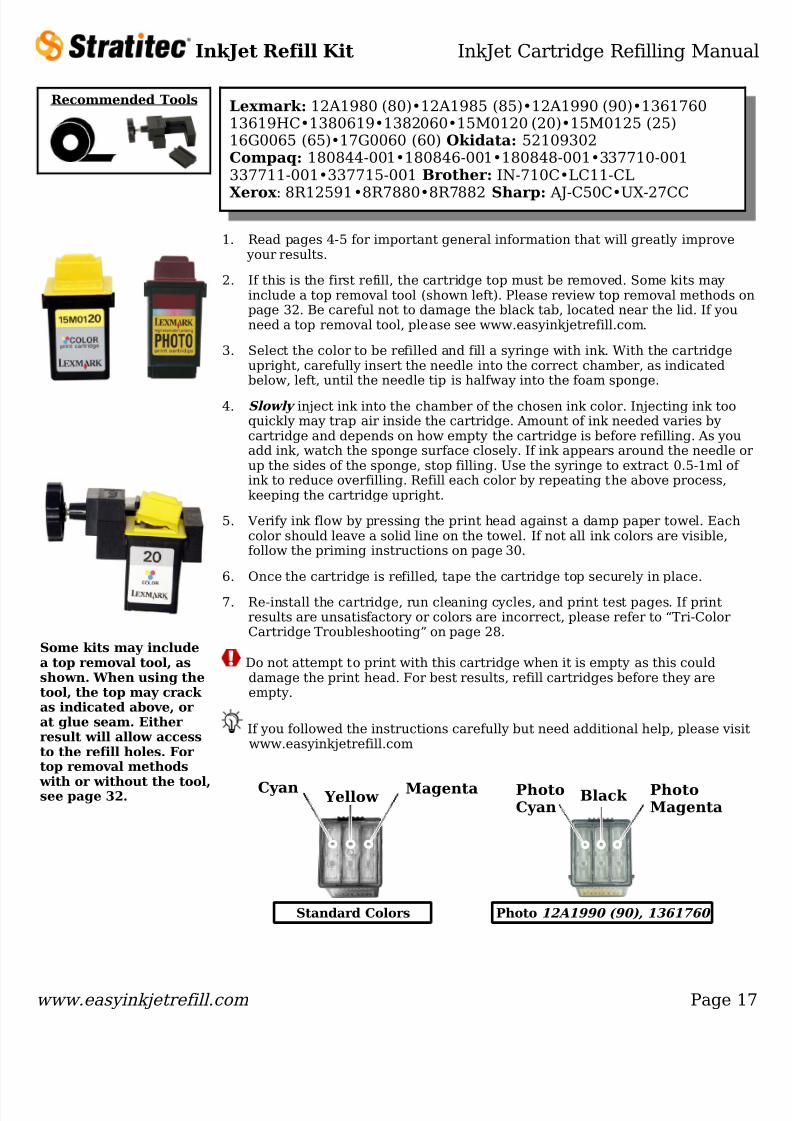
1. Read pages 4 -5 for important general information that will greatly improve your results.
2. Press and hold the ink outlet hole against the rubber sealing pad, maintainingpressure against the sealing pad to minimize leaking as you refill. If your kitdoes not include the rubber sealing pad, you may optionally use high qualityblack electrical tape. (If you do not seal the ink outlet, ink will drip from theink outlet hole until the refill hole is sealed with a plug.)
3. Use the included 3mm drill bit to drill a hole where indicated at left. Be surethat the refill hole is clean and smooth, as the small plug must create anairtight seal once the cartridge is refilled.
4. Inject the appropriate color of ink into the ink reservoir until it is full. Wait 15-30 seconds for the ink to saturate the sponge. Add additional ink, if necessary,to fill the ink reservoir.
5. Seal the refill hole with a small plug. If the seal is not airtight, the cartridgewill leak. If you did not use the included 3mm drill bit, if the plug does not sealproperly, or if the cartridge continues to leak, use hot glue to seal the refillhole. Do NOT use tape as it will not provide a proper permanent seal.
6. After you remove the tape or rubber sealing pad from the ink outlet, a fewdrops of ink SHOULD drip from the cartridge. If you don't get any drips, holdthe cartridge over paper towels and carefully remove the plug from the sealhole until the ink outlet begins to drip, then quickly repeat step 5.
7. Let the cartridge sit for 10-20 seconds until it is no longer dripping ink. Givethe sponge chamber a light squeeze for a final drip to balance the pressure. If the cartridge continually drips ink, refer to step 5 to seal the refill hole.
8. Once the cartridge is filled and no longer dripping ink, re-install the cartridge,run cleaning cycles, and print test pages. NEVER install a dripping or leakingcartridge in your printer.
9. Some printers may not be able to tell that the CLI-8 and PGI-5 type cartridgesare full again after reinstalling them in the printer. If so, you may need toeither press the button on the printer until the error light goes out, or use theprinter driver option to continue printing. If you do this, be sure to keep thecartridges refilled BEFORE they run empty.
For best results, do not leave empty or refilled cartridges out of the printerunless tightly sealed in a heavy plastic bag.
If you followed the instructions carefully but need additional help, please visitwww.easyinkjetrefill.com
Page 18 Free Technical Support at 316.618.3500
Sponge
chamber
To prevent excess drips while filling, press andhold the ink outletagainst the rubber sealing pad. As analternate, use black electrical tape.
Ink outlet
Ink reservoir
Drill refillhole using a
3mm bit within the
markedsection.
Use a smallrubber plugto seal thehole after
filling.
Recommended Tools Canon: BC-30/BC-30e•BC-31/BC-31e•BC-33e•BCI-3Bk/BCI-3eBk•BCI-3C/BCI-3eC•BCI-3M/BCI-3eM•BCI-3Y/BCI-3eY•BCI-3PC/3PM•BCI-5Bk•BCI-5C/BCI-5M/BCI-5Y•BCI-6Bk•BCI-6C/BCI-6M/BCI-6Y•BCI-6PC/BCI-6PM•BCI-8Bk•BCI-8C/BCI-8M/BCI-8Y•BJI-201Bk(HC)•BJI-201C/BJI-201M/BJI-201Y•CLI-8BK•CLI-
8C•CLI-8M•CLI-8Y•CLI-8PC•CLI-8PM•PGI-5 Apple: M1949•M1950•M1951•M1952•M3822•M3852
8/14/2019 Manual Recarga de Cartuchos (Bom e Completo, Mas Nao Tem Toner)
http://slidepdf.com/reader/full/manual-recarga-de-cartuchos-bom-e-completo-mas-nao-tem-toner 19/36
InkJet Refill Kit InkJet Cartridge Refilling Manual
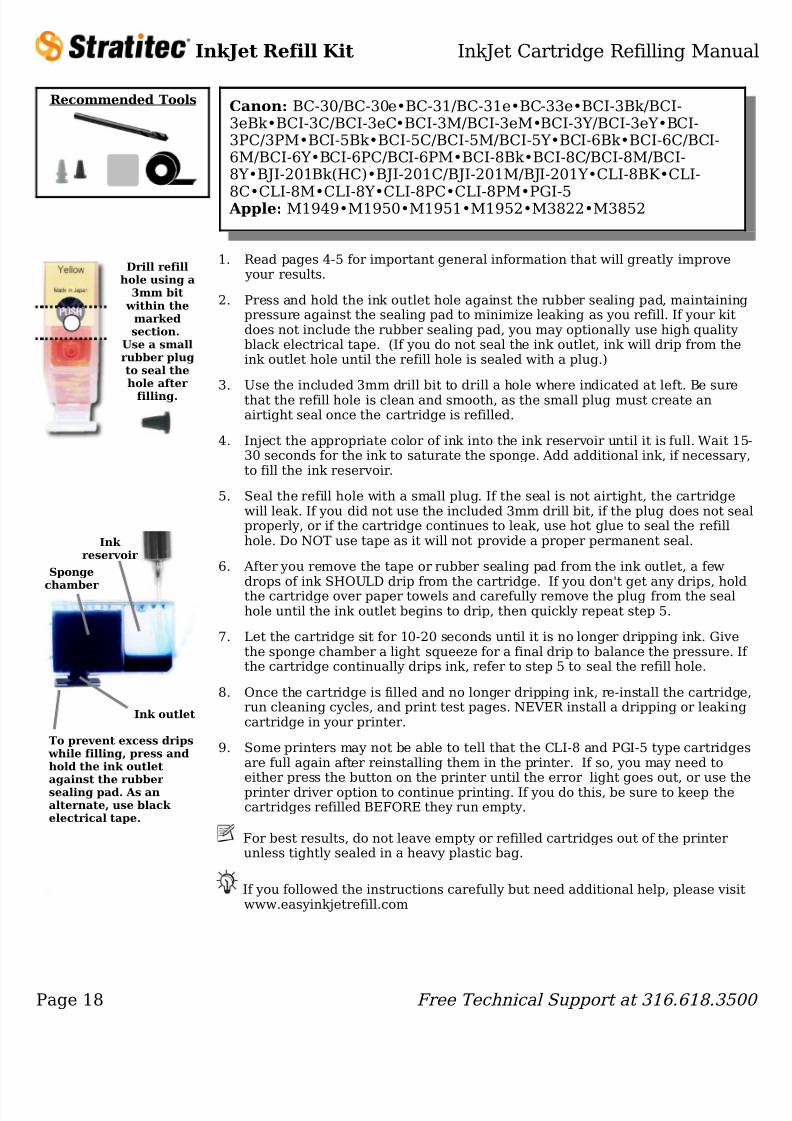
1. Read pages 4 -5 for important general information that will greatly improve your results.
2. These cartridges have a plug on the top of the cartridge that must be removedas indicated at left. Press the included screw tool into the plug and turnclockwise until the tool is secured in the plug and you are able to pull the plugout. Keep the plug for reinserting into the cartridge fill hole.
Although not required, we recommend using an accurate scale, such as apostal scale, to measure the cartridge mass. See pages 34 -35 for estimatedcartridge mass/volume for various cartridges.
3. Select the color to be refilled and fill a syringe with ink. With the cartridgeupright, carefully insert the needle into the refill hole until the needle tip ishalfway into the foam sponge.
4. Slowly inject ink. As you add ink, watch the print head closely. If ink begins tocome out of the print head or around the refill hole, stop filling, then use thesyringe to extract 1ml of ink.
5. Reinsert the plug into the fill hole.
6. Verify ink flow by pressing the print head against a damp paper towel. Theprint head should leave a solid black line on the towel. If ink is not visible,follow the priming instructions on page 30 .
7. Re-install the cartridge, run cleaning cycles, and print test pages.
These cartridges are easy to overfill. Check / correct overfilling by followingthe instructions on page 33 .
For best results, refill cartridges before they are empty. Empty ink cartridgesshould be refilled promptly, as cartridges that are old or dry may not refillsuccessfully. If necessary, refilled cartridges may be stored in a sealed plasticbag.
If you followed the instructions carefully but need additional help, please visitwww.easyinkjetrefill.com
www.easyinkjetrefill.com Page 19
Recommended Tools Canon: BC-20•BC-23•BX-20 Apple : M3240
Removethis plugfrom thefill holeusing thescrew tool
Press the print headagainst a paper towel to
verify the ink flow.
Replace the plug after refilling. If the screw toolis still attached to theplug, rotate the screw tool counter-clockwise toremove it from the plug.
8/14/2019 Manual Recarga de Cartuchos (Bom e Completo, Mas Nao Tem Toner)
http://slidepdf.com/reader/full/manual-recarga-de-cartuchos-bom-e-completo-mas-nao-tem-toner 20/36
InkJet Refill Kit InkJet Cartridge Refilling Manual
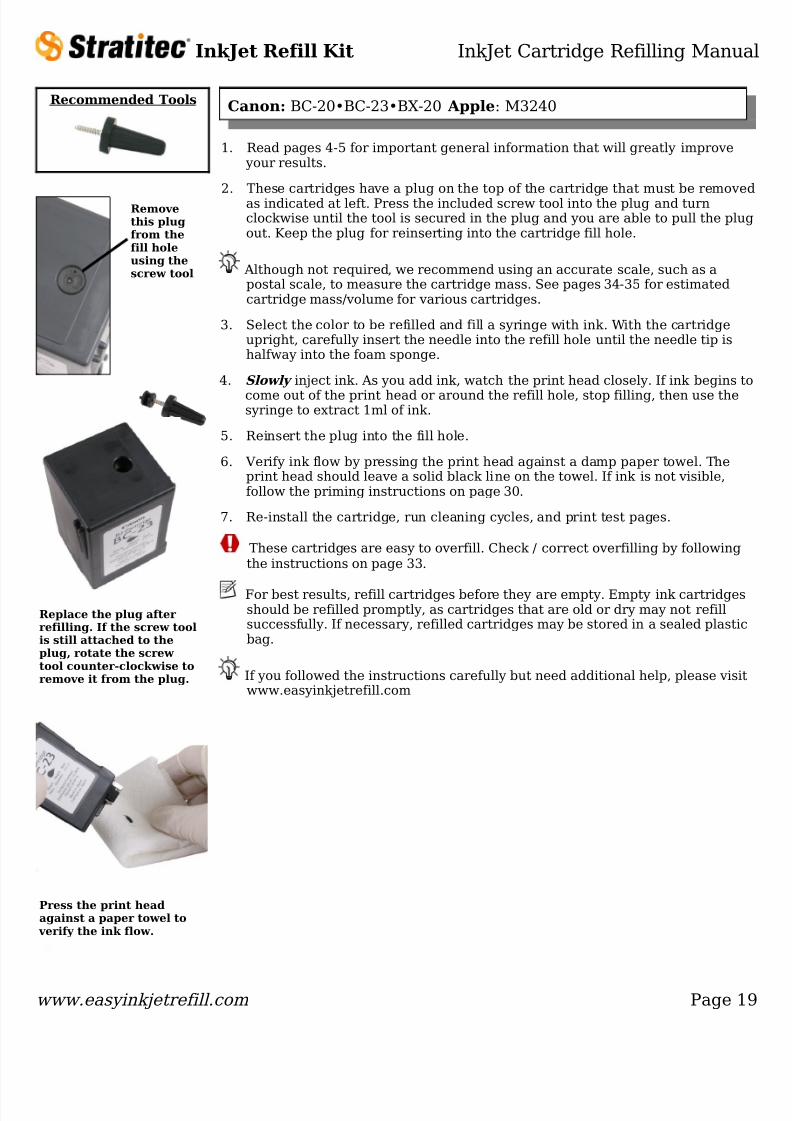
1. Read pages 4 -5 for important general information that will greatly improve your results.
2. To reduce the risk of ink contamination, we recommend removal of thecartridge top on color cartridges that have separate tops. Please review thecartridge top “Alternate Removal Methods” on page 32 .
3. Place the cartridge with the ink outlet(s) facing up, as shown below at left, ona flat, ink-resistant surface or on paper towels or absorbent cloth in case of spills or leakage.
4. Select color to be refilled and fill a syringe with ink, then carefully remove theneedle and attach the small priming tip (page 3 ).
5. Gently press the priming tip against the ink outlet on the cartridge asindicated at left and slowly inject up to 5ml of color ink or up to 12ml of black ink. It is important not to dent, mar, or damage the sponge when refilling orthe cartridge will be unusable. Stop filling when the sponge is full and stopsabsorbing ink quickly. A dry sponge may absorb ink more slowly.
6. Carefully turn the cartridge to the upright position, using a paper towel orabsorbent cloth to absorb any ink dripping from the ink outlet. Hold cartridgeupright until ink no longer drips from the ink outlet. Installing the cartridgewhile ink is still dripping and/or running out of the cartridge may damage yourprinter.
7. Tape the cartridge top securely in place, re-install the cartridge, run cleaningcycles, and print test pages. Most Canon printers will automatically reset ink levels.
For best results, refill your cartridge regularly. In some cases, the sponge maynot absorb ink immediately. After refilling, allow 1-2 hours (12 hours for verydry sponges) for the sponge to absorb the ink.
The BCI-21 cartridges contain more absorbent sponge material than the BCI-24 and may provide better results, with longer time between refills.
If you followed the instructions carefully but need additional help, please visitwww.easyinkjetrefill.com
Page 20 Free Technical Support at 316.618.3500
Magenta
Black Color
Cyan Yellow
BCI-11 BCI-15BCI-21/24
Black
CyanMagenta
Yellow
Color location varies. Check cartridge before refilling.
Recommended Tools
BCI-21,24 COLOR ONLY: Remove top of
cartridge. See page 32.
Press small primingtip gently against ink
outlet and slowly inject ink. Stop when
ink comes out the
bottom.
Canon: BCI-10•BCI-11•BCI-15•BCI-21•BCI-24 Apple: M3329•M3330•M3908•M3909•M3910•M3911•M3912
Cyan
Yellow Magenta
Inject carefully. DoNOT allow ink to
enter any of the other colors.
If you overflow,immediately wipe
away any excess ink.
8/14/2019 Manual Recarga de Cartuchos (Bom e Completo, Mas Nao Tem Toner)
http://slidepdf.com/reader/full/manual-recarga-de-cartuchos-bom-e-completo-mas-nao-tem-toner 21/36
InkJet Refill Kit InkJet Cartridge Refilling Manual
Read pages 4 -5 for important general information that will greatly improve yourresults.
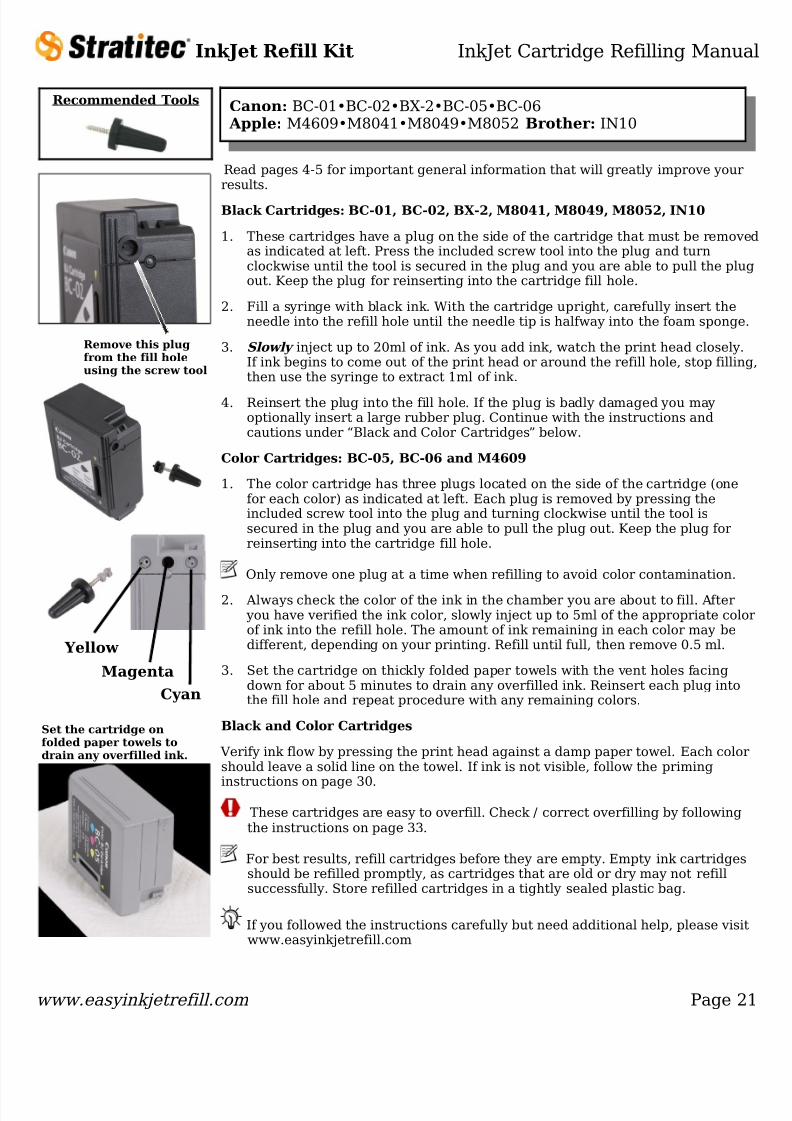
Black Cartridges: BC-01, BC-02, BX-2, M8041, M8049, M8052, IN10
1. These cartridges have a plug on the side of the cartridge that must be removedas indicated at left. Press the included screw tool into the plug and turnclockwise until the tool is secured in the plug and you are able to pull the plugout. Keep the plug for reinserting into the cartridge fill hole.
2. Fill a syringe with black ink. With the cartridge upright, carefully insert theneedle into the refill hole until the needle tip is halfway into the foam sponge.
3. Slowly inject up to 20ml of ink. As you add ink, watch the print head closely.If ink begins to come out of the print head or around the refill hole, stop filling,then use the syringe to extract 1ml of ink.
4. Reinsert the plug into the fill hole. If the plug is badly damaged you mayoptionally insert a large rubber plug. Continue with the instructions andcautions under “Black and Color Cartridges” below.
Color Cartridges: BC-05, BC-06 and M4609
1. The color cartridge has three plugs located on the side of the cartridge (onefor each color) as indicated at left. Each plug is removed by pressing theincluded screw tool into the plug and turning clockwise until the tool issecured in the plug and you are able to pull the plug out. Keep the plug forreinserting into the cartridge fill hole.
Only remove one plug at a time when refilling to avoid color contamination.
2. Always check the color of the ink in the chamber you are about to fill. After you have verified the ink color, slowly inject up to 5ml of the appropriate colorof ink into the refill hole. The amount of ink remaining in each color may bedifferent, depending on your printing. Refill until full, then remove 0.5 ml.
3. Set the cartridge on thickly folded paper towels with the vent holes facingdown for about 5 minutes to drain any overfilled ink. Reinsert each plug intothe fill hole and repeat procedure with any remaining colors.
Black and Color Cartridges
Verify ink flow by pressing the print head against a damp paper towel. Each colorshould leave a solid line on the towel. If ink is not visible, follow the priming
instructions on page 30 .
These cartridges are easy to overfill. Check / correct overfilling by followingthe instructions on page 33 .
For best results, refill cartridges before they are empty. Empty ink cartridgesshould be refilled promptly, as cartridges that are old or dry may not refillsuccessfully. Store refilled cartridges in a tightly sealed plastic bag.
If you followed the instructions carefully but need additional help, please visitwww.easyinkjetrefill.com
www.easyinkjetrefill.com Page 21
Canon: BC-01•BC-02•BX-2•BC-05•BC-06 Apple: M4609•M8041•M8049•M8052 Brother: IN10
CyanMagenta
Yellow
Recommended Tools
Remove this plugfrom the fill holeusing the screw tool
Set the cartridge onfolded paper towels todrain any overfilled ink.

8/14/2019 Manual Recarga de Cartuchos (Bom e Completo, Mas Nao Tem Toner)
http://slidepdf.com/reader/full/manual-recarga-de-cartuchos-bom-e-completo-mas-nao-tem-toner 22/36
InkJet Refill Kit InkJet Cartridge Refilling Manual
1. Read pages 4 -5 for important general information that will greatly improve your results. Note: Refilling the LC41M is not recommended.
2. Fill a syringe without a locking tip with 25ml of black ink (for the LC41BK) or20ml of color ink (for the LC41C or LC42Y). If your kit does not include asyringe without a locking tip (as shown at left), please visitwww.easyinkjetrefill.com .
3. Remove the needle from the syringe.
4. Place the cartridge on a flat, ink proof surface, with the bottom facing up, asshown.
5. Push the tip of the syringe into the ink exit hole and tilt the syringe to the side.Pull back on the syringe and tilt/rotate the syringe until air flows into thesyringe easily.
6. Pull the syringe back until 3-4 ml of air from the cartridge bubbles up throughthe ink. A slight vacuum will form in the cartridge. Then, push on the syringeslightly to inject 3-4 ml of ink. Repeat this step 5-10 times to “pump” the airout of the cartridge and replace it with ink.
7. When the refill process is complete, the syringe will be filled with air but theplunger will be in the starting location. Pull back one last time on the plungerto pull a few extra ml of air out of the cartridge and then pull the syringe outof the ink exit hole
Do not bump or press the pressure release button during or after filling.
8. Re-install the cartridge, run cleaning cycles, and print test pages. If printresults are unsatisfactory, be sure the cartridge is reinserted completely and
correctly.
These cartridges do not need to be refilled before they are empty.
If you followed the instructions carefully but need additional help, please visitwww.easyinkjetrefill.com
Page 22 Free Technical Support at 316.618.3500
Brother: LC41BK/C/Y Recommended Tools
Use asyringe
without alocking
tip.
Ink ExitHole
PressureReleaseButton
Push the tip into the ink exit hole and tilt thesyringe as shown.
Fill to 25ml (black) or 20ml (color). You willneed the remaining spacein the syringe for air during the refill process.
Repeat until all the ink is in the cartridge.
Pull back andpush inrepeatedly untilall the ink is inthe cartridge.Notice that theplunger of thesyringe is in thestarting position
when finished.
Then release (andgently push) anequal amount (3-4ml) of ink into thecartridge.
First, pull back on the syringeuntil 3-4 ml of air bubbles arepulled into thesyringe.
8/14/2019 Manual Recarga de Cartuchos (Bom e Completo, Mas Nao Tem Toner)
http://slidepdf.com/reader/full/manual-recarga-de-cartuchos-bom-e-completo-mas-nao-tem-toner 23/36
InkJet Refill Kit InkJet Cartridge Refilling Manual
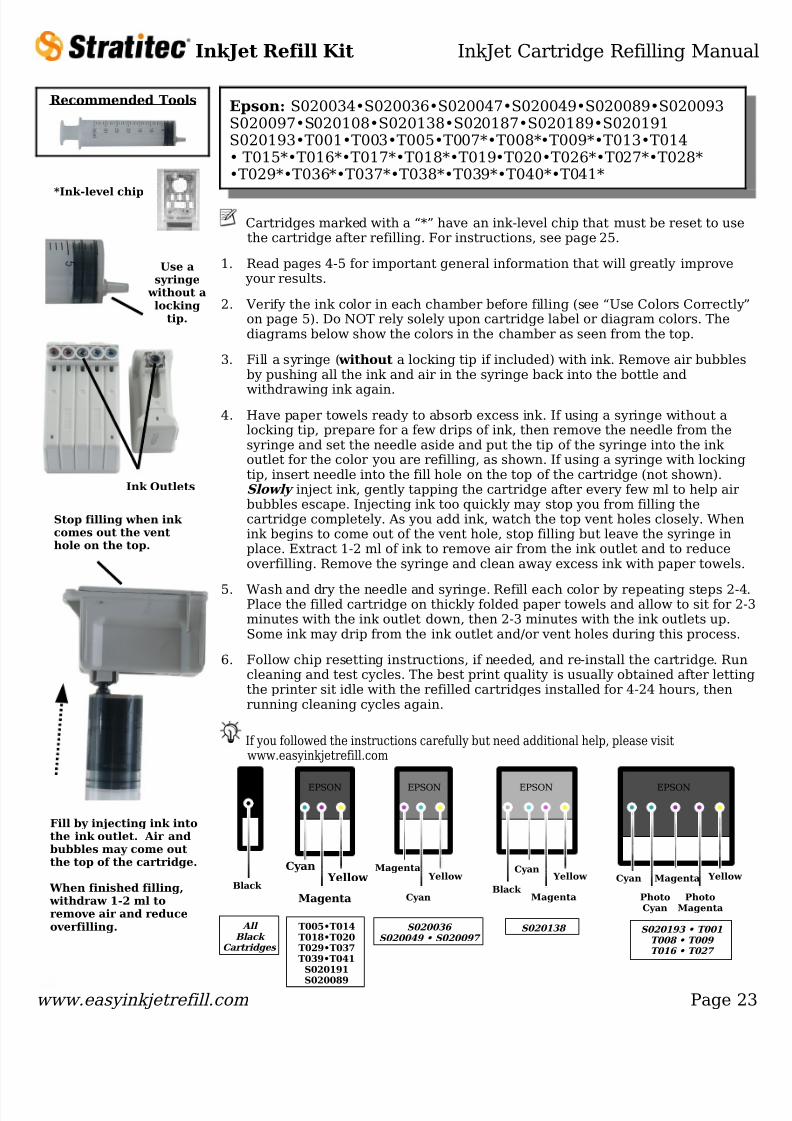
Cartridges marked with a “*” have an ink-level chip that must be reset to usethe cartridge after refilling. For instructions, see page 25 .
1. Read pages 4 -5 for important general information that will greatly improve your results.
2. Verify the ink color in each chamber before filling (see “Use Colors Correctly”on page 5 ). Do NOT rely solely upon cartridge label or diagram colors. Thediagrams below show the colors in the chamber as seen from the top.
3. Fill a syringe ( without a locking tip if included) with ink. Remove air bubblesby pushing all the ink and air in the syringe back into the bottle and
withdrawing ink again.4. Have paper towels ready to absorb excess ink. If using a syringe without a
locking tip, prepare for a few drips of ink, then remove the needle from thesyringe and set the needle aside and put the tip of the syringe into the ink outlet for the color you are refilling, as shown. If using a syringe with lockingtip, insert needle into the fill hole on the top of the cartridge (not shown).Slowly inject ink, gently tapping the cartridge after every few ml to help airbubbles escape. Injecting ink too quickly may stop you from filling thecartridge completely. As you add ink, watch the top vent holes closely. Whenink begins to come out of the vent hole, stop filling but leave the syringe inplace. Extract 1-2 ml of ink to remove air from the ink outlet and to reduceoverfilling. Remove the syringe and clean away excess ink with paper towels.
5. Wash and dry the needle and syringe. Refill each color by repeating steps 2-4.Place the filled cartridge on thickly folded paper towels and allow to sit for 2-3minutes with the ink outlet down, then 2-3 minutes with the ink outlets up.Some ink may drip from the ink outlet and/or vent holes during this process.
6. Follow chip resetting instructions, if needed, and re-install the cartridge. Runcleaning and test cycles. The best print quality is usually obtained after lettingthe printer sit idle with the refilled cartridges installed for 4-24 hours, thenrunning cleaning cycles again.
If you followed the instructions carefully but need additional help, please visitwww.easyinkjetrefill.com
www.easyinkjetrefill.com Page 23
S020036 S020049 • S020097
S020138
Yellow
T005•T014T018•T020T029•T037T039•T041
S020191
S020089
S020193 • T001T008 • T009 T016 • T027
All Black
Cartridges
Black
EPSON
Yellow
Magenta
Cyan
EPSON
Black
Magenta Yellow
Cyan
EPSON
Magenta
Yellow Cyan
EPSON
PhotoMagenta
Magenta
EPSON
PhotoCyan
Cyan
Epson: S020034•S020036•S020047•S020049•S020089•S020093S020097•S020108•S020138•S020187•S020189•S020191S020193•T001•T003•T005•T007*•T008*•T009*•T013•T014• T015*•T016*•T017*•T018*•T019•T020•T026*•T027*•T028*•T029*•T036*•T037*•T038*•T039*•T040*•T041*
Recommended Tools
*Ink-level chip
Ink Outlets
Fill by injecting ink intothe ink outlet. Air andbubbles may come outthe top of the cartridge.
When finished filling, withdraw 1-2 ml toremove air and reduceoverfilling.
Stop filling when ink comes out the venthole on the top.
Use asyringe
without alocking
tip.
8/14/2019 Manual Recarga de Cartuchos (Bom e Completo, Mas Nao Tem Toner)
http://slidepdf.com/reader/full/manual-recarga-de-cartuchos-bom-e-completo-mas-nao-tem-toner 24/36
InkJet Refill Kit InkJet Cartridge Refilling Manual
Cartridges marked with a “*” have an ink-level chip that must be reset touse the cartridge after refilling. For instructions, see page 25 .
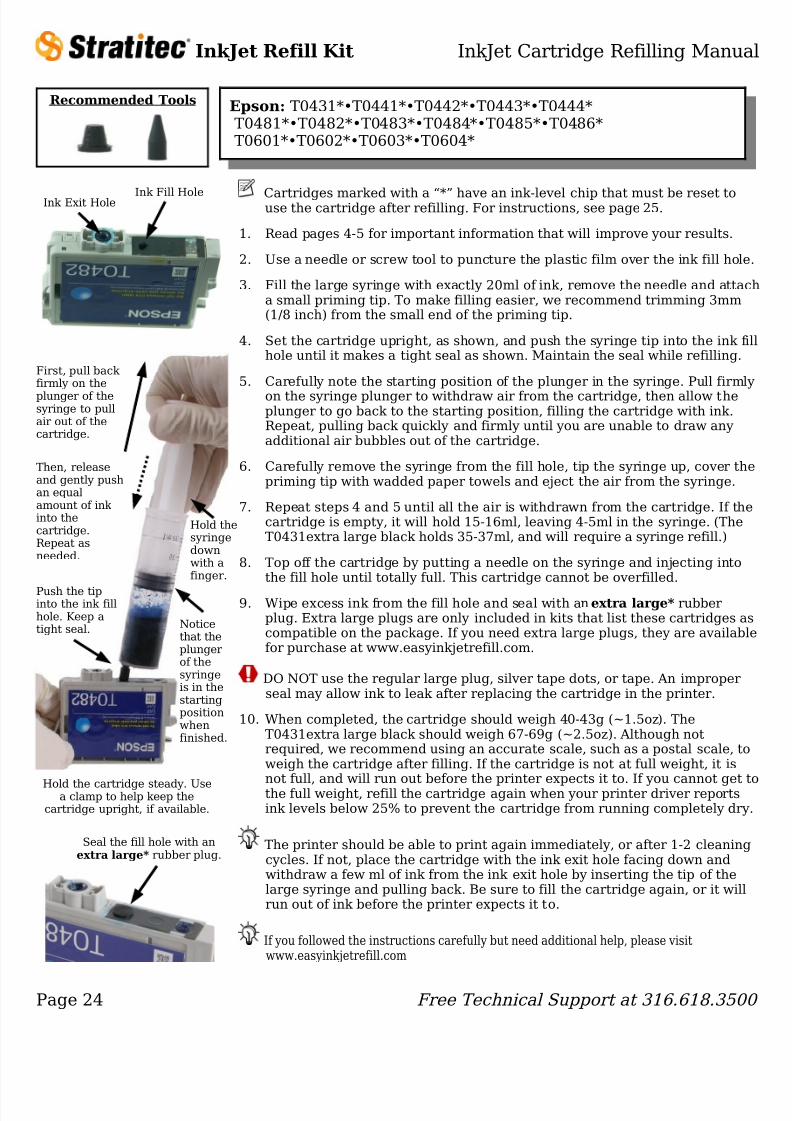
1. Read pages 4 -5 for important information that will improve your results.
2. Use a needle or screw tool to puncture the plastic film over the ink fill hole.
3. Fill the large syringe with exactly 20ml of ink, remove the needle and attacha small priming tip. To make filling easier, we recommend trimming 3mm(1/8 inch) from the small end of the priming tip.
4. Set the cartridge upright, as shown, and push the syringe tip into the ink fillhole until it makes a tight seal as shown. Maintain the seal while refilling.
5. Carefully note the starting position of the plunger in the syringe. Pull firmlyon the syringe plunger to withdraw air from the cartridge, then allow theplunger to go back to the starting position, filling the cartridge with ink.Repeat, pulling back quickly and firmly until you are unable to draw anyadditional air bubbles out of the cartridge.
6. Carefully remove the syringe from the fill hole, tip the syringe up, cover thepriming tip with wadded paper towels and eject the air from the syringe.
7. Repeat steps 4 and 5 until all the air is withdrawn from the cartridge. If thecartridge is empty, it will hold 15-16ml, leaving 4-5ml in the syringe. (TheT0431extra large black holds 35-37ml, and will require a syringe refill.)
8. Top off the cartridge by putting a needle on the syringe and injecting intothe fill hole until totally full. This cartridge cannot be overfilled.
9. Wipe excess ink from the fill hole and seal with an extra large* rubberplug. Extra large plugs are only included in kits that list these cartridges ascompatible on the package. If you need extra large plugs, they are availablefor purchase at www.easyinkjetrefill.com.
DO NOT use the regular large plug, silver tape dots, or tape. An improperseal may allow ink to leak after replacing the cartridge in the printer.
10. When completed, the cartridge should weigh 40-43g (~1.5oz). TheT0431extra large black should weigh 67-69g (~2.5oz). Although notrequired, we recommend using an accurate scale, such as a postal scale, toweigh the cartridge after filling. If the cartridge is not at full weight, it isnot full, and will run out before the printer expects it to. If you cannot get tothe full weight, refill the cartridge again when your printer driver reportsink levels below 25% to prevent the cartridge from running completely dry.
The printer should be able to print again immediately, or after 1-2 cleaningcycles. If not, place the cartridge with the ink exit hole facing down andwithdraw a few ml of ink from the ink exit hole by inserting the tip of thelarge syringe and pulling back. Be sure to fill the cartridge again, or it willrun out of ink before the printer expects it to.
If you followed the instructions carefully but need additional help, please visitwww.easyinkjetrefill.com
Page 24 Free Technical Support at 316.618.3500
Epson: T0431*•T0441*•T0442*•T0443*•T0444*T0481*•T0482*•T0483*•T0484*•T0485*•T0486*T0601*•T0602*•T0603*•T0604*
Recommended Tools
Ink Fill HoleInk Exit Hole
Push the tipinto the ink fillhole. Keep atight seal.
First, pull back firmly on theplunger of thesyringe to pullair out of thecartridge.
Then, releaseand gently pushan equalamount of ink into thecartridge.Repeat asneeded.
Hold the cartridge steady. Usea clamp to help keep thecartridge upright, if available.
Seal the fill hole with anextra large* rubber plug.
Noticethat theplungerof thesyringeis in thestartingpositionwhenfinished.
Hold thesyringedownwith afinger.
8/14/2019 Manual Recarga de Cartuchos (Bom e Completo, Mas Nao Tem Toner)
http://slidepdf.com/reader/full/manual-recarga-de-cartuchos-bom-e-completo-mas-nao-tem-toner 25/36
InkJet Refill Kit InkJet Cartridge Refilling Manual
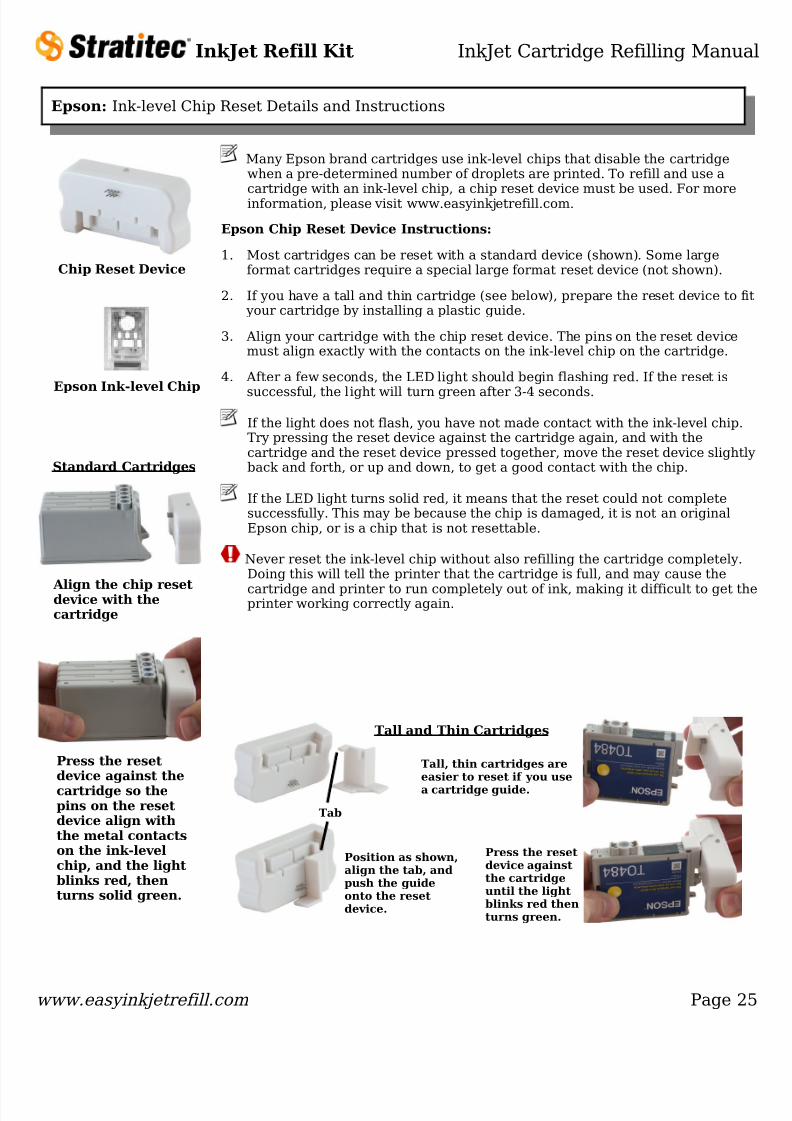
Many Epson brand cartridges use ink-level chips that disable the cartridgewhen a pre-determined number of droplets are printed. To refill and use acartridge with an ink-level chip, a chip reset device must be used. For moreinformation, please visit www.easyinkjetrefill.com.
Epson Chip Reset Device Instructions:
1. Most cartridges can be reset with a standard device (shown). Some largeformat cartridges require a special large format reset device (not shown).
2. If you have a tall and thin cartridge (see below), prepare the reset device to fit your cartridge by installing a plastic guide.
3. Align your cartridge with the chip reset device. The pins on the reset devicemust align exactly with the contacts on the ink-level chip on the cartridge.
4. After a few seconds, the LED light should begin flashing red. If the reset is
successful, the light will turn green after 3-4 seconds.
If the light does not flash, you have not made contact with the ink-level chip.Try pressing the reset device against the cartridge again, and with thecartridge and the reset device pressed together, move the reset device slightlyback and forth, or up and down, to get a good contact with the chip.
If the LED light turns solid red, it means that the reset could not completesuccessfully. This may be because the chip is damaged, it is not an originalEpson chip, or is a chip that is not resettable.
Never reset the ink-level chip without also refilling the cartridge completely.Doing this will tell the printer that the cartridge is full, and may cause the
cartridge and printer to run completely out of ink, making it difficult to get theprinter working correctly again.
www.easyinkjetrefill.com Page 25
Epson: Ink-level Chip Reset Details and Instructions
Epson Ink-level Chip
Align the chip resetdevice with thecartridge
Chip Reset Device
Press the resetdevice against thecartridge so thepins on the resetdevice align withthe metal contactson the ink-levelchip, and the lightblinks red, thenturns solid green.
Position as shown,align the tab, andpush the guideonto the resetdevice.
Tall, thin cartridges areeasier to reset if you usea cartridge guide.
Tab
Press the resetdevice againstthe cartridgeuntil the lightblinks red thenturns green.
Tall and Thin Cartridges
Standard Cartridges
8/14/2019 Manual Recarga de Cartuchos (Bom e Completo, Mas Nao Tem Toner)
http://slidepdf.com/reader/full/manual-recarga-de-cartuchos-bom-e-completo-mas-nao-tem-toner 26/36
InkJet Refill Kit InkJet Cartridge Refilling Manual
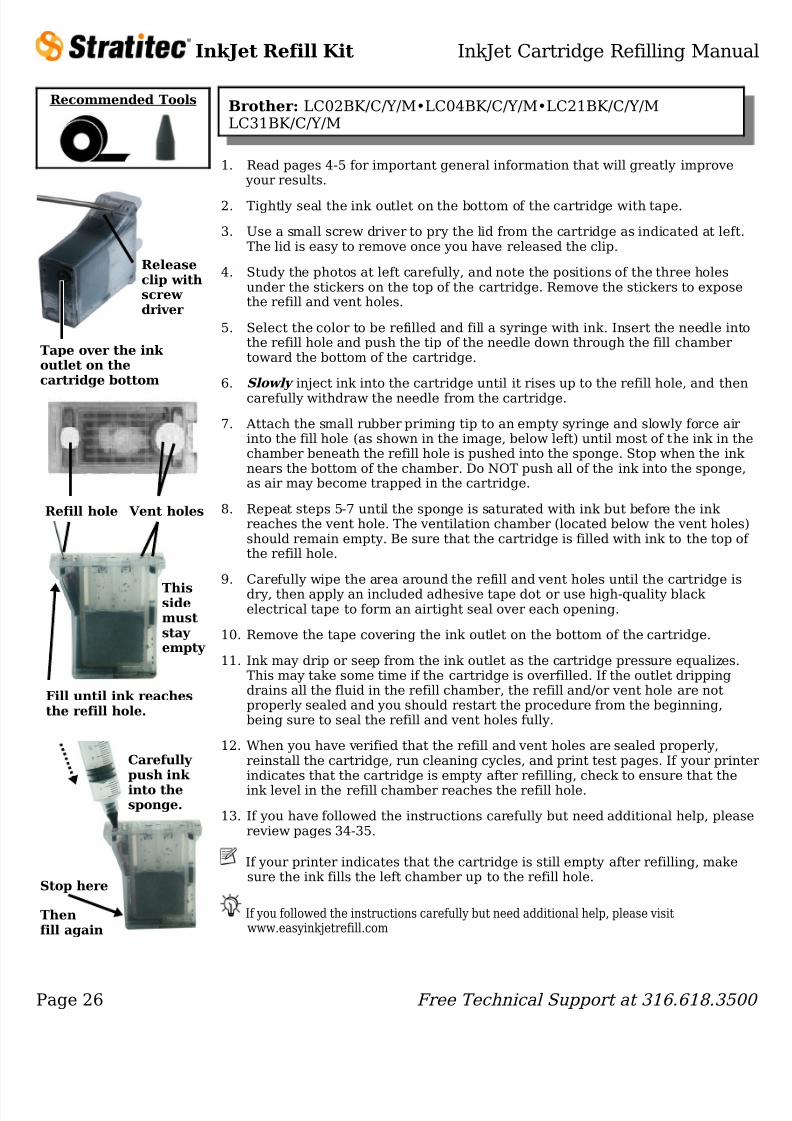
1. Read pages 4 -5 for important general information that will greatly improve your results.
2. Tightly seal the ink outlet on the bottom of the cartridge with tape.
3. Use a small screw driver to pry the lid from the cartridge as indicated at left.The lid is easy to remove once you have released the clip.
4. Study the photos at left carefully, and note the positions of the three holesunder the stickers on the top of the cartridge. Remove the stickers to exposethe refill and vent holes.
5. Select the color to be refilled and fill a syringe with ink. Insert the needle intothe refill hole and push the tip of the needle down through the fill chambertoward the bottom of the cartridge.
6. Slowly inject ink into the cartridge until it rises up to the refill hole, and thencarefully withdraw the needle from the cartridge.
7. Attach the small rubber priming tip to an empty syringe and slowly force airinto the fill hole (as shown in the image, below left) until most of the ink in thechamber beneath the refill hole is pushed into the sponge. Stop when the ink nears the bottom of the chamber. Do NOT push all of the ink into the sponge,as air may become trapped in the cartridge.
8. Repeat steps 5-7 until the sponge is saturated with ink but before the ink reaches the vent hole. The ventilation chamber (located below the vent holes)should remain empty. Be sure that the cartridge is filled with ink to the top of the refill hole.
9. Carefully wipe the area around the refill and vent holes until the cartridge isdry, then apply an included adhesive tape dot or use high-quality black electrical tape to form an airtight seal over each opening.
10. Remove the tape covering the ink outlet on the bottom of the cartridge.
11. Ink may drip or seep from the ink outlet as the cartridge pressure equalizes.This may take some time if the cartridge is overfilled. If the outlet drippingdrains all the fluid in the refill chamber, the refill and/or vent hole are notproperly sealed and you should restart the procedure from the beginning,being sure to seal the refill and vent holes fully.
12. When you have verified that the refill and vent holes are sealed properly,reinstall the cartridge, run cleaning cycles, and print test pages. If your printerindicates that the cartridge is empty after refilling, check to ensure that theink level in the refill chamber reaches the refill hole.
13. If you have followed the instructions carefully but need additional help, pleasereview pages 34-35.
If your printer indicates that the cartridge is still empty after refilling, makesure the ink fills the left chamber up to the refill hole.
If you followed the instructions carefully but need additional help, please visitwww.easyinkjetrefill.com
Page 26 Free Technical Support at 316.618.3500
Recommended Tools Brother: LC02BK/C/Y/M•LC04BK/C/Y/M•LC21BK/C/Y/MLC31BK/C/Y/M
Carefully push ink into thesponge.
Stop here
Vent holesRefill hole
Tape over the ink outlet on thecartridge bottom
Releaseclip withscrew driver
Fill until ink reachesthe refill hole.
Thenfill again
Thissidemuststay empty
8/14/2019 Manual Recarga de Cartuchos (Bom e Completo, Mas Nao Tem Toner)
http://slidepdf.com/reader/full/manual-recarga-de-cartuchos-bom-e-completo-mas-nao-tem-toner 27/36
InkJet Refill Kit InkJet Cartridge Refilling Manual
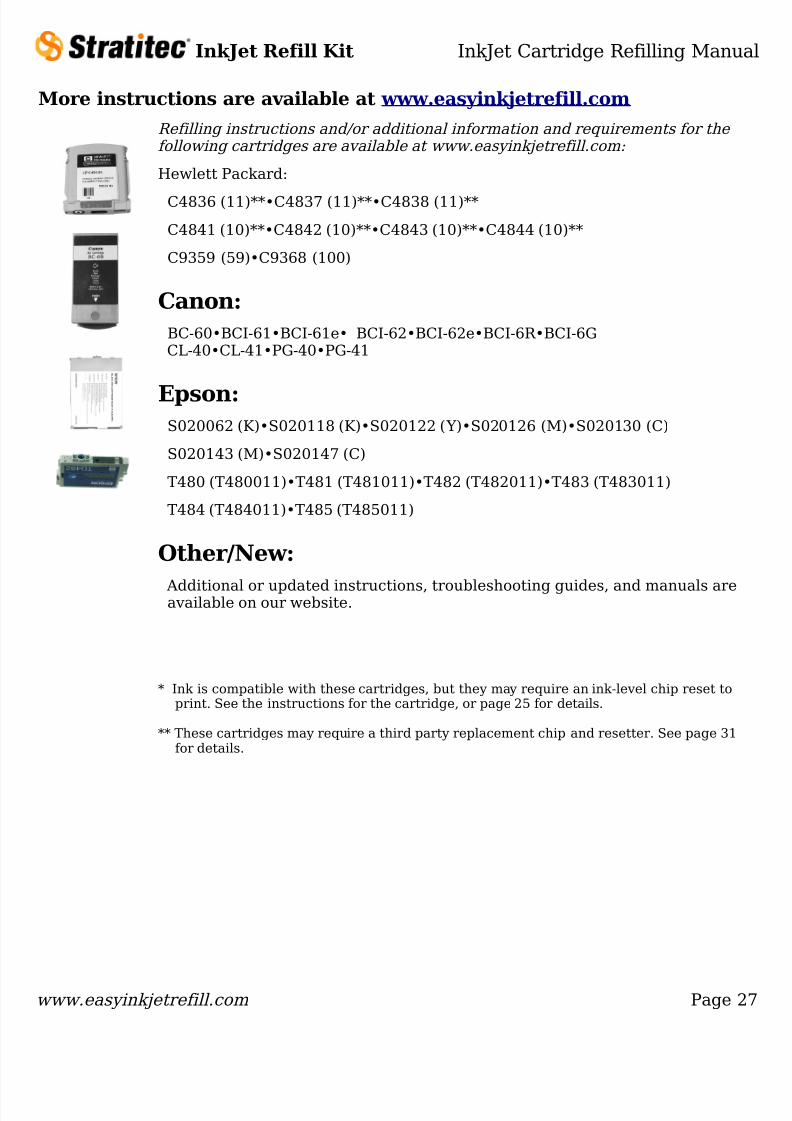
More instructions are available at www.easyinkjetrefill.comRefilling instructions and/or additional information and requirements for the following cartridges are available at www.easyinkjetrefill.com:
Hewlett Packard:
C4836 (11)**•C4837 (11)**•C4838 (11)**
C4841 (10)**•C4842 (10)**•C4843 (10)**•C4844 (10)**
C9359 (59)•C9368 (100)
Canon:BC-60•BCI-61•BCI-61e• BCI-62•BCI-62e•BCI-6R•BCI-6GCL-40•CL-41•PG-40•PG-41
Epson:S020062 (K)•S020118 (K)•S020122 (Y)•S020126 (M)•S020130 (C)
S020143 (M)•S020147 (C)
T480 (T480011)•T481 (T481011)•T482 (T482011)•T483 (T483011)
T484 (T484011)•T485 (T485011)
Other/New:
Additional or updated instructions, troubleshooting guides, and manuals areavailable on our website.
* Ink is compatible with these cartridges, but they may require an ink-level chip reset toprint. See the instructions for the cartridge, or page 25 for details.
** These cartridges may require a third party replacement chip and resetter. See page 31for details.
www.easyinkjetrefill.com Page 27
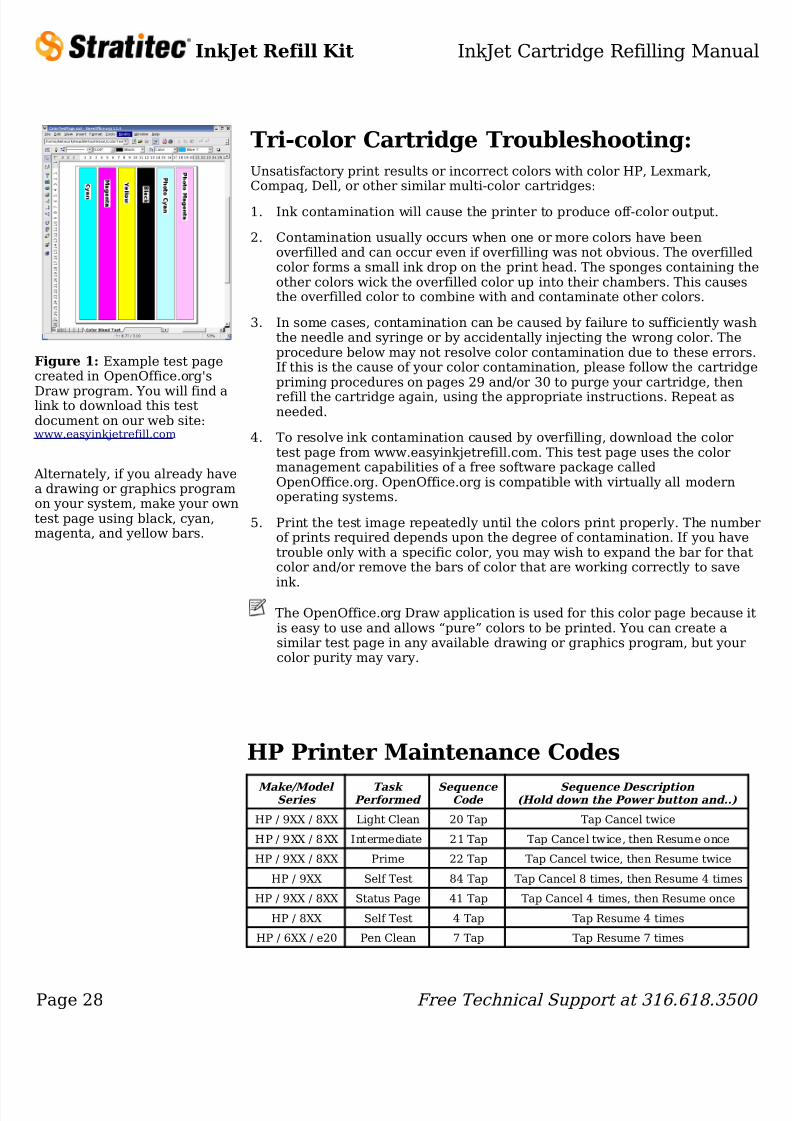
8/14/2019 Manual Recarga de Cartuchos (Bom e Completo, Mas Nao Tem Toner)
http://slidepdf.com/reader/full/manual-recarga-de-cartuchos-bom-e-completo-mas-nao-tem-toner 28/36

8/14/2019 Manual Recarga de Cartuchos (Bom e Completo, Mas Nao Tem Toner)
http://slidepdf.com/reader/full/manual-recarga-de-cartuchos-bom-e-completo-mas-nao-tem-toner 29/36
InkJet Refill Kit InkJet Cartridge Refilling Manual
www.easyinkjetrefill.com Page 29
Ensure that theseal is tight
Note: syringe tipstyles may
vary. Always use
a syringewith a
locking tip.
Warning:Never
push ink back intoa multi-
color cartridge.
HP CartridgeClip Tool
Preparing to Use the Clip Tool
6. Place the ink cartridge in the cartridge refill clip by placing the print headagainst the flat surface of the rubber tip and squeezing the cartridge intothe clip with gentle pressure toward the center of the cartridge until itsnaps into place. Do not force the top of the cartridge down once it isclipped. There should be a small gap visible.
7. Ensure that the print head is aligned with the refill hole in the rubber tipand that it fits flush against the base of the clip. If necessary, adjust thecartridge position by removing and reinserting the cartridge.
Syringe styles may vary. Always use a syringe with a locking tip, as shown,when using the cartridge refill clip.
Refilling with the Clip Tool
CAREFULLY follow the instructions below. It is important to hold both thesyringe and the cartridge securely while refilling. DO NOT attempt to injectink too quickly. Excess pressure may break the seal or cause the syringe toseparate from the rubber tip, resulting in dripping or spraying ink!
1. Attach a needle to a clean syringe, fill the syringe with ink and thencarefully remove the needle. Attach the locking tip of the syringe to therubber tip on the refill clip, and SLOWLY inject ink into the cartridgethrough the print head.
2. As you inject ink, make certain that the syringe and cartridge remainsecurely attached. Refill the syringe as needed. Inject ink until the cartridgeis full, usually 25 to 40ml.
3. Balance the pressure in the cartridge by rotating the cartridge clip until theprint head and syringe are upright and slowly withdrawing the plunger untilair and approximately 3ml of liquid ink is drawn into the syringe.
4. Remove the cartridge from the refill clip and clean the print head with adamp paper towel. Hold the cartridge upright for 30 seconds and watch theprinthead for seeping or dripping ink.
HP Cartridge Priming
Cartridges that have run completely dry may not print properly when refilled.Priming the cartridge using the instructions below may correct this problem. Forbest results, always refill cartridges before they are empty.
1. Attach the locking tip of a clean syringe to the rubber tip on the refill clip.
2. Once you are sure that the seal is tight, position the cartridge as shown, andpull back on the plunger until ink begins to flow into the syringe. Never pushink back into a multi-color cartridge.
3. Remove the cartridge from the refill clip and clean the print head andcontacts with a damp paper towel.
4. Re-install the cartridge, run cleaning cycles, and print test pages. If printresults are unsatisfactory or colors are incorrect, please refer to “Tri-ColorCartridge Troubleshooting” on page 28 .
5. If prints are still streaky, use the large and/or small priming tip as describedon page 30 .
Inject ink slowly!!
Leave agap asshown tohelpensure thehead isproperlyaligned
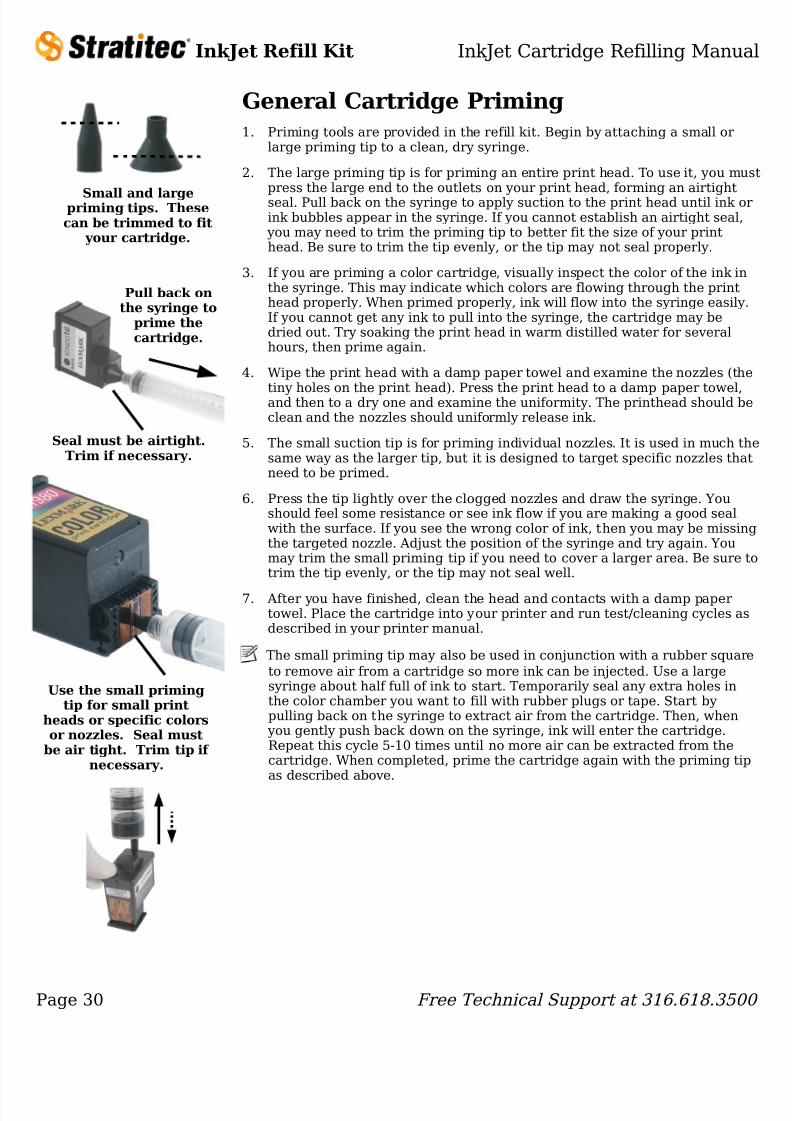
8/14/2019 Manual Recarga de Cartuchos (Bom e Completo, Mas Nao Tem Toner)
http://slidepdf.com/reader/full/manual-recarga-de-cartuchos-bom-e-completo-mas-nao-tem-toner 30/36
InkJet Refill Kit InkJet Cartridge Refilling Manual
General Cartridge Priming1. Priming tools are provided in the refill kit. Begin by attaching a small or
large priming tip to a clean, dry syringe.
2. The large priming tip is for priming an entire print head. To use it, you mustpress the large end to the outlets on your print head, forming an airtightseal. Pull back on the syringe to apply suction to the print head until ink orink bubbles appear in the syringe. If you cannot establish an airtight seal,
you may need to trim the priming tip to better fit the size of your printhead. Be sure to trim the tip evenly, or the tip may not seal properly.
3. If you are priming a color cartridge, visually inspect the color of the ink inthe syringe. This may indicate which colors are flowing through the printhead properly. When primed properly, ink will flow into the syringe easily.If you cannot get any ink to pull into the syringe, the cartridge may bedried out. Try soaking the print head in warm distilled water for severalhours, then prime again.
4. Wipe the print head with a damp paper towel and examine the nozzles (the
tiny holes on the print head). Press the print head to a damp paper towel,and then to a dry one and examine the uniformity. The printhead should beclean and the nozzles should uniformly release ink.
5. The small suction tip is for priming individual nozzles. It is used in much thesame way as the larger tip, but it is designed to target specific nozzles thatneed to be primed.
6. Press the tip lightly over the clogged nozzles and draw the syringe. Youshould feel some resistance or see ink flow if you are making a good sealwith the surface. If you see the wrong color of ink, then you may be missingthe targeted nozzle. Adjust the position of the syringe and try again. Youmay trim the small priming tip if you need to cover a larger area. Be sure totrim the tip evenly, or the tip may not seal well.
7. After you have finished, clean the head and contacts with a damp papertowel. Place the cartridge into your printer and run test/cleaning cycles asdescribed in your printer manual.
The small priming tip may also be used in conjunction with a rubber squareto remove air from a cartridge so more ink can be injected. Use a largesyringe about half full of ink to start. Temporarily seal any extra holes inthe color chamber you want to fill with rubber plugs or tape. Start bypulling back on the syringe to extract air from the cartridge. Then, when
you gently push back down on the syringe, ink will enter the cartridge.Repeat this cycle 5-10 times until no more air can be extracted from thecartridge. When completed, prime the cartridge again with the priming tipas described above.
Page 30 Free Technical Support at 316.618.3500
Small and largepriming tips. Thesecan be trimmed to fit
your cartridge.
Seal must be airtight.Trim if necessary.
Pull back onthe syringe to
prime thecartridge.
Use the small primingtip for small print
heads or specific colorsor nozzles. Seal must
be air tight. Trim tip if necessary.

8/14/2019 Manual Recarga de Cartuchos (Bom e Completo, Mas Nao Tem Toner)
http://slidepdf.com/reader/full/manual-recarga-de-cartuchos-bom-e-completo-mas-nao-tem-toner 31/36
InkJet Refill Kit InkJet Cartridge Refilling Manual
www.easyinkjetrefill.com Page 31
Resetting Ink levelsMany printers or print drivers use droplet or page counters to track ink usage. In most cases it is NOTnecessary to reset the page/droplet counter. In some cases, however, this can be a useful tool fordetermining when a cartridge should be refilled. Printing with an empty cartridge can damage a print head,so low ink warnings can help prolong printhead life if the cartridge is promptly refilled. If you cannot or donot reset the ink-counter, be sure to refill frequently to ensure your cartridge does not run dry.
Reset procedures can differ for each printer model and/or printer driver, so always check documentationand manuals provided with your printer or printer driver before attempting any reset method. Somemanufacturers may include instructions on how to reset or override these counters from the printer orwithin the driver software.
Listed below are various methods that may be used by the manufacturer to track ink usage.
Self-Resetting Printers:
Some printers use a combination of counters and sensors. When properly filled and returned to the printer,these cartridges will read as full. Some Canon and Brother printers behave this way.
Menu/LCD Reset:Some multifunction printers will ask if the printer cartridge is new every time it is replaced in the printercarriage. When you choose “new,” the printer will reset the droplet counters and treat this cartridge asnew. Some do not detect when the cartridge has been replaced, but have a menu option for replacing thecartridge. Always read the your printer manual before removing the cartridge to determine the propermethod.
Driver Reset:
The drivers that came with your printer may have a tool under the maintenance tab (if using Windows) forsetting your cartridges as new. Your printer or driver manual will have information in the section forchanging printer cartridges.
Cartridge Memory:Some printers (including many HP models) have a “memory” that recalls the last few cartridges of eachmodel used in the printer. Procedures exist for some of these printers that attempt to rotate the currentcartridge ID out of the printer memory. Sometimes old cartridges can be used in this rotation procedureonce they have exceeded their useful life cycle.
Many such printers allow you to continue printing with a used cartridge until the cartridge fails despiteannoying warning messages. These counters are more like an odometer than a gas gauge and may not resetuntil you replace the cartridge. Printing with an empty cartridge can damage a cartridge's print head, so becareful to refill before the cartridge is empty in order to prolong the life of your cartridge.
Chip Reset:
A few HP cartridges (such as the HP 10/11) will have a separate print head and require a replacement chipand resetter specific to the cartridge. You may wish to perform an Internet search for your cartridgemodel(s) and color(s) to find the specific chip and resetter required for your cartridge.
Alternate Instructions:
Many unverified instructions for resetting or overriding cartridges may be available online as newcartridges and procedures are developed. Stratitec, Inc. does not support or guarantee such procedures.For further information on this subject, please contact our Customer Solution Center.
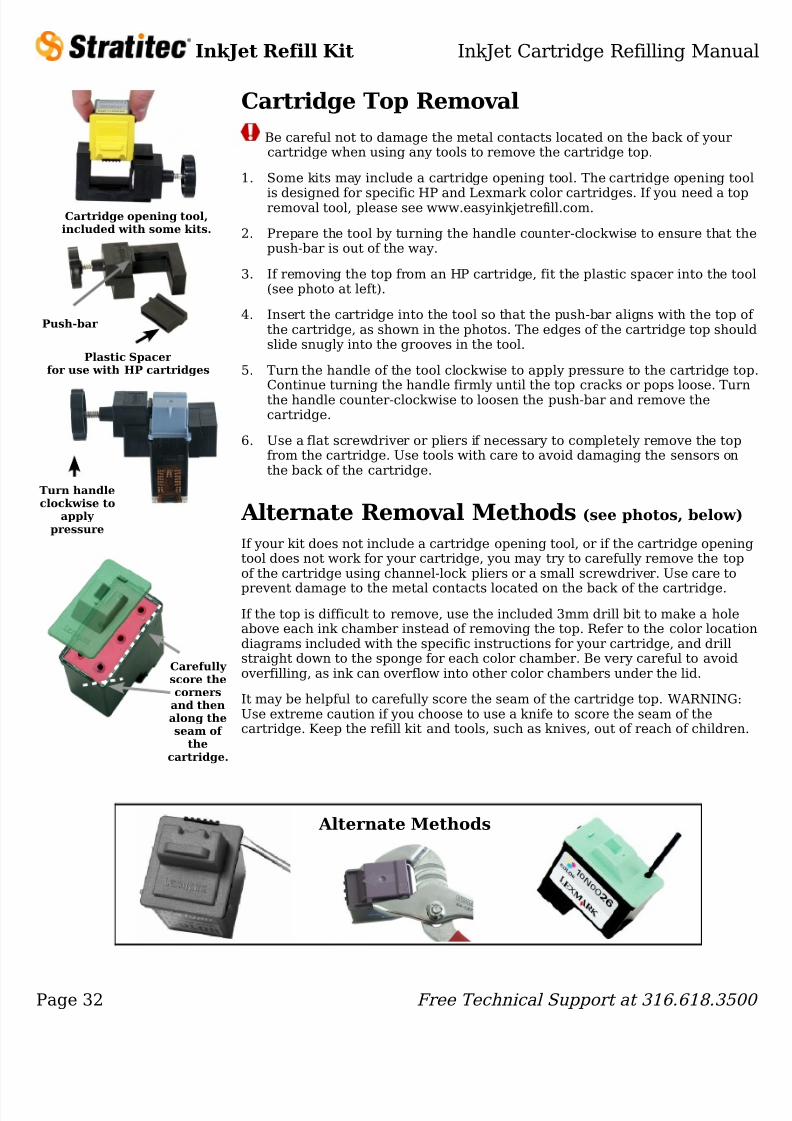
8/14/2019 Manual Recarga de Cartuchos (Bom e Completo, Mas Nao Tem Toner)
http://slidepdf.com/reader/full/manual-recarga-de-cartuchos-bom-e-completo-mas-nao-tem-toner 32/36
InkJet Refill Kit InkJet Cartridge Refilling Manual
Cartridge Top RemovalBe careful not to damage the metal contacts located on the back of yourcartridge when using any tools to remove the cartridge top.
1. Some kits may include a cartridge opening tool. The cartridge opening tool
is designed for specific HP and Lexmark color cartridges. If you need a topremoval tool, please see www.easyinkjetrefill.com.
2. Prepare the tool by turning the handle counter-clockwise to ensure that thepush-bar is out of the way.
3. If removing the top from an HP cartridge, fit the plastic spacer into the tool(see photo at left).
4. Insert the cartridge into the tool so that the push-bar aligns with the top of the cartridge, as shown in the photos. The edges of the cartridge top shouldslide snugly into the grooves in the tool.
5. Turn the handle of the tool clockwise to apply pressure to the cartridge top.Continue turning the handle firmly until the top cracks or pops loose. Turnthe handle counter-clockwise to loosen the push-bar and remove thecartridge.
6. Use a flat screwdriver or pliers if necessary to completely remove the topfrom the cartridge. Use tools with care to avoid damaging the sensors onthe back of the cartridge.
Alternate Removal Methods (see photos, below)
If your kit does not include a cartridge opening tool, or if the cartridge openingtool does not work for your cartridge, you may try to carefully remove the topof the cartridge using channel-lock pliers or a small screwdriver. Use care to
prevent damage to the metal contacts located on the back of the cartridge.If the top is difficult to remove, use the included 3mm drill bit to make a holeabove each ink chamber instead of removing the top. Refer to the color locationdiagrams included with the specific instructions for your cartridge, and drillstraight down to the sponge for each color chamber. Be very careful to avoidoverfilling, as ink can overflow into other color chambers under the lid.
It may be helpful to carefully score the seam of the cartridge top. WARNING:Use extreme caution if you choose to use a knife to score the seam of thecartridge. Keep the refill kit and tools, such as knives, out of reach of children.
Page 32 Free Technical Support at 316.618.3500
Alternate Methods
Cartridge opening tool,included with some kits.
Turn handleclockwise to
apply pressure
Push-bar
Carefully score thecorners
and thenalong theseam of
thecartridge.
Plastic Spacer for use with HP cartridges
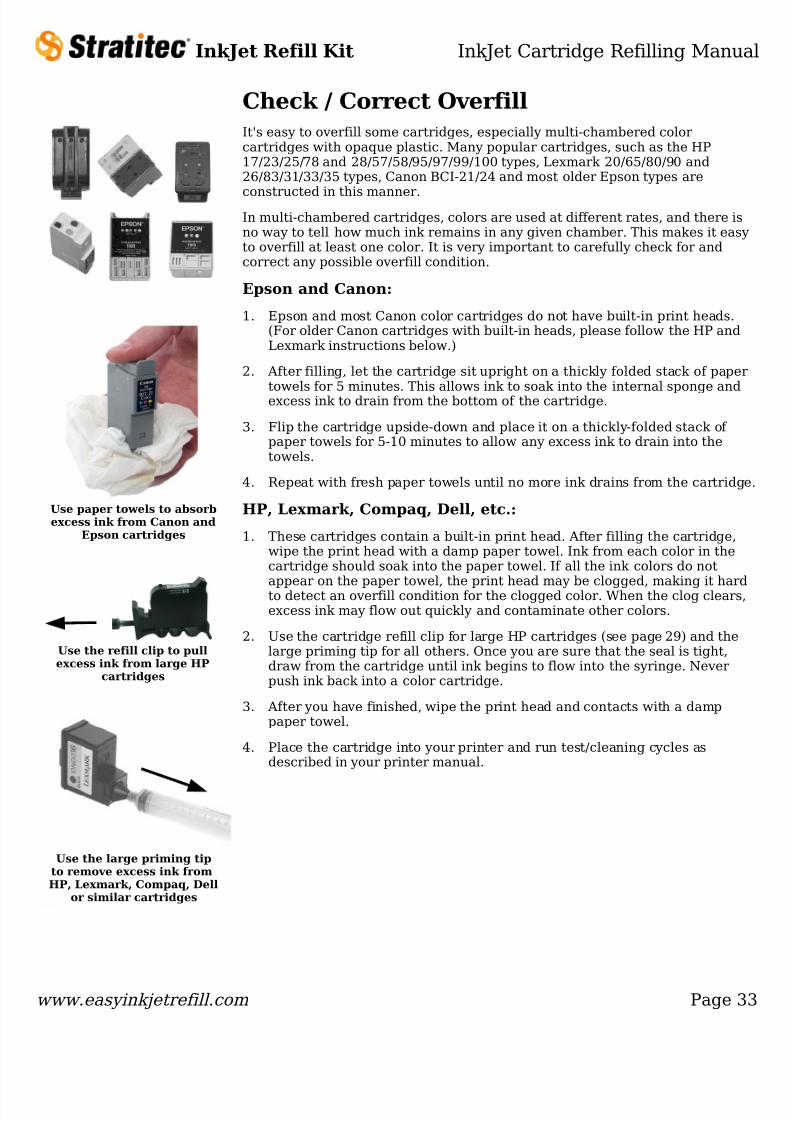
8/14/2019 Manual Recarga de Cartuchos (Bom e Completo, Mas Nao Tem Toner)
http://slidepdf.com/reader/full/manual-recarga-de-cartuchos-bom-e-completo-mas-nao-tem-toner 33/36
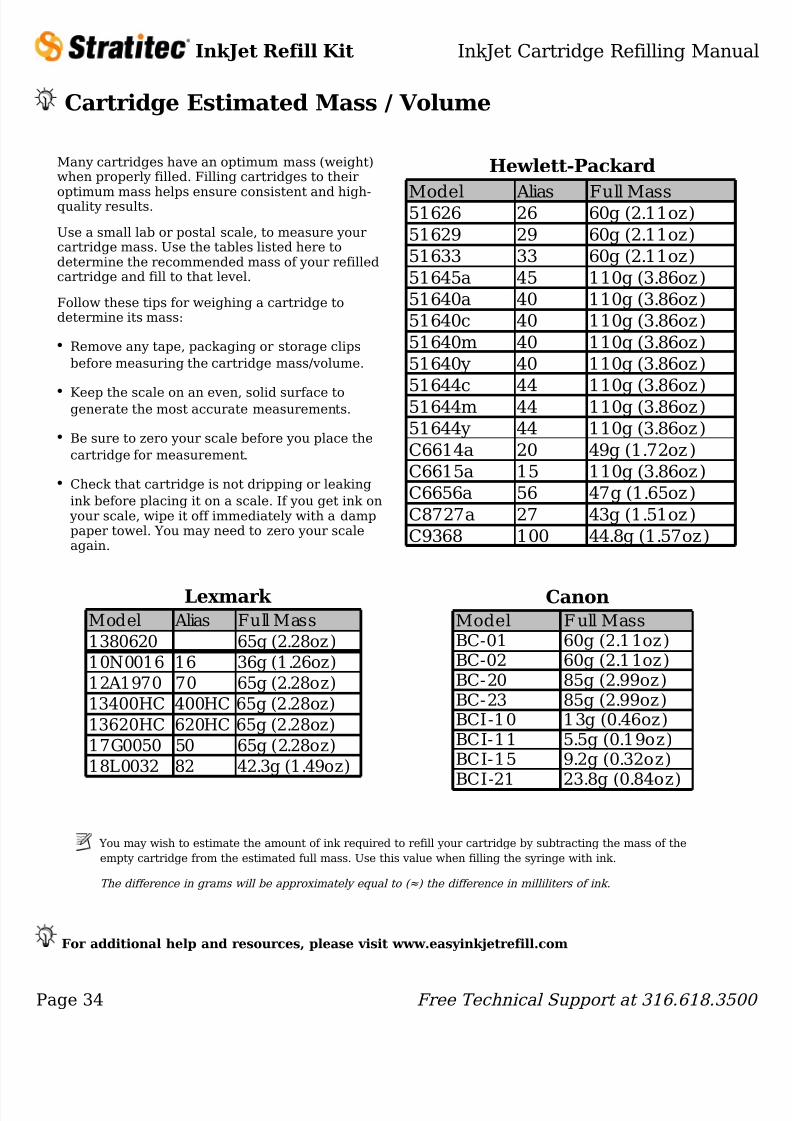
8/14/2019 Manual Recarga de Cartuchos (Bom e Completo, Mas Nao Tem Toner)
http://slidepdf.com/reader/full/manual-recarga-de-cartuchos-bom-e-completo-mas-nao-tem-toner 34/36
InkJet Refill Kit InkJet Cartridge Refilling Manual
Cartridge Estimated Mass / Volume
For additional help and resources, please visit www.easyinkjetrefill.com
Page 34 Free Technical Support at 316.618.3500
Model Alias Full Mass51626 26 60g (2.11oz)51629 29 60g (2.11oz)51633 33 60g (2.11oz)51645a 45 110g (3.86oz)51640a 40 110g (3.86oz)51640c 40 110g (3.86oz)51640m 40 110g (3.86oz)51640y 40 110g (3.86oz)
51644c 44 110g (3.86oz)51644m 44 110g (3.86oz)51644y 44 110g (3.86oz)C6614a 20 49g (1.72oz )C6615a 15 110g (3.86oz)C6656a 56 47g (1.65oz)C8727a 27 43g (1.51oz )C9368 100 44.8g (1.57oz)
Hewlett-Packard
Model Alias Full Mass1380620 65g (2.28oz)10N0016 16 36g (1.26oz)12A1970 70 65g (2.28oz)13400HC 400HC 65g (2.28oz)13620HC 620HC 65g (2.28oz)17G0050 50 65g (2.28oz)18L0032 82 42.3g (1.49oz)
Lexmark Model F ull MassBC-01 60g (2.11oz)BC-02 60g (2.11oz)BC-20 85g (2.99oz)BC-23 85g (2.99oz)BCI-10 13g (0.46oz)BCI-11 5.5g (0.19oz)BCI-15 9.2g (0.32oz)
BCI-21 23.8g (0.84oz)
Canon
Many cartridges have an optimum mass (weight)when properly filled. Filling cartridges to their
optimum mass helps ensure consistent and high-quality results.
Use a small lab or postal scale, to measure yourcartridge mass. Use the tables listed here todetermine the recommended mass of your refilledcartridge and fill to that level.
Follow these tips for weighing a cartridge todetermine its mass:
• Remove any tape, packaging or storage clipsbefore measuring the cartridge mass/volume.
• Keep the scale on an even, solid surface togenerate the most accurate measurements.
• Be sure to zero your scale before you place thecartridge for measurement.
• Check that cartridge is not dripping or leakingink before placing it on a scale. If you get ink on
your scale, wipe it off immediately with a damppaper towel. You may need to zero your scaleagain.
You may wish to estimate the amount of ink required to refill your cartridge by subtracting the mass of theempty cartridge from the estimated full mass. Use this value when filling the syringe with ink.
The difference in grams will be approximately equal to (≈) the difference in milliliters of ink.
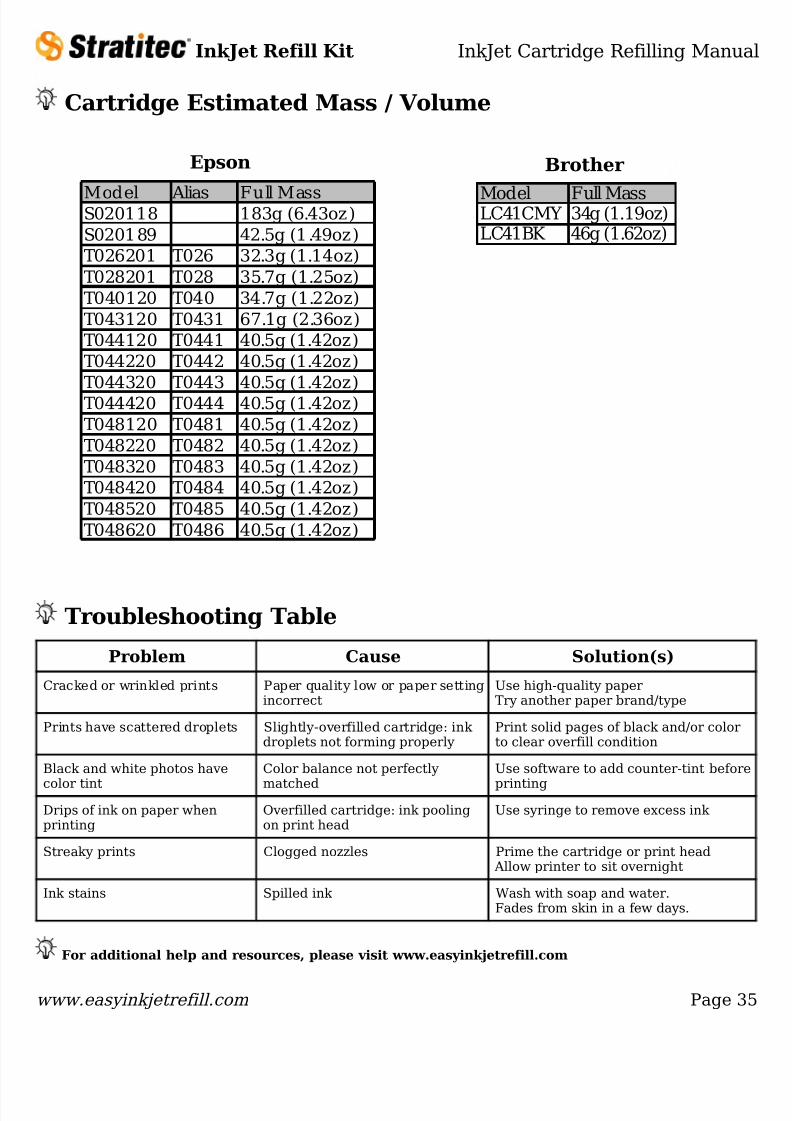
8/14/2019 Manual Recarga de Cartuchos (Bom e Completo, Mas Nao Tem Toner)
http://slidepdf.com/reader/full/manual-recarga-de-cartuchos-bom-e-completo-mas-nao-tem-toner 35/36
InkJet Refill Kit InkJet Cartridge Refilling Manual
Cartridge Estimated Mass / Volume
Troubleshooting Table
Problem Cause Solution(s)
Cracked or wrinkled prints Paper quality low or paper settingincorrect
Use high-quality paperTry another paper brand/type
Prints have scattered droplets Slightly-overfilled cartridge: ink droplets not forming properly
Print solid pages of black and/or colorto clear overfill condition
Black and white photos have
color tint
Color balance not perfectly
matched
Use software to add counter-tint before
printingDrips of ink on paper whenprinting
Overfilled cartridge: ink poolingon print head
Use syringe to remove excess ink
Streaky prints Clogged nozzles Prime the cartridge or print head Allow printer to sit overnight
Ink stains Spilled ink Wash with soap and water.Fades from skin in a few days.
For additional help and resources, please visit www.easyinkjetrefill.com
www.easyinkjetrefill.com Page 35
Model Alias Full MassS020118 183g (6.43oz)S020189 42.5g (1.49oz)T026201 T026 32.3g (1.14oz)T028201 T028 35.7g (1.25oz)T040120 T040 34.7g (1.22oz)T043120 T0431 67.1g (2.36oz)T044120 T0441 40.5g (1.42oz)T044220 T0442 40.5g (1.42oz)T044320 T0443 40.5g (1.42oz)T044420 T0444 40.5g (1.42oz)T048120 T0481 40.5g (1.42oz)T048220 T0482 40.5g (1.42oz)T048320 T0483 40.5g (1.42oz)T048420 T0484 40.5g (1.42oz)T048520 T0485 40.5g (1.42oz)T048620 T0486 40.5g (1.42oz)
Epson
Model Full MassLC41CMY 34g (1.19oz)LC41BK 46g (1.62oz)
Brother
8/14/2019 Manual Recarga de Cartuchos (Bom e Completo, Mas Nao Tem Toner)
http://slidepdf.com/reader/full/manual-recarga-de-cartuchos-bom-e-completo-mas-nao-tem-toner 36/36