Embed Size (px)
Citation preview
Module 1, 2: Text Format
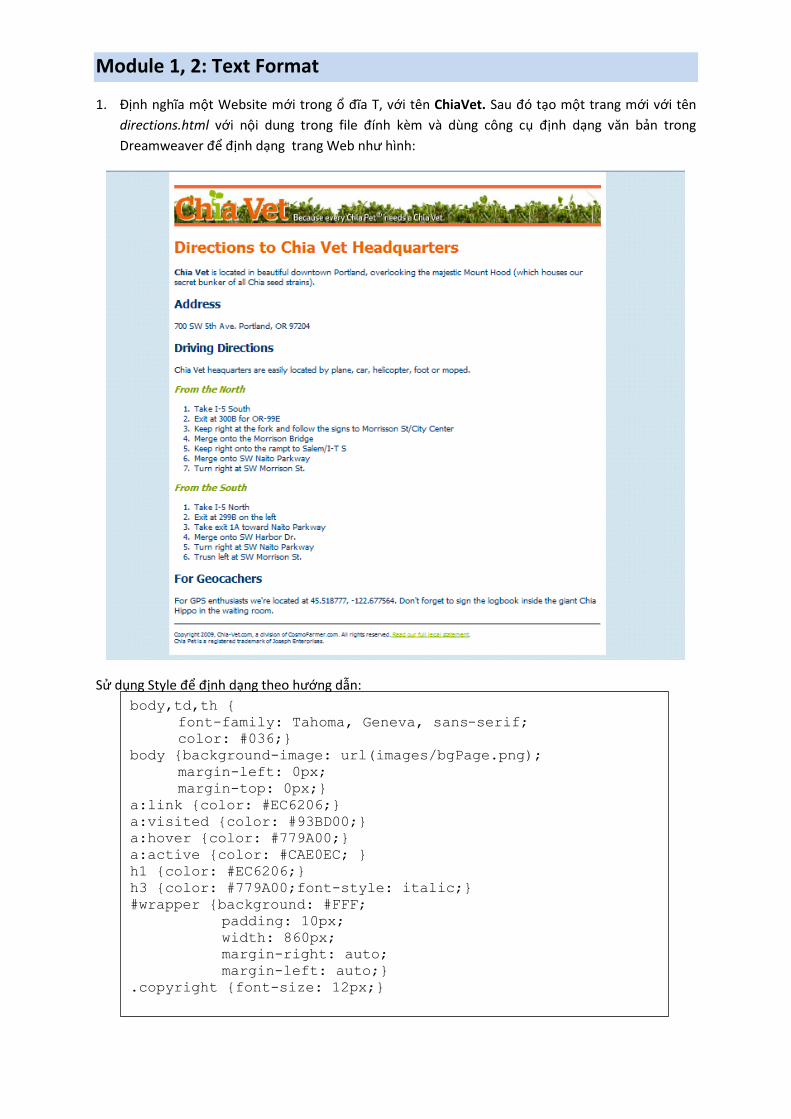
1. Định nghĩa một Website mới trong ổ đĩa T, với tên ChiaVet. Sau đó tạo một trang mới với tên
directions.html với nội dung trong file đính kèm và dùng công cụ định dạng văn bản trong
Dreamweaver để định dạng trang Web như hình:
Sử dụng Style để định dạng theo hướng dẫn:
body,td,th {
font-family: Tahoma, Geneva, sans-serif;
color: #036;}
body {background-image: url(images/bgPage.png);
margin-left: 0px;
margin-top: 0px;}
a:link {color: #EC6206;}
a:visited {color: #93BD00;}
a:hover {color: #779A00;}
a:active {color: #CAE0EC; }
h1 {color: #EC6206;}
h3 {color: #779A00;font-style: italic;}
#wrapper {background: #FFF;
padding: 10px;
width: 860px;
margin-right: auto;
margin-left: auto;}
.copyright {font-size: 12px;}

2. Tạo trang Web với tên about.html trong cùng Website ChiaVet, với nội dung theo file đính kèm
sau đó dùng công cụ định dạng và style sheet trong Dreamweaver để định dạng trang như hình:
Tạo một tập tin StyleSheet với tên Global.css trong thư mục html với nội dung như hướng dẫn, sau
đó liên kết với trang html: <link href="global.css" rel="stylesheet" type="text/css" />
h1 {
font:normal 48px"Palatino Linotype","Book Antiqua",Palatino,serif;
color: #779A00;
border-top: 7px solid #FF9933;
border-bottom: 2px solid #FC9D36;
padding-top: 5px;
}
p {
margin-left: 75px;
font: 14px/150% "Trebuchet MS", Arial, Helvetica, sans-serif;
margin-top: 5px;
}
h2 {
color: #EC6206;
text-transform: uppercase;
font:24px"Palatino Linotype", "Book Antiqua", Palatino, serif;
margin-bottom: 0px;
}
.copyright {
font-size: 12px;
color: #666;
margin-top: 25px;
margin-left: 0px;
border-top: 1px dashed #93BD00;
padding-top: 5px;
font-weight: bold;
}

3. Tạo trang Web ChiaVet trong website Chiave, sau đó dùng style sheet định dạng trang
web ChiaVet
Chia trang web thành 3 phần
<body id="tip" class="twocol">
<div id="container">
<div id="header">
<p id="logo"> <img src="../IMAGE/logo.png" width="533" height="73" /></p>
</div>
<div id="sidebar">
Nội dung của cột bên phải của trang
</div>
<div id="mainwrapper">
<div id="mainContent">
Nội dung chính của trang (Cột bên trái của trang)
</div>
<br class="clearfloat" />
</div>
header
Main
Footer
header
Maincontent Sidebar
Container
Main

<div id="footer"> <div id="footercol1">
Cột thứ 1 </div>
<div id="footercol2"> Cột thứ 2
</div>
<div id="footercol3"> Cột thứ 3
</div> <br class="clearall" />
</div>
</div> </body>
Bước 1: Tạo style sheet cho phần header của trang
body { font-family: Tahoma, Geneva, sans-serif; font-size: 100%; background-color: #FFF; background-image: url(../IMAGE/bgPage.png); background-repeat: repeat; text-align: center; margin: 0px; padding-top: 0px; padding-right: 0px; padding-bottom: 15px; padding-left: 0px; }
#header { background-image: url(../IMAGE/bgGrass.jpg); background-repeat: no-repeat; background-position: left bottom; padding: 0px; height: 145px; margin-top: 0px; margin-right: 0px; margin-bottom: 10px; margin-left: 0px; border-top-width: 6px; border-top-style: solid; border-top-color: #f63; position: relative; }
#container { background-color: #FFF; text-align: left; width: 860px; margin-top: 0px; margin-right: auto; margin-left: auto; padding-top: 0px; padding-right: 15px; padding-bottom: 3px; padding-left: 15px; }
#logo { margin-top: 0px; margin-right: 0px; margin-bottom: 38px; margin-left: 0px; }
Bước 2: Định dạng cột bên phải của trang
Footer

#sidebar p { font-family: "Palatino Linotype", "Book Antiqua", Palatino, serif; margin-top: 7px; margin-bottom: 0px; padding-left: 10px; } #sidebar .seperator { background-image: url(../IMAGE/separator.png); background-repeat: no-repeat; background-position: center bottom; padding-bottom: 25px; text-align:justify; }
#sidebar dd { font-size: 13px; margin-bottom: 10px; margin-right: 0px; margin-left: 0px; line-height: 130%; padding-top: 0px; padding-right: 0px; padding-bottom: 0px; padding-left: 10px; }
#question label { font-family: Tahoma, Geneva, sans-serif; font-size: 12px; font-weight: bold; display: block; margin-top: 10px; }
#question input, #question textarea { font-size: 16px; width: 240px; border: 1px solid #779a00; }
#sidebar dl strong { font-family: Tahoma, Geneva, sans-serif; font-size: 14px; font-weight: bold; color: #ec6211; }
#question input#submitQuestion { font-size: 14px; font-weight: bold; color: #FFF; background-color: #ff9933; width: auto; }
#sidebar dt { font-family: "Palatino Linotype", "Book Antiqua", Palatino, serif; font-size: 14px; line-height: 115%; font-weight: bold; margin-bottom: 5px; padding-left: 10px; }

Bước 3: Định dạng phần chính của trang
#mainwrapper { background-color: #FFF; background-image: url(../IMAGE/bgMainWrapper.png); background-repeat: no-repeat; background-position: left bottom; padding-top: 0px; padding-right: 0px; padding-bottom: 3px; padding-left: 0px; }
#mainContent h1 { font-size: 30px; font-weight: normal; text-transform: uppercase; letter-spacing: 1px; margin: 0px; } #mainContent h1 strong { font-weight: normal; color: #ec6206; }
#mainContent p { font-size: 14px; line-height: 130%; margin-top: 15px; margin-right: 0px; margin-bottom: 0px; margin-left: 0px; text-align: justify; } #mainContent { padding-left: 10px; }
#mainContent .tagline { font-family: "Palatino Linotype", "Book Antiqua", Palatino, serif; font-size: 16px; border-bottom-width: 1px; border-bottom-style: solid; border-bottom-color: #ec6206; color: #779a00; margin-top: -2px; margin-right: 0px; margin-bottom: 15px; margin-left: 0px; padding-bottom: 5px; }
#mainContent h2 { font-size: 22px; font-weight: normal; color: #638000; margin-top: 20px; margin-right: 0px; margin-bottom: 0px; border-bottom-width: 1px; border-bottom-style: solid; border-bottom-color: #ec6206; }
#tip #sidebar { background-color: #eaebe4; background-image: url(../IMAGE/bgQnA.png); background-repeat: no-repeat; background-position: center top; padding-top: 65px; }

Bước 4: Tạo 2 cột
.twocol #sidebar { background-color: #eaebe4; background-image: url(../IMAGE/bgRightCol.png); background-repeat: repeat-x; background-position: left top; margin: 0px; float: right; width: 260px; padding-top: 15px; padding-right: 10px; border-top-width: 3px; border-right-width: 3px; border-left-width: 3px; border-top-style: solid; border-right-style: solid; border-left-style: solid; border-top-color: #9BBF13; border-right-color: #9BBF13; border-left-color: #9BBF13; }
.twocol #mainContent { margin-top: 0px; margin-right: 290px; margin-bottom: 0px; margin-left: 0px; padding-top: 10px; padding-right: 15px; padding-bottom: 60px; border-top-width: 3px; border-right-width: 3px; border-left-width: 3px; border-top-style: solid; border-right-style: solid; border-left-style: solid; border-top-color: #93bd00; border-right-color: #93bd00; border-left-color: #93bd00; }
Bước 5: Tạo phần footer

#footercol1 { padding: 10px; float: left; width: 270px; } #footercol2 { background-image: url(../IMAGE/vetLogo.png); background-repeat: no-repeat; background-position: 0px 15px; float: left; width: 290px; margin-left: 35px; padding-top: 20px; padding-right: 10px; padding-bottom: 0px; padding-left: 70px; } #footercol3 { font-weight: bold; float: left; padding-top: 20px; padding-right: 0px; padding-bottom: 0px; padding-left: 20px; font-size: 12px; }
#footer p { font-size:12px } #footercol1 blockquote { font-family: Tahoma, Geneva, sans-serif; color: #FFF; background-image: url(../IMAGE/quoteBubble.png); text-align: center; margin: 0px; height: 60px; width: 270px; padding-top: 15px; padding-right: 0px; padding-bottom: 0px; font-size:12px; } #footer { clear: both; } #footer p { font-size: 12px; }
#container #footer .copyright { font-size: 10px; line-height: 130%; color: #999; margin-top: 10px; margin-right: 0px; margin-bottom: 0px; margin-left: 0px; } .clearall { clear: both; }
.twocol #footer { padding-top: 15px; padding-right: 0px; padding-bottom: 0px; padding-left: 0px; } .twocol #footer p { margin: 0px; padding: 0px; }

Module 3: Tạo menu
#signup {
margin: 0px;
border-left: 1px solid #CAE0EC;
border-right: 2px solid #CAE0EC;
border-top: 1px solid #CAE0EC;
border-bottom: 2px solid #CAE0EC;
width: 255px;
position: absolute;
top: 0px;
right: 0px;
background-color: #EDEEE8;
z-index: 100;
background-color: #EDEEE8;
margin: 0px;
padding: 4px 10px 6px 10px;
font-size: 12px;
}
Tạo menu
I. Tạo menu và liên kết đến các trang: Đặt trỏ dưới Logo và trong header.
1. Mở lại trang ChiaVet trong bài tập style1
2. Chọn Insert-> Spry-> Spry Menu Bar.
3. Chọn Horizontal click OK
4. Choose File ➝ Save.
5. Tạo nhãn, thêm nút và tạo liên kết: trong document window, click Spry
Menu Bar trên new menu. Thanh Property inspector hiển thị thuộc tính
của menubar.
6. Trong Property inspector chọn Item 1 trong cột bên trái, trong Text box,
nhập nhãn Home.

7. Tạo liên kết: Click nút “Browse for File” trong root button chọn tập tin
index.html.
8. Trong cột thứ 2 trong Property inspector, lần lượt chọn item 1.1 Item 1.2
và Item 1.3 click nút – (Xóa submenu)
9. Chọn Item 2: nhập nhãn Meet the Vets, link đến trang meet_vets.html
10. Chọn Item 3: nhập nhãn Services, và tạo liên kết đến trang index.html
trong folder services.
11. Trong cột thứ 2 của Property inspector, chọn Item 3.1; nhập nhãn
Preventative Care, và tạo liên kết đến trang preventative.html trong folder
services. Menu này có 2 pop-up menu
12. Trong cột thứ 3, xóa 3.1.1 và Item 3.1.2.
13. Tương tự cho Item 3.2 và Item 3.3: với các nhãn và link lần lượt là
Boarding liên kết đến trang boarding.html trong folder services; nhãn
Emergency Services link đến trang emergency.html trong folder services
14. Tương tự cho Item 4: nhập nhãn About Us, liên kết đến trang index.html
trong folder about.
15. Chọn About Us trong cột thứ nhất, click dấu +, trong cột thứ 2 thêm
pop-up menu. Trong Text field, nhập nhãn History,và link đến trang
history.html trong folder about.
16. Tương tự, click dấu + trong cột thứ 2 thêm pop-up menu cho About Us
với nhãn là Facilities và link đến trang facilities.html trong folder shop.
17. Chọn Facilities, trong the Property Inspector, trong cột thứ 3 clicks dấu +
button. Tạo pop-up menu Patient Care và link đến patient.html trong
folder about.
18. Tiếp tục tạo nút Chia Research Institute, và link đến trang research.html
trong folder about.
19. Trong cột thứ nhất, Click dấu + thêm menu Directions, và link đến trang
directions.html trong root folder.
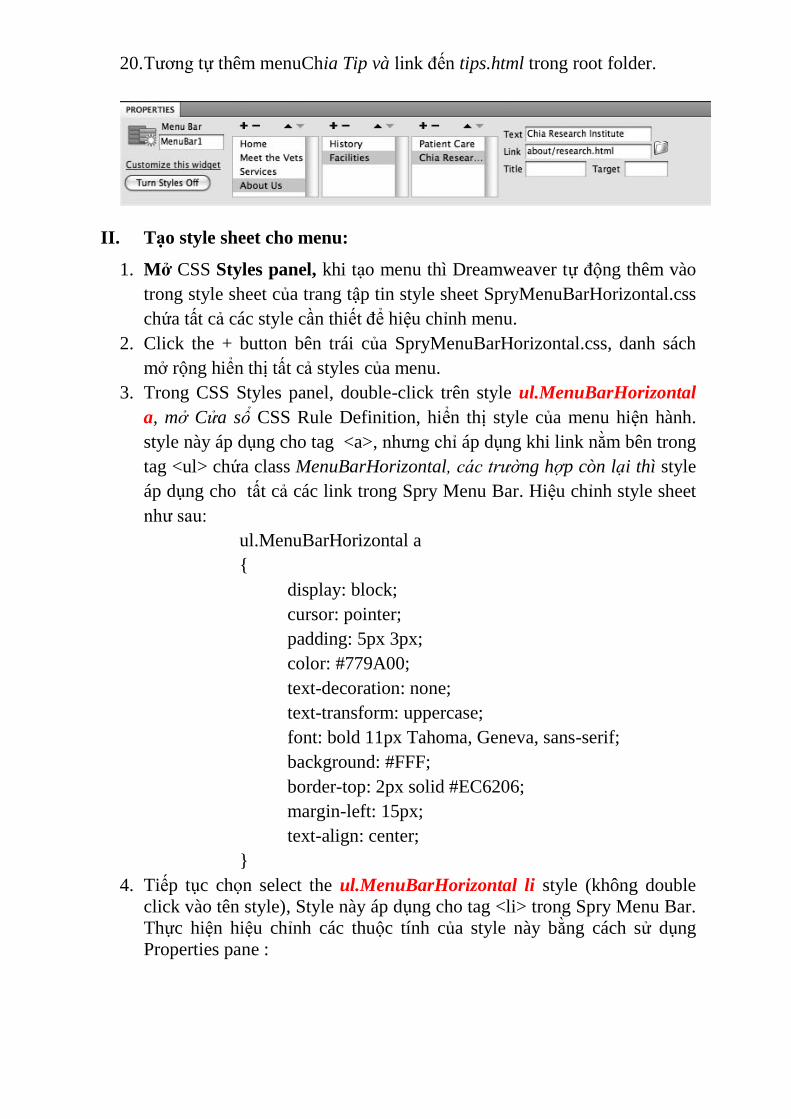
20. Tương tự thêm menuChia Tip và link đến tips.html trong root folder.
II. Tạo style sheet cho menu:
1. Mở CSS Styles panel, khi tạo menu thì Dreamweaver tự động thêm vào
trong style sheet của trang tập tin style sheet SpryMenuBarHorizontal.css
chứa tất cả các style cần thiết để hiệu chỉnh menu.
2. Click the + button bên trái của SpryMenuBarHorizontal.css, danh sách
mở rộng hiển thị tất cả styles của menu.
3. Trong CSS Styles panel, double-click trên style ul.MenuBarHorizontal
a, mở Cửa sổ CSS Rule Definition, hiển thị style của menu hiện hành.
style này áp dụng cho tag <a>, nhưng chỉ áp dụng khi link nằm bên trong
tag <ul> chứa class MenuBarHorizontal, các trường hợp còn lại thì style
áp dụng cho tất cả các link trong Spry Menu Bar. Hiệu chỉnh style sheet
như sau:
ul.MenuBarHorizontal a
{
display: block;
cursor: pointer;
padding: 5px 3px;
color: #779A00;
text-decoration: none;
text-transform: uppercase;
font: bold 11px Tahoma, Geneva, sans-serif;
background: #FFF;
border-top: 2px solid #EC6206;
margin-left: 15px;
text-align: center;
}
4. Tiếp tục chọn select the ul.MenuBarHorizontal li style (không double
click vào tên style), Style này áp dụng cho tag <li> trong Spry Menu Bar.
Thực hiện hiệu chỉnh các thuộc tính của style này bằng cách sử dụng
Properties pane :

Tại thuộc tính “width” mặc định 8em,
nhập lại 125 đơn vị là px
Tại cuối của cửa sổ Properties Pane,
click vào mục Add Property link; chọn
margin-left: 15px.
ul.MenuBarHorizontal li
{
padding: 0;
list-style-type: none;
font-size: 100%;
position: relative;
text-align: left;
cursor: pointer;
width: 135px;
float: left;
margin-left: 7px;
}
1. Chọn ul.MenuBarHorizontal ul style.
Chọn ul.MenuBarHorizontal ul và click the
Trash can icon (delete)
Chọn ul.MenuBarHorizontal ul li. Sử dụng
the Properties pane, set width=125px và
margin-left = 0.
Style này chỉ áp dụng cho tag <li> bên trong tag <ul> với
MenuBarHorizontal
III. Submenus and Rollover Buttons
1. Trong CSS Styles panel, double-click trên ul.MenuBarHorizontal ul ul
style. Thực hiện hiệu chỉnh trong CSS Rule Definition window
ul.MenuBarHorizontal ul ul
{
position: absolute;
margin-top: 2px;
margin-left: 142px;
}
2. Tương tự, Chọn style ul.MenuBarHorizontal a.MenuBarItem-Hover (a
little over half of the way down the list of styles).
Tên đầy đủ của style này là tên của một nhóm các style:
o ul.MenuBarHorizontal a.MenuBarItemHover,
o ul.MenuBarHorizontal a.MenuBarItemSubmenu-Hover,
o ul.MenuBarHorizontal a.MenuBarSubmenuVisible”,
thực hiện hiệu chỉnh các thuộc tính cho nhóm style này như sau:
o background color and text color in the Properties pane:
background-color: #33C;
color: #FFF;

3. Chọn ul.MenuBarHorizontal a:hover, thực hiện định dạng như bước 2.
4. Trong Files panel (Window ➝ Files), folder NEW_NAV_IMAGES chứa 4 tập
tin image.
5. Drag chuột đưa những tập tin
này vào trong thư mục
SpryAssets để thay thế các
tập tin cũ.
6. Trong Styles panel, chọn
ul.MenuBarHorizontal click Add Property button;
hiệu chỉnh thuộc tính zoom: 1
7. Choose Commands ➝ “Insert
Mark of the Web”.
IE không cho bạn xem trước
bất kỳ hiệu ứng JavaScript (ví
dụ: the pop-up menu). Chèn
“Mark of the Web” ngăn IE
can thiệp vào JavaScript.
Để bỏ “mark,” chọn
Commands ➝ “Remove Mark of the Web”.
8. Choose File ➝ Save All, nhấn F12 (Option-F12) để preview.
Module 4, 5: Dùng Stylesheet định dạng Table
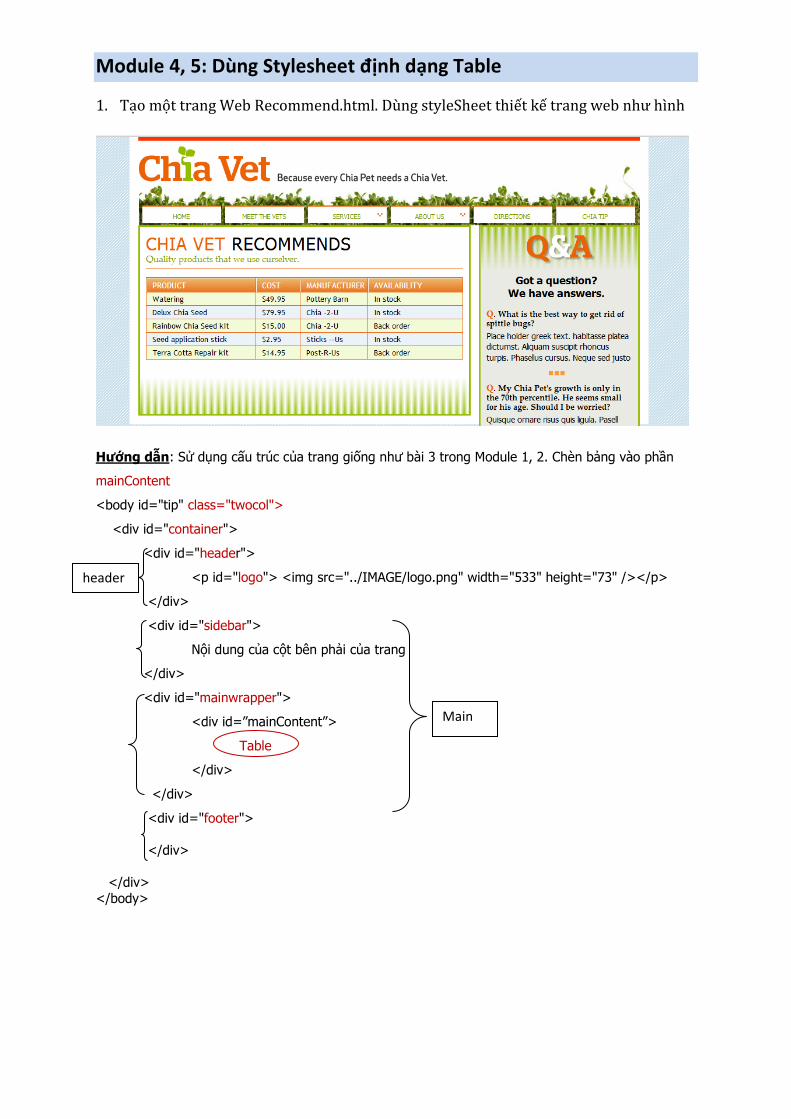
1. Tạo một trang Web Recommend.html. Dùng styleSheet thiết kế trang web như hình
Hướng dẫn: Sử dụng cấu trúc của trang giống như bài 3 trong Module 1, 2. Chèn bảng vào phần
mainContent
<body id="tip" class="twocol">
<div id="container">
<div id="header">
<p id="logo"> <img src="../IMAGE/logo.png" width="533" height="73" /></p>
</div>
<div id="sidebar">
Nội dung của cột bên phải của trang
</div>
<div id="mainwrapper">
<div id=”mainContent”>
Table
</div>
</div>
<div id="footer">
</div>
</div>
</body>
header
Main

Bước 1: Tạo một trang mới tên Table, định dạng trang như hình trên áp dụng các stylesheet đã tạo trong bài trước.
Bước 2: Chèn bảng vào trang bằng một trong 2 cách sau: a. Dùng chức năng Import dữ liệu và tạo bảng và file dữ liệu kèm theo:
Trong document window, chọn menu file Import Tabular Data… Xuất hiện cửa sổ Import Tabular Data. Trong Data file: chọn file dữ liệu cần import dạng .txt, dữ liệu trong các cell được
nhập cách nhau bởi dấu “,” hoặc “tab” hoặc “;”. Delimiter: chọn loại dấu cách Chỉ định Cell padding , cell spacing và border =0 ->OK Chọn dòng đầu làm dòng tiêu đề (<th>).

b. Dùng chức năng insert Table Nhập số dòng số cột, xác định dòng đầu làm tiêu đề Xác định độ rộng của bảng width=100% Chọn dòng đầu làm dòng tiêu đề (<th>) Nhập dữ liệu cho bảng.
Bước 2: Dùng stylesheet định dạng bảng (Formatting the Table) a. Tạo class .products gán cho tag <table class=” product”)
.product { Border-collapse: collapse; Font-family: "Trebuchet MS", Arial, Helvetica, sans-serif; Font-size: 13px; }
b. Tạo một style gồm 2 CSS selectors: .product th định dạng tag <th> bên trong tag có class là .product .product th { text-transform: uppercase; color: #FFF; background-color: #EC6206; background-image: url(../images/bgTh.jpg); (trong chapter 7) text-align: left; padding-top: 4px; padding-right: 5px; padding-bottom: 2px;

padding-left: 10px; border: 1px solid #EC6206; }
c. Tương tự tạo style .products td định dạng tag <td> .product td { padding-top: 2px; padding-right: 2px; padding-bottom: 2px; padding-left: 10px; border: 1px solid #EC6206; }
d. Tạo style định dạng lưới của bảng sao cho các dòng chẵn và lẻ có màu nền khác nhau: Tạo class .odd
.old { Background-color: #ECF4F9; }
Tạo class .even .even { background-color: #F4FBD9; }
e. Chọn dòng chẵn gán class even, và dòng lẻ gán class odd

2. Tạo một Website mới với tên Table, tạo trang web mới tên KPAF.html trong
website Table. Sử dụng chức năng table và stylesheet để định dạng trang web sau:
Hướng dẫn:
Cấu trúc của trang:
Bước 1: Tạo stylesheet cho body và container
body { background-image: url(../hinh/bgPage.png); background-repeat: repeat; margin-top: 0px; margin-left: 0px; } #container { background-color: #FFF; width: 1044px; margin-left: auto;
rightcol Maincontent
Header
<body>
<div id="container">
<div id="heading">
Nội dung Phần header
</div>
<div id="rightcol">
Phần rightcol
</div>
<div id="maincontent">
Phần Main
</div>
</div>
</body>

margin-right: auto; padding-right: 10px; padding-left: 10px; padding-bottom: 5px; }
Bước 2: Copy nội dung dưới đây vào phần heading
<h2>| Listener supported <i>since</i> 1966</h2>
<ul>
<li><a href="#">Home</a></li>
<li class="roundedBox"><a href="#">Schedule</a></li>
<li><a href="#">Programs</a></li>
<li><a href="#">Music</a></li>
<li><a href="#">News</a></li>
<li><a href="#">Events</a></li>
<li><a href="#">Listen Live</a></li>
<li><a href="#">Contact Us</a></li>
<li><a href="#">Support KPAF</a></li>
</ul>
Bước 3: Tạo stylsheet cho phần heading
#heading {color: white; background-color: rgb(215, 205, 151);
border-bottom: 1px solid rgb(105, 177, 60)}
#heading h2 {color: white; background-color: rgb(105, 177, 60);
font-size: 1.1em; padding: 5px 0px 5px 12px; margin: 0px}
#heading i {font-size: 0.7em}
#heading ul {list-style-type: none; margin: 0px; padding: 0px}
#heading ul li {
display: inline;
font-size: 0.9em;
font-family: 'Courier New', monospace;
background-color: rgb(215, 205, 151);
padding: 0px 10px;
margin: 0px
}
#heading ul li a {text-decoration: none; color: rgb(105, 177, 60)}
#heading ul li a:hover {color: rgb(153, 0, 153)}
Bước 4: Tạo cột rightcol
a) Tạo stylesheet
#rightcol {
float: right;
width: 270px;
}
b) Tạo table bên trong <div id=rightcol>:
<table class="roundedBox" cellpadding="0" cellspacing="0">
<tr>
<td class="topLeft" scope="col"></td>
<td class="top"></td>
<td class="topRight"></td>
</tr>

<tr>
<td class="left"></td>
<td class="boxcontent">Nội dung trong table </td>
<td class="right"></td>
</tr>
<tr>
<td class="bottomLeft"></td>
<td class="bottom"></td>
<td class="bottomright"></td>
</tr>
</table>
c) Tạo stylesheet cho table:
table.roundedBox td.topLeft {width: 16px; height: 16px} table.roundedBox td.topRight {width: 16px; height: 16px} Table.roundedBox td-bottomleft {width: 16px; height: 16px} table.roundedBox td.bottomRight {width: 16px; height: 16px} table.roundedBox td.top {width: auto; height: 16px} table.roundedBox td.bottom {width: auto; height: 16px} table.roundedBox td.left {width: 16px; height: auto} table.roundedBox td.right {width: 16px; height: auto} .topLeft {background: url (../hinh/topleft.png) no-repeat top left} .topRight { background-image: url(../hinh/topright.png); background-repeat: no-repeat; background-position: right top; } .top { background-image:url(../hinh/top.png)} .bottom { background-image:url(../hinh/bottom.png); background-repeat: repeat-x; background-position: bottom; } .bottomLeft { background-image: url(../hinh/bottomleft.png); background-repeat: no-repeat; background-position: left bottom; } .bottomright { background-image: url(../hinh/bottomright.png); background-repeat: no-repeat; background-position: right bottom; }

.left {background: url(../hinh/left.png) repeat-y left}
.right { background-image: url(../hinh/right.png); background-repeat: repeat-y; background-position: right; }
d) Chép nội dung vào table:
<h1 class="newshows">Coming Up on KPAF</h1>
<ul class="newshows">
<li>
<h2 class="newshows">April 11 - 14</h2>
<h3 class="newshows">The Classical Music Connection</h3>
<p>Peter Thiesen shares his eclectic selections from the world of
classical music. </p>
</li>
<li>
<h2 class="newshows">April 11</h2>
<h3 class="newshows">Opera Fest</h3>
<p>Excerpts from <i>Turandot</i> by Giacomo Puccini.</p>
</li>
<li>
<h2 class="newshows">April 12</h2>
<h3 class="newshows">Radio U</h3>
<p>Novelist Karen Graves reads from her latest
work, <i>Hellion of Troy</i>.</p>
</li>
<li>
<h2 class="newshows">April 13</h2>
<h3 class="newshows">Science Week</h3>
<p>Prof. Thomas Glass from UND discusses
<i>String Theory and Spooky Action at a Distance</i>.</p>
</li>
<li>
<h2 class="newshows">April 14</h2>
<h3 class="newshows">The Living World</h3>
<p>A panel discussion on the <i>Return of the Electric Car</i> and the
latest in eco-news. <br /></p>
</li>
<li> </li>
</ul>
e) Tạo stylesheet cho nội dung trong table của rightcol:
h1.newshows {font-size: 0.9em; text-align: center; color: white; background-color: rgb(153,0,153); font-family: 'Trebuchet MS', Arial, Verdana, sans-serif; margin: 0px; padding: 0px}
h2.newshows { font-size: 1.5em; color: black; text-align: left; line-height: 0.95; font-family: 'Trebuchet MS', Arial, Verdana, sans-serif; margin: 10px 0px 0px 0px; padding: 0px } h3.newshows { font-size: 1.2em; color: black; text-align: left; font-weight: bold; font-family: 'Trebuchet MS', Arial, Verdana, sans-serif; margin: 0px; padding: 0px } ul.newshows {
font-size: 0.7em; padding: 0px; margin: 0px 0px 0px 5px;
list-style-type: none} ul.newshows li {padding: 0px; margin: 0px} ul.newshows li p { font-size: 1.2em; margin: 5px 0px 0px 0px; padding: 0px 0px 0px 5px; border-left: 4px solid rgb(255,202,255) } p.newshows {
Font-size: 0.7em; Padding: 0px 0px 0px 5px; Margin: 5px 0px 0px 0px;
Border-left: 4px solid rgb(255,202,255)} Bước 5: Tạo phần main
a) Chép nội dung bên dưới vào phần main
<h1><img src="../hinh/kpaf.jpg" alt="KPAF" /></h1>
<h2>KPAF Nightly Schedule</h2>
<p>KPAF airs listener-supported public radio in Bismarck, North Dakota
from
5:00 a.m. to 10:30 p.m. You can <a href="#">Listen Live</a> to
streaming audio of our broadcast. Please refer below for our current
nightly schedule.
</p>
b) Tạo styleshhet cho nội dung trên:
#maincontent h1 {margin: 0px; padding: 0px} #maincontent h2 {
Color: white; Background-color: rgb(153, 0, 153);
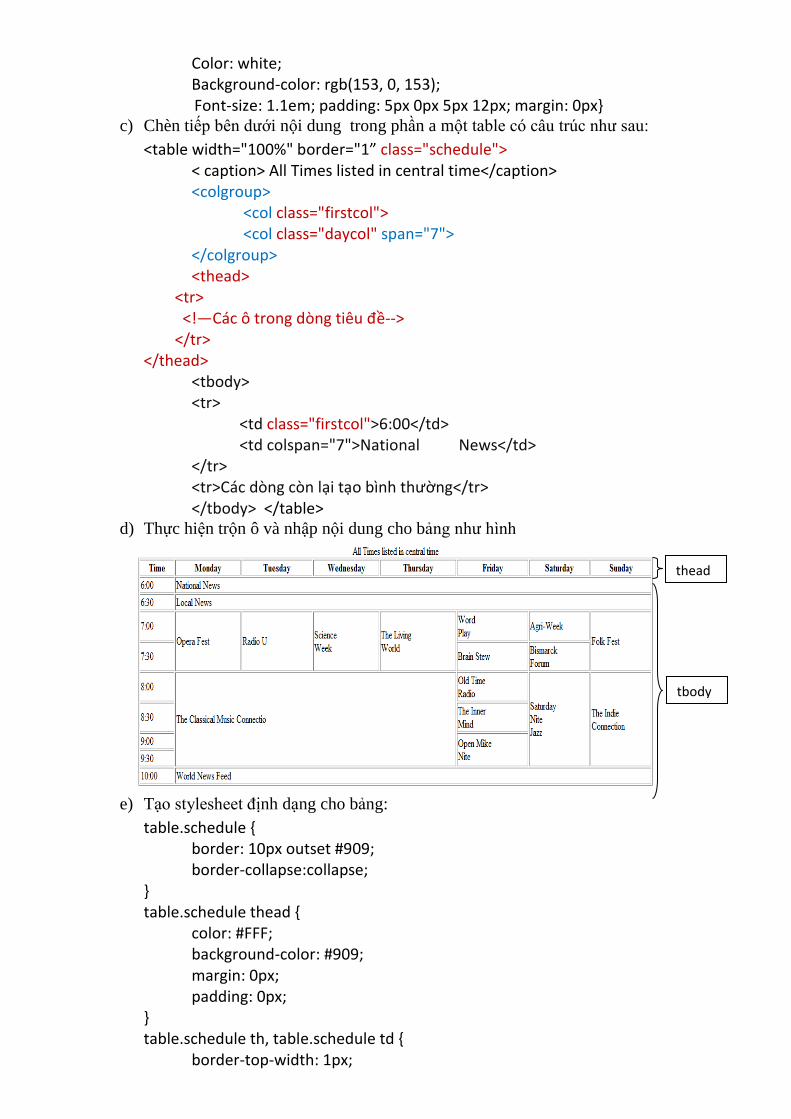
Font-size: 1.1em; padding: 5px 0px 5px 12px; margin: 0px} c) Chèn tiếp bên dưới nội dung trong phần a một table có câu trúc như sau:
<table width="100%" border="1” class="schedule"> < caption> All Times listed in central time</caption> <colgroup> <col class="firstcol"> <col class="daycol" span="7"> </colgroup> <thead> <tr> <!—Các ô trong dòng tiêu đề--> </tr> </thead> <tbody> <tr> <td class="firstcol">6:00</td> <td colspan="7">National News</td> </tr> <tr>Các dòng còn lại tạo bình thường</tr> </tbody> </table>
d) Thực hiện trộn ô và nhập nội dung cho bảng như hình
e) Tạo stylesheet định dạng cho bảng:
table.schedule { border: 10px outset #909; border-collapse:collapse; } table.schedule thead { color: #FFF; background-color: #909; margin: 0px; padding: 0px; } table.schedule th, table.schedule td { border-top-width: 1px;
thead
tbody

border-top-style: solid; border-top-color: gray; } table.schedule thead tr { height: 20px; } table.schedule tbody tr { height: 30px; }
f) Chép nội dung trong phần address vào cuối table và tạo stylesheet cho tag
<address>
<address>
KPAF ·
4300 Magnolia Lane ·
Bismarck, ND 58504 ·
(701) 555 - 5611
</address>
h1, h2, h3, p
{
font-family: 'Trebuchet MS', Arial, Verdana, sans-serif
}
address
{
font-size: 0.65em; font-style: normal; text-align: center;
font-family: 'Trebuchet MS', Arial, Verdana, sans-serif;
color: white; background-color: rgb(105, 177, 60);
margin: 20px 0px
}

Module 6, 7: Dùng Stylesheet định dạng Form-chức năng validate
Sử dụng chức năng CSS Layout để tạo trang web sau:
1. Chọn File ➝ New. 2. Chọ Blank Page trong cột Page type, chọn HTML, trong cột Layout column, chọn loại
“2 column fixed, right sidebar, header and footer” Create 3. Định dạng cho phần header giống như bài trước. 4. Chèn thêm tag <div id=” mainWrapper”> chứa mainContent và sidebar
5. Chép nội dung vào maincontent: <h1><strong>Make </strong>an<strong> Appointment</strong></h1> <p class="tagline">Keep your Chia Pet happy and healthy.</p> <p>Make an appointment with Chia-Vet.com 24 hours a day, 7 days a week with this online appointment form. Please fill out the fields below with the appropriate information and click the "Make Appointment" button.</p> 6. Tạo stylesheet cho phần maincontent:
#mainWrapper { margin: 10px 0 0 0; padding: 0 0 3px 0; background-color: #FFFFFF; background-image: url(../images/bgMainWrapper.png); background-repeat: no-repeat; background-position: left bottom; } .twoColFixRtHdr #mainContent { margin: 0 290px 0 0 padding: 0px 10px 0 10px border-top: 3px solid #9BBF13 }

#mainContent h1 { font-weight: normal; text-transform: uppercase; font-size: 30px; letter-spacing: 1px; margin: 0; } #mainContent h1 strong { font-weight: normal; color: #EC6206; } #mainContent .tagline { font: 16px "Palatino Linotype", "Book Antiqua", Palatino, serif; border-bottom: 1px solid #EC6206; padding-bottom: 5px; margin: -2px 0 15px 0; color: #779A00; }
7. Chép nội dung vào sidebar:
<h2>Appointment Scheduling</h2> <h3>Hours</h3> <p><strong>Monday-Friday:</strong> 8:00am – 6:00pm </p> <h3>Location and Contact Info</h3> <p>700 SW 5th Ave. <br /> Portland, OR 97204<br /> (866) 555-100</p> <p><strong>Appointment: </strong>(866) 555-1212<br /> <strong>24 Hour Emergency:</strong> (866) 555-9111</p> <h3>Cancellation PolicY</h3> <p>Donec eu mi sed turpis feugiat feugiat. Integer turpis arcu, pellentesque eget, cursus et, fermentum ut, sapien. Fusce metus mi, eleifend sollicitudin, molestie id, varius et, nibh. Donec nec libero.Donec eu mi sed turpis feugiat feugiat. Integer turpis arcu, pellentesque eget, cursus et, fermentum ut, sapien. Fusce metus mi, eleifend sollicitudin, molestie id, varius et, nibh. </p>
8. Định dạng cho sidebar: #sidebar1 h2 { font-size: 16px; text-align: center; margin: 0 0 25px 0; } #sidebar1 h3 { color: #EC6206; font-size: 14px; border-top: 1px solid #999; text-transform: uppercase; font-weight: bold; padding-top: 2px; margin: 20px 0 0 0; } #sidebar1 p { font: 14px "Palatino Linotype", "Book Antiqua", Palatino, serif;

margin-top: 7px; margin-bottom: 0px; } .twoColFixRtHdr #sidebar1 { float: right; width: 250px; margin: 0; border-top: 3px solid #9BBF13; border-right: 3px solid #9BBF13; border-left: 3px solid #9BBF13; background-color: #EAEBE4; background-image: url(images/bgRightCol.png); background-repeat: repeat-x; background-position: left top; padding-top: 45px 10px15px 10px } #services #sidebar1 { padding-top: 45px; background-image: url(images/bgFacts.png); background-repeat: no-repeat; background-position: center top; }
9. Chèn vào mainContent một form và các phần tử của form như hình, thiết lập thuộc tính cho form và các phần tử của form theo hướng dẫn bên dưới:
a) Thuộc tính của Form − Trong Property inspector, Form ID= appointment − Action = http://www.chia-vet.com/make.php. − Method = POST
b) Chèn các phần tử vào trong form:
− Text Field: a) ID = clientName b) Label = Your name; chọn “Attach label tag using ‘for’ attribute”;

c) Position: chọn “Before form item” d) OK
e) Chọn textfiel clientName và hiệu chỉnh các thuộc tính trong Property inspector như sau: Char width= 35 Tạo stylesheet cho label (Các label có class= question)
#appointment .question { font-weight: bold; display: block; margin-top: 15px; padding-top: 5px; border-top: 1px dashed #9BBF13 }
Làm tương tự cho các text field còn lại
10. Gán Spry Validation cho Text Field
Trong document window, Chọn textfield phone
Click nút Spry validation textField
Chọn Spry tab của phone number
Trong properties inspector, chỉ định những ràng buộc cho textField Phone o Type: chọn phone number o Preview states: chọn required
Tương tự chọn lại Spry tab của phone number
o Preview states: chọn invalid format (nghĩa là text field số điện thoại có 2 ràng buộc: bắt buộc nhập và nhập đúng định dạng)
11. Hiệu chỉnh định dạng của thông báo lỗi: o Click bên trong của thông báo lỗi o Trong CSS panel chọn .textfieldRequiredState .textfieldRequiredMsg o Hiệu chỉnh các thuộc tính như hình

12. Tương tự gán Spry validation cho các phần tử còn lại:
Gán Spry validation cho textField Date với các yêu cầu: − Đúng định dạng kiễu ngày: dd/mm/yy − Bắt buộc nhập − Kiểm tra hợp lệ khi click nút submit
Gán Spry validation cho textField time: − Phần tử time là một drop down list, tạo và nhập giá trị như hình:
− Trong Property inspector:
o Do not allow: chọn Invalid value và nhập -1 o Preview states: Invalid
− Hiệu chỉnh định dạng của thông báo lỗi trong style: .selectRequiredState
.selectRequiredMsg.
Gán Spry validation cho Radio Group:

− Dưới ô time chèn một label − <label class=question>Please select a reason for this appointment.</label> − Bên dưới nhãn chèn Validation Radio Group.( Insert ➝ Form ➝ Spry Validation Radio
Group) − Name: appointmentType. − Line breaks:<br>OK
− Trong Property inspector − Preview States: Required. − Thông báo lỗi: “Please make a selection”
Tạo một paragraph mới và gán class=question. − <p class=question></p> − Chèn một button vào trong tag <p> − Value=Make appointment. − Type=Submit

13. Tạo Collapsible Panels
Spry Collapsible Panel là một tab hoặc một panel đơn mà khi click vào tab, nó có thể đóng hoặc mở panel.
Đặt trỏ tại góc trên phải của panel
Chọn Insert ➝ Spry ➝ Spry Collapsible Panel, hoặc trên Insert panel, click Spry Collapsible Panel.
Trong collapsible panel, có 2 phần: labeled “Tab” và “Content”
o Trong Tab: Nhập “+ Sign up for our newsletter”.
Click chọn collapsible panel, trong Property inspector:
o Display: Open o Default state: Open
Check: Enable animation.
Nhập nội dung cho Collapsible Panel
Định dạng cho Collapsible Panel: Khi đưa Spry Collapsible Panel vào trang thì Dreamweaver liên kết đến stylesheet SpryCollapsiblePanel.css chứa tất cả các style điều khiển tab và the panel.
o The Collapsible Panel: .CollapsiblePanel o All tabs: .CollapsiblePanelTab o Tab when moused over: .CollapsiblePanelTabHover, o .CollapsiblePanelOpen o .CollapsiblePanelTabHover
Tạo các stylesheet định dạng cho nội dung của Collapsible Panel #signup label, #question label, #appt label { font-family:Tahoma, Geneva, sans-serif; font-weight: bold; font-size:12px; display: block; margin-top: 10px; } #signup #submit { margin-top: 15px; margin-bottom: 5px; } #signup #email, #signup #name { width: 250px;

background-color: #DBF3FF; border: 1px solid #779A00; font-size: 16px;}

Module 8, 9: Tổng hợp
Tạo trang Index.html trong Website Chiavet dùng stylesheet định dạng trang như mẫu
.oneColFixCtrHdr #header h1 { margin: 0; /* zeroing the margin of the last element in the #header div will avoid margin collapse - an unexplainable space between divs. If the div has a border around it, this is not necessary as that also avoids the margin collapse */ padding: 10px 0; /* using padding instead of margin will allow you to keep the element away from the edges of the div */ } .oneColFixCtrHdr #mainContent { padding: 0px; /* remember that padding is the space inside the div box and margin is the space outside the div box */ background: #FFFFFF; } .oneColFixCtrHdr #footer { padding: 10px 0 0 0; clear: both; } .oneColFixCtrHdr #footer p { margin: 0; /* zeroing the margins of the first element in the footer will avoid the possibility of margin collapse - a space between divs */ padding: 0; /* padding on this element will create space, just as the the margin would have, without the margin collapse issue */ } #home #homeColumns a:link, #home #homeColumns a:visited { font: bold 12px "Trebuchet MS", Arial, Helvetica, sans-serif; text-transform: uppercase; color: #F93; text-decoration: none; }

.twoColFixRtHdr #header h1 { margin: 0; /* zeroing the margin of the last element in the #header div will avoid margin collapse - an unexplainable space between divs. If the div has a border around it, this is not necessary as that also avoids the margin collapse */ padding: 10px 0; /* using padding instead of margin will allow you to keep the element away from the edges of the div */ } .twoColFixRtHdr #sidebar1 { float: right; /* since this element is floated, a width must be given */ width: 250px; /* the actual width of this div, in standards-compliant browsers, or standards mode in Internet Explorer will include the padding and border in addition to the width */ background: #EAEBE4 url(../images/bgRightCol.png) repeat-x left top; /* the background color will be displayed for the length of the content in the column, but no further */ padding: 15px 10px; margin: 10px 0 0 0; border-top: 3px solid #9BBF13; border-right: 3px solid #9BBF13; border-left: 3px solid #9BBF13; } .twoColFixRtHdr #mainContent { margin: 10px 290px 0 0; /* the right margin on this div element creates the column down the right side of the page - no matter how much content the sidebar1 div contains, the column space will remain. You can remove this margin if you want the #mainContent div's text to fill the #sidebar1 space when the content in #sidebar1 ends. */ padding: 10px 15px 60px; border-top: 3px solid #93BD00; border-right: 3px solid #93BD00; border-left: 3px solid #93BD00; } /* fix 3 pixel problem with IE 6 */ * html .twoColFixRtHdr #mainContent { margin-right: 287px; } .twoColFixRtHdr #footer { padding: 15px 0 0 0; } .twoColFixRtHdr #footer p { margin: 0; /* zeroing the margins of the first element in the footer will avoid the possibility of margin collapse - a space between divs */ padding: 0; /* padding on this element will create space, just as the the margin would have, without the margin collapse issue */ } .fltrt { /* this class can be used to float an element right in your page. The floated element must precede the element it should be next to on the page. */ float: right; margin-left: 8px; } .fltlft { /* this class can be used to float an element left in your page */ float: left; margin-right: 8px; } .clearfloat { /* this class should be placed on a div or break element and should be the final element before the close of a container that should fully contain a float */ clear:both; height:0; font-size: 1px; line-height: 0px; }

Global.css h1, h2, h3, h4, p, ul, ol, blockquote, form { margin: 0; padding: 0; } li { padding-left: 1em; margin-left: 0; } body { font: 100% Tahoma, Verdana, Arial, Helvetica, sans-serif; background: #FFF url(../images/bgPage.png) repeat; margin: 0; /* it's good practice to zero the margin and padding of the body element to account for differing browser defaults */ padding: 0 0 15px 0; text-align: center; /* this centers the container in IE 5* browsers. The text is then set to the left aligned default in the #container selector */ color: #000000; } a:hover { color: #EC6206 !important; } .clearAll { clear: both; } #container { width: 860px; margin: 0 auto; text-align: left; padding: 0 15px 3px 15px; -webkit-box-shadow: 2px 2px 2px #999; /* safari */ -moz-box-shadow: #999 2px 2px 2px; /* firefox 3.1 */ background-color: #FFFFFF; } #header { padding: 0; border-top: 6px solid #F63; background: url(../images/bgGrass.jpg) no-repeat left bottom; height: 142px; position: relative; } #logo { margin: 0 0 38px 0; } #logo img { display: block; border: none; } #homeImage { background: url(../images/bgHome.jpg);
height: 170px; margin-top: 10px; padding-top: 100px; padding-left: 585px; } #homeImage #bug { margin-top: 100px; margin-left: 580px; } #homeColumns .column{ padding: 15px; border: 3px solid #93BD00; width: 240px; float: left; height: 8em; } #home #homeColumns h2{ font-size: 15px; background: url(../images/headBullet.png) no-repeat left center; padding-left: 20px; margin: 0px; font-weight: bold; color: #000; border-style: none; } #homeColumns #col3 { background: url(../images/homeDoc.jpg) no-repeat right bottom; padding-right: 55px; width: 200px; } #home #homeColumns p{ font: 14px/140% "Palatino Linotype", "Book Antiqua", Palatino, serif; margin: 5px 0 0 0; } #homeColumns #col2 { margin-right: 15px; } #homeColumns #col1{ margin-right: 15px; position: relative; } #home #callout{ border: 1px solid #779A00; padding: 3px; width: 220px; text-align: center; } #homeColumns { margin-top: 10px; } #home #callout p{ color: #FFF; background: #779A00; margin: 0px;

padding: 15px 5px; font-weight: bold; font-size: 16px; } #home #mainContent { background-image: none; } #home #container { background-color: #FFF; background-image: none; } #mainWrapper { margin: 0; padding: 0 0 3px 0; background-color: #FFFFFF; background-image: url(../images/bgMainWrapper.png); background-repeat: no-repeat; background-position: left bottom; } #mainContent h1 { font-weight: normal; text-transform: uppercase; font-size: 30px; letter-spacing: 1px; margin: 0; } #mainContent h1 strong { font-weight: normal; color: #EC6206; } #mainContent p { font-size: 14px; line-height: 130%; margin: 5px 0 0 0; } #mainContent .tagline { font: 16px "Palatino Linotype", "Book Antiqua", Palatino, serif; border-bottom: 1px solid #EC6206; padding-bottom: 5px; margin: -2px 0 15px 0; color: #779A00; } #mainContent h2 { font-weight: normal; font-size: 22px; margin: 20px 0 0; border-bottom: 1px solid #EC6206; color: #638000; } #sidebar1 h2 { font-size: 16px; text-align: center; margin: 0 0 25px 0;
} #sidebar1 h3 { color: #EC6206; font-size: 14px; border-top: 1px solid #999; text-transform: uppercase; font-weight: bold; padding-top: 2px; margin: 20px 0 0 0; } #sidebar1 p { font: 14px "Palatino Linotype", "Book Antiqua", Palatino, serif; margin-top: 7px; margin-bottom: 0px; } #services #sidebar1 { background-image: url(../images/bgFacts.png); background-repeat: no-repeat; background-position: center top; padding-top: 45px; } #tips #sidebar1 { padding-top: 65px; background: #EAEBE4 url(../images/bgQnA.png) no-repeat center top; } #footerCol1 blockquote { background: url(../images/quoteBubble.png) no-repeat; height: 60px; width: 270px; margin: 0px; padding: 15px 0px 0px; font: 12px Tahoma, Geneva, sans-serif; color: #FFF; text-align: center; } #footer p { font-size: 12px; } #container #footer .copyright{ font-size: 10px; color: #999; line-height: 130%; margin: 10px 0 0 0; } #footerCol1 { float: left; width: 270px; padding: 10px; } #footerCol2 { float: left; width: 290px; padding: 20px 10px 0 70px;

margin-left: 35px; background: url(../images/vetLogo.png) no-repeat 0px 15px; } #footerCol3 { background: url(../images/bgFooterDiv.png) no-repeat 0 27px; font-weight: bold; padding: 20px 0 0 20px; float: left; } #footerCol3 strong { color: #EC6206; } #footer { clear: both; } #signup label, #question label, #appt label { font-family:Tahoma, Geneva, sans-serif; font-weight: bold; font-size:12px; display: block; margin-top: 10px; } #signup #submit { margin-top: 15px; margin-bottom: 5px; } #signup #email, #signup #name { width: 250px; background-color: #DBF3FF; border: 1px solid #779A00; font-size: 16px; } #question input, #question textarea { width: 240px; border: 1px solid #779A00; font-size: 16px; } #question input#submitQuestion, #appt input#submitAppt { width: auto; background-color: #FF9933; font-weight: bold; color: #FFF; font-size: 14px; } p#askLogo { text-align: center; margin-top: 15px; } #sidebar1 dt {

margin-bottom: 5px; font: bold 14px/115% "Palatino Linotype", "Book Antiqua", Palatino, serif; } #sidebar1 dl strong { font-family: Tahoma, Geneva, sans-serif; font-weight: bold; color: #EC6211; font-size: 14px; } #sidebar1 dd.seperator { background: url(../images/separator.png) no-repeat center bottom; padding-bottom: 25px; } #sidebar1 dd { font-size: 13px; margin-bottom: 10px; padding: 0px; margin-right: 0px; margin-left: 0px; line-height: 130%; } #container #mainWrapper .announcement{ padding: 10px; width: 210px; border: 3px solid #9ABF13; float: right; } #mainContent .announcement h2 { font-size: 20px; margin: 0px; } #mainContent .announcement p { font-size: 12px; }

Module 10: Ôn tập- Sinh viên tự thiết kế trang Web