Embed Size (px)
Citation preview

取扱説明書/INSTRUCTION MANUAL
PICTROGRAPHY 3500/4000II /4500
超高画質フルカラーデジタルプリンター
DIGITAL IMAGE PRINTER
NETWORK ADAPTER用 プリンタードライバーPRINTER DRIVER for NETWORK ADAPTER● Mac OS Xへのインストール● Installing to Mac OS X
第2版033PC109B
追補編2
Second EditionPP3-B501E2
SUPPLEMENT 2

LICENSING AGREEMENT1. Copyright
The copyright for this software is owned by Fuji Photo Film Co., Ltd. ("FUJI").2. Conditions of Use
You are licensed to use this software on only one PICTROGRAPHY 3500/4000II/4500 device.3. Prohibitions
You may not (1) copy, modify or adapt any or all parts of this software; (2) provide thissoftware to a third party in the form of a copy, loan or gift; or (3) reverse engineer thissoftware.
4. After-Sale ServiceShould the software fail to function properly due to a defect in the medium within 7 (seven)days after the date of purchase, please return the software to the place of purchase for areplacement.
5. Exemptions(1) FUJI does not guarantee that this software will achieve the results intended by the
purchaser.(2) FUJI is not liable for problems that arise from the quality or performance of this software.(3) FUJI is not liable for damages incurred directly or indirectly by the purchaser or a third
party through the use of this software.

INTRODUCTION
This manual gives procedures for installing and using the PICTROGRAPHY 3500/4000II/4500 printerdriver for Mac OS X, as well as several precautions. For information that is not contained in this instructionmanual see the third edition (Ref. No.PP3-B483E3) of the instruction manual for Printer Driver NetworkAdapter.
This software provides a means of making prints with the PICTROGRAPHY 3500/4000II/4500 that isconnected to a network via the PICTROGRAPHY Network Adapter.Before installing the software, be sure to verify that the employed computer is networked and properlyoperating.
For the use of the PICTROGRAPHY Network Adapter, see the supplied installation documentation andonline manual.
For issues directly involving Windows, Macintosh, or other operating systems, please refer to the manualprovided with the particular operating system.
The functions and screen contents presented in this manual are subject to change as software may beupgraded at any time. Screen contents and set-up procedures may differ according to the operatingenvironment which is employed (e.g. type of the OS).
This manual may not be copied or transcribed in whole or in part without prior approval from the publisher.
• Adobe PhotoShop 7.0 is a trademark of Adobe Systems Inc. in several nations.• Microsoft, Windows, and Windows NT are registered trademarks of Microsoft Corp. in the US and other countries.• Macintosh, Mac OS, and AppleTalk are registered trademarks of Apple Computer Inc.• PICTROGRAPHY is a registered trademark of Fuji Photo Film Co, Ltd.• Other product and company names are registered trademarks of the respective companies.
1
2
1. PICTROGRAPHY 3500/4000II/4500 PRINTER DRIVER FOR MAC OS X................... 3
1.1 Operating environment .................................................................................................................. 31.2 Setting up AppleTalk...................................................................................................................... 3
2. INSTALLATION ............................................................................................................. 4
3. UNINSTALL ................................................................................................................... 8
4. USING PRINTER DRIVER............................................................................................. 9
4.1 Work flow through printing ............................................................................................................. 94.2 Print setup and printing.................................................................................................................. 94.3 Print Center.................................................................................................................................. 11
4.3.1 Print Center Outline.................................................................................................... 114.3.2 Checking the print status............................................................................................ 114.3.3 Canceling printing....................................................................................................... 12
5. RESTRICTIONS........................................................................................................... 13
CONTENTS

1. PICTROGRAPHY 3500/4000II/4500 PRINTER DRIVER FOR MAC OS X
1.1 Operating environment
The PICTROGRAPHY 3500/4000II/4500 PrinterDriver for Mac OS X runs in the personalcomputer operating environments detailedbelow:
Hardware
• Model: Power Macintosh G3 or greater• Memory: 128MB or more of available space• HDD: 96MB or more of available space• A computer on which AppleTalk is usable.
Software
• OS: Mac OS X 10.1.3 or later
1.2 Setting up AppleTalk
You need to set up AppleTalk to enable network(Ethernet) printing.Perform setup so as to permit the use ofAppleTalk.
3

2. INSTALLATION
Install the printer driver by performing the followingprocedure:
1. Insert the [PICTROGRAPHY 3500/4000II/4500Network Adapter Printer Driver] CD-ROM intothe PC.
2. Open the following folders on the CD-ROM.PICTROGRAPHY 3500:[Driver]>[PG3500]>[Mac OS X]PICTROGRAPHY 4000II/4500:[Driver]>[PG4K2_4500]>[Mac OS X]The following appears.(Screen shot for PG3500)
3. Double-click the following file in the "Mac OS X"folder.PICTROGRAPHY 3500:"PG3500AT Install.pkg"PICTROGRAPHY 4000II/4500:"PG4K2_4500AT Install.pkg"The following dialog box appears.(Screen shot for PG3500)
4. Click the lock mark.The following dialog box appears.
5. Enter the administrator's name and password,and then click the [OK] button.The following dialog box appears.(Screen shot for PG3500)
6. Click the [Continue] button.The following dialog box appears.(Screen shot for PG3500)
4

2. INSTALLATION
7. Select a destination volume to install the printerdriver and then click the [Continue] button.The following dialog box appears.(Screen shot for PG3500)
8. Click the [Install] button.The following dialog box appears.
9. Click the [Continue Installation] button.When installation is completed, the followingappears. (Screen shot for PG3500)
10.Click the [Restart] button to restart thecomputer.
Installation of PICTROGRAPHY 3500/4000II/4500 Printer Driver for Mac OS X is completed.
When the installation of PICTROGRAPHY 3500/4000II/4500 Printer Driver for Mac OS X iscompleted, perform settings for making prints withthe PICTROGRAPHY 3500/4000II/4500 that isconnected to a network via the PICTROGRAPHYNetwork Adapter.
11.Confirm the PICTROGRAPHY 3500/4000II/4500 and PICTROGRAPHY Network Adapterare connected to the network correctly.
12.Turn ON the PICTROGRAPHY 3500/4000II/4500 and wait until the "Self Check" messageappears on the LCD display.
13.Turn ON the PICTROGRAPHY NetworkAdapter.
∗ Be sure to turn ON the PICTROGRAPHYNetwork Adapter after the "Self Check"message appears on the LCD display on thePICTROGRAPHY 3500/4000II/4500.
14.Select [System Preferences] from the Applemenu.
The [System Preferences] window appears.
5
2. INSTALLATION
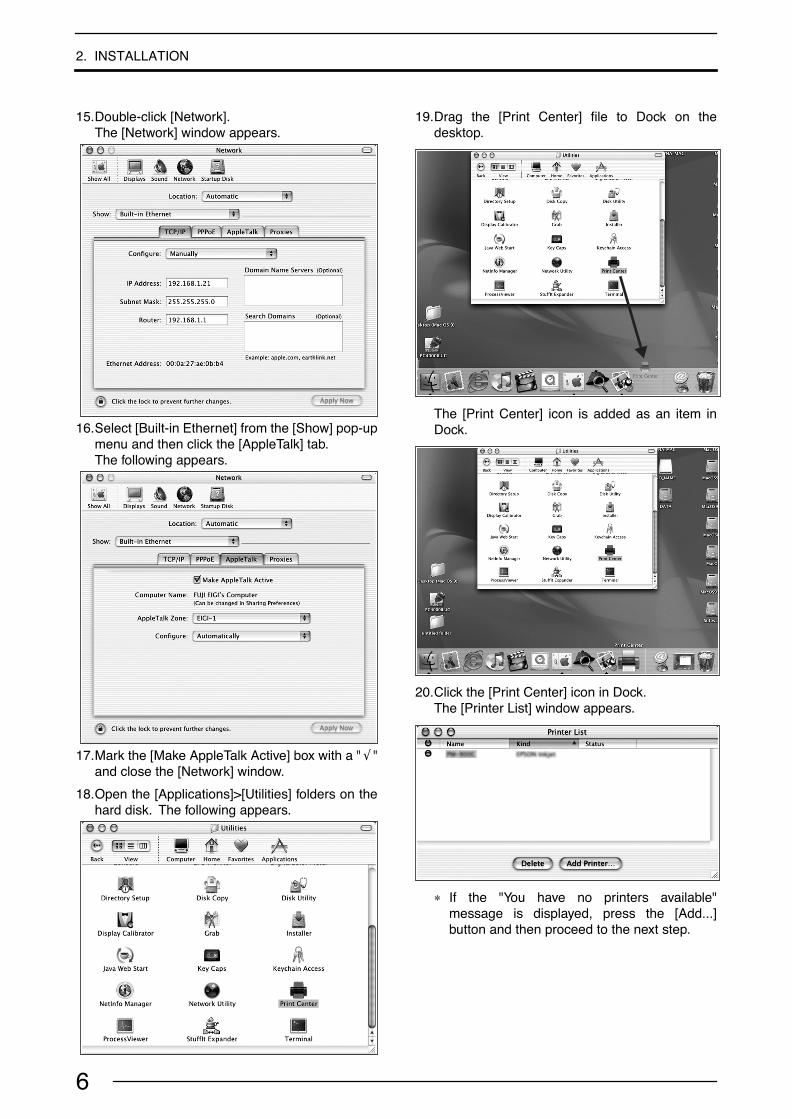
15.Double-click [Network].The [Network] window appears.
16.Select [Built-in Ethernet] from the [Show] pop-upmenu and then click the [AppleTalk] tab.The following appears.
17.Mark the [Make AppleTalk Active] box with a " √ "and close the [Network] window.
18.Open the [Applications]>[Utilities] folders on thehard disk. The following appears.
19.Drag the [Print Center] file to Dock on thedesktop.
The [Print Center] icon is added as an item inDock.
20.Click the [Print Center] icon in Dock.The [Printer List] window appears.
∗ If the "You have no printers available"message is displayed, press the [Add...]button and then proceed to the next step.
6

2. INSTALLATION
21.Click the [Add Printer...] button.The following appears.
22.Select [FUJIFILM PNA(AT)] from the upperpop-up menu. If there are zones in the Apple-Talk network, select a zone to which the PIC-TROGRAPHY 3500/4000II/4500 is connectedfrom the lower pop-up menu.When a PICTROGRAPHY 3500/4000II/4500 onthe network is found, its printer name isdisplayed on the [Product] column. (Screen shotfor PG3500)AppleTalk Printer Names installed in the PIC-TROGRAPHY Network Adapter are displayedon the [Product] column.
23.Select the PICTROGRAPHY 3500/4000II/4500to be used and then click the [Add] button.The selected PICTROGRAPHY 3500/4000II/4500 is added to the printer list.(Screen shot for PG3500)
24.Close the [Printer List] screen.
Settings for making prints with the PICTRO-GRAPHY 3500/4000II/4500 are completed.
7

3. UNINSTALL
The printer driver uninstall procedure is shownbelow.
∗ Even if the uninstall procedure below isperformed, the installed printer driver files arenot deleted. The printer driver files cannot bedeleted in an ordinary way. Normally, there is noneed to delete the printer driver files.
1. Click the [Print Center] icon in Dock on thedesktop.The [Printer List] window appears.(Screen shot for PG3500)
2. Select the printer to be deleted and then clickthe [Delete] button.The selected printer is deleted.
3. Close the [Printer List] window.
Uninstall is completed.
8

4. USING PRINTER DRIVER
4.1 Work flow through printing
Launching an application (preparing print data)Start the application software and create data tobe printed. If you have already created a datafile, open that file.
4.2 Print setup and printing
The specific steps involved in printing vary withapplications. For more information, see theinstruction manual for the application. Theprocedure described below uses AdobePhotoshop 7.0 as an example.
1. Setting a paper sizeOpen the print data file and then select [PaperSetup...] from the [File] menu.
The [Page Setup] window appears.(Screen shot for PG3500)
FormatSelect a destination to print (printer name).
∗ Be sure to select a destination to print. Ifanother printer (or volume) is selected inthis menu, printing may be performedincorrectly. If [Any Printer] is selected,printing is performed with the print size forthe default printer.
Paper SizeSelect a paper size for printing.Note that the printable paper size depends onthe type of paper currently loaded in thePICTROGRAPHY 3500/4000II/4500.
OrientationSelect an orientation of printing.
2. Setting print conditionsOpen the print data file and then select [Print]from the [File] menu.
The [Print] window appears.(Screen shot for PG3500)
9

4. USING PRINTER DRIVER
PrinterSelect a destination to print (printer name).
CopiesSpecify the number of copies you plan toprint. The maximum number of copies is 50.
3. Setting image processing optionsClick the pop-up menu displaying [Copies &Pages] to select [Image Processing].The following appears.(Screen shot for PG3500)
BrightnessAdjust the print density. Settings toward theright (plus direction) result in lighter prints,while settings toward the left (minus direction)result in darker prints.
ContrastAdjust the print contrast. Settings toward theright (plus direction) produce higher contrast,while settings toward the left (minus direction)produce lower contrast.
Color balance (Red/Green/Blue)Adjust color balance for prints. Settingstoward the right (plus direction) result inhigher print density of the color specified,while settings toward the left (minus direction)result in lower print density of the colorspecified.
Image processSelect a color-matching function. This color-matching function refers to the one providedwith the PICTROGRAPHY 3500/4000II/4500,which provides the following options:
ON1 (CG): Performs color conversionssuitable for printing high-chroma images, includingcomputer graphics.Intended for monitors havingcolor temperatures of 9300K*1 and γ 2.2*2.
ON2 (Photo): Produces somewhat softerprints.Intended for monitors havingcolor temperatures of 6500Kand γ 1.8.
ON3 (sRGB): Suitable for printing with ansRGB*3 monitor.As compared with ON1setting, ON3 setting enablesto print saturated colors lowerin brightness and higher insaturation.
ON4: A color-matching function will(PG3000 OFF) work that produces results
close to that obtained withPICTROGRAPHY 3000 colormatching function set to"OFF". (for PG3500)
ON4: A color-matching function will(PG4000 OFF) work that produces results
close to that obtained withPICTROGRAPHY 4000 colormatching function set to"OFF". (for PG4000II/4500)
OFF: Disables printer color matching.With this option selected, grayreproduction is determined bysettings for [Gray balance].
Gray balanceSelect gray gradation and color balance, ifImage process is set to OFF.
Gray1: Suitable for printing withmonitors having (2.2/9300)color temperatures of 9300Kand γ 2.2.
Gray2: Suitable for printing withmonitors having (1.8/6500)color temperatures of 6500Kand γ 1.8.
Gray3 (sRGB): Suitable for printing with ansRGB monitor.
10

4. USING PRINTER DRIVER
*1 Color : The color of a light source isindicated in temperature[Kelvin degrees (K)]. Thehigher the temperature is, themore the color of a lightsource is bluish. The lower thetemperature is, the more thecolor of a light source isreddish.
*2 g (gamma): This shows reproduction ofcolor tone using figures. Thelarger the g rating is, the morethe color is contrasty. Thesmaller the g rating is, themore the color is softer.
*3 sRGB: This is adopted as thestandard RGB color base.
ColorSyncCheck here to use the Mac OS colormanagement function (ColorSync).Checking the ColorSync option displays thefollowing (Screen shot for PG3500):
ProfileChooses an ICC profile for ColorSync.PICTROGRAPHY 3500:Select [Pictrography3500PG-D_ER V3.0].PICTROGRAPHY 4000II:Select [Pictrography4000IIPG-D_ER V3.0].PICTROGRAPHY 4500:Select [Pictrography4500PG-D_ER V3.0].
4. Click the [Print] button.Printing is executed.
4.3 Print Center
4.3.1 Print Center Outline
Print Center is used to monitor the print statusor abort a printing process during printing. Tolaunch Print Center, click the [Print Center] iconin Dock on the desktop. When Print Center islaunched, the following window opens.(Screen shot for PG3500)
Status Display area (Upper part of thescreen)The upper part of the Print Center screenshows a document name and the print statusfor that document, if a print job is currentlybeing processed.
Spool List Display area (Lower part of thescreen)The lower part of the Print Center screenshows a listing of document names andvarious data for those documents, if the printqueue contains any jobs (spool files).If another print job is executed when a printjob is underway, the new job is appended atthe bottom of this list.
4.3.2 Checking the print status
Click the [Print Center] icon in Dock on thedesktop. The [Print Center] window appears. If aprint job is currently in progress, thecorresponding document name and other dataare displayed in the Status Display area (upperpart of the screen).Or, if the print queue contains other jobs to beprinted, document names and other data arelisted in the Spool List Display area (lower partof the screen).
11

4. USING PRINTER DRIVER
4.3.3 Canceling printing
Click the [Print Center] icon in Dock on thedesktop. The [Print Center] window appears.Click [Stop Queue] in the [Queue] menu. If aprint job is currently in progress, printing issuspended.
Printing of the suspended print job is held if youclick the document name in the Spool ListDisplay area and then click the [Hold] button.The held condition is canceled if you click the[Resume] button. The suspended print job isdeleted from the Spool List if you click thedocument name in the Spool List Display areaand then click the [Delete] button.(The Screen shot below is for PG3500)
To resume printing, click [Start Queue] from the[Queue] menu.
12
5. RESTRICTIONS
Error messages may not be displayed when thePICTROGRAPHY 3500/4000II/4500 or thePICTROGRAPHY Network Adapter is turnedOFF, or is not connected to a network. If printingis not performed while "Printing job" or "Openingprinter connection" remains on the Print Centerscreen for a long time, check whether or not thePICTROGRAPHY 3500/4000II/4500 and thePICTROGRAPHY Network Adapter are turnedON, and are connected to a network correctly.
When printing is performed with the [Collated]check box marked with a " √ " (default setting) in[Copies & Pages] of the [Print] screen, datatransfer to the printer is repeated for a number oftimes equal to the designated number of copies.Remove the " √ " mark from the [Collated] checkbox for higher efficiency when multiple copiesare made for a single-page document.
When printing an image from Photoshop 7.0, ifthe size of the image is equal to the designatedpaper size, the image edges may not be printedfor several lines.
When printing from Illustrator 10, collatedprinting is not performed even if the [Collated]check box is marked with a " √ " in [Copies &Pages] of the [Print] screen.
The print queue or print job in Print Center maynot be controlled by the user depending on thetiming of operation.
The positioning or scaling up/down function maynot work correctly depending on applications.
13

FUJI PHOTO FILM CO., LTD.26-30, Nishiazabu 2-chome, Minato-ku, Tokyo 106-8620, Japan
Ref. No. PP3-B501E2 TD-02.12-FG Printed in Japan
033PC109B 営技-02.12-FG
富士写真フイルム株式会社〒106-8620 東京都港区西麻布2-26-30
ピクトロ部
Printed on Recycled Paper
この用紙は再生紙を使用しています.