Embed Size (px)
Citation preview
Multilingual Version
English
日本語
Italiano
Français
中文
Español
Deutsch
Arabic
V0.9
NETWORK SETUP
For Video Recorder
Please read instructions thoroughly before operation and retain it for future reference.
We reserve the right to revise or remove any content in this manual at any time. We do not warrant or assume any legal liability or responsibility for the accuracy, completeness, or usefulness of this manual.
The content of this manual is subject to change without notice.

1
1. BEFORE STARTED
Note: Network configurations may require a person who has advanced network knowledge. It’s
recommended to check with your installer for this service if possible.
Understand How Your Laptop / Computer Connect to Internet
Then, connect your video recorder directly to your router / hub / modem with a network cable, and power it on.
If you’re using:
Router + modem, please refer to “2. Router + Modem” at page 2.
Modem or modem + hub, please refer to “3. Modem / Hub + Modem” at page 5.
2
2. Router + Modem
Before configuring, make sure: Your laptop / PC is connected to the same router as the video recorder is intended to connect to.
You know the IP address, user name and password to access your router.
The DHCP function of your router is on.
Note: For details, please refer to the user manual of your router.
The setup of your video recorder is completed as instructed in its user manual, and it’s powered on.
Note: For details, please refer to the user manual of your video recorder.
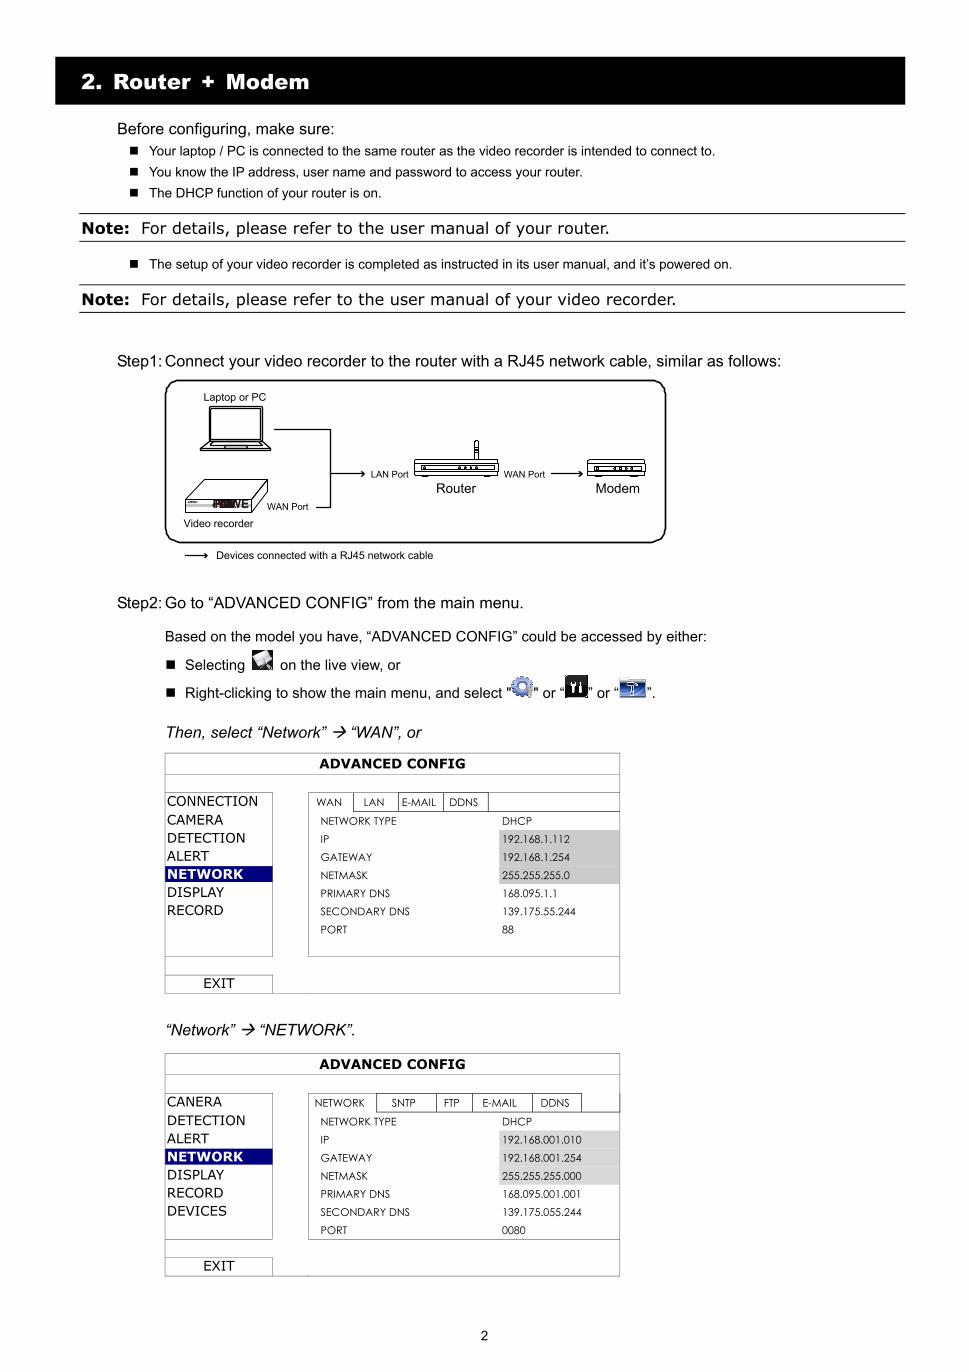
Step1: Connect your video recorder to the router with a RJ45 network cable, similar as follows:
Video recorder
Router ModemLAN Port WAN Port
WAN Port
Devices connected with a RJ45 network cable
LANWANALARMPOWER
Laptop or PC
Step2: Go to “ADVANCED CONFIG” from the main menu.
Based on the model you have, “ADVANCED CONFIG” could be accessed by either:
Selecting on the live view, or
Right-clicking to show the main menu, and select " " or “ ” or “ ”.
Then, select “Network” “WAN”, or
ADVANCED CONFIG
CONNECTION WAN LAN E-MAIL DDNS
CAMERA NETWORK TYPE DHCP DETECTION IP 192.168.1.112 ALERT GATEWAY 192.168.1.254 NETWORK NETMASK 255.255.255.0 DISPLAY PRIMARY DNS 168.095.1.1 RECORD SECONDARY DNS 139.175.55.244 PORT 88
EXIT
“Network” “NETWORK”.
ADVANCED CONFIG
CANERA NETWORK SNTP FTP E-MAIL DDNS
DETECTION NETWORK TYPE DHCP ALERT IP 192.168.001.010 NETWORK GATEWAY 192.168.001.254 DISPLAY NETMASK 255.255.255.000 RECORD PRIMARY DNS 168.095.001.001 DEVICES SECONDARY DNS 139.175.055.244 PORT 0080
EXIT

3
Step3: Select “DHCP”, and configure the DNS setting and port number.
Note: DNS is the domain name server obtained from your ISP (Internet Service Provider).
Note: The default port number is 80. Typically, the TCP port used by HTTP is 80. However in some cases, it is better to change this port number for added flexibility or security.
Then, note down the IP address shown in “IP”. This is the IP address assigned to your video recorder by
the router. You’ll need it later for port forwarding.
Step4: Go to “DDNS”, and select “eagleeyes” in “SYSTEM NAME”.
Note down the whole address under “CURRENT HOST ADDRESS”, such as
MAC000E5318B3F0.ddns.dvrtw.com.tw. This will be the address used to access your video recorder
remotely.
ADVANCED CONFIG
CONNECTION WAN LAN E-MAIL DDNS
CAMERA DDNS ON DETECTION SYSTEM NAME eagleeyes ALERT HOST NAME MAC000E5318B3F0 NETWORK E-MAIL EMPTY DISPLAY RECORD NOTIFY CURRENT HOST ADDRESS
EXIT MAC000E5318B3F0.ddns.dvrtw.com.tw
Then, select “EXIT” to return to the live view, and continue to Step5 for port forwarding.
Step5: Open Internet Explorer® from your laptop / PC, and enter the IP address of your router to access your
router. Enter the user name and password if needed.
Note: Internet Explorer is the registered trademark of Microsoft Corporation in the United States and other countries.
Step6: In the router setting interface, go to the port forwarding (or virtual server) rule configuration page.
Note: The naming of port forwarding or virtual server may vary based on different router brands. To know where it is, please refer to the user manual of your router.
Then, enter the IP address and the port number you note down in Step3, and enable this rule.
Take D-Link router as an example:
Go to “ADVANCED” “PORT FORWARDING”.
IP Address: The IP address of the video recorder, such as 192.168.1.112 in our example.
Ports to Open: The port number you set for the video recorder, such as 88 in our example.

4
Check your connection – via Internet Explorer
Step1: Disconnect the network connection between your laptop and the router, and connect your laptop to other
wireless network if possible.
Note: If there’s no other wireless connection available for your laptop, this method is not suitable for you. Please go to the next section, “Check your connection – via iOS® / Android™ mobile device”.
Step1: Open your web browser, e.g. Internet Explorer.
Step2: Enter the address and the port number in the URL address box of the web browser, and see if you can
access the login page successfully.
The format is “http://hostaddress:portnum”, such as
“http://MAC000E5318B3F0.ddns.dvrtw.com.tw:88” in our example.
If no, the network setup is failed. Please start from Step1 again.
Check your connection – via iOS® / Android™ mobile device
Step1: Download our free mobile app, EagleEyes, from App StoreSM (iOS device) or Google Play™ (Android
device).
Note: App Store is a service mark of Apple Inc. iOS is the trademark of Apple Inc., registered in the U.S. and other countries. Google Play is the trademark of Google Inc.
Step2: Switch the network mode to 3G mode or other wireless network on your
iOS / Android device.
Step3: Open EagleEyes, and select “Manual” when you’re prompted to choose
the setup method.
Step4: Click “+” on the bottom to enter the configuration page.
Then, enter the address, port number, user name and password of your
video recorder.
In our example, the address is MAC000E5318B3F0.ddns.dvrtw.com.tw,
the port number is 88, and the user name and password are both admin
by default (if they haven’t been changed).
Step5: Select “Get Type” to see if you can get the type of your video recorder. If
no, the network setup is failed. Please start from Step1 again.
5
3. Modem / Hub + Modem
Before configuring, make sure: You know you’re using static IP address or PPPoE for Internet service.
For users with static IP address, make sure you get the information of the static IP address, gateway and net mask from your ISP
(Internet Service Provider).
For users with PPPoE, make sure you get the user name and password from your ISP (Internet Service Provider).
The setup of your video recorder is completed as instructed in its user manual, and it’s powered on.
Note: For details, please refer to the user manual of your video recorder.
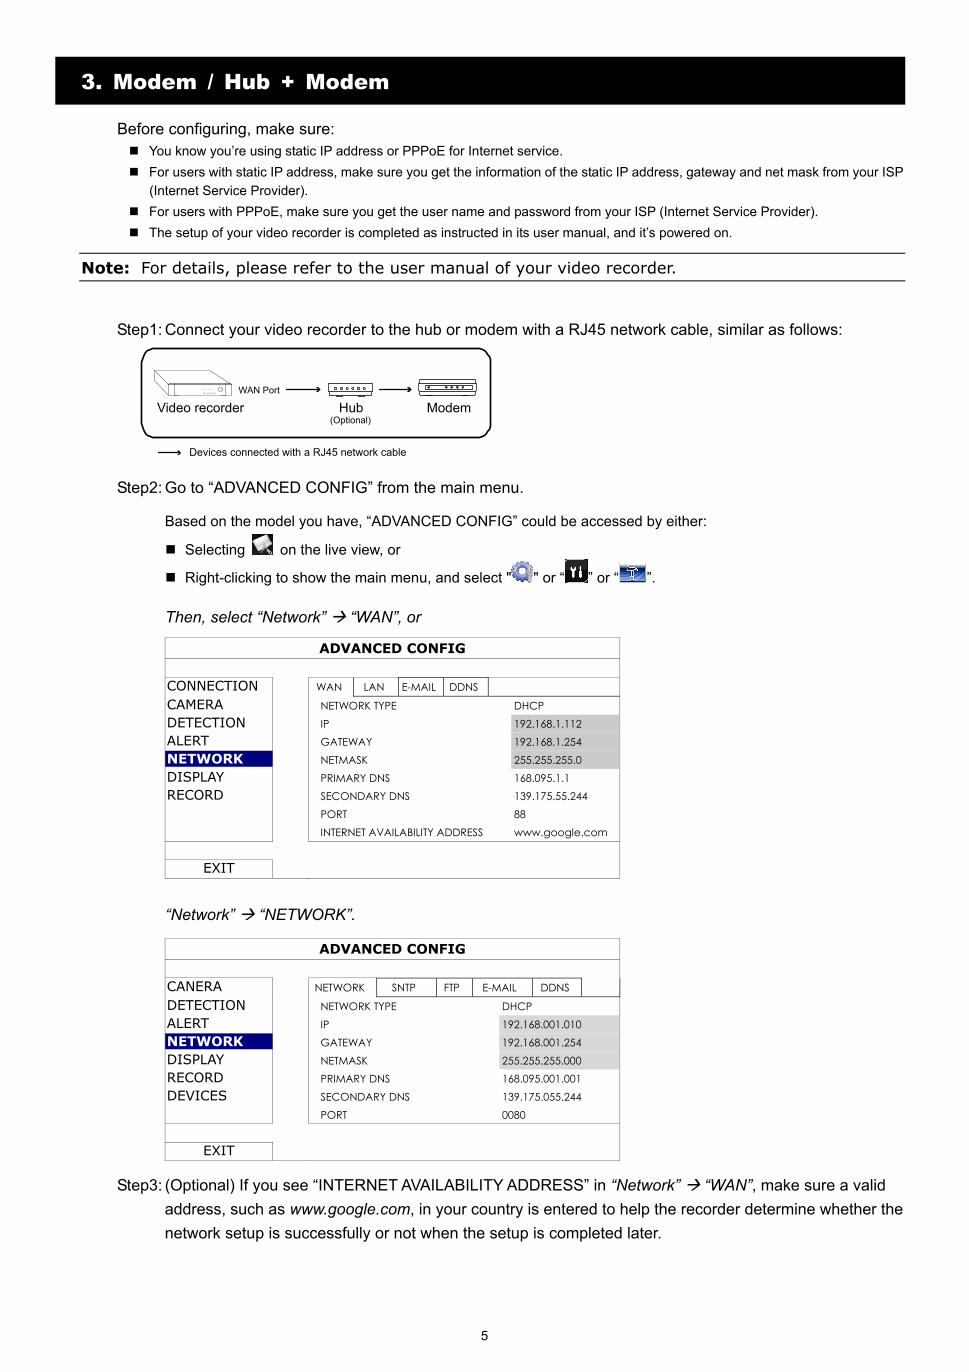
Step1: Connect your video recorder to the hub or modem with a RJ45 network cable, similar as follows:
Video recorder Hub�(Optional)
Modem
WAN Port
Devices connected with a RJ45 network cable
HDD LAN WAN
Step2: Go to “ADVANCED CONFIG” from the main menu.
Based on the model you have, “ADVANCED CONFIG” could be accessed by either:
Selecting on the live view, or
Right-clicking to show the main menu, and select " " or “ ” or “ ”.
Then, select “Network” “WAN”, or
ADVANCED CONFIG
CONNECTION WAN LAN E-MAIL DDNS
CAMERA NETWORK TYPE DHCP DETECTION IP 192.168.1.112 ALERT GATEWAY 192.168.1.254 NETWORK NETMASK 255.255.255.0 DISPLAY PRIMARY DNS 168.095.1.1 RECORD SECONDARY DNS 139.175.55.244 PORT 88 INTERNET AVAILABILITY ADDRESS www.google.com
EXIT
“Network” “NETWORK”.
ADVANCED CONFIG
CANERA NETWORK SNTP FTP E-MAIL DDNS
DETECTION NETWORK TYPE DHCP ALERT IP 192.168.001.010 NETWORK GATEWAY 192.168.001.254 DISPLAY NETMASK 255.255.255.000 RECORD PRIMARY DNS 168.095.001.001 DEVICES SECONDARY DNS 139.175.055.244 PORT 0080
EXIT
Step3: (Optional) If you see “INTERNET AVAILABILITY ADDRESS” in “Network” “WAN”, make sure a valid
address, such as www.google.com, in your country is entered to help the recorder determine whether the
network setup is successfully or not when the setup is completed later.
6
Step4: Select “STATIC”, “PPPOE” or “DHCP” based on your network type, and change the port number if
needed.
For “STATIC”, enter the information of the static IP address, gateway and net mask from your ISP, and go to the next
section, “Check your connection – via Internet Explorer” directly to examine your setup.
For “PPPOE”, enter the DNS address, user name and password from your ISP, assign a port number (if necessary), and
go to “Step4” to continue.
Note: The default port number is 80. Typically, the TCP port used by HTTP is 80. However in some cases, it is better to change this port number for added flexibility or security.
For “DHCP”, go to “Step4” to continue.
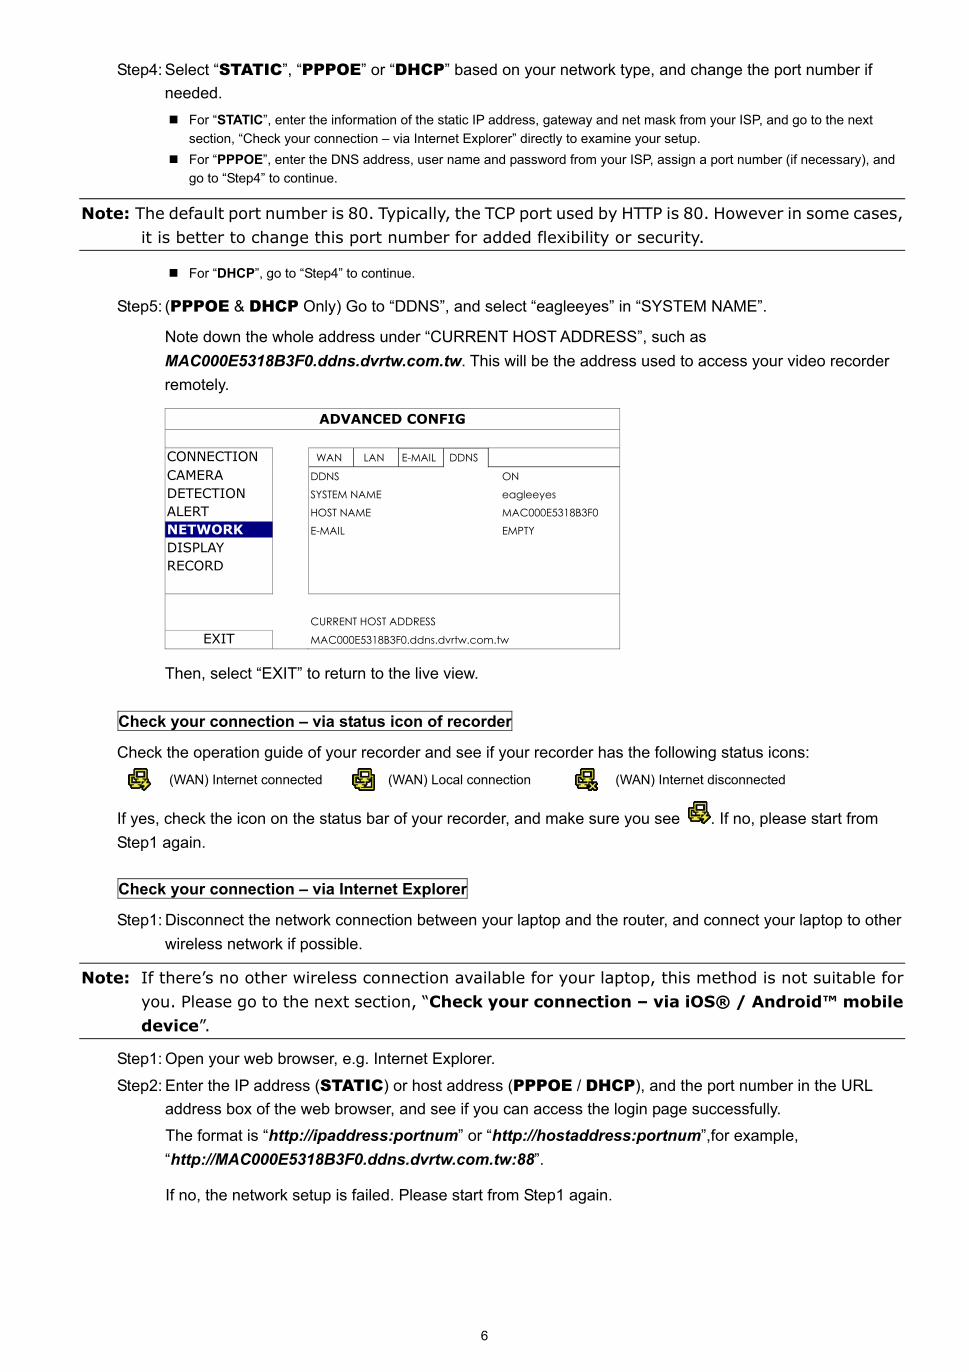
Step5: (PPPOE & DHCP Only) Go to “DDNS”, and select “eagleeyes” in “SYSTEM NAME”.
Note down the whole address under “CURRENT HOST ADDRESS”, such as
MAC000E5318B3F0.ddns.dvrtw.com.tw. This will be the address used to access your video recorder
remotely.
ADVANCED CONFIG
CONNECTION WAN LAN E-MAIL DDNS
CAMERA DDNS ON DETECTION SYSTEM NAME eagleeyes ALERT HOST NAME MAC000E5318B3F0 NETWORK E-MAIL EMPTY DISPLAY RECORD CURRENT HOST ADDRESS
EXIT MAC000E5318B3F0.ddns.dvrtw.com.tw
Then, select “EXIT” to return to the live view.
Check your connection – via status icon of recorder
Check the operation guide of your recorder and see if your recorder has the following status icons:
(WAN) Internet connected (WAN) Local connection (WAN) Internet disconnected
If yes, check the icon on the status bar of your recorder, and make sure you see . If no, please start from
Step1 again.
Check your connection – via Internet Explorer
Step1: Disconnect the network connection between your laptop and the router, and connect your laptop to other
wireless network if possible.
Note: If there’s no other wireless connection available for your laptop, this method is not suitable for you. Please go to the next section, “Check your connection – via iOS® / Android™ mobile device”.
Step1: Open your web browser, e.g. Internet Explorer.
Step2: Enter the IP address (STATIC) or host address (PPPOE / DHCP), and the port number in the URL
address box of the web browser, and see if you can access the login page successfully.
The format is “http://ipaddress:portnum” or “http://hostaddress:portnum”,for example,
“http://MAC000E5318B3F0.ddns.dvrtw.com.tw:88”.
If no, the network setup is failed. Please start from Step1 again.

7
Check your connection – via iOS® / Android™ mobile device
Step1: Download our free mobile app, EagleEyes, from App StoreSM (iOS device) or Google Play™ (Android
device).
Note: App Store is a service mark of Apple Inc. iOS is the trademark of Apple Inc., registered in the U.S.
and other countries. Google Play is the trademark of Google Inc.
Step2: Switch the network mode to 3G mode or other wireless network on your
iOS / Android device.
Step3: Open EagleEyes, and select “Manual” when you’re prompted to choose
the setup method.
Step4: Click “+” on the bottom to enter the configuration page.
Then, enter the IP address (STATIC) or host address (PPPOE /
DHCP), port number, user name and password of your video recorder.
In our example, the address is MAC000E5318B3F0.ddns.dvrtw.com.tw,
the port number is 88, and the user name and password are both admin
by default (if they haven’t been changed).
Step5: Select “Get Type” to see if you can get the type of your video recorder. If
no, the network setup is failed. Please start from Step1 again.

jp_V0.9
ネットワーク設定
ビデオレコーダ
今後ご参考のため、この取扱説明書をよくお読みになった上、よく保管してください。
我々はこのマニュアルの内容をいつでも修正もしくは除去してもよい権利を保留します。 我々は本マニュアルの精度、完全性あるいは有用性に対して法的責任あるいは義務を正当化もしくは適用しません。
本マニュアルの内容は無断で変更する場合があります。

1
1. 開始する前に
注意: ネットワーク設定には、高度なネットワーク知識を有する人が必要です。できれば、このサービスの設置者と相談す
ることをお勧めします。
自分のラップトップコンピュータ/デスクトップコンピュータがどのようにインターネットに接続されているかを理解してくだ
さい
次に、ネットワークケーブルを使用して、ビデオレコーダをルーター/ハブ/モデムに直接接続し、電源を入れてください。以
下の機器を使用している場合。
ルーターとモデムを使用している場合は、2 ページの「2. ルーター + モデム」を参照してください。
モデムまたはモデムとハブを使用している場合は、5 ページの「3. モデム/ハブとモデム」を参照してください。
ルーター + モデム
コンピュータ
ラップトップコンピュータ ルーター モデム
モデムまたはモデム + ハブ
コンピュータ
ラップトップコンピュータ ハブ
(オプション装備)
モデム
RJ45 ネットワークケーブルで接続された装置

2
2. ルーター + モデム
設定する前に、以下のことを確認してください。 ラップトップコンピュータ/デスクトップコンピュータが、ビデオレコーダ接続用のルーターと同じルーターに接続されています。
ルーターにアクセスするには、IP アドレス、ユーザー名およびパスワードが必要です。
ルーターの DHCP 機能がオンになっています。
注意: 詳しくは、ルーターのユーザマニュアルを参照してください。
ユーザーマニュアルの指示に従ってビデオレコーダの設定を完了し、電源を入れてください。
注意: 詳細については、お持ちのビデオレコーダのユーザーマニュアルを参照してください。
ステップ 1:以下と同様に、RJ45 ネットワークケーブルを使用して、ビデオレコーダをルーターに接続してください。
Video recorder
Router ModemLAN Port WAN Port
WAN Port
Devices connected with a RJ45 network cable
LANWANALARMPOWER
Laptop or PC
ステップ 2:メインメニューから「詳細設定」に移動します。
お手持ちのモデルに応じて、下記のいずれかによって「詳細設定」にアクセスできます:
ライブビューで を選択します、または
右クリックしてメインメニューを表示し、 、 または を選択します。
次に、「ネットワーク」「WAN」を選択します、または
詳細設定
接続 WAN LAN 電子メール DDNS
カメラ ネットワークタイプ DHCP 検知 IP 192.168.1.112 警報音設定 ゲートウェイ 192.168.1.254 ネットワーク ネットマスク 255.255.255.0 表示設定 優先 DNS サーバー 168.095.1.1 録画設定 代替 DNS サーバー 139.175.55.244 ポート 88
戻る
「ネットワーク」「ネットワーク」。
詳細設定
カメラ ネットワーク SNTP FTP 電子メール DDNS
検知 ネットワークタイプ DHCP 警報音設定 IP 192.168.001.010 ネットワーク ゲートウェイ 192.168.001.254 表示設定 ネットマスク 255.255.255.000 録画設定 優先 DNS サーバー 168.095.001.001 外部デバイス 代替 DNS サーバー 139.175.055.244 ポート 0080
戻る
RJ45 ネットワークケーブルで接続された装置
ラップトップコンピュータまたはデスクトップコンピュータ
ビデオレコーダ
WAN ポート
LAN ポート
ルーター
WAN ポート
モデム

3
ステップ 3:「DHCP」を選択し、DNS 設定およびポート番号を設定してください。
注意: DNS は ISP (インターネットサービスプロバイダ)から取得されるドメインネームサーバーです。
注意: デフォルトのポート番号は 80 です。代表的な例として、HTTP に使用される TCP ポートは 80 です。ただし、場合に
よっては柔軟性やセキュリティ強化のため、ポート番号を変更した方が望ましいこともあります。
次に、「IP」に示されている IP アドレスを書き留めてください。これはルーターによってビデオレコーダに割り
当てられる IP アドレスです。この IP アドレスは後にポートフォワーディングのために必要になります。
ステップ 4:「DDNS」に行き、「システム名」で「eagleeyes」を選択してください。
MAC000E5318B3F0.ddns.dvrtw.com.tw など、「現在のホストアドレス」下でのアドレス全体を書き留めて
ください。これはビデオレコーダにリモートでアクセスするのに使用されるアドレスです。
詳細設定
接続 WAN LAN 電子メール DDNS
カメラ DDNS ON 検知 システム名 eagleeyes 警報音設定 ホスト名 MAC000E5318B3F0 ネットワーク 電子メール 無し 表示設定 録画設定 プッシュ機能の通報 現在のホストアドレス
戻る MAC000E5318B3F0.ddns.dvrtw.com.tw
次に、「戻る」を選択し、続いてポートフォワーディングのためのステップ 5 に進みます。
ステップ 5: ラップトップコンピュータ/デスクトップコンピュータから Internet Explorer®を開き、ルーターの IP アドレスを入
力してルーターにアクセスします。必要な場合はユーザー名とパスワードを入力してください。
注意: Internet Explorer は米国およびその他の国におけるマイクロソフトの登録商標です。
ステップ 6: ルーター設定インタフェースにおいて、ポートフォワーディング(またはバーチャルサーバー)ルールの設定ペ
ージに進んでください。
注意: ポートフォワーディングまたはバーチャルサーバーの名前の付け方は、ルーターのメーカーによって異なります。そ
れが存在する位置を知るには、ルーターのユーザーマニュアルを参照してください。
次に、ステップ 3 で書き留めた IP アドレスとポート番号を入力して、このルールを有効にします。
以下に、例として D-Link ルーターを取り上げます。
「詳細」「ポート・フォワード」に進みます。
IP Address
(IP アドレス):
例における 192.168.1.112 などのビデオレコーダの IP アドレス。
Ports to Open
(開くポート):
例における 88 など、ビデオレコーダに対して設定するポート番号。
4
接続の確認-Internet Explorer を経由
ステップ 1: 可能な場合は)ラップトップコンピュータとルーター間のネットワーク接続を切断して、ラップトップコンピュータ
を他のワイヤレスネットワークに接続します。
注意: ラップトップコンピュータ用に使用できる他のワイヤレス接続が存在しない場合、この方法は不適切です。次のセク
ション、「接続の確認 - iOS®/Android™ mobile モバイルデバイスを経由」。
ステップ 1:Internet Explorer などのウェブブラウザを開きます。
ステップ 2: ドレスとポート番号をウェブブラウザの URL アドレスボックスに入力し、ログインページに正常にアクセスで
きるかどうか確認します。
フォーマットは「http://hostaddress:portnum」です。例えば、
「http://MAC000E5318B3F0.ddns.dvrtw.com.tw:88」。
アクセスできない場合、ネットワーク設定が正常に行われていません。再度、ステップ 1 から始めてください。
接続の確認-iOS®/Android™ mobile モバイルデバイスを経由
ステップ 1:App StoreSM (iOS デバイス)または Google Play™ (Android デバイス)から当社の無料モバイルアプリ
EagleEyes をダウンロードしてください。
注意: App Store は Apple Inc.のサービスマークです。iOS は米国およびその他の国で登録された Apple Inc.の商標
です。Google Play は Google Inc.の商標です。
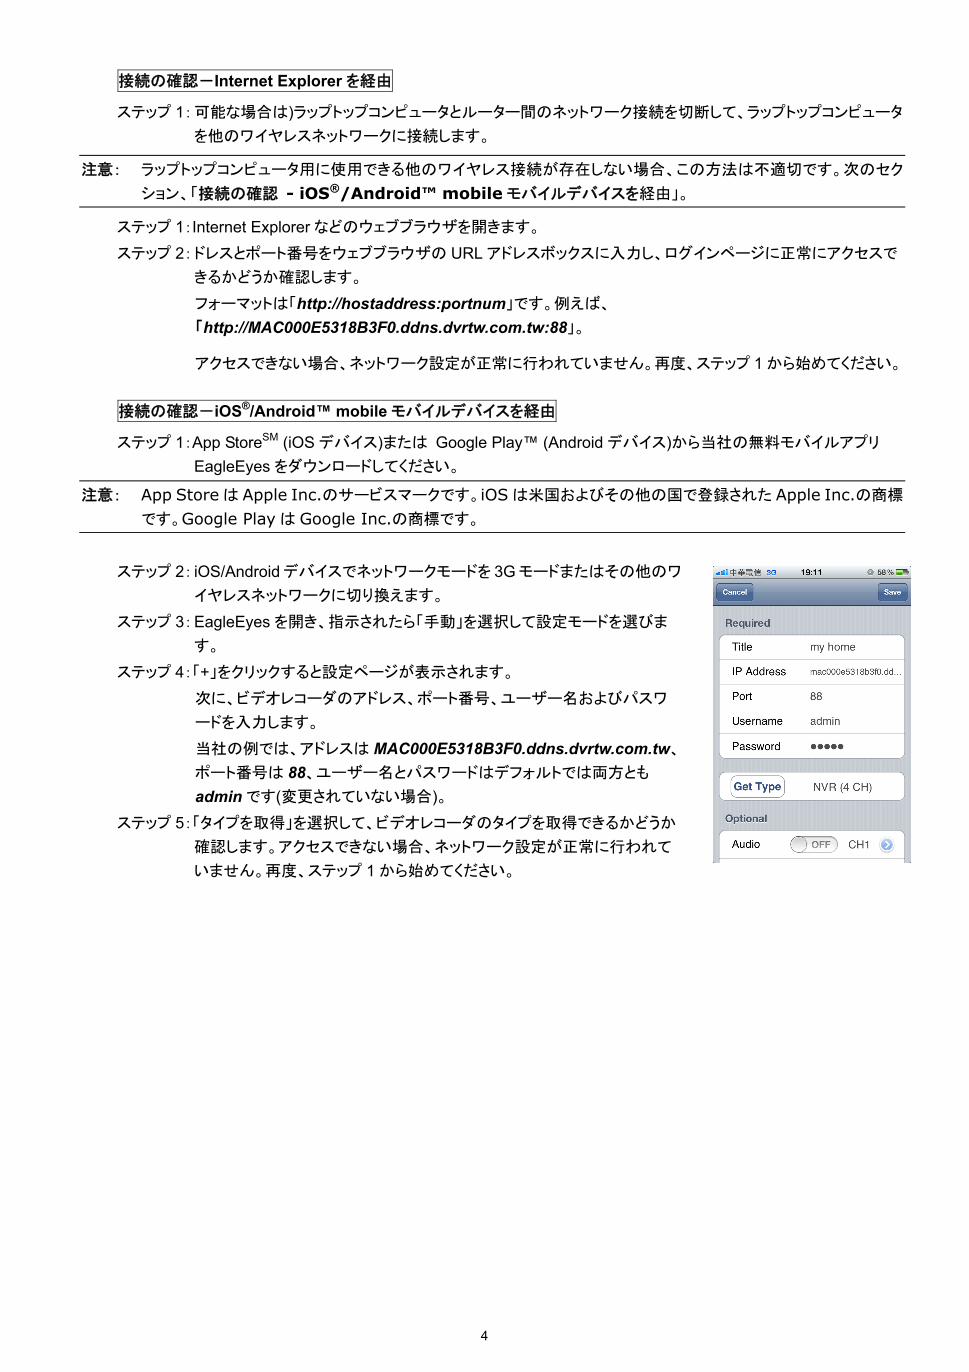
ステップ 2: iOS/Android デバイスでネットワークモードを 3G モードまたはその他のワ
イヤレスネットワークに切り換えます。
ステップ 3: EagleEyes を開き、指示されたら「手動」を選択して設定モードを選びま
す。
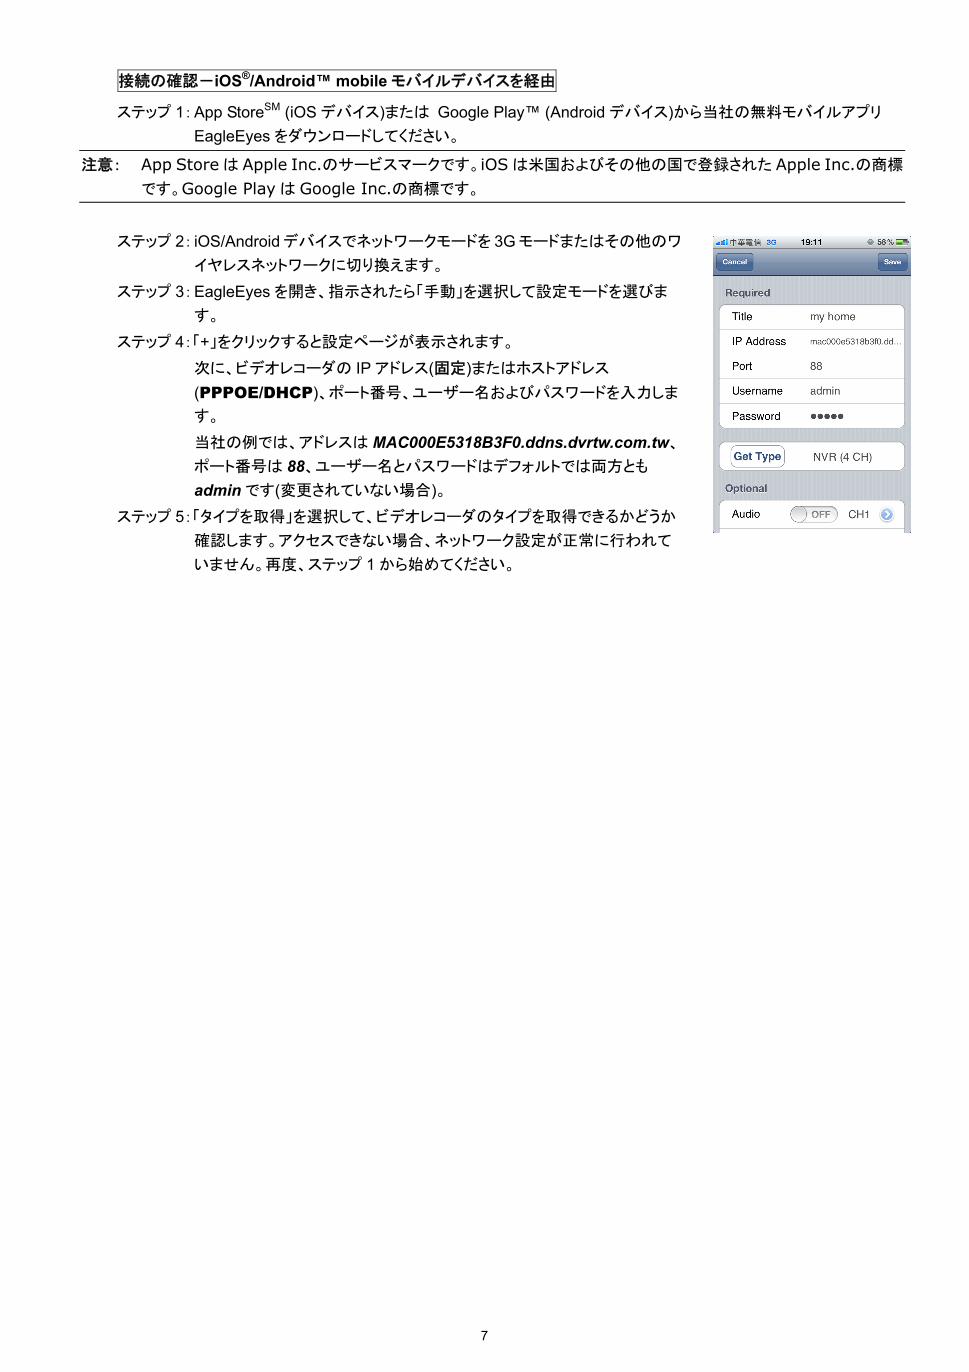
ステップ 4:「+」をクリックすると設定ページが表示されます。
次に、ビデオレコーダのアドレス、ポート番号、ユーザー名およびパスワ
ードを入力します。
当社の例では、アドレスは MAC000E5318B3F0.ddns.dvrtw.com.tw、
ポート番号は 88、ユーザー名とパスワードはデフォルトでは両方とも
adminです(変更されていない場合)。
ステップ 5:「タイプを取得」を選択して、ビデオレコーダのタイプを取得できるかどうか
確認します。アクセスできない場合、ネットワーク設定が正常に行われて
いません。再度、ステップ 1 から始めてください。
5
3. モデム/ハブとモデム
設定する前に、以下のことを確認してください。 インターネットサービス用の固定 IP アドレスまたは PPPoE を使用していることが分かっていることが必要です。
固定 IP アドレスがあるユーザーの場合、固定 IP アドレス、ゲートウェイおよびネットマスクを ISP (インターネットサービスプロバイダ)から
確実に入手してください。
PPPoE を使用したいユーザーの場合、ISP (インターネットサービスプロバイダ)からユーザー名とパスワードを確実に入手してください。
ユーザーマニュアルの指示に従ってビデオレコーダの設定を完了し、電源を入れてください。
注意: 詳細については、お持ちのビデオレコーダのユーザーマニュアルを参照してください。
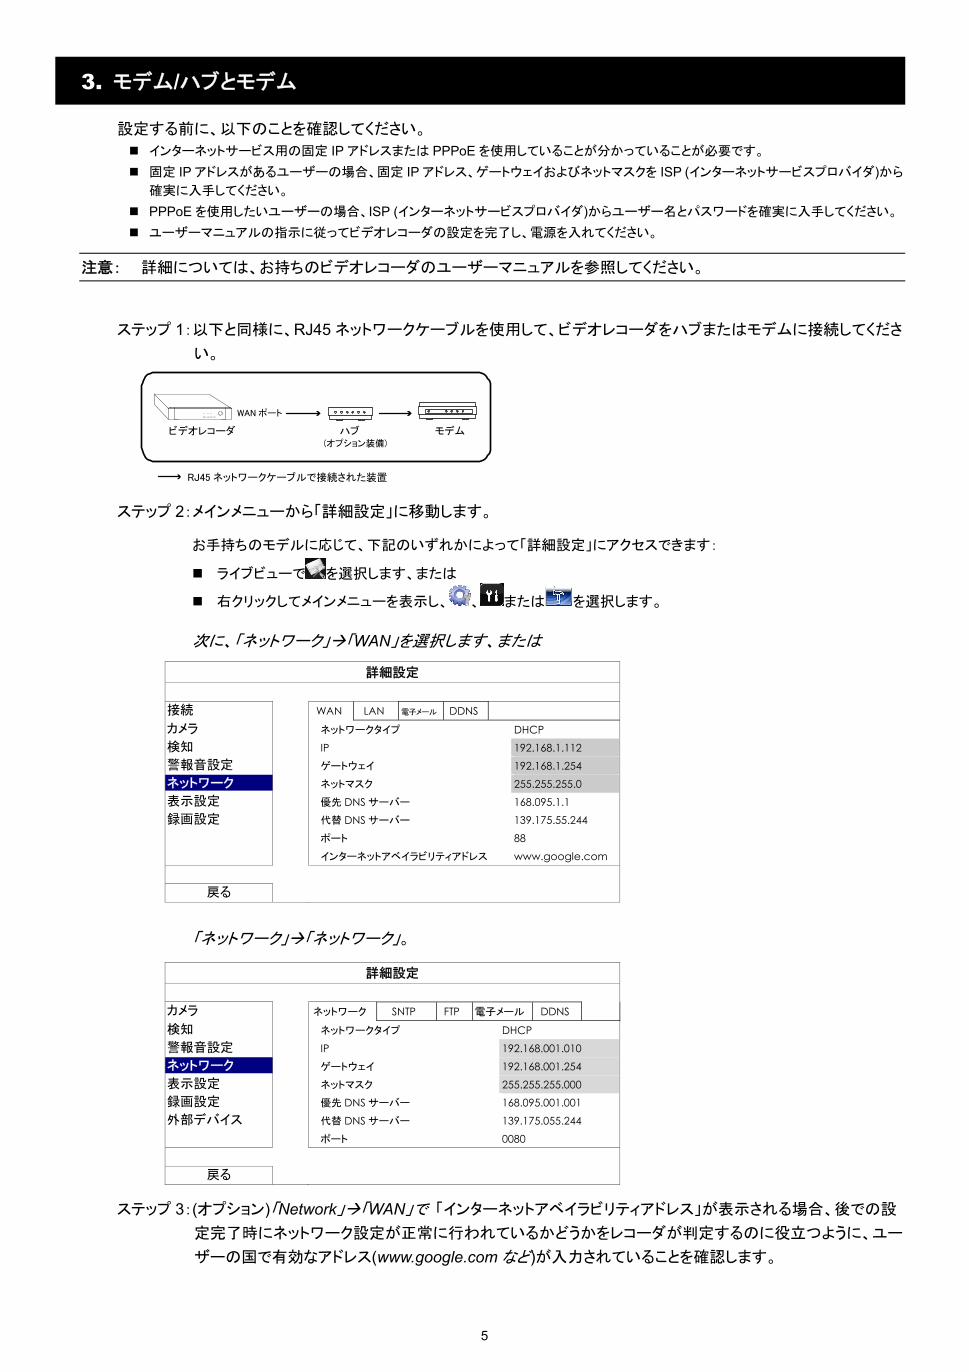
ステップ 1:以下と同様に、RJ45 ネットワークケーブルを使用して、ビデオレコーダをハブまたはモデムに接続してくださ
い。
Video recorder Hub�(Optional)
Modem
WAN Port
Devices connected with a RJ45 network cable
HDD LAN WAN
ステップ 2:メインメニューから「詳細設定」に移動します。
お手持ちのモデルに応じて、下記のいずれかによって「詳細設定」にアクセスできます:
ライブビューで を選択します、または
右クリックしてメインメニューを表示し、 、 または を選択します。
次に、「ネットワーク」「WAN」を選択します、または
詳細設定
接続 WAN LAN 電子メール DDNS
カメラ ネットワークタイプ DHCP 検知 IP 192.168.1.112 警報音設定 ゲートウェイ 192.168.1.254 ネットワーク ネットマスク 255.255.255.0 表示設定 優先 DNS サーバー 168.095.1.1 録画設定 代替 DNS サーバー 139.175.55.244 ポート 88 インターネットアベイラビリティアドレス www.google.com
戻る
「ネットワーク」「ネットワーク」。
詳細設定
カメラ ネットワーク SNTP FTP 電子メール DDNS
検知 ネットワークタイプ DHCP 警報音設定 IP 192.168.001.010 ネットワーク ゲートウェイ 192.168.001.254 表示設定 ネットマスク 255.255.255.000 録画設定 優先 DNS サーバー 168.095.001.001 外部デバイス 代替 DNS サーバー 139.175.055.244 ポート 0080
戻る
ステップ 3:(オプション)「Network」「WAN」で 「インターネットアベイラビリティアドレス」が表示される場合、後での設
定完了時にネットワーク設定が正常に行われているかどうかをレコーダが判定するのに役立つように、ユー
ザーの国で有効なアドレス(www.google.com など)が入力されていることを確認します。
RJ45 ネットワークケーブルで接続された装置
ビデオレコーダ
WAN ポート
ハブ モデム (オプション装備)
6
ステップ 4: 自分のネットワークタイプに基づいて「固定」、「PPPOE」または「DHCP」を選択し、必要ならポート番号を変
えてください。
「固定」の場合、ISP から提供された固定 IP アドレス、ゲートウェイおよびネットマスクの情報を入力し、次のセクション「接続
の確 - Internet Explorer を経由」に進み、直接、設定を確認します。
「PPPOE」の場合、ISP から提供された DNS アドレス、ユーザー名およびパスワードを入力して、(必要な場合は)ポート番号
を入力し、「ステップ 4」に進んで続行します。
注意: デフォルトのポート番号は 80 です。代表的な例として、HTTP に使用される TCP ポートは 80 です。ただし、場合に
よっては柔軟性やセキュリティ強化のため、ポート番号を変更した方が望ましいこともあります。
「DHCP」の場合、「ステップ 4」に進んで続行します。
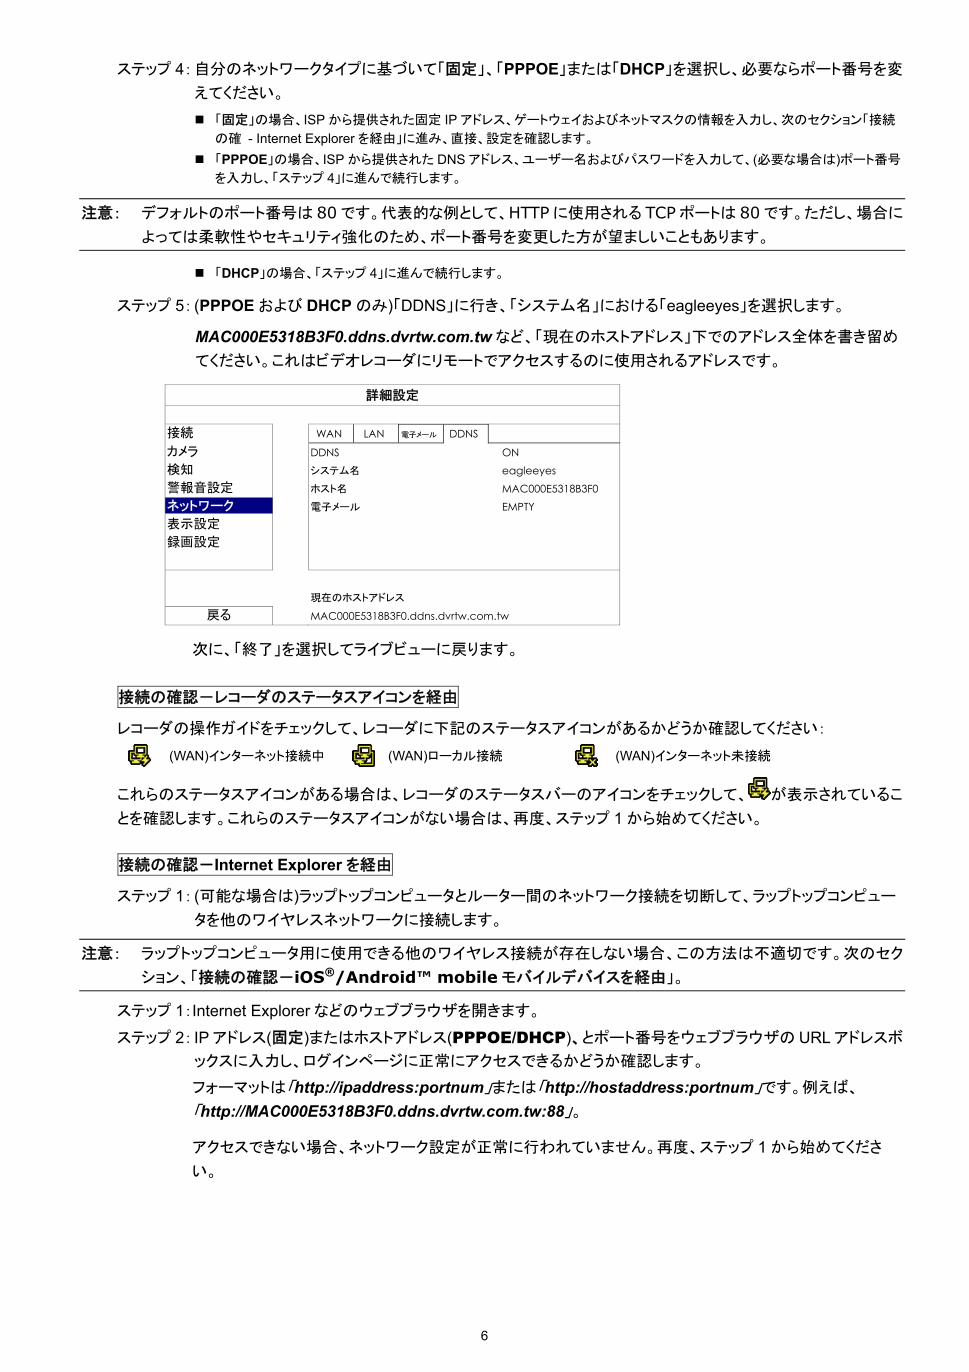
ステップ 5: (PPPOE および DHCP のみ)「DDNS」に行き、「システム名」における「eagleeyes」を選択します。
MAC000E5318B3F0.ddns.dvrtw.com.twなど、「現在のホストアドレス」下でのアドレス全体を書き留め
てください。これはビデオレコーダにリモートでアクセスするのに使用されるアドレスです。
詳細設定
接続 WAN LAN 電子メール DDNS
カメラ DDNS ON 検知 システム名 eagleeyes 警報音設定 ホスト名 MAC000E5318B3F0 ネットワーク 電子メール EMPTY 表示設定 録画設定 現在のホストアドレス
戻る MAC000E5318B3F0.ddns.dvrtw.com.tw
次に、「終了」を選択してライブビューに戻ります。
接続の確認-レコーダのステータスアイコンを経由
レコーダの操作ガイドをチェックして、レコーダに下記のステータスアイコンがあるかどうか確認してください:
(WAN)インターネット接続中 (WAN)ローカル接続 (WAN)インターネット未接続
これらのステータスアイコンがある場合は、レコーダのステータスバーのアイコンをチェックして、 が表示されているこ
とを確認します。これらのステータスアイコンがない場合は、再度、ステップ 1 から始めてください。
接続の確認-Internet Explorer を経由
ステップ 1: (可能な場合は)ラップトップコンピュータとルーター間のネットワーク接続を切断して、ラップトップコンピュー
タを他のワイヤレスネットワークに接続します。
注意: ラップトップコンピュータ用に使用できる他のワイヤレス接続が存在しない場合、この方法は不適切です。次のセク
ション、「接続の確認-iOS®/Android™ mobile モバイルデバイスを経由」。
ステップ 1:Internet Explorer などのウェブブラウザを開きます。
ステップ 2: IP アドレス(固定)またはホストアドレス(PPPOE/DHCP)、とポート番号をウェブブラウザの URL アドレスボ
ックスに入力し、ログインページに正常にアクセスできるかどうか確認します。
フォーマットは「http://ipaddress:portnum」または「http://hostaddress:portnum」です。例えば、
「http://MAC000E5318B3F0.ddns.dvrtw.com.tw:88」。
アクセスできない場合、ネットワーク設定が正常に行われていません。再度、ステップ 1 から始めてくださ
い。
7
接続の確認-iOS®/Android™ mobile モバイルデバイスを経由
ステップ 1: App StoreSM (iOS デバイス)または Google Play™ (Android デバイス)から当社の無料モバイルアプリ
EagleEyes をダウンロードしてください。
注意: App Store は Apple Inc.のサービスマークです。iOS は米国およびその他の国で登録された Apple Inc.の商標
です。Google Play は Google Inc.の商標です。
ステップ 2: iOS/Android デバイスでネットワークモードを 3G モードまたはその他のワ
イヤレスネットワークに切り換えます。
ステップ 3: EagleEyes を開き、指示されたら「手動」を選択して設定モードを選びま
す。
ステップ 4:「+」をクリックすると設定ページが表示されます。
次に、ビデオレコーダの IP アドレス(固定)またはホストアドレス
(PPPOE/DHCP)、ポート番号、ユーザー名およびパスワードを入力しま
す。
当社の例では、アドレスは MAC000E5318B3F0.ddns.dvrtw.com.tw、
ポート番号は 88、ユーザー名とパスワードはデフォルトでは両方とも
adminです(変更されていない場合)。
ステップ 5:「タイプを取得」を選択して、ビデオレコーダのタイプを取得できるかどうか
確認します。アクセスできない場合、ネットワーク設定が正常に行われて
いません。再度、ステップ 1 から始めてください。
Ita_V0.9
IMPOSTAZIONE RETE
Per il registratore video
Leggere accuratamente le istruzioni prima dell’uso e conservarle per riferimenti futuri.
Ci riserviamo il diritto di rivedere o rimuovere, in qualsiasi momento, qualsiasi contenuto di questo manuale. Non facciamo garanzie, né ci assumiamo alcuna responsabilità legale nei riguardi dell’accuratezza,
completezza o utilità di questo manuale. I contenuti di questo manuale sono soggetti a modifica senza preavviso.
1
1. OPERAZIONI PRELIMINARI
Nota: le configurazioni di rete possono richiedere una persona esperta di reti avanzate. Si consiglia di
verificare con l’installatore la disponibilità del servizio.
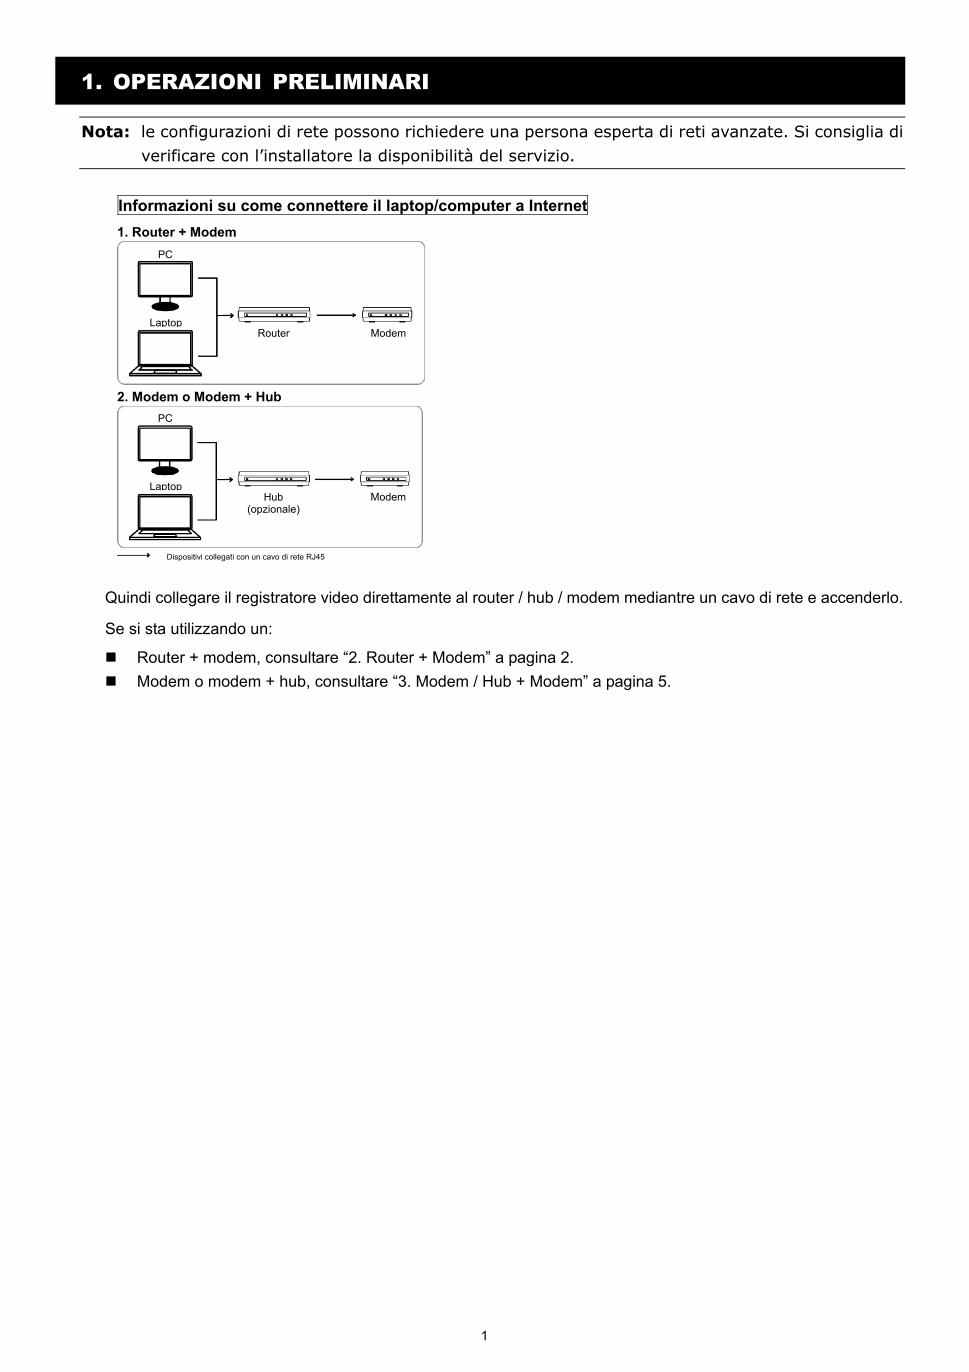
Informazioni su come connettere il laptop/computer a Internet
1. Router + Modem
2. Modem o Modem + Hub
Dispositivi collegati con un cavo di rete RJ45
Quindi collegare il registratore video direttamente al router / hub / modem mediantre un cavo di rete e accenderlo.
Se si sta utilizzando un:
Router + modem, consultare “2. Router + Modem” a pagina 2.
Modem o modem + hub, consultare “3. Modem / Hub + Modem” a pagina 5.
PC
Laptop Router Modem
PC
Laptop Hub
(opzionale) Modem
2
2. Router + Modem
Prima di eseguire la configurazione, verificare che: Il laptop / PC sia collegato allo stesso router del registratore video a cui eseguire il collegamento.
Si conosca l’indirizzo IP, nome utente e password per accedere al router.
La funzione DHCP del router sia attiva.
Nota: Per i dettagli, fare riferimento al manuale utente del router.
L’impostazione del ricevitore video è stata completata come indicato nel manuale utente e il ricevitore è acceso.
Nota: Per informazioni sull’installazione, fare riferimento al manuale utente del registratore video.
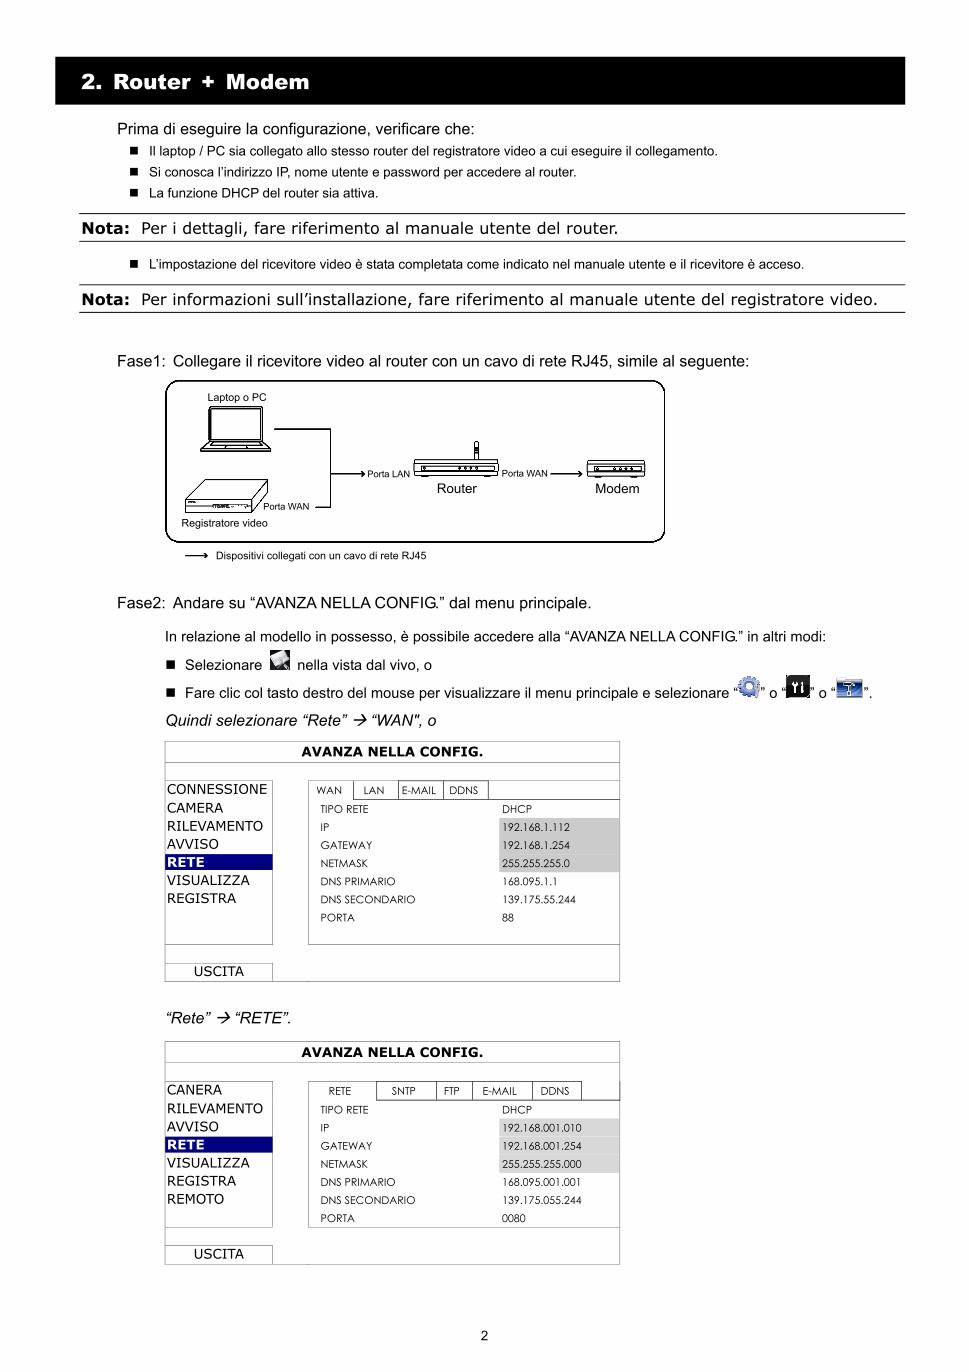
Fase1: Collegare il ricevitore video al router con un cavo di rete RJ45, simile al seguente:
Fase2: Andare su “AVANZA NELLA CONFIG.” dal menu principale.
In relazione al modello in possesso, è possibile accedere alla “AVANZA NELLA CONFIG.” in altri modi:
Selezionare nella vista dal vivo, o
Fare clic col tasto destro del mouse per visualizzare il menu principale e selezionare “ ” o “ ” o “ ”.
Quindi selezionare “Rete” “WAN", o
AVANZA NELLA CONFIG.
CONNESSIONE WAN LAN E-MAIL DDNS
CAMERA TIPO RETE DHCP RILEVAMENTO IP 192.168.1.112 AVVISO GATEWAY 192.168.1.254 RETE NETMASK 255.255.255.0 VISUALIZZA DNS PRIMARIO 168.095.1.1 REGISTRA DNS SECONDARIO 139.175.55.244 PORTA 88
USCITA
“Rete” “RETE”.
AVANZA NELLA CONFIG.
CANERA RETE SNTP FTP E-MAIL DDNS
RILEVAMENTO TIPO RETE DHCP AVVISO IP 192.168.001.010 RETE GATEWAY 192.168.001.254 VISUALIZZA NETMASK 255.255.255.000 REGISTRA DNS PRIMARIO 168.095.001.001 REMOTO DNS SECONDARIO 139.175.055.244 PORTA 0080
USCITA
Laptop o PC
Registratore video Porta WAN
Porta LAN
Router Porta WAN
Modem
Dispositivi collegati con un cavo di rete RJ45
3
Fase3: Selezionare “DHCP” e configurare l’impostazione DNS e il numero di porta.
Nota: DNS è il server nome di dominio ottenuto dall’ISP (Internet Service Provider).
Nota: Il numero porta predefinito è 80. Tipicamente la porta TCP usata dal protocollo HTTP è 80. Tuttavia, in alcuni casi, è meglio cambiare questo numero di porta per una maggiore flessibilità o protezione.
Quindi, annotare l’indirizzo IP mostrato in “IP”. È l’indirizzo IP assegnato al registratore video dal router.
Sarà necessario in seguito per l’inoltro porta.
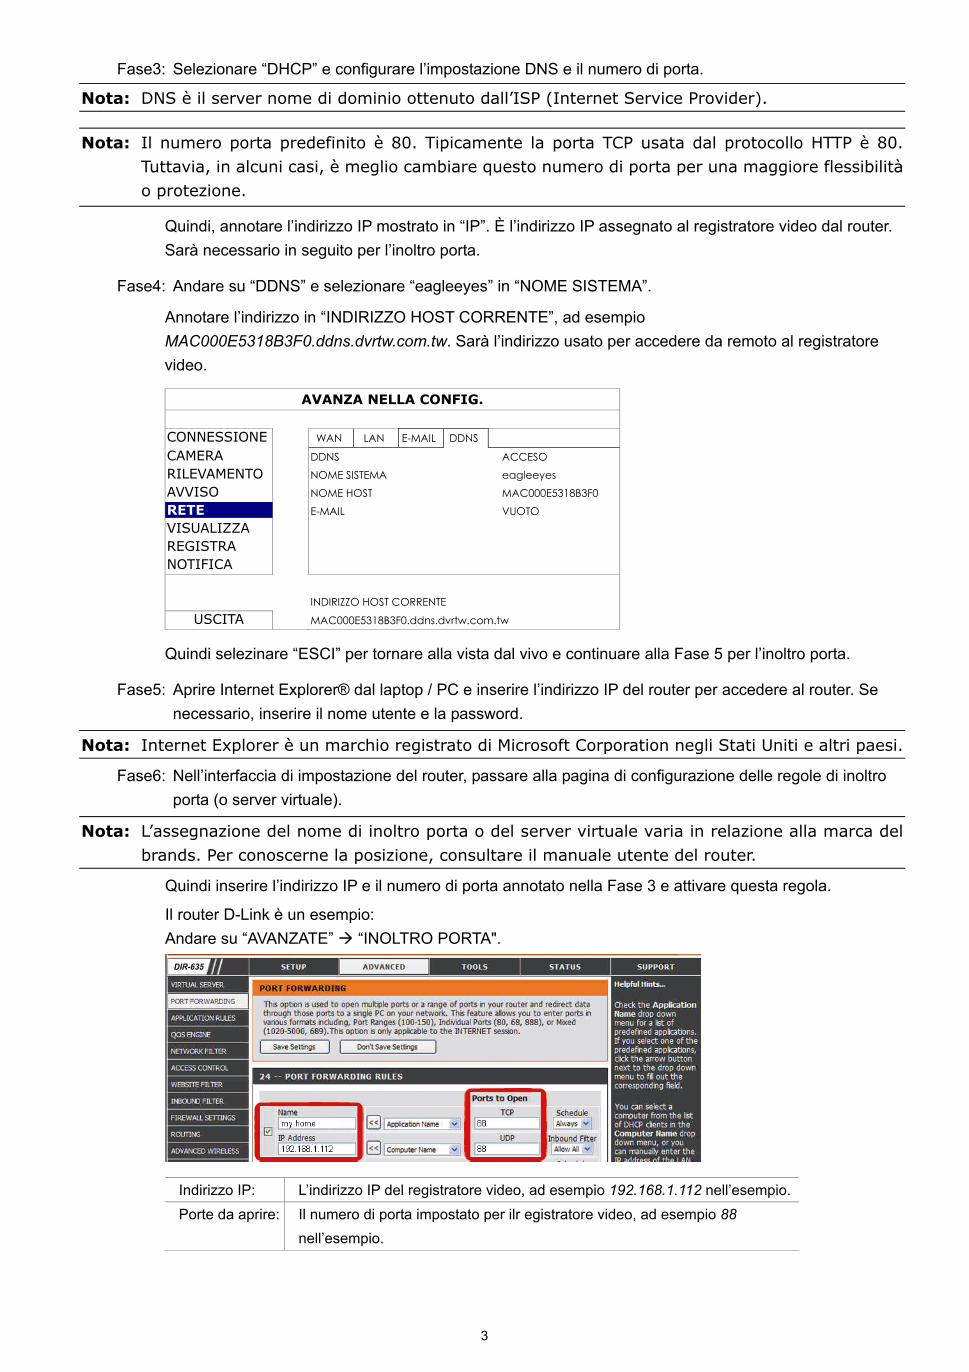
Fase4: Andare su “DDNS” e selezionare “eagleeyes” in “NOME SISTEMA”.
Annotare l’indirizzo in “INDIRIZZO HOST CORRENTE”, ad esempio
MAC000E5318B3F0.ddns.dvrtw.com.tw. Sarà l’indirizzo usato per accedere da remoto al registratore
video.
AVANZA NELLA CONFIG.
CONNESSIONE WAN LAN E-MAIL DDNS
CAMERA DDNS ACCESO RILEVAMENTO NOME SISTEMA eagleeyes AVVISO NOME HOST MAC000E5318B3F0 RETE E-MAIL VUOTO VISUALIZZA REGISTRA NOTIFICA INDIRIZZO HOST CORRENTE
USCITA MAC000E5318B3F0.ddns.dvrtw.com.tw
Quindi selezinare “ESCI” per tornare alla vista dal vivo e continuare alla Fase 5 per l’inoltro porta.
Fase5: Aprire Internet Explorer® dal laptop / PC e inserire l’indirizzo IP del router per accedere al router. Se
necessario, inserire il nome utente e la password.
Nota: Internet Explorer è un marchio registrato di Microsoft Corporation negli Stati Uniti e altri paesi.
Fase6: Nell’interfaccia di impostazione del router, passare alla pagina di configurazione delle regole di inoltro
porta (o server virtuale).
Nota: L’assegnazione del nome di inoltro porta o del server virtuale varia in relazione alla marca del brands. Per conoscerne la posizione, consultare il manuale utente del router.
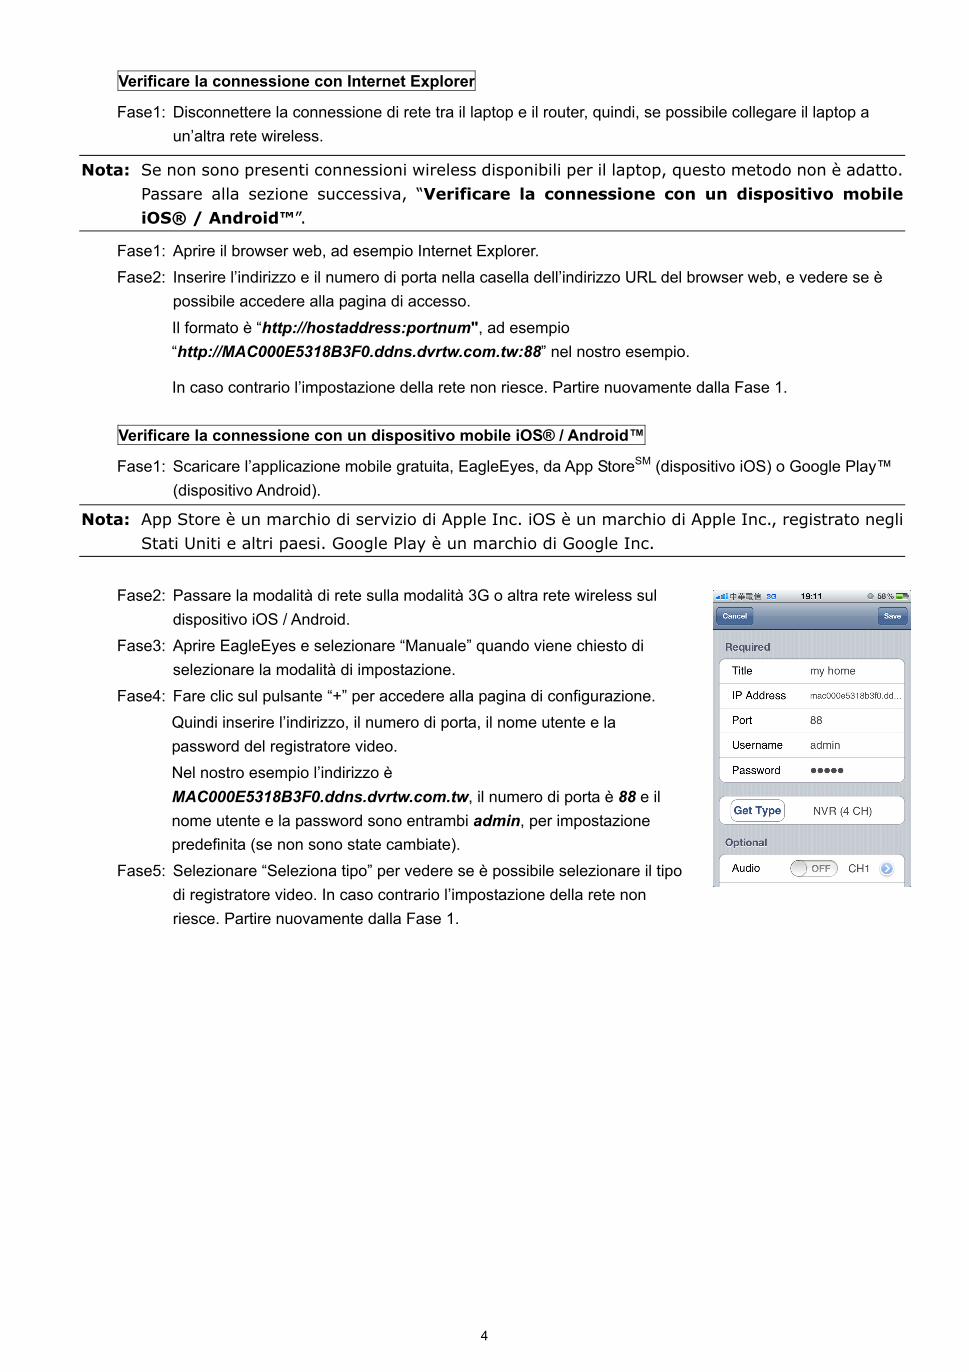
Quindi inserire l’indirizzo IP e il numero di porta annotato nella Fase 3 e attivare questa regola.
Il router D-Link è un esempio:
Andare su “AVANZATE” “INOLTRO PORTA".
Indirizzo IP: L’indirizzo IP del registratore video, ad esempio 192.168.1.112 nell’esempio.
Porte da aprire: Il numero di porta impostato per ilr egistratore video, ad esempio 88
nell’esempio.
4
Verificare la connessione con Internet Explorer
Fase1: Disconnettere la connessione di rete tra il laptop e il router, quindi, se possibile collegare il laptop a
un’altra rete wireless.
Nota: Se non sono presenti connessioni wireless disponibili per il laptop, questo metodo non è adatto. Passare alla sezione successiva, “Verificare la connessione con un dispositivo mobile iOS® / Android™”.
Fase1: Aprire il browser web, ad esempio Internet Explorer.
Fase2: Inserire l’indirizzo e il numero di porta nella casella dell’indirizzo URL del browser web, e vedere se è
possibile accedere alla pagina di accesso.
Il formato è “http://hostaddress:portnum", ad esempio
“http://MAC000E5318B3F0.ddns.dvrtw.com.tw:88” nel nostro esempio.
In caso contrario l’impostazione della rete non riesce. Partire nuovamente dalla Fase 1.
Verificare la connessione con un dispositivo mobile iOS® / Android™
Fase1: Scaricare l’applicazione mobile gratuita, EagleEyes, da App StoreSM (dispositivo iOS) o Google Play™
(dispositivo Android).
Nota: App Store è un marchio di servizio di Apple Inc. iOS è un marchio di Apple Inc., registrato negli Stati Uniti e altri paesi. Google Play è un marchio di Google Inc.
Fase2: Passare la modalità di rete sulla modalità 3G o altra rete wireless sul
dispositivo iOS / Android.
Fase3: Aprire EagleEyes e selezionare “Manuale” quando viene chiesto di
selezionare la modalità di impostazione.
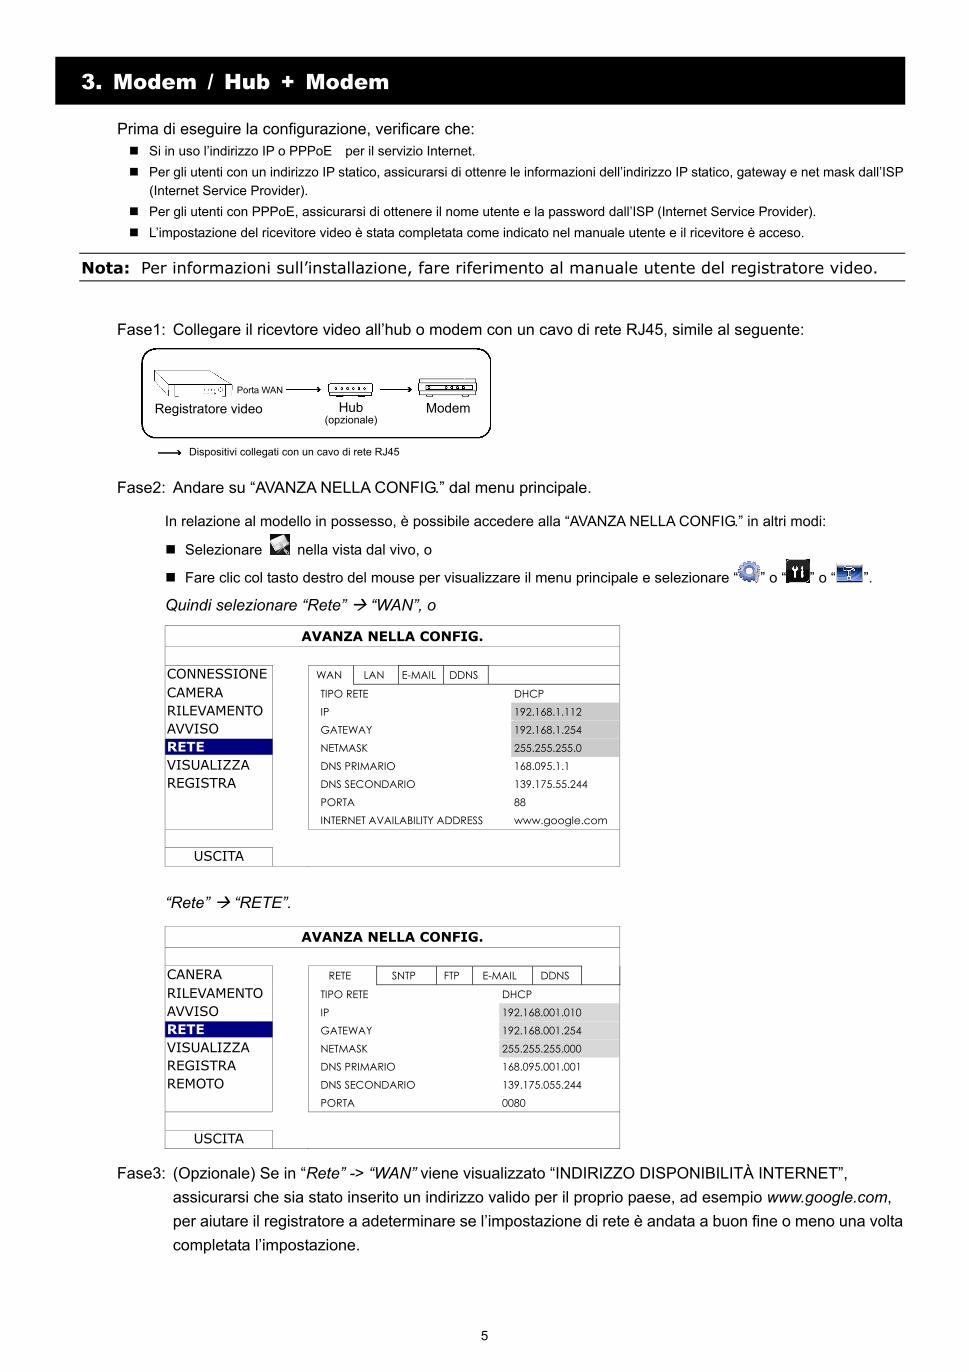
Fase4: Fare clic sul pulsante “+” per accedere alla pagina di configurazione.
Quindi inserire l’indirizzo, il numero di porta, il nome utente e la
password del registratore video.
Nel nostro esempio l’indirizzo è
MAC000E5318B3F0.ddns.dvrtw.com.tw, il numero di porta è 88 e il
nome utente e la password sono entrambi admin, per impostazione
predefinita (se non sono state cambiate).
Fase5: Selezionare “Seleziona tipo” per vedere se è possibile selezionare il tipo
di registratore video. In caso contrario l’impostazione della rete non
riesce. Partire nuovamente dalla Fase 1.
5
3. Modem / Hub + Modem
Prima di eseguire la configurazione, verificare che: Si in uso l’indirizzo IP o PPPoE per il servizio Internet.
Per gli utenti con un indirizzo IP statico, assicurarsi di ottenre le informazioni dell’indirizzo IP statico, gateway e net mask dall’ISP
(Internet Service Provider).
Per gli utenti con PPPoE, assicurarsi di ottenere il nome utente e la password dall’ISP (Internet Service Provider).
L’impostazione del ricevitore video è stata completata come indicato nel manuale utente e il ricevitore è acceso.
Nota: Per informazioni sull’installazione, fare riferimento al manuale utente del registratore video.
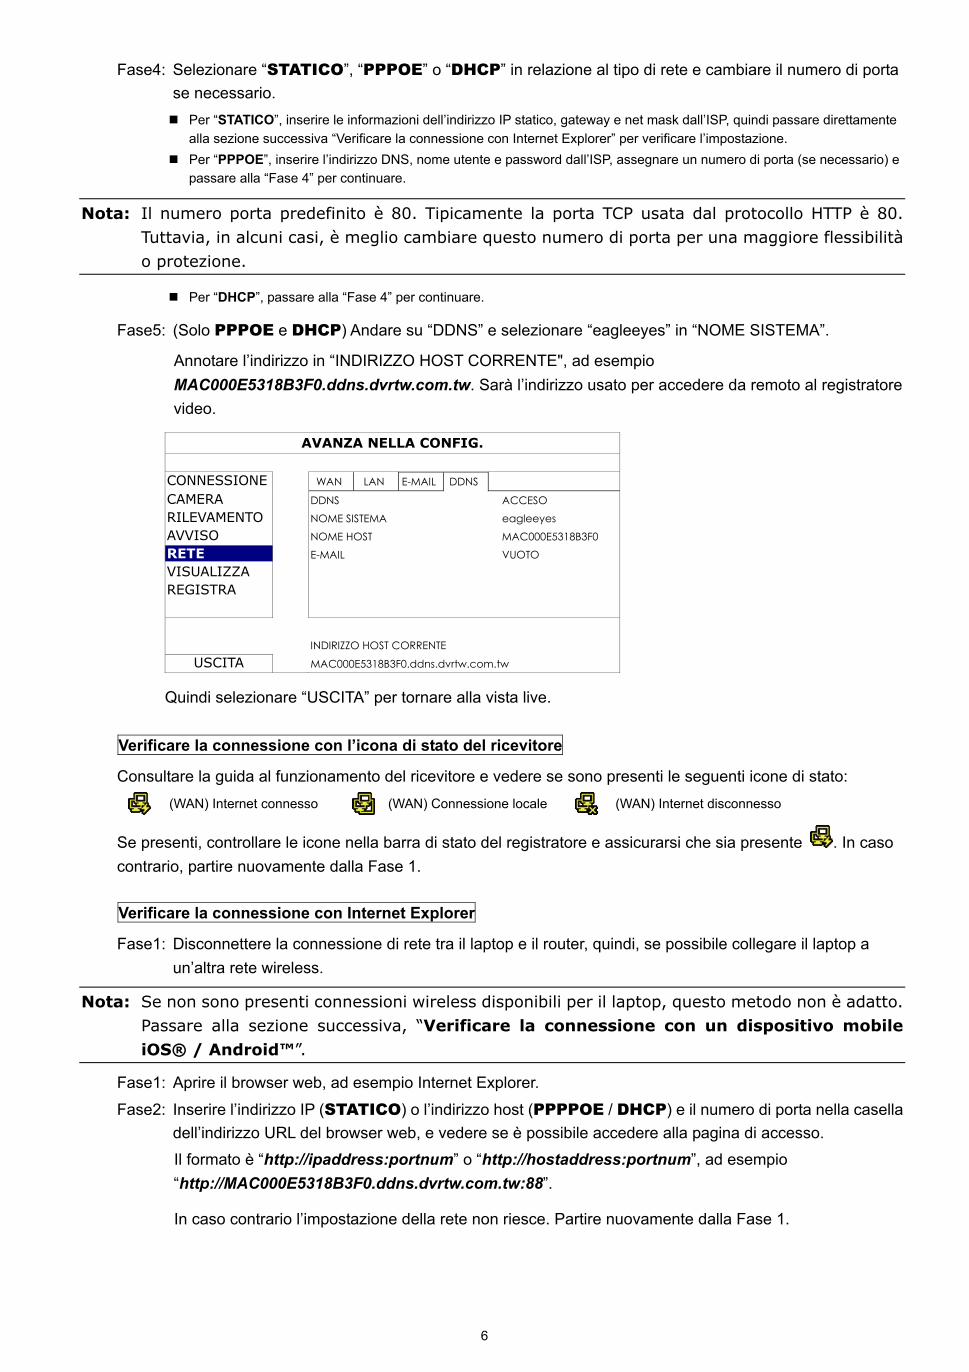
Fase1: Collegare il ricevtore video all’hub o modem con un cavo di rete RJ45, simile al seguente:
Fase2: Andare su “AVANZA NELLA CONFIG.” dal menu principale.
In relazione al modello in possesso, è possibile accedere alla “AVANZA NELLA CONFIG.” in altri modi:
Selezionare nella vista dal vivo, o
Fare clic col tasto destro del mouse per visualizzare il menu principale e selezionare “ ” o “ ” o “ ”.
Quindi selezionare “Rete” “WAN”, o
AVANZA NELLA CONFIG.
CONNESSIONE WAN LAN E-MAIL DDNS
CAMERA TIPO RETE DHCP RILEVAMENTO IP 192.168.1.112 AVVISO GATEWAY 192.168.1.254 RETE NETMASK 255.255.255.0 VISUALIZZA DNS PRIMARIO 168.095.1.1 REGISTRA DNS SECONDARIO 139.175.55.244 PORTA 88 INTERNET AVAILABILITY ADDRESS www.google.com
USCITA
“Rete” “RETE”.
AVANZA NELLA CONFIG.
CANERA RETE SNTP FTP E-MAIL DDNS
RILEVAMENTO TIPO RETE DHCP AVVISO IP 192.168.001.010 RETE GATEWAY 192.168.001.254 VISUALIZZA NETMASK 255.255.255.000 REGISTRA DNS PRIMARIO 168.095.001.001 REMOTO DNS SECONDARIO 139.175.055.244 PORTA 0080
USCITA
Fase3: (Opzionale) Se in “Rete” -> “WAN” viene visualizzato “INDIRIZZO DISPONIBILITÀ INTERNET”,
assicurarsi che sia stato inserito un indirizzo valido per il proprio paese, ad esempio www.google.com,
per aiutare il registratore a adeterminare se l’impostazione di rete è andata a buon fine o meno una volta
completata l’impostazione.
Registratore video Porta WAN
Modem
Dispositivi collegati con un cavo di rete RJ45
Hub (opzionale)
6
Fase4: Selezionare “STATICO”, “PPPOE” o “DHCP” in relazione al tipo di rete e cambiare il numero di porta
se necessario.
Per “STATICO”, inserire le informazioni dell’indirizzo IP statico, gateway e net mask dall’ISP, quindi passare direttamente
alla sezione successiva “Verificare la connessione con Internet Explorer” per verificare l’impostazione.
Per “PPPOE”, inserire l’indirizzo DNS, nome utente e password dall’ISP, assegnare un numero di porta (se necessario) e
passare alla “Fase 4” per continuare.
Nota: Il numero porta predefinito è 80. Tipicamente la porta TCP usata dal protocollo HTTP è 80. Tuttavia, in alcuni casi, è meglio cambiare questo numero di porta per una maggiore flessibilità o protezione.
Per “DHCP”, passare alla “Fase 4” per continuare.
Fase5: (Solo PPPOE e DHCP) Andare su “DDNS” e selezionare “eagleeyes” in “NOME SISTEMA”.
Annotare l’indirizzo in “INDIRIZZO HOST CORRENTE", ad esempio
MAC000E5318B3F0.ddns.dvrtw.com.tw. Sarà l’indirizzo usato per accedere da remoto al registratore
video.
AVANZA NELLA CONFIG.
CONNESSIONE WAN LAN E-MAIL DDNS
CAMERA DDNS ACCESO RILEVAMENTO NOME SISTEMA eagleeyes AVVISO NOME HOST MAC000E5318B3F0 RETE E-MAIL VUOTO VISUALIZZA REGISTRA INDIRIZZO HOST CORRENTE
USCITA MAC000E5318B3F0.ddns.dvrtw.com.tw
Quindi selezionare “USCITA” per tornare alla vista live.
Verificare la connessione con l’icona di stato del ricevitore
Consultare la guida al funzionamento del ricevitore e vedere se sono presenti le seguenti icone di stato:
(WAN) Internet connesso (WAN) Connessione locale (WAN) Internet disconnesso
Se presenti, controllare le icone nella barra di stato del registratore e assicurarsi che sia presente . In caso
contrario, partire nuovamente dalla Fase 1.
Verificare la connessione con Internet Explorer
Fase1: Disconnettere la connessione di rete tra il laptop e il router, quindi, se possibile collegare il laptop a
un’altra rete wireless.
Nota: Se non sono presenti connessioni wireless disponibili per il laptop, questo metodo non è adatto. Passare alla sezione successiva, “Verificare la connessione con un dispositivo mobile iOS® / Android™”.
Fase1: Aprire il browser web, ad esempio Internet Explorer.
Fase2: Inserire l’indirizzo IP (STATICO) o l’indirizzo host (PPPPOE / DHCP) e il numero di porta nella casella
dell’indirizzo URL del browser web, e vedere se è possibile accedere alla pagina di accesso.
Il formato è “http://ipaddress:portnum” o “http://hostaddress:portnum”, ad esempio
“http://MAC000E5318B3F0.ddns.dvrtw.com.tw:88”.
In caso contrario l’impostazione della rete non riesce. Partire nuovamente dalla Fase 1.

7
Verificare la connessione con un dispositivo mobile iOS® / Android™
Fase1: Scaricare l’applicazione mobile gratuita, EagleEyes, da App StoreSM (dispositivo iOS) o Google Play™
(dispositivo Android).
Nota: App Store è un marchio di servizio di Apple Inc. iOS è un marchio di Apple Inc., registrato negli
Stati Uniti e altri paesi. Google Play è un marchio di Google Inc.
Fase2: Passare la modalità di rete sulla modalità 3G o altra rete wireless sul
dispositivo iOS / Android.
Fase3: Aprire EagleEyes e selezionare “Manuale” quando viene chiesto di
selezionare la modalità di impostazione.
Fase4: Fare clic sul pulsante “+” per accedere alla pagina di configurazione.
Quindi inserire l’indirizzo IP (STATICO) o l’indirizzo host (PPPOE /
DHCP), il numero di porta, il nome utente e la password del registratore
video.
Nel nostro esempio l’indirizzo è
MAC000E5318B3F0.ddns.dvrtw.com.tw, il numero di porta è 88 e il
nome utente e la password sono entrambi admin, per impostazione
predefinita (se non sono state cambiate).
Fase5: Selezionare “Seleziona tipo” per vedere se è possibile selezionare il tipo
di registratore video. In caso contrario l’impostazione della rete non
riesce. Partire nuovamente dalla Fase 1.