Embed Size (px)
Citation preview
ELCART
ELCART DISTRIBUTION SPA via Michelangelo Buonarroti, 46 - 20093 Cologno Monzese (Milano) ITALYTel. +39 02.25117310 Fax +39 02.25117610 sito internet: www.elcart.com e-mail: [email protected]
Manuale di istruzioni/Scheda tecnica
La divulgazione dei dati contenuti in questa scheda è da ritenersi un servizio puramente informativo e non costituisce alcun vincolo da parte della Elcart in merito a prestazioni ed utilizzo del prodotto.The divulgation of data contained on this technical sheet are exclusively for informational reasons and establish no link on behalf of Elcart regard to thr performances and the usa of the product.La divulgacion de los datos contenidos en esta ficha son un servicio unicamente informativo y no constituyen ningun vinculo de parte de Elcart respecto a las prestaciones y uso del producto.
ART. 44/4010 PAGINA 1 DI 14
MANUALE
Art. 44/4010 Mod. KA-401
Version 1.02 Gennaio 2012

ELCART
ELCART DISTRIBUTION SPA via Michelangelo Buonarroti, 46 - 20093 Cologno Monzese (Milano) ITALYTel. +39 02.25117310 Fax +39 02.25117610 sito internet: www.elcart.com e-mail: [email protected]
Manuale di istruzioni/Scheda tecnica
La divulgazione dei dati contenuti in questa scheda è da ritenersi un servizio puramente informativo e non costituisce alcun vincolo da parte della Elcart in merito a prestazioni ed utilizzo del prodotto.The divulgation of data contained on this technical sheet are exclusively for informational reasons and establish no link on behalf of Elcart regard to thr performances and the usa of the product.La divulgacion de los datos contenidos en esta ficha son un servicio unicamente informativo y no constituyen ningun vinculo de parte de Elcart respecto a las prestaciones y uso del producto.
ART. 44/4010 PAGINA 2 DI 14
I. Contenuto confezione
Scaner KA-401 Carrello negativi Foto/Business Card Carrello
Note
Suggeriamo di utilizzare periodicamente per la pulizia del prodotto, un panno di cotone umido (senza utilizzare alcool) per ottenere immagini chiare e nitide.
Pulire la fessura laterale con il pennello in dotazione. Sporcizia e polvere sui negativi e sulle diapositive, possono ridurre la qualità
dell’immagine scansionata; controllare il materiale prima di inserire i negativi e le diapositive all’interno dello scanner.
Cercare ed utilizzare per la pulizia dei negativi e delle diapositive solo prodotti professionali in modo da non rovinare irreversibilmente i Vostri vecchi ricordi.
Carrello diapositive Backlight Holder
Cavo USB/Video Alimentatore Pennina per pulizia
Manuale
Carrello Business Card
● Premere il tasto FLIP durante la modalità live view [Figure 2.3]
● Premere il pulsante “Play” Mode/Setting per selezionare la funzione “Flip” (Refer to P.25) [Figure 2.4]
-5-
Down/Flip pulsante (Flip hard key)
Flip
Pulsante di riproduzione Play
Foto/Business Card slot
III. Istruzioni d’uso
-6-
Up/Mirror
OK/Capture Down/Flip
ON button Power status LED
Film/Diapositive slot
Slot for Backlight holder
USB Port
TV out jack
Power core port
Play Mode/Setting
Left/EV
Right/Colore
SD card slot
-7-
Scansione negativo/diapositive 1. Inserire la scheda di memoria SD (non fornita) nello slot dedicato e i negativi
all’interno del carrello; successivamente inserire il carrello all’interno dell’unità: 2. Inserire il back light holder nella parte frontale dell’unità:
3. Inserire il cavo di alimentazione all’interno dell’unità e successivamente inserire la
spina nella presa rete 220V (Figure 3.1).
Figure 3.1
II. Installazione negativo e/o diapositiva
● Installazione diapositiva all’interno del carrello
1. Aprire il carrello diapositive come da foto
2. Posizionare le diapositive come foto 3. Chiudere il carrello
Installazione del negativo all’interno del carrello
1. Aprire il carrello negativi come da foto
-3-
2. Inserire il negativo all’interno dello slot 3. Chiudere il carrello
Note
Per evitare di scansionare le immagini al contrario, seguire i numeri seriali (da sinistra a destra) che trovate in alto al Vostro negativo (fig 1)
Se l’immagine è capovolta [fig.2] non è un problema in quanto può essere corretta
utilizzando la funzione “Flip” prima o dopo la scansione [fig.3 and fig.4].
Figure 1
Figure 2

ELCART
ELCART DISTRIBUTION SPA via Michelangelo Buonarroti, 46 - 20093 Cologno Monzese (Milano) ITALYTel. +39 02.25117310 Fax +39 02.25117610 sito internet: www.elcart.com e-mail: [email protected]
Manuale di istruzioni/Scheda tecnica
La divulgazione dei dati contenuti in questa scheda è da ritenersi un servizio puramente informativo e non costituisce alcun vincolo da parte della Elcart in merito a prestazioni ed utilizzo del prodotto.The divulgation of data contained on this technical sheet are exclusively for informational reasons and establish no link on behalf of Elcart regard to thr performances and the usa of the product.La divulgacion de los datos contenidos en esta ficha son un servicio unicamente informativo y no constituyen ningun vinculo de parte de Elcart respecto a las prestaciones y uso del producto.
ART. 44/4010 PAGINA 3 DI 14
4. Premere il pulsante ON nella parte alta dell’unità. Selezionare dal menu il corretto
formato da scannerizzare (vedere pag 29)
5. Premere il pulsante OK/Capture per scannerizzare l’immagine. 6. Premere il pulsante Play per rivedere le immagini salvate
Power
button
OK/Capture button
Pulsante Play
Media Type
3. Inserire il carrello foto all’interno dello slot dell’unità (foto rivolta verso l’alto):
4. Selezionare dal menu il media corretto da scansionare (vedi P.29)
5. Premere il pulsante OK/Capture per scansionare l’immagine.
-11-
OK/Capture button
Media Type
Scansione Business Card (biglietti da visita) 1. Seguire lo step 1 della scansione foto; rimuovere quindi il carrello diapositive e il
back light holder.
2. Aprire il carrello foto e posizionare il biglietto da visita seguendo la figura: 3. Posizionare il carrello per le business card come figura:
-12-
4. Inserire il carrello foto con il carrello per le business card all’interno dell’unità: 5. Dal menu principale, selezionare il format corretto per iniziare la scansione (P.29)
6. Premere il tasto OK/Capture per iniziare la scansione
-13-
OK/Capture button
Media Type
7. Dopo aver effettuato le scansioni, estrarre la scheda di memoria SD card dove saranno memorizzate tutte le scansioni.
8. In alternativa al punto 7, le scansioni salvate possono essere trasferite sul PC mediante la funzione “trasferimento dati” (vedi P.31)
Scansione Foto 1. Rimuovere il carrello delle diapositive e e il back light holder dall’unità:
2. Aprire il carrello foto, e posizionare la foto all’interno facendo attenzione a centrare l’immagine; chiudere il carrello come foto
-10-
ELCART
ELCART DISTRIBUTION SPA via Michelangelo Buonarroti, 46 - 20093 Cologno Monzese (Milano) ITALYTel. +39 02.25117310 Fax +39 02.25117610 sito internet: www.elcart.com e-mail: [email protected]
Manuale di istruzioni/Scheda tecnica
La divulgazione dei dati contenuti in questa scheda è da ritenersi un servizio puramente informativo e non costituisce alcun vincolo da parte della Elcart in merito a prestazioni ed utilizzo del prodotto.The divulgation of data contained on this technical sheet are exclusively for informational reasons and establish no link on behalf of Elcart regard to thr performances and the usa of the product.La divulgacion de los datos contenidos en esta ficha son un servicio unicamente informativo y no constituyen ningun vinculo de parte de Elcart respecto a las prestaciones y uso del producto.
ART. 44/4010 PAGINA 4 DI 14
IV. Guida
-14-
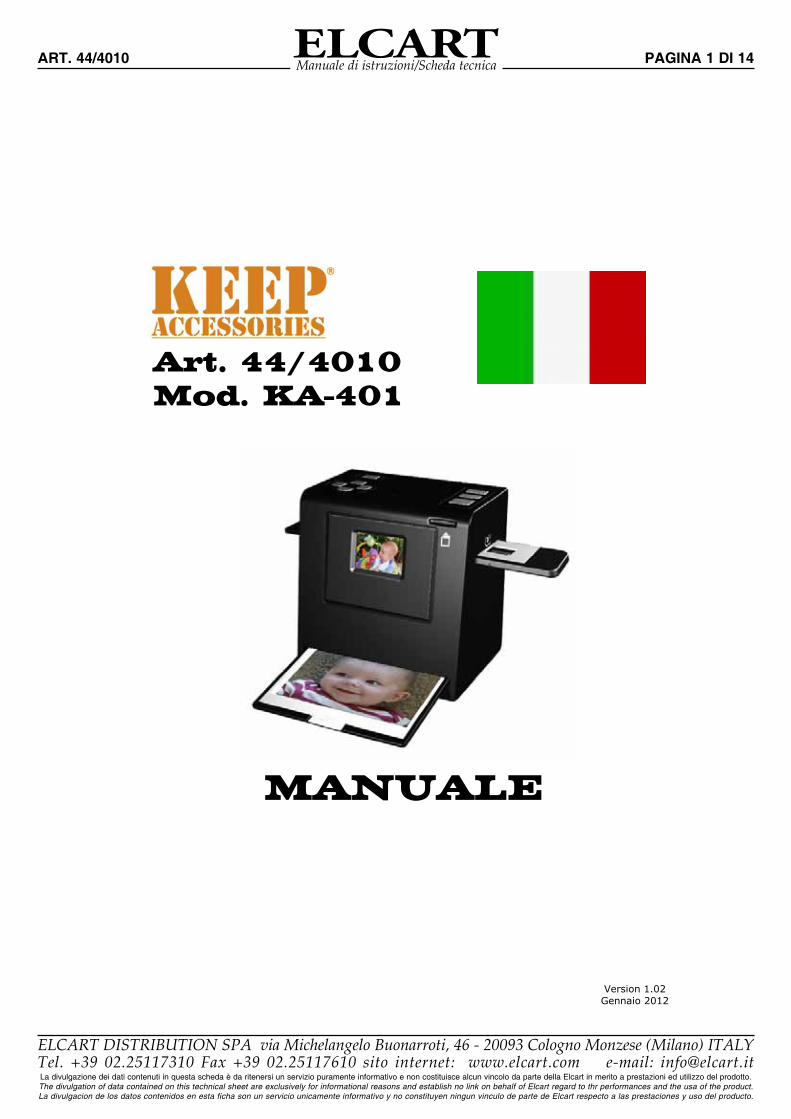
Modalità scansione
Playback Mode Modalità di setting Modalità Play
Modalità Live View
1.3 EV (Hard Key)
● Premere il tasto Sinistra/EV per entrare nel menu di controllo lumnosità (EV)
● Premere il tasto Up/+ per aumentare la luminosità da -3 to 3
● Premere il pulsante Down/- button per diminuire la luminosità
Up/+ pulsante
Down/- pulsante
Sinistra/EV OK/Capture Salvataggio/Uscita Up/+
Down/-
1.4 Colore (Hard Key)
● Premere il pulsante Right/Color per entrare nel menu di controllo colore
● Premere il tasto Up/+ button per aumentare il colore da -3 to 3
● Premere il tasto Down/- per diminuire il colore
Pulsante Up/+
Pulsante Down/-
2. Scansione
-19-
OK/Capture mode
Salvataggio imagine sulla scheda di memoria SD
Rotazione +90
Annullamento
Rotazione -90
Immagine selezionata
Left/Precedente
1. Modalità “Live View” Dopo una veloce schermata di benvenuto, il sistema entrerà in automatico nella modalità “Live View”. Un led rosso apparirà nella schermata in alto a sx.
1.1 Mirror
● Premere il pulsante Up/Mirror per ottenere la visione speculare dell’immagine
-15-
Up/Mirror
Pulsante Up/Mirror
OK/Capture
indicatore Live View (flash ogni 0.5sec)
Salvataggio/Uscita
1.2 Funzione “Flip”
● Premere il pulsante Down/Flip per roteare l’immagine di 180°
Pulsante Down/Flip
Down/Flip OK/Capture Salvataggio/Uscita

ELCART
ELCART DISTRIBUTION SPA via Michelangelo Buonarroti, 46 - 20093 Cologno Monzese (Milano) ITALYTel. +39 02.25117310 Fax +39 02.25117610 sito internet: www.elcart.com e-mail: [email protected]
Manuale di istruzioni/Scheda tecnica
La divulgazione dei dati contenuti in questa scheda è da ritenersi un servizio puramente informativo e non costituisce alcun vincolo da parte della Elcart in merito a prestazioni ed utilizzo del prodotto.The divulgation of data contained on this technical sheet are exclusively for informational reasons and establish no link on behalf of Elcart regard to thr performances and the usa of the product.La divulgacion de los datos contenidos en esta ficha son un servicio unicamente informativo y no constituyen ningun vinculo de parte de Elcart respecto a las prestaciones y uso del producto.
ART. 44/4010 PAGINA 5 DI 14
2.1 Salvataggio sulla scheda di memoria SD
L’icona del salvataggio immagine viene selezionata; basta premere il tasto di conferma “OK/Capture button” per confermare il salvataggio.
2.2 Rotazione +/-90 gradi Potete roteare l’immagine di 90 gradi a sinistra (o destra) selezionando il tasto dedicato e confermando l’operazione premendo il tasto “OK/Capture”; in automatico si illuminerà l’icona di salvataggio immagine; confermare se si desidera salvare l’operazione o selezionare il pulsante di uscita exit. In automatico si passerà alla modalità “Live View”.
-20-
Pulsante OK
3. Modalità Play
Premere il tasto Play per entrare nella modalità Play mode.
3.1 Play Show automatico
Indicatore Show Quando si seleziona la modalità Play mode, un icona in alto a sinistra apparirà in automatico inizieranno a scorrere tutte le immagini memorizzate nella SD card con un intervallo di 2 secondi. Si può mettere in pausa la presentazione premendo il tasto Right o Left.
-23-
Play
Mode/SettingLeft/Precendenteection
Right/Successiva
3.2 Play Manuale Slide Show automatico Slide Show automatico
3.3 Uscita dalla modalità Play
Premere il tasto “Play” per uscire dalla modalità Play show automatico e tornare alla modalità Live View.
-24-
Pausse
Left O Right
Left E Right
Left Right
Pulsante Play
3.4 Modifica immagine: Rotazione+90/Rotate-90/Mirror/Flip/Annullamento Nella modalità “Play”, premere il tasto Mode per entrare nel pannello di controllo dell’immagine; premere il pulsante “Mode” un ulteriore volta per entrare nel menu di modifica. Utilizzando i tasti Left and Right selezionare la modifica desiderata: ● Mirror: immagine speculare ● Flip: rotazione dell’immagine a 180 gradi ● Annullamento: cancellare immagini salvate Premere il tasto Mode per tornare al pannello di controllo Play.
Rotazione +90 Annullamento
Rotazione -90 Mirror Flip
Mode/SettingLeft/Precedente
Right/Successivo
OK/Capture
2.3 Annullamento Selezionare il pulsante di annullamento e confermare l’operazione con il tasto “OK/Capture” per annullare l’operazione e tornare successivamente alla modalità “Live View”. Non ci saranno salvamenti sulla SD card.
2.4 Memoria piena Quando la memoria SD è piena, apparirà un icone sul display con la scritta FULL. Scaricare le immagini dalla SD card sul computer o inserire una nuova SD card.
-21-
Pulsante OK
2.5 SD card bloccata
Se la scheda di memoria SD è bloccata, apparirà un’icona con il lucchetto sul display. Per sbloccare la SD card, rimuovere la scheda di memoria e premere il tasto di sblocco sulla scheda di memoria.
2.6 Errore SD card Se lo scanner non riesce a leggere correttamente la scheda di memoria SD, apparirà un logo di errore come da figura. Provare a formattare la SD o inserire una nuova scheda di memoria SD.
-22-
Icona di SD card bloccata
Logo errore SD card

ELCART
ELCART DISTRIBUTION SPA via Michelangelo Buonarroti, 46 - 20093 Cologno Monzese (Milano) ITALYTel. +39 02.25117310 Fax +39 02.25117610 sito internet: www.elcart.com e-mail: [email protected]
Manuale di istruzioni/Scheda tecnica
La divulgazione dei dati contenuti in questa scheda è da ritenersi un servizio puramente informativo e non costituisce alcun vincolo da parte della Elcart in merito a prestazioni ed utilizzo del prodotto.The divulgation of data contained on this technical sheet are exclusively for informational reasons and establish no link on behalf of Elcart regard to thr performances and the usa of the product.La divulgacion de los datos contenidos en esta ficha son un servicio unicamente informativo y no constituyen ningun vinculo de parte de Elcart respecto a las prestaciones y uso del producto.
ART. 44/4010 PAGINA 6 DI 14
3.5 Menu Play; Modifica immagine Premere il tasto Mode durante il menu di modifica immagine; sul display apparirà l’ultima scansione visualizzata.
3.6 Menu Play: Cancellazione Selezionare l’icone a forma di bidone e confermare con il tasto “OK” per cancellare l’immagine sul display. Se si vuole cancellare più immagini, ripetere il processo.
-26-
Mode button
Pulsante OK
Cancellazione
4.1 Impostazioni media
-29-
Diaspositive B&W Negativi
Negativi a colori
Negativi a colori
B&W Negativi
Diapositive
Business/Plastic card Foto
Foto
Business Card Plastic Card
4.2 Impostazioni formato
Se la scheda di memoria interna richiede una formattazione, premere il tasto MODE durante la modalità Live View. Selezionare la seconda icona come da disegno e confermare con il tasto OK. In automatico il cursore si posizionerà sull’icona di destra ; selezionare l’icona in fianco a sinistra e confermare con il tasto OK per inizializzare la formattazione della scheda di memoria
Note Se non è presente una scheda SD all’interno dell’unità, verrà formattata la sola memoria interna.
4.3 Impostazioni TV out
-30-
OK button
OK button
Si può utilizzare la TV per visualizzare meglio le immagini anzichè utilizzare l’LCD dell’unità. Basta connettere lo scanner alla TV mediante I cavi di connessione AV inclusi e entrare nel menu di impostazione TV out. Selezionare il format PAL or NTSC a seconda del format richiesto dalla Vs TV.
4.4 Impostazioni USB Mode
Dopo aver scansionato, si possono trasferire le immagini dalla memoria interna o dalla SD card direttamente sul vostro PC utilizzando l’impostazione USB dal menu. Fate attenzione di aver collegato correttamente il cavo USB nell’unità e sul PC. Entrare nel menu e selezionare l’icona USB Mode; un icona con il logo USB aparirà sul display come da figura. Il Vostro PC leggerà l’unita come disco.
-31-
OK button
3.7 Modalità Play: Immagini non trovate Se all’interno della scheda di memoria SD non ci sono immagini, apparirà un’icona con un punto di domanda come da figura. Dopo 2 secondi, in automatico si tornerà alla modalità Live View.
-27-
Playback button
4. Impostazioni
Durante la modalità Live View Mode, premere Il tasto Mode per entrare nel menu impostazioni. ● Media Type: Select the type of media loaded in holder ● Format: Format Internal memory or SD card ● TV out: select NTSC or PAL according to TV system ● USB mode: MSDC (Mass Storage Device Class)
Tasto Mode
Formato Media USB Mode
Memoria interna o SD
TV Out

ELCART
ELCART DISTRIBUTION SPA via Michelangelo Buonarroti, 46 - 20093 Cologno Monzese (Milano) ITALYTel. +39 02.25117310 Fax +39 02.25117610 sito internet: www.elcart.com e-mail: [email protected]
Manuale di istruzioni/Scheda tecnica
La divulgazione dei dati contenuti in questa scheda è da ritenersi un servizio puramente informativo e non costituisce alcun vincolo da parte della Elcart in merito a prestazioni ed utilizzo del prodotto.The divulgation of data contained on this technical sheet are exclusively for informational reasons and establish no link on behalf of Elcart regard to thr performances and the usa of the product.La divulgacion de los datos contenidos en esta ficha son un servicio unicamente informativo y no constituyen ningun vinculo de parte de Elcart respecto a las prestaciones y uso del producto.
ART. 44/4010 PAGINA 7 DI 14
V. Specifiche
Sensore: 5 mega CMOS sensor Lenti: F no.=2.0, 4 Glass elements, LCD: 2.4” Color TFT LCD Memoria interna: 24MB NAND Flash Focus Range: 2x Predefined Focuses Controllo esposizione:
6 livelli di controllo
Controllo colore: 6 livelli di controllo Qualità scansione: 1,800 dpi Conversione: 10 bit per colore Scan Method: Single pass Fonte luce: Film/Slide scanning:
3 LEDs bianchi Foto/Business Card scanning: 8 LEDs bianchi
Interfaccia: USB 2.0, TV-out (video 3.5mm jack) USB: Mass Storage Device Class/MSDC Alimentazione: 5V adattatore, o USB Dimensioni: 190x145x205mm Peso: 0.90kg Memoria sterna: SD/SDHC compatible
-33-
MADE IN CHINA
Informazioni agli utenti Il simbolo riportato sull’apparecchiatura indica che il rifiuto deve essere oggetto di “raccolta separata”. Pertanto, l’utente dovrà conferire (o far conferire) il rifiuto ai centri di raccolta differenziata predisposti dalle amministrazioni locali, oppure consegnarlo al rivenditore contro acquisto di una nuova apparecchiatura di tipo equivalente. La raccolta differenziata del rifiuto e le successive operazioni di trattamento, recupero e smaltimento favoriscono la produzione di apparecchiature con materiali riciclati e limitano gli effetti negativi sull’ambiente e sulla salute eventualmente causati da una gestione impropria del rifiuto. Lo smaltimento abusivo del prodotto da parte dell’utente comporta l’applicazione delle sanzioni amministrative di cui l’articolo 50 e seguenti del D. Lgs. N. 22/1997.
Distribuito da: /Distributed by:
Elcart Distribution SPA
Via Michelangelo Buonarroti 46 Cologno Monzese – MI (ITALY)
www.elcart.com

ELCART
ELCART DISTRIBUTION SPA via Michelangelo Buonarroti, 46 - 20093 Cologno Monzese (Milano) ITALYTel. +39 02.25117310 Fax +39 02.25117610 sito internet: www.elcart.com e-mail: [email protected]
Manuale di istruzioni/Scheda tecnica
La divulgazione dei dati contenuti in questa scheda è da ritenersi un servizio puramente informativo e non costituisce alcun vincolo da parte della Elcart in merito a prestazioni ed utilizzo del prodotto.The divulgation of data contained on this technical sheet are exclusively for informational reasons and establish no link on behalf of Elcart regard to thr performances and the usa of the product.La divulgacion de los datos contenidos en esta ficha son un servicio unicamente informativo y no constituyen ningun vinculo de parte de Elcart respecto a las prestaciones y uso del producto.
ART. 44/4010 PAGINA 8 DI 14
Combo Scan II
User Manual
Art 44/4010 Mod. KA-401
Version 1.02 Gennaio 2012

ELCART
ELCART DISTRIBUTION SPA via Michelangelo Buonarroti, 46 - 20093 Cologno Monzese (Milano) ITALYTel. +39 02.25117310 Fax +39 02.25117610 sito internet: www.elcart.com e-mail: [email protected]
Manuale di istruzioni/Scheda tecnica
La divulgazione dei dati contenuti in questa scheda è da ritenersi un servizio puramente informativo e non costituisce alcun vincolo da parte della Elcart in merito a prestazioni ed utilizzo del prodotto.The divulgation of data contained on this technical sheet are exclusively for informational reasons and establish no link on behalf of Elcart regard to thr performances and the usa of the product.La divulgacion de los datos contenidos en esta ficha son un servicio unicamente informativo y no constituyen ningun vinculo de parte de Elcart respecto a las prestaciones y uso del producto.
ART. 44/4010 PAGINA 9 DI 14
I. Unpack Combo Scan II
Combo Scan II Negative Film Holder Photo/Business Card Holder
Note
We strongly suggest using a clean, dry, non-alcohol cotton swab to clean the glass surface on the back-light holder and the business card fixture periodically to produce a clear image. Make sure all negative films, slide films, cover trays and photos are free of dust and dirt before inserting into the Combo Scanner as this may affect the image quality when scanning. When cleaning films, please use a professionally recommended purger from a photo store to avoid damaging old or precious films.
-2-
Slide Film Holder Backlight Holder
USB/Video Cable Power Core & Cable Clean Brush User Manual
Business Card Fixture
● Press hard key on top of device in live view [Figure 2.3]
● Press Playback button Mode/Setting to select Flip function (Refer to P.25) [Figure 2.4]
Down/Flip button (Flip hard key)
Flip
Playback button
Photo/Business Card slot
III. Quick Start
-6-
Up/Mirror
OK/Capture Down/Flip
Power button Power status LED
Film/Slide slot
Slot for Backlight holder
USB Port
TV out jack
Power core port
Playback Mode/Setting
Left/EV Right/Color
SD card slot
How to use Combo Scan II Scanning Film/Slide 1. Put Film into Film holder, and Insert the film holder into the right side of the unit. 2. Insert the back light holder at the rear side of the unit.
3. Plug in power cable to the power port on the unit and one end to the power outlet
(Figure 3.1).
-7-
Figure 3.1
II. Install film into the film holder
● Install slide film into the holder entitled “Slides Only”
1. Open the slide holder as illustrated
2. Place slide in recessed slot in holder 3. Close the slide holder
● Install Negative Film into holder entitled “Negative Film Only”
1. Open the film holder as illustrated
-3- 2. Install film into negative film slot 3. Close the film holder
Note
To avoid mirror image, follow the serial numbers (from left to right) on top of film when install negative film into holder
If the image is upside down [Figure 2.2], the image can be corrected by pressing
Down/Flip button before capturing [Figure 2.3]. Alternative, enter the playback mode and press Mode button to select Flip function [Figure 2.4]
-4-
Figure 2.1
Figure 2.2
ELCART
ELCART DISTRIBUTION SPA via Michelangelo Buonarroti, 46 - 20093 Cologno Monzese (Milano) ITALYTel. +39 02.25117310 Fax +39 02.25117610 sito internet: www.elcart.com e-mail: [email protected]
Manuale di istruzioni/Scheda tecnica
La divulgazione dei dati contenuti in questa scheda è da ritenersi un servizio puramente informativo e non costituisce alcun vincolo da parte della Elcart in merito a prestazioni ed utilizzo del prodotto.The divulgation of data contained on this technical sheet are exclusively for informational reasons and establish no link on behalf of Elcart regard to thr performances and the usa of the product.La divulgacion de los datos contenidos en esta ficha son un servicio unicamente informativo y no constituyen ningun vinculo de parte de Elcart respecto a las prestaciones y uso del producto.
ART. 44/4010 PAGINA 10 DI 14
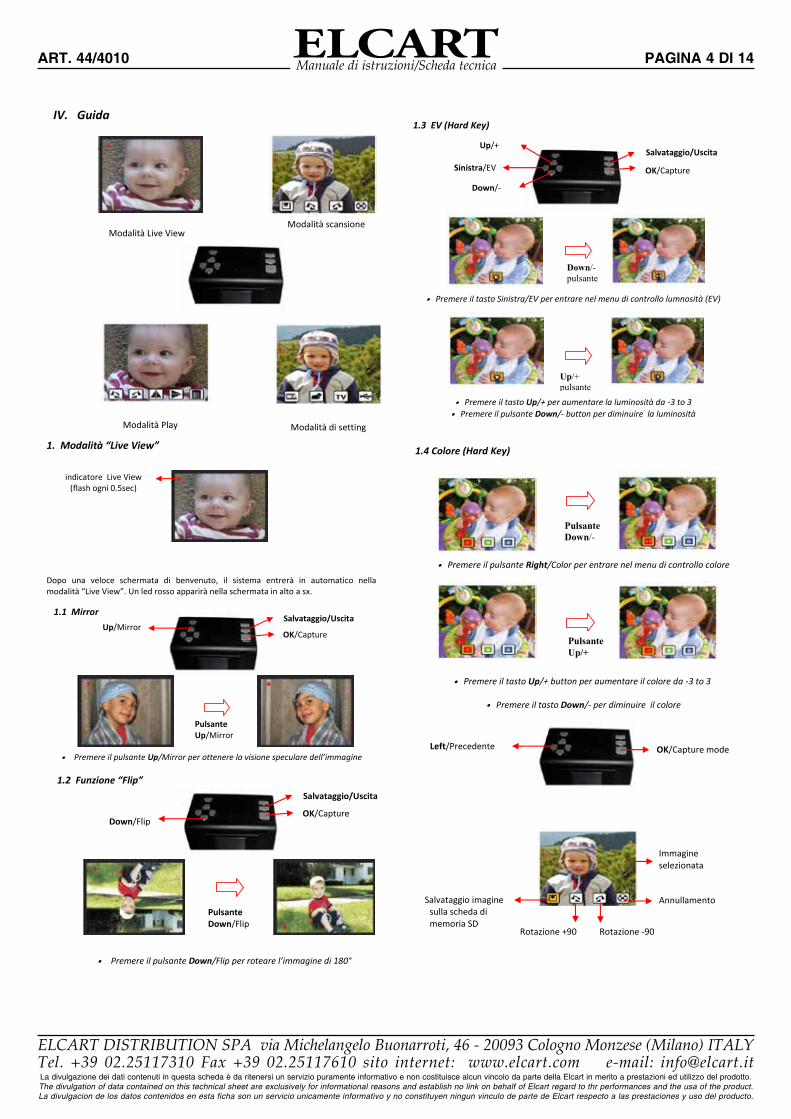
4. Press Power button to power on the unit. Enter media type menu to select the correct media for scanning. (Refer to P.29) 5. Press OK/Capture button to capture the image.
6. Press on Playback button to playback the saved images.
-8-
Power button
OK/Capture button
Playback button
Media Type
3. Insert the photo holder into the photo slot of the unit.
4. Enter Media Type Mode to select the correct media for scanning. (Refer to P.29)
5. Press OK/Capture button to capture the image.
-11-
OK/Capture button
Media Type
Scanning Business Card 1. Follow step 1 from scanning photo to remove the film/slide holder as well as the
back light holder in the previous pages.
2. Open the photo holder frame and place the business card on the base of the photo holder following the engraved guide line.
3. Put the business card fixture on the top of photo holder.
-12-
4. Insert the photo holder with business card fixture into the photo slot of the unit. 5. Enter media type menu to select the correct media for scanning. (Refer to P.29)
6. Press OK/Capture button to capture the image.
-13-
Media Type
OK/Capture button
7. After capturing, take out the SD card which stored the saved images.
8. Alternative to 7, saved picture can be read directly, without taking out the SD card, from PC by entering MSDC mode. (Refer to P.31)
-9-
Scanning Photo 1. Remove the film/slide holder as well as the back light holder from the unit if either
one is attached.
2. Open the photo holder frame as illustrated, place the photo on the base of the photo holder and close the photo holder frame.
-10-
Remove film/slide holder by exiting the sliding to the left hand side.
Remove backlight holder by pressing down the handle and pull it out.

ELCART
ELCART DISTRIBUTION SPA via Michelangelo Buonarroti, 46 - 20093 Cologno Monzese (Milano) ITALYTel. +39 02.25117310 Fax +39 02.25117610 sito internet: www.elcart.com e-mail: [email protected]
Manuale di istruzioni/Scheda tecnica
La divulgazione dei dati contenuti in questa scheda è da ritenersi un servizio puramente informativo e non costituisce alcun vincolo da parte della Elcart in merito a prestazioni ed utilizzo del prodotto.The divulgation of data contained on this technical sheet are exclusively for informational reasons and establish no link on behalf of Elcart regard to thr performances and the usa of the product.La divulgacion de los datos contenidos en esta ficha son un servicio unicamente informativo y no constituyen ningun vinculo de parte de Elcart respecto a las prestaciones y uso del producto.
ART. 44/4010 PAGINA 11 DI 14
IV. Operation Guide
Capture Mode
Playback Mode Setting Mode Playback Mode
Live View Mode
● Press Up/+ button to increase exposure(brightness) with ranges of -3 to 3 ● Press Down/- button to decrease exposure(brightness) with ranges of -3 to 3
1.4 Color (Hard Key)
● Press Right/Color button to enter color control
Up/+ button
Down/- button
Right/Color OK/Capture Save & Exit Up/+
Down/-
● Press Up/+ button to increase Color with ranges of -3 to 3
● Press Down/- button to decrease Color with ranges of -3 to 3
● Press arrow hard key Left and Right to move between R, G, B
-18-
Up/+ button
Down/- button
Left/Go Previous Right/Go Next
2. Capture Mode
Once user presses the OK/Capture hard key, the live view image is selected and wait for 2-3 seconds to enter the Capture mode shown with four icons on the display.
● Save to Memory: save selected image to memory ● Rotate +90: rotate +90 degrees ● Rotate -90: continue rotate -90 degrees (this is for adjusting the user who took the portrait picture) ● Cancel: cancel all action and return to Live View
OK/Capture mode
Save to Memory
Rotate +90
Cancel
Rotate -90
Selected image
Left/Go Previous Selection
Right/Go Next
1. Live View Mode After a quick display of welcome page, system will enter the Live View mode. A flashing red dot appears on the top left hand corner indicating the state in Live View. (Note: select correct media type (Refer to P.29) before capturing. By default the setting is at Negative Film. Unit will reset back to the default setting after power off)
1.1 Mirror (Hard Key)
● Press Up/Mirror button to turn the image left to right, press again vice versa
-15-
Up/Mirror
Up/Mirror button
OK/Capture
Live View indicator (flashing at 0.5sec rate)
Save & Exit
1.2 Flip (Hard Key)
● Press Down/Flip button to turn the image upside down, press again vice versa
1.3 EV (Hard Key)
● Press Left/EV button to enter EV(Brightness) control
Down/Flip button
Down/Flip OK/Capture Save & Exit
Left/EV OK/Capture Save & Exit Up/+
Down/-

ELCART
ELCART DISTRIBUTION SPA via Michelangelo Buonarroti, 46 - 20093 Cologno Monzese (Milano) ITALYTel. +39 02.25117310 Fax +39 02.25117610 sito internet: www.elcart.com e-mail: [email protected]
Manuale di istruzioni/Scheda tecnica
La divulgazione dei dati contenuti in questa scheda è da ritenersi un servizio puramente informativo e non costituisce alcun vincolo da parte della Elcart in merito a prestazioni ed utilizzo del prodotto.The divulgation of data contained on this technical sheet are exclusively for informational reasons and establish no link on behalf of Elcart regard to thr performances and the usa of the product.La divulgacion de los datos contenidos en esta ficha son un servicio unicamente informativo y no constituyen ningun vinculo de parte de Elcart respecto a las prestaciones y uso del producto.
ART. 44/4010 PAGINA 12 DI 14
2.1 Save to Memory
Save icon will be highlighted for user to confirm the saving by pressing the OK/Capture button. After save action the display returns back to Live View.
2.2 Rotate +/-90 degrees User can manipulate rotate +90 or rotate -90 with the Left or Right button to highlight on the rotate +90/-90 icon. Press OK/Capture button to do a clockwise or anti-clockwise rotation and move to Save and Exit screen page. Press again the OK/Capture button to save the rotated image or exit without save. The screen will return back to Live View.
-20-
OK button
3. Playback Mode
Press the Playback button to enter the Playback Mode.
3.1 Playback Auto Slide Show
Slide Show Indicator Once user enters the playback mode, a slide show indicator is showing at the top left hand corner of screen. The display will start playing all images stored in SD card or internal memory with 2 seconds interval between saved images. User can pause the slide show by pressing either the Left or Right or Mode hard key.
-23-
Playback Mode/Setting Left/Go Previous
Selection
Right/Go Next
3.2 Playback Manual Control Auto Slide Show Edit mo Auto Slide Show
3.3 Playback Exit
Press the Playback button to exit the Playback Mode to return to Live View Mode.
-24-
Pausse
Left OR Right
Left AND Right
Single Picture
Press Left OR Right button to scroll picture
Press Left AND Right button together to resume to Slide Show
Left Right
Playback button
2.3 Cancel With Cancel icon highlighted, pressing the OK/Capture button to cancel all action and return back to the state of Live View. Nothing will be saved onto the SD card.
2.4 Memory full Once the internal memory or SD card is full, user can see a FULL icon showing on the display. User can either upload the saved images to PC or replace with another SD card for continuing capture.
-21-
OK button
2.5 SD card locked
If the SD card is locked, press the OK/Capture button will show up a SD Card Locked icon at the center of screen. Unlock the SD card by switching the bar to unlock position to continue use of the SD card.
2.6 SD card error If scanner cannot detect a good working SD card in the SD slot, a warning icon with question mark will appear at the center of screen. Either format the SD card (Refer to P.30) or replace with another good SD card for continue operation.
-22-
SD card locked icon
SD card error indicator

ELCART
ELCART DISTRIBUTION SPA via Michelangelo Buonarroti, 46 - 20093 Cologno Monzese (Milano) ITALYTel. +39 02.25117310 Fax +39 02.25117610 sito internet: www.elcart.com e-mail: [email protected]
Manuale di istruzioni/Scheda tecnica
La divulgazione dei dati contenuti in questa scheda è da ritenersi un servizio puramente informativo e non costituisce alcun vincolo da parte della Elcart in merito a prestazioni ed utilizzo del prodotto.The divulgation of data contained on this technical sheet are exclusively for informational reasons and establish no link on behalf of Elcart regard to thr performances and the usa of the product.La divulgacion de los datos contenidos en esta ficha son un servicio unicamente informativo y no constituyen ningun vinculo de parte de Elcart respecto a las prestaciones y uso del producto.
ART. 44/4010 PAGINA 13 DI 14
3.4 Playback Edit: Rotate+90/Rotate-90/Mirror/Flip/Delete While at the Playback Mode, press the Mode button to enter Playback Manual Control Mode. Press the Mode button one more time to enter Playback Edit. Use Left and Right button to move to the desired icons and press OK button to confirm the action. ● Rotate +90: rotate image +90 degrees ● Rotate -90: rotate image -90 degrees ● Mirror: turn image left to right ● Flip: turn image upside down ● Delete: delete selected image stored in memory Press the Mode button to resume back to Playback Manual Control Mode.
-25-
Rotate +90 Delete Rotate -90 Mirror Flip
Mode/Setting Left/Go Previous Selection
Right/Go Next
OK/Capture
4. Setting Mode While in Live View Mode, press the Mode hard key to enter the Setting Mode. ● Media Type: Select the type of media loaded in holder ● Format: Format Internal memory or SD card ● TV out: select NTSC or PAL according to TV system ● USB mode: MSDC (Mass Storage Device Class)
-28-
Mode (Hard Key)
Media Type USB Mode
Format TV Out
4.1 Setting: Media Type
-29-
Slide film B&W Negative
Color Negative film
Color Negative film
B&W Negative film
Slide
Business/Plastic card Photo
Photo
Business Card Plastic Card
4.2 Setting: Format
If the internal memory or SD card requires format by scanner, user can enter Format Mode by pressing the Mode button while under the Live View Mode. Scroll to the second icon from the left and press OK button to enter format confirmation page. The highlight is at the Cancel icon by default. User can press Left or Right button to move to Confirm or Cancel icon and press the OK button.
Note If there is no SD card inside the unit, the internal memory will be formatted once processing the Formatting action. Vice versa, the SD card will be formatted
4.3 Setting: TV out
-30-
OK button
OK button
3.5 Playback Edit Exit Press the Mode button while at the Playback Edit Mode the display will go back to Playback Manual Control Mode on current selected picture.
3.6 Playback: Delete With highlight on the Delete icon press OK button will delete the current selected picture and resume back to Playback Manual Control Mode. If user intends to continue to delete the images, repeat the process by pressing the Mode button and move to delete icon again and press OK button to confirm.
-26-
Mode button
OK button
Delete
3.7 Playback: No Picture If there is no picture inside the internal memory or SD card when pressing the Playback button, a page with Question Mark symbol at the screen center will show up. The page will remain for 2 seconds and resume back to Live View Mode.
-27-
Playback button

ELCART
ELCART DISTRIBUTION SPA via Michelangelo Buonarroti, 46 - 20093 Cologno Monzese (Milano) ITALYTel. +39 02.25117310 Fax +39 02.25117610 sito internet: www.elcart.com e-mail: [email protected]
Manuale di istruzioni/Scheda tecnica
La divulgazione dei dati contenuti in questa scheda è da ritenersi un servizio puramente informativo e non costituisce alcun vincolo da parte della Elcart in merito a prestazioni ed utilizzo del prodotto.The divulgation of data contained on this technical sheet are exclusively for informational reasons and establish no link on behalf of Elcart regard to thr performances and the usa of the product.La divulgacion de los datos contenidos en esta ficha son un servicio unicamente informativo y no constituyen ningun vinculo de parte de Elcart respecto a las prestaciones y uso del producto.
ART. 44/4010 PAGINA 14 DI 14
User is able to view the images from a TV display instead of the unit’s own LCD display for bigger viewing pleasure. By connecting the AV cable to unit’s TV out jet and one end to TV, confirm by pressing OK button to select PAL or NTSC matching to TV system. The TV is now working as an alternative display to perform all tasks like scan, capture, edit and playback.
4.4 Setting: USB Mode
After capture user can upload the saved images from internal memory or SD card to PC by selecting USB Mode. Make sure the USB cable is connected between the unit and PC. Scroll to the USB Mode icon and press the OK button. The display is showing a USB status icon at the center of screen confirming the unit is now becoming a mass storage device. User can review or edit images on the external storage device. Or just take out the SD card from device into PC to read the images directly.
-31-
OK button
Image Sensor: 5 mega CMOS sensor Lens: F no.=2.0, 4 Glass elements, LCD: 2.4” Color TFT LCD Internal memory: 24MB NAND Flash (for saving images) Focus Range: 2x Predefined Focuses Exposure Control: 6 levels of control Color Balance: 6 levels of control Scan Quality: 1,800 dpi Data Conversion: 10 bit per color channel Scan Method: Single pass Light Source: Film/Slide scanning:
Light bar (3 white LEDs) Photo/Business Card scanning: Light bar (8 white LEDs)
Interface: USB 2.0, TV-out (video 3.5mm jack) USB Configuration: Mass Storage Device Class/MSDC Power: 5V adapter, or USB power Dimensions: 190x145x205mm Weight: 0.90kg External memory: SD/SDHC compatible
MADE IN CHINA
Distribuito da: /Distributed by:
Elcart Distribution SPA Via Michelangelo Buonarroti 46 Cologno Monzese – MI (ITALY)
www.elcart.com