Embed Size (px)
Citation preview

User’s Guide
110/220 volt edition
Xanté Corporation 2800 Dauphin St.
Mobile, AL 36606-2400Phone: 251-473-6502
Fax: 251-473-6503Web Site: xante.com

2 ScreenWrier 5 User’s Guide
Trademarks X-ACT™ are trademarks of Xante Corporation.
Adobe®, Adobe® Illustrator®, Adobe® PageMaker®, Aldus®, Adobe® Photoshop®, Adobe® PostScript®, Acrobat®, Minion®, Adobe® Type Manager®, ATM®, and the ATM® and PostScript® logos are registered trademarks and Adobe® Acrobat® Reader™, AdobePS™, and Adobe® PostScript® 3™ are trademarks of Adobe Systems Incorporated which may be registered in certain jurisdictions. Apple®, AppleTalk®, ColorSync®, EtherTalk®, LaserWriter®, AppleShare®, Mac® OS, Mac®, Power Macintosh®, QuickDraw®, QuickTime®, TrueType®, and Macintosh® are registered trademarks and LocalTalk™, Balloon Help™, and SimpleText™ are trademarks of Apple Computer, Inc.
Helvetica®, New Century Schoolbook®, and Times® are registered trademarks of Linotype AG and/or its subsidiaries.
FreeHand™ is a trademark of Macromedia, Inc. Microsoft®, Windows®, Windows NT®, and OpenType®, are registered trademarks of Microsoft Corporation. Installer VISE® is a registered trademark of MindVision, Inc.
Netscape Navigator® is a registered trademark of Netscape Communications Corporation in the United States and other countries.
PowerQuest® is a registered trademark of PowerQuest.
QuarkXPress® and Quark are registered trademarks of Quark, Inc.
Preps® is a registered trademark and ScenicSoft™ is a trademark of ScenicSoft, Inc. Solaris™ is a trademark of Sun Micro Systems, Inc.
Ethernet® and Xerox® are registered trademarks of Xerox Corporation.
All other brand and product names are trademarks, registered trademarks, or service marks of their respective holders.
Manual Notice Xante Corporation reserves the right to make changes to this manual and to the equipment described herein without notice. Every effort has been made to ensure that this manual is free of inaccuracies and omissions. However, Xante Corporation makes no warranty of any kind including, but not limited to, any implied warranties of merchantability and fi tness for a particular purpose with regard to this manual.

ScreenWriter 5 User’s Guide 3
Xante Corporation assumes no responsibility for, or liability for, errors contained in this manual or for incidental, special, or consequential damages arising out of the furnishing of this manual, or the use of this manual in operating the equipment, or in connection with the performance of the equipment when so operated.
Proprietary The digitally encoded software included with the Xante ScreenWriter is copyrighted © 2011 by Xante Corporation. All Rights Reserved. Patent Pending. This software may not be reproduced, modifi ed, displayed, transferred, or copied in any form or manner or on any media, without the express written permission of Xante Corporation.
Copyright This manual is Copyrighted © 2011 by Xante Corporation. All Rights Reserved. Printed in the USA. This manual may not be copied in whole or in part, nor transferred to any other media or language without the express written permission of Xante Corporation.
Safety Information The ScreenWriter generates a small amount of ozone gas during image transfer in the printing process. When shipped from the factory, the ScreenWriter meets the Underwriter’s Laboratory (UL) standard for ozone emission.
An invisible laser beam which radiates inside the platemaker’s scanner unit can cause permanent eye damage. DO NOT disassemble or try to adjust the laser scanner unit.
FCC Classifi cation
Changes or modifi cations to this unit not expressly approved by the party responsible for compliance could void the user’s authority to operate the equipment.

4 ScreenWrier 5 User’s Guide
This equipment has been tested and found to comply with the limits for a Class A digital device, pursuant to Part 15 of the FCC Rules. These limits are designed to provide reasonable protection against harmful interference when the equipment is operated in a commercial environment. This equipment generates, uses, and can radiate radio frequency energy and, if not installed and used in accordance with the instruction manual, may cause harmful interference to radio communications. Operation of this equipment in a residential area is likely to cause harmful interference in which case the user will be required to correct the interference at his own expense.
Shielded cables must be used with this unit to ensure compliance with the FCC Class A limits.
Power Information100/120 V Version:100/120 VAC (90-132 V), 50/60 Hz (47-63 Hz), 6.5 A220/240 V Version:220/240 VAC (198-264 V), 50/60 Hz (47-63 Hz), 3.2 A
Power CordThe power cord is the main disconnect device. It should be plugged into an easily accessible outlet.
For 115 Volt Confi guration:The power cord to be used with 115 Volt confi guration is minimum type SJT (SVT) 18/3, rated 250 Volts AC, 10 Amps with a maximum length of 15 feet. One terminated in an IEC 320 attachment plug. The other end is terminated in a NEMA 5-15P plug.
For 230 Volt Confi gurationThe power cord (not supplied) to be used with 230 Volt confi guration is minimum type SJT (SVT) 18/3, rated 250 Volts AC, 10 Amps with a maximum length of 15 feet. One terminated in an IEC 320 attachment plug. The other end is terminated as required by the country where it will be installed. Argentina customers must utilize an IRAM certifi ed power cord.

ScreenWriter 5 User’s Guide 5
Manufacturer’s Declaration of ConformityThe Product has been designed and manufactured in accordance with the following international standards:
EN 50081-1 “Generic Emissions Standard for Residential, Commercial and Light Industrial Products of” 01, Feb. 1991
EN 50082-1 “Generic Immunity Standard for Residential, Commercial and Light Industrial Products of” 01, Feb. 1991
EN 55022 “Limits and Methods of Measurement of Radio Interference Information Technology Equipment of” 14, April 1987
IEC 1000-4-2 “Testing Measurement Techniques, Electrostatic Discharge of” 1995, First Edition
IEC 1000-4-3 “Testing and Measurement Techniques, Radio Frequency, Electromagnetic Field Immunity Test of” 1995 First Edition
IEC 1000-4-4 “Testing and Measurement Techniques, Electrical Fast Transient/Burst Immunity Test of” 1995 First edition
MIL-STD-45662A “Calibration System Requirements”
EN 60950 “Safety of Information Technology Equipment including Electric al Business Equipment”
I, the undersigned, hereby declare that the equipment specifi ed above conforms to the above Directives and Standards
Robert C RossXante Corporation Founder and CEO

6 ScreenWrier 5 User’s Guide
Table of ContentsChapter 1 - Introduction and Installation ...................................9
About this Manual .......................................................................................9Installation .................................................................................................11
ScreenWriter Location .........................................................................11ScreenWriter Package .........................................................................11Imaging Unit (IU)..................................................................................12Handling the Imaging Unit ...................................................................12Removing and Installing the Imaging Unit ...........................................12Standard Cassette ...............................................................................14Multipurpose Feeder ............................................................................16Multipurpose Feeder Tip ......................................................................17Connecting the Power Cord.................................................................17Turning the ScreenWriter On ...............................................................18Turning the ScreenWriter Off ...............................................................18
Chapter 2 - Windows Setup ......................................................19Ethernet Connection ............................................................................19Confi guring the IP Address ..................................................................19
Installing Printer Driver ..............................................................................20Installation Windows XP ......................................................................20
Chapter 3 - Macintosh Setup .....................................................24Port Connection ........................................................................................24
Ethernet Connection ............................................................................24Confi guring the IP Address ..................................................................24
Installation - Macintosh OS X ....................................................................25Chapter 4 - Confi guration ..........................................................31
Confi guring ScreenWriter 5 Features ..................................................31Front Panel ..........................................................................................31Window ................................................................................................31Status Lights ........................................................................................31Control Keys ........................................................................................31
Confi guration Menus .................................................................................32Selecting Menu Options.......................................................................33
Browser Utilities Access ............................................................................33

ScreenWriter 5 User’s Guide 7
Accessing the Browser Utilities............................................................33ScreenWriter 5 Features ...........................................................................34
Accurate Calibration Technology (X-ACT and More X-ACT) ...............34Enhanced Angles .................................................................................37Fuser Temperature ..............................................................................37Halftone Calibration Technology (Gamma) ..........................................37Information (Diagnostic, General, Installed Options) ...........................40Interface Confi guration ........................................................................40IO Settings ..........................................................................................41Language .............................................................................................41Lines Per Inch (LPI) .............................................................................41Page Count ..........................................................................................41ScreenWriter Name .............................................................................41Reset to Factory Defaults ....................................................................41Security ................................................................................................41Screen Shape / Spot Function ............................................................44Units (English and Metric)....................................................................45Utility Pages .........................................................................................46Web Access (ScreenWriter 5 Web Site, Register, and Help)...............47
The PPD....................................................................................................48Selecting PPD Options (Windows XP) ................................................48Selecting PPD Options (Macintosh OS X) ...........................................49PPD Menus..........................................................................................49
Confi guring ScreenWriter Options ............................................................49EP1 (Toner Control) ............................................................................50Screen (LPI).........................................................................................50Screen Shape / Spot Function .............................................................50Tray Switch ..........................................................................................51Optional Tray(s) ...................................................................................51
CD-ROM ...................................................................................................51View Manuals ......................................................................................51PS_Files Folder ...................................................................................51
Chapter 5 - Media: Selecting and Imaging ...............................52Media Specifi cations .................................................................................52
Guidelines for Selecting and Storing Media ........................................52Media Sizes .........................................................................................53

8 ScreenWrier 5 User’s Guide
Printing on Custom Sized Media ........................................................53Media Types .......................................................................................53
Media Handling ........................................................................................53Media Sources ....................................................................................53Printing with Various Media Types .......................................................55
Chapter 6 - Maintenance and Specifi cations ...........................59Maintenance..............................................................................................59
Handling the ScreenWriter ...................................................................59Storing the ScreenWriter .....................................................................59Moving the ScreenWriter .....................................................................60
Cleaning the ScreenWriter ........................................................................60Transfer Roller Cleaning ......................................................................60Imaging Unit and Manual Feed Area Cleaning ...................................61Manual Feed Pick Up Roller Removal and Cleaning...........................62Exterior Cleaning ................................................................................64
Chapter 7 - Troubleshooting ......................................................66Introduction ...............................................................................................66Status Messages.......................................................................................66Power and Setup Issues ...........................................................................68Image Quality Issues.................................................................................69
Imaging Unit Control ............................................................................69Miscellaneous Image Quality Issue .....................................................70
Mechanical Issues.....................................................................................75Media Jams ...............................................................................................75
Preventing Jams ..................................................................................75Locating Jams......................................................................................76Clearing Jams ......................................................................................77
Technical Support......................................................................................81

ScreenWriter 5 User’s Guide 9
Chapter 1 - Introduction and Installation
The ScreenWriter 5 is designed for high-end silk-screen and graphics applications. Standard density and advanced graphics features allow you to print images directly to XANTÉ Myriad fi lm, process the output through XANTÉ’s FilmStar 2, and then use the fi lm to burn silk-screen emulsions.
The innovative, economical ScreenWriter 4 features 10 ppm monochrome printing at standard 1200 x 1200 dpi or an optional 2400 x 2400 dpi resolution. Media sizes can range from 3.94” x 5.83” (100 mm x 148 mm) up to 13.00” x 35.50” (330 mm x 902 mm).
About this Manual The User’s Guide covers installation, setup, special features, and common troubleshooting issues of a ScreenWriter.
Features ScreenWriter 5
IDT 79RC32355 Processor Std.
RAM: 128 MB Std. 256 MB (2400 dpi) Opt.
Adobe PostScript 3 Std.
136 PostScript Fonts Std.
Resolutions: 600 x 600 dpi Std. 1200 x 1200 dpi Std. 2400 x 2400 dpi Opt.
Engine Speed (letter/A4): 10 ppm Std.

10 ScreenWrier 5 User’s Guide
Interfaces: Ethernet (EtherTalk, LPR, TCP/IP) Std.
Paper Sizes: From 3.94" x 5.83" Std. (100 mm x 148 mm) Up to 13.00" x 35.50" Std. (330 mm x 902 mm)
Paper Weights: Cassettes 16-28 lb. bond (60 -105 g/m2) Std. Multipurpose Feeder 16-36 lb. bond (60-135 g/m2) Std.
Media Handling: Multipurpose Feeder (150 sheets) Std. Built in Paper Feeder (500 sheets) Std. Second Paper Feeder (500 sheets) Opt. Third Paper Feeder (500 sheets) Opt.
Media Types: Paper Std. Heavy Paper Std. Cover Std. Transparencies Std. Labels Std. Matte Film Std. Clear Film Std. Vellum Std. Envelopes Std.
Mirror Print Std.
Tray Chaining Std.
Xante Utilities (PC and Macintosh) Std.
Internal IDE Hard disk Opt.
Graphic Software Package Dot Gain Calibration (Gamma) Std. Enhanced Screening Technology Std. Accurate Calibration Technology (X-ACT) Std. Custom Dot Gain Calibration (Densitometer Support) Std.

ScreenWriter 5 User’s Guide 11
InstallationInstallation covers selecting a ScreenWriter location as well as unpacking, becoming familiar with, and connecting your ScreenWriter.
ScreenWriter Location Set up your ScreenWriter in a location that can support its weight and provide suffi cient operation and maintenance clearance. To prevent overheating, allow at least 8.0" (200 mm) clearance for the ScreenWriter’s vent.
ScreenWriter Package Unpack the ScreenWriter and save the packing materials.
1. Remove the items packed on top of the ScreenWriter.
The ScreenWriter weighs approximately 58.5 lb. (26.5 kg) without the imaging unit, cassettes, and media installed. • Always have two people lift the ScreenWriter. • Only lift the ScreenWriter using the recessed grip areas on the right and left sides.
2. Remove the shipping stabilizer from the top of the ScreenWriter
3. Remove the plastic wrap and tape from all of the items.
Your ScreenWriter package contains the following items:
• Your Xante ScreenWriter• 500 Sheet Cassette • Power Cord • Quick Reference Manual • Xante Utilities CD-ROM • Imaging Unit (IU)
Additional paper cassettes and feeders are packed separately. RAM, internal hard disk, and resolution upgrades ordered with your ScreenWriter are installed at the factory before shipping.
If you do not receive your full shipment or if anything is damaged , call Xante Customer Support at 800-926-8393 (US and Canada) or your Xante vendor.

12 ScreenWrier 5 User’s Guide
Imaging Unit (IU)The ScreenWriter’s imaging unit combines the toner and drum. This IU can print approximately 7,000 sheets of letter/A4 size pages at 5% coverage.
Quality and reliability of refi lled imaging units vary; Xante recommends not using them. Damage caused by these products is not covered by your ScreenWriter warranty.
Handling the Imaging Unit Use these guidelines to ensure maximum life and print quality from your IU and to prevent damage to the ScreenWriter or the IU:
• Use imaging units before their expiration dates. IU shelf life is approximately 2 years unopened or 6 months opened.
• Never move the ScreenWriter with the IU installed. Toner spills can damage the ScreenWriter and affect print quality.
• Do not expose the IU to bright lights or direct sunlight. Keep the IU in its protective bag until installation. If you must remove it temporarily, place it in the original bag or wrap it well to protect it from light.
• Do not open the drum shutter or touch the drum’s surface. The shutter protects the photosensitive drum from light.
• Keep the IU away from computer hard disks and monitors. It contains a magnet that can cause data loss or equipment damage.
• Store unopened IU right side up on a level surface.
• Always set the IU fl at with the handles on the top.
• Dispose of the IU following safety laws and regulations .
The toner is highly combustible. Never dispose of it by incineration.
Removing and Installing the Imaging Unit
Check the density dial when you replace an imaging unit. The dial setting for the previous IU may be too high or too low for the new IU.
1. Remove all media from the output tray. Then, squeeze the top cover latch to release the lock.

ScreenWriter 5 User’s Guide 13
2. Lift the top cover. The multipurpose feeder opens automatically as you open the top cover.
3. Remove the imaging unit if it is in the printer by grasping the handles and pulling it slowly out of the ScreenWriter.
Once you begin pulling the imaging unit out, remove the unit completely. The drum shutter may not open properly if the unit is pulled partially out and then pushed back in. This can damage the imaging unit or result in a malfunction.
4. Remove the new imaging unit from its package. Then gently shake the IU several times to distribute toner evenly. Shake the IU enough to free any compacted toner. Using the ScreenWriter with toner still compacted may damage the IU.
5. Place the imaging unit on a fl at surface; then, grasp the sealing tape’s end tab and pull the tape straight out. If the tape is pulled out at an angle, it may break off inside the IU.

14 ScreenWrier 5 User’s Guide
6. Insert the pins on the sides of the IU into the guide channels in the ScreenWriter. Then, slide the IU into the ScreenWriter until it is seated properly.
7. Close the top cover by pressing down on the center section until the latch engages.
Standard Cassette The standard universal cassette holds up to 500 sheets of 20 lb. bond /60 lb. text weight (65 g/m2) paper or other paper to a stack height of 2.13" (54 mm). This cassette can handle media weights from 16 - 28 lb. (60 to 105 g/m2).
1. Remove the cassette if it is in the ScreenWriter by pulling the cassette straight out until it stops. Then, lift it slightly and pull it from the ScreenWriter.
2. Place the cassette on a fl at surface and remove the cassette cover. Lift the paper length guide to release it and slide it forward.

ScreenWriter 5 User’s Guide 15
3. Squeeze the sides of the paper width guide to release it. Then, slide the guide to the outside of the cassette.
4. Align the paper stack and load it into the cassette print side up, leading edge to the back.
5. Adjust media guides to the size of the paper stack.
To prevent paper jams, make sure the paper fi ts between the paper guides and under the cassette’s retaining clips.
6. Replace the cassette cover. Then, slide the cassette into the ScreenWriter until it snaps into place.
You will feel a slight resistance as you push the cassette into the ScreenWriter; this is caused by the catch that prevents the cassette from being dropped.
7. Pull out the output tray extension and turn up the paper stop for paper sizes larger than letter/A4.
Your ScreenWriter can utilize up to 3 standard cassettes. See “Tray Switch” in chapter 4 for more information.

16 ScreenWrier 5 User’s Guide
Multipurpose Feeder The ScreenWriter’s multipurpose feeder holds a stack height of about 0.70" (18 mm).
The multipurpose feeder supports to 13" x 35.5" (330 mm x 902 mm). This feeder can handle media weights from 16 - 36 lb. (60 - 155 g/m2).
Loading the multipurpose feeder
1. Open the multipurpose feeder by grasping the cover’s top center handle and pull down.
The multipurpose feeder does not open at a 90° angle. To prevent damage, do not exert strong pressure or place heavy objects on the feeder.
2. Pull out the tray extension for media larger than letter/A4 size.
3. Align the edges of the paper stack and load it into the MP tray print side up, leading edge toward the back of the ScreenWriter. To prevent jams, make sure the media fi ts under the media guide’s retaining clips.

ScreenWriter 5 User’s Guide 17
4. Adjust the media guide to the size of the media stack.
Multipurpose Feeder TipOccasionally, in a Macintosh OS 9 environment if media is in the multipurpose feeder, the system’s Print Monitor sends a prompt message to put paper into the manual feed tray and click OK.
This prompt can only be turned off in Print Monitor. You cannot turn the manual feed message off on the Desktop Print Monitor.
1. Go to System Folder: Extensions: Print Monitor.
2. Double click Print Monitor to open it. Then, select File: Preferences.
3. Select Give no Notifi cation under When a manual feed job starts; then, click OK.
Connecting the Power Cord
Plug the ScreenWriter into a dedicated, properly grounded AC outlet. Do not use an extension cord. Use a surge protected outlet to help prevent power source fl uctuations from damaging your ScreenWriter.
1. Make sure the ScreenWriter’s power switch is off (the O is pressed in).
2. Connect the power cable’s female connector to the back of the ScreenWriter and the male connector to a standard electrical outlet.
Never use a damaged power cord. Check the cord and plug monthly and replace immediately if you fi nd any damage.

18 ScreenWrier 5 User’s Guide
Turning the ScreenWriter On
Press the | on the power switch to turn on the ScreenWriter.
ScreenWriter initialization takes approximately 60 seconds. When Ready/Idle displays, the ScreenWriter is ready to accept print jobs.
Due to shipping movement, you should calibrate your ScreenWriter after setup. For procedures, see the More X-ACT in Chapter 4 (ScreenWriter 5 Features).
Turning the ScreenWriter Off
1. Verify that the Ready/Idle message displays.
2. Press the O on the power switch to turn off the ScreenWriter.
When the ScreenWriter is turned off, job information in memory is lost.
◊◊◊

ScreenWriter 5 User’s Guide 19
Chapter 2 - Windows Setup
Ethernet Connection To connect via the Ethernet port:
1. Turn off your ScreenWriter.
2. Connect the ScreenWriter to the appropriate port for the cable used on your network.
Before using your ScreenWriter, set it up for your network environment and confi gure the Ethernet interface using the appropriate procedures later in this chapter.
Confi guring the IP Address
Note: If you are using the DHCP on your computer, turn off the ScreenWriter then restart it for the new IP address to take effect.
To set the IP address, network class, and net mask, do the following:
1. Turn on the ScreenWriter then press the MENU key until [Setup: Network] appears.
2. Press the ENTER key to enter the Network menu.
3. Set the IP address, network class, and network mask settings.
a. Press the MENU key until the appropriate menu appears.
b. Press the ENTER key to enter the selected menu.
c. Use the RESET, MENU, NEXT, and ENTER keys to change and accept the new settings.
4. Reboot your ScreenWriter and go to DOS Command Prompt to ping the

20 ScreenWrier 5 User’s Guide
ScreenWriter.
For example, if your IP address is 192.9.200.204, type PING 192.9.200.204 at the DOS prompt).
PING <IP ADDRESS>
Installing Printer Driver
Installation Windows XP
1. Insert Xante Utility CD-ROM; select [Xante Driver]. Click [Continue].
2. The ScreenWriter 5 Setup window appears, click the button

ScreenWriter 5 User’s Guide 21
3. Select again and the Choose Destination Location windowappears. Select again.
4. The window to enter the IP Address will appear. Enter the Printer’s IP Address now and select . When the Hardware Installation window appears click
5. The properties window will open.

22 ScreenWrier 5 User’s Guide
6. Change the Output Protocol to Binary and the Send CTRL-D After Each Job to No
7. Select the Installable Options such as the Resolution and RAM installed.
8. Click and then click
Confi guring PPD Defaults
1. Select Start: Settings: Printers and Faxes
2. Select ScreenWriter icon; select File: Properties
3. Select appropriate options; close Printers and Faxes window.

ScreenWriter 5 User’s Guide 23
4. Selec tthe Device Settings tab and confi gure the Installable Optiosn at this time.
◊◊◊

24 ScreenWrier 5 User’s Guide
Chapter 3 - Macintosh SetupThis chapter describes your ScreenWriter’s Macintosh setup, including connecting to the Ethernet port, as well as installing utilities, drivers, your ScreenWriter’s PPD (PostScript Printer Description), and related fi les. Use your browser to access ScreenWriter features. For more information on features, see chapter 5 in this manual.
Port Connection
Ethernet Connection To connect to the Ethernet port
1. Turn off your computer.
Before using your ScreenWriter, set it up for your network environment and confi gure the Ethernet interface.
2. Connect one end of the CAT 5 Ethernet cable to your ScreenWriter’s Ethernet port.
3. Connect the cable’s other end to the appropriate port on your network or directly to a computer if you are using a crossover patch cable.
Confi guring the IP Address
Note: If you are using the DHCP on your computer, turn off the ScreenWriter and computer, then restart it for the new IP address to take effect.
To set the IP address, network class, and net mask, do the following:
1. Turn on the ScreenWriter then press the MENU key until [Setup: Network] appears.
2. Press the ENTER key to enter the Network menu.

ScreenWriter 5 User’s Guide 25
3. Set the IP address, network class, and network mask settings.
a. Press the MENU key until the appropriate menu appears.
b. Press the ENTER key to enter the selected menu.
c. Use the RESET, MENU, NEXT, and ENTER keys to change and accept the new settings.
4. Reboot your ScreenWriter and go to [Network: Utility] to ping the ScreenWriter. (If you are using LPR printing on OS X, use the Network Utility to ping the ScreenWriter.)
For example, if your IP address is 192.9.200.204, type PING 192.9.200.204 at the command prompt).
PING<IP ADDRESS>
Installation - Macintosh OS XThis section takes you through the installation process on a Macintosh OS X
operating system. You should have the latest OS X version to properly install this ScreenWriter.
You must type in your name and password to begin, then click [OK].

26 ScreenWrier 5 User’s Guide
Click [Continue].
Select the location for the installation then click [Continue].

ScreenWriter 5 User’s Guide 27
Choose [OS X only] then click [Install].
Your installation was successful. Click [Quit] to exit or [Continue] to add choices.

28 ScreenWrier 5 User’s Guide
Click [Add] to add the ScreenWriter to your list of printers.
Printer List window. Click [Add].

ScreenWriter 5 User’s Guide 29
Enter the IP address for the ScreenWriter and Query the name.Select the [ScreenWriter 5] from the menu list and click [Add].
The ScreenWriter 5 is added to your printer list.

30 ScreenWrier 5 User’s Guide
When the Main Screen reappears, you can register your ScreenWriter (if on-line).
Complete the Registration Form.
◊◊◊

ScreenWriter 5 User’s Guide 31
Chapter 4 - Confi guration
Confi guring ScreenWriter 5 Features ScreenWriter interfaces and features are set using front panel keys and menus as well as PPD options in your application print dialog box, and Xante Utilities fi les. This section describes available ScreenWriter features and their confi guration.
PPD options override ScreenWriter default (front panel) settings for a specifi c job or for all jobs sent to the ScreenWriter from your host.
Front Panel The ScreenWriter front panel provides status information and allows you to confi gure some features.
Window The ScreenWriter front panel window displays confi guration menu options and messages. The messages indicate ScreenWriter status, request operator help, and relay error or service information.
Status Lights
ScreenWriter front panel status lights, or LEDs (Light Emitting Diodes), indicate the ScreenWriter status.
Online/Ready LED is on when the ScreenWriter is ready to receive data. It is off when an engine error occurs.
Data LED is on and does not blink when the ScreenWriter is receiving data. Blinking indicates that the ScreenWriter is
processing data.
Manual LED is on when the multipurpose feeder is selected.
Control Keys Front panel control keys allow you to confi gure some ScreenWriter features and to access the confi guration menus.

32 ScreenWrier 5 User’s Guide
Online key is used to take the ScreenWriter on and off line. The ScreenWriter must be online to receive data from your computer.
Form Feed key allows you to feed a blank page through the printer.
Tray Select key allows you to change the default paper tray. Press once to display the current tray selection. Press the Tray Select key to toggle between the available trays.
Reset key allows you to return to the previous menu level when using confi guration menus. To cancel a job that the ScreenWriter is processing, take the ScreenWriter offl ine an press the Reset key.
Left Arrow key allows you to scroll back through options on a menu level when using the confi guration menus. To image a start-up page, take the ScreenWriter off line and press the Left Arrow key.
Menu key allows you to enter the menu structure and to scroll forward through menus and options.
Enter key allows you to select the menu or option displayed in the window. When you select an option, an asterisk appears next to the option name in the window to indicate it is now the current setting.
Confi guration Menus Use confi guration menus to set features and interface defaults. This section describes using these menus. The ScreenWriter menu quick reference sheet illustrates the ScreenWriter front panel menu structure and lists Xante support.
As you scroll through options in a menu, the option that is the current setting has an asterisk after it. If necessary, you can return to factory default settings (see “Resetting to Factory Defaults” later in this chapter).

ScreenWriter 5 User’s Guide 33
PPD options override default settings for a specifi c job or for all jobs sent to the ScreenWriter from your computer.
Selecting Menu Options The following example explains changing the ScreenWriter default LPI from 106 to 85 lines per inch using control keys and confi guration menus.
1. Make sure the ScreenWriter is on and Ready appears in the window.
2. Press the Menu key until Setup: Graphic appears.
3. Press the Enter key to enter the Graphic menu.
4. Press the Menu key until Graphic: LPI appears in the window.
5. Press the Enter key to enter the LPI menu.
6. Press the Menu key until LPI: 85 lines/in appears.
7. Press the Enter key to select 85 as the default.
8. Press the Online key. Ready appears in the window.
Browser Utilities Access You can monitor, control, and confi gure features using your ScreenWriter’s internal web browser.
Accessing the Browser Utilities The ScreenWriter must have a valid IP address before you can use the
browser utilities.
To access your ScreenWriter browser utilities options:
1. Turn on your ScreenWriter and the computer.
2. Open your browser and enter your ScreenWriter IP address. The ScreenWriter 5 Home Page appears.
If you are not sure of the current address, check the ScreenWriter front panel either under the Ready message or under Network: IP Address.

34 ScreenWrier 5 User’s Guide
ScreenWriter 5 Home Page
ScreenWriter 5 Features
Accurate Calibration Technology (X-ACT and More X-ACT) Due to manufacturing variations and usage, a traditional printer may not image lines with the exact dimensions specifi ed by the application. Xante created X-ACT to compensate for these differences and implemented this technology in your ScreenWriter.
X-ACT (patented Xante Accurate Calibration Technology) allows you to calibrate your ScreenWriter line lengths and to correct inaccuracies in imaging width and height. If you want to calibrate the line lengths as well as compensate for line skew, your ScreenWriter 5 also features an advanced More X-ACT option.
Set the X-ACT feature via the front panel X-ACT menu (Setup: Graphic: X-ACT). Set More X-ACT via your web browser.
Front Panel X-ACT Your ScreenWriter front panel X-ACT menu (Setup: Graphic: X-ACT) allows you to make 1/2 mm line length adjustments using the following procedure.
To use X-ACT, you need a metric ruler with 1/2 millimeter rule markings or you can use the More X-ACT ruler that comes with your ScreenWriter. Adjustments for one size media apply to every media size; you do not have to make individual adjustments for each size.

ScreenWriter 5 User’s Guide 35
1. Make sure the ScreenWriter is on and Ready appears in the window. Then, make sure that a media is loaded in the MP tray and that the MP tray is selected as the media source.
2. Press the Menu key until Setup: Graphic appears. Then, press the Enter key.
3. Press the Menu key until Graphic: X-ACT appears. Then, press the Enter key.
4. Press the Menu key until X-ACT: Test Page appears. Then, press the Enter key. A page images with 2 lines, Line A and Line B. The measurement listed by each line is the desired length for that line on that page.
5. Measure Line A. Use the following procedures to adjust the line length.
a. Note the amount Line A is over or under. Next, press the Menu key until X-ACT: LineA appears, and then press the Enter key.
b. Press the Menu key until the amount which would most closely adjust the line to the desired length appears. For example, if Line A is 341.9 mm instead of 342.9 mm, select 1.00 mm to lengthen the line to 342.9. Then, press the Enter key.
6. Measure Line B. Use the following procedures to adjust the line length.
a. Note the amount Line B is over or under. Next, press the Menu key until X-ACT: LineB appears, and then press the Enter key.
b. Press the Menu key until the amount which would most closely adjust the line to the desired length appears. For example, if Line B is 229.1 mm instead of 228.6 mm, select -0.50 mm to shorten the line to 228.6. Then, press the Enter Key.
7. Press the Reset key to return to the previous menu level. Then, press the Menu key until X-ACT: Test Page reappears and press the Enter key to image a new test page.
8. Repeat steps 5 and 6 until the line measurements agree with the lengths listed on the test page. Then, press the On Line key when the line lengths are correct. Ready appears in the window.

36 ScreenWrier 5 User’s Guide
Browser More X-ACT The More X-ACT feature in your browser utilities allows you to calibrate line lengths and adjust for skew.
More X-ACT changes must be measured and changed in mm. A More X-ACT ruler with millimeter rulings comes with your ScreenWriter to use with this procedure.
1. Turn on your ScreenWriter and computer. Then, open your browser and enter the ScreenWriter IP address. The ScreenWriter 5 Home Page appears.
2. Select Confi guration: More X-ACT to open the More X-ACT window.
More X-ACT Window
3. Follow the directions on the More X-ACT window to calibrate your ScreenWriter output to exact dimensions.
More X-ACT is a cumulative process and can be performed multiple times to achieve exact dimensional accuracy.
4. Close your browser after you fi nish the calibration.

ScreenWriter 5 User’s Guide 37
Enhanced Angles Enhanced Angles allows you change the color angles imaged from your ScreenWriter to achieve the best possible output. Enable (On) or disable (Off) this feature via the front panel Enhanced Angles menu (Setup: Graphic: Enhanced Angles), via the ScreenWriter web browser utilities (Halftoning: Spot Function), or through the PPD option.
The angle settings are as follows:
Enhanced Angles
Black Cyan Magenta Yellow
Off 45˚ 105˚ 75˚ 90˚On 75˚ 105˚ 45˚ 90˚
Fuser TemperatureThe Fuser Temperature feature allows you to adjust the printer’s fuser temperature for the type of media used. Set the fuser temperature from the Fuser front panel menu. Temperature increases as the options increase from 0 - none to 8 - hot and the default depends on the selected media.
Select 0 - none or 1 when printing Myriad fi lm, envelopes, and paper. Select hotter settings for heavy paper or heavy fi lm.
Halftone Calibration Technology (Gamma)
Understanding Halftone Calibration
XANTÉ’s Halftone Calibration Technology allows you to adjust printer output for ink, media, fi le, and environmental conditions. For example, if a scanned image is too dark, you can select a new gamma setting to lighten and enhance the details. Gamma corrections bring out details that can be lost when printing at higher line screens or when dark photos are scanned.
XANTÉ provides seven standard gamma correction curves and you can create one custom curve. You can select any custom or standard gamma curve on a job by job basis using the front panel Graphic: Gamma confi guration menu or the Print dialog box Gamma menu.
XANTÉ Gamma curves 1 through 5 progressively lighten midrange grayscale values in an image. Gamma 0, the factory default, makes no change to the image and Gamma 6 produces a reverse (negative) image without changing the image in the application.

38 ScreenWrier 5 User’s Guide
You may want to create and download a custom gamma curve to calibrate your printer for specifi c conditions.
Temperature – Please keep your ScreenWriter at a reasonable constant temperature at all times. For instance, if you turn off your air conditioning for several hours and the room varies 10º F or more in temperature you will get very inconsistent results.
Humidity – A constant humidity level +-5% is the best operating level for your ScreenWriter. Calibrating at 50% and operating at 30% will produce bad results. In general, the higher humidity level, the more consistent the image.
Laser Power – The power of the imaging laser in the ScreenWriter can be set from your front panel or the web browser. This value defaults to level 2 and is generally fi ne for most applications. The values range between 0 and 7. The lower the value the lighter the image. Higher values result in darker imaging. This may be a useful tool if you wish to reduce the thickness of your fonts, etc. The default halftone calibrations in your ScreenWriter are based on a power level 2. You can experiment with different levels, however if you choose a level too low, an “e-scanner” error may occur. This error is temporary and you will need to restart to your ScreenWriter and adjust your laser power higher. In general the lower the laser power, the better the image quality.
EP1 – EP1 (critical to image quality) is a setting used to compensate for background toning, a characteristic in all electrophotographic devices such as your ScreenWriter. Devices that use toner to image onto fi lm must eliminate stray toner particles that can show up in the white areas of the page. The higher the EP1 setting of the ScreenWriter the more stray particles are eliminated. However, if EP1 is set too high, it can affect your image quality. Your halftones may become inconsistent and your solids may appear “washed out.” Usually, for the best output, the EP1 setting should be between 3-7. For lower humidity environments or high altitudes you may need to go to a higher setting. You can experiment with the setting, but lower is always better for image quality and worse for background toning. Once you set the EP1, you should not have to adjust it unless your environmental conditions change or you replace your imaging unit. If you do change the EP1 settings, your halftone calibrations may need to be adjusted.
You can access the settings for laser power and EP1 in the front panel of the ScreenWriter or the web browser using the address shown in the front panel.

ScreenWriter 5 User’s Guide 39
Calibrating Your Halftones:
In order to start the calibration of your ScreenWriter access the web browser through your computer.
Enter the URL displayed on the front panel of your ScreenWriter. For example “10.1.2.138.” Click on the word “Halftoning” and then “Halftone Calibration.”
Halftone Calibration page.
Your ScreenWriter comes with halftone calibrations that will be successful for most applications but you may wish to set this yourself to gain greater control. There is a 210 LPI setting, although the ScreenWriter is only guaranteed to 150 LPI when the 2400 dpi option is installed.
Calibration Method:
Select the input tray containing the media you are calibrating to. The Cassette tray will default to the media size installed. If you select the Manual Feed Tray the page size will also need to be identifi ed. Click on the Page Size listed and you will be taken to another window identifying the available page sizes or you can choose Custom Page Size type the width and height of the page and press Select.

40 ScreenWrier 5 User’s Guide
Fill in the remainder of the options listed, select the Calibration page radial button and click the Print button.
Take the calibration page from the printer. Using a loop or densitometer fi ll in the remainder of the Linearize Printer page and click the Linearize button at the bottom of the page. Your printer is not linearized.
To verify the settings click the Verifi cation page radial button and click Print. A page will print with the new calibration curve applied.
For a quick calibration fi ll in the pure black and pure white boxes. Now location the 50% box number on the calibration page and type the number in the box next to 50. Click the Linearize button and the remainder of the boxes will be calibration based on the pure black, pure white, and 50% values.
The new custom settings are now available at print time by selecting the Custom Dot Gain under the PPD’s Dot Gain selection.
Information (Diagnostic, General, Installed Options)This is detailed information that may be requested and used by Xante Technical Support. Access this information through the ScreenWriter browser utilities.
Diagnostic Information allows you to check your ScreenWriter EEPROM status and contains other information that may be requested if you call Xante Technical Support. If the EEPROM condition is good, you don't have to do anything; if an error displays, contact Xante Technical Support or your authorized dealer.
General Information provides you with miscellaneous information such as the product name, engine speed, page count, ROM version, etc .
Installed Options , as its name implies, allows you to check the installation status of your options. Options not applicable to your ScreenWriter may appear in the list; if so, their status will be listed as not installed.
Interface Confi guration You can confi gure the ScreenWriter Ethernet Interface both from the front panel and via the browser utilities. You are able to set the IP address, network class, subnet mask, gateway, DHCP, and duplex mode .

ScreenWriter 5 User’s Guide 41
IO Settings The IO Settings has AppSocket, EtherTalk, IP, and LPR options, each of which displays current setting for its network protocol. You can check these settings using the ScreenWriter browser utilities I/O Settings options.
Language Select the language for the ScreenWriter front panel window from the Language menu (Setup: Utility: Language). English is the factory default.
Lines Per Inch (LPI) Lines per inch (LPI) settings allow you to select the LPI when it is not an option in your software. You can set the LPI from the front panel LPI menu (Setup: Graphic: LPI) or through the PPD options.
Page Count The Page Count feature indicates how many pages have been imaged from your ScreenWriter. To check the current page count, use the Page Count menu (Setup: Utility: Features: Page Count) or use the ScreenWriter browser utilities (Information: General Information).
ScreenWriter Name The front panel ScreenWriter name menu (Setup: Utility: Features: ScreenWriter Name) indicates the name assigned to your ScreenWriter.
You can change your ScreenWriter name using the browser utilities ScreenWriter name option. Look under Confi guration: Network: EtherTalk. If you have more than one ScreenWriter on a network, renaming the units can prevent confusion. To change the name, use the Setname.ps fi le in the Xante utilities .
Reset to Factory Defaults You can reset your ScreenWriter to factory defaults via the front panel keys or the ScreenWriter browser utilities. For detail, contact Xante Technical Support .
www.xante.com/support
Security The Security feature is designed to prevent unwanted changes to the ScreenWriter confi guration. Some features that are confi gurable from the web page can be locked by setting a password using the ScreenWriter browser utilities.

42 ScreenWrier 5 User’s Guide
Login and Logout When ScreenWriter security password protection is active, you have to login to access the ScreenWriter secure web page areas and should log out when you are fi nished.
1. Go to the ScreenWriter 5 home page. Select Security: Login to open the Login window. If no password is currently set, you can change the options that normally would be protected by a password. If you want to password protect these options, you need to set up a password.
2. Enter your password in the Password fi eld then click Submit. Now, you can access the secure web page areas. When you are through, select Security: Logout. The Logout window appears.
3. Click Submit. When a message appears that you are now logged out, close the browser.
Set Password Set Password allows you to set your ScreenWriter password to access the secure web page areas.
1. Go to the ScreenWriter 5 home page and select Security: Set Password. When a Set Password window appears, take the following appropriate action.

ScreenWriter 5 User’s Guide 43
Set Password window
a. If you do not have a password skip to step 2.
b. If you have a password but want to change it:, enter your password in the Current Password fi eld and continue to step 2.
2. Type in the desired password (up to 8 characters in length) in the New Password fi eld; then, re-enter that new password in the Re-enter Password fi eld.
3. Click Submit. You now can access the secure web page areas. When you are through, select Security: Logout. The Logout window appears.
4. Click Submit. Then, close your browser.
This new password will be required every time you log onto your ScreenWriter’s web page.
Erasing the Password To erase the current password
1. Go to the ScreenWriter 5 home page and select Security: Set Password. The Set Password window appears.
2. Enter the password in the Current Password fi eld and leave the New Password and the Re-enter Password fi elds blank.

44 ScreenWrier 5 User’s Guide
3. Click Submit. A message appears to let you know that the password has been erased.
4. Close your browser.
Forgotten Password If you have forgotten your password, go to
http://www.xante.com/support/PrinterSecurity.html for instructions on resetting your password. The instructions for the ScreenWriter 5 will be listed under the KEY1 heading.
Screen Shape / Spot Function The Screen Shape feature allows you to select the shape of the dots that make up the screen pattern for printing. Set this feature via the front panel Spot Function menu (Setup: Graphic: Spot Function), via the ScreenWriter web browser utilities (Halftoning: Spot Function), or through the PPD options.
Shape choices include the standard, Euclidian, Enhanced 145 LPI; 197 LPI; 256 LPI, Line, Round, Ellipse, Square, Diamond, Rhomboid, and Dual options. Also, there are options to turn on and off the Z-dot feature (see the next section for Z-dot details) and the Enhanced Angles feature (covered earlier in this chapter).
Clicking on Round and Ellipse allows you access advanced options for those shapes. Both shapes feature an Inverted option that allows you to choose how a dot is constructed within its grid. A standard dot is constructed from the mid-point of the grid and expands toward the outside edges. For example, if you change a 10% grayscale to a 90% grayscale, the dot expands from the middle of the grid out. If you select invert and again switch from a 10% to 90% grayscale, the dot grows from the outer edges of the grid in toward the middle.

ScreenWriter 5 User’s Guide 45
Normal Ellipse Rotated Ellipse
50% Height 75% Height
Rotated 45º and Percent Dot Examples
Ellipse offers two additional advanced options: Percent and Rotate 45º. Percent allows you to defi ne the height of the ellipse relative to its width in 5% increments from 25% to 90%; for example, 50% defi nes an ellipse half as high as it is wide. Rotate allows you to rotate the dot 45º.
Z-dot - Z-dot is Xante’s implementation of a halftoning technique which makes use of a supercell, rather than a single cell, to generate halftones. This technology, which works with any of the screen shapes, allows you to maintain 256 levels of gray at higher line screens, to decrease posterization, and to compensate for dot gain; all at the same time. Set Z-dot through the front panel (Setup: Graphic: Z-dot) or the ScreenWriter browser utilities (Halftoning: Spot Function).
Units (English and Metric) The Units feature allows you to select the type of measurements used when working with the ScreenWriter. The English option sets measurement units to inches; Metric sets units to millimeters. For example English Pinbar measurements would appear in inches and metric measurements would appear in millimeters.

46 ScreenWrier 5 User’s Guide
Units window
You can select the type of units through the front panel Units menu (Setup: Utility: Units) or via the ScreenWriter web browser utilities (Confi guration: Units).
Utility PagesThe utility pages provide a way for you to check current confi guration settings, imaging quality, and other aspects such as the various line screen brightness settings. You select these to print through the front panel Test Images menu (Setup: Utility: Print) or the ScreenWriter web browser utilities (Utility Pages). Low Toner Page - This prints a toner reorder form which you can fi ll out and return to Xante or your Xante vendor.
Network Page - This prints a page listing current network EtherTalk, IP, LPR, and Ethernet physical settings.
Font List Page - This prints a list of the Adobe PostScript 3 fonts resident on your Xante printer

ScreenWriter 5 User’s Guide 47
Font Sample Page — prints samples of Adobe PostScript 3 fonts resident on your Xante printer.
Menu Layout - prints a page listing the front panel menus and their current settings.
1. Go to the printer home page
2. Select Utility Pages. The Utilities Pages window appears.
3. Select Print to the right of the utility page you wish to print (Start Page, Low Toner Page, Network Page, Font List Page, Font Sample Page, or Menu Layout Page). Depending on the selected page, printing takes approximately 6 to 30 seconds.
4. Close your browser.
Web Access (ScreenWriter 5 Web Site, Register, and Help ) When you are online, you can use ScreenWriter browser utilities to access the ScreenWriter web site (http://www.xante.com/products/sw5), to register your ScreenWriter, and to get help.
1. Go to the ScreenWriter 5 home page and select the desired web access, http://www.xante.com/products/sw5, Register ScreenWriter 5, or Help. When the selected site’s window appears, take the following appropriate action.
a. http://www.xante.com/products/sw5: Browse this web site for desired product support, and contact information as well as other related details. When you fi nish, skip to step 2.
b. Register ScreenWriter 5: Fill out and submit the registration form. Then, skip to step 2.
c. Help: Browse Xante’s Support site for desired information. You can search for information by product links, by topics through the search option, or by the Frequently Asked Questions option.
2 . Close your browser when you fi nish.
You can register your ScreenWriter during your setup if you are online or, you can go directly to Xante’s web site at www.xante.com to register or get help.

48 ScreenWrier 5 User’s Guide
The PPD The ScreenWriter 5 PostScript Printer Description (PPD) allows you to select many settings from your application’s print dialog box. These settings override default settings and other software settings. You can customize features for individual or all jobs without resetting the front panel menus or using the ScreenWriter browser utilities.
For these options to be available, the Adobe PostScript printer driver and your ScreenWriter PPD must be installed and confi gured properly. See chapter 2 (PC) or 3 (Macintosh) for details.
Usually, specifi c options in the PPD are accessed through the Device Settings tab (Windows) and Printer Features (OS X).
PPD windows
Selecting PPD Options (Windows XP)To confi gure a feature from the Print dialog box
1. Install and confi gure the printer driver and your ScreenWriter PPD following the instructions in chapter 2.
2. Select Start: Settings: Printers and Faxes (Windows XP).
3. Select the ScreenWriter 5 and right click Properties.
4. Click the Printing Preferences (or General tab) and then click Advanced (Windows XP) to access the options. Then, select the desired setting from each option’s drop-down menu.

ScreenWriter 5 User’s Guide 49
5. Click OK. Then, when the Print dialog box reappears, click OK or Print, depending on the application, to send the fi le to the ScreenWriter.
Selecting PPD Options (Macintosh OS X) To confi gure a feature from the Print dialog box
1. Install and confi gure your ScreenWriter. Then, open a fi le in your application.
2. Select File: Print. The Print dialog box appears.
3. Select Printer Features from the drop-down menu. When the Printer Features window appears, select the desired settings from the drop-down menus by each option if necessary.
4. Click Print to send the fi le to the ScreenWriter.
5. Multiple presets can be saved under the Presets drop-down menu or from within certain applications, such as Adobe InDesign.
PPD Menus The features in the following list can be confi gured from the Print dialog box. Enhanced Angles Rotate 180 Degrees EP1 Screen (LPI) Mirror Print Screen Shape Negative Print Media Width Optional Trays Tray Switch
Enhanced Angles, Lines Per Inch (LPI), Rotate, and Screen Shape features are covered earlier in this chapter.
Some applications require additional confi guration to access certain features. See your application documentation. Depending on the application, a Printer’s Default option may be available. When this option is selected, the current setting is used for the job.
Confi guring ScreenWriter Options Various ScreenWriter specifi c options become available through your software applications after you install the ScreenWriter’s PPD. This section covers these options and suggested settings for them.

50 ScreenWrier 5 User’s Guide
EP1 (Toner Control) EP1 (Electrophotography) allows you to control the level of toner transferred from the toner drum to the media to control toning.
Set EP1 from your application Print dialog box. Options are 1 up to 10. The default setting is 3.
Depending on the application used, a ScreenWriter’s default option may be available. When this option is selected, the current ScreenWriter setting is used for the job. Visit www.xante.com for more details.
Screen (LPI) The Screen LPI (lines per inch) feature allow you to control the number of gray levels and enhance the resolution quality of your printed image
Usually you set lines per inch through your application. However, when LPI is not a software option, you can use the Screen option provided by your ScreenWriter’s PPD in the Print dialog box.
Depending on the application being used, a ScreenWriter’s default option may be available. When this option is selected, the current ScreenWriter setting is used for the job.
Screen Shape / Spot FunctionThe Screen Shape feature allows you to select the shape of dots that make up the screen pattern for your printed image. This feature is controlled by your ScreenWriter’s PPD that is loaded on your system during setup.
Set the Screen Shape menu option in your application Print dialog box. The choice of shape depends on the type of print job. For Example, euclidian is usually used for traditional offset printing, but others may choose line or ellipse.
Depending on the application being used, a ScreenWriter’s default option may be available.

ScreenWriter 5 User’s Guide 51
Tray Switch Tray Switch allows you to select the ScreenWriter’s tray chaining feature on a per job basis. Tray chaining on your ScreenWriter is controlled via the ScreenWriter’s PPD Tray Switch feature. Options are False (the factory default) which disables chaining and True which enables it. When True is selected, your ScreenWriter automatically switches to another media source when the current source runs out of media as long as the following conditions are met.
• All selected media sources must contain the same size media. If the ScreenWriter detects a different size media when it switches to a new tray, the ScreenWriter stops printing.
• All trays must be inserted properly. When Tray Switch is set to True, an incorrectly positioned tray prevents the ScreenWriter from printing.
Tray Switch only applies to the cassette(s), not to the Multipurpose tray.
Optional Tray(s) The Optional Tray setting must be set to agree with your ScreenWriter and ScreenWriter properties confi gurations. Otherwise, the tray will not appear or be selectable from within your application.
CD-ROMView Manuals
The View Manuals link opens a copy of your ScreenWriter’s manual. Acrobat Reader will need to be installed to view this manual.
1. Insert the Xante Utilities CD-ROM into your PC.
2. Click View Manuals or browse the manuals folder on the CD.
PS_Files Folder This folder contains Adobe PostScript fi les to help setup and maintain your ScreenWriter. They help in areas such as keeping track of your ScreenWriter’s status, performing specifi c functions, and printing fonts samples. See the Description.txt fi le for a description of each fi le.
◊◊◊

52 ScreenWrier 5 User’s Guide
Chapter 5 - Media: Selecting and ImagingMedia Specifi cations
To ensure your job prints correctly, always use appropriate media. Store and handle it carefully to prevent damage to the media and ScreenWriter. This section provides guidelines for selecting media and describes media types and sizes for your ScreenWriter.
Guidelines for Selecting and Storing Media To prevent media jams and print quality problems when selecting media for your ScreenWriter, use media that
• can withstand a temperature of 302˚ F (150˚ C).
Preprinted inks, such as letterheads, that cannot withstand these temperatures can damage the ScreenWriter’s fusing rollers permanently.
• meets weight and media type requirements for the media source. See “Loading Media” later in this chapter.
Do not use media that
• is unusually thick, thin, wrinkled, torn, curled, creased, wet, damp, or otherwise damaged.
• is coated, synthetically reinforced, colored with surface treatment, or heavily textured.
• has metal clasps, strings, staples , cutouts, perforations , or windows.
• has exposed adhesives or is a partial sheet of labels or a sheet on which the glue has soaked through the labels.
Using media that does not meet these guidelines may void your ScreenWriter warranty. Xante is not responsible for damages caused by media. Repair will be at the user’s expense.
To prevent damage to media, store media
• in small, fl at stacks (not set on its side or end).
• in the original wrapper in a location with a temperature range from 50 to 86˚ F (10 to 30˚ C) and a stable relative humidity from 30 to 65%.
• in a dark area; do not expose it to direct sunlight.

ScreenWriter 5 User’s Guide 53
Media SizesYour ScreenWriter allows you to use media from 3.94" x 5.83" (100 mm x 148 mm) up to 13" x 35.5" (330 mm x 902 mm).
Printing on Custom Sized Media Set the custom page size through your application. Make sure that paper size selections in the page or document setup section agree with those in the Print dialog box to ensure that the page prints correctly.
If a virtual memory error occurs, there is not enough ScreenWriter memory to process the job. In this case, try adding memory to your ScreenWriter, printing at a lower resolution, or using only ScreenWriter resident fonts.
Media Types Your printer supports paper, envelopes, transparencies, and fi lm media with weights from 16 - 36 lb bond (60 - 135 g/m2). See “Media Sources” later in this chapter about which media source to use with specifi c media types and weights. See “Printing with Various Media Types” later in this chapter regarding printing on fi lm, envelopes, transparencies, and labels.
Media used should meet the guidelines for selecting and storing media covered earlier in this chapter. To save on media costs, test a sample of new media before buying in quantity. Run a test print on plain paper to check layout and alignment before using more expensive stock.
Media Handling This section describes using the paper cassettes, the optional paper feeders, and the multipurpose feeder.
Media Sources Your ScreenWriter is equipped with a built-in paper cassette feeder and a multipurpose tray; these provide an input capacity of approximately 500 sheets of standard (20 lb. bond /60 lb. text weight; [65 g/m2]) paper. You can add up to 2 optional paper feeders to increase input capacity to approximately 1500.
All media sources can be used to increase the capacity for a single media size with the tray switch option or as sources for different sizes or types of media.

54 ScreenWrier 5 User’s Guide
Optional Paper FeedersYou can add up to two optional paper cassette feeders to your printer to increase input capacity for standard paper to approximately 1,650 sheets. Chapter 7 covers installing feeders. Chapter 1 covers loading paper cassettes.
Paper CassettesThe universal cassette included with your printer handles paper sizes from 5.50” x 8.50” (140 mm x 216 mm) up to 13.00” x 18.50” (330 mm x 470 mm) and paper weights from 16 - 28 lb bond (60 - 105 g/m2). For a 20 lb bond/60 lb text weight (65 g/m2) paper, you can load approximately 500 sheets of paper or to a stack height of 2.13” (54 mm).
The optional envelope cassette handles Com-10, Monarch, DL, and C5 sizedenvelopes with the same paper weight range as the universal cassette. You can load approximately 75 envelopes in the envelope cassette.
Use the arrow tab on the media guides to select the paper size in the cassette. Select the paper cassette or tray chaining from your application Print dialog box or the printer’s front panel.
Multipurpose FeederThe multipurpose feeder handles media sizes from 3.94” x 5.83” (100 mm x 148 mm) up to 13.00” x 35.50” (330 mm x 902 mm) and media weights from 16 - 36 lb bond (60 - 135 g/m2). Use the multipurpose feeder extension to support larger media. Select the media size from the front panel Utility: Manual Feed menu or use the custom size option in your application.
You can load paper, Myriad fi lm, transparencies, labels, and envelopes to a stack height of .70” (18 mm) in the multipurpose feeder. For typical media weights, this equals approximately 150 sheets of paper, 10 envelopes, or 30 sheets of fi lm, transparencies, or labels.
Loading Media Select the cassette or multipurpose feeder as the media source using the [Utility: Tray Select]. Load media in the cassettes and multipurpose feeder print side up, leading edge to the back of the ScreenWriter. Most media packages indicate the print side.

ScreenWriter 5 User’s Guide 55
Tray ChainingTray chaining directs the printer to automatically switch to another source for media when the current source is empty. You can chain to all paper cassettes and the multipurpose feeder. Use the following guidelines and the procedure in “Tray Selection Options” in chapter 4 when tray chaining.
• All selected media sources must contain the same size media. If the printer detects a different size media when it switches to a new tray, a Paper Out message appears.
• All trays must be inserted properly. When tray chaining is enabled, an incorrectly positioned tray will prevent the printer from printing.
Printing with Various Media Types
This section covers printing on fi lm, envelopes, labels, and transparencies. It also lists Myriad fi lm sizes. Chapter 1 provides information on the multipurpose feeder and chapter 8 contains printing troubleshooting procedures.
Printing FilmYou can print directly to XANTÉ’s Myriad fi lm to create an image for burning silk screen emulsions, bypassing camera and darkroom.
Myriad fi lm is a specially designed fi lm with low UV blockage. The transmissive density of the toner on Myriad fi lm is increased from 1.5 or 1.6 up to 3.0 to 3.3 when processed through FilmStar 4.
Always use the multipurpose feeder following the procedures in chapter 1 and the following guidelines when printing fi lm.
• Use only XANTÉ’s Myriad Film (clear or matte), designed specifi cally for use with your printer and FilmStar 4. Using other fi lm material may void your printer warranty.
• Avoid handling fi lm excessively to prevent fi ngerprints and scratches.
• Keep the printer clean (see chapter 6 for cleaning instructions).
• Load up to 30 sheets of fi lm or to a stack height of .70” (18 mm). Load fewer sheets if jams occur.
• Remove each sheet as it prints to prevent static buildup.
56 ScreenWrier 5 User’s Guide
• Do not fan fi lm. This causes static buildup which can cause jams.
• Once an image is printed on Myriad Film, the toner side is the emulsion side. For FilmStar 4 processing, fi lm loads emulsion side up.
• If you experience problems printing fi lm, see “Film and FilmStar 4 Specifi c Issues” in chapter 8.
The following chart lists Myriad Film sizes. To order Myriad Film, call your preferred XANTÉ dealer or your XANTÉ Consumables Sales Representative at 800-540-7091 (US and Canada). Make sure to indicate which type of fi lm you want, Myriad Clear or Myriad Matte.
Myriad Matte FilmPart Number
Myriad Matte FilmSize
Myriad Clear FilmPart Number
Myriad Clear FilmSize
200-100001 8.50” x 11.00” (Letter)(215 mm x 279 mm)
200-100107 8.50” x 11.00” (Letter)(215 mm x 279 mm)
200-100002 8.26” x 11.69” (A4)(210 mm x 297 mm)
200-100108 8.26” x 11.69” (A4)(210 mm x 297 mm)
200-100003 11.00” x 17.00” (Tabloid)(215 mm x 279 mm)
200-100109 11.00” x 17.00” (Tabloid)(215 mm x 279 mm)
200-100004 11.69” x 16.54” (A3)(297 mm x 420 mm)
200-100110 11.69” x 16.54” (A3)(297 mm x 420 mm)
200-100005 10.00” x 15.00”(254 mm x 381 mm)
200-100111 13.00” x 18.50” (Uni-versal)(330 mm x 470 mm)
200-100006 11.75” x 18.00”(298 mm x 457 mm)
200-100007 12.00” x 18.00”(304 mm x 457 mm)
200-100036 12.00” x 25.00”(304 mm x 635 mm)
200-100062 13.00” x 18.50” (Univer-sal)(330 mm x 470 mm)
200-100063 13.00” x 25.00”(330 mm x 635 mm)
200-100072 13.00” x 35.50”(330 mm x 902 mm)
Printing EnvelopesUse the multipurpose feeder or the envelope cassette, following the procedures in chapter 1, the media specifi cations earlier in this chapter, and the following guidelines when printing envelopes.
• Do not use gummed envelopes or envelopes with adhesive tape.

ScreenWriter 5 User’s Guide 57
• Before loading an envelope, place it on a fl at surface and press it smooth to make the corners and folds as fl at as possible.
• Feed envelopes print side up, short edge fi rst.
• Load envelopes fl ap open in the multipurpose feeder to provide the best print quality in the address area. Load envelopes fl ap closed in the envelope cassette.
• Format envelopes in your application and run a plain paper test print to check fl ap alignment before running on more expensive envelope stock.
• Use the Cool fuser temperature setting when printing envelopes.
Printing LabelsAlways use the multipurpose feeder, following the procedure in chapter 1, the media specifi cations earlier in this chapter, and these guidelines when printing labels.
• Do not overload the label stock. Label sheets compressed by the weight of the stack will expand as they feed into the printer which can cause a jam.
• Make sure labels are not curled on the corners or coming loose from the backing sheet.
• Use only labels that are rated as “laser safe.” Do not use label sheets with exposed adhesives (such as partially used sheets or sheets on which the adhesive has seeped through to the surface).
• Use the Cool fuser temperature setting when printing labels.
Printing TransparenciesAlways use the multipurpose feeder, following the procedure in chapter 1, the media specifi cations earlier in this chapter, and these guidelines when printing transparencies.
• Avoid handling transparencies excessively to prevent fi ngerprints and scratches.
• Keep the paper path clean (see chapter 6); dust or dirt can scratch transparencies and reduce print quality.
• Load fewer transparencies if jams occur. The weight of a stack of transparencies could cause the sheets to stick together.
• Remove each transparency as it is printed to help prevent static buildup.

58 ScreenWrier 5 User’s Guide
• Do not fan transparencies. This causes static buildup which can cause jams.
• Use the Cool fuser temperature setting when printing transparencies.◊◊◊

ScreenWriter 5 User’s Guide 59
Chapter 6 - Maintenance and Specifi cationsMaintenance
Proper care will extend the ScreenWriter life. Use the guidelines in this section to maintain your ScreenWriter in optimum working condition and to ensure the highest quality output.
Handling the ScreenWriterUse the following guidelines when handling or using your ScreenWriter.
The ScreenWriter weighs approximately 73 lbs. (50 kg.) with consumables installed. Always have two people lift the ScreenWriter, using the recessed grip areas on the right and left sides only.
• Turn off the ScreenWriter at the end of the day.
• Never move the ScreenWriter with the imaging unit installed.
• Do not place anything on top of the ScreenWriter.
• Always lift the ScreenWriter by the recessed grip areas on the bottom left and right — never by the Multi Purpose tray.
• Make sure the ScreenWriter location meets the requirements in “ScreenWriter 5 Location” in chapter 1.
• Never oil the ScreenWriter.
• Allow the ScreenWriter side vent at least an 8.0" (200 mm) clearance to prevent overheating. Never insert anything into the vent.
• Check the power cord monthly and replace immediately if you fi nd damage.
Storing the ScreenWriter Use the following procedure when storing the ScreenWriter for an extended period.
1. Turn off the ScreenWriter and unplug the power cord from the power source.
2. Remove all media and close the ScreenWriter including the top cover.
a. Store the ScreenWriter and media in an area with a temperature of 32˚ to 95˚ F (0˚ to 35˚ C) and a relative humidity of 15% to 80% with no condensation.

60 ScreenWrier 5 User’s Guide
b. Store the ScreenWriter and media in their original containers or cover them to protect from dust.
Moving the ScreenWriter Use the following procedure when moving the ScreenWriter.
The ScreenWriter weighs approximately 73 lbs. (50 kg) with consumables installed. Always have two people lift the ScreenWriter, using the recessed grip areas on the right and left sides only.
1. Turn off the ScreenWriter and unplug the power cord from the power source.
2. Remove any media that may be in the Multi Purpose tray. Close the Multi Purpose tray and the top cover.
3. Remove the imaging unit. Never move the ScreenWriter with the imaging unit installed.
a. Place the imaging unit in its original bag to protect it from light. If you no longer have this bag, place the unit in a dark bag or wrap it in a dark cloth.
b. Ensure the imaging unit stays level during the move. Rock it gently to redistribute toner before placing the unit back in the ScreenWriter.
4. Remove the interface cables.
5. Move the ScreenWriter to a location that meets the guidelines in “ScreenWriter 5 Location” in chapter 1.
6. Set up the ScreenWriter following the instructions in chapter 1.
Cleaning the ScreenWriter To help keep your ScreenWriter running smoothly and to avoid unnecessary problems, perform the following cleaning steps monthly. Also, clean the ScreenWriter inside after removing a media jam or replacing the imaging unit .
Transfer Roller Cleaning Use the following procedure to clean the transfer roller.

ScreenWriter 5 User’s Guide 61
Required Equipment: • Soft bristle brush • Vacuum with a soft brush attachment or compressed air with safety glasses
1. Turn off and unplug the ScreenWriter.
2. Remove the imaging unit.
3. Remove the roller assembly by turning up the roller’s plastic levers, one on each end; then, holding the levers, lift the transfer roller up and out at a 45˚ angle.
Transfer Roller
4. Clean toner from the transfer roller with a soft bristle brush.
5. Vacuum the area using a soft brush attachment or blow it with compressed air. Wear protective safety glasses when using compressed air.
6. Lower the roller back into place with the gear end to the left, fi rst. Make sure the lever protruding below the transfer roller fi ts inside the small opening on the door.
7. Push the roller into its holding clips. The roller assembly should spring back freely when pressed.
Imaging Unit and Manual Feed Area Cleaning Clean the imaging unit and manual feed area after removing a media jam or replacing the imaging unit.
Required Equipment: • Clean, dry, lint-free cloth
62 ScreenWrier 5 User’s Guide
1. Turn off the ScreenWriter and disconnect it from the power source; then, remove the media jam and the imaging unit.
Note: The fuser unit becomes very hot during operation. Always allow this unit to cool completely before opening the fuser unit cover. If a media jam occurs in the fuser unit area, turn off the ScreenWriter and wait at least 20 minutes before attempting to clear the jam.
2. Remove any media scraps and wipe off paper and toner dust with a dry, clean cloth.
3. Reassemble the ScreenWriter and reconnect it to the power source.
Manual Feed Pick Up Roller Removal and Cleaning Use the following procedure to remove and clean the pick up rollers.
Required Equipment: • Flat head screwdriver • Cotton swabs
1. Remove all media from the output and multi purpose tray. Then, squeeze the top cover latch to release the lock.
Open Top Cover and MP Tray
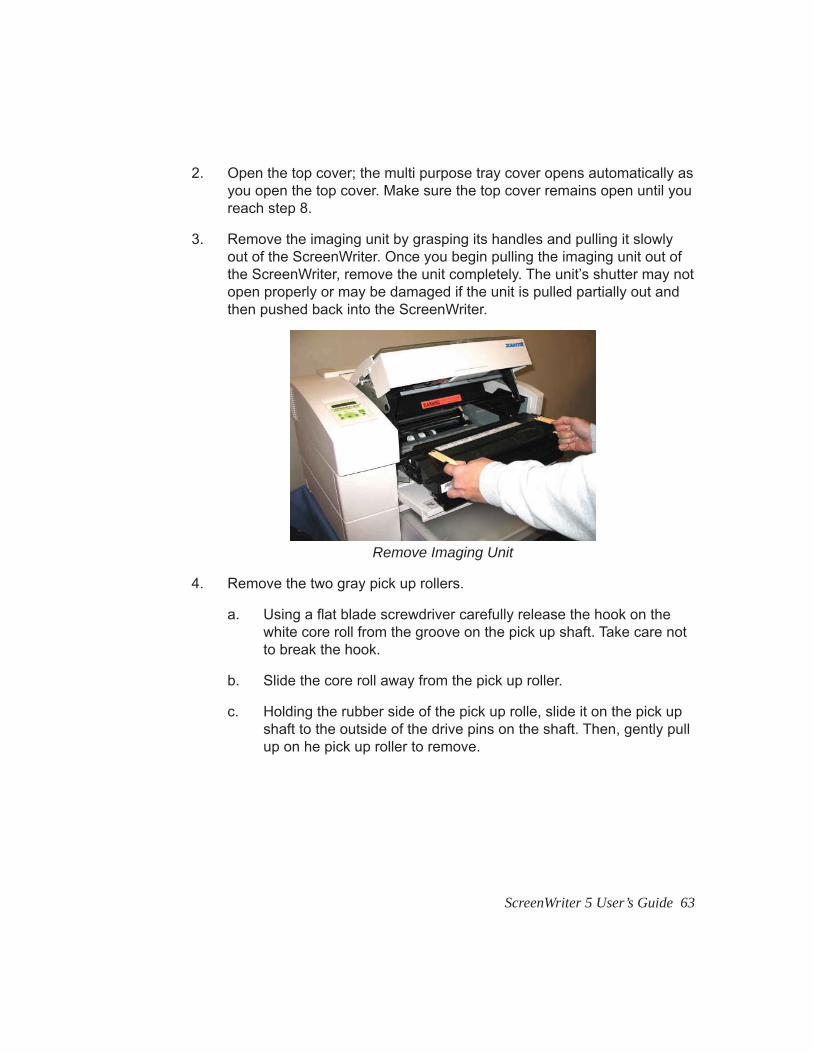
ScreenWriter 5 User’s Guide 63
2. Open the top cover; the multi purpose tray cover opens automatically as you open the top cover. Make sure the top cover remains open until you reach step 8.
3. Remove the imaging unit by grasping its handles and pulling it slowly out of the ScreenWriter. Once you begin pulling the imaging unit out of the ScreenWriter, remove the unit completely. The unit’s shutter may not open properly or may be damaged if the unit is pulled partially out and then pushed back into the ScreenWriter.
Remove Imaging Unit
4. Remove the two gray pick up rollers.
a. Using a fl at blade screwdriver carefully release the hook on the white core roll from the groove on the pick up shaft. Take care not to break the hook.
b. Slide the core roll away from the pick up roller.
c. Holding the rubber side of the pick up rolle, slide it on the pick up shaft to the outside of the drive pins on the shaft. Then, gently pull up on he pick up roller to remove.

64 ScreenWrier 5 User’s Guide
Manual Feed Pick Up Rollers and Pick Up Shaft
5. Clean the pick up rollers and pick up shaft by gently wiping them with cotton swabs.
The arrows molded into the side of the pick up rollers show the direction of rotation. Be sure to install the rollers correctly.
6. Replace the two gray pick up rollers using the following steps for each roller.
a. Align the pick up roller above the pick up shaft and between two core rolls; then, lower the pick up roller onto the pick up shaft.
b. Slide the pick up roller toward the pick up shaft drive pins until the pins insert into the groove on the roller.
c. Slide the white core roll in the same direction toward the drive pins, until its hook snaps into the groove on the pick up shaft.
7. Reinstall the imaging unit.
8. Close the top cover; then, close the multi purpose tray.
Exterior Cleaning Use the following procedure to clean the exterior of the ScreenWriter.
Required Equipment: • Water or mild detergent • Clean, lint-free cloth

ScreenWriter 5 User’s Guide 65
1. Turn off your ScreenWriter and disconnect it from the power source.
Use only water or mild detergent for cleaning. To prevent discoloration, cracking, and deformation of the case, do not use alcohol, ammonia-based cleaners, or other volatile cleaners on or around the ScreenWriter. Never spray or pour solutions directly on the ScreenWriter. Always put the solution on the cloth and wipe it with the cloth.
2. Clean the ScreenWriter exterior using a clean, lint-free cloth dampened with water.
3. Give the ScreenWriter a few minutes to dry thoroughly. Then, reconnect it to the power source.
◊◊◊

66 ScreenWrier 5 User’s Guide
Chapter 7 - TroubleshootingIntroduction
This chapter describes the status messages that can direct you to the source of a problem, suggests solutions for some typical printer setup and print quality problems, and provides information about preventing and clearing media jams.
Status Messages ScreenWriter front panel window messages provide status information and can help you determine the source of a problem or media jam.
Bad Imaging Unit The imaging unit is bad and needs to be replaced.
Calibrating The ScreenWriter is calibrating and warming up.
Early Paper Jam A paper jam has occurred along the media path caused by the paper reaching a position earlier than expected.
E:FIFO The FIFO SIMM or SODIMM is not present, is not inserted properly, or is broken.
E:Laser There is a hardware problem with the laser.
E:Motor There is a hardware problem with the motor.
Exit Paper Jam A media jam has occurred after the media has been imaged but before it has been deposited in the output tray.
Front Paper Jam A media jam has occurred caused by the media not being pulled from the tray properly.
Holding The ScreenWriter is offl ine and data is coming across the interface. It cannot receive the data when it is offl ine.
Imaging Unit Out Toner in the imaging unit is low or needs to be redistributed.
ScreenWriter 5 This appears when the ScreenWriter is fi rst turned on, before initialization begins.

ScreenWriter 5 User’s Guide 67
Initializing The ScreenWriter is warming up and performing setup routines.
Inval Imaging Unit The installed imaging unit is not the right type and should be replaced with a Xante unit.
Late Paper Jam A media jam has occurred caused by the media not reaching the exit roller at the correct time.
Low Paper The media stack is low in the multi purpose tray.
No Imaging Unit The imaging unit is either not in the ScreenWriter or not seated in place.
Offl ine The ScreenWriter is off line. It cannot receive or process data.
Paper Jam A media jam has occurred along the media path.
Paper MisMatch The media loaded in the ScreenWriter is not the same size indicated for the job in the application fi le.
Paper Out There is no media in the paper tray.
Processing The ScreenWriter is processing a job to image.
Ready/Font Accel Font Accelerator is updating the RAM disk at runtime with the most recently used fonts.
Ready The ScreenWriter is on line and ready to accept a job.
Ready/Imaging The ScreenWriter is completing an imaging job and ready to accept a new job to begin imaging.
Reset 1 The ScreenWriter has reset to factory default settings and the Reset and Enter keys can be released safely.
68 ScreenWrier 5 User’s Guide
Reset 2 The ScreenWriter has reset to factory default settings except for ScreenWriter margins, gamma settings, IP network parameters, and More X-ACT settings. The Menu and Enter keys can be released.
Resetting Job The ScreenWriter is resetting after the Reset key has been pressed and an active job has been cancelled.
Waiting The ScreenWriter is processing a job and waiting to receive more data before imaging.
Power and Setup Issues This section provides tips for resolving problems concerning power to the ScreenWriter and the host or concerning the setup.
My ScreenWriter has no power.
• Make sure the power cord is plugged into the ScreenWriter and the power source.
• Make sure the ScreenWriter is turned on.
• Make sure the power source is grounded, working, and rated for 100V, 15A.
My ScreenWriter does not respond properly to my host using an Ethernet connection.
• Make sure all cables are connected and seated properly.
• Make sure the ScreenWriter PPD is installed and confi gured properly.
• Make sure the ScreenWriter Ethernet interface is confi gured properly for your operating environment.
• Make sure the Macintosh or PC is confi gured properly to communicate using the Ethernet connection.
• Make sure the ScreenWriter is on line.
• Make sure the network is available. Try using the ping command.
• Reduce the number of items on the network to determine the problem’s source.

ScreenWriter 5 User’s Guide 69
• Make sure that you are using a crossover cable if you are directly connecting the ScreenWriter and a computer.
• Do not use a transceiver that allows devices to daisy chain on a twisted pair network.
When I image a scanned image, it is so dark that most of the detail is lost.
• Adjust the ScreenWriter gamma setting to change the midrange grayscale values of the image . See “Halftone Calibration” in chapter 4.
• Rescan the image with a higher resolution. Generally, black and white images should be scanned at a resolution of two times the line screen desired on the imaged output. Multiply this number by the ratio of the imaged output size to the original image size.
SR = Print Image LPI x 2 x Image Size Ratio
SR = the Scan resolution
Image Size Ratio = printed image size/original image size
For example, for a line screen of 95, set the scanner resolution to 190 dpi (95 x 2). To image the same image at 75% of its original size, set scanner resolution to 142 dpi (95 x 2 x .75).
Scanning the image at a lower than optimum resolution results in less detail. Scanning at a higher resolution increases fi le size and processing time, and it may only slightly increase the amount of detail.
Image Quality Issues This section provides tips for resolving ScreenWriter output quality problems.
Imaging Unit Control If your ScreenWriter does not produce the rich, black images that you expect, try redistributing the toner in the imaging unit and adjusting the image density before replacing the imaging unit.
Redistributing Toner If you have not used the imaging unit in several days, toner may have settled. Remove the IU from the ScreenWriter, and shake the unit gently to redistribute toner. Replace the IU in the ScreenWriter. See “Imaging Unit” in chapter 1.

70 ScreenWrier 5 User’s Guide
Adjusting Density You can increase or decrease the amount of toner applied by the ScreenWriter using the density dial.
The amount of toner used increases as dial settings move from low (L) to high (H). Imaging with too high a setting shortens the life of the imaging unit and may degrade image quality.
To adjust the density dial
1. Open the multi purpose tray by grasping the handle in the top center of the cover and pulling down.
Adjust Density Dial
2. Turn the density dial toward the H (Higher density) to darken the image or toward the L (Lower density) to lighten the image.
3. Close the multi purpose tray.
Check the density dial when you replace an imaging unit. The setting required for the previous unit may be too high or too low for the new unit.
Miscellaneous Image Quality Issue
The solid black on the image or text is washed out.
• The media may be damp or otherwise damaged.
• The toner may have settled in the imaging unit. Remove and shake the unit gently to redistribute the toner.

ScreenWriter 5 User’s Guide 71
• Toner may be low in the imaging unit or the unit may need replacing.
Random black dots appear on the imaged media.
• The media path may be dirty. Image several blank sheets to clean the path.
• The imaging unit may need replacing.
Vertical black streaks on the imaged media.
• The imaging unit may need replacing.
Repetitive defects appear on the imaged media.
• The media path may be dirty. Image several blank sheets to clean the path.
• Toner may have settled in the imaging unit. Remove and shake the unit gently to redistribute the toner.
• The imaging unit may need replacing.
Some characters are missing or only partially imaged.
• The imaging unit may need replacing.
• Check for an obstruction to the scanner.
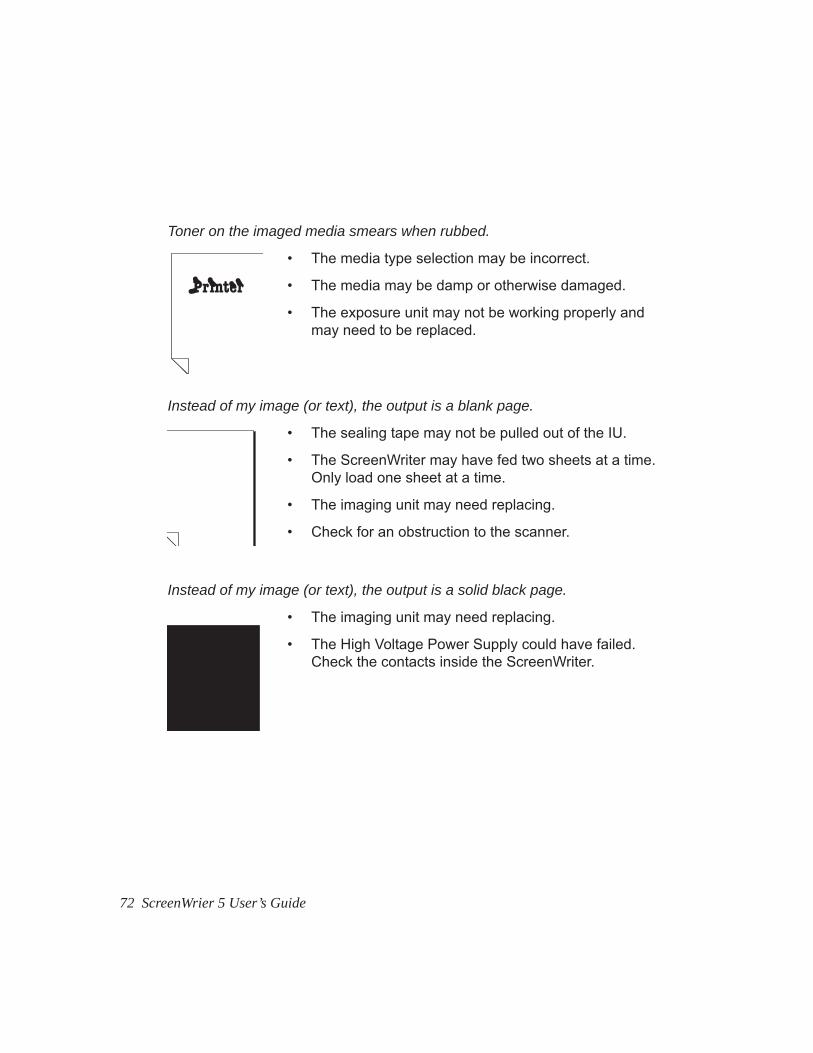
72 ScreenWrier 5 User’s Guide
Toner on the imaged media smears when rubbed.
• The media type selection may be incorrect.
• The media may be damp or otherwise damaged.
• The exposure unit may not be working properly and may need to be replaced.
Instead of my image (or text), the output is a blank page.
• The sealing tape may not be pulled out of the IU.
• The ScreenWriter may have fed two sheets at a time. Only load one sheet at a time.
• The imaging unit may need replacing.
• Check for an obstruction to the scanner.
Instead of my image (or text), the output is a solid black page.
• The imaging unit may need replacing.
• The High Voltage Power Supply could have failed. Check the contacts inside the ScreenWriter.

ScreenWriter 5 User’s Guide 73
Blank areas appear in my image (or text).
• The media may be damp or otherwise damaged.
• The sealing tape may not be pulled completely out of the imaging unit.
• Check for an obstruction to the scanner.
The media comes out of the ScreenWriter creased or crumpled.
• The media may be damp or otherwise damaged.
• The media may be loaded improperly.
• The Exposure Unit/Fuser may be damaged and need to be replaced.
The image is smudged or small spaces are plugged.
• The media may be damp or otherwise damaged.
• The imaging unit may need replacing.
• The calibration may be off.
Vertical blanks appear on my image (or text).
• The imaging unit may not be properly installed.
• The imaging unit may need replacing.
• Check for an obstruction to the scanner.

74 ScreenWrier 5 User’s Guide
The image is blurred on the output.
• The imaging unit may need replacing.
• The transfer roller may need to be adjusted.
Bold print appears shaded on the output.
• The imaging unit may need replacing.
• The calibration may be off.
• The black graphics may not be pure.
Horizontal banding appears on the imaged output.
• Dust, toner, and debris may have accumulated inside the ScreenWriter.
• The media may be damp or otherwise damaged.
• Toner may have settled in the imaging unit. Remove and shake the unit gently to redistribute the toner.
• The imaging unit may need replacing.
• The ScreenWriter settings or the application settings may need adjustment for the image. Lowering the line screen (at a set resolution) produces larger dots and more levels of gray, which result in a more accurate image representation.

ScreenWriter 5 User’s Guide 75
My image is clipped when I image it.
• Make sure the document size in your application’s Page Setup matches the document size specifi ed in the Print dialog box.
Mechanical Issues This section provides tips for resolving problems with the ScreenWriter mechanical setup.
My ScreenWriter is making funny noises.
• Make sure the ScreenWriter is set up on a stable, level surface.
• Make sure the tray cover is closed fi rmly.
• There may be a foreign object in the ScreenWriter. Turn off the ScreenWriter and remove the object.
Media Jams This section contains suggestions for solving media jam problems.
Preventing Jams Use the following guidelines to prevent most media jams.
• Make sure the ScreenWriter is level and in an appropriate location.
• Make sure the media is laser approved.
• Make sure the media is stored properly.
• Make sure the media is loaded properly in the tray.
- Load and image only one sheet at a time.
- Make sure the correct size media is loaded in the multi purpose tray.
• Make sure the output tray does not become overfi lled.

76 ScreenWrier 5 User’s Guide
• Remove any media in the multi purpose tray before turning on the ScreenWriter. Reinsert the media when the ScreenWriter displays the Ready message.
• Use the Xante ScreenWriter 5 imaging unit.
• Keep the ScreenWriter clean.
Locating Jams
Always remove a jam by pulling the sheet out in the direction of the media feed. Damage caused by improper jam removal is not covered by your warranty.
AB
CD
Media Path
• In the multi purpose tray and the imaging unit areas (A)
• In the back of the ScreenWriter (B)
• Around the imaging unit (C)
• In the exit area under the exposure unit cover (D)
Use the following procedures to locate a media jam; then, see “Clearing Jams” later in this chapter for details on removing the jam.
1. Check for media jams in the multi purpose tray.
2. Check for media jams in the exit area under the fuser unit cover.
3. Check for media jams around the imaging unit.
4. Check for media jams in the back of the ScreenWriter.
5. Reassemble the ScreenWriter.

ScreenWriter 5 User’s Guide 77
Clearing Jams This section describes removing media jams from specifi c locations.
Always remove a jam by slowly and carefully pulling the media out in the direction of the paper feed. Damage caused by improper jam removal is not covered by your warranty.
Clearing a Multi Purpose Tray Jam
The multi purpose tray opens automatically as you open the top cover. The multi purpose tray does not open to a 90° angle. To prevent damage, do not exert strong pressure or place heavy objects on the tray.
1. Remove any media in the input/output trays
Open Top Cover and Multi Purpose Tray
2. Squeeze the latch on the top cover to release lock.
• The multi purpose tray does not open to a 90° angle. To prevent damage, do not exert strong pressure or place heavy objects on the tray.

78 ScreenWrier 5 User’s Guide
Remove Imaging Unit
3. Remove the imaging unit from the ScreenWriter by grasping the unit by the handles on the top and pulling it slowly out of the ScreenWriter.
• Once you begin pulling the imaging unit out, remove the unit completely. The drum shutter ay not open properly if the unit is pulled out partially and then pushed back in. This can damage the imaging unit or result in a malfunction.
• Place the imaging unit fl at on a level surface.
• Always remove a jam by pulling the media out in the direction of the paper feed path. Damage caused by improper jam removal is not covered by your warranty.
4. Remove the jammed media from the multi purpose tray in the feed direction.
5. Remove, clean, and reinstall the pick up rollers.
Clearing a Back of ScreenWriter Jam
1. Open the ScreenWriter back cover by grasping the notches on the upper left and right edges of the cover and pulling down.

ScreenWriter 5 User’s Guide 79
• The cover is held in place by two strong springs. Hold it open with one hand to avoid pinching your fi ngers.
Open the Back Cover and remove Jam
• Always remove a jam by pulling the media out in the direction of the media feed. Damage caused by improper jam removal is not covered by your warranty.
2. Remove the jammed media from the back of the ScreenWriter.
3. Close the back cover.
Clearing a Imaging Unit Area Jam
The inside of the ScreenWriter becomes very hot during operation. Do not touch any area with a high-temperature warning label without fi rst turning off the ScreenWriter and allowing it to cool for at least 20 minutes.
When the ScreenWriter is turned off, all job information still in memory is lost; the Jam Recover feature cannot image the last page processed.
1 Remove the imaging unit from the ScreenWriter by grasping the unit by the handles on the top and pulling it slowly out.
• Once you begin pulling the imaging unit out, remove the unit completely. The drum shutter may not open properly if the unit is pulled partially out and then pushed back in. This can damage the imaging unit or result in a malfunction.

80 ScreenWrier 5 User’s Guide
• Place the imaging unit fl at on a level surface.
• Always remove a jam by pulling the media out in the direction of the media feed. Damage caused by improper jam removal is not covered by your warranty.
2. Remove a jammed media from the back of the multi purpose tray and from the imaging unit area.
Clearing an Exit Area Jam The fuser becomes very hot during operation. Do not touch any area with a
high-temperature warning label without fi rst turning off the ScreenWriter and allowing it to cool for at least 20 minutes.
When the ScreenWriter is turned off, all job information still in memory is lost; the Jam Recover feature cannot image the last page processed.
Open Fuser Unit Cover
1. Open the fuser unit cover by pulling it toward the back of the ScreenWriter.
2. Open the fuser unit drum cover using the colored tabs on each side of the cover.

ScreenWriter 5 User’s Guide 81
Remove Jam from Fuser Unit
• Always remove a jam by pulling the media out in the direction of the media feed. Damage caused by improper jam removal is not covered by your warranty.
3. Remove any jammed media from the fuser unit area.
4. Close the fuser unit drum cover using the colored tabs on each side of the over. Then, close the fuser unit cover.
• Make sure the fuser unit cover is closed properly to prevent image quality problems.
Reassembling the ScreenWriter
1. Insert the imaging unit.
2. Close and latch the top cover.
If the ScreenWriter was turned off to clear a media jam, turn on the ScreenWriter before loading a multi purpose tray.
3. Verify that Ready appears in the front panel window.
Technical Support If you encounter problems that cannot be resolved by following the procedures in this chapter, you may call Xante Technical Support at 800-926-8393 (US and Canada) from 7 A.M. to 6 P.M. Central Standard Time (CST) Monday through Friday. From other areas, call your Xante vendor. Depending on your service agreement, there may be a charge for Technical Support.

82 ScreenWrier 5 User’s Guide
To assist our technicians in serving you more effectively, please have the following information available when calling for Technical Support.
• ScreenWriter model and serial number (on the Xante sticker on the back of the ScreenWriter).
• Your computer type and operating system (version number)
• Confi guration menu settings for your ScreenWriter interface
• Applications (including version numbers) you are using
• Full description of the problem
• List of error or status messages if applicable
Also, you can fax questions to Xante’s Technical Support at 251-473-6503. Include your name, your company name, and the troubleshooting information listed earlier in this section. Indicate whether you wish the response to be faxed or emailed and include the appropriate number or address.
If you have access to the internet, you can access Xante’s web page at:
xante.com
You also can e-mail questions to Xante Technical Support.
◊◊◊