Embed Size (px)
Citation preview
This is the Internet version of the user�s guide. © Print only for private use.
P910iUser Guide
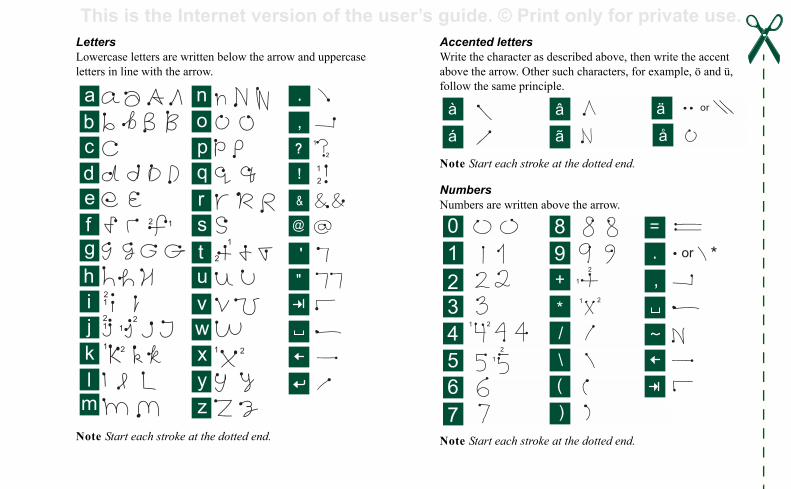
This is the Internet version of the user�s guide. © Print only for private use. nted letters the character as described above, then write the accent the arrow. Other such characters, for example, ö and ü, the same principle.
Start each stroke at the dotted end.
bersers are written above the arrow.
Start each stroke at the dotted end.
8
9
,
. *or
+
*
/
\
(
)
=
LettersLowercase letters are written below the arrow and uppercase letters in line with the arrow.
Note Start each stroke at the dotted end.
AcceWriteabovefollow
Note
NumNumb
Note
a
b
c
d
e
f
g
h
k
l
m
n
o
p
q
r
s
t
u
v
y
z
w
x 1 2
i
j1
1
1
1
1
1
2
1
2
2
2
2 2
2
,
.
?
!
&
@
"
'
0
1
2
3
4
5
6
7
3
This is the Internet version of the user�s guide. © Print only for private use.
tering text with the flip closed..................................... 32tering text with the flip open ....................................... 3310i locks....................................................................... 37
e.......................................................................... 40ll handling with the flip closed .................................... 40ll handling with the flip open ...................................... 43ndling two or more calls.............................................. 45ll list and call log ......................................................... 47nts and smart functions ................................................ 48eferences....................................................................... 53
IA
muniCorder....................................................... 59cording video clips ...................................................... 59king pictures ................................................................ 61mera settings................................................................ 63
res and Image editor ........................................ 64ctures ............................................................................ 64age editor ..................................................................... 66
o .......................................................................... 68deo clips ....................................................................... 68reaming ......................................................................... 70eferences....................................................................... 71
ContentsOVERVIEW
Introduction ................................................................. 9
Getting to know your P910i...................................... 10P910i package................................................................... 10P910i overview ................................................................. 11SIM card ........................................................................... 12Battery .............................................................................. 12Care instructions ............................................................... 13First time start-up.............................................................. 14Turning your P910i on and off ......................................... 14Importing phone book entries........................................... 14Flip closed mode............................................................... 15Flip open mode ................................................................. 16Flip removed..................................................................... 17Screen areas ...................................................................... 18Jog Dial ............................................................................ 19Keypad functions ............................................................. 20Indicators and status bar icons.......................................... 21Memory Stick ................................................................... 22Connecting the accessories ............................................... 24Services............................................................................. 25Applications - overview.................................................... 25Updating the software....................................................... 28General functions.............................................................. 28
EnEnP9
PhonCaCaHaCaHiPr
MED
ComReTaCa
PictuPiIm
VideViStPr
This is the Internet version of the user�s guide. © Print only for private use. Music player............................................................... 73
Playing sound files............................................................ 73Calendar .................................................................. 108
Creating calendar entries................................................ 108g calendar entries ............................................. 109and receiving calendar entries.......................... 110ces ..................................................................... 110
.................................................................. 111 task entries....................................................... 111g task entries .................................................... 112task entries........................................................ 112and receiving task entries................................. 113ces ..................................................................... 113
.................................................................. 114 and editing notes ............................................. 114 pictures ............................................................ 115g notes .............................................................. 115and receiving notes .......................................... 115
order........................................................ 116sound recordings............................................... 116und recordings as ring signals.......................... 117sound recordings .............................................. 117
r ................................................................ 118
.................................................................. 119ime and date...................................................... 119ng workdays...................................................... 120
4
Managing sound files........................................................ 74
Internet ....................................................................... 77Using the browser view .................................................... 78Using the bookmark view................................................. 81Preferences........................................................................ 83
Games ......................................................................... 85Chess................................................................................. 85Solitaire............................................................................. 86
BUSINESS
Messages..................................................................... 87Folders in Messages.......................................................... 88The accounts in Messages ................................................ 89Handling text messages .................................................... 89Handling multimedia messages ........................................ 90Handling email.................................................................. 94More about messaging...................................................... 98
Contacts.................................................................... 101Using Contacts with the flip closed ................................ 101Using Contacts with the flip open .................................. 103Creating and editing contacts.......................................... 104Managing contacts .......................................................... 106Making an owner card .................................................... 107Preferences...................................................................... 107
ManaginSending Preferen
Tasks ......CreatingManaginMoving Sending Preferen
Jotter ......CreatingDrawingManaginSending
TOOLS
Sound recMaking Using soSending
Calculato
Time........Setting tSpecifyi
5
This is the Internet version of the user�s guide. © Print only for private use. hronization and backup ................................. 139cal synchronization.................................................... 139mote synchronization ................................................ 141cking up data ............................................................. 142storing data ................................................................ 143
INGS
onalizing your P910i........................................ 144emes........................................................................... 144anging your application shortcuts ............................. 144tting a background picture ......................................... 144tting the light intensity ............................................... 144tting a screen saver..................................................... 145ding images to your Contacts.................................... 145
ng signals.................................................................... 145arm tones and sound notification ............................... 146
rol panel........................................................... 147e Device tabplication shortcuts ..................................................... 147splay ........................................................................... 147ight mode .................................................................... 149ternational ................................................................... 149cks.............................................................................. 149unds and alerts ........................................................... 149xt input ....................................................................... 151emes........................................................................... 151me & date ................................................................... 152
Setting locations ............................................................. 120Setting number formats .................................................. 120Setting alarms ................................................................. 121
Viewers and editors � Quickoffice ......................... 122Common viewer and editor functions ............................ 122Quickword ...................................................................... 123Quicksheet ..................................................................... 123Quickpoint ...................................................................... 124Pdf+ .............................................................................. 125
File manager ............................................................ 126
Online services ......................................................... 128
ADVANCED FUNCTIONS
PC Suite and Content and Application ................. 129Sony Ericsson PC Suite .................................................. 129Content and Application CD .......................................... 130
Installing applications ............................................. 131Installing applications on your P910i ............................. 131Removing applications from your P910i........................ 133Sony Ericsson Update Service........................................ 133
Connecting to other devices.................................... 134Connection via SyncStation............................................ 134Connection via Infrared port........................................... 135Connection via Bluetooth wireless technology .............. 136
SyncLoReBaRe
SETT
PersThChSeSeSeAdRiAl
ContThApDiFlInLoSoTeThTi
This is the Internet version of the user�s guide. © Print only for private use. User greeting................................................................... 153 REFERENCE
ooting ...................................................... 178
s for safe and efficient use...................... 184warranty............................................................ 186tement ............................................................... 188
ental information............................................ 188ion of Conformity............................................. 188
definitions............................................. 189
data ......................................................... 197
.................................................................. 201
6
The Connections tabBluetooth......................................................................... 153Cable ............................................................................... 154GSM Networks ............................................................... 154Infrared ........................................................................... 155Internet accounts............................................................. 155Messaging accounts ........................................................ 159WAP accounts ................................................................ 165
The Other tabCertificate manager......................................................... 166Flip settings..................................................................... 167Format disk ..................................................................... 167IP Security manager........................................................ 167Language selection ......................................................... 167Master reset..................................................................... 168Secure tokens .................................................................. 168Storage manager ............................................................. 169WIM PIN settings ........................................................... 170
Getting started with Internet and Messages ......... 171Introduction..................................................................... 171Automatically set up service provider and messaging ... 172Manually set up service provider.................................... 172Manually set up messaging............................................. 173Setting up WAP accounts ............................................... 174Using your P910i as a modem........................................ 174GPRS - connection information...................................... 176
Troublesh
GuidelineLimited FCC StaEnvironmDeclarat
Terms and
Technical
Index.......
7
This is the Internet version of the user�s guide. © Print only for private use. d all Java-based trademarks and logos are trademarks or registered arks of Sun Microsystems, Inc. in the U.S. and other countries.End-user agreement for Sun™ Java™ J2ME™:
rictions: Software is confidential copyrighted information of Sun and title to ies is retained by Sun and/or its licensors. Customer shall not modify, pile, disassemble, decrypt, extract, or otherwise reverse engineer Software. re may not be leased, assigned, or sublicensed, in whole or in part.rt Regulations: Software, including technical data, is subject to U.S. export
laws, including the U.S. Export Administration Act and its associated ions, and may be subject to export or import regulations in other countries. stomer agrees to comply strictly with all such regulations and ledges that it has the responsibility to obtain licenses to export, re-export,
ort Software. Software may not be downloaded, or otherwise exported or rted (i) into, or to a national or resident of, Cuba, Iraq, Iran, North Korea, Sudan, Syria (as such listing may be revised from time to time) or any to which the U.S. has embargoed goods; or (ii) to anyone on the U.S.
ry Department's list of Specially Designated Nations or the U.S. Commerce ment's Table of Denial Orders.ricted Rights: Use, duplication or disclosure by the United States ment is subject to the restrictions as set forth in the Rights in Technical Data mputer Software Clauses in DFARS 252.227-7013(c) (1) (ii) and FAR -19(c) (2) as applicable.ght © SyncML initiative Ltd. (1999-2002). All rights reserved.s of software © PacketVideo Corporation (USA) 1999, 2002. PacketVideo, er and the PacketVideo logo are trademarks of PacketVideo Corporation. ts reserved.
roduct and company names mentioned herein may be the trademarks of spective owners.
hts not expressly granted herein are reserved.
ome of the services in this User Guide are not supported by all networks. so applies to the GSM International Emergency Number 112. Please contact twork operator or service provider if you are in doubt whether you can use
cular service or not.
Sony Ericsson P910iUser GuideSecond edition (December 2004)This User Guide is published by Sony Ericsson Mobile Communications AB, without any warranty. Improvements and changes to this User Guide necessitated by typographical errors, inaccuracies of current information, or improvements to programs and/or equipment, may be made by Sony Ericsson Mobile Communications AB at any time and without notice. Such changes will, however, be incorporated into new editions of this User Guide.©Sony Ericsson Mobile Communications AB, 2004. All rights reserved.Publication number: EN/LZT 162 02 R2AThe Bluetooth™ word mark and logos are owned by the Bluetooth SIG, Inc. and any use of such marks by Sony Ericsson is under license.Symbian and all Symbian-based marks and logos are trademarks of Symbian Limited.Memory Stick™, Memory Stick Duo™ and Memory Stick PRO Duo™ are trademarks of Sony, its parent and/or its affiliates.Beatnik is a trademark of Beatnik, Inc.T9� Text Input is a trademark or a registered trademark of Tegic CommunicationsT9� Text Input is licensed under one or more of the following: U.S. Pat. Nos. 5,818,437, 5,953,541, 5,187,480, 5,945,928, and 6,011,554; Canadian Pat. No. 1,331,057, United Kingdom Pat. No. 2238414B, Hong Kong Standard Pat. No. HK0940329; Republic of Singapore Pat. No. 51383; Euro. Pat. No. 0 842 463 (96927260.8) DE/DK, FI, FR, IT, NL, PT, ES, SE, GB; and additional patents are pending worldwide.Quicksheet, Quickpoint, Quickoffice and Quickword are either trademarks or registered trademarks of Cutting Edge Software, Inc.Adobe and Acroba are either trademarks or registered trademarks of Adobe Systems Incorporated in the United States and/or other countries.Microsoft Outlook, Visual Basic, Windows and PowerPoint are either registered trademarks or trademarks of Microsoft Corporation in the Unites States and/or other countriesApple is a trademark of Apple Corporation, Inc.AppForge is a trademark of AppForge, IncLotus Notes and Lotus Organizer are trademarks of International Business Machines Corporation in the United States, other countries, or both.This product contains software copyright © Beatnik, Inc. 1996-2002.
Java antrademlicense
1. Restall copdecomSoftwa2. ExpocontrolregulatThe Cuacknowor impre-expoLibya, countryTreasuDepart3. Restgovernand Co52.227CopyriPortionpvPlayAll righ
Other ptheir re
Any rig
Note SThis alyour nea parti
This is the Internet version of the user�s guide. © Print only for private use. ImportantYour mobile phone has the capability to load, store and forward additional content,
8
e.g. ring tone melodies. The use of such content may be restricted or prohibited by rights of third parties, including but not limited to restriction under applicable copyright laws. You, and not Sony Ericsson, are entirely responsible for additional content that you download to or forward from your mobile phone. Prior to your use of any additional content, please verify that your intended use is properly licensed or is otherwise authorized. Sony Ericsson does not guarantee the accuracy, integrity or quality of any additional content or any other third-party content. Under no circumstances will Sony Ericsson be liable in any way for your improper use of additional content or other third party content.
Introduction 9
This is the Internet version of the user�s guide. © Print only for private use. OVERVIEW
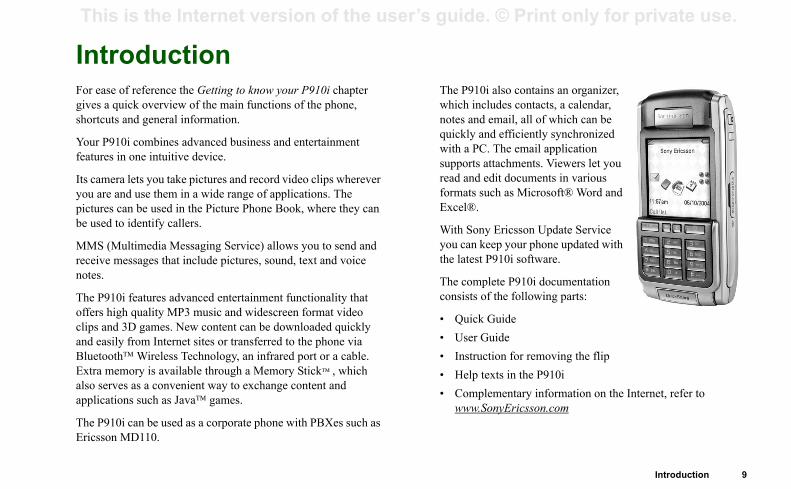
IntroductionFor ease of reference the Getting to know your P910i chapter gives a quick overview of the main functions of the phone, shortcuts and general information.
Your P910i combines advanced business and entertainment features in one intuitive device.
Its camera lets you take pictures and record video clips wherever you are and use them in a wide range of applications. The pictures can be used in the Picture Phone Book, where they can be used to identify callers.
MMS (Multimedia Messaging Service) allows you to send and receive messages that include pictures, sound, text and voice notes.
The P910i features advanced entertainment functionality that offers high quality MP3 music and widescreen format video clips and 3D games. New content can be downloaded quickly and easily from Internet sites or transferred to the phone via Bluetooth™ Wireless Technology, an infrared port or a cable. Extra memory is available through a Memory Stick™ , which also serves as a convenient way to exchange content and applications such as Java™ games.
The P910i can be used as a corporate phone with PBXes such as Ericsson MD110.
The P910i also contains an organizer, which includes contacts, a calendar, notes and email, all of which can be quickly and efficiently synchronized with a PC. The email application supports attachments. Viewers let you read and edit documents in various formats such as Microsoft® Word and Excel®.
With Sony Ericsson Update Service you can keep your phone updated with the latest P910i software.
The complete P910i documentation consists of the following parts:
� Quick Guide� User Guide� Instruction for removing the flip� Help texts in the P910i� Complementary information on the Internet, refer to
www.SonyEricsson.com
This is the Internet version of the user�s guide. © Print only for private use.
Getting to know your P910i
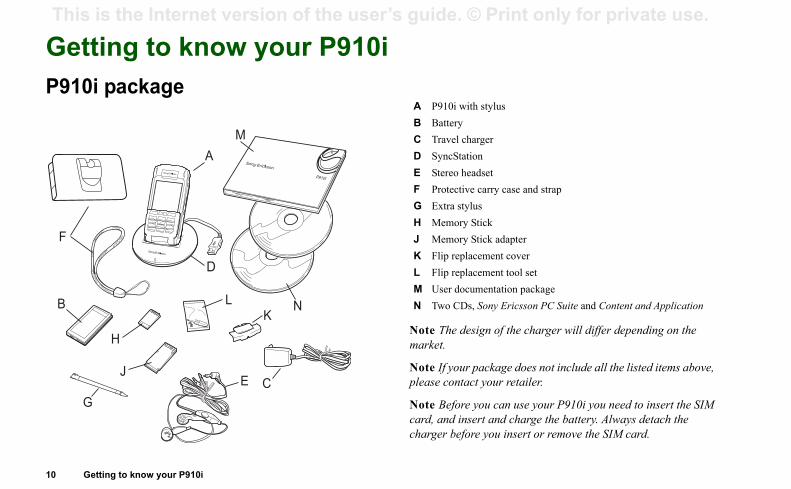
esign of the charger will differ depending on the
r package does not include all the listed items above, ct your retailer.
e you can use your P910i you need to insert the SIM sert and charge the battery. Always detach the ore you insert or remove the SIM card.
ith stylus
hargertioneadsetve carry case and strapylus Stick Stick adapter
lacement coverlacement tool setcumentation packages, Sony Ericsson PC Suite and Content and Application
10 Getting to know your P910i
P910i package
Note The dmarket.
Note If youplease conta
Note Beforcard, and incharger bef
B
C
A
E
F
K
H
J
N
P910i
M
G
D
L
A P910i wB BatteryC Travel cD SyncStaE Stereo hF ProtectiG Extra stH MemoryJ MemoryK Flip repL Flip repM User doN Two CD
Getting to know your P910i 11
This is the Internet version of the user�s guide. © Print only for private use.
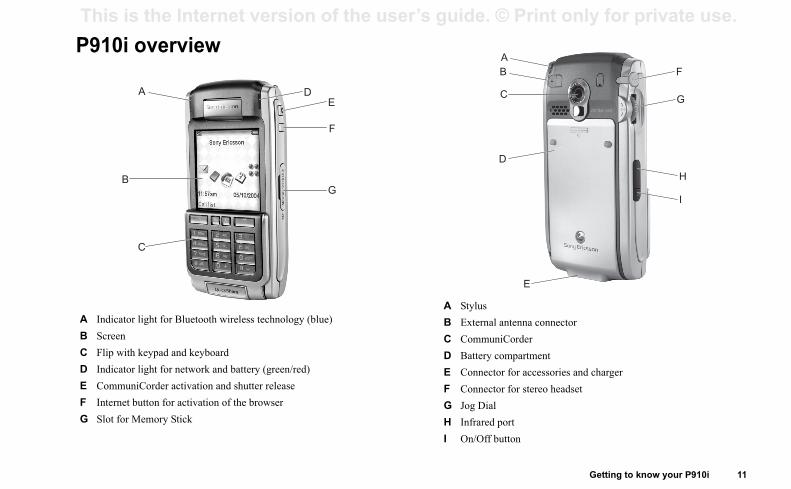
tylusxternal antenna connectorommuniCorder attery compartmentonnector for accessories and chargeronnector for stereo headset
og Dial frared port n/Off button
AB
C
D
E
F
G
H
I
P910i overview
A Indicator light for Bluetooth wireless technology (blue)B ScreenC Flip with keypad and keyboardD Indicator light for network and battery (green/red)E CommuniCorder activation and shutter release F Internet button for activation of the browserG Slot for Memory Stick
A
B
C
D
F
G
E
A SB EC CD BE CF CG JH InI O
This is the Internet version of the user�s guide. © Print only for private use. SIM card Battery
use your P910i for the first time, charge the battery r at least 4 hours. Use the supplied charger. See he battery� on page 13.
and removal
e battery at the flip is closed.
the battery cover by downwards. battery in the battery ent and close the
he batteryat your P910i is f.
portant that you always turn off your P910i before e battery. Failure to do so can result in loss of .
the battery cover by sliding it downwards. fingernail at the lower left-hand edge of the battery lift the lower edge of the battery outwards. the battery.
12 Getting to know your P910i
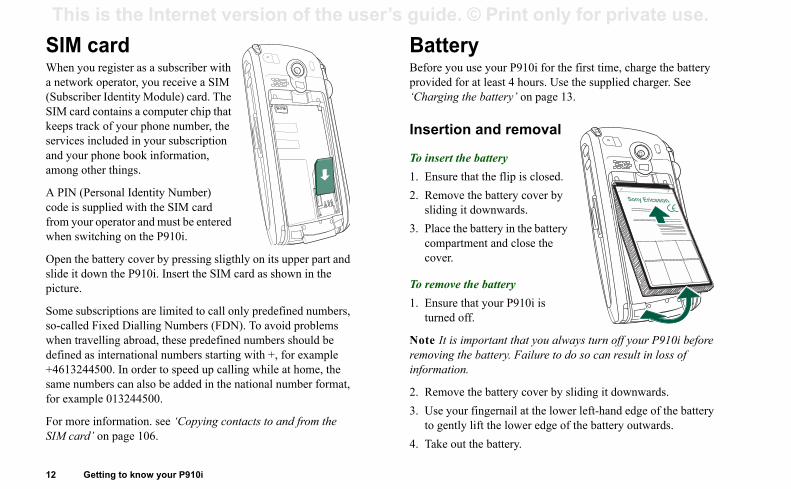
When you register as a subscriber with a network operator, you receive a SIM (Subscriber Identity Module) card. The SIM card contains a computer chip that keeps track of your phone number, the services included in your subscription and your phone book information, among other things.
A PIN (Personal Identity Number) code is supplied with the SIM card from your operator and must be entered when switching on the P910i.
Open the battery cover by pressing sligthly on its upper part and slide it down the P910i. Insert the SIM card as shown in the picture.
Some subscriptions are limited to call only predefined numbers, so-called Fixed Dialling Numbers (FDN). To avoid problems when travelling abroad, these predefined numbers should be defined as international numbers starting with +, for example +4613244500. In order to speed up calling while at home, the same numbers can also be added in the national number format, for example 013244500.
For more information. see �Copying contacts to and from the SIM card� on page 106.
Before you provided fo�Charging t
Insertion
To insert th1. Ensure th2. Remove
sliding it3. Place the
compartmcover.
To remove t1. Ensure th
turned of
Note It is imremoving thinformation
2. Remove3. Use your
to gently4. Take out
Getting to know your P910i 13
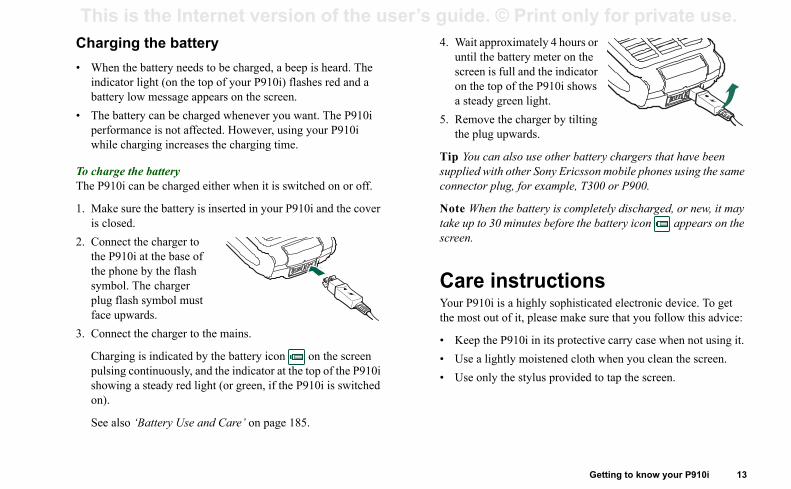
This is the Internet version of the user�s guide. © Print only for private use. ait approximately 4 hours or til the battery meter on the reen is full and the indicator the top of the P910i shows teady green light.move the charger by tilting plug upwards.
ou can also use other battery chargers that have been ied with other Sony Ericsson mobile phones using the same ctor plug, for example, T300 or P900.
When the battery is completely discharged, or new, it may p to 30 minutes before the battery icon appears on the
n.
re instructionsP910i is a highly sophisticated electronic device. To get ost out of it, please make sure that you follow this advice:
ep the P910i in its protective carry case when not using it. e a lightly moistened cloth when you clean the screen.e only the stylus provided to tap the screen.
Charging the battery� When the battery needs to be charged, a beep is heard. The
indicator light (on the top of your P910i) flashes red and a battery low message appears on the screen.
� The battery can be charged whenever you want. The P910i performance is not affected. However, using your P910i while charging increases the charging time.
To charge the batteryThe P910i can be charged either when it is switched on or off.
1. Make sure the battery is inserted in your P910i and the cover is closed.
2. Connect the charger to the P910i at the base of the phone by the flash symbol. The charger plug flash symbol must face upwards.
3. Connect the charger to the mains.
Charging is indicated by the battery icon on the screen pulsing continuously, and the indicator at the top of the P910i showing a steady red light (or green, if the P910i is switched on).
See also �Battery Use and Care� on page 185.
4. Wunscona s
5. Rethe
Tip Ysupplconne
Notetake uscree
CaYour the m
� Ke� Us� Us
This is the Internet version of the user�s guide. © Print only for private use. First time start-up functions. Set your P910i in Flight mode if the use of mobile
phones is not allowed, or if you want to use the other functions ant incoming calls.
ting phone book entriesnt to import existing contact information from ile phone to your P910i. You can do this in several
e phone book entries from the other phone by or Bluetooth wireless technology and save the set to acts. See �Creating and editing contacts� on .
nize the SIM and the internal memory on the other ith Microsoft Outlook or Lotus Notes in a PC. Then ize this information with Contacts.
you synchronize Contacts with your PC, the SIM will not be synchronized. You might get two versions contact. See �Synchronization and backup� on
ok entries stored on your SIM card are accessible Contacts. Select SIM in the folders menu to the
he menu bar to see the list of entries in your SIM ok. These entries can be imported to Contacts. ying contacts to and from the SIM card� on .
14 Getting to know your P910i
Please read �Guidelines for safe and efficient use� on page 184 before you start using your P910i.
Note The first time you start your phone the start-up procedure will proceed slowly.
When you start your P910i for the first time1. Press the On/Off button to turn on your P910i, keeping the flip
closed. The language selection dialog opens. 2. Select one of the languages from the list. Read more about
selecting a language in �Language selection� on page 167.3. Open the flip. Press the On/Off button again. The Setup Wizard
starts and guides you through the essential settings.4. The Power menu opens. Select Phone on.
5. Enter your PIN when the dialog box appears and press . Press to delete a digit.
Turning your P910i on and offBy default the Power menu prompts you to choose normal operation or Flight mode each time you press the On/Off button. These settings can be turned off. See �To use the Power menu� on page 49.
In Flight mode the phone radio transmitter and Bluetooth functions are switched off, but you can still use the other
but do not w
ImporYou may waanother mobways:
� Beam thinfrared
Contpage 104
� Synchrophone wsynchron
Note Wheninformationof the same page 139.
� Phone bothrough right in tphone boSee �Coppage 106

Getting to know your P910i 15
This is the Internet version of the user�s guide. © Print only for private use.
the keypad flip closed, the P910i can be used as a ntional mobile phone using the keypad to dial and the Jog o navigate. For more information please see �Jog Dial� on 19 and �Keypad functions� on page 20.
an open the flip at any time to continue working. Many functions are available when the flip is open.
dby viewtandby view shows shortcuts to the most commonly used ations. Choose which shortcuts you want to use in
by. See �Personalizing your P910i� on page 144.
cting and starting applicationse the Jog Dial to select an application. Press the Jog Dial ds or to start the application.
hen view is selected, it is also possible to start an cation by pressing its specific number.
ing applicationsurrent application automatically closes and the data is when you return to the standby view or switch to another ation. To return to standby, press and hold or press the ial backwards.
hortcut to the Calendar applicationhows all applications available in flip closed mode
Flip closed mode
Touch the Jog Dial to see the shortcut icons
With conveDial tpage
You cmore
StanThe sapplicstand
SeleRotatinwar
Tip Wappli
ClosThe csavedapplicJog D
A Shortcut to the Messages applicationB Shortcut to the Contacts applicationC Shortcut to the Call list application
Sony EricssonSony Ericsson
Call listCall list
11:20am 21/06/200411:20am 21/06/2004
C
D
E
B
A
CommuniCorder
Music player
Messages
Contacts
Calendar
Tasks
Jotter
1
2
3
4
5
6
7
8 Sound recorder
9 Connections
Applications
CommuniCorder
Music player
Messages
Contacts
Calendar
Tasks
Jotter
1
2
3
4
5
6
7
8 Sound recorder
Applications
D SE S
This is the Internet version of the user�s guide. © Print only for private use. Options menuPress or press the Jog Dial forwards to open the standby
CommuniCorderPicturesVideoMusic playerInternetMessagesContactsPhoneCalendarTasks
Quicksheet
Sound recorderPdf+
Time
Storage wizardRemote Sync
Online services
Quickword
DemoGPRS data logChessSolitaire
CommuniCorderPicturesVideoMusic playerInternetMessagesContactsPhoneCalendarTasks
pplications Edit All
C D E
F
File manager
i
Jotter
CalculatorControl panel
JotterControlpanelCalculator
16 Getting to know your P910i
options menu to get access to keylock, battery status, accepted callers and more.
Flip open modeWhen the flip is opened, the large touch-screen is revealed. You use the stylus to tap the screen to navigate and enter data. There is also a handwriting recognition feature, so that you can use the stylus to write on the screen.
You can change the shortcuts A-E. See �Changing your application shortcuts� on page 144.
A Shortcut to the Messages applicationB Shortcut to the Contacts applicationC Shortcut to the Phone applicationD Shortcut to the Calendar applicationE Shortcut to the Internet applicationF Shows all applications available in flip open mode
A
A
B
Getting to know your P910i 17
This is the Internet version of the user�s guide. © Print only for private use. al flip
an use a virtual flip when the real flip is removed. Tap the virtual flip checkbox in Control Panel > Other > Flip s and select the check box to activate it. When the virtual enabled, is shown on the status bar when the virtual open. Select to �close� the virtual flip.
the virtual flip is closed, the virtual flip keypad is shown. t to �open� the virtual flip.
The Jog Dial provides further navigation and selection capability. Closing the flip generally ends an activity and saves the data. Multimedia phone calls and data sessions will, however, continue.
NavigationWhen the flip is open, the application shortcut icons shown in the flip closed mode move to the top row in the flip open screen. You navigate by using the stylus and tapping selected items and by using the Jog Dial, see �Jog Dial� on page 19.
Flip removedThe flip can also be removed, which makes the organizer applications easier to access. When the flip is removed, the P910i works in flip open mode.
Note Turn off the P910i before you remove the flip to avoid to damage your phone.
To remove and attach the flip, refer to the separate instructions.
Note Please note that Sony Ericsson does not accept any liability for lost parts or product defects resulting from any disassembly or modification of the product.
VirtuYou cEnablesettingflip isflip is
WhenSelec

This is the Internet version of the user�s guide. © Print only for private use. Screen areas B Menu bar Usually contains two menus on the left, and a folder
menu on the right. The two left-hand menus contain:� the application menu, whose name is always the
same as the application. It contains the system services used by most applications, such as Find, Send as, and Delete.
� the edit menus contain editing items such as Cut, Copy, Paste, Zoom, Preferences and Help.
With the flip closed, the menu bar often shows the function of the key.
n Applications use this central area of the screen to display the essential information.Many of the applications are based on two standard view layouts: a list view and a detail view.
r An application view displays a button bar that contains useful controls and shortcuts. Not all application views require a button bar.Displays device status information such as: signal strength, battery and device information, settings for sounds and time, on-screen keyboard, as well as temporary indicators such as missed calls and unread messages.Displays the name of the active application.
18 Getting to know your P910i
When the flip is closed, you use the keyboard and the Jog Dial. When the flip is open the screen is touch-sensitive. The screen is divided into a number of areas: see the figure and table below.
Item DescriptionA Application
pickerDisplays six icons for quick and easy access to the most common applications. These can be customized.
Chat EditInternet Edit
A
B
C
D
E
Sony Ericsson
E
F
C
B
John Smith+4613244500 (h)
11:03
End call
C Applicatioarea
D Button ba
E Status bar
F Title bar
Getting to know your P910i 19
This is the Internet version of the user�s guide. © Print only for private use.
Up
Down
wards
wards Forwards
Jog Dial Action FunctionRotate the Jog Dial up
Scrolls items in a list up/to the left, increases volume during a call, moves back a page when playing a multimedia message.
Rotate the Jog Dial down
Scrolls items in a list down/to the right, decreases volume during a call, moves forward a page when playing a multimedia message.
Press the Jog Dial inwards
Selects a highlighted item, dials selected phone numbers. Generally the same action as in flip closed.
Press the Jog Dial backwards
Goes back to the previous screen, dismisses dialogs, and sends a busy signal to the calling party when you receive a call. It will not end a call. Always the same action as in flip closed and in flip open.
Press the Jog Dial forwards
Flip closed: Brings up the Options menu. Press and hold takes you to the Applications list.Flip open: Toggles the Application, Edit and Category menus. Press and hold takes you to the Application launcher.
In
Back
This is the Internet version of the user�s guide. © Print only for private use. Keypad functions
STAR� Enter the character *.� Press and hold to enter a p (pause) character.� Press to switch between different input modes
(Abc, 123 ... ). This is useful when writing SMS or similar texts.
� Press and hold to change between T9 and multitap.
HASH� Enter the character # .� Press and hold to see a list with special
characters.� Terminate the input of PIN and security codes.� Retrieve a phone number from the SIM card
phone book. Enter the number of the memory
position and then press .
NUMERIC KEYS� Enter the digits 0 to 9.� Enter associated characters or perform associated
functions. See �Shortcuts� on page 42.� Press and hold digits 1 to 9 to open Contacts.
Key Function
20 Getting to know your P910i
Key FunctionOK� Enter selected function, indicated on the display
above the key.BACK� Return to previous menu.� Reject an incoming call.� Press and hold to return to Standby.CLEAR� Delete entered characters/digits from the screen
one by one.� Press and hold to delete an entire row of entered
characters/digits.� Delete an entry from Contacts, Calendar, Tasks,
Sound Recorder, and Messages.� Press and hold to disconnect the microphone
(mute function) when a call is in progress.� Mute the ring signal during an incoming call.� Pause/play the melody when the Music player is
open.� Press and hold to put the P910i into silent mode,
when in the standby view.OPTIONS� Open the menu with different options for
different applications.� Press and hold to open Applications.
-
Getting to know your P910i 21
This is the Internet version of the user�s guide. © Print only for private use.
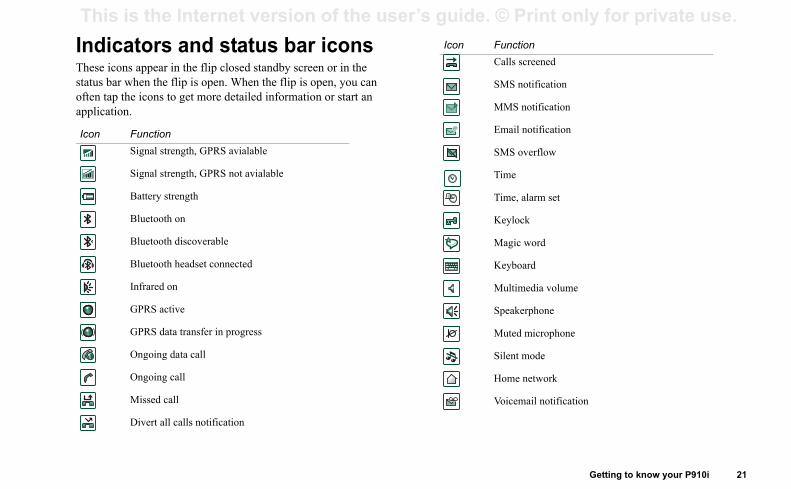
Calls screened
SMS notification
MMS notification
Email notification
SMS overflow
Time
Time, alarm set
Keylock
Magic word
Keyboard
Multimedia volume
Speakerphone
Muted microphone
Silent mode
Home network
Voicemail notification
Function
Indicators and status bar iconsThese icons appear in the flip closed standby screen or in the status bar when the flip is open. When the flip is open, you can often tap the icons to get more detailed information or start an application.Icon FunctionSignal strength, GPRS avialable
Signal strength, GPRS not avialable
Battery strength
Bluetooth on
Bluetooth discoverable
Bluetooth headset connected
Infrared on
GPRS active
GPRS data transfer in progress
Ongoing data call
Ongoing call
Missed call
Divert all calls notification
Icon

This is the Internet version of the user�s guide. © Print only for private use. Memory Stick Note Insert the Memory Stick correctly to avoid damage to your
P910i or the Memory Stick.
y Stick supplied with the P910i may or may not be a contains the lock function. Remember, you can isting files without the lock function.
he Memory Stickge of the Memory Stick using your fingernail or the ease it. You hear a click as it jumps out of the slot.
reful not to drop the Memory Stick when removing it.
g a Memory Stickame a Memory Stick to give it a name that is to you. The name you set will be shown in the een internal and external storage in the folder menu. s� on page 28. There are two ways to rename a ck:
Control Panel > Other > Format disk and tap Rename. mat disk� on page 167.
File manager > File > Format disk and tap Rename.
ill not erase any data.
and moving datation on how to copy and move data to and from the ck, refer to �Folders� on page 28.
22 Getting to know your P910i
Memory Sticks provide a convenient way of increasing the storage space in the phone. You can use both Memory Stick Duo™ and Memory Stick PRO Duo™ in your P910i. Memory Sticks used in P800 or P900 can be used in P910i but you cannot use a P910i Memory Stick PRO Duo™ in P800 or P900. You can save pictures, video clips, music, and voice recordings as well as computer data and applications on a Memory Stick and use it to store or transfer the contents for many different purposes. These include:
� Storing backup copies of important files.� Storing media for personalizing your P910i.� Storing media for use when composing MMS messages.� Storing installation files for new applications.� Transferring data between the P910i and a PC or Mac.� Providing storage for third-party applications.
To insert the Memory Stick 1. Open the cover for the Memory
Stick slot.2. Insert the Memory Stick in the
slot, with the connector side towards the back (see picture).Make sure it is securely inserted. A click should be heard.
The Memorversion thatoverwrite ex
To remove tPress the edstylus to rel
Note Be ca
RenaminYou can renmeaningful divider betwSee �FolderMemory Sti
� Select See �For
� Select
Renaming w
CopyingFor informaMemory Sti
Getting to know your P910i 23
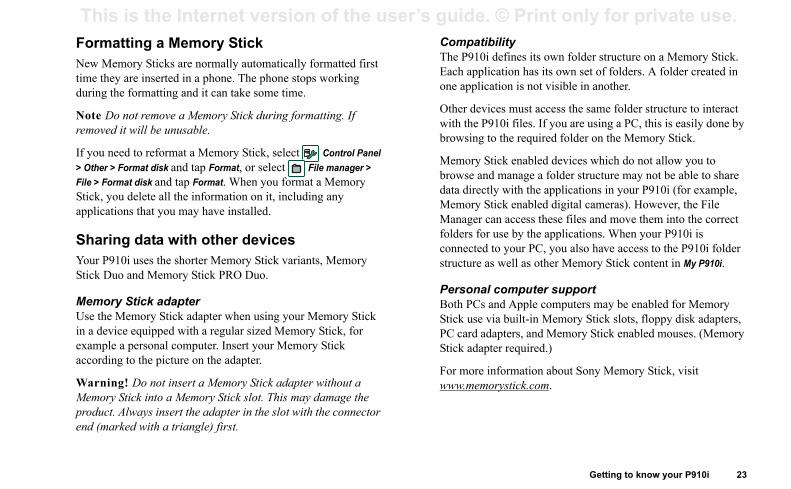
This is the Internet version of the user�s guide. © Print only for private use. patibility910i defines its own folder structure on a Memory Stick. application has its own set of folders. A folder created in pplication is not visible in another.
devices must access the same folder structure to interact he P910i files. If you are using a PC, this is easily done by sing to the required folder on the Memory Stick.
ory Stick enabled devices which do not allow you to se and manage a folder structure may not be able to share irectly with the applications in your P910i (for example,
ory Stick enabled digital cameras). However, the File ger can access these files and move them into the correct rs for use by the applications. When your P910i is cted to your PC, you also have access to the P910i folder ure as well as other Memory Stick content in My P910i.
onal computer supportPCs and Apple computers may be enabled for Memory use via built-in Memory Stick slots, floppy disk adapters, rd adapters, and Memory Stick enabled mouses. (Memory adapter required.)
ore information about Sony Memory Stick, visit memorystick.com.
Formatting a Memory StickNew Memory Sticks are normally automatically formatted first time they are inserted in a phone. The phone stops working during the formatting and it can take some time.
Note Do not remove a Memory Stick during formatting. If removed it will be unusable.
If you need to reformat a Memory Stick, select Control Panel > Other > Format disk and tap Format, or select File manager > File > Format disk and tap Format. When you format a Memory Stick, you delete all the information on it, including any applications that you may have installed.
Sharing data with other devicesYour P910i uses the shorter Memory Stick variants, Memory Stick Duo and Memory Stick PRO Duo.
Memory Stick adapterUse the Memory Stick adapter when using your Memory Stick in a device equipped with a regular sized Memory Stick, for example a personal computer. Insert your Memory Stick according to the picture on the adapter.
Warning! Do not insert a Memory Stick adapter without a Memory Stick into a Memory Stick slot. This may damage the product. Always insert the adapter in the slot with the connector end (marked with a triangle) first.
ComThe PEach one a
Otherwith tbrow
Membrowdata dMemManafoldeconnestruct
PersBoth Stick PC caStick
For mwww.
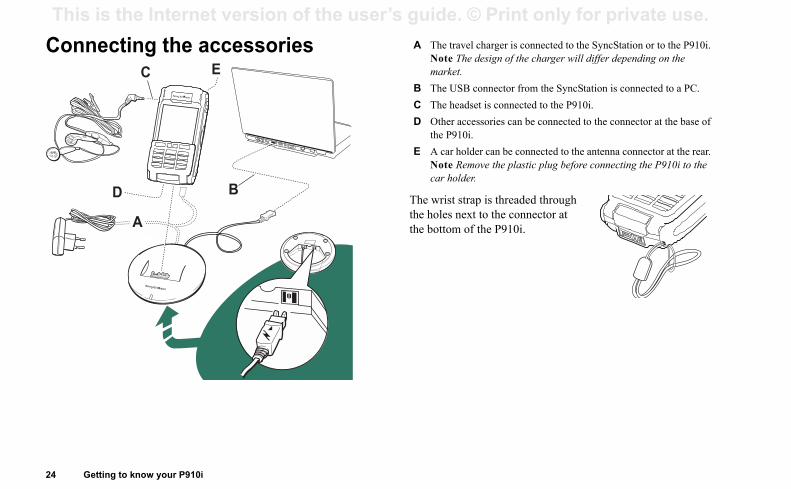
This is the Internet version of the user�s guide. © Print only for private use. Connecting the accessories
rap is threaded through xt to the connector at f the P910i.
A The travel charger is connected to the SyncStation or to the P910i. Note The design of the charger will differ depending on the
connector from the SyncStation is connected to a PC.dset is connected to the P910i.cessories can be connected to the connector at the base of i. lder can be connected to the antenna connector at the rear. move the plastic plug before connecting the P910i to the er.
24 Getting to know your P910i
The wrist stthe holes nethe bottom oA
BD
C E market.B The USBC The heaD Other ac
the P910E A car ho
Note Recar hold
Getting to know your P910i 25
This is the Internet version of the user�s guide. © Print only for private use. an uninstall the demo application and also reinstall it from ontent and Application CD. See �Removing applications your P910i� on page 133 for how to uninstall the demo ation and �Installing applications on your P910i� on
131 for how to reinstall it.
rt the demolect the Applications icon . lect the Demo icon and the demo starts.
p the demoe screen or rotate the Jog Dial to stop the demo.emo also stops when any other dialog is opened.
When the flip is open, an incoming text or MMS message ot stop the demo.
emo application can be launched also when the P910i is d without a SIM card inserted. When the P910i asks you to the SIM card, just press OK. If the flip is closed, open it.
hones the mobile phone application. When the flip is opened, to start it.
ServicesYou need the following services to use the P910i functions:
Please consult your network operator and Internet service provider about the services that are available to you.
Applications - overviewYou can start applications in different ways. Select icons in the standby view (flip closed) and in the application picker (flip open) to start the most important ones. Select to list all applications.
Demo application (Not in all phone versions)The Demo application shows some of the most common functions in your P910i. You can release this application to remove memory.
You cthe Cfrom applicpage
To sta1. Se2. Se
To stoTap thThe d
Notewill n
The Dstarteinsert
PThis iselect
To use... You need...phone services GSM subscriptiontext messaging (SMS) GSM subscriptionmultimedia messaging (MMS) MMS account, GSM data subscriptionemail email account, GSM data subscriptionInternet Internet account, WAP account (only
for WAP 1.x services), GSM data subscription
data communication GSM data subscription
This is the Internet version of the user�s guide. © Print only for private use. Call list Music player
tracks and other audio files. You can download he Internet or transfer them from your PC. The orts the most common sound formats. You can save s on the Memory Stick.
et (flip open only)t browser can access both Web and WAP pages. It
nload images, video clips, audio files, and Java .
gesd, create, send and delete text (SMS), multimedia email messages in this view.
ctsist of your contacts. Select a contact to view ontact data.
darar view displays entries for the current day. Use the get more information about a selected entry or to .
of your tasks. Set due date, alarm, priority, and so our tasks and let your P910i remind you in time.
26 Getting to know your P910i
The call list displays the most recent calls, either outgoing, incoming or missed. In flip closed, press the Jog Dial or to call the selected entry. To view the call list when the flip is open, open Phone and tap the call list icon.
CommuniCorderFor taking video clips and still pictures. In CommuniCorder view, the screen becomes a viewfinder. Press the CommuniCorder button or the Jog Dial to start recording or take a photo. Alternatively tap the red button at the bottom of the screen.
Pictures (flip open only)Manages your pictures. You can take pictures with CommuniCorder, or receive them via email, Bluetooth wireless technology and infrared communication. Download via the Internet browser, or transfer them from your PC. With the image editor you can also edit your pictures.
Video (flip open only)Plays video clips. You can record video clips with CommuniCorder, download them from Internet or transfer them from your PC. You can stream video and audio from the Internet.
Plays musicthese from tplayer suppmusic track
InternThe Internecan also dowapplications
MessaYou can rea(MMS) and
ContaDisplays a lassociated c
CalenThe CalendJog Dial to change days
TasksKeeps trackon, for all y
Getting to know your P910i 27
This is the Internet version of the user�s guide. © Print only for private use. ile manager (flip open only)an handle the content and organization of media, both in 10i and on the Memory Stick.
torage Wizard (flip open only) you to release memory. The icon appears in the status hen the memory is running short. Tap it to start the Storage rd.
emote Sync (flip open only)rms synchronization over the air. Using GPRS, the P910i e continuously connected to the remote synchronization r. Remote Sync works equally well over CSD or HSCSD.
nline servicesservice provider may offer different services, for example, er forecasts, financial information or newsletters. Contact
service provider for more information.
PRS data log (flip open only) of GPRS Internet accounts. Open an account to view your d GPRS traffic, including your costs. The P910i creates a ata log when a connection to an account is created.
onnections (flip closed only)e way you communicate with your PC or other devices. t between infrared, Bluetooth wireless technology and . In the cable menu, you can also select whether the P910i ronizes with a PC or acts as a wireless modem.
Quicksheet, Quickword, Quickpoint, Pdf+ (flip open only)
Use them to view and edit various types of documents. Quickpoint- and Pdf-documents cannot be edited.
JotterDisplays a list of stored entries. In detailed view, the complete entry is displayed.
Control panel (flip open only)Contains all settings that are system-wide and affect more than one application. This is the main view to use when initially setting up your P910i.
Note Settings for Flight mode and P910i locks are located under Control panel > Device
Calculator (flip open only)A standard 10-digit calculator. You can add, subtract, multiply, divide, calculate square roots and percentages.
Sound recorderYou can use your P910i as a sound recorder.
Time (flip open only)Shows time and date. You can set your current location and another. You can also set different alarms.
FYou cthe P9
SHelpsbar wWiza
RPerfocan bserve
OYour weathyour
GA listloggenew d
CSet thSeleccablesynch
i
This is the Internet version of the user�s guide. © Print only for private use. Updating the software a handheld device. If you make it a habit to set up specific
folders to suit your needs and use them to categorize all your , working with it becomes easy.
ation has its own set of folders. A folder created in tion is not visible in another.
plication there is a default Unfiled folder. Since there f seeing on your P910i, whether a file in an Unfiled ated on your P910i or on a Memory Stick, we that you move files to your own folders as soon as
created in an application is always assigned to a r, by default the folder as displayed in the list view.
the folder menu is used to organize your entries. In the folder menu allows you to change the folder of tem.
folder menuations that use folders you can see the folder menu
in the menu bar.
mory Stick is available in the P910i, the folders on it n the folder menu under the divider. If you rename �Renaming a Memory Stick� on page 22) the
show the new name.
there is a super-folder called All, which, when plays items from all folders (in Contacts, the All
28 Getting to know your P910i
With Sony Ericsson Update Service you can keep your phone updated with the latest P910i software. See �Sony Ericsson Update Service� on page 133 how to download the software from the Internet.
General functions
Application launcher viewsIn flip open, the P910i can present the applications in two ways:
� List view (small icons appear in one column)� Icon view (large icons appear in two columns)
FoldersFolders are used to organize information, for example contacts, jotter entries, or task lists. You might want to organize your contacts in business and personal folders.
Folders are also used when managing files of different types on your P910i and Memory Stick. You might want to move or copy sound files into a sound track folder to store on a Memory Stick.
As you may notice, if you connect your P910i to a PC and view the contents of your P910i in My P910i, it is easier to get an overview of a folder and file structure on a large screen than on
information
Each applicone applica
For each apis no way ofolder is locrecommendpossible.
Every item single folde
In list view,detail view,the current i
Using the In the applicto the right
When a Meare shown ithe disk (seedivider will
In list view,selected, dis
Getting to know your P910i 29
This is the Internet version of the user�s guide. © Print only for private use. py a file to another folderen the file in detail view. In the folder menu, select the
stination folder. Select Copy to in the main application nu; for example Music or Pictures.lect the destination Folder from the list and tap Copy.
o delete multiple files in an application you can use ge manager. See �Deleting or copying general files� on 169.
aging your files the File Manager, you can handle the content and ization of media, both in the P910i and on the Memory See �File manager� on page 126.
an also use the Storage manager in the Control Panel. See ge manager� on page 169.
mingan change the size of the screen fonts. Choose between
l, Medium or Large. From the menu bar, tap Edit > Zoom.
matic saving you work in an application and leave it, your work is atically saved.
folder does not display the entries in the SIM phone book). All is the default value in list views and when an application is first launched.
Use the Edit Folders menu item to:
� Rename a folder, or move a folder to or from the Memory Stick. Select the folder you want to move or rename, tap Edit, type the name of the new folder, and choose a Location from the list. Tap Done.
� To add a new folder. Tap Add, enter a folder Name and choose a Location from the list. Tap Done.
� To delete a folder. Select the folder you want to delete and tap Delete. A folder can only be deleted if it is empty. Not all folders can be deleted.
To copy all the files in a folder to another folder1. From within an application such as Pictures or Video, select a
folder from the folder menu. From the application menu, first select Select all and then Copy.
2. Select the destination Folder from the list and select Copy.
To move a file from one folder to anotherOpen the file in detail view. In the folder menu, select the destination folder.
To co1. Op
deme
2. Se
Tip TStorapage
ManUsingorganStick.
You c�Stora
ZooYou cSmal
AutoWhenautom
This is the Internet version of the user�s guide. © Print only for private use. Find To send an item using Send as
Send as menu in the specific application.ng on the application and item, you can choose the following transfer methods:
age (using SMS): P910i will create a new text . Add the mobile number of the recipient and tap
P910i will create a new message with the item as an attachment. Complete with address and and tap Send.a message (using MMS): the P910i will create a new with the item included as an attachment. Complete age and tap Send.align the infrared port of the P910i with the infrared e other device. Select Send. Messages on screen will hen the information has been transferred.
wireless technology: the P910i will search the local Bluetooth devices that are set to be visible. These resented in a list. Select a device to which the item is t and select Send. Progress messages will tell you information has been transferred.
er devices must have Bluetooth wireless technology u can select Refresh to perform a new search if, for destination device was not enabled at first.
30 Getting to know your P910i
The Find function searches through all the items stored in an application. The standard Find dialog contains a single text edit box with two buttons, Find and Cancel. Selecting Find starts the search, while Cancel closes the Find dialog.
In some applications, for example Messages, Find may be more advanced:
� The size of each message is so large that you may want to restrict the search to the current message only.
� Folders are potentially more significant, so you may want to restrict the search to the current folder only.
Sorting your filesYou can sort the files you have stored in your P910i. By sorting your files, you choose in which order you want the files to be displayed on the screen. You can choose between sorting by, for example type, size, date, or name.
Note Sort is not included in all applications.
Sending and receiving itemsFrom many applications it is possible to exchange items like appointments, contacts and images.
1. Enter the2. Dependi
between
� Text messmessageSend.
� Email: theincludedsubject,
� Multimedimessagethe mess
� Infrared: port of thtell you w
� Bluetootharea for will be pto be senwhen the
Tip The othenabled. Yoexample, a
Getting to know your P910i 31
This is the Internet version of the user�s guide. © Print only for private use. emory Stick (expansion memory). M card, for phone numbers and associated names. See opying contacts to and from the SIM card� on page 106.her memory-expansion alternatives available on the rket.
ing help and setting zoom the menu bar tap Edit > Help to get to the P910i help system the zoom level. The help system uses two views:
e Topics view shows all available topics, for example both ecific application topics and general topics. e Detail view presents the title and text of a single topic.
opics view allows you to select a topic, which opens the view and displays the selected topic.
ny dialog boxes you can select the Help icon in the right corner.
ingsttings that are application-specific, tap Edit > Preferences in plication menu bar. For generic settings, use Control panel.
To handle items received in email and multimedia messages1. Tap the notification icon , or
open Messages and select MMS or an email inbox.2. Open the message.3. Select the attachments tab.4. Select the required attachment. The attachment or a summary
of the attachment will be displayed.5. Select Save to save the item. You may optionally display the
received item within the related application.
See �Messages� on page 87 for more information.
To receive beamed items1. Ensure that infrared or Bluetooth wireless technology is
activated and, for infrared, that the infrared ports are aligned.2. The received item will be notified by a dialog box listing the
item(s) received. When using Bluetooth you will also be asked to accept or reject the connection.
3. Select View to view item. Select Done to save the item in the Beamed inbox in Messages. Select Delete to delete the item.
Methods for storing dataYour P910i can store data in different ways:
� Internal memory. Used for storing pictures, messages, music, applications, and so on.
� M� SI
�C� Ot
ma
GettFromor set
� Thsp
� Th
The Tdetail
In maupper
SettFor sethe ap
This is the Internet version of the user�s guide. © Print only for private use. Entering text with the flip � Press to switch between the input types in text edit
mode.
symbolsre editing text you can press and, depending cation, choose Add symbol or Text options > Add symbol item from the symbol selector table. Use the Jog t the row and press . Then scroll within the t a symbol and press .
input T9™ Text Input when writing, for example text d email. The T9 Text Input method uses a built-in
o recognise the most commonly used word for each key presses. This way, you press each key only
hen the letter you want is not the first letter on the nd hold to change input method.
ng example shows how to start writing a text.
ters using T9 Text Inputr example, Messages > Create SMS.ple, if you want to write the word �Jane�, press
.ext entry, a suggestion list with word candidates are d. The most frequently used word is highlighted.rd is the word you want:
32 Getting to know your P910i
closedWith the flip closed, you use the keypad keys to enter text, for example, when writing a text message. When you press a key, a pre-edit box with the different characters on that key is shown in the title area:
If the same key is pressed again, the next character in the pre-edit box will be selected.
The key deletes the character to the left of the cursor. If continuously pressed, the key deletes several characters and then whole words.
Types of text inputThere are four text input types:
� Abc � initial uppercase letter, the rest lowercase. Default for each new text edit field.
� 123 � numeric entry only� ABC � uppercase entry� abc � lowercase entry
When you are editing text you can:
� Press and select Text options > Input type to select text input type.
InsertingWhen you aon the applito select an Dial to selecrow to selec
T9® textYou can usemessages andictionary tsequence ofonce, even wkey. Press a
The followi
To enter let1. Select, fo2. For exam
During tpresente
3. If the wo
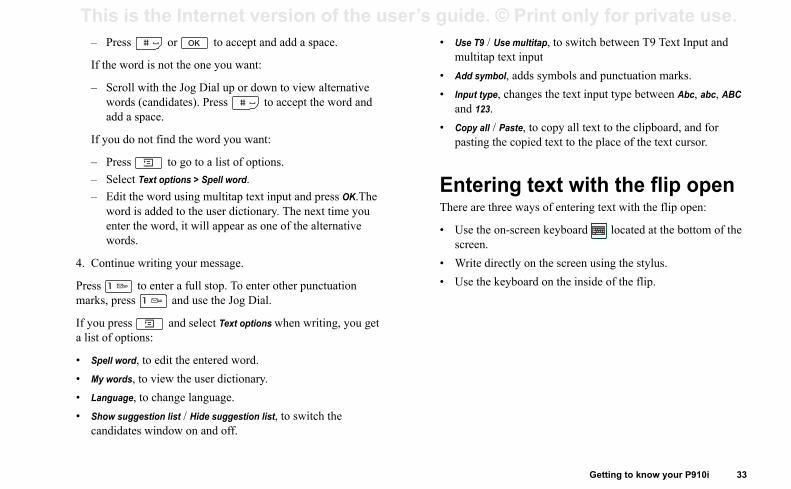
Getting to know your P910i 33
This is the Internet version of the user�s guide. © Print only for private use. e T9 / Use multitap, to switch between T9 Text Input and ltitap text input
d symbol, adds symbols and punctuation marks.ut type, changes the text input type between Abc, abc, ABC d 123.py all / Paste, to copy all text to the clipboard, and for sting the copied text to the place of the text cursor.
tering text with the flip open are three ways of entering text with the flip open:
e the on-screen keyboard located at the bottom of the reen.rite directly on the screen using the stylus.e the keyboard on the inside of the flip.
� Press or to accept and add a space.
If the word is not the one you want:
� Scroll with the Jog Dial up or down to view alternative words (candidates). Press to accept the word and add a space.
If you do not find the word you want:
� Press to go to a list of options.� Select Text options > Spell word.� Edit the word using multitap text input and press OK.The
word is added to the user dictionary. The next time you enter the word, it will appear as one of the alternative words.
4. Continue writing your message.
Press to enter a full stop. To enter other punctuation marks, press and use the Jog Dial.
If you press and select Text options when writing, you get a list of options:
� Spell word, to edit the entered word.� My words, to view the user dictionary.� Language, to change language.� Show suggestion list / Hide suggestion list, to switch the
candidates window on and off.
� Usmu
� Ad
� Inpan
� Copa
EnThere
� Ussc
� W� Us
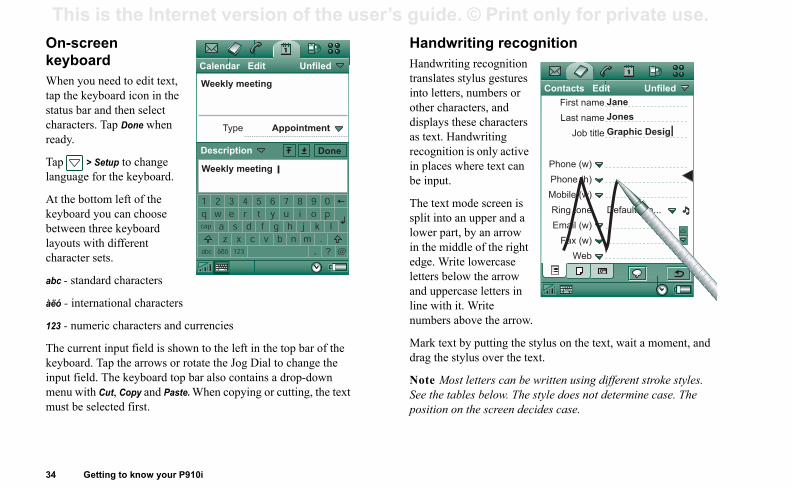
This is the Internet version of the user�s guide. © Print only for private use. On-screen Handwriting recognition
recognition ylus gestures numbers or ters, and se characters dwriting is only active ere text can
de screen is upper and a by an arrow e of the right lowercase
the arrow se letters in
Write ove the arrow.
y putting the stylus on the text, wait a moment, and lus over the text.
letters can be written using different stroke styles. es below. The style does not determine case. The the screen decides case.
Chat EditContacts Edit Unfiled
First name
Last name
Job title
Phone (w)
Phone (h)
Mobile (w)
Ring tone Default Rin...
Email (w)
Fax (w)
Web
Jane
Jones
Graphic Desig
34 Getting to know your P910i
keyboardWhen you need to edit text, tap the keyboard icon in the status bar and then select characters. Tap Done when ready.
Tap > Setup to change language for the keyboard.
At the bottom left of the keyboard you can choose between three keyboard layouts with different character sets.
abc - standard characters
àëó - international characters
123 - numeric characters and currencies
The current input field is shown to the left in the top bar of the keyboard. Tap the arrows or rotate the Jog Dial to change the input field. The keyboard top bar also contains a drop-down menu with Cut, Copy and Paste. When copying or cutting, the text must be selected first.
Handwritingtranslates stinto letters, other characdisplays theas text. Hanrecognition in places whbe input.
The text mosplit into anlower part, in the middledge. Writeletters belowand uppercaline with it.numbers ab
Mark text bdrag the sty
Note Most See the tablposition on
Chat EditCalendar Edit Unfiled
Weekly meeting
Type Appointment
The agenda for...
1 2 3 4 5 6 7 8 9 0q w e r t y u i o p
acap
abc 123aeo
s d f g h j k lz x c v b n m .
, ? @
DoneDescription
Weekly meeting
Getting to know your P910i 35
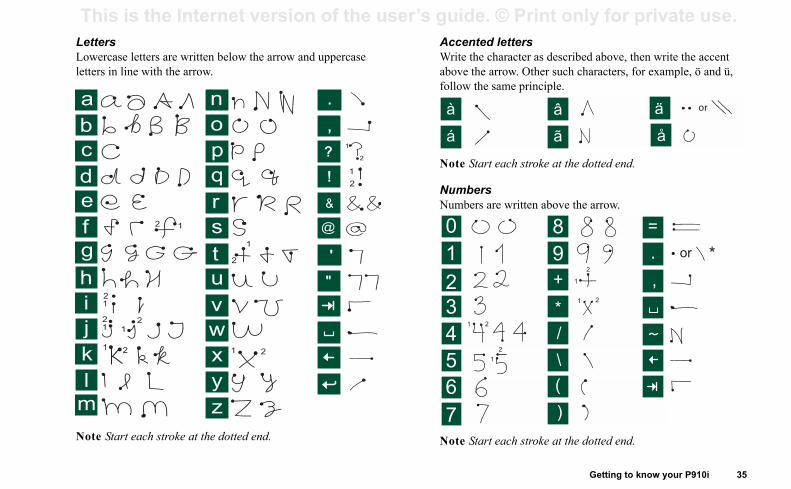
This is the Internet version of the user�s guide. © Print only for private use. nted letters the character as described above, then write the accent the arrow. Other such characters, for example, ö and ü, the same principle.
Start each stroke at the dotted end.
bersers are written above the arrow.
Start each stroke at the dotted end.
8
9
,
. *or
+
*
/
\
(
)
=
LettersLowercase letters are written below the arrow and uppercase letters in line with the arrow.
Note Start each stroke at the dotted end.
AcceWriteabovefollow
Note
NumNumb
Note
a
b
c
d
e
f
g
h
k
l
m
n
o
p
q
r
s
t
u
v
y
z
w
x 1 2
i
j1
1
1
1
1
1
2
1
2
2
2
2 2
2
,
.
?
!
&
@
"
'
0
1
2
3
4
5
6
7
This is the Internet version of the user�s guide. © Print only for private use. Extended charactersTo write symbols and characters that are not shown in these
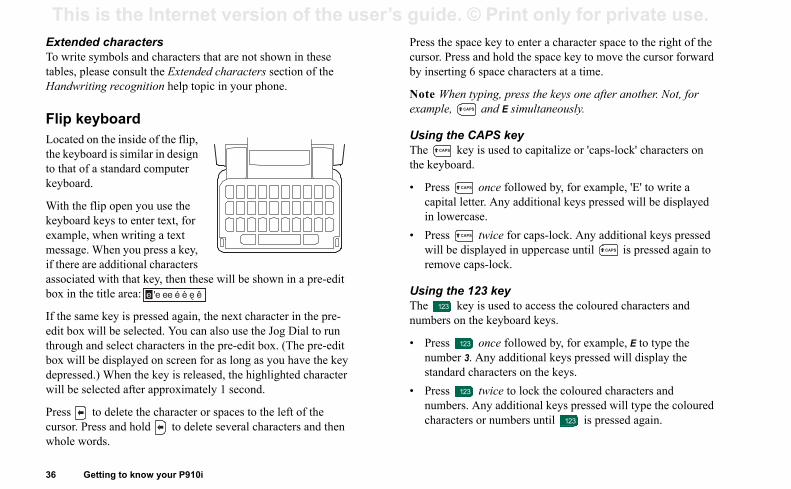
Press the space key to enter a character space to the right of the cursor. Press and hold the space key to move the cursor forward
6 space characters at a time.
typing, press the keys one after another. Not, for and E simultaneously.
CAPS keyy is used to capitalize or 'caps-lock' characters on d.
once followed by, for example, 'E' to write a tter. Any additional keys pressed will be displayed ase. twice for caps-lock. Any additional keys pressed
isplayed in uppercase until is pressed again to aps-lock.
123 keyy is used to access the coloured characters and the keyboard keys.
once followed by, for example, E to type the . Any additional keys pressed will display the
characters on the keys. twice to lock the coloured characters and
. Any additional keys pressed will type the coloured rs or numbers until is pressed again.
APS
PS
PS
CAPS
36 Getting to know your P910i
tables, please consult the Extended characters section of the Handwriting recognition help topic in your phone.
Flip keyboardLocated on the inside of the flip, the keyboard is similar in design to that of a standard computer keyboard.
With the flip open you use the keyboard keys to enter text, for example, when writing a text message. When you press a key, if there are additional characters associated with that key, then these will be shown in a pre-edit box in the title area:
If the same key is pressed again, the next character in the pre-edit box will be selected. You can also use the Jog Dial to run through and select characters in the pre-edit box. (The pre-edit box will be displayed on screen for as long as you have the key depressed.) When the key is released, the highlighted character will be selected after approximately 1 second.
Press to delete the character or spaces to the left of the cursor. Press and hold to delete several characters and then whole words.
by inserting
Note Whenexample,
Using the The kethe keyboar
� Press capital lein lowerc
� Press will be dremove c
Using the The kenumbers on
� Press number 3standard
� Press numberscharacte
e 'e ee é è e ê
C
CAPS
CA
CA
Getting to know your P910i 37
This is the Internet version of the user�s guide. © Print only for private use. card lockIM card lock protects your SIM card, not the P910i, st unauthorized use. It is unlocked by the PIN and PUK which you receive from your service provider.
an choose to have to unlock the SIM card every time you he P910i on, or to have the SIM card unlocked.
PIN (Personal Identification Number) code consists of four ht digits. If you activate the SIM card lock, the P910i will r the PIN code every time you turn it on. You unlock the ard by entering the PIN code.
tivate the SIM card locklect Control panel > Device > Locks.
lect a lock option.lect Done.
ror message informs you if a wrong PIN code has been d. Usually, the SIM card will be blocked after three wrong pts (the number of attempts is SIM-card dependent), and eed to enter the PUK code to unblock it.
UK code consists of eight digits. When you have entered ght PUK code you must enter a new PIN code. You have tempts to enter the PUK code. If all ten attempts fail, the
Inserting symbolsThere are a number of ways to insert symbols with the P910i keyboard.
� Press the or keys to show additional symbols in the pre-edit box in the title area.
� Use the to access the coloured symbols on the keys.� Holding down the key for a short time will generate the
symbol selector table. To select a symbol use the Jog Dial by first scrolling through the rows, and select the row by pressing the Jog Dial inwards. Then use the Jog Dial to scroll within the row, and selecting the symbol by pressing the Jog Dial inwards.
See �Flip settings� on page 167 how to specify which keyboard your P910i has.
P910i locksUse the SIM card lock and the device lock to protect your SIM card and your P910i from unauthorized use. Use the keylock to prevent the keys from being accidentally pressed.
Note You can usually make an emergency call without unlocking the P910i.
SIMThe Sagaincodes
You cturn t
Your to eigask foSIM c
To ac1. Se2. Se3. Se
An erentereattemyou n
The Pthe riten at
This is the Internet version of the user�s guide. © Print only for private use. SIM card will be disabled and you need to contact your network operator.
The default device lock code is 0000.
the device lockControl panel > Device > Locks.
lock option.ne.
ose to have the P910i locked every time you turn it hen the SIM card has been changed, or unlocked.
ssible to use the device lock in combination with the r. Just mark the checkbox Control panel > Device > een > Screen saver device lock to have the device lock hen the screen saver goes on.
using the screen saving device lock, make sure you device lock to activate at Power on. Otherwise your e unprotected after Power on, until the screen saver
ill not be able to browse the contents of your P910i r synchronize items using the SyncStation, when the
e lock is enabled and active.
38 Getting to know your P910i
You cannot change the PUK code.
PIN2Some functions on the SIM card can be protected by a secondary code feature. Some SIM cards do not have a PIN2 lock.
The PIN2 lock cannot be deactivated. The code can be changed by a user who knows the old code.
Device lockThe device lock protects your P910i and the data in it against unauthorized use.
If the device lock is set to When SIM changed, it means that the P910i is not normally locked. However, if the SIM has been changed, the P910i asks you to enter the code to unlock the P910i before you can use it. This means that if someone steals your P910i and puts another SIM card into it, they will not be able to use it.
Note Your operator can block your SIM, if you report that your phone has been stolen.
The device lock is not on when you buy your P910i. You can change the device lock code to any four to eight digit personal code.
To activate 1. Select 2. Select a 3. Select Do
You can choon, locked w
It is also poscreen saveDisplay > Scractivated w
Note Whenhave set theP910i will bgoes on.
Note You wfrom a PC, oP910i devic
Getting to know your P910i 39
This is the Internet version of the user�s guide. © Print only for private use. he flip removed. When this setting is active, the screen utomatically become locked after a period of inactivity.
tivate or change the screen locklect > Settings > Screen > Automatic input lock.lect a lock time or Off.
ck the screent > Lock screen.
lock the screenthe Jog Dial Forwards > Inwards or Backwards > Inwards.
Change code
To change a code1. Select Control panel > Device > Locks.
2. Select Change Codes.3. Select the code you want to change. 4. First enter the old code, then the new one. (To ensure that
you have typed the new code correctly you have to enter it twice.)
Automatic keylockThis option locks the keys on your P910i when the flip is closed. This is to protect the device if the keys are accidentally pressed. When this setting is active, the keypad will become automatically locked after a period of inactivity.
To activate or change the keylockSelect Control panel > Device > Locks.
To unlock the keysSelect > .
Screen lockThis option locks the screen of your P910i. This is to protect the device if the screen is accidentally pressed in flip open mode or
with twill a
To ac1. Se2. Se
To loSelec
To unPush
This is the Internet version of the user�s guide. © Print only for private use.
Phoneode which enables the P910i to be used as a PDA in s where radio transmitters may not be used. The d Bluetooth transmitters (and receivers) are switched
closed you can access most of the functions using and the keypad. More advanced tasks such as onference calls or using other applications during a handled with the flip open.
s may be hidden or not available depending on your .
andling with the flip
closed, you can use either the keypad or the Jog le calls.
g calls
allone number on the keypad and press the Jog Dial or .
40 Phone
The Phone application is easy for the beginner, yet powerful for the advanced user. It can be used together with the other functions of the P910i, including applications from developers outside Sony Ericsson.
The phone includes useful features such as:
� Personalized ring types.� Picture phone book.� Quick access back to the entries in Contacts, making it easy
to try an alternative number or send a message if the contact is unavailable or busy.
� Voice-dialling � make a call by saying the contact�s name. � Voice answer � an incoming call may be answered or sent a
busy signal, using the words recorded for �answer� and �busy�.
� Incoming call acceptance limit � specify those who should be able to reach you.
� Access to other applications while talking on the phone.� Office handsfree (speakerphone) which starts when you open
the flip, making it easy to access applications such as Calendar and Jotter while talking.
� Flight msituationGSM anoff.
With the flipthe Jog Dialhandling a ccall are best
Some optionsubscription
Call hclosedWith the flipDial to hand
Outgoin
To make a cEnter the phpress
Phone 41
This is the Internet version of the user�s guide. © Print only for private use. ke a call using Contacts
lect on the standby screen.ess the Jog Dial or .roll the list by rotating the Jog Dial and select a contact.roll by rotating the Jog Dial and select the desired number.ess the Jog Dial or .
ore information, see �Contacts� on page 101.
ake a call using voice controlere are various ways to make a call using voice control. Press and hold the Jog Dial.Press and hold .Say the �Magic word�.Press the call button on the headset.
hen the Magic word function is active, the icon pears in the status bar.
hen you hear a short tone, say the voice command linked to number you want to call. The P910i will connect you th the matching contact.
an use voice control when the P910i is handheld, used handsfree set (car or portable), or with a Bluetooth
� Press to delete a typed character. Press and hold to delete all characters.
� Press and hold to insert the international call prefix +.� Press and select Hide my number when you have
entered the phone number, if you do not want to show your phone number to the party you are calling. Select Show my number, if you want to show it.
If the called party is busy, a dialog box appears from which you can set your P910i to automatically retry to connect.
To make a call using Speed dialSpeed dial is a fast way to call one of your special numbers. See �Set up speed dial numbers� on page 48.
1. Press the key corresponding to the number of the speed dial contact.The speed dial name is shown above the key. If a picture is attached to the speed dial, the picture is also shown.
2. Press .
To make a call using the Call list1. Select on the standby screen.2. Press the Jog Dial or .3. Scroll the list by rotating the Jog Dial and select an entry.4. Press the Jog Dial or .
To ma1. Se2. Pr3. Sc4. Sc5. Pr
For m
To m1. Th
����
Wap
2. Wthewi
You cwith a
This is the Internet version of the user�s guide. © Print only for private use. wireless technology headset. Magic word cannot be used together with a Bluetooth wireless technology headset.
� Press and hold any of the keys from to to open your Contact list. Press again to reach the next letter.
al key presses will add letters to your search. digit followed by to reach a phone number
M phone book. for the last dialled number.
g callseceive a call, the name of the caller will be displayed party is in Contacts and the caller�s number is m the network. If there is an associated picture it shown in a small or large version. See �Incoming on page 53.
ect whether an ongoing program will remain active et an incoming call or if the Phone program shall For settings see �Incoming call behaviour� on page
n incoming callss to answer the call or answer by voice �Voice control� on page 53.
ss to reject a call and press to silence the
g call will bring up the following options:
� Answer the call.
42 Phone
Read more about this in �Voice control� on page 53.
To make an emergency callEnter the emergency number on the keypad and press or the Jog Dial.
Usually, but not always, no SIM card or PIN code is required for emergency calls and you will be able to make the call as long as you have coverage from a GSM network. Check with your local provider to find out if emergency calls are possible without a SIM card, and which emergency call numbers are supported.
To end a callPress , or press the Jog Dial.
Shortcuts
� Press and hold to dial your voicemail. With the flip open, select Phone > Call voice mail.See �Voicemail� on page 56 on how to set up voicemail.
� Press any of the keys from to followed by to call a speed dial number.
� Press twice to call the last dialled number.
Addition� Press any
in the SI� Press
IncominWhen you rif the callingreceived frowill also becall picture�
You can selwhen you ginterrupt it. 57.
To handle aYou can precontrol, see
You can prering signal.
An incomin
� 1 Answer
Phone 43
This is the Internet version of the user�s guide. © Print only for private use. nsfer sound � Transfer the call to a Bluetooth wireless hnology headset.
rn On/Off tones � You can send DTMF tones with the ypad, �Controlling tone-based services� on page 49.crophone mute On/Off � Turn the microphone on or off.py number � Copy a phone number to the clipboard.ste number � Paste a copied number to be used for the next ll.eakerphone On/Off � You can use the P910i as a eakerphone. See �Speakerphone� on page 48.plications � Open another application, and, for example, ste a copied phone number into a Jotter entry.
and hold to mute the microphone during a call. ly press again to reactivate the microphone.
ll handling with the flip opense the stylus and the virtual keypad to handle calls with the pen.
going calls
ke a calllect in the application picker. The Speed dial view is ened.
� 2 Send Busy � Reject the call. The calling party will hear a busy tone and the call will be logged as a rejected call.
� 3 Mute � Silence the ring signal. The calling party will not notice that you have silenced the call. The call will be logged as a missed call.
If a large picture of the caller fills the screen, you can press or use the Jog Dial to access the menu with the options
above.
Options during or directly after a callUse the Jog Dial to change the phone volume during a call.
Press to get a list of call handling options. The list will vary depending on the situation. Options that concern two or more active calls are described in �Handling two or more calls� on page 45.
� End call � End the active call.� New call/Hold call/Retrieve call � Put the active call on hold /
retrieve the held call. This is useful if you want to make a new call during a call.
� Add to contacts � Create a new Contacts entry if the phone number of the active call is known, and not already stored in Contacts.
� Show contact � Display the entry in Contacts, if any, that corresponds to the phone number of the active call.
� Tratec
� Tuke
� Mi
� Co
� Paca
� Spsp
� Appa
PressShort
CaYou uflip o
Out
To ma1. Se
op
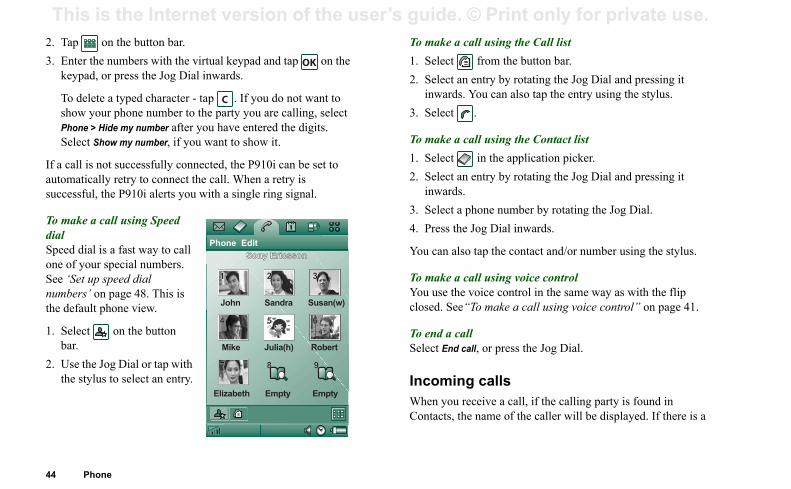
This is the Internet version of the user�s guide. © Print only for private use. 2. Tap on the button bar. To make a call using the Call list
from the button bar. entry by rotating the Jog Dial and pressing it You can also tap the entry using the stylus.
.
all using the Contact list in the application picker.
entry by rotating the Jog Dial and pressing it
phone number by rotating the Jog Dial. Jog Dial inwards.
o tap the contact and/or number using the stylus.
all using voice control voice control in the same way as with the flip To make a call using voice control� on page 41.
llall, or press the Jog Dial.
g callseceive a call, if the calling party is found in e name of the caller will be displayed. If there is a
44 Phone
3. Enter the numbers with the virtual keypad and tap on the keypad, or press the Jog Dial inwards.
To delete a typed character - tap . If you do not want to show your phone number to the party you are calling, select Phone > Hide my number after you have entered the digits. Select Show my number, if you want to show it.
If a call is not successfully connected, the P910i can be set to automatically retry to connect the call. When a retry is successful, the P910i alerts you with a single ring signal.
To make a call using Speed dialSpeed dial is a fast way to call one of your special numbers. See �Set up speed dial numbers� on page 48. This is the default phone view.
1. Select on the button bar.
2. Use the Jog Dial or tap with the stylus to select an entry.
1. Select 2. Select an
inwards.3. Select
To make a c1. Select 2. Select an
inwards.3. Select a 4. Press the
You can als
To make a cYou use theclosed. See�
To end a caSelect End c
IncominWhen you rContacts, th
Chat EditPhone Edit
Sony EricssonSony Ericsson
8 9
John Sandra Susan(w)
Mike Julia(h) Robert
Elizabeth Empty Empty
1 2 3
4 5 6
7
Phone 45
This is the Internet version of the user�s guide. © Print only for private use. d to contacts � Create a new Contacts entry. This option pears automatically after a call if the phone number of the ll is known, and not already stored in Contacts. See �Add to ntacts� on page 54.ow contact � Display the entry in Contacts, if any, that rresponds to the phone number of the active call.py number � Copy a phone number to the clipboard.ste number � Paste a copied number into a field
to make the following adjustments:
ll volume � Adjust the volume in the phone. This is easier to with the Jog Dial.rating alert � Set when the vibrating alert should be active.
ent mode � All sounds, for example ring signals, will be ned off.eakerphone � Activate the P910i as a speakerphone.te microphone � Turn the microphone on or off.
ndling two or more callsg a call, you can make a second call, or answer an ing call. The ongoing call is put on hold and the new call es active. The held call is shown with a grey background.
eone calls when a call is on hold, you will be asked if you to release the held call and answer the incoming call.
picture, it will also be shown in a small or large version. See �Incoming call picture� on page 53.
To handle an incoming callUse the screen buttons to select what to do.
� Answer � Answer the call.� Send Busy � Reject the call. The calling party will hear a busy
tone and the call will be logged as a rejected call.� Mute � Silence the ring signal. The calling party will not
notice that you have silenced the call. The call will be logged as a missed call.
You can also answer by voice control, see �Voice control� on page 53.
Options during or after a callThere are several options available, depending on the situation. You can access some of them using the screen buttons, by tapping the field with the calling party details, or on the menus.
Options that concern two or more active calls are described in �Handling two or more calls� on page 45.
� End call � End the active call.� New call/Hold call/Retrieve call � Put the active call on hold/
retrieve the held call.
� Adapcaco
� Shco
� Co
� Pa
Tap
� Cado
� Vib
� Siltur
� Sp
� Mu
HaDurinincombecom
If somwant
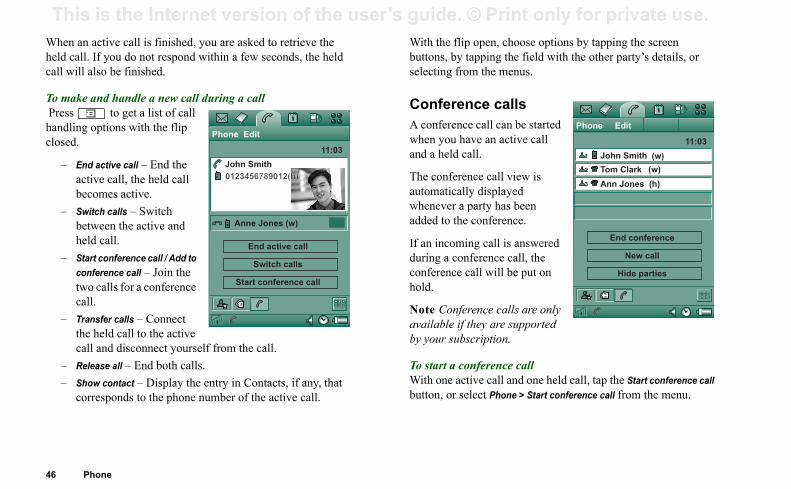
This is the Internet version of the user�s guide. © Print only for private use. When an active call is finished, you are asked to retrieve the held call. If you do not respond within a few seconds, the held
With the flip open, choose options by tapping the screen buttons, by tapping the field with the other party�s details, or
m the menus.
nce callse call can be started ave an active call all.
nce call view is ly displayed party has been conference.
ing call is answered ference call, the
call will be put on
rence calls are only they are supported scription.
nference calltive call and one held call, tap the Start conference call lect Phone > Start conference call from the menu.
Chat EditPhone Edit
John Smith
Tom Clark
11:03
Ann Jones
(w)1
(w)
(h)
End conference
New call
Hide parties
2
3
46 Phone
call will also be finished.
To make and handle a new call during a call Press to get a list of call handling options with the flip closed.
� End active call � End the active call, the held call becomes active.
� Switch calls � Switch between the active and held call.
� Start conference call / Add to conference call � Join the two calls for a conference call.
� Transfer calls � Connect the held call to the active call and disconnect yourself from the call.
� Release all � End both calls.� Show contact � Display the entry in Contacts, if any, that
corresponds to the phone number of the active call.
selecting fro
ConfereA conferencwhen you hand a held c
The confereautomaticalwhenever aadded to the
If an incomduring a conconference hold.
Note Confeavailable if by your sub
To start a coWith one acbutton, or se
Chat EditPhone Edit
John Smith
11:03
End active call
Switch calls
Start conference call
Anne Jones (w)
0123456789012(h)0123456789012(h)
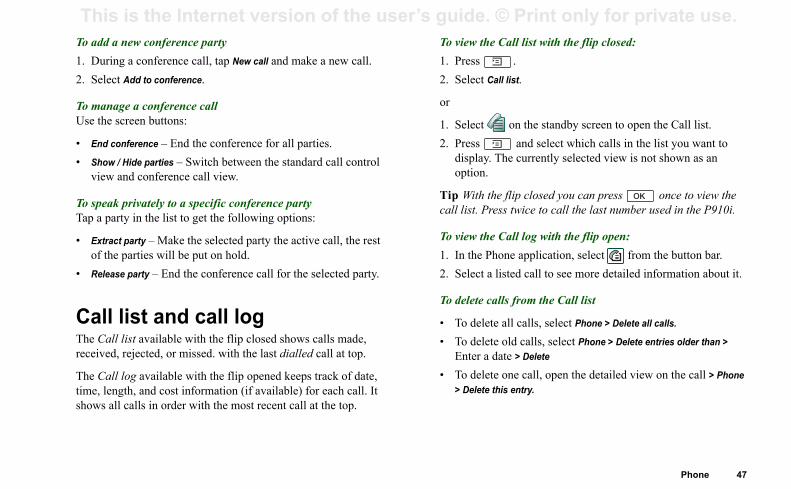
Phone 47
This is the Internet version of the user�s guide. © Print only for private use. w the Call list with the flip closed:
ess .lect Call list.
lect on the standby screen to open the Call list.ess and select which calls in the list you want to play. The currently selected view is not shown as an tion.
ith the flip closed you can press once to view the st. Press twice to call the last number used in the P910i.
w the Call log with the flip open: the Phone application, select from the button bar.lect a listed call to see more detailed information about it.
lete calls from the Call list
delete all calls, select Phone > Delete all calls.
delete old calls, select Phone > Delete entries older than > ter a date > Delete
delete one call, open the detailed view on the call > Phone elete this entry.
To add a new conference party1. During a conference call, tap New call and make a new call.2. Select Add to conference.
To manage a conference callUse the screen buttons:
� End conference � End the conference for all parties.� Show / Hide parties � Switch between the standard call control
view and conference call view.
To speak privately to a specific conference partyTap a party in the list to get the following options:
� Extract party � Make the selected party the active call, the rest of the parties will be put on hold.
� Release party � End the conference call for the selected party.
Call list and call logThe Call list available with the flip closed shows calls made, received, rejected, or missed. with the last dialled call at top.
The Call log available with the flip opened keeps track of date, time, length, and cost information (if available) for each call. It shows all calls in order with the most recent call at the top.
To vie1. Pr2. Se
or
1. Se2. Pr
disop
Tip Wcall li
To vie1. In2. Se
To de
� To� To
En� To
> D
This is the Internet version of the user�s guide. © Print only for private use. Hints and smart functions Set up speed dial numbers
s a fast way to call one of nine selected phone e view contains nine speed dial positions. Each
ntry consists of a picture or an icon, and a name or a e names, numbers and pictures shown in the Speed e derived from the Contacts application, see n page 101. If the contact has a picture stored then
is used. A default icon is used if the contact does not d picture.
ed dial number from the button bar.
empty position.e desired contact.name tag if desired.ne.
elete a Speed dial number on the button bar.
it > Edit speed dial.e contact to edit or delete.e the name, enter the new name. a contact, tap Delete.
ne.
48 Phone
SpeakerphoneIf you open the flip during a call, the speakerphone function is activated and the volume will increase. This lets you continue the conversation while using other functions of the P910i.
Close the flip or tap to switch off the speakerphone.
Note The speakerphone does not work while the phone is in silent mode.
Warning! The volume may be uncomfortably loud at the higher volume levels if the phone is close to your ear. Exposure to excessive volume may damage hearing.
Silent modeIn silent mode all audible ring and alarm signals are turned off. When the flip is closed, press and select Turn on silent to put the phone in silent mode. Press and select Turn off silent to turn off silent mode. When the flip is open, tap the sounds icon in the status bar to open a dialog where you can switch silent mode on or off.
The vibrating alert still works in silent mode if not deactivated.
Speed dial inumbers. Thspeed dial enumber. Thdial view ar�Contacts� othis picture have a store
To set a Spe1. Select 2. Select an3. Select th4. Edit the 5. Select Do
To edit or d1. Select 2. Select Ed
3. Select th4. To chang
To delete
5. Select Do
Phone 49
This is the Internet version of the user�s guide. © Print only for private use. the Power menu, select the option you want.
ess the Jog Dial, , or tap Done.
t flight mode on or off lect Control panel > Device > Flight mode.
lect Flight mode now / Phone on now.p Done.
trolling tone-based services an use your P910i to control phone banking services or
tone-based services that use DTMF (Dual Tone Multi ency).
910i provides different ways of sending tones during a
essing keypad keys during an active call.cluding a tone sequence in the call setup. Enter the phone mber, then press and hold to insert a pause, resented by the character p. Continue to enter your
mbers for the tone-based code. Finally make the call by essing .
erlinks in Messaging and Jotter you write text in Messaging and Jotter, your P910i rets a number as a phone number. If you select that
Flight modeNote The phone and other communication functions must never be used in an aircraft unless otherwise instructed by the aircraft personnel. If the use of equipment without a radio transmitter is permitted, you can turn on the flight mode on the product. Doing so turns off the radio function.
In flight mode the radio function is turned off so that it does not disturb sensitive equipment, for instance in an aeroplane or in a hospital. You cannot make and receive calls, but most of the other functions in the P910i are available.
A Power menu asks you if you want to start the P910i in normal mode or flight mode each time you turn on the P910i. See �Flight mode� on page 149 on how to activate and deactivate this Power menu.
Note You must set the Power menu before the flight.
To use the Power menuThe Power menu has the following options:
� Phone on � Start the P910i in the normal way.� Flight mode � Start the P910i in flight mode.� Power off � Turn the P910i off.
To set flight mode on and off when Power menu is selected1. Press the On/Off button.
2. On3. Pr
To se1. Se2. Se3. Ta
ConYou cotherFrequ
The Pcall:
� Pr� In
nurepnupr
HypWheninterp
This is the Internet version of the user�s guide. © Print only for private use. number, you have the possibility to, for example, call the number or send an SMS to it.
Note You should not store any personal codes in your P910i, in case your phone is stolen or lost.
for TTYTY) accessory, text phone, is an aid for people with irments.
TY device together with the P910i the TTY device to the accessories connector at the he P910i., go to Edit > Preferences > TTY Accessory and select box to set the P910i into TTY mode.
TTY device user manual to find out how to use the ay be necessary to use an adapter between the TTY he P910i.
l make normal calls with the P910i in TTY mode but ories such as handsfree will not work properly.
the flip during a TTY call. It will impair the quality ction.
rt for voice carry over (VCO) and hearing carry is handled through the TTY device and not through
50 Phone
Your P910i also recognises email addresses and URLs. If you select an email address you have almost the same possibilities as for the phone number. If you select an URL, your have the possibility to start the Internet browser which opens the corresponding Internet page.
� Write digit sequences into a Contact entry for the service. Each digit sequence to be sent as tones must begin with p. A space will end the tone sequence and you can add a comment after the space. Once your call to the service has been established and you want to send one of your pre-programmed digit sequences, choose Show contact on the Phone menu to get back to the Contact card with the tone sequences.
SupportTeletype (Tspeech impa
To use the T1. Connect
base of t2. In Phone
the check
Refer to thedevice. It mdevice and t
You can stilother access
Do not openof the conne
Note Suppoover (HCO)the phone.
Chat EditContacts Edit Unfiled
Bank
+4613244500 p1#1234567890
p10#0#34#56789 balance (w)
p30#1234#56 account 1 (w)
p10#1#5678901 account 2 (w)
p20#123456789 (w)
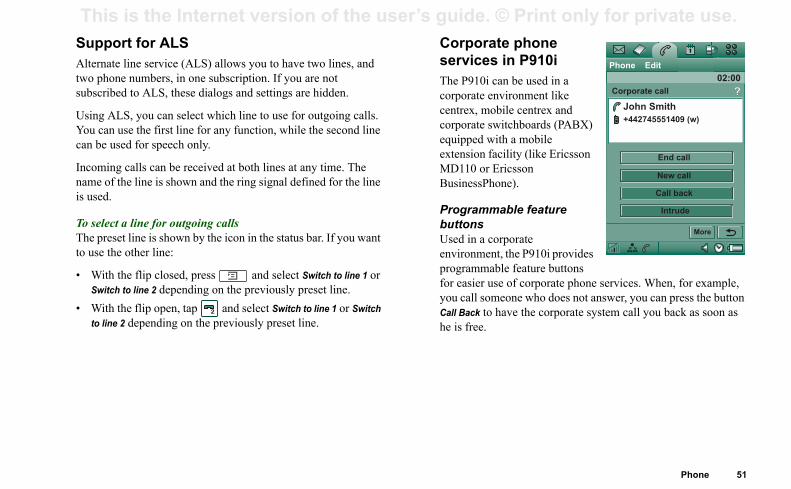
Phone 51
This is the Internet version of the user�s guide. © Print only for private use. porate phone ices in P910i910i can be used in a rate environment like x, mobile centrex and rate switchboards (PABX) ped with a mobile sion facility (like Ericsson 10 or Ericsson essPhone).
rammable feature ns
in a corporate onment, the P910i provides ammable feature buttons sier use of corporate phone services. When, for example, all someone who does not answer, you can press the button ack to have the corporate system call you back as soon as free.
Chat EditPhone Edit
John Smith
+442745551409 (w)
02:00
New call
Call back
Intrude
End call
Corporate call ?
More
Support for ALSAlternate line service (ALS) allows you to have two lines, and two phone numbers, in one subscription. If you are not subscribed to ALS, these dialogs and settings are hidden.
Using ALS, you can select which line to use for outgoing calls. You can use the first line for any function, while the second line can be used for speech only.
Incoming calls can be received at both lines at any time. The name of the line is shown and the ring signal defined for the line is used.
To select a line for outgoing callsThe preset line is shown by the icon in the status bar. If you want to use the other line:
� With the flip closed, press and select Switch to line 1 or Switch to line 2 depending on the previously preset line.
� With the flip open, tap and select Switch to line 1 or Switch to line 2 depending on the previously preset line.
CorservThe PcorpocentrecorpoequipextenMD1Busin
ProgbuttoUsedenvirprogrfor eayou cCall Bhe is
2
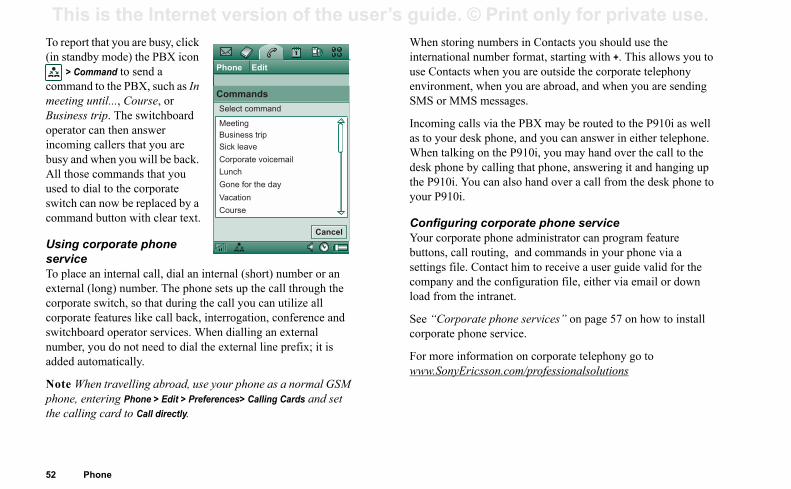
This is the Internet version of the user�s guide. © Print only for private use. To report that you are busy, click (in standby mode) the PBX icon
When storing numbers in Contacts you should use the international number format, starting with +. This allows you to
s when you are outside the corporate telephony t, when you are abroad, and when you are sending S messages.
lls via the PBX may be routed to the P910i as well esk phone, and you can answer in either telephone. g on the P910i, you may hand over the call to the by calling that phone, answering it and hanging up ou can also hand over a call from the desk phone to
g corporate phone serviceate phone administrator can program feature l routing, and commands in your phone via a . Contact him to receive a user guide valid for the d the configuration file, either via email or down e intranet.
rate phone services� on page 57 on how to install one service.
formation on corporate telephony go to ricsson.com/professionalsolutions
52 Phone
> Command to send a command to the PBX, such as In meeting until..., Course, or Business trip. The switchboard operator can then answer incoming callers that you are busy and when you will be back. All those commands that you used to dial to the corporate switch can now be replaced by a command button with clear text.
Using corporate phone serviceTo place an internal call, dial an internal (short) number or an external (long) number. The phone sets up the call through the corporate switch, so that during the call you can utilize all corporate features like call back, interrogation, conference and switchboard operator services. When dialling an external number, you do not need to dial the external line prefix; it is added automatically.
Note When travelling abroad, use your phone as a normal GSM phone, entering Phone > Edit > Preferences> Calling Cards and set the calling card to Call directly.
use ContactenvironmenSMS or MM
Incoming caas to your dWhen talkindesk phone the P910i. Yyour P910i.
ConfigurinYour corporbuttons, calsettings filecompany anload from th
See �Corpocorporate ph
For more inwww.SonyE
Chat EditPhone Edit
Commands
Select command
Meeting
Business trip
Sick leave
Corporate voicemail
Lunch
Gone for the day
Vacation
Course
Cancel
Phone 53
This is the Internet version of the user�s guide. © Print only for private use. word you can also press and hold the Jog Dial or press the free set call button.
Magic word is not supported with the Bluetooth headset/t in the P910i. Instead of magic word, push the button on
luetooth headset. After a confirmation tone, you should say me.
ice dialling � Select or unselect the checkbox.gic word � Select the cases where you want to use the gic word when you use voice dialling. You must, wever, record a magic word before you can select to use it. ing Magic word will increase battery drain.ice answer � Select or unselect the checkbox. Tap On if you nt to answer or reject incoming calls by voice commands. u must first record voice commands for Answer and Busy.y caller name � If you have recorded a name for a person in ntacts, the P910i will tell you the person�s name when he
she calls you. This is useful when using your P910i ether with a handsfree.
ice commands � A list of the voice commands. A balloon ans that a voice command is recorded for the command.
cord a voice commandlect one of the options, Magic word, Answer, or Busy and tap cord.
PreferencesIn this menu you can change the settings for the phone options. (Settings on your P910i that are system-wide and affect more than one application are made from the Control panel, see �Control panel� on page 147).
To set the phone preferences1. In the Phone program select Edit > Preferences.
2. Select the item to set up.
Incoming call pictureIf an incoming caller has a picture stored in Contacts it will be shown on the screen. Select the checkbox to show a large version of the picture over the whole screen.
Voice controlThe voice control option lets you manage calls using your voice. With Voice answer you can use words recorded for �answer� and �busy� to answer or send a busy signal to an incoming call. With Voice dialling, you can make a call by saying the contact�s name.
A magic word ensures that the P910i will not call somebody whose name has just been mentioned by chance.
Say the �magic word� and then the name of the person you want to call, and the P910i will try to call the person. Instead of the
magichands
Notecar kithe Bthe na
� Vo
� MamahoUs
� VowaYo
� PlaCoortog
� Vome
To re1. Se
Re
This is the Internet version of the user�s guide. © Print only for private use. 2. Say the magic word, the answer command or the busy
command after the tone. � Answering mode � Select the option you want.
l � Answer calls as normal.y � Press any key (except ) on the keypad to
er. seconds � P910i answers automatically after five ds.
o select to use a Bluetooth headset as the preferred e. See �Pairing� on page 136 for information on how connection with the headset.
: Preferred Handsfree � Select the option you want. � Use the keypad to manage incoming and outgoing
et � Use the headset or the keypad to manage ing and outgoing calls.
llsert incoming calls to another number if for any are unable to answer them.
llse type of call you want to divert.he phone number you want to divert to.ne.
54 Phone
If you are recording a magic word, make sure that you choose a long unusual word, which can easily be distinguished from ordinary background speech.
3. Select Play to check the quality of your recording.4. Select Done to exit.
You are advised to record voice commands in a quiet environment to maximize recognition.You also have to select the voice commands carefully, so it does not activate by mistake from environment sounds.
To record voice commands for individual contacts, see �Creating and editing contacts� on page 104.
Add to contactsThis is a function for adding called and calling parties to Contacts. After a call has ended, if the phone number is not already stored in the Contacts, you are asked if you would like to add it.
Set the function On or Off.
HandsfreeSpecify how to manage calls when the P910i is used with a handsfree kit connected.
� Norma
� Any keansw
� After 5secon
You can alssound devicto establish
� Bluetooth
� Phonecalls.
� Headsincom
Divert caYou can divreason you
To divert ca1. Select th2. Specify t3. Select Do

Phone 55
This is the Internet version of the user�s guide. © Print only for private use. waitinghese settings to control how P910i handles incoming calls g an ongoing call.
� You will be alerted by incoming calls.f � The P910i sends a busy tone to the calling party.
trict callsan set restrictions for calls made from or to your P910i. an, for example, protect it from being used for long-ce calls.
strict incoming callslect the Incoming tab.t restrictions for:All incoming calls.Incoming calls when roaming. Use this to avoid costs for incoming calls when travelling abroad.
strict outgoing callslect the Outgoing tab.t restrictions for:All outgoing calls.Outgoing international calls.Outgoing international calls except to your home country.
The settings are stored in the network. Tap Refresh to receive the current settings.
Tip Normally the data/fax options should not be changed.
Accept callsYou can specify who should be able to call you. All other callers will be rejected. Your options are:
� All callers � Everybody can phone you.� Listed callers only � Only people on the Accept callers list
can phone you.� Contacts � Only people in your Contacts address book can
phone you.� Speed dial list � Only people in your Speed dial list can
phone you.� No one � No one can phone you. You can still receive
messages such as SMS, MMS and email.
To add a contact to the Accepted list1. Select Add new.
2. Select Lookup and choose a contact, or write the name and number of the contact.
3. Select Done.
Tap a contact on the list to remove it.
CallUse tdurin
� On
� Of
ResYou cYou cdistan
To re1. Se2. Se
��
To re1. Se2. Se
���
This is the Internet version of the user�s guide. © Print only for private use. Voicemail � Access tab:
� Name � Enter a name for the calling card account.s number � Enter the phone number of the calling erver.ation code � Enter the verification code. ational prefix � Enter the international prefix used by rver.
:g order � Number then code means that the P910i,
you have connected to the server, first sends the number you have entered, and then sends the
cation number. Code then number means the opposite .for number/code � Set a time delay between the ent the calling card answers the call and the P910i sending tones.
ational calling card services instruct their users to uage by pressing a digit. When using the P910i feature, you can insert such a digit in one of these
tely after the access number, but preceded by a n, p.rification code.one number that you dial.
56 Phone
For easy voicemail access, enter the number of your voicemail box.
With the flip closed, press and hold to call this number.
With the flip open, select Phone > Call voice mail.
Note It is possible to include DTMF tones in the number. Insert a p before the tones.
Calling cardsCalling cards are used together with some phone services, which means that calls are set up via a calling card server. These settings specify how P910i handles calling cards. Most Calling card settings are protected by the Device lock, see �Device lock� on page 38.
� Calling card mode � Select how to use the selected calling card.
� Calling cards � A list of your calling cards.� Selected card � Select which of your calling cards you
want to use.
Please consult your calling card supplier for more details.
To create a new calling cardSelect New and enter the account information.
� Accescard s
� Verific
� Internthe se
� Set up tab� Sendin
after phoneverifiorder
� Delay momstarts
Some internselect a langcalling cardplaces:
� Immediapause sig
� In the ve� In the ph
Phone 57
This is the Internet version of the user�s guide. © Print only for private use. S Alert make a new telephone call you can interrupt an ongoing session, for example, an incoming email. Select the check get a warning in such a case.
Accessoryt the check box when you want to use the P910i together TTY accessory. Teletype (TTY) accessory, text phone, is for deaf and speech-impaired people.
- Call meter settings e of Charge allows you to keep track of the cost of calls stop the P910i from making chargeable calls when a
n credit limit has been exceeded. The Advice of Charge n only appears in the list if it is supported by your current ription.
credit is limited, a Low credit warning is displayed, when is approximately thirty seconds of credit left. When the runs out, Credit expired is displayed and ongoing, eable calls are stopped.
e refer to the Help system for detailed information about all meter settings.
PIN2 is required from your network operator for storing hanges you make to the Call meter settings.
Corporate phone servicesYou set up corporate phone services by importing a .pbx type settings file from your corporate IT-manager. This file can be received via email, stored on the Memory Stick or downloaded from Internet.
Note Make sure the file is authentic before you import it.
To set up corporate phone services1. Place the file in the Document > Unfiled folder of the P910i or
the Memory Stick.2. Select Edit > Preferences > Calling cards and enter your device
lock code.3. Tap Import.4. Select the settings pbx file and tap Import.5. Select the card among the imported cards in the Selected card
control.6. Activate the card by setting the Calling Card Mode to either
Always use calling card or Prompt before call.
Incoming call behaviourWhen you answer a call when the flip is open the default behaviour is for the P910i to switch to the phone program. Select the check box if you prefer to stay in the ongoing program when you answer a call with the flip open.
GPRIf youGPRSbox to
TTYSelecwith aan aid
AoCAdvicand tocertaioptiosubsc
If thethere creditcharg
Pleasthe C
Noteany c
This is the Internet version of the user�s guide. © Print only for private use. Not all networks provide charging information to the phone during a call. If your network provides this service and your
58 Phone
subscription is for Advice of Charge Charging, you cannot make or receive any chargeable calls if you are roaming in a network that does not provide charging information.
ALS settings (subscription dependent)Use Alternate Line Service to make calls on two lines with separate phone numbers. Some of the phone settings are used on a per line basis. In most cases, the settings displayed apply to the selected line. This is then indicated in the dialog title bar. In other cases, the lines correspond to separate settings or tabs in the dialogs.
To set the line tags1. Select the ALS settings dialog.2. Edit the names for line 1 and 2.3. Tap Done.
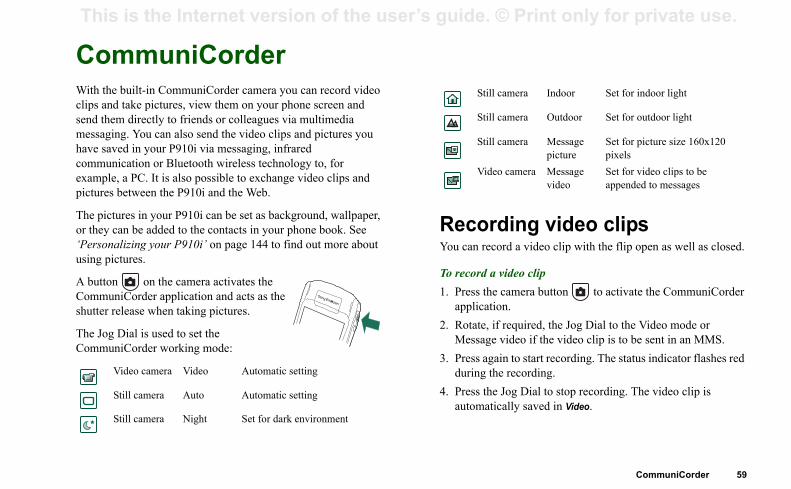
CommuniCorder 59
This is the Internet version of the user�s guide. © Print only for private use.
cording video clipsan record a video clip with the flip open as well as closed.
cord a video clipess the camera button to activate the CommuniCorder plication.tate, if required, the Jog Dial to the Video mode or
essage video if the video clip is to be sent in an MMS.ess again to start recording. The status indicator flashes red ring the recording.ess the Jog Dial to stop recording. The video clip is tomatically saved in Video.
Still camera Indoor Set for indoor light
Still camera Outdoor Set for outdoor light
Still camera Message picture
Set for picture size 160x120 pixels
Video camera Message video
Set for video clips to be appended to messages
MEDIA
CommuniCorderWith the built-in CommuniCorder camera you can record video clips and take pictures, view them on your phone screen and send them directly to friends or colleagues via multimedia messaging. You can also send the video clips and pictures you have saved in your P910i via messaging, infrared communication or Bluetooth wireless technology to, for example, a PC. It is also possible to exchange video clips and pictures between the P910i and the Web.
The pictures in your P910i can be set as background, wallpaper, or they can be added to the contacts in your phone book. See �Personalizing your P910i� on page 144 to find out more about using pictures.
A button on the camera activates the CommuniCorder application and acts as the shutter release when taking pictures.
The Jog Dial is used to set the CommuniCorder working mode:
ReYou c
To re1. Pr
ap2. Ro
M3. Pr
du4. Pr
au
Video camera Video Automatic setting
Still camera Auto Automatic setting
Still camera Night Set for dark environment
This is the Internet version of the user�s guide. © Print only for private use. You can also press the Jog Dial, or, when the flip is open, tap the capture button at the bottom of the screen to record a
To delete a video clip you have just recorded in flip closed, select Delete clip from the flip closed context menu.
video clips, tap to go directly to Video. See age 68 for more information.
erorder has a delay timer with a delay of 1-25 seconds. me is the time between the moment you activate the se and the moment when the recording starts.
elay timemuniCorder > Preferences.
and set the desired delay time
ideo with delay timermuniCorder > Delay timer.
camera button. The timer beeps for the set time and con is shown before the recording is started.
elay timer is set, you will see the timer status icon
muniCorder > Delay timer to deactivate the timer.
60 CommuniCorder
video clip.
By default the video clips you record are stored internally in the Unfiled folder. Tap the folder menu to the right in the menu bar to change the storage location to another location, for example, on a Memory Stick. See �Folders� on page 28 for more information on using folders.
To send a video clip you have just recorded in flip closed, select Send as MMS from the flip closed context menu. In flip open, tap
.
Note Most operators only accept video clips of 10 seconds length or 95 KB size.Use the Message video mode, or the Video limit setting in Video mode to limit the file size.
Open the flip to access the full range of CommuniCorder settings. With the flip open, the CommuniCorder is activated by selecting > .
To delete the last video clip1. Select CommuniCorder > Delete clip.2. Confirm the delete operation.
To manage �Video� on p
Delay timCommuniCThe delay tishutter relea
To set the d1. Tap Com
2. Tap
To record v1. Tap Com
2. Press thea timer i
When the d.
3. Tap Com
CommuniCorder 61
This is the Internet version of the user�s guide. © Print only for private use. ory Stick. See �Folders� on page 28 for more information
ing folders.
nd a picture you have just taken in flip closed, select Send S from the flip closed context menu. In flip open, tap .
the flip to access the full range of CommuniCorder gs. With the flip open, you activate the CommuniCorder lecting > or pressing the camera button .
w the last picturelect CommuniCorder > View picture.lect Done to return.
lete the last picturelect CommuniCorder > Delete picture.lect Delete to delete the picture.
lete a picture you have just taken in flip closed, select picture from the flip closed context menu.
anage or edit the picture, tap to go directly to Pictures. lso �Pictures and Image editor� on page 64.
Video statusAbove the viewfinder, you will find the video status. Icons show whether the CommuniCorder is ready or busy, video quality, and audio quality. A number indicates how much time you have left. The calculation is based on the current settings plus available space on the storage location you have selected (internal or the Memory Stick).
Taking picturesYou can take a picture with the flip open as well as closed.
To take a picture1. Press the camera button to activate the CommuniCorder
application.2. Rotate, if required, the Jog Dial to the desired mode.3. Press again to capture the image on the screen. The picture is
automatically saved in Pictures.
You can also press the Jog Dial, the button, or when the flip is open, tap the capture button at the bottom of the screen to take a picture.
By default the pictures you take are stored internally in the Unfiled folder. Tap the folder menu to the right in the menu bar to change the storage location to another location, for example, on
a Memon us
To seas MM
Opensettinby se
To vie1. Se2. Se
To de1. Se2. Se
To deDelete
To mSee a

This is the Internet version of the user�s guide. © Print only for private use. Delay timer status, picture size and picture quality. A number indicates how
many pictures you have left. The calculation is based on the ngs plus available space on the storage location you d (internal or the Memory Stick).
62 CommuniCorder
CommuniCorder has a delay timer with a delay of 1-25 seconds. The delay time is the time between the moment you activate the shutter release and the moment when the picture is taken.
To set the delay time and the picture freeze time1. Tap CommuniCorder > Preferences.
2. Tap and set the desired delay time.
In this dialog box you can also set the picture freeze time. This specifies the time the picture stays unchanged in the screen after you have taken it.
To take a picture with delay timer1. Select > .2. Tap CommuniCorder > Delay timer.
3. Press the camera button. The timer beeps for the set time and a timer icon is shown before the picture is taken.
When the delay timer is set, you will see the timer status icon .
4. Tap CommuniCorder > Delay timer to deactivate the timer.
Image statusAbove the viewfinder, you will find the image status. Icons show whether the CommuniCorder is ready or busy, delay timer
current settihave selecte
CommuniCorder 63
This is the Internet version of the user�s guide. © Print only for private use. cons in the upper right corner of the main view reflect the y and size settings of the pictures and video clips and also und quality of video clips.
store default CommuniCorder preferencesp CommuniCorder > Preferences.p Default.p Yes.
Camera settingsYou may want to change some of these settings if, for example you are taking a picture in daylight or in dark surroundings. You can also choose what resolution, size and quality, you want for the pictures you take.
Note Depending on which mode you are using, some settings may be fixed (and not user adjustable).
To change preferences for the camera1. Tap CommuniCorder > Preferences.2. Select the setting you want to change:
The iqualitthe so
To re1. Ta2. Ta3. Ta
Move the slider to change the brightness of the picture.
Move the slider to change the contrast.
Turn the backlight On when the light behind the subject is brighter than the light in front of the subject.Turn the flicker free function On to reduce the effects of flicker from, for example, fluorescent light.Choose white balance according to the lighting conditions you are in when taking the picture.For pictures, choose quality and size. The picture sizes, 640x480, 320x240 and 160x120, are displayed in pixels.For video, choose quality for video and audio.Larger size and higher quality use more memory.Choose delay time and freeze time for the still camera, and delay time and Video limit for video.
This is the Internet version of the user�s guide. © Print only for private use.
Pictures and Image editorail view gives an overview of all the pictures in your the list view shows a more compact list. At the e screen you can see how many pictures you have current folder.
a new picture, tap to go to the CommuniCorder.
g the pictures with the arrow buttons or Jog Dial.
rch for specific pictures and sort your pictures by size or type. Tap Edit to choose how to sort the
ewe or select it with the Jog Dial to open it. Specify in nces if pictures should open in detail view or full .
view, you can rename your pictures and sort them . This makes it easier for you to keep track of your ad more about organizing files in �Folders� on
64 Pictures and Image editor
In Pictures you can manage all pictures saved in your P910i. The pictures can be taken using the CommuniCorder or received via Messages, Bluetooth wireless technology or infrared communication. They can also be downloaded via the browser or transferred from your PC via a cable. Your P910i supports JPEG, GIF, MBM, PNG, WBMP and BMP picture formats. In the Image editor you can perform basic editing of JPEG pictures.
Pictures You can send the pictures to others, add them to the contacts in your phone book, or use one as a background image (wallpaper) or screensaver.
Thumbnail and list viewsTap and to change between the thumbnail view and the list view.
The thumbnP910i whilebottom of thsaved in the
Tip To take
Move amon
You can seaname, date,pictures.
Detail viTap a picturEdit > Preferescreen view
In the detailinto folderspictures. Repage 28.
Chat EditPictures Edit All
Brioney Mer de gla...
Mont Blanc Wakeboard
12 pictures (890Kb)
Pictures and Image editor 65
This is the Internet version of the user�s guide. © Print only for private use. ming pictures, widescreen and full en
the detail view of the picture you can:
p and to zoom in and out.p and drag the zoomed picture to view specific details in picture.p a picture to display it in widescreen. Tap it again to play it in fullscreen. Tap and drag the picture to view
ecific details. Tap once more to zoom in. Return to the tail view by tapping, or pressing the Jog Dial backwards.tate the Jog Dial to browse the pictures in widescreen w.
ing, copying and deleting the detail view of the picture you can:
lect a folder from the folders menu to move the picture to t folder (internal or on a Memory Stick). See �Folders� on
ge 28 for more information.lect Pictures > Copy to to copy the picture to another folder ternal or on a Memory Stick).lect Pictures > Delete picture to delete it.lect Pictures > Copy picture to copy the picture to a clipboard that you can paste it into an item in another application.
To rename a picture1. Select Pictures > Rename picture.2. Enter a picture name > Done.
Note Two or more pictures cannot have the same name.
At the bottom of the screen you can see the picture information, for example, the size of the picture and the date the picture was taken.
Use and or the Jog Dial to move between the pictures in the current folder. takes you back to the thumbnail or list view.
Sending and receiving picturesSelect Pictures > Send as to send pictures to other phones or to a PC via multimedia messaging, IR or Bluetooth. See �Sending and receiving items� on page 30. You can also save pictures that you have received via email and multimedia messages. See �Incoming multimedia messages� on page 91 and �Receiving attachments� on page 96.
Pictures in JPEG can also be imported/exported from/to a memory card.
Note Pictures with Forward lock cannot be sent further.
ZooscreFrom
� Ta� Ta
the� Ta
disspde
� Rovie
MovFrom
� Sethapa
� Se(in
� Se� Se
so
Chat EditPictures Edit Photos
JPG-0002 10:15am,21/06/04
This is the Internet version of the user�s guide. © Print only for private use. To copy, delete or move multiple pictures Editing pictures
ntrolled from the toolbar below the picture. Tapping s will bring up a palette with choices:
e the edited image by selecting Image editor > Done.
aste by selecting Edit > Copy and Edit > Paste. You can nd paste whole pictures.
an error when editing the picture, you can undo the by Edit > Undo. You can also undo all actions since
as saved, by selecting Edit > Undo all.
in
out
ct colour Select one of the 16 colours
ct pen Select one of the 4 pen sizes
ct ing tool
Select one of the tools:- Pen for freehand drawing- Undo last action- Undo all actions- Add text- Crop picture- Resize picture
ct rotation Select rotation � clockwise or anti-clockwise
66 Pictures and Image editor
� In the thumbnail and list views, select the check boxes beside the picture names. Then select Pictures > the command you want.
� To copy and delete pictures you can also use the Storage Manager found in the Control panel. For more information, refer to �Folders� on page 28.
Image editorUsing the Image editor, you can edit JPEG images.
You can
� crop and resize the pictures� rotate them by 90° at a
time� write and draw on them,
using different colours
To start the Image editorFrom a picture opened in Pictures, select Edit > Edit picture.
Editing is cothe tool icon
You can sav
Copy and ponly copy a
If you makelast change the picture w
Image editor Edit
Zoom
Zoom
Sele
Sele
Seledraw
Sele
Pictures and Image editor 67
This is the Internet version of the user�s guide. © Print only for private use. u can return to the text editor by tapping on the text item.
As soon as you tap outside the text item, the text is merged he picture and cannot be edited or moved.
op a picturep and select the cropping tool .frame with 8 handles is placed around the picture.p and drag one of the handles to define how the picture ould be cropped.p anywhere, except on the handles, to crop the picture.
size a picturep and select the resizing tool .frame with four handles is placed around the picture.p and drag one of the handles to define the new size of the ture.
hen you lift the stylus, the picture will be resized.
To zoom in and outThis is not available in all formats.
� Tap to zoom in.� Tap and drag the zoomed picture to view specific details in
the picture.� Tap to zoom out.� Select Edit > Zoom, and select between Fit to screen and Full
size.
To draw on a picture1. If desired, tap and select the desired colour.2. If desired, tap and select the desired pen size.3. Tap and select the pen tool .4. Draw with the stylus on the picture.
To add text to a picture1. Tap and select the text tool .2. Tap the place where the text should be put on the picture. 3. Enter the text in the text field.4. If required, change the text properties, using the choices on
the text, style and colours tabs.5. Tap Done to place the text on the picture.
� You can move the text on the picture by tapping and dragging on the text.
� Yo
Notewith t
To cr1. Ta
A 2. Ta
sh3. Ta
To re1. Ta
A 2. Ta
picW

This is the Internet version of the user�s guide. © Print only for private use.
Videoclips
video clips layer opens in the list view. In this view, you get an all the MPEG-4 video clips in your P910i. You can pecific video clips, zoom the video clip names and name, date, or size. At the bottom of the screen you many video clips you have saved in your P910i.
deo clip > Video.
video clip in the list.
The volume may be uncomfortably loud at the me levels if the phone is close to your ear, or if you e stereo headset. Exposure to excessive volume amage hearing.
eo clip plays, tap the screen to display the video clip en. Tap the screen again to go back. Specify the tation in Edit > Preferences > Display.
68 Video
You can play video clips that are recorded with the CommuniCorder, stored in your P910i or streamed. A video clip is a short video sequence. You can also play audio-only material which is encapsulated within an MPEG file or streamed. You can download video clips from an Internet site or transfer them from a PC via a cable, or from a Memory Stick. You can also exchange video clips with other phones or PCs via infrared communication, Bluetooth wireless technology or multimedia messaging.
You do not have to download a complete video clip to be able to view it. You can use the streaming function and view the video clip from the Web site where it is located. The video clip is played with only a short time delay.
The video player supports files in the MPEG-4 file format, for example name.mp4.
You can store video clips both internally and externally. You can also copy them between the internal memory and the Memory Stick. See �Folders� on page 28.
To adjust the volumeRotate the Jog Dial up to increase the volume, and down to decrease the volume.
Video
Playing The Video poverview ofsearch for ssort them bycan see how
To view a vi1. Select 2. Select a
Warning! higher voluare using thlevels may d
While a vidin widescrescreen orien
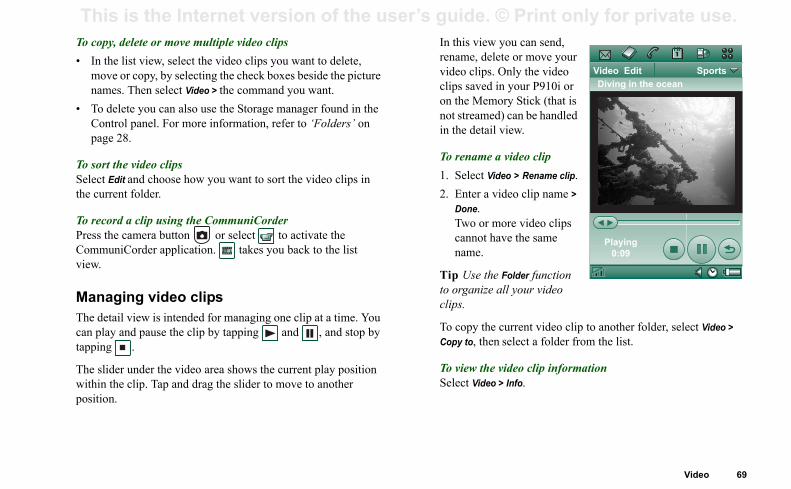
Video 69
This is the Internet version of the user�s guide. © Print only for private use. s view you can send, e, delete or move your
clips. Only the video saved in your P910i or Memory Stick (that is
reamed) can be handled detail view.
name a video cliplect Video > Rename clip.ter a video clip name > ne.o or more video clips
nnot have the same me.
se the Folder function anize all your video
py the current video clip to another folder, select Video > to, then select a folder from the list.
w the video clip informationt Video > Info.
Chat EditVideo Edit Sports
Playing
0:09
Diving in the ocean
To copy, delete or move multiple video clips� In the list view, select the video clips you want to delete,
move or copy, by selecting the check boxes beside the picture names. Then select Video > the command you want.
� To delete you can also use the Storage manager found in the Control panel. For more information, refer to �Folders� on page 28.
To sort the video clipsSelect Edit and choose how you want to sort the video clips in the current folder.
To record a clip using the CommuniCorderPress the camera button or select to activate the CommuniCorder application. takes you back to the list view.
Managing video clipsThe detail view is intended for managing one clip at a time. You can play and pause the clip by tapping and , and stop by tapping .
The slider under the video area shows the current play position within the clip. Tap and drag the slider to move to another position.
In thirenamvideoclips on thenot stin the
To re1. Se2. En
DoTwcana
Tip Uto orgclips.
To coCopy
To vieSelec
This is the Internet version of the user�s guide. © Print only for private use. To delete a video clip Streaming
s a data transfer method making multimedia real-time. You can, for example, listen to audio and almost at the same time as it is sent.
the file is divided into small packets that are sent in a flow, a stream.You can then begin viewing the file ginning as the rest of the packets are sent. The short start is to enable a small amount of data to be
can receive streaming multimedia.
ionspplications can be classified into on-demand and tions.
f on-demand applications are:
g of music.g of news (video and audio).g of movie trailers.g and download of video.aming of music or video (broadcast).
70 Video
1. Select the video clip you want to delete.2. Select Video > Delete clips.
Saving video clipsWhen you play video clips that you have received via email or multimedia messaging, or that you have downloaded to your P910i from the Web, the viewer detail view is automatically launched. From the viewer detail view you can then save the video clip to your P910i.
To save a video clip from another application1. Select the video clip you want to save.2. Select Video > Save clip.3. Select the folder you want to save the video clip in > Save.
Sending and receiving video clipsYou can send and receive video clips using Video > Send as. See �Sending and receiving items� on page 30.
Streaming iavailable inwatch video
The data in continuous from the bedelay at thebuffered.
Your P910i
ApplicatStreaming alive applica
Examples o
� Streamin� Streamin� Streamin� Streamin� Live stre
Video 71
This is the Internet version of the user�s guide. © Print only for private use. ferences
you view a video clip in full screen mode, you can select ientation of the picture
ange the orientation of the picture in full screen modelect Edit > Preferences.lect the Display tab.p Left-handed or Right-handed orientation > Done.
you view a video clip from a Web site, using the ing function, a media buffer is used to provide a steady
of data. Increasing the size of the media buffer may ve the play-back of the video clip.
ange the media buffer sizelect Edit > Preferences.lect the Buffering tab.lect Custom setting and move the slider left or right > Done.
you download a video clip to your P910i, it is saved in the load cache memory. When this memory is full, you have to it to be able to download new video clips to your P910i.
ar the download cachelect Edit > Preferences.lect the Buffering tab.
How to connect to a streaming service� If you know the URL of the streaming service:1. Select Video > Open location.2. Enter the URL of the streaming service, or select a service
from the drop-down list.3. Tap Done.
� If you do not know the URL of the streaming service:1. Open Internet and browse to the site where the service is.2. Select the item you want to play, for example a video.
The site server will download part of the video to the P910i buffer memory. This will take a short while. When the buffer memory is filled, the Video player will open the detail view, described above, and play the video seamlessly.
PreWhenthe or
To ch1. Se2. Se3. Ta
Whenstreamflow impro
To ch1. Se2. Se3. Se
Whendownempty
To cle1. Se2. Se
This is the Internet version of the user�s guide. © Print only for private use. 3. Select Clear Cache > Done.
72 Video
When you view a video clip from a Web site, you may have to set the proxy settings.
To change the proxy settings1. Select Edit > Preferences.2. Select the Proxy tab.
� If the proxy settings set in the control panel are to be used, tap Automatic configuration.
� If the manual settings are to be used, enter the relevant information.
Music player 73
This is the Internet version of the user�s guide. © Print only for private use.
navigate to the standby screen while you play music, you ress to pause. Press it again to play.
to go back to the standby screen and launch another ation. The music will still play. If this application requires
ated audio, the playback will be paused.
use the Music player a lot, it can be useful to create flip d and flip open shortcuts to it. This way you can quickly s the Music player when you for example want to adjust lume or change track folder. Refer to �Application
cuts� on page 147 for more information.
ial controle the Jog Dial to select a sound track. Press it inwards to Press it again to stop.
just the volumee the Jog Dial up to increase the volume, and down to ase the volume.
ing! The volume may be uncomfortably loud at the r volume levels if the phone is close to your ear, or if you ing the stereo headset. Exposure to excessive volume may damage hearing.
Music playerYour P910i has mobile music in the form of a stereo music player. With the music player you can listen to single music tracks or entire folders with tracks. You can download tracks to your P910i from a PC, the Internet or Memory Stick, and create different folders with tracks. Your P910i supports a number of different sound files, including the popular MP3 format. See �Technical data� on page 197 for more information on supported file types.
You can store sound files both internally and on the Memory Stick. You can also copy them between the internal memory and the Memory Stick. See �Folders� on page 28.
When you receive a phone call while listening, the playback will be paused. When you end the call, you must navigate back to the Music application to restart playing.
Tip To listen to more music you can store music on several Memory Sticks and carry them with you.
Playing sound filesYou can play MP3 music both in flip closed and in flip open. In flip closed, with the Jog Dial, select , select Music player, and select the track you want to play. Press to find other commands.
If youcan p
Pressapplicdedic
If youcloseaccesthe voshort
Jog DRotatplay.
To adRotatdecre
Warnhigheare uslevels
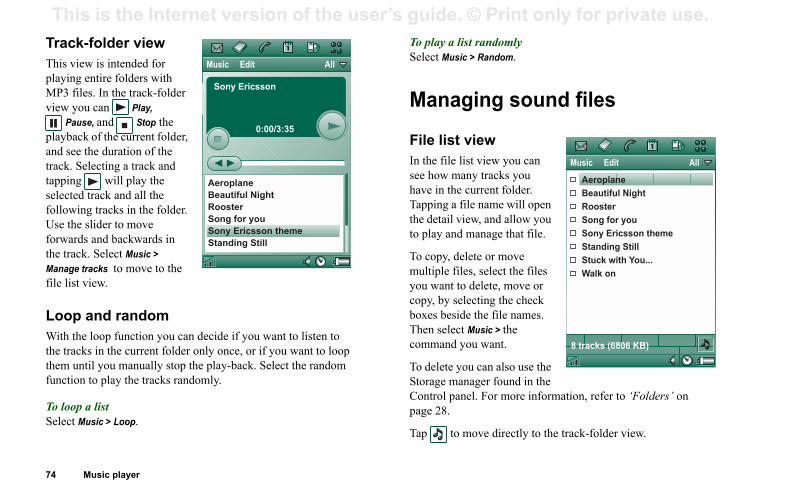
This is the Internet version of the user�s guide. © Print only for private use. Track-folder view To play a list randomly
Select Music > Random.
ing sound files
iew st view you can ny tracks you current folder. le name will open ew, and allow you manage that file.
lete or move s, select the files delete, move or ecting the check e the file names. Music > the ou want.
u can also use the ager found in the
el. For more information, refer to �Folders� on
ove directly to the track-folder view.
Music Edit All
AeroplaneBeautiful NightRoosterSong for youSony Ericsson themeStanding StillStuck with You...Walk on
8 tracks (6806 KB)
74 Music player
This view is intended for playing entire folders with MP3 files. In the track-folder view you can Play,
Pause, and Stop the playback of the current folder, and see the duration of the track. Selecting a track and tapping will play the selected track and all the following tracks in the folder. Use the slider to move forwards and backwards in the track. Select Music > Manage tracks to move to the file list view.
Loop and randomWith the loop function you can decide if you want to listen to the tracks in the current folder only once, or if you want to loop them until you manually stop the play-back. Select the random function to play the tracks randomly.
To loop a listSelect Music > Loop.
Manag
File list vIn the file lisee how mahave in the Tapping a fithe detail vito play and
To copy, demultiple fileyou want tocopy, by selboxes besidThen selectcommand y
To delete yoStorage manControl panpage 28.
Tap to m
Music Edit All
Sony Ericsson
0:00/3:35
AeroplaneBeautiful NightRoosterSong for youSony Ericsson themeStanding Still
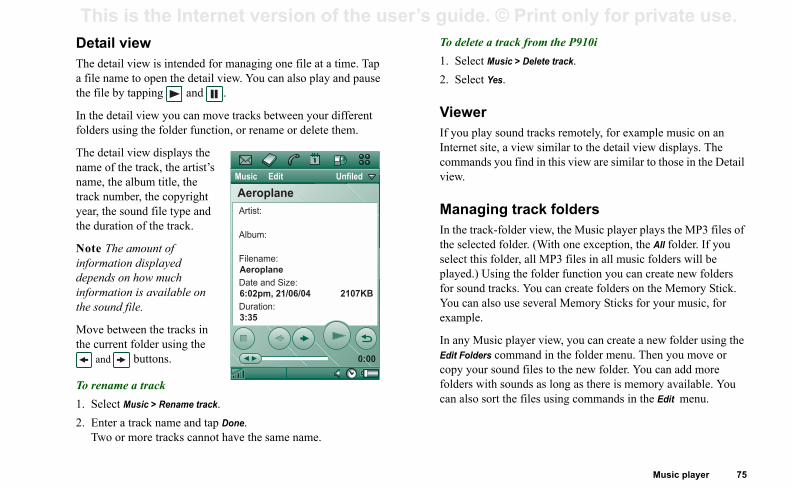
Music player 75
This is the Internet version of the user�s guide. © Print only for private use. lete a track from the P910ilect Music > Delete track.lect Yes.
er play sound tracks remotely, for example music on an et site, a view similar to the detail view displays. The ands you find in this view are similar to those in the Detail
aging track folders track-folder view, the Music player plays the MP3 files of lected folder. (With one exception, the All folder. If you this folder, all MP3 files in all music folders will be d.) Using the folder function you can create new folders und tracks. You can create folders on the Memory Stick. an also use several Memory Sticks for your music, for ple.
Music player view, you can create a new folder using the olders command in the folder menu. Then you move or your sound files to the new folder. You can add more rs with sounds as long as there is memory available. You lso sort the files using commands in the Edit menu.
Detail viewThe detail view is intended for managing one file at a time. Tap a file name to open the detail view. You can also play and pause the file by tapping and .
In the detail view you can move tracks between your different folders using the folder function, or rename or delete them.
The detail view displays the name of the track, the artist�s name, the album title, the track number, the copyright year, the sound file type and the duration of the track.
Note The amount of information displayed depends on how much information is available on the sound file.
Move between the tracks in the current folder using the
and buttons.
To rename a track1. Select Music > Rename track.2. Enter a track name and tap Done.
Two or more tracks cannot have the same name.
To de1. Se2. Se
ViewIf youInterncommview.
ManIn thethe seselectplayefor soYou cexam
In anyEdit Fcopy foldecan a
Music Edit Unfiled
Artist:
Album:
Filename:
Date and Size:
Duration:
0:00
Aeroplane
Aeroplane
6:02pm, 21/06/04 2107KB
3:35
This is the Internet version of the user�s guide. © Print only for private use. Preferences
76 Music player
You can choose if you want all types of sound files to be displayed in the file list view, or if you want to display only a certain type of sound file.
To select sound file types1. Select Edit > Preferences from the file list view.2. Check the boxes next to the sound files you want to include
in the track folders and tap Done.
Saving sound filesWhen you receive sound files in other applications, such asemail and multimedia messages, you activate the viewer in your P910i. From the viewer you can then save the sound fileto your P910i.
To save a track from another application1. Tap the save (floppy disk) icon or select Music and tap Save.2. Select the folder you want to save the track in and tap Save.
Sending and receiving sound filesYou can send and receive sound files using Send as. See �Sending and receiving items� on page 30.
Internet 77
This is the Internet version of the user�s guide. © Print only for private use.
es it might be necessary to set up a WAP account in the l panel as well. See �Getting started with Internet and
ages� on page 171.
rt the browser Start the browser by: pressing the Internet button.selecting in the application picker.selecting in the application launcher .selecting a URL in another application.
If required, you have to enter your username and ord to log in to your Internet account.
opening a page, the P910i might not receive incoming However, when the page is properly opened you can e a call and the page will still be open.
pplication has two views:
ser view The base view of the application, where you can view Web and WAP pages.
marks A list view where you can save shortcuts:� to Web and WAP sites on the Internet� to locally stored pages� to documents digitally signed by you.
InternetYou use Internet, the P910i browser, to:
� Connect to the Internet to view and access Web and WAP pages.
� Receive and view Push messages from your WAP service provider.
� Download Java applications, images and audio.
The browser can open Web pages that use Java script or frames, but functions that use Java script in the Web page will not work properly.
You can save bookmarks to viewed pages, to be able to access them easily. You can also save pages in the P910i for off-line viewing.
The browser uses folders for categorising information. The folders used are bookmarks, saved pages, signed documents, and Push messages.
Push messages is a service that gives you notifications about, for example, weather forecasts, sport results, and stock quotes. The notification is sent to you as a message that contains a WAP link to the site with the information you subscribe to.
Before you can use Internet, you need to set up an Internet account in the Control panel. If you intend to use certain WAP
servicControMess
To sta���
�
Notepassw
Whilecalls.receiv
The a
Brow
Bookview
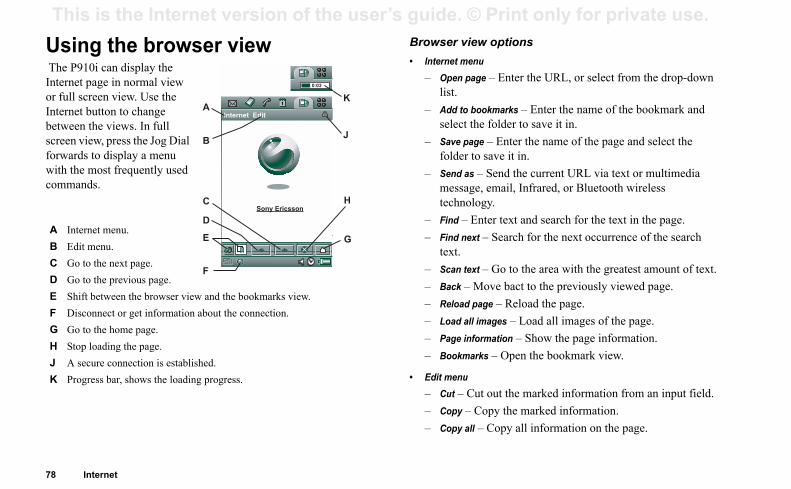
This is the Internet version of the user�s guide. © Print only for private use. Using the browser view Browser view options
enupage � Enter the URL, or select from the drop-down
bookmarks � Enter the name of the bookmark and the folder to save it in.age � Enter the name of the page and select the
r to save it in.s � Send the current URL via text or multimedia ge, email, Infrared, or Bluetooth wireless
ology. Enter text and search for the text in the page.ext � Search for the next occurrence of the search
ext � Go to the area with the greatest amount of text. Move bact to the previously viewed page. page � Reload the page.ll images � Load all images of the page.
nformation � Show the page information.arks � Open the bookmark view.
Cut out the marked information from an input field.� Copy the marked information.all � Copy all information on the page.
78 Internet
The P910i can display the Internet page in normal view or full screen view. Use the Internet button to change between the views. In full screen view, press the Jog Dial forwards to display a menu with the most frequently used commands.
� Internet m� Open
list.� Add to
select� Save p
folde� Send a
messatechn
� Find �� Find n
text.� Scan t
� Back �� Reload
� Load a
� Page i
� Bookm
� Edit menu� Cut � � Copy � Copy
A Internet menu.B Edit menu.C Go to the next page.D Go to the previous page.E Shift between the browser view and the bookmarks view.F Disconnect or get information about the connection.G Go to the home page.H Stop loading the page.J A secure connection is established.K Progress bar, shows the loading progress.
0:03
Chat EditInternet EditA
H
J
G
B
C
D
E
F
K
Sony Ericsson
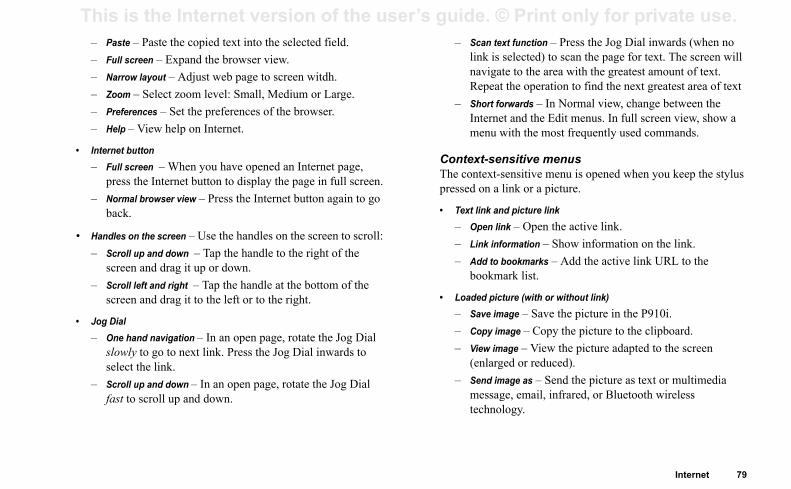
Internet 79
This is the Internet version of the user�s guide. © Print only for private use. Scan text function � Press the Jog Dial inwards (when no link is selected) to scan the page for text. The screen will navigate to the area with the greatest amount of text. Repeat the operation to find the next greatest area of textShort forwards � In Normal view, change between the Internet and the Edit menus. In full screen view, show a menu with the most frequently used commands.
ext-sensitive menusontext-sensitive menu is opened when you keep the stylus ed on a link or a picture.
xt link and picture linkOpen link � Open the active link.Link information � Show information on the link.Add to bookmarks � Add the active link URL to the bookmark list.
aded picture (with or without link)Save image � Save the picture in the P910i.Copy image � Copy the picture to the clipboard.View image � View the picture adapted to the screen (enlarged or reduced).Send image as � Send the picture as text or multimedia message, email, infrared, or Bluetooth wireless technology.
� Paste � Paste the copied text into the selected field.� Full screen � Expand the browser view.� Narrow layout � Adjust web page to screen witdh.� Zoom � Select zoom level: Small, Medium or Large.� Preferences � Set the preferences of the browser.� Help � View help on Internet.
� Internet button� Full screen � When you have opened an Internet page,
press the Internet button to display the page in full screen.� Normal browser view � Press the Internet button again to go
back.
� Handles on the screen � Use the handles on the screen to scroll:� Scroll up and down � Tap the handle to the right of the
screen and drag it up or down.� Scroll left and right � Tap the handle at the bottom of the
screen and drag it to the left or to the right.
� Jog Dial� One hand navigation � In an open page, rotate the Jog Dial
slowly to go to next link. Press the Jog Dial inwards to select the link.
� Scroll up and down � In an open page, rotate the Jog Dial fast to scroll up and down.
�
�
ContThe cpress
� Te���
� Lo���
�
This is the Internet version of the user�s guide. © Print only for private use. � Not loaded picture (with or without link)
� Load image � Load the picture.To navigate through recently opened pages
to move back to previously viewed pages. to move forwards again.
ge for off-line browsingternet > Save page.he page name, if required, and select a folder to save
ne.
bookmark to the open pageternet > Add to bookmarks.
he bookmark name, if required, and select a folder t in.ne.
d and upload files, for example, applicationsu select a link to a downloadable file, for example, ons, images and so on, information on the file is d.s to start the download.
u select a link for uploading a file, a form for g the file is displayed.
e file and select Yes to start the upload.
80 Internet
� Voice call link� Call � Place a call according to the link.� New SMS � Send an SMS message according to the link.� New MMS � Send an MMS message according to the link.� New contact � Create a contact with the link information.
� Mail to link� New email � Send an email according to the link.� New MMS � Send an MMS message according to the link.� New contact � Create a contact with the link information.
Icons within a page Picture not loaded (can be loaded manually).
Damaged picture (not possible to load).
Note If images are not loaded, select the picture icons or select Internet > Load all images.
To open a specific Web page1. Select Internet > Open page.
2. Enter the page URL or select a previously viewed page from the drop-down list.
3. Select Open.
1. Select 2. Select
To save a pa1. Select In2. Change t
it in.3. Select Do
To create a 1. Select In2. Change t
to save i3. Select Do
To downloa� When yo
applicatidisplayeSelect Ye
� When yosubmittin
Select th
Internet 81
This is the Internet version of the user�s guide. © Print only for private use. authentication requestever a user authentication is requested, you have the
bility to either select a certificate and confirm the user ntication, to select to continue anonymously or to cancel nnection.
nect anonymously has been set, the browser will instead atically try to connect anonymously.
ing the bookmark view
older menu.dit menu.
nternet menu.elect an icon to view formation on the bookmark.hecked bookmarks can be eleted from the Internet enu.elect the bookmark text to pen the page.elect to go to the home page.hift between browser and ookmarks views.
Chat EditInternet Edit All
Search Internet
My home page
News
Webmail
Project home
711 time table
CSS fonts
C
B
D
E
F
H
A
G
SonyEricsson
To view information on the open page1. Select Internet > Page information.2. Select the Content tab to view the page information.3. Select the Connection tab to view information on the
connection.4. Select the Certificates button to view the information on:
� Server� User
To disconnect from the Internet1. Select the connection icon (HSCSD/CSD or GPRS )
in the status bar.2. Select Disconnect from the pop-up menu3. The dialog Do you want to disconnect, Yes/No appears.4. Select Yes.
WIM AccessWhen the browser requires access to the WIM card, for example, when establishing a secure connection, you have to enter the correct PIN. For more information, please contact your service provider or IT department.
Signing documentsYou have to enter the signing PIN each time a signing operation is going to be performed.
UserWhenpossiauthethe co
If Conautom
Us
A FB EC ID S
inE C
dm
F So
G SH S
b
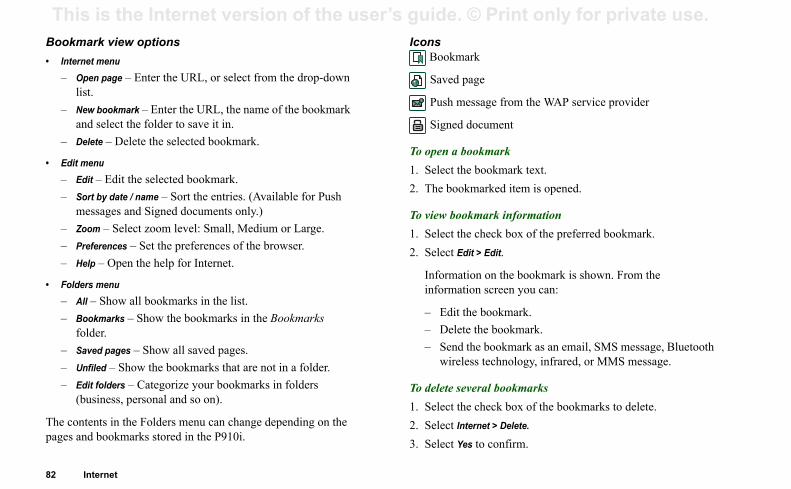
This is the Internet version of the user�s guide. © Print only for private use. Bookmark view options Icons
Bookmark
age
essage from the WAP service provider
document
ookmarke bookmark text.marked item is opened.
kmark informatione check box of the preferred bookmark.it > Edit.
ion on the bookmark is shown. From the ion screen you can:
he bookmark.e the bookmark.the bookmark as an email, SMS message, Bluetooth ess technology, infrared, or MMS message.
veral bookmarkse check box of the bookmarks to delete.ternet > Delete.
s to confirm.
82 Internet
� Internet menu� Open page � Enter the URL, or select from the drop-down
list.� New bookmark � Enter the URL, the name of the bookmark
and select the folder to save it in.� Delete � Delete the selected bookmark.
� Edit menu� Edit � Edit the selected bookmark.� Sort by date / name � Sort the entries. (Available for Push
messages and Signed documents only.)� Zoom � Select zoom level: Small, Medium or Large.� Preferences � Set the preferences of the browser.� Help � Open the help for Internet.
� Folders menu� All � Show all bookmarks in the list.� Bookmarks � Show the bookmarks in the Bookmarks
folder.� Saved pages � Show all saved pages.� Unfiled � Show the bookmarks that are not in a folder.� Edit folders � Categorize your bookmarks in folders
(business, personal and so on).
The contents in the Folders menu can change depending on the pages and bookmarks stored in the P910i.
Saved p
Push m
Signed
To open a b1. Select th2. The book
To view boo1. Select th2. Select Ed
Informatinformat
� Edit t� Delet� Send
wirel
To delete se1. Select th2. Select In3. Select Ye
Internet 83
This is the Internet version of the user�s guide. © Print only for private use. c settingsEnter the URL for the page to be shown when the browser is started from the Internet button; either a page stored in the P910i or a page on the Internet.Select the WAP account to be used when the home page is loaded. The accounts are set up in the control panel.Select if a new page should be displayed over the whole screen.Select if you want to use a vertical scroll bar to scroll the pages up and down. Otherwise you can use the Jog Dial.Select if images should be loaded. If images are not loaded, the page will be loaded faster. Non-loaded images can be loaded manually when viewing the page. Select if sounds should be played when the page is opened.Select if animations should be played when the page is opened.
rity settingsSelect if you want to save signed documents.Select if you want to connect without giving away your identity.Select if you want to connect using the WIM card.Select if you want to allow cookies.
PreferencesThe browser is initially set up to work, but you have to set up your own account. A simple way of setting up an Internet account is to use the Web phone setup-message generator on www.SonyEricsson.com. See also �Internet accounts� on page 155 for more information.
The easiest way to set up Internet and WAP accounts is to ask your Internet service provider to send you an auto setup message containing the required setup information. The accounts will then be set up automatically on your P910i. To guarantee the integrity of the settings, a PIN may be used.
For security reasons, some WAP pages and services, for example on-line banking, can only be accessed from a particular WAP account. See �WAP accounts� on page 165 for more information.
Note Proxy settings for MMS messages, and for a WAP gateway should be set in the WAP accounts. Other proxy settings should be set in the Internet accounts.
To set up the browser1. Select Edit > Preferences.2. Perform the setup according to the following:
Basi�
�
�
�
�
�
�
Secu��
��
This is the Internet version of the user�s guide. © Print only for private use. Advanced settings
� Select if you want to be able to receive messages from
84 Internet
your WAP service provider.� Select if you want to automatically open the URL in WAP
Push messages.� Select if you want to remove out-of-date messages
automatically.� Select a sound that notifies you when a Push message
arrives.� Set the size of the cache memory. The cache is the part of
the memory where viewed pages are stored. Stored pages will load faster when you visit them again.
� Select Clear history to empty the list of pages visited and cookies stored.
� Select Clear cache to empty the cache memory.
Games 85
This is the Internet version of the user�s guide. © Print only for private use.
Played � Select if you want to play locally against your P910i or against another P910i user.
p Play to start the game.
y Chesslect the piece you want to move.e square where it is standing will now be marked with a angle.
lect the square to which you want to move the piece and piece will move to it.
ng the flip closes the game temporarily and saves the n status. Your opponent will be sent an end-of-game text ge.
GamesThere are two pre-installed games in your P910i. Traditional Chess and the card game Solitaire.
More games are available on the Content and Application CD in your original P910i box. You can also install games from other developers, see �Installing applications� on page 131.
ChessYou can play Chess against the P910i, or against another P910i user via SMS.
Please read the help texts for detailed information on how to set up and play Chess.
To start a new game1. Select Chess > New game to initiate a game.2. Enter details as desired in the New game dialog. You can
return to these details later.
� Name � Give the game a name so you can return to it later if you have to interrupt it.
� Notes � Write a note about the game.� You play � Choose to play white or black.� Against � Select the level of your opponent.
�
3. Ta
To pla1. Se
Thtri
2. Sethe
Closisessiomessa
This is the Internet version of the user�s guide. © Print only for private use. Solitaire � Aces are low and may not be played onto kings. Jokers can
be played onto any card and any card can be played onto a
itairenly available with the flip open.
e icon for Solitaire.e will either start with a new game or with the layout rlier, interrupted game. (the game data is saved on desktop, when the flip is closed or when the battery
e card you want to move and it will be higlighted.e card to which you would like to move the d card.
e game during a gameire > New game.
o a move Undo move / Redo move.
86 Games
Solitaire is a card game played with a standard deck of 52 cards and up to 4 Jokers.
The purpose of Solitaire is to remove all the cards from the piles to the layout card while scoring as many points as possible.
Points are awarded for playing pile cards and bonus points are awarded for unbroken, ascending or descending runs of four or more rank cards.
When you cannot play any more cards and cards still remain in the piles, the game is over. If all the pile cards are removed, bonus points are awarded and the hand is won. You are then challenged to play a Higher/Lower game to acquire more bonus points. After the challenge, the game continues and a new hand is dealt with one less Joker.
RulesWhen the game starts, 35 cards are dealt from the deck into7 piles of 5 cards. A further card is then dealt face up from the layout card.
� Cards can only be played from the bottom of the piles.� To play a pile card it must have a face value of one more or
one less than the layout card.
joker.
Play SolSolitaire is o
1. Select thThe gamfor an eareturn tois low).
2. Select th3. Select th
higlighte
To restart thSelect Solita
To undo/redSelect Edit >
Messages 87
This is the Internet version of the user�s guide. © Print only for private use.
Files for exchanging electronic business cards (vCard) and calendar information (vCal).to setup files for OTA (Over The Air) configuration.amed messages. These are files received via infrared or uetooth wireless technology.
ifferent types of messages are handled by separate ging accounts. Select Control panel > Connections > ging accounts to see the details of the messaging accounts ur P910i.
an have any number of email accounts - a typical guration will be one business and one personal account. you set up a synchronization with your PC, an account for ronized email is automatically created on your P910i.
the flip closed, text and multimedia messages can be sent ceived using the Jog Dial and the keypad. More advanced are, however, best handled with the flip open.
re using Messagese you can send and receive any messages (except for SMS) eed to set up the necessary accounts.
BUSINESS
MessagesWith Messages you can create, send, and receive different types of messages:
You also use Messages to receive:
� Area Information messages.These are text messages broadcast to all subscribers in a network area, for example local road reports or local taxi phone numbers. (Area Information services are not available from all operators).
� BIO (Bearer Independent Object) messages. There are different types of messages:� Setup (email, Internet, WAP accounts).� Email notifications.
�
� Au� Be
Bl
The dmessaMessaon yo
You cconfiWhensynch
With and retasks
BefoBeforyou n
SMS (Short Message Service) messages are text messages sent and received via the network operator's message centre. When a text message has pictures, sounds, melodies and animations inserted, it becomes an EMS (Enhanced Message Service).
MMS (Multimedia Message Service) messages.A multimedia message can contain text, graphics, animations, photographic images, audio clips and ring melodies.
Email messages. Your P910i mail client supports POP3 and IMAP4 mail servers, MIME attachments and SMTP for sending mail.
This is the Internet version of the user�s guide. © Print only for private use. A simple way of setting up an Internet, email, or MMS account is to ask your service provider to send you a message that
To save an email message to Outboxposing your message, select Send.
ve to outbox.
at you send from an email synchronization account aved to Outbox and sent from your PC after your
onization.
s messages that are not ready to be sent.
ew message in Draftessage and exit without selecting Send.
essage from Outbox to Drafttbox message list, select the message, and select
ove to draft.
s messages you have sent from your P910i.
rly delete old messages from your Sent folder, ose with attachments, to clear storage space.
88 Messages
contains the required information to create an account automatically on your P910i. You can also use the Web phone setup-message generator on www.SonyEricsson.com. Received auto-setup messages are stored in the Auto setup inbox.
See �Getting started with Internet and Messages� on page 171.
Folders in MessagesMessaging accounts can have the following folders: Inbox, Outbox, Draft, Sent, and folders you can create yourself, local folders. You can also subscribe to folders based on a server (remote folders), if you have selected IMAP for your email account.
InboxInbox contains received messages. You can reply to, forward, and delete messages, but not edit them.
OutboxOutbox contains messages that are ready to be sent. If you are creating several messages, and not using GPRS, you can reduce connection time by saving them to Outbox and then connect and send them all at the same time.
1. After com2. Select Sa
Messages thare always snext synchr
DraftDraft contain
To store a nCreate the m
To move a mOpen the OuMessage > M
SentSent contain
Tip Regulaespecially th
Messages 89
This is the Internet version of the user�s guide. © Print only for private use. and to download messages from the folders you have
ribed to.
e accounts in Messages you open Messages, a list of your accounts appears.
op items in the list, Create SMS, and Create MMS, are uts for directly creating new messages.
terisk next to an account indicates that a message has d since you last opened the accounts inbox.
ndling text messagest message is sent via SMS (Short Message Service). It can in up to 160 characters (70 characters if you use non-Latin cters). If you create a longer message it will be sent as two ore) separate messages (concatenated), but will usually be ed as one message. If you add pictures, sounds and other
to your message it becomes an EMS message.
essages can be sent to one or more people (not more than , we recommend), and you can request a delivery report your text messages have been delivered to the recipients. elivery report arrives on your P910i as a text message.
Local folders
To create a new folder1. From the folder menu, select Edit folders.2. Tap Add.3. Name the folder.4. Tap Done.
Remote foldersIf you have selected connection type IMAP for your email account, you can subscribe to remote folders on your email server. (To select connection type, see �Email account basic tab settings� on page 160.) By default you subscribe to an Inbox folder.
Note If you change connection type, your Inbox will be emptied. Use the Get&send command to download your messages again. See �Get and send� on page 98.
To subscribe to a new remote folder1. From the folder menu, select Subscribe.2. Select the check box for the folders you wish to subscribe to.3. Tap Done.
The new folders are shown in the folder list. Your subscribed folders will be shown in a flat structure, that is, subfolders will be shown on the same level as main folders. Use the Get&send
commsubsc
ThWhen
The tshortc
An asarrive
HaA texcontachara(or mreceivitems
Text mthirtywhenThe d
This is the Internet version of the user�s guide. © Print only for private use. If you leave the message before sending it, it will automatically be stored in the Draft folder (unless you edit a message which
� Tap to insert a sound. The sounds last used appear.� Tap More to get more sounds to use.
to write bold text.to change the size of the text you write.
e text in the message using EMS featurest the text you want to format.
> Format text.
ral tab to change the Alignment and Font. tab to check the character style check boxes: bold, derline, or strike through. ne.
o use the icons and described above.
ceived EMS itemtem.it > Save object.
ing multimedia messagestimedia Messaging Service) messages can include imations and sound, organized like a slide with time-based control of the playback.
a multimedia message is like building a small slide
aa
90 Messages
was already located in Outbox).
Tip To enter several addresses manually (without using Contacts) in a text message, multimedia message or in an email: enter a comma between each address.
To write and send a text message1. In Messages select Create SMS. (You can also select SMS >
tap Message > New.)2. Enter the recipient�s number or select To and select recipient
or recipients from your contact list and select Done.
3. Write your message.4. Go to the address tab and specify whether you want a
delivery report or not.5. Tap Send.
To add an EMS item to your text messageUse the icons at the bottom of the screen to select the type of item you wish to add.
� Tap to insert one of the smilies that appear.� Tap to insert a picture or an animation. The pictures and
animations last used appear.� Tap More to get more pictures and animations to use.� Tap New to draw a picture of your own.
� Tap � Tap
To format th1. Highligh2. Tap Edit
3. Tap Gene
4. Tap Styleitalic, un
5. Select Do
You can als
To save a re1. Tap the i2. Select Ed
HandlMMS (Mulpictures, anpresentationComposing
aa
Messages 91
This is the Internet version of the user�s guide. © Print only for private use. e first time a multimedia message is opened it plays tomatically. The next time you open the message you can y it by pressing the Play Button (flip open) or by choosing y from the menu (flip closed).
rward an MMSen the message.
om the Message menu, select Forward. the address tab, select To and enter the recipient�s bile number or email address.
lect Send.
re a received MMS item, for example a pictureen the message.lect the picture you want to save.lect Save picture or select Edit > Save picture.lect the storage location.lect Save.
an store items both internally and externally. You can also them between the internal memory and the Memory Stick. olders� on page 28.
ting and sending multimedia messagesan create multimedia messages in the P910i but you can se the MMS editor on the Content and Application CD.
presentation. A typical page will consist of a picture, some text and sound. Refer to Technical data, section �MMS� on page 199 for supported file types that you can add.
You can take a picture with the CommuniCorder and send it as a multimedia message using the Send as command from Pictures. Multimedia messages can be sent to a mobile phone or an email account.
How a recipient receives an MMS you send depends on your MMS service and how the receiving phone complies to MMS specifications. Phones can, for example, only receieve pictures of a maximum size, video and sound.
Your P910i can help you to create messages which conform to standard and therefore are more likely to reach recipients. Set the Content alert to warn or restrict you. See �MMS Advanced settings tabs� on page 163.
Tip To enter several addresses manually (without using Contacts) in a text message, multimedia message or in an email: enter a comma between each address.
Incoming multimedia messages
To play a received multimedia message � Open the MMS inbox and select the new message.
ThauplaPla
To fo1. Op2. Fr3. On
mo4. Se
To sto1. Op2. Se3. Se4. Se5. Se
You ccopy See �F
CreaYou calso u
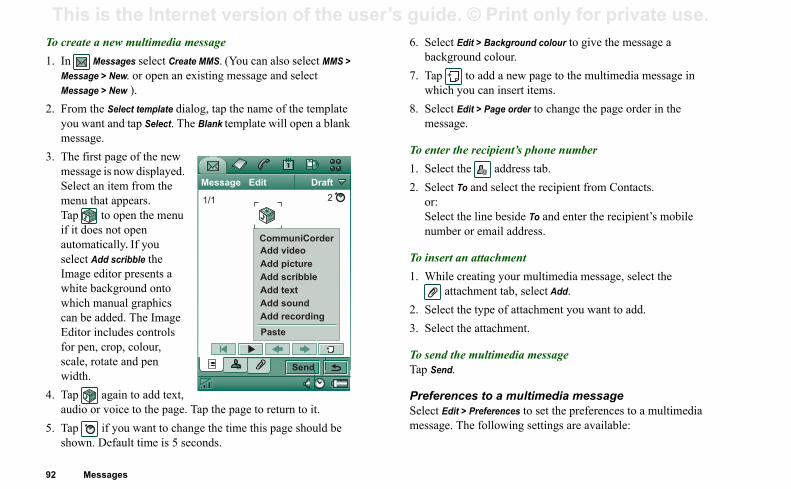
This is the Internet version of the user�s guide. © Print only for private use. To create a new multimedia message 6. Select Edit > Background colour to give the message a
background colour.to add a new page to the multimedia message in u can insert items.it > Page order to change the page order in the
.
recipient�s phone numbere address tab. and select the recipient from Contacts.
e line beside To and enter the recipient�s mobile r email address.
attachmenteating your multimedia message, select the hment tab, select Add.e type of attachment you want to add.e attachment.
multimedia message
es to a multimedia message Preferences to set the preferences to a multimedia e following settings are available:
92 Messages
1. In Messages select Create MMS. (You can also select MMS > Message > New. or open an existing message and select Message > New ).
2. From the Select template dialog, tap the name of the template you want and tap Select. The Blank template will open a blank message.
3. The first page of the new message is now displayed. Select an item from the menu that appears. Tap to open the menu if it does not open automatically. If you select Add scribble the Image editor presents a white background onto which manual graphics can be added. The Image Editor includes controls for pen, crop, colour, scale, rotate and pen width.
4. Tap again to add text, audio or voice to the page. Tap the page to return to it.
5. Tap if you want to change the time this page should be shown. Default time is 5 seconds.
7. Tap which yo
8. Select Edmessage
To enter the1. Select th2. Select To
or:Select thnumber o
To insert an1. While cr
attac2. Select th3. Select th
To send theTap Send.
PreferencSelect Edit >message. Th
Chat EditMessage Edit Draft
1/1
Send
2
Add picture
Add video
CommuniCorder
Add scribble
Add text
Add sound
Add recording
Paste
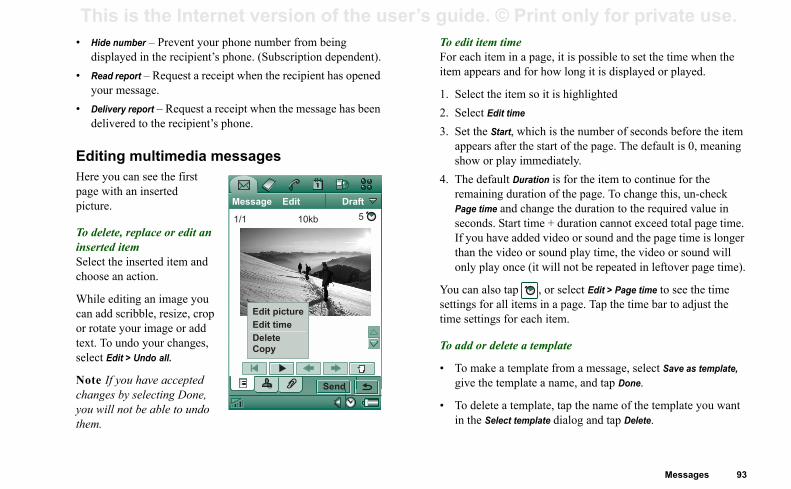
Messages 93
This is the Internet version of the user�s guide. © Print only for private use. it item timeach item in a page, it is possible to set the time when the ppears and for how long it is displayed or played.
lect the item so it is highlightedlect Edit time
t the Start, which is the number of seconds before the item pears after the start of the page. The default is 0, meaning ow or play immediately.e default Duration is for the item to continue for the aining duration of the page. To change this, un-check
ge time and change the duration to the required value in conds. Start time + duration cannot exceed total page time. you have added video or sound and the page time is longer n the video or sound play time, the video or sound will ly play once (it will not be repeated in leftover page time).
an also tap , or select Edit > Page time to see the time gs for all items in a page. Tap the time bar to adjust the ettings for each item.
d or delete a template
make a template from a message, select Save as template, e the template a name, and tap Done.
delete a template, tap the name of the template you want the Select template dialog and tap Delete.
� Hide number � Prevent your phone number from being displayed in the recipient�s phone. (Subscription dependent).
� Read report � Request a receipt when the recipient has opened your message.
� Delivery report � Request a receipt when the message has been delivered to the recipient�s phone.
Editing multimedia messagesHere you can see the first page with an inserted picture.
To delete, replace or edit an inserted itemSelect the inserted item and choose an action.
While editing an image you can add scribble, resize, crop or rotate your image or add text. To undo your changes, select Edit > Undo all.
Note If you have accepted changes by selecting Done, you will not be able to undo them.
To edFor eitem a
1. Se2. Se3. Se
apsh
4. ThremPaseIf thaon
You csettintime s
To ad
� Togiv
� Toin
Chat EditMessage Edit Draft
1/1
Send
5
Edit picture
Edit time
Delete
Copy
10kb

This is the Internet version of the user�s guide. © Print only for private use. To set the download method for receiving multimedia messages, manual or automatic
To enter addresses from Contacts when writing an email:
lect contact dialog select the check box for each entry t to send the email to.ne.
r several addresses manually (without using a text message, multimedia message or in an email: ma between each address.
email message> Send immediately.
i is connected to the Internet when you send an l be sent immediately and your P910i will remain o the Internet. If not, your P910i will connect to the then send the email.
re creating several messages, and not using GPRS, uce connection time by saving them to Outbox and t and send them all at the same time.
email message and send it later> Save to outbox.
94 Messages
� In Control panel, select Connections > Messaging accounts > MMS > Automatic.
� Off means that only headers will be downloaded and can be viewed.
� Home only means the same as for On below, but is only valid in your home country.
� On means that the multimedia message is downloaded and can be read like any other message. There is no intermediate step.
Handling emailWriting email
To write a new emailSelect an email account and select Message > New.
If you leave the message before sending it, it will automatically be stored in the Draft folder (unless you edit a message which was already located in Outbox).
To mark an email as urgentOn the address tab, select High in the Priority list.
1. Select To
2. In the Seyou wan
3. Select Do
Tip To enteContacts) inenter a com
Sending e
To send an Select Send
If your P910email, it wilconnected tInternet and
Tip If you ayou can redthen connec
To save an Select Send
Messages 95
This is the Internet version of the user�s guide. © Print only for private use. dar, Contacts, Tasks, and Jotter. You can use this service if s is available in the application�s main menu.
ach a Calendar entry to an email messageen the entry in Calendar and select Calendar > Send As.
lect Email > Done.
mplete the email message and select Send.
ach a Contact to an email messageen the contact details for the contact you wish to send and
lect Contacts > Send as.
lect Email > Done.
mplete the email message and select Send.
iving emaill must be fetched from the email server on the Internet or at office. This can be done manually using the Get & send ion or automatically by requesting the P910i to check for mail at certain times.
you forward an email, you can choose whether or not to rd the attachment. Large attachments increase the size of ail and consequently the connection time needed to send
To move an email message from Outbox to DraftIn your list of Outbox messages, tap to the left of the email (a tick appears), and select Message > Move to draft.
If you leave the message before sending it, it will automatically be stored in the Draft folder (unless it was created from Outbox).
Setting email preferencesSelect Edit > Preferences to open the preferences dialogue.
� Email account � The email account you are currently using.� Always attach your card � The entry in Contacts specified as
My card will be attached to your email messages.� Always reply with history � The contents of the email you
replay to is included in your new email.� Signature � The signature you write here ends your email
messages.
Adding attachments
To attach an entry to an email message1. On the attachment tab, select Add.
2. Select the type of attachment you want to add, and select the item.
�Send as� emailYou can send an open entry as an attachment to a new email from multimedia applications, document editors, Internet,
CalenSend a
To att1. Op2. Se3. Co
To att1. Op
se2. Se3. Co
ReceEmaiyour functnew e
Whenforwaan emit.
This is the Internet version of the user�s guide. © Print only for private use. Receiving attachmentsAny attachments to an email message are displayed on the
To specify a size limit for email, above which you only receive a header
Control panel > Connections > Messaging accounts > lect the email account) > Edit.
box.
option from the Download list.
of messages, headers are denoted by .
d the full messageist of messages, select the header.g Download, Yes/No appears.
s.
d a series of messagesist of messages, select the check box to the left of y (a tick appears).t & Send.
essagesete messages both locally and in your email server.
message locallyist of messages, select the check box to the left of the header.essage > Local delete.
96 Messages
tab. The icon next to an attachment in the list identifies the type of attachment.
To view an attachment you need a viewer for that type of file.Your P910i comes with pre-installed viewers for Microsoft Word, Excel, and Adobe Acrobat (PDF) files.
To save an attachment, for example a picture1. Open the email message and select the tab.2. Tap the attachment, which opens the Pictures application.3. Select Pictures > Save.4. Select the location where you want to store the message.5. Select Save.
You can store items both internally and externally. You can also copy them between the internal memory and the Memory Stick. See �Folders� on page 28.
DownloadingYou can choose not to download large messages and receive just a header instead. A header contains the subject line, sender�s details, and date, but not the full message.
1. Select Email (se
2. Select In3. Select an
In your list
To downloa1. In your l2. The dialo3. Select Ye
To downloa1. In your l
each entr2. Select Ge
Deleting mYou can del
To delete a 1. In your l
message2. Select M
Messages 97
This is the Internet version of the user�s guide. © Print only for private use. connected before sending an email, it will connect and the message, and then disconnect.
You can send text messages while connected to the et. If your connection is CSD or HSCSD it must be
nnected before you can make or receive a phone call.r connection is GPRS, it may be suspended to enable a call to be made or received. You may need to repeat the ctivity (Web page fetch, get email) after the call has .
r P910i cannot connect to the email account, automatic load will fail, and will be displayed next to the email nt.
eduled download will fail if your P910i is engaged in a call. It may fail if it is connected to another ISP, that is, gh a different Internet account than specified for the email nt.
ail messages are not downloaded because a scheduled load fails, they will be downloaded during the next ssful connection.
3. Select Yes.
The message body and attachments are deleted but the heading remains. You can download the message again later.
To delete a message both locally and in your email server1. In your list of messages, select the check box to the left of the
message header.2. Select Message > Delete message.
3. Select Yes.
The message is deleted in your P910i and in your email server and will no longer be visible in your message list.
Downloading email automaticallyYou can schedule your email messages to be downloaded automatically at certain times.
To download your email automatically1. In Control Panel, select Connections > Messaging accounts >
Email.
2. Select the required email account and select Edit.
3. Select Inbox > Schedule.
4. Set time or interval for scheduled download and select Done.
Disconnecting and connectingIf your P910i is already connected to the Internet when you send an email, it will remain connected after sending it. If your P910i
is notsend
NoteInterndiscoIf youphonedata aended
If youdownaccou
A schvoicethrouaccou
If emdownsucce
This is the Internet version of the user�s guide. © Print only for private use. More about messaging Note If the email account is set up to access the mail server
through a Secure access connection (see �Secure tokens� on ou must have the flip open when you use Get&send. closed you will see an error message.
d and unreadnds on the Edit menu to mark your received ad or unread. You can also make P910i show just sages. If you have selected connection type IMAP for ccount, the read or unread status will be updated for s on the server the next time you use the Get&send
changed the read or unread status for the messages r, for example from your PC, the read and unread hange accordingly on your P910i.
nnection type, see �Email account basic tab page 160.
change connection type, your Inbox will be emptied. send command to download your messages again.
en viewmand Edit > Full screen to view your email messages full screen. You can also edit email in full screen.
10i to open email messages in full screen view by �Email account Inbox tab settings� on page 161,
98 Messages
Finding messagesIn both the list of accounts and list of messages, Find searches through the subject lines, senders� details, the text of the message, and dates.
In an open message, Find searches through the text of the message and highlights the text it finds.
You can only search through email messages that have been fully downloaded.
Get and send
To get and send messages for one specific account1. Select Messages.2. Select the desired account (MMS or email for example).3. Select Get&send.
To get and send messages for all your accounts1. Select Messages.2. Select Message > Get&send. Any unsent messages in your
Outbox will now be sent and new messages not yet downloaded will be downloaded to your P910i.
page 168) yIf the flip is
Mark reaUse commamessages reunread mesyour email athe messagecommand.
If you have on the servestatus will c
To select cosettings� on
Note If youUse the Get&
Full screUse the comand MMS inSet your P9default, see

Messages 99
This is the Internet version of the user�s guide. © Print only for private use. e dialog Do you want to disconnect from Internet?, Yes/No pears.lect Yes.
ur service provider or network is vailabletimes a message cannot be sent because your P910i cannot ct to a network. Please check that the Messaging Account ternet Account information in the Control Panel is correct.
have both GPRS and Dial-Up Internet accounts, try ng the email message using an account of the other type. Internet accounts use the GPRS network and Dial-Up et accounts use the GSM network.
hronized email you set up a synchronization with your PC, an account for ronized email messages is automatically created on your
i and indicated by . You can have more than one nt for synchronized email, but only one per PC. If you
an email as PC mail, the mail will be sent via the PC when ave synchronized your P910i with the PC.
set up a POP or IMAP account which accesses the same erver, the two accounts will contain the same messages. that there is no connection between the accounts; the s in each account are separate.
and to play received MMS in full screen by default, see �MMS Advanced settings tabs� on page 163.
Saving contact detailsWhen you receive a message, you can save the contact details of the person who sent you the message.
To save the sender�s detailsOn the message�s address tab, select From.
Note If you save an address from an email message synchronized from your company PC, the corporate version of the address, rather than the full Internet email address, will be saved to Contacts. If the corporate version of the address is not an Internet address (an X.400 address, or just the sender's name, for example), you can use it to send email from your synchronized account, but you cannot use it in email that you send directly from your P910i.
Connecting and disconnecting from the Internet
To disconnect from the Internet1. Select the connection icon (HSCSD/CSD or GPRS )
in the status bar.2. Select Disconnect from the pop-up menu
3. Thap
4. Se
If younaSomeconneand In
If yousendiGPRSIntern
SyncWhensynchP910accousend you h
If youmail sNote copie
This is the Internet version of the user�s guide. © Print only for private use. Area information
100 Messages
Area information messages are text messages that are sent to all subscribers in a certain network area, for example, a local traffic report. When you receive an area information message, the message automatically appears on the screen. When you dismiss the information, it will be stored in the Area info Inbox until it is replaced by a new message received on the same channel. Please consult your service provider for more information about the availability of area information services and area information channel numbering. See ��Area tab� on page 164 for more information.
Contacts 101
This is the Internet version of the user�s guide. © Print only for private use.
usth list view and detail view, you can use to access of the P910i�s contact functions. The options will vary ding on the situation.
options in list view
� Display the contacts of the SIM card.nd my card � Send your owner card (See �Making an owner rd� on page 107) via infrared or Bluetooth wireless hnology.d � Search for a specific contact.do delete � Restore the last deleted contact. Will appear ly if there is something to undo.pplications � Access the application list view.
options in detail view options in detail view: (availability depends on the type of ct detail, for example mobile number, that is highlighted.)
nd SMS � Send a multimedia message to the active contactnd MMS � Send a text message to the active contact.ll � Call the active contact.
ContactsContacts is like an address book, in which you can store names, phone numbers, email addresses and other useful information, including photos.
The information stored in the SIM is also accessible. SIM entries can be copied to Contacts and Contacts entries can be copied to the SIM. Some SIM cards have Information numbers and Service numbers stored on the SIM card by the operator. These numbers are useful for service and information, and are accessible from the SIM within Contacts.
You can synchronize the contents in Contacts with one of the PIM applications in your PC supported by the P910i. See �Synchronization and backup� on page 139.
Using Contacts with the flip closedWith the flip closed, you can make calls and send text or multimedia messages.
Contacts has two views when the flip is closed:
MenIn bosomedepen
Menu
� SIM
� Secatec
� Fin
� Unon
� # A
MenuMenuconta
� Se
� Se
� CaList view An alphabetical list of contacts. The list view is the starting point for finding a contact.
Detail view The details for a contact.
This is the Internet version of the user�s guide. © Print only for private use. � Send as � Send the active contact using infrared or Bluetooth
wireless technology.3. Select a contact and press the Jog Dial or press to open
the detail view for a contact.
the list view, press .
ke a call to a contact in the SIM, select SIM from the u. If there are service numbers or information red on the SIM card, you can also access them.
allphone number. Jog Dial or press .
phone number.ll from the options menu.
xt messagephone number.nd SMS from the options menu.
ultimedia messagephone number.nd MMS from the options menu.
102 Contacts
� Delete contact � Delete the active contact.� # Applications � Will access the application list view.
Menu options in SIM
� View all � Switch to Contacts list.� Service numbers � Display the service numbers on the SIM
card. This option is only displayed if there are service numbers stored on the SIM card.
� Information numbers � As for service numbers above.� Find � Search for a specific contact.� # Applications � Will access the application list view.
Selecting a contact with the flip closed
To select a contact1. Select .2. Then either:
� Scroll down to the desired contact.� Press a number key. The first contact corresponding to the
first letter of the key appears. To search further, continue to enter the letters with the keys.
� Select Find from the menu and search for the contact.
To return to
Note To maoptions mennumbers sto
To make a c1. Select a 2. Press the
or
1. Select a 2. Select Ca
To send a te1. Select a 2. Select Se
To send a m1. Select a 2. Select Se
Contacts 103
This is the Internet version of the user�s guide. © Print only for private use.
at the bottom of the list view provide a fast way to locate ation. To highlight the first entry that begins with the first
on a tab, select the tab once. To highlight the first entry egins with the next letter on the tab, select the tab again, gain for the third letter on the tab.
ing a call with the flip open
en Contacts or select Contacts in the Application launcher .
ke a callrequired, change folder from the Folders menu.roll down to the desired contact.the contact list is long, first select a tab at the bottom of the w.
lect the contact to display the contact details.pending on what you want to do, make one of the
llowing choices:Select or or the phone number to make a call.Select or the email address to send an email.
il view The details for a contact.
view Contact details, displayed in a way that allows you to add and change the information.
ef ghi jkl mno pqr stu v-z
To add a contactYou can create a new contact using information from a recently received voice call or message. See also �Add to contacts� on page 54.
1. Select Yes when asked to add to contacts.2. Enter contact name and edit the number, if required.
To delete a contact1. Select the contact.2. Select Delete contact from the options menu.
� To restore a deleted contact, select Undo delete from the options menu.
Using Contacts with the flip openOpen the flip and tap or select Contacts in the Application launcher to open Contacts.
Contacts has three views when the flip is open:
Tabs informletterthat band a
Mak
To opTap
To ma1. If 2. Sc
If vie
3. Se4. De
fo��
List view An alphabetical list of contacts. The list view is the starting point for finding a contact.
DetaEdit
abc d
This is the Internet version of the user�s guide. © Print only for private use. � Select or the URL to open a Web page.� Select to send a multimedia message.
Note Save mobile numbers as mobile numbers. Otherwise they will not be available when addressing text messages.
ld to a contacte contact.it > Edit contact.
it > Add field.
e field to be added from the drop-down list.d.
MF tone sequencefield and set it to Phone (h).w field if necessary. and then the tone digits. Enter a p to insert a pause.ssary to start the tone sequence with a p so the cognises it as a tone sequence.
TMF tone sequence during a call call, open the contact�s detail view.at the tone sequence.
about DTMF tones in �Controlling tone-based page 49.
ice dialling commandth a voice dialling command are shown in Voice the folders menu.
104 Contacts
� Select to send a text message.
Using service and information numbers
To call an Information number or Service number on the SIM card1. Select SIM in the folders menu.2. Select Contacts > Information numbers / Service numbers and
select a phone number or select a sub-category and then a phone number.
3. Select Call.
Creating and editing contactsYou can sort the contacts according to first name, last name or company. The contact entries can also be filtered by folder, such as Business or Personal.
To create a new contact1. Select Contacts > New.2. Enter the desired information. When applicable, select from
the drop-down menus.
To add a fie1. Select th2. Select Ed
3. Select Ed
4. Select th5. Select Ad
To add a DT1. Select a
Add a ne2. Enter a p
It is necephone re
To send a D1. During a2. Tap
Read more services� on
To add a voContacts wicommands in
Contacts 105
This is the Internet version of the user�s guide. © Print only for private use. rsonalize the ring melody for a contactcts with a personalized ring melody are shown in Personal pe in the folders menu.
ainst Ring Tone, select Find sound from the drop-down nu.
required, change folder.lect the required sound.p and to preview the sound.p Select to set this sound for the contact.
The selected ring melody will only be played if the rk provides a CLI (Calling Line Identity) to enable the ct to be identified, otherwise the Default Melody will be d.
If the ring melody selected for this contact is later deleted ved, the Default Melody will be played.
ange the details of a contactlect a contact.lect Edit > Edit contact, or tap the tab.ange the desired information. When applicable, select m the drop-down menus.
lete a contactlect the contact.
1. Select at the bottom of the screen.2. Select a number.3. Tap the Record button and record a voice command after the
tone.4. Tap Play to check the quality of the recording.
� To remove a voice command, select the Del button.
To add a note to a contact1. Select .2. Enter the text.3. If you do not want the note to be included when you send,
beam, or synchronize the contact, select the Private check box.
To add a photo or other picture to a contact1. Select the photo view tab .2. Tap the picture space.3. If required, change folder.4. Select the picture to use.5. Tap the Select button.
� To change a picture, select the picture and select Replace image.
� To remove a picture, select the picture and select Delete image.
To peContaring ty
1. Agme
2. If 3. Se4. Ta5. Ta
Notenetwocontaplaye
Noteor mo
To ch1. Se2. Se3. Ch
fro
To de1. Se
This is the Internet version of the user�s guide. © Print only for private use. 2. Select Contacts > Delete contact. 4. Follow the instructions, for example, select a folder or a
sending method. or Yes to confirm the action.
or an entry containing specific textntacts > Find.
text string you wish to search for.ther In all fields or In Names & Company and tap Find.
e search is complete, all results will be displayed.
hing is not case sensitive and you do not have to ire word to locate a matching entry.
contacts to and from the SIM cardo copy information between the contacts list and the
tacts from the SIM cardM in the folders menu to the right in the menu bar.it > Copy all to Contacts for copying all SIM entries
entry to open it and select Edit > Copy to Contacts to selected SIM entry.
tacts to the SIM cardcontact.
106 Contacts
To create or edit a contact on the SIM card1. Select SIM from the Folders menu.2. Create or edit the contact as described above.
All options are, however, not available for the SIM card contacts.
Managing contactsYou can use Contacts manager to move contacts between the folders, send contacts as a Vcard to another device, or to delete them. You can also send or delete contacts on the SIM card with the Contacts manager.
See �Sending and receiving items� on page 30 for information about how to receive contacts from another device.
To move, send or delete a contact1. Select Contacts > Contacts manager.2. Select the contacts you want to manage.
(If required, change folder from the Folders menu. Selecting All will show all the contacts from all the folders except the SIM. Clicking the Select all check box will select all the contacts in the current folder.)
3. Select Send / Move / Delete.
5. Tap Done
To search f1. Select Co
2. Enter the3. Select ei4. When th
Note Searcenter an ent
CopyingYou can alsSIM card.
To copy con1. Select SI
2. Select EdorTap a SIMcopy the
To copy con1. Select a
Contacts 107
This is the Internet version of the user�s guide. © Print only for private use. ferences
tacts tab
rt the contact list and show the preferred phone numberlect Edit > Preferences.lect the desired sorting option (first name, last name or mpany) and tap Done.
you want a phone number to be shown next to the name in t view, select Show preferred phone number.no preferred number has been set up for the contact, the st phone number will be used.
lect Done.
ange the preferred phone numberlect a contact.lect Edit > Edit contact.lect Edit > Show in list.
lect the number to be shown from the list.p Done.
If no number appears, ensure that Show preferred phone r is checked in preferences.
2. Select Edit > Copy to SIM card.3. If the contact has multiple phone numbers, each number will
be created as a separate entry in the SIM phone book.4. Select Done.
Making an owner cardYou can create an electronic business card, containing your contact details, including notes and a photo. You can then send this card to another device.
To create your owner card1. Select Contacts > New and enter your details.2. Select Contacts > Set as my card.
Tip You can also create an owner card by viewing the detail view of a contact and selecting the menu option Set as my card.
To send your owner card 1. Open the list view, and then select Contacts > Send my card.2. Send the card using Send as.
Read more about sending items in �Sending and receiving items� on page 30.
To view or edit your owner card� Select Contacts > View my card.
Pre
Con
To so1. Se2. Se
co3. If
lisIf fir
4. Se
To ch1. Se2. Se3. Se4. Se5. Ta
Notenumbe
This is the Internet version of the user�s guide. © Print only for private use.
Calendarng calendar entriesnew calendar entrylendar > New and enter a short description of the is is the description you see in the calendar.ed (the folder menu) in the menu bar and select a store the entry in. to enter information for the items on the detail
Specify if the entry is an appointment, reminder or y event. Select the date to get a calendar where you can set a or the entry. Set start and end time for the entry.on - Specify a location or select a location you have before. - Select the check box if you want your P910i to ou about the entry with a sound. Select the time and
hat appears for your settings.t - Specify if you want to repeat the entry or not. more about this below.
108 Calendar
The Calendar function helps you to keep track of appointments and events, and you can also set reminder alarms for the entries. A reminder is denoted by a .
Different viewsYou can see your Calendar entries in three views with the flip open: Day, Week and Month. With the flip closed you will see the Day view.
To change view in flip open� Tap to display the Day view.� Tap to display the Week view.� Tap to display the Month view.� Tap to navigate to the present day in the displayed view.
If you tap an entry in week view, the subject and time for that entry are shown.
To navigate backwards or forwards in the current viewTap the left and right arrows in the button bar at the bottom of the screen. You can also rotate the Jog Dial.
To navigate to a specific date in the current viewTap the day, week or month heading at the top of the display to show a calendar pop-up in which you can select a specific date.
CreatiTo create a 1. Select Ca
entry. Th2. Tap Unfil
folder to3. Continue
page.� Type -
all da� Date -
date f� Time -� Locati
used � Alarm
alert ydate t
� RepeaRead
Calendar 109
This is the Internet version of the user�s guide. © Print only for private use. naging calendar entriesd a certain entrylect Calendar > Find.ter a search word in the menu that appears.lect where to search (Everywhere, Future, Past).lect Find. A result list is then displayed.lect an entry on the result list to open it.
lete an entry the entry and select Calendar > Delete entry.
eted entry may be restored with Edit > Undo delete.
lete all entries in a period of timelect Calendar > Remove entries. lect the time period and select Done. All entries from that e period are deleted from the Calendar.
Repeated entries will not be deleted.
py, cut or paste an entryen the entry.lect Edit > Copy entry/ Cut entry.
to the day where you want to place the entry.lect Paste entry.
� Private - Select the check box to prevent the item from being viewed by others than yourself if you synchronize your calendar with, for example, your PC.
4. Select the note page tab to write a note for this entry.5. Select to save and close the entry.
You should delete old entries regularly to release memory.
To create re-occurring entries1. When the entry is open, select Repeat.
� Set repeating to Daily, Weekly, Monthly by date, Monthly by day, Yearly by date or Yearly by day.
� Interval - Specify how often the event will happen, for example, by selecting Weekly and Interval 2 means that the event will go off every two weeks on the specified day.
� Forever/Until - Set the time limit for the alarm or select forever.
2. Select days - Weekly repeated events can be set to occur twice or more in a week. For example, eating lunch with a friend Tuesday and Friday every week.
Note You cannot repeat All Day Events
To edit an entry1. Open the entry by tapping it in the calendar.2. Make the changes in accordance with the instructions above.
MaTo fin1. Se2. En3. Se4. Se5. Se
To deOpen
A del
To de1. Se2. Se
tim
Note
To co1. Op2. Se3. Go4. Se
This is the Internet version of the user�s guide. © Print only for private use. To move a Calendar item to Tasks 2. Select the General tab, and fill in the required details.
e the alarm settingsit > Preferences.
e Alarm tab.
n change the Alarm precedes event by setting - the e before an entry that the alarm goes off.
olours to your entries using the foldersdar, select the folders menu to the right in the menu elect Edit folders.
folder and select Edit or create a new folder by Add.e colour box and select colour for that folder and ne.
folder with a specific colour appear in that colour in ek views (but not in Month view) so that you can rn of events in your diary. Reminders appear as e folder colour.
hanges Calendar while editing an entry, your changes will tomatically.
110 Calendar
1. Open the entry and select Calendar > Move to Tasks.2. The entry is moved, not copied.
If you move an entry with an alarm, the alarm will also sound in Tasks.
To cut or copy Calendar entries to the Tasks application1. Open the entry and select Edit > Cut entry or Copy entry.
2. Open Tasks.3. Select Edit > Paste entry.
Sending and receiving calendar entriesYou can send and receive calendar entries using Send as. See �Sending and receiving items� on page 30.
PreferencesYou can customize the calendar views and alarm settings to suit your own needs.
To customize the calendar view, General tab1. Select Edit > Preferences.
To customiz1. Select Ed
2. Select th
Now, you calength of tim
To assign c1. In Calen
bar and s2. Select a
selecting3. Select th
select Do
Entries in a Day and Wesee the pattewhatever th
Saving cIf you leavebe saved au
Tasks 111
This is the Internet version of the user�s guide. © Print only for private use.
Completed � Select the check box when the task is done.This can also be done directly in the Tasks list.Priority � Set a priority for the task. You can sort the tasks by priority.Due date � Select the check box to set a deadline for the task. Select the date that appears to get a calendar where you can set a due date.Alarm � Select the check box if you want your P910i to alert you about the task. Select the time and date that appears for your settings.Private � Select the check box to prevent the task from being visible by others, when synchronized with shared calendars or tasks in other devices, for example your PC.
lect the note page tab to write a note for this entry.lect to save and close the task.
Delete will delete the whole task entry.
it an entryen the entry by tapping it in the Tasks list.
ake the changes according to the instructions above.
TasksWith the Tasks function you can make a list of things you need to do. The folders help you to separate different types of activities.
You can move entries between Tasks and the Calendar, which is useful when you come to schedule a Tasks entry. You can also send an entry via text message, infrared, Bluetooth wireless technology, multimedia message or email.
Creating task entriesThe Tasks list shows a short description of the task. Select a task to see its full information.
A task entry consists of two pages. One detail page where you set the properties for the task, and one page where you can add notes.
To create a new task entry1. Select Tasks > New and enter a short description of the task.
This is the description you see in the task list.2. Select Unfiled (the folder menu) in the menu bar and select a
folder to store the task in.3. Continue to enter information for the items on the detail
page.
�
�
�
�
�
4. Se5. Se
Note
To ed1. Op2. M
This is the Internet version of the user�s guide. © Print only for private use. Managing task entries To restore a deleted entry
Select Edit > Undo delete.
l completed entriess list, select Tasks > Delete completed.
you delete All Completed Entries, they are deleted and cannot be restored.
g task entries entry to the Calendartry and select Tasks > Move to Calendar. The entry is copied.
sk entry to Calendar entry and select Edit > Copy entry. lendar. day you wish the task to appear.it > Paste entry in Calendar.
move or copy an entry to the Calendar, it will lose it was assigned in Tasks.
t set a due date for the task entry, the current date for the new Calendar entry. If you move or copy an n alarm, the alarm will also be moved to the
112 Tasks
To open an existing entrySelect the entry in the Tasks list.
To mark an entry as completedSelect the check box to the left of the entry in the Tasks list.
To sort the entriesSelect Edit > Sort on priority or Sort on date.
To find a certain entry1. Select Tasks > Find.2. Enter a search word.3. Select in which folder to search or use the default value
All folders.4. Select Find. A result list is then displayed.5. Select an entry on the result list to open it.
To make a copy of an entry or paste an entry1. Open a task and select Edit > Copy entry.
2. In list view, select Edit > Paste entry.
To delete an entryOpen the entry in the task list and then select Delete.
To delete alIn your Task
Note Whenpermanently
MovinTo move anOpen the enmoved, not
To copy a ta1. Open the2. Open Ca3. Enter the4. Select Ed
Note If youthe priority
If you do nowill be usedentry with aCalendar.
Tasks 113
This is the Internet version of the user�s guide. © Print only for private use.
Sending and receiving task entriesYou can send and receive task entries using Send as. See �Sending and receiving items� on page 30.PreferencesSelect Edit > Preferences to change the settings. The following settings are available.
� Display due dates � Select whether or not to display them in the Tasks list.
� Display completed � Select whether or not to display them in the Tasks list. This will not delete the completed tasks.
This is the Internet version of the user�s guide. © Print only for private use.
Jotterte while working with it select Edit > Revert.returns to its original state. All changes are lost.
hes, select Edit > Undo.ice removes your last pen stroke. If you change your lect Edit > Redo.
new note from text or sketches copied from another
t of notes and select Edit > Paste.
paste a sketch over an existing sketch, the existing e deleted.
te with the flip closed (text only)plications >Jotter with the flip closed.ve previous notes stored, these will now be listed. og Dial to select a previous note in order to open it.
if you want to create a new note. Select New. ur text by using the keypad.
114 Jotter
The Jotter works as a notebook where you can write notes and draw pictures. The folders help you to separate different types of notes.
A Jotter entry consists of two pages. One text page and one drawing page. With the flip closed, you can read and edit your notes, but you cannot view or edit pictures.
When opening Jotter you will see a list of entered notes, with the first words of each text note. Select a note to see its full information or edit it.
Creating and editing notesTo create a new note1. Open Jotter and select Jotter >New.
The new note will automatically start as a text note. Select to get bold text and to create a bullet list.
2. Select Unfiled (the folder menu) in the menu bar and select a folder to store the jotter in.
3. Select the drawing page tab to draw a sketch for this note.4. Select to save and close the note.
To edit a no� For text,
The text
� For sketcThis chomind, se
To create a applicationOpen the lis
Note If yousketch will b
Create a no1. Select Ap
2. If you haUse the J
3. Press Insert yo
A
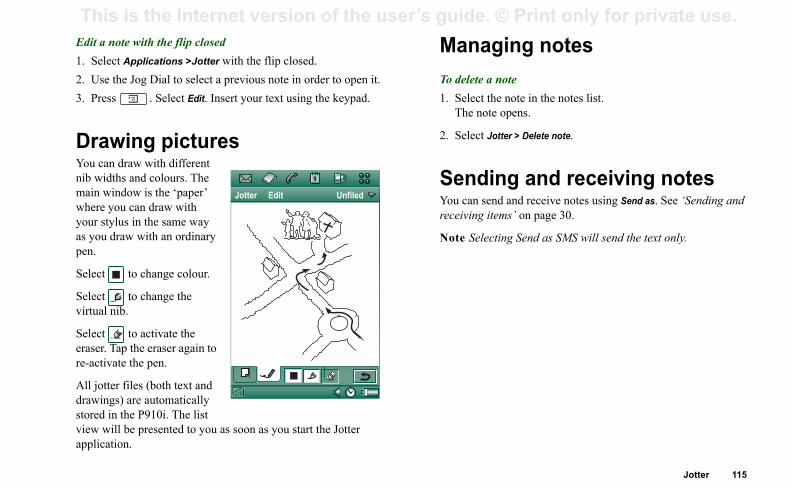
Jotter 115
This is the Internet version of the user�s guide. © Print only for private use. naging noteslete a notelect the note in the notes list.e note opens.
lect Jotter > Delete note.
nding and receiving notesan send and receive notes using Send as. See �Sending and ing items� on page 30.
Selecting Send as SMS will send the text only.
Edit a note with the flip closed1. Select Applications >Jotter with the flip closed.2. Use the Jog Dial to select a previous note in order to open it.3. Press . Select Edit. Insert your text using the keypad.
Drawing picturesYou can draw with different nib widths and colours. The main window is the �paper� where you can draw with your stylus in the same way as you draw with an ordinary pen.
Select to change colour.
Select to change the virtual nib.
Select to activate the eraser. Tap the eraser again to re-activate the pen.
All jotter files (both text and drawings) are automatically stored in the P910i. The list view will be presented to you as soon as you start the Jotter application.
MaTo de1. Se
Th
2. Se
SeYou creceiv
Note
Jotter Edit Unfiled
This is the Internet version of the user�s guide. © Print only for private use. TOOLS
Sound recorder to finish the recording.
ons
sound recordingsound recording you want to delete.lete recording > Yes.
To...start recording a sound.
listen to the current sound recording.
stop the current sound recording.
go to the previous sound recording in the list.
go to the next sound recording in the list.
116 Sound recorder
In Sound recorder you can record and listen to your own sound recordings. You can also send your recordings to other devices via Bluetooth wireless technology, infrared communication, email or multimedia message, and use a sound recording as a ring signal.
Each memo is identified by the date and time it was recorded and by its position in the list of sound recordings.
Making sound recordingsTo record and save a sound recording1. Select > > New.
A new sound recording is created.
2. Select and start recording after the beep.3. Select to finish the recording.
The new sound recording is automatically saved in the list of sound recordings with the current date and time.
To append to the end of a previous sound recording1. Select the required recording.2. Select and start recording after the beep.
3. Select
Key functi
To delete a 1. Select a 2. Select De
Select...
Sound recorder 117
This is the Internet version of the user�s guide. © Print only for private use.
Using sound recordings as ring signalsYou can set a sound recording as a ring signal.Your sound recordings will appear in the list of sounds that can be selected as ring signals. They will take the form voicenote and a number, for example voicenote1470.To set a sound recording as a ring signal see �Sounds and alerts� on page 149.
Sending sound recordingsYou can send Sound recorder recordings via Bluetooth wireless technology, infrared communication, email or as a multimedia message.
To send a sound recording1. Select Sound recorder > Send as.2. Select how you want to send the sound recording. See �To
send an item using Send as� on page 30 for more information.
Note All other sound media on your P910i is handled via the Music player application. You can send sound items from
Music player and all received sound items are played using Music player.
118 Calculator
This is the Internet version of the user�s guide. © Print only for private use.
CalculatorThe Calculator is a standard 12-digit calculator. You can add, subtract, multiply, divide, calculate square roots and percentages. It also has a memory function.
To use the calculator1. Select > .2. Enter the calculations by tapping the digits.
All calculations, except percentage calculations, are performed in the order they are entered, for example: 5+5x5=50, not 30.
Percentage calculations are performed backwards. To calculate, for example, 10% of 50, enter 50x10%. The result is displayed when you tap the %-key.
Key functions
You can copy and paste values to and from other applications by selecting Calculator > Copy or Paste.
Values stored in the memory are retained while using other applications.
mr Tap once to retrieve a value from the memory and enter it into the screen.Tap twice to clear the memory.
m+ Tap once to store an entered value in the memory.If you have already entered a value in the memory, tap once to add the value on the screen to the value in the memory.
m- Tap once to subtract the entered value from the value in the memory. The memory is adjusted but not displayed.Tap once to delete the last digit you entered.
C Tap once to reset the screen to 0.
Time 119
This is the Internet version of the user�s guide. © Print only for private use.
e the am/pm box to switch between am and pm. (This is ly possible if you use the 12-hour time format.) Confirm tapping outside the time picker.
lect Done.
atan specify how you want the time and date to be displayed screen, and if you want to use the 12- or 24-hour time t.
t the time and date display formatlect > .p the clock, or select Time > Set time & date, to view the rrent time and date settings.lect Format.p the Date Format box and choose a format.p the Date Separator box and choose a separator.lect a Time format.p the Time separator box and choose a separator.lect Done.
TimeThe time and date are always displayed on the flip closed standby screen. You can customize the display of times and dates throughout your P910i. You can set your current location and another location of your choice. It is also possible to set three different alarms.
Setting time and dateTo set the current time and date1. Select > .2. Tap the clock, or select Time > Set time & date, to view the
current time and date settings.3. Tap the Date box, then use the arrows to set the current year
and month. Then select the current day.4. Tap Summertime, then select the check box next to the zone
that currently has summer time and tap Done. This is only required if you are currently in a country/region with summer time.
5. Tap the time box, then tap the upper half of the hour or minute box to increase the number displayed, or the lower half to decrease the number.
Usonby
6. Se
FormYou con theforma
To se1. Se2. Ta
cu3. Se4. Ta5. Ta6. Se7. Ta8. Se
This is the Internet version of the user�s guide. © Print only for private use. Specifying workdays To set the locations
> .
> Set location.urrent Country/Region box and select the country/u are in at that moment.urrent City box and select the city you are in at that
If the city you are in is not listed, select the city you.ther Country/Region box and choose a country/
ther City box and choose a city..
g number formatsose how you want the measurements and numbers
0i to be displayed in all your applications. Distances ayed using the imperial or the metric system and nctuation marks can be used as separators.
umber details > .
me > Set location.mbers.
120 Time
You can specify what days you work, if, for example, you want to set an alarm that sounds only on workdays. You can also specify the first day of your week to customize the display of both Week and Month views in Calendar.
To specify your workdays1. Select > .2. Tap the clock, or select Time > Set time & date, to view the
current time and date settings.3. Select Workdays.4. Select the check boxes next to the days you normally work.5. Select First day of week and choose a day.6. Tap Done.
Setting locationsSpecify the country/region and city you are currently in. The city you select will be displayed next to the clock in Time.
If you are away from home, for example travelling in another country/region, it can be useful to know what the time is in your home country/region as well as the country/region you are in. The city you select as Other City will be displayed below the clock in Time.
1. Select 2. Tap Time
3. Tap the Cregion yo
4. Tap the Cmoment.closest to
5. Tap the Oregion.
6. Tap the O7. Tap Done
SettinYou can choin your P91can be displdifferent pu
To set the n1. Select 2. Select Ti
3. Select Nu
Time 121
This is the Internet version of the user�s guide. © Print only for private use. t a new alarmlect > .lect one of the alarm slots.lect Time and choose at what time you want the alarm to go f. Confirm by tapping outside the time picker.lect When and choose how often you want the alarm to go f:
Once The alarm will go off once only, at a time more than 24 hours from now but within the next eight days.Next 24 hours Within the next 24 hours.Daily Every day at the specified time.Workdays Every workday at the specified time.Weekly Every week at the specified time.
lect Alarm sound and choose a sound.lect Message and choose a preset message or write a new e.p Done.ake sure the check box next to the alarm is selected.
the alarm goes off, select Snooze to postpone the alarm for inutes or Silence to turn off the alarm sound. To turn off
arm completely, tap Done.
4. Choose separators and symbol positions from the drop-down lists. You can tap the keyboard icon to find currency symbols.
5. Tap Done.
Setting alarmsYou can set up to three different alarms in your P910i. You can choose to activate one of the preset alarms, or set a new alarm with your own definitions.
You can choose to set a silent alarm, where only a message is displayed when it goes off, or you can set a sound alert.
Alarms requires that the P910i is turned on. If you want to get alarms in an environment where radio transmitters are not allowed, you can set the P910i to flight mode, see �Flight mode� on page 49.
Note If you have connected a stereo headset to the P910i, the alarm will only be heard in the headset.
To activate an existing alarm� Select the check box in the alarm slot. is displayed on the
status bar on the screen.
To se1. Se2. Se3. Se
of4. Se
of�
����
5. Se6. Se
on7. Ta8. M
Whenfive mthe al
This is the Internet version of the user�s guide. © Print only for private use.
Viewers and editors � Quickofficeon viewer and editor
onsocument from an email or Internet pageocument link. The document viewer opens the the detail view.
ocument from the list viewe Application launcher icon .r example, the Quickword icon .d, change folder.
the desired file and select the file name.ment is shown in the detail view.
122 Viewers and editors � Quickoffice
Your phone contains the following viewers and editors:
� Quickword™ � view and edit Microsoft Word documents� Quicksheet™ � view and edit Microsoft Excel documents� Quickpoint™ � view Microsoft Power Point presentations� Pdf+ � view Adobe™ Acrobat™ (PDF) documents
When the flip is open there are two views:
The applications are also started automatically when selecting and opening attachments to messages.
To save documents to another location (internal or on the Memory Stick) you use folders, see �Folders� on page 28.
The functions available differ depending on the document type. Common functions are similar between the applications and are described first.
Please read the help texts for detailed information about the viewers and editors.
CommfunctiTo open a dSelect the ddocument in
To open a d1. Select th2. Select, fo3. If require4. Scroll to5. The docu
List view An alphabetical list of files, for selecting a file to view.
Detail view The contents of a file, for viewing and editing the file.
Viewers and editors � Quickoffice 123
This is the Internet version of the user�s guide. © Print only for private use. icksheet ve and copy the document to a specific folder the list view, select Quicksheet > Copy. lect where to save the document, and select Copy.
it a document irst time you edit a document (in native Microsoft Excel t) transferred to your P910i, you have to rename it. When
elect OK, your P910i copies the document with the new .
bottom of the screen you find the spreadsheet character field, and icons for performing the most common dsheet functions.
you have edited the document and leave it, your P910i it automatically.
QuickwordTo save and copy the document to a specific folder1. In the list view, select Quickword > Copy. 2. Select where to save the document, and select Copy.
To edit a document In the detail view, from the toolbar at the bottom of the screen, select the edit icon .
The first time you edit a document (in native Microsoft Word format) transferred to your P910i, you have to rename it. When you select OK, your P910i copies the document with the new name.
In the toolbar you find icons for performing the most common word-processing functions.
When you have finished editing and leave the document, your P910i saves it automatically.
QuTo sa1. In2. Se
To edThe fformayou sname
At theinputsprea
Whensaves
This is the Internet version of the user�s guide. © Print only for private use. Quickpoint Show previous slide.
nd the current slide (in Outline view).
apse the current slide (in Outline view).
in (in Slide view).
out (in Slide view).
124 Viewers and editors � Quickoffice
Store large presentations on the Memory Stick to leave the phone memory available for running applications. Animations and embedded objects will be shown as plain text.
To handle a presentation file1. Highlight the presentation file in List view.2. Select the required command from the Quickpoint menu.
Viewing a presentationThe presentation opens by default in Outline view where the outline of the whole presentation appears. You can shift to Notes view where you can see the notes to each slide, or to Slide view to show the slides.
Navigate through the presentation with the stylus and the Jog Dial. Change the type of viewing from the toolbar at the bottom of the screen. The commands are also available from the menus:
Outline view. Show the slide headings and the sub texts.
Notes view. Show notes added to a slide.
Slide view. Show the presentation.
Switch between fullscreen view and normal view.
Show next slide.
Expa
Coll
Zoom
Zoom

Viewers and editors � Quickoffice 125
This is the Internet version of the user�s guide. © Print only for private use. Wrap the document, that is the text is displayed in a format which fits the screen. Images and line drawings are not visible in this view. Unwrap the document.
Search.
Search for links.
Pdf+ To save and copy a received document1. In the detail view, from the toolbar at the bottom of the
screen, select the save icon .2. Name the document, select where to save it, and select Save.
To move a documentIn the detail view, from the folder menu, select a new folder.
To view a documentChange the type of viewing from the toolbar at the bottom of the screen:
Bookmarks view. Select a heading to go to the corresponding page. You can also use the Jog Dial to select a bookmark, and then use the icon below to go to the corresponding page.Go to the selected page.
Return to the page view.
Go to previous page.
Go to next page.
Full screen.
To return to the normal view, select the icon and de-select Full screen.
This is the Internet version of the user�s guide. © Print only for private use.
File managerthe Memory Stick, see �Formatting a Memory Stick�
thin the folder structure
up in the hierarchy - tap the top folder.the contents of a folder or a file - tap the top folder.re opened in the file manager while other files are
n the applicable application.
lderle > New folder.lder name and tap Done.
ove one or more folders or filese folders or files to handle.e required activity from the File menu.e destination and tap Done.
126 File manager
With the File manager you can view, rename, copy, move, and delete files and folders on the P910i. You can also add folders, send files and rename and format the Memory Stick.
Initially, the root view is shown, with the sub folders:
� Audio, where all audio files are stored.� Document, where different document files are stored.� Image, where all images, pictures as well as drawings, are
stored.� Other, where all files not applicable for the other folders are
stored.� Video, where all video clips are stored.
Using the folder menu, you can select between the internal storage and the external storage, that is, the Memory Stick. The path to the selected folder is shown at the top of the window.
Note There is an important distinction between External media and External other. External other lets you view folders that have been placed on the Memory Stick by other equipment, such as digital cameras. This is the only place where these folders can be viewed.
From the file manager it is possible to reach the Control Panel storage manager, see �Storage manager� on page 169. You can
also format on page 23.
To move wi
� To move� To view
Folders aopened i
To add a fo1. Select Fi
2. Type a fo
To copy or m1. Select th2. Select th3. Select th
File manager 127
This is the Internet version of the user�s guide. © Print only for private use.
To delete one or more folders or filesNote Only empty folders can be deleted.
1. Select the folders or files to delete.2. Select File > Delete.3. Tap Delete.
To change properties for one or more folders or files1. Select the folders or files to change.2. Select File > Properties.3. Change the properties, as required.4. Tap Done.
128 Online services
This is the Internet version of the user�s guide. © Print only for private use.
Online services Online services is a customized service offered by a network
operator. This function is network- or subscription-dependent.
Online services provides a mechanism that allows applications that exist on the SIM to interact and operate with the P910i. It may provide services ranging from weather forecasts to the latest information from the stock market.
Online service are placed on your SIM card by your operator.
Note Contact your operator to find out which services are available for your account.
Note If this service is available on your SIM, the Online services application will appear in the application list under a name defined by the SIM provider. However, the icon used to represent the Online services application will not change.
i
i
PC Suite and Content and Application 129
This is the Internet version of the user�s guide. © Print only for private use.
icationallation of the Sony Ericsson PC Suiteony Ericsson PC Suite programs can be used with ows ME, 98, 2000 and XP.
inserting the CD in the PC, a start menu is automatically n. Select language and then start the Sony Ericsson PC Suite . Follow the instructions in the installation wizard.
start menu is not automatically shown, use the Run and in the Windows Start menu to start Start.exe from your
rive.
fault the Sony Ericsson PC Suite is accessed from enu > Programs > Sony Ericsson > P910i.
etup application also can be used later to add or delete onents.
an download the latest PC Suite software from SonyEricsson.com/support
ADVANCED FUNCTIONS
PC Suite and Content and ApplSony Ericsson PC SuiteThe Sony Ericsson PC Suite CD delivered with your P910i contains a set of useful applications:
� Synchronization � Synchronization of Calendar, Notes, Contacts and Tasks against Microsoft Outlook, Lotus Notes and Lotus Organizer.
� Backup and Restore � Make safety copies of your data via SyncStation.
� File Manager � Transfer files (images, documents, music) via Windows® Explorer between your P910i and PC.
� Install software � Install applications in the P910i.� Download Language � Change the language in the P910i.
Additional languages are downloaded from www.SonyEricsson.com/support
� Dial-Up Networking Wizard � Wizard for GPRS and HSCSD settings for using your P910i as a modem.
� Drivers � Drivers for modem and the USB cable connected SyncStation.
Refer to the online help for each specific application.
InstThe SWind
WhenshowSetup
If thecommCD d
By deStart m
The Scomp
You cwww.
This is the Internet version of the user�s guide. © Print only for private use. Content and Application CD
130 PC Suite and Content and Application
The Multimedia for P910i CD contains a number of applications and files to be installed in, or downloaded to, your P910i and used together with its applications.
� Games� Audio files� Pictures� Video clips� MMS templates� MMS editor� Image editor
Opening the Content and Application CDWhen you insert the CD in the PC, a start menu opens automatically. Select an item from the menu and follow the instructions on the PC screen.
If the start menu is not automatically shown, use the Run command in the Windows Start menu to start CDBrowser.exe from your CD drive.
Installing applications 131
This is the Internet version of the user�s guide. © Print only for private use.
cations which are not approved by Sony Ericsson are not nteed to work correctly or securely, and users install them ir own risk. Product failures caused by applications not ved or made for Sony Ericsson will not be covered by your nty.
talling applications on your 10i
allation file securitylation files in SIS format are typically used for installation oc or PersonalJava� applications or other content into the i file system.The vendor who prepared the SIS file decides in the file system the various content of the SIS file will talled. This means that you need to decide if you trust that S file does not contain harmful content. If you are certain origin of the SIS file you can take an installation decision on what you know about that vendor. Your P910i supports ographic verification of vendor identity.
g installation the P910i verifies a digital signature and icate in the SIS file against a root certificate in the phone. ssful verification means that you can trust the origin of the
Installing applicationsIt is possible to install new applications in your P910i. These applications can be obtained in several ways, for example:
� from the Internet.� from a CD.� from a Memory Stick.� as an email attachment.� from other devices.
There are two types of installation files for applications:
� SIS (Symbian Standard Installation) made for P910i or other Sony Ericsson devices.
� MIDP JAR (Mobile Information Device Profile Java Archive).
Note SIS and JAR files are installation packages containing one or more files.
Programs made for the Sony Ericsson P800 and P900 series can also be used in the P910i.
This chapter also applies to other types of software to install, for example, system components and add-ons.
Applications from developers outside Sony Ericsson, so-called third-party developers, might be possible to install in the P910i.
Appliguaraat theapprowarra
InsP9
InstInstalof EpP910wherebe insthe SIof thebasedcrypt
DurincertifSucce
This is the Internet version of the user�s guide. © Print only for private use. SIS file and that the content has not been modified after it was created. If the SIS file does not contain a digital signature you
4. Select target drive (phone memory or Memory Stick).Download to the P910i begins.
on starts when the download is complete.
P910ickages, for example, games, can also be downloaded 0i from the Internet or from a Memory Stick. When g a file from the Internet, the installation will start ly when the file is completely downloaded to your rocedure below describes installation of application nsferred to the P910i but not yet installed.
nload and upload files, for example, applications� for information about how to download files from .
pplications in the P910i.
e menu, select Applications > Install.e software from the list.stall. If the software is certified, an information ill be shown with the name of the software, version lier. Select Install again.
pending on the software, you may be prompted to previous installation, select language, memory and select other installation options.
132 Installing applications
will be given a warning about the problem but you can still decide to proceed with the installation at your own risk. In general, it is recommended that you install only from SIS files where the vendor identity and file integrity can be verified.
Note Installation of uncertified applications may cause your system to crash and all your data will then be lost.
MIDP applications run in a protected environment with no access to sensitive information so no signatures are required for MIDP JAR files.
From a PCSony Ericsson PC Suite must be installed in your PC and the P910i must be connected to the PC via SyncStation, infrared, or Bluetooth wireless technology in order to install applications from your PC.
Installing applications from your PC1. Connect your P910i to the PC via SyncStation, infrared or
Bluetooth wireless technology. When connected, an icon is shown in the status area to the right in the taskbar on the PC.
2. Start the PC software Install Software and select the application (.sis file) to install. You can also open a .sis file directly in your PC.
3. Confirm to install the application in the P910i.
5. Installati
From theProgram pato your P91downloadinautomaticalP910i. The ppackages tra
See �To dowon page 80 the Internet
Installing a1. Select 2. From th3. Select th4. Select In
dialog wand supp
5. Now, dereplace alocation
Installing applications 133
This is the Internet version of the user�s guide. © Print only for private use. tation and an Internet-connected PC (preferably via
band).
date the P910i softwarennect the SyncStation to your PC and place your P910i o it.sit Sony Ericsson P910i support site on w.SonyEricsson.com/support
lect Sony Ericsson Update Service and follow the tructions on how to proceed with the update sequence.
er Yes when you are asked if you want to install the Sony son Update Service PC program.
User data can be lost when the software is updated. ys back up the phone before updating.
Removing applications from your P910iIt is sometimes necessary to remove installed applications and user data to free up memory.
Removing applications in the P910i1. Select .2. From the menu, select Applications > Uninstall.3. Select the application to be uninstalled.4. Select Uninstall.5. Tap Yes to confirm.6. Select Done.
Tip See also �Master reset� on page 168 and �Storage manager� on page 169 in Control Panel for more options regarding removal of applications and user data.
Some removed applications can be reinstalled from the Sony Ericsson PC Suite CD or the Content and Application CD.
Sony Ericsson Update ServiceWith Sony Ericsson Update Service you can keep your phone updated with the latest P910i software. When a new software version is available, you can download and install it using the
SyncSbroad
To up1. Co
int2. Vi
ww3. Se
ins
AnswErics
NoteAlwa
This is the Internet version of the user�s guide. © Print only for private use.
Connecting to other devicesectivity softwareis delivered with a CD, Sony Ericsson PC Suite. re must be installed in the PC you want to connect alling applications� on page 131 for more . You do not need to install the Sony Ericsson PC only want to perform beaming with the PC or use a dset.
ction via SyncStationl the Sony Ericsson PC Suite before you connect the .
SyncStation to your PC with the USB cable. A s you to install the USB cable the first time. The on PC Suite CD contains the necessary software.
10i in the SyncStation. A new wizard starts which connect your P910i if this is the first time. in the status area to the right on the taskbar when connected.
ecting via cable, the P910i can be set in PC Connect dem mode. The setting is made in Control panel > > Cable, see �Cable� on page 154.
134 Connecting to other devices
Your P910i can be connected to other devices with similar interfaces such as PCs, other P910is and handheld computers.
The connection can be made via:
� Bluetooth wireless technology (not together with Windows 98)
� Cable� Infrared (IrDA)
Note To save the battery, turn off Bluetooth wireless technology and infrared when you do not need them.
Depending on the type of connection you have chosen, you can use your P910i to perform various tasks, for example:
� Sending and receiving files via infrared or Bluetooth wireless technology � �beaming�.
� Making Backup/Restore and Synchronization of your data and file transfer (cable, infrared and Bluetooth wireless technology).
You can even use your P910i as a modem for Dial-Up Networking using cable, infrared and Bluetooth wireless technology. With Bluetooth wireless technology, you can for example, connect a cordless headset.
PC connYour P910i This softwato. See �InstinformationSuite if youcordless hea
ConneNote InstalSyncStation
Connect thewizard helpSony Ericss
Put your P9helps you to
appearsthe P910i is
When connmode or MoConnections
Connecting to other devices 135
This is the Internet version of the user�s guide. © Print only for private use. t the port state to On or On for 10 minutes.an also change the infrared port state with the flip closed, Connections application.
tivate the infrared port on the PCght click in the status area to the right on the taskbar.lect Properties
lect the Infrared check boxick Close.
Clear the Infrared check box when ready.
d and receivean send items via the infrared port, beam, in any ation if there is a Send as command. To send, select d. If you receive a beamed item, a dialog box appears with options: Delete, View or Done. Delete deletes the item; View the associated application which shows the item; Done it in the Beamed folder in Messages.
Set the P910i in PC connect mode for
� Synchronization.� Installation of software.� Backup and restore.
Set the P910i in Modem mode when using
� P910i as a modem.� Dial-up network wizard.
You should disable the USB cable connection in these two cases. In your PC select Start > Settings > Control Panel > Phone Monitor Options > COM Ports and disable the COM port to which the cable is connected.
Connection via Infrared portWhen connecting via the infrared port, make sure that both devices are placed within one metre from each other and that the infrared ports have a free line of sight between them.
Both your P910i and the device you connect to must have their infrared ports activated before communication can begin.
To activate the infrared port on the P910i1. Go to Control panel > Connections > Infrared.2. Set the P910i to PC connect or Modem as required.
3. SeYou cin the
To ac1. Ri2. Se3. Se4. Cl
Note
SenYou capplicInfrarethree openssaves
This is the Internet version of the user�s guide. © Print only for private use. Connection via Bluetooth set if your P910i should be Visible by other devices or not. See
�Bluetooth� on page 153 for more information on Bluetooth hnology settings.
th wireless technology operation mode can also be th the flip closed, through the Connections When the Bluetooth wireless technology is
appears on the screen and the left indicator light ur P910i flashes blue.
P910i initiate pairing with another device, such as
l panel > Connections> Bluetooth > Settings, set Bluetooth ake sure Visible to other devices is selected.ther device to be on or discoverable.vices tab, tap Add. Your P910i searches for all n the vicinity and lists them.abled devices that are visible to others within range, own with their name and icon. You can use Show: to
ct the list to one category (only PC, for example). d devices that are within range are shown with ar text.paired devices that are within range are shown with names in italics.
136 Connecting to other devices
wireless technologyYou can connect your P910i to other products equipped with Bluetooth wireless technology, for example PCs, car handsfree devices, or other mobile phones, and exchange data. Since Bluetooth wireless technology is radio-based, there does not have to be a free line of sight between transmitting and receiving devices. This means that your P910i can stay in your pocket while communicating. However, items between transmitting and receiving devices might weaken the signal.
Connection to another device can be made within a range of up to 10 metres. Obstructions between the transmitting devices will have an effect on the performance. For all tasks, except beaming, it is necessary that you first set up a permanent and trusted relationship between your P910i and the other device. This process is called pairing (other documentation may refer to it as bonding). The paired devices are remembered by your P910i even after you have turned it off so you do not need to repeat the process for every connection with those devices. The reason for pairing is to simplify future connections and to make them secure � only paired devices can connect to your P910i.
Activating Bluetooth wireless technology Activate Bluetooth wireless technology on your P910i in Control panel > Connections > Bluetooth > Settings. Set Bluetooth to On, and
wireless tec
The Bluetoochanged wiapplication.activated, on top of yo
Pairing
To let your a headset1. In Contro
to On. M2. Set the o3. In the De
devices i� All en
are shrestri
� Paireregul
� Non-their
Connecting to other devices 137
This is the Internet version of the user�s guide. © Print only for private use. a headphone initiate pairing with your P910ieck that the device you want to pair with your P910i:Is on and within range.Has its Bluetooth function activated and that it is in visible mode.
Control panel > Connections > Bluetooth > Settings, set etooth to On.llow the headphone�s manual to initiate pairing on the adphone. the Devices tab tap Add. Your P910i searches for all devices the vicinity and lists them.hen asked for a passcode, enter the headphone�s passcode your P910i.in the future you want to allow the headphone to connect to ur P910i without you explicitly approving each nnection, you should select Control panel > Connections > etooth > Devices, select the headphone and the check box
ow to connect without confirmation.
move a paired device from your P910it a device in the list and select Remove.
� Devices that are within range but unknown are shown with a preset name.
4. Select the device you want your P910i to pair with, and enter a passcode when asked for it. When the passcode is accepted, the pairing process is complete, see �Passcodes� on page 138.
5. If in the future you want to allow a paired device to connect to your P910i without you explicitly approving each connection, you should select Control panel > Connections > Bluetooth > Devices, then select a device and the check box Allow to connect without confirmation.
To let another device initiate pairing with your P910i1. In Control panel > Connections > Bluetooth > Settings, set
Bluetooth to On.2. Follow the other device�s manual to initiate pairing.3. When asked for a passcode, enter the same on both devices.4. If in the future you want to allow a paired device to connect
to your P910i without you explicitly approving each connection you should select Control panel > Connections > Bluetooth > Devices, select a device and the check box Allow to connect without confirmation.
Tip You can change the name of a paired device. When you pair with other Bluetooth wireless technology enabled phones, it is very useful to include the user's name as part of the device name. This will make it very easy to beam information to the desired recipients.
To let1. Ch
��
2. InBlu
3. Fohe
4. Inin
5. Won
6. If yocoBluAll
To reSelec
This is the Internet version of the user�s guide. © Print only for private use. Passcodes Shared folder, a request dialog is shown, where you can Accept or
Reject the transfer.
138 Connecting to other devices
Passcodes ensure that the device you pair with really is the device you think it is. A passcode is a set of numbers and/or letters (at least four characters) that you agree to exchange with the owner of the other device. Simply agree a passcode with the other user and each enter the same code into both devices when asked for it. The actual code is up to you; the important thing is that you both enter the same code. Accessories like headsets often have a default passcode, usually �0000�, see the specific user guide.
Send and receiveYou can send items via Bluetooth wireless technology in any application if there is a Send as command. To send, select Bluetooth. If you receive an item via Bluetooth wireless technology, a dialog box appears with three options: Delete, View or Done. Delete deletes the item; View opens the associated application which shows the item; Done saves it in the Beamed folder in Messages.
Bluetooth shareYou can make it possible for other users to transfer items from your P910i. To make an item accessible, select Send as > Bluetooth Shared. The item is then copied to the Shared folder, accessible by other users. When a user requests to access your
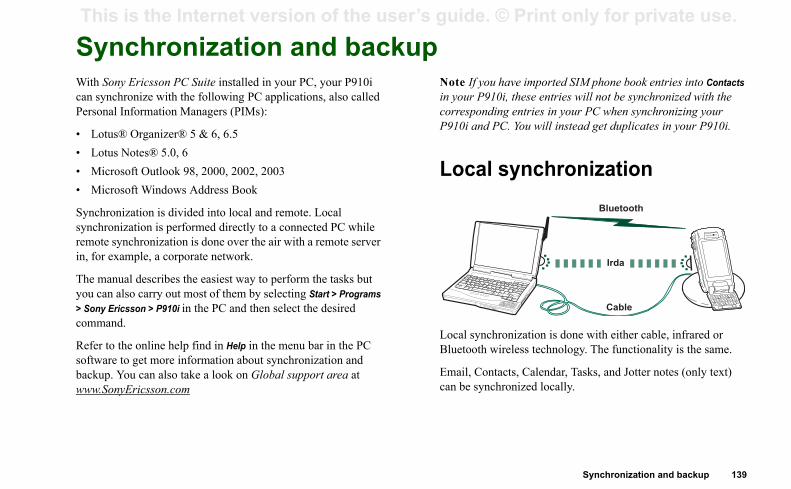
Synchronization and backup 139
This is the Internet version of the user�s guide. © Print only for private use.
If you have imported SIM phone book entries into Contacts r P910i, these entries will not be synchronized with the
sponding entries in your PC when synchronizing your i and PC. You will instead get duplicates in your P910i.
cal synchronization
synchronization is done with either cable, infrared or ooth wireless technology. The functionality is the same.
l, Contacts, Calendar, Tasks, and Jotter notes (only text) e synchronized locally.
Bluetooth
Cable
Irda
Synchronization and backupWith Sony Ericsson PC Suite installed in your PC, your P910i can synchronize with the following PC applications, also called Personal Information Managers (PIMs):
� Lotus® Organizer® 5 & 6, 6.5� Lotus Notes® 5.0, 6� Microsoft Outlook 98, 2000, 2002, 2003� Microsoft Windows Address Book
Synchronization is divided into local and remote. Local synchronization is performed directly to a connected PC while remote synchronization is done over the air with a remote server in, for example, a corporate network.
The manual describes the easiest way to perform the tasks but you can also carry out most of them by selecting Start > Programs > Sony Ericsson > P910i in the PC and then select the desired command.
Refer to the online help find in Help in the menu bar in the PC software to get more information about synchronization and backup. You can also take a look on Global support area at www.SonyEricsson.com
Notein youcorreP910
Lo
LocalBluet
Emaican b
This is the Internet version of the user�s guide. © Print only for private use. Local synchronization settings To make a manual synchronization
your P910i via cable, infrared or Bluetooth wireless gy. For more information, see �Connecting to other on page 134., click on on the PC taskbar and select
ise.hronization starts.hort time, the PC application you want to ize with might ask you to allow the P910i access to
er Yes and the synchronization continues.
140 Synchronization and backup
Local synchronization is initiated from the PC and all settings are made in the P910i PC software (included on the Sony Ericsson PC Suite CD).
The easiest way to synchronize is to set the Synchronization to automatically make a synchronization every time your P910i is connected.
To make the synchronization settingsIn the PC, click on in the status area to the right in the taskbar on the PC and select Sync Station Settings.A dialog appears where you can make the synchronization settings. Click Help in the dialog to get more information about the settings.
Making a local synchronization
To make an automatic synchronization1. Connect your P910i via SyncStation, infrared or Bluetooth
wireless technology. For more information, see �Connecting to other devices� on page 134.
2. Synchronization starts automatically.3. After a short time, the PC application you want to
synchronize with might ask you to allow the P910i access to it. Answer Yes and the synchronization continues.
1. Connecttechnolodevices�
2. In the PCSynchronThe sync
3. After a ssynchronit. Answ
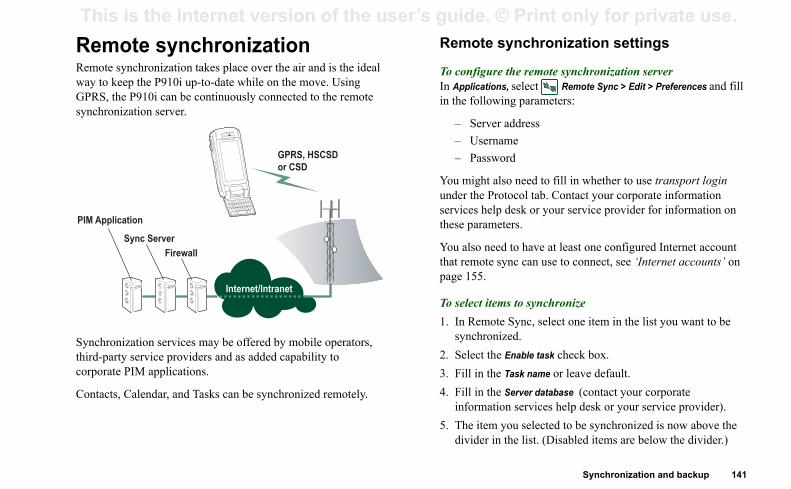
Synchronization and backup 141
This is the Internet version of the user�s guide. © Print only for private use. ote synchronization settings
nfigure the remote synchronization serverplications, select Remote Sync > Edit > Preferences and fill following parameters:
Server addressUsernamePassword
ight also need to fill in whether to use transport login the Protocol tab. Contact your corporate information es help desk or your service provider for information on
parameters.
lso need to have at least one configured Internet account emote sync can use to connect, see �Internet accounts� on 155.
lect items to synchronize Remote Sync, select one item in the list you want to be nchronized.lect the Enable task check box.ll in the Task name or leave default.ll in the Server database (contact your corporate ormation services help desk or your service provider).e item you selected to be synchronized is now above the ider in the list. (Disabled items are below the divider.)
Remote synchronizationRemote synchronization takes place over the air and is the ideal way to keep the P910i up-to-date while on the move. Using GPRS, the P910i can be continuously connected to the remote synchronization server.
Synchronization services may be offered by mobile operators, third-party service providers and as added capability to corporate PIM applications.
Contacts, Calendar, and Tasks can be synchronized remotely.
Rem
To coIn Apin the
���
You munderservicthese
You athat rpage
To se1. In
sy2. Se3. Fi4. Fi
inf5. Th
div
Internet/Intranet
PIM Application
Sync ServerFirewall
GPRS, HSCSDor CSD
This is the Internet version of the user�s guide. © Print only for private use. 6. Repeat for other items. Note Backup and restore does not work via infrared or
Bluetooth wireless technology.
ing a backupackup
your P910i and connect it to the PC via cable., click on on the PC taskbar and select Back up
re.ur P910i in the menu that appears. Several P910is
acked up to the same PC.ckup and choose what to back up: P910i and/or Stick. and follow the instructions in the PC and in the
up is complete.
142 Synchronization and backup
Making a remote synchronizationOpen Applications > Remote Sync and tap the Sync button.
When ready, the Task status column shows today's date for all successfully synchronized items.
Backing up dataYou can use the P910i Backup and Restore PC software to back up the contents stored in your P910i to your computer. Keeping backups of your P910i contents on your computer means that you have a separate copy of the contents of the P910i, which can be restored into the P910i. Backups should be made on a regular basis. See the online help for P910i Backup and Restore for more information on how to use the application.
Note All user data will be deleted when the P910i software is upgraded by a Service Partner. Always back up your data before handing over the P910i for upgrading, so that you can restore it afterwards
PreconditionsThe Sony Ericsson PC Suite must be installed in the PC and the P910i must be connected to the PC via cable.
PerformTo make a b1. Turn on 2. In the PC
and resto
3. Select yocan be b
4. Select BaMemory
5. Click YesP910i.
6. The back
Synchronization and backup 143
This is the Internet version of the user�s guide. © Print only for private use.
Restoring dataLost data or accidentally deleted information in your P910i can be restored from an earlier backup. A backup from the phone can only be restored to the phone, and a backup from a Memory Stick can only be restored to a Memory Stick.To restore a backup1. Turn on your P910i and connect it to the PC via cable.2. In the PC, click on on the PC taskbar and select Back up
and restore.
3. Select your P910i in the menu that appears. Several P910is can be backed up to the same PC.
4. Select one of the backups in the list of previously saved backups and click Restore.
5. Click Yes and follow the instructions in the PC and in the P910i.
6. The restore is complete.
Note Everything in your P910i will be overwritten by the chosen backup. Once you have clicked Yes to start the restore, you cannot cancel the procedure.
Note If you have used your Secure Tokens (Secure Access files) since you made your backup, you must reconfigure these. If you restore another P910i, you must reconfigure your Secure Tokens. For more information see �Secure tokens� on page 168.
This is the Internet version of the user�s guide. © Print only for private use. SETTINGS
Personalizing your P910ig a background picturenge the background image (wallpaper) for the en in Control panel > Device > Display. You can use tored internally or on a Memory Stick.
ackground images can be found on the Multimedia elivered with your P910i.
ain suitable background picture files by g, MMS, beaming using Bluetooth or infrared, or them using a cable from your PC.
picture images are 208 x 144 pixels and the picture in the standby screen. (Any chosen picture will be the screen). The images can be JPEG, GIF, BMP, M or PNG format.
g the light intensity the maximum and minimum display light intensity. ul to save the battery or protect your night sight g a car. See �Power tab� on page 148.
144 Personalizing your P910i
There are a number of ways you can give your P910i a personal touch and change its settings to suit your requirements.
ThemesThemes control the colour of screen and text, the icons, and the background picture, the wallpaper. Sound themes control the notification alerts. Some themes are pre-loaded in the P910i. Extra themes can be found on the Content and Application CD where you also can use the themes editor to modify the themes or create new ones.
To change the theme, select Control panel > Device > Themes, see �Themes� on page 151.
Changing your application shortcutsYou can change and rearrange the five shortcuts to applications, shown in the standby screen when the flip is closed, and the five first shortcuts in the Application picker area in flip open (not the Application launcher ). The flip closed shortcuts can even be hidden, if you wish.
SettinYou can chastandby screany image s
Tip More bP910i CD, d
You can obtdownloadintransferring
Backgroundcan be seenscaled to fitWBMP, MB
SettinYou can setThis is usefwhen drivin

Personalizing your P910i 145
This is the Internet version of the user�s guide. © Print only for private use. r network operator provides a CLI (Calling Line Identity) e, your P910i can display the contact�s picture together he other information when an incoming call is received CLI matching that contact (not all numbers can be yed). The contact�s picture is also displayed when you a call to that person.
oose the contact�s picture sizelect Phone > Edit >Preferences > Incoming call picture.lect the Show large pop-up picture for incoming calls check x.p Done.
g signalsP910i can play both iMelody format and polyphonic ring ls in WAV, AU, AMR, MIDI, RMF, and MP3 sound file ts. When you choose a ring signal, your P910i will scan ternal and Memory Stick storage and present you with a ring signals that are in these formats. Recordings you made using Sound Recorder can also be selected.
signals can be added by downloading from the Internet, ing using infrared or Bluetooth wireless technology file er from a PC and by using a Memory Stick. Extra ring ls can be found on the Content and Application CD. You
Setting a screen saverYou can set a screen saver picture to be displayed after a period of inactivity. See �Display� on page 147. Keylock and device lock may be used in combination with the screen saver. When you press a key or touch the screen, you will be prompted to activate keys and/or enter the device lock code.
The images can be JPEG, GIF (including animated), BMP, WBMP, MBM or PNG format. Image format for the screen saver is 208 x 320 pixels.
Note Using animated GIF uses more power.
Adding images to your ContactsYou can store a picture with each entry in Contacts. See �Creating and editing contacts� on page 104.
Pictures are easily taken using the CommuniCorder (see �CommuniCorder� on page 59) though of course other images can be used.
If youservicwith twith adisplamake
To ch1. Se2. Se
bo3. Ta
RinYour signaformathe inlist ofhave
Ring beamtransfsigna
John S mith+4613244500 (h)
11:03
End call
This is the Internet version of the user�s guide. © Print only for private use. can add as many ring signals as desired, subject only to available storage space.
use an audio file as alarm or notification signal, it ed using the Multimedia volume setting. The ring ng will not effect the sound volume.
Tasks Set a sound for reminder alarms. See �Preferences� on page 113.
es Set a different sound for each type of message as notification of a new message: See �Sounds and alerts� on page 149.
146 Personalizing your P910i
Tip Sound Recorder recordings are listed as voicenote and a number, for example voicenote1470.
A ring signal may be selected for an entry in Contacts, so that the caller can be identified by the ring signal that is played. See �To personalize the ring melody for a contact� on page 105.
Note The mobile network must provide the CLI (Calling Line Identity) of the caller to enable the contact to be identified.
You may change the default ring signal that is played in all other cases. To do this, see �Sounds and alerts� on page 149.
Note If your P910i finds that you have renamed, moved or deleted a ring signal, it will play the default instead.
Alarm tones and sound notificationYou can choose different sounds for alarms and notifications in these applications:
Note If youwill be playvolume setti
Time See �Setting alarms� on page 121. Calendar Set a sound for reminder alerts, see �Preferences�
on page 110).
Messag
Control panel 147
This is the Internet version of the user�s guide. © Print only for private use.
avigation� on page 17. You can change the five shortcuts n. If you feel that the flip closed shortcuts obscure your round, you can choose to have them hidden when you do ed them.
ange an application shortcut the Application shortcuts dialog, select the Flip open or Flip sed tab depending on the shortcuts you intend to change.lect the icon you wish to change. The name of the plication is shown in the Set application pick list.oose the application you want to replace it with from the t.
de the flip closed application shortcuts when your P910i ctiver the Shortcuts always displayed check box.
playhe Display settings to control the screen and power ions of your P910i.
Control panelThe Control Panel is the location for all the main settings on your P910i that are system-wide and affect more than one application. This is the main place to go to initially set up your P910i, and to change settings at any point thereafter. To access it, select Applications > Control panel.
Tip You can find settings that apply to a single application in the Preferences menu of the application, for example: Phone > Edit > Preferences, CommuniCorder > CommuniCorder > Preferences, Internet > Edit > Preferences.
The sections below describe the settings available for each of the default items in the Control panel.
The Device tabThe device tab contains settings related to the behaviour of your P910i device itself.
Application shortcutsUse this dialog to configure the application shortcuts shown in the flip closed standby view, and the Application picker shortcuts in the flip open mode. See �Standby view� on page 15
and �Nshowbackgnot ne
To ch1. In
clo
2. Seap
3. Chlis
To hiis ina Clea
DisUse tfunct
This is the Internet version of the user�s guide. © Print only for private use. Wallpaper tab screen ensures that the correct item is activated. Tap Calibrate
screen and follow the instructions.
bif the power save should switch off the screen, blank r show a clock on the screen. You can also set the time between 1 and 30 minutes.
mes for both screen saver and power saver, the time will commence after the screen saver is
the screen light settings for handheld use and car
t brightness to set to set the normal (max) and in) light intensity for handheld use and car use. The ox works as a slider.
ht switches on when you tap the screen, press a key, or eive an incoming callht is always onht is always off
148 Control panel
You can set a picture to be the background, wallpaper, for the standby screen.
1. Select if the flip closed or flip open wallpaper should be changed.
2. Tap the image showing the current picture.3. Browse to see picture files available on your P910i. 4. Select a picture and tap Select.
Read more about background in �Personalizing your P910i� on page 144.
Screen tabYou can set a picture to be the screen saver.
1. Select a picture for the screen saver.2. Set the activation time for the screen saver.If you select the Screen saver device lock check box the device lock will activate when the delay runs out. Read more about the device lock in �Device lock� on page 38.
If you set a time for the Automatic Input Lock, the keyboard lock will activate when the time runs out. Read more about the automatic keylock in �Automatic keylock� on page 39.
Occasionally you may find that you tap one item (for example a button or menu option) but another is activated. Calibrating the
Power taYou can set the screen opower save
If you set tipower saverdisplayed.
You can setuse.
Select Adjusdimmed (mBrightness b
Auto Ligrec
On LigOff Lig
Control panel 149
This is the Internet version of the user�s guide. © Print only for private use. e Location tab
t Current country/region and Current city to your current ation.t Other country/region and Other city to an alternative ation (for example your home location if you are abroad).
city you want is not listed, select another city in the d time zone.
e Numbers tabe decimal separator and thousands separator you desire.
ckss contains options for activating the locks on the device, M card and the keys on the keypad, and for changing the odes, see �P910i locks� on page 37.
unds and alertshese settings to control sounds and alerts of your P910i.
lls tab � Sets ring tones and volume.ssages tab � Sets notification alerts for messages.
her tab � Sets button and screen clicks, reminders, alarms, d other notifications.
Flight modeIn flight mode the radio function is turned off. You cannot make and receive calls but most of the other functions in the P910i are available.
Use these settings to turn the flight mode on or off and also to activate the Power menu. When activated, the Power menu will ask you if you want to start the P910i in normal mode or flight mode each time you turn on the P910i. Also, when you press the On/Off button when your P910i is on, the Power menu will ask you if you want to turn off the P910i, or switch to another mode.
To activate the Power menuSelect the Prompt me... check box and tap Done.
To cancel the selection of Power menuClear the Prompt me... check box and tap Done.
InternationalUse these settings to set the locations shown in Time, as well as the units for distances, numerical separators, and how currency values should be shown.There are two tabs: Location and Numbers.
On th
� Seloc
� Seloc
If thedesire
On thSet th
LoLockthe SIlock c
SoUse t
� Ca
� Me
� Otan
This is the Internet version of the user�s guide. © Print only for private use. You can choose to use any sound recording or audio file. You can select ring signals that are stored on your phone or on a Memory
Calls tabgs set incoming call alerts. For more information see ls� on page 145.
rsonalize the ring melodies further for individual e �To change the details of a contact� on page 105.
e) � Select a ring signal for incoming voice calls.e) line 2 � Select a ring signal for incoming voice
) � Select a ring signal for incoming data calls.
me � Set the preferred sound level for handheld, e and car use.
ring � Select the checkbox to use increasing ring his disables the other volume settings.
s tabgs set messaging alerts.
otification message � Select the check box to receive ion of a received message.lect an alert for received SMS messages.elect an alert for received Email messages. lect an alert for received MMS messages.
150 Control panel
Stick. If the selected file is later deleted or moved, the Default Melody will be played instead.
To listen to the selected ringtone or alert1. Tap the icon to listen to the signal. 2. Tap again to stop playback.
To change the default ring tone or alert1. Tap the drop-down menu.2. Select Default Melody for the P910i default or Find sound to
select a new one.3. If required, change folder.4. Select the required sound5. Tap and to preview the sound.6. Tap Select to set this sound.
Warning! The volume may be uncomfortably loud at the higher volume levels if the phone is close to your ear. Exposure to excessive volume may damage hearing.
To set vibrating alert, silent mode, speakerphone, or mute the microphone� Tap the volume icon on the status bar.
These settin�Ring signa
You may pecontacts, se
� Ring (voic
� Ring (voiccalls.
� Ring (data
� Ring voluhandsfre
� Increasingsignals. T
MessageThese settin
� Display nnotificat
� SMS � Se� Email � S� MMS � Se
Control panel 151
This is the Internet version of the user�s guide. © Print only for private use. he settings on the Primary, Alternative and Flip Closed tabs to ethods for entering text in your P910i.
load other text input software, select it and adjust its gs here.
emesan set the look of the user interface by changing the theme.
change the theme, select a theme from the list. The picture ows the flip closed standby background. Tap Select. listen to a theme sound, select the event from the drop-wn list. Tap the icon to play. Tap again to stop playback. send a theme, select the theme and tap Send as. delete a theme, select the theme and tap Delete.
ry The method that you select here is activated automatically when you need to enter text into your P910i.
ative The method that you select here is activated if you tap at the bottom of the screen.
losed The method that you select here is activated when you need to enter text with the flip closed.
� Area info � Select an alert for received area information messages.
� Auto setup � Select an alert for auto setup messages.
Other tabThese settings set button and screen clicks, reminders, alarms, and other notifications.
� Button click � Select the sound used when you press a key on the keypad.
� Screen tap � Select the sound used when you tap the screen.� Key press � Select the sound used when you press a key on
the keyboard on the flips inside.� Reminder � Select an alert to be played for reminders.� Voice messages � Select an alert to be played for voice
messages. � Default alarm � Select the default alarm sound.
Text inputThere are several standard ways of entering text in your P910i. See �Entering text with the flip closed� on page 32 and �Entering text with the flip open� on page 33.
Use tset m
If yousettin
ThYou c
� Tosh
� Todo
� To� To
Prima
Altern
Flip c
This is the Internet version of the user�s guide. © Print only for private use. Time & date 2. Select the am/pm box.
This is only possible if you use the 12-hour time format.
by tapping outside the time picker.
ons you have set under Control panel > are in a country/region that currently has (daylight saving time), you can adjust the time and
light saving time onime &date tab, select Summertime, select the check r the zones that currently have daylight saving time.one.
abcify how you want the time and date to be displayed n, and if you want to use the 12-hour (am/pm) or 24-rmat.
me and date display formatte format and choose a format.te separator and choose a separator.
Time format.me separator choose a separator.ne.
152 Control panel
Adjusting the time and date here sets these throughout your P910i.
The dialog has three tabs. You can set:
Note These settings are also available in the Time application.
Time & date tab
To set the current date1. On the Time & date tab, select the date. A calendar view opens.
Tap the arrows to set the current year and month.2. Select the current date.
To set the current time1. On the Time & date tab, select the time. Select the upper half of
the hour or minute box to increase the number displayed, or the lower half to decrease the number.
3. Confirm
If the locatiInternational summertimedate.
To turn day1. On the T
boxes fo2. Select D
Format tYou can speon the screehour time fo
To set the ti1. Select Da
2. Select Da
3. Select a 4. Select Ti
5. Select Do
Time & date The current time and date. Here you can also turn Summertime (daylight saving time) on or off for your location.
Format Specify how you want the time and date to be displayed on the screen.
Workdays Specify the days in your working week.
Control panel 153
This is the Internet version of the user�s guide. © Print only for private use. cting to other devices using Bluetooth wireless technology nnection via Bluetooth wireless technology� on page 136.
oth settings are shown on two tabs:
ou will probably find that the preset name of your P910i, f devices you pair it with, are not very meaningful or easily nisable. It is a good idea to change these names to thing more useful. The name you choose for your P910i rs on any devices you pair it with.
airing� on page 136 for instructions on how to connect to er device using Bluetooth wireless technology.
gs � A device name for your P910i.� Bluetooth on or off.� If it should be visible to other Bluetooth equipped
devices. es A list of all the Bluetooth-enabled devices that your
P910i is paired (bonded) with. � To change the name of a device, and to allow for
connection without confirmation, select the name in the list.
� To remove a device from the list, select the name and select Remove.
� To locate other devices in the vicinity, and add them to the list, tap Add.
Workdays tabYou can specify what days you work, if, for example, you want to set an alarm that sounds only on workdays. You can also specify the first day of your week to customize the display of both Week and Month views in Calendar.
User greetingYour P910i can show a user greeting on the standby screen when you turn it on. Use this dialog to turn this function on or off. You can define your own user greeting text (up to 32 characters).
The Connections tabThe connections tab contains settings related to how your P910i communicates with other devices.
BluetoothBluetooth wireless technology uses radio waves to enable wireless connections between your P910i and other Bluetooth-enabled devices. This method of linking works well at a range of up to 10 metres. Obstructions between the transmitting devices will have an effect on the performance. Read more about
connein �Co
Blueto
Tip Yand orecogsomeappea
See �Panoth
Settin
Devic
This is the Internet version of the user�s guide. © Print only for private use. Security � Set the baud rate, parity, number of stop bits, character length
and type of flow control required for the connection. When ng your P910i via the SyncStation to a USB port on use the following (default) settings:
set the cable connection mode when the flip is lecting Applications > Connections >
etworks lets you choose what network to use when you are r operator�s area. Choose if you want to search for a k or use a preferred one. You can also make a list of tworks.
ode � Select between automatic or manual search for k.
work � Tap the button to get a list of available .
h � Tap the button to search for available networks.
115200None1
ngth 8l CTS/RTS
154 Control panel
On the Settings tab you can set the Bluetooth security related settings of your P910i.
CableUse Cable to set the cable connection mode and the connection parameters used when communicating through your P910i's cable port.
� Set the cable connection mode. Please note that you must set the mode to Modem when using the P910i as a modem and when using the DUN (Dial-up Networking) Wizard.
connectiyour PC,
Tip You canclosed by se
Cable.
GSM NThis optionoutside younew networpreferred ne
� Search ma networ
� Select netnetworks
� New searc
Bluetooth on All Bluetooth wireless technology functionality from your P910i works. Visibility according to the Visible to other devices setting.Set Bluetooth to Off if you do not use Bluetooth, it will decrease battery drain. Bluetooth will automatically switch on if you use Send as > Bluetooth from the applications
Visible to other devices
Selected: All Bluetooth wireless technology functionality from your P910i works.Cleared: All Bluetooth wireless technology functionality from your P910i works but you cannot receive beamed items, and other devices cannot initiate pairing with your P910i.
Baud rateParityStop bitsCharacter leFlow contro

Control panel 155
This is the Internet version of the user�s guide. © Print only for private use. i automatically uses to access the Internet. You need to set Internet account before you can:
cess Web pages and download multimedia messages.t up an email account to send and receive email messages.
simple way of setting up an Internet account is to ask service provider to send you a message that contains the red information to create an account automatically on your i.
are three types of Internet account:
ialog has two tabs: Accounts and Other.
p: For Dial-Up (CSD, Circuit Switched Data) connections, you are charged for the length of time that you are connected to the Internet.
Speed Dial-Up: For High-Speed Dial-Up (HSCSD, High Speed Circuit Switched Data) connections you are charged for the length of time you are connected but you can increase the connection speed so that information is transferred faster. The service must be included in your subscription and billing rates from your network operator may increase as you increase the connection speed.
: For a GPRS connection you are charged for the amount of information you view, download, or send.
� Preferred list � Show the networks that your P910i will search for when you are outside your home network.
Note Your operator may not allow you to access all available networks.
To add a network to the preferred list1. Tap Add network.2. Select a network from the displayed list.3. Select a position in the Preferred list and tap Done.
InfraredUse this setting to control the state of the infrared port of your P910i.
Set the infrared status to PC connect or Modem, as required.
You can set it Off, On or On for 10 minutes. Read more about connecting to other devices using infrared in �Connection via Infrared port� on page 135.
Internet accountsYou access the Internet using an Internet Service Provider (ISP), who supplies you with account details including: a username, a password, and the phone number or Web site address that your
P910up an
� Ac� Se
Tip Ayour requiP910
There
The d
Dial-U
High-
GPRS

This is the Internet version of the user�s guide. © Print only for private use. Accounts tab New GPRS account
counts you may need to make advanced settings, your ISP. Select Advanced and enter settings on the ribed below
anced tabsUser name and passwordNormally, you do not have to enter a username and password when you connect to a GPRS account. However, some service providers may require you to enter these details. If you select the Username and password required check box, but do not enter a username and password, you will be prompted to enter these when the P910i connects.AddressEnter the Internet address of your access point. The address is supplied by your service provider.
156 Control panel
The Internet accounts dialog lists all the Internet accounts that have been set up on your P910i.
You can add a New account to the list and Edit or Delete an existing account.
If you want to select an Internet account every time you connect to the Internet, select the Show connection dialog check box. This may be useful if you use different Internet accounts for
Internet and Messages.
Whenever you connect to the Internet, your Preferred account is the account that your P910i prompts you to use.
To create a new Internet account1. On the Accounts tab, select New.2. Give the account a name. This will be the name shown in
your list of accounts. (In dialogs that appear while a connection is being established the text -GPRS is automatically added to names of GPRS accounts.)
3. Choose the Connection type for the type of account that you want to create, GPRS or Dial-Up.
4. Continue entering settings as required. These will differ depending on the type of account: GPRS, Dial-Up or High-Speed Dial-Up:
For some acprovided bytabs as desc
GPRS AdvServer
Control panel 157
This is the Internet version of the user�s guide. © Print only for private use.
Dial-Up or High-Speed Dial-Up account Internet Service Provider (ISP) supplies you with your User your Password, and their Phone number, which your P910i to connect to the Internet. If you have a High-Speed Dial-count with your network operator you can increase the of your connection by making settings on the Speed tab Advanced.
Authentication is used by some network operators to identify the mobile phone connecting to their GPRS network. There are different methods, or protocols, for doing this.Normal: PAP (Password Authentication Protocol). The user's username and password are transmitted over the network in an unencrypted form. Secure: CHAP (Challenge Handshake Authentication Protocol). The user's username and password are never transmitted over the network. None: No authentication is required by the network operator.Check with your network operator before changing any of the QoS (Quality of Service) settings.The settings Precedence, Delay, Peak rate, and Mean rate are all by default set to Subscribed, which means that your operators default QoS (Quality of Service) values will apply. Reliability is set as Class 3 by default.
S Advanced tabs
NewYour name,dials Up acspeedunder
Log in The settings on this tab deal with IP and DNS addresses.The DNS address uniquely identifies your Internet Service Provider (ISP)'s computers, which your P910i uses to connect to the Internet. Your P910i can normally fetch these addresses automatically from most ISPs. If, after setting up an Internet account, you cannot connect to the Internet and you suspect these addresses are incorrect, ask your ISP for their primary and secondary DNS addresses.An IP address consists of four 3-digit boxes and valid input is between 000 and 255 in each box.
Proxy A proxy server is a computer connected between your P910i and the computer you communicate with. This arrangement can be used for connections to Remote Sync servers, or within a company network. If this setting is needed, your company's Information Services department or Remote Sync provider must give you instructions.
Other If your ISP supports Point to Point Protocol (PPP) extensions, you can select the Enable PPP extensions check box. PPP extensions allow your P910i to provide features such as encryption, which increases the security of your Internet connection.
GPRS Advanced tabs
QoS
GPR
This is the Internet version of the user�s guide. © Print only for private use. Tip To avoid having to change the phone number when you travel abroad: enter the international dialling prefix (for Select the check box Post connect terminal if:
� The login script of the account that you are setting up requires that you input certain information or you will need to respond to prompts from the Internet accounts.
You are connecting to a Dial-Up account that uses Secure Access generated by a separate smart card or password generator.For an explanation of these settings, see Proxy in the �GPRS Advanced tabs� on page 156.You can only increase the speed of your connection if you have a High-Speed Dial-Up account with your network operator.To enable secure access for this Internet account you must link it to a vendor-associated Secure Token in this dialog:1. Select the Enable secure access check box.To create or delete Secure Tokens on your P910i, select Control panel > Other >Secure tokens. 2. Select the vendor and token names of the Secure Token that you want to link to this account from the drop-down lists.If your Internet Service Provider (ISP) supports Point to Point Protocol (PPP) extensions, you can select the Enable PPP extensions check box. PPP extensions allow your P910i to provide features such as encryption, which increases the security of your Internet connection.
Dial-Up and High-Speed Dial-Up Advanced tabs
158 Control panel
example '+') and the appropriate country code for your ISP.
For some accounts you may also need to make advanced settings.
Select Advanced and enter settings on the tabs as described below
Dial-Up and High-Speed Dial-Up Advanced tabsLog in The settings on this tab deal with IP and DNS addresses.
For an explanation of these settings, see Log in in the �GPRS Advanced tabs� on page 156.
Script As an alternative to entering your username and password to access the Internet you may need to use a login script stored on your P910i. Although uncommon, scripts may be required by your Internet Service Provider (ISP). Select the Use login script check box and enter the script text in the Script editor.If you select the check box Plain text authentication (required by some ISPs), the security of your connection will decrease during the connection process. Once you are connected, the security of your connection will be restored.
Proxy
Speed
Secure
Other
Control panel 159
This is the Internet version of the user�s guide. © Print only for private use. ceive incoming calls. As soon as the transfer stops : ) incoming calls will be accepted.
g the Preferred mode lets you choose how you want to use P910i:
lect GPRS only if you do not want to be disturbed by oming phone calls while browsing the Web. All incoming ice (and GSM data) calls are rejected. If you disconnect m the Internet, incoming calls can be received. Outgoing
lls are possible, except during data transfer. This mode is eful if you are using sensitive Internet services, such as nking. you select GSM only, your P910i will not be connected to GPRS network. If you choose to download email or
owse the Web, your P910i will connect to GPRS only as g as is needed for the data connection.
you select Automatic, your P910i will let you answer oming GSM calls while having normal GPRS
nctionality. A GPRS data connection will be temporarily errupted by a voice call.
ssaging accountsMessages application can handle many different types
ssages, but you must first set up accounts and make gs as described below.
To edit an Internet account1. On the Accounts tab, select the account in the list.2. Select Edit.3. Change your settings as desired.4. Select Done.
Note If you change the Connection type, all account data for that account will be deleted.
To delete an Internet account1. On the Accounts tab, select the account in the list.2. Select Delete.3. Select Done.
Other tabYou can use the Dial-up timeout and GPRS timeout settings to set up your P910i to disconnect automatically from the Internet, if you are not using it. The connection is broken after the period you specify has lapsed.
Preferred mode (bearer preference)Please note that your P910i can be used for either voice (or GSM data) calls or transferring GPRS data, but not both at the same time. It may, however, still be connected to GPRS. As an example, during GPRS data transfer (Icon: ) your P910i may
not re(Icon
Settinyour
� Seincvofrocausba
� If thebrlon
� If incfuint
MeThe of mesettin
This is the Internet version of the user�s guide. © Print only for private use. The Messaging accounts dialog has four tabs, one for each type of messaging account:
Email tabb shows a list of the email accounts on your an add a New account to the list and Edit or Delete an ount.
ose one of your email accounts as Preferred. This mail account that your P910i uses when you use nd an entry as email directly from one of your P910i
new email accountmail tab, select New.
following settings on the tabs:
unt basic tab settings e This is the name you give to your email account.
This name appears on your outgoing email messages.
ss Your Internet Service Provider (ISP) supplies you with your email address.
type Select POP3 or IMAP. POP3 is most common. IMAP makes it possible to subscribe to server based folders.
unt Select the Internet account to access your email messages.
160 Control panel
Tip A simple way of setting up an email or multimedia message account is to ask your service provider to send you a message that contains the required information to create an account automatically on your P910i.
Read more about the different types of messages in �Messages� on page 87.
The Email taP910i.You cexisting acc
You can chowill be the eSend as to seapplications
To create a 1. On the E2. Enter the
Email You can have any number of email accounts. To receive and send email, you must first set up an Internet account (if one is not already set up). See �Internet accounts� on page 155.
SMS You can only have one SMS (Short Message Service) account.The settings on this tab also apply to EMS (Extended Message Service) messages.
MMS You can only have one MMS (Multimedia Messaging Service) account. To receive MMS messages you must first set up Internet and WAP accounts (if not already set up). See�Internet accounts� on page 155.
Area You can only have one Area info account. The number of Area Information channels that you can subscribe to is limited by the space on your SIM.
Email accoAccount namYour name
Email addre
Connection
Internet acco
Control panel 161
This is the Internet version of the user�s guide. © Print only for private use. il account Outbox tab settingsoing server ss
Your Internet Service Provider (ISP) supplies you with its Outgoing server address, which identifies the computer through which your outgoing email messages are sent.
MTP ntication
Some SMTP servers might also require authentication when sending email. In that case, select the check box Use SMTP authentication and enter your User name and Password.
nbox login ls
If the SMTP server accepts using your Inbox login information for authentication, select the check box Use Inbox login details.
il account Advanced tab settingsre ection
Your Internet Service Provider (ISP) will tell you whether you can use either a Secure connection or Secure password authentication.
oing mail Normally 25. Do not change unless your ISP instructs you to.
IME ding
MIME encoding is a standard that allows non-textual information (for example graphics) and accented characters to be sent in email messages. If you should not wish to Use MIME encoding, clear the check box.
Email account Inbox tab settingsUsernamePassword Incoming server address
Your Internet Service Provider (ISP) supplies you with your username, your password, and its incoming server address, which identifies the computer where your incoming email messages are stored.
Open in full screen
Select to open messages in full screen portrait view.
Download If you want to limit the data traffic, you can choose to receive just Just headers (the sender, subject, and date only) or set a size limit (if a message is larger than the Smaller than limit, only the headers are downloaded). You can download the complete message later. You can also set a limit to the total number of messages held in your email account at any one time.
Schedule Select Schedule to schedule an automatic download of your incoming email messages. Messages that are waiting in your Outbox will not be sent at the same time.
EmaOutgaddre
Use Sauthe
Use Idetai
EmaSecuconn
Outgport
Use Menco
This is the Internet version of the user�s guide. © Print only for private use. SMS tab
ttings to set up text messaging and EMS
end and receive text messages in several countries, id having to change the service centre address when broad by entering the international dialling prefix e '+') and the appropriate country code for your rator.
Email account Advanced tab settings
accounts SMS tab settings ss
The SMS Service centre address is the phone number where your text messages are stored. It is normally imported from the SIM card but if that fails, your network operator can provide you with the service centre address.
t Your network operator may also specify the Character set.
ored You can set a time limit after which text messages are deleted from the network by choosing a value in the Messages stored for list.
type Specify if you prefer to use GPRS or GSM connection as directed by your network operator.
162 Control panel
To edit an email account1. On the Email tab, select the account in the list.2. Select Edit.3. Change your settings as desired.4. Select Done.
To delete an email account1. On the Email tab, select the account in the list.2. Select Delete.3. Select Yes.
Use these semessaging:
Tip If you syou can avoyou travel a(for examplnetwork ope
Incoming mail port
Normally 110. Do not change unless your ISP instructs you to.
Secure password authentication
A secure connection means that all information (including your username, password, and all messages) is encrypted to maximize security while you are connected to the Internet. In contrast, secure password authentication means that only your password is encrypted.
MessagingSMS Servicecentre addre
Character Se
Messages stfor
Connection
Control panel 163
This is the Internet version of the user�s guide. © Print only for private use. nced settings
t Advanced to make settings about how your P910i will and receive multimedia messages.
Advanced settings tabsThe values you give these settings will be default for all multimedia messages that you send. You can of course choose other values for an individual message in Messages.You can set the Validity period for your messages, that is, how long they should be available to the receiver. Maximum is the default.You can give your messages a Priority of Low, Normal (default) or High.You can set Content alert for the multimedia messages you create to help you check content. If you select Warning, a warning message is displayed whenever you add a non-conformant item to a multimedia message. You have the option to send anyway. If you select Restricted, the message will not be sent in the situation described above. Free means no restrictions.Select the check boxes to provide the function you want:Hide number prevents the sent message from showing your number.Read report requests a read notification from receivers of your messages.Delivery report requests a delivery notification from receivers of your messages.Reply with history includes the original with your reply.
MMS tabUse these settings to set up multimedia messaging:
AdvaSelecsend
Messaging accounts MMS tab settingsService centre address
The MMS Service centre address is the URL to the server on which your multimedia messages are stored. Your MMS service provider or your network operator can provide you with the service centre address.
WAP account Specify which of your configured WAP accounts you wish to use.� WAP accounts are created in Control panel >
Connections > WAP accountsAutomatic Select between:
� Off - automatic download is off, you will receive notifications of incoming messages and have to download them manually.
� Home only - messages are downloaded automatically when you are connected to your home network.
� On - messages are also downloaded automatically when you are roaming outside your home network.
Download size and Smaller than
Set whether or not to have a size limit for incoming messages:� No restrictions - the size of the incoming messages
does not matter, all messages will be received.� Smaller than - messages smaller than the limit will
be received, bigger messages will be deflected.
MMSSend
This is the Internet version of the user�s guide. © Print only for private use. Area Information is a type of text message that is sent to all subscribers in a certain network area, for example a local traffic
ell Informationell information check box
a Information one Area information check box. Received messages utomatically stored, and displayed in the list when d.hows all the channels that you have defined on your he check box for each channel shows if it is on , ready to receive messages) or off (cleared, not
w channelw. number of the new channel in the New Channel hannel numbers can be from 0 to 999. If there are channels defined, New will be disabled and you will
ssage: Maximum channels on SIM. numbering is operator-dependent. Please consult
ork operator for information.
annel on or offhannel in the list and select the check box. To turn it e check box.
MMS Advanced settings tabs
164 Control panel
Area tabOn the Area tab you make settings related to Cell Broadcast Services. These include both Area Information and Cell Information services. The availability of Cell and Area Information Services is operator-dependent.
Your network may broadcast the area code as cell information. Your P910i can display it below the network name in the flip closed standby view.
report.
To enable CSelect the C
To turn Are1. Check th
will be adismisse
2. The list sP910i. T(selectedactive):
To add a ne1. Select Ne
2. Enter thedialog. Ctoo manysee a meChannelyour netw
To turn a chSelect the coff, clear th
Receive These settings apply to multimedia messages that you receive.Select the Play full screen checkbox, when you want to play MMS messages in full screen.Select the check boxes to send a notification message to the sender when a message is:� Delivered to you: Allow delivery notification� Read by you: Allow read notificationYou can filter reception of incoming messages by message type (Advertisements, Information) or from senders not listed in Contacts (Anonymous senders). Selecting a check box will filter out messages of that category.To receive multimedia messages only from senders listed in your Contacts, select all other check boxes and clear the check box for Anonymous senders.
Control panel 165
This is the Internet version of the user�s guide. © Print only for private use. You access WAP pages through an Internet Service der (ISP) so, when you create a WAP account, you must e one of your existing Internet accounts or first create a ne.
eate a new WAP accountter the name of the WAP account.lect the Internet account you want to use. Preferred icates the account set as preferred in the Internet setup.
you are going to use a WAP gateway or a proxy, select the e Proxy check box.ter the Address of the gateway or proxy.ter the Port of the gateway or proxy.r a WAP gateway use:
9201 for a normal connection. 9203 for an encrypted secure connection.
the gateway/proxy requires Username and Password, which very unusual, fill in the last two fields in the dialog.
erred tabt the check box to set a preferred WAP account. It will be when you use the Open page command in the Internet ation and when a page is opened from another P910i ation. If you do not set a preferred WAP account, the
rred Internet account will be used when connecting to the et.
To delete a channelSelect Delete. Since deleting a channel cannot be undone, you will be asked to confirm the delete. Deleting the channel will also delete any stored Area Information messages for that channel in your Area Info Inbox.
WAP accountsUse these settings to set up and manage WAP accounts on your P910i.
WAP accounts are intended for multimedia messages and for accessing the Internet through a WAP gateway. (Such gateways make use of proxy port 9200-9203.) All other proxy settings should be included in your Internet accounts.
For security reasons, some WAP pages and services, for example online banking, can only be accessed from a particular WAP account.
The dialog has two tabs: Basic and Preferred.
Basic tabThe dialog shows a list of all the WAP accounts on your P910i. You can add a New account to the list and Edit or Delete an existing account.
NoteProvichoosnew o
To cr1. En2. Se
ind3. If
Us
4. En5. En
Fo
��
6. If is
PrefSelecused applicapplicprefeIntern
This is the Internet version of the user�s guide. © Print only for private use.
The Other tab Security informationormation is displayed when Certificate manager re of the origin of the page or software. For
curity information will be displayed if:
ficate on a page has expired.tity of a software manufacturer cannot be verified.
ormation is also displayed when a certificate on your
oked by the independent organization that issued it.
nd deleting certificateshandles certificates automatically so, most of the n browse the Internet securely without using nager. If you do need to add or delete a certificate, ally be informed by your network operator or inistrator. You should delete a certificate from nager if you are informed, or suspect, that:
ficate does not belong to the person who supplied it.ficate was issued incorrectly by the independent tion that created it.
166 Control panel
The other tab contains all settings that are not related to the device or connections. This is also where settings from system components and add-ons, developed by third-party developers, will be found.
Certificate managerDigital certificates ensure that the Web or WAP pages you visit, or any software you install, really are created by the person you expect.
Certificates may be present on the pages that you view or the software that you download. Your P910i compares these certificates with a set of certificates that are stored in Certificate manager to ensure the authenticity of the page or software. If the certificates do not match, your P910i informs you, and gives you the following choices:
� Prevent the page being loaded or the software being installed.� Continue at your own risk.
The certificates on your P910i have been created and issued by an independent organization that ensures their authenticity.
Security infcannot be suexample, se
� The certi� The iden
Security infP910i has:
� Expired.� Been rev
Adding aYour P910i time, you caCertificate mayou will ususystem admCertificate ma
� The certi� The certi
organiza
Control panel 167
This is the Internet version of the user�s guide. © Print only for private use. you format a disk, you delete all the information on it, ing any applications that you may have installed. You also all information placed on it by other devices (these
rs are hidden except in File Manager).
Security managerP security manager displays stored policies and only one can be activated at a time.This is used for secure ctions over the Internet, typically to a corporate intranet. If d, your company information services department will y the necessary information.
are two types of passwords needed:
security password: is to be set when activating the very st policy, that is, this password is only set once, but it is ssible to change it later at any time by tapping the ssword button.tivation password: is needed when a policy is activated
r the first time and the supplier of the policy gives this.
guage selectionhis list of all languages stored on your P910i to change age. The highlighted entry is the language presently in use. an delete all languages except English.
Type of certificateThe type can be either User or Certificate Authority.
� User certificates contain your identity. This type of certificate is used when the server asks for client authentication. The client application requests you to identify yourself by choosing a user certificate.
� Certificate Authority certificates contain server details. This type of certificate is handled by your P910i when the server only requires server authentication. This means that your identity remains anonymous.
Flip settingsFlip keyboard - Specify the keyboard your P910i has on the inside of the flip.
Enable virtual flip - Select the check box to use of the Virtual flip when the flip of your P910i has been removed.
Format diskThis dialog primarily lets you rename and format any Memory Stick that you install in your P910i. Your P910i comes with one Memory Stick.
Whenincluddeletefolde
IP The Ipolicyconneneedesuppl
There
� IPfirpoPa
� Acfo
LanUse tlanguYou c
This is the Internet version of the user�s guide. © Print only for private use. To conserve storage space only a limited set of languages is loaded on your P910i at delivery. When you select one of the
Secure tokensaccess to a network that requires secure access n as �strong authentication�), for example a tranet, you can set up the Internet account you use to t network to use secure access and generate the e-time password when you make the connection.
supports the following secure access systems:
from RSAd from Secure Computing
ssible to add other access systems through third-re.
a separate device or application that requires one-rds according to one of these systems, you do not
rate hardware token generator (Hard Token). Your enerate passwords that are not associated with an ount.
secure access in your P910i using Secure Tokens.
is associated with one vendor/system and may be ith one or more Internet accounts (or none, when
168 Control panel
languages from the list the unused languages in the set are deleted from the memory of your P910i. You can, at any time, download additional languages from www.SonyEricsson.com/support
Master resetUse Master reset to reset your P910i.
Note All user data, as well as pre-installed media files and application data files (including, for example, backgrounds, ring signals and pictures), will be deleted and settings will be set to the state they were, after you selected the language. The selected local language will be restored.
If you have backed up your user data, you can restore it from the backup, see �Restoring data� on page 143.
You can restore media files and application data files from the Content and Application CD, or from the Web.
If you want to keep installed applications, clear the Delete user installed applications check box.
If you need (often knowcorporate inlog in to tharequired on
Your P910i
� SecureID� SafeWor
It is also poparty softwa
If you have time passwoneed a sepaP910i can gInternet acc
You manage
Each token associated w
Control panel 169
This is the Internet version of the user�s guide. © Print only for private use. Tasks, delete all completed entries by selecting sks > Delete completed in your list of entries.roughout your P910i, use folders as you create and receive ormation to speed up housekeeping later.
ting or copying general filesiles to see lists of all stored general file types on your P910i e Memory Stick. You can copy files to a specified folder, unwanted files, and launch the appropriate application to or play a file in the list.
lete files or copy files between folderslect Files.
lect the Type of file to move or delete.lect the Location folder.p one or more check boxes to select the files to copy or lete. copy files, tap Copy and select the destination folder. delete files, tap Delete. You will be asked to confirm.
stalling applications uninstall an application, you can always reinstall it if you to use it later.
you use your P910i as a Hard Token). You can configure as many tokens as needed.
Tip Dialog details when using secure access are vendor, system and network-specific. You should contact the administrator of the network you wish to access to get the correct information.
Storage managerThe list shows the applications on your P910i and the space they occupy. Tapping the Files button lets you manage general files stored internally on the P910i or on a Memory Stick.
Deleting information from applications To delete information from an application: select an application in the list. This application is then displayed. Delete the old or unwanted entries or information.
Here are some housekeeping tips for different applications:
� Delete any unwanted recordings as even short ones occupy a lot of space.
� In Messages, delete any old messages from your Inbox or Sent folders.
� In Calendar, delete all entries in a specified time period by selecting Calendar > Remove entries in your list of entries.
� InTa
� Thinf
DeleTap Fand thdeleteview
To de1. Se2. Se3. Se4. Ta
de5. To
To
UninIf youwant
This is the Internet version of the user�s guide. © Print only for private use. To uninstall applications Note The PIN-G applies to the whole WIM and any items that
do not have a different PIN. This means that no specific items on linked to PIN-G.
nge status of a PIN:
IN A PIN code that is enabled is requested for tion of an operation. To proceed with the operation t enter the PIN code. PIN A PIN code that is disabled is not requested to an operation to proceed.
he PIN codee PIN you want to change from the choice list. ange PIN.
e has been blocked, you must unblock it before it again. Select the PIN and select Change PIN.
170 Control panel
1. Select Uninstall.A list of applications that can be uninstalled is shown.
2. Select the application to uninstall.3. Select Uninstall.
Note You cannot uninstall the standard applications that come with your P910i.
WIM PIN settingsWIM (WAP Identity Module) is used for performing security functions, especially to store and process information needed for user identification and authentication. It is a tamper-resistant store for private keys, certificates and other items that may require a PIN for access or modification.
The WIM management dialog consists of a PIN choice list and a WIM items list.
You can select a PIN from the PIN choice list. The WIM items list changes content dynamically, displaying only the keys that are protected by the selected PIN and also have an associated certificate. Other keys that are protected by the selected PIN but do not have an associated certificate are not shown in the WIM item list. This is the case when WIM PIN (PIN-G) is selected.
the WIM are
You can cha
� Enable Pauthorisayou mus
� Disable authorize
To change t1. Select th2. Select Ch
If a PIN codcan be used
Getting started with Internet and Messages 171
This is the Internet version of the user�s guide. © Print only for private use.
d Messagesnection type your P910i connects to a service provider, it will use a or GPRS network provided by a network operator. Many rk operators offer both GPRS and GSM services.
onnection type defines which network your account uses nect to the Internet. GPRS Internet accounts use the GPRS rk, and Dial-Up Internet accounts use the GSM network.
Sr network operator supports GPRS, a GPRS Internet nt allows you to:
main permanently connected to the Internet without being arged for connection time. With a GPRS account, you are arged for the amount of information you view, download send when your are connected to the Internet. Check your erator for details of your subscription.oid having to reconnect to the Internet if the connection is
oken.
Upoth Dial-Up and High-Speed Dial-Up accounts, you are ed for the length of time you are connected. If your rk operator supports them, you can increase your ction speed (at a cost) by setting up a high-speed account.
Getting started with Internet anIntroduction Before you can use Internet and Messages to access the Internet and send or receive messages, you will need to make some user-specific settings in the Control Panel.
Service providerYou will need a service provider to connect your P910i to the network.The service provider could be:
� An Internet Service Provider (ISP) which connects you to the Internet.
� An access point provided by your network operator.� A private service provider such as your company or your
bank.
You will need to enter specific service provider details into your P910i to set up an Internet account. It can hold the details of multiple service providers, for example, you may have separate Internet and corporate accounts.
Your network operator or retailer may have pre-installed services, check with them.
ConWhenGSMnetwo
The cto connetwo
GPRIf youaccou
� Rechchorop
� Avbr
Dial-For bchargnetwoconne

This is the Internet version of the user�s guide. © Print only for private use. Automatically set up service Accepting new Internet or Messages
set-up messages will appear in the Auto setup ox of Messages. (Phone set-up messages for nts will, however, be found in your SMS message
one set-up message appears, select it.
th a brief text and operator message appears on the can accept the new settings or leave the message in
of the new account is the same as that of an existing can choose to create a new account with the same lace the existing account.
accept remote phone set-up messages if you are not em or are unsure where they have come from.
lly set up service er
ative to setting up an Internet account automatically, er the settings manually from Control panel > > Internet accounts.
172 Getting started with Internet and Messages
provider and messagingThe easiest way to set up your P910i is automatically, through your service provider.
For Messages settings your P910i supports automatic setup of:
� email accounts� MMS message (Multimedia Messaging Service) settings.
Check your service provider's Web site for information or contact their support desk and ask about automatic remote phone set-up of ISP (Internet Service Provider) settings, email and MMS message settings.
If remote phone set-up is possible, they will send you the phone set-up messages required by SMS message.
Settings valid for your network operator and one or more of these services may also be available through the phone setup-message generator at www.SonyEricsson.com/support
To check that your SMS messaging settings are correct1. Select Control panel > Connections > Messaging accounts >
SMS.
2. Check the information, for example the address of the service centre.
settingsNew phoneaccount inbemail accouinbox.)
When an ph
A dialog wiscreen. Youthe inbox.
If the name account youname or rep
Note Neverexpecting th
ManuaprovidAs an alternyou can entConnections
Getting started with Internet and Messages 173
This is the Internet version of the user�s guide. © Print only for private use. ialog has four tabs, one for each type of messaging e:
The provider of your email service, or for a corporate account, your information services manager can provide you with the necessary details.All settings are described in �Email tab� on page 160.To set up a new account follow the steps under �To create a new email account� on page 160.
ageShort Message ServiceThe necessary settings are usually provided on your SIM card. All settings are described in �SMS tab� on page 162.
age
Multimedia Messaging ServiceYour MMS messaging provider will be able to provide you with the necessary information.Before you set up MMS messaging you need to set up an Internet account in Control panel > Connections > Internet accounts and a WAP account in Control panel > Connections > WAP accounts All settings are described in �MMS tab� on page 163.Cell Broadcast Service: Area and Cell informationYour network operator will be able to inform you if these services are available.All settings are described in �Area tab� on page 164.
First collect all the information you will need. You can obtain this information from your ISP (Internet Service Provider), or if you are connecting to a corporate network, your information services department.
All settings are described in �Internet accounts� on page 155.
To set up a new account follow the steps under �To create a new Internet account� on page 156.
Manually set up messagingAs an alternative to setting up Messages automatically, you can enter the settings for the messaging services you want to use yourself from Control panel > Connections > Messaging accounts.
First collect all the information you will need. You can obtain this information from the following sources:
� If your network operator offers an email service you can get the necessary details from them.
� Your Internet service provider.� Your information services manager in the case of connecting
to the corporate network to access your work email account.� Your network operator in the case of SMS message and Cell
Broadcast Services.
The dservic
SMS mess
MMSmess
Area

This is the Internet version of the user�s guide. © Print only for private use. Setting up WAP accounts First collect all the information you will need. You can obtain
this information from the WAP service provider, or if you are to a corporate network, your information services
are described in �WAP accounts� on page 165.
ew account follow the steps under �To create a new nt� on page 165.
your P910i as a modemcontains a complete GSM/GPRS modem, so you connect your PC to the Internet or corporate r P910i appears to the laptop like a normal modem.
laptop to your P910i using Bluetooth wireless infrared, or cable (USB or serial).The connection can be by any of the bearers that your P910i
(High-speed Circuit Switched Data)rcuit Switched Data).
modem driver file and a PC utility, the Dial-Up izard, is provided on your Sony Ericsson PC Suite
zard will help you configure DUN (Dial-Up
174 Getting started with Internet and Messages
A WAP account (sometimes called a WAP profile) defines a service provider and gateway that should be used when making a connection to WAP services. You also need a WAP account when you use MMS message (Multimedia Messaging Service).
The WAP gateway sits between your P910i and the WAP site coding and decoding information. You can set up details of more than one gateway if necessary, for example one for your MMS messaging, one to access corporate data over WAP, and another to access your bank's WAP service.
The easiest way to set up a WAP account on your P910i is automatically, through your service provider. Check your service provider's Web site for information or contact their support desk and ask about automatic setup. You can also find more information, and settings for many operators on:http://www.SonyEricsson.com/support.
Note You access WAP pages through an Internet Service Provider (ISP) so, when you create a WAP account, you must choose one of your existing Internet accounts or first create a new one.
Manually set up a WAP accountInstead of setting up a WAP account automatically, you can enter the settings manually from Control panel > Connections > WAP accounts.
connecting manager.
All settings
To set up a nWAP accou
UsingYour P910i can use it tointranet.You
You link thetechnology,over the air supports:
� GPRS� HSCSD � CSD (Ci
A WindowsNetworking WCD. The wi
Getting started with Internet and Messages 175
This is the Internet version of the user�s guide. © Print only for private use. be connected to the PC via cable, infrared or Bluetooth ess technology. See �Connecting to other devices� on 134.
sure that you have any information concerning, for ple, phone numbers, names of servers or domains, that the r that you want to connect to may require.
t up a GPRS or HSCSD (High-Speed Circuit Switched connection using the Dial-Up Networking Wizardart the Dial-Up Networking Wizard from the Sony Ericsson lder of the Start menu on your PC.oose Create a new Dial-Up connection.llow the instructions in the wizard.
it a previously created DUN entryart the Dial-Up Networking Wizard from the Sony Ericsson lder of the Start menu on your PC.odify a Dial-Up connection.lect the desired connection from the list.llow the instructions in the wizard.
efine P910i as a modem t up a CSD (GSM Data) or HSCSD connection you will to install your P910i as a modem manually.
Networking) entries on your PC for GPRS and HSCSD connections.
Once paired with a Bluetooth-enabled laptop, your P910i is ready to make a connection to the Internet or corporate network. Since Bluetooth is wire-free and requires no line-of-sight alignment, you can place the laptop in a comfortable position and let your P910i remain in your pocket, briefcase, or even be placed up to 10 metres away.
If you wish to use an infrared link, the range is typically up to one metre. The two infrared ports must be kept in line of sight, at an angle of no more than approximately 30 degrees.
The Dial-Up Networking WizardThe wizard simplifies creating GPRS DUN connections by setting the proper values in the PC DUN entry and linking the entry to one of the GPRS configurations in your P910i. You can also view and modify the GPRS settings in the P910i.
For HSCSD DUN entries, the wizard updates the modem settings such that the specified data rate and type of bearer (ISDN / Analogue) will be used when you make a DUN connection.
You can view or change the DUN entries created with the wizard using the standard Windows DUN user interface.
The Dial-Up Networking Wizard software included in the Sony Ericsson PC Suite must be installed in your PC and your P910i
must wirelpage
Makeexamserve
To seData)1. St
fo2. Ch3. Fo
To ed1. St
fo2. M3. Se4. Fo
To dTo seneed
This is the Internet version of the user�s guide. © Print only for private use. To set up a Dial-Up entry for CSD or HSCSD GPRS - connection information
status bar let you overview the information on data calls.
signal strength and GPRS signal icon provides on the GPRS service status. The GPRS connection rs above the signal strength icon. There are three e icon, unavailable , available and .
/CSD and GPRS icons are displayed during ction. Where GPRS is suspended, for example, the nded state is indicated by a combined icon . ree states for the GPRS icon: Active ,ferring data (alternates between and )ed . Any data transfer either received or sent GPRS active icon for 5 seconds.
ion informationelect the data connection icon, during an active data a menu appears with the choices Information and
formation to view information on the connection. sconnect to end the connection.
176 Getting started with Internet and Messages
1. On the PC, open the Control Panel.2. Choose to install a new modem.3. Choose your P910i as the modem.4. Select the port where the P910i is connected.5. Confirm the selection. A new DUN connection has been
created.
Connecting
To connect using a DUN entry created by the wizard1. If you are connecting by cable, set your P910i to Modem cable
connection mode, see �Cable� on page 154.2. Use any conventional method to make a connection:
� Click the Desktop shortcut created by the wizard.� Select the entry from within the system DUN folder.� Run an application that has built-in support for using
DUN entries (for example a browser or email client).
Icons on theconnection
A combinedinformationstatus appeastates for thattached
The HSCSDa data conneGPRS suspeThere are thactive transand suspendactivates the
ConnectWhen you sconnection,Disconnect.
� Select In� Select Di
Getting started with Internet and Messages 177
This is the Internet version of the user�s guide. © Print only for private use. set the log of an accountlect an account in the list.lect GPRS data log > Reset.
lete or reset the log of several accountslect the check boxes of the accounts in the list to be deleted reset.lect GPRS data log > Reset or GPRS data log > Delete.
ion data the connection is deactivated, for example when the
nt Internet account is disconnected, the total data sent and ed in the last session is displayed.
nformation is displayed for a couple of seconds. To dismiss formation when the flip is closed, press .
GPRS status informationWhen the signal strength icon is selected, network, GPRS status information and, if applicable, GPRS error text appear.
GPRS data logA new GPRS data log entry is created when a GPRS account establishes a connection for the first time. It does not wait for transfer data. If there is an existing data log associated with the current GPRS connection, this is updated.
The GPRS data log shows a list of GPRS Internet accounts. Where one account is active or suspended, the relevant status icon is displayed to the left of the account.
To view information on an account1. Select an account in the list.2. Information on the account is shown. The data log is updated
dynamically.
Buttons allow you to delete or reset the current data. These buttons are disabled during an active or suspended connection.
To delete the log for an account1. Select an account in the list.2. Select GPRS data log > Delete.
To re1. Se2. Se
To de1. Se
or2. Se
SessWhencurrereceiv
The ithe in
This is the Internet version of the user�s guide. © Print only for private use. REFERENCE
Troubleshooting
roblemsot � Handheld phone: recharge or replace the battery.
� Make sure the contacts on the battery and charger are clean and avoid charging the battery in extreme temperatures.
� Vehicle Handsfree: check that the P910i is properly inserted into the holder and check the fuse in the fuse holder (connected to the battery cable).
lems� Make sure a SIM card is activated and inserted
into your P910i. See �SIM card� on page 12.
If your PIN is entered incorrectly three times in a row, the SIM card will be blocked. You can unblock it by using your PUK. See �SIM card lock� on page 37.
178 Troubleshooting
This chapter consists of a selection of suggestions for solving possible problems with your P910i. If this does not help, please try the Knowledge base on the global support site, www.SonyEricsson.com/support. There you also find other information that can be helpful.
Your P910i also contains help files with additional information. Access help with the menu option Edit > Help or, in many dialog boxes, with the help icon .
To improve performance, you can update the software of your P910i. See �Sony Ericsson Update Service� on page 133.
If you need to hand in your P910i for repair, please note that you may lose information and content that you have saved in your P910i. You are advised to make a copy of such information (make a backup) before handing your P910i in for repair.
Start-up pP910i will nstart
Lock probInsert card
Blocked SIMcard
Troubleshooting 179
This is the Internet version of the user�s guide. © Print only for private use.
munication problemshone does ork
� The received signal can be too weak, possibly because you are being shielded from the signal. Check your display signal strength indicator. Move outdoors or up from the ground to obtain a sufficiently strong signal.
� Make sure the P910i is not set in Flight mode.� Your P910i might be busy sending or receiving
data or email.� Check the settings for diverting or restricting
calls. See �Divert calls� on page 54, �Accept calls� on page 55 and �Restrict calls� on page 55.
� If Emergency calls only is displayed on the screen, you are not allowed to use the network within range. You can, however, usually make an emergency call using the emergency number.
� If No network is displayed on the screen, you are in an area that is not covered by a network or the received signal is too weak.
ot hear ing call
� Increase the ring signal volume.� Your P910i is set in silent mode.� Your P910i is set in Flight mode.
Device lock Phone locked is displayed followed by the prompt Enter lock code.Your P910i is locked to prevent unauthorized use.To unlock the P910i:� Enter your device lock code, 0000 by default,
then press or .
Key symbol The keypad is locked to prevent unintentional key action.Press followed by to unlock the keys.
Indicator lightFlashes red This indicates that the battery is running low and
soon needs recharging or replacing with a spare.� With Vehicle Handsfree (VHF) equipment, make
sure that the following are inserted or connected: Your P910i and its holder, the fuse in the fuse holder, and/or the external antenna.
Does not flash If the indicator light at the top of your P910i does not flash and no network is displayed there is no network within range. See �Telephone does not work� on page 179.
ComTelepnot w
Cannincom
This is the Internet version of the user�s guide. © Print only for private use. The person I am talking to
� Make sure you do not cover the microphone when you talk. You find the microphone at the
Cannot use e-mail
� Check with your service provider that your subscription includes email.
� The settings might not be correct. Enter new settings. Use the phone setup-message generator for email on www.SonyEricsson.com/support to send you an auto setup message, or contact your service provider. See also �Email tab� on page 160.
� Your P910i does not support fax transmission. Even if your operator subscription supports fax transmission, fax calls will be rejected. However, they can be diverted to another number such as the office fax number, see �Divert calls� on page 54 for more information.
� Make sure potential fax callers do not try to send a fax to your P910i as they can experience a number of retries before the fax transmission is stopped.
180 Troubleshooting
has a problem hearing what I am saying
bottom of the phone, next to the connector.� You could be almost out of network range. The
sound improves with a better network connection.
Cannot use WAP
� Your subscription does not include WAP. Check with your service provider.
� The settings are not correct. Enter new settings. Contact you service provider or visit www.SonyEricsson.com/support and use the WAP phone setup-message generator.
Cannot send nor receive SMS or MMS
� Your subscription does not include SMS or MMS. Check with your service provider.
� Check with you service provider that you have entered the correct Service Centre phone number.
� Check the settings in the Control panel. Contact you service provider or visit www.SonyEricsson.com/support and use the MMS phone setup-message generator.
� Make sure that Flight mode is deactivated.� Phone memory might be full. Delete some
pictures or music, for example.
Fax calls
Troubleshooting 181
This is the Internet version of the user�s guide. © Print only for private use. ot lish ection with etooth ess ology set or sfree
� Make sure that the devices are correctly paired. See �Connection via Bluetooth wireless technology� on page 136.
� Make sure that the handset or handsfree is charged.
� Make sure that the devices are in range with each other.
ot find PC are for loading
� You can find PC software on www.SonyEricsson.com/support and also on local sites.
ot use my i as a m
� First ask your service provider to enable your data connection.
� Then connect your P910i to your PC with cable, Bluetooth technology, or infrared. See �Using your P910i as a modem� on page 174, �Connecting to other devices� on page 134, and Knowledge base on www.SonyEricsson.com/support
Problems to connect to a PC or another deviceNot possible to establish connection using cable
� Make sure that the SyncStation and cable is correctly connected to the PC.
� Make sure that the correct COM port on the PC is enabled. Right-click the P910i link symbol in the PC taskbar, and select Properties. Select the USB COM port.
� Make sure the device lock is not active.� Uninstall Sony Ericsson PC Suite. Connect the
SyncStation with the P910i to the PC. Reinstall Sony Ericsson PC Suite, following the installation procedure carefully.
� Check for Sony Ericsson PC Suite updates on www.SonyEricsson.com/support. If you find a new version of the program, download it and install this instead of the old one.
Cannot transfer pictures
Place the P910i in the SyncStation. In the PC, open My P910i and browse through the P910i file system to find the picture.
Cannot transfer items with Bluetooth wireless technology
� Make sure that Bluetooth wireless technology is activated.
� Make sure that the devices are in range with each other. Maximum range is 10 metres.
Cannestabconna Bluwireltechnhandhand
Cannsoftwdown
CannP910mode
This is the Internet version of the user�s guide. © Print only for private use. Cannot synchronize
� Connect to your PC with cable, Bluetooth technology, or infrared. See �Connecting to
Storage Manager
You can also use the storage manager to free up memory.
� Select Applications > Control panel > Other > Storage manager.
� A list of all applications and their memory requirements is shown.
� See �Deleting or copying general files� on page 169 and �Deleting information from applications� on page 169.
in s
Use the applications to remove unused or old items from the P910i internal memory:� WAP history or bookmarks.� Messages.� Contacts.� Call logs.� Calendar tasks or appointments.� Jotter notes.
eouse on ck
� You might have a Memory Stick with a lock switch. Move the switch in the other direction.
� The Memory Stick might be full. Delete some files on it.
182 Troubleshooting
with my PC other devices� on page 134. � Then install Sony Ericsson PC Suite, and make
necessary settings. See �Synchronization and backup� on page 139 and the help files in Sony Ericsson PC Suite. See also Knowledge base on www.SonyEricsson.com/support
Memory fullWhen your P910i has no more space available to save or store information, the icon is shown in the status bar. You must then free up memory to ensure the proper functioning of the P910i.� Make sure regular backups are made with
Communications Suite to reduce the risk of lost or corrupted information.
Storage Wizard � Tap the icon in the status bar to start the Storage Wizard, or start it in the application launcher. Then use the storage wizard to move items from the P910i internal memory to a Memory Stick, or remove items from the P910i memory.
Informationapplication
MiscellanCannot savMemory Sti
Troubleshooting 183
This is the Internet version of the user�s guide. © Print only for private use. ications responding
� Close the flip and open it again.� Turn off the P910i and turn it on again.� Remove the battery, wait about 10 seconds, and
insert it again.� Phone memory might be full. Delete some
pictures or music, for example.� If the problem continues, do a master reset. See
�Master reset� on page 168. All data will be lost.
m failure In the case of a system failure, your P910i will flash an animated warning. To recover, please restart the P910i like this:� Press and hold the On/Off button for at least 10
seconds to turn the P910i off.� Restart as normal: Press the On/Off button to
turn on your P910i.
Tap on display does not work
Occasionally you may find that you tap one item (for example a button or menu option) but another is activated. Calibrating the screen ensures that the correct item is activated. Tap Control panel > Device tab > Display > Screen tab > Calibrate screen and follow the instructions.
Cannot change language
� The first time you start the P910i you select a language. All other languages are then deleted, in order to free memory. You can find all languages on the Sony Ericsson PC Suite CD. From the CD, you can install the language you want. You can find more languages on www.SonyEricsson.com/support
� When you have installed a new language, you have to turn your P910i off and then on again for the change to take effect.
Incorrect character appears when keyboard key is pressed
� The wrong keyboard type can be specified in the control panel. Make sure the correct settings are defined in Control panel > Device tab > Flip settings > Flip keyboard.
Applstop
Syste
This is the Internet version of the user�s guide. © Print only for private use.
Guidelines for safe and efficient usecy (RF) Exposure and SARone is a low-power radio transmitter and receiver. When it is turned levels of radio frequency energy (also known as radio waves or fields). round the world have adopted comprehensive international safety eloped by scientific organizations, e.g. ICNIRP (International Non-Ionizing Radiation Protection) and IEEE (The Institute of lectronics Engineers Inc.), through periodic and thorough ientific studies. These guidelines establish permitted levels of radio
for the general population. The levels include a safety margin ure the safety of all persons, regardless of age and health, and to variations in measurements.
ption Rate (SAR) is the unit of measurement for the amount of radio gy absorbed by the body when using a mobile phone. The SAR ined at the highest certified power level in laboratory conditions, AR level of the mobile phone while operating can be well below is because the mobile phone is designed to use the minimum power h the network. R below the radio frequency exposure guidelines do not mean that
ions in safety. While there may be differences in SAR levels among all Sony Ericsson mobile phone models are designed to meet radio sure guidelines.let with SAR information for this mobile phone model is included al that comes with this mobile phone. This information can also be with more information on radio frequency exposure and SAR, on:sson.com.
local laws and regulations restrict the use of mobile phones while ire drivers to use handsfree solutions. We recommend that you use r Sony Ericsson handsfree solutions intended for use with your note that because of possible interference with other equipment,
184 Guidelines for safe and efficient use
Please read this information before using your mobile phone.
Note Important: to avoid hearing impairment, answer call or lower volume before placing this product to your ear.
Recommendations� Always treat your product with care and keep it in a clean and dust-free place.� Do not expose your product to liquid or moisture or humidity.� Do not expose your product to extreme high or low temperatures.� Do not expose your product to open flames or lit tobacco products.� Do not drop, throw or try to bend your product. � Do not paint your product.� Do not use your product near medical equipment without requesting permission.� Do not use your product when in, or around aircraft, or areas posted �turn off
two-way radio�. � Do not use your product in an area where a potentially explosive atmosphere
exists.� Do not place your product or install wireless equipment in the area above your
car�s airbag. � Do not attempt to disassemble your product. Only Sony Ericsson authorized
personnel should perform any service.
AntennaOnly use an antenna that has been specifically designed by Sony Ericsson for your mobile phone. Use of unauthorized or modified antennas could damage your mobile phone and may violate regulations, causing loss of performance and SAR levels above the recommended limits (see below).
Efficient useHold your mobile phone as you would any other phone. Do not cover the top of the phone when in use, as this affects call quality and may cause the phone to operate at a higher power level than needed, thus shortening talk and standby times.
Radio FrequenYour mobile phon, it emits lowradio frequencyGovernments aguidelines, devCommission onElectrical and Eevaluation of scwave exposuredesigned to assaccount for anySpecific Absorfrequency enervalue is determbut the actual Sthis value. Thisrequired to reacVariations in SAthere are variatmobile phones,frequency expoA separate leafwith the materifound, togetherwww.SonyEric
DrivingPlease check ifdriving or requonly Ericsson oproduct. Please

Guidelines for safe and efficient use 185
This is the Internet version of the user�s guide. © Print only for private use. ency Calls phones operate using radio signals, which cannot guarantee connection ll conditions. Therefore you should never rely solely upon any mobile
for essential communications (e.g. medical emergencies).ency calls may not be possible on all cellular networks or when certain k services and/or mobile phone features are in use. Check with your local provider.
y Use and Careommend that you fully charge the battery before you use your mobile phone first time. The battery can only be charged in temperatures between +5°C ) and +45°C (+113°F).battery or one that has not been used for a long time could have reduced y the first few times it is used.k and standby times depend on the actual transmission conditions when he mobile phone. If the mobile phone is used near a base station, less power ired and talk and standby times are prolonged.argeable battery can be charged and discharged hundreds of times. er, it will eventually wear out � this is not a defect. When the talk-time or time is noticeably shorter, it is time to replace your battery. Sony Ericsson ends that you use only batteries and chargers approved by Sony Ericsson.
ning! May explode if disposed of in fire. nly Ericsson or Sony Ericsson branded original batteries and rgers intended for use with your mobile phone. Other rgers may not charge sufficiently or may produce excessive t. Using other batteries and chargers could be dangerous.ot expose the battery to liquid.ot let the metal contacts on the battery touch another metal ect. This could short-circuit and damage the battery. ot disassemble or modify the battery.
some vehicle manufacturers forbid the use of mobile phones in their vehicles unless a handsfree kit with an external antenna supports the installation. Always give full attention to driving and pull off the road and park before making or answering a call if driving conditions so require.
Personal Medical DevicesMobile phones may affect the operation of cardiac pacemakers and other implanted equipment. Please avoid placing the mobile phone over the pacemaker, e.g. in your breast pocket. When using the mobile phone, place it at the ear opposite the pacemaker. If a minimum distance of 15 cm (6 inches) is kept between the mobile phone and the pacemaker, the risk of interference is limited. If you have any reason to suspect that interference is taking place, immediately turn off your mobile phone. Contact your cardiologist for more information. For other medical devices, please consult the manufacturer of the device.
ChildrenDO NOT ALLOW CHILDREN TO PLAY WITH YOUR MOBILE PHONE OR ITS ACCESSORIES. THEY COULD HURT THEMSELVES OR OTHERS, OR COULD ACCIDENTALLY DAMAGE THE MOBILE PHONE OR ACCESSORIES. YOUR MOBILE PHONE AND ITS ACCESSORIES MAY CONTAIN SMALL PARTS THAT COULD BE DETACHED AND CREATE A CHOKING HAZARD.
Disposing of the ProductYour mobile phone should not be placed in municipal waste. Please check local regulations for disposal of electronic products.
Power SupplyConnect the AC power adapter only to designated power sources as marked on the product. Make sure the cord is positioned so that it will not be subjected to damage or stress. To reduce the risk of electric shock, unplug the unit from any power source before attempting to clean it. The AC power adapter must not be used outdoors or in damp areas. Never alter the cord or plug. If the plug will not fit into the outlet, have a proper outlet installed by a qualified electrician.
EmergMobileunder aphone Emergnetworservice
BatterWe recfor the(+41°FA new capacitThe talusing tis requA rechHowevstandbyrecomm� War� Use o
chachahea
� Do n� Do n
obj� Do n
This is the Internet version of the user�s guide. © Print only for private use. � Do not expose the battery to extreme temperatures, and never
above +60°C (+140°F). For maximum battery capacity, use the authorized distributors or service partners, in the country/region* where you purchased the Product, will, at their option, either repair or replace the Product in
h the terms and conditions stipulated herein.and its service partners reserve the right to charge a handling fee if a ct is found not to be under warranty according to the conditions
t your personal settings/downloads might be lost when the Product placed.
nsy is valid only if the original proof of purchase issued to the original y a dealer authorized by Sony Ericsson for this Product, specifying purchase and serial number**, is presented with the Product to be replaced. Sony Ericsson reserves the right to refuse warranty is information has been removed or changed after the original
f the Product from the dealer. sson repairs or replaces the Product, the repaired or replaced ll be warranted for the remaining time of the original warranty r ninety (90) days from the date of repair, whichever is longer.
eplacement may involve the use of functionally equivalent ed units. Replaced parts or components will become the property of son.ty does not cover any failure of the Product due to normal wear and to misuse, including but not limited to use in other than the normal ary manner, in accordance with the Sony Ericsson instructions for intenance of the Product. Nor does this warranty cover any failure uct due to accident, software or hardware modification or , acts of God or damage resulting from liquid.llular system on which the Product is to operate is provided by a pendent from Sony Ericsson, Sony Ericsson will not be responsible ration, availability, coverage, services or range of that system.ty does not cover Product failures caused by installations, ns, or repair or opening of the Product performed by a non-Sony thorized person.
186 Guidelines for safe and efficient use
battery in room temperature. � Turn off your mobile phone before removing the battery.
� Keep out of the reach of children.� Use the battery for the intended purpose only.� Do not allow the battery to be put into the mouth. Battery
electrolytes may be toxic if swallowed.
Disposing of the battery Please check local regulations for disposal of batteries or call your local Sony Ericsson Customer Care Centre for information.The battery should never be placed in municipal waste. Use a battery disposal facility if available.
Limited warrantySony Ericsson Mobile Communications AB, S-221 88 Lund, Sweden, (Sony Ericsson), provides this Limited Warranty for your mobile phone and original accessory delivered with your mobile phone (hereinafter referred to as "Product").Should your Product need warranty service, please return it to the dealer from whom it was purchased, or contact your local Sony Ericsson Customer Care Centre (national rates may apply) or visit www.SonyEricsson.com to obtain further information.
Our warrantySubject to the conditions of this Limited Warranty, Sony Ericsson warrants this Product to be free from defects in design, material and workmanship at the time of its original purchase by a consumer, and for a subsequent period of one (1) year.
What we will doIf, during the warranty period, this Product fails to operate under normal use and service, due to defects in design, materials or workmanship, Sony Ericsson
accordance witSony Ericsson returned Produbelow.Please note thais repaired or re
Conditio1. The warrant
purchaser bthe date of repaired orservice if thpurchase o
2. If Sony EricProduct shaperiod or foRepair or rreconditionSony Erics
3. This warrantear, or dueand customuse and maof the Prodadjustment
4. Since the cecarrier indefor the ope
5. This warranmodificatioEricsson au
Guidelines for safe and efficient use 187
This is the Internet version of the user�s guide. © Print only for private use.
6. The warranty does not cover Product failures which have been caused by use ofaccessories or other peripheral devices which are not Ericsson or Sony Ericsson branded original accessories intended for use with the Product.
7. Tampering with any of the seals on the Product will void the warranty.8. THERE ARE NO EXPRESS WARRANTIES, WHETHER WRITTEN OR
ORAL, OTHER THAN THIS PRINTED LIMITED WARRANTY. ALL IMPLIED WARRANTIES, INCLUDING WITHOUT LIMITATION THE IMPLIED WARRANTIES OF MERCHANTABILITY OR FITNESS FOR A PARTICULAR PURPOSE, ARE LIMITED TO THE DURATION OF THIS LIMITED WARRANTY. IN NO EVENT SHALL SONY ERICSSON OR ITS LICENSORS BE LIABLE FOR INCIDENTAL OR CONSEQUENTIAL DAMAGES OF ANY NATURE WHATSOEVER, INCLUDING BUT NOT LIMITED TO LOST PROFITS OR COMMERCIAL LOSS, TO THE FULL EXTENT THOSE DAMAGES CAN BE DISCLAIMED BY LAW.
Some countries/states do not allow the exclusion or limitation of incidental or consequential damages, or limitation of the duration of implied warranties, so the preceding limitations or exclusions may not apply to you. The warranty provided does not affect the consumer's statutory rights under applicable legislation in force, nor the consumer's rights against the dealer arising from their sales/purchase contract.* European Union (EU)If you have purchased your Product in an EU country you can have your Product serviced, under the conditions set out above, within the warranty period in any EU country where an identical Product is sold by an authorized Sony Ericsson distributor. To find out if your Product is sold in the EU country you are in, please call the local Sony Ericsson Customer Care Centre. Please observe that certain services may not be possible anywhere other than in the country of original purchase, for example due to the fact that your Product may have an interior or exterior which is different from equivalent models sold in other EU countries. It may not be possible to repair SIM-locked Products.** In some countries/regions additional information is requested. If so, this is clearly shown on the valid proof of purchase.
This is the Internet version of the user�s guide. © Print only for private use. FCC Statement Declaration of Conformity
sson Mobile Communications AB of net, Swedenur sole responsibility that our product type FAB-1021012-BV and FAB-1021012-CNtion with our accessories, to which this declaration relates is in h the appropriate standards 3GPP TS 51.010-1, EN 301489-7,
301489-17 and EN 60950, following the provisions of, Radio Telecommunication Terminal Equipment directive 99/5/EC with overing EMC directive 89/336/EEC, and Low Voltage directive 73/
quirements of the R&TTE Directive (99/5/EC).
ista, June 2004lace & date of issue
0682
188 Guidelines for safe and efficient use
This device complies with Part 15 of the FCC rules. Operation is subject to the following two conditions: (1) This device may not cause harmful interference, and (2) This device must accept any interference received, including interference that may cause undesired operation.
Environmental information �Halogenated flame retardants are not used in cabinets or the printed wiring board of the phone.� Power consumption of charger during standby < 0.3W.
For more environmental information, look at the Environmental Declaration for P910i at www.SonyEricsson.com
We, Sony EricNya VattentorS-221 88 Lunddeclare under oSony Ericssonand in combinaconformity witEN 300328, ENEquipment andrequirements c23/EEC.
We fulfil the re
KP
Terms and definitions 189
This is the Internet version of the user�s guide. © Print only for private use.
er second � rate of data flow.
Lsion of HTML optimised for small devices.
g Line Identity. Shows the number of the person calling your mobile phone display. Your P910i will also display me and photograph of the caller if they are in Contacts. an then make an informed choice as to whether or not to he call. Bear in mind that not all numbers can be displayed. e this service, it must be supported by your network.
Portes a serial/RS-232 port within the Windows environment.
it Switched. Connection from A to B which has a fixed idth and is maintained over a period of time, for example e phone call.
it Switched Data. CSD is a GSM service providing a CS onnection at a rate of 9.6 or 14.4kbps.
Terms and definitionsAUFormat for audio data files .AU files have the suffix .au
BearerPath over which data flows. Specifically in CSD and HSCSD, the type of phone link from the GSM network to the server � PSTN or ISDN.
BluetoothBluetooth wireless technology is a secure, fast radio connection technology. It is a computing and telecommunications industry specification that describes how mobile phones, computers, and personal digital assistants (PDAs) can easily interconnect with each other and with home and business phones and computers using a short-range wireless connection.
BMPMicrosoft Windows Bitmap. A graphics format defined by Microsoft supporting 1, 4, 8 or 24 bit colour depth. No compression, so files can be large.
BookmarkA URL and header/title stored in the phone, enabling the user to go directly to a Web or WAP page.
bpsBits p
cHTMA ver
CLICallinyou inthe naYou ctake tTo us
COMDefin
CSCircubandwa voic
CSDCircudata c
This is the Internet version of the user�s guide. © Print only for private use. CSSCascading Style Sheet. A feature of browsers.
GIFGraphics Interchange Format. Format for storing images which
ts animated images. Highly compressed by limiting alette to 16 or 256 colours. It is one of the two most e formats for graphic images on the World Wide ther is JPEG.
ket Radio Services. A radio technology for GSM at adds packet-switching protocols, shorter setup connections, and offers the possibility of charging nt of data sent rather than by connection time. ises to support flexible data transmission rates to 20 or 30 kbps (with a theoretical maximum of , as well as continuous connection to the network.
em for Mobile Communications. GSM is the world's -used digital mobile phone system, now operating countries around the world.
ystem family includes GSM 900, GSM 1800 and GSM 900 refers to GSM working on a frequency of
190 Terms and definitions
DTMFDual Tone Multi Frequency. A method of coding digits as a combination of two audible tones.
DUNDial-Up Networking. The dial-up networking capability in Windows.
e-GSMExtended GSM. New frequencies specified by the European Radio Communications Committee (ERC) for GSM use when additional spectrum is needed (network-dependent). It allows operators to transmit and receive just outside GSM's core 900MHz frequency band. This extension gives increased network capability.
EMSEnhanced Messaging Service. An extension of SMS enabling pictures, animations, sound and text formatting to be added to text messages.
FCCFederal Communications Commission. US government agency which regulates radio communications.
also supporthe colour pcommon filWeb. The o
GPRSGeneral Pacnetworks thtime for ISPby the amouGPRS promtypically up171.2 kbps)
GSMGlobal Systmost widelyin over 160
GSM 900The GSM sGSM 1900.900 MHz.
Terms and definitions 191
This is the Internet version of the user�s guide. © Print only for private use. ocal server. The email is received and held for you by your server. You (or your client email receiver) can view just ading and the sender of the letter and then decide whether nload the mail.
nfrared Data Association is dedicated to developing ards for wireless, infrared transmission systems between es. With IrDA ports, a device such as your P910i can nge data with other devices without a cable connection. requires line-of-sight transmission.
rated Services Digital Network. Communication protocol d by phone companies that permits phone networks to
data, voice, and other source traffic. Selecting ISDN for HSCSD connections provides quicker call setup.
et Service Provider. An organization that provides access Internet.
File Interchange Format.
Photographic Experts Group, best known for the .JPG t for still image compression.
GSM 1800 Also known as DCS 1800 or PCN, this is a GSM digital network working on a frequency of 1800 MHz. It is used in Europe and Asia-Pacific.
GSM 1900Also known as PCS. Refers to a GSM system running in the 1900 MHz band. Used in the USA and Canada, for instance.
HSCSDHigh-Speed Circuit-Switched Data (HSCSD) is circuit-switched wireless data transmission for mobile users at data rates of up to 64 kbps.
HTMLHypertext Markup Language is the set of markup symbols or codes inserted in a file intended for display on a World Wide Web browser page. The markup tells the Web browser how to display a Web page's words and images.
HTTPHyperText Transfer Protocol. The communications protocol used to connect to servers on the World Wide Web. Its primary function is to establish a connection with a Web server and transmit HTML pages to the client browser.
IMAP4Internet Message Access Protocol (the latest version is IMAP4) is a standard client/server protocol for accessing email from
your lIMAPthe heto dow
IrDAThe IstanddevicexchaIrDA
ISDNIntegofferecarryCSD/
ISPInternto the
JFIFJPEG
JPEGJoint forma
This is the Internet version of the user�s guide. © Print only for private use. MBMMultiple Bit Map. Symbian OS bitmap format.
MP3MPEG-1 Audio Layer-3 is a standard technology and format for
a sound sequence into a very small file (about one-ize of the original file) while almost preserving the
el of sound quality when it is played.
Picture Experts Group, develops standards for and digital audio compression. It operates under of the International Organization for tion (ISO). MPEG-4 goes far beyond compression stead of treating the data as continuous streams, als with audio/video items that can be manipulated tly, allowing for interaction with the coded data and exibility in editing. MPEG-4 supports a wide range video modes and transmission speeds.
ystem, such as Symbian OS, Linux, Microsoft
ir. A technology for transmission and reception of related configuration information in a wireless tions system.
mputer.
192 Terms and definitions
MeTMobile Electronic Transactions. An initiative founded by Ericsson, Nokia and Motorola to establish a secure and consistent framework for mobile transactions.
MIDIMIDI (Musical Instrument Digital Interface) is a protocol designed for recording and playing back music on digital synthesizers that is supported by many makes of personal computer sound cards.
MIMEMultipurpose Internet Mail Extensions. A protocol defining how messages are sent on the Internet. For example, MIME is used to describe how attachments are encoded and what type of data they contain.
MMSMultimedia Messaging Service. Logical extension of SMS and EMS. MMS defines a service enabling sound, images and video to be combined into multimedia messages. It supports photo quality pictures, and sounds in WAV, MIDI, AMR, or Melodies format.
compressiontwelfth the soriginal lev
MPEG-4The Movingdigital videothe auspicesStandardizamethods. InMPEG-4 deindependenproviding flof audio and
OSOperating SWindows.
OTAOver The Aapplication communica
PCPersonal Co
Terms and definitions 193
This is the Internet version of the user�s guide. © Print only for private use. 3
ffice Protocol 3 is a standard client/server protocol for ing email. The email is received and held for you by your
server. Periodically, the P910i Messages application can your mail-box on the server and download any mail.
colormation technology, a protocol is the special set of rules nd points in a telecommunication connection use when ommunicate. Protocols exist at several levels in a mmunication connection.
GAer Quarter VGA, 160 x 120 pixels.
Aer VGA size, typically refers to a portrait oriented screen ixels wide x 320 pixels high.
2ndard for serial transmission between computers and heral devices
ce Centre (for SMS).
ice Providerpany that provides services and subscriptions to mobile
users.
PCSPersonal Communications Services, often used to describe GSM 1900 networks.
PDAPersonal Digital Assistant. A handheld computer having functions such as address book, calendar, and so on.
PDFPortable Document Format. A format created by Adobe for storing and distributing documents.
Phone bookA memory in the SIM card where phone numbers can be stored and accessed by name or position.
PIMPersonal Information Management. Generic term for applications such as Contacts, Calendar, Tasks, and so on.
PINA PIN is a personal identification number.
PNGPortable Network Graphics. Format for storing images on file with data compression but without lowering of quality (loss of information).
POPPost OreceivPOP check
ProtoIn infthat ethey cteleco
QQVQuart
QVGQuart240 p
RS23A staperip
SCServi
ServA comphone
This is the Internet version of the user�s guide. © Print only for private use. SGMLA generic markup language for representing documents.
TCP/IPTransmission Control Protocol/Internet Protocol. TCP/IP is the
unication language or protocol of the Internet. It can as a communications protocol in a private network tranet or an extranet).
ayer Security. Used by Web browsers, for example.
source Locator. Points to a service or information on , for example: http://www.SonyEricsson.com
erial Bus. A plug-and-play interface between a d add-on devices (such as audio players, joysticks,
phones, scanners, and printers). With USB, a new e added to your computer without having to add an or even having to turn the computer off.
d Supplementary Services Data. Narrow-band GSM . For example entering *79*1234# might return the for stock 1234.
endarefines a transport and platform-independent format ing calendar and scheduling information for use in
194 Terms and definitions
SIMA SIM (Subscriber Identity Module) card is a �smart card�, inserted into GSM phones, that contains your phone account information. SIM cards can also be programmed to display custom menus for personalized services, for instance to assist operators in providing mobile commerce applications.
SMILSynchronized Multimedia Integration Language. Used by MMS to describe how media items are to be played.
SMSShort Message Service. Allows messages of up to 160 characters to be sent and received via the network operator's message centre to a mobile phone.
SMTPSimple Mail Transfer Protocol. Protocol used to send email from an email client via an SMTP server.
SWIMA SWIM card is a SIM card containing a WIM.
SyncMLSyncML is a universal protocol for data synchronization, developed by the SyncML Initiative Ltd.
basic commalso be used(either an in
TLSTransport L
URLUniform Rethe Internet
USBUniversal Scomputer ankeyboards, device can badapter card
USSDUnstructuredata servicestock price
vCal; vCalvCalendar dfor exchang
Terms and definitions 195
This is the Internet version of the user�s guide. © Print only for private use. for Internet access, including email, the World Wide Web, ewsgroups.
ve file is an audio file format, created by Microsoft, that ecome a standard PC audio file format for everything from
and game sounds to CD-quality audio. A Wave file is fied by a file name extension of WAV (.wav).
MLess Binary Extensible Markup Language.
ireless Identity Module is a data module for electronic ty certificates. It can contain both trusted and client icates, private keys and algorithms needed for WTLS haking, encryption, decryption, and signature generation. IM module can be placed on a SIM card, called a SWIM
ess Markup Language. A markup language used for ring services, fulfilling the same purpose as HyperText up Language (HTML) does on the World Wide Web W). In contrast to HTML, WML is designed to fit small eld devices.
PIMs/PDAs and group schedulers. vCalendar is specified by IETF.
vCard vCard automates the exchange of personal information typically found on a traditional business card, for use in applications such as Internet mail, voice mail, Web browsers, phone applications, call centres, video conferencing, PIMs /PDAs, pagers, fax, office equipment, and smart cards. vCard is specified by IETF.
VGAVideo Graphics Array. Graphics standard introduced by IBM, having a resolution of 640 x 480 pixels.
VPNVirtual Private Network. A private network that is configured within a public network. A VPN appear as private national or international network to the customer, but physically shares a backbone trunk with other customers. VPNs enjoy the security of a private network via access control and encryption, while taking advantage of the economies of scale and built-in management facilities of large public networks. Today, there is tremendous interest in VPNs over the Internet, especially due to the constant threat of hacker attacks.
WAPWireless Application Protocol is a specification for a set of communication protocols to standardise the way that wireless devices, such as cellular phones and radio transceivers, can be
used and n
WAVA Wahas bsystemidenti
WBXWirel
WIMThe WidenticertifhandsThe Wcard.
WMLWirelauthoMark(WWhandh
This is the Internet version of the user�s guide. © Print only for private use. WTLSWireless Transport Layer Security. Part of WAP, WTLS
196 Terms and definitions
provides privacy, data integrity and authentication on transport layer level between two applications.
W3CThe main standards body for the WWW.
xHTMLExtensible Hypertext Markup Language. A reformulation of HTML 4.01 in XML. Being XML, means that XHTML can be viewed, edited, and validated with standard XML tools. At the same time, it operates as well as or better than HTML 4 in existing HTML 4 conforming user agents.
XMLExtensible Markup Language. An initiative from the W3C defining an �extremely simple� dialect of SGML suitable for use on the WWW.
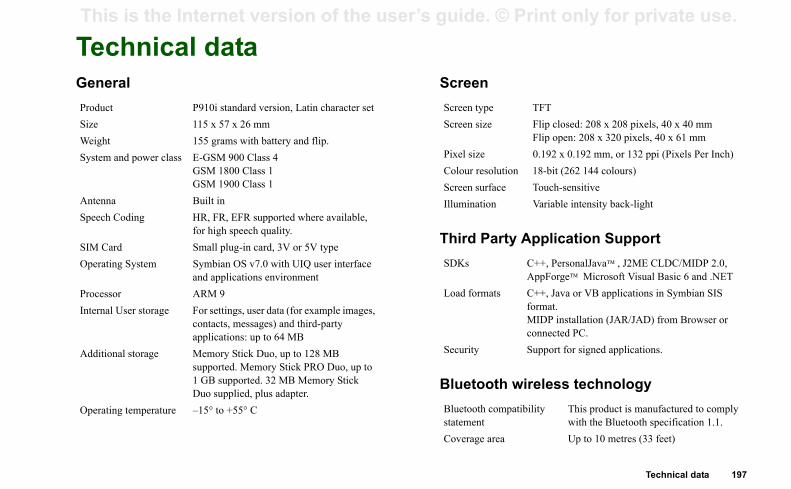
Technical data 197
This is the Internet version of the user�s guide. © Print only for private use.
en
d Party Application Support
tooth wireless technology
n type TFTn size Flip closed: 208 x 208 pixels, 40 x 40 mm
Flip open: 208 x 320 pixels, 40 x 61 mm size 0.192 x 0.192 mm, or 132 ppi (Pixels Per Inch)ur resolution 18-bit (262 144 colours)n surface Touch-sensitiveination Variable intensity back-light
s C++, PersonalJava™ , J2ME CLDC/MIDP 2.0, AppForge™ Microsoft Visual Basic 6 and .NET
formats C++, Java or VB applications in Symbian SIS format.MIDP installation (JAR/JAD) from Browser or connected PC.
rity Support for signed applications.
ooth compatibility ent
This product is manufactured to comply with the Bluetooth specification 1.1.
rage area Up to 10 metres (33 feet)
Technical dataGeneral Scre
Thir
Blue
Product P910i standard version, Latin character setSize 115 x 57 x 26 mmWeight 155 grams with battery and flip.System and power class E-GSM 900 Class 4
GSM 1800 Class 1GSM 1900 Class 1
Antenna Built inSpeech Coding HR, FR, EFR supported where available,
for high speech quality.SIM Card Small plug-in card, 3V or 5V typeOperating System Symbian OS v7.0 with UIQ user interface
and applications environmentProcessor ARM 9 Internal User storage For settings, user data (for example images,
contacts, messages) and third-party applications: up to 64 MB
Additional storage Memory Stick Duo, up to 128 MB supported. Memory Stick PRO Duo, up to 1 GB supported. 32 MB Memory Stick Duo supplied, plus adapter.
Operating temperature �15° to +55° C
ScreeScree
PixelColoScreeIllum
SDK
Load
Secu
BluetstatemCove
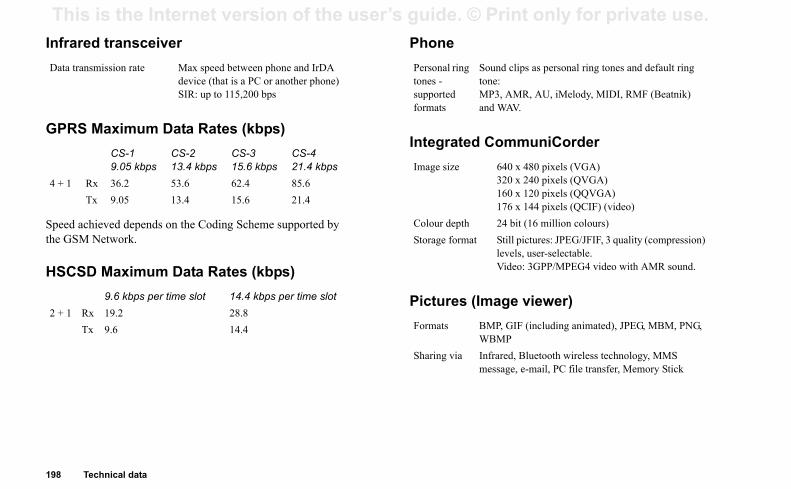
This is the Internet version of the user�s guide. © Print only for private use. Infrared transceiver Phone
d CommuniCorder
(Image viewer)
Sound clips as personal ring tones and default ring tone:MP3, AMR, AU, iMelody, MIDI, RMF (Beatnik) and WAV.
640 x 480 pixels (VGA)320 x 240 pixels (QVGA) 160 x 120 pixels (QQVGA)176 x 144 pixels (QCIF) (video)24 bit (16 million colours)
at Still pictures: JPEG/JFIF, 3 quality (compression) levels, user-selectable.Video: 3GPP/MPEG4 video with AMR sound.
BMP, GIF (including animated), JPEG, MBM, PNG, WBMPInfrared, Bluetooth wireless technology, MMS message, e-mail, PC file transfer, Memory Stick
198 Technical data
GPRS Maximum Data Rates (kbps)
Speed achieved depends on the Coding Scheme supported by the GSM Network.
HSCSD Maximum Data Rates (kbps)
Integrate
Pictures
Data transmission rate Max speed between phone and IrDA device (that is a PC or another phone) SIR: up to 115,200 bps
CS-1 9.05 kbps
CS-2 13.4 kbps
CS-315.6 kbps
CS-4 21.4 kbps
4 + 1 Rx 36.2 53.6 62.4 85.6Tx 9.05 13.4 15.6 21.4
9.6 kbps per time slot 14.4 kbps per time slot2 + 1 Rx 19.2 28.8
Tx 9.6 14.4
Personal ringtones -supported formats
Image size
Colour depthStorage form
Formats
Sharing via
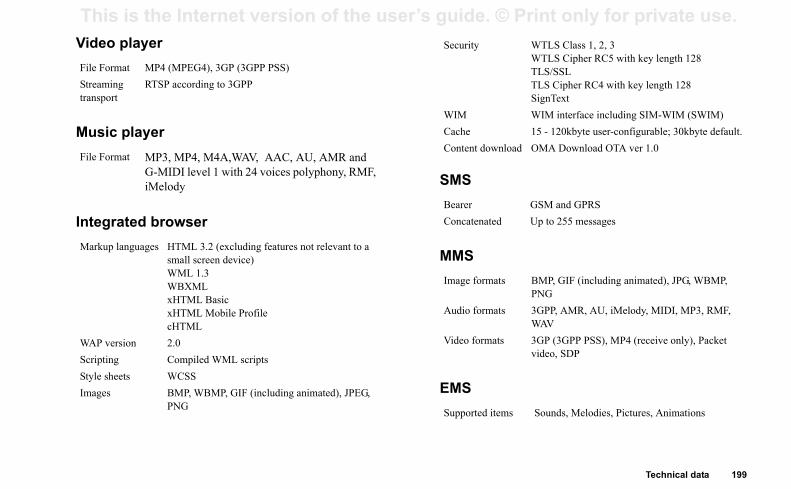
Technical data 199
This is the Internet version of the user�s guide. © Print only for private use. rity WTLS Class 1, 2, 3
WTLS Cipher RC5 with key length 128TLS/SSLTLS Cipher RC4 with key length 128SignTextWIM interface including SIM-WIM (SWIM)
e 15 - 120kbyte user-configurable; 30kbyte default.ent download OMA Download OTA ver 1.0
r GSM and GPRSatenated Up to 255 messages
e formats BMP, GIF (including animated), JPG, WBMP, PNG
o formats 3GPP, AMR, AU, iMelody, MIDI, MP3, RMF, WAV
formats 3GP (3GPP PSS), MP4 (receive only), Packet video, SDP
orted items Sounds, Melodies, Pictures, Animations
Video player
Music player
Integrated browser
SMS
MMS
EMS
File Format MP4 (MPEG4), 3GP (3GPP PSS)Streaming transport
RTSP according to 3GPP
File Format MP3, MP4, M4A,WAV, AAC, AU, AMR and G-MIDI level 1 with 24 voices polyphony, RMF, iMelody
Markup languages HTML 3.2 (excluding features not relevant to a small screen device) WML 1.3WBXMLxHTML BasicxHTML Mobile ProfilecHTML
WAP version 2.0Scripting Compiled WML scriptsStyle sheets WCSSImages BMP, WBMP, GIF (including animated), JPEG,
PNG
Secu
WIMCachCont
BeareConc
Imag
Audi
Video
Supp
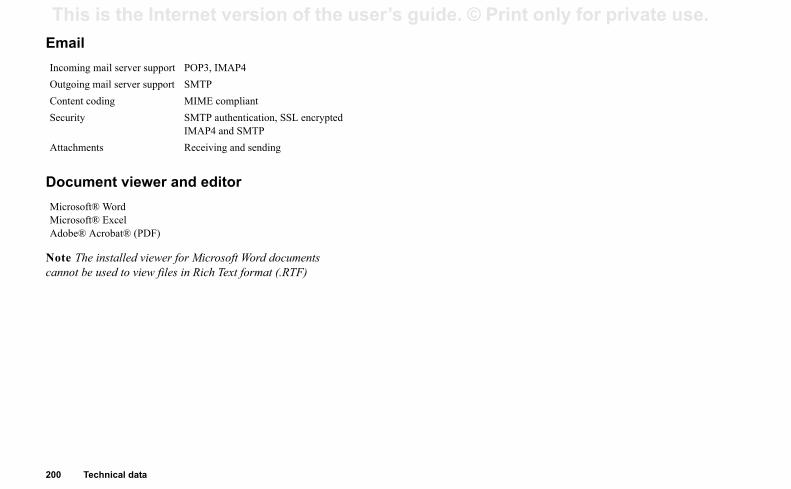
This is the Internet version of the user�s guide. © Print only for private use. Email
200 Technical data
Document viewer and editor
Note The installed viewer for Microsoft Word documents cannot be used to view files in Rich Text format (.RTF)
Incoming mail server support POP3, IMAP4Outgoing mail server support SMTPContent coding MIME compliantSecurity SMTP authentication, SSL encrypted
IMAP4 and SMTPAttachments Receiving and sending
Microsoft® WordMicrosoft® ExcelAdobe® Acrobat® (PDF)
201
This is the Internet version of the user�s guide. © Print only for private use.
t 47iting 55 cards 56
swering 42, 45nference 46verting 54ergency 42
p closed 40p open 43coming 44ternational 41aking 40, 43tions 43, 45eferences 53jecting 42, 45stricting 55trying automatically
eed dialling 44o or more 45ice control 53
ttings 63structions 184
Cell information 164Certificate manager 166Chess 85CommuniCorder
- recording video clips 59- settings 63- taking pictures 61
Conference calls 46Connecting
- via Bluetooth wireless technology 136- via infrared port 135- via SyncStation 134
Connection type 171Connectivity software 134Contacts 101
- adding images 145- creating and managing contacts 104- to add a contact 103- to delete a contact 103
Content and application CD 130Control panel 147Corporate phone services 51
- set up 57
Index
IndexAAccented letters
- handwriting 2, 35Accepted callers 55Accessories 24Add to contacts 54Alarm tones 146Alarms 121ALS
- settings 58- support 51
Antenna 184AoC - Call meter settings 57Application shortcuts 144Applications
- flip closed 15- installing 131- overview 25- removing 133, 169
Area information 164Attachments 95
BBackgrounds 144, 148Backing up data 142
Battery- charging 13- information 185- inserting 12- removing 12
Bluetooth wireless technology 136, 153
- bluetooth share 138- headphone 137- pairing 136- passcodes 138
Bookmarks 81Browser view 78Browsing the internet 77
CCable 154Calculator 118Calendar 108
- creating entries 108- managing entries 109- preferences 110- sending and receiving entries 110
Calibrate 148Call costs 57
Call lisCall waCallingCalls
- an- co- di- em- fli- fli- in- in- m- op- pr- re- re- re44- sp- tw- vo
Camera- se
Care in
Index
This is the Internet version of the user�s guide. © Print only for private use. DData backup 142
- flip keyboard 36- flip open 33
Handwriting recognition 34- accented letters 2, 35
characters 36, 35 2, 35
6662ne book
picture 53s 44g 150t 179
155bols 32lications 131alls 41ettings 149
155rks 81 view 78g 77
- signing documents 81- user authentication request 81
Introduction to P910i 9IP security manager 166
JJog Dial 19Jotter 114
- creating and editing notes 114- drawing pictures 115- managing notes 115- sending and receiving notes 115
KKey functions 118Key lock 39Keyboard
- flip keyboard 36- on screen 34
Keypad functions 20
LLanguages 167Letters
- handwriting 2, 35Light intensity 144
202
Data restore 143Data storage 31Date settings 119Demo application 25Device lock 38, 179Dial-Up Networking Wizard 175Disk formatting 166Display 147Disposing of the battery 186Diverting calls 54Drawing pictures 115Driving 184DTMF 49
- turning on 43
EEditing
- spreadsheets 123- Word documents 123
Efficient use 184E-mail 87, 94, 160Emergency calls 42EMS 89Entering text
- flip closed 32
- handwriting 34- keyboard on the screen 34
Extended characters- handwriting 36
FFile manager 126Find 30First time start-up 14Flight mode 49Flip
- virtual 17Flip closed 15Flip open 16Folders 28Folders in Messages 88Formatting disks 166
GGames 85General functions 28Getting help 31GPRS 171, 176
HHandsfree 54
- extended- letters 2- numbers
Help texts 31
IIcons 21Image editor Image status Importing phoentries 14Incoming callIncoming callIncreasing rinIndicator lighIndicators 21Infrared 135,Inserting symInstalling appInternational cInternational sInternet 77
- accounts- bookma- browser- browsin
203
This is the Internet version of the user�s guide. © Print only for private use. umentsewing 122lizing your P910i
ookporting entries 14 64awing 115nding and receiving
king 61ewing 64
8
ointewing 122
requency 184ing sounds 116 synchronization 141ing applications 133ng data 143ing calls 55 call 44
gnals 145
Ring volume 150
SSAR 184Screen areas 18Screen saver 145Secure tokens 168Security information 166Self timer - picture 62Self timer - video 60Send as 30Sending notes 115Service provider 171Services 25Settings 31Setup Wizard 14Shortcuts 170Silent mode 48SIM card 12SIM card lock 37SMS 87, 89, 162Solitaire 86Sony Ericsson Update Service 133Sound files
- loop 74- managing 74- playing 73
Index
Local synchronization 139Locations 120Lock problems 178Locks 37
- device 38- key lock 39- SIM card 37
MMaking a call 102Media buffer 71, 72Medical Devices 185Memory Stick Duo 22
- adapter 23- formatting 166
Messages- accounts 89, 159- attachments 95- e-mail 94- MMS 90- multimedia messages 90- SMS 89- text messages 89
Messaging- accounts 89, 159
MMS 87, 163Mobile music 73
Modem 174Multimedia messages 87, 90Music player 73
NNavigation 17Notes 114
- creating and editing 114- managing 115- sending and receiving 115
Numbers- formats 120- handwriting 2, 35
OOff 14On 14Online services 128Options menu 16Owner card 107
PP910i Locks 37P910i overview 11P910i package 10PC connectivity software 134PC Suite for P910i 129
Pdf doc- vi
Persona144Phone b
- imPictures
- dr- se65- ta- vi
PIN 37PIN2 3PUK 37
QQuickp
- vi
RRadio FRecordRemoteRemovRestoriRestrictRetry toRing si
Index
This is the Internet version of the user�s guide. © Print only for private use. Sound notification 146Sound recorder 116
TT9® text input 32
VVibrating alert 45, 48, 150
ding 71g 69680and receiving
1
ments 122int 122eets 122cuments 122
53a call 41
43
4, 148s 165
ment 170
Word documents- viewing 122-editing 123
ZZoom the screen 31Zooming 29
204
Sound recordings 116- sending and receiving 117- using as ring signals 117
Sounds and alerts 149Speakerphone 48Speed dial
- making a call 44- set-up 48
Spreadsheets- editing 123- viewing 122
Standby view 15Start-up 14Storage Manager 182Storage manager 169Storage Wizard 182Storing data 31Streaming 70Symbols 32Synchronization
- local 139- remote 141
Tasks 111Technical data 197Text input 32, 149Text messages 89Themes 144Time 119
- alarms 121- locations 120- number formats 120- settings 119- workdays 120
Time & date settings 166Tone based services 49Touchscreen lock 39Transfer items with Send As 30Troubleshooting 178TTY settings 57TTY support 50Turning on and off 14
UUninstalling applications 133, 169Updating the software 133User greeting 152
Video 59, 68Video clips
- downloa- managin- playing - saving 7- sending 70
Video status 6Viewing
- pdf docu- Quickpo- spreadsh- Word do
Virtual flip 17Voice control
- making Voice mail 56Volume
- changing
WWallpaper 14WAP accountWarranty 186WIM manage