Embed Size (px)
Citation preview
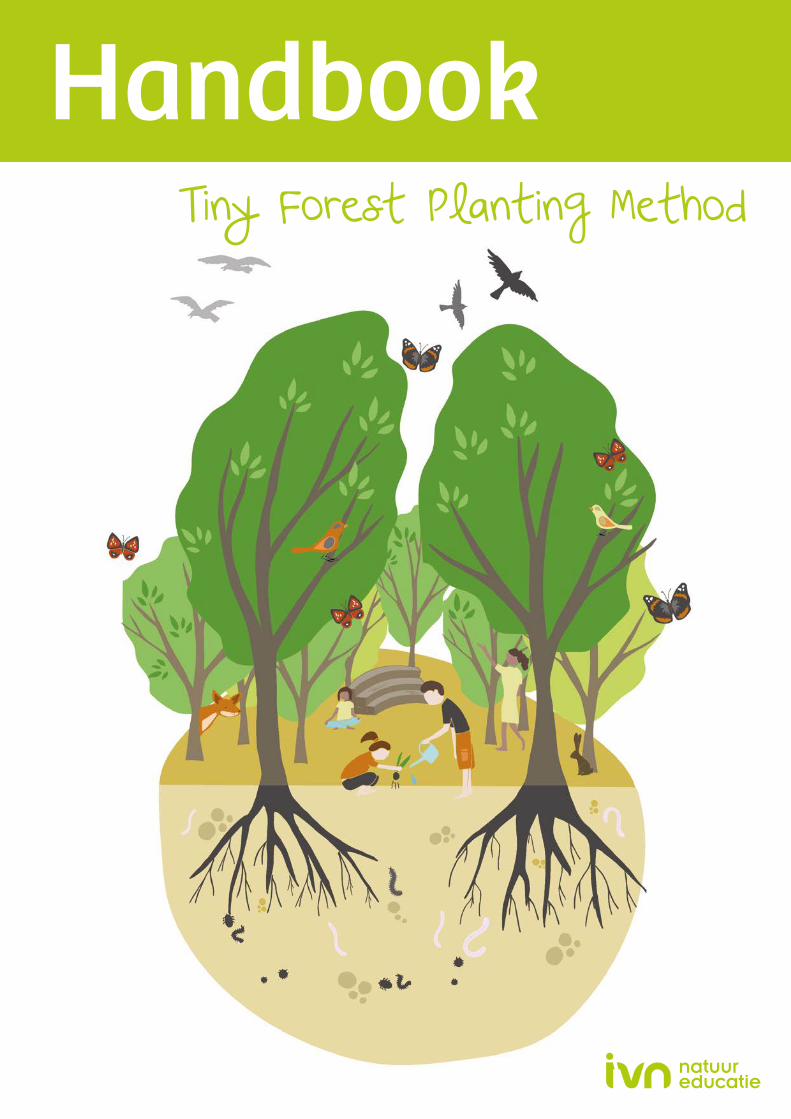
Tiny Forest Planting Method
Handbook

2
ColophonIVN Natuureducatie© 2019
This handbook was made possible by financial contributions from
Authors: Maarten Bruns, Daan Bleichrodt, Essi Laine, Karin van Toor, Wim Dieho,Louwra Postma, and Marten de Groot (PEFC).
Editors: Merel den Otter and Lieke Kragt
Design: Anne Copier
Illustrations: Studio Brun, Sylvia Neutel, Jasper de Ruiter, and Karin van Toor.
Photography: Thomas Duiker, Jessica de Lepper, Merel den Otter, Tomasz Lamartine, Daan Bleichrodt, Karin van Toor, Essi Laine, Sunny Verma, and Rick Mellink.
Introductie
3
Introduction 4
Standing on the shoulders of Sharma and Miyawaki 6
Step-by-step plan 8
Step 1: Forest cover type field survey 9
Step 2: Soil survey 10
Step 3: Soil preparation 12
Step 4: Draw up a planting plan 14
Step 5: Planting day 18
Step 6: Management 21 Inspiration and tips 22 Appendix 1: Checklist: Is my miniature forest a Tiny Forest? 23Appendix 2: Species distribution according to Miyawaki and Sharma 24Appendix 3: List of edible plants 25Appendix 4: Tiny Forest Calendar 27Appendix 5: Tiny Forest ‘Karin’s Bos’ 28
Contents
4
Introduction
Nature makes people healthy and happy, but unfortunately, we have less and less green space in our increasingly urbanised living environment. By planting a Tiny Forest the size of a tennis court, you can help bring nature and adventure back into our busy urban society. A Tiny Forest gives children a place to play and discover how important nature is, and it also has a beneficial effect on the climate in the city.
The great thing about a Tiny Forest is that anyone can plant one! IVN Natuureducatie has developed a planting method specifically for Tiny Forests, in collaboration with the forestry experts Shubhendu Sharma and Akira Miyawaki. The planting method makes it possible to create a forest that would normally take a century to mature in only 10 years. This handbook teaches you how to plant a Tiny Forest step-by-step. We wish you the best of luck, and we’re sure you’ll enjoy the process!
What is a Tiny Forest?A Tiny Forest is a dense, fast-growing native woodland that is around the size of a tennis court. The forest is not only an attractive location for butterflies, birds, bees and small mammals; it’s also a nice place for people as well. In the outdoor classroom, children can learn about nature, and it provides a pleasant and healthy spot for neighbours to come together.
Why plant a Tiny Forest?IVN works to build a better world, where people and nature come together as a matter of course, and Tiny Forest is a perfect expression of IVN’s mission. We consider these miniature forests to be the first step towards the creation of a natural living- and learning environment for people of all ages.
Through Tiny Forest, we aim to realise two important ambitions: restoring our natural woodlands and ensuring that people can build a bond with their own miniature forest.
EffectsA forest measuring 200 m2 consists of a wide variety of tree species. This diverse population of trees in turn attracts a wide variety of insects, birds, and other animals. In 2017, Wageningen Environmental Research (WENR) proved that a Tiny Forest has a stimulating effect on biodiversity.
A Tiny Forest also brings the experience of nature closer to people’s daily lives. The gap between humans and their natural environment has never been as wide as it is today. A Tiny Forest across the street piques people’s curiosity, and gives them the opportunity to discover and learn about nature in their own living environment. Tiny Forests also have major benefits for the city’s climate. They increase the area’s water storage capacity, improve air quality, and help moderate the effects of heat stress. And last but not least, a forest also has a positive effect on human health: more nature in the vicinity can help reduce stress and stress-related health problems.
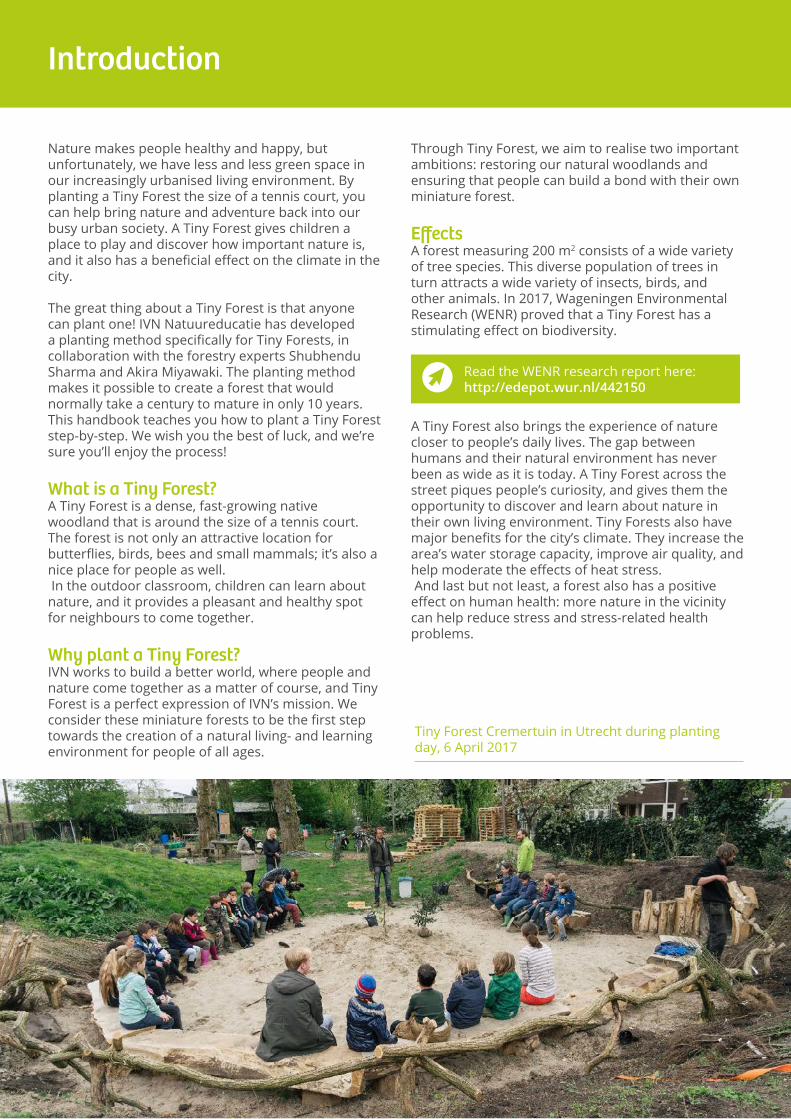
Tiny Forest Cremertuin in Utrecht during planting day, 6 April 2017
Read the WENR research report here: http://edepot.wur.nl/442150
5
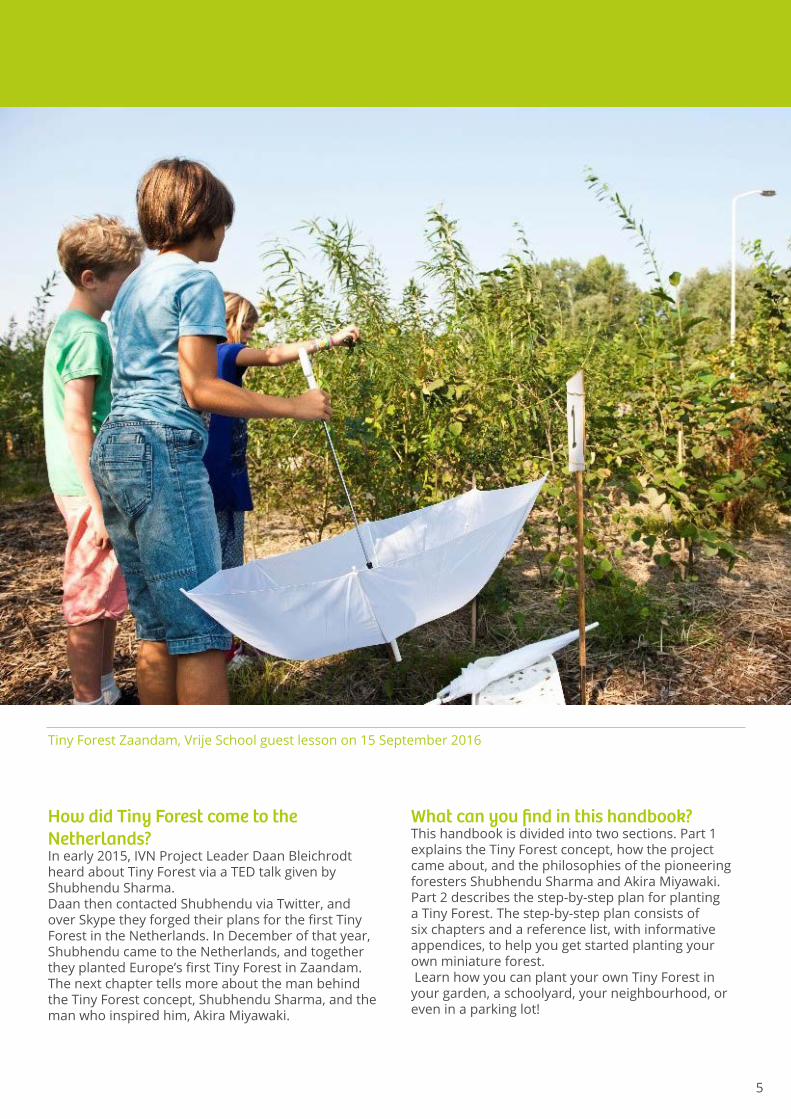
Tiny Forest Zaandam, Vrije School guest lesson on 15 September 2016
How did Tiny Forest come to the Netherlands?In early 2015, IVN Project Leader Daan Bleichrodt heard about Tiny Forest via a TED talk given by Shubhendu Sharma.Daan then contacted Shubhendu via Twitter, and over Skype they forged their plans for the first Tiny Forest in the Netherlands. In December of that year, Shubhendu came to the Netherlands, and together they planted Europe’s first Tiny Forest in Zaandam. The next chapter tells more about the man behind the Tiny Forest concept, Shubhendu Sharma, and the man who inspired him, Akira Miyawaki.
What can you find in this handbook?This handbook is divided into two sections. Part 1 explains the Tiny Forest concept, how the project came about, and the philosophies of the pioneering foresters Shubhendu Sharma and Akira Miyawaki. Part 2 describes the step-by-step plan for planting a Tiny Forest. The step-by-step plan consists of six chapters and a reference list, with informative appendices, to help you get started planting your own miniature forest. Learn how you can plant your own Tiny Forest in your garden, a schoolyard, your neighbourhood, or even in a parking lot!
6
We stand on the shoulders of Sharma and Miyawaki
Physicist Isaac Newton made some truly great achievements in his lifetime, like proving how gravity works. But when asked how he was able to achieve such success, he answered: “If I have seen further, it is by standing on the shoulders of giants”.Newton was referring to the influence of thinkers such as Plato and Aristotle. To us, the success of Tiny Forest in the Netherlands feels a bit the same. We also stand on the shoulders of two giants: Akira Miyawaki and Shubhendu Sharma. We feel that it is an honour and a privilege to be able to build on their pioneering work.
Shubhendu SharmaShubhendu Sharma is the CEO of Afforestt and the founder of Tiny Forest. In 2010, he was working as an engineer at Toyota, when Akira Miyawaki was hired to make the factory where Sharma worked CO2-neutral by planting a native woodland.Sharma volunteered to help plant the forest, and was so touched by the effect it had, that he began planting a small version of the forest in his own garden. That garden forest was the seed that would eventually sprout to become the global Tiny Forest movement.After planting his first miniature forest, he decided to devote the rest of his life to planting native woodlands, so he quit his job at Toyota and founded the company Afforestt.
Afforestt’s workBy 2019, Sharma and Afforestt have realised more than 100 forests in India, Singapore, Malaysia, France, Chile, and the United States. He is currently working on his most ambitious project to date: planting a native forest in the middle of the desert near Jodhpur. In October 2018, a group of IVN project leaders and volunteers travelled to India to help plant the first 500 square meters of this desert forest, known in Hindi as ‘Maruvan’. Over the course of the week, Shubhendu and his team trained us in his forestry method, and we have applied the experiences gained during the study trip to this handbook.
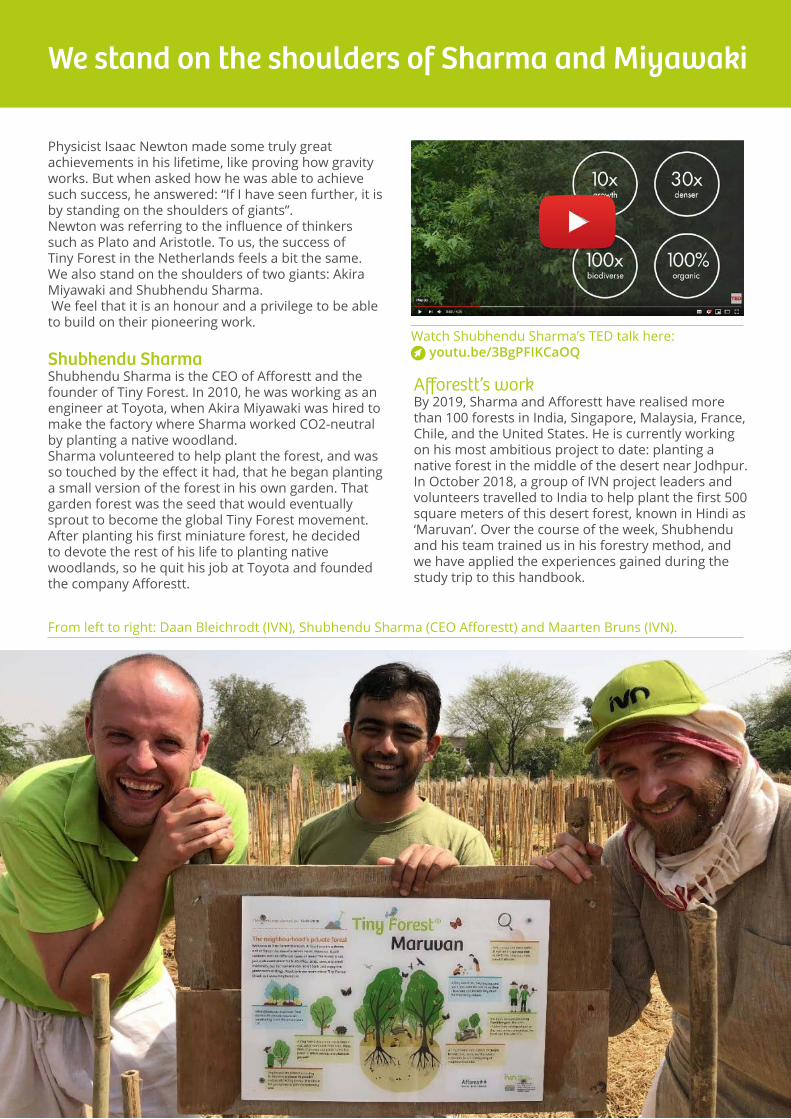
From left to right: Daan Bleichrodt (IVN), Shubhendu Sharma (CEO Afforestt) and Maarten Bruns (IVN).
Watch Shubhendu Sharma’s TED talk here: youtu.be/3BgPFIKCaOQ
7
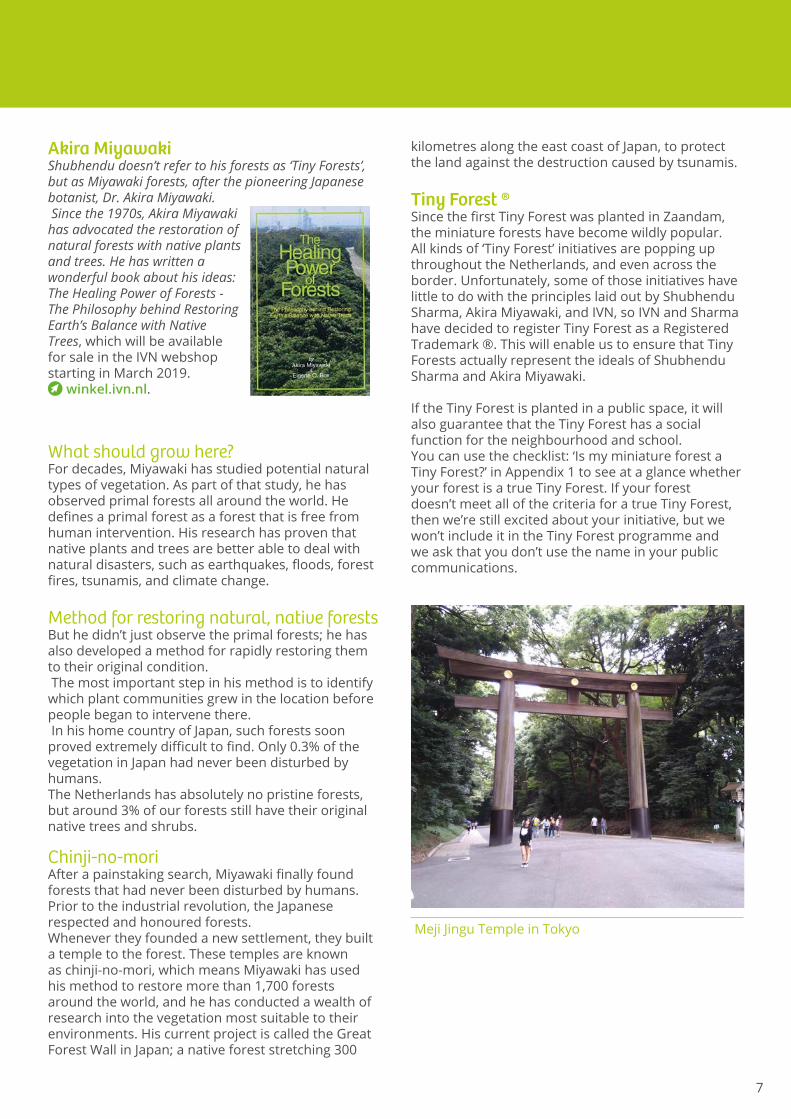
Akira MiyawakiShubhendu doesn’t refer to his forests as ‘Tiny Forests’, but as Miyawaki forests, after the pioneering Japanese botanist, Dr. Akira Miyawaki. Since the 1970s, Akira Miyawaki has advocated the restoration of natural forests with native plants and trees. He has written a wonderful book about his ideas: The Healing Power of Forests - The Philosophy behind Restoring Earth’s Balance with Native Trees, which will be available for sale in the IVN webshop starting in March 2019.
winkel.ivn.nl.
What should grow here?For decades, Miyawaki has studied potential natural types of vegetation. As part of that study, he has observed primal forests all around the world. He defines a primal forest as a forest that is free from human intervention. His research has proven that native plants and trees are better able to deal with natural disasters, such as earthquakes, floods, forest fires, tsunamis, and climate change.
Method for restoring natural, native forestsBut he didn’t just observe the primal forests; he has also developed a method for rapidly restoring them to their original condition. The most important step in his method is to identify which plant communities grew in the location before people began to intervene there. In his home country of Japan, such forests soon proved extremely difficult to find. Only 0.3% of the vegetation in Japan had never been disturbed by humans.The Netherlands has absolutely no pristine forests, but around 3% of our forests still have their original native trees and shrubs.
Chinji-no-moriAfter a painstaking search, Miyawaki finally found forests that had never been disturbed by humans. Prior to the industrial revolution, the Japanese respected and honoured forests.Whenever they founded a new settlement, they built a temple to the forest. These temples are known as chinji-no-mori, which means Miyawaki has used his method to restore more than 1,700 forests around the world, and he has conducted a wealth of research into the vegetation most suitable to their environments. His current project is called the Great Forest Wall in Japan; a native forest stretching 300
kilometres along the east coast of Japan, to protect the land against the destruction caused by tsunamis.
Tiny Forest ®Since the first Tiny Forest was planted in Zaandam, the miniature forests have become wildly popular. All kinds of ‘Tiny Forest’ initiatives are popping up throughout the Netherlands, and even across the border. Unfortunately, some of those initiatives have little to do with the principles laid out by Shubhendu Sharma, Akira Miyawaki, and IVN, so IVN and Sharma have decided to register Tiny Forest as a Registered Trademark ®. This will enable us to ensure that Tiny Forests actually represent the ideals of Shubhendu Sharma and Akira Miyawaki.
If the Tiny Forest is planted in a public space, it will also guarantee that the Tiny Forest has a social function for the neighbourhood and school.You can use the checklist: ‘Is my miniature forest a Tiny Forest?’ in Appendix 1 to see at a glance whether your forest is a true Tiny Forest. If your forest doesn’t meet all of the criteria for a true Tiny Forest, then we’re still excited about your initiative, but we won’t include it in the Tiny Forest programme and we ask that you don’t use the name in your public communications.
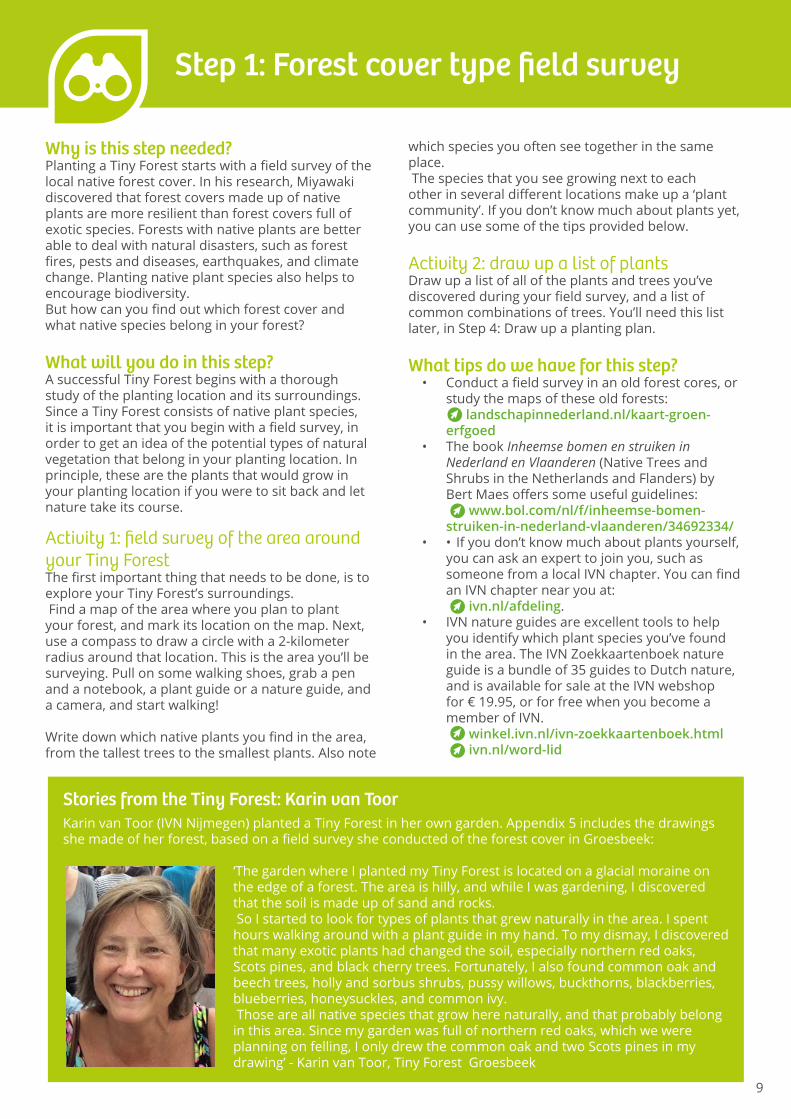
Meji Jingu Temple in Tokyo

8
Step-by-step plan
The Tiny Forest planting method consists of six steps, and each step is explained in greater detail in its own chapter:
1 2 3
654
Forest cover type field survey
Draw up a planting plan Planting day Management
Soil survey Soil preparation
Each of the chapters has been written using the same outline, in order to make them easier to read. In each chapter, we answer the following questions:
Why is this step needed?What will you do in this step?What tips do we have for this step?
9
LesbeschrijvingStep-by-step plan Step 1: Forest cover type field survey
Why is this step needed?Planting a Tiny Forest starts with a field survey of the local native forest cover. In his research, Miyawaki discovered that forest covers made up of native plants are more resilient than forest covers full of exotic species. Forests with native plants are better able to deal with natural disasters, such as forest fires, pests and diseases, earthquakes, and climate change. Planting native plant species also helps to encourage biodiversity.But how can you find out which forest cover and what native species belong in your forest?
What will you do in this step?A successful Tiny Forest begins with a thorough study of the planting location and its surroundings. Since a Tiny Forest consists of native plant species, it is important that you begin with a field survey, in order to get an idea of the potential types of natural vegetation that belong in your planting location. In principle, these are the plants that would grow in your planting location if you were to sit back and let nature take its course.
Activity 1: field survey of the area around your Tiny ForestThe first important thing that needs to be done, is to explore your Tiny Forest’s surroundings. Find a map of the area where you plan to plant your forest, and mark its location on the map. Next, use a compass to draw a circle with a 2-kilometer radius around that location. This is the area you’ll be surveying. Pull on some walking shoes, grab a pen and a notebook, a plant guide or a nature guide, and a camera, and start walking!
Write down which native plants you find in the area, from the tallest trees to the smallest plants. Also note
which species you often see together in the same place. The species that you see growing next to each other in several different locations make up a ‘plant community’. If you don’t know much about plants yet, you can use some of the tips provided below.
Activity 2: draw up a list of plantsDraw up a list of all of the plants and trees you’ve discovered during your field survey, and a list of common combinations of trees. You’ll need this list later, in Step 4: Draw up a planting plan.
What tips do we have for this step?• Conduct a field survey in an old forest cores, or
study the maps of these old forests: landschapinnederland.nl/kaart-groen-
erfgoed • The book Inheemse bomen en struiken in
Nederland en Vlaanderen (Native Trees and Shrubs in the Netherlands and Flanders) by Bert Maes offers some useful guidelines:
www.bol.com/nl/f/inheemse-bomen-struiken-in-nederland-vlaanderen/34692334/
• • If you don’t know much about plants yourself, you can ask an expert to join you, such as someone from a local IVN chapter. You can find an IVN chapter near you at:
ivn.nl/afdeling. • IVN nature guides are excellent tools to help
you identify which plant species you’ve found in the area. The IVN Zoekkaartenboek nature guide is a bundle of 35 guides to Dutch nature, and is available for sale at the IVN webshop for € 19.95, or for free when you become a member of IVN.
winkel.ivn.nl/ivn-zoekkaartenboek.html ivn.nl/word-lid
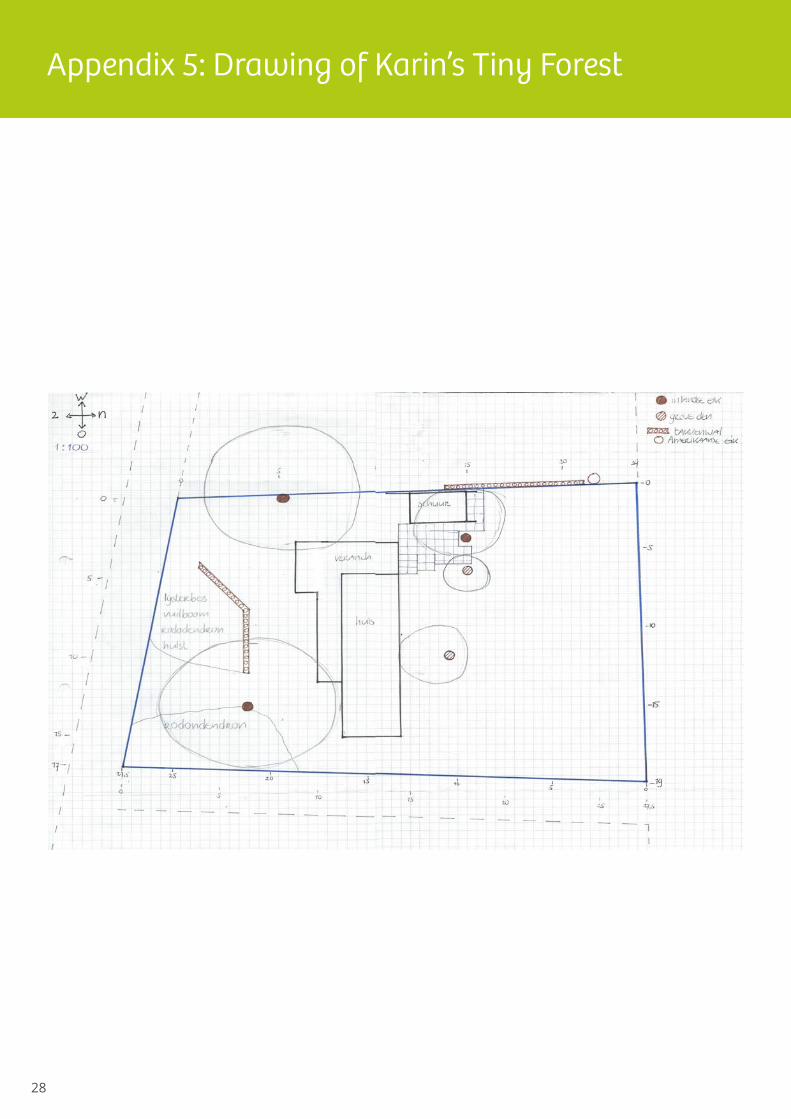
Stories from the Tiny Forest: Karin van ToorKarin van Toor (IVN Nijmegen) planted a Tiny Forest in her own garden. Appendix 5 includes the drawings she made of her forest, based on a field survey she conducted of the forest cover in Groesbeek:
‘The garden where I planted my Tiny Forest is located on a glacial moraine on the edge of a forest. The area is hilly, and while I was gardening, I discovered that the soil is made up of sand and rocks. So I started to look for types of plants that grew naturally in the area. I spent hours walking around with a plant guide in my hand. To my dismay, I discovered that many exotic plants had changed the soil, especially northern red oaks, Scots pines, and black cherry trees. Fortunately, I also found common oak and beech trees, holly and sorbus shrubs, pussy willows, buckthorns, blackberries, blueberries, honeysuckles, and common ivy. Those are all native species that grow here naturally, and that probably belong in this area. Since my garden was full of northern red oaks, which we were planning on felling, I only drew the common oak and two Scots pines in my drawing’ - Karin van Toor, Tiny Forest Groesbeek
Management
Soil preparation
10
Step 2: Soil survey
Why is this step needed?The soil is the foundation upon which your Tiny Forest is built. Soil is a complex ecosystem, where microbes, fungi, and other organisms play a vital role. Soil, plants, and trees are all inseparably linked to one another. In order to grow, a tree needs water, light, space to extend its roots, and nutrients.Before you start planting your Tiny Forest, you need to study what the soil needs in order to serve as a good foundation for the forest. The purpose of the soil survey is to help you answer the following questions: What type of soil is present in the location? How deep is the water table, and how dense is the soil? What nutrients does the soil contain? In this chapter, we’ll assume that you’ve already chosen a location for your Tiny Forest.
If the location is outside of a built-up area, such as along a river or stream, or on a glacial moraine, then the soil is probably an old forest soil, so you fortunately won’t have to do much work to prepare the ground for planting.
What will you do in this step?
Activity 1: check for cables and pipelines Submit a Klic report to the city. In the Netherlands, a Klic report is required when you plan to use machinery to dig below the surface, regardless of how deep you plan to dig. The city will then inform
you whether there are any cables or pipelines buried under your planting location. You should submit the Klic report to the municipal cadastral office no more than 20 working days and no less than 3 working days in advance, using the link in the inset.
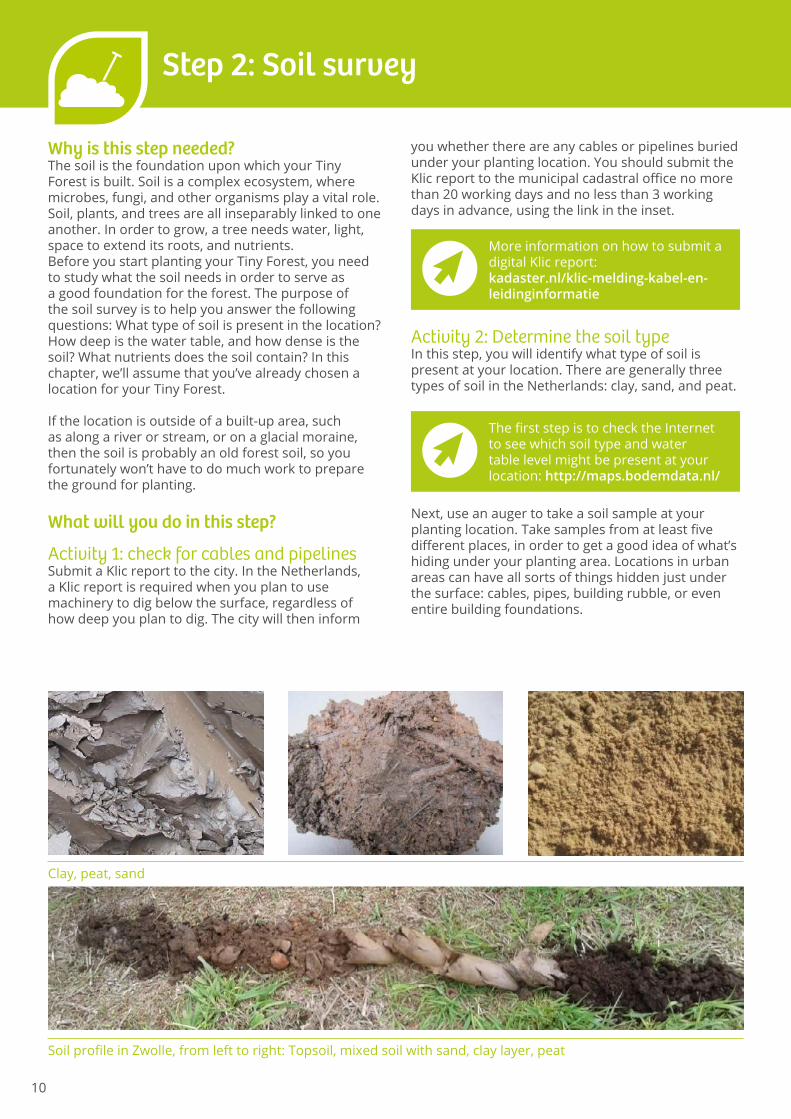
Activity 2: Determine the soil typeIn this step, you will identify what type of soil is present at your location. There are generally three types of soil in the Netherlands: clay, sand, and peat.
Next, use an auger to take a soil sample at your planting location. Take samples from at least five different places, in order to get a good idea of what’s hiding under your planting area. Locations in urban areas can have all sorts of things hidden just under the surface: cables, pipes, building rubble, or even entire building foundations.
More information on how to submit a digital Klic report:kadaster.nl/klic-melding-kabel-en-leidinginformatie
The first step is to check the Internet to see which soil type and water table level might be present at your location: http://maps.bodemdata.nl/
Clay, peat, sand
Soil profile in Zwolle, from left to right: Topsoil, mixed soil with sand, clay layer, peat
11
Take a close look at what you dig up with the auger. You can often see what type of soil is present at a single glance. The illustration above shows what clay, peat, and sand look like. The illustration below shows the soil profile for the planting location for Tiny Forest Zwolle. If you want to conduct a more precise test, you can send the soil to a lab, or you can conduct a simple soil test on your own, as Nicole Brennan shows in this YouTube video: youtu.be/fufeaLBLGlk
Activity 3: Determine the density of the soilAsk a professional horticulturist to measure the density of your soil using a penetrometer or a pantograph.You could also conduct a similar test yourself, but the result would be less reliable. Use a long, thin metal pin approximately 1 cm in diameter to poke into several different locations in the soil. If you can insert the pen into the soil easily, then the soil is probably fairly loose. If you have difficulty inserting the pen into the soil, then the soil is probably too dense for your trees, and needs to be loosened up before you start planting.
Activity 4: Determine the nutrients in the soilYou can test how nutrient-rich your soil is by rubbing a bit of the soil across a sheet of paper.The darker the soil, the more nutrients it probably contains. If you would like to know exactly which nutrients are present in your soil, you can send a sample to a soil survey bureau and ask them to analyse the soil’s suitability for planting a forest.
Activity 5: Determine the water table levelThe depth to groundwater (DWT) indicates the fluctuations in the water table level. This fluctuation affects what needs to be done to make the ground suitable for a Tiny Forest. The depth to groundwater (DWT) indicates the fluctuations in the water table level, from very wet to very dry.
If the groundwater is less than 80 cm under the surface, then you will have to provide additional drainage so that excess water can drain away. If the groundwater depth does not exceed 120 cm, then no extra measures need be taken, because the trees only put out roots to 120 cm. If the water table fluctuates below 120 cm, then you’ll have to improve the soil by adding organic matter to help the soil absorb more water. In the next chapter, ‘Step 3: Preparing the soil’, we will explain what kinds of materials you can add to the soil for that purpose.
Activity 6: Study condition of topsoilTake a look at the top layer of the soil sample. Does it mainly contain grass, or is the top layer hard and infertile? If so, you can remove the top layer and mix it with the rest of the soil when you prepare it for planting.
If the topsoil is already loose and fertile, then you should carefully remove it and store it separately at the planting location, so you can return it after you prepare the soil for planting.
What tips do we have for this step?• The information provided by the cadastral
office isn’t always 100% accurate. At the Muziekplein Tiny Forest in Utrecht, the cables shown in the drawings were actually located in a slightly different position. That is another reason why you should take soil samples from several spots around your planting location, so you can get a good idea of the actual situation under the surface.
• Using a pantograph to sample the soil costs money, but it can also save you money, because you won’t have to dig as deep.
• It’s also a good idea to sample the soil with a metal pin during the field survey step, in order to get an impression of how dense or loose the soil is in a natural forest.
• If you would like to include edible plants in your Tiny Forest, you should also have a soil survey bureau test the soil for toxic substances. A list of native edible species is included in Appendix 3.
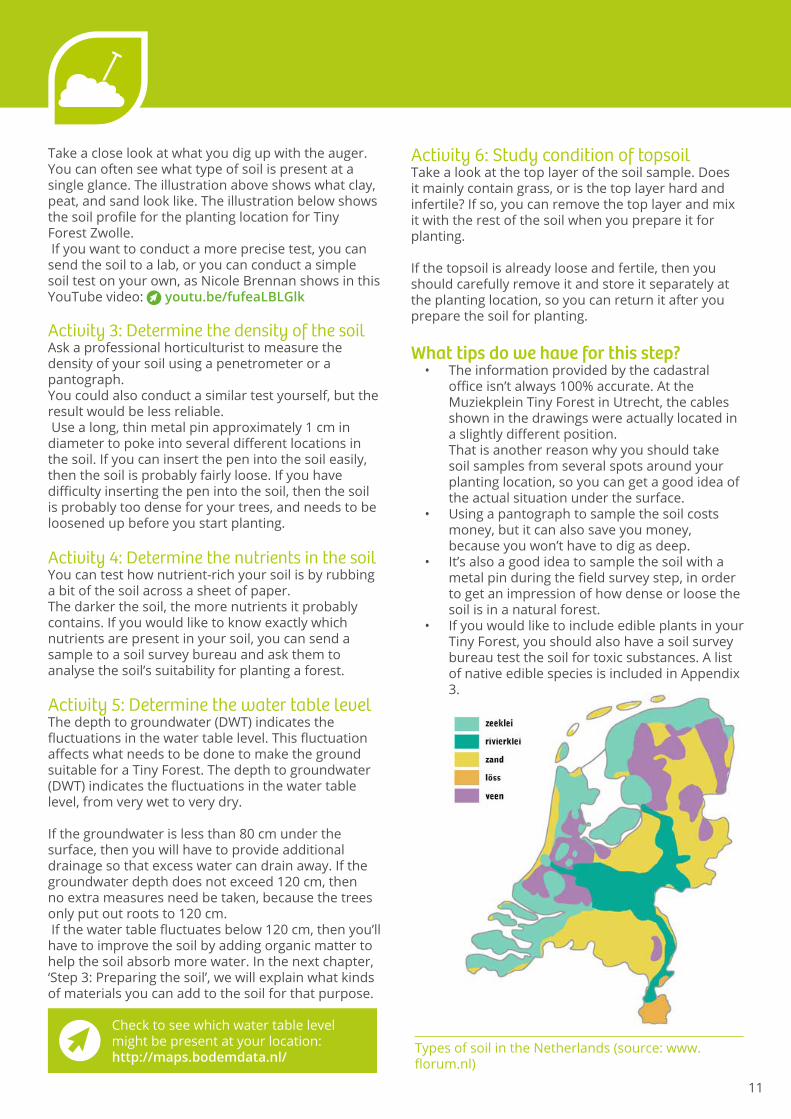
Types of soil in the Netherlands (source: www.florum.nl)
Check to see which water table level might be present at your location:http://maps.bodemdata.nl/
12
Step 3: Soil preparation
Why is this step needed?Now that you’ve studied the soil, the next step is to prepare it in order to create the optimal conditions: a paradise for trees.
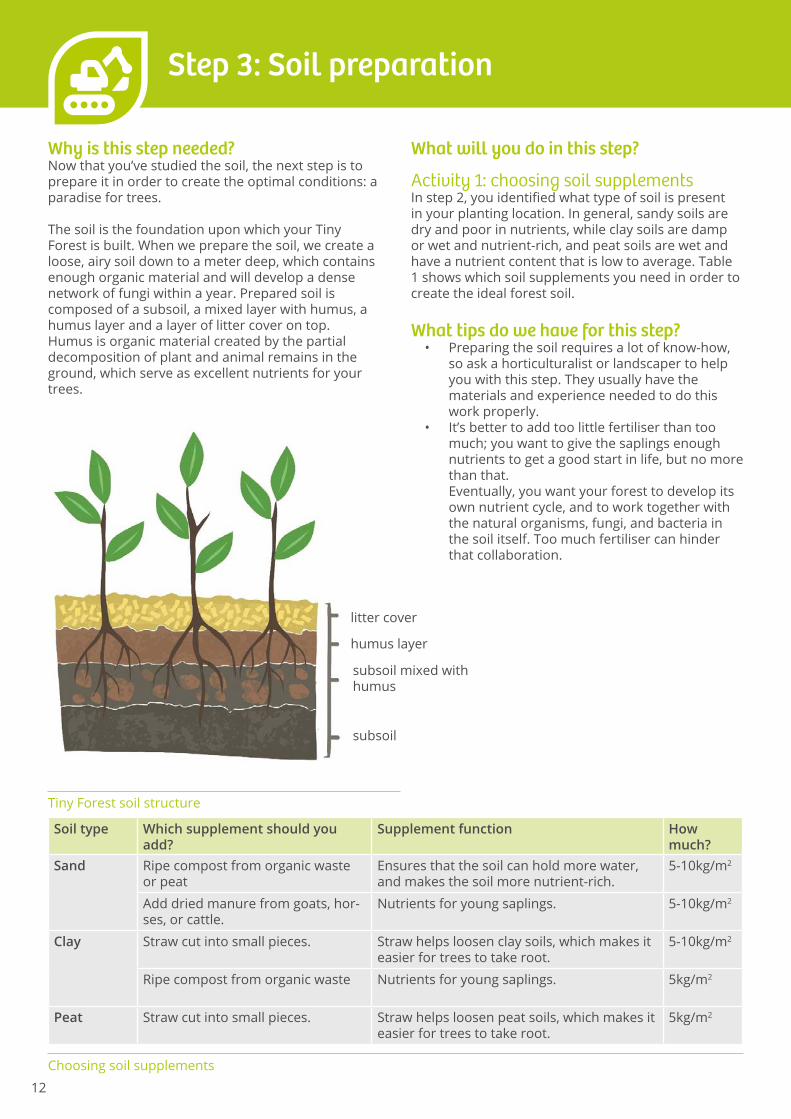
The soil is the foundation upon which your Tiny Forest is built. When we prepare the soil, we create a loose, airy soil down to a meter deep, which contains enough organic material and will develop a dense network of fungi within a year. Prepared soil is composed of a subsoil, a mixed layer with humus, a humus layer and a layer of litter cover on top.Humus is organic material created by the partial decomposition of plant and animal remains in the ground, which serve as excellent nutrients for your trees.
What will you do in this step?
Activity 1: choosing soil supplements In step 2, you identified what type of soil is present in your planting location. In general, sandy soils are dry and poor in nutrients, while clay soils are damp or wet and nutrient-rich, and peat soils are wet and have a nutrient content that is low to average. Table 1 shows which soil supplements you need in order to create the ideal forest soil.
What tips do we have for this step?• Preparing the soil requires a lot of know-how,
so ask a horticulturalist or landscaper to help you with this step. They usually have the materials and experience needed to do this work properly.
• It’s better to add too little fertiliser than too much; you want to give the saplings enough nutrients to get a good start in life, but no more than that. Eventually, you want your forest to develop its own nutrient cycle, and to work together with the natural organisms, fungi, and bacteria in the soil itself. Too much fertiliser can hinder that collaboration.
Tiny Forest soil structure
litter cover
humus layer
subsoil mixed with humus
subsoil
Soil type Which supplement should you add?
Supplement function How much?
Sand Ripe compost from organic waste or peat
Ensures that the soil can hold more water, and makes the soil more nutrient-rich.
5-10kg/m2
Add dried manure from goats, hor-ses, or cattle.
Nutrients for young saplings. 5-10kg/m2
Clay Straw cut into small pieces. Straw helps loosen clay soils, which makes it easier for trees to take root.
5-10kg/m2
Ripe compost from organic waste Nutrients for young saplings. 5kg/m2
Peat Straw cut into small pieces. Straw helps loosen peat soils, which makes it easier for trees to take root.
5kg/m2
Choosing soil supplements
13
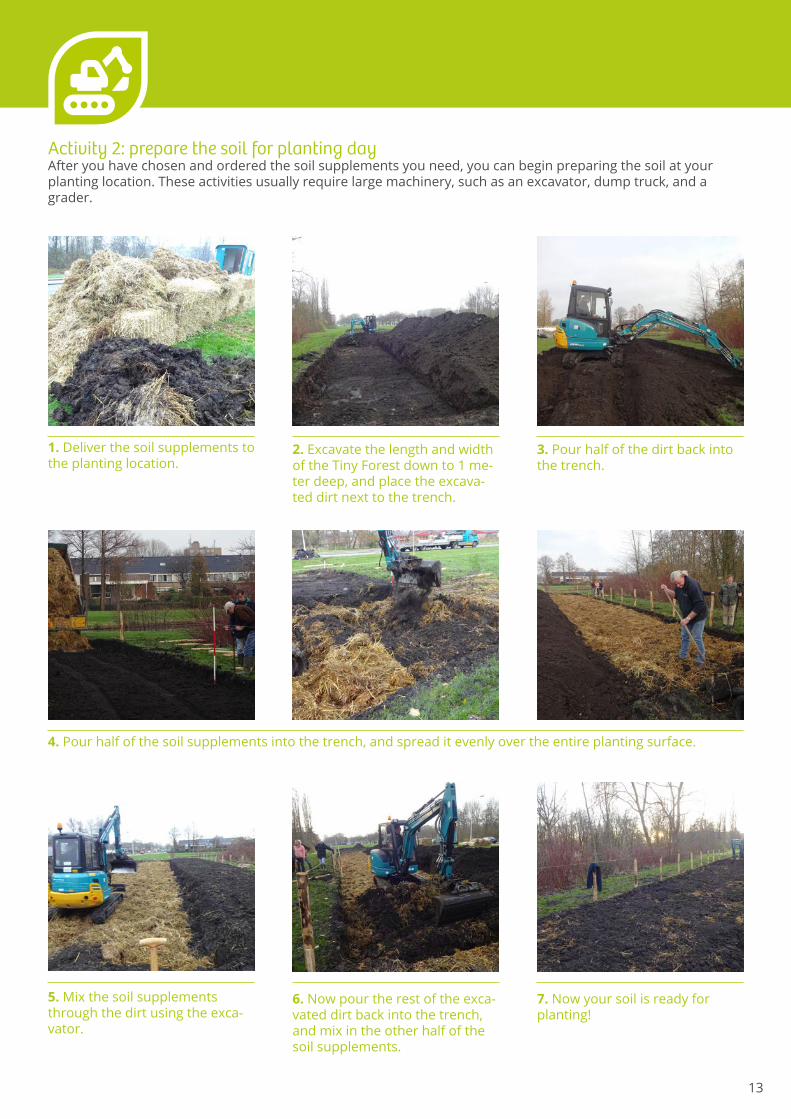
Activity 2: prepare the soil for planting dayAfter you have chosen and ordered the soil supplements you need, you can begin preparing the soil at your planting location. These activities usually require large machinery, such as an excavator, dump truck, and a grader.
1. Deliver the soil supplements to the planting location.
5. Mix the soil supplements through the dirt using the exca-vator.
4. Pour half of the soil supplements into the trench, and spread it evenly over the entire planting surface.
2. Excavate the length and width of the Tiny Forest down to 1 me-ter deep, and place the excava-ted dirt next to the trench.
6. Now pour the rest of the exca-vated dirt back into the trench, and mix in the other half of the soil supplements.
3. Pour half of the dirt back into the trench.
7. Now your soil is ready for planting!
14
Step 4: Draw up a planting plan
Why is this step needed?A Tiny Forest only contains native tree species, preferably from genetically wild sources; the plants that would probably grow there naturally if the area were left undisturbed for 100 years. All we’re doing is giving nature a helping hand.
Where several different plant species often grow together in the same location, we call it a plant community. When drawing up your planting plan, you should therefore choose the plant community that is most suitable for your location. But a Tiny Forest isn’t just about plants; it also involves people and education, so try to come up with an attractive and functional design that fits well within its surroundings.
What will you do in this step?
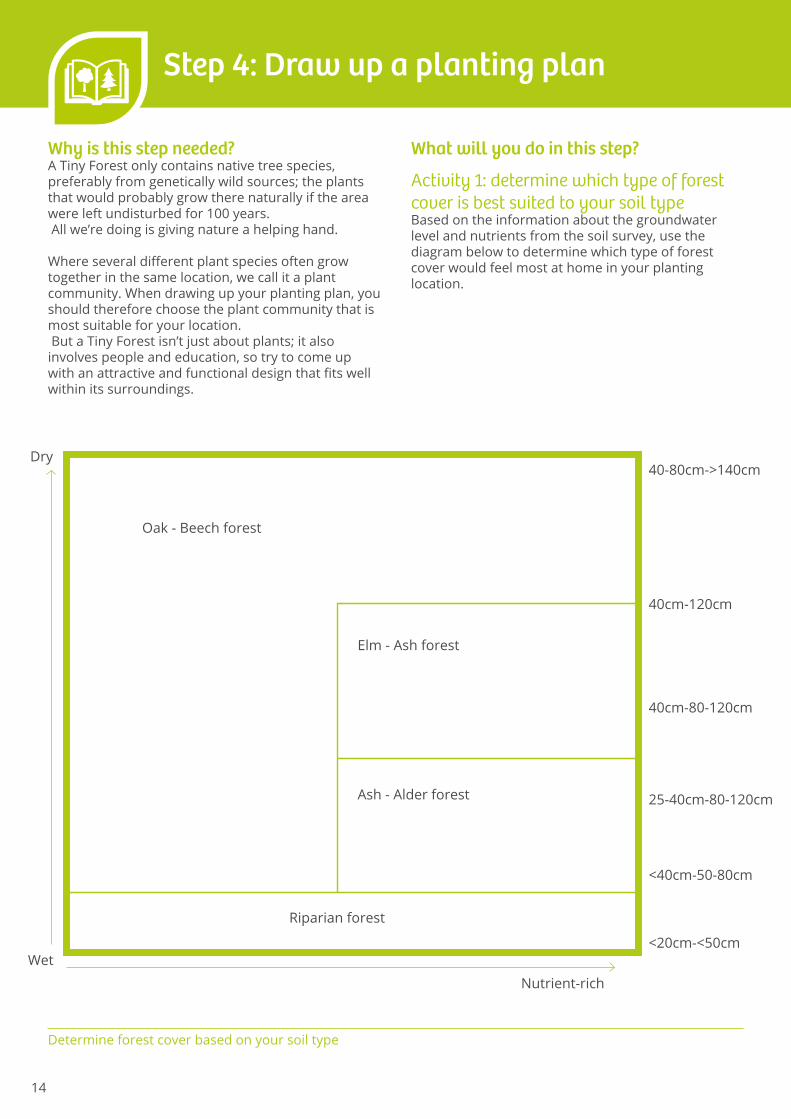
Activity 1: determine which type of forest cover is best suited to your soil typeBased on the information about the groundwater level and nutrients from the soil survey, use the diagram below to determine which type of forest cover would feel most at home in your planting location.
Determine forest cover based on your soil type
40-80cm->140cm
Nutrient-rich
Wet
Dry
Oak - Beech forest
Elm - Ash forest
Ash - Alder forest
Riparian forest
40cm-120cm
40cm-80-120cm
25-40cm-80-120cm
<40cm-50-80cm
<20cm-<50cm

15
Activity 2: Draw up a basic tree listNow you can draw up a list of trees using the table below. In order to promote biodiversity, it’s a good idea to many different species of trees. In a Tiny Forest, we select at least 25 different tree species, but in some places we’ve planted up to 38 different species. The composition of the tree population can differ from location to location, so take a careful look at your forest cover type field survey. We avoid planting highly toxic species, such as yew trees.
The percentages of plant types can vary slightly depending on the region and location.
Activity 3: Draw up plant order listFind a nursery that can provide saplings around 80 to 90 centimetres tall, preferably with bare roots (not potted plants). Use the percentages for each layer as a guideline when ordering plants. For a Tiny Forest, order 3 trees per square meter. We prefer to avoid pesticides in a Tiny Forest, so make sure to specify that you want organic plants when you order from a nursery.
Activity 4: Decide on design requirementsBefore you start designing your Tiny Forest, determine whether there are any obstacles you need to take into consideration, such as surface water, existing trees, or built structures. Also make a list of extra elements you would like to have in or around your forest, such as a pond, benches, or a fence.
Activity 5: Choose a shape for your Tiny ForestAlmost any shape is suitable, whether it is rectangular, square, pear-shaped, U-shaped, or something completely different. What’s important, is that the forest is at least 4 meters wide, without interruptions, such as a path.
Activity 6: Draw up a designUse a map of the location with a scale of 1:200 as the basis for your design. The design for the forest depends on its location and the amount of space available. You will need between 200 - 400 meters for the Tiny Forest itself, and you should set aside an extra 50 to 100 meters if you would like to add an outdoor classroom. Plan on a total space of around 500 m2.
Forest cover type Oak-beech forest Elm-ash forest Ash-alder forest Riparian forestCanopy layer 15-20% Beech
Common oak Small-leaved linden Large-leaved linden Aspen Cornish oak
Ash Common oak Black poplar Scots elm
Ash Alder Black poplar Common oak
Alder White birch
Understory 40-50% Silver birch Ash White birch Field mapleHackberryHornbeamEuropean crab apple
Field elm Fluttering elm Field maple Hackberry European crab apple
Hackberry White willowField elm Scots elm
Ash White willow Crack willow
Shrub layer 25-30% Holly Sorbus Hawthorn European crab apple
Sorbus Hawthorn European crab apple
Pussy willow Grey willow Hawthorn European crab apple
Pussy willow Grey willow Bay willow Sorbus
Herbaceous layer 8-12% Redcurrant Guelder rose HazelDogwood Elderberry Spindle tree Privet Alder buckthorn Common buckthorn
Sweet briar Guelder rose Hazel Dog rose PrivetDogwood Blackthorn ElderberryBlackcurrantAlder buckthorn
Redcurrant Guelder rose Hazel Dog rose Dogwood ElderberryAlder buckthornBlackcurrant
Purple willow Eared willow ElderberryMyrica gale Alder buckthorn Blackcurrant
16
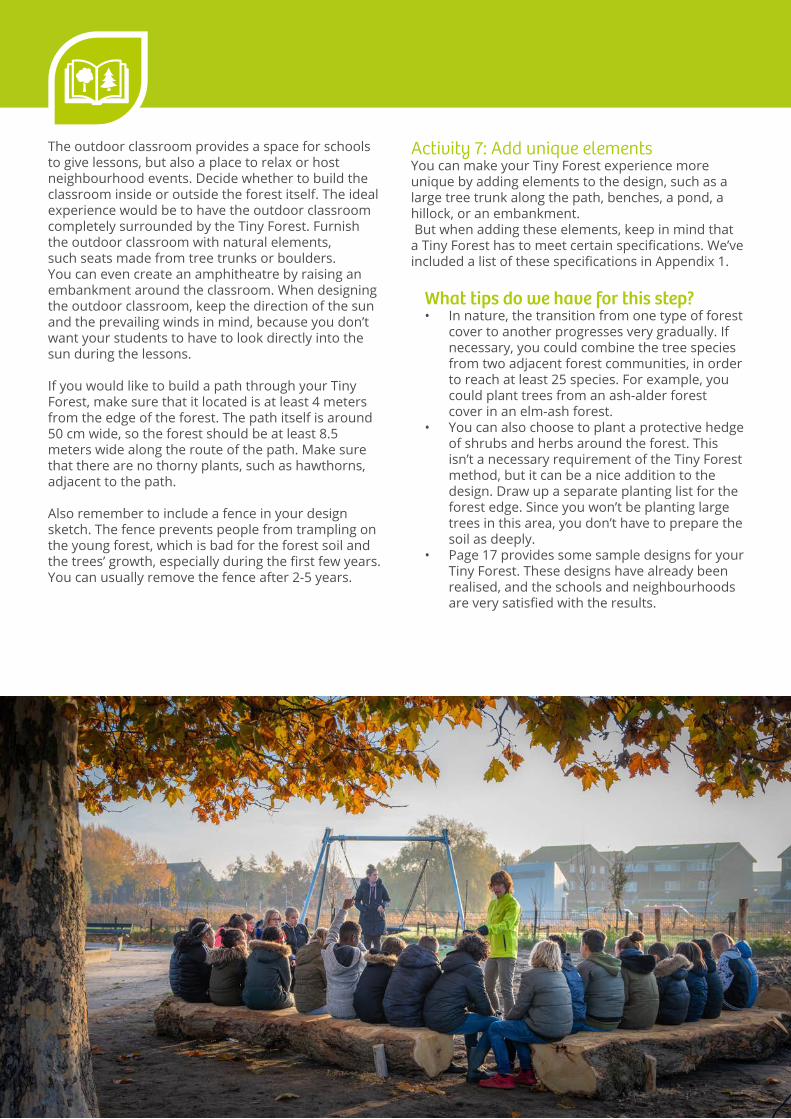
The outdoor classroom provides a space for schools to give lessons, but also a place to relax or host neighbourhood events. Decide whether to build the classroom inside or outside the forest itself. The ideal experience would be to have the outdoor classroom completely surrounded by the Tiny Forest. Furnish the outdoor classroom with natural elements, such seats made from tree trunks or boulders. You can even create an amphitheatre by raising an embankment around the classroom. When designing the outdoor classroom, keep the direction of the sun and the prevailing winds in mind, because you don’t want your students to have to look directly into the sun during the lessons.
If you would like to build a path through your Tiny Forest, make sure that it located is at least 4 meters from the edge of the forest. The path itself is around 50 cm wide, so the forest should be at least 8.5 meters wide along the route of the path. Make sure that there are no thorny plants, such as hawthorns, adjacent to the path.
Also remember to include a fence in your design sketch. The fence prevents people from trampling on the young forest, which is bad for the forest soil and the trees’ growth, especially during the first few years. You can usually remove the fence after 2-5 years.
Activity 7: Add unique elementsYou can make your Tiny Forest experience more unique by adding elements to the design, such as a large tree trunk along the path, benches, a pond, a hillock, or an embankment. But when adding these elements, keep in mind that a Tiny Forest has to meet certain specifications. We’ve included a list of these specifications in Appendix 1.
What tips do we have for this step?• In nature, the transition from one type of forest
cover to another progresses very gradually. If necessary, you could combine the tree species from two adjacent forest communities, in order to reach at least 25 species. For example, you could plant trees from an ash-alder forest cover in an elm-ash forest.
• You can also choose to plant a protective hedge of shrubs and herbs around the forest. This isn’t a necessary requirement of the Tiny Forest method, but it can be a nice addition to the design. Draw up a separate planting list for the forest edge. Since you won’t be planting large trees in this area, you don’t have to prepare the soil as deeply.
• Page 17 provides some sample designs for your Tiny Forest. These designs have already been realised, and the schools and neighbourhoods are very satisfied with the results.
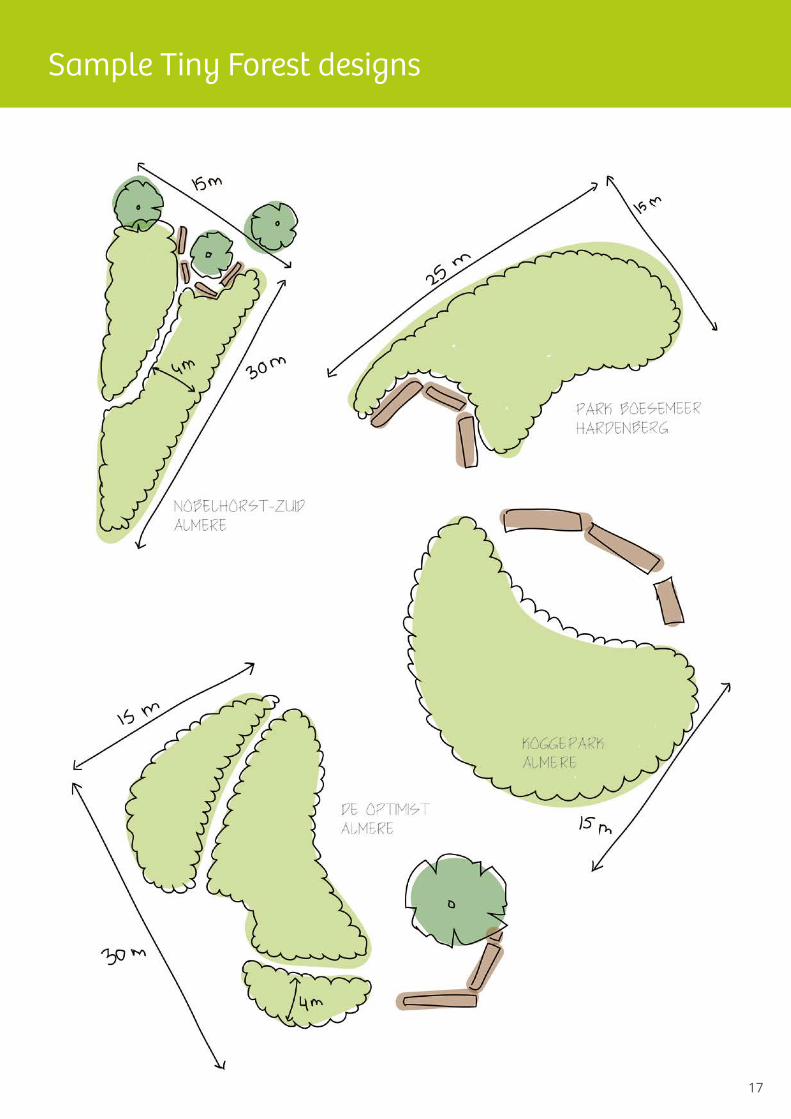
17
Sample Tiny Forest designs
18
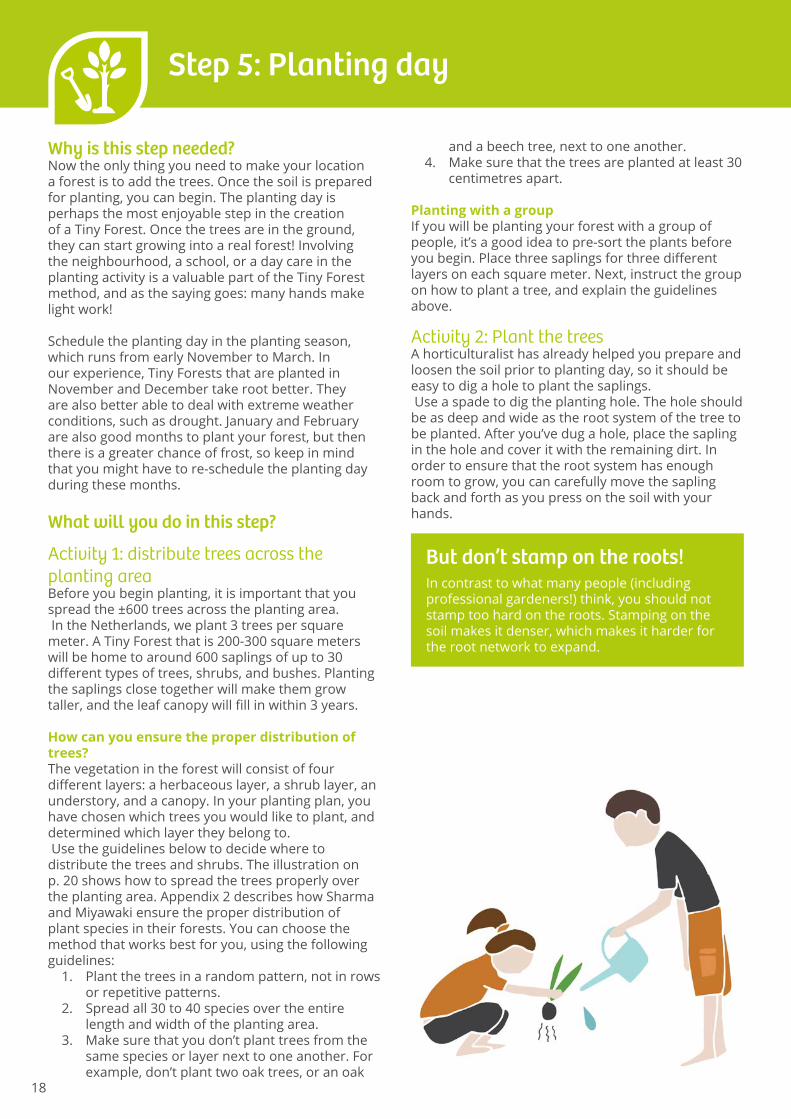
Step 5: Planting day
Why is this step needed?Now the only thing you need to make your location a forest is to add the trees. Once the soil is prepared for planting, you can begin. The planting day is perhaps the most enjoyable step in the creation of a Tiny Forest. Once the trees are in the ground, they can start growing into a real forest! Involving the neighbourhood, a school, or a day care in the planting activity is a valuable part of the Tiny Forest method, and as the saying goes: many hands make light work!
Schedule the planting day in the planting season, which runs from early November to March. In our experience, Tiny Forests that are planted in November and December take root better. They are also better able to deal with extreme weather conditions, such as drought. January and February are also good months to plant your forest, but then there is a greater chance of frost, so keep in mind that you might have to re-schedule the planting day during these months.
What will you do in this step?
Activity 1: distribute trees across the planting areaBefore you begin planting, it is important that you spread the ±600 trees across the planting area. In the Netherlands, we plant 3 trees per square meter. A Tiny Forest that is 200-300 square meters will be home to around 600 saplings of up to 30 different types of trees, shrubs, and bushes. Planting the saplings close together will make them grow taller, and the leaf canopy will fill in within 3 years.
How can you ensure the proper distribution of trees?The vegetation in the forest will consist of four different layers: a herbaceous layer, a shrub layer, an understory, and a canopy. In your planting plan, you have chosen which trees you would like to plant, and determined which layer they belong to. Use the guidelines below to decide where to distribute the trees and shrubs. The illustration on p. 20 shows how to spread the trees properly over the planting area. Appendix 2 describes how Sharma and Miyawaki ensure the proper distribution of plant species in their forests. You can choose the method that works best for you, using the following guidelines:
1. Plant the trees in a random pattern, not in rows or repetitive patterns.
2. Spread all 30 to 40 species over the entire length and width of the planting area.
3. Make sure that you don’t plant trees from the same species or layer next to one another. For example, don’t plant two oak trees, or an oak
and a beech tree, next to one another.4. Make sure that the trees are planted at least 30
centimetres apart.
Planting with a groupIf you will be planting your forest with a group of people, it’s a good idea to pre-sort the plants before you begin. Place three saplings for three different layers on each square meter. Next, instruct the group on how to plant a tree, and explain the guidelines above.
Activity 2: Plant the treesA horticulturalist has already helped you prepare and loosen the soil prior to planting day, so it should be easy to dig a hole to plant the saplings. Use a spade to dig the planting hole. The hole should be as deep and wide as the root system of the tree to be planted. After you’ve dug a hole, place the sapling in the hole and cover it with the remaining dirt. In order to ensure that the root system has enough room to grow, you can carefully move the sapling back and forth as you press on the soil with your hands.
But don’t stamp on the roots!In contrast to what many people (including professional gardeners!) think, you should not stamp too hard on the roots. Stamping on the soil makes it denser, which makes it harder for the root network to expand.
19
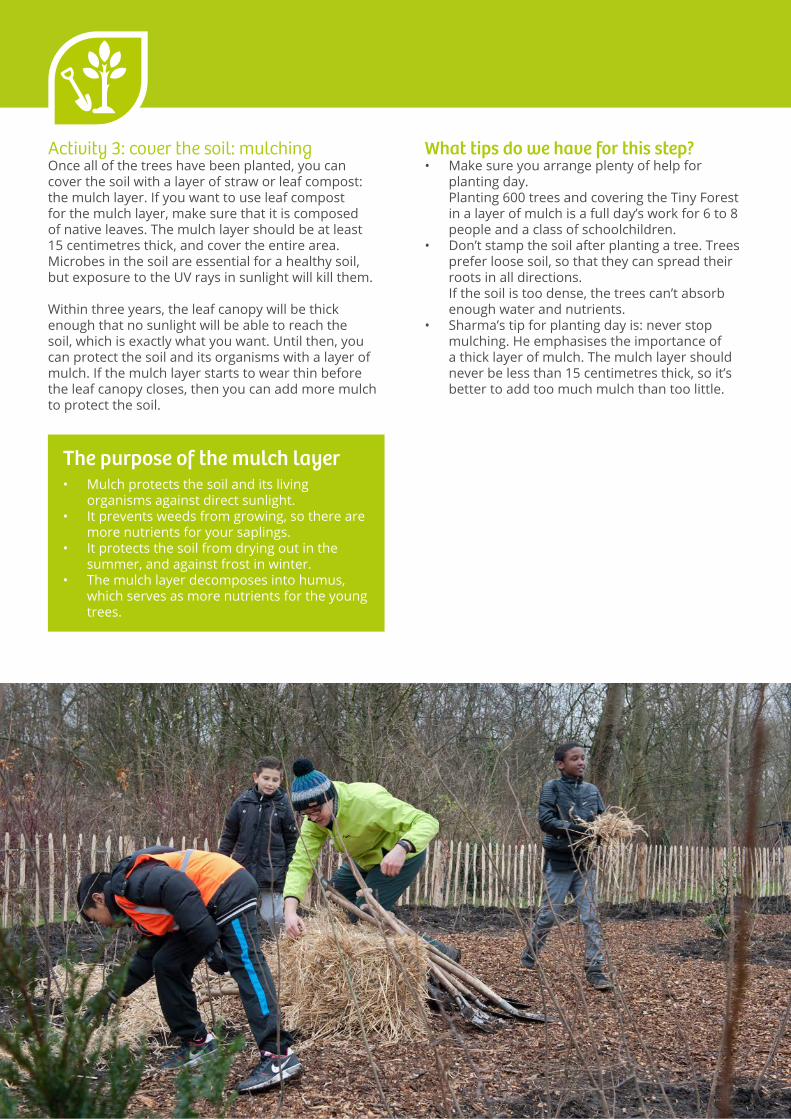
Activity 3: cover the soil: mulchingOnce all of the trees have been planted, you can cover the soil with a layer of straw or leaf compost:the mulch layer. If you want to use leaf compost for the mulch layer, make sure that it is composed of native leaves. The mulch layer should be at least 15 centimetres thick, and cover the entire area. Microbes in the soil are essential for a healthy soil, but exposure to the UV rays in sunlight will kill them.
Within three years, the leaf canopy will be thick enough that no sunlight will be able to reach the soil, which is exactly what you want. Until then, you can protect the soil and its organisms with a layer of mulch. If the mulch layer starts to wear thin before the leaf canopy closes, then you can add more mulch to protect the soil.
What tips do we have for this step?• Make sure you arrange plenty of help for
planting day. Planting 600 trees and covering the Tiny Forest in a layer of mulch is a full day’s work for 6 to 8 people and a class of schoolchildren.
• Don’t stamp the soil after planting a tree. Trees prefer loose soil, so that they can spread their roots in all directions. If the soil is too dense, the trees can’t absorb enough water and nutrients.
• Sharma’s tip for planting day is: never stop mulching. He emphasises the importance of a thick layer of mulch. The mulch layer should never be less than 15 centimetres thick, so it’s better to add too much mulch than too little.
The purpose of the mulch layer• Mulch protects the soil and its living
organisms against direct sunlight.• It prevents weeds from growing, so there are
more nutrients for your saplings.• It protects the soil from drying out in the
summer, and against frost in winter.• The mulch layer decomposes into humus,
which serves as more nutrients for the young trees.
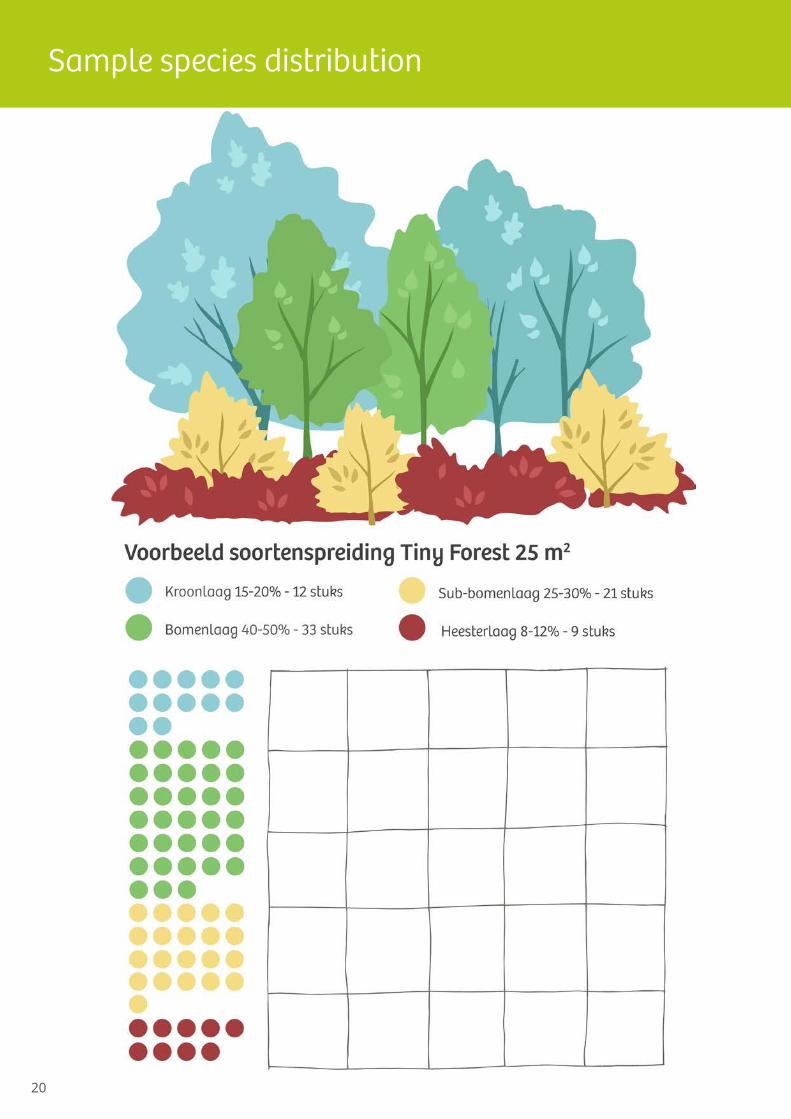
20
Sample species distribution

21
Step 6: Management
Why is this step needed?The most important period for the Tiny Forest begins only after the planting has been completed. For the first two to three years, your Tiny Forest will require some care, but in principle it will take care of itself after that. The rule of thumb for managing your Tiny Forest is: do as little as possible, so that the forest can grow as naturally as possible.Basically, you leave the management of the forest to nature.
What will you do in this step?
Activity 1: The mulch layerAt the end of the planting day, you covered the Tiny Forest with a mulch layer of straw or native leaves. This mulch layer prevents sunlight from reaching the soil, which helps keep it fertile. If you notice bare patches in the mulch layer after a while, you can cover them with a thick layer of straw (10-15 cm) once or twice per year. Continue maintaining the mulch layer until the trees grow a full canopy of leaves. Within three years, the leaf canopy should be dense enough, and the forest should produce its own mulch layer of twigs, leaves, and seeds.It’s better to mulch too much than too little!
Activity 2: Water the treesDuring the first growing season, feel under the mulch layer in a few different places to see if the soil is wet enough. If the soil feels dry, it is probably a good idea to give the young trees and shrubs some extra water. You can also look at the leaves on your trees. If they seem limp in the morning, then the trees probably need some extra water.
But keep in mind that if you water them too much, their roots will stay near the surface and won’t grow deep enough to find water on their own. So don’t water your trees more than once per week. Try to use water from natural sources, such as drainage ditches or rainwater reservoirs.
It is especially important to regularly check whether the soil is too dry during the growing season. After the first year, you probably won’t have to give your forest extra water anymore. Starting from the third year, your forest will regulate its own water supplies, so you can stop watering the plants.
Activity 3: Recognising weeds‘Weeds’ are the plants that we didn’t plant in the forest ourselves, and that could crowd out the young trees and shrubs. For the first two years, you should try to remove as many of these plants as possible, in order to keep them from slowing your trees’ growth. The most common types of weeds are: brambles, bindweed, thistles, sorrel, and nettles.
Activity 4: WeedingWhat is the best way to remove weeds from your Tiny Forest? During the growing season, from April to October, you can pull or cut weeds every 8 weeks. You can cut larger weeds into smaller pieces. Remember to leave all of the weeds lying on the mulch layer, so that the nutrients can return back to the soil.
Action 5: Clear the pathIf you have a path through your Tiny Forest, you naturally want to keep it accessible. Prune any overhanging branches, cut them into smaller pieces, and leave them on the mulch layer. You can also sweep up any leaves lying on the path and leave them on top of the mulch layer as well.
Activity 6: Pick up litterClean up any litter that has blown into your Tiny Forest.
What tips do we have for this step?• For the first few years, you might see some
wildflowers blooming in your forest. These flowers are not a threat to your trees, so just leave them where they are. They are not only colourful and attractive, they also attract pollinators and butterflies.
• • Make clear agreements with the municipal government, school, and neighbourhood regarding the management of the forest. Who should do what? Record these agreements in a management plan or management calendar. A calendar is a handy way to make sure everyone knows which tasks they need to do, and at what times.
• Take advantage of national events, such as the Natuurwerkdag, Burendag, and NL Doet, because they make it easier to find volunteers willing to lend a hand. Appendix 4 provides a useful overview of these events.
• After around six years, your trees will be large enough that they will be subject to your municipality’s specialist tree management service. At that time, it’s a good idea to have an expert check whether the trees are safe. The municipal government has specialist tree management staff, or you can ask a specialist bureau to conduct the inspection for you.
• Download a sample management plan via:
ivn.nl/tinyforest/downloads

22
This is an overview of the websites and books we used as references in writing this handbook, as well as a list of links from the handbook for more information, inspiration, and tips.
Books• The Healing Power of Forests; The Philosophy behind Restoring Earth’s Balance with Native Trees (2006) by Akira
Miyawaki en Elgene O. Box. • Inheemse bomen en struiken in Nederland en Vlaanderen; herkenning, verspreiding, geschiedenis en gebruik
(2013) by Bert Maes.
Websites• www.ivn.nl/tinyforest• https://winkel.ivn.nl/• https://www.afforestt.com/• https://www.ted.com/talks/shubhendu_sharma_an_engineers_vision_for_tiny_forests_everywhere • https://www.ted.com/talks/shubhendu_sharma_how_to_grow_a_forest_in_your_backyard • https://en.wikipedia.org/wiki/Akira_Miyawaki • https://morinoproject.com/english • landschapinnederland.nl/kaart-groen-erfgoed • ivn.nl/afdeling• kadaster.nl/klic-melding-kabel-en-leidinginformatie• http://maps.bodemdata.nl/• Nicole Brennan: https://www.youtube.com/watch?v=fufeaLBLGlk• www.florum.nl
Inspiration and tips
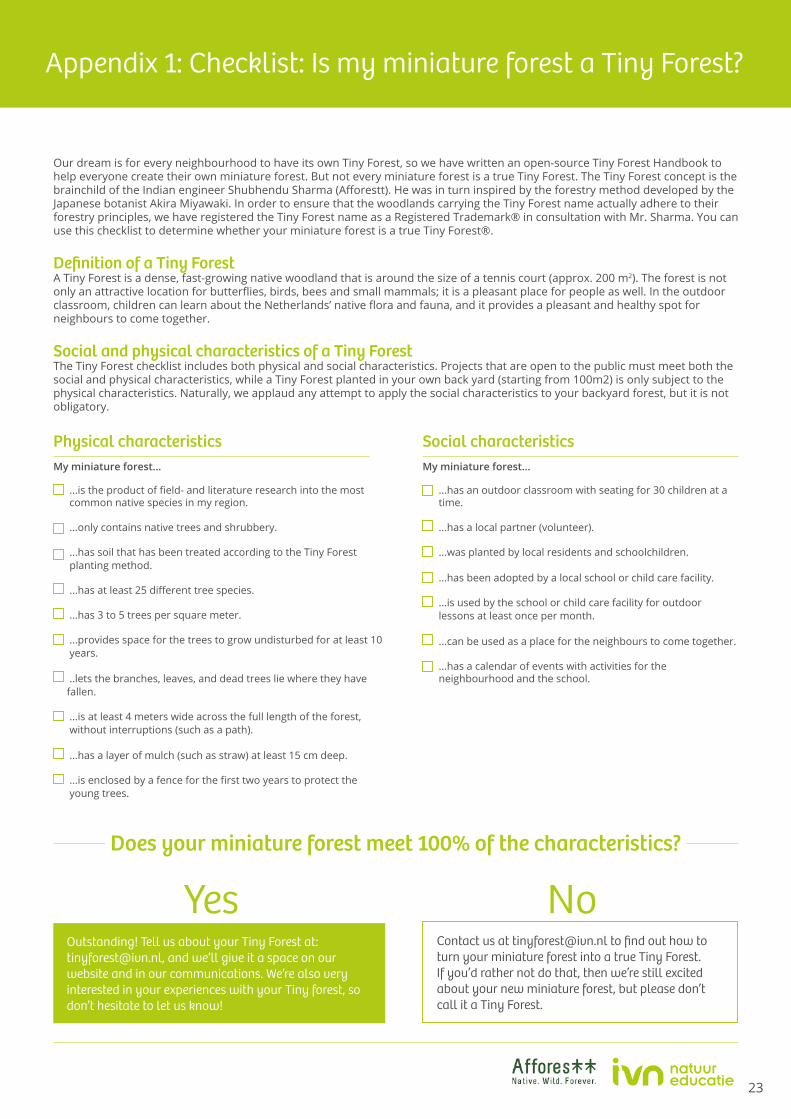
Checklist: is my forest a Tiny Forest®?Our dream is for every neighbourhood to have its own Tiny Forest, so we have written an open-source Tiny Forest Handbook to help everyone create their own miniature forest. But not every miniature forest is a true Tiny Forest. The Tiny Forest concept is the brainchild of the Indian engineer Shubhendu Sharma (Afforestt). He was in turn inspired by the forestry method developed by the Japanese botanist Akira Miyawaki. In order to ensure that the woodlands carrying the Tiny Forest name actually adhere to their forestry principles, we have registered the Tiny Forest name as a Registered Trademark® in consultation with Mr. Sharma. You can use this checklist to determine whether your miniature forest is a true Tiny Forest®.
Definition of a Tiny ForestA Tiny Forest is a dense, fast-growing native woodland that is around the size of a tennis court (approx. 200 m2). The forest is not only an attractive location for butterflies, birds, bees and small mammals; it is a pleasant place for people as well. In the outdoor classroom, children can learn about the Netherlands’ native flora and fauna, and it provides a pleasant and healthy spot for neighbours to come together.
Social and physical characteristics of a Tiny ForestThe Tiny Forest checklist includes both physical and social characteristics. Projects that are open to the public must meet both the social and physical characteristics, while a Tiny Forest planted in your own back yard (starting from 100m2) is only subject to the physical characteristics. Naturally, we applaud any attempt to apply the social characteristics to your backyard forest, but it is not obligatory.
Outstanding! Tell us about your Tiny Forest at: [email protected], and we’ll give it a space on our website and in our communications. We’re also very interested in your experiences with your Tiny forest, so don’t hesitate to let us know!
Yes NoContact us at [email protected] to find out how to turn your miniature forest into a true Tiny Forest. If you’d rather not do that, then we’re still excited about your new miniature forest, but please don’t call it a Tiny Forest.
Social characteristicsMy miniature forest...
...has an outdoor classroom with seating for 30 children at a time.
...has a local partner (volunteer).
...was planted by local residents and schoolchildren.
...has been adopted by a local school or child care facility.
...is used by the school or child care facility for outdoor lessons at least once per month.
...can be used as a place for the neighbours to come together.
...has a calendar of events with activities for the neighbourhood and the school.
Physical characteristicsMy miniature forest...
...is the product of field- and literature research into the most common native species in my region.
...only contains native trees and shrubbery.
...has soil that has been treated according to the Tiny Forest planting method.
...has at least 25 different tree species.
...has 3 to 5 trees per square meter.
...provides space for the trees to grow undisturbed for at least 10 years.
..lets the branches, leaves, and dead trees lie where they have fallen.
...is at least 4 meters wide across the full length of the forest, without interruptions (such as a path).
...has a layer of mulch (such as straw) at least 15 cm deep.
...is enclosed by a fence for the first two years to protect the young trees.
Does your miniature forest meet 100% of the characteristics?
23
Inspiration and tips
Checklist: is my forest a Tiny Forest®?Our dream is for every neighbourhood to have its own Tiny Forest, so we have written an open-source Tiny Forest Handbook to help everyone create their own miniature forest. But not every miniature forest is a true Tiny Forest. The Tiny Forest concept is the brainchild of the Indian engineer Shubhendu Sharma (Afforestt). He was in turn inspired by the forestry method developed by the Japanese botanist Akira Miyawaki. In order to ensure that the woodlands carrying the Tiny Forest name actually adhere to their forestry principles, we have registered the Tiny Forest name as a Registered Trademark® in consultation with Mr. Sharma. You can use this checklist to determine whether your miniature forest is a true Tiny Forest®.
Definition of a Tiny ForestA Tiny Forest is a dense, fast-growing native woodland that is around the size of a tennis court (approx. 200 m2). The forest is not only an attractive location for butterflies, birds, bees and small mammals; it is a pleasant place for people as well. In the outdoor classroom, children can learn about the Netherlands’ native flora and fauna, and it provides a pleasant and healthy spot for neighbours to come together.
Social and physical characteristics of a Tiny ForestThe Tiny Forest checklist includes both physical and social characteristics. Projects that are open to the public must meet both the social and physical characteristics, while a Tiny Forest planted in your own back yard (starting from 100m2) is only subject to the physical characteristics. Naturally, we applaud any attempt to apply the social characteristics to your backyard forest, but it is not obligatory.
Outstanding! Tell us about your Tiny Forest at: [email protected], and we’ll give it a space on our website and in our communications. We’re also very interested in your experiences with your Tiny forest, so don’t hesitate to let us know!
Yes NoContact us at [email protected] to find out how to turn your miniature forest into a true Tiny Forest. If you’d rather not do that, then we’re still excited about your new miniature forest, but please don’t call it a Tiny Forest.
Social characteristicsMy miniature forest...
...has an outdoor classroom with seating for 30 children at a time.
...has a local partner (volunteer).
...was planted by local residents and schoolchildren.
...has been adopted by a local school or child care facility.
...is used by the school or child care facility for outdoor lessons at least once per month.
...can be used as a place for the neighbours to come together.
...has a calendar of events with activities for the neighbourhood and the school.
Physical characteristicsMy miniature forest...
...is the product of field- and literature research into the most common native species in my region.
...only contains native trees and shrubbery.
...has soil that has been treated according to the Tiny Forest planting method.
...has at least 25 different tree species.
...has 3 to 5 trees per square meter.
...provides space for the trees to grow undisturbed for at least 10 years.
..lets the branches, leaves, and dead trees lie where they have fallen.
...is at least 4 meters wide across the full length of the forest, without interruptions (such as a path).
...has a layer of mulch (such as straw) at least 15 cm deep.
...is enclosed by a fence for the first two years to protect the young trees.
Does your miniature forest meet 100% of the characteristics?
Appendix 1: Checklist: Is my miniature forest a Tiny Forest?
24
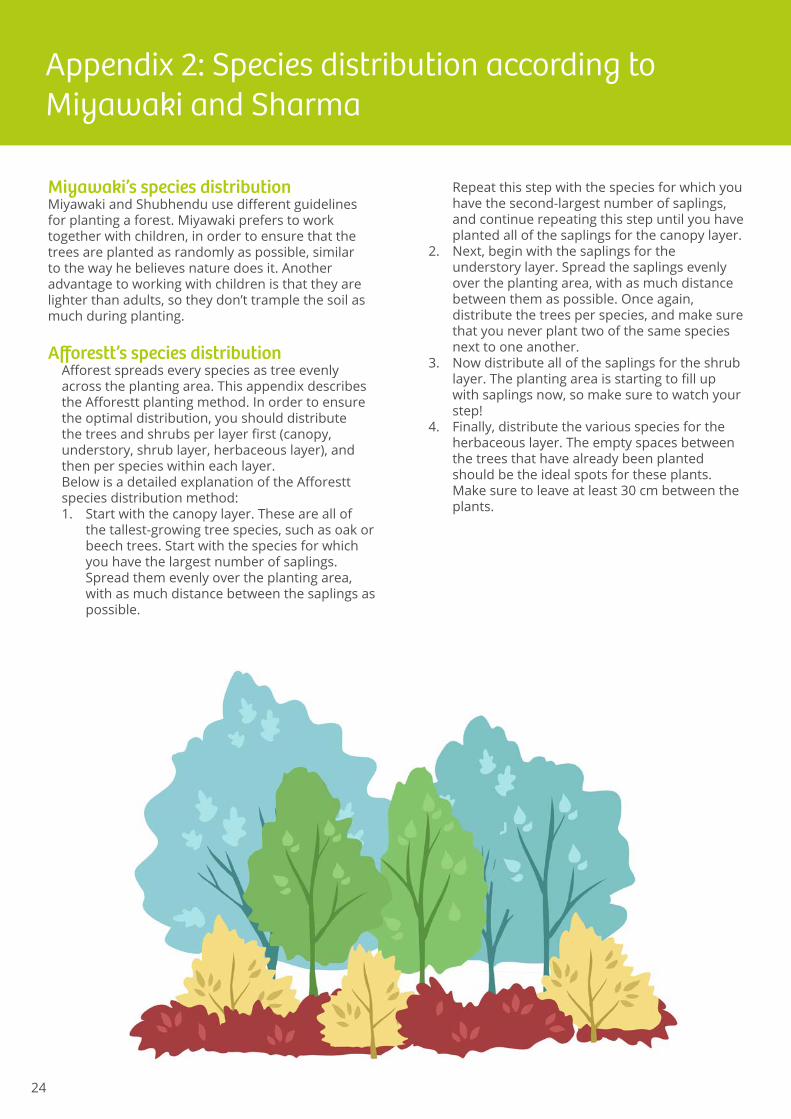
Miyawaki’s species distributionMiyawaki and Shubhendu use different guidelines for planting a forest. Miyawaki prefers to work together with children, in order to ensure that the trees are planted as randomly as possible, similar to the way he believes nature does it. Another advantage to working with children is that they are lighter than adults, so they don’t trample the soil as much during planting.
Afforestt’s species distributionAfforest spreads every species as tree evenly across the planting area. This appendix describes the Afforestt planting method. In order to ensure the optimal distribution, you should distribute the trees and shrubs per layer first (canopy, understory, shrub layer, herbaceous layer), and then per species within each layer.Below is a detailed explanation of the Afforestt species distribution method:1. Start with the canopy layer. These are all of
the tallest-growing tree species, such as oak or beech trees. Start with the species for which you have the largest number of saplings. Spread them evenly over the planting area, with as much distance between the saplings as possible.
Appendix 2: Species distribution according to Miyawaki and Sharma
Repeat this step with the species for which you have the second-largest number of saplings, and continue repeating this step until you have planted all of the saplings for the canopy layer.
2. Next, begin with the saplings for the understory layer. Spread the saplings evenly over the planting area, with as much distance between them as possible. Once again, distribute the trees per species, and make sure that you never plant two of the same species next to one another.
3. Now distribute all of the saplings for the shrub layer. The planting area is starting to fill up with saplings now, so make sure to watch your step!
4. Finally, distribute the various species for the herbaceous layer. The empty spaces between the trees that have already been planted should be the ideal spots for these plants. Make sure to leave at least 30 cm between the plants.
Vlierbes
Braam of framboos
Rode of zwarte bes
Plukhulp
Waar: in het bos
Waar: Langs de rand van het bos
Waar: Aan de rand van het bos
Wat: 5 trosjes bessen of 5 bloesems
Wat: 10 -20 bramen of frambozen
Wat: 5 – 10 trosjes bessen
25
Appendix 3: List of edible plants
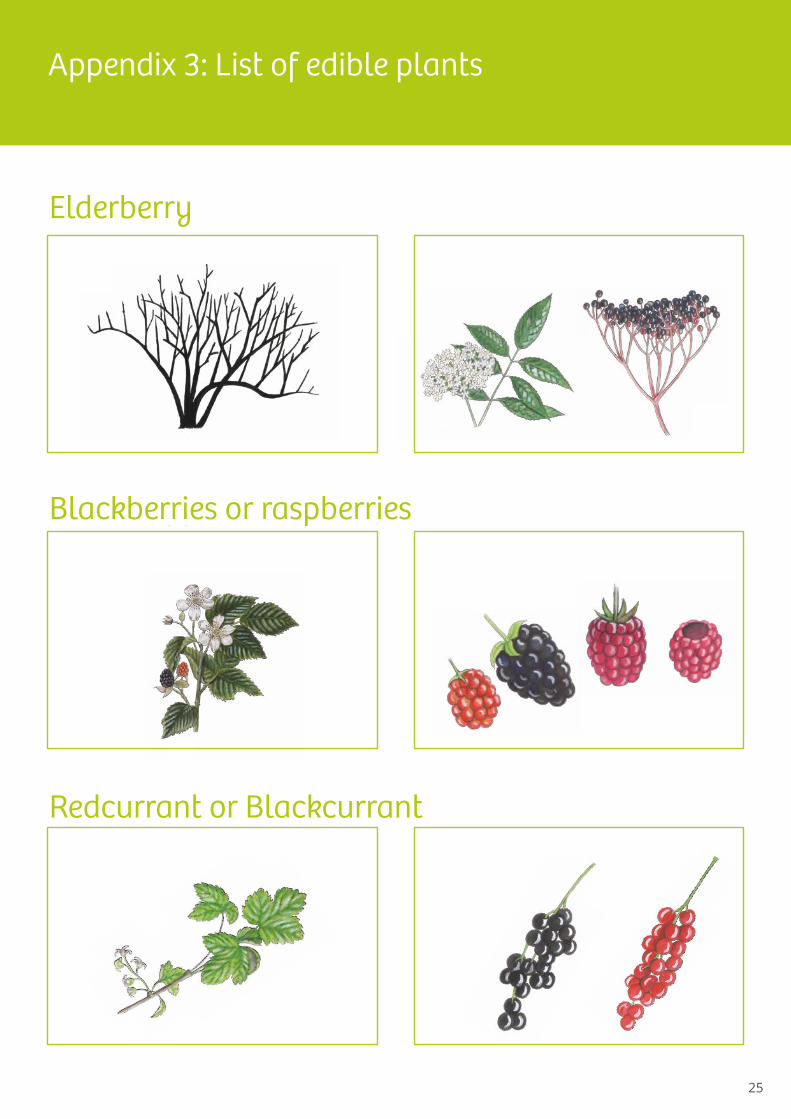
Vlierbes
Braam of framboos
Rode of zwarte bes
Plukhulp
Waar: in het bos
Waar: Langs de rand van het bos
Waar: Aan de rand van het bos
Wat: 5 trosjes bessen of 5 bloesems
Wat: 10 -20 bramen of frambozen
Wat: 5 – 10 trosjes bessen
Elderberry
Blackberries or raspberries
Redcurrant or Blackcurrant
26
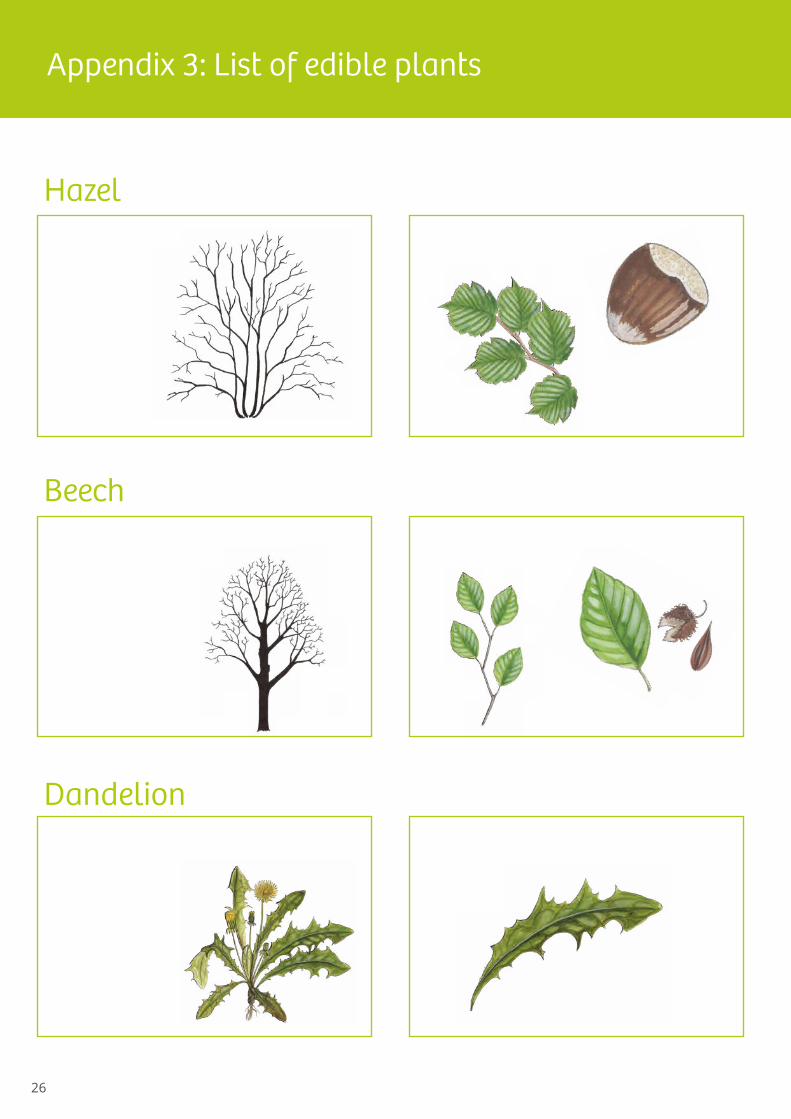
Appendix 3: List of edible plants
Hazelaar
Beuk
Paardenbloem
Waar: In het bos
Waar: Langs de rand van het bos
Waar: Langs de rand van het bos
Wat: 10 – 20 hazelnoten
Wat: 20 beukennootjes
Wat: 5 blaadjes
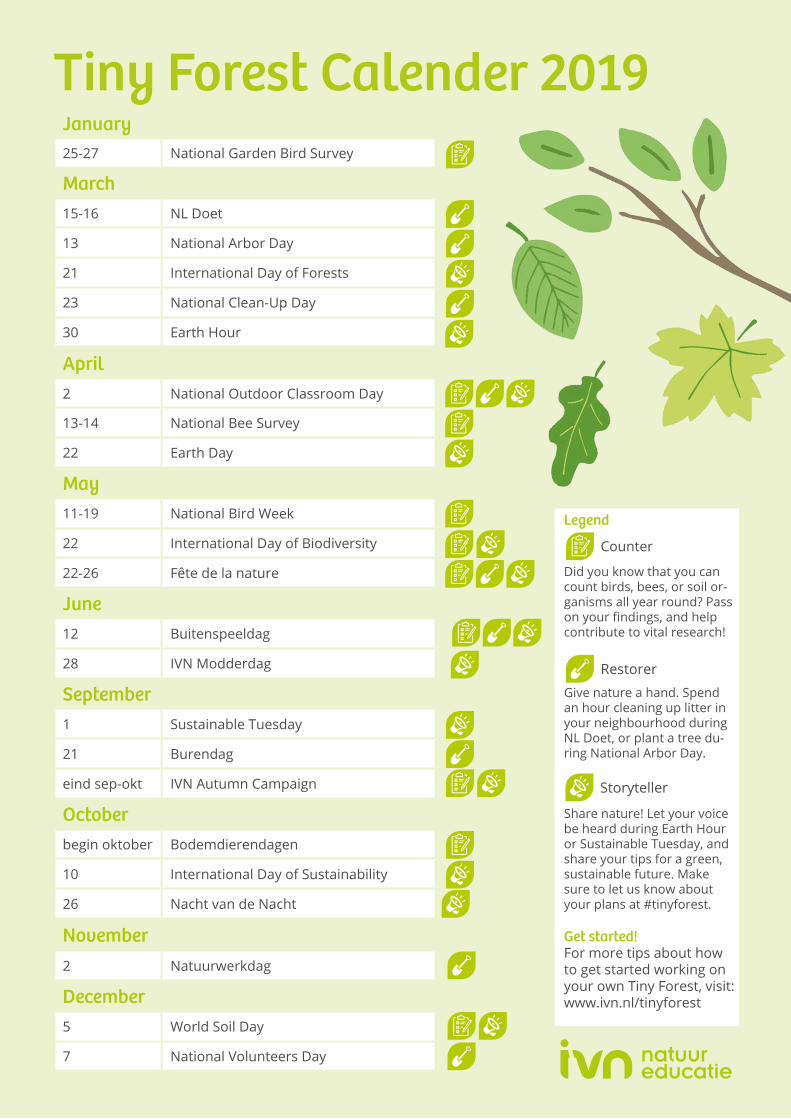
PlukhulpTiny Forest Calender 2019
January25-27 National Garden Bird Survey
March15-16 NL Doet
13 National Arbor Day
21 International Day of Forests
23 National Clean-Up Day
30 Earth Hour
April2 National Outdoor Classroom Day
13-14 National Bee Survey
22 Earth Day
May11-19 National Bird Week
22 International Day of Biodiversity
22-26 Fête de la nature
June12 Buitenspeeldag
28 IVN Modderdag
September1 Sustainable Tuesday
21 Burendag
eind sep-okt IVN Autumn Campaign
Octoberbegin oktober Bodemdierendagen
10 International Day of Sustainability
26 Nacht van de Nacht
November2 Natuurwerkdag
December5 World Soil Day
7 National Volunteers Day
Legend
Did you know that you can count birds, bees, or soil or-ganisms all year round? Pass on your findings, and help contribute to vital research!
Give nature a hand. Spend an hour cleaning up litter in your neighbourhood during NL Doet, or plant a tree du-ring National Arbor Day.
Share nature! Let your voice be heard during Earth Hour or Sustainable Tuesday, and share your tips for a green, sustainable future. Make sure to let us know about your plans at #tinyforest.
Get started!For more tips about how to get started working on your own Tiny Forest, visit: www.ivn.nl/tinyforest
Counter
Restorer
Storyteller
Hazel
Beech
Dandelion
27
Tiny Forest Calender 2019January25-27 National Garden Bird Survey
March15-16 NL Doet
13 National Arbor Day
21 International Day of Forests
23 National Clean-Up Day
30 Earth Hour
April2 National Outdoor Classroom Day
13-14 National Bee Survey
22 Earth Day
May11-19 National Bird Week
22 International Day of Biodiversity
22-26 Fête de la nature
June12 Buitenspeeldag
28 IVN Modderdag
September1 Sustainable Tuesday
21 Burendag
eind sep-okt IVN Autumn Campaign
Octoberbegin oktober Bodemdierendagen
10 International Day of Sustainability
26 Nacht van de Nacht
November2 Natuurwerkdag
December5 World Soil Day
7 National Volunteers Day
Legend
Did you know that you can count birds, bees, or soil or-ganisms all year round? Pass on your findings, and help contribute to vital research!
Give nature a hand. Spend an hour cleaning up litter in your neighbourhood during NL Doet, or plant a tree du-ring National Arbor Day.
Share nature! Let your voice be heard during Earth Hour or Sustainable Tuesday, and share your tips for a green, sustainable future. Make sure to let us know about your plans at #tinyforest.
Get started!For more tips about how to get started working on your own Tiny Forest, visit: www.ivn.nl/tinyforest
Counter
Restorer
Storyteller
28
Appendix 5: Drawing of Karin’s Tiny Forest

29
ivn.nl/wordlid
Become a member
Experience nature!IVN helps people of all ages experience how fun, educational, healthy, and important nature is to us. Together with 25,000 members and volunteers, we facilitate unforgettable nature experiences, such as planting Tiny Forests in urban neighbourhoods. With your contribution, we can help bring nature closer to everyone, including those who might not be able to experience it on their own, such as the elderly, people with chronic illnesses, and children. Would you like to help make the Netherlands a greener place? You can become a member starting at only € 2.00 per month.
30
Postbus 201231000 HC [email protected]/tinyforest
@IVNNatuureducatie
@IVNNederland
@IVNNatuureducatie