Embed Size (px)
Citation preview
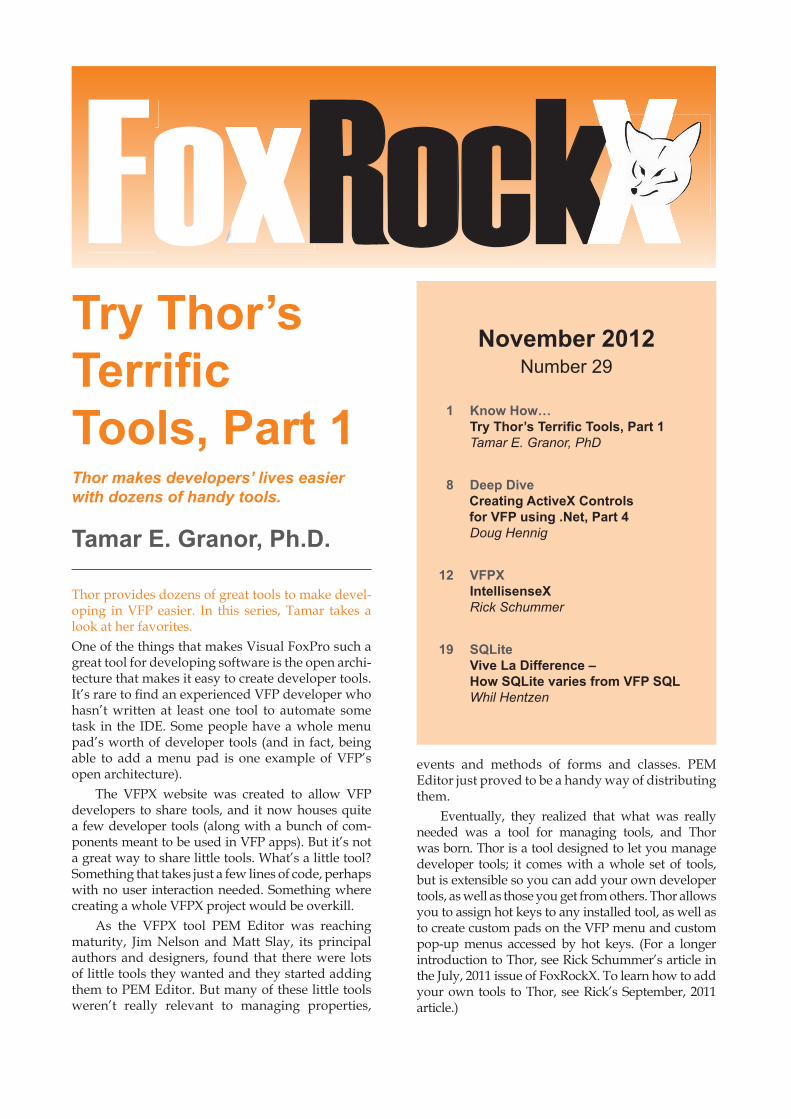
November 2012Number 29
1 Know How… Try Thor’s Terrifi c Tools, Part 1 Tamar E. Granor, PhD
8 Deep DiveCreating ActiveX Controlsfor VFP using .Net, Part 4
Doug Hennig
12 VFPX IntellisenseX Rick Schummer
19 SQLite Vive La Difference – How SQLite varies from VFP SQL Whil Hentzen
Try Thor’s Terrifi c Tools, Part 1Thor makes developers’ lives easier with dozens of handy tools.
Tamar E. Granor, Ph.D.
Thor provides dozens of great tools to make devel-oping in VFP easier. In this series, Tamar takes a look at her favorites.One of the things that makes Visual FoxPro such a great tool for developing software is the open archi-tecture that makes it easy to create developer tools. It’s rare to fi nd an experienced VFP developer who hasn’t written at least one tool to automate some task in the IDE. Some people have a whole menu pad’s worth of developer tools (and in fact, being able to add a menu pad is one example of VFP’s open architecture).
The VFPX website was created to allow VFP developers to share tools, and it now houses quite a few developer tools (along with a bunch of com-ponents meant to be used in VFP apps). But it’s not a great way to share little tools. What’s a little tool? Something that takes just a few lines of code, perhaps with no user interaction needed. Something where creating a whole VFPX project would be overkill.
As the VFPX tool PEM Editor was reaching maturity, Jim Nelson and Matt Slay, its principal authors and designers, found that there were lots of little tools they wanted and they started adding them to PEM Editor. But many of these little tools weren’t really relevant to managing properties,
events and methods of forms and classes. PEM Editor just proved to be a handy way of distributing them.
Eventually, they realized that what was really needed was a tool for managing tools, and Thor was born. Thor is a tool designed to let you manage developer tools; it comes with a whole set of tools, but is extensible so you can add your own developer tools, as well as those you get from others. Thor allows you to assign hot keys to any installed tool, as well as to create custom pads on the VFP menu and custom pop-up menus accessed by hot keys. (For a longer introduction to Thor, see Rick Schummer’s article in the July, 2011 issue of FoxRockX. To learn how to add your own tools to Thor, see Rick’s September, 2011 article.)
Page 2 FoxRockX November 2012
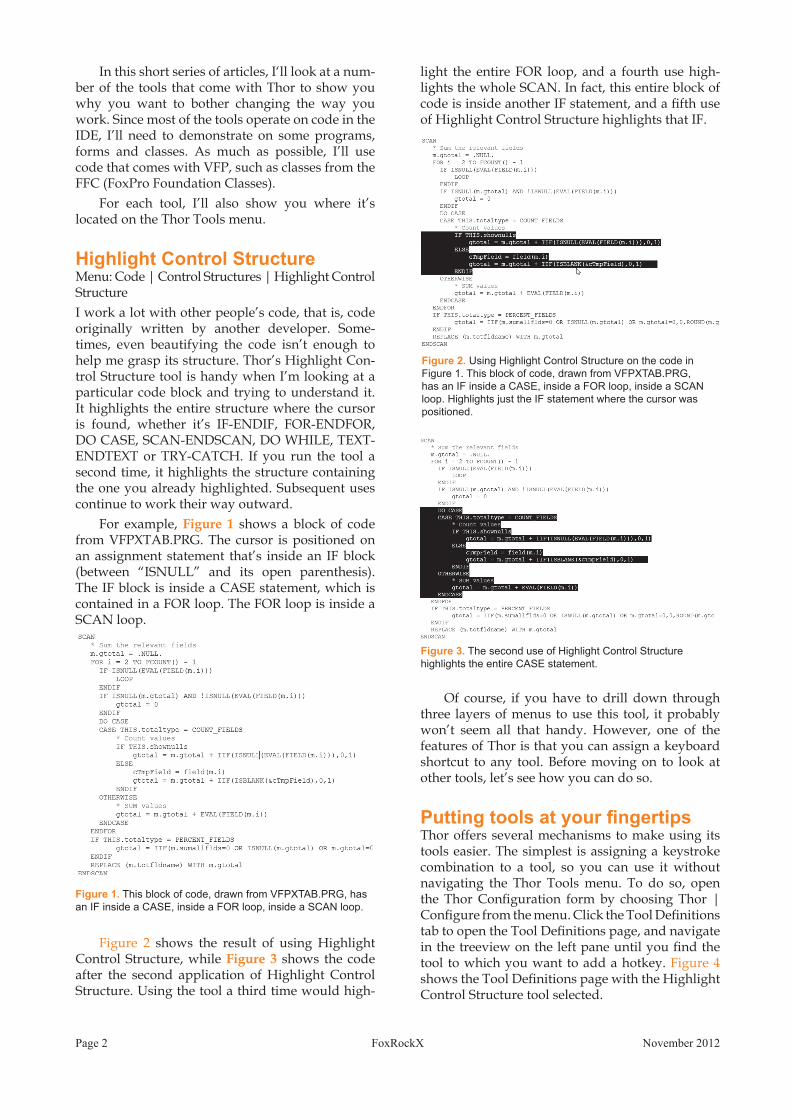
light the entire FOR loop, and a fourth use high-lights the whole SCAN. In fact, this entire block of code is inside another IF statement, and a fifth use of Highlight Control Structure highlights that IF.
Of course, if you have to drill down through three layers of menus to use this tool, it probably won’t seem all that handy. However, one of the features of Thor is that you can assign a keyboard shortcut to any tool. Before moving on to look at other tools, let’s see how you can do so.
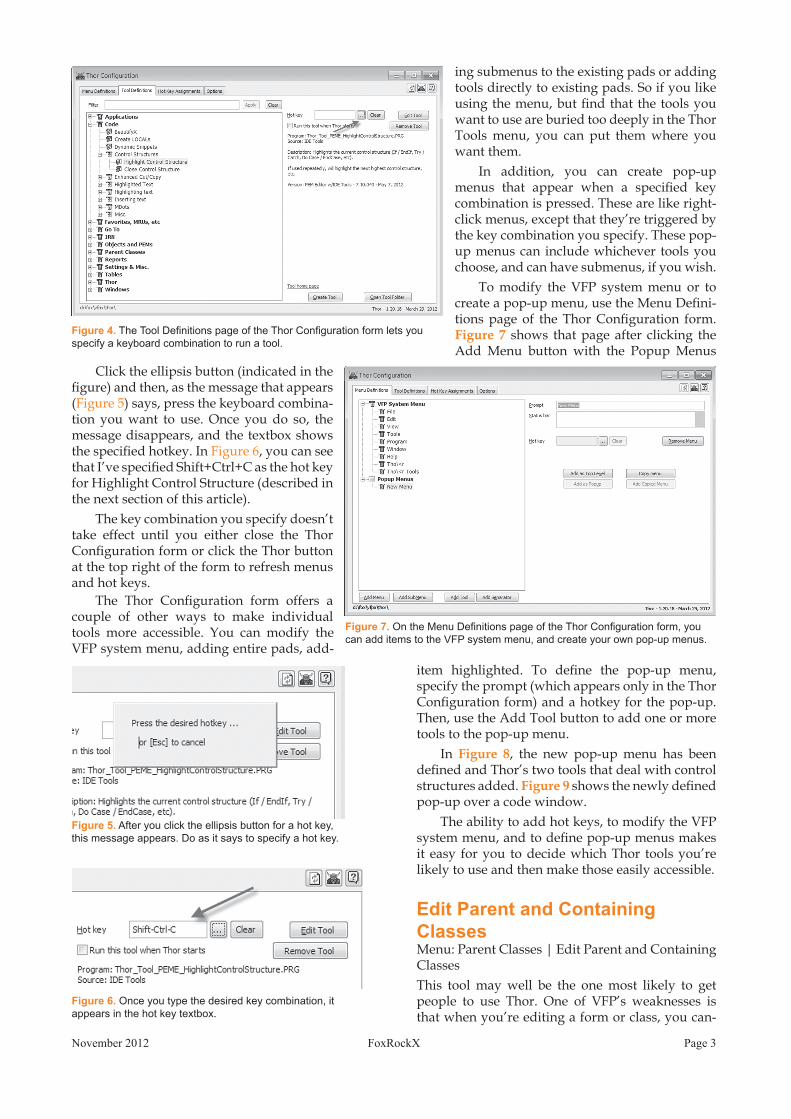
Putting tools at your fingertipsThor offers several mechanisms to make using its tools easier. The simplest is assigning a keystroke combination to a tool, so you can use it without navigating the Thor Tools menu. To do so, open the Thor Configuration form by choosing Thor | Configure from the menu. Click the Tool Definitions tab to open the Tool Definitions page, and navigate in the treeview on the left pane until you find the tool to which you want to add a hotkey. Figure 4 shows the Tool Definitions page with the Highlight Control Structure tool selected.
In this short series of articles, I‘ll look at a num-ber of the tools that come with Thor to show you why you want to bother changing the way you work. Since most of the tools operate on code in the IDE, I’ll need to demonstrate on some programs, forms and classes. As much as possible, I’ll use code that comes with VFP, such as classes from the FFC (FoxPro Foundation Classes).
For each tool, I’ll also show you where it’s located on the Thor Tools menu.
Highlight Control StructureMenu: Code | Control Structures | Highlight Control Structure I work a lot with other people’s code, that is, code originally written by another developer. Some-times, even beautifying the code isn’t enough to help me grasp its structure. Thor’s Highlight Con-trol Structure tool is handy when I’m looking at a particular code block and trying to understand it. It highlights the entire structure where the cursor is found, whether it’s IF-ENDIF, FOR-ENDFOR, DO CASE, SCAN-ENDSCAN, DO WHILE, TEXT-ENDTEXT or TRY-CATCH. If you run the tool a second time, it highlights the structure containing the one you already highlighted. Subsequent uses continue to work their way outward.
For example, Figure 1 shows a block of code from VFPXTAB.PRG. The cursor is positioned on an assignment statement that’s inside an IF block (between “ISNULL” and its open parenthesis). The IF block is inside a CASE statement, which is contained in a FOR loop. The FOR loop is inside a SCAN loop.
Figure 2 shows the result of using Highlight Control Structure, while Figure 3 shows the code after the second application of Highlight Control Structure. Using the tool a third time would high-
Figure 1. This block of code, drawn from VFPXTAB.PRG, has an IF inside a CASE, inside a FOR loop, inside a SCAN loop.
Figure 2. Using Highlight Control Structure on the code in Figure 1. This block of code, drawn from VFPXTAB.PRG, has an IF inside a CASE, inside a FOR loop, inside a SCAN loop. Highlights just the IF statement where the cursor was positioned.
Figure 3. The second use of Highlight Control Structure highlights the entire CASE statement.
November 2012 FoxRockX Page 3
ing submenus to the existing pads or adding tools directly to existing pads. So if you like using the menu, but fi nd that the tools you want to use are buried too deeply in the Thor Tools menu, you can put them where you want them.
In addition, you can create pop-up menus that appear when a specifi ed key combination is pressed. These are like right-click menus, except that they’re triggered by the key combination you specify. These pop-up menus can include whichever tools you choose, and can have submenus, if you wish.
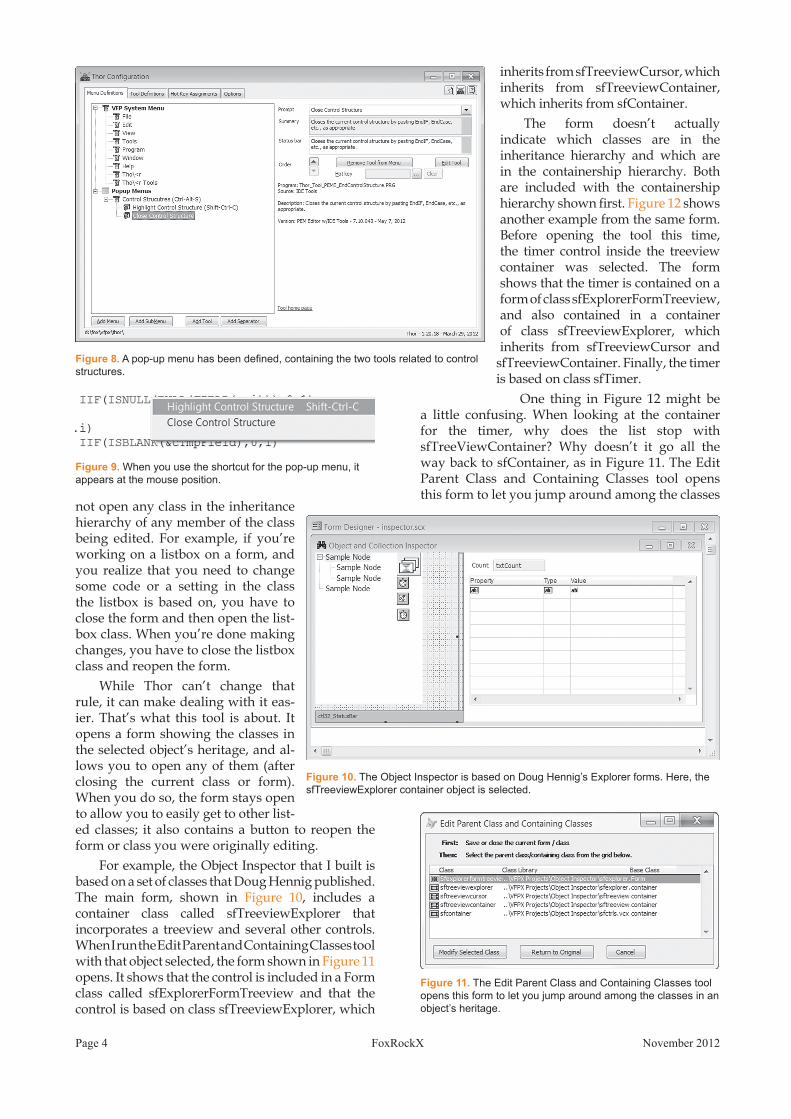
To modify the VFP system menu or to create a pop-up menu, use the Menu Defi ni-tions page of the Thor Confi guration form. Figure 7 shows that page after clicking the Add Menu button with the Popup Menus
item highlighted. To defi ne the pop-up menu, specify the prompt (which appears only in the Thor Confi guration form) and a hotkey for the pop-up. Then, use the Add Tool button to add one or more tools to the pop-up menu.
In Figure 8, the new pop-up menu has been defi ned and Thor’s two tools that deal with control structures added. Figure 9 shows the newly defi ned pop-up over a code window.
The ability to add hot keys, to modify the VFP system menu, and to defi ne pop-up menus makes it easy for you to decide which Thor tools you’re likely to use and then make those easily accessible.
Edit Parent and Containing ClassesMenu: Parent Classes | Edit Parent and Containing ClassesThis tool may well be the one most likely to get people to use Thor. One of VFP’s weaknesses is that when you’re editing a form or class, you can-
Click the ellipsis button (indicated in the fi gure) and then, as the message that appears (Figure 5) says, press the keyboard combina-tion you want to use. Once you do so, the message disappears, and the textbox shows the specifi ed hotkey. In Figure 6, you can see that I’ve specifi ed Shift+Ctrl+C as the hot key for Highlight Control Structure (described in the next section of this article).
The key combination you specify doesn’t take effect until you either close the Thor Confi guration form or click the Thor button at the top right of the form to refresh menus and hot keys.
The Thor Confi guration form offers a couple of other ways to make individual tools more accessible. You can modify the VFP system menu, adding entire pads, add-
Figu re 4. The Tool Defi nitions page of the Thor Confi guration form lets you specify a keyboard combination to run a tool.
Figur e 5. After you click the ellipsis button for a hot key, this message appears. Do as it says to specify a hot key.
Figure 6. Once you type the desired key combination, it appears in the hot key textbox.
Figure 7. On the Menu Defi nitions page of the Thor Confi guration form, you can add items to the VFP system menu, and create your own pop-up menus.
Page 4 FoxRockX November 2012
not open any class in the inheritance hierarchy of any member of the class being edited. For example, if you’re working on a listbox on a form, and you realize that you need to change some code or a setting in the class the listbox is based on, you have to close the form and then open the list-box class. When you’re done making changes, you have to close the listbox class and reopen the form.
While Thor can’t change that rule, it can make dealing with it eas-ier. That’s what this tool is about. It opens a form showing the classes in the selected object’s heritage, and al-lows you to open any of them (after closing the current class or form). When you do so, the form stays open to allow you to easily get to other list-ed classes; it also contains a button to reopen the form or class you were originally editing.
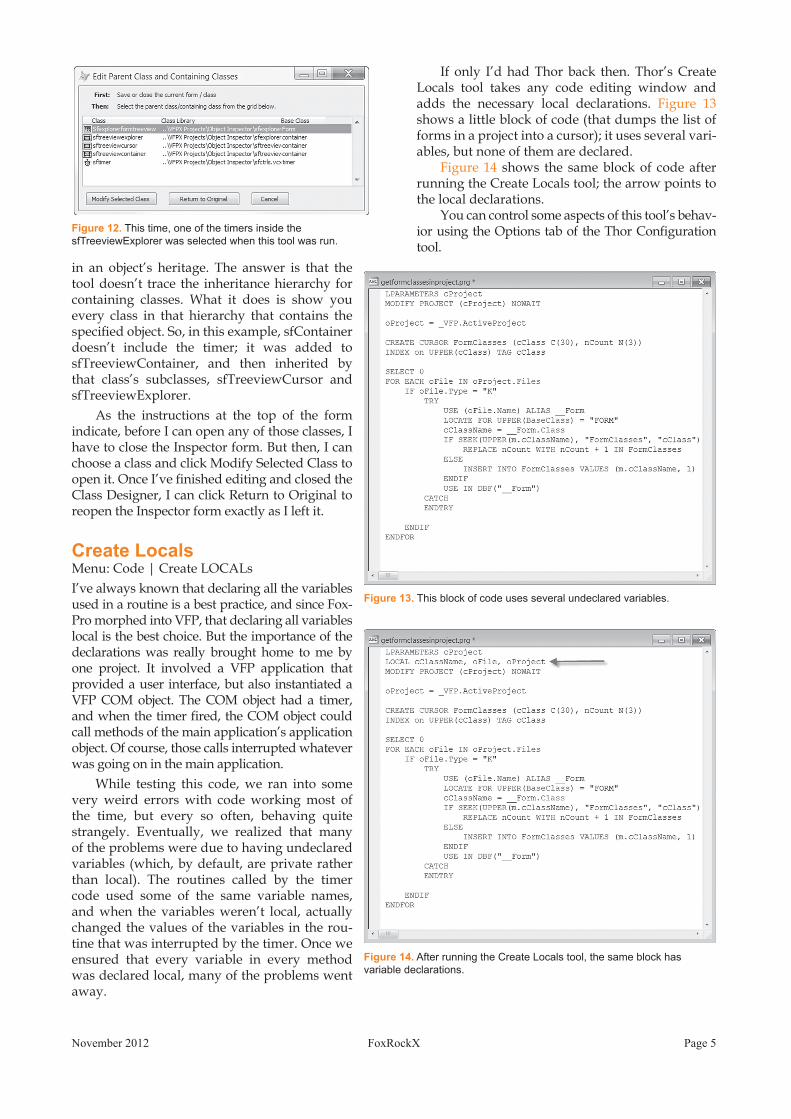
For example, the Object Inspector that I built is based on a set of classes that Doug Hennig published. The main form, shown in Figure 10, includes a container class called sfTreeviewExplorer that incorporates a treeview and several other controls. When I run the Edit Parent and Containing Classes tool with that object selected, the form shown in Figure 11 opens. It shows that the control is included in a Form class called sfExplorerFormTreeview and that the control is based on class sfTreeviewExplorer, which
inherits from sfTreeviewCursor, which inherits from sfTreeviewContainer, which inherits from sfContainer.
The form doesn’t actually indicate which classes are in the inheritance hierarchy and which are in the containership hierarchy. Both are included with the containership hierarchy shown fi rst. Figure 12 shows another example from the same form. Before opening the tool this time, the timer control inside the treeview container was selected. The form shows that the timer is contained on a form of class sfExplorerFormTreeview, and also contained in a container of class sfTreeviewExplorer, which inherits from sfTreeviewCursor and
sfTreeviewContainer. Finally, the timer is based on class sfTimer.
One thing in Figure 12 might be a little confusing. When looking at the container for the timer, why does the list stop with sfTreeViewContainer? Why doesn’t it go all the way back to sfContainer, as in Figure 11. The Edit Parent Class and Containing Classes tool opens this form to let you jump around among the classes
Figure 8 . A pop-up menu has been defi ned, containing the two tools related to control structures.
Figure 9. When you use the shortcut for the pop-up menu, it appears at the mouse position.
Figure 10. The Object Inspector is based on Doug Hennig’s Explorer forms. Here, the sfTreeviewExplorer container object is selected.
Figure 11. The Edit Parent Class and Containing Classes tool opens this form to let you jump around among the classes in an object’s heritage.
November 2012 FoxRockX Page 5
in an object’s heritage. The answer is that the tool doesn’t trace the inheritance hierarchy for containing classes. What it does is show you every class in that hierarchy that contains the specifi ed object. So, in this example, sfContainer doesn’t include the timer; it was added to sfTreeviewContainer, and then inherited by that class’s subclasses, sfTreeviewCursor and sfTreeviewExplorer.
As the instructions at the top of the form indicate, before I can open any of those classes, I have to close the Inspector form. But then, I can choose a class and click Modify Selected Class to open it. Once I’ve fi nished editing and closed the Class Designer, I can click Return to Original to reopen the Inspector form exactly as I left it.
Create Local sMenu: Code | Create LOCALsI’ve always known that declaring all the variables used in a routine is a best practice, and since Fox-Pro morphed into VFP, that declaring all variables local is the best choice. But the importance of the declarations was really brought home to me by one project. It involved a VFP application that provided a user interface, but also instantiated a VFP COM object. The COM object had a timer, and when the timer fi red, the COM object could call methods of the main application’s application object. Of course, those calls interrupted whatever was going on in the main application.
While testing this code, we ran into some very weird errors with code working most of the time, but every so often, behaving quite strangely. Eventually, we realized that many of the problems were due to having undeclared variables (which, by default, are private rather than local). The routines called by the timer code used some of the same variable names, and when the variables weren’t local, actually changed the values of the variables in the rou-tine that was interrupted by the timer. Once we ensured that every variable in every method was declared local, many of the problems went away.
If only I’d had Thor back then. Thor’s Create Locals tool takes any code editing window and adds the necessary local declarations. Figure 13 shows a little block of code (that dumps the list of forms in a project into a cursor); it uses several vari-ables, but none of them are declared.
Figure 14 shows the same block of code after running the Create Locals tool; the arrow points to the local declarations.
You can control some aspects of this tool’s behav-ior using the Options tab of the Thor Confi guration tool.
Figure 12. This time, one of the timers inside the sfTreeviewExplorer was selected when this tool was run.
Figure 13. Th is block of code uses several undeclared variables.
Figure 14. Aft er running the Create Locals tool, the same block has variable declarations.
Page 6 FoxRockX November 2012
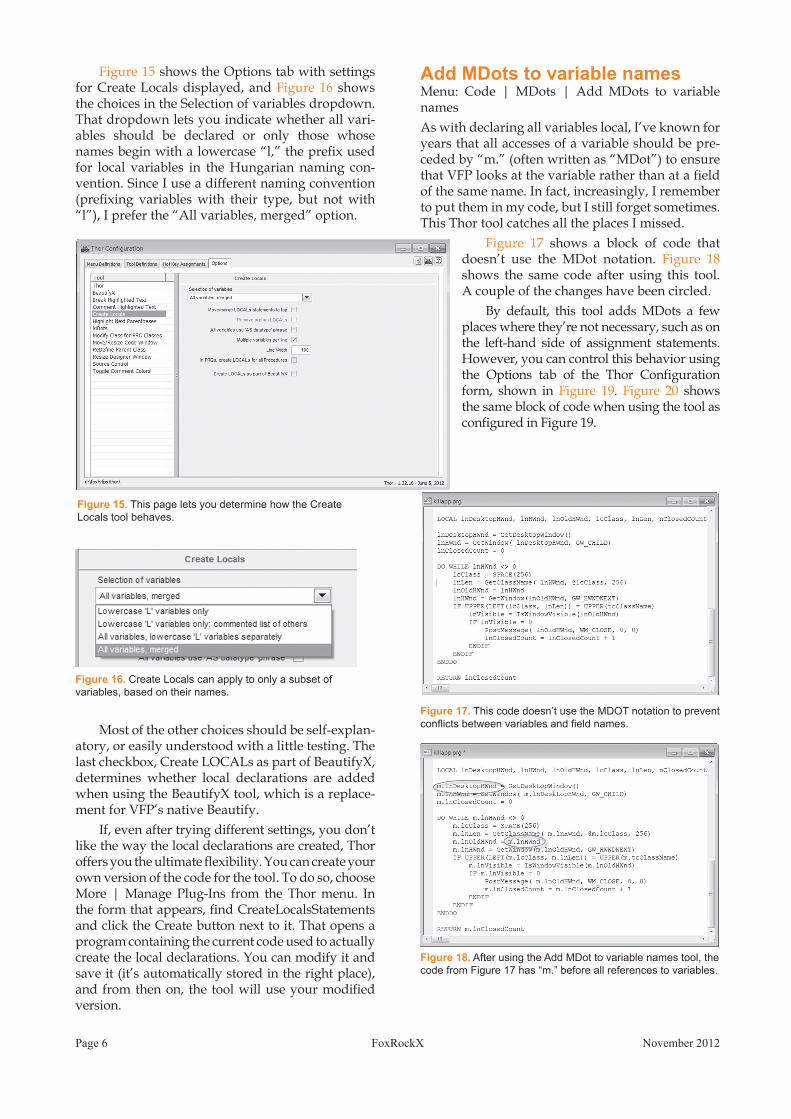
Figure 15 shows the Options tab with settings for Create Locals displayed, and Figure 16 shows the choices in the Selection of variables dropdown. That dropdown lets you indicate whether all vari-ables should be declared or only those whose names begin with a lowercase “l,” the prefi x used for local variables in the Hungarian naming con-vention. Since I use a different naming convention (prefi xing variables with their type, but not with “l”), I prefer the “All variables, merged” option.
Most of the other choices should be self-explan-atory, or easily understood with a little testing. The last checkbox, Create LOCALs as part of BeautifyX, determines whether local declarations are added when using the BeautifyX tool, which is a replace-ment for VFP’s native Beautify.
If, even after trying different settings, you don’t like the way the local declarations are created, Thor offers you the ultimate fl exibility. You can create your own version of the code for the tool. To do so, choose More | Manage Plug-Ins from the Thor menu. In the form that appears, fi nd CreateLocalsStatements and click the Create button next to it. That opens a program containing the current code used to actually create the local declarations. You can modify it and save it (it’s automatically stored in the right place), and from then on, the tool will use your modifi ed version.
Add MDots to var iable namesMenu: Code | MDots | Add MDots to variable namesAs with declaring all variables local, I’ve known for years that all accesses of a variable should be pre-ceded by “m.” (often written as “MDot”) to ensure that VFP looks at the variable rather than at a fi eld of the same name. In fact, increasingly, I remember to put them in my code, but I still forget sometimes. This Thor tool catches all the places I missed.
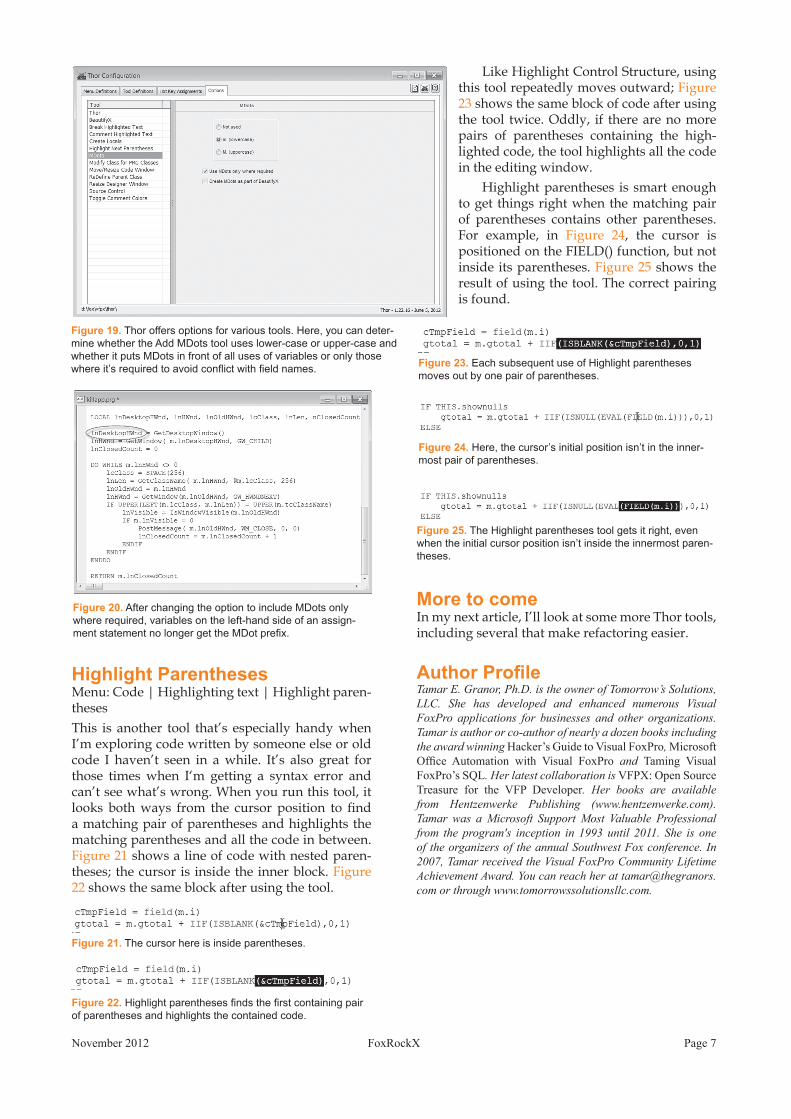
Figure 17 shows a block of code that doesn’t use the MDot notation. Figure 18 shows the same code after using this tool. A couple of the changes have been circled.
By default, this tool adds MDots a few places where they’re not necessary, such as on the left-hand side of assignment statements. However, you can control this behavior using the Options tab of the Thor Confi guration form, shown in Figure 19. Figure 20 shows the same block of code when using the tool as confi gured in Figure 19.
Figure 15. This page lets you determine how the Create Locals tool behaves.
Figure 16. Creat e Locals can apply to only a subset of variables, based on their names.
Figure 17. This c ode doesn’t use the MDOT notation to prevent confl icts between variables and fi eld names.
Figure 18. After u sing the Add MDot to variable names tool, the code from Figure 17 has “m.” before all references to variables.
November 2012 FoxRockX Page 7
Highlight ParenthesesMenu: Code | Highlighting text | Highlight paren-thesesThis is another tool that’s especially handy when I’m exploring code written by someone else or old code I haven’t seen in a while. It’s also great for those times when I‘m getting a syntax error and can’t see what’s wrong. When you run this tool, it looks both ways from the cursor position to fi nd a matching pair of parentheses and highlights the matching parentheses and all the code in between. Figure 21 shows a line of code with nested paren-theses; the cursor is inside the inner block. Figure 22 shows the same block after using the tool.
Like Highlight Control Structure, using this tool repeatedly moves outward; Figure 23 shows the same block of code after using the tool twice. Oddly, if there are no more pairs of parentheses containing the high-lighted code, the tool highlights all the code in the editing window.
Highlight parentheses is smart enough to get things right when the matching pair of parentheses contains other parentheses. For example, in Figure 24, the cursor is positioned on the FIELD() function, but not inside its parentheses. Figure 25 shows the result of using the tool. The correct pairing is found.
More to comeIn my next article, I’ll look at some more Thor tools, including several that make refactoring easier.
Author Profi leTamar E. Granor, Ph.D. is the owner of Tomorrow’s Solutions, LLC. She has developed and enhanced numerous Visual FoxPro applications for businesses and other organizations. Tamar is author or co-author of nearly a dozen books including the award winning Hacker’s Guide to Visual FoxPro, Microsoft Offi ce Automation with Visual FoxPro and Taming Visual FoxPro’s SQL. Her latest collaboration is VFPX: Open Source Treasure for the VFP Developer. Her books are available from Hentzenwerke Publishing (www.hentzenwerke.com). Tamar was a Microsoft Support Most Valuable Professional from the program's inception in 1993 until 2011. She is one of the organizers of the annual Southwest Fox conference. In 2007, Tamar received the Visual FoxPro Community Lifetime Achievement Award. You can reach her at [email protected] or through www.tomorrowssolutionsllc.com.
Figure 19. Thor off ers options for various tools. Here, you can deter-mine whether the Add MDots tool uses lower-case or upper-case and whether it puts MDots in front of all uses of variables or only those where it’s required to avoid confl ict with fi eld names.
Figure 20. After cha nging the option to include MDots only where required, variables on the left-hand side of an assign-ment statement no longer get the MDot prefi x.
Figure 21. The cursor here is inside parentheses.
Figure 22. Highlight p arentheses fi nds the fi rst containing pair of parentheses and highlights the contained code.
Figure 23. Each subsequ ent use of Highlight parentheses moves out by one pair of parentheses.
Figure 24. Here, the cur sor’s initial position isn’t in the inner-most pair of parentheses.
Figure 25. The Highlight parentheses tool gets it right, even when the initial cursor position isn’t inside the innermost paren-theses.