Embed Size (px)
Citation preview
www.fi sher-price.comwww.fi sher-price.com
Consumer Information• Please keep these instructions for future reference as they contain
important information. • Software installation and hookup to your computer should be done by an adult. • For proper use of this product we recommend that your computer meet
minimum system requirements (see page 4). • Install Computer Cool School™ software included with this product BEFORE
installing any other Computer Cool School™ software (not included).• This product can be used with your computer mouse. Use the
Computer Cool School™ pen or your computer mouse to make selections.• To use the Computer Cool School™ pen, push and then release the tip of the pen
on the tablet to click choices on your computer screen.• The software included with this product includes a Parent Tips folder full of
activities you can do with your child. After installing the software, you can fi nd the Parent Tips by clicking, in order, the following items: Start>Programs>Fisher-Price>Computer Cool School>Parental Tips.
Refer to page 10.• This product must be used with listed Information Technology Equipment (I.T.E.).
2
To prevent strangulation, keep computer cables away from children.
WARNING
3
Consumer InformationConsumer Assistance
For technical assistance with this product call 1-888-892-6123 or visit www.service.fi sher-price.com and enter the product number: M6635 or P5123in the guided search box. Write to us at: Fisher-Price® Consumer Relations, 636 Girard Avenue, East Aurora, New York 14052.
Care
• Keep water, sand and dirt off of this toy. • Wipe the toy with a soft, clean cloth. Do not immerse this toy.• This toy has no consumer serviceable parts. Please do not take this toy apart.• Do not drop this toy on hard surfaces.
Storage
• Store the pen in the hole on top of or on the side of the Computer Cool School™ keyboard.
• Software can be stored in the slot in the back of the Computer Cool School™ keyboard.
For countries outside the United States:
CANADA Questions? 1-888-892-6123. Mattel Canada Inc., 6155 Freemont Blvd., Mississauga, Ontario L5R 3W2; www.service.mattel.com. GREAT BRITAINMattel UK Ltd, Vanwall Business Park, Maidenhead SL6 4UB.Helpline: 01628 500303; www.service.mattel.com/uk.AUSTRALIAMattel Australia Pty. Ltd., 658 Church Street, Locked Bag #870, Richmond, Victoria 3121 Australia. Consumer Advisory Service 1300 135 312.NEW ZEALAND16-18 William Pickering Drive, Albany 1331, Auckland.ASIAMattel East Asia Ltd, Room 1106, South Tower, World Finance Centre, Harbour City, Tsimshatsui, HK, China.
4
Minimum System RequirementsOperating System ............... Microsoft® Windows Vista™ or Windows XP
Processor ............................ 1.2GHz
Memory .............................. 256MB RAM
Hard Drive ........................... 200MB available
Video Resolution ................ 800x600 32-bit color DirectX9.0c compatible
Sound ................................. 16-bit DirectX compatible
CD or DVD drive
USB port ............................. 1.1
Recommended: Printer, Internet Connection (for software updates)
One (1) Year Limited Warranty Fisher-Price®, Inc., 636 Girard Avenue, East Aurora, New York 14052 warrants Computer Cool School™ is free from all defects in material and workmanship when used under normal conditions for a period of one (1) year from the date of purchase.Should the product fail to perform properly, we will repair or replace it at our option, free of charge. Purchaser is responsible for shipping the product to Consumer Relations at the address indicated above and for all associated freight and insurance cost. Fisher-Price®, Inc. will bear the cost of shipping the repaired or replaced item to you. This warranty is void if the owner repairs or modifi es the product. This warranty excludes any liability other than that expressly stated above including but not limited to any incidental or consequential damages.SOME STATES DO NOT ALLOW THE EXCLUSION OR LIMITATION OF INCIDENTAL OR CONSEQUENTIAL DAMAGES, SO THE ABOVE LIMITATION OR EXCLUSION MAY NOT APPLY TO YOU.THIS WARRANTY GIVES YOU SPECIFIC LEGAL RIGHTS, AND YOU MAY ALSO HAVE OTHER RIGHTS WHICH MAY VARY FROM STATE TO STATE.
5
FCC Statement(United States Only)
This equipment has been tested and found to comply with the limits for a Class B digital device, pursuant to Part 15 of the FCC Rules. These limits are designed to provide reasonable protection against harmful interference in a residential installation. This equipment generates, uses and can radiate radio frequency energy and, if not installed and used in accordance with the instructions, may cause harmful interference to radio communications. However, there is no guarantee that interference will not occur in a particular installation. If this equipment does cause harmful interference to radio or television reception, which can be determined by turning the equipment off and on, the user is encouraged to try to correct the interference by one or more of the following measures:• Reorient or relocate the receiving antenna.• Increase the separation between the equipment and receiver.• Consult the dealer or an experienced radio/TV technician for help.Note: Changes or modifi cations not expressly approved by the manufacturer responsible for compliance could void the user’s authority to operate the equipment.This device complies with Part 15 of the FCC Rules. Operation is subject to the following two conditions: (1) This device may not cause harmful interference and (2) this device must accept any interference received, including interference that may cause undesired operation.
ICES-003• This Class B digital apparatus complies with Canadian ICES-003.• Operation is subject to the following two conditions: (1) this device may not
cause harmful interference and (2) this device must accept any interference received, including interference that may cause undesired operation.
NMB-003• Cet appareil numérique de la classe B est conforme à la norme NMB-003
du Canada.• L’utilisation de ce dispositif est autorisée seulement aux conditions suivantes:
(1) il ne doit pas produire de brouillage et (2) l’utilisateur du dispositif doit être prêt à accepter tout brouillage radioélectrique reçu, même si ce brouillage est susceptible de compromettre le fonctionnement du dispositif.
Install/UninstallInstalling Software
• Before inserting the CD-ROM, insert the USB cord for Computer Cool School™ keyboard into the USB port on your computer.
• If you have multiple logons on your computer, be sure the logon you are using has Administrator privileges. You will need Administrator privileges to install this software.
• Insert the Computer Cool School™ CD into the CD-ROM or DVD drive of your computer.
• The software installer launches automatically. Follow the on-screen instructions to complete installation.
• You will be asked to set a password as part of the installation process. Refer to page 8 for instructions to set a password.
Note: You need to install all components to use this software. • If installation of the software does not launch automatically, go to the “Start”
menu, click on “Run” and type “D:\setup”. Note: If you are using Windows Vista™, you will need to restart your computer after installing the software.
Uninstalling Software
• Click on the following items (in order): - “Start” menu on your computer taskbar - “Programs” - “Fisher-Price” - “Computer Cool School” - “Uninstall Computer Cool School”
6
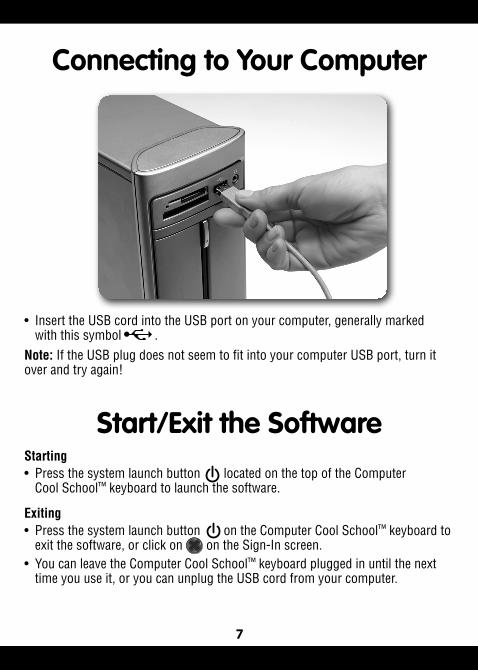
Connecting to Your Computer
• Insert the USB cord into the USB port on your computer, generally marked with this symbol .
Note: If the USB plug does not seem to fi t into your computer USB port, turn it over and try again!
7
Start/Exit the SoftwareStarting
• Press the system launch button located on the top of the ComputerCool School™ keyboard to launch the software.
Exiting
• Press the system launch button on the Computer Cool School™ keyboard to exit the software, or click on on the Sign-In screen.
• You can leave the Computer Cool School™ keyboard plugged in until the next time you use it, or you can unplug the USB cord from your computer.

Set Parental Controls
8
• To set-up or change parental controls, click on Parental Controls icon, located on the Sign-In screen.
Parental Controls Icon
Set the following options on the parental controls screen:
• Protect access to your desktop and hard drive by setting a password.• Type your password in the Password and Confi rm Password fi elds. Select a
hint to help you remember your password. Note: If you set a password, you cannot enter Parental Controls or exit the software without entering the password.Background Music
• Click to turn the background music on or off.Volume Control
• Click and drag the control button to turn the volume up or down.Printables
• Select a subject on the bottom of the bulletin board to view printouts for that subject. Click on the sheet you’d like to print. Click on the arrows to view more printouts.
• Click on the to go back to the Parental Controls.Number of Prints
• Click on the arrows to select the number of printouts for each session. Choose a number from 1 to 20 or select unlimited. If you do not make a choice, the number of prints defaults to unlimited.
System Information
• View information about your software, operating system, fi rmware and accessories.
• Click on the to exit Parental Controls.
Parental Controls Screen
9
Software Selection Screen
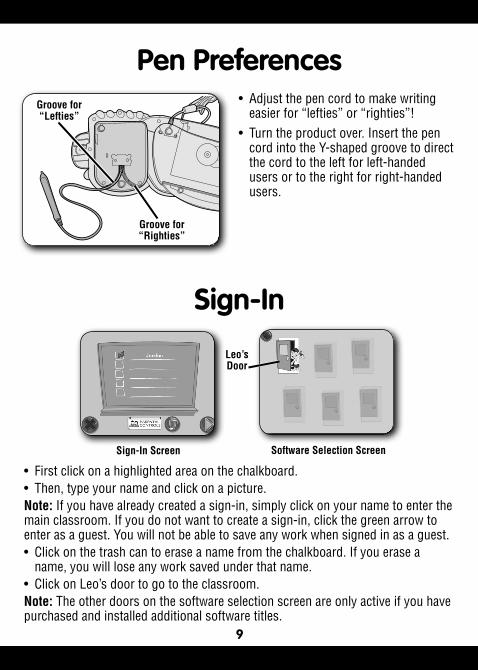
Sign-In
• First click on a highlighted area on the chalkboard. • Then, type your name and click on a picture. Note: If you have already created a sign-in, simply click on your name to enter the main classroom. If you do not want to create a sign-in, click the green arrow to enter as a guest. You will not be able to save any work when signed in as a guest. • Click on the trash can to erase a name from the chalkboard. If you erase a
name, you will lose any work saved under that name.• Click on Leo’s door to go to the classroom.Note: The other doors on the software selection screen are only active if you have purchased and installed additional software titles.
Leo’s Door
Groove for “Lefties”
Groove for “Righties”
Sign-In Screen
Pen Preferences• Adjust the pen cord to make writing
easier for “lefties” or “righties”! • Turn the product over. Insert the pen
cord into the Y-shaped groove to direct the cord to the left for left-handed users or to the right for right-handed users.
Parent Tips
10
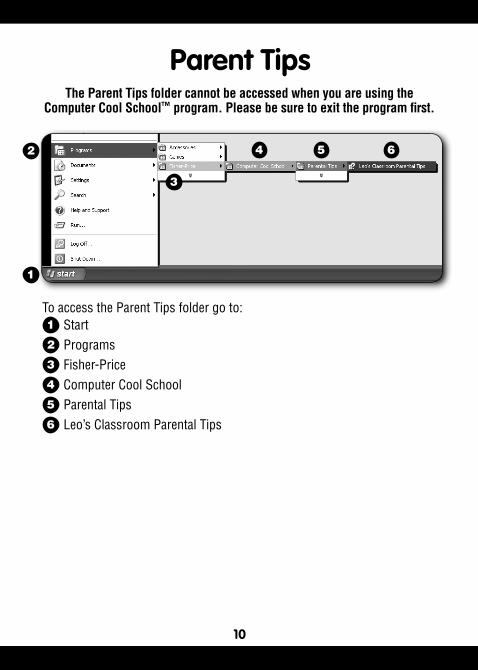
To access the Parent Tips folder go to: Start Programs Fisher-Price Computer Cool School Parental Tips Leo’s Classroom Parental Tips
2
1
3
4
5
6
2
1
3
4 5 6
The Parent Tips folder cannot be accessed when you are using the Computer Cool School™ program. Please be sure to exit the program fi rst.
Parent Tips
11
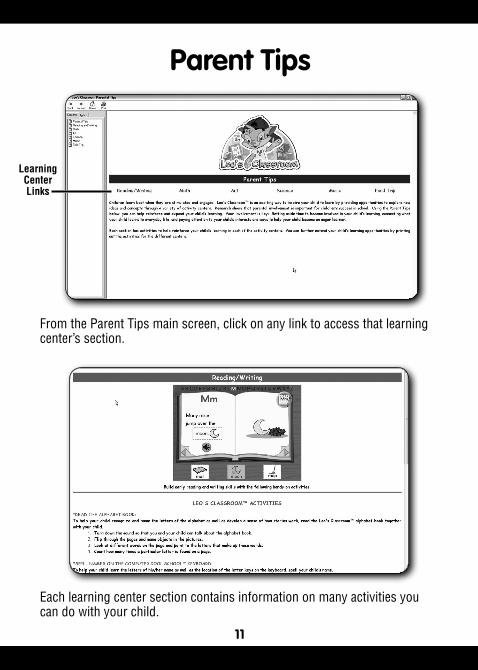
From the Parent Tips main screen, click on any link to access that learning center’s section.
Each learning center section contains information on many activities you can do with your child.
Learning Center Links
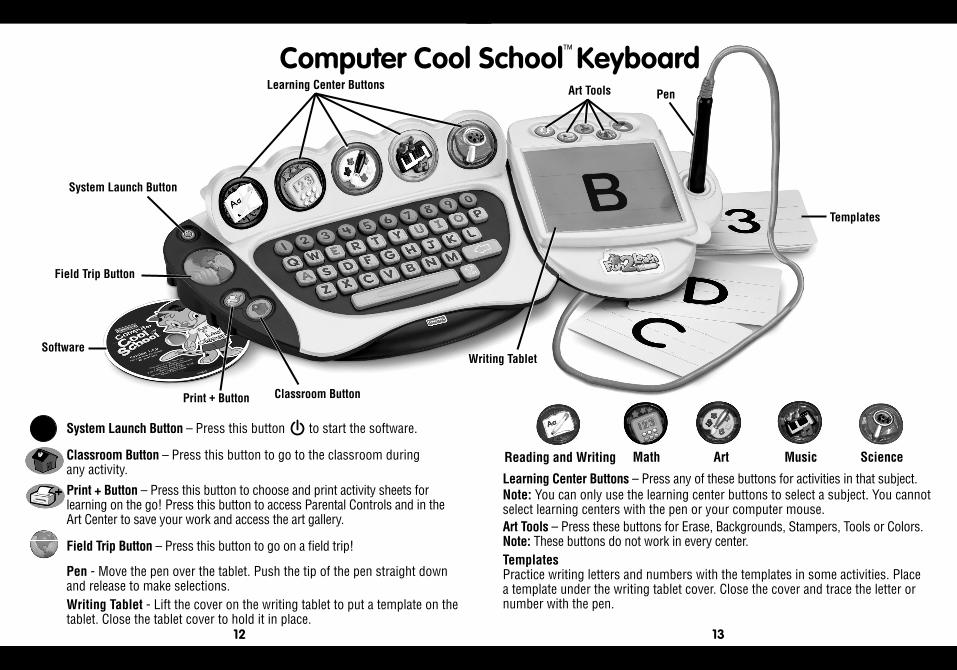
Learning Center Buttons – Press any of these buttons for activities in that subject. Note: You can only use the learning center buttons to select a subject. You cannot select learning centers with the pen or your computer mouse. Art Tools – Press these buttons for Erase, Backgrounds, Stampers, Tools or Colors.Note: These buttons do not work in every center. TemplatesPractice writing letters and numbers with the templates in some activities. Place a template under the writing tablet cover. Close the cover and trace the letter or number with the pen.
Computer Cool School™ Keyboard
System Launch Button
Software
Classroom Button
Field Trip Button
Print + Button
Writing Tablet
Templates
PenArt Tools
System Launch Button – Press this button to start the software.
Classroom Button – Press this button to go to the classroom during any activity.Print + Button – Press this button to choose and print activity sheets for learning on the go! Press this button to access Parental Controls and in the Art Center to save your work and access the art gallery.
Field Trip Button – Press this button to go on a fi eld trip!
Pen - Move the pen over the tablet. Push the tip of the pen straight down and release to make selections. Writing Tablet - Lift the cover on the writing tablet to put a template on the tablet. Close the tablet cover to hold it in place.
Reading and Writing Math Art Music Science
Learning Center Buttons
12 13
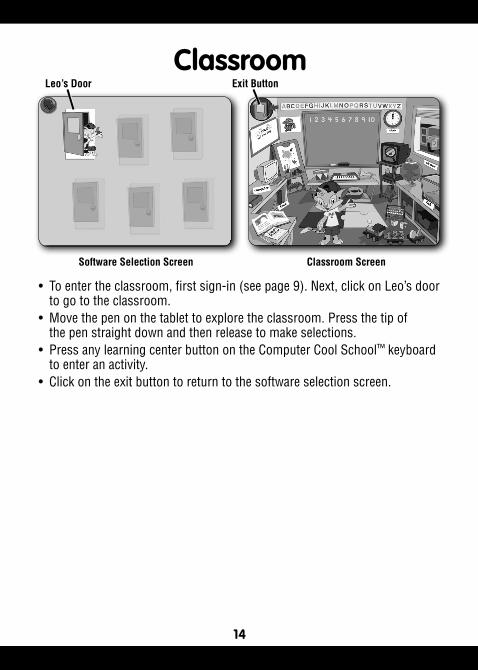
• To enter the classroom, fi rst sign-in (see page 9). Next, click on Leo’s door to go to the classroom.
• Move the pen on the tablet to explore the classroom. Press the tip of the pen straight down and then release to make selections.
• Press any learning center button on the Computer Cool School™ keyboard to enter an activity.
• Click on the exit button to return to the software selection screen.
14
ClassroomExit Button
Classroom ScreenSoftware Selection Screen
Leo’s Door
15
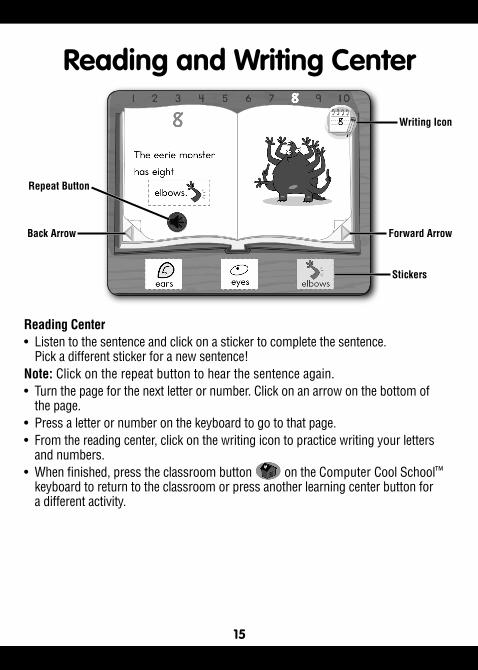
Reading Center
• Listen to the sentence and click on a sticker to complete the sentence. Pick a different sticker for a new sentence!
Note: Click on the repeat button to hear the sentence again. • Turn the page for the next letter or number. Click on an arrow on the bottom of
the page. • Press a letter or number on the keyboard to go to that page. • From the reading center, click on the writing icon to practice writing your letters
and numbers.• When fi nished, press the classroom button on the Computer Cool School™
keyboard to return to the classroom or press another learning center button for a different activity.
Repeat Button
Back Arrow Forward Arrow
Stickers
Reading and Writing Center
Writing Icon
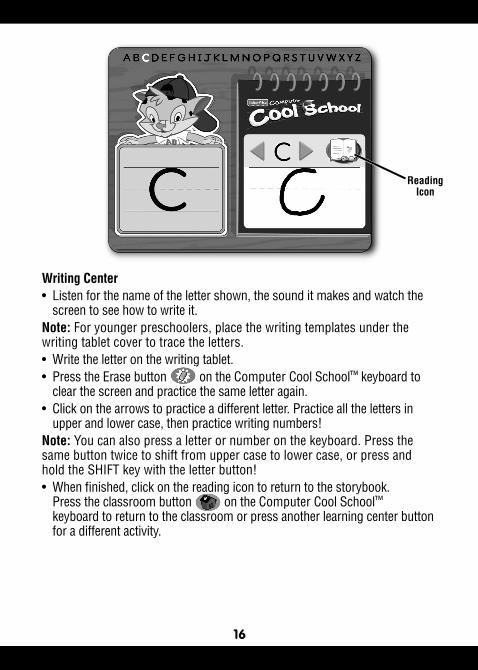
Writing Center • Listen for the name of the letter shown, the sound it makes and watch the
screen to see how to write it. Note: For younger preschoolers, place the writing templates under the writing tablet cover to trace the letters. • Write the letter on the writing tablet.• Press the Erase button
g
on the Computer Cool School™ keyboard to clear the screen and practice the same letter again.
• Click on the arrows to practice a different letter. Practice all the letters in upper and lower case, then practice writing numbers!
Note: You can also press a letter or number on the keyboard. Press the same button twice to shift from upper case to lower case, or press and hold the SHIFT key with the letter button! • When fi nished, click on the reading icon to return to the storybook.
Press the classroom button on the Computer Cool School™ keyboard to return to the classroom or press another learning center button for a different activity.
16
ReadingIcon
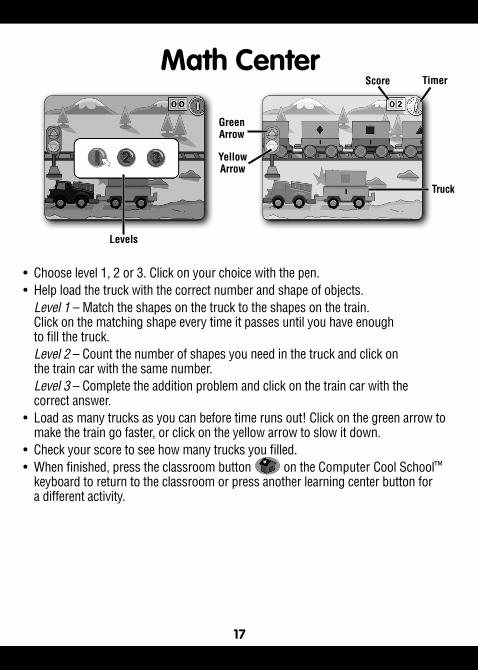
• Choose level 1, 2 or 3. Click on your choice with the pen.• Help load the truck with the correct number and shape of objects. Level 1 – Match the shapes on the truck to the shapes on the train.
Click on the matching shape every time it passes until you have enough to fi ll the truck.
Level 2 – Count the number of shapes you need in the truck and click on the train car with the same number.
Level 3 – Complete the addition problem and click on the train car with the correct answer.
• Load as many trucks as you can before time runs out! Click on the green arrow to make the train go faster, or click on the yellow arrow to slow it down.
• Check your score to see how many trucks you fi lled. • When fi nished, press the classroom button on the Computer Cool School™
keyboard to return to the classroom or press another learning center button for a different activity.
17
Green
Arrow
Yellow
Arrow
TimerScore
Truck
Levels
Math Center
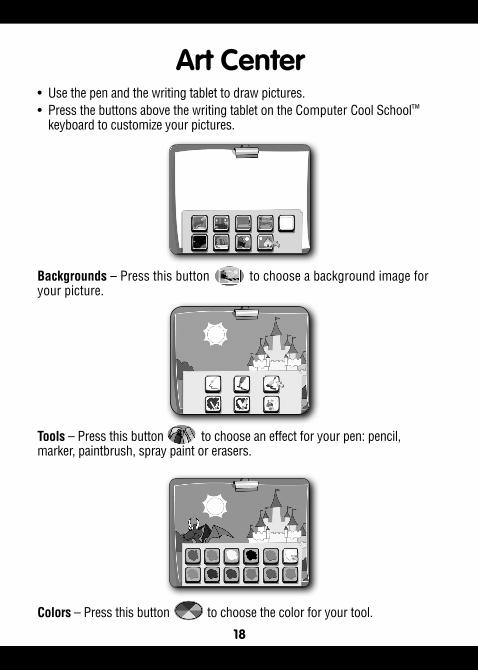
Backgrounds – Press this button to choose a background image for your picture.
18
Tools – Press this button to choose an effect for your pen: pencil, marker, paintbrush, spray paint or erasers.
Colors – Press this button to choose the color for your tool.
• Use the pen and the writing tablet to draw pictures.• Press the buttons above the writing tablet on the Computer Cool School™
keyboard to customize your pictures.
Art Center
19
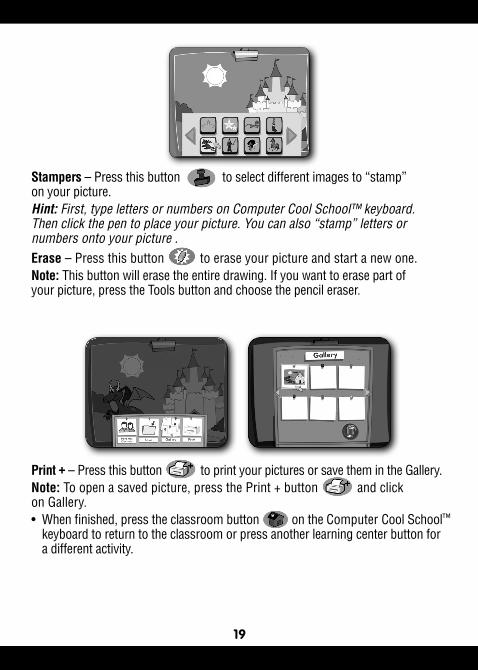
Stampers – Press this button to select different images to “stamp” on your picture.Hint: First, type letters or numbers on Computer Cool School™ keyboard. Then click the pen to place your picture. You can also “stamp” letters or numbers onto your picture . Erase – Press this button to erase your picture and start a new one.Note: This button will erase the entire drawing. If you want to erase part of your picture, press the Tools button and choose the pencil eraser.
Print + – Press this button to print your pictures or save them in the Gallery.Note: To open a saved picture, press the Print + button and click on Gallery. • When fi nished, press the classroom button on the Computer Cool School™
keyboard to return to the classroom or press another learning center button for a different activity.
20
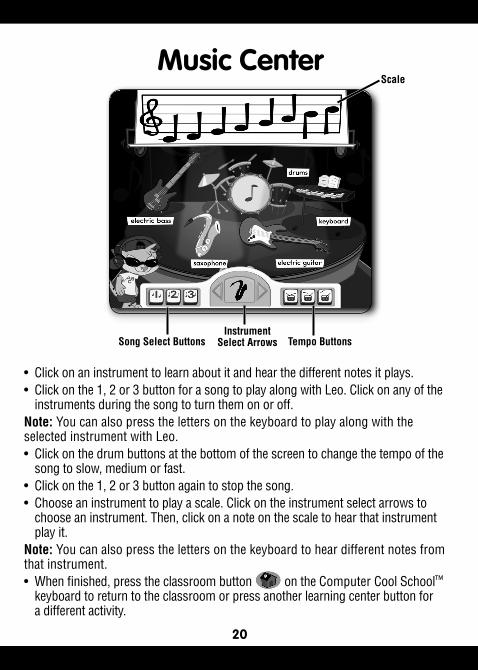
Song Select Buttons Tempo Buttons
Music CenterScale
InstrumentSelect Arrows
• Click on an instrument to learn about it and hear the different notes it plays.• Click on the 1, 2 or 3 button for a song to play along with Leo. Click on any of the
instruments during the song to turn them on or off.Note: You can also press the letters on the keyboard to play along with the selected instrument with Leo. • Click on the drum buttons at the bottom of the screen to change the tempo of the
song to slow, medium or fast. • Click on the 1, 2 or 3 button again to stop the song. • Choose an instrument to play a scale. Click on the instrument select arrows to
choose an instrument. Then, click on a note on the scale to hear that instrument play it.
Note: You can also press the letters on the keyboard to hear different notes from that instrument. • When fi nished, press the classroom button on the Computer Cool School™
keyboard to return to the classroom or press another learning center button for a different activity.
21
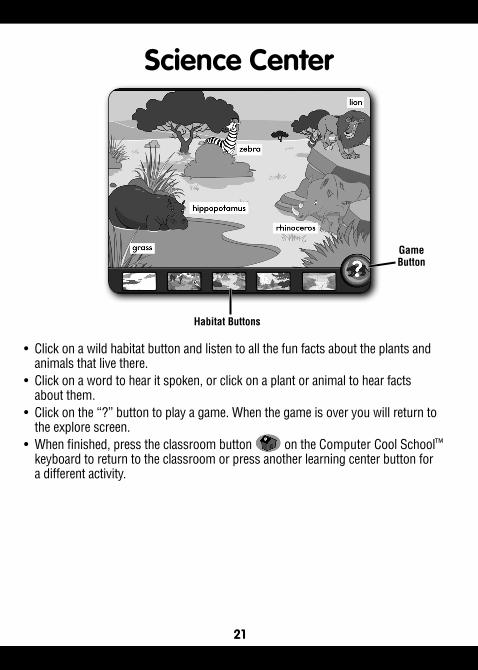
• Click on a wild habitat button and listen to all the fun facts about the plants and animals that live there.
• Click on a word to hear it spoken, or click on a plant or animal to hear facts about them.
• Click on the “?” button to play a game. When the game is over you will return to the explore screen.
• When fi nished, press the classroom button on the Computer Cool School™ keyboard to return to the classroom or press another learning center button for a different activity.
Habitat Buttons
Game
Button
Science Center
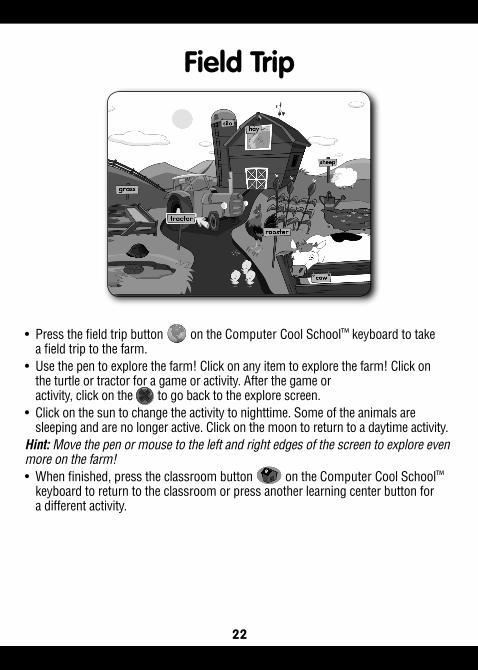
• Press the fi eld trip button on the Computer Cool School™ keyboard to take a fi eld trip to the farm.
• Use the pen to explore the farm! Click on any item to explore the farm! Click on the turtle or tractor for a game or activity. After the game or activity, click on the to go back to the explore screen.
• Click on the sun to change the activity to nighttime. Some of the animals are sleeping and are no longer active. Click on the moon to return to a daytime activity.
Hint: Move the pen or mouse to the left and right edges of the screen to explore even more on the farm! • When fi nished, press the classroom button on the Computer Cool School™
keyboard to return to the classroom or press another learning center button for a different activity.
22
Field Trip
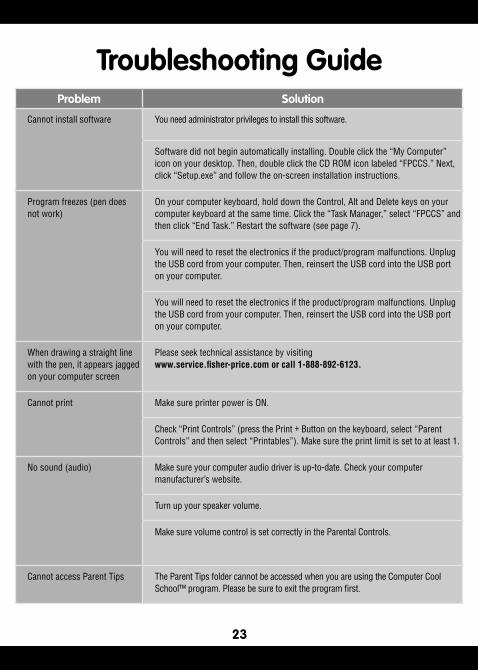
Troubleshooting GuideProblem Solution
Cannot install software You need administrator privileges to install this software.
Software did not begin automatically installing. Double click the “My Computer” icon on your desktop. Then, double click the CD ROM icon labeled “FPCCS.” Next, click “Setup.exe” and follow the on-screen installation instructions.
Program freezes (pen does not work)
On your computer keyboard, hold down the Control, Alt and Delete keys on your computer keyboard at the same time. Click the “Task Manager,” select “FPCCS” and then click “End Task.” Restart the software (see page 7).
You will need to reset the electronics if the product/program malfunctions. Unplug the USB cord from your computer. Then, reinsert the USB cord into the USB port on your computer.
You will need to reset the electronics if the product/program malfunctions. Unplug the USB cord from your computer. Then, reinsert the USB cord into the USB port on your computer.
When drawing a straight line with the pen, it appears jagged on your computer screen
Please seek technical assistance by visiting www.service.fi sher-price.com or call 1-888-892-6123.
Cannot print Make sure printer power is ON.
Check “Print Controls” (press the Print + Button on the keyboard, select “Parent Controls” and then select “Printables”). Make sure the print limit is set to at least 1.
No sound (audio) Make sure your computer audio driver is up-to-date. Check your computer manufacturer’s website.
Turn up your speaker volume.
Make sure volume control is set correctly in the Parental Controls.
Cannot access Parent Tips The Parent Tips folder cannot be accessed when you are using the Computer Cool School™ program. Please be sure to exit the program fi rst.
23
PRINTED IN CHINA M6635c-0920
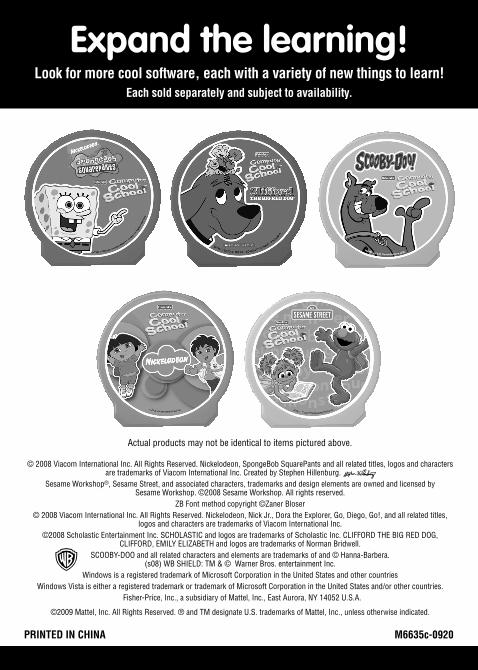
Expand the learning!Look for more cool software, each with a variety of new things to learn!
Each sold separately and subject to availability.
Actual products may not be identical to items pictured above.
© 2008 Viacom International Inc. All Rights Reserved. Nickelodeon, SpongeBob SquarePants and all related titles, logos and characters are trademarks of Viacom International Inc. Created by Stephen Hillenburg.
Sesame Workshop®, Sesame Street, and associated characters, trademarks and design elements are owned and licensed by Sesame Workshop. ©2008 Sesame Workshop. All rights reserved.
ZB Font method copyright ©Zaner Bloser© 2008 Viacom International Inc. All Rights Reserved. Nickelodeon, Nick Jr., Dora the Explorer, Go, Diego, Go!, and all related titles,
logos and characters are trademarks of Viacom International Inc.©2008 Scholastic Entertainment Inc. SCHOLASTIC and logos are trademarks of Scholastic Inc. CLIFFORD THE BIG RED DOG,
CLIFFORD, EMILY ELIZABETH and logos are trademarks of Norman Bridwell. SCOOBY-DOO and all related characters and elements are trademarks of and © Hanna-Barbera.
(s08) WB SHIELD: TM & © Warner Bros. entertainment Inc. Windows is a registered trademark of Microsoft Corporation in the United States and other countries
Windows Vista is either a registered trademark or trademark of Microsoft Corporation in the United States and/or other countries. Fisher-Price, Inc., a subsidiary of Mattel, Inc., East Aurora, NY 14052 U.S.A.
©2009 Mattel, Inc. All Rights Reserved. ® and TM designate U.S. trademarks of Mattel, Inc., unless otherwise indicated.