
8/10/2019 TOBUL_TMBladder062309v1
http://slidepdf.com/reader/full/tobultmbladder062309v1 1/4Phone: 803-245-5111 Fax: 803-245-2636 Tobul Accumulator, Inc. Bamberg, SC USA www.Tobul.com
Troubleshooting & Maintenance
Bladder-Type Hydraulic Accumulators
(Steel Shell W/Hemispherical Ends)
(TBR-Bottom Repairable Type)
WARNING: Accumulators, gas bottles and hydraulic systems are inherently
dangerous due to high pressure gases and fluids. DO NOT
ATTEMPT to maintain these systems unless adequately
trained, have experience with the items and systems in
question, and can recognize the potential risks involved if
mishandled. Always wear appropriate safety equipment.
READ & UNDERSTAND ALL INSTRUCTIONS PRIOR
TO SERVICING & MAINTAINING ACCUMULATOR!
GAS VALVE
GAS
CHAMBER
RUBBER
SEPARATOR
STEEL
BOTTLE
FLUID
CHAMBER
POPPET
ALVE
FLUID PORT
TROUBLE SHOOTING
The most prevalent concern with bladder
accumulators is the loss of pre-charge pressure.
Since accumulators function only due to the
differential pressure of the compressed gas
and the fluid utilized, any variation in the pre-
charge will result in operating difficulties or theloss of functionality. A loss of nitrogen gas pre-
charge may occur due to, but not limited to,
gas valve leakage or internal bladder damage/
failure. Some symptoms of these conditions
are: Failure of the bladder bag indicated by the
lack of functionality of the accumulator; Inability
to maintain pre-charge pressure or gurgling/
bubbling of the fluid reservoir – nitrogen gas is
leaking out of the bladder bag into system.
Insufficient pre-charge is a major concern
– a single cycle of hydraulic pressure into a
bladder accumulator without pre-charge can
result in significant damage to the bladder bag,
necessitating bladder replacement. Bladder
damage can also occur if the bladder is inflated
too fast with extremely cold nitrogen gas.
Nitrogen gas leakage from the gas valve
can occur if the valve is not tightened securely;
also, if dual wrenches are not used when
loosening a jam-nut style gas valve (Military
style or strut type) the lower body can break
free and allow the gas pressure to force the
o-ring seal out. If the valve body is simply re-
tightened, there is a distinct possibility thatthe o-ring will be cut and/or damaged by the
valve body, and the o-ring will not seal properly.
When loosening this type of valve, hold the base
of the valve securely with one wrench, while
loosening the upper jam nut with another.
Bladder accumulators function best when
mounted vertically. Horizontal orientation can
result in increased bladder bag wear due to
friction with the internal surface of the pressure
shell, along with any system contaminants
which collect in the shell. Horizontal mounting
also increases the possibility of fluid being
trapped away from the outlet valve.
For detailed procedures for checking and
adjusting pre-charge pressures, see Tobul’s
Operating and Maintenance Instructions.
V
8/10/2019 TOBUL_TMBladder062309v1
http://slidepdf.com/reader/full/tobultmbladder062309v1 2/4Phone: 803-245-5111 Fax: 803-245-2636 Tobul Accumulator, Inc. Bamberg, SC USA www.Tobul.com
Troubleshooting & Maintenance Bladder-Type Hydraulic Accumulators
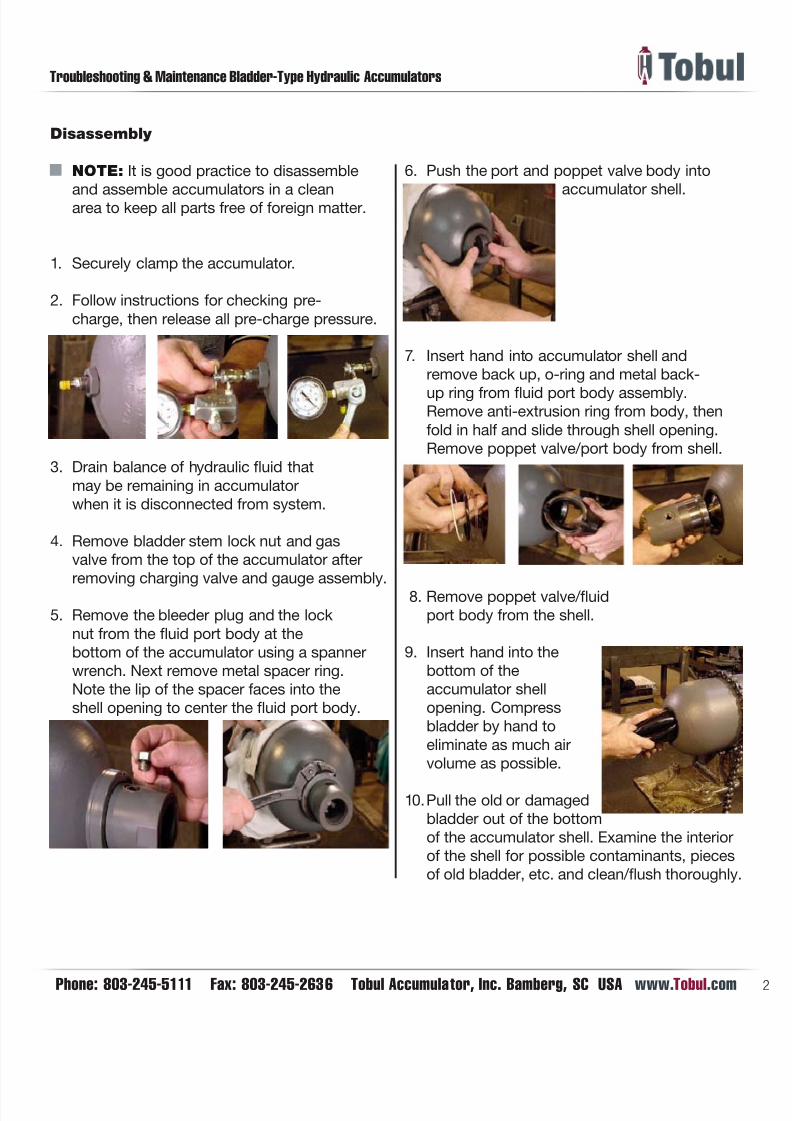
Disassembly
NOTE: It is good practice to disassemble
and assemble accumulators in a cleanarea to keep all parts free of foreign matter.
1. Securely clamp the accumulator.
2. Follow instructions for checking pre-
charge, then release all pre-charge pressure.
3. Drain balance of hydraulic fluid that
may be remaining in accumulator
when it is disconnected from system.
4. Remove bladder stem lock nut and gas
valve from the top of the accumulator after
removing charging valve and gauge assembly.
5. Remove the bleeder plug and the lock
nut from the fluid port body at the
bottom of the accumulator using a spanner
wrench. Next remove metal spacer ring.
Note the lip of the spacer faces into the
shell opening to center the fluid port body.
6. Push the port and poppet valve body into
accumulator shell.
7. Insert hand into accumulator shell and
remove back up, o-ring and metal back-
up ring from fluid port body assembly.Remove anti-extrusion ring from body, then
fold in half and slide through shell opening.
Remove poppet valve/port body from shell.
8. Remove poppet valve/fluid
port body from the shell.
9. Insert hand into the
bottom of the
accumulator shell
opening. Compress
bladder by hand to
eliminate as much air
volume as possible.
10. Pull the old or damaged
bladder out of the bottom
of the accumulator shell. Examine the interior
of the shell for possible contaminants, pieces
of old bladder, etc. and clean/flush thoroughly
8/10/2019 TOBUL_TMBladder062309v1
http://slidepdf.com/reader/full/tobultmbladder062309v1 3/4Phone: 803-245-5111 Fax: 803-245-2636 Tobul Accumulator, Inc. Bamberg, SC USA www.Tobul.com
Troubleshooting & Maintenance Bladder-Type Hydraulic Accumulators
Re-Assembly
1. Lubricate the inside of the shell and the
outside of the bladder with clean systemfluid. Also pour additional amount of fluid
in the shell to act as a cushion. Remove gas
valve or valve core from new bladder. Attach
the bladder pull rod to the bladder bag.
2. Pull the rod and bladder through the shell
fluid port. Pull bladder stem out through
the valve stem opening on the opposite
end of the shell. Slide lock nut over pull
rod and thread on to bladder stem. Using
two wrenches, in order to prevent the
bladder bag from rotating inside the shell,
tighten lock nut. Remove the bladder pull rod.
3. Slide the fluid port body/poppet valve
assembly (poppet first) into the accumulatorshell. Fold the anti-extrusion ring in half and
slide it through the oil port opening. Place
the anti-extrusion ring on the port body/
poppet valve assembly with the stainless
steel ring facing toward the shell opening.
Pull plug through
accumulator shell
opening. Using both
hands, pull plug hard
until it seats into
position on shell
opening.
4. Install gas valve or valve core into bladder
stem. Using dry
nitrogen, SLOWLY
inflate the bladder
bag with 5-10 psig
of pressure to
set and hold fluid
port body/poppetassembly in place.
Install metal washer onto fluid port body/
poppet assembly. Push the metal washer
into shell opening until bottomed out.
8/10/2019 TOBUL_TMBladder062309v1
http://slidepdf.com/reader/full/tobultmbladder062309v1 4/4Phone: 803-245-5111 Fax: 803-245-2636 Tobul Accumulator, Inc. Bamberg, SC USA www.Tobul.com
Troubleshooting & Maintenance Bladder-Type Hydraulic Accumulators
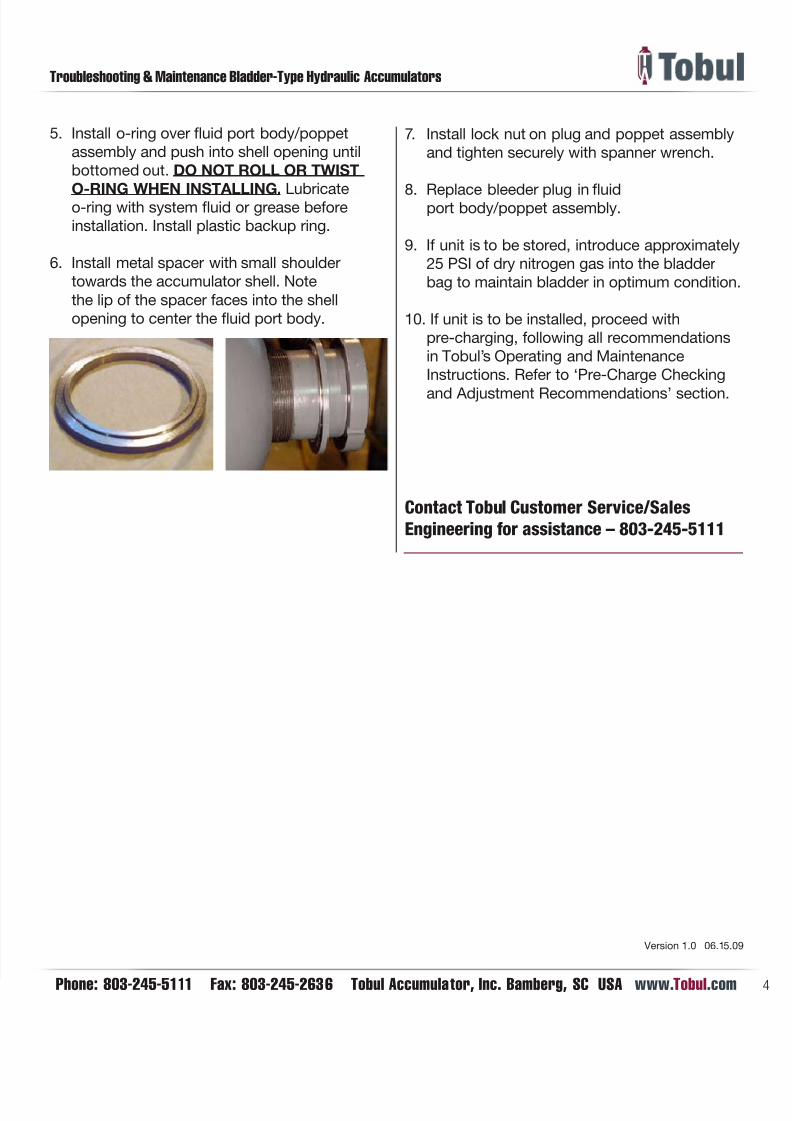
5. Install o-ring over fluid port body/poppet
assembly and push into shell opening until
bottomed out. DO NOT ROLL OR TWIST
O-RING WHEN INSTALLING. Lubricateo-ring with system fluid or grease before
installation. Install plastic backup ring.
6. Install metal spacer with small shoulder
towards the accumulator shell. Note
the lip of the spacer faces into the shell
opening to center the fluid port body.
7. Install lock nut on plug and poppet assembly
and tighten securely with spanner wrench.
8. Replace bleeder plug in fluidport body/poppet assembly.
9. If unit is to be stored, introduce approximately
25 PSI of dry nitrogen gas into the bladder
bag to maintain bladder in optimum condition.
10. If unit is to be installed, proceed with
pre-charging, following all recommendations
in Tobul’s Operating and Maintenance
Instructions. Refer to ‘Pre-Charge Checking
and Adjustment Recommendations’ section.
Contact Tobul Customer Service/Sales
Engineering for assistance – 803-245-5111
Version 1.0 06.15.09
Recommended


