KE
EP
ING
TH
E W
OR
LD
SE
WIN
G
Use
r’s
Guid
eM
anual
de
inst
rucc
iones
315
, 325
, 335

2Whe
n us
ing
an e
lect
rical
app
lianc
e, b
asic
saf
ety
prec
autio
ns s
houl
d al
way
s be
fo
l low
ed, i
nclu
ding
the
follo
win
g:Re
ad a
ll in
struc
tions
bef
ore
usin
g th
is ho
useh
old
sew
ing
mac
hine
DA
NG
ER –
To
redu
ce th
e ris
k of
el
ec tr
ic sh
ock:
• A
sew
ing
mac
hine
sho
uld
neve
r be
left
unat
tend
ed w
hen
plug
ged
in. A
lway
s un
plug
th
e se
win
g m
achi
ne fr
om th
e el
ectri
c ou
tlet i
mm
edia
tely
afte
r usin
g an
d be
fore
cl
eani
ng.
• Al
way
s un
plug
bef
ore
rela
mpi
ng. R
epla
ce b
ulb
with
sam
e ty
pe ra
ted
15 W
atts.
WA
RNIN
G –
To
redu
ce th
e ris
k of
bu
rns,
fi re,
ele
ctric
shoc
k, or
inju
ry to
pe
rson
s:•
Do
not a
llow
to b
e us
ed a
s a
toy.
Clo
se a
ttent
ion
is ne
cess
ary
whe
n us
ed b
y or
nea
r ch
ildre
n.•
Use
onl
y fo
r its
inte
nded
use
as
desc
ribed
in th
is m
anua
l. U
se o
nly
atta
chm
ents
reco
mm
ende
d by
the
man
ufac
ture
r as
cont
aine
d in
this
man
ual.
• N
ever
ope
rate
this
sew
ing
mac
hine
if it
has
a d
amag
ed c
ord
or p
lug,
if it
is n
ot
wor
king
pro
perly
, if i
t has
bee
n dr
oppe
d or
dam
aged
, or d
ropp
ed in
to w
ater
. Ret
urn
it to
the
near
est a
utho
rized
dea
ler o
r ser
vice
cen
ter f
or e
xam
inat
ion,
repa
ir, e
lect
rical
or
me c
han i
cal a
djus
tmen
t.•
Nev
er o
pera
te th
e se
win
g m
achi
ne w
ith a
ny a
ir op
enin
gs b
lock
ed. K
eep
vent
ilatio
n op
enin
gs o
f the
sew
ing
mac
hine
and
foot
con
trolle
r fre
e fro
m th
e ac
cum
ulat
ion
of
lint,
dust,
and
loos
e cl
oth.
• Ke
ep fi
nger
s aw
ay fr
om a
ll m
ovin
g pa
rts. S
peci
al c
are
is re
quire
d ar
ound
the
sew
ing
mac
hine
nee
dle.
• Al
way
s us
e th
e pr
oper
nee
dle
plat
e. T
he w
rong
pla
te c
an c
ause
the
need
le to
bre
ak.
• D
o no
t use
ben
t nee
dles
.•
Do
not p
ull o
r pus
h th
e fa
bric
whi
le s
titch
ing.
It m
ay d
efl e
ct th
e ne
edle
cau
sing
it to
br
eak.
• Sw
itch
the
sew
ing
mac
hine
off
(”0”
) whe
n m
akin
g an
y ad
justm
ents
in th
e ne
edle
ar
ea, s
uch
as th
read
ing
need
le, c
hang
ing
need
le, t
hrea
ding
bob
bin,
or c
hang
ing
pres
ser f
oot,
etc.
• Al
way
s un
plug
the
sew
ing
mac
hine
from
ele
ctric
al o
utle
t whe
n re
mov
ing
cove
rs,
or w
hen
mak
ing
any
othe
r use
r ser
vici
ng a
djus
tmen
ts m
entio
ned
in th
e in
struc
tion
man
ual.
No
lubr
icat
ion
by c
usto
mer
is re
com
men
ded.
• N
ever
dro
p or
inse
rt an
y ob
ject
into
any
ope
ning
.•
Do
not u
se o
utdo
ors.
• D
o no
t ope
rate
whe
re a
eros
ol (s
pray
) pro
duct
s ar
e be
ing
used
or w
here
oxy
gen
is be
ing
adm
inist
rate
d.•
To d
iscon
nect
, tur
n th
e sw
itch
off (
”0”)
, the
n re
mov
e pl
ug fr
om o
utle
t.•
Do
not u
nplu
g by
pul
ling
on c
ord.
To
unpl
ug, g
rasp
the
plug
, not
the
cord
.
SAVE
THE
SE IN
STRU
CTIO
NS
IMPO
RTA
NT
SAFE
TY IN
STRU
CTI
ON
S
3In
stru
ctio
n bo
ok/M
anua
l de
inst
rucc
ione
s 31
5, 3
25, 3
35
Inst
rucc
ione
s de
seg
urid
ad
Est
a m
áquin
a de
cose
r de
fam
ilia
ha
sido c
onst
ruid
a se
gún las
inst
rucc
iones
de
segu
ridad
par
a ap
arat
os
eléc
tric
os.
Co
nexi
ón
eléc
tric
aControle
que
la m
áquin
a es
té e
nch
ufa
da
a la
red
y lea
las
indic
acio
nes
en la
pla
ca d
e tip
o d
e la
m
áquin
a an
tes
de
ench
urf
arla
por
prim
era
vez
Seg
urid
ad•
Man
tener
los
ded
os
lejo
s de
las
pie
zas
en m
ovi
mie
nto
, es
pec
ialm
ente
en la
zona
cerc
ana
a la
ag
uja
•
Cuan
do n
o s
e util
ice
la m
áquin
a o d
ura
nte
el m
ante
nim
iento
o m
odifi
caci
ones
mec
ánic
as, se
re
com
ienda
dej
ar la
máq
uin
a des
conec
tada.
Est
o s
e ef
ectu
e tir
ando e
l ca
ble
de
alim
enta
ción
de
la tom
a de
corr
iente
.•
No u
tiliz
ar la
máq
uin
a co
mo ju
guet
e. P
onga
ate
nci
ón e
spec
ialm
ente
cuan
do la
máq
uin
a se
a util
izad
a por
niñ
os.
•
Est
a m
áquin
a tie
ne
un c
able
esp
ecia
l del
ped
al. Si
el ca
ble
est
uvi
era
dañ
ado c
ambie
lo p
or
otro c
able
del
mis
mo tip
o. Est
e ca
ble
se
vende
por
los
reve
nded
ore
s de
Husq
varn
a Vik
ing.
El m
onta
je d
el c
able
deb
e ef
ectu
arse
por
un e
spec
ialis
ta.
•
La m
áquin
a de
cose
r deb
e util
izar
se s
egún las
inst
rucc
iones
en e
ste
man
ual
.•
Util
izar
las
bom
bill
as a
dec
uad
as d
e 15
W (
pote
nci
a).

4In
stru
ctio
n bo
ok/M
anua
l de
inst
rucc
ione
s 31
5, 3
25, 3
35
Lis
t o
f co
nten
tsS
afet
y in
stru
ctio
ns
2M
achi
ne p
arts
6
Pro
cedu
res
7-19
Unpac
king,
Pac
king
away
7
Connec
ting
the
foot co
ntrol
8Connec
ting
to the
pow
er s
upply
8
Acc
esso
ry b
ox,
Sew
ing
surf
ace
9Sp
ool pin
10
Thre
adin
g th
e upper
thre
ad
11
Bobbin
win
din
g, D
irec
t w
indin
g 12
Thre
adin
g lo
wer
thre
ad
13Thre
ad ten
sion, Corr
ect an
din
corr
ect th
read
ten
sion
14
Chan
ging
the
nee
dle
, Chan
ging
the
pre
sser
foot
15Pre
sser
foot pre
ssure
, Pre
sser
foot lif
t 16
Rev
erse
, Lo
wer
ing
the
feed
tee
th
17St
itch s
elec
tion
18St
itch w
idth
, St
itch len
gth
19
Sew
ing
20-3
1 Buttonhole
s 20
-21
Bal
ance
set
ting
for
buttonhole
21
Sew
ing
buttons,
Buttonhole
knife
22
Stra
ight st
itch, Cle
aran
ce p
late
23
Sew
ing
zipper
s 24
-25
Rei
nfo
rced
strai
ght st
itch
25N
eedle
posi
tions,
Zig
zag
26
Thre
e-st
ep z
igza
g,
Men
din
g an
d d
arnin
g 27
Se
win
g te
rry
cloth
, Se
am a
nd
Ove
rcas
t 28
Hem
min
g 29
Flat
lock
, D
ouble
Act
ion s
titch
30
Dec
ora
tive
Stitc
hes
, 33
5 31
Mai
nten
ance
32
-33
Faul
t-fi
ndin
g 34
-35
Indi
ceIn
stru
ccio
nes
de s
egur
idad
3
La
máq
uina
y s
us p
arte
s
6M
anej
o
7-19
Des
embal
aje,
Em
bal
aje
7
Conex
ión d
el p
edal
, Conex
ión
a la
red
8
Caj
a de
acce
sorios,
Super
fi ci
e de
trab
ajo
9Porta-
carr
ete
10
Enheb
rado d
el h
ilo s
uper
ior
11
Dev
anad
o d
e la
can
illa,
direc
to
12Enheb
rado d
el h
ilo infe
rior
13
Tensi
ón d
el h
ilo
14Te
nsi
ón, co
rrec
ta e
t in
corr
ecta
14Cam
bio
de
la a
guja
, Cam
bio
del
pre
nsa
tela
s
15
Pre
sión d
el p
rensa
tela
s, P
alan
ca
de
elev
ació
n d
el p
rensa
tela
s 16
M
arch
a at
rás,
Baj
ada
del
tra
nsp
orte
de
die
nte
s
17Se
lecc
ión d
e punta
da
18Am
plit
ud d
e punta
da,
Longi
tud
de
punta
da
19
Co
stur
a
20-3
1O
jale
s
20-2
1Reg
ula
ción e
xact
a del
equili
brio
par
a oja
les
21
Cost
ura
boto
nes
, Abridor
de
oja
les
22
Cost
ura
rec
ta, Pla
ca p
ara
cost
ura
s tu
pid
as
23Cosi
do d
e cr
emm
aler
as
24-2
5Cost
ura
rec
ta r
eforz
ada
25
Posi
ción d
e la
agu
ja, Zig
-zag
26
Zig
-zag
de
tres
pas
os,
Rem
endar
y z
urc
ir
27
Tejid
os
esponjo
sos,
U
nió
n y
sobre
hila
do
28D
obla
dill
o
29Punta
da
ove
rlock
triple
, Punta
de
de
tric
ot
30Cost
ura
s dec
ora
tivas
, 33
5 31
Man
teni
mie
nto
32
-33
Posi
bles
ave
rías
y r
emed
ios
34
-35
5In
stru
ctio
n bo
ok/M
anua
l de
inst
rucc
ione
s 31
5, 3
25, 3
35
For
you
and
your
new
sew
ing
mac
hine
With
your
new
sew
ing
mac
hin
e yo
u a
re p
rovi
ded
with
this
book
of in
stru
ctio
ns.
The
inst
ruct
ions
show
how
your
mac
hin
e oper
ates
and h
ow
to u
se the
mac
hin
e to
its
full
capa-
city
. W
e re
com
men
d that
you r
ead thes
e in
stru
ctio
ns
bef
ore
you b
egin
to s
ew.
We
are
convi
nce
d y
ou w
ill b
e re
war
ded
with
man
y sa
tisfy
ing
and insp
irin
g hours
of se
win
g w
ith y
our
new
sew
ing
mac
hin
e. Mo
del
s co
vere
d i
n t
his
man
ual
:335,
325 a
nd
315.
All
mo
del
s m
igh
t n
ot
be
avai
lab
le i
n a
ll m
ark
ets.
Par
a U
d. y
su
nuev
a m
áqui
na d
e co
ser
Junto
la
máq
uin
a de
cose
r U
d. re
cibirá
este
man
ual
de
inst
rucc
iones
.El m
anual
de
inst
rucc
iones
le
ense
ñar
a co
mo funci
ona
la m
áquin
a y
com
o s
e re
aliz
an las
aplic
a-ci
ones
par
a ap
rove
char
todas
las
posi
bili
dad
es d
e la
máq
uin
a.Pos
consi
guie
nte
, le
a co
n d
eten
imie
nto
est
as inst
rucc
iones
ante
s de
empez
ar a
cose
r.Est
amos
conve
nci
dos
de
que
tendrá
much
os
mom
ento
s de
satis
facc
ión y
de
insp
irac
ión c
on s
u
nuev
a m
áquin
a.
Mo
del
os
lleg
and
o e
n e
sto
man
ual
:335,
325,
y 3
15.
To
do
s lo
s m
od
elo
s n
o f
uer
an d
isp
on
ible
s en
to
do
s m
erca
do
s.

6In
stru
ctio
n bo
ok/M
anua
l de
inst
rucc
ione
s 31
5, 3
25, 3
35
Sum
mar
yN
om
encl
atur
a
1.
Door
2.
Thre
ad tak
e-up lev
er
3.
Pre
sser
foot pre
ssure
dia
l
4.
Thre
ad g
uid
e
5.
Thre
ad g
uid
e fo
r bobbin
win
din
g
6.
Ligh
t
7.
Nee
dle
bar
with
nee
dle
cla
mp
8.
Pre
sser
bar
and P
ress
er foot an
kle
9.
Pre
sser
foot
10.
Bobbin
cove
r11.
Free
arm
12.
Bas
e pla
te13.
Nee
dle
pla
te14.
Nee
dle
cla
mp s
crew
15.
Pre
sser
foot le
ver
16.
Thre
ad ten
sion d
ial
17.
Spool pin
18.
Spool hold
ers
19.
Thre
ad c
utter
for
bobbin
win
din
g20.
Rec
ess
for
additi
onal
spool pin
21.
Stitc
h v
aria
tion
22.
Bobbin
spin
dle
23.
Han
dw
hee
l24.
Stitc
h w
idth
dia
l25.
Stitc
h s
elec
tor
26.
Stitc
h len
gth d
ial
27.
Rev
erse
28.
Dro
p fee
d tee
th29.
Mai
n p
ow
er s
witc
h, Connec
tion to p
ow
er
su
pply
30.
Thre
ad c
utter
1.
Tap
a
2.
Pal
anca
tira-
hilo
3.
Reg
ula
dor
de
la p
resi
ón d
el p
rensa
tela
s
4.
Guía
-hilo
5.
Guía
-hilo
del
dev
anad
or
6.
Luz
7.
Soporte
aguja
s co
n s
uje
ción d
e la
agu
ja
8.
Bar
ra d
el p
rensa
tela
s co
n c
uer
po
del
pre
nsa
tela
s
9.
Pie
pre
nsa
tela
s
10.
Tap
a de
pro
tecc
ión c
ápsu
la11.
Bra
zo lib
re
12.
Zóca
lo13.
Pla
ca d
e ag
uja
14.
Torn
illo d
e su
jeci
ón d
e la
agu
ja15.
Pal
anca
de
elev
ació
n d
el p
rensa
tela
s16.
Reg
ula
dor
de
la ten
sión d
el h
ilo17.
Porta-
carr
etes
18.
Dis
cos
par
a bobin
a19.
Cortad
or
de
hilo
s dev
anad
o20.
Enta
lladura
/Agu
jero
par
a porta-
carr
ete
ex
tra
21.
”Stit
ch v
aria
tion”
– va
riac
ión d
e punta
da
22.
Eje
del
can
iller
o23.
Vola
nte
24.
Reg
ula
dor
de
amplit
ud d
e punta
das
25.
Sele
ctor
de
punta
da
26.
Reg
ula
dor
de
longi
tud d
e punta
das
27.
Mar
cha
atrá
s28.
Des
cendo d
el tra
nsp
ortad
or
29.
Conex
ión e
léct
rica
30.
Cortad
or
de
hilo
s
1 2 3 4 5 87 9 10 11 12
1314151618
6
17
19 20 21 22 23 24 25
26, 2
7, 2
8
29
30
7In
stru
ctio
n bo
ok/M
anua
l de
inst
rucc
ione
s 31
5, 3
25, 3
35
Unp
acki
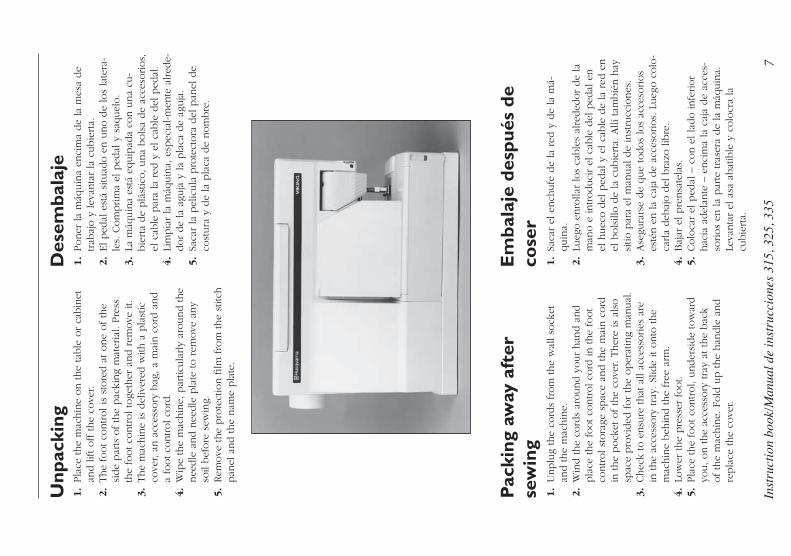
ng1.
Pla
ce the
mac
hin
e on the
table
or
cabin
et
and lift off the
cove
r.2.
The
foot co
ntrol is
sto
red a
t one
of th
e si
de
par
ts o
f th
e pac
king
mat
eria
l. Pre
ss
the
foot co
ntrol to
geth
er a
nd r
emove
it.
3.
The
mac
hin
e is
del
iver
ed w
ith a
pla
stic
co
ver, a
n a
cces
sory
bag
, a
mai
n c
ord
and
a fo
ot co
ntrol co
rd.
4.
Wip
e th
e m
achin
e, p
artic
ula
rly
around the
nee
dle
and n
eedle
pla
te to r
emove
any
soil
bef
ore
sew
ing.
5.
Rem
ove
the
pro
tect
ion fi lm
fro
m the
stitc
h
pan
el a
nd the
nam
e pla
te.
1.
Poner
la
máq
uin
a en
cim
a de
la m
esa
de
trab
ajo y
lev
anta
r la
cubie
rta.
2.
El ped
al e
stá
situ
ado e
n u
no d
e lo
s la
tera
-le
s. C
om
prim
a el
ped
al y
saq
uel
o.
3.
La m
áquin
a es
tá e
quip
ada
con u
na
cu-
bie
rta
de
plá
stic
o, una
bols
a de
acce
sorios,
el
cab
le p
ara
la r
ed y
el ca
ble
del
ped
al.
4.
Lim
pia
r la
máq
uin
a, e
spec
ial-m
ente
alred
e-dor
de
la a
guja
y la
pla
ca d
e ag
uja
.5.
Saca
r la
pel
icula
pro
tect
ora
del
pan
el d
e co
stura
y d
e la
pla
ca d
e nom
bre
.
Des
emba
laje
Em
bala
je d
espu
és d
e co
ser
1.
Unplu
g th
e co
rds
from
the
wal
l so
cket
an
d the
mac
hin
e.2.
Win
d the
cord
s ar
ound y
our
han
d a
nd
pla
ce the
foot co
ntrol co
rd in the
foot
control st
ora
ge s
pac
e an
d the
mai
n c
ord
in
the
pock
et o
f th
e co
ver. T
her
e is
als
o
spac
e pro
vided
for
the
oper
atin
g m
anual
. 3.
Chec
k to
ensu
re that
all
acce
ssories
are
in
the
acce
ssory
tra
y. S
lide
it onto
the
mac
hin
e beh
ind the
free
arm
.4.
Low
er the
pre
sser
foot.
5.
Pla
ce the
foot co
ntrol,
under
side
tow
ard
you, on the
acce
ssory
tra
y at
the
bac
k of th
e m
achin
e. F
old
up the
han
dle
and
repla
ce the
cove
r.
Pac
king
aw
ay a
fter
se
win
g1.
Saca
r el
ench
ufe
de
la r
ed y
de
la m
á-quin
a.2.
Lueg
o e
nro
llar
los
cable
s al
reded
or
de
la
man
o e
introduci
r el
cab
le d
el p
edal
en
el h
uec
o d
el p
edal
y e
l ca
ble
de
la r
ed e
n
el b
ols
illo d
e la
cubie
rta.
Allí
tam
bié
n h
ay
sitio
par
a el
man
ual
de
inst
rucc
iones
. 3.
Ase
gura
rse
de
que
todos
los
acce
sorios
esté
n e
n la
caja
de
acce
sorios.
Lueg
o c
olo
-ca
rla
deb
ajo d
el b
razo
lib
re.
4.
Baj
ar e
l pre
nsa
tela
s.5.
Colo
car
el p
edal
– c
on e
l la
do infe
rior
hac
ia a
del
ante
– e
nci
ma
la c
aja
de
acce
s-so
rios
en la
par
te tra
sera
de
la m
áquin
a.
Leva
nta
r el
asa
abat
ible
y c
olo
cra
la
cubie
rta.
8In
stru
ctio
n bo
ok/M
anua
l de
inst
rucc
ione
s 31
5, 3
25, 3
35
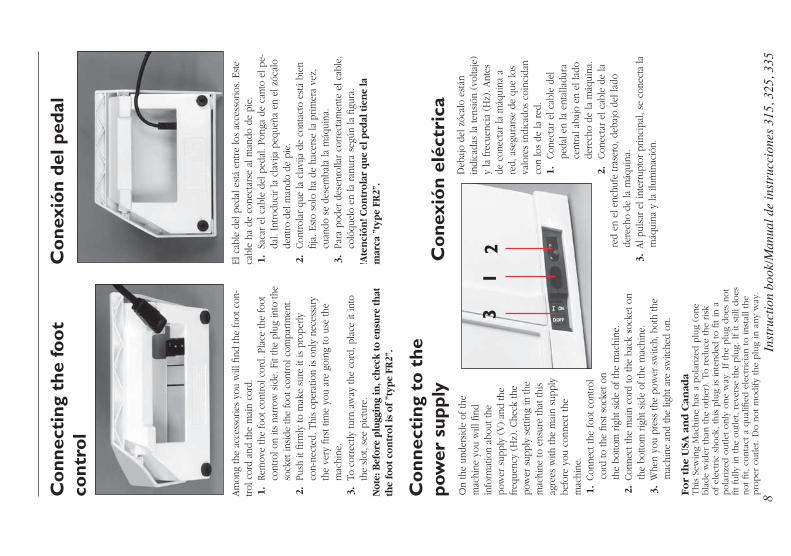
Co
nnec
ting
the
foo
t co
ntro
l
Am
ong
the
acce
ssor
ies
you
will
fi nd
the
foot
con
-trol
cor
d an
d th
e m
ain
cord
.1.
Re
mov
e th
e fo
ot c
ontrol
cor
d. P
lace
the
foot
co
ntro
l on
its n
arro
w s
ide.
Fit
the
plug
into
the
sock
et in
side
the
foot
con
trol
com
partm
ent.
2.
Push
it fi
rmly
to m
ake
sure
it is
pro
perly
co
n-ne
cted
. Thi
s op
e ra t
ion
is o
nly
nece
ssar
y th
e ve
ry fi
rst t
ime
you
are
goin
g to
use
the
mac
hine
.3.
To
cor
rect
ly tu
rn a
way
the
cord
, pla
ce it
into
th
e sl
ot, s
ee p
ictu
re.
Not
e: B
efor
e p
lugg
ing
in, c
hec
k to
en
sure
th
at
the
foot
con
trol
is o
f ”t
ype
FR2”
.
Co
nnec
ting
to
the
po
wer
sup
ply
On
the
unde
rsid
e of
the
mac
hine
you
will
fi nd
in
form
atio
n ab
out t
he
pow
er s
uppl
y (V
) an
d th
e fr
eque
ncy
(Hz)
. Che
ck th
e po
wer
sup
ply
setti
ng in
the
mac
hine
to e
nsur
e th
at th
is
agre
es w
ith th
e m
ain
supp
ly
befo
re y
ou c
onne
ct th
e m
achi
ne.
1. C
onne
ct th
e fo
ot c
ontrol
co
rd to
the
fi rst
soc
ket o
n th
e bo
ttom
rig
ht s
ide
of th
e m
achi
ne.
2. C
onne
ct th
e m
ain
cord
to th
e ba
ck s
ocke
t on
the
botto
m r
ight
sid
e of
the
mac
hine
.3.
Whe
n yo
u pr
ess
the
pow
er s
witc
h, b
oth
the
mac
hine
and
the
light
are
sw
itche
d on
.
Fo
r th
e U
SA a
nd
Can
ada
This
Sew
ing
Mac
hin
e has
a p
ola
rize
d p
lug
(one
bla
de
wid
er than
the
oth
er). T
o r
educe
the
risk
of el
ectric
shock
, th
is p
lug
is inte
nded
to fi t in a
pola
rize
d o
utle
t only
one
way
. If the
plu
g does
not
fi t fu
lly in the
outle
t, re
vers
e th
e plu
g. I
f it
still
does
not fi t,
conta
ct a
qual
ifi ed
ele
ctrici
an to inst
all th
e pro
per
outle
t. D
o n
ot m
odify
the
plu
g in
any
way
.
Co
nexi
ón
del p
edal
El c
able
del
ped
al e
stá
entre
los
acce
ssor
ios.
Est
e ca
ble
ha d
e co
nect
arse
al m
ando
de
pie.
1.
Saca
r el
cab
le d
el p
edal
. Pon
ga d
e ca
nto
el p
e-da
l. In
trod
ucir
la c
lavi
ja p
eque
ña e
n el
zóc
alo
dent
ro d
el m
ando
de
pie.
2.
Con
trol
ar q
ue la
cla
vija
de
cont
acto
est
á bi
en
fi ja.
Est
o so
lo h
a de
hac
erse
la p
rimer
a ve
z,
cuan
do s
e de
sem
bala
la m
áqui
na.
3.
Para
pod
er d
esen
rolla
r co
rrec
tam
ente
el c
able
, co
lóqu
elo
en la
ran
ura
segú
n la
fi gu
ra.
!Ate
nci
ón! C
ontr
olar
que
el p
edal
tie
ne
la
mar
ca ”
typ
e FR
2”.
Deb
ajo
del z
ócal
o es
tán
indi
cada
s la
tens
ión
(vol
taje
) y
la fre
cuen
cia
(Hz)
. Ant
es
de c
onec
tar
la m
áqui
na a
re
d, a
segu
rars
e de
que
los
valo
res
indi
cado
s co
inci
dan
con
los
de la
red
.1.
Con
ecta
r el
cab
le d
el p
edal
en
la e
ntal
ladu
ra ce
ntra
l aba
jo e
n el
lado
der
echo
de
la m
áqui
na.
2.
Con
ecta
r el
cab
le d
e la
re
d en
el e
nchu
fe tr
aser
o, d
ebaj
o de
l lad
o de
rech
o de
la m
áqui
na.
3. A
l pul
sar
el in
terr
upto
r pr
inci
pal,
se c
onec
ta la
m
áqui
na y
la il
umin
ació
n. C
one
xió
n el
éctr
ica
31
2
9In
stru
ctio
n bo
ok/M
anua
l de
inst
rucc
ione
s 31
5, 3
25, 3
35
Acc
esso
ry b
ox
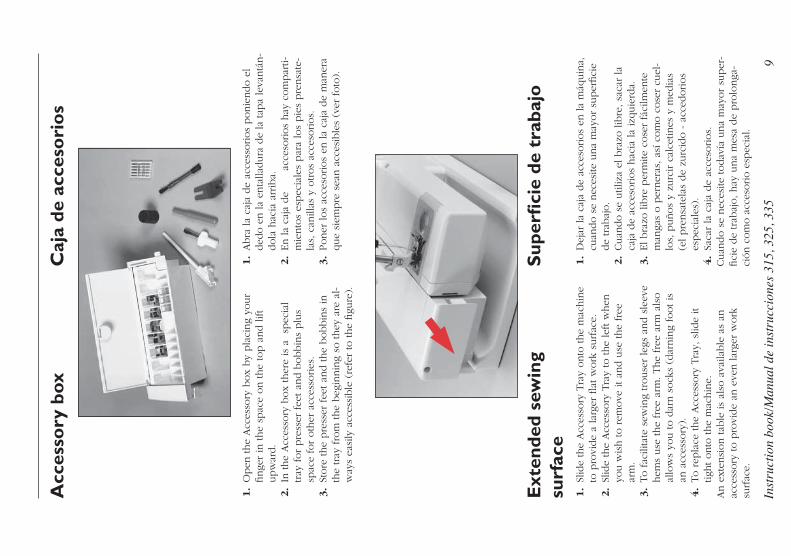
1.
Open
the
Acc
esso
ry b
ox
by
pla
cing
your
fi nge
r in
the
spac
e on the
top a
nd lift
upw
ard.
2.
In the
Acc
esso
ry b
ox
ther
e is
a sp
ecia
l tray
for
pre
sser
fee
t an
d b
obbin
s plu
s sp
ace
for
oth
er a
cces
sories
.3.
Store
the
pre
sser
fee
t an
d the
bobbin
s in
th
e tray
fro
m the
beg
innin
g so
they
are
al-
way
s ea
sily
acc
essi
ble
(re
fer
to the
fi gu
re).
Ext
ende
d se
win
g su
rfac
e1.
Slid
e th
e A
cces
sory
Tra
y onto
the
mac
hin
e to
pro
vide
a la
rger
fl a
t w
ork
surf
ace.
2.
Slid
e th
e A
cces
sory
Tra
y to
the
left w
hen
yo
u w
ish to r
emove
it an
d u
se the
free
ar
m.
3.
To fac
ilita
te s
ewin
g trouse
r le
gs a
nd s
leev
e hem
s use
the
free
arm
. The
free
arm
als
o
allo
ws
you to d
arn s
ock
s (d
arnin
g fo
ot is
an
acc
esso
ry).
4.
To r
epla
ce the
Acc
esso
ry T
ray,
slid
e it
tight onto
the
mac
hin
e.An e
xten
sion tab
le is
also
ava
ilable
as
an
acce
ssory
to p
rovi
de
an e
ven lar
ger
work
su
rfac
e.
Caj
a de
acc
eso
rio
s
1.
Abra
la
caja
de
acce
ssorios
ponie
ndo e
l ded
o e
n la
enta
lladura
de
la tap
a le
vantá
n-
dola
hac
ia a
rrib
a.
2.
En la
caja
de
ac
ceso
rios
hay
com
par
ti-m
iento
s es
pec
iale
s par
a lo
s pie
s pre
nsa
te-
las,
can
illas
y o
tros
acce
sorios.
3.
Poner
los
acce
sorios
en la
caja
de
man
era
que
siem
pre
sea
n a
cces
ible
s (v
er foto
).
Sup
erfi
cie
de t
raba
jo
1.
Dej
ar la
caja
de
acce
sorios
en la
máq
uin
a,
cuan
do s
e nec
esite
una
may
or
super
fi ci
e
de
trab
ajo.
2.
Cuan
do s
e util
iza
el b
razo
lib
re, sa
car
la
ca
ja d
e ac
ceso
rios
hac
ia la
izquie
rda.
3.
El bra
zo lib
re p
erm
ite c
ose
r fá
cilm
ente
m
anga
s o p
erner
as, as
í co
mo c
ose
r cu
el-
los,
puños
y zu
rcir c
alce
tines
y m
edia
s (e
l pre
nsa
tela
s de
zurc
ido -
acc
edorios
espec
iale
s).
4.
Saca
r la
caj
a de
acce
sorios.
Cuan
do s
e nec
esite
todav
ía u
na
may
or
super
-fi ci
e de
trab
ajo, hay
una
mes
a de
pro
longa
-ci
ón c
om
o a
cces
orio e
spec
ial.
10In
stru
ctio
n bo
ok/M
anua
l de
inst
rucc
ione
s 31
5, 3
25, 3
35
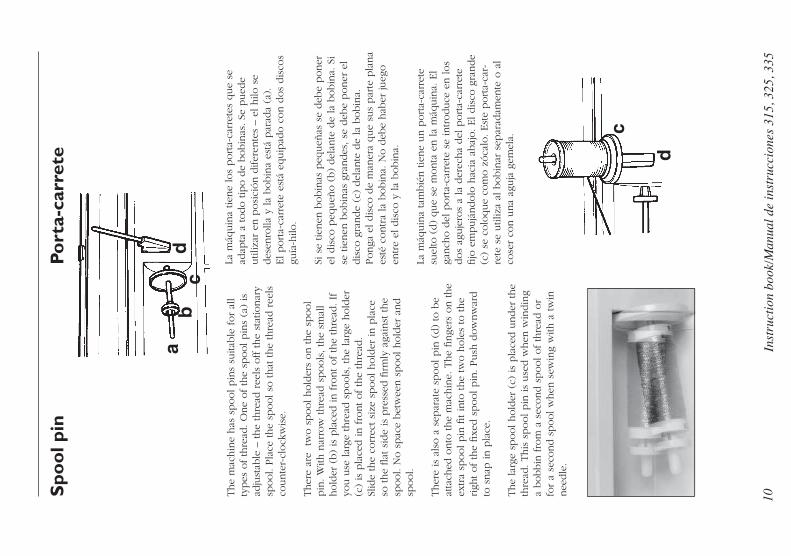
Spo
ol p
in
The
mac
hin
e has
spool pin
s su
itable
for
all
types
of th
read
. O
ne
of th
e sp
ool pin
s (a
) is
ad
just
able
– the
thre
ad r
eels
off the
stat
ionar
y sp
ool.
Pla
ce the
spool so
that
the
thre
ad r
eels
co
unte
r-cl
ock
wis
e.
Ther
e ar
e tw
o s
pool hold
ers
on the
spool
pin
. W
ith n
arro
w thre
ad s
pools
, th
e sm
all
hold
er (
b)
is p
lace
d in fro
nt of th
e th
read
. If
you u
se lar
ge thre
ad s
pools
, th
e la
rge
hold
er
(c)
is p
lace
d in fro
nt of th
e th
read
.Sl
ide
the
corr
ect si
ze s
pool hold
er in p
lace
so
the
fl at
sid
e is
pre
ssed
fi rm
ly a
gain
st the
spool.
No s
pac
e bet
wee
n s
pool hold
er a
nd
spool.
Ther
e is
als
o a
sep
arat
e sp
ool pin
(d)
to b
e at
tach
ed o
nto
the
mac
hin
e. T
he
fi nge
rs o
n the
extra
spool pin
fi t into
the
two h
ole
s to
the
righ
t of th
e fi xe
d s
pool pin
. Push
dow
nw
ard
to s
nap
in p
lace
.
The
larg
e sp
ool hold
er (
c) is
pla
ced u
nder
the
thre
ad. This
spool pin
is
use
d w
hen
win
din
g a
bobbin
fro
m a
sec
ond s
pool of th
read
or
for
a se
cond s
pool w
hen
sew
ing
with
a tw
in
nee
dle
.
Port
a-ca
rret
e
La m
áquin
a tie
ne
los
porta-
carr
etes
que
se
adap
ta a
todo tip
o d
e bobin
as. Se
pued
e util
izar
en p
osi
ción d
ifer
ente
s –
el h
ilo s
e des
enro
lla y
la
bobin
a es
tá p
arad
a (a
).
El porta-
carr
ete
está
equip
ado c
on d
os
dis
cos
guía
-hilo
.
Si s
e tie
nen
bobin
as p
equeñ
as s
e deb
e poner
el
dis
co p
equeñ
o (
b)
del
ante
de
la b
obin
a. S
i se
tie
nen
bobin
as g
randes
, se
deb
e poner
el
dis
co g
rande
(c)
del
ante
de
la b
obin
a.Ponga
el dis
co d
e m
aner
a que
sus
par
te p
lana
esté
contra
la b
obin
a. N
o d
ebe
hab
er ju
ego
entre
el d
isco
y la
bobin
a.
La m
áquin
a ta
mbié
n tie
ne
un p
orta-
carr
ete
suel
to (
d)
que
se m
onta
en la
máq
uin
a. E
l ga
nch
o d
el p
orta-
carr
ete
se introduce
en los
dos
aguje
ros
a la
der
echa
del
porta-
carr
ete
fi jo
em
pujá
ndolo
hac
ia a
baj
o. El dis
co g
rande
(c)
se c
olo
que
com
o z
óca
lo. Est
e porta-
car-
rete
se
util
iza
al b
obin
ar s
epar
adam
ente
o a
l co
ser
con u
na
aguja
gem
ela.
bc
da
c
d
11In
stru
ctio
n bo
ok/M
anua
l de
inst
rucc
ione
s 31
5, 3
25, 3
35
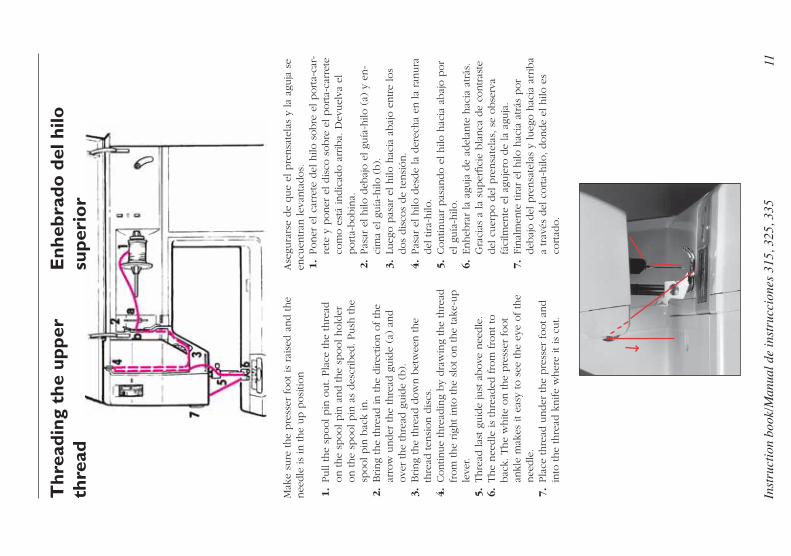
Thr
eadi
ng t
he u
pper
th
read
Enh
ebra
do d
el h
ilo
supe
rio
r
Mak
e su
re the
pre
sser
foot is
rai
sed a
nd the
nee
dle
is
in the
up p
o si
tion
1.
Pull
the
spool pin
out.
Pla
ce the
thre
ad
on the
spool pin
and the
spool hold
er
on the
spool pin
as
des
crib
ed. Push
the
spool pin
bac
k in
.2.
Bring
the
thre
ad in the
direc
tion o
f th
e ar
row
under
the
thre
ad g
uid
e (a
) an
d
ove
r th
e th
read
guid
e (b
).3.
Bring
the
thre
ad d
ow
n b
etw
een the
thre
ad ten
sion d
iscs
.4.
Contin
ue
thre
adin
g by
dra
win
g th
e th
read
fr
om
the
righ
t in
to the
slot on the
take
-up
leve
r.5.
Thre
ad las
t gu
ide
just
above
nee
dle
.6.
The
nee
dle
is
thre
aded
fro
m fro
nt to
bac
k. T
he
white
on the
pre
sser
foot
ankl
e m
akes
it ea
sy to s
ee the
eye
of th
e nee
dle
.7.
Pla
ce thre
ad u
nder
the
pre
sser
foot an
d
into
the
thre
ad k
nife
wher
e it
is c
ut.
Ase
gura
rse
de
que
el p
rensa
tela
s y
la a
guja
se
encu
entran
lev
an ta
dos.
1.
Poner
el ca
rret
e del
hilo
sobre
el porta-
car-
rete
y p
oner
el dis
co s
obre
el porta-
carr
ete
com
o e
stá
indic
ado a
rrib
a. D
evuel
va e
l porta-
bobin
a.2.
Pas
ar e
l hilo
deb
ajo e
l gu
ía-h
ilo (
a) y
en-
cim
a el
guía
-hilo
(b).
3.
Lueg
o p
asar
el hilo
hac
ia a
baj
o e
ntre
los
dos
dis
cos
de
tensi
ón.
4.
Pas
ar e
l hilo
des
de
la d
erec
ha
en la
ranura
del
tira-
hilo
.5.
Contin
uar
pas
ando e
l hilo
hac
ia a
baj
o p
or
el g
uía
-hilo
.6.
Enheb
rar
la a
guja
de
adel
ante
hac
ia a
trás
. G
raci
as a
la
super
fi ci
e bla
nca
de
contras
te
del
cuer
po d
el p
rensa
tela
s, s
e obse
rva
fáci
lmen
te e
l ag
uje
ro d
e la
agu
ja.
7.
Final
men
te tirar
el hilo
hac
ia a
trás
por
deb
ajo d
el p
rensa
tela
s y
lueg
o h
acia
arr
iba
a trav
és d
el c
orta-
hilo
, donde
el h
ilo e
s
cortad
o.
12In
stru
ctio
n bo
ok/M
anua
l de
inst
rucc
ione
s 31
5, 3
25, 3
35
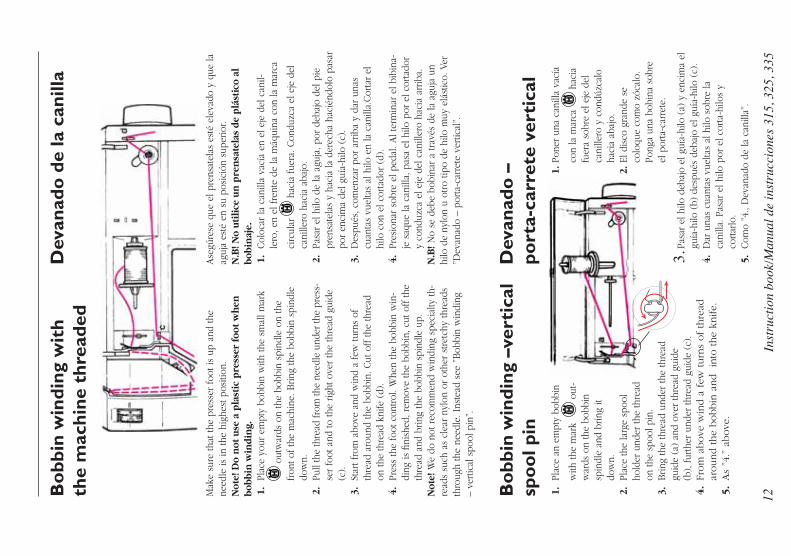
Bo
bbin
win
ding
wit
h th
e m
achi
ne t
hrea
ded
Mak
e su
re th
at th
e pr
esse
r fo
ot is
up
and
the
need
le is
in th
e hi
ghes
t pos
ition
.N
ote!
Do
not
use
a p
last
ic p
ress
er f
oot
wh
en
bobb
in w
indi
ng.
1.
Pl
ace
your
em
pty
bobb
in w
ith th
e sm
all m
ark
out
war
ds o
n th
e bo
bbin
spi
ndle
on
the
fron
t of th
e m
achi
ne. B
ring
the
bobb
in s
pind
le
dow
n.2.
Pu
ll th
e th
read
from
the
need
le u
nder
the
pres
s-se
r fo
ot a
nd to
the
right
ove
r th
e th
read
gui
de
(c).
3.
Star
t fro
m a
bove
and
win
d a
few
turn
s of
th
read
aro
und
the
bob b
in. C
ut o
ff th
e th
read
on
the
thre
ad k
nife
(d)
.4.
Pr
ess
the
foot
con
trol
. Whe
n th
e bo
bbin
win
-di
ng is
fi ni
shed
, rem
ove
the
bobb
in, c
ut o
ff th
e th
read
and
brin
g th
e bo
bbin
spi
ndle
up.
Not
e! W
e do
not
rec
omm
end
win
ding
spe
cial
ty th
-re
ads
such
as
clea
r ny
lon
or o
ther
stret
chy
thre
ads
thro
ugh
the
need
le. I
nste
ad s
ee ”
Bob
bin
win
ding
–
vertic
al s
pool
pin
”.
Bo
bbin
win
ding
–ve
rtic
al
spo
ol p
in1.
Pl
ace
an e
mpt
y bo
bbin
with
the
mar
k
out
-w
ards
on
the
bobb
in
spin
dle
and
brin
g it
dow
n.2.
Pl
ace
the
larg
e sp
ool
hold
er u
nder
the
thre
ad
on th
e sp
ool p
in.
3.
Brin
g th
e th
read
und
er th
e th
read
gu
ide
(a)
and
over
thre
ad g
uide
(b
), fur
ther
und
er th
read
gui
de (
c).
4.
From
above
win
d a
few
turn
s of th
read
ar
ound the
bobbin
and in
to the
knife.
5. A
s ”4
.” a
bove
.
Ase
gúre
se q
ue e
l pre
nsat
elas
est
é el
evad
o y
que
la
aguj
a es
té e
n su
pos
ició
n su
perio
r.N
.B! N
o ut
ilic
e un
pre
nsa
tela
s de
plá
stic
o al
bo
bin
aje.
1.
Col
ocar
la c
anill
a va
cía
en e
l eje
del
can
il-le
ro, e
n el
fre
nte
de la
máq
uina
con
la m
arca
circ
ular
h
acia
fue
ra. C
ondu
zca
el e
je d
el
cani
llero
hac
ia a
bajo
.2.
Pa
sar
el h
ilo d
e la
agu
ja, p
or d
ebaj
o de
l pie
pr
ensa
tela
s y
haci
a la
der
echa
hac
iénd
olo
pasa
r po
r en
cim
a de
l guí
a-hi
lo (
c).
3.
Des
pués
, com
enza
r po
r ar
riba
y da
r un
as
cuan
tas
vuel
tas
al h
ilo e
n la
can
illa.
Cor
tar
el
hilo
con
el c
orta
dor
(d).
4.
Pres
iona
r so
bre
el p
edal
. Al t
erm
inar
el b
ibin
a-je
saq
ue la
can
illa,
pas
a el
hilo
por
el c
orta
dor
y co
nduz
ca e
l eje
del
can
iller
o ha
cia
arrib
a.N
.B! N
o se
deb
e bo
bina
r a
trav
és d
e la
agu
ja u
n hi
lo d
e ny
lon
u ot
ro ti
po d
e hi
lo m
uy e
lást
ico.
Ver
”D
evan
ado
– po
rta-
carr
ete
vertic
al”.
Dev
anad
o d
e la
can
illa
Dev
anad
o –
po
rta-
carr
ete
vert
ical
1. P
oner
una
can
illa
vací
a
co
n la
mar
ca
hac
ia
fuer
a so
bre
el e
je d
el
cani
llero
y c
ondú
zcal
o
haci
a ab
ajo.
2. E
l dis
co g
rand
e se
co
loqu
e co
mo
zóca
lo.
Po
nga
una
bobi
na s
obre
el
por
ta-c
arre
te.
3. P
asar
el h
ilo d
ebaj
o el
guí
a-hi
lo (
a) y
enc
ima
el
guía
-hilo
(b)
des
pués
deb
ajo
el g
uía-
hilo
(c)
. 4.
D
ar u
nas
cuan
tas
vuel
tas
al h
ilo s
obre
la
cani
lla. P
asar
el h
ilo p
or e
l cor
ta-h
ilos
y
cortar
lo.
5.
Com
o ”4
., D
evan
ado
de la
can
illa”
.
13In
stru
ctio
n bo
ok/M
anua
l de
inst
rucc
ione
s 31
5, 3
25, 3
35
b
a
c
21 3
4
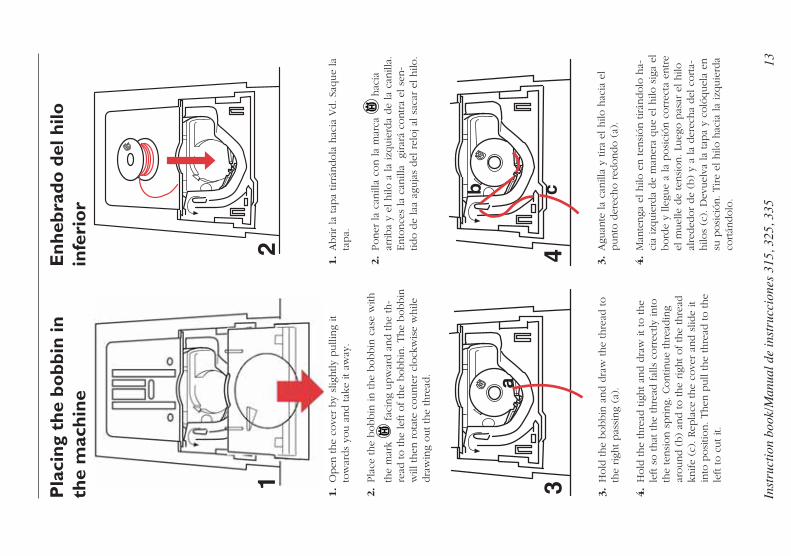
Pla
cing
the
bo
bbin
in
the
mac
hine
1.
Open
the
cove
r by
slig
htly
pulli
ng
it to
war
ds
you a
nd tak
e it
away
.
2.
Pla
ce the
bobbin
in the
bobbin
cas
e w
ith
the
mar
k fac
ing
upw
ard a
nd the
th-
read
to the
left o
f th
e bobbin
. The
bobbin
w
ill then
rota
te c
ounte
r cl
ock
wis
e w
hile
dra
win
g out th
e th
read
.
3.
Hold
the
bobbin
and d
raw
the
thre
ad to
the
righ
t pas
sing
(a).
4.
Hold
the
thre
ad tig
ht an
d d
raw
it to
the
left s
o that
the
thre
ad fal
ls c
orr
ectly
into
th
e te
nsi
on s
pring.
Contin
ue
thre
adin
g ar
ound (
b)
and to the
righ
t of th
e th
read
kn
ife
(c). R
epla
ce the
cove
r an
d s
lide
it in
to p
osi
tion. Then
pull
the
thre
ad to the
left to c
ut it.
1.
Abrir
la tap
a tir
rándola
hac
ia V
d. Sa
que
la
tapa.
2.
Poner
la
canill
a co
n la
mar
ca
hac
ia
arriba
y el
hilo
a la
izquie
rda
de
la c
anill
a.
Ento
nce
s la
can
illa
girar
á co
ntra
el s
en-
tido d
e la
a ag
uja
s del
rel
oj a
l sa
car
el h
ilo.
3.
Agu
ante
la
canill
a y
tira
el h
ilo h
acia
el
punto
der
echo r
edondo (
a).
4.
Man
tenga
el hilo
en ten
sión tirán
dolo
ha-
cia
izquie
rda
de
man
era
que
el h
ilo s
iga
el
bord
e y
llegu
e a
la p
osi
ción c
orr
ecta
entre
el m
uel
le d
e te
nsi
on. Lu
ego p
asar
el hilo
al
reded
or
de
(b)
y a
la d
erec
ha
del
corta-
hilo
s (c
). D
evuel
va la
tapa
y co
lóquel
a en
su
posi
ción. Tire
el h
ilo h
acia
la
izquie
rda
cortán
dolo
.
Enh
ebra
do d
el h
ilo
infe
rio
r
14In
stru
ctio
n bo
ok/M
anua
l de
inst
rucc
ione
s 31
5, 3
25, 3
35
You c
an a
dju
st the
thre
ad ten
sion b
y tu
rnin
g th
e dia
l w
hic
h is
num
ber
ed. The
hig
her
the
num
ber
the
tighte
r th
e te
nsi
on. N
orm
al thre
ad
tensi
on is
num
ber
4.
When
sew
ing
buttonhole
s an
d d
ecora
tive
stitc
hes
set
thre
ad ten
sion to n
um
ber
3.
When
topst
itchin
g w
ith a
coar
se thre
ad in
thic
k fa
bric,
incr
ease
the
tensi
on to 7
-9.
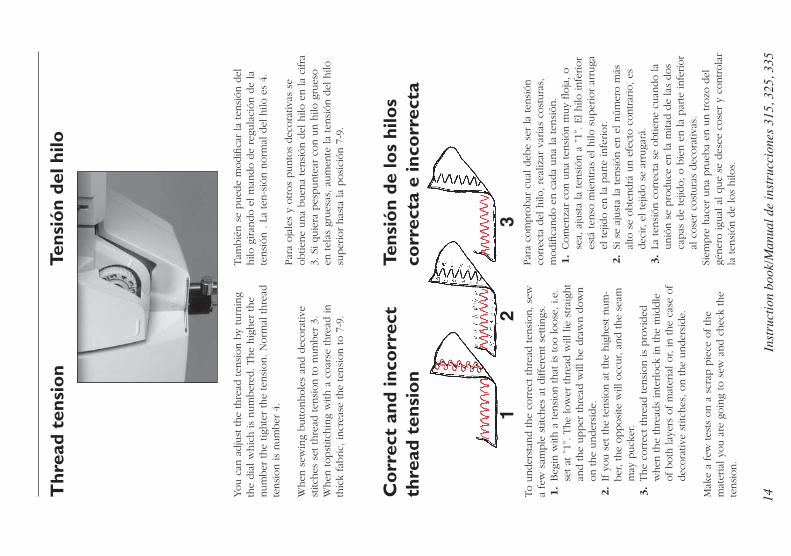
Thr
ead
tens
ion
Co
rrec
t an
d in
corr
ect
thre
ad t
ensi
on
To u
nder
stan
d the
corr
ect th
read
ten
sion, se
w
a fe
w s
ample
stit
ches
at diffe
rent se
ttin
gs.
1.
Beg
in w
ith a
ten
sion that
is
too loose
, i.e
. se
t at
”1”
. The
low
er thre
ad w
ill lie
strai
ght
and the
upper
thre
ad w
ill b
e dra
wn d
ow
n
on the
under
side.
2.
If y
ou s
et the
tensi
on a
t th
e hig
hes
t num
-ber
, th
e opposi
te w
ill o
ccur, a
nd the
seam
m
ay p
uck
er.
3.
The
corr
ect th
read
ten
sion is
pro
vided
w
hen
the
thre
ads
inte
rlock
in the
mid
dle
of both
lay
ers
of m
ater
ial or, in the
case
of
dec
ora
tive
stitc
hes
, on the
under
side.
Mak
e a
few
tes
ts o
n a
scr
ap p
iece
of th
e m
a te r
i al yo
u a
re g
oin
g to
sew
and c
hec
k th
e te
nsi
on.
Tam
bié
n s
e pued
e m
odifi
car
la ten
sión d
el
hilo
giran
do e
l m
ando d
e re
gula
ción d
e la
te
nsi
ón . L
a te
n-s
ión n
orm
al d
el h
ilo e
s 4.
Par
a oja
les
y otros
punto
s dec
ora
tivas
se
obtie
ne
una
buen
a te
nsi
ón d
el h
ilo e
n la
cifra
3. S
i quie
ra p
espunte
ar c
on u
n h
ilo g
rues
o
en tel
as g
rues
as, au
men
te la
tensi
ón d
el h
ilo
super
ior
has
ta la
posi
ción 7
-9.
Tens
ión
del h
ilo
Tens
ión
de lo
s hi
los
corr
ecta
e in
corr
ecta
Par
a co
mpro
bar
cual
deb
e se
r la
ten
sión
corr
ecta
del
hilo
, re
aliz
ar v
aria
s co
stura
s,
modifi
cando e
n c
ada
una
la ten
sión.
1.
Com
enza
r co
n u
na
tensi
ón m
uy
fl oja
, o
sea,
aju
sta
la ten
sión a
”1”
. El hilo
infe
rior
está
ten
so m
ientras
el hilo
super
ior
arru
ga
el tej
ido e
n la
par
te infe
rior.
2.
Si s
e aj
ust
a la
ten
sión e
n e
l núm
ero m
ás
alto
se
obte
ndrá
un e
fect
o c
ontrar
io, es
dec
ir, el
tej
ido s
e ar
ruga
rá.
3.
La ten
sión c
orr
ecta
se
obtie
ne
cuan
do la
unió
n s
e pro
duce
en la
mita
d d
e la
s dos
capas
de
tejid
o; o b
ien e
n la
par
te infe
rior
al c
ose
r co
stura
s dec
ora
tivas
.Si
empre
hac
er u
na
pru
eba
en u
n tro
zo d
el
géner
o igu
al a
l que
se d
esee
cose
r y
controla
r la
ten
sión d
e lo
s hilo
s.
12
3
15In
stru
ctio
n bo
ok/M
anua
l de
inst
rucc
ione
s 31
5, 3
25, 3
35
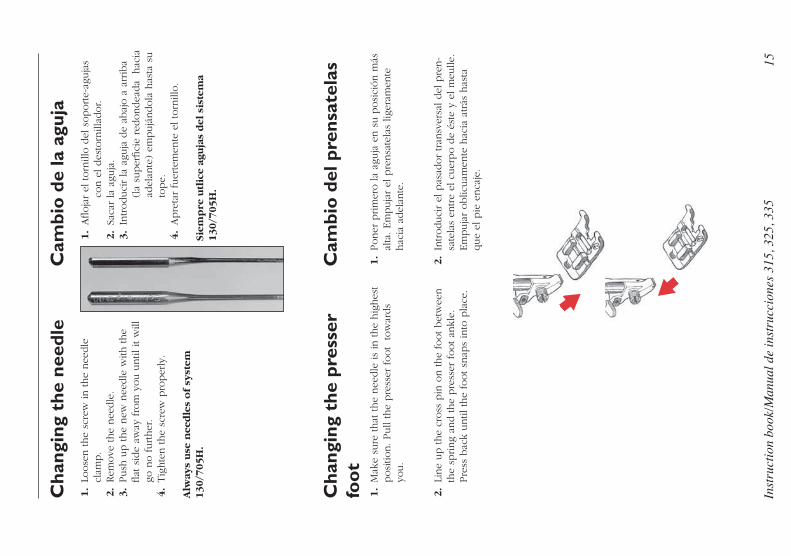
1.
Mak
e su
re that
the
nee
dle
is
in the
hig
hes
t posi
tion. Pull
the
pre
sser
foot tow
ards
you.
2.
Line
up the
cross
pin
on the
foot bet
wee
n
the
spring
and the
pre
sser
foot an
kle.
Pre
ss b
ack
until
the
foot sn
aps
into
pla
ce.
1.
Poner
prim
ero la
aguja
en s
u p
osi
ción m
ás
alta
. Em
puja
r el
pre
nsa
tela
s lig
eram
ente
hac
ia a
del
ante
.
2.
Introduci
r el
pas
ador
tran
sver
sal del
pre
n-
sate
las
entre
el c
uer
po d
e és
te y
el m
eulle
. Em
puja
r oblic
uam
ente
hac
ia a
trás
has
ta
que
el p
ie e
nca
je.
Cam
bio
del
pre
nsat
elas
Cha
ngin
g th
e pr
esse
r fo
ot
Cam
bio
de
la a
guja
Cha
ngin
g th
e ne
edle
1.
Loose
n the
scre
w in the
nee
dle
cl
amp.
2.
Rem
ove
the
nee
dle
.3.
Push
up the
new
nee
dle
with
the
fl at
sid
e aw
ay fro
m y
ou u
ntil
it w
ill
go n
o further
.4.
Tig
hte
n the
scre
w p
roper
ly.
Alw
ays
use
nee
dle
s o
f sy
stem
130/7
05
H.
1.
Afl oja
r el
torn
illo d
el s
oporte-
aguja
s
con e
l des
torn
illad
or.
2.
Saca
r la
agu
ja.
3.
Introduci
r la
agu
ja d
e ab
ajo a
arr
iba
(la
super
fi ci
e re
dondea
da
hac
ia
adel
ante
) em
pujá
ndola
has
ta s
u
tope.
4.
Apre
tar
fuer
tem
ente
el to
rnill
o.
Siem
pre
utl
ice
agu
jas
del
sis
tem
a 130/7
05
H.
16In
stru
ctio
n bo
ok/M
anua
l de
inst
rucc
ione
s 31
5, 3
25, 3
35
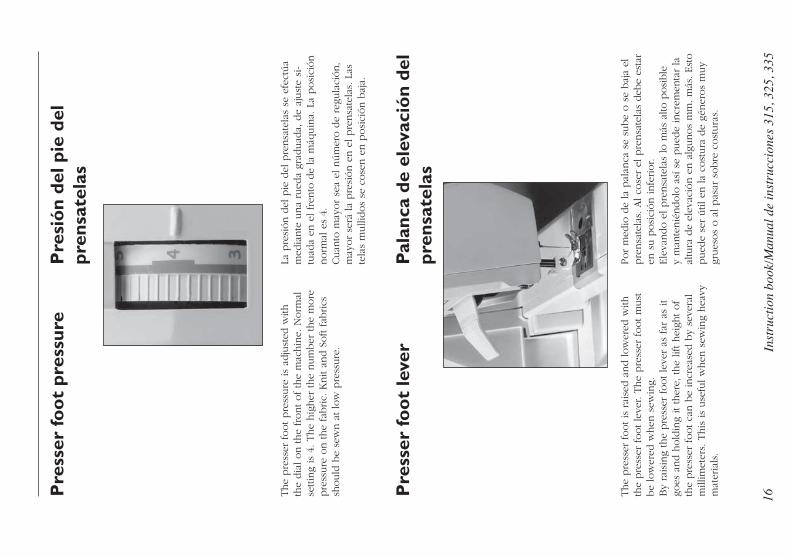
Pre
sser
foo
t pr
essu
re
Pal
anca
de
elev
ació
n de
l pr
ensa
tela
s
Pre
sió
n de
l pie
del
pr
ensa
tela
s
La p
resi
ón d
el p
ie d
el p
rensa
tela
s se
efe
ctúa
med
iante
una
rued
a gr
aduad
a, d
e aj
ust
e si
-tu
ada
en e
l fr
ento
de
la m
áquin
a. L
a posi
ción
norm
al e
s 4.
Cuan
to m
ayor
sea
el n
úm
ero d
e re
gula
ción,
may
or
será
la
pre
sión e
n e
l pre
nsa
tela
s. L
as
tela
s m
ulli
dos
se c
ose
n e
n p
osi
ción b
aja.
The
pre
sser
foot pre
ssure
is
adju
sted
with
th
e dia
l on the
front of th
e m
achin
e. N
orm
al
settin
g is
4. The
hig
her
the
num
ber
the
more
pre
ssure
on the
fabric.
Knit
and S
oft fab
rics
sh
ould
be
sew
n a
t lo
w p
ress
ure
.
Por
med
io d
e la
pal
anca
se
sube
o s
e baj
a el
pre
nsa
tela
s. A
l co
ser
el p
rensa
tela
s deb
e es
tar
en s
u p
osi
ción infe
rior.
Ele
vando e
l pre
nsa
tela
s lo
más
alto
posi
ble
y
man
tenié
ndolo
así
se
pued
e in
crem
enta
r la
al
tura
de
elev
ació
n e
n a
lgunos
mm
. m
ás. Est
o
pued
e se
r útil
en la
cost
ura
de
géner
os
muy
grues
os
o a
l pas
ar s
obre
cost
ura
s.
The
pre
sser
foot is
rai
sed a
nd low
ered
with
th
e pre
sser
foot le
ver. T
he
pre
sser
foot m
ust
be
low
ered
when
sew
ing.
B
y ra
isin
g th
e pre
s ser
foot le
ver
as far
as
it go
es a
nd h
old
ing
it th
ere,
the
lift hei
ght of
the
pre
sser
foot ca
n b
e in
crea
sed b
y se
vera
l m
illim
eter
s. T
his
is
use
ful w
hen
sew
ing
hea
vy
mat
eria
ls.
Pre
sser
foo
t le
ver
17In
stru
ctio
n bo
ok/M
anua
l de
inst
rucc
ione
s 31
5, 3
25, 3
35
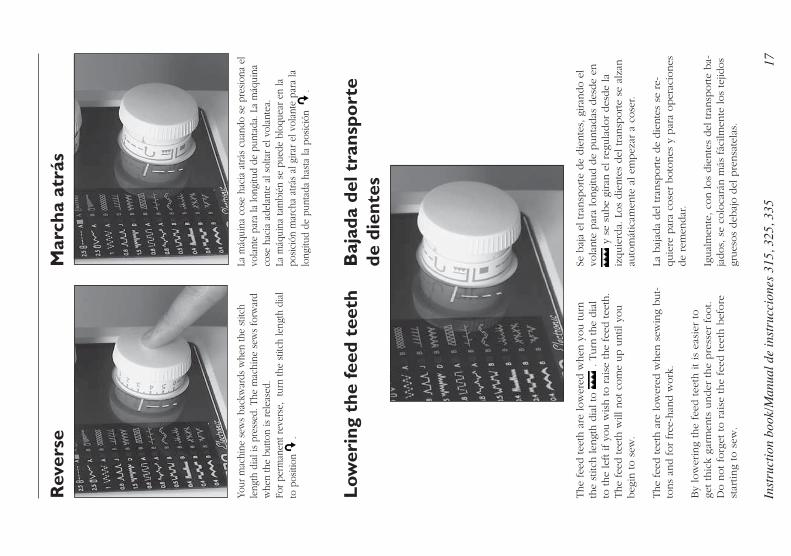
Your
mac
hine
sew
s ba
ckw
ards
whe
n th
e st
itch
leng
th d
ial i
s pr
esse
d. T
he m
achi
ne s
ews
for w
ard
whe
n th
e bu
tton
is r
elea
sed.
Fo
r pe
rman
ent r
ever
se,
turn
the
stitc
h le
ngth
dia
l to
pos
ition
.
La m
áqui
na c
ose
haci
a at
rás
cuan
do s
e pr
esio
na e
l vo
lant
e pa
ra la
long
itud
de p
unta
da. L
a m
áqui
na
cose
hac
ia a
dela
nte
al s
olta
r el
vol
ante
a.
La m
áqui
na ta
mbi
én s
e pu
ede
bloq
uear
en
la
posi
ción
mar
cha
atrá
s al
gira
r el
vol
ante
par
a la
lo
ngitu
d de
pun
tada
has
ta la
pos
ició
n
.
Rev
erse
Mar
cha
atrá
s
The
feed
tee
th a
re low
ered
when
you turn
th
e st
itch len
gth d
ial to
. T
urn
the
dia
l to
the
left if yo
u w
ish to r
aise
the
feed
tee
th.
The
feed
tee
th w
ill n
ot co
me
up u
ntil
you
beg
in to s
ew.
The
feed
tee
th a
re low
ered
when
sew
ing
but-
tons
and for
free
-han
d w
ork
.
By
low
erin
g th
e fe
ed tee
th it is
eas
ier
to
get th
ick g
arm
ents
under
the
pre
sser
foot.
Do n
ot fo
rget
to r
aise
the
feed
tee
th b
efore
st
arting
to s
ew.
Baj
ada
del t
rans
port
e de
die
ntes
Low
erin
g th
e fe
ed t
eeth
Se b
aja
el tra
nsp
orte
de
die
nte
s, g
iran
do e
l vo
lante
par
a lo
ngi
tud d
e punta
das
des
de
en
y s
e su
be
gira
n e
l re
gula
dor
des
de
la
izquie
rda.
Los
die
nte
s del
tra
nsp
orte
se a
lzan
au
tom
átic
amen
te a
l em
pez
ar a
cose
r.
La b
ajad
a del
tra
nsp
orte
de
die
nte
s se
re-
quie
re p
ara
cose
r boto
nes
y p
ara
oper
acio
nes
de
rem
endar
.
Igual
men
te, co
n los
die
nte
s del
tra
nsp
orte
ba-
jados,
se
colo
cará
n m
ás fác
ilmen
te los
tejid
os
grues
os
deb
ajo d
el p
rensa
tela
s.

18In
stru
ctio
n bo
ok/M
anua
l de
inst
rucc
ione
s 31
5, 3
25, 3
35
Sti
tch
sele
ctio
nS
elec
ció
n de
pun
tada
Your
mac
hin
e w
ill s
ew a
ll th
e st
itches
pic
tu-
red o
n the
front.
The
stitc
h is
set by
turn
ing
the
stitc
h s
elec
tor
– th
e upper
dia
l. A
colo
red
mar
ker
lines
up w
hile
turn
ing
the
stitc
h s
elec
-to
r, s
how
ing
whic
h s
titch
is
set.
Chec
k th
at the
nee
dle
is
in its
hig
hes
t posi
tion
bef
ore
you turn
the
stitc
h s
elec
tor.
The
low
er d
ial is
to a
jdust
the
stitc
h len
gth.
The
stitc
hes
are
div
ided
into
tw
o g
roups.
For-
war
d m
otio
n a
nd trim
otio
n s
titch
es. The
stitc
h
lengt
h for
the
left g
roup, fo
rwar
d m
otio
n
stitc
hes
, ca
n b
e va
ried
bet
wee
n 0
and 6
and
the
wid
th b
etw
een 0
-5.5
.Rec
om
men
dat
ions
for
the
sugg
este
d s
titch
le
ngt
h a
re g
iven
nex
t to
the
stitc
hes
.
When
you w
ish to u
se o
ne
of th
e st
itches
in
the
righ
t gr
oup, th
e trim
otio
n s
titch
es, yo
u
turn
the
stitc
h len
gth d
ial to
the
left u
ntil
it
reac
hes
the
area
. The
stitc
h len
gth
is s
et for
thes
e st
itches
. The
stitc
h w
idth
can
be
set bet
wee
n 0
-5.5
.Ther
e ar
e le
tter
s bet
wee
n the
stitc
h p
ictu
res
whic
h indic
ate
the
most
suita
ble
pre
sser
foot
for
each
stit
ch. The
letter
is
also
mar
ked o
n
the
pre
sser
foot.
En la
par
te fro
nta
l de
la m
áquin
a se
encu
en-
tra
el s
elec
tor
de
las
cost
ura
s que
Ud. pued
e re
aliz
ar c
on e
lla. La
cost
ura
des
eada
se o
btie
ne
gira
ndo e
l se
lect
or
de
punta
da.
Un c
urs
or
de
colo
r se
muev
e sim
ultá
nea
men
te a
l gi
rar
el
sele
ctor de
punta
da
y m
ues
tra
la q
ue
ha
sido
sele
ccio
nad
a. C
ontrola
r que
la a
guja
est
é en
su
posici
ón m
ás a
lta a
l gi
rar
el s
elec
tor
de
punta
da.
Con e
l vo
lante
infe
rior
se c
ambia
la
longi
tud d
e punta
das
. La
s co
stura
s es
tán
div
idid
as e
n d
os
grupos. P
ara
las
de
grupo a
la
izquie
rda,
la
longi
tud d
e punta
da
pued
e va
riar
en
tre
0 y
6 m
m y
la
amplit
ud e
ntre
0-5.
5 m
m.
Del
ante
de
resp
ectiv
e punta
da
se p
rese
nta
in-
form
ació
n s
obre
la
regu
laci
ón m
ás c
onve
nie
nte
al
tip
o d
e co
stura
sel
ecci
onad
a.
Cuan
do q
uira
real
izar
alg
una
de
las
cost
ura
s del
gru
po a
la
der
echa
deb
e gi
rar
el r
egula
dor
de
longi
tud d
e punta
da
a la
izq
uie
rda,
has
ta
la z
ona
. Est
o s
ignifi
ca q
ue
esas
co
stura
s te
ndrá
n a
hora
una
longi
tud inco
r-pora
da
fi ja
. La
am
plit
ud d
e punta
da
pued
e re
gula
r en
tre
0-5.
5 m
m. Entre
los
sìm
bolo
s de
cost
ura
s hay
let
ras
que
indic
an e
l pre
nsa
tela
s m
ás a
pro
pia
do p
ara
cada
cost
ura
. La
mis
ma
letra
se e
ncu
entra
en e
l pre
nsa
tela
s.
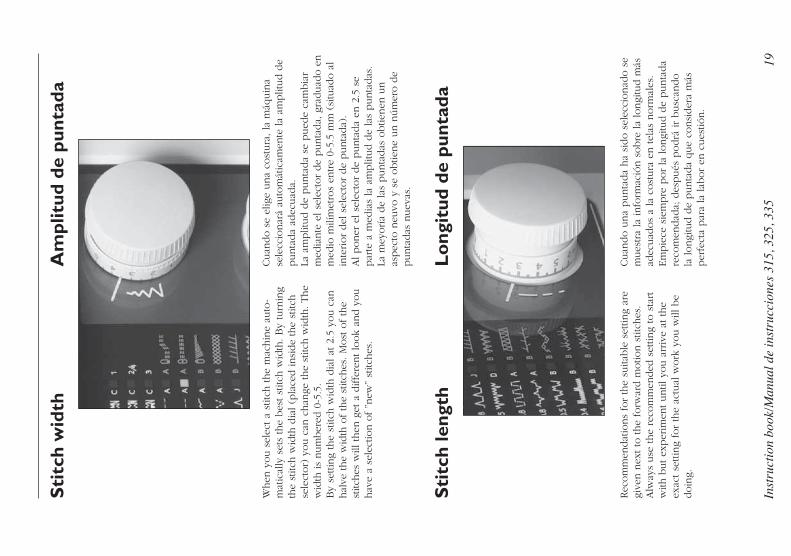
19In
stru
ctio
n bo
ok/M
anua
l de
inst
rucc
ione
s 31
5, 3
25, 3
35
Sti
tch
wid
thA
mpl
itud
de
punt
ada
When
you s
elec
t a
stitc
h the
mac
hin
e au
to-
mat
ical
ly s
ets
the
bes
t st
itch w
idth
. By
turn
ing
the
stitc
h w
idth
dia
l (p
lace
d insi
de
the
stitc
h
sele
ctor)
you c
an c
han
ge the
stitc
h w
idth
. The
wid
th is
num
ber
ed 0
-5.5
.By
settin
g th
e st
itch w
idth
dia
l at
2.5
you c
an
hal
ve the
wid
th o
f th
e st
itches
. M
ost
of th
e st
itches
will
then
get
a d
iffe
rent lo
ok
and y
ou
hav
e a
sele
ctio
n o
f ”n
ew”
stitc
hes
.
Sti
tch
leng
thL
ong
itud
de
punt
ada
Rec
om
men
dat
ions
for
the
suita
ble
set
ting
are
give
n n
ext to
the
forw
ard m
otio
n s
titch
es.
Alw
ays
use
the
reco
mm
ended
set
ting
to s
tart
with
but ex
per
imen
t until
you a
rriv
e at
the
exac
t se
ttin
g fo
r th
e ac
tual
work
you w
ill b
e doin
g.
Cuan
do s
e el
ige
una
cost
ura
, la
máq
uin
a se
lecc
ionar
á au
tom
átic
amen
te la
amplit
ud d
e punta
da
adec
uad
a.La
am
plit
ud d
e punta
da
se p
ued
e ca
mbia
r m
edia
nte
el se
lect
or
de
punta
da,
gra
duad
o e
n
med
io m
ilím
etro
s en
tre
0-5.
5 m
m (
situ
ado a
l in
terior
del
sel
ecto
r de
punta
da)
.Al poner
el se
lect
or
de
punta
da
en 2
.5 s
e par
te a
med
ias
la a
mplit
ud d
e la
s punta
das
. La
mey
oría
de
las
punta
das
obtie
nen
un
aspec
to n
euvo
y s
e obtie
ne
un n
úm
ero d
e punta
das
nuev
as.
Cuan
do u
na
punta
da
ha
sido s
elec
cionad
o s
e m
ues
tra
la info
rmac
ión s
obre
la
longi
tud m
ás
adec
uad
os
a la
cost
ura
en tel
as n
orm
ales
.Em
pie
ce s
iem
pre
por
la longi
tud d
e punta
da
reco
men
dad
a; d
espués
podrá
ir
busc
ando
la longi
tud d
e punta
da
que
consi
der
a m
ás
per
fect
a par
a la
lab
or
en c
ues
tión.
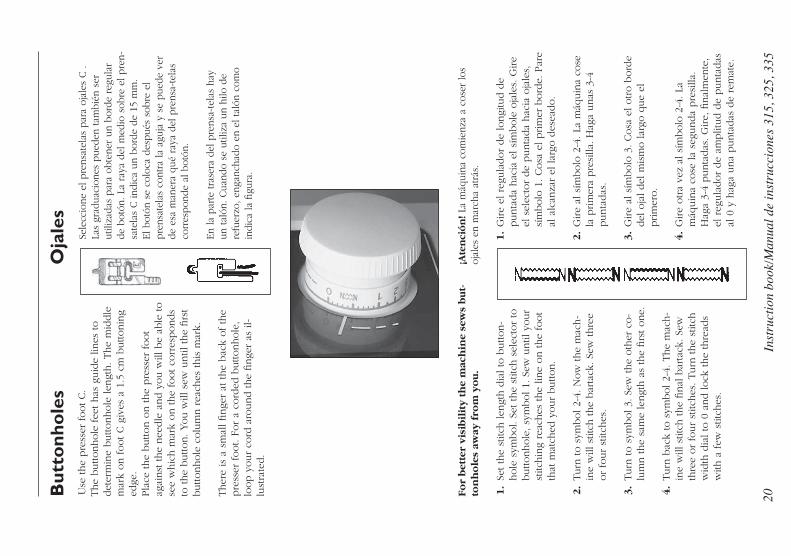
20In
stru
ctio
n bo
ok/M
anua
l de
inst
rucc
ione
s 31
5, 3
25, 3
35
Fo
r b
ette
r vi
sib
ilit
y t
he
mac
hin
e se
ws
bu
t-to
nh
ole
s aw
ay f
rom
yo
u.
1.
Set th
e st
itch len
gth d
ial to
button-
hole
sym
bol.
Set th
e st
itch s
elec
tor
to
buttonhole
, sy
mbol 1.
Sew
until
your
stitc
hin
g re
aches
the
line
on the
foot
that
mat
ched
your
button.
2.
Turn
to s
ymbol 2-
4. N
ow
the
mac
h-
ine
will
stit
ch the
bar
tack
. Se
w thre
e or
four
stitc
hes
.
3.
Turn
to s
ymbol 3.
Sew
the
oth
er c
o-
lum
n the
sam
e le
ngt
h a
s th
e fi rs
t one.
4.
Turn
bac
k to
sym
bol 2-
4. T
he
mac
h-
ine
will
stit
ch the
fi nal
bar
tack
. Se
w
thre
e or
four
stitc
hes
. Turn
the
stitc
h
wid
th d
ial to
0 a
nd lock
the
thre
ads
with
a few
stit
ches
.
But
tonh
ole
sO
jale
s
¡Ate
nci
ón
! La
máq
uina
com
ienz
a a
cose
r lo
s oj
ales
en
mar
cha
atrá
s.
1.
Gire
el r
egula
dor
de
longi
tud d
e
punta
da
hac
ia e
l sí
mbole
oja
les.
Gire
el
sel
ecto
r de
punta
da
hac
ia o
jale
s,
sím
bolo
1. Cosa
el prim
er b
ord
e. P
are
al
alc
anza
r el
lar
go d
esea
do.
2.
Gire
al s
ímbolo
2-4
. La
máq
uin
a co
se
la
prim
era
pre
silla
. H
aga
unas
3-4
punta
das
.
3.
Gire
al s
ímbolo
3. Cosa
el otro b
ord
e
del
oja
l del
mis
mo lar
go q
ue
el
prim
ero.
4.
Gire
otra
vez
al s
ímbolo
2-4
. La
m
áquin
a co
se la
segu
nda
pre
silla
.
H
aga
3-4
punta
das
. G
ire,
fi n
al m
en te
,
el
reg
ula
dor
de
amplit
ud d
e punta
das
al 0
y h
aga
una
punta
das
de
rem
ate.
Use
the
pre
sser
foot C.
The
buttonhole
fee
t has
guid
e lin
es to
det
erm
ine
buttonhole
len
gth. The
mid
dle
m
ark
on foot C g
ives
a 1
.5 c
m b
uttonin
g ed
ge.
Pla
ce the
button o
n the
pre
sser
foot
agai
nst
the
nee
dle
and y
ou w
ill b
e ab
le to
see
whic
h m
ark
on the
foot co
rres
ponds
to the
button. You w
ill s
ew u
ntil
the
fi rs
t buttonhole
colu
mn r
each
es this
mar
k.
Ther
e is
a s
mal
l fi nge
r at
the
bac
k of th
e pre
sser
foot.
For
a co
rded
buttonhole
, lo
op y
our
cord
aro
und the
fi nge
r as
il-
lust
rate
d.
Sele
ccio
ne e
l pre
nsat
elas
par
a oj
ales
C .
Las
grad
uaci
ones
pue
den
tam
bién
ser
ut
iliza
das
par
a ob
tene
r un
bor
de r
egul
ar
de b
otón
. La
ray
a de
l m
edio
sob
re e
l pre
n-sa
tela
s C ind
ica
un b
orde
de
15 m
m.
El b
otón
se
colo
ca d
espué
s so
bre
el
pre
nsat
elas
con
tra
la a
guja
y s
e pue
de v
er
de e
sa m
aner
a qu
é ra
ya d
el p
rens
a-te
las
corr
espon
de a
l bo
tón.
En la
par
te tra
sera
del
pre
nsa-
tela
s ha
y un
tal
ón. Cua
ndo
se u
tiliz
a un
hilo
de
refu
erzo
, en
ganc
hado
en
el tal
ón c
omo
indi
ca la
fi gur
a.
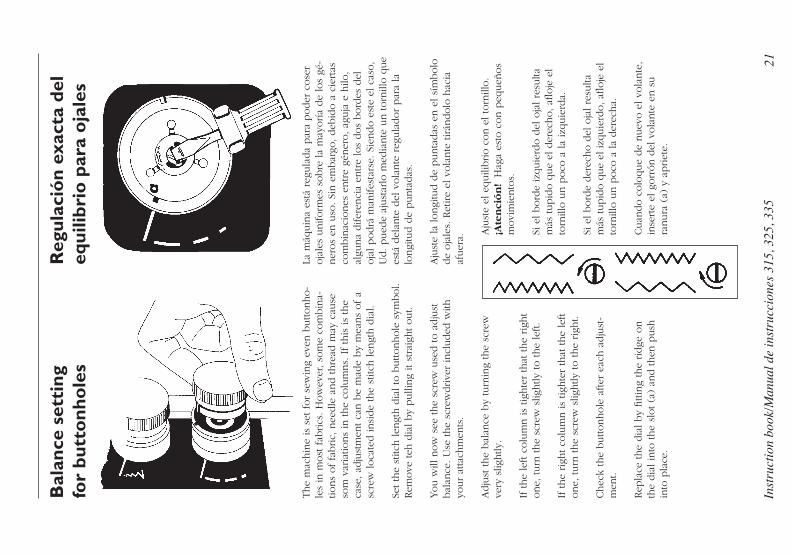
21In
stru
ctio
n bo
ok/M
anua
l de
inst
rucc
ione
s 31
5, 3
25, 3
35
Bal
ance
set
ting
fo
r bu
tto
nho
les
Reg
ulac
ión
exac
ta d
el
equi
libri
o p
ara
oja
les
The
mac
hin
e is
set
for
sew
ing
even
buttonho-
les
in m
ost
fab
rics
. H
ow
ever
, so
me
com
bin
a-tio
ns
of fa
bric,
nee
dle
and thre
ad m
ay c
ause
so
m v
aria
tions
in the
colu
mns.
If th
is is
the
case
, ad
just
men
t ca
n b
e m
ade
by
mea
ns
of a
scre
w loca
ted insi
de
the
stitc
h len
gth d
ial.
Set th
e st
itch len
gth d
ial to
buttonhole
sym
bol.
Rem
ove
teh
dia
l by
pulli
ng
it st
raig
ht out.
You w
ill n
ow
see
the
scre
w u
sed to a
dju
st
bal
ance
. U
se the
scre
wdrive
r in
cluded
with
yo
ur
atta
chm
ents
.
Adju
st the
bal
ance
by
turn
ing
the
scre
w
very
slig
htly
.
If the
left c
olu
mn is
tighte
r th
at the
righ
t one,
turn
the
scre
w s
lightly
to the
left.
If the
righ
t co
lum
n is
tighte
r th
at the
left
one,
turn
the
scre
w s
lightly
to the
righ
t.
Chec
k th
e buttonhole
after
eac
h a
dju
st-
men
t.
Rep
lace
the
dia
l by
fi ttin
g th
e ridge
on
the
dia
l in
to the
slot (a
) an
d then
push
in
to p
lace
.
La m
áquin
a es
tá r
egula
da
par
a poder
cose
r oja
les
uniform
es s
obre
la
may
oría
de
los
gé-
ner
os
en u
so. Si
n e
mbar
go, deb
ido a
cie
rtas
co
mbin
acio
nes
entre
géner
o, ag
uja
e h
ilo,
algu
na
difer
enci
a en
tre
los
dos
bord
es d
el
oja
l podrá
man
ifes
tars
e. S
iendo e
ste
el c
aso,
Ud. pued
e aj
ust
arlo
med
iante
un torn
illo q
ue
está
del
ante
del
vola
nte
reg
ula
dor
par
a la
lo
ngi
tud d
e punta
das
.
Aju
ste
la longi
tud d
e punta
das
en e
l sí
mbolo
de
oja
les.
Ret
ire
el v
ola
nte
tirán
dolo
hac
ia
afuer
a.
Aju
ste
el e
quili
brio c
on e
l to
rnill
o.
¡Ate
nci
ón
! H
aga
esto
con p
equeñ
os
movi
mie
nto
s.
Si e
l bord
e iz
quie
rdo d
el o
jal re
sulta
m
ás tupid
o q
ue
el d
erec
ho, afl
oje
el
torn
illo u
n p
oco
a la
izquie
rda.
Si e
l bord
e der
echo d
el o
jal re
sulta
m
ás tupid
o q
ue
el izq
uie
rdo, afl
oje
el
torn
illo u
n p
oco
a la
der
echa.
Cuan
do c
olo
que
de
nuev
o e
l vo
lante
, in
serte
el g
orr
ón d
el v
ola
nte
en s
u
ranura
(a)
y a
priet
e.
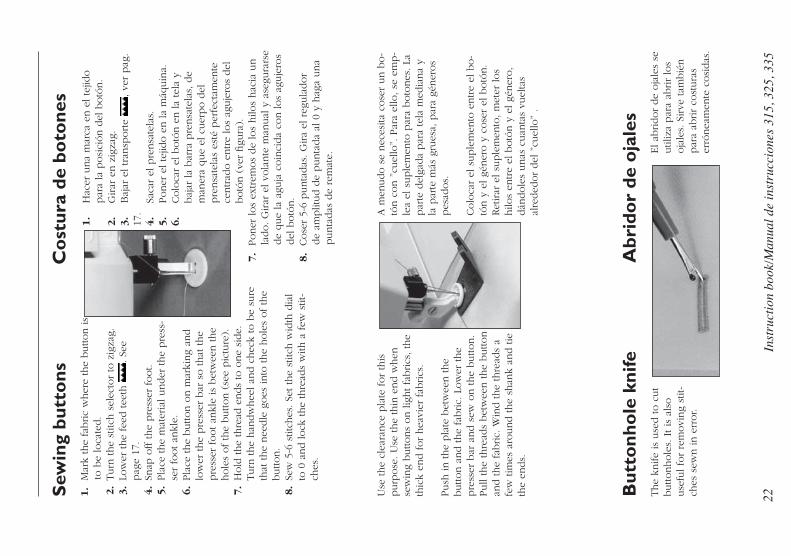
22In
stru
ctio
n bo
ok/M
anua
l de
inst
rucc
ione
s 31
5, 3
25, 3
35
1.
Mar
k th
e fa
bric
wher
e th
e button is
to b
e lo
cate
d.
2.
Turn
the
stitc
h s
elec
tor
to z
igza
g.3.
Low
er the
feed
tee
th
. Se
e pag
e 17
.4.
Snap
off the
pre
sser
foot.
5.
Pla
ce the
mat
eria
l under
the
pre
ss-
ser
foot an
kle.
6.
Pla
ce the
button o
n m
arki
ng
and
low
er the
pre
s ser
bar
so that
the
pre
sser
foot an
kle
is b
etw
een the
hole
s of th
e button (
see
pic
ture
).
7.
Hold
the
thre
ad e
nds
to o
ne
side.
Turn
the
han
dw
hee
l an
d c
hec
k to
be
sure
th
at the
nee
dle
goes
into
the
hole
s of th
e button.
8.
Sew
5-6
stit
ches
. Se
t th
e st
itch w
idth
dia
l to
0 a
nd lock
the
thre
ads
with
a few
stit
-ch
es.
Use
the
clea
rance
pla
te for
this
purp
ose
. U
se the
thin
end w
hen
se
win
g buttons
on lig
ht fa
brics
, th
e th
ick
end for
hea
vier
fab
rics
.
Push
in the
pla
te b
etw
een the
button a
nd the
fabric.
Low
er the
pre
sser
bar
and s
ew o
n the
button.
Pull
the
thre
ads
bet
wee
n the
button
and the
fabric.
Win
d the
thre
ads
a fe
w tim
es a
round the
shan
k an
d tie
th
e en
ds.
Sew
ing
butt
ons
1.
Hac
er u
na
mar
ca e
n e
l te
jido
par
a la
posi
ción d
el b
otó
n.
2.
Girar
en z
igza
g.3.
Baj
ar e
l tran
sporte
, ve
r pag
. 17
.4.
Saca
r el
pre
nsa
tela
s.5.
Poner
el te
jido e
n la
máq
uin
a.
6.
Colo
car
el b
otó
n e
n la
tela
y
baj
ar la
bar
ra p
rensa
tela
s, d
e
man
era
que
el c
uer
po d
el
pre
nsa
tela
s es
té p
erfe
ctam
ente
ce
ntrad
o e
ntre
los
aguje
ros
del
botó
n (
ver
fi gu
ra).
7.
Poner
los
extrem
os
de
los
hilo
s hac
ia u
n
lado. G
irar
el vo
lante
man
ual
y a
segu
rars
e de
que
la a
guja
coin
cida
con los
aguje
ros
del
botó
n.
8.
Cose
r 5-
6 punta
das
. G
ira
el r
egula
dor
de
amplit
ud d
e punta
da
al 0
y h
aga
una
punta
das
de
rem
ate.
Co
stur
a de
bo
tone
s
A m
enudo s
e nec
esita
cose
r un b
o-
tón c
on ”
cuel
lo”. P
ara
ello
, se
em
p-
lea
el s
uple
men
to p
ara
boto
nes
. La
par
te d
elga
da
par
a te
la m
edia
na
y la
par
te m
ás g
rues
a, p
ara
géner
os
pes
ados.
Colo
car
el s
uple
men
to e
ntre
el b
o-
tón y
el gé
ner
o y
cose
r el
botó
n.
Ret
irar
el su
ple
men
to, m
eter
los
hilo
s en
tre
el b
otó
n y
el gé
ner
o,
dán
dole
s unas
cuan
tas
vuel
tas
alre
ded
or
del
”cu
ello
” .
But
tonh
ole
kni
feThe
knife
is u
sed to c
ut
buttonhole
s. It is
als
o
use
ful fo
r re
movi
ng
stit-
ches
sew
n in e
rror.
Abr
ido
r de
oja
les
El ab
ridor
de
oja
les
se
util
iza
par
a ab
rir
los
oja
les.
Sirve
tam
bié
n
par
a ab
rir
cost
ura
s er
rónea
men
te c
osi
das
.
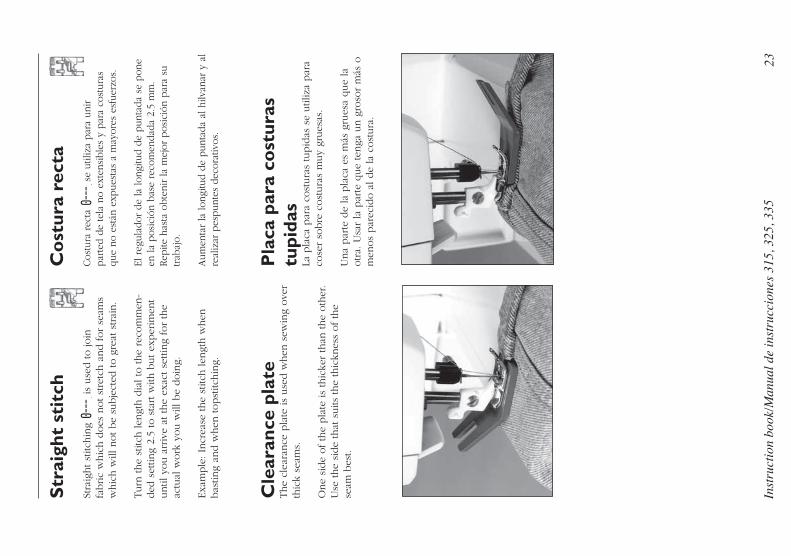
23In
stru
ctio
n bo
ok/M
anua
l de
inst
rucc
ione
s 31
5, 3
25, 3
35
Stra
ight st
itchin
g is
use
d to jo
in
fabric
whic
h d
oes
not st
retc
h a
nd for
seam
s w
hic
h w
ill n
ot be
subje
cted
to g
reat
strai
n.
Turn
the
stitc
h len
gth d
ial to
the
reco
mm
en-
ded
set
ting
2.5
to s
tart w
ith b
ut ex
per
imen
t until
you a
rriv
e at
the
exac
t se
ttin
g fo
r th
e ac
tual
work
you w
ill b
e doin
g.
Exa
mple
: In
crea
se the
stitc
h len
gth w
hen
bas
ting
and w
hen
topst
itchin
g.
Str
aigh
t st
itch
Co
stur
a re
cta
Cos
tura
rec
ta
se
utili
za p
ara
unir
par
ted
de tel
a no
ext
ensi
bles
y p
ara
cost
uras
qu
e no
est
án e
xpue
stas
a m
ayor
es e
sfue
rzos
.
El r
egul
ador
de
la lon
gitu
d de
pun
tada
se
pon
e en
la
pos
ició
n ba
se r
ecom
enda
da 2
.5 m
m.
Rep
ite h
asta
obt
enir la
mej
or p
osic
ión
par
a su
trab
ajo.
Aum
enta
r la
lon
gitu
d de
pun
tada
al hi
lvan
ar y
al
real
izar
pes
pun
tes
deco
rativ
os.
Cle
aran
ce p
late
The
clea
rance
pla
te is
use
d w
hen
sew
ing
ove
r th
ick
seam
s.
One
side
of th
e pla
te is
thic
ker
than
the
oth
er.
Use
the
side
that
suits
the
thic
knes
s of th
e se
am b
est.
Pla
ca p
ara
cost
uras
tu
pida
sLa
pla
ca p
ara
cost
ura
s tu
pid
as s
e util
iza
par
a co
ser
sobre
cost
ura
s m
uy
grues
as.
Una
par
te d
e la
pla
ca e
s m
ás g
rues
a que
la
otra.
Usa
r la
par
te q
ue
tenga
un g
roso
r m
ás o
m
enos
par
ecid
o a
l de
la c
ost
ura
.
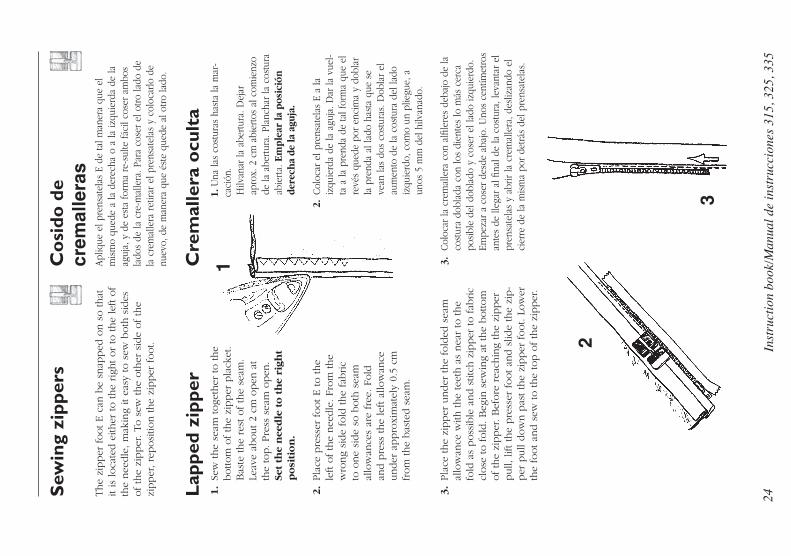
24In
stru
ctio
n bo
ok/M
anua
l de
inst
rucc
ione
s 31
5, 3
25, 3
35
1
2
3
Sew
ing
zipp
ers
The
zipper
foot E c
an b
e sn
apped
on s
o that
it
is loca
ted e
ither
to the
righ
t or
to the
left o
f th
e nee
dle
, m
akin
g it
easy
to s
ew b
oth
sid
es
of th
e zi
pper
. To
sew
the
oth
er s
ide
of th
e zi
pper
, re
posi
tion the
zipper
foot.
1.
Sew
the
seam
toge
ther
to the
bottom
of th
e zi
pper
pla
cket
. B
aste
the
rest
of th
e se
am.
Leav
e ab
out 2
cm o
pen
at
the
top. Pre
ss s
eam
open
. Se
t th
e n
eed
le t
o t
he
righ
t p
o si
tio
n.
2.
Pla
ce p
ress
er foot E to the
left o
f th
e nee
dle
. Fr
om
the
wro
ng
side
fold
the
fabric
to o
ne
side
so b
oth
sea
m
allo
wan
ces
are
free
. Fo
ld
and p
ress
the
left a
llow
ance
under
appro
xim
atel
y 0.
5 cm
fr
om
the
bas
ted s
eam
.
3.
Pla
ce the
zipper
under
the
fold
ed s
eam
al
low
ance
with
the
teet
h a
s nea
r to
the
fold
as
poss
ible
and s
titch
zip
per
to fab
ric
close
to fold
. B
egin
sew
ing
at the
bot tom
of th
e zi
pper
. B
efore
rea
chin
g th
e zi
pper
pull,
lift th
e pre
sser
foot an
d s
lide
the
zip-
per
pull
dow
n p
ast th
e zi
pper
foot.
Low
er
the
foot an
d s
ew to the
top o
f th
e zi
pper
.
Co
sido
de
crem
alle
ras
Apl
ique
el p
rens
atel
as E
de
tal m
aner
a qu
e el
m
ism
o qu
ede
a la
der
echa
o a
la iz
quie
rda
de la
ag
uja,
y d
e es
ta for
ma
re-s
ulte
fác
il co
ser
ambo
s la
dos
de la
cre
-mal
lera
. Par
a co
ser
el o
tro
lado
de
la c
rem
alle
ra r
etira
r el
pre
nsat
elas
y c
oloc
arlo
de
nuev
o, d
e m
aner
a qu
e és
te q
uede
al o
tro
lado
.
Cre
mal
lera
ocu
lta
Lap
ped
zipp
er1.
Una
las
cost
uras
has
ta la
mar
-ca
ción
. H
ilvan
ar la
abe
r tu r
a. D
ejar
ap
rox.
2 c
m a
bier
tos
al c
omie
nzo
de
la a
bertur
a. P
lanc
har
la c
ostu
ra
abie
rta.
Em
ple
ar la
pos
ició
n
dere
cha
de la
agu
ja.
2. C
oloc
ar e
l pre
nsat
elas
E a
la
izqu
ierd
a de
la a
guja
. Dar
la v
uel-
ta
a la
pre
nda
de ta
l for
ma
que
el
revé
s qu
ede
por
enci
ma
y do
blar
la
pre
nda
al la
do h
asta
que
se
ve
an la
s do
s co
stur
as. D
obla
r el
au
men
to d
e la
cos
tura
del
lado
iz
quie
rdo,
com
o un
plie
gue,
a
unos
5 m
m d
el h
ilvan
ado.
3.
Col
ocar
la c
rem
alle
ra c
on a
lfi le
res
deba
jo d
e la
cost
ura
dobl
ada
con
los
dien
tes
lo m
ás c
erca
po
sibl
e de
l dob
lado
y c
oser
el l
ado
izqu
ierd
o.
Empe
zar
a co
ser
desd
e ab
ajo.
Uno
s ce
ntím
etro
s an
tes
de ll
egar
al fi
nal
de
la c
ostu
ra, l
evan
tar
el
pren
sate
las
y ab
rir la
cre
mal
lera
, des
lizan
do e
l ci
erre
de
la m
ism
a po
r de
trás
del
pre
nsat
elas
.
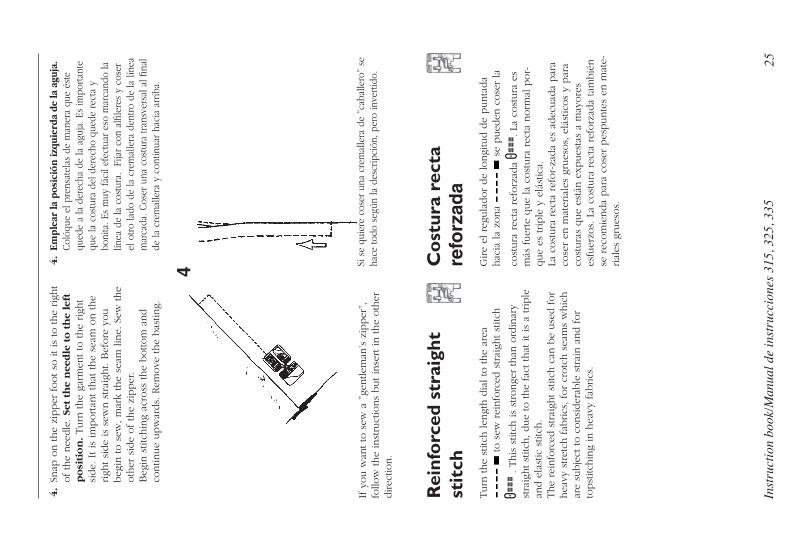
25In
stru
ctio
n bo
ok/M
anua
l de
inst
rucc
ione
s 31
5, 3
25, 3
35
4
4.
Snap
on the
zipper
foot so
it is
to the
righ
t of th
e nee
dle
. Se
t th
e n
eed
le t
o t
he
left
p
o si
tio
n. Turn
the
garm
ent to
the
righ
t si
de.
It is
im
portan
t th
at the
seam
on the
righ
t si
de
is s
ewn s
trai
ght.
Bef
ore
you
beg
in to s
ew, m
ark
the
seam
lin
e. S
ew the
oth
er s
ide
of th
e zi
pper
.
Beg
in s
titch
ing
acro
ss the
bottom
and
contin
ue
upw
ards.
Rem
ove
the
bas
ting.
If y
ou w
ant to
sew
a ”
gentle
man
’s z
ipper
”,
follo
w the
inst
ruct
ions
but in
sert in the
oth
er
direc
tion.
Rei
nfo
rced
str
aigh
t st
itch
Turn
the
stitc
h len
gth d
ial to
the
area
to s
ew r
einfo
rced
strai
ght st
itch
. T
his
stit
ch is
stro
nge
r th
an o
rdin
ary
stra
ight st
itch, due
to the
fact
that
it is
a triple
an
d e
last
ic s
titch
. The
rein
forc
ed s
trai
ght st
itch c
an b
e use
d for
hea
vy s
tret
ch fab
rics
, fo
r cr
otc
h s
eam
s w
hic
h
are
subje
ct to c
onsi
der
able
strai
n a
nd for
topst
itchin
g in
hea
vy fab
rics
.
Si s
e qu
iere
cos
er u
na c
rem
alle
ra d
e ”c
abal
lero
” se
ha
ce to
do s
egún
la d
escr
ipci
ón, p
ero
inve
rtid
o.
4.
Emp
lear
la p
osic
ión
izqu
ierd
a de
la a
guja
. Col
óque
el p
rens
atel
as d
e m
aner
a qu
e és
te
qued
e a
la d
erec
ha d
e la
agu
ja. E
s im
port an
te
que
la c
ostu
ra d
el d
erec
ho q
uede
rec
ta y
bo
nita
. Es
muy
fác
il ef
ectu
ar e
so m
arca
ndo
la
línea
de
la c
ostu
ra.
Fija
r co
n al
fi ler
es y
cos
er
el o
tro
lado
de
la c
rem
alle
ra d
entro
de la
líne
a m
arca
da. C
oser
una
cos
tura
tran
s ver
sal a
l fi n
al
de la
cre
mal
lera
y c
ontin
uar
haci
a ar
riba.
Co
stur
a re
cta
refo
rzad
aG
ire
el r
egula
dor
de
longi
tud d
e punta
da
hac
ia la
zona
se
pued
en c
ose
r la
cost
ura
rec
ta r
eforz
ada
. La
cost
ura
es
más
fuer
te q
ue
la c
ost
ura
rec
ta n
orm
al p
or-
que
es triple
y e
lást
ica.
La
cost
ura
rec
ta r
efor-
zada
es a
dec
uad
a par
a co
ser
en m
ater
iale
s gr
ues
os,
elá
stic
os
y par
a co
stura
s que
está
n e
xpues
tas
a m
ayore
s es
fuer
zos.
La
cost
ura
rec
ta r
eforz
ada
tam
bié
n
se r
ecom
ienda
par
a co
ser
pes
punte
s en
mat
e-rial
es g
rues
os.
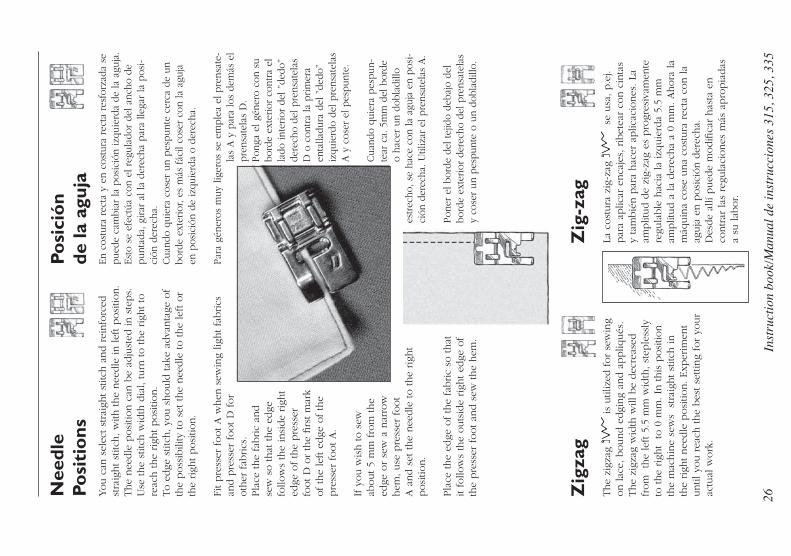
26In
stru
ctio
n bo
ok/M
anua
l de
inst
rucc
ione
s 31
5, 3
25, 3
35
Zig
zag
The
zigz
ag
is
util
ized
for
sew
ing
on lac
e, b
ound e
dgi
ng
and a
ppliq
ués
.The
zigz
ag w
idth
will
be
dec
reas
ed
from
th
e le
ft 5
.5 m
m w
idth
, st
eple
ssly
to
the
righ
t to 0
mm
. In
this
posi
tion
the
mac
hin
e se
ws
strai
ght st
itch in
the
righ
t nee
dle
posi
tion. Exp
erim
ent
until
you r
each
the
bes
t se
ttin
g fo
r yo
ur
actu
al w
ork
.
Zig
-zag
La c
ost
ura
zig
-zag
se
usa
, p.e
j. par
a ap
licar
enca
jes,
rib
etea
r co
n c
inta
s y
tam
bié
n p
ara
hac
er a
plic
acio
nes
. La
am
plit
ud d
e zi
g-za
g es
pro
gres
ivam
ente
re
gula
ble
hac
ia la
izquie
rda
5.5
mm
am
plit
ud a
la
der
echa
a 0
mm
. A
hora
la
máq
uin
a co
se u
na
cost
ura
rec
ta c
on la
aguja
en p
osi
ción d
erec
ha.
Des
de
allí
pued
e m
odifi
car
has
ta e
n
contrar
las
reg
ula
ciones
más
apro
pia
das
a
su lab
or.
Nee
dle
Posi
tio
nsYou c
an s
elec
t st
raig
ht st
itch a
nd r
einfo
rced
st
raig
ht st
itch, w
ith the
nee
dle
in lef
t posi
tion.
The
nee
dle
posi
tion c
an b
e ad
just
ed in s
teps.
U
se the
stitc
h w
idth
dia
l, tu
rn to the
righ
t to
re
ach the
righ
t posi
tion.
To e
dge
stit
ch, yo
u s
hould
tak
e ad
vanta
ge o
f th
e poss
ibili
ty to s
et the
nee
dle
to the
left o
r th
e righ
t posi
tion.
Fit pre
sser
foot A
when
sew
ing
light fa
brics
an
d p
ress
er foot D
for
oth
er fab
rics
. Pla
ce the
fabric
and
sew
so that
the
edge
fo
llow
s th
e in
side
righ
t ed
ge o
f th
e pre
sser
fo
ot D
or
the
fi rs
t m
ark
of th
e le
ft e
dge
of th
e pre
sser
foot A
.
If y
ou w
ish to s
ew
about 5
mm
fro
m the
edge
or
sew
a n
arro
w
hem
, use
pre
s ser
foot
A a
nd s
et the
nee
dle
to the
righ
t posi
tion.
Pla
ce the
edge
of th
e fa
bric
so that
it
follo
ws
the
outs
ide
righ
t ed
ge o
f th
e pre
s ser
foot an
d s
ew the
hem
.
Posi
ció
n de
la a
guja
En c
ostu
ra r
ecta
y e
n co
stur
a re
cta
resf
orza
da s
e pue
de c
ambi
ar la
pos
ició
n iz
quie
rda
de la
aguj
a.
Esto
se
efec
túa
con
el r
egul
ador
del
anc
ho d
e pun
tada
, gi
rar
al la
dere
cha
par
a lle
gar
la p
osi-
ción
der
echa
.Cua
ndo
quie
ra c
oser
un
pes
pun
te c
erca
de
un
bord
e ex
terior
, es
más
fác
il co
ser
con
la a
guja
en
pos
ició
n de
izq
uier
da o
der
echa
.
Para
gén
eros
muy
lig
eros
se
emple
a el
pre
nsat
e-la
s A
y p
ara
los
dem
ás e
l pre
nsat
elas
D.
Pong
a el
gén
ero
con
su
bord
e ex
terior
con
tra
el
lado
int
erio
r de
l ”d
edo”
dere
cho
del pre
nsat
elas
D
o c
ontra
la p
rim
era
enta
lladu
ra d
el ”
dedo
” iz
quie
rdo
del pre
nsat
elas
A
y c
oser
el pes
pun
te.
Cua
ndo
quie
ra p
espun
-te
ar c
a. 5
mm
del
bor
de
o ha
cer
un d
obla
dillo
es
trec
ho, se
hac
e co
n la
agu
ja e
n pos
i-ci
ón d
erec
ha. U
tiliz
ar e
l pre
nsat
elas
A.
Pone
r el
bor
de d
el tej
ido
deba
jo d
el
bord
e ex
terior
der
echo
del
pre
nsat
elas
y
cose
r un
pes
pun
te o
un
dobl
adill
o.
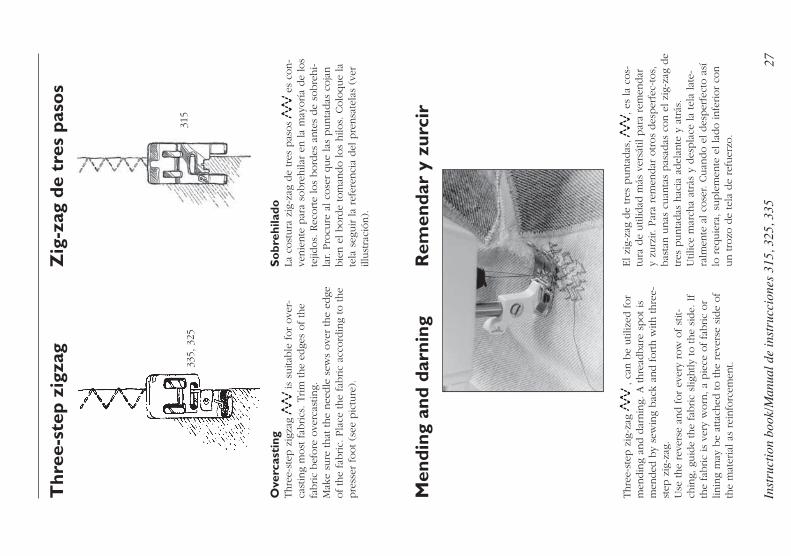
27In
stru
ctio
n bo
ok/M
anua
l de
inst
rucc
ione
s 31
5, 3
25, 3
35
335,
325
315
Thr
ee-s
tep
zigz
ag
Ove
rcas
ting
Thre
e-st
ep z
igza
g is
suita
ble
for
ove
r- ca
s tin
g m
ost
fab
rics
. Trim
the
edge
s of th
e fa
bric
bef
ore
ove
r cas
ting.
M
ake
sure
that
the
nee
dle
sew
s ove
r th
e ed
ge
of th
e fa
bric.
Pla
ce the
fabric
acco
rdin
g to
the
pre
sser
foot (s
ee p
ictu
re).
Men
ding
and
dar
ning
Thre
e-st
ep z
ig-z
ag
, c
an b
e util
ized
for
men
din
g an
d d
arnin
g. A
thre
adbar
e sp
ot is
m
ended
by
sew
ing
bac
k an
d forth w
ith thre
e-st
ep z
ig-z
ag.
Use
the
reve
rse
and for
ever
y ro
w o
f st
it-ch
ing,
guid
e th
e fa
bric
slig
htly
to the
side.
If
the
fabric
is v
ery
worn
, a
pie
ce o
f fa
bric
or
linin
g m
ay b
e at
tach
ed to the
reve
rse
side
of
the
mat
eria
l as
rei
nfo
rcem
ent.
El zi
g-za
g de
tres
punta
das
, , es
la
cos-
tura
de
util
idad
más
ver
sátil
par
a re
men
dar
y
zurz
ir. Par
a re
men
dar
otros
des
per
fec-
tos,
bas
tan u
nas
cuan
tas
pas
adas
con e
l zi
g-za
g de
tres
punta
das
hac
ia a
del
an te
y a
trás
. U
tilic
e m
arch
a at
rás
y des
pla
ce la
tela
la t
e -ra
l men
te a
l co
ser. C
uan
do e
l des
per
fect
o a
sí
lo r
equie
ra, su
ple
men
te e
l la
do infe
rior
con
un tro
zo d
e te
la d
e re
fuer
zo.
Zig
-zag
de
tres
pas
os
So
breh
ilado
La c
ost
ura
zig
-zag
de
tres
pas
os
es
con-
venie
nte
par
a so
bre
hila
r en
la
may
oría
de
los
tejid
os.
Rec
orte
los
bord
es a
nte
s de
sobre
hi-
lar. P
rocu
re a
l co
ser
que
las
punta
das
coja
n
bie
n e
l bord
e to
man
do los
hilo
s. C
olo
que
la
tela
seg
uir la
refe
renci
a del
pre
nsa
tela
s (v
er
illust
raci
ón).
Rem
enda
r y
zurc
ir
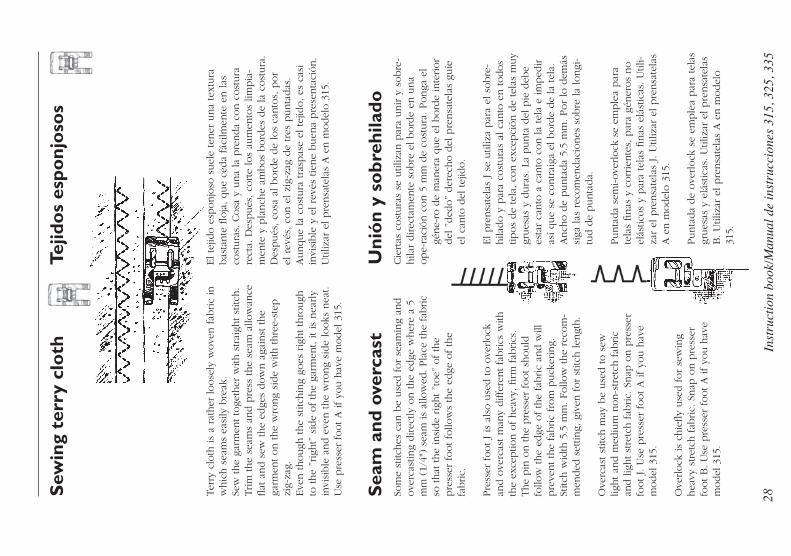
28In
stru
ctio
n bo
ok/M
anua
l de
inst
rucc
ione
s 31
5, 3
25, 3
35
Sew
ing
terr
y cl
oth
Terr
y cl
oth
is
a ra
ther
loose
ly w
ove
n fab
ric
in
whic
h s
eam
s ea
sily
bre
ak.
Sew
the
garm
ent to
geth
er w
ith s
trai
ght st
itch.
Trim
the
seam
s an
d p
ress
the
seam
allo
wan
ce
fl at
and s
ew the
edge
s dow
n a
gain
st the
garm
ent on the
wro
ng
side
with
thre
e-st
ep
zig-
zag.
Eve
n though
the
stitc
hin
g go
es r
ight th
rough
to
the
”rig
ht”
sid
e of th
e ga
rmen
t, it
is n
early
invi
sible
and e
ven the
wro
ng
side
looks
nea
t. U
se p
ress
er foot A
if yo
u h
ave
model
315
.
El te
jido e
sponjo
so s
uel
e te
ner
una
text
ura
bas
tante
fl o
ja, que
ceda
fáci
lmen
te e
n las
co
stura
s. C
osa
y u
na
la p
renda
con c
ost
ura
re
cta.
Des
pués
, co
rte
los
aum
ento
s lim
pia
-m
ente
y p
lanch
e am
bos
bord
es d
e la
cost
ura
. D
espués
, co
sa a
l bord
e de
los
canto
s, p
or
el r
evés
, co
n e
l zi
g-za
g de
tres
punta
das
. Aunque
la c
ost
ura
tra
spas
e el
tej
ido, es
cas
i in
visi
ble
y e
l re
vés
tiene
buen
a pre
senta
ción.
Util
izar
el pre
nsa
tela
s A
en m
odel
o 3
15.
Tejid
os
espo
njo
sos
Som
e st
itches
can
be
use
d for
seam
ing
and
ove
r cas
ting
direc
tly o
n the
edge
wher
e a
5 m
m (
1/4"
) se
am is
allo
wed
. Pla
ce the
fabric
so that
the
insi
de
righ
t ”t
oe”
of th
e pre
sser
foot fo
llow
s th
e ed
ge o
f th
e fa
bric.
Pre
sser
foot J
is a
lso u
sed to o
ver lock
an
d o
verc
ast m
any
dif fe
rent fa
brics
with
th
e ex
ceptio
n o
f hea
vy, fi rm
fab
rics
. The
pin
on the
pre
sser
foot sh
ould
fo
llow
the
edge
of th
e fa
bric
and w
ill
pre
vent th
e fa
bric
from
puck
e rin
g.
Stitc
h w
idth
5.5
mm
. Fo
llow
the
reco
m-
men
ded
set
ting,
giv
en for
stitc
h len
gth.
Ove
rcas
t st
itch m
ay b
e use
d to s
ew
light an
d m
ediu
m n
on-s
tret
ch fab
ric
and lig
ht st
retc
h fab
ric.
Snap
on p
ress
er
foot J. U
se p
ress
er foot A
if yo
u h
ave
model
315
.
Ove
rlock
is
chie
fl y
use
d for
sew
ing
hea
vy s
tret
ch fab
ric.
Snap
on p
ress
er
foot B
. U
se p
ress
er foot A
if yo
u h
ave
model
315
.
Sea
m a
nd o
verc
ast
Uni
ón
y so
breh
ilado
Cie
rtas
cost
ura
s se
util
izan
par
a unir y
sobre
-hila
r direc
tam
ente
sobre
el bord
e en
una
ope-
raci
ón c
on 5
mm
de
cost
ura
. Ponga
el
géne-
ro d
e m
aner
a que
el b
ord
e in
terior
del
”ded
o”
der
echo d
el p
rensa
tela
s gu
íe
el c
anto
del
tej
ido.
El pre
nsa
tela
s J
se u
tiliz
a par
a el
sobre
-hila
do y
par
a co
stura
s al
can
to e
n todos
tipos
de
tela
, co
n e
xcep
ción d
e te
las
muy
grues
as y
dura
s. L
a punta
del
pie
deb
e es
tar
canto
a c
anto
con la
tela
e im
ped
ir
así que
se c
ontrai
ga e
l bord
e de
la tel
a.
Anch
o d
e punta
da
5.5
mm
. Por
lo d
emás
si
ga las
rec
om
endac
iones
sobre
la
longi
-tu
d d
e punta
da.
Punta
da
sem
i-ove
rlock
se
emple
a par
a te
las
fi nas
y c
orr
iente
s, p
ara
géner
os
no
elás
ticos
y par
a te
las
fi nas
elá
stic
as. U
tili-
zar
el p
rensa
tela
s J. U
tiliz
ar e
l pre
nsa
tela
s A e
n m
odel
o 3
15.
Punta
da
de
ove
rlock
se
emple
a par
a te
las
grues
as y
elá
stic
as. U
tiliz
ar e
l pre
nsa
tela
s B
. U
tiliz
ar e
l pre
nsa
tela
s A
en m
odel
o
315.
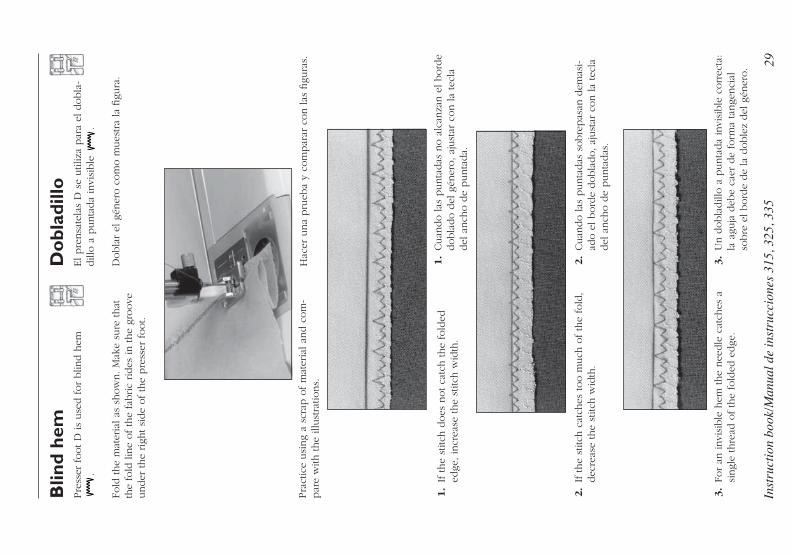
29In
stru
ctio
n bo
ok/M
anua
l de
inst
rucc
ione
s 31
5, 3
25, 3
35
2.
If the
stitc
h c
atch
es too m
uch
of th
e fo
ld,
dec
reas
e th
e st
itch w
idth
.
Blin
d he
mPre
sser
foot D
is
use
d for
blin
d h
em
.
Fold
the
ma t
e ri a
l as
show
n. M
ake
sure
that
th
e fo
ld lin
e of th
e fa
bric
rides
in the
groove
under
the
righ
t si
de
of th
e pre
sser
foot.
Pra
ctic
e usi
ng
a sc
rap o
f m
ater
ial an
d c
om
-par
e w
ith the
illust
ratio
ns.
1.
If the
stitc
h d
oes
not ca
tch the
fold
ed
edge
, in
crea
se the
stitc
h w
idth
.
1.
Cuan
do las
punta
das
no a
lcan
zan e
l bord
e dobla
do d
el g
éner
o, aj
ust
ar c
on la
tecl
a del
anch
o d
e punta
da.
3.
Un d
obla
dill
o a
punta
da
invi
sible
corr
ecta
: la
agu
ja d
ebe
caer
de
form
a ta
nge
nci
al
sobre
el bord
e de
la d
oble
z del
gén
ero.
Do
blad
illo
El pre
nsa
tela
s D
se
util
iza
par
a el
dobla
-dill
o a
punta
da
invi
sible
.
Dobla
r el
gén
ero c
om
o m
ues
tra
la fi g
ura
.
Hac
er u
na
pru
eba
y co
mpar
ar c
on las
fi g
ura
s.
3.
For
an invi
sible
hem
the
nee
dle
cat
ches
a
singl
e th
read
of th
e fo
lded
edge
.
2.
Cuan
do las
punta
das
sobre
pas
an d
emas
i-ad
o e
l bord
e dobla
do, aj
ust
ar c
on la
tecl
a del
anch
o d
e punta
das
.
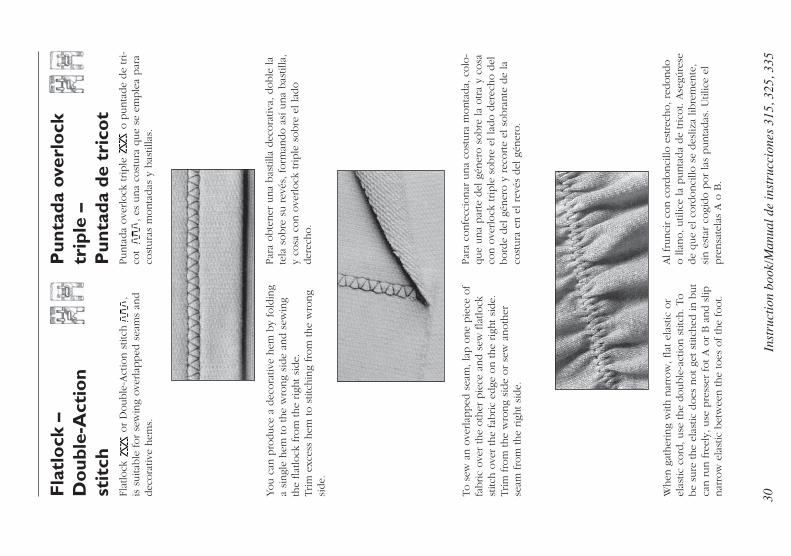
30In
stru
ctio
n bo
ok/M
anua
l de
inst
rucc
ione
s 31
5, 3
25, 3
35
Fla
tlo
ck –
D
oub
le-A
ctio
n st
itch
Flat
lock
o
r D
ouble
-Act
ion s
titch
,
is s
uita
ble
for
sew
ing
ove
rlap
ped
sea
ms
and
dec
ora
tive
hem
s.
You c
an p
roduce
a d
ecora
tive
hem
by
fold
ing
a si
ng l
e hem
to the
wro
ng
side
and s
ewin
g th
e fl at
lock
fro
m the
righ
t si
de.
Trim
exc
ess
hem
to s
titch
ing
from
the
wro
ng
side.
To s
ew a
n o
verlap
ped
sea
m, la
p o
ne
pie
ce o
f fa
bric
ove
r th
e oth
er p
iece
and s
ew fl a
tlock
st
itch o
ver
the
fabric
edge
on the
righ
t si
de.
Trim
fro
m the
wro
ng
side
or
sew
anoth
er
seam
fro
m the
righ
t si
de.
Pun
tada
ove
rlo
ck
trip
le –
P
unta
da d
e tr
ico
tPunta
da
ove
rlock
triple
o
punta
de
de
tri-
cot
, es
una
cost
ura
que
se e
mple
a par
a co
stura
s m
onta
das
y b
astil
las.
Par
a obte
ner
una
bas
tilla
dec
ora
tiva,
doble
la
tela
sobre
su r
evés
, fo
rman
do a
sí u
na
bas
tilla
, y
cosa
con o
verlock
triple
sobre
el la
do
der
echo.
Par
a co
nfe
ccio
nar
una
cost
ura
monta
da,
colo
-que
una
par
te d
el g
éner
o s
obre
la
otra
y co
sa
con o
verlock
triple
sobre
el la
do d
erec
ho d
el
bord
e del
gén
ero y
rec
orte
el s
obra
nte
de
la
cost
ura
en e
l re
vés
del
gén
ero.
When
gat
her
ing
with
nar
row
, fl at
ela
stic
or
elas
tic c
ord
, use
the
double
-act
ion s
titch
. To
be
sure
the
elas
tic d
oes
not ge
t st
itched
in b
ut
can r
un fre
ely,
use
pre
sser
fot A
or
B a
nd s
lip
nar
row
ela
stic
bet
wee
n the
toes
of th
e fo
ot.
Al fr
unci
r co
n c
ord
onci
llo e
stre
cho, re
dondo
o lla
no, util
ice
la p
unta
da
de
tric
ot.
Ase
gúre
se
de
que
el c
ord
onci
llo s
e des
liza
libre
men
te,
sin e
star
cogi
do p
or
las
punta
das
. U
tilic
e el
pre
nsa
tela
s A
o B
.
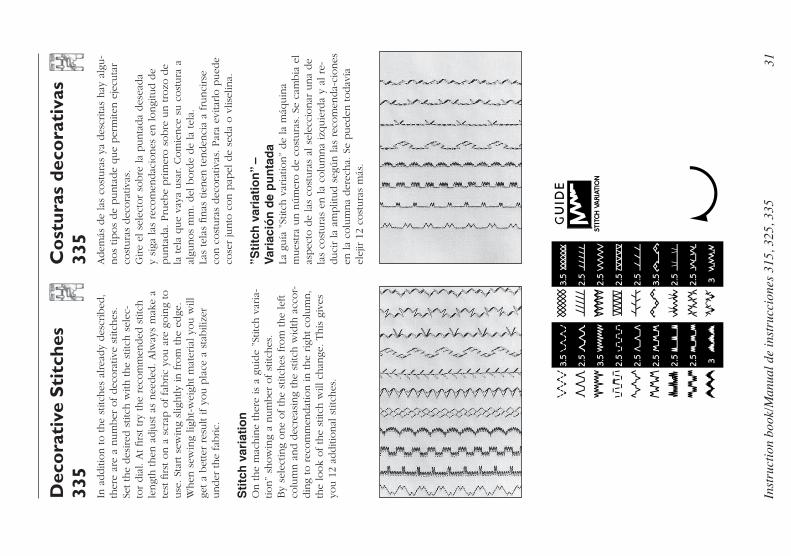
31In
stru
ctio
n bo
ok/M
anua
l de
inst
rucc
ione
s 31
5, 3
25, 3
35
Dec
ora
tive
Sti
tche
s 33
5C
ost
uras
dec
ora
tiva
s 33
5In
additi
on to the
stitc
hes
alrea
dy
des
crib
ed,
ther
e ar
e a
num
ber
of dec
ora
tive
stitc
hes
.Se
t th
e des
ired
stit
ch w
ith the
stitc
h s
elec
-to
r dia
l. A
t fi rs
t try
the
reco
mm
ended
stit
ch
lengt
h then
adju
st a
s nee
ded
. Alw
ays
mak
e a
test
fi rst
on a
scr
ap o
f fa
bric
you a
re g
oin
g to
use
. St
art se
win
g sl
ightly
in fro
m the
edge
.W
hen
sew
ing
light-w
eigh
t m
ater
ial yo
u w
ill
get a
bet
ter
resu
lt if y
ou p
lace
a s
tabili
zer
under
the
fabric.
Sti
tch
var
iati
on
On the
mac
hin
e th
ere
is a
guid
e ”S
titch
var
ia-
tion”
show
ing
a num
ber
of st
itches
.By
sele
ctin
g one
of th
e st
itches
fro
m the
left
colu
mn a
nd d
ecre
asin
g th
e st
itch w
idth
acc
or-
din
g to
rec
om
men
dat
ion in the
righ
t co
lum
n,
the
look
of th
e st
itch w
ill c
han
ge. This
giv
es
you 1
2 ad
diti
onal
stit
ches
.
Adem
ás d
e la
s co
stura
s ya
des
crita
s hay
alg
u-
nos
tipos
de
punta
de
que
per
mite
n e
jecu
tar
cost
ura
s dec
ora
tivas
.G
ire
el s
elec
tor
sobre
la
punta
da
des
eada
y si
ga las
rec
om
endac
iones
en longi
tud d
e punta
da.
Pru
ebe
prim
ero s
obre
un tro
zo d
e la
tel
a que
vaya
usa
r. C
om
ience
su c
ost
ura
a
algu
nos
mm
. del
bord
e de
la tel
a.La
s te
las
fi nas
tie
nen
ten
den
cia
a frunci
rse
con c
ost
ura
s dec
ora
tivas
. Par
a ev
itarlo p
ued
e co
ser
junto
con p
apel
de
seda
o v
lisel
ina.
”Sti
tch
var
iati
on
” –
Var
iaci
ón
de
pu
nta
da
La g
uía
”St
itch v
aria
tion”
de
la m
áquin
a m
ues
tra
un n
úm
ero d
e co
stura
s. S
e ca
mbia
el
aspec
to d
e la
s co
stura
s al
sel
ecci
onar
una
de
las
cost
ura
s en
la
colu
mna
izquie
rda
y al
re-
duci
r la
am
plit
ud s
egún las
rec
om
enda-
ciones
en
la
colu
mna
der
echa.
Se
pued
en todav
ía
elej
ir 1
2 co
stura
s m
ás.
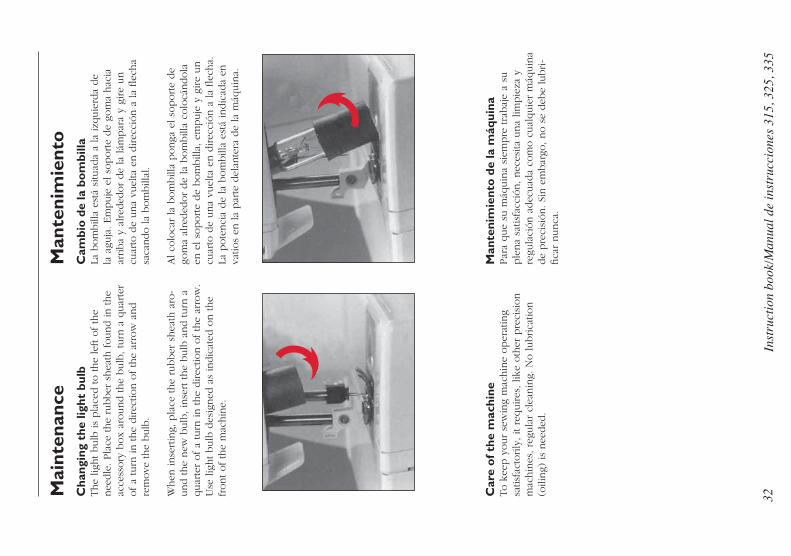
32In
stru
ctio
n bo
ok/M
anua
l de
inst
rucc
ione
s 31
5, 3
25, 3
35
Mai
nten
ance
Cha
ngin
g th
e lig
ht b
ulb
The
light bulb
is
pla
ced to the
left o
f th
e nee
dle
. Pla
ce the
rubber
shea
th found in the
acce
ssory
box
around the
bulb
, tu
rn a
quar
ter
of a
turn
in the
direc
tion o
f th
e ar
row
and
rem
ove
the
bulb
.
When
inse
rtin
g, p
lace
the
rubber
shea
th a
ro-
und the
new
bulb
, in
sert the
bulb
and turn
a
quar
ter
of a
turn
in the
direc
tion o
f th
e ar
row
. U
se lig
ht bulb
des
igned
as
indic
ated
on the
front of th
e m
achin
e.
Car
e o
f the
mac
hine
To k
eep y
our
sew
ing
mac
hin
e oper
atin
g sa
tisfa
ctorily
, it
requires
, lik
e oth
er p
reci
sion
mac
hin
es, re
gula
r cl
eanin
g. N
o lubrica
tion
(oili
ng)
is
nee
ded
.
Man
teni
mie
nto
Cam
bio
de
la b
om
billa
La b
om
bill
a es
tá s
ituad
a a
la izq
uie
rda
de
la a
guja
. Em
puje
el so
porte
de
gom
a hac
ia
arriba
y al
reded
or
de
la lám
par
a y
gire
un
cuar
to d
e una
vuel
ta e
n d
irec
ción a
la
fl ec
ha
saca
ndo la
bom
bill
al.
Al co
loca
r la
bom
bill
a ponga
el so
porte
de
gom
a al
reded
or
de
la b
om
bill
a co
locá
ndola
en
el so
porte
de
bom
bill
a, e
mpuje
y g
ire
un
cuar
to d
e una
vuel
ta e
n d
irec
ción a
la
fl ec
ha.
La
pote
nci
a de
la b
om
bill
a es
tá indic
ada
en
vatio
s en
la
par
te d
elan
tera
de
la m
áquin
a.
Man
teni
mie
nto
de
la m
áqui
naPar
a que
su m
áquin
a si
empre
tra
baj
e a
su
ple
na
satis
facc
ión, nec
esita
una
limpie
za y
re
gula
ción a
dec
uad
a co
mo c
ual
quie
r m
áquin
a de
pre
cisi
ón. Si
n e
mbar
go, no s
e deb
e lu
bri-
fi ca
r nunca
.
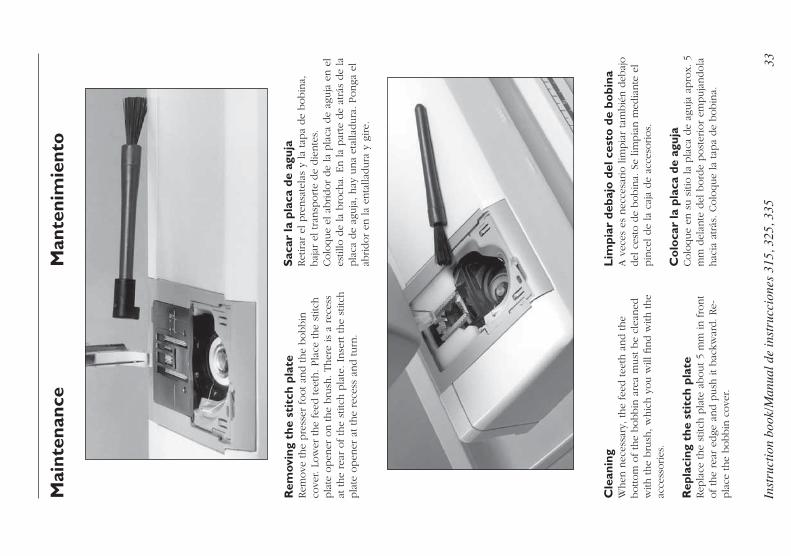
33In
stru
ctio
n bo
ok/M
anua
l de
inst
rucc
ione
s 31
5, 3
25, 3
35
Rem
ovin
g th
e st
itch
pla
teRem
ove
the
pre
sser
foot an
d the
bobbin
co
ver. L
ow
er the
feed
tee
th. Pla
ce the
stitc
h
pla
te o
pen
er o
n the
bru
sh. Ther
e is
a r
eces
s at
the
rear
of th
e st
itch p
late
. In
sert the
stitc
h
pla
te o
pen
er a
t th
e re
cess
and turn
.
Cle
anin
gW
hen
nec
essa
ry, th
e fe
ed tee
th a
nd the
bottom
of th
e bobbin
are
a m
ust
be
clea
ned
w
ith the
bru
sh, w
hic
h y
ou w
ill fi n
d w
ith the
acce
ssories
.
Rep
laci
ng t
he s
titc
h pl
ate
Rep
lace
the
stitc
h p
late
about 5
mm
in fro
nt
of th
e re
ar e
dge
and p
ush
it bac
kwar
d. Re-
pla
ce the
bobbin
cove
r.
Mai
nten
ance
Man
teni
mie
nto
Sac
ar la
pla
ca d
e ag
uja
Ret
irar
el pre
nsa
tela
s y
la tap
a de
bobin
a,
baj
ar e
l tran
sporte
de
die
nte
s.Colo
que
el a
bridor
de
la p
laca
de
aguja
en e
l es
tillo
de
la b
roch
a. E
n la
par
te d
e at
rás
de
la
pla
ca d
e ag
uja
, hay
una
etal
ladura
. Ponga
el
abridor
en la
enta
lladura
y g
ire.
Lim
piar
deb
ajo
del
ces
to d
e bo
bina
A v
eces
es
nec
cesa
rio lim
pia
r ta
mbié
n d
ebaj
o
del
ces
to d
e bobin
a. S
e lim
pia
n m
edia
nte
el
pin
cel de
la c
aja
de
acce
sorios.
Co
loca
r la
pla
ca d
e ag
uja
Colo
que
en s
u s
itio la
pla
ca d
e ag
uja
apro
x. 5
m
m d
elan
te d
el b
ord
e post
erio
r em
puja
ndola
hac
ia a
trás
. Colo
que
la tap
a de
bobin
a.
34In
stru
ctio
n bo
ok/M
anua
l de
inst
rucc
ione
s 31
5, 3
25, 3
35
Faul
t-fi
ndin
gA
lway
s st
art
by c
heck
ing
the
need
le• A
lway
s st
art w
ith a
new
nee
dle
as
soon
as y
ou d
isco
ver
that
a s
titch
is
not w
hat
you
expec
ted. Te
st s
ew o
n a
scr
ap o
f th
e fa
bric
you a
re s
ewin
g. C
hec
k th
at y
ou h
ave
chose
n
the
corr
ect nee
dle
and s
ee that
it is
corr
ectly
in
serted
. Se
e pag
e 15
.
Una
ttra
ctiv
e st
itch
es• T
he th
read
tens
ion
is n
ot c
orre
ct. S
ee p
age
14.
• M
ake
sure
that
the
thre
ad is
not ca
tchin
g.
Cer
-tai
n thre
ad s
pools
are
unsu
itable
for
spoolin
g fr
om
the
horizo
nta
l sp
ool pin
. Try
in
stea
d w
ith the
vertic
al s
pool pin
. • T
he
mac
hin
e m
ay b
e in
corr
ectly
thre
aded
. B
e su
re to p
lace
spool hold
ers
corr
ectly
. The
corr
ect th
read
ing
is s
how
n o
n p
age
11.
• W
rong
bobbin
thre
ad. It s
hould
be
of th
e sa
me
thic
knes
s as
the
upper
thre
ad.
The
nee
dle
brea
ks• Y
ou m
ay h
ave
hel
ped
the
mac
hin
e to
fee
d
by
pulli
ng
the
fabric.
The
nee
dle
can
strik
e ag
ainst
stit
ch p
late
and b
reak
. Chan
ge the
nee
dle
. Se
e pag
e 15
.
The
upp
er t
hrea
d br
eaks
• C
hec
k th
e th
read
spool to
see
that
it has
not ca
ugh
t in
any
way
.• T
he
nee
dle
eye
may
hav
e sh
arp e
dge
s w
hic
h c
ut th
e th
read
. If s
o, ch
ange
the
nee
dle
. Se
e pag
e 15
.• T
he
upper
thre
ad is
inco
rrec
tly thre
aded
. Se
e pag
e 11
. • T
he
upper
thre
ad m
ay h
ave
too m
uch
ten
-si
on. Ref
er to p
age
14.
The
thr
ead
is k
nott
ed• T
he
hole
in the
stitc
h p
late
may
be
chip
ped
an
d h
ave
shar
p e
dge
s. W
e re
com
men
d that
yo
u r
epla
ce it.
The
bo
bbin
thr
ead
brea
ks• T
he
bobbin
thre
ad m
ay b
e in
corr
ectly
th
read
ed. Se
e pag
e 13
.• T
he
stitc
h p
late
hole
is
dam
aged
. Se
e ”U
p-
per
thre
ad b
reak
s”.
Irre
gula
r bo
bbin
win
ding
• T
his
may
be
due
to p
oor
qual
ity thre
ad.
When
sew
ing
with
cotton thre
ad, in
crea
se the
thre
ad ten
sion.
Posi
bles
ave
rías
Co
ntro
lar
la a
guja
• C
uand
o al
guna
vez
una
cos
tura
no
sea
satis
-fa
ctor
ia, c
ompro
bar co
n un
a ag
uja
nuev
a en
un
troz
o de
tel
a. C
ontrol
ar q
ue s
e ha
ya e
legi
-do
la
aguj
a co
rrec
ta y
ase
gura
rse
de q
ue la
agu
ja s
ea
introd
ucid
a ha
sta
su top
e y
que
el tor
nillo
está
apre
tado
cor
rect
amen
te, v
éa p
ág. 1
5.
Pun
tada
s fa
lsas
• L
a te
nsió
n de
l hilo
no
es c
orre
cta,
véa
pág
. 14.
• A
segú
rars
e que
el h
ilo n
o e
stá
blo
quea
do.
Cie
rtos
porta-
carr
etes
no s
on a
dec
uad
os
par
a el
dev
anad
o d
esde
porta-
carr
etes
hori-z
onta
-le
s. P
or
lo tan
to, co
mpro
bar
con u
n p
orta-
car-
rete
ver
tical
. • E
l en
heb
rado n
o e
s co
rrec
-to, ve
rifi ca
r se
gún la
pág
. 11
. • H
ilo infe
rior
in-a
dec
uad
o. Est
e deb
e se
r ig
ual
que
el s
uper
ior.
Ro
tura
de
la a
guja
• N
unca
se
deb
e tir
ar d
e la
tel
a dura
nte
el
cosi
do, porq
ue
la a
guja
se
pued
e ro
mper
al
tropez
ar c
ontra
la p
laca
de
aguja
. Cam
bia
r la
ag
uja
, vé
a pág
. 15
.
Ro
tura
del
hilo
sup
erio
r• E
xam
inar
el ca
rret
e del
hilo
y v
erifi
car
si e
l hilo
se
ha
enga
nch
ado e
n a
lguna
par
te.
• P
odría
ser
que
el a
guje
ro d
e la
agu
ja n
o
estu
vier
a lo
sufi ci
emen
te b
ien p
ulid
o. Cam
-bia
r la
agu
ja, vé
a pág
. 15
.• E
l hilo
super
ior
está
mal
enheb
rado, vé
a pág
. 11
. • L
a te
nsi
ón d
el h
ilo s
uper
ior
es d
emas
iado
fuer
te. Ver
la
”Ten
sión d
el h
ilo”, p
ág. 14
.
El h
ilo t
iene
nud
os.
• E
l ag
uje
ro d
e la
pla
ca d
e la
agu
ja s
e ha
dañ
ado p
or
los
contin
uos
pin
chaz
os
de
la
aguja
. Lo
mej
or
es c
ambia
r la
pla
ca d
e ag
uja
.
Ro
tura
del
hilo
infe
rio
r• E
l hilo
infe
rior
está
mal
enheb
rado, vé
a pág
. 13
. • S
e ha
dañ
ado e
l ag
uje
ro d
e la
pla
ca d
e ag
uja
, ve
r ar
riba.
Bo
bina
do ir
regu
lar
del h
ilo• P
ued
e se
r a
causa
de
la d
ifi ci
ente
cal
idad
del
hilo
. Al co
ser
con u
n h
ilo d
e al
godón,
aum
enta
r la
ten
sión d
el h
ilo.
35In
stru
ctio
n bo
ok/M
anua
l de
inst
rucc
ione
s 31
5, 3
25, 3
35
• T
he
mac
hin
e is
not co
rrec
tly thre
aded
for
bobbin
win
din
g. S
ee p
age
12.
The
fabr
ic p
ucke
rs• T
he
upper
thre
ad ten
sion is
too tig
ht.
See
pag
e 14
for
corr
ect th
read
ten
sion.
The
mac
hine
do
es n
ot
feed
the
fabr
ic• T
he
stitc
h len
gth is
too s
hort. In
crea
se s
titch
le
ngt
h.
• T
he
feed
tee
th m
ay b
e lo
wer
ed. Rai
se them
by
turn
ing
the
stitc
h len
gth d
ial to
the
left.
• T
he
feed
tee
th a
re full
of dust
and d
irt.
Cle
an w
ith the
bru
sh. Se
e pag
e 33
.
The
sea
m is
to
o lo
ose
– fa
bric
laye
rs
not
held
tog
ethe
r• T
he
thre
ad ten
sion is
far
too loose
. Pag
e 14
sh
ow
s how
to a
dju
st the
thre
ad ten
sion.
Mac
hine
run
s sl
uggi
shly
• D
irt or
lint has
built
up u
nder
the
stitc
h
pla
te. Lo
ose
n the
pla
te a
nd b
rush
cle
an b
et-
wee
n the
feed
tee
th a
nd in the
bottom
are
a.
See
pag
e 33
.• D
irt or
lint has
pac
ked in the
hook.
Rem
ove
th
e bobbin
and c
lean
with
the
bru
sh. Se
e pag
e 33
.
Exp
ert
assi
stan
ceH
ave
your
mac
hin
e ”t
uned
up”
regu
larly
by
your
dea
ler.
If y
ou h
ave
follo
wed
the
pre
cedin
g poin
ts
and s
till do n
ot ge
t sa
tisfa
ctory
res
ults
, yo
u
should
conta
ct the
dea
ler
wher
e yo
u b
ough
t th
e m
achin
e.
When
the
mac
hin
e is
bei
ng
chec
ked, it
is
a gr
eat hel
p if it
can b
e te
st s
ewn u
nder
as
sim
ilar
conditi
ons
as p
oss
ible
as
when
you
use
d it.
Rem
ember
to tak
e a
sew
ing
sam
ple
alo
ng
with
you, pre
fera
bly
of th
e fa
bric
and w
ith
the
thre
ad y
ou inte
nd to u
se.
A s
ewin
g sa
mple
will
often
giv
e m
uch
bet
ter
info
rmat
ion than
word
s.
No
n-o
rigi
nal P
arts
and
Acc
esso
ries
The
war
ranty
does
not co
ver
any
def
ect or
dam
age
cause
d b
y use
of non-o
rigi
nal
acc
es-
sories
or
par
ts.
• L
a m
áquin
a no e
stá
corr
ecta
men
te e
nhe-
bra
da
par
a el
bobin
ado, ve
r la
pág
. 12
.
La
tela
se
frun
ce• L
a te
nsi
ón d
el h
ilo s
uper
ior
es d
emas
iado
fuer
te. Te
nsi
ón c
orr
ecta
del
hilo
, vé
a pág
. 14
.
No
hay
ava
nce
del t
ejid
o• L
a lo
ngi
tud d
e la
punta
da
es d
emas
iado
corta.
Aum
enta
r.
• P
ued
e se
r que
el tra
nsp
orte
esté
baj
ado, ve
r la
pág
. 17
. • E
l tra
nspor
te e
stá
lleno
de
pel
usill
a y
apre
sto.
Li
mpia
rlo
con
un p
ince
l, ve
r la
pág
. 33.
La
cost
ura
resu
lta
dem
asia
do fl
oja
–
las
capa
s de
l tej
ido
no
est
án
fuer
tem
ente
uni
das
• L
a te
nsi
ón d
el h
ilo e
s dem
asia
do fl o
ja. Te
n-
sión c
orr
ecta
del
hilo
, vé
a pág
. 14
.
La
máq
uina
mar
cha
con
difi
cult
ad• S
e hay
a ac
um
ula
do d
emas
iada
pel
usi
lla y
ap
-res
to p
or
deb
ajo d
e la
pla
ca d
e ag
uja
. Q
ui-
tar
la p
laca
de
aguja
y lim
pia
r el
den
tado d
el
tran
sporte
y en
el ca
nill
ero, ve
r la
pág
. 33
.• P
ued
e se
r que
hay
a ac
um
ula
do p
elusi
lla y
ap
rest
o e
n e
l ga
rfi o
. Ret
irar
la
cápsu
la y
lim
-pia
rla
con u
na
bro
cha,
ver
la
pág
. 33
.
Asi
sten
cia
técn
ica
Cuan
do s
e hay
an s
eguid
o todas
las
inst
rucc
io-
nes
men
cionad
as y
no s
e co
nsi
gan r
esulta
dos
satis
fact
orios,
poner
se e
n c
onta
cto c
on e
l es
-ta
ble
cim
iento
que
le v
endió
la
máq
uin
a.
Allí
, le
ate
nder
án g
ust
osa
men
te c
on los
conse
jos
e in
stru
ccio
nes
corr
espondie
nte
s.
Tam
bié
n le
aconse
jerá
n d
onde
pued
e m
andar
la
máq
uin
a par
a un s
ervi
cio. Se
ría
de
much
a util
idad
y a
yuda
par
a el
per
sonal
téc
nic
o
acom
pañ
ar a
la
máq
uin
a unas
mues
tras
del
te
jido e
hilo
s util
izad
os,
com
o, as
imis
mo, una
mues
tra
del
cosi
do d
efec
tuoso
. M
uch
as v
eces
una
mues
tra
del
cosi
do d
a m
ejor
info
rmac
ión
que
un info
rme
ora
l.
Acc
eso
rio
s y
repu
esto
s no
ori
gina
les
La g
aran
tía n
o c
ubre
nin
gún d
esper
fect
o o
av
ería
cau
sado p
or
la u
tiliz
ació
n d
e ac
ceso
rios
o rep
ues
tos
que
no s
ean o
rig i
na l
es.
Husq
varn
a Vik
ing
rese
rves
the
righ
t to
chan
ge
the
mac
hin
e eq
uip
men
t an
d the
ass o
rt m
ent
of ac
cess
ories
with
out prior
notic
e, o
r m
ake
modifi
catio
ns
to the
per
form
ance
or
des
ign.
Such
modifi
catio
ns,
how
ever
, w
ill a
lway
s be
to the
ben
efi t o
f th
e use
r an
d the
pro
duct
.
Nos
rese
rvam
os
el d
erec
ho a
modifi
car
la
máq
uin
a, e
l eq
uip
o ó
los
acce
ssorios
extras
si
n p
revi
o a
viso
. Tal
es m
odifi
caci
ones
ser
án
siem
pre
en a
ben
efi c
io d
el c
onsu
mid
or
y el
pro
duct
o.
Dec
lara
tion
of C
onfo
rmity
Her
ewith
we
confi rm
that
this
Sew
ing
Mac
hin
e in
its
ess
entia
l par
ts,
fulfi
ls the
Low
Volta
ge D
irec
tive
73/2
3/EEC a
nd 9
3/68
/EEC.
This
confi rm
atio
n is
bas
ed u
pon C
ertifi
cat
e or
Tech
nic
al C
on st
ruc t
ion
File
s, p
erfo
rmed
by
SEM
KO
.
The
com
ple
te a
rchiv
e fi le
is
dra
wn u
p a
nd m
ainta
ined
by:
VSM
Gro
up A
BSE
-561
84
Husk
varn
aSw
eden


World F
irst
s Fr
om
Husq
varn
a V
ikin
gH
usq
varn
a V
ikin
g, t
he
world l
eader
in h
om
e se
win
g,
continues
to a
dd t
o i
ts l
ist
of
fi rs
ts t
o e
nsu
re y
our
sew
ing
is a
s fa
st,
fun,
and e
asy
as i
t ca
n b
e.
412 60 79-45D • Copyright VSM Group AB • All rights reserved • Printed on environmentally friendly paper
VS
M G
roup
AB
• S
E-5
61 8
4 H
uskv
arna
, Sw
eden
ww
w.h
usq
va
rna
vik
ing
.co
m
1953
Fi
rst
fl oat
ing
jam
-pro
of
hook
1961
Fi
rst
colo
r-co
ded
stitc
h s
elec
tion
1965
Fi
rst
snap
-on p
ress
er f
oot
syst
em
1971
Fi
rst
to e
lim
inat
e th
e nee
d f
or
oilin
g
1980
Fi
rst
pro
gram
mab
le l
ette
ring
– A
writing
sew
ing
mac
hin
e
Firs
t pro
gram
mab
le s
titc
hin
g
1981
Fi
rst
with d
ual
lig
hts
1982
Fi
rst
Sew
ing
Advi
sor®
– A
thin
kin
g se
win
g m
achin
e
1983
Fi
rst
thin
kin
g an
d w
riting
sew
ing
mac
hin
e
1989
Fi
rst
LCD
Info
dis
pla
y® –
A b
uilt-in
inst
ruct
ion b
ook
Fi
rst
LCD
Pro
gram
dis
pla
y® –
See
bef
ore
you s
ew
Firs
t tr
uly
auto
mat
ic s
elf-
adju
stin
g te
nsi
on
1994
Fi
rst
embro
ider
y so
ftw
are
for
hom
e co
mpute
rs
1998
Fi
rst
Senso
r Fo
ot
Lift
Fi
rst
Senso
r Fo
ot
Pre
ssure
Fi
rst
Sele
ctiv
e Thre
ad C
utter
s
Firs
t Colo
r Touch
Scr
een
Fi
rst
Built-in
Dis
k D
rive
KE
EP
ING
TH
E W
OR
LD
SEW
ING
Recommended