Embed Size (px)
Citation preview
Maxillary Anesthesia
Dr. Deepak K. Gupta

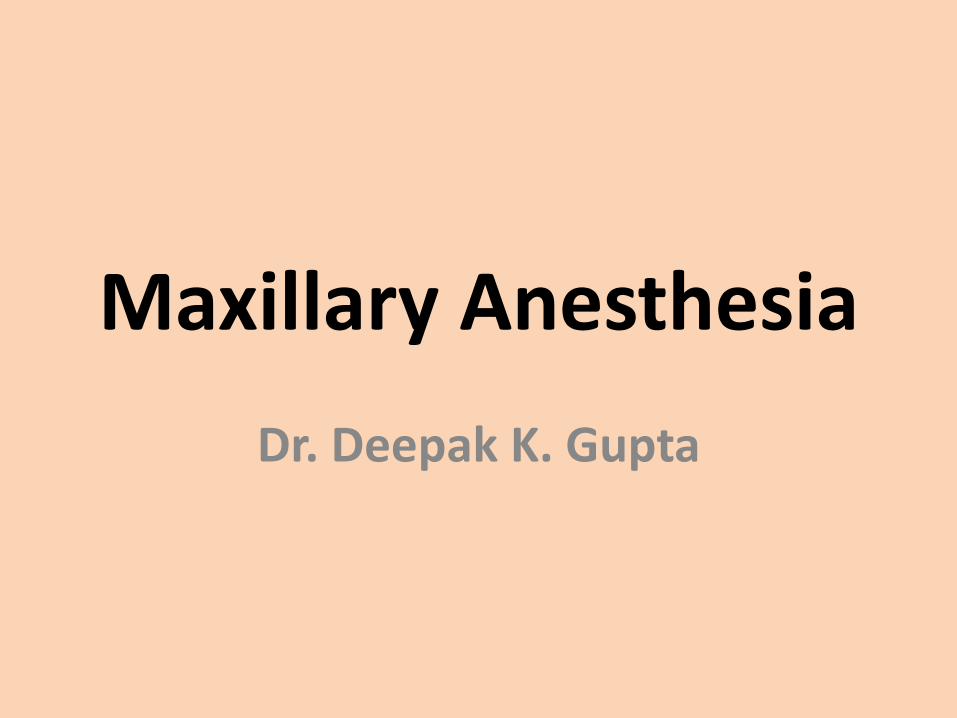
Maxillary Nerve
• Second division of the trigeminal nerve arises from the middle of the trigeminal ganglion.
• Intermediate in size between ophthalmic and mandibular divisions,
• It is purely sensory in function
• Leaves the cranium through the foramen rotundum.
www.facebook.com/notesdental
www.facebook.com/notesdental
Maxillary Nerve
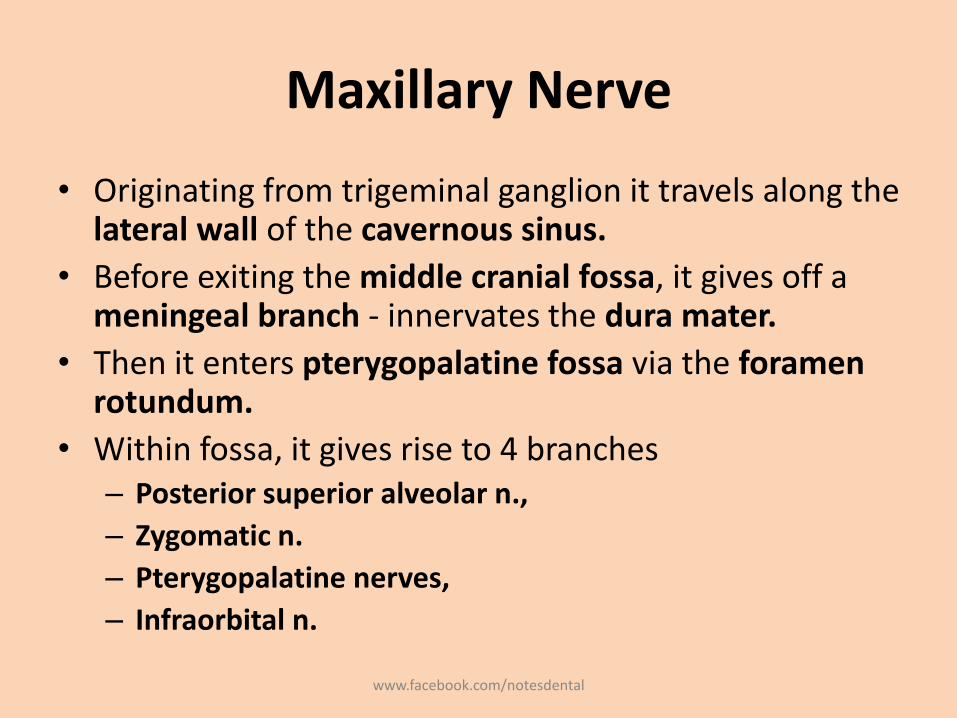
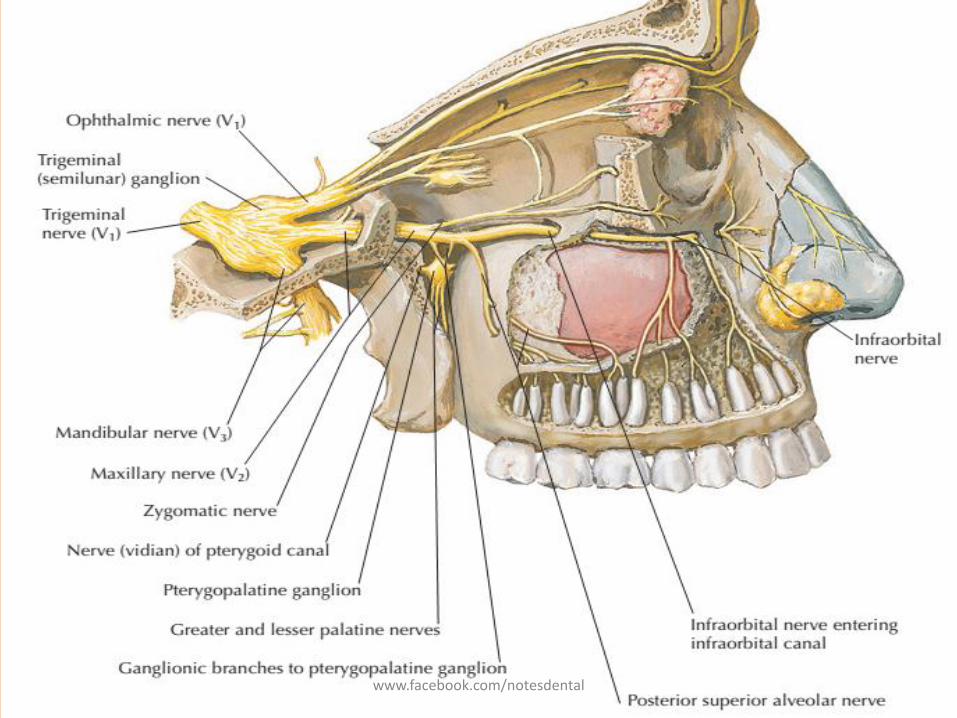
• Originating from trigeminal ganglion it travels along the lateral wall of the cavernous sinus.
• Before exiting the middle cranial fossa, it gives off a meningeal branch - innervates the dura mater.
• Then it enters pterygopalatine fossa via the foramen rotundum.
• Within fossa, it gives rise to 4 branches– Posterior superior alveolar n.,
– Zygomatic n.
– Pterygopalatine nerves,
– Infraorbital n.
www.facebook.com/notesdental
www.facebook.com/notesdental
Posterior superior alveolar Nerve
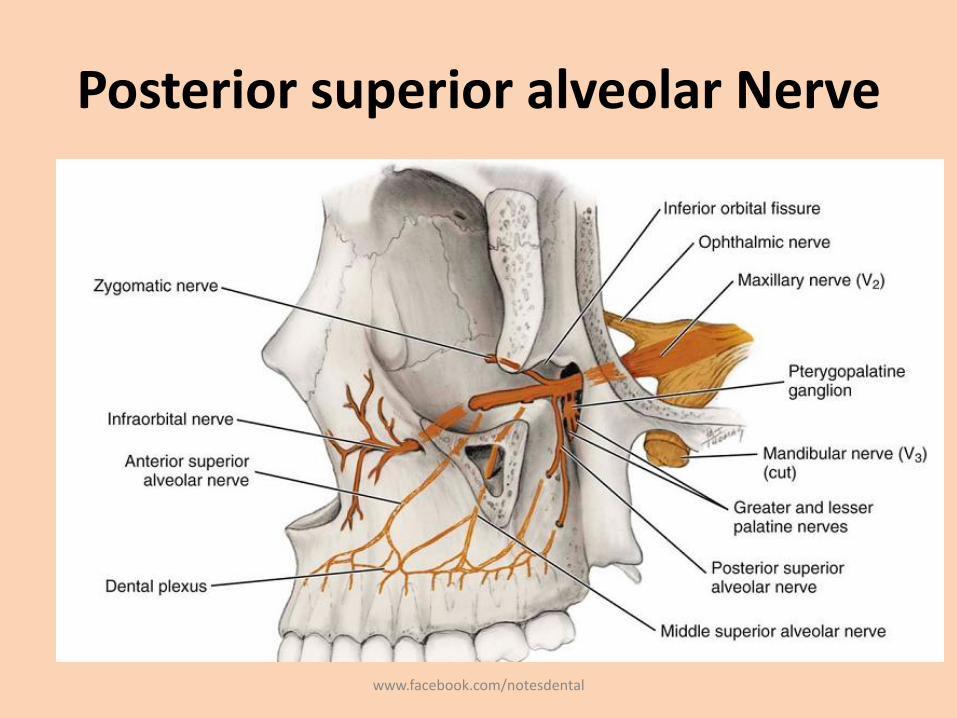
• Enters posterior surface of the maxilla alongthe region of the maxillary tuberosity,
• Gives rise to a gingival branch that innervates the buccal gingiva alongside the maxillary molars.
• Then it supplies maxillary sinus and the pulp of maxillary molars with the possible exception of the mesiobuccal root of the first maxillary molar.
www.facebook.com/notesdental
Posterior superior alveolar Nerve
www.facebook.com/notesdental
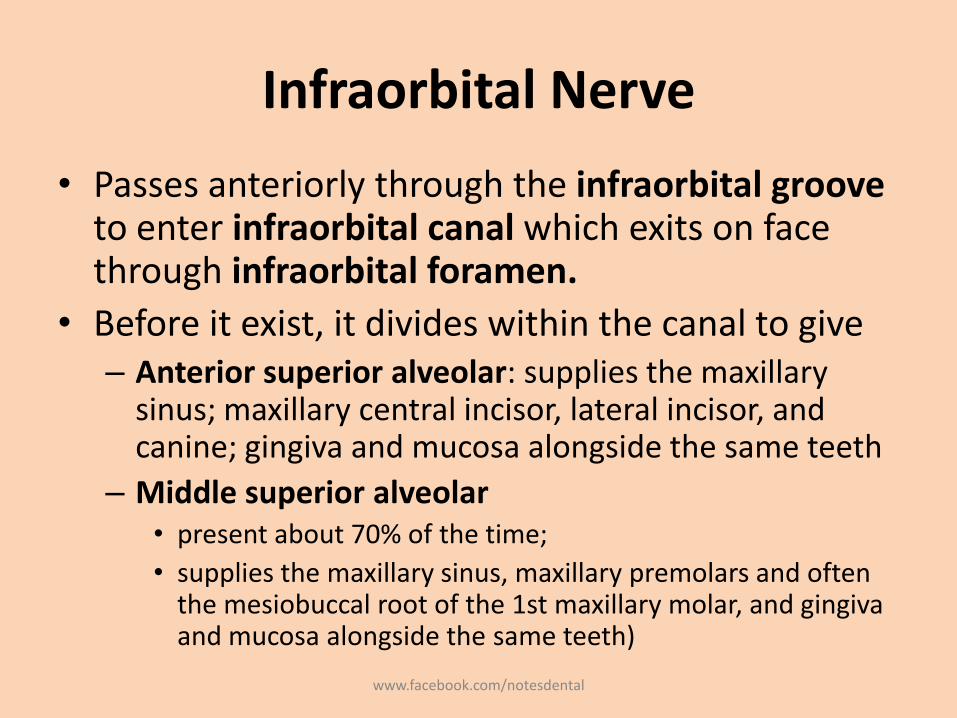
Infraorbital Nerve
• Passes anteriorly through the infraorbital groove to enter infraorbital canal which exits on face through infraorbital foramen.
• Before it exist, it divides within the canal to give– Anterior superior alveolar: supplies the maxillary
sinus; maxillary central incisor, lateral incisor, and canine; gingiva and mucosa alongside the same teeth
– Middle superior alveolar• present about 70% of the time;
• supplies the maxillary sinus, maxillary premolars and often the mesiobuccal root of the 1st maxillary molar, and gingivaand mucosa alongside the same teeth)
www.facebook.com/notesdental
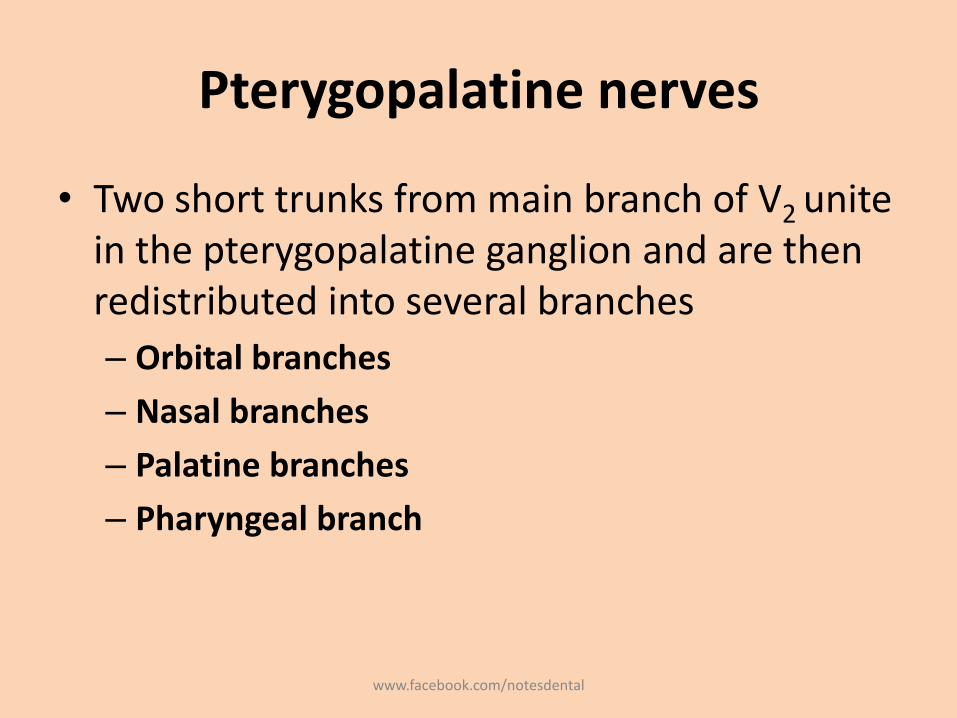
Pterygopalatine nerves
• Two short trunks from main branch of V2 unite in the pterygopalatine ganglion and are then redistributed into several branches
– Orbital branches
– Nasal branches
– Palatine branches
– Pharyngeal branch
www.facebook.com/notesdental
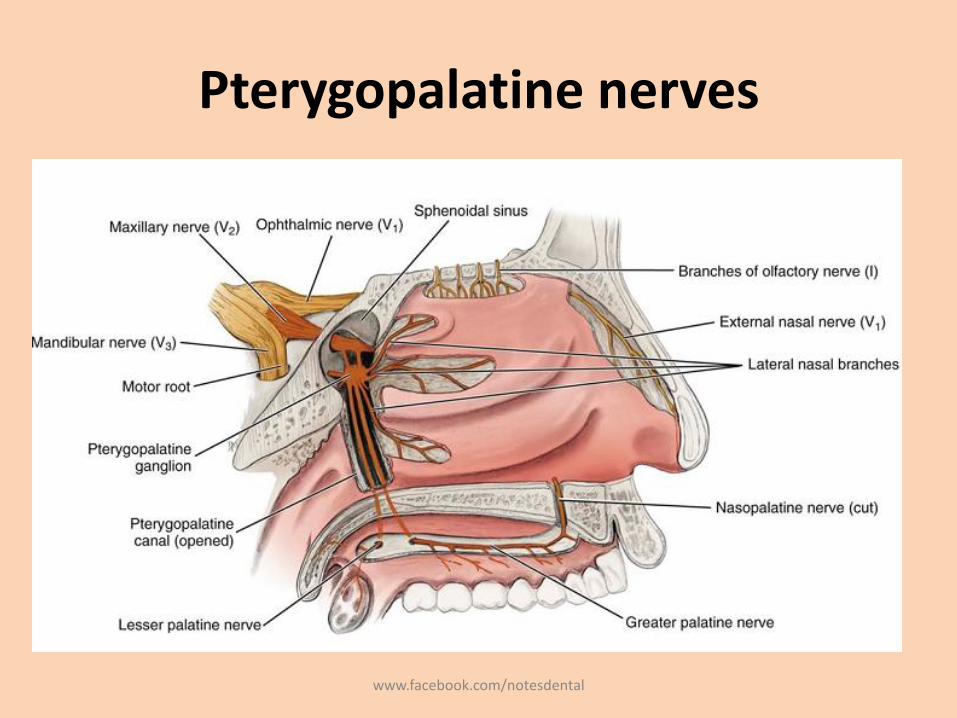
Pterygopalatine nerves
www.facebook.com/notesdental
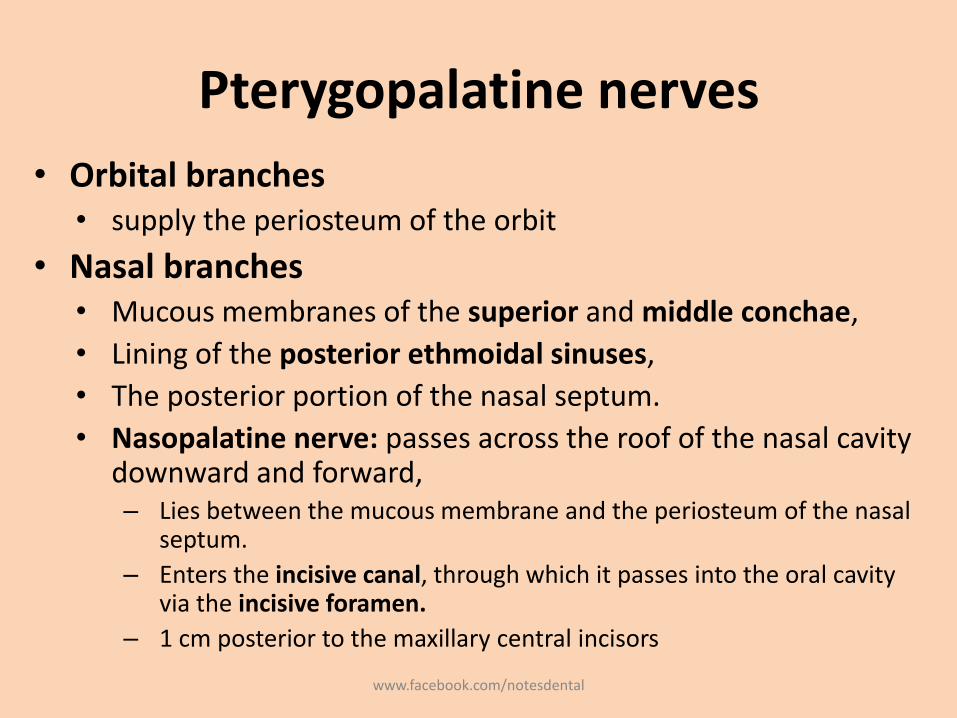
Pterygopalatine nerves
• Orbital branches• supply the periosteum of the orbit
• Nasal branches• Mucous membranes of the superior and middle conchae,
• Lining of the posterior ethmoidal sinuses,
• The posterior portion of the nasal septum.
• Nasopalatine nerve: passes across the roof of the nasal cavity downward and forward,– Lies between the mucous membrane and the periosteum of the nasal
septum.
– Enters the incisive canal, through which it passes into the oral cavity via the incisive foramen.
– 1 cm posterior to the maxillary central incisors
www.facebook.com/notesdental
Pterygopalatine nerves
• Palatine branches• It divides into the greater (or anterior) palatine nerve and the
lesser (middle and posterior) palatine nerves.
• Anteriorly it communicates with terminal fibers of the nasopalatine nerve
• It supplies sensory innervation to hard palate and also to some parts of the soft palate
• Pharyngeal branch• small nerve that leaves the posterior part of the pterygopalatine
ganglion
• Supplies to mucous membrane of the nasal part of the pharynx, posterior to the auditory (eustachian) tube
www.facebook.com/notesdental

Pterygopalatine nerves
www.facebook.com/notesdental
Zygomatic Nerve
• Passes through the inferior orbital fissure to enter theorbit
• Passes on the lateral wall of the orbit and branches intothe zygomaticotemporal and zygomaticofacialbranches
• A communicating branch from it joins the lacrimal n.from the ophthalmic division of the trigeminal to carryautonomics to the lacrimal gland
www.facebook.com/notesdental
Maxillary Anesthesia
• The following techniques are available– Posterior superior alveolar (PSA) nerve block -
several molar teeth in one quadrant
– Middle superior alveolar (MSA) nerve block -premolars in one quadrant
– Anterior superior alveolar (ASA) nerve block -anterior teeth in one quadrant
– Maxillary (V2, second division) nerve block -extensive buccal, palatal, and pulpal management in one quadrant
www.facebook.com/notesdental
Maxillary Anesthesia
– Greater (anterior) palatine nerve block - palatal soft and osseous tissue treatment distal to the canine in one quadrant
– Nasopalatine nerve block - palatal soft and osseous tissue management from canine to canine bilaterally
– Anterior middle superior alveolar (AMSA) nerve block - anterior teeth, palatal and buccal soft and hard tissues
– Palatal approach-anterior superior alveolar (P-ASA) nerve block - anterior teeth and their palatal and facial soft and hard tissues
www.facebook.com/notesdental
Maxillary Anesthesia: Acessory
• Supraperiosteal (infiltration)
• Periodontal ligament (PDL, intraligamentary) injection
• Intraseptal injection
• Intracrestal injection,
• Intraosseous (IO) injection
www.facebook.com/notesdental
Posterior Superior Alveolar Nerve Block
• Commonly used dental nerve block
• Highly successful technique (>95%)
• Other Common Names - Tuberosity block, zygomatic block.
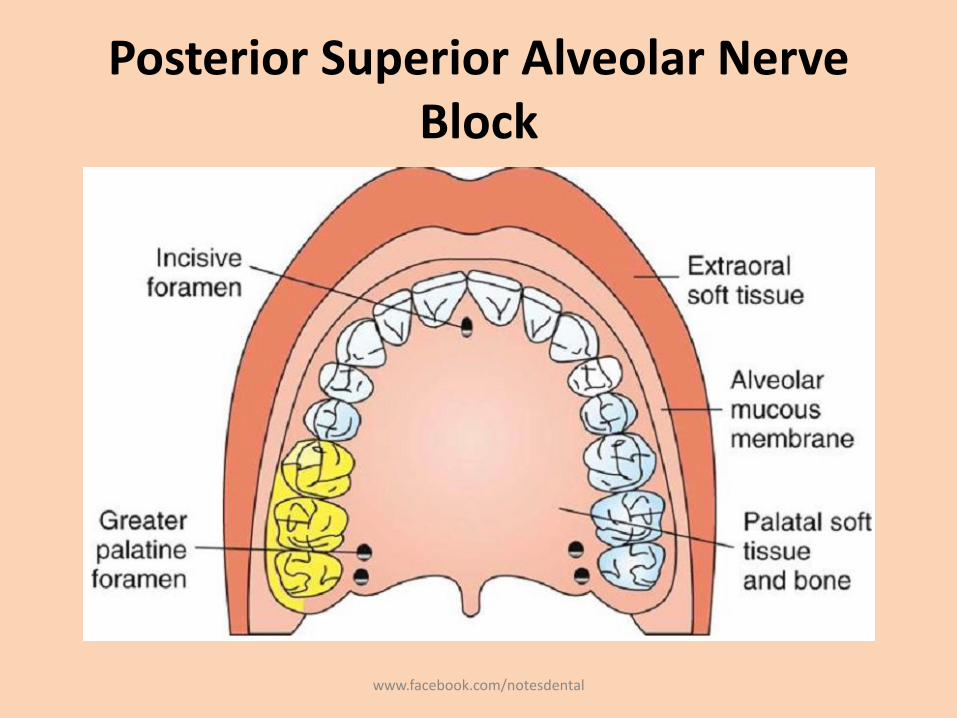
• Areas Anesthetized
– Pulps of the maxillary third, second, and first molars (entire tooth = 72%; mesiobuccal root of the maxillary first molar not anesthetized = 28%)
– Buccal periodontium and bone overlying these teeth www.facebook.com/notesdental
Posterior Superior Alveolar Nerve Block
www.facebook.com/notesdental
Posterior Superior Alveolar Nerve Block
• Indications– When treatment involves two or more maxillary
molars
– When supraperiosteal injection is contraindicated (e.g., with infection or acute inflammation)
– When supraperiosteal injection has proved ineffective
• Contraindication– When the risk of hemorrhage is too great. Ex:
hemophiliac patient
www.facebook.com/notesdental
Posterior Superior Alveolar Nerve Block
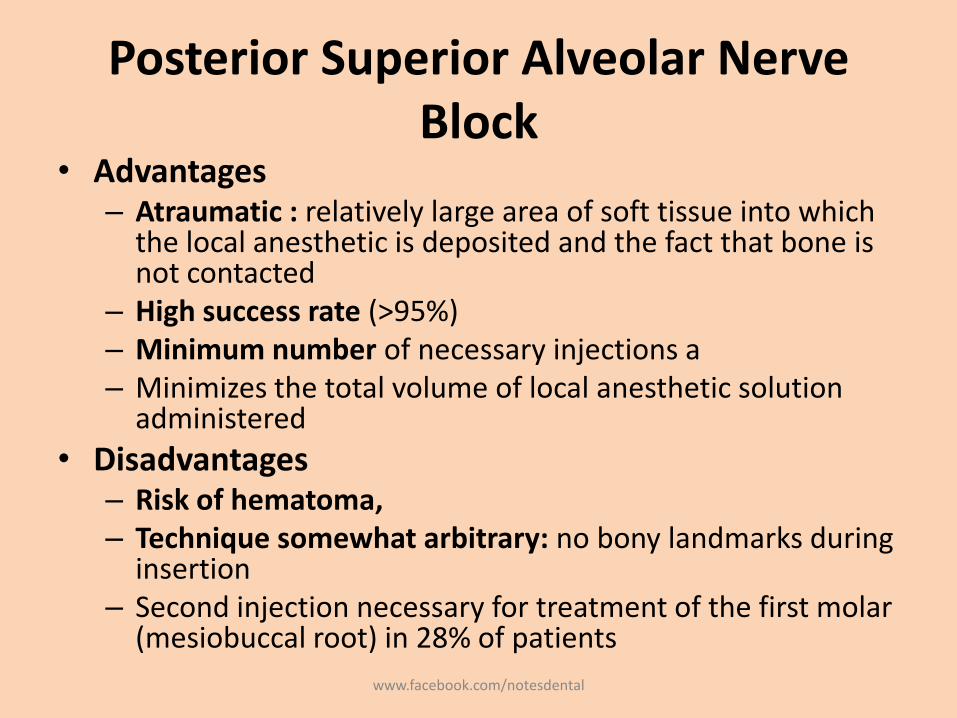
• Advantages– Atraumatic : relatively large area of soft tissue into which
the local anesthetic is deposited and the fact that bone is not contacted
– High success rate (>95%) – Minimum number of necessary injections a – Minimizes the total volume of local anesthetic solution
administered
• Disadvantages– Risk of hematoma, – Technique somewhat arbitrary: no bony landmarks during
insertion– Second injection necessary for treatment of the first molar
(mesiobuccal root) in 28% of patients
www.facebook.com/notesdental
Posterior Superior Alveolar Nerve Block
• Positive Aspiration: Approximately 3.1%.
• Alternatives
– Supraperiosteal or PDL injections for pulpal and root anesthesia
– Infiltrations for the buccal periodontium and hard tissues
– Maxillary nerve block
www.facebook.com/notesdental
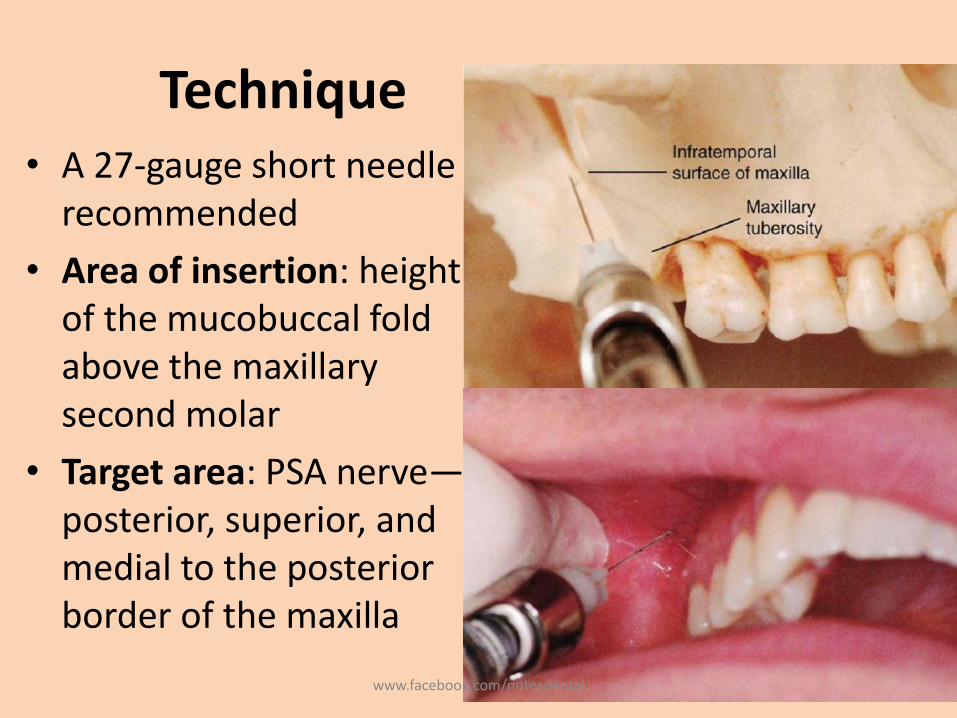
Technique• A 27-gauge short needle
recommended
• Area of insertion: height of the mucobuccal fold above the maxillary second molar
• Target area: PSA nerve—posterior, superior, and medial to the posterior border of the maxilla
www.facebook.com/notesdental
Technique
• Landmarks
– Mucobuccal fold
– Maxillary tuberosity
– Zygomatic process of the maxilla
• Orientation of the bevel: toward bone during the injection. If bone is accidentally touched, the sensation is less unpleasant.
www.facebook.com/notesdental

Procedure• Operator position
– Left PSA nerve block, a right-handed administrator - 10 o'clock position facing the patient.
– Right PSA block, a right-handed administrator - 8 o'clock position facing the patient
www.facebook.com/notesdental
Procedure
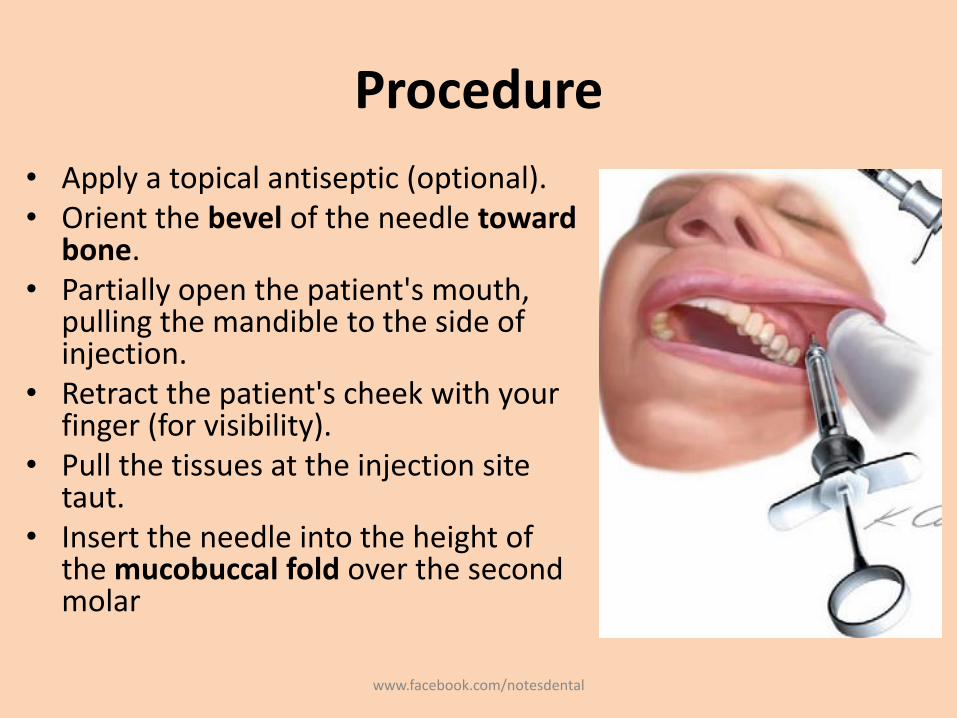
• Apply a topical antiseptic (optional). • Orient the bevel of the needle toward
bone. • Partially open the patient's mouth,
pulling the mandible to the side of injection.
• Retract the patient's cheek with your finger (for visibility).
• Pull the tissues at the injection site taut.
• Insert the needle into the height of the mucobuccal fold over the second molar
www.facebook.com/notesdental
Procedure
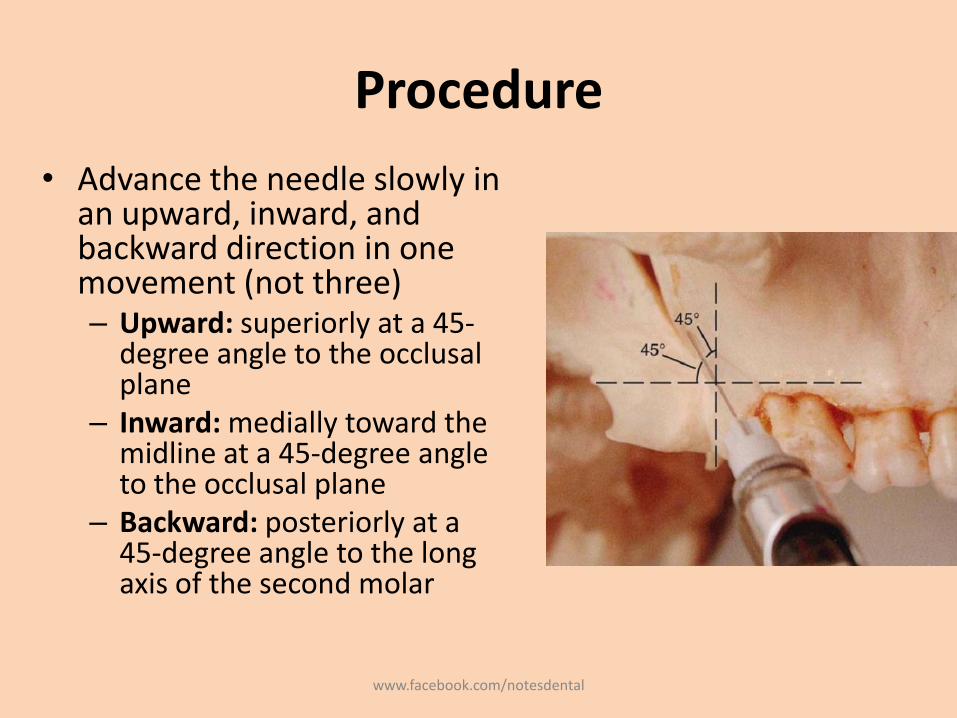
• Advance the needle slowly in an upward, inward, and backward direction in one movement (not three)– Upward: superiorly at a 45-
degree angle to the occlusalplane
– Inward: medially toward the midline at a 45-degree angle to the occlusal plane
– Backward: posteriorly at a 45-degree angle to the long axis of the second molar
www.facebook.com/notesdental
Procedure
• Slowly advance the needle through soft tissue.
– Ideally there should be no resistance and therefore no discomfort to the patient.
– If resistance (bone) is felt, the angle of the needle in toward the midline is too great.
• Withdraw the needle slightly (but do not remove it entirely from the tissues) and bring the syringe barrel closer to the occlusal plane.
• Readvance the needle.
www.facebook.com/notesdental
Procedure
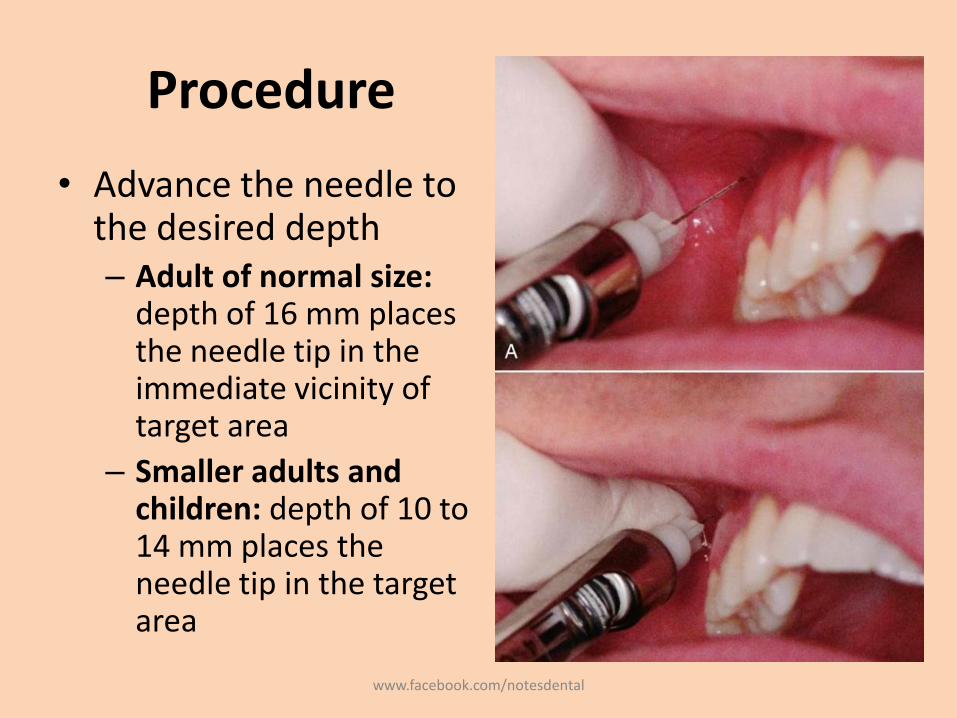
• Advance the needle to the desired depth– Adult of normal size:
depth of 16 mm places the needle tip in the immediate vicinity of target area
– Smaller adults and children: depth of 10 to 14 mm places the needle tip in the target area
www.facebook.com/notesdental
Procedure
• Aspirate in two planes.
• If both aspirations are negative: Slowly, over 30 to 60 seconds, deposit 0.9 to 1.8 mL of anesthetic solution.
• Slowly withdraw the syringe.
• Wait minimally 3 to 5 minutes before commencing the dental procedure.
www.facebook.com/notesdental
Signs and Symptoms
• Subjective: usually none; the patient has difficulty reaching this region to determine the extent of anesthesia
• Objective: electrical pulp testing with no response and absence of pain during treatment
• Safety Features – Slow injection, repeated aspirations
– No anatomic safety features to prevent overinsertionof the needle; therefore careful observation is necessary
www.facebook.com/notesdental

Precaution
• The depth of needle penetration should be checked: – Overinsertion (too deep) increases the risk of
hematoma;
• Failures of Anesthesia– Needle too lateral. To correct: Redirect the needle tip
medially– Needle not high enough. To correct: Redirect the
needle tip superiorly.– Needle too far posterior. To correct: Withdraw the
needle to the proper depth.
www.facebook.com/notesdental
Complications
• Hematoma: inserting the needle too far posteriorly into the pterygoid plexus of veins and in addition, the maxillary artery may be perforated.– Use of a short needle minimizes the risk of pterygoid
plexus puncture.
• Mandibular anesthesia: V3 is located lateral to the PSA nerves. Deposition of local anesthetic lateral to the desired location may produce varying degrees of mandibular anesthesia.
www.facebook.com/notesdental
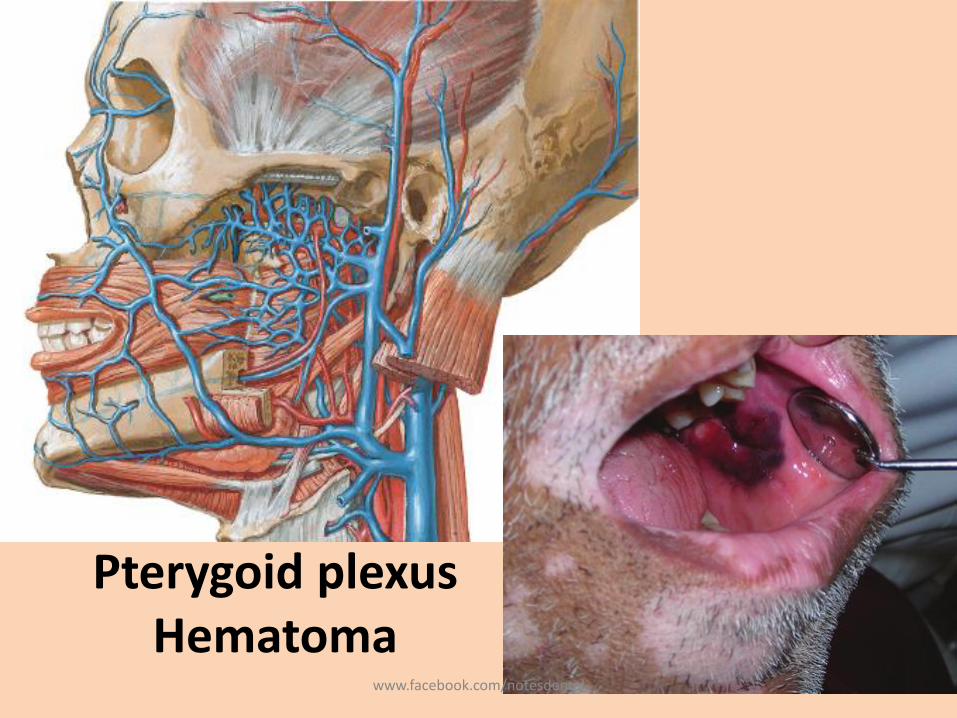
Pterygoid plexus Hematoma
www.facebook.com/notesdental
Middle Superior Alveolar Nerve Block
• present in only about 28% of the population
• success rate of the MSA nerve block is high.
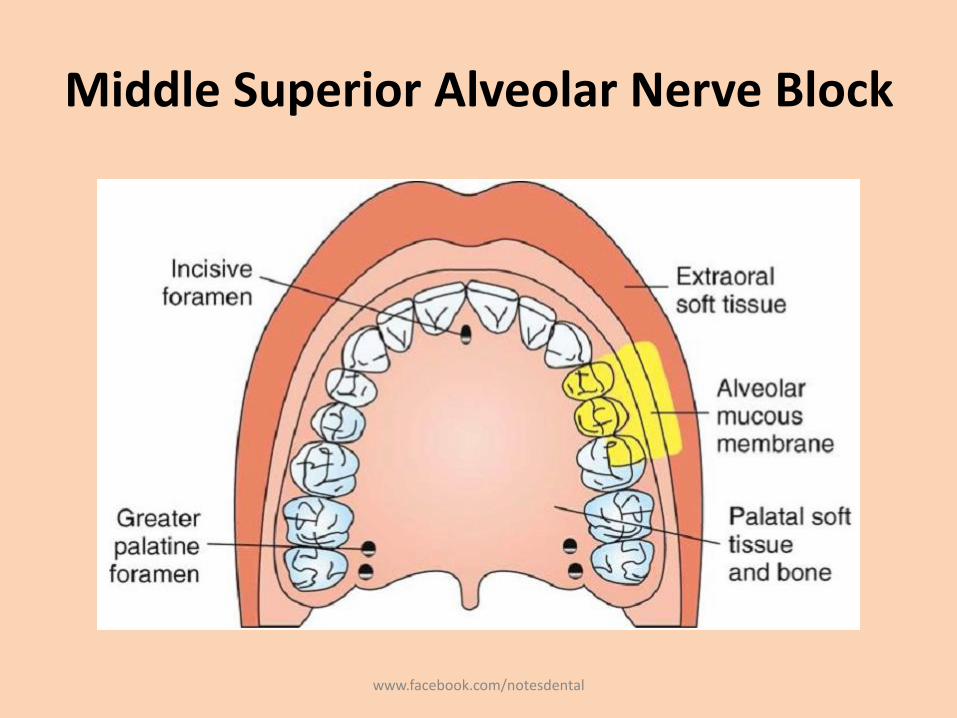
• Areas Anesthetized
– Pulps of the maxillary first and second premolars, mesiobuccal root of the first molar
– Buccal periodontal tissues and bone over these same teeth
www.facebook.com/notesdental
Middle Superior Alveolar Nerve Block
www.facebook.com/notesdental

Indications
• Where the ASA nerve block fails to provide pulpalanesthesia distal to the maxillary canine
• Dental procedures involving both maxillary premolars only.
• Contraindications– Infection or inflammation in the area of injection or needle
insertion or drug deposition – Where the MSA nerve is absent, innervation is through the
anterior superior alveolar (ASA) nerve; – However, branches of the ASA innervating the premolars
and the mesiobuccal root of the first molar can be anesthetized by means of the MSA technique.
www.facebook.com/notesdental
Advantages
• Minimizes the number of injections and the volume of solution.
• Disadvantages: None.
• Positive Aspiration: Negligible (<3%).
• Alternatives
– Local infiltration (supraperiosteal), PDL, IO injections
– ASA nerve block
www.facebook.com/notesdental
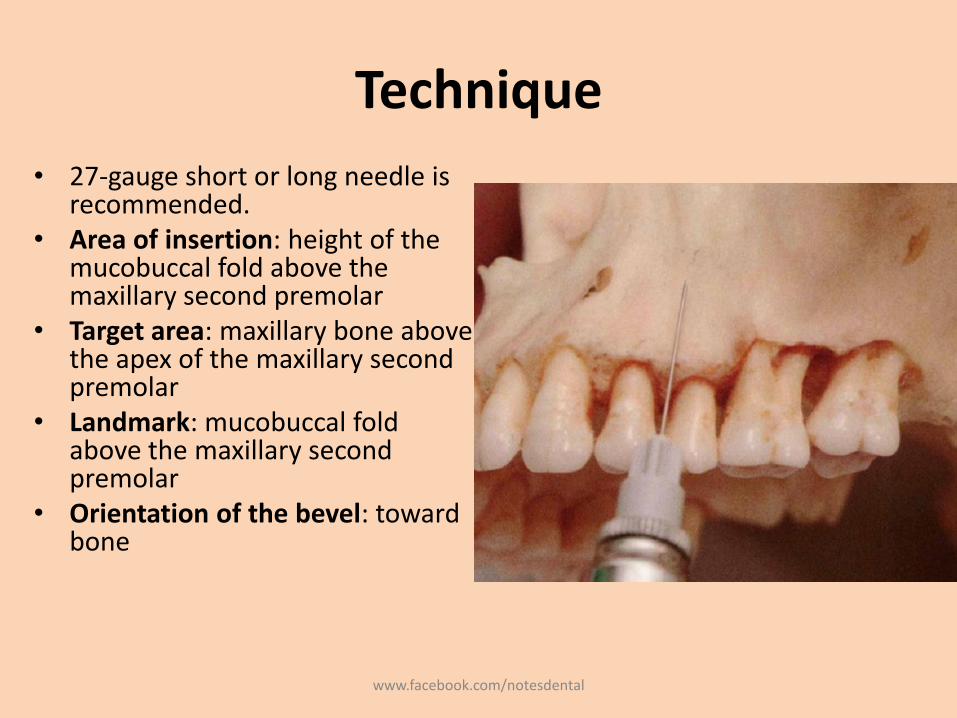
Technique
• 27-gauge short or long needle is recommended.
• Area of insertion: height of the mucobuccal fold above the maxillary second premolar
• Target area: maxillary bone above the apex of the maxillary second premolar
• Landmark: mucobuccal fold above the maxillary second premolar
• Orientation of the bevel: toward bone
www.facebook.com/notesdental

Procedure• Assume the correct position (right-handed)
– Right MSA nerve block - 10 o'clock position– Left MSA nerve block - 8 or 9 o'clock position.
• Prepare the tissues at the site of injection.– Dry with sterile gauze– Apply topical antiseptic (optional) for a minimum of 1 minute.
www.facebook.com/notesdental
Procedure• Stretch the patient's upper lip to make the tissues taut and
to gain visibility. • Insert the needle into the height of the mucobuccal fold
above the second premolar with the bevel directed toward bone.
• Penetrate the mucous membrane and slowly advance the needle until its tip is located well above the apex of the second premolar
• Aspirate.• Slowly deposit 0.9 to 1.2 mL of solution (approximately 30
to 40 seconds).• Withdraw the syringe and make the needle safe. • Wait a minimum of 3 to 5 minutes before commencing
dental therapy.
www.facebook.com/notesdental
Signs and Symptoms
• Subjective: upper lip numb
• Objective– use of electrical pulp testing with no response
– Absence of pain during treatment
• Precautions – To prevent pain, do not insert too close to the
periosteum
– do not inject too rapidly; the MSA should be an atraumatic injection.
www.facebook.com/notesdental
Failures of Anesthesia
• Anesthetic solution not deposited high above the apex of the second premolar• To correct: Check radiographs and increase the depth of
penetration.
• Deposition of solution too far from the maxillary bone with the needle placed in tissues lateral to the height of the mucobuccal fold• To correct: Reinsert at the height of the mucobuccal fold.
• Bone of the zygomatic arch at the site of injection preventing the diffusion of anesthetic• To correct: Use the supraperiosteal, ASA, or PSA injection in
place of the MSA
www.facebook.com/notesdental
Complications
• Rare
• A hematoma may develop at the site of injection.
• Apply pressure with sterile gauze over the site of swelling and discoloration for a minimum of 60 seconds.
www.facebook.com/notesdental
Anterior Superior Alveolar Nerve Block
• Also known as Infraorbital Nerve Block.
• Not so popular – general lack of experience with this highly successful and extremely safe technique.
• Infraorbital nerve provides anesthesia to the soft tissues of the anterior portion of the face, not to the teeth or intraoral soft and hard tissues.
• Therefore it is inaccurate to call the ASA nerve block the infraorbital nerve block
www.facebook.com/notesdental
Nerves Anesthetized
• Anterior superior alveolar• Middle superior alveolar• Infraorbital nerve
– Inferior palpebral– Lateral nasal– Superior labial
• Areas Anesthetized– Pulps of the maxillary central incisor through the canine on
the injected side– In about 72% of patients, pulps of the maxillary premolars
and mesiobuccal root of the first molar– Buccal (labial) periodontium and bone of these same teeth– Lower eyelid, lateral aspect of the nose, upper lip
www.facebook.com/notesdental
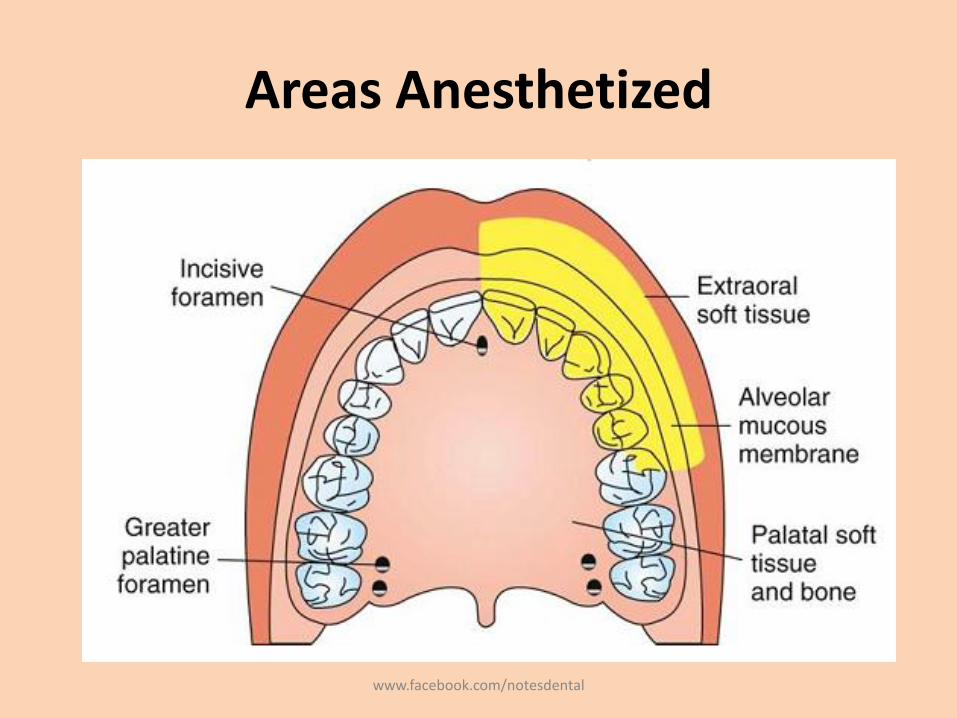
Areas Anesthetized
www.facebook.com/notesdental
Indications
• Dental procedures involving more than two maxillary teeth and their overlying buccal tissues
• Inflammation or infection (which contraindicates supraperiosteal injection)
• When supraperiosteal injections have been ineffective because of dense cortical bone.
• Contraindications– Discrete treatment areas (one or two teeth only;
supraperiosteal preferred)
– Hemostasis of localized areas
www.facebook.com/notesdental
Advantages
• Comparatively simple technique• Comparatively safe; minimizes the volume of
solution used and the number of needle punctures necessary to achieve anesthesia.
• Disadvantages– Psychological
• Administrator: There may be an initial fear of injury to the patient's eye
• Patient: An extraoral approach to the infraorbital nerve may prove disturbing; however, intraoral techniques are rarely a problem.
– Anatomic: difficulty defining landmarks (rare)
www.facebook.com/notesdental
Technique
• Positive Aspiration: 0.7%.
• Alternatives
– Supraperiosteal, PDL, or IO injection for each tooth
– Infiltration for the periodontium and hard tissues
– Maxillary nerve block
www.facebook.com/notesdental
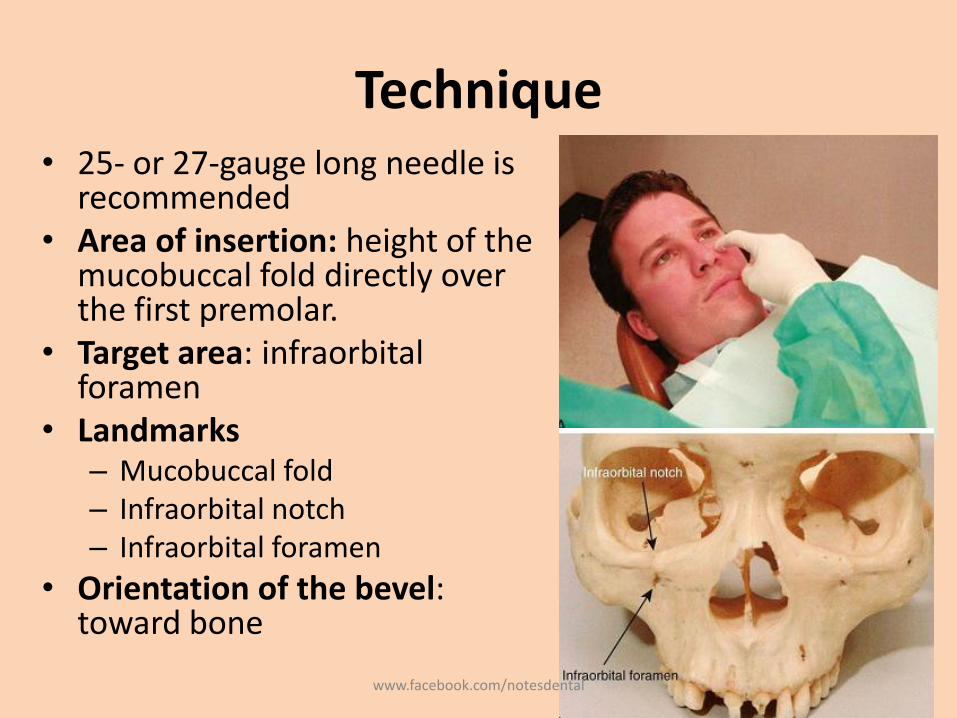
Technique• 25- or 27-gauge long needle is
recommended• Area of insertion: height of the
mucobuccal fold directly over the first premolar.
• Target area: infraorbitalforamen
• Landmarks– Mucobuccal fold– Infraorbital notch– Infraorbital foramen
• Orientation of the bevel: toward bone
www.facebook.com/notesdental
Procedure
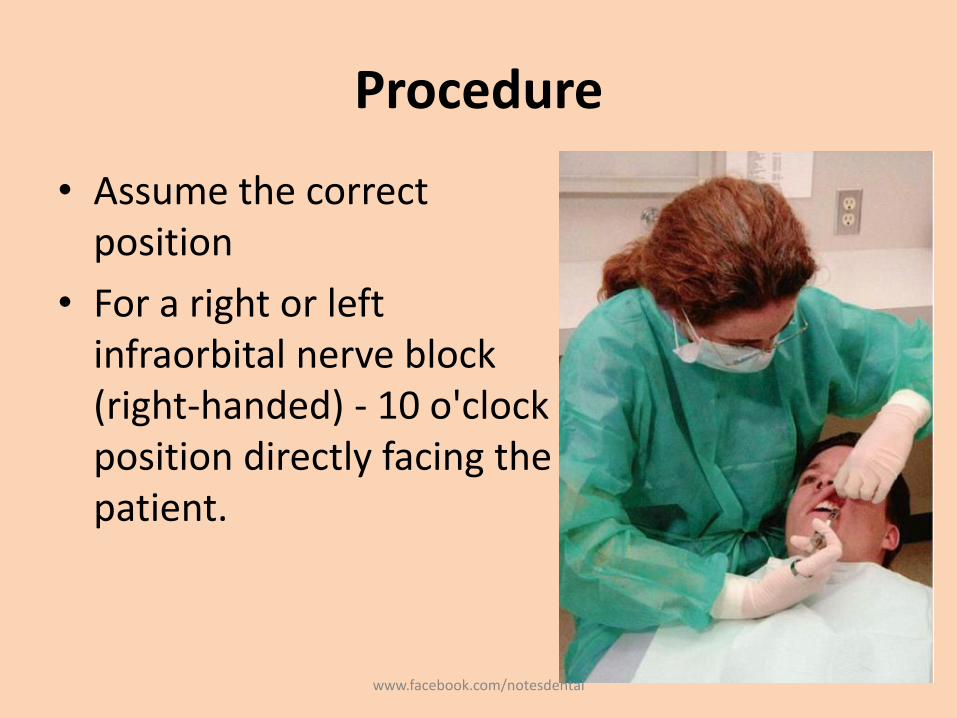
• Assume the correct position
• For a right or left infraorbital nerve block (right-handed) - 10 o'clock position directly facing the patient.
www.facebook.com/notesdental

Procedure
• Prepare the tissues at the injection site.
• Locate the infraorbital foramen– Feel the infraorbital notch.
– Move your finger downward from the notch, applying gentle pressure to the tissues.
– The bone immediately inferior to the notch is convex (felt as an outward bulge). This represents the lower border of the orbit and the roof of the infraorbital foramen
– As your finger continues inferiorly, a concavity is felt; this is the infraorbital foramen.
– The patient senses a mild soreness when the foramen is palpated as the infraorbital nerve is pressed against bone.
www.facebook.com/notesdental
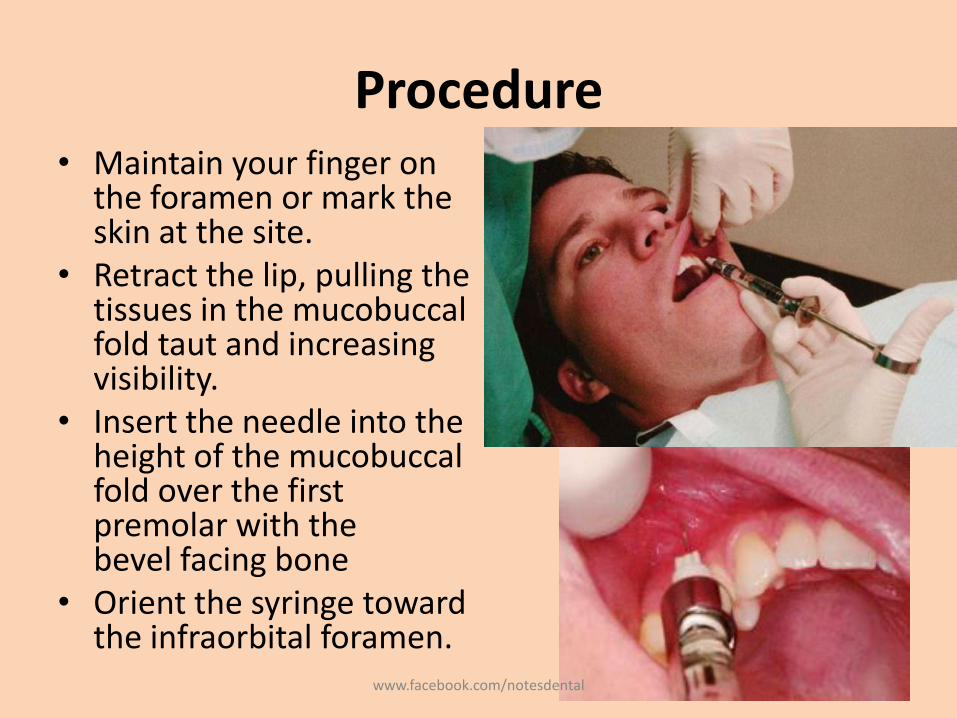
Procedure• Maintain your finger on
the foramen or mark the skin at the site.
• Retract the lip, pulling the tissues in the mucobuccalfold taut and increasing visibility.
• Insert the needle into the height of the mucobuccalfold over the first premolar with thebevel facing bone
• Orient the syringe toward the infraorbital foramen.
www.facebook.com/notesdental

Procedure• The needle should be held parallel
with the long axis of the tooth as it is advanced, to avoid premature contact with bone
• Advance the needle slowly until bone is gently contacted.– The point of contact should be the
upper rim of the infraorbital foramen.– The general depth of needle
penetration is 16 mm for an adult of average height
– The depth of penetration varies• In a patient with a high (deep)
mucobuccal fold • a low infraorbital foramen
– A preinjection approximation of the depth of penetration can be made by placing one finger
www.facebook.com/notesdental

Procedure
• Before injecting the anesthetic solution, check for the following:– Depth of needle penetration (adequate to reach the
foramen)– Any lateral deviation of the needle from the
infraorbital foramen; – Orientation of the bevel (facing bone)– Position the needle tip during injection with the bevel
facing into the infraorbital foramen and the needle tip touching the roof of the foramen
• Aspirate in two planes.
www.facebook.com/notesdental
Procedure
• Slowly deposit 0.9 to 1.2 mL (over 30 to 40 seconds).• Little or no swelling should be visible as the solution is
deposited. • If the needle tip is properly inserted at the opening of the
foramen, solution is directed toward the foramen.– The administrator is able to “feel” the anesthetic solution as it is
deposited beneath the finger on the foramen if the needle tip is in the correct position.
– At the conclusion of the injection, the foramen should no longer be palpable (because of the volume of anesthetic in this position).
– At this point, the infraorbital nerve block (providing anesthesia to the soft tissues on the anterior portion of the face and the lateral aspect of the nose) is complete.
www.facebook.com/notesdental
Procedure
• To transform it into the anterior superior alveolar nerve block do the following:– Maintain firm pressure with your finger over the injection
site both during and for at least 1 minute after the injection
– Withdraw the syringe slowly and immediately make the needle safe.
– Maintain direct finger pressure over the injection site for a minimum of 1 minute, preferably 2 minutes, after injection.
– Wait a minimum of 3 to 5 minutes after completion of the injection before commencing the dental procedure.
www.facebook.com/notesdental
Signs and Symptoms
• Subjective: Tingling and numbness of the lower eyelid, side of the nose, and upper lip
• Subjective and objective: numbness in the teeth and soft tissues along the distribution of the ASA and MSA nerves
• Objective
– electrical pulp testing - no response
– Absence of pain during treatment
www.facebook.com/notesdental
Safety Features
• Needle contact with bone at the roof of the infraorbital foramen prevents inadvertent over-insertion and possible puncture of the orbit.
• A finger positioned over the infraorbital foramen helps direct the needle toward the foramen.– The needle should not be palpable. If it is felt, then its
path is too superficial (away from the bone).
– In most patients, it is not possible to palpate the needle through soft tissues over the foramen unless it is too superficial.
www.facebook.com/notesdental
Precautions
• For pain on insertion of the needle and tearing of the periosteum, reinsert the needle in a morelateral (away from bone) position, or deposit solution as the needle advances through soft tissue.
• To prevent overinsertion of the needle, estimate the depth of penetration before injection (reviewprocedure), and exert finger pressure over the infraorbital foramen.
• Overinsertion is unlikely because of the rim of bone that forms the superior rim of the infraorbital foramen. The needle tip contacts this rim.
www.facebook.com/notesdental
Failures of Anesthesia
• Needle contacting bone below (inferior to) the infraorbital foramen. To correct:– Keep the needle in line with the infraorbital foramen
during penetration. Do not direct the needle toward bone.
– Estimate the depth of penetration before injecting.
• Needle deviation medial or lateral to the infraorbitalforamen. To correct:– Direct the needle toward the foramen immediately after
inserting and before advancing through the tissue.
– Recheck needle placement before aspirating and depositing the anesthetic solution
www.facebook.com/notesdental
Complications
• Hematoma (rare) may develop
– across the lower eyelid and the tissues between it and the infraorbital foramen.
• Management: apply pressure on the soft tissue over the foramen for 2 to 3 minutes.
• Its extremely rare because pressure is routinely applied to the injection site both during and afteradministration of the ASA nerve block.
www.facebook.com/notesdental
Greater Palatine Nerve Block
• Also known as Anterior palatine nerve block.
• Although potentially traumatic, its less than the nasopalatine nerve block
– tissues surrounding the greater palatine foramen are not as firmly adherent to bone
– therefore are better able to accommodate the volume of solution deposited.
• Nerve Anesthetized: Greater palatine
www.facebook.com/notesdental
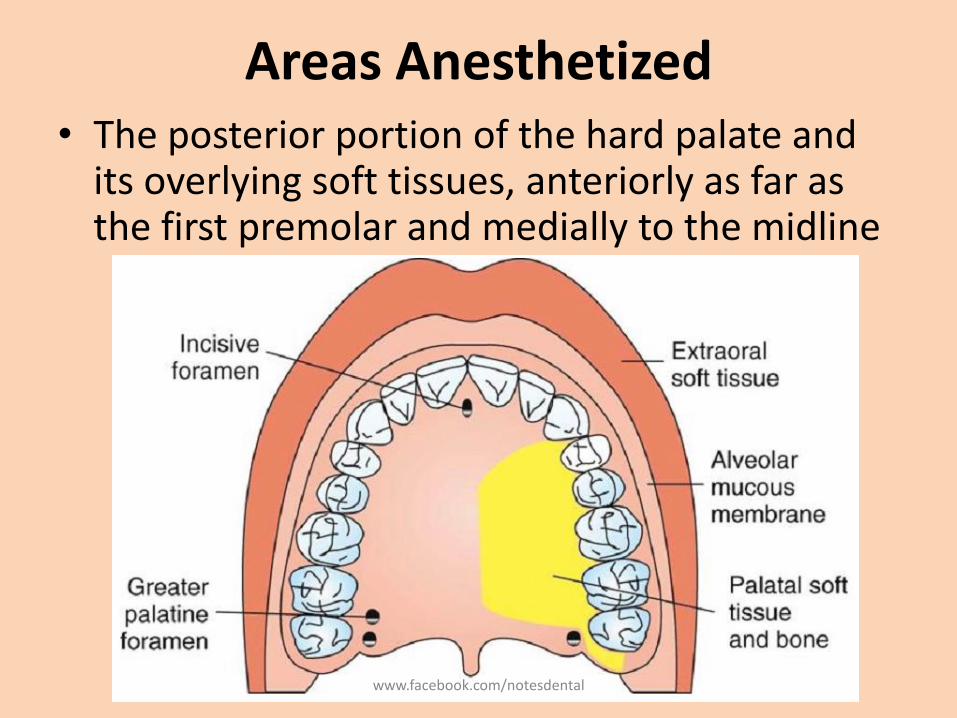
Areas Anesthetized• The posterior portion of the hard palate and
its overlying soft tissues, anteriorly as far as the first premolar and medially to the midline
www.facebook.com/notesdental
Indications
• When palatal soft tissue anesthesia is necessary for restorative therapy on more than two teeth– Ex: subgingival restorations - insertion of matrix bands
subgingivally
• For pain control during periodontal or oral surgical procedures involving the palatal soft and hard tissues
• Contraindications– Inflammation or infection at the injection site
– Smaller areas of therapy (one or two teeth)
www.facebook.com/notesdental
Advantages
• Minimizes needle penetrations and volume of solution
• Minimizes patient discomfort• Disadvantages
– No hemostasis except in the immediate area of injection
– Potentially traumatic– Positive Aspiration: Less than 1%.
• Alternatives– Local infiltration into specific regions– Maxillary nerve block
www.facebook.com/notesdental
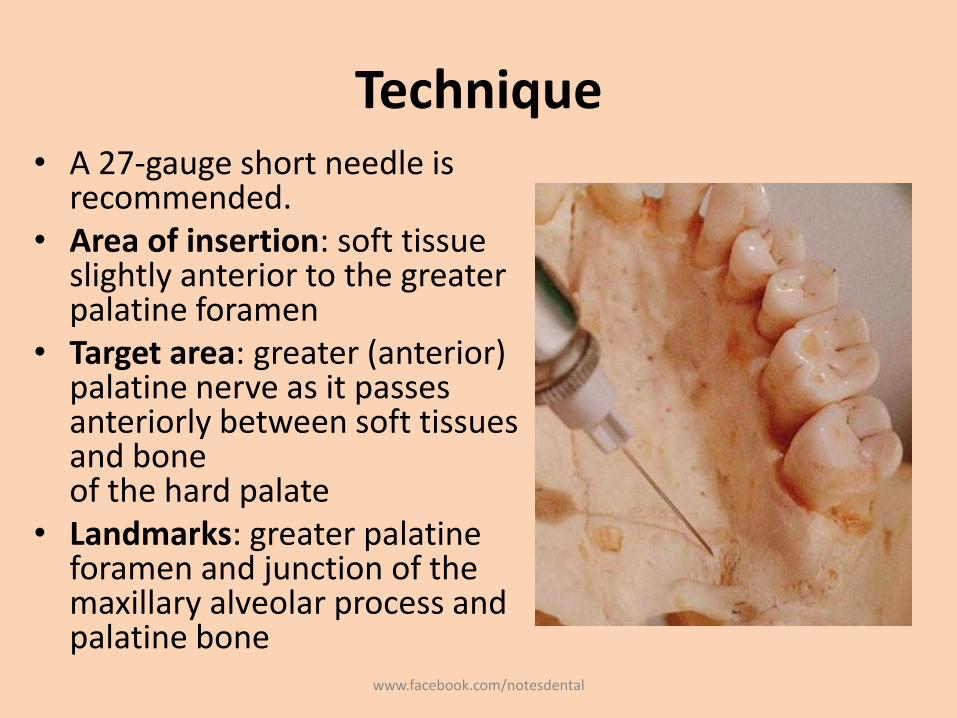
Technique• A 27-gauge short needle is
recommended.• Area of insertion: soft tissue
slightly anterior to the greater palatine foramen
• Target area: greater (anterior) palatine nerve as it passes anteriorly between soft tissues and boneof the hard palate
• Landmarks: greater palatine foramen and junction of the maxillary alveolar process and palatine bone
www.facebook.com/notesdental
Technique
• Path of insertion: advance the syringe from the opposite side of the mouth at a right angle to the target area
• Orientation of the bevel: toward the palatal soft tissues
www.facebook.com/notesdental
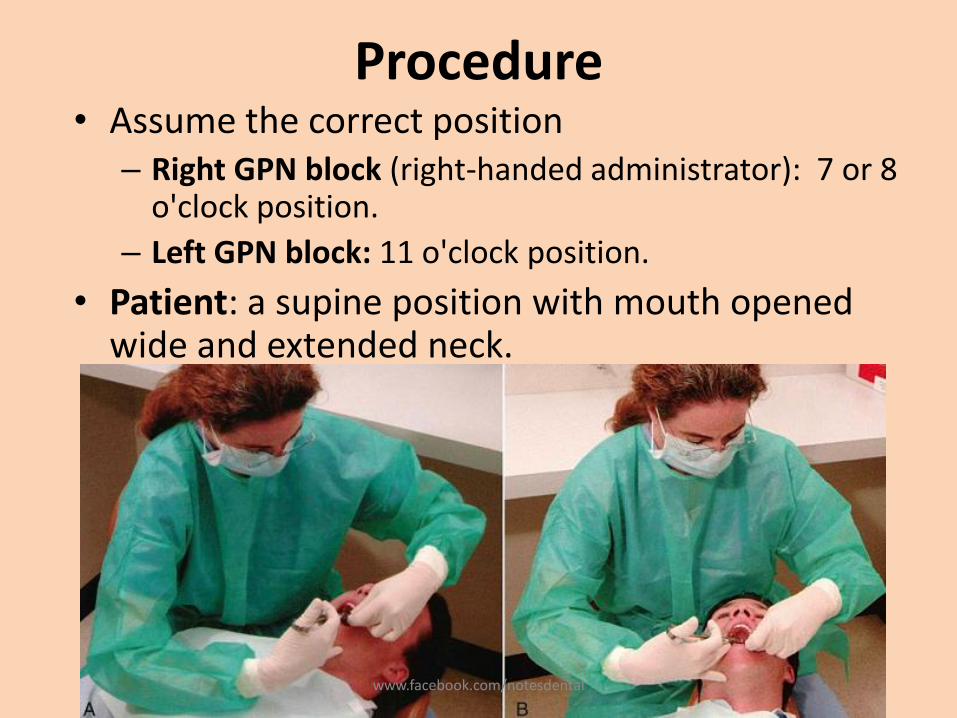
Procedure• Assume the correct position
– Right GPN block (right-handed administrator): 7 or 8 o'clock position.
– Left GPN block: 11 o'clock position.
• Patient: a supine position with mouth opened wide and extended neck.
www.facebook.com/notesdental
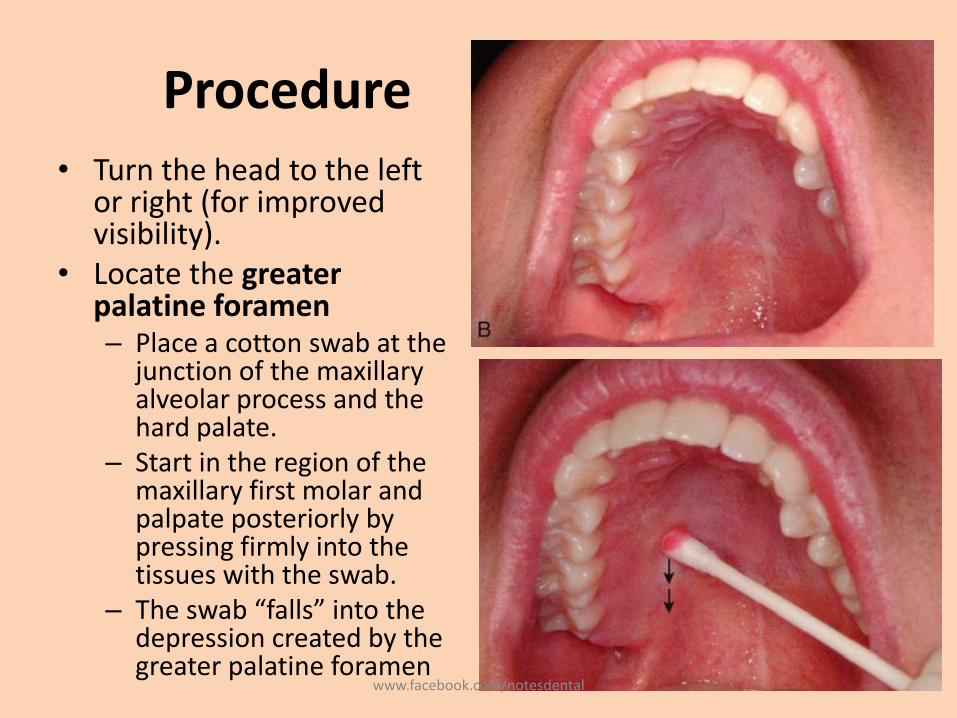
Procedure• Turn the head to the left
or right (for improved visibility).
• Locate the greater palatine foramen– Place a cotton swab at the
junction of the maxillary alveolar process and the hard palate.
– Start in the region of the maxillary first molar and palpate posteriorly by pressing firmly into the tissues with the swab.
– The swab “falls” into the depression created by the greater palatine foramen
www.facebook.com/notesdental
Procedure• The foramen is most frequently located distal to the
maxillary second molar, but it may be located anterior or posterior to its usual position
• Prepare the tissue at the injection site, just 1 to 2 mm anterior to the greater palatine foramen.– Clean and dry with sterile gauze.– Apply topical antiseptic (optional).– Apply topical anesthetic for 2 minutes.
• Move the swab posteriorly so it is directly over the greater palatine foramen.– Apply considerable pressure at the area of the foramen with the
swab– Note the ischemia (whitening of the soft tissues) at the injection
site.
www.facebook.com/notesdental
Procedure
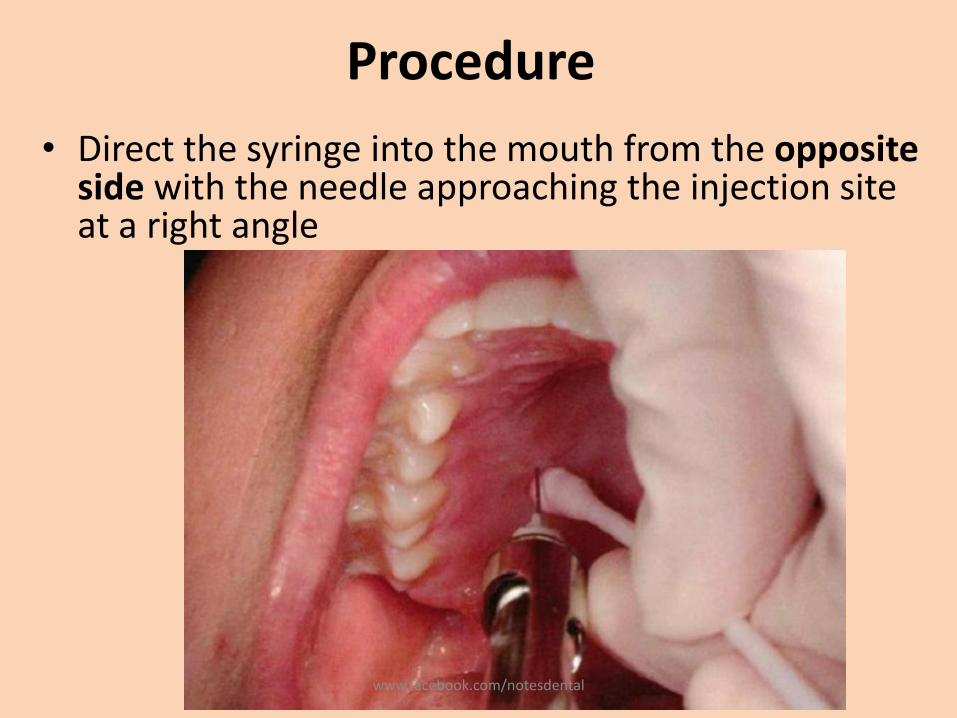
• Direct the syringe into the mouth from the opposite side with the needle approaching the injection site at a right angle
www.facebook.com/notesdental

Procedure
• Place the bevel (not the point) of the needle gently against the previously blanched (ischemic) soft tissue at the injection site.
• It must be well stabilized to prevent accidental penetration of the tissues.
www.facebook.com/notesdental
Procedure
• With the bevel lying against the tissue
– Angle the needle a little and deposit a small volume of anesthetic - forced against the mucous membrane
– Straighten the needle and permit the bevel to penetrate mucosa.
• Continue to deposit small volumes of anesthetic throughout the procedure.
• Ischemia spreads into adjacent tissues as the anesthetic
www.facebook.com/notesdental
Procedure
• Continue to apply pressure anesthesia throughout the deposition of the anesthetic solution
• Slowly advance the needle until palatine bone is gently contacted.– The depth of penetration is usually about 5 mm.
• Aspirate in two planes
• slowly deposit (30 second minimum): 0.45 to 0.6 ml
• Withdraw the syringe.
• Make the needle safe.
• Wait 2 to 3 minutes before commencing the procedure.
www.facebook.com/notesdental
Signs and Symptoms
• Subjective: numbness in the posterior portion of the palate
• Objective: no pain during dental therapy
• Safety Features: Contact with bone
• Precautions :Do not enter the greater palatine canal.
– Not hazardous: no reason to enter the canal for this technique to be successful
www.facebook.com/notesdental
Failures of Anesthesia
• Not a technically difficult injection to administer -success is well above 95%.
• If LA is deposited too far anterior to the foramen, inadequate soft tissue anesthesia posterior to the site of injection (partial success).
• Inadequate anesthesia in the area of the maxillary first premolar: overlapping fibers from the nasopalatine nerve (partial success).– To correct: Local infiltration may be necessary as a
supplement in the area of inadequate anesthesia.
www.facebook.com/notesdental
Complications
• Few of significance
• Ischemia and necrosis of soft tissues when highly concentrated vasoconstricting solution used for hemostasis over a prolonged period
• Hematoma is possible but rare because of the density and firm adherence of palatal tissues to underlying bone.
• Some patients may be uncomfortable if their soft palate becomes anesthetized
www.facebook.com/notesdental
Nasopalatine Nerve Block
• Also known as Incisive nerve block, sphenopalatine nerve block
• Administration of a minimum volume of anesthetic solution.
• wide area of palatal soft tissue anesthesia is achieved
• Thereby minimizing the need for multiple palatal injections.
• Nerves Anesthetized: Nasopalatine nerves bilaterally.
www.facebook.com/notesdental
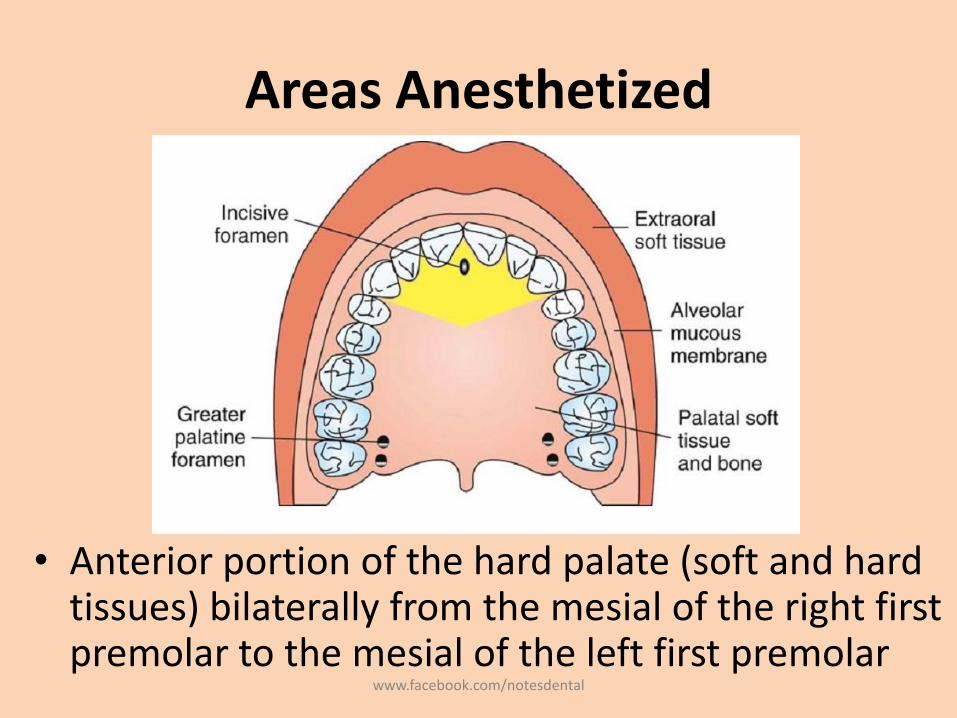
Areas Anesthetized
• Anterior portion of the hard palate (soft and hard tissues) bilaterally from the mesial of the right first premolar to the mesial of the left first premolar
www.facebook.com/notesdental
Indications• When palatal soft tissue anesthesia is necessary
for restorative treatment on more than two teeth (e.g., subgingival restorations, insertion of matrix bands subgingivally)
• For pain control during periodontal or oral surgical procedures involving palatal soft and hard tissues
• Contraindications– Inflammation or infection at the injection site
– Smaller area of therapy (one or two teeth)
www.facebook.com/notesdental
Advantages
• Minimizes needle penetrations and volume of solution
• Minimal patient discomfort from multiple needle penetrations
• Disadvantages– No hemostasis except in the immediate area of injection– Potentially the most traumatic intraoral injection;
however• the protocol for an atraumatic injection • or use of a C-CLAD system• or a buffered local anesthetic solution can minimize or entirely
eliminate discomfort
www.facebook.com/notesdental
• Positive Aspiration: Less than 1%.
• Alternatives
– Local infiltration into specific regions
– Maxillary nerve block (unilateral only)
– Anterior middle superior alveolar (AMSA) nerve block (unilateral only)
www.facebook.com/notesdental
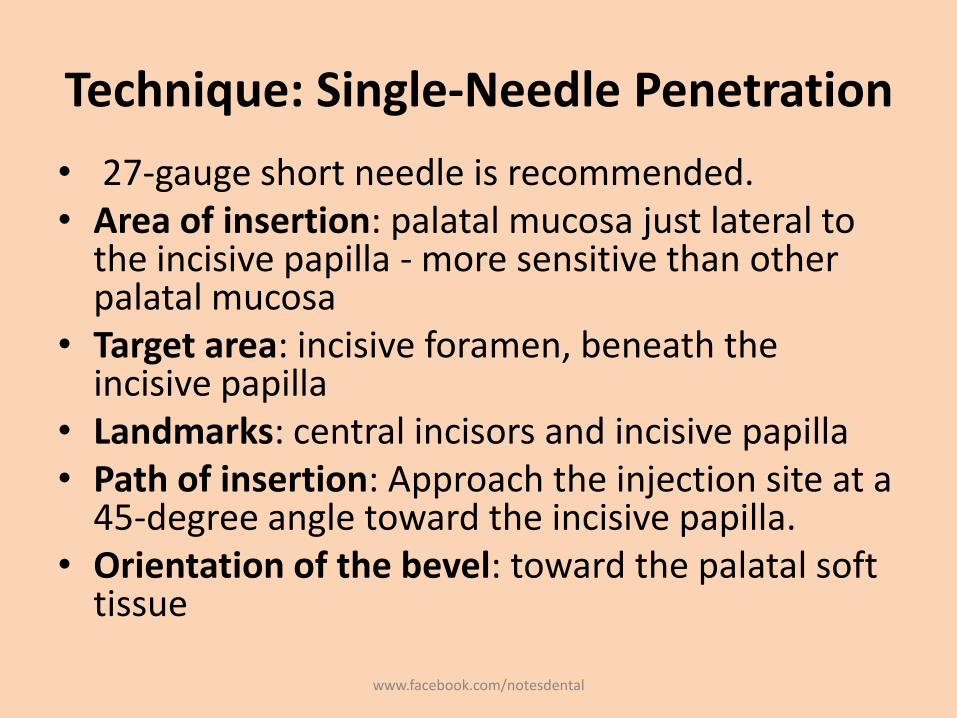
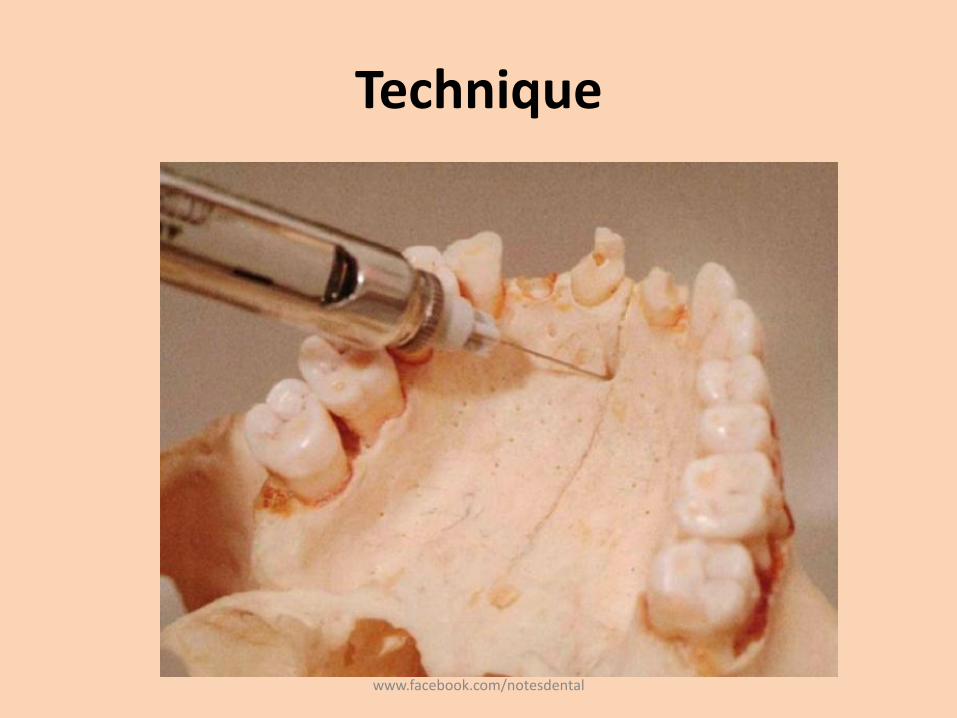
Technique: Single-Needle Penetration
• 27-gauge short needle is recommended. • Area of insertion: palatal mucosa just lateral to
the incisive papilla - more sensitive than other palatal mucosa
• Target area: incisive foramen, beneath the incisive papilla
• Landmarks: central incisors and incisive papilla• Path of insertion: Approach the injection site at a
45-degree angle toward the incisive papilla.• Orientation of the bevel: toward the palatal soft
tissue
www.facebook.com/notesdental
Technique
www.facebook.com/notesdental
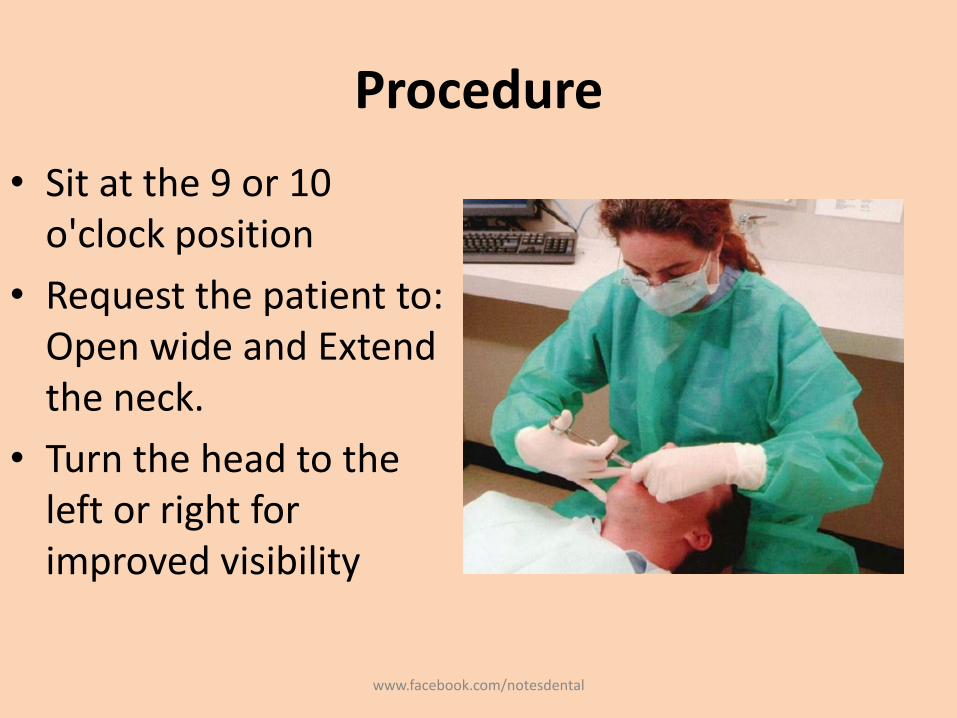
Procedure
• Sit at the 9 or 10 o'clock position
• Request the patient to: Open wide and Extend the neck.
• Turn the head to the left or right for improved visibility
www.facebook.com/notesdental
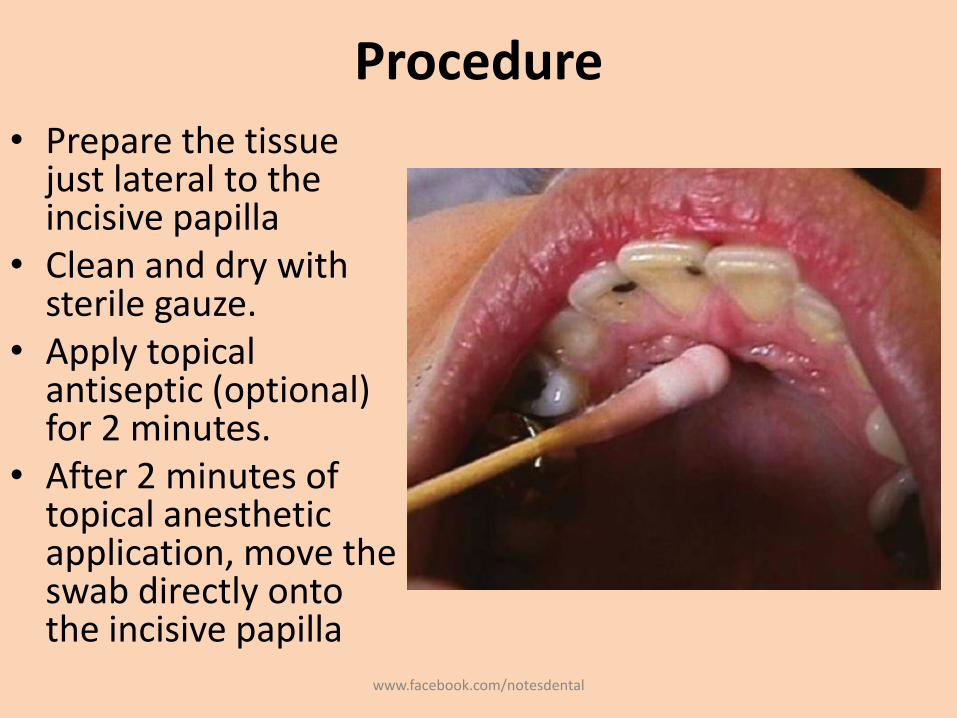
Procedure
• Prepare the tissue just lateral to the incisive papilla
• Clean and dry with sterile gauze.
• Apply topical antiseptic (optional) for 2 minutes.
• After 2 minutes of topical anesthetic application, move the swab directly onto the incisive papilla
www.facebook.com/notesdental
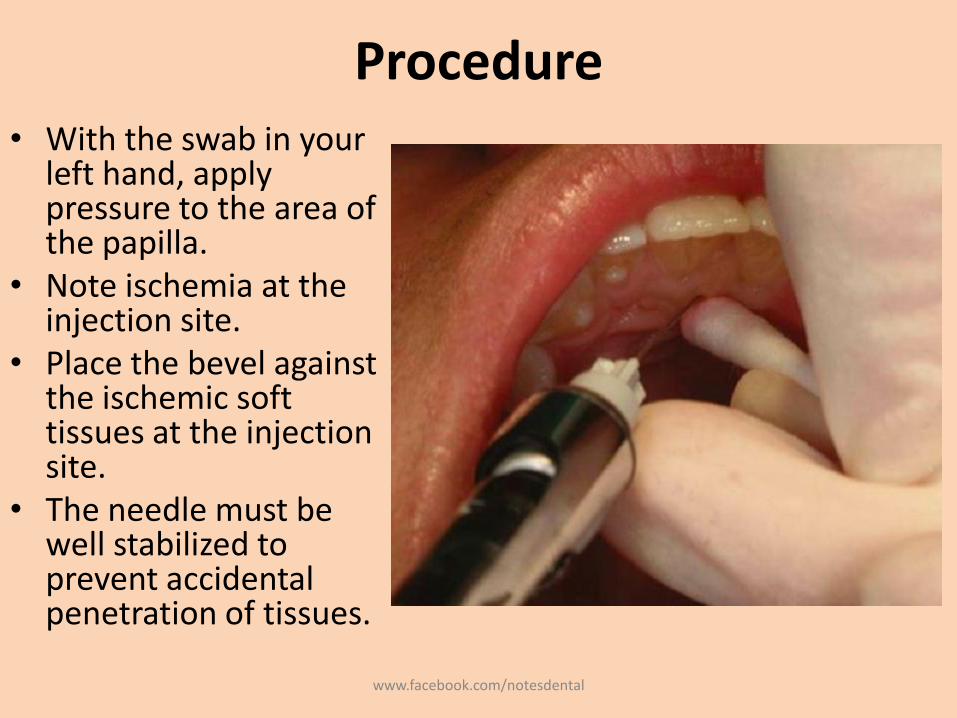
Procedure• With the swab in your
left hand, apply pressure to the area of the papilla.
• Note ischemia at the injection site.
• Place the bevel against the ischemic soft tissues at the injection site.
• The needle must be well stabilized to prevent accidental penetration of tissues.
www.facebook.com/notesdental
Procedure
• With the bevel lying against the tissue• Apply enough pressure to bow the needle slightly. • Deposit a small volume of anesthetic. • The solution will be forced against the mucous
membrane.• Straighten the needle and permit the bevel to
penetrate the mucosa. • Continue to deposit small volumes of anesthetic
throughout the procedure. • Observe ischemia spreading into adjacent tissues as
solution is deposited.
www.facebook.com/notesdental
Procedure
• Continue to apply pressure with the cotton applicator stick while injecting the anesthetic.
• Slowly advance the needle toward the incisive foramen until bone is gently contacted
• The depth of penetration normally is not greater than 5 mm.
• Deposit small volumes of anesthetic while advancing the needle.
• As the tissue is entered, resistance to the deposition of solution is significantly increased; this is normal with this block
www.facebook.com/notesdental
Procedure
• Withdraw the needle 1 mm (to prevent subperiostealinjection).
• The bevel now lies over the center of the incisive foramen.• Aspirate in two planes. • If negative, slowly deposit (15- to 30-second minimum) not
more than 0.45 mL• In some patients, it is difficult to deposit 0.45 mL of
anesthetic solution in this injection. • Slowly withdraw the syringe. • Make the needle safe.• Wait 2 to 3 minutes before commencing the dental
procedure.
www.facebook.com/notesdental
Signs and Symptoms
• Subjective: numbness in the anterior portion of the palate
• Objective: no pain during dental therapy
• Safety Features: Contact with bone
• Precautions– Against pain
• Do not insert directly into the incisive papilla (quite painful).
• Do not deposit solution too rapidly.
• Do not deposit too much solution.
– Against infection• If the needle is advanced more than 5 mm into the incisive canal and
the floor of the nose is entered accidentally, infection may result.
• There is no reason for the needle to enter the incisive canal during a nasopalatine nerve block.
www.facebook.com/notesdental
Failures of Anesthesia
• Highly successful injection (>95% incidence of success)
• Unilateral anesthesia: If solution is deposited to one side of the incisive canal– To correct: Reinsert the needle into the already
anesthetized tissue and reinject solution into the unanesthetized area.
• Inadequate palatal soft tissue anesthesia in the area of the maxillary canine and first premolar– fibers from the GPN overlap those of the nasopalatine
nerve, – To correct: Local infiltration may be necessary as a
supplement in the area inadequately anesthetized.www.facebook.com/notesdental
Complications
• Few of significance
• Hematoma is possible but extremely rare because of the density and firm adherence of palatal soft tissues to bone.
• Necrosis of soft tissues is possible when highly concentrated vasoconstricting solution (e.g., norepinephrine) is used for hemostasis over a prolonged period
• Because of the density of soft tissues, anesthetic solution may “squirt” back out the needle puncture site during administration or after needle withdrawal.
www.facebook.com/notesdental

THANKS……Like, share and comment on
https://www.facebook.com/notesdental
http://www.slideshare.net/DeepakKumarGupta2
www.facebook.com/notesdental